If you’ve been craving a quick win at the clay table, these easy polymer clay earring ideas are my go-to designs for cute results without fussy sculpting. Think simple shapes, slab techniques, and beginner-friendly details that look polished the moment you add your hardware.
Classic Arch Dangles
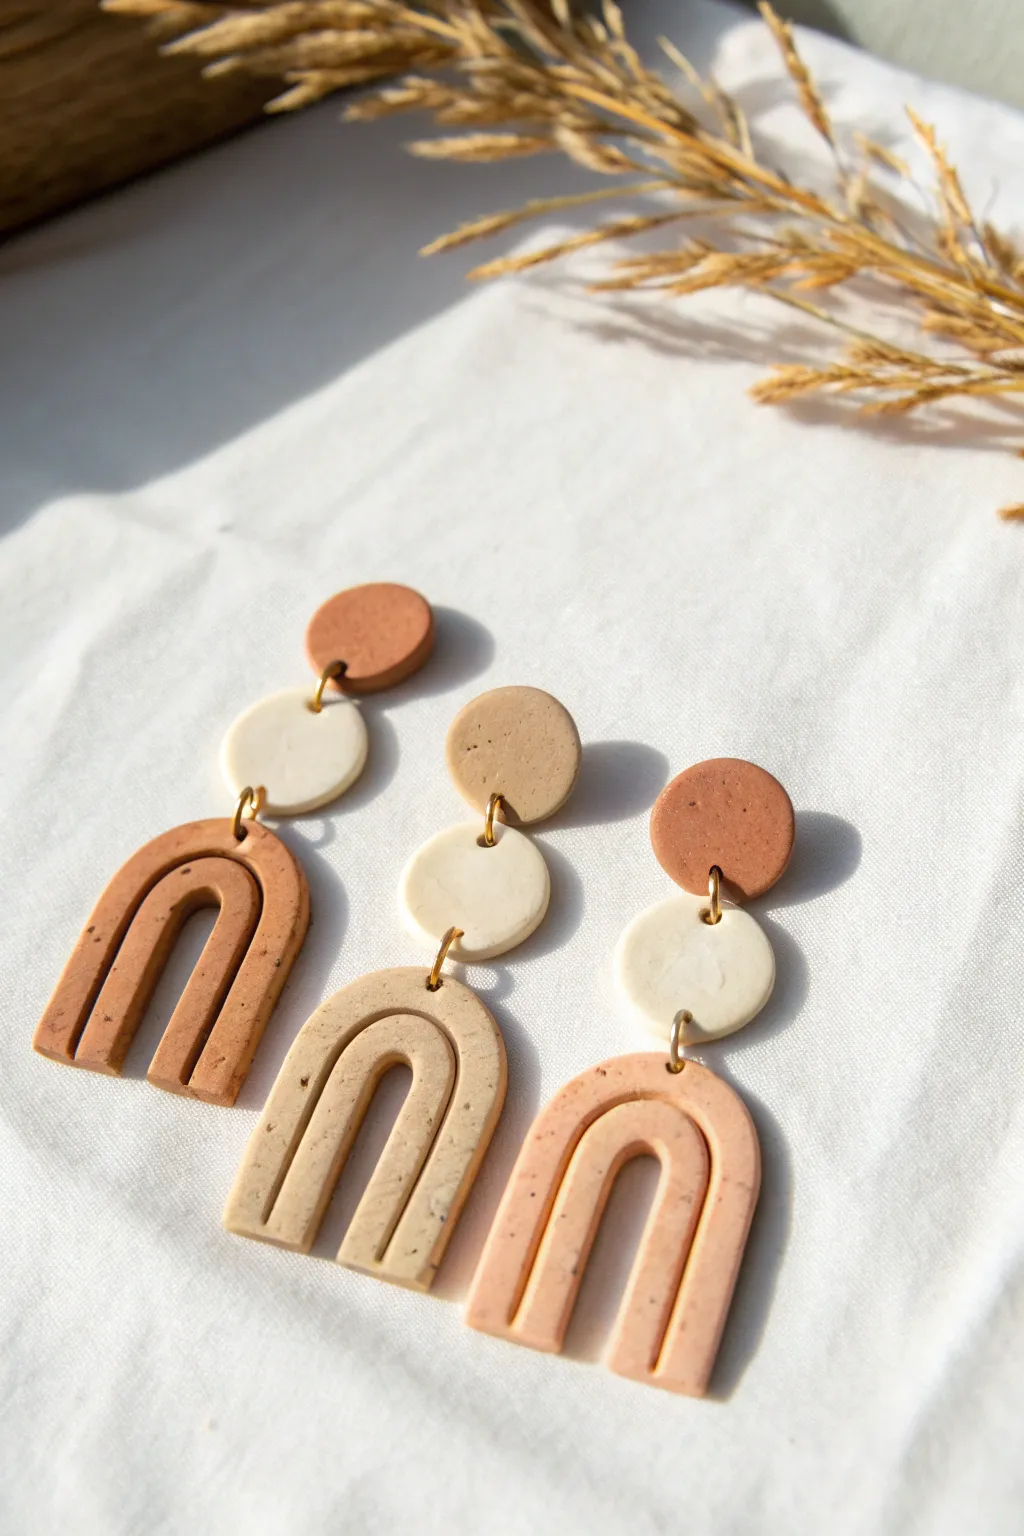
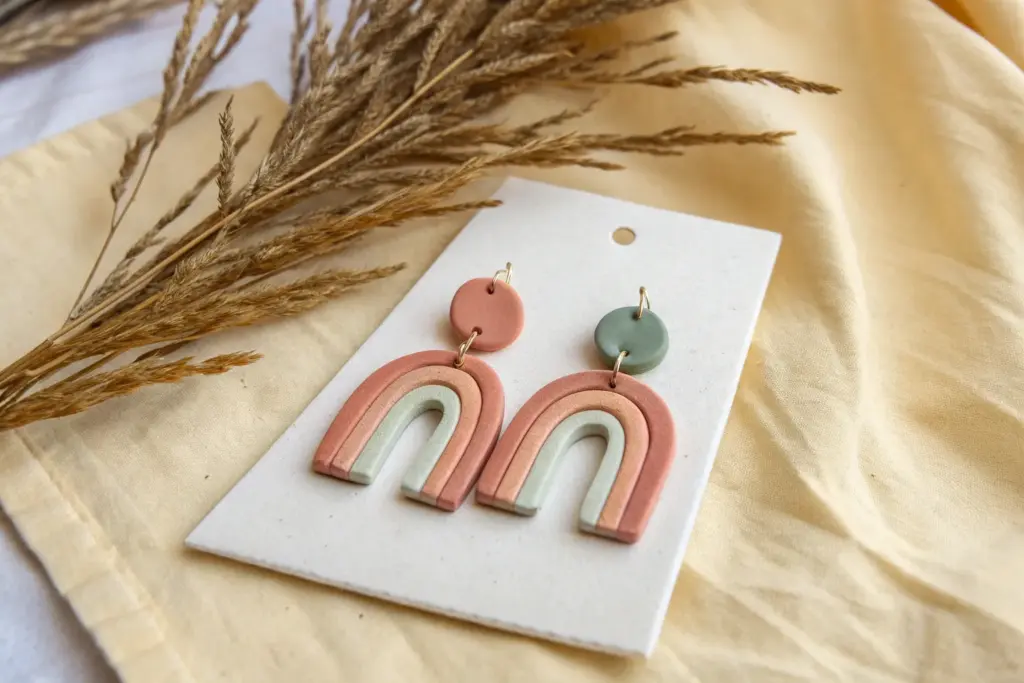
Create a set of modern boho statement earrings featuring warm, earthy tones and a classic arch shape. This project combines simple geometric forms—circles and arches—linked together for beautiful movement and style.
Step-by-Step Guide
Materials
- Polymer clay in terracotta, beige, and white (or pre-mixed granite effect clay)
- Black pepper or dried coffee grounds (if creating your own speckled texture)
- Acrylic rolling pin or pasta machine
- Circle cutters (approx. 10mm and 15mm)
- U-shaped arch cutter (or a craft knife and template)
- Jump rings (gold, 6mm or 7mm)
- Earring posts and backs
- Jewelry pliers (flat nose)
- Hand drill or needle tool for piercing
- Super glue or liquid clay
- Baking sheet and parchment paper
- Fine grit sandpaper (optional)
Step 1: Preparing the Clay
-
Condition the clay:
Start by warming the polymer clay in your hands, kneading it until it is soft and pliable. If you are using standard solid colors, this is the time to mix in your speckles. -
Create the granite effect:
To achieve the stone look seen in the photo without buying specialty clay, take your solid color and sprinkle in a pinch of ground black pepper or dried used coffee grounds. Fold and knead the clay repeatedly until the specks are evenly distributed. -
Roll out the slab:
Using an acrylic roller or a pasta machine on a medium setting, roll your clay out on a smooth work surface. Aim for a consistent thickness of about 3mm to 4mm so the arches feel substantial but not heavy.
Smooth Operator
Before baking, wipe the surface of your clay gently with a baby wipe or a Q-tip dipped in rubbing alcohol. This removes dust and fingerprints for a professional finish.
Step 2: Cutting and Shaping
-
Cut the top studs:
Use your smallest circle cutter (around 10mm) to punch out the top pieces where the earring post will go. You will need two of these per pair, matching your chosen color scheme. -
Cut the connector circles:
Next, use a slightly larger circle cutter (around 15mm) to cut the middle connecting pieces. In this design, contrasting colors work beautifully—for example, a white circle between a terracotta stud and arch. -
Cut the arches:
Use a U-shaped cutter to create the bottom dangle. If you don’t have a specific cutter, lightly sketch an arch shape on paper, cut it out, lay it on the clay, and carefully trace around it with a craft knife. -
Refine the edges:
Gently smooth the cut edges with your fingertip to remove any loose bits of clay or sharp corners. I prefer to dip my finger in a tiny bit of cornstarch first to prevent fingerprints. -
Pierce holes:
Before baking, use a needle tool to poke holes for the jump rings. You need: one hole at the bottom of the small top stud; two vertical holes on the middle circle (top and bottom); and one hole at the very center top of the arch.
Step 3: Baking and Assembly
-
Bake the pieces:
Arrange your clay shapes on a baking sheet lined with parchment paper. Follow the baking temperature and time instructions on your specific brand of clay packaging, as this varies. -
Cool and sand:
Allow the clay to cool completely on the baking sheet to ensure it hardens properly. Once cool, you can use fine-grit sandpaper to buff away any minor imperfections on the edges. -
Attach earring posts:
Apply a small dot of super glue or liquid clay to the back of the smallest top circles and press the flat pad of the earring post onto them. Let this dry or cure fully before moving on. -
Open jump rings:
Using two pairs of pliers, twist your jump rings open sideways (never pull them apart outward) to maintain their circular shape. -
Connect middle to top:
Thread an open jump ring through the bottom hole of the top stud and the top hole of the middle circle. Close the ring securely with your pliers. -
Connect arch to middle:
Repeat the process with a second jump ring, connecting the bottom hole of the middle circle to the top hole of the arch. -
Final check:
Hold the earring up to ensure all pieces hang straight and face forward. Adjust the jump rings carefully if needed.
Mix & Match Palette
Try swapping the color order for each earring in the pair (e.g., terracotta top vs. beige top) to create an asymmetrical, artistic look.
Now you have a stunning set of geometric dangles ready to wear or gift to a friend


Simple Circle Studs
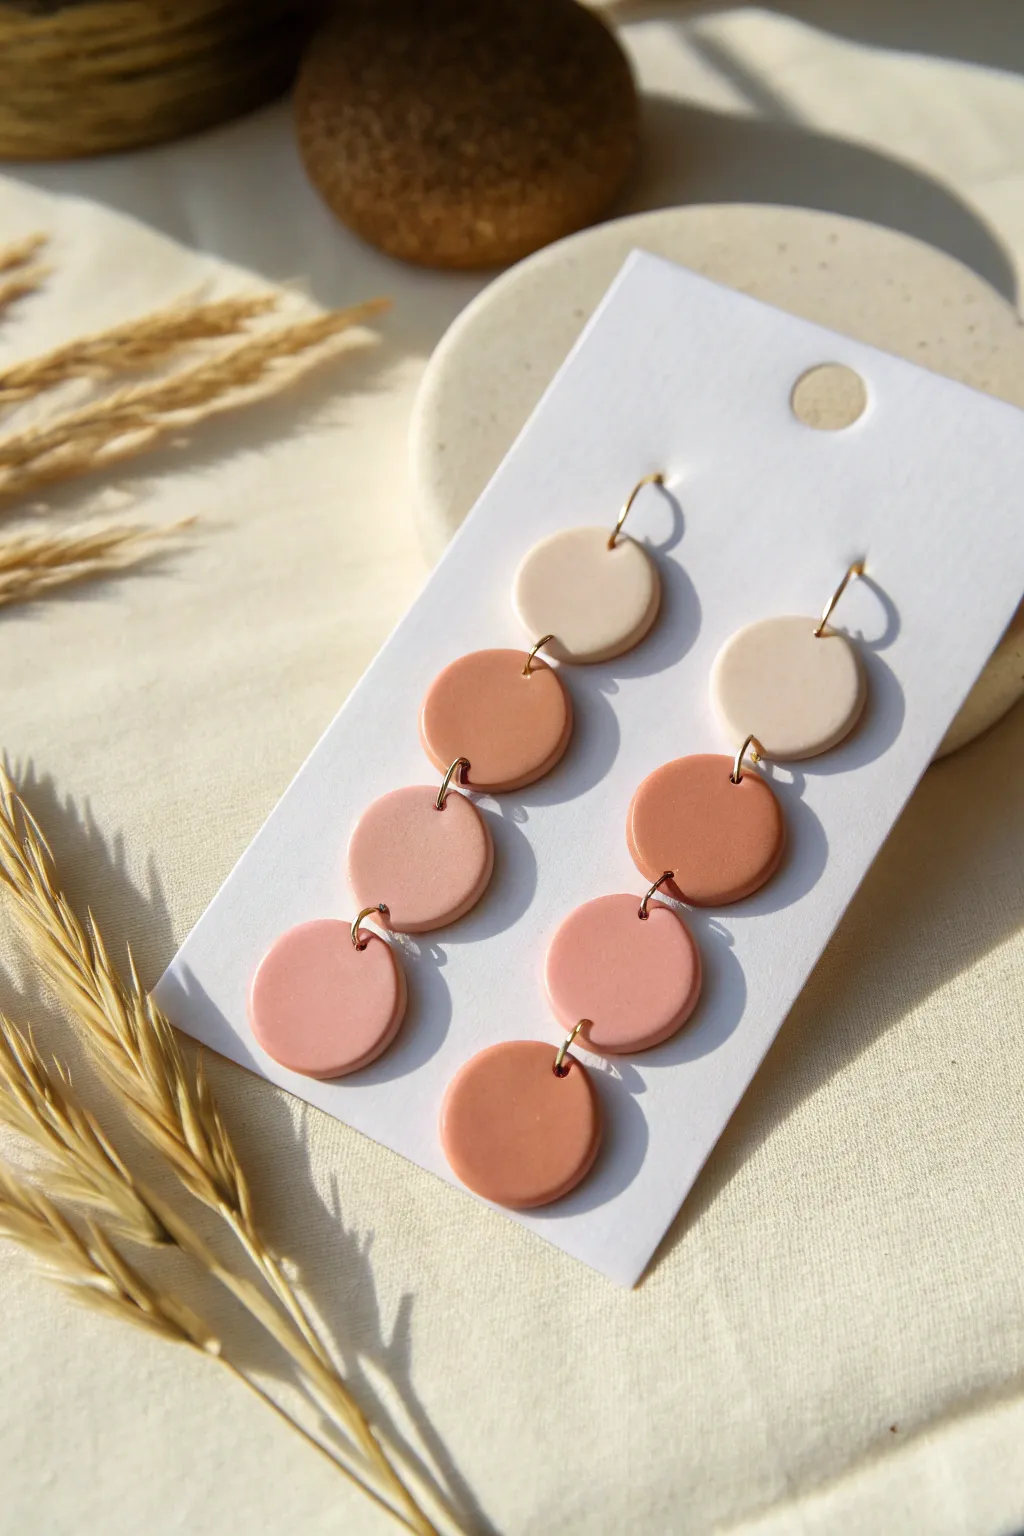
These elegant earrings feature a cascading design of linked circles in a warm, earthy color palette ranging from cream to terracotta. The simple geometry combined with the soft gradient creates a sophisticated yet bohemian look perfect for everyday wear.
Step-by-Step
Materials
- Polymer clay in four shades: cream/beige, light terracotta, dusty pink, and dark rust
- Small circular clay cutter (approx. 1.5 – 2 cm diameter)
- Acrylic rolling pin or pasta machine
- Clean working surface (ceramic tile or glass mat)
- Small hand drill or pin vise
- Gold tone jump rings (6mm or 7mm)
- 2 Gold tone earring hooks (fish hook style)
- Jewelry pliers (flat nose and round nose)
- Baking sheet and cardstock or parchment paper
- Fine grit sandpaper (optional)
Step 1: Preparing the Clay
-
Condition the clay:
Start by warming up each color of polymer clay in your hands. Knead them individually until they are soft, pliable, and free of any cracks or air bubbles. -
Roll out the sheets:
Using your acrylic rolling pin or pasta machine, roll each color into a slab of even thickness. Aim for about 2mm to 3mm thick—thick enough to be sturdy but thin enough to be lightweight. -
Check for imperfections:
Inspect your rolled slabs for lint or fingerprints. Give them a final smooth-over with your finger or a light pass with the roller if needed.
Fingerprint Fix
Before baking, lightly brush a tiny amount of cornstarch or baby oil over the clay surface. This magically smooths out accidental fingerprints.
Step 2: Cutting and Baking
-
Cut the circles:
Using your small circular cutter, press firmly into the clay to cut your shapes. You will need two circles of each color (eight circles total). Lift the cutter straight up to keep the edges clean. -
Smooth the edges:
Gently pick up each circle and run your finger lightly around the rim to smooth out any sharp edges or little bits of clay left by the cutter. -
Create holes for assembly:
Before baking, you can use a needle tool to poke holes, but for the cleanest look, I prefer to drill them after baking. If you choose to poke them now, make a hole at the top and bottom of the middle circles, and just one hole for the top and bottom pieces. -
Arrange for baking:
Place your cut circles onto a piece of cardstock on your baking sheet. This helps prevent shiny spots on the back of the clay. -
Bake the pieces:
Bake the clay according to the manufacturer’s instructions on the package. This is usually around 275°F (130°C) for 15-30 minutes, depending on the brand. -
Cool down:
Once baked, remove the tray from the oven and let the clay pieces cool completely before handling them further.
Color Customization
Mix a tiny bit of white clay into your terracotta to create a seamless custom gradient if your pre-made colors feel too distinct from one another.
Step 3: Assembly
-
Drill the holes:
If you didn’t poke holes earlier, use a small hand drill (pin vise) to carefully drill holes now. The top cream circle needs one hole at the bottom and one at the top. The two middle circles need holes at top and bottom. The bottom rust circle needs just one hole at the top. -
Sand for finish:
If there are any rough spots on the edges or near the drill holes, lightly sand them with fine-grit sandpaper available in water for a smoother finish. -
Open the jump rings:
Use your two pairs of pliers to twist open your jump rings. Remember to twist the ends away from each other (side-to-side), never pull them apart, to maintain their circle shape. -
Connect the gradient:
Start connecting the circles. Link the cream circle to the light terracotta one, then the light terracotta to the dusty pink, and finally the dusty pink to the bottom rust circle. -
Attach the hooks:
Open the small loop on your earring hook (or use a small jump ring if needed) and attach it to the top hole of the cream circle. -
Repeat for second earring:
Repeat the assembly process for the second earring, ensuring the color order matches exactly. -
Final check:
Double-check that all jump rings are closed tightly so the pieces don’t slip out while wearing them.
Now you have a stunning pair of handmade dangle earrings ready to complement any outfit with their earthy tones

Half-Moon Minis
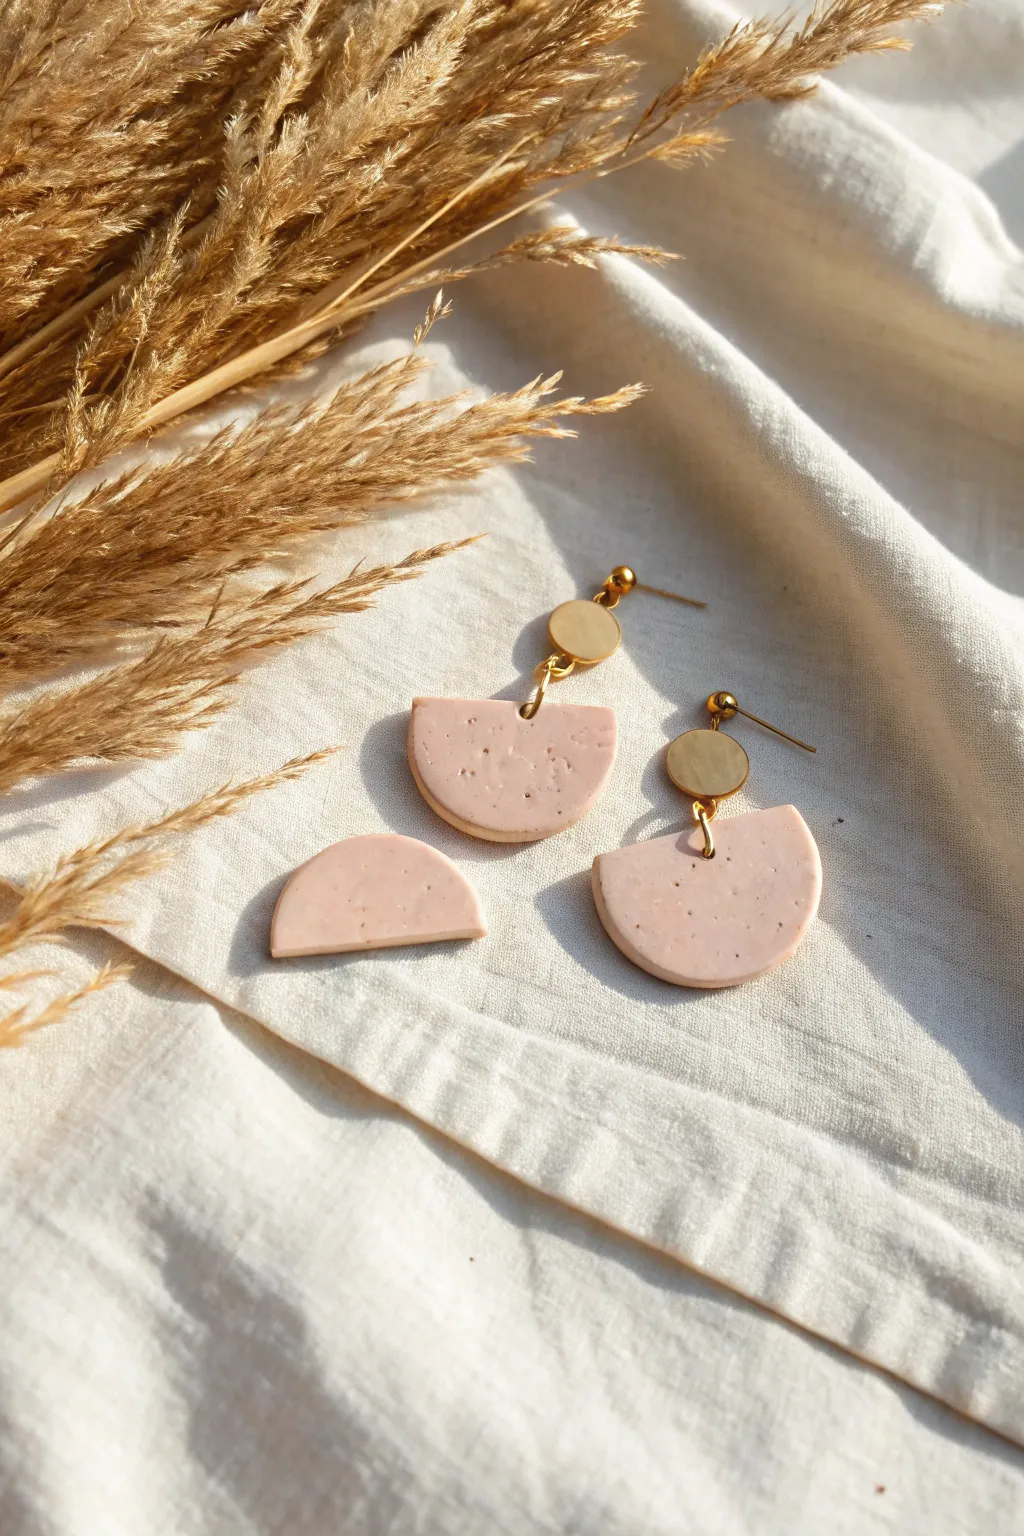
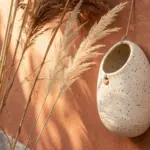
Embrace the delicate beauty of these minimalist earrings, featuring soft, speckled peach polymer clay in a classic half-moon shape. Paired with brushed gold connectors, they offer an elegant yet earthy aesthetic perfect for everyday wear.
Step-by-Step Tutorial
Materials
- Polymer clay (pale peach or beige)
- Fimo effect clay (granite or black glitter for speckles)
- Acrylic rolling pin
- Circle clay cutter (approx. 1-1.5 inch diameter)
- Hobby knife or tissue blade
- Hand drill or needle tool
- Jump rings (gold, 4-6mm)
- Gold flat disc ear posts with loop
- Jewelry pliers
- Baking sheet
- Parchment paper
Step 1: Preparing the Clay
-
Condition the clay:
Start by warming the pale peach clay in your hands, kneading it until it is soft and pliable. This conditioning step prevents cracks later on. -
Create the speckled effect:
If your peach clay isn’t pre-speckled, take a tiny crumb of black or granite-effect clay and mix it in. Use a very small amount—sometimes I like to use black pepper or craft sand for a more organic texture—and knead until the specks are evenly distributed. -
Roll it out:
Place the conditioned clay on a smooth surface or a ceramic tile. Use your acrylic roller to flatten the clay to an even thickness, ideally around 3mm thick. -
Check for bubbles:
Inspect the surface for any trapped air bubbles. If you spot one, gently pierce it with a needle and smooth over the area with your finger.
Sticky Situation?
If clay sticks to your cutter or work surface, dust a tiny amount of cornstarch or baby powder on the clay before rolling. It acts as a release agent and brushes off easily after baking.
Step 2: Cutting and Baking
-
Cut the circles:
Press your circle cutter firmly into the flattened clay sheet to create two perfect circles. Lift the cutter straight up to ensure clean edges. -
Create the half-moons:
Using your tissue blade or a sharp knife, carefully slice each clay circle strictly across the middle. This single cut transforms your two circles into four half-moon shapes (you’ll have two spares for practice!). -
Refine the edges:
Before baking, gently run your finger along the cut edges to soften any sharpness or remove stray bits of clay. -
Pierce holes:
Use a needle tool or toothpick to poke a small hole in the top center of the straight edge on two of the half-moons. Make sure the hole is big enough for your jump rings. -
Bake:
Place the clay pieces on a baking sheet lined with parchment paper. Bake according to your brand’s package instructions—usually at 275°F (130°C) for about 15-30 minutes. -
Cool down:
Allow the clay pieces to cool completely on the baking sheet before moving them. The clay hardens fully as it cools.
Step 3: Assembly
-
Sand (optional):
If you notice any rough spots after baking, lightly sand the edges with fine-grit sandpaper for a professional finish. -
Prepare the jump rings:
Use two pairs of jewelry pliers to gently twist open two gold jump rings. Always twist the ends away from each other side-to-side, rather than pulling them apart, to maintain the circle shape. -
Connect the pieces:
Slide one open jump ring through the hole in your clay half-moon piece. -
Attach the stud:
Thread the loop of your gold flat disc ear post onto the same jump ring. -
Close the ring:
Using your pliers, twist the jump ring back into a closed position, ensuring the ends meet perfectly so nothing slips out. -
Repeat:
Follow the same assembly steps for the second earring to complete the pair.
Level Up: Texture
Before cutting your shapes, gently press a piece of coarse sandpaper or a clean toothbrush onto the raw clay surface. This adds a subtle, stone-like texture that mimics real granite.
Wear these soft neutral dangles with your favorite linen top to complete the natural look


Clean Rectangle Drops
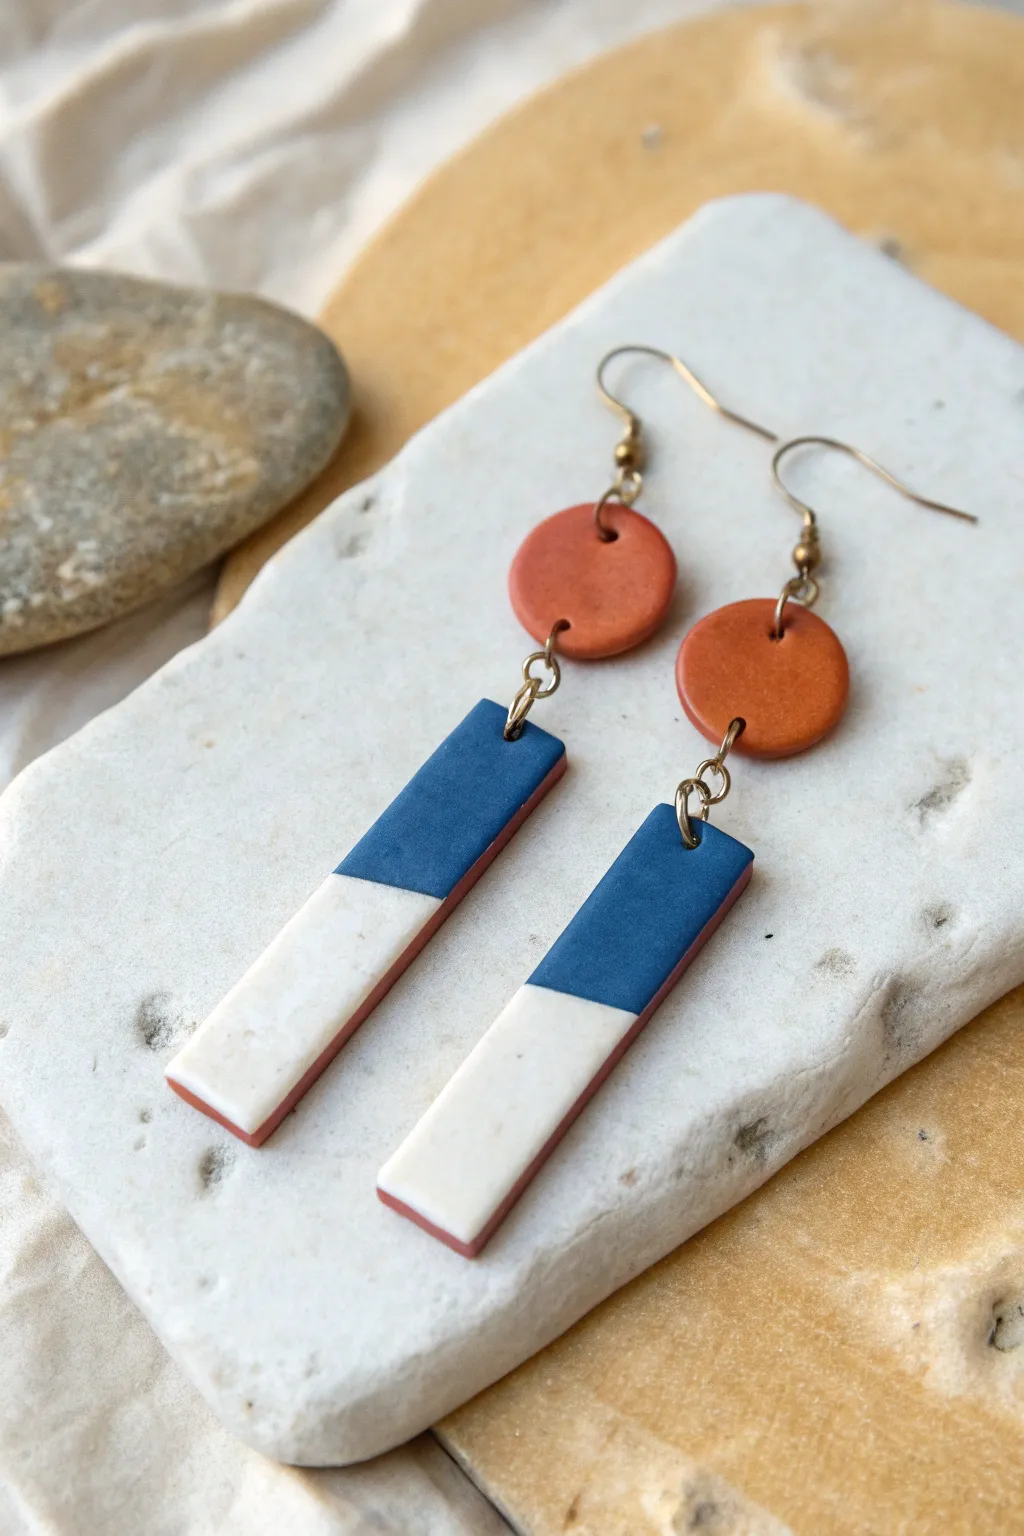
These sophisticated earrings combine earthy terracotta tones with a crisp navy and cream geometric design for a modern, architectural look. The diagonal color-blocking creates a striking visual balance that looks complicated but is surprisingly simple to achieve with a layering technique.
Detailed Instructions
Materials
- Polymer clay in terracotta/rust
- Polymer clay in navy blue
- Polymer clay in cream or white granite
- Polymer clay rolling pin or pasta machine
- Tissue blade or extensive craft knife
- Small circle cutter (approx. 10mm)
- Small rectangle cutter (or ruler and blade)
- Oven for baking
- Hand drill or pin tool
- Jump rings (gold or brass)
- Fish hook earring wires
- Jewelry pliers
- Fine grit sandpaper (optional)
Step 1: Creating the Terracotta Base
-
Condition the clay:
Start by manipulating the terracotta clay in your hands until it becomes soft and pliable. This conditioning step prevents cracks later on. -
Roll the base sheet:
Roll out a slab of terracotta clay to a medium thickness, roughly 2-3mm. This will serve as both the top circle and the backing foundation for your rectangular drops. -
Cut the circles:
Using your small circle cutter, cut out two round shapes. These will be the top post connectors for your earrings. Set them aside carefully on your baking tile. -
Prepare the rectangle base:
From the remaining terracotta sheet, cut out two long rectangles. I like to make these slightly wider than the final desired width so I have room to trim later.
Clean Seams Tip
If the seam between cream and navy doesn’t look perfect, roll gently over it with parchment paper on top. The pressure fuses the clay without distorting the straight edges.
Step 2: The Geometric Design
-
Prepare accent colors:
Condition and roll out your navy blue and cream clay. These sheets should be significantly thinner than your base layer—aim for about 1mm thickness. -
Cut the diagonal:
Using your tissue blade, cut a long strip of navy and a long strip of cream that are the same width as your terracotta rectangle bases. -
Create the angle:
Lay the navy strip over the cream strip and use your blade to slice through both layers simultaneously at a sharp diagonal angle. This ensures the two pieces will fit together like a perfect puzzle. -
Assemble the layer:
Place the navy triangle on the top half of your terracotta base and the cream triangle on the bottom half. Gently press them down so they adhere to the base and the diagonal seam meets cleanly. -
Smooth the surface:
Place a piece of parchment paper over the assembled rectangles. Use an acrylic roller or your finger to gently burnish the surface, smoothing out the seam between the blue and cream so it feels like one continuous piece. -
Final trim:
Now that the layers are fused, take your blade or a rectangular cutter and trim the edges cleanly to get sharp, crisp sides. This reveals that beautiful terracotta edge visible from the side profile.
Step 3: Finishing Up
-
Add holes:
Using a needle tool or small pin, poke a hole at the top and bottom of the terracotta circles, and one centered at the top of the rectangles. Ensure the holes are large enough for your jump rings. -
Bake:
Place all pieces on a tile or baking sheet lined with parchment paper. Bake according to your brand of clay’s instructions (usually 275°F/130°C for 30 minutes). -
Cool down:
Allow the pieces to cool completely inside the oven or on a wire rack before handling, as warm clay is fragile. -
Sand edges:
If there are any rough spots, lightly sand the edges under running water using fine-grit wet/dry sandpaper. -
Connect the pieces:
Open a jump ring with your pliers (twist sideways, don’t pull apart) and connect the bottom of a circle to the top of a rectangle. -
Attach hooks:
Attach the earring hook to the top hole of the terracotta circle using another jump ring or by opening the loop on the ear wire itself. -
Final check:
Double-check that all closures are tight and the rectangles hang facing forward.
Bubbles?
If you see air bubbles between your layers, poke them gently with a craft needle and smooth the air out with your finger before baking.
You now have a stunning pair of geometric statement earrings ready to wear or gift

The Complete Guide to Pottery Troubleshooting
Uncover the most common ceramic mistakes—from cracking clay to failed glazes—and learn how to fix them fast.
Teardrop Cutout Dangles
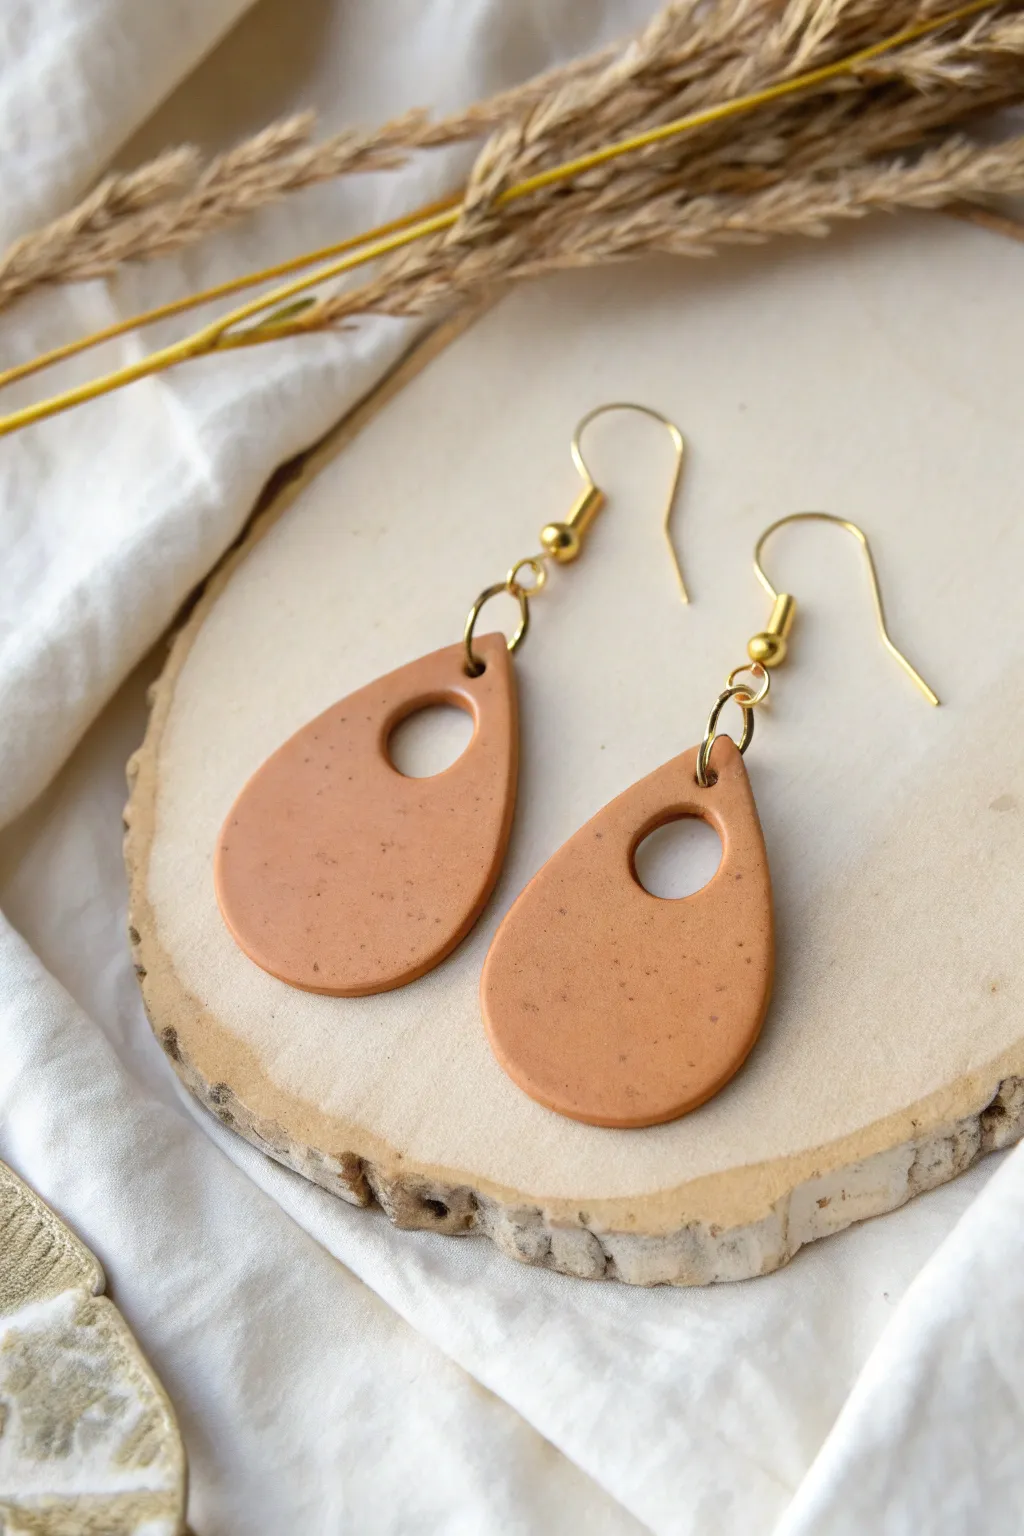
These earthy, bohemian dangles mimic the look of natural stone or pottery with a beautiful speckled terracotta finish. The simple teardrop shape with a peekaboo cutout creates a modern silhouette that pairs perfectly with casual linen or denim outfits.
How-To Guide
Materials
- Terracotta or rust-colored polymer clay
- Coarse black pepper or finely ground coffee (for speckling)
- Acrylic rolling pin or pasta machine
- Teardrop clay cutter (approx. 1.5 inches)
- Small circle cutter (approx. 0.25 inch)
- Parchment paper or ceramic tile work surface
- Needle tool or toothpick
- Standard oven
- 2 Gold French hook ear wires
- 4 Gold jump rings (6-8mm)
- Chain nose pliers
- Fine-grit sandpaper (optional)
Step 1: Preparing the Faux Stone Clay
-
Condition the clay:
Start by warming the terracotta clay in your hands. Knead and fold it repeatedly until it becomes soft, pliable, and easy to work with. -
Add texture:
Flatten your conditioned clay into a pancake shape. Sprinkle a small pinch of coarse black pepper or finely used coffee grounds onto the surface. -
Mix thoroughly:
Fold the clay over the inclusions and knead again. Continue mixing until the speckles are evenly distributed throughout the entire block of clay. This creates that natural stoneware effect. -
Roll it out:
Using your acrylic roller or pasta machine, roll the clay out into an even slab. Aim for a thickness of about 3mm (or setting #1 on most machines) so the earrings feel substantial but not heavy.
Uneven Thickness?
If you don’t have a pasta machine, place two stacks of playing cards (same height) on either side of your clay. Roll your rolling pin over the cards to get a perfectly even slab.
Step 2: Cutting and Shaping
-
Cut the main shape:
Place your teardrop cutter onto the clay slab. Press down firmly and evenly to cut out two identical teardrop shapes. Give the cutter a little wiggle before lifting to ensure a clean release. -
Create the cutout:
Take your small circle cutter and position it near the top (narrow end) of the teardrop. Try to center it visually. Press down to remove the circle of clay, creating the negative space feature. -
Add a hole for hardware:
Using a needle tool, pierce a very small hole right at the top tip of the teardrop, above the circular cutout. Ensure this hole is large enough for your jump ring to pass through later. -
Smooth the edges:
Gently run your finger dipped in a little cornstarch or water around the raw edges of the clay to smooth out any rugged cuts or fingerprints before baking.
Level Up: Texture
Before cutting your shapes, gently press a piece of coarse grit sandpaper or a clean toothbrush onto the clay surface to give it a realistic, pitted stone texture.
Step 3: Baking and Assembly
-
Bake the pieces:
Place your clay pieces on a parchment-lined baking sheet or a ceramic tile. Bake according to the manufacturer’s instructions for your specific brand of clay (usually 275°F for 30 minutes). -
Cool down:
Let the earrings cool completely in the oven with the door cracked open. This gradual cooling helps prevent cracking and ensures strength. -
Light sanding (optional):
If there are any sharp bits on the edges after baking, lightly buff them away with fine-grit sandpaper for a professional finish. -
Prepare the jump rings:
Using two pairs of pliers, twist open two jump rings. Remember to twist the ends away from each other (front to back) rather than pulling them apart horizontally. -
Connect the hardware:
Slide the open jump ring through the small hole at the top of the clay teardrop. -
Add the hook:
Before closing the ring, slide the loop of the French hook ear wire onto the jump ring as well. Ensure the hook is facing the correct direction relative to the front of the earring. -
Secure the ring:
Use your pliers to twist the jump ring back into a closed position, ensuring the ends meet perfectly so the wire doesn’t slip out. -
Repeat:
Repeat the assembly process for the second earring to complete your beautiful new set.
Now you have a stunning pair of faux-stone earrings ready to wear or gift.
Terrazzo Speckle Slab Earrings
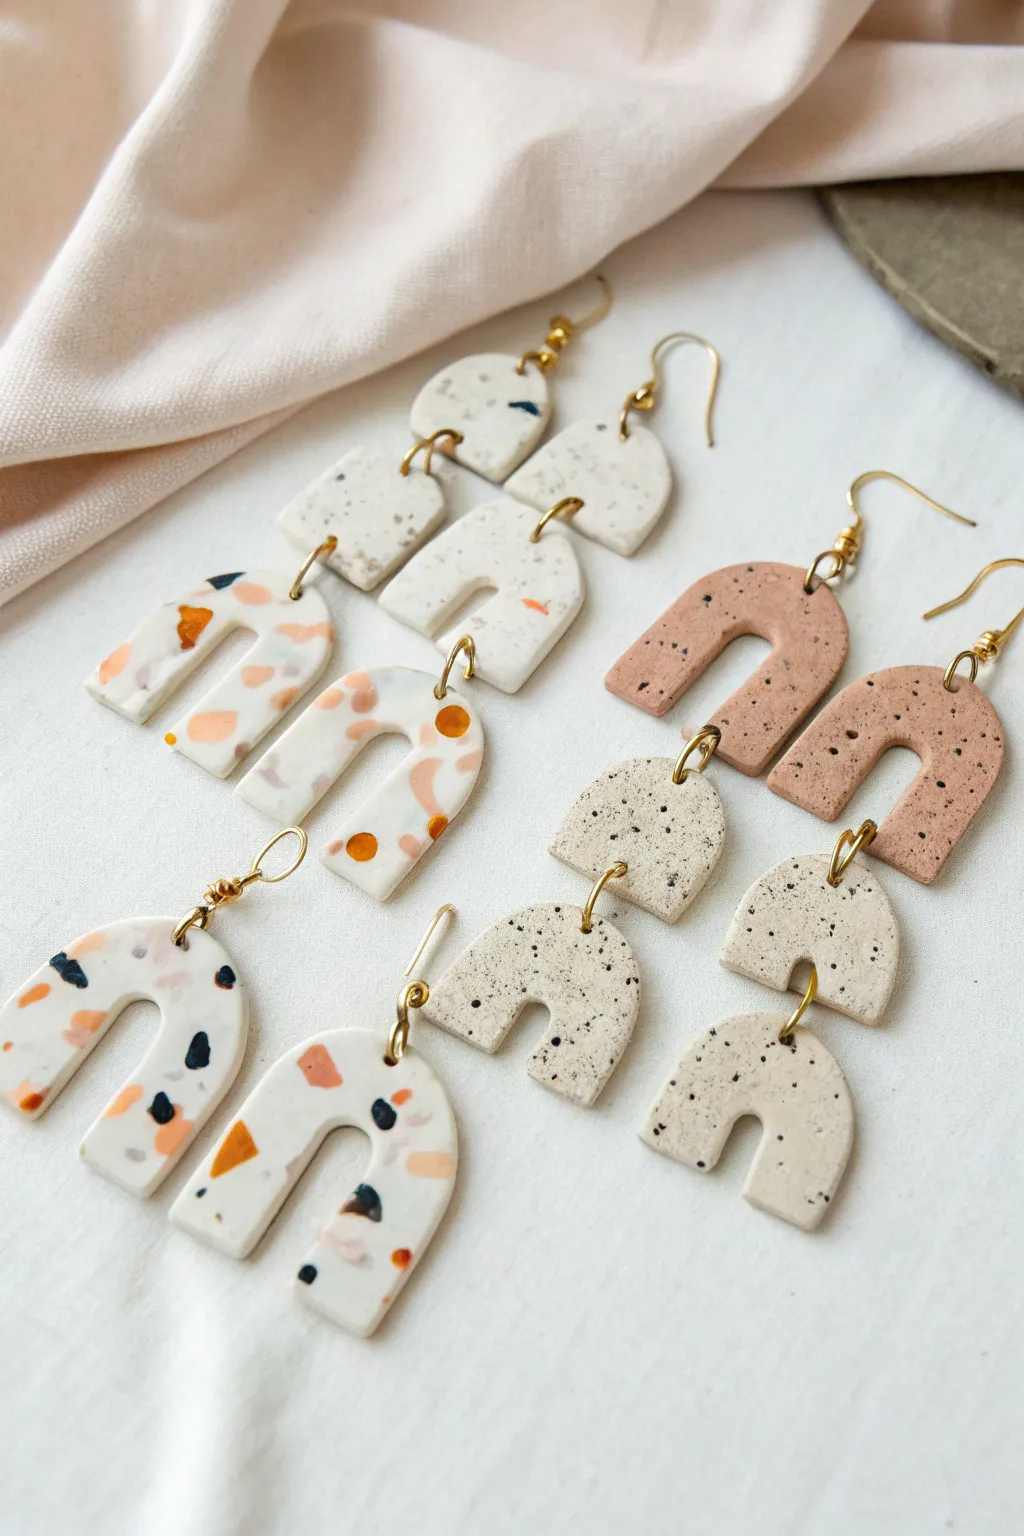
Embrace the playful modern aesthetic with these polymer clay earrings featuring two distinct surface techniques. Whether you prefer the bold, chunky look of colorful terrazzo or the subtle, organic feel of faux stone speckles, these arch designs are surprisingly simple to master.
Step-by-Step
Materials
- Polymer clay (white, beige, black, terracotta/orange, light grey)
- Black acrylic paint or black pepper (for speckles)
- Rolling pin or pasta machine
- U-shaped or arch clay cutters (various sizes)
- Small circle cutter or piercing tool
- Jump rings (gold finish)
- Earring hooks (gold finish)
- Jewelry pliers
- Parchment paper or ceramic tile
- Tissue blade or X-Acto knife
- Oven and baking sheet
- Fine grit sandpaper (optional)
Step 1: Preparing the Terrazzo Slab
-
Condition base clay:
Begin by conditioning a block of white or cream polymer clay until it is soft and pliable. Roll this out into a medium-thickness sheet, about 3-4mm thick. This will be your canvas. -
Create color chips:
Condition small amounts of your accent colors—terracotta, black, grey, and beige. Roll these out very thinly. -
Chop the chips:
Use your tissue blade to chop these thin colored sheets into jagged, irregular confetti-like pieces. Vary the sizes for a more natural look. -
Apply the terrazzo:
Scatter the colored chips randomly over your white base sheet. Gently press them down with your fingers to make sure they stick. -
Roll smooth:
Run your rolling pin over the slab to embed the chips flush with the surface. Roll in different directions to ensure the chips spread nicely and the surface is completely flat.
Sticky Cutter Fix
If clay sticks inside your cutters, dip the cutter into a small bowl of cornstarch or water before pressing it into the slab. It’ll pop right out.
Step 2: Creating the Speckle Slab
-
Mix the speckle base:
For the faux granite look, take a lump of beige or light tan clay. Instead of chopping bits, we’ll use a finer inclusion. -
Add texture:
Mix in a generous amount of coarse black pepper or finely grated baked black clay into the raw beige clay. Knead thoroughly until the speckles are evenly distributed throughout the block. -
Roll out:
Roll this speckled mixture into a sheet of similar thickness to your terrazzo slab.
Step 3: Cutting and Baking
-
Cut out shapes:
Using your arch cutters, press firmly into your prepared slabs. For the dangling styles shown, cut out a mix of larger arches and smaller connecting pieces like small half-circles or trapezoids. -
Smooth edges:
Before baking, gently run your finger along the cut edges to smooth out any roughness or stray bits of clay. -
Pierce holes:
Use a needle tool or a small drinking straw to poke holes where your jump rings will go. Make sure not to make the hole too close to the edge. -
Bake:
Transfer your cut shapes onto a parchment-lined baking sheet or ceramic tile. Bake according to your clay manufacturer’s instructions, usually around 275°F (135°C) for 30 minutes.
Pro Tip: Depth trick
For realistic terrazzo, shave off the very top later of your baked piece with sandpaper to reveal hidden layers of chips, then buff.
Step 4: Assembly
-
Cool down:
Let the pieces cool completely before handling. They will harden fully as they return to room temperature. -
Open jump rings:
Use two pairs of pliers to twist your jump rings open laterally (never pull them apart outward). -
Connect pieces:
Thread the jump ring through the hole of a main arch component and its corresponding top piece. Close the ring securely. -
Attach hooks:
Finally, attach the earring hooks to the top components using another jump ring or directly onto the loop of the hook.
Now you have a stunning set of boutique-quality earrings ready to wear or gift.


What Really Happens Inside the Kiln
Learn how time and temperature work together inside the kiln to transform clay into durable ceramic.
Soft Marble Swirl Drops
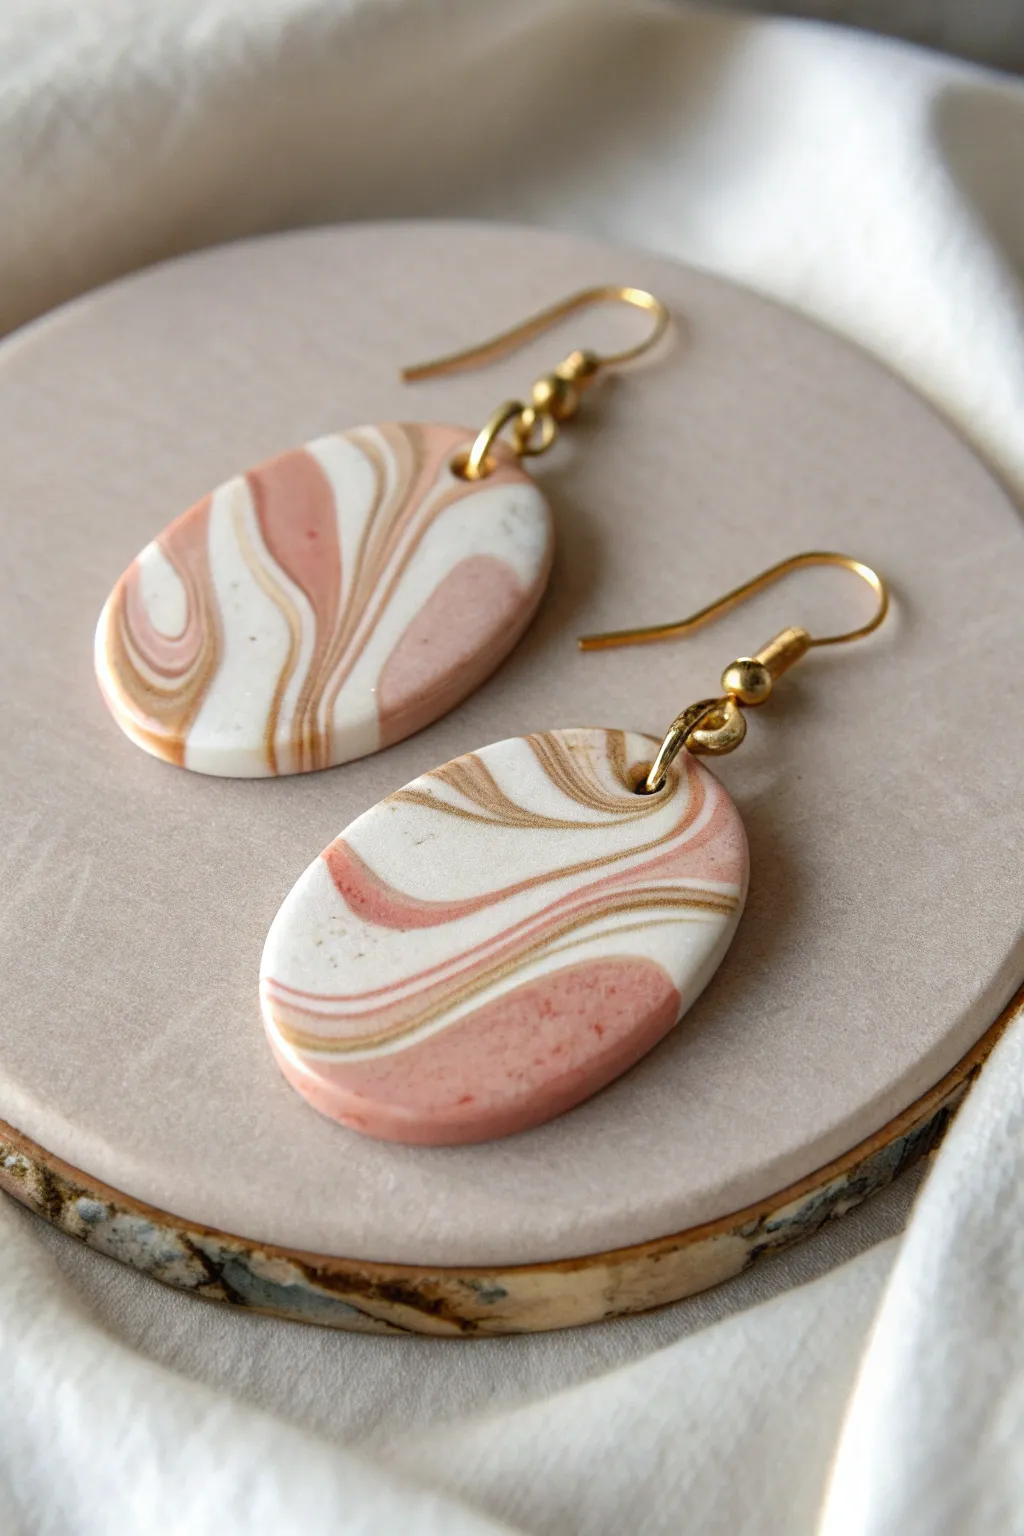
Embrace the elegance of neutrals with these dreamy, soft marble swirl earrings. The sophisticated palette of dusty rose, sandy beige, and creamy white swirls together to create a stone-like effect that feels both modern and timeless.
How-To Guide
Materials
- Polymer clay (white, beige/tan, dusty rose/terra cotta)
- Acrylic rolling pin
- Tissue blade or craft knife
- Oval shape cutter (approx. 1.5 inches)
- Ceramic tile or glass work surface
- Hand drill or pin tool
- Fine-grit sandpaper (400, 600, 800 grit)
- Gold fishhook ear wires
- Jump rings (gold, small)
- Jewelry pliers (flat nose and round nose)
- Parchment paper
Step 1: Color Prep
-
Condition the clay:
Begin by kneading each block of clay—white, beige, and dusty rose—separately until they are soft, pliable, and warm to the touch. -
Form logs:
Roll each color into a smooth snake or log shape, aiming for roughly equal lengths, though the thickness can vary slightly depending on which color you want to dominate. -
Combine the logs:
Press the three logs together lengthwise to form one thick multi-colored cylinder. Twist the ends of this combined log in opposite directions like a candy wrapper to begin the marbling process.
Step 2: Marbling Magic
-
Fold and roll:
Fold the twisted log in half, bringing the ends together. Roll it out on your work surface until it’s a long snake again. -
Repeat the twist:
Twist the log again. Be careful not to over-twist or over-mix, as you want distinct lines of color rather than a muddy blend. I usually stop when I see nice, distinct ribbons of color. -
Create a ball:
Roll your marbled snake into a loose ball, compressing the swirls together. -
Roll out the slab:
Place the ball on your work surface or tile. Use your acrylic roller to flatten the ball into a slab about 3mm thick. Roll in different directions to stretch the pattern organically. -
Inspect the pattern:
Look at your slab. If you don’t love the pattern on top, check the underside—sometimes the best swirls are hiding on the bottom.
Clean It Up
Before baking, gently wipe the raw clay surface with a Q-tip dipped in rubbing alcohol or acetone. This removes stray fingerprints and lint for a pristine finish.
Step 3: Cutting and Baking
-
Select your spot:
Hover your oval cutter over the slab to find the most pleasing composition of swirls. Look for areas where the white, beige, and rose interact gracefully. -
Cut the shapes:
Press the cutter firmly down into the clay. Give it a tiny wiggle to ensure a clean cut, then lift. Cut two ovals for your pair. -
Pierce the holes:
Before baking, use a pin tool or toothpick to carefully poke a hole near the top of each oval. Make sure the hole is big enough for your jump ring but not too close to the edge. -
Smooth the edges:
Gently rub your finger along the cut edges of the clay to smooth out any harsh lines or fingerprints. -
Bake:
Place the pieces on a baking sheet lined with parchment paper. Bake according to your clay package instructions (usually 275°F/135°C for about 30 minutes for this thickness).
Add a Little Sparkle
Mix a tiny pinch of gold leaf flakes or gold glitter into the beige clay before you start twisting the logs. It adds a subtle mineral shimmer to the stone effect.
Step 4: Finishing Touches
-
Cool down:
Let the clay cool completely on the baking sheet before handling so it hardens fully. -
Sand for perfection:
Dip your sandpaper in a little water and gently sand the edges and surface in a circular motion. Start with the lowest grit and move to the highest for a silky-smooth, stone-like finish. -
Buff (optional):
For a slight sheen, rub the surface vigorously with a piece of denim or a soft cotton cloth. -
Open jump rings:
Use your pliers to twist a jump ring open sideways (never pull it apart). -
Attach hardware:
Slide the jump ring through the hole in the clay piece, then loop the fishhook ear wire onto the ring. -
Close and secure:
Use your pliers to twist the jump ring back into a closed position, ensuring the ends meet perfectly so the charm doesn’t slip off.
Enjoy wearing your sophisticated new accessories that capture the beauty of natural stone.
Two-Tone Color-Blocked Tabs
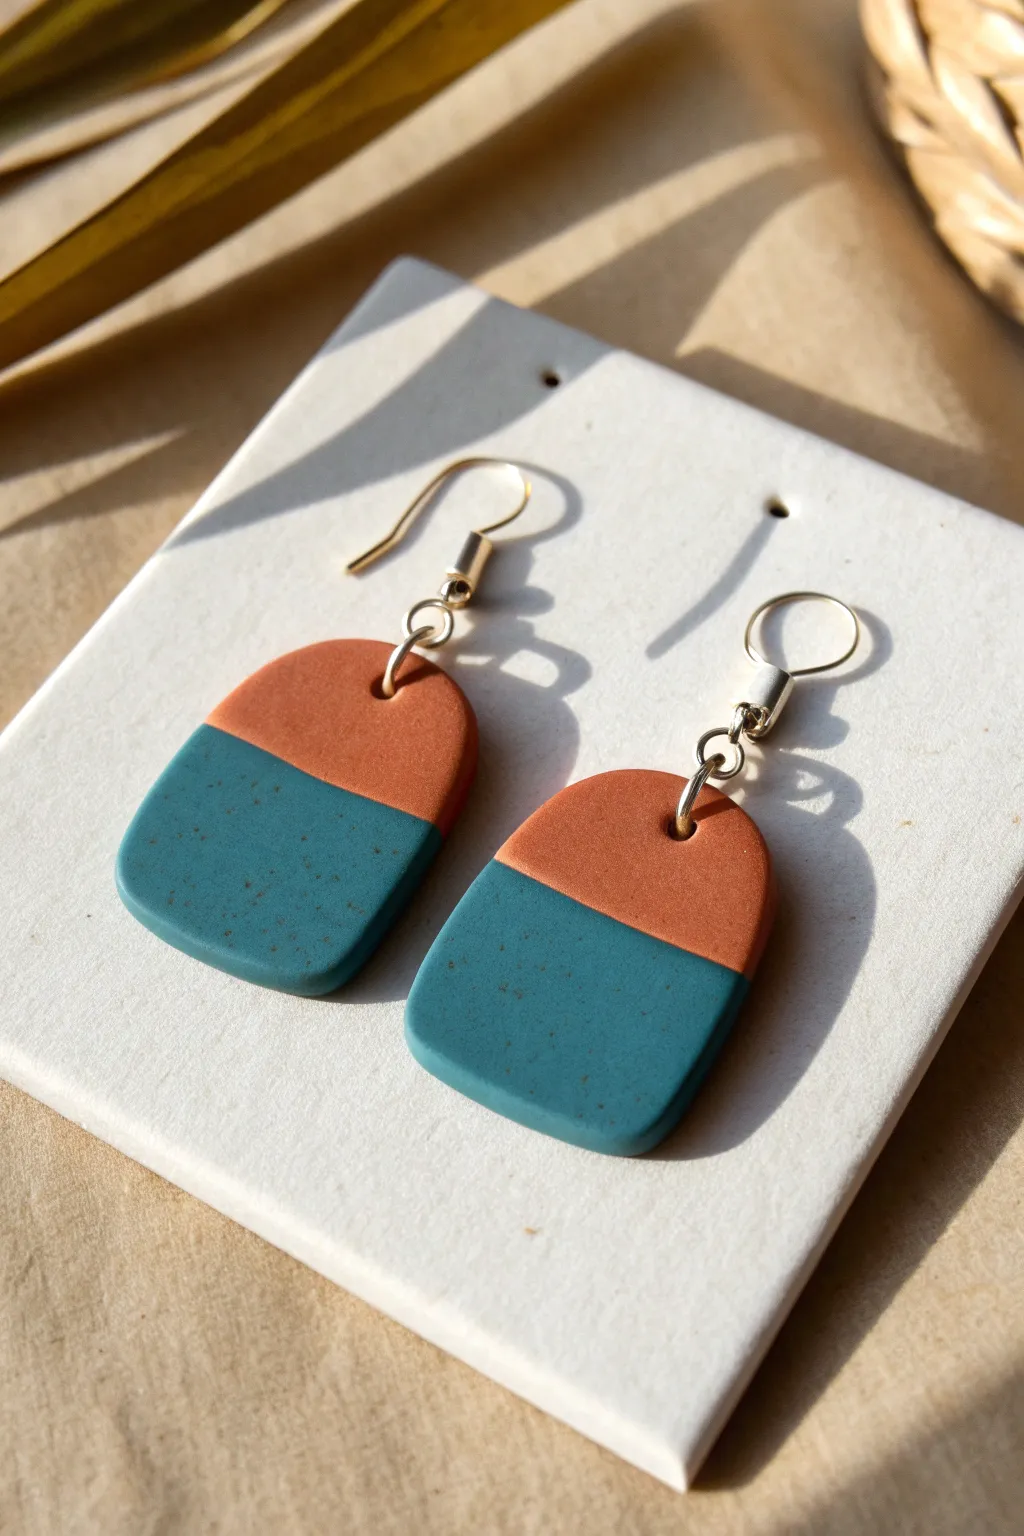
Achieve a modern, earthy aesthetic with these simple two-tone polymer clay earrings. The speckled teal combined with warm terracotta creates a striking contrast that feels both organic and geometric.
Step-by-Step Guide
Materials
- Polymer clay (terracotta/burnt orange)
- Polymer clay (teal/petrol blue)
- Ground black pepper or sand (for speckling)
- Acrylic rolling pin or clay brightness
- Tissue blade or X-Acto knife
- U-shaped or rounded rectangle clay cutter
- Small circle cutter or toothpick
- Parchment paper or ceramic tile
- Oven
- 2 large jump rings (gold or silver)
- 2 earring fishhooks
- Jewelry pliers (flat nose and round nose)
- Fine-grit sandpaper (optional)
Step 1: Preparing the Clay
-
Condition the terracotta:
Start by warming up the terracotta clay in your hands. Knead and roll it until it is soft, pliable, and free of any air bubbles. -
Create the speckled teal:
Condition your teal clay similarly. To get that organic stone look, I like to sprinkle a tiny pinch of ground black pepper or darker embossing powder into the teal clay and knead it until the specks are evenly distributed. -
Roll out slabs:
Using your acrylic roller or pasta machine, roll both the terracotta and the teal clay into sheets of equal thickness, aiming for roughly 3mm to 4mm thick.
Seam Security
Apply a tiny bit of liquid polymer clay to the raw edges before joining them. This acts as glue, ensuring the two colors won’t snap apart after baking.
Step 2: Creating the Color Block
-
Cut straight edges:
Use your tissue blade to cut a perfectly straight, long edge on both the terracotta and teal clay sheets. -
Join the seams:
Position the straight edge of the terracotta sheet again the straight edge of the teal sheet. Push them gently together so they touch without overlapping. -
Merge the slab:
Place a piece of parchment paper over the seam. Gently roll over the join with your acrylic roller to fuse the two colors into a single, cohesive slab. -
Smooth the back:
Flip the entire slab over. If the seam looks weak on the back, use your finger or a smoothing tool to gently smudge the clay across the line to reinforce the bond.
Step 3: Cutting and Baking
-
Position the cutter:
Place your rounded rectangle cutter over the slab so that the seam sits horizontally about one-third of the way down from the top. -
Cut the shapes:
Press down firmly to cut out your two earring shapes. Before lifting the cutter, give it a tiny wiggle to ensure the clay separates clean. -
Pierce the holes:
Use a small circle cutter or a toothpick to create a hole at the top center of the terracotta section. Make sure the hole is big enough for your jump rings. -
Smooth edges:
Dip your finger in a little bit of water or cornstarch and gently smooth any rough edges around the perimeter of the cut shapes. -
Bake:
Place the shapes on a ceramic tile or baking sheet lined with parchment paper. Bake according to your specific clay brand’s instructions (usually 275°F/135°C for 30 minutes). -
Cool and finish:
Allow the pieces to cool completely. If there are still rough spots on the edges, lightly sand them with fine-grit sandpaper for a professional finish.
Make it Matte
After baking, buff the surface with a piece of denim or a microfiber cloth for a soft, matte sheen, or add a UV resin top coat for a high-gloss finish.
Step 4: Assembly
-
Open jump rings:
Using two pairs of pliers, twist your jump ring open sideways (never pull it apart outwards) to preserve its circle shape. -
Connect hardware:
Slide the open jump ring through the hole in the clay piece, and then add your earring hook. -
Close the ring:
Twist the jump ring back using your pliers until the ends meet perfectly flush. Repeat for the second earring.
Wear your new geometric statement pieces with a neutral outfit to let those earthy colors really pop

TRACK YOUR CERAMIC JOURNEY
Capture glaze tests, firing details, and creative progress—all in one simple printable. Make your projects easier to repeat and improve.
Easy Two-Piece Link Dangles
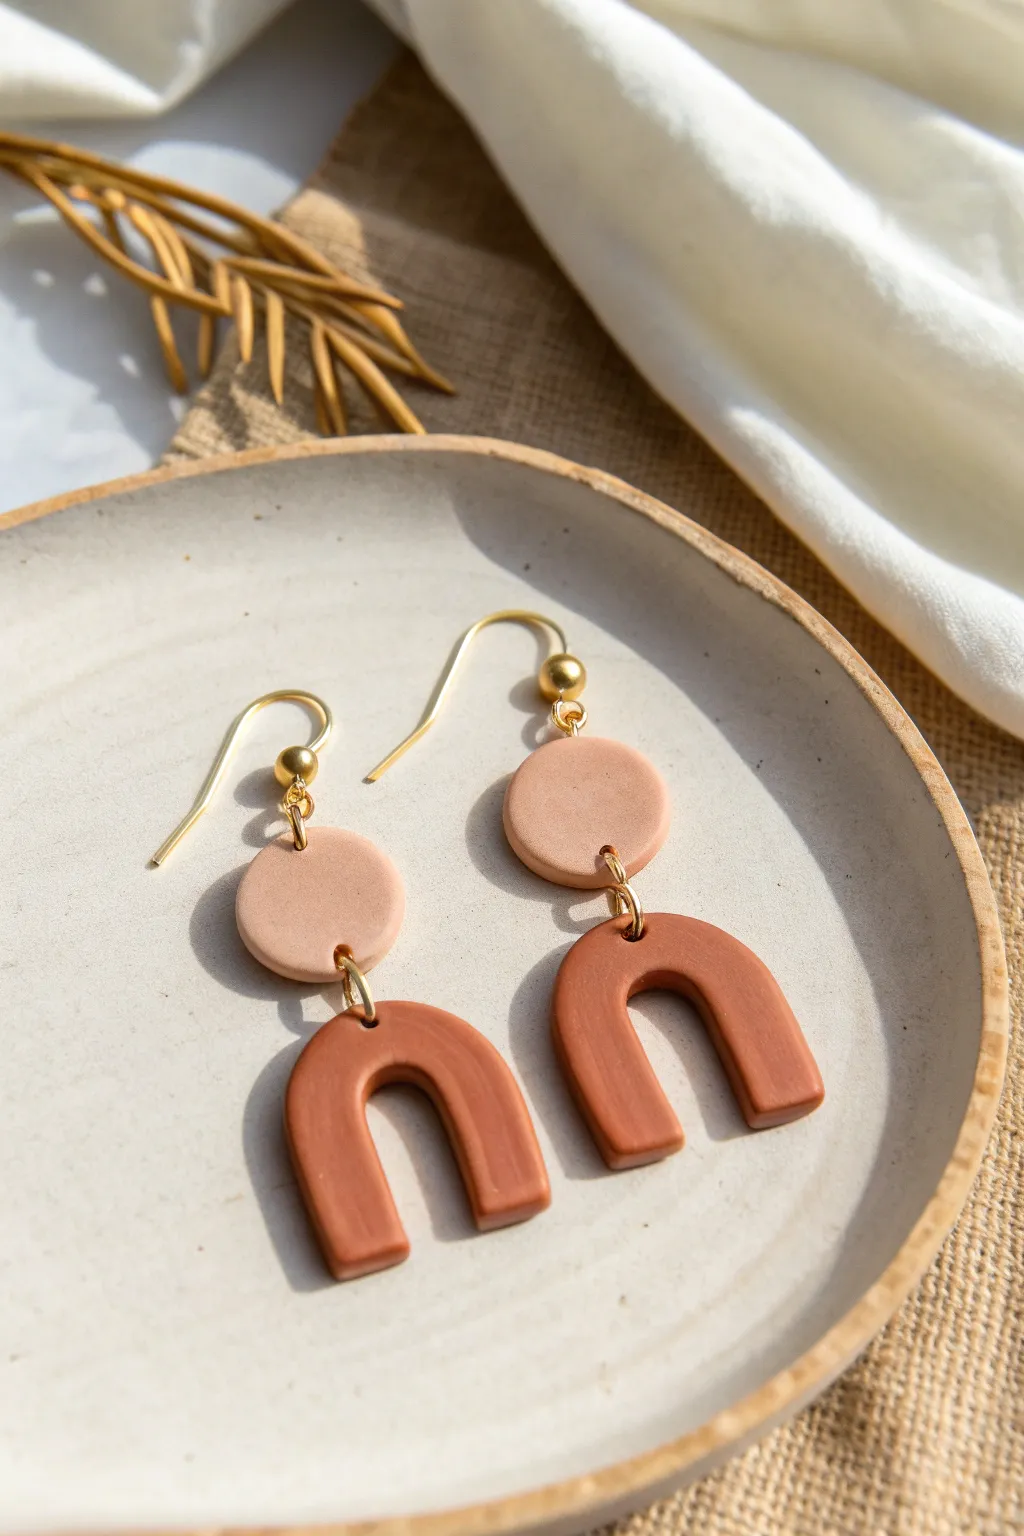
Embrace the warm, earthy tones of autumn with these simple yet striking terracotta arch dangles. The combination of a soft beige stud and a deep rust arch creates a modern, minimalist look that pairs perfectly with cozy sweaters.
Detailed Instructions
Materials
- Polymer clay (light beige/flesh tone)
- Polymer clay (terracotta/rust color)
- Acrylic rolling pin
- Circle cutter (small, approx. 1-1.5 cm)
- Arch cutter or stiff blade/craft knife
- Two gold ball-post ear wires
- Four gold jump rings (6mm or 7mm)
- Jewelry pliers (flat nose and round nose)
- Hand drill or needle tool used for piercing
- Parchment paper or baking tile
- Cornstarch or baby powder (optional)
- Toaster oven or conventional oven
Step 1: Prepping the Clay
-
Condition the clay:
Start by warming up your clay blocks in your hands. Knead both the light beige and the terracotta colors separately until they are soft, pliable, and free of cracks. -
Roll out the beige slab:
Place the conditioned beige clay on a flat surface or baking tile. Using your acrylic rolling pin, roll it out to an even thickness of about 3mm. If the clay is sticking, I like to lightly dust the surface with a tiny bit of cornstarch. -
Roll out the terracotta slab:
Repeat the process with the terracotta clay, aiming for the exact same thickness as your beige slab for a uniform look.
Fixing Fingerprints
If you notice fingerprints after baking, dip a Q-tip in 100% acetone and gently rub the surface of the cooled clay. It will dissolve the top layer slightly and buff away marks.
Step 2: Cutting the Shapes
-
Cut the circles:
Take your small circle cutter and firmly press it into the beige slab to cut two identical circles. These will form the top stud portion of the earring. -
Create the arches:
For the terracotta clay, use an arch-shaped cutter if you have one. If not, cut a long strip of clay, bend it gently over a cylindrical object to form the U-shape, or cut a large circle and cut out the center to make a donut, then slice it in half. -
Smooth the edges:
Gently lift your cut shapes. Use your finger or a soft brush dipped in a tiny bit of baby oil to smooth out any rough edges or fingerprints on the clay. -
Pierce the holes:
Before baking, use a needle tool to poke holes for the jump rings. Place one hole at the bottom of the beige circle and one at the top center of the terracotta arch. Ensure the hole is large enough for your jump rings to wiggle freely.
Step 3: Baking and Assembly
-
Bake the pieces:
Arrangement the pieces on parchment paper on a baking sheet. Bake according to the manufacturer’s instructions on your specific package of clay (usually 275°F/135°C for 15-30 minutes). -
Cool down:
Allow the pieces to cool completely inside the oven or on a cooling rack. Do not try to assemble them while warm, as the clay is still slightly flexible and vulnerable. -
Open the jump rings:
Using two pairs of pliers, twist your jump rings open sideways (never pull them apart outward) to preserve their circular shape. -
Connect the pieces:
Slide an open jump ring through the hole in the beige circle and the hole in the terracotta arch. Close the jump ring securely using your pliers. -
Attach the ear wires:
Depending on your earring post style, you may need a second jump ring to attach the beige circle to the gold ball post. Open a second jump ring, loop it through the top of the beige circle (you might need to drill a second hole if you didn’t earlier, or glue a post to the back instead), and attach the findings. -
Alternative post attachment:
The style in the photo uses a jump ring to connect the post stud to the clay. If you pierced a top hole in the beige circle, simply attach the ball post loop there. -
Double check security:
Give all your jump rings a final squeeze to ensure there are no gaps where the clay components could slip out.
Pro Tip: Seamless Arches
When shaping arches by hand, roll a ‘snake’ of clay first. Gently flatten it with an acrylic block *after* bending it into a U-shape to ensure the width is consistent throughout.
Enjoy styling these versatile earthy dangles with your favorite outfits
Clay Charm Hoops
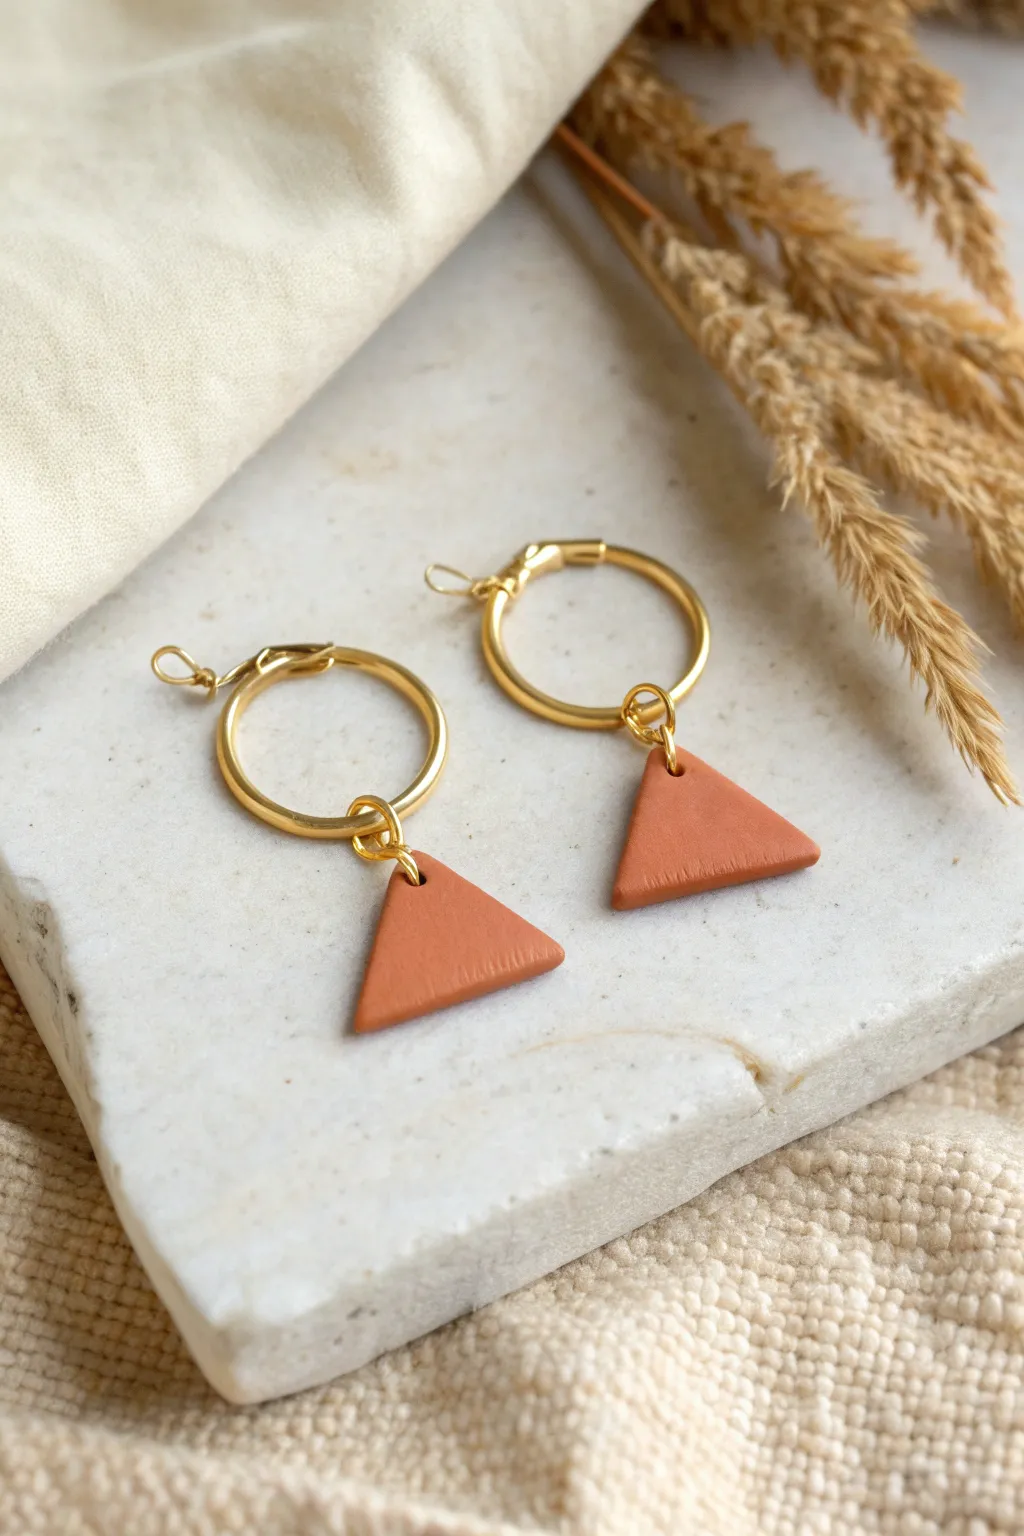
These minimalist earrings combine the warmth of terracotta-colored clay with the elegance of gold hardware. By creating simple geometric charms that slide onto classic hoops, you get a modern, versatile accessory that feels both earthy and chic.
How-To Guide
Materials
- Terracotta or burnt orange polymer clay
- Gold hoop earrings (approx. 20-30mm diameter)
- 4 large gold jump rings (6-8mm)
- Clay roller or acrylic rolling pin
- Sharp clay blade or X-Acto knife
- Small triangle cutter (approx. 1.5 cm) or a paper template
- Needle tool or toothpick
- Jewelry pliers (flat nose and round nose)
- Parchment paper or ceramic tile for baking
- Fine grit sandpaper (optional)
Step 1: Preparing the Clay
-
Condition the clay:
Start by taking a small block of your terracotta polymer clay. Knead it thoroughly in your hands until it becomes soft, pliable, and warm to the touch. -
Roll it out:
Place the conditioned clay on a clean, flat surface or ceramic tile. Using your acrylic roller, flatten the clay into an even sheet. -
Check thickness:
Aim for a thickness of about 3mm to 4mm. You want the triangles to be sturdy enough to hang well but not too chunky.
Fixing Fingerprints
If you notice fingerprints on your raw clay triangles before baking, dip a Q-tip in a tiny bit of acetone or rubbing alcohol and gently glide it over the surface to smooth them out instantly.
Step 2: Shaping the Charms
-
Cut the shapes:
Press your small triangle cutter firmly into the clay sheet to create two identical shapes. If you don’t have a cutter, place a small paper triangle template on the clay and carefully trace around it with your blade. -
Smooth the edges:
Gently lift the triangles. Lightly run your finger along the cut edges to soften them and remove any stray crumbs of clay. -
Pierce the holes:
Using a needle tool or toothpick, poke a hole near the top point of each triangle. Ensure the hole is centered and enough clay remains above it to prevent breaking. -
Widen the openings:
Give the tool a tiny wiggle to ensure the hole is large enough to fit your jump rings comfortably. I always make the hole slightly larger than I think I need since it can shrink slightly during baking.
Texture Twist
Before cutting your triangles, press a piece of coarse sandpaper, lace, or a textured roller onto the clay sheet. This adds a subtle, professional-looking surface detail to the plain color.
Step 3: Baking and Finishing
-
Bake the pieces:
Place your clay triangles on parchment paper or a baking tile. Bake according to the specific temperature and time instructions on your package of polymer clay (usually around 275°F/135°C for 15-30 minutes). -
Cool down:
Once baked, remove them from the oven and let them cool completely before handling. They are fragile when hot. -
Sand if necessary:
If there are any rough spots or fingerprints, gently buff the edges and surface with fine-grit sandpaper under running water.
Step 4: Assembly
-
Open the jump rings:
Take two of your gold jump rings. Use two pairs of pliers to twist them open—move one side forward and one back, rather than pulling them apart, to maintain the circle shape. -
Attach the charm:
Slide one open jump ring through the hole in a clay triangle. -
Add a connector ring:
Before closing that first ring, loop a *second* jump ring onto it. This double-ring technique helps the triangle hang facing forward rather than sideways. -
Close the first ring:
Twist the first jump ring closed securely so the gap is flush. -
Connect to the hoop:
The upper jump ring (the one without the clay) is now the connector. Slide this ring onto the wire of your gold hoop earring. -
Repeat for the second earring:
Follow the same assembly process for the other earring to complete the pair.
Enjoy wearing your new handmade geometric hoops with your favorite casual outfits
Stamped Texture Studs
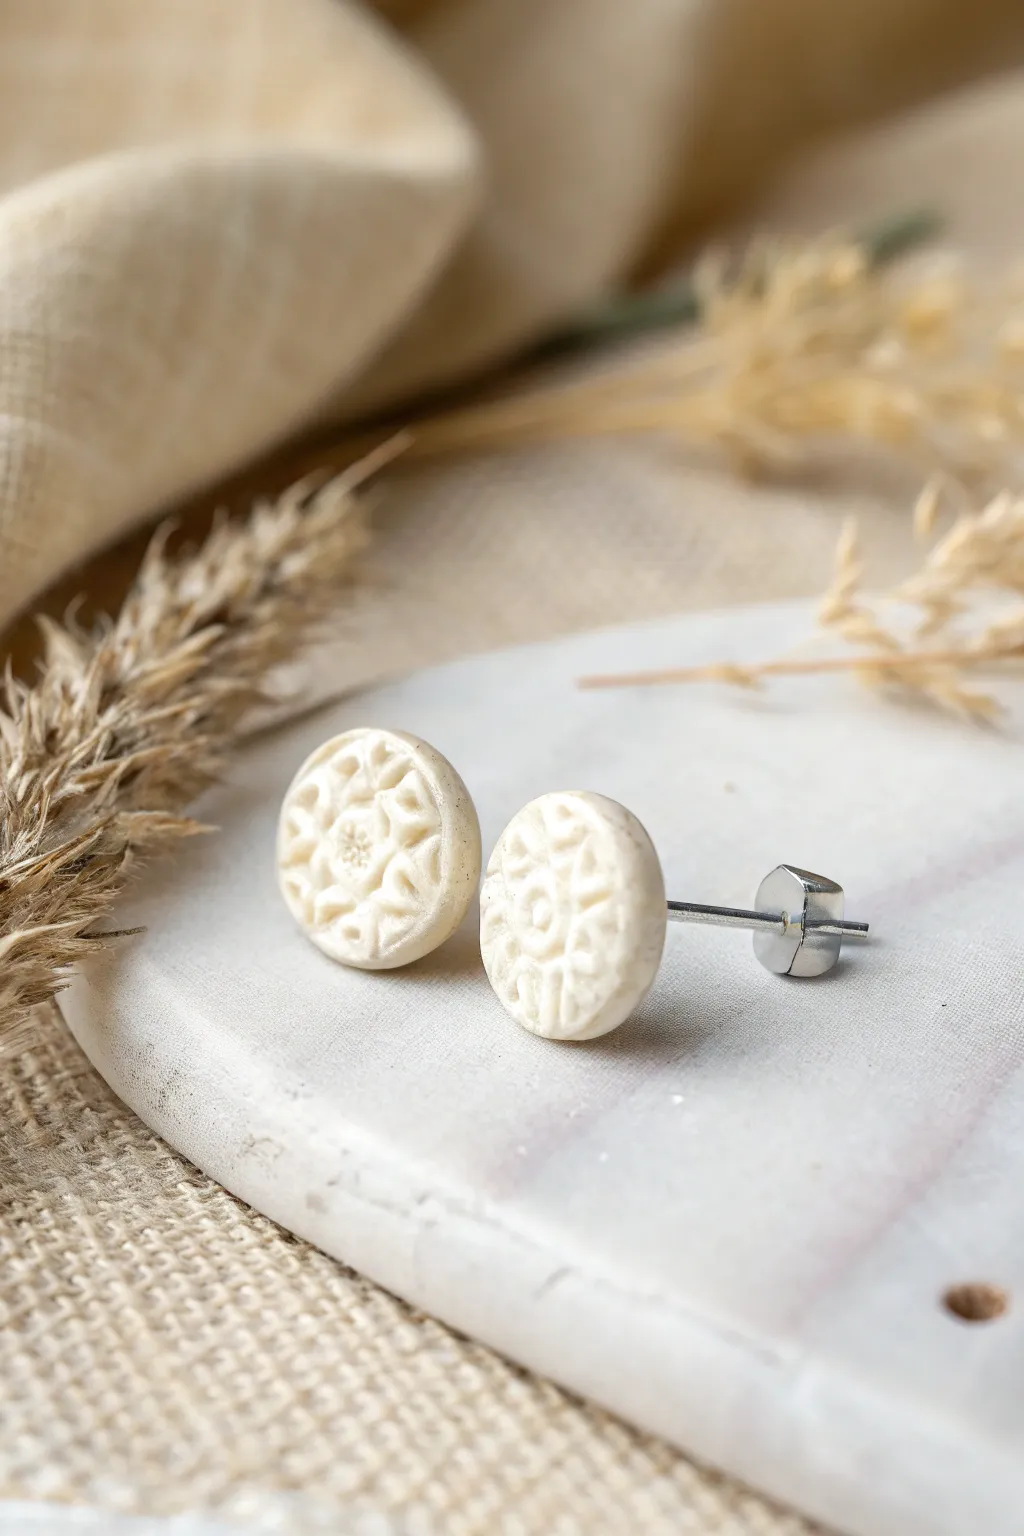
These elegant studs feature a delicate mandala-style imprint that adds depth and sophistication to simple cream clay. The finished result is a versatile pair of earrings with an organic, matte finish perfect for everyday wear.
Detailed Instructions
Materials
- White or cream polymer clay (e.g., Fimo Soft, Premo)
- Small round clay cutter (approx. 10-12mm)
- Texture stamp or patterned button (floral/mandala design)
- Acrylic rolling pin
- Ceramic tile or glass work surface
- Cornstarch or baby powder (release agent)
- Earring posts (surgical steel or sterling silver)
- Super glue or jewelry adhesive (e.g., E6000)
- Oven for baking
- Fine grit sandpaper (optional)
Step 1: Clay Preparation
-
Condition the Clay:
Begin by slicing off a small block of your cream polymer clay. Work it in your hands, kneading and rolling it until it becomes soft, pliable, and free of any air bubbles. -
Roll Out the Slab:
Place your conditioned clay on a clean ceramic tile or glass surface. Use your acrylic roller to flatten the clay into an even slab. -
Check Thickness:
Aim for a thickness of about 3mm to 4mm. You want them thick enough to hold the imprint without becoming flimsy, but light enough to wear comfortably.
Clean Cuts Pro Tip
Place a sheet of cling film over the textured clay before cutting. The cutter pushes the plastic into the clay, creating softly rounded, domed edges automatically.
Step 2: Creating the Texture
-
Apply Release Agent:
To prevent your stamp from sticking to the clay, lightly dust the surface of the clay slab with a tiny pinch of cornstarch or baby powder. -
Spread the Powder:
Gently rub the powder across the surface with your finger so it is evenly coated but not clumpy, then blow away any excess. -
Position the Stamp:
Take your chosen texture stamp or a patterned vintage button. Position it over the area of the clay slab you want to texturize. -
Press Firmly:
Press the stamp down firmly into the clay. I like to apply even pressure and wiggle it very slightly to ensure the design transfers deeply. -
Reveal the Pattern:
Carefully lift the stamp straight up to reveal the raised floral pattern. Inspect the design to ensure it is crisp and clear.
Stamp Sticking?
If the clay gets stuck in the crevices of your stamp, use an old toothbrush and warm soapy water to scrub it out immediately before it cures or dries hard.
Step 3: Cutting and Baking
-
Cut the Shapes:
Take your small circular cutter and center it over the most interesting part of the stamped pattern. Press down cleanly to cut out your earring shape. -
Release the Rounds:
Gently lift the clay cutter. If the clay stays inside, poke it out gently from the top; if it stays on the tile, carefully peel away the excess clay surrounding the circle. -
Refine Edges:
Before baking, gently tap the edges of the circles with your fingertip to smooth out any sharp ridges left by the cutter. -
Bake:
Place the tile with your clay circles into an oven preheated according to your clay manufacturer’s instructions (usually 230°F/110°C to 265°F/130°C). Bake for about 30 minutes. -
Cool Down:
Once bakes, turn off the oven and let the pieces cool partially inside, then remove and let them cool completely to room temperature before handling.
Step 4: Assembly
-
Sand Back (Optional):
If there are any rough spots on the back or edges, lightly sand them with fine-grit sandpaper for a professional finish. -
Prepare Adhesion:
Clean the back of the clay circles with a little rubbing alcohol to ensure a grease-free surface for the glue. -
Glue the Posts:
Apply a small dot of strong jewelry adhesive to the flat pad of the earring post. -
Secure the Backs:
Press the post firmly onto the center of the back of the clay circle. Check from the side to ensure the post stands straight. -
Dry Time:
Let the glue cure fully according to the package directions, usually at least 24 hours, to ensure the bond is secure.
Enjoy wearing your handcrafted, textured studs that bring a touch of artisan charm to any outfit
Ruffled Scallop Dangles
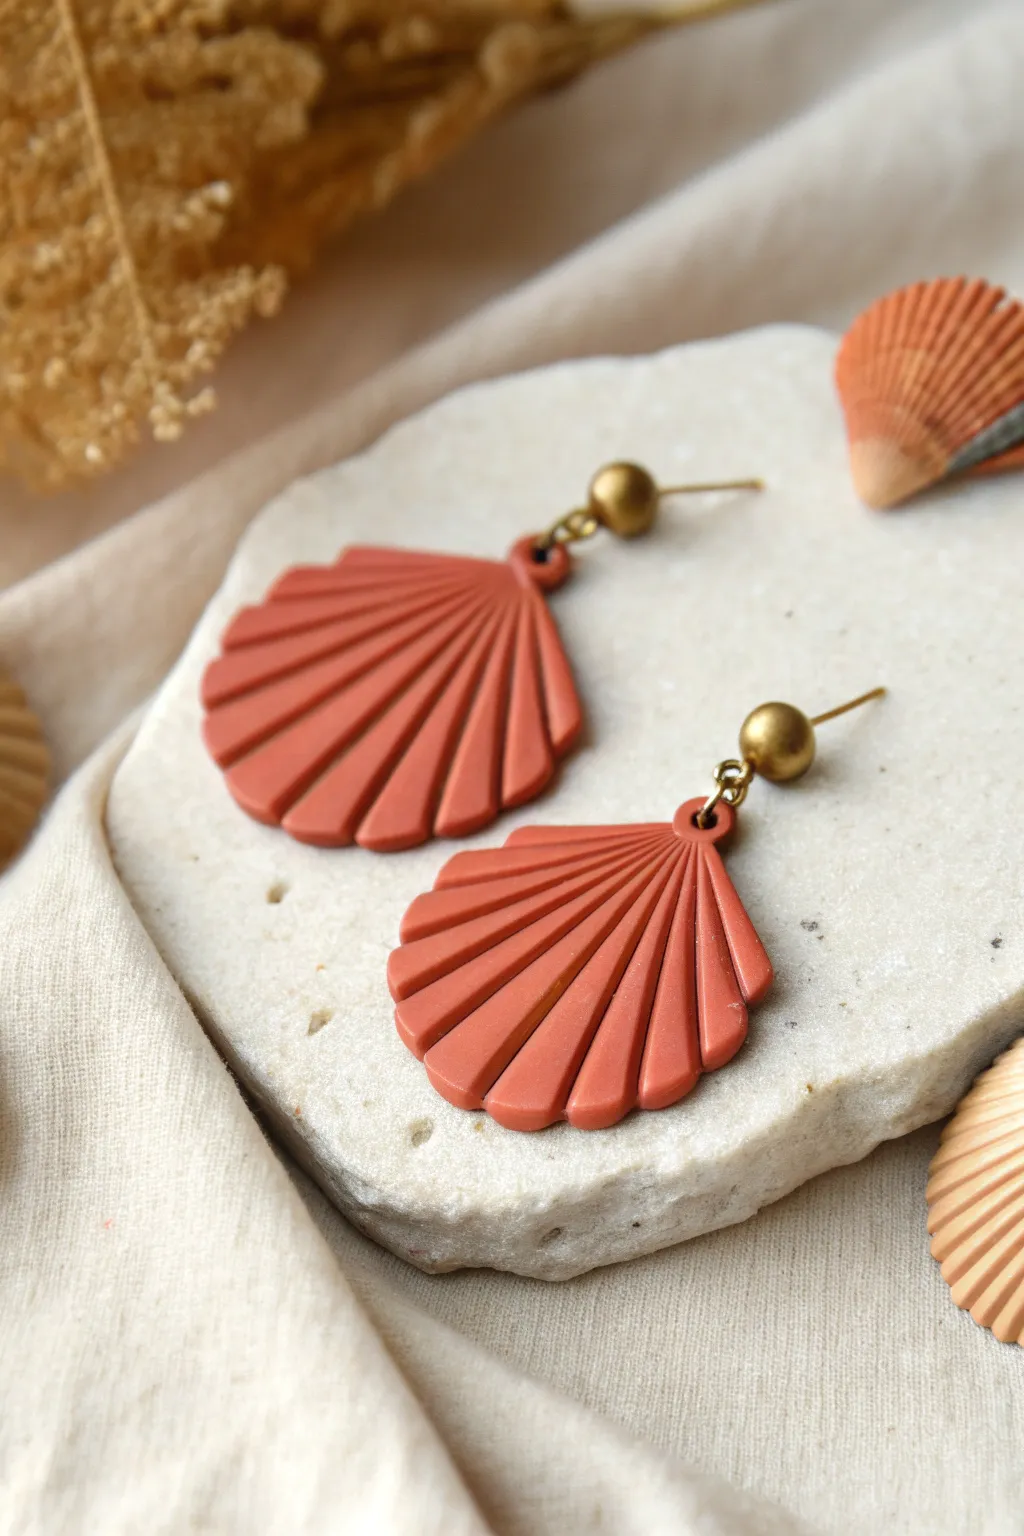
Bring a touch of the seaside to your style with these warm, rust-colored scallop dangles. The deep, radiating grooves and matte finish give them a sophisticated, architectural look that pairs perfectly with simple gold hardware.
Step-by-Step Guide
Materials
- Polymer clay in terracotta or rust
- Acrylic rolling pin
- Scallop shell cutter (approx. 1-1.5 inches wide)
- Rigid tissue blade or craft knife
- Modeling tool or knitting needle (for grooves)
- Needle tool or small drill bit
- Gold ball stud earrings with loops
- Jump rings (gold)
- Jewelry pliers
- Ceramic tile or baking sheet
- Parchment paper
Step 1: Clay Conditioning & Cutting
-
Condition the clay:
Begin by warming the terracotta clay in your hands, kneading and rolling it until it is soft and pliable. This prevents cracks later on. -
Roll out a slab:
Using your acrylic rolling pin, roll the clay into an even slab. Aim for a medium thickness, roughly 3mm or an 1/8th of an inch, so the grooved texture doesn’t make the clay too thin. -
Cut the shapes:
Press your scallop shell cutter firmly into the clay. If you don’t have a specific cutter, you can cut a fan shape freehand using a craft knife or a printed paper template as a guide. -
Smooth the edges:
gently rub your finger along the raw cut edges of the clay to smooth out any burrs or sharp corners left by the cutter.
Step 2: Adding Texture & Detail
-
Mark the center:
Identify the top center point of the fan shape where the jump ring will eventually go. This will be the focal point where all your lines radiate from. -
Create the first groove:
Using a modeling tool or the side of a thick knitting needle, press a deep groove straight down the center of the shape, starting from the top point and widening slightly as you reach the bottom edge. -
Add side grooves:
Work outward from the center groove, adding 3-4 more creating distinct radiating lines on the left side. I find it helpful to angle the tool slightly to create a sharper ridge between indentations. -
Mirror the texture:
Repeat the grooving process on the right side, trying to keep the spacing symmetrical with the left side. -
Refine the scallops:
Once the grooves are pressed in, the bottom edge might look a bit wavy. Use your finger to gently round the bottom of each ‘rib’ to emphasize that classic scallop silhouette. -
Drill the hole:
Use a needle tool or small awl to pierce a hole at the very top center of the shell. Make sure it is large enough to fit your jump ring.
Groove Smoothness
To prevent fingerprints or rough spots in your grooves, lay a piece of plastic wrap over the clay before pressing your tool down. It softens the edges instantly.
Step 3: Baking & Assembly
-
Bake the pieces:
Place your shells on a parchment-lined baking sheet or ceramic tile. Bake according to your brand of clay’s specific instructions (usually 275°F/135°C for 30 minutes). -
Cool down:
Allow the pieces to cool completely in the oven or on the tray before handling them to ensure maximum strength. -
Open jump rings:
Using two pairs of jewelry pliers, twist a jump ring open sideways (never pull it apart). -
Connect the components:
Slide the open jump ring through the hole in the clay shell and the loop on your gold ball stud post. -
Close the ring:
Use the pliers to twist the jump ring back into a closed position, ensuring the ends meet perfectly flush so the connection is secure.
Uneven Spacing?
If your grooves look lopsided, don’t re-roll immediately; gently nudging the raised ridges with a silicone tool can often correct spacing without starting over.
Wear these coastal-inspired beauties with a simple linen top to let the texture really shine
Tiny Line Inlay Earrings
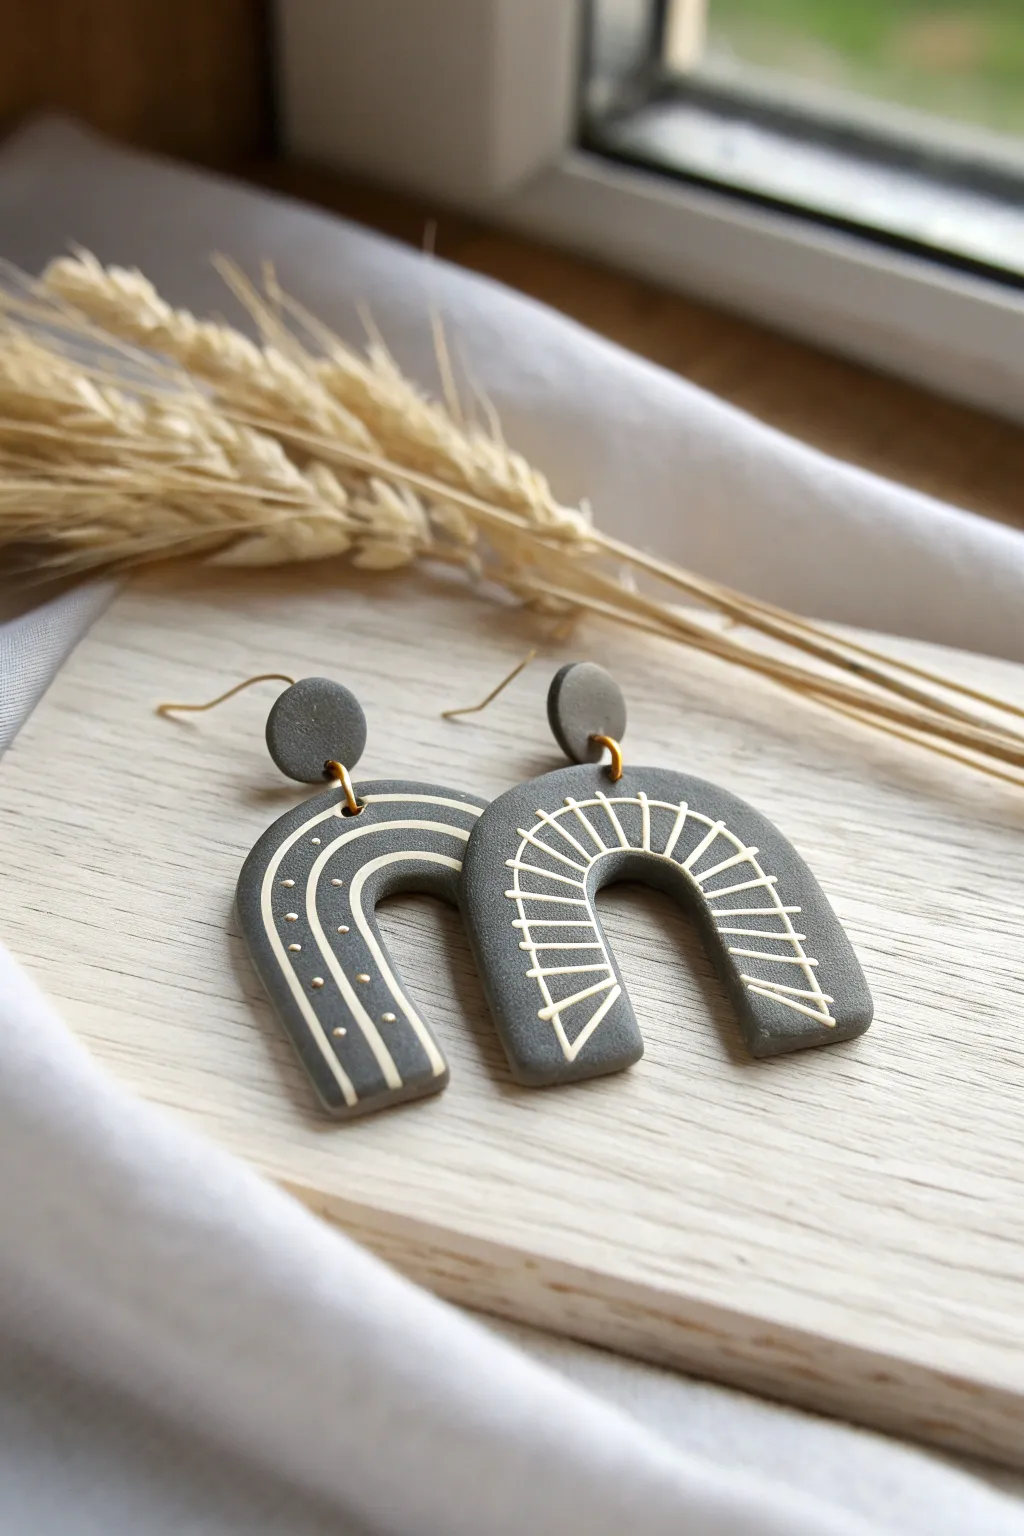
These sophisticated arch earrings combine a matte grey base with crisp white inlay work for a modern, architectural look. The technique creates a smooth, flush surface where the delicate lines seem to float within the clay.
How-To Guide
Materials
- Polymer clay (dark grey)
- Acrylic paint (white)
- Liquid polymer clay (optional, for softening)
- U-shape arch clay cutter
- Small circle cutter (approx. 8-10mm)
- Acrylic roller or pasta machine
- Detail needle tool or craft knife
- Fine grit sandpaper (400-1000 grit)
- Jump rings (gold)
- Earring hooks (gold)
- Jewelry pliers
- Wet wipe or paper towel
- Ceramic tile or baking sheet
Step 1: Prepping the Base
-
Condition the grey clay:
Start by conditioning your dark grey polymer clay until it is soft and pliable. If the clay feels too stiff or crumbles, add a tiny drop of liquid clay or clay softener. -
Roll out a slab:
Using an acrylic roller or the medium setting on a pasta machine, create a smooth, even slab of grey clay about 3mm thick. -
Cut the shapes:
Press your U-shape arch cutter firmly into the slab to create two identical arch shapes. Use the small circle cutter to punch out two matching discs for the earring studs. -
Smooth the edges:
Gently rub your finger along the cut edges of the clay to smooth out any harsh lines or burrs left by the cutters before moving on to the design phase.
Messy Lines?
If paint smears stubbornly, let it dry fully, then lightly sand the surface with 1000-grit sandpaper under running water to remove the top layer.
Step 2: Carving the Designs
-
Plan your pattern:
Decide which arch will have which pattern. As seen in the photo, one earring features concentric arches and dots, while the other showcases a radiating sunburst or ladder design. -
Carve the concentric lines:
On the first arch, use a needle tool to gently carve two curved lines following the shape of the arch. Press deep enough to create a distinct groove but don’t cut all the way through. -
Add the dots:
Between the two carved lines on the first arch, press the tip of your needle tool straight down to create a row of evenly spaced small divots. -
Carve the sunburst:
On the second arch, carve a central curved line. Then, carve short, straight lines radiating outward from the center curve to the edges of the arch, creating a ladder-like effect. -
Bake the pieces:
Place your carved clay pieces on a ceramic tile or baking sheet. Bake according to the manufacturer’s instructions (usually 275°F/135°C for 15-30 minutes per 1/4 inch of thickness). -
Cool completely:
Remove the pieces from the oven and allow them to cool completely. The clay must be hard and cool before you apply the paint.
Step 3: Inlay and Assembly
-
Apply white paint:
Squeeze a small amount of white acrylic paint onto a palette. Brush the paint generously over the carved areas, enduring the paint gets deep into the grooves and dot indentations. -
Wipe the surface:
While the paint is still wet (or semi-dry depending on preference), take a slightly damp wet wipe or paper towel and wipe across the surface of the clay. -
Reveal the design:
Continue wiping gently until the surface grey clay is clean, leaving the white paint trapped only inside the engraved lines and dots. -
Sand for finish:
Once the paint is fully dry, lightly sand the surface with fine-grit sandpaper to remove any stubborn paint haze and give the earrings a professional matte finish. -
Drill holes:
Using a hand drill or excessive force with a needle tool, carefully drill a small hole at the top center of each arch and near the bottom edge of each circle stud. -
Attach findings:
Use your jewelry pliers to open a jump ring. Thread it through the hole in the arch and the hole in the circle stud, then close the ring securely. -
Add the hooks:
Flip the pieces over. Attach the earring hooks to the back of the circle studs using super glue designed for jewelry, or drill a hole at the top of the stud if using dangle hooks instead of posts.
Level Up
Mix gold mica powder into your white paint or use metallic acrylic paint for the inlay to give the lines a stunning, subtle shimmer.
Now you have a chic, modern pair of earrings that look like intricate stonework
Faux Stone Pebble Studs
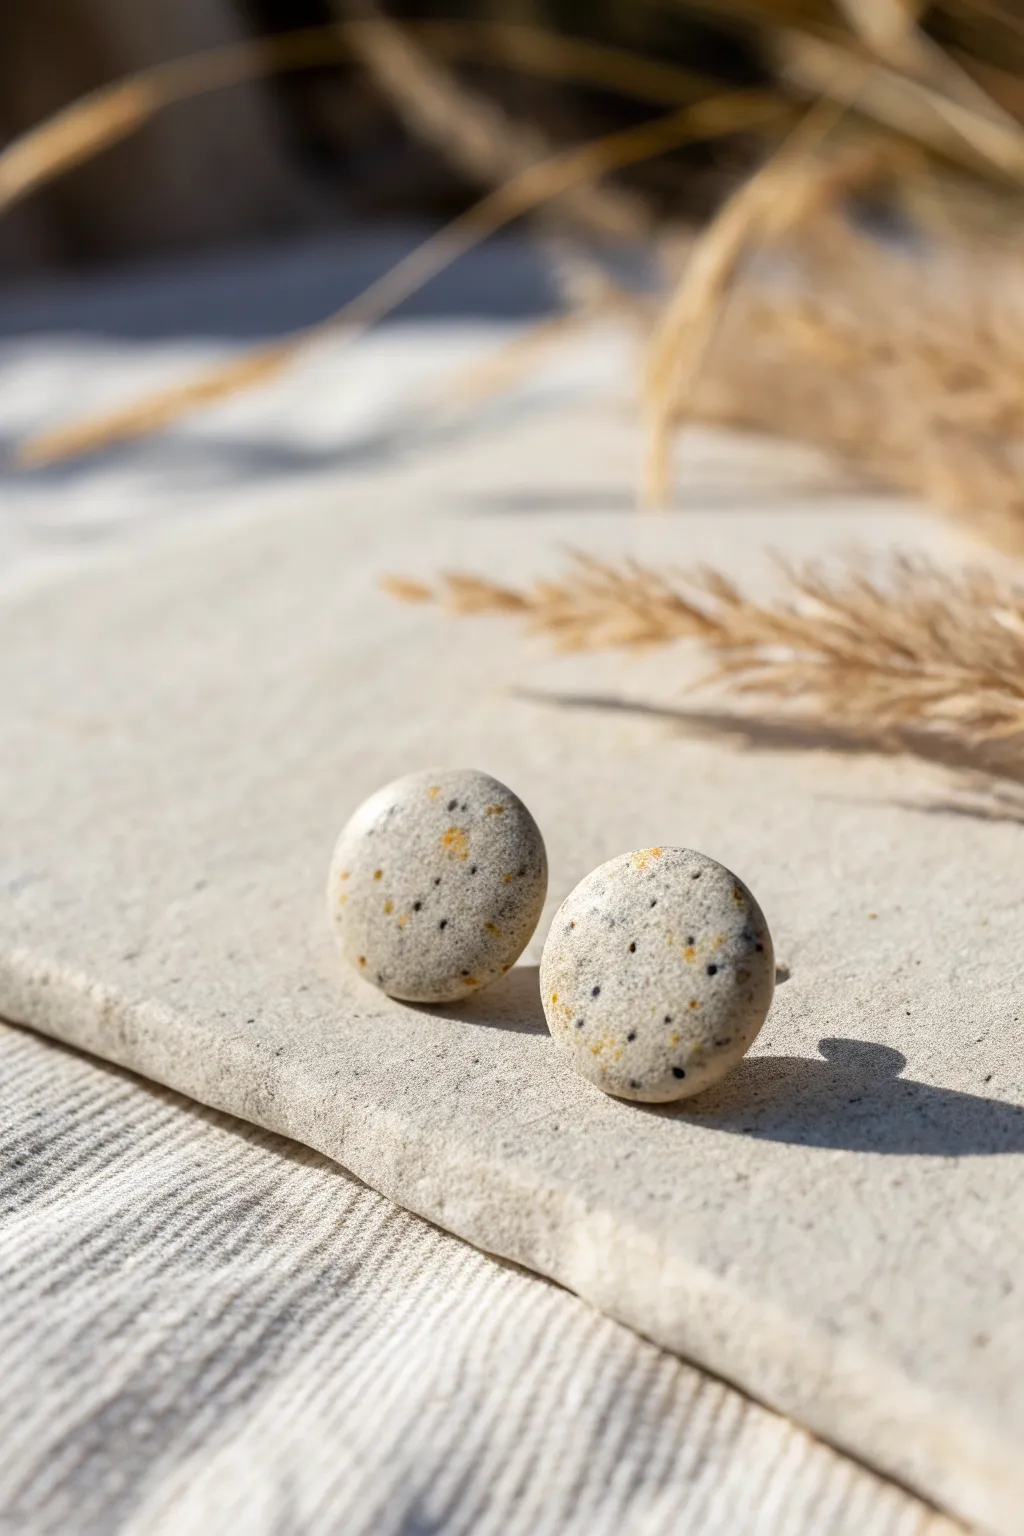
These understated earrings capture the organic beauty of smooth river stones with a sophisticated beige palette speckled in black and amber. The perfectly round, domed shape adds a modern touch to this nature-inspired accessory.
Step-by-Step Guide
Materials
- Polymer clay (translucent or ecru)
- White acrylic paint
- Coarse black pepper or dried coffee grounds
- Gold or amber embossing powder (or scraped soft pastel)
- Small round clay cutter (approx. 10-12mm)
- Acrylic rolling pin
- Earring stud posts
- Jewelry glue (E6000 or similar)
- Wet/dry sandpaper (400 to 1000 grit)
- Matte finish varnish (optional)
- Glossy tile or glass work surface
- Oven for baking
Step 1: Mixing the Faux Stone Clay
-
Condition the base:
Begin by conditioning your translucent or ecru polymer clay until it is soft and pliable. If you want a more opaque stone look, mix in a very small pea-sized amount of white clay. -
Add texture elements:
Flatten the clay into a pancake shape. Sprinkle a pinch of coarse black pepper or dried, used coffee grounds onto the clay for the black speckles. This organic material mimics mineral inclusions perfectly. -
Incorporate color flecks:
Add a small pinch of gold embossing powder or scrape some dust from an amber-colored soft pastel onto the clay. This provides those warm, rusty tones seen in natural pebbles. -
Mix thoroughly:
Fold the clay over the inclusions and knead it thoroughly. I like to twist and fold repeatedly to ensure the specks are distributed evenly throughout the entire batch of clay rather than clumped in one spot.
Step 2: Shaping and Cutting
-
Roll the slab:
Using your acrylic rolling pin, roll the mixed clay out on your work surface. Aim for a thickness of about 3mm to 4mm—you want these to have a nice, substantial feel. -
Cut the shapes:
Press your small round cutter firmly into the clay slab. Wiggle it slightly before lifting to ensure a clean cut. -
Release the circles:
Gently remove the clay circles from the cutter. If they stick, you can gently poke them out from the back with a blunt tool or use a piece of plastic wrap over the clay before cutting for rounded edges. -
Refine the shape:
Pick up each clay circle and gently smooth the edges with your fingertip to remove any harsh cut lines. -
Create the dome:
Place the circle in the palm of your hand and gently rotate your finger over the top to create a slight dome shape, mimicking a water-worn pebble.
Browning Too Fast?
If your white or translucent clay starts scorching or yellowing before it’s fully cured, tent a piece of aluminum foil over the baking tray to protect it from direct heat.
Step 3: Baking and Finishing
-
Prepare for baking:
Place your shaped pebbles on a ceramic tile or a baking sheet lined with parchment paper. -
Bake the clay:
Bake according to your specific clay brand’s instructions (usually around 275°F/130°C) for 30 to 45 minutes. Longer baking ensures durability. -
Cool down:
Allow the clay pieces to cool completely before determining if they need sanding. -
Sand for realism:
Wet your sandpaper and gently sand the surface of the cured clay in a circular motion. This exposes the pepper and embossing powder inside, making the stone effect pop. -
Buff the surface:
Wipe away any sanding dust and buff the pieces on a piece of denim or heavy fabric to give them a natural, satiny sheen. -
Attach the hardware:
Apply a small dot of strong jewelry glue to the flat pad of an earring post. Press it firmly onto the back of the clay pebble. -
Secure the post:
For extra durability, you can place a tiny piece of clay over the glued post base and bake again briefly, or simply let the glue cure fully for 24 hours.
Natural Texture
Before baking, gently roll a textured rock or a piece of rough sandpaper over the raw clay surface. This imitates the pitted texture of real limestone.
Enjoy wearing your new nature-inspired accessories that look just like they was found on a riverbank
Leaf Imprint Dangles
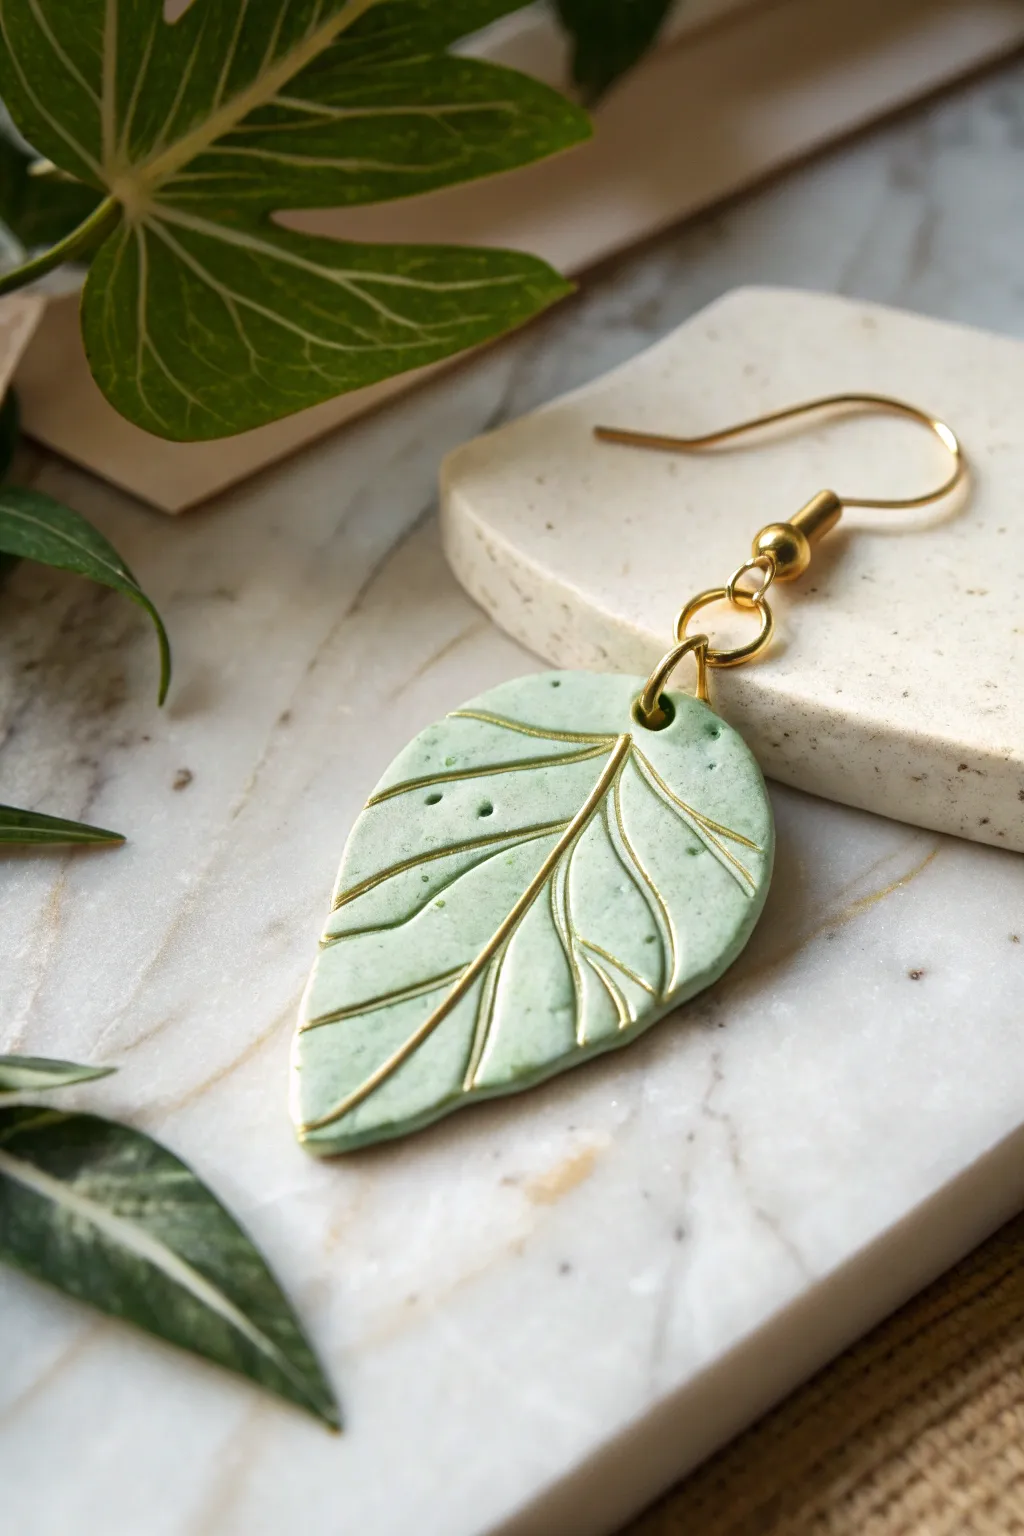
Capture the delicate beauty of botanical textures with these elegant sage-green polymer clay earrings. The design features intricate, gold-filled impressed veins that add a touch of luxury to the soft, stone-like matte finish.
Detailed Instructions
Materials
- Polymer clay in light sage green (or white mixed with a touch of green and granite)
- Acrylic rolling pin or pasta machine
- Leaf-shaped clay cutter (or a craft knife and cardstock template)
- Needle tool or sharp toothpick
- Gold acrylic paint
- Small paintbrush
- Paper towel or baby wipe
- Hand drill or small hole punch tool
- Gold jump rings (6mm or 7mm)
- Gold ball-end earring hooks
- Pliers (chain nose and flat nose)
- Baking tile or parchment paper
Step 1: Shaping and Texturing
-
Condition the Clay:
Begin by warming the sage green polymer clay in your hands. Knead it thoroughly until it is soft, pliable, and free of any air bubbles. If you are mixing custom colors, ensure the blend is uniform. -
Roll the Slab:
Using your acrylic rolling pin or a pasta machine on a medium setting, roll the clay out into an even slab. Aim for a thickness of about 3mm—thick enough to act as a sturdy base but thin enough to be lightweight. -
Cut the Shape:
Place your leaf-shaped cutter onto the clay slab and press down firmly to cut out your earring shapes. If you don’t have a cutter, you can trace around a cardstock template with a craft knife. -
Refine the Edges:
Gently lift the cut shapes. Use your fingertip to lightly smooth the raw edges, removing any loose bits of clay or sharp corners created by the cutter. -
Create the Veins:
Take your needle tool and gently press into the surface of the clay to draw the center vein of the leaf. Press deep enough to create a groove for the paint later, but be careful not to slice all the way through. -
Add Secondary Veins:
Branching out from the center line, press in smaller, curved veins. I find it helpful to vary the pressure slightly to make the lines look more organic and natural. -
Pierce the Hole:
Use a small hole punch tool or a needle tool to create a hole at the very top of the leaf stem. Make sure the hole is large enough for your jump ring to pass through freely.
Step 2: Baking and Gilding
-
Bake the Pieces:
Place your clay leaves on a baking tile or parchment-lined tray. Bake according to the manufacturer’s instructions for your specific brand of clay (usually around 275°F/135°C for 30 minutes). -
Cool Down:
Once baked, remove the tray from the oven and allow the clay to cool completely. The clay hardens fully as it cools, so don’t rush this step. -
Apply Gold Paint:
Squeeze a small amount of gold acrylic paint onto a palette. Using a small brush, dab the paint generously over the indented vein lines you created earlier. It doesn’t need to be neat; just ensure the grooves are filled. -
Wipe the Surface:
Before the paint dries completely, take a slightly damp paper towel or baby wipe and gently wipe the surface of the clay. The goal is to remove the paint from the raised surface while leaving the gold trapped inside the engraved lines. -
Clean Up:
If there is any stubborn paint haze left on the surface, you can use a cotton swab dipped in a tiny bit of rubbing alcohol to clean it up precisely. -
Seal (Optional):
If you want extra protection, you can apply a thin layer of matte varnish, though polymer clay is durable enough on its own.
Paint Wipe Woes
If you wipe away too much gold paint from the grooves, let the piece dry fully, then re-apply a second layer of paint and wipe again with a lighter touch.
Step 3: Assembly
-
Open the Jump Ring:
Hold a gold jump ring with two pairs of pliers. Twist the pliers in opposite directions (one forward, one back) to open the ring without distorting its circle shape. -
Attach to Leaf:
Slide the open jump ring through the hole you pierced in the top of the clay leaf. -
Add the Hook:
Before closing the ring, loop the bottom of your gold earring hook onto the jump ring as well. Ensure the hook is facing the correct direction so the leaf will hang forward. -
Close the Ring:
Use your pliers to twist the jump ring back into position, ensuring the two ends meet perfectly flush so the hardware doesn’t slip out.
Natural Speckles
Mix a tiny pinch of ground black pepper or dried tea leaves into your green clay before rolling. This creates a realistic, stone-like speckled texture effortlessly.
Wear these botanical beauties with pride or gift them as a handmade treasure.
Simple Daisy Studs
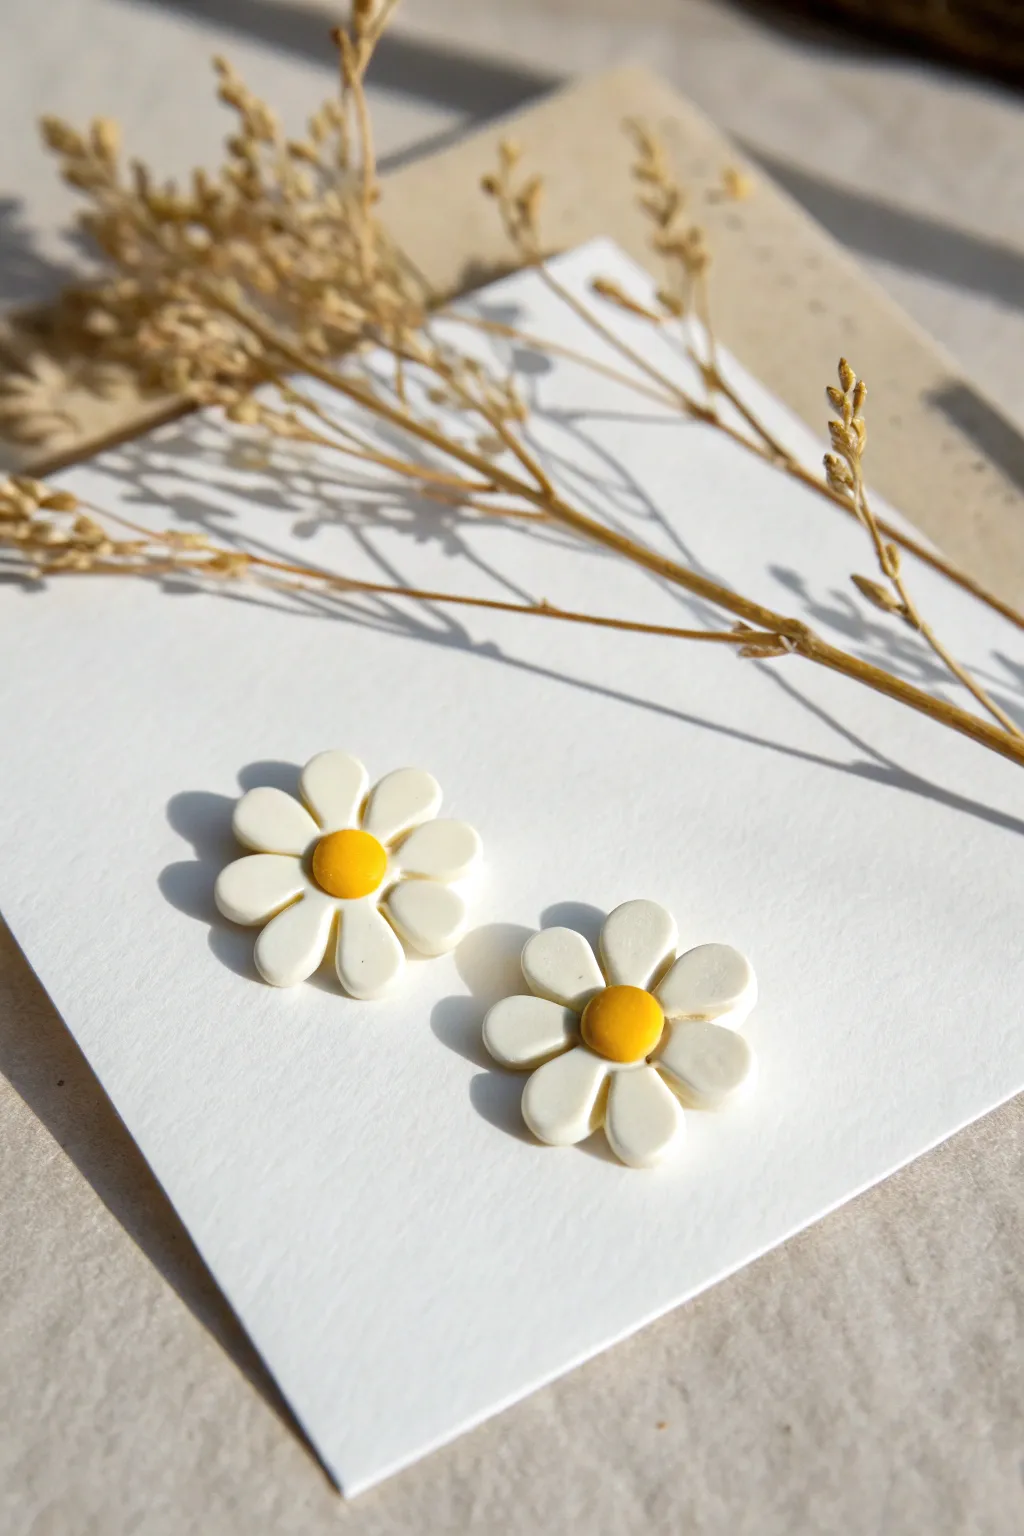
Capture the freshness of a summer meadow with these adorable polymer clay daisy studs. Their simple white petals and cheerful yellow centers make them a versatile accessory that pairs perfectly with almost any outfit.
Step-by-Step
Materials
- White polymer clay
- Yellow or mustard yellow polymer clay
- Small daisy shaped clay cutter (approx. 15-20mm) OR a sharp x-acto knife
- Dotting tool or small ball tool
- Acrylic rolling pin or clay machine
- Gloss glaze or UV resin (optional for shine)
- 2 earring posts
- Super glue or E6000 adhesive
- Baking tile or parchment paper
- Wet wipes (for cleaning hands)
Step 1: Prepping the Clay
-
Condition the white clay:
Begin by taking a chunk of your white polymer clay. Knead it thoroughly in your hands until it becomes soft, pliable, and warm to the touch. This conditioning step is crucial to prevent cracks later. -
Clean your space:
Before rolling, ensure your work surface and rolling pin are spotless. White clay picks up dust and lint easily, so a quick wipe-down with a baby wipe or alcohol helps keep it pristine. -
Roll out the sheet:
Roll the white clay into a flat, even sheet. Aim for a thickness of about 2-3mm. If using a pasta machine, a medium setting usually works best for stud earrings.
Keep it Clean
White clay shows every speck of dust. Keep a scrap piece of ‘waste’ white clay nearby and roll it in your hands first to pull off any dirt before starting your actual project.
Step 2: Shaping the Flowers
-
Cut the daisies:
Use your small daisy-shaped cutter to punch out two flower shapes from the white sheet. Press down firmly and give it a little wiggle before lifting to get a clean cut. -
Alternative petal method:
If you don’t have a cutter, roll 6-8 small balls of white clay per flower. Flatten them slightly into teardrops and arrange them in a circle with the points meeting in the center to form the petals. -
Soften the edges:
Gently tap the edges of the petals with your fingertip to round off any sharp cuts or harsh lines, giving the flower a softer, more organic look. -
Create the center indent:
Take a dotting tool or a small ball tool and press it gently into the very center of your white flower shape. This creates a small divot that allows the yellow center to sit securely.
Stuck in the Cutter?
If your clay sticks inside the daisy cutter, dip the cutter into a small pile of cornstarch or baby powder before pressing it into the clay. This acts as a release agent.
Step 3: Adding the Details
-
Prepare the yellow centers:
Condition a very small amount of yellow or mustard clay. Roll two tiny balls, roughly 3-4mm in diameter. -
Attach the centers:
Place a yellow ball into the center divot of each white flower. Press down gently with your thumb or the flat side of a tool to flatten it slightly so it doesn’t look like a marble sitting on top. -
Add texture:
I like to take a needle tool or a clean toothbrush and gently tap the yellow center to give it a realistic, pollen-like texture. -
Final inspection:
Check your daisies for any lint or fingerprints. You can use a cotton swab dipped in a tiny bit of rubbing alcohol to lightly brush away imperfections before baking.
Step 4: Baking and Assembly
-
Bake the pieces:
Place your daisies on a baking tile covered with standard printer paper (to prevent shiny spots on the back). Bake according to your clay manufacturer’s instructions, typically around 275°F (130°C) for 30 minutes. -
Cool down:
Let the flowers cool completely inside the oven or on the counter before handling them to ensure they harden fully. -
Prepare adhesive:
Place a small drop of super glue or strong jewelry adhesive onto the flat pad of your earring post. -
Attach the posts:
Press the glued post firmly onto the center of the back of each daisy. For extra security, you can seal the post over with a tiny thin layer of liquid clay or resin and cure again, though glue often suffices for studs. -
Optional glaze:
If you prefer a glossy finish, brush a thin layer of polymer clay glaze or UV resin over the front of the flower and cure/dry as directed.
Now you have a charming set of handmade floral earrings ready to wear or gift to a friend
Citrus Slice Dangles
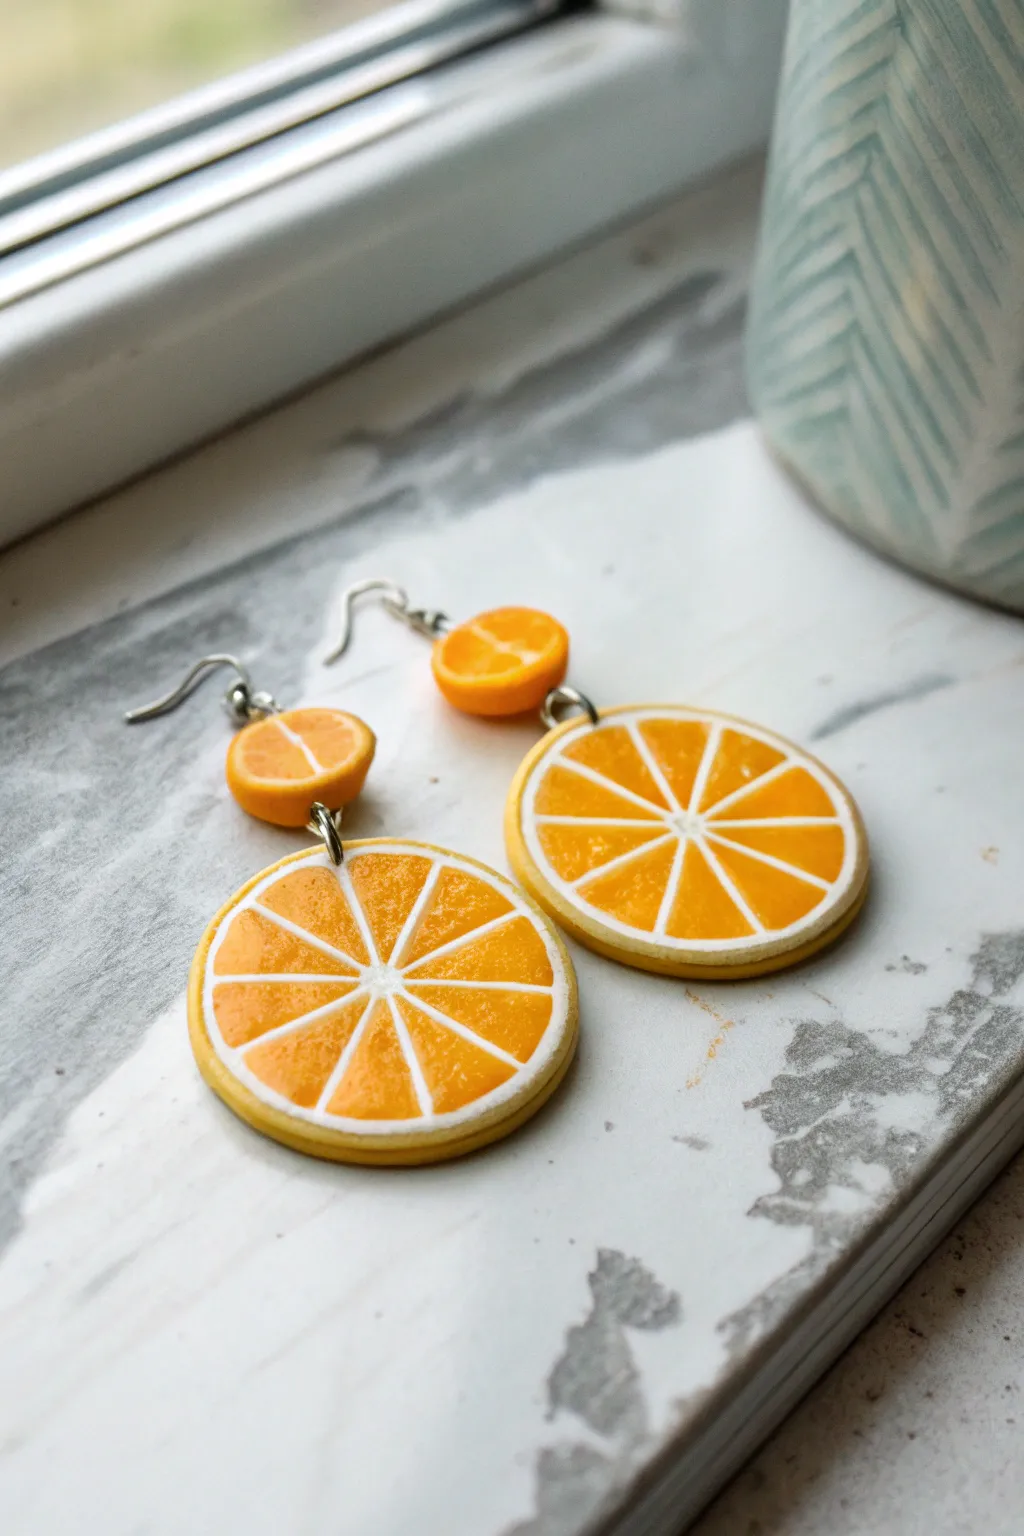
Brighten up any outfit with these vibrant citrus slice dangles that look good enough to eat. With their realistic pith detailing and glossy finish, they capture the refreshing energy of summer in a simple jewelry project.
Detailed Instructions
Materials
- Translucent orange polymer clay (or mix orange with translucent)
- White polymer clay
- Yellow polymer clay (small amount for skin tone adjustment)
- Liquid polymer clay (translucent)
- Texture tool (needle tool or toothpick)
- Round cutters (two sizes: approx. 1 inch and 0.25 inch)
- Craft blade or tissue blade
- Acetone and cotton swabs (for cleanup)
- High-gloss varnish or UV resin
- Earring hooks and jump rings
- Jewelry pliers
- Small hand drill or pin vise
- Acrylic roller or pasta machine
Step 1: Creating the Orange Cane
-
Mix the colors:
Prepare your orange clay. If you want that realistic juicy look, mix translucent clay with orange clay at a 1:1 ratio. Mix a tiny bit of orange into white clay to create a warm off-white for the pith so it isn’t stark white. -
Form the segments:
Roll the orange clay into a thick log, about 1 inch in diameter. This will form the meat of the fruit. -
Wrap the pith:
Roll out a thin sheet of your off-white clay. Wrap this sheet around the orange log completely, trimming any excess overlap for a clean seam. -
Reduce the cane:
Gently roll and stretch the log until it gets longer and thinner. You are aiming for a triangular shape eventually, so you can pinch one side slightly as you reduce different sections. -
Create the wedge:
Cut the long log into 8 equal lengths. Pinch each length into a teardrop or wedge shape, so the white ‘rind’ is on the two flat sides and the rounded bottom. -
Assemble the center:
Roll a very thin snake of off-white clay to act as the central core. Place your 8 orange wedges around this center piece like a flower. -
Final wrap:
Roll a thicker sheet of white clay (for the thick outer pith) and wrap the bundle. Follow this with a final thin layer of orange-yellow mixed clay for the zest skin. -
Reduce to size:
Compress the entire cane carefully, starting from the middle and working out, until it is the diameter you want for your large slices (about 1-1.5 inches).
Smudged Slices?
If your cane slices look distorted, rotate the cane slightly after every cut. Always use fresh, sharp blades and don’t “saw” back and forth; press straight down for a clean cut.
Step 2: Slicing and Texturing
-
Let it rest:
I usually put the cane in the fridge for 20 minutes before slicing. This stiffens the clay and prevents the design from smushing when you cut it. -
Slide the main rounds:
Using a very sharp tissue blade, slice two even rounds from the cane. These will be the main pendants. -
Create the top beads:
Reduce the remaining cane further until it is much smaller (about 0.5 inches). Slice two more rounds, then cut those small rounds in half to create the semi-circles for the top part. -
Texture the fruit:
Use a needle tool or toothpick to gently prick and drag the orange sections of the clay. This creates that fibrous, juicy citrus texture. Avoid texturing the white pith lines. -
Attach hardware (Method A):
You can insert small eye pins into the top of the large slices and the top of the small semi-circles now, or drill holes after baking. -
Bake:
Place your pieces on a tile or parchment paper. Bake according to your clay manufacturer’s instructions (usually 275°F/135°C for 30 minutes).
Step 3: Finishing Touches
-
Cool and clean:
Let the pieces cool completely. If there are any fingerprints on the white rind, a quick swipe with acetone on a cotton swab will clean them up. -
Drill holes:
If you didn’t insert eye pins, use a small hand drill to carefully bore a hole at the top of the big slice, and two holes in the small semi-circle (one at the flat bottom, one at the top). -
Add that shine:
Apply a coat of UV resin or high-gloss varnish to the front of the slices. This mimics the wet look of fresh fruit. Cure under a UV lamp or let dry completely. -
Assembly:
Use jump rings to connect the large slice to the bottom of the semi-circle. Then, attach the earring hook to the top of the semi-circle.
Add Sparkle
Before glossing, dust the wet orange sections with super fine iridescent glitter or white flocking powder. This adds a ‘sugared’ or extra frosty texture to the fruit flesh.
Enjoy wearing your fresh and fruity accessories all summer long
Bold Checkerboard Squares
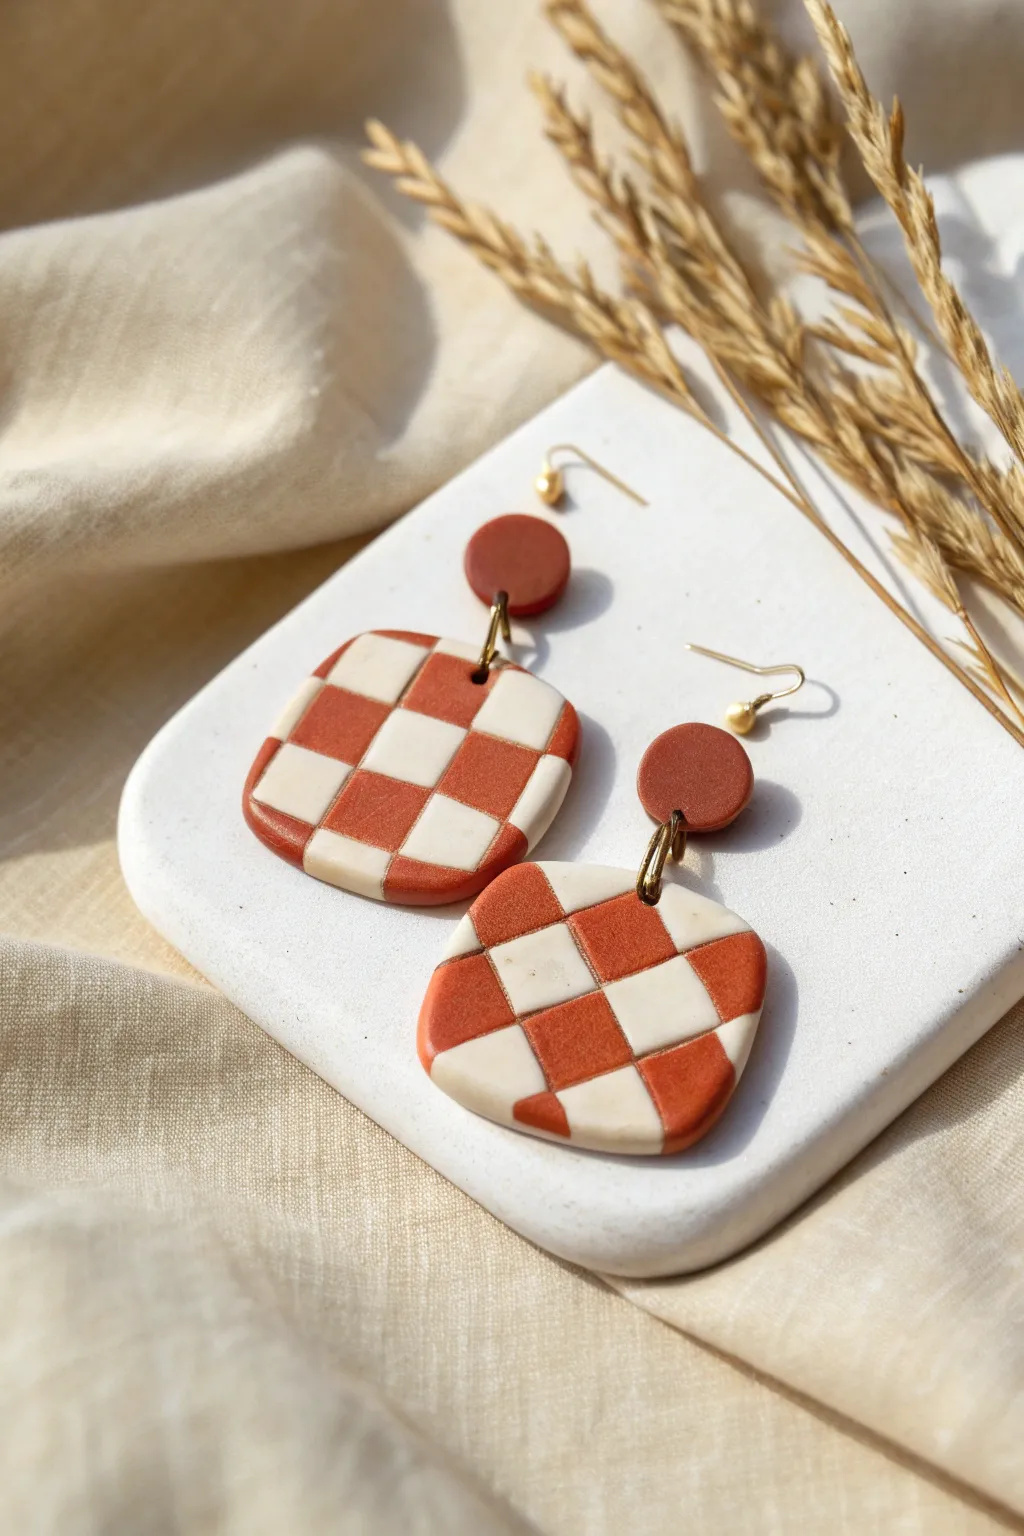
These warm, geometric earrings combine a classic grid pattern with soft, organic shapes for a modern look. The rich terracotta and creamy white tones evoke a cozy, earthy vibe perfect for everyday wear.
Step-by-Step
Materials
- Polymer clay in terracotta (rust red) and cream (or beige)
- Acrylic rolling pin or pasta machine
- Tissue blade or flexible clay slicer
- Small circle cutter (approx. 10-12mm)
- Medium rounded square cutter (approx. 30mm)
- Jump rings (gold finish)
- Earring posts and backs (gold finish)
- Super glue or jewelry resin
- Hand drill or needle tool
- Jewelry pliers (flat nose and round nose)
- Parchment paper or ceramic tile for baking
Step 1: Prepping the Clay Cane
-
Condition the Clay:
Begin by warming up both the terracotta and cream clays in your hands. Knead them separately until they are soft, pliable, and free of cracks. -
Create Slabs:
Roll out both colors into thick, even slabs. Aim for a thickness of about 4-5mm (or the thickest setting on your pasta machine) to ensure your checks are substantial. -
Cut Strips:
Use your tissue blade to cut long, straight strips from each slab. Ensure all strips are the exact same width—about 5mm works well for this scale. -
Stack the Strips:
Alternate the colors to build a stack: lay down a terracotta strip, place a cream strip next to it, and continue until you have a panel about four strips wide. -
Build the Grid:
Create a second layer on top of the first, but offset the colors. Place a cream strip on top of a terracotta one, and vice versa. Continue stacking until your block is roughly square in cross-section. -
Consolidate the Cane:
Gently press the sides of your square log (cane) inward to adhere the strips together fully. Roll over each side lightly with your acrylic roller to smooth the exterior without distorting the internal grid.
Grid Goddess Tip
Chill your clay cane in the fridge for 15 minutes before slicing. Cold clay is firmer and won’t smush or drag the colors, keeping your checkerboard lines crisp and clean.
Step 2: Shaping and Baking
-
Slice the Pattern:
Using a very sharp tissue blade, slice thin slabs (approx. 3mm thick) off the end of your checkerboard cane. These slices will be the face of your earrings. -
Cut the Main Shape:
Place your rounded square cutter over the checkerboard slice. Try to frame the pattern so the lines look interesting—slightly angled creates a dynamic look, while straight is more classic. Cut out two squares. -
Make the Studs:
Roll out a small sheet of plain terracotta clay. Use your small circle cutter to punch out two discs for the top stud component. -
Smooth the Edges:
Gently rub the edges of all four cut pieces with your fingertip to soften any sharp cutting lines. This gives the finished piece a polished, professional feel. -
Pierce Holes:
Use a needle tool to create a small hole near the top center of the checkerboard squares and the bottom center of the circular studs. Make sure the hole is big enough for your jump rings. -
Bake:
Arrange your pieces on a ceramic tile or parchment-lined baking sheet. Bake according to your clay manufacturer’s instructions (usually 275°F/135°C for 15-30 minutes).
Level Up: Texture
Before cutting your shapes, place a piece of plastic wrap over the clay slice. Pressing the cutter down through the plastic creates beautifully pillowed, rounded edges without sanding.
Step 3: Assembly
-
Cool and Sand:
Let the pieces cool completely. If there are any rough spots on the edges, lightly sand them with fine-grit sandpaper. -
Attach Step 1:
Use your jewelry pliers to open a jump ring. Twist it open sideways rather than pulling it apart to maintain its strength. -
Connect Pieces:
Thread the jump ring through the hole in the square pendant and the hole in the circular stud. Close the ring securely with your pliers. -
Affix Posts:
Apply a small dab of super glue (or UV resin for a stronger bond) to the back of the terracotta circles. Press the flat pad of the earring post into the glue. -
Final Set:
Allow the glue to cure fully before handling or wearing. I find waiting a few hours ensures the posts never pop off unexpectedly.
Enjoy styling these versatile geometric beauties with your favorite casual outfits
Sunset Ombre Arch Earrings
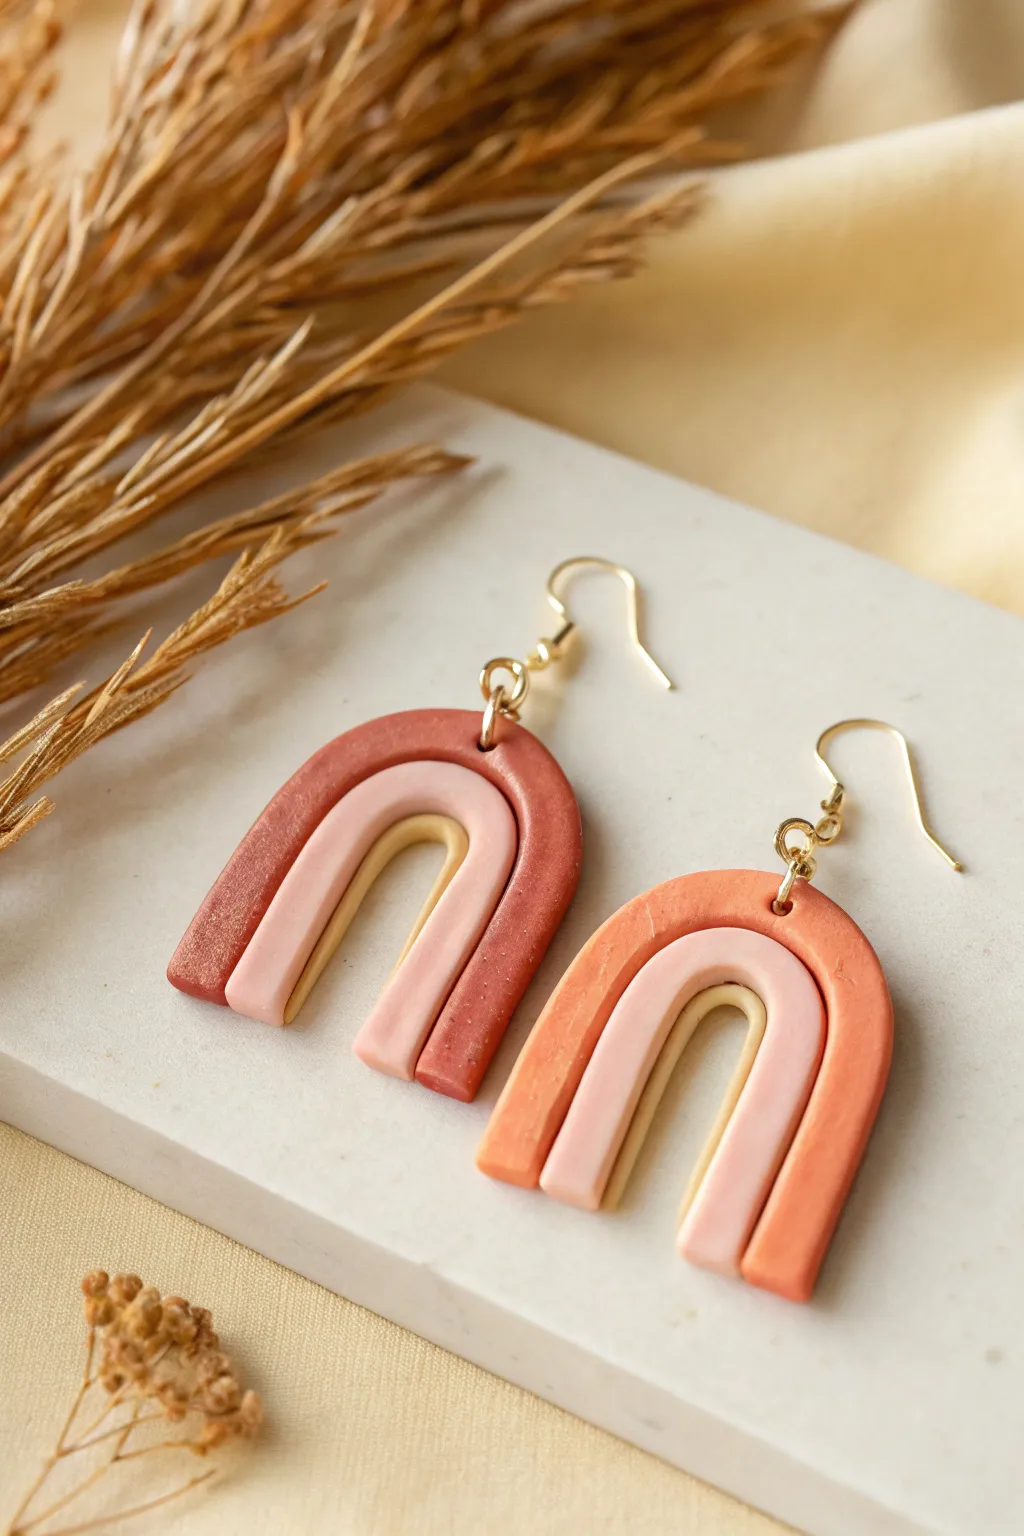
Capture the warmth of golden hour with these layered arch earrings. The subtle gradient from deep terracotta to creamy beige creates a sophisticated, modern look perfect for everyday wear.
Detailed Instructions
Materials
- Polymer clay in three colors: terracotta/rust, dusty pink, and cream/beige
- Acrylic roller or pasta machine
- Clay slicer or craft knife
- Smooth work surface (ceramic tile or glass mat)
- Small circle cutter (approx. 2mm) or piercing tool
- 2 Earring hooks (gold tone)
- 4 Jump rings (gold tone)
- Jewelry pliers
- Oven for baking
Step 1: Clay Preparation
-
Condition the clay:
Begin by kneading each color of polymer clay separately until it is soft, pliable, and free of air bubbles. This conditioning step is crucial to prevent cracking later. -
Roll the logs:
Take a portion of each color and roll them on your work surface into long, even snakes or logs. Aim for a thickness of about 4-5mm for each log. -
Check consistency:
Ensure all three clay snakes are roughly the same thickness. Uniformity here helps the finished arch look polished and professional.
Seamless Bonding
Apply a tiny amount of liquid polymer clay between the coils before pressing them together for an unbreakable bond after baking.
Step 2: Forming the Arches
-
Create the inner arch:
Take the cream/beige snake and gently bend it into a tight U-shape. This will be the smallest, innermost layer of your earring. Trim the excess length but keep the legs slightly long for now. -
Add the middle layer:
Take the dusty pink snake and carefully wrap it around the outside of the cream arch. Gently press them together so they adhere without deforming the round shape of the logs. -
Add the outer layer:
Finally, wrap the terracotta snake around the pink layer to complete the rainbow shape. Press lightly along the seams to ensure the layers form a single cohesive unit. -
Smooth the shape:
I like to gently press down on the top of the arch with a flat object, just slightly, to help the coils bond and flatten the face a tiny bit if desired, or leave them fully rounded for more texture. -
Trim the bottom edge:
Use your sharp clay slicer or craft knife to cut straight across the bottom of the legs. This creates a clean, flat base for your arch shape.
Step 3: Finishing and Baking
-
Pierce hole for assembly:
Use your small circle cutter or a piercing tool to make a hole at the very top center of the terracotta (outer) arch. Ensure the hole is large enough for your jump ring. -
Final inspection:
Check for any lint or fingerprints. You can gently wipe the surface with a tiny bit of rubbing alcohol or baby oil on your finger to smooth out imperfections. -
Duplicate:
Repeat the entire process to create the second earring, ensuring it matches the size and height of the first one. -
Bake carefully:
Place your clay pieces on a ceramic tile or baking sheet lined with parchment paper. Bake according to your brand of polymer clay’s specific temperature and time instructions. -
Cool down:
Allow the pieces to cool completely inside the oven or on the counter before handling them. The clay hardens fully only as it cools.
Fixing Uneven Logs
If your snakes are uneven, roll them under a flat acrylic block instead of your hand. This applies even pressure for a perfect cylinder.
Step 4: Assembly
-
Prepare findings:
Using two pairs of pliers, gently twist open your jump rings. Remember to twist sideways (like opening a door), not pull them apart. -
Attach rings:
Slide an open jump ring through the hole you created in the top of the clay arch. -
Add hooks:
Thread the loop of the earring hook onto the jump ring before closing it. Twist the jump ring back into place securely. -
Final touches:
Repeat for the second earring and double-check that all metal connections are tight.
Enjoy wearing your warm, desert-inspired creations with your favorite outfit
Mixed-Material Tassel Dangles
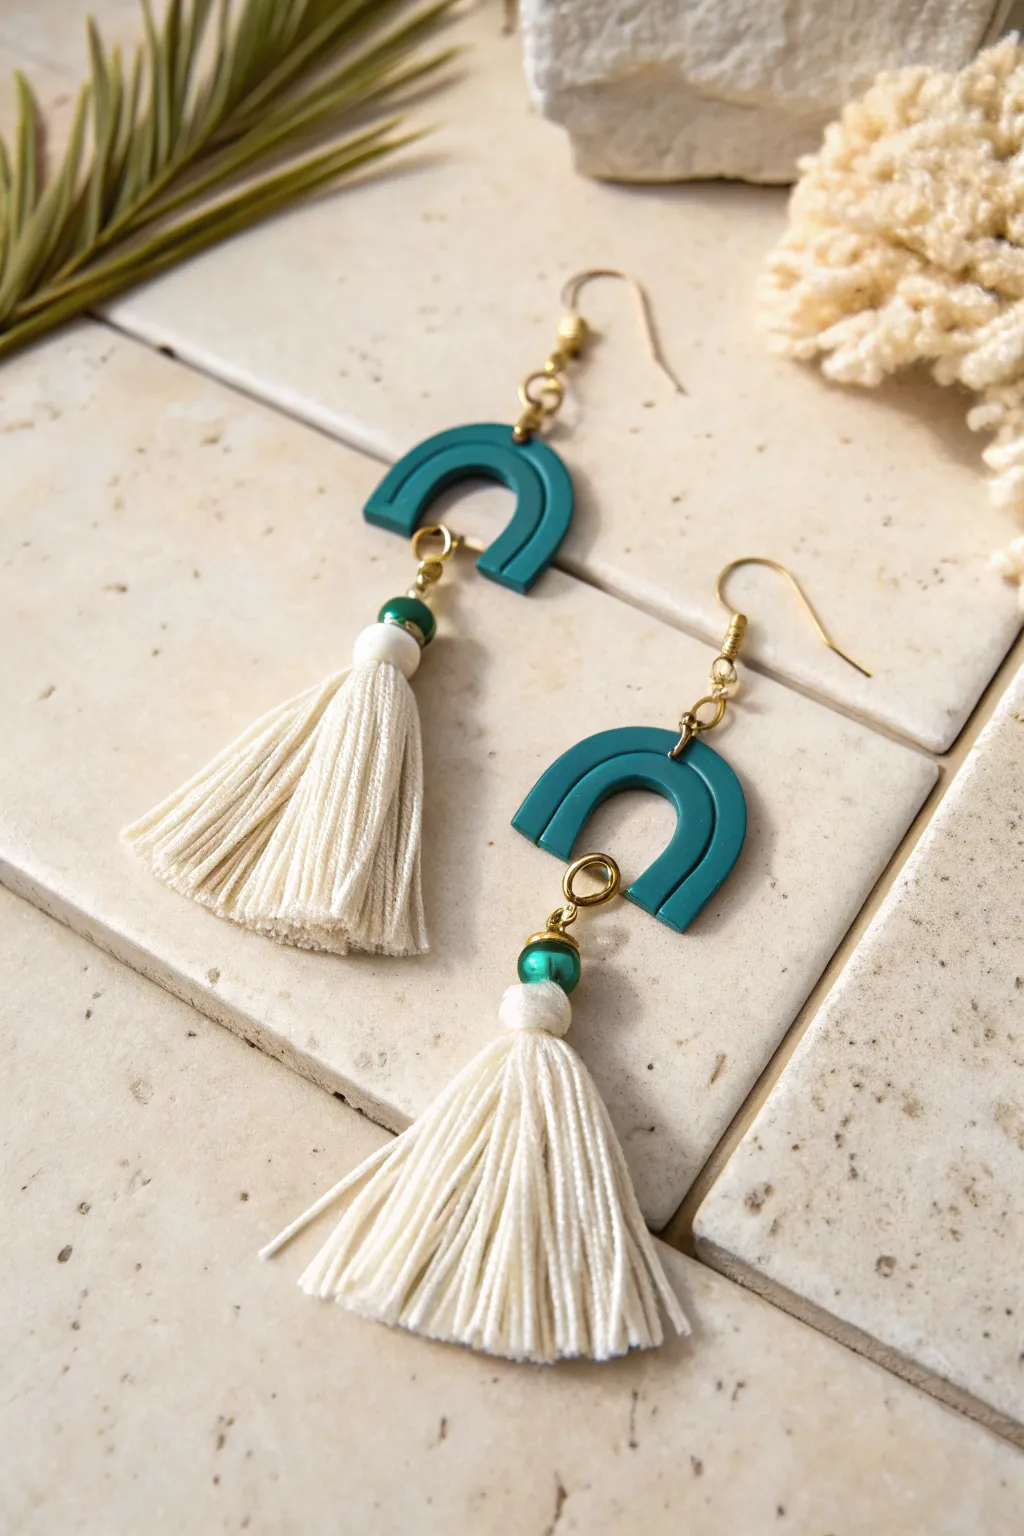
Combine the sleek structure of polymer clay with the soft texture of fiber in these stunning mixed-media earrings. The deep teal arch provides a modern frame for the creamy, swinging tassels, creating a perfect balance of hard and soft elements.
Step-by-Step Tutorial
Materials
- Teal polymer clay (e.g., Soufflé or Premo)
- White or cream cotton embroidery floss or thin yarn
- 4 Gold jump rings (6mm or 8mm)
- 2 Gold earring hooks
- 2 Teal glass or wooden rondelle beads (small)
- Use of an extruder or clay roller
- Arch shaped cutter (or craft knife)
- Jewelry pliers (round nose and flat nose)
- Small needle tool or toothpick
- Cardboard sizing template (approx. 2 inches)
- Super glue (liquid or gel)
- Parchment paper and baking tile
Step 1: Crafting the Clay Arches
-
Condition the Clay:
Begin by thoroughly conditioning your teal polymer clay until it is soft and pliable. Warm clay is less likely to crack when you bend it. -
Create a Snake:
Roll the clay into a long, even snake. For the most uniform look, I prefer to use a clay extruder with a medium circle die, but rolling by hand on a flat surface works beautifully too. -
Form the Arches:
Cut the snake into two equal lengths, approximately 3 inches long. Gently bend each segment into a U-shape or arch. Ensure the legs of the arch are even. -
Flatten and Refine:
Use an acrylic roller or block to gently press down on the arches to flatten them slightly. You want a flat surface, not a round tube. Use your fingers to smooth out any fingerprints. -
Trim the Ends:
Using a sharp tissue blade or craft knife, slice the bottom of the arch legs to make them perfectly straight and flat. -
Create Holes:
With a needle tool or toothpick, pierce a hole at the very top center of each arch. Then, pierce another hole near the bottom of *one* leg on each arch. The tassel will hang from this side hole. -
Bake:
Place your arches on a ceramic tile or baking sheet lined with parchment paper. Bake according to the manufacturer’s instructions for your specific brand of clay usually around 275°F (135°C) for 30 minutes.
Smooth Edges
Before baking, dampen your finger with a tiny bit of water (or cornstarch for sticky clay) and run it over the clay edges. This smooths imperfections so you don’t have to sand later.
Step 2: Making the Tassels
-
Wrap the Floss:
While the clay cools, wrap your embroidery floss around a piece of cardboard or your fingers about 20-30 times. The width of your wrapping object determines the tassel length. -
Tie the Top:
Cut a separate 6-inch piece of floss. Thread it under the wrapped loop at one end and tie it tightly with a double knot. Leave these tail ends long for now. -
Cut the Loops:
Slide the bundle off the cardboard. Take your scissors and cut through all the loops at the bottom end, opposite your knot. -
create the Head:
Cut another piece of floss. Wrap this piece snugly around the bundle, about 1/4 inch down from the top knot, to create the round ‘head’ of the tassel. Tie it off securely and tuck the ends inside the tassel using a needle. -
Trim Evenly:
Comb through the tassel strands with your fingers or a small comb. Trim the bottom in a straight line so the tassel looks neat and full. Repeat to make a second tassel.
Variation Idea
Swap the embroidery floss for silk thread for a luxurious sheen, or use a macramé cord and brush it out for a fluffier, more bohemian texture.
Step 3: Assembly
-
Add the Bead:
Take the two long tail threads from the very top of your tassel (the ones you used to tie the initial loop). Thread both tails through your small teal bead. -
Attach to Jump Ring:
Open a gold jump ring. Tie the tassel strings securely onto the jump ring, sitting right above the bead. Add a dab of super glue to the knot for security, then trim the excess string close to the knot. -
Connect Tassel to Clay:
Hook this jump ring (now holding the tassel) through the bottom hole you created in the clay arch leg. Close the jump ring securely using two pairs of pliers to twist it shut. -
Attach Earring Hook:
Open a second jump ring. Thread it through the top hole of the clay arch. Slide the loop of your earring hook onto this same jump ring. -
Final Close:
Twist the top jump ring closed. Double-check that all your metal connections are flush so nothing slips out.
Give them a little shake to make sure the tassels swing freely and enjoy wearing your new statement piece