When I’m crafting with kids, I always reach for polymer clay because it’s colorful, forgiving, and turns into durable little treasures after baking. These ideas stick to super-simple shapes so your child can finish with that proud “I made it!” feeling.
Mini Donut Charms
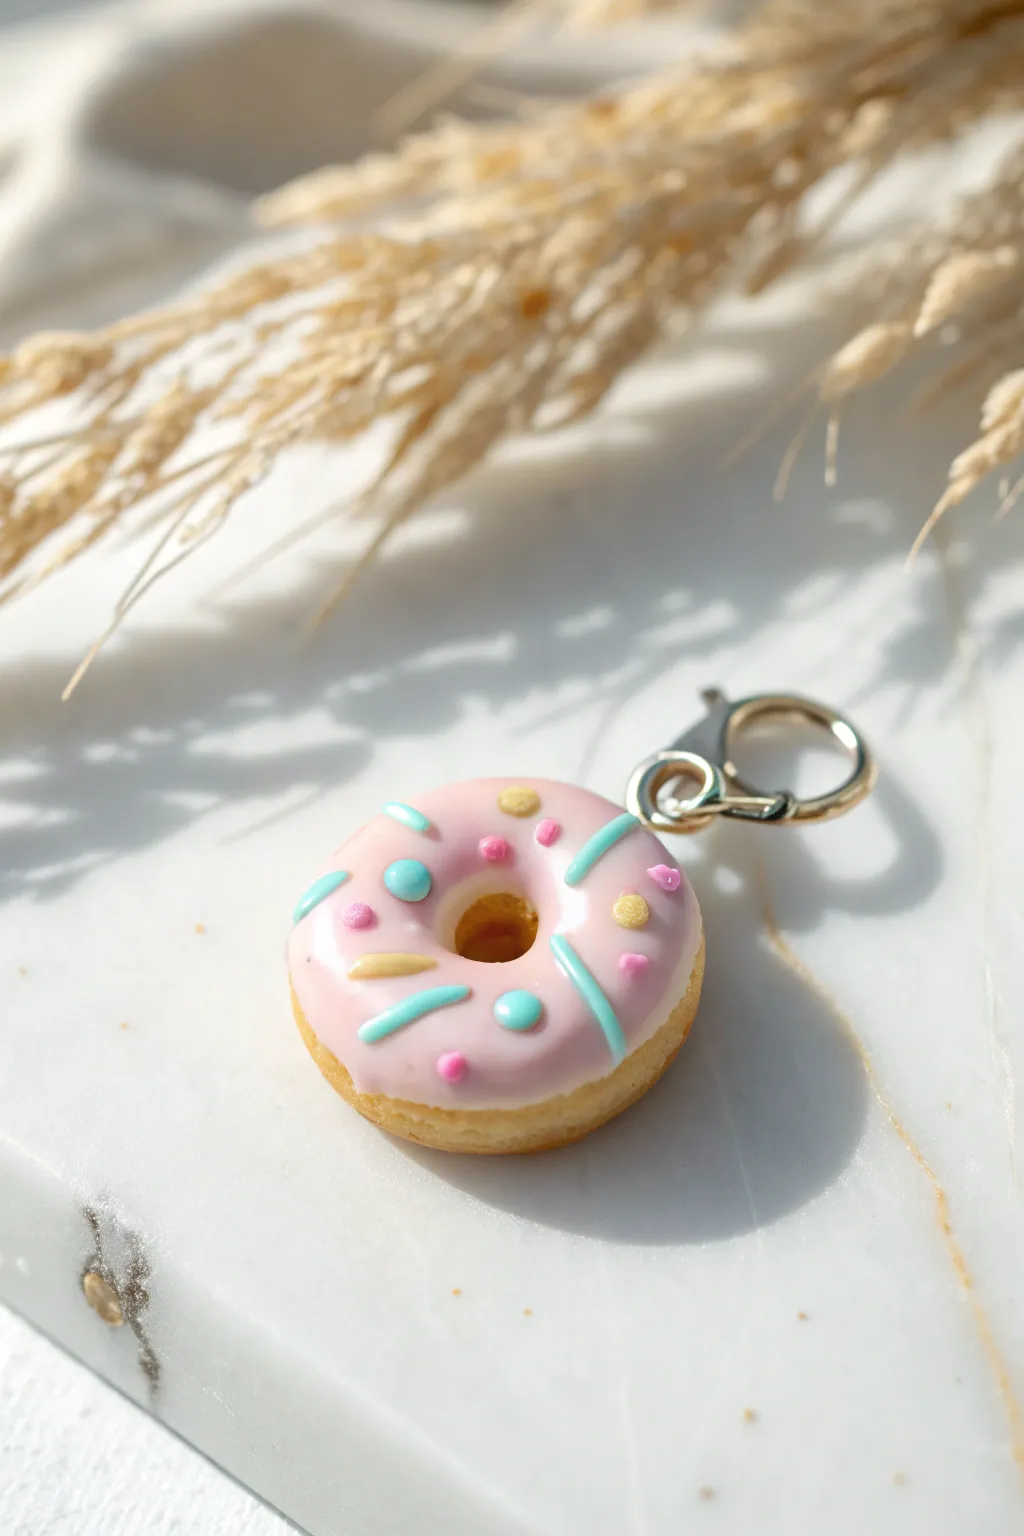
Create an adorable, calorie-free treat that looks good enough to eat with this fun polymer clay project. This tiny pink-frosted donut charm is perfect for keychains, jewelry, or just to collect, featuring realistic texture and custom sprinkles.
Step-by-Step Guide
Materials
- Polymer clay (Tan/Beige color for the dough)
- Polymer clay (Baby Pink for frosting)
- Polymer clay scraps (Teal, Yellow, Hot Pink for sprinkles)
- Liquid transparent polymer clay (optional but helpful for ‘glue’)
- Needle tool or toothpick
- Small circle cutter (or a straw)
- Soft pastel chalk (Ochre/Brown) and a soft paintbrush
- Metal eyepin or screw eye
- Lobster clasp charm strap
- Gloss glaze (water-based polyurethane)
Step 1: Shaping the Doughnut Base
-
Condition the clay:
Start by taking a small amount of tan or beige polymer clay (about the size of a large marble) and kneading it in your hands until it is soft and pliable. -
Form a ball:
Roll the conditioned clay between your palms to create a smooth, crack-free sphere. -
Flatten slightly:
Gently press the ball down on your work surface with your thumb to create a thick disc shape, keeping the edges nice and rounded. -
Create the center hole:
Use the handle of a small paintbrush or a dedicated dotting tool to push a hole directly through the center of the disc. -
Refine the shape:
Gently widen the hole by rotating your tool, smoothing the inner edges so the clay looks like a puffy, yeasted donut rather than a flat tire. -
Add realistic shading:
Scrape a little bit of ochre or light brown soft pastel into a powder. With a dry, soft brush, gently dust the top and bottom edges of the donut to make it look ‘baked’ golden brown.
Fixing Fingerprints
If you smudge the smooth clay while working, lightly brush the surface with a tiny bit of baby oil or cornstarch before baking to buff out prints.
Step 2: Adding the Frosting
-
Prepare the pink clay:
Condition a smaller piece of baby pink clay and roll it into a thin sheet or flatten it with your fingers. -
Cut the frosting shape:
Use a small round cutter (slightly smaller than your donut) to cut a circle, or shape a rough circle by hand for a more organic look. -
Make the frosting hole:
Poke a hole in the center of the pink circle, matching the size of the hole in your beige donut base. -
Apply the frosting:
Gently lay the pink ring onto the tan base. I find it helpful to start lining up the center holes first. -
Create the drip effect:
Using your finger or a silicone tool, gently smudge and pull the edges of the pink clay down the sides of the donut to mimic melted icing. -
Smooth the transition:
Ensure there are no gaps between the pink and tan layers, gently patting the pink clay so it hugs the curves of the donut underneath.
Step 3: Sprinkles & Hardware
-
Make long sprinkles:
Roll tiny snakes of teal and yellow clay. Cut them into tiny segments to resemble ‘jimmies’ or long sprinkles. -
Make round sprinkles:
Roll tiny dots of dark pink, teal, and yellow clay to create round confetti sprinkles. -
Apply the decorations:
Press the tiny clay sprinkles gently into the pink frosting. You can use a needle tool to pick them up and place them precisely. -
Secure the sprinkles:
Once placed, give each sprinkle a very gentle tap to ensure it adheres well to the pink clay so they don’t pop off later. -
Add the eyepin:
Trim a metal eyepin to a short length. Dip the end in a tiny bit of liquid clay (or bake & bond) and push it securely into the side or top of the donut. -
Bake carefully:
Bake the charm according to your specific brand of clay’s instructions—usually around 275°F (135°C) for 15-20 minutes. -
Glaze for shine:
Once cooled completely, coat just the frosting area with a gloss glaze to make it look like wet icing. -
Attach the clasp:
Use pliers to open the jump ring on your lobster clasp and attach it to the eyepin loop.
Texture Twist
Before baking, use an old toothbrush to gently tap the tan parts of the donut. It adds a realistic ‘cakey’ texture compared to the smooth icing.
Now you have a sweet little charm ready to hang on your bag or gift to a friend


Pizza Slice Magnets
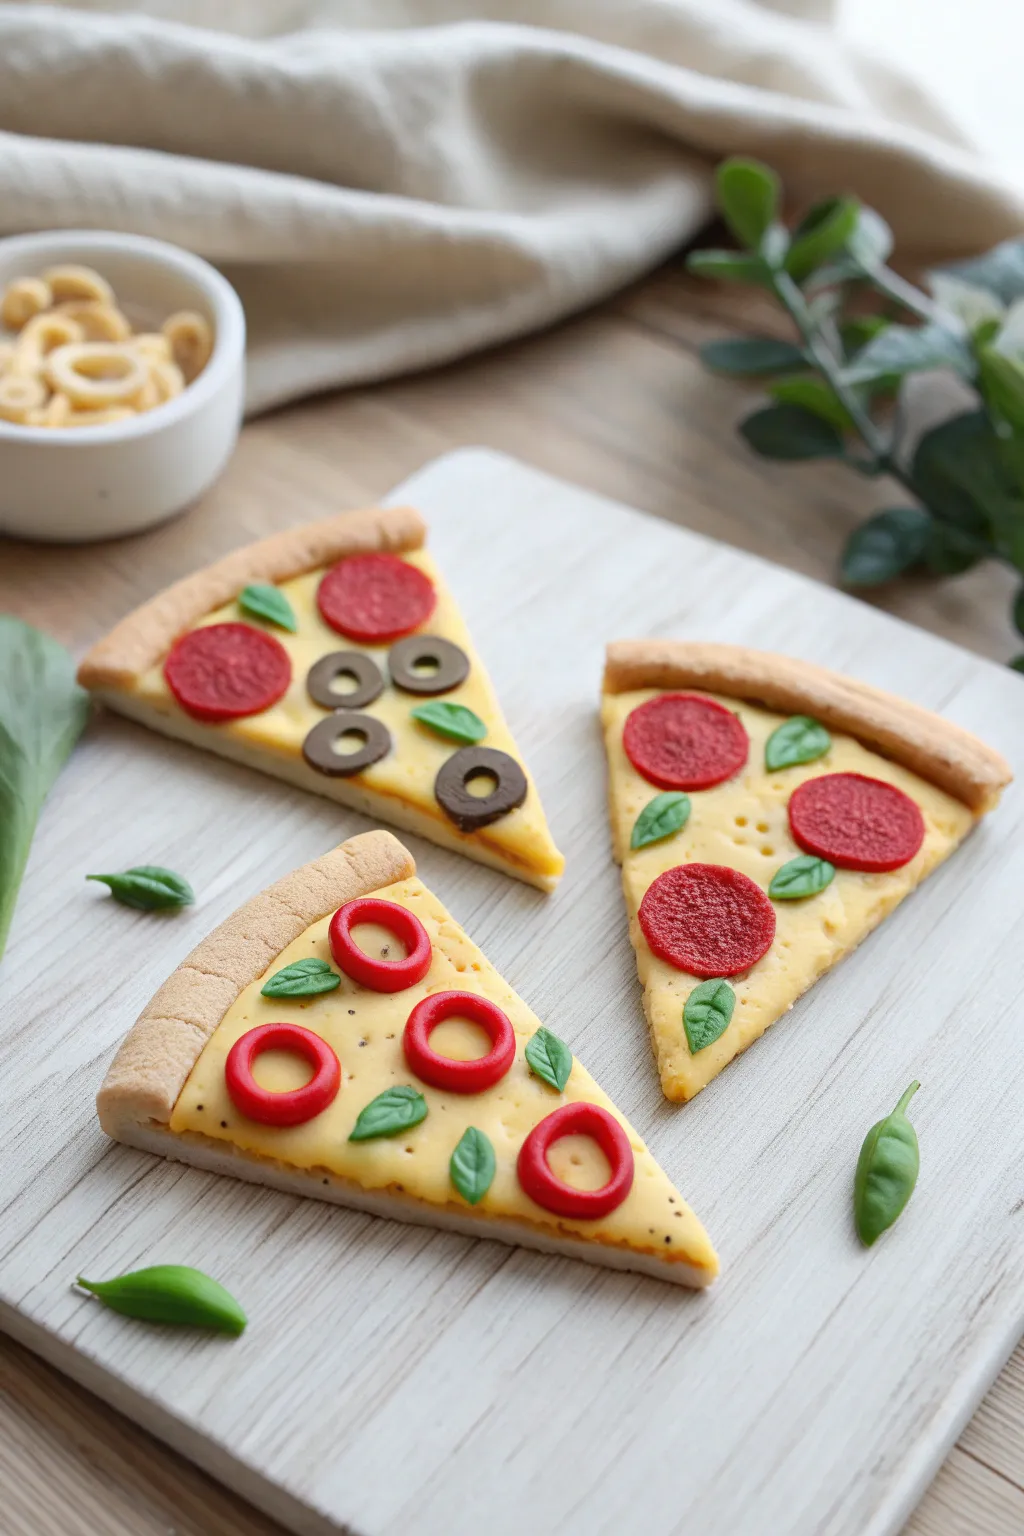
These adorable pizza slice magnets are a feast for the eyes and shockingly easy to make. With their realistic textured crusts and colorful toppings, they create a fun, personalized touch for any fridge or magnetic board.
Detailed Instructions
Materials
- Polymer clay (beige/tan for crust, pale yellow for cheese, red for pepperoni/peppers, dark brown for olives, green for basil)
- Rolling pin or pasta machine
- sharp craft knife or clay blade
- Needle tool or toothpick
- Soft pastel chalks (orange, golden brown) and a soft brush
- Small round piping tip or straw (optional)
- Texturing tool (old toothbrush or sandpaper)
- Strong magnets
- Super glue or heavy-duty craft glue
- Oven for baking
Step 1: Creating the Base
-
Mix the Crust Color:
Start by conditioning your beige clay until it’s soft and pliable. If the beige looks too ‘clean,’ mix in a tiny speck of translucent or white clay to give it a more natural dough look. -
Roll and Cut:
Roll the beige clay into a thick sheet, about 4-5mm thick. Use your craft knife to cut a clean triangle shape. Gently soften the straight cut edges with your finger so they aren’t razor-sharp. -
Form the Crust Rim:
Roll a snake of beige clay roughly the same thickness as your slice’s top edge. Press this onto the wide end of your triangle, blending the bottom seam slightly so it attaches firmly but leaves a distinct raised crust. -
Texture the Crust:
Take an old toothbrush or a crumpled ball of aluminum foil and gently tap it all over the raised crust rim to simulate a baked bread texture. -
Add the Cheese Layer:
Roll out the pale yellow clay much thinner than the crust. Cut a smaller triangle that fits inside the crust borders. Place it on top of the beige base, gently pressing it down so it adheres. -
Melt the Cheese:
Use your finger or a rounded tool to smooth the edges of the yellow clay, making it look like melted mozzarella pooling against the crust. -
Pre-Bake Coloring:
Scrape some orange and golden brown pastel chalk into a fine powder. Using a soft dry brush, gently dust the raised crust rim and the edges of the cheese to give it a ‘baked’ golden glow.
Step 2: Adding Toppings
-
Create Pepperoni Slices:
For the pepperoni pizza, roll a snake of red clay and cut very thin slices. Press them lightly onto a piece of sandpaper or texture them with a toothbrush to get that meaty look before placing them on the cheese. -
Make Black Olives:
Roll a thin snake of dark brown or black clay. Slice small discs, then use a needle tool or small straw to poke a hole in the center of each disc to create olive rings. -
Craft Red Pepper Rings:
To make the red rings shown in the bottom slice, roll a thin red snake of clay. Wrap it around a small dowel or the end of a paintbrush, cut, and join the ends to form perfect circles. -
Add Basil Leaves:
Roll tiny teardrop shapes from green clay. Flatten them slightly and use a needle tool to impress a central vein down the middle. Gently curve them for movement. -
Arrange and Texture:
Place your chosen toppings onto the yellow cheese layer. I like to press them down slightly so they look embedded in the cheese rather than just floating on top. -
Add Spice Speckles:
For a final touch of realism, you can add tiny specks of black pepper or oregano. Either use tiny bits of black clay or sprinkle real ground spices (lightly!) onto the unbaked clay.
Sticky Situation?
If your clay gets too soft and sticky to handle, pop it in the fridge or freezer for 5-10 minutes. This firms it up, making it easier to slice those tiny pepperoni rounds cleanly.
Step 3: Finishing Up
-
Bake:
Bake the slices according to your clay manufacturer’s instructions (usually 275°F/130°C for 15-30 minutes). Let them cool completely on the tray. -
Attach Magnets:
Flip the cooled pizza slices over. Apply a drop of strong super glue to the back and press a magnet firmly into place. Let it dry undisturbed.
Make It Glossy
After baking and cooling, brush a thin layer of gloss glaze or polyurethane varnish over just the ‘cheese’ and toppings. This makes the pizza look hot, greasy, and freshly baked.
Now you have a delicious-looking set of magnets ready to hold up your grocery lists and photos


Rainbow Coil Keychains
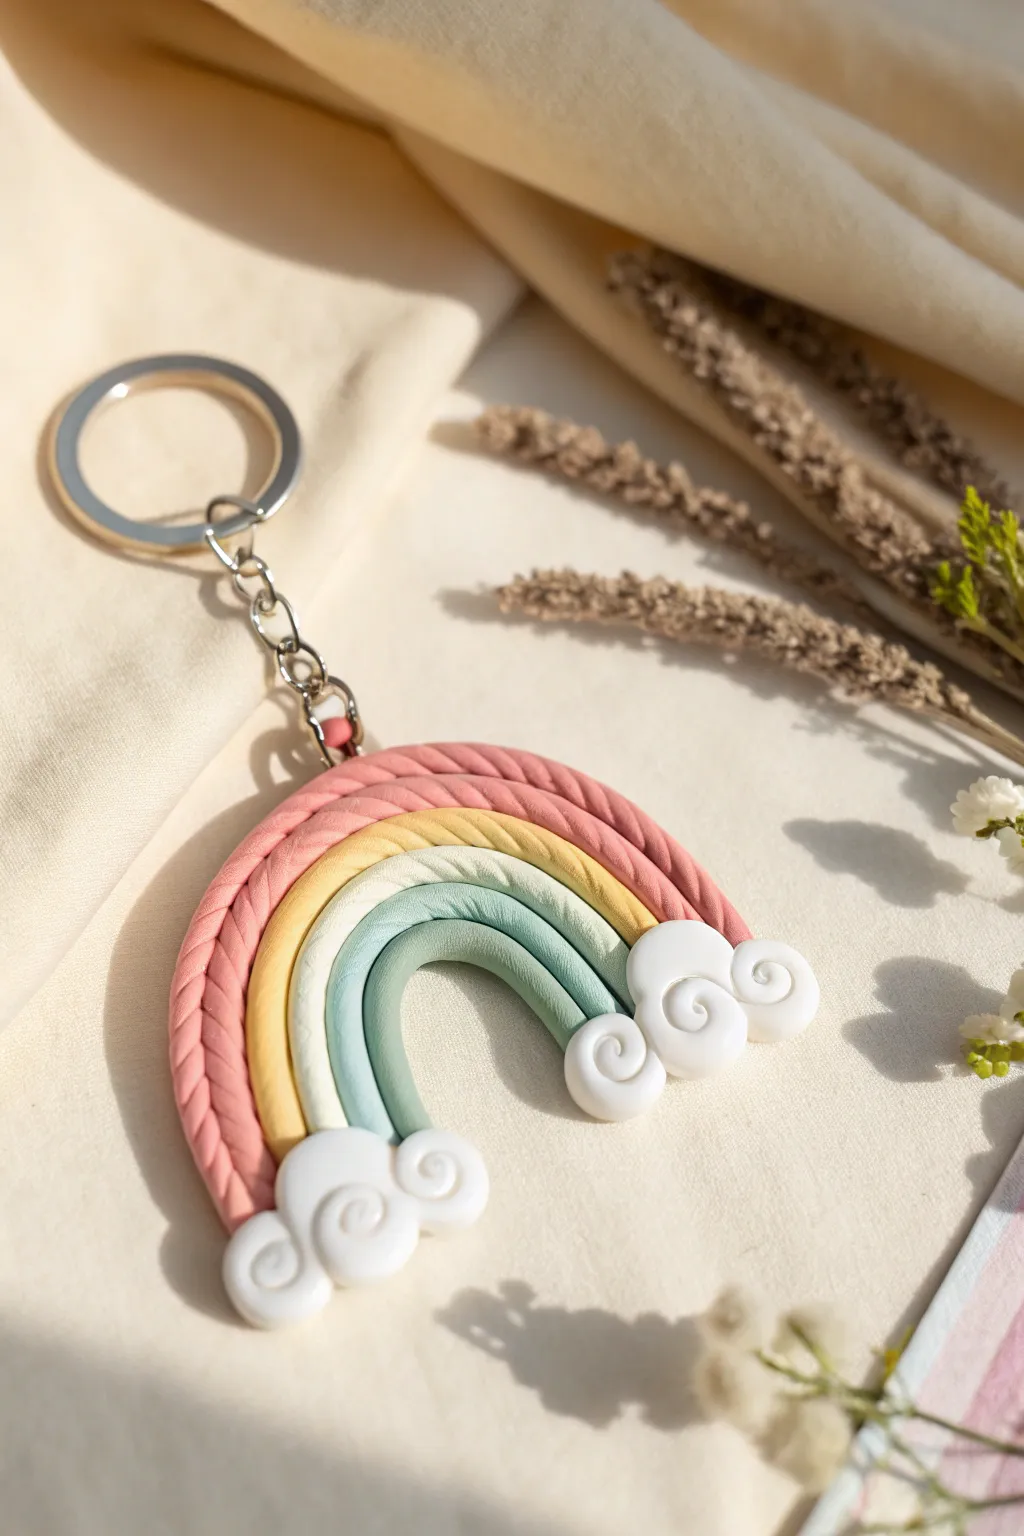
This charming keychain features muted pastel arches with a delightful twisted rope texture, finished off with fluffy, swirly clouds. It is a sweet, tactile accessory that looks professional but is surprisingly simple to assemble using basic clay techniques.
How-To Guide
Materials
- Polymer clay (muted pink, mustard yellow, pastel sage green, and white)
- Clay roller or acrylic rolling pin
- Clay extruder (optional, but helpful for even snakes)
- Needle tool or toothpick
- Flexible clay blade or craft knife
- Liquid polymer clay (Bake and Bond)
- Eyepin or jump ring
- Keychain hardware
- Needle-nose pliers
- Ceramic tile or baking surface
Step 1: Creating the Twisted Strands
-
Condition the Clay:
Begin by conditioning each color of polymer clay—pink, yellow, green, and white—until they are soft and pliable. This prevents cracking later. -
Roll Snakes:
Roll out long, thin snakes for the colored arches. For each color arch, you will need two strands of equal thickness. You can do this by hand or use an extruder for perfect consistency. -
Twist the Pink:
Take two strands of the pink clay. Pinch them together at one end, then gently twist them around each other to create a rope effect. Keep the twist tight and even. -
Twist Remaining Colors:
Repeat the twisting process for the yellow and sage green clay strands. For the white layer shown in the image, twist two white strands together just like the others. -
Check Lengths:
Ensure your twisted ropes are long enough to form the arches. The pink (outer) rope needs to be the longest, followed by yellow, white, and then fluidly down to the smallest green arch.
Twist Trick
Roll your initial clay snakes as evenly as possible. If one strand is thicker than the other, the rope twist will look lumpy instead of uniform.
Step 2: Assembling the Rainbow
-
Form the Center Arch:
Take the twisted green rope and bend it into a tight U-shape on your work surface or ceramic tile. This will be the innermost layer. -
Apply Adhesive:
Run a very thin line of liquid polymer clay along the outer edge of the green arch to help the next layer stick. -
Add the White Layer:
Curve the twisted white rope over the green one. Press them gently together so they bond without flattening the rope texture. -
Continue Layering:
Repeat the process with the yellow rope, and finally the pink rope, applying a touch of liquid clay between each layer for durability. -
Trim the Ends:
Use your flexible clay blade to slice through the bottom of the rainbow legs, creating a straight, flush edge where the clouds will sit.
Step 3: Adding Clouds & Hardware
-
Create Cloud Balls:
Roll four small balls of white clay for each side of the rainbow (eight total). Make slightly different sizes for a natural look. -
Attach the Clouds:
Press the white balls onto the flat bottom edges of your rainbow legs, arranging them in a clustered cloud shape. Use a dot of liquid clay to secure them. -
Add Swirl Details:
I like to use a needle tool to gently press a spiral indentation into the center of each cloud ball, giving them that cute stylized look shown in the photo. -
Insert the Eyepin:
Push an eyepin (or a strong jump ring) down into the center top of the pink arch. If using an eyepin, trim it if it’s too long, or bend the end slightly so it anchors inside the clay. -
Bake:
Bake the piece according to your polymer clay package instructions (usually 275°F/135°C for 15-30 minutes). -
Cool and Finish:
Let the rainbow cool completely. Once hard, use your pliers to attach the keychain ring to the eyepin or jump ring at the top.
Make It Sparkle
Before baking, lightly brush the white cloud sections with mica powder or pearl ex powder to give the clouds a dreamy, shimmering finish.
Now you have a durable and adorable accessory ready to brighten up your keys or backpack


Smiley Face Bead Bracelets
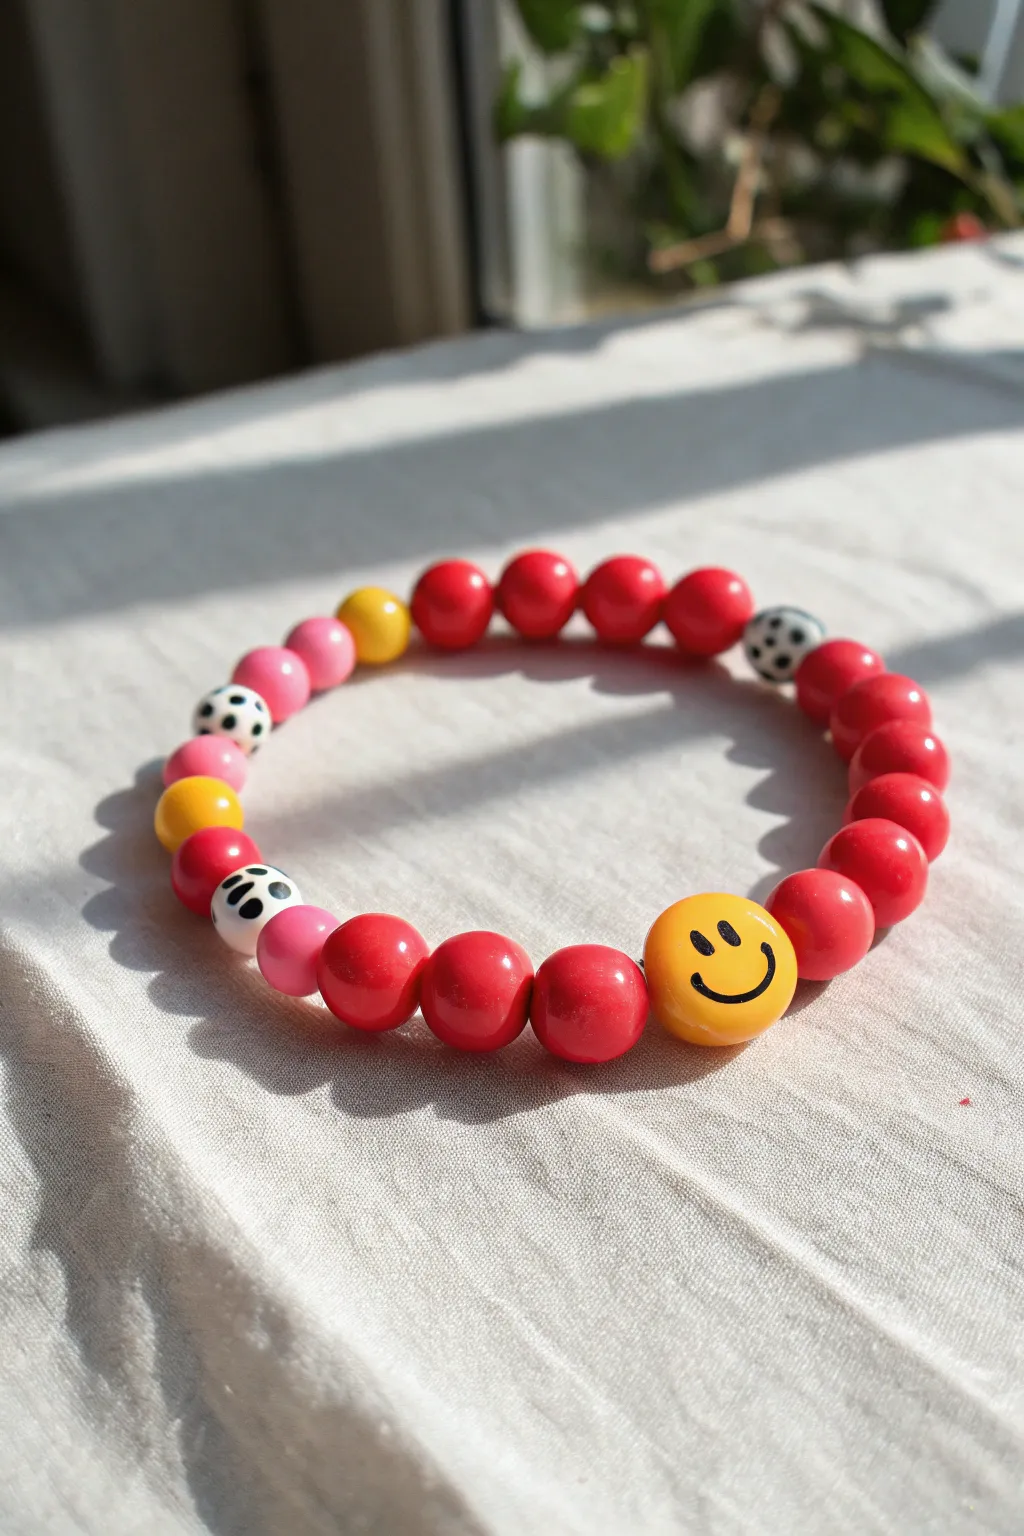
Brighten up your accessories with this cheerful handmade beaded bracelet featuring a signature smiley face centerpiece. By hand-rolling simple polymer clay spheres and adding a few painted details, you can create a custom piece that perfectly matches your style.
Step-by-Step Guide
Materials
- Polymer clay (Bright Red, Yellow, Light Pink, White)
- Black acrylic paint
- Fine detail paintbrush or toothpick
- Gloss glaze or varnish (polyurethane based)
- Beading elastic cord (0.8mm or 1mm)
- Needle tool or toothpick (for piercing holes)
- Ceramic tile or baking sheet with parchment paper
- Oven (for baking)
- Strong jewelry glue (optional)
- Scissors
Step 1: Creating the Clay Beads
-
Condition the Red Clay:
Start by taking a chunk of bright red polymer clay and kneading it in your hands until it becomes soft and pliable. This step prevents cracking later on. -
Shape the Red Beads:
Roll the conditioned red clay into a long snake, then cut it into equal-sized segments. Roll each segment between your palms to form perfect, smooth spheres about the size of a pea. You’ll need approximately 15-18 red beads. -
Form the Pink Accent Beads:
Repeat the conditioning and rolling process with your light pink clay. Create about 3-4 beads that are slightly smaller than your red ones to add some size variation to the strand. -
Make the Yellow Beads:
Using the yellow clay, create 2 small round beads similar in size to the red ones. Set aside a slightly larger chunk of yellow clay for the main smiley face bead. -
Create the Smiley Centerpiece:
Roll the larger yellow chunk into a flattened sphere. It should be distinctly bigger than the other beads but flat enough to sit comfortably against the wrist like a coin. -
Make Dalmation-Style Beads:
Roll 3 small spheres using white clay. These will become your patterned spacer beads. -
Pierce the Holes:
Before baking, carefully poke a hole through the center of every bead using a needle tool or toothpick. Gently twist the tool as you push through to avoid squishing the bead’s shape. -
Check the Hole Size:
I always double-check that the holes are wide enough for the elastic cord by giving the needle tool a little wiggle inside each bead. -
Bake the Beads:
Arrange all your beads on a ceramic tile or a parchment-lined baking sheet. Bake them according to your clay package instructions (usually around 275°F/135°C for 15-30 minutes). Let them cool completely before handling.
Step 2: Decorating and Assembly
-
Paint the Smiley Face:
Using a very fine brush or a toothpick dipped in black acrylic paint, carefully draw two oval eyes and a wide U-shaped smile onto the large yellow bead. -
Add Spots to White Beads:
Take your white beads and dab small, irregular spots of black paint onto them to create a cow or dalmatian print effect. Let the paint dry completely. -
Seal the Beads:
Coat all the beads, especially the painted ones, with a layer of gloss glaze. This protects the paint and gives the clay a polished, professional look. -
Prepare the Elastic:
Cut a piece of elastic cord about 10-12 inches long. This gives you plenty of extra room to tie the knot later without struggling. -
Thread the Smiley Bead:
Start threading by placing the large yellow smiley face bead onto the cord first. This will help you center the design. -
String the Pattern:
Add the rest of the beads in a mirroring pattern. Try flanking the smiley with red beads, then adding the spotted and pink ones sporadically for an organic look. -
Check the Fit:
Wrap the unfinished strand around your wrist to check the length. Add or remove red filler beads until it fits comfortably. -
Tie the Knot:
Tie a strong surgeon’s knot (right over left, left over right) to secure the bracelet. Pull the elastic tight to ensure the knot holds. -
Secure and Trim:
Place a tiny dot of jewelry glue on the knot for extra security. Once dry, trim the excess elastic cord close to the knot, tucking the knot inside a neighboring bead if possible.
Clean Hands, Clean Clay
Use baby wipes between colors! Red and black clay can easily stain yellow or white clay. Wipe your hands and tools thoroughly before handling lighter colors to keep them bright.
Glow Up
Make the white spotted beads glow-in-the-dark for a night-time surprise. Simply swap standard white clay for a luminescent polymer clay brand before baking.
Wear your new bracelet specifically to share that contagious smile with everyone you meet

The Complete Guide to Pottery Troubleshooting
Uncover the most common ceramic mistakes—from cracking clay to failed glazes—and learn how to fix them fast.
Fruit Slice Bag Tags
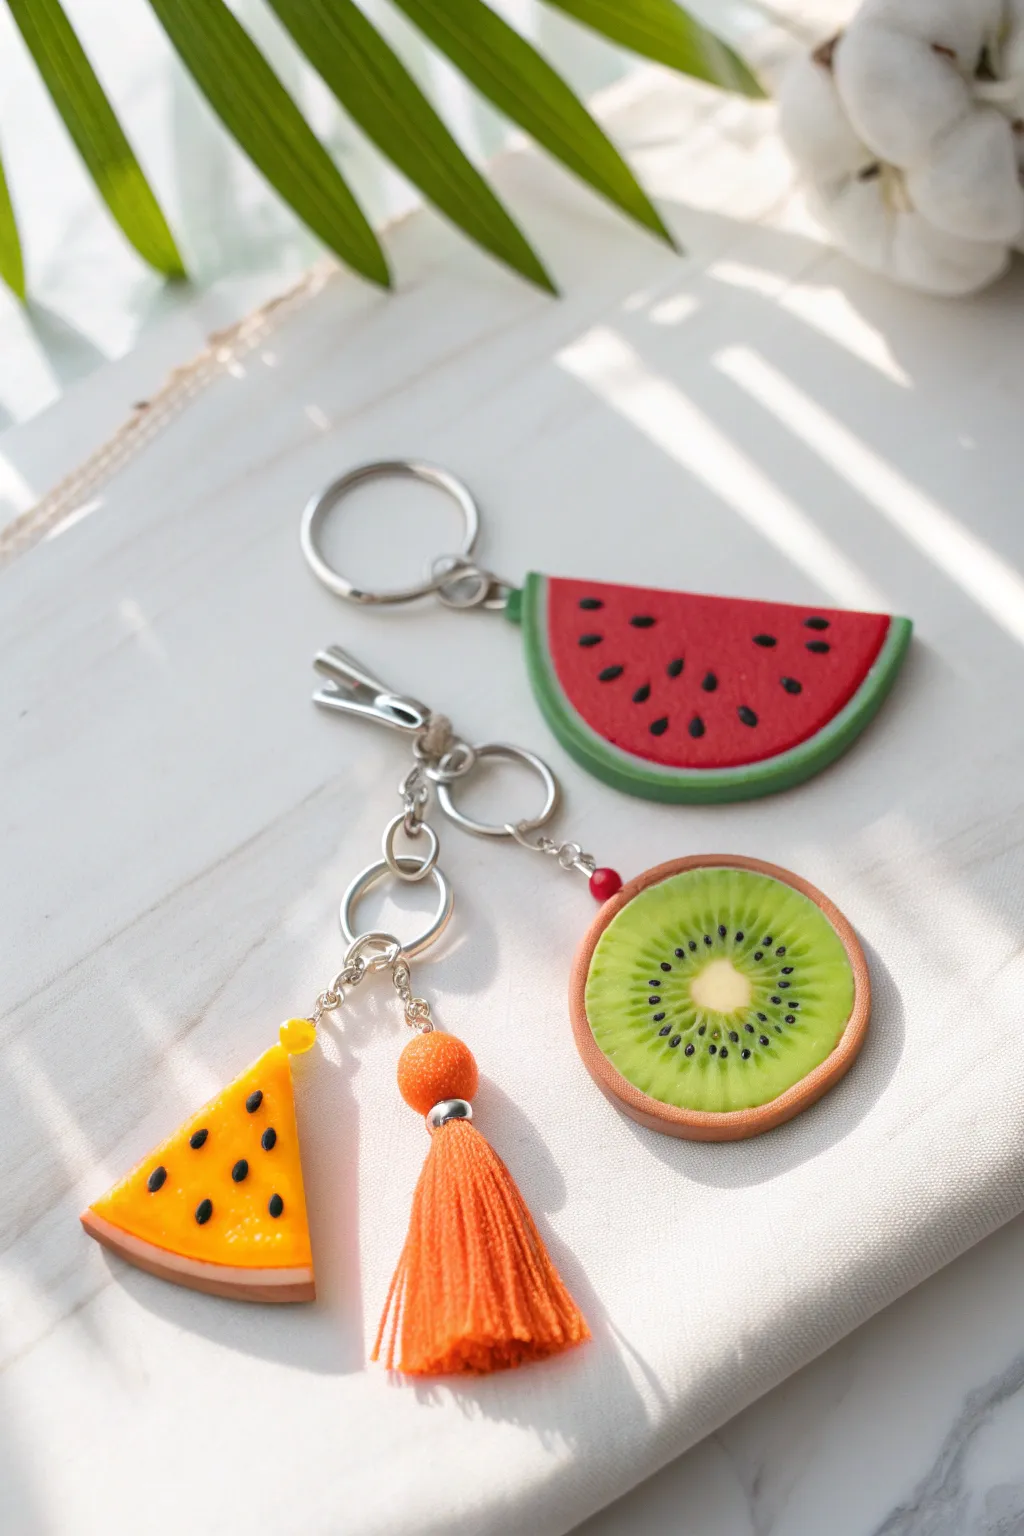
These vibrant, summery bag tags look good enough to eat and are the perfect way to personalize a backpack or purse. Featuring a juicy red watermelon, a sunny yellow melon, and a realistic kiwi, this project teaches simple layering and texturing techniques that yield professional-looking results.
How-To Guide
Materials
- Polymer clay (Red, Green, White, Yellow, Translucent, Black, Brown)
- Acrylic rolling pin
- Circle cutters (various sizes)
- Craft knife or clay blade
- Needle tool or toothpick
- Headpins or eye pins
- Jump rings and keychain hardware
- Jewelry pliers
- Orange embroidery floss (for tassel)
- Gloss glaze (optional)
Step 1: Making the Watermelon Slice
-
Prepare the core:
Condition a piece of red clay until it is soft and pliable. Roll it into a thick sheet, about 1/4 inch thick, and use a large circle cutter to punch out a perfect round shape. -
Add the rind:
Roll out a thin sheet of white clay and a slightly thicker sheet of green clay. Cut a long strip of white and wrap it around the edge of your red circle, trimming the excess neatly. -
Finish the skin:
Wrap a strip of the green clay over the white layer to create the outer rind. Roll the circle on your work surface gently to smooth the seams so the layers bond together. -
Create the slices:
Use your clay blade to cut the circle in half. You now have two semi-circle watermelon shapes. Set one aside for another project or make two tags. -
Add seeds:
Roll tiny, rice-sized specks of black clay. Gently press these onto the surface of the red clay in a random pattern using your finger or a flat tool to make them flush with the fruit. -
Texture:
For a realistic look, gently poke the red area repeatedly with a toothbrush or a ball of aluminum foil to give it a fleshy fruit texture.
Cane Slicing Trick
Chill your clay cane in the fridge for 15 minutes before slicing. This firms up the clay so the kiwi design doesn’t get squished or distorted as you cut.
Step 2: Crafting the Kiwi Slice
-
Build the center:
Roll a small snake of white or pale yellow clay for the kiwi core. Surround this core with a thick cylinder of translucent green clay mixed with a tiny bit of yellow. -
Create the seeds:
This part is tricky but rewarding: I prefer to roll very thin snakes of black clay and press them vertically around the green cylinder, then wrap another thin layer of green clay over them to bury the seeds slightly. -
Wrap the skin:
Wrap the entire cane in a thin sheet of brown clay to mimic the kiwi skin. Squeeze and roll the cane gently to reduce its size and adhere the layers. -
Slice and texture:
Slice a thick disk from your cane. Use a needle tool to drag faint lines from the white center outward toward the seeds to create the radial fruit pattern.
Step 3: Yellow Melon and Assembly
-
Form the yellow slice:
Repeat the steps used for the red watermelon, but substitute bright yellow clay for the red center. Don’t forget the black seeds for that distinct melon look. -
Add hardware:
Before baking, carefully insert an eye pin into the top center of each fruit slice. Ensure it goes deep enough to be secure but doesn’t poke out the sides. -
Baking:
Bake the pieces according to your clay package instructions (usually 275°F for 15-30 minutes). Let them cool completely before handling. -
Make the tassel:
Wrap orange embroidery floss around three fingers about 20 times. Slide it off, tie a piece of floss through the top loop, and wrap another piece tightly around the ‘neck’ of the tassel. Cut the bottom loops open. -
Glazing:
Once cool, brush a coat of gloss glaze over the fruit parts (avoiding the crust) to make them look juicy and fresh. -
Final assembly:
Use jump rings to attach your fruit slices and the orange tassel to the main keychain ring or lobster clasp. Double-check that all rings are closed tightly with pliers.
Dirty Clay Fix
If dust gets on your bright yellow or white clay, dip a cotton swab in rubbing alcohol or nail polish remover and gently wipe the surface before baking.
Now you have a fresh set of accessories ready to brighten up any bag or set of keys
Silly Blob Monsters
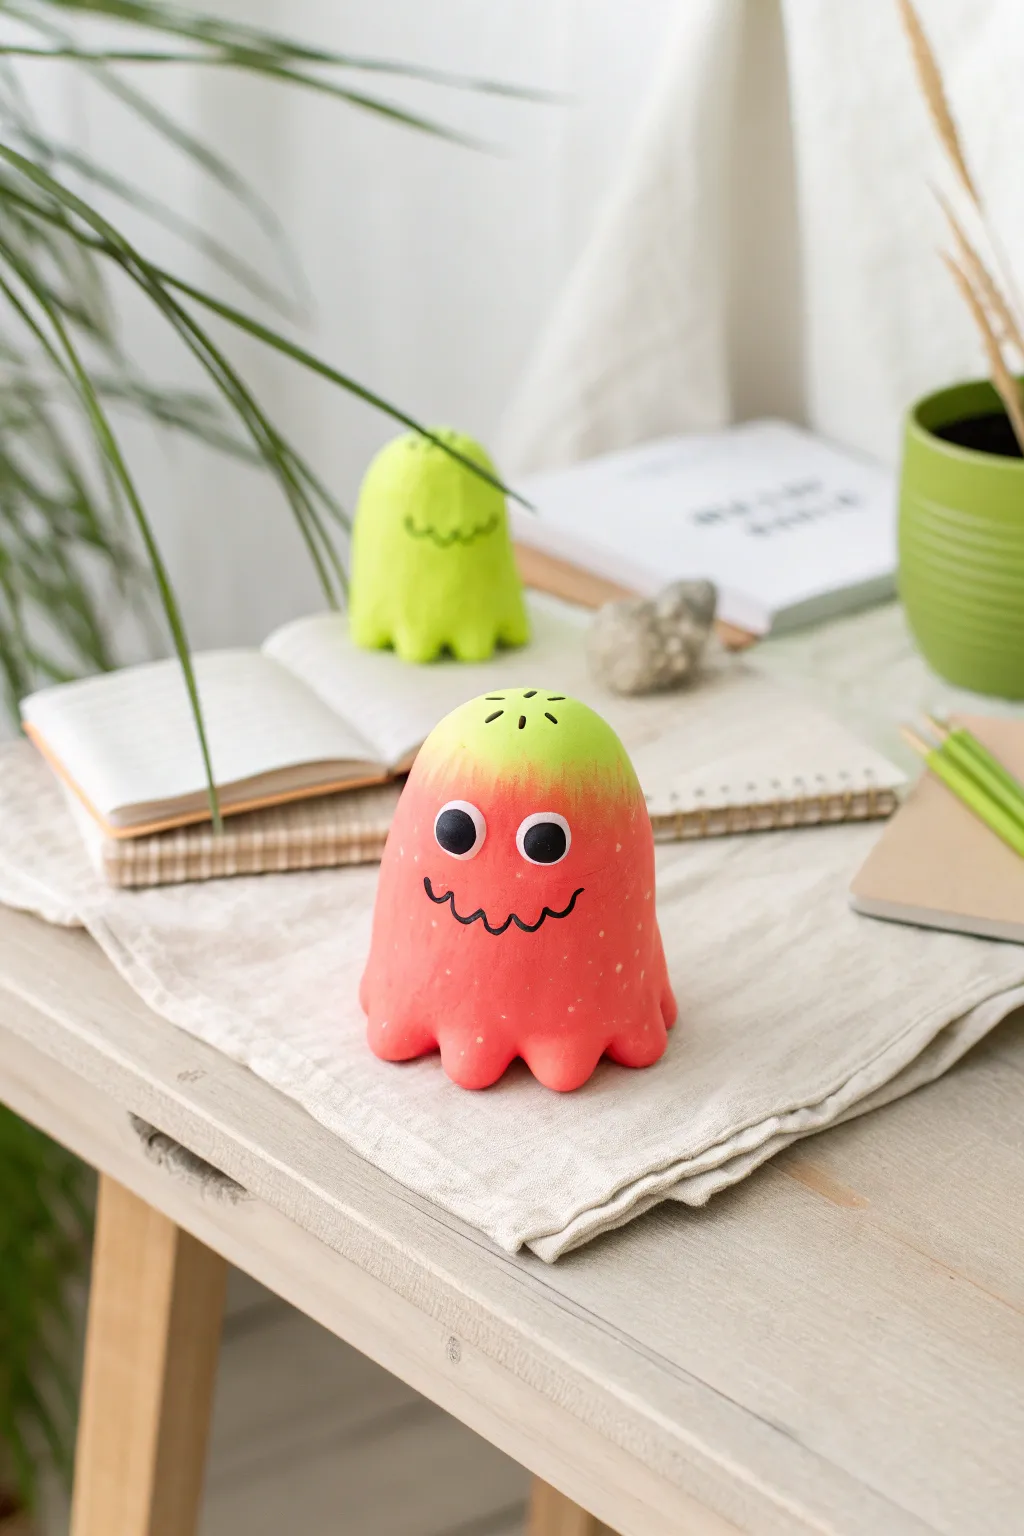
These quirky little creatures look like they wiggled right out of a swamp or outer space with their funky two-toned skin. The smooth ombre effect from red to lime green makes them extra special, while their wiggly smiles add loads of personality.
Detailed Instructions
Materials
- Polymer clay (Bright Red)
- Polymer clay (Neon Green or Lime)
- Googly eyes (self-adhesive or glue-on)
- Fine-point black permanent marker
- Pointed sculpting tool or toothpick
- Rolling pin or round marker casing
- Baking sheet
- Parchment paper
Step 1: Creating the Ombre Base
-
Prepare your colors:
Start by conditioning a chunk of red clay and a slightly smaller chunk of lime green clay in your hands until they are soft and pliable. Warm clay mixes much better. -
Form the initial shape:
Roll the red clay into a ball, then slightly flatten the top. Take your green clay and form a flattened disc that is roughly the same width as the top of your red ball. -
Begin the blend:
Place the green disc on top of the red ball. Using your thumbs, begin to smoosh the green clay downwards over the sides of the red ball. -
Refine the gradient:
Roll the combined ball between your palms gently. As you roll, the colors will start to smear into each other where they meet, creating that soft gradient transition. -
Shape the body:
Once you are happy with the color blend, roll the clay into a smooth, slightly elongated gumdrop shape. The green should be at the crown, fading into the red body. -
Hollow it out (Optional):
If your blob is very thick, you can gently press your thumb into the bottom to create a hollow cavity. This helps it bake more evenly and saves clay.
Smooth Seams
If fingerprints are visible on your gradient, dip your finger in a tiny bit of baby oil or cornstarch and rub gently over the clay before baking to smooth it out.
Step 2: Adding Details & Features
-
Form the feet:
Place your blob on your work surface. Using your finger or a round tool, gently press down around the bottom edge at regular intervals to create little indentations. -
Refine the toes:
Pinch the clay between the indentations you just made to form about six to eight distinct, round nubby feet that stick out slightly. -
Create hair texture:
Use a toothpick or a pointed sculpting tool to poke several small holes into the very top of the green head. I find usually 5-6 holes look best to simulate hair follicles. -
Add freckles:
Take a tiny scrap of light-colored clay (or white paint after baking) and add extremely subtle speckles to the red section for texture, though this is optional. -
Prepare for eyes:
Press your thumbs slightly into the front of the face where you want the eyes to go. This creates a flat seat so the googly eyes don’t pop off later. -
Bake the blob:
Place your monster on a parchment-lined baking sheet. Bake according to your specific clay package’s instructions (usually 275°F/135°C for 15-30 minutes). -
Cool down:
Let the clay cool completely before handling. It will be slightly soft when hot but hardens as it returns to room temperature.
Glow Up
Use glow-in-the-dark polymer clay for the top green section. Your monster will look normal in the day but will hauntingly illuminate when the lights go out.
Step 3: Bringing It to Life
-
Attach the eyes:
Once cool, peel the backing off two mismatched googly eyes and stick them into the indentations you made earlier. A dab of super glue helps if they aren’t self-adhesive. -
Draw the mouth:
Use a fine-point black permanent marker to draw a wiggly, jagged smile underneath the eyes. I like to add little upticks at the corners for extra cuteness.
Now you have a charming little desk buddy ready to keep you company while you work.


What Really Happens Inside the Kiln
Learn how time and temperature work together inside the kiln to transform clay into durable ceramic.
Easy Animal Face Pins
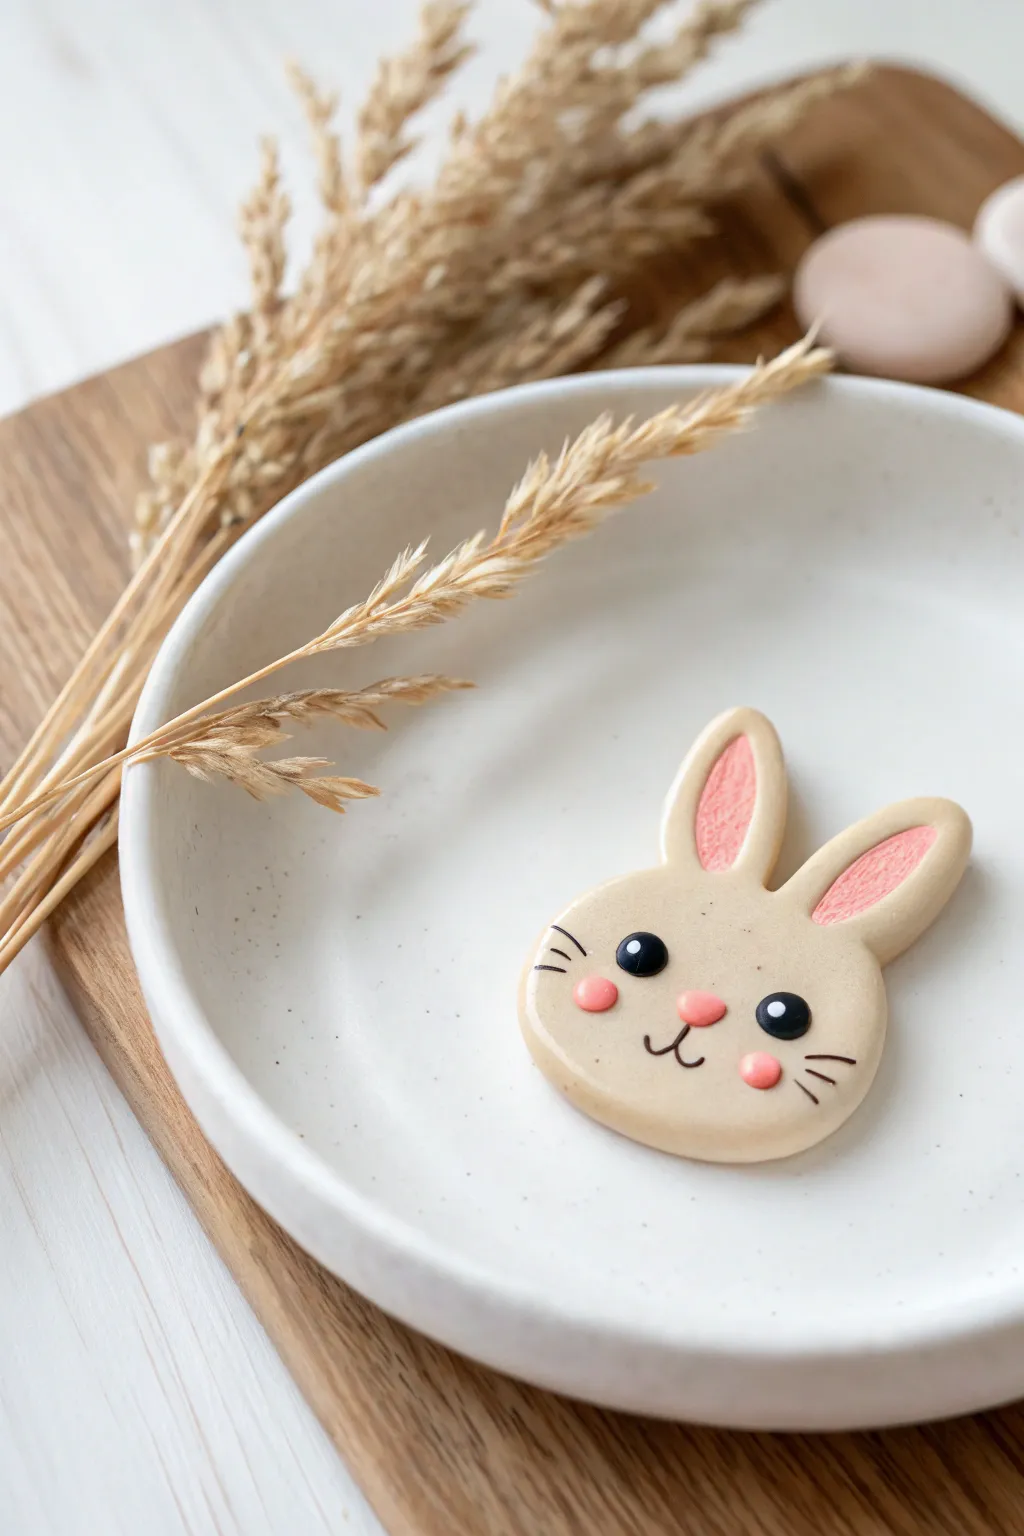
This adorable polymer clay bunny face pin is a simple yet rewarding project that captures a soft, kawaii aesthetic perfectly. With its gentle beige tone, rosy cheeks, and minimal details, it makes for a delightful accessory or a sweet handmade gift for a friend.
How-To Guide
Materials
- Polymer clay (beige/tan, pink, white, black)
- Acrylic rolling pin
- Small round cutter or oval cutter (optional)
- X-acto knife or clay blade
- Ball stylus tool
- Needle tool
- Pin back or brooch finding
- Strong craft glue (e.g., E6000)
- Oven for baking
- Gloss glaze (optional)
Step 1: Shaping the Head
-
Condition the clay:
Start by warming up your beige polymer clay in your hands until it becomes soft, pliable, and free of cracks. -
Form the base shape:
Roll the clay into a smooth ball, roughly the size of a walnut. Flatten it gently with your palm or acrylic roller to create a thick, rounded disc about 1/4 inch thick. -
Refine the outline:
Use your fingers to gently pinch the bottom of the disc slightly to create a wider cheek area, tapering slightly toward the top where the ears will go. You want a soft, chubby oval shape. -
Smooth the edges:
Run your finger along the rim of the face to soften any sharp edges from flattening, ensuring a rounded, pebble-like finish.
Step 2: Adding the Ears
-
Create ear shapes:
Take two smaller equal-sized balls of beige clay. Roll them into logs and taper one end of each to form long teardrop shapes. -
Flatten the ears:
Gently press these teardrops flat. They should be relatively thick to match the style of the head. -
Make the inner ear:
Take a tiny amount of pink clay and roll two very thin, small teardrops. Press these onto the center of your beige ears. -
Texture the inner ear:
I like to use a needle tool to gently scratch fine lines into the pink clay, giving it a bit of texture that resembles fur or fabric. -
Attach to head:
Place the ears at the top of the head. Use your clay tool to blend the clay slightly at the back seam to ensure they stick firmly, or use a dab of liquid clay as glue.
Sticky Fingerprints?
If you see fingerprints on your smooth clay, lightly brush the raw clay with a little baby oil or cornstarch before baking to smooth them out perfectly.
Step 3: Creating the Face
-
Make eye sockets:
Use a medium-sized ball stylus to press two shallow indentations into the face where the eyes will sit. Spacing them slightly apart adds to the cute factor. -
Add the eyes:
Roll two small balls of black clay. Place them into the indentations and press gently so they look embedded rather than just sitting on top. -
Add eye sparkle:
Take the tiniest speck of white clay you can manage and place it on the upper right side of each black eye for a life-like glint. -
Create the nose:
Roll a very small oval of pink clay and press it into the center of the face, just below the eyes. -
Make rosy cheeks:
Form two small, flat circles of pink clay. Press these onto the face below the eyes and slightly to the outside.
Texture Twist
Before adding the face, gently press a piece of sandpaper or an old toothbrush over the beige clay to give the bunny a realistic fuzzy texture.
Step 4: Finishing Touches
-
Draw the mouth:
Roll a microscopic snake of black clay. Carefully shape it into a ‘w’ or anchor shape and press it below the nose. Alternatively, you can paint this on after baking. -
Add whiskers:
Similarly, roll incredibly thin threads of black clay for whiskers—three on each side—and press them onto the cheeks. Painting these with acrylic paint after baking is often easier for beginners. -
Bake the piece:
Place your bunny on a parchment-lined baking sheet. Bake according to your clay manufacturer’s instructions (usually 275°F for about 15-20 minutes depending on thickness). -
Cool and glue:
Let the piece cool completely. Once hard, flip it over and use strong craft glue to attach a metal pin back to the center. -
Optional glaze:
If you want a shiny finish like the photo, apply a thin coat of gloss glaze to the eyes and nose, leaving the rest matte for contrast.
Now you have a charming little keepsake that adds a touch of whimsy to any jacket or bag
Star And Heart Pendants
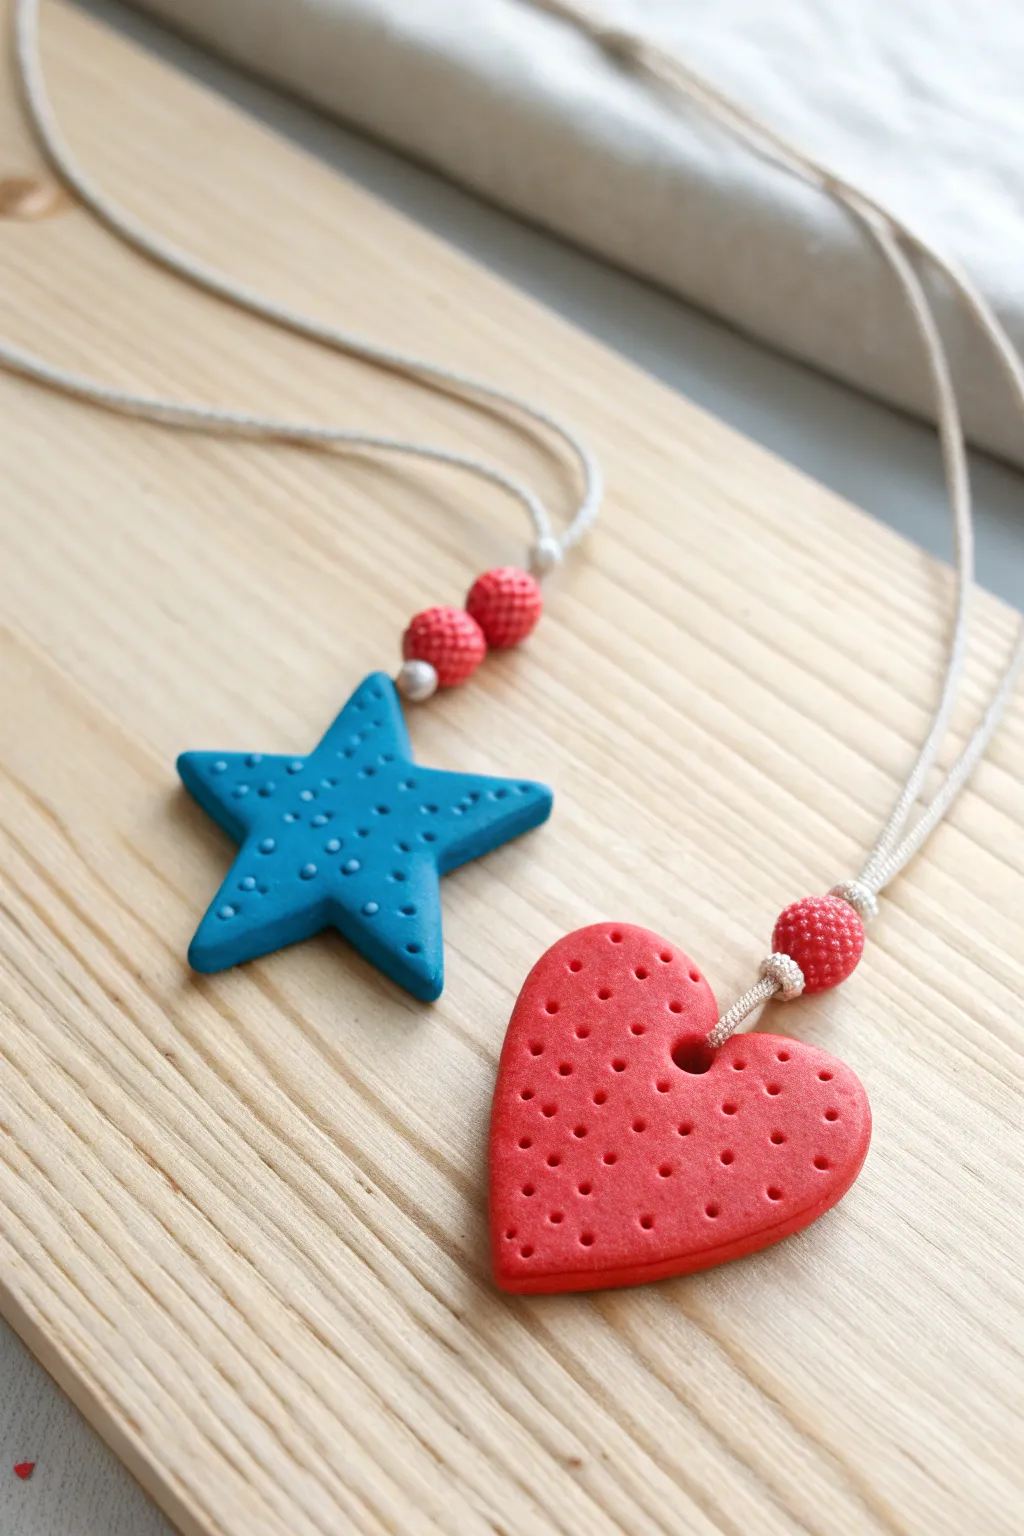
These classic red and blue pendants make for a sweet, retro-inspired accessory set perfect for a beginner’s afternoon crafting session. The texture is key here, with tiny pin-pricked details giving the smooth clay a finished, professional look.
Detailed Instructions
Materials
- Polymer clay (Bright Blue and Poppy Red)
- Rolling pin or pasta machine
- Star cookie cutter (approx. 1.5 inch)
- Heart cookie cutter (approx. 1.5 inch)
- Needle tool or toothpick
- Small round piping tip or straw (optional for hole)
- Waxed cotton cord (Light beige/natural)
- Textured beads (red/berry style)
- Small spacer beads (silver or white)
- Baking sheet and parchment paper
- Oven
Step 1: Shaping the Clay
-
Condition the clay:
Start by warming the blue and red polymer clay in your hands separately. Knead them until they are soft, pliable, and free of cracks. -
Roll it out:
Flatten the blue clay into a smooth sheet. You want it relatively thick, about 1/4 inch (6mm), to give the pendant a nice chunky feel that won’t break easily. -
Repeat for red:
Clean your rolling pin to avoid color transfer, then roll out the red clay to the same 1/4 inch thickness. -
Cut the shapes:
Press your star cutter firmly into the blue sheet and the heart cutter into the red sheet. Wiggle them slightly before lifting to ensure a clean cut. -
Smooth the edges:
Gently rub your finger along the cut edges of both shapes to soften any sharp ridges left by the cutters.
Fixing Fingerprints
If you see fingerprints on your smooth clay before baking, lightly brush the surface with a tiny amount of baby oil or cornstarch to smooth them away without ruining the shape.
Step 2: Adding Texture and Details
-
Create the hanging hole:
Use a straw or a small round tool to punch a clean hole near the top of the heart and one of the star’s points. Ensure the hole is large enough for your cord to pass through easily. -
Begin stippling:
Take your needle tool or a dull toothpick. Gently press small dots into the surface of the blue star. Vary the pressure slightly for a more organic look. -
Cover the surface:
Continue dotting across the entire face of the star, spacing them somewhat evenly but not perfectly. I like to leave a tiny smooth margin right at the very edge. -
Texture the heart:
Repeat the stippling process on the red heart pendant, covering the front face with the same dotted pattern. -
Make bead accents:
Roll small leftover bits of red clay into three small spheres (two for the star, one large one for the heart). -
Texture the beads:
Roll these spheres gently over a textured surface (like sandpaper or a clean comb) or poke them repeatedly with your needle tool to create a ‘berry’ texture. -
Pierce the beads:
Carefully slide a toothpick through the center of each textured bead to create a hole for threading. -
Bake:
Place the pendants and beads on a parchment-lined baking sheet. Bake according to your clay package instructions (usually 275°F/135°C for 15-30 minutes). -
Cool down:
Let the pieces cool completely inside the oven with the door slightly ajar to prevent cracking.
Step 3: Assembly
-
Prepare the cord:
Cut two lengths of the beige waxed cotton cord, each about 24-30 inches long, depending on how low you want the pendants to hang. -
String the star:
Fold one cord in half to find the center. Thread the loop end through the star pendant, then pull the loose ends through the loop to create a lark’s head knot. -
Add beads to star:
Thread a small silver spacer bead onto both cord ends, followed by two of your handmade red berry beads. -
String the heart:
For the heart, thread the cord through the hole. You can use a simple overhand knot right above the pendant to secure it. -
Add beads to heart:
Slide a silver spacer bead and one large red berry bead down onto the cord so they sit just above the knot or pendant top. -
Finish the ends:
Tie the loose ends of the necklaces into a simple sliding knot or a strong double knot to complete your jewelry.
Make it Sparkle
Before baking, brush a tiny amount of mica powder or pearlescent eyeshadow over the textured dots. The powder will settle into the holes and catch the light beautifully.
These charming textured pendants are ready to wear or gift to a best friend

TRACK YOUR CERAMIC JOURNEY
Capture glaze tests, firing details, and creative progress—all in one simple printable. Make your projects easier to repeat and improve.
Marble-Swirl Snails

Create a cheerful garden companion with this delightful polymer clay snail project. Featuring a vibrant, textured shell and an adorable face, this little figurine brings a pop of color to any shelf or windowsill.
Detailed Instructions
Materials
- Polymer clay (white/granite effect for body)
- Polymer clay (coral red, teal/turquoise, yellow)
- Basic sculpting tools (needle tool, small ball tool)
- Rolling pin or pasta machine
- Aluminum foil (for armature)
- Black acrylic paint
- Fine detail paintbrush
- Gloss varnish (optional)
Step 1: Sculpting the Body
-
Prepare the foil core:
Crumple a small piece of aluminum foil into a tight ball, roughly the size of a walnut. This will act as the lightweight core for the shell so the clay doesn’t get too heavy. -
Condition the body clay:
Take a generous amount of white or stone-effect polymer clay. Knead it in your hands until it becomes soft and pliable. -
Form the base shape:
Roll the white clay into a thick log, tapering one end slightly for the tail and rounding the other for the head. -
Curve the body:
Gently bend the log into an ‘L’ shape, lifting the rounded head portion up while keeping the tail flat against your work surface. Flatten the bottom slightly so it sits stably without rolling over. -
Add texture:
Using a stiff brush or a textured sponge, gently tap over the surface of the snail’s body to give it a natural, stone-like appearance rather than a perfectly smooth finish.
Droopy Antennae?
If the eye stalks keep wilting, bake the antennae separately on a flat surface first. Once hard, glue them onto the unbaked head with liquid clay, then bake the whole piece again.
Step 2: Creating the Colorful Shell
-
Roll colored snakes:
Condition your coral red, teal, and yellow clays. Roll each color into long, even ropes (snakes) of equal thickness, roughly 1/4 inch thick. -
Start the spiral:
Take the teal rope and begin coiling it tightly around itself to start the very center of the shell. -
Add color bands:
Attach the coral red rope next, wrapping it around the teal center. Smooth the seam gently with your finger so the transition is connected but the colors remain distinct. -
Continue the pattern:
Follow with the yellow rope, and then another layer of teal. Continue wrapping these coils around your foil ball core until the shell reaches your desired size. I find covering the foil completely usually takes about 3-4 layers of color. -
Texture the shell:
Use a needle tool or a dull knife to press shallow grooves into the colored ropes. These indentations should run perpendicular to the spiral, mimicking the growth ridges on a real snail shell. -
Attach shell to body:
Create a slight depression in the center of the snail’s back. Place the shell securely into this spot, pressing down firmly to ensure a strong bond between the two clay parts.
Pro Tip: Seamless Spirals
Cut the ends of your clay ropes at a detailed 45-degree angle. This allows you to join new colors invisibly without creating a noticeable lump in your spiral pattern.
Step 3: Adding Details and Finishing
-
Make the antennae:
Roll two small, thin logs of white clay. Attach a tiny ball of clay to the top of each to form the eye stalks. -
Insert supports (optional):
If your clay is soft, you might want to insert small pieces of cut wire or toothpick into the head first, then slide the antennae over them for extra stability. -
Attach antennae:
Press the antennae onto the top of the snail’s head, blending the clay at the base downward with a sculpting tool so they don’t fall off. -
Bake the project:
Place your snail on a baking sheet lined with parchment paper. Bake according to your specific brand of clay’s instructions (usually around 275°F/135°C for 15-30 minutes). -
Cool down:
Let the sculpture cool completely in the oven before handling. This prevents cracking. -
Paint facial features:
Using a very fine brush and black acrylic paint, add two small dots on the tips of the antennae for eyes and a tiny curved line for a smiling mouth. -
Add a protective coat:
For a durable finish, brush a layer of matte or gloss varnish over the entire piece once the paint is fully dry.
Now you have a charming little snail ready to explore your desk or bookshelf
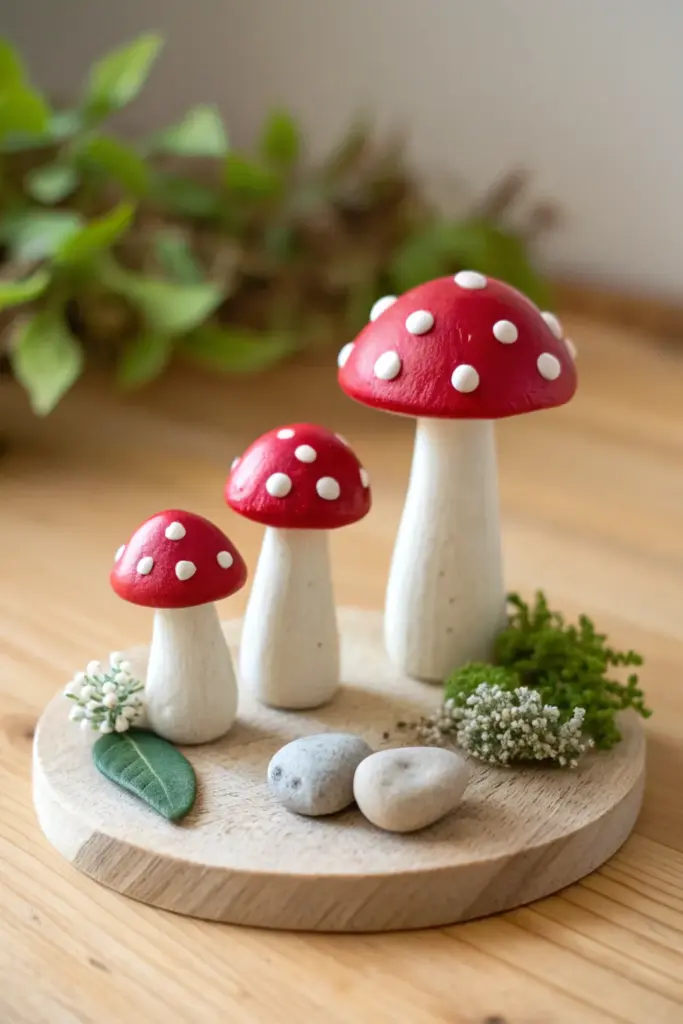
Fairy Garden Mushroom Set
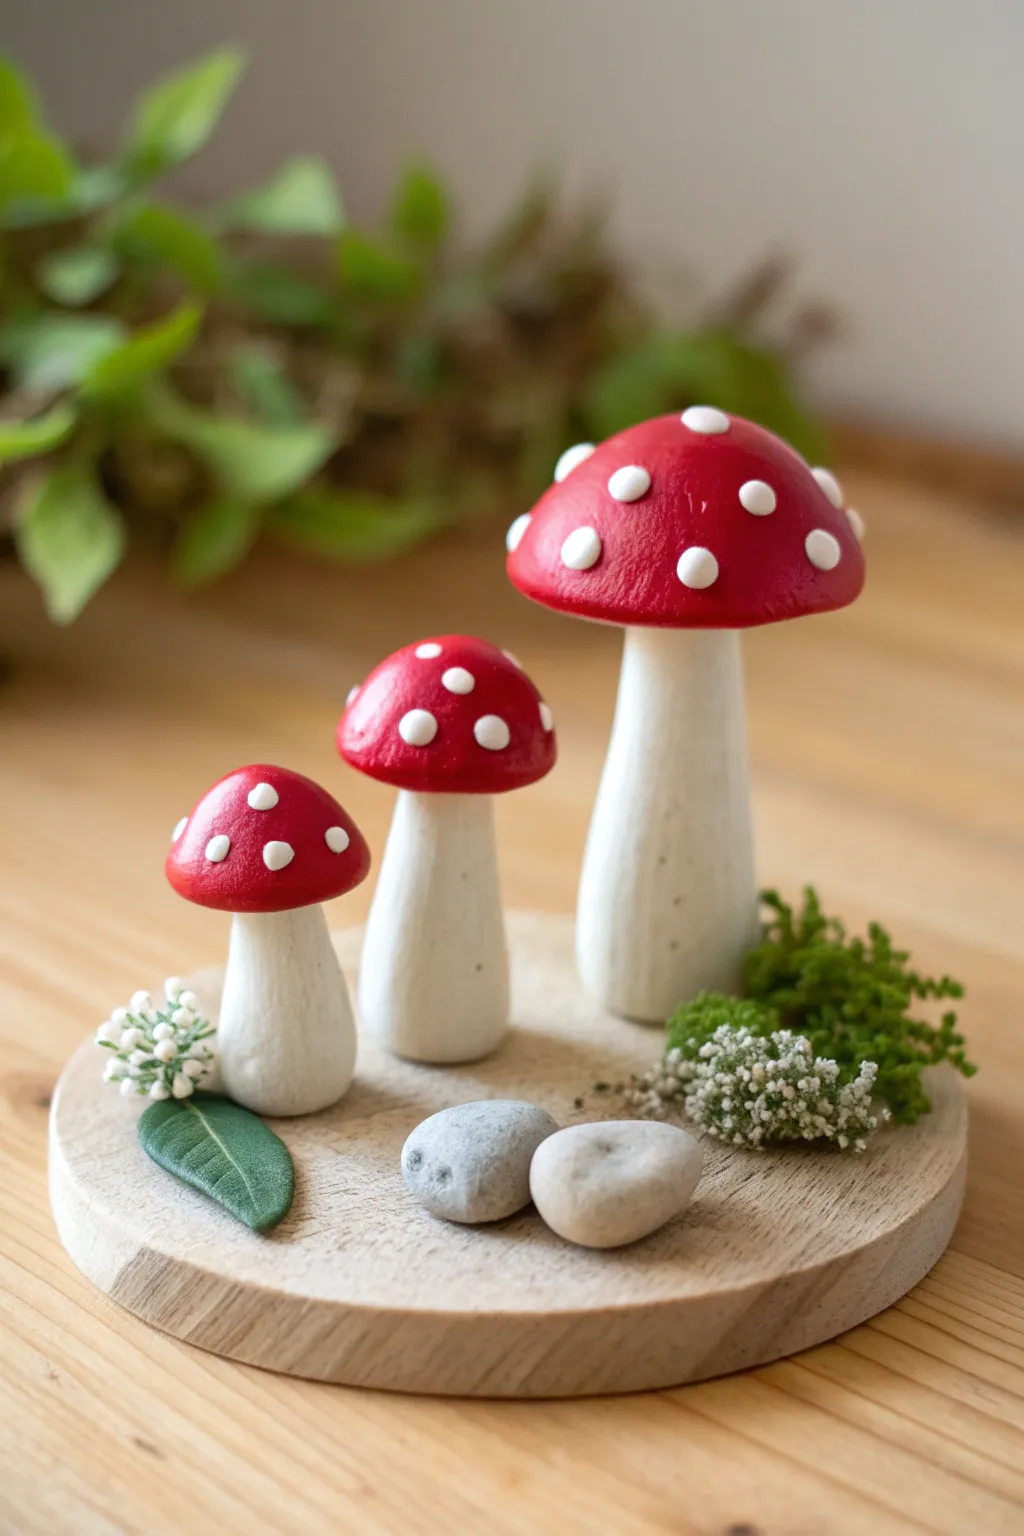
Bring the magic of the forest indoors with this charming set of three speckled toadstools. Mounted on a rustic wooden slice with tiny pebbles and moss, these classic red-capped mushrooms make a perfect centerpiece for a miniature fairy garden.
Step-by-Step
Materials
- Polymer clay (Bright Red, White, Green)
- Small wooden slice (coaster size)
- Acrylic rolling pin
- Clay sculpting tools (needle tool, small ball tool)
- Textured sponge or toothbrush
- Small smooth stones/pebbles
- Dried floral bits or faux moss
- Super glue or heavy-duty craft glue
- Liquid clay (optional but recommended)
Step 1: Sculpting the Mushroom Stalks
-
Prepare the white clay:
Condition a block of white polymer clay by kneading it until it is soft and pliable. Divide the clay into three portions of varying sizes: large, medium, and small. -
Shape the base forms:
Roll each portion into a smooth ball first to remove air bubbles, then gently elongate them into thick cylinders. -
Taper the stalks:
Roll one end of each cylinder slightly thinner to create the neck where the cap will sit. Keep the bases wide and flat so they stand up easily on their own. -
Add subtle texture:
Take a clean toothbrush or a coarse sponge and gently press it against the sides of the stalks to give them a natural, organic texture. I find this hides fingerprints perfectly. -
Insert structural support:
For the largest mushroom, you might want to insert a small toothpick or wire into the center of the stalk for extra strength, leaving a bit poking out the top to hold the cap.
Clean Clay Tip
Work with the white clay first, then the red. Red pigment is very strong and transfers easily to hands, which can turn your white stalks pink if you aren’t careful.
Step 2: Creating the Iconic Caps
-
Form the red caps:
Take your bright red clay and divide it into three balls corresponding to your stalk sizes. Flatten the bottom of each ball and smooth the top into a rounded dome shape. -
Fit caps to stalks:
Press the domed caps gently onto the tapered ends of your white stalks. Use a drop of liquid clay or ‘Bake & Bond’ between the parts if you have it to ensure they fuse securely. -
Curve the edges:
Gently pull the edges of the red cap down slightly so it cups the top of the white stalk, creating that classic mushroom silhouette. -
Make the decorative spots:
Roll tiny, tiny balls of white clay. You will need about 10-15 per mushroom, varying the sizes for a natural look. -
Apply the spots:
Press the tiny white balls onto the red caps. Flatten them slightly with your fingertip so they look like they are part of the mushroom skin, not just sitting on top.
Step 3: Accessories and Assembly
-
Sculpt a green leaf:
With a small amount of green clay, shape a single teardrop leaf. Use a needle tool or knife to gently score a central vein and smaller side veins into the surface. -
Bake everything:
Place your three mushrooms and the single leaf on a baking sheet lined with parchment paper. Bake according to your specific brand of clay’s instructions (usually around 275°F for 15-30 minutes). -
Cool down:
Let the clay pieces cool completely in the oven before handling them to prevent cracking. -
Arrange the scene:
Take your wooden slice base and arrange the mushrooms in a cluster. Once you like the spacing, glue the bases of the mushrooms firmly to the wood. -
Add the ground cover:
Glue the green clay leaf near the base of the smallest mushroom. Arrange a few small smooth stones around the stems. -
Final flourish:
Tuck small bits of dried flowers or faux moss clusters between the mushrooms and rocks to soften the transition between the clay and the wood base.
Droopy Caps?
If your red caps are sliding down the stalks before baking, the clay is too warm. Pop the whole unbaked assembly in the fridge for 10 minutes to firm it up.
Now you have a serene little forest scene that brings a touch of magic to any shelf or desk