
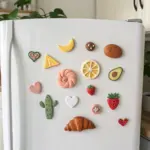
In my studio, I’m always reaching for polymer clay magnets when I want a quick project that still feels like a tiny piece of art. These easy magnet ideas are all about simple shapes, cute details, and that satisfying moment when they pop onto the fridge and instantly brighten the room.
Mini Citrus Slice Magnets
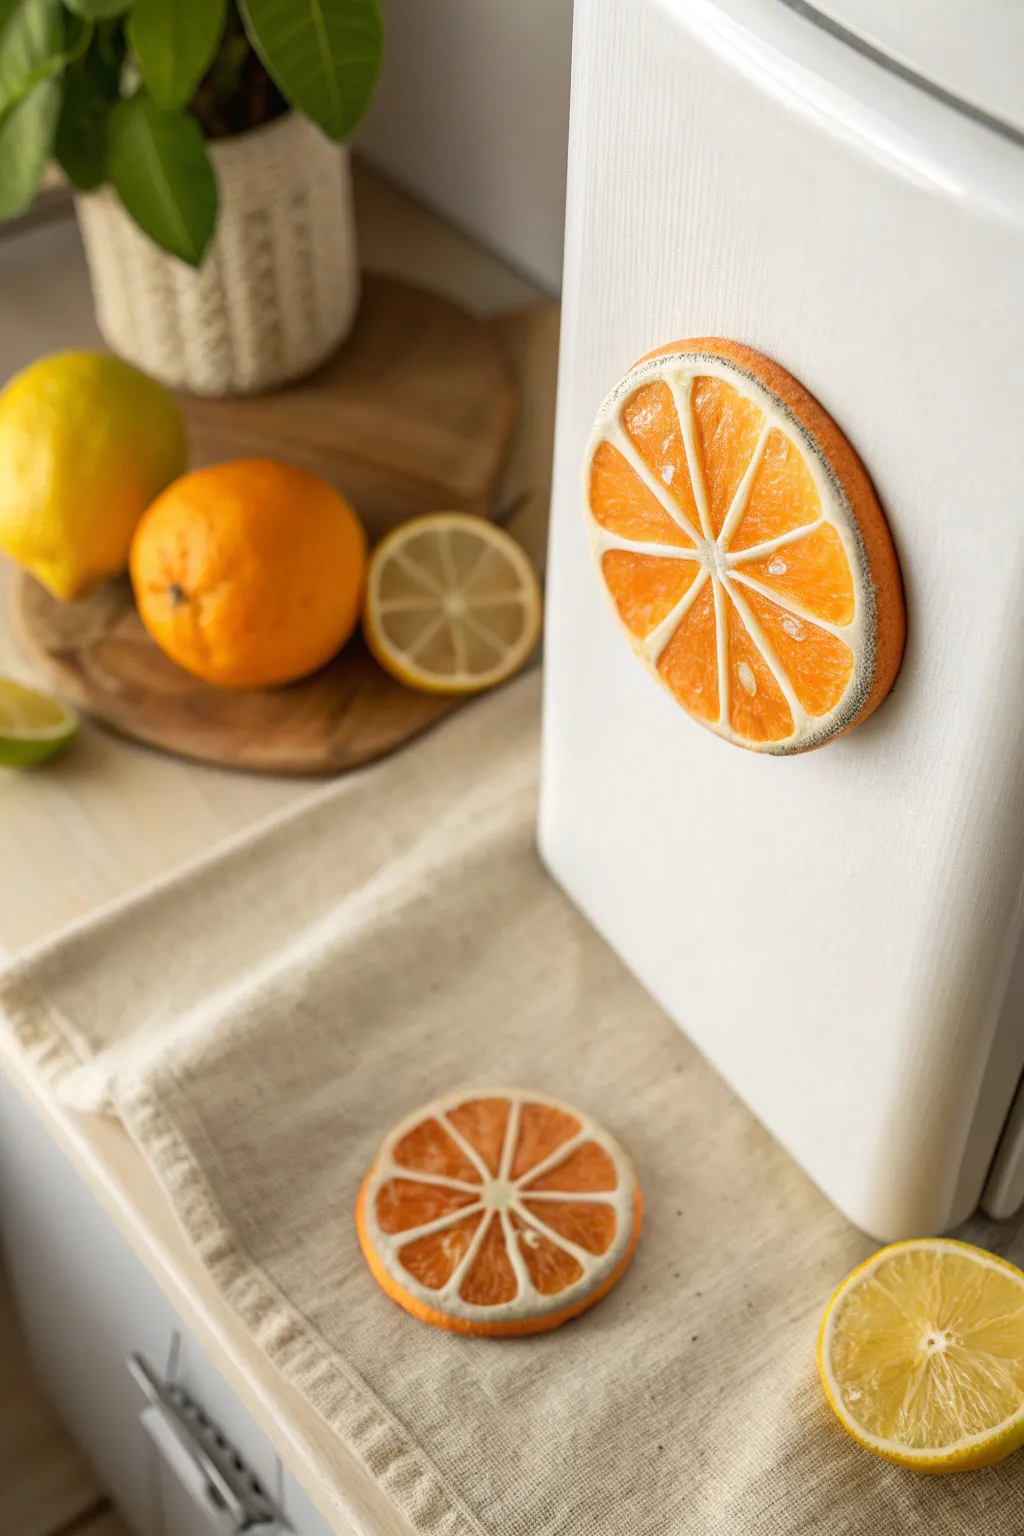
Brighten up your kitchen with these incredibly realistic citrus slice magnets that look fresh enough to squeeze. Using simple polymer clay techniques, you’ll create textured rinds and juicy-looking segments that add a pop of summer to any refrigerator door.
Step-by-Step Guide
Materials
- Translucent polymer clay
- Orange polymer clay
- White polymer clay
- Liquid polymer clay (translucent)
- Round clay cutter (approx. 2-3 inches)
- Needle tool or toothpick
- Toothbrush or texturing sponge
- X-acto knife or tissue blade
- Acrylic rolling pin
- Soft pastel chalks (orange and yellow)
- Paintbrush
- Gloss glaze or UV resin
- Strong round magnets
- Super glue or E6000
Step 1: Creating the Canes
-
Mix the citrus color:
Start by mixing translucent clay with a small amount of orange clay. You want a color that looks like orange juice—mostly see-through but distinctly orange. If it’s too opaque, add more translucent clay. -
Form the segment log:
Roll your mixed orange clay into a thick cylinder, about 1 inch in diameter. -
Wrap in pith:
Roll out a thin sheet of white polymer clay. Wrap this sheet around your orange cylinder, trimming the excess so the edges meet perfectly without overlapping too much. -
Reduce the cane:
Genlty squeeze and roll the cylinder to elongate it until it is about 1/2 inch in diameter. Let this rest for 10 minutes to firm up so it doesn’t distort when cutting. -
Cut the segments:
Use your tissue blade to slice the log into 8 equal lengths. These will become the individual triangular segments of your orange. -
Shape the triangles:
Pinch one side of each small log to turn the round shape into a teardrop or wedge shape. The white ‘pith’ should now outline the wedge shape.
Smudged Pith?
If your white lines look messy after slicing the cane, your clay was likely too soft. Chill the cane for 20-30 minutes before cutting to keep those white lines crisp and sharp.
Step 2: Assembling the Slice
-
Reassemble the orange:
Arrange the 8 wedge logs in a circle, with the pointy ends meeting in the center. Place a very thin snake of white clay in the absolute center to separate the tips slightly. -
Wrap the bundle:
Roll out another thin sheet of white clay and wrap the entire bundle of wedges to form the outer pith layer. -
Add the rind:
Roll out a sheet of orange clay (slightly thicker than the white). Wrap this around the outside to create the skin of the orange. -
Slice the final shape:
Carefully slice a distinct disc from your large cane, about 1/4 inch thick. If the clay is too soft, pop it in the fridge for 15 minutes first. -
Refine the shape:
If the slicing process squashed your circle, gently pat the edges back into a perfect round shape.
Step 3: Texturing and Finishing
-
Texture the rind:
Roll the edge of your slice over a toothbrush or stiff sponge to mimic the porous texture of citrus skin. -
Texture the flesh:
Use a needle tool to gently scratch and pick at the orange segments. Create radiating lines and tiny divots to simulate juice vesicles. -
Add depth with pastels:
I like to scrape a little orange and yellow pastel dust onto a palette and brush it into the textured center segments to boost the color saturation. -
Bake the clay:
Bake according to your clay manufacturer’s instructions (usually 275°F/135°C for 30 minutes). Let it cool completely. -
Apply gloss:
Coat only the orange segments with a gloss glaze or UV resin. Leave the white pith and outer rind matte for realistic contrast. -
Attach the magnet:
Once the glaze is dry, use strong glue to attach a round magnet to the back of the slice.
Make it a Lemon
Swap the orange clay for bright yellow to create a lemon slice. For a lime, use a darker green for the rind and a pale, translucent yellow-green for the inner segments.
Now you have a refreshing piece of decor that looks good enough to eat


Simple Pizza Slice Magnets
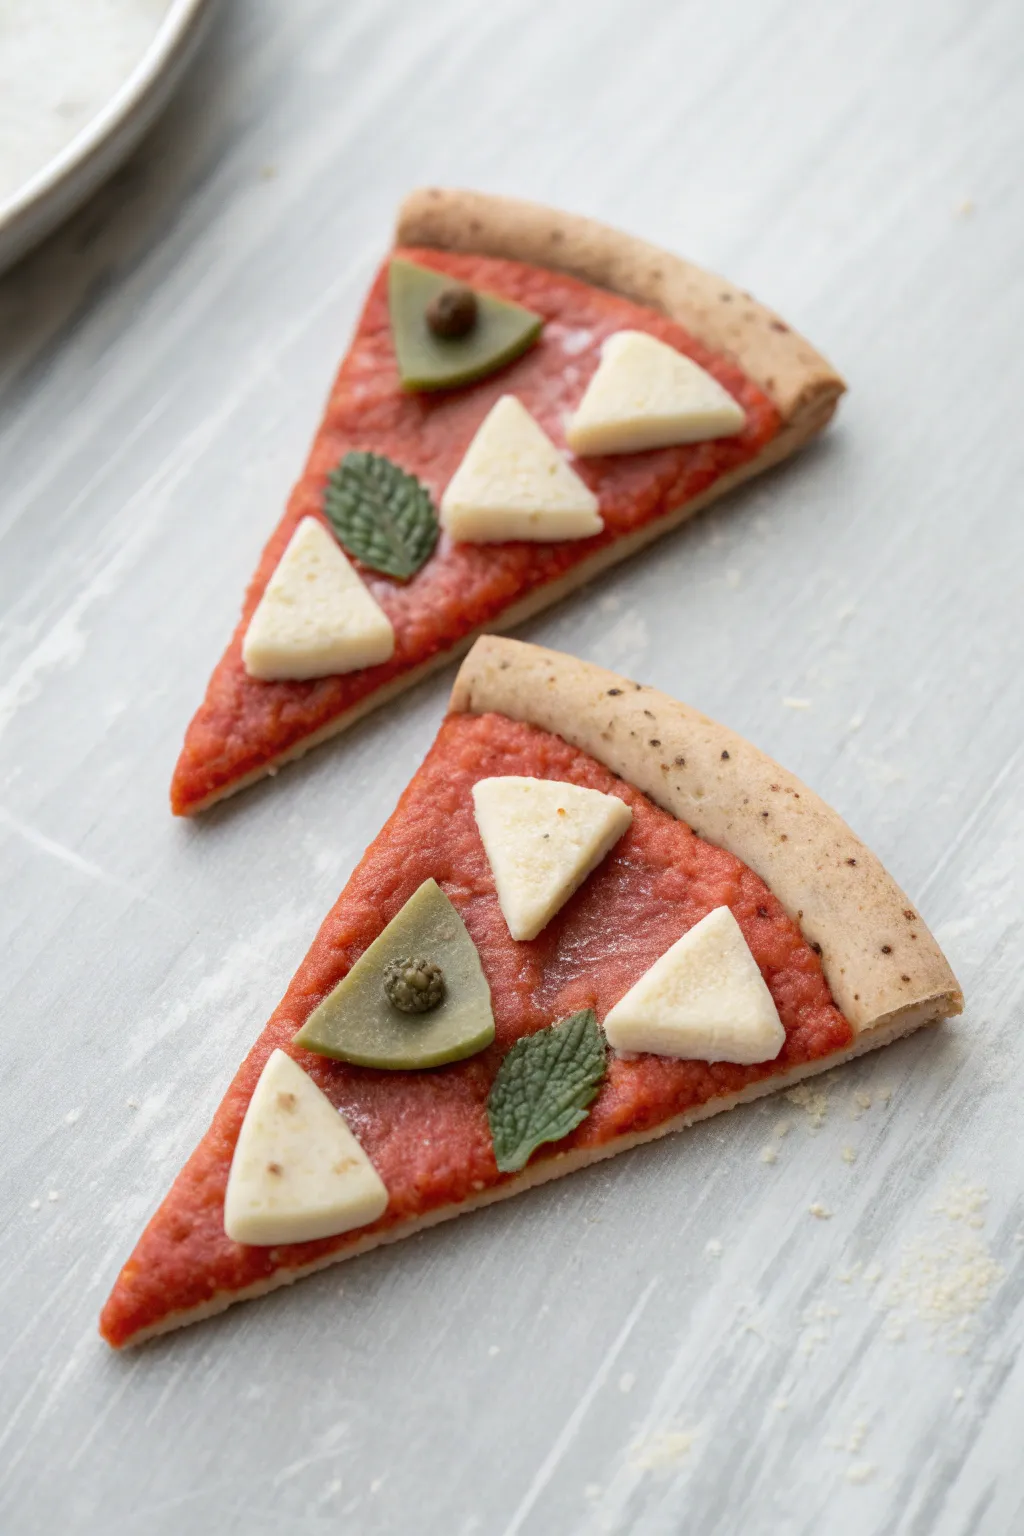
These charming pizza slice magnets look good enough to eat with their textured tomato sauce and realistic toppings. Using polymer clay and some simple texturing techniques, you can create a fun, food-themed accessory for your fridge or locker.
Step-by-Step
Materials
- Polymer clay (beige/tan, red, white, olive green, dark green)
- Black pepper or dark embossing powder (for speckling)
- Liquid polymer clay (translucent or red)
- Toothbrush or texturing tool
- Needle tool or toothpick
- Rolling pin or acrylic roller
- X-acto knife or clay blade
- Small round magnets
- Super glue (E6000 or strong adhesive)
- Oven for baking clay
Step 1: Creating the Pizza Base
-
Mix the Dough Color:
Begin by conditioning your beige or tan polymer clay until it’s soft. To achieve that realistic artisan crust look, mix in a tiny pinch of ground black pepper or dark embossing powder, kneading it thoroughly until the speckles are evenly distributed. -
Roll the Dough:
Roll the speckled clay out into a flat sheet, approximately 1/4 inch thick. You want it substantial enough to hold the toppings but not too bulky. -
Cut the Slices:
Using your clay blade or knife, cut out an elongated triangle shape. The top edge (the crust) should be slightly curved outward, while the two sides taper down to a point. -
Form the Crust Edge:
Take a separate small log of the speckled clay and attach it along the curved top edge of your triangle. Blend the seam on the bottom side so it attaches firmly, but leave the top distinct. -
Texture the Crust:
Gently roll the attached log backward to create a raised, puffy crust rim. I like to tap this rim lightly with a toothbrush to simulate a baked bread texture.
Fixing “Sauce” Smears
If red clay smears onto your white cheese, use a Q-tip dipped in rubbing alcohol or baby oil to gently wipe the cheese surface clean before baking.
Step 2: Adding Sauce and Cheese
-
Prepare the Sauce:
Mix a small amount of red polymer clay with liquid polymer clay until you have a thick paste consistency. Alternatively, soften red clay drastically with your fingers until it is very spreadable. -
Spread the Sauce:
Apply the red mixture onto the flat part of the triangle, spreading it right up to the puffy crust but not over it. Use a needle tool to stipple and roughen the surface, giving it a chunky tomato sauce appearance. -
Create Cheese Triangles:
Roll out white polymer clay into a thick slab. Use your blade to cut small, distinct triangle shapes to represent chunks of fresh mozzarella or sharp cheese. -
Place the Cheese:
Arrange three white triangles on your pizza slice. Press them gently into the red sauce layer so they adhere well without losing their sharp geometric shape. -
Texture the Cheese:
Lightly tap the tops of the white cheese triangles with your finger or a tool to soften the edges just slightly, mimicking how cheese begins to melt.
Step 3: Creating Garnish Toppings
-
Make the Olive Slice:
Take a small amount of olive green clay and flatten it. Cut a triangle shape that is slightly smaller than your cheese pieces. Press a tiny ball of dark brown clay into the center for the pit/stuffing. -
Position the Olive:
Place one olive triangle onto the pizza slice, usually near the center or top, pressing it gently into the red base. -
Form Basil Leaves:
Roll a tiny piece of dark green clay into a teardrop shape. Flatten it slightly to form a leaf. -
Detail the Leaves:
Use your needle tool to gently impress a central vein and small side veins onto the leaf. This texture adds a surprising amount of realism to the piece. -
Place the Basil:
Add one or two basil leaves to the pizza slice, tucking them slightly under a cheese corner or placing them in an open spot on the sauce.
Add a Crispy Finish
After baking, lightly brush distinct brown soft pastel dust onto the edges of the crust and the tops of the cheese for a toasted, oven-baked effect.
Step 4: Baking and Assembly
-
Final Inspection:
Check all your toppings to ensure they are secure. If needed, add a tiny drop of liquid clay under loose pieces to act as ‘glue’ before baking. -
Bake the Clay:
Place your pizza slices on a baking sheet or ceramic tile. Bake according to your polymer clay package instructions (usually around 275°F or 130°C for 15-30 minutes). -
Cool Down:
Allow the pieces to cool completely before handling. The clay is fragile when hot and needs to harden fully. -
Attach the Magnet:
Flip the cooled pizza slice over. Apply a dab of strong super glue (like E6000) to the back and press your round magnet firmly into place. -
Let Dry:
Allow the glue to cure for the recommended time (usually 24 hours for full strength) before placing your new art on the fridge.
Enjoy displaying your delicious-looking miniature pizza slices on your magnetic board or fridge


Cute Fried Egg Magnets
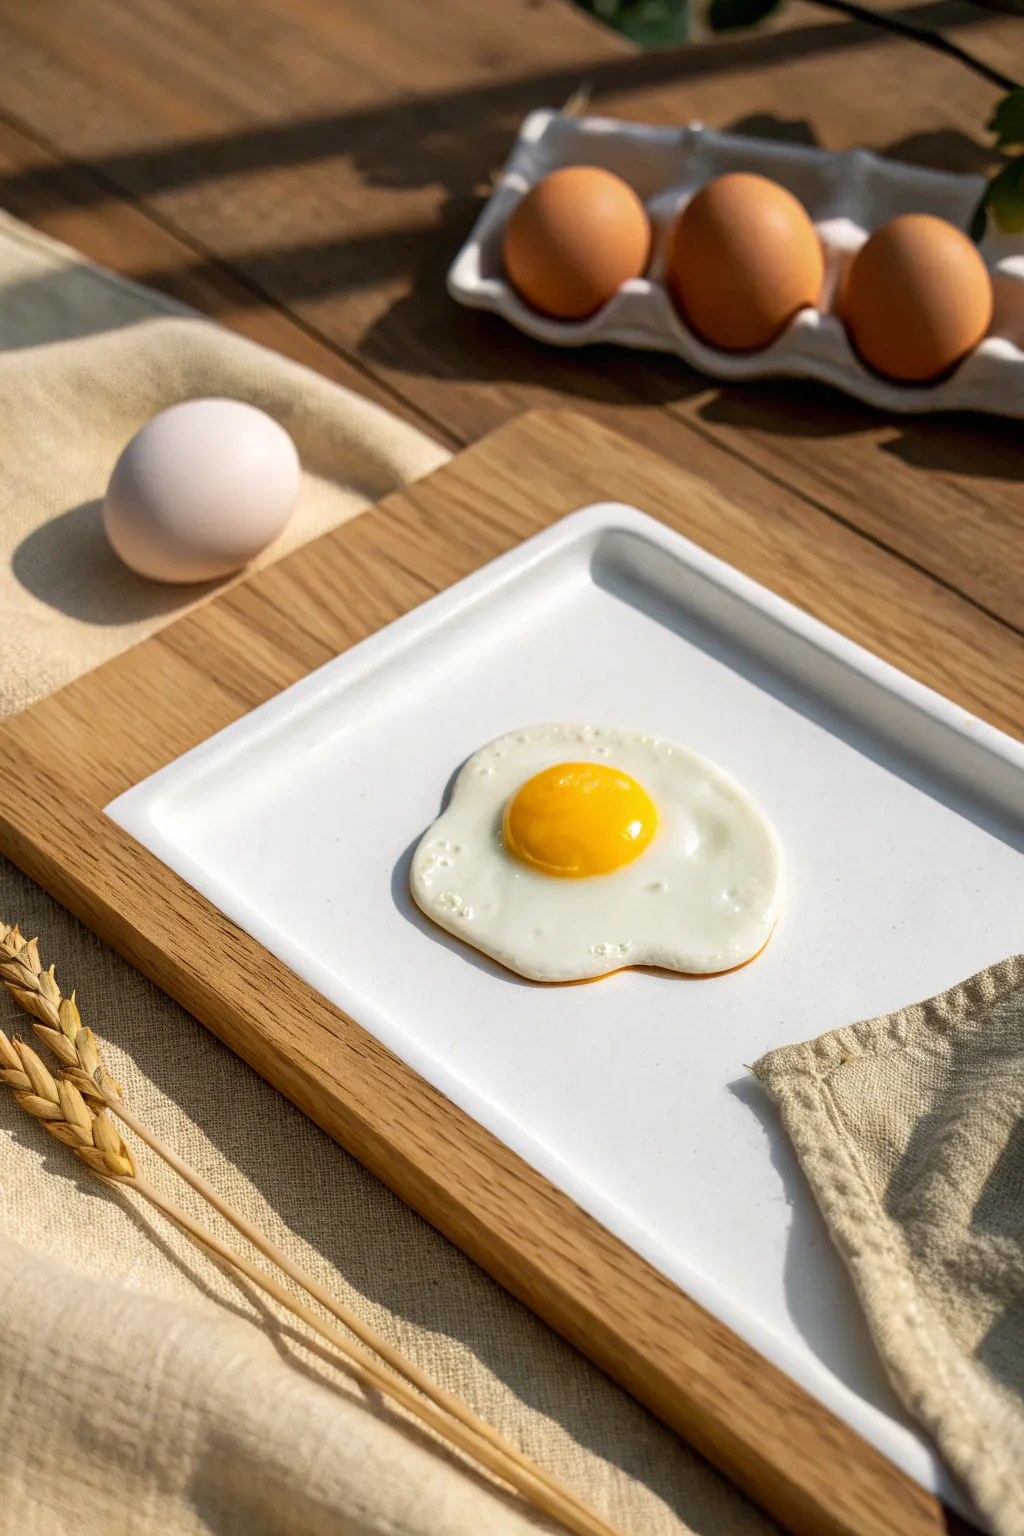
Create a delightfully realistic breakfast-themed magnet that looks good enough to eat but is made entirely of polymer clay. This project captures the glossy sheen of a perfectly fried egg, complete with crispy edges and a vibrant yolk.
Step-by-Step Tutorial
Materials
- White polymer clay
- Translucent polymer clay
- Yellow polymer clay (sunflower or cad yellow)
- Orange polymer clay (tiny amount for shading)
- Liquid polymer clay (translucent or white)
- Gloss glaze or UV resin
- Pastel chalks (brown and orange)
- Small paintbrush
- Dotting tool or toothpick
- Strong round magnet
- Super glue (E6000 or cyanoacrylate gel)
Step 1: Forming the Egg White
-
Mix the Base Color:
Begin by conditioning your white polymer clay. To make the egg look less like plastic and more like cooked protein, mix in a small amount of translucent clay—about one part translucent to three parts white. -
Shape the White:
Roll the mixed clay into a balls about 1 inch in diameter, then flatten it onto your work surface. Use your fingers to stretch and pull the edges into an irregular ripple shape, mimicking the natural flow of egg whites in a pan. -
Texture the Edges:
Using a dotting tool or the end of a paintbrush, gently press into the very edges of the flattened shape. You want to create slight bubbled textures where the ‘egg’ would be frying in oil. -
Add Dimension:
Press down slightly in the center of the white shape to create a shallow indentation. This little nest will hold the yolk securely in place later.
Crispy Texture Tip
For ultra-realistic crispy edges, mix tiny scraps of translucent clay with brown pastel, chop it finely, and press these ‘crumbs’ onto the egg edge before baking.
Step 2: Creating the Perfect Yolk
-
Mix Yolk Color:
Condition your yellow clay. For a richer, farm-fresh look, I like to mix a tiny pinch of orange into the yellow so it isn’t too neon. -
Form the Dome:
Roll a small ball of the yellow clay, sizing it appropriately for your egg white base. Gently flatten just the bottom so it sits flush, keeping the top a nice, high dome. -
Attach the Yolk:
Place the yellow dome into the indentation you made on the white base. Press gently to bond the clays together without smashing the dome shape. -
Add Liquid Clay:
To integrate the two pieces seamlessy, brush a tiny amount of liquid polymer clay around the seam where the yolk meets the white. This adds strength and a bit of realistic ‘uncooked’ shine near the yolk.
Step 3: Shading and Baking
-
Prepare Pastels:
Scrape a bit of brown and orange pastel chalk into fine powder using a craft knife or sandpaper. -
Apply crispy edges:
Dip a dry brush into the brown pastel powder. Lightly dust the very outer edges of the egg white, focusing on the textured areas to simulate crispy, browned bits. -
Shade the Yolk:
Using a clean brush and the orange powder, gently shade just the bottom curve of the yolk where it meets the white. This subtle shadow gives the yolk incredible 3D depth. -
Bake:
Bake the piece according to your clay manufacturer’s instructions (usually 275°F/135°C for 15-30 minutes). Let it cool completely before moving to the next step.
Make it a Breakfast Set
Don’t stop at eggs! Use tan and brown clay to sculpt strips of bacon or little toast triangles to create a whole breakfast heavy magnet collection.
Step 4: Finishing and Assembly
-
Glaze for Shine:
Brush a coat of gloss glaze or UV resin over the yolk. For the white part, you can glaze the whole thing or just brush patches near the yolk to make it look wet and freshly cracked. -
Cure or Dry:
Allow the glaze to air dry fully, or cure under a UV lamp if you used resin. -
Attach the Magnet:
Flip the fried egg over. Place a drop of strong super glue or E6000 onto the back center of the clay. -
Secure:
Press the magnet firmly into the glue and let it set undisturbed for the glue’s full cure time to ensure a lasting hold.
Your fridge is now much tastier with these charmingly realistic fried egg magnets holding up your notes


Smiling Sushi Bite Magnets
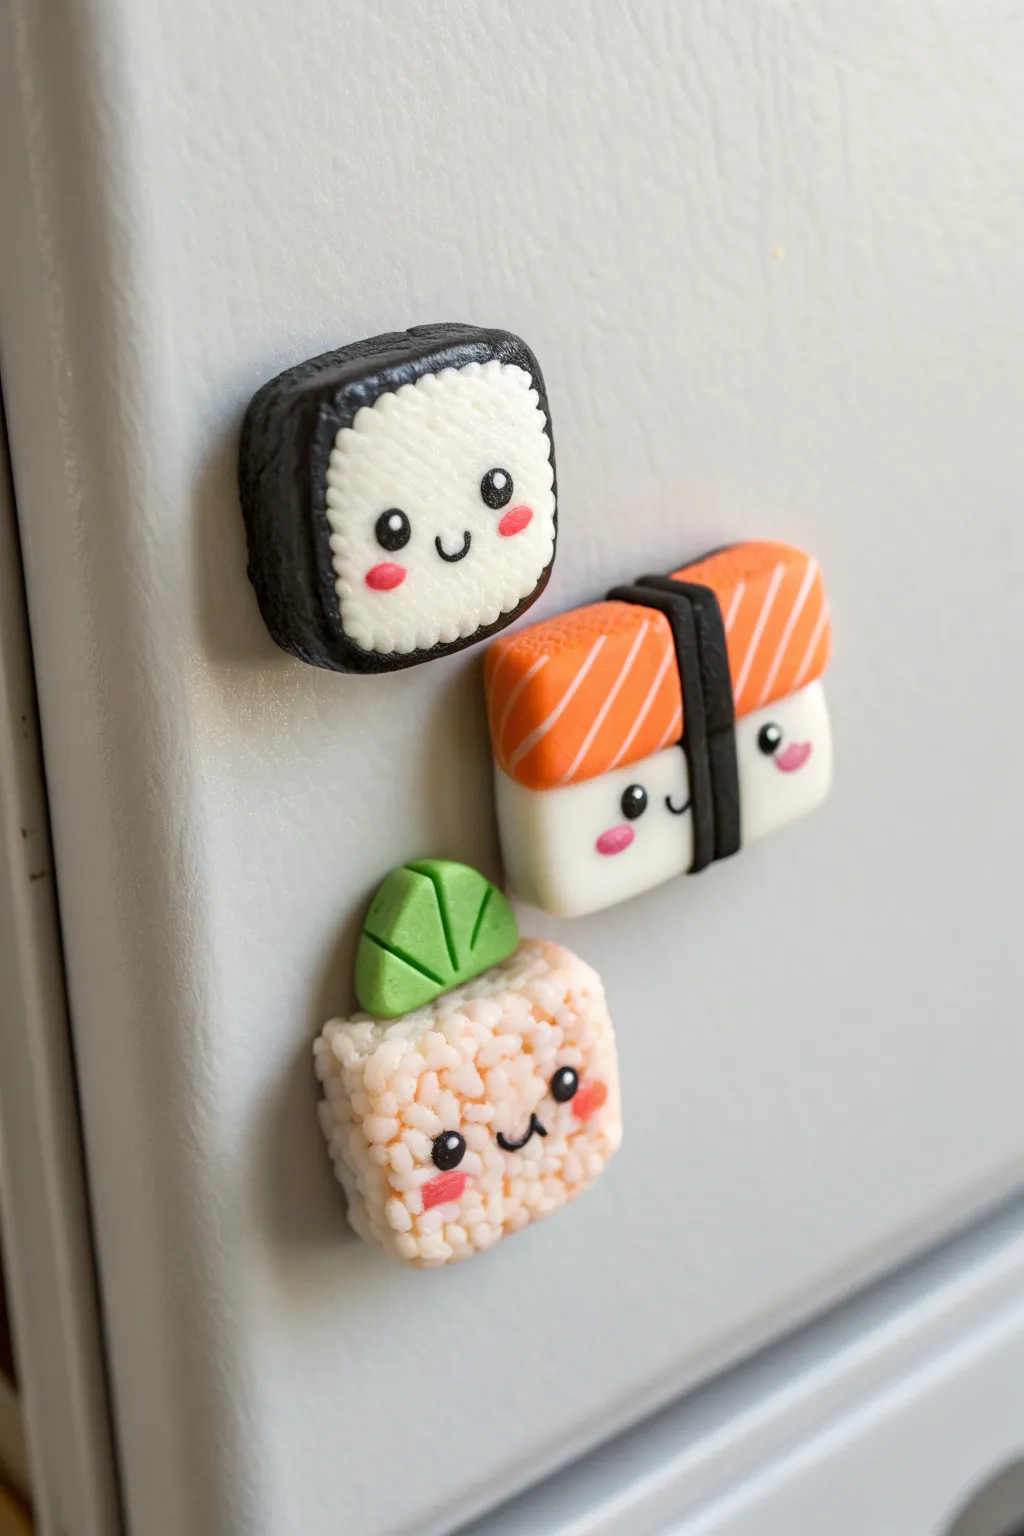
Transform your fridge into a cute menu with these adorable polymer clay sushi magnets. Featuring a classic maki roll, salmon nigiri, and a textured rice ball, this trio brings a smile to your kitchen with their tiny, blushing faces.
Step-by-Step
Materials
- Polymer clay (white, black, orange, pale pink, lime green)
- Translucent liquid clay (optional)
- Texture tools (needle tool, toothbrush, or ball of foil)
- Rolling pin or clay machine
- Craft knife or flexible blade
- Small dotting tool
- Strong craft glue (E6000 or similar)
- 3 round ceramic or neodymium magnets
- Glaze (matte or semi-gloss)
Step 1: Crafting the Maki Roll
-
Shape the rice:
Start by conditioning a chunk of white clay and forming it into a rounded square block. Keep the edges soft and slightly cushion-shaped rather than perfectly sharp. -
Add texture:
To mimic the look of rice grains, gently press a clean toothbrush or a ball of crumpled aluminum foil over the front surface of the white block until it looks textured. -
Wrap the nori:
Roll out a thin strip of black clay. Wrap this strip around the sides of your white rice block, trimming the excess at the bottom so the seam is hidden. Press gently to bond the black clay to the white. -
Create the face:
Roll two tiny balls of black clay for eyes and press them onto the rice. Add a tiny snake of black clay for a U-shaped smile. Finish with two small, flattened ovals of pink clay for blushing cheeks.
Needle Tool Trick
When texturing the rice ball, swirl the needle tip slightly in circular motions rather than just poking straight down. This creates a fluffier, more realistic grain look.
Step 2: Creating the Salmon Nigiri
-
Form the base:
Shape a rectangle of white clay for the rice base, rounding the corners. Like the maki roll, texturing the rice isn’t strictly necessary here, but you can add it if you like extra detail. -
Sculpt the salmon:
Create a slightly thinner, rounded rectangle using orange clay. Lay this on top of your white base so it curves over the edges slightly. -
Add fat lines:
Roll extremely thin threads of pale pink clay (or mix white with a speck of orange). Lay these diagonally across the orange salmon piece to resemble the fat marbling, then roll over the top gently to flatten them flush. -
Bind with seaweed:
Roll a thin strip of black clay and wrap it vertically around the center of the entire piece, binding the fish to the rice. -
Add facial details:
Place the face on the white rice section below the black band. Use the same technique as before: black dot eyes, a tiny smile, and pink cheeks.
Make it a Charm
Insert a tiny metal eye pin into the top of the sushi before baking. Once baked, you can skip the magnet and attach these to a keychain or necklace instead.
Step 3: Making the Textured Rice Ball
-
Mix the rice color:
Mix a small amount of pale orange or pink into your white clay to create a toasted or seasoned rice color, then shape it into a rounded square or triangle. -
Deep texture technique:
For this piece, use a needle tool to poke many small, shallow holes all over the surface. This creates a distinct, fluffy rice texture compared to the other pieces. -
Top with pickle:
Form a semi-circle of lime green clay. Use a knife to impress three lines fanning out from the center, making it look like a slice of cucumber or pickled vegetable, and attach it to the top of the block. -
Finalize the face:
Add the face low on the block. Press the eyes and mouth well into the texture so they don’t fall off during baking.
Step 4: Baking and Assembly
-
Bake:
Place all three pieces on a baking tile or parchment paper. Bake according to your polymer clay package instructions (usually 275°F/135°C for 15-30 mins). -
Cool down:
Allow the pieces to cool completely before handling. I like to let them sit inside the oven while it cools to prevent cracking from thermal shock. -
Glaze:
Apply a thin layer of matte or semi-gloss glaze to seal the clay and protect the painted faces. Avoid high-gloss, as it can make the food look plastic rather than artistic. -
Attach magnets:
Once dry, flip the pieces over. Use a strong adhesive like E6000 to glue a round magnet to the back of each sushi piece. Let the glue cure fully for 24 hours.
Now your fridge is served with the cutest magnetic meal imaginable

The Complete Guide to Pottery Troubleshooting
Uncover the most common ceramic mistakes—from cracking clay to failed glazes—and learn how to fix them fast.
Avocado Half With a Face Magnets
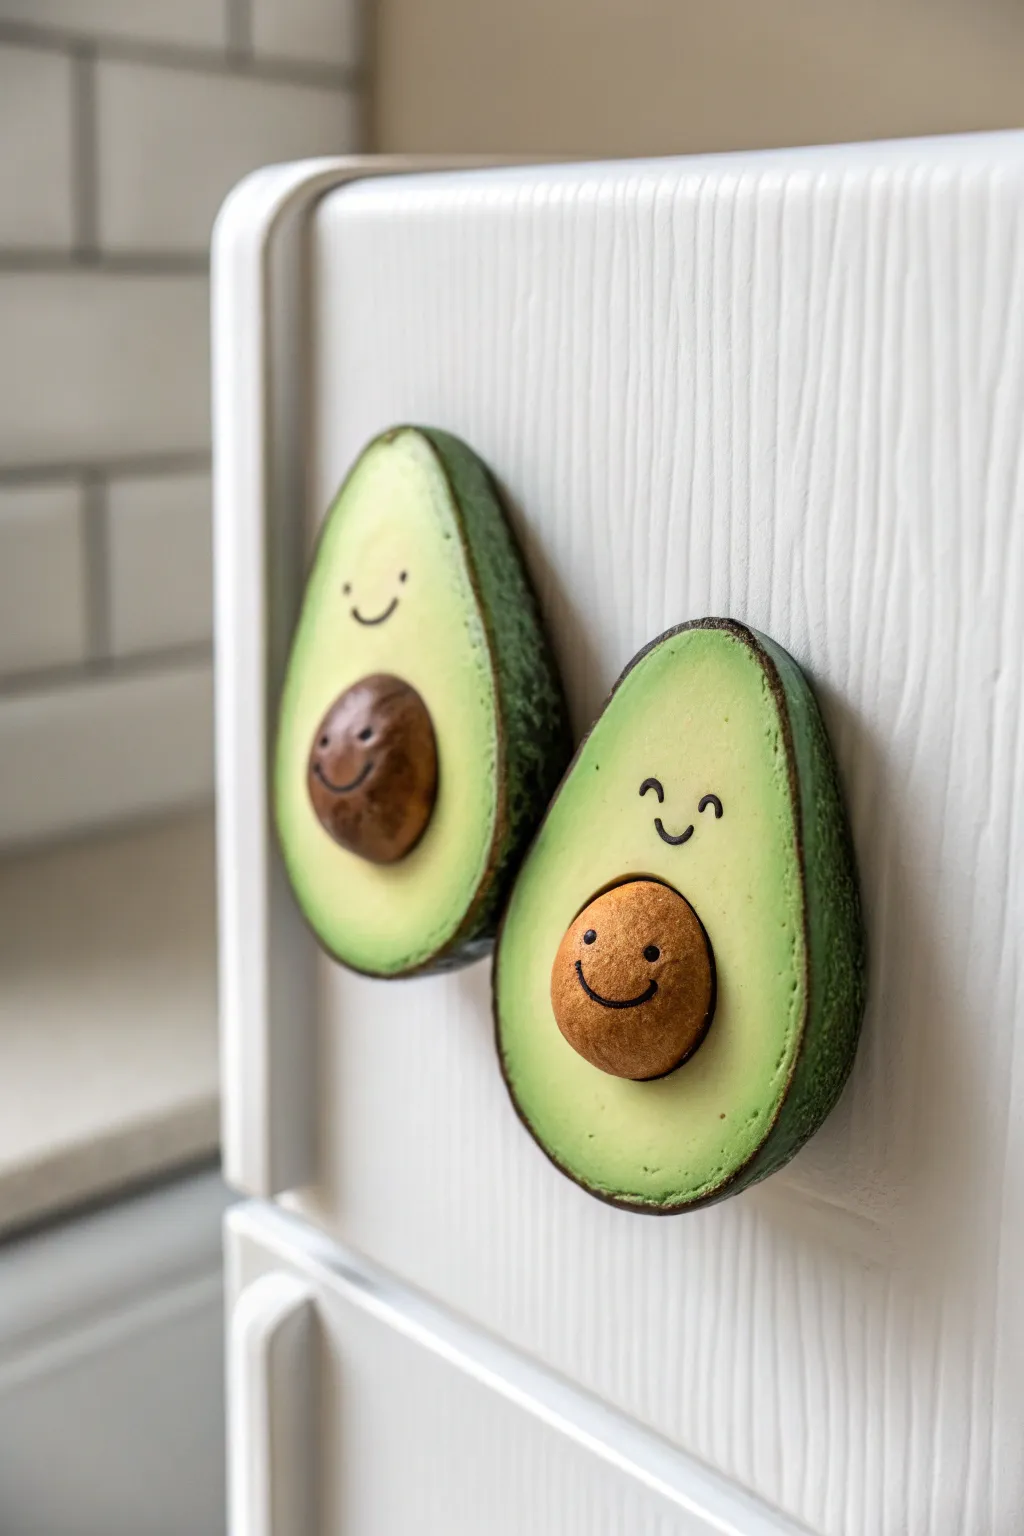
These adorable avocado halves feature cheerful smiles that brighten up any fridge door. With realistic texture on the skin and a smooth gradient for the flesh, they strike the perfect balance between cute character design and realistic food art.
Step-by-Step Tutorial
Materials
- Polymer clay (translucent white, yellow, various greens, browns)
- Liquid polymer clay or bake and bond
- Texturing tool (stiff toothbrush, sandpaper, or needle tool)
- Chalk pastels (yellow, lime green, dark green, brown)
- Soft paintbrush for pastels
- Rolling pin or pasta machine
- Circle cutter (optional)
- Black acrylic paint or fine tip permanent marker
- Strong round magnets
- Super glue (cyanoacrylate)
- Gloss glaze (optional for the pit)
- Matte varnish (optional for the flesh)
Step 1: Creating the Avocado Flesh
-
Mix the Base Color:
Start by conditioning a mix of translucent white clay with a small amount of yellow and a tiny touch of lime green. You want a very pale, creamy yellow-green color that looks like the center of a ripe avocado. -
Shape the Halves:
Form two teardrop shapes from your mixed clay. Flatten them slightly with your palm until they are about 1/4 to 1/2 inch thick, keeping the rounded, organic look of a real avocado half. -
Create the Indentation:
Use a large ball tool or your thumb to press a gentle, rounded hollow into the lower, wider part of each teardrop where the pit will eventually sit. -
Apply the Gradient:
Shave some lime green and dark green chalk pastels into fine powders. Using a soft dry brush, gently dust the lime green around the outer edges of the face of the avocado. -
Deepen the Edge Color:
Apply the darker green pastel powder to the very rim of the avocado face to create that realistic transition from flesh to skin.
Dirty fingerprints?
Pale clay shows dirt easily. Keep a pack of baby wipes nearby or use a cotton swab dipped in rubbing alcohol to gently wipe away dust or lint from the raw clay before baking.
Step 2: Adding the Skin and Texture
-
Roll the Skin Clay:
Condition a dark forest green clay. Roll it out into a thin sheet, roughly 2mm thick. -
Wrap the Avocado:
Cut a strip of the dark green clay wide enough to cover the sides and back of your avocado shape. Wrap this strip around the curved sides of your pale avocado base, smoothing the seams where they join at the back. -
Refine the Rim:
Gently press the dark green skin flush against the pale flesh so there is no gap, but leave a distinct line. This mimics the thick skin of the fruit. -
Texture the Skin:
Take a stiff toothbrush, a piece of coarse sandpaper, or a crumpled ball of aluminum foil. Press it firmly all over the dark green exterior to create a bumpy, realistic avocado skin texture.
Realistic texture tip
For the most realistic skin texture, use a needle tool to drag tiny, shallow scratches over the bumpy dark green surface. This mimics the rough, uneven nature of real Hass avocados.
Step 3: Making the Happy Pits
-
Form the Pits:
Mix different shades of brown clay—make one lighter tan (like the bottom magnet) and one darker mocha (like the top magnet). Roll them into balls that fit perfectly into the indentations you made earlier. -
Flatten Slightly:
Gently press the balls so they aren’t perfect spheres but look like protruding pits. I like to texture these slightly with a sponge to give them a woody feel. -
Insert the Pits:
Add a drop of liquid clay or bake and bond into the indentations on the avocado halves and press the brown pits securely in place.
Step 4: Baking and Detailing
-
Initial Bake:
Place your avocados on a tile or baking sheet lined with parchment paper. Bake according to your brand of polymer clay instructions (usually around 275°F/130°C for 15-30 minutes). -
Cool Completely:
Let the pieces cool down entirely before painting. The clay must be room temperature for the paint to adhere properly. -
Paint the Faces:
Using a very fine detail brush and black acrylic paint (or a permanent marker), carefully draw the faces. Note that one face is drawn on the flesh above the pit, while the other is drawn directly onto the pit itself. -
Add Cheeks (Optional):
If you want extra cuteness, dust a tiny bit of pink pastel on the ‘cheeks’ using a Q-tip. -
Seal the Project:
Once the paint is dry, apply a matte varnish to the flesh and skin. You can use a satin or gloss glaze just on the pit if you want it to look shiny and distinct. -
Attach the Magnet:
Flip the avocados over. Use a strong super glue to attach a round magnet to the back of each piece. Hold it in place for 30 seconds to ensure a strong bond.
Your fridge now has the friendliest produce in the kitchen to hold up your important notes
Easy Flower Burst Magnets
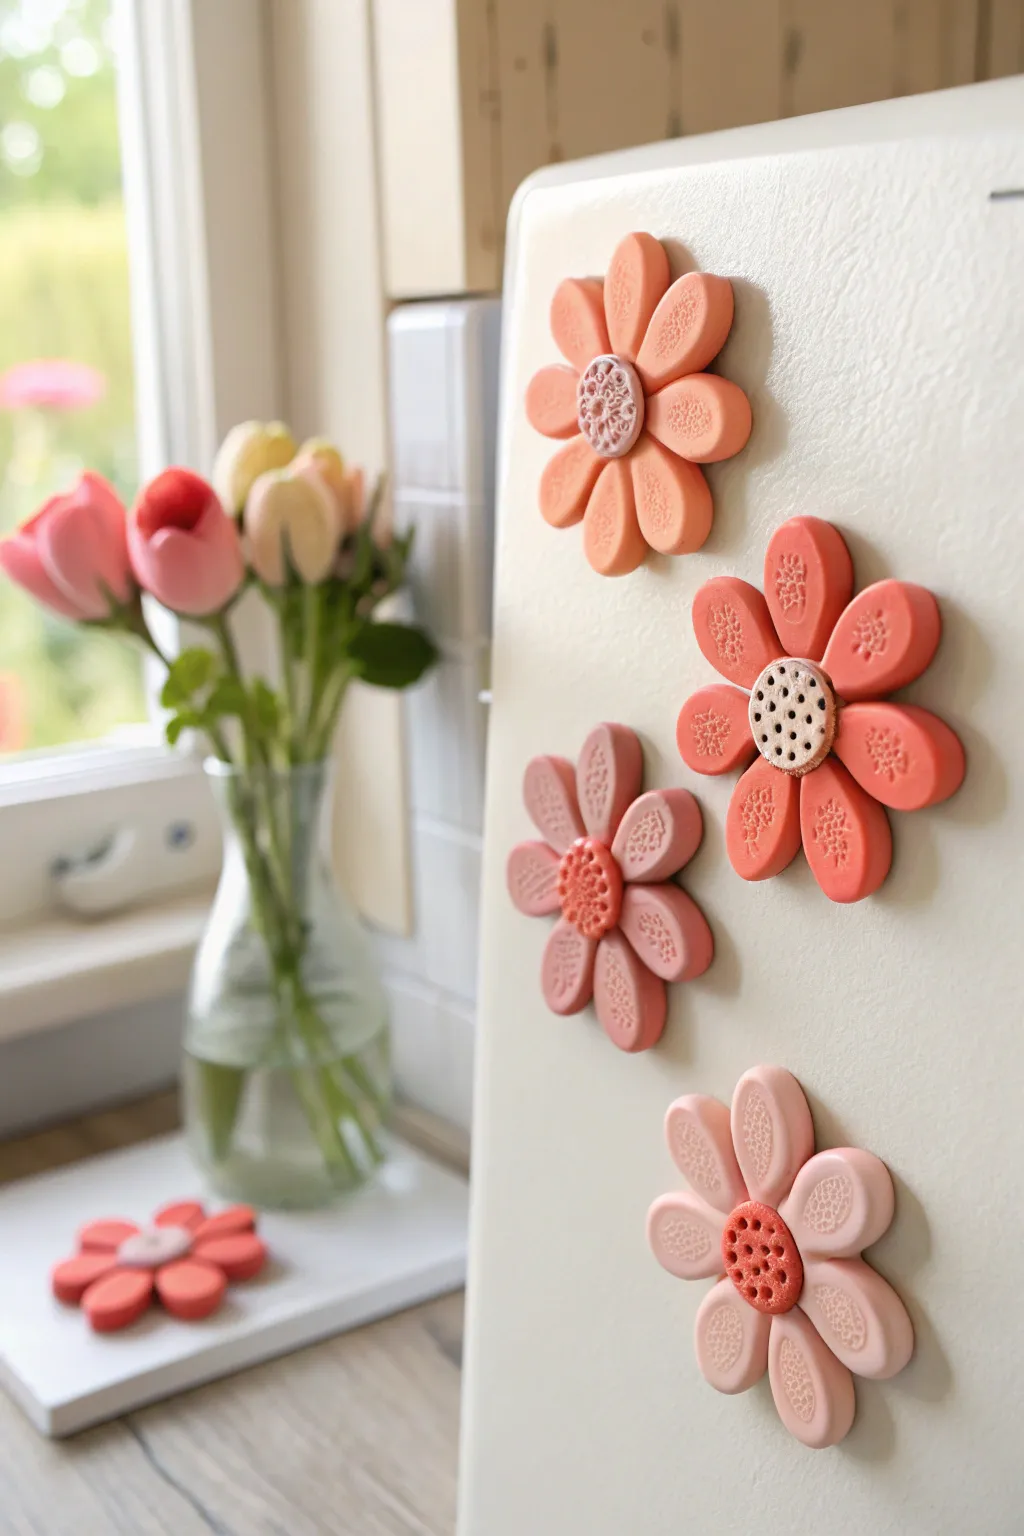
Brighten up your appliance surfaces with these delightful, textural flower magnets featuring soft coral and pink tones. This project uses polymer clay to create dimensional blooms with embossed details that look effortlessly chic and handmade.
How-To Guide
Materials
- Polymer clay in coral, peach, terracotta, and soft pink shades
- Liquid polymer clay (translucent or white)
- Round clay cutters (approx. 0.5 inch diameter)
- Acrylic rolling pin
- Texture tools (lace scraps, coarse sandpaper, or rubber stamps)
- Needle tool or toothpick
- Small round piping tip or straw (for center texture)
- Strong round magnets (neodymium recommended)
- Super glue or E6000 adhesive
- Craft knife
- Baking sheet and parchment paper
Step 1: Forming the Petals
-
Condition the Clay:
Start by warming your chosen clay colors in your hands until they are soft and pliable. I find conditioning for at least 2-3 minutes prevents cracking later. -
Roll a Sheet:
Using your acrylic roller, roll the clay out to a uniform thickness, roughly 1/4 inch (6mm). You want these to be substantial, not paper-thin. -
Cut Petal Rounds:
Use a small round cutter to punch out 7 circles for each flower. These will form your petals. -
Shape into Teardrops:
Take each circle and gently roll one end between your fingers to taper it into a slight teardrop shape, flattening it slightly so it looks like a chubby petal.
Step 2: Adding Texture & Assembly
-
Impress the Surface:
Before assembling, press your chosen texture tool into the top surface of each petal. A scrap of lace creates the delicate bubbly pattern seen in the photos, but a rubber stamp works too. -
Create the Base:
Cut a separate small circle of clay (about 1 inch) to serve as the hidden base plate that holds everything together. -
Arrange Petals:
Place your 7 textured petals in a circle onto the base plate, pressing the tapered points toward the center so they touch and fuse slightly. -
Lift and Shape:
Gently lift the outer rounded edges of the petals upward just a tiny bit to give the flower a cupped, 3D effect rather than laying perfectly flat.
Clean Cuts Matter
Before baking, lightly brush the clay with a little baby oil or cornstarch. This smoothes out fingerprints and removes any lint stuck to the surface.
Step 3: The Center & Finishing
-
Make the Center Core:
Roll a small ball of contrasting clay color (e.g., darker terracotta for a light pink flower) and flatten it into a thick disk. -
Texture the Core:
Place the disk over the center where the petals meet. Use a needle tool or small piping tip to prick distinct holes all over the surface, mimicking a seed pod. -
Secure the Bond:
Add a tiny drop of liquid polymer clay under the center disk before pressing it down to ensure it bonds permanently during baking. -
Bake:
Place your flowers on a parchment-lined baking sheet. Bake according to your clay manufacturer’s instructions, usually at 275°F (130°C) for 15-20 minutes. -
Cool Down:
Allow the clay flowers to cool completely on the baking sheet to harden. -
Attach Magnet:
Flip the cooled flower over. Apply a dab of strong adhesive like E6000 to the center back. -
Set and Dry:
Press a strong round magnet into the glue and let it cure fully (usually 24 hours) before placing it on your fridge.
Ombré Effect
Mix varying amounts of white clay into your main color to create a set of flowers that fade from dark to light for a stunning gradient display.
Now you have a bouquet of durable blooms ready to organize your notes and photos with style


What Really Happens Inside the Kiln
Learn how time and temperature work together inside the kiln to transform clay into durable ceramic.
Little Succulent Pot Magnets
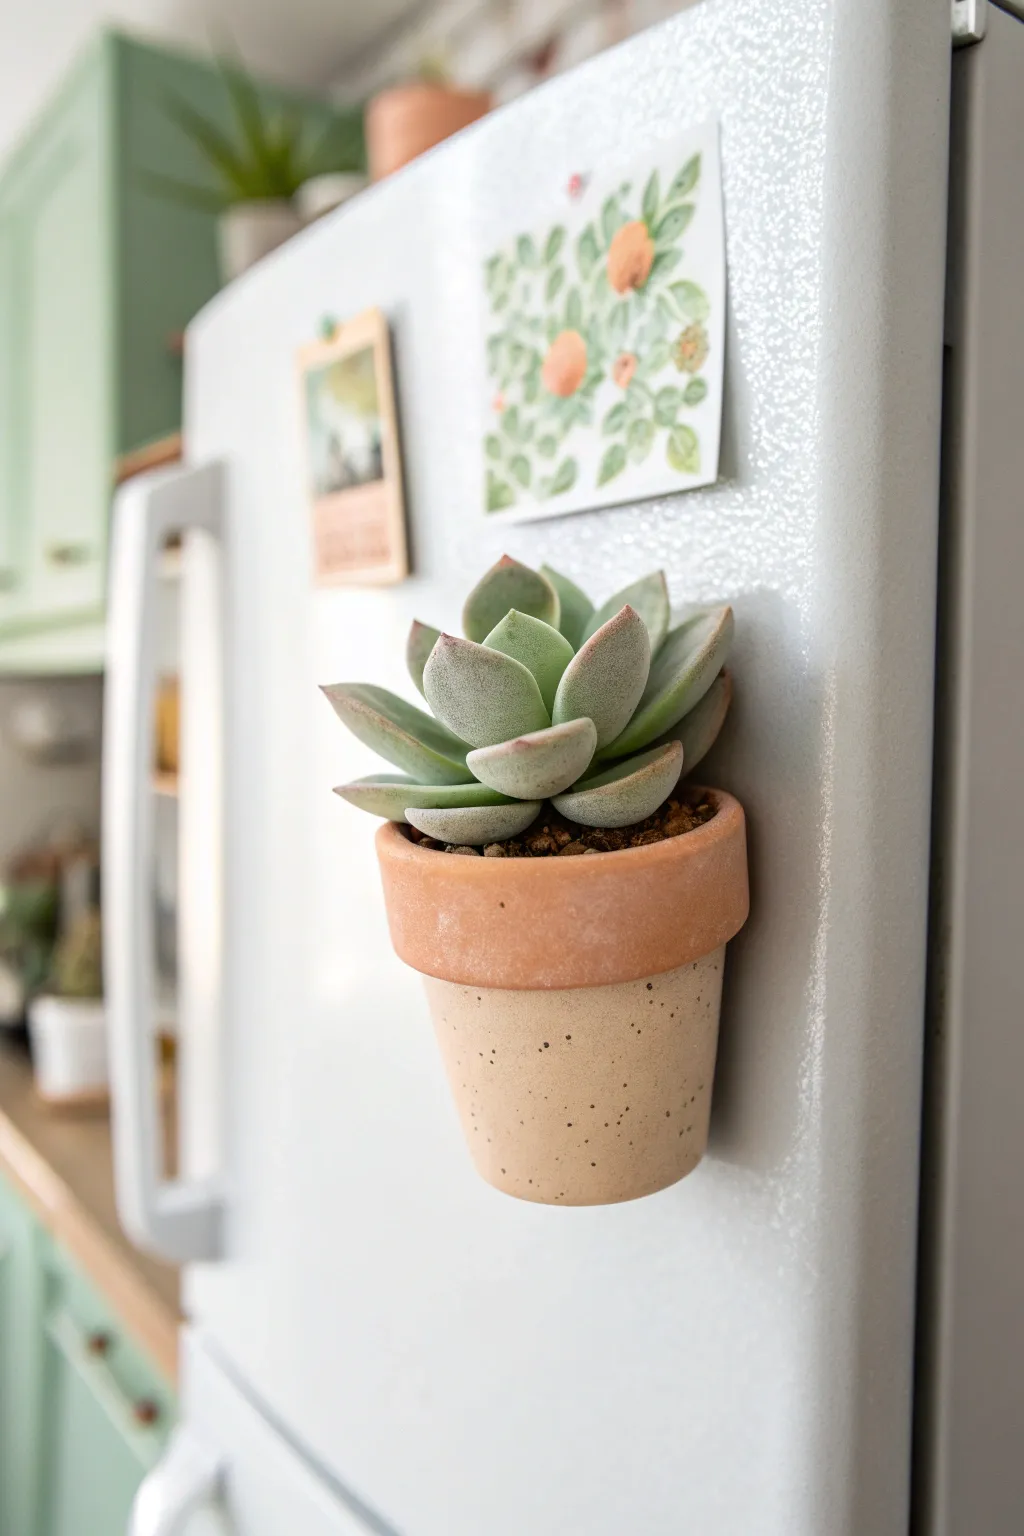
Transform your fridge into a vertical garden with these remarkably realistic miniature pot magnets. These tiny half-pots hold real or faux succulents and add an adorable touch of greenery to any magnetic surface.
Step-by-Step
Materials
- Terracotta-colored polymer clay
- Beige or sand-colored polymer clay (with speckles if available)
- Circular cookie cutter (approx. 1.5 – 2 inches)
- Craft knife or scalpel
- Rolling pin (acrylic or wooden)
- Heavy-duty round magnet (neodymium recommended)
- Super glue (cyanoacrylate) or strong craft glue
- Sandpaper or a rough nail file
- Liquid polymer clay (optional)
- Texturing tool (old toothbrush or sandpaper)
- Small succulent (real or faux) and tiny pebbles/soil
Step 1: Shaping the Pot Body
-
Condition the beige clay:
Begin by warming up your beige-colored polymer clay in your hands until it is pliable and soft. If you want a speckled look like the photo but only have plain beige, knead in a tiny pinch of black pepper or black embossing powder. -
Form a cylinder:
Roll the conditioned clay into a smooth, thick log, slightly tapered at one end to mimic the shape of a flower pot. -
Cut the clay in half:
Since this magnet needs to lie flat against the fridge, slice your cylinder directly down the middle vertically using your craft knife. You now have two pot halves. -
Hollow out the center:
Carefully scoop out the top portion of the flat side of the cylinder to create a pocket for the plant. Leave the walls thick enough to be sturdy, about 1/4 inch. -
Refine the shape:
Smooth out any fingerprint marks with your finger. Gently tap the bottom of the pot on your work surface to ensure it has a flat base.
Strong Grip
Use rare-earth (neodymium) magnets. Traditional black ceramic magnets often aren’t strong enough to hold the weight of the baked clay plus the soil.
Step 2: Adding the Terracotta Rim
-
Prepare the rim clay:
Condition a piece of terracotta-colored clay. Roll it out into a flat sheet, approximately 1/8 inch thick. -
Cut a strip:
Cut a long, rectangular strip from the terracotta sheet. The width should be proportional to a standard pot rim, roughly 1/4 to 1/2 inch wide depending on your pot size. -
Attach the rim:
Wrap this strip around the top edge of your beige pot body. I like to use a tiny bit of liquid polymer clay as ‘glue’ here to ensure a permanent bond. -
Trim the excess:
Use your craft knife to slice off the excess orange clay at the back so it sits flush with the flat back of the pot. -
Texture the surface:
To make the pot look like real fired clay, gently press an old toothbrush or a piece of crumpled aluminum foil against the exterior to remove the plastic sheen and add texture.
Make it Real
Dust the finished baked pot with a little bit of white flour or chalk pastel before sealing to give it a weathered, aged garden pot look.
Step 3: Embedding the Magnet
-
Create a magnet recess:
Press your magnet gently into the flat back of the clay where you want it to sit. This creates an indentation. -
Remove and deepen:
Remove the magnet and carefully scoop out a little more clay from that indentation so the magnet will sit flush or slightly recessed later. -
Bake the clay:
Place your clay pot on a baking sheet lined with parchment paper. Bake according to your polymer clay package instructions (usually 275°F for 15-30 minutes). -
Cool down:
Allow the clay piece to cool completely before determining your next step. Handling it while warm can cause cracks.
Step 4: Assembly and Planting
-
Glue the magnet:
Place a drop of strong super glue into the recess you created on the back. Press the magnet firmly into place and let it dry completely. -
Sand the back:
If the back isn’t perfectly flat, gently rub it over a piece of sandpaper placed on a flat surface to ensure a tight grip on the fridge. -
Prepare your succulent:
If using a real succulent, ensure it is a slow-growing variety that needs very little soil. If using faux, trim the stem to fit the cavity. -
Fill the pot:
Add a tiny amount of cactus soil or gluing medium into the pot cavity. -
Secure the plant:
Nestle your succulent into the pot. If it’s a faux plant, a dab of glue will keep it permanent. -
Final touch:
Clean off any loose dust or soil particles from the exterior of the pot to keep that clean, modern aesthetic.
Enjoy seeing your tiny vertical garden grow every time you open the refrigerator
Puffy Heart Magnets
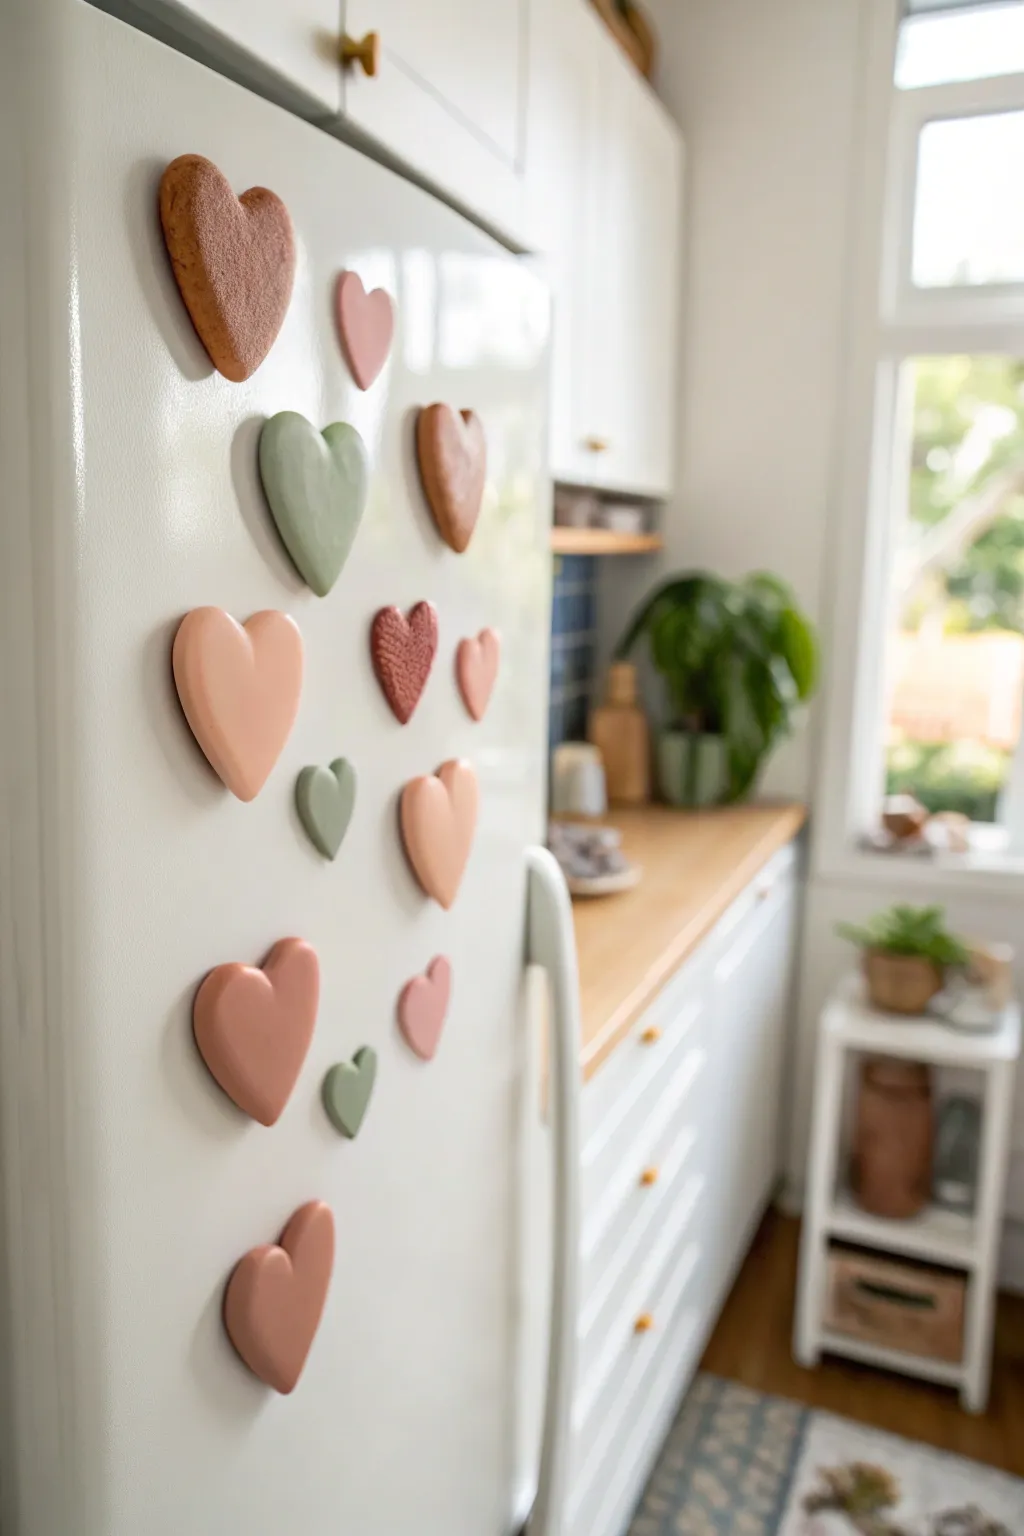
Bring a touch of warmth to your kitchen with these charming, minimalist magnets that look like soft little cushions. With their earthy palette of terracotta, sage, and blush, plus a mix of smooth and textured finishes, they create a cozy and curated look on any magnetic surface.
Step-by-Step Guide
Materials
- Polymer clay in muted tones (terracotta, sage green, peach, blush pink, beige)
- Heart-shaped cookie cutters (various sizes)
- Acrylic rolling pin or pasta machine
- Texture tools (clean sponge, sandpaper, or textured rolling pin)
- Parchment paper or ceramic tile for baking
- Strong craft magnets (round neodymium or ceramic)
- Super glue or E6000 adhesive
- Cornstarch (optional, prevents sticking)
- Gloss or matte glaze (optional)
- Small paintbrush (for optional glaze)
Step 1: Prepping the Clay
-
Conditioning:
Start by warming the polymer clay in your hands. Knead each color separately until it becomes soft, pliable, and free of cracks. This conditioning step is crucial for smoother edges later. -
Color Mixing:
If you don’t have the exact muted shades shown, try mixing bright colors with a little bit of beige or white to soften them. A touch of brown added to pink creates that lovely terra cotta look. -
Rolling:
Roll out your clay on a smooth surface or parchment paper. For that signature ‘puffy’ look, keep the slab relatively thick—aim for about 1/4 inch (6mm). If it’s too thin, the hearts won’t have that rounded, cushion-like dimension.
Step 2: Shaping and Texturing
-
Cutting Shapes:
Dip your heart cutter into a little cornstarch to prevent sticking. Press firmly into the thick clay slab and wiggle slightly before lifting. -
Rounding Edges:
Once the heart is cut, the edges will likely be sharp and straight. Use your fingertip to gently smooth and round over the top edges of the heart. The goal is to make it look like a seamless, inflated pillow rather than a cookie cutout. -
Adding Texture:
To recreate the textured hearts seen in the photo, take a piece of sandpaper, a clean kitchen sponge, or a crumpled ball of foil. If I want a subtle stone look, I gently press the sandpaper against the raw clay surface now. -
Creating Variety:
Repeat the cutting and smoothing process with different colors and sizes of cutters. Leave some hearts perfectly smooth and texture others to create visual interest in your final set.
Fixing Fingerprints
Smoothed clay often shows fingerprints. Before baking, lightly brush the surface with a tiny bit of baby oil or cornstarch to buff away prints.
Step 3: Baking and Assembly
-
Baking:
Place your clay hearts on a parchment-lined baking sheet or a ceramic tile. Bake according to your specific clay brand’s package instructions—usually between 230°F and 275°F (110°C – 135°C) for about 15-30 minutes depending on thickness. -
Cooling Down:
Allow the hearts to cool completely in the oven with the door slightly ajar. Sudden temperature changes can sometimes cause cracks, so patience is key here. -
Attaching Magnets:
Once fully cooled, flip the hearts over. Place a small dot of strong adhesive like E6000 or super glue on the back center. Press your magnet firmly into the glue. -
Setting Time:
Let the glue cure fully before putting them on the fridge. If you use E6000, wait at least 24 hours for maximum strength; this ensures the heavy clay won’t slide down your refrigerator door. -
Optional Glaze:
If you prefer a glossy finish, brush a thin layer of polymer clay glaze over the cooled hearts. For the matte, natural look seen in the inspiration photo, you can skip this step entirely.
Level Up: Faux Stone
Mix black pepper or dried used coffee grounds into your beige clay before rolling. It creates a realistic speckled granite effect effortlessly.
Your fridge is now ready to display photos and lists with a lovely, handmade touch

TRACK YOUR CERAMIC JOURNEY
Capture glaze tests, firing details, and creative progress—all in one simple printable. Make your projects easier to repeat and improve.
Rainbow Arch Magnets
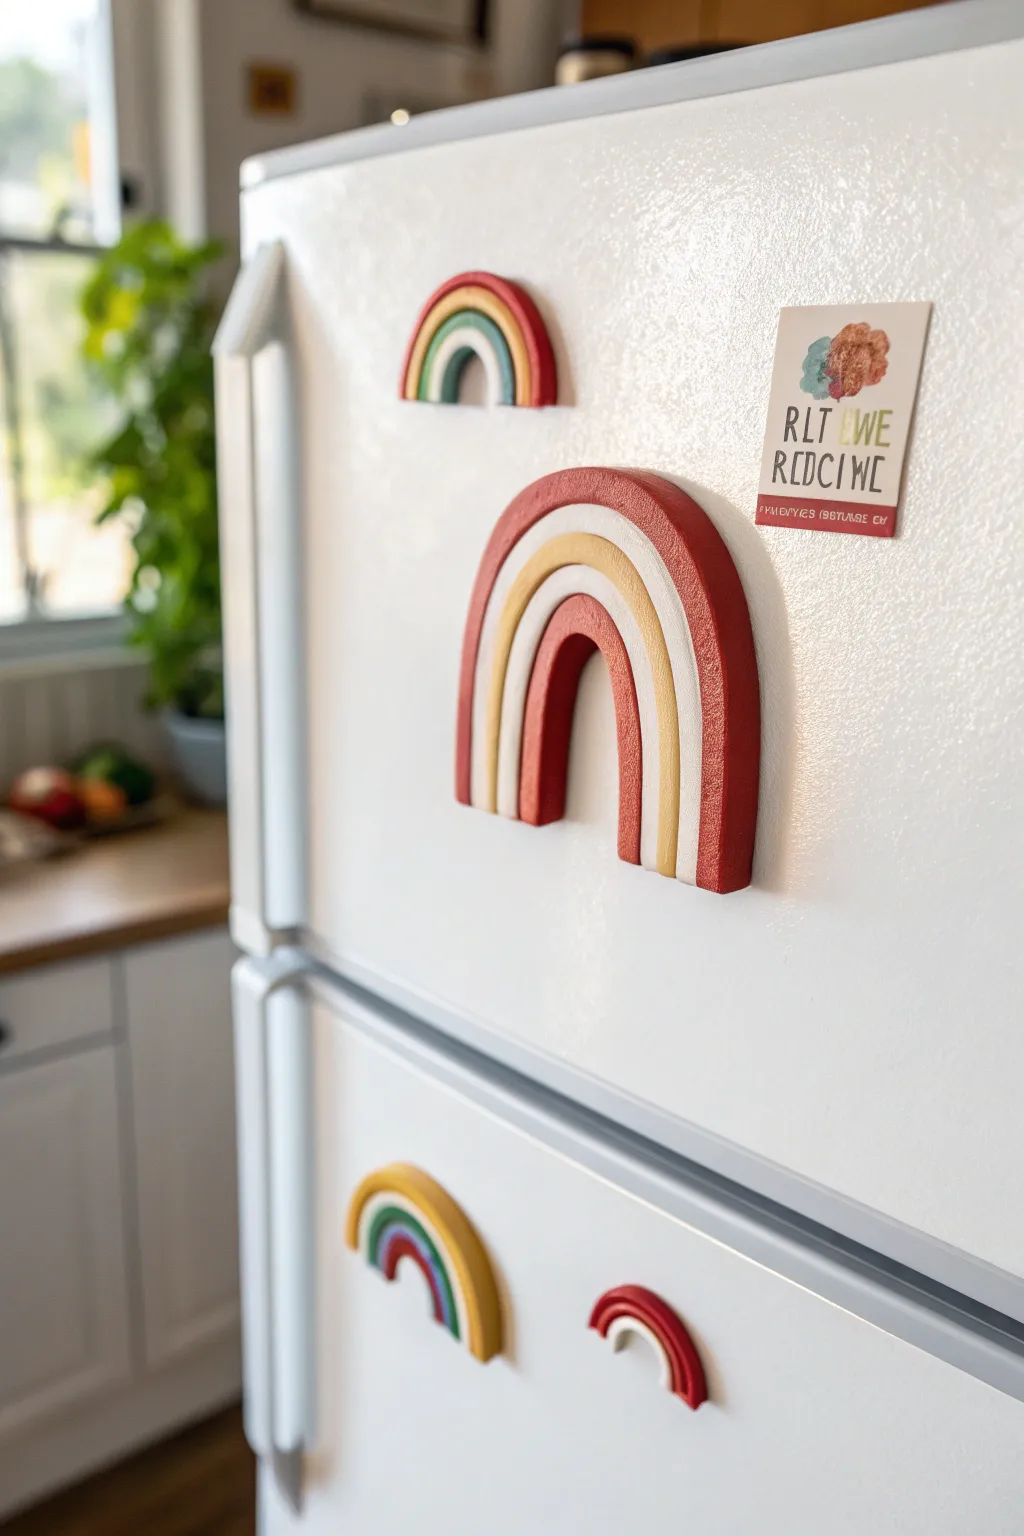
Brighten up your fridge with these charming, textured rainbow arch magnets that bring a touch of handmade warmth to your kitchen. With their distinct bands of color and sturdy, chunky shape, they are a satisfyingly simple project perfect for clay beginners.
Detailed Instructions
Materials
- Polymer clay in red, white, yellow/ochre, and teal/blue
- Rolling pin or acrylic roller
- Clay knife or craft blade
- Strong adhesive (E6000 or superglue gel)
- Round ceramic magnets
- Parchment paper or ceramic tile (work surface)
- Wet wipes (for cleaning hands between colors)
- Oven for baking
Step 1: Prepping and Rolling
-
Condition the clay:
Start by kneading your chosen clay colors individually until they are soft, pliable, and free of cracks. This conditioning step is crucial for smooth rolling later. -
Roll the first snake:
Take a portion of the red clay (for the largest outer arch) and roll it into a long, even ‘snake’ or coil on your work surface. Aim for a thickness of about 1/4 to 1/2 inch depending on how chunky you want the final magnet. -
Roll subsequent colors:
Clean your hands and work surface, then repeat the rolling process with the white clay for the second band. -
Match the thickness:
Roll out your yellow or ochre clay next, trying to keep the diameter consistent with the red and white coils so the rainbow surface stays level. -
Create the inner arch:
Roll your final coil for the smallest inner arch. In the main example, this matches the outer red color, but you can feel free to swap this for teal or blue like the smaller magnets shown.
Clean Lines Tip
Use baby wipes or rubbing alcohol to clean your hands and tools between colors, especially before touching white clay to avoid transferring red lint.
Step 2: Assembling the Arches
-
Form the inner curve:
Take your smallest coil and gently bend it into a tight ‘U’ shape on your baking tile or parchment paper. This sets the foundation for the rest of the rainbow. -
Add the second layer:
Take the yellow/ochre coil and curve it snugly over the top of the first arch. Press the sides together gently so they adhere without smashing the round shape of the coils. -
Layer the white band:
Drape the white coil over the yellow layer, ensuring there are no gaps between the colors. I like to smooth the connection point slightly with a finger to ensure a strong bond. -
Attach the final arch:
Wrap the large red coil over the very top to complete the rainbow stack. Press everything inward gently toward the center to secure the structure. -
Texture the surface (optional):
Looking closely at the image, the clay has a slightly matte, stone-like texture. You can achieve this by gently dabbing the surface with a toothbrush or a piece of coarse sandpaper before baking.
Textured Twist
Instead of smooth coils, try twisting two thin strands of different colored clay together for one of the arches to add a unique braided detail.
Step 3: Finishing Touches
-
Trim the bottom:
Use your stiff craft blade to cut straight across the bottom of the rainbow legs. This creates a clean, flat base for the magnet to stand visually upright. -
Bake the clay:
Place your tile or parchment paper onto a baking sheet. Bake the rainbows according to the specific temperature and time instructions on your package of polymer clay. -
Cool down completely:
Once bakes, turn off the oven and let the clay pieces cool down slowly inside, or remove them and let them rest on a cooling rack until they are room temperature and hard. -
Check the magnets:
Test your magnets on the fridge first to make sure they are strong enough to hold the weight of the chunky clay. If the rainbow is heavy, use two magnets. -
Glue the backing:
Apply a dab of strong adhesive to the back of the clay rainbow and press your magnet firmly into the glue. Let it cure fully according to the glue’s instructions. -
Final clean up:
If there are any rough edges on the back or bottom after baking, you can lightly sand them down with fine-grit sandpaper for a professional finish.
Pop these colorful arches onto your fridge or filing cabinet to organize your notes with style
Soft Cloud and Raindrop Magnets
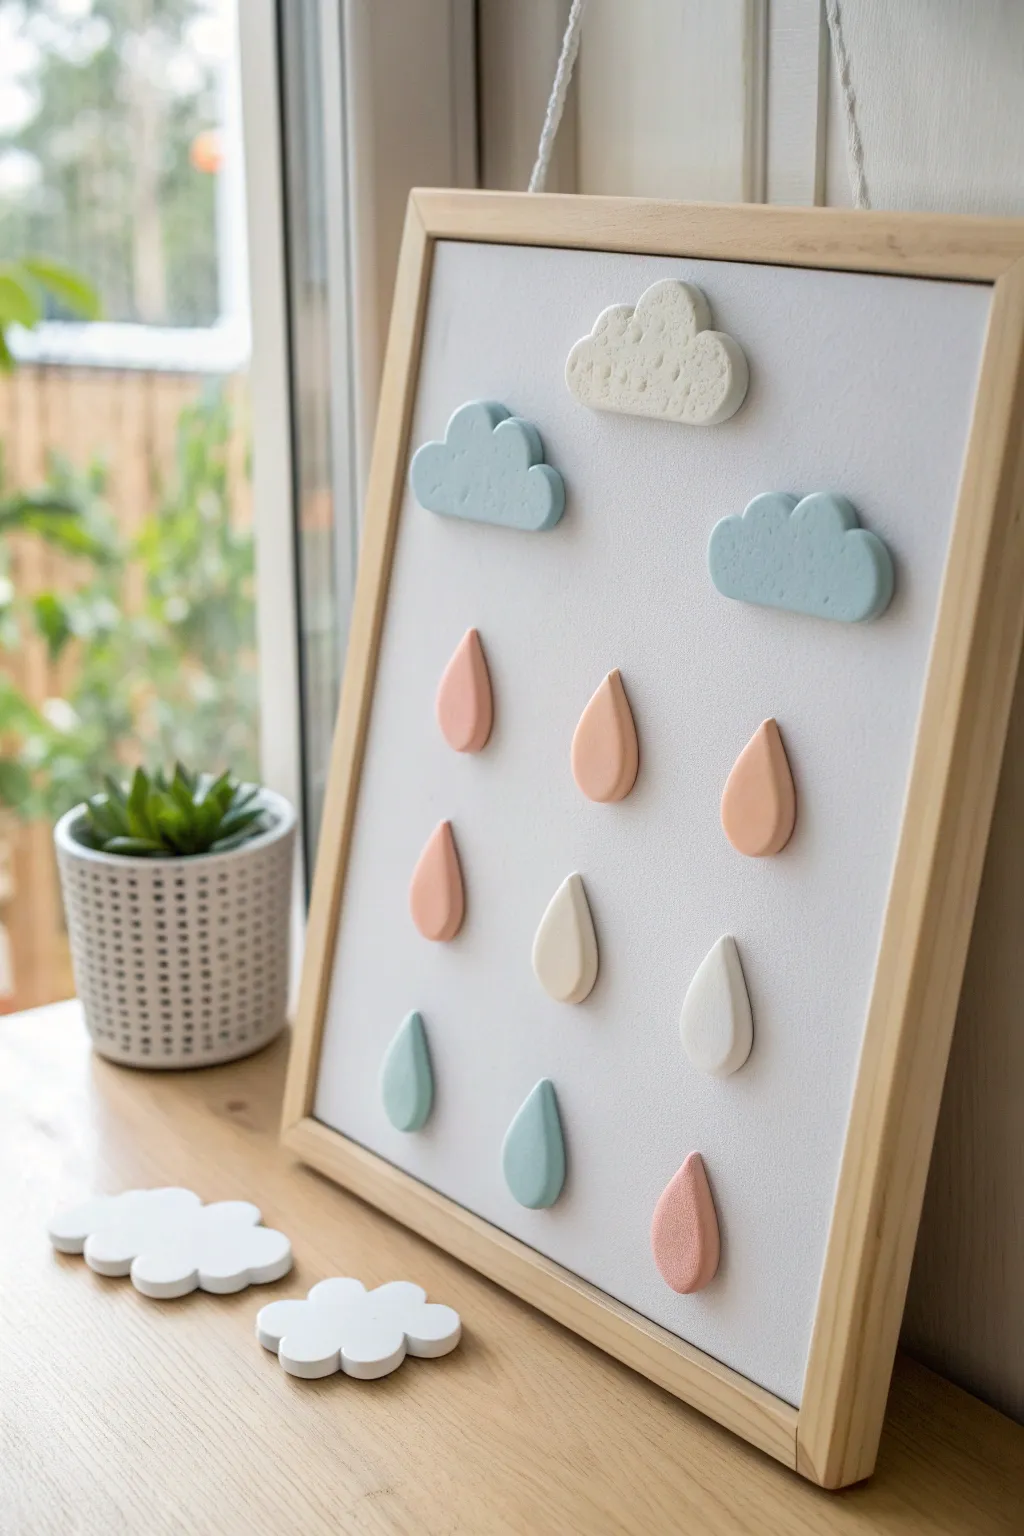
Bring a gentle shower of color to your space with this charming magnetic art display. Using soft pastel polymer clay, you will sculpt puffy clouds and smooth raindrops that attach to a framed magnetic canvas for a customizable weather scene.
Step-by-Step Tutorial
Materials
- Polymer clay in white, baby blue, pastel pink, and cream
- Rolling pin or pasta machine
- Cloud-shaped cookie cutters (small)
- Small teardrop cutter (optional) or craft knife
- Framed magnetic board or sheet metal inside a wooden frame
- Strong small round magnets (neodymium recommended)
- Super glue (cyanoacrylate)
- Parchment paper or baking tile
- Oven for baking clay
- Sandpaper (fine grit)
Step 1: Sculpting the Clouds
-
Condition the white clay:
Begin by kneading your white polymer clay until it is soft and pliable. Warm clay prevents cracking later on. -
Roll the base layer:
Roll out the white clay to a thickness of about 1/4 inch (6mm). This substantial thickness gives the finished magnets a nice 3D effect. -
Texture the surface (optional):
For the textured white cloud shown at the top, gently press a piece of coarse sponge or crumpled aluminum foil into the clay surface before cutting. -
Cut the shapes:
Use your cloud cutters to punch out several cloud shapes. I find that wiggling the cutter slightly helps release the clay cleanly. -
Create blue clouds:
Repeat the process with baby blue clay to make the secondary clouds. Keep these smooth for a nice contrast against the textured white one. -
Smooth the edges:
Gently run your finger along the cut edges of all cloud shapes to soften any sharp ridges left by the cutter.
Glue Won’t Stick?
If magnets pop off, the clay surface might be too smooth. Scuff the back of the clay thoroughly with coarse sandpaper and try a two-part epoxy glue for a permanent bond.
Step 2: Forming the Raindrops
-
Mix pastel shades:
Prepare your pink, remaining blue, and cream clays. If your colors are too vibrant, mix in a tiny amount of white to achieve the soft pastel look. -
Shape the drops:
Take a small ball of clay and roll it between your palms into a smooth sphere, then pinch and pull one side to form a teardrop shape. -
Flatten slightly:
Place the teardrop on your work surface and gently press down to flatten the back while keeping the front rounded and domed. -
Refine the contour:
Use your fingers to smooth the curves. The bottom should be rounded and the top point should be soft, not needle-sharp. -
Repeat for variety:
Make roughly 8-10 raindrops in various colors (pink, cream, blue, white) to fill out your rain shower.
Add Sparkle
Before baking, brush a tiny amount of pearl mica powder or shimmer eyeshadow over the white raindrops to give them an iridescent, wet look.
Step 3: Baking and Assembly
-
Prepare for baking:
Arrange all your clay pieces on a parchment-lined baking sheet or a ceramic tile. -
Bake the clay:
Bake according to your specific clay manufacturer’s instructions (usually 230°F – 275°F for 15-30 minutes). Do not overbake. -
Cool down:
Allow the pieces to cool completely inside the oven with the door cracked, or on a wire rack. -
Sand the backs:
Once cool, lightly sand the flat back of each piece to create a rough surface for better glue adhesion. -
Attach magnets:
Apply a drop of super glue to the back of each cloud and raindrop, then press a magnet firmly into the glue. Let them dry undisturbed for a few hours. -
Arrange the scene:
Place your magnetic board upright and arrange the clouds at the top, scattering the raindrops below in a whimsical pattern.
Now you have a playful, interactive weather station to brighten up any corner of your home
Minimal Animal Face Discs
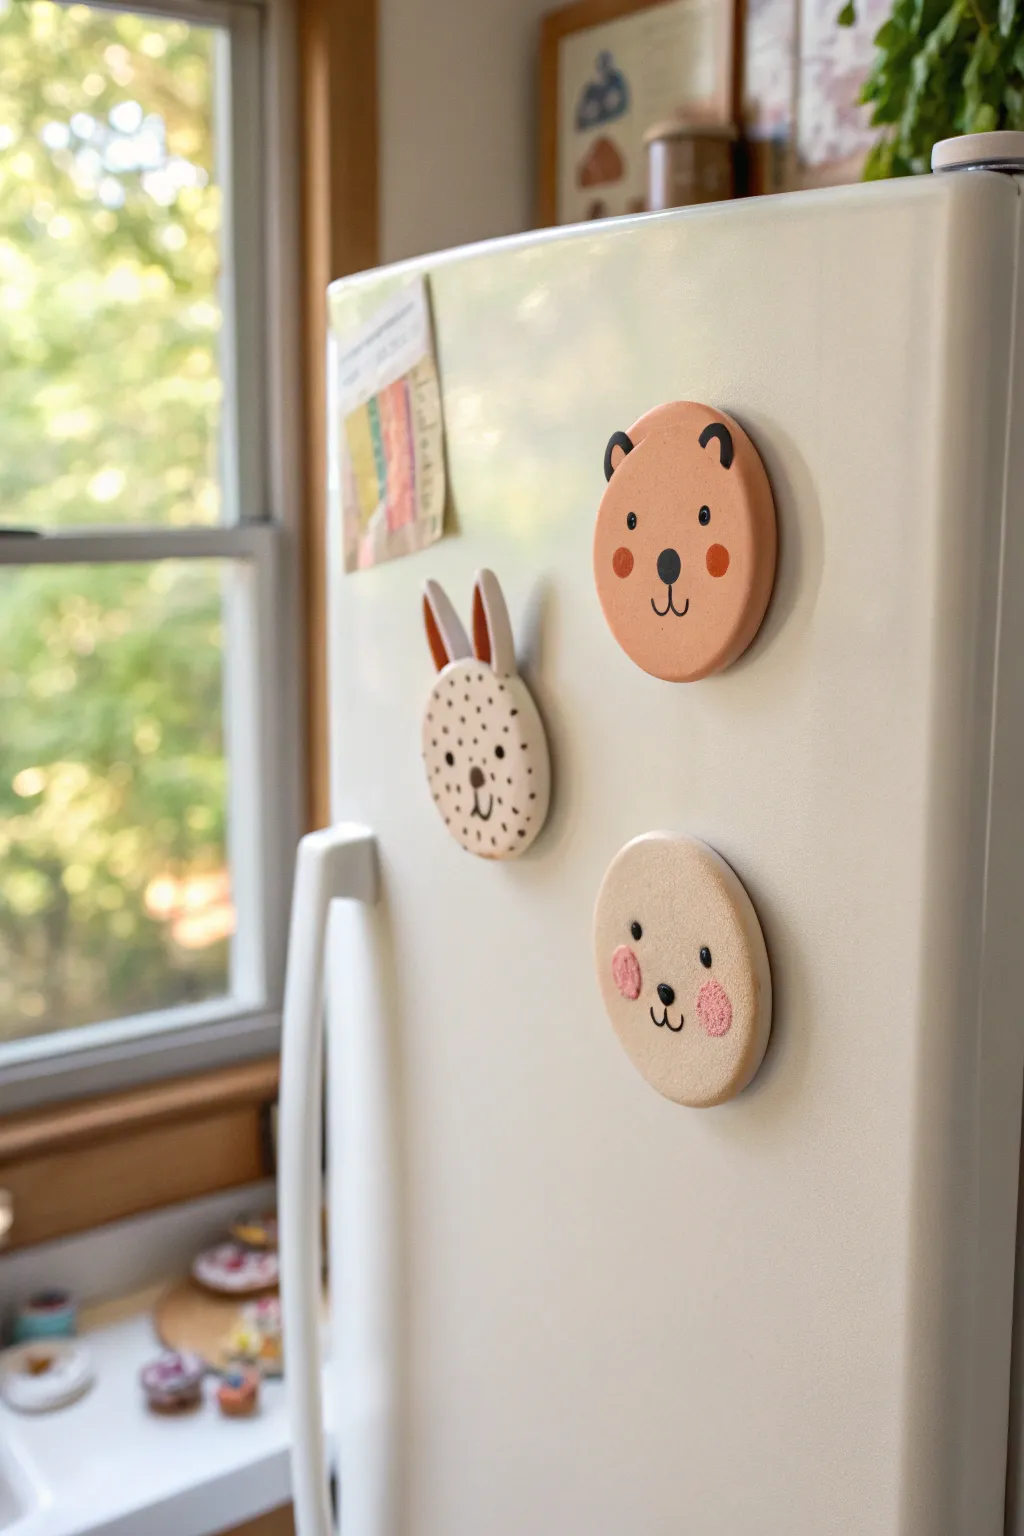
These charming animal face magnets bring a touch of whimsy to any kitchen with their sweet expressions and soft, matte finish. Using simple geometric shapes and earthy tones, you’ll sculpt durable discs that look almost like high-end boutique ceramics.
Detailed Instructions
Materials
- Polymer clay (terracotta/peach, white, black, beige)
- Round cookie cutter (approx. 2-3 inches)
- Acrylic rolling pin
- Small ball stylus tool
- Strong craft magnets (neodymium recommended)
- Super glue or E6000
- Acrylic paint (black, pink, orange)
- Fine detail paintbrush or toothpick
- Clean work surface (tile or glass mat)
- Oven for baking
Step 1: Creating the Base Discs
-
Condition the clay:
Start by warming up your chosen base colors—a warm terracotta for the bear and a creamy beige for the dog—by kneading them in your hands until they are soft and pliable. This prevents cracks later on. -
Roll out the slab:
Using your acrylic rolling pin, flatten the clay into a smooth sheet. Aim for a thickness of about 1/4 inch; you want them sturdy enough to hold a magnet but not too heavy to slide down the fridge. -
Cut the circles:
Press your round cookie cutter firmly into the clay slab to create clean, perfect circles. Gently release the clay from the cutter. -
Smooth the edges:
Use your finger to gently rub around the rim of each circle to soften the sharp cut edge, giving it a more organic, handmade pottery look.
Sticky Situation?
If your clay sticks to the work surface, try rolling it out on a piece of parchment paper or plastic wrap. You can lift the whole paper to peel the shape off without distorting it.
Step 2: Sculpting the Features
-
Add rabbit ears:
For the rabbit, roll two small logs of white clay and taper the ends. Flatten them slightly and press them firmly onto the top back edge of a white circle so they peek over the top. Gently blend the seam on the back. -
Form the bear ears:
For the bear, roll two tiny balls of the same terracotta clay. Press them onto the top curve of the circle, slightly flattening them to integrate them with the main shape. -
Create the nose base:
For the rabbit design specifically, roll a tiny ball of black clay and press it into the center of the face. For the bear and dog, we will paint the noses later for a different textural look. -
Pre-bake texture (optional):
If you want the subtle stippled texture seen on the rabbit’s face, gently tap the surface with a clean toothbrush or stiff paintbrush before baking. -
Bake the pieces:
Place your clay discs on a baking sheet lined with parchment paper. Bake according to your specific clay brand’s instructions (usually 275°F for 15-30 minutes). Let them cool completely before handling.
Step 3: Painting the Details
-
Paint the eyes:
Using a tiny detail brush or the tip of a toothpick dipped in black acrylic paint, add two small dots for eyes. Keep them wide-set for that cute, innocent look. -
Draw the mouths:
Carefully paint a small ‘w’ shape or a simple vertical line connected to a curve under the nose area to create the classic animal snout mouth. -
Add bear and dog noses:
Paint a solid black oval or rounded triangle for the noses of the beige and terracotta animals. -
Create rosy cheeks:
Dilute a tiny bit of pink or orange paint with water. Dab this onto the cheek area with your finger or a dry brush to create a soft, blushing effect rather than a harsh circle. -
Detail the rabbit pattern:
For the spotted rabbit, use your smallest tool to add tiny, irregular black dots all over the white face, working around the eyes and nose. -
Highlight the ears:
Paint the inner sections of the rabbit ears with a touch of terracotta or brown paint to add depth. -
Seal the surface (Optional):
If you want extra protection, apply a thin layer of matte varnish over the painted areas, but leaving the clay raw often looks best for this style.
Smooth Operator
Before baking, lightly brush the unbaked clay with a little baby oil or cornstarch. This smoothes out visible fingerprints and removes lint for a professional finish.
Step 4: Final Assembly
-
Prepare the back:
Flip the cooled clay faces over. Ensure the back is clean and free of dust. -
Apply adhesive:
Place a small dot of strong super glue or E6000 in the center of the disc. -
Attach the magnet:
Press your round magnet firmly into the glue. I like to let this dry undisturbed for at least 24 hours to ensure the bond is permanent before sticking it to the fridge.
Now your fridge is ready to host this adorable menagerie of handmade friends
Paw Print Badge Magnets
These adorable paw print magnets resemble freshly baked thumbprint cookies, complete with a golden-brown toasted effect in the center. The textured, matte finish gives them a rustic charm that looks sweet enough to eat, right on your refrigerator door.
Step-by-Step Tutorial
Materials
- White or beige polymer clay
- Translucent polymer clay (optional)
- Soft pastels or chalk (brown, ochre, orange)
- Medium-grit sandpaper or a stiff toothbrush
- Round cookie cutter (approx. 2 inches)
- Various sized ball tools or round blending tools
- Small strong magnets
- Super glue or E6000
- Paintbrush (soft bristles)
- Acrylic roller
Step 1: Preparing the ‘Dough’
-
Mix the Base Color:
Start by conditioning your beige or white polymer clay. For a realistic dough look, I like to mix one part translucent clay with three parts beige; this gives it that slight depth found in real baked goods. -
Create a Speckled Effect (Optional):
To mimic the tiny specks seen in the photo, you can grate a very small amount of golden-brown baked clay or pastel chalk into your raw clay mixture and fold it in until well distributed. -
Roll the Sheet:
Roll your conditioned clay out to a thickness of about 1/4 inch (6mm). You want it substantial enough to hold the imprint without warping. -
Texture the Surface:
Before cutting, gently press medium-grit sandpaper or a stiff toothbrush over the surface of the clay sheet. This texturing removes the plastic shine and creates a believable cookie surface. -
Cut the Shape:
Use your round cookie cutter to punch out a circle. Smooth the edges with your finger to soften the sharp cut line, making it look more like a hand-formed cookie.
Pro Tip: Realistic Texture
For ultra-realistic pastry texture, roll a ball of aluminum foil over the clay surface instead of sandpaper. This creates random, deep pockmarks like a true sugar cookie.
Step 2: Creating the Paw Print
-
Mark the Placement:
Lightly touch the surface with your tools to plan where the pads will go. You need one large central shape (the metacarpal pad) and four smaller toe pads arranged in an arc above it. -
Press the Main Pad:
Using a large ball tool or the rounded end of a paintbrush, press firmly into the lower center of the circle to create the main triangular pad indentation. Rock the tool slightly to widen the shape. -
Add the Toe Pads:
Switch to a slightly smaller ball tool to press the four toes above the main pad. Ensure they are evenly spaced and deep enough to hold pigment. -
Refine the Edges:
The pressure from indentation might displace some clay. Gently pat down any raised ridges around the paw print to keep the surface relatively flat.
Step 3: Adding the ‘Baked’ Color
-
Prepare the Pigment:
Scrape your brown, ochre, and orange soft pastels into a fine powder. Mix them to create a warm, toasted golden-brown shade. -
Shading the Recesses:
Dip a soft, dry paintbrush into your powder mix. Carefully dab the color into the recessed paw print areas. The goal is to make the indentations look baked and golden. -
Highlighting the Edges:
With the leftover powder on your brush, very lightly dust the outer rim of the cookie shape to simulate browning at the edges. -
Clean Up:
If any dark powder got onto the main ‘dough’ surface where you don’t want it, use a piece of scotch tape or a baby wipe to gently lift it off.
Troubleshooting: Blurry Prints
If your paw print loses definition while you texture the rest of the clay, do the texturing step first, then press the paw print indentations last for crisp, clear edges.
Step 4: Baking and Assembly
-
Bake the Clay:
Place your magnet front on a ceramic tile or baking sheet lined with parchment paper. Bake according to your brand of polymer clay instructions (usually 275°F/135°C for 15-30 minutes). -
Cool Down:
Allow the piece to cool completely in the oven or on a wire rack. Don’t handle it while hot, as the clay is still fragile. -
Attached the Magnet:
Flip the cooled cookie over. Add a drop of strong adhesive (E6000 or super glue gel) to the center of the back. -
Set the Magnet:
Press your round magnet firmly into the glue. Let it cure for the full time recommended on your glue package before sticking it to the fridge.
Now you have a charming artisan-style magnet that celebrates your furry friend in the kitchen
Terrazzo Chip and Marble Slab Magnets
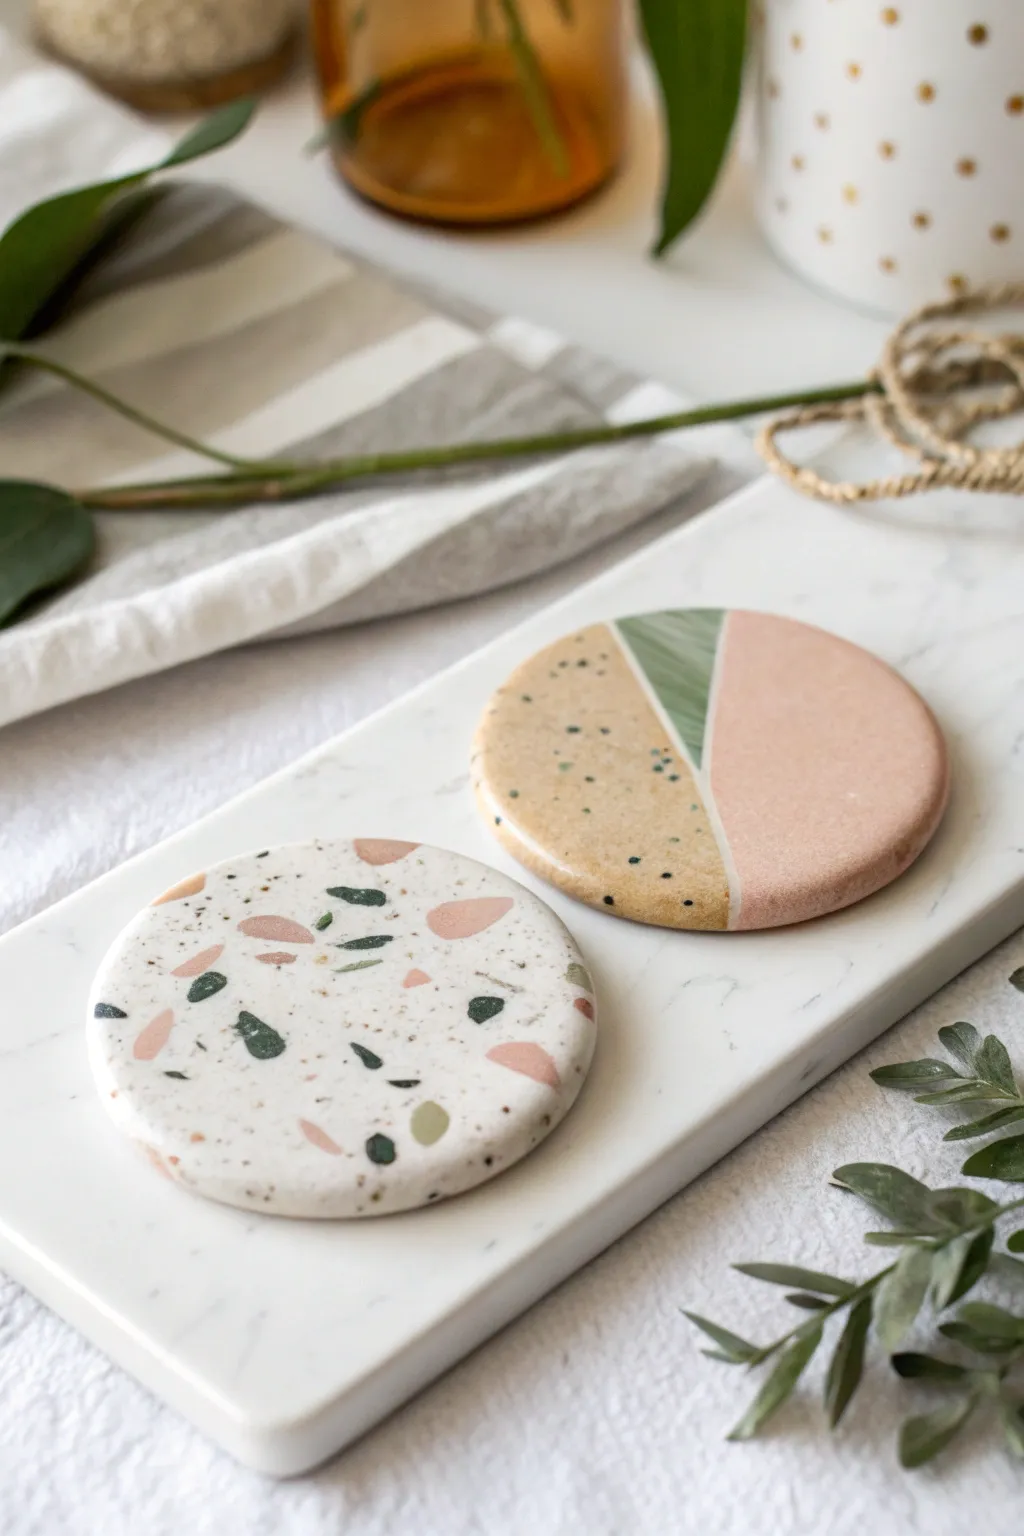
These sophisticated polymer clay magnets mimic the high-end look of terrazzo stone and modern abstract art. With a few simple techniques, you can create custom patterned discs that add a touch of trendy elegance to your fridge or magnetic board.
Step-by-Step Guide
Materials
- White polymer clay
- Pink polymer clay (dusty rose shade)
- Green polymer clay (sage or olive)
- Black polymer clay
- Mustard yellow polymer clay
- Acrylic rolling pin or clay machine
- Round clay cutters (approx. 2-3 inches)
- Craft knife or tissue blade
- Parchment paper or ceramic tile
- Magnets (strong ceramic or neodymium)
- Super glue or E6000
- Fine grit sandpaper (optional)
- Matte or glossy glaze (optional)
Step 1: Creating the Terrazzo Pattern
-
Base Preparation:
Begin by conditioning a block of white polymer clay until it is soft and pliable. Roll it out into a smooth slab about 1/4 inch thick. This will serve as the canvas for your terrazzo chips. -
Making the Chips:
Take small amounts of pink, green, and black clay. Roll them into very thin sheets, much thinner than your base slab. Using your blade, chop these thin sheets into tiny, irregular angular fragments. -
Arranging the Pattern:
Gently scatter the colored fragments over the white slab. Aim for a random distribution, ensuring some color overlapping and varying sizes. Don’t press them in just yet. -
Embedding the Design:
Place a sheet of parchment paper over the clay to prevent sticking. Use your acrylic roller to firmly roll over the chips, pressing them flat into the white base until the surface is completely smooth and level. -
Cutting the Shape:
Position your round cutter over the area with the most pleasing chip arrangement. Press down firmly to cut out your circle. Remove the excess clay from around the cutter before lifting.
Clean Cuts Pro-Tip
Before cutting your circles, cover the clay slab with a piece of plastic cling wrap. Press the cutter down through the plastic. This creates beautifully rounded, domed edges instead of sharp ones.
Step 2: Creating the Color-Block Design
-
Prepare Colors:
Condition your mustard, pink, and green clays separately. Roll the pink and green into standard slabs. For the mustard section, mix in some tiny black specks or black pepper to create a stone-like texture before rolling it out. -
Cutting Segments:
Using your tissue blade, cut straight geometric shapes from each clay sheet. You’ll need a large semicircle of pink, a large segment of speckled mustard, and a thin sliver of green. -
Assembling the Slab:
On a fresh work surface, fit these cut geometric pieces together like a puzzle. Ensure the straight edges touch cleanly without gaps. Gently press the seams together with your fingers to bond them. -
Smoothing the Seams:
Cover the assembled puzzle with parchment paper and roll over it gently. The goal is to flatten the seams and make the clay pieces become one unified slab without distorting the straight lines too much. -
Final Cut:
Use the same round cutter to punch a circle from your assembled color-blocked slab. Try to position the cutter so the intersection of the three colors is off-center for a dynamic look.
Step 3: Baking and Finishing
-
Baking:
Place your cut circles on a ceramic tile or baking sheet lined with parchment paper. Bake according to your clay package instructions, usually at 275°F (135°C) for about 30 minutes. -
Cooling:
Allow the clay pieces to cool completely in the oven or on a wire rack. They will harden fully as they return to room temperature. -
Sanding (Optional):
If you want a truly stone-like finish, use wet sandpaper to lightly buff the surface under running water. This reveals the terrazzo chips more clearly and smooths any fingerprints. -
Attaching Magnets:
Flip the discs over. Apply a dab of strong adhesive like E6000 or super glue to the back of the magnet and press it firmly into the center of the clay disc. -
Final Cure:
Let the glue cure fully according to the manufacturer’s directions before sticking your new art pieces to the fridge.
Level Up: Gold Leaf
Add a touch of luxury by pressing small flakes of gold or silver leaf onto the clay surface alongside your terrazzo chips before the final rolling step.
Your fridge is now displaying these mini works of modern art