Whenever someone tells me they “can’t sculpt,” I hand them a small lump of clay and we start with simple shapes—because that’s honestly where all the cutest pieces begin. These easy clay sculptures are made to feel doable and fun, whether you’re using air-dry clay, polymer clay, or traditional clay with basic hand-building techniques.
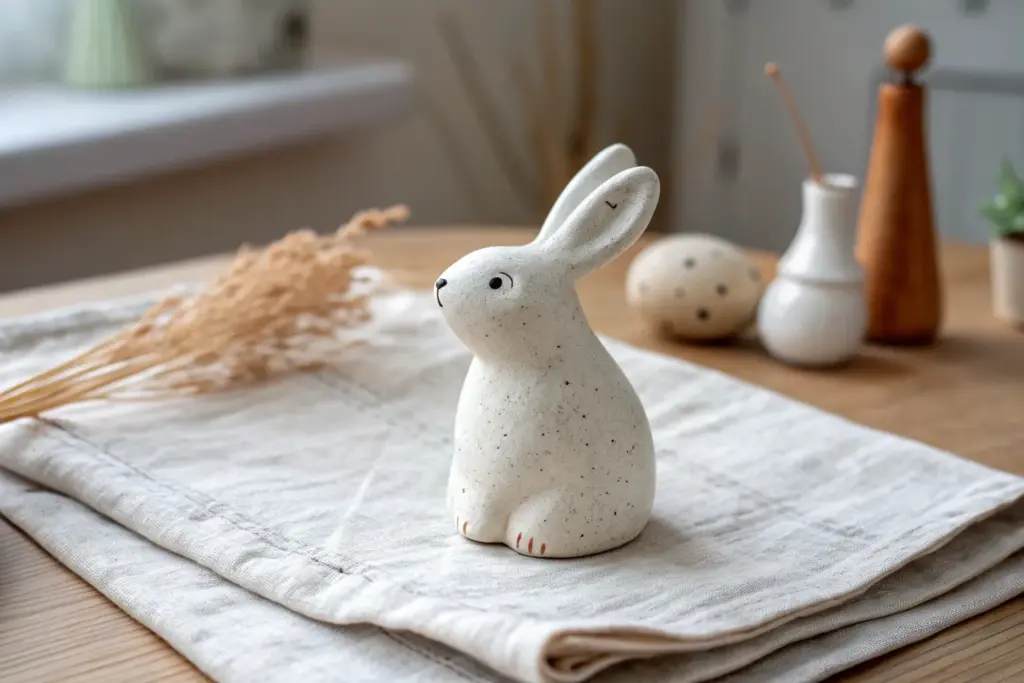
Pinch Pot Bunny
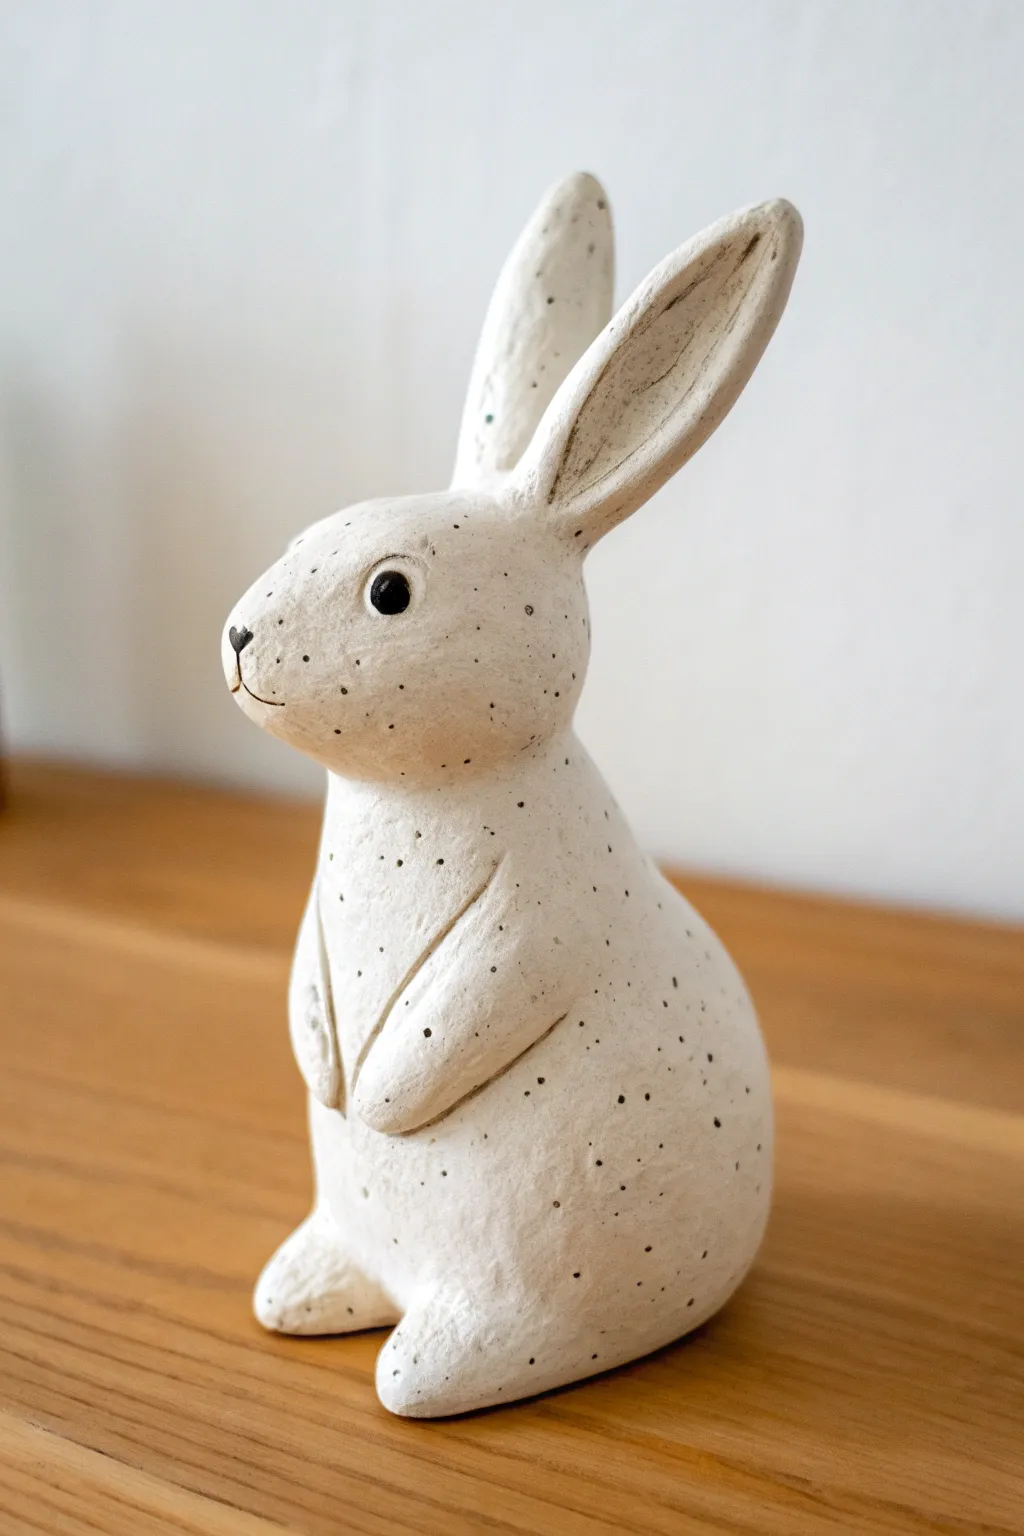
Transform simple clay into a charming, upright rabbit figurine that looks like expensive boutique decor. This project combines basic pinch pot techniques with solid sculpting to create a rustic, speckled finish that adds character to any shelf.
How-To Guide
Materials
- Air-dry clay (white or light grey)
- Acrylic paint (black and cream/off-white)
- Small paintbrush (fine tip)
- Old toothbrush
- Water cup
- Sculpting tools (or a butter knife and toothpick)
- Fine-grit sandpaper
- Matte varnish (optional)
Step 1: Forming the Body
-
Create the base:
Start with a ball of clay roughly the size of a tennis ball. Use your thumb to create a deep opening, pinching the walls to form a classic pinch pot shape. This will be the main body. -
Shape the torso:
Turn the pinch pot upside down so the opening is on the table. Gently squeeze and elongate the top portion to create a slight upward slope, narrowing it towards where the neck will be. -
Add the head:
Roll a second, smaller ball of clay for the head. Flatten the bottom slightly and score both the neck area of the body and the bottom of the head with a toothpick (scratching the surface). -
Attach and smooth:
Apply a little water or slip (clay mixed with water) to the scored areas and press the head firmly onto the body. Use your thumb or a modeling tool to smooth the seam completely so the clay looks like one solid piece. -
Refine the facial shape:
Gently pinch the front of the head to pull out a subtle snout area. It doesn’t need to be sharp; a soft, rounded mound works best for this style.
Splatter Control
Test your splatter technique on a piece of scrap paper first. The distance you hold the brush from the object changes the dot size significantly.
Step 2: Adding Limbs and Features
-
Sculpt the ears:
Roll two small coils of clay, tapering them at the ends. Flatten them slightly to resemble long bunny ears. I find it helpful to curve the inner face of the ear inward just a bit for depth. -
Attach the ears:
Score and slip the top of the head and the base of the ears. Attach them securely, blending the clay downwards into the head using a tool to ensure they stand upright without drooping. -
Form the arms:
Create two small, elongated teardrop shapes for the front paws. Attach these to the chest area, angling them slightly inward so they look like they are resting on the bunny’s tummy. -
Add the feet:
Make two slightly larger, flattened oval shapes for the back feet. Attach these at the very bottom front of the base, blending the back edge seamlessly into the body for stability. -
Smooth the texture:
Dip your finger in a tiny bit of water and run it over the entire sculpture to remove any harsh fingerprints or cracks. The goal is a smooth, matte finish. -
Dry the sculpture:
Let the bunny dry completely. Depending on your clay type and humidity, this usually takes 24 to 48 hours. The clay will lighten significantly when fully dry.
Step 3: Painting and Finishing
-
Sand imperfections:
Once fully dry, use fine-grit sandpaper to gently buff away any rough bumps, especially around where the ears and paws join the body. -
Apply the base coat:
Paint the entire bunny with a cream or off-white acrylic paint. You may need two thin coats for opaque coverage. Let this dry completely. -
Add the face details:
Using a very fine brush and black paint, add a small ‘Y’ shape for the nose and mouth. Paint two solid black circles for the eyes, keeping them simple and graphic. -
Highlight the eyes:
Add a tiny speck of white paint inside each black eye circle to give the bunny a spark of life. -
Create the speckled effect:
Dilute a small amount of black paint with water until it’s inky. Dip an old toothbrush into this mixture, aim it at the bunny, and run your thumb across the bristles to flick tiny specks all over the surface. -
Seal the piece:
To protect your paint job and give it a finished look, apply a layer of matte varnish once the speckles are totally dry.
Floppy Ears?
If the ears won’t stay up while wet, prop them up with crumpled paper towels or small toothpicks inserted temporarily until the clay stiffens.
Place your rustic bunny near a plant or window to enjoy its sweet, handcrafted personality


Chubby Clay Cat
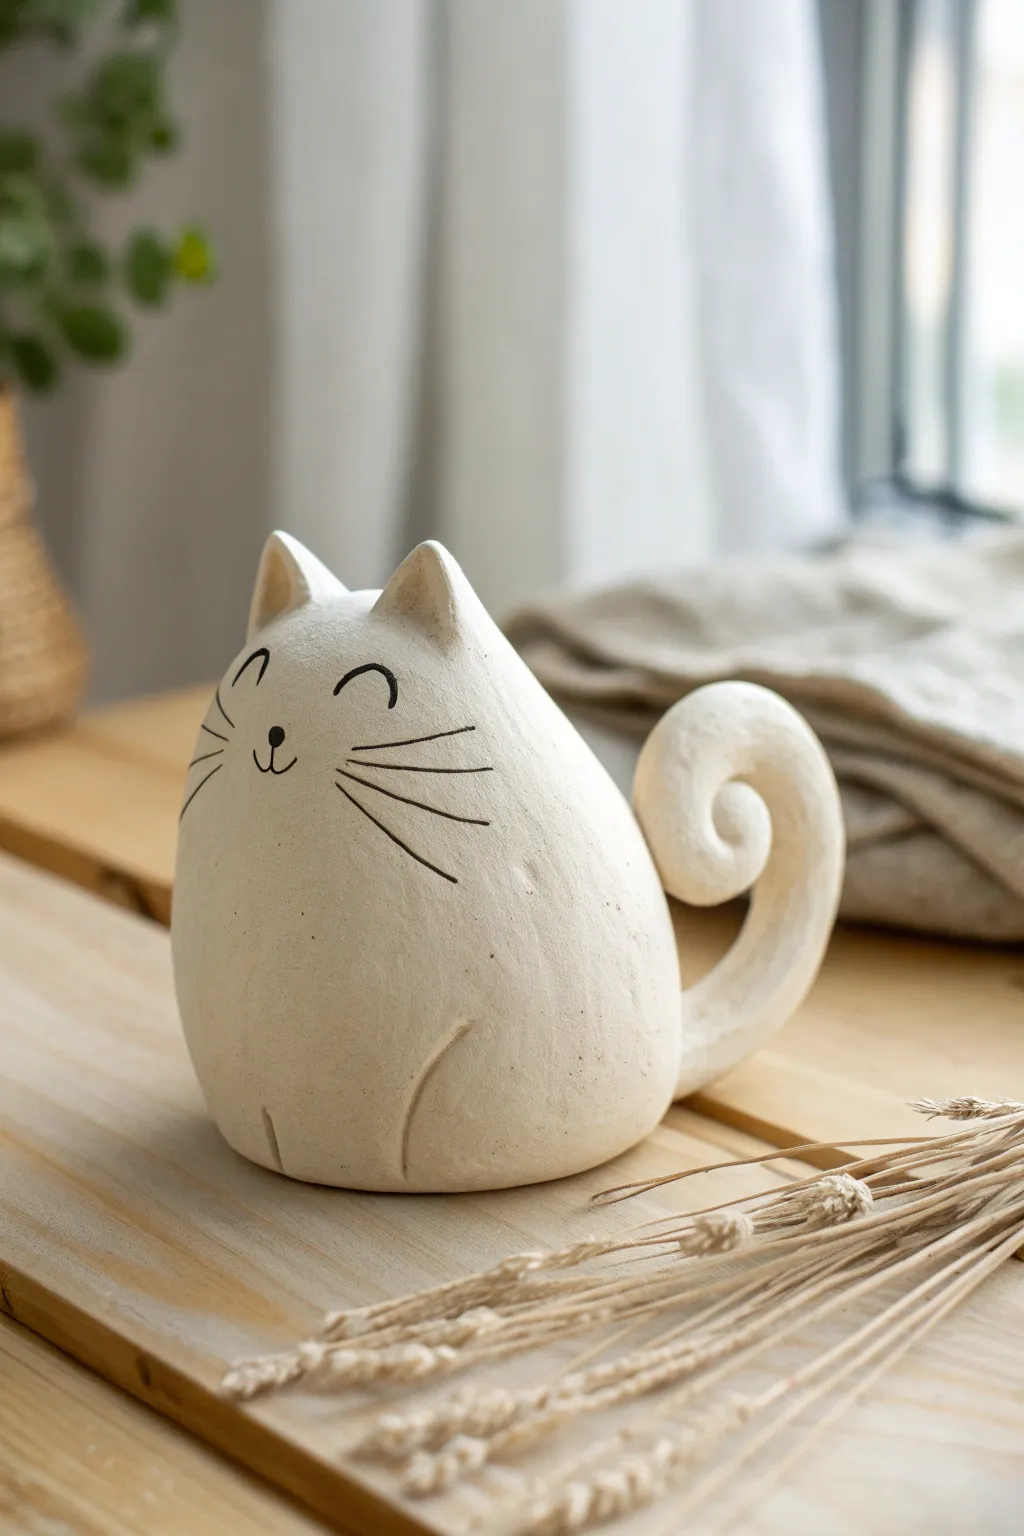
This delightful minimalist sculpture captures the essence of a happy cat with simple, rounded forms and a textured, matte finish. It’s an ideal beginner project that focuses on smooth shapes and charming, drawn-on details.
Step-by-Step Tutorial
Materials
- White air-dry clay (or polymer clay)
- Small cup of water
- Rolling pin
- Needle tool or toothpick
- Black fine-tip marker or acrylic paint pen
- Sponge or fine sandpaper
- Clear matte varnish (optional)
Step 1: Shaping the Base
-
Prepare the clay:
Start with a large handful of white clay. Knead it thoroughly in your hands to warm it up and remove any air bubbles, which helps prevent cracks later. -
Form the body:
Roll the clay into a smooth ball. Then, gently roll it on your work surface to create a teardrop or pear shape. The bottom should remain wide and round, tapering slightly towards the top for the head. -
Flatten the base:
Tap the bottom of your pear shape firmly against the table. You want a flat, stable surface so your cat sits upright without wobbling. -
Smooth the surface:
Dip your finger in a little water and run it over the clay to smooth out any fingerprints or uneven bumps. For that stone-like texture, don’t worry about making it perfectly glass-smooth.
Cracks Appearing?
If small cracks appear while drying, mix a tiny bit of fresh clay with water to make a paste. Fill the cracks, smooth it over, and let it dry again.
Step 2: Adding Features
-
Pinch the ears:
At the very top of the tapered head, gently pinch two small triangles of clay upwards to form the ears. Use your thumb and forefinger to shape them into soft points. -
Create the tail:
Take a separate piece of clay and roll it into a thick snake or coil, tapering one end slightly. This will be the distinct curling tail. -
Curl the tail:
Wind the tapered end of the coil into a tight spiral. Leave the other end thicker for attaching to the body. It should look like a little cinnamon roll or a fern frond. -
Attach the tail:
Score the back of the cat body and the base of the tail with your needle tool (make little scratches). Add a dab of water or slip, then press the tail firmly onto the lower back. -
Blend the seams:
Use a modeling tool or your finger to smooth the clay where the tail meets the body so it looks like one cohesive piece. -
Refine the spiral:
Ensure the spiral shape of the tail remains distinct. If it got squished during attachment, gently reshape the curl so it sits proud and jaunty.
Faux Stone Finish
To mimic stone even more, dab a dry sponge with very light gray paint all over the dried clay before drawing the face. It adds subtle, realistic texture.
Step 3: Detailing and Finishing
-
Carve the paws:
Using your needle tool or a dull knife, gently carve a curved line on the side of the body to suggest a haunch or hind leg. Add two tiny vertical lines at the very bottom front to hint at front paws. -
Dry the sculpture:
Let the sculpture dry completely. For air-dry clay, this usually takes 24-48 hours depending on thickness. I find turning it upside down halfway through helps the bottom dry evenly. -
Sand for texture:
Once bone dry, lightly sand the surface with fine-grit sandpaper. This enhances the matte, stone-like appearance and removes any sharp rough spots. -
Draw the face:
Using a black fine-tip marker, carefully draw two closed, curved eyes high on the face. Add a small dot for the nose and a tiny curved mouth underneath. -
Add whiskers:
Draw three long, sweeping whiskers on each cheek. Keep your hand steady and loose to get nice, flowing lines. -
Seal the piece:
Verify the marker is fully dry, then apply a coat of clear matte varnish if you want to protect the clay from moisture and dust.
Place your charming new sculpture on a windowsill or shelf to add a touch of calm to your space


Frog on a Lily Pad
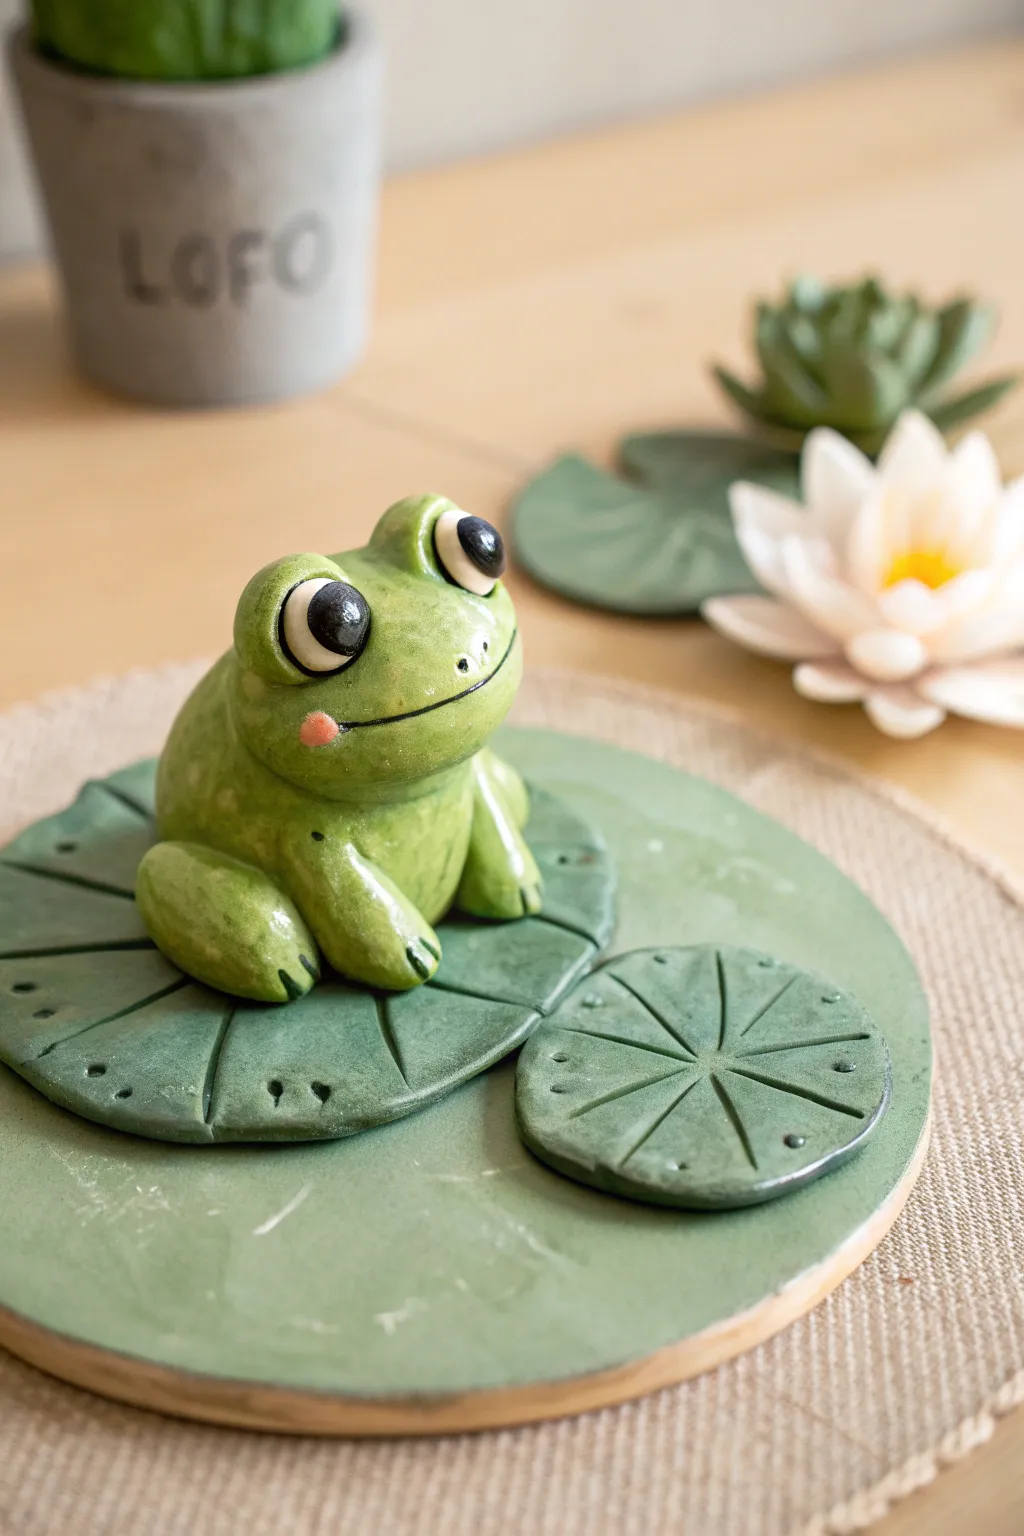
Create a charming little amphibian friend resting on a multi-part lily pad base with this clay project. Its glossy finish and exaggerated, expressive eyes give it a whimsical, cartoon-like quality that brightens up any desk or shelf.
How-To Guide
Materials
- Polymer clay (Green, White, Black, Pink)
- Circular wooden base or coaster (approx. 4-5 inches)
- Clay sculpting tools (needle tool, ball stylus)
- Rolling pin or pasta machine
- Circle cutters (various sizes)
- Glossy glaze or polyurethane varnish
- Soft paintbrush
- Strong craft glue (if baking separately)
Step 1: Creating the Lily Pad Base
-
Prepare the Base Layer:
Start by rolling out a sheet of green clay to cover your circular wooden base. Trim the excess so it fits perfectly flush with the edge, creating a smooth green foundation. -
Sculpt the Large Leaf:
Roll out a slightly thicker piece of green clay for the main lily pad. Cut roughly a 3-inch circle, then cut a ‘V’ notch out of one side to give it that classic lily pad shape. -
Add Leaf Veins:
Using a needle tool or the back of a knife, gently press indentation lines radiating from the center of the pad to the edges. Add small dot details near the edge using a small stylus. -
Make the Small Leaf:
Repeat the process to make a smaller, secondary lily pad about 1.5 inches wide. Mark the radiating veins deeply as shown in the reference. -
Assemble the Pads:
Place the large lily pad on the left side of your base and the smaller one on the right. Press them down gently to adhere them to the base layer without squashing the texture.
Keep it Clean
White clay picks up lint easily. Wash your hands thoroughly before rolling the eyeballs, or have a baby wipe nearby to clean your fingertips.
Step 2: Sculpting the Frog Body
-
Form the Torso:
Roll a ball of bright green clay about the size of a golf ball. Shape it into a smooth, rounded squat tear-drop shape for the frog’s main body. -
Position the Frog:
Place the body securely onto the center of the large lily pad. Press down slightly to create a flat bottom for stability. -
Attach the Hind Legs:
Roll two thick logs of green clay. Bend them into a ‘V’ shape to form the folded back legs. Attach these to the sides of the body, blending the clay at the hip joint so it looks seamless. -
Add Front Legs:
Create two smaller, shorter logs for the front arms. Attach them vertically to the front of the body, splaying them slightly outward. -
Detail the Toes:
Use a needle tool or small knife to press two indentations into the end of each foot, creating three distinct toes on all four limbs.
Loose Parts?
If the legs won’t stick to the body, scratch the surface of both joining pieces (score) and add a tiny drop of liquid clay or translucent bake-glue before pressing together.
Step 3: Character Features & Finishing
-
Create Eye Sockets:
Roll two small balls of green clay and flatten them slightly. distinct mounds on top of the head for the eye sockets. -
Add the Eyes:
Roll two balls of white clay and press them into the green sockets. Add large black pupils to the center, slightly crossed or looking upward for a cute expression. -
Sculpt the Mouth:
Use a needle tool to carve a long, wide smile across the face. Curve the ends upward toward the cheeks. -
Apply Blush:
Taking a tiny amount of pink clay, flatten it into a small oval and press it onto the cheek, just below the eye. -
Add Nostrils:
Make two tiny pricks with a needle tool above the mouth for the nose. -
Bake the Piece:
Bake your sculpture according to your specific brand of clay’s instructions (usually 275°F for 15-30 minutes). Let it cool completely. -
Glaze Technique:
In my experience, a thick coat of gloss varnish makes all the difference here. Apply it generously over the frog to make him look wet and shiny, but keep the lily pad base matte or satin for contrast.
Once the glaze is dry, you’ll have an adorable, moisture-slicked frog ready to keep watch over your workspace


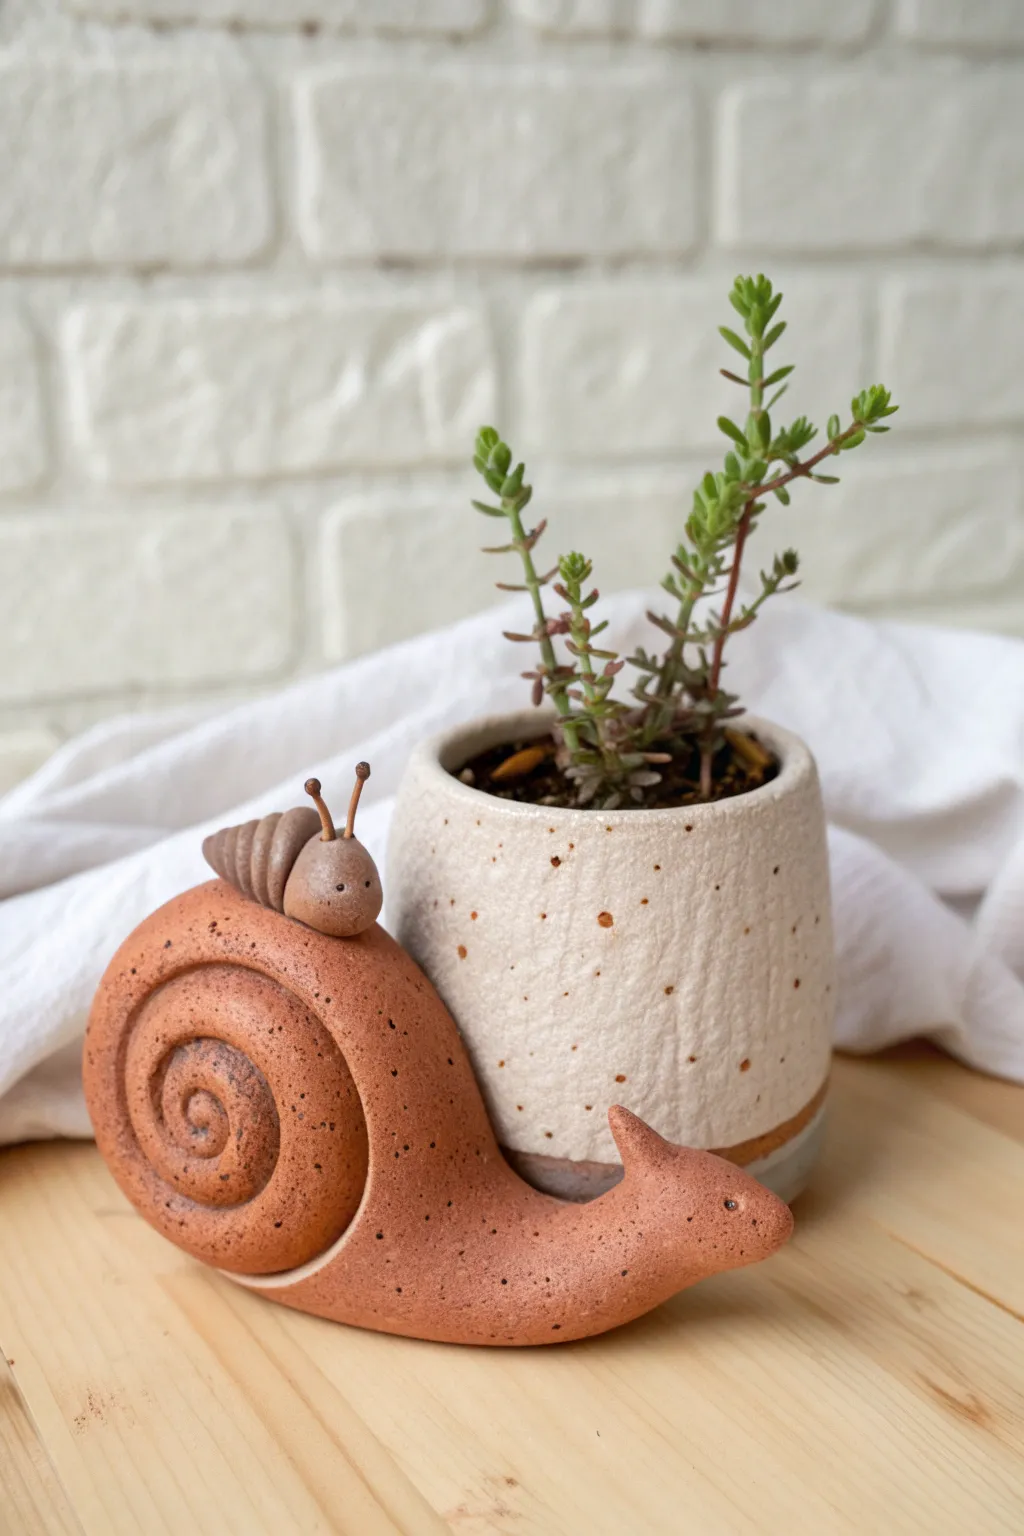
Mini Snail With Spiral Shell

Bring a little garden charm indoors with this delightful clay snail, featuring a deeply textured spiral shell and a friendly, cartoonish expression. This project uses reddish-brown modeling clay to create a warm, terracotta-like finish that looks perfect perched on a sunny windowsill.
Step-by-Step Tutorial
Materials
- Reddish-brown polymer clay or air-dry clay (terracotta color)
- White clay (for the eyes)
- Black clay (for the pupils)
- Small ball stylus tool
- Pointed detailing tool or toothpick
- Sculpting wire or armature wire (optional for neck support)
- Clear matte varnish (optional)
Step 1: Sculpting the Shell
-
Roll the main coil:
Start with a large chunk of reddish-brown clay. Roll it into a long, tapered snake shape, keeping one end significantly thicker than the other. -
Form the spiral:
Begin curling the thin end of the coil inward to start the spiral. Continue rolling the coil brightly around itself to create the classic snail shell shape. -
Shape the finish:
Once the spiral is complete, tuck the thick end underneath or smooth it into the side so the shell sits flat and stable. -
Add shell texture:
Using a pointed detailing tool or a toothpick, press parallel indented lines across the entire length of the shell coil. These ridges imitate natural growth lines. -
Refine the center:
Use a small ball stylus to deepen the very center of the spiral, giving the shell more dimension and depth.
Step 2: Forming the Body
-
Shape the base:
Flatten a new piece of clay into an elongated teardrop shape. This will be the foot of the snail. I like to curve one end slightly upward where the head will go. -
Texture the skin:
Lightly tap the surface of the body clay with a toothbrush or a crumpled ball of aluminum foil to give it a realistic, slightly pitted texture. -
Build the neck:
Form a thick cylinder of clay rising from the front of the body base. Smooth the seams where the neck meets the foot so it looks like one continuous piece. -
Attach the shell:
Place the spiral shell onto the back of the body. Press it down firmly to secure it. If the clay is dry, score the surfaces and add a dab of water or liquid clay for adhesion.
Shell Stability
If your shell keeps flopping over or losing its round shape, form the clay spiral around a crumpled ball of aluminum foil. This reduces weight and saves clay.
Step 3: Face and Details
-
Create the antennae:
Roll two small, thin logs of clay. Attach tiny balls of clay to the tips to create the eye stalks. -
Attach antennae:
Press the antennae onto the top of the head. Use your detailing tool to blend the base of the stalks into the head for a seamless look. -
Make the eyes:
Roll two small balls of white clay and press them side-by-side onto the front of the face, just below the antennae. -
Add pupils:
Take tiny dots of black clay and press them onto the white circles. Placing them slightly off-center or cross-eyed adds a lot of personality. -
Carve the smile:
Use a sharp tool or a small knife to carve a simple, curved line for the mouth. Enhance it by rolling a hair-thin thread of black clay and pressing it into the groove. -
Final smoothing:
Check the entire sculpture for fingerprints. Smooth them out gently with your finger or a soft brush.
Cracks while rolling?
If the long coil for the shell starts cracking as you roll it, your clay is too dry. Mix in a drop of baby oil or clay softener and knead until pliable.
Enjoy displaying your charming little snail friend on a desk or shelf to brighten your day

The Complete Guide to Pottery Troubleshooting
Uncover the most common ceramic mistakes—from cracking clay to failed glazes—and learn how to fix them fast.
Duck With an Oversized Beak
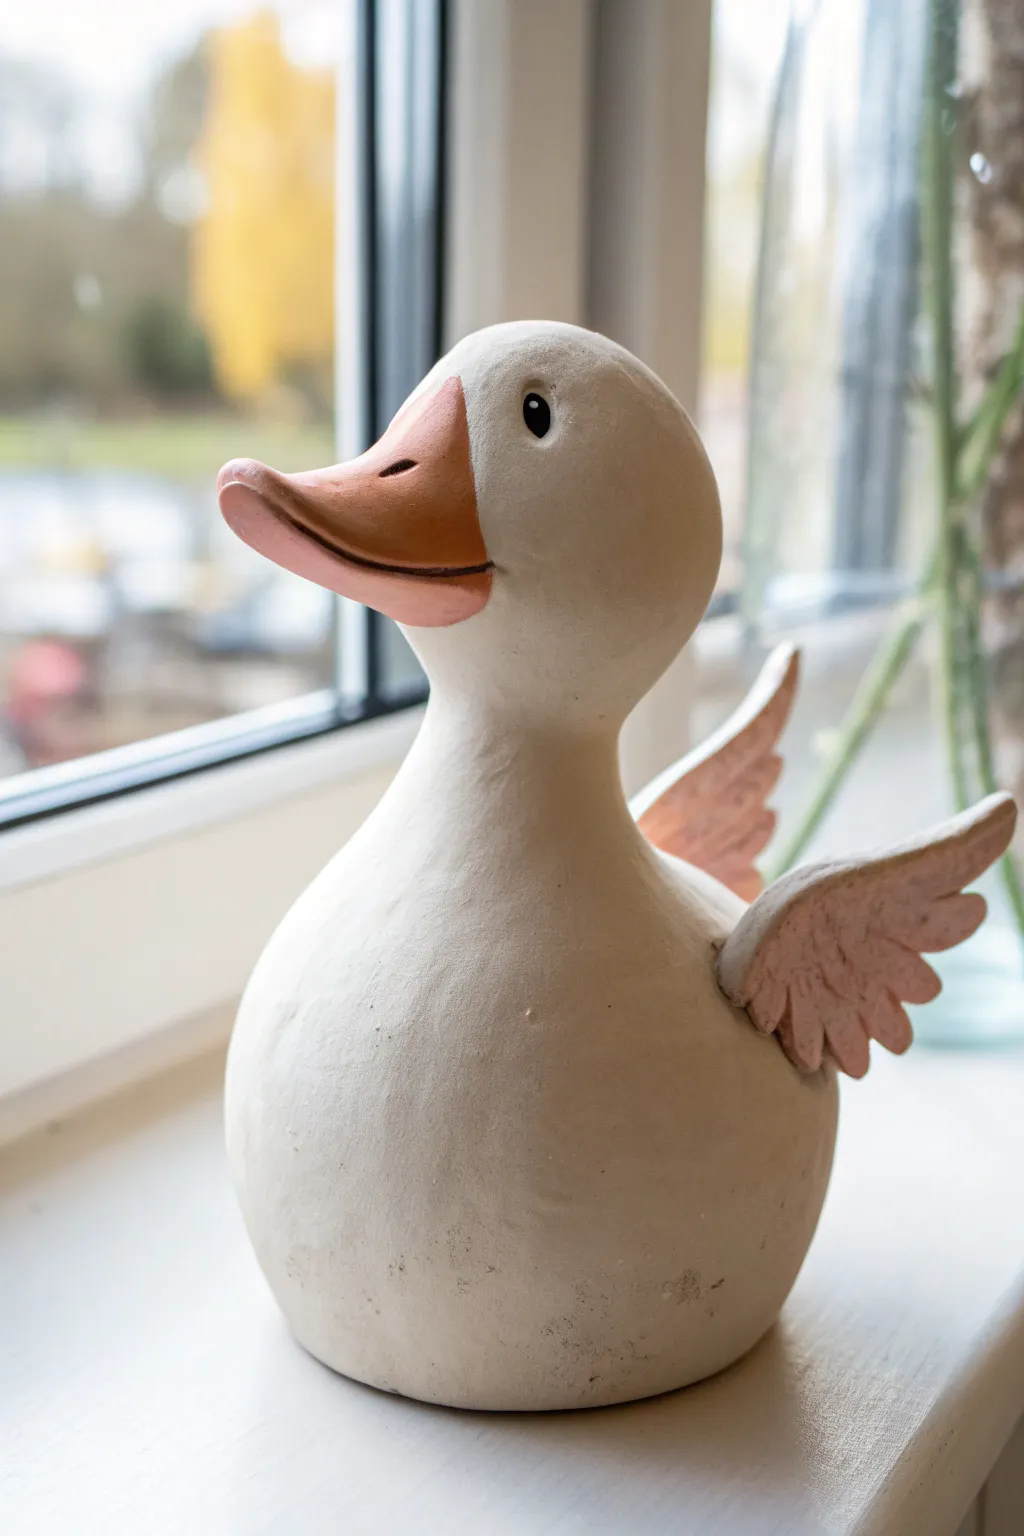
Create a charming, slightly comical duck sculpture that features exaggerated features and a smooth, minimalist aesthetic. With its round belly, uplifted gaze, and tiny wings, this figure adds a splash of lighthearted fun to any windowsill.
Detailed Instructions
Materials
- Air-dry clay (white or off-white)
- Acrylic paints (terracotta/dark orange, light pink, black, white)
- Small palette knife or clay sculpting tool
- Bowl of water
- Fine-grit sandpaper
- Soft paintbrushes (various sizes)
- Matte varnish or sealant
Step 1: Sculpting the Base
-
Form the body:
Start with a large ball of clay, roughly the size of a grapefruit. Roll it until smooth, then gently tease the top upward to create a pear shape. This upper section will become the neck, while the bottom remains bulbous for the belly. -
Shape the head:
Roll a smaller ball of clay for the head. It should be slightly oval-shaped. I usually score both the top of the neck and the bottom of the head with a sculpting tool, add a dab of water (slip), and press them firmly together to join. -
Smooth the neck:
Use your thumb and a little water to blend the clay from the head down into the neck, erasing the seam completely so it looks like one continuous form. -
Create the base:
Tap the bottom of the body firmly on your work surface to create a flat, stable base so the duck sits upright without wobbling.
Step 2: Adding Features
-
Sculpt the beak:
Take a separate piece of clay and fashion a wide, flat triangular shape. This beak should be oversized for a cartoonish look. Gently curve the top surface and give it a slight upward scoop. -
Attach the beak:
Score the face area and the back of the beak. Attach it securely, smoothing the connection points mostly on the top and bottom, but keeping the sides distinct to maintain that wide grin. -
Detail the mouth:
Use a knife tool to slice horizontally into the beak’s side to create the mouth line, separating the upper and lower mandible. Carve two small nostril slits near the top center. -
Form the wings:
Shape two small, flattened tear-drop pieces of clay. Use a tool to press indentations into them to mimic feather textures. -
Attach wings:
Attach these wings low on the back of the body, angling them upward as if the duck is about to flap. Scoring and slipping is crucial here to keep them attached. -
Refine the surface:
Dip your finger in water and run it over the entire sculpture to smooth out fingerprints or bumps. Let the sculpture dry completely (24-48 hours).
Cracks happen
If small cracks appear while drying, don’t panic. Mix a small amount of fresh clay with water to make a paste and fill the cracks, then smooth over.
Step 3: Painting and Finishing
-
Sand imperfections:
Once bone dry, take your fine-grit sandpaper and gently buff the body. Focus on the neck join and the round belly to get a porcelain-like finish. -
Base color:
If your clay isn’t naturally the creamy white shown, paint the entire body (except the beak and wings) with an off-white or cream acrylic paint. -
Paint the beak:
Mix a terracotta or brownish-orange shade. Paint the top of the beak fully. For the lower mandible, mix in a little white or pink to make it slightly lighter than the top. -
Color the wings:
Use a soft, diluted pink or salmon color for the wings. Apply it somewhat transparently so the texture of the ‘feathers’ shows through. -
Add eyes:
Using a small detail brush or the end of a paintbrush handle, dot two black circles for eyes on either side of the head, placed fairly high up. -
Eye highlights:
Wait for the black paint to dry, then add a tiny speck of white to the top corner of each black eye pupil. This spark of life is essential. -
Seal the work:
Finish by applying a matte varnish over the entire piece to protect the paint and give it a finished, ceramic feel.
Make it a planter
Hollow out the back of the duck slightly before drying to create a space for a tiny air plant or succulent to sit nestled between the wings.
Now you have a cheerful handmade companion ready to brighten up your shelf
Baby Elephant With a Curved Trunk
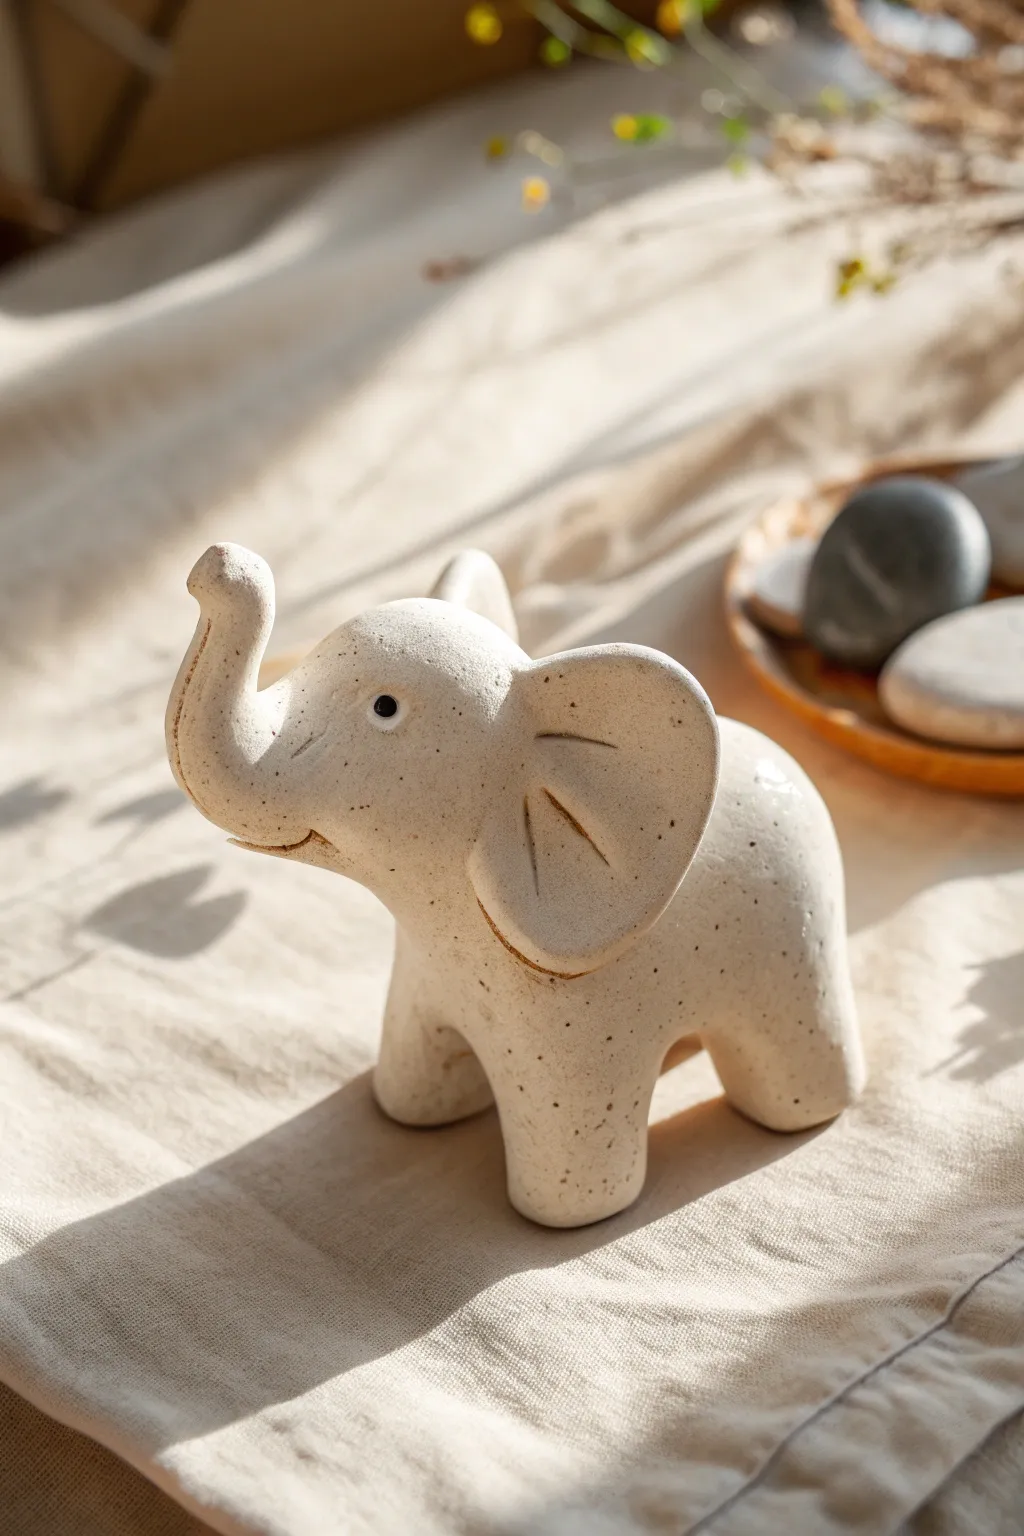
Sculpt a charming baby elephant with rounded features and a joyful, upturned trunk. This project uses speckling techniques to give polymer or air-dry clay a natural, stone-like ceramic finish.
Step-by-Step Tutorial
Materials
- White or cream polymer clay (or air-dry clay)
- Black acrylic paint or black pepper (for speckles)
- Small black glass seed beads (for eyes)
- Sculpting tools (needle tool, smoothing tool)
- Acrylic roller
- Clear gloss glaze (optional)
- Toothbrush (for texturing)
Step 1: Preparing the Clay Body
-
Create the speckles:
Before sculpting, condition your white clay until it is soft. To get that granite look, mix in a tiny amount of black pepper or dry heavy-body black acrylic paint. Fold and knead the clay repeatedly until the specks are evenly distributed throughout the batch. -
Form the main body:
Roll a large portion of your clay into a smooth ball about the size of a golf ball. Gently elongate it into a thick oval shape, slightly tapering one end where the head will attach. -
Shape the legs:
Roll four equal-sized smaller balls of clay for the legs. Roll each into a short, stout cylinder. -
Attach the legs:
Stand the four leg cylinders upright on your work surface in a rectangular formation. Press the body oval firmly onto them, blending the seams upward onto the belly so the join is invisible. I find using a rubber-tipped tool helps smooth these curves without leaving fingerprints. -
Smooth the stance:
Gently press the entire figure down onto the table to ensure all four feet are flat and the elephant stands evenly.
Natural Texture
Mix dried tea leaves or ground coffee into your clay instead of pepper for brown earth-toned speckles and a slightly coarser texture.
Step 2: Sculpting the Head and Trunk
-
Form the head base:
Roll a ball slightly smaller than the body. Mold it into a rounded pear shape, pulling the narrower end outward to begin forming the trunk. -
Extend the trunk:
Continue to gently roll and pull the trunk end, curving it upwards in a ‘U’ shape. The tip should be slightly thicker than the middle section for a cute, cartoony look. -
Add trunk details:
Use a ball stylus tool to make a small indentation at the very tip of the trunk. You can also lightly press two small lines near the curve for wrinkles. -
Attach the head:
Place the head onto the front of the body. Blend the clay at the neck seam thoroughly using a modeling tool or your finger so the head is secure. -
Create the mouth:
Use a needle tool or a thin blade to cut a small, curved smile just under the base of the trunk.
Sagging Trunk?
If the trunk droops, support it with a crumpled piece of aluminum foil or a small wedge of paper while baking or drying to hold the curve.
Step 3: Adding Details and Ears
-
Make the ears:
Flatten two balls of clay into thick pancake shapes. Pinch one side of each circle to create a slightly straighter edge for attachment. -
Detail the ears:
Press a few indentation lines into the center of the ears to mimic folds. Curve the outer edges slightly forward to give them dimension. -
Attach the ears:
Press the straight edge of the ears onto the sides of the head. Blend the clay at the back of the ear attachment point, keeping the front seam crisp. -
Insert eyes:
Press two small black glass beads into the face for eyes. Push them in deep enough that they won’t pop out during baking or drying. -
Final texture check:
Inspect your sculpture for fingerprints. You can gently tap the surface with an old toothbrush to remove prints and enhance the stone-like texture. -
Bake or dry:
If using polymer clay, bake according to the package instructions (usually 275°F for 15-30 minutes). If using air-dry clay, let it sit in a dry spot for 24-48 hours. -
Seal (optional):
For a finished look, apply a thin coat of matte or satin varnish to protect the clay.
Now you have a sturdy little friend ready to decorate your shelf or desk


What Really Happens Inside the Kiln
Learn how time and temperature work together inside the kiln to transform clay into durable ceramic.
Coil-Built Snail Planter Buddy
This charming duo features a large, coiled snail sculpture doubling as a decorative planter companion, topped with a tiny hitchhiking friend. The speckled clay body and simple spiral design give it a warm, organic feel perfect for sitting alongside your favorite succulents.
Detailed Instructions
Materials
- Speckled stoneware clay (red/brown tone)
- Needle tool
- Scoring tool or serrated rib
- Slip (clay and water mixture)
- Potter’s sponge
- Modeling tool or wooden skewer
- Small paintbrush
- Rolling pin (optional)
- Black underglaze (for eyes)
Step 1: Sculpting the Large Snail Body
-
Roll the main coil:
Begin by taking a substantial chunk of speckled clay and rolling it into a long, thick snake on your work surface. Aim for a tapered shape that is thicker at one end (for the shell) and thinner at the other (for the tail). -
Form the spiral shell:
Starting with the thickest end of your coil, tightly roll the clay inward upon itself to create a classic spiral shape. Leave about one-third of the length unrolled to form the neck and head. -
Shape the head and neck:
Gently curve the unrolled portion of the coil upwards. Smooth the transition between the spiral and the neck so it looks like one continuous muscle. -
Refine the face:
Pinch the end of the neck slightly to form a distinct snout. Gently tap the nose to blunt it, giving the snail a soft, friendly profile. -
Blend the coil seams:
Where the spiral touches the main body, flip the piece over and carefully smudge the clay across the seams on the bottom or back side to secure the coil so it won’t unravel. -
Add texture:
Use a slightly damp sponge to smooth out fingerprints, but don’t over-smooth; the natural texture of the speckled clay adds character.
Step 2: Creating the Tiny Snail
-
Roll a mini coil:
Take a very small ball of clay, about the size of a grape, and roll it into a tiny tapered coil. -
Coil the mini shell:
Just like the large snail, roll the thick end into a tight spiral. Since this is so small, you might need to use just your fingertips or tweezers. -
Shape the mini body:
Form a small, rounded head shape from the remaining clay. The body should be compact and essentially just a head sticking out of the shell. -
Make the antennae:
Roll two impossibly thin threads of clay. Attach tiny balls to the ends of these threads to make the eye stalks. -
Attach antennae:
Score the top of the mini snail’s head with a needle tool, add a dot of slip, and gently press the antennae into place. Be extremely delicate here.
Crack Prevention
If your coil seams start cracking as you bend them, your clay is too dry. Sprritz it with water or cover with plastic for an hour to rehydrate before continuing.
Step 3: Assembly and Finishing
-
Position the passenger:
Decide where you want the little snail to sit on the larger snail’s shell. The top curve is usually the most stable spot. -
Score and slip:
Rough up the contact points on both the bottom of the small snail and the top of the large shell. Apply a generous amount of slip. -
Secure the bond:
Press the small snail firmly onto the large one. Wiggle it slightly to lock the clay particles together, then clean up any excess slip with a brush. -
Add the eyes:
Use a needle tool to make tiny indentations for the eyes on the large snail. For the small snail, simple poke holes work best. -
Bisque fire:
Allow the piece to dry slowly and completely before bisque firing to the temperature appropriate for your specific clay body. -
Enhance details:
Once bisqued, dab a tiny dot of black underglaze into the eye indentations to make them pop. -
Final firing:
Since the clay itself is decorative, clear glaze isn’t strictly necessary, but you can fire it to maturity to make the stone vitrified and waterproof.
Glossy Trail
Apply a clear gloss glaze only to the bottom ‘foot’ of the snail and the shell spiral to mimic a slimy snail trail while keeping the rest matte.
Place your finished ceramic snails next to a leafy plant to give them a natural habitat to explore
Pocket-Size Whale Sculpture
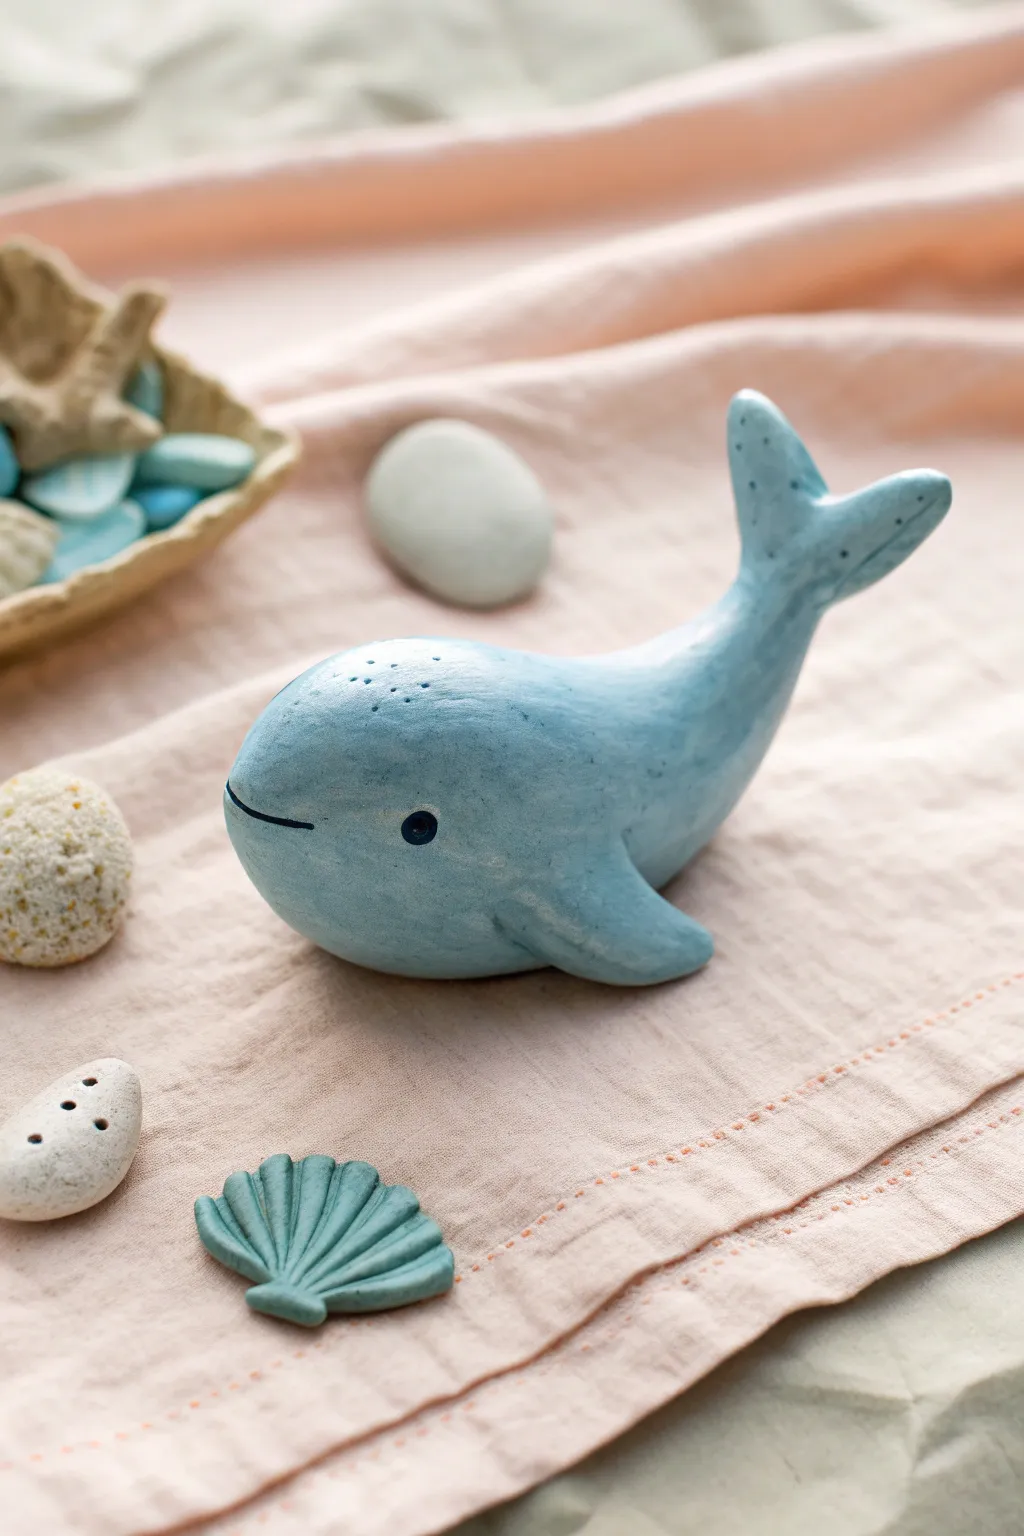
This charming little whale sculpture brings a splash of the sea to your desk or shelf with its smooth, curved lines and friendly expression. Perfect for beginners, this project captures the gentle nature of these aquatic giants in a palm-sized format.
Step-by-Step Tutorial
Materials
- Light blue polymer clay (or air-dry clay)
- Black acrylic paint or black clay for eyes/mouth
- Sculpting tools (needle tool, smoothing tool)
- Aluminum foil (optional, for armature)
- Acrylic rolling pin
- Matte varnish or sealant
- Thin paintbrush
- Sandpaper (fine grit)
Step 1: Shaping the Base
-
Prepare the Clay:
Start by conditioning your light blue clay until it is soft and pliable. If you want to save on clay, you can crunch a small ball of aluminum foil into a teardrop shape to use as a core. -
Form the Body:
Roll the clay into a large, smooth teardrop shape. If using a foil core, wrap the sheet of clay evenly around it, ensuring no air bubbles are trapped inside. -
Create the Curve:
Gently bend the tapered end of the teardrop upwards to form the tail section. The body should have a slight, natural curve, like a whale surfacing for air. -
Flatten the Tail:
Pinch the very tip of the tapered end to flatten it horizontally. This will become the base for the tail flukes.
Cracks Appearing?
If you see tiny cracks while smoothing, your clay might be too dry. Dip your finger in water (for air-dry) or baby oil (for polymer) and massage the crack in circular motions to heal it.
Step 2: Sculpting Features
-
Shape the Flukes:
Use a knife tool to cut a notch in the center of the flattened tail tip. Gently round off each side to create the distinct two-lobed shape of the whale’s tail. -
Add the Fins:
Create two small triangular pieces of clay for the pectoral fins. Attach one to each side of the lower body, blending the seams smoothly with a modeling tool or your finger so they look like they grow seamlessly from the body. -
Smooth the Surface:
Take a moment to inspect the entire form. Use a little baby oil or water on your fingertip to lightly buff away any fingerprints or harsh tool marks, ensuring the whale is perfectly smooth. -
Define the Mouth:
Using a needle tool or a thin blade, gently press a curved line into the front of the face to create a smiling mouth. Keep the incision shallow and clean. -
Add Eye Sockets:
Press a small ball tool or the end of a paintbrush handle into the clay just above the corners of the mouth to create small indentations for the eyes. -
Texture the Top:
For a bit of realistic detail, use a needle tool to poke a few very tiny, shallow holes on the top of the head to represent blowholes or skin texture.
Make it a Charm
Before baking or drying, insert a metal screw eye into the top of the whale’s back. Once hardened, you can attach a chain or cord to turn your sculpture into a cute necklace or keychain.
Step 3: Finishing Touches
-
Bake or Dry:
If using polymer clay, bake your piece according to the package instructions (usually around 275°F/130°C for 15-30 minutes). If using air-dry clay, let it sit undisturbed for 24-48 hours until fully hardened. -
Sand Imperfections:
Once fully cured and cooled, check for any rough spots. I like to use very fine-grit sandpaper here to gently polish the surface, giving it that soft, stone-like quality. -
Paint the Details:
Using a fine detail brush and black acrylic paint, carefully fill in the mouth line and paint small circles in the eye indentations. Alternatively, you can glue in tiny beads or balls of black baked clay. -
Add Speckles:
To mimic the texture in the photo, dilute a tiny bit of darker blue or grey paint and flick it onto the sculpture with an old toothbrush, or stipple it gently on the tail and back. -
Seal the Piece:
Finish by applying a coat of matte varnish. This protects the paint and clay while preserving that natural, non-glossy look characteristic of the original design.
Enjoy your serene little whale as a calming desk companion or a thoughtful handmade gift.

TRACK YOUR CERAMIC JOURNEY
Capture glaze tests, firing details, and creative progress—all in one simple printable. Make your projects easier to repeat and improve.
Owl With Big Round Eyes
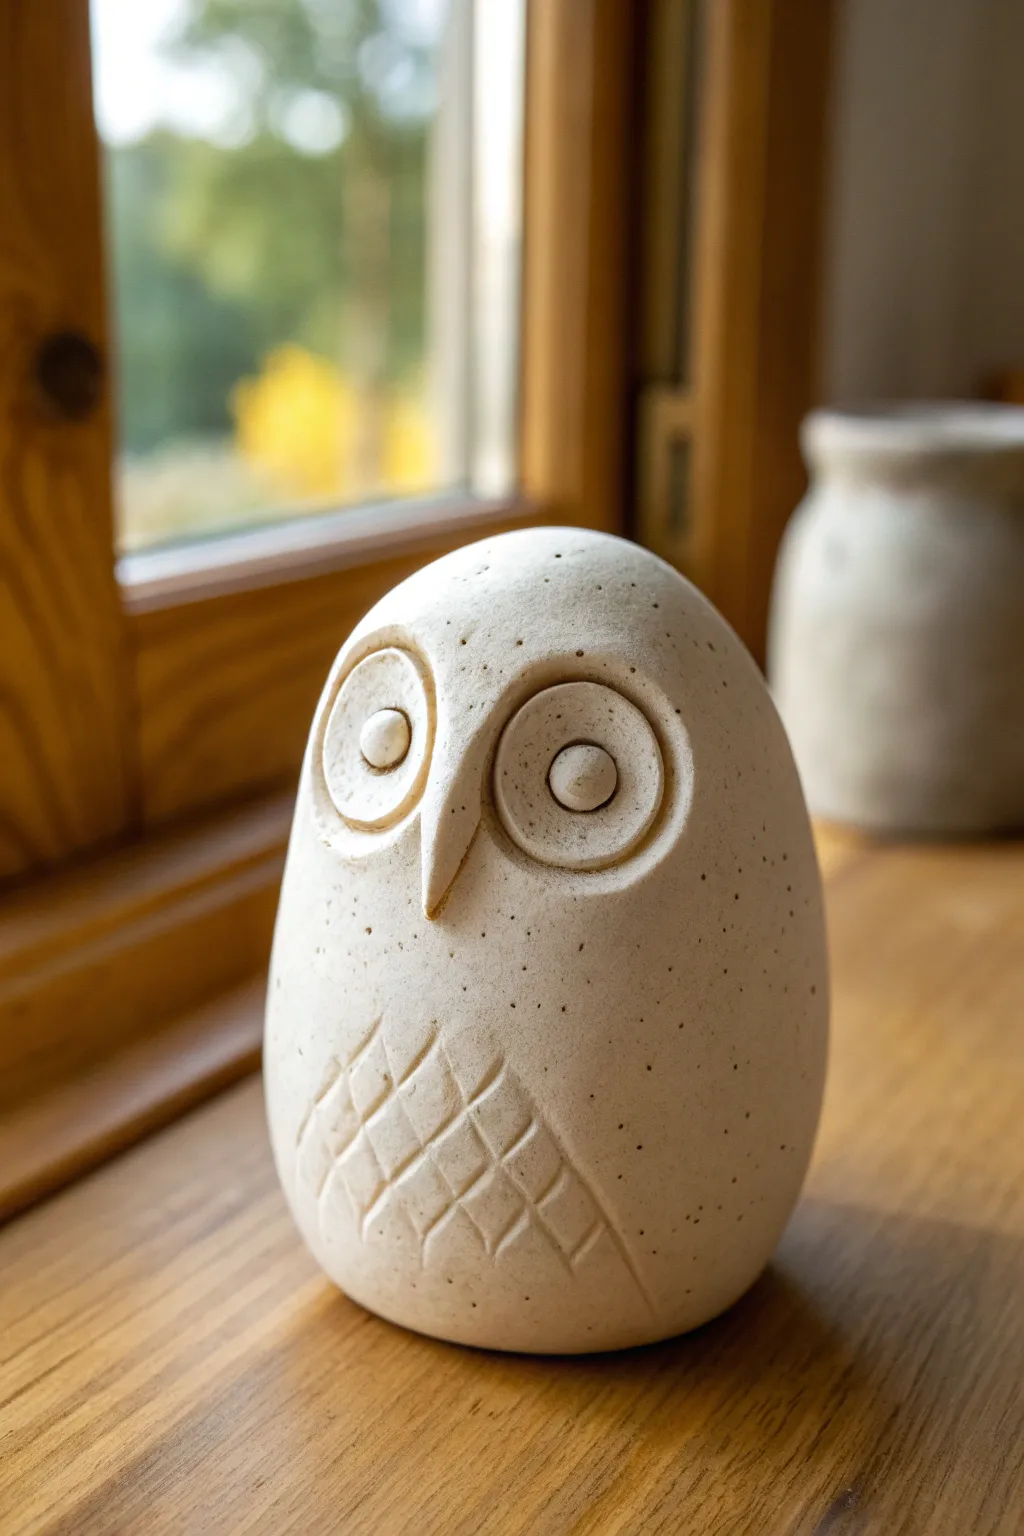
Embrace simplicity with this charming egg-shaped owl sculpture that mimics the look of natural carved stone. Its wide, watchful eyes and subtle hatched feather details make it a serene addition to any bookshelf or windowsill.
Step-by-Step
Materials
- White or beige air-dry clay (approx. 500g)
- Small carving tool or toothpick
- Rolling pin (optional)
- Small circle cutter (approx. 1 inch)
- Smaller circle cutter or straw (approx. 0.5 inch)
- Fine-grit sandpaper
- Brown speckled acrylic paint (optional for finish)
- Matte sealant
Step 1: Shaping the Base
-
Prepare the clay:
Start by kneading your block of air-dry clay until it is warm, pliable, and free of air bubbles. This conditioning step prevents cracks later on. -
Form the egg shape:
Roll the clay into a smooth ball between your palms, then gently elongate it to create an oval, egg-like form. The base should be slightly wider than the top. -
Flatten the bottom:
Tap the wider end of your egg firmly against your work surface. You want a completely flat base so the owl stands securely without wobbling. -
Smooth the surface:
Dip your finger in a little water and run it over the entire surface to smooth out any fingerprints or bumps. Aim for a seamless, stone-like finish.
Step 2: Sculpting the Face
-
Position the eye sockets:
In the upper third of the egg shape, decide where the eyes will go. They should be side-by-side with very little space in between. -
Outline the eyes:
Using your larger circle cutter, gently press two rings into the clay to mark the outer rim of the eyes. Don’t cut all the way through; just create an indentation. -
Recess the sockets:
Use a modeling tool or your thumb to gently press the clay inside those circles inwards, creating a shallow, concave dish shape for the eye sockets. -
Add the pupils:
Roll two small, pea-sized balls of clay. Flatten them slightly and press one into the center of each concave eye socket. -
Refine the look:
I like to use a damp brush to blend the edges of the pupils slightly so they look integrated rather than just stuck on. -
Form the beak:
Roll a small cone of clay. Attach it vertically between the eyes, with the point facing downwards. The top of the beak should blend into the forehead area. -
Blend the beak:
Smooth the clay from the top of the beak upwards into the head so there is no seam, leaving the pointed tip sharp and distinct.
Cracks Appearing?
If small cracks form while drying, mix a tiny amount of fresh clay with water to make a paste (slip). Fill the cracks with this paste and smooth it over with your finger.
Step 3: Detailing and Finishing
-
Mark the belly area:
Visualize a semi-circle or shield shape on the lower front of the owl. This will be the feather area. -
Carve diagonal lines:
Using a toothpick or a sharp carving tool, draw a series of parallel diagonal lines across this belly area. -
Cross-hatch the feathers:
draw a second set of diagonal lines going in the opposite direction to create a diamond cross-hatch pattern. Press deep enough to be visible but not so deep you deform the shape. -
Dry completely:
Let the sculpture dry for 24-48 hours. Turn it occasionally so the bottom dries evenly. -
Sand imperfections:
Once bone dry, use fine-grit sandpaper to buff away any rough spots, fingerprints, or sharp edges, enhancing that smooth river-stone aesthetic. -
Add texture (optional):
If your clay is plain white, you can flick a toothbrush loaded with watered-down brown paint over the surface to create a speckled, granite-like effect. -
Seal the piece:
Finish with a coat of matte varnish to protect the clay while keeping the natural, earthy look intact.
Weighted Base
For a sturdier feel, press a crumpled ball of aluminum foil or a small smooth rock into the center of your clay ball before forming the egg shape.
Enjoy the quiet presence of your new handcrafted stone friend on your shelf
Sleepy Sloth Hanging On a Branch
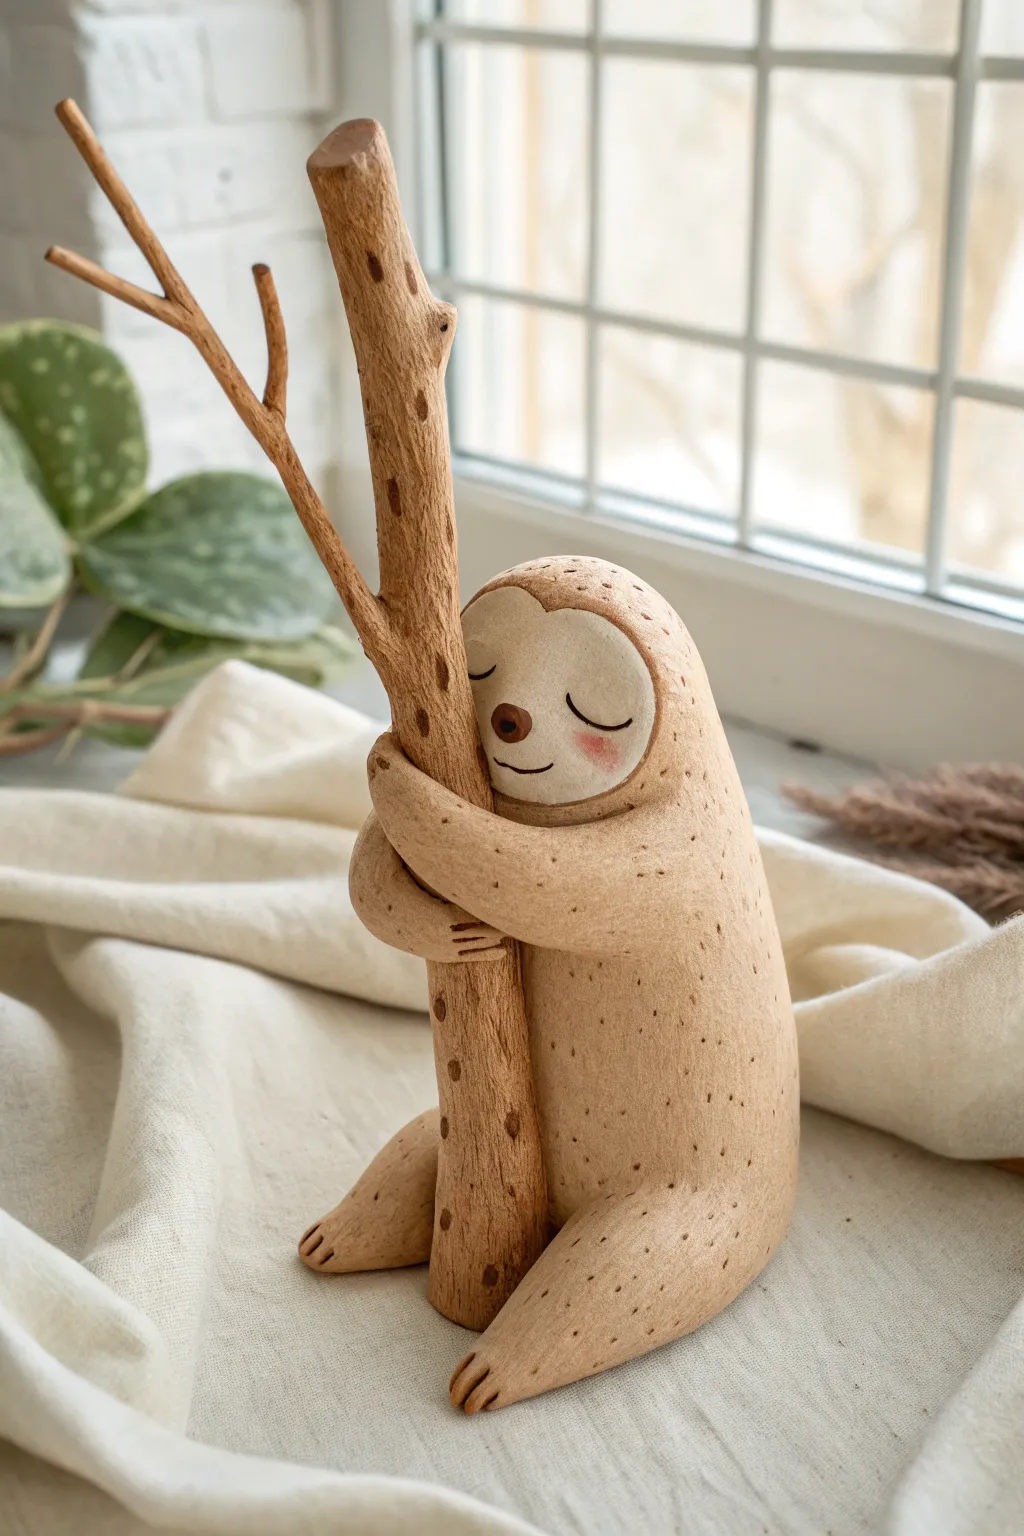
Capture the serenity of a snoozing sloth with this charming clay project that doubles as adorable decor. The design features a smooth, speckled finish and a heartwarming pose, hugging a textured branch.
Detailed Instructions
Materials
- Air-dry clay or polymer clay (beige/tan)
- Small amount of white clay (for the face)
- Dark brown acrylic paint
- Pink chalk pastel or blush
- Sculpting tools (needle tool, blending tool)
- Acrylic rolling pin
- Texture tool (scratch tool or crumpled foil)
- Parchment paper or non-stick mat
- Water (for smoothing air-dry clay)
- Small paintbrush
- Clear matte varnish
Step 1: Forming the Branch
-
Create the core trunk:
Roll a log of beige clay about 6-8 inches long. It doesn’t need to be perfectly straight; a slight natural curve adds realism. Flatten the bottom so it stands upright securely. -
Add branches:
Roll two or three thinner snake-like coils for branches. Attach them near the top of the main trunk, blending the seams completely smooth so they look grown from the wood. -
Texture the bark:
Using a needle tool or a stiff-bristled brush, drag vertical lines down the entire length of the trunk and branches to simulate bark texture. -
Add knots:
Press a small, circular indentation into the wood here and there, then refine the edges to look like knots in the wood. Set the branch aside to firm up slightly while you work on the sloth.
Natural Speckle Hack
Mix spent coffee grounds or black pepper directly into your clay block before sculpting to get that organic, speckled pottery texture instantly.
Step 2: Sculpting the Sloth
-
Shape the body:
Form a large, smooth egg shape from your beige clay. This will be the main torso of the sloth. Gently flatten the bottom so it can sit beside the branch. -
Attach the body:
Place the egg shape against the branch trunk. Press it gently so it conforms to the curve of the wood, ensuring a snug fit. -
Form the legs:
Roll two thick sausage shapes for the legs. Attach them to the bottom of the body, curving them forward so the feet rest on the ground. Use a tool to press three small indentations into the ends for toes. -
Create the arms:
Roll two longer, tapered coils for the arms. Attach them at the shoulders and wrap them affectionately around the tree trunk. The hands should meet or overlap slightly on the other side. -
Sculpt the claws:
Use a knife tool to define three claws on each hand where they grip the bark. Smooth all attachment points (shoulders and hips) with a little water or clay softener. -
Refine the shape:
Check the silhouette from all angles. I find using a silicone tool helps smooth out any fingerprints without ruining the overall form.
Step 3: Face and Details
-
Make the face plate:
Flatten a small ball of white clay into a disc. Attach this to the upper front of the head area, blending the edges softly so it transitions into the beige clay. -
Add facial features:
Using a very small amount of dark brown clay (or painting later), add a tiny oval nose in the center of the white disc. Scribe a smiling mouth line just below it. -
Create sleepy eyes:
Carve two U-shaped curves for closed eyes. If using paint, wait until the piece is dry to paint these thin lines. -
Apply speckling:
To mimic the speckled clay look, take a toothbrush dipped in watered-down brown paint and gently flick tiny specks all over the sloth’s body (avoiding the white face). Let the specks dry. -
Define the bark details:
Paint the recessed texture of the tree trunk with a wash of darker brown paint, wiping away the excess on the surface to highlight the grooves. -
Add blushing cheeks:
Scrape a little pink chalk pastel into a powder. Use a dry, soft brush to dust rosy circles onto the sloth’s cheeks. -
Final dry and seal:
Allow the sculpture to dry thoroughly according to your clay type’s instructions. Once cured, apply a matte varnish to protect the surface.
Gravity Defying
If the tree trunk wobbles or slumps, insert a crumpled core of aluminum foil or a wooden skewer inside the trunk for lightweight, rigid support.
Place your finished sloth near a window or plant to give it a peaceful spot to nap
Little Monster With One Big Eye
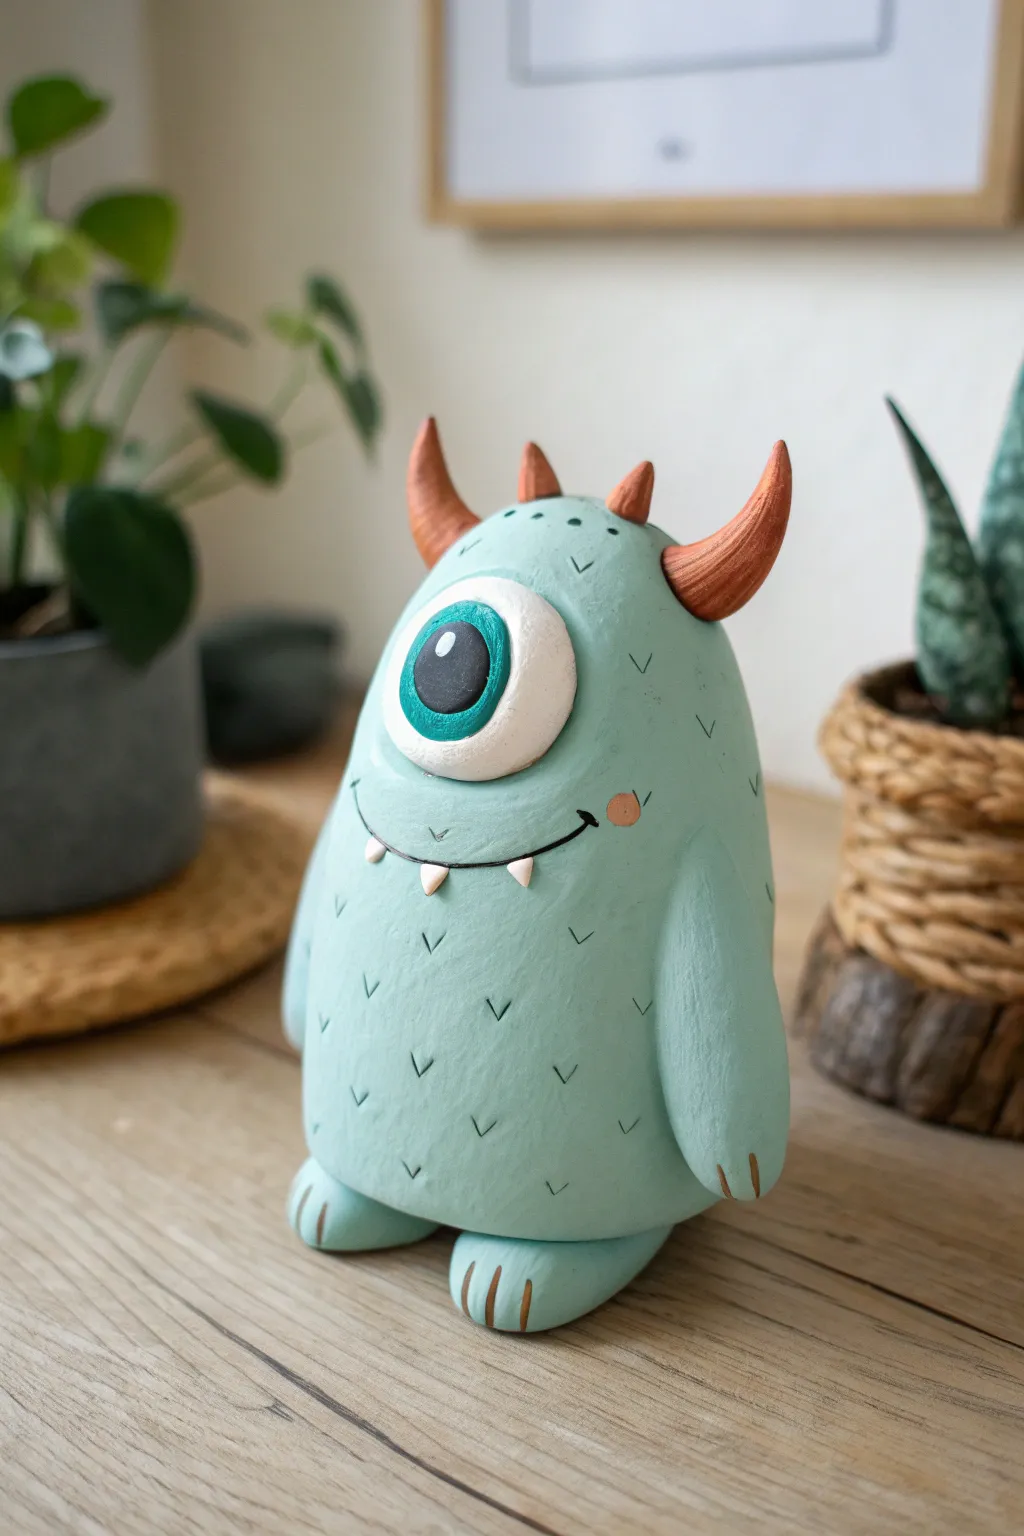
Create your own adorable desk companion with this simple yet charming one-eyed monster sculpture. Featuring a smooth teal body, textured details, and prominent horns, this character brings a playful vibe to any shelf.
Detailed Instructions
Materials
- Polymer clay (Teal/Light Blue, White, Black, Terra Cotta/Orange, Pink)
- Clay sculpting tools (needle tool, ball stylus)
- Aluminum foil (for armature)
- Rolling pin or pasta machine
- Baking sheet and parchment paper
- Oven (for curing)
- Matte varnish (optional)
Step 1: Forming the Body base
-
Create the core:
Ball up a piece of aluminum foil into an egg shape about the size of a large lemon. This saves clay and keeps the sculpture lightweight while preventing cracking during baking. -
Condition the main color:
Take a large block of teal or light blue polymer clay and knead it until it is soft and pliable. I like to warm it in my hands for a few minutes to make it easier to work with. -
Cover the armature:
Flatten the teal clay into a sheet about 1/4 inch thick. Wrap this sheet fully around your foil egg, smoothing the seams together with your fingers until you have a seamless, smooth egg-shaped body. -
Shape the silhouette:
Gently tap the bottom of the egg on your work surface to create a flat base so the monster stands on its own. Slightly taper the top of the egg shape for the head area.
Step 2: Adding Important Features
-
Sculpt the feet:
Roll two medium-sized balls of teal clay and flatten them slightly into distinct oval shapes. Press these firmly onto the bottom front of the body for feet. -
Detail the toes:
Use a needle tool or a dull knife to press three vertical lines into the front of each foot to imply toes. -
Attach the arms:
Create two elongated teardrop shapes from teal clay. Attach one to each side of the body, blending the upper shoulder area into the main body while letting the hands rest naturally against the sides. -
Add hand details:
Like the feet, use your needle tool to impress three small lines at the bottom of each arm to create simple fingers.
Keep it Clean
White clay picks up dust instantly. Use baby wipes to clean your hands and tools thoroughly before handling white parts to keep the eye bright.
Step 3: The Face and Horns
-
Make the eye white:
Roll a large ball of white clay and flatten it into a thick disc. Press this firmly onto the upper center of the face. It should be prominent and slightly bulging. -
Add the iris and pupil:
Place a smaller circle of teal clay in the center of the white disc, followed by an even smaller black circle for the pupil. Add a tiny white dot on the black pupil for a reflection ‘sparkle’. -
Shape the horns:
Roll two cone shapes from terra cotta or dark orange clay. Curve them slightly to look like bull horns. -
Texture the horns:
Before attaching, use a needle tool to scratch subtle horizontal lines up the length of the horns for a woody, organic texture. -
Attach the horns and spikes:
Press the large horns onto the sides of the head. Create 2-3 smaller cones of the same orange color and place them in a row directly on top of the head like a mohawk.
Horns Won’t Stick?
If the horns keep drooping or falling off, insert a small piece of toothpick or wire into the base of the horn and push it into the head for internal support.
Step 4: Final Details and Curing
-
Carve the mouth:
Use a needle tool to drag a wide, sweeping U-shape across the face below the eye. Press deeper at the ends to create small dimples. -
Add teeth and blush:
Make three tiny white triangles and press them onto the mouth line (two hanging down, one pointing up). Add a small flattened circle of pink clay to the right cheek for a blush spot. -
Create body texture:
Using the very tip of a sharp needle tool or knife, gently press small ‘V’ shapes randomly all over the teal body to mimic fur or scales. -
Bake the project:
Place your monster on parchment paper and bake according to your clay package instructions (usually 275°F for 15-30 minutes per 1/4 inch of thickness). -
Cool and finish:
Let the sculpture cool completely inside the oven to prevent cracking. Once cool, you can brush on a matte varnish for protection if desired.
Now you have a quirky little friend ready to guard your succulents or books