Slab building is my favorite way to get something cute and useful on the table fast—no wheel, no drama. If you can roll out a flat sheet of clay, you’re already halfway to making pieces that look intentional, modern, and totally you.
Easy Slab Trinket Dish With Pinched Corners
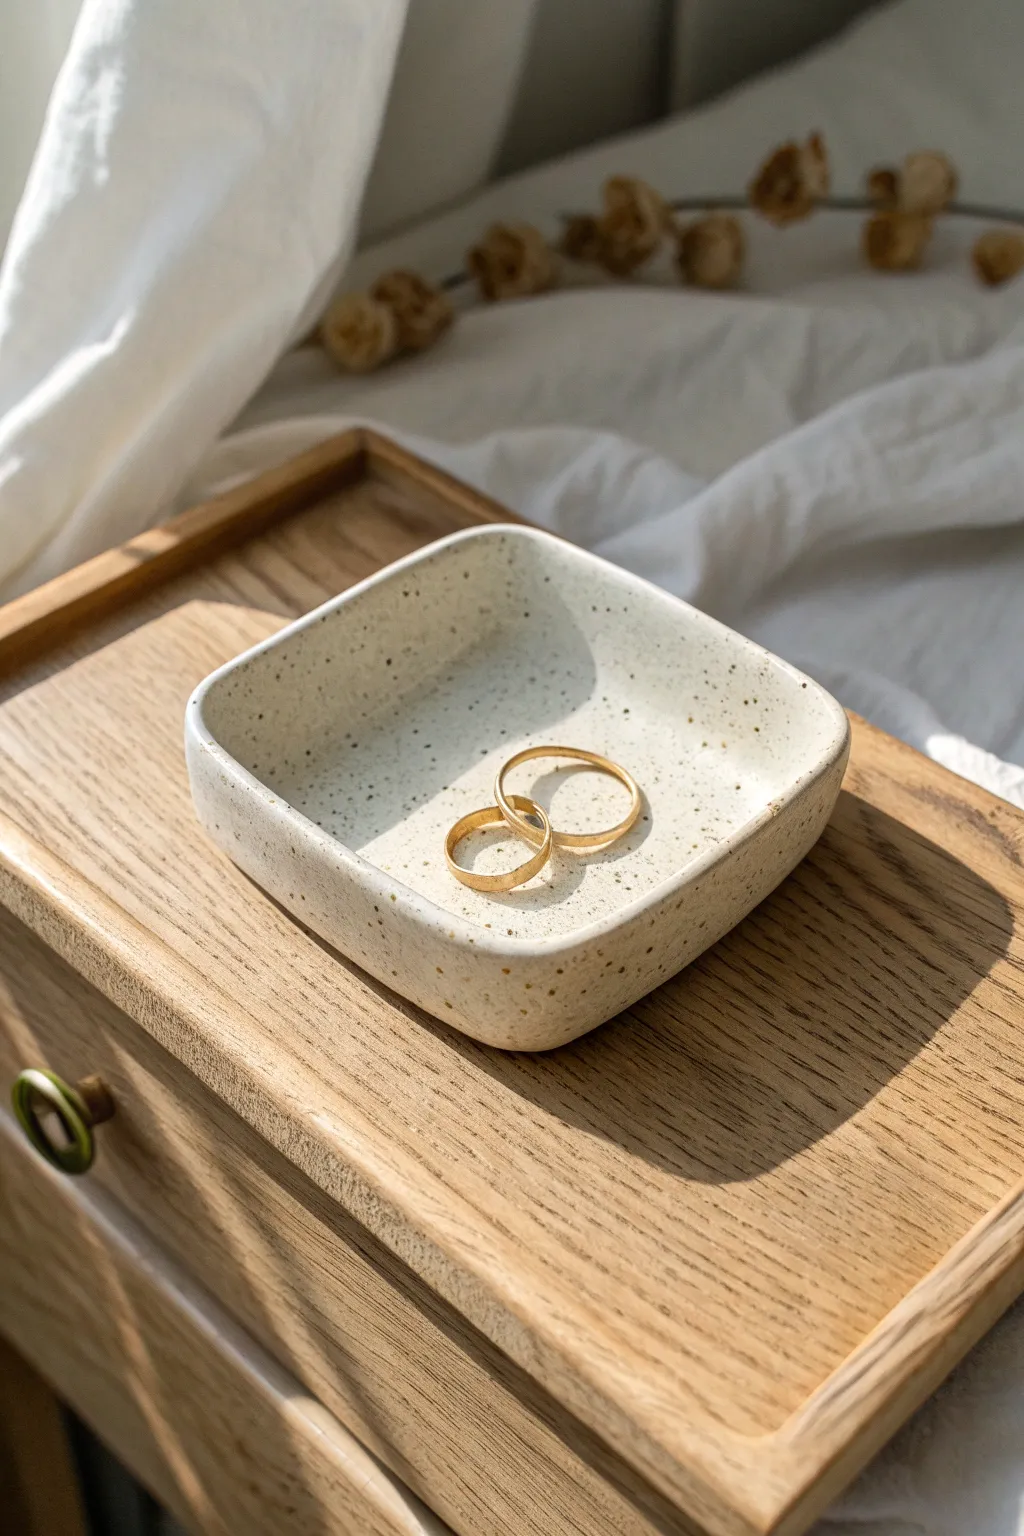
This elegant trinket dish combines the organic warmth of speckled clay with a clean, modern form. The soft white finish allows the natural texture of the clay body to shine through, creating a perfect resting spot for your favorite jewelry.
Step-by-Step
Materials
- Speckled Stoneware Clay
- Rolling Pin
- Two Wooden Guide Strips (approx. 1/4 inch thick)
- Square Paper Template (approx. 4×4 or 5×5 inches)
- Needle Tool or Fettling Knife
- Sponge
- Rib tool (wooden or silicone)
- Clear or Transparent White Glaze
- Kiln
Step 1: Preparing the Slab
-
Wedge the clay:
Begin by taking a ball of speckled stoneware clay and wedging it thoroughly. This removes air bubbles and ensures the clay particles are aligned for easier rolling. -
Set up guides:
Place your wooden guide strips on your canvas or work surface. These should be spaced just wider than your intended dish size to ensure the slab gets rolled to an even thickness. -
Roll the slab:
Place the clay ball between the guides. Using the rolling pin, roll the clay out until the pin rests flat against both wooden strips. Rotate the clay occasionally to keep the shape relatively circular or square. -
Compress the surface:
Take a rib tool and gently drag it across the surface of the clay in multiple directions. This compression is crucial as it strengthens the slab and prevents future warping in the kiln.
Smooth Moves
Use a damp chamois strip on the rim while the clay is still plastic. This compresses the edge better than a sponge and creates a buttery-smooth finish.
Step 2: Shaping the Form
-
Cut the square:
Lay your square paper template gently on top of the slab. Using your needle tool or fettling knife, cut straight down along the edges of the template to create a clean square. -
Smooth the edges:
Once the excess clay is removed, run a slightly damp finger or the rib tool along the cut edges to soften the harsh 90-degree angles. -
Lift the edges:
Carefully lift all four sides of the square slab upwards. You aren’t folding it; you are gently urging the clay to curve upward to create the dish walls. -
Pinch the corners:
At each of the four corners, gently pinch the clay together from the outside. Push the corner inward slightly to create a rounded, soft curve rather than a sharp point. -
Refine the walls:
Use your thumb on the inside and fingers on the outside to smooth the transition between the base and the walls, ensuring the curve is continuous and organic. -
Level the rim:
Place the dish on a flat surface and look at it from eye level. Tap the rim gently with a flat wooden tool or paddle to ensure the top edge is level all the way around.
Step 3: Finishing and Firing
-
Dry slowly:
Tent the dish loosely with plastic and allow it to dry very slowly to the leather-hard stage. This slow drying helps prevent the corners from cracking. -
Final smoothing:
Once bone dry, use a slightly damp sponge to wipe away any sharp burrs or imperfections on the rim or surface, taking care not to re-wet the clay too much. -
Bisque fire:
Load the bone-dry piece into the kiln for the bisque firing, typically to Cone 04. This hardens the clay and prepares it for glazing. -
Apply glaze:
Dip or brush your transparent white glaze onto the piece. I find that a transparent glaze works best here, as an opaque one will hide those beautiful speckles we want to show off. -
Wipe the foot:
Use a wet sponge to completely remove any glaze from the bottom of the dish so it doesn’t fuse to the kiln shelf during firing. -
Glaze fire:
Place the dish back in the kiln for the final glaze firing, usually to Cone 5 or 6 for stoneware. Allow the kiln to cool completely before opening to reveal the finished speckled surface.
Gold Touch
After the final glaze firing, apply a gold luster overglaze to just the very edge of the rim and re-fire at a low temperature for a luxurious gilded look.
Place your finished dish on a nightstand or dresser to catch the morning light and your favorite rings


Simple Slab Soap Dish With Drain Holes
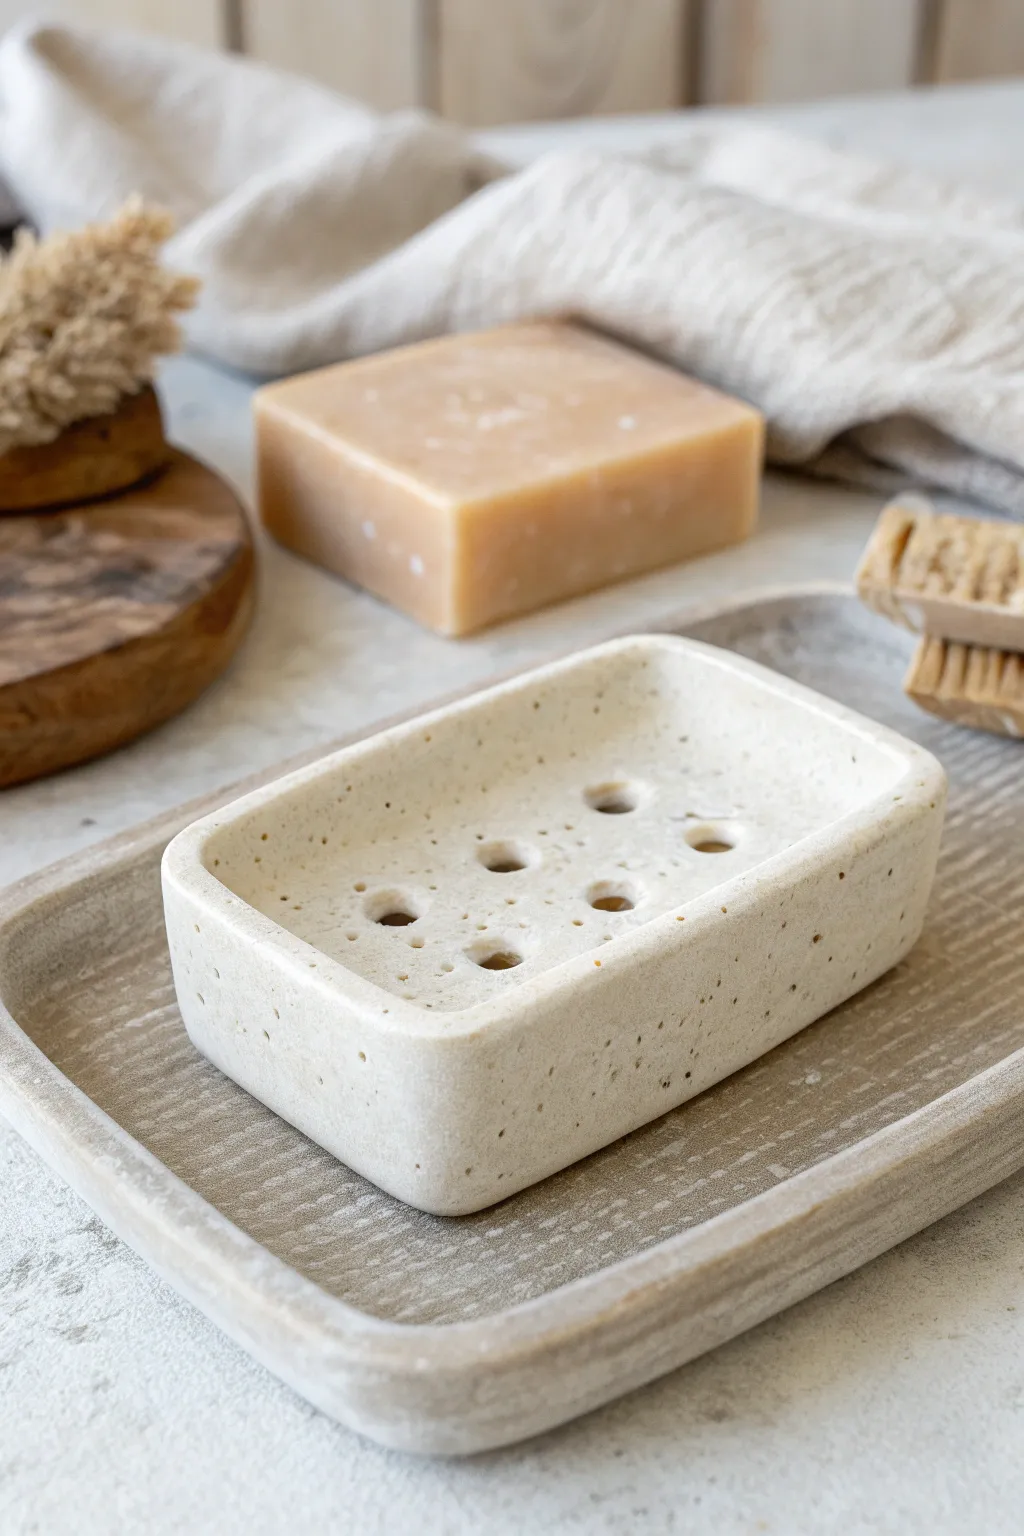
Create a minimal and functional sanctuary for your favorite bar soap with this sleek, slab-built dish. Its thick, rounded walls and efficient drain holes give it a spa-like stone aesthetic that looks beautiful sink-side.
Step-by-Step Tutorial
Materials
- Speckled stoneware clay (mid-fire)
- Rolling pin with guide strips or thickness guides (approx. 1/4 to 3/8 inch)
- Fettling knife or needle tool
- Small rectangular template (paper or cardstock)
- Hole punch tool or straw
- Scoring tool or serrated rib
- Slip (clay water slurry)
- Wooden modeling tool
- Sponge
- Canvas or slab mat for rolling
Step 1: Preparing the Slabs
-
Roll the main slab:
Begin by wedging your speckled clay to remove air bubbles, then roll it out into a smooth, even slab. Aim for a thickness of about 3/8 of an inch, as this chunky look mimics the stone aesthetic best. -
Compress the clay:
With a rubber rib, firmly compress the clay on both sides. This aligns the clay particles, reducing warping later, and ensures a super smooth surface texture. -
Cut the base:
Using your rectangular paper template, cut out the base of the soap dish. A size around 3 x 4.5 inches usually works well for standard soap bars. -
Cut the walls:
From the remaining slab, cut a long strip for the walls. Calculate the length by measuring the perimeter of your base rectangle, plus a little extra for the overlap. The height should be about 1 inch.
Warping worries?
If the base bows upward while drying, place a small sandbag or weight inside the dish during the leather-hard stage to keep it flat.
Step 2: Constructing the Dish
-
Score the connection points:
Take your scoring tool and rough up the top outer edge of your base piece. I also score the bottom edge of the wall strip to ensure a really strong bond. -
Apply slip:
Generously dab slip or water onto the scored areas. It should be glistening but not a puddle. -
Attach the wall:
Place the wall strip onto the base. Instead of squaring the corners, gently curve the clay around the corners of the rectangle to achieve that soft, rounded look seen in the photo. -
Join the ends:
Where the two ends of the wall strip meet, cut them at a 45-degree angle for a cleaner seam. Score, slip, and press them firmly together. -
Blend the seams:
Using a wooden tool or your thumb, drag clay from the wall down onto the base on the inside, and from the base up onto the wall on the outside. Smooth these joins completely until the seam disappears. -
Reinforce the inside:
Roll a very thin coil of clay and press it into the interior seam where the floor meets the wall. Smooth it out with a rounded tool to create a seamless, curved transition.
Add some feet
Attach four tiny balls of clay to the bottom corners. This elevates the dish, allowing water to drain away freely and keeping the base dry.
Step 3: Refining and Finishing
-
Clean the rim:
Use a damp sponge to smooth the top rim of the dish. You want to round off any sharp edges created by the cutting tool. -
Punch drain holes:
Using a hole punch tool or a simple drinking straw, press straight down through the base to create the drainage holes. Create two rows of three or four holes, keeping them centered. -
Clean up the holes:
Wait for the clay to stiffen slightly, then smooth the little burrs of clay around the exit and entry points of your holes with a damp fingertip or sponge. -
Final sponge wipe:
Give the entire piece one last wipe with a well-wrung sponge. This brings out the grit and speckles in the clay body. -
Dry slowly:
Loosely cover the dish with plastic for the first day to let the moisture equalize, then uncover to dry completely before firing. -
Glazing:
After the bisque fire, apply a transparent matte glaze or simply leave the exterior raw if your clay body is vitreous enough, glazing only the interior for easy cleaning.
Enjoy the organized calm this handmade piece brings to your daily routine


Slab Coasters With Stamped Texture

Embrace the natural beauty of botanical patterns with these minimalist white coasters, which feature delicate stamped textures of ferns, leaves, and tiny blooms. This simple slab project results in a set of functional art pieces that bring a soft, organic touch to any coffee table.
Step-by-Step Guide
Materials
- White stoneware clay or air-dry clay (smooth body)
- Canvas or heavy cloth for rolling
- Rolling pin
- Wooden guide strips (1/4 inch thick) or two identical magazines
- Round cookie cutter (approx. 4 inches) or a bowl and needle tool
- Fern leaves, small flowers, or botanical rubber stamps
- Needle tool or toothpick
- Sponge
- Small bowl of water
- Sandpaper (fine grit)
- Small kiln (if using stoneware) or sealant (if using air-dry clay)
- Clear matte glaze (optional, for stoneware)
Step 1: Preparing the Slab
-
Wedge the clay:
Begin by taking a manageable lump of your smooth white clay. Wedge it thoroughly on a canvas surface to remove air bubbles and ensure an even consistency, which prevents cracking later. -
Set up your guides:
Place your wooden guide strips or magazines on either side of the clay. These will act as depth stops for your rolling pin, ensuring your entire slab is a perfectly uniform thickness. -
Roll the slab:
Roll the clay out firmly and evenly. Start from the center and push outwards, rotating the clay occasionally to keep the shape somewhat circular, until your rolling pin rests on the guide strips. -
Smooth the surface:
Take a flexible rib tool or a barely damp sponge and gently compress the surface of the clay slab. This removes the canvas texture and creates a pristine, smooth canvas for your stamping.
Warping Woes?
If coasters curl up while drying, place a lightweight board on top of them (sandwiching them between two boards) as they dry to physically force them flat.
Step 2: Creating the Impressions
-
Select your stamps:
Choose your botanical elements. You can use rubber stamps with leaf motifs or fresh, sturdy leaves (like the fern shown) for a direct nature print. If using fresh leaves, place them vein-side down. -
Position the design:
Lay your chosen stamp or leaf onto the smooth clay slab. I like to arrange them slightly off-center for a more organic, artistic look rather than perfect symmetry. -
Press the texture:
Use a small pony roller or gently press with your fingers to push the stamp or leaf into the clay. Apply firm, even pressure to ensure all the fine details transfer without distorting the clay slab’s thickness. -
Remove the stamp:
Carefully lift one edge of your stamp or leaf. Peel it away slowly to reveal the clean impression left behind in the clay. -
Add detail dots:
Using the blunt end of a needle tool or a small stylus, gently press tiny dots around your main botanical motifs. This adds whimsical texture and fills negative space effectively.
Level Up: Color Wash
Apply a dark underglaze or acrylic wash into the stamped grooves, then sponge off the surface. The color will stay in the deep lines, highlighting the texture.
Step 3: Cutting and Refining
-
Cut the circles:
Position your round cutter over the stamped design. Press down firmly to cut the coaster shape. If you don’t have a cutter, place a small bowl upside down and trace around it with a needle tool. -
Release the coasters:
Remove the excess clay from around your cut circles. If the clay sticks to the surface, slide a wire cutter or long blade underneath to release them gently. -
Soften the edges:
Dip your finger in a tiny bit of water and run it along the cut rim of the coaster. Smooth away any sharp angles or burrs created by the cutting tool for a professional finish. -
Dry slowly:
Place the coasters on a flat board covered with newspaper or drywall board. Cover them loosely with plastic to let them dry very slowly; fast drying causes warping, especially with flat slabs. -
Flip occasionally:
Over the next few days, flip the coasters over gently once a day. This ensures air reaches both sides evenly, keeping them perfectly flat.
Step 4: Finishing and Sealing
-
Sand the dry form:
Once bone dry (or fully cured for air-dry clay), take fine grit sandpaper and lightly sand the edges to make them buttery smooth. Wipe away any dust with a slightly damp sponge. -
Fire (Stoneware only):
If using ceramic clay, bisque fire to cone 04. After bisque, you can leave the clay raw for a matte stone feel or apply a thin clear matte glaze to protect the surface from coffee stains. -
Seal (Air-dry only):
For air-dry clay, apply several thin coats of a waterproof sealant or acrylic varnish. This is crucial to prevent moisture from mug condensation from ruining your work. -
Add protective backing:
Adhere small cork pads or felt circles to the bottom of the finished coasters. This prevents them from scratching your table and adds a finished quality.
Now you have a charming set of handmade coasters ready to brave your morning coffee routine


Leaf-Shaped Slab Ring Dish
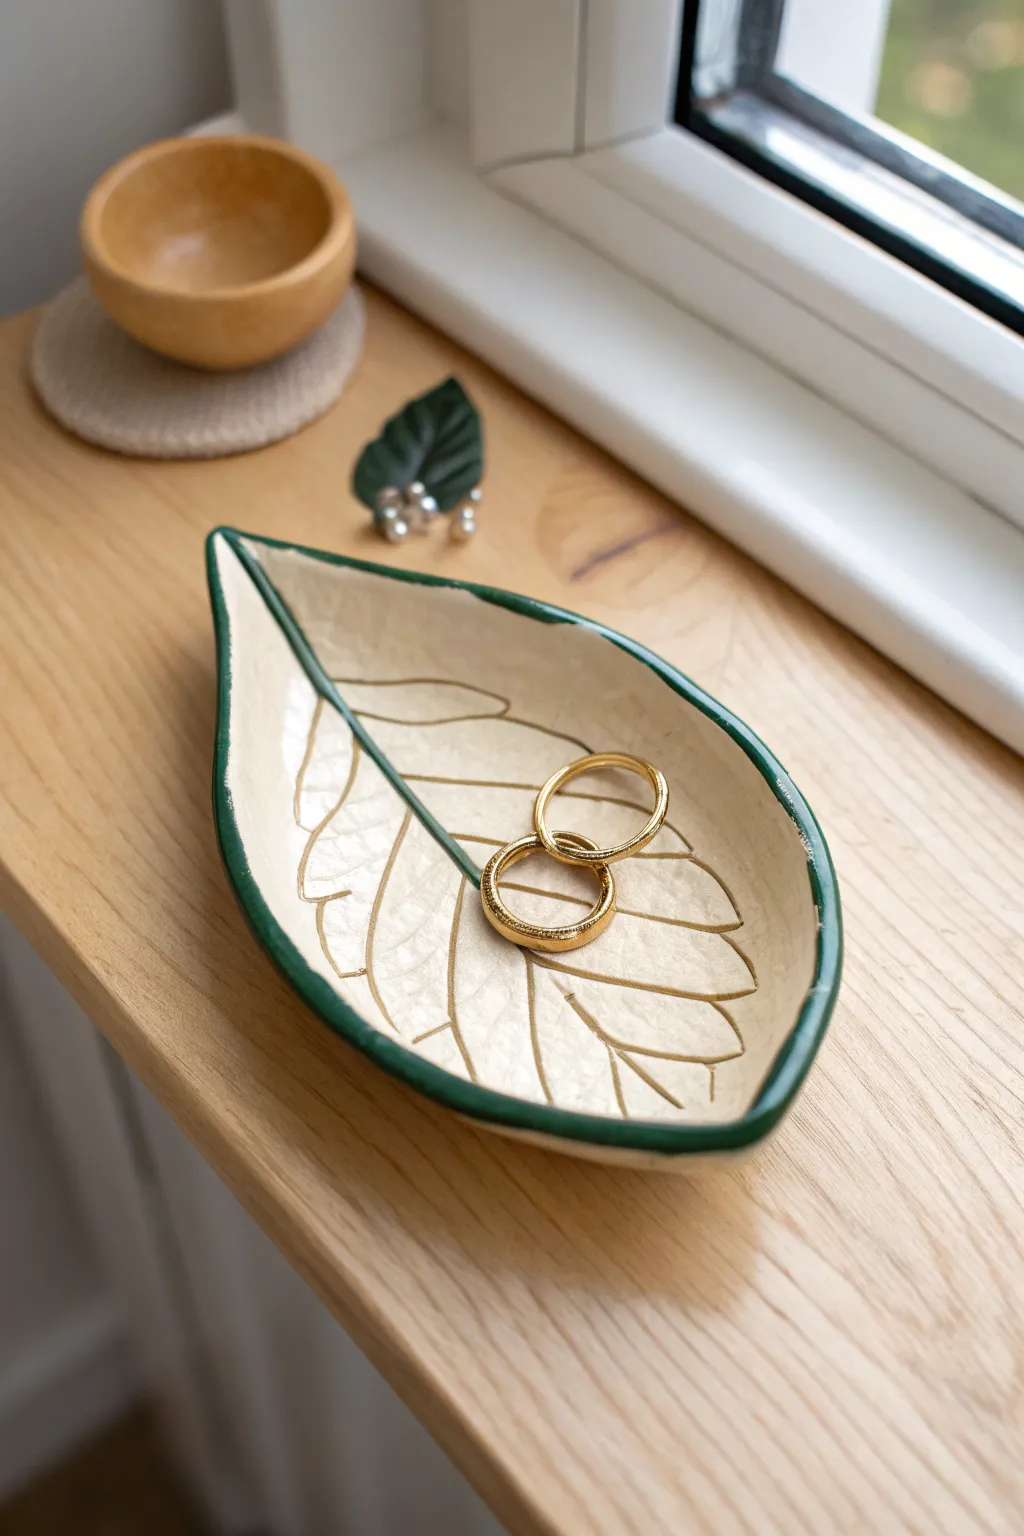
This charming, nature-inspired ring dish captures the simplicity of a leaf with its delicate vein detailing and deep green rim. Perfect for holding your favorite jewelry, this project uses basic slab building techniques to create a functional piece of art that looks right at home on any windowsill.
Step-by-Step
Materials
- White or light-colored air-dry clay or earthenware clay
- Rolling pin
- Canvas or cloth mat (for rolling)
- Needle tool or sharp knife
- Leaf template (cardstock) or a real large leaf
- Small carving tool or toothpick (for veins)
- Sponge
- Small bowl (for shaping)
- Dark forest green acrylic paint or underglaze
- Clear gloss varnish or glaze
- Fine liner paintbrush
Step 1: Shaping the Slab
-
Prepare the workspace:
Lay down your canvas or cloth mat to prevent the clay from sticking to your table. Take a ball of clay about the size of a tennis ball and knead it briefly to remove any air bubbles. -
Roll out the slab:
Using your rolling pin, roll the clay out into a smooth, even slab. Aim for a thickness of about 1/4 inch (approx. 6mm). Turn the clay occasionally to ensure it doesn’t stick and stays uniform. -
Cut the leaf shape:
Place your leaf template (or a real leaf) onto the slab. Using a needle tool or a sharp knife, carefully trace around the edge of the leaf to cut out the shape. Remove the excess clay. -
Smooth the edges:
Dip your finger or a small piece of sponge in a little water and run it along the cut edges of the clay. This softens any sharp corners or rough spots left by the knife.
Use Nature’s Texture
For realistic texture, press a real leaf with prominent veins into the slab before cutting. The veins will imprint directly into the clay, saving you carving time.
Step 2: Adding Details
-
Score the central vein:
With your needle tool or carving tool, draw a long, curved line down the center of the leaf, starting from the stem end and tapering towards the tip. Press deeply enough to make a mark, but be careful not to cut all the way through. -
Add side veins:
Carve smaller diagonal lines branching off from the center vein towards the edges. Vary the spacing slightly to make it look organic, mimicking the pattern of a real leaf. -
Create form:
Gently lift the clay leaf and place it inside a shallow bowl or curve it slightly with your hands. The goal is to lift the edges so it can hold items, but it shouldn’t be too deep. -
Refine the rim:
While the clay is curved, check the rim again. I often find that shaping exposes new rough spots, so smooth them out one last time with a damp sponge. -
Drying:
Let the clay dry completely. If using air-dry clay, this usually takes 24-48 hours. If using kiln-fire clay, follow the firing schedule for bisque ware at this stage.
Step 3: Painting and Finishing
-
Base coat (Optional):
If your clay isn’t already a creamy white color, paint the entire dried dish with a light cream or almond acrylic paint. Let this base layer dry fully. -
Paint the rim:
Using a fine liner brush and dark forest green paint (or underglaze), carefully paint the very edge of the rim. Let the line wobble naturally with the clay’s edge for a rustic look. -
Extend the green detail:
Bring the green paint slightly inward at the very tip of the leaf and the stem end, framing the shape. Ensure the paint connects smoothly with the rim line you just created. -
Protect the piece:
Once all paint is dry, apply a coat of clear gloss varnish or clear glaze. This seals the clay and gives it that polished, ceramic shine visible in the photo. -
Final cure:
Allow the varnish or glaze to cure completely according to the manufacturer’s instructions before placing any jewelry in the dish.
Curling Leaf Tips?
If the leaf tip curls too much while drying, weight it down gently with a small bag of sand or dry rice to keep the overall curve subtle and functional.
Place this lovely dish on your vanity to keep your rings safe and add a touch of handcrafted botanical beauty to your room

The Complete Guide to Pottery Troubleshooting
Uncover the most common ceramic mistakes—from cracking clay to failed glazes—and learn how to fix them fast.
Soft Slump-Mold Slab Bowl
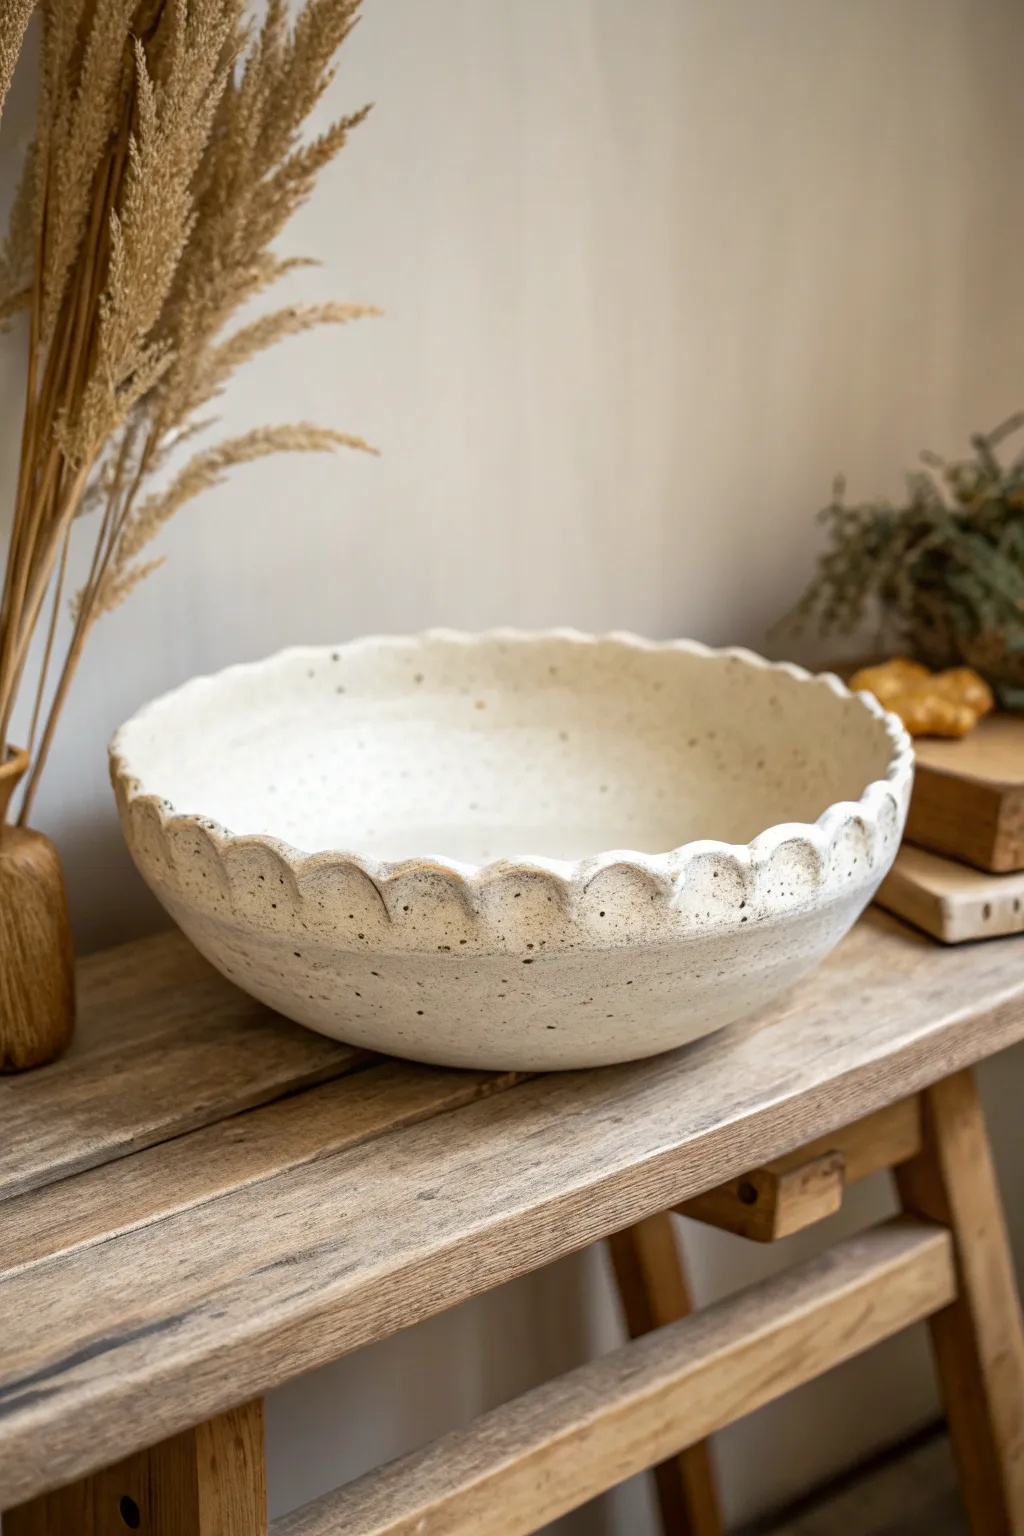
Embrace the beauty of imperfection with this large, rustic slump bowl featuring a charming wavy rim. The speckled stoneware clay adds instant character, while the scalloped edges provide a handmade warmth that perfectly complements farmhouse or boho decor.
Step-by-Step Tutorial
Materials
- Speckled stoneware clay (approx. 3-4 lbs)
- Rolling pin
- Canvas ware board or heavy fabric
- Large round plaster or bisque slump mold
- Wooden rib tool
- Needle tool
- Fettling knife
- Soft sponge
- Round cookie cutter (optional, for spacing scallops)
- Guide sticks or slab roller (approx. 1/4 inch thick)
- Clear matte glaze
Step 1: Preparing the Slab
-
Wedge the clay:
Start by wedging your speckled stoneware clay thoroughly to remove air bubbles. This step is crucial for preventing cracks and ensuring an even texture once fired. -
Flatten and roll:
Pat the clay into a flat pancake shape with your hands. Using your rolling pin and guide sticks (or a slab roller), roll out a large, even slab about 1/4 inch thick. Make sure the slab is several inches wider than your intended mold. -
Compress the slab:
Take a rubber or wooden rib and firmly drag it across the surface of the clay in multiple directions. This compression aligns the clay particles, strengthening the bottom of your bowl preventing future warping.
Warping Woes?
If the rim warps during drying, weigh it down gently with small sandbags on the high points while it’s in the leather-hard stage to level it out.
Step 2: Shaping and Refining
-
Position over the mold:
Carefully lift your slab and drape it inside your slump mold. If you don’t have a specific mold, a large serving bowl lined with cheesecloth works beautifully. -
Settle the clay:
Gently press the clay into the curve of the mold, starting from the center and working spirally outward. Be careful not to stretch the clay too thin; just encourage it to take the shape. -
Trim the excess:
Using a needle tool, cut off the excess clay around the rim of the mold. Leave about an inch of overhang above where you want the final rim to be to allow for shrinking and the scalloping process. -
Create the scalloped guide:
Visualize the wave pattern. You can lightly sketch a wavy line with your needle tool, or press a round object (like a cookie cutter) halfway into the clay repeatedly around the rim to create consistent arcs. -
Cut the scallops:
Use your fettling knife to cut along your guide marks, creating the distinct wavy peaks and valleys. I find that moving the mold on a banding wheel makes this continuous cut much smoother.
Add Height
After removing from the mold, score and slip a rolled coil ring onto the bottom to create a stable, elevated foot ring for a more professional lift.
Step 3: Finishing Touches
-
Soften the edges:
Once the rim is cut, dip your fingers or a small piece of chamois in water and run it along the cut edge. This rounds off sharp angles and gives the rim that thick, finished look seen in the photo. -
Refine the interior:
Use a damp sponge to smooth the interior surface of the bowl, erasing any finger marks from the pressing stage. The speckles in the clay will start to show through nicely here. -
Slow drying:
Cover the rim loosely with plastic to ensure it dries at the same rate as the thicker bottom. Let the bowl dry to leather-hard inside the mold before attempting to remove it. -
Bisque fire:
Once fully bone dry, bisque fire the piece according to your clay body’s specifications (usually Cone 04). -
Glazing:
Apply a clear matte glaze to both the interior and exterior. This highlights the natural speckling of the stoneware without obscuring the form. -
Final wipe:
Wipe the foot of the bowl clean with a sponge to prevent it from sticking to the kiln shelf. -
Glaze fire:
Fire the bowl to maturity (typically Cone 5 or 6 for stoneware). Allow the kiln to cool completely before removing your new centerpiece.
Place your finished bowl on a wooden table to let its natural textures shine
Quick Slab Plate With Curled Rim
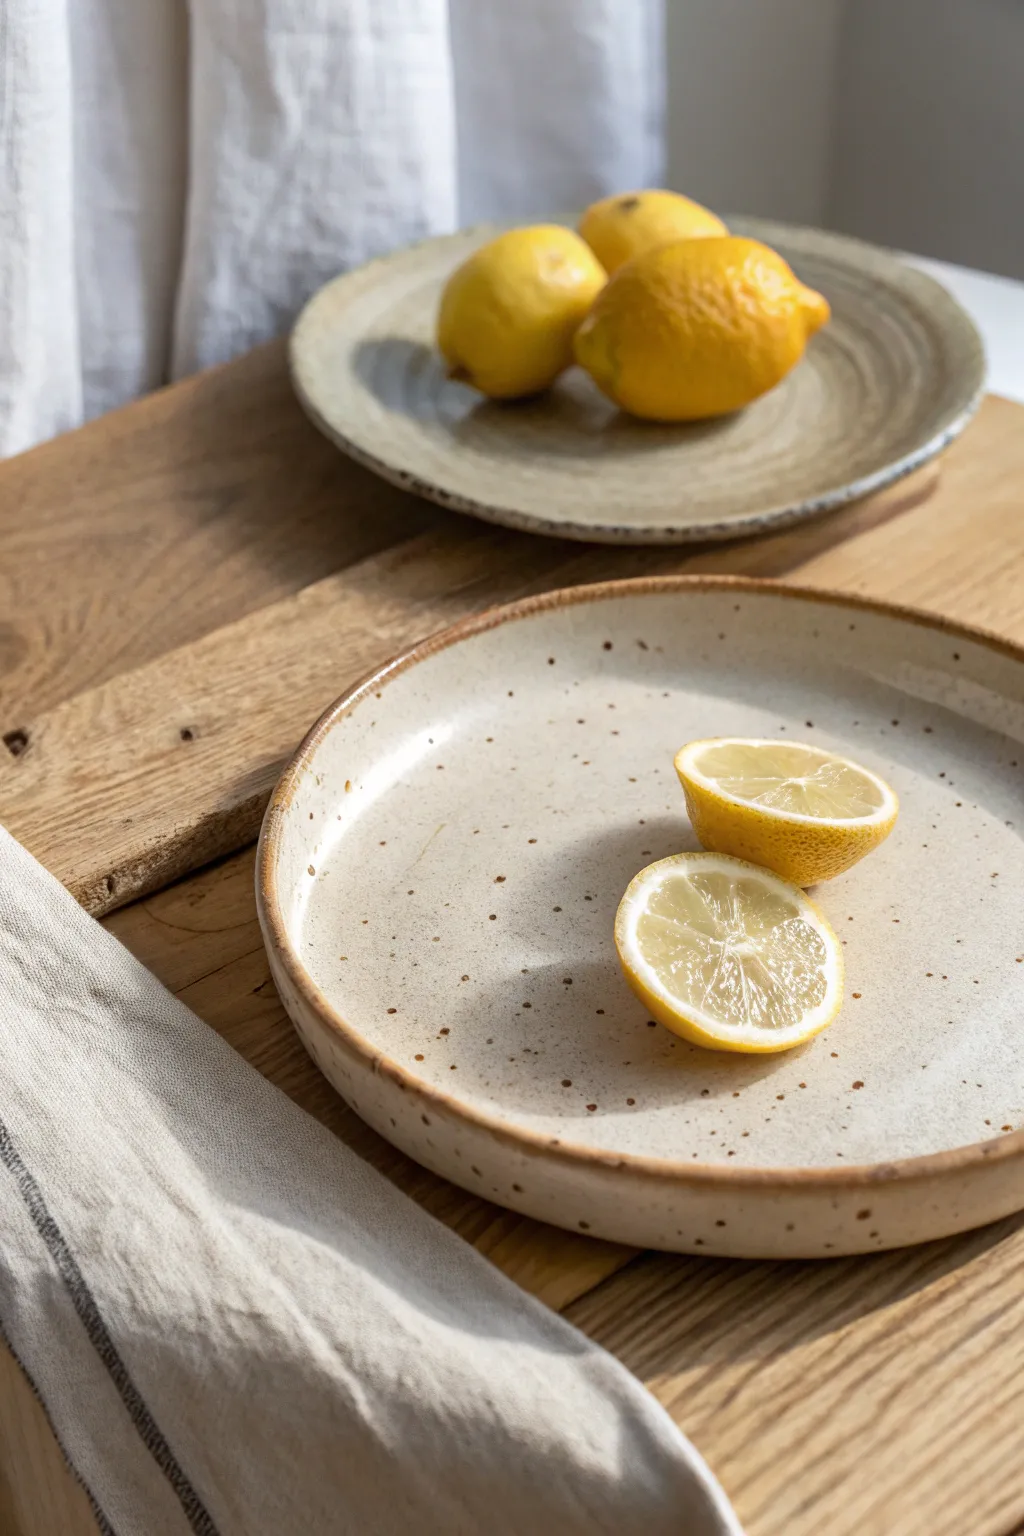
Embrace the natural beauty of imperfection with this charming slab-built plate featuring a gentle, hand-formed rim and a lovely speckled glaze. The raw, organic finish makes it perfect for displaying fresh fruit or serving casual meals.
Step-by-Step Guide
Materials
- Speckled stoneware clay (mid-fire)
- Rolling pin
- Canvas mat or slab roller
- Wooden guide strips (approx. 1/4 inch thick)
- Needle tool or fettling knife
- Circular paper template (approx. 8-9 inches)
- Smooth kidney rib (soft rubber)
- Sponge
- Slightly damp sponge for rim finishing
- Porous ware board
- Clear or transparent glossy glaze
Step 1: Prepping and Rolling the Slab
-
Wedge the clay:
Begin by thoroughly wedging your speckled stoneware clay to remove any air bubbles and ensure an even particle distribution; this is crucial for preventing cracks later. -
Flatten the mass:
Pat the wedged clay into a hamburger-patty shape with your palms, keeping the edges relatively round to make rolling easier. -
Roll the slab:
Place your clay on a canvas mat between two 1/4 inch wooden guide strips. I like to roll from the center outward, rotating the clay periodically to maintain a circular shape. -
Compress the clay:
Once rolled to thickness, take your soft kidney rib and drag it across the surface of the clay in multiple directions. -
Smooth the texture:
This compression step aligns the clay particles, strengthens the slab, and removes the canvas texture, leaving a smooth surface for your plate.
Step 2: Cutting and Forming
-
Cut the circle:
Lay your paper template onto the smooth slab. Holding your needle tool vertically, trace around the template to cut out your circle. -
Clean the edges:
Remove the excess clay and gently run a damp finger along the sharp cut edge to soften it before you start lifting. -
Create the rim lift:
Transfer the slab to a ware board. Gently slide one hand under the edge of the slab and use your thumb to curl the outer 1/2 inch of clay upward. -
Secure the shape:
As you curl the rim up, press lightly with your thumb to create that slightly thickened, vertical wall; work your way around the entire circumference. -
Refine the curve:
Go around a second time to even out the height of the rim. Don’t worry about perfect symmetry; the slight undulation adds to the rustic aesthetic. -
Smooth the rim:
Use a slightly damp sponge (wrung out extensively) to compress the very top lip of the rim, rounding over any final sharp angles.
Warping Woes?
If the bottom curves up during drying, weigh it down lightly with a small sandbag placed in the center once the rim is stiff enough to hold its shape.
Step 3: Drying and Grazing
-
Slow drying:
Loosely cover the plate with plastic to let it dry slowly to leather hard. This prevents the rim from warping as the bottom shrinks. -
Bisque fire:
Once bone dry, bisque fire the piece to the temperature recommended by your clay manufacturer (usually Cone 06 or 04). -
Wash the bisqueware:
Wipe the bisque-fired plate with a damp sponge to remove any dust that might interfere with glaze adhesion. -
Apply glaze:
Dip, brush, or pour a clear or transparent glossy glaze over the plate. This transparency is key to letting the natural clay speckles shown in the photo shine through. -
Wipe the foot:
Clean the bottom of the plate thoroughly with a sponge to ensure no glaze touches the kiln shelf. -
Glaze fire:
Fire the plate to maturity (likely Cone 5 or 6 depending on your stoneware). Allow the kiln to cool completely before removing your new favorite dish.
Pro Tip: Rustic Rim
For that toasted rim effect seen in the photo, apply a thin line of red iron oxide wash to the very edge of the lip before glazing.
Enjoy using your beautifully understated plate for your next breakfast or snack presentation


What Really Happens Inside the Kiln
Learn how time and temperature work together inside the kiln to transform clay into durable ceramic.
Folded Slab Catchall Tray (Paper-Look Style)
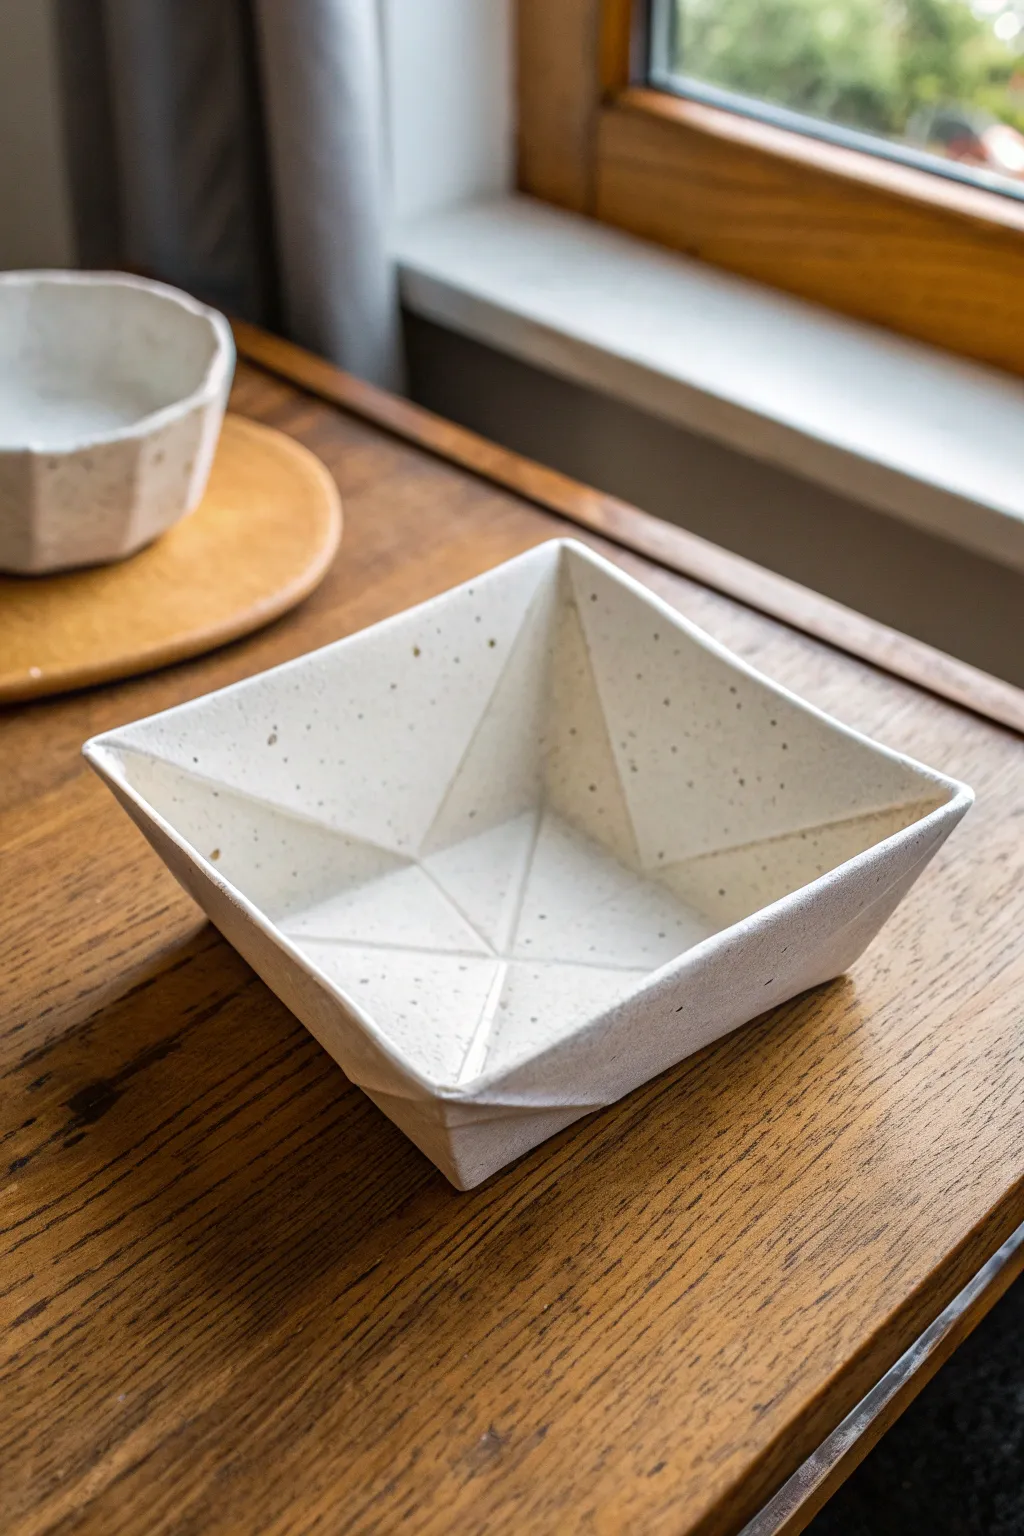
This project captures the delicate, crisp lines of folded paper using sturdy slab clay. The resulting tray features geometric creases and a speckled finish that feels modern yet handcrafted, perfect for holding keys or jewelry.
How-To Guide
Materials
- Speckled stoneware clay (white or light buff)
- Rolling pin
- Canvas or slab mat
- Paper template (square, approx. 6×6 or 8×8 inches)
- Fettling knife or needle tool
- Straight edge or ruler
- Small sponge
- Clear matte glaze
Step 1: Preparation and Rolling
-
Wedge the clay:
Begin by thoroughly wedging your speckled clay to remove air bubbles and ensure an even consistency. -
Roll the slab:
Roll out a slab of clay to a thickness of about 1/4 inch. Try to keep the thickness very consistent, as this helps the ‘paper’ illusion. -
Compress the slab:
Use a rib tool or a damp sponge to compress the clay surface on both sides. This aligns the clay particles and creates a smooth, finished texture. -
Cut the square:
Place your paper square template onto the clay. Using your straight edge and fettling knife, cut a precise square shape.
Crisp Corners
Let the slab firm up to ‘leather hard’ before folding. If the clay is too soft, the walls will slump and lose that sharp, paper-like geometry.
Step 2: Adding the Fold Lines
-
Mark the diagonals:
Lightly lay your ruler across opposite corners of the square. Gently press the ruler edge into the clay to create a diagonal impression, but don’t cut through. -
Mark the cross:
Repeat this process horizontally and vertically through the center point, creating a ‘plus’ sign impression. -
Add inner details:
Looking at the reference image, notice the diamond shape in the center base. Connect the midpoints of each side with light score lines to define the base area. -
Deepen the creases:
Go back over your structural lines with a modeling tool to deepen them slightly, mimicking sharp paper folds.
Step 3: Forming the Tray
-
Lift the sides:
Gently lift the four corners of your square clay slab upwards. Allow the clay to naturally slope inward based on your score lines. -
Pinch the corners:
At each corner where the clay bunches, pinch the excess material together to form a triangular flap pointing outward. -
Fold the triangles:
take those pinched triangular corners and fold them firmly against the exterior side of the bowl. This locks the shape in place. -
Secure the folds:
I usually score and slip these exterior flaps slightly before pressing them down to ensure they don’t pop open during firing. -
Refine the rim:
Run a damp chamois or sponge along the top raw edge to soften any sharpness while maintaining a relatively straight line.
Color Pop
Instead of clear glaze, paint the exterior folded triangles with a bright underglaze like teal or mustard yellow for a fun contrast.
Step 4: Drying and Glazing
-
Slow drying:
Loosely cover the piece with plastic to let it dry slowly. Uneven drying can warp those crisp geometric lines. -
Bisque fire:
Once bone dry, bisque fire the piece to the appropriate cone for your clay body (usually cone 04 or 06). -
Apply clear glaze:
Dip or brush a clear matte glaze over the entire piece. A clear glaze allows the natural speckles of the clay to be the star of the show. -
Glaze fire:
Fire the piece a final time to the glaze temperature (commonly cone 5 or 6 for stoneware).
Enjoy using your sleek geometric tray to organize your desk or coffee table
One-Seam Slab Pencil Cup
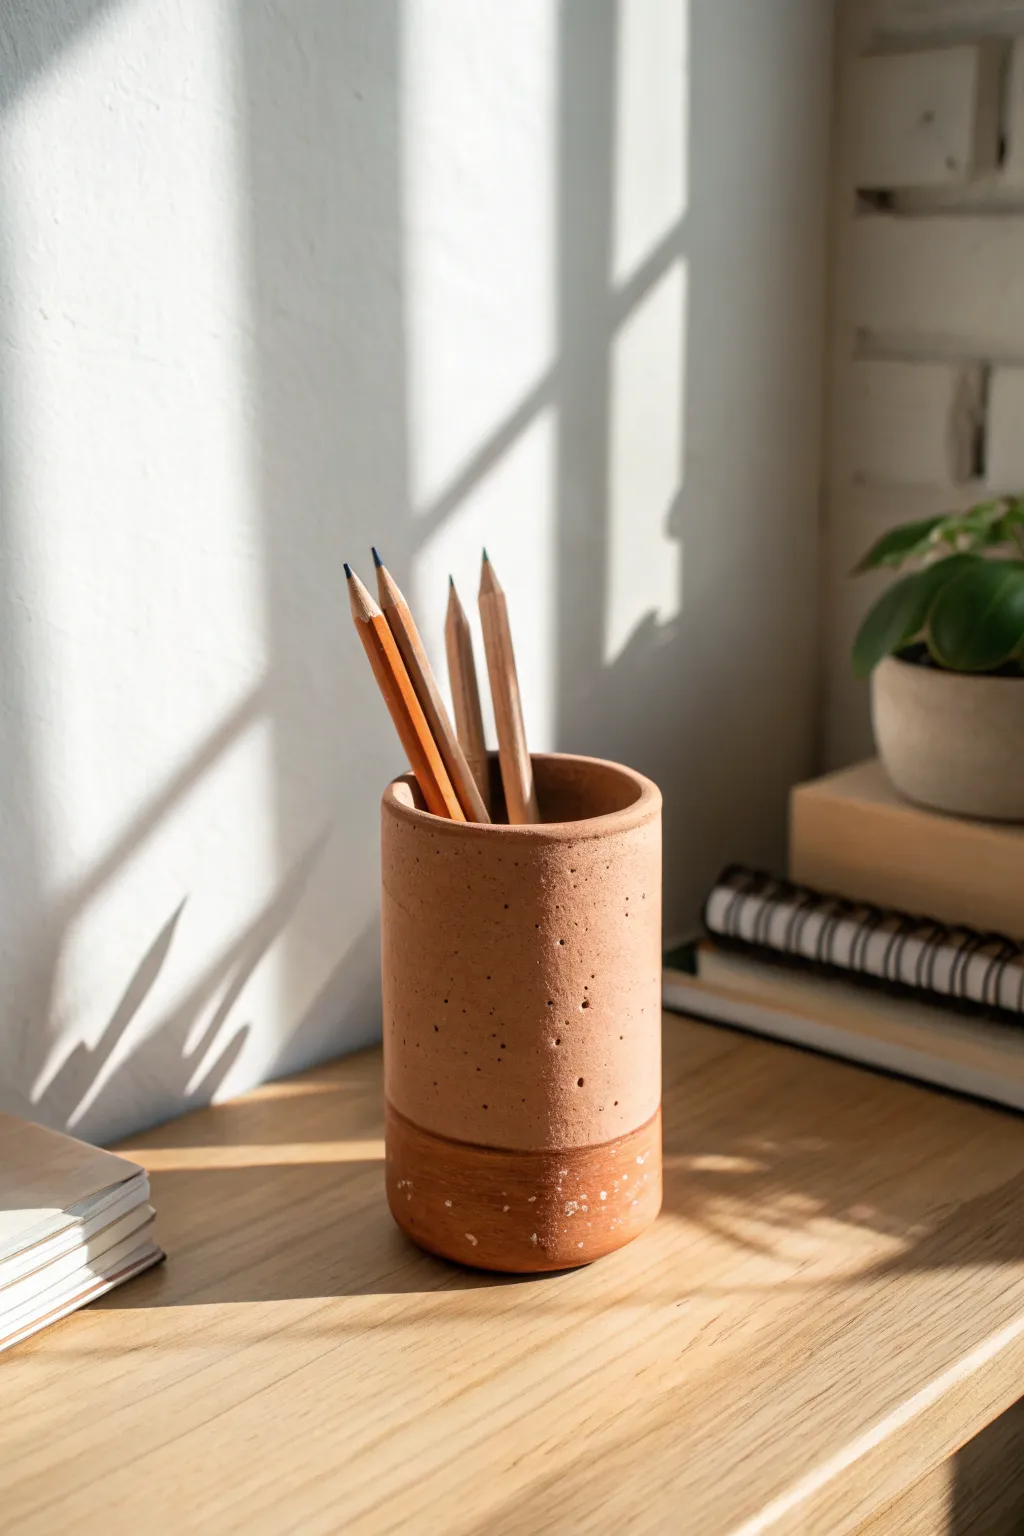
Create a sleek, modern desktop organizer using a simple slab technique that results in a professional-looking cylinder. This pencil cup features a subtle two-tone design, blending natural clay texture with a dipped or glazed accent base for a warm, earthy aesthetic.
Step-by-Step Guide
Materials
- Earthenware or stoneware clay (terracotta color recommended)
- Rolling pin
- Two wooden guide slats (approx. 1/4 inch thick)
- Canvas or cloth board for rolling
- Fettling knife or craft knife
- Needle tool
- Slip (clay and water slurry)
- Scoring tool or old fork
- Cylindrical form (like a soda can or PVC pipe) wrapped in paper
- Sponge
- Clear matte glaze
- Optional: darker iron-oxide wash or terra sigillata for the base
Step 1: Preparing the Slab
-
Wedge the clay:
Begin by thoroughly wedging a ball of clay to ensure it is uniform in consistency and free of air bubbles, which is crucial for a smooth wall. -
Set up guides:
Place your wooden guide slats on either side of your fabric-covered work surface. These will ensure your slab is perfectly even in thickness. -
Roll the slab:
Roll the clay ball out between the slats until the rolling pin rests flat on the wood. I find rolling in multiple directions helps compress the clay particles better. -
Smooth the surface:
Use a damp sponge or a soft rib tool to compress the slab surface, removing any canvas texture if you prefer a smooth, modern finish like the example.
Step 2: Cutting and Forming
-
Measure the template:
Cut a paper template that matches the circumference of your cylindrical form plus a little extra for the overlap, and the desired height (about 4-5 inches). -
Cut the rectangle:
Place the template on the slab and cut out a precise rectangle using your fettling knife. Save the excess clay. -
Bevel the edges:
To create a seamless invisible join, cut the two short vertical edges of your rectangle at opposite 45-degree angles. -
Score the edges:
Rough up the beveled edges using a scoring tool or fork. This texture acts like velcro for the clay join. -
Apply slip:
Dab a generous amount of slip onto the scored areas. -
Form the cylinder:
Wrap the slab around your paper-covered cylindrical form. Press the beveled edges together firmly to create the wall. -
Blend the seam:
Use a burnishing tool or your thumb to smooth the seam line inside and out until it is virtually invisible.
Seam Cracking?
If the vertical seam splits during drying, your clay was likely too dry when joining. Patch with a tiny coil of soft clay and slip, then re-compress it.
Step 3: Adding the Base and Finishing
-
Cut the base:
Place your cylinder on the remaining slab clay and trace a circle around the bottom. Cut this circle out. -
Score and slip base:
Score the bottom edge of the cylinder and the outer edge of the circle base. Apply slip to both. -
Attach the base:
Press the cylinder firmly onto the base. Use a modeling tool to blend the clay from the base up into the wall creates a strong, unified piece. -
Smooth the exterior:
Go over the entire exterior with a damp sponge to remove fingerprints and refine the rim so it is soft and rounded. -
Add speckling (optional):
If your clay isn’t naturally speckled, you can flick a stiff toothbrush with iron oxide wash lightly over the surface. -
Bisque fire:
Allow the piece to dry slowly under plastic, then bisque fire it in a kiln. -
Create the two-tone look:
To mimic the image, tape off the bottom inch of the cup. Glaze the top section with a clear matte glaze, leaving the bottom raw or applying a darker wash. -
Final firing:
Fire the piece again to the temperature required by your specific clay and glaze body.
Stamp It
Before rolling the cylinder, press a sprig of dried lavender or a rubber stamp into the slab to create a personalized, textured fossil effect.
Place your freshly fired pot on your desk and enjoy the natural warmth it adds to your workspace

TRACK YOUR CERAMIC JOURNEY
Capture glaze tests, firing details, and creative progress—all in one simple printable. Make your projects easier to repeat and improve.
Easy Slab Mug With Strap Handle

Create this cozy, farmhouse-style mug using simple slab construction techniques suitable for any skill level. The design features a distinctive unglazed or oxide-washed stripe sandwiched between creamy, speckled glaze for a warm, rustic aesthetic.
Step-by-Step Tutorial
Materials
- Speckled Stoneware Clay
- Rolling Pin
- Canvas or Sla Mats
- Fettling Knife or Clay Cutter
- Ruler
- Scoring Tool (or fork)
- Slip (clay and water slurry)
- Mug Template (roughly 11″ x 4.5″ rectangle)
- Wooden Modeling Tool
- Sponge
- Cream Gloss Glaze
- Iron Oxide Wash or Terracotta Underglaze
- Wax Resist
Step 1: Forming the Body
-
Roll the Slab:
Begin by tossing your speckled clay onto a canvas-covered surface to compress the particles. Roll it out into an even slab that is roughly 1/4 inch thick. Ensure the thickness is consistent to prevent warping during firing. -
Cut the Rectangle:
Place your rectangular paper template onto the slab. Using your fettling knife and a ruler as a guide, cut out the main body of the mug. Save the excess clay for the base and handle. -
Bevel the Edges:
On the two shorter sides of your rectangle, cut 45-degree bevels in opposite directions. This allows the clay to overlap seamlessly when you form the cylinder, creating a stronger joint than a simple butt joint. -
Form the Cylinder:
Score the beveled edges thoroughly and apply a generous amount of slip. Bring the two ends together to form a cylinder, pressing the beveled edges firmly against each other. -
Seal the Seam:
Support the inside of the cylinder with one hand while using a wooden modeling tool or your thumb to smooth the seam on the outside. Repeat this process on the inside to ensure the join is invisible and strong.
Step 2: Adding the Floor & Handle
-
Cut the Base:
Roll a small piece of leftover clay to the same 1/4 inch thickness. Place your cylinder on top of this slab and trace around it lightly with a needle tool. -
Attach the Base:
Score and slip the bottom edge of your cylinder and the outer edge of the circular base. Press the cylinder onto the base firmly. I like to use a small wooden tool to drag clay from the base up onto the wall to stitch them together. -
Make the Strap Handle:
Cut a strip of clay about 3/4 inch wide and 5 inches long from your remaining slab. Smooth the sharp edges with a damp sponge so the handle will be comfortable to hold. -
Shape the Handle:
Bend the strip into a ‘C’ or ear shape and let it stiffen slightly on the table for about 10–15 minutes. This helps it hold its arch once attached. -
Attach Handle to Body:
Score and slip the attachment points on both the mug body and the handle ends. Press the handle firmly onto the mug, smoothing the clay at the joints to ensure a secure bond. Check the alignment so it sits straight.
Straight Seams
To keep the vertical seam straight while joining, stand the slab cylinder up around a rigid object like a PVC pipe or a rolling pin covered in newspaper.
Step 3: Glazing & Finishing
-
Bisque Fire:
Allow the mug to dry slowly under plastic to prevent cracking, then bisque fire it to cone 04 (or your clay body’s recommended temperature). -
Applying Wax Resist:
For the crisp central band, paint a thick ring of wax resist around the middle of the mug body and the entire handle. This will prevent glaze from adhering to these areas. -
Glazing the Interior:
Pour your cream gloss glaze inside the mug, roll it around to coat the entire interior surface, and pour out the excess. -
Dipping the Exterior:
Hold the mug by the foot or using glazing tongs. Dip the entire mug into the cream glaze. The wax resist on the central band and handle will repel the glaze, leaving those areas bare. -
Clean Up:
Use a damp sponge to wipe away any stray droplets of glaze that may have beaded up on the waxed areas. Ensure the foot is completely clean. -
Apply the Oxide Wash:
Once the glaze is dry, brush a thin layer of iron oxide wash or terracotta underglaze onto the exposed raw clay band and handle. This creates that rich, reddish-brown contrast. -
Final Fire:
Glaze fire the mug to cone 6 (or your clay’s maturity temperature). The heat will reveal the beautiful speckles in the clay through the cream glaze.
Dual-Tone Texture
Before assembling, roll a texture mat onto the slab section that will become the central band. The glaze gathering in the texture will add amazing depth.
Now brew your favorite coffee and enjoy the warmth of your handmade creation
Slab Planter With Simple Box Sides
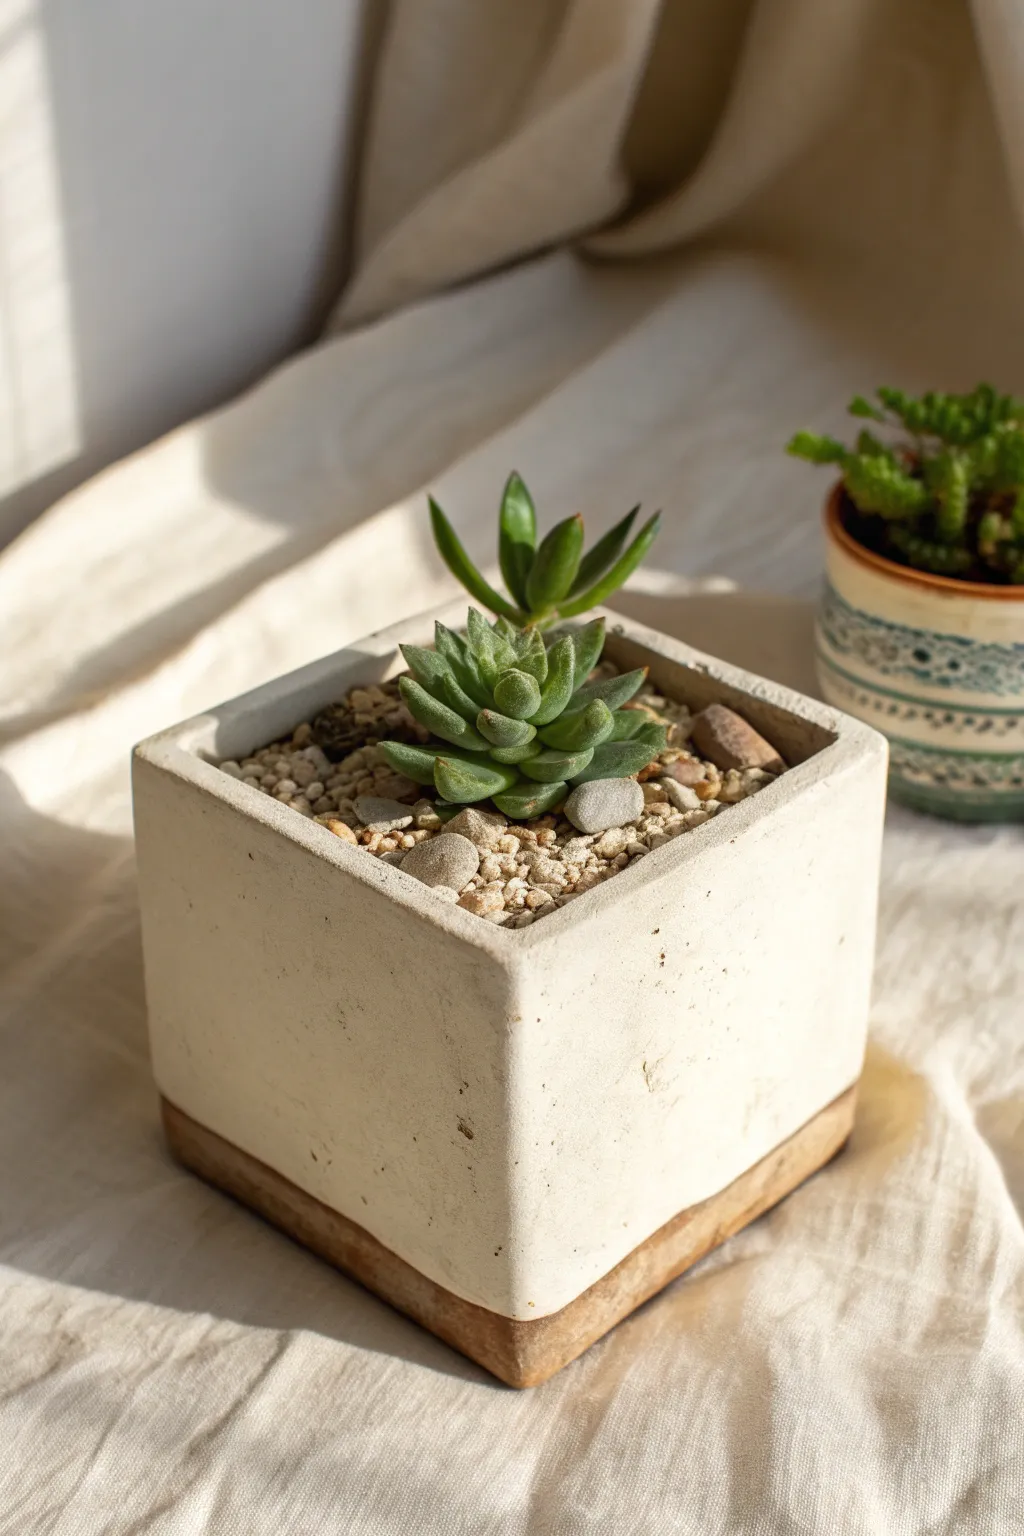
This minimalist square planter features a clean white body with a subtle, unglazed terracotta base, offering a sophisticated home for your favorite succulents. Using simple slab-building techniques, you can achieve this polished, architectural look that mimics high-end garden decor.
Detailed Instructions
Materials
- White stoneware clay body (or cream)
- Speckled tan or terracotta clay body (for the base)
- Rolling pin
- Two wooden thickness strips (about 1/4 inch thick)
- Guide template (cardboard square, approx. 4×4 inches)
- Needle tool or fettling knife
- Serrated rib or scoring tool
- Slip (clay and water slurry)
- Smoothing sponge
- Wooden modeling tool
- Clean cutting wire
Step 1: Preparing the Slabs
-
Roll the white clay:
Begin by wedging your white stoneware clay to remove air bubbles. Place it between your thickness strips and roll it out into a smooth, even slab. This will form the main walls of your box. -
Roll the contrast base:
Repeat the rolling process with a smaller amount of the terracotta or tan clay. You want this slab to handle the weight of the pot, so ensure it is rolled to the same thickness as the walls. -
Let the slabs stiffen:
This is crucial for box construction. Let your slabs sit out until they reach a ‘leather-hard’ state where they can hold their shape without bending but are still soft enough to join. I usually check them after about an hour. -
Cut the components:
Using your cardboard template, cut four identical square walls from the white clay. Then, cut one square from the tan clay for the floor of the pot.
Shrinkage Rates
Ensure your two clay bodies have similar shrinkage rates (check the manufacturer label). If one shrinks much more than the other, the base will crack off during drying.
Step 2: Assembling the Box
-
Miter or straight cut:
Decide on your joinery. For this clean look, you can bevel the vertical edges of your white squares at a 45-degree angle for a miter joint, or keep them straight for a butt joint. Mitering hides the seams better. -
Score the edges:
Take your serrated tool and rough up the vertical edges of all four white wall pieces where they will touch. -
Apply slip:
Dab a generous amount of slip onto the scored edges. It acts as the glue for your clay ceramic. -
Construct the white box:
Press the four white walls together to form a bottomless square tube. Apply firm pressure to ensure a tight bond. -
Reinforce the interior seams:
Roll a very thin ‘coil’ (snake) of soft white clay. Press this into the inside corners of your box and smooth it out with a wooden tool to strengthen the joints. -
Prepare the base connection:
Thoroughly score the bottom edge of your assembled white box and the top perimeter of your tan base square. -
Attach the base:
Place the white box directly on top of the tan square. Press down firmly to adhere the two different clay bodies. This creates that distinct two-tone bottom detail.
Geometric Texture
Before assembling, lightly press a piece of canvas or linen into the soft white slabs to give the exterior a subtle, woven texture that catches the glaze beautifully.
Step 3: Refining and Finishing
-
Smooth the exterior:
Using a metal contour rib or a flat scraper, drag it across the exterior walls to create sharp, straight visuals and remove any finger marks. -
Clean the two-tone seam:
Pay special attention to where the white and tan clays meet. Use your finger or a sponge to wipe away excess slip so the line between the colors remains crisp. -
Soften the rim:
Run a slightly damp sponge over the top rim of the planter to take off the sharp edge, making it safer to handle once fired. -
Add drainage:
Using a small circular cutter or hole punch tool, remove a circle of clay from the exact center of the tan base to allow for water drainage. -
Dry slowly:
Cover the pot loosely with plastic sheet. Let it dry very slowly over several days to prevent the seams from cracking or the different clays pulling apart. -
Firing and Glazing:
Bisque fire the piece. For the glaze firing, apply a matte white glaze to the interior and exterior walls, but use wax resist on the tan base to keep it raw and unglazed as shown in the photo.
Once fired, fill your planter with gritty soil and your favorite succulents for a stunning contrast of organic and geometric forms
Easy Slab Box With Lift-Off Lid
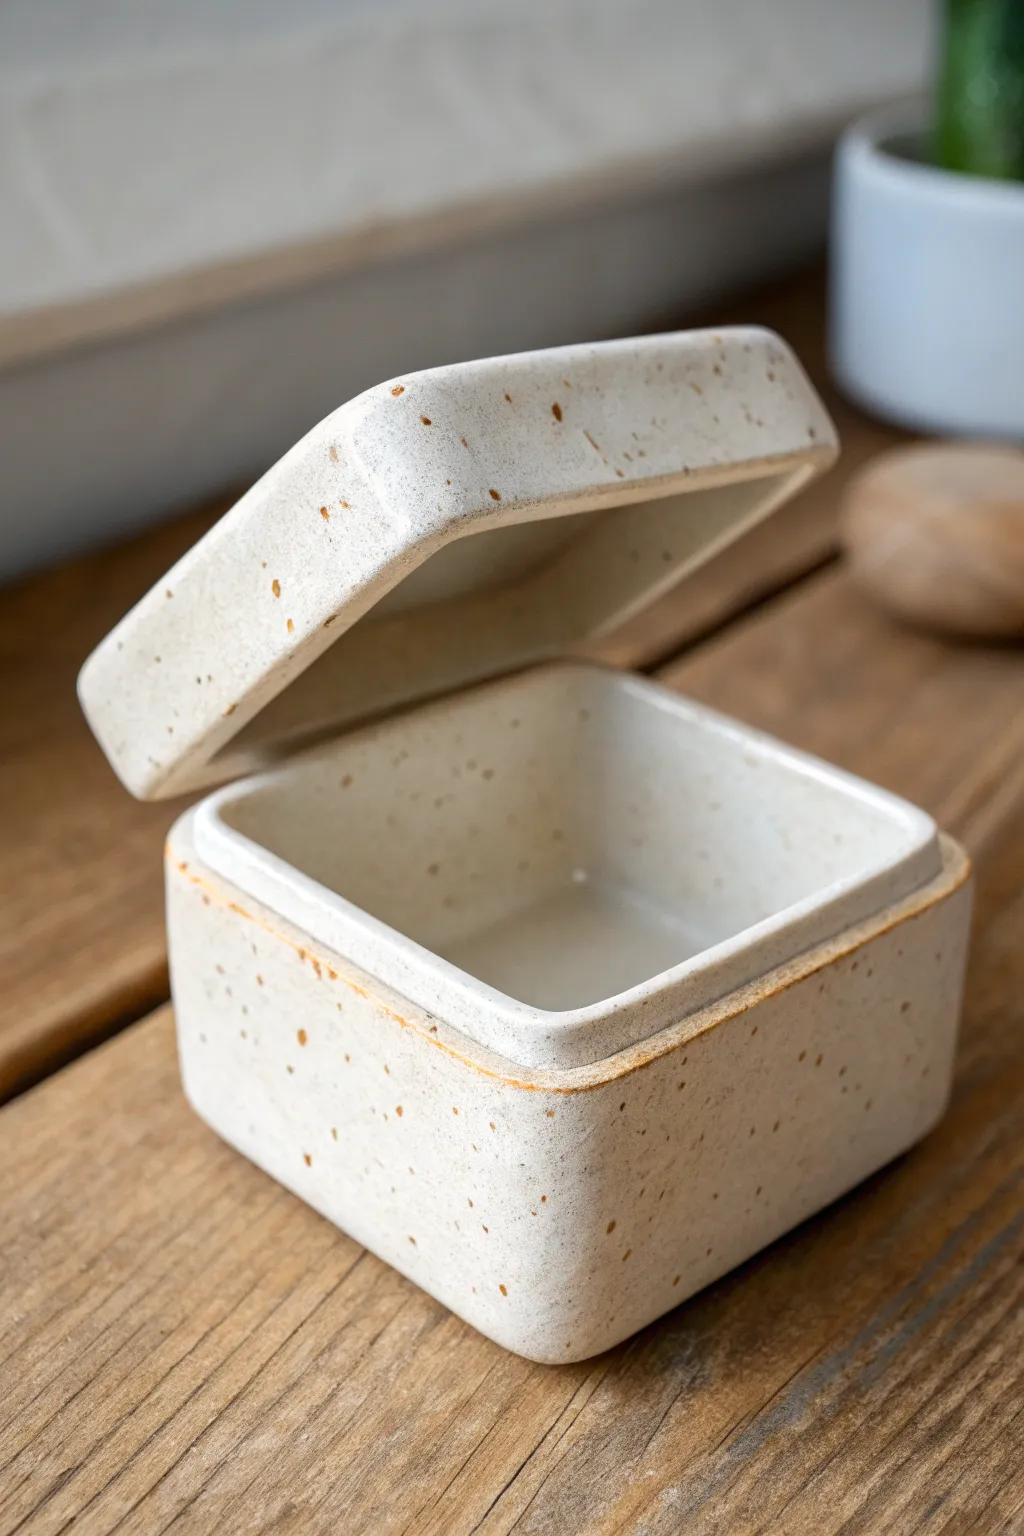
This charming ceramic box features a soft, square form with rounded corners and a lovely speckled clay body that adds immediate texture. The clever lift-off lid design uses a hidden gallery rim, keeping the profile sleek and ensuring a satisfyingly snug fit.
How-To Guide
Materials
- Speckled stoneware clay (white or light buff)
- Rolling pin
- Two wooden guide strips (approx. 1/4 inch thick)
- Fettling knife or needle tool
- Paper template (square with rounded corners)
- Serrated rib or flexible metal rib
- Scoring tool or fork
- Slip or vinegar
- Sponge
- Canvas or slab mat
Step 1: Preparing the Slabs
-
Roll the clay:
Begin by wedging your speckled clay to remove air bubbles. Place the clay between your two wooden guide strips on a canvas surface and roll it out into a smooth, even slab about 1/4 inch thick. -
Smooth the surface:
Before cutting, take a flexible metal rib and compress the clay on both sides. This aligns the clay particles to prevent warping and creates that smooth, professional finish you see in the photo. -
Cut the components:
Using a square paper template with rounded corners (approx. 3-4 inches), cut two identical squares for the top and bottom. Then, cut a long rectangular strip for the side walls. The strip’s length should equal the perimeter of your square plus an inch for overlap.
Drying Pro-Tip
Dry the box with the lid ON. Placing a small square of paper towel between the lid and base prevents sticking while ensuring they shrink at the exact same rate.
Step 2: Constructing the Base
-
Bevel the wall strip:
To create a seamless join for the wall loop, cut both short ends of your long strip at a 45-degree angle. This allows them to overlap cleanly without adding bulk. -
Form the walls:
Stand the strip up on its edge and shape it to match the outline of your bottom square slab. Score and slip the beveled ends, pressing them firmly together to create a continuous wall. -
Attach wall to base:
Score the bottom edge of your wall loop and the outer perimeter of your bottom square slab. Apply slip liberally. -
Join and compress:
Press the wall firmly onto the base. Use a modeling tool to smooth the seam on the outside, dragging clay from the wall down to the base to lock it together. Repeat this on the inside seam for extra strength. -
Refine the shape:
Use a paddle or a flat board to gently tap the walls straight and ensure the corners maintain that soft, rounded curve.
Step 3: Adding the Gallery Rim
-
Create the inner flange:
Roll a slightly thinner strip of clay, about half the height of your main walls. This will sit inside the box to hold the lid in place. -
Fit the flange:
Test-fit this strip inside the rim of your box. It should press snugly against the interior walls but extend slightly above the top edge—or, you can set it flush if you plan to make the lid possess the flange. In this specific design, the gallery looks built into the base walls. -
Secure the gallery:
Score and slip the back of the inner strip and the interior of the box walls. Press the strip inside so it sticks up about 1/4 inch above the main wall height. This sticking-up part forms the ‘male’ part of the fitting. -
Smooth the lip:
Use a damp chamois or sponge to round off the top edge of this new inner rim so the lid will slide on easily without chipping.
Level It Up
Before the clay hardens, press a textured fabric or lace into the exterior slabs to create a tactile surface that the glaze will break over beautifully.
Step 4: The Lid and Finishing
-
Construct the lid:
Take your second square slab (the top). You need to create a small vertical rim for it to look like the photo. Cut a narrow strip of clay and attach it to the perimeter of the top slab, smoothing it downwards. -
Check the fit:
Place the lid gently over the base. The lid’s outer walls should sit flush with the base’s outer walls, while resting on the interior gallery rim you created earlier. -
Softening edges:
Once the box is leather hard, run a damp sponge along all corners. The goal is to mimic the soft, marshmallow-like edges seen in the image rather than sharp, machined angles. -
Bisque fire:
Allow the box to dry slowly with the lid on to prevent warping. Fire to cone 04 (or your clay’s bisque temperature). -
Glazing:
Apply a clear or semi-transparent matte white glaze. The transparency is key here—it allows the natural iron speckles from the clay body to burn through and create that beautiful spotted effect. -
Baking:
Glaze fire to the maturation temperature of your clay (likely cone 5 or 6 for stoneware). Be sure to wax deeply around the gallery rim and lid contact points so they don’t fuse together.
This simple yet elegant box makes a perfect keeper for small jewelry or precious keepsakes
Slab Picture Frame With Textured Border
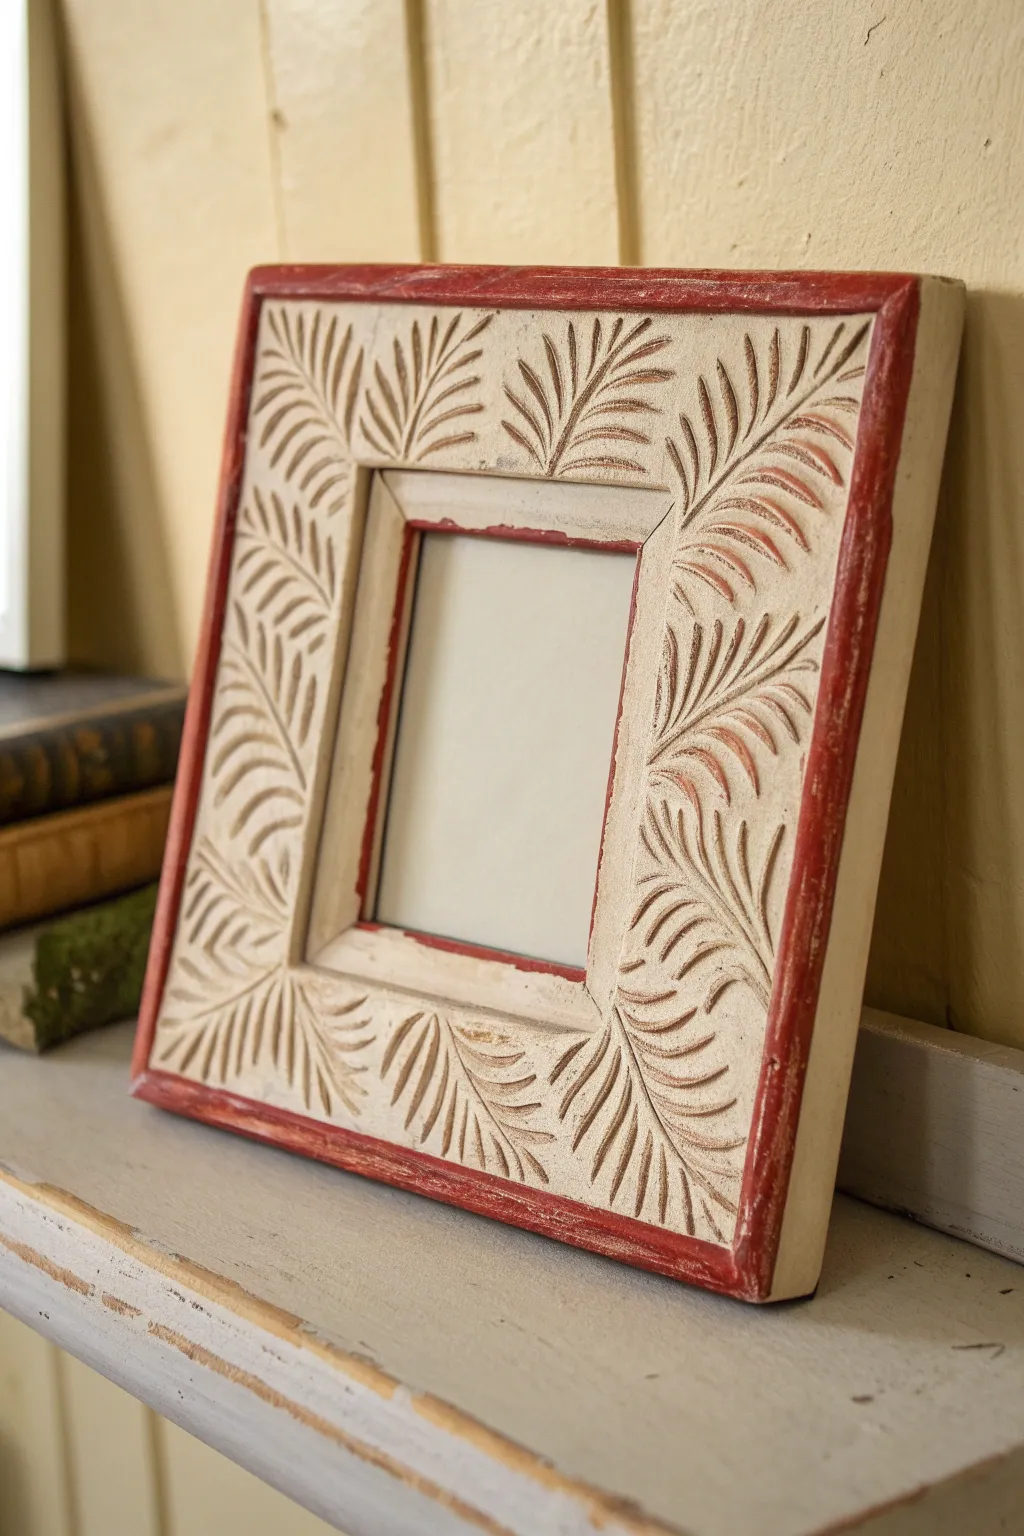
This charming picture frame uses simple slab construction techniques to create a piece that looks like intricately carved wood. The repeating palm-leaf texture and distressed creamy finish give it a warm, rustic appeal perfect for displaying cherished memories.
Step-by-Step
Materials
- White or buff stoneware clay
- Rolling pin
- Two wooden thickness strips (quarter-inch)
- Ruler
- Needle tool or fettling knife
- Leaf carving tool or loop tool
- Small carving gouge
- Large sponge
- Underglaze (Terracotta/Red Iron Oxide)
- White matte glaze
- Clear wax resist (optional)
- Bisque mold or wooden board for drying
Step 1: Slab Preparation & Cutting
-
Roll the Slab:
Begin by wedging your clay thoroughly to remove air bubbles. Place it between your two quarter-inch wooden thickness strips and roll it out into a smooth, even slab. Ensure the slab is large enough to cut a square frame wider than your desired photo size. -
Measure the Frame:
Using a ruler, mark a large square for the outer edge (e.g., 8×8 inches) and a smaller inner square for the photo opening (e.g., 4×4 inches). Lightly trace these lines with your needle tool before committing to the cut. -
Cut the Shape:
Slice cleanly along your marked lines using a fettling knife or needle tool. Remove the center square carefully; you can save this scrap clay for another small project. -
Smooth the Edges:
Dip your finger in a little water or vinegar and run it along the sharp cut edges to soften them. Compressing the edges now helps prevent cracking later.
Warping Woes?
Flat slabs love to warp. Dry very slowly between two pieces of drywall or wooden boards to keep the frame perfectly straight.
Step 2: Creating the Texture
-
Plan the Pattern:
Visualize the corners first. The leaf pattern in the example flows outward from the center of each side, meeting at the corners. You might want to lightly sketch a diagonal line at each corner to guide where the patterns will meet. -
Carve the Center Stems:
Using a small gouge or needle tool, carve a central curved line for each leaf stem. Start near the inner frame edge and curve effectively toward the outer corners. -
Carve the Leaf Veins:
With a carving tool or small loop tool, press and drag to create the individual fronds coming off the main stems. Vary the pressure—start deeper and lift up as you flick outward to create a tapered leaf shape. -
Detail the Corners:
Pay special attention to the corners where the leaf patterns converge. I find it helpful to angle the last few fronds so they nestle together without overlapping messily. -
Refine the Surface:
Once the carving is complete, gently brush away any clay crumbs with a soft, dry brush. Don’t use water here, or you’ll wash away the crisp details of your carving.
Rustic Variation
Instead of white glaze, try a dry-brush technique with acrylic paints after the final firing for an even more weathered, wooden appearance.
Step 3: Structural Addition
-
Create the Back Flange:
Roll a small coil or a very thin strip of slab. Score and slip the back of the frame opening, then attach this strip to create a ‘lip’ that will hold the glass and photo in place. -
Dry Slowly:
Place the frame on a flat board. To prevent warping—a common enemy of flat frames—weight the corners gently or dry it slowly under a loose sheet of plastic until bone dry. -
Bisque Fire:
Fire the piece to cone 04 (or your clay body’s bisque temperature).
Step 4: Glazing & Finishing
-
Apply Base Color:
Mix a terracotta or red iron oxide wash. Brush this freely over the entire frame, ensuring it gets into all the deep carved grooves. -
Wipe Back:
Using a damp sponge, wipe away the majority of the red wash from the raised surfaces. You want the red to remain only in the recesses and along the very outer edges to mimic that distressed wood look. -
Apply White Glaze:
Apply a coat of matte white glaze over the top faces of the frame. You have two options here: carefully brush it on to avoid the red edges, or apply it all over and then lightly sand/wipe back after it dries to reveal the red underneath. -
Distress the Edges:
If the white glaze is too heavy, gently wipe the outer rim again to expose that red underglaze border, reinforcing the framed effect. -
Final Fire:
Glaze fire the piece according to your clay and glaze specifications.
Once fired, simply cut a piece of glass and backing board to size, and your hand-carved masterpiece is ready to hang
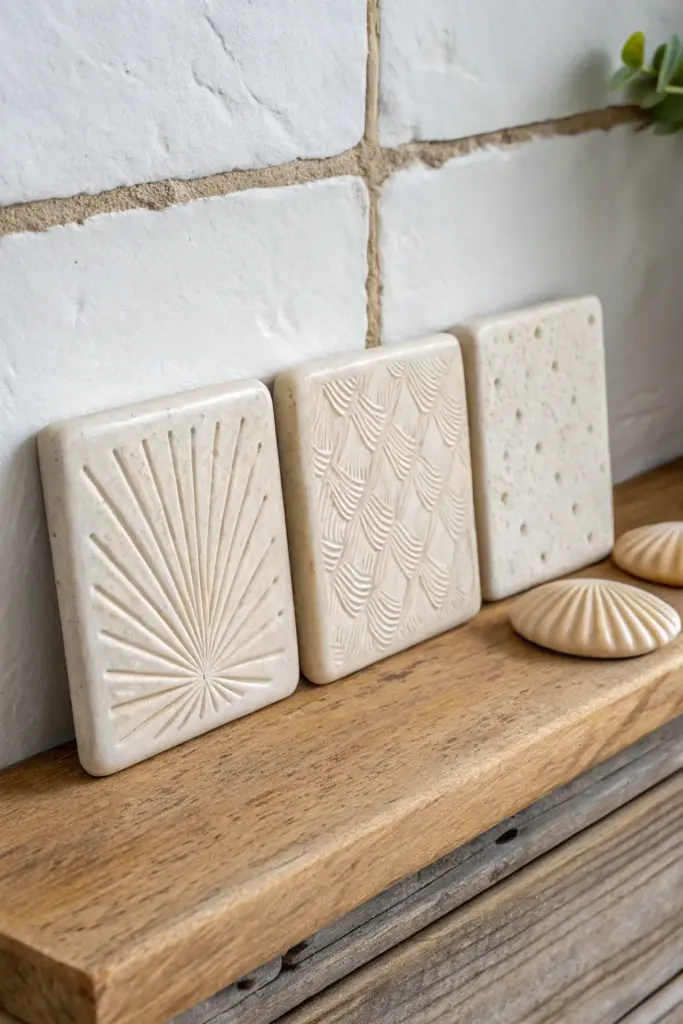
Easy Slab Wall Tile Set (Mix-and-Match Patterns)
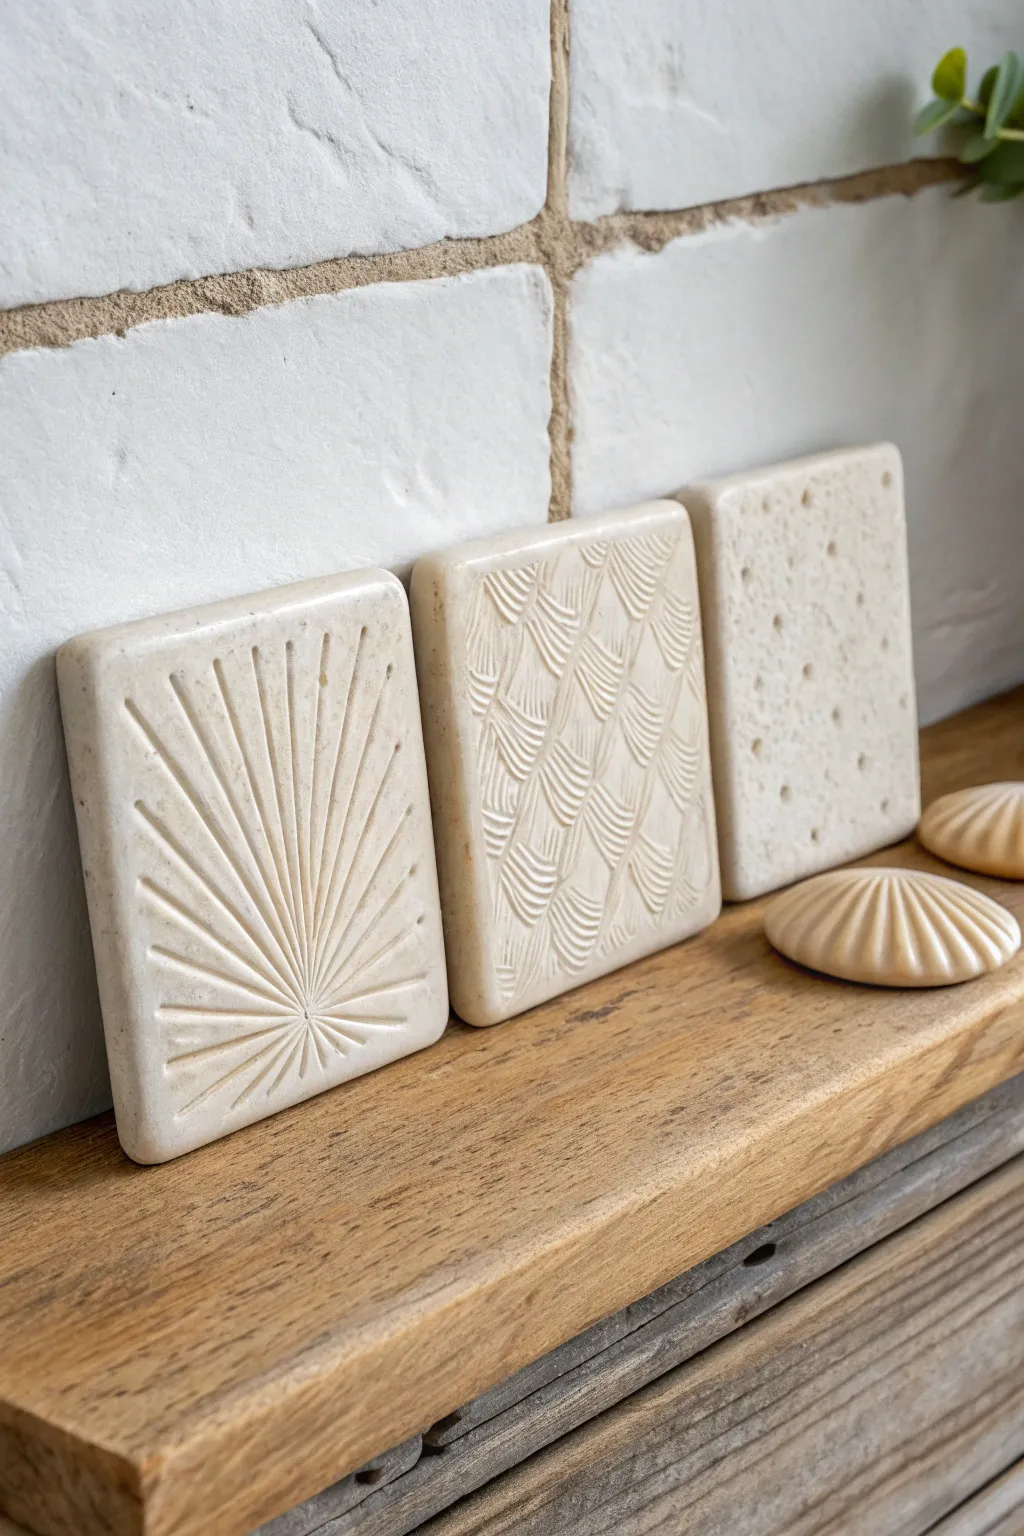
These minimalist clay tiles bring an earthy, artisanal touch to any shelf with their creamy finish and varied textures. The project features three distinct patterns—a radiating sunburst, elegant scallops, and random stippling—that look beautiful standing alone or grouped together as a triptych.
Step-by-Step Tutorial
Materials
- Air-dry clay (white or cream)
- Rolling pin
- Two wooden guide strips (approx. 1/4 inch thick)
- Rectangular clay cutter (or ruler and knife)
- Clean crafting mat or canvas
- Carving tools (needle tool, small loop tool)
- Stylus tool or blunt pencil
- Sponge and water
- Fine-grit sandpaper (optional)
- Clear matte varnish or sealant (optional)
Step 1: Preparing the Slabs
-
Condition the clay:
Begin by kneading a good-sized chunk of air-dry clay until it is smooth, pliable, and free of air bubbles. This ensures your tiles won’t crack during drying. -
Roll out the slab:
Place your clay between two wooden guide strips on your work surface. Use the rolling pin to flatten the clay until the roller rests on the guides, guaranteeing an even thickness of about 1/4 inch across the entire slab. -
Smooth the surface:
Before cutting, take a slightly damp sponge or a rubber rib and gently wipe the surface of the clay to remove any canvas texture or rolling pin marks. You want a pristine, smooth canvas for your designs. -
Cut the rectangles:
Using a rectangular cutter, press firmly into the clay to create three identical shapes. If you don’t have a cutter, measure and mark three rectangles (approx. 3×4 inches) with a ruler and cut them out cleanly with a craft knife. -
Refine the edges:
Dip your finger in a little water and run it along the cut edges of each rectangle to soften the sharp angles. I find this gives the final piece a more polished, ceramic look rather than a sharp, raw finish.
Clean Lines Tip
When carving lines, let the clay dry for about 15-20 minutes first. Creating texture on ‘leather-hard’ clay prevents dragging and gives crisper edges.
Step 2: Creating the Textures
-
Design 1: The Sunburst:
For the first tile, locate a center point near the bottom edge. Using a needle tool or small carving tool, carve straight lines radiating outward from this point toward the top and sides, varying the length of the lines slightly for organic appeal. -
Refine the rays:
Go back over your sunburst lines to deepen them slightly, brushing away any little clay crumbs (burrs) that form with a soft brush. -
Design 2: The Scallops:
For the middle tile, you’ll create a fish-scale pattern. Use a small loop tool or a U-shaped carving tool. Press and drag slightly to create overlapping semi-circles, starting from the bottom row and working your way up. -
Detailing the scales:
Within each scalloped shape, use a needle tool to scratch in fine vertical lines to add extra dimension and shadow to the texture. -
Design 3: The Stipple:
For the final tile, take a stylus tool, the end of a paintbrush, or a blunt pencil. Press it into the clay repeatedly to create a random pattern of small indentations. -
Vary the depth:
Keep the spacing irregular and vary the pressure slightly so some dots are deeper than others, creating a porous, stone-like surface.
Step 3: Finishing Touches
-
Initial drying phase:
Place your tiles on a flat wire rack or a clean board to dry. Flip them over gently every few hours during the first day to ensure they dry evenly and stay flat. -
Full cure:
Allow the tiles to dry completely for 24-48 hours, depending on the humidity and brand of clay. They should turn chalky white and feel hard to the touch. -
Sanding:
Once fully dry, lightly sand the edges and corners with fine-grit sandpaper to remove any remaining roughness or sharp spots. -
Dusting off:
Wipe the tiles with a dry cloth or soft brush to remove all sanding dust before sealing. -
Sealing:
Apply a thin coat of clear matte varnish or acrylic sealer. This protects the clay from moisture and gives it a finished sheen without making it look plastic.
Fixing Warping
If a tile corners lift while drying, gently weigh it down with a heavy book placed on top of a piece of paper towel to flatten it back out.
Arrange your trio on a mantle or shelf to bring a calming, tactile element to your decor space