Whenever you’re craving a quick win, easy small clay ideas are my go-to because you can finish something adorable without a ton of tools or time. Think mini projects you can gift, use on your desk, or keep as tiny treasures that make everyday life feel a little more handmade.
Little Heart Magnets
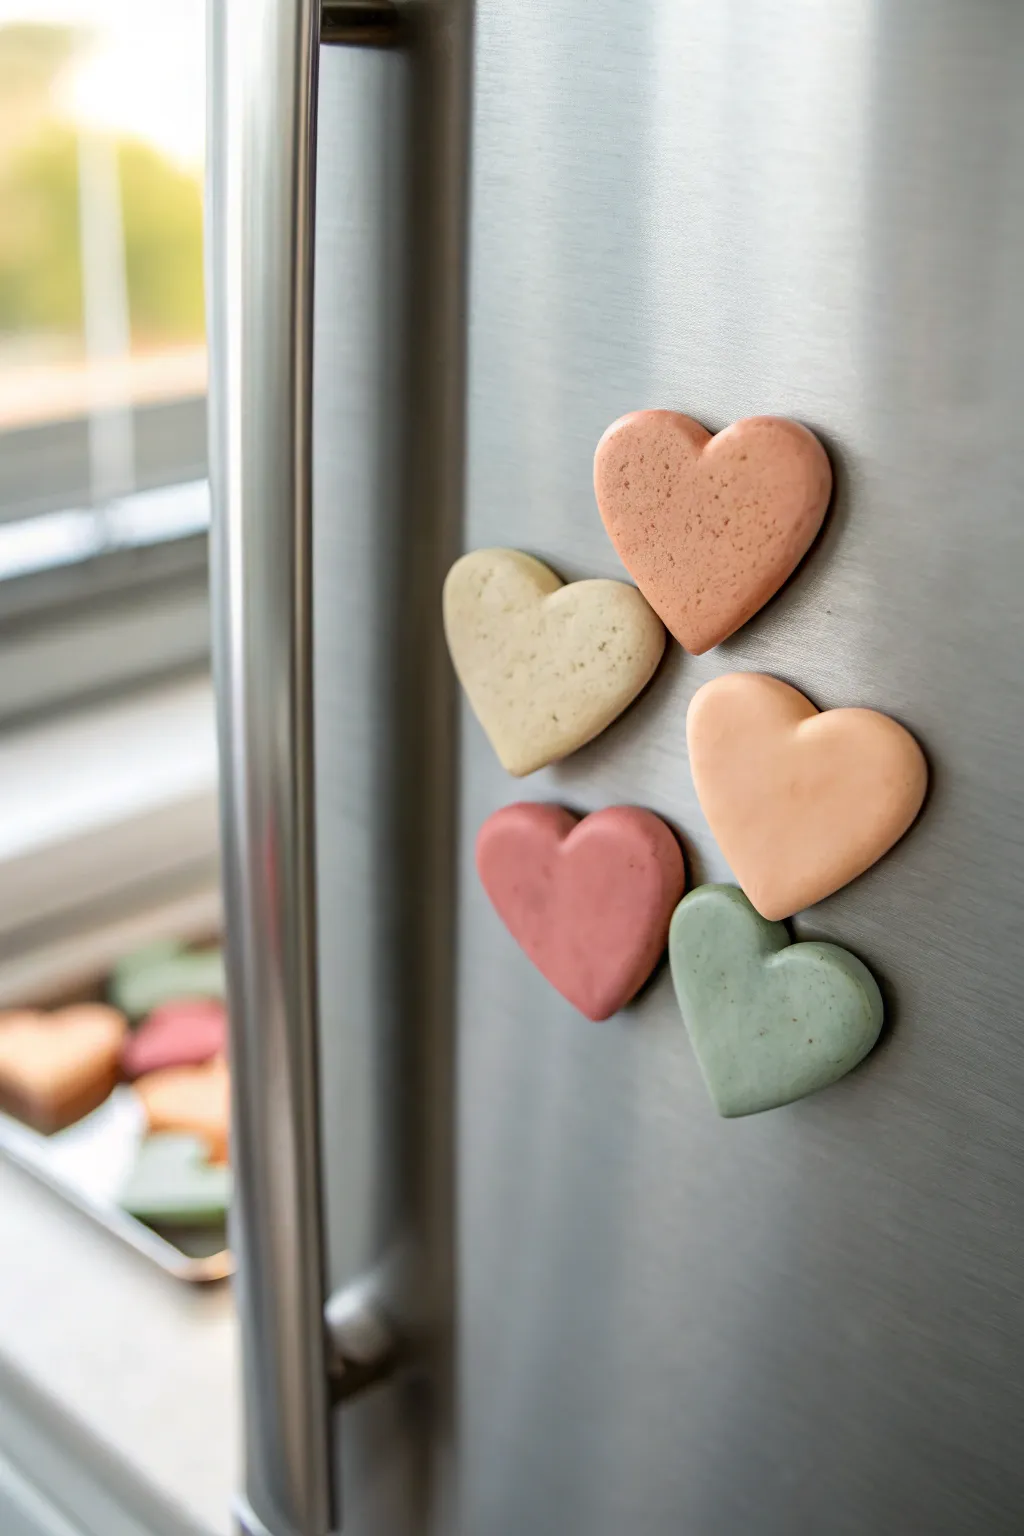
These charming little heart magnets add a soft pop of colour to your fridge with their matte, speckled finish. They are incredibly simple to make, requiring just a bit of clay and some muted, earthy tones.
Step-by-Step Guide
Materials
- Polymer clay (white base)
- Acrylic paints (muted pink, terracotta, sage green, cream)
- Small heart-shaped cookie cutter (approx. 1.5 – 2 inches)
- Rolling pin or clay machine
- Coarse black pepper or dried coffee grounds (for speckling)
- Strong craft glue (E6000 or harsh superglue)
- Small round ceramic magnets
- Baking sheet with parchment paper
- Sandpaper (fine grit)
Step 1: Preparing the Clay
-
Condition the clay:
Start by taking a block of white polymer clay and kneading it thoroughly in your hands until it becomes soft, pliable, and warm. -
Mix your colours:
To achieve the specific pastel tones shown, mix small amounts of acrylic paint or coloured clay into your white base. You want a terracotta orange, a dusty rose pink, a sage green, and a creamy off-white. -
Create the speckled effect:
Before rolling, sprinkle a tiny pinch of coarse black pepper or dried coffee grounds onto each colour ball. -
Incorporate the texture:
Fold the clay over the speckles and knead gently just enough to distribute the particles throughout the clay without crushing them completely.
Step 2: Shaping and Baking
-
Roll out the clay:
Use your acrylic roller or clay machine to roll the clay out to a uniform thickness, roughly 1/4 inch thick. You want them chunky enough to hold the magnet but not too heavy. -
Cut the shapes:
Press your heart-shaped cutter firmly into the rolled clay. Wiggle it slightly to ensure a clean cut before lifting. -
Smooth the edges:
Once cut, run your fingertip gently around the perimeter of each heart to soften any sharp edges left by the cutter. -
Create a slight curve (optional):
For a softer, puffier look, you can gently press the center of the heart from the back or pinch the edges inward very slightly. -
Prepare for baking:
Arrange your hearts on a baking sheet lined with parchment paper, ensuring they aren’t touching each other. -
Bake:
Bake according to your specific polymer clay package instructions. This is usually around 275°F (130°C) for 15-30 minutes depending on thickness. -
Cool down:
Allow the hearts to cool completely on the baking sheet to harden fully. They will be slightly soft when hot.
Sticky Cutter?
If the clay sticks inside your cutter, dip the cutting edge into a little cornstarch or water before pressing it into the clay for a clean release.
Step 3: Finishing Touches
-
Check for imperfections:
Inspect your cooled hearts. If there are any fingerprints or rough spots on the edges, lightly buff them away with fine-grit sandpaper. -
Prepare the back:
Flip the hearts over. I find that lightly scratching the spot where the magnet will go helps the glue adhere better. -
Apply adhesive:
Place a dab of strong craft glue, like E6000, onto the back of your gathered magnets. -
Attach the magnets:
Press the magnets firmly onto the center back of each clay heart. -
Let it cure:
Leave the magnets upside down to dry for the full cure time recommended on your glue bottle (often 24 hours) before placing them on the fridge.
Stamped Messages
Before baking, use small letter stamps to impress words like ‘LOVE’ or ‘NOTES’ into the clay for personalized message holders.
Your fridge now has a lovely set of custom, earthy decor pieces to hold up your favorite photos


Cute Mini Animal Figurines (Cats, Frogs, Bears)
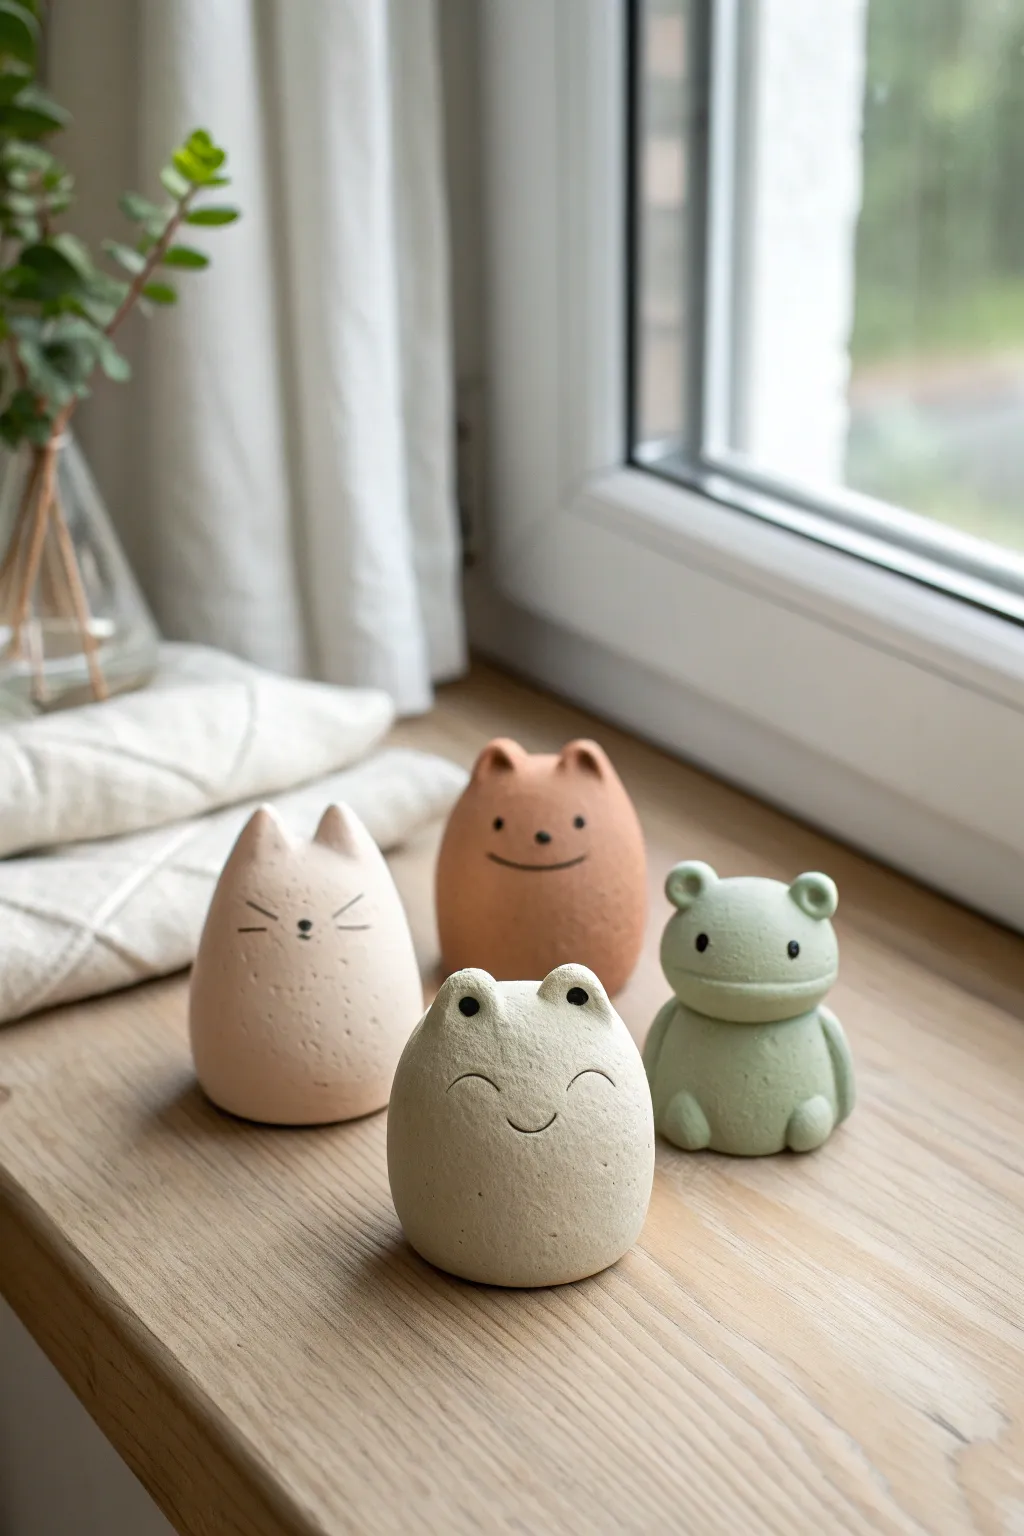
These charming, egg-shaped figurines prove that simple shapes make the sweetest friends. With their smooth, matte finishes and sweet hand-painted expressions, this set of a cat, bear, and two frogs is perfect for beginners looking to practice basic modeling.
How-To Guide
Materials
- Air-dry clay or polymer clay (white, terracotta, and soft green)
- Acrylic paints (black, white, soft pink, sage green)
- Fine-grit sandpaper (400-600 grit)
- Small bowl of water
- Fine detail paintbrush (size 0 or 00)
- Needle tool or toothpick
- Matte varnish (optional)
- Rolling pin or smooth jar
- Clean work surface (ceramic tile or silicone mat)
Step 1: Shaping the Bodies
-
Condition the clay:
Start by kneading your clay until it is warm, pliable, and free of cracks. If you are using white clay for all animals, divide it into four equal portions about the size of a large walnut. -
Form the base shapes:
Roll each portion into a smooth ball between your palms. Gently tap the bottom on your work surface to create a flat base so the figurine stands upright. -
Taper the top:
For the cat and frogs, gently roll the top half of the ball to taper it slightly, creating more of a rounded egg or teardrop shape. Keep the bear shape slightly more round and stout.
Cracks Appearing?
If you see tiny cracks while air-drying, mix a small amount of fresh wet clay with water to make a paste (slip) and fill them in before painting.
Step 2: Sculpting the Cat
-
Pinch the ears:
On the tapered top of the pinkish-beige form, use your thumb and forefinger to pinch up two small triangles. Smooth the clay between them to define the head shape. -
Refine the silhouette:
Use a little water on your finger to smooth the transition from the ears to the body, ensuring the cat looks like one cohesive, seamless piece.
Stone Effect Texture
To get the speckled look seen on the cat, dip an old toothbrush in watered-down brown paint and flick tiny speckles onto the clay before varnishing.
Step 3: Creating the Bear
-
Add bear ears:
Roll two tiny, pea-sized balls of terracotta-colored clay. Press them gently onto the top left and right sides of the bear’s rounded head. -
Blend the seams:
Using a modeling tool or the back of your fingernail, drag the clay from the bottom of the ears down into the head to attach them firmly. Smooth over the seam until invisible.
Step 4: Forming the Green Frog
-
Make the eyes:
Roll two small balls of green clay for the frog’s prominent eyes. Attach these to the very top of the head, spacing them slightly apart. -
Add limbs:
Roll two small sausage shapes for the legs and press them vertically against the front belly of the frog. Add two rounded tabs for feet at the bottom. -
Create the mouth line:
Use a needle tool or toothpick to gently press a horizontal indentation across the face, just below the eyes, giving the frog a wide, defined mouth.
Step 5: Sculpting the White Frog
-
Shape the eye mounds:
Similar to the cat, pinch up two rounded mounds on top of the head for this frog’s eyes, rather than attaching separate balls. This creates a smoother, more integrated look. -
Verify stability:
Double-check that all figures stand solidly. If any are wobbly, gently press them down onto the table again to flatten the base further.
Step 6: Refining and Drying
-
Smooth the surface:
Dip your finger in water and gently rub over every figurine to remove fingerprints and tiny imperfections. The goal is a stone-like smoothness. -
Allow to dry:
Let the figurines air dry completely. This usually takes 24-48 hours depending on humidity. If using oven-bake clay, bake according to the package instructions now. -
Sand for perfection:
Once fully dry or cured, use fine-grit sandpaper to buff away any remaining roughness or lint, focusing on the bottom edges.
Step 7: Painting Details
-
Paint the cat’s face:
Using your finest brush and black paint, add two small dots for eyes, a tiny inverted triangle for the nose, and three thin whiskers on each cheek. -
Detail the bear:
Paint wide-set black eyes and a simple U-shaped smile. I find placing the eyes lower on the face makes the bear look cuter. -
Finish the frogs:
For the green frog, paint black dots inside the eye mounds. For the white frog, use black for the eyes and a curved line for the smile. Add a tiny dot of white inside the black eyes for a ‘sparkle’ effect. -
Seal the work:
Protect your paint by applying a thin coat of matte varnish. Avoid glossy finishes to maintain the natural, stone-like aesthetic.
Arranging these little friends on a windowsill brings a quiet joy to any room


Mini Food Friends (Donuts, Strawberries, Sushi)
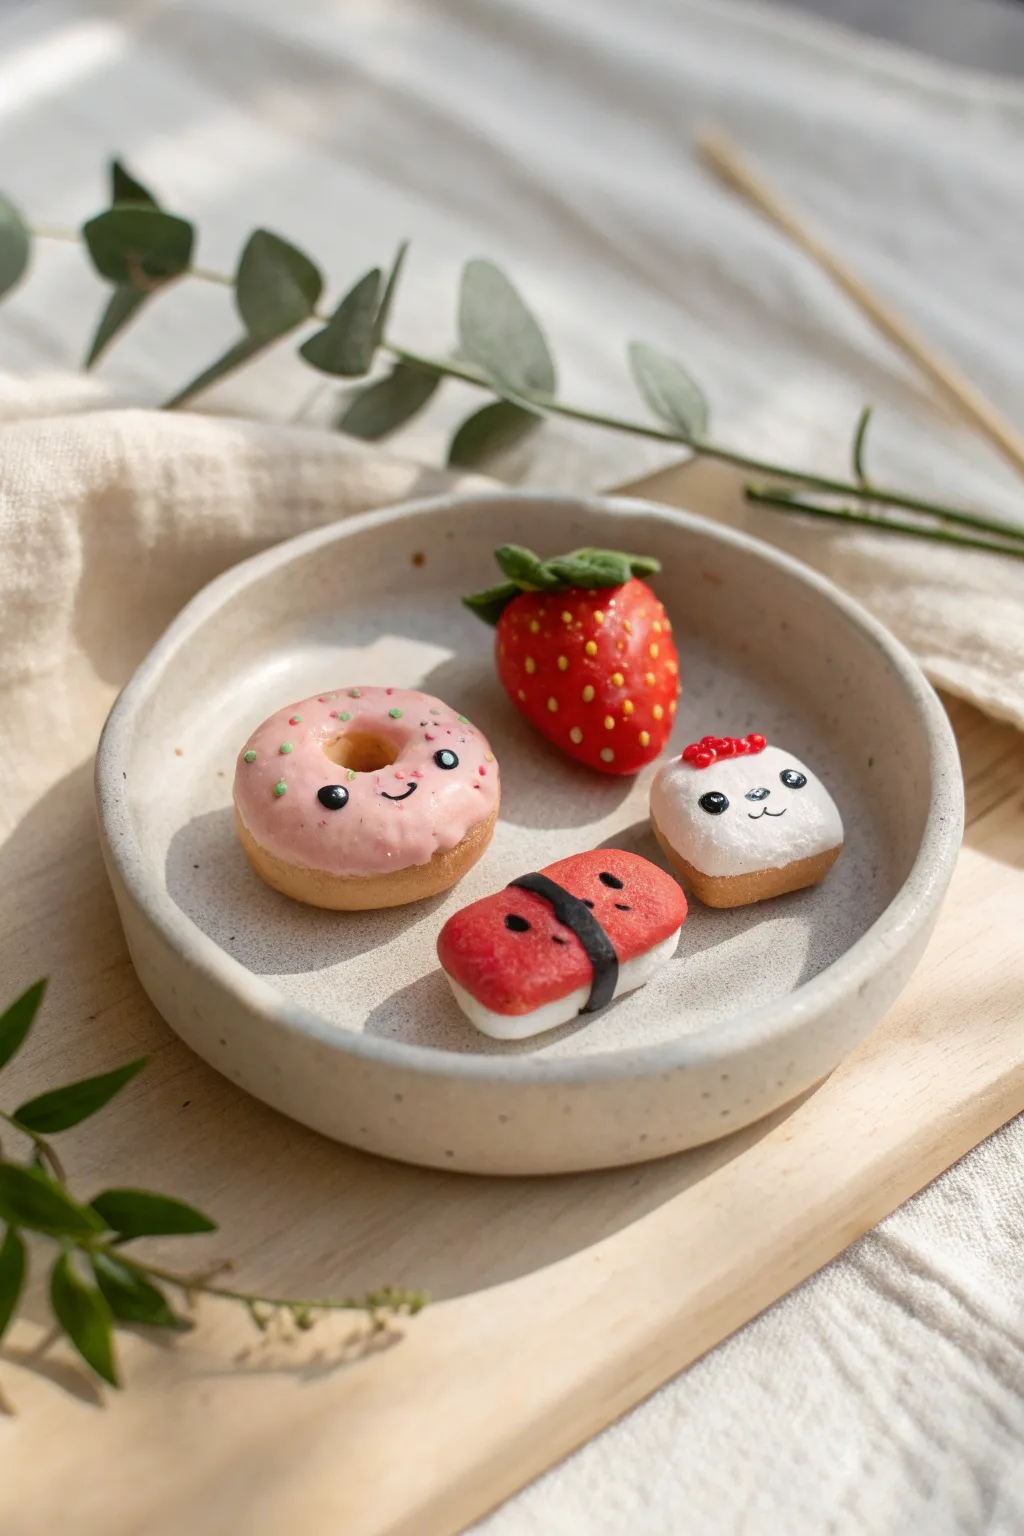
These adorable miniature clay figures bring a touch of kawaii charm to any desk or shelf. You’ll create a smiling pink donut, a vibrant strawberry, a cheerful piece of sushi, and a sweet little tofu cube, all perfectly sized for a tiny display dish.
How-To Guide
Materials
- Polymer clay (beige/tan, pink, translucent red, white, white translucent, black, green)
- Liquid polymer clay (optional, for frosting)
- Gloss glaze or UV resin
- Fine-tipped detailing tools or toothpicks
- Small rolling pin
- Needle tool
- Soft pastel chalks (brown/orange for shading)
- Small soft paintbrush
- Acrylic paint (black, white) and a fine liner brush
Step 1: Shaping the Happy Donut
-
Base shape:
Start with a small ball of beige or tan clay, about the size of a large marble. Flatten it slightly into a thick disc shape to form the donut body. -
Creating the hole:
Use the rounded end of a paintbrush handle or a dotting tool to press a hole directly into the center. Gentle widen the hole by rotating the tool, smoothing the edges so it looks baked and round. -
Adding texture:
I like to take a soft toothbrush and lightly tap it over the tan surface to mimic the texture of fried dough. Then, brush on a tiny amount of shaved brown pastel chalk for a golden-baked look. -
Frosting layer:
Roll out a thin piece of pink clay and cut a wavy, irregular circle. Drape this over the top of your donut, smoothing the edges down to look like melted icing. -
Tiny face:
Roll two miniscule balls of black clay and press them into the frosting for eyes. Roll a hair-thin snake of black clay for the smile and position it centrally. -
Sprinkle details:
For the sprinkles, you can either paint them on later or roll impossibly thin snakes of green and pink clay, chop them into bits, and press them lightly onto the donut’s surface.
Step 2: Crafting the Strawberry
-
Berry body:
Form a teardrop shape using red clay. If you want a more realistic finish, mix a tiny bit of translucent clay into your red to give it a juicy depth. -
Seed texture:
Using a needle tool, poke shallow indentations all over the strawberry’s surface. Don’t worry about being perfectly uniform; nature loves variety. -
Adding seeds:
Roll tiny specks of yellow or light green clay and gently press one into each indentation you created. This takes patience but looks fantastic. -
Leafy green top:
Flatten a small ball of green clay and cut a star shape. Place this on the wider end of the berry, curling the tips slightly upward, and add a small stem in the center.
Fixing Fingerprints
If you notice fingerprints on your smooth clay surfaces before baking, lightly brush them with a little baby oil or cornstarch to smooth them out instantly.
Step 3: Sushi & Tofu Pals
-
Sushi rice base:
Shape a rectangular block of white clay with rounded corners to serve as the rice base for your sushi. -
Fish topping:
Mix red and a little white clay to create a shrimp or tuna colour. Flatten it into an oval that covers the top of the rice block, draping slightly over the ends. -
Nori belt:
Roll a flat strip of black clay and wrap it around the center of the sushi to bind the fish to the rice. -
Sushi face:
Using a needle tool or black paint, add two small eyes and a tiny mouth directly onto the fish topping. -
Tofu cube:
Form a soft square or cube shape from white clay. Round the edges so it looks pillowy and soft like tofu or mochi. -
Baked base:
Brush the very bottom edge of the white cube with brown pastel chalk dust to make it look like a toasted crust. -
Bow and face:
Create a tiny red bow from two small triangles and a center dot, pressing it onto the head. Add a sweet painted or clay face with wide-set eyes.
Make Them Charms
Insert a small metal eye pin into the top of each figure before baking. Once baked and cooled, you can attach them to a bracelet, necklace, or keychain!
Step 4: Finishing Touches
-
Baking:
Arrange all your food friends on a tile or baking sheet. Bake according to your clay manufacturer’s specific instructions (usually around 275°F/135°C for 15-30 minutes). -
Glazing:
Once cool, apply a coat of gloss glaze or UV resin specifically to the strawberry and the ‘fish’ part of the sushi to make them look wet and fresh. -
Final highlights:
Use a toothpick to add a tiny dot of white paint to the eyes of the donut, sushi, and tofu for that extra sparkle of life.
Display your new tiny culinary crew together on a small dish for maximum cuteness


Mini Toothbrush Holder Critter
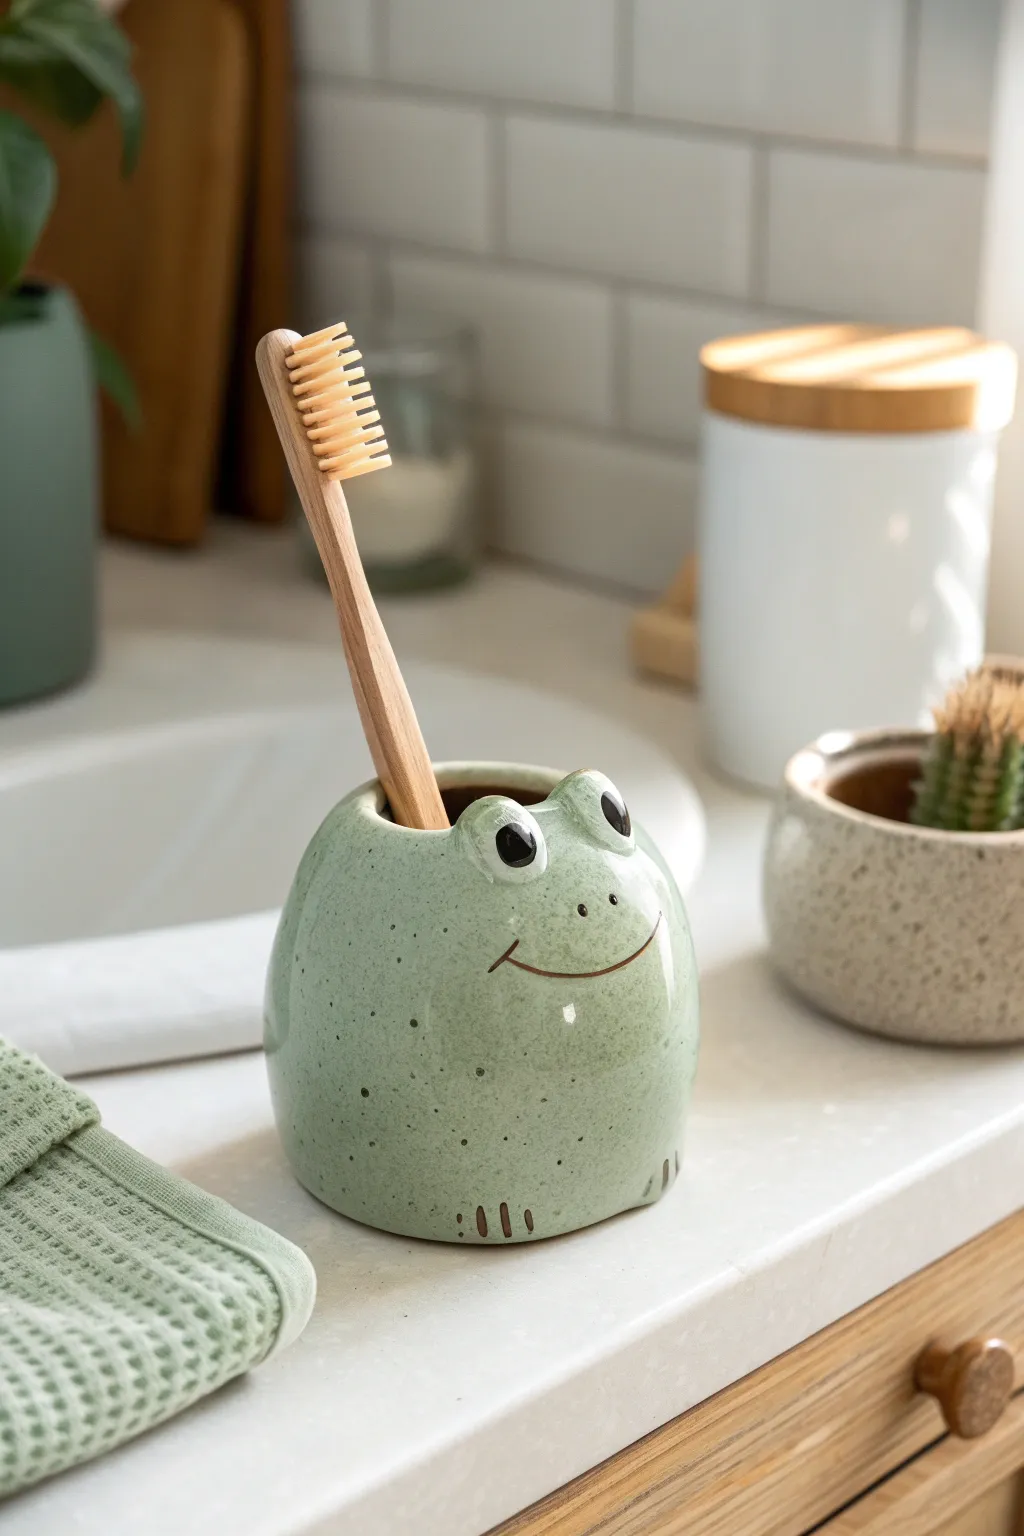
Brighten up your bathroom vanity with this adorable amphibious friend, designed to keep your toothbrush upright and drying properly. Its round, speckled body and simple smile add a touch of whimsy to your daily routine while serving a practical purpose.
Step-by-Step Guide
Materials
- Air-dry clay or polymer clay (white)
- Acrylic paints (pale sage green, dark brown, white)
- Glossy varnish or sealant (water-resistant is crucial)
- Clay carving tools (needle tool, small loop tool)
- Sponge or stiff bristle brush (for texturing)
- Rolling pin
- Water and slip (if using air-dry clay)
- Fine-grit sandpaper
Step 1: Shaping the Base
-
Form the main body:
Start with a ball of clay roughly the size of a tennis ball. Roll it firmly between your palms to smooth out any cracks, then gently tap the bottom on your work surface to create a flat base so it stands up on its own. -
Create the hollow:
Using your thumb or a large loop tool, press into the center of the top to create the opening. You want a hole deep and wide enough to hold a toothbrush handle comfortably—about 1 inch in diameter and 2 inches deep. -
Smooth the walls:
Work the clay upwards slightly as you hollow it out, keeping the walls relatively thick (about 1/4 inch) for stability. Dip your finger in a little water to smooth out the interior rim so there are no sharp edges. -
Refine the shape:
Gently gently squeeze the clay to taper the top opening slightly, giving the frog a chubby, rounded bottom and a slightly narrower head area.
Uneven Splatter?
If your freckles are looking too blobby, blot the brush on a paper towel first. Always test the splatter on scrap paper before aiming at your frog.
Step 2: Adding Character
-
Sculpt the eye sockets:
Roll two small marble-sized balls of clay. Score and slip (scratch the surface and add water/clay slurry) the attachment points on top of the head, then press the balls firmly into place. -
Blend the eyes:
Using a modeling tool or your finger, blend the seams where the eyes meet the head so they look like protrusions, not just stuck-on spheres. I usually wet my finger to get a really seamless transition here. -
Indicate the feet:
At the very bottom front of the body, use a needle tool to lightly carve three small vertical lines on the left and right sides. These subtle marks suggest little toes without needing to sculpt full feet. -
Scribe the smile:
Use your needle tool to carve a gentle, wide U-shape curve across the front of the face. Press deep enough that the glaze won’t fill it in later. -
Add nostrils:
Right above the smile and between the eyes, poke two tiny holes for the nostrils using the tip of your needle tool. -
Smooth and dry:
Give the entire piece a final smoothing with a slightly damp sponge. Let the clay dry completely according to the package instructions (usually 24-48 hours for air-dry clay).
Drainage Tip
Poke a small hole through the bottom center before drying. This allows trapped water to drain out, keeping your toothbrush cleaner.
Step 3: Painting and Finishing
-
Sand imperfections:
Once fully dry (and hardened), lightly sand any rough spots or fingerprints with fine-grit sandpaper. Wipe away the dust with a dry cloth. -
Apply base color:
Mix a soft sage green acrylic paint. Apply two to three thin coats over the entire outside and just inside the rim, letting each coat dry before the next. -
Create the speckled effect:
Dilute a small amount of dark brown paint with water. Dip an old stiff toothbrush or bristle brush into it, and flick the bristles with your thumb to splatter tiny brown dots all over the green skin. -
Detail the face:
Use a fine liner brush and dark brown paint to carefully trace inside the carved smile line, the toe marks, and to paint the large circular pupils on the eyes. -
Add eye highlights:
Dip the back end of a paintbrush into white paint and dot a small highlight onto the upper right corner of each pupil to bring the frog to life. -
Seal for protection:
Apply a water-resistant glossy varnish over the entire piece. Because this will live in a bathroom, apply at least 2-3 coats, paying special attention to the bottom and the inside rim.
Place your new green buddy on the sink edge and enjoy a cheerful start to your mornings