If you’re craving that cozy, enchanted-forest vibe, fairy clay ideas are the fastest way to turn a little lump of clay into a whole tiny world. I’ve pulled together my favorite fairy house, fairy garden, and magical mini accessories that feel whimsical but still totally doable at your craft table.
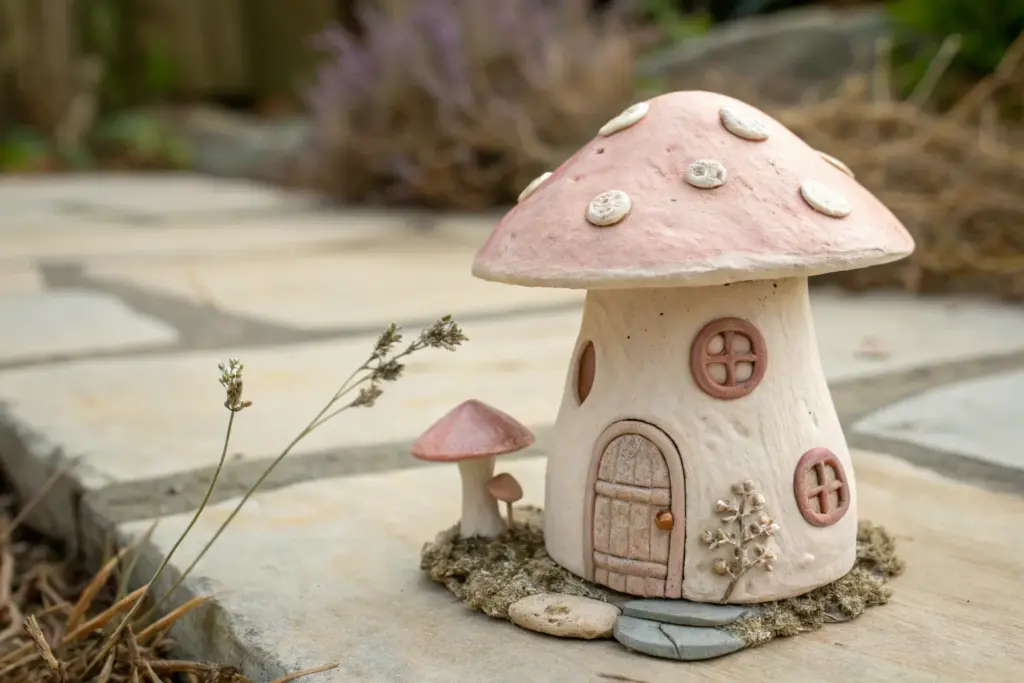
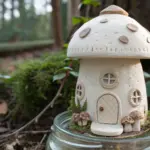
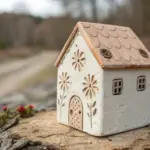
Classic Mushroom Fairy Houses
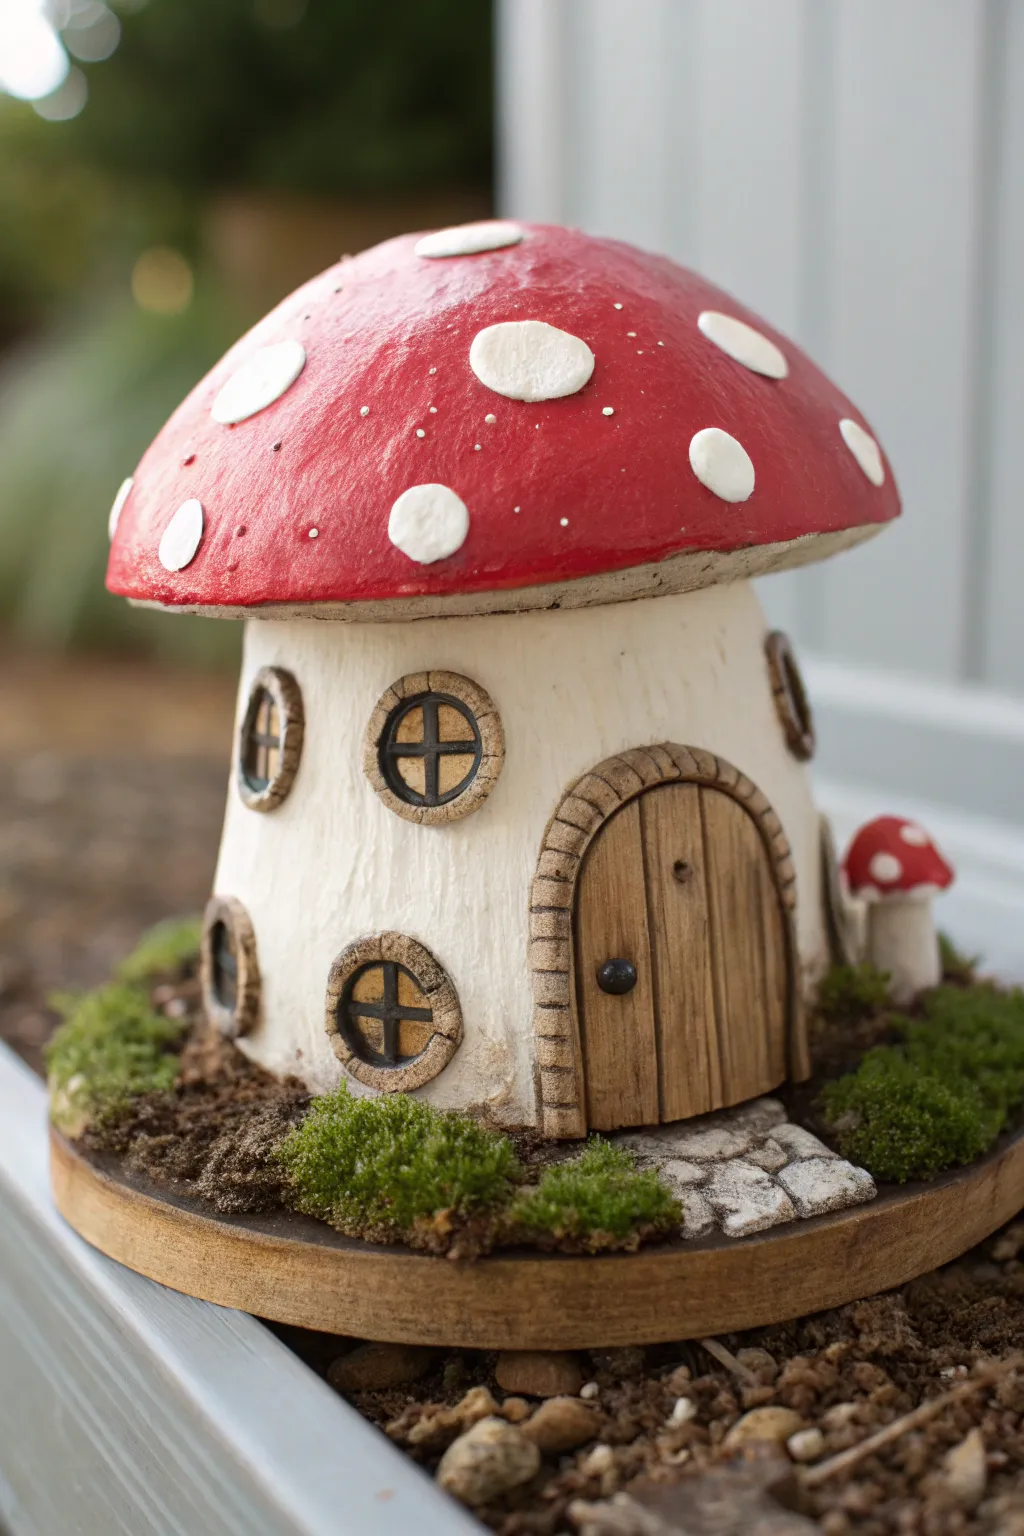
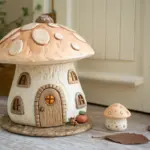
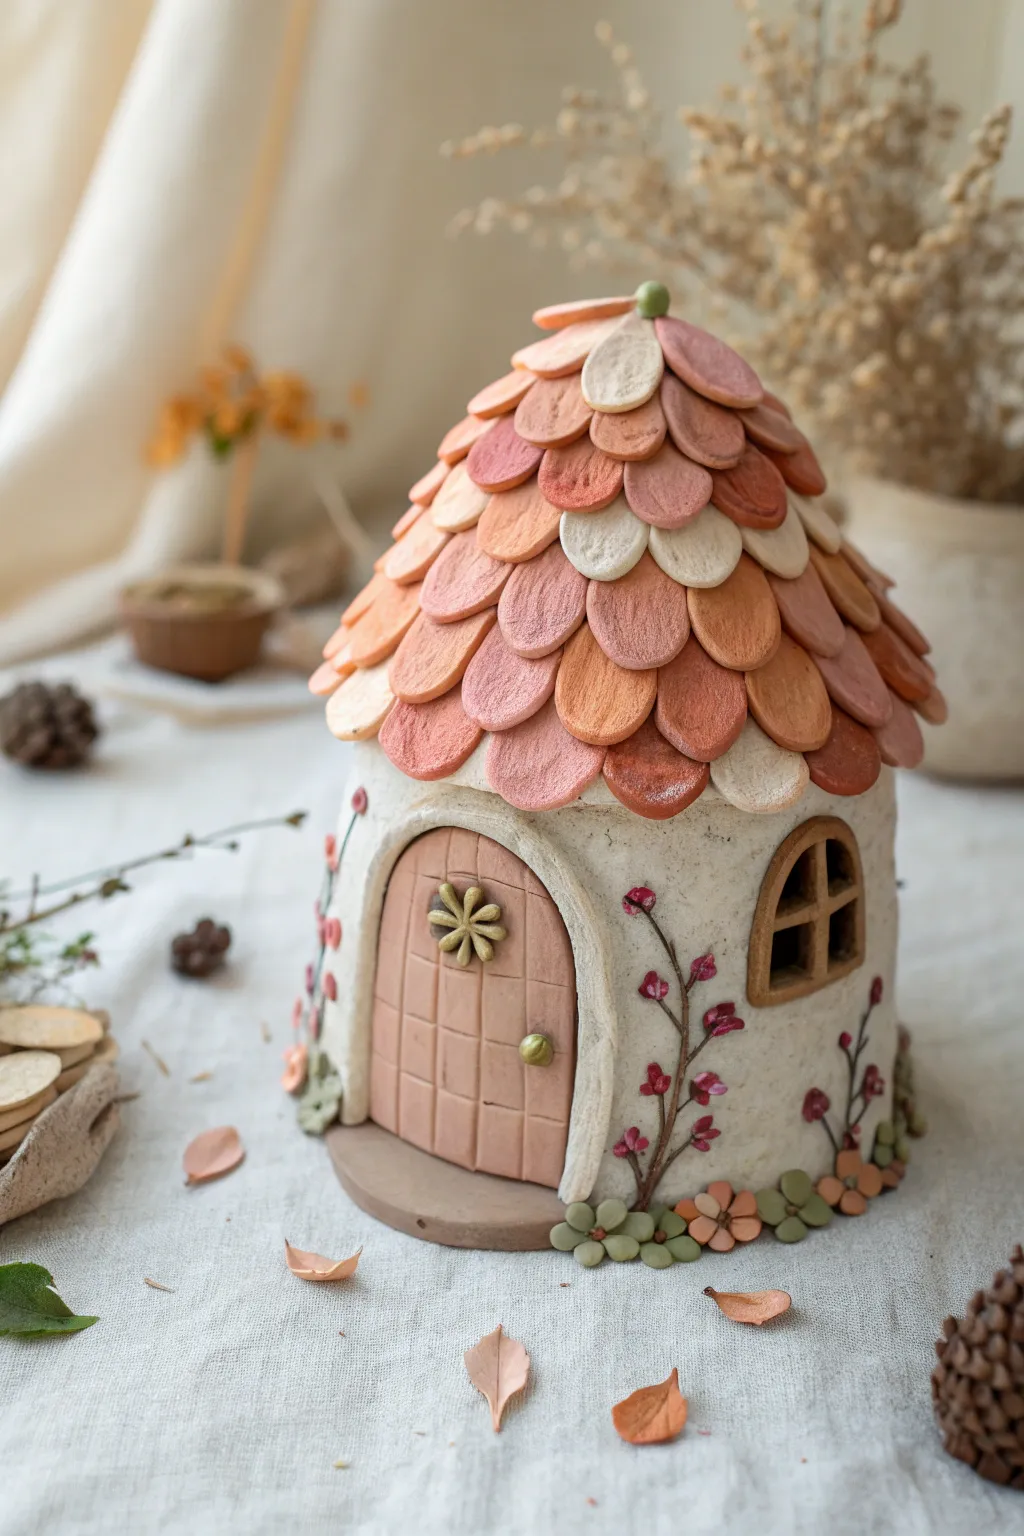
Bring a touch of woodland magic to your shelf with this classic toadstool fairy house. Featuring a textured stem, a vibrant spotted red cap, and charming rustic details like a tiny wooden door, this project captures the quintessential fairy tale aesthetic.
Detailed Instructions
Materials
- Air-dry clay or polymer clay (white)
- Aluminum foil (for armature)
- Wooden circular base (approx. 4-5 inches)
- Acrylic paints (bright red, white, dark brown, tan, black)
- Sculpting tools (needle tool, ball stylus)
- Rolling pin
- Clear craft glue or tacky glue
- Preserved moss
- Small paintbrush set (detail and flat)
- Texture sponge or toothbrush
- Clear matte varnish (optional)
Step 1: Building the Structure
-
Form the foil core:
Crumple aluminum foil into a sturdy cylinder shape for the stem. Make a wider, dome-like shape for the mushroom cap. The cap should be slightly larger than the stem’s top width. -
Join the pieces:
Press the foil cap onto the foil stem. You can use a bit of hot glue or masking tape to secure them together so they don’t wiggle while you sculpt. -
Coat the stem:
Roll out a sheet of white clay to about 1/4 inch thickness. Wrap it around the foil stem, smoothing the seam where the clay meets. Leave the top of the foil dome exposed for now. -
Add texture:
Use a toothbrush or a rough sponge to tap gently against the wet clay stem. This creates a realistic, stucco-like texture rather than perfectly smooth perfection. -
Cover the cap:
Roll out a larger circle of clay and drape it over the foil dome. Trim the excess around the rim, tucking the edges under to meet the top of the stem smoothly.
Step 2: Adding Details
-
Create the door:
Roll a small oval slab of clay. Use a needle tool to score vertical lines to mimic wood planks. Press this onto the front of the stem. -
Frame the entrance:
Roll a thin snake of clay and flatten it slightly. Wrap it over the top arch of the door. Use a tool to impress horizontal lines, creating a stone brick effect. -
Install windows:
Make small circles of clay and press them onto the walls. Roll very thin threads of clay to form a ‘+’ sign over each circle for the window panes. -
Add window frames:
Similar to the door, wrap a thin clay snake around each window circle. Texture these with small indentations to look like rough stone or wood. -
Sculpt the path:
Form irregular, flat pebble shapes from small bits of clay. Press them onto the base leading up to the door to create a cobblestone walkway. -
Add the mini mushroom:
Form a tiny cylinder and a tiny cap from scrap clay. Attach this small sidekick mushroom to the right side of the house. -
Dry the sculpture:
Let the entire piece dry completely according to your clay’s package instructions. Air-dry clay may take 24-48 hours.
Clay Texture Tip
Before the clay dries, gently press a piece of real sandpaper against the stem walls. This transfers a perfect gritty texture that looks like aged stucco when painted.
Step 3: Painting and Finishing
-
Paint the cap:
Coat the mushroom cap with bright red acrylic paint. You may need two coats for full opacity. I like to let this dry briefly before moving to the next color. -
Detail the door:
Paint the door area a medium tan. Once dry, use a watered-down dark brown paint as a wash over the ‘planks’ to highlight the grooves. -
Paint the frames:
Paint the door arch and window frames in a stone grey or dark brown. Paint the window panes dark greys or black to suggest depth. -
Add the spots:
Using white paint, dab irregular circles onto the red cap. Make some large and some tiny for a natural, organic look. Paint the small side mushroom to match. -
Weather the stem:
The white stem can look too stark, so lightly brush a very diluted beige or grey wash over the textured surface to age it slightly. -
Apply the base:
Glue the finished house centered on your wooden disc. Paint the clay cobblestones grey with white highlights. -
Landscaping:
Apply clear glue generously around the base of the house and between the cobblestones. Press preserved moss into the glue to simulate grass. -
Final touches:
Paint a tiny black doorknob on the door and add tiny white dots to the red cap (if you want extra sparkle).
Level Up: Night Mode
Hide a small battery-operated LED tea light inside the foil structure (leaving a hole in the bottom) and cut out the window spaces so the house glows in the dark.
Now you have an adorable, handcrafted centerpiece ready to welcome any wandering pixies into your home

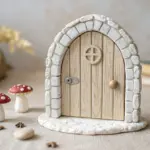
Fairy Doors With Wood-Grain Texture
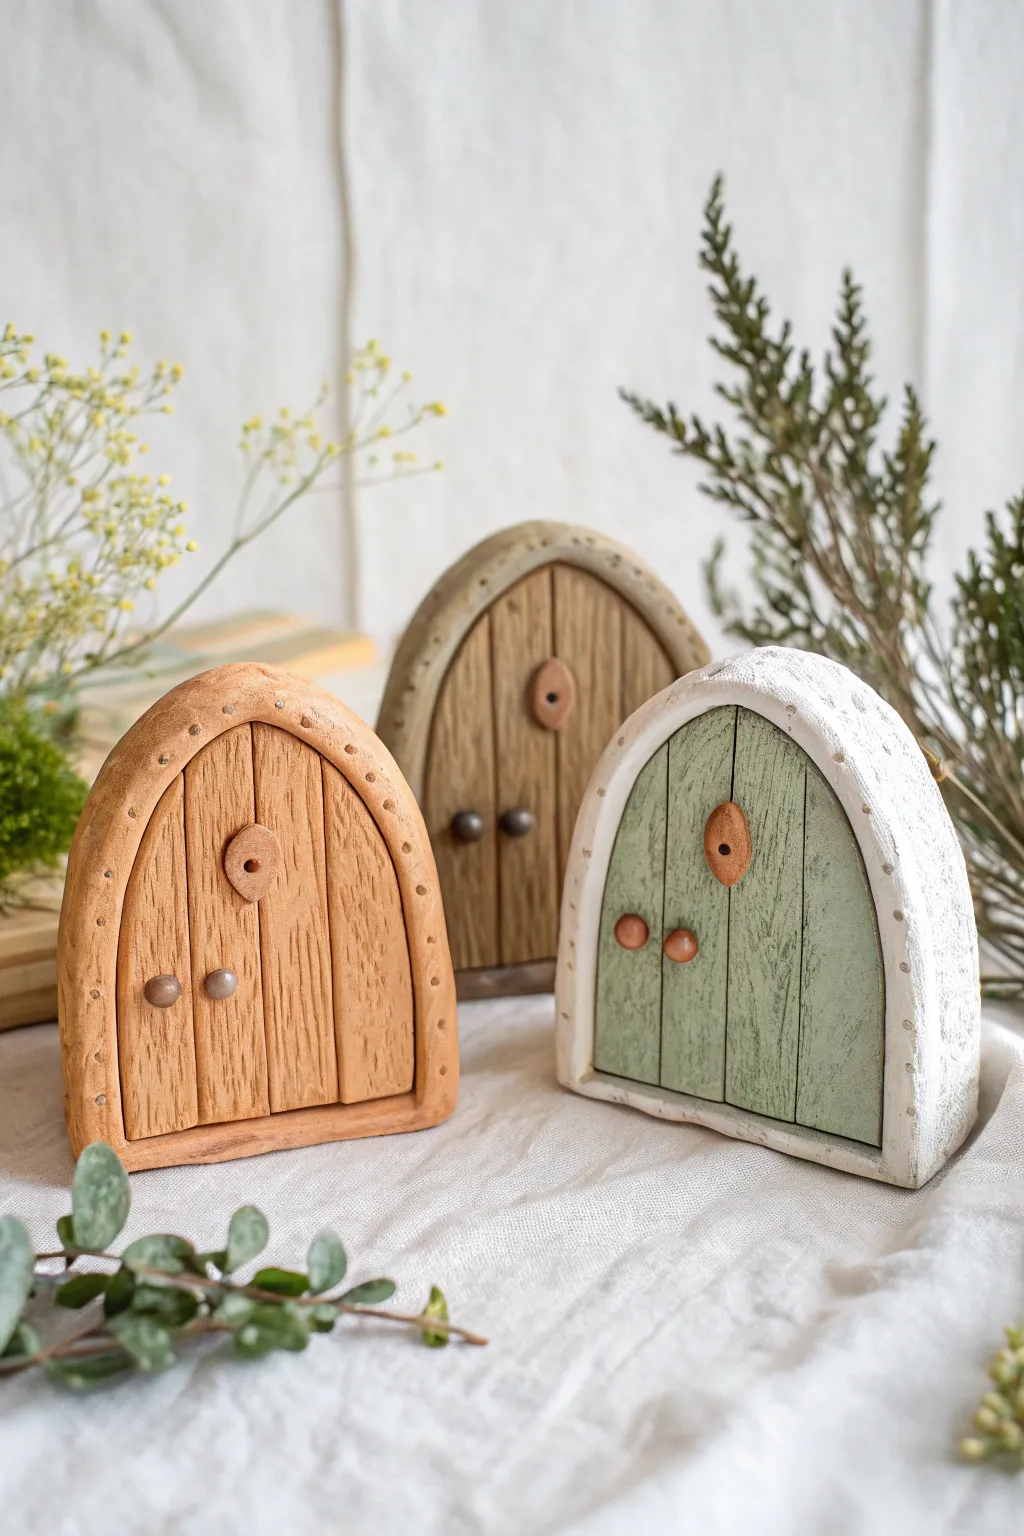
These enchanting miniature portals add a touch of magic to any garden or bookshelf, featuring realistic wood textures and charming arched frames. Using simple clay techniques, you’ll create rustic, durable doorways that look like they’ve been crafted by forest sprites themselves.
Step-by-Step Tutorial
Materials
- Polymer clay or air-dry clay (shades of brown, tan, green, gray, and white)
- Clay roller or rolling pin
- Texture tools (needle tool, toothpick, or old toothbrush)
- Blade or X-Acto knife
- Small circle cutter (optional)
- Acrylic paints (brown and black washes)
- Matte varnish
- Aluminum foil (for armature core)
Step 1: Forming the Base
-
Prepare the core:
Crumple a piece of aluminum foil into a flattened arch shape about 3-4 inches tall. Press it firmly so it is dense and holds its shape; this saves clay and keeps the door lightweight. -
Roll the backing slab:
Roll out a slab of scrap clay or a neutral color to about 1/4 inch thickness. Place your foil arch on top and trim the clay, leaving a small border around the edge. -
Cover the back:
Wrap the clay smoothly around the back of the foil shape, ensuring the foil is completely hidden. This creates a solid foundation for your decorative front.
Step 2: Creating the Rustic Wooden Door
-
Mix your wood color:
Choose your door color—warm caramel, deep brown, or soft sage green. Roll this clay into a smooth slab about 1/8 inch thick. -
Cut the door shape:
Cut an arch shape from this colored slab that is strictly smaller than your base, leaving room for the stone frame later. Place this onto the front of your foil-covered base. -
Add plank lines:
Using the back of a knife or a needle tool, gently press vertical lines into the door clay to simulate separate wooden planks. Don’t cut all the way through; just make deep indentations. -
Texture the wood:
Take a needle tool or a stiff brush and drag it vertically down each ‘plank’ to create a realistic wood grain texture. Add small knots or swirls for character. -
Highlight the grain:
I like to gently press the edges of the planks slightly inward to make them look rounded and aged, rather than sharp and freshly cut.
Fixing Cracks
If air-dry clay cracks while drying, mix a small amount of fresh clay with water to make a paste (slip). Fill the cracks, smooth over with a finger, and let dry again.
Step 3: Building the Stone Archway
-
Roll the frame coil:
Roll a thick snake of clay in a contrasting color (like speckled white, gray, or sand). Flatten it slightly to create a long strip. -
Attach the frame:
Wrap this flattened strip around the curved edge of your wooden door. Smooth the seam where the frame meets the back of the base so distinct layers aren’t visible from the side. -
Refine the shape:
Press the frame so it sits flush against the ‘wood.’ You can leave it smooth for a plaster look or texture it with a rock or foil ball for a stone effect. -
Add decorative details:
Use a small dotting tool or the blunt end of a skewer to press a row of evenly spaced dots along the center line of the arch frame.
Magical Moss
Glue dried moss or tiny faux florals into the crevices at the bottom of the frame after baking. This grounds the door and makes it look like it’s been in the forest for years.
Step 4: Finishing Hardware Details
-
Make the handle:
Roll two tiny balls of dark clay (brown or metallic) for the door handles. Press them onto the door planks, generally placing one slightly lower than the other for a whimsical feel. -
Create the peephole plate:
Flatten a tiny oval of clay in a contrasting wood tone. Press this onto the upper center of the door. -
Indent the peephole:
Use a small tool to press a deep hole into the center of the oval plate you just attached. -
Bake or dry:
Follow part of the manufacturer’s instructions to bake (if using polymer) or let dry (if using air-dry clay). Ensure the piece is stable. -
Apply an antique wash:
Once cool or dry, mix a tiny bit of black or dark brown acrylic paint with water. Brush it over the wood texture and wipe it off immediately with a rag, leaving dark paint in the crevices to pop the texture. -
Seal the piece:
Apply a coat of matte varnish to protect your work, especially if these will live outside in a fairy garden.
Place your finished door against the base of a tree or on a special shelf to invite a little everyday magic into your home

Mini Fairy Windows With Shutters

Bring a touch of old-world charm to your fairy garden with these delightful arched windows featuring textured brickwork and tiny planter boxes. The terracotta clay contrasts beautifully with the crisp white frames, creating a cozy cottage feel that’s perfect for a bookshelf or windowsill display.
Step-by-Step
Materials
- Air-dry clay (terracotta color)
- Air-dry clay (white)
- Small rolling pin
- Craft knife or scalpel
- Ruler
- Cardboard or sturdy cardstock (for templates)
- Sculpting tools (needle tool, small spatula)
- Texture tool (real stone, crumpled foil, or toothbrush)
- Clear heavy plastic sheet (acetate/packaging)
- White acrylic paint
- Terracotta acrylic paint (for touch-ups)
- Wood glue or strong craft glue
- Small dried flowers (baby’s breath, dried moss)
- Floral foam or styrofoam block (small piece)
- Sandpaper (fine grit)
Step 1: Creating the Frame Structure
-
Design your template:
Begin by drawing your window shape onto cardboard. Draw an arch approximately 4-5 inches tall. You will need two templates: one for the outer brick arch and a slightly smaller one for the inner window frame. -
Prepare the terracotta clay:
Roll out a thick slab of terracotta-colored air-dry clay, aiming for about 1/2 inch to 3/4 inch thickness. This needs to be sturdy enough to stand upright. -
Cut the main arch:
Place your larger template over the clay slab and cut out the arched shape using your craft knife. Smooth the edges with a wet finger to remove any sharp cut marks. -
Hollow the center:
Use the smaller inner template to mark the window opening in the center of your arch. Carefully cut this section out and remove the excess clay, leaving you with a thick clay doorway shape.
Warping Woes?
If your main brick arch starts to curl while drying, place it under a heavy book (with parchment paper) once it’s ‘leather hard’ to flatten it out again.
Step 2: Texturing the Brickwork
-
Mark the mortar lines:
Using a blunt sculpting tool or the back of your knife, gently score horizontal lines across the front of the terracotta arch to define your brick rows. Then, add vertical lines, staggering them on each row to create a running bond brick pattern. -
Add realistic texture:
Now for the fun part: take a crumpled ball of aluminum foil or a real rough stone and press it gently into each individual ‘brick.’ This removes the smooth clay look and mimics weathered masonry. -
Refine the keystone:
At the very top of the arch, carve deeper lines to imply a central keystone and radiating voussoirs (the wedge-shaped stones) for authentic architectural detail. -
Let it dry completely:
Allow this main structure to dry for at least 24-48 hours. Turn it over halfway through to ensuring even drying and prevent warping.
Level Up: Swinging Shutters
Create a second matching white window frame, cut it in half vertically, and attach these halves to the sides using small fabric strips as hinges for open shutters.
Step 3: Crafting the Window & Planter
-
Roll the white clay:
Roll out your white air-dry clay much thinner this time, about 1/8 inch thick. This will be used for the delicate window panes and the planter box. -
Cut the inner frame:
Using your smaller inner template as a guide, cut a flat arch shape that fits precisely inside the opening of your terracotta piece. Don’t worry about the grid yet; just get the outline right. -
Create the muntins:
Cut out the spaces within that white arch to leave a grid pattern—a vertical center bar and horizontal crossbars. Alternatively, you can cut thin strips of white clay and glue them together to form the grid. -
Form the planter box:
Cut a rectangular strip of white clay long enough to span the base of the window. Fold up the ends and sides to create a shallow trough or box shape. Texture the outside slightly if you want a stucco look. -
Dry the components:
Let the white clay pieces dry completely on a flat surface. I find placing a heavy book on them (with wax paper in between) helps keep them perfectly flat.
Step 4: Assembly and Bloom
-
Create the glass:
Cut a piece of clear acetate plastic slightly larger than the window opening. Glue this to the back of your dried white window frame. -
Combine frame and brick:
Apply strong craft glue to the edges of the white window frame assembly and insert it snugly into the terracotta arch opening. If there are gaps, fill them with a tiny bit of wet clay or spackle. -
Paint touch-ups:
Once assembled, use a dry brush with a little white paint to distress the edges of the bricks for a weathered look. If the white clay looks too pristine, give it a wash of diluted brown paint for an antique effect. -
Attach the planter:
Glue the white planter box to the bottom front of the brick arch. Let the glue cure fully before adding any weight to it. -
Fill with flora:
Cut a small strip of floral foam to fit inside the planter box. Insert small sprigs of dried baby’s breath, dried moss, or tiny faux flowers to create a miniature garden beneath the window.
Place these charming windows against a wall or tree trunk to instantly suggest a hidden home within


Jar-Wrapped Fairy House Lanterns
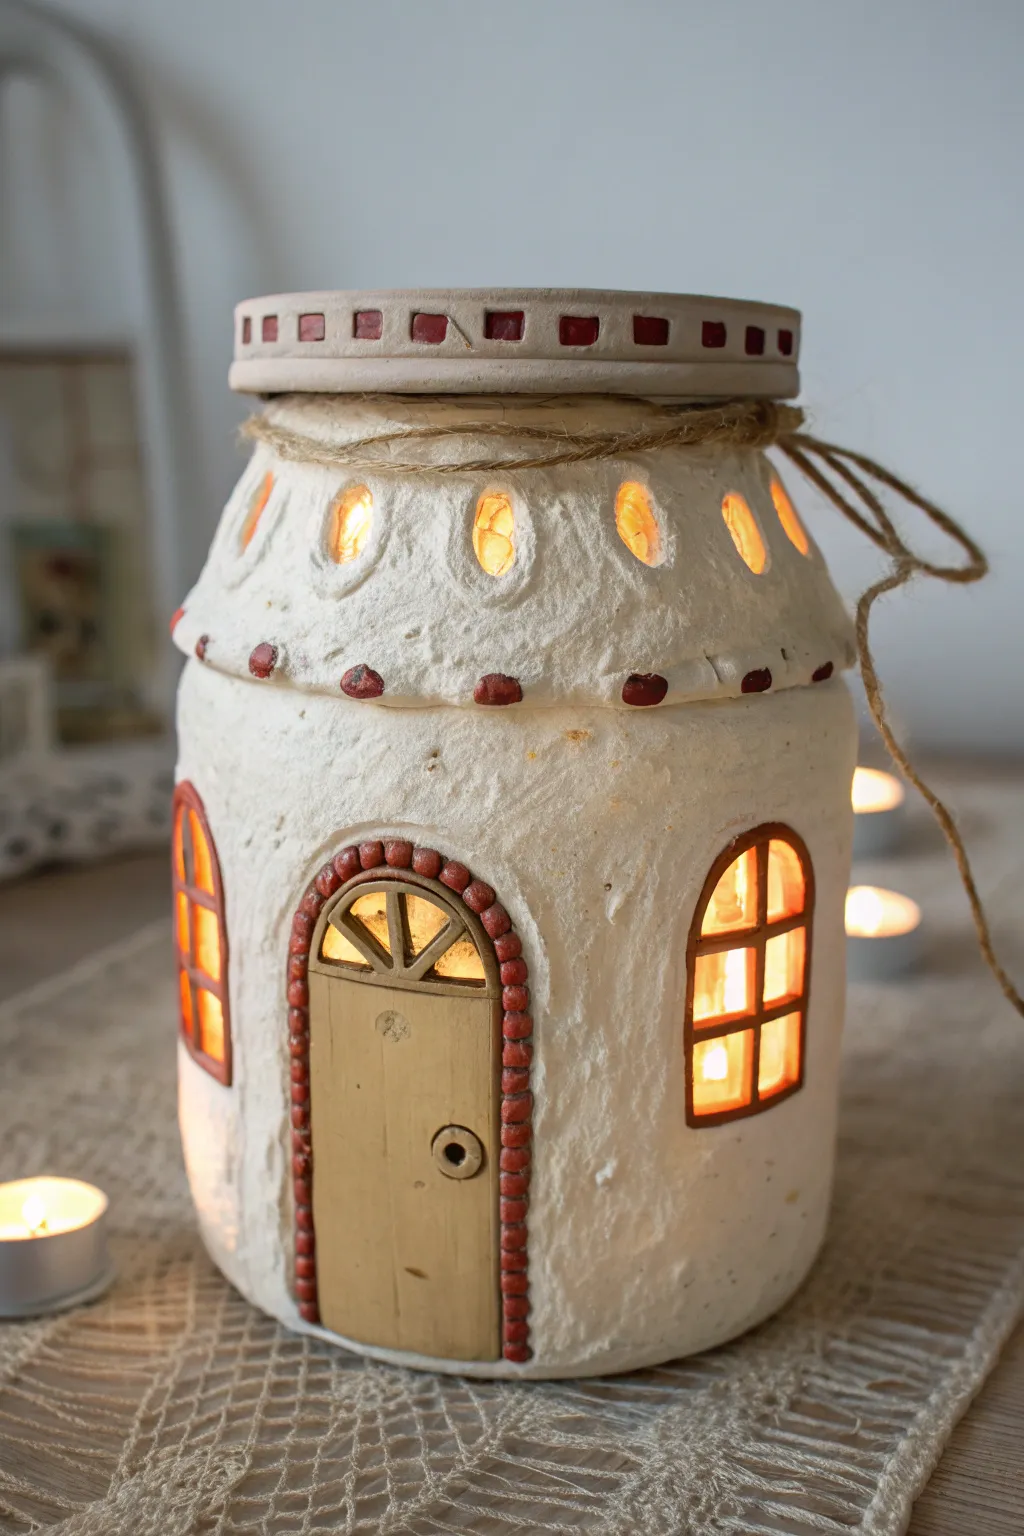
Transform an ordinary glass jar into a whimsical fairy cottage that glows from within. This project uses paper clay to create a textured, old-world plaster effect complete with a charming wooden door and arched windows.
Detailed Instructions
Materials
- Clean glass jar with a wide mouth
- Paper clay or air-dry clay (white)
- Small rolling pin
- Craft knife or clay sculpting tools
- Water and a small bowl
- Acrylic paints (terracotta red, dark brown, creamy beige)
- Small paintbrushes (detail and flat)
- Balsa wood or cardstock (for the door)
- Wood glue or tacky glue
- Twine or jute string
- Battery-operated tea lights
- Sandpaper (fine grit)
Step 1: Preparing the Base
-
Clean the Surface:
Begin by thoroughly cleaning and drying your glass jar to ensure the clay adheres properly. Remove any labels or sticky residue. -
Create Window Guides:
Using a marker, sketch out where you want your windows and door to be directly on the glass. This acts as a map so you don’t cover these areas with clay. -
Roll the Clay:
Roll out a slab of paper clay to about 1/4 inch thickness. It doesn’t need to be perfectly smooth; a little texture adds to the rustic charm.
Clay Adhesion Tip
If the clay feels like it’s slipping off the glass while wet, apply a thin layer of PVA glue to the glass jar before wrapping the clay sheet around it.
Step 2: Building the Walls
-
Wrap the Jar:
Carefully wrap the clay slab around the jar, pressing it firmly against the glass. Leave the very top rim exposed for the lid. -
Reveal the Openings:
Use your craft knife to cut away the clay where you marked the windows. Maintain an arch shape for the windows to give it a classic cottage feel. -
Texture the Walls:
Dip your finger in water and rub the clay surface. Instead of smoothing it completely, dab it to create a stucco or rough plaster texture. -
Shape the Roof Line:
Add a slightly thicker band of clay around the neck of the jar to differentiate the roof section from the main house body. -
Carve Roof Windows:
On the upper ‘roof’ section, carve out smaller, oval-shaped windows evenly spaced around the circumference.
Weathered Effect
After painting the red bricks, do a very light ‘dry brush’ over them with white paint. This makes the bricks look aged and mortared.
Step 3: Adding Details
-
Construct the Door Frame:
Roll thin snakes of clay and press them around the door opening to create an arch. Use a sculpting tool to impress vertical lines, making them look like individual bricks. -
Add Decorative Accents:
Create small, flattened beads of clay and press them along the roofline band and the rim of the lid. These will become terracotta accents later. -
Form the Window Panes:
Roll very thin coils of clay to create the cross-bars for the window panes. Carefully press these into the glass within your window cutouts. -
Create the Door:
Cut a piece of balsa wood or thick cardstock to fit inside the door arch. Score it vertically to mimic wood planks and add a small clay circle for a doorknob. -
Dry Completely:
Allow the clay to dry fully. This usually takes 24-48 hours depending on humidity. I like to rotate the jar occasionally so it dries evenly.
Step 4: Painting and Finishing
-
Paint the Details:
Paint the brick archway and decorative clay beads with terracotta red acrylic paint. Use a steady hand to avoid getting paint on the white walls. -
Stain the Door:
Paint the wooden door piece with a wash of beige or light brown to give it a natural wood look. Glue this piece securely into the door cavity. -
Paint Window Frames:
Carefully paint the clay cross-bars in the windows with a dark brown or terracotta color to match the door bricks. -
Paint the Lid:
Paint the rim of the jar lid with a cream or beige color, and paint the decorative squares on the lid rim with terracotta red. -
Add the Twine:
Once all paint is dry, wrap a length of jute twine around the neck of the jar, tying it in a simple bow at the side. -
Light It Up:
Place a battery-operated tea light inside the jar, screw on the lid, and watch your fairy house come to life.
Enjoy the cozy glow of your handmade cottage as it lights up a corner of your room

The Complete Guide to Pottery Troubleshooting
Uncover the most common ceramic mistakes—from cracking clay to failed glazes—and learn how to fix them fast.
Tree Stump Fairy Cottages
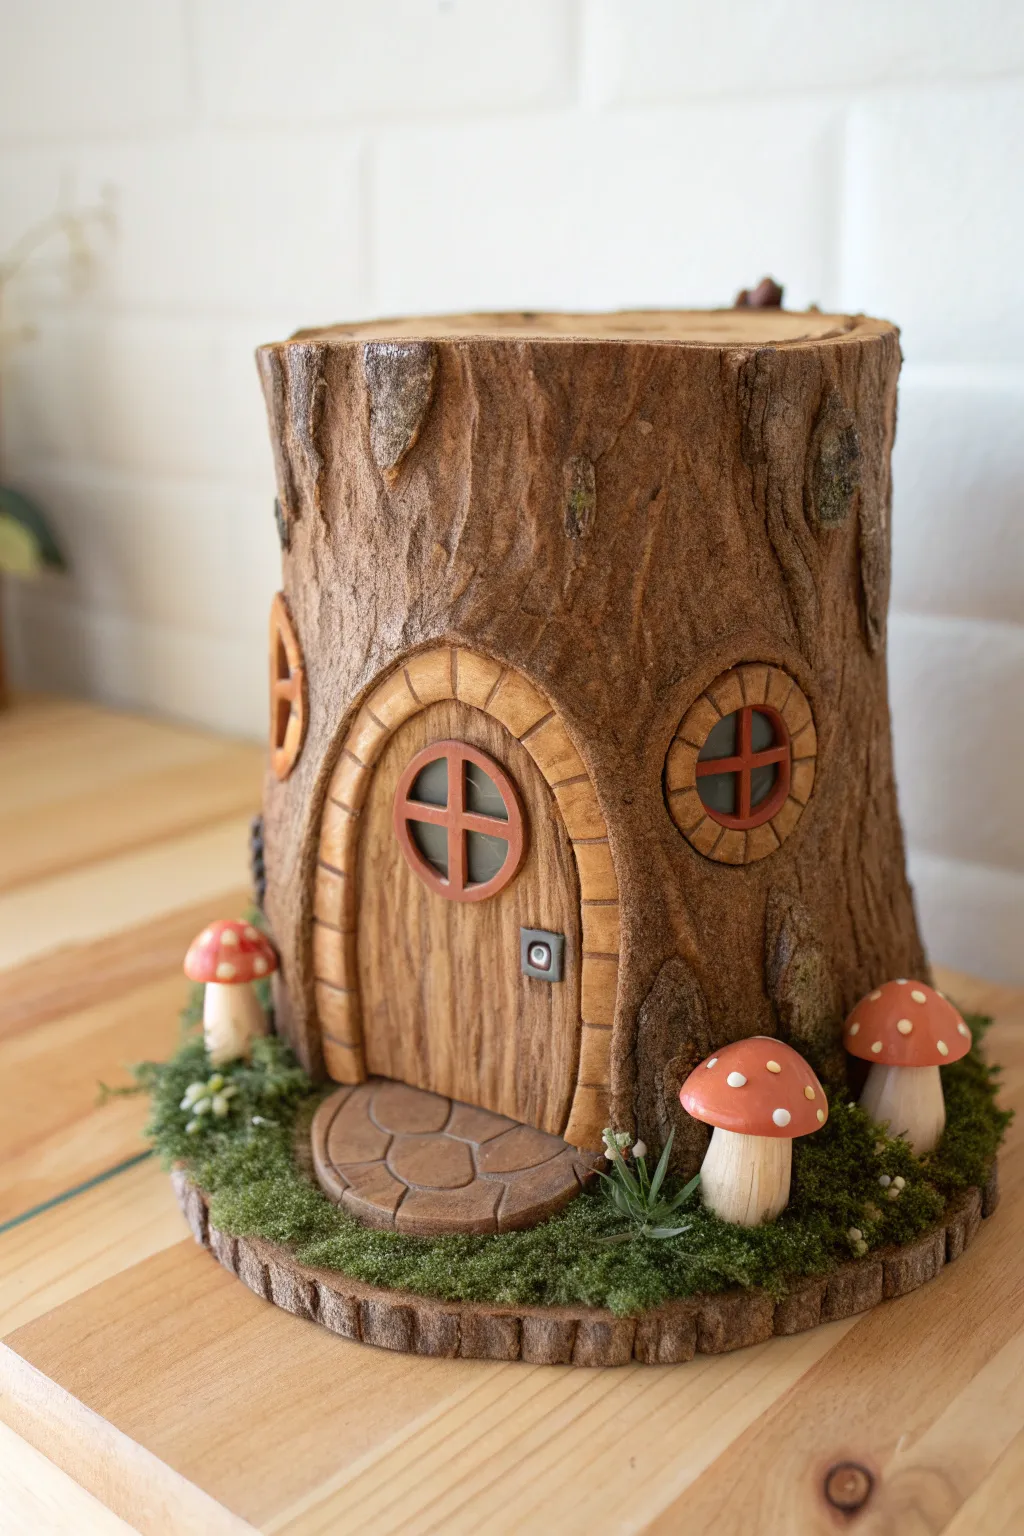
Transform a simple jar or foil armature into an enchanting forest dwelling with this detailed polymer clay project. The finished piece features incredible bark textures, a charming arched door, and adorable spotted mushrooms nestled in moss.
Step-by-Step Tutorial
Materials
- Glass jar or aluminum foil (for the core armature)
- Polymer clay (brown, tan, white, red, terracotta, grey)
- Texture tools (needle tool, stiff bristle brush, crumpled aluminum foil)
- Clay sculpting tools (blades, ball stylus)
- Wood slice base (approx 6-8 inches)
- Liquid polymer clay (Bake & Bond)
- Acrylic paints (dark brown, black, green) for weathering
- Matte varnish or glaze
- Dried moss and craft glue
Step 1: Building the Core Structure
-
Prepare the Armature:
Begin by covering your glass jar or foil shape with a thin, even sheet of scrap clay or brown clay. Smooth out any trapped air bubbles to ensure a solid foundation. -
Rough Bark Layer:
Roll out a thicker sheet of brown clay (about 1/4 inch thick). Apply this over your base layer, pressing firmly to adhere it fully. -
Texturing the Bark:
Using a needle tool or clay blade, drag deep, vertical lines down the clay to simulate bark grooves. Vary the pressure to create both shallow and deep fissures. -
Adding Realism:
Take a tool with a curved tip or a small ball stylus and gouge out small knots or ‘eyes’ in the wood. I like to gently press crumpled aluminum foil onto the raised areas to give the bark a porous, organic surface.
Step 2: Crafting the Entrance
-
Cut the Doorway:
Cut an arch shape out of tan or lighter brown clay. Using a blade, score vertical lines to look like wood planks. -
Attach the Door:
Apply a small amount of liquid clay to the back of your door and clear a flat spot on the stump. Press the door firmly into place. -
Sculpt the Stone Arch:
Roll a snake of light brown or stone-colored clay. Wrap it around the door frame and use a blade to impress lines, turning the single snake into individual ‘stones’. -
Window Details:
Repeat the process for the windows. Create small circles of dark grey clay for the glass, frame them with a stone clay border, and add crossbars using thin strips of terracotta clay. -
Door Hardware:
Add a tiny round window to the door and sculpt a miniature square handle plate from grey clay. Use a needle tool to poke a hole for the lock.
Cracked Clay Fix
If the bark cracks during baking, fill the fissures with a mix of liquid clay and scrap clay paste. smooth it over and re-bake for a seamless repair that blends in perfectly.
Step 3: Landscaping Details
-
Make the Mushrooms:
Form thick stalks from white or cream clay. Create separate caps from red clay, flattening them slightly into domes. -
Attach Caps and Spots:
Press the red caps onto the stalks. Roll tiny balls of white clay and gently press them onto the red caps to create the classic toadstool look. -
Create the Doorstep:
Flatten a piece of brown clay into a semi-circle. Use a tool to carve a crazy-paving stone pattern into the surface and place it directly in front of the door. -
Final Bark Check:
Before baking, pull down the bark clay slightly at the base to flare it out, making the stump look rooted. -
Baking:
Bake the entire sculpture according to your clay manufacturer’s instructions (usually 275°F/130°C for 15-30 minutes per 1/4 inch of thickness).
Glow Up
Use translucent clay for the window panes and door window. Place a small battery-operated LED tea light underneath the hollow jar core to make the cottage glow at night.
Step 4: Finishing Touches
-
Applying a Wash:
Once cool, mix dark brown or black acrylic paint with water. Brush it over the entire tree stump, getting into the cracks. -
Wiping Back:
Immediately wipe the wet paint off the surface with a paper towel or damp sponge. The dark paint will stay in the grooves, highlighting the texture remarkably. -
Base Assembly:
Glue the finished stump onto your wood slice base using strong craft adhesive or epoxy. -
Planting the Mushrooms:
Glue the clay mushrooms around the base of the stump in clusters. -
Adding Moss:
Apply craft glue liberally around the base of the stump and between the mushrooms. Press dried preserved moss into the glue to complete the forest floor scene.
Place your finished cottage on a shelf or in a planter to add a touch of magic to your home
Tiny Fairy Garden Stepping Stones
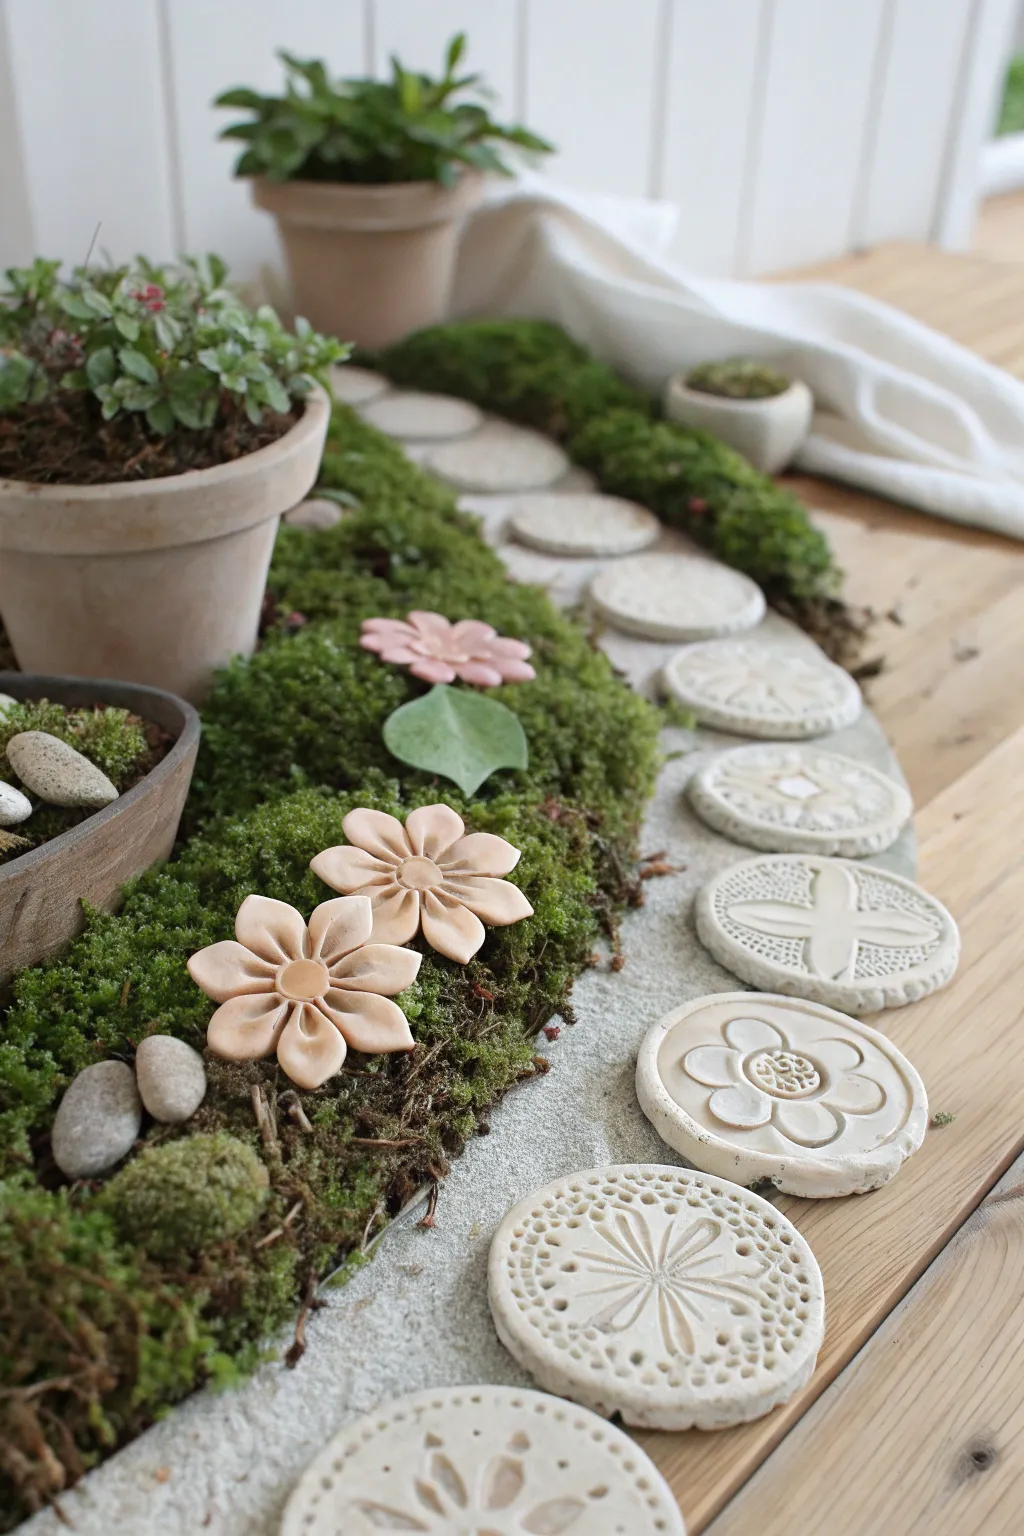
Transform simple clay into an enchanting miniature pathway for your fairy garden with these textured stepping stones. Using lace doilies and found objects to stamp unique patterns creates an intricate, antique look that feels magical and timeless.
Step-by-Step Guide
Materials
- Polymer clay (white, beige, or light grey)
- Small circular clay cutter or bottle cap
- Rolling pin
- Parchment paper
- Textured lace doilies
- Rubber stamps (floral/geometric)
- Baking sheet
- Oven
- Fine grit sandpaper
- Optional: Acrylic paint or antiquing wax
Step 1: Preparing the Clay
-
Condition the clay:
Start by taking a chunk of your polymer clay and kneading it in your hands until it becomes soft, warm, and pliable. This prevents cracking later. -
Roll it out:
Place the clay between two sheets of parchment paper to prevent sticking. Use your rolling pin to flatten the clay to an even thickness, aimed at about 1/4 inch thick so the stones are sturdy.
Stamp Clarity Tip
Dust your lace or stamps lightly with cornstarch or baby powder before pressing them into the clay. This acts as a release agent and prevents sticking.
Step 2: Creating the Textures
-
Select your textures:
Gather your lace doilies, buttons with designs, or rubber stamps. Look for deep, clear patterns that will transfer well. -
Position the lace:
Lay a piece of textured lace or a doily directly onto the flattened sheet of clay. -
Impress the pattern:
Gently roll over the lace with your rolling pin once or twice. Press firmly enough to leave a deep impression, but not so hard that you distort the clay’s thickness too much. Carefully peel back the lace to reveal the design. -
Stamp alternative designs:
For variety, press rubber stamps or textured buttons into other areas of the smooth clay. I like to mix floral motifs with geometric patterns for visual interest.
Step 3: Cutting and Refining
-
Cut the stones:
Position your circular cutter or bottle cap over the most interesting parts of the imprinted patterns. Press down firmly to cut out individual stepping stones. -
Release the shapes:
Gently remove the excess clay from around the circles. If the clay sticks inside the cutter, push it out gently from the back. -
Soften the edges:
Use your fingertip to very gently tap down any sharp ridges along the outer circumference of each circle. This gives them a worn, natural stone look rather than a sharp ‘cookie-cutter’ appearance. -
Add detail (optional):
If you want extra detail, use a toothpick to poke tiny decorative holes or dots around the border of some stones.
Glow-in-the-Dark Magic
Mix glow-in-the-dark powder into your clay or use a specialty glow clay. Your fairy path will illuminate softly at night for an extra magical touch.
Step 4: Baking and Finishing
-
Prepare for baking:
Transfer your unbaked stones onto a parchment-lined baking sheet, spacing them out slightly. -
Bake the clay:
Bake the pieces according to the specific temperature and time instructions on your package of polymer clay. Usually, this is around 275°F (135°C) for 15-30 minutes. -
Cool completely:
Remove from the oven and let the stones cool down entirely before handling them to ensure they harden properly. -
Sand edges:
Once cool, inspect the edges. If there are any rough burrs, lightly smooth them away with fine-grit sandpaper. -
Optional: Antique finish:
To make the pattern pop, dilute a little brown acrylic paint with water. Brush it over the stone and immediately wipe the surface with a paper towel, leaving dark paint only in the deep grooves.
Arrange your finished stones through a bed of moss to invite tiny travelers into your garden


What Really Happens Inside the Kiln
Learn how time and temperature work together inside the kiln to transform clay into durable ceramic.
Fairy Garden Gates and Arches
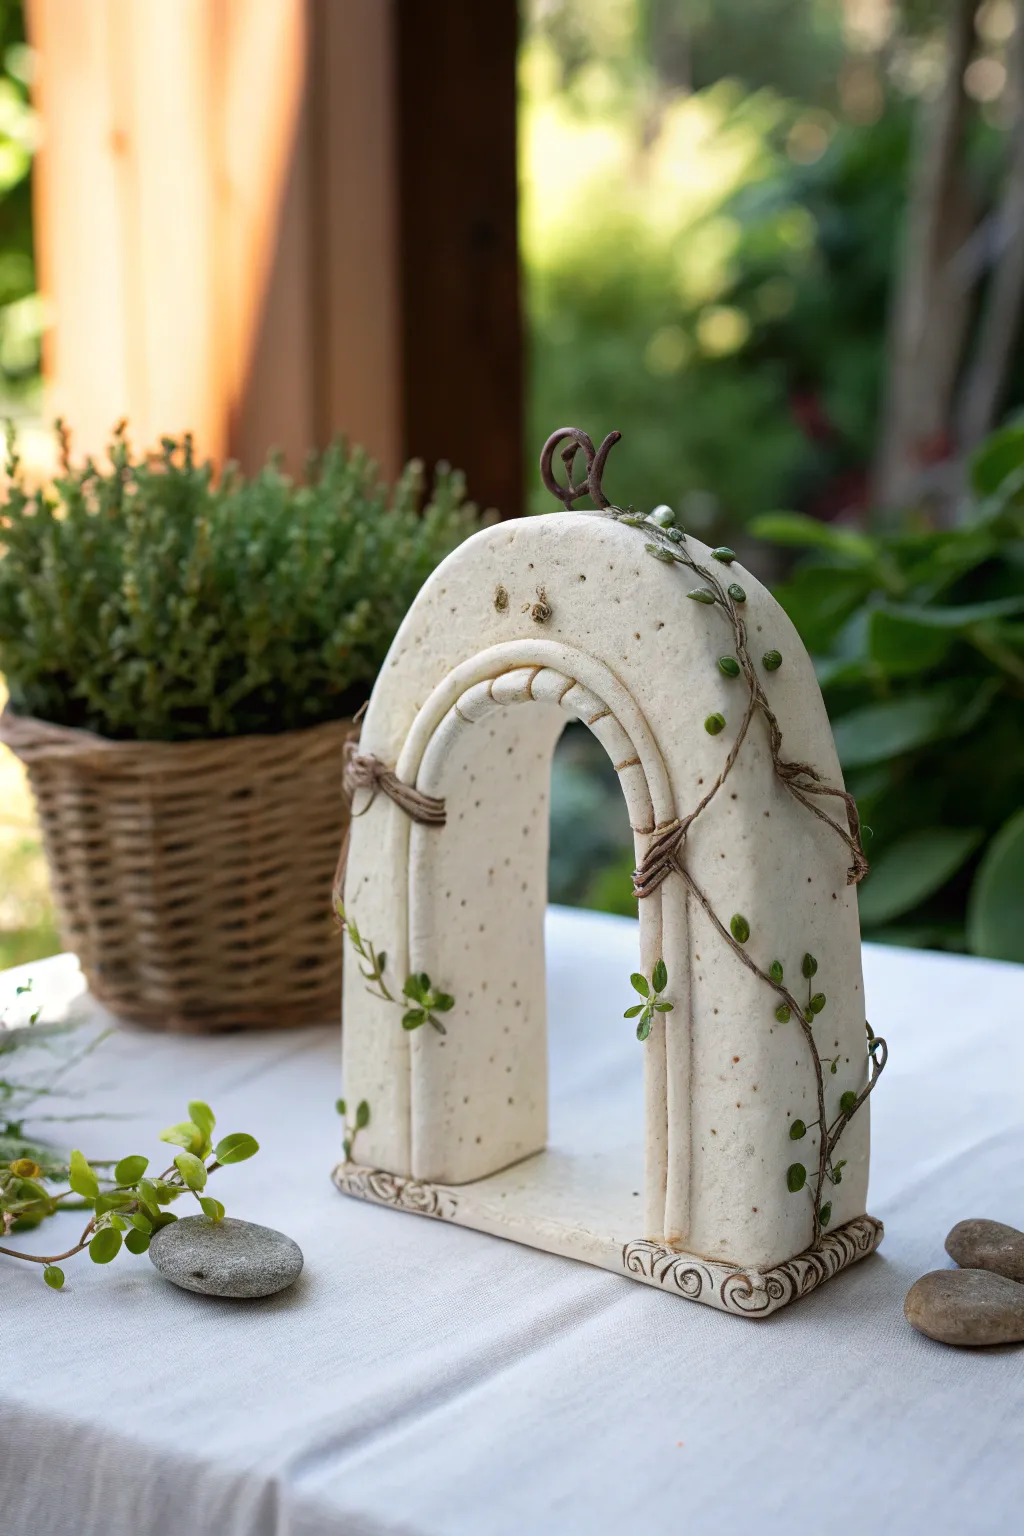
Transport your fairy friends into a secret garden with this elegant, speckled clay archway featuring faux vine detailing. Its soft, rounded corners and delicate greenery give it an ancient, magical feel perfect for a centerpiece entrance.
How-To Guide
Materials
- Polymer clay (white or ivory with faux stone speckles)
- Small rolling pin
- Clay knife or craft blade
- Rectangular clay cutter (optional)
- Texturing tools (or a toothpick)
- Thin floral wire or jewelry wire (brown)
- Faux greenery strands or tiny paper leaves
- Liquid clay (Bake and Bond)
- Light brown acrylic wash (optional)
- Cardboard for template
Step 1: Shaping the Base Structures
-
Draft your template:
Cut a U-shaped arch from cardboard to serve as your guide. Aim for a height of about 4-5 inches and a width of 3 inches to ensure it stands stable. -
Roll the main slab:
Roll out a slab of speckled white or ivory clay to a thickness of about 1/4 inch. It needs to be sturdy enough to support its own weight without slumping. -
Cut the arch faces:
Use your template to cut two identical arch shapes from the slab. These will form the front and back of your gateway. -
Create the inner wall:
Roll a long strip of clay the same width as the depth you want the arch to be (approx. 1 inch wide). Carefully curve this strip to match the interior curve of your arch faces. -
Assemble the hollow form:
Stand the inner wall strip on its edge. Apply a thin line of liquid clay to the edges of the strip, then gently press the front arch face against it. -
Attach the back:
Repeat the process for the back arch face. Use your fingers or a clay tool to smooth the seams where the three pieces meet, blending the clay until the joins disappear. -
Add the base slab:
Cut a rectangular base slightly larger than the footprint of your arch. Place the arch on top, securing it with liquid clay, and smooth the clay from the feet of the arch onto the base for stability.
Stone Effect Secret
Mix black pepper or dried tea leaves into plain white clay before rolling to create gorgeous faux-granite speckling without needing to paint.
Step 2: Texturing and Details
-
Create the decorative inlay:
Roll a very thin snake of clay and flatten it slightly. Press this into the front face of the arch, following the curve, about a half-inch from the opening edge to create a recessed border effect. -
Detail the inner curve:
Inside that border, add a small, segmented roll of clay along the very top of the arch interior to look like decorative stonework or bricks. -
Carve the base:
Using a needle tool, carve swirling scroll patterns into the edges of the rectangular base to mimic classical stone carving. -
Add texture:
Gently tap the entire surface with a stiff brush or a crumpled ball of aluminum foil. This removes fingerprints and gives the piece a realistic, weathered stone texture. -
Prepare for hardware:
Poke a few tiny holes near the sides of the arch where you plan to anchor your vines later. If you want a top loop like the photo, insert a curled piece of heat-safe wire into the top center now. -
Bake:
Bake the structure according to your clay package’s instructions. I prefer to prop the arch against a ceramic mug while baking to ensure it doesn’t lean.
Make it Glow
Before assembling, cut a hollow channel up loosely inside one pillar to hide a battery pack, then thread a tiny LED fairy light string through the vines.
Step 3: Decoration and Finishing
-
Antique the stone:
Once cool, brush a very watery brown acrylic paint over the piece, letting it settle into the carved swirls and textures, then wipe away the excess with a paper towel. -
Twist the vines:
Take thin brown wire or twine and twist it loosely to create a vine-like texture. Wrap it diagonally around the arch columns. -
Secure the vines:
Use a dab of strong super glue to hold the wire vines in place against the clay. -
Add miniature leaves:
Glue tiny individual faux leaves or bits of dried moss along the wire vine. Cluster them at the base and sporadically up the sides for a natural growth look.
Place your finished archway in a mossy corner as a welcoming portal for tiny visitors
Mini Fairy Swings and Benches
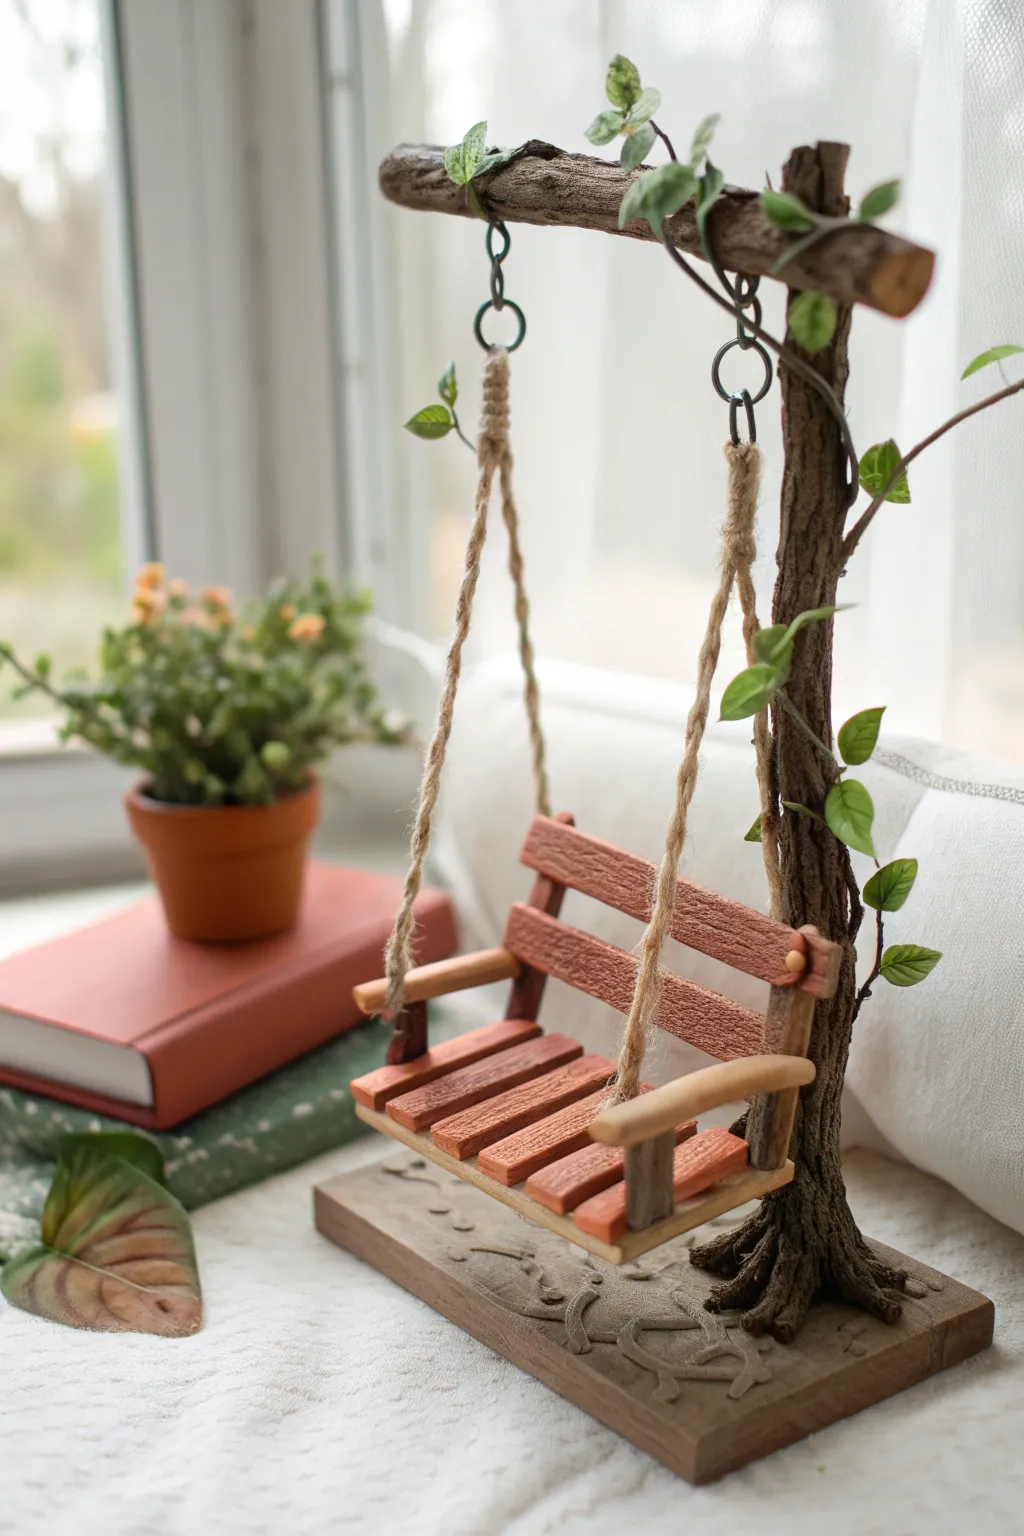
Create a charming resting spot for your garden sprites with this rustic miniature swing. Featuring realistic bark textures and a faux-stone base, this polymer clay project brings a touch of enchantment to any shelf or windowsill.
Detailed Instructions
Materials
- Polymer clay (brown, terracotta/red-brown, green, grey)
- Aluminum wire (12 gauge for armature)
- Thin wire (24 gauge for vines)
- Texture tools (needle tool, stiff toothbrush, sandpaper)
- Jute twine or thin hemp cord
- Liquid polymer clay (Bake & Bond)
- Acrylic paints (dark brown, black, moss green)
- Craft knife
- Small eye screws or jump rings
- Rolling pin
Step 1: Sculpting the Tree Stand
-
Form the Armature:
Twist two lengths of 12-gauge aluminum wire together to create an L-shaped structure. The vertical part will be the tree trunk, and the horizontal part will be the branch holding the swing. Create a loop or base at the bottom for stability. -
Core the Trunk:
Wrap the wire armature with scrap clay or foil first to bulk it up, then cover the entire structure with a layer of dark brown polymer clay. Smooth the seams with your fingers. -
Texture the Bark:
Using a needle tool or an X-acto knife, drag deep, uneven vertical lines down the trunk to mimic rough bark. Vary the pressure to create knots and natural ridges. -
Extend the Branch:
Ensure the horizontal branch is thick enough to hold weight. Texture it similarly to the trunk, adding small clay lumps at the end to look like a cut or broken branch tip. -
Add Suspension Loops:
Embed two small wire loops or eye screws into the underside of the horizontal branch where the swing ropes will hang. Secure them with a drop of liquid clay.
Natural Texture Hack
Press real bark or a rough stone directly onto the raw clay trunk before baking. It transfers an incredibly realistic organic pattern instantly.
Step 2: Building the Base
-
Lay the Foundation:
Roll out a slab of grey or beige clay into a rectangular shape about 1/4 inch thick. This will be the heavy base that prevents tipping. -
Create Stone Texture:
Press a crumpled ball of aluminum foil or a stiff toothbrush over the surface to give it a weathered stone appearance. You can lightly carve decorative swirls or faux cracks for character. -
Mount the Tree:
Press the wire base of your tree firmly into the clay slab. Blend the clay from the trunk roots down into the base so they look like one seamless piece. Add extra clay ‘roots’ spreading out for better grip.
Magical Moss
Mix green acrylic paint with baking soda or fine sand and dab it into the crevices of the tree roots and stone base for a fuzzy, mossy effect.
Step 3: Crafting the Swing Seat
-
Make Wood Planks:
Roll out terracotta or reddish-brown clay. Cut five or six small, equal-sized rectangular strips to serve as the seat slats and backrest slats. -
Texturize the Wood:
Take your needle tool and gently scratch wood grain patterns into each slat. I find lightly dragging a piece of coarse sandpaper over the clay creates a perfect subtle grain. -
Construct the Frame:
Cut two curved pieces of brown clay for the armrests and support beams. Assemble the slats onto these supports using liquid clay to bond them. It should look like a classic park bench seat. -
Pre-Bake Anchors:
Before baking, create small holes in the armrests or attach tiny wire loops where the rope will thread through later. -
First Bake:
Bake the tree stand and the swing seat separately according to your clay package instructions (usually 275°F for 15-30 minutes). Let them cool completely.
Step 4: Assembly and Details
-
Paint a Wash:
Dilute dark brown or black acrylic paint with water. Brush it over the bark and the swing seat, then quickly wipe away the excess. The dark paint will stay in the crevices, enhancing the texture. -
Create Vines:
Roll very thin snakes of green clay or use green-wrapped floral wire. Twist them loosely around the tree trunk and branch. -
Add Leaves:
Press tiny teardrop shapes of green clay onto the vines. Use a needle tool to impress a center vein in each leaf. -
Hang the Swing:
Cut two lengths of jute twine. Tie one end of each to the loops on the tree branch, and the other ends to the armrests of your baked swing seat. -
Final Secure:
If needed, add a touch of super glue to the knots to ensure they don’t slip over time. Adjust the height so the swing hangs evenly.
Place your finished swing near a window and imagine the tiny visitors who might stop by for a sway

TRACK YOUR CERAMIC JOURNEY
Capture glaze tests, firing details, and creative progress—all in one simple printable. Make your projects easier to repeat and improve.
Winged Fairy Figurines
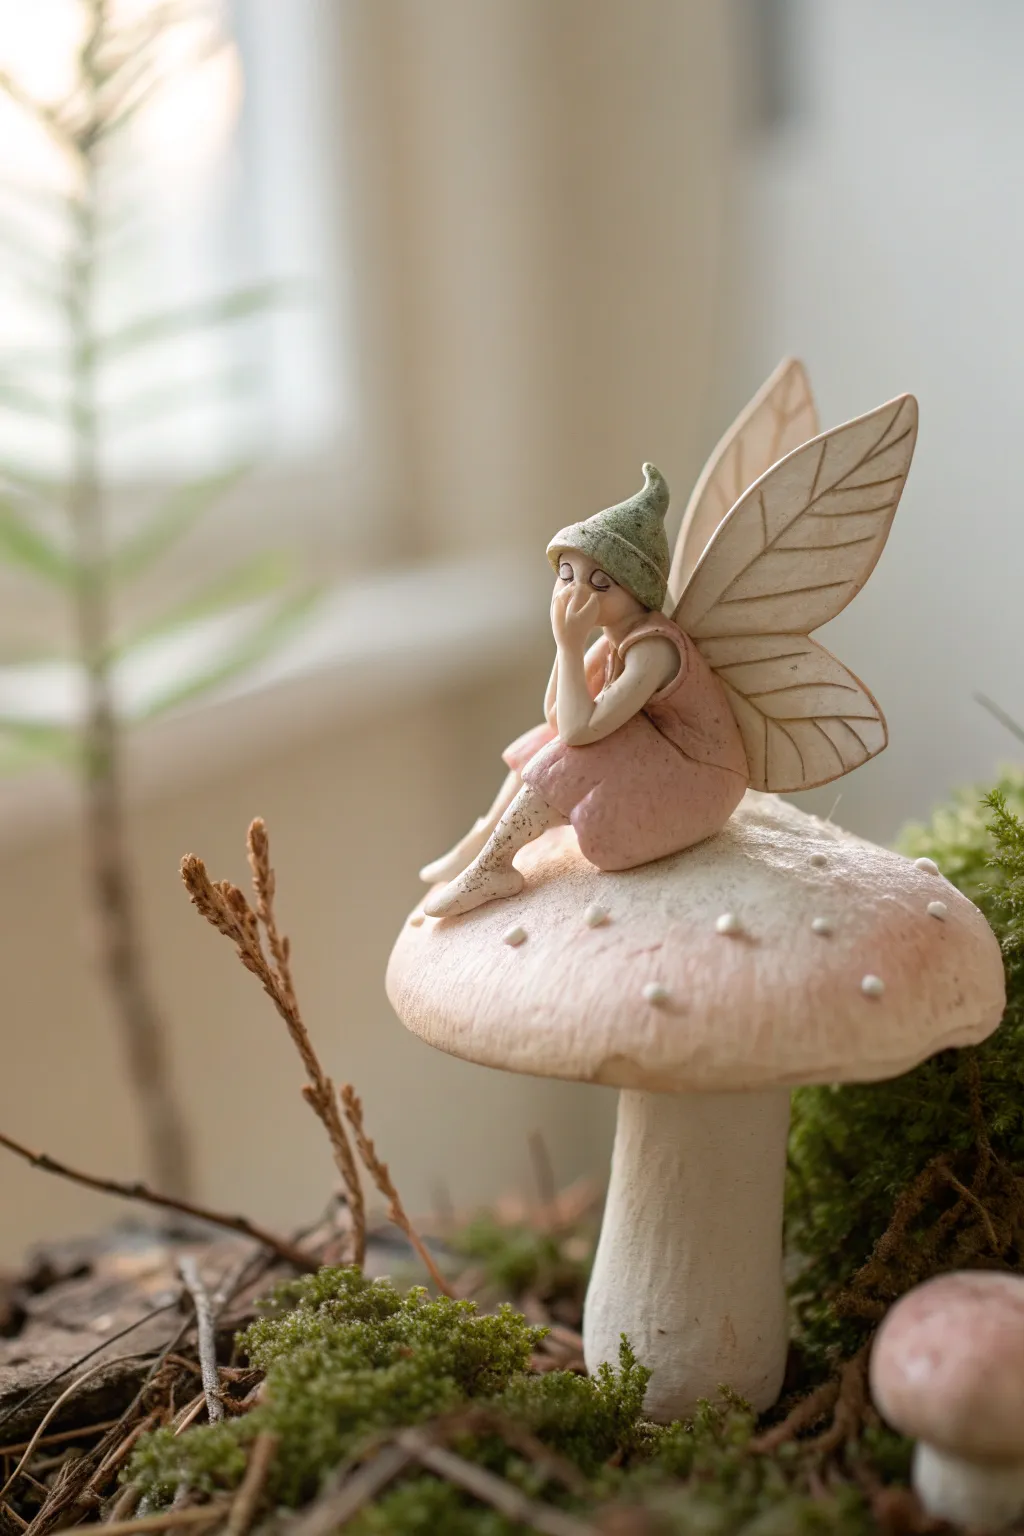
This charming project captures a quiet moment in the fairy realm, featuring a delicate winged sprite resting atop a spotted toadstool. With its muted pinks, soft greens, and natural textures, this figurine makes a perfect addition to any indoor fairy garden or shelf display.
Step-by-Step Guide
Materials
- Polymer clay (flesh tone, dusty pink, moss green, white, beige)
- Wire armature (thin gauge for wings/arms, medium for mushroom stem)
- Translucent liquid clay or bake-and-bond
- Sculpting tools (needle tool, ball stylus, rubber shaper)
- Fine grit sandpaper
- Acrylic paints (brown/antique wash)
- Matte varnish
- Textured sponge or toothbrush
Step 1: Sculpting the Mushroom Base
-
Form the stem core:
Begin by rolling a thick log of white clay. Insert a medium-gauge wire through the center for stability, leaving enough wire at the top to connect the cap later. Taper the log slightly so it is wider at the bottom. -
Shape the cap:
Create a large, flattened dome shape using beige or light tan clay mixed with a tiny bit of pink for warmth. The underside should be flat or slightly concave. -
Connect the pieces:
Apply a dab of liquid clay to the exposed wire on the stem and press the cap firmly onto it. Smooth the seam where the stem meets the underside of the cap using a rubber sculpting tool. -
Add the spots:
Roll tiny balls of white clay in varying sizes. Press them gently onto the top of the mushroom cap, flattening them slightly so they look like natural growth rather than stuck-on beads.
Clean Clay Tip
Keep baby wipes or hand sanitizer nearby. Clean your hands thoroughly when switching from the dark green hat clay back to the light flesh tones to avoid color contamination.
Step 2: Creating the Fairy Body
-
Torso and legs:
Mold a small teardrop shape from flesh-toned clay for the torso. Attach two small cylinders for legs, bending them at the knees so they drape naturally over the curve of the mushroom cap. -
Secure the pose:
Gently press the body onto the mushroom. I like to continuously check the balance here to ensure she looks relaxed, not stiff. -
Dress the fairy:
Roll out a thin sheet of dusty pink clay. Cut a simple frock shape and drape it over the body, smoothing the clay around the torso and letting it flare slightly over the legs to mimic fabric folds.
Step 3: Head and Details
-
Sculpt the head:
Roll a smooth ball of flesh-toned clay. Use a needle tool to gently indent closed eyes and a small mouth, giving her a serene expression. -
Attach the arms:
Create delicate arms from thin coils of flesh clay. Position the left arm resting on her knee and the right arm bent upward so her hand can support her chin. -
Position the head:
Place the head onto the neck area, carefully aligning it so her chin rests naturally in her cupped hand. Secure with liquid clay. -
Fashion the hat:
Form a small cone from moss green clay. Hollow out the base slightly and place it on her head, curving the tip backward for a whimsical touch. Use a texture sponge to give the hat a felt-like look.
Make It Sparkle
Before baking, lightly brush pearl ex powder or fine glitter onto the wings and the mushroom cap spots to give the piece a magical, iridescent shimmer.
Step 4: Wings and Finishing
-
Shape the wings:
Flatten a sheet of translucent or pale beige clay. Cut out two leaf-shaped wings, one slightly larger than the other for each side. -
Detail the veins:
Use a sharp needle tool or knife to score leaf-vein patterns into the wings. This adds realism and texture. -
Attach the wings:
Press the wings firmly onto the fairy’s back. You can blend the clay slightly at the attachment point or add a tiny strip of dress clay to cover the join. -
Bake the project:
Bake the entire sculpture according to your clay manufacturer’s instructions (usually 275°F/130°C for 15-30 minutes). -
Antique finish:
Once cool, water down some brown acrylic paint to create a wash. Brush it over the wings and mushroom stem, then quickly wipe it off with a paper towel to highlight the textures. -
Speckle effect:
For the speckles on her legs and the mushroom, load a stiff brush or toothbrush with thinned brown paint and flick it gently over the surface.
Now you have a serene little guardian to watch over your houseplants
Fairy Companion Creatures
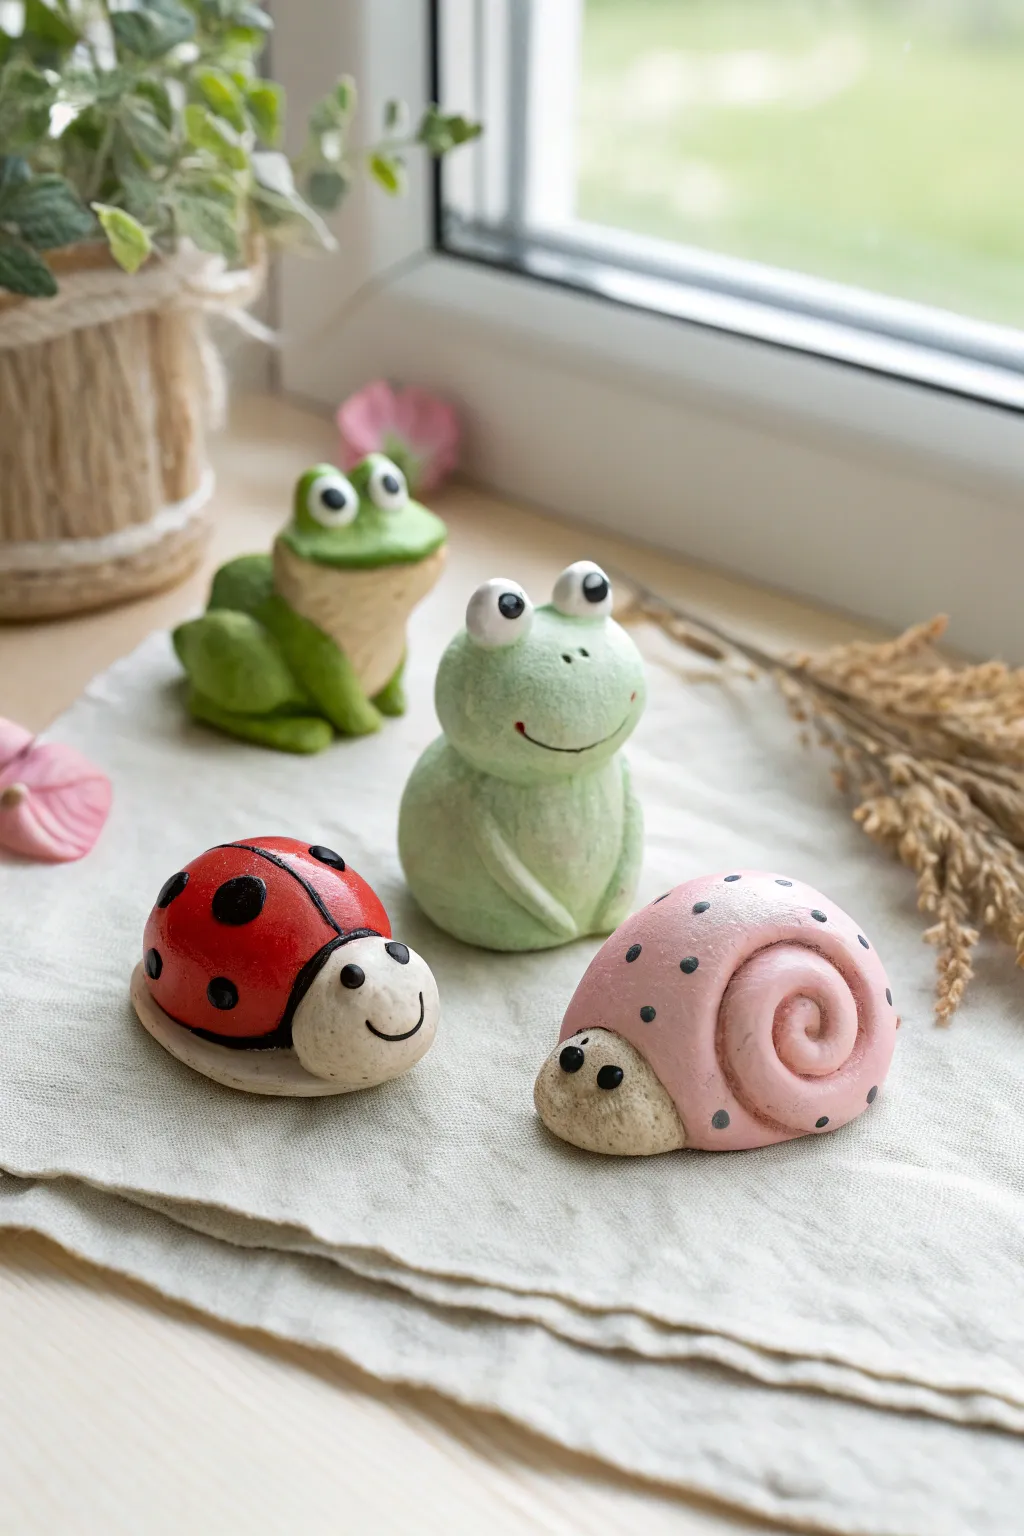
Bring your fairy garden to life with this charming quartet of clay companions: two friendly frogs, a cheerful ladybug, and a pastel snail. These small, rounded figurines have a soft, matte finish that gives them a delightful handcrafted feel, perfect for windowsill displays or miniature scenes.
Detailed Instructions
Materials
- Air-dry clay or polymer clay (white base recommended)
- Acrylic paints (Leaf green, pale mint green, bright red, soft pink, black, white, beige)
- Fine-grit sandpaper (optional)
- Small dotting tools or toothpicks
- Fine detail paintbrush
- Medium flat paintbrush
- Matte varnish or sealant
- Aluminum foil (for larger cores if needed)
- Water cup (for smoothing)
Step 1: Sculpting the Frogs
-
Form the dark green frog base:
Start with a walnut-sized ball of clay for the body, shaping it into a rounded mound. Add two smaller balls on top for the eye sockets and blend the seams downwards using a wet finger or smoothing tool. -
Add frog legs:
Create two sausage shapes for the hind legs. Bend them into a ‘V’ shape and attach them to the sides of the body, blending the upper thigh area into the main torso while leaving the feet distinct. -
Sculpt the light green frog body:
For the upright frog, roll a slightly taller, egg-shaped piece of clay. Like the first frog, attach two small balls for the eyes on the very top of the head. -
Give the upright frog arms:
Roll two thin, tapered snakes of clay for arms. Attach them at the shoulders and gently press them down so the hands rest on the belly or ground in a seated position.
Step 2: Sculpting the Bugs
-
Shape the ladybug shell:
Roll a smooth, half-sphere of clay for the ladybug’s back. Slightly flatten the bottom so it sits stable on your work surface. -
Add the ladybug head:
Create a smaller, slightly flattened ball for the head. Press it firmly against the front of the shell, smoothing the underside connection point so it stays secure. -
Form the snail shell:
Roll a long snake of clay and coil it into a spiral to create the snail’s shell. Make sure the coils touch each other firmly to prevent gaps. -
Complete the snail body:
Shape a chubby, slug-like body that is slightly wider at the front. Place the spiral shell onto the back of this body, pressing gently to adhere them together. -
Dry the sculptures:
Allow all four figures to dry completely according to your clay manufacturer’s instructions—usually 24-48 hours for air-dry clay.
Smooth Operator
Before painting, dip your finger in water and run it over the clay to erase fingerprints. If the clay is already dry, a very fine-grit sanding sponge works wonders.
Step 3: Painting and Details
-
Base coat the dark frog:
Paint the first frog using a leafy green acrylic. For the chest and throat area, mix a beige or creamy yellow tone and paint a bib shape. -
Paint the upright frog:
Use a very pale, minty green for the second frog’s entire body. Hand-crafting allows for subtle variations, so I sometimes mix a tiny bit of white into the green for a softer look. -
Color the ladybug:
Paint the ladybug’s shell a vibrant red. Paint the face a warm beige or cream color. Let the red dry completely before moving to the next step. -
Paint the snail:
Paint the snail’s spiral shell a soft bubblegum pink. Use a sandy beige or light brown for the body underneath. -
Add ladybug details:
Using a fine brush or a black marker, draw a line down the center of the red shell. Add large black polka dots on either side. -
Detail the snail shell:
Use a dotting tool or the end of a paintbrush handle to add small, grey or black dots scattered across the pink shell for texture. -
Paint the eyes:
For all creatures, paint white circles for the eyes. Once dry, add a large black pupil. For the frogs, the eyes are on the protruding bumps; for the bugs, paint them directly on the face. -
Add final expressions:
Use a very fine liner brush to paint simple, curved black smiles on all the creatures. Add tiny red cheek dots if desired for extra cuteness. -
Seal the work:
Once all paint is visibly dry, apply a coat of matte varnish to protect your new garden friends without making them too shiny.
Mossy Texture
Dab a dry sponge with darker green paint lightly over the dried frog bodies. This creates a speckled, organic texture that looks like real amphibian skin.
Now these adorable creatures are ready to keep your plants company
Fairy Potion Bottles and Tiny Jars
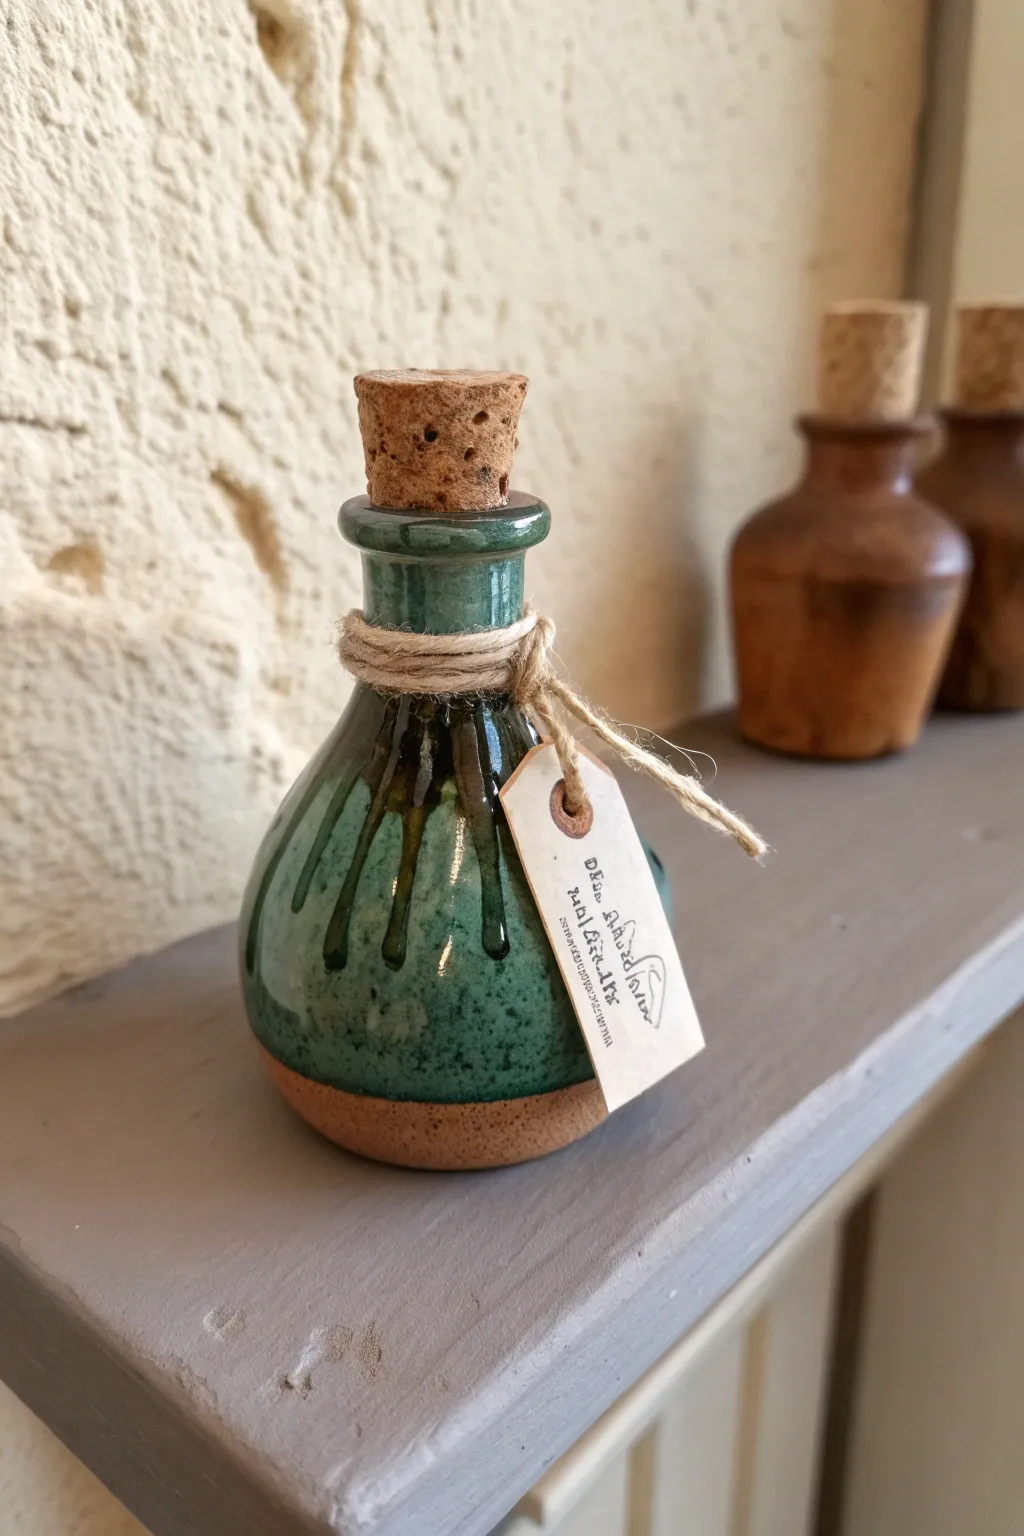
Evoke the magic of an alchemist’s workshop with this handcrafted clay potion bottle featuring an organic, dripping glaze effect. The earthy stoneware base peeks through a vibrant forest green finish, creating a wonderfully aged and rustic aesthetic perfect for fairy gardens or cosplay props.
Step-by-Step Tutorial
Materials
- Stoneware or earthenware clay (speckled buff recommended)
- Pottery wheel or slab roller (for hand-building)
- Small sponge and bowl of water
- Pottery trimming tools (loop tool, wire cutter)
- Rib tool
- Small natural cork stopper
- Jute twine
- Cardstock or kraft paper for the tag
- Fine-point black pen
- Forest green reactive glaze
- Dark charcoal or black glaze (for accents)
- Kiln (or access to a firing service)
Step 1: Forming the Vessel
-
Center the clay:
Start with a small ball of clay, roughly the size of a tangerine. Throw it onto the center of your wheel head and use wet hands to seal it down, coning it up and down until perfectly centered. -
Open the form:
Press your thumbs into the center to create the interior space, leaving about a quarter-inch of thickness for the floor. Pull the opening out slightly to establish the floor width. -
Pull the walls:
Gently pull the clay upward to create a cylinder. Since we want a bulbous bottom, aim to keep the lower section slightly thicker and wider than the top rim. -
Shape the belly:
Using a rib tool or your fingers from the inside, gently push the clay outward to form a rounded, bulbous belly. Be careful not to let the walls get too thin. -
Create the neck:
Collar the top of the cylinder inward by encircling it with your hands and gently squeezing as the wheel spins. This creates the narrow neck of the potion bottle. -
Refine the rim and catch:
Flare the very top rim slightly to create a lip. Just below the lip, use a modeling tool to press a small groove or indentation; this is crucial as it gives the twine a place to sit securely later.
Glaze Gravity
To get perfect drips that don’t run onto the kiln shelf, stop your heavy glaze application about 1/2 inch higher than you want the final drip to end. Gravity does the rest during firing.
Step 2: Refining and Firing
-
Trim the foot:
Once leather-hard, trim the bottom of the bottle to create a clean foot ring. I like to smooth the transition between the trimmed raw clay and the smooth body with a damp sponge. -
Bisque fire:
Allow the piece to dry completely (bone dry) before loading it into the kiln for a bisque firing to cone 04 (or your clay’s specific requirement). -
Wax resist application:
Apply wax resist to the bottom half-inch of the bottle and the foot ring. This ensures the raw, speckled clay remains visible at the base, contrasting beautifully with the glaze.
Running Too Much?
If your glaze ran onto the shelf during firing, grind the bottom smooth with a Dremel or grinding stone. Next time, widen the wax resist band at the bottom or use unstable glazes more sparingly.
Step 3: Glazing the Magic
-
Base coat:
Pour your forest green reactive glaze inside the bottle, swirl it around to coat the interior, and pour out the excess. Then, dip the exterior top section into the glaze, stopping where the wax resist begins. -
Create the drips:
Using a brush loaded heavily with the same green glaze (or a slightly darker variation), dab extra blobs of glaze around the shoulder of the bottle. Let gravity pull these down slightly to encourage those thick, organic drips during firing. -
Accentuate the details:
Take a very small brush with dark charcoal glaze or an iron oxide wash and paint thin lines vertically down the neck and over the ‘drip’ areas to add depth and shadow. -
Glaze fire:
Fire the piece again, this time to the maturity temperature of your glaze (typically Cone 5 or 6 for stoneware). The heat will cause the glaze to melt and run, creating the magical effect.
Step 4: Finishing Touches
-
Fit the cork:
Once the bottle is cool, test fit your cork stopper. If it’s too snug, you can sand the cork down slightly for a perfect seal. -
Add the twine:
Wrap a length of jute twine around the neck groove you created earlier. Wrap it around 3-4 times for a layered look, tying a tight knot to secure it. -
Create the tag:
Cut a tiny rectangle from kraft paper or cardstock. Punch a hole in one end and use a fine-point pen to write a mysterious label or runic script. -
Attach the label:
Thread the loose ends of your twine knot through the tag’s hole and tie it off in a simple bow or knot, letting the excess twine hang naturally.
Now your tiny vessel constitutes a charming addition to any magical collection
Fairy Books and Scrolls
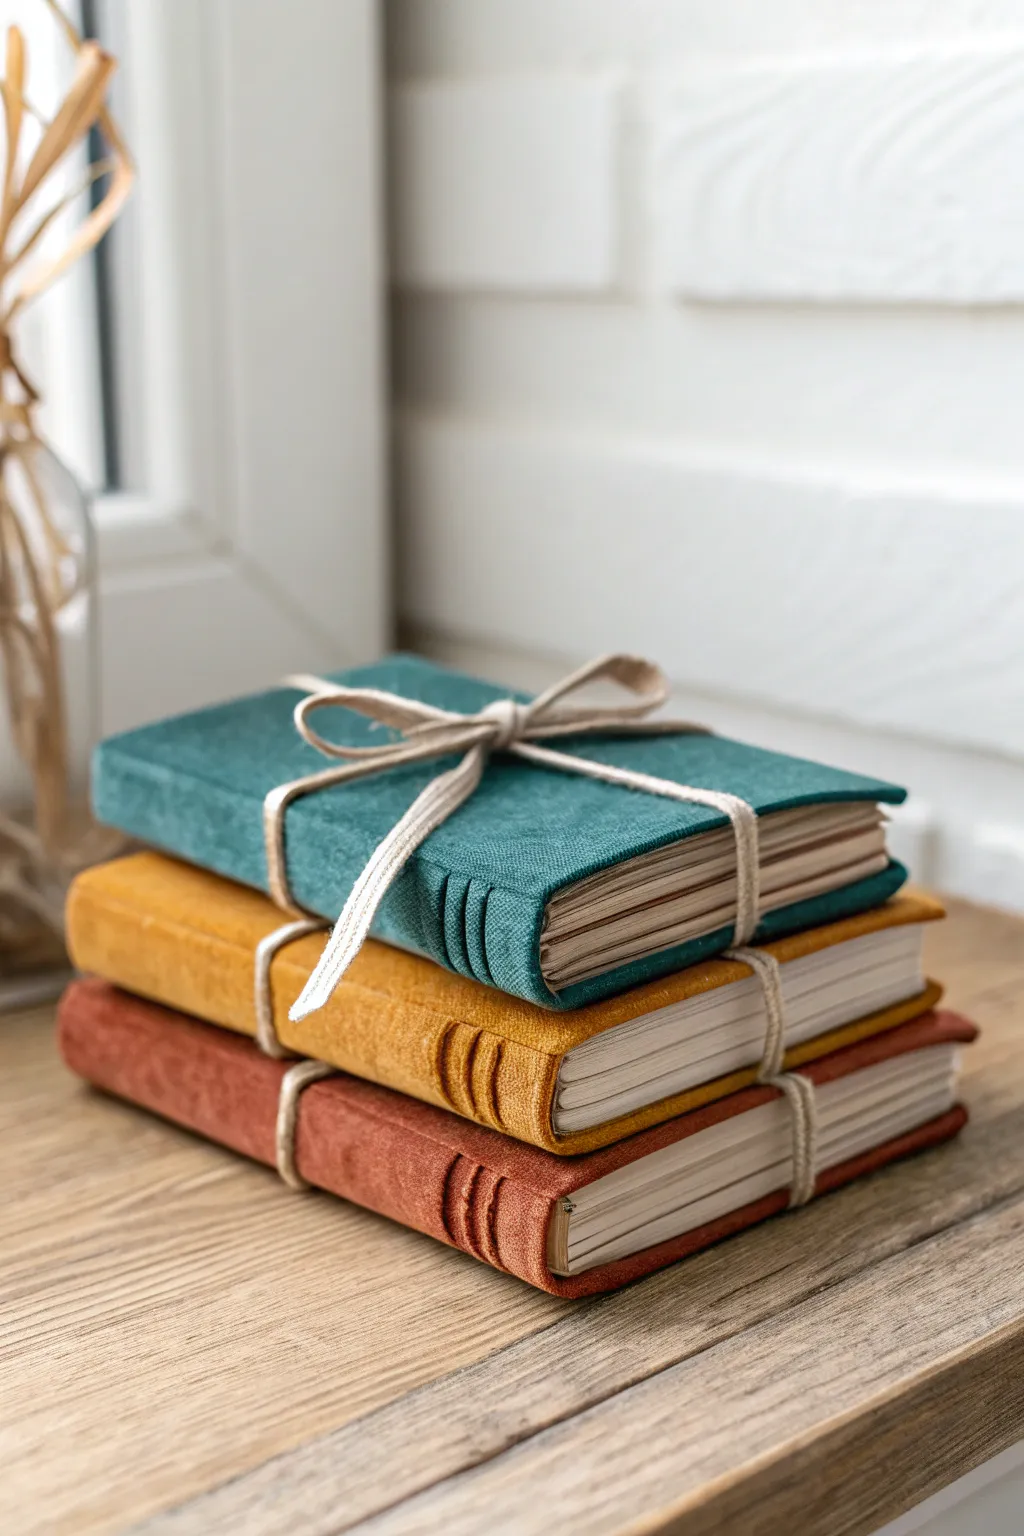
These enchanting little volumes look like soft, suede-bound journals, complete with decorative ridges and rustic twine binding. Crafted from textured polymer clay and real paper, they make perfect accessories for a fairy library or a whimsical desk display.
How-To Guide
Materials
- Polymer clay (Teal, Mustard Yellow, Terracotta)
- White or cream cardstock paper
- Liquid polymer clay (Bake & Bond)
- Craft knife or tissue blade
- Texture tool (sandpaper, stiff toothbrush, or fabric scrap)
- Needle tool or toothpick
- Thin hemp cord or rustic twine
- Paper glue or white PVA glue
- Ruler
- Rolling pin or pasta machine
- Brown acrylic paint (for antiquing, optional)
Step 1: Creating the Pages
-
Measure and slice:
Cut your cardstock into long strips, approximately 1 inch wide (or your desired book height). You will need multiple strips to create a thick enough stack for each book. -
Accordion fold:
Fold the cardstock strips back and forth accordion-style to create the pages. The width of each fold determines the width of your book. -
Stack and glue:
Glue multiple accordion strips together to form a dense text block. Press under a heavy weight for a few minutes to ensure the pages sit flat and tight together. -
Trim the edge:
For the spine side of your paper block, apply a thin layer of white glue to hold the folds together securely. This creates a solid surface for the clay cover to adhere to.
Pro Tip: Realistic Pages
Tea-stain your cardstock or paper before cutting and folding. This gives the page edges a yellowed, vintage look that matches the rustic clay covers perfectly.
Step 2: Crafting the Clay Covers
-
Roll the clay:
Condition the teal polymer clay and roll it out into a flat sheet, roughly 2-3mm thick. Repeat this for the yellow and terracotta colors if making a full stack. -
Add texture:
Here I prefer to press a piece of rough sandpaper or a scrap of denim firmly onto the clay sheet before cutting. This imitates the soft, napped texture of suede leather seen in the image. -
Cut to size:
Measure your paper text block. Cut a rectangle of clay that is slightly larger than the open book (front cover + spine + back cover), allowing a tiny overhang for realism. -
Attach the paper:
Apply a thin layer of liquid polymer clay or Bake & Bond to the spine of your paper block. Center the block onto the clay rectangle and gently fold the clay up to form the front and back covers. -
Detail the spine:
Using the back of a craft knife or a needle tool, gently press horizontal indentations across the spine area. These mimic the cords found in traditional bookbinding. -
Enhance text block lines:
If your paper block looks too solid, create distinct page lines by gently dragging a sharp needle tool horizontally across the edge of the paper stack. -
Refine the edges:
Softly round the corners of the clay covers with your finger so they don’t look sharp or artificial. The suede look works best with softer edges.
Troubleshooting: Paper Burns
If you’re worried about the paper burning in the oven, tent a piece of aluminum foil loosely over the books while baking to deflect direct heat from the coils.
Step 3: Baking and Assembly
-
Pre-bake prep:
Check that the covers haven’t pulled away from the paper spine. If needed, insert a small piece of parchment paper between the clay cover and the first paper page to prevent sticking during baking. -
Bake carefully:
Bake the books according to your clay manufacturer’s instructions. A lower temperature for a longer time is often safer for projects involving paper to prevent scorching. -
Cool and clean:
Allow the books to cool completely. If there is any residue or shine, lightly buff the clay surface with a soft cloth to matte it down. -
Antique the finish (Optional):
To age the books, brush a little watered-down brown acrylic paint into the spine grooves and texture, then immediately wipe it off with a damp paper towel. -
The final bind:
Take your rustic twine or hemp cord. Wrap it around the book twice horizontally, then tie a simple bow on top. -
Stacking:
For the full effect shown in the example, stack your three completed books and use a longer piece of twine to tie the entire bundle together loosely.
Place your stack of ancient-looking tomes on a shelf to add instant history to your miniature world
Fruit Cottage Fairy Houses
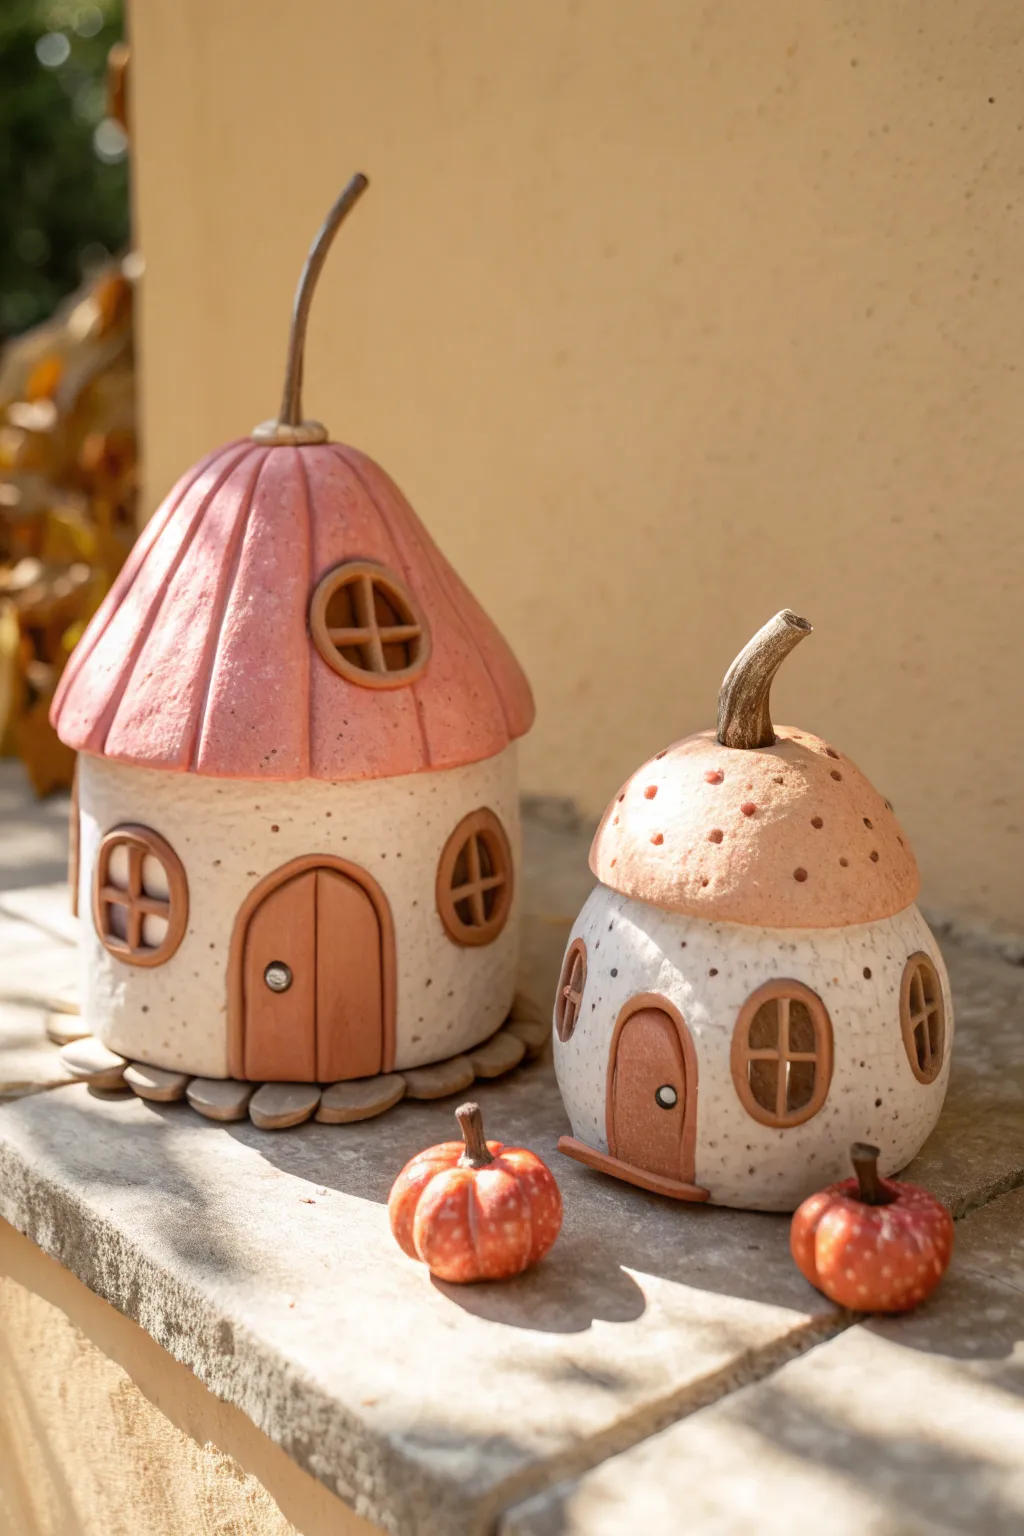
These charming little dwellings combine the organic shapes of gourds and mushrooms with cozy architectural details. With their speckled white walls, soft pink roofs, and realistic stems, they make the perfect magical addition to any indoor garden or shelf.
Step-by-Step
Materials
- Air-dry clay or polymer clay (white and terracotta/brown)
- Acrylic paints (soft pink, antique white, dark brown, orange)
- Clay sculpting tools (needle tool, ball stylus)
- Rolling pin
- Aluminum foil (for armature)
- Clear matte varnish
- Small paintbrush
- Toothbrush or stiff bristle brush (for texture)
- Water cup (for smoothing)
Step 1: Shaping the Base Structures
-
Form the armatures:
Crumple aluminum foil into two distinct shapes: a taller, pear-like shape for the larger house and a squat, rounded mushroom cap shape for the smaller cottage. Pack the foil tightly so it holds its form while you work. -
Cover the walls:
Roll out a sheet of white clay to about 1/4 inch thickness. Wrap this around the bottom portion of your foil armatures to create the walls. Smooth the seams with a little water or by blending with your thumb so the join is invisible. -
Add speckle texture:
To achieve that organic, stone-like look, take a stiff toothbrush and gently tap it all over the white clay surface. For the actual speckles, you can either mix tiny bits of black pepper/dried herbs into the clay beforehand or flick diluted brown paint onto the surface later. -
Create the roofs:
Roll out a separate piece of clay for the roofs. For the tall house, drape the clay over the top, shaping it into a dome that overhangs slightly. For the smaller house, create a rounded cap shape. I like to tint this clay a soft pink before shaping, or you can paint it later.
Cracking Clay?
If air-dry clay cracks while drying, mix a small amount of fresh clay with water to make a paste (slip) and fill in the cracks, then smooth over.
Step 2: Adding Architectural Details
-
Rib the tall roof:
Using a modeling tool or the back of a knife, press vertical indentations into the tall pink roof, starting from the apex and curving down to the rim. This mimics the natural ridges of a pumpkin or gourd. -
Shape the doors:
Roll out terracotta or brown clay into small slabs. Cut out two arched door shapes. Press a border of clay around the edge of each door to create a frame, then use a needle tool to draw a vertical line partially down the center for a double-door look on the large house. -
Attach the doors:
Score the back of your doors and the spot on the white walls where they will go. Apply a dab of water or liquid clay (if using polymer) and press them firmly into place. -
Make the windows:
Create small circles of brown clay for the window frames. Use a smaller round cutter or a knife to remove the center, leaving a ring. Attach these to the walls. Roll tiny snakes of clay to create the cross-pane muntins inside the frames. -
Craft the stems:
Roll a tapered snake of brown clay for the stems. Twist them slightly to look organic and withered. Attach one to the very top of each roof, pressing firmly to blend the clay at the base of the stem.
Step 3: Finishing Touches
-
Add roof texture:
For the smaller house, use a ball stylus or the end of a paintbrush to gently press small indentations all over the roof surface, giving it a porous, mushroom-like texture. -
Create the stone base:
For the taller house, roll small balls of grey or brown clay and flatten them into irregular discs. Arrange them in a circle underneath the house to act as a flagstone foundation or flower petal base. -
Sculpt mini pumpkins:
Use leftover orange clay to roll small spheres. Use a needle tool to press vertical ridges around the sides and add a tiny brown stem on top. These little pumpkins add great scale to the scene. -
Dry or bake:
If using air-dry clay, let the pieces sit in a dry area for 24-48 hours. If using polymer clay, bake according to the manufacturer’s instructions.
Light Up The Night
Before drying, cut a hole in the bottom and leave the windows open (no backing clay) so you can place a battery-operated tea light inside for a warm glow.
Step 4: Painting and Sealing
-
Base coat the roof:
If you didn’t use colored clay, paint the roofs a soft, dusty pink. You might want to water down the paint slightly so it settles into the textures without looking too heavy. -
Detail the speckles:
If your white walls look too plain, mix a very watery brown paint and flick it onto the walls using an old toothbrush for a natural, speckled eggshell effect. -
Paint the hardware:
Use a tiny dot of silver or gold paint to add a doorknob to each door. -
Seal:
Once all paint is completely dry, coat the entire project with a clear matte varnish to protect it and unify the finish.
Now you have a pair of delightful fruit cottages ready to welcome their tiny inhabitants home
Flower Roof Fairy Hideaways
Bring a touch of magic to your shelves with this enchanting fairy hideaway, featuring a distinctive roof that mimics the soft, overlapping layers of flower petals. The textured white walls and delicate climbing vines give it an earthy, organic feel perfect for any woodland-themed display.
Step-by-Step Guide
Materials
- Air-dry clay (white or terracotta)
- Acrylic paints (terracotta, peach, dusty rose, white, brown, sage green)
- Sculpting tools (needle tool, ball stylus)
- Rolling pin
- Circle cutter or small teardrop cutter
- Aluminum foil (for armature)
- Craft knife
- Wood glue or tacky glue
- Matte sealant or varnish
Step 1: Forming the Base Structure
-
Create the core:
Begin by crumpling aluminum foil into a stout cylinder shape with a slightly domed top to serve as the armature; this saves clay and keeps the house lightweight. -
Cover the walls:
Roll out a slab of white clay to about 1/4 inch thickness. Wrap this around your foil cylinder, smoothing the seam at the back with a bit of water. -
Add texture:
Using a crumpled ball of foil or a stiff-bristled toothbrush, gently tap the entire surface of the clay walls to create a rough, stucco-like plaster texture. -
Construct the roof base:
Form a cone shape from more aluminum foil that fits perfectly atop your cylinder base. Cover this cone with a thin layer of clay to create a smooth surface for the tiles to adhere to.
Step 2: Crafting the Petal Roof
-
Mix your colors:
To achieve the varied hues shown, I like to pre-mix small batches of clay with acrylic paint—creating shades of terracotta, soft peach, dusty pink, and creamy white before sculpting. -
Cut the tiles:
Roll out your colored clays thinly. Use a small teardrop cutter or hand-shape small balls of clay into flat, elongated oval ‘petals’. -
Layer the bottom row:
Starting at the very bottom edge of the roof cone, apply a row of clay petals, alternating colors randomly. Use a dab of glue or water to secure them. -
Build upward:
Add the next row of petals slightly above the first, positioning these tiles so they overlap the gaps between the tiles below, like fish scales. -
Complete the peak:
Continue layering rows until you reach the very top. Create a small, green ball of clay to act as a decorative finial cap at the apex to hide the final seams.
Clean Color Tip
Keep wet wipes handy when switching between clay colors! The white clay stains easily, so cleaning hands between the terracotta and white steps keeps the walls crisp.
Step 3: Adding Charming Details
-
Sculpt the door frame:
Roll a thick snake of white clay and flatten it slightly. form it into an arch shape and attach it to the front of the house to define the majestic doorway. -
Install the door:
Cut an arch shape from terracotta-colored clay that fits inside your frame. Use a needle tool to score vertical and horizontal lines to mimic wood planks. -
Door embellishments:
Add a tiny gold or yellow clay ball for a doorknob and create a simple five-petal flower to place near the top of the door for extra charm. -
Create the window:
Fashion a small arched window frame from brown or clay. Add a cross-piece for the panes and attach it to the side of the cottage, pressing it gently into the textured wall. -
Plant the vines:
Roll very thin threads of brown clay or paint vines directly onto the white walls. If using clay, gently press the vines so they look embedded in the plaster. -
Bloom the garden:
Form tiny teardrops of dark pink and red clay. Clusters these along the vines as buds, and place larger flattened flowers around the base of the house to ground it. -
Finishing touches:
Add tiny green leaves near the base flowers. Once fully dry (24-48 hours), enhance the depth by dry-brushing a little brown paint into the roof crevices before sealing with matte varnish.
Make it a Lantern
Build the foil core around a battery-operated tea light (keep the switch accessible at the bottom) and cut out the window spaces so a warm glow shines through.
Place your finished cottage among some dried flowers or moss for a truly magical display
Glow-Inspired Fairy Light Posts
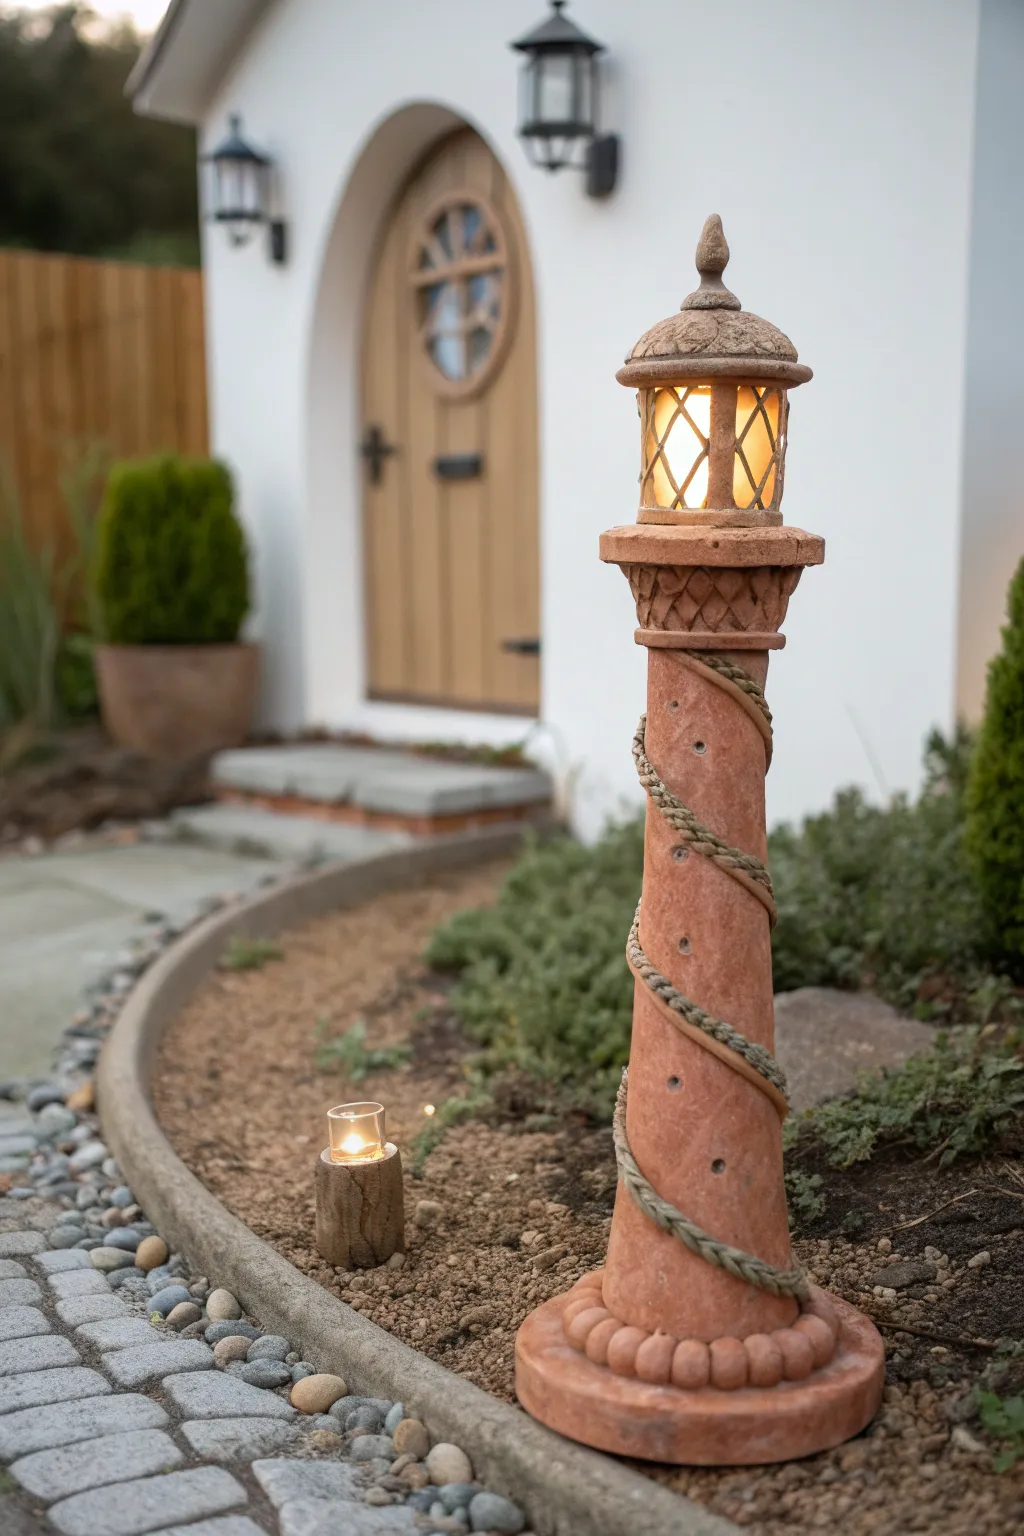
Bring a warm, coastal glow to your fairy garden with this charming lighthouse-style lamp post sculpted from sturdy clay. The design features a faux-terracotta finish, rustic rope detailing, and a real glowing element that creates a magical ambiance at twilight.
Step-by-Step
Materials
- Polymer clay (terracotta color) or air-dry clay painted terracotta
- PVC pipe (approx. 12-15 inches long, 2-inch diameter) for core structure
- Aluminum foil
- Textured clay roller or sculpting tools
- Heavy jute twine or hemp rope
- Outdoor-grade craft glue (E6000)
- Small solar LED path light component (top portion)
- Translucent vellum or thin frosty plastic sheet
- Acrylic paints (terracotta, dark brown, cream)
- Sponge for texturing
- Outdoor matte varnish/sealant
Step 1: Building the Core Column
-
Prepare the armature:
Clean your PVC pipe thoroughly. To help the clay adhere better, scuff the surface with coarse sandpaper. Apply a thin layer of craft glue over the pipe. -
Apply the base clay:
Roll out a large sheet of terracotta-colored clay, approximately 1/4 inch thick. Wrap this around the PVC pipe, smoothing the seam where the edges meet so it becomes invisible. -
Taper the shape:
Add extra clay near the bottom to widen the base, smoothing it upwards to create a gentle taper that mimics a lighthouse silhouette. Ensure the structure feels stable. -
Create the foundation ring:
Roll about 20 small balls of clay, roughly 1 inch in diameter. Press them around the very bottom edge of the column to form the decorative beaded base seen in the image.
Cracking Clay?
If using air-dry clay, cracking can occur if it dries too fast. Drape a slightly damp paper towel over the sculpture while it cures to slow the drying process.
Step 2: Adding Texture and Rope Details
-
Distress the surface:
Before the clay hardens, use a crumpled ball of aluminum foil or a coarse sponge to dab the surface of the column. This creates a weathered, stone-like texture rather than a smooth plastic look. -
Embed the rope channel:
Use a sculpting tool to gently carve a shallow spiraling groove winding its way up the column. This will serve as a guide and seating for your rope later. -
Add faux rivets:
Using the back of a small paintbrush or a dotting tool, press small indentations randomly along the spiral path to mimic rivet holes or mounting points for the rope. -
Construct the upper platform:
Mold a flat disc of clay slightly wider than the top of your column. Attach this securely to the top of the pipe structure. Add a decorative band underneath this platform and texture it with a cross-hatch or diamond pattern.
Nautical Upgrade
Embed small seashells or pieces of sea glass into the base of the column before the clay hardens for an authentic beachcomber vibe.
Step 3: Crafting the Lantern Top
-
Check your light source:
Measure the diameter of your solar LED component. You will need to build the lantern housing so the solar panel can sit on top or slide inside. -
Form the lantern cage:
Roll out thin snakes of clay to form the vertical bars and crisscross window panes of the lantern housing. Assemble these on top of the upper platform, leaving open spaces for the light to shine through. -
Sculpt the roof cap:
Create a doomed or conical roof from solid clay. I prefer to texture this piece heavily with floral impressions or hatch marks to give it an old-world feel. Add a small finial on top for extra height. -
Bake or Dry:
If using polymer clay, bake the entire structure upright in the oven according to package directions (usually 275°F for 15-30 mins per 1/4 inch). If using air-dry clay, allow it to cure for at least 48 hours.
Step 4: Finishing and Assembly
-
Antique the surface:
Once cool/dry, mix a wash of dark brown acrylic paint and water. Brush it over the entire piece, getting into the textures, then immediately wipe away the excess with a rag to highlight the details. -
Dry brush highlights:
Lightly dip a dry brush into cream or light beige paint. Whisk it gently over the raised areas—the rivets, the top texture, and the base beads—to create a sun-bleached effect. -
Seal the piece:
Apply two coats of outdoor matte varnish to protect your work from moisture and UV rays. -
Attach the rope:
Apply dabs of strong outdoor glue (like E6000) along the spiral groove you created earlier. Press your jute rope firmly into the groove, winding it all the way to the top. -
Install the windows:
Cut small pieces of translucent vellum or frosty plastic to fit inside the lantern cage. Glue them to the inside of the bars to diffuse the light softly. -
Insert the light:
Place your solar LED unit into the top housing. If it’s a tight fit, you may not need glue, which makes changing batteries easier later.
Set your new lighthouse among the garden greens and watch it guide the way when the sun goes down
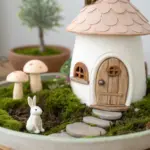
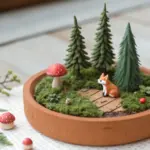
Mini Fairy Garden Terrarium Scenes
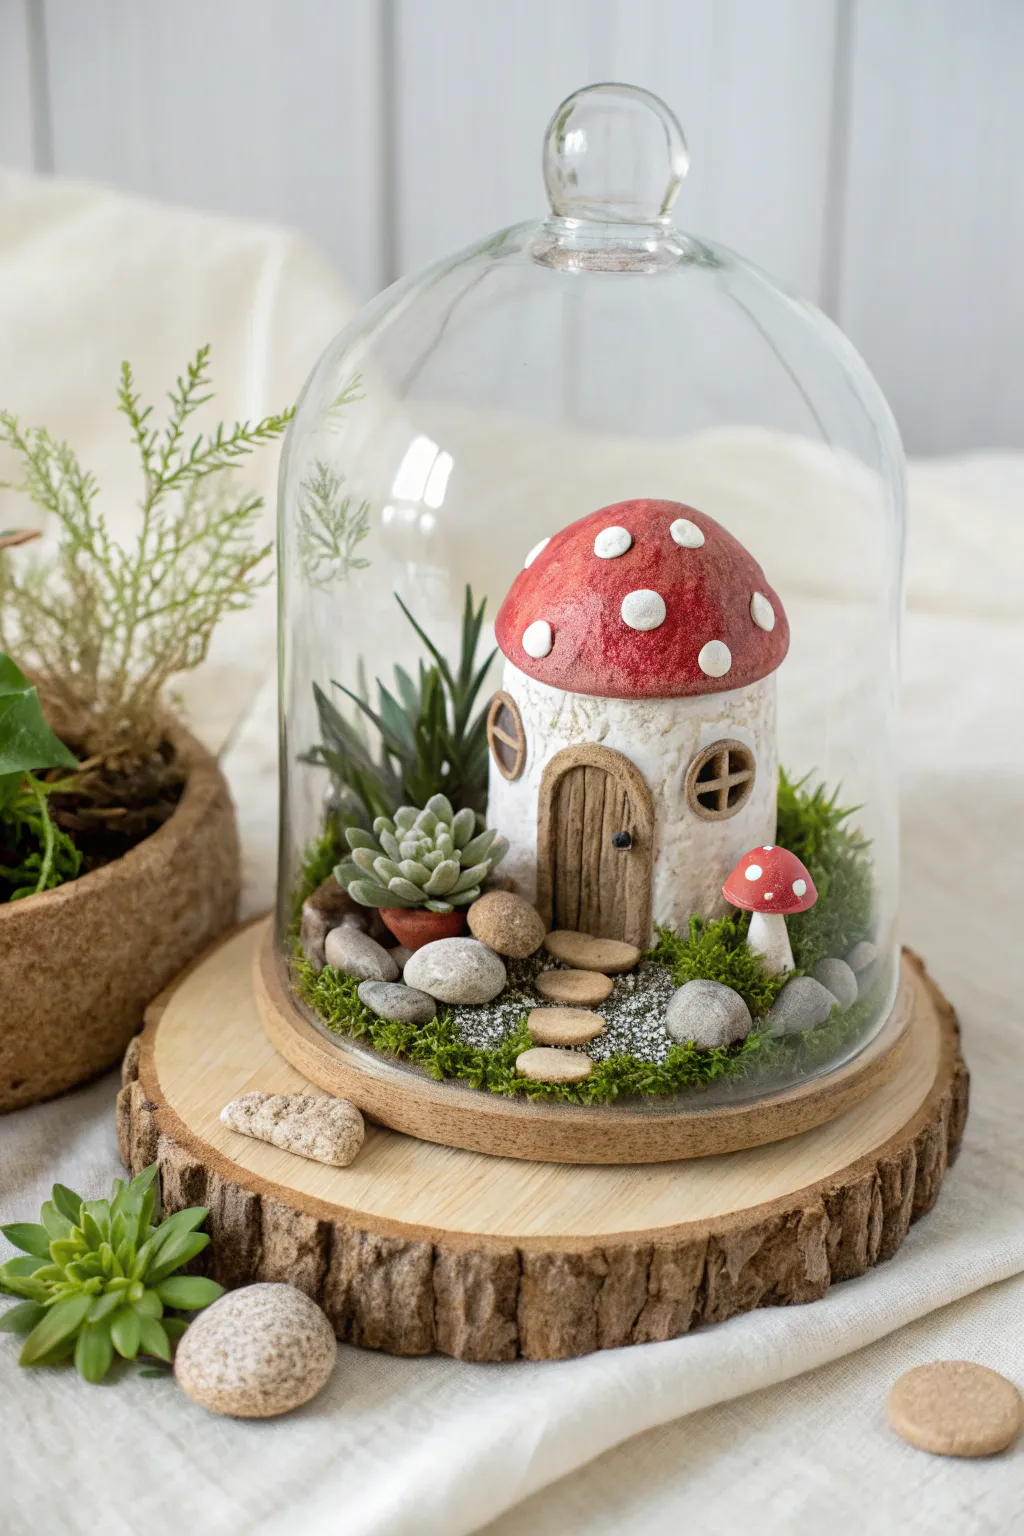
Capture the magic of a forest floor with this enchanting miniature scene enclosed in glass. Featuring a hand-sculpted clay mushroom house and tiny stepping stones, this terrarium brings a cozy fairy tale vibe to any shelf.
Detailed Instructions
Materials
- Glass cloche with wooden base (dome)
- Air-dry clay or polymer clay (white, red, brown)
- Acrylic paints (if using white clay)
- Fine-grit sandpaper
- Preserved moss (sheet moss and reindeer moss)
- Small pebbles and gravel
- Artificial mini succulent
- Tacky glue or strong craft adhesive
- Sculpting tools (needle tool, small ball stylus)
- Texture tool (or a crumpled ball of foil)
- Clear matte varnish (optional)
Step 1: Sculpting the Cottage Base
-
Form the structure:
Start by rolling a ball of white clay and shaping it into a varied cylinder for the house walls. It should be slightly wider at the bottom for stability. -
Add texture:
Before the clay hardens, press a crumpled ball of aluminum foil or a texture tool gently against the walls to create a stucco-like, rough surface. -
Carve the door:
Roll a small oval of brown clay and flatten it. Press vertical lines into it to mimic wood grain and attach it to the front of the house base. -
Frame the entrance:
Roll a thin snake of varied brown or beige clay and wrap it around the door frame to create a rustic archway. -
Insert windows:
Create two small circles of brown clay. Press a cross shape into each to form window panes, then attach them to the sides of the house walls.
Clay Cracking?
If air-dry clay cracks while drying, fill the fissures with a mix of fresh clay and water, then smooth it out with a damp finger.
Step 2: Creating the Roof and Details
-
Shape the mushroom cap:
Form a large hemisphere from red clay. Hollow out the underside slightly so it fits snugly over your cylinder base. Test the fit frequently. -
Add iconic spots:
Roll tiny balls of white clay and flatten them into uneven discs. Press these randomly onto the red roof to create the classic toadstool look. -
Assemble the house:
Secure the roof to the base. I prefer using a little slip (clay mixed with water) or liquid clay here to ensure a permanent bond. -
Make stepping stones:
Roll out several small, flat ovals of light brown or grey clay to serve as the path leading to the door. -
Form a mini mushroom:
Create a tiny version of the main house using a white stem and red cap to place in the garden later. Let all clay pieces dry or bake according to package instructions.
Glow Up
Hide a tiny battery-operated LED fairy light inside the hollow base of the mushroom house to make the windows glow at night.
Step 3: Assembling the Terrarium
-
Prepare the base:
Take the wooden base of your cloche. Apply a layer of tacky glue to the center area where the house will sit. -
Position the cottage:
Firmly press your dried clay house into the glue slightly off-center to leave room for landscaping. -
Lay the path:
Glue the clay stepping stones leading from the house door to the edge of the glass line. -
Plant the greenery:
Glue pieces of preserved sheet moss around the house to cover the wooden base. Tuck a small artificial succulent into the moss on the left side. -
Add rocky details:
Scatter small grey pebbles and gravel around the stepping stones and behind the house to fill gaps and add realism. -
Final flourish:
Place the tiny mini-mushroom you sculpted earlier on the right side, nestling it into the moss. Place the glass dome over the finished scene.
Now you have a peaceful little world contained safely under glass to enjoy on your desk