Fall is basically the perfect excuse to pull out the clay, put on something cozy, and make your space feel a little more golden and glowy. Here are my favorite fall clay ideas—from classic pumpkins and leaves to a few unexpected harvest-themed projects that still feel totally doable at home.
Mini Clay Pumpkins and Gourds in Warm Neutrals
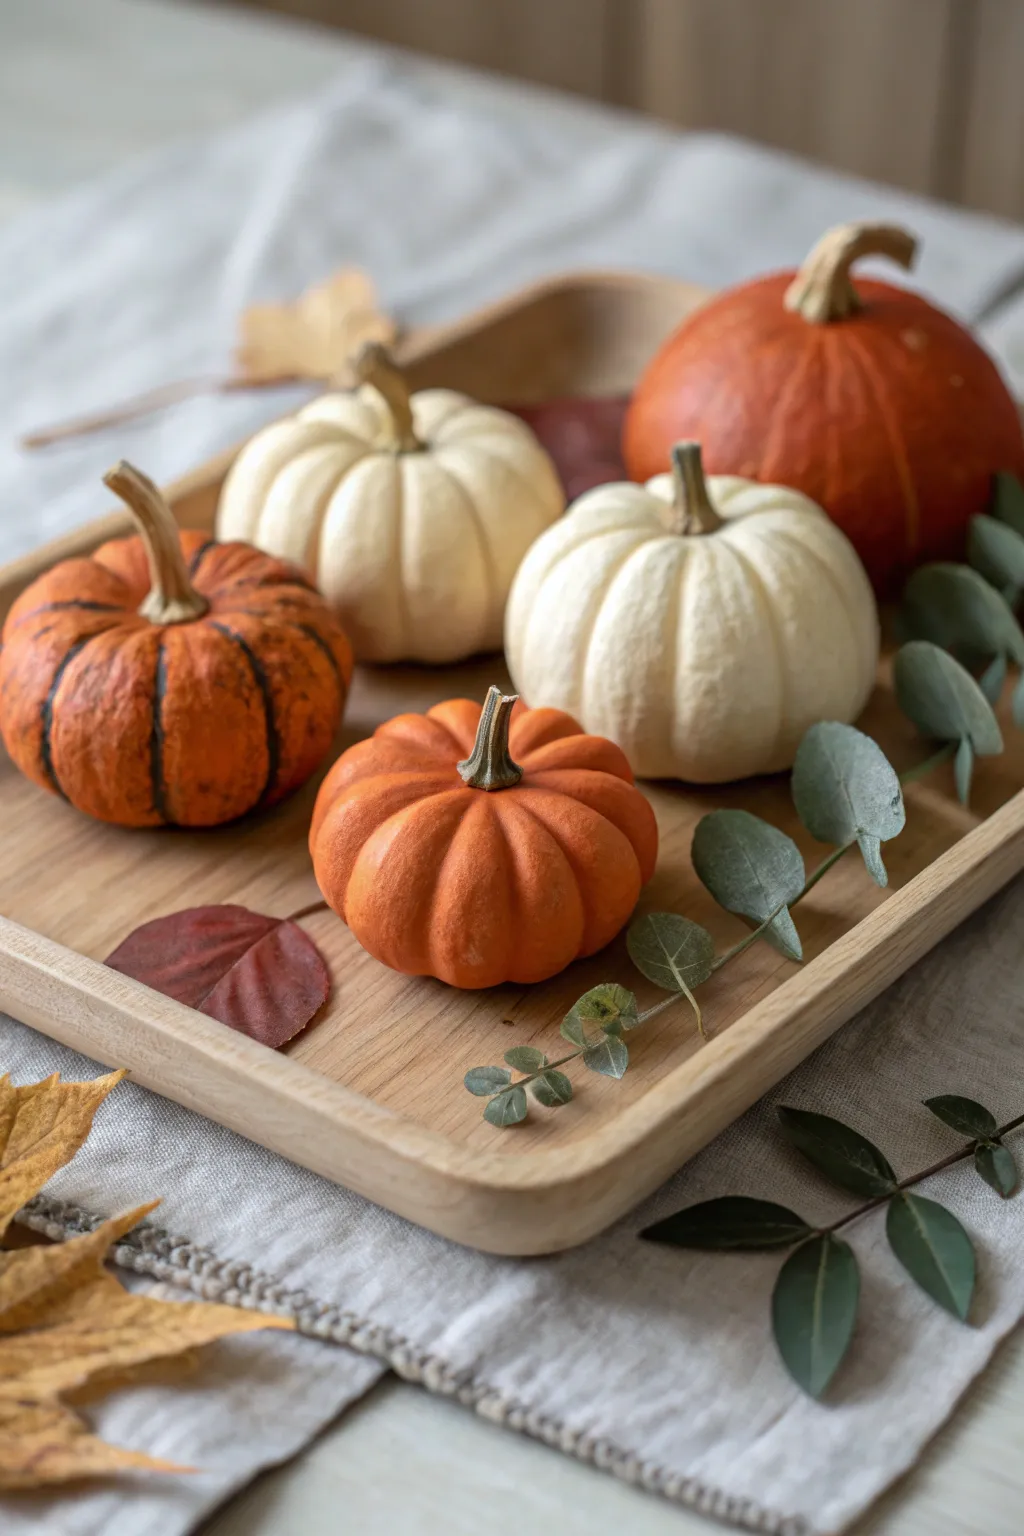
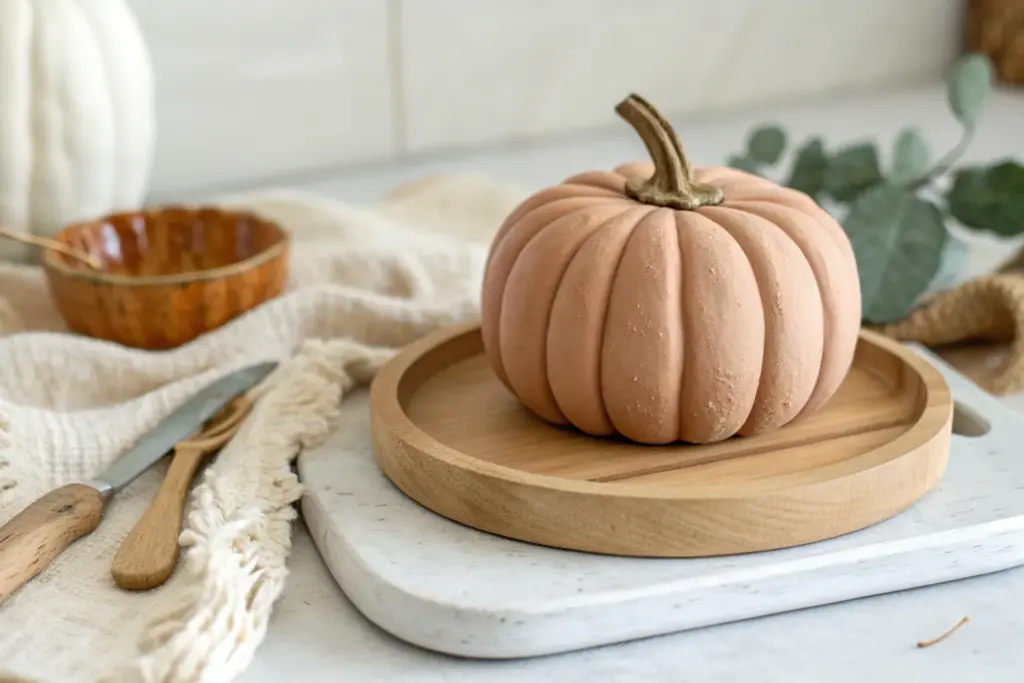
Capture the cozy essence of autumn with these incredibly realistic miniature pumpkins crafted from polymer clay. This project focuses on achieving organic shapes and warm, natural textures that look beautiful arranged on a wooden tray or scattered across a mantel.
Detailed Instructions
Materials
- Polymer clay (burnt orange, cream/white, brown, translucent)
- Acrylic paints (dark brown, burnt umber, sage green)
- Sculpting tools (needle tool, ball stylus, silicone shaper)
- Soft pastel chalks within earth tones (rust, brown, yellow ochre)
- Paintbrush (fine detail and soft fluffy brush)
- Texture sponge or toothbrush
- Aluminum foil
- Matte varnish or sealant
Step 1: Forming the Base Shapes
-
Prepare the foil cores:
To save clay and keep the pumpkins lightweight, start by crunching aluminum foil into tight balls. Create five distinct sizes: two larger round ones for the main pumpkins, two medium flatter discs for the ribbed pumpkins, and one smaller ball. -
Condition the clay:
Thoroughly condition your orange and cream clays. For a more realistic look, I like to mix a tiny amount of translucent clay into the colored blocks; this prevents the final pieces from looking too ‘plastic’ and mimics the waxy skin of a real gourd. -
Cover the cores:
Sheet the clay to about 1/8 inch thickness. Wrap each foil core completely, smoothing the seams with your fingers until you have clean, seamless orbs. -
Create the segments:
Using a needle tool or the back of a knife, press vertical indentations from the top center to the bottom center of each ball. Press deeply to define the classic pumpkin ribs. Vary the spacing—some pumpkins have wide, fat segments, while others are tighter. -
Soften the edges:
Use your finger or a large ball stylus to gently run down the valley of each indentation. This rounds off the harsh cut lines and makes the segments look plump and inflated.
Uneven Chalk?
If your pastel shading looks blotchy, dip your brush in a tiny bit of rubbing alcohol before picking up the powder. This turns it into a sheer paint that blends smoothly.
Step 2: Texturing and Coloring
-
Add skin texture:
Real pumpkins aren’t perfectly smooth. Gently dab the surface of your clay with a texture sponge or an old toothbrush. Focus specifically on the top near where the stem will be. -
Apply shading:
Shave some soft pastel chalks into a fine powder (rust, brown, and yellow ochre). Use a soft, fluffy brush to dust the powders into the crevices and creases of the pumpkins. This creates depth and shadows. -
Highlight the form:
For the cream pumpkins, use a very light touch of yellow ochre pastel just in the deepest grooves. For the orange ones, deepen the shadows with rust or dark brown powder. -
Paint fine characteristic lines:
Looking at the reference, the orange pumpkin on the left has distinct dark vertical striations. Dilute dark brown acrylic paint with water and paint very thin, broken lines vertically down the ribs. Quickly blot them with a paper towel so they stain the clay rather than sit on top.
Realistic Imperfections
Don’t aim for symmetry! Make one pumpkin lean to the side, give another a crooked stem, or add small blemishes with a needle tool to mimic nature’s variety.
Step 3: Sculpting the Stems
-
Mix the stem color:
Blend brown clay with a touch of green and light beige to get a dried wood color. Roll this into small logs, tapering one end slightly. -
Attach the stems:
Press a small indentation into the top of each pumpkin. Insert the tapered end of your stem clay. Use a sculpting tool to blend the base of the stem outward onto the pumpkin shoulders, creating a strong bond. -
Texture the wood:
Use a needle tool to scratch deep vertical lines into the stem, mimicking fibrous dried wood. Twist the stem slightly for a natural, organic look, and cut the top off bluntly. -
Final shading:
Brush a little dark brown pastel powder at the base of the stem where it connects to the fruit, and a tiny bit on the cut top edge.
Step 4: Baking and Finishing
-
Bake the batch:
Arrange your pumpkins on a tile or baking sheet. Bake according to your polymer clay manufacturer’s specific directions (usually 275°F/135°C for 30 minutes per 1/4 inch of thickness). -
Cool and assess:
Allow the pumpkins to cool completely. The colors often darken slightly after baking, revealing the true richness of the pastels. -
Dry brushing details:
If the stems look too uniform, dry brush a tiny amount of light beige acrylic paint over the raised ridges of the stem texture to highlight the wood grain. -
Seal the surface:
To protect the chalk pastels, apply a thin coat of matte varnish. Avoid glossy finishes, as the goal is a natural, matte gourd skin texture. -
Optional greenery:
While not clay, adding dried eucalyptus sprigs around your finished pumpkins on the tray completes the realistic display shown in the photo.
Arrange your new harvest on a wooden tray for a centerpiece that lasts year after year


Leaf-Imprint Trinket Dishes With Real Veins
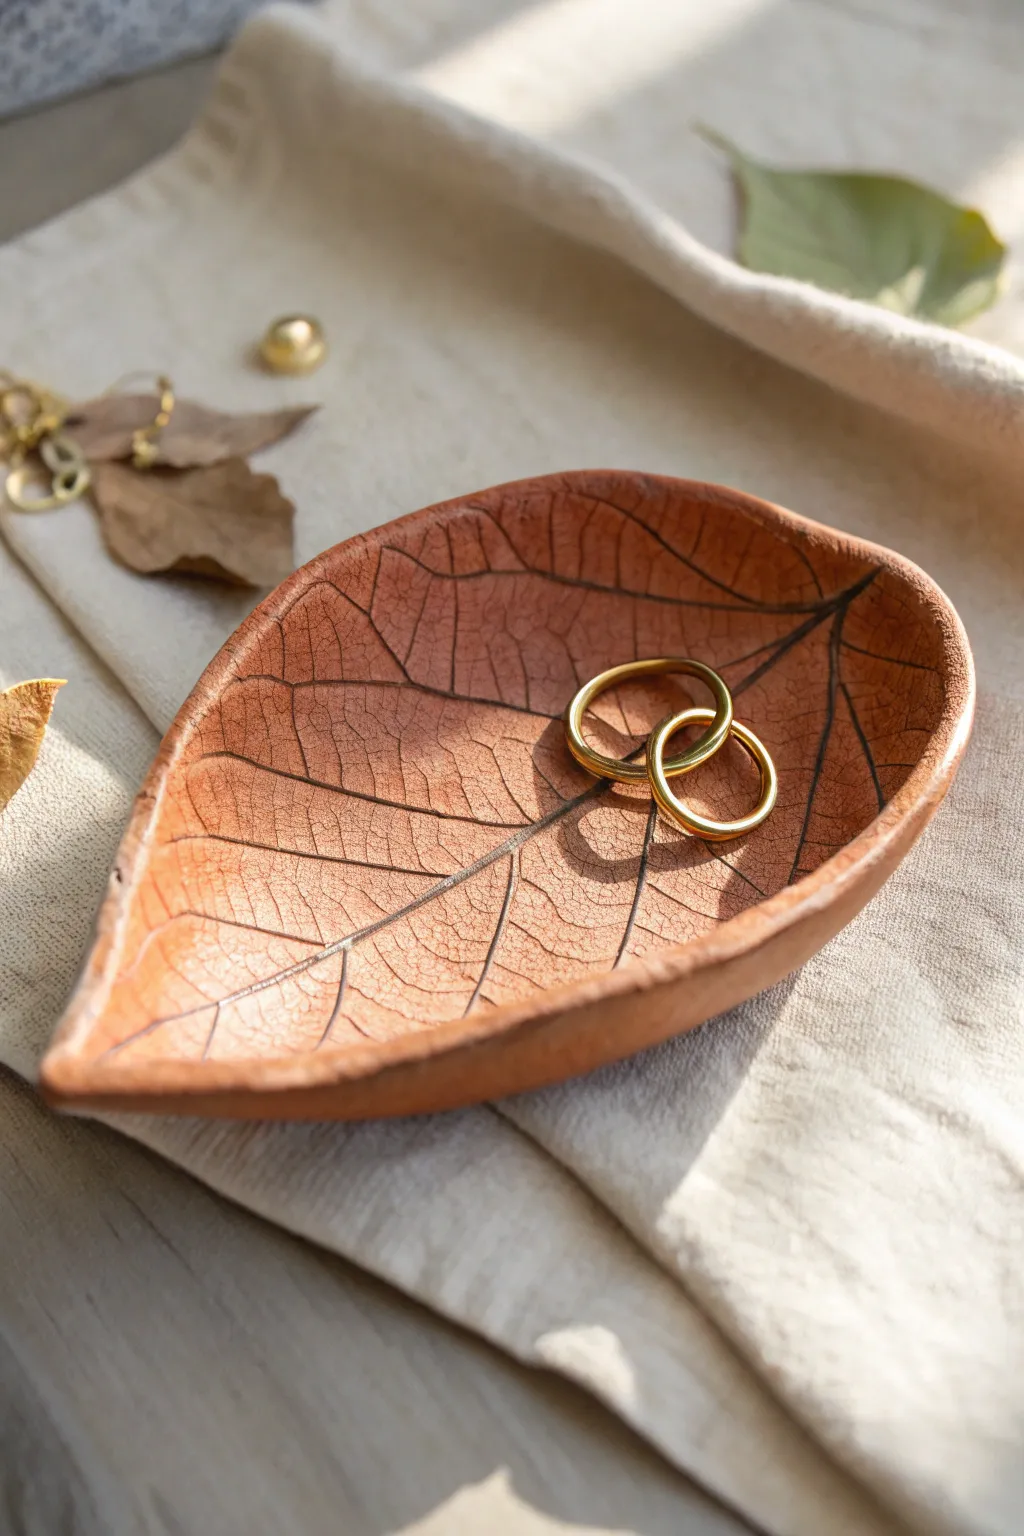
Capture the fleeting beauty of autumn foliage by pressing real leaves into warm, terracotta-hued clay. These delicate trinket dishes showcase the intricate network of natural veins, creating a functional piece of decor that feels plucked straight from the forest floor.
How-To Guide
Materials
- Air-dry clay (terracotta color)
- Fresh, sturdy leaves with prominent veins (e.g., hydrangea, oak, or maple)
- Rolling pin
- Sharp craft knife or scalpel
- Rolling mat or parchment paper
- Small bowl or curved surface (for drying)
- Fine-grit sandpaper
- Dark brown acrylic paint or antiquing wax
- Paper towels or soft cloth
- Matte clear sealant or varnish
- Small paintbrush
- Sponge
Step 1: Preparing the Impression
-
Condition the clay:
Begin by taking a handful of terracotta air-dry clay and kneading it in your hands until it becomes soft, pliable, and free of cracks. -
Roll the slab:
Place the clay on your rolling mat or parchment paper. Use the rolling pin to flatten it into an even slab, aiming for a thickness of about 1/4 inch (6mm) to ensure durability. -
Select your leaf:
Choose a fresh leaf that isn’t too brittle. Place it vein-side down onto the clay slab; the vein side usually has the most prominent texture, which gives the best imprint. -
Press the leaf:
Gently roll over the leaf with your rolling pin. Apply firm, even pressure to embed the leaf into the clay surface without thinning the slab too much further. -
Verify the transfer:
I like to carefully lift just the edge of the stem to peek underneath and ensure the veins have transferred clearly before fully removing the leaf.
Keep it Fresh
Use fresh leaves rather than dried ones. Dried leaves will crumble when you roll over them, leaving debris in your clay, while fresh leaves are flexible and leave a clean impression.
Step 2: Shaping and Drying
-
Cut the shape:
Using a sharp craft knife or scalpel, carefully cut around the outline of the leaf. Hold the knife vertically to keep the edges clean and straight. -
Smooth the edges:
Dip your finger in a little water and gently run it along the cut edges of the clay to smooth out any roughness or sharp corners left by the knife. -
Form the curve:
Carefully lift the clay leaf and place it inside a shallow bowl or drape it over a curved surface. This will give your dish its cupped shape as it dries. -
Initial drying:
Allow the clay to dry in the bowl for at least 24 hours. Keep it away from direct heat sources to prevent cracking. -
Flip and finish drying:
Once the top feels dry to the touch, flip the leaf over or remove it from the bowl to let the underside dry completely for another 12-24 hours. -
Sand imperfections:
After the dish is bone dry, use fine-grit sandpaper to lightly buff away any remaining rough spots on the rim.
Step 3: Antiquing and Sealing
-
Apply the wash:
Mix a small amount of dark brown acrylic paint with water to create a thin wash. Brush this over the entire inside surface of the leaf, ensuring it gets into all the tiny vein crevices. -
Wipe back:
Immediately use a damp paper towel or sponge to wipe away the excess paint from the surface. The dark pigment will remain in the deep veins, highlighting the natural pattern. -
Paint the rim:
For a finished look, use a detailed brush to lightly darken the very edge of the rim, mimicking the natural browning of a dried leaf. -
Let the paint set:
Allow the paint or antiquing medium to dry completely, which usually takes about 30 minutes to an hour. -
Seal the dish:
Apply a coat of matte clear sealant or varnish to protect the clay and give it a finished, professional sheen.
Gilded Edges
After the dark wash dries, use a metallic gold paint pen or gilding wax on just the very rim of the dish for a luxurious, high-end finish that catches the light.
Now you have a stunning, nature-inspired vessel perfect for holding your rings and small treasures


Clay Acorns With Textured Caps
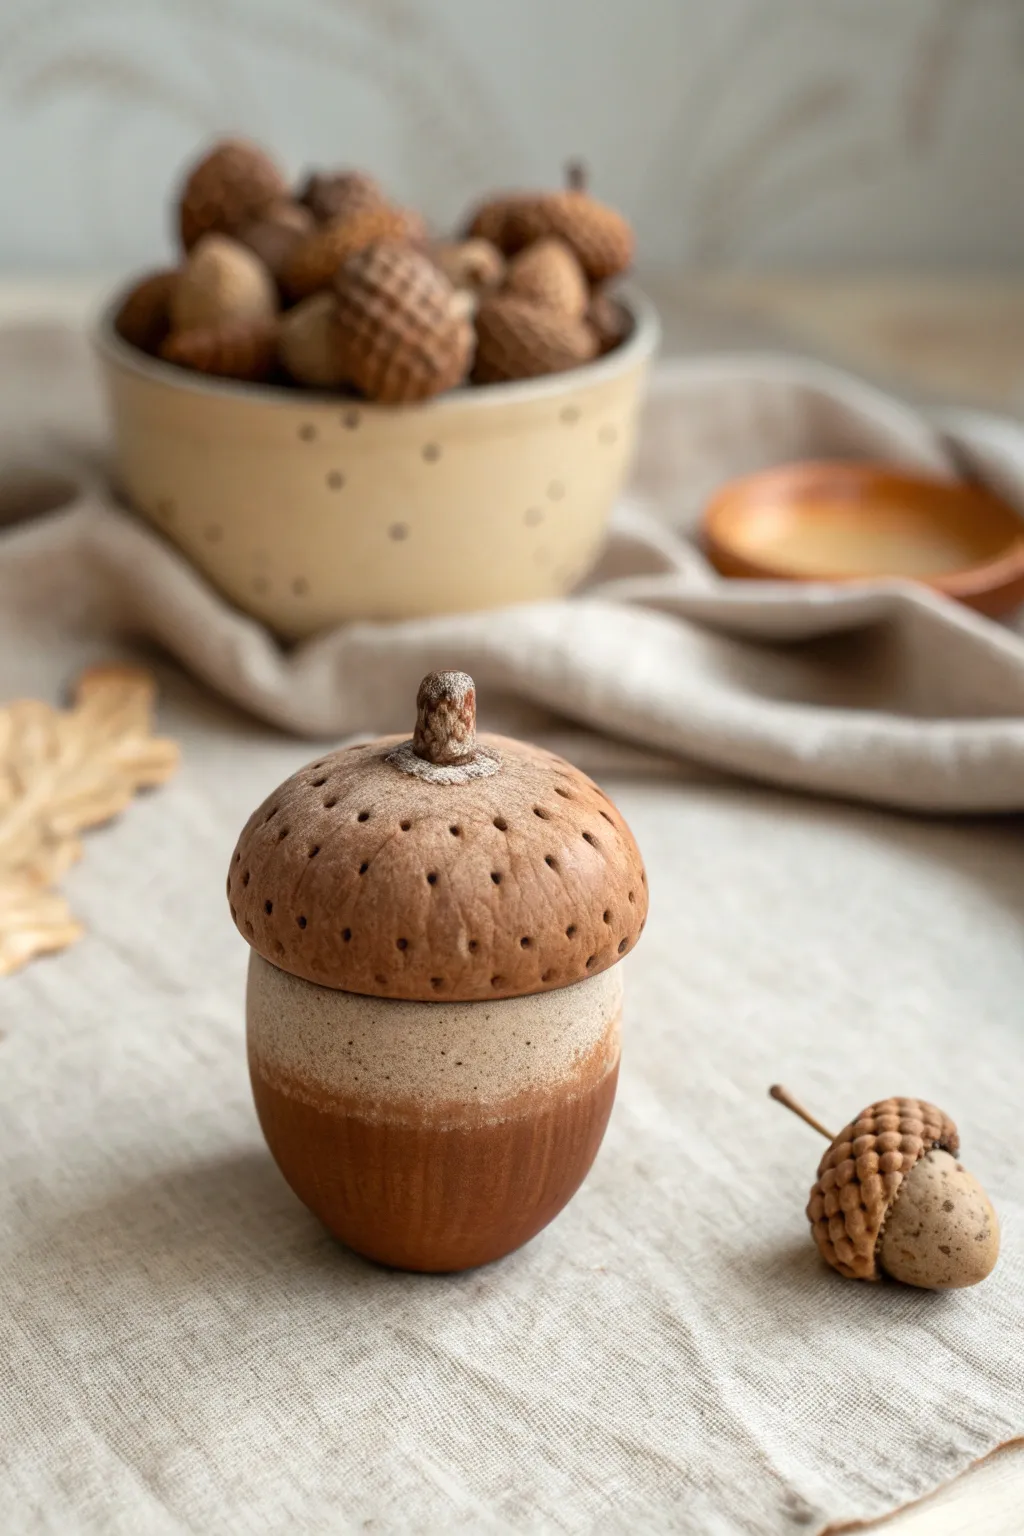
Capture the essence of autumn with this delightful lidded jar shaped like a fallen acorn. Featuring a tactile, stippled cap and a dual-toned body with subtle fluting, this functional piece brings woodland charm straight to your table.
Detailed Instructions
Materials
- Stoneware clay (buff or speckled)
- Pottery wheel (or coil-building supplies)
- Needle tool
- Small loop tool
- Rib tool (smooth wood or metal)
- Scoring tool or fork
- Slip
- Underglaze (warm brown)
- Glaze (creamy matte white)
- Clear matte glaze
- Small round tool or drill bit (for texturing)
Step 1: Throwing the Form
-
Throw the body:
Begin with a ball of wedged clay on the wheel. Center it and open it up to create a small, bowl-like vessel. Keep the walls even, about 1/4 inch thick. Shape it into a gentle curve that tapers slightly at the bottom, mimicking the bottom half of an acorn. -
Refine the rim:
Create a gallery for the lid to sit on. Carefully press down on the inner edge of the rim with a wet finger or tool to create a small ledge. This ensures your lid will sit flush and secure. -
Throw the lid:
Using a separate, slightly smaller ball of clay, throw a low dome shape upside down (or right-side up as a shallow bowl). Measure it frequently with callipers against your jar’s gallery to ensure a perfect fit. -
Trim while leather hard:
Once both pieces are leather hard, return the body to the wheel. Trim away excess weight from the bottom and refine the curve so it feels round and organic in the hand.
Lid Wobble?
If the lid rattles after firing, apply a dab of grinding paste to the rim and twist the lid back and forth against the jar. This grinds the surfaces for a perfect, airtight fit.
Step 2: Adding Texture & Detail
-
Sculpt the stem:
Roll a small coil of clay for the stem. Score and slip the center of the lid, then attach the coil. I like to twist it slightly and flatten the top to make it look like a natural, woody stem. -
Texture the cap:
This is the signature detail. Using a small, blunt round tool (like the back of a paintbrush or a specialized texture tool), press random divots all over the lid’s surface. Vary the pressure slightly for a natural, porous look. -
Refine the cap edges:
Ensure the texturing wraps gently around the curve of the lid but doesn’t interfere with the area that touches the jar body. -
Create the body fluting:
On the bottom two-thirds of the jar body, carve vertical lines using a loop tool or a carving tool. These should represent the striations found on an acorn shell. Keep the lines relatively straight but soft. -
Smooth the transition:
Leave the upper third of the jar body smooth. This smooth band creates a beautiful visual break between the textured cap and the fluted base. -
Bisque fire:
Allow both pieces to dry slowly to prevent warping. Once bone dry, bisque fire them according to your clay body’s specifications (usually cone 04 or 06).
Step 3: Glazing Technique
-
Wax the galleries:
Apply wax resist to the rim of the jar and the underside edge of the lid where they will touch. This prevents the pieces from fusing together in the kiln. -
Glaze the cap:
Brush a matte, warm brown oxide or underglaze onto the lid. Wipe it back with a damp sponge so the color stays dark in the indented dots but reveals the clay color on the high points. Coat with a thin matte clear glaze if desired. -
Glaze the body base:
Dip the bottom two-thirds of the jar (covering the fluted texture) into a warm, reddish-brown glaze. Let it dry completely. -
Glaze the upper band:
Dip the top rim area into a creamy, speckled matte white glaze. Let it overlap slightly with the brown glaze to create a soft transition line. -
Interior glazing:
Pour the creamy white glaze inside the jar, swirl to coat, and pour out the excess. This makes the vessel food-safe and easy to clean. -
Final fire:
Glaze fire the piece to the maturity temperature of your clay and glazes (likely cone 5 or 6). Allow the kiln to cool completely before opening.
Make it a Set
Vary the sizes and shapes—try a tall, skinny acorn or a squat, round one. Glaze each in slightly different autumn hues like ochre, sage, or deep rust for a diverse forest collection.
Fill your finished acorn with small trinkets or sea salt and enjoy the cozy autumn vide it brings into your home


Pumpkin Tea Light Holders for Soft Autumn Glow
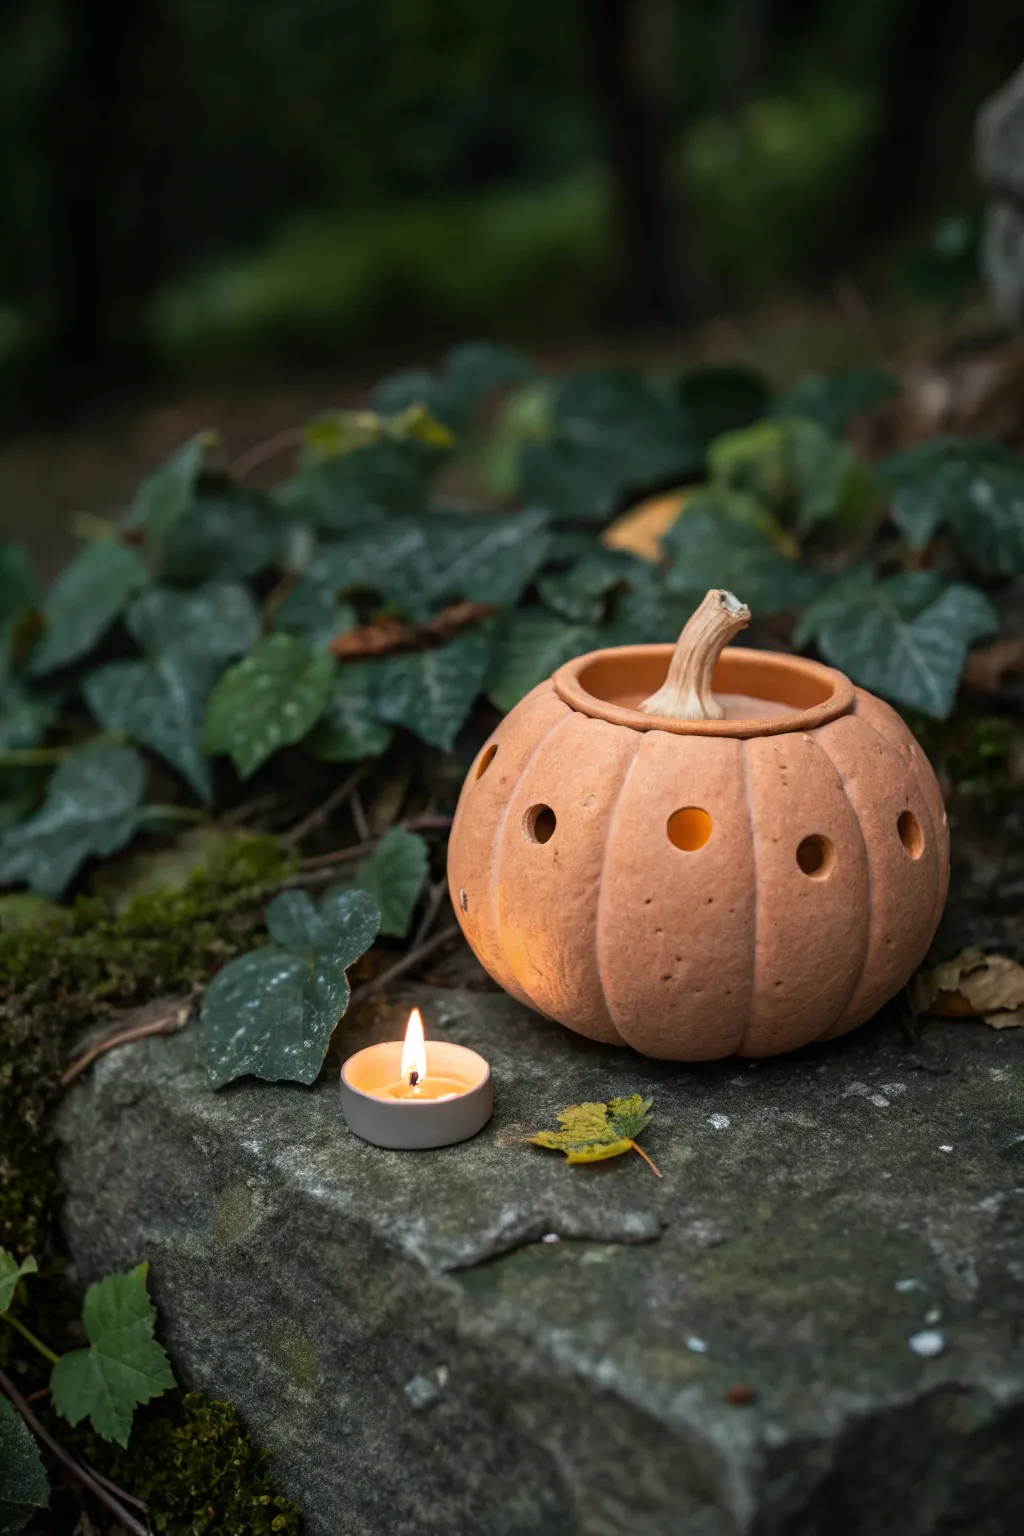
Create a cozy autumn atmosphere with this delightful clay pumpkin lantern that mimics the warm, earthy look of traditional terracotta. Its segmented curves and circular cutouts cast a soft, dancing glow that is perfect for cool evenings.
Step-by-Step
Materials
- Terracotta-colored air-dry clay or polymer clay
- Rolling pin
- Aluminum foil (for armature)
- Clay carving tools or a plastic knife
- Small circular clay cutter or a straw
- Toothbrush or texture sponge
- Slip (clay mixed with water) for joining
- Real pumpkin stem (dried) or brown clay for the stem
- Sandpaper
Step 1: Forming the Base
-
Create the core:
Start by creating a rounded ball of aluminum foil slightly smaller than your desired pumpkin size. This acts as an armature to support the clay while it dries and saves material. -
Prepare the clay:
Condition your clay by kneading it until it is soft and pliable. Roll it out into a flat sheet, roughly 1/4 inch thick. -
Cover the foil:
Drape the clay sheet over your foil ball. Gently smooth the clay down the sides, gathering the excess at the bottom. Trim away extra clay and smooth the seams so the sphere is uniform.
Keep it Clean
Keep a small bowl of water nearby to smooth cracks as you work, but don’t over-wet the clay or it may become slushy and lose structural integrity.
Step 2: Sculpting the Pumpkin Shape
-
Define the center:
Press a small indentation into the very top of the sphere where the lid will eventually sit. -
Create the segments:
Using a modeling tool or the back of a plastic knife, press vertical lines from the top center down to the bottom center to create the pumpkin’s ribs. -
Soften the curves:
Use your thumb or a rounded tool to gently press the clay between the vertical lines, making the segments look plump and rounded rather than flat. -
Texture the surface:
To mimic the look of unglazed pottery or real squash skin, gently tap the entire surface with a toothbrush or a dry sponge for a subtle, organic texture.
Natural Speckles
Mix dried coffee grounds or tiny specks of black pepper into your clay before sculpting. This creates a speckled, stone-like texture that looks amazing.
Step 3: Carving and Details
-
Cut the lid:
Carefully cut a circular opening around the top indentation. I find angling the knife slightly inward helps create a ledge so the lid won’t fall through later. -
Remove the foil:
Once the lid is free, carefully extract the aluminum foil ball from the inside. You may need to use tweezers or needle-nose pliers to grab small pieces. -
Smooth the interior:
Reach inside with a finger or a slightly damp sponge to smooth out any rough bits of clay left from the foil removal. -
Punch the light holes:
Select a spot on each pumpkin segment, about midway up. Use a small circular cutter, a straw, or the back of a paintbrush to punch clean, round holes for the light to shine through. -
Refine the holes:
Smooth the edges of each circular cutout with a damp fingertip to remove any sharp burrs.
Step 4: The Stem and Finish
-
Shape a lid handle:
If you have a dried real pumpkin stem, glue it to the center of your clay lid. If not, shape a twisted piece of brown or lighter clay into a stem shape. -
Attach the clay stem:
If using a clay stem, score (scratch) the bottom of the stem and the center of the lid. Add a dab of slip and press firmly to join them. -
Final drying:
Allow the pumpkin to dry completely. For air-dry clay, this can take 24-48 hours. Turn it occasionally to ensure even airflow. -
Sanding:
Once bone dry, lightly sand any remaining rough spots for a professional matte finish. -
Add the light:
Place a battery-operated tea light inside your new creation to test the glow.
Place your finished lantern on a stone step or porch railing to welcome the season with warmth

The Complete Guide to Pottery Troubleshooting
Uncover the most common ceramic mistakes—from cracking clay to failed glazes—and learn how to fix them fast.
Maple Leaf Garland With Clay Cutouts
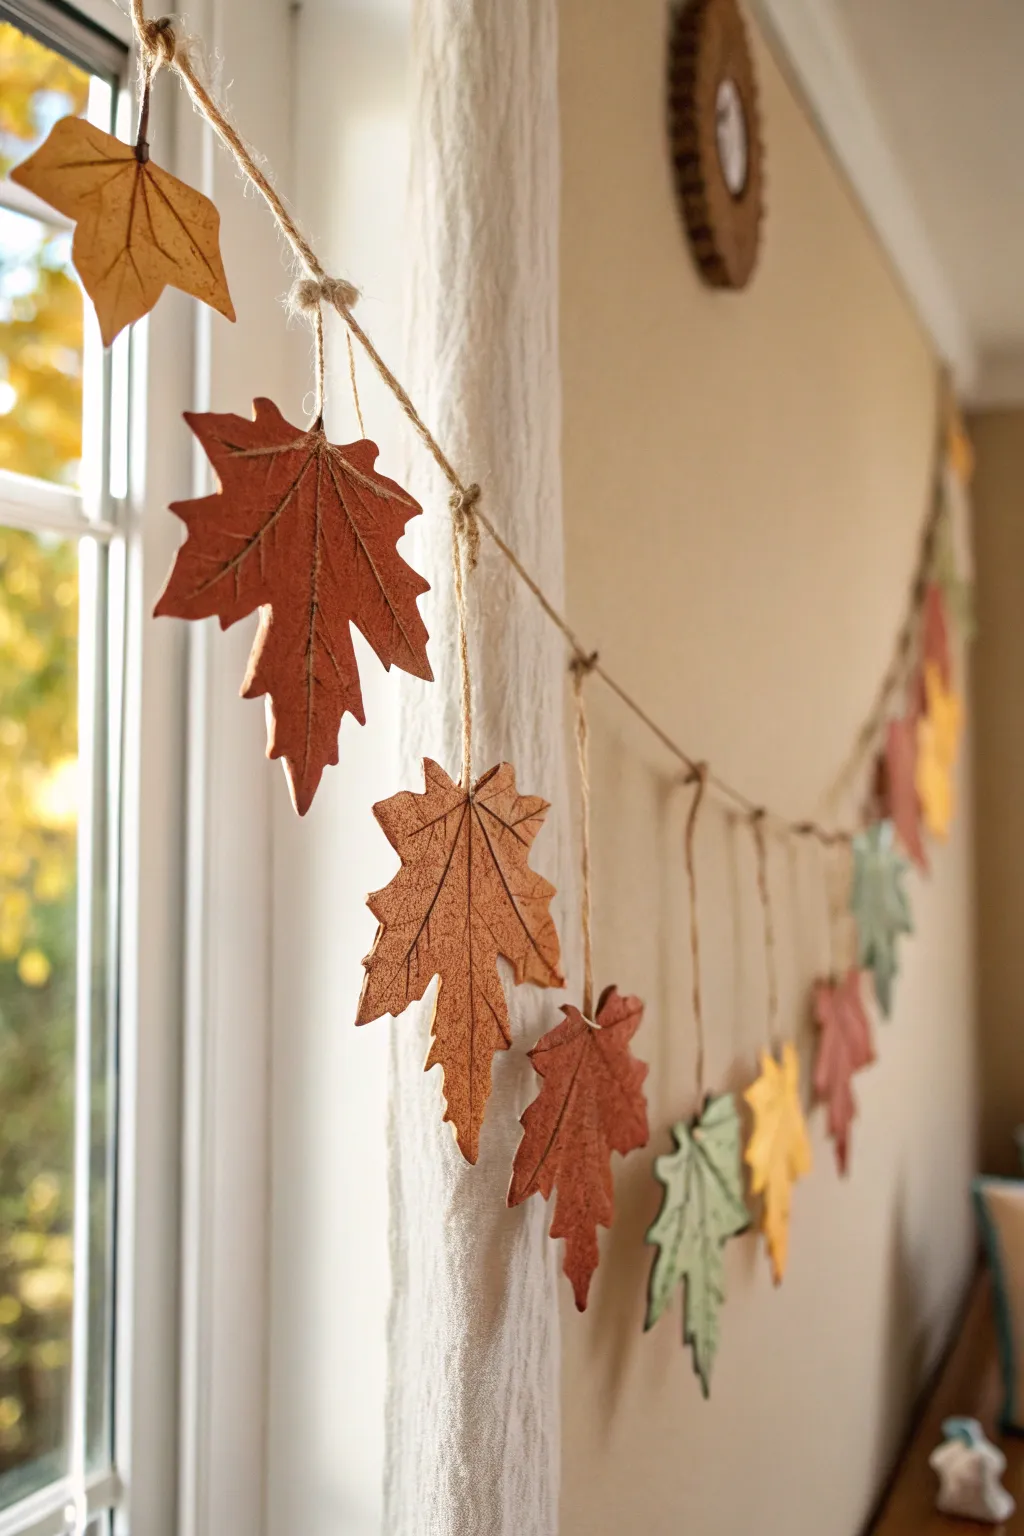
Bring the golden warmth of autumn indoors with this charming handmade garland featuring textured clay leaves. The natural jute string and earthy, painted tones create a cozy, rustic aesthetic perfect for draping across mantels or windows.
Step-by-Step Guide
Materials
- Air-dry clay (white or terracotta)
- Maple leaf cookie cutters (various sizes optional)
- Rolling pin
- Parchment paper or silicone mat
- Craft knife or needle tool
- Jute twine
- Acrylic paints (burnt orange, mustard yellow, sage green, deep red)
- Paintbrushes (flat and fine detail)
- Small bowl for water
- Paper towels
- Sponge (optional for texturing)
- Clear matte sealant spray (optional)
Step 1: Shaping the Leaves
-
Prepare the workspace:
Lay down parchment paper or a silicone mat to protect your work surface and prevent the clay from sticking. Tape the edges if necessary to keep it flat. -
Roll out the clay:
Take a handful of air-dry clay and knead it briefly until pliable. Roll it out to an even thickness of about 1/4 inch. If you want a more rustic look, don’t worry about making it perfectly smooth. -
Cut the leaf shapes:
Press your maple leaf cookie cutters firmly into the clay. If you don’t have cutters, you can print a leaf template, place it over the clay, and trace around it with a craft knife. -
Refine the edges:
Gently lift the cutouts and smooth any rough or jagged edges with a little bit of water on your fingertip. -
Add vein details:
Using a needle tool or the back of a craft knife, gently score vein lines into each leaf. Start with a central line from the stem to the tip, then add branching veins. Press firmly enough to create a groove but not cut through. -
Create hanging holes:
Use a straw, skewer, or the end of a paintbrush to poke a small hole near the top of the stem on each leaf. Make sure the hole is large enough for your jute twine to pass through easily. -
Dry the leaves:
Place the clay leaves on a flat surface to dry. Turn them over halfway through the drying process to prevent curling. Follow the manufacturer’s instructions for drying times, typically 24-48 hours.
Natural Texture Hack
Before cutting shapes, gently press a real leaf or a piece of coarse linen fabric into the wet clay using your rolling pin. This transfers authentic, organic textures instantly.
Step 2: Painting and Finishing
-
Apply base colors:
Once fully dry, paint the leaves in solid autumn shades. Paint some in burnt orange, others in sage green, mustard yellow, or deep red. I like to dilute the paint slightly with water for a more stained, natural look. -
Add depth:
While the base coat is still slightly tacky or just dry, use a dry brush or sponge to dab a darker shade (like brown or dark red) onto the edges and vein grooves to highlight the texture. -
Add speckling (optional):
To mimic real dry leaves, use a toothbrush dipped in diluted brown paint to lightly flick speckles over the leaves. -
Seal the clay:
Allow the paint to complete dry. For durability, spray a light coat of clear matte sealant over the leaves, front and back.
Step 3: Assembling the Garland
-
Measure the twine:
Cut a long piece of jute twine to your desired garland length, leaving an extra 12 inches on each end for tying loops. -
Prepare hanging loops:
Tie a loop at each end of the main twine strand for easy hanging. -
Cut individual strings:
Cut smaller pieces of jute twine, about 6-8 inches long, for each leaf you created. -
Thread the leaves:
Thread a small piece of twine through the hole of a clay leaf. -
Attach to main line:
Tie the leaf onto the main garland twine using a simple overhand knot. You can let them hang down at varying lengths for a playful look. -
Space them out:
Continue tying on leaves, spacing them about 4-6 inches apart along the main strand. -
Secure knots:
Once you are happy with the placement, trim the excess tails of the small ties to keep things neat.
Fixing Broken Dry Leaves
If a leaf snaps after drying, don’t toss it. Use a small dab of white PVA glue or superglue to reattach the pieces, then paint over the crack. The texture hides repairs well.
Hang your beautiful handmade garland in a sunny window and enjoy the autumn vibes all season long
Leaf Pinch Pots for Tiny Treasures
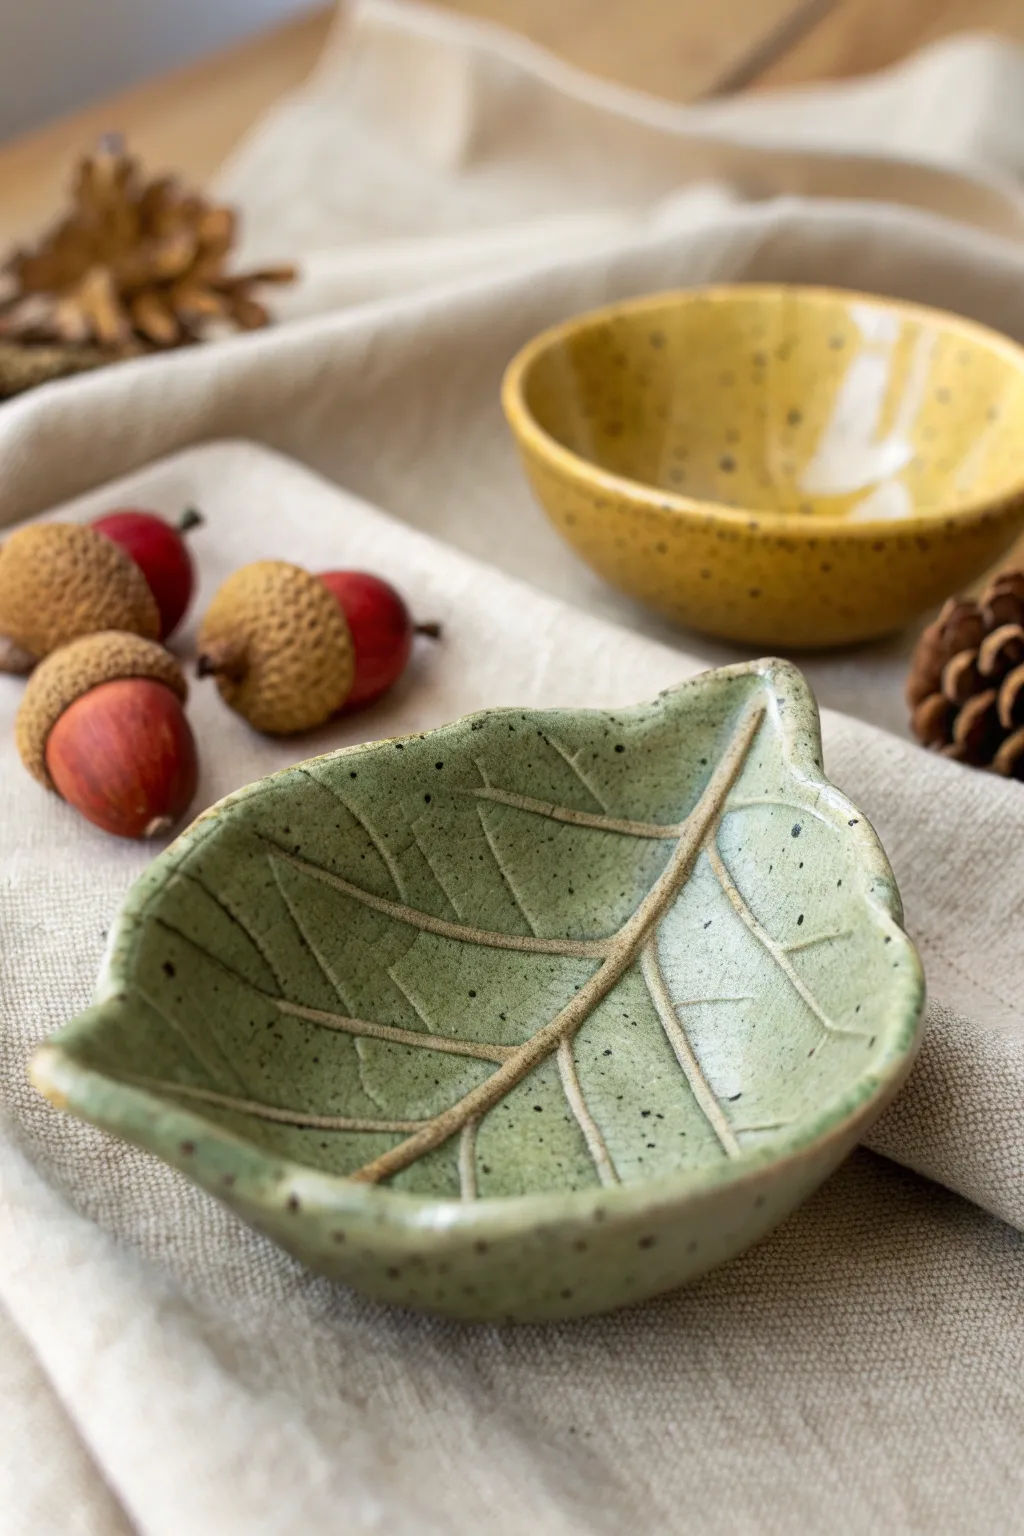
Embrace the crisp autumn air by sculpting a delicate leaf dish perfect for holding rings or trinkets. This project mimics nature with its organic shape, deep green glaze, and realistic veining textures.
Step-by-Step Tutorial
Materials
- Air-dry clay or low-fire earthenware clay
- Rolling pin
- Real leaf with pronounced veins (or a leaf template)
- Needle tool or X-Acto knife
- Small sponge
- Small bowl (for shaping)
- Acrylic paints (Sage Green, Dark Brown)
- Clear gloss varnish or glaze
- Old toothbrush (for speckling)
- Fine liner paintbrush
Step 1: Shaping the Clay
-
Prepare the Clay:
Begin with a ball of clay about the size of a lemon. Knead it thoroughly to remove air bubbles and ensure a smooth consistency, which prevents cracking later. -
Roll it Out:
Using a rolling pin, flatten the clay into an even slab approximately 1/4 inch thick. If the clay sticks, you can roll it out on a piece of canvas or parchment paper. -
Trace the Leaf:
Place your real leaf or template onto the clay slab. Lightly trace around the perimeter with a needle tool to outline the shape. I find it helpful to not cut all the way through on the first pass. -
Cut the Shape:
Once you are happy with the outline, use your knife or needle tool to cut all the way through the clay. Remove the excess clay from around the leaf shape. -
Smooth the Edges:
Dip your finger in a little water and gently run it along the cut edges of your clay leaf to smooth out any sharpness or roughness.
Step 2: Adding Texture & Form
-
Create the Veins:
Using the needle tool again, gently score a central line down the middle of the leaf. Then, branch out with smaller lines to mimic the natural veins of a leaf. -
Deepen the Lines:
Go over your vein lines a second time, pressing slightly deeper to ensure the texture remains visible after painting or glazing. -
Create the Pinch Pot Curve:
Lift the clay leaf and gently press it into the bottom of a small bowl. This will act as a mold to give the leaf a curved, dish-like shape as it dries. -
Dry Completely:
Allow the clay to dry fully in the bowl. Depending on your humidity and clay type, this could take 24 to 48 hours.
Fixing Cracks
If hairline cracks appear while drying, mix a tiny bit of fresh clay with water to make a paste (slip) and fill the crack, then smooth it over.
Step 3: Painting & Finishing
-
Base Coat:
Once dry, paint the entire leaf, front and back, with a sage green acrylic paint. You may need two coats for opaque coverage. -
Highlighting the Veins:
Mix a watery wash of dark brown paint. Brush this into the recessed vein lines you carved earlier. -
Wipe Back:
Before the brown wash dries completely, use a slightly damp sponge to wipe the surface gently. This leaves the brown paint in the crevices while revealing the green on the raised areas. -
Create the Speckles:
Dip an old toothbrush into thinned dark brown paint. Hold it over the dish and run your thumb across the bristles to flicker tiny speckles onto the surface. -
Seal the piece:
Protect your work with a coat of clear gloss varnish. This gives it that finished ceramic look and intensifies the colors.
Level Up: Gradient Glaze
Instead of solid green, sponge a little yellow paint near the leaf edges before sealing to create a turning autumnal transition.
Display your charming new leaf dish on a coffee table or gift it to a nature lover


What Really Happens Inside the Kiln
Learn how time and temperature work together inside the kiln to transform clay into durable ceramic.
Tiny Clay Mushrooms in Fall Forest Colors
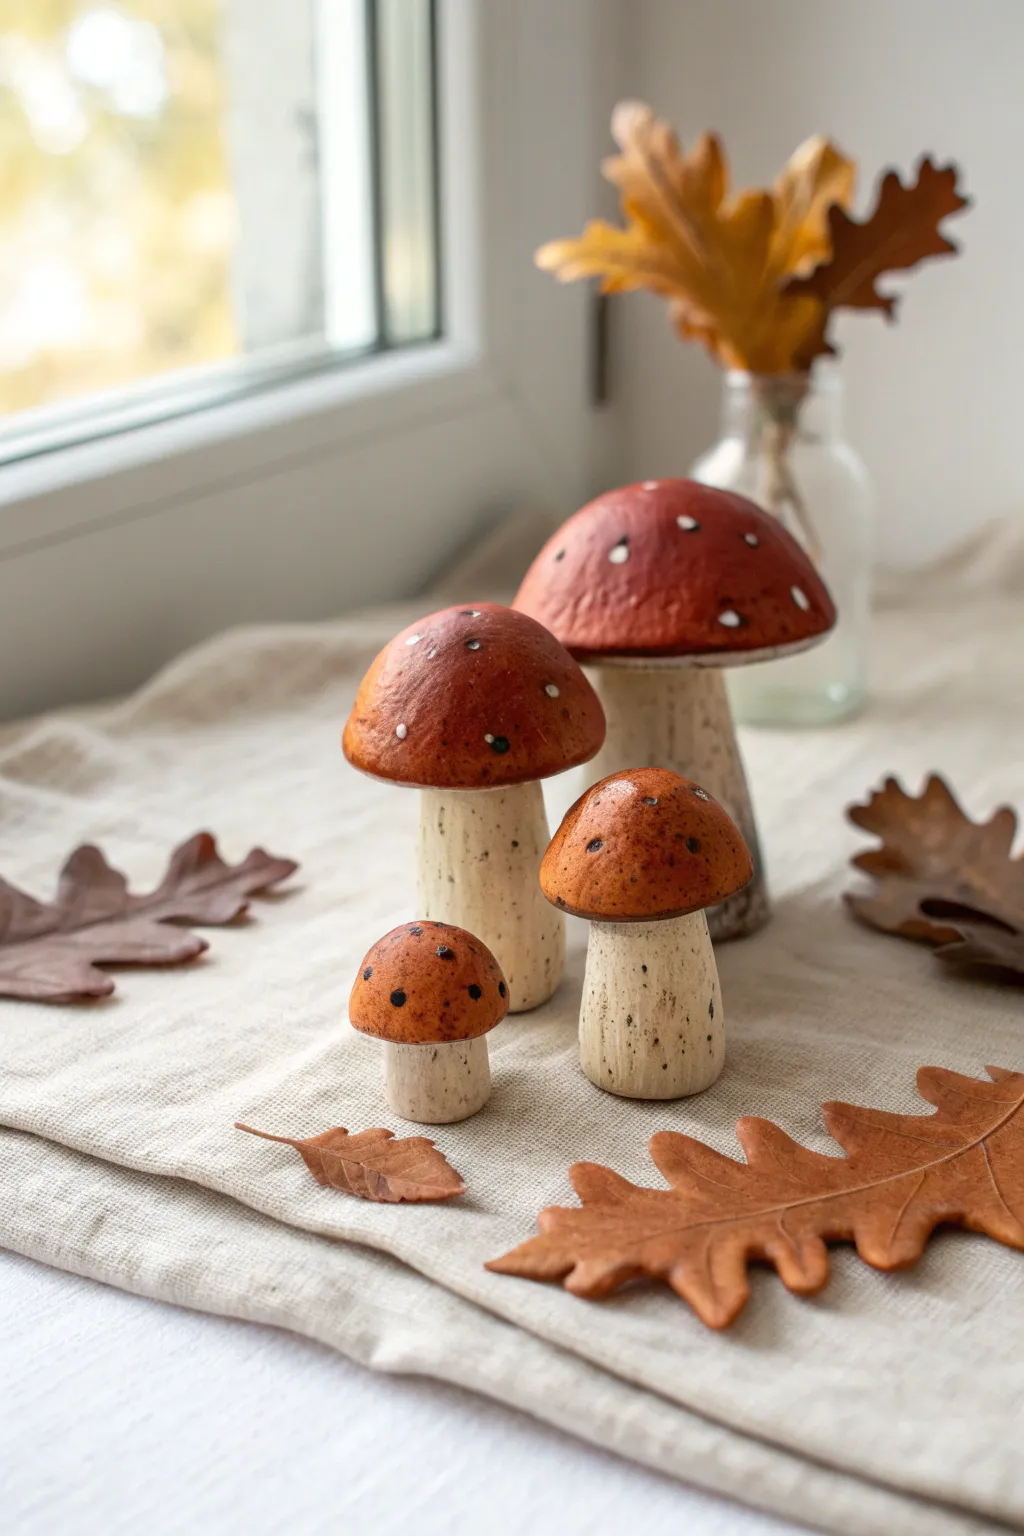
These charming rustic mushrooms bring the magic of a forest floor right onto your windowsill with their warm, earthy tones and speckled textures. Crafted from polymer or air-dry clay, they feature beautifully weathered stems and vibrant, spotted caps that look like they were freshly plucked from an autumn fairytale.
Step-by-Step
Materials
- Polymer clay (white or beige) or air-dry clay
- Aluminum foil (for armatures)
- Acrylic paints: Burnt sienna, terracotta, cream/off-white, black
- stiff bristle brush (e.g., old toothbrush or stencil brush)
- Fine detail paintbrush
- Matte or satin varnish
- Sculpting tools (needle tool, ball tool)
- Sandpaper (fine grit)
Step 1: Sculpting the Stems
-
Form the core:
For the larger mushrooms, crumple a small piece of aluminum foil into a cylinder shape to create a lightweight core. This saves clay and helps with baking or drying. -
Cover with clay:
Roll your white or beige clay into a thick sheet and wrap it around the foil cylinder, smoothing the seams completely. -
Shape the base:
Gently press the bottom of the stem onto your work surface to flatten it so the mushroom stands upright. Taper the top slightly where the cap will sit. -
Add texture:
Use a toothbrush or a ball of crumpled tin foil to press texture into the stem surface, giving it a porous, organic look rather than a perfectly smooth finish. -
Make the tiny baby:
For the smallest mushroom, you don’t need a foil core; simply roll a small log of solid clay, flattening the base and rounding the top.
Step 2: Creating the Caps
-
Roll the cap shape:
Roll a ball of clay and flatten almost like a thick pancake, then gently dome it over your thumb or a rounded tool to create the classic mushroom cap shape. -
Attach cap to stem:
Score (scratch) the top of the stem and the underside of the cap. Apply a tiny amount of liquid clay (or water for air-dry clay) and press the parts firmly together. -
Smooth the transition:
Ensure the connection is secure. You can leave the underside of the cap a bit rough or use a needle tool to draw radiating lines for gills if you prefer extra detail. -
Refine the shape:
Gently gently reshape the cap if it warped during attachment. I find that smoothing the edges with a wet finger helps remove any fingerprints. -
Bake or dry:
Follow your clay manufacturer’s instructions to bake (polymer) or dry (air-dry) your sculptures completely before painting.
Natural Texture Hack
Before baking, gently roll the unbaked stems over a piece of coarse sandpaper or a real rock to imprint varied, realistic textures instantly.
Step 3: Painting and Finishing
-
Base coat the stems:
Paint the stems with an off-white or cream acrylic paint. Let it dry completely. -
Add the speckles:
Dilute a bit of black or dark brown paint with water. Load an old toothbrush or stiff brush, and run your thumb over the bristles to flick tiny speckles onto the stems for that gritty, natural texture. -
Paint the caps:
Mix burnt sienna with a touch of terracotta or red to get that rich, autumnal rusty orange. Apply two thin coats to the caps for opaque coverage. -
Detail the spots:
Using your finest brush or a dotting tool, add tiny white dots randomly across the cap. Add darker brown or black dots interspersed for depth, mimicking the photo. -
Distress (optional):
Once dry, you can very lightly sand patches of the cap to reveal a bit of the lighter clay underneath for a weathered look. -
Seal:
Protection is key. Apply a coat of matte or satin varnish to seal the paint and give the mushrooms a finished, ceramic-like sheen.
Make a Forest Scene
Glue your finished mushrooms onto a wood slice base and surround them with preserved moss and tiny acorns for a complete autumn centerpiece.
Arranging your new mushroom family on a linen cloth creates a cozy, seasonal display right in your home
Corn Husk-Inspired Texture Vases in Earthy Clay
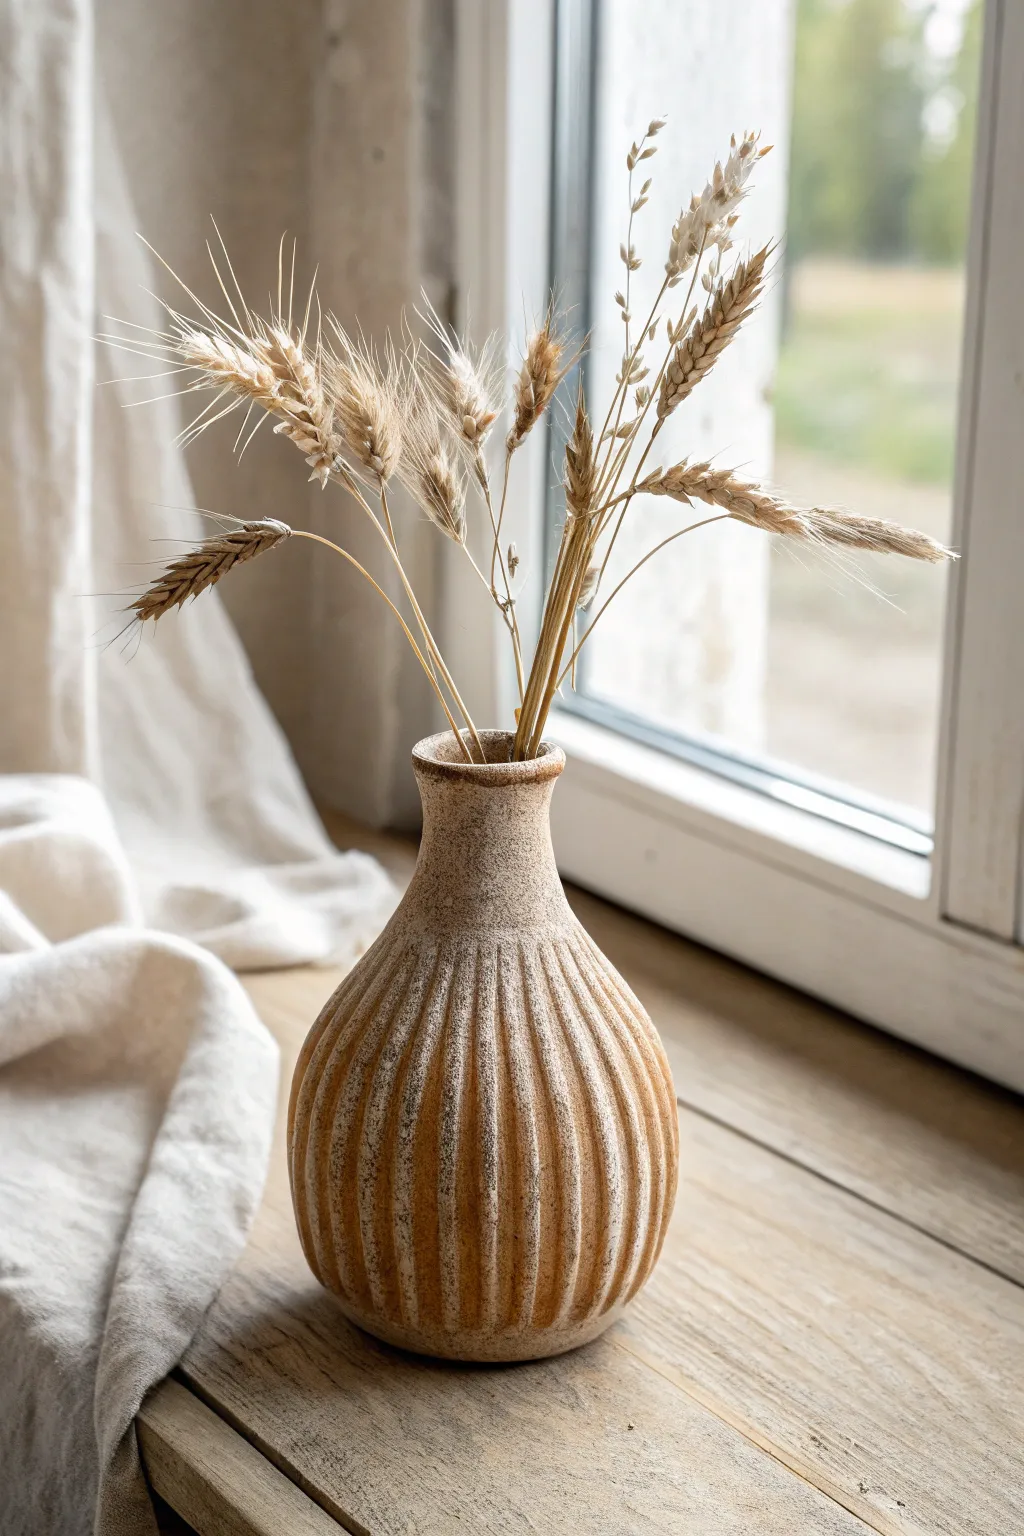
Embrace the earthy tones of autumn with this handcrafted clay vase, featuring deep vertical fluting that mimics the texture of dried corn husks. The distressed finish highlights the ridges, making it the perfect vessel for displaying golden wheat stalks or dried grasses.
Detailed Instructions
Materials
- Stoneware or earthenware clay (approx. 2-3 lbs)
- Pottery wheel (or coil-building supplies for hand-building)
- Modeling tool with a rounded edge (or wooden rib)
- Wire clay cutter
- Sponge
- Loop carving tool (medium width)
- White underglaze or white slip
- Matte clear glaze (optional)
- Rib tool
- Clean rags
- Water bucket
Step 1: Forming the Base
-
Center the clay:
Begin by wedging your clay to remove air bubbles, then slam it onto the center of your wheel head. Use water and steady pressure to center the clay into a smooth dome. -
Open the form:
Press your thumbs into the center of the dome to open it, leaving about a half-inch of thickness at the bottom for the base. -
Pull the cylinder:
Slowly pull the walls upward to create a cylinder. Aim for a height of about 8-10 inches, ensuring the walls are even but slightly thicker than usual (about 1/4 inch) to accommodate the carving later. -
Shape the belly:
Using a rib tool on the inside and gentle pressure from the outside, push the clay outward slightly at the bottom third to create a rounded, bulbous base. -
Create the neck:
Collar in the top third of the cylinder to form a narrow, elegant neck. Flare the rim outward very slightly to create a finished lip. -
Refine the surface:
Run a metal or wooden rib over the exterior to remove throwing lines and create a smooth canvas for your texture. Let the piece dry to a leather-hard state.
Step 2: Carving the Texture
-
Mark vertical guides:
Lightly sketch vertical lines from the top of the neck to the bottom curve using a needle tool if you need help keeping your spacing straight. -
Carve the first groove:
Using a medium loop tool, start just below the rim and carve a vertical channel straight down to the base. Apply consistent pressure to keep the depth uniform. -
Establish the pattern:
Continue carving parallel grooves around the entire circumference of the vase. Leave a thin ridge of uncarved clay between each channel to create the fluted effect. -
Soften edges:
Once all grooves are carved, use a slightly damp sponge to gently wipe the surface. This removes sharp burrs and clay crumbs without washing away the texture. -
Dry partially:
Allow the vase to dry fully until it is bone dry. This is crucial before applying any liquid decoration to prevent the clay from turning to mush.
Groove Smoothness
When carving the vertical lines, pull the tool downwards rather than pushing up. Gravity helps keep the line straight and prevents jumping.
Step 3: Finishing and Firing
-
Bisque fire:
Load the bone-dry vase into the kiln and bisque fire it to Cone 04 (or according to your clay body’s specifications). This prepares it for glazing. -
Apply the wash:
Mix a white underglaze with a little water to thin it slightly. Brush this mixture generously over the entire exterior, ensuring it gets deep into the carved grooves. -
Wipe back:
Immediately use a damp sponge to wipe the underglaze off the raised ridges. I find this reveals the raw clay color on top while leaving the white pigment in the recesses for contrast. -
Clear coat (optional):
If you want the vase to hold water, dip the interior in a clear glaze. For the exterior, you can leave it matte for a rustic look or apply a very thin matte clear coat. -
Glaze fire:
Fire the piece a second time to the maturation temperature of your clay (typically Cone 5 or 6 for stoneware). -
Sand the bottom:
Once cool, check the bottom of the vase for any rough spots and sand them smooth to prevent scratching your furniture.
Color Variation
Swap the white underglaze for a dark iron oxide wash. Wipe it back to leave dark recesses, giving the vase an antique, aged appearance.
Fill your new textured vessel with dried wheat or wildflowers to bring a touch of the harvest season indoors

TRACK YOUR CERAMIC JOURNEY
Capture glaze tests, firing details, and creative progress—all in one simple printable. Make your projects easier to repeat and improve.
Pumpkin Swirl Marbling for Bowls and Dishes
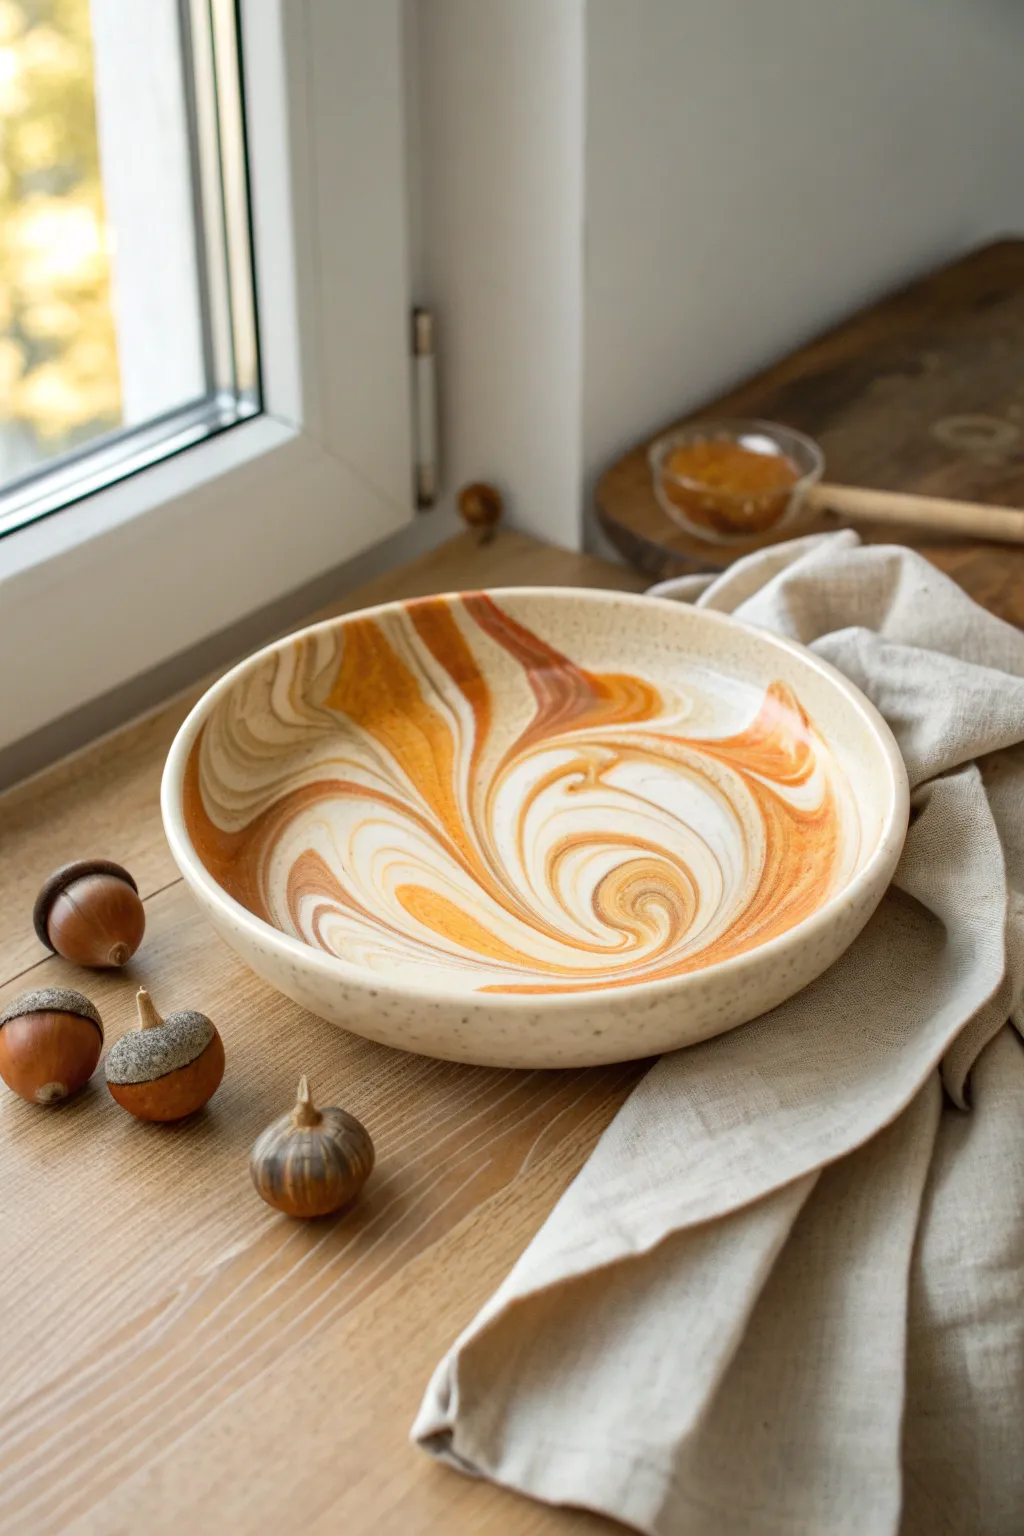
Capture the essence of autumn with this stunning wheel-thrown bowl featuring mesmerizing swirls of burnt orange and cream. The organic marbling technique ensures that no two pieces are ever alike, giving your table setting a truly unique, handmade warmth.
Step-by-Step
Materials
- White stoneware clay (mid-fire)
- Mason stain (burnt orange or pumpkin color)
- Slip trailer or syringe (optional)
- Pottery wheel
- Throwing tools (sponge, rib, wire cutter)
- Trimming tools
- Clear transparent glaze (cone 5/6)
- Kiln
Step 1: Preparing the Clay Body
-
Weigh your base clay:
Start by measuring out about 2.5 lbs of fresh white stoneware clay. Separate a smaller portion (roughly 1/4 of the total amount) to be colored. -
Mix the color:
Take the smaller portion of clay and create a well in the center. Add your burnt orange Mason stain powder—start with about 1-2 teaspoons per pound depending on the intensity you want. Wear a dust mask for this step. -
Wedge the color in:
Thoroughly wedge the stained clay until the color is completely uniform and streak-free. This creates your ‘pumpkin’ colored clay body. -
Stack the clays:
Form both the plain white clay and the orange clay into thick logs. Slice them lengthwise and reassemble them, sandwiching alternating layers of white and orange together. -
Light wedging:
This is the critical moment: wedge the combined lump only 3 to 5 times. You want to twist the colors together without blending them into a single muddy hue. Stop while the distinct stripes remain visible.
Step 2: Throwing on the Wheel
-
Center carefully:
Place the marbled ball on the wheel head. Center the clay using steady but gentle pressure. Avoid pushing the clay up and down (coning) too many times, as this will over-mix the marbling pattern. -
Open the form:
Open the clay to a wide, shallow curve suitable for a serving bowl. Use a broad, flat bottom to maximize the visible surface area for the swirl pattern. -
Pull the walls:
Gently pull the walls outward and upward. As you pull, clear the slip (slurry) off the surface often with a rib tool to reveal the distinct swirls hiding beneath the muddy surface. -
Shape the rim:
Use a soft leather chamois or your sponge to compress and round the rim. This gives the bowl a professional finish and prevents sharp edges after firing. -
Refine the interior:
Run a flexible metal or rubber rib across the interior curve one last time to remove finger ridges and make the marble pattern crisp and clean. -
Wire off:
Run your wire cutter underneath the pot and carefully transfer the bat or bowl to a drying shelf. Let it dry slowly to leather-hard consistency.
Muddy colors?
If the swirls are turning brown or disappearing, you likely over-wedged or over-worked the clay on the wheel. Try wedging less next time and center the clay faster.
Step 3: Finishing and Glazing
-
Trim the foot:
Once leather hard, center the bowl upside down on the wheel. Trim away excess clay to create a neat foot ring. The trimming process will reveal beautiful agate-like patterns on the exterior as well. -
Bisque fire:
Allow the bowl to become bone dry, which may take several days depending on humidity. Load it into the kiln for a bisque firing (usually Cone 04). -
Apply clear glaze:
Wipe the bisqued piece with a damp sponge to remove dust. I find that dipping or pouring a clear, food-safe glaze works best here to highlight the clay colors without obscuring them. -
Wipe the foot:
Use a sponge to clean any glaze off the foot ring to prevent the bowl from sticking to the kiln shelf. -
Glaze fire:
Fire the piece to maturity (Cone 5 or 6 depending on your clay body). Let the kiln cool completely before unloading.
Add Texture
Before the clay dries, leave the exterior unglazed (raw clay) but add specks of grog or sand to the white clay body for a speckled, organic stone look.
Now perfectly food-safe, your pumpkin swirl bowl is ready to hold warm soups or seasonal treats
Oak Leaf Napkin Rings for a Fall Table
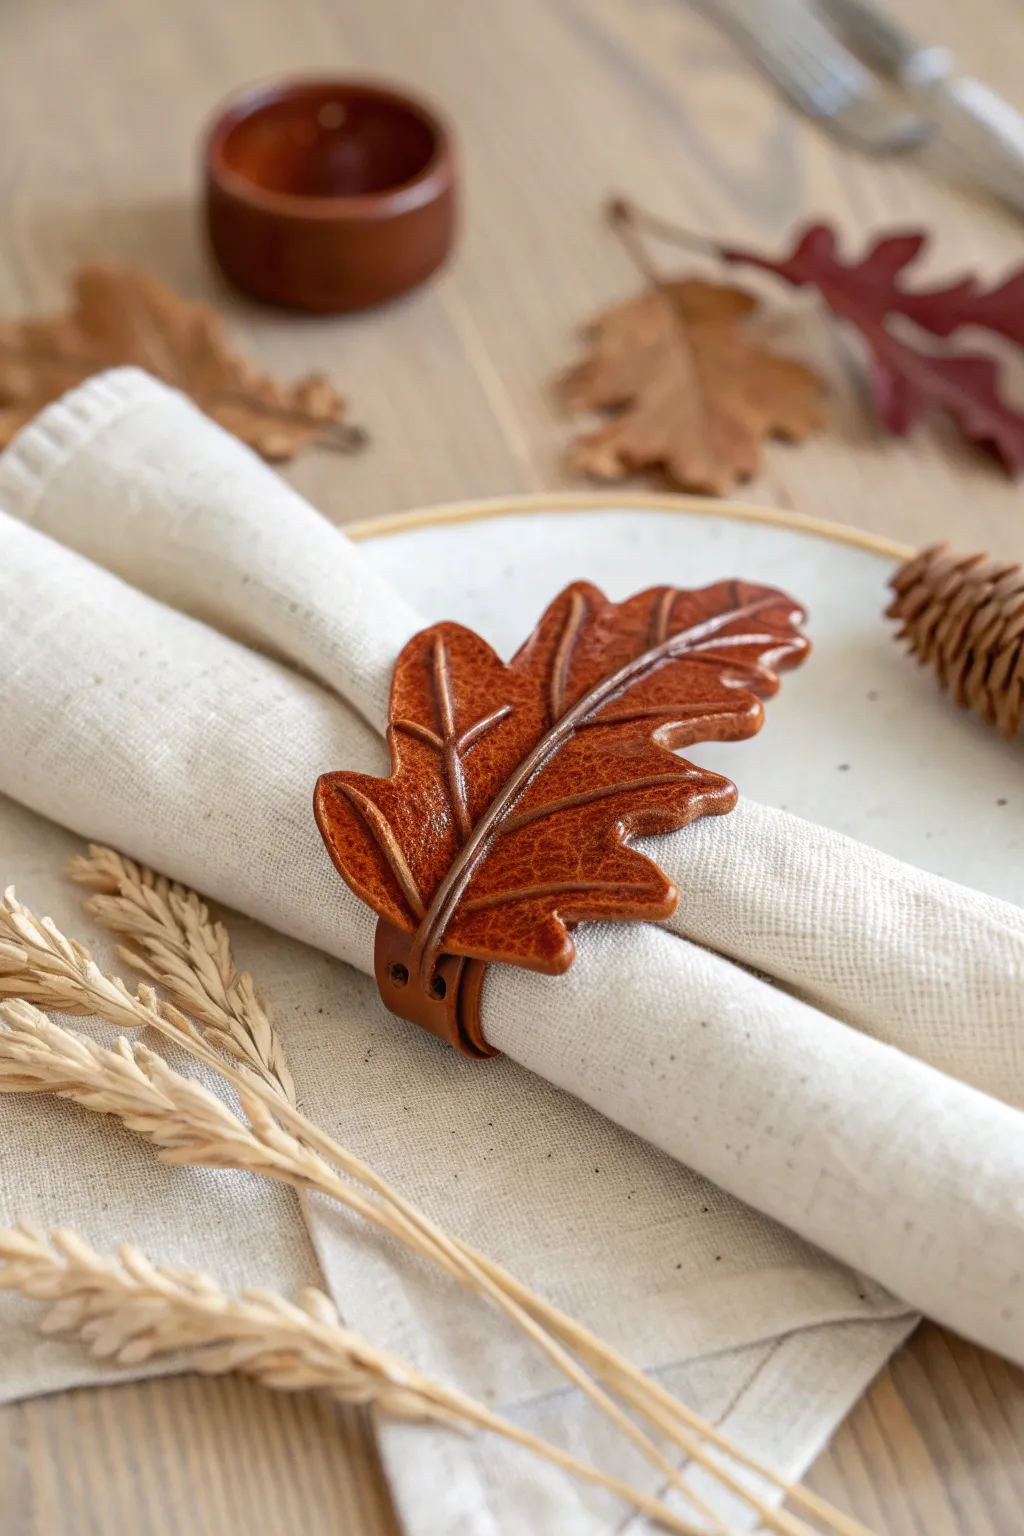
Bring the warmth of autumn to your dining table with these stunningly realistic oak leaf napkin rings crafted from clay. The detailed texturing and rich, glazed finish give them the sophisticated look of hand-tooled leather without the complex leatherworking tools.
Step-by-Step Tutorial
Materials
- Polymer clay (terracotta or reddish-brown color)
- Small rolling pin
- Oak leaf cookie cutter or printed template
- X-Acto knife or craft blade
- Needle tool or toothpick
- Small ball stylus tool
- Coarse sandpaper or texture mat (faux leather)
- Brown acrylic paint (burnt umber)
- Paper towels or soft rag
- Gloss or semi-gloss clay varnish
- Empty paper towel tube or rolling pin (for shaping)
- Super glue or liquid clay
- Paintbrush
Step 1: Shaping the Clay
-
Condition the Clay:
Start by kneading your reddish-brown polymer clay until it is soft, pliable, and free of air bubbles. -
Roll it Out:
Roll the clay into an even sheet, approximately 1/4 inch thick. You want it sturdy enough to hold its shape but not overly bulky. -
Add Leather Texture:
Before cutting, press a piece of coarse sandpaper or a leather texture mat firmly into the clay surface. This creates that authentic, pebbled grain look visible in the photo. -
Cut the Leaf Shape:
Place your oak leaf cutter or paper template onto the textured clay. Cut out the shape cleanly. If using a knife, keep the blade vertical for crisp edges. -
Create the Ring Band:
From the remaining clay, cut a strip about 3/4 inch wide and 4 inches long. Texture this strip to match the leaf.
Fix Cracking Clay
If your clay cracks while wrapping it around the tube, apply a tiny drop of baby oil to the crack and smooth it out with your finger before baking.
Step 2: Detailing and Veining
-
Score the Central Vein:
Using a blunt tool or the back of your knife, gently impress a central line running from the stem to the tip of the leaf. Don’t cut through; just indent. -
Add Side Veins:
Create branching veins extending from the center line to the lobes of the leaf. Pressing slightly firmer at the start of the vein creates depth. -
Refine the Edges:
Use your finger to gently soften the cut edges of the leaf and the band so they look worn and finished rather than sharp and blocky. -
Raised Vein Detail:
To mimic the ‘tooled’ look, roll very thin snakes of clay. Place them directly over your indented vein lines. -
Blend the Veins:
Use a small ball stylus or your finger to smooth these thin clay snakes onto the leaf surface, making them look like raised embossments rather than separate pieces.
Step 3: Forming and Baking
-
Form the Ring:
Take your textured clay strip and wrap it around a cardboard tube (like a paper towel roll) to create a circle. Overlap the ends slightly and press them together firmly to seal the ring. -
Attach the Leaf:
Place a small dab of liquid clay or scratch the surface of the ring where the leaf will sit. Press the leaf onto the ring, curving the leaf slightly to match the rounded shape. -
Curve the Edges:
I like to gently lift and twist the tips of the leaf lobes upward slightly while it’s on the tube, giving it a natural, dried-leaf movement. -
Bake:
Bake the assembly according to your polymer clay package instructions (usually 275°F for 15-30 minutes). Keep it on the cardboard tube to maintain the round shape. -
Cool Down:
Allow the piece to cool completely before removing it from the form.
Golden Hour Glow
Mix a tiny amount of gold mica powder or metallic gold paint into your varnish for a subtle, shimmering finish that catches candlelight beautifully.
Step 4: Finishing the Look
-
Apply Antiquing Wash:
Dilute burnt umber acrylic paint with a little water. Brush this wash over the entire leaf, making sure it gets into the texture crevices and around the veins. -
Wipe Back:
Immediately wipe the surface with a damp paper towel or rag. The dark paint will stay in the low spots and texture grain, highlighting the ‘leather’ effect. -
Dry and Seal:
Let the paint dry fully. finally, apply a coat of semi-gloss varnish to simulate the sheen of polished leather.
Set your table with these rings and some dried wheat for a truly cozy autumnal gathering
Harvest Wreath Accents With Clay Leaves and Berries
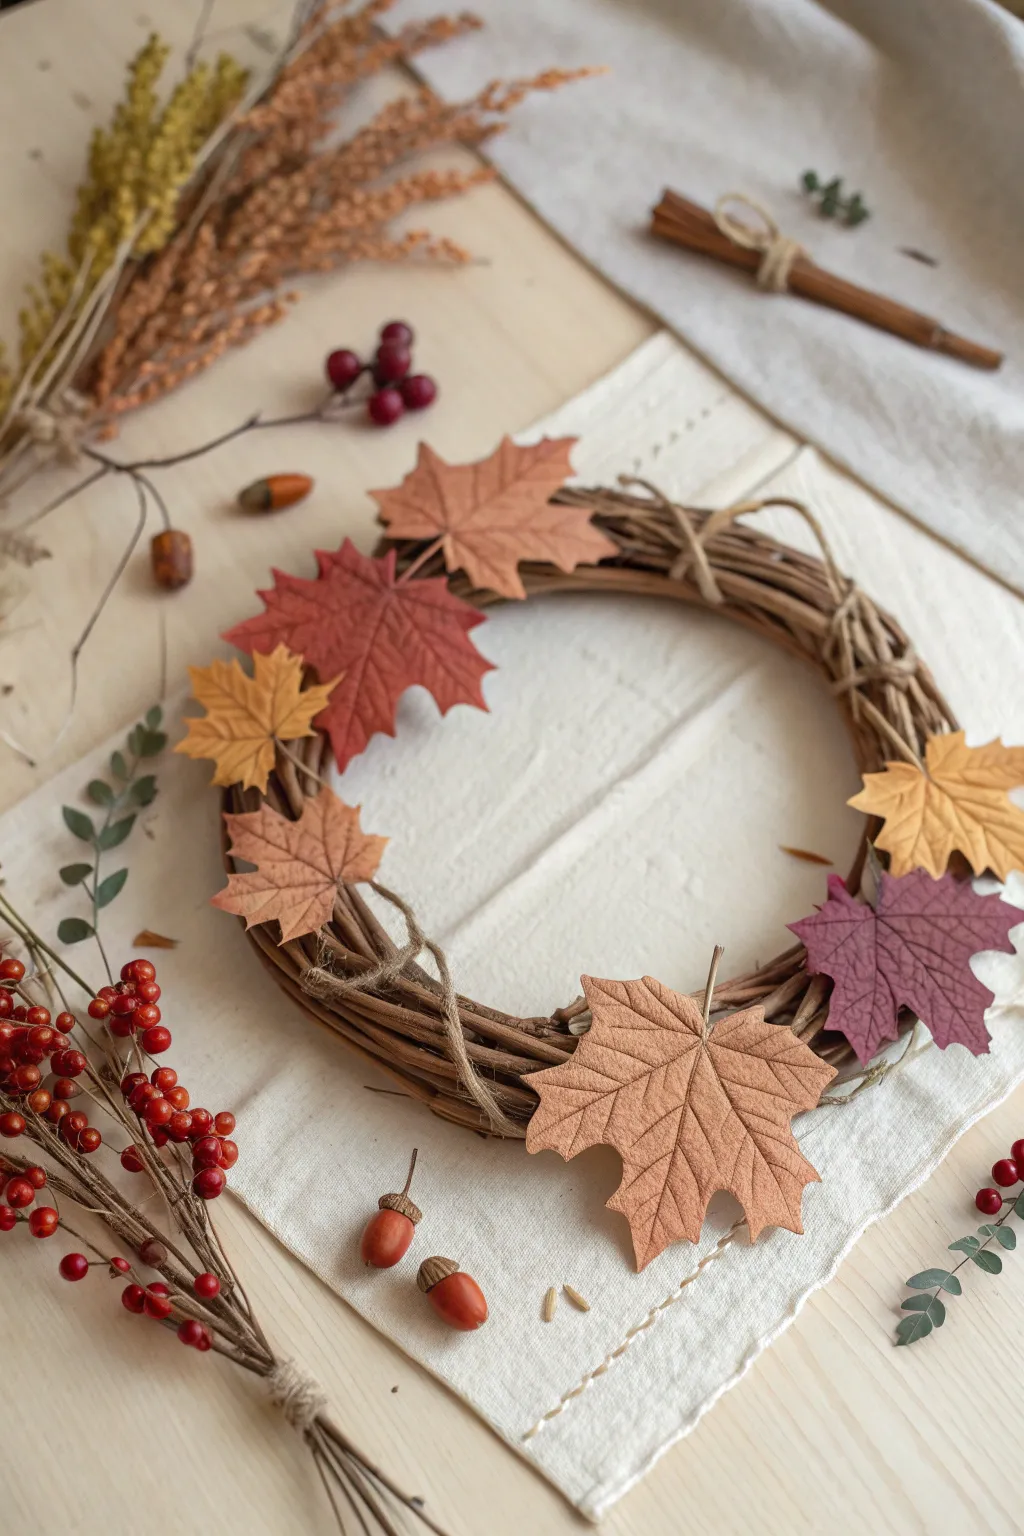
Bring the rich, warm hues of autumn indoors with this charming grapevine wreath adorned with handcrafted clay maple leaves. The detailed texture and natural color palette make this a timeless piece of decor perfect for celebrating the harvest season.
Detailed Instructions
Materials
- Grapevine wreath form (approx. 10-12 inches)
- Polymer clay in fall colors: burnt orange, maroon, ochre, deep purple, and beige
- Rolling pin or pasta machine
- Leaf-shaped cookie cutters (maple leaf style in various sizes) or exacto knife
- Real maple leaf (for texturing) or a clay texture sheet
- Needle tool or toothpick
- Brown acrylic paint (optional, for antiquing)
- Small paintbrush
- Hot glue gun and glue sticks
- Matte varnish or sealant
- Baking sheet and parchment paper
- Thin crafting wire
Step 1: Crafting the Clay Leaves
-
Condition the clay:
Begin by kneading your polymer clay blocks until they are soft and pliable. I find that mixing a tiny bit of beige into the darker colors gives them a more natural, muted tone suitable for dried leaves. -
Roll out the clay:
Roll the clay out onto a clean work surface or parchment paper until it is about 1/8 inch thick. Aim for a consistent thickness so the leaves bake evenly. -
Cut the shapes:
Use your maple leaf cookie cutters to stamp out several leaf shapes in different colors. If you don’t have cutters, you can print a leaf template, place it over the clay, and carefully trace around it with an exacto knife. -
Add texture:
To create realistic veins, gently press a real leaf (vein-side down) onto your clay cutout and roll over it lightly. Alternatively, use a needle tool to hand-draw a central vein and branching side veins. -
Shape the edges:
Before baking, gently pinch or curl the tips of the leaves upward or downward. This slight movement removes the flat, manufactured look and mimics how real leaves dry. -
Create attachment holes:
Use a needle tool or toothpick to poke a small hole near the base of the stem on each leaf. This creates a spot to thread wire through later if you prefer wiring over gluing. -
Bake the leaves:
Arrange your leaves on a parchment-lined baking sheet. Bake according to the manufacturer’s instructions on your clay package (usually around 275°F for 15-30 minutes). -
Cool and inspect:
Allow the leaves to cool completely on the baking sheet. Once hard, handle them gently as thin clay can be brittle.
Texturing Shortcut
Don’t have a real leaf? Use a piece of coarse sandpaper or a crumpled ball of aluminum foil to press a subtle, organic texture onto the clay surface before cutting.
Step 2: Adding Details and Assembly
-
Enhance the veins:
For added depth, dilute a small amount of brown acrylic paint with water to create a wash. Brush it over the leaves, letting it settle into the vein crevices, then quickly wipe the surface clean with a paper towel. -
Seal the finish:
Apply a thin coat of matte varnish to each leaf to protect the clay and give it a finished, professional look without making it too glossy. -
Prepare the wreath base:
Lay your grapevine wreath flat. Identify any loose twigs or gaps you might want to cover with your decorations. -
Plan your arrangement:
Place your clay leaves onto the wreath without gluing them first. Try grouping two or three leaves together on the left side, and perhaps balancing it with a single large leaf on the bottom right. -
Attach the main leaves:
Using a hot glue gun, apply a dab of glue to the back of each leaf and press it firmly onto the grapevine branches. Hold for a few seconds until the glue sets. -
Wire for security:
If you are hanging this wreath on a moving door, reinforce the largest leaves by threading thin wire through the holes you made earlier and twisting it around a vine branch. -
Add berry accents:
If you have leftover clay, roll tiny balls of red clay to look like berries. Glue these in small clusters near the base of the leaves to add a pop of bright color. -
Final touches:
Check the wreath from all angles to ensure no large globs of glue are visible. Adjust any leaves slightly if needed before the glue fully hardens.
Level Up: Acorn Accents
Create clay acorns by rolling oval shapes in nutty brown clay. Glue real acorn caps onto the tops after baking for a mixed-media touch that adds authenticity.
Hang your new wreath on your front door or above the mantel to welcome the season with handmade charm
Pumpkin Planters for Tiny Succulents (Faux or Real)
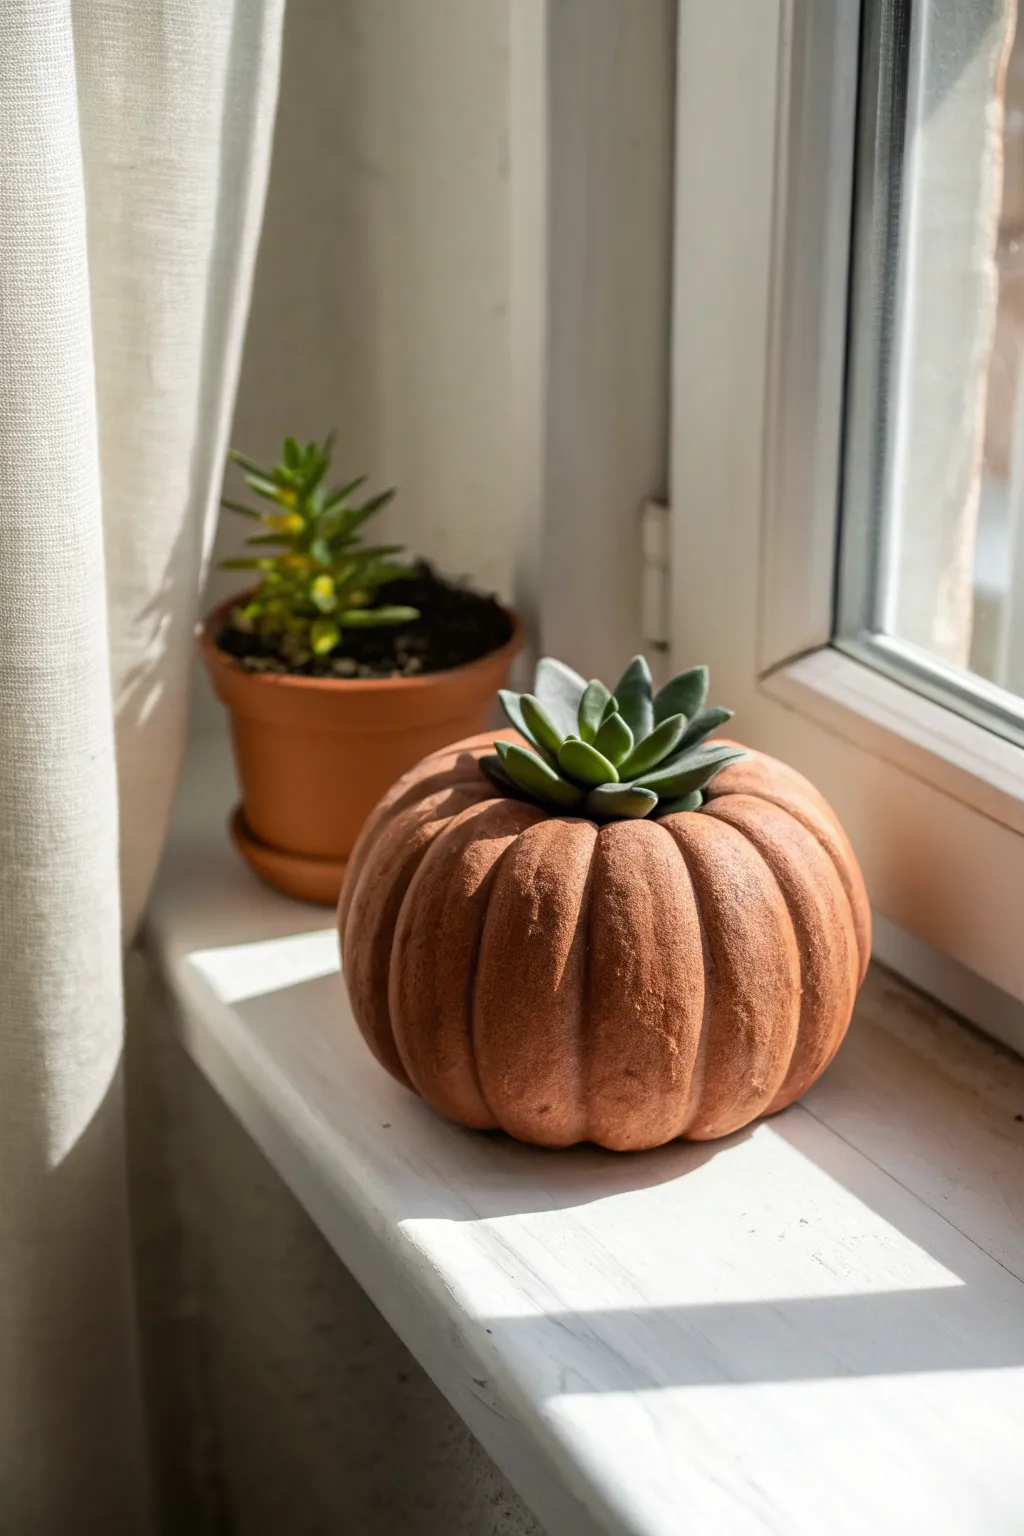
Bring a touch of harvest warmth to your windowsill with this charming DIY pumpkin planter. Molded with deep, realistic ridges and finished with a textured terracotta look, it’s the perfect cozy home for your favorite tiny succulent.
Step-by-Step
Materials
- Air-dry clay (terra cotta color or white)
- Small rolling pin
- Modeling tools (or a butter knife and spoon)
- Cookie cutter (round, approx. 4 inches) or a bowl to trace
- Texture sponge or old toothbrush
- Acrylic paint (burnt orange, raw sienna, burnt umber)
- Baking soda (for texture)
- Matte sealant spray
- Small succulent (real or faux)
Step 1: Shaping the Base
-
Prepare the Clay:
Start by conditioning your air-dry clay. Knead a generous handful until it’s soft, pliable, and free of cracks. If you’re using white clay, don’t worry about the color yet—we’ll paint it later. -
Form a Sphere:
Roll the clay into a smooth ball. For the size shown in the image, aim for a sphere roughly the size of a tennis ball or slightly larger. -
Create the Opening:
Using your thumb, press gently into the top center of the sphere to create a hollow. Widen this opening gradually by pinching the sides until you have a pot shape with thick walls. -
Smooth the Interior:
Use a little water on your finger to smooth out the inside walls. The interior doesn’t need to be perfect since it will be filled with soil or a faux plant insert.
Crack Control
If small cracks appear while drying, don’t panic. Mix a small amount of clay with water to make a paste, fill the crack, and smooth it over with a damp finger
Step 2: Sculpting the Pumpkin
-
Marking the Sections:
Take a modeling tool or the back of a butter knife and lightly mark vertical lines around the outside of the pot, dividing it into 8 to 10 equal sections. -
Defining the Lobes:
Press your tool deeper into these lines to create the pumpkin’s characteristic lobes. Rock the tool slightly back and forth to widen the grooves, making the sections puff out. -
Refining the Shape:
Use your fingers to round off each section, smoothing the edges of the grooves so they look organic rather than sharp cuts. The tops near the opening should curve inward slightly. -
Adding Texture:
To mimic the earthy look of real terracotta, gently dab a texture sponge or an old toothbrush over the entire exterior surface. This removes fingerprints and adds a natural, stone-like grain. -
Dry Time:
Set your pumpkin aside to dry completely. Depending on the humidity and clay thickness, this can take 24 to 48 hours. Turn it occasionally to ensure the bottom dries evenly.
Step 3: Faux Terracotta Finish
-
Mixing the Paint:
Mix burnt orange acrylic paint with a small touch of burnt umber to deepen the tone. To get that powdery, authentic clay feel, stir in a teaspoon of baking soda into your paint mix. -
Base Coat:
Apply a thick layer of your textured paint mixture all over the outside and the inner rim of the pumpkin. The baking soda will give it a gritty, matte finish as it dries. -
Adding Dimension:
While the base coat is still slightly tacky, I like to take a darker brown wash (watered-down paint) and run it specifically into the vertical grooves. -
Highlighting:
Once the wash is dry, use a dry brush with a lighter orange or raw sienna color. Lightly whisk it over the raised parts of the lobes to accentuate the roundness. -
Sealing the Work:
If you plan to use a real plant, seal the inside with waterproof varnish. For the outside, a matte spray sealant protects the paint without adding unwanted shine. -
Planting:
Once fully dry, nestle your succulent inside. The green foliage contrasting against the warm orange finish creates that beautiful autumnal look.
Level Up: Realistic Dust
After painting, lightly dust the finished piece with actual flour or white chalk pastel powder before sealing. It mimics the white bloom found on aged terracotta pots
Now you have a charming little pumpkin accent that brings the spirit of autumn indoors all year round
Stacked Gourd Totems as Cozy Shelf Sculptures
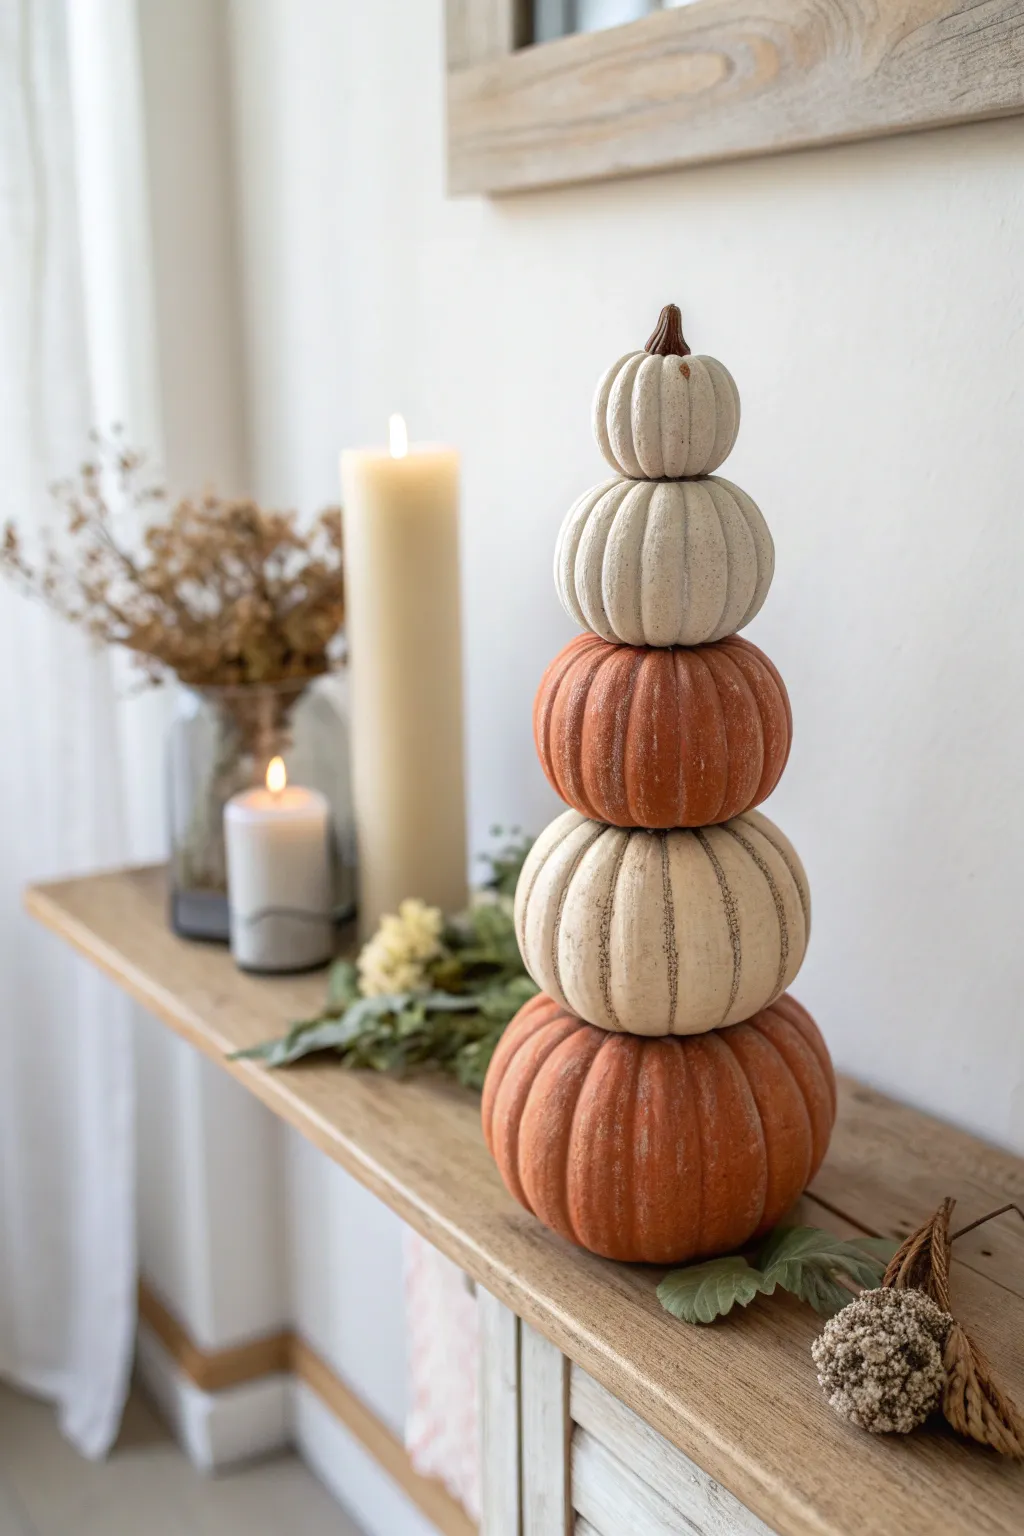
Bring the warmth of autumn indoors with this charming stack of handmade clay pumpkins, featuring alternating tones of burnt orange and creamy white. This rustic vertically-stacked sculpture creates a cozy focal point for mantels or shelves without taking up too much horizontal space.
How-To Guide
Materials
- Air-dry clay (white or terracotta)
- Acrylic paints (burnt orange, antique white/cream, dark brown)
- Wooden dowel or metal rod (approx. 10-12 inches)
- Sculpting tools (needle tool, rib tool)
- Aluminium foil
- Paintbrushes (flat shader and fine detail)
- Matte varnish or sealant
- Sponge or textured cloth
- Creating texture: an old toothbrush or stiff bristle brush
Step 1: Planning and Base Structure
-
Size the pumpkins:
Begin by dividing your clay into five portions, graduating in size from large to small. The bottom pumpkin should be the largest/heaviest to support the tower. -
Create foil cores:
To save clay and reduce weight, scrunch aluminium foil into five tight balls that correspond to your clay sizes. This internal armature helps the pumpkins dry more evenly. -
Cover with clay:
Roll each clay portion into a flat sheet about 1/4 inch thick. Wrap the clay completely around each foil ball, smoothing the seams together until you have five seamless spheres. -
Shape the gourds:
Gently press down on the top and bottom of each sphere to squash them slightly into a pumpkin donut shape. They should look a bit flattened, not perfectly round.
Natural Texture Hack
Before the clay dries, gently press a real pumpkin stem or a piece of textured fabric onto the surface to create ultra-realistic organic patterns.
Step 2: Sculpting the Details
-
Carve vertical ribs:
Using a modeling tool or the back of a butter knife, press deep vertical lines from the center top to the center bottom of each pumpkin to create the classic ribbed sections. -
Soften the edges:
Use a damp sponge or your finger to smooth the edges of the ribs so they look organic and grown, rather than sharp and mechanical. -
Add surface texture:
I find that gently tapping the surface with a stiff-bristled brush or an old toothbrush gives that realistic, slightly pitted skin texture found on real gourds. -
Create the center holes:
While the clay is still wet, carefully push your wooden dowel through the vertical center of each pumpkin. Wiggle it slightly to ensure the hole is loose enough for assembly later. -
Sculpt the top stem:
For the smallest (top) pumpkin only, pinch a small amount of extra clay on top to form a twisted, organic stem. The other pumpkins don’t need stems since they will be stacked. -
Allow to dry:
Let all pieces dry completely according to package instructions. This usually takes 24-48 hours, flipping them occasionally for even airflow.
Step 3: Painting and Assembly
-
Base coat application:
Once dry, paint the first, third, and fifth (top) pumpkins in an antique white or cream color. Paint the second and fourth pumpkins a warm, burnt orange. -
Add depth wash:
Mix a very watery brown paint. Brush this into the deep crevices of the ribs on all pumpkins, then immediately wipe the surface with a rag. This leaves shadow in the grooves. -
Dry brushing:
Dip a dry brush into a lighter shade (white for the cream pumpkins, light yellow for the orange ones) and lightly dust the raised areas to highlight the texture. -
Detailing the stem:
Paint the stem on the top pumpkin a dark chocolate brown, blending it slightly down onto the top of the cream pumpkin for a natural transition. -
Sealing the work:
Coat each pumpkin with a matte varnish to protect the paint and give the clay a finished, high-quality look without looking plasticky. -
Final assembly:
Insert your dowel into a base (or simply use the weight of the bottom pumpkin). Thread the pumpkins onto the dowel from largest to smallest to complete your totem.
Level Up: Mossy Details
Glue small bits of dried preserved moss or faux lichen between the stacked layers to make the sculpture look like it was freshly picked from a garden patch.
Place your new pumpkin stack on a mantel next to a warm candle to enjoy the autumn vibes all season long
Woodland Story Scene: Tiny Pumpkins, Leaves, and Mushrooms
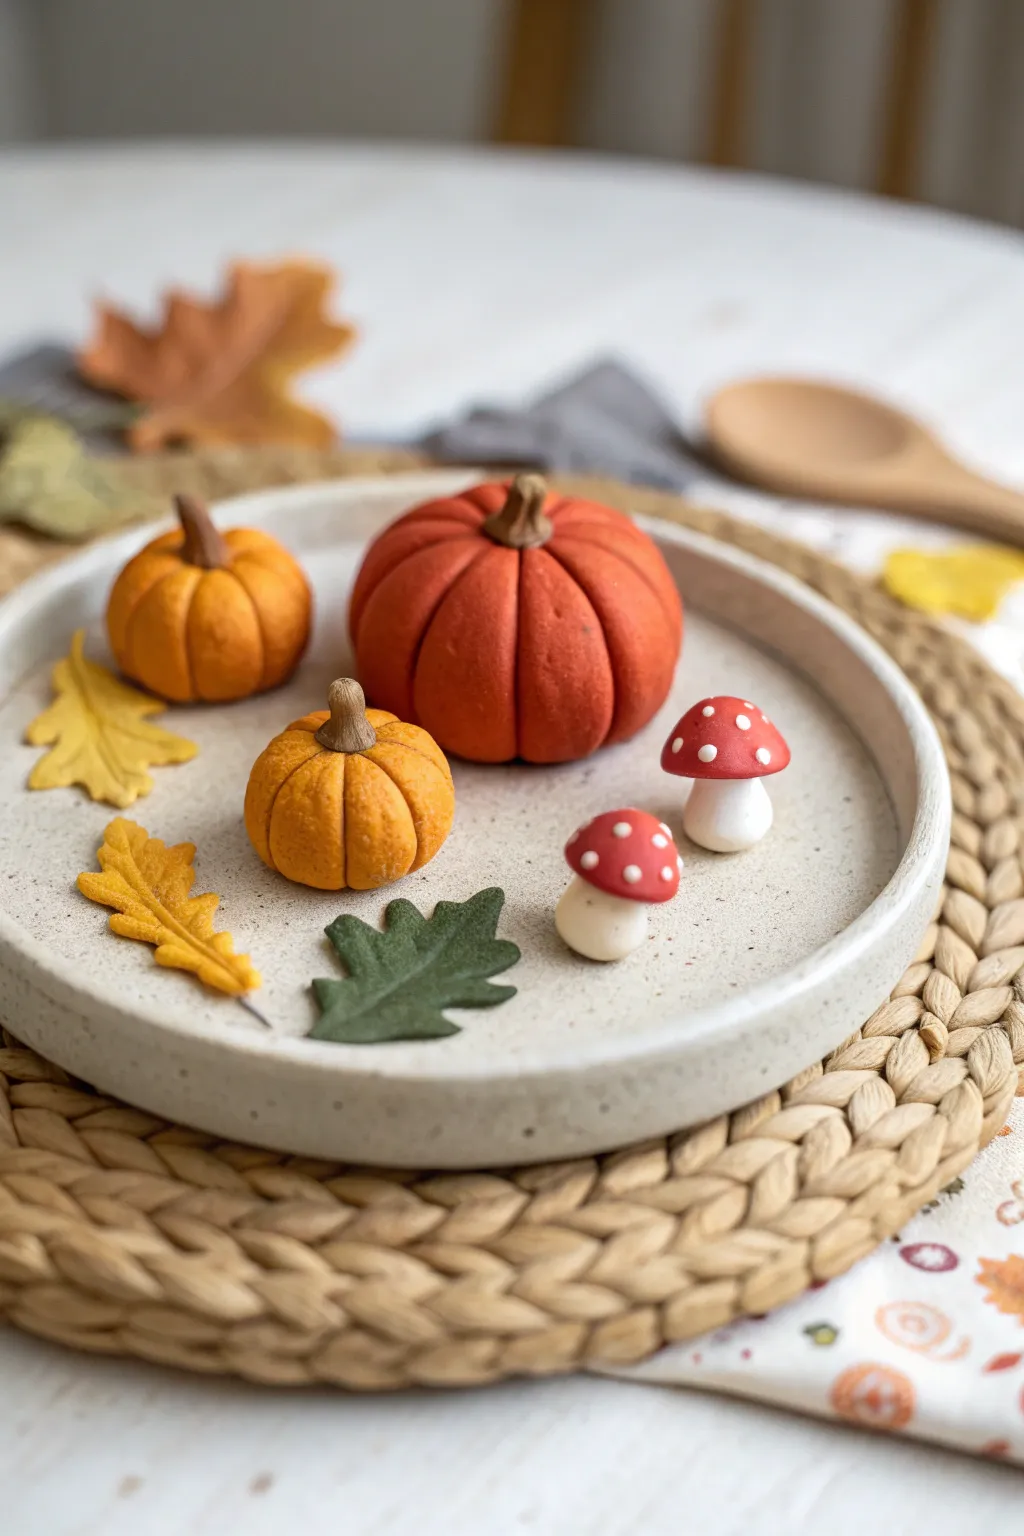
This charming autumn centerpiece brings the warmth of the season into miniature scale with tiny pumpkins, spotted toadstools, and fallen leaves arranged on a speckled clay plate. The matte, textured finish gives each piece a realistic, handcrafted look perfect for a seasonal display.
Detailed Instructions
Materials
- Polymer clay (terracotta orange, golden yellow, dark green, deep red, white, speckled beige)
- Clay sculpting tools (needle tool, ball stylus)
- Soft pastel chalks in brown and burnt orange
- Small paintbrush
- Circle cutter (approx. 4-5 inches diameter)
- Sandpaper or texture sponge
- Matte varnish
- Oven and baking sheet
Step 1: Sculpting the Dish Base
-
Roll the base:
Begin by conditioning the speckled beige clay until soft, then roll it out into a slab about 1/4 inch thick. Use your circle cutter to create a perfect round shape for the plate base. -
Form the rim:
Roll a long snake of the same speckled clay. Place it directly on top of the circle’s edge, blending the clay downwards on the outside and inside to fuse the rim seamlessly to the base. -
Add texture:
Before baking, gently press a piece of coarse sandpaper or a texture sponge over the surface of the plate to give it that authentic, stoneware finish. Bake the plate according to your clay package instructions and set aside to cool.
Texturing Trick
Use a crumpled ball of aluminum foil to gently tap freshly sculpted clay. This creates a realistic ‘rind’ texture instantly and hides fingerprints.
Step 2: Crafting the Pumpkins
-
Mix pumpkin colors:
Prepare your pumpkin shades. Use pure terracotta for the large pumpkin, and mix golden yellow with a touch of orange for the two smaller ones to create variety. -
Shape the spheres:
Roll three balls of clay corresponding to the sizes you want. Start by slightly flattening the top and bottom of each ball so they sit steadily. -
Create the ribs:
Take a needle tool or the dull side of a blade and press vertical indentations from the center top to the bottom of each pumpkin. Rock the tool slightly to widen the grooves for a plump look. -
Add shading:
Shave a little brown pastel chalk into a powder. Using a dry brush, dust the powder into the vertical grooves you just created; I find this adds incredible depth and realism to the miniature gourds. -
Attach the stems:
Form tiny, tapered snakes from brown clay. Attach these to the center of each pumpkin, using a needle tool to drag the clay from the stem down into the pumpkin body for a secure bond. -
Texture the surface:
Gently tap the surface of the pumpkins with a stiff toothbrush or texture sponge to remove fingerprints and mimic organic skin.
Uneven Baking?
If your pumpkins scorch, tent a piece of aluminum foil over the baking tray to protect the colors while ensuring the thick centers cure fully.
Step 3: Making Mushrooms & Leaves
-
Shape the mushroom stems:
Roll two small pieces of white clay into thick, squat cylinders. Press the bottoms gently so they stand upright. -
Form the caps:
Roll balls of red clay, flatten the bottoms, and gently dome the tops. Press these onto your white stems. -
Add the dots:
Roll extremely tiny specks of white clay. Press them gently onto the red caps, making sure not to flatten the curvature of the mushroom while attaching them. -
Cut the clay leaves:
Roll out thin sheets of yellow, golden, and green clay. Use a craft knife to cut out jagged oak leaf shapes, keeping them roughly proportional to your pumpkins. -
Detail the veins:
Use your needle tool to carefully score a central vein and branching side veins into each leaf. Lift the edges slightly to make them look crisp and dry. -
Final arrangement:
Arrange the unbaked pumpkins, mushrooms, and leaves onto the previously baked plate (or bake them separately on a tile if you prefer to glue them later). Bake the elements according to package directions.
Once cooled, arrange your tiny woodland scene on the table for a dash of autumn charm