Every Father’s Day, I reach for clay because it turns a tiny moment in time into something Dad can actually use every day. These ideas are sweet, doable, and made for real life—think handprints, simple stamps, and functional pieces that live on a desk or dresser.
Thumbprint Heart Keychain
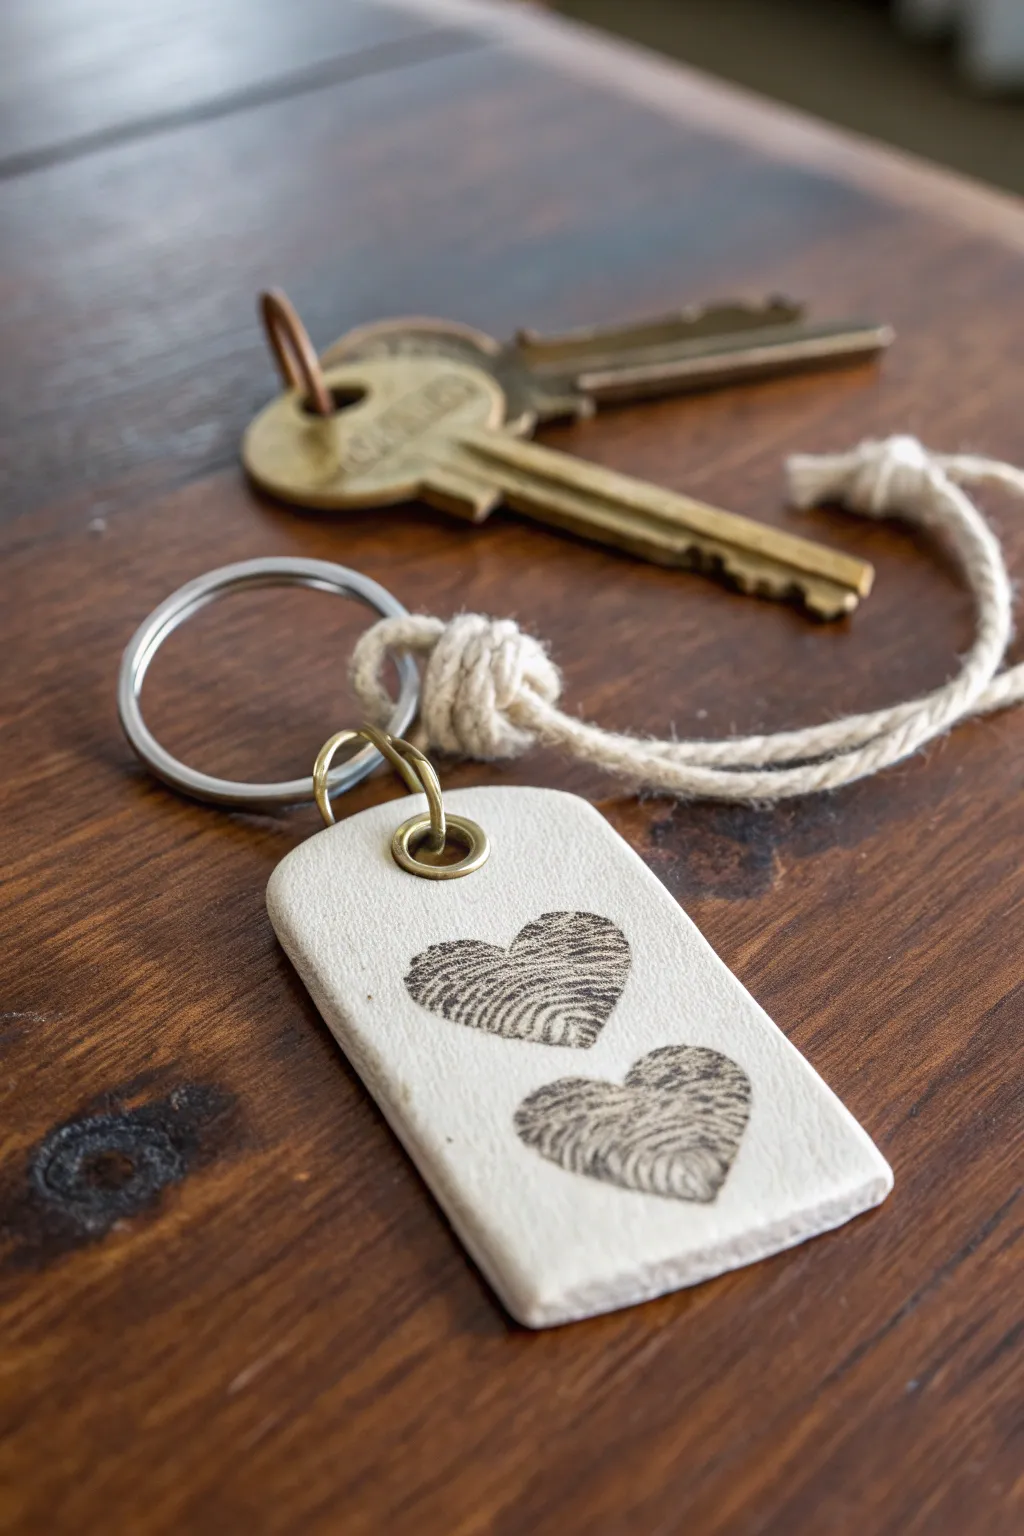
Capture a moment in time for Dad with this minimalist and touching keychain. Made from simple white clay and stamped with two sweet thumbprints forming heart shapes, it’s a practical gift that carries a lot of sentimental weight.
Step-by-Step
Materials
- White polymer clay or air-dry clay (smooth texture)
- Black stamp pad or black acrylic paint
- Rolling pin or smooth glass jar
- Craft knife or rectangular cookie cutter
- Small eyelet grommet (bronze or gold tone)
- Eyelet setting tool
- Hole punch or straw
- Split ring keyring (silver tone)
- Natural cotton twine or hemp cord
- Fine-grit sandpaper (optional)
- Spray sealant or matte varnish (optional)
Step 1: Shaping the Clay Base
-
Condition the Clay:
Start by kneading your white clay until it is soft, pliable, and free of air bubbles. If you are using polymer clay, warmth from your hands will make this easier. -
Roll It Out:
Roll the clay out on a smooth work surface to a consistent thickness of about 1/4 inch (6mm). You want it sturdy enough to withstand daily pocket use but not too bulky. -
Cut the Shape:
Using a craft knife and a straight edge (or a specific rectangular cutter), cut a rectangle approximately 1.5 inches wide by 2.5 inches tall. I like to gently tap the edges inward with my finger to soften the sharp cut lines. -
Smooth the Edges:
Dip your finger in a tiny bit of water (for air-dry clay) or baby oil (for polymer clay) and run it along the cut edges to round them off slightly. This prevents chipping later. -
Punch the Hole:
Using a straw or a small circular cutter, punch a hole centered near the top edge of the rectangle. Ensure the hole is slightly larger than your eyelet grommet to account for any shrinkage during drying.
Step 2: Creating the Prints
-
Prepare the Ink:
Open your black stamp pad. Press your own thumb or the child’s thumb firmly onto the pad to get a solid, even coating of ink. -
Practice First:
Before touching the clay, make a few test prints on a scrap piece of paper to figure out the right angle and pressure for a clear heart shape. Two thumbprints angled toward each other at the bottom create the heart. -
Stamp the First Heart:
Carefully press the inked thumb onto the clay at a 45-degree angle. Lift straight up. Re-ink, then press again at the opposite angle so the bottoms touch, forming the top heart. -
Add the Second Heart:
Repeat the process just below the first heart to create a second one. You can use a smaller thumbprint here if representing a child, or keep them uniform. -
Clean Up:
If any stray ink landed where it shouldn’t, carefully scrape it away with the tip of your craft knife or wipe it gently with a damp q-tip.
Smudged Prints?
If the ink smudges on raw clay, don’t panic! For polymer clay, wipe it off with a bit of rubbing alcohol. For air-dry clay, scrape the very top layer off gently with a blade.
Step 3: Finishing and Assembly
-
Dry or Bake:
If using polymer clay, bake according to the package instructions (usually 275°F for 15-30 minutes). If using air-dry clay, let it sit in a dry, cool spot for 24-48 hours until completely hard. -
Sand for Perfection:
Once fully cured, use fine-grit sandpaper to lightly smooth the edges or back of the tag if there are any rough spots. -
Seal the Design:
To protect the ink from rubbing off over time, give the tag a light coat of matte spray sealant or varnish. Avoid heavy brushing, which might smear the ink. -
Install the Eyelet:
Place your metal eyelet into the top hole. Use an eyelet setting tool to secure it tightly. This adds a professional finish and protects the clay from rope friction. -
Add the Jump Ring:
Attach a small metal jump ring through the eyelet. This acts as the bridge between your clay piece and the keyring. -
Tie the Knot:
Cut a 6-inch piece of cotton twine. Fold it in half, push the loop through the jump ring, and pull the tails through the loop to create a lark’s head knot. -
Secure the decorative knot:
Tie a hefty overhand knot with the two tails about an inch away from the lark’s head knot to create the decorative rope handle shown in the photo. -
Final Assembly:
Finally, attach the large split ring to the jump ring. Your custom keepsake is now ready for keys.
Make it Personal
Before baking, use a needle tool or small alphabet stamps to impress a date, initials, or ‘dad’ onto the back of the keychain for an extra hidden message.
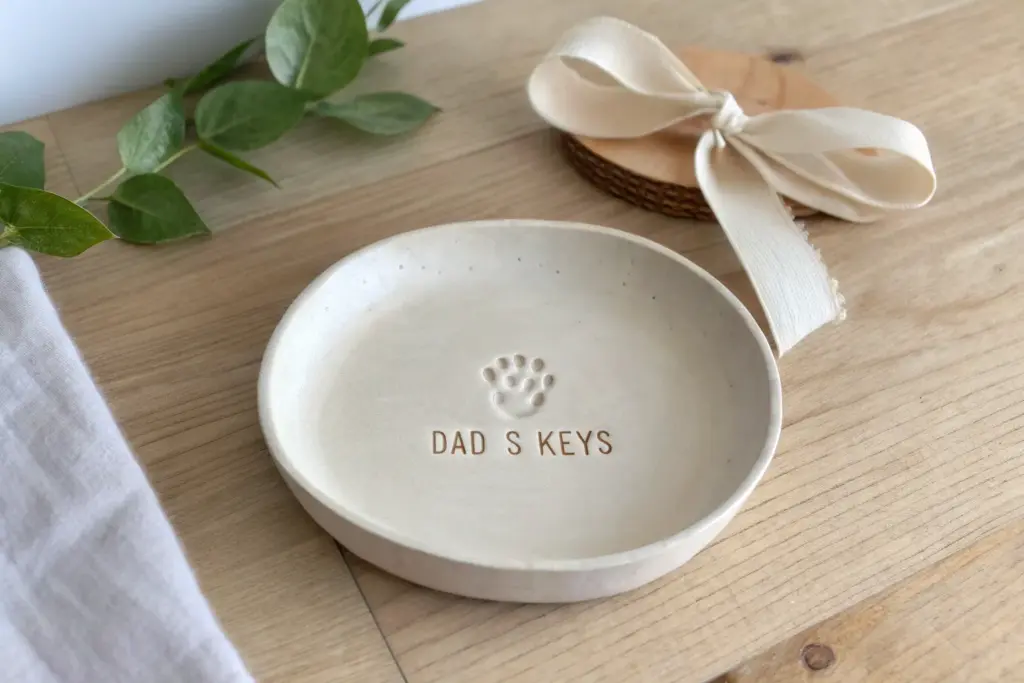
This meaningful little tag is ready to remind him of your love every time he reaches for his keys


Best Dad Paperweight
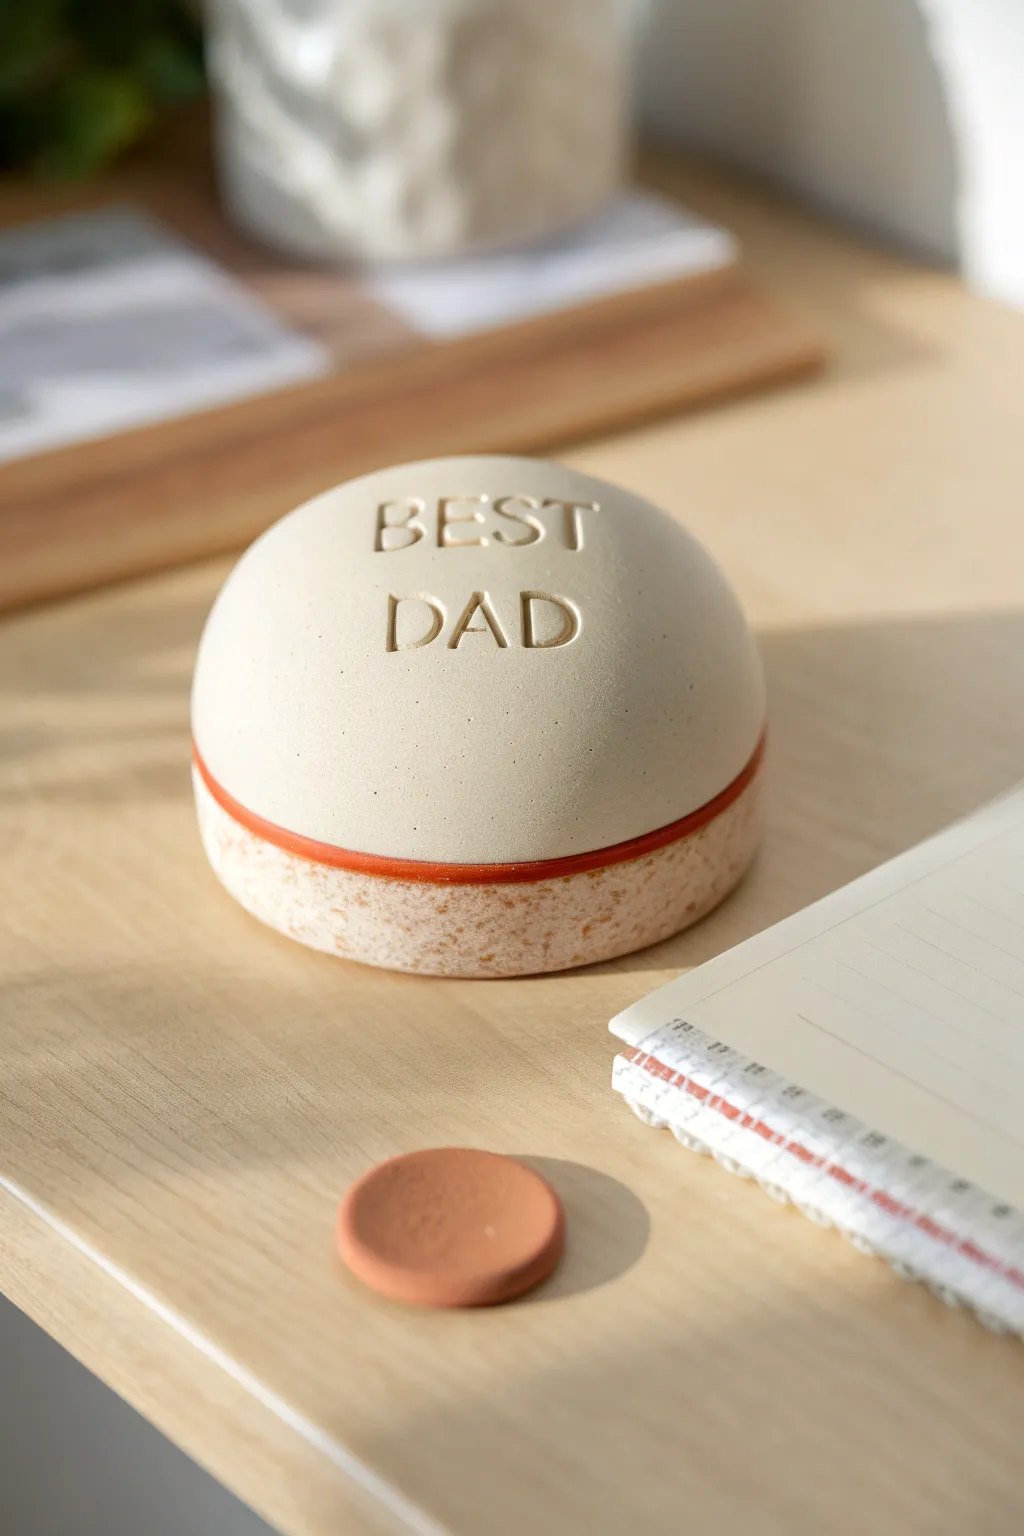
Create a sophisticated and practical gift for Father’s Day with this two-tone round paperweight. Its smooth, stone-like finish and crisp stamped lettering give it a professional look that fits perfectly on any office desk.
Detailed Instructions
Materials
- White air-dry clay (smooth texture)
- Speckled or granite-effect clay (or mix coarse sand into beige clay)
- Alphabet stamp set (serif font preferred)
- Small rolling pin
- Round cookie cutter (approx. 3-4 inches)
- Terracotta or burnt orange acrylic paint
- Fine detail paintbrush
- Medium-grit sandpaper
- Fine-grit sandpaper (400+ grit)
- Clear matte varnish or sealant
- Bowl of water
- Knife or clay blending tool
Step 1: Forming the Base
-
Prepare the speckled clay:
Start by conditioning your speckled or granite-effect clay until it’s pliable. If you don’t have pre-made stone effect clay, knead a small amount of coarse sand or brown craft glitter into beige clay to mimic the texture seen in the photo. -
Roll the base slab:
Roll this clay out into a thick slab, approximately 1/2 inch to 3/4 inch high. Aim for a consistent thickness. -
Cut the circle:
Use your round cookie cutter to punch out a perfect circle. Keep the cutter in place for a moment to help maintain the vertical edges. -
Smooth the edges:
Remove the cutter and gently tap down any sharp clay ridges with your finger dipped in a little water.
Uneven Seams?
If the gap between the base and dome looks messy, roll a very thin ‘snake’ of clay, press it into the seam, and smooth it out with a damp finger before painting.
Step 2: Creating the Dome
-
Shape the white clay:
Take a larger ball of smooth white air-dry clay. Roll it in your palms until it is completely crack-free. -
Create the hemisphere:
Gently press the ball onto a flat surface to flatten the bottom, while cupping your hands over the top to maintain a perfect dome shape. It needs to match the diameter of your base circle exactly. -
Check the fit:
Place the white dome on top of the speckled base. If the dome overhangs or is too small, reshape it now while the clay is still workable. -
Score and slip:
Use a needle tool or knife to scratch cross-hatch marks on the top of the base and the bottom of the dome. Apply a little water or liquid clay (slip) to these roughed-up areas. -
Join the pieces:
Press the dome firmly onto the base. Use your finger to smooth the seam slightly, ensuring they are bonded, but try to keep a slight visual distinction between the two distinct layers.
Make it Functional
Embed a strong magnet inside the clay dome before attaching the base to turn this paperweight into a handy desktop paperclip holder.
Step 3: Stamping and Refining
-
Position the stamps:
Select the letters for ‘BEST DAD’. Before pressing into the clay, line them up gently on the surface to ensure your spacing is centered. -
Impress the text:
Press the stamps firmly into the center of the dome. I find rocking the stamp very slightly helps get a clean, deep impression of the serifs. -
Initial drying:
Let the paperweight dry completely. This can take 24-48 hours depending on humidity. Rotate it occasionally so the bottom dries evenly. -
Sand for perfection:
Once fully cured, use medium-grit sandpaper to smooth out any bumps on the dome. Switch to fine-grit sandpaper to give the white clay a satin-smooth finish.
Step 4: Adding Color
-
Mix the accent color:
Prepare a terracotta or burnt orange acrylic paint. You want a warm, earthy tone that contrasts with the pale stone colors. -
Paint the dividing line:
Using a fine detail brush, paint a thin, consistent stripe exactly where the white dome meets the speckled base. You can use masking tape if you have a shaky hand, but a freehand organic line looks great too. -
Fill the letters:
The image shows the letters strictly embossed without ink, but if you want them to pop, you could do a very subtle wash here. Otherwise, leave them raw for that minimalist look. -
Seal the piece:
Apply two coats of clear matte varnish to protect the clay from moisture and stains, letting it dry fully between coats.
Place this handsome accessory on a stack of papers and admire your clean, architectural handiwork


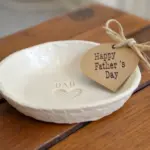
Photo Frame With Clay Imprint Border
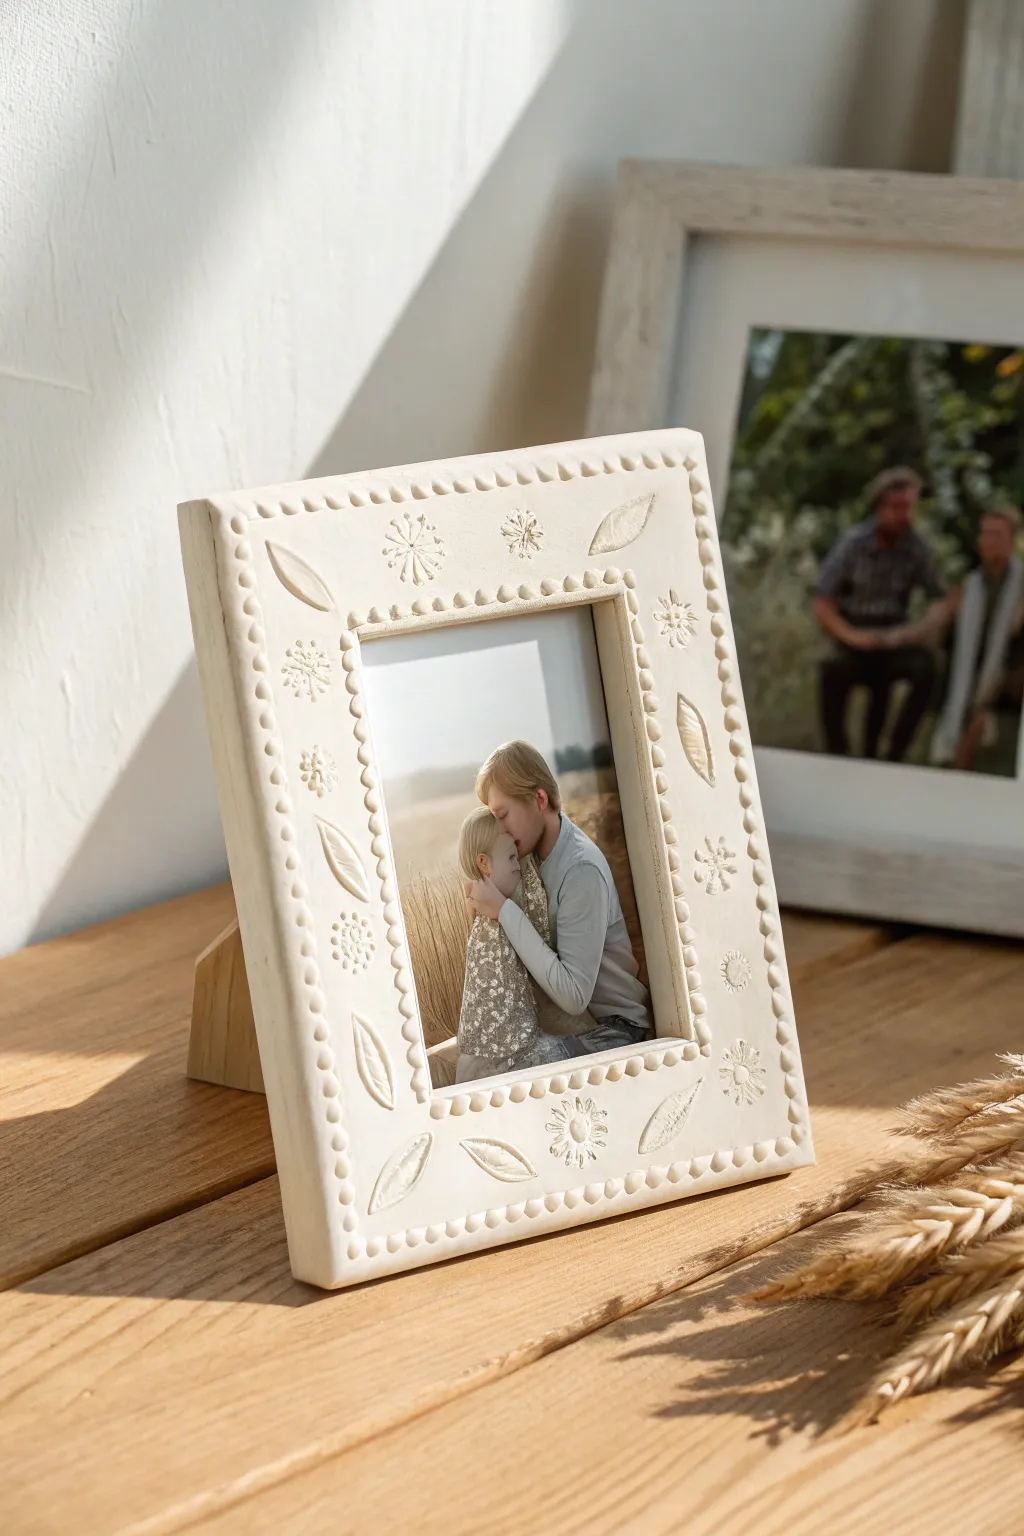
Capture the essence of spring with this elegant air-dry clay frame, featuring delicate floral imprints and a raised beaded border. Its creamy, matte finish gives it a timeless, handcrafted ceramic look perfect for Father’s Day.
Step-by-Step
Materials
- White air-dry clay (or polymer clay)
- Wooden rolling pin
- Sharp crafting knife or clay blade
- Wooden slats or rulers (for even thickness)
- Small wooden sculpting tools (ball stylus)
- Natural leaves (small, sturdy ones with good veins)
- Small flower stamp or textured button
- Strong craft glue
- Cardboard backing or a simple wooden frame base
- Fine grit sandpaper
- Clear matte acrylic sealer (optional)
- A small bowl of water
Step 1: Preparing the Base
-
Condition the clay:
Begin by kneading your white air-dry clay until it is warm, pliable, and free of cracks. If it feels too dry, dip your fingers in a little water and work it in. -
Roll out a slab:
Place your clay between two wooden slats or rulers (about 5-7mm thick) on your work surface. Roll the clay out into a smooth, even slab. This ensures your frame won’t be lumpy or uneven. -
Cut the frame shape:
Using a template or ruler, cut out a large rectangle for the frame’s outer edge. Then, carefully cut a smaller rectangle from the center to create the window for the photograph. I like to keep the removed center piece to test my stamps on first. -
Smooth the edges:
Dip your finger in water and gently run it along the cut edges—both inside and outside—to smooth away any sharp corners or clay burrs.
Step 2: Creating the Decorative Details
-
Prepare the beaded trim:
Roll thin snakes of clay, roughly 3-4mm in diameter. You will need enough length to go around the entire outer perimeter and the inner window perimeter. -
Attach the trim:
Score the edges of your main frame lightly with a needle tool and drag a wet finger over it to create ‘slip’. Press the clay snakes gently onto these edges. -
Texture the trim:
Use a ball-tipped tool or the back of a thin paintbrush to press small indentations into the clay snakes at regular intervals. This creates the charming beaded look without having to roll individual tiny balls. -
Imprint the leaves:
Select small, vein-heavy leaves. Press them firmly into the flat surface of the frame at angles, alternating the direction for a natural flow. Gently peel them back to reveal the impression. -
Stamp floral accents:
Use a small flower stamp, a textured button, or even the end of a marker cap to press circular floral motifs into the empty spaces between the leaf imprints. -
Refine the surface:
Inspect your work for any accidental fingerprints. Lightly brush them away with a damp soft brush or your finger.
Stamp Sourcing Tip
Don’t have stamps? Look for vintage buttons, old jewelry, or even pasta shapes. Pressing these into scrap clay often yields surprisingly beautiful textures.
Step 3: Finishing Touches
-
Let it dry:
Place the frame on a flat, breathable surface (like a wire rack covered with paper towel) to dry. This usually takes 24-48 hours depending on humidity. Rotate it occasionally to prevent warping. -
Sand for perfection:
Once fully dry and hard, use fine-grit sandpaper to gently smooth the outer edges or any rough spots on the back. -
Seal the work:
To protect the clay from moisture, apply a thin coat of clear matte acrylic sealer. This preserves the raw, bisque-like appearance seen in the photo. -
Add the backing:
Glue a sturdy piece of cardboard or wood to the back, leaving the top edge unglued so you can slide a photo in. Alternatively, glue a simple easel back stand to make it upright. -
Insert the memory:
Slide in your favorite photo of dad and enjoy your handmade creation.
Make it Antique
For an aged look, dilute brown acrylic paint with water. Brush it over the dried textured areas, then immediately wipe the surface with a damp cloth.
This charming frame will now stand as a lasting display for your most cherished family memories


Sports Ball Trinket Bowl
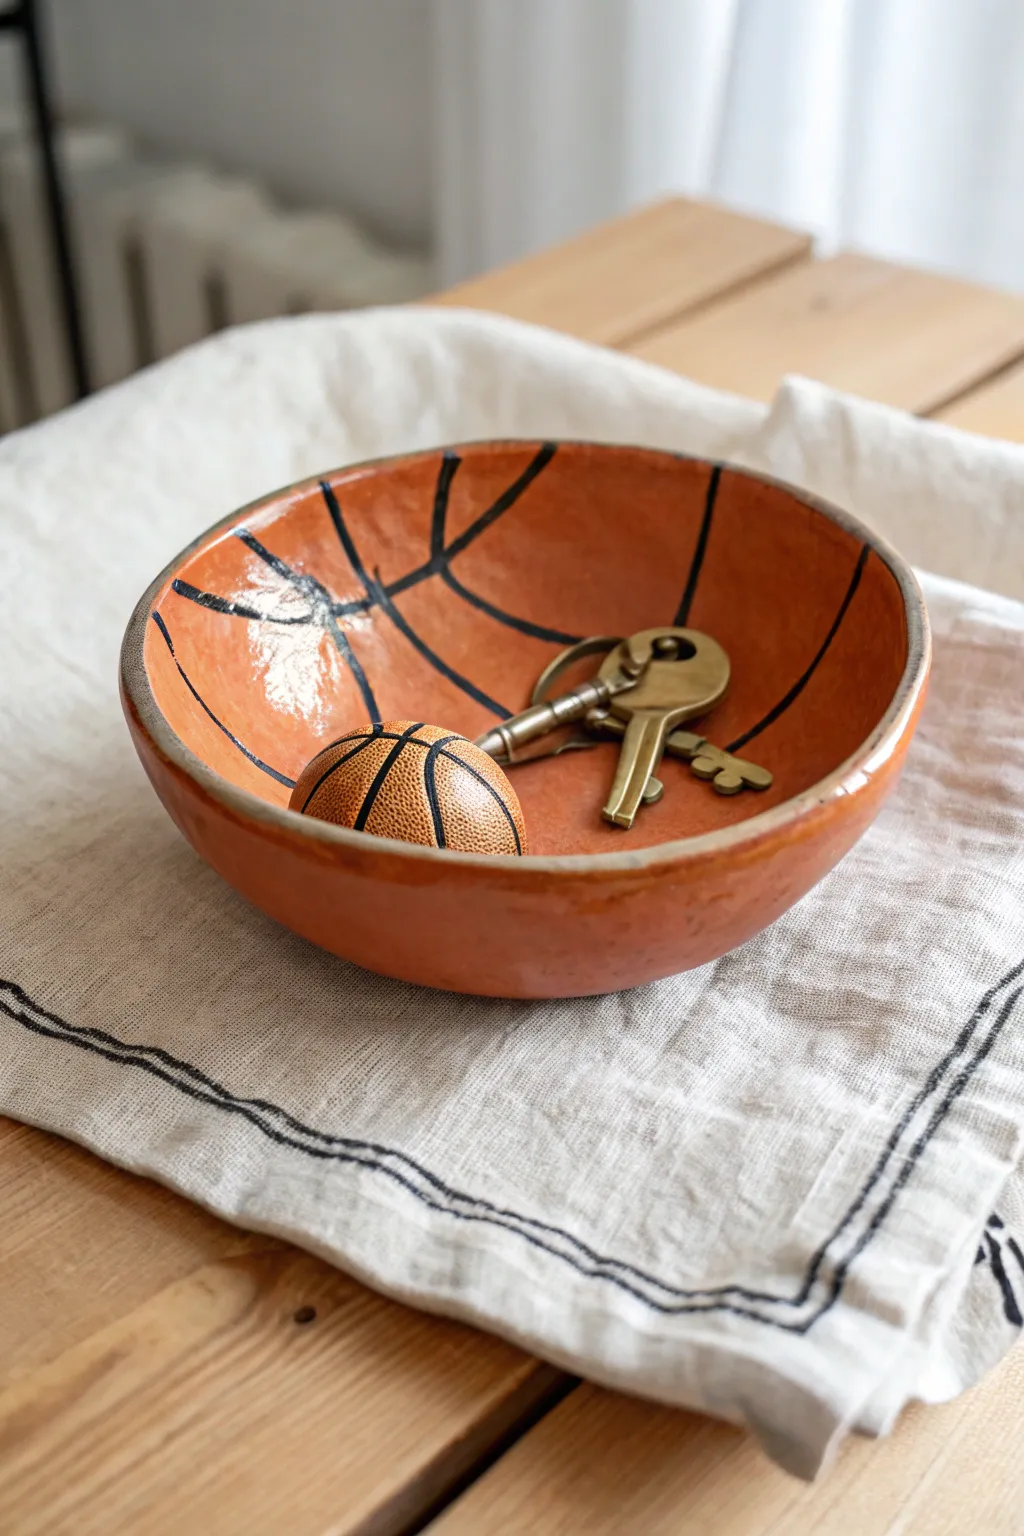
Score big points with Dad using this handmade clay catch-all bowl designed to look just like a classic basketball. With its rustic, hand-glazed finish and bold black lines, it’s the perfect spot for him to toss his keys and loose change after a game.
Step-by-Step Guide
Materials
- Air-dry clay or polymer clay (terracotta or white)
- Small mixing bowl (to use as a mold)
- Plastic wrap
- Rolling pin
- Sandpaper (medium and fine grit)
- Orange acrylic paint (burnt orange or terracotta shades)
- Black acrylic paint or black paint pen
- High-gloss varnish or glaze (Mod Podge Gloss works well)
- Paintbrushes (flat wide brush and thin liner brush)
- Knife or clay cutting tool
- Sponge
Step 1: Shaping the Bowl
-
Prepare your mold:
Select a small cereal or mixing bowl from your kitchen to use as a slump mold. Line the inside completely with plastic wrap, ensuring there are few wrinkles, to prevent the clay from sticking. -
Roll the clay:
Take a large chunk of your clay and knead it until it’s pliable. Roll it out on a flat surface to about a quarter-inch thickness. You want it sturdy enough to hold keys but not overly heavy. -
Form the shape:
Gently lift your clay slab and drape it inside your lined bowl. Press the clay firmly against the bottom and sides to take on the bowl’s curve. -
Trim the rim:
Using a knife or clay tool, trim the excess clay flush with the rim of your mold bowl to create a clean, even edge. -
Smooth the interior:
Dip your finger or a small sponge in water and run it over the inside surface of the clay to smooth out any fingerprints or cracks. -
Initial dry:
Let the clay sit in the mold for about 24 hours (or until leather hard). This ensures it holds its shape before you remove it. -
Remove and dry completely:
Carefully lift the clay out of the mold using the plastic wrap. Peel off the plastic and set the clay bowl upside down on a drying rack to dry completely, usually another 24-48 hours depending on humidity.
Step 2: Decoration and Finishing
-
Sand for smoothness:
Once fully cured and bone dry, gently sand any rough edges on the rim or bumps on the surface. Wipe away the clay dust with a damp cloth. -
Base coat application:
Apply a coat of burnt orange paint to the entire interior and exterior of the bowl. If you didn’t use terracotta clay, you might need two coats to get that rich, basketball-leather color. -
Drawing the lines guidelines:
Lightly sketch the basketball seam pattern with a pencil first. Draw one main line creating a ‘U’ shape through the center, and intersecting curved lines on the sides to mimic a ball’s geometry. -
Painting the seams:
Using a thin liner brush and black paint, or a steady hand with a black paint pen, trace over your pencil lines. Make these lines thick enough to be bold, mimicking the rubber channels on a real ball. -
Adding texture (Optional):
For a hyper-realistic look, I like to gently stipple the wet orange paint with a stiff bristle brush or a textured sponge before drawing the black lines to simulate the pebbled leather surface. -
Sealing the deal:
Once the paint is totally dry, apply a high-gloss varnish or glaze over the entire piece. This gives it that shiny, polished look seen in the photo and protects it from scratches. -
Final cure:
Allow the varnish to cure according to the bottle instructions ensuring it is non-tacky before wrapping it up for Dad.
Rim Perfection
For a smoother rim, run a damp sponge along the cut edge immediately after trimming the excess clay while it is still in the mold.
Team Spirit
Personalize the bowl by painting Dad’s favorite team logo on the bottom center or stamping his initials into the clay before it dries.
This sporty and functional gift will act as a daily reminder of your appreciation every time Dad grabs his keys

The Complete Guide to Pottery Troubleshooting
Uncover the most common ceramic mistakes—from cracking clay to failed glazes—and learn how to fix them fast.
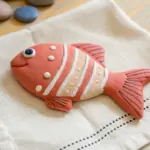
Fishing-Themed Keychain Tag
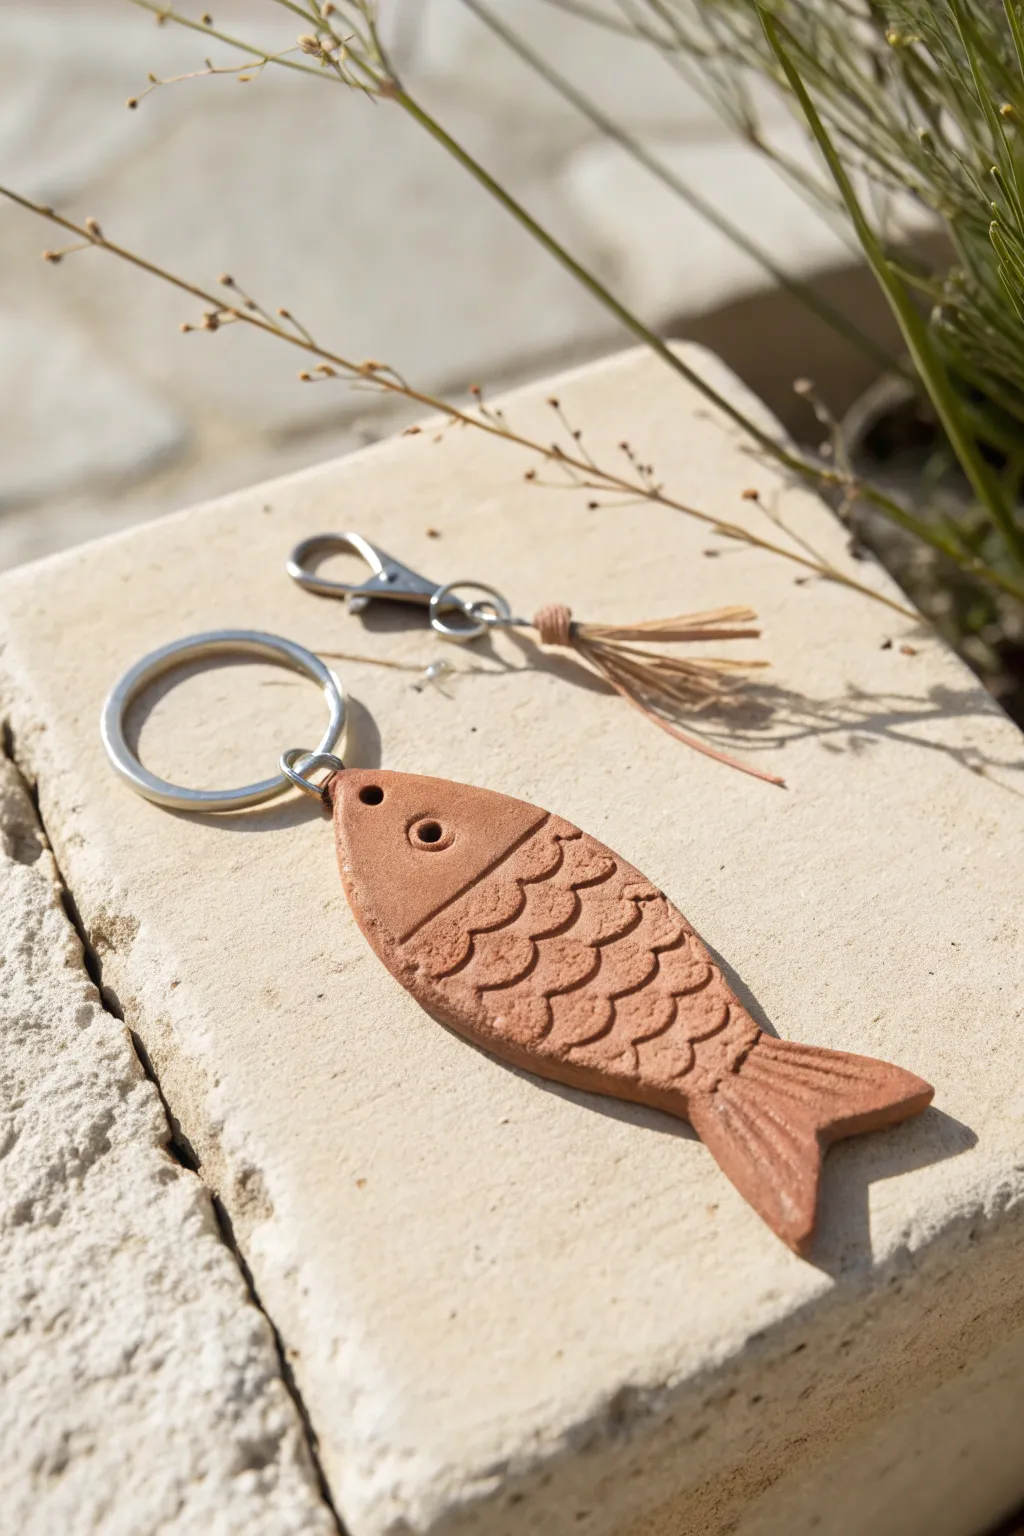
Celebrate the fisherman in your life with this rustic, terracotta-style clay keychain. Its charming scale texture and simple design make it a rugged yet sweet accessory that attaches easily to any set of car keys or tackle box.
How-To Guide
Materials
- Terracotta-colored air-dry clay (or polymer clay)
- Small rolling pin
- Fish-shaped cookie cutter (optional) or craft knife
- Modeling tool or dull butter knife
- Straw or coffee stirrer (for creating scales)
- Small round tool or wooden skewer (for the eye)
- Sandpaper (fine grit)
- Metal split key ring
- Jump ring
- Leather cord or twine
- Small decorative tassel (optional)
- Lobster clasp (optional)
Step 1: Shaping the Fish
-
Prepare the Clay:
Start by kneading a small ball of terracotta clay until it is soft and conditioned. This prevents cracks from forming later. -
Roll it Out:
Flatten the clay on a smooth surface using a small rolling pin. You want a consistent thickness of about 1/4 inch so strictly sturdy enough for daily use. -
Cut the Shape:
If you have a fish-shaped cookie cutter, press it firmly into the clay. If not, lightly sketch a simple fish outline with a toothpick and carefully cut it out using a craft knife. -
Smooth the Edges:
Dip your finger in a tiny bit of water and run it along the cut edges of the fish to smooth out any roughness or sharp crumbs of clay.
Scale Perfection
Work from the tail toward the head when pressing in your scale pattern. This layering mimics how real fish scales overlap naturally.
Step 2: Adding Details
-
Create the Gill Line:
Use a modeling tool or the back of a knife to gently press a curved line distinguishing the head from the body. Don’t cut all the way through; just make an indentation. -
Form the Eye:
Take a small round tool or the end of a straw and press a distinct circle into the head area to create the fish’s eye. -
Add the Scales:
This is the fun part: take the end of a straw (cut in half lengthwise for a crescent shape) or a small U-shaped tool. Press it repeatedly into the body section to create rows of semicircles resembling scales. -
Texture the Tail:
Use your knife tool to press several straight lines fanning out across the tail fin to simulate fin rays. -
Make the Hole:
Before the clay dries, use a skewer or drinking straw to punch a hole near the mouth of the fish. Ensure the hole is not too close to the edge to prevent breakage.
Personalize It
Before drying, stamp Dad’s initials or the year on the back of the fish using small letter stamps for a customized keepsake.
Step 3: Finishing Touches
-
Let it Dry:
Set the fish aside on a flat surface to dry completely. For air-dry clay, I usually wait at least 24 hours, turning it over halfway through to ensure even drying. -
Sand the Edges:
Once fully cured, use fine-grit sandpaper to gently buff the outer edges of the fish, removing any remaining imperfections. -
Attach Hardware:
Open a jump ring with pliers and thread it through the hole you made earlier at the fish’s mouth. -
Secure the Key Ring:
Loop the metal split key ring onto the jump ring and close the jump ring securely with your pliers. -
Add Flair (Optional):
If you want extra decoration like in the image, attach a small leather tassel or a secondary clip to the main ring for a layered look.
Step 4: Final Presentation
-
Clean Up:
Wipe away any clay dust with a slightly damp cloth to make the terracotta color pop. -
Gift Wrap:
Place the finished keychain in a small box or tie it to a larger fishing-themed gift for Dad.
Now you have a durable, handmade catch that Dad can carry with him everywhere he goes