
Father’s Day is the perfect excuse to turn a little bit of clay into something Dad will actually use and keep. I love projects that feel personal (tiny fingerprints and all) but still land in that sweet spot of simple, sturdy, and gift-worthy.
Golf Tee Holder Cup With Name
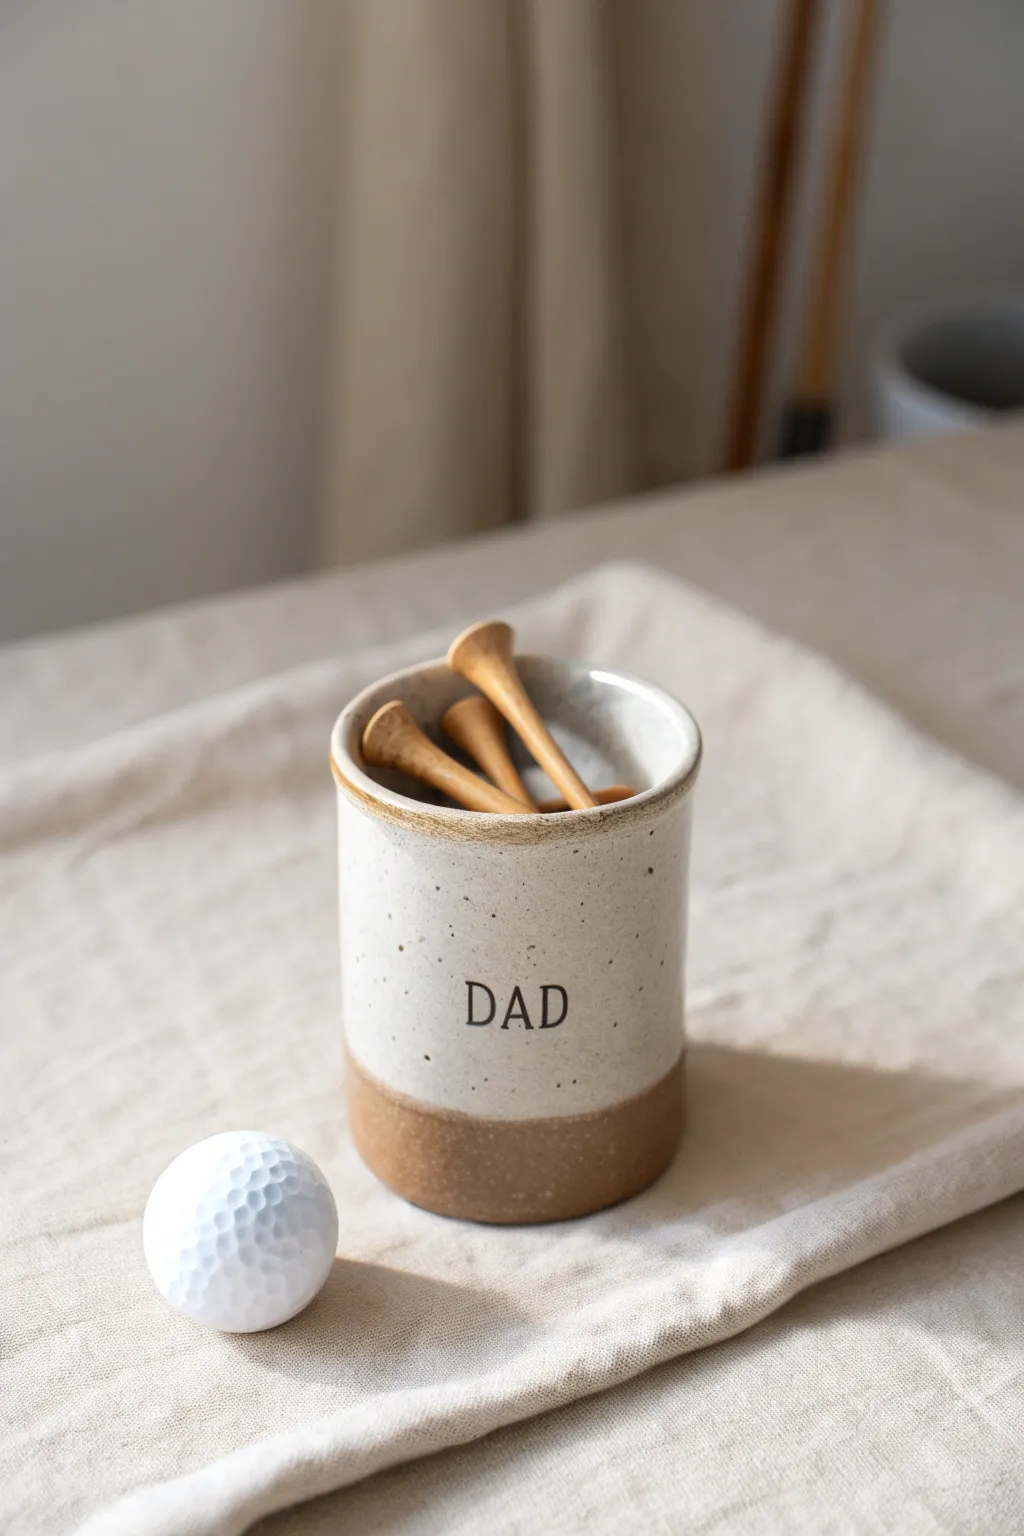
This handsome two-toned cup offers a sophisticated storage solution for the golfing dad, featuring a natural clay base and a speckled creamy glaze. It’s perfect for holding tees on a desk or bureau, blending practical function with handmade charm.
Step-by-Step Guide
Materials
- Stoneware clay (speckled buff is ideal)
- Small rolling pin
- Rolling guides or slat sticks (1/4 inch thick)
- Needle tool
- Clay scoring tool
- Slip (water mixed with clay scraps)
- Cylindrical form or beverage can (for template)
- Small alphabet stamp set
- Bisque firing kiln access
- Speckled cream or white glaze
- Wax resist
- Glaze brush
- Sponge
Step 1: Forming the Cylinder
-
Roll the slab:
Begin by rolling out a workable amount of stoneware clay on a canvas board. Use your 1/4 inch slats as guides on either side to ensure the slab is completely even in thickness. -
Cut the base:
Select a circle cutter or use a small bowl as a template that matches your desired diameter (about 3 inches works well). Cut a perfect circle from the slab using your needle tool to form the base. -
Measure the walls:
Calculate the circumference of your base circle. Cut a rectangular strip from your remaining slab that is exactly that length plus a half-inch for overlap, and about 3.5 to 4 inches tall. -
Score and slip:
Score the outer edge of your circular base and the bottom edge of your rectangular strip. Apply a generous amount of slip to these roughened areas. -
Assemble the cup:
Wrap the rectangular strip around the base, pressing it firmly onto the scored edge. I like to wrap the clay around a soda can covered in newspaper to help it keep its round shape during this step. -
Seal the seam:
Where the two ends of the wall meet, score and slip the vertical seam. Press interactions tightly together and smooth the join with your thumb or a wooden rib tool until the seam is invisible. -
Join the floor:
Use a modeling tool to firmly blend the clay from the outside wall down onto the base. Repeat this process on the inside to ensure a watertight bond.
Stamp Clarity
If your stamp letters are getting stuck, dust the rubber stamp face lightly with cornstarch before pressing it into the moist clay for a cleaner release.
Step 2: Refining and Stamping
-
Smooth the lip:
Run a damp sponge or piece of chamois leather over the top rim of the cup. You want a rounded, comfortable edge, not a sharp one. -
Stamp the text:
While the clay is leather-hard (stiff but still cool to the touch), locate the center front of the cup. Gently press your alphabet stamps to spell “DAD.” Support the wall from the inside with your hand to prevent warping. -
Clean the surface:
Check the exterior for any fingerprints or rough spots. Smooth them away with a barely damp sponge, being careful not to erase the texture of the clay itself. -
Dry and fire:
Allow the cup to dry slowly under loose plastic for a few days to prevent cracking. Once bone dry, fire the piece to bisque temperatures (Cone 04 typically) in a kiln.
Make it a Set
Create a matching shallow dish for ball markers or a larger tray to hold this cup and a drink, turning it into a complete desk organizer set.
Step 3: Glazing
-
Define the dip line:
Clean the bisque-fired cup with a damp sponge to remove dust. Decide how much raw clay you want exposed at the bottom—about an inch looks balanced. -
Apply wax resist:
Paint a band of wax resist over the bottom inch of the cup and cover the entire underside. This prevents glaze from sticking to these areas and creates that clean, straight line seen in the photo. -
Highlight the text:
Mix a tiny amount of black underglaze or iron oxide wash. Paint it into the stamped “DAD” letters, then wipe the surface clean with a damp sponge, leaving the dark color only deep inside the impressions. -
Dip the glaze:
Stir your speckled cream glaze thoroughly. Holding the cup by the waxed base, dip it upside down into the glaze bucket for about 3 seconds, then lift and shake off the excess. -
Clean the distinct line:
Once the glaze is dry to the touch, use a sponge to wipe away any tiny droplets that might have beaded up on the wax resist area, ensuring a crisp transition. -
Final firing:
Load the piece into the kiln for the final glaze firing according to your clay and glaze instructions (usually Cone 5 or 6 for stoneware).
Once cooled, fill it with a handful of wooden tees and gift it to a dad who loves the green


Desk Pen Cup With Fingerprint Band
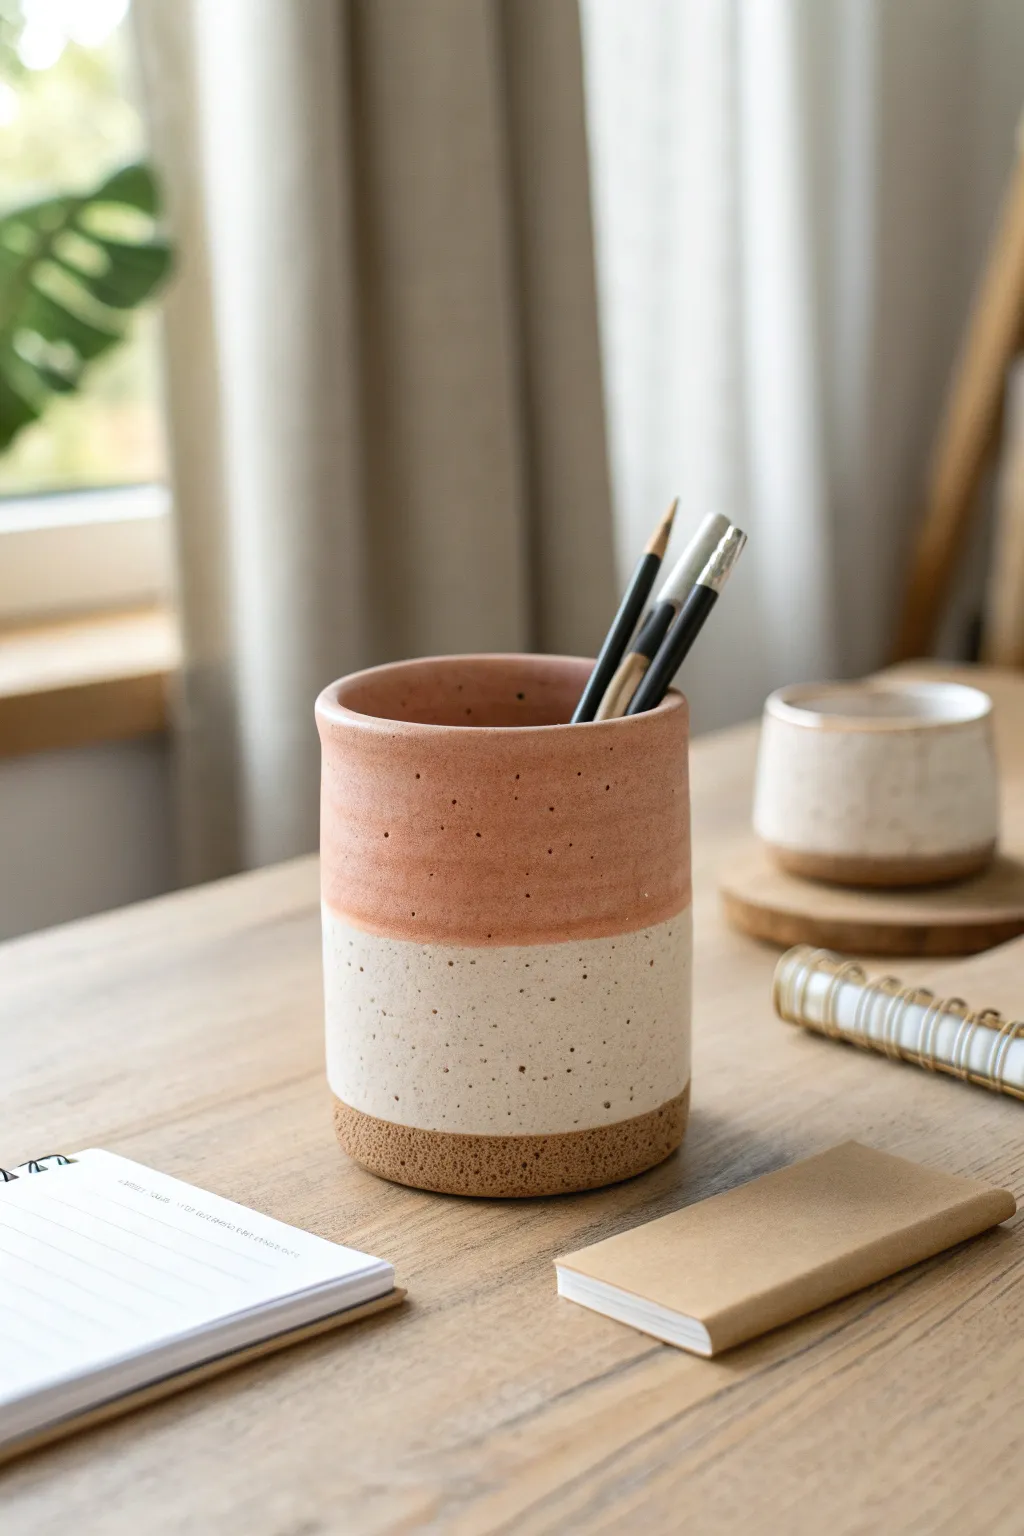
This sophisticated pen cup features a rustic three-tone design that mimics the look of wheel-thrown pottery using accessible hand-building techniques. With distinct bands of warm terracotta, creamy white, and textured raw clay, it makes a handsome addition to any dad’s workspace.
How-To Guide
Materials
- Air-dry clay or oven-bake polymer clay (white or light beige)
- Rolling pin
- Sharp craft knife
- Circular template (like a jar lid, approx. 3-4 inches)
- Ruler
- Small cup of water (for air-dry clay) or liquid clay (for polymer)
- Acrylic paints: Terracotta/dusty pink, Creamy white, Dark brown
- Paintbrushes: Flat brush for stripes, old toothbrush for speckling
- Fine-grit sandpaper
- Matte spray sealant or varnish
- Texturing tool (coarse sponge or stiff bristle brush)
- Painter’s tape (optional)
Step 1: Prepping the Base Structure
-
Roll the clay slab:
Begin by conditioning your clay until it is pliable. Roll it out into a large, even slab approximately 1/4 inch thick. Try to keep the thickness consistent so the cup walls stand straight. -
Cut the base:
Place your circular template on the clay slab and cut around it using your craft knife to create the floor of your pen cup. -
Measure the circumference:
Use a piece of string or a flexible measuring tape to measure the outer edge of your circular base. Add about half an inch to this measurement to account for the seam overlap. -
Cut the rectangular wall:
Cut a long rectangular strip from your clay slab. The length should match your measured circumference, and the height should be around 4-5 inches, depending on how tall you want the cup.
Step 2: Assembling the Form
-
Texture the bottom band:
Before assembling, identify the bottom inch of your rectangular strip. Use a coarse sponge or a stiff brush to tap firmly against this area, creating a rough, pitted texture that mimics raw stoneware. -
Score and slip:
Score the edges of the circular base and the bottom edge of the rectangular wall with a needle tool or knife tip. Dab a little water (or liquid clay) on the roughed-up areas to act as glue. -
Attach the wall:
Carefully wrap the rectangular strip around the circular base. Press the wall firmly onto the base, ensuring a tight seal all the way around. -
Seal the vertical seam:
Where the two ends of the wall meet, blend the clay together smoothly using a modeling tool or your finger. I find that supporting the wall from the inside with one hand while smoothing the outside helps prevent warping. -
Refine the rim:
Use a damp sponge or finger to smooth the top rim of the cup. It should be slightly rounded and even, not sharp or jagged. -
Dry or bake:
Follow your clay manufacturer’s instructions to cure the piece. If using air-dry clay, let it dry for 24-48 hours until fully hard and white. If using polymer, bake according to the package temperature.
Keep it Straight
If your cylinder walls keep sagging or collapsing during assembly, wrap the clay around a cardboard tube or soda can wrapped in parchment paper for support while it dries.
Step 3: Painting and Finishing
-
Sand for smoothness:
Once fully cured, use fine-grit sandpaper to smooth out any unintentional bumps on the middle and top sections. Leave the textured bottom band rough. -
Paint the bottom texture:
Mix a dark brown acrylic paint with a tiny bit of water to create a wash. Paint this over the textured bottom band, getting into the crevices, then wipe off the excess surface paint with a paper towel to highlight the texture. -
Apply the middle band:
Paint the middle section of the cup (about 2 inches wide) with a creamy white acrylic paint. You may need two coats for full opacity. -
Apply the top band:
Paint the top third of the cup and the inner rim with a dusty terracotta or muted pink color. Create a soft, slightly uneven transition line where it meets the white to keep that hand-dipped pottery look. -
Create the speckles:
Dip an old toothbrush into thinned dark brown paint. Hold it near the cup and run your thumb across the bristles to flick tiny splatters of paint onto the white and pink sections. Practice on paper first to control the spray. -
Seal the project:
Allow all paint to dry completely. Finish by spraying the entire cup with a matte sealant to protect the finish without making it look plasticky.
Pro Tip: Hidden Weight
Air-dry clay can be very light. Before the clay dries, press a few heavy metal washers into the inside floor of the cup to give it a satisfying, tip-resistant weight.
Once dry, this sturdy cup is ready to organize pens and pencils with effortless artisan style


Coaster Set With Kid Scribble Textures
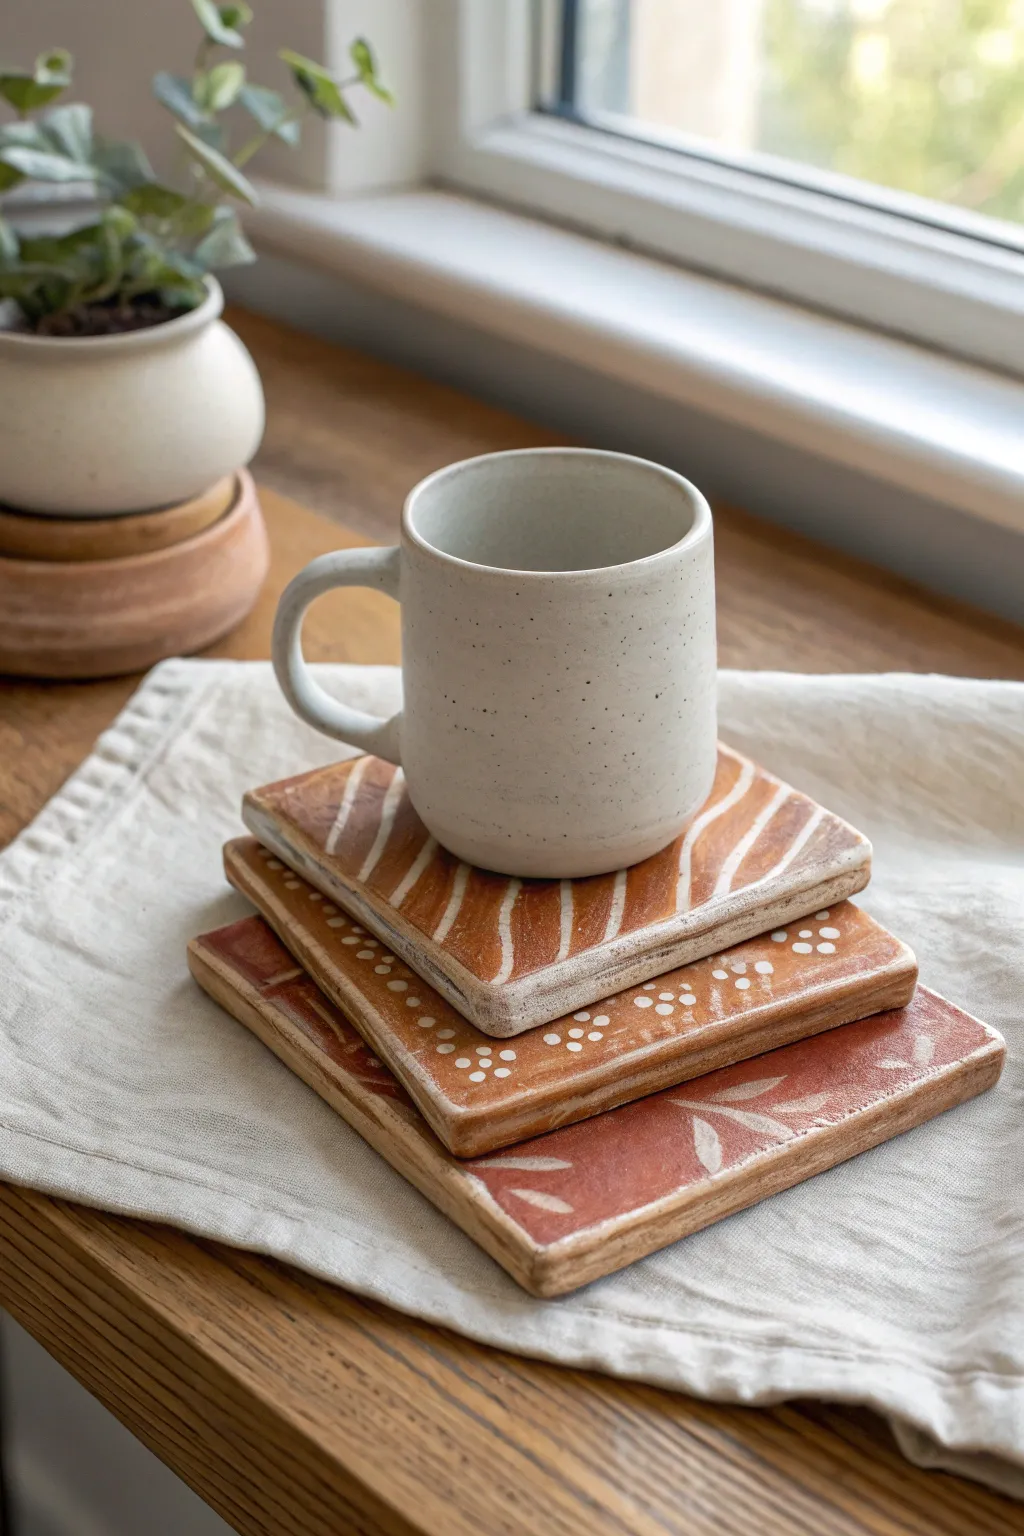
Create a sophisticated set of coasters that balances rustic warmth with modern design using a clever paint-and-wipe technique. This project mimics the look of etched terracotta tiles, making it perfect for capturing simple patterns or kid-drawn scribbles in a stylish way.
Step-by-Step Tutorial
Materials
- Air-dry clay or polymer clay (white or light beige)
- Square cookie cutter (approx. 4×4 inches)
- Rolling pin
- Two wooden dowels (1/4 inch thick) for thickness guides
- Carving tool or stylus (a dull pencil works too)
- Sandpaper (fine grit)
- Terracotta colored acrylic paint (burnt sienna mixed with a touch of red)
- White acrylic paint
- Clean rags or paper towels
- Clear matte varnish or sealant
- Felt pads for the bottom
Step 1: Shaping the Base
-
Prepare the Clay:
Begin by conditioning your clay. If using air-dry clay, knead it briefly to remove air bubbles. Place the clay on a clean, smooth surface or a silicone mat. -
Roll Even Slabs:
Place your wooden dowels on either side of the clay ball. Use your rolling pin on top of the dowels to roll the clay out; this ensures an even, consistent thickness for all your coasters. -
Cut the Squares:
Press the square cookie cutter firmly into the rolled slab. Create 3-4 squares for a full set. If you don’t have a cutter, use a ruler and a craft knife to measure and slice 4-inch squares. -
Smooth the Edges:
Dip your finger in a little water (for air-dry clay) or baby oil (for polymer) and run it gently along the sharp cut edges to round them off slightly. This prevents chipping later.
Clean Grooves Only
When wiping back the top coat of paint, keep your rag very flat. Do not press down into the carvings, or you will wipe the paint out of the design grooves.
Step 2: Creating the Designs
-
Plan Your Patterns:
Think about three coordinating designs. The example uses organic wavy lines for one, a dotted border for the second, and a leaf motif for the third. -
Carve the Clay:
Using your carving tool or stylus, firmly press the designs into the wet clay. You want the grooves to be deep enough to hold paint later, but not so deep they cut through the coaster. -
Add Texture Details:
For the dotted patterns, press a blunt tool straight down. For the wavy lines, drag the tool smoothly with consistent pressure. I usually wipe the tool tip clean between strokes to keep the lines crisp. -
Dry or Bake:
Follow the instructions for your specific clay. Air-dry clay typically needs 24-48 hours to fully harden. If using polymer clay, bake according to the package directions and let cool completely. -
Sand for Smoothness:
Once fully cured, use fine-grit sandpaper to smooth out any rough burs created during carving. Wipe away all dust with a damp cloth.
Make it a Keepsake
Have your child draw the design directly into the wet clay with a toothpick. Their actual handwriting or doodles make the absolute best Father’s Day texture.
Step 3: The Terracotta Finish
-
Apply Base Inlay:
This step seems counter-intuitive, but first, paint the *entire* surface of the coaster, including the carved grooves, with your white acrylic paint. -
Let the White Dry:
Allow the white paint to dry completely. This white layer in the grooves will become your design color. -
Apply the Terracotta Coat:
Mix a rusty, warm terracotta color. Paint a generous layer over the top of the dried white paint. You want to cover the surface fully. -
The Reveal Technique:
While the terracotta paint is still slightly tacky (not fully dry, but not soaking wet), take a damp rag or paper towel. Gently wipe the surface flat. -
Refine the Look:
Continue wiping gently. The goal is to remove most of the terracotta paint from the raised surface, revealing the white underneath, while leaving the terracotta color in the subtle textures of the clay. -
Alternative: Reverse Method:
If that felt too tricky, try the reverse: Paint the whole coaster terracotta first and let it dry. Then, carefully paint white *only* into the carved grooves using a very fine detail brush. -
Clean Up:
Check the edges of the coaster. Use your damp rag to create a distressed, worn look on the sides and corners where real terracotta would naturally fade.
Step 4: Finishing Up
-
Seal the Work:
Since coasters encounter moisture, apply 2-3 coats of a matte clear varnish or sealant. Make sure it is waterproof once cured. -
Protect Surfaces:
Stick small felt pads or a square of cork to the bottom of each coaster to prevent them from scratching tables.
Stack them up and wrap with a ribbon for a handmade gift that looks professionally crafted


Mustache Ring Dish for Dad
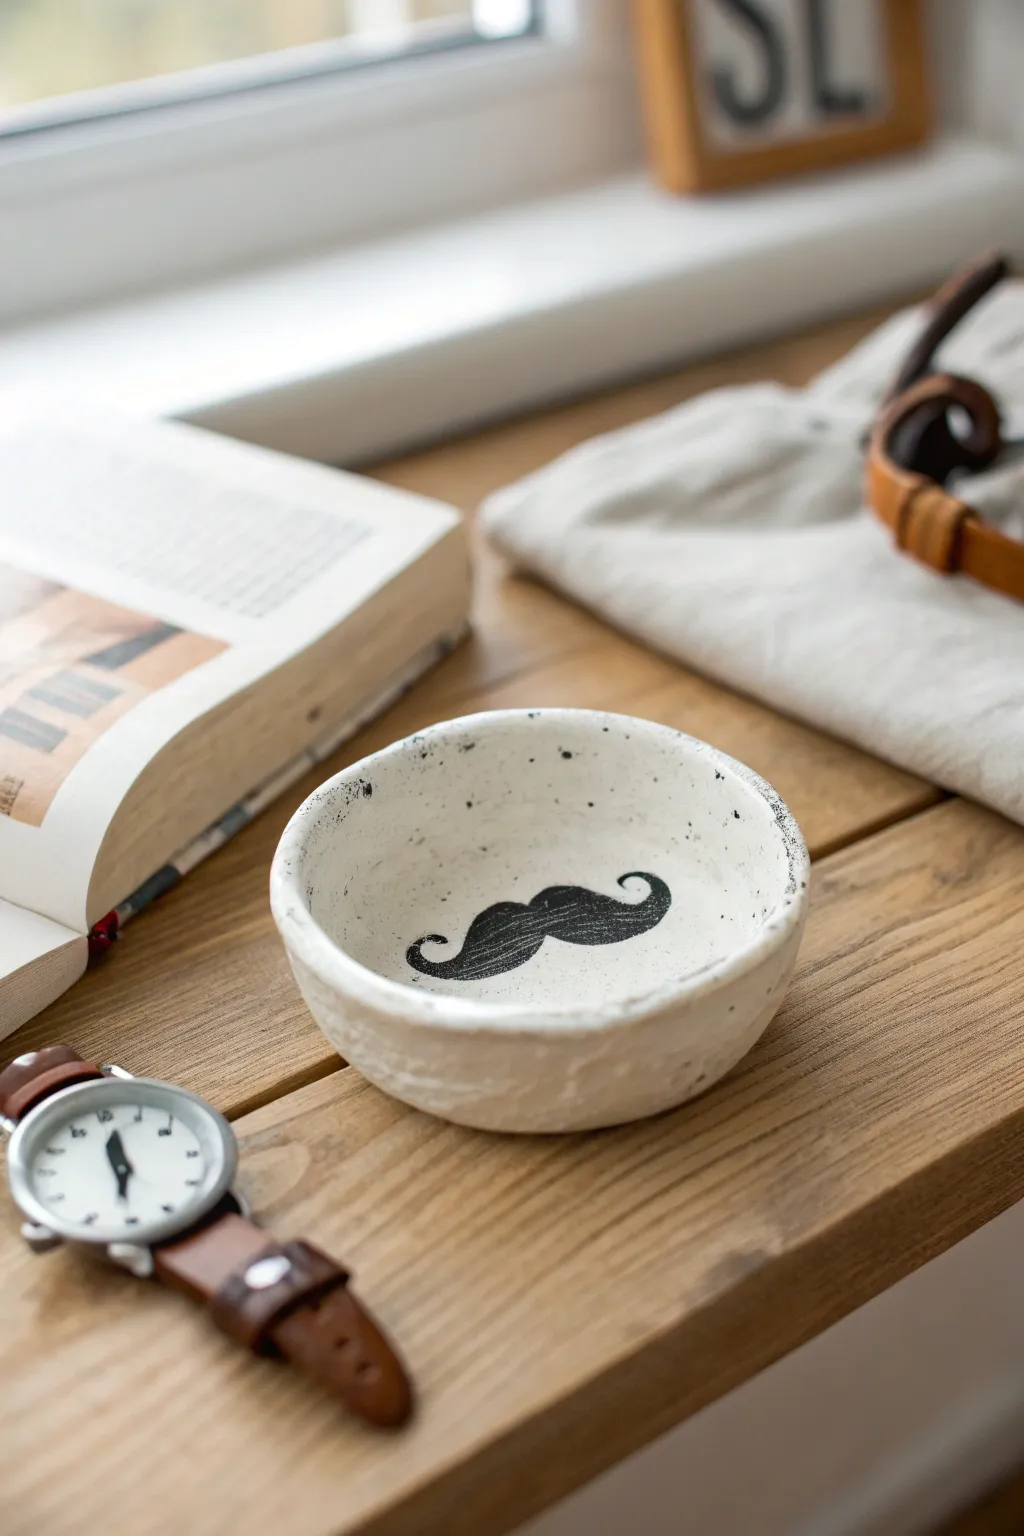
Give dad the perfect spot for his spare change or watch with this rustic, handcrafted ring dish. Featuring a playful stamped mustache design and a speckled finish, this clay project strikes the ideal balance between charmingly handmade and stylishly masculine.
Step-by-Step
Materials
- White air-dry clay (or polymer clay)
- Black acrylic paint
- Rolling pin
- Small bowl (approx. 4-5 inches diameter) for molding
- Sandpaper (fine grit)
- Mustache stamp (or a printed template and craft knife)
- Small stipple brush or circular sponge dabber
- Old toothbrush
- Matte finish sealer or varnish
- Water and a small bowl
- Carving tool or toothpick
Step 1: Shaping the Clay
-
Condition the material:
Begin by taking a handful of white air-dry clay and kneading it in your hands until it becomes warm and pliable. This prevents cracks later on. -
Roll it out:
Use your rolling pin to flatten the clay into an even slab, aiming for a thickness of about 1/4 inch. If the clay sticks, lay it on a piece of parchment paper. -
Cut the circle:
Find a circular object slightly larger than your intended final dish size (like a large mug or cereal bowl rim). Press it into the clay to cut out a perfect circle, removing the excess material. -
Soften the edges:
Dip your finger in a little bit of water and run it along the cut edge of the clay circle to smooth out any sharp ridges or crumbs. -
Form the bowl shape:
Gently lift your clay circle and place it inside your curved molding bowl. Press it down lightly so it takes the shape of the bowl’s interior. -
Add texture:
For that rustic, handmade look seen in the photo, don’t smooth the inside perfectly. I like to lightly press my thumbs around the inner walls to create subtle undulations. -
Let it dry:
Allow the clay to dry completely inside the mold. This usually takes 24-48 hours depending on humidity. Don’t rush this, or the shape might warp.
Cracked Clay?
If hairline cracks appear while drying, mix a tiny bit of fresh clay with water to make a paste (slip) and smooth it into the cracks with your finger.
Step 2: Decorating and Finishing
-
Sand the surface:
Once bone dry, pop the clay dish out of the mold. Use fine-grit sandpaper to gently smooth the rim and any rough patches on the bottom. -
Prepare the mustache design:
If you have a mustache rubber stamp, coat it evenly with black acrylic paint. If using a stencil or freehanding, sketch the mustache lightly in the center with a pencil. -
Apply the central motif:
Press the painted stamp firmly into the center of the bowl. If painting by hand, use a fine-tip brush to fill in your sketched mustache with solid black paint. -
Create the speckled effect:
Dilute a small amount of black acrylic paint with water until it is runny. Dip an old toothbrush into the mixture. -
Splatter the dish:
Hold the toothbrush over the dish and run your thumb across the bristles to flick tiny specks of paint onto the white clay. Aim for random distribution. -
Paint the rim:
Dip a dry sponge or stipple brush lightly into undiluted black paint. Dab exactly along the top rim to create a distressed, dark edge that frames the bowl. -
Dry the paint:
Let all the paint work dry completely for at least an hour. -
Seal the project:
Apply a coat of matte varnish or sealer over the entire dish to protect the clay and paint from moisture and wear.
Sharper Stamping
Apply paint to your stamp with a makeup sponge rather than dipping it directly; this prevents paint from glopping in the crevices of the design.
Now wrap this rugged little masterpiece up for a gift he will use every single day