When I’m short on time but still want that satisfying build, I reach for flat clay slabs—they’re basically the blank sheets of paper of the ceramics world. Here are my favorite flat clay slab ideas that start as one rolled-out slab and turn into pieces you’ll actually use (no wheel required).
Classic Slab Plates With Soft Lifted Rims
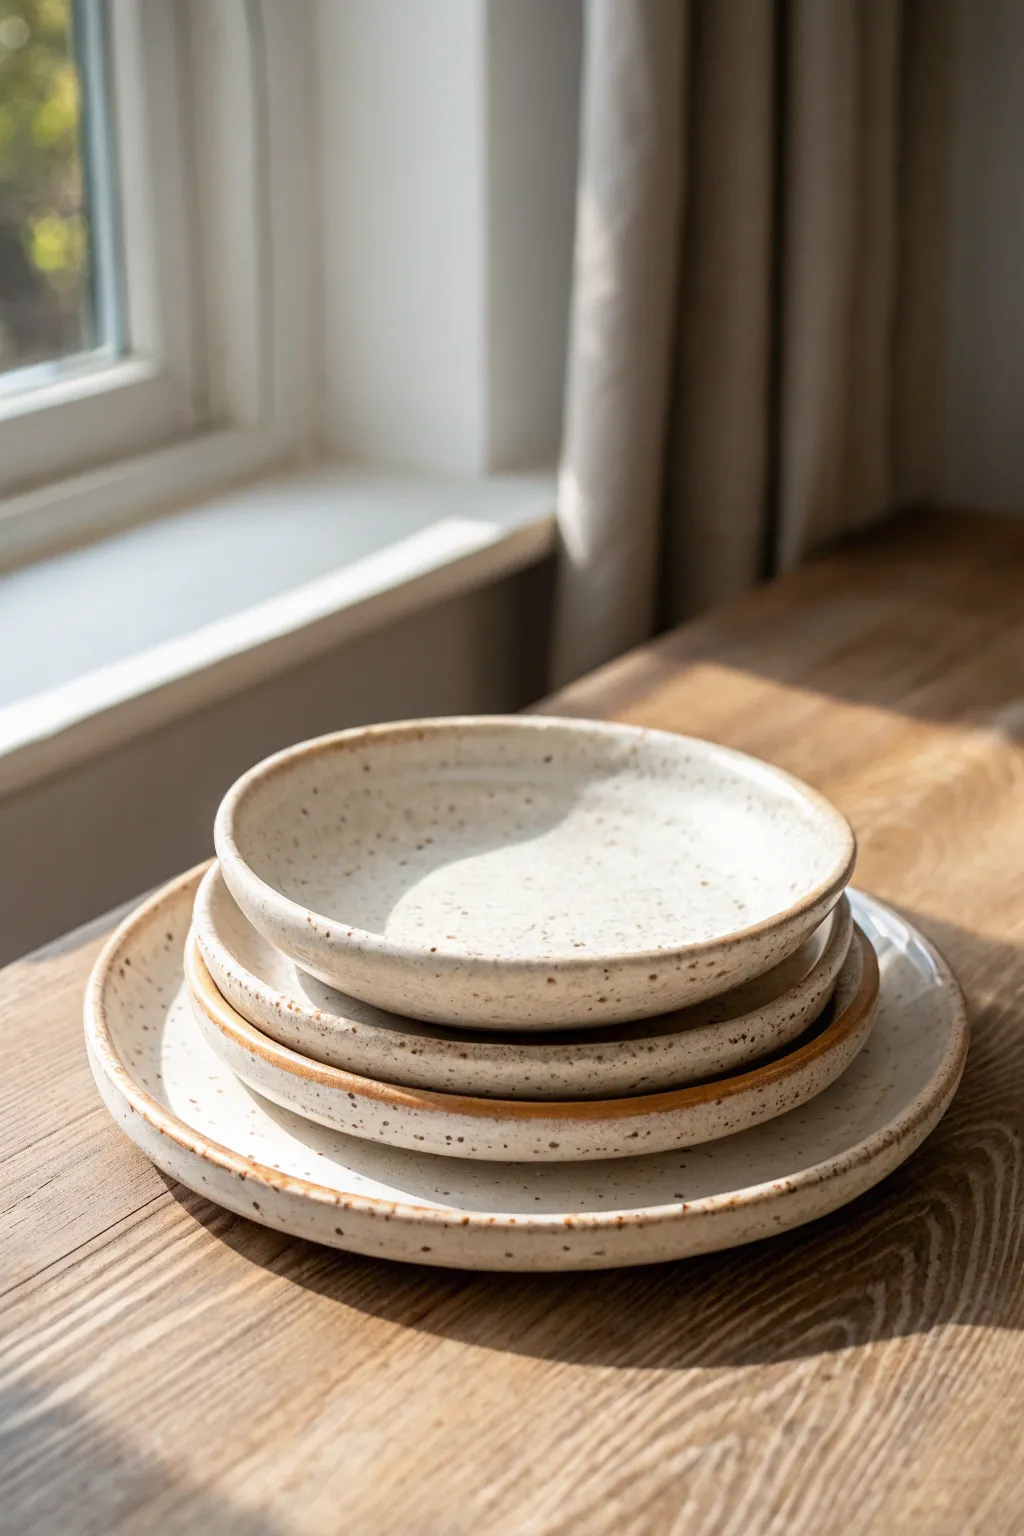
These simple yet satisfying plates showcase the beauty of hand-built ceramics with their soft, lifted rims and organic profiles. By using a speckled clay body and a minimal glaze approach, you’ll create a dinnerware set that feels both rustic and modern.
Step-by-Step Guide
Materials
- Speckled stoneware clay (mid-fire)
- Rolling pin or slab roller
- Canvas working mat or heavy fabric
- Wooden guide strips (1/4 inch thick)
- Needle tool
- Circular templates (paper or plastic)
- GR Pottery Forms or plaster hump molds (optional but helpful)
- Soft rubber rib
- Sponge
- Wire cutter
- Kiln
- Glossy transparent glaze
Step 1: Preparing the Slabs
-
Wedge the clay:
Begin with a fresh bag of speckled stoneware. Wedge a few pounds of clay thoroughly to remove air bubbles and ensure particle alignment, which helps prevent warping later. -
Set up your workspace:
Lay down your canvas mat. If you aren’t using a mechanical slab roller, place two wooden guide strips on either side of your clay block to ensure an even thickness. -
Roll out the slab:
Roll the clay out firmly and evenly. For dinnerware, I prefer a thickness of about 1/4 inch. If you are rolling by hand, flip and rotate the slab occasionally to compress the clay fibers in multiple directions. -
Compress the surface:
Take a soft rubber rib and run it over the entire surface of the slab on both sides. This compression step is crucial for preventing cracks during drying and firing, and it creates a smooth canvas for the glaze.
Step 2: Shaping the Plates
-
Cut the circles:
Place your circular templates onto the slab. Using a needle tool, cut straight down around the template. Cut a mix of sizes to create the stacked look—dinner plate, salad plate, and shallow bowl sizes. -
Smooth the edges:
Once the circles are cut, run a slightly damp sponge around the raw cut edge to round it off. Sharp edges can become razor-like after firing, so soften them now. -
Lift the rim:
To achieve the ‘soft lifted’ look, place your clay circle onto a foam sheet or a shallow hump mold. Gently press the center down, allowing the edges to rise naturally. Alternatively, pinch the edges upward slightly with your fingers for a more organic, undulating rim. -
Refine the curve:
Ensure there is a smooth transition from the flat base to the lifted rim. Use your rib tool to smooth the interior curve, ensuring there are no sharp creases where food could get stuck. -
Slow drying:
Cover the plates loosely with plastic to let them dry slowly to leather-hard. This slow drying prevents the distinct rims from warping as the clay shrinks.
Warping Woes?
If rims warp, place a small bean bag weight in the center while drying to leather hard. This keeps the base flat while the rim stiffens.
Step 3: Finishing and Firing
-
Bisque fire:
Once the plates are bone dry, load them into the kiln for a bisque fire (usually Cone 04). This sets the form and prepares the clay for glazing. -
Clean the bisque:
Wipe down the fired plates with a damp sponge to remove any kiln dust. This prevents pinholes in your final glaze. -
Glaze application:
For this specific look, dip the entire plate into a glossy transparent glaze. The speckles are creating the visual texture from within the clay body itself, so a clear coat is all you need. -
Rim effect:
The brownish rim seen in the image often happens naturally where the glaze breaks over the edge on speckled clay. However, you can enhance this by wiping a tiny bit of the glaze off the very edge of the rim with a sponge. -
Glaze fire:
Fire the plates to the maturity temperature of your clay (typically Cone 5 or 6 for stoneware). Ensure the plates are not touching in the kiln. -
Sanding the foot:
After the final firing, use diamond sandpaper or a sanding block to smooth the unglazed bottom foot of the plate so it doesn’t scratch your table.
Pro Tip: Rim Definition
For that toasty rim color, brush a very thin wash of iron oxide on the rim before dipping in clear glaze. It enhances the burnt look.
Now stack your beautiful set and enjoy a handmade meal on your new creations


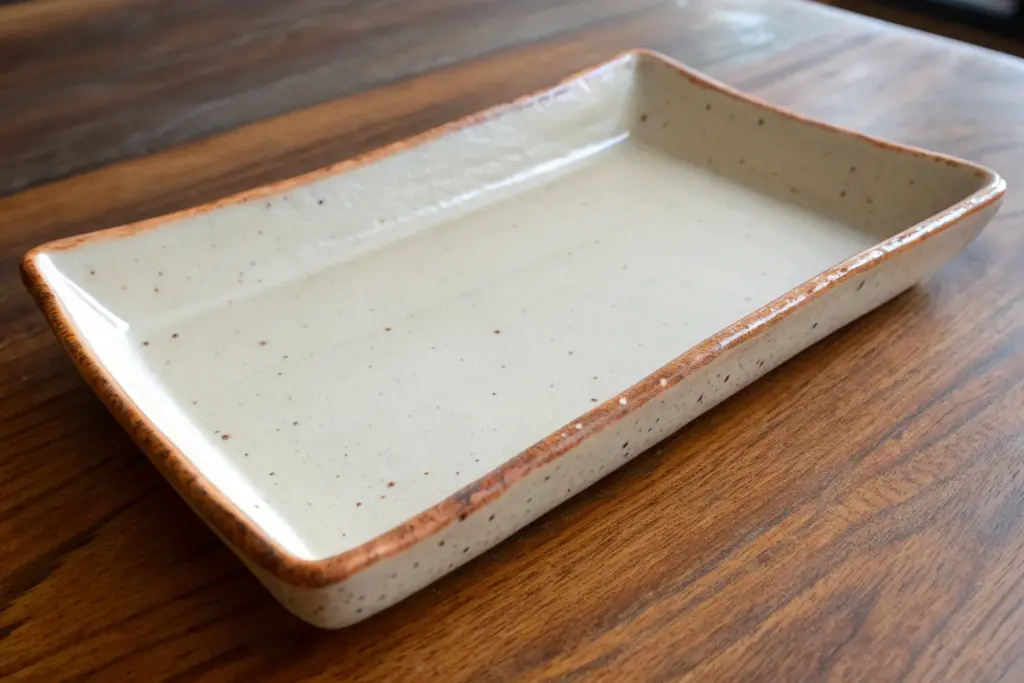
Organic Free-Form Catchall Trays
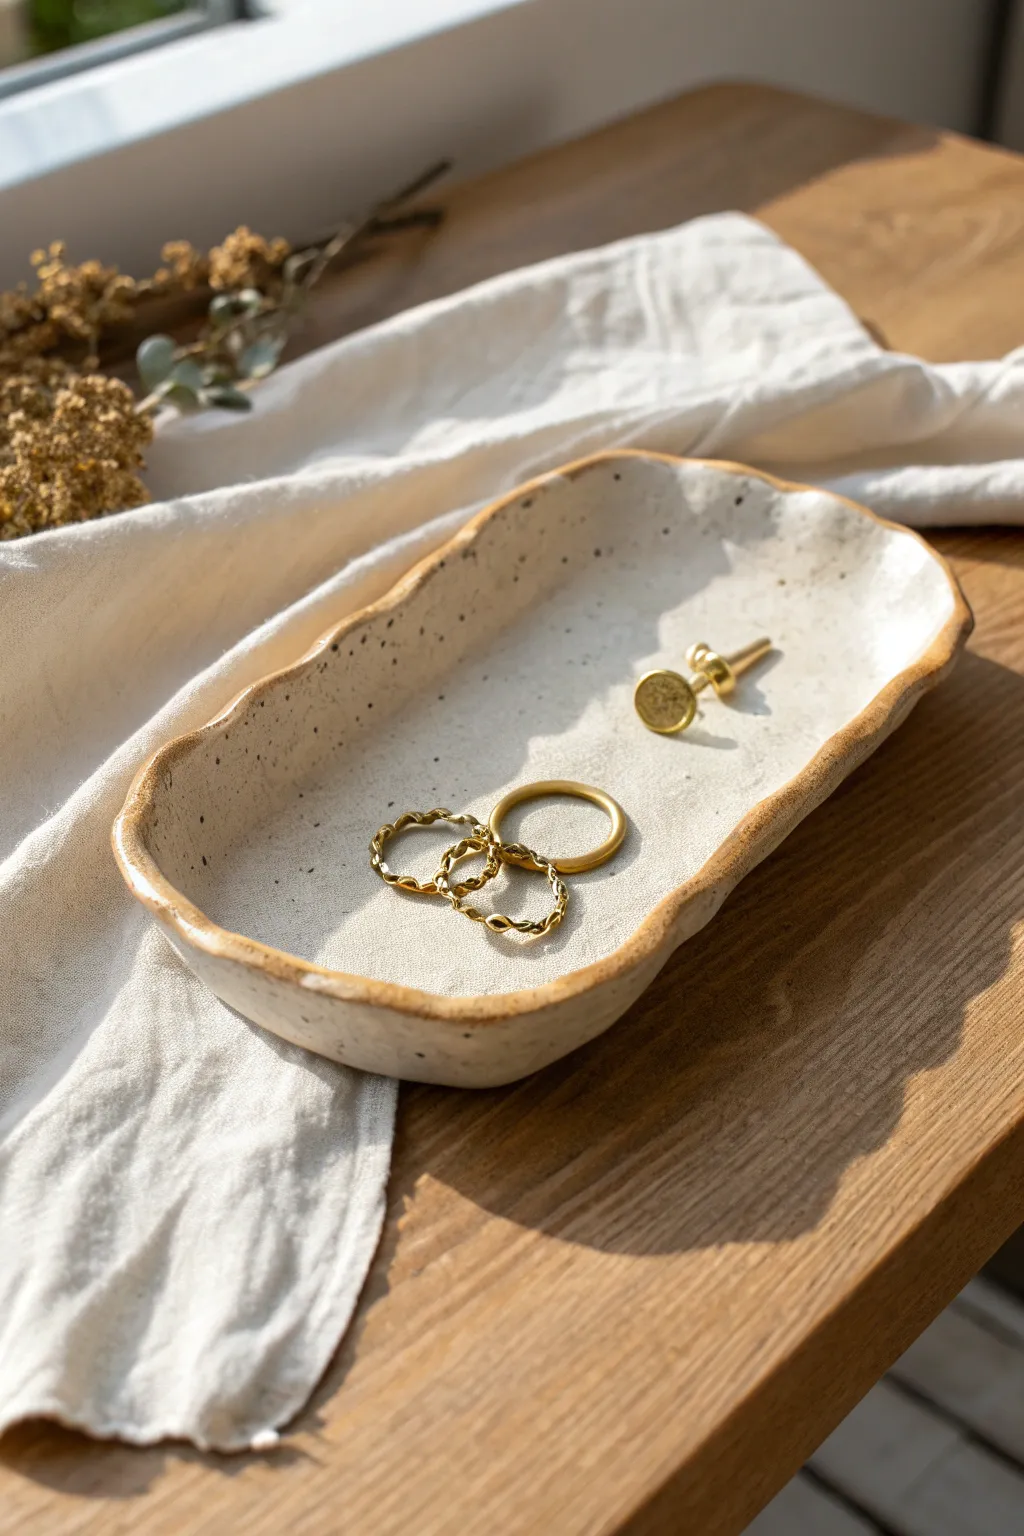
Embrace the beauty of imperfection with this lovely, oblong catchall tray featuring a charmingly irregular, wavy rim. The speckled clay body shines through a milky white glaze, creating a warm, organic aesthetic perfect for holding your favorite rings and studs.
Detailed Instructions
Materials
- Speckled stoneware clay (white or buff)
- Rolling pin
- Canvas board or cloth
- Needle tool or fettling knife
- Kidney rib (soft rubber)
- Small sponge
- Wooden modeling tool
- Glossy white or clear glaze
- Kiln (or access to firing services)
Step 1: Slab & Form
-
Review clay:
Begin with a ball of speckled stoneware clay about the size of a large orange. Ensure it is wedged well to remove air bubbles. -
Roll out slab:
On your canvas surface, flatten the ball slightly with your palm, then use the rolling pin to roll it into a slab approximately 1/4 inch thick. -
Check consistency:
Make sure your pressure is even so the slab has a uniform thickness throughout. If surface texture is desired, you can press a fabric lightly into wet clay now, but for this smooth look, use a kidney rib to compress and smooth both sides. -
Cut the shape:
Using a needle tool, freehand an elongated oval or lozenge shape. Don’t worry about perfect symmetry; the organic look relies on subtle variation. -
Clean edges:
Run a damp sponge or your finger along the cut edge to soften the sharp corner left by the needle tool. -
Lift the sides:
Gently pinch the edges of the slab upwards to create a shallow wall. Work your way around the entire perimeter. -
Create the wave:
As you pinch the walls up, intentionally vary the height and angle slightly to create the undulating, wavy rim. I like to push slightly in with one finger while supporting with two fingers on the outside to create soft dips.
Rim Character
To enhance the ‘toasted’ rim look, lightly brush the exposed clay edge with an iron oxide wash before the final glaze application.
Step 2: Refine & Fire
-
Smooth the interior:
Use a damp sponge to wipe the inside curve where the wall meets the floor, ensuring a seamless transition and no sharp angles. -
Define the rim:
With a damp chamois or sponge, compress the very top lip of the rim to make it rounded and durable. This prevents chipping later. -
Dry slowly:
Place the tray on a ware board and cover it loosely with plastic. Let it dry slowly to the leather-hard stage to prevent warping. -
Refine leather hard:
Once leather hard, sponge away any remaining roughness or fingerprints. The surface should be buttery smooth. -
Bisque fire:
Allow the piece to dry completely to bone dry, then bisque fire it to cone 04 (or according to your clay’s instructions). -
Glaze interior:
Pour or brush a glossy white or translucent glaze into the interior of the tray. Swirl it to coat evenly, then pour out the excess. -
Clean the rim:
For the look in the photo, sponge the glaze off the very top edge of the rim, allowing the raw toasted color of the clay to frame the piece. -
Final fire:
Fire the tray again to the maturation temperature of your clay and glaze (typically cone 5 or 6 for stoneware).
Warping Woes?
If the bottom curves up during drying, weigh it down gently with a small sandbag placed in the center of the tray while it is leather hard.
Now you have a stunning, minimal display piece for your jewelry collection


Simple Slab Coasters With Stamped Texture
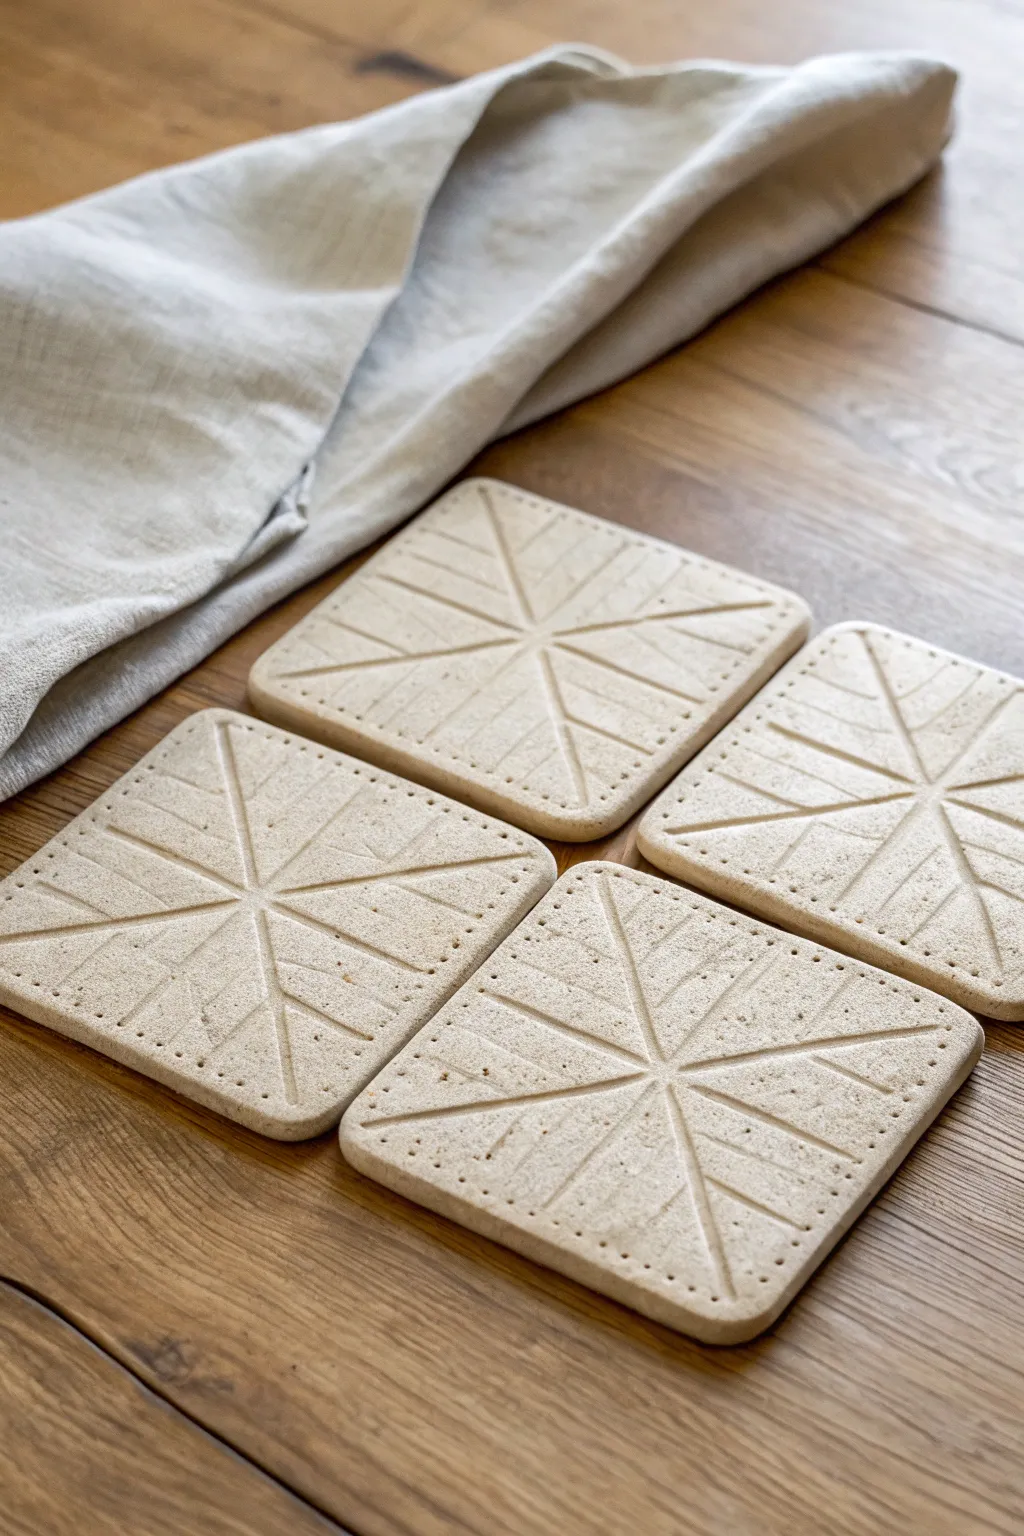
These elegant coasters feature a satisfyingly symmetrical starburst pattern pressed directly into natural speckled stoneware. The resulting set is both functional and sculptural, showcasing the raw beauty of unglazed clay with precise geometric lines.
Step-by-Step Tutorial
Materials
- Speckled stoneware clay (mid-fire)
- Rolling pin
- Two 1/4-inch wooden thickness strips (rolling guides)
- Square cookie cutter (approx. 4 inches) or ruler and needle tool
- Fettling knife or bevel cutter
- Wooden modeling tool with a straight edge (or a credit card)
- Needle tool
- Clean sponge
- Ware board for drying
- Weight bags (canvas filled with sand or rice) – optional but helpful
Step 1: Preparing the Slabs
-
Wedging the Clay:
Start by thoroughly wedging a ball of speckled stoneware clay to remove air bubbles and ensure particle alignment. A well-wedged ball prevents warping later. -
Rolling Out:
Place your clay ball on a canvas cloth. Set your 1/4-inch thickness strips on either side of the clay. Roll the clay out until the rolling pin rests flat on the wooden guides, ensuring a perfectly even thickness. -
Compressing:
Before cutting, take a rubber rib or a flat metal scraper and compress the surface of the slab on both sides. This aligns the clay platelets and creates a smooth canvas for your texture. -
Cutting the Shape:
Using a 4-inch square cookie cutter, press firmly into the slab to cut your coaster shapes. If you don’t have a cutter, measure a 4×4 inch square with a ruler and cut carefully with a needle tool. -
Smoothing Edges:
Lift the squares gently. Run a slightly damp sponge along the cut edges to soften the harsh right angles. I prefer to use my finger to gently round the corners just a tiny bit so they aren’t sharp.
Step 2: Creating the Texture
-
Marking the Center:
Find the exact center of your square. You can do this by lightly laying a ruler diagonally corner-to-corner; mark the center point where the lines would cross with a tiny pinprick. -
Stamping the Primary Cross:
Using a wooden modeling tool with a crisp, straight edge, press a line horizontally across the center, stopping slightly short of the edge. Repeat vertically to form a central cross. -
Adding Diagonal Rays:
Press diagonal lines extending from the center point toward the four corners. Again, try to maintain consistent depth and stop just before the coaster’s rim to keep the border clean. -
Filling the Negative Space:
In the triangle spaces created between your main lines, press shorter parallel lines. These should radiate outward, creating the ‘leaf’ or ‘flight’ pattern look seen in the reference. -
Stippling the Border:
Using the tip of a needle tool or a small blunt awl, gently press small dots around the perimeter of the stamped design. Space them evenly to frame the geometric pattern. -
Refining the Lines:
Go back over your main structural lines with the modeling tool one last time to clean up any clay burrs displaced during the secondary stamping.
Warping Worries?
Flat slabs love to curl. Flip your coasters twice a day while drying, or dry them slowly between two pieces of sheetrock to keep them perfectly flat.
Step 3: Drying and Finishing
-
Initial Drying:
Place the finished coasters on a ware board. If possible, sandwich them between two pieces of drywall ware board or place a small sandbag on top to discourage curling edges. -
Slow Drying:
Cover the coasters loosely with plastic for the first 24 hours to let moisture even out, then uncover them to dry slowly to the bone-dry stage. -
Bisque Firing:
Fire the coasters to cone 04 (or your clay’s bisque temperature) in a kiln. -
Glazing Decision:
For the look in the image, leave the clay unglazed to show off the raw stone texture. If you want protection from coffee stains, apply a clear matte glaze. -
Final Firing:
Fire to the clay’s maturity temperature (e.g., cone 5/6 for mid-fire stoneware). If unglazed, verify the clay body is fully vitrified so it won’t absorb water.
Pro Tip: Clean Lines
Let the clay stiffen to ‘leather hard’ before doing the deep stamping. If the clay is too soft, the tool will drag and create messy, ragged edges.
Now you have a set of durable, minimalist coasters ready to protect your table with style


Draining Slab Soap Dishes That Actually Work
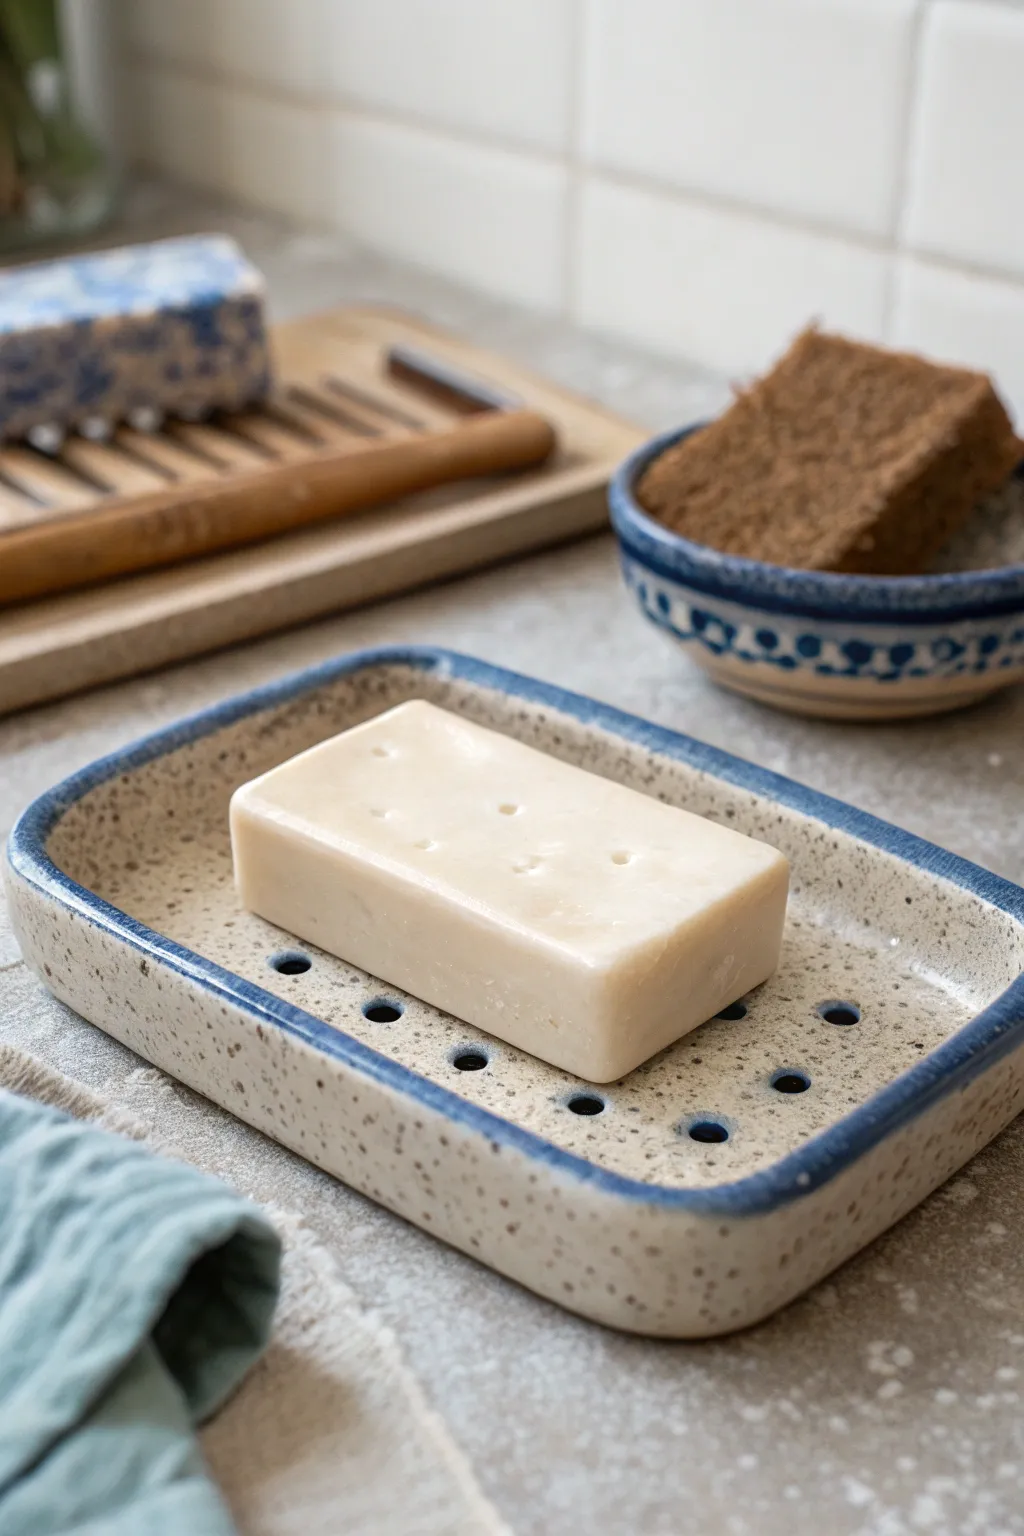
This charming, speckled soap dish relies on a simple slab construction technique to create a functional and stylish bathroom accessory. With its gentle curve and custom drainage holes, it keeps your soap dry while adding a touch of rustic elegance to your sink side.
Step-by-Step Guide
Materials
- Speckled Stoneware Clay (e.g., Laguna Speckled Buff)
- Rolling pin
- Canvas or slab mat
- Rectangular paper template (approx. 4″ x 6″)
- Fettling knife or needle tool
- Circular hole cutter or straw
- Small sponge
- Modeling tool or rib
- Cobalt blue underglaze
- Small paintbrush
- Clear transparent glaze
- Loop tool for trimming (optional)
Step 1: Slab Preparation & Shaping
-
Roll the Slab:
Begin by wedging a pound of speckled clay to remove air bubbles. Roll it out on your canvas into a smooth, even slab about 1/4 inch thick. I find turning the clay frequently helps keep the thickness consistent. -
Cut the Shape:
Place your rectangular paper template onto the slab. Using your fettling knife, cut cleanly around the perimeter. Remove the excess clay. -
Smooth the Surface:
Take a damp sponge or a soft rib tool and gently compress the surface of the clay. This removes canvas texture and aligns the clay particles to prevent warping later. -
Form the Rim:
Gently lift the edges of the rectangle. Use your fingers to pinch and curve the outer half-inch of the clay upwards to create a shallow wall. It doesn’t need to be high, just enough to catch water. -
Refine the corners:
Since the original cut was a rectangle, the corners might box up when lifted. Gently smooth and round the corners with your thumb to create that soft, continuous oval-rectangular hybrid shape seen in the image.
Pro Tip: Avoid Warping
Dry the dish slowly on a slat board or drywall to allow air to reach the bottom. If drying on a solid surface, flip it gently every few hours so the base dries evenly.
Step 2: Adding Functionality
-
Create Drainage:
Using a small circular hole cutter or a clean drinking straw, punch a series of holes into the flat bottom section. Space them evenly in a grid pattern to ensure water drains effectively. -
Clean the Holes:
Once the clay has stiffened slightly (leather hard), go back and smooth the underside of the holes. Often, punching through leaves little ‘hanging chads’ of clay on the back that need to be wiped away. -
Checking for Flatness:
Set the dish on a flat board. Press gently on the center to ensure the bottom isn’t bowing upwards. If it bows, the soap will slide off; you want a slight concave or perfectly flat bed. -
Refine the Rim:
Run a damp sponge along the top edge of your raised rim. It should feel smooth to the touch with no sharp angles. -
Slow Drying:
Cover the piece loosely with plastic. Let it dry slowly to the bone-dry stage. Rushing this step can cause the flat bottom to warp or crack.
Step 3: Glazing & Finishing
-
Bisque Fire:
Fire the bone-dry piece in the kiln to cone 04 (or your clay body’s bisque temperature). -
Wipe Down:
After the kiln cools, wipe the bisque ware with a damp sponge to remove any dust that might resist the glaze. -
Paint the Rim:
Dip a small brush into cobalt blue underglaze. Carefully paint a steady line along the very top edge of the rim. Let the color flow slightly over the edge for a hand-painted look. -
Spatter Effect (Optional):
If your clay isn’t naturally speckled, you can flick a stiff toothbrush loaded with iron oxide wash or brown underglaze across the surface to mimic the speckles. -
Clean the Bottom:
Apply wax resist to the bottom foot area where the dish will touch the kiln shelf to prevent sticking. -
Apply Clear Glaze:
Dip the entire piece into a transparent clear glaze. Shake off excess gently to ensure the drainage holes don’t get clogged with thick glaze. -
Check the Holes Again:
Before firing, double-check that the clear glaze hasn’t formed a film over your drainage holes. Poke them clear with a pin if necessary. -
Final Fire:
Fire to the maturity temperature of your clay and glaze (typically Cone 5 or 6 for stoneware). Allow to cool completely before use.
Troubleshooting: Uneven Rim
If your painted blue line looks shaky, don’t wipe it off, which smears pigment. Instead, let it dry, then gently scrape the mistake away with an X-Acto knife before glazing.
Now you have a custom draining dish that will extend the life of your artisan soaps

The Complete Guide to Pottery Troubleshooting
Uncover the most common ceramic mistakes—from cracking clay to failed glazes—and learn how to fix them fast.
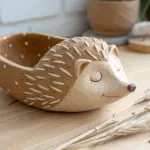
Minimal Slab Spoon Rests With a Handle Notch
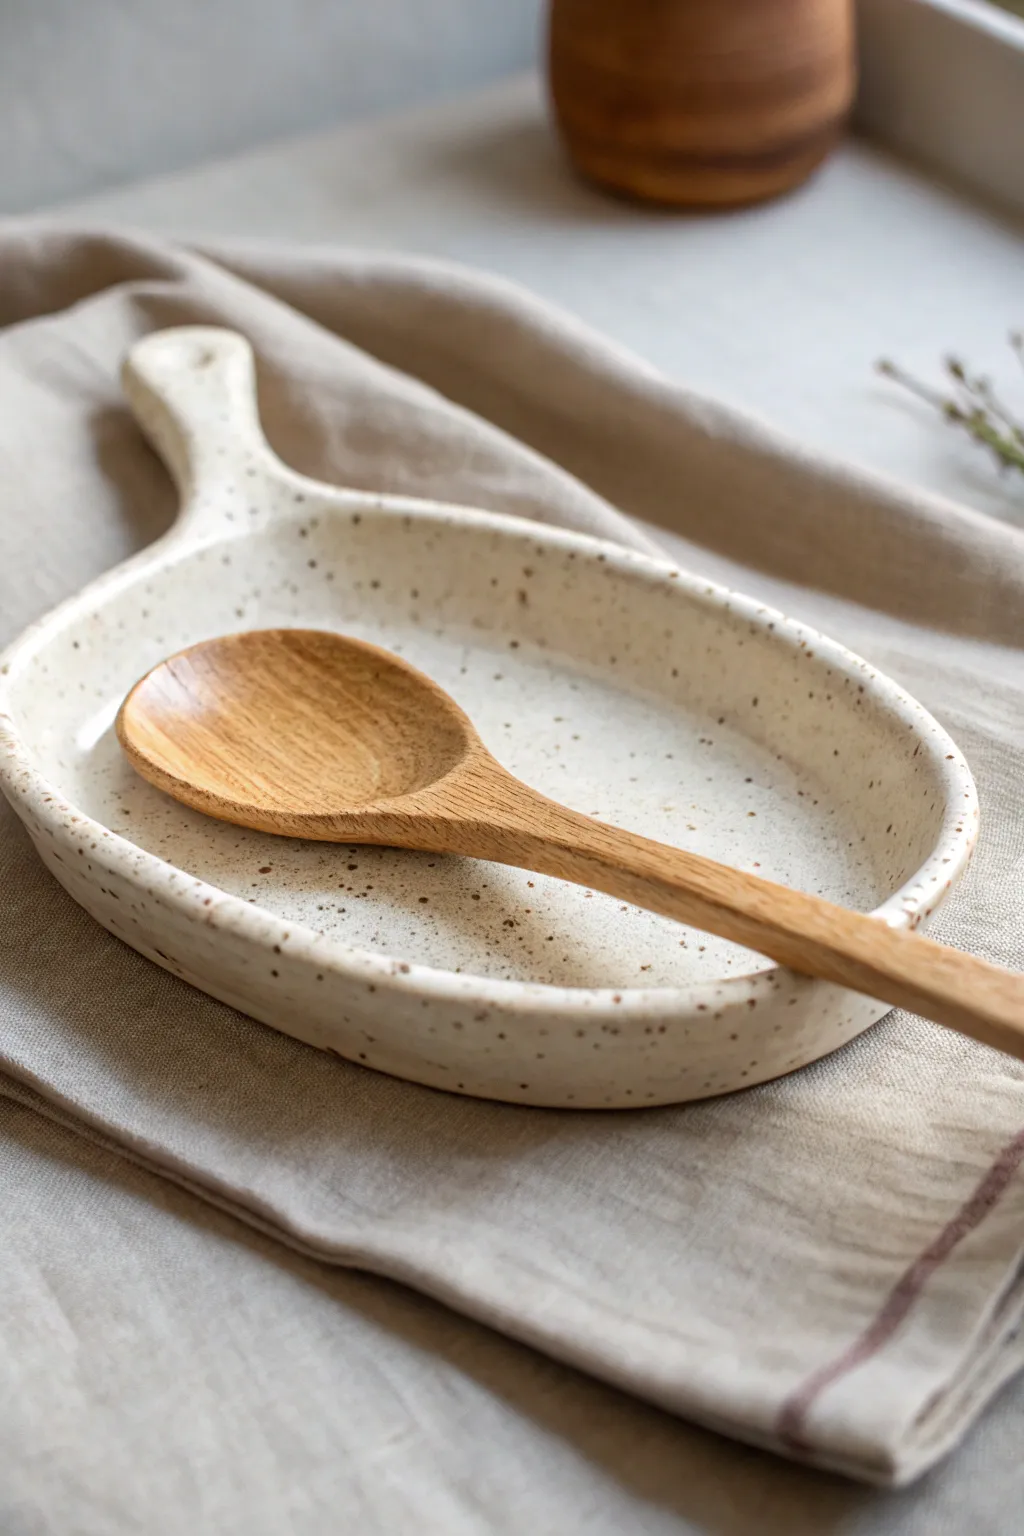
This charming spoon rest combines form and function with its elegant oval shape and integrated handle. The speckled cream finish gives it a warm, farmhouse-modern aesthetic that looks beautiful on any countertop.
Detailed Instructions
Materials
- Speckled buff stoneware clay (or white clay with grog)
- Rolling pin
- Canvas mat or slab roller
- Paper template (oval shape)
- Fettling knife or needle tool
- Rib tool (flexible rubber or metal)
- Sponge
- Small bowl of water
- Soft brush for glazing
- Speckled cream or ‘Oatmeal’ stoneware glaze
Step 1: Planning and Rolling
-
Create your template:
Sketch an oval shape on a piece of paper, approximately 6 inches long by 4 inches wide. Draw a 2-inch handle extension coming off one of the narrow ends, blending the connection point with a smooth curve so it doesn’t look like an afterthought. Cut this shape out. -
Prepare the clay:
Wedging your clay roughly is essential to remove air bubbles. Take a manageable chunk of speckled stoneware clay and pat it into a rough, thick pancake to start. -
Roll the slab:
Using your rolling pin and canvas mat (or guide sticks if you have them), roll the clay out to a uniform thickness. Aim for about 1/4 inch thick—anything thinner might warp, and thicker will be heavy. -
Smooth the surface:
Before cutting, take your flexible rib tool and compress the clay slab on both sides. This removes the canvas texture and aligns the clay particles, which helps prevent warping later.
Step 2: Shaping the Form
-
Trace and cut:
Lay your paper template onto the smooth slab. Using a fettling knife or needle tool, cut vertically around the perimeter. Hold the tool perpendicular to the table for a clean, straight edge. -
Soften the edges:
Once cut, run a damp sponge or your finger gently along the sharp cut edges to round them slightly. This prevents chipping later and gives the piece a finished look. -
Lift the rim:
Place the clay shape on a distinct piece of fabric or foam. Gently pinch and lift the edge of the oval section upwards to create a shallow wall, roughly 1/2 inch high. leave the handle section mostly flat. -
Refine the curve:
Work your way around the oval, using your thumb on the inside and fingers on the outside to smooth the transition where the wall rises. I prefer to use a damp sponge here to erase any fingerprint marks as I shape. -
Curve the handle:
Gently lift the handle section just slightly so it isn’t perfectly flat against the table. You can prop it up with a small wad of clay or a rolled-up paper towel underneath so it dries with a slight upward curve. -
Drill a hanging hole:
If you want the option to hang this piece, use a straw or a small hole cutter to create a hole near the end of the handle. Make sure it’s centered.
Smooth Rim Tip
Use a piece of plastic wrap over the clay slab before cutting. Pressing the cutter through the plastic rounds the edges automatically as you cut.
Step 3: Drying and Bisque
-
Slow drying:
Loosely cover the piece with plastic sheeting. Let it dry slowly for the first 24 hours to ensure the stress from bending the rim doesn’t cause cracks. -
Refine bone dry stage:
Once the clay is bone dry (room temperature and chalky to the touch), use a fine sanding sponge to gently smooth out any remaining rough spots on the rim or handle edges. Wear a mask for this step. -
Initial firing:
Load the piece into the kiln for a bisque fire (usually Cone 04 or 06, depending on your clay body). This hardens the clay and prepares it for glazing.
Warping Issues?
If the handle curls up too much during firing, add a tiny ‘prop’ of clay under the handle during the drying phase to support its weight.
Step 4: Glazing and Finishing
-
Clean the bisque:
Wipe the fired piece with a damp sponge to remove any dust from sanding or the kiln, which can prevent glaze from adhering properly. -
Apply the glaze:
Using a soft fan brush, apply 2-3 coats of your speckled cream glaze. If your clay body is already speckled, a semi-transparent white glaze works wonders. Allow each coat to dry to the touch before adding the next. -
Check the foot:
Ensure the bottom of the spoon rest is completely free of glaze. Wipe away any drips with a sponge, or use wax resist on the bottom before you start glazing. -
Final firing:
Fire the piece to the maturity temperature of your clay and glaze combination (often Cone 5 or 6 for stoneware). Allow the kiln to cool naturally before unloading.
Enjoy using your custom spoon rest for many meals to come, noting how the glaze breaks beautifully over that speckled clay
Tiny Slab Ring Dishes for Nightstands

These minimalist ring dishes feature a gorgeous speckled finish and organic, hand-shaped rims that add a touch of artisanal charm to any bedroom. Perfect for keeping your everyday jewelry organized, they are simple to make and beautifully understated.
Step-by-Step
Materials
- Speckled stoneware clay (or white clay with speckles added)
- Canvas or cloth-covered rolling surface
- Rolling pin
- Two wooden slats (approx. 1/4 inch thick) for thickness guides
- Round cookie cutter or jar lid (approx. 3-4 inches diameter)
- Small foam sponge
- Smoothing rib (rubber or metal)
- Small slump mold (a small bowl or rounded plaster form) or a foam pad
- Pottery knife or needle tool
- Clear or glossy white glaze (food safe recommended)
- Kiln (or air-dry clay alternatives for non-functional decorative use)
Step 1: Prepping and Rolling the Slab
-
Prepare your clay:
Begin by wedging a small ball of speckled stoneware clay to remove air bubbles and ensure an even consistency. -
Set up your workspace:
Place your canvas on a flat surface and position the two wooden slats on either side of your workspace. These will help you roll a perfectly even slab. -
Roll the slab:
Flatten the clay ball slightly with your palm, then use the rolling pin to roll it out into a slab. Roll back and forth, resting the pin on the wooden slats until the clay is uniform in thickness. -
Compress the slab:
Take your smoothing rib and gently drag it across the surface of the clay in multiple directions. This compresses the clay particles, preventing future warping, and removes any canvas texture. -
Cut the shapes:
Press your round cookie cutter or jar lid firmly into the slab to cut out your circles. For this set, you’ll want two circles of roughly equal size.
Warping Woes?
If your dishes warp while drying, dry them slower! Keep them covered longer or weigh the centers down gently with a small sandbag.
Step 2: Forming and Refining
-
Soften the edges:
Once cut, the edges will be sharp and square. Gently run a damp sponge or your finger along the rim to round it off slightly. -
Lift the edges:
Place the clay circle on your foam pad or in the palm of your hand. Gently press the center with your thumb while lifting the edges to create a shallow curve. You don’t want a deep bowl, just a slight lip to contain the rings. -
Add organic character:
Instead of keeping the rim perfectly uniform, I like to pinch a few spots or gently warp the edge slightly to give it that handmade, organic feel seen in the photo. -
Smooth the interior:
Use a barely damp sponge to wipe the inside of the dish again, ensuring there are no fingerprints or tool marks on the surface where the jewelry will sit. -
Dry slowly:
Place the finished forms on a board covered with newsprint. Cover them loosely with plastic for the first day to let them dry slowly and evenly, preventing cracks.
Make it Luxe
Add a rim of real gold luster paint after the glaze firing. You’ll need a third, low-temp firing, but the metallic edge is stunning.
Step 3: Firing and Glazing
-
Bisque fire:
Once bone dry, fire the pieces in the kiln to the appropriate cone for your clay body (usually Cone 04 or 06) to create bisque ware. -
Wipe down:
After the kiln cools, remove the dishes and wipe them with a damp sponge to remove any kiln dust that could interfere with the glaze. -
Apply glaze:
Dip the dishes into a clear or glossy white glaze. If your clay already has speckles, a clear glaze will show them off best. If using plain white clay, choose a glaze with suspended speckles. -
Clean the foot:
Using a sponge or wax resist, completely clean the bottom of the dish so no glaze remains where it will touch the kiln shelf. -
Glaze fire:
Load the kiln again and fire to the final temperature required by your glaze and clay combination (often Cone 5 or 6 for stoneware).
Place your new dishes on your bedside table and enjoy the simple elegance of your handmade pottery


What Really Happens Inside the Kiln
Learn how time and temperature work together inside the kiln to transform clay into durable ceramic.
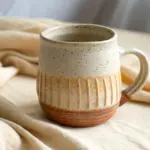
Slab-Built Mugs Using One Wraparound Wall
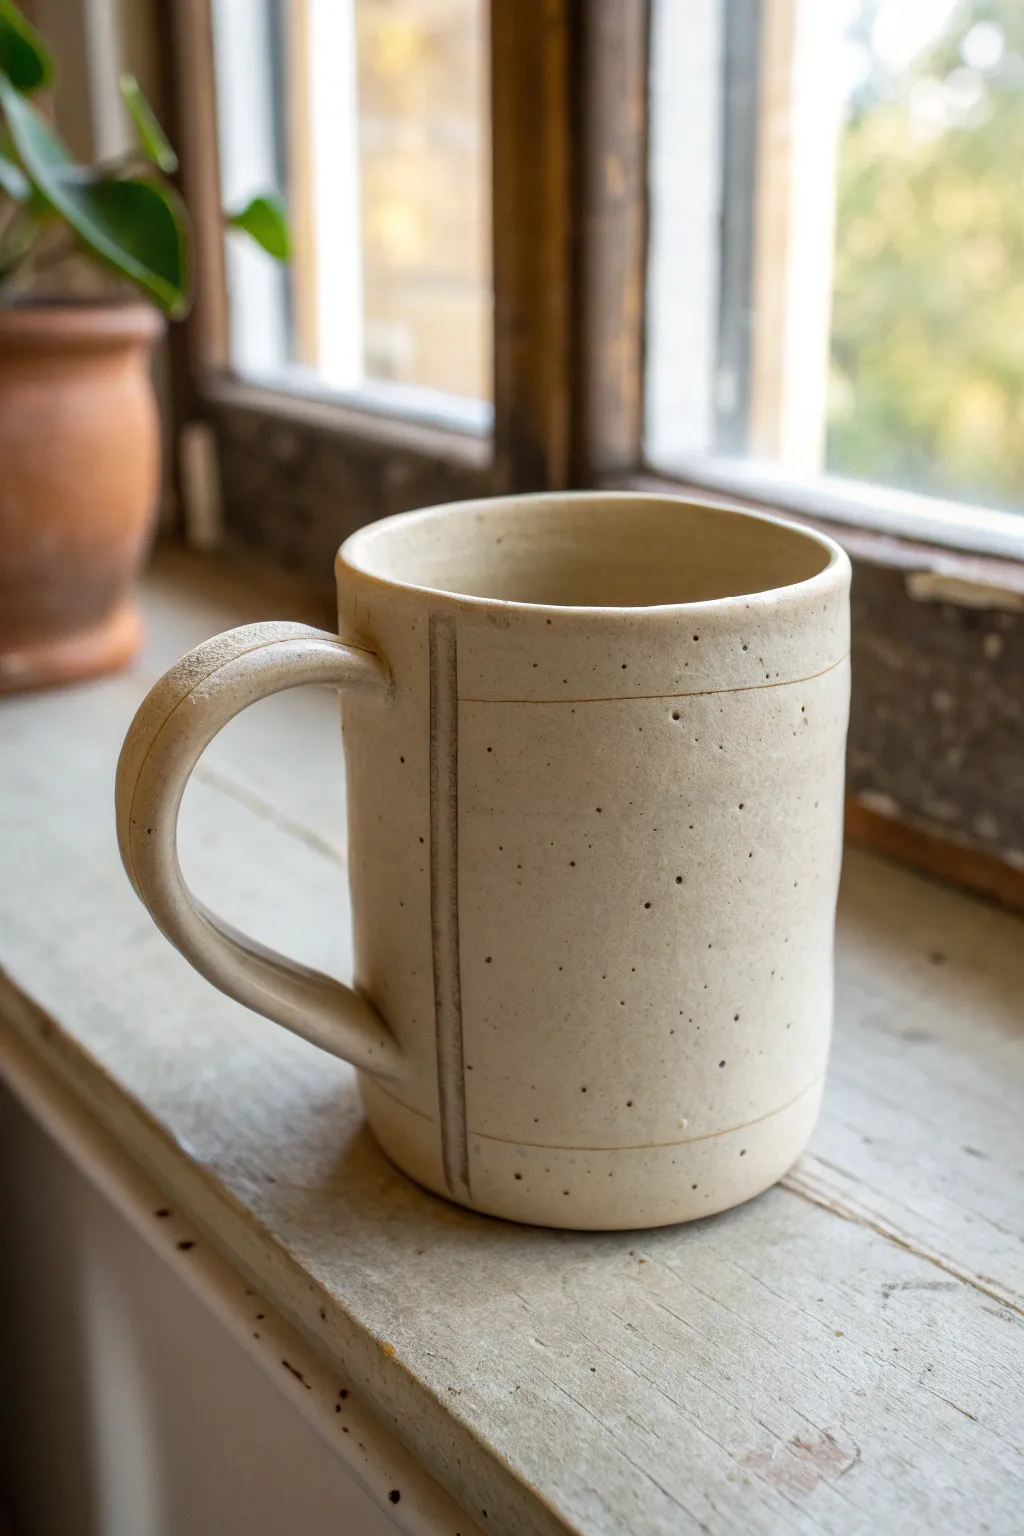
Embrace the beauty of simplicity with this sturdy, handcrafted mug built from a single slab of clay. Featuring a distinct exposed seam and subtle horizontal accents, this project highlights the natural texture of speckled stoneware.
Detailed Instructions
Materials
- Speckled cream stoneware clay (cone 5/6 recommended)
- Rolling pin
- Two wooden guide strips (approx. 1/4 inch thick)
- Paper mug template (rectangular)
- Fettling knife or needle tool
- Scoring tool or serrated rib
- Slip (clay and water slurry)
- Wooden modeling tool
- Sponge
- Modeling tool with a rounded tip
- Clear or matte white glaze
Step 1: Preparing the Slab
-
Roll out the clay:
Begin by wedging your speckled clay to remove air bubbles, then flatten it slightly with your palm. Place your wooden guide strips on either side of the clay and roll it into a smooth, even slab about 1/4 inch thick. -
Compress the surface:
Using a rubber rib, firmly compress the clay on both sides. This aligns the clay particles to prevent cracking later and gives you a nice, smooth canvas to work with. -
Cut the rectangle:
Lay your paper template onto the slab. Using your fettling knife, cut precisely around the template to create the main body of the mug. Save the excess clay for the base and handle. -
Texture and trim:
If you want a smoother rim, lightly run a damp sponge along the top long edge of your rectangle to soften the corner before assembly.
Seam Success
When making the vertical indentation, support the wall from the inside with your other hand. This prevents the cylinder from warping out of round while you press.
Step 2: Forming the Cylinder
-
Score the connection points:
Score the two short vertical edges of your slab where they will join. Be generous with your scoring to ensure a strong bond. -
Apply slip:
Dab a layer of thick slip onto the scored areas. It should be wet but not dripping. -
Join the walls:
Gently lift the slab and curve it into a cylinder, bringing the short ends together. Instead of blending the seam invisible, overlap them slightly or butt them together firmly. -
Create the signature groove:
Press the seam together securely from the inside. On the outside, use a wooden tool to intentionally press a vertical indentation along the join line, emphasizing the construction rather than hiding it. -
Add horizontal accents:
While the cylinder is standing, use a needle tool or a dull knife to gently incise two horizontal lines—one near the top rim and one near the base—running parallel to the edges.
Step 3: Adding the Base and Handle
-
Cut the base:
Place your cylinder onto the remaining slab of clay. Trace lightly around the bottom, remove the cylinder, and cut out the circle. -
Attach the bottom:
Score and slip both the bottom edge of the cylinder and the outer edge of the circular base. Press them firmly together. -
Seal the interior:
Take a very thin coil of clay and place it inside the mug at the bottom seam. Smooth this coil down into the corner to create a water-tight seal and a nice curve for washing. -
Pull a handle:
Take a lump of clay and pull a traditional strap handle using water and friction. I prefer to let this stiffen up for about 20 minutes on a table edge so it holds its shape better during attachment. -
Attach the handle:
Cut the handle to size at an angle. Score and slip the attachment points on the mug body opposite your vertical seam. Press the handle on firmly, reinforcing the top join and curving the bottom tail into the mug wall. -
Clean up:
Smooth away any sharp edges on the handle with a damp sponge, ensuring comfortable finger placement.
Handle Comfort
Flatten the top of the handle slightly where your thumb will rest. A wider attachment point at the top makes the mug feel much lighter when full of coffee.
Step 4: Finishing Touches
-
Dry slowly:
Cover the mug loosely with plastic for the first 24 hours to let the moisture equalize, then uncover to let it become bone dry. -
Bisque fire:
Fire the mug to bisque temperature (usually cone 04/06) to prepare it for glazing. -
Glaze application:
Dip the mug into a simple matte white or clear glaze. This transparency is crucial to let the clay’s natural iron speckles create that ‘cookies and cream’ aesthetic seen in the photo. -
Final firing:
Fire to the maturity temperature of your clay (likely cone 5 or 6). Once cooled, sand the bottom if necessary.
Enjoy your morning coffee in a vessel that perfectly balances modern lines with earthy warmth
Straight-Sided Slab Vases With Crisp Seams
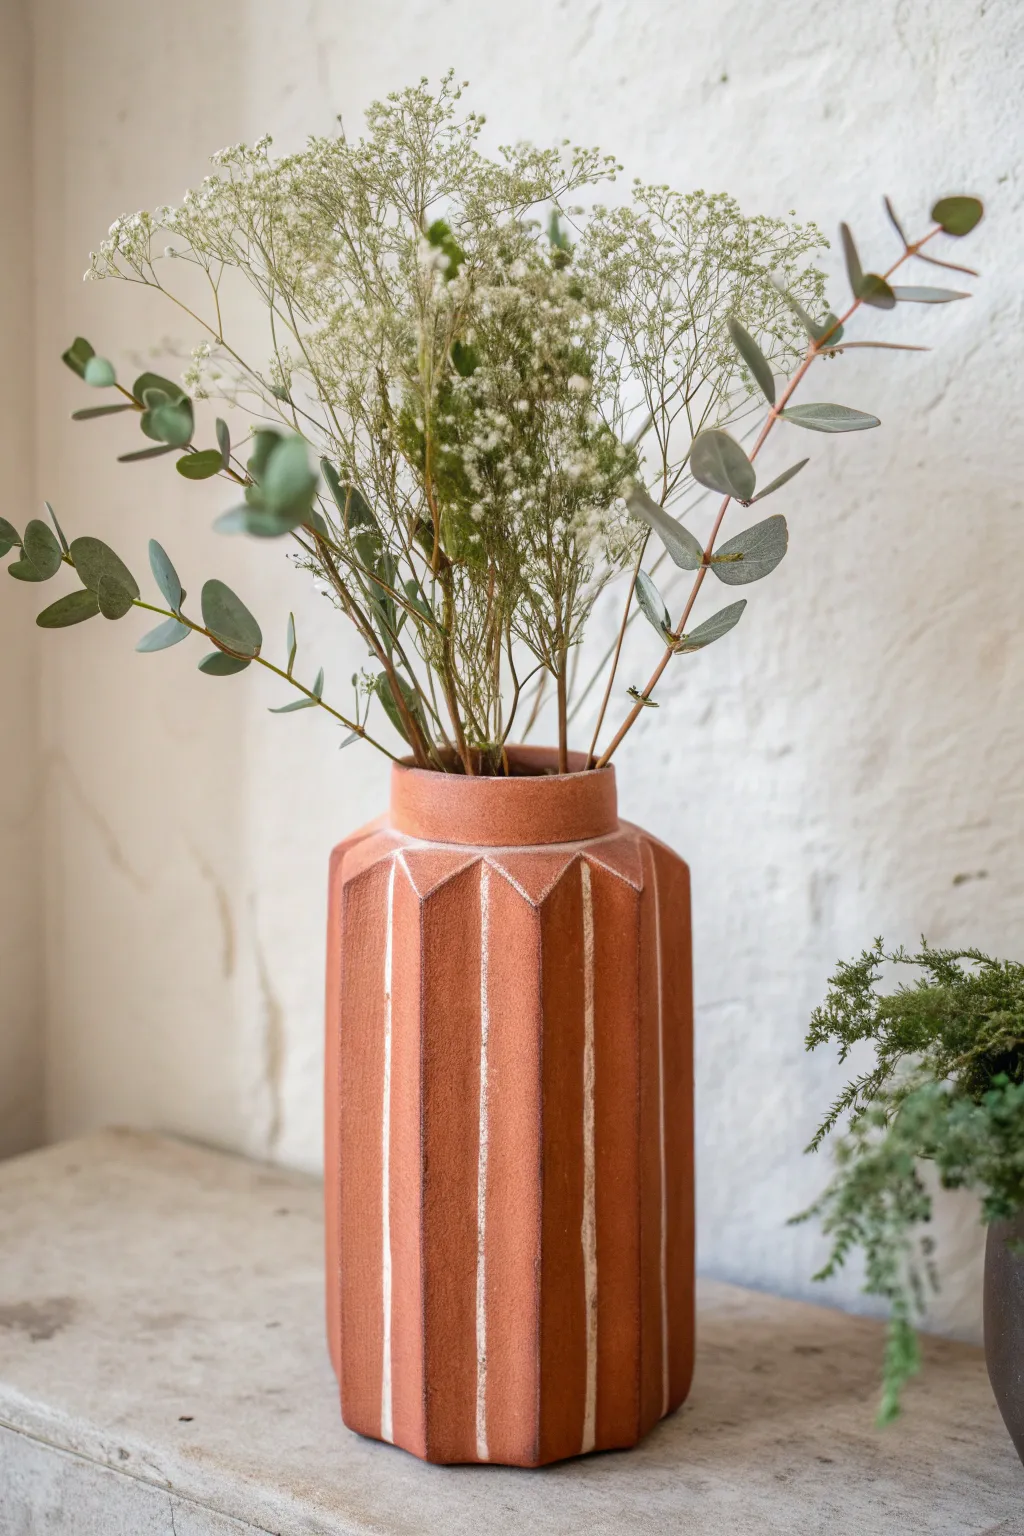
This striking vase combines the raw warmth of terracotta with crisp, geometric precision. By scoring and folding a single slab rather than cutting separate strips, you create deep, structural flutes that are highlighted with a contrasting white slip for a modern, architectural finish.
Step-by-Step Guide
Materials
- Red stoneware or terracotta clay (with grog for strength)
- White decorative slip or white underglaze
- Rolling pin and slats (or slab roller)
- Fettling knife
- Beveled cutting tool (45-degree angle)
- Metal ruler or straight edge
- Scoring tool or serrated rib
- Slip for joining
- Sponge and bucket of water
- Banding wheel (optional)
Step 1: Preparing the Slab
-
Roll out the clay:
Begin by rolling out a medium-sized slab of red clay to an even thickness of about 1/4 inch. If you are using guide slats, ensure the roller stays on them throughout to keep the thickness consistent. -
Compress the slab:
Use a rubber rib to compress the clay on both sides. This aligns the clay particles, preventing warping later, and creates a smooth canvas for the terra cotta color to shine. -
Cut the rectangle:
Measure and cut a large rectangle. The height will determine your vase’s height (around 10-12 inches looks elegant), and the width needs to be long enough to accommodate all the folds—likely 18-20 inches depending on how many facets you want.
Cracking folds?
If the clay cracks while folding, it’s too dry. Mist it with water, cover with plastic, and let it rehydrate for an hour. The clay should be ‘leather hard’ but still pliable.
Step 2: Creating the Folds
-
Mark vertical guides:
Using your ruler, lightly mark vertical lines across the entire width of the slab at equal 1.5-inch intervals. These will be your folding points. -
Score the fold lines:
On the ‘back’ prominent side of the slab (the inside of the vase), use a dull tool or the back of your fettling knife to firmly indent every other line. Careful not to cut all the way through. -
Create the V-grooves:
Flip the slab over. On the remaining alternating lines, use a bevel tool or carefully cut V-shaped channels. This removes material so you can fold the clay backward to create the sharp outward-facing points of the star shape. -
Apply the contrast:
Before folding, paint a layer of white slip or underglaze into those V-grooves you just cut. This ensures the white line is deeply embedded in the seam. -
Initial folding:
Methodically accordion-fold the slab along your marked lines. The scored lines fold inward, and the V-grooves fold outward, revealing the white slip in the deep crevices.
Cleaner Lines
After the bisque firing, lightly sand the vertical white seams with 400-grit sandpaper. This sharpens the contrast and removes any stray red clay dust from the white slip.
Step 3: Assembling the Form
-
Form the cylinder:
Stand the folded slab up and curve it into a cylinder shape. You may need to gently persuade the clay to curve without cracking the flat panels. -
Join the seam:
Score and slip the two vertical ends of the slab. Join them securely, trying to hide the seam within one of the inner folds so the pattern remains uninterrupted. -
trace the base:
Place your folded cylinder onto a spare piece of rolled slab. Trace the distinctive star-shaped footprint onto the clay below. -
Cut and attach base:
Cut out the base shape slightly larger than the tracing. Score and slip both the bottom edge of the cylinder walls and the perimeter of the base, then press them firmly together. -
Refine the seams:
Use a wooden modeling tool to clean up the exterior white lines, scraping away any terracotta that smudged over the white slip to keep the lines crisp.
Step 4: Finishing Touches
-
Add the collar:
Roll a small strip of clay, about 1 inch tall. Attach this to the top interior rim of the vase to create a smooth, recessed neck. This helps hold flower stems upright. -
Smooth the surfaces:
Use a slightly damp sponge to wipe down the flat panels, removing fingerprints but avoiding the white slip seams. -
Slow drying:
Cover the vase loosely with plastic for at least 24 hours. Because of the stress at the folds, straight-sided slab vases need slow, even drying to prevent cracks. -
Bisque fire:
Once bone dry, bisque fire the piece to cone 04 (or your clay body’s specifications). -
Glazing:
For the look in the photo, leave the exterior unglazed to show off the raw clay texture. Glaze only the interior with a clear or white liner glaze to make it waterproof.
Fill your new architectural vessel with dried eucalyptus or baby’s breath to complement the earthy tones.

TRACK YOUR CERAMIC JOURNEY
Capture glaze tests, firing details, and creative progress—all in one simple printable. Make your projects easier to repeat and improve.
Slab Bowls Slumped Over a Simple Mold
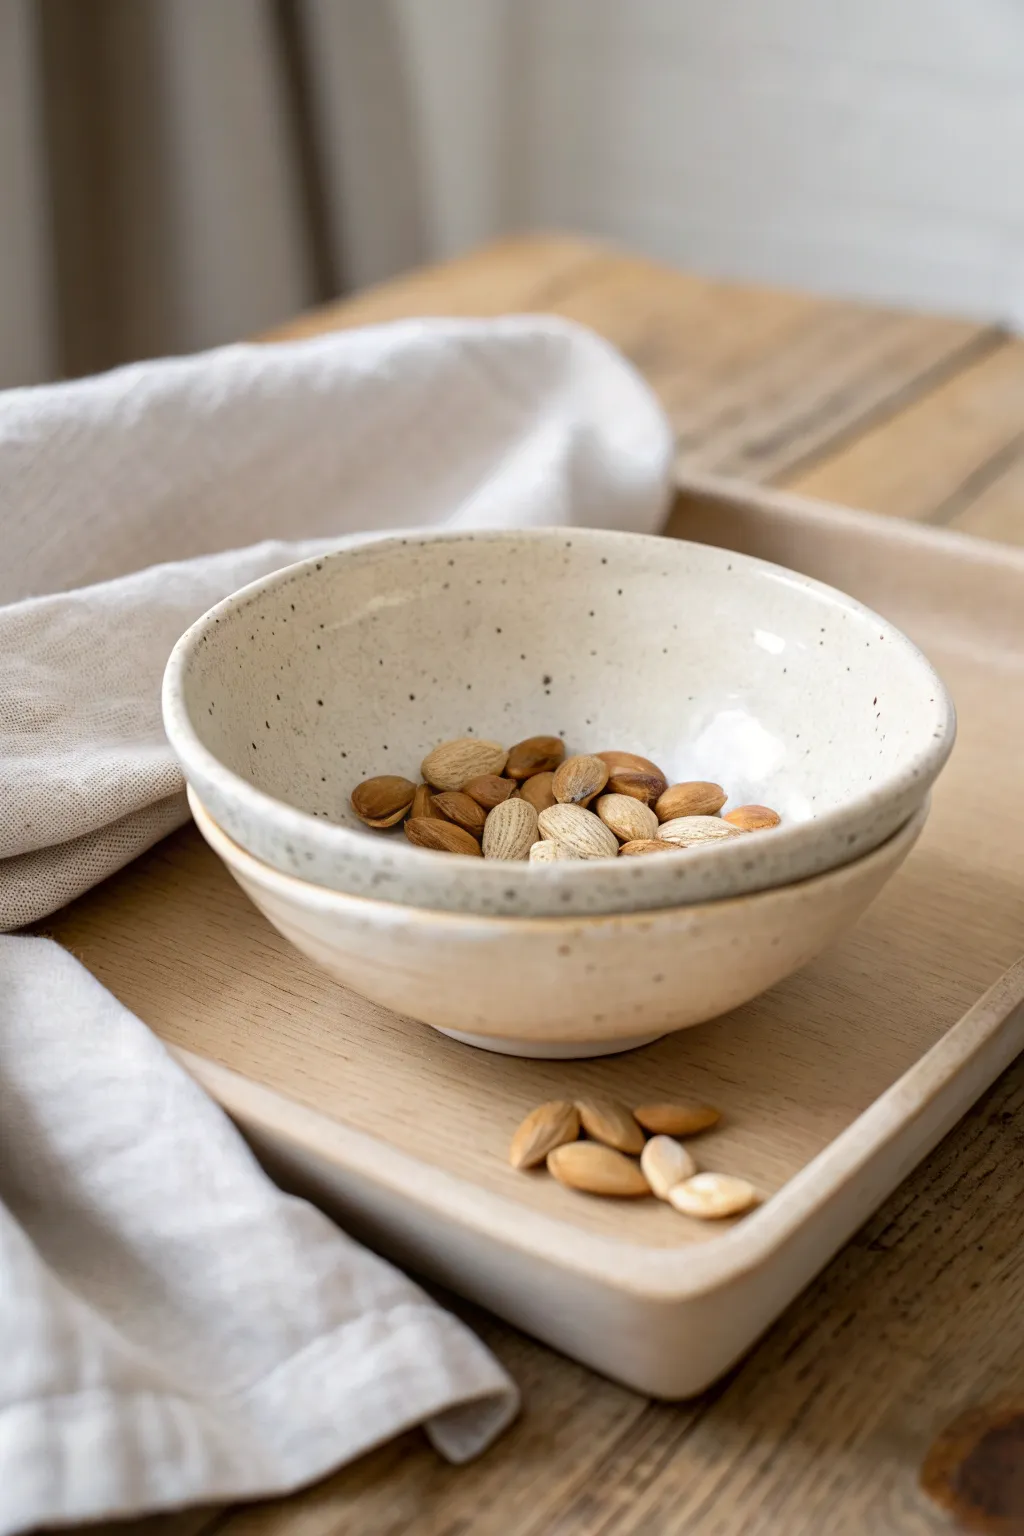
These charmingly rustic nesting bowls showcase the beautiful simplicity of hand-built pottery, featuring an organic rim and a creamy, speckled glaze. Using a basic slump mold technique, you can create a stacked set perfect for serving dry snacks or simply displaying as sculptural objects.
Step-by-Step Tutorial
Materials
- Stoneware clay (preferably a speckled buff body)
- Rolling pin
- Canvas or slab mat
- Two wood guides (approx. ¼ inch thick)
- Round slump molds (plaster or bisqueware)
- Fettling knife or needle tool
- Soft rubber rib
- Sponge
- Surform tool (cheese grater tool for clay)
- Creamy white speckle glaze
- Clear matte glaze (optional for exterior)
- Kiln
Step 1: Preparing the Slab
-
Wedge the clay:
Begin by wedging your speckled stoneware clay thoroughly to remove air pockets and ensure an even consistency. -
Flatten and roll:
Pat the clay into a thick pancake shape with your hands, then place it on your canvas between the two wood guides. These guides ensure your slab is a uniform thickness. -
Roll the slab:
Using the rolling pin, roll out the clay until the pin rides evenly on the wood strips. Roll in multiple directions to compress the clay particles. -
Smooth the surface:
Take your soft rubber rib and firmly compress both sides of the slab. This aligns the clay particles further and removes the canvas texture, giving you a smooth canvas for glazing later.
Step 2: Forming the Bowl
-
Cut the circle:
Place your slump mold upside down on the slab to trace, or use a paper template slightly larger than your mold. Cut a circle using your needle tool. -
Soften the edge:
Before placing it on the mold, run a damp sponge or your finger along the cut edge to round it off. It is much easier to smooth the rim while the slab is flat. -
Drape over the mold:
Gently lift the clay circle and drape it over your convex mold (a plaster hump mold or an overturned bowl covered in plastic). I like to drop it straight down so the center aligns naturally. -
Shape the form:
Starting from the top center, use your hands or a soft rib to gently press the clay down against the mold. Work in a spiral outward to avoid trapping air bubbles. -
Define the rim:
If the rim is uneven, you can trim it now with a needle tool while rotating the mold (if on a banding wheel). Alternatively, embrace the organic, slightly undulating rim seen in the photo. -
Check the foot:
Decide if you want a foot ring or a flat bottom. For this project, gently flatten the very center of the overturned bowl with a wooden paddle to create a stable resting surface.
Slump Sags
If your slab tears while draping, the clay might be too thin or rolled unevenly. Keep slabs at least ¼ inch thick for structural integrity during the slump.
Step 3: Drying and Refining
-
Wait for leather hard:
Allow the clay to stiffen on the mold until it is leather hard. If you remove it too soon, the bowl will warp; too late, and it might crack as it shrinks against the mold. -
Remove and refine:
Gently pop the bowl off the mold. Use a surform tool to even out any heavy spots on the rim or base, then smooth those marks away with a rib. -
Sponge smooth:
Do a final pass with a slightly damp sponge to ensure the rim is rounded and comfortable to the touch. This makes the finished piece feel high-quality. -
Bisque fire:
Let the bowls dry slowly and completely before loading them into the kiln for a bisque firing (usually cone 04 or 06).
Rim Texture
Before glazing, gently sand the rim of the bisque-fired bowl. Leaving the rim unglazed (raw clay) creates a beautiful tactile contrast against the smooth interior.
Step 4: Glazing
-
Wax the bottom:
Apply wax resist to the bottom of the foot to prevent glaze from sticking to the kiln shelf. -
Dip the interior:
Pour a creamy white speckled glaze into the interior of the bowl, swirl it quickly to coat, and pour out the excess. Wipe any drips off the rim immediately. -
Dip the exterior:
Dip the exterior into the same glaze, or perhaps a slightly darker tan glaze to create subtle contrast. The goal is a warm, neutral palette that highlights the clay specks. -
Glaze fire:
Fire the bowls to the maturity temperature of your clay and glaze (typically cone 5 or 6 for stoneware). The specks in the clay body will burn through the white glaze, creating that lovely spotted effect.
Enjoy using your new nesting bowls for morning snacks or organizing small treasures around the house
Square Slab Planters With Little Corner Feet
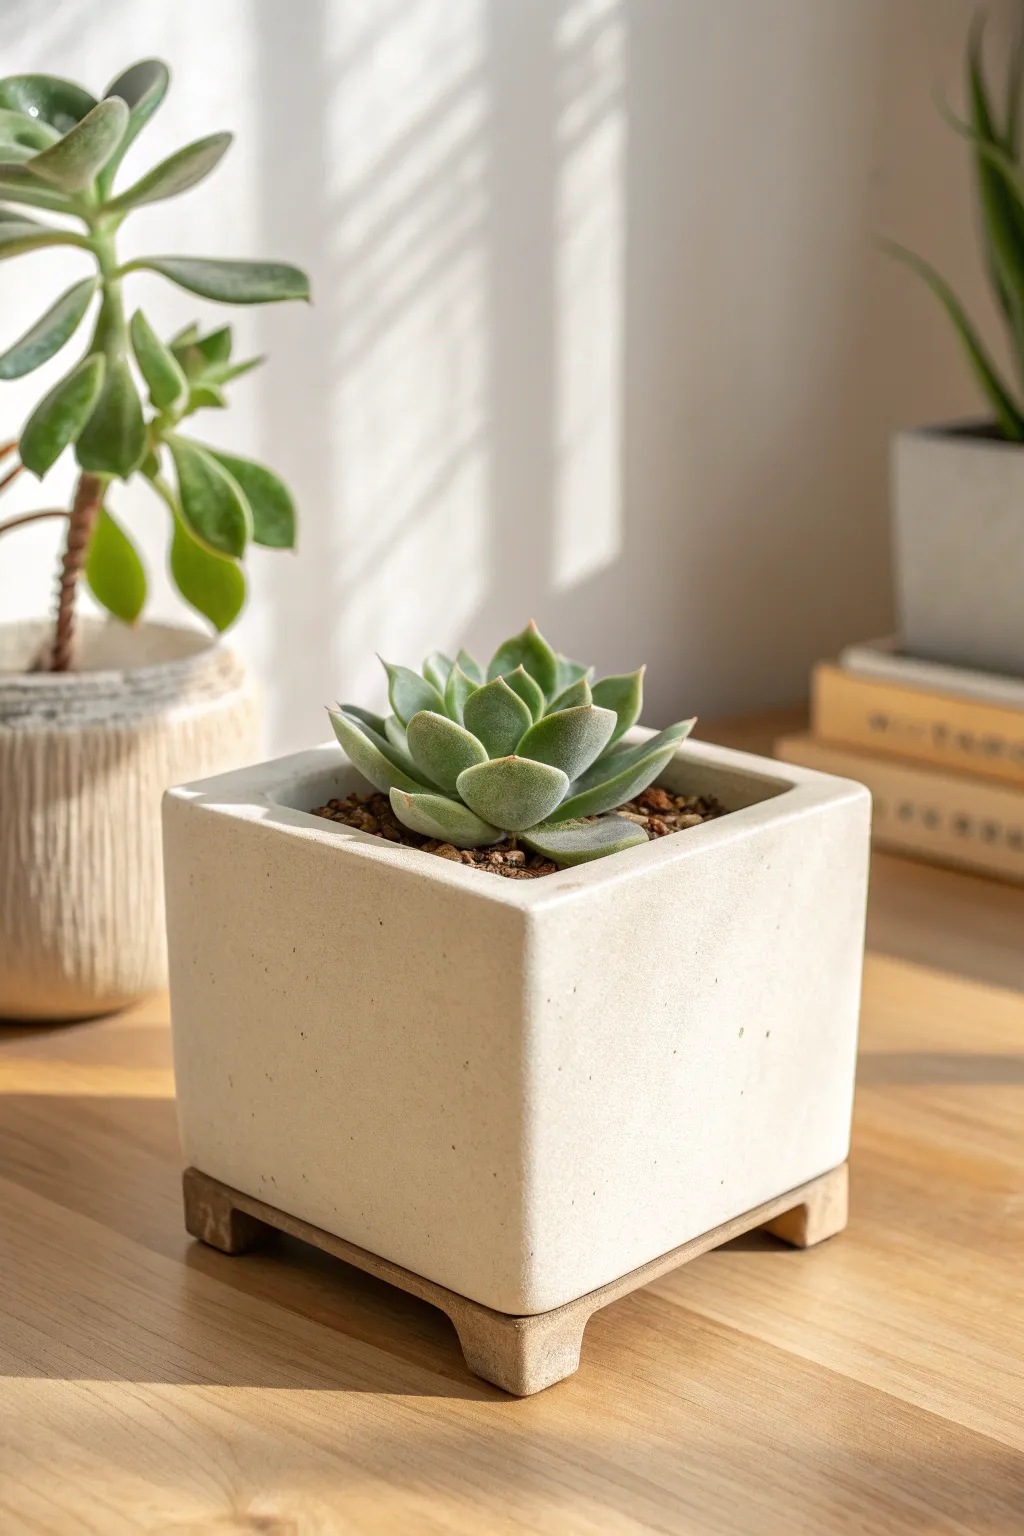
This elegant square planter features clean lines and subtle corner feet that lift the pot slightly, giving it a light, floating appearance. Using slab-building techniques, you’ll create a modern vessel perfect for showcasing your favorite succulents in style.
How-To Guide
Materials
- White stoneware clay or porcelain
- Rolling pin
- Two 1/4-inch thickness guide strips (wood slats)
- Needle tool or fettling knife
- Ruler
- Serrated rib or scoring tool
- Slip (clay mixed with water)
- Wooden modeling tool
- Sponge
- Matte white glaze (optional if using white clay)
Step 1: Preparing the Slabs
-
Roll the clay:
Begin by wedging your white stoneware clay to remove air bubbles. Place it between your thickness guide strips and roll it out into a large, consistent slab. I find that compressing the slab with a rubber rib on both sides at this stage prevents warping later. -
Measure the template:
Decide on the dimensions for your pot. For a standard succulent planter like the one shown, a 4-inch square is ideal. You will need five squares total: one for the base and four for the walls. -
Cut the pieces:
Using a ruler and your needle tool or fettling knife, carefully cut out your five 4×4 inch squares. Keep your knife perpendicular to the table for straight edges. -
Let them stiffen:
Allow the cut slabs to sit until they reach a ‘leather-hard’ state. They should be firm enough to hold their shape without slumping but still soft enough to join. This usually takes about an hour or two depending on humidity.
Clean Corner Hack
Use a 45-degree angle cutting tool specifically designed for foam board or clay. It makes creating perfect mitered corners dramatically easier than freehand cutting.
Step 2: Assembling the Box
-
Bevel the edges:
For the cleanest corners, use your knife to cut 45-degree angles on the vertical edges of the wall pieces where they will meet. You can also butt-joint them if you prefer a simpler method, but beveling creates a seamless look. -
Score and slip:
Rough up the edges you plan to join using a serrated rib or scoring tool. Apply a generous amount of slip to these scored areas. -
Construct the walls:
Place one wall onto the base slab (after scoring and slipping the base). Press it largely into place. Repeat with the remaining three walls, ensuring the corners line up perfectly. -
Reinforce the interior:
Roll a very thin coil of clay. Press this coil into the interior bottom seams and the vertical corner seams. Smooth it out with a wooden tool or your finger to ensure a watertight bond. -
Smooth the exterior:
On the outside, use a rib to smooth over the intricate join lines. The goal is to make the walls look like a single continuous piece of clay.
Elevate It
Instead of separate feet, cut the base slab slightly smaller than the walls. Attach the walls so they hang over the base by 1/4 inch, creating a ‘shadow gap’ foot.
Step 3: Adding the Feet
-
Create the feet:
From your remaining slab scraps, cut four small rectangles, approximately 1 inch by 1/2 inch. These will become the corner lifts. -
Attach the feet:
Flip the box over gently. Score and slip the four corners of the bottom slab. Press the small rectangular feet onto the comers so they align flush with the outer walls. -
Level the pot:
Flip the pot back onto its feet. Is it wobbling? Gently press down on the high corners until the planter sits perfectly flat and stable on the table. -
Refine the rim:
Use a damp sponge to soften the top rim of the planter. It should look crisp but not sharp to the touch.
Step 4: Finishing
-
Dry slowly:
Cover the pot loosely with plastic sheeting. Let it dry very slowly over several days to prevent the walls from warping or cracking at the seams. -
Bisque fire:
Once bone dry, fire the piece to bisque temperature (usually cone 04) in a kiln. -
Interior glazing:
Pour a glaze inside the pot and swirl it to coat just the interior if you want the outside to remain raw clay, or dip the entire piece. -
Exterior texture:
To achieve the look in the photo, use a matte white or speckled cream glaze. Alternatively, if your clay body is beautiful on its own, leave the exterior unglazed for a natural stone texture. -
Final firing:
Fire the piece again to the maturity temperature of your clay and glaze (often cone 5 or 6 for stoneware).
Once fired and cooled, pot up your favorite Echeveria to complete this modern, tranquil display
Lidded Slab Boxes for Trinkets and Keepsakes
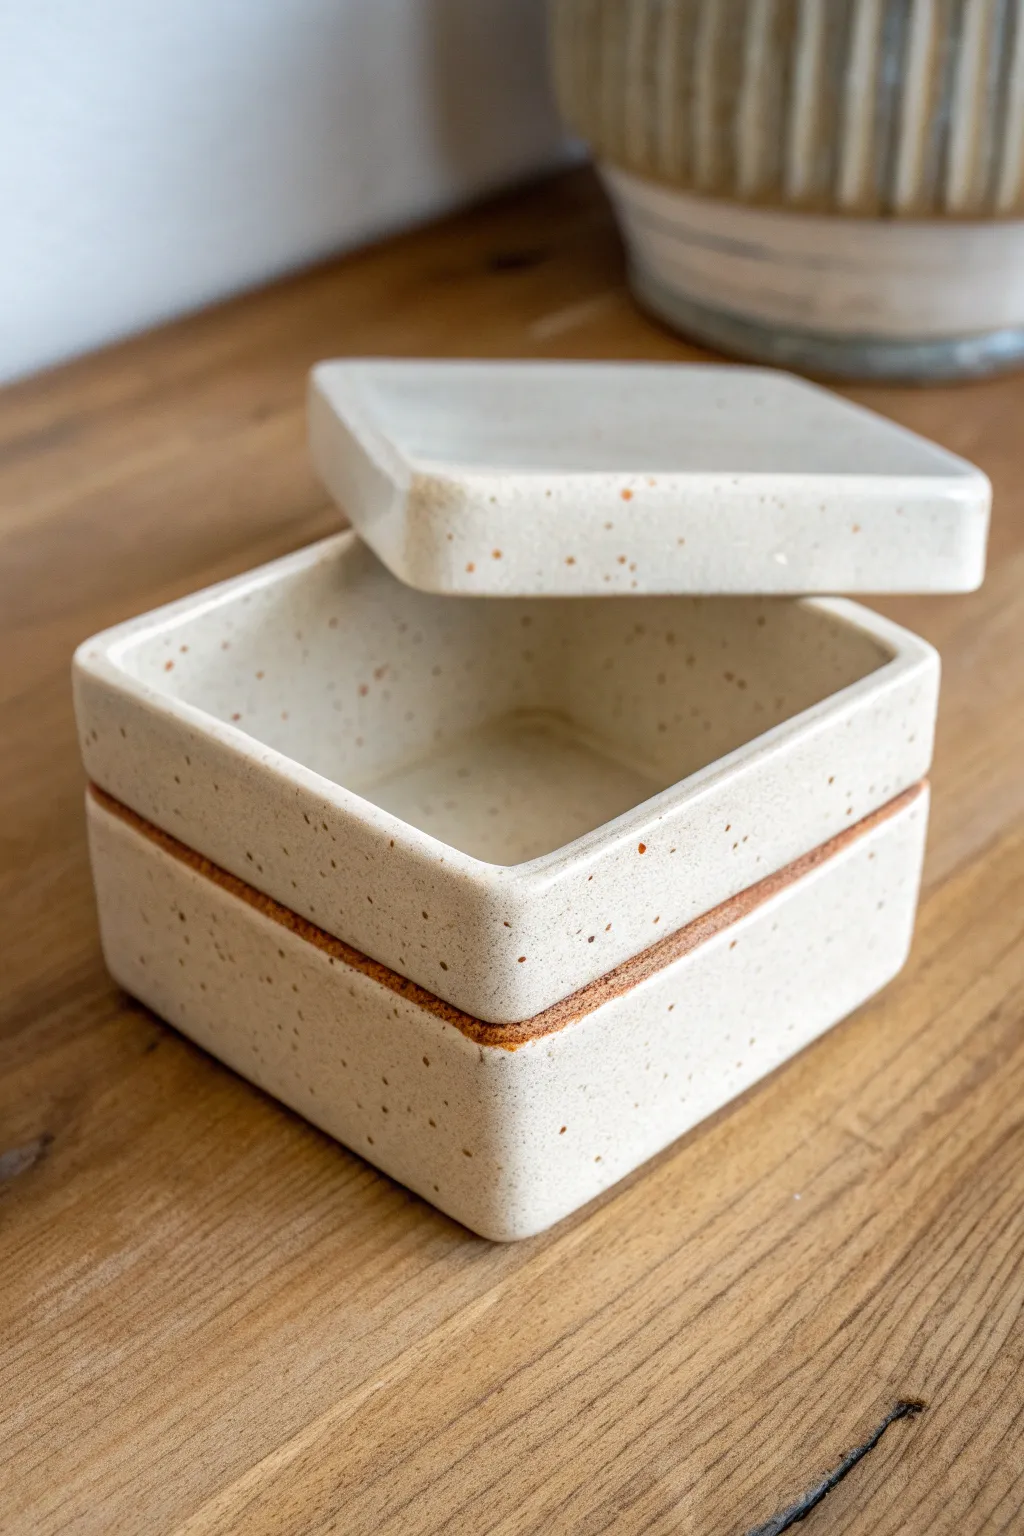
This charming ceramic box features a clean, square silhouette with soft corners and a speckled creamy white glaze that highlights the warm clay body beneath. The design utilizes a clever gallery system, allowing the lid to sit flush and creating a distinct visual break between the sections.
Step-by-Step
Materials
- Stoneware clay (preferably a grogged body for stability)
- Rolling pin
- Two wooden thickness strips (approx. 1/4 inch or 6mm)
- Fettling knife or needle tool
- Ruler or square template
- Serrated rib or scoring tool
- Slip (clay mixed with water)
- Wooden paddle
- Sponge
- Soft paintbrush
- Speckled white glaze
- Wax resist
Step 1: Preparing the Slabs
-
Roll the Clay:
Begin by wedging your clay to remove air bubbles. Place the clay between your two wooden thickness strips and roll it out into a large, even slab. Smooth the surface with a rib to compress the clay particles. -
Cut the Base and Wall Strips:
Using a ruler and fettling knife, cut out two identical squares for the top and bottom (approx. 4×4 inches). Next, cut long strips for the walls. You’ll need enough length to wrap around the perimeter of your square base plus a little overlap. -
Leather Hard Stage:
Let these pieces sit until they reach a soft leather-hard state. They need to be firm enough to stand up without slumping but soft enough to bend slightly without cracking.
Warped Walls?
If walls bow inward while drying, cut a block of rigid foam to the exact interior size of the box. Place it inside while the clay dries to leather hard to force the walls to stay perfectly straight.
Step 2: Assembling the Box Body
-
Bevel the Base:
Cut a 45-degree bevel on all four edges of your bottom square slab. This increases surface area for a strong join. -
Prepare the Walls:
Measure the wall strip against the base. Instead of four separate sides, I prefer to score lines where the corners will be and gently bend the single strip to form a square. Cut the excess and bevel the ends to join them together. -
Score and Slip:
Thoroughly score (scratch) the beveled edges of the base and the bottom edge of your wall strip. Apply a generous amount of slip to both scored areas. -
Attach Walls to Base:
Press the wall onto the base firmly. Use your fingers or a small wooden tool to smooth the clay from the outside wall down onto the base, blurring the seam completely. -
Reinforce the Inside:
Roll a very thin coil of soft clay and press it into the interior seam where the wall meets the floor. Smooth it out with a rounded tool or your finger. -
Shape the Box:
Use a wooden paddle to gently tap the walls straight and square from the outside. This is crucial for fixing any warping that happened during handling.
Step 3: Creating the Gallery and Lid
-
Create the Gallery Ledge:
To make the recessed area where the lid sits (and the decorative unglazed line), roll a slightly smaller strip of clay. Attach this strip to the *inside* top rim of the box, leaving about 1/4 inch protruding upwards creates a flange, or attaching it slightly lower to create a shelf. -
Alternative Gallery Method:
For the specific look in the photo, attach a slab ‘collar’ to the top rim that is slightly inset. Score and slip this onto the main box rim. This creates the ‘stacked’ visual effect. -
Fit the Lid:
Take your second square slab (the lid) and place it gently on the box to check the fit. It should sit flush with the outer walls. Refine the edges with a rasp or rib so the lid and box walls are perfectly aligned. -
Soften the Corners:
With the lid on, gently paddle or sand the corners to round them off. The example image has distinctively soft, non-sharp corners.
Level Up: Texture
Before assembling, roll your slab onto a piece of canvas or textured fabric. This will leave a subtle imprint on the exterior that glazes beautifully, adding more depth than a smooth surface.
Step 4: Glazing and Finishing
-
Standard Bisque Fire:
Allow the piece to dry slowly under plastic to prevent warping. Once bone dry, bisque fire it according to your clay body’s specifications (usually cone 04 or 06). -
Wax Application:
This step is key for the look: Apply wax resist carefully to the area where the lid meets the box—specifically the exposed rim of the box gallery and the underside rim of the lid where they touch. -
Glaze Application:
Dip or brush on your speckled white glaze. The wax resist will keep the glaze off the rim, revealing that distinct line of raw clay seen in the photo. -
Final Cleanup:
Wipe away any rogue droplets of glaze on the waxed areas with a damp sponge to ensure a crisp line. -
Glaze Fire:
Fire the piece to the glaze’s maturity temperature (e.g., cone 5 or 6). Do not fire the lid *on* the box unless you have applied alumina hydrate to the join, otherwise, they will fuse together.
Now you have a sleek, functional box perfect for holding your tiny treasures
Slab Butter Dishes Using Fold-and-Join Shapes

Embrace the warmth of speckled clay with this charming two-piece butter dish, featuring a creamy white glaze that contrasts beautifully with the raw terracotta-hued base. The clean lines and rounded corners create a modern farmhouse aesthetic that elevates any breakfast table.
Detailed Instructions
Materials
- Speckled stoneware clay or terracotta clay
- Rolling pin
- Rolling slats or guide sticks (approx. 1/4 inch)
- Rectangular slump mold (or a wooden block covered in plastic)
- Fettling knife
- Needle tool
- Scoring tool (serrated rib)
- Slip
- Smoothing sponge
- Creamy white speckled glaze
- Wax resist
- Small loop tool
Step 1: Forming the Base Tray
-
Roll the slab:
Begin by rolling out a consistent slab of clay using your guide sticks to ensure an even thickness of about 1/4 inch. Smooth both sides with a rib to compress the particles. -
Measure and cut:
Depending on your mold size, cut a rectangle large enough to cover the bottom and rise up the sides about 1 inch. Leave a little extra margin; it’s better to trim later than to be short. -
Shape the tray:
Gently lift your clay slab and drape it *into* your rectangular slump mold. Alternatively, you can drape it *over* a hump mold. Press the clay firmly into the bottom corners, being careful not to stretch it too thin. -
Define the walls:
Smooth the walls upward against the mold sides. Use a sponge or soft rib to ensure the interior is seamless and smooth. -
Trim the rim:
Once the clay has stiffened slightly to leather-hard, use a needle tool to cut the rim straight across at an even height (about 1 to 1.5 inches tall). Smooth the cut edge with a damp chamois or sponge.
Uneven Lid?
If the lid rocks on the base after the bisque fire, wet-sand the bottom edge of the lid on a piece of sandpaper taped to a flat table until it sits perfectly flush.
Step 2: Constructing the Lid and Handle
-
Create the lid slab:
Roll a second slab for the lid. This needs to be slightly smaller than the base tray so it fits comfortably inside, or sized to sit perfectly on a gallery rim if you choose to add one. -
Form the lid box:
Using a smaller rectangular form or block as a guide, drape the clay to form a deep inverted box shape. The height should be taller than the base, roughly 2-3 inches, to clear a standard stick of butter. -
Refine the shape:
Once the clay holds its shape, remove the support. Gently paddle the outside walls with a flat wooden paddle to square them up while keeping the corners softly rounded like the example image. -
Make the handle coil:
Roll a small, thick coil of clay. Flatten it slightly into a strap shape, arching it to form a snug semi-circle loop. -
Attach the handle:
Score the center top of the lid and the ends of your handle loop. Apply slip and press the handle firmly into place. I like to use a tiny coil around the connection point to blend it seamlessly for extra strength. -
Check the fit:
Place the lid onto the base tray. It should sit steadily. If it wobbles, check the bottom edges of the lid and sand or trim them until flush.
Add Texture
Before folding your slabs, roll a textured fabric or lace gently over the clay surface. This subtle texture will break nicely under the cream glaze.
Step 3: Glazing and Finishing
-
Bisque fire:
Allow both pieces to dry slowly under plastic to prevent warping, then bisque fire them according to your clay body’s specifications. -
Apply wax resist:
Paint a band of wax resist along the bottom inch of the outside of the lid, and the bottom half-inch of the base tray. This preserves the ‘dipped’ look where the raw clay shows. -
Glaze the interior:
Pour your creamy white glaze into the interior of the lid and the base tray. Swirl it around to coat completely and pour out the excess. -
Dip the exterior:
Holding the pieces firmly, dip the exterior into the glaze. The wax resist will prevent the glaze from sticking to the lower sections, creating that sharp, clean line seen in the photo. -
Clean up:
Use a damp sponge to wipe away any stray droplets of glaze that may have beaded up on the waxed areas. -
Final firing:
Fire the piece to the glaze’s maturity temperature (likely Cone 5 or 6 depending on your clay).
Now you have a functional piece of art ready to bring a touch of crafted elegance to your morning toast routine
Flat Slab Wall Tiles With Bold Impressions
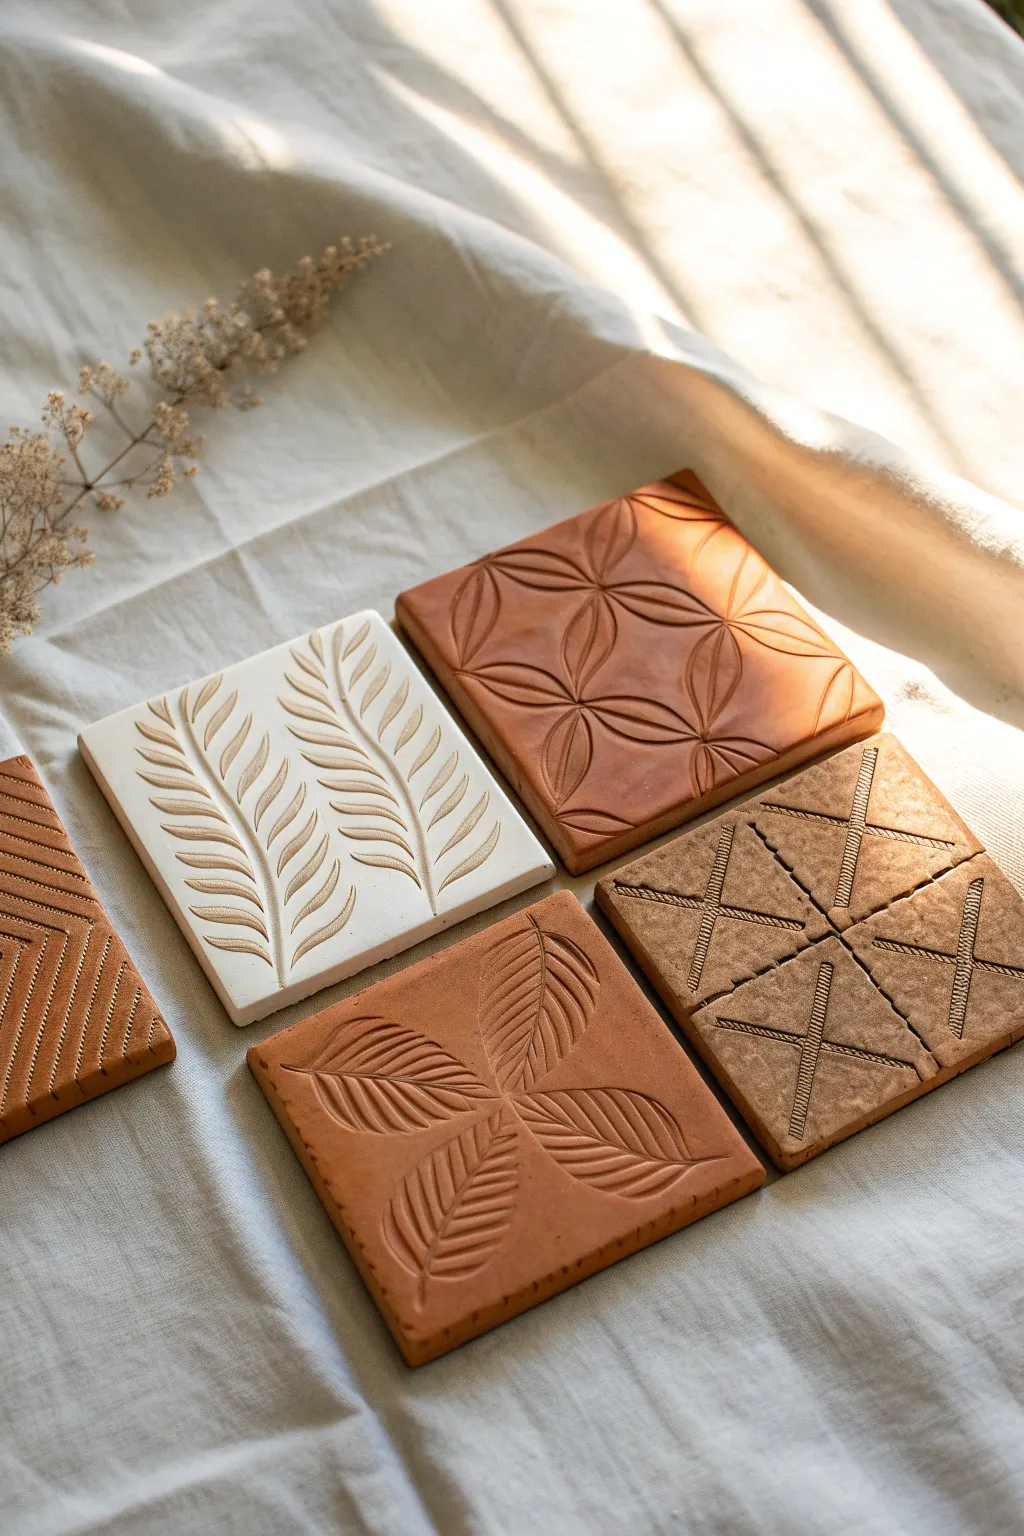
These striking square tiles showcase the beauty of simple clay slabs transformed by deep, confident impressions. Combining warm terracotta and smooth white clay creates a sophisticated rustic palette perfect for coasters, trivets, or a statement wall art installation.
Step-by-Step Tutorial
Materials
- Terracotta clay body
- White stoneware clay body
- Rolling pin
- Two wooden guide strips (approx. 1/4 inch thick)
- Square cookie cutter (approx. 4×4 inches) or ruler and knife
- Carving tools (loop tool, needle tool)
- Modeling tool with a rounded tip
- Canvas work surface
- Sponge
- Fettling knife
- Kiln for firing
Step 1: Slab Preparation
-
Wedging the Clay:
Begin by thoroughly wedging your terracotta clay to remove air bubbles. This is crucial for flat tiles to prevent explosions in the kiln. Repeat the process with a smaller amount of white clay. -
Rolling the Slabs:
Place your canvas on a flat table. Set up your wooden guide strips on either side of the clay ball. Roll the clay out until the rolling pin rests on the guides, ensuring a perfectly even thickness across the entire slab. -
Smoothing the Canvas Texture:
If your canvas left a rough texture, verify the surface is smooth by running a soft rib or a damp sponge lightly over the clay. Do this before cutting to avoid warping the shape later. -
Cutting the Squares:
Using a square cookie cutter is the easiest way to get uniform tiles. Press down firmly and wiggle slightly before lifting. If using a ruler and knife, measure carefully to ensure 90-degree corners.
Step 2: Designing the Geometric Tile
-
Planning the Grid:
For the crossed-line tile, lightly score an ‘X’ across the surface with a needle tool to find your center. Then mark a plus sign to divide the tile into four equal quadrants and triangles. -
Impressing the Texture:
Use a tool with a serrated edge or a small comb tool. Press it firmly into the clay along your scored lines to create distinct, textured bands that form the large geometric ‘X’ pattern shown in the example.
Warping Woes?
Tiles curling up at the edges? Flip them over every 12 hours during the drying phase. This ensures air hits both sides equally, keeping tension uniform.
Step 3: Carving the Botanical Tiles
-
Drafting the Fronds:
For the white tile, lightly sketch two curving stems rising from the bottom edge using a needle tool. Allow these lines to flow naturally rather than being perfectly straight. -
Carving Leaves:
Using a small loop tool or a carving gouge, remove thin strips of clay branching off the main stems. Vary the pressure: press harder at the base of the leaf and lift up as you taper the tip. -
Radiating Leaf Pattern:
On a terracotta tile, mark the center point. Sketch four leaf shapes radiating outward toward the corners. Use a modeling tool to depress the veins deeply, creating a ‘pillow’ effect for the leaf sections between the veins. -
Geometric Flower Pattern:
For the top-right tile, use a compass or circular object to lightly impress overlapping circles (the Flower of Life pattern). Trace over these lines deeply with a rounded modeling tool to create smooth, defined channels.
Level Up: Oxide Wash
Apply a black iron oxide wash into the deep carvings and sponge off the high points. This highlights the texture significantly, making the design pop.
Step 4: Finishing and Drying
-
Cleaning the Edges:
once the clay is leather-hard, run a damp sponge along the outer edges of each square to soften any sharp cuts left by the knife or cutter. -
Drying Strategy:
Sandwich the tiles between two pieces of drywall aka sheetrock or place them on a wire rack covered loosely with plastic. I’ve found slow drying is the only way to keep flat tiles from warping. -
Bisque Firing:
Fire the completely dry pieces to cone 04 (or your clay’s specific bisque temperature). Stack them carefully if you have limited kiln space. -
Leaving Raw or Glazing:
To achieve the look in the photo, leave the tiles unglazed to show off the raw clay body texture. Alternatively, apply a clear matte glaze to seal them without altering the color. -
Final Firing:
Fire the tiles to maturity. If unglazed, they will have a beautiful matte, stone-like finish perfect for absorbing condensation if used as coasters.
Now you have a set of custom-designed tiles that bring an earthy, artisanal touch to your home decor
Ceramic Slab Wall Hangings as Texture Canvases
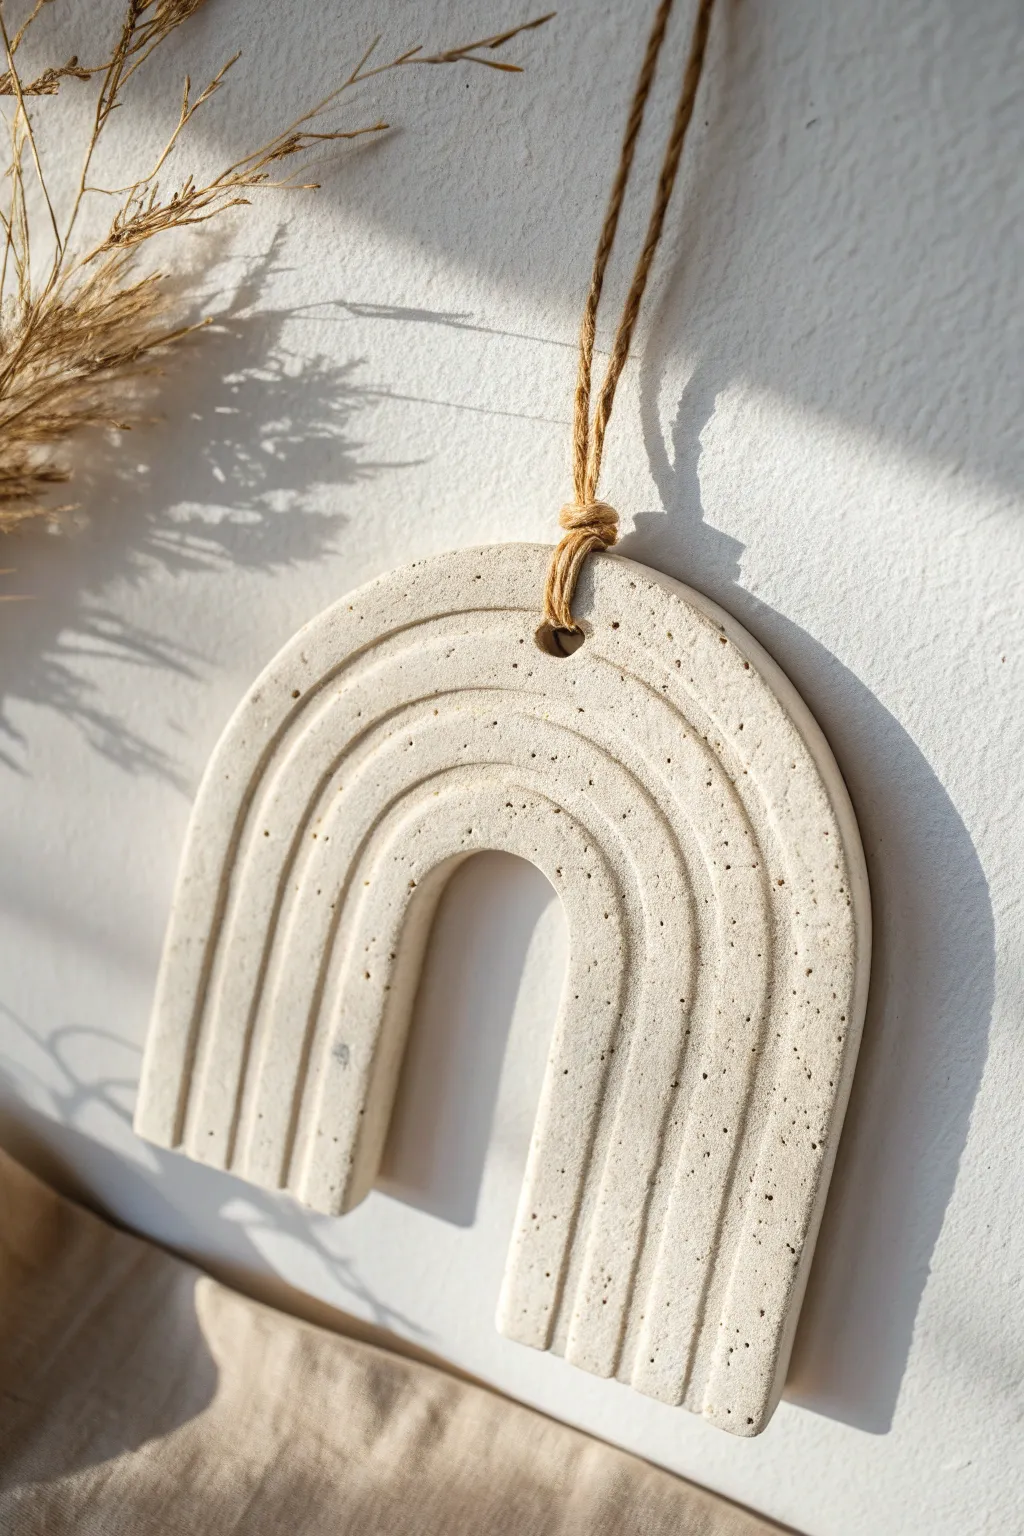
Capture the minimalist charm of boho decor with this textured ceramic wall hanging. The unglazed finish highlights natural speckling, while simple concentric grooves add depth and visual rhythm to the classic arch shape.
Step-by-Step
Materials
- Speckled stoneware clay (mid-fire or high-fire)
- Rolling pin
- Canvas or slab mat
- Two wooden guide slats (approx. 1/4 inch thick)
- Needle tool
- Fettling knife
- Loop tool or carving tool (medium width)
- Smooth river stone or rib tool
- Straw or circular hole punch
- Sponge
- Twine or jute cord
Step 1: Creating the Base Slab
-
Prepare your workspace:
Set up a clean, flat surface covered with canvas or a slab mat to prevent sticking. Place your wooden guide slats on either side of where you will roll the clay. -
Wedge the clay:
Thoroughly wedge a ball of speckled stoneware clay to remove air bubbles and ensure an even consistency. -
Roll the slab:
Flatten the clay ball slightly with your palm, then use the rolling pin to roll it out into a slab. Rest the rolling pin on the guide slats to ensure a perfectly uniform thickness across the entire piece. -
Smooth the surface:
Before cutting, run a soft rib tool gently over the surface to compress the clay particles. This helps prevent warping later and gives you a nice canvas for texturing.
Troubleshooting: Warping
If your edges curl up while drying, flip the piece over daily and weigh down the corners gently with small sandbags to keep it perfectly flat.
Step 2: Shaping and Carving
-
Outline the arch:
Using a needle tool, lightly sketch the rainbow arch shape onto the slab. You can freehand this for an organic look or use paper templates for precision. -
Cut the shape:
Once you are happy with the outline, use a fettling knife to cut cleanly through the clay. Hold the knife vertically to keep the edges straight. -
Create the inner negative space:
Carefully cut out the smaller inner arch to create the open rainbow shape. Remove the excess clay. -
Smooth the edges:
Dip your finger or a sponge in a tiny bit of water and run it along all the cut edges to soften any sharpness. -
Carve the grooves:
Take your loop tool and carefully carve concentric lines following the curve of the arch. Press firmly enough to create a distinct shadow but be careful not to cut all the way through the slab. -
Refine the lines:
Run a damp finger or a small brush along the carved grooves to smooth out any clay burrs or crumbs left by the loop tool. -
Add the hanging hole:
Using a straw or a small circular cutter, punch a hole at the very top center of the arch. Make sure it is not too close to the edge to prevent cracking.
Step 3: Finishing Touches
-
Dry slowly:
Place the piece on a drywall board or wooden ware board. Cover it loosely with plastic to let it dry very slowly, which is crucial for flat slabs to prevent warping. -
Bisque fire:
Once bone dry, fire the piece in a kiln to the appropriate bisque temperature for your specific clay body. -
Final firing:
Since this look relies on the raw clay texture, you can skip glazing and fire it directly to maturity. If you want a sealed surface, apply a clear matte glaze before this step. -
String it up:
Cut a length of natural jute twine. Fold it in half, push the loop through the hole from front to back, and pull the tails through the loop to create a secure lark’s head knot.
Level Up: Dyed Clay
Mix mason stains into your white clay body before rolling to create pastel pink or terracotta colored versions of this arch.
Hang your finished ceramic arch near a window where shadows can play across the textured grooves
Slab Clocks With Carved Marks and a Center Hole
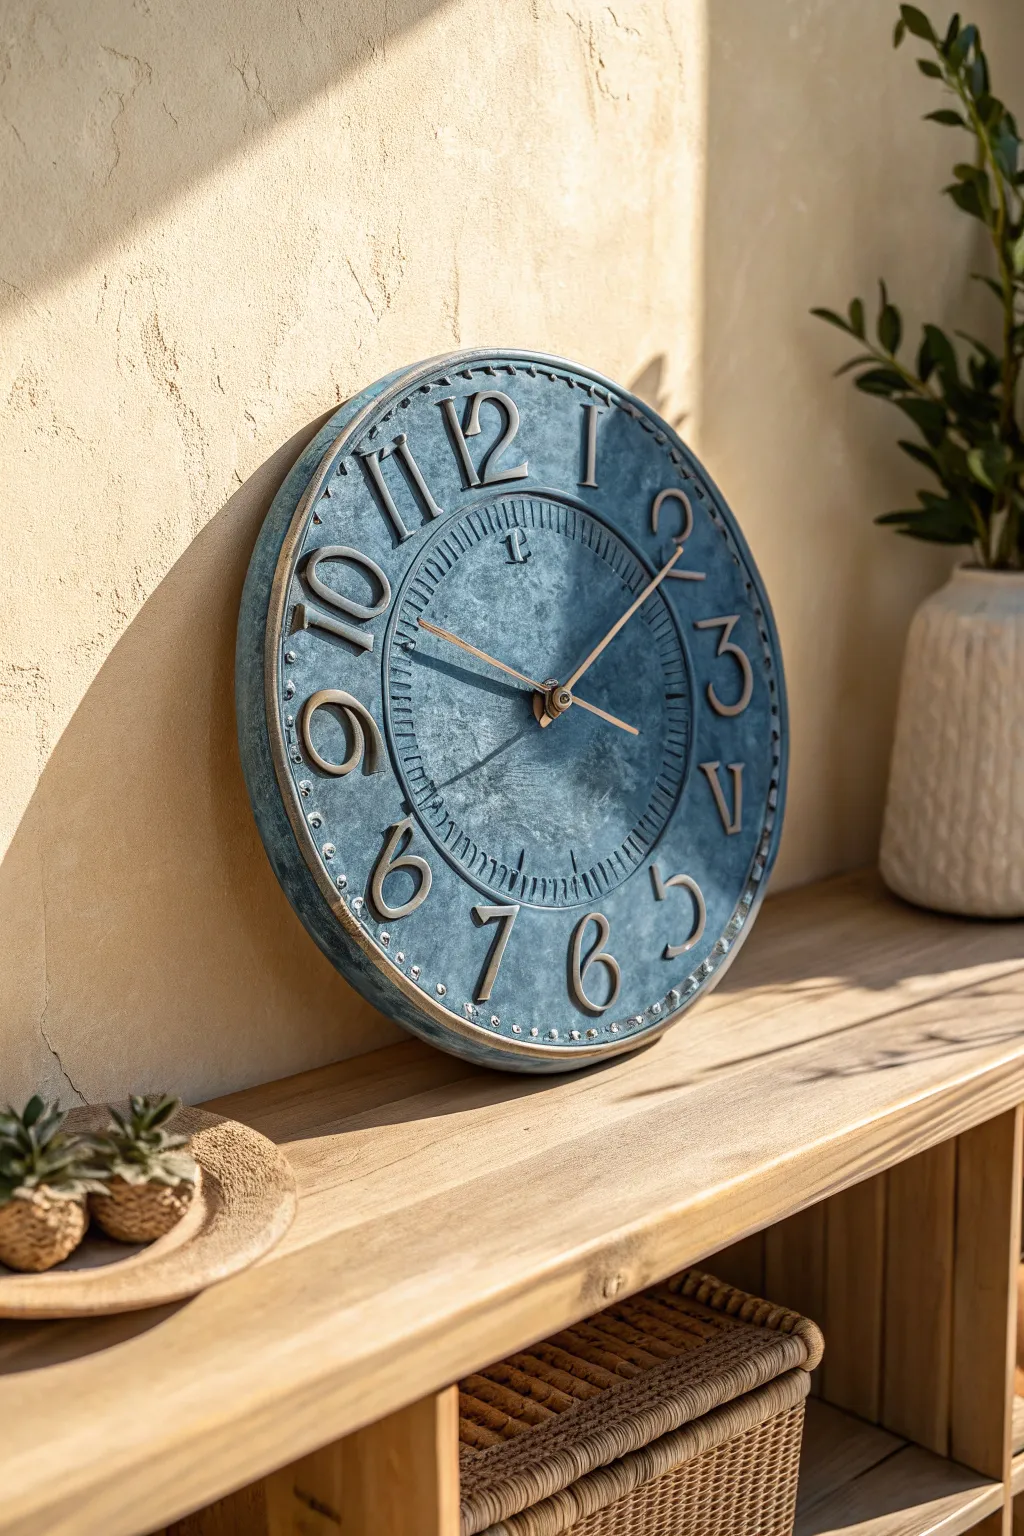
Transform a simple slab of clay into a stately timepiece that evokes the look of weathered slate and antique bronze. This project focuses on texture and layering finishes to achieve a rich, dimensional surface that looks heavy but hangs lightly.
Detailed Instructions
Materials
- Low-fire white earthenware clay (approx. 3-4 lbs)
- Rolling pin and guide strips (3/8-inch thickness)
- Large circular template (12-14 inches diameter)
- Fettling knife
- Medium and large circle cutters (for inner ring)
- Number stencils or paper templates (standard & Roman numerals)
- Slip trailer or scoring tool
- Sponge and water
- Underglaze (Dark Blue-Grey)
- Acrylic paints (Metallic Bronze, Antiquing Black)
- Clock mechanism kit (high torque recommended)
- Clear matte varnish
Step 1: Forming the Base
-
Roll the slab:
Begin by rolling out your clay on a canvas board to a consistent 3/8-inch thickness, using guide strips to ensure the surface is perfectly flat. Smooth out any canvas texture with a flexible metal rib. -
Cut the outer shape:
Place your large circular template over the slab and trace around it with a needle tool before cutting cleanly with a fettling knife. Don’t discard the trimmings yet; you will need them for the numerals. -
Establish the inner zone:
Lightly press a smaller circular object or template (about 8 inches wide) into the center to create an impression. You don’t want to cut through; just create a clear boundary between the outer number ring and the inner dial. -
Texture the surface:
Using a crumpled ball of aluminum foil or a stiff-bristle brush, tap texture all over the clay surface. Focus the heaviest texture on the inner circle to create a contrast with the slightly smoother outer ring. -
Define the boundary:
Use a modeling tool to deepen the groove of that inner circle you marked earlier. I like to drag a small loop tool here to create slight ‘tick marks’ or ridges radiating outward, giving it a mechanical, gear-like feel. -
Create the center hole:
Using a straw or a small hole cutter, punch a hole directly in the center for the clock mechanism mechanism shaft. Enlarge it slightly to account for clay shrinkage during drying.
Warp Prevention
Flip your drying slab every 12 hours and dry it between two pieces of drywall. This creates a sandwich that forces the clay to remain perfectly flat as moisture leaves it.
Step 2: Adding Dimension
-
Cut out the numerals:
Roll your spare clay slightly thinner (1/4 inch). Using stencils or hand-cutting, create a mix of standard numbers (for 12, 3, 6, 9) and Roman numerals (or simple bars) for the others, matching the reference style. -
Attach the numbers:
Score the back of each number and the corresponding spot on the clock face. Apply slip and press them firmly into place. Tidy up the edges with a damp brush so they look integrated, not just stuck on. -
Add rim details:
Roll tiny spheres of clay to create rivets. Attach these evenly around the very outer edge of the clock face and along the inner circle boundary for an industrial touch. -
Dry slowly:
Place the clock on a flat drywall board or wood ware board. Cover it loosely with plastic to ensure slow, even drying, which helps prevent the large flat disc from warping. -
Bisque fire:
Once bone dry, fire the piece to cone 04.
Faux Oxidized Look
Dab bits of teal or diluted turquoise paint into the crevices of the bronze numbers while the metallic paint is wet. It mimics the beautiful green verdigris of aged copper.
Step 3: Finishing and Assembly
-
Apply base color:
Paint the entire face with a dark blue-grey acrylic paint (or underglaze if you prefer to glaze fire again). Let it get into all the textures, then wipe back the high points slightly with a sponge to enhance the depth. -
Dry brush the stone effect:
Mix a lighter grey-blue paint. Dip a stiff, dry brush into the paint, wipe most of it off on a paper towel, and lightly sweep it across the textured surface to highlight the ‘slate’ peaks. -
Metallic accents:
Using a metallic bronze or copper wax paste (or acrylic paint), carefully highlight the raised numbers, the rim rivets, and the inner circle boundary. This simulates worn metal sitting on top of stone. -
Seal result:
Apply a coat of clear matte varnish to seal the paint and give the ‘stone’ areas a realistic sheen without being glossy. -
Install mechanism:
Insert the clock movement through the back. Secure it with the washer and nut on the front, then press the hands onto the shaft—hour hand first, then the minute hand.
Hang your new timepiece securely and enjoy the timeless character it brings to your wall
Slab Lanterns With Simple Cutout Windows

Create a stunning focal point for your mantle with this architectural clay lantern, featuring elegant arched windows and a pierced dome roof. The raw, unglazed finish highlights the natural beauty of the clay while casting warm, intricate shadows when lit.
Step-by-Step
Materials
- Stoneware clay (buff or white)
- Rolling pin
- Two 1/4 inch wooden thickness strips
- Fettling knife or piercing tool
- Ruler
- Paper templates (walls and roof)
- Slip and scoring tool
- Small round metal cutter (for roof holes)
- Sponge
- Metal wire (for the handle)
Step 1: Preparing the Slabs
-
Roll the main slab:
Begin by wedging your clay to remove air bubbles, then roll out a large, even slab using your 1/4 inch thickness strips as guides to ensure uniform walls. -
Smooth the surface:
Compress the clay on both sides with a rib tool to align the particles; this prevents warping later and gives you that smooth, stone-like finish shown in the photo. -
Cut the wall components:
Using a ruler or paper template, cut four identical rectangles for the walls. These appear to be roughly 4 inches wide by 6 inches tall. -
Allow to leather hard:
This is crucial: let your cut slabs firm up to a ‘leather hard’ state. They need to be stiff enough to hold their shape vertically without slumping but soft enough to cut and join.
Step 2: Carving the Windows
-
Trace the design:
Lightly trace your window pattern onto each slab. The design features a large central arch shape subdivided into smaller geometric sections: circular motifs at the top and elongated ovals at the bottom. -
Cut the negative space:
With a sharp fettling knife or scalpel, carefully cut out the negative spaces. Keep your blade perpendicular to the clay for clean, sharp edges. -
Smooth the cutouts:
Once cut, use a slightly damp sponge or a soft brush to smooth the sharp inner edges of your windows so they look refined rather than ragged.
Slumping Walls?
If walls buckle during assembly, the clay is too wet. Let slabs dry longer or use a cardboard box wrapped in newspaper inside as a temporary support.
Step 3: Assembling the Body
-
Bevel the edges:
Cut the long vertical edges of your four wall panels at a 45-degree angle. This mitering allows for a seamless, strong corner joint. -
Score and slip:
Aggressively score the beveled edges and apply clay slip. Connect the four walls to create a square tube. -
Reinforce the interior:
I usually roll a very thin coil of clay and press it into the interior corners to reinforce the seams, smoothing it out so it disappears. -
Add the floor:
Place your square tube onto a fresh piece of slab, trace around it, cut the square base, and attach it using the score and slip method.
Level Up: Light Play
Use different sized drill bits or hole cutters on the roof to create a ‘constellation’ effect that projects varying sizes of light dots onto your walls.
Step 4: Creating the Roof
-
Form the dome base:
Cut four triangular pieces with slightly curved sides. These will form the pyramidal dome structure. -
Add perforation details:
Before assembling, use a small circular cutter or the back of a paintbrush to punch the pattern of holes into the roof panels, mimicking the starry look in the reference. -
Assemble the dome:
Score, slip, and join the four roof panels together. Gently press from the inside to round them out slightly, creating that soft domed appearance. -
Attach roof to body:
Score the top rim of your lantern body and the bottom of the roof structure. Join them securely, blending the clay where they meet. -
Add the finial:
Model a small knob or finial shape for the very top. Create a horizontal hole through it large enough for your wire handle.
Step 5: Finishing Touches
-
Final sponge:
Wipe down the entire piece with a damp sponge to remove any fingerprints or joining marks. -
Dry slowly:
Loosely cover the lantern with plastic to let it dry very slowly. This prevents the delicate window bars from cracking due to uneven shrinkage. -
Fire the piece:
Bisque fire the piece. For the look in the image, leave it unglazed or apply a clear matte glaze before the final firing to maintain the natural stone texture. -
Attach the handle:
Once fully fired and cool, thread a piece of dark heavy-gauge wire through the finial hole and twist it into a loop.
Place a tea light inside and enjoy the warm, patterned glow your hand-built lantern casts on the room
Layered Slab Relief Panels With Inset Shapes

Embrace the soothing elegance of minimalism with this triptych of textured clay slabs. Featuring carved rainbow arches in relief, these warm, sandy-toned panels bring a sophisticated yet earthy vibe to any wall display.
Step-by-Step Guide
Materials
- Light-colored stoneware or porcelain clay (grogged for texture)
- Rolling pin
- Two wooden guide strips (thickness slats, approx. 1/4 inch)
- Needle tool
- Metal kidney scraper
- Carving tools (loop tool or wire end tool)
- Ruler
- Compass or circular templates (varying sizes)
- Fettling knife
- Sponge
- Cutting wire
- Canvas or slab mat
Step 1: Preparing the Slabs
-
Wedge the clay:
Begin by thoroughly wedging your clay to remove air bubbles and ensure a uniform consistency, which prevents warping later. -
Set up guides:
Place your wooden guide strips on either side of your working surface (canvas or slab mat). These ensure your slabs are perfectly even in thickness. -
Roll the slab:
Using a rolling pin over the guides, roll out a large enough sheet of clay to cut three identical rectangles. -
Compress the surface:
Take a metal kidney scraper and firmly drag it across the clay surface in multiple directions. This aligns the clay particles and creates the smooth, stone-like finish seen in the image. -
Measure and cut:
Using a ruler and needle tool, mark out three identical rectangles. A size like 4×6 inches works well for this design. Cut them out cleanly with a fettling knife. -
Smooth edges:
Gently run a damp finger or sponge along the cut edges to soften sharpness without rounding them over too much; keep that crisp geometric look.
Step 2: Carving the Relief Design
-
Mark the center:
On the bottom edge of your first rectangle, faintly mark the center point with your needle tool. This will be the anchor for your arches. -
Draft the arches:
Using a compass or a set of circular templates, lightly scratch three concentric semi-circles onto the clay surface. Leave equal spacing between each line to define the width of your relief bands. -
Begin the outer cut:
Select a U-shaped loop tool or wire end tool. Carefully carve into the space *between* your marked arches to recess the background. -
Define the depth:
Carve down evenly, about half the thickness of the slab. I find it helpful to do this in shallow passes rather than digging deep all at once to maintain control. -
Create the inner arch:
Move to the innermost semi-circle and carve out the center area solid, leaving the raised arch shape intact. -
Refine the channels:
Use a smaller loop tool to clean up the recessed channels between the raised arches. The goal is a flat, even bottom in the carved areas. -
Repeat for the set:
Recreate the same pattern on the remaining two clay rectangles. Consistency is key here to make them look like a cohesive set.
Clean Lines
For sharper relief edges, wait until the clay is stiff leather-hard before carving. Soft clay drags and creates messy burrs that are hard to smooth.
Step 3: Finishing Touches
-
Texture the surface:
If your clay is too smooth, gently tap the surface with a stiff-bristled brush or a scouring pad to create a subtle, sandy stone texture. -
Clean up crumbs:
Once the clay is leather-hard, use a soft, dry brush to sweep away any clay crumbs or burrs created during carving. -
Dry slowly:
Sandwich the slabs between sheets of drywall or weigh them down lightly under plastic to ensure they dry perfectly flat without curling edges. -
Bisque fire:
Fire the pieces to bisque temperature once bone dry. -
Glaze or wash:
To mimic the image, leave the raw clay unglazed if it’s a beautiful stone color, or apply a matte, dry-finish glaze in a beige or sandstone tone. -
Final firing:
Complete the final firing according to your clay or glaze specifications.
Mounting Magic
Before drying, create small angled holes on the back of each slab with a needle tool. This lets you hang them flush on the wall with nails later.
Once fired, mount your trio vertically to bring a calm, architectural beauty to your favorite space