Flowers are my go-to when I want a clay project that feels special fast, even on a busy weeknight in the studio. These flower clay sculpture ideas will give you lots of styles to try in air-dry clay, polymer clay, or ceramic clay, from classic blooms to total conversation starters.
Classic Rolled-Petal Roses
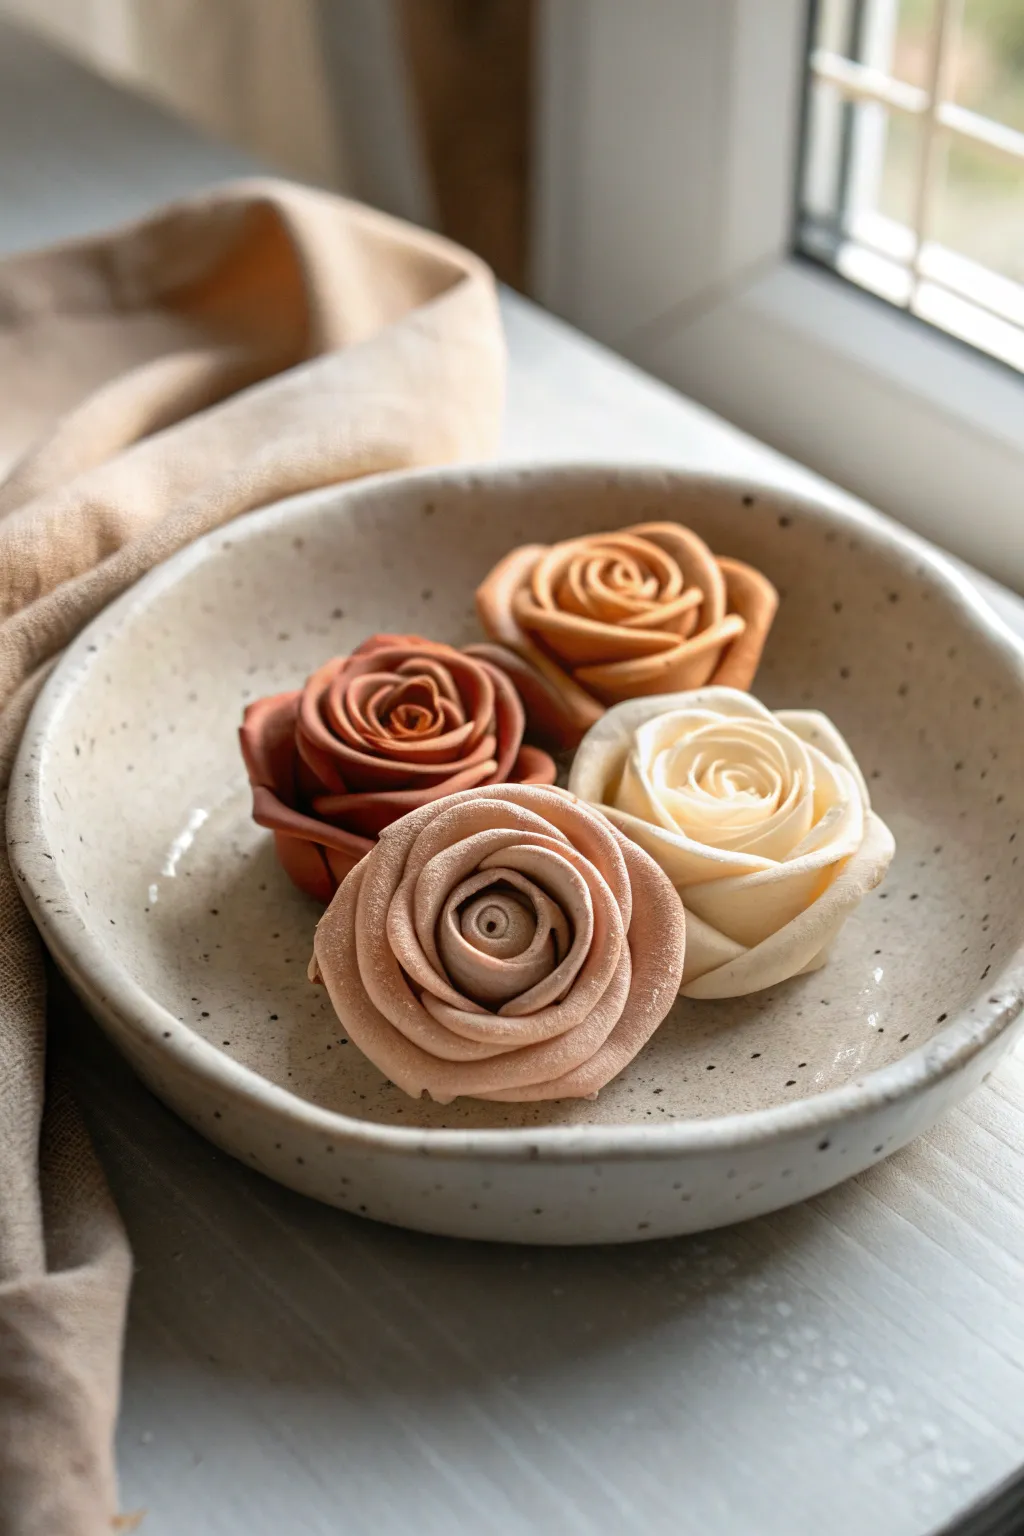
These elegant clay roses feature a soft, velvety texture and realistic rolled petals, perfect for displaying in a ceramic bowl or using as standalone decor. The project balances simple rolling techniques with delicate petal shaping to create blooms that look perpetually fresh.
Step-by-Step Guide
Materials
- Polymer clay or air-dry cold porcelain clay (in cream, peach, terracotta, and soft brown)
- Clean ceramic bowl for drying/display
- Ball stylus tool (medium size)
- Non-stick rolling pin or acrylic rod
- Cornstarch or baby powder (creates the matte, velvety look)
- Small soft paintbrush
- Flexible clay blade or craft knife
- Plastic wrap or clear file folder
Step 1: Preparing the Palette
-
Mix Custom Shades:
Begin by conditioning your clay until it is soft and pliable. To achieve the earthy palette shown, mix a base cream color with tiny amounts of brown and orange to create a gradient: one pure cream, one soft peach-brown, one warm terracotta, and one deeper caramel. -
Create the Velvet Finish:
Dust your hands and the clay surface lightly with cornstarch or baby powder before rolling. Kneading a small amount of powder directly into the outer layer of the clay helps achieve that signature matte, almost fabric-like texture seen in the photo.
Step 2: Forming the Petals
-
Roll Snakes and Slices:
Take your first color of clay and roll it into a thick log, about 1 inch in diameter. Use your blade to slice off roughly 15-20 thin, equal-sized discs. -
Flatten Into Petals:
Take each disc and press it flat between two sheets of smooth plastic or using your fingers. Aim for a teardrop or rounded oval shape. -
Thin the Edges:
Place a flattened petal on your palm or a foam mat. Using the ball stylus, gently roll around the very edge of the petal to thin it out and make it curl slightly. This ensures the rose won’t look chunky or heavy. -
Create the Center Bud:
Take one of your smaller, less perfect petals and roll it tightly into a tube or spiral. This forms the tight center ‘heart’ of the rose.
Powder Power
Don’t skip the cornstarch dusting step! It is the secret ingredient that transforms shiny, plastic-looking clay into the soft, organic ‘sugar-flower’ texture shown here.
Step 3: Assembling the Bloom
-
Add First Layer:
Take a second petal and wrap it around the center spiral, positioning it slightly higher than the center point. Press the bottom firmly to adhere it to the base of the bud. -
The Triangle Technique:
Overlap the next three petals in a spiraling triangle formation around the bud. I like to tuck the edge of the last petal under the edge of the first one in this layer to keep the spiral continuous. -
Build Outward:
Continue adding petals, increasing the overlap slightly with each layer. For the outer layers, curl the top edges of the petals backward just a tiny bit to mimic a blooming rose. -
Shape the Base:
As the flower grows, the bottom can get bulky. Occasionally pinch the excess clay at the very bottom into a stem-like stump and trim it off with your blade to keep the flower sitting flat. -
Final Petal Adjustments:
Once you have reached your desired size (usually 5-6 layers), use your thumb to gently push the outer petals open more, giving the flower a relaxed, full shape.
Scent Infusion
For a sensory twist, mix a drop of rose essential oil into the clay before sculpting, or place a scented cotton ball hidden under the roses in the display bowl.
Step 4: Refining and Drying
-
Smooth the Touch:
Take your soft paintbrush and dip it in a little more cornstarch. Gently brush the entire flower. This removes fingerprints and enhances the soft, velvety appearance. -
Repeat for All Colors:
Repeat the entire process for the remaining three colors of clay to create your set of four roses. -
Cupped Drying:
To prevent the heavy flowers from flattening under their own weight, let them dry sitting inside small curved cups or an empty egg carton. This preserves the rounded, 3D shape. -
Final Trim:
Once semi-firm but not fully hard, check the bottom of each rose. If they don’t sit flat, carefully slice the very bottom flush with your blade. -
Arrange Display:
Once fully cured, arrange your quartet of roses in a speckled ceramic bowl to complete the look.
Enjoy the timeless beauty of these everlasting blooms as a centerpiece that never fades

Tulip Buds on Stems

Create a serene, long-lasting bouquet with these stylized clay tulip buds, featuring a lovely textured finish that mimics organic matter. The design focuses on soft, muted tones and simple, elegant curves that look beautiful in any small ceramic vase.
Step-by-Step Guide
Materials
- Air-dry clay (white or terracotta)
- Floral wire (18 or 20 gauge)
- Acrylic paints (Soft Pink, Terracotta/Orange, Deep Green, Sage Green)
- Texture tool (stiff bristle brush, sandpaper, or an old toothbrush)
- Sculpting tools (needle tool, small spatula)
- Wire cutters
- Floral tape (green)
- Matte varnish or sealant
Step 1: Forming the Stems
-
Prepare the wires:
Cut three pieces of floral wire to your desired lengths, approximately 10-12 inches each. Varying the heights slightly will create a more natural arrangement later. -
Thicken the stems:
Take a small amount of clay and roll it into a very thin snake. Spiral this snake around the floral wire to bulk it up, or simply coat the wire in a thin layer of clay for a smoother look. -
Smooth the surface:
Wet your fingers slightly and run them up and down the clay-covered wire to smooth out any seams or bumps. Allow these stems to dry completely, preferably hanging upside down or stuck into a foam block to stay straight.
Cracks Appearing?
If small cracks form as the clay dries, mix a tiny bit of fresh clay with water to make a paste (slip) and fill them in with a brush.
Step 2: Sculpting the Tulip Heads
-
Create the base shape:
Roll a medium-sized ball of clay (about the size of a walnut) into a smooth egg shape. This will form the core of your tulip bud. -
Attach to stem:
Apply a tiny dab of glue to the top of a dried stem wire and gently insert it into the wider bottom of your egg-shaped clay base. Smooth the clay around the insertion point to secure it. -
Define the petals:
Using a needle tool or a thin modeling tool, gently carve vertical grooves down the sides of the egg shape to suggest tightly closed petals. -
Sculpt the tips:
At the top of the egg shape, create a small indentation and use your tool to separate the clay into three or four distinct petal tips, slightly parting them to show depth. -
Refine the form:
Use your fingers to gently pinch and pull the petal tips upward, creating that classic tapered tulip shape. I find it helps to look at a reference photo of real tulips to get the curve just right. -
Add texture:
Before the clay dries, take a stiff bristle brush or a balled-up piece of aluminum foil and gently tap the surface of the flower head. This creates the stone-like, organic texture seen in the example.
Step 3: Adding Leaves
-
Shape the leaf:
Roll a small piece of clay into a flattened teardrop or canoe shape. Tulips have long, broad leaves, so keep the shape elongated. -
Curve and attach:
Gently curve the leaf so it looks like it’s wrapping slightly. Attach it low on one of the stems using a bit of water and scoring techniques (making little scratches on both surfaces) to ensure a strong bond. -
Dry thoroughly:
Allow the entire assembly to dry completely. Air-dry clay often takes 24-48 hours depending on thickness and humidity.
Mix It Up
Create a gradient effect by painting the bottom of the flower head slightly darker than the tips for a realistic ombré look.
Step 4: Painting and Finishing
-
Base coat the stems:
Mix a muted olive or sage green paint. Carefully paint the stems and the single leaf. Apply two thin coats for opaque coverage. -
Mix flower colors:
Prepare your palette with a dusty pink and a warm terracotta orange. You want these colors to look matte and natural, so avoid neons. -
Paint the blooms:
Paint two of the tulip heads in the soft pink and one in the terracotta (or your chosen color scheme). Use a tapping motion with your brush to get paint into the texture you created earlier. -
Add depth:
Once the base color is dry, you can dry-brush a tiny amount of a lighter shade on the very tips of the petals to highlight the texture. -
Seal the work:
Finish with a spray of matte varnish. This protects the paint and maintains the natural, stone-like aesthetic of the sculpture.
Arranging your handmade tulips in a ceramic vase brings a permanent touch of spring to your space


Calla Lily Wrap Petals
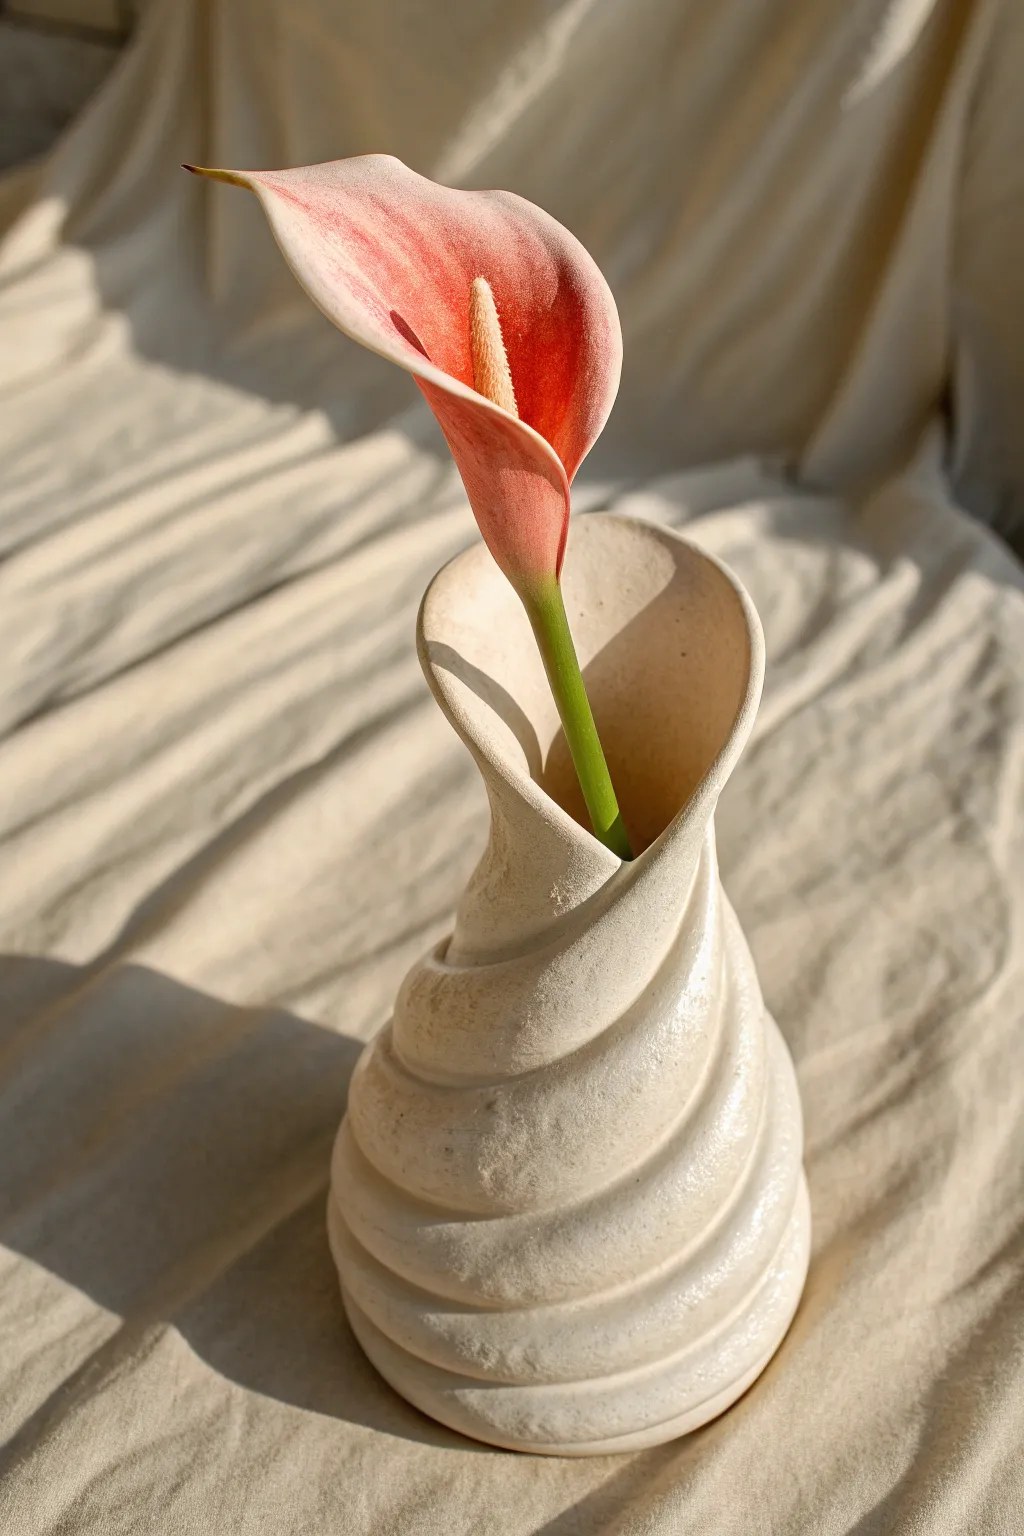
This elegant vase mimics the graceful, organic form of a flower petal wrapping around itself, creating strong fluid lines and soft shadows. It’s perfect for holding a single statement bloom like a Calla Lily and features a beautiful textured, natural clay finish.
Step-by-Step
Materials
- White stoneware clay or air-dry clay (approximately 2-3 lbs)
- Pottery wheel (helpful but optional, can be hand-built)
- Rigid rib tool (rubber or wood)
- Needle tool
- Water and sponge
- Canvas work surface
- Rolling pin (if hand-building)
- Clear matte glaze or sealant (for air dry clay)
Step 1: Forming the Base
-
Prepare the clay:
Begin by wedging your clay thoroughly to remove any air bubbles. Form it into a smooth, round ball about the size of a grapefruit. -
Center on the wheel:
If throwing, center your clay firmly on the wheel head. If you are hand-building, roll out a flat slab about 1/4 inch thick and cut a clean rectangular strip. -
Open the form:
For wheel-throwers, open the clay to create a narrow, tall cylinder. Keep the walls even, creating a sturdy base that is wider at the bottom and tapers slightly upward. -
Hand-building alternative:
If using slabs, form your rectangular strip into a cylinder by scoring and slipping the edges together. Smooth the seam completely so it disappears.
Keep the Spiral flowing
When carving the spiral groove, keep your tool movement continuous from bottom to top. Stopping and starting creates jagged lines that ruin the flow.
Step 2: Creating the Spiral Effect
-
Mark the spiral path:
Using a wooden modeling tool or your finger, gently trace a spiral line starting from the bottom of the cylinder, winding upwards to the rim. This acts as your guide. -
Emphasize the twist:
With the wheel spinning slowly (or turning your hand-built form), press firmly into the clay just below your traced line with your thumb or a rigid rib tool to create a deep groove. -
Refining the ridges:
Push the clay above the groove slightly outward to create an overlapping ‘step’ effect. It should look like distinct layers wrapping over one another. -
Smooth the transitions:
Use a damp sponge to soften the sharp edges of your spiral ridges. You want them defined but organic, not mechanical. -
Texture the surface:
I like to gently dab the surface with a coarse sponge or a bit of rough fabric while the clay is still damp to simulate a stone-like texture.
Step 3: Shaping the Petal Rim
-
Elongate the neck:
Gently pull the clay at the rim upwards. You want it taller than a standard vase to accommodate the final shaping. -
Cut the asymmetry:
Using a needle tool, trim the rim into an uneven, wavy shape. Cut one side significantly lower than the other to mimic the opening of a flower. -
Flare the opening:
Gently push the taller side of the rim outward and curl the shorter side slightly inward. This creates the ‘wrapped petal’ look. -
Refine the lip:
Use a chamois or wet fingertips to compress and smooth the cut edge of the rim so it is rounded and professional-looking.
Rim collapsing?
If the flared rim starts drooping, the clay is too wet. Use a heat gun briefly to stiffen the neck, or prop the flare up with foam until it firms up.
Step 4: Finishing Touches
-
Slow drying:
Cover the piece loosely with plastic to let it dry slowly. Uneven drying can cause the spiral ridges to crack. -
Bisque firing:
Once bone dry, fire the piece in a kiln to bisque temperature (usually cone 04). If using air-dry clay, simply let it cure completely for 48-72 hours. -
Glazing:
Apply a transparent or slightly creamy matte glaze. Avoid thick, opaque glazes that will fill in your beautiful spiral texture. -
Final fire or seal:
Fire the glaze to maturity (cone 5/6 for stoneware). For air-dry clay, seal with a high-quality matte varnish to protect the surface.
Place your favorite single stem inside and enjoy the organic rhythm of your new sculpture


Sunflowers With Textured Centers
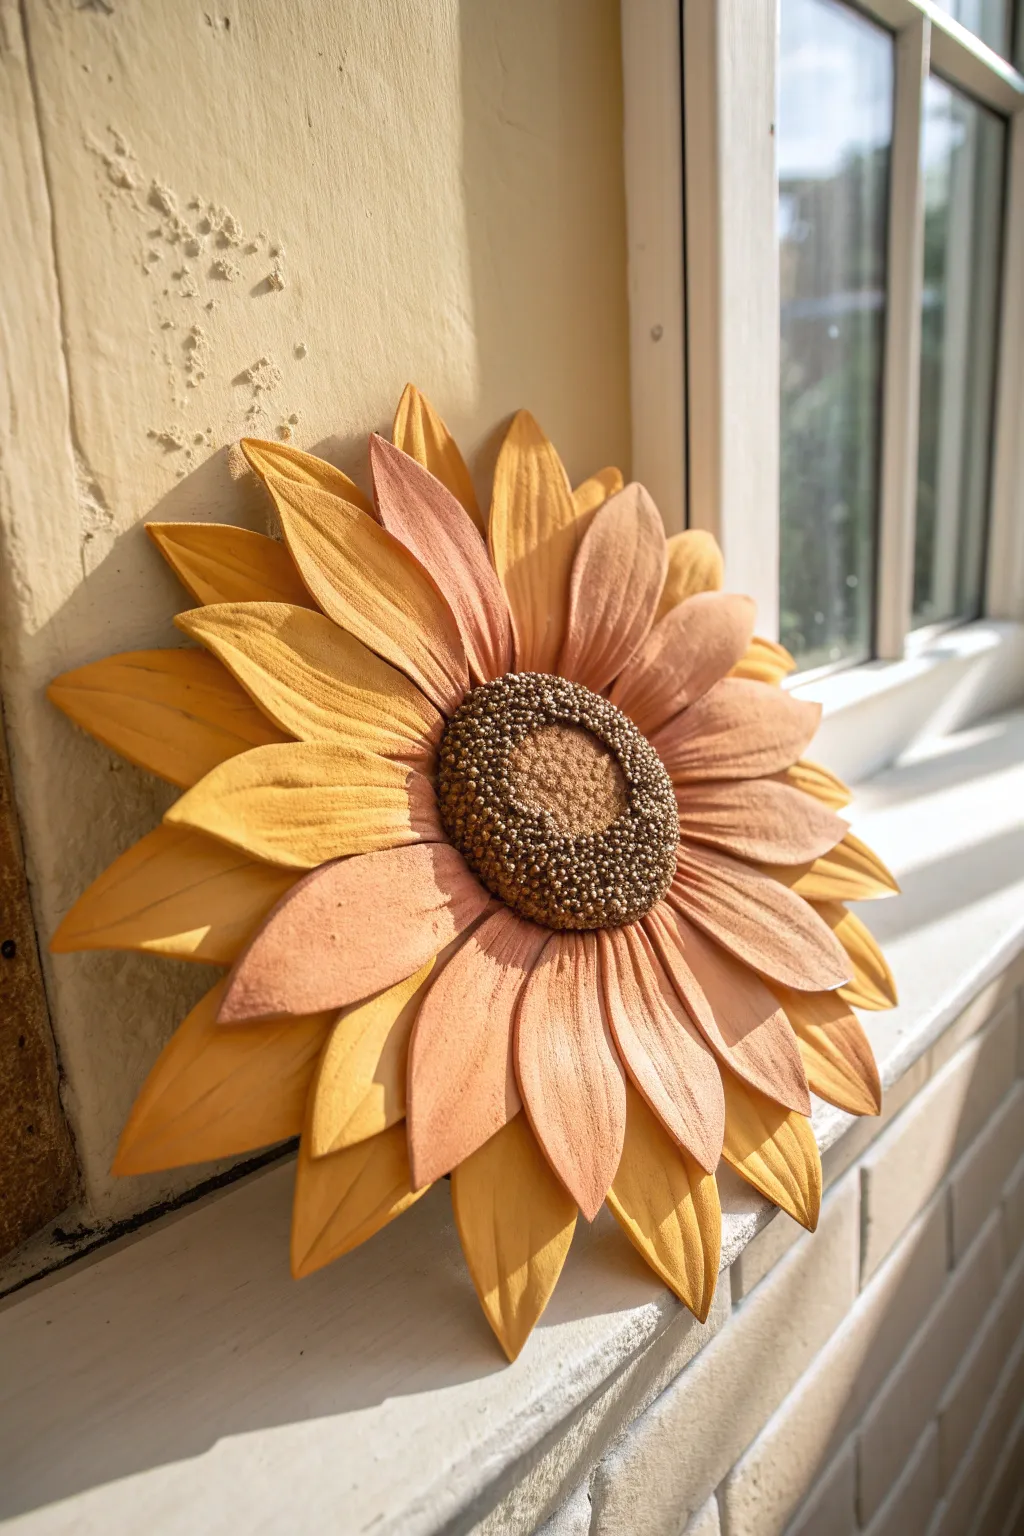
Capture the warmth of late summer with this striking polymer clay sunflower sculpture, designed to sit cheerily on a windowsill or hang as wall decor. It features layers of individually shaped petals in a gradient of golden hues surrounding a deeply textured, seed-packed center.
Detailed Instructions
Materials
- Polymer clay (Golden Yellow, Cadmium Orange, Burnt Umber/Brown, Translucent)
- Acrylic rolling pin or pasta machine
- Leaf veining mold or textured silicone mat
- Small ball tool or dotting tool
- Needle tool or toothpick
- Circular clay cutter (approx. 2-3 inches for the base)
- Leaf-shaped cutter (teardrop shape) or craft knife
- Soft pastel chalks (orange and brown for shading)
- Wire brush or stiff toothbrush
- Liquid polymer clay (Bake & Bond)
- Oven and baking sheet
Step 1: Preparing the Base and Center
-
Mix Your Center Tone:
Start by conditioning your brown clay. Mix in a tiny pinch of translucent clay to give it depth, then roll it into a ball about 1.5 inches in diameter. -
Form the Disc:
Flatten the brown ball into a thick disc. Don’t make it too flat; you want a nice dome shape for that classic seed-head look. This will serve as the anchor for your petals. -
Create the Texture Base:
Press a smaller circle indentation into the very center of your brown dome using a thumb or a large ball tool to define the inner versus outer seed rings. -
Detail the Seeds:
Using your smallest ball tool or a needle tool, stipple the entire surface of the brown center. Press repeatedly to create hundreds of tiny dot indentations, mimicking tightly packed seeds. -
Add Micro-Texture:
For extra realism, gently tap a stiff toothbrush or wire brush over the seeded area to roughen the surface slightly, removing any fingerprints. -
Highlight the Center:
Lightly brush a small amount of golden or copper mica powder (or shaved pastel chalk) onto just the raised bumps of the center texture to make the seed details pop.
Step 2: Crafting the Petals
-
Create a Color Gradient:
Mix three shades of yellow clay: a pure bright yellow, a mid-tone golden yellow, and a deeper yellow-orange. This variation creates the natural depth seen in the photo. -
Sheet the Clay:
Roll out your clay sheets to a medium thickness (about 3mm). You want the petals sturdy enough to hold their shape but thin enough to look delicate. -
Cut the Basic Shapes:
Use a teardrop cutter or your craft knife to cut out approximately 20-25 petals in varying sizes. Make the darker petals slightly larger and the lighter ones slightly smaller. -
Vein the Petals:
Press each clay cutout onto a leaf veining mold. If you don’t have a mold, use a needle tool to drag fine lines from the base to the tip of each petal. -
Pinch and Shape:
Gently pinch the pointed tip of each petal to sharpen it. Give the wide base a little pinch too, curving the sides inward slightly to create a concave, cupped shape.
Drooping Petals?
If petals sag while baking, make a nests of cornstarch or polyester fiberfill on your baking tray. Rest the flower on this soft bed to support the specific curves.
Step 3: Assembly and Baking
-
Apply the Outer Ring:
Flip your textured center piece over. Apply a small amount of liquid clay to the back rim. Attach the largest, darkest petals first, evenly spacing them around the perimeter. -
Layer the Inner Ring:
Flip the flower right-side up. Apply a thin line of liquid clay near the edge of the brown center. Place the lighter, smaller petals in the gaps between the outer petals. -
Adjust the Flow:
While the clay is still raw, gently bend some petal tips upward and others slightly downward. This natural irregularity brings life to the sculpture. -
Shade with Pastels:
Before baking, scrape some orange soft pastel into a powder. With a fluffy brush, dust the centers of the petals where they meet the brown disc to enhance the shadow. -
Bake the Sculpture:
Place your sunflower on a baking sheet lined with parchment paper. I recommend propping up curved petals with bits of tissue paper to support them during baking. -
Final Cure:
Bake according to your clay manufacturer’s instructions (usually 275°F/130°C for 30 minutes per 1/4 inch of thickness). Let it cool completely in the oven to prevent cracking.
Go Big or Small
Add a strong magnet to the back for a fridge decoration, or embed a piece of heavy wire into the back before baking to create a sturdy stem for a vase arrangement.
Once cooled, your durable sunflower is ready to bring a touch of eternal sunshine to any corner of your home

The Complete Guide to Pottery Troubleshooting
Uncover the most common ceramic mistakes—from cracking clay to failed glazes—and learn how to fix them fast.
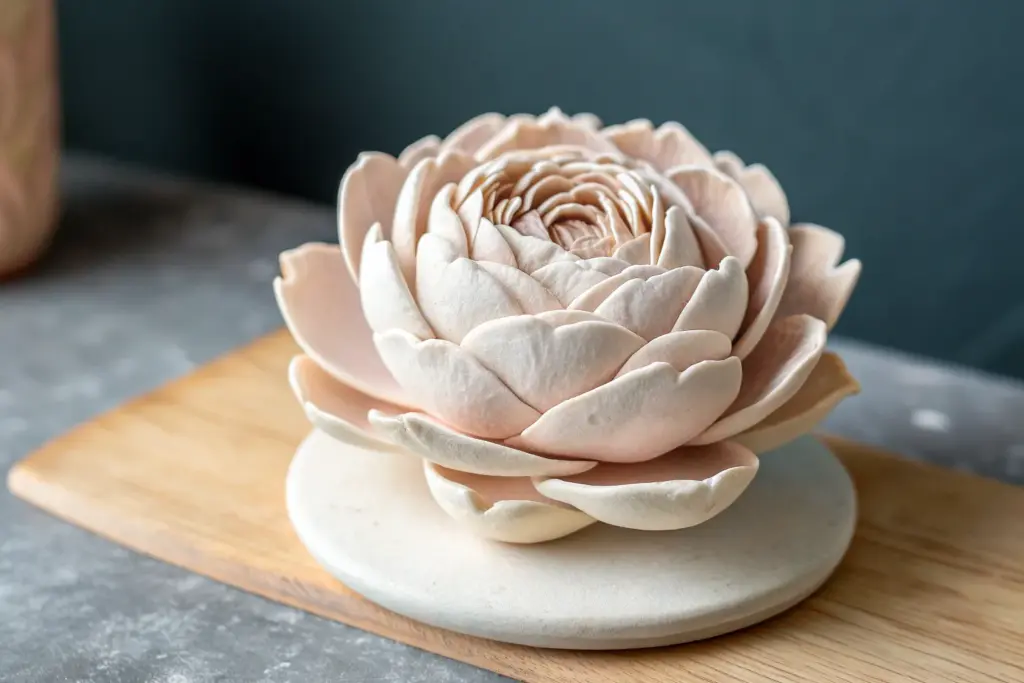
Layered Lotus-Style Flowers
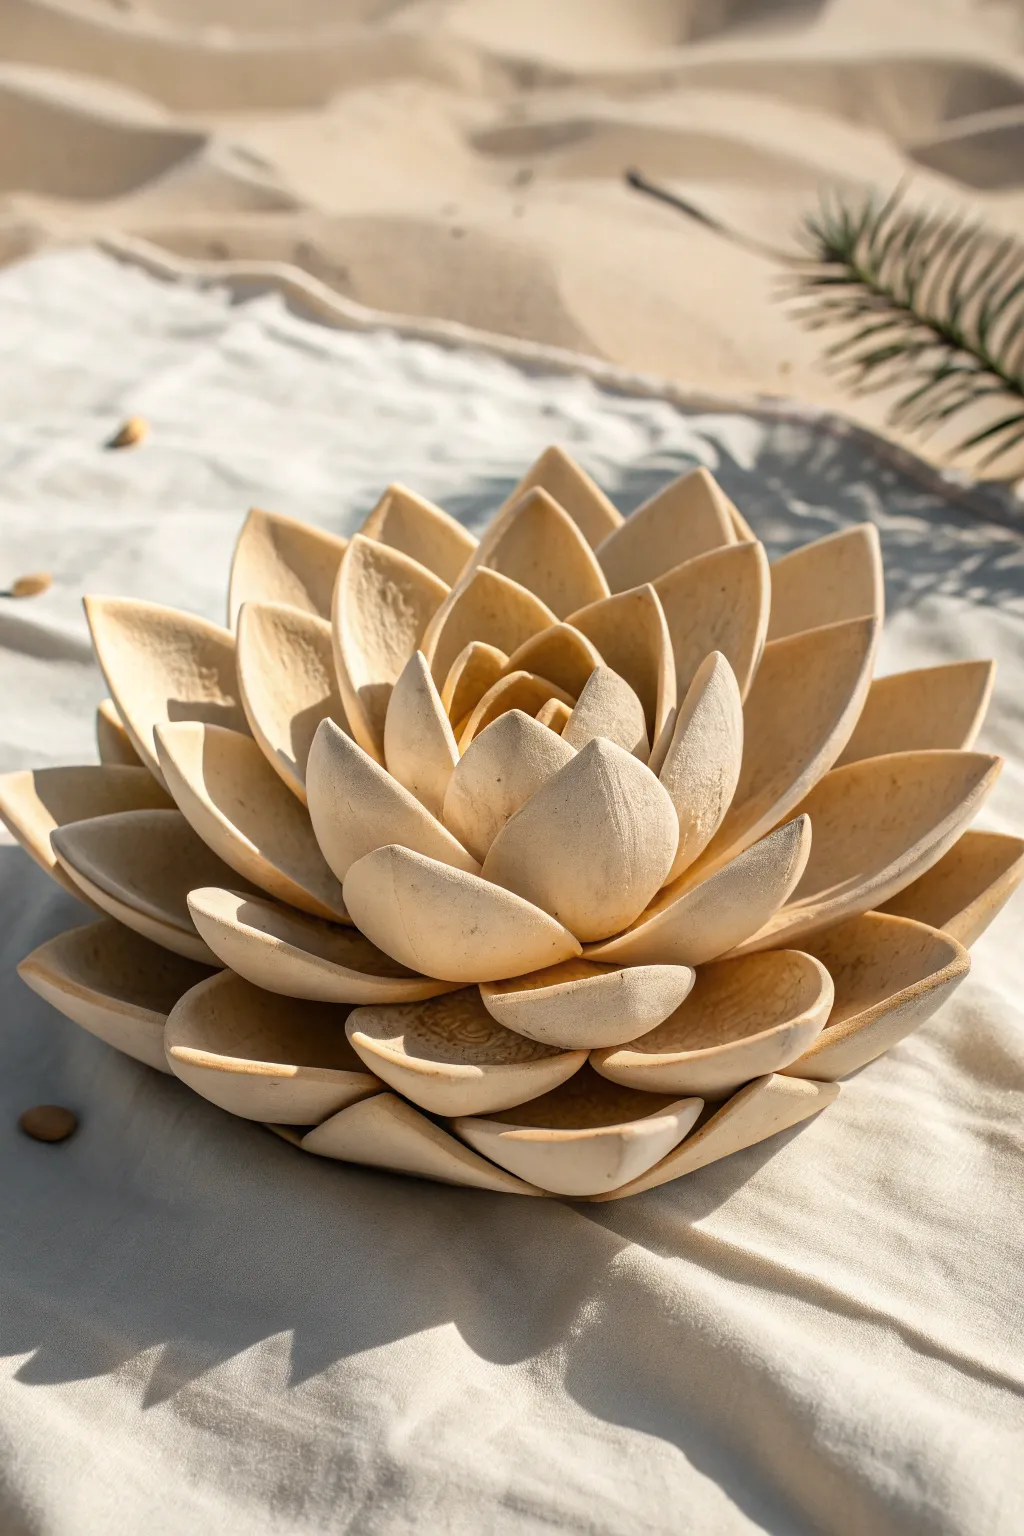
Capture the serene beauty of a desert bloom with this warm, beige-toned clay lotus. Its layered, cupped petals create a satisfying geometric symmetry that looks stunning on any coffee table or shelf.
Step-by-Step Tutorial
Materials
- Air-dry clay (white or natural stone color)
- Drying foam or several small bowls (for cupping petals)
- Wide rolling pin
- Leaf-shaped cookie cutters (large, medium, small)
- Pottery sponge
- Slip (clay mixed with water)
- Sculpting tool or butter knife
- Fine-grit sandpaper
- Matte acrylic paint (sand/beige)
- Large soft paintbrush
- Sealant (matte spray)
Step 1: Creating the Base and Center
-
Prepare the foundation:
Start by rolling a ball of clay roughly the size of a tangerine and flattening it into a thick disc. This will serve as the sturdy base that holds all your petal layers. -
Form the central bud:
Roll a smaller piece of clay into a cone shape. Take three small pieces of clay, flatten them into teardrops, and wrap them tightly around the cone to create the closed center of the lotus. -
Secure the center:
Score the bottom of your bud and the center of your base disc with a sculpting tool. Apply a dab of slip to both scratched areas and press the bud firmly onto the center of the base.
Step 2: Shaping the Petals
-
Roll out your clay sheet:
Roll out a large portion of clay until it is about 1/4 inch thick. Aim for an even thickness, as too thin will crack and too thick will look clunky. -
Cut the shapes:
Using your leaf-shaped cutters or a knife and template, cut out approximately 8 large, 8 medium, and 6 small petals. If cutting by hand, ensure they have a wide bottom and a pointed tip. -
Softening edges:
Dip your finger in a little water and smooth the raw cut edges of every petal. I find this much easier to do now while the clay is wet than sanding later. -
Cupping the curve:
Place each petal into the palm of your hand and gently press the center with your thumb to create a spoon-like curve. The petals need deep curvature to mimic the photo. -
Pre-drying curves:
Lay the curved petals into a drying foam form, an egg carton, or small curved bowls. Let them sit for about 20-30 minutes until they hold their shape but are still slightly flexible.
Cracking Issues?
If you see tiny cracks forming as the clay dries, mix a tiny bit of fresh clay with water to make a thick paste and fill the cracks immediately, then smooth with a damp finger.
Step 3: Assembling the Layers
-
Attach the inner ring:
Take the small petals first. Score the bottom of each petal and apply slip. Attach them around the central bud, overlapping them slightly so they hug the center tightly. -
Build the middle layer:
Move on to the medium-sized petals. attach these in a ring outside the first layer. Position each new petal in the gap between two petals from the previous row. -
Angle outwards:
As you attach this middle layer, ensure the petals are angled slightly more open than the inner ring, creating the blooming effect. -
Add the outer petals:
Attach the large petals for the final outer row. These should lay almost flat against the base disc but curve upward at the tips. -
Support structure:
If the outer petals droop too much, wedge small balls of scrap clay or paper towel underneath them for support. Leave these supports in place while the sculpture dries completely.
Make it Functional
Before drying, form the center bud slightly wider and deeper, leaving it hollow instead of closed. This turns your sculpture into a beautiful candle holder or incense burner.
Step 4: Finishing Touches
-
Dry thoroughly:
Allow the sculpture to dry for at least 24-48 hours. Air-dry clay needs to be bone dry before any finishing work. -
Sand imperfections:
Once dry, use fine-grit sandpaper to gently smooth any rough spots on the petal tips. Be very gentle to avoid snapping the delicate edges. -
Create the texture:
To achieve the sandy look from the reference, mix a small amount of baking soda or fine sand into your beige acrylic paint. -
Painting the bloom:
Paint the entire flower with your textured mixture. Use a soft brush to get into the deep crevices between layers. -
Seal the piece:
Finish with a matte spray sealant to protect the clay while maintaining that natural, non-glossy desert aesthetic.
Place your finished lotus in a spot with soft lighting to let the shadows highlight those lovely layers
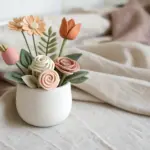
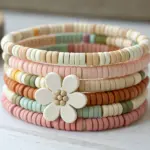
Mini Wildflower Bouquet Stems
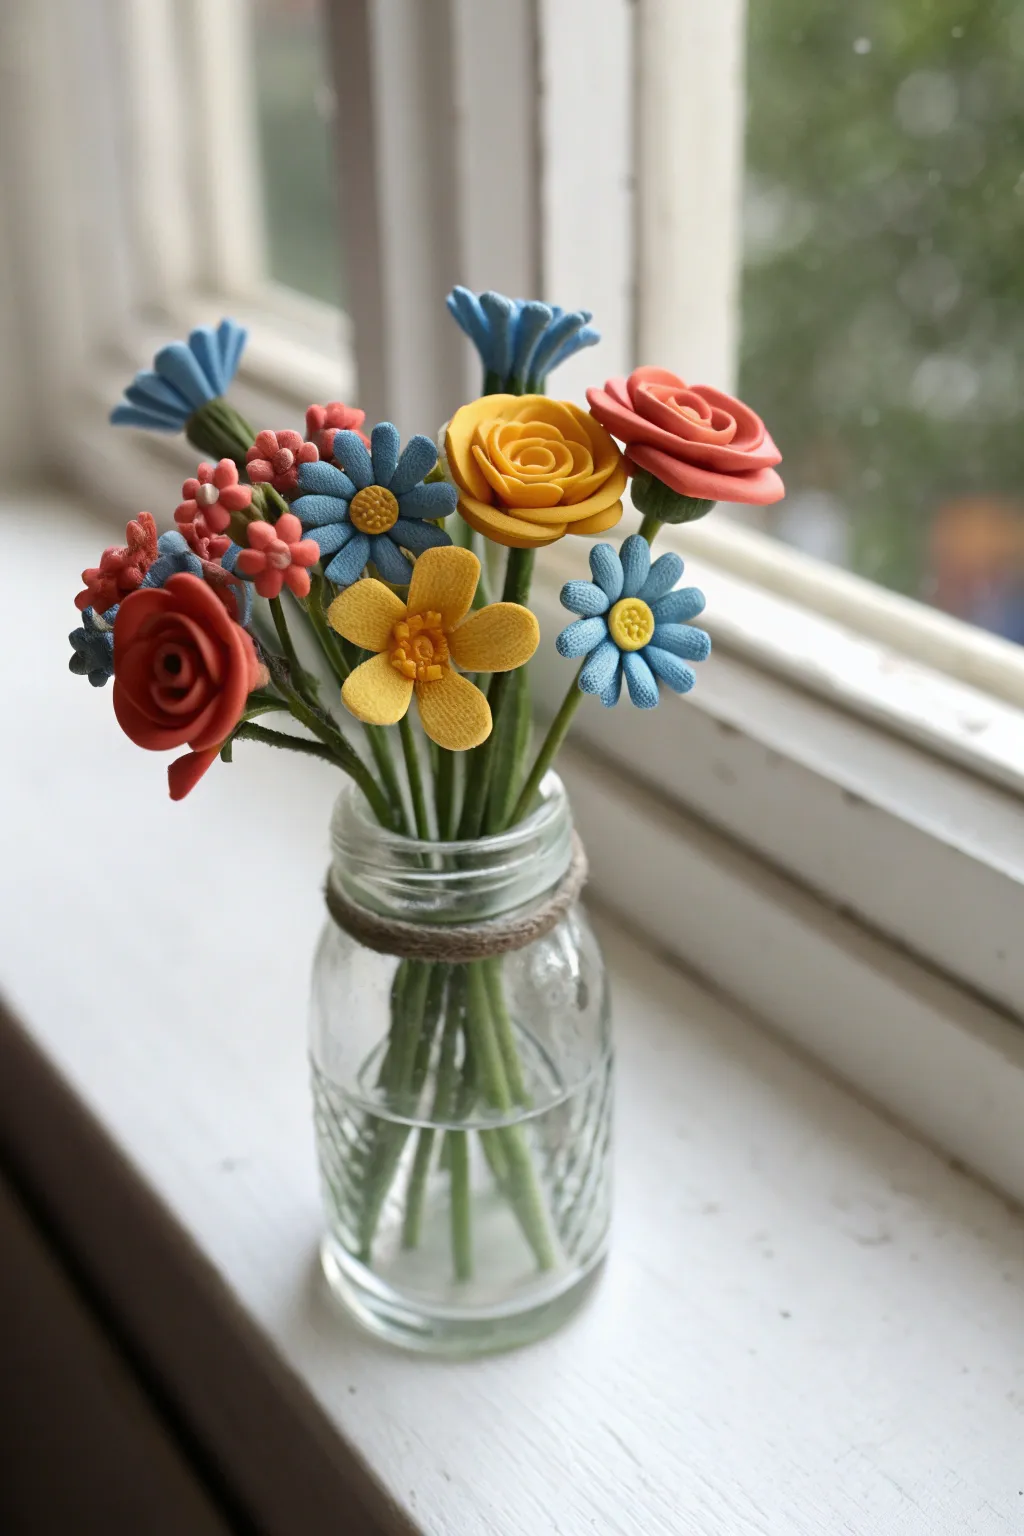
Brighten up any windowsills with this charming bouquet of everlasting wildflowers sculpted from polymer clay. These tiny blooms capture the delicate details of roses and daisies in a vibrant palette, all arranged in a rustic miniature jar.
Step-by-Step Guide
Materials
- Polymer clay (red, orange, yellow, light blue, dark blue, green)
- Floral wire (20 or 22 gauge)
- Liquid polymer clay (optional, for adhesion)
- Sculpting tools (needle tool, ball tool, small knife)
- Green floral tape
- Small glass jar
- Jute twine
- Oven for baking
Step 1: Preparing the Stems
-
Cut the wires:
Cut your floral wire into varied lengths between 3 and 5 inches. You will need about a dozen stems for a full bouquet. -
Wrap the stems:
Condition a small amount of green clay until soft. Roll it into a very thin snake. -
Cover the wire:
Press the wire into the clay snake and roll it gently on your work surface to coat the metal entirely. Alternatively, wrapping tightly with green floral tape works for a textured look. -
Create the base:
Create a tiny loop or hook at the top of each wire using pliers; add a small ball of scrap clay over the loop to give the flower head a secure foundation.
Keeping It Clean
Polymer clay picks up dust easily. Keep baby wipes nearby to clean your hands when switching between dark and light colors to avoid staining the yellow centers.
Step 2: Sculpting the Roses
-
Make the petals:
Condition red, orange, and yellow clay separately. For a single rose, roll 5-7 tiny balls of clay, flattening each between your fingers into a thin pancake. -
Form the center:
Take the first flattened petal and roll it tightly into a spiral tube. Press this onto the clay base at the top of a wire stem. -
Layer the bloom:
Wrap the subsequent flattened petals around the center spiral, overlapping them slightly. Gently curl the edges of the outer petals outward for a natural, blooming effect. -
Add the calyx:
Flatten a small ball of green clay and cut a star shape. Skewer this onto the bottom of the rose head, blending it onto the stem. -
Repeat for variety:
Create 3-4 roses in different colors (red, orange, yellow), varying the size by adding more or fewer petals.
Step 3: Creating the Daisies
-
Shape the petals:
Roll small teardrop shapes from light blue clay. You will need 8-10 petals for each daisy. -
Attach petals:
Press the wide end of each teardrop onto the clay base on a wire stem, arranging them in a circle. Use a needle tool to press an indentation down the center of each petal for texture. -
Add the center:
Roll a small ball of yellow clay and flatten it slightly. Press it firmly into the center of the blue petals. -
Texture the center:
Use a needle tool or a stiff brush to stipple tiny dots across the yellow center, mimicking pollen. -
Create filler flowers:
Make smaller, simplified buds using coral or pink clay. Just create small clusters of tiny balls or simple 4-petal shapes to add variety to the bouquet.
Droopy Petals?
If your petals are wilting before baking, the clay is too warm. Place the sculpted flower in the fridge for 10 minutes to firm it up before putting it in the oven.
Step 4: Assembly and Baking
-
Bake the flowers:
Preheat your oven according to the clay manufacturer’s instructions. Stick the wire stems into a crumpled ball of aluminum foil to keep the flowers upright. -
Cool and set:
Bake for the directed time (usually 15-30 mins). Let them cool completely before handling so the clay hardens fully. -
Prepare the vase:
Take your small glass jar and wrap a piece of jute twine around the neck two or three times. Tie it in a simple knot or bow. -
Arrange the bouquet:
Place the flowers into the jar one by one, crossing the stems to create a matrix that holds them in place. I like to put the largest roses in first and fill the gaps with the smaller daisies and filler flowers.
Place your everlasting bouquet near a window to catch the light and enjoy spring colors all year round


What Really Happens Inside the Kiln
Learn how time and temperature work together inside the kiln to transform clay into durable ceramic.
Floral Relief Tiles for Wall Art
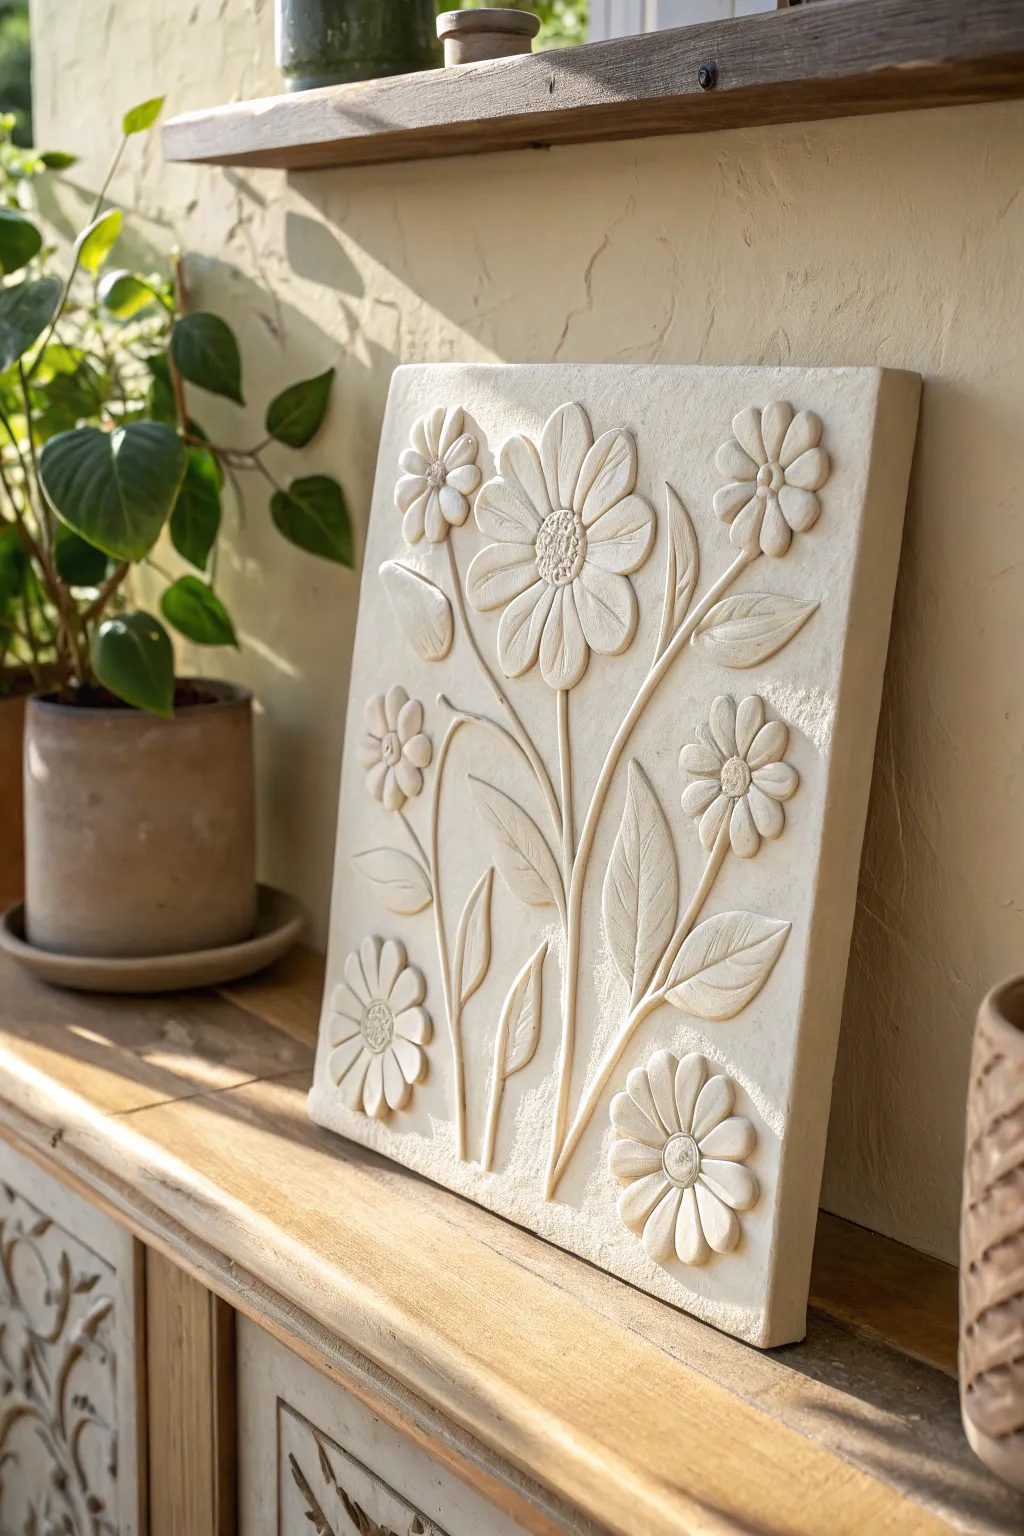
Capture the timeless elegance of stone-carved botanicals with this faux-stone relief tile project. Using air-dry clay and simple sculpting techniques, you’ll create a dimensional floral panel that brings a touch of classical artistry to any shelf or wall.
Detailed Instructions
Materials
- Stone-effect air-dry clay (or white clay + fine sand)
- Square wooden board or backing panel (approx. 10×10 inches)
- Rolling pin
- Sculpting tools (needle tool, ball stylus, rubber shaper)
- Leaf veining tool or a real leaf for texture
- Water in a small cup
- Slip (clay mixed with water to a paste)
- Sponge
- Matte cream acrylic paint (optional, for finishing)
- Fine grit sandpaper
Step 1: Preparing the Base
-
Roll the foundation:
Begin by rolling out a substantial slab of clay to about 1/4 inch thickness. Ensure it is slightly larger than your wooden backing board to allow for trimming later. -
Secure the slab:
Apply a thin layer of PVA glue or score the surface of your wooden board heavily. Press the clay slab firmly onto the board, smoothing out any trapped air bubbles with your palm. -
Create the texture:
Before adding flowers, give the background a stone-like texture. Use a crumpled ball of aluminum foil or a stiff bristle brush to tap gently across the entire surface, eliminating perfectly smooth areas. -
Sketch the layout:
Using a needle tool, very lightly sketch your floral composition directly onto the damp clay. Draw a central stem, a large focal bloom near the top, and smaller offshoot flowers on the sides.
Seamless Merging
To get that true ‘carved relief’ look, use a damp paintbrush to blend the very bottom edges of your applied stems and leaves into the background clay, eliminating harsh seams.
Step 2: Sculpting the Stems and Leaves
-
Roll the coils:
Roll out several thin, even snakes of clay for the stems. I find it helpful to keep these slightly thinner than the final look, as flattening them spreads the clay. -
Attach the main stem:
Score the path of the main stem on your base and apply a dab of slip. Press your longest clay coil along this line, flattening it slightly so it integrates with the background while staying raised. -
Shape the leaves:
Form teardrop shapes from small balls of clay. Flatten them between your fingers to create the basic leaf silhouette. -
Vein the foliage:
Press the leaves onto the background near the stems using slip. Use a knife tool to score a central vein and gentle side veins into each leaf, creating a depression that catches the light. -
Refine leaf edges:
Use a rubber shaper to smooth the edges where the leaf meets the background, making it look carved from the slab rather than just stuck on top.
Antique Wash
Mix a tiny drop of brown paint into a cup of water. Brush this wash over the dried tile and immediately wipe the high points with a rag to darken the crevices and add age.
Step 3: Forming the Floral Elements
-
Prepare petal cane:
Roll a thick log of clay and pinch one side to create a teardrop cross-section. Slice this log into equal-thickness discs to create uniform petals for your main flower. -
Assemble the focal flower:
Arrange the petals in a circle around the top of your main stem. overlap them slightly or butt them against each other, pressing the narrow ends into the center. -
Add the flower center:
Roll a ball of clay, flatten it into a button shape, and press it firmly into the center of the petals. Use a needle tool to stipple the surface, creating a seeded texture. -
Create smaller blooms:
Repeat the petal process for the smaller side flowers (like the one in the bottom left), but use smaller clay discs. Group 5-6 petals for a simple daisy look. -
Add unbloomed buds:
For variety, create a closed bud shape using a single teardrop of clay. Use a knife to carve a single line down the center to suggest folded petals. -
Detailing top petals:
On the large main flower, use a modeling tool to press a subtle indentation or line down the center of each petal, giving them a soft, organic curve.
Step 4: Finishing Touches
-
Clean connection points:
Check every point where a stem meets a flower or leaf. Use a tiny amount of water and a small brush to smooth these transitions. -
Final texturing:
Take a moment to re-texture any background areas you might have accidentally smoothed down while attaching the flowers. -
Dry slowly:
Place a light plastic sheet loosely over the tile to prevent rapid drying, which causes cracks. Let it cure for at least 24-48 hours away from direct heat. -
Sand and soften:
Once fully bone dry, use fine-grit sandpaper to gently knock back any sharp peaks or rough crumbs on the petals and leaves. -
Paint for unity:
Apply a coat of matte cream acrylic paint mixed with a little water. This wash unifies the clay tones and enhances the stone-like appearance.
Place your finished relief tile on a mantel where the afternoon light can play across the textures you’ve created
Flower Corner Frame Accents
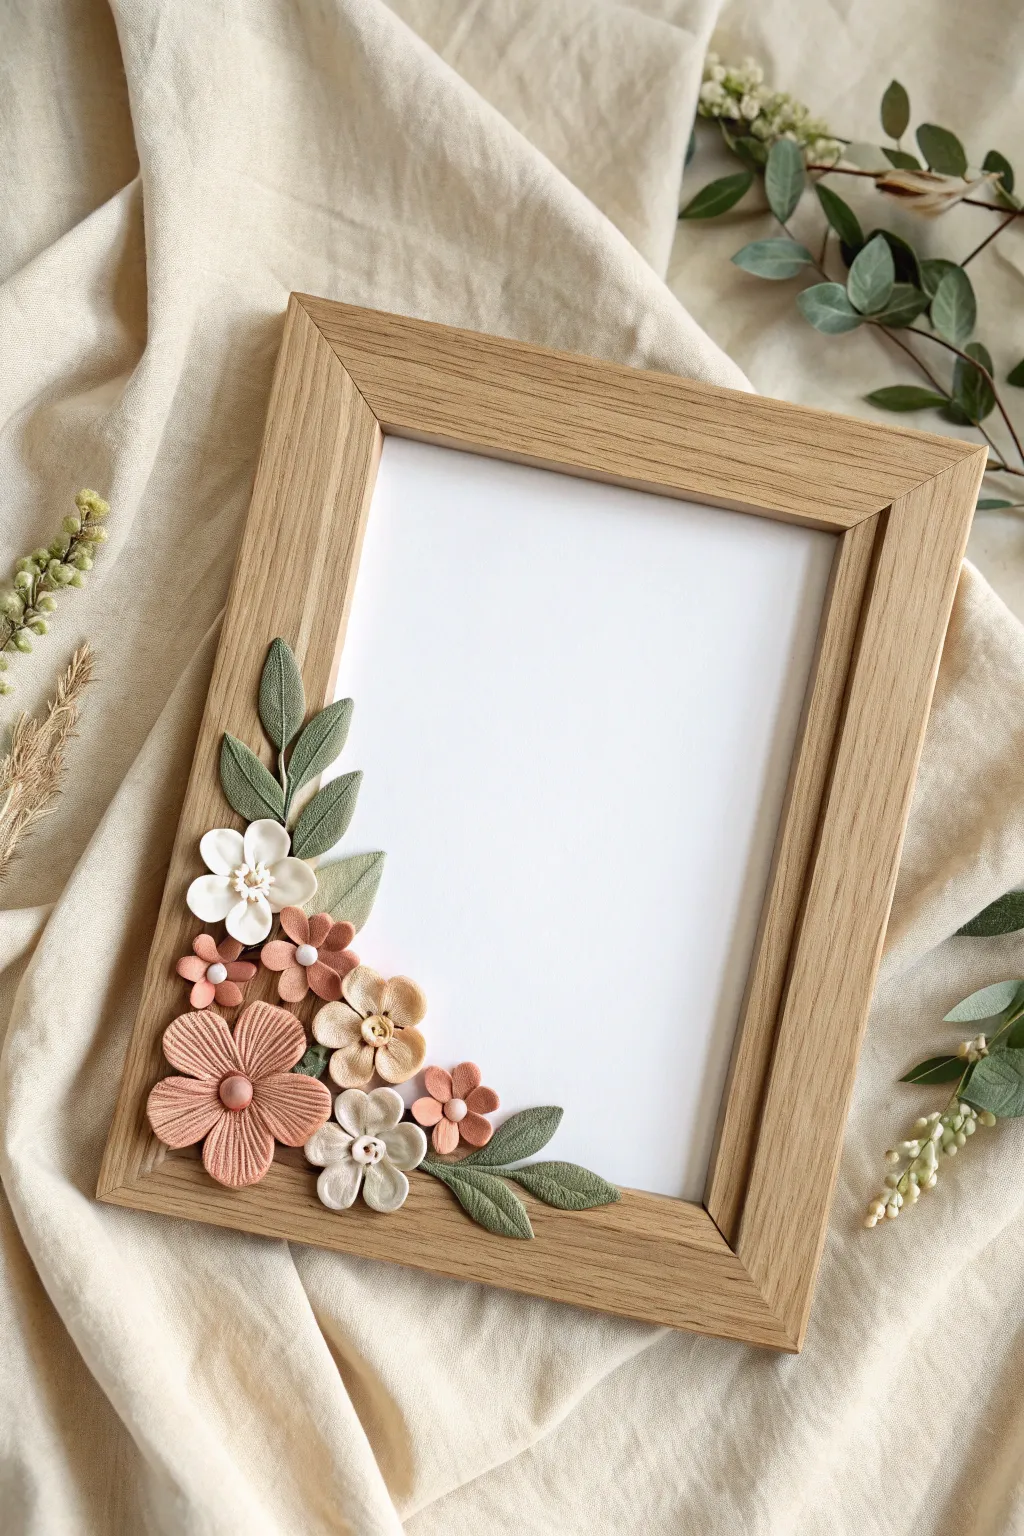
Transform a plain wooden frame into a charming keepsake with this delicate polymer clay corner arrangement. Featuring soft pastel blooms and textured leaves, this project adds a romantic, handcrafted touch to any photo or artwork display.
How-To Guide
Materials
- Plain wooden picture frame (light oak or pine)
- Polymer clay in pastel pink, peach, white, beige, and sage green
- Clay sculpting tools (ball tool, needle tool, small knife)
- Strong craft glue or heavy-duty jewelry adhesive
- Parchment paper or ceramic tile (for baking)
- Small rolling pin or acrylic roller
- Optional: Texture sheet or real leaf for imprinting
- Soft paintbrush and baby oil (for smoothing)
Step 1: Creating the Foliage Base
-
Mix your greens:
Begin by conditioning your sage green clay. For a more natural look, I like to marble in a tiny pinch of white or beige so the leaves aren’t one flat color. -
Shape the leaves:
Roll small balls of green clay into teardrop shapes. Flatten them gently with your finger or a roller to create the basic leaf form. -
Add veining texture:
Using a needle tool or small knife, score a central vein down each leaf. Add smaller diagonal veins branching out to mimic real foliage texture. -
Form the branches:
Roll thin snakes of green clay to act as stems. Attach your leaves to these stems in alternating patterns, creating two main branches: one that extends vertically and one horizontally to hug the frame corner. -
Test the fit:
Before baking, lay your green branches onto the actual wooden frame corner to ensure they curve correctly. Once satisfied, carefully move them to your baking surface.
Sticky Situation?
If your clay gets too soft and sticky to handle, pop it in the fridge for 10 minutes. This firms it up, making detailed sculpting much easier.
Step 2: Sculpting the Blooms
-
Make the large textured flower:
Mix a warm pink shade. Create five teardrop shapes and flatten them widely. Use a needle tool to score deep, close parallel lines along the length of each petal for a ribbed texture. -
Assemble the main bloom:
Arrange the five ribbed petals in a circle, overlapping the edges slightly. Press a smooth ball of slightly darker pink clay into the center to bond them. -
Create the white daisy:
Form five small white teardrops. Flatten them gently and pinch the outer tips to make them slightly pointed. Arrange in a circle and add a textured beige center using a needle tool to poke tiny dots. -
Sculpt the accent flowers:
Using peach and beige clay, create two smaller five-petal flowers similar to the white daisy but slightly simpler in shape. Add small pearl-like balls of white clay to their centers. -
Form the tiny filler buds:
Roll three very small balls of terracotta or dark peach clay. Press a ball tool into the center of each to cup them slightly, creating tiny simple blossoms.
Level Up: Vintage Vibe
After baking, lightly brush the petals with antique brown acrylic paint, then wipe it off immediately. The paint stays in the grooves for a rustic look.
Step 3: Assembly & Baking
-
Arrange the composition:
On your baking tile, place the green foliage base first. Layer the flowers on top, starting with the large ribbed pink flower in the corner ‘crook’. Place the white daisy above it and the smaller blooms cascading down. -
Bonding the clay:
Gently press the layers together. If the clay is too dry to stick, a tiny dab of liquid polymer clay or baby oil can act as a bonding agent between the raw pieces. -
Final detailing:
Check your arrangement against the frame one last time to ensure it doesn’t obscure the photo opening. Use a soft brush with a little baby oil to smooth out any fingerprints. -
Bake the piece:
Bake according to your clay manufacturer’s instructions (usually 230°F – 275°F for 15-30 minutes). Let it cool completely before moving. -
Attach to frame:
Apply strong craft glue to the back of your hardened clay sculpture and press it firmly onto the bottom left corner of the wooden frame. Hold in place until the glue sets.
Step back and admire how this simple addition brings a bespoke, organic elegance to your framed memories.

TRACK YOUR CERAMIC JOURNEY
Capture glaze tests, firing details, and creative progress—all in one simple printable. Make your projects easier to repeat and improve.
Flower Place Card Holders
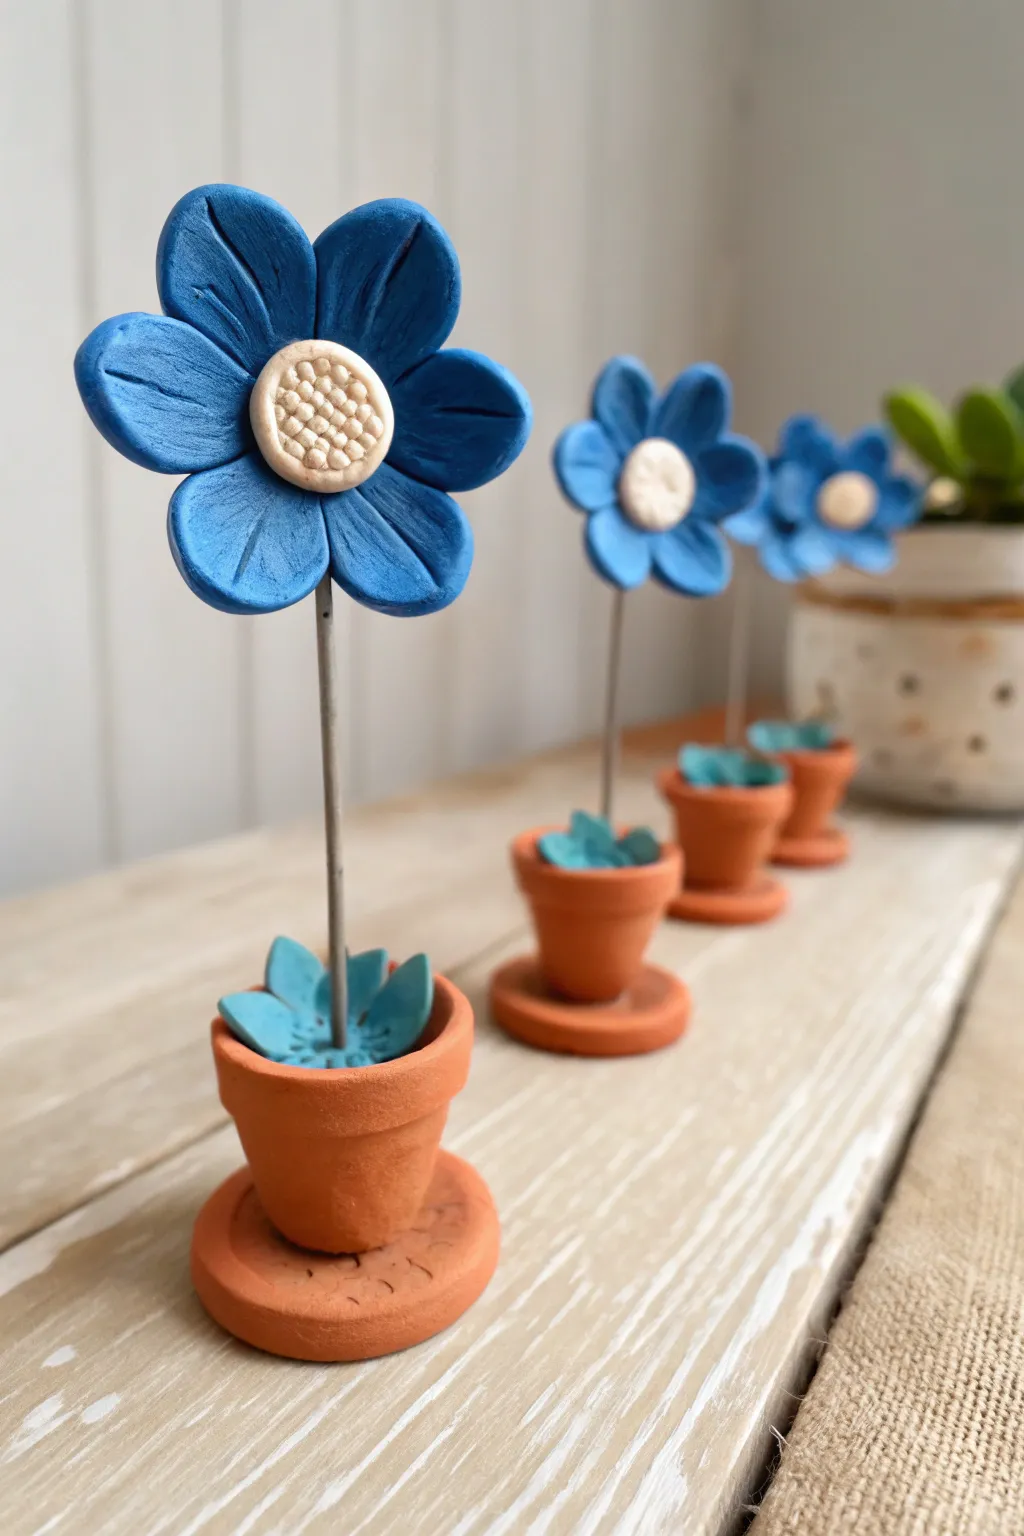
These charming miniature flower sculptures add a pop of cheerful blue to any shelf or table setting. With their sturdy wire stems and tiny terracotta-style pots, they look like fresh-picked blooms that will never fade.
Step-by-Step
Materials
- Blue polymer clay
- Terracotta-colored polymer clay
- Light beige or white polymer clay
- Teal or light blue polymer clay (for leaves)
- Floral wire (18 or 20 gauge)
- Wire cutters
- Super glue or liquid clay
- Needle tool or toothpick
- Small circle cutter (optional)
- Clay texture tool (or a clean toothbrush)
- Baking sheet and parchment paper
- Oven (for baking polymer clay)
Step 1: Creating the Flower Head
-
Prepare the petals:
Start by conditioning your blue polymer clay until it is soft and pliable. Roll six small, equal-sized balls, each about the size of a pea. -
Shape the petals:
Flatten each ball into a teardrop shape with your fingers. Use your thumb to gently press the wider end to round it off, creating a classic petal form. -
Assemble the bloom:
Arrange the six petals in a circle with their pointed ends meeting in the center. Gently press them together so they adhere to one another. -
Add texture:
using a needle tool or toothpick, press a single line down the center of each petal, starting from the center and stopping just before the edge. Add two faint, shorter lines on either side of the main vein for realistic detail. -
Create the center:
Roll a small ball of beige or white clay and flatten it slightly into a disc. Press this firmly into the specific center of your blue flower. -
Detail the center:
Use a needle tool to poke many tiny holes into the beige center to mimic pollen texture. I find that doing this in a circular pattern looks the neatest.
Step 2: Pot and Stem Assembly
-
Form the pot base:
Condition the terracotta-colored clay. Roll a medium-sized ball and flatten it into a thick disc to create the saucer base for the pot. Use a toothpick to add a few notches or imperfections to the edge for a rustic look. -
Shape the pot:
Roll a slightly larger ball of terracotta clay into a cylinder. Pinch the bottom slightly so it tapers, resembling a classic garden pot shape. -
Make the rim:
Roll a thin snake of terracotta clay and wrap it around the top edge of your pot cylinder. Blend the seam gently with your finger or a smoothing tool so it looks like a rolled rim. -
Attach pot to base:
Press the pot firmly onto the center of the saucer base you created earlier. Ensure they are bonded well. -
Prepare the stem:
Cut a piece of floral wire to your desired height (about 3-4 inches works well). Insert the wire straight down into the center of the clay pot. -
Add soil leaves:
Roll tiny bits of teal or light blue clay into small teardrops. Press 3 or 4 of these around the base of the wire where it meets the pot to simulate leaves sprouting from the soil. -
Mount the flower:
take your finished blue flower head and carefully push it onto the top of the wire stem. The wire should go slightly into the back of the flower but not poke through the front.
Wire Stability Tip
Create a small hook or loop at the bottom of the wire before burying it in the pot clay. This anchors the stem inside the clay so it won’t spin or pull out easily after baking.
Step 3: Baking and Finishing
-
Final check:
Stand your flower upright on a parchment-lined baking sheet. Make sure the stem is straight and the flower isn’t tilting too heavily. -
Bake carefully:
Bake the sculpture according to your polymer clay package instructions (typically 275°F/135°C for 15-30 minutes). Use an oven thermometer to ensure accuracy. -
Cool down:
Let the piece cool completely in the oven with the door slightly ajar. This helps prevent cracking from thermal shock. -
Secure with glue:
Once cool, gently pull the wire out of the flower head and the pot (if it feels loose). Add a tiny drop of super glue to the wire tips and re-insert them for a permanent hold.
Floppy Flower Fix
If the flower head slides down the wire while creating it, bake the flower head separately first. Then glue it onto the wire stem during final assembly.
Arrange a trio of these durable little blooms on a windowsill to enjoy a garden view regardless of the season
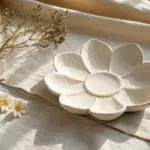
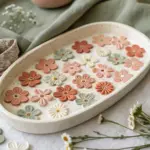
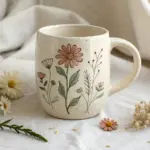
Bloom-Topped Trinket Dishes
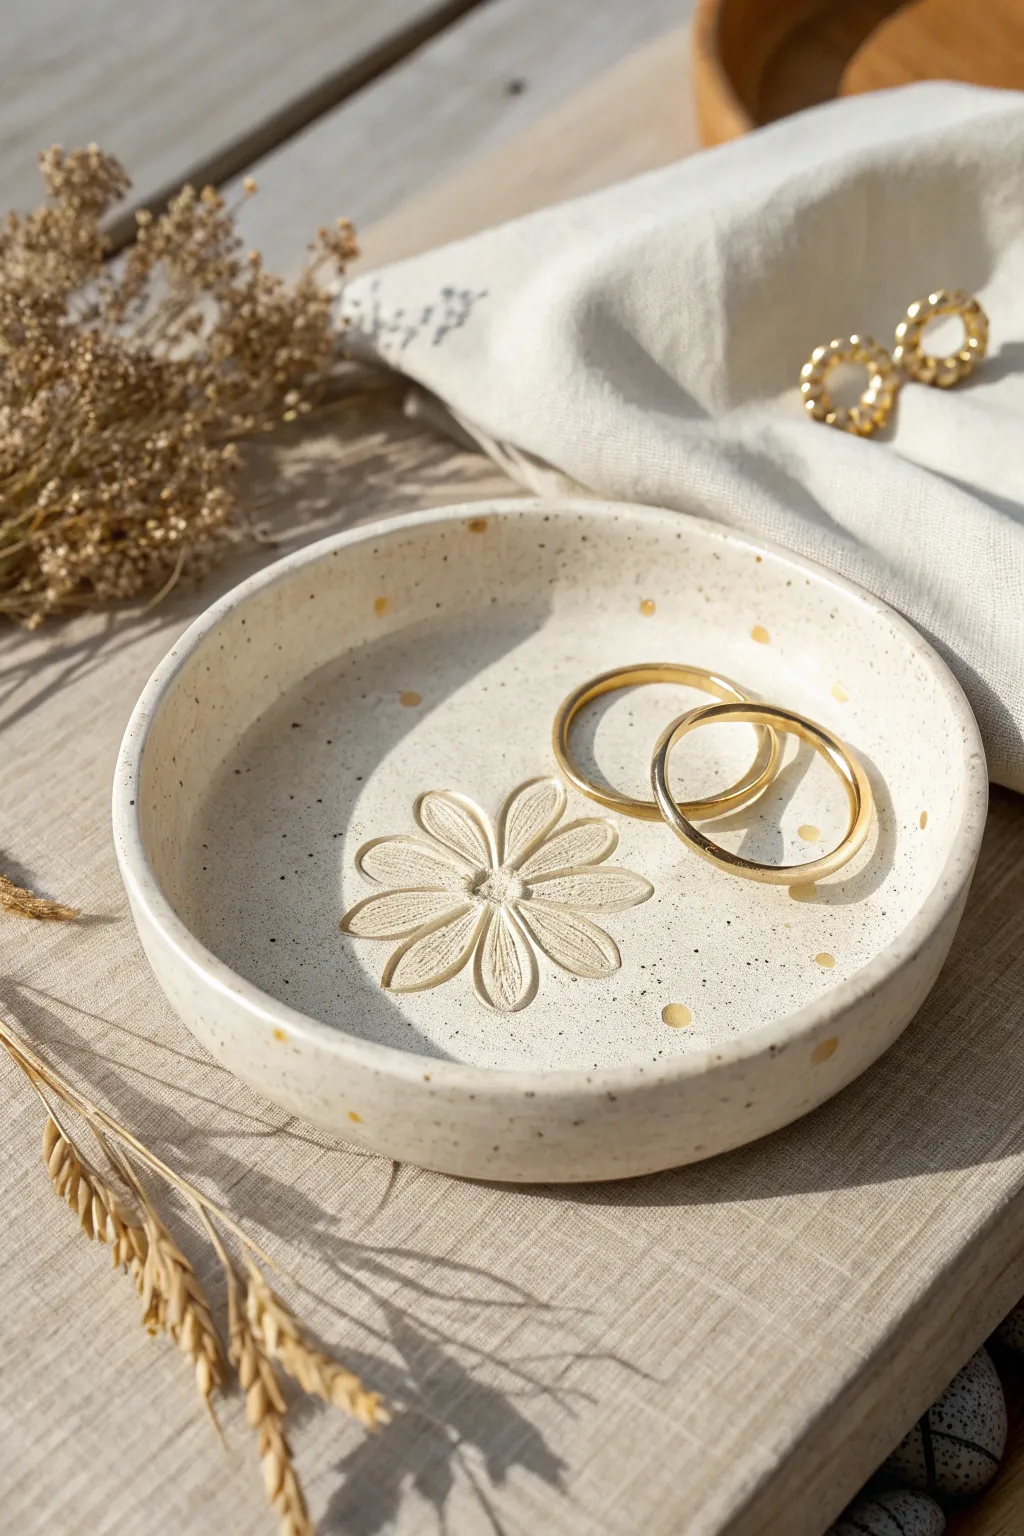
This charming, shallow dish serves as a delicate vessel for your favorite rings or earrings, featuring a sweet, carved daisy motif at its heart. The speckled finish and subtle gold accents give it an organic, handmade feel that rivals high-end boutique ceramics.
Step-by-Step Guide
Materials
- White air-dry clay or polymer clay
- Rolling pin
- Circle cutter (approx. 4-5 inches) or a bowl to trace
- Small carving tools or a dull needle tool
- Dried oregano or decorative sand (for speckles)
- Sponge
- Fine-grit sandpaper
- Acrylic gloss varnish or glaze
- Gold leaf paint or liquid gold leaf
- Fine detail paintbrush
Step 1: Forming the Base
-
Prepare the Clay:
Begin by conditioning your white clay until it is soft and pliable. If you want that beautiful speckled stone look seen in the photo, knead in a pinch of dried oregano or dark sand now until it is evenly distributed. -
Roll the Slab:
Roll out the clay to an even thickness of about 1/4 inch. Lightly dusting your work surface with cornstarch can prevent sticking. -
Cut the Circle:
Use your circle cutter or place a small bowl upside down on the clay to trace and cut out a perfect circle. -
Build the Rim:
Gently curve the edges of the circle upwards to create a shallow rim. I find that smoothing the outside edge with a slightly damp finger helps eliminate any tiny cracks that form during bending. -
Smooth the Surface:
Use a damp sponge to wipe down the inside and outside surfaces, ensuring the transition from the base to the wall is seamless and soft.
Step 2: Carving the Bloom
-
Mark the Center:
Find the exact center of your dish and make a tiny indentation to guide your flower placement. -
Outline the Petals:
Using a needle tool, very lightly sketch a simple daisy shape with roughly 8-10 petals radiating from the center. -
Carve the Detail:
Take your carving tool and carefully carve out the interior of each petal, removing thin shavings of clay to create depth. Leave the outline slightly raised to define the shape. -
Refine the Center:
Texture the center of the flower by poking small dots or cross-hatching to mimic the pollen area of a real daisy. -
Clean Up Edges:
Brush away any loose clay crumbs from your carving with a soft, dry brush.
Natural Speckles
For the most realistic stone effect, use cracked black pepper or dried used coffee grounds mixed into white clay. The texture adds incredible depth.
Step 3: Finishing Touches
-
Dry the Dish:
Allow the clay to dry completely according to the package instructions. Air-dry clay may take 24-48 hours; bake polymer clay as directed. -
Sand for Smoothness:
Once solid, lightly sand the rim and the uncarved surfaces with fine-grit sandpaper to achieve a professional, matte finish. -
Seal the piece:
Apply a coat of gloss varnish or glaze to the entire dish to protect it and bring out the contrast of the speckles. -
Paint Gold Accents:
Dip a fine detail brush into liquid gold leaf. Paint a few random, tiny dots around the rim and inner bowl to mimic organic spotting. -
Gild the Flower:
If desired, you can add a wash of diluted gold paint inside the carved petals for a subtle shimmer, or keep it natural as shown. -
Final Cure:
Let the varnish and paint cure fully before placing any jewelry inside.
Warped Edges?
If your dish warps while air drying, gently weigh down the center with a small bag of rice or beans during the first few hours of the drying process.
Now you have a serene little spot to keep your treasures safe
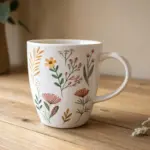
Oversized Statement Flower Magnets
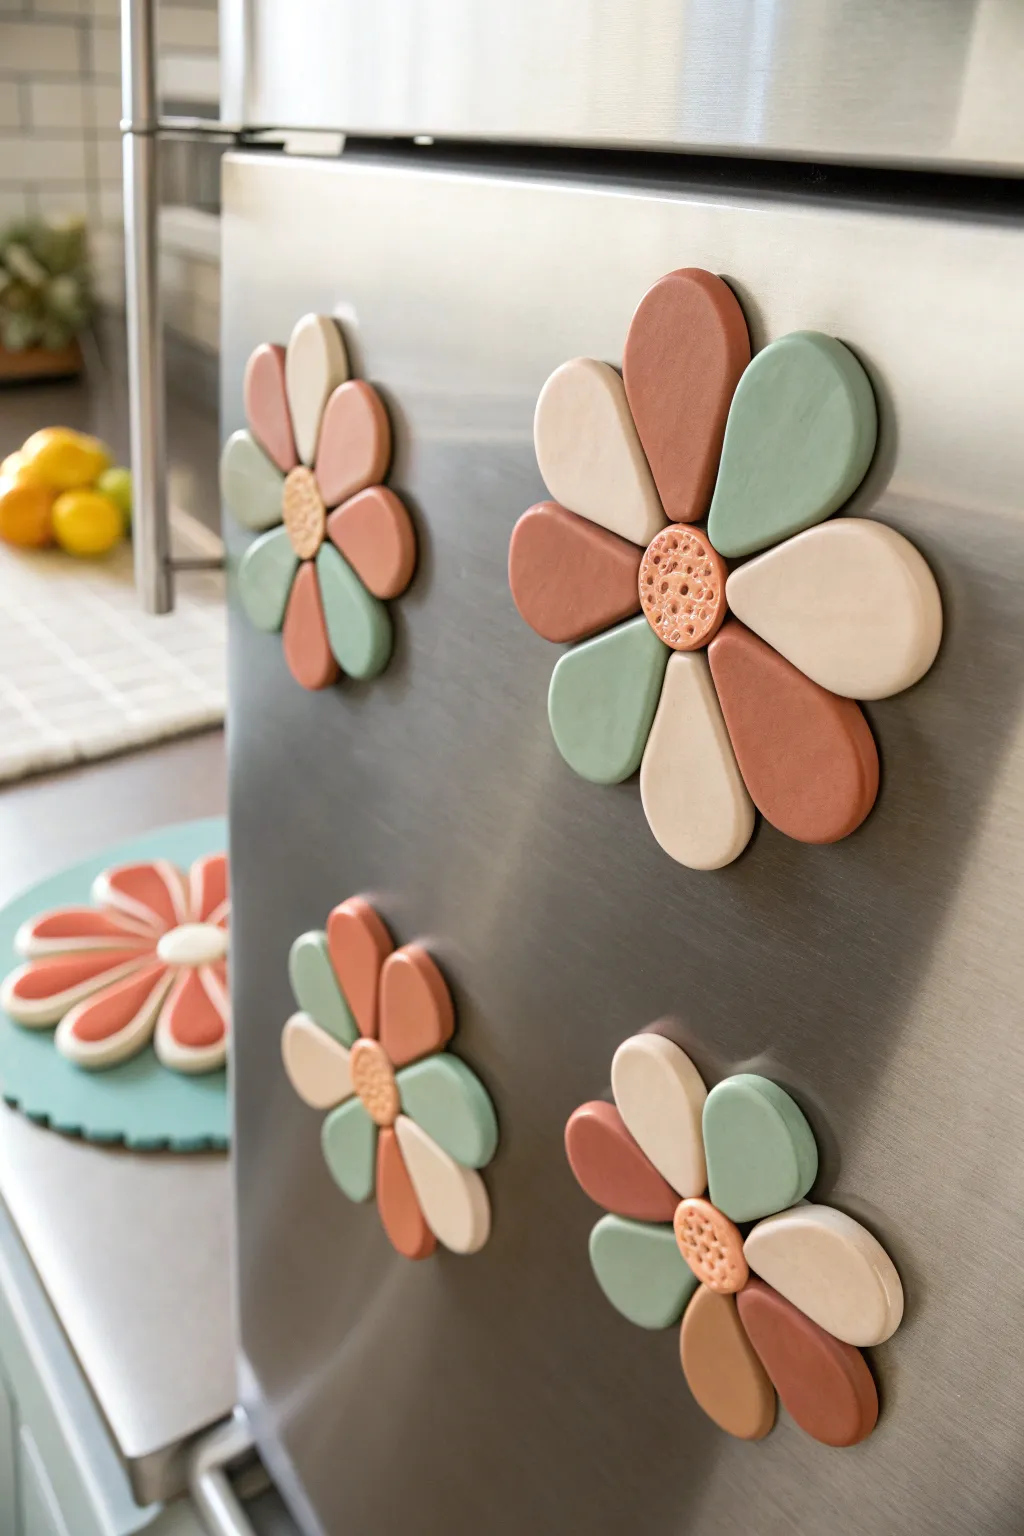
Brighten up your kitchen appliances with these delightfully oversized flower magnets featuring a trendy, muted color palette. The soft matte finish and textured centers give them a sophisticated, handcrafted look that feels both modern and cozy.
Step-by-Step
Materials
- Polymer clay in terracotta, sage green, and cream/beige
- Rolling pin or acrylic roller
- Teardrop-shaped clay cutters (two sizes: large for petals, small for centers is optional)
- Small round cutter (for the center)
- Texture tools (needle tool, toothbrush, or crumpled foil)
- Strong craft glue or E6000
- Heavy-duty ceramic or neodymium magnets
- Baking sheet and parchment paper
- Clay sculpting tools (smoothing tool)
- Fine-grit sandpaper (optional)
- Matte varnish (optional)
Step 1: Preparing the Clay
-
Condition the clay:
Begin by kneading each block of polymer clay individually until it is soft and pliable. This conditioning process is crucial to prevent cracking and ensures a smooth finish later on. -
Mix custom colors:
If your store-bought colors are too bright, tone them down to match the image. Mix a little white into the green for that sage look, or a touch of brown into orange for a terracotta shade. I like to experiment with small batches until I get the perfect earthy palette. -
Roll out the slab:
Roll your conditioned clay out on a flat surface to a uniform thickness, ideally about 1/4 inch (6mm). Using thickness guides or playing cards stacked on either side of your roller can help keep it perfectly even.
Step 2: Shaping the Flowers
-
Cut the petals:
Use your large teardrop cutter to punch out petals from each color slab. For the design shown, you will need roughly 8 petals per flower, but you can vary the colors within a single flower for a playful look. -
Cut the centers:
Use a small round cutter to create the flower centers. You can use a contrasting color like terracotta or beige. Avoid making these too thin, as they need to anchor the petals. -
Soften the edges:
Gently run your finger or a smoothing tool around the cut edge of each petal and center to remove any sharp ridges left by the cutter. This gives the final piece a softer, more sculpted appearance. -
Assemble the flower:
Arrange your petals in a circle on your parchment-lined baking sheet. Press the pointy ends of the teardrops gently together in the middle so they touch. -
Attach the center:
Place the round center piece directly on top of where the petal points meet. Press down firmly but carefully to bond the clay together without distorting the petal shapes.
Fixing Cracks
If you notice small cracks after baking, fill them with a mix of liquid clay and regular clay in the matching color. Smooth it over and re-bake for a seamless repair.
Step 3: Texturing and Baking
-
Texture the center:
Using a needle tool, poke random small holes into the round center piece to mimic seed pods. Vising a slightly larger tool or the end of a paintbrush can add variety to the hole sizes. -
Add surface detail:
For extra realism, you can gently press a clean toothbrush or crumpled aluminum foil onto the center dot to give it a porous, organic texture. -
Final inspection:
Check for any fingerprints or lint. You can gently wipe the surface with a tiny bit of baby oil or acetone on a cotton swab to smooth imperfections before baking. -
Bake the clay:
Bake the flowers according to the temperature and time instructions on your specific brand of polymer clay package. Usually, this is around 275°F (135°C) for 15-30 minutes. -
Cool down:
Let the flowers cool completely on the baking sheet. Do not try to move them while they are hot, as the clay is still slightly soft and can warp.
Stronger Bond
Embed the magnet directly into the clay before baking for an unbreakable bond. Press it into the back, cover with a thin layer of liquid clay, and bake as normal.
Step 4: Assembly
-
Sand edges (optional):
Once cool, if there are any rough spots on the edges, lightly sand them with fine-grit sandpaper under running water to keep dust down. -
Prepare the back:
Flip the flowers over. If the back feels very slick, scratch the center area slightly with your needle tool to give the glue more surface area to grip. -
Glue the magnet:
Apply a dab of strong craft glue or E6000 to the back of the flower center. Press your magnet firmly into the glue. -
Dry time:
Allow the glue to cure fully—usually 24 hours for maximum strength—before placing your new art on the fridge.
Once the glue is fully cured, these earthy blooms are ready to hold up your favorite photos and grocery lists in style
Ombre Petals With Colored Clay Blends
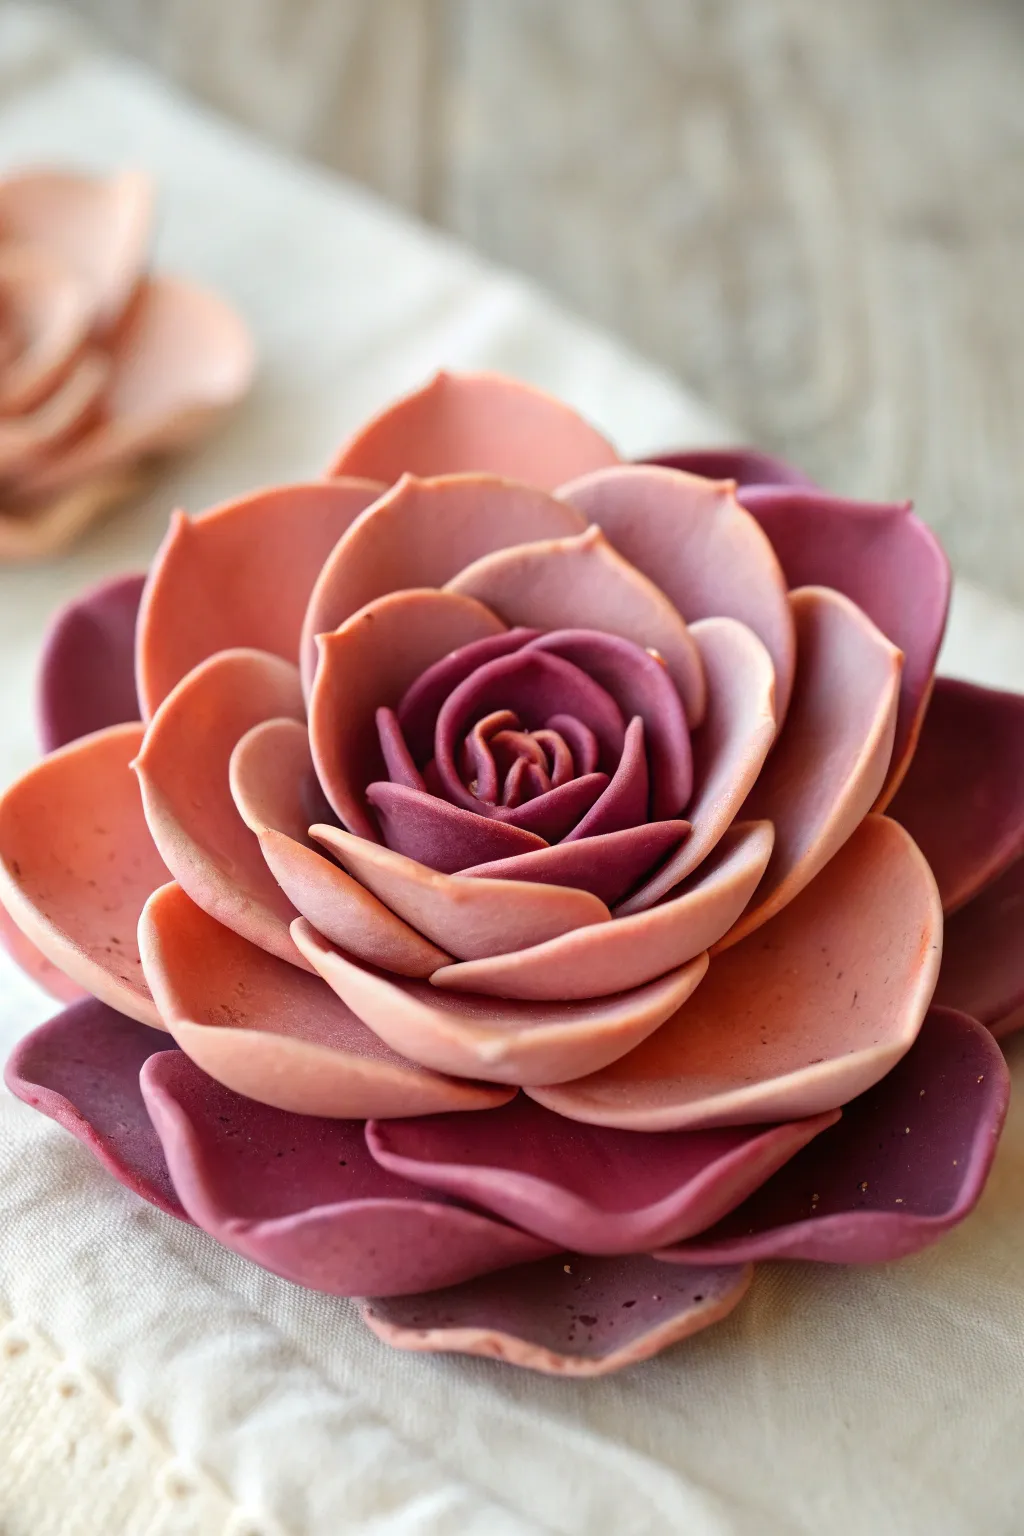
Capture the natural beauty of a blushing succulent with this detailed clay sculpting project. By blending gradients from deep burgundy to soft peach, you will create a realistic botanical piece perfect for jewelry or decor.
Detailed Instructions
Materials
- Polymer clay (Deep Burgundy or Plum)
- Polymer clay (Peach or Salmon Pink)
- Polymer clay (Translucent White)
- Pasta machine or acrylic rolling pin
- Teardrop-shaped cutter set (various sizes)
- Ball tool (large and medium)
- Foam sculpting pad
- Detailing needle tool
- Soft pastel chalks (Black or Dark Brown for speckling)
- Old toothbrush or stiff bristle brush
- Oven and baking sheet
Step 1: Preparing the Ombre Gradient
-
Condition the clay:
Begin by thoroughly conditioning your burgundy, peach, and translucent clays separately until they are soft and pliable. Warm clay is much easier to blend without cracking. -
Create the color mixes:
You need three distinct shades. Keep a portion of pure burgundy for the center. Mix a 50/50 blend of burgundy and peach for the mid-tones. Finally, mix peach with a small amount of translucent clay for the outer, lighter petals. -
Skinner blend technique:
To get that seamless transition seen in the photo, take your 50/50 mix and your pure peach mix and create a ‘Skinner blend’ sheet using your pasta machine. This creates a sheet of clay that fades smoothly from dark to light. -
Sheet preparation:
Roll your pure burgundy clay and your blended gradient sheet to a uniform medium thickness (approx. number 3 or 4 on a pasta machine).
Droopy Petals?
If the bottom petals sag while sculpting, tuck small balls of polyester fiberfill or tissue under them for support. Remove these supports only after the clay is fully baked and cooled.
Step 2: Forming the Petals
-
Cut the shapes:
Using graduated teardrop cutters, punch out your petals. You will need roughly 6-8 small petals from the darkest burgundy, 8-10 medium petals from the gradient sheet (mid-tone area), and 10-12 large petals from the lightest peach section. -
Thin the edges:
Place a petal on your foam pad. Use the ball tool to gently roll gently around the upper edges of the teardrop. This thins the clay to look like a delicate leaf edge and creates a slight curl. -
Pinch the base:
Gently pinch the bottom point of the teardrop together to give the petal a structural curve and a base to attach to the flower core. -
Create the texture:
The reference photo shows subtle speckling. Grate a tiny amount of dark pastel chalk into a powder. Dip a toothbrush into the powder and flick it very lightly over the unbaked petals to create organic imperfections.
Dew Drop Effect
After baking, add tiny droplets of UV resin to the center petals and cure with a UV lamp. This mimics fresh morning dew trapped in the succulent’s core.
Step 3: Assembling the Succulent
-
Create the core:
Roll a small ball of burgundy clay to act as the base. Take your smallest, darkest petals and wrap them tightly around each other in a spiral to form the tight ‘rosebud’ center. -
Add the first layer:
Attach the next row of small burgundy petals, positioning each one so it overlaps the seam of the previous petal. Press the pinched bases firmly into the core. -
Build the gradient:
Switch to your medium-sized gradient petals. As you attach these, angle them slightly more open than the center. I find it helpful to look at the flower from the top down to ensure the symmetry remains balanced. -
Expand the bloom:
Begin adding the large, light peach petals. These should be placed quite openly, almost flat, to create that wide, rosette shape characteristic of echeveria succulents. -
Insert contrast base petals:
For the bottom-most layer, use large petals cut from the dark burgundy clay. This creates the beautiful framing effect seen in the original image, where the dark base leaves cup the lighter center. -
Final shaping:
Once assembled, gently use your fingers to curl the tips of the outer petals upward slightly. This ‘cup’ shape adds realism and softness to the sculpture.
Step 4: Finishing Touches
-
Check for fingerprints:
Before baking, inspect your petals for fingerprints. Smooth them away lightly with a drop of baby oil or clay softener on your finger. -
Bake:
Bake the succulent according to your polymer clay manufacturer’s instructions. Usually, this is around 275°F (135°C) for 30 minutes per 1/4 inch of thickness. -
Cool and verify:
Let the piece cool completely in the oven to prevent thermal shock cracks. The result should have a lovely matte finish like the reference.
Enjoy displaying your permanent botanical art on a desk or turning it into a stunning brooch
Veined Petals Using Simple Texture
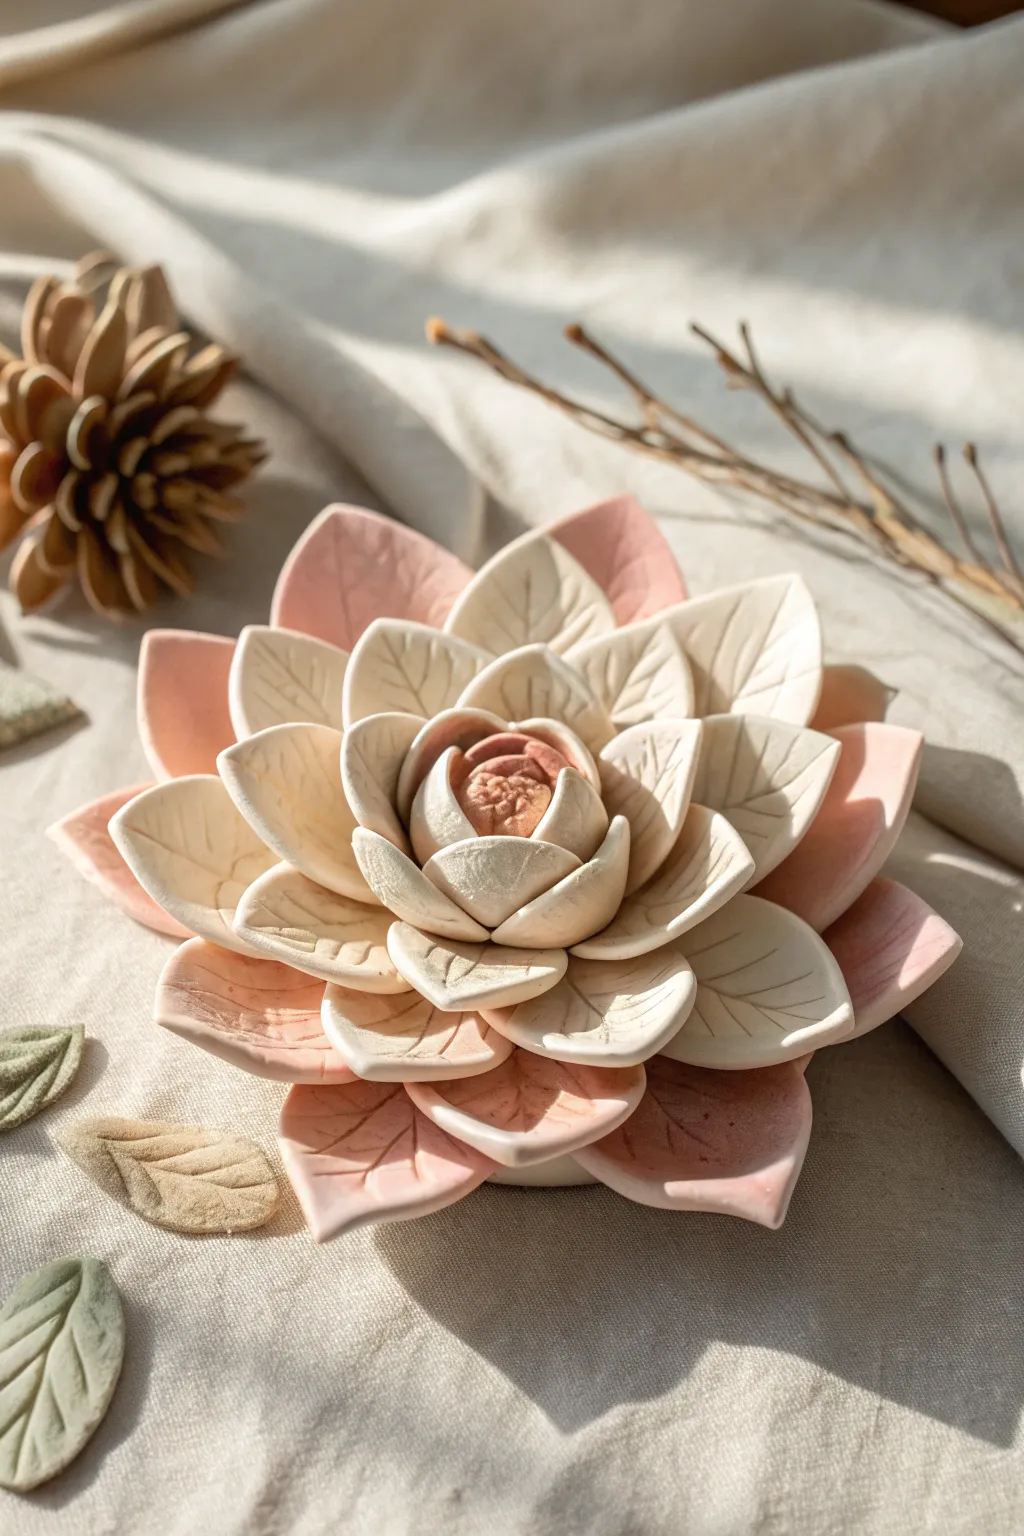
Capture the serene beauty of a blooming lotus with this textured petal sculpture, featuring soft gradients of blush pink and creamy white. By imprinting natural leaf veins directly onto the clay, you’ll create an organic, lifelike finish that feels as gentle as it looks.
Step-by-Step Guide
Materials
- Polymer clay (white and translucent)
- Soft pastel chalks (blush pink, dusty rose, and subtle peach)
- Leaf vein texture sheet or a real leaf with prominent veins
- Ball stylus tool (medium and large)
- Sharp clay blade or craft knife
- Teardrop-shaped cutter (optional, or freehand)
- Small paintbrush for pastels
- Baking tile or oven-safe surface
- Liquid clay (optional, for adhesion)
- Matte varnish
Step 1: Preparing the Gradient Clay
-
Condition the base:
Begin by thoroughly conditioning your white polymer clay until it is soft and pliable. I like to mix in a tiny amount of translucent clay here, which gives the petals a more realistic, waxy translucency after baking. -
Create the color palette:
Shave a small amount of blush pink and dusty rose pastel chalk into fine powder using your craft knife. Keep the colors separate on a piece of scrap paper. -
Tint the clay:
Divide your clay into three portions. Keep one pure white. Mix a very small amount of pink powder into the second to create a pale baby pink. Mix slightly more powder into the third for a deeper dusty rose tone.
Use Cornstarch
Dust your texture sheet or mold lightly with cornstarch before pressing the clay. This acts as a release agent and prevents the clay from sticking and tearing the fine veins.
Step 2: Sculpting the Textured Petals
-
Roll out the clay:
Roll your clay portions into thin sheets, approximately 2mm to 3mm thick. You want them sturdy enough to hold shape but thin enough to look delicate. -
Cut the shapes:
Using a large teardrop cutter or a craft knife, cut out roughly 8-10 large petals from the darkest pink clay, 8-10 medium petals from the pale pink, and 10-12 smaller petals from the white clay. -
Apply the texture:
Press a petal onto your texture sheet or the back of a real leaf. Apply firm, even pressure to ensure the central vein and branching veins transfer clearly. -
Soften the edges:
Gently lift the textured petal. Use the tip of your finger to delicately smooth the very outer rim of the petal, removing any sharp cut marks while leaving the texture intact. -
Shade the veins:
Dip a dry brush into a tiny bit of darker pink pastel powder and dust it into the deep center vein and base of the pink petals to add depth. -
Shape the curve:
Place the petal in your palm. Using a large ball stylus, gently roll over the bottom third of the petal to cup it inwards.
Incense Holder Hack
Before baking, use a needle tool or small dowel to poke a hole in the very center of the sculpted bud. This turns your flower into a functional and beautiful incense stick holder.
Step 3: The Center Bud
-
Form the core:
Roll a small ball of pink clay for the absolute center. Texture it slightly with a toothbrush or needle tool to simulate pollen or stamen details. -
Wrap the first layer:
Take three of your smallest white petals. Arrange them tightly around the center core so they overlap significantly, creating a closed bud shape.
Step 4: Assembly and Baking
-
Add the inner rows:
Continue adding the white petals around the bud, placing each new petal over the seam where the previous two met. -
Transition to pink:
Begin adding the pale pink petals. As you move outward, angle the petals slightly more open, allowing them to bloom away from the center. -
Place the outer ring:
Attach the largest, darkest pink petals for the final row. These should lie almost flat against your work surface. -
Curve the tips:
For a natural look, gently pinch or curl the very tip of a few outer petals so they don’t look too uniform. -
Check stability:
If the clay feels dry or isn’t sticking well, brush a tiny amount of liquid clay at the base of the petals before attaching them. -
Bake the piece:
Bake according to your manufacturer’s instructions (usually 275°F/130°C for 15-30 minutes). I recommend tenting foil over the flower to prevent the white tips from scorching.
Step 5: Finishing Touches
-
Cool and inspect:
Let the sculpture cool completely in the oven to prevent thermal shock cracks. -
Seal (optional):
Apply a thin coat of matte varnish to protect the pastel shading, or leave it raw for a natural matte ceramic look.
Now you have a serene, nature-inspired sculpture that brings a touch of calm to any space
Sliced Flower Cross-Section Sculptures
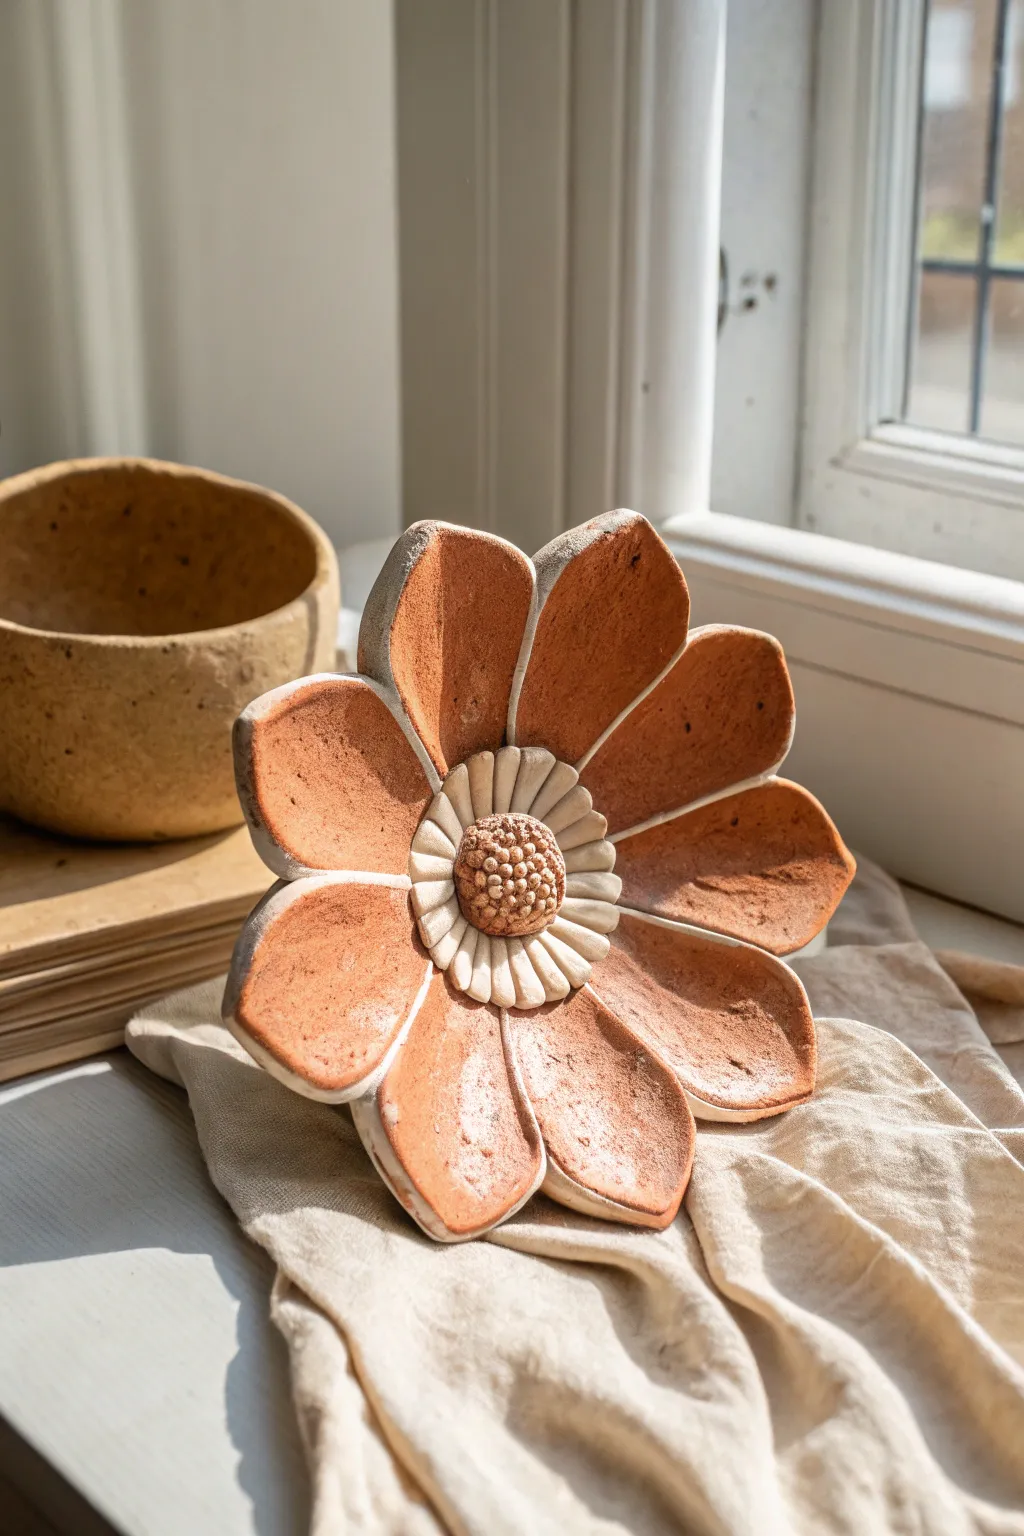
This rustic, nature-inspired sculpture captures the simple beauty of a daisy-like bloom using two contrasting clay bodies. The warm terracotta petals are framed by white clay spines, creating a striking cross-section effect that feels both modern and organic.
Detailed Instructions
Materials
- Terracotta colored stoneware clay (smooth or fine grog)
- White stoneware or porcelain clay
- Rolling pin
- Needle tool or fettling knife
- Scoring tool (serrated rib or needle)
- Slip (matching the clay bodies)
- Sponge
- Small carving tools
- Plastic wrap
Step 1: Petal Preparation
-
Roll the terracotta slabs:
Begin by rolling out your terracotta clay to a consistent thickness of about 1/4 inch. Ensure the clay is free of air bubbles by wedging it well beforehand. -
Roll the white clay:
Roll out a smaller amount of the white clay to the same thickness. This will be used for the backing and the intricate center. -
Create the white backing:
Cut a thin sheet of white clay and layer it entirely underneath your terracotta slab. Gently roll them together just enough to bond them without thinning the slab too much. This creates the white underside visible at the petal edges. -
Cut the petal shapes:
Using a needle tool, cut out large, elongated tear-drop shapes for your petals. You will need about 7-9 large petals for the main ring. Aim for a slightly organic, imperfect shape rather than geometric precision.
Step 2: Assembly and Detailing
-
Shape the petals:
Gently curve each petal upwards. Pinch the bottom (narrow end) slightly to create a concave form that resembles a real flower petal. -
Expose the edges:
Smooth the edges of each petal with a damp sponge or your finger. This action often smears the terracotta slightly over the white, or reveals the white sandwich layer, creating that lovely defined border seen in the example. -
Form the base:
Create a small, flat disc of white clay to serve as the anchor point for your petals. -
Attach the main petals:
Score and slip the narrow ends of your terracotta petals and attach them radially to the white base disc. Arrange them so they fan out evenly, overlapping slightly if desired for a fuller look. -
Prop for drying:
Place balls of paper or plastic wrap under the petals to keep them lifted and curved while the clay is soft. I find this helps maintain that lively, blooming gesture.
Cracking at seams?
If petals separate during drying, the clays may be shrinking at different rates. Use a ‘paper clay’ slip (slip mixed with toilet paper pulp) to fill gaps.
Step 3: Center Piece Creation
-
Create the white floret ring:
Roll a small coil of white clay and flatten it slightly. Use a knife to make small vertical cuts all along the strip to simulate small inner petals. -
Attach the floret ring:
Form this strip into a ring and attach it to the very center of your flower, covering the join points of the large terracotta petals. -
Form the central pod:
Roll a ball of terracotta clay for the seed pod. Texture it heavily using a small tube tool or the end of a paintbrush to create a pitted, pollinated surface. -
Final assembly:
Score and slip the textured terracotta ball into the center of the white floret ring. -
Clean up:
Check the sculpture for any sharp burrs or unwanted clay crumbs. Smooth these away with a barely damp sponge, paying attention to preserving the texture on the center pod. -
Drying:
Cover the flower loosely with plastic to let it dry showly. Because you have two different clays attached, slow drying is critical to prevent cracking where they join.
Pro Tip: Highlight Edges
After the piece is bone dry but before firing, gently sand the very edges of the petals to reveal the stark white clay layer beneath the terracotta.
Once fired, the contrast between the earthy red and clean white clay will make this piece a stunning focal point on any table or shelf
Whimsical Flower-Head Figurines
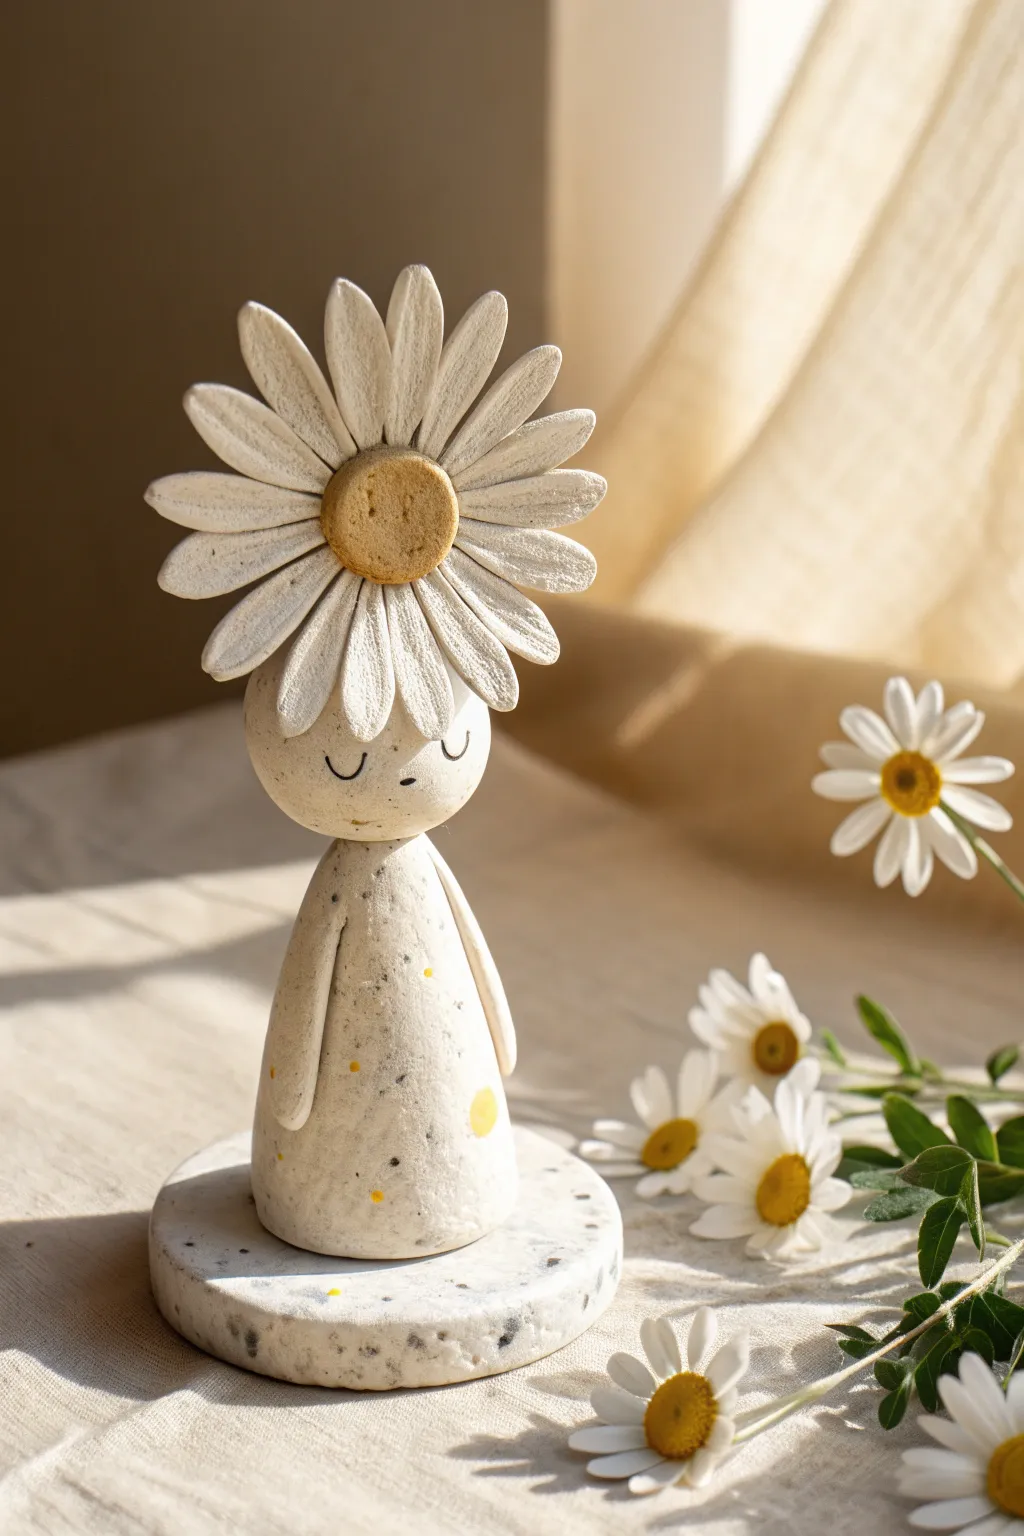
Capture the serenity of a sunlit garden with this charming figurine features a sweet, sleeping face topped with an oversized daisy bloom. Using speckled clay adds a wonderful organic texture that makes the piece feel like a carved river stone come to life.
Step-by-Step Guide
Materials
- White or cream polymer clay with speckles (granitex style)
- Yellow ochre polymer clay
- Basic sculpting tools (needle tool, ball stylus)
- Rolling pin
- Circle cutters (various sizes)
- Liquid clay or bake-and-bond
- Black acrylic paint and fine detail brush
- Matte varnish (optional)
- Craft knife
- Toothpicks or wire armature for support
Step 1: Sculpting the Base and Body
-
Form the base:
Start by conditioning a large ball of speckled clay. Roll it into a thick slab about 1/2 inch high. Use your largest circle cutter (or a jar lid) to cut a perfect round base. Smooth the edges with your finger to soften the cut marks. -
Shape the body cone:
Roll a medium-sized ball of speckled clay into a smooth cone shape. Flatten the bottom so it stands independently and round off the top slightly where the head will attach. -
Create the arms:
Roll two thin snakes of clay for the arms. They should be slightly tapered at the bottom. Attach these vertically to the sides of the body cone, blending the top seams into the shoulder area so they look seamless. -
Secure the body:
Insert a toothpick or short piece of wire into the center of the round base. Apply a drop of liquid clay, then press the body cone down onto the wire to secure it permanently to the base.
Step 2: Creating the Head and Flower
-
Form the head:
Roll a sphere of speckled clay that is proportional to your body cone. It should be slightly flattened on the bottom. Add a small piece of wire into the neck of the body, apply liquid clay, and press the head onto the body. -
Make the flower center:
Take a small ball of yellow ochre clay and flatten it into a thick disk. Texture the surface by gently stippling it with a needle tool or an old toothbrush to mimic pollen. -
Prepare the petals:
Roll out a sheet of white speckled clay. Use a teardrop cutter or hand-cut about 14-16 petal shapes. They should be long and oval. -
Detail the petals:
Use a needle tool or knife to score a central line down the length of each petal for a realistic floral texture. I find it helps to gently pinch the base of each petal to give it dimension. -
Assemble the flower:
Arrange the petals in a circle on top of the head, pressing them gently to adhere. They should radiate outward like a halo. Place the textured yellow center in the middle of the petals and press down firmly to bond everything together. -
Add floating petals:
For extra whimsy, attach a few small, flattened circles of yellow clay randomly on the body or base to look like falling pollen or polka dots.
Clean Clay Tip
Keep wet wipes handy! Speckled clay hides dust well, but switching to the yellow center can transfer dark lint. Wipe hands before touching the yellow clay.
Step 3: Finishing Touches
-
Bake the sculpture:
Preheat your oven according to your clay manufacturer’s instructions (usually around 275°F/130°C). Place your sculpture on a ceramic tile or baking sheet and bake for 30-45 minutes. -
Cool down:
Let the sculpture cool completely in the oven with the door dedicated. This prevents thermal shock and cracking. -
Paint the face:
Using a very fine detail brush and black acrylic paint, carefully paint two small semi-circles for the sleeping eyes. Add a tiny dot for the mouth if desired, or leave it minimal. -
Seal the piece:
Apply a thin coat of matte varnish to the entire sculpture to protect the paint and give the clay a unified, finished sheen.
Seasonal Swap
Change the flower type to match the seasons! Try a sunflower for autumn, a poinsettia for winter, or a tulip shape for early spring.
Now you have a peaceful little floral guardian to bring a moment of calm to your desk or shelf.
Floating Flower Mobiles
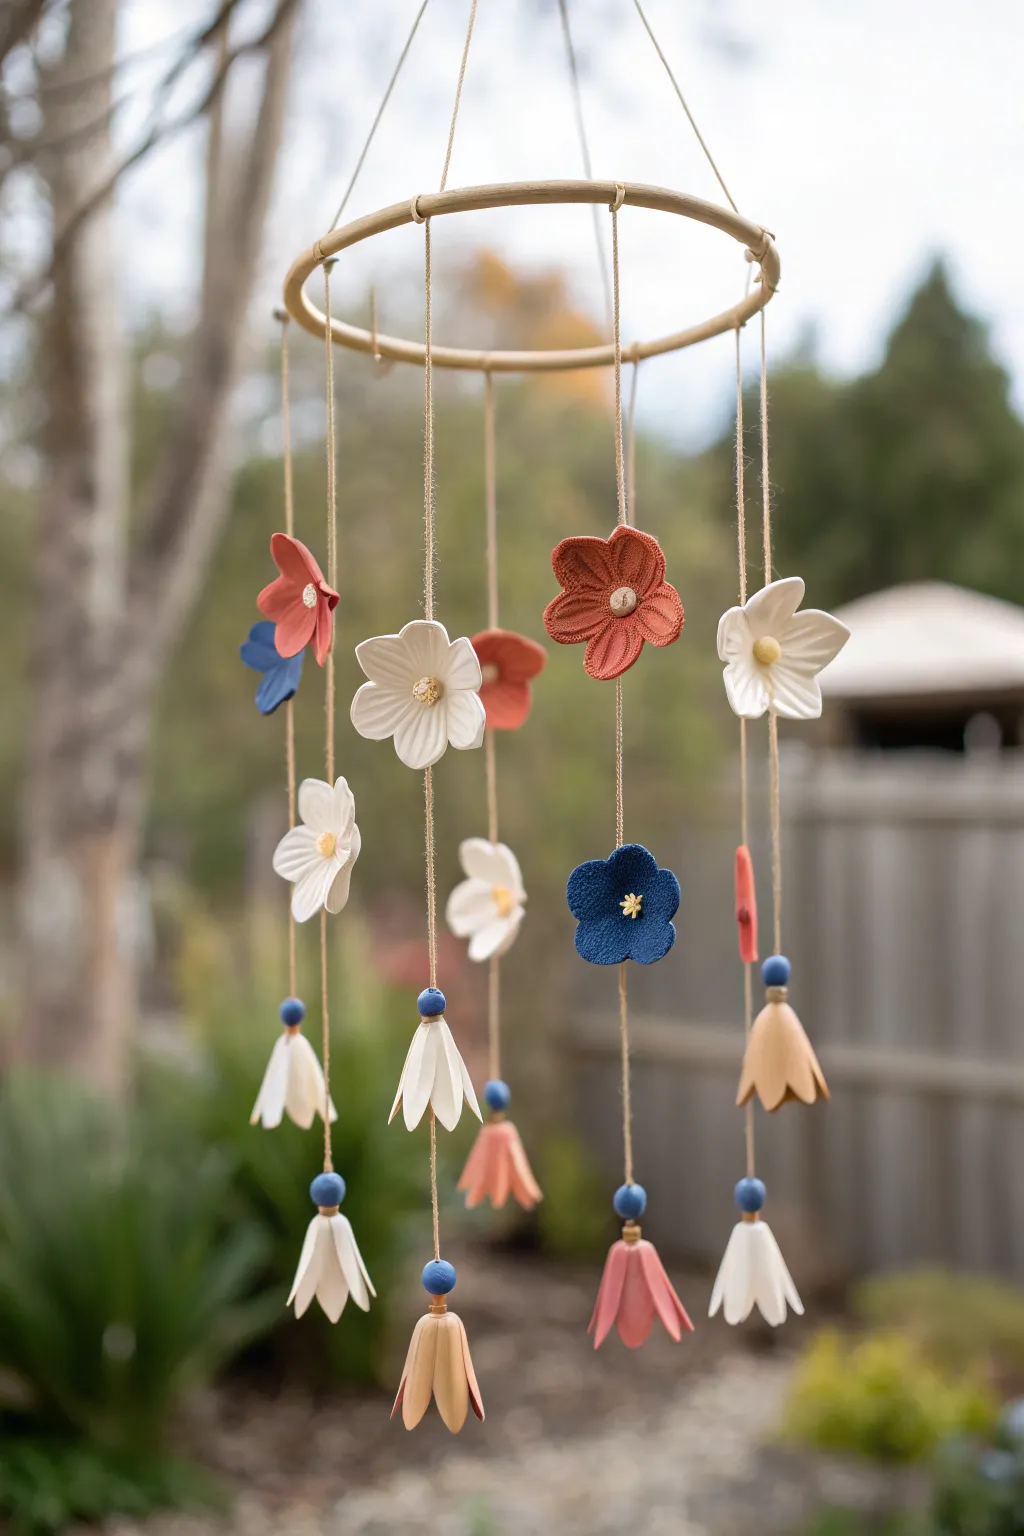
Bring the garden indoors with this charming mobile featuring hand-sculpted clay flowers and gentle bell tassels. Its earthy palette of terracotta, white, and indigo creates a soothing, natural aesthetic perfect for a patio or nursery.
How-To Guide
Materials
- Polymer clay or air-dry clay (white, terracotta, navy blue, ochre)
- Wooden mobile hoop (approx. 8-10 inches)
- Natural jute twine or hemp cord
- Small wooden beads (approx. 10mm, blue and natural wood)
- Sculpting tools (needle tool, ball stylus)
- Rolling pin
- Small flower cookie cutters (3-5 petal shapes)
- Acrylic paint and fine brush (optional, for details)
- Matte varnish
- Strong craft glue or hot glue
- Scissors
Step 1: Sculpting the Components
-
Condition the clay:
Begin by softening your clay. If using polymer clay, knead each color block until it’s pliable and smooth. For this project, you’ll need white, terracotta, deep blue, and a soft yellow-ochre. -
Form the flower bases:
Roll out slabs of clay to about 1/4 inch thickness. Use your flower cutters or a craft knife to cut out various 5-petal flower shapes in different sizes and colors. -
Add texture and shape:
Before the clay sets, place the flowers in your palm and gently press the center with a ball tool to curve the petals naturally upward. Use a needle tool to score delicate lines from the center outward on each petal for realistic texture. -
Create flower centers:
Roll tiny balls of contrasting clay colors (like yellow for white flowers, white for red ones). Press these into the centers of your blooms. I like to poke the centers with a needle tool to create a stippled pollen effect. -
Make the bell tassels:
For the hanging elements at the bottom, form cone shapes from clay. Pinch the wide end into four points and gently curve them outward to resemble a bellflower or tulip. -
Create attachment holes:
This step is crucial: Use a needle tool to pierce a vertical hole completely through the center of every flower and the top of every bell tassel. Ensure the hole is wide enough for your twine to pass through. -
Cure or dry:
Bake your polymer clay pieces according to the package instructions (usually 275°F for 15-30 minutes) or let air-dry clay sit for 24-48 hours until fully hardened.
Smoother Texture
Work with clean hands and use a bit of cornstarch on your tools to prevent sticking. If fingerprints appear, lightly brush them with baby oil before baking.
Step 2: Assembly and Hanging
-
Prepare the strings:
Cut 6 to 8 lengths of jute twine, varying them slightly between 18 and 24 inches long. This variation creates a nice cascading effect. -
Attach the bottom bells:
Thread a length of twine through the top hole of a bell tassel. Tie a secure double knot on the inside of the bell so the string doesn’t pull through. Add a small drop of glue to the knot for extra security. -
Add decorative beads:
Slide a wooden bead down the string so it rests directly on top of the bell tassel. Mix blue painted beads with natural wood ones for visual interest. -
Position the flowers:
Decide where you want a flower to sit on the string. Tie a knot at that location, thread the flower on, and then tie another knot immediately above the flower to hold it in place. The flower should ‘float’ between these knots. -
Layering elements:
Continue adding 2-3 flowers per string, spacing them out unevenly. Alternate colors so you don’t have two blue flowers right next to each other. -
Attach strings to hoop:
Tie the top end of each completed string to your wooden hoop. Space them evenly around the circumference. Adjust the lengths so the bells hang at staggered heights. -
Create the hanging harness:
Cut three equal lengths of twine (about 12 inches) and tie them to the hoop at equidistant points (12, 4, and 8 o’clock positions). Bring these three strings together at the top and knot them into a sturdy loop for hanging. -
Final adjustments:
Hang the mobile up temporarily and adjust the spacing of the strings on the hoop to ensure it balances perfectly level.
Add Sound
Hide tiny metal jingle bells inside the clay bell tassels. When the wind catches the mobile, it will create a soft, pleasant chiming sound.
Hang your finished mobile near a sunny window where the light can catch the subtle textures of the clay petals