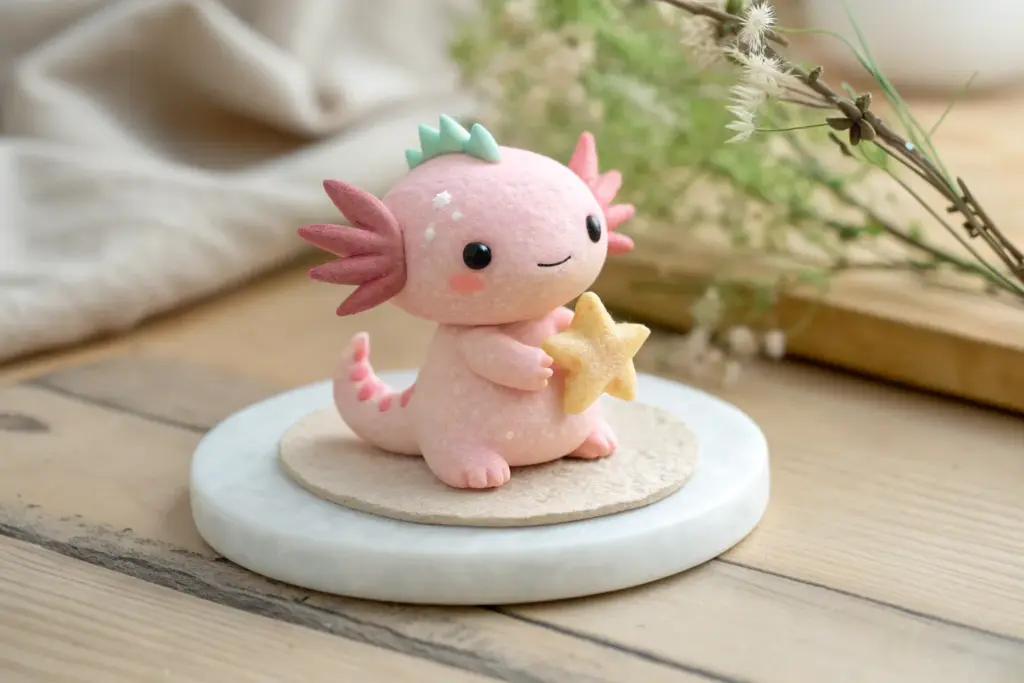
Whenever I need a craft that feels playful and low-pressure, I reach for foam clay because it’s lightweight, forgiving, and made for those smooth, rounded shapes. Here are my favorite foam clay art ideas—from classic cute minis to bold, dimensional decor you can actually finish in an afternoon.
Mini Macaron and Cookie Charms
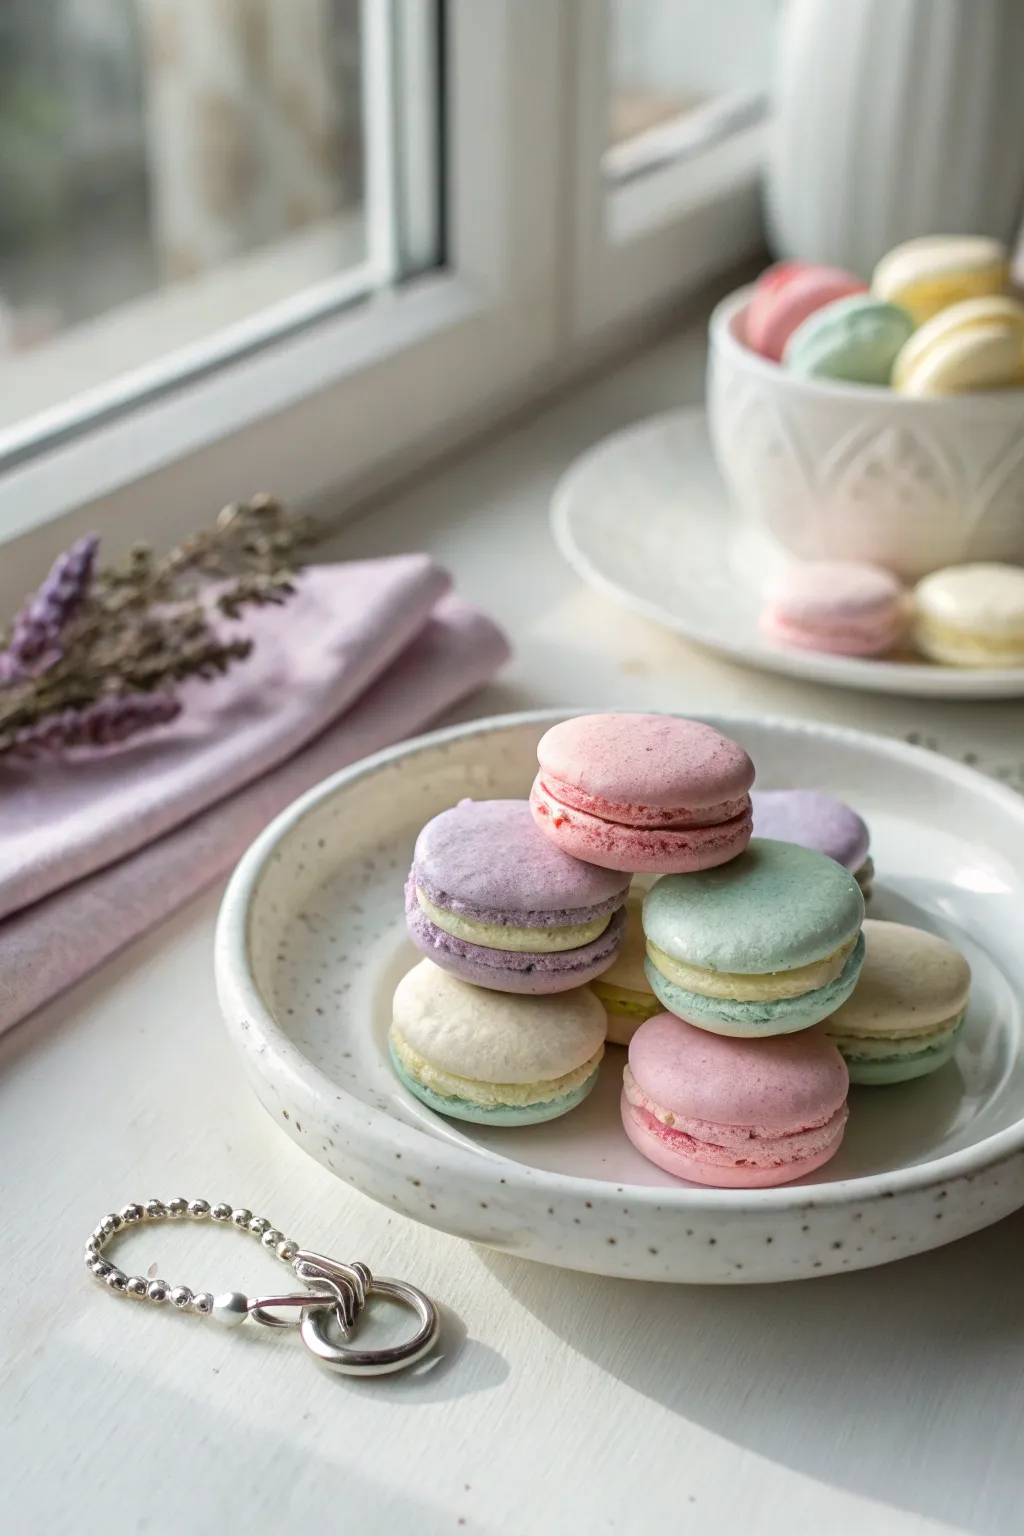
Recreate the sweet elegance of a French patisserie with these pillowy, realistic macaron charms made from foam clay. These lightweight treats feature the iconic “feet” texture and delicate pastel fillings, perfect for jewelry or display.
How-To Guide
Materials
- Foam clay (white, pink, light blue, purple, yellow)
- Clay roller or acrylic block
- Small round cutter (approx. 1 inch diameter)
- Needle tool or toothpick
- Ball tool (small)
- Toothbrush (for texturing)
- Gloss glaze (optional)
- Metal eyepins (if making charms)
Step 1: Creating the Shells
-
Mixing Colors:
Start by mixing your white foam clay with tiny pinches of colored clay to achieve soft pastel shades. You’ll need a light pink, lavender, mint blue, and a creamy vanilla color. Keep the colors very pale for that authentic, airy look. -
Rolling the Clay:
Take a portion of your colored clay (e.g., pink) and roll it into a thick sheet, about 1/4 inch high. Ensure the surface is smooth and free of major cracks. -
Cutting Rounds:
Using your small round cutter, punch out two identical circles for each macaron. Gently push them out of the cutter, being careful not to warp the circle shape. -
Softening Edges:
Use the pad of your finger to very gently tap around the top edge of each circle. You want to round off the sharp cut edge just slightly to create the classic smooth dome of a macaron shell.
Sticky Situation?
If the clay sticks to your cutter, dust the tool with a tiny bit of cornstarch or baby powder before cutting. This helps the shape release cleanly.
Step 2: Texturing the Feet
-
Defining the Base:
With a needle tool, lightly score a line around the circumference of the shell, about 1/8 inch up from the bottom flat side. This marks where the bubbly ‘foot’ texture will begin. -
Teasing the Clay:
Use the needle tool to pick and drag the clay downwards just below that scored line. Use small, circular motions to disturb the clay, making it look crumbly and aerated. -
Adding Detail:
For extra realism, I take a clean toothbrush and gently dab it against that disturbed bottom section. This creates those tiny pores that foam clay mimics so well. -
Repeat:
Repeat this texturing process for the second shell. Make sure to only texture the bottom rim, leaving the top dome perfectly smooth.
Level Up: Fruity Centers
Add realism by mixing tiny dark specks into the filling clay to mimic vanilla bean, or create a marbled color effect for a ‘jam’ center.
Step 3: The Cream Filling
-
Preparing the Filling:
Take a ball of white foam clay (or a contrasting pastel color like pale yellow) and flatten it into a thick disc. It should be slightly smaller in diameter than your shells. -
Assembly Start:
Place the filling disc onto the flat bottom of one shell. Press it down gently so it adheres without squishing the textured feet. -
Sandwiching:
Place the second shell on top. Apply even, gentle pressure to sandwich them together. The filling should be just visible between the two textured rims but shouldn’t spill out. -
Refining the Shape:
If the macaron looks too tall, tap the top gently to compress it slightly. Check the sides to ensure the filling looks uniform all the way around.
Step 4: Finishing Touches
-
Making it a Charm:
If you plan to use these as charms like the silver ring in the photo, dip the tip of a metal eyepin in a tiny bit of glue. -
Inserting Hardware:
Insert the eyepin straight down through the center of the top shell. Push it in until the loop sits flush against the clay. -
Drying:
Let your macarons air dry for at least 24-48 hours. Foam clay shrinks slightly as it dries, which tightens the texture and makes it durable. -
Optional Glaze:
For a ‘freshly baked’ sheen, you can brush a very thin layer of satin or matte varnish over the smooth domes, but leave the textured feet matte for contrast.
Once fully cured, thread your new charms onto a keychain or display them on a tiny plate for a delightful faux-sweet scene


Kawaii Animal Desk Buddy
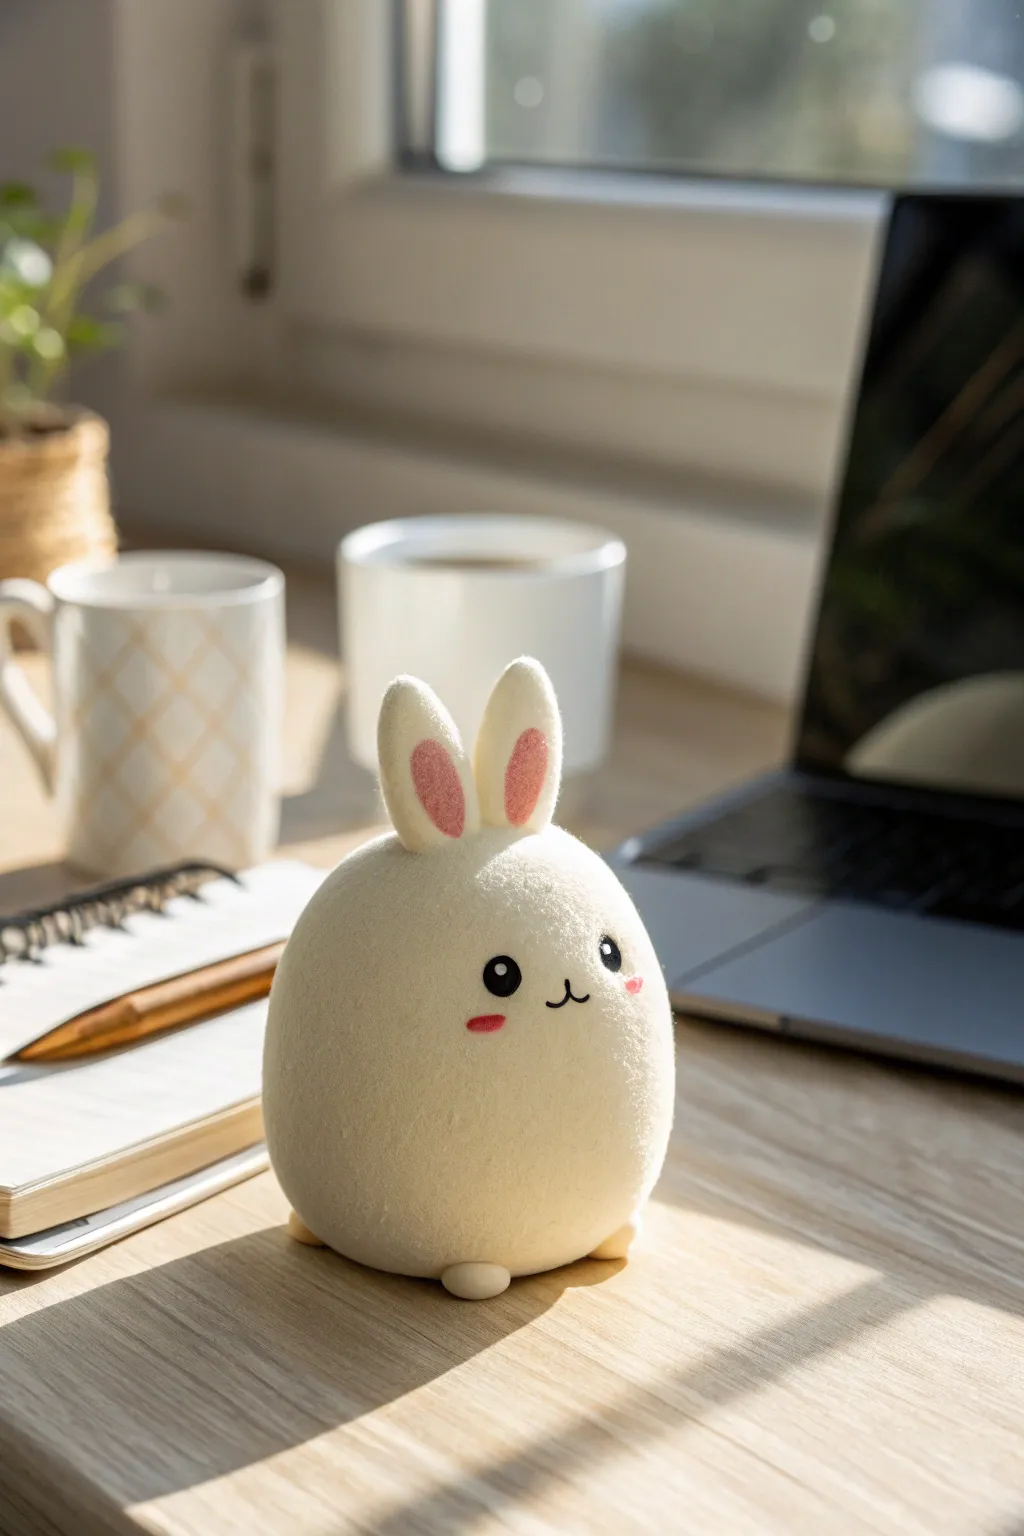
Brighten up your workspace with this absurdly cute foam clay bunny that sits perfectly round and cheery on your desk. Its minimalist egg shape and soft, matte texture make it a soothing little companion for long study sessions.
Step-by-Step Tutorial
Materials
- White airy foam clay (air-dry)
- Small amount of soft pink foam clay
- Black foam clay or black acrylic paint
- Fine-point sculpting tool or toothpick
- Water spray bottle (optional, for smoothing)
- Small ball tool
- Matte finish sealer (optional)
Step 1: Shaping the Base
-
Prep the clay:
Start with a generous handful of white foam clay. Knead and stretch it thoroughly to ensure the texture is consistent and there are no large air bubbles trapped inside. -
Roll the main body:
Roll the clay between your palms to create a perfectly smooth sphere. While rolling, gently apply more pressure at the top and less at the bottom to slightly taper it. -
Form the egg shape:
Refine the sphere into a subtle egg shape. It should be chubby and wide at the base, creating a stable ‘bottom’ so the bunny won’t tip over easily. -
Smooth the surface:
Inspect the surface for any fingerprints or cracks. If you spot any, dip your finger in a tiny bit of water and gently buff them out until the finish is seamless and velvety. -
Create the feet:
Pinch off two very small balls of white clay. Flatten them slightly into ovals and attach them to the bottom front of the body, spacing them somewhat apart for stability.
Clean Hands Tip
Foam clay picks up dust easily. Wash hands thoroughly before starting, and wipe your work surface down with a damp cloth to keep that white clay pristine.
Step 2: Adding the Ears
-
Shape the outer ears:
Take two medium-sized pieces of white clay. Roll them into logs and taper the ends to create teardrop shapes, pressing them slightly flat. -
Create the inner ear:
Using a tiny amount of pink clay, create two smaller teardrops. Press these flat into the center of your white ear shapes. -
Blend the seams:
Gently press the pink clay into the white so they become one flush surface. I prefer to smooth the edges with a fingertip so there isn’t a harsh ridge between colors. -
Attach the ears:
Place the ears on top of the head, slightly closer to the back than the front. Press them down firmly to adhere, pushing the clay at the base to blend it into the head. -
Check symmetry:
Look at your bunny from the front. Make sure the ears are standing up straight or tilting symmetrically before the clay begins to set.
Fuzzy Texture Hack
Want it to look even more like real felt? Before the clay dries, gently tap the entire surface with an old, dry toothbrush to create a stippled texture.
Step 3: The Kawaii Face
-
Mark the features:
Use a round ball tool to create two shallow indentations where the eyes will go. This helps the black clay sit flush with the face rather than bulging out. -
Insert the eyes:
Roll two tiny spheres of black foam clay. Place them into the indentations you made and press gently to flatten them. -
Add the eye shine:
Using the absolute tiniest speck of white clay, add a reflection dot to the upper right corner of each black eye. -
Sculpt the mouth:
Roll a microscopically thin ‘snake’ of black clay. Shape it into a small ‘w’ or anchor shape on your work surface first, then transfer it carefully to the face using a needle tool. -
Blush the cheeks:
Take two small bits of pink clay—smaller than the eyes—and flatten them into horizontal ovals. Press them onto the cheeks found just below the outer corners of the eyes. -
Final texture check:
Give the whole piece a once-over. The foam clay should look soft and almost fuzzy, like felt. -
Drying time:
Let your desk buddy dry undisturbed for at least 24 to 48 hours. The core takes longer to dry than the surface, so be patient.
Enjoy your quiet new friend as it adds a touch of calm to your daily workflow


Tiny Sushi Set Minis
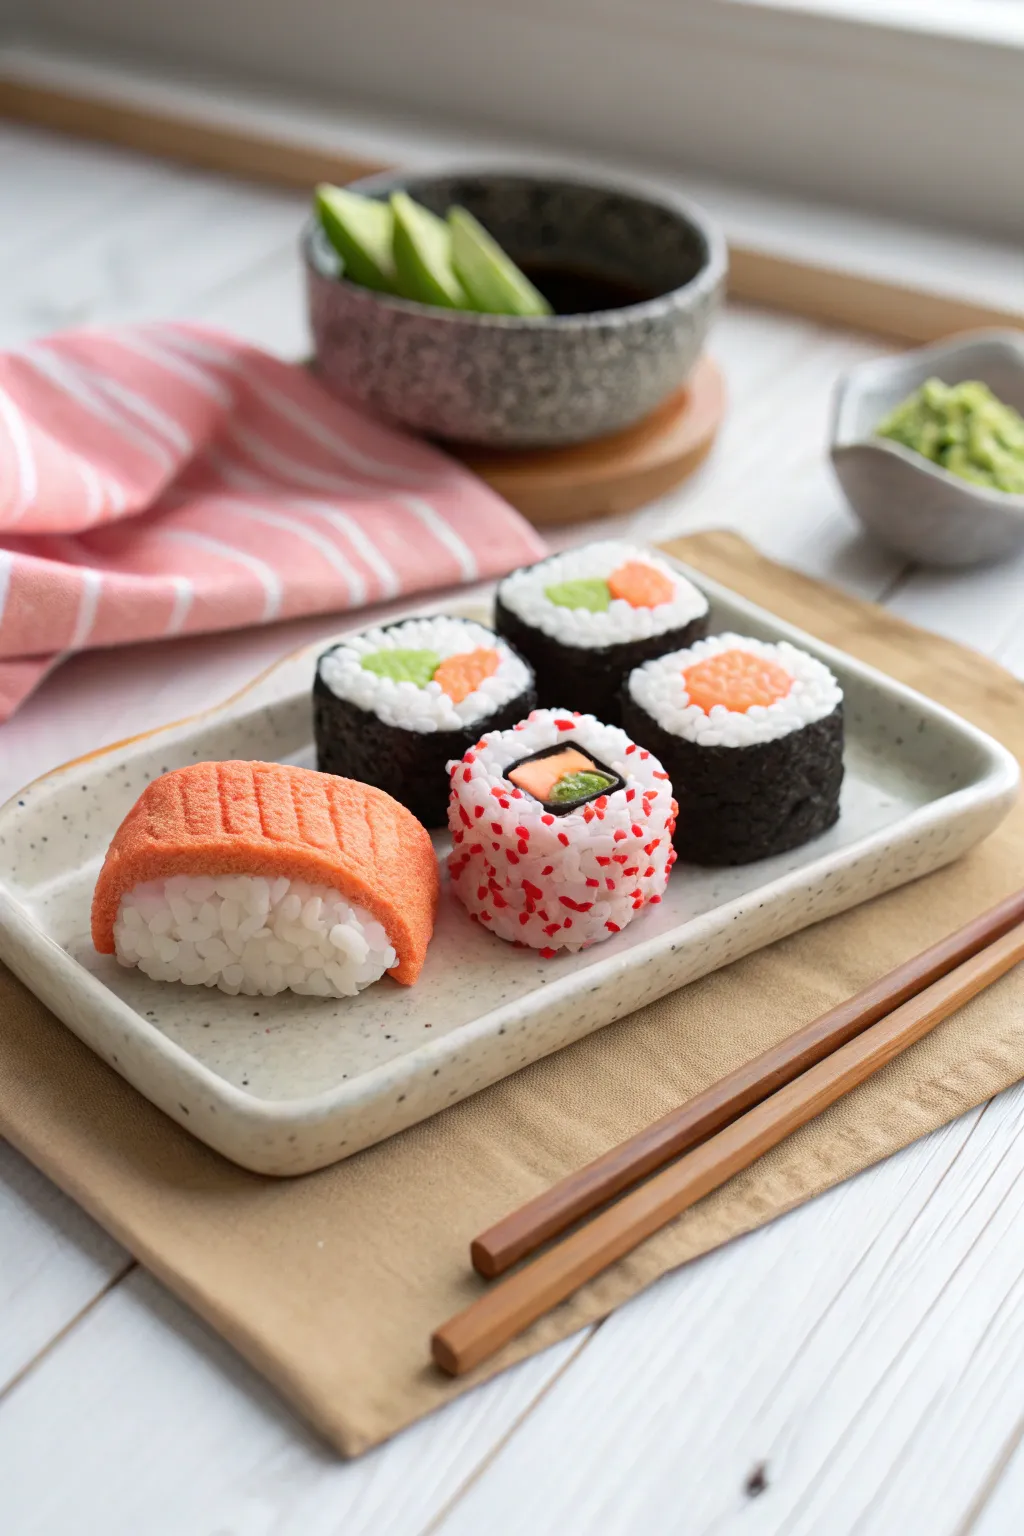
Transform soft, pliable foam clay into a delectable display of bite-sized treats that look good enough to eat. This project focuses on realistic textures, from the grainy look of rice to the striated surface of sashimi, creating a charming set perfect for play or display.
Detailed Instructions
Materials
- White foam clay (for rice)
- Black foam clay (for nori)
- Orange/Salmon-pink foam clay
- Light green foam clay (for avocado/wasabi)
- Red micro-beads or red foam clay bits (for roe/tobiko)
- Texture tool: old toothbrush or stiff bristle brush
- Modeling tools (scalpel or craft knife, needle tool)
- Clear drying craft glue
- Gloss glaze or modulus medium (optional)
Step 1: Preparing the Rice Base
-
Shape the rice mounds:
Begin by taking portions of white foam clay and forming them into small, rectangular mounds with rounded corners. You will need one for the nigiri and four slightly smaller, cylindrical bases for the maki rolls. -
Add texture:
While the clay is still wet, gently press an old toothbrush or a stiff bristle brush against the surface of the white clay. This creates the bumpy, grainy texture of sticky rice.
Texturing Tip
For ultra-realistic rice, form tiny individual grains of clay for the outer layer instead of just stippling perfectly smooth clay. It takes longer but adds immense depth.
Step 2: Crafting the Nigiri
-
Form the salmon slice:
Roll a piece of salmon-pink clay into a flat, elongated oval. It should be slightly longer and wider than your rice mound so it drapes naturally over the top. -
Create fish texture:
Using a needle tool or the back of a craft knife, gently press parallel diagonal lines across the top of the pink oval to mimic the natural fat striations found in salmon. -
Assemble the nigiri:
Place the textured salmon slice onto one of your prepared rice mounds, gently curving the edges down to hug the rice. Press lightly to adhere.
Make it a Charm
Before the clay dries, insert an eye screw into the nigiri or one of the rolls. Once hardened, attach a keyring or phone strap to take your sushi to go.
Step 3: Making Maki Rolls
-
Wrap the nori:
Roll out a thin strip of black foam clay. It needs to be long enough to wrap around the circumference of your cylindrical white ‘rice’ bases and slightly taller than the rice itself. -
Attach the seaweed:
Wrap the black strip around three of the white cylinders. Smooth the seam where the clay meets so it’s invisible, creating the classic maki look. -
Prepare fillings:
Create tiny triangular or rectangular wedges of orange (salmon) and light green (avocado/cucumber) clay. These should be small enough to fit in the center of the rolls. -
Insert fillings:
I find it easiest to make a small indentation in the center of the white rice top first. Place your orange and green wedges into this divot, pressing them flush with the top of the roll.
Step 4: The California Roll
-
Form the inside-out base:
Take your final white rice cylinder. Unlike the black-wrapped rolls, the rice will remain on the outside for this piece. -
Create the center:
Punch a larger hole in the center. Fill it with a small plug of black clay (nori), then add your tiny orange and green filling pieces inside that black ring. -
Apply the roe:
Coat the exterior sides of the white cylinder with a thin layer of clear craft glue. Roll the sides in red micro-beads to simulate tobiko (fish roe). Alternatively, you can stipple tiny dots of red clay all over the sides.
Step 5: Finishing Touches
-
Add surface details:
Check all your pieces. If the rice texture was smoothed out during handling, gently re-texture with your toothbrush tool. -
Gloss for realism:
For a ‘fresh fish’ look, apply a thin coat of gloss glaze specifically to the orange salmon parts and the center fillings. Keep the rice and nori matte. -
Create condiments:
Use leftover green clay to make a messy little mound for wasabi, and create thin slices of folded green clay for pickled ginger. -
Final cure:
Let the entire set dry completely for 24-48 hours. Foam clay shrinks slightly as it dries, which will tighten up the textures nicely.
Now you have a stunning miniature feast that will stay fresh forever


Boba Cup Keychain Charm
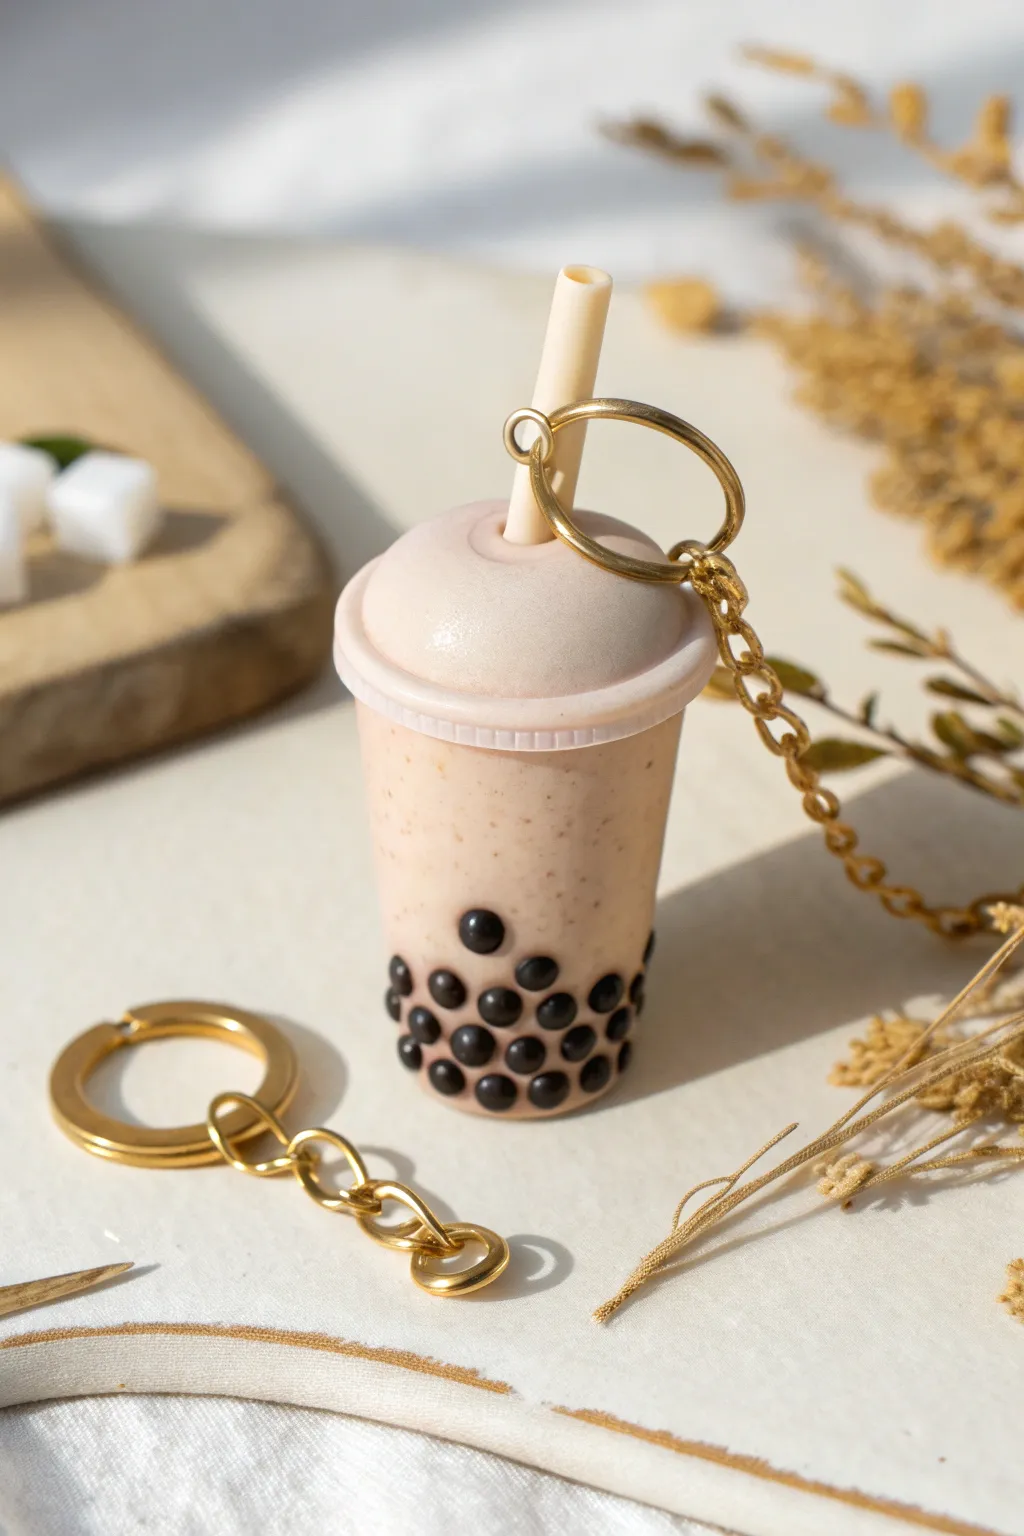
Carry your favorite cafe treat wherever you go with this adorable miniature bubble tea charm. This foam clay project captures the milky texture of tea and the glossy shine of tapioca pearls in a durable, lightweight keychain.
Step-by-Step Tutorial
Materials
- Beige or light tan foam clay (for the milk tea)
- Black foam clay (for the tapioca pearls)
- White foam clay (for the lid)
- Translucent or light yellow foam clay (for the straw)
- Gold screw eye pin
- Gold keychain ring with chain
- Clay sculpting tools (specifically a small ball tool)
- Glossy varnish or UV resin
- Small paintbrush
- Brown acrylic paint or chalk pastels (optional for speckling)
- Toothbrush (for texturing)
Step 1: Sculpting the Cup Base
-
Mix the tea color:
Start by kneading your beige foam clay. If you want a more realistic ‘tea’ look like the photo, mix in a tiny pinhead amount of brown or orange clay to warm up the tone. Knead until the color is uniform. -
Form the cylinder:
Roll the clay into a smooth ball, then gently roll it back and forth on your work surface to create a cylinder shape. Tap the top and bottom flat against the table to create the cup form. -
Taper the shape:
Gently roll just the bottom half of the cylinder with slightly more pressure to create a subtle taper, making the top wider than the bottom, just like a real plastic cup. -
Add texture (optional):
To mimic the icy, blended texture shown in the image, you can lightly tap the surface with a speckling of brown acrylic paint using an old toothbrush, or mix ground dried tea leaves directly into the clay before shaping.
Step 2: Adding the Boba Pearls
-
Create the pearls:
Take your black foam clay and roll many tiny, equal-sized spheres. You will need about 20-30 of these depending on the size of your cup. -
Attach the bottom layer:
Press the black spheres gently onto the lower third of the beige cup. Start at the very bottom edge and work your way up. -
Layering:
As you add more rows, make sure they sit snugly against each other but don’t completely flatten out. You want them to retain their round, bubble-like appearance. -
Embed slightly:
Gently press each pearl into the beige base so they look like they are inside the cup pressing against the plastic, rather than just stuck on the outside.
Pearl Perfection
Make the black boba balls varying sizes—some slightly smaller, some larger—to mimic the organic look of real handmade tapioca pearls.
Step 3: The Lid and Straw
-
Shape the lid dome:
Take a portion of white or very light beige foam clay. Roll it into a ball, then flatten the bottom and slightly round the top to create a dome shape that matches the width of your cup. -
Create the rim:
Roll a very thin snake of the same lid-colored clay. Wrap this around the bottom edge of your dome to create the cup’s rim. Use a sculpting tool to make tiny vertical indentations around this rim for a realistic plastic lid detail. -
Attach the lid:
Place the dome on top of your tea cup base. You can use a tiny dab of water to help the foam clay adhere securely. -
Make the straw:
Roll a small piece of translucent or pale yellow clay into a thin, even cylinder. I suggest inserting a toothpick inside while rolling to keep it straight, then removing it. -
Insert the straw:
Using a tool, make a small indentation in the center of the lid. Insert your straw piece securely into this hole.
Flavor Variations
Change the ‘tea’ clay color! Use pastel purple for taro milk tea, light green for matcha, or baby pink for strawberry milk.
Step 4: Assembly and Finishing
-
Add hardware:
While the clay is still slightly soft but firm, twist a gold screw eye pin into the top of the dome, slightly off-center from the straw. -
Drying time:
Let the entire piece dry completely. Foam clay can take 24-48 hours to fully cure depending on thickness and humidity. -
Glazing the pearls:
Once dry, use a small brush to apply a thick layer of glossy varnish or UV resin specifically to the black boba pearls. This makes them look wet and shiny. -
Seal the cup:
Apply a matte or satin varnish to the rest of the cup and lid to protect it without making it look unnatural. -
Final assembly:
Open the jump ring on your gold keychain and attach it to the eye pin on your finished boba cup. Close the ring securely with pliers.
Clip this sweet accessory onto your bag and enjoy your zero-calorie treat

The Complete Guide to Pottery Troubleshooting
Uncover the most common ceramic mistakes—from cracking clay to failed glazes—and learn how to fix them fast.
Fridge Magnets With Simple Faces
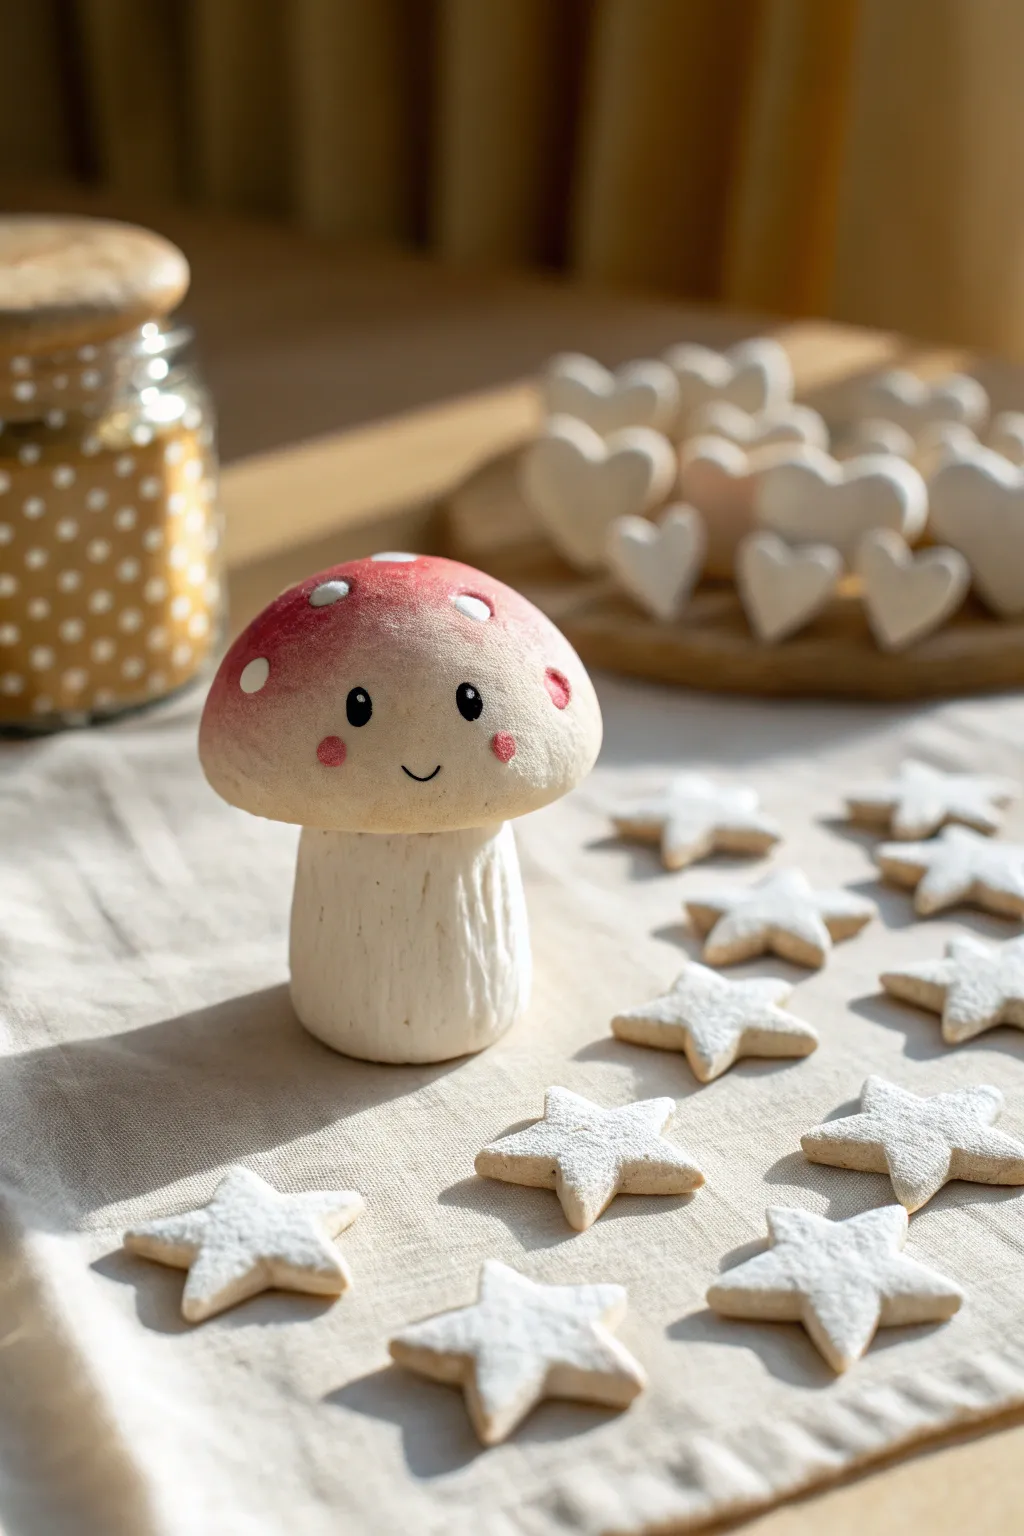
This adorable mushroom figurine features a rosy red cap, a sturdy stem, and the sweetest little smiling face. It’s a perfect beginner-friendly project that turns a simple ball of foam clay into a charming fridge magnet or desk companion.
Detailed Instructions
Materials
- White air-dry foam clay
- Red air-dry foam clay (or white clay painted red)
- Black fine-liner marker or acrylic paint
- Pink soft pastel chalk or blush powder
- Small paintbrush (soft bristle)
- Sculpting tool (needle tool or toothpick)
- Strong round magnet
- Super glue or strong craft glue
- White acrylic paint (optional, for highlights)
Step 1: Sculpting the Base
-
Shape the stem:
Begin by taking a chunk of white foam clay roughly the size of a walnut. Roll it into a smooth ball first to remove any cracks. -
Form the cylinder:
Gently roll the ball into a thick, squat cylinder shape. It should be slightly wider at the bottom to give the mushroom stability. -
Add texture:
Using a needle tool or the tip of a toothpick, drag vertical lines down the sides of the stem. Vary the pressure to create natural-looking grooves that mimic a real mushroom stalk. -
Flatten the top:
Press the top of the cylinder gently against your work surface to create a flat area where the cap will sit.
Soft Gradient Hack
To get that faded red look on the cap, sculpt with white clay first. Once dry, use a makeup sponge to dab on dry red pastel powder, concentrating color at the top.
Step 2: Creating the Cap
-
Prepare the cap clay:
Take a slightly larger amount of white clay for the cap. Roll it into a smooth sphere. -
Shape the dome:
Press your thumb into the center of the sphere while cupping the outside with your other hand, forming a hollow dome shape that resembles a mushroom cap. -
Add the red tint:
I like to mix a tiny drop of red paint into white clay for a mottled look, or you can use red clay directly. Alternatively, keep it white and dry brush red pastel chalk over the top later for that soft, ombre gradient seen in the photo. -
Attach cap to stem:
Place the cap onto the textured stem. If the clay is fresh, it should stick on its own; otherwise, add a tiny drop of water or glue to secure the bond. -
Refine the shape:
Gently smooth the seam where the cap meets the stem underneath, but keep the distinct overhang of the mushroom cap.
Step 3: Adding Details
-
Create the spots:
Roll very tiny balls of white foam clay. Press them flat onto the red cap to create the classic mushroom polka dots. -
Texture the dots:
Gently press the white dots into the cap so they sit flush with the surface rather than sticking out too much. -
Embed the magnet:
Press a strong round magnet into the back of the mushroom stem while the clay is still soft. Make sure it sits flush so the magnet holds well against the fridge. -
Let it dry:
Allow the entire sculpture to dry completely. This usually takes 24-48 hours depending on the humidity and thickness of the clay.
Make a Forest Family
Vary the cap shapes! Try tall, skinny caps or flat, wide ones. Paint them different earthy colors like moss green or ochre for a woodland set.
Step 4: Painting the Face
-
Draw the eyes:
Once fully dry, use a black fine-liner or a tiny dotting tool with black paint to place two oval eyes widely spaced on the cap. -
Add the smile:
Draw a tiny, simple ‘U’ shape exactly between the eyes for the mouth. -
Apply the blush:
Dip a dry, soft brush into pink pastel chalk dust or real cosmetic blush. Gently dab rosy cheeks underneath the eyes. -
Add highlights:
Using the tip of a toothpick and white paint, place a tiny white dot in the upper corner of each black eye to bring the character to life.
Now your fridge has a cheerful little guardian to hold up your grocery lists and photos
Bookmark Toppers With Puffy Icons
Capture the sweetness of summer reading with this charming, textured bookmark featuring a puffy foam clay strawberry. The soft pink base and vibrant berry icon create a delightful contrast that adds a touch of whimsy to your favorite novels.
How-To Guide
Materials
- Red foam clay
- Green foam clay
- Pink cardstock or thick watercolor paper
- Textured rolling pin or sandpaper (for texture)
- Small sculpting tool or toothpick
- Craft glue or tacky glue
- Hole punch
- Natural jute twine or hemp cord
- Scissors
- Ruler
Step 1: Preparing the Base
-
Cut the paper:
Measure and cut a strip of pink cardstock approximately 2 inches wide and 6-7 inches long. You can adjust the dimensions to fit your specific book sizes. -
Add texture:
To mimic the handmade paper look seen in the photo, gently press a piece of coarse sandpaper or a textured fabric against the cardstock. Alternatively, you can use paper that already has a fibrous, recycled texture. -
Punch the hole:
Using a standard hole punch, create a single hole centered about half an inch from the top edge of the bookmark. -
Add the twine:
Cut a length of jute twine about 8 inches long. Fold it in half, push the loop through the hole, and pull the tails through the loop to create a lark’s head knot. Let the ends trail loose for a rustic feel.
Sticky Clay Problems?
If the foam clay is sticking to your fingers, let it air dry for 2-3 minutes before molding, or dab a tiny amount of baby lotion on your hands.
Step 2: Sculpting the Strawberry
-
Condition the clay:
Take a small ball of red foam clay, about the size of a marble. Knead it in your fingers until it is warm, pliable, and smooth. -
Shape the berry body:
Roll the clay into a smooth ball, then gently pinch one side to form a tapered strawberry shape—wide at the top and slightly pointed at the bottom. -
Flatten deeply:
Place the strawberry shape onto a non-stick surface and press down firmly with your palm. You want a flat, low-profile icon so it doesn’t damage your book pages. -
Add seed indentations:
Using a toothpick or a small dotting tool, press tiny, shallow holes all over the surface of the red clay to represent seeds. I find that varying the pressure slightly makes it look more organic. -
Create the leaves:
Pinch off three very tiny pieces of green foam clay. Roll each into a teardrop shape. -
Attach the greenery:
Press the green teardrops onto the top (wide end) of the red berry. Flatten them slightly so they adhere well to the red base. -
Texture the leaves:
Use your toothpick to draw a single vein line down the center of each green leaf for added detail.
Make it Scented
Knead a single drop of strawberry essential oil into the red clay before sculpting. release a faint, sweet scent whenever you open your book.
Step 3: Assembly
-
Dry the clay:
Check the instructions on your specific foam clay, but generally, let the strawberry sit for at least 6–12 hours until it feels firm and bouncy to the touch. -
Position the icon:
Place the dried strawberry on the upper third of your pink bookmark to see where it looks best. -
Glue in place:
Apply a dab of craft glue to the back of the foam strawberry and press it firmly onto the cardstock. -
Final press:
Place a light object, like a notepad, on top of the strawberry while the glue sets to ensure a strong bond without crushing the foam.
Now you have a sweet companion to mark your place in your next adventure


What Really Happens Inside the Kiln
Learn how time and temperature work together inside the kiln to transform clay into durable ceramic.
Bubble Bead Vase or Mini Pot
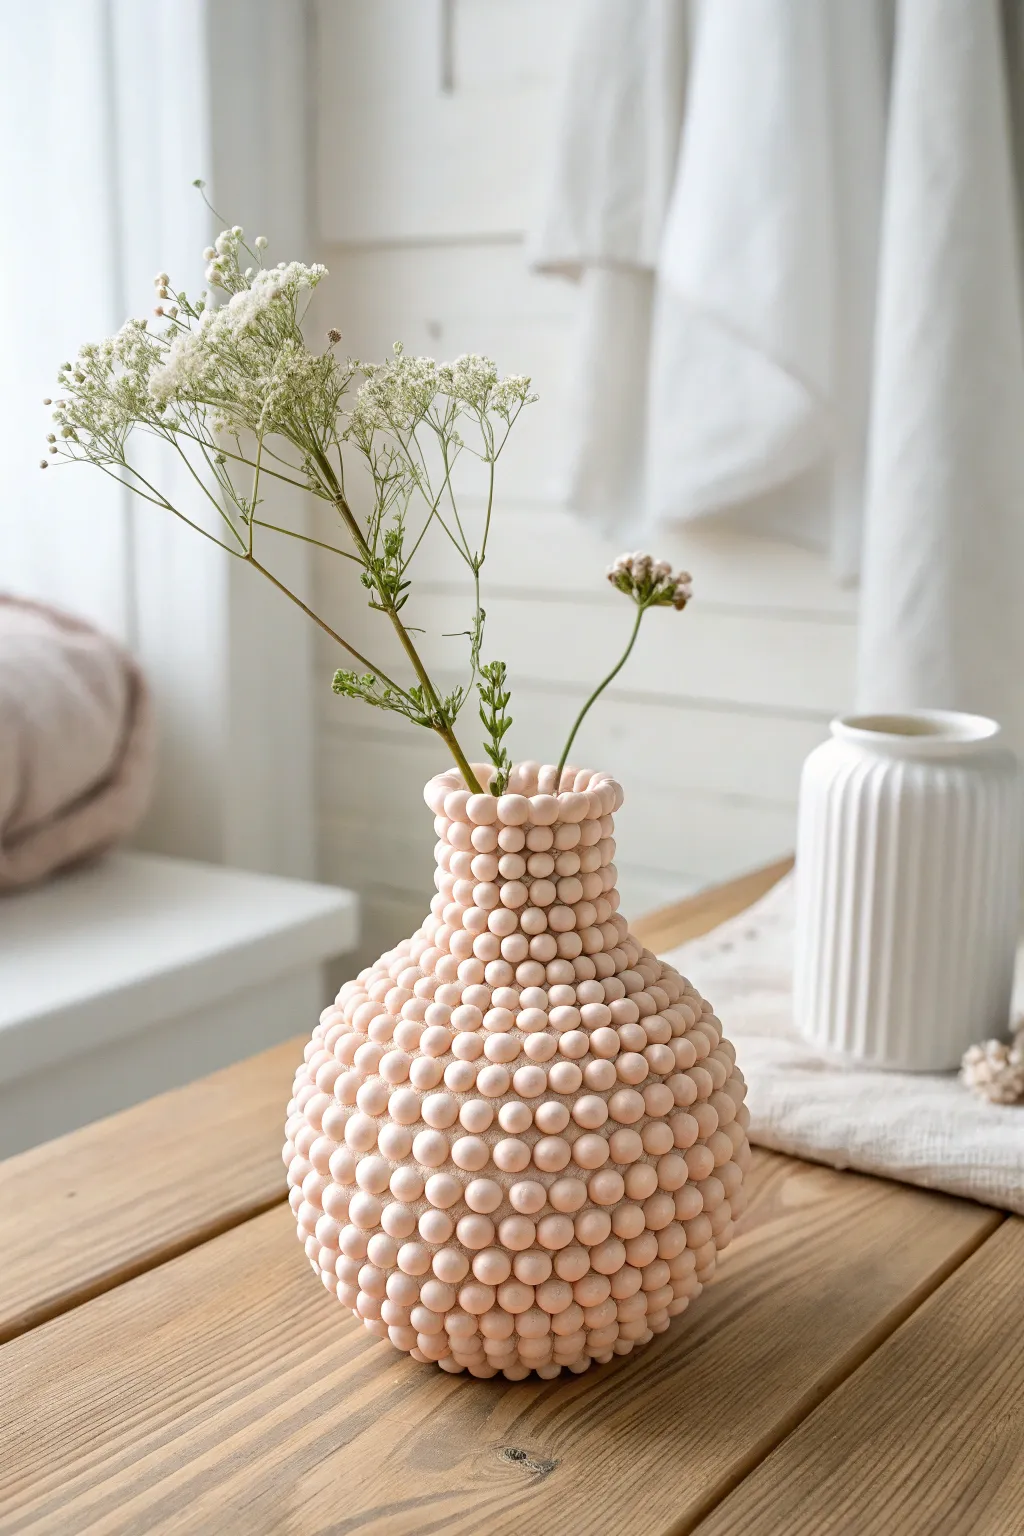
Transform a simple glass or ceramic vessel into a textural masterpiece with this bubbly foam clay project. The finished vase features hundreds of uniform, peach-colored spheres that create a satisfying, tactile surface perfect for displaying dried stems.
How-To Guide
Materials
- Foam clay (pale peach or light pink)
- Small glass or ceramic vase (bulbous shape preferred)
- Clean work surface (silicone mat recommended)
- Ruler for sizing reference
- Air-tight container (to keep clay fresh while working)
- Optional: White craft glue or tacky glue
Step 1: Prepping the Elements
-
Clean the base:
Start by thoroughly washing and drying your base vase. Any dust or oils on the surface can prevent the foam clay from adhering properly, so give it a good wipe down with rubbing alcohol if you have it. -
Color mixing:
If your foam clay isn’t the exact shade of pale peach you desire, knead a tiny amount of red or orange pigment into white foam clay until the color is completely uniform and streak-free. -
Roll texture test:
Pinch off a small piece of clay and roll it into a ball between your palms. Aim for a diameter of about 1 to 1.5 cm. Place it against the vase to see if you like the scale of the ‘bubble’ against the size of the container. -
Mass production:
Create a large batch of these small spheres before you start attaching them. I find it meditative to roll about 20-30 at a time, keeping them under a damp cloth or in a sealed container so they don’t begin to cure before use. -
Check consistency:
Ensure all your rolled balls are roughly the same size. Slight variations add organic charm, but major size differences can make the rows uneven later.
Keep it Fresh
Foam clay dries fast! Only take out a small golf-ball sized chunk from the packet at a time. Keep the rest sealed tight in a ziplock bag to prevent it from getting crumbly.
Step 2: Building the Bubbles
-
Establish the base row:
Begin at the very bottom edge of the vase. Press your first foam ball gently against the glass. Foam clay is usually self-adhesive, but if it feels dry, a tiny dot of tacky glue helps secure it. -
Complete the circle:
Continue attaching balls in a ring around the bottom base. Press them firmly enough to stick to the vase and to their neighbors, but not so hard that you flatten the spherical shape. -
Start the second layer:
Begin the next row directly above the first. You can stack them directly on top of the previous spheres (straight grid) or nest them in the valleys between the lower spheres (brick pattern). The example shows a mostly stacked alignment. -
Work upwards:
Work your way up the body of the vase, row by row. Rotate the vase frequently to ensure your horizon lines remain straight and don’t start spiraling upwards. -
Adjusting for curves:
As the vase widens, you may need to cheat the spacing slightly or squish the balls just a fraction wider to maintain the row count. As it narrows, simply squeeze them tighter together. -
Handling the neck:
When you reach the neck of the vase, the transition can be tricky. Pay extra attention to pressing the clay balls into the curve of the glass so there are no unsightly gaps behind the bubbles. -
Finishing the rim:
For the top rim, place your final row of beads so they sit slightly proud of the vase lip. This hides the glass edge completely and gives the piece a professional, sculptural look.
Ombré Effect
Mix three shades of clay from dark to light. Use the darkest shade for the bottom third, the medium for the middle, and the lightest at the top for a stunning gradient look.
Step 3: Refining and Curing
-
Smooth the shapes:
Once the vase is fully covered, gently run your fingers over the surface. If any balls were flattened during handling, careful pinch them back into roundness while the clay is still pliable. -
Gap check:
Inspect the vase for any large triangular gaps between the spheres where the base vase shows through too clearly. You can gently nudge adjacent balls to close these gaps. -
Initial drying:
Set the vase in a safe, dust-free area to dry. Foam clay typically takes 24-48 hours to fully cure depending on humidity and thickness. -
Rotate while drying:
About halfway through the drying time, turn the vase to ensure air reaches all sides evenly, especially the bottom row. -
Final inspection:
Once hardened, the foam will feel firm remarkably lightweight. Give it one last look over and enjoy your new textured creation.
Place your favorite dried botanicals or faux flowers inside and admire the cozy texture you’ve added to your decor
Smiley Face Flower Bouquet
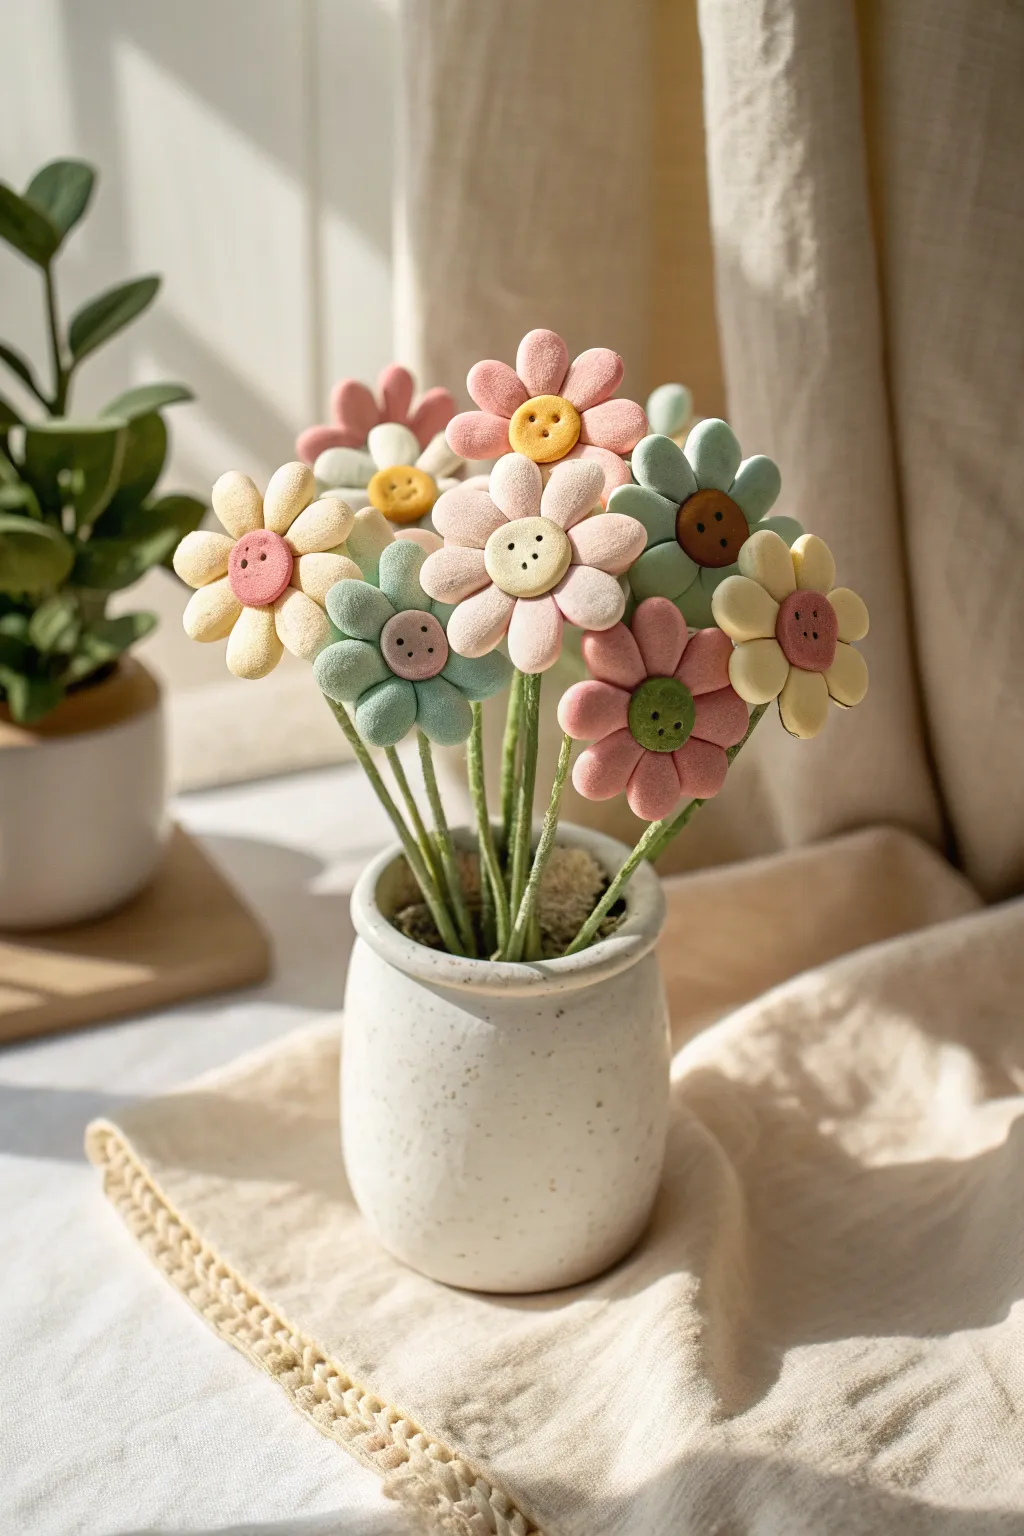
Bring everlasting sunshine into your home with this charming bouquet of foam clay daisies. With their soft, matte finish and adorable button-like centers, these flowers offer a playful, textural twist on traditional floral arrangements.
Detailed Instructions
Materials
- Foam clay (white, pastel pink, soft yellow, sage green, mint green, muted teal)
- Floral wire (18 or 20 gauge)
- Green floral tape
- Small rolling pin or smooth jar
- Tear-drop shaped clay cutter (approx. 1 inch long)
- Circle clay cutter (approx. 0.75 inch diameter)
- Toothpick or needle tool
- Mod Podge or white craft glue
- Small ceramic pot or vase
- Floral foam block (to fit inside the pot)
- Dried moss
Step 1: Preparing the Centers
-
Mix Custom Colors:
Start by mixing your foam clay to achieve those soft, muted pastel tones seen in the image. If you have bright colors, knead in a generous amount of white clay to desaturate them into lovely pastel pinks, yellows, and sage greens. -
Shape the Button Centers:
Roll a small ball of contrasting clay for each flower center—yellow for pink flowers, pink for yellow flowers, and brown for the green ones. Flatten the ball slightly into a thick disc shape about the size of a large coat button. -
Create the Button Detail:
Using the blunt end of a toothpick or a small dotting tool, press four distinct holes into the center of the disc to mimic a button. Arrange them in a square formation. -
Add Texture:
For that soft, fabric-like look shown in the photo, gently tap the surface of the clay button with a clean, dry toothbrush or a piece of textured fabric. Set these aside to firm up slightly while you work on the petals.
Droopy Petals?
If your petals are flopping down before they dry, place the flower head on a small curved surface, like a spoon or inside an egg carton cup, to support the shape while curing.
Step 2: Crafting the Petals
-
Roll the Clay:
Take a portion of your petal-colored clay (e.g., pale yellow) and roll it out into a slab about 1/4 inch thick. You want it substantial enough to hold the puffy shape without drooping. -
Cut the Petals:
Use your teardrop cutter to punch out 7-8 petals for a single flower. If you don’t have a cutter, roll small balls and flatten them into teardrop shapes by hand. -
Soften the Edges:
Gently rub the cut edges of each petal with your finger to smooth out any sharp lines. You want the petals to look pillowy and soft, like marshmallows. -
Score the Attachments:
Take your prepared button center. Use a needle tool to lightly scratch the side edge where the petals will attach; this rough texture helps the fresh clay adhere better.
Step 3: Assembling the Flower Base
-
Connect Petals:
Press the pointed end of each teardrop petal against the side of the button center. Work in a circle, ensuring the petals are evenly spaced. -
Secure the Joints:
Once all petals are attached, flip the flower over gently. Use a sculpting tool or your finger to smooth the clay from the back of the petal onto the back of the center to create a seamless bond on the underside. -
Final Shaping:
Flip the flower back explicitly face up. Gently nudge the petals upward just a tiny bit so the flower cups slightly rather than laying perfectly flat.
Pro Tip: Velvet Texture
To mimic the velvety look in the photo perfectly, lightly dust the finished, slightly damp clay with cornstarch using a fluffy makeup brush before it fully dries.
Step 4: Stems and Potting
-
Prepare the Wire:
Cut your floral wire to varying lengths between 6 and 10 inches to create a staggered bouquet look. -
Wrap the Stems:
Wrap each wire fully with green floral tape. Stretch the tape as you go to activate the adhesive. For a thicker, more clay-like stem, you can coat the wire in a thin layer of green foam clay instead. -
Attach the Head:
Dip the top half-inch of the wire into white craft glue. Carefully insert this end into the bottom of your foam flower head, pushing it into the center disc without poking through to the front. -
Cure the Flowers:
I prefer to stand the stems upright in a styrofoam block or jar to let them dry completely for 24-48 hours. Foam clay shrinks slightly as it dries, which will tighten the grip on the wire. -
Prep the Vase:
Cut a block of floral foam to fit snugly inside your ceramic vase. -
Arrange the Bouquet:
Insert the dry flowers into the floral foam, starting with the tallest ones in the center and shorter ones around the perimeter. -
Add Moss:
Tuck dried moss around the base of the stems to hide the floral foam and complete the natural, rustic aesthetic.
Place your everlasting bouquet on a sunny windowsill and enjoy a touch of spring all year round

TRACK YOUR CERAMIC JOURNEY
Capture glaze tests, firing details, and creative progress—all in one simple printable. Make your projects easier to repeat and improve.
Mini Succulent Toppers With Cute Expressions
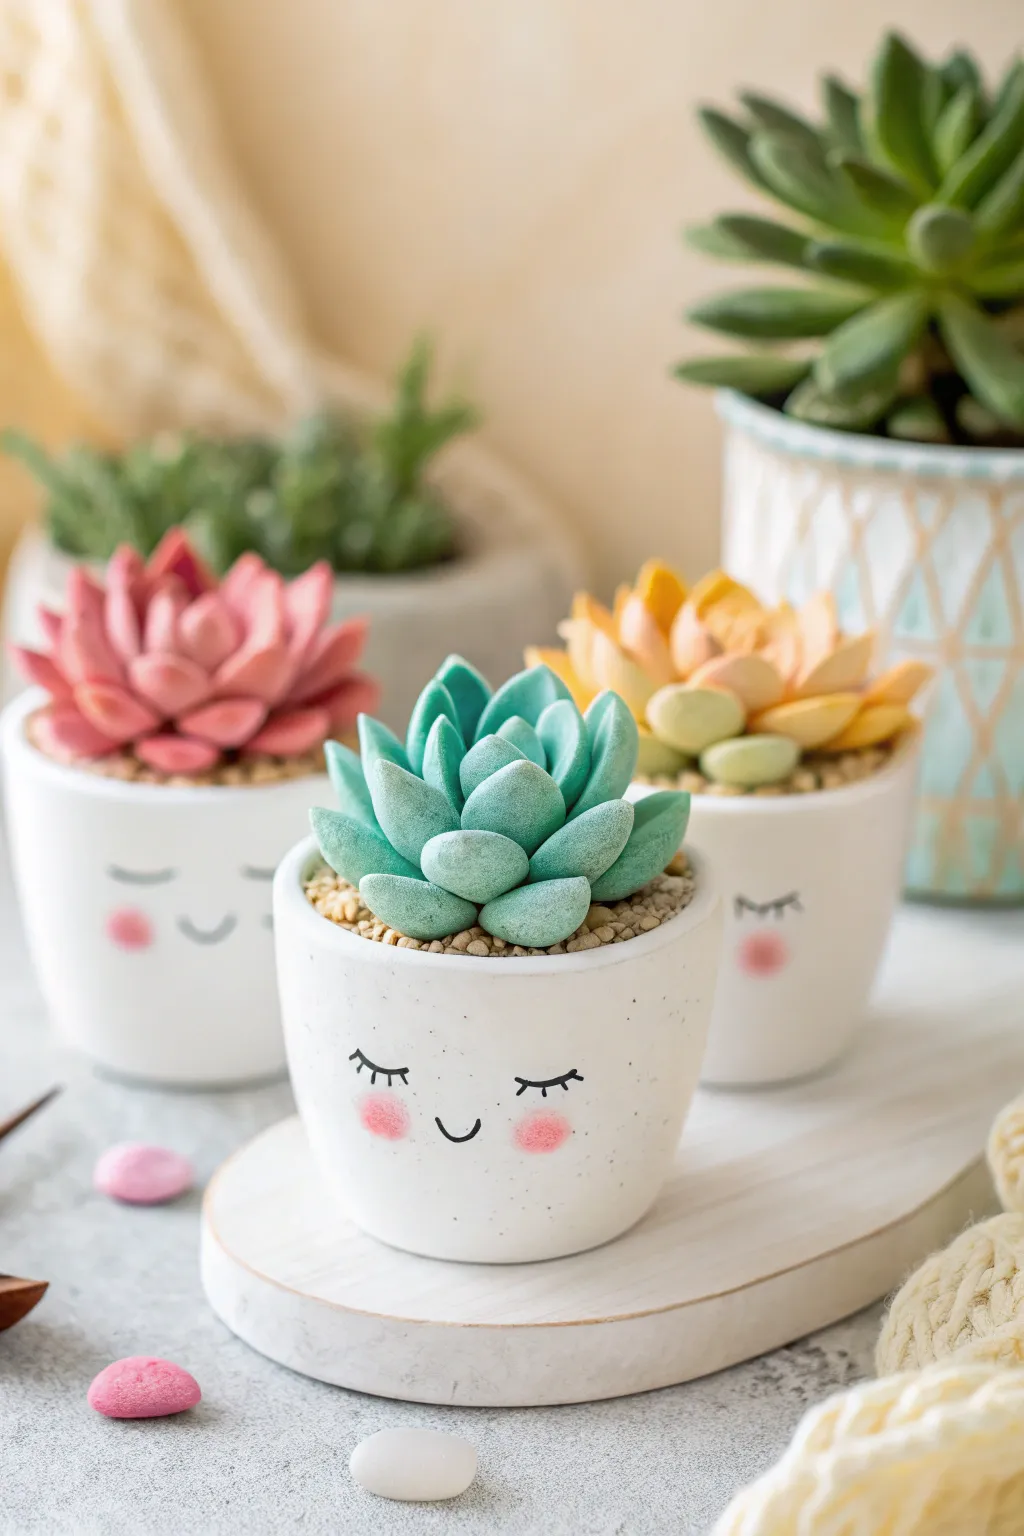
Bring a touch of everlasting greenery to your desk with these adorable foam clay succulent pots. These charming minis feature soft, ombre-colored leaves and sweet, sleepy expressions that add personality to any small space.
Step-by-Step Tutorial
Materials
- White air-dry foam clay
- Acrylic paints (teal, pink, yellow, orange, white, black)
- Small white ceramic mini-pots (approx. 2 inches)
- Small styrofoam balls (to fill the pots)
- Texture tool or toothbrush
- Ball stylus tool
- Fine detail paintbrush
- Beige or brown sand (for the soil effect)
- Craft glue
Step 1: Pot Preparation
-
Fill the Pots:
Start by inserting a small styrofoam ball or a wad of aluminum foil into each mini-pot. This saves clay and gives you a raised base to work on. -
Texture the Soil:
Press a thin layer of beige or light brown foam clay over the filler, ensuring it sits just below the rim. If you want a realistic texture, gently tap the surface with a toothbrush or a texture tool. -
Add Realistic Grit:
For extra realism like in the photo, brush a thin layer of glue over the clay ‘soil’ and sprinkle fine beige sand or tiny clay crumbs over it while it’s still wet.
Clay cracking?
If your foam clay starts drying or cracking while shaping, knead in a tiny drop of water. Keep unused clay wrapped in plastic/slimes.
Step 2: Sculpting the Teal Succulent
-
Mix the Base Color:
Knead white foam clay with a drop of teal acrylic paint until you achieve a soft, pastel mint shade. Keep the color uniform. -
Form the Leaves:
Roll small balls of clay in varying sizes. You will need about 15-20 balls depending on the fullness you desire. -
Shape the Teardrops:
Pinch one side of each ball to create a teardrop shape. Gently flatten the ‘fat’ end slightly to give the leaf some volume without it being a perfect sphere. -
Build the Core:
Take three of your smallest leaves and press them together at the bases, tips pointing up, to form the tight center bud. -
Add Outer Layers:
Begin attaching slightly larger leaves around the core in a spiral pattern. Overlap them slightly so the leaves look nestled together. -
Attach to Pot:
Place a dab of glue in the center of your prepared pot and press the succulent arrangement firmly onto the soil.
Level Up: Texture
Dust the tips of the dried succulent leaves with soft pastel chalk using a fluffy brush to mimic the ‘stress colors’ real plants get.
Step 3: Sculpting the Pink & Yellow Variants
-
Create Ombre Pink:
For the pink succulent, mix a deeper pink clay and a lighter pink clay. I like to blend them incompletely so the leaves have a natural, subtle marble or gradient effect. -
Shape Pointier Leaves:
Form teardrops as before, but pinch the tips a bit sharper for the pink variety to distinguish its species. -
Assemble the rosette:
Assemble this one flatter and wider than the teal one, fanning the leaves out horizontally before building up height. -
Yellow Gradient:
For the yellow pot, create leaves in three shades: pale yellow, golden yellow, and light orange. Use the darker leaves on the outside and the palest ones in the very center.
Step 4: The Kawaii Faces
-
Draft the Expressions:
Before painting, lightly sketch the sleepy eyes and mouth onto the white pot using a pencil to ensure symmetry. -
Paint the Details:
Using your finest detail brush and black acrylic paint, carefully trace the ‘U’ shapes for sleeping eyes. Add tiny eyelashes if desired. -
Add Blushing Cheeks:
Dip a dry brush or a Q-tip into a tiny amount of pink paint. Dab off the excess on a paper towel, then gently stamp round rosy cheeks just below the eyes.
Let your little garden dry completely overnight before displaying these delightful, unkillable plants.
Rainbow and Cloud Wall Charm
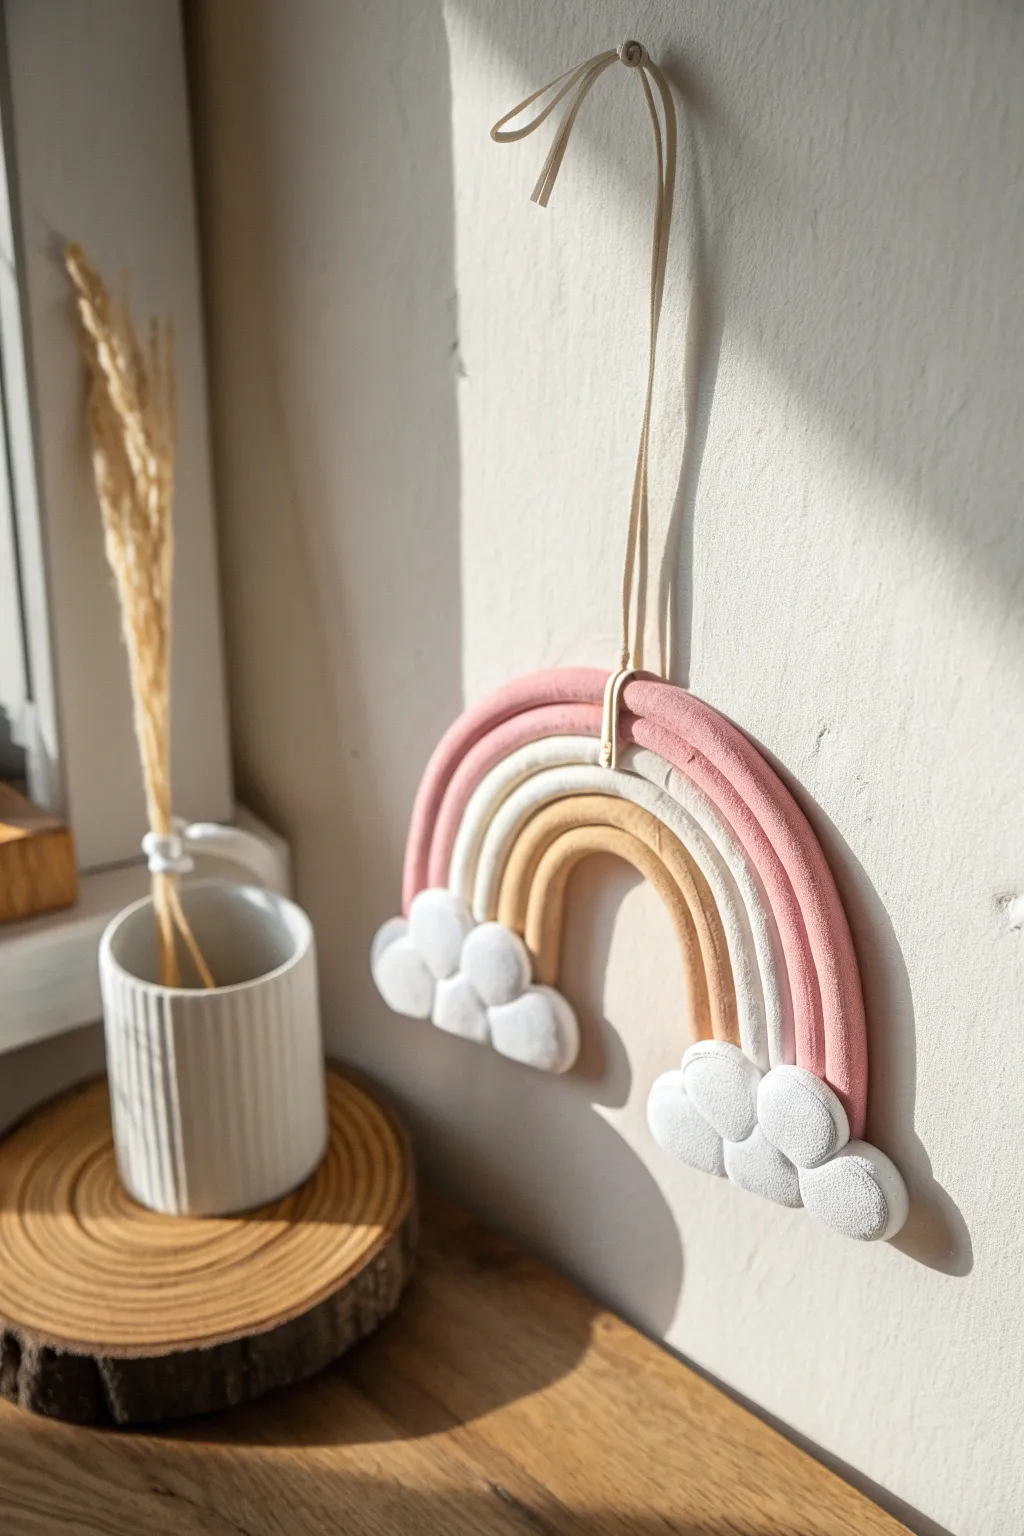
This charming pastel rainbow wall hanging adds a soft, dreamy touch to any nursery or bedroom decor. With its muted pink, cream, and tan arches nestled into fluffy foam clay clouds, it’s a lightweight and delightful project to craft.
Step-by-Step
Materials
- Foam clay (muted pink, cream/white, tan)
- Aluminum foil (for the core)
- Simple sculpting tools or a butter knife
- Leather or cotton cord for hanging
- Parchment paper or a silicone mat
- Strong craft glue (optional)
- Scissors
Step 1: Forming the Arches
-
Prepare the foil core:
To save clay and keep the ornament light, start by rolling three pieces of aluminum foil into long, thin snakes. One should be the longest for the outer arch, one medium, and one shortest for the inner arch. -
Shape the foil:
Curve your foil snakes into horseshoe shapes to check the sizing. They should nestle inside each other comfortably with a little breathing room. -
Condition the pink clay:
Take your muted pink foam clay and knead it in your hands until it is warm and pliable. This ensures a smooth finish without cracks. -
Cover the outer arch:
Flatten the pink clay into a long strip. Place the longest foil snake in the center and wrap the clay around it, rolling it gently on your work surface to smooth out the seam. -
Repeat for inner arches:
Repeat this process using the cream/white clay for the middle arch and the tan clay for the smallest inner arch. -
Create the texture:
Gently roll each clay-covered arch on the table to ensure they are uniform in thickness. I find that a light touch here prevents flattening the bottom too much. -
Assemble the rainbow:
Place the three arches on your parchment paper in their rainbow formation. Press them together gently along the sides so they adhere to one another while wet.
Cracks Appearing?
If you see small cracks as the clay dries, dip your finger in water and smooth the area. If it’s already dry, fill the crack with fresh wet clay and smooth it out.
Step 2: Adding the Clouds
-
Form cloud balls:
Roll about 6-8 small balls of white foam clay, varying the sizes slightly for a natural look. -
Cluster the clouds:
Group 3-4 balls together to form a cluster. Press them gently so they stick together but maintain their individual bubbly shapes. -
Attach to the rainbow:
Firmly press a cloud cluster onto the bottom left end of the rainbow arches. The fresh foam clay should bond easily, but add a dot of glue if the arches have started to dry. -
Complete the set:
Repeat the process on the bottom right side. Ensure both cloud bases are somewhat flat at the bottom if you want the option to stand it up on a shelf, though hanging is preferred.
Step 3: Finishing Touches
-
Add the hanger channel:
While the clay is still wet, carefully push a small tool or toothpick through the top center of the pink and white arches to create a gap for the cord, or plan to tie it around the whole unit. -
Secure the cord:
For this specific look, loop a length of leather cord around the center of the rainbow structure. Tie a knot at the top to close the loop. -
Reinforce the hanging point:
If the cord feels loose, you can press a tiny bit of extra pink clay over the cord at the back of the top arch to lock it in place. -
Smooth imperfections:
Do a final check for fingerprints. Because foam clay is forgiving, you can smooth them out with just a drop of water on your finger. -
Let it cure:
Allow the project to dry undisturbed for at least 24-48 hours. Turn it over gently halfway through to let the back breathe and dry evenly.
Make it Sparkle
Mix a pinch of biodegradable glitter into the white cloud clay before rolling your spheres for a subtle shimmer that catches the sunlight.
Hang your new creation in a sunny spot to enjoy its soft textures and calming colors
Mushroom House Mini Sculpture

Bring a touch of fairy magic to your shelf with this adorable mushroom house sculpture made from lightweight foam clay. Featuring a warm terra-cotta cap and rustic details, this mini dwelling is the perfect cozy addition to any woodland display.
How-To Guide
Materials
- White foam clay (large tub)
- Terra-cotta or burnt orange acrylic paint
- Beige or tan foam clay (or white mixed with acrylic paint)
- Brown modeling clay (or brown foam clay)
- Small rolling pin or smooth jar
- Clay sculpting tools (knife tool, ball tool)
- Aluminum foil (for armature)
- Fine-grit sandpaper (optional)
- Matte varnish or sealant
- Small paintbrush
- Texturing tool (stiff bristle brush or toothbrush)
Step 1: Building the Core Structure
-
Create the foil armature:
Start by crumpling aluminum foil into two distinct shapes: a thick, squat cylinder for the base and a wide, dome-like semi-circle for the cap. This saves clay and keeps the sculpture lightweight. -
Cover the base:
Take a large handful of white foam clay and condition it by kneading it in your hands until it’s warm and stretchy. Roll it into a flat sheet about a quarter-inch thick. -
Wrap the cylinder:
Wrap the white clay sheet around your foil cylinder, smoothing the seam where the edges meet. I find that wetting your finger slightly helps blend the clay invisibly. -
Shape the stalk:
Gently gently roll the covered cylinder on your work surface to ensure it is smooth. Taper the top slightly so the cap will sit nicely, and flatten the bottom firmly so it stands upright. -
Texture the walls:
Using a stiff paintbrush or a toothbrush, gently tap the surface of the white clay to give it a subtle, organic plaster texture rather than a perfectly smooth plastic look.
Step 2: Sculpting the Cap
-
Prepare the cap color:
Mix white foam clay with a generous amount of terra-cotta acrylic paint (or use pre-colored orange clay). Knead until the color is uniform and streak-free. -
Cover the foil dome:
Roll out a large circle of your colored clay and drape it over the foil dome armature. Gently press it down to conform to the shape, tucking the excess underneath the rim. -
Refine the rim:
Smooth the underside of the cap rim. You can add a thin snake of white clay underneath the orange overhang to represent the gills or just to create a clean transition. -
Add spots:
Roll small balls of beige clay and flatten them into uneven circles. Press these firmly onto the cap while the clay is still fresh so they adhere without glue. -
Texture the cap:
Use a toothbrush to stipple texture onto the orange surface, avoiding the beige spots. This mimics the porous look of a real mushroom cap.
Seamless Smoothness
Dip your finger in water to smooth out fingerprints or cracks before the clay dries. Foam clay reacts well to moisture for blending.
Step 3: Adding Architectural Details
-
Form the door:
Shape a piece of light brown clay into an arch. Use a sculpting knife to score vertical lines into it, simulating wood grain planks. -
Attach the door:
Press the door onto the base of the white stalk. Add a tiny ball of dark orange or copper-colored clay for the doorknob. -
Create windows:
Make two small arch shapes from teal or light blue clay for the window panes. Frame them with thin snakes of brown clay to create the beautiful wooden trim. -
Detailed framing:
Add a cross of very thin brown clay snakes over the teal pane to create the muntins (window grids). Gently press this assembly onto the upper part of the white stalk. -
Extra embellishment:
Roll tiny green snakes and shape them into a small vine or leaf sprig near the door to add a bit of life to the facade.
Secret Garden Base
Glue your house to a wood slice and add preserved moss or tiny pebbles around the bottom for a complete diorama scene.
Step 4: Assembly and Finish
-
Connect the pieces:
Place the cap onto the stalk. If the clay has dried too much, use a dab of PVA glue or clear tacky glue to secure the bond. -
Create side mushrooms:
Use leftover white and beige clay to make tiny companion mushrooms. Simply roll a small stalk and top it with a mini cap, following the same steps as the large house but without foil. -
Final drying:
Let the entire piece sit undisturbed for 24-48 hours. Foam clay shrinks slightly as it dries, so ensure it’s in a spot with good airflow. -
Seal the work:
Apply a coat of matte varnish to protect your sculpture and unify the sheen, giving it a professional, finished appearance.
Now you have a charming woodland abode ready to welcome imaginary fairy guests
Fairy Garden Scene in a Little Tray
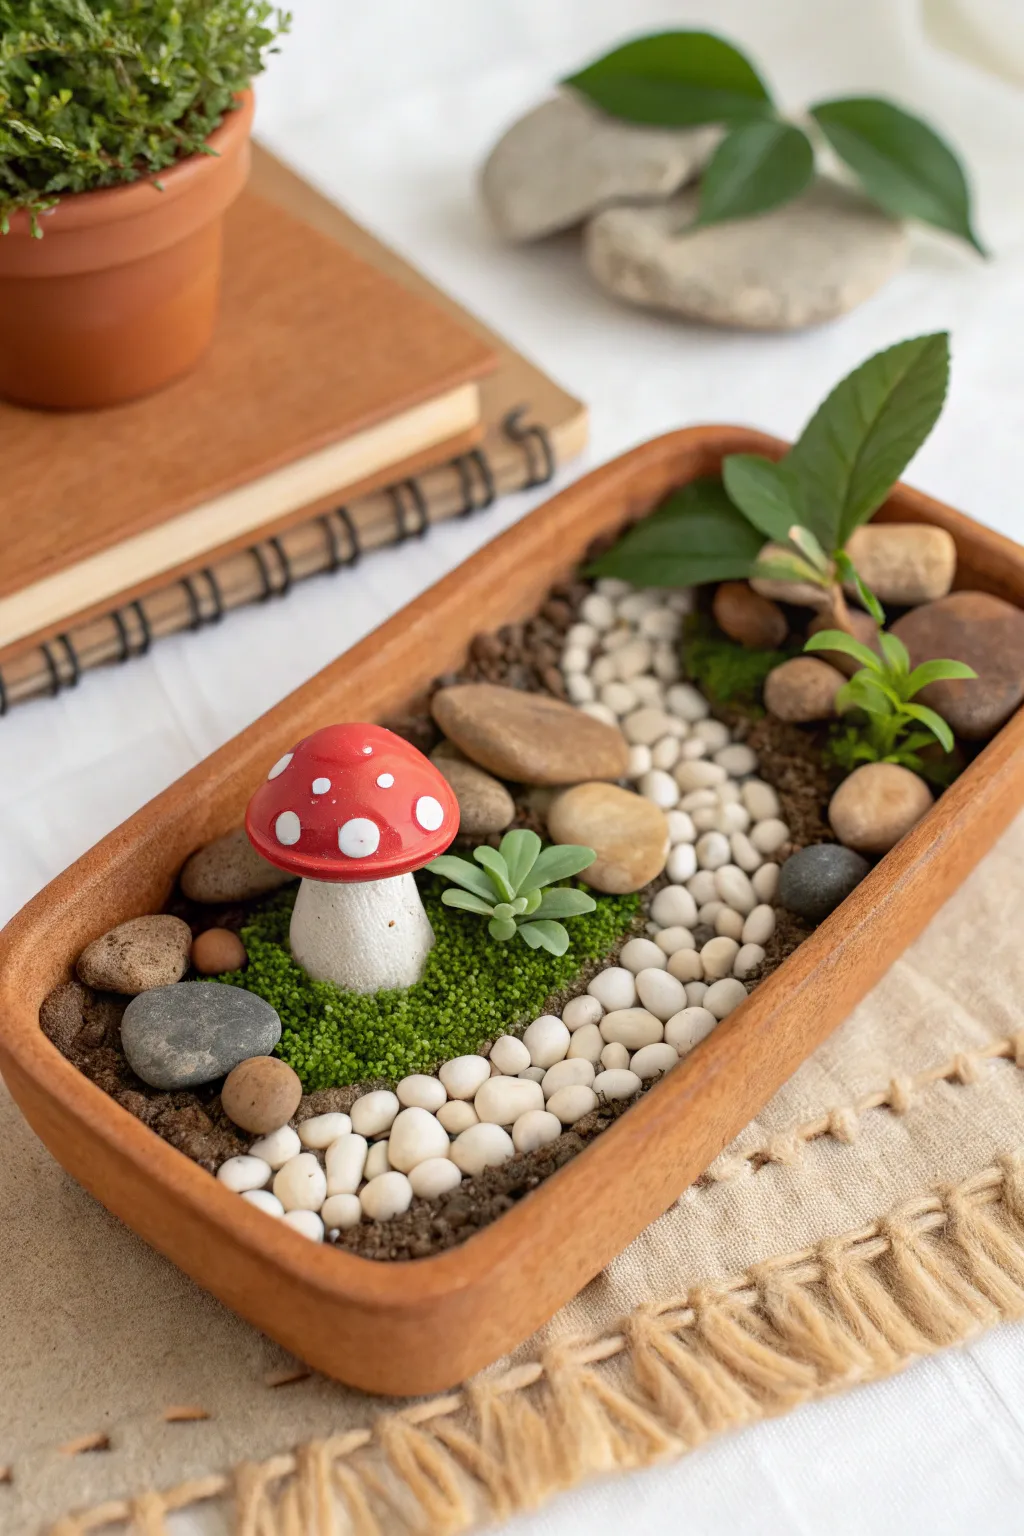
Bring a touch of woodland magic to your desk with this miniature landscape featuring a vibrant foam clay mushroom. This charming scene uses mixed textures like pebbles and moss to create a serene, low-maintenance garden that never needs watering.
Detailed Instructions
Materials
- Rectangular terracotta tray or shallow planter
- Air-dry foam clay (white, red, brown, and green)
- Small white pebbles or gravel
- Larger river stones (gray and tan/brown)
- Fine brown crafting sand or coffee grounds (for soil texture)
- Faux moss or green flocking powder
- Small artificial leaves or succulent clippings
- Craft glue (PVA or tacky glue)
- Sculpting tools or a toothpick
- Texture tool (like a stiff brush or crinkled foil)
Step 1: Sculpting the Mushroom
-
Form the Stem:
Take a walnut-sized piece of white foam clay and roll it into a thick cylinder. Gently taper the top so it’s slightly narrower than the base. Press the bottom flat against your work surface so it stands upright on its own. -
Shape the Cap:
Roll a slightly larger ball of red foam clay. Flatten the bottom with your palm and round the top into a classic dome shape. I like to gently curve the edges downward to make it look plump. -
Attach the Cap:
Place the red dome onto the white stem. If the clay is fresh, it should stick immediately; if not, add a tiny dot of water or glue. Press down gently to secure it without squashing the stem. -
Add the Spots:
Roll tiny, varied sizes of white clay into little spheres. Flatten them into thin discs and press them randomly all over the red cap. Smooth the edges so they look painted on rather than stuck on.
Natural Texture Hack
To make the mushroom stem look organic, gently roll it over a piece of textured fabric or lightly scratch vertical lines with a toothpick before the clay hardens.
Step 2: Prepping the Base
-
Fill the Tray:
Fill your terracotta tray with a base layer of brown foam clay. This doesn’t need to be perfectly smooth, as it represents the earth, but ensure it covers the bottom completely. -
Create the Riverbed:
While the brown clay is still soft, use your finger or a sculpting tool to press a winding, shallow channel running diagonally across the tray. This groove is where your white pebbles will eventually sit. -
Texture the Soil:
For the areas outside the river channel, press fine brown crafting sand or coffee grounds into the soft clay. This creates a realistic, gritty dirt effect that contrasts nicely with the smooth elements.
Step 3: Assembling the Landscape
-
Plant the Mushroom:
Position your finished mushroom on the left side of the ‘river.’ Press the base of the stem firmly into the soil layer so it looks like it’s growing out of the ground, not just sitting on top. -
Lay the River:
Apply a layer of craft glue inside the winding channel you created earlier. Carefully place the small white pebbles one by one, fitting them tightly together to simulate a flowing rocky stream. -
Position Large Rocks:
Nestle a few larger river stones into the soil areas. I suggest placing a few near the mushroom base and others on the opposite bank to balance the composition visually. -
Add Greenery:
Use green foam clay to create small mounds around the base of the mushroom. Taking a stiff brush or a ball of crinkled foil, tap the surface repeatedly to create a spongy, moss-like texture. -
Flocking Detail:
For extra realism, brush a little glue over your textured green clay and sprinkle faux moss or flocking powder on top. This soft fuzz makes the moss look incredibly lifelike. -
Growing Leaves:
Poke a small hole into the soil on the right side of the tray. Insert the stems of your artificial leaves or faux succulent clippings, securing them with a drop of glue if needed. -
Final Touches:
Scatter a few tiny pinch-pots of brown clay or extra pebbles around the edges to hide any gaps. Ensure the white pebble river flows cleanly from one edge of the tray to the other.
Clay Shrinkage
Foam clay shrinks slightly as it dries. Pack your base layer tightly against the tray edges to prevent gaps from forming between the ‘soil’ and the container walls.
Place your completed miniature garden on a sunny shelf or desk to enjoy a peaceful nature scene indoors
Undersea Creatures With Rounded Shapes
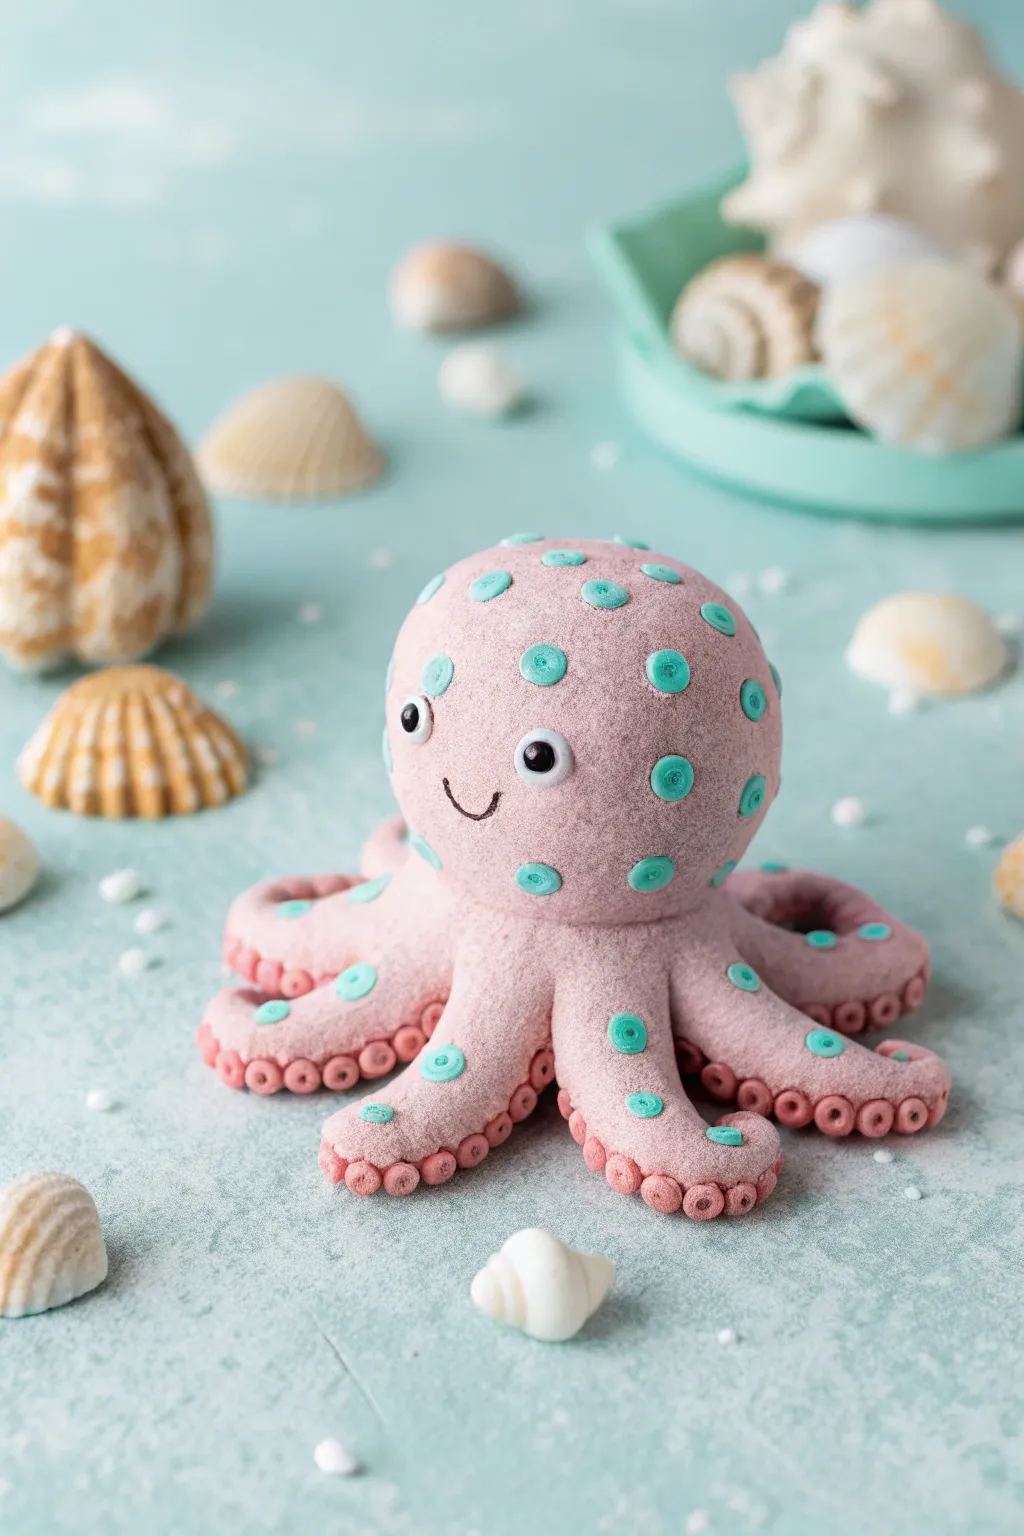
Bring the ocean depths to your crafting table with this adorable foam clay octopus. Featuring a dusty pink body speckled with teal polka dots and detailed suction cups, this round little friend has a soft, matte texture that looks professional yet playful.
Step-by-Step
Materials
- Light pink foam clay (dusty rose shade)
- Teal or turquoise foam clay
- Small amount of black foam clay
- Small amount of white foam clay
- Styrofoam ball (approx. 2-3 inches)
- Modeling tools (ball tool, needle tool)
- Non-stick work surface
- Optional: Toothpick for structural support
Step 1: Creating the Body Base
-
Prepare the core:
Start with your Styrofoam ball as the armature. While foam clay holds its shape well, a core saves clay and keeps the head perfectly spherical. -
Cover the head:
Take a large portion of the pink foam clay and flatten it into a pancake. Gently drape it over the Styrofoam ball. -
Smooth the surface:
Work the clay down the sides of the ball, smoothing seams with your thumbs. Roll the covered ball gently on your work surface to erase fingerprints and ensure an even, matte finish. -
Prepare the tentacle clay:
Roll out eight equal-sized logs of pink clay. They should be slightly thicker at one end (where they attach to the body) and taper to a rounded point. -
Attach the tentacles:
Press the thicker end of each tentacle under the base of the head. Space them evenly around the circumference. -
Curve the tentacles:
Gently curl the tips of the tentacles upward or sideways to give the octopus a relaxed, swimming posture. Varying the curves makes it look more organic. -
Blend the seams:
Use a modeling tool or your fingertip to lightly blend the clay where the tentacles meet the head, creating a seamless transition.
Smoother Texture
If your foam clay feels tacky or shows fingerprints, lightly dampen your fingertip with water before smoothing. Don’t use too much water, or the clay will get slimy.
Step 2: Adding Texture and Details
-
Make the suction cups:
Roll many tiny balls of pink clay—smaller than a pea. I find it easiest to make a whole batch of these at once so I don’t have to keep stopping. -
Attach suction cups:
Press these tiny pink balls in rows along the *underside* of each tentacle. They should slightly visible from the side view. -
Create the cup indentation:
Use a small ball tool to press a dimple into the center of each suction cup. This creates that classic ring shape. -
Prepare the teal spots:
Switch to your teal clay. Roll out very small, flat circles in slightly varying sizes. -
Apply the spots:
Gently press the teal circles all over the top of the head and the upper sides of the tentacles. Space them somewhat randomly for a natural look. -
Detail the spots:
Using a very small, clean ball tool or the head of a pin, press a tiny indentation into the precise center of each teal spot. -
Add extra spots:
Place a few extra teal spots onto the visible tops of the tentacles to tie the design together.
Accessorize It
Before drying, press real tiny seashells into the base of the tentacles so it looks like the octopus is collecting treasures from the ocean floor.
Step 3: Face and Finishing Touches
-
Form the eyes:
Roll two small white balls of clay and flatten them slightly. Press them onto the front of the face, spacing them comfortably apart. -
Add pupils:
Roll tiny specks of black clay and press them into the center of the white eyes. -
Add the eye shine:
For that spark of life, add a microscopic dot of white clay to the upper corner of each black pupil. -
Make the smile:
Roll a very thin, short thread of black clay. Shape it into a small ‘U’ and press it gently between the eyes. -
Final drying:
Let your octopus sit undisturbed for 24 hours to cure completely. Foam clay shrinks slightly as it dries, which will tighten everything up beautifully.
Once fully dry, place your cheerful octopus on a shelf or among some collected seashells for a perfect nautical display
3D Shadow Box Foam Clay Landscape
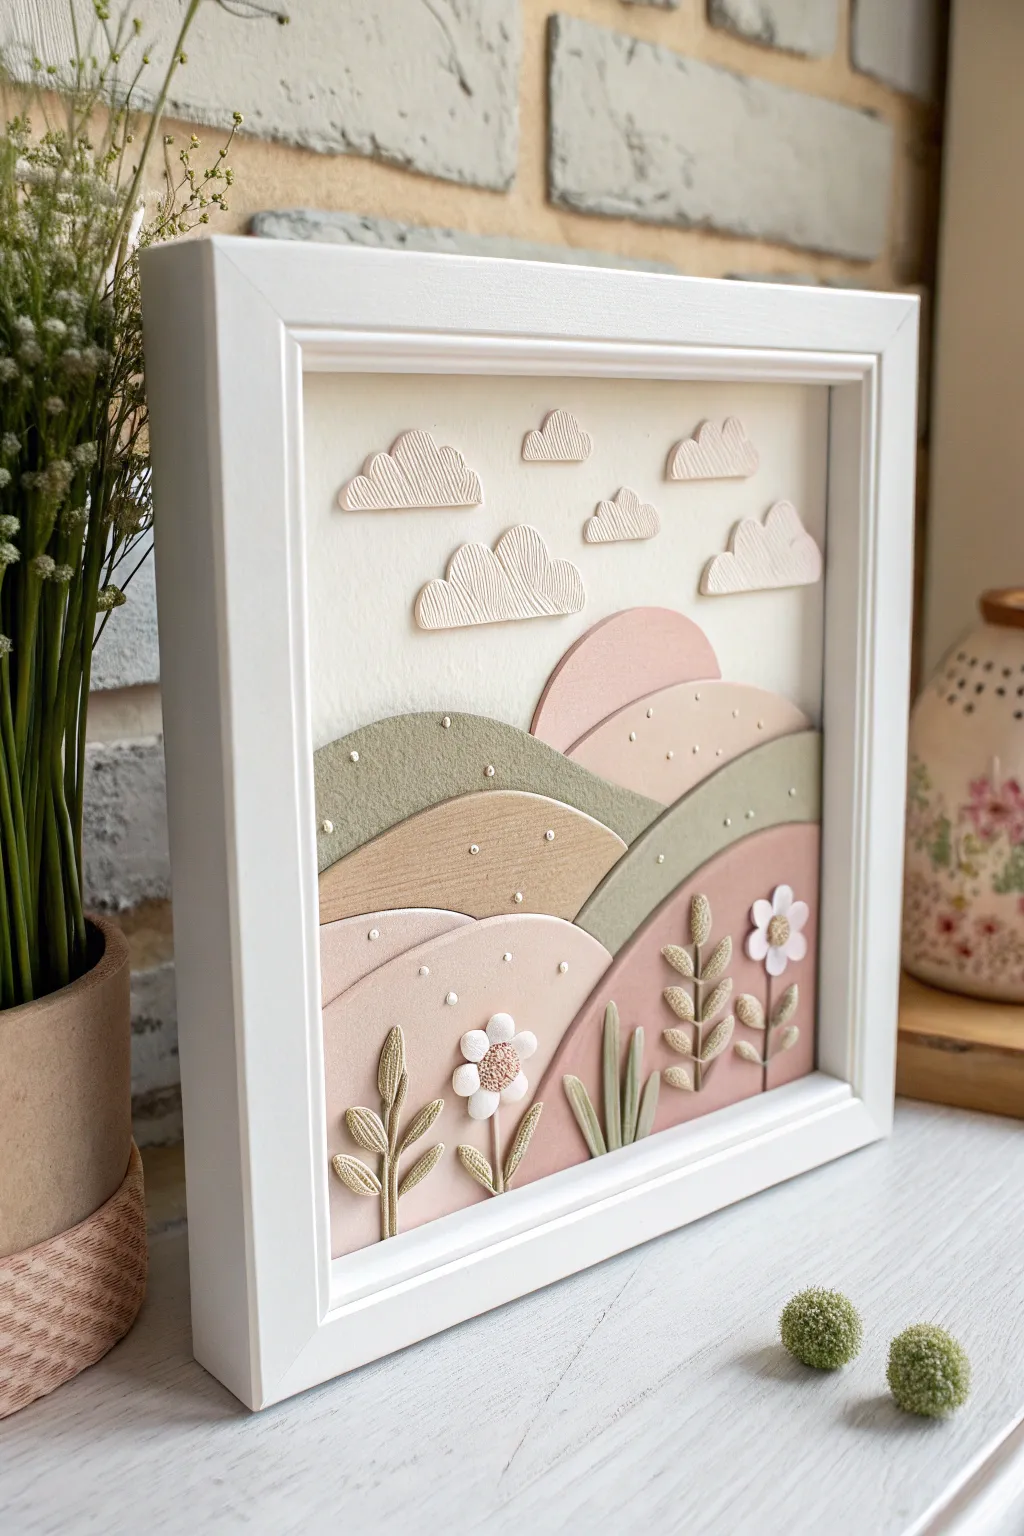
Create a serene, dimensional landscape that practically pops off the wall using soft foam clay. This shadow box art features rolling hills in gentle earth tones, textured clouds, and adorable 3D floral accents for a charming, tactile finish.
Step-by-Step Guide
Materials
- White deep shadow box frame (approx. 8×8 or 10×10 inches)
- Foam clay (air dry clay) in white, olive green, dusty pink, beige, and tan
- Rolling pin or clay roller
- Clay modeling tools (specifically a needle tool and a small petal shaper)
- Textured rolling pin or coarse fabric (for cloud texture)
- Craft knife or scalpel
- PVA glue or tacky glue
- Cardstock or heavy watercolor paper (for the backing)
- Ruler
- Small dotting tool or toothpick
Step 1: Preparing the Foundation
-
Prepare the backing:
Remove the back panel from your shadow box frame. Cut a piece of heavy cardstock or watercolor paper to fit exactly inside the frame. This will be the base for your landscape. -
Mock up the landscape:
Lightly sketch your hill placement on the backing paper with a pencil. Plan for roughly five distinct layers of rolling hills, rising from the bottom foreground to the middle ground. -
Mix your palette:
Prepare your foam clay colors. You want a harmonious pastel palette: dusty rose, pale blush, sage green, olive, and soft beige. Mixing white clay with small amounts of colored clay helps achieve these soft, milky tones.
Texture Trick
Don’t have a texture roller? Gently press a clean piece of burlap or canvas onto the wet clay surface of the clouds to create that woven fabric look instantly.
Step 2: Sculpting the Hills
-
Create the background sun/hill:
Start with the furthest element, which looks like a setting sun or distant hill. Roll out a thin sheet of pink clay. -
Shape the first layer:
Cut a semi-circle shape and adhere it to the backing paper using a small amount of PVA glue. Press it gently to ensure it stays flat. -
Add middle ground hills:
Roll out sheets of beige and light olive clay. Use your craft knife to cut gentle, rolling slopes. Layer these over the bottom of your first shape, slightly overlapping them to build physical depth. -
Texturing the hills:
Before the clay dries, use a small dotting tool or the blunt end of a needle tool to press tiny, random indents into specific hill layers (like the olive and beige ones) to mimic vegetation or pebbles. -
Foreground layers:
Create the final two foreground hills using a darker dusty pink and a light blush tone. These should be slightly thicker (about 3-4mm) than the background layers to enhance the 3D effect. -
Smooth the edges:
After cutting your hill shapes, run your finger along the cut edges to soften them so they look molded rather than sharp.
Clay Shrinkage
Foam clay shrinks slightly as it dries. Overlap your hill layers by at least 3-4mm more than you think you need to prevent gaps from appearing between the layers.
Step 3: Adding Details & Sky
-
Sculpting the clouds:
Roll out white clay to about 3mm thickness. To get that fabric-like texture shown in the image, press a piece of coarse linen or a textured roller onto the clay surface before cutting. -
Cutting cloud shapes:
Cut out 6-7 small, fluffy cloud shapes. Group them in pairs or singles and glue them to the upper sky portion of the backing. -
Making flower centers:
For the flowers in the foreground, roll tiny balls of beige clay. Press them flat and use a needle tool to stipple the centers, creating a pollen texture. -
Forming petals:
Shape small teardrops of white clay for petals. Arrange 5-6 petals around each textured center directly onto the bottom pink hills. -
Adding foliage:
Roll very thin snakes of olive clay for stems. I like to use a knife tool to score vertical lines on the leaves to mimic veins. -
Final assembly:
Allow the clay to dry fully for 24 hours. The foam clay will shrink slightly and harden into a lightweight foam. Once dry, place the backing into the frame and secure the back panel.
Hang your soft, textured landscape in a sunny spot to enjoy the shifting shadows throughout the day
Wire-Limbed Critters for Extra Pose
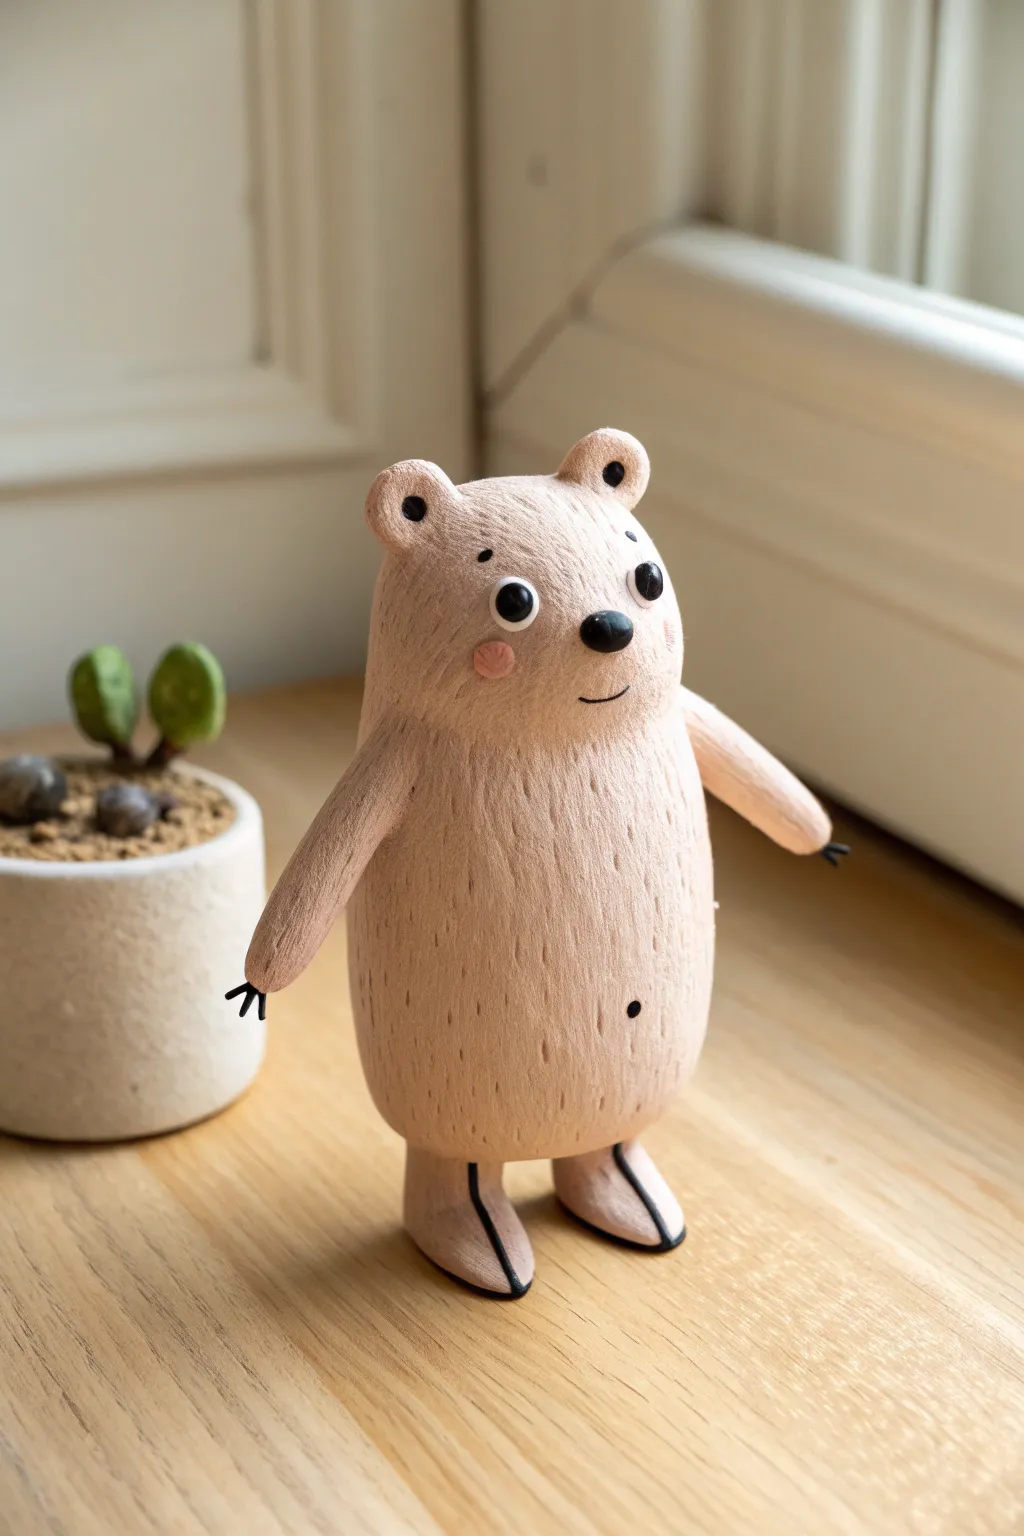
Create this charming, whimsical bear figurine that looks like it stepped right out of a storybook illustration. With its distinctive textured fur and sturdy, wire-reinforced limbs, this character makes for a delightful desk companion that you can actually pose.
How-To Guide
Materials
- Beige or pale pink foam clay
- Aluminum crafting wire (1-2mm thickness)
- Black foam clay (small amount)
- Small pink foam clay ball (for cheeks)
- Needle tool or stiff toothbrush (for texturing)
- Two small black beads or safety eyes
- Wire cutters
- Pliers
- Styrofoam egg or ball (optional, for core structure)
Step 1: Building the Armature
-
Form the skeleton:
Cut a length of aluminum wire approximately 8 inches long. Fold it into a U-shape to create the legs and a central spine. -
Add arm supports:
Cut a second shorter piece of wire for the arms. Twist the center of this wire around the ‘spine’ of your first wire piece, about a third of the way down from the top loop. This creates a cross shape. -
Create foot loops:
Using pliers, bend the bottom ends of the leg wires into small loops. This provides a flat base so your bear will stand securely later on. -
Prepare the core:
If you are using a styrofoam core to save clay, push the wire spine into the foam egg now. Otherwise, bulk up the center of the wire frame with a preliminary layer of scrap clay or aluminum foil.
Step 2: Sculpting the Body
-
Base layer application:
Take your main beige or pinkish foam clay and begin wrapping it around the wire armature. Start with the torso, creating a smooth, oval-shaped body that hides the internal structure completely. -
Shape the limbs:
Extend the clay down the leg wires and out along the arm wires. Keep the arms slightly tapered toward the hands, and ensure the legs are thick enough to look sturdy. -
Form the feet:
Sculpt the feet into distinct, slightly oversized shoe-like shapes at the base of the legs. Flatten the bottoms against your work surface to ensure the figure stands independently. -
Define the head:
Since this bear has a unified head and body, gently shape the top of the oval to be slightly narrower but rounded. Pinch two small bits of clay at the very top corners to create the ears. -
Add the snout:
Roll a small pea-sized ball of the main body color and press it gently onto the center of the face area to create a subtle muzzle.
Needle Tool Trick
When texturing fur, drag the needle tool slightly upwards as you pull it out of the clay. This lifts the surface just enough to create a fluffy, tufted look.
Step 3: Texturing and Details
-
Create fur texture:
Use a needle tool or a stiff toothbrush to press texture into the clay. Make short, vertical indentations all over the body, skipping only the muzzle and the very bottom of the feet. I prefer to work from the bottom up to layer the texture naturally. -
Insert the eyes:
Press the two small black beads into the face just above the muzzle. Push them in deep enough so they look embedded, not just stuck on the surface. -
Add the nose:
Roll a tiny oval of black foam clay and attach it to the tip of the muzzle. -
Create the mouth:
Roll a microscopically thin ‘snake’ of black clay. Shape it into a small smile and gently press it onto the face below the nose. -
Apply the claws:
Roll very tiny, thin spikes of black clay. Carefully attach three to the end of each arm to serve as claws. -
Detail the feet:
Roll two thin strings of black clay. Run them vertically down the front center of each foot and under the sole to mimic a shoe seam or paw detail. -
Final touches:
Add a tiny black dot for the belly button and press small flattened tonal pink circles onto the cheeks for a blush effect. Add tiny black eyebrows above the eyes with a marker or tiny clay strings.
Accessorize It
Before the clay dries completely, sculpt a tiny scarf, a backpack, or a miniature hat to give your bear a unique personality and backstory.
Let your bear dry completely for 24 hours before attempting to pose its arms and legs
Whimsical Frame With Puffy Foam Clay Border
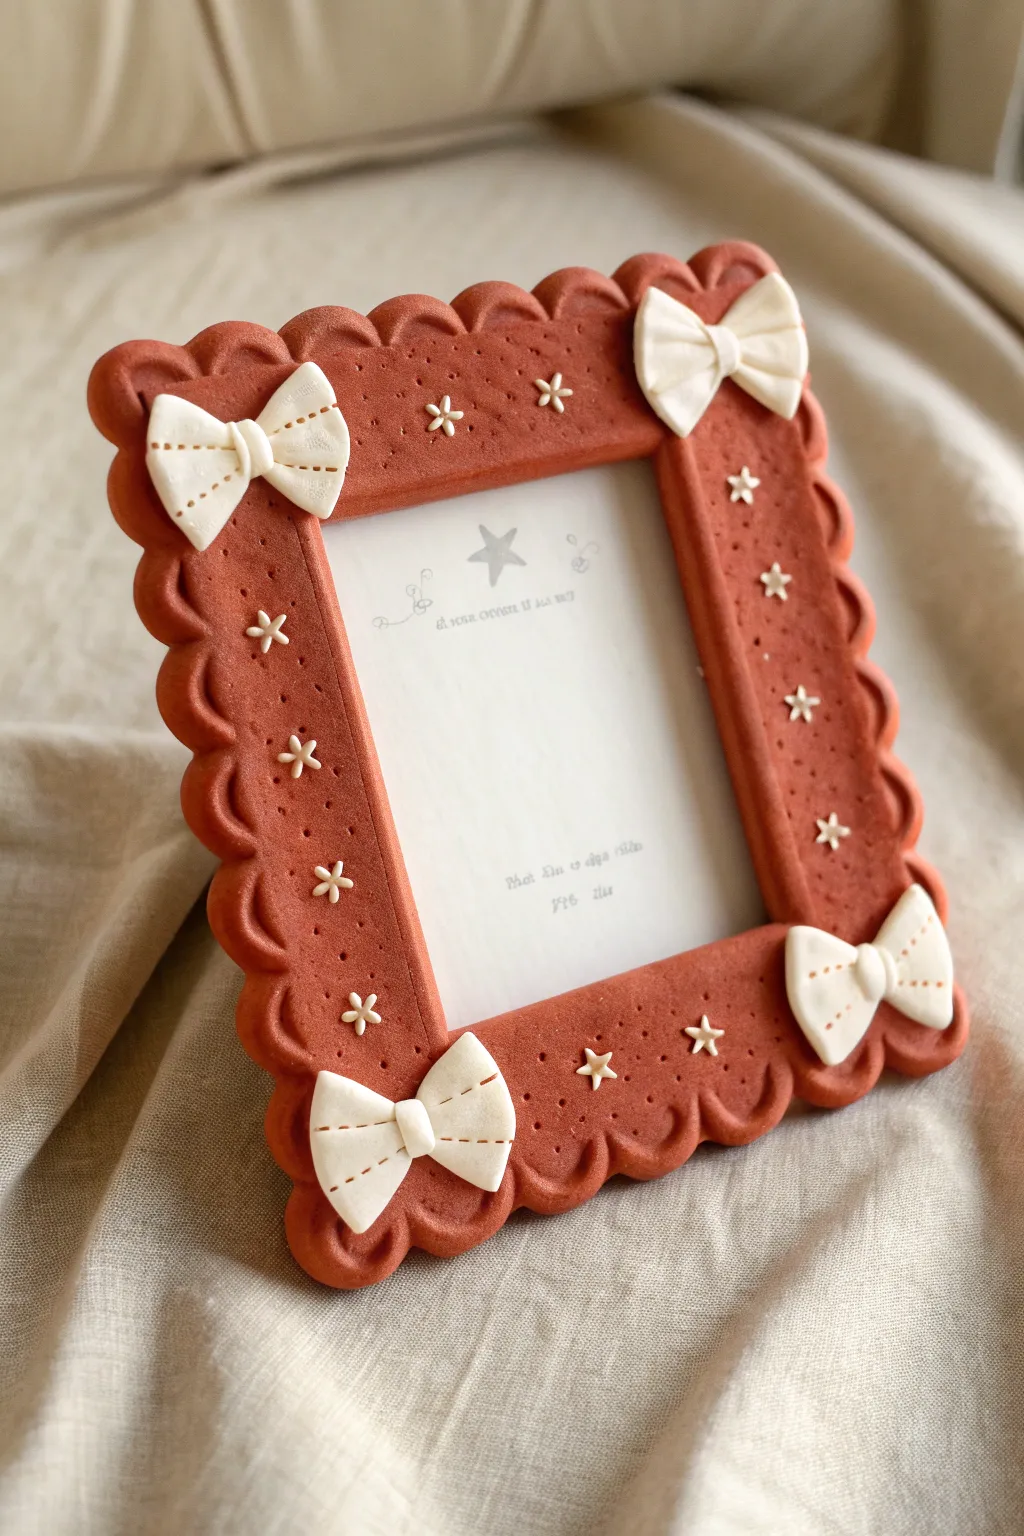
Transform a plain picture frame into a sweet, bakery-inspired keepsake using puffy foam clay. This project features a classic scalloped gingerbread edge, frosted bow accents, and tiny star sprinkles for a cozy, handcrafted look.
Step-by-Step Tutorial
Materials
- Plain wooden picture frame (rectangular)
- Foam clay (terracotta/reddish-brown)
- Foam clay (white)
- Clay modeling tools (specifically a needle tool or toothpick)
- Small star-shaped fondant plunger cutter or silicone mold
- Rolling pin (acrylic or smooth plastic)
- Craft glue or tacky glue
- Sandpaper (optional, for frame prep)
- Gloss or matte varnish (optional)
Step 1: Preparing the Base
-
Prep the frame:
Remove the glass and backing from your wooden frame. If the wood surface is very slick, give it a quick scuff with sandpaper to help the clay adhere better. -
Condition the clay:
Take a large handful of the terracotta-colored foam clay. Knead and stretch it in your hands until it becomes warm, pliable, and sticky. -
Apply the base layer:
Press the clay directly onto the front face of the wooden frame. Spread it evenly with your thumbs, ensuring the wood is completely covered. -
Smooth the surface:
Use your acrylic rolling pin gently over the clay on the frame to create a mostly flat, uniform surface. It doesn’t need to be perfect; a slight texture adds to the cookie effect.
Clay Shrinkage
Foam clay shrinks slightly as it dries. If gaps appear at the frame edges, fill them with a small amount of fresh clay and smooth it out with water.
Step 2: Sculpting the Scalloped Edge
-
Roll coils for the border:
Roll out thick snakes or sausages of the same terracotta clay. These should be roughly half an inch in diameter. -
Attach the border:
Place these coils along the outer perimeter of the frame. Smooth the seam where the coil meets the base layer so they fuse together. -
Create the scallops:
Using your thumb or a large ball tool, press indentations into the outer coil at regular intervals to create the wavy, scalloped ‘cookie’ edge. Keep the spacing consistent. -
Texture the cookie:
Take a stiff bristle brush or a crumpled ball of aluminum foil and gently tap it all over the terracotta clay. This creates a realistic baked goods texture. -
Add pore details:
Use a needle tool to poke tiny, random holes scattered across the surface, mimicking the air pockets found in baked gingerbread.
Pro Tip: Clean White Clay
Terracotta clay can stain hands easily. Wash hands thoroughly and use baby wipes before touching the white clay to keep your bows pristine.
Step 3: Adding the Frosting Details
-
Make the bows:
Clean your hands thoroughly before switching to white clay. Roll out a small sheet of white foam clay and cut four strips for the bows. -
Shape the loops:
Fold the ends of a strip toward the center to create two loops. Pinch the center tight. Wrap a tiny band of white clay around the middle to finish the bow shape. -
Replicate four times:
Repeat the previous step until you have four identical white bows. -
Add stitching detail:
Using your needle tool, gently press dashed lines along the edges of the bow loops to look like icing stitching. -
Attach the bows:
Apply a tiny dab of water or craft glue to the back of each bow and press them onto the four corners of the frame. -
Create star sprinkles:
Roll out a thin layer of white clay. Use a small star plunger cutter to punch out several tiny stars. If you don’t have a cutter, you can hand-shape tiny balls and flatten them into star shapes with a tool. -
Place the stars:
Arrange the white stars randomly on the sides of the frame between the bows. Press them gently so they bond with the terracotta base. -
Add center details:
Use a small ball tool or toothpick to press a tiny indentation into the center of each white star for extra dimension. -
Final drying:
Set the frame flat in a safe, dust-free area. Let it air dry completely for 24 to 48 hours before reinserting the glass and backing.
Once fully dry, this charming frame is ready to hold your favorite memory