Foam clay is one of my favorite materials for quick, cheerful projects because it’s lightweight, forgiving, and dries without any fuss. If you’re craving ideas that lean into that soft, puffy look (and even the crunchy bead-texture style), you’re in the right place.
Chubby Foam Clay Animal Figurines

Create this adorable, soft-textured bunny figurine that brings a touch of whimsy to any windowsill or desk. With its distinct bumpy texture and sweet minimalist face, this project perfectly showcases the unique properties of foam clay.
Step-by-Step Guide
Materials
- Light pink foam clay (air-dry modeling foam)
- Black foam clay (small amount for eyes)
- Darker pink foam clay (tiny amount for nose)
- Black fine-tip marker or acrylic paint pen
- Modeling tools (or a toothpick)
- Clean, smooth work surface
Step 1: Shaping the Body Base
-
Prepare the main body:
Start by taking a generous handful of light pink foam clay. Knead it thoroughly in your hands to ensure the little Styrofoam beads are evenly distributed within the binder. -
Form the shape:
Roll the clay into a smooth ball first to eliminate cracks. Then, gently press down on your work surface while rolling slightly to form a stout, rounded teardrop or egg shape. This will be the combined head and body. -
Define the head:
Using your thumb and forefinger, gently squeeze the upper third of the shape to create a very subtle indentation. You don’t want a separate head and body, just a slight narrowing to suggest a neck area. -
Flatten the base:
Tap the bottom of your figure firmly against the table. This creates a flat, stable base so your bunny sits upright without wobbling.
Cracks Appearing?
If you notice cracks forming while shaping, your clay might be too dry. Add a tiny drop of water to your fingers and knead it back into the clay to restore elasticity.
Step 2: adding Limbs and Ears
-
Create the ears:
Take two equal, medium-sized pieces of pink clay. Roll them into balls, then elongate them into thick, rounded sausage shapes about an inch long. -
Shape the ear curve:
Gently pinch one end of each ear to make it slightly thinner. Use your thumb to press a shallow groove down the center of the wider part to give it a cupped, realistic ear shape. -
Attach the ears:
Press the ears onto the top of the head. Because foam clay is sticky, they should adhere on their own, but you can use a sculpting tool to smooth the seam where the ear meets the head for a stronger bond. -
Make the arms:
Roll two small balls of pink clay for the arms. Elongate them slightly into ovals. -
Attach the arms:
Press these ovals onto the sides of the body, fairly low down. Smooth the top edge of the arm into the body, but leave the bottom edge slightly raised to give it dimension. -
Add little feet:
Create two small, slightly flattened dabs of clay for the feet. Press them under the front of the body so they just barely peek out, giving that cute, seated posture.
Smoother Seams
To ruin visible seams where limbs attach, wet a modeling tool or your fingertip very slightly. The water helps dissolve the binder just enough to blend the parts seamlessly.
Step 3: Facial Features and Finishing
-
Place the eyes:
Take two tiny specks of black foam clay. Roll them into tight spheres and press them flat onto the face. Space them widely apart to enhance the ‘kawaii’ look. -
Add the nose:
Using the darker pink clay, roll a tiny ball—smaller than the eyes. Place this centrally below the eyes to serve as the nose. -
Draw the mouth:
Once the surface of the clay feels dry to the touch (usually 20-30 minutes), use a fine-tip marker to verify the surface is stable. Carefully draw a small ‘w’ shape descending from the nose to create the mouth. -
Add eye highlights:
I like to use a white gel pen or a tiny dot of white acrylic paint on the black clay eyes to add a ‘sparkle’ of life. -
Final texture check:
Give the whole figure a once-over. If you see any fingerprints, lightly pat them with your finger to blend them back into the bead texture. -
Drying time:
Allow the figure to dry completely for at least 24 hours. The vibrant color will remain matte, and the figure will become lightweight and squishy-firm.
Place your finished bunny in a sunny spot to enjoy its cheerful presence


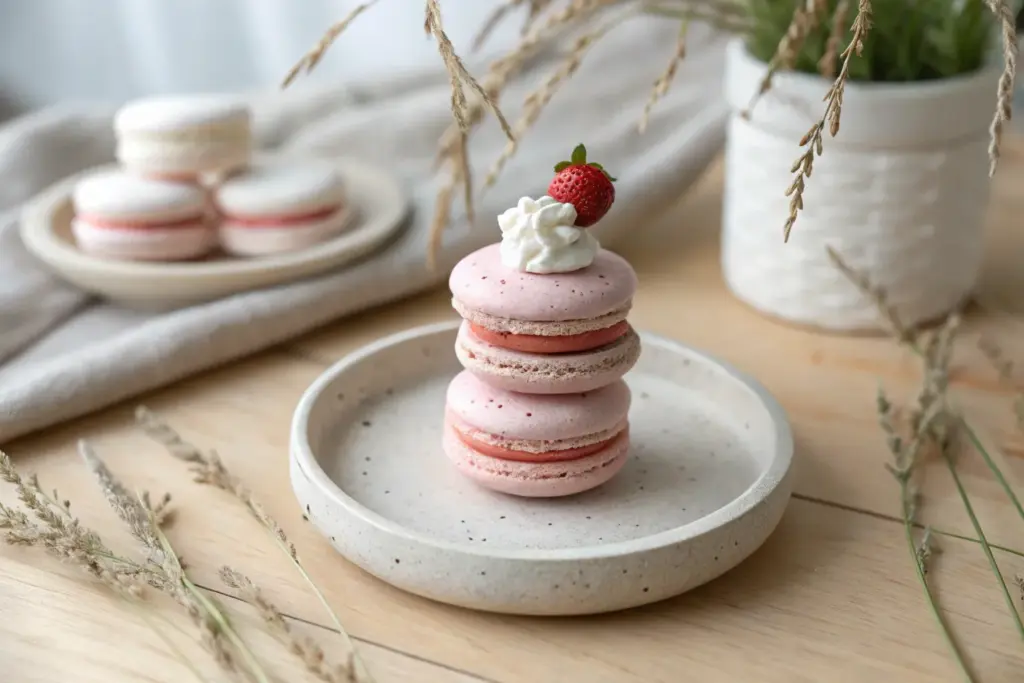
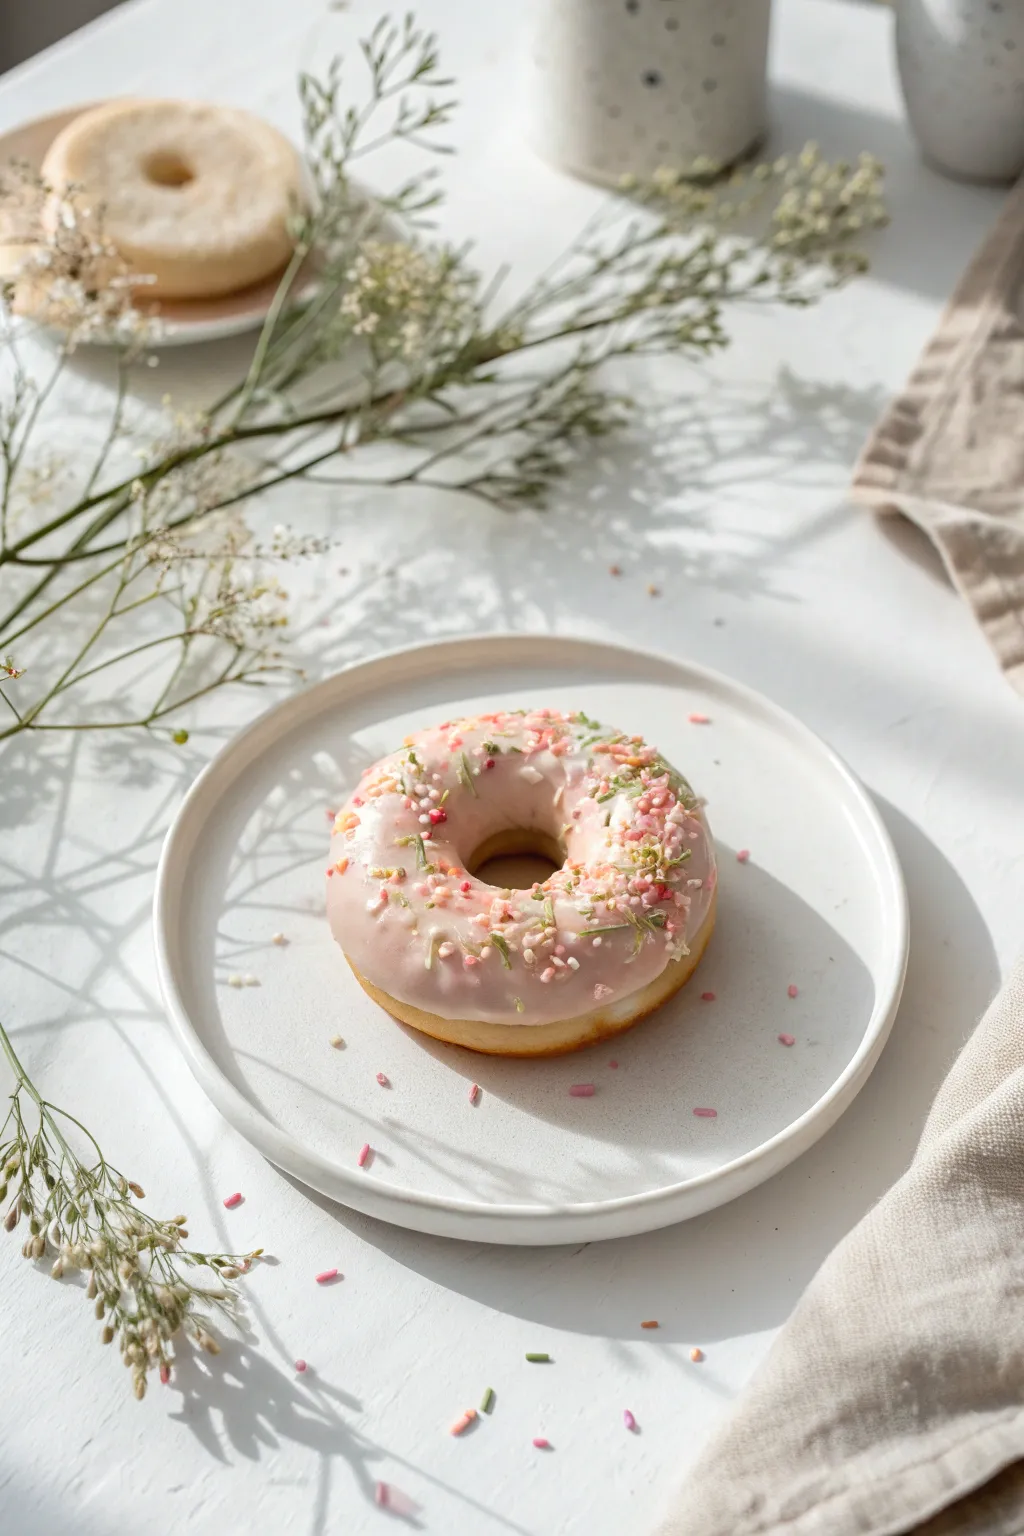
Mini Foam Clay Macaron Stack
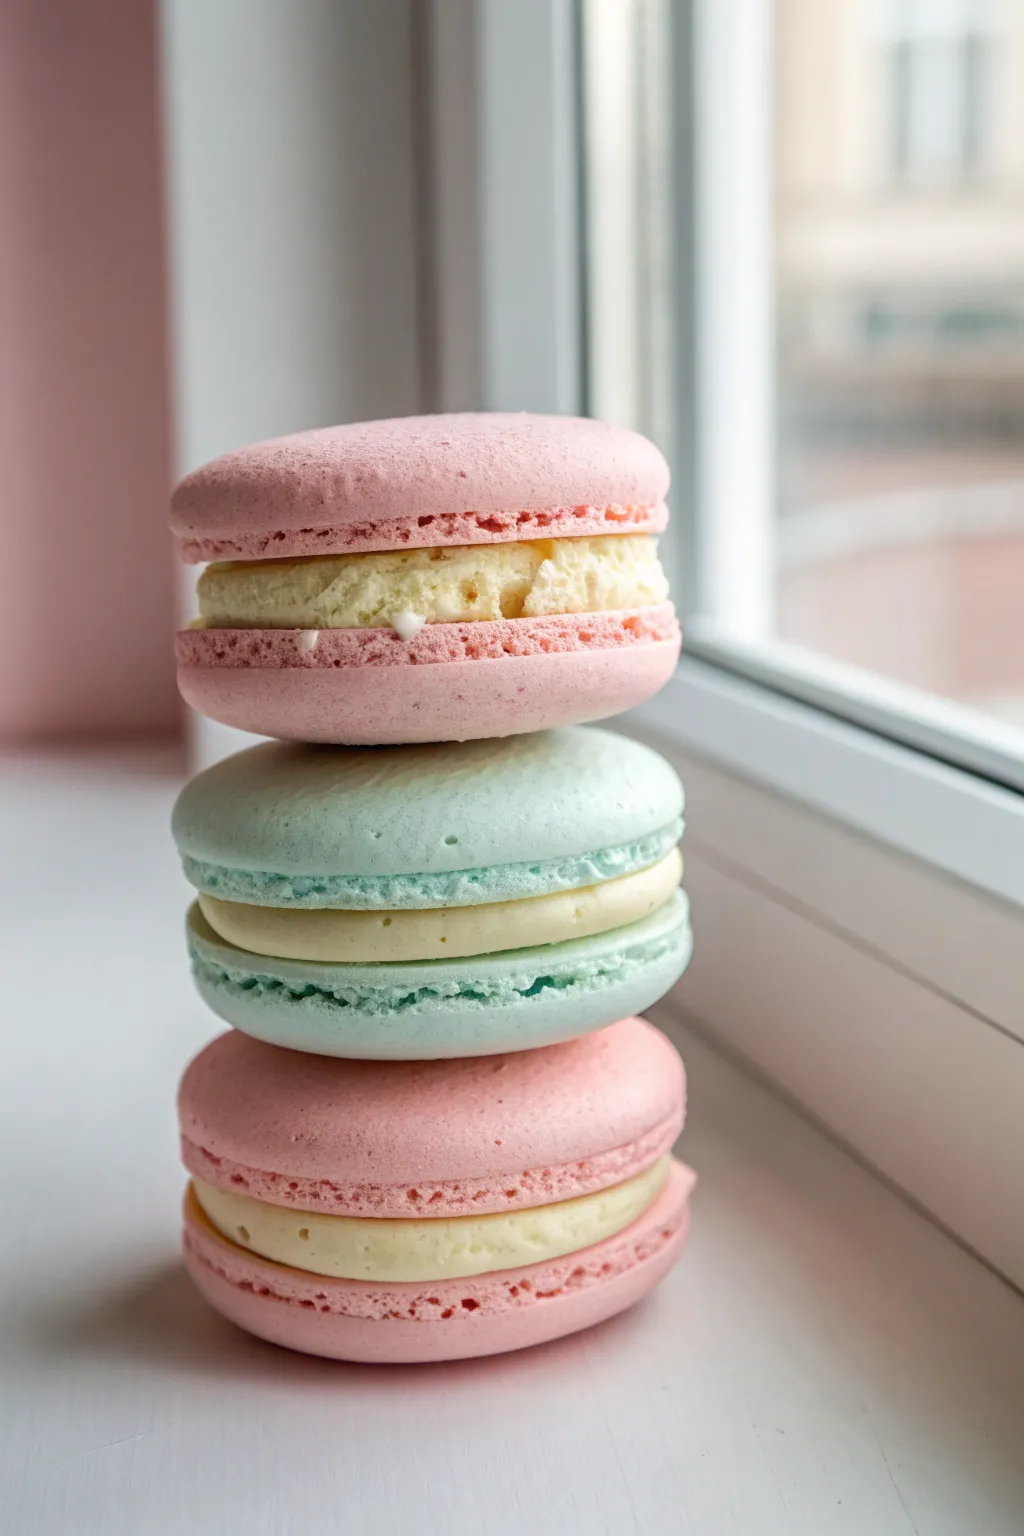
Create a delightful tower of faux desserts that look good enough to eat but are soft to the touch. This tutorial guides you in sculpting a realistic tri-color macaron stack with convincing textures and a creamy center using lightweight foam clay.
Step-by-Step
Materials
- Foam clay (pink, light blue, and white/cream)
- Small round cookie cutter or a bottle cap (approx. 1.5 – 2 inches)
- Needle tool or toothpick
- Ball tool (small)
- Aluminium foil
- Rolling pin or smooth round marker
- Clean work surface (silicone mat recommended)
Step 1: Shaping the Macaron Shells
-
Measure the clay:
Start by pinching off four equal-sized balls of pink foam clay and two equal-sized balls of light blue clay. These will form the top and bottom shells of your three macarons. -
Roll and flatten:
Take one pink ball and roll it until it is perfectly smooth and free of cracks. Gently press it down onto your work surface with your palm to create a thick, rounded disc. -
Refine the shape:
Use your cookie cutter or bottle cap to gently press down on the disc, but don’t cut all the way through initially. This helps uniform the size. If you want a more organic look, just shape the edges with your fingers to keep them rounded. -
Create the ‘feet’:
The signature ruffled edge of a macaron is called the ‘foot.’ Use a needle tool or toothpick to tease out the clay at the very bottom edge of the dome. Poke and pull the clay slightly outward and messy all around the circumference. -
Texture the feet:
Go back over the ruffled area with the needle tool, poking small holes to mimic the airy, baked texture of almond flour. Keep the top part of the dome perfectly smooth. -
Repeat the process:
Repeat these shaping and texturing steps for the remaining three pink shells and the two blue shells. You should end up with six finished shells. -
Initial drying:
Let the shells sit for about 15-20 minutes. This allows the foam to firm up slightly, so they don’t squish when you assemble the stack later.
Smooth Operator
If your foam clay has cracks while rolling, dip your finger in a tiny drop of water and smooth it over the surface before shaping. Water acts as a solvent.
Step 2: Creating the Filling
-
Prepare the cream:
Condition a ball of white or cream-colored foam clay. You want this to be slightly smaller than the volume of the two shells combined. -
Flatten the filling:
Roll the white clay into a thick disc that is just slightly smaller in diameter than your macaron shells. The edges don’t need to be perfect. -
Sandwich the first macaron:
Take one pink shell component. Place the white disc on the flat bottom side, then press the matching pink shell on top. Apply gentle, even pressure so they bond. -
Texturizing the cream:
While the white clay is still soft, use your needle tool to rough up the exposed edges of the filling. Pull bits of the white clay outward slightly to make it look like piped buttercream. -
Assemble the rest:
Repeat the filling process for the blue macaron and the second pink macaron. Ensure the filling thickness is consistent across all three.
Step 3: Assembly and Finishing
-
Stacking the tower:
Apply a tiny dab of water or transparent craft glue to the center of the top shell of one pink macaron. Place the blue macaron directly on top. -
Complete the stack:
Apply another dab of adhesive to the top of the blue macaron and place the final pink macaron on the summit. -
Adjust alignment:
I prefer to gently nudge them while the clay is still flexible to ensure they look naturally stacked, not rigidly perfect. A slight tilt adds realism. -
Final texture check:
Inspect the ‘feet’ and the filing. If any texture got smoothed out during stacking, re-poke those areas with your toothpick now. -
Full cure:
Allow the entire stack to dry undisturbed for at least 24-48 hours. Foam clay needs air circulation to cure completely, so turning it over halfway through can help.
Pastel Shading
Dust the dried macaron shells with soft chalk pastels using a dry brush to highlight the rounded tops and deepen the shadows near the feet.
Place your completed stack on a shelf or desk for a permanent touch of sweetness that never expires


Foam Clay Roll Cake Slices
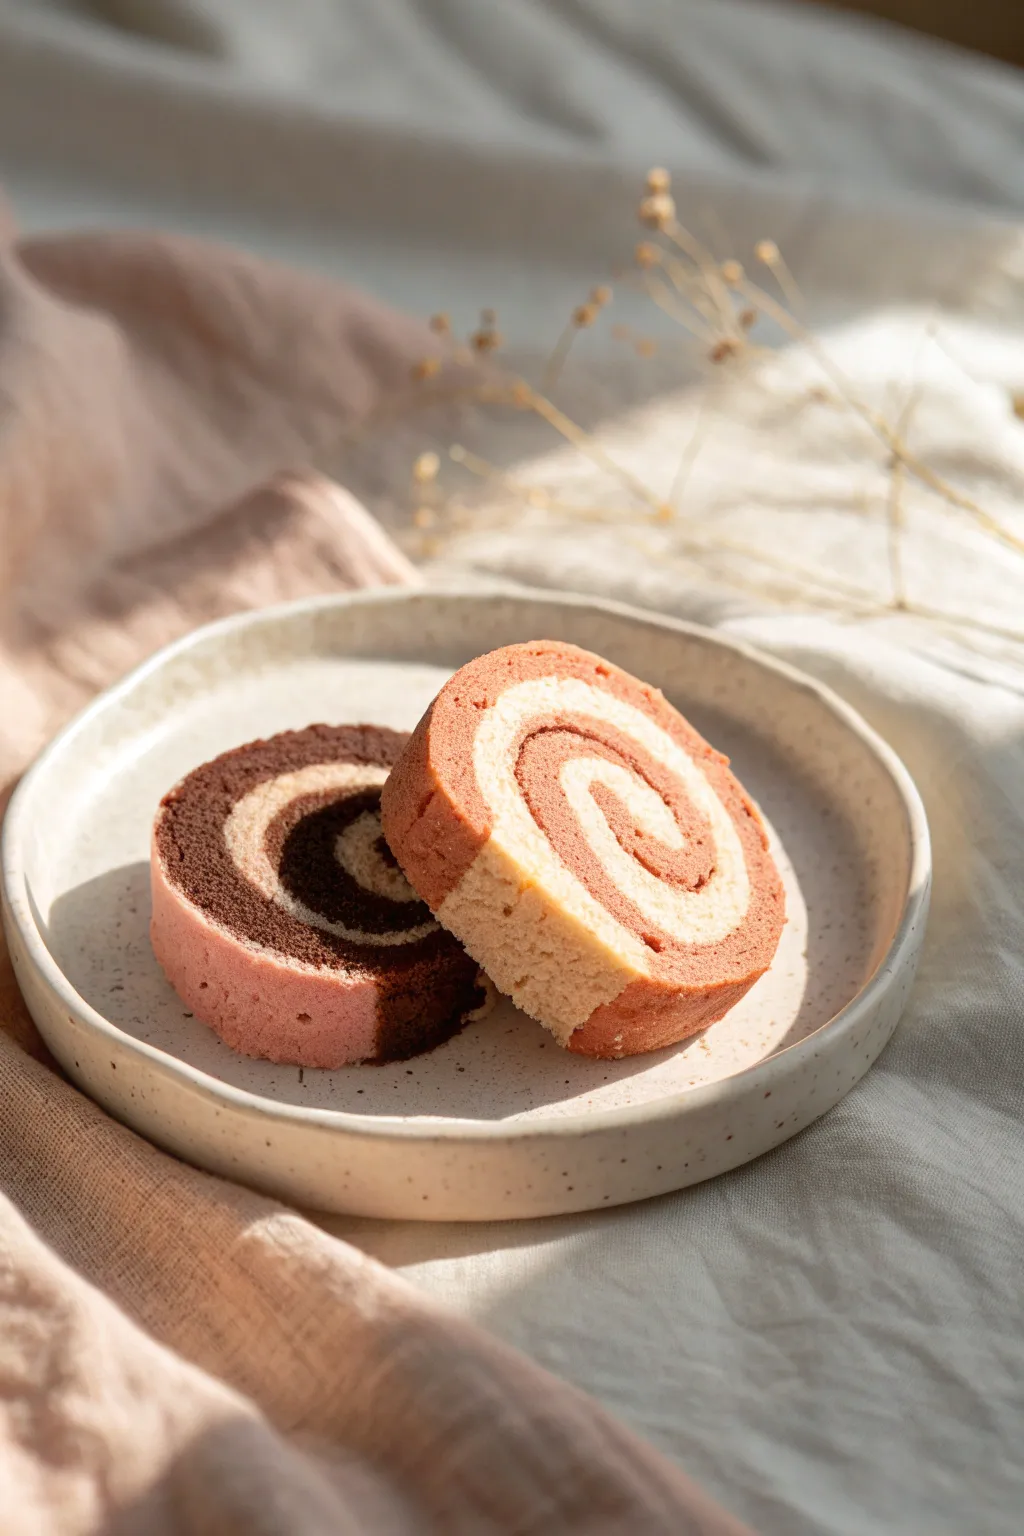
These adorable cake slices look good enough to eat but are actually lightweight foam clay creations. With their realistic sponge texture and soft coloring, they make charming play food or desk decorations.
Detailed Instructions
Materials
- Foam clay (brown, pink, cream/white, beige)
- Clean work surface or silicone mat
- Rolling pin or smooth cylindrical object
- Texturing tool (toothbrush or needle tool)
- Clay cutting blade or sharp craft knife
- Ruler (optional)
Step 1: Preparing the Base
-
Mix your colors:
Start by mixing your clay to get realistic cake tones. You’ll need a chocolate brown, a soft strawberry pink, and a creamy vanilla off-white. If your white is too bright, mix in a tiny pinprick of yellow or brown to warm it up. -
Portion the clay:
Decide on your first slice flavor combo. For the chocolate swirl slice, grab equal balls of the chocolate brown and the vanilla cream clay. -
Roll out sheets:
Using a rolling pin, flatten the brown clay into a long, rectangular strip about 1/4 inch thick. Repeat this process with the cream clay, trying to make the strips identical in width and length.
Smudged Colors?
If layers smear during slicing, wait longer! Foam clay is sticky when fresh. Letting the log dry for 30 minutes before cutting ensures cleaner definitions.
Step 2: Creating the Swirl
-
Texturing stage 1:
Before rolling, press a stiff toothbrush or needle tool gently onto the surface of both clay strips. This creates that airy, spongy cake texture. -
Layer the strips:
Carefully place the cream strip directly on top of the brown strip. Press them together gently so they adhere without squishing the shape too much. -
Trim the edges:
For a neat spiral, use your blade to trim the short ends of your rectangle stack so they are straight and clean. -
Bevel the starting edge:
On the short end where you will begin rolling, slice a small 45-degree angle or bevel. This helps the center of the spiral tuck in tightly without leaving a large gap. -
Roll the log:
Slowly and evenly roll the stacked strips up into a tight log, starting from the beveled end. Watch the sides to ensure the layers stay aligned.
Crust Styling
For a darker ‘baked’ look on the outer edge, lightly brush soft pastel chalk dust (brown or orange) onto the outer layer before wrapped.
Step 3: Adding the ‘Crust’ and Finishing
-
Prepare the outer layer:
For the pink outer wrapping shown in the chocolate slice, roll out a thin sheet of pink clay. It should be thinner than your cake layers. -
Texture the crust:
Texture this pink sheet on one side using your toothbrush method. -
Wrap the log:
Wrap this pink sheet around the circumference of your rolled log. Cut off any excess clay so the seam meets neatly without overlapping bulges. -
Slice into portions:
Allow the log to sit for about 10-15 minutes so the foam clay firms up slightly. Then, use a very sharp blade to slice the log into individual rounds. Use a single straight-down motion rather than sawing to preserve the swirl shape. -
Final texturing:
Once sliced, the cut face will look smooth and unnatural. I like to take a needle tool and gently poke and drag small circles over the cut surfaces to bring back the fluffy cake texture inside the spiral. -
Reshape gently:
Slicing might have slightly flattened the bottom. Gently cup the slice in your hands to round it back out, or press lightly on the sides to restore the circular shape. -
Repeat for variety:
Repeat the entire process for the second slice, swapping the brown layer for a pink strawberry layer and using a darker reddish-brown for the outer crust. -
Drying:
Let your cake slices air dry completely for 24-48 hours. Flip them over halfway through so both sides dry evenly.
Once fully dry, these sweet slices are ready to serve as cute decor in your collection


Foam Clay Cupcake Toppers
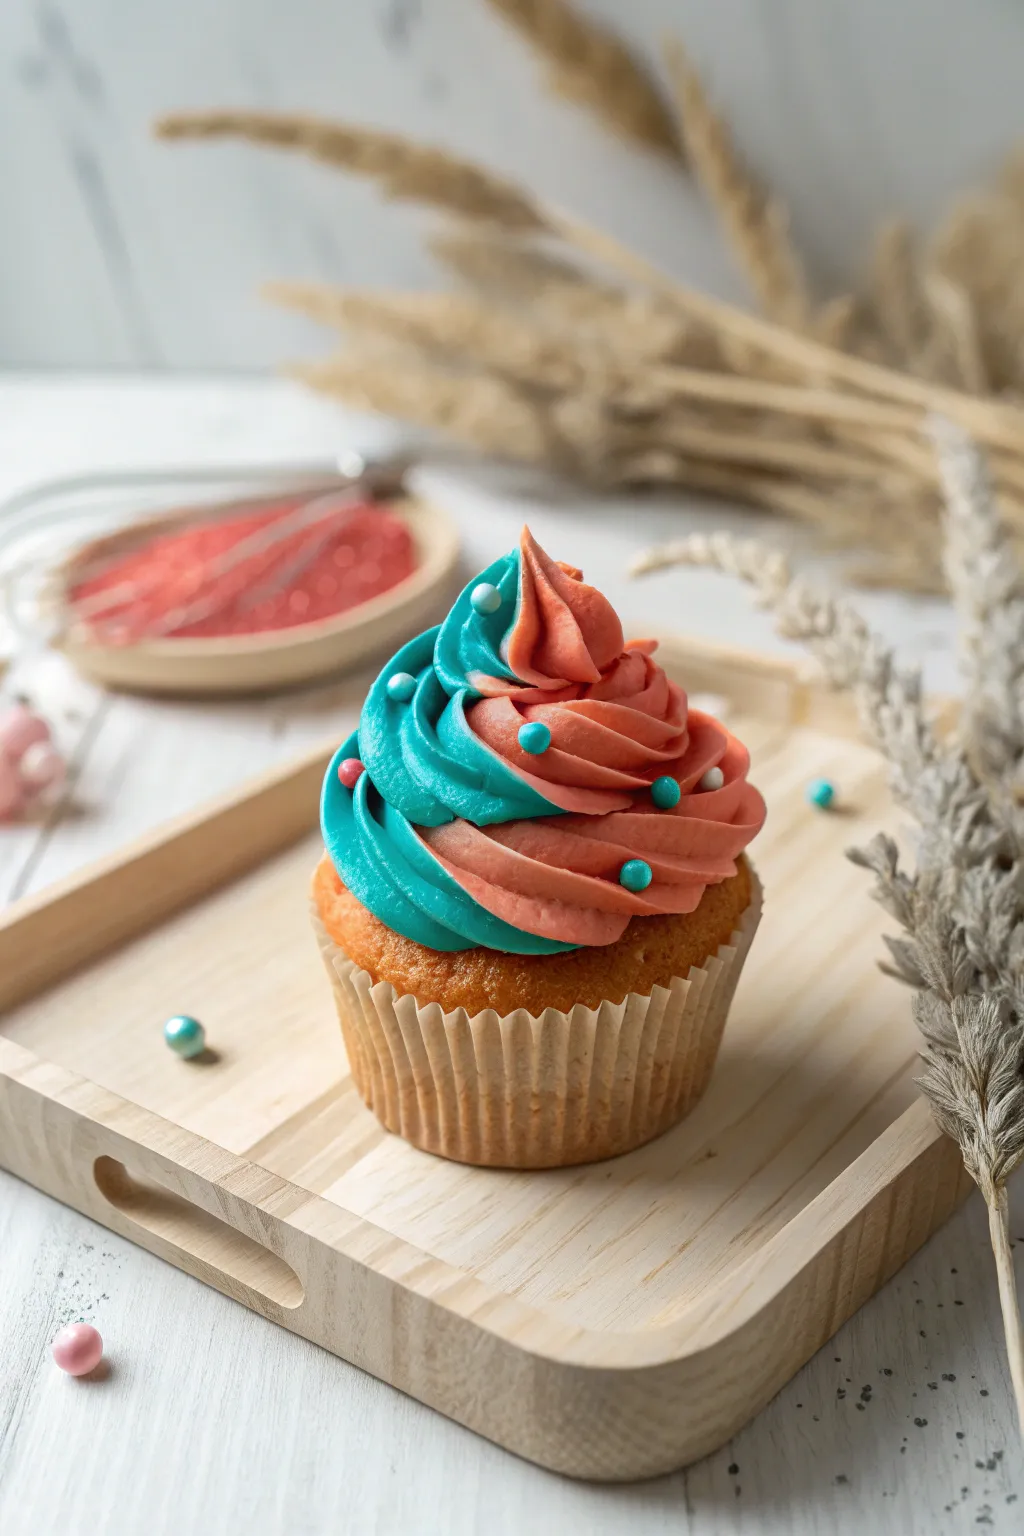
Create a convincing, everlasting treat with this two-tone swirled foam clay cupcake. The soft, airy texture of foam clay mimics buttercream perfectly, while the vibrant teal and coral colors create a playful, modern aesthetic that looks good enough to eat but is meant for display.
How-To Guide
Materials
- Light brown or tan foam clay (for the cake base)
- Teal foam clay
- Coral or salmon pink foam clay
- Paper cupcake liner (standard size)
- Styrofoam ball (slightly smaller than the liner diameter)
- Craft knife
- Small pearl beads (teal, pink, and white)
- Piping bag with a large star tip (metal or plastic)
- Texture tool or clean toothbrush
- Tacky glue or craft glue
Step 1: Forming the Cake Base
-
Prepare the core:
Cut your styrofoam ball in half using a craft knife. You only need one hemisphere for the base structure, which saves on clay and keeps the shape uniform. -
Cover with clay:
Take a generous amount of light brown foam clay and flatten it into a thick pancake. Drape this over the rounded side of your styrofoam hemisphere, smoothing it down the sides until fully covered. -
Texture the sponge:
To make the “cake” look baked and porous, gently tap the surface of the brown clay with a clean toothbrush or a stiff texture tool. Focus on the visible rim that will peek out above the liner. -
Secure the liner:
Place your clay-covered dome into the paper cupcake liner. Press down firmly so the clay spreads slightly to fill the ridges of the paper, securing it in place.
Step 2: Creating the Two-Tone Swirl
-
Condition the colored clay:
Knead the teal and coral foam clay separately until they are very soft and pliable. If the clay feels too stiff, add a tiny drop of water to improve elasticity. -
Prepare the ropes:
Roll both the teal and coral clay into long, thick snake shapes. They should be roughly the same length and thickness. -
Load the piping bag:
Carefully place the two clay ropes side-by-side and slide them together into a piping bag fitted with a large open star tip. Push them down until they reach the nozzle. -
Test the flow:
Squeeze a small amount of clay out onto a scrap surface to ensure both colors are emerging simultaneously and the star definition is sharp. -
Pipe the base layer:
Starting at the outer edge of your brown cake base, squeeze the piping bag firmly while rotating the cupcake. Create a wide circle of frosting. -
Build the height:
Continue piping in a spiral motion, moving inward and upward. Let the clay overlap the previous layer slightly to build a classic soft-serve peak. -
Finish the peak:
As you reach the top center, release pressure on the bag and pull up quickly to create a neat, pointed tip.
Clay hydration trick
Add water to your clay before piping to make it softer—like real frosting consistency. This reduces strain on your hands and prevents the clay form cracking as it exits the piping tip.
Step 3: Adding the Final Touches
-
Inspect the swirl:
Look closely at your piped design. If any ridges look jagged or torn, you can gently smooth them with a dab of water on your finger, though leaving the sharp piped lines usually looks best. -
Apply adhesive:
Using a toothpick or fine-tip applicator, dab tiny dots of tacky glue randomly onto the ridges of the frosting swirl where you want your sprinkles to sit. -
Place the pearls:
I find it easiest to use tweezers to place the teal, pink, and white pearl beads onto the glue dots. Press them gently into the foam clay so they embed slightly. -
Final cure:
Set the cupcake in a safe, dry place. Because the frosting layer is thick, allow at least 24-48 hours for the foam clay to fully cure and harden all the way through.
Make it a keepsake
Embed a looped wire or a memo clip into the center of the swirl while the clay is still wet to turn this cute dessert into a functional photo holder or a place card stand.
Enjoy displaying your sweet creation on a tier tray or shelf for a touch of permanent whimsy

The Complete Guide to Pottery Troubleshooting
Uncover the most common ceramic mistakes—from cracking clay to failed glazes—and learn how to fix them fast.
Foam Clay Donuts With Faux Sprinkles
These delightfully realistic donuts look good enough to eat but are surprisingly lightweight and permanent. Using foam clay allows for a smooth, matte texture that perfectly mimics baked dough, while a glossy faux glaze brings them to life.
Step-by-Step Tutorial
Materials
- Beige or tan foam clay
- Pink foam clay (or white mixed with a tiny drop of pink acrylic)
- Small styrofoam wreath form or aluminum foil
- Rolling pin or smooth jar
- Circle cutter (or a small bottle cap for the hole)
- Mod Podge or gloss varnish
- Polymer clay (various colors for sprinkles)
- Sculpting tools or a toothpick
- Soft paintbrush
- Pastel chalks (browns, ochres)
Step 1: Creating the Sprinkle Mix
-
Roll thin snakes:
Before starting the donut, prepare your faux sprinkles. Take tiny amounts of colored polymer clay (pink, green, white, yellow) and roll them into extremely thin snake-like strands. -
Bake the clay:
Bake these thin strands according to the package directions (usually a short time since they are so thin) and let them cool completely. -
Chop into sprinkles:
Using a craft knife or sharp blade, chop the hardened clay strands into tiny, uneven bits to mimic real sprinkles. Set these aside in a small bowl.
Step 2: Forming the Donut Base
-
Prepare the core:
Create a core structure to save on clay and keep the shape consistent. You can use a small styrofoam wreath ring, or simply crumple aluminum foil into a ring shape, compressing it tightly. -
Roll out base clay:
Take a generous amount of beige/tan foam clay. Knead it until soft, then roll it into a thick log or flatten it slightly with a rolling pin. -
Cover the core:
Wrap the beige foam clay around your foil or foam core. Smoosh the seams together and use a bit of water on your finger to blend them until they are invisible. -
Smooth the shape:
Gently roll the donut between your palms to smooth out any bumps. The texture should look soft and bread-like. -
Add baked texture:
To make it look truly baked, use a clean toothbrush or a ball of aluminum foil to gently tap texture onto the surface of the ‘dough’. -
Shade with pastels:
Shave a little bit of golden brown and ochre pastel chalk into dust. With a dry, soft brush, gently dust the outer edges of the donut to simulate a golden-brown oven bake. I like to focus on the ‘equator’ line where a real donut would fry.
Bakery Secret
For a ‘creamy’ glaze look instead of sheer icing, mix white acrylic paint into your frosting slime mixture. It makes the pink opaque and rich.
Step 3: Glazing and Decorating
-
Create the frosting:
Mix a small amount of pink foam clay with a generous amount of water or liquid glue (like PVA or clear slime glue) in a small cup. You want a consistency that is thick but pourable, like heavy cream. -
Apply the frosting:
Drizzle this mixture over the top of your donut base. Use a toothpick or tool to guide the drips down the sides naturally, ensuring it doesn’t look too perfect. -
Refine the drip edges:
If the frosting looks too jagged, smooth the edges with a wet finger to give it that melted, poured look. -
Add the sprinkles:
While the frosting layer is still wet and sticky, sprinkle your pre-made polymer clay bits over the top. Press them in very gently so they adhere well. -
Let it cure:
Allow the donut to sit undisturbed for at least 24 hours. Foam clay needs ample time to dry fully, especially the wetter frosting layer. -
Apply gloss:
Once fully dry, brush a coat of high-gloss varnish or Mod Podge strictly over the pink frosting area. This mimics the shine of sugar glaze. -
Final drying:
Let the gloss coat dry completely before handling your finished faux treat.
Sticky Situation?
If the foam clay is sticking to your hands too much, let it sit out for 5 minutes to air dry slightly, or rub a tiny drop of lotion on your palms.
Enjoy displaying these sweet treats on a tiered tray or turning them into adorable photo props
Foam Clay Keychains With Cute Faces
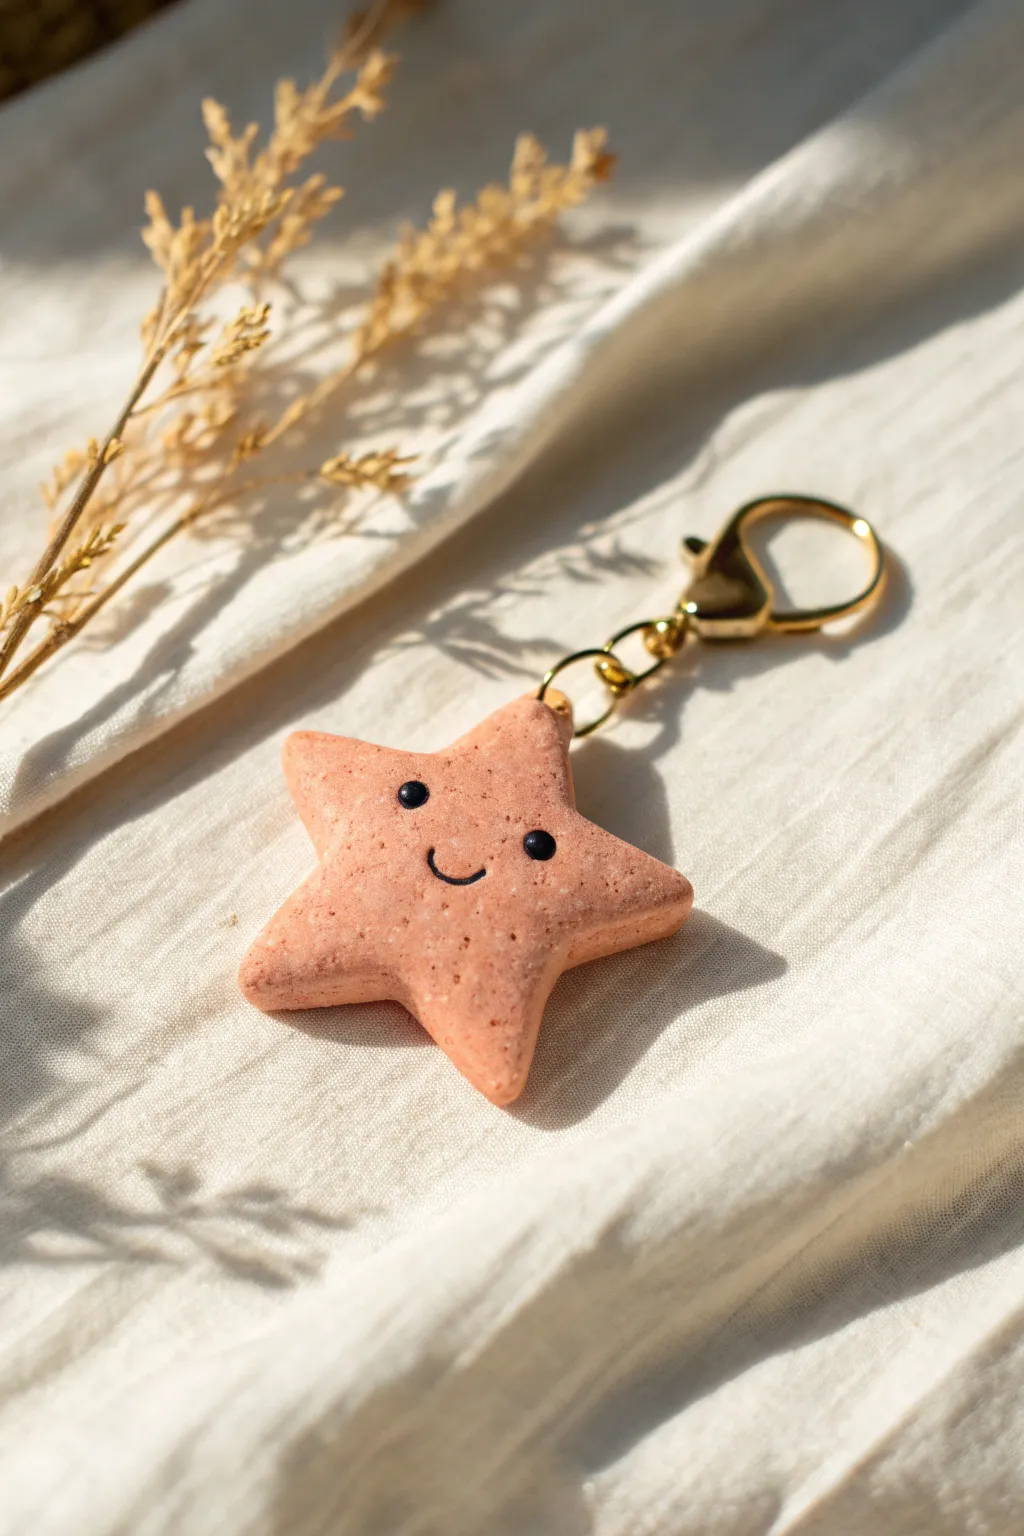
This adorable keychain project features a chunky, five-pointed star with a sweet, minimalist face. The speckled peach-pink finish gives it a charming, cookie-like texture that pairs perfectly with warm gold hardware.
How-To Guide
Materials
- Peach or light pink foam clay
- Brown or beige foam clay (for speckles)
- Black foam clay (tiny amount)
- Gold keychain clasp with jump rings
- Eye screw pin (gold)
- Modeling tool or toothpick
- Rolling pin (optional)
- Star cookie cutter (optional)
- Clear sealant or varnish (optional)
Step 1: Preparing the Base
-
Mix the color:
Start by taking a golf-ball-sized amount of peach foam clay. If you don’t have peach, mix white with a tiny dot of orange and pink until you reach a warm, fleshy tone. -
Add texture:
To achieve that ‘cookie-dough’ speckled look, take a tiny pinch of brown or beige clay. Crumble it into mostly microscopic bits and mix it into your peach ball. Knead until the speckles are evenly distributed throughout but still visible. -
Shape the star:
Roll the clay into a smooth ball first to remove cracks. Gently flatten it with your palm or a rolling pin until it is about 1/2 inch thick. -
Refine the points:
You can use a star-shaped cookie cutter for precision, or hand-shape it. I prefer to pinch out five points gently from the circle, smoothing the valleys between them with a modeling tool to keep them rounded and soft. -
Smooth the edges:
Tap the edges of your star gently against your work surface to blunt them slightly. This gives the finished piece a chubby, friendly appearance rather than sharp, geometric points.
Hardware Loose?
If the eye screw feels loose after drying, pull it out, add a dab of superglue to the threads, and screw it back into the same hole for a permanent hold.
Step 2: Adding the Face
-
Mark the eye placement:
Before adding clay, use a toothpick or dotting tool to gently press two small indentations where you want the eyes to sit. This ensures they stay flush with the face. -
Create the eyes:
Take the tiniest amount of black foam clay—truly, think breadcrumb size—and roll two identical spheres. -
Attach the eyes:
Place the black spheres into your prepared indentations. Press them down gently so they look embedded rather than just stuck on top. -
Roll the smile:
Roll a microscopically thin ‘snake’ of black clay. It needs to be hair-thin for a delicate smile. -
Shape the smile:
Cut a tiny segment of your black thread. Using a needle tool or toothpick, gently curve it into a ‘U’ shape on your work surface first. -
Apply the smile:
carefully transfer the smile to the star’s face, positioning it centered between the eyes. Tap it down lightly with your tool to bond the clays together.
Step 3: Assembly & Finishing
-
Insert hardware:
While the clay is still semi-wet, take your gold eye screw pin. Insert it carefully into the top point of the star, screwing it in gently to grip the foam. -
Secure the pin:
Smooth the clay around the base of the screw pin slightly to ensure a tight seal as it dries. -
Main drying time:
Allow the star to dry completely. Foam clay can take 24-48 hours to fully cure depending on thickness. Flip it over halfway through to help the back dry evenly. -
Check hardness:
Squeeze the star gently; if it still feels squishy in the center, give it another day. -
Attach the clasp:
Once fully cured, use pliers to open the jump ring on your gold keychain clasp. Thread it through the eye screw on the star. -
Seal (optional):
For extra durability, you can brush on a thin layer of matte varnish, which will also protect the face details from rubbing off.
Galaxy Glitter
Mix fine iridescent glitter into the clay before shaping, or brush gold mica powder on the edges for a magical, stardust effect.
Clip your smiling star onto a bag or keys and clear skies are sure to follow


What Really Happens Inside the Kiln
Learn how time and temperature work together inside the kiln to transform clay into durable ceramic.
Foam Clay Bag Charms With Layered Colors
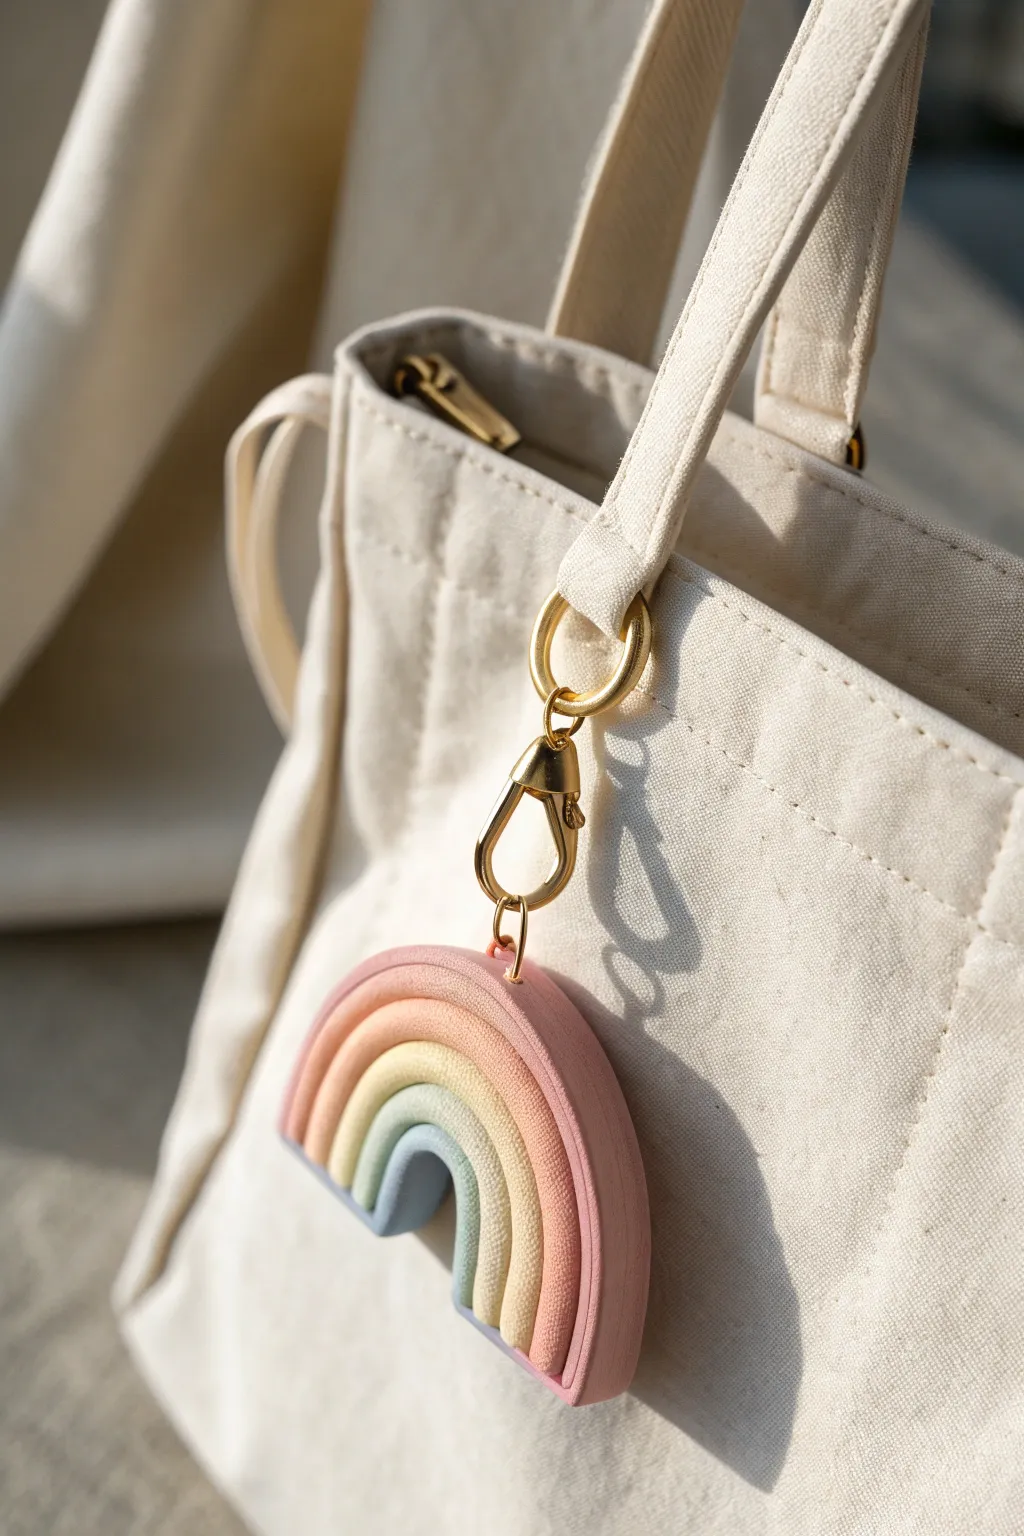
Add a touch of whimsical charm to your tote with this soft, matte-finish rainbow accessory. Crafted from lightweight foam clay in soothing pastel layers, this project creates a durable yet adorable keychain that looks professionally made.
Step-by-Step
Materials
- Foam clay (pink, peach/orange, yellow, pale green, light blue)
- Small rolling pin or smooth cylinder
- Gold lobster clasp keychain with jump rings
- Small eye screw pin (gold)
- Craft knife or clay cutter
- Smooth work surface (silicone mat recommended)
- Super glue or heavy-duty craft glue
- Clear matte sealant spray (optional)
Step 1: Planning and Mixing
-
Prepare your palette:
Begin by selecting your foam clay colors. If you don’t have pre-mixed pastels, mix a small amount of your primary colors with a large amount of white foam clay. You want a gradient of 5 colors: dusky pink, soft peach, buttercream yellow, sage green, and airy blue. -
Condition the clay:
Take your first color (the blue inner arch) and knead it thoroughly in your hands. Foam clay needs warmth and motion to become pliable and smooth out any initial wrinkles.
Smooth Seams
If your clay coils aren’t sticking together, lightly dampen your finger with water and run it along the seams to merge the foam.
Step 2: Forming the Arches
-
Roll the first coil:
Roll the blue clay into a smooth, even snake about 3 inches long and roughly 1/4 inch thick. Try to keep the pressure consistent so the thickness doesn’t vary. -
Form the base arch:
Bend the blue coil into a tight U-shape to form the smallest, innermost arch of the rainbow. Place this on your work surface. -
Create the green layer:
Repeat the conditioning and rolling process with the pale green clay. Make this coil slightly longer than the blue one. -
Stack the layers:
Gently gently press the green coil over the blue arch. I like to apply just a tiny bit of water to the connecting seam to help the foam clay adhere better. -
Continue the gradient:
Move on to the yellow clay. Roll it out, ensuring it’s the same thickness as the previous strands, and mold it over the green arch. -
Add the peach layer:
Roll and attach the peach/orange coil next. As the rainbow gets wider, handle the shape carefully so you don’t squash the inner layers. -
Finish with pink:
Create the final, largest arch using the dusky pink clay. Press it firmly but gently onto the peach layer to ensure the whole stack is unstable.
Cloud Base
Instead of a straight cut, mold two small white balls of foam clay and attach them to the bottom of the legs for fluffy clouds.
Step 3: Refining and Assembly
-
Compress the shape:
Once all layers are stacked, gently press the flat sides of the rainbow (front and back) with a flat tool or book to ensure the surface is uniform and the coils are flush with each other. -
Trim the bottom:
Using a sharp craft knife or clay cutter, make a clean, straight cut across the bottom of the rainbow legs. This gives that polished, professional look seen in the photo. -
Insert hardware:
While the clay is still wet, screw the small gold eye pin into the top center of the pink arch. Remove it, add a dab of super glue to the threads, and screw it back in for a permanent hold. -
Allow to dry:
Let the rainbow sit undisturbed for at least 24-48 hours. Foam clay needs significant time to cure fully to the center; flip it over halfway through. -
Attach the clasp:
Once fully hardened, use pliers to open the jump ring on your gold lobster clasp. Loop it through the eye pin on the rainbow and close the jump ring securely.
Now clip your new pastel creation onto your favorite bag and enjoy the pop of color
Foam Clay Fridge Magnets In Sweet Shapes
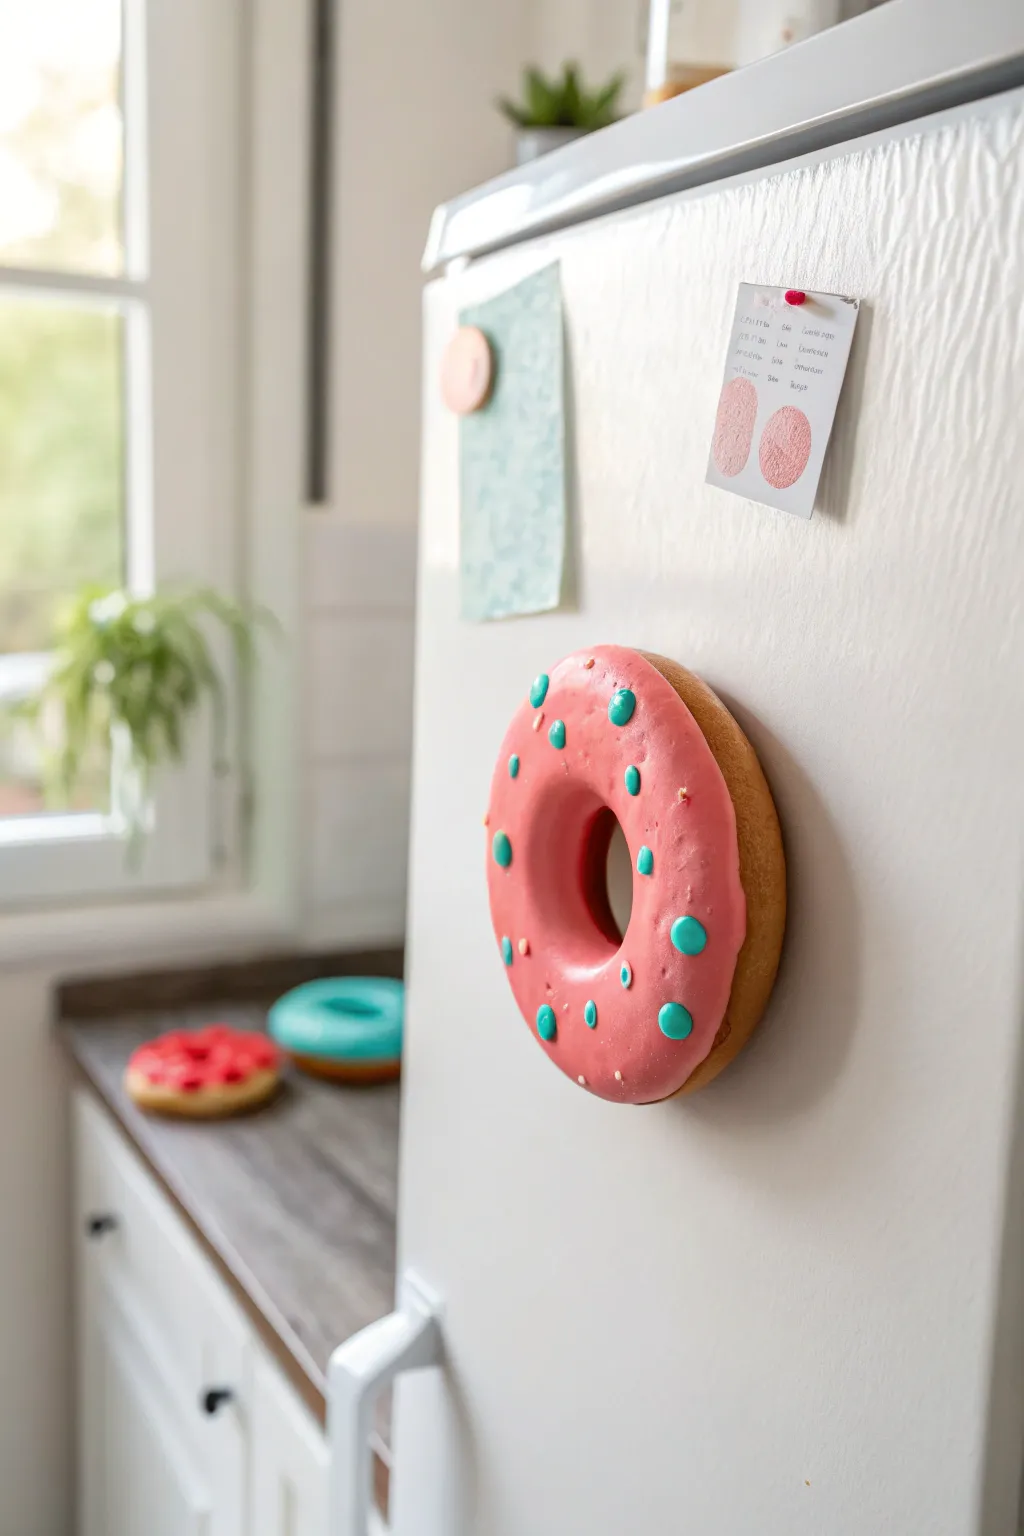
Transform your refrigerator door into a bakery display with these delightful foam clay magnets. Modeled to look like a freshly glazed donut, this project features a realistic golden-brown dough base topped with vibrant pink frosting and teal sprinkles.
How-To Guide
Materials
- Light brown or tan foam clay
- Pink foam clay
- Teal or turquoise foam clay
- Strong round magnet (ceramic or neodymium)
- Clay sculpting tools (or a toothpick)
- Clean, flat work surface
- Craft glue (optional, for extra magnet strength)
Step 1: Shaping the Dough Base
-
Portion the clay:
Start by taking a medium-sized ball of tan or light brown foam clay. The amount you use will determine the final size of your donut. -
Embed the magnet:
Press your round magnet firmly into the back of the clay ball until it is flush with the surface. Smooth the clay around the edges of the magnet to secure it in place. -
Flatten the shape:
Flip the ball over onto your flat workspace so the magnet side is down. Gently press the ball into a thick, flattened disc shape, smoothing the rounded edges with your finger. -
Create the center hole:
Using a blunt sculpting tool or the back of a thick marker, press directly into the center of the disc to create a hole. Widen the hole by gently pushing the clay outward from the center. -
Refine the form:
Smooth out the inner ring of the hole and the outer edges of the donut to ensure it looks plump and baked, removing any fingerprints.
Step 2: Adding the Glaze
-
Roll the frosting:
Take a slightly smaller amount of pink foam clay and roll it into a ball, then flatten it into a thin, uneven circle. -
Create the drip effect:
Gently stretch the edges of the pink circle in random spots to create wavy, organic shapes that mimic dripping glaze. -
Apply to the donut:
Lay the pink clay over the top of your tan donut base. I like to gently press the wavy edges down the sides so it looks like the icing is melting naturally. -
Clear the center:
Usually, the pink layer covers the holes, so use your tool to poke through the frosting layer in the center, pressing the pink clay down into the hole to line up with the tan dough.
Magnet Won’t Stick?
If the clay shrinks while drying and exposes the magnet too much, add a dab of super glue to the magnet back after the clay is fully hardened to secure it.
Step 3: Sprinkles and Finishing
-
Prepare the sprinkles:
Pinch off tiny, grain-sized bits of teal foam clay. Roll them into very small spheres between your fingertips. -
Attach the polka dots:
Press the tiny teal balls randomly onto the pink surface. Flatten them slightly as you press so they adhere well to the ‘frosting’. -
Add detail texture:
For extra realism, you can take a toothpick and add tiny indentation dots on the surface of the pink glaze in between your teal sprinkles. -
Final smooth:
Give the entire magnet a gentle once-over with your finger to ensure all parts are bonded without squishing the shape. -
Drying time:
Allow the magnet to air dry completely for at least 24-48 hours. Foam clay needs good airflow to harden properly. -
Glue reinforcement:
Once fully dry, if the magnet feels loose, you can pop it out and glue it back in with strong craft glue for permanent hold.
Make It Glossy
Once the foam clay is completely dry, brush a layer of clear gloss varnish or Mod Podge specifically over the pink “icing” area to make it look wet and sugary.
Now you have a sweet treat that holds your notes without adding any calories suitable for any kitchen decor

TRACK YOUR CERAMIC JOURNEY
Capture glaze tests, firing details, and creative progress—all in one simple printable. Make your projects easier to repeat and improve.
Foam Clay Bookmarks With Puffy Characters
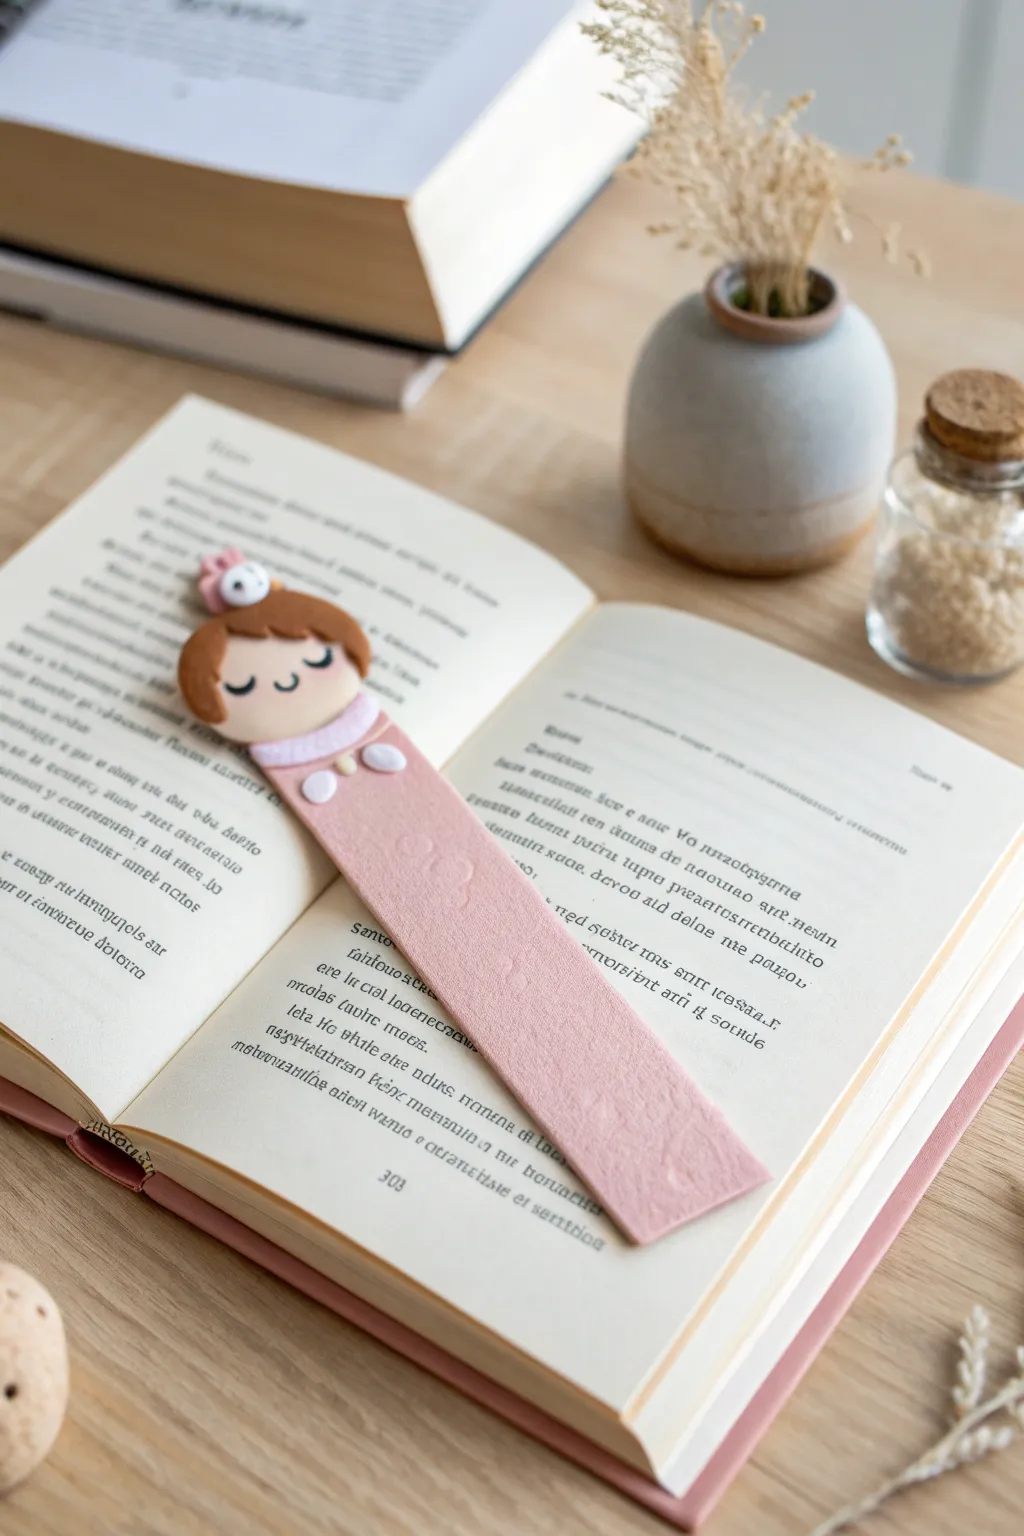
Reading becomes even sweeter with this adorable, handmade bookmark featuring a sleeping character head and a long, textured foam strip. The soft, puffy texture of foam clay makes this project tactile and lightweight, perfect for slipping between the pages of your favorite novel.
Step-by-Step
Materials
- Foam clay in: peach/skin tone, brown, light pink, white, soft grey
- Rolling pin or smooth round marker
- Plastic clay sculpting tools or a toothpick
- Textured mat or lace (optional, for the body pattern)
- Non-stick work surface (silicone mat or parchment paper)
- Clear PVA glue (optional, foam clay often self-adheres)
- Black fine-liner or clay paint for details
Step 1: Creating the Base Strip
-
Prepare the pink clay:
Start by conditioning a large ball of light pink foam clay. Knead it in your hands until it is warm, pliable, and free of cracks. -
Roll out the strip:
On your non-stick surface, roll the pink clay out into a long, flat rectangle. Aim for a thickness of about 2-3mm to ensure it’s sturdy but not too bulky for a book. -
Trim the edges:
Use a plastic knife or straight edge tool to cut the long sides straight. Trim the bottom into a straight line or a rounded end, depending on your preference. -
Add texture:
If you want the subtle embossed pattern shown in the photo, gently press a textured mat (or even a piece of lace) onto the bottom half of the strip while the clay is still wet. -
Shape the top:
Round the top edge of the strip slightly where the head will eventually sit. This creates a natural transition.
Keep It Flexible
Add a tiny drop of PVA glue into your foam clay mixture before sculpting the long strip. This helps the dried bookmark remain slightly flexible without cracking.
Step 2: Sculpting the Head
-
Form the face:
Take a walnut-sized amount of peach or skin-tone foam clay. Roll it into a smooth ball and then flatten it into a thick oval disc. -
Add the hair base:
Roll out a thin sheet of brown clay. Cut a circle slightly larger than the head and drape it over the back and top of the peach disc to create the main hair shape. -
Create the bangs:
Fashion a small, curved crescent of brown clay. Press this onto the forehead area, smoothing the edges into the back hair piece so it looks seamless. -
Make the bun accessory:
Roll a tiny ball of pink clay (match the bookmark body) and place it on top of the head. Add a minuscule white dot to the center of this pink bun for extra detail. -
Add facial features:
Using a very fine tool or a needle, gently indent two U-shapes for sleeping eyes and a tiny curve for the smile. Alternatively, you can paint these on with a fine liner after the clay dries.
Step 3: Assembly and Details
-
Construct the collar:
Roll a small sausage of light pink clay and flattening it slightly. Wrap this around the base of the head’s chin area to form a cozy collar or scarf. -
Add decorative buttons:
Roll two tiny balls of white clay and flatten them into discs. Press these onto the collar area just below the chin. -
Connect head to body:
Place the finished head assembly onto the top of your long pink strip. Foam clay usually sticks to itself when wet, but a dab of water or clear glue can help secure the bond. -
Smooth the connection:
Flip the bookmark over carefully. Use a sculpting tool to gently blend a bit of the clay from the back of the head onto the strip for structural integrity. -
Refine the shape:
Check the edges one last time. If handling the clay deformed the long strip, gently pat the sides back into a straight line. -
Final drying time:
Lay the bookmark completely flat on a piece of parchment paper. I recommend letting it cure for at least 24-48 hours to ensure it is fully hardened before use.
Scented Markers
Mix a Drop of essential oil or use scented markers to color white foam clay. Your bookmark will release a gentle, relaxing fragrance every time you open your book.
Once fully dry, your charming new reading companion is ready to mark your place for your next reading session
Foam Clay Pencil Toppers That Stay Lightweight
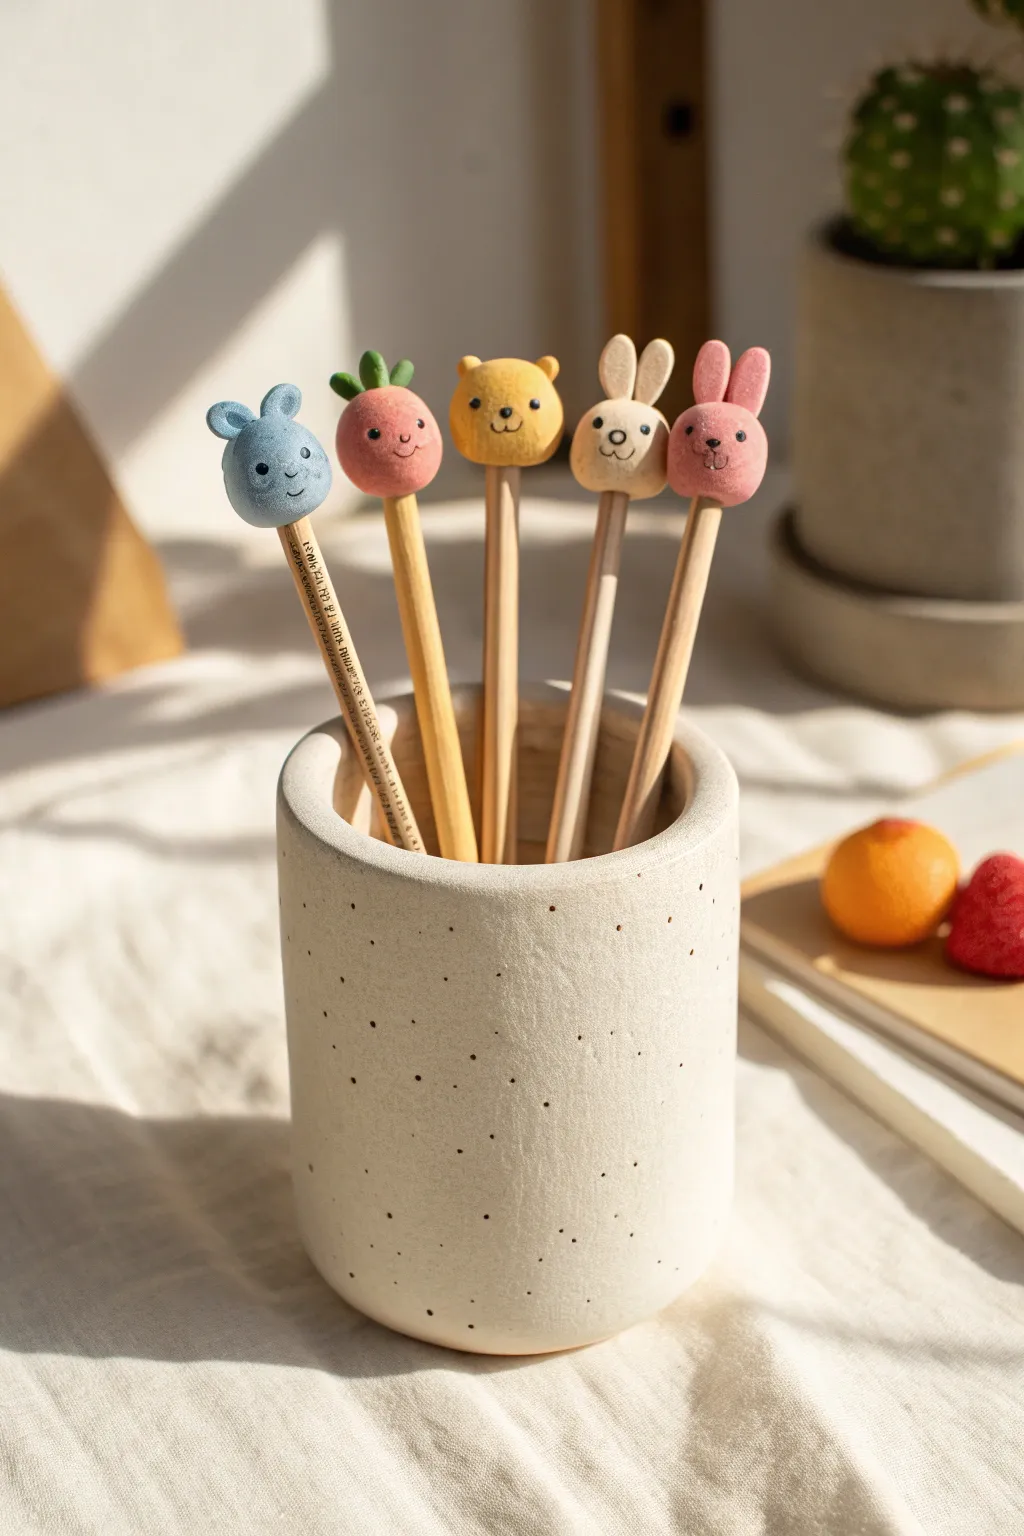
These adorable animal pencil toppers add a touch of charm to any stationery set without weighing down your writing hand. Using lightweight foam clay, you can sculpt smooth, matte-finish characters that grip perfectly onto standard pencils.
How-To Guide
Materials
- Foam clay in pastel colors (blue, pink, yellow, beige, earthy red)
- Standard wooden pencils
- Black fineliner pen or fine-tip permanent marker
- Ball stylus tool or rounded chopstick end
- Detail modeling tool or toothpick
- Small amount of water (for smoothing)
- PVA glue (optional, for extra hold)
Step 1: Base Shapes
-
Prepare the pencils:
If you want a permanent bond, dab a tiny dot of PVA glue on the top eraser or flat end of the pencil where the clay will sit. -
Roll the main spheres:
Take a walnut-sized amount of foam clay for each character. Roll it vigorously between your palms to remove air bubbles and cracks, forming a smooth, perfect sphere. -
Attach to pencil:
Gently push the bottom of the foam sphere onto the top of the pencil. Don’t push too far down; you just want it seated securely. Reshape slightly if the pressure flattened the ball. -
Smooth the join:
Use your finger or a modeling tool to verify the clay hugs the wood. If there’s a visible gap, gently smooth the clay downward slightly to create a seal.
Step 2: Sculpting Ears & Features
-
Create bear ears:
For the yellow bear, roll two tiny balls of yellow clay. Press them gently onto the top sides of the head using a small dot of water to help them adhere. -
Indent the bear ears:
Use the ball stylus tool to press a small indentation into the center of each ear for a cupped look. -
Form rabbit ears:
For the beige and pink rabbits, roll small tear-drop shapes. Flatten them slightly and attach them to the top of the head, standing upright. -
Shape the blue mouse ears:
Make rounded, slightly larger discs for the blue character’s ears and attach them closer to the sides of the head. -
Add the stem details:
For the coral-red fruit character, roll three tiny tear-drops of green clay. Attach them to the very top center to mimic a leafy stem. -
Refine the shapes:
Look at the toppers from all angles. Use your fingertips to gently smooth out any accidental fingerprints or bumps while the clay is still pliable.
Keep it smooth
If your foam clay starts drying or cracking while rolling, knead in a single drop of water to restore elasticity before shaping the sphere.
Step 3: Drying & Detailing
-
Initial drying:
Stand the pencils upright in a jar or floral foam block. Let the foam clay dry for at least 1-2 hours until the surface feels firm and leathery. -
Draw the eyes:
Using a fine-tip black marker, draw two small, wide-set dots for eyes on each character. Keep them roughly halfway down the face for a cute proportion. -
Add noses and mouths:
Draw tiny ‘Y’ shapes or small triangular noses with smiling lines underneath. For the rabbits, add a tiny vertical line connecting the nose to the mouth. -
Create cheek details:
For added cuteness, use a very light touch with a pink marker or even a bit of real blush powder on a Q-tip to dab cheeks onto the beige and yellow characters. -
Full cure:
Allow the toppers to dry completely for 24 hours. The foam clay will harden fully but remain lightweight and slightly squishy to the touch.
Marker bleeding?
If your ink bleeds into the clay, the foam isn’t fully dry yet. Wait another hour, or use acrylic paint and a toothpick instead of a pen.
Now you have a cheerful set of writing companions ready for your desk
Foam Clay Phone Stand Creatures

Create this charmingly minimalist foam clay phone stand that looks like a friendly little rock creature. With its speckled stone texture and sweet, tiny features, it brings a touch of whimsy and practical organization to your desk.
Detailed Instructions
Materials
- Pink or salmon-colored foam clay (air dry)
- Black foam clay (small amount)
- Black acrylic paint
- Old toothbrush or stiff bristle brush
- Modeling tools (ball tool)
- Rolling pin or smooth round jar
- Your phone (for sizing)
- Plastic wrap
- Matte finish sealant (optional)
Step 1: Shaping the Base Body
-
Prepare the clay:
Start by conditioning a large handful of pink foam clay. Knead it thoroughly until it is warm, pliable, and free of any cracks. -
Form the main shape:
Roll the clay into a large, smooth ball. Gently slightly flatten the bottom so it sits stable on your work surface without rolling away. -
Elongate slightly:
Use your palms to gently shape the ball into a tall, rounded gumdrop or egg shape. It needs to be tall enough to support the back of your phone. -
Create the slot:
Wrap the bottom half of your phone in plastic wrap to protect it. Press the phone firmly into the top-center of the shape at a slight backward angle to create a deep groove. -
Widen and smooth:
Remove the phone. The foam clay will bounce back slightly, so use your fingers to manually widen the slot a tiny bit to ensure the phone fits easily once the clay dries. -
Check stability:
Place the wrapped phone back in the slot. If the creature tips over, add more clay to the back base to act as a counterweight.
Step 2: Adding Features & Details
-
Shape the feet:
Roll two small balls of pink clay, about the size of large marbles. Slightly flatten them into ovals. -
Attach the feet:
Press these ovals onto the bottom front of the body. Blend the seams at the back of the feet into the main body so they look integrated, not just stuck on. -
Add tiny arms:
Roll two smaller sausage shapes for the arms. Attach them low on the sides of the body, pointing downwards, and blend the upper seams smooth. -
Create the eyes:
Take two minuscule pieces of black foam clay. Roll them into tiny spheres and press them into the face area, spacing them wide apart for a cute look. -
Make the mouth:
Use a small ball tool or the end of a paintbrush to press a small, circular indentation evenly between the eyes to form a surprised little mouth. -
Final smoothing:
Dip your finger in a tiny bit of water and rub it over the entire surface to smooth out any fingerprints or join lines.
Weighted Core
For extra stability with heavy phones, hide a smooth, clean stone or a ball of aluminum foil inside the center of your clay body while forming the base shape.
Step 3: The Terrazzo Effect
-
Prepare the speckle paint:
Dilute a small drop of black acrylic paint with water until it is quite thin and inky. -
Test the splatter:
Dip an old toothbrush into the paint and test flicking the bristles on a scrap piece of paper first to control the spray. -
Apply the speckles:
Gently flick the paint onto your clay creature. Aim for an uneven, random distribution to mimic natural stone or ceramic glaze. -
Dry completely:
Let the sculpture dry undisturbed for at least 24-48 hours. I find flipping it over halfway through helps the bottom dry evenly.
Slot Shrinkage
If the phone slot shrinks too much after drying, carefully use a folded piece of sandpaper to widen the groove until your device slides in comfortably.
Now you have a sturdy little friend ready to hold your phone while you work or watch videos
Foam Clay Tiny Succulent Pots
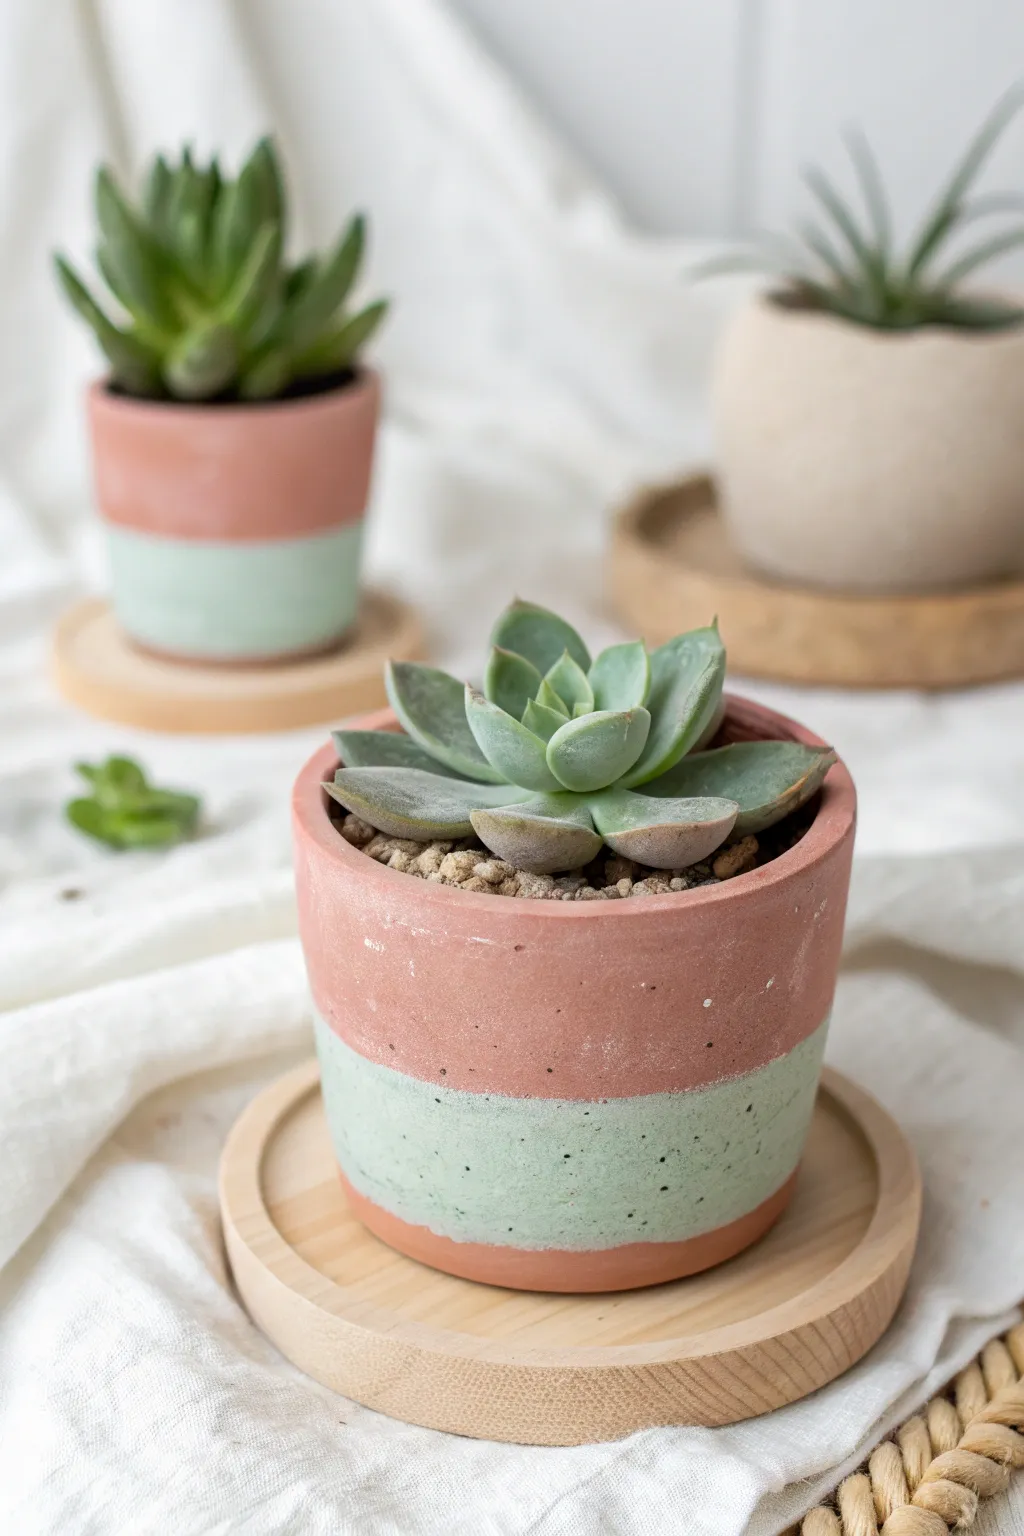
Transform basic foam clay into adorable, realistic-looking mini planters perfect for succulents. This project uses color-blocking and texture techniques to mimic the matte, earthy finish of terracotta and concrete.
Step-by-Step
Materials
- White foam clay
- Terra cotta acrylic paint (or burnt sienna + white)
- Mint green acrylic paint
- Small plastic cup or container (to use as a mold)
- Rolling pin
- Craft knife or clay tool
- Aluminum foil (for texturing)
- Sandpaper (optional)
- Matte finish sealant spray
Step 1: Color & Base Preparation
-
Prepare the workspace:
Lay down a non-stick craft mat or parchment paper to prevent your clay from sticking. Clean your plastic mold cup thoroughly. -
Mix the terra cotta shade:
Take a large chunk of white foam clay. Add a few drops of terra cotta acrylic paint directly into the clay. Knead thoroughly until the color is uniform. -
Mix the mint shade:
Repeat the process with a slightly smaller ball of clay and mint green paint. Aim for a soft pastel hue to contrast nicely with the earth tone. -
Create the base:
Roll a small ball of the terra cotta clay and flatten it into a disc slightly larger than the bottom of your plastic cup mold. -
Secure the base:
Place the plastic cup on top of your disc and press the edges up slightly to create a lip for the walls to attach to.
Sticky Situation?
If the clay sticks to your hands while mixing paint, let it sit for 5 minutes to air out, or add a dusting of cornstarch to reduce tackiness.
Step 2: Building the Walls
-
Roll out the strips:
Use your rolling pin to flatten both colored clays into long strips, roughly 1/4 inch thick. You want them fairly uniform. -
Cut the bands:
Using a craft ruler and knife, cut straight edges on your strips. You’ll need two terra cotta bands (for top and bottom) and one mint band (for the middle). -
Wrap the bottom layer:
Wrap a terra cotta strip around the bottom of the cup, blending it seamlessly into the base disc you made earlier. -
Add the middle layer:
Place the mint green strip directly above the bottom strip. Press the edges together gently so they bond without distorting the straight line too much. -
Add the top layer:
Finish with the final terra cotta strip at the top rim. If it extends past the plastic cup, fold it over slightly for a thick, finished rim. -
Smooth the seams:
Wet your finger slightly with water and gently rub the vertical seam where the ends of the strips meet to make it disappear.
Step 3: Texture & Finishing
-
Create the concrete texture:
Crumple a ball of aluminum foil. Gently roll and press this over the entire surface of the pot to create that porous, stone-like texture. -
Refine the shape:
If the rolling deformed your straight lines, gently nudge the clay back into position. I find using a flat ruler to push up against the color bands helps straighten them out. -
Add faux speckles:
Flick a tiny amount of diluted brown or black paint onto the wet clay using an old toothbrush for a speckled, gritty effect. -
Let it dry:
Allow the clay to dry completely for at least 24-48 hours. Foam clay shrinks slightly as it dries, which will help it pop off the plastic mold. -
Remove the mold:
Once fully hardened, carefully wiggle and slide the plastic cup out of the foam pot. -
Final touches:
If there are any sharp edges from the foil texturing, lightly sand them down. Seal with a matte spray to protect the paint and finish the concrete look.
Drainage Hole Hack
Before drying, use a straw to punch a hole in the bottom center. Foam clay is porous but water can still pool, so a hole keeps real plants happy.
Pop in your favorite succulent and enjoy your lightweight, modern planter
Foam Clay Coil Snakes And Wormy Desk Buddies
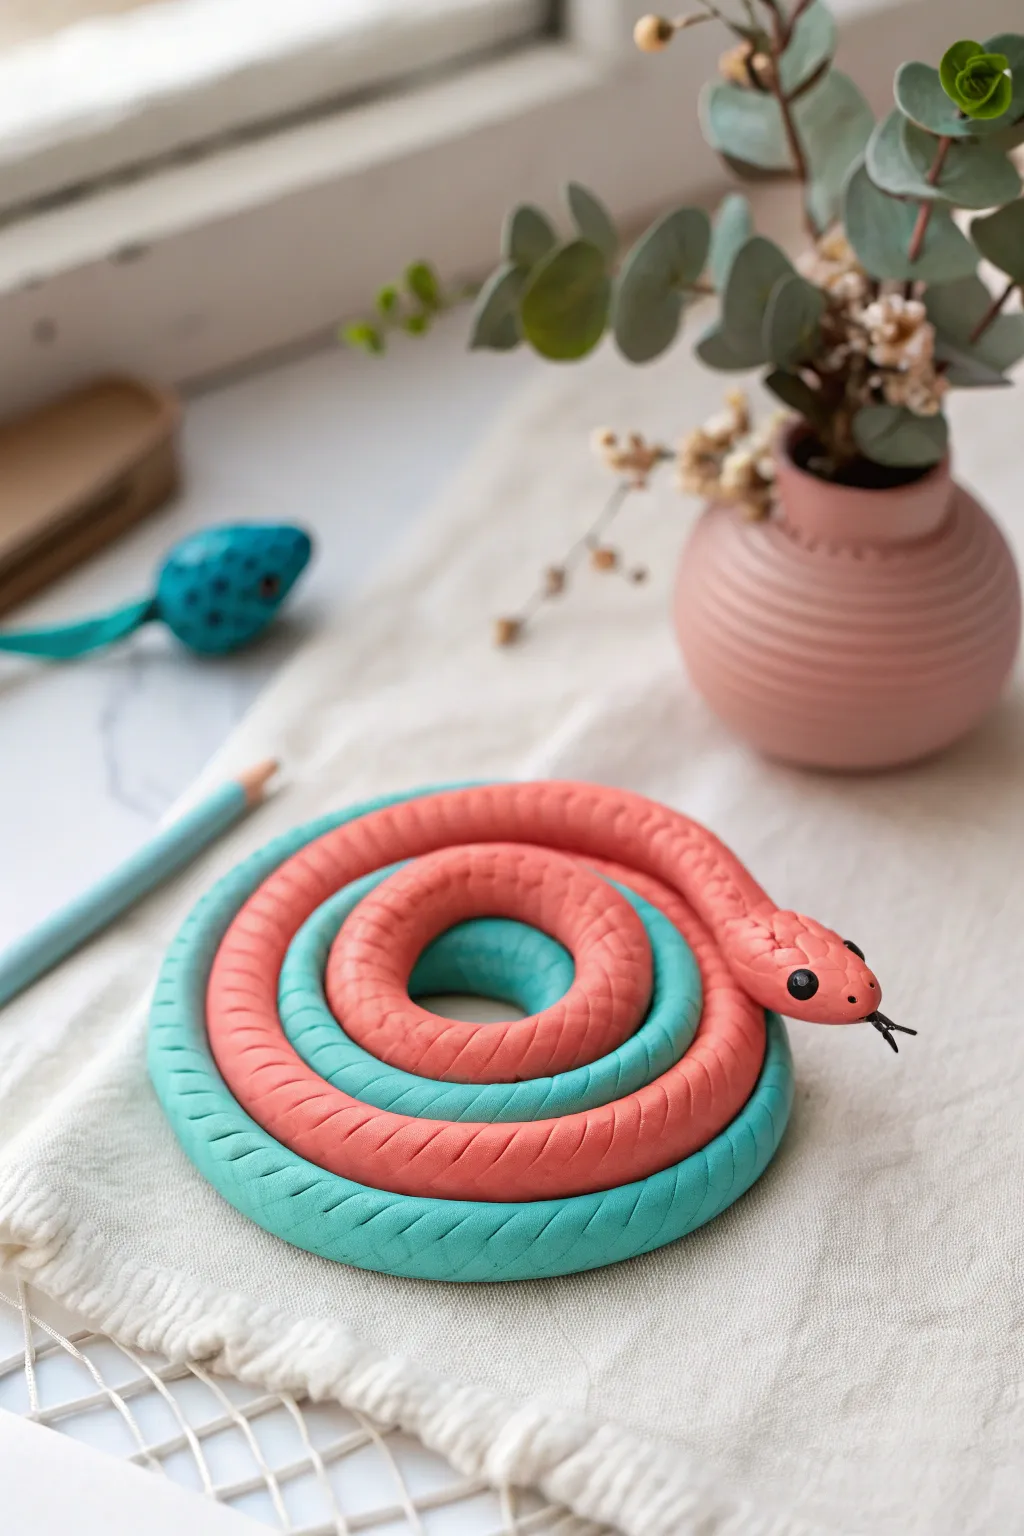
This charming, dormant reptile adds a pop of pastel color to any workspace without the scare factor. Using foam clay, you’ll create a lightweight, flexible two-tone snake coiled tightly into a satisfying spiral shape.
Step-by-Step Guide
Materials
- Foam clay in salmon pink
- Foam clay in teal or turquoise
- Black foam clay (small amount)
- Modeling tool with a flat or blade edge
- Two small black beads (for eyes)
- Clean rolling surface
- Dotting tool or toothpick
Step 1: Creating the Coils
-
Prepare the clay:
Start by kneading both the salmon pink and teal foam clay separately until they are soft, pliable, and free of cracks. -
Roll the first snake:
Take a large chunk of the teal clay and roll it out on your surface into a long, even rope, roughly the thickness of your finger. -
Roll the second snake:
Repeat the process with the salmon pink clay, aiming to make this rope slightly longer than the teal one since it will form the head later. -
Connect the strands:
Lay the two clay ropes side-by-side. Gently press them together along their entire length so they stick without losing their round shape. -
Twist tightly:
Carefully twist the joined ropes together to create a candy-cane spiral effect, ensuring the colors alternate evenly. -
Smooth the seam:
Once twisted, verify that the two colors are firmly bonded. If not, give the combined rope a very gentle roll on the table to seal them.
Step 2: Shaping and Texturing
-
Form the spiral:
Starting from the tail end (choose the messier end), begin coiling the twisted rope flat onto your work surface, tucking the end into the center. -
Build the body:
Continue winding the rope around the center coil, keeping the circles tight against each other. -
Arrange the head:
When you reach the end of the coil, lift the remaining pink section slightly so it rests on top of the outer ring, creating a raised head. -
Sculpt the head shape:
Smooth the end of the pink clay into a rounded, slightly tapered snake head shape, merging it seamlessly with the twisted body. -
Add texture:
Using a flat modeling tool or the back of a plastic knife, gently press diagonal indentations along the spine of the snake to mimic scales. -
Refine the pattern:
Continue these textural marks up onto the head, angling them slightly to follow the curve of the skull.
Cracking Clay?
If your foam clay starts drying or cracking while rolling, dip your fingers in a tiny bit of water and knead it back into the clay to restore elasticity.
Step 3: Adding the Details
-
Create eye sockets:
Use a dotting tool or the end of a paintbrush to make two small indentations on either side of the head for eyes. -
Insert the eyes:
Press a small black bead into each socket. You can add a tiny dab of glue if the clay feels too dry to hold them. -
Make the tongue:
Roll a tiny amount of black foam clay into a very thin thread and cut a ‘Y’ shape at one end to make a forked tongue. -
Attach the tongue:
Use a toothpick to poke a small hole at the very tip of the snout and insert the non-forked end of the black tongue. -
Final adjustments:
Look over your snake for any fingerprints or uneven spots and smooth them out gently with your finger before setting it aside. -
Drying time:
Let the sculpture sit undisturbed for at least 24 hours to cure completely. I prefer to leave it for 48 hours just to be safe.
Scale Upgrade
Instead of simple lines, try pressing the end of a small drinking straw or a piping tip into the clay to create raised, circular dragon-style scales.
Enjoy your new colorful desk companion as it brightens up your creative space
Floam-Style Foam Clay Monster Textures
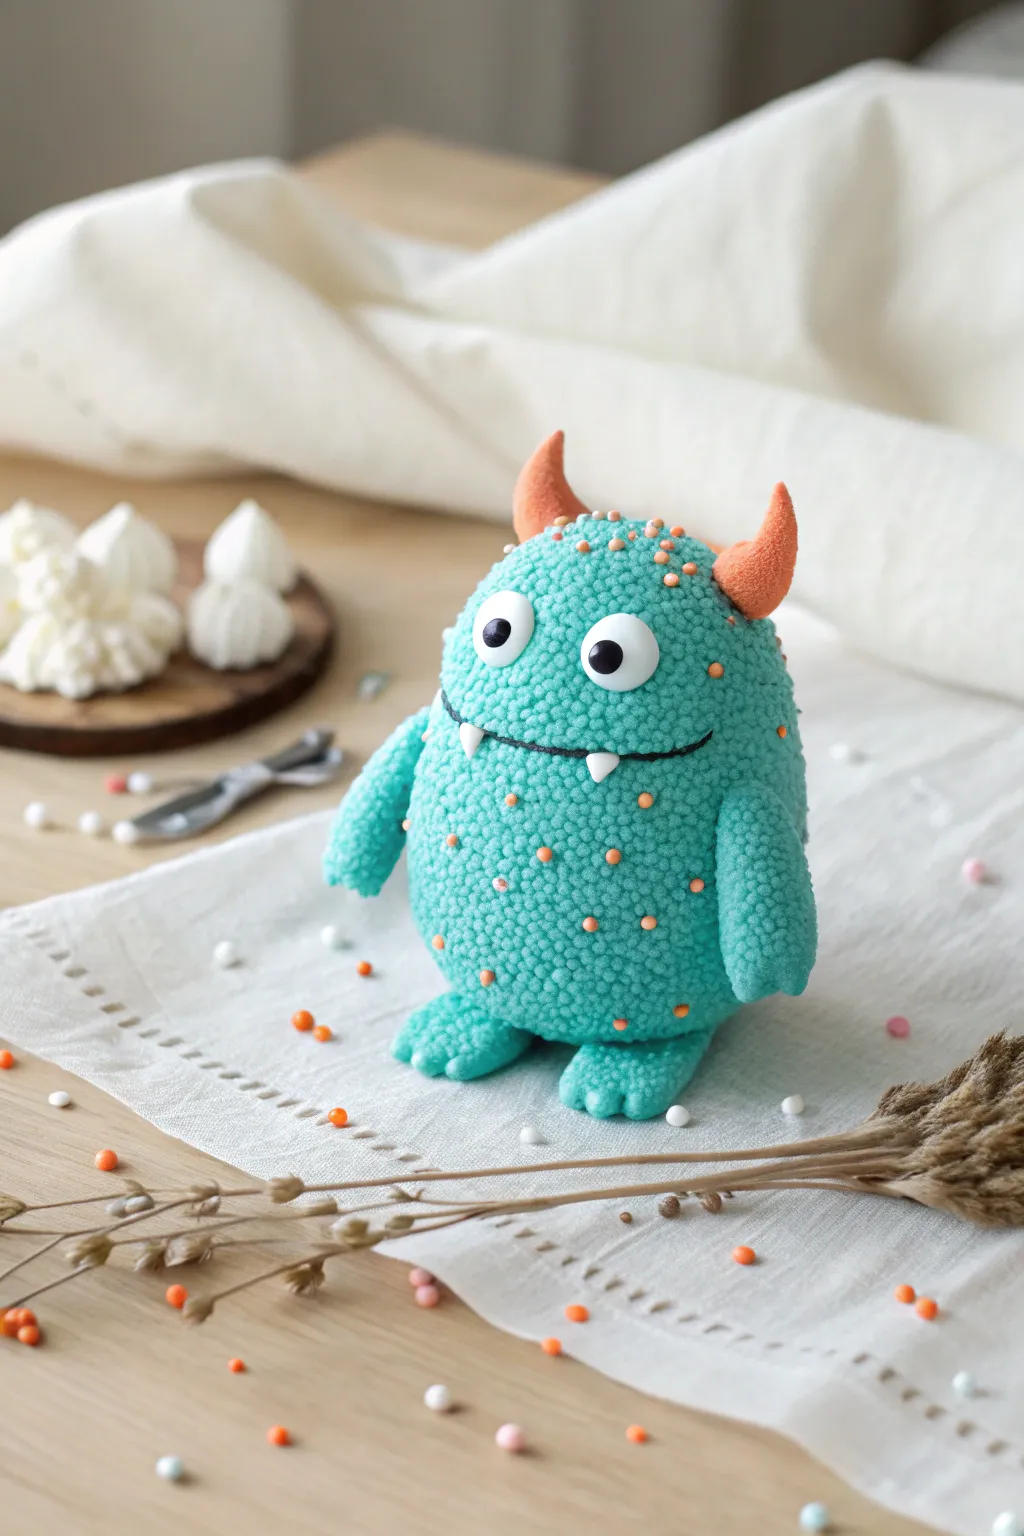
Embrace texture with this adorable teal monster, made using a unique floam-style foam clay technique. The finished creature has a delightful bumpy surface and charmingly simple features that make it perfect for beginners and advanced crafters alike.
Step-by-Step
Materials
- Teal ball clay or foam clay with micro-beads
- Orange smooth foam clay (for horns)
- White smooth foam clay
- Black smooth foam clay
- Small black wire or black clay (for the mouth)
- Small styrofoam egg or ball (as an armature)
- Clay modeling tools
- Toothpicks (optional, for support)
Step 1: Forming the Body
-
Prepare the Base:
Start with your styrofoam egg or ball armature. This helps save clay and keeps the figure lightweight. If you want a chubbier monster, press the styrofoam gently against a table to flatten the bottom so it stands upright. -
Cover with Texture:
Take your teal ball clay (or mix micro-beads into regular foam clay) and knead it until pliable. Flatten a large pancake of clay and drape it over the styrofoam base. -
Smooth the Seams:
Gently press and smooth the clay around the base until the styrofoam is completely hidden. Roll the entire shape gently between your palms to ensure the beaded texture is even. -
Sculpt the Arms:
Roll two sausage shapes from the same teal clay for the arms. They should be slightly thicker at the shoulder end and rounded at the hand end. -
Attach the Limbs:
Press the arms firmly onto the sides of the body. You can blend the clay slightly at the shoulder connection or leave it distinct. I like to angle them slightly forward for a cute pose. -
Create the Feet:
Form two small, flat oval shapes for feet using the teal clay. Use a modeling tool to press two small indentations into the front edge of each foot to suggest toes. -
Stand Him Up:
Attach the feet to the bottom front of the body, positioning them slightly outward for stability.
Keep it Clean
Work with the white clay parts only after washing your hands thoroughly. The pigment from the teal or orange clay can easily transfer and stain the pristine white eyes and teeth.
Step 2: Adding Features
-
Shape the Horns:
Using smooth orange foam clay, roll two small cones. Curve the tips slightly inward or backward for character. -
Mount the Horns:
Press the wide base of each horn onto the top of the monster’s head. If the clay is dry, a tiny dab of water or glue will help them stick. -
Sprinkle Details:
Take tiny pinches of the orange clay and roll them into microscopic balls. Press these randomly into the teal body to look like contrasting speckles or freckles. -
Make the Eyes:
Roll two balls of smooth white clay, making one slightly larger than the other for a goofy look. Flatten them into discs and press them onto the upper center of the face. -
Add Pupils:
Roll two tiny black clay balls and press them onto the white discs. Placement is key—putting them slightly cross-eyed or looking in different directions adds personality. -
Form the Mouth:
Roll a very thin snake of black clay (or use a piece of black creative wire). Curve it into a gentle smile and press it horizontally across the face, just below the eyes. -
Add Teeth:
Shape two tiny triangular cones from smooth white clay. Carefully attach them to the mouth line pointing downwards to serve as little fangs. -
Final Adjustments:
Look over your monster. If any beads have fallen loose or if the shape got squished, gently nudge it back into place before the clay sets completely.
Glow Up
Mix glow-in-the-dark powder into your white clay before shaping the eyes and teeth. Your monster will look cute by day and delightfully spooky when the lights go out.
Let your monster dry for at least 24 hours in a cool, dry place to ensure the beaded texture sets firmly without shrinking
Foam Clay Flowers With Bead-Texture Centers
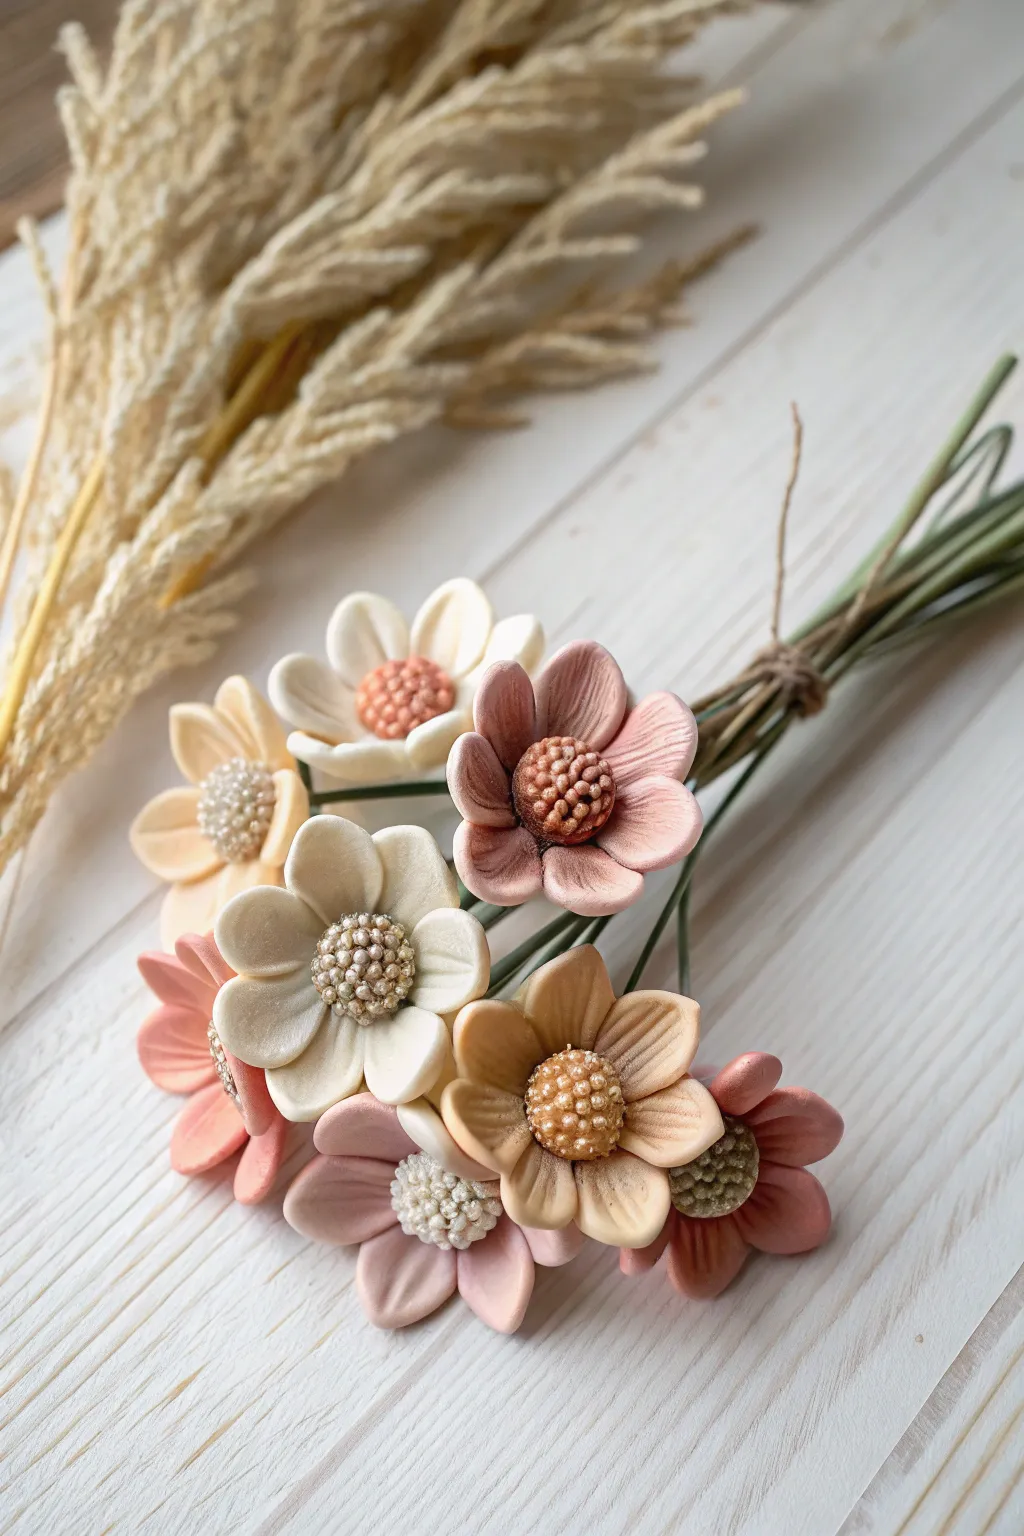
Create a delicate, everlasting bouquet using soft foam clay in gentle earth tones. These charming flowers feature distinctive textured centers that resemble tiny seed pods or beads, adding realistic detail to their stylized petals.
How-To Guide
Materials
- Foam clay (white, peach, dusty pink, mocha)
- Floral wire (18 or 20 gauge)
- Green floral tape
- Ball stylus tool
- Small scissors or detail knife
- Mod Podge or tacky glue
- Pastel chalks (optional for shading)
- Jute twine
Step 1: Preparing the Centers
-
Mix center colors:
Start by mixing small amounts of brown or mocha clay with a touch of yellow or orange to create a warm, seed-like color for the centers. You want a contrasting tone to your petals. -
Form the base:
Roll a small ball of clay, about the size of a pea, and flatten it slightly onto the end of a piece of floral wire. Ensure the wire penetrates about halfway into the ball. -
Create the texture:
To achieve the beaded look, you have two options. You can either roll dozens of microscopic balls of clay and press them onto the domed surface, or use a very fine-tipped tool to imprint a grid of dots. -
Apply the beads:
If adding clay beads, brush a tiny amount of glue onto the dome first. As you place each tiny sphere, press gently so they adhere without losing their round shape. I find working in concentric circles from the outside in yields the neatest result. -
Add detail:
For the outer ring of the center, consider using a different shade or slightly larger beads to frame the inner section, just like a real flower head.
Natural Shading
Before assembly, brush the petal centers with dry pastel chalk powder in a slightly darker shade. This adds instant depth and realism.
Step 2: Shaping the Petals
-
Color mixing:
Prepare your petal colors. Mix white clay with tiny amounts of pink, peach, or beige to get those soft, muted pastel tones shown in the image. -
Portioning:
Roll 5 to 7 small balls of clay for each flower. These should be slightly larger than the center dome you created earlier. -
Forming teardrops:
Roll each ball into a teardrop shape. Flatten them gently with your finger or a flat tool. -
Texturing petals:
Use a ball stylus tool to thin the edges of the petals. Drag the tool from the outer edge toward the tapered base to create a slight cup shape and central vein impression. -
Pinching tips:
For a more natural look, gently pinch the outer tip of some petals to give them a slight point, or leave them rounded for a different variety.
Sticky Situation?
If the clay gets too sticky or warm, let it sit for 5-10 minutes (leaching). It will become firmer and easier to detail without warping.
Step 3: Assembly & Finishing
-
Attach first layer:
Apply a dab of glue to the tapered end of a petal and press it against the underside of your prepared center. Repeat with two or three more petals, spacing them evenly. -
Second layer:
Attach the remaining petals in the gaps between the first layer’s petals. This overlapping creates fullness and depth. -
Secure the base:
Blend the clay from the bottom of the petals onto the wire stem slightly to ensure a strong bond as it dries. -
Wrap stems:
Once the flower heads are dry and stable, wrap the floral wire completely with green floral tape. Stretch the tape as you go to activate the adhesive. -
Create the bouquet:
Gather your finished stems, varying the heights slightly. Bind them together with rustic jute twine tied in a simple knot.
Place your everlasting bouquet in a small vase or lay it flat on a shelf for a lovely cottage-core accent
Foam Clay Mirror Frame With Puffy Border Shapes
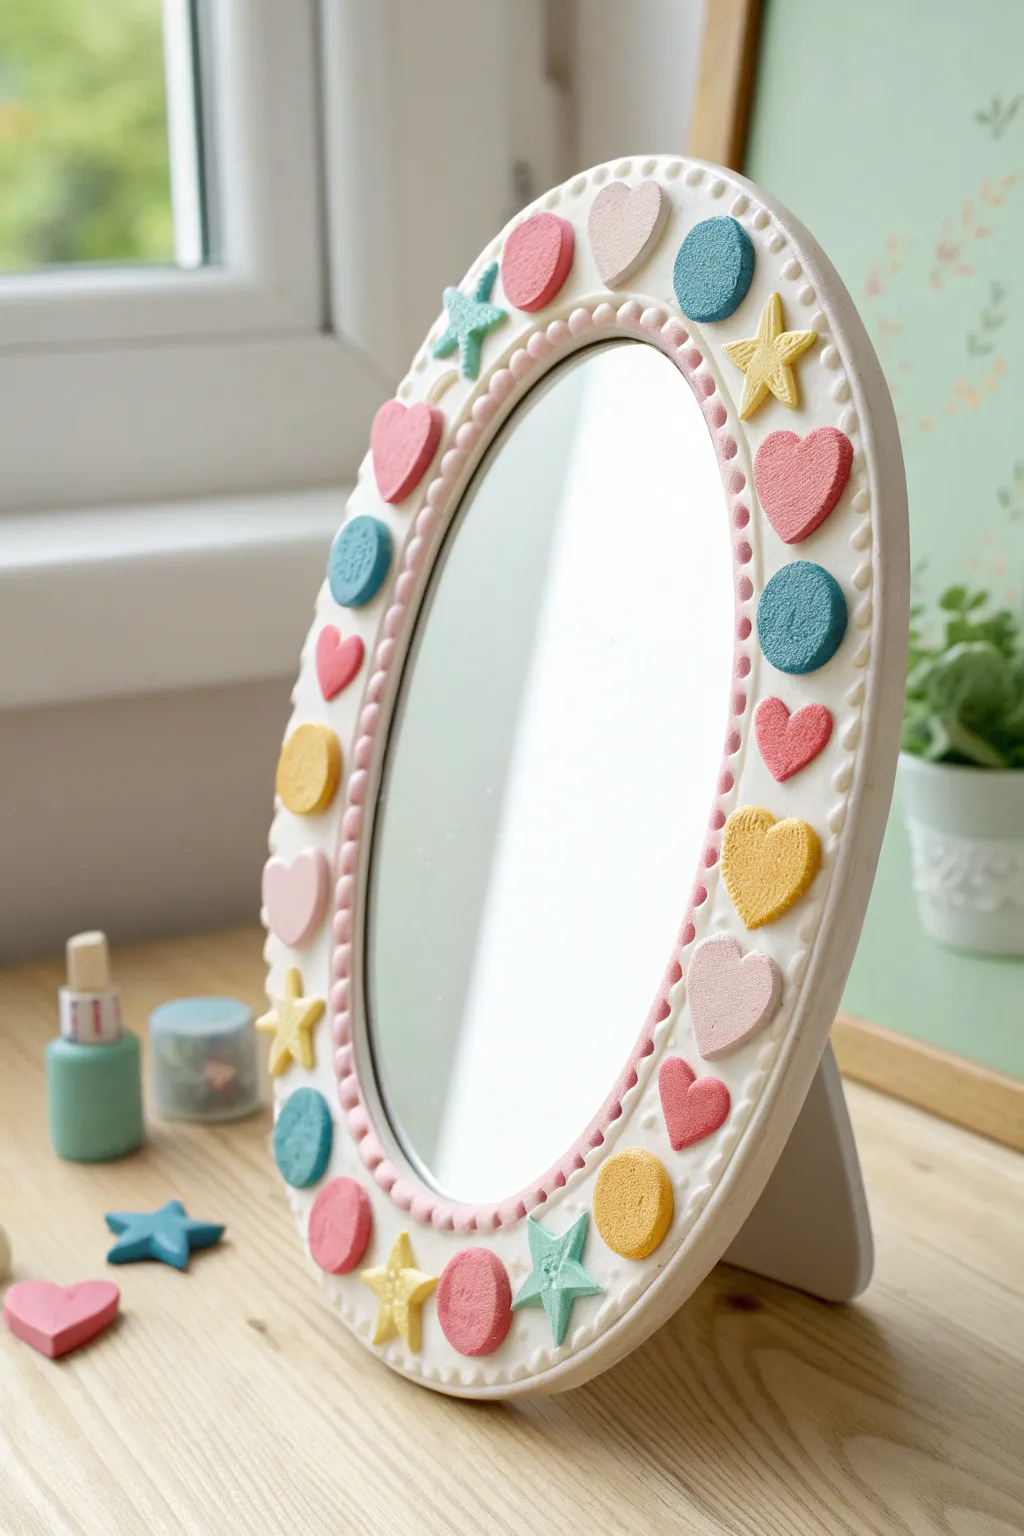
Transform a plain mirror into a whimsical décor piece using the soft, airy texture of foam clay. This project features delightful pastel shapes like hearts, stars, and circles arranged around an oval frame for a sweet, playful look.
Step-by-Step Guide
Materials
- Oval standing mirror (white frame)
- Foam clay in various pastel colors (pink, yellow, light blue, teal, coral)
- Small shape cutters (optional, but helpful for uniformity)
- Clay sculpting tools or a dull knife
- Rolling pin or smooth round object
- Parchment paper or non-stick craft mat
- Strong craft glue (if the clay isn’t self-adhesive)
Step 1: Preparation & Base Layer
-
Clean the surface:
Before starting, wipe down the plastic or wood frame of your mirror thoroughly to remove any dust or oils, ensuring the clay adheres perfectly. -
Mix your colors:
If you don’t have pre-mixed pastel foam clay, knead small amounts of white clay into your brighter colors to soften them into the gentle hues seen in the example.
Shrinky Shapes?
Foam clay shrinks slightly as it dries! Make your shapes about 10% larger than you want the final result to be so gaps don’t appear between elements.
Step 2: Creating the Inner Border
-
Roll tiny spheres:
Pinch off very small amounts of light pink foam clay and roll them into tiny, uniform balls between your fingertips. You will need quite a few to go around the mirror’s inner edge. -
Apply the first bead:
Press a small pink clay ball gently onto the inner rim of the frame, right where the glass meets the border. Flatten it slightly so it stays put. -
Complete the chain:
Continue placing the pink spheres side-by-side all the way around the inner oval. Keep them touching to create a seamless beaded look. -
Secure the border:
If your clay feels dry, dab a tiny dot of glue before placing each bead, although fresh foam clay usually sticks well on its own.
Step 3: Sculpting the Shapes
-
Shape the hearts:
Take small balls of pink and coral clay. Flatten them slightly, then pinch the bottom to form a point and indent the top center with a tool or fingernail to create the heart lobes. -
Form the circles:
Roll balls of blue and yellow clay, then squash them gently onto your non-stick mat to create flat, thick discs. Smooth the edges with your finger to remove any cracks. -
Create the stars:
Form a ball of yellow or teal clay and flatten it. Pinch out five points using your fingers while pressing down the center, refining the star shape with a modeling tool for sharpness. -
Check for consistency:
I prefer to lay out all my shapes on the parchment paper first to ensure they are roughly the same thickness and size before attaching them. -
Let them rest:
Allow the shapes to air dry for about 10-15 minutes. This makes them slightly firmer and easier to handle without deforming them during placement.
Add Sparkle
While the clay is still wet, gently press in tiny rhinestones or dust the shapes with iridescent glitter powder for a customized, magical effect.
Step 4: Assembly
-
Plan your pattern:
Arrange your shapes loosely around the mirror frame before gluing to find a pleasing color rhythm. Try alternating warm colors (pinks, yellows) with cool colors (blues). -
Attach the top motif:
Start at the very top center with a prominent shape like a heart or circle to anchor your design. -
Work symmetrically:
Place shapes down opposing sides simultaneously. For instance, if you place a star on the upper left, place one on the upper right to keep the visual weight balanced. -
Fill the gaps:
Continue filling in the frame, maintaining equal spacing between each decorative element. Adjust the spacing slightly if you crowd the bottom. -
Add glue if needed:
Press each shape firmly onto the frame. If the shapes have dried too much on the back, use a specific craft glue to ensure a lasting bond.
Step 5: Finishing Touches
-
Smooth the edges:
Inspect your attached shapes. If any look wonky or have fingerprints, gently smooth them with a slightly damp finger. -
Final drying time:
Let the mirror sit flat and undisturbed for at least 24 hours to allow the foam clay to cure completely and harden.
Now you have a delightfully textured mirror perfect for brightening up any vanity or shelf
Foam Clay Jewelry Trays With Sprinkle Texture
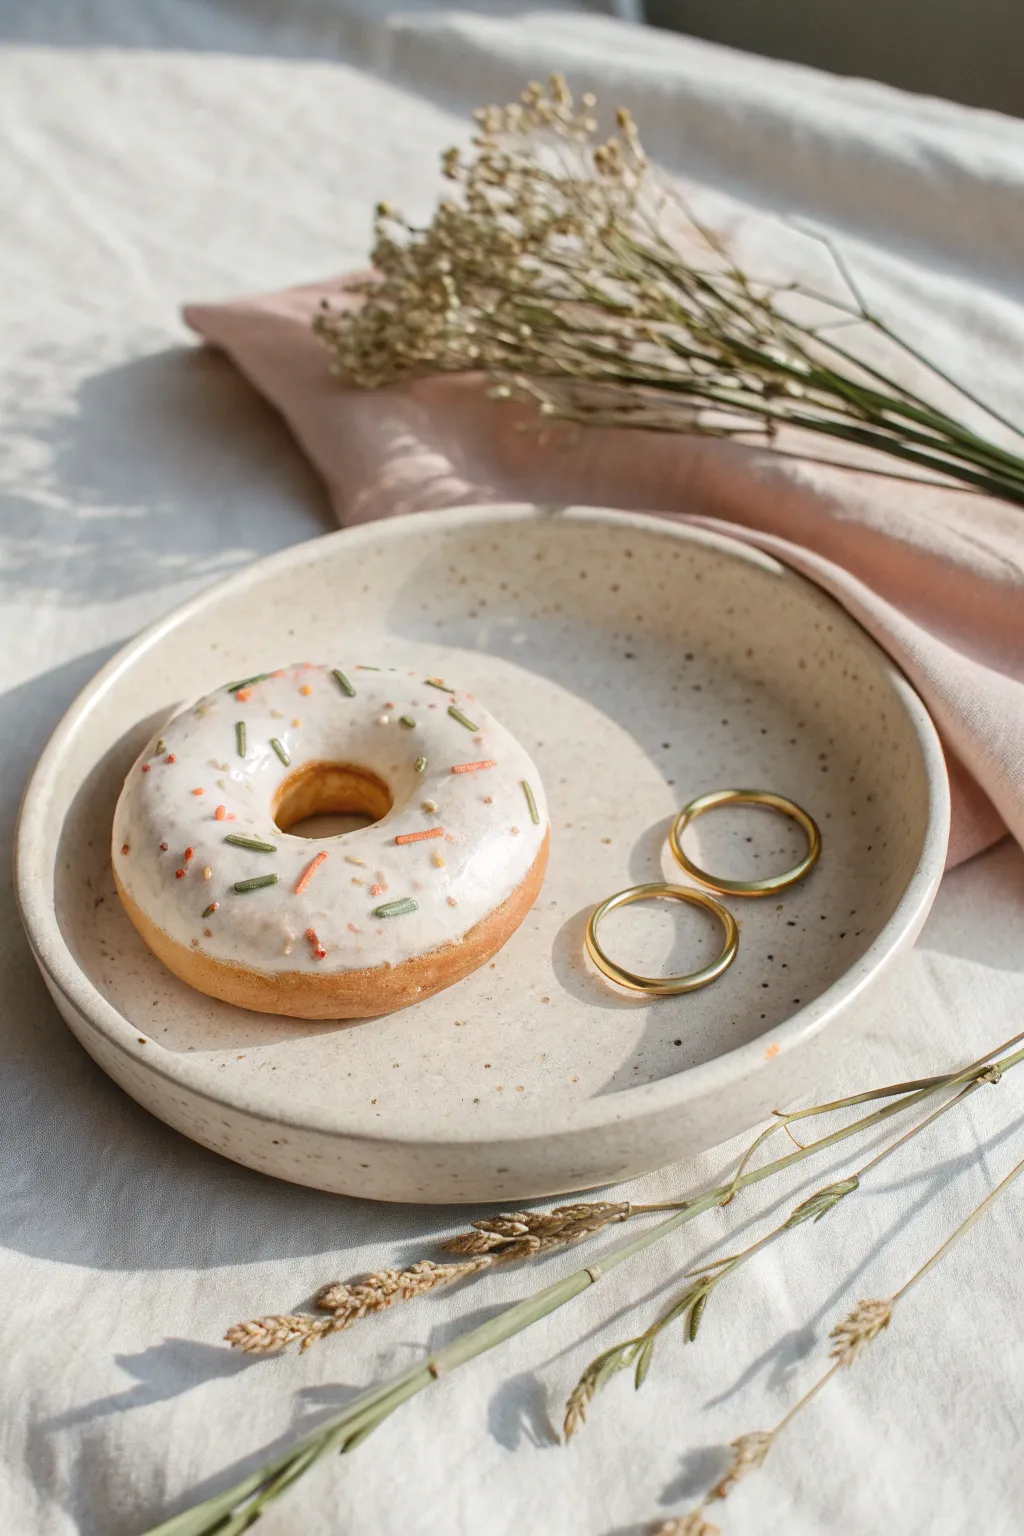
Create a sophisticated, minimalist jewelry dish that mimics the look of high-end speckled stoneware without the need for a kiln. Using air-dry foam clay, this project achieves an organic, curved lip and a subtle grainy texture that is perfect for holding your favorite rings.
Step-by-Step Tutorial
Materials
- White or cream air-dry foam clay
- Rolling pin
- Small bowl (for shaping)
- Sandpaper (fine grit)
- Brown and black acrylic paint
- Old toothbrush
- Matte finish sealant or varnish
- Small bowl of water
- Plastic wrap
Step 1: Shaping the Base
-
Condition the clay:
Begin by taking a handful of white or cream foam clay. Knead it thoroughly in your hands to warm it up and ensure it is pliable and free of air bubbles. -
Roll it out:
Place the clay on a smooth, non-stick surface. Use a rolling pin to flatten it into an even circle, aiming for a thickness of about 1/4 inch. -
Cut the circle:
Find a bowl or round object with a diameter of roughly 5-6 inches. Place it upside down on your rolled clay and trace around it with a clay tool or knife to get a perfect circle. -
Create the curve:
Gently lift the edges of your clay circle. Use your fingers to curve the rim upward slightly to create a shallow dish shape. -
Smooth the edges:
Dip your finger in a tiny bit of water and run it along the rim of the tray to smooth out any cracks or sharp cuts. I find this really helps the final piece look more like fired ceramic. -
Use a mold for support:
To keep the curved shape while drying, place a piece of plastic wrap inside a shallow bowl. Gently lay your clay circle inside so it takes on the bowl’s curvature. -
Refine the lip:
While it sits in the mold, gently press the very edge of the rim to ensure it’s even all the way around. It shouldn’t be too steep, just a gentle slope. -
Allow to dry:
Let the tray dry completely. This usually takes 24-48 hours depending on humidity. Flip it over halfway through so the bottom dries evenly.
Smoother Surfaces
Use a tiny amount of water on your fingertips while shaping foam clay. It helps smooth out wrinkles instantly and prevents cracking as it dries.
Step 2: Adding the Faux Stoneware Effect
-
Sand for smoothness:
Once fully hard, inspect the tray. Use fine-grit sandpaper to gently buff away any fingerprints or uneven spots on the rim. -
Prepare the speckle paint:
Mix a small amount of brown acrylic paint with a tiny drop of water to thin it slightly. You want a fluid consistency but not a wash. -
Apply the first speckles:
Dip an old toothbrush into the thinned brown paint. Hold it over the tray and run your thumb across the bristles to flick tiny specks of paint onto the surface. -
Control the density:
Start with a light dusting. You can always add more, but you can’t take them away easily. Focus on a random, organic distribution. -
Add dimension:
Repeat the process with a tiny amount of black paint. These specks should be sparser than the brown ones to create depth and realistic stone texture. -
Clean the rim:
If any large globs landed on the rim where you don’t want them, quickly wipe them away with a damp paper towel before they dry. -
Let the paint set:
Allow the speckles to dry completely, which should only take about 15-20 minutes. -
Seal the piece:
Apply a coat of matte varnish or sealant over the entire tray. This protects the clay from moisture and gives it that finished, ceramic feel. -
Final cure:
Let the sealant cure according to the bottle instructions before placing any jewelry on the tray.
Color Customization
Mix a tiny drop of beige acrylic paint directly into the white foam clay before rolling. This creates a warm, oatmeal-colored base that looks even more like natural stoneware.
Now you have a chic, minimalist tray to keep your rings safe and stylishly displayed
Foam Clay Faux Ice Cream Scoops And Cones

These delightful faux ice cream cones look good enough to eat but are entirely inedible thanks to the magic of foam clay. With their realistic waffle textures and soft pastel scoops, they make perfect props for summer decor or play food for little ones.
Detailed Instructions
Materials
- Light brown or tan foam clay (for cones)
- Pink foam clay (for strawberry scoop)
- Light blue or mint foam clay (for mint scoop)
- White foam clay (for sprinkles)
- Textured rolling pin or clay texture sheet (waffle/grid pattern)
- Smooth rolling pin
- Cone form (cardboard cone or plastic cone mold)
- Ball tool or rounded sculpting tool
- Texture brush (optional, stiff bristled)
- Small craft knife or scissors
- Clear drying craft glue
Step 1: Sculpting the Waffle Cones
-
Roll the Base:
Begin by taking a generous amount of tan foam clay. Knead it slightly to warm it up, then roll it out on a non-stick surface into a flat, even sheet about 1/8 inch thick. -
Add Waffle Texture:
Cleanly press your grid-patterned texture sheet or rolling pin firmly into the flattened clay. Ensure the pattern is deep enough to mimic a real waffle cone but not so deep that it tears the clay. -
Cut the Shape:
Using a craft knife, cut the textured clay into a wide triangle shape. You can approximate a pie slice shape with a rounded top edge to make rolling the cone easier. -
Form the Cone:
Gently wrap your textured clay triangle around your cone form (or create a cone shape by hand if comfortable). Overlap the edges slightly and press them together gently to seal the seam without squashing the waffle pattern. -
Refine the Rim:
Check the top opening of your cone. If the edge looks too sharp, gently tap it with your finger to dull it slightly, making it look like a baked pastry edge. Let the cones dry completely until they hold their shape firmly.
Step 2: Creating the Ice Cream Scoops
-
Shape the Spheres:
Roll a ball of pink foam clay and a ball of mint-colored foam clay. Size them so they sit surprisingly large on top of your cones, just like a generous scoop. -
Create the ‘Feet’:
Press the bottom of the ball gently to flatten it slightly where it will sit. Then, use your fingers to pull and drag small amounts of clay down around the bottom edge to create the uneven, ruffly ‘skirt’ that forms when ice cream melts slightly. -
Add Surface Texture:
Real ice cream isn’t perfectly smooth. I like to tap the surface of the clay balls lightly with a stiff toothbrush or crumpled foil to give it that porous, frozen texture. -
Detail the Mint Scoop:
For the mint scoop, push a few tiny indentations into the side to create cracks or ‘scoop marks’ using a ball tool, mimicking how hard ice cream breaks apart. -
Assemble the Cone:
Apply a ring of clear craft glue to the inside rim of your dried waffle cone. Press your textured scoop firmly onto the cone, ensuring the ‘melted’ ruffle overlaps the cone’s edge.
Make It Frosty
For a hyper-realistic frozen look, dust the finished scoops lightly with cornstarch or baby powder using a dry brush. This mimics the frost on cold ice cream.
Step 3: Adding the Sprinkles Details
-
Roll Tiny Logs:
For the sprinkles on the strawberry cone, take a pinch of white foam clay and roll it into extremely thin, tiny logs between your fingers. -
Cut Sprinkles:
Snip these thin logs into tiny speck-sized pieces. Allow them to dry for just a minute so they don’t squish when handled. -
Apply Decorations:
Dab tiny dots of glue onto the top of the pink scoop and gently place your white sprinkles. Arrange them randomly for a natural look. -
Final Setting:
Place your finished cones in a safe spot to dry completely. If you made the lying-down cone, let it dry on its side on a piece of parchment paper to flatten the contact points slightly for realism.
Cone Collapse?
If your cone is sagging while drying, stuff the inside loosely with paper towels or plastic wrap to support the walls until the foam clay hardens fully.
Display your sweet creations in a sunny spot to enjoy the summer vibes all year round
Foam Clay Mini Diorama Tiles With Puffy Scenes
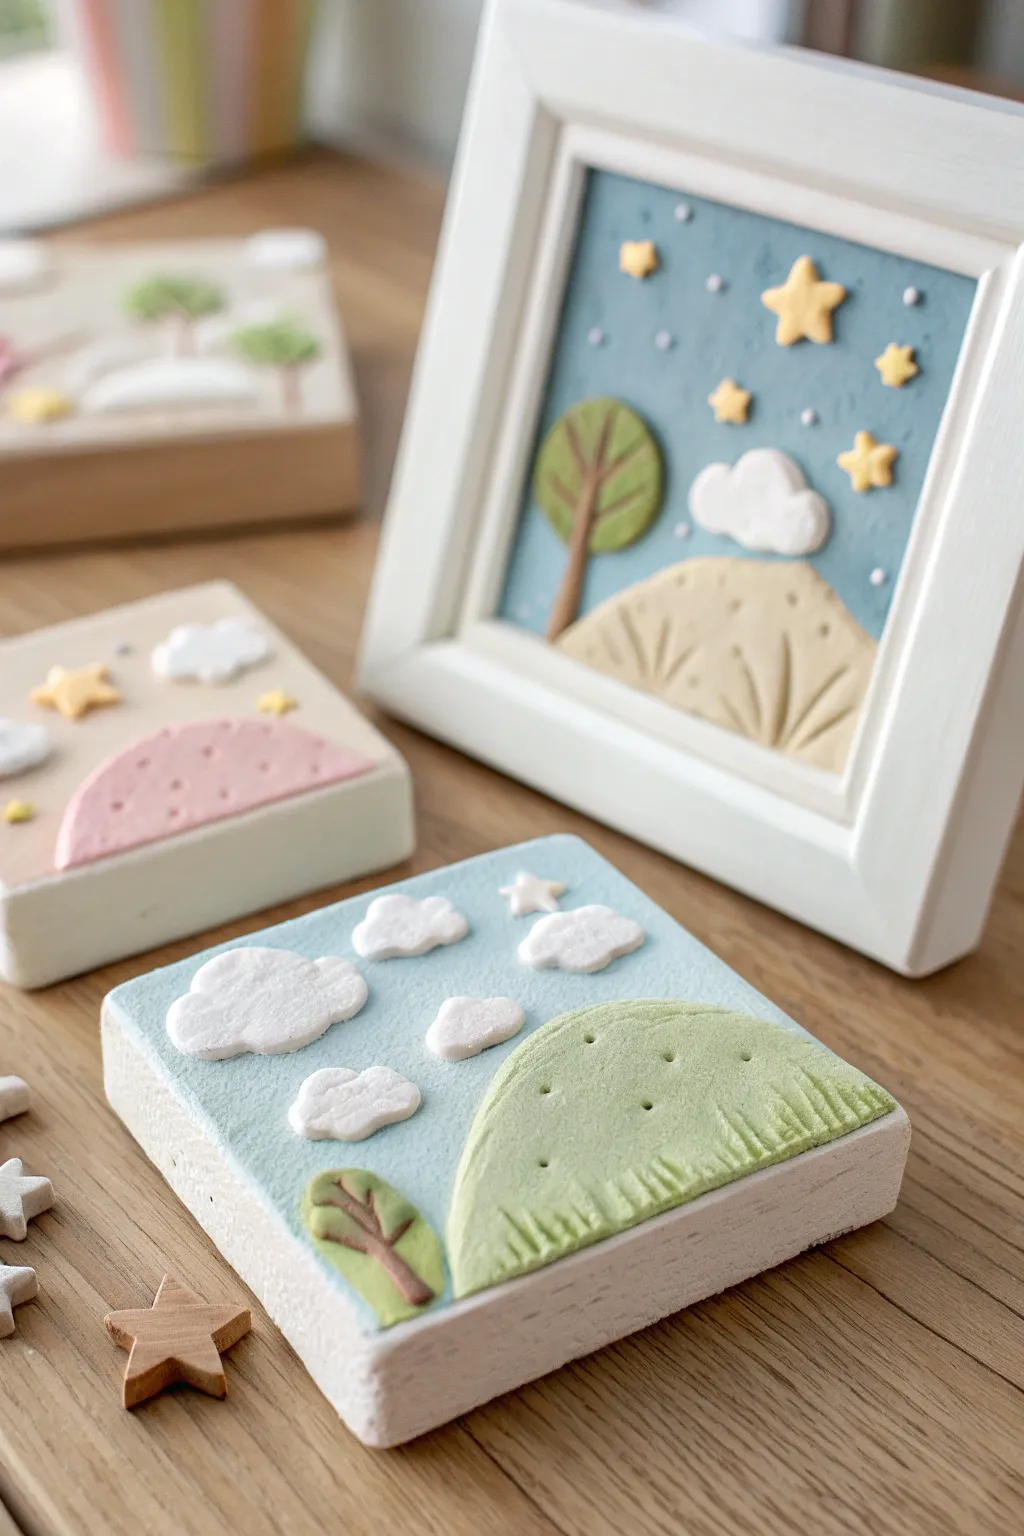
These adorable mini diorama tiles bring a touch of dreamlike magic to any shelf with their soft, pastel textures and 3D relief effects. Using air-dry foam clay, you’ll sculpt charming scenes featuring rolling hills, fluffy clouds, and tiny trees on simple wooden blocks.
How-To Guide
Materials
- Small wooden blocks or mini canvas panels (approx 4×4 inches)
- Foam clay set (white, light blue, mint green, baby pink, beige, brown, yellow)
- Clay sculpting tools (needle tool, ball stylus)
- Acrylic rolling pin
- Craft knife or plastic clay knife
- White craft glue (optional for extra hold)
- Matte sealant spray (optional)
Step 1: Preparing the Sky Base
-
Choose your palette:
Select a light blue or soft beige foam clay for your background sky color. Knead the clay in your hands for about 30 seconds to wake up the texture and ensure it’s pliable. -
Cover the surface:
Press a ball of the background clay onto the wooden block. Using your fingers or a small acrylic roller, spread it evenly to cover the entire top face. -
Smooth the edges:
Gently push the clay to the very edges of the square, smoothing it down so it is flush with the sides of the block for a clean, framed look. -
Texturize the sky:
For a more tactile finish, lightly tap the surface of the clay with a stiff bristle brush or a crumpled ball of aluminum foil. This removes fingerprints and adds a matte, stone-like quality.
Step 2: Sculpting the Landscape
-
Form the hill:
Take a walnut-sized amount of green or beige clay. Roll it into a ball, then flatten it into a semi-circle shape. -
Attach the landscape:
Press the hill shape onto the lower half of your tile. Since the base layer is still slightly fresh, it should stick on its own, but a tiny dot of water or glue helps if it feels dry. -
Add grassy texture:
Using a needle tool or the edge of a plastic knife, press small vertical indentations along the bottom edge of the hill to simulate tufts of grass. -
Create dimples:
Press a small ball stylus or the tip of a toothpick gently into the hill sporadically to add cute little decorative dimples.
Clean Cuts hack
If your clay drags when cutting grass details, dip your plastic knife or tool into a tiny bit of water or baby oil first. It creates a smooth slice without pulling the foam.
Step 3: Adding Charming Details
-
Make the tree trunk:
Roll a very thin snake of brown clay. Cut a short segment and press it vertically near the side of the hill to act as a tree trunk. -
Add branches:
Attach two tiny V-shaped pieces of brown clay to the top of the trunk for branches. -
Shape the tree canopy:
Flatten a small circle of green clay. Press your knife tool into it to create leaf vein patterns, then attach this over the branches. -
Form clouds:
Pinch off three or four small pieces of white clay. Roll them into irregular, puffy shapes and press them flat against the blue sky background. -
Create stars:
For a nighttime scene, roll tiny balls of yellow clay. Pinch five points on each to make stars, or simply use a tiny star-shaped plunger cutter if you have one. -
Balance the composition:
Arrange the stars and clouds around the sky area, making sure not to clutter one spot too heavily. I like to vary the sizes, placing larger clouds near the top and smaller stars scattered throughout. -
Add tiny fillers:
Roll incredibly small spheres of white or pastel purple clay—no bigger than a pinhead. Dot these around the sky to act as distant stars or magical dust.
Clay won’t stick?
If your base layer has already dried before you add the hills or clouds, the fresh clay won’t adhere well. Simply dab a tiny amount of white PVA glue on the back of the new piece.
Step 4: Finishing Touches
-
Let it cure:
Set the block aside in a dry, room-temperature area. Foam clay needs about 24 to 48 hours to fully harden depending on the thickness of your hill. -
Optional sealing:
Once fully dry, you can mist the piece with a matte sealant spray to protect the colors from fading and dust accumulation.
Display your finished puffy landscapes on a desk or hang them in a grid for a sweet gallery wall