If you’ve been craving easy foam clay ideas that look adorable without needing fancy tools, you’re in the right place. I love how foam clay lets you build cute little projects from basic shapes and still get that colorful, textured, “I actually made this!” finish.
Strawberries and Cream Bites
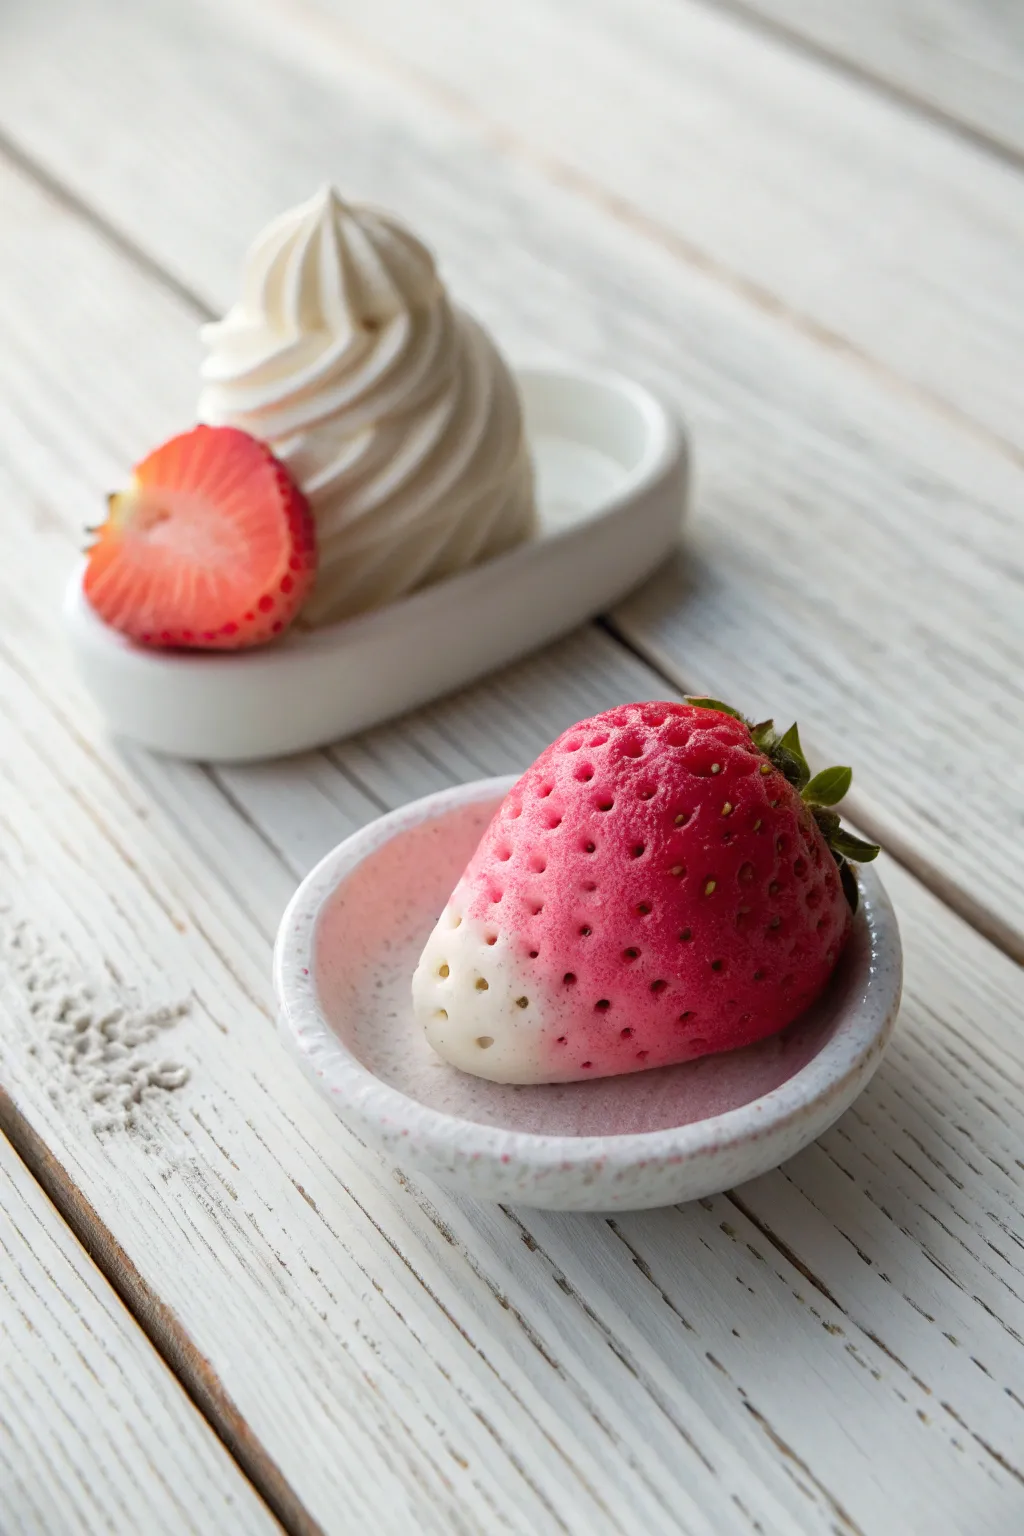
Create a sweet, realistic-looking treat that looks good enough to eat but will last forever. This project uses foam clay to sculpt a delicate gradient strawberry and fluffy whipped cream, perfect for play food or cute decor.
Step-by-Step
Materials
- White foam clay
- Red or dark pink foam clay
- Small round sculpting tool (or a toothpick)
- Pastel chalks (red, pink, white)
- Soft paintbrush
- Green foam clay or artificial leaves
- Star-shaped piping trip (open star)
- Empty piping bag or plastic sandwich bag
- Craft glue
- Two small ceramic condiment dishes (optional, for display)
Step 1: Sculpting the Whole Strawberry
-
Prepare the Base:
Start by taking a medium-sized ball of white foam clay. Knead it until it’s soft and pliable to remove any air bubbles. -
Shape the Berry forms:
Roll the clay into a ball, then gentl pinch one end to create a tapered teardrop shape. Flatten the wider top slightly to mimic a real strawberry’s shoulder. -
Create the Gradient:
Instead of pre-dying the clay, we’ll use surface coloring for realism. While the clay is still fresh, take your red and pink pastel chalks and shave them into a fine powder. -
Apply the Blush:
Dip a soft, dry brush into the red powder. Gently tap the color onto the wider top half of the strawberry, fading it out as you move toward the tapered white tip. -
Add Texture:
Using a small round sculpting tool or a dull toothpick, gently press small indentations all over the surface of the berry to create seed pockets. -
Insert Seeds (Optional):
For extra detail, you can roll tiny, microscopic specks of yellow or light green clay and press them into the larger indentations, though the indentations alone often look realistic enough. -
Attach the Calyx:
Use a small amount of green foam clay to cut out a star shape, or glue a small artificial leaf piece to the flat top of your strawberry.
Softer Texture Tip
To make the ‘whipped cream’ look ultra-smooth and pipe easily, mix a pea-sized amount of lotion or glycerine into the white clay before loading the bag.
Step 2: Whipped Cream & Sliced Garnish
-
Prepare Cream Clay:
Take a large portion of white foam clay. Add a tiny drop of water and knead it until it becomes slightly sticky and very soft, almost like actual frosting. -
Pipe the Swirl:
Place the softened clay into a piping bag fitted with an open star tip. I prefer not to use a coupler here as the clay can get stuck. -
Form the Mound:
Pipe a tight swirl directly onto your work surface or display dish, building height by spiraling inward as you go up, finishing with a peaked tip. -
Slice Shape:
Create another small strawberry shape using red foam clay this time. Let it dry partially for about 20 minutes so it holds its shape. -
Cut the Slice:
Use a craft knife or clay blade to slice the red strawberry vertically. This creates a flat face. -
Inner Details:
On the flat cut side, add a small core of white clay blended outward to look like the inside of the fruit, or paint it with white acrylic paint. -
Assembly:
Press the flat ‘cut’ side of the strawberry slice gently into the side of your wet whipped cream swirl so it adheres as it dries. -
Final Drying:
Allow both pieces to dry completely for at least 24-48 hours. Foam clay shrinks slightly as it dries, which will tighten the textures.
Scented Creation
Add realism by kneading a drop of strawberry or vanilla essential oil into the clay before sculpting. The scent will release whenever the item is squeezed.
Now you have a delectable-looking display that adds a touch of sweetness to any room


Simple Sushi Roll Minis
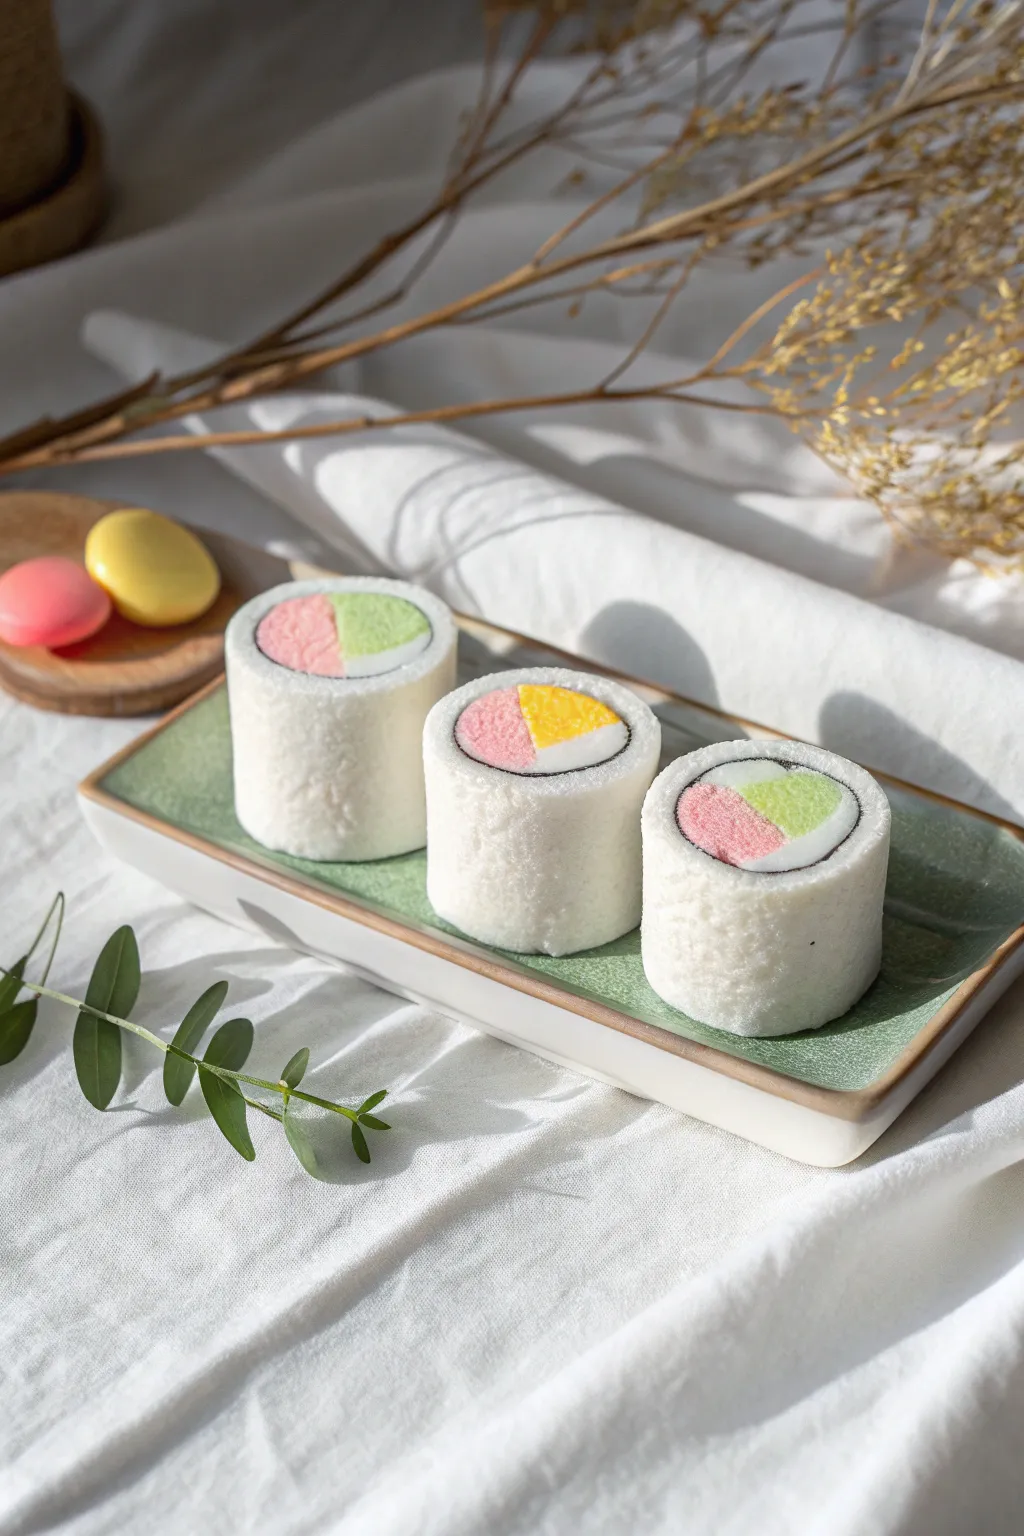
Create these impossibly cute faux sushi rolls that look good enough to eat but are soft to the squish. With their clean white rice exterior and colorful pastel fillings, these foam clay miniatures make adorable desk friends or play food props.
How-To Guide
Materials
- White foam clay (standard)
- Pastel pink foam clay
- Pastel green (or mint) foam clay
- Pastel yellow foam clay
- Black foam clay (or dark grey)
- Rolling pin or smooth round marker
- Plastic clay knife or blade tool
- Old toothbrush or stiff bristle brush (for texture)
- Non-stick work surface (silicone mat)
Step 1: Preparing the Fillings
-
Mix your colors:
Start by ensuring your pastel clays are the right hue. If you only have bright primary colors, knead a tiny amount of color into a larger ball of white clay until you achieve soft, marshmallow-like shades of pick, green, and yellow. -
Roll the wedges:
Take a small grape-sized ball of pink clay and roll it into a thick log, about 1 inch long. Repeat this with the green and yellow clays so you have three colorful logs. -
Shape the components:
Pinch one side of each log gently along its length to create a teardrop cross-section. We want these to fit together like slices of a pie. -
Assemble the core:
Press the flat sides of the pink and green logs together. For the third roll shown in the middle of our example, you can swap green for yellow. The goal is to make a compact cylinder of two or three colors pressed together. -
Add the contrast line:
Roll a very thin ‘snake’ of white clay. Place this gently between the colored sections before pressing them fully together if you want that clean separation line seen in the reference, though pressing them directly works too.
Step 2: Wrapping the Nori
-
Create the seaweed layer:
Take a small amount of black foam clay. Roll it out as thin as possible with your rolling pin. -
Measure the strip:
Cut a clean rectangular strip from the flattened black clay. It needs to be just wide enough to cover the length of your colored filling log. -
Wrap the filling:
Carefully wrap the black clay strip around your colored cylinder. -
Seal the seam:
Trim any excess black clay where the ends meet and gently rub the seam with your finger to make it invisible. You should now have a colorful core wrapped in black.
Clean Cuts
To get a sharp slice without squishing your roll, let the clay log sit for about 15-20 minutes to ‘firm up’ slightly before cutting it into individual pieces.
Step 3: Creating the Rice Exterior
-
Prepare the rice layer:
Take a large chunk of white foam clay. You’ll need enough to create a thick coating around your seaweed-wrapped center. -
Roll the white sheet:
Flatten the white clay into a thick rectangular slab. Unlike the black layer, this should be substantial—about a quarter-inch thick. -
Wrap the sushi:
Place your black cylinder at one end of the white slab and roll it up like a carpet until the ends meet. -
Smooth the cylinder:
Cut off the excess white clay. Roll the entire cylinder gently on your work surface to smooth out the seam and ensure it is perfectly round. -
Slice the rolls:
Currently, you have one long sushi log. Use your sharpest plastic clay tool or a blade to slice this log into two or three individual bite-sized pieces. Use a sawing motion to avoid squashing the circle shape.
Magnet Magic
Before the clay dries completely, press a small, strong neodymium magnet into the back or bottom of the sushi roll to turn these into adorable fridge magnets.
Step 4: Texturing and Finishing details
-
Check the shape:
After slicing, the pieces might be slightly oval. Gently pat the sides to return them to a perfect circle. -
Texturing tool:
Grab your old toothbrush or a stiff bristle brush. This is the secret to the realistic look. -
Apply rice texture:
Gently tap the bristles all over the exterior white surface of the rolls. I like to rotate the sushi while tapping to keep the texture even. -
Avoid the center:
Be careful not to texture the cut faces (the colorful spiral part) too much; those should look smooth where the knife ‘cut’ them. -
Refine the edges:
If the texture makes the edges fuzzy, use your finger to gently pat down any stray bits of clay sticking out. -
Final drying:
Let your sushi rolls sit undisturbed for 24-48 hours. Foam clay shrinks slightly as it dries, which will make the texture look even tighter and more realistic.
Now you have a set of everlasting sushi that looks perfect on display


Mini Burger Desk Buddy
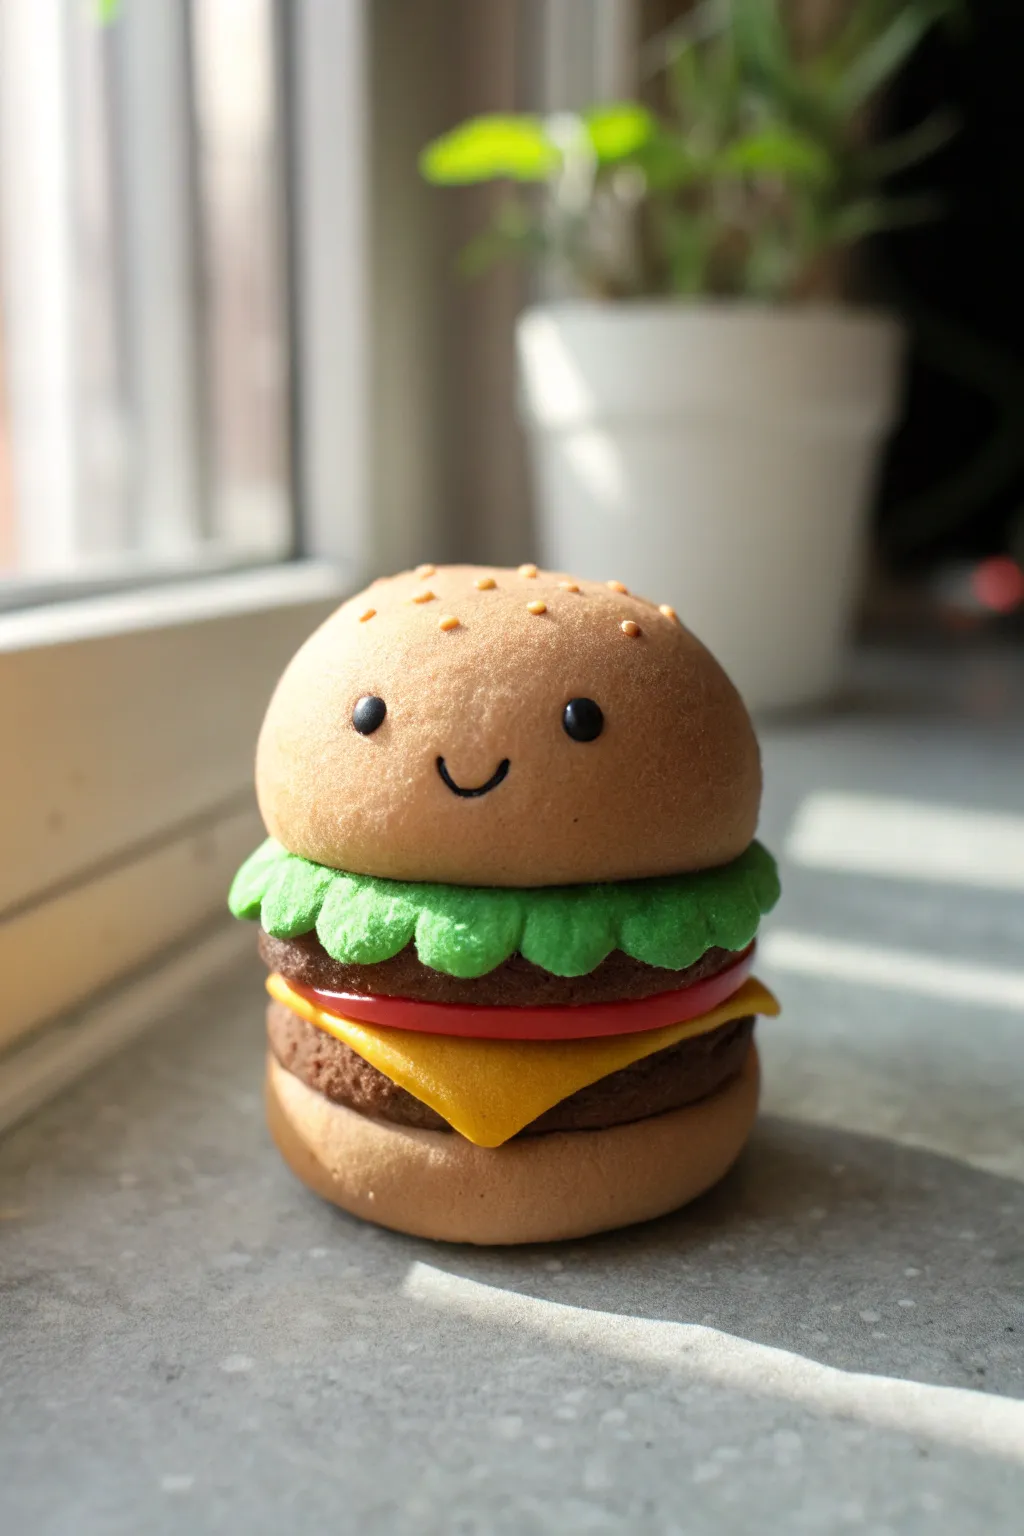
Treat yourself to a zero-calorie snack with this adorable, smiling mini burger figurine. Made from soft, airy foam clay, this kawaii creation features distinct layers and a cheerful expression that’s perfect for perking up your windowsill or workspace.
Step-by-Step
Materials
- Light tan or beige foam clay (buns)
- Dark brown foam clay (patty)
- Bright green foam clay (lettuce)
- Red foam clay (tomato)
- Yellow foam clay (cheese)
- Black foam clay (eyes and mouth)
- Tiny amount of white or lighter tan clay (sesame seeds)
- Detailing tool or toothpick
- Clean rolling surface
Step 1: Creating the Buns
-
Form the Top Bun:
Start with a generous ball of light tan clay, roughly the size of a golf ball. Roll it until it’s perfectly smooth and free of major cracks. -
Shape the Dome:
Gently press the ball onto your work surface to flatten the bottom, creating a nice dome shape. Smooth the edges with your thumb so they are rounded, not sharp. -
Form the Bottom Bun:
Take a slightly smaller amount of the same tan clay. Roll it into a ball and then flatten it into a thick disc. Ensure the diameter matches the bottom of your top bun for stability.
Bun Texture Tip
For realistic bun texture, let the clay dry for 10 minutes, then press a clean piece of sandpaper gently against the surface.
Step 2: Layering the Filling
-
Make the Patty:
Roll a ball of dark brown clay. Flatten it into a disc that is just slightly wider than your bottom bun. Foam clay tends to shrink slightly, so going a tiny bit wider helps maintain the burger look. -
Texturize the Meat:
Using a toothpick or a rough texturing tool, gently stipple the sides of the brown disc to give it that cooked burger texture. -
Create the Cheese Slice:
Roll out a small amount of yellow clay until it’s thin. Cut or shape it into a square. Place this squarely on top of your brown patty. -
Melt the Cheese:
Gently press the corners of the yellow square down over the edge of the brown patty so it looks like it’s melting slightly. -
Add the Tomato:
Create a thin red disc of clay. This should be about the same diameter as the patty. Place it directly on top of the cheese layer. -
Craft the Lettuce:
Roll a uneven snake of bright green clay. Flatten it with your fingers, intentionally leaving the edges wavy and irregular to mimic leafy greens. -
Assemble the Body:
Stack your layers: Bottom bun, patty with cheese, tomato, and finally the lettuce on top. Press them gently together so the foam clay bonds self-adheres.
Make It a Charm
Before the top bun dries, screw in a small eye hook at the very top center. Once dry, you can attach a keychain or lanyard to your burger buddy.
Step 3: Adding Personality
-
Top It Off:
Place the domed top bun onto the lettuce layer. Give the whole stack a gentle squeeze from top to bottom to secure everything, but be careful not to squish the shapes too much. -
Add the Eyes:
Roll two tiny specks of black clay into balls. Press them onto the front of the top bun, spacing them widely apart for that cute kawaii look. -
Create the Smile:
Roll a microscopic ‘snake’ of black clay. Shape it into a small ‘U’ and gently press it into the center of the bun between the eyes. -
Sprinkle the Seeds:
Take tiny pinches of lighter tan or white clay. Roll them into miniature ovals and scatter them randomly over the top of the bun. -
Final Texture:
I like to take a soft toothbrush or a texture sponge and very lightly tap the top bun (avoiding the face) to make it look like baked bread rather than smooth plastic.
Let your little burger sit undisturbed for 24 hours to cure completely before moving him to his new home on your desk


Ball-Segment Caterpillar
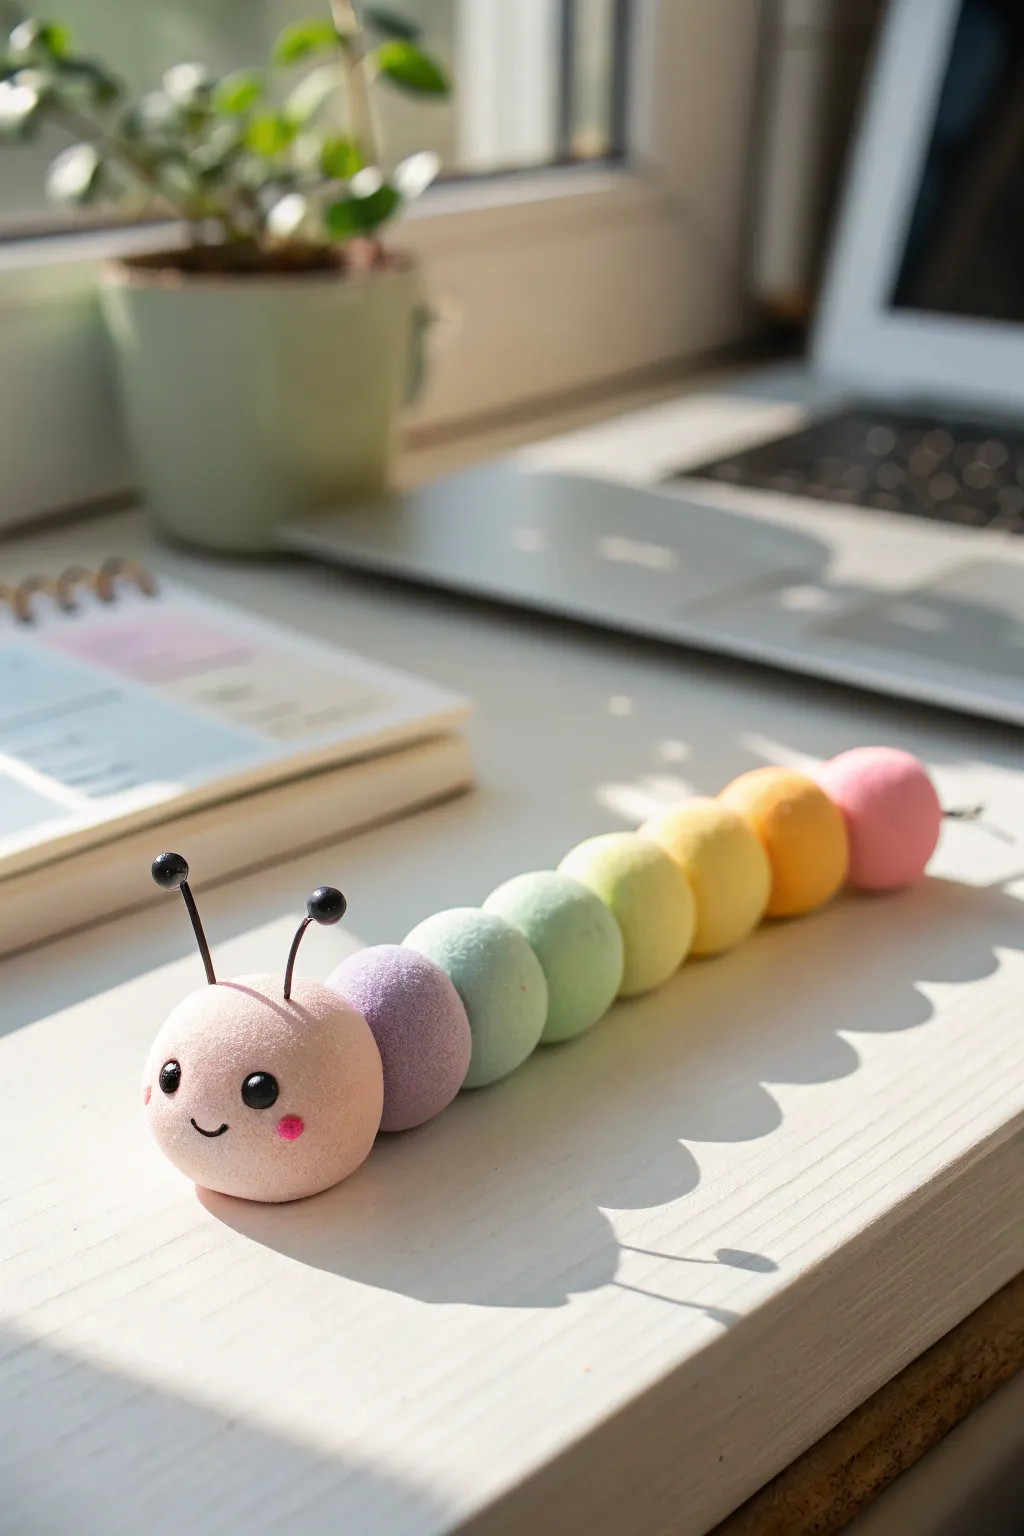
Brighten up your desk with this adorable, multi-colored caterpillar made from soft foam clay. Its smooth, segmented body features a gentle pastel gradient that’s incredibly satisfying to look at and easy to shape.
How-To Guide
Materials
- Foam clay in various colors (pink, purple, teal, green, yellow, orange)
- Black foam clay (for eyes and antennae)
- Small amount of darker pink foam clay (for blush)
- Black craft wire or stiff floral wire
- Wire cutters
- Modeling tool or toothpick
- Clean, smooth work surface
Step 1: Prepping the Colors
-
Mix pastel shades:
Since the caterpillar has a soft, muted look, you’ll need to create pastel versions of your base colors. Take small balls of white foam clay and mix in tiny amounts of your vibrant colors (purple, teal, green, yellow, orange) until you achieve a uniform, chalky pastel tone for each. -
Size your portions:
Divide your prepared clay into portions. You will need eight distinct balls in total. The head should be the largest piece (light pink). The body segments should be slightly smaller than the head but roughly equal to each other in size.
Fixing Cracks
If your clay spheres develop small cracks while rolling, dip your finger in water and smooth over the surface. The moisture helps reseal the foam texture.
Step 2: Shaping the Body
-
Roll the head:
Take your light pink clay and roll it between your palms. Apply even pressure in a circular motion to ensure it is perfectly spherical and free of cracks or seams, then set it aside. -
Create body segments:
Repeat the rolling process for each of your colored body segments: lavender, mint blue, soft green, yellow-green, buttery yellow, pumpkin orange, and finally a pinkish-red tail piece. -
Flatten slightly:
Very gently press the bottom of each sphere against your table. You don’t want a pancake, just a tiny flat spot so the caterpillar sits stable and doesn’t roll away. -
Connect the first segments:
Take the pink head and the lavender segment. Press them gently together. Foam clay sticks to itself easily while wet, so firm contact is usually enough. -
Build the line:
Continue adding the spheres in rainbow order: mint blue next, then green, and so on. Keep them in a straight line or add a very slight wiggle to the arrangement for a natural crawling look. -
Secure the bond:
Once all spheres are lined up, give the whole line a gentle squeeze from both ends (head and tail) to ensure all contact points are secure.
Step 3: Adding the Face
-
Make eye sockets:
Using a round-tipped modeling tool or the end of a paintbrush, make two small, shallow indentations on the front of the pink head for the eyes. -
Insert the eyes:
Roll two tiny beads of black clay. They should be small but substantial enough to look cute. Press one into each indentation you just made. -
Add the shine:
For that lively look, take a microscopic spec of white clay (or white paint) and place it on the top right corner of each black eye pupil. -
Create the smile:
Roll a very thin ‘snake’ of black clay. It needs to be hair-thin. Cut a tiny u-shaped piece and press it carefully between the eyes to form a smile. -
Apply blush:
Take two tiny specks of darker pink clay. Flatten them into minuscule discs and press them onto the cheeks, just below and to the outside of the eyes.
Texture Twist
Before the clay dries, gently press a piece of coarse sandpaper against the body segments to give them a fuzzy, moss-like texture.
Step 4: Finishing Touches
-
Prepare antennae wire:
Cut two short pieces of black wire, about 1 inch long each. I like to bend them ever so slightly so they aren’t perfectly straight. -
Make antenna tips:
Roll two small balls of black clay. Push one onto the end of each wire piece to create the bobble at the top. -
Attach antennae:
Insert the bare end of the wires into the top of the pink head. Place them symmetrically. -
Final drying:
Leave your caterpillar undisturbed on a flat surface. Foam clay can take 24-48 hours to fully air harden depending on humidity.
Place your little critter on a windowsill or shelf to enjoy your handiwork

The Complete Guide to Pottery Troubleshooting
Uncover the most common ceramic mistakes—from cracking clay to failed glazes—and learn how to fix them fast.
Round Little Chick Figures
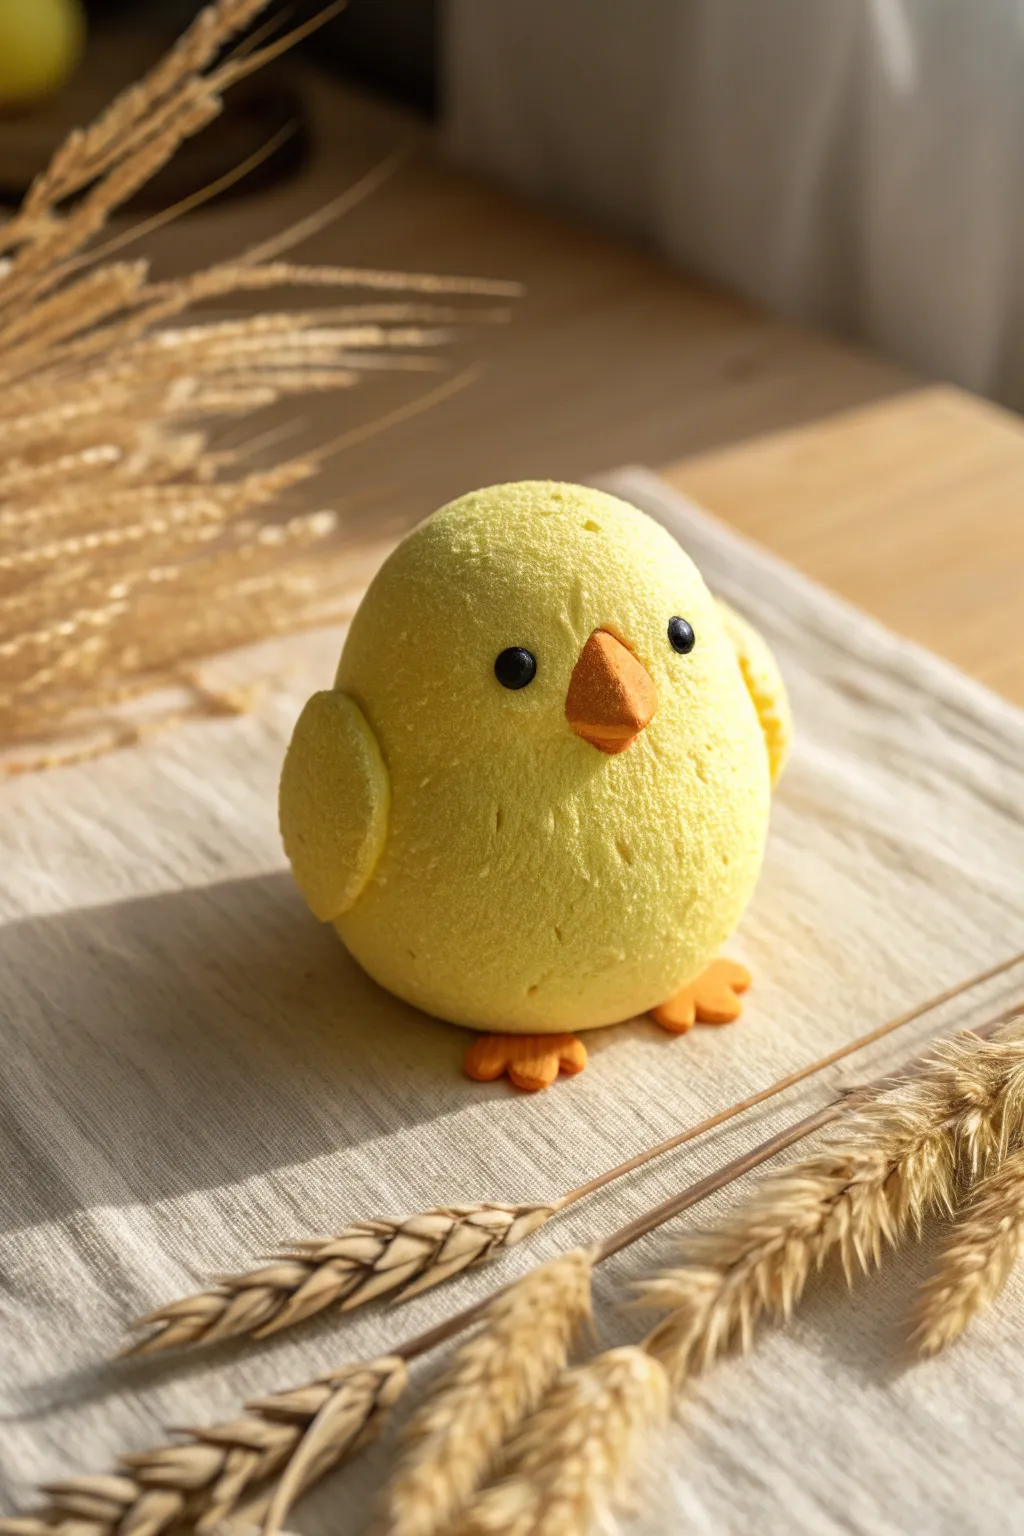
This adorable round chick is the perfect beginner project to get comfortable with foam clay’s unique texture. With its simple shapes and sunny yellow hue, it makes a cheerful desk companion or a sweet handmade gift.
Detailed Instructions
Materials
- Yellow foam clay
- Orange foam clay
- Black foam clay
- Clay modeling tools (ball tool, knife tool)
- Clean working surface or mat
Step 1: Shaping the Body
-
Prepare the clay:
Start by taking a generous amount of yellow foam clay and kneading it in your hands to warm it up and make it pliable. -
Form the main sphere:
Roll the yellow clay into a smooth, tight ball between your palms. Aim for a size roughly slightly larger than a golf ball. -
Create the egg shape:
While rolling, gently apply more pressure towards the top half of the sphere to taper it slightly, creating a soft egg or teardrop shape. The base should remain wide and round for stability. -
Check stability:
Tap the bottom of your egg shape gently on your work surface to flatten it just enough so the chick stands upright without wobbling.
Step 2: Adding Wings and Details
-
Make the wings:
Pinch off two small, identical balls of yellow clay, each about the size of a marble. -
Shape the wings:
Flatten these small balls into circles, then gently pinch one side to create a teardrop shape. -
Attach the wings:
Press the flattened teardrops onto the sides of the body towards the middle. I like to blend the top edge of the wing into the body slightly with a modeling tool for a seamless look. -
Create the beak:
Take a very small piece of orange foam clay and roll it into a tiny ball. -
Shape the beak:
Pinch the orange ball into a cone or pyramid shape to form the beak. -
Attach the beak:
Place the beak in the center of the face area, pressing it gently so it adheres. You can use a knife tool to mark a horizontal line for the mouth opening.
Clay Won’t Stick?
If pieces aren’t sticking together, dab a tiny drop of water on the joining points. The moisture acts like glue for foam clay essentially welding the parts.
Step 3: The Face and Feet
-
Form the eyes:
Roll two tiny specks of black foam clay into spheres. These should be very small to keep the face cute. -
Place the eyes:
Position the black spheres on either side of the beak, slightly higher up. Press them firmly into the yellow clay so they sit flush with the surface. -
Make the feet:
Create two small balls of orange clay for the feet, slightly larger than the beak piece. -
Detail the toes:
Flatten the orange balls slightly and use a knife tool or the side of a credit card to make two indentations in each, creating a three-toed webbed look. -
Attach the feet:
Place the feet under the front of the chick’s body, tucked slightly underneath so they poke out just enough to be visible. -
Add texture (optional):
If your foam clay is very smooth, you can gently tap the surface with a clean toothbrush to give it a fluffy, feathery texture. -
Refine the shape:
Give the entire figure a final once-over, smoothing out any accidental fingerprints or bumps. -
Let it dry:
Allow your chick to dry completely according to your clay package’s instructions, usually 24-48 hours, before handling.
Hatching Scene
Make a broken eggshell using white foam clay flattened into a thin sheet. Shape jagged edges and place it on the chick’s head like a hat for extra cuteness.
Once fully dry, you can display your sunny little friend on a shelf to brighten up any room
Pocket-Size Teddy Bear Minis
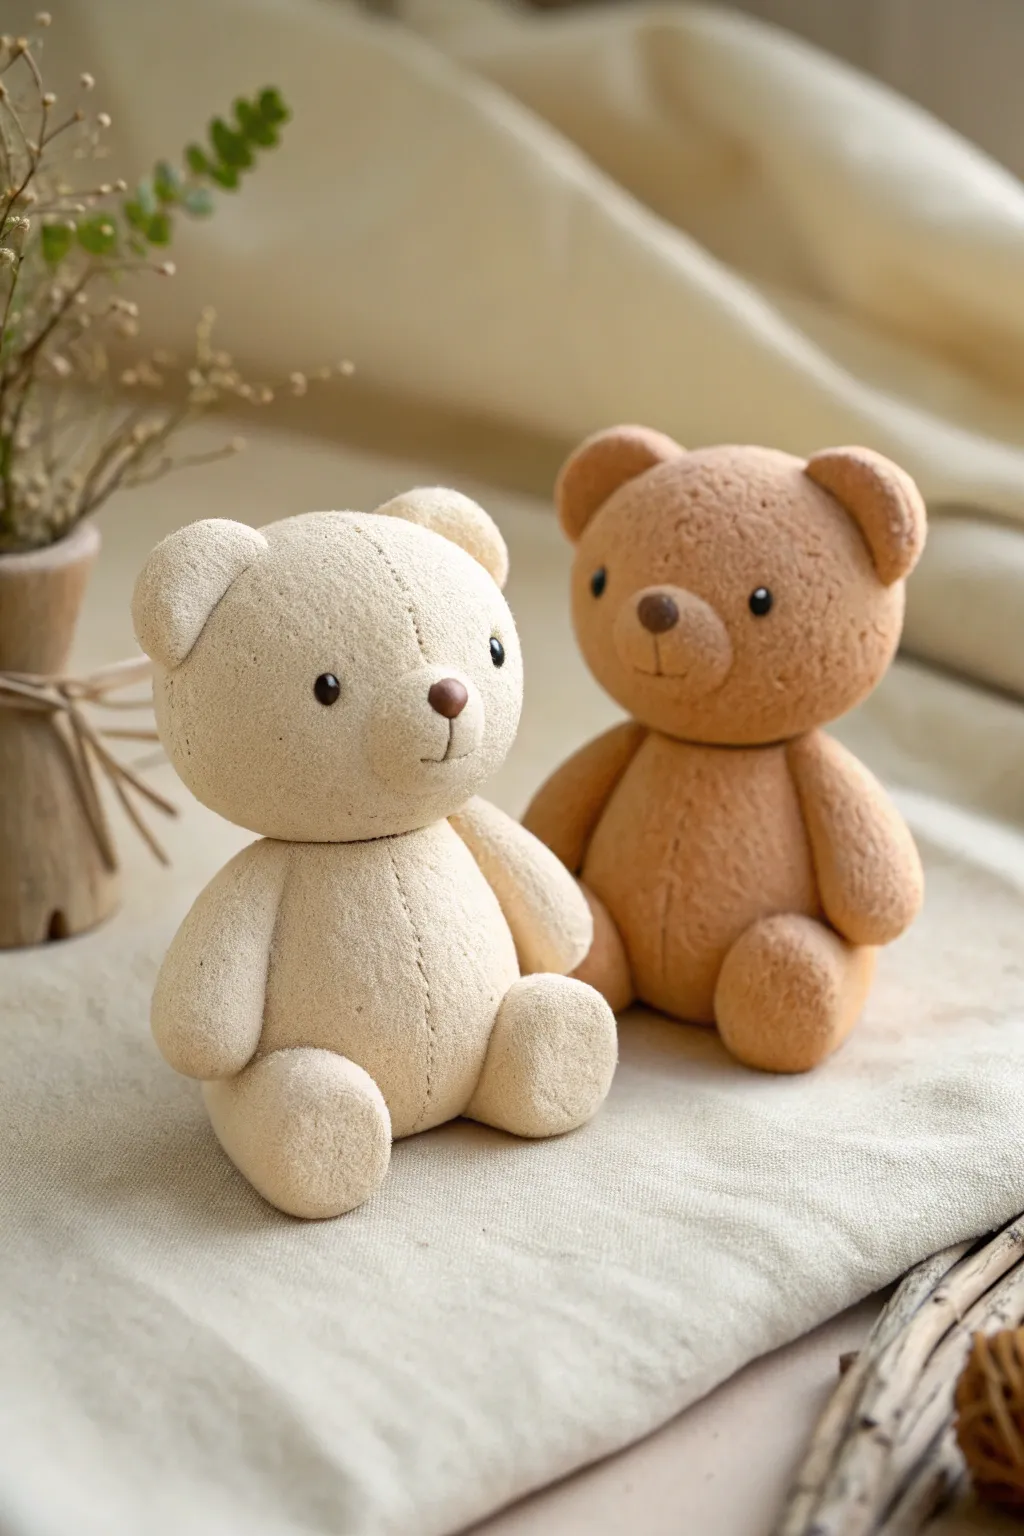
These adorable pocket-sized bears mimic the cozy look of plush fabric using the velvety texture of foam clay. With their faux-stitched seams and gentle matte finish, they make distinctive little keepsakes or desk companions.
Step-by-Step Tutorial
Materials
- Foam clay in two shades (cream and caramel brown)
- Dark chocolate brown foam clay (for eyes and noses)
- Clay sculpting tools (needle tool and small ball tool)
- Toothpick or small wire (optional for head support)
- A clean, non-stick work surface
Step 1: Shaping the Bodies
-
Form the base torso:
Start with a golf-ball-sized amount of your main color foam clay (cream or caramel). Roll it into a smooth sphere, then gently flatten the bottom so it sits stable on your work surface. -
Create the legs:
Take two smaller equal portions of clay and roll them into thick sausage shapes with rounded ends for the legs. -
Attach the legs:
Press the legs firmly against the bottom sides of the torso, angling them slightly outward so the bear looks like it’s sitting comfortably. Foam clay usually sticks to itself, but you can use a tiny drop of water if needed. -
Sculpt the arms:
Create two teardrop shapes for the arms, slightly smaller than the legs. Flatten the wider end just a bit. -
Join the arms:
Attach the arms to the upper sides of the torso body, blending the shoulder joint slightly with your finger or a smoothing tool so it looks seamless.
Fixing Squashed Shapes
If you accidentally squish a limb while texturing, don’t pull it off. Wait 10 minutes for the foam to firm slightly, then reshape it.
Step 2: Creating the Head
-
Roll the head:
Roll a sphere slightly larger than the torso. It should be perfectly round for that classic teddy bear silhouette. -
Shape the muzzle:
Take a tiny pinch of the same color clay and flatten it into a small oval disc. Press this onto the lower center of the face to create a distinct muzzle area. -
Make the ears:
Roll two small balls and press them flat into thick discs. Attach these to the top sides of the head. -
Detail the ears:
Use a ball tool or your pinky finger to create a shallow indentation in the center of each ear for depth. -
Connect head to body:
Place the head onto the torso. I find inserting a short piece of toothpick between the head and body adds stability while the foam clay cures.
Add Accessories
Make a tiny clay bowtie or a scarf in a contrasting pastel color to give each bear a unique personality
Step 3: Adding Details & Texture
-
Add the nose:
Roll a tiny triangle of dark chocolate brown clay. Place it at the very top of the muzzle you created earlier. -
Place the eyes:
Roll two extremely small balls of black or dark brown clay. Press them gently into the face above the muzzle, spacing them wide apart for a cute expression. -
Create the stitched seam effect:
This is the signature step. Using a needle tool, gently drag a vertical line down the center of the torso and the center of the forehead. -
Add stitch marks:
along the lines you just drew, make tiny horizontal hatch marks with the needle tool. This mimics thread stitches. -
Texture the surface:
To get that velvety, fabric-like look, gently tap the entire surface of the bear with a clean, dry toothbrush or a crumpled ball of aluminum foil. Be careful not to squash your shapes. -
Final smooth:
If the texture looks too rough in spots, lightly pat it down with your finger to soften the effect.
Set your cozy little bears aside to dry completely for about 24 hours before handling them


What Really Happens Inside the Kiln
Learn how time and temperature work together inside the kiln to transform clay into durable ceramic.
Easy Frog With Big Eyes
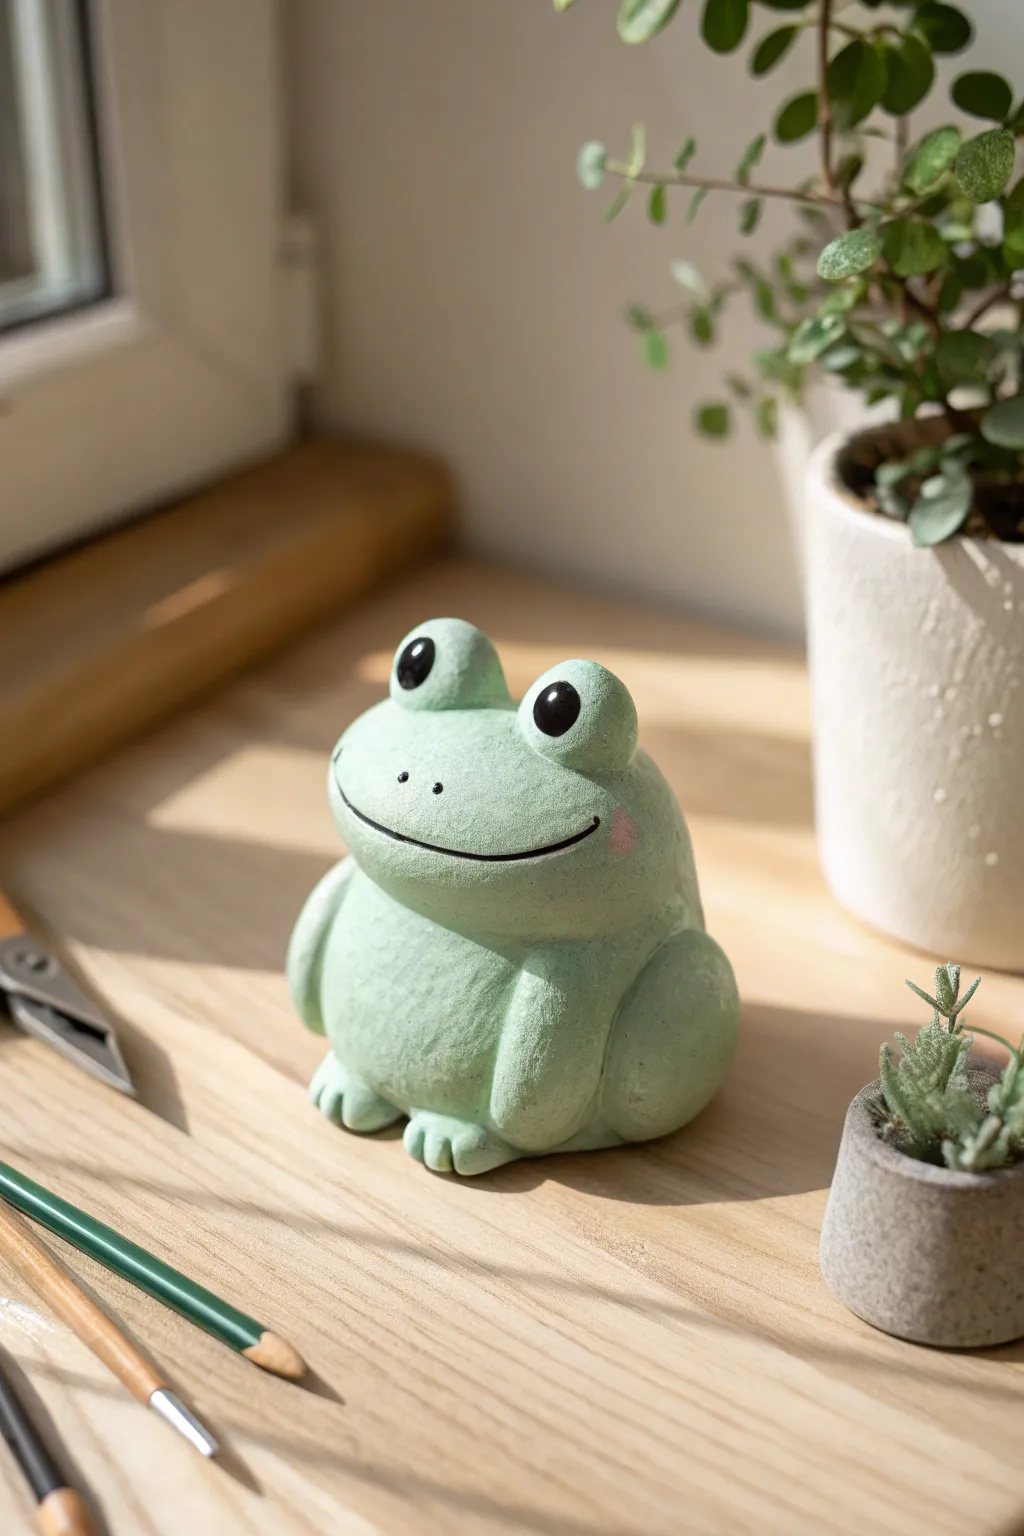
Create this adorable, minimalist frog sculpture using soft and pliable foam clay. With its smooth curves, tiny blush spots, and large expressive eyes, this little desk companion brings a touch of whimsical greenery to any space.
Step-by-Step Guide
Materials
- Light green foam clay (or air-dry clay)
- Black foam clay (small amount)
- White or lighter green foam clay (optional for mixing)
- Pink chalk pastel or pink paint
- Fine-point sculpting tool or toothpick
- Soft paintbrush
- Water (for smoothing)
- Thin black marker or liner
Step 1: Shaping the Body
-
Mix the perfect green:
Start by preparing your main color. If your green is too dark, knead in a small amount of white clay until you achieve a soft, pastel mint green shade like the one in the photo. -
Form the base:
Take a large handful of the green clay and roll it into a smooth ball. Gently press it onto your work surface to flatten the bottom so it sits stably. -
Create the pear shape:
Mold the ball slightly so it becomes pear-shaped, narrower at the top for the head and wider at the bottom for the belly. -
Smooth the surface:
Dip your finger in a tiny drop of water and smooth out any fingerprints or cracks on the main body. Foam clay is forgiving, so take your time here.
Cracks Appearing?
If you see small cracks forming as you shape the clay, dip your finger in water and smooth them out immediately. Cracks usually mean the clay is getting too dry while you work.
Step 2: Adding Features
-
Make the eye sockets:
Roll two smaller balls of green clay, about the size of marbles. Attach them to the top of the head area, pressing them firmly so they fuse with the main body. -
Blend the seams:
Use your sculpting tool or finger to blend the clay from the eye mounds into the head, ensuring there is no visible separation line. -
Insert the eyes:
Roll two small balls of black clay. Flatten them slightly and press them into the center of the green eye mounds to create the pupils. -
Create the highlights:
For that cheerful look, add a tiny dot of white clay (or white paint later) to the upper right corner of each black pupil.
Seamless Joints
When attaching the limbs, score the contact points slightly with a tool before pressing them together. This roughens the surface and helps the foam clay bond stronger.
Step 3: Limbs and Details
-
Form the back legs:
Roll two medium-sized balls of green clay. Flatten them into thick ovals and attach them to the lower sides of the body. -
Shape the thighs:
Gently press the back of these ovals into the body to mimic the folded look of a resting frog’s powerful hind legs. -
Add front arms:
Roll two sausage shapes for the front arms. Attach them vertically to the front to define the chest area, blending the shoulders into the body. -
Sculpt the toes:
At the bottom of the front arms and back legs, use your sculpting tool to gently press indentations, separating the clay into little rounded toes. -
Carve the smile:
Using a thin tool or the edge of a credit card, press a wide, curved line across the face for the mouth. Ensure it curves up at the ends for a happy expression.
Step 4: Finishing Touches
-
Define the mouth:
Once the indentation is made, you can gently trace inside it with a thin black marker to make the smile pop, or insert a very thin string of black clay. -
Add blush:
Scrape a little dust from a pink chalk pastel. Use a dry, soft brush to gently apply this pink powder to the cheeks, just below the outer corners of the eyes. -
Add nose dots:
Use a needle tool or black marker to place two tiny dots between the eyes for nostrils. -
Final texture:
If you want the textured look seen in the image, lightly dab the surface with a stiff bristle brush or a ball of textured foil before the clay fully hardens. -
Let it dry:
Set your frog aside in a dry, ventilated area. Foam clay typically takes 24-48 hours to cure completely depending on thickness.
Place your new green buddy on a windowsill near some plants for the perfect natural habitat look
Fridge Magnets With Cute Faces
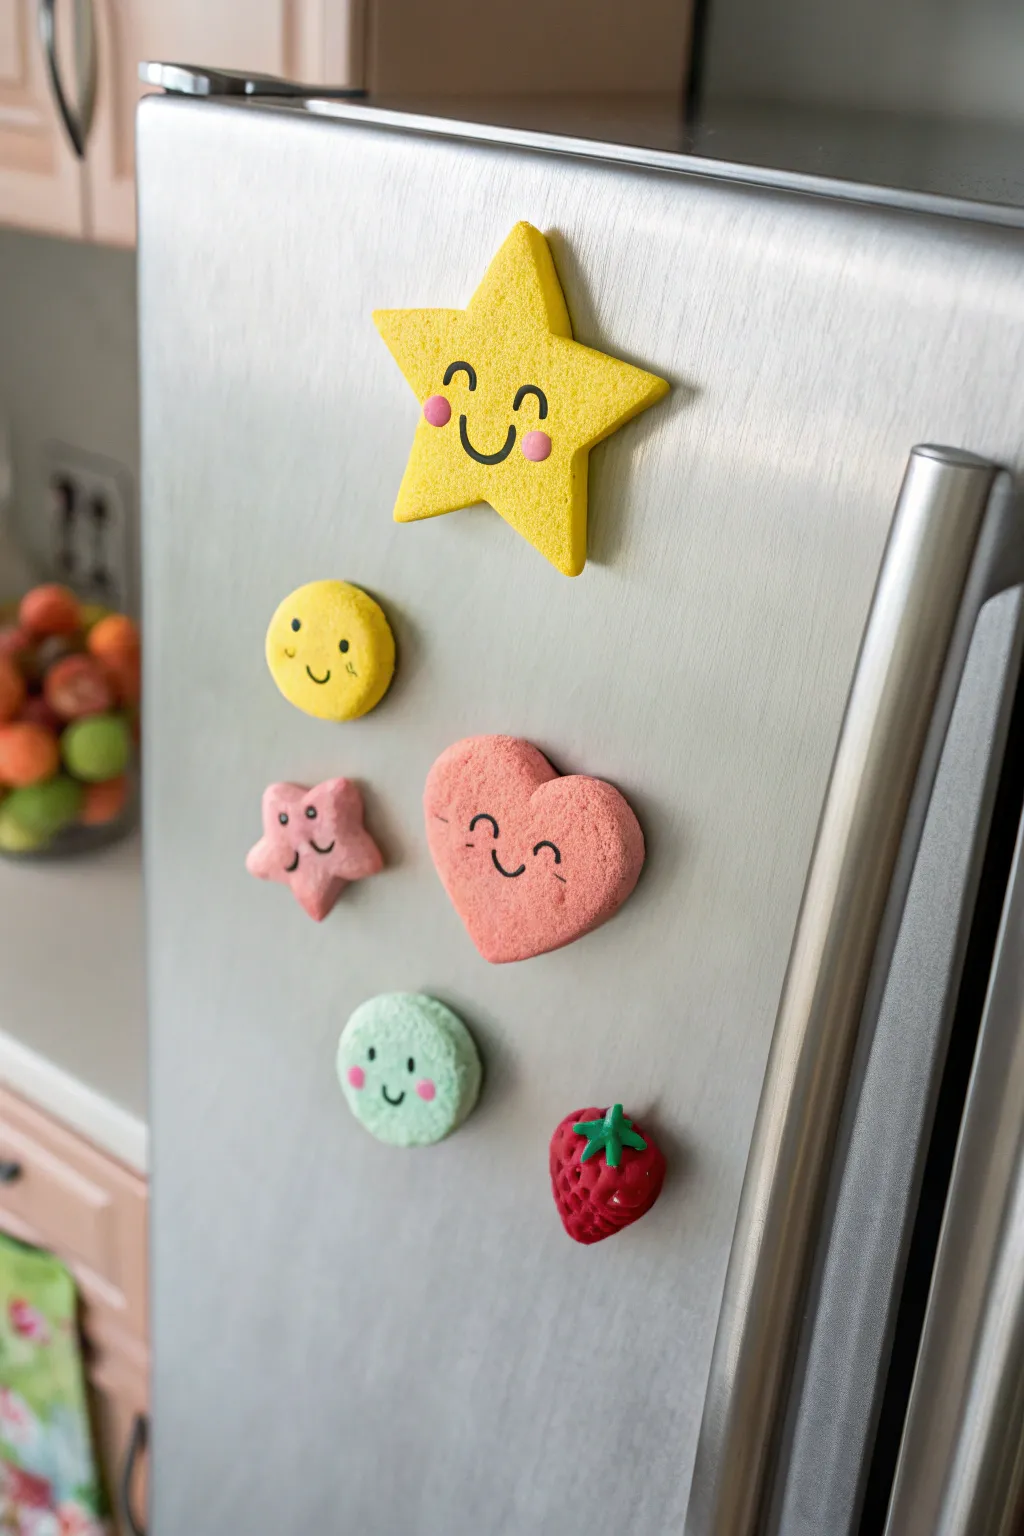
Brighten up your kitchen with these adorable, squishy fridge magnets made from air-dry foam clay. Using simple shapes and sweet painted expressions, you can create a charming cast of characters that stick right to your refrigerator door.
How-To Guide
Materials
- Air-dry foam clay (yellow, pink, mint green, red, dark green)
- Small round magnets
- Rolling pin or smooth round marker
- Cookie cutters (star, heart, circle)
- Black acrylic paint or black fine-liner marker (for faces)
- Pink acrylic paint or pink marker (for cheeks)
- Small detail paintbrush
- Craft glue or hot glue gun
- Toothpick or sculpting tool
Step 1: Shaping the Stars and Hearts
-
Prep the yellow clay:
Start with a generous ball of yellow foam clay. Knead it in your hands for a minute until it feels warm and pliable, which helps prevent cracks later. -
Roll it out:
Flatten the yellow ball on a clean, non-stick surface. Use a rolling pin to get an even thickness of about 1/4 to 1/2 inch. You want them thick enough to be sturdy but light enough for the magnets. -
Cut the large star:
Press a star-shaped cookie cutter firmly into the rolled clay. Wiggle it slightly to ensure a clean cut, then gently push the shape out. Smooth any rough edges with your finger. -
Shape the heart:
Repeat the rolling process with pink foam clay. Use a heart-shaped cutter to create the large heart magnet, smoothing the sides to give it a soft, puffy look. -
Create mini shapes:
Use leftover pink clay to cut a smaller star shape, and use leftover yellow clay to cut a small circle. These will be the friends for your main shapes.
Step 2: Crafting the Textured Fruits
-
Form the strawberry base:
Take a piece of red foam clay and roll it into a ball, then gently pinch one end to create a tapered strawberry shape. -
Add texture:
Using a toothpick or a small sculpting tool, poke small indentations all over the red surface to mimic seeds. -
Top it off:
Create tiny teardrop shapes from dark green clay and press them onto the top of the strawberry to form the leaves and stem. -
Make the mint cookie:
Roll a ball of mint green clay and flatten it into a thick disc. If you want a macaron look, you can gently roughen the edges with a toothpick. -
Let them dry:
Place all your formed shapes on a piece of parchment paper. I usually let foam clay sit for at least 24 hours to cure completely; flip them halfway through so the backs dry too.
Smooth Surface Secret
To remove fingerprints before drying, dip your finger in a tiny bit of water and gently rub the clay surface until it is perfectly smooth.
Step 3: Adding Faces and Magnets
-
Draft the faces:
Once the clay is fully hard, lightly plan where the eyes and mouths will go. The style here is ‘kawaii’—eyes set wide apart and high up on the face usually look cutest. -
Paint the eyes:
Using a very fine paintbrush and black acrylic paint, create small curved lines for eyes. For the heart, try closed ‘u’ shaped eyes; for the big star, larger upside-down ‘u’ arches work well. -
Add the smiles:
Paint a small, simple smile between the eyes. Keep the lines thin and steady. -
Apply rosy cheeks:
Dip the back end of your paintbrush (or a dotting tool) into pink paint. Gently stamp small pink circles under the eyes to give them a blushing look. -
Dry the details:
Allow the paint to dry completely. Since it’s on foam, it should dry relatively quickly, but give it an hour to be safe. -
Attach the magnets:
Flip all the shapes over. Apply a strong dab of craft glue or hot glue to the center of each shape. -
Press and hold:
Press a round magnet into the glue. Hold it there for a few seconds to ensure a secure bond before letting it set.
Clay Shrinkage
Foam clay shrinks slightly when drying. If your shape warps, gently weigh it down with a light book once it’s dry to the touch but still flexible.
Once the glue is set, your cheerful new magnets are ready to hold up your grocery lists and photos

TRACK YOUR CERAMIC JOURNEY
Capture glaze tests, firing details, and creative progress—all in one simple printable. Make your projects easier to repeat and improve.
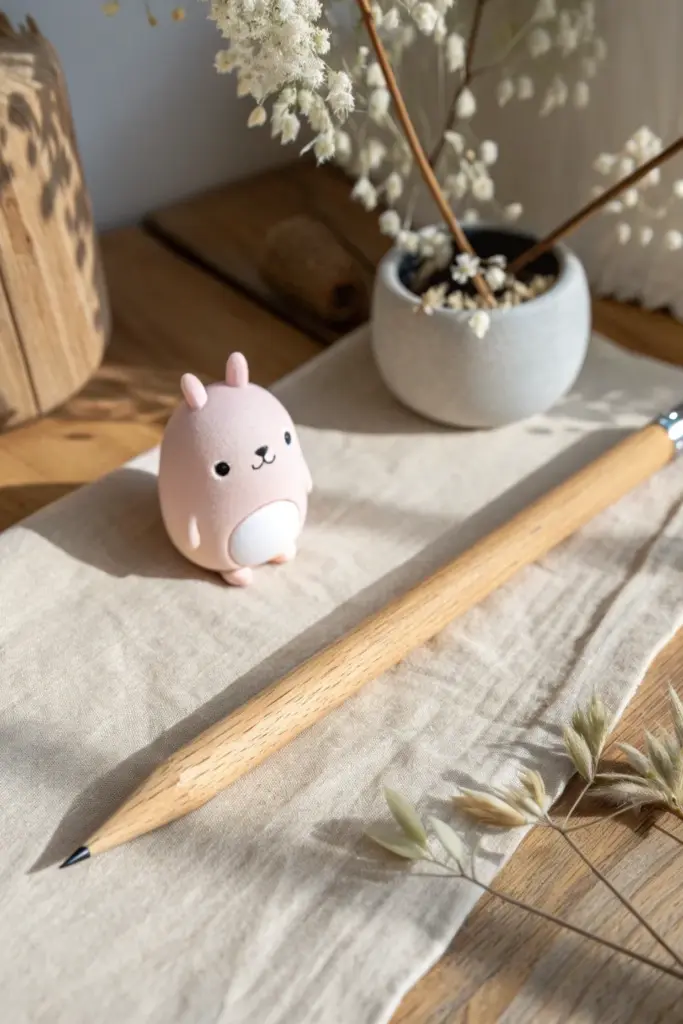
No-Fuss Pencil Topper Characters

This adorable, chubby bunny figure is crafted from soft foam clay, featuring a minimalist design with tiny ears and a sweet expression. Its smooth, velvet-like texture and soothing pink hue make it a charming desk companion or a cute pencil topper transformation.
Detailed Instructions
Materials
- Light pink foam clay
- White foam clay
- Black acrylic paint or a fine-tip permanent marker
- Modeling tool (smooth, rounded edge)
- Toothpick (optional, for structure)
- Standard wooden pencil (if adapting as a topper)
Step 1: Shaping the Base
-
Prepare the clay:
Take a generous handful of light pink foam clay and knead it thoroughly until it becomes warm and pliable. Eliminating air bubbles now prevents cracks later. -
Form the body:
Roll the pink clay into a smooth ball between your palms. Gently tap and flatten the bottom slightly onto your work surface so it stands upright on its own. -
Refine the shape:
While the clay is still workable, gently elongate the ball into a subtle egg shape, keeping the wider part at the bottom for that chubby, seated look. -
Adapt for a pencil (Optional):
If you are making this specifically as a topper, insert the end of your pencil into the bottom center now, pushing it in about an inch to create the socket, then remove it to let the clay dry without sticking.
Step 2: Adding Features
-
Create the tummy:
Take a small pinch of white foam clay and roll it into a tiny ball. -
Attach the tummy:
Flatten the white ball into a thin oval disk. Press this gently onto the lower front center of the pink body, smoothing the edges so it integrates seamlessly. -
Make the ears:
Pinch off two very small, equal-sized pieces of pink clay. Roll them into tiny tear-drop shapes. -
Attach the ears:
Place the ears on the very top of the head, spacing them slightly apart. I find pressing down with a rounded tool helps fuse the clay without losing the ear shape. -
Form the feet:
Create two tiny balls of pink clay for the feet. -
Position the feet:
Attach these firmly to the bottom front of the body, just slightly protruding past the tummy, so it looks like the bunny is sitting politely. -
Create arms:
Roll two small sausage shapes of pink clay for the arms. Press them vertically against the sides of the body.
Smooth Operator
To get that seamless finish where pieces join, wet your finger slightly with water and rub the seam gently. It melts the clay just enough to blend it perfectly.
Step 3: Finishing Touches
-
Let it cure:
Allow the figure to sit undisturbed for at least 24 hours. Foam clay needs time to harden from the outside in. -
Paint the eyes:
Using the tip of a toothpick dipped in black paint (or a fine marker), place two small dots for the eyes, positioned somewhat wide apart. -
Add the nose and mouth:
Draw a tiny ‘Y’ shape or a small anchor shape between the eyes to create the nose and smiling mouth. -
Final smooth:
Check for any rough spots. If the clay is fully dry, you can sometimes gently rub impurities away with your finger.
Shrinkage Alert
Foam clay shrinks slightly as it dries. If making a pencil topper, wiggle the pencil back into the hole periodically during the first hour of drying to ensure a good fit.
Now you have a sweet little bunny to keep you company while you work or study