When I’m craving calm studio energy, I reach for forest clay projects—there’s something so soothing about sculpting tiny trees, mossy textures, and little woodland details. Here are my favorite forest clay ideas that feel totally doable, whether you’re using polymer clay, air-dry clay, or good old modeling clay.
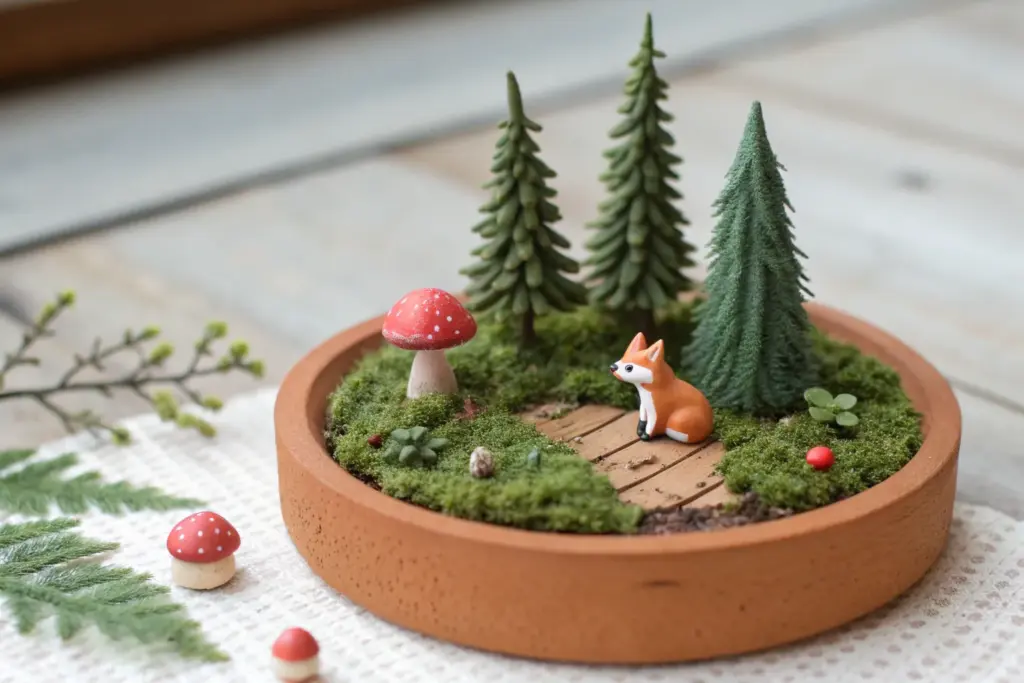
Mini Forest Diorama on a Base
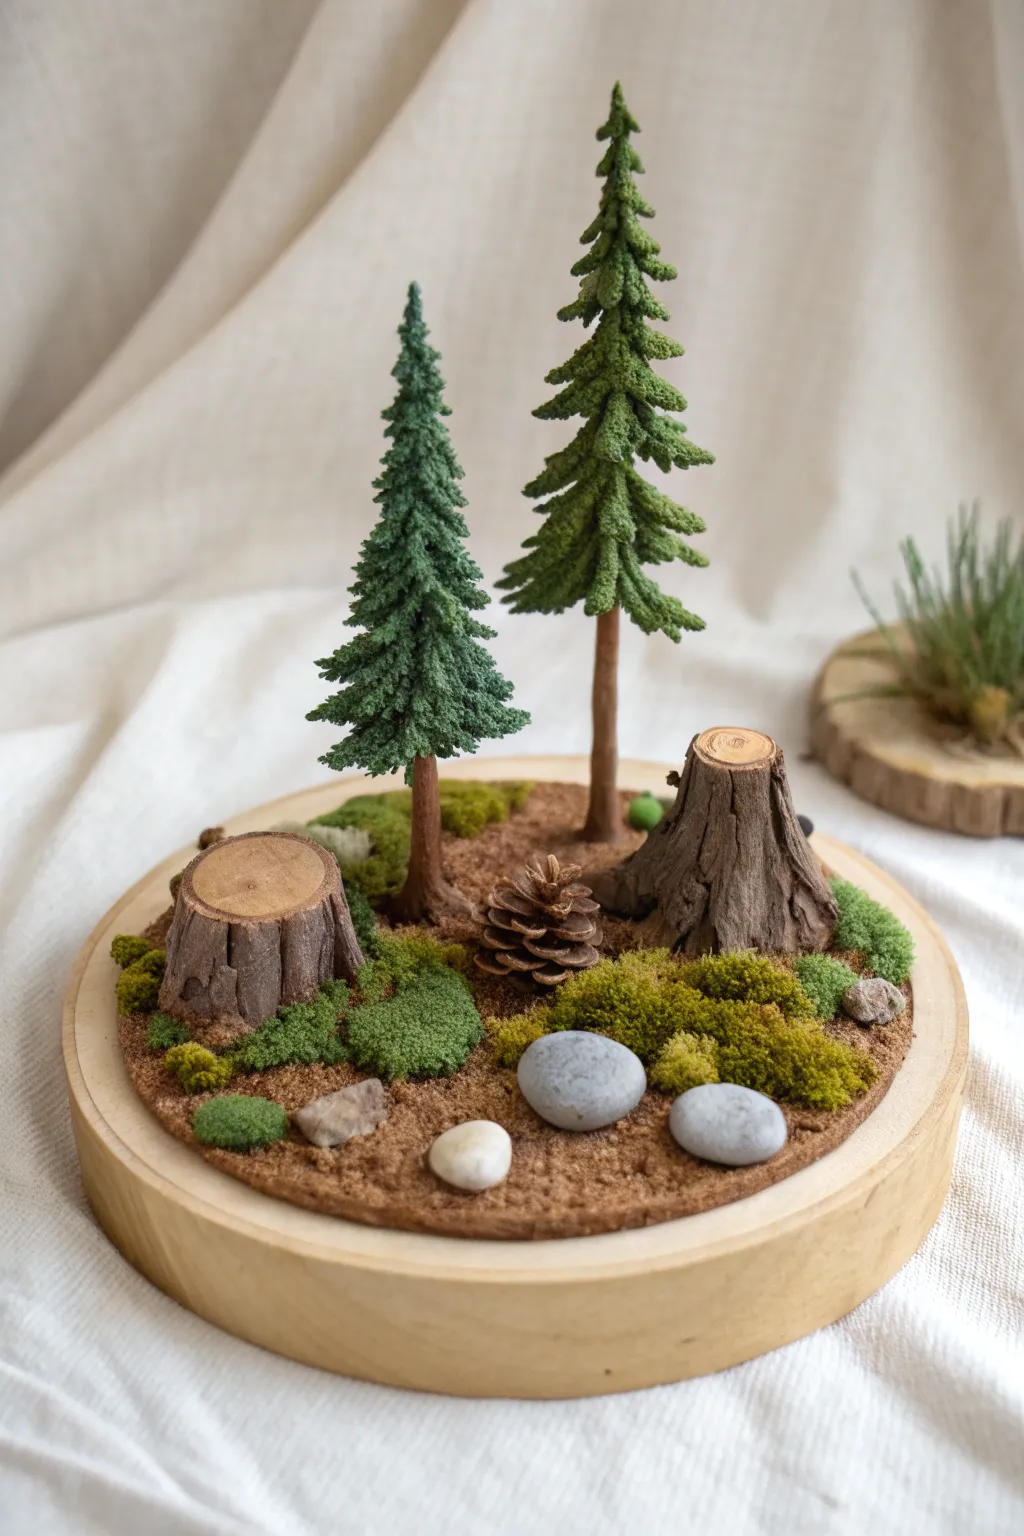
Bring the tranquility of the forest indoors with this hyper-realistic miniature diorama on a rustic wooden slice. Combining textured polymer clay techniques with natural elements creates a serene, everlasting woodland scene perfect for a desk or shelf display.
Step-by-Step Tutorial
Materials
- Round wooden art board or thick wood slice (approx. 6-8 inches)
- Polymer clay (Browns: Dark Espresso, Tan, Cinnamon)
- Polymer clay (Greens: Leaf Green, Forest Green)
- Texture tools: Needle tool, stiff bristle brush, toothbrush
- Wire armature (18 or 20 gauge floral wire)
- Aluminum foil
- Liquid polymer clay (Bake and Bond)
- Acrylic paints (dark brown, black wash)
- Dried landscaping moss (various shades)
- Fine sand or brown flocking powder
- Small smooth stones (grey/white)
- Miniature pinecone
- Craft glue or superglue
Step 1: Sculpting the Trees and Stumps
-
Form the armatures:
Cut two lengths of wire for your trees, one slightly taller than the other. Twist a small loop at the bottom of each to act as a stand. For the stumps, ball up small pieces of aluminum foil into cylinder shapes to save on clay. -
Create the tree trunks:
Wrap the wire armatures in Cinnamon brown clay, tapering it slightly as you go up. Use a needle tool to scratch vertical lines into the clay to simulate bark texture. -
Sculpt the foliage:
For the fir needles, I find it easiest to mix green clay with a tiny bit of liquid clay to soften it. Using a needle tool, tease small clumps of clay outward to create a rough, specialized ‘flocked’ texture, resembling evergreen needles. Apply this in cone shapes to the top two-thirds of the trunks. -
Cover the stumps:
Sheet out your Dark Espresso clay and wrap it around your foil stump bases. Sheet out a circle of Tan clay for the cut top of the stump and press it onto the cylinder. -
Texturizing the stumps:
Use your needle tool to drag deep, uneven grooves vertically down the sides of the stumps to mimic rough bark. On the top Tan circle, scratch concentric rings to look like growth rings and add a few cracks. -
Initial baking:
Bake your clay components (trees and stumps) according to the package instructions. Usually, this is around 275°F (135°C) for 15-20 minutes. Let them cool completely.
Step 2: Base Preparation
-
Protect the wood:
While the clay cools, ensure your wooden base is clean and dry. If using a raw wood slice, you might want to seal the bottom with a matte varnish. -
Lay the groundwork:
Spread a thin, even layer of craft glue over the top surface of the wooden base, leaving a small clean rim around the edge. -
Create the soil:
Sprinkle fine brown sand or brown flocking powder over the wet glue to create a unified earthy floor. Shake off the excess gently.
Needle Tool Tactics
When texturing the fir tree foliage, pull the clay outward in short, quick flicks rather than smooth strokes. This creates the jagged, organic look of individual pine needles.
Step 3: Assembly and Detailing
-
Position the main elements:
Once the ground is dry, arrange your trees and stumps. Place the tall tree near the back center and the shorter one to its left. Position the stumps in the foreground on opposite sides to balance the composition. -
Secure the sculptures:
Glue the trees and stumps firmly in place using strong craft glue or superglue. -
Add nature’s carpet:
Tear small clumps of preserved moss in varying shades of green. Glue these around the base of the trees and creeping up the sides of the stumps to simulate overgrowth. -
Place the stones:
Nestle a few smooth grey stones into the ‘soil’ near the front. I like to push them down slightly so they look embedded in the earth rather than just sitting on top. -
The focal point:
Glue a real miniature pinecone in the center area between the stumps and the trees. -
Final weathering:
Dilute a tiny drop of black acrylic paint with water to make a wash. Very lightly brush this into the deepest crevices of the tree bark and stump grooves to add depth and shadow.
Seasonal Shift
Dust the tips of the trees and the tops of the stumps with white pastel powder or white acrylic paint to turn this into a winter scene with a light dusting of fresh snow.
Now you have a peaceful slice of the forest to admire anytime you need a moment of calm


Mushroom Cluster Scene
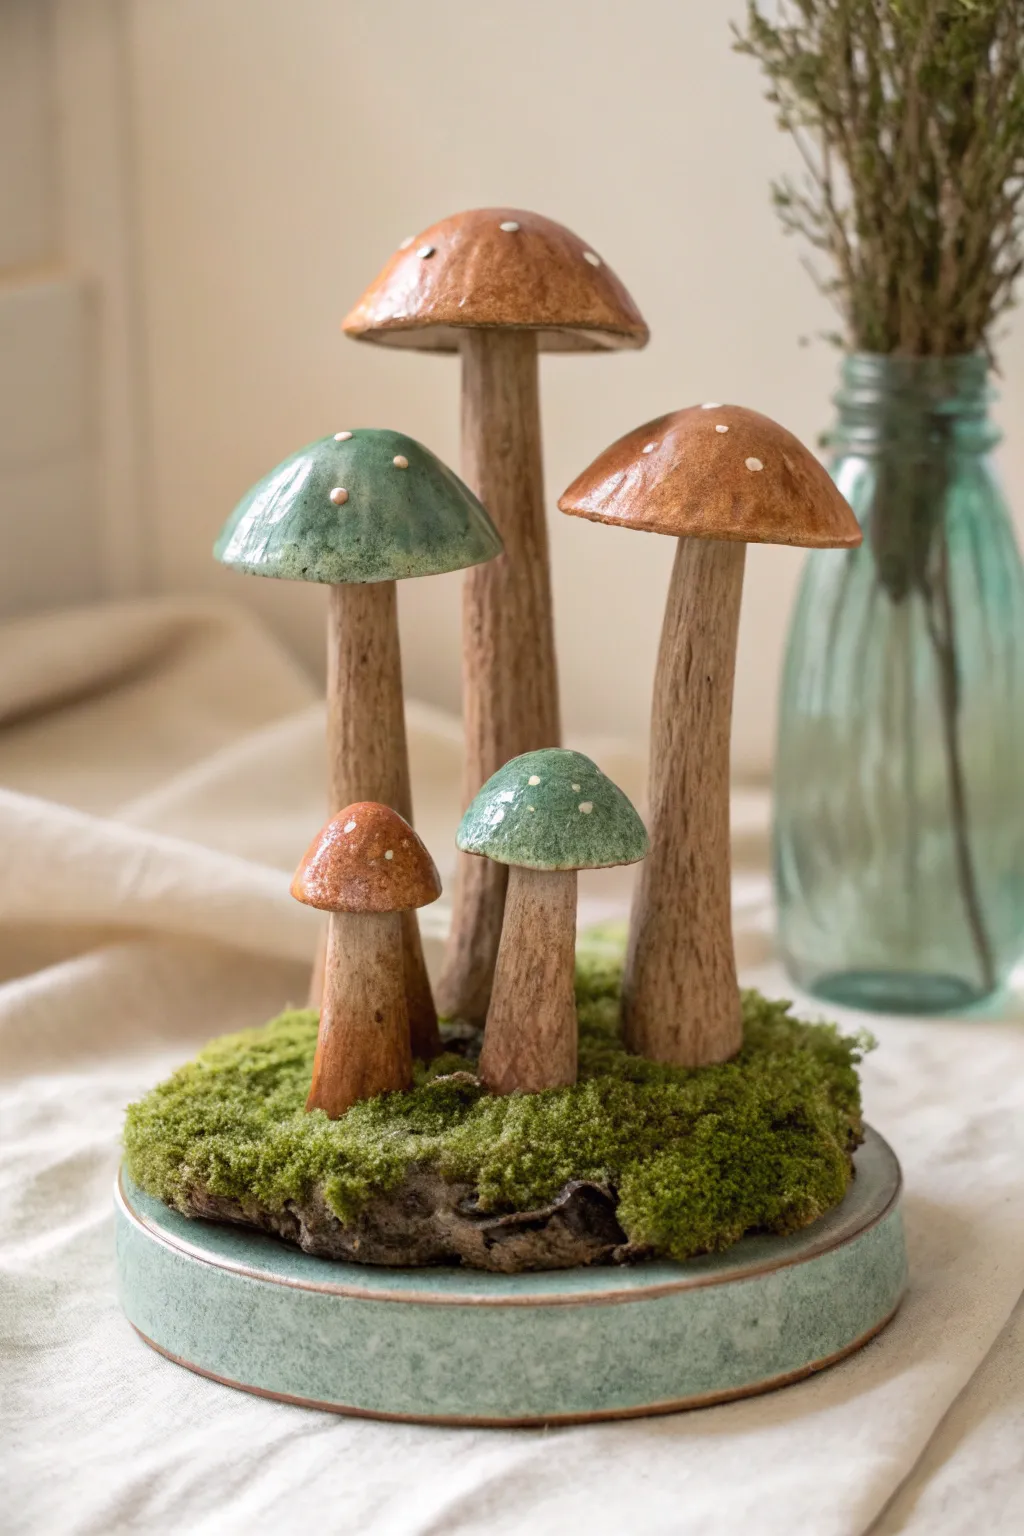
Bring the enchantment of the forest floor into your home with this ceramic mushroom cluster sculpture. Featuring earthy glazed caps and textured stoneware stems, this piece sits beautifully on a mossy bed atop a custom-made ceramic stand.
Detailed Instructions
Materials
- Stoneware clay (groggy or speckled for texture)
- Pottery wheel (optional for base, or hand-build)
- Clay carving tools & needle tool
- Slip and scoring tool
- Underglazes or glazes (sage green, earthy brown, white)
- Clear glaze (optional)
- Loop tool
- Preserved reindeer moss or sheet moss
- Strong craft adhesive (E6000 or similar)
- Kiln
Step 1: Sculpting the Mushrooms
-
Form the Stems:
Begin by rolling five coils of clay for the stems. Vary the thickness and height to create visual interest—you’ll need a tall central stem, two medium ones, and two smaller ones. -
Texture the Bark:
Before the clay hardens, use a needle tool or serrated rib to drag vertical lines down the length of each stem. This mimics the striations of organic mushroom stalks or tree bark. -
Shape the Caps:
Roll five balls of clay corresponding to your stem sizes. Pinch them into curved domes, keeping the edges slightly thick to prevent chipping. Smooth the tops initially with a damp sponge. -
Refine the Shapes:
Press the underside of each cap gently with your thumb to create space for the stem connection. I like to slightly warp one or two caps so they don’t look perfectly manufactured. -
Connect Cap to Stem:
Score the top of a stem and the underside of its matching cap thoroughly. Apply slip, press them together firmly, and smooth the clay at the join underneath so it’s seamless. -
Dry to Leather Hard:
Set your assembled mushrooms aside to dry slowly until leather hard. If the taller ones are top-heavy, prop them up or dry them upside down until stiff.
Step 2: Creating the Base
-
Create the Platform:
Roll out a thick slab or throw a low cylinder on the wheel. You want a heavy, sturdy base about 6-7 inches in diameter with straight vertical walls about 1 inch high. -
Add the Earth Mound:
Build a slightly raised, irregular mound of clay in the center of the platform. This ‘earth’ area is where your mushrooms will be planted. Texture it heavily so the moss has something to grip later. -
Test Fit the Cluster:
While the base is still workable, make indentations where your mushroom stems will sit. You can attach them permanently with slip/score now for a single piece, or fire them separately and glue later. I prefer firing separately for easier glazing.
Natural Texture
For realistic stem texture, gently roll the raw clay stems over a piece of textured tree bark or rough sandpaper before attaching the caps.
Step 3: Glazing and Firing
-
Bisque Fire:
Once all components are bone dry, load them into the kiln for a bisque firing according to your clay body’s specifications. -
Glaze the Caps:
Apply your glazes carefully. Use a speckled sage green for the rounder caps and a warm, distinct brown for the flatter ones. Paint 2-3 coats for opacity. -
Add the Dots:
Using a fine-tip applicator bottle or a small brush, dab tiny white glaze dots onto the caps. Keep them irregular for a natural look. -
Glaze the Base:
Glaze the vertical rim of the round platform in the green tone to tie the piece together. Leave the stems of the mushrooms unglazed to highlight the raw clay texture. -
Glaze Fire:
Fire the pieces a second time to your glaze temperature. Ensure the unglazed stems don’t touch any glazed surfaces in the kiln.
Glow Up
Make the mushrooms hollow and poke holes in the stems. Place a battery-operated tea light inside the base mound to create a magical forest nightlight.
Step 4: Final Assembly
-
Secure the Mushrooms:
If you fired the pieces separately, use strong epoxy or adhesive to glue the mushroom stems into the indentations on your base. -
Prepare the Moss:
Take your preserved moss and tear it into small tufts. You want enough to completely cover the central clay mound. -
Apply the Greenery:
Dab glue onto the mound around the base of the stems. Press the moss firmly into place, tucking it tightly against the mushroom stalks to hide any connection points.
Place your finished sculpture near a window or alongside your houseplants to create a charming little woodland corner

Woodland Animal Figurines
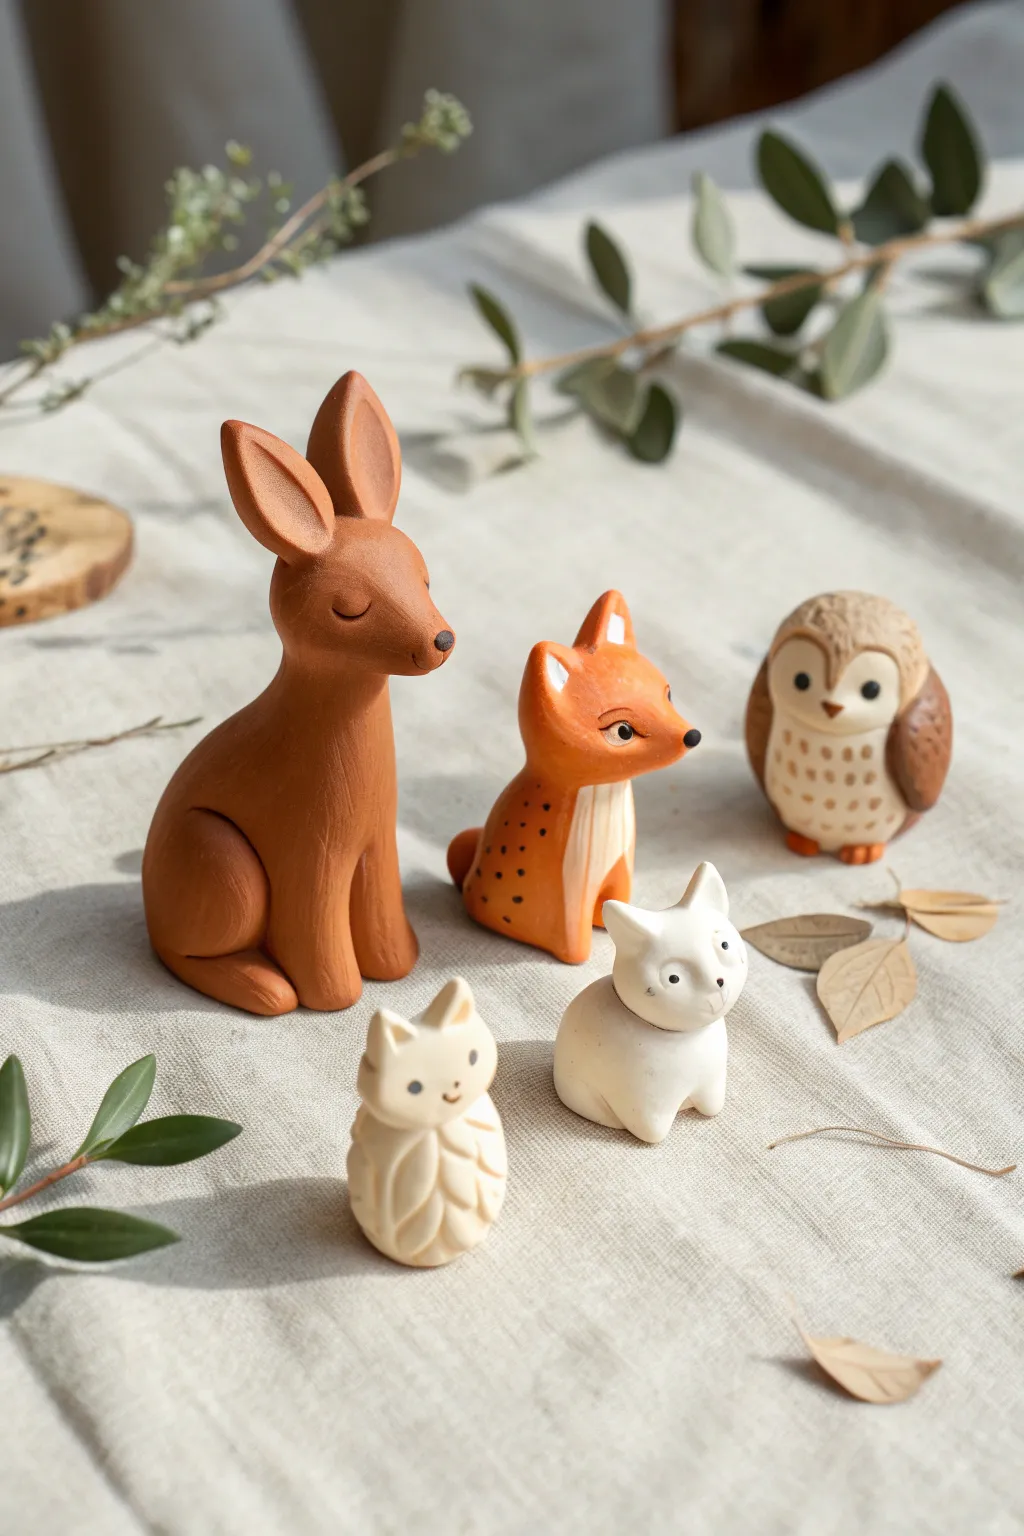
Bring the magic of the deep forest onto your desk with these charming, minimalist animal figurines crafted from polymer or air-dry clay. Their smooth textures and earthy tones create a serene, cohesive set perfect for nature-inspired decor.
Step-by-Step Tutorial
Materials
- Polymer clay (terracotta, orange, white, cream/beige)
- Set of small sculpting tools (ball stylus, needle tool, silicone shapers)
- Acrylic paints (black, white, burnt sienna, deep brown)
- Fine detail paintbrush (size 0 or 00)
- Rolling pin for clay
- Aluminum foil (for armature in larger figures)
- Matte varnish or sealant
- Sandpaper (fine grit)
Step 1: Sculpting the Gentle doe
-
Form the base body:
Start with a ball of terracotta-colored clay about the size of a golf ball. Roll it into a smooth teardrop shape, pulling the narrower end upwards to form a long, elegant neck and chest area. -
Shape the head:
Roll a smaller oval for the head and attach it firmly to the neck. Use a blending tool to smooth the seam completely so the neck transitions seamlessly into the jaw. -
Add the large ears:
Shape two long, petal-like ears. Press a thumb or large ball tool into the center of each to create the inner ear cavity. Attach them high on the head, angling them slightly back for an alert look. -
Create the seated legs:
Roll two thick sausages of clay for the rear haunches. Press them against the lower sides of the body, blending the upper thigh into the torso while keeping the rounded knee distinct.
Step 2: Crafting the Fox & Owl
-
Fox body basics:
Using bright orange clay, form a seated body shape similar to the doe but smaller and more compact. Pull the front chest clay forward slightly to hint at front legs. -
Fox head and tail:
Sculpt a wide, diamond-shaped head with pointed ears and a distinct snout. Attach a thick, bushy tail wrapping around the side of the body. I like to curve the tail tip upward for extra personality. -
Owl foundation:
Roll a simple egg shape from brown clay. Flatten the bottom so it stands securely. This simple shape serves as the entire body and head combined. -
Owl facial features:
Create a heart-shaped disk from cream clay and press it onto the front of the egg. Add two tiny triangles for ears at the very top and small clay wings pressed flat against the sides. -
Texturing the feathers:
For the owl’s belly, use a small tool to press tiny ‘v’ or ‘u’ shapes into the cream clay, mimicking soft breast feathers.
Cracking Clay?
If using air-dry clay, cracks can happen as moisture leaves. Repair hairline cracks by smoothing a ‘slip’ (clay mixed with water into a paste) over the area with your finger.
Step 3: The Tiny Companions
-
Sculpting the white wolf:
Form a small white clay oval. Pinch upward at one end to create a head with two small triangular ears. Keep the shape very abstract and smooth. -
The textured creature:
For the smallest cream figure, interpret it as a pinecone-owl hybrid. Create a small oval and use a knife tool to make deep, overlapping petal-shaped cuts all over the body for a scale-like texture. -
Baking or Drying:
Follow the instructions for your specific clay. If using polymer clay, bake on a ceramic tile or baking sheet. If using air-dry, let them sit undisturbed for 24-48 hours in a dry, draft-free spot.
Leafy Base
Make a display stand! Roll out a flat sheet of green clay and cut it into a large organic leaf shape. Bake or dry it, then arrange your finished animals on top for a complete diorama.
Step 4: Painting and Finishing
-
Sanding imperfections:
Once fully cured or dry, inspect your figures. Gently sand away any fingerprints or rough mold lines with fine-grit sandpaper to achieve that satin-smooth finish. -
Painting the fox details:
Mix a creamy white paint. Apply it to the fox’s chest, tip of the tail, and inside the ears. Let this dry completely before moving to the eyes. -
Adding eyes and noses:
Using your finest brush and black paint, add tiny details. Paint closed, curved lines for the sleeping doe’s eyes to make her look peaceful. For the fox and owl, paint small black circles with tiny white reflection dots. -
Final touches:
Add small black dots to the fox’s snout for whisker spots. Paint the owl’s beak and the doe’s nose with a dark brown or black. A tiny touch of pink inside the ears adds life. -
Sealing:
Coat all figurines with a matte varnish. This unifies the sheen of the clay and the paint, giving the set a professional, high-end ceramic look.
Arranging your new forest family together creates a peaceful little scene that captures the quiet beauty of the woods.


Tiny Pine Tree Variations
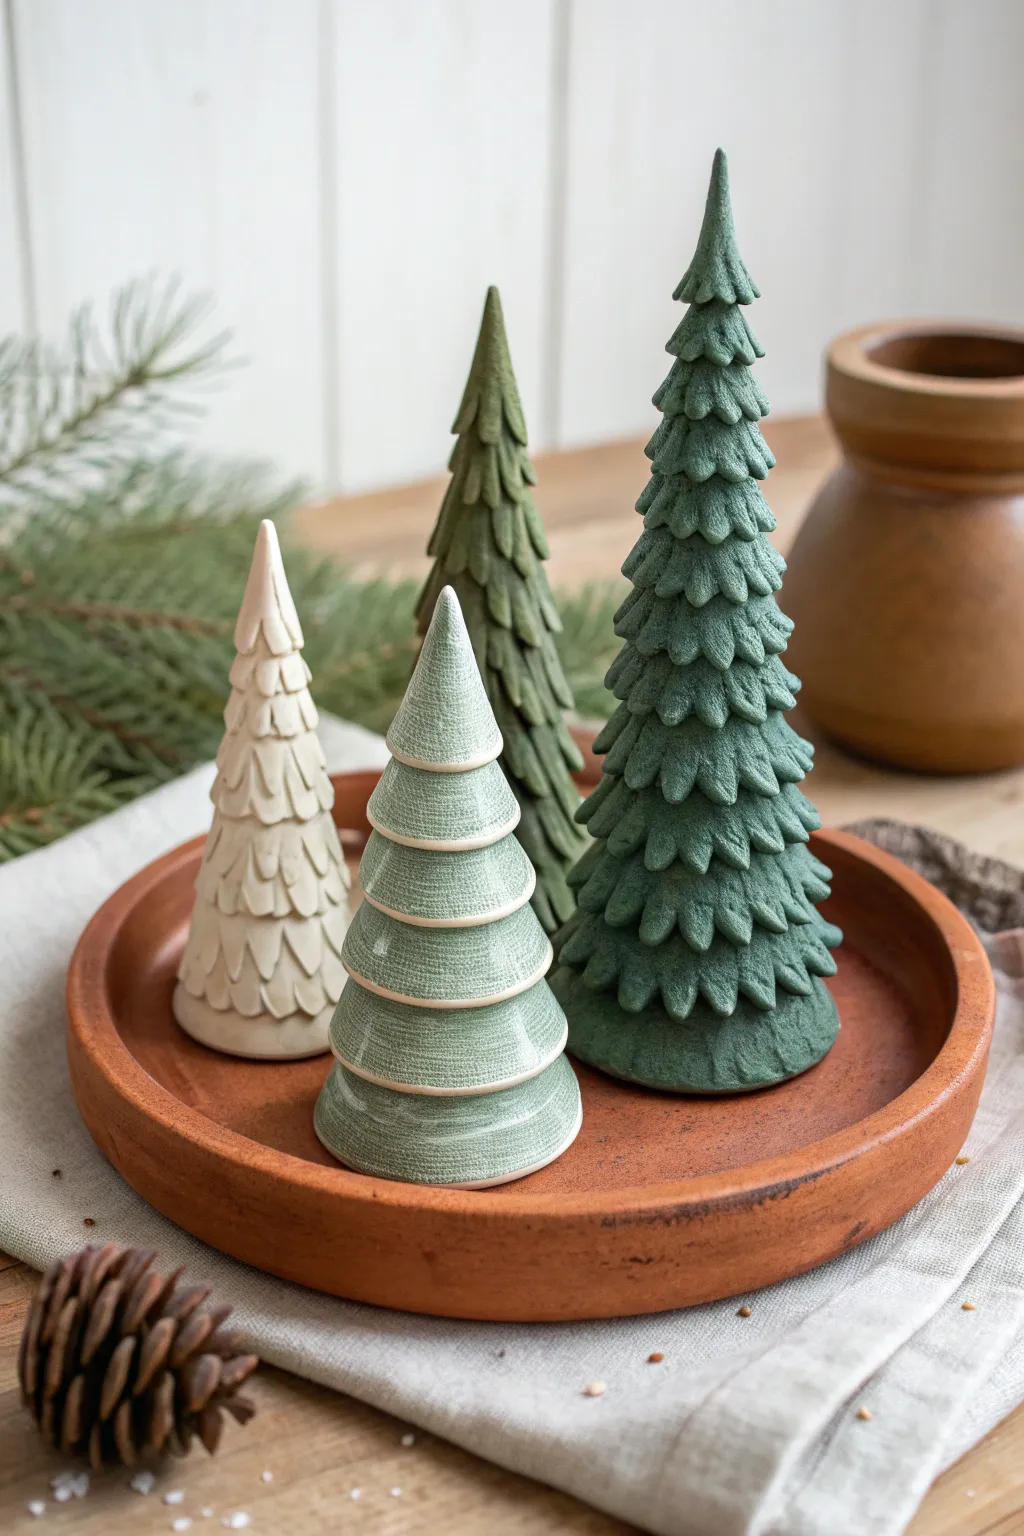
Create a serene winter woodland scene with these stylized polymer clay pine trees, each boasting a unique texture and shade of green. This project explores three distinct sculpting techniques—layering scales, stacking tiers, and detailed carving—perfect for a modern holiday display.
How-To Guide
Materials
- Polymer clay (White, Sage Green, Forest Green, Dark Green)
- Cone-shaped bases (aluminum foil or scrap clay)
- Rolling pin or pasta machine
- Small teardrop cutter (optional for scales)
- Needle sculpting tool
- Small curved scissors or embroidery scissors
- Flexible clay blade
- Texture sponge or stiff paintbrush
- Baking sheet and parchment paper
- Oven (for curing)
- Matte varnish (optional)
Step 1: Preparation & Base Forms
-
Condition the clay:
Start by warming and kneading your polymer clay until it is soft and pliable. You’ll need four distinct colors: a creamy white, a soft sage green, and two shades of deep forest green. -
Form the cores:
To save weight and clay, create cone-shaped armatures using tightly scrunched aluminum foil. Make four cones of varying heights and widths to mimic a natural forest variation. -
Cover the cores:
Roll out thin sheets of your base clay colors. Wrap the corresponding clay sheet around each foil cone, smoothing the seams with your fingers until you have clean, smooth cone shapes ready for texturing.
Needle Tip
Work from the bottom up on every tree design. This prevents your hands from accidentally squashing the detailed work you’ve already completed on the lower sections.
Step 2: Technique 1: The White Scaled Tree
-
Create the scales:
For the cream-colored tree, roll a small snake of clay and slice it into tiny, equal beads. Flatten each bead into a teardrop shape using your thumb or a small tool. -
Apply the first row:
Starting at the very bottom of the white cone, press a ring of clay scales around the base, ensuring the pointed ends face downward and slightly overlap the edge. -
Build the layers:
Continue adding rows of scales, moving upward. Offset each new row so the point of the new scale sits between the two scales below it, creating a roof-shingle effect. -
Finish the peak:
As you reach the top, make the scales smaller and gently pinch the final tip into a sharp, elegant point.
Winter Frost
Before baking, lightly brush white mica powder or dry pastel on the tips of the green branches to create a permanent, shimmering dusty snow effect.
Step 3: Technique 2: The Tiered Sage Tree
-
Roll thick sheets:
For the sage green tree, roll out a slab of clay about 3-4mm thick. Use circle cutters in graduating sizes to cut out several discs. -
Shape the tiers:
Take the largest disc and gently pinch the edges to taper them slightly, creating a shallow cone shape rather than a flat disc. -
Stack and texture:
Thread the largest disc onto your central cone base. Before adding the next, use a stiff brush or texture sponge to gently dab the surface, creating a subtle, horizontal striated texture. -
Complete the stack:
Repeat this process with smaller and smaller discs, stacking them up the cone. Smooth the underside of each tier onto the one below it to secure the structure.
Step 4: Technique 3: The Ruffled Forest Trees
-
Prepare the surface:
For the two darker green trees, ensure your base cone is perfectly smooth. The texture here relies on manipulating the clay directly on the form. -
Snip the branches:
Using small curved embroidery scissors, make small, upward snips into the surface of the clay. Start at the bottom and work your way around. -
Shape the needles:
After snipping a row, use your finger or a needle tool to gently curl the snipped piece outward and downward, creating a fluffy, bough-like appearance. -
Vary the density:
For the tallest tree, keep the snips close together and deeply curved for a heavy texture. For the medium tree, keep the rows tighter and flatter against the cone for a streamlined look. -
Refine the texture:
I like to gently press a piece of sandpaper or a texture sponge against the tips of the ‘branches’ while the clay is soft to mimic pine needles.
Step 5: Finishing Touches
-
Bake carefully:
Place your finished trees on a parchment-lined baking sheet. Bake according to your brand of polymer clay’s instructions, usually around 275°F (135°C) for 30 minutes per 1/4 inch of thickness. -
Cool and inspect:
Let the trees cool completely in the oven to prevent cracking. Once cool, verify they stand flat; if not, lightly sand the bases. -
Optional finish:
If desired, brush a very light coat of matte varnish over the trees to protect them and deepen the green colors without adding unnatural shine.
Arranging your diverse collection of trees on a simple terracotta plate brings a touch of calm nature to your table

The Complete Guide to Pottery Troubleshooting
Uncover the most common ceramic mistakes—from cracking clay to failed glazes—and learn how to fix them fast.
Leaf Imprint Forest Tiles
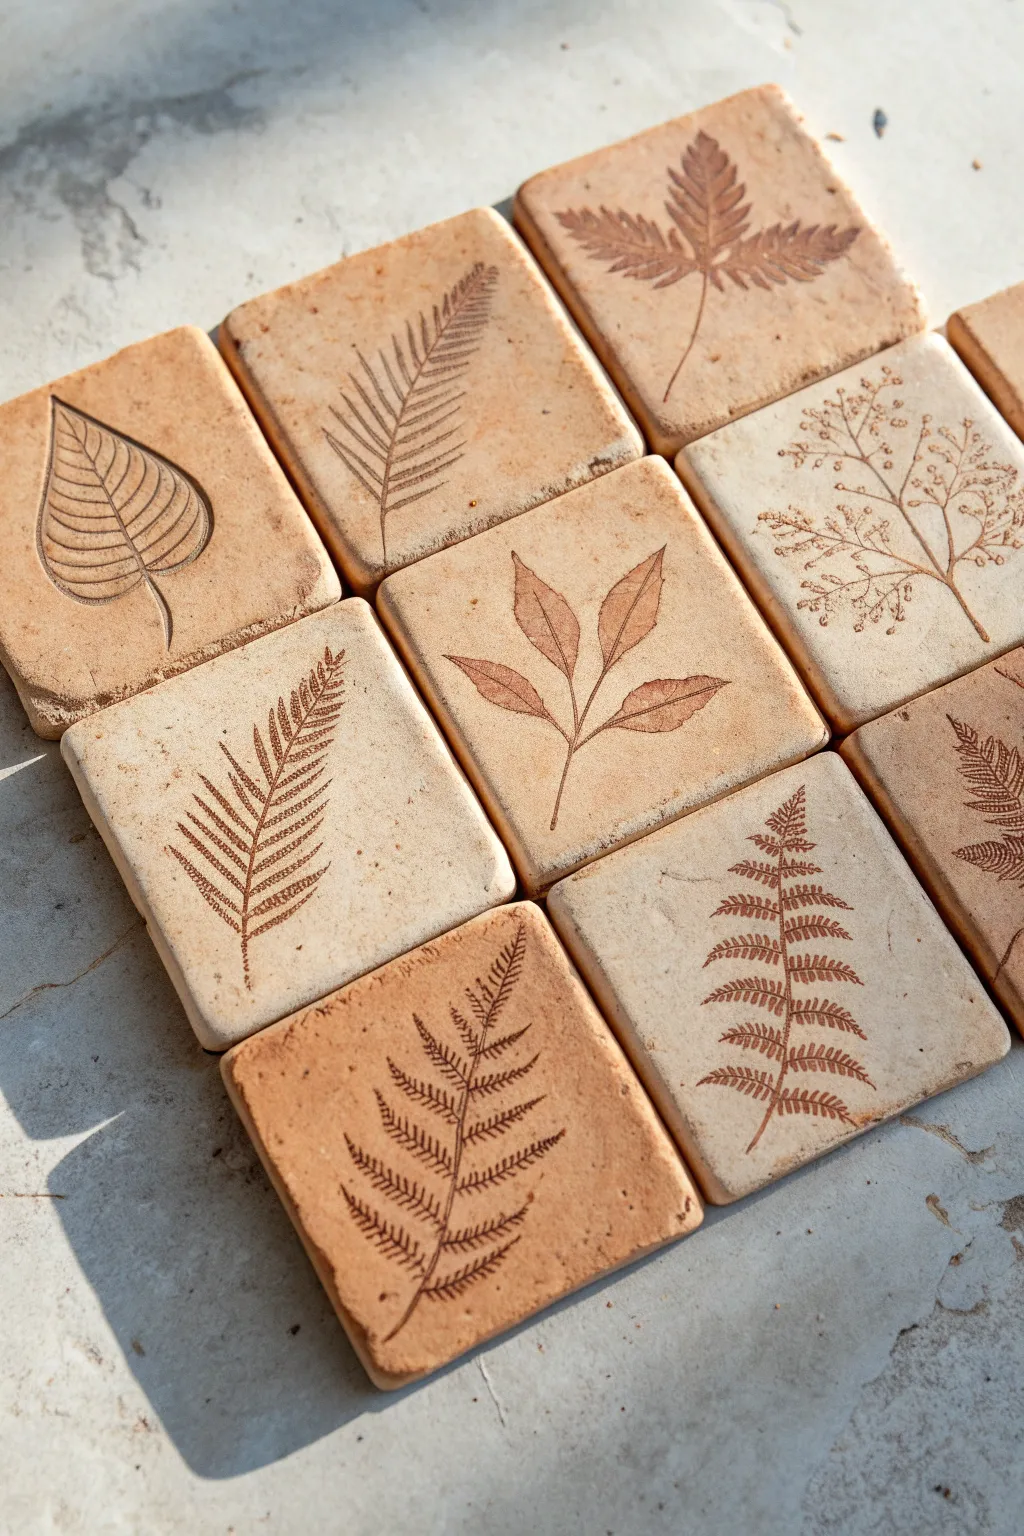
Capture the delicate details of the forest floor with these handmade clay tiles. Featuring real leaf impressions on earthy terracotta and stoneware squares, this project creates a stunning, fossil-like grid perfect for coasters or wall art.
Step-by-Step Guide
Materials
- Air-dry clay or polymer clay (terracotta and white/beige colors)
- Fresh leaves with prominent veins (ferns, beech, birch)
- Rolling pin
- Square cookie cutter (approx. 3-4 inches) or knife and ruler
- Canvas mat or parchment paper
- Sponge
- Brown acrylic paint or antiquing wax
- Paper towels
- Matte varnish (optional)
Step 1: Preparing the Clay Base
-
Condition the Clay:
Begin by kneading your clay until it is warm and pliable. If you want the varied tones seen in the example, loosely marble together a chunk of terracotta clay with a chunk of beige or white clay. -
Roll Out the Slab:
Place the clay on a canvas mat or parchment paper to prevent sticking. Roll it out to an even thickness of about 1/4 inch (6mm). Make sure the surface is smooth and free of air bubbles. -
Cut the Squares:
Using your square cutter or a sharp knife and ruler, cut out your tile shapes. I find it helpful to cut a few extra squares to test your leaf impressions first. -
Smooth the Edges:
Dip your finger or a small sponge in a little water and gently run it along the cut edges of the tiles to soften any sharpness or crumbling.
Vein Definition Tip
Use a brayer or a small jar to roll over the leaf instead of a large rolling pin. This concentrates pressure exactly where you need it without thinning the whole tile.
Step 2: Creating the Impressions
-
Leaf Selection:
Choose leaves that are stiff enough to hold their shape. Leaves with raised veins on the back work best for a deep impression. -
Positioning:
Place a leaf face-down (vein side down) onto the center of a clay square. Arrange them diagonally or straight, varying the angles for a natural look. -
Rolling the Impression:
Gently roll over the leaf with your rolling pin once. Apply firm, even pressure to embed the veins into the clay without distorting the square shape too much. -
Removing the Foliage:
Carefully find the stem or edge of the leaf and peel it away to reveal the design. Use a tweezer if the stem is too delicate to grasp with fingers. -
Detail Enhancement:
If any parts of the impression are too faint, you can carefully re-etch them using a needle tool, following the existing lines.
Step 3: Firing and Finishing
-
Drying Phase:
Let the tiles dry completely. For air-dry clay, this takes 24-48 hours. Turn them over halfway through so the bottom dries evenly and prevents warping. -
Sanding:
Once bone dry, lightly sand the edges with fine-grit sandpaper to remove any rough burrs. -
Applying the Wash:
Mix a small amount of brown acrylic paint with water to create a thin wash. Brush this over the entire surface of the tile, ensuring it gets into the deep crevices of the leaf print. -
Wiping Back:
Immediately wipe the surface with a damp paper towel or sponge. This removes the paint from the high points but leaves the dark color in the recessed veins, highlighting the design. -
Final Sealing:
To protect your tiles, especially if using them as coasters, apply a coat of matte varnish or sealant. This enriches the clay color and prevents moisture damage.
Warped Tiles?
If your tiles curl up while drying, gently weigh them down with a heavy book placed over parchment paper once they are leather-hard (semi-dry) to flatten them.
Arrange your finished tiles in a grid to create a beautiful botanical mosaic that brings the outdoors inside
Bark-Textured Tree Stump Planter
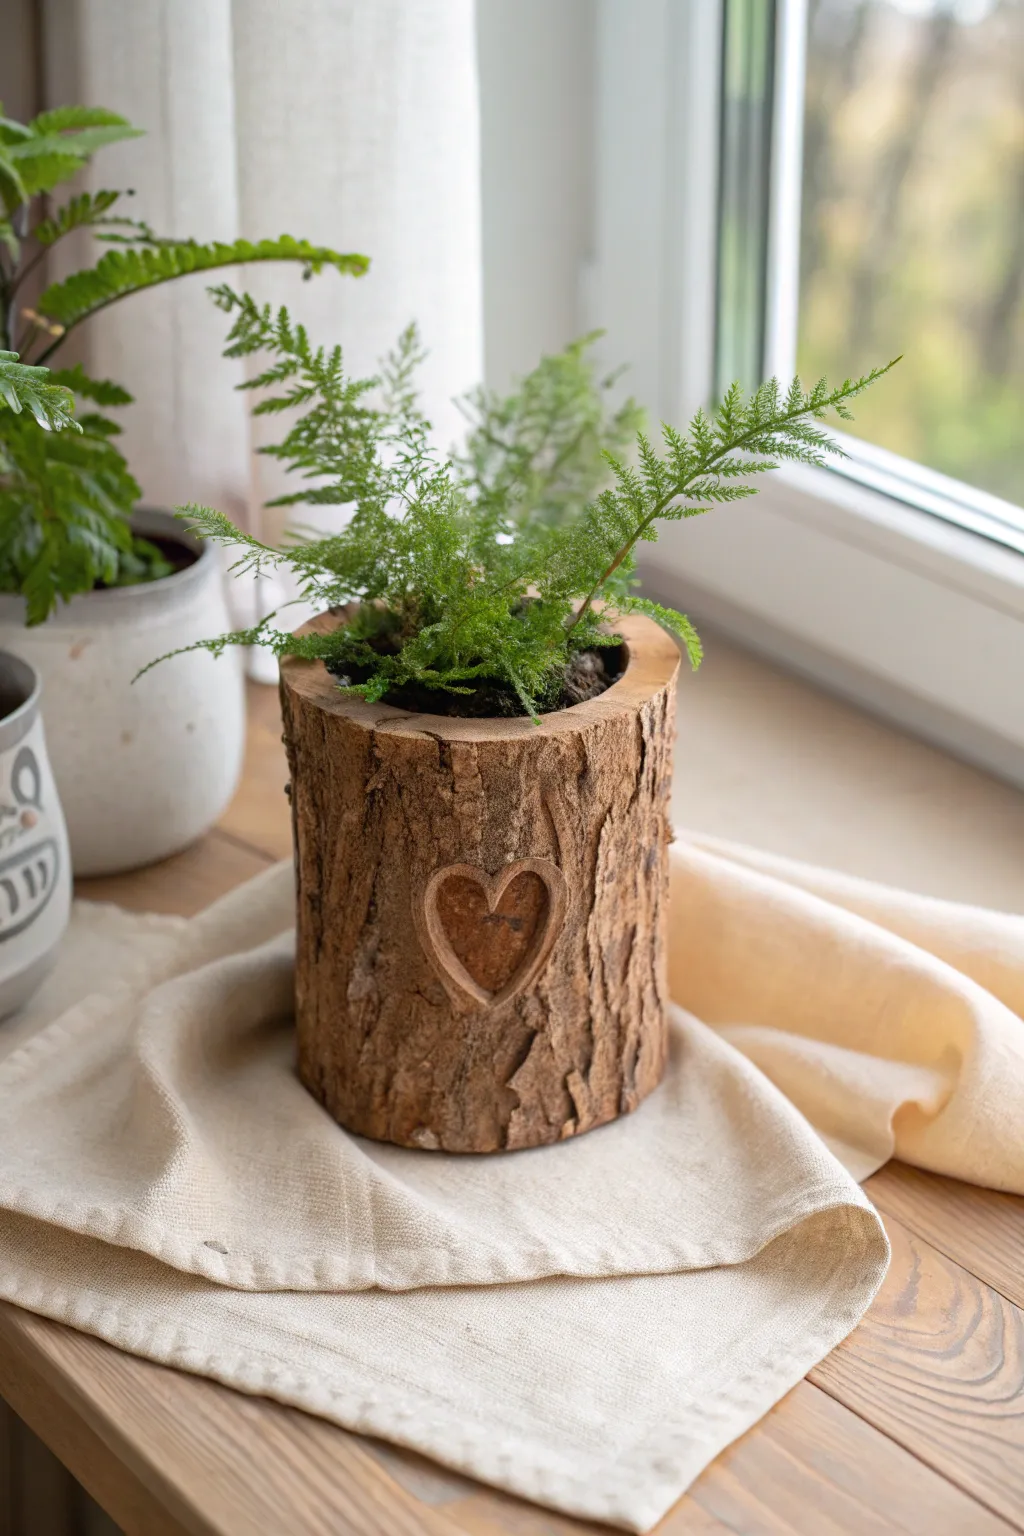
Bring a touch of the woodlands inside with this charming faux-wood planter that captures the rugged beauty of tree bark. Using air-dry or polymer clay, you will sculpt a realistic stump vessel complete with a sweet carved heart detail, perfect for holding small ferns or succulents.
Detailed Instructions
Materials
- Air-dry clay (brown or terracotta color preferred) or polymer clay
- Empty tin can or cylindrical glass jar (as a mold/armature)
- Aluminum foil
- Sculpting tools (needle tool, small loop tool)
- Wire texture brush or an old stiff toothbrush
- Rolling pin
- Acrylic paints (dark brown, ochre, touches of black and green)
- Matte varnish or sealant
- Craft knife
- Water and sponge (for smoothing)
Step 1: Preparing the Base
-
Prep your armature:
Select a clean tin can or sturdy glass jar to serve as the permanent interior or removable mold for your planter. If you plan to remove the can later, wrap it loosely in aluminum foil to prevent the clay from sticking. -
Roll the slab:
Roll out a thick slab of clay, roughly 1/4 to 1/2 inch thick. Measure the circumference and height of your container to ensure the slab is large enough to wrap completely around it with a little overlap. -
Wrap the form:
Carefully lift your clay slab and wrap it around the container. Press the vertical seam together firmly, blending the clay with a little water (if using air-dry clay) so the join becomes invisible. -
Create the rim:
Allow the clay to extend slightly above the rim of your container. Fold this excess clay inward and smooth it down to create a solid, thick top edge that mimics a sawed-off log.
Clay cracking?
If you see cracks forming as air-dry clay dries, mix a tiny bit of fresh clay with water to make a paste (slip) and fill the cracks, then smooth over.
Step 2: Sculpting the Bark
-
Rough texturing:
Take a wire brush or a crumpled ball of aluminum foil and press it repeatedly all over the surface. This creates the initial porous, organic texture of wood before we add deep grooves. -
Carving grand rugged lines:
Using a modeling tool or craft knife, score deep, varied vertical lines into the clay. I find it helpful to make these lines jagged and irregular—nature rarely makes straight lines. -
Adding knot details:
In a few random spots, swirl your tool to create small knots or imperfections in the ‘wood’. Vary the depth of your cuts to make the bark look thick and aged. -
Refining the top edge:
Score concentric circles onto the flat top rim of the planter to simulate tree rings. These don’t need to be perfect circles; wobbly lines look more realistic.
Mossy Effect
For an older forest look, stipple tiny amounts of muted green paint into the deeper crevices of the bark or near the bottom edge.
Step 3: The Heart Detail
-
Outline the heart:
Choose a prominent spot on the front of the planter. Lightly trace a heart shape with a needle tool to guide your carving. -
Recess the shape:
Use a small loop tool to gently scoop out the clay inside your heart outline. You want to create a recessed area that looks like someone carved into the tree years ago. -
Smooth the interior:
Use your finger or a small damp sponge to smooth the clay inside the recessed heart, making it look smoother than the rough bark surrounding it. -
Define the edge:
Deepen the cut right around the heart’s perimeter to create a sharp shadow line, emphasizing the difference between the outer bark and the inner wood.
Step 4: Finishing and Painting
-
Let it dry:
Allow the planter to dry completely. For air-dry clay, this may take 24-48 hours. If using polymer clay, bake according to the manufacturer’s package instructions. -
Base coat:
Paint the entire exterior with a dark brown acrylic paint. While it’s still wet, wipe some of it off the raised surfaces with a paper towel so the dark color stays only in the deep crevices. -
Dry brushing:
Dip a dry brush into a lighter ochre or tan paint. Lightly whisk this over the raised bark textures to highlight the details. This contrasting technique instantely brings the ‘wood’ to life. -
Heart coloring:
Paint the inside of the heart a slightly warmer, reddish-brown tone to suggest fresh or different wood grain, distinguishing it from the weathered exterior. -
Sealing:
Once the paint is fully dry, apply a coat of matte varnish to protect your work from moisture, especially if you plan to water defined plants inside.
Place your favorite fern inside and enjoy your mini slice of the forest on your windowsill


What Really Happens Inside the Kiln
Learn how time and temperature work together inside the kiln to transform clay into durable ceramic.
Forest Creek or Pond Insert
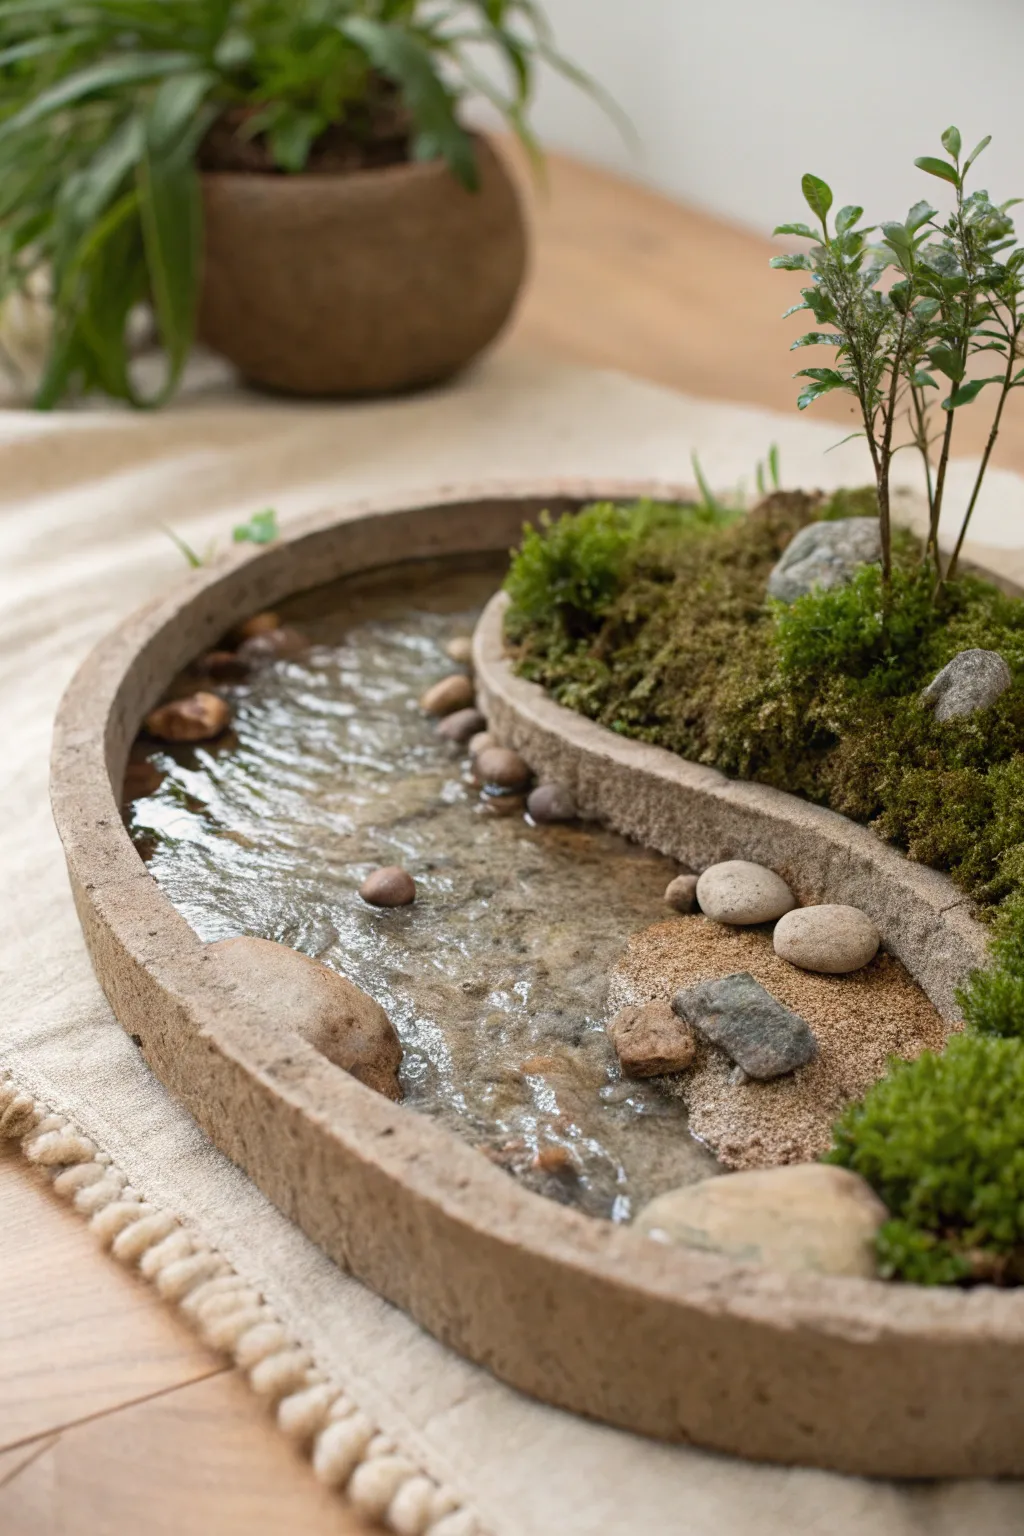
Bring the serene beauty of a woodland stream indoors with this handcrafted clay basin project. Featuring a realistic resin water feature alongside a miniature mossy bank, this piece serves as a stunning tabletop terrarium or meditative decor accent.
Step-by-Step Guide
Materials
- Air-dry clay or polymer clay (stone or earth tone)
- Epoxy resin (two-part clear casting resin)
- Small pebbles and river stones of varying sizes
- Preserved reindeer moss or live sheet moss
- Tiny twigs or miniature scale model trees
- Sand (fine grain)
- Clear waterproof sealant (e.g., Mod Podge or varnish)
- Sculpting tools (rolling pin, knife, smoothing tool)
- Acrylic paint (optional: greys, browns, greens for washing)
- Disposable mixing cup and stir stick
- Tweezers
Step 1: Sculpting the Base
-
Prepare the Clay:
Begin by kneading a large lump of clay until it is pliable and smooth. Roll it out into a thick, oval slab about 1/2 inch thick to form the sturdy base of your container. -
Build the Outer Wall:
Roll a long snake of clay and flatten it slightly to create a strip about 1.5 inches high. Attach this strip around the perimeter of your base, blending the seams on both the inside and outside to ensure it is watertight and structurally sound. -
Form the Dividing Wall:
Create a curved, S-shaped wall that runs through the center of the oval, separating the basin into two distinct zones: the water side and the land side. Blend this wall seamlessly into the base and the outer rim. -
Texture the Clay:
Use a rough stone or a texturing tool to gently press against the exterior and interior walls. This gives the clay a weathered, organic stone appearance rather than a perfectly smooth finish. -
Dry and Seal:
Allow the clay to dry completely according to the package instructions. If using polymer clay, bake it now. Once hardened, apply main coats of waterproof sealant to the entire piece, paying extra attention to the ‘water’ side to prevent resin leakage.
Sticky Situation?
If your resin is leaking into the land side, your clay divider wasn’t sealed perfectly. Use a tiny dab of UV resin or clear glue to plug the gap quickly before the main pour hardens.
Step 2: Creating the Landscape
-
Prepare the Creek Bed:
In the lower ‘water’ section, sprinkle a thin layer of sand. Arrange small pebbles and flat river stones along the bottom, placing some near the dividing wall to simulate a rocky shoreline. -
Prepare the Land Side:
Fill the higher section with a dense packing material or extra clay if you don’t want to fill it entirely with soil. Top it with a layer of soil or sand to create the planting ground. -
Pour the Resin:
Mix your two-part epoxy resin slowly to avoid bubbles. Carefully pour it into the creek bed side until it covers the sand and partially submerges the rocks. -
Create Ripples:
As the resin begins to set (usually after 30-45 minutes), use a toothpick or tool to gently drag across the surface. This manipulation creates the illusion of moving water ripples rather than a stagnant pool. -
Cure the Water:
Let the resin cure fully in a dust-free area for 24 hours. The surface should be hard and glossy like real water.
Step 3: Final Details
-
Add Greenery:
On the land side, tuck pieces of preserved heavy moss into the soil area, mounding it up slightly around the edges of the dividing wall to soften the transition. -
Plant the Trees:
Using tweezers, carefully insert small twigs or miniature model trees into the moss. Group them towards one end to create a focal point and a sense of scale. -
Detail the Shoreline:
Add a few tiny loose pebbles on top of the moss near the resin ‘water’ to make the scene look integrated and natural. -
Clean Up:
Wipe away any stray granules of sand or loose moss from the outer rim of the clay vessel to finish the presentation.
Pro Tip: Depth Effects
Add a tiny drop of blue or green alcohol ink to your resin mix. A very faint tint gives the ‘water’ implied depths, making the creek look deeper than it actually is.
Place your finished miniature landscape near a window to catch the light on the water ripples
Bridge Over a Clay Stream
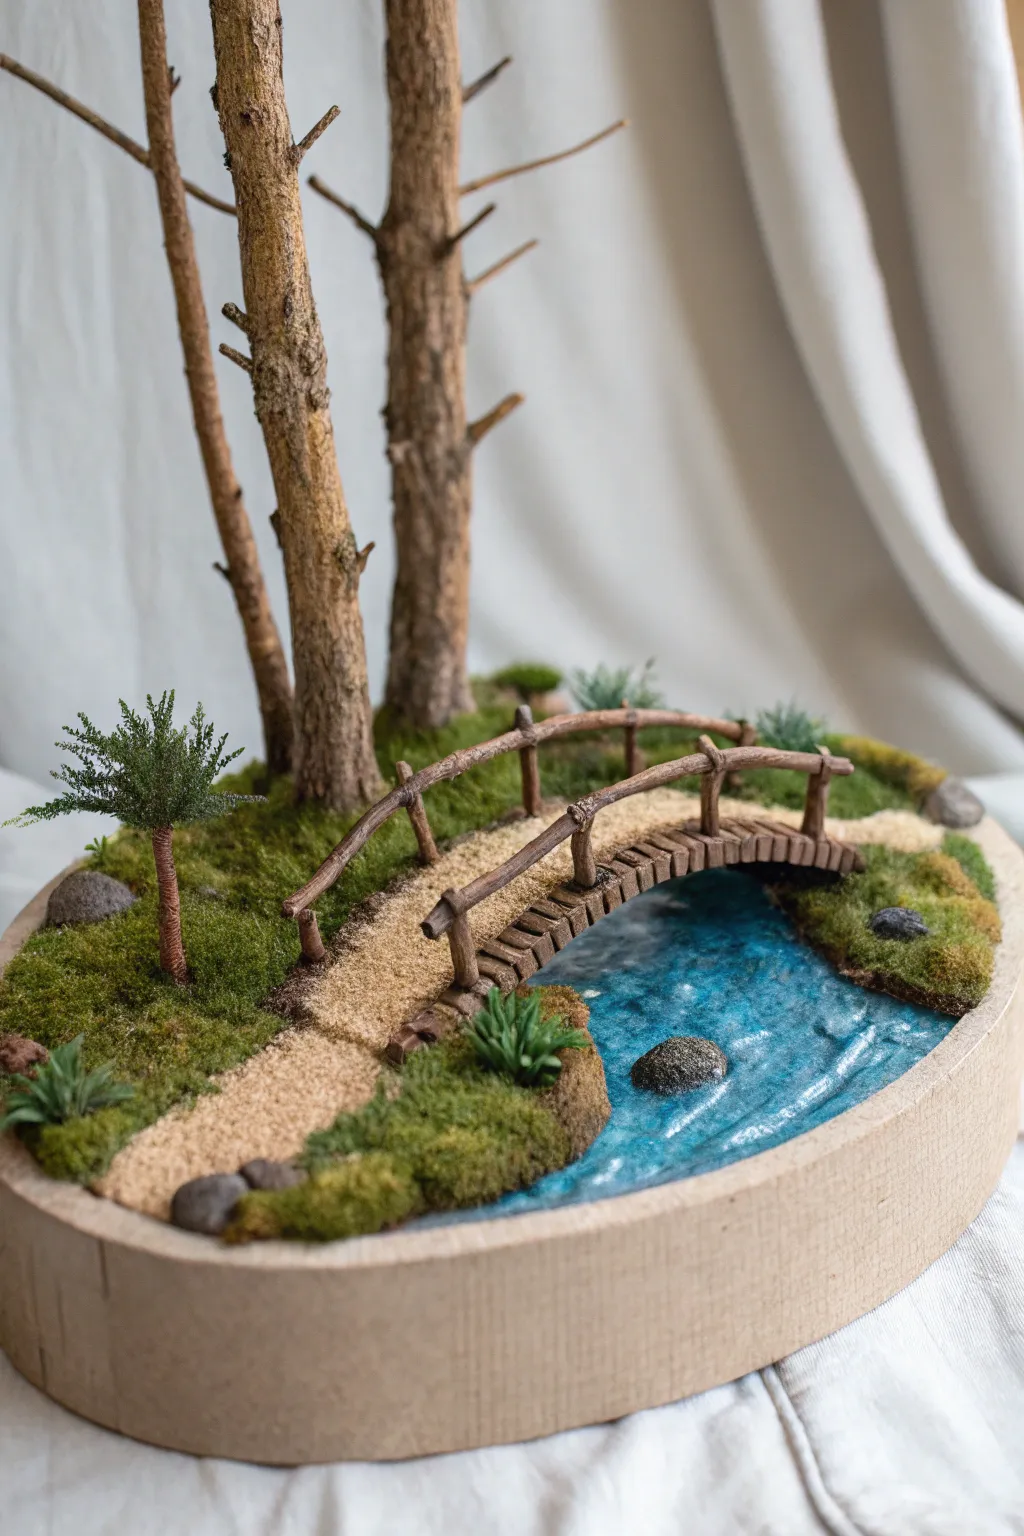
Capture the serenity of a quiet forest walk with this diorama featuring a rustic bridge spanning a sparkling blue stream. This project combines natural textures like wood and moss with resin effects to create a peaceful, realistic nature scene.
Detailed Instructions
Materials
- Round wooden shadow box or craft base (approx. 6-8 inches)
- Air-dry clay or polymer clay (brown and terracotta)
- Two-part epoxy resin
- Blue alcohol ink (cyan or turquoise)
- Dried twigs or small branches (for trees)
- Balsa wood strips or popsicle sticks
- Preserved moss (sheet moss and clump moss)
- Fine sand or beige grout
- PVA glue (white glue)
- Super glue or tacky glue
- Acrylic paints (browns, grays, greens)
- Small pebbles or gravel
- Artificial miniature plants or tufts
- Styrofoam block (for landscaping base)
Step 1: Preparing the Landscape Base
-
Build the Terrain Foundation:
Cut pieces of Styrofoam to fill the sides of your wooden base, leaving a wide channel in the middle for the river. Glue these down securely. -
Sculpt the Riverbed:
Cover the bottom of the river channel and the foam banks with a thin layer of brown air-dry clay. Smooth out the transition between the river bottom and the banks to create a natural slope. -
Texture the Banks:
While the clay is still wet, press small pebbles into the riverbed and along the waterline. Use a crumpled ball of foil to texture the clay banks so they resemble earth. -
Paint the Base:
Once the clay is fully dry, paint the riverbed. Start with a darker blue-green in the center for depth and fade to a lighter, sandy brown near the edges. Let the paint dry completely.
Step 2: Pouring the Stream
-
Mix the Resin:
Mix a small batch of two-part epoxy resin according to the package instructions. Add a single drop of blue alcohol ink to tint it; you want it translucent, not opaque. -
Pour the Water:
Carefully pour the resin into the river channel. If you want a rippled effect, wait until the resin gets slightly tacky (usually after 30-45 minutes) and gently disturb the surface with a toothpick. -
Cure Time:
Set the base aside on a perfectly level surface and let the resin cure hard, usually for 24 hours. Cover it with a box to prevent dust from settling on the sticky surface.
Cloudy Water?
If your resin looks cloudy after mixing, you likely whipped too many air bubbles into it. Let the mixture sit for 5 minutes before pouring, or pass a heat gun quickly over the surface to pop bubbles.
Step 3: Constructing the Bridge
-
Frame the Arch:
Cut two thin strips of balsa wood to span your river. Gently bend them into an arch shape. If the wood is stiff, I find that soaking it in warm water for ten minutes helps it bend without snapping. -
Add Decking:
Cut small rectangular pieces of balsa wood or clay strips to act as the bridge planks. Glue them perpendicularly across your two arched beams. -
Create Railings:
Use thin twigs or sculpted clay coils to create the handrails and vertical posts. Glue these to the sides of the bridge deck. -
Weathering:
Once assembled, stain or paint the bridge with a diluted brown acrylic wash to give it an aged, weathered wood appearance.
Go Wider
Expand the scene by adding a tiny clay rough-hewn bench alongside the path or a miniature fishing pole leaning against one of the tree trunks for a lived-in narrative feel.
Step 4: Assembling the Forest
-
Plant the Trees:
Select 2-3 sturdy branches to act as tree trunks. Drill small holes into the foam bank on one side and glue the trunks vertically. Ensure they are firmly anchored. -
Create the Path:
Brush a layer of PVA glue along the top of the foam banks leading to and from where the bridge will sit. Sprinkle fine sand heavily over the glue to create a walking path. -
Apply Mossy Grass:
Glue patches of preserved sheet moss on the remaining exposed areas of the foam banks. Press it down firmly to mimic a grassy forest floor. -
Install the Bridge:
Glue your finished bridge across the stream, resting the ends on your sandy path. Use a little extra glue underneath the contact points for stability. -
Detailing Work:
Add small tufts of faux plants or shrubbery near the base of the trees and around the bridge entrance to blend the structure into the landscape. -
Final Touches:
Place a few larger rocks along the path edge or partially submerged in the vegetation to break up the greenery and add realism.
This charming nature scene brings a permanent touch of the outdoors to your shelf

TRACK YOUR CERAMIC JOURNEY
Capture glaze tests, firing details, and creative progress—all in one simple printable. Make your projects easier to repeat and improve.
Forest Floor Texture Sampler
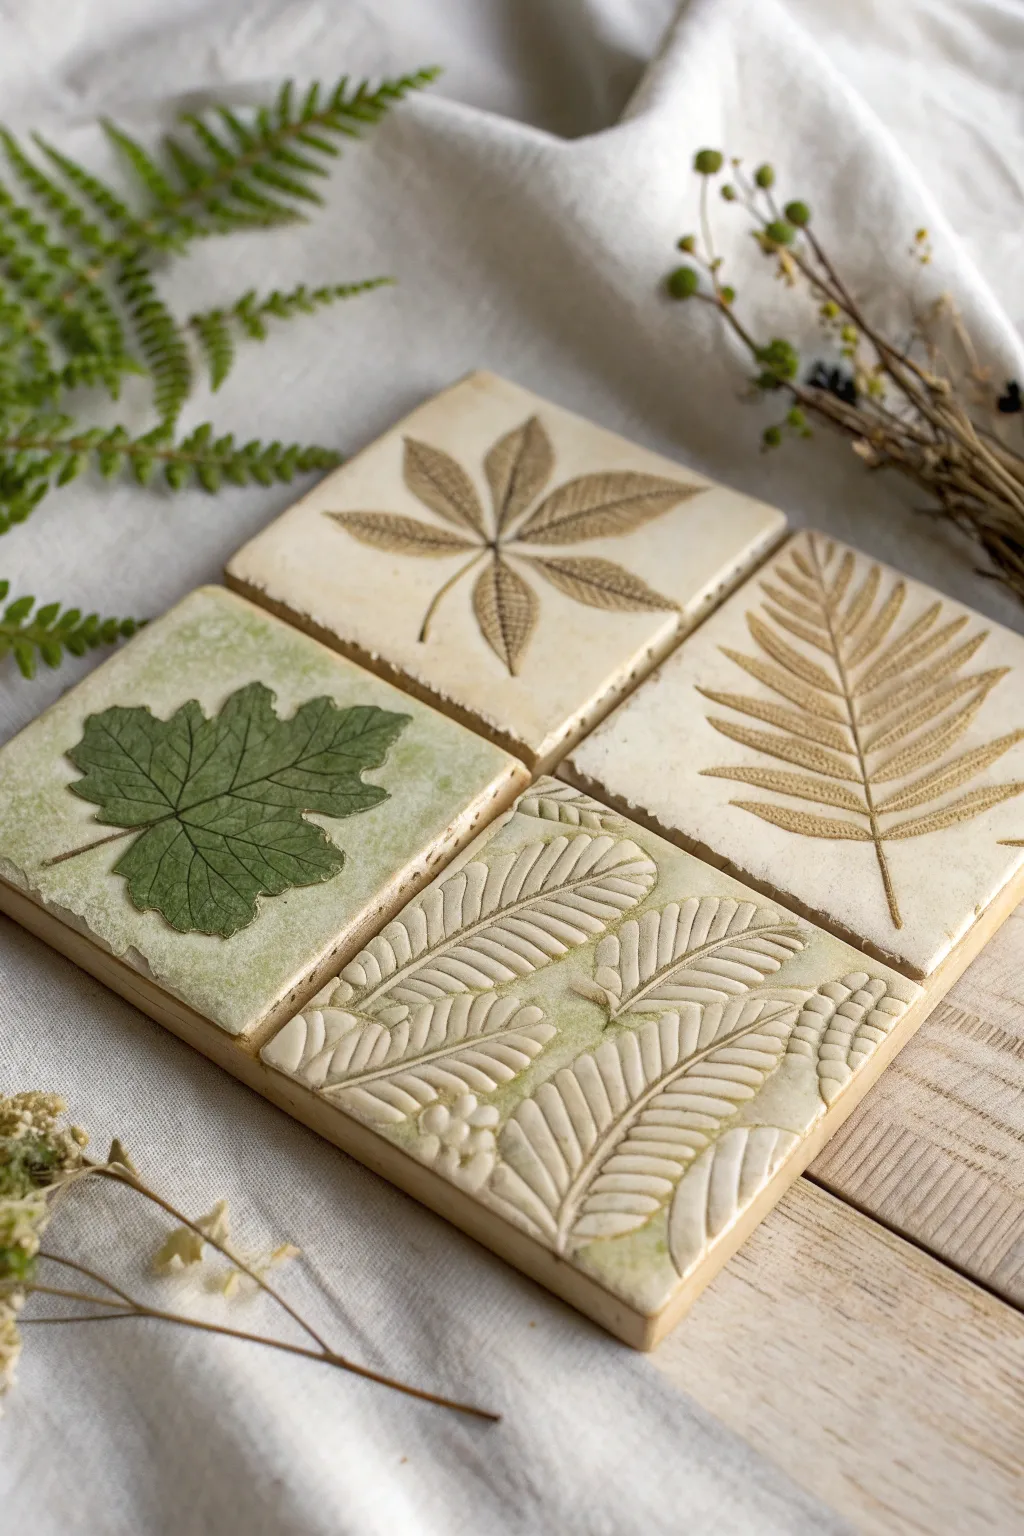
Capture the delicate details of the woodland floor with this set of four textured clay tiles. Featuring real leaf impressions and subtle earthy glazing, these squares make beautiful coasters or decorative wall art.
How-To Guide
Materials
- Air-dry clay (stone or white color) or polymer clay
- Rolling pin
- Square cookie cutter (approx. 4×4 inches) or ruler and knife
- Fresh leaves with prominent veins (fern, maple, chestnut)
- Wooden sculpting tools or needle tool
- Fine grit sandpaper
- Watercolor paints or diluted acrylics (moss green, raw umber)
- Small soft paintbrush
- Matte sealant or varnish
- Small sponge
Step 1: Preparing the Clay Base
-
Condition the clay:
Start by taking a substantial chunk of your clay and kneading it in your hands until it becomes warm, pliable, and free of cracks. -
Roll out the slab:
Place the clay on a smooth, clean surface. Use a rolling pin to flatten it into an even slab, aiming for a consistent thickness of about 1/4 inch to ensure durability. -
Cut the shapes:
Using a square cookie cutter or a ruler and craft knife, cut four identical squares from the clay slab to serve as the base for your sampler. -
Smooth the edges:
Dip your finger in a little water and run it gently along the cut edges of each square to smooth out any sharpness or roughness.
Fixing Curled Edges
If your tiles curl while drying, slightly dampen the concave side and place them under a heavy book overnight to flatten them back out.
Step 2: Creating Botanical Impressions
-
Select your specimens:
Choose your leaves carefully. For this project, you want a variety: a large chestnut leaf, a fern frond, and a broad, textured leaf like maple or currant. -
Placement strategy:
Lay one leaf on each of the first three squares. Position them thoughtfully—center the chestnut leaf, but try placing the fern diagonally for dynamic flow. -
Pressing the texture:
Gently roll over the leaves with your rolling pin. Apply firm, even pressure to force the veins deep into the clay without maximizing the square’s distortion. -
Reveal the print:
Carefully peel back the leaves to reveal the intricate vein patterns left behind. If a stem gets stuck, use a needle tool to gently lift it. -
Sculpting the fourth tile:
For the fourth tile (bottom right in the image), use a sculpting tool to carve a stylized, repeating fern pattern manually if you don’t have a specimen that fits, creating a nice contrast with the real impressions.
Step 3: Finishing and Coloring
-
Dry thoroughly:
Allow the tiles to dry completely according to your clay package instructions. This usually takes 24-48 hours for air-dry clay. I prefer to flip them halfway through to prevent curling. -
Sand for smoothness:
Once bone dry, take fine-grit sandpaper and lightly sand the edges and flat surfaces (avoiding the textured leaf areas) to create a professional finish. -
Apply the wash:
Mix a very watery wash of mossy green paint. Brush this over the ‘maple’ leaf tile and patches of the sculpted fern tile, letting the pigment pool in the deep crevices. -
Enhance with earth tones:
For the beige tiles, use a raw umber wash. Brush it over the entire surface, then immediately wipe the high points with a damp sponge, leaving the dark color only in the veins to highlight the texture. -
Seal the work:
Protect your artwork by applying a coat of matte varnish or sealant. This deepens the colors slightly and ensures the clay is protected from moisture.
Level Up: Framing
Mount the four finished tiles onto a piece of reclaimed wood or inside a shadow box frame to create a substantial piece of rustic wall decor.
Display your botanical artwork together to bring a permanent touch of nature into your home
Tree Trunk Face Sculpture
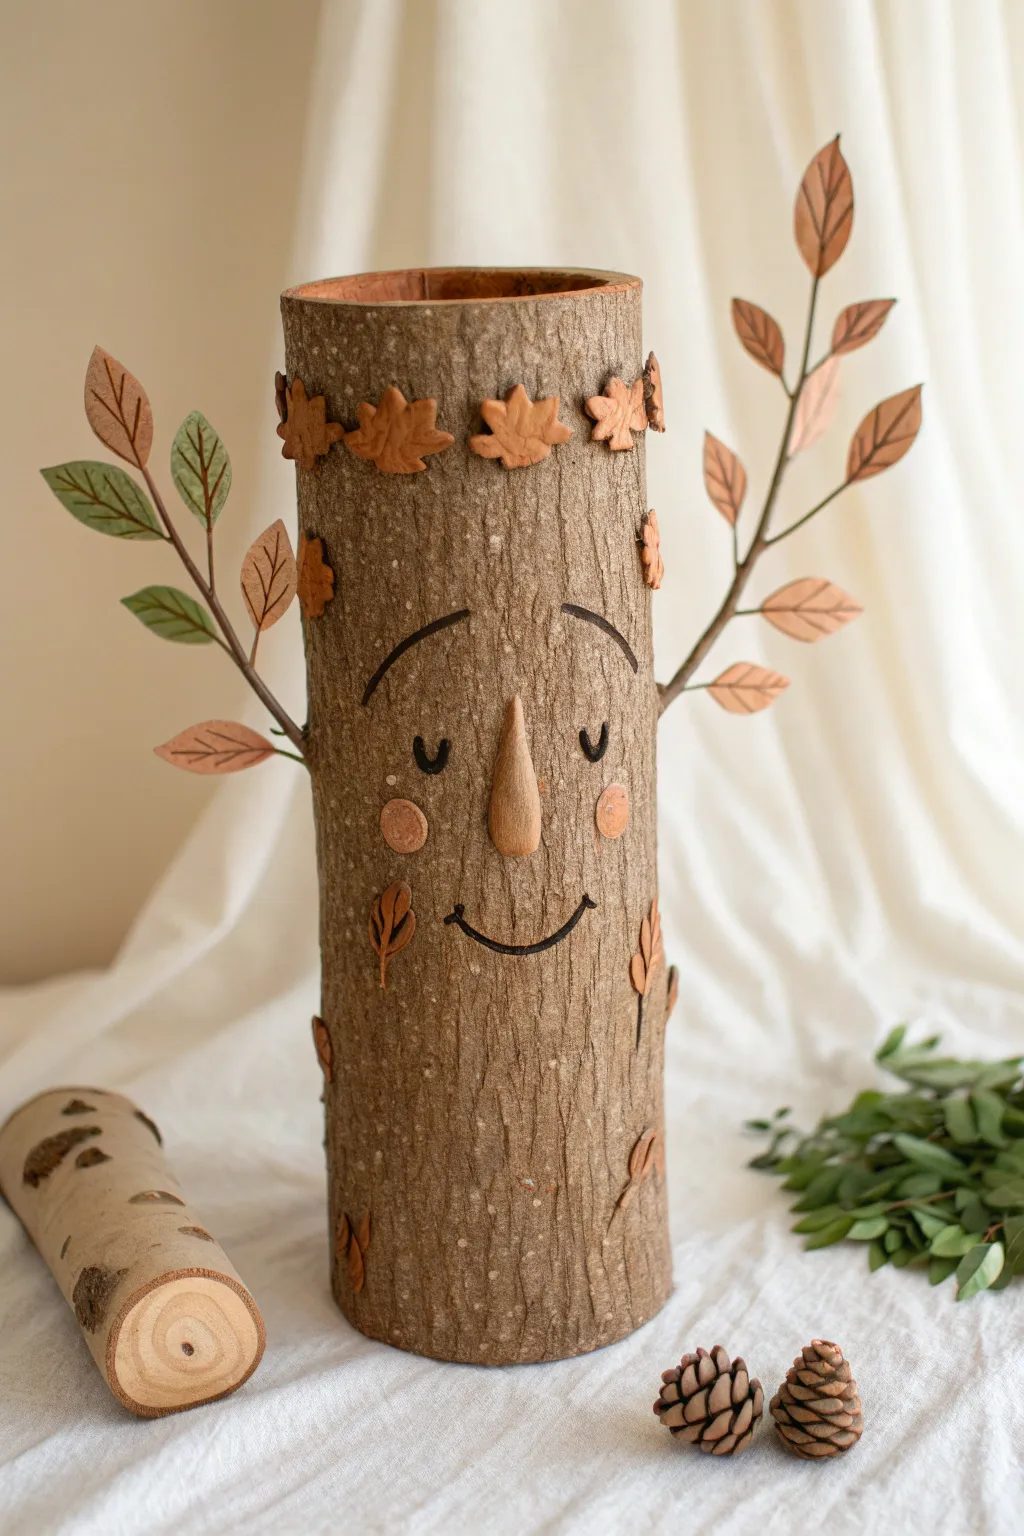
Transform a simple wooden log into an enchanting forest character with just a bit of clay and imagination. This decorative piece combines natural wood textures with sculpted clay details to create a warm, smiling presence perfect for seasonal decor.
Step-by-Step Guide
Materials
- Clean, cylindrical wooden log (approx. 4-6 inches diameter)
- Air-dry clay or polymer clay (terracotta or wood tone)
- Brown acrylic paint or permanent marker
- Floral wire or thin gathered twigs
- Strong craft glue or hot glue gun
- Sculpting tools or a toothpick
- Green and brown acrylic paints (for leaves)
- Fine grit sandpaper
Step 1: Preparing the Base and Nose
-
Select your log:
Choose a log that stands upright securely. If the bottom is uneven, sand it flat or use a saw to create a level base so your sculpture doesn’t wobble. -
Clean the surface:
Brush off any loose dirt, moss, or flaking bark from the log’s surface. A clean surface ensures the clay and glue will adhere properly. -
Sculpt the nose:
Take a walnut-sized piece of clay and roll it into a teardrop shape. Flatten the back slightly to fit the curve of the log. -
Attach the nose:
Depending on your clay type, either glue the nose directly onto the center of the log or adhere it using a bit of water and scoring if the wood is porous enough. If using polymer clay, bake the nose separately first.
Natural Texture
Mix a tiny bit of real sand into your brown paint for the nose or cheeks. This gritty texture helps the painted clay blend seamlessly with the rough tree bark.
Step 2: Creating the Foliage
-
Make leaf templates:
Roll out a thin slab of clay. Use a small knife or cutter to create several small leaf shapes, roughly 1 inch long. -
Shape the crown:
Create about 8-10 leaves specifically for the top rim. I like to gently pinch the ends to give them a natural curve. -
Texture the leaves:
Use a toothpick or sculpting tool to press central veins and smaller side veins into each leaf for realistic detail. -
Form the branches:
Cut two lengths of floral wire, about 8 inches long each. These will be the arms. -
Attach leaves to wire:
Press pairs of clay leaves onto the wire, pinching the clay at the stem around the metal to secure them. Make about 6-8 leaves per branch. -
Cure the clay:
Allow all your clay pieces—the nose, the loose leaves, and the leafy branches—to dry or bake according to the manufacturer’s package instructions.
Glue Not Holding?
Bark acts like a dusty surface, rejecting glue. Sand a small ‘bald spot’ onto the wood where you plan to attach elements to reach the solid wood beneath.
Step 3: Painting and Assembly
-
Paint the leaves:
Once hardened, paint the leaves. Use varying shades of autumnal orange, brown, and sage green. Painting veins in a darker shade adds nice depth. -
Paint the nose:
Paint the nose a wood-tone brown that complements but stands out slightly from the log’s natural bark color. -
Draw the face:
Using a black permanent marker or a fine brush with dark brown paint, draw two curved arches for eyebrows. -
Add the eyes and mouth:
Draw two U-shapes for closed, sleeping eyes below the brows. Add a wide, gentle U-shape for the smile below the nose. -
Create rosy cheeks:
Paint small, soft pink or terracotta circles on either side of the smile to give your log friend a healthy glow. -
Attach the crown:
Glue the crown leaves around the very top rim of the log, overlapping them slightly to create a continuous wreath. -
Install the branches:
Drill two small angled holes into the sides of the log or use strong hot glue to attach the wire branches so they stick up and out. -
Add floating leaves:
Glue the remaining individual clay leaves randomly onto the trunk, making them look like falling foliage caught on the bark.
Place your charming log sculpture on a mantle or shelf to bring a peaceful touch of the outdoors inside
Layered Forest Habitat Shadow Box
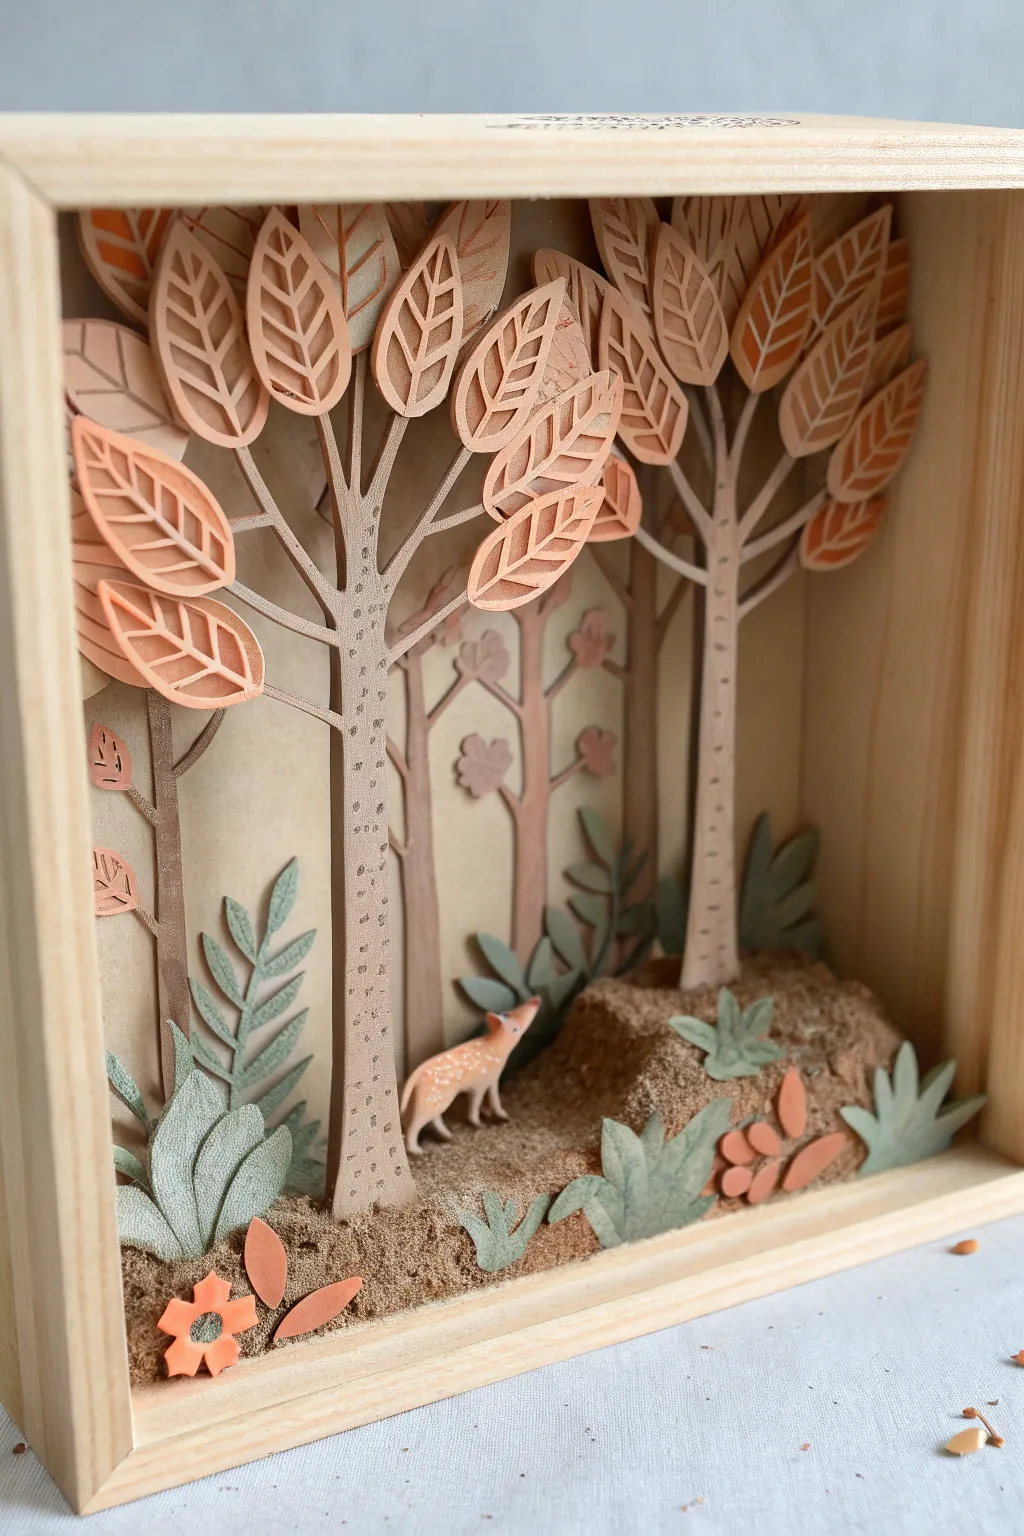
This intricate shadow box creates a calming woodland scene by combining the sharp, clean lines of papercraft with the organic texture of sand and clay. The layered depth brings the trees and tiny fox to life, making it a perfect decorative piece for a nature-themed shelf.
Detailed Instructions
Materials
- Deep wooden shadow box frame (approx. 8×10 inches)
- Neutral cardstock pack (Beige, taupe, light brown, terra cotta)
- Sage green cardstock (for foliage)
- White or light beige polymer clay
- Brown acrylic paint (diluted) or watercolor
- Fine sand or textured faux moss powder
- Craft glue or white PVA glue
- Precision craft knife (X-Acto)
- Self-healing cutting mat
- Fine-grit sandpaper
- Mod Podge (matte finish)
- Foam spacers or cardboard scraps
- Fine detail paintbrush
Step 1: Creating the Trees
-
Design the trunks:
Begin by sketching two main tree silhouettes on beige cardstock. One should be slightly taller to sit in the foreground, and one shorter for the background. Keep the trunks relatively straight but allow the branches to fan out in a ‘V’ shape. -
Cut the framework:
Using your precision knife, carefully cut out the trunk shapes. Take your time with the branches, ensuring they are thick enough to support the leaves later. -
Prepare leaf layers:
On terra cotta and light brown paper, draw simple oval leaf shapes. Inside each oval, cut away small geometric sections to create a stylized vein pattern. You will need about 20-30 of these leaves. -
Assemble the canopy:
Glue individual leaves onto the branch tips of your tree trunks. Overlap them slightly to create volume, but leave space to see the branches underneath. -
Add bark texture:
With a fine-tip pen or a very small brush and diluted brown paint, add tiny stippled dots or faint vertical lines onto the tree trunks to simulate birch bark texture.
Trees sagging?
If your paper trees droop forward, glue a thin strip of stiff clear plastic or wire behind the trunk to act as an invisible spine for support.
Step 2: Sculpting the Inhabitants
-
Shape the terrain base:
Form a small mound of polymer clay that fits the bottom width of your shadow box. Create gentle slopes and a small hill on the right side. This doesn’t need to be perfectly smooth; texture is good. -
Sculpt the fox:
Using a small amount of clay, model a tiny fox figure. Keep perfectly simple shapes: a tapered body, four small legs, and a pointed snout. The fox should be scaled to look small next to the trees. -
Bake the clay:
Bake your terrain base and the fox figure according to the polymer clay package instructions. Let them cool completely before handling. -
Paint the fox:
Paint the fox with a light beige or peach color. Once dry, use a toothpick to add tiny white spots on its back for a whimsical, fawn-like pattern. -
Texture the ground:
Coat the baked clay terrain mound with Mod Podge. While wet, sprinkle fine brown sand or textured powder significantly over the surface to create a soil effect. Shake off excess once dry.
Natural Texture
Mix different shades of sand (tan, brown, grey) for the ground cover. Monotone sand looks flat, but a mix creates realistic earthy depth.
Step 3: Background & Foliage
-
Create background trees:
Cut simpler, thinner tree silhouettes from darker brown cardstock. These don’t need detailed leaves; simple cloud-shaped foliage clumps work well to suggest distance. -
Cut ground foliage:
From the sage green cardstock, cut out various small plants. Create some that look like ferns with jagged edges and others with broad, rounded leaves. -
Score and fold:
Gently score the center of your green leaves and fold them slightly. This crease gives the flat paper dimension and makes it look like real vegetation.
Step 4: Final Assembly
-
Install the background:
Glue a sheet of plain beige paper to the very back of the shadow box interior. Attach your background trees directly to this sheet. -
Place the terrain:
Glue the sanded clay terrain mound securely into the bottom of the box frame. -
Plant the main trees:
Glue the shorter main tree behind the clay mound, and the taller main tree slightly in front of it. Use foam spacers behind the trunks if needed to keep them rigid and separated from the back wall. -
Arrange ground cover:
Glue your paper ferns and plants along the base of the clay mound, tucking some behind the mound and placing others in the very front to create depth. -
Position the fox:
Finally, glue the painted fox onto the terrain, positioning it so it appears to be walking through the trees. -
Add foreground details:
I like to add one or two small paper flowers or leaves in the bottom corners, glued directly to the frame glass or inner rim, to frame the scene completely.
Place your finished shadow box near a window to let natural light play with the layers you created
Hollow Log Hideaway
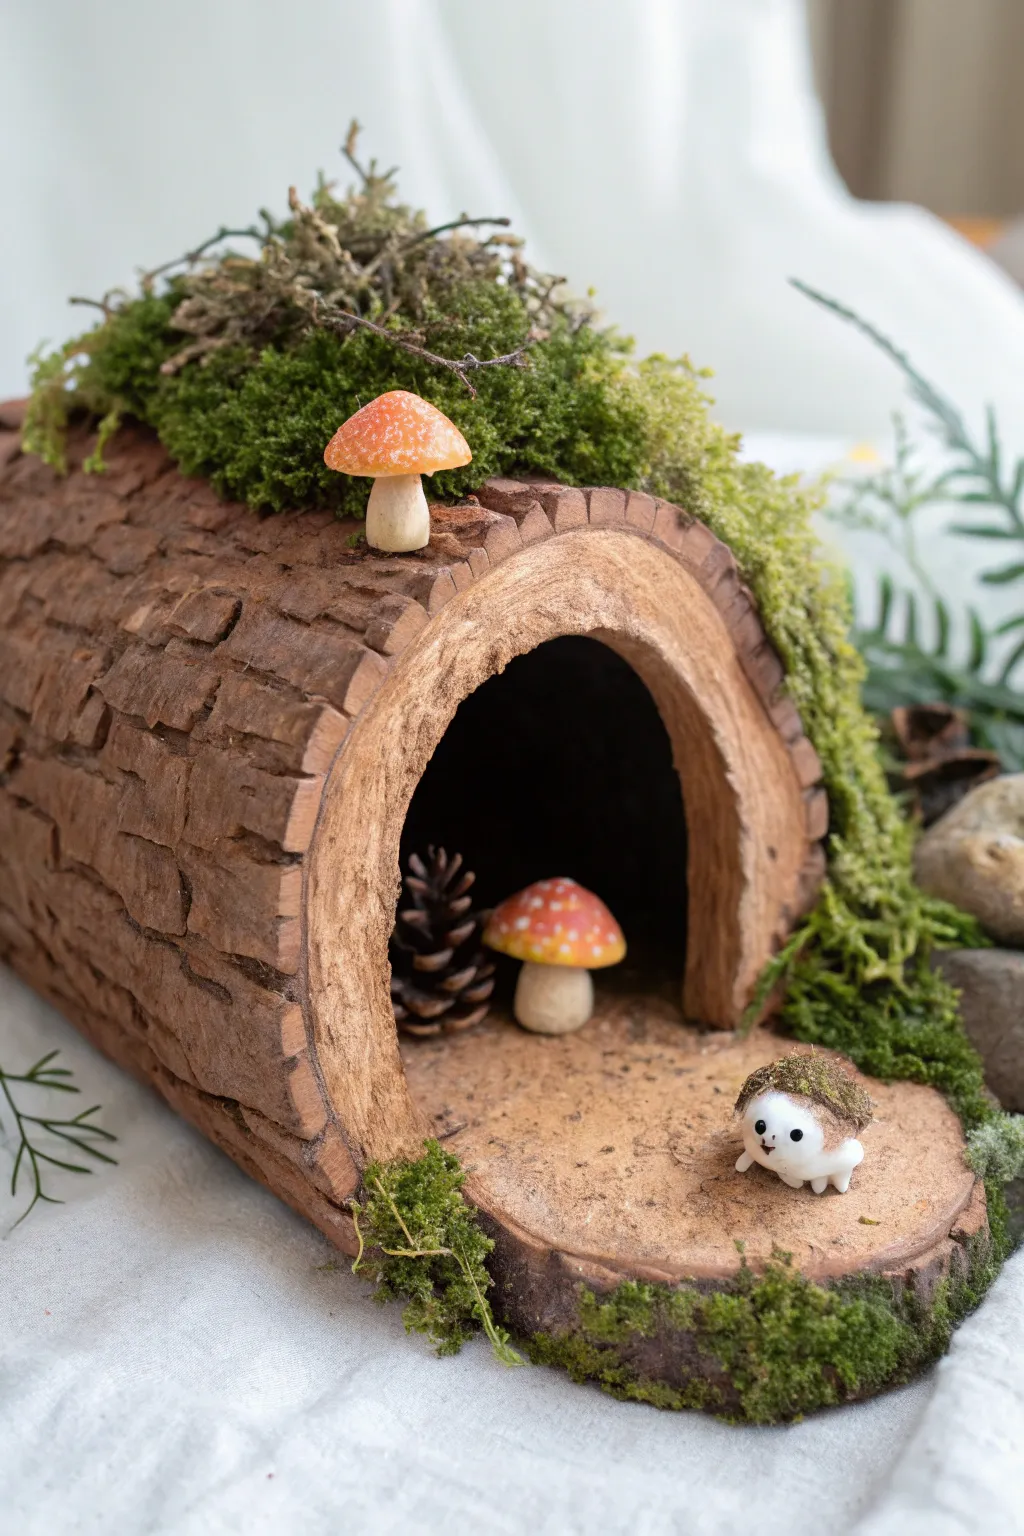
Transport yourself to a miniature fairytale forest with this enchanted hollow log hideaway, complete with a cozy den and tiny mushroom guardians. The realistic bark texture and lush faux moss make this the perfect sanctuary for a delightful little clay creature.
Step-by-Step
Materials
- Brown polymer clay (medium shade)
- White polymer clay
- Orange/Red polymer clay
- Black polymer clay (tiny amount)
- Aluminum foil
- Rolling pin or pasta machine
- Clay sculpting tools (needle tool, small ball tool)
- Texture tools (or crumpled foil, stiff brush)
- Small real pinecone (baked/dried)
- Preserved reindeer moss (various green shades)
- Craft glue or strong adhesive
- Soft pastels or acrylic paints (dark brown/black for wash)
Step 1: Forming the Log Core
-
Create the structural base:
Begin by crumpling aluminum foil into a cylinder shape, approximately 4-5 inches long and 2-3 inches wide. Compress one end slightly flatter to create a sturdy bottom. -
Hollow out the entrance:
Use your thumb to press deeply into one end of the foil cylinder, creating a cave-like indentation. This will be the main hollow opening. If you want a ‘floor’ extending out like in the photo, flatten a piece of foil extending from the bottom lip. -
Prepare the clay sheet:
Condition your brown clay until pliable, then roll it out into a sheet about 1/4 inch thick. It needs to be large enough to wrap around your foil armature. -
Cover the armature:
Wrap the clay sheet over the foil form. Trim away excess, but leave enough overhang at the front to fold inward into the hollow opening, covering the foil walls completely. -
Extend the base:
Roll a separate slab of brown clay for the extended ‘patio’ area in front of the log. Press the log assembly firmly onto this base, blending the seams underneath so they become one solid unit.
Natural Texture Hack
Roll a real rock or a piece of actual tree bark over your clay before baking. The imprint creates an instant, hyper-realistic organic surface that tools alone can’t match.
Step 2: Texturing the Bark
-
Score the surface:
Use a needle tool or a clay blade to score deep, uneven vertical lines along the length of the log. Vary the pressure to create thick and thin fissures. -
Create bark chips:
Using a small spatula tool, gently lift the edges of the scored lines to make the ‘bark’ look rough and peeling. Press small horizontal cracks randomly across the vertical lines for realism. -
Add detail color:
For depth, I like to brush some shaved dark brown pastel powder into the deepest crevices before baking. This natural shadowing makes the bark pop. -
Texture the inner wood:
Inside the hollow and on the front face (the cross-section of the log), use a needle tool to scratch frantic, circular motions or tight rings. This simulates the rough grain of cut wood, contrasting with the outer bark.
Step 3: Sculpting the Inhabitants
-
Shape the mushrooms:
Form two small stems from white clay—one short and stout, one slightly taller. Create two orange caps, gently curving them into domes, and press them onto the stems. Use a needle tool to dot the caps for a speckled look. -
Create the hedgehog creature:
Roll a small ball of white clay for the body. Use a tiny pinch of moss-green clay or actual dried moss mixed with liquid clay to create a ‘helmet’ on their head. Add two minuscule black clay dots for eyes and a tiny nose. -
Initial bake:
Place the log, mushrooms, and creature on a ceramic tile. Bake according to your clay package instructions (usually 275°F/130°C for 15-30 minutes). Let everything cool completely.
Clay Too Soft?
If your clay gets too warm and sticky to hold the bark detail, pop the whole sculpture in the fridge for 10 minutes. The firm clay will take sharp tool marks much better.
Step 4: Assembly and Greenery
-
Apply a dark wash:
Mix a little black acrylic paint with water. Brush it over the entire cooled log, getting into all the cracks. Quickly wipe the surface with a damp paper towel, leaving dark paint only in the recesses. -
Secure the elements:
Once the wash is dry, glue the pinecone deep inside the hollow. Glue the shorter mushroom near the entrance and the taller one on top of the log. -
Add the moss:
Apply dabs of craft glue along the top ridge of the log and down one side. Press clumps of preserved moss into the glue, letting some drape naturally over the entrance. -
Position the resident:
Place a dot of glue on the extended wooden ‘patio’ and secure your little hedgehog creature so they are looking out to welcome visitors. -
Final touches:
Tuck small bits of moss around the base of the log and near the extended platform to blend the piece into its surroundings.
Now you have a charming woodland scene ready to bring a touch of magic to your shelf
Fairy Door on a Tree Base
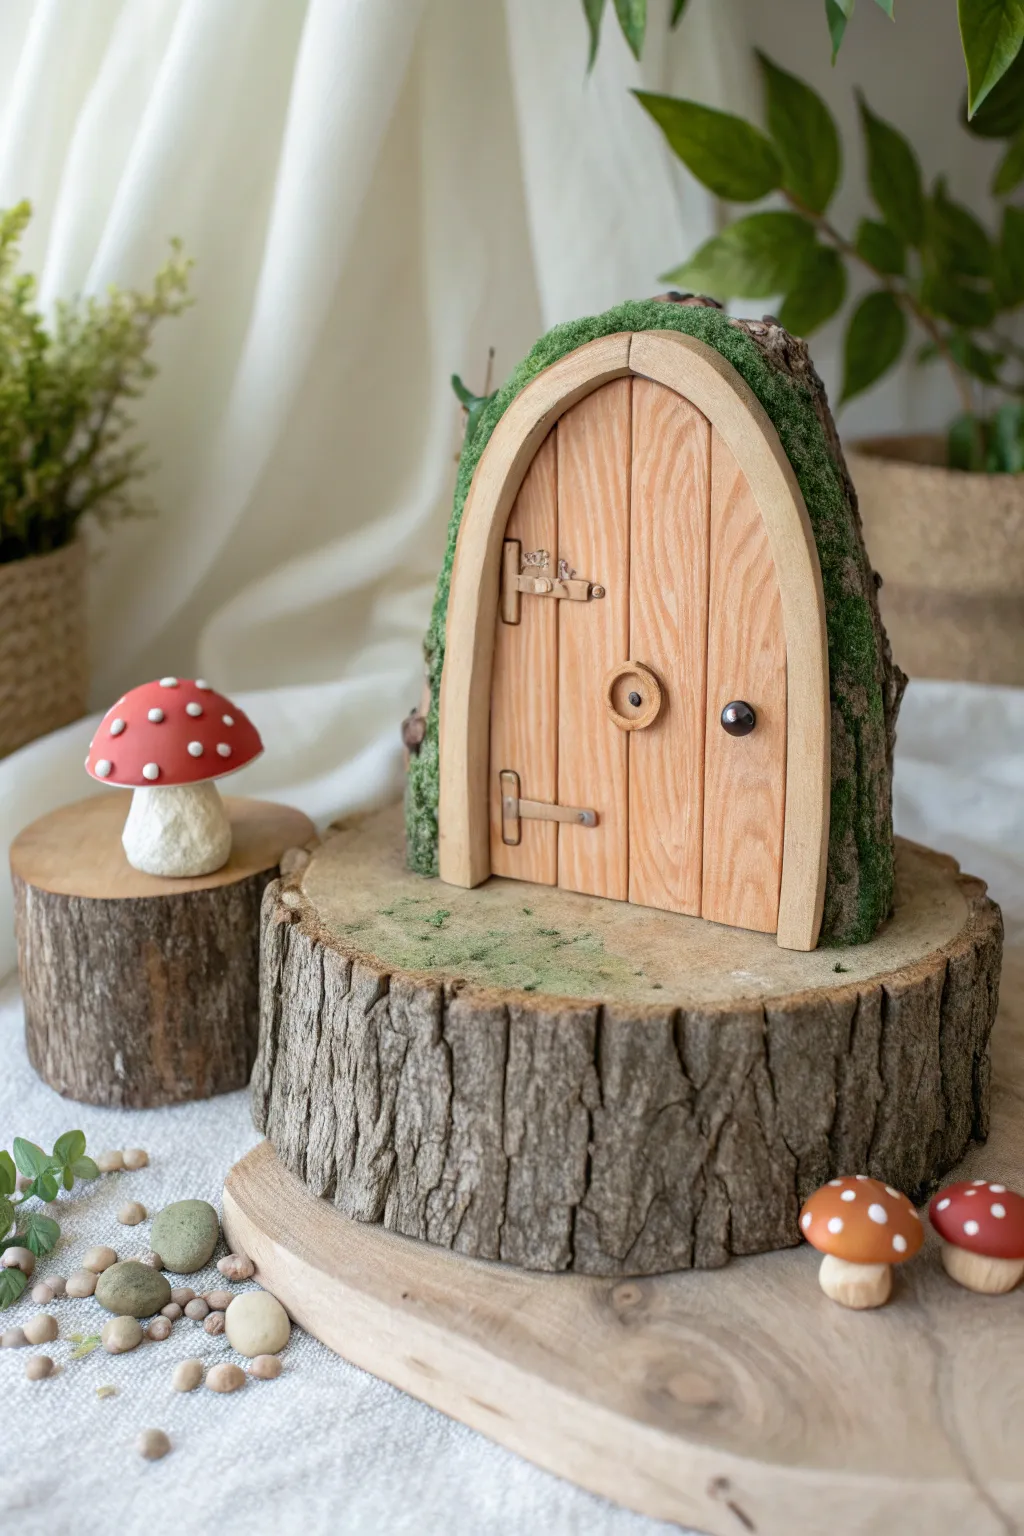
Transform a simple slice of wood into an enchanting gateway for garden sprites. This project combines natural textures like bark and moss with the pliability of polymer clay to create a charming, freestanding woodland decoration.
How-To Guide
Materials
- Large wood slice (about 4-6 inches wide) for the base
- Medium wood log piece (cut at an angle or flat) for the door backing
- Polymer clay (wood brown, terracotta/beige, red, white, grey, black)
- Liquid polymer clay (optional but helpful for adhesion)
- Faux moss or preserved sheet moss
- Sculpting tools (needle tool, ball stylus, clay blade)
- Texture sheet or stiff brush (for wood grain)
- Strong craft glue (E6000 or similar)
- Acrylic paints (black wash or brown for antiquing)
- Matte varnish
Step 1: Preparing the Base Structure
-
Select your wood:
Choose a sturdy wood slice for the bottom platform. It should be wide enough to support the upright log piece without tipping. Clean off any loose debris or dust with a dry brush. -
Position the upright log:
Take your second, slightly taller piece of wood (some call this a ‘branch cross-section’) which will serve as the wall for the door. Glue it securely onto the center or back edge of the base slice using strong craft glue. Let it dry completely. -
Establish the ground:
If there remain gaps where the two wood pieces meet, you can smooth a small amount of green-tinted clay or texturing paste over the seam to blend them together, creating a foundational hill.
Clay Adhesion Fix
If the clay door pops off the wood after baking, don’t panic. Wood contracts with heat. Simply use a two-part epoxy glue to reattach it; it will hold much stronger than craft glue.
Step 2: Sculpting the Door
-
Shape the door slab:
Condition your light brown or terracotta-colored clay. Roll it into a smooth slab about 1/4 inch thick. Cut it into an arch shape that fits comfortably on the front of your upright log. -
Create wooden planks:
Using a needle tool or clay blade, score vertical lines down the arch to simulate separate wooden planks. Don’t make them perfectly straight; a little wobble adds character. -
Add wood grain texture:
Take a texture tool or a stiff-bristled brush and gently drag it down the ‘planks’ to create a wood grain effect. I find that pressing a real piece of rough bark into the clay also creates a fantastic organic texture. -
Form the door frame:
Roll a snake of lighter beige clay and flatten it slightly. Wrap this around the curved edge of your door arch to create a distinct frame. Texture this piece similarly to the planks. -
Install the hardware:
Using tiny amounts of grey or bronze-colored clay, sculpt small rectangles for hinges on the left side. Add tiny dots for nails. Create a small circular handle and a rounded doorknob on the right side. -
Attach to the wood:
Apply a thin layer of liquid polymer clay or bake-and-bond to the back of your clay door, then press it firmly onto the vertical log face.
Step 3: Adding Woodland Details
-
Mossy surround:
Before baking, you can add texture around the door frame using green clay stippled with a toothbrush, or wait until after baking to glue on real faux moss. For this look, we will glue real moss later. -
Sculpt the mushrooms:
Form small, thick stalks using white or beige clay. Create smooth, rounded caps using red clay. Press the caps onto the stalks firmly to ensure they fuse during baking. -
Detail the mushrooms:
Roll extremely tiny balls of white clay and press them onto the red caps to create the classic toadstool spots. Flatten them gently so they don’t fall off. -
Bakig the components:
If your wood is dry and untreated, you can often bake the entire piece (wood and clay) at the temperature recommended on your clay package (usually 275°F/130°C) for 30 minutes. If unsure, bake the clay door separately on a tile and glue it on later.
Level Up: Glow Effect
Mix glow-in-the-dark powder into your white clay for the mushroom spots and the door handle. Your fairy portal will magically illuminate when the lights go down.
Step 4: Finishing and Assembly
-
Cooling and gluing:
Once baked and cooled, use strong glue to secure the separate mushroom figurines onto the base log and the smaller side log. -
Applying moss:
Tear small bits of preserved moss. Glue them around the outer rim of the door frame (hiding any gap between the clay and the wood bark) and scatter patches on the base log to resemble a forest floor. -
Antique wash:
Mix a tiny drop of black or dark brown acrylic paint with water. Brush it over the door and hinges, then quickly wipe it off with a paper towel. This stays in the crevices, making the wood grain pop. -
Final varnish:
Protect your work with a coat of matte varnish on the clay parts, specifically the door and mushroom caps, to seal in the paint and durability.
Place your finished portal on a bookshelf or near a plant pot to invite a little magic into your home
Mushroom House Mini Cottage
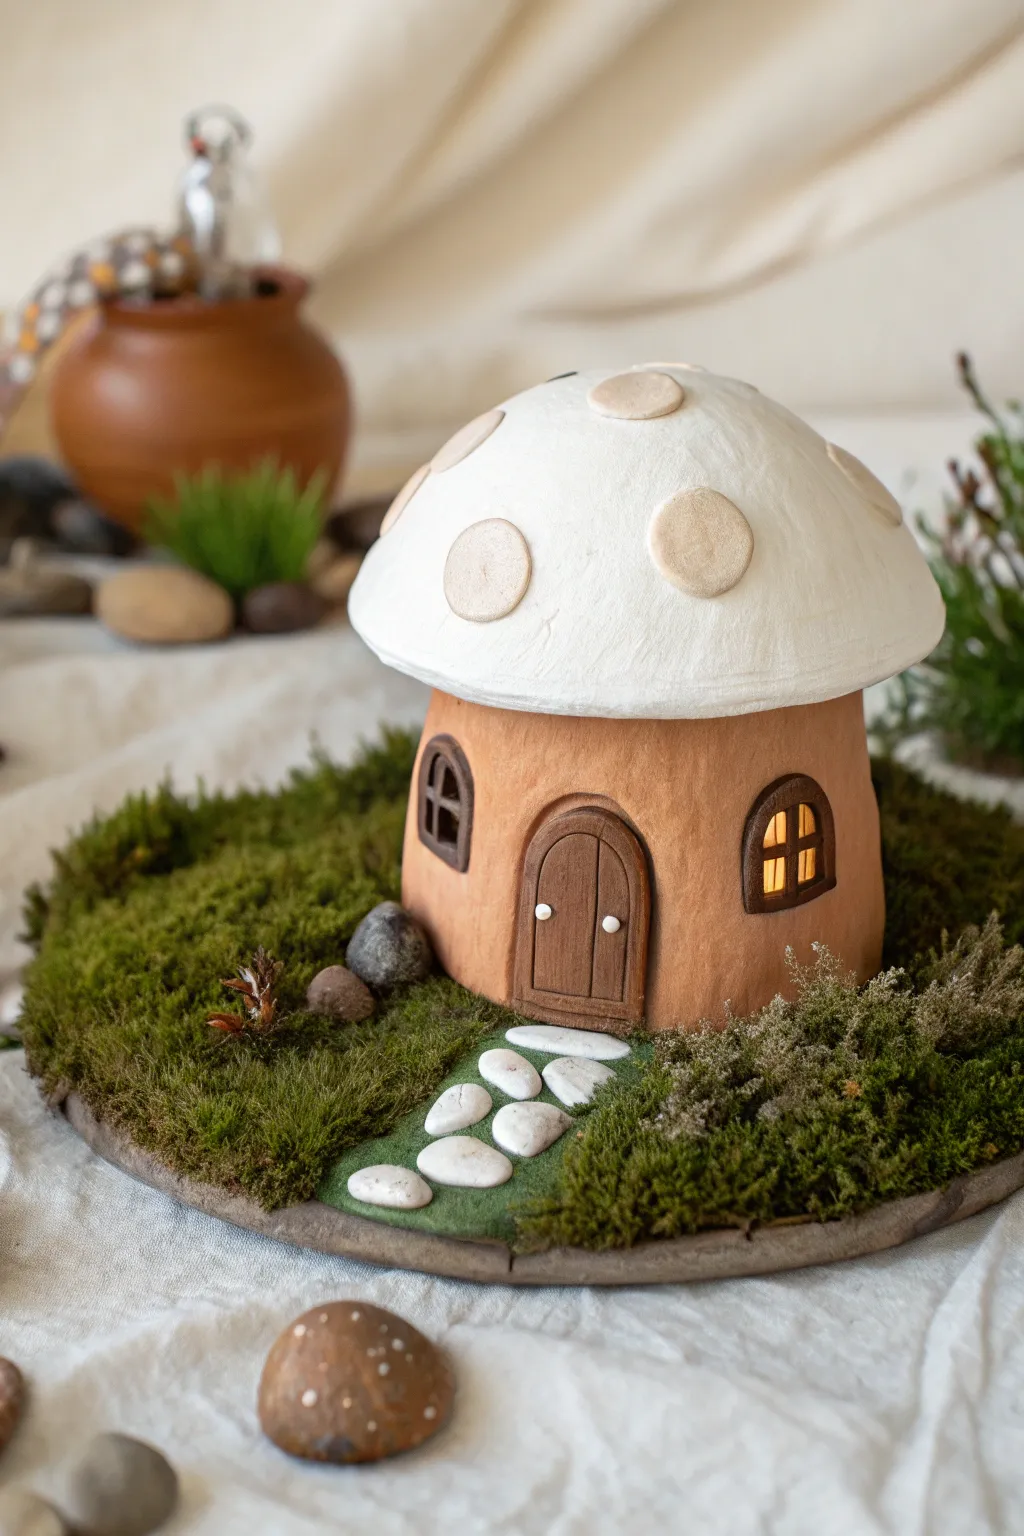
Bring a touch of woodland magic into your home with this enchanting mushroom cottage sculpture. Featuring a glowing interior and a detailed mossy base, this project combines simple clay techniques with natural textures for a cozy, fairy-tale finish.
Step-by-Step
Materials
- Air-dry clay (white and terracotta/brown)
- Acrylic paints (white, beige, brown, dark grey)
- Clay sculpting tools (knife, needle tool)
- Rolling pin
- Aluminum foil (for armature)
- Round base (wood or cardboard disc, approx. 6-8 inches)
- Dried craft moss or preserved sheet moss
- Small white pebbles or gravel
- LED tea light (battery operated)
- PVA glue or tacky glue
- Green felt or green acrylic paint
- Sandpaper (fine grit)
Step 1: Building the Core Structure
-
Form the armature:
Begin by crumbling aluminum foil into a cylinder shape for the house base and a dome shape for the mushroom cap. This saves clay and keeps the sculpture lightweight. Ensure the base cylinder is slightly wider at the bottom. -
Create a hollow space:
Since we want the house to light up, gently press a hollow cavity into the bottom of the foil cylinder, large enough to fit your LED tea light later. It’s crucial to plan this space before adding clay. -
Cover the base:
Roll out a slab of terracotta-colored air-dry clay to about 1/4 inch thickness. Wrap this around the foil cylinder, smoothing the seam with a little water and your finger until it’s invisible.
Step 2: Adding Architectural Details
-
Cut window openings:
Use a sharp craft knife to cut out two arched window shapes from the wet clay. Carefully remove the clay to reveal the foil underneath, then push the foil inwards slightly to create depth for the window frame. -
Sculpt the door:
Roll a small oval slab of brown clay for the door. Use a needle tool to score vertical lines to mimic wood planks. I like to add a slightly curved top edge to match the windows. -
Add the door frame:
Roll a thin snake of brown clay and press it around the door slab to create a sturdy frame. Attach the entire door assembly to the front of the house base using a dab of water (scoring the surfaces first helps adhesion). -
Frame the windows:
Create similar thin snakes of brown clay to outline the arched windows. Add a vertical and horizontal strip inside each arch to form the window panes. -
Door details:
Roll two tiny spheres of white clay and attach them to the door as knobs. Make sure they are firmly pressed on so they don’t fall off during drying.
Cracking Clay?
If small cracks appear as the clay dries, mix a tiny amount of fresh clay with water to make a paste (slip). Fill the cracks with this paste and smooth it over with a damp finger.
Step 3: Sculpting the Mushroom Cap
-
Cover the cap armature:
Roll out a large circle of white air-dry clay. Drape it over your foil dome armature, smoothing it down the sides. Leave the edge slightly rough or uneven for a natural organic look. -
Texture the surface:
Take a stiff bristle brush or a ball of aluminum foil and gently tap it all over the white clay surface. This creates a realistic, porous mushroom texture. -
Add the spots:
Roll out beige clay very thinly and cut or punch out circles of varying sizes. Press these onto the white cap randomly, flattening them slightly so they look integrated rather than just stuck on top.
Make it Glow
For a magical window effect, glue a small piece of yellow tissue paper or tracing paper on the inside of the windows before placing the tea light inside to diffuse the glow.
Step 4: Assembly and Base
-
Initial drying:
Let the base and cap dry separately for 24-48 hours. Drying them apart allows you to access the interior if you need to remove foil later for better light transmission. -
Prepare the base:
Take your round wooden or cardboard base. If using wood, you can leave the edge raw; otherwise, paint it a neutral earth tone. Glue a strip of green felt down the center to act as the grassy path foundation. -
Lay the stone path:
Glue small white pebbles onto the green felt strip, creating a stepping stone path leading to where the door will sit. Leave small gaps between stones for a grassy effect. -
Secure the house:
Glue the dry terracotta house base onto the round platform at the end of the path. Once secure, place the LED tea light inside (underneath) and set the mushroom cap on top. You can glue the cap or leave it removable to access the light more easily. -
Apply the moss landscape:
Apply generous amounts of PVA glue to the rest of the base surrounding the house. Press clumps of preserved moss firmly into the glue, banking it up slightly against the walls of the house for an overgrown look. -
Finishing touches:
Add a few larger grey rocks or pebbles near the base of the house and nestled into the moss to add variety in scale and texture.
Now turn on your tea light and enjoy the cozy glow of your handmade forest dwelling
Forest Jewelry Charms
Celebrate the beauty of the woods with this delightful polymer clay necklace, featuring handcrafted acorns, a detailed oak leaf, and a cute mushroom. These earthy charms hang from a rustic cord, making it the perfect accessory for nature lovers.
Step-by-Step Tutorial
Materials
- Polymer clay in olive green, terracotta, light beige, cream, and translucent white
- Brown waxed cotton cord or leather cord
- Jump rings (antique bronze finish)
- Eye pins (antique bronze finish)
- Needle tool or toothpick
- Texture tools (sandpaper, toothbrush, or dedicated clay texturing sponge)
- Small round cutter or drinking straw
- Clay roller or pasta machine
- Liquid polymer clay (optional, for bonding)
- Oven for baking
- Round nose pliers and wire cutters
- Acrylic paint (brown/dark wash) for detailing
Step 1: Sculpting the Oak Leaf
-
Condition the clay:
Start by conditioning your olive green clay until it is soft and pliable. Roll it out into a sheet about 3-4mm thick. -
Shape the leaf:
Use a needle tool or a small knife to freehand cut an elongated oak leaf shape with lobed edges. Alternatively, if you have a leaf cutter, stamp it out and soften the edges with your finger. -
Add vein details:
Take your needle tool and gently press a central vein line down the middle of the leaf, stopping short of the tip. Branch off smaller veins towards each lobe to create a realistic texture. -
Insert the hardware:
Carefully insert a jump ring directly through the clay at the top of the stem, or insert an eye pin if you prefer a dangle effect, securing it with a touch of liquid clay.
Loose Eye Pins?
If eye pins wiggle after baking, pull them out, add a drop of super glue to the metal shaft, and slide them back into the existing hole for a permanent bond.
Step 2: Creating the Acorns
-
Form the nut bases:
Roll a ball of light brown clay into an oval shape for the main acorn body. For the smaller acorn, use a greyish-beige clay and form a smaller oval. -
Texture the nut:
Gently roll the light brown oval over sandpaper or tap it with a toothbrush to give the nut a realistic, matte shell texture. Leave the smaller grey one relatively smooth or add vertical lines. -
Make the caps:
Shape a small ball of terracotta clay into a dome for the large acorn cap. Press it onto the top of the nut. For the smaller one, create a cream-colored cap. -
texture the caps:
Use a needle tool to stipple the terracotta cap, creating a rough, bumpy surface. For the cream cap, press small circles into it or use a tiny ball tool to create a patterned ‘hat’. -
Secure the hangers:
Trim an eye pin to size and insert it through the center of each cap into the nut body. I find twisting the pin slightly as you insert it helps it grip the raw clay better.
Step 3: crafting the Mushroom
-
Shape the stalk:
Roll a thick cylinder of white or cream clay for the mushroom stem. Slightly flatten the bottom so it has a bulbous look. -
Create the cap:
Form a dome from the terracotta clay. Make the underside slightly concave so it fits snugly over the stem. -
Detail the cap:
Texture the red cap with a cross-hatch pattern using your needle tool or by rolling it gently against a piece of fabric mesh to mimic the pore texture. -
Assemble:
Press the cap onto the stem. Insert an eye pin through the top center.
Texturing Tip
Use actual natural objects like a rough rock, a piece of bark, or real acorn caps to press texture directly into your raw clay for the most authentic organic finish.
Step 4: Baking and Assembly
-
Bake the pieces:
Arrange all your sculpted charms on a ceramic tile or baking sheet. Bake according to your brand of polymer clay instructions (usually around 275°F/130°C for 15-30 minutes). -
Cool and wash:
Once baked and fully cooled, apply a thin wash of dark brown acrylic paint over the textured areas (like the acorn caps and leaf veins). Quickly wipe away the excess with a damp paper towel to leave shadow in the crevices. -
Seal (Optional):
If desired, apply a matte varnish to the pieces to protect the paint and give them a finished look. -
Stringing the necklace:
Cut your brown cord to your desired necklace length. Thread the charms onto the cord using jump rings. You can tie knots between charms to keep them spaced out or let them slide freely.
Enjoy wearing your tiny piece of the forest wherever you go
Glow-Style Firefly Jar Scene

Create a cozy woodland atmosphere with this enchanting green clay jar, featuring hand-carved pine trees and delicate light-piercing accents. This functional luminary casts a warm, speckled glow perfect for winter evenings or rustic decor.
How-To Guide
Materials
- Stoneware or earthenware clay (white or buff body)
- Pottery wheel (or coil/slab tools for hand-building)
- Needle tool
- Small hole punch or piercing tool
- Carving tool (sgraffito tool or small loop tool)
- Sponge
- Forest green underglaze or glaze
- Gold luster or gold acrylic paint (depending on firing capability)
- Clear transparent glaze
- Kiln (if firing)
- Battery-operated fairy lights
Step 1: Forming the Vessel
-
Throwing the Body:
Begin by centering a ball of clay on the wheel and throwing a cylinder with a slightly bulbous, rounded belly. Narrow the neck gently to form a gallery for the lid. -
Shaping the Rim:
Refine the rim using a chamois or sponge to ensure it is smooth and accepts the lid perfectly. I like to double-check the diameter with calipers before moving on. -
Creating the Lid:
Using a smaller ball of clay, throw a simple domed lid with a flange that fits the gallery you just measured. Add a small, classic knob handle on top. -
Leather-Hard Drying:
Allow both pieces to dry to a leather-hard state. The clay should be firm enough to handle without deforming but soft enough to carve easily.
Clean Piercing Hack
When piercing the clay, punch the hole from the outside, then wait until the clay is bone dry to lightly sand the inside. This prevents warping the delicate holes while wet.
Step 2: Carving and Piercing
-
Trimming the Base:
Flip the jar over (using a chuck or foam bat) and trim the excess clay from the bottom to create a neat foot ring. -
Mapping the Design:
Lightly scratch or sketch the positions of your pine trees around the belly of the jar using a needle tool. Vary the heights for a natural forest look. -
Sgraffito or Incising:
Carefully carve out the tree shapes. You want shallow, precise lines for the trunks and branches. If you plan to inlay gold later, make these grooves distinct. -
Adding Firefly Holes:
Using a small hole punch or drill tool, pierce tiny holes above the tree line and around the upper shoulder of the jar. These holes will simulate fireflies when lit. -
Smoothing Instructions:
Gently sponge away any burrs or clay crumbs created by the piercing to ensure clean, crisp holes.
Rustic Texture Upgrade
Before glazing, gently dab the surface with a coarse sponge dipped in iron oxide wash. This adds speckling and depth to the green glaze, mimicking mossy stone.
Step 3: Glazing and Finishing
-
Bisque Firing:
Fire the jar and lid to cone 04 (or your clay’s specific bisque temperature). -
Base Glazing:
The jar in the image has a lovely textured green finish. Apply a forest green glaze, perhaps one that breaks over texture, to the exterior. Wipe the foot ring clean. -
Glaze Firing:
Fire the piece again to the maturation temperature of your glaze (e.g., cone 5 or 6). -
Applying Gold Accents:
Once cool, highlight the carved trees. If using real gold luster, paint it into the tree grooves and re-fire at a low temperature (cone 018). Alternatively, for a non-fired finish, carefully paint gold acrylic into the grooves. -
Lid Detailing:
The lid in the image has a natural, stony texture on the rim. You can leave the rim unglazed or apply a matte oxide wash before firing to achieve this contrast. -
Final Assembly:
Insert a bundle of battery-operated fairy lights into the jar and place the lid on top to watch your forest come alive.
Place your finished jar on a slice of wood with some greenery to complete the magical scene
Fantasy Forest Guardian Totem
This charming decorative totem features four stacked clay spheres transforming from rustic stone textures to a peaceful sleeping guardian at the peak. With its earthy tones, delicate leaf detailing, and serene expression, this project brings a touch of forest magic to any shelf or nature table.
Detailed Instructions
Materials
- Polymer clay (white, beige/stone, terracotta, moss green)
- Aluminum foil (for armature)
- Texturing tools (toothbrush, sandpaper, or crumpled foil)
- Needle tool and clay knife
- Soft pastels (pink, brown) and a soft brush
- Acrylic paint (black, brown)
- Fine detail brush
- Liquid polymer clay or strong craft glue
- Oven for baking
Step 1: Forming the Base Structure
-
Prepare the foil cores:
Crumple aluminum foil into four tight balls of decreasing sizes. The base ball should be the largest (about 2.5 inches wide) and the top head ball slightly smaller (about 1.5 inches wide). Compression is key here to prevent air pockets. -
Cover the base stones:
Roll out a sheet of beige or stone-colored clay. Wrap the three largest foil balls completely, smoothing the seams so the foil is hidden. Don’t worry about perfect smoothness yet; texture is coming next. -
Texture the stones:
Use a toothbrush or a ball of crumpled foil to firmly tap and roll over the surface of the three beige spheres. This creates a realistic, porous stone or seed-pod texture. I like to add a few larger dings for character. -
Add deep details:
On the second sphere from the bottom, use a dotting tool to press two small indentations for rustic ‘eyes’. On the bottom sphere, press a larger, rougher hole on the side to mimic a natural hollow. -
Construct the head:
Cover the smallest foil ball with smooth white clay. Roll this one perfectly smooth in your palms to contrast with the textured body below.
Step 2: Adding Natural Elements
-
Create the leaves:
Roll out moss green clay thinly. Use a small leaf cutter or cut teardrop shapes freehand with a knife. You will need about 5-6 leaves for each junction between the spheres. -
Texture the veins:
Use a needle tool to gently score a central vein and smaller branching veins onto each green leaf. Keep the pressure light to avoid cutting all the way through. -
Assemble the stack:
Choose the flattest side of your base sphere for stability. Apply a dab of liquid clay on top, arrange a circle of leaves draping downwards, and press the second sphere on top. Repeat this for the third sphere. -
Attach the head:
Place the final ring of leaves on top of the third sphere. Secure the smooth white head on top, ensuring it is centered and stable.
Unstable Stack?
If the totem feels wobbly before baking, insert a piece of uncooked spaghetti or a stiff wire through the center of all spheres to act as an internal spine.
Step 3: Sculpting the Guardian’s Hat
-
Form the cap base:
Flatten a small disk of terracotta or brown clay and mold it over the top of the white head like a beanie. Texture it slightly with a sponge or brush to look like an acorn cap. -
Add the ears:
Shape two small triangles from the same brown clay. Indent the centers slightly and attach them to the sides of the cap, blending the seams so they emerge naturally. -
Create the crowning leaf:
Cut a larger, serrated leaf shape from the terracotta clay. Score deep vein lines into it and attach it vertically to the very top center of the cap.
Seasonal Shift
Change the vibe by altering leaf colors. Use bright orange/yellow for autumn, or dust the tips with white paint and glitter for a winter frost version.
Step 4: Finishing Touches
-
Painting the face:
Using a very fine brush and black acrylic paint, carefully paint two curved lines for sleeping eyes and a tiny dot for the nose. Keep the lines thin and delicate. -
Add rosy cheeks:
Scrape a little pink soft pastel into powder. Use a soft, dry brush to gently dust rosy cheeks onto the white face and inside the brown ears. -
Baking the sculpture:
Bake the entire totem according to your clay manufacturer’s instructions (usually 275°F/135°C for 15-30 minutes per 1/4 inch of thickness). Let it cool completely inside the oven to prevent cracking. -
Applying the wash:
Once cool, mix brown acrylic paint with water. Brush it over the textured beige body parts and wipe it off immediately with a damp cloth. The dark paint will stay in the textures, enhancing the stone effect.
Set your finished guardian near a potted plant or window to watch over your indoor garden