If you’ve got a bowl of clay disc beads and that urge to make something festive, Fourth of July bracelets are the perfect quick win. I love how red, white, and blue stacks can look classic, playful, or totally elevated just by tweaking the pattern and a few little accents.
Classic Red, White, and Blue Stripes
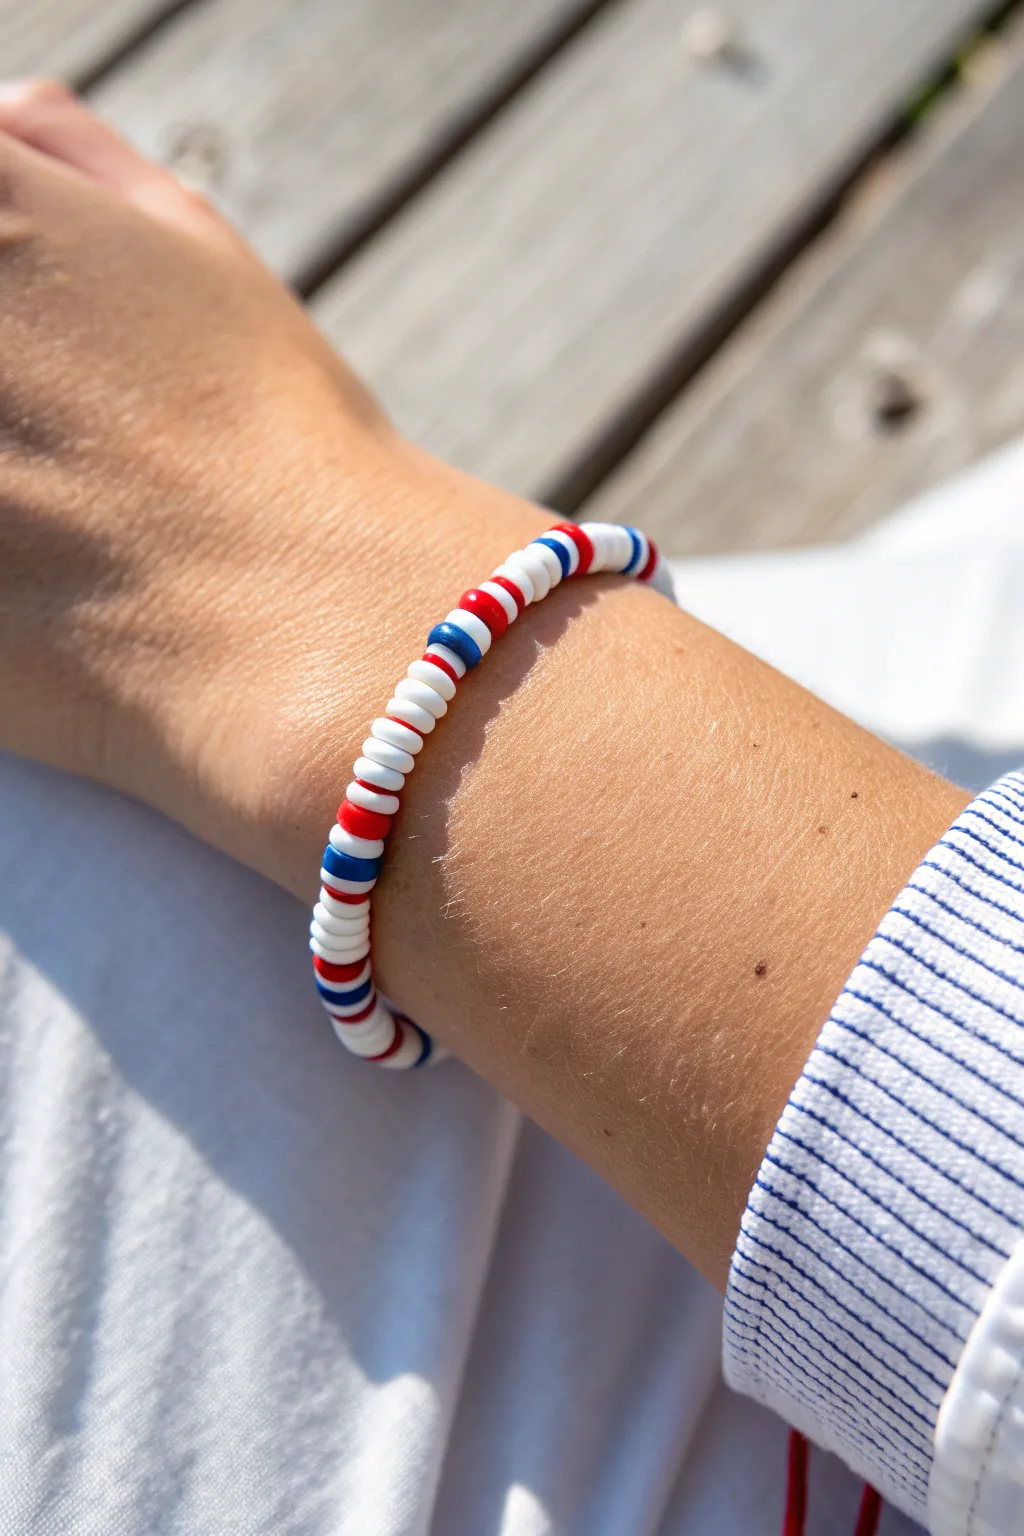
Achieve an effortlessly cool Fourth of July look with this classic red, white, and blue stripe pattern. The smooth clay heishi beads create a sleek, comfortable accessory perfect for stacking or wearing as a subtle solo statement.
Step-by-Step Tutorial
Materials
- 6mm polymer clay heishi beads in red
- 6mm polymer clay heishi beads in white
- 6mm polymer clay heishi beads in royal blue
- 0.8mm clear elastic stretch cord
- Super glue or jewelry cement
- Scissors
- Bead stopper or tape
- Ruler or measuring tape
Step 1: Preparation
-
Measure your wrist:
Wrap a flexible measuring tape around your wrist bone to determine the circumference. Add about 0.5 to 1 inch to this measurement depending on how loose you want the fit. -
Cut the cord:
Cut a piece of elastic cord approximately 10-12 inches long. Having this extra length makes tying the final knot significantly easier than working with short ends. -
Secure the end:
Place a bead stopper on one end of your cut elastic. If you don’t have a stopper, a piece of masking tape folded over the end works perfectly to keep beads from sliding off.
Pattern Precision Tip
For a symmetrical look, try to end your strand exactly where the pattern finishes. Ending on a blue bead allows it to meet the starting white block perfectly.
Step 2: Beading the Pattern
-
Start with a white block:
Begin your pattern by threading on five white heishi beads. This creates the solid white spacers that define the look. -
Add the red stripe:
Thread on one red clay bead. Ensure it sits flush against the white stack. -
Add the separator:
Follow the red bead immediately with one single white bead. -
Add the blue stripe:
Thread on one blue clay bead to complete the first full pattern sequence. -
Verify the sequence:
Check your work. The basic repeating unit is: 5 White, 1 Red, 1 White, 1 Blue. This creates that distinct segmented look rather than a busy scramble. -
Repeat the pattern:
Continue adding the sequence (5 White, 1 Red, 1 White, 1 Blue) repeatedly. I find it helpful to lay out piles of the beads beforehand so I can just grab and thread without counting every time. -
Check fit periodically:
Wrap the strand around your wrist occasionally as you work. You want the beads to touch end-to-end comfortably without stretching the elastic visible between them. -
Adjust length:
Stop beading when you reach your target length. Try to end the pattern after a blue bead so the design flows seamlessly when connected back to the starting white block.
Knot Slipping?
If your elastic knot won’t hold tight, try using a slightly textured elastic cord or tie three knots instead of two. The glue is crucial for slick cords.
Step 3: Finishing Touches
-
Pre-stretch the cord:
Before tying, give the ends of the elastic a gentle tug. This pre-stretching prevents the bracelet from loosening up drastically the first time you wear it. -
Remove the stopper:
Carefully remove your bead stopper or tape while holding the ends of the cord firmly so no beads escape. -
Tie the first knot:
Cross the left cord over the right and pull through to make a simple overhand knot. Pull it tight to bring the beads together. -
Secure with a surgeon’s knot:
For the second knot, loop the cord through twice instead of once before pulling tight. This extra friction helps lock the elastic in place. -
Apply adhesive:
Dab a tiny drop of super glue or jewelry cement directly onto the knot. Be careful not to get glue on the surrounding beads, as it can discolor the clay. -
Hide the knot:
While the glue is still wet, quickly slide the knot inside the hole of one of the adjacent white beads. This hides the mechanics for a professional finish. -
Final trim:
Once the glue has fully dried (wait at least 15 minutes), use sharp scissors to trim the excess elastic tails as close to the bead hole as possible without cutting the knot itself.
Slip on your new striped wrist accessory and enjoy the festive flair all summer long


Solid Color Trio Stack
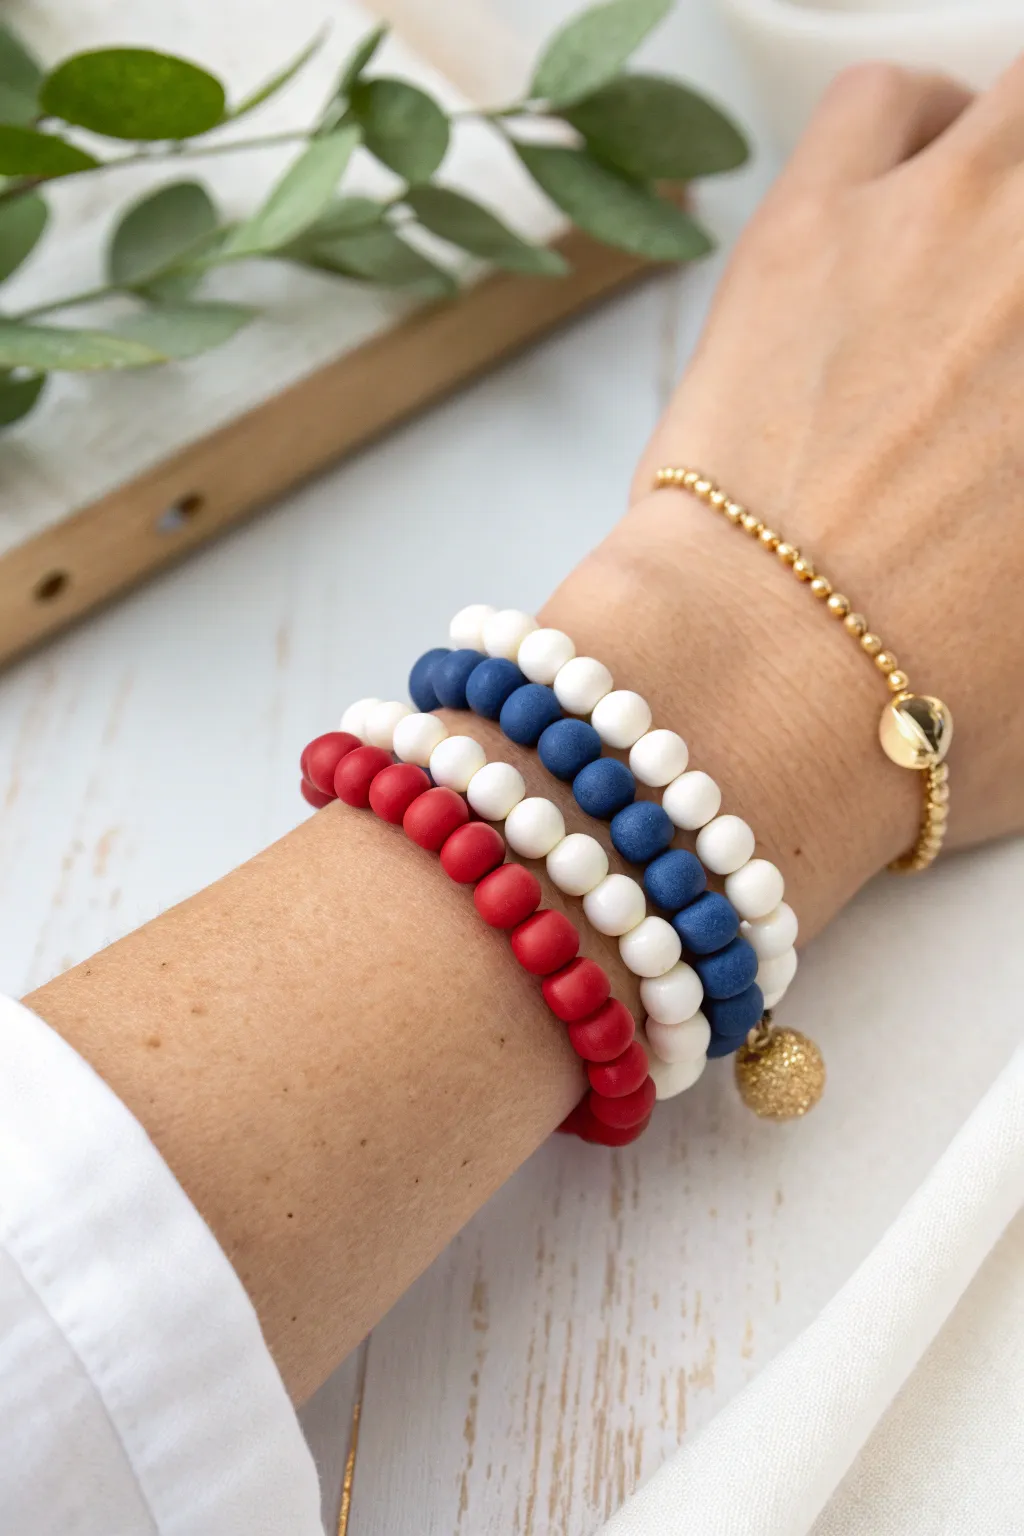
Celebrate the stars and stripes with this clean and classic stack of three monochromatic bracelets. Using matte polymer clay beads in solid blocks of red, white, and blue creates a sophisticated, modern take on festive Fourth of July jewelry.
Step-by-Step Guide
Materials
- 6mm matte polymer clay disc beads (Heishi beads) in solid red
- 6mm matte polymer clay disc beads in solid white
- 6mm matte polymer clay disc beads in solid royal blue
- Strong elastic stretch cord (0.7mm or 0.8mm transparent)
- Gold accent beads or a small gold charm (optional for the white bracelet)
- Jewelry adhesive (e.g., G-S Hypo Cement)
- Scissors
Step 1: Preparation
-
Measure your wrist:
Before cutting any cord, wrap a measuring tape around your wrist to determine the circumference. For a comfortable fit, add about half an inch to your actual wrist measurement. -
Prepare the elastic:
Cut three lengths of elastic cord, making sure each is about 3-4 inches longer than your final bracelet size. This extra length is crucial for tying secure knots later without struggling. -
Pre-stretch the cord:
Give each piece of elastic a few gentle tugs. Pre-stretching helps prevent the bracelets from sagging or loosening permanently after you wear them for the first time.
Sticky Situation?
If your knot keeps slipping before you can glue it, ask a friend to put a finger on the knot while you tie, or use a tiny dab of clear nail polish for a quick temporary hold.
Step 2: The Red Bracelet
-
Secure the end:
Place a piece of tape or a bead stopper on one end of your first cord to stop beads from sliding off while you work. -
String the beads:
Begin threading the solid red matte clay beads onto the cord. Keep adding beads until the beaded section matches your determined wrist length. -
Check the fit:
Wrap the unfinished strand around your wrist to check the size. Remove or add a few beads until it sits comfortably without digging into your skin. -
Tie the knot:
Remove the tape and bring the ends together. Tie a surgeon’s knot (loop the cord through twice before pulling tight) to secure it. Pull the ends firmly to lock the knot in place. -
Secure with glue:
Dab a tiny drop of jewelry adhesive directly onto the knot. Let it dry for a moment before trimming the excess cord ends close to the knot.
Step 3: The White & Blue Bracelets
-
Create the white strand:
Repeat the stringing process with the white clay beads. I find that white beads can sometimes show dirt or makeup, so handle them with clean hands. -
Add a gold accent:
As seen in the inspiration photo, you can add a small gold textured bead or charm to one of the strands. If doing so, thread it onto the white bracelet near the knot area to hide the join. -
Tie and finish white:
Secure the white bracelet with the same surgeon’s knot and glue technique used for the red one. -
Create the blue strand:
Finally, string the royal blue beads onto your last piece of elastic cord, ensuring the length matches the previous two bracelets exactly for a uniform stack. -
Finish the set:
Knot, glue, and trim the blue bracelet. Allow the glue on all three bracelets to cure fully (usually 15-20 minutes) before stretching them over your hand.
Add a Little Sparkle
Use gold spacer beads every 10 clay beads to break up the solid color blocks. This adds a metallic rhythm that matches the gold chain bracelet perfectly.
Stack them high and enjoy your festive new accessory set


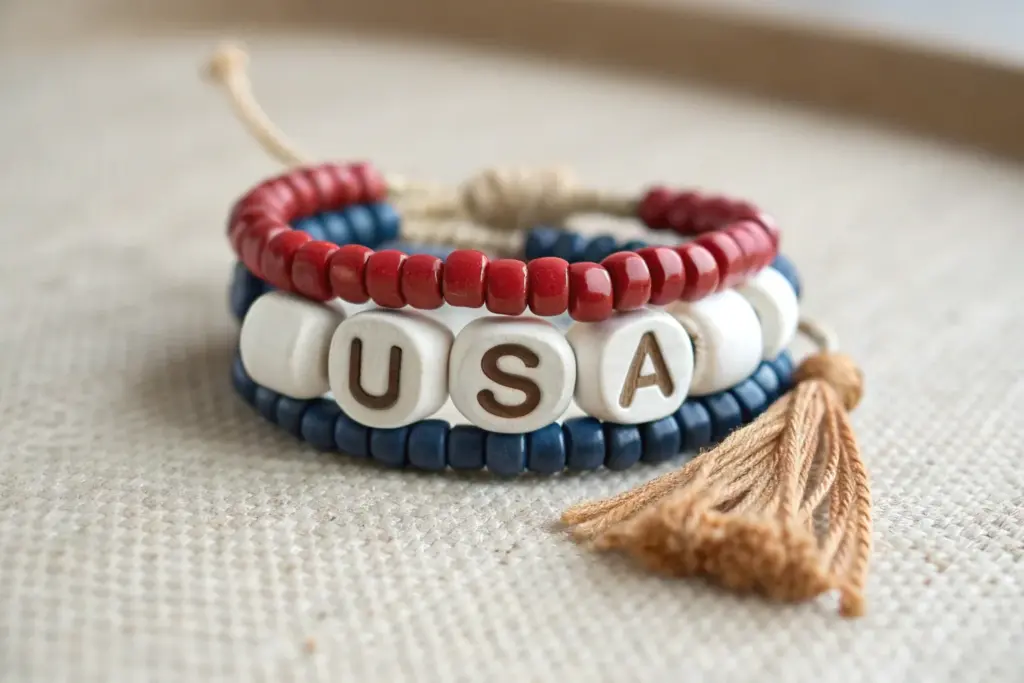
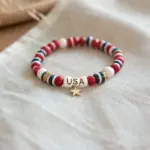
USA Letter Bead Centerpiece
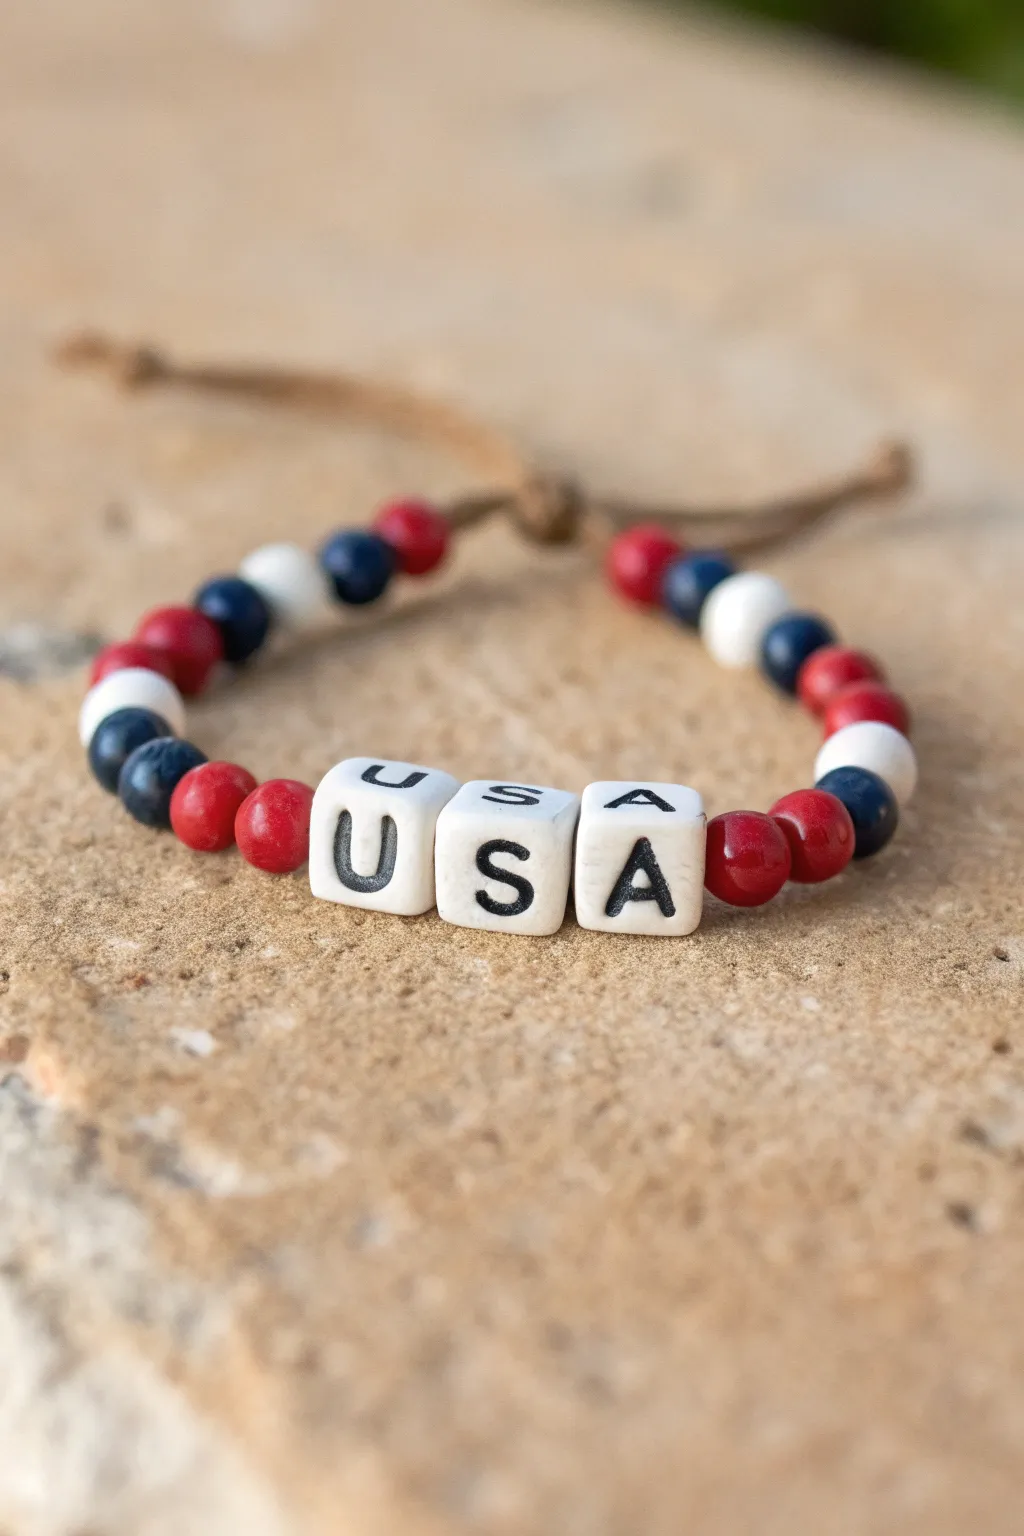
Show off your American spirit with this simple yet striking beaded bracelet. Featuring a classic red, white, and blue color scheme centered around bold letter beads, this adjustable accessory is perfect for Independence Day celebrations.
Step-by-Step
Materials
- Hemp or waxed cotton cord (light brown or natural color)
- White square letter beads (‘U’, ‘S’, ‘A’)
- Red round beads (approx. 6mm, clay or wood)
- White round beads (approx. 6mm, clay or wood)
- Dark blue/navy round beads (approx. 6mm, clay or wood)
- Scissors
- Tape or clipboard (optional)
Step 1: Preparation & Center Setup
-
Cut the cord:
Begin by cutting a length of hemp cord roughly 12 to 14 inches long. This generous length gives you plenty of room to knot the ends comfortably without struggling. -
Secure the workspace:
If you find the cord moves around too much, tape one end to your table or secure it under a clipboard. This helps keep the tension steady while you thread. -
Thread the centerpiece:
Locate your ‘U’, ‘S’, and ‘A’ cube beads. Thread them onto the cord in that specific order so they read correctly from left to right. -
Center the letters:
Slide the three letter beads to the exact middle of your cord length. This ensures the rest of your design builds out evenly on both sides.
Step 2: Beading the Right Side
-
First red beads:
Working on the cord strand to the right of the ‘A’, thread on two red round beads. -
Add the blue accent:
Slide on one dark blue bead next to the red ones. -
White separator:
Add a single white bead to create a bright contrast break. -
Continue the pattern:
Thread on a red bead, followed quickly by another dark blue bead. -
Final pattern beads:
Finish this side’s sequence with one white bead followed by a red bead and a final dark blue bead. Check against the photo to ensure your pattern matches. -
Secure with a knot:
Once the beads are on, tie a simple overhand knot right up against the last bead. This keeps them snug against the center letters so gaps don’t appear.
Knot Slipping?
If your adjustable knots feel too loose on the hemp cord, add a tiny dot of clear nail polish or craft glue to the knot itself (not the cord it slides on) to stiffen it.
Step 3: Beading the Left Side
-
Start the left side:
Now pick up the cord strand on the left side of the ‘U’. Start by threading two red beads, mirroring the start of the right side. -
Add contrasting colors:
Slide on a dark blue bead followed by a white bead. -
Extend the pattern:
Add a red bead, then a dark blue bead to continue the symmetrical look. -
Complete the sequence:
Finish this side by adding one white bead, one dark blue bead, and finally a red bead. -
Tie the second knot:
Just like before, tie a tight overhand knot snug against this last bead. Make sure the total length of the beaded section fits comfortably across the top of your wrist.
Make It Sparkle
Swap the plain red or blue beads for glitter-infused pony beads or add tiny star-shaped silver spacers between the ‘USA’ letters for extra festive flair.
Step 4: Finishing the Closure
-
Form the loop:
Bring the two cord ends together so they overlap. You can use a ‘shamballa’ or square knot technique if you know it, but a simple adjustable sliding knot works perfectly here. -
Tie the sliding knot:
Take one cord end and tie a loose overhand knot *around* the other cord. Pull it tight enough to hold but loose enough to slide. -
Secure the second end:
Repeat this with the other cord end, tying it around the main cord strand in the opposite direction. Now the two knots should slide toward or away from each other to adjust sizing. -
Knot the very ends:
Tie a small, tight knot at the very tip of each cord tail to prevent the sliding knots from slipping off securely. -
Trim excess:
Snip off any extra cord extending past your final safety knots for a clean, professional finish.
Wear your new customized bracelet with pride at your next barbecue or fireworks display


Flag-Inspired Color Blocking
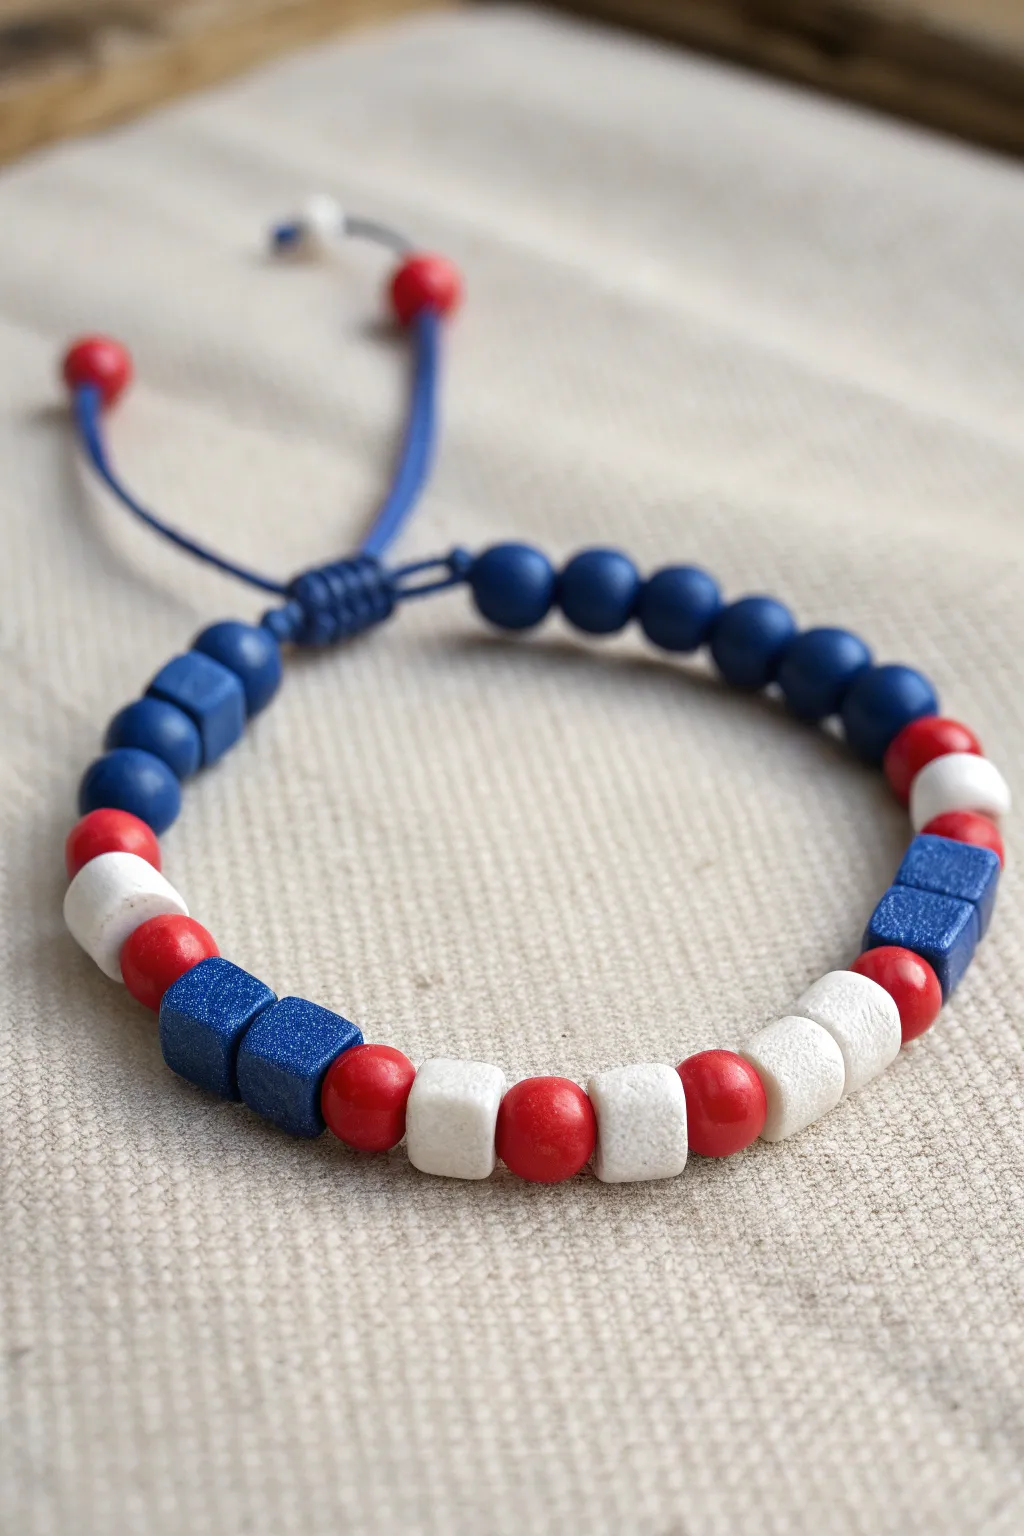
Show off your stars and stripes with this unique bracelet that mixes shapes as well as colors. By alternating round beads with textured cubes, you get a playful, modern take on classic Fourth of July spirit that stands out from simple strung designs.
Step-by-Step Guide
Materials
- 1mm blue nylon cord (approx. 15 inches)
- Blue wooden or clay cube beads (approx. 6-8mm)
- White clay cube beads (approx. 6-8mm)
- Red spherical wooden beads (6mm)
- Blue spherical wooden beads (8mm)
- White spherical wooden or clay beads (8mm)
- Scissors
- Lighter or thread burner (for sealing cord ends)
- Clipboard or tape (to hold the cord while working)
Step 1: Setting Up the Base
-
Prepare the Cord:
Cut a length of blue nylon cord about 15 inches long to ensure you have plenty of room for knots and the adjustable closure. -
Seal the Ends:
Briefly run a lighter flame over the very tips of your cord to prevent fraying, which makes stringing the beads significantly easier. -
Secure the Start:
Tie a simple overhand knot about 3 inches from one end. I find taping this end down to a table helps keep everything steady.
Step 2: Creating the Pattern
-
Start with Blue Spheres:
Begin the pattern by threading on about 9 dark blue spherical beads. These form the solid ‘blue field’ section of the flag inspiration. -
Transition with a Cube:
Add one blue cube bead next. This subtle shift in shape marks the transition out of the solid blue section. -
Begin the Red and White:
Thread on a medium red bead followed by a large white spherical bead to start the color-blocked rhythm. -
Add Texture:
String two blue cube beads. These textured squares add a nice visual break and weight to the center of the design. -
The Center Sequence:
Add a pattern of colors: Red Sphere, White Cube, Red Sphere, White Cube, Red Sphere, White Cube. -
Symmetry Check:
Continue slightly past the center with a Red Sphere followed by two White Spheres (or one large white cylinder/bead). -
Finish the Pattern Side:
Mirror the blue side if desired, or finish with a mix: add a blue cube, then more red and white spheres until the beaded section covers about 6 to 6.5 inches of the cord. -
Secure the End:
Once you are happy with the length, tie another overhand knot snug against the last bead to lock everything in place.
Clean Cord Tip
If the bead holes are tight, roll the cord end in a dab of white glue or clear nail polish and let it dry stiff. It acts like a built-in needle.
Step 3: The Macramé Closure
-
Form the Circle:
Curve the bracelet into a circle, overlapping the two 3-inch tail ends of the cord. -
Cut a Anchor Cord:
Cut a separate small piece of blue nylon cord, roughly 6 inches long. -
Start the Square Knots:
Tie the new short cord around the two overlapped main strands using a basic square knot. -
Build the slider:
Continue tying square knots (macramé) for about half an inch. This creates the sliding mechanism that makes the bracelet adjustable. -
Trim and Melt:
Trim the excess lengths of the knotting cord (not the main bracelet tails!) and carefully melt the ends with your lighter to fuse the knot so it doesn’t unravel. -
Add End Beads:
On each of the main tail ends, thread one small red bead. -
Final Knots:
Tie a small knot at the very end of each tail to keep the red beads on, then trim any excess fluff.
Level Up: Sparkle
Swap the plain blue cube beads for glitter-infused polymer clay beads or star-shaped beads to make the flag theme even more literal and festive.
Slide it on your wrist and enjoy your custom patriotic accessory all summer long

The Complete Guide to Pottery Troubleshooting
Uncover the most common ceramic mistakes—from cracking clay to failed glazes—and learn how to fix them fast.
Confetti Mix Patriotic Scatter
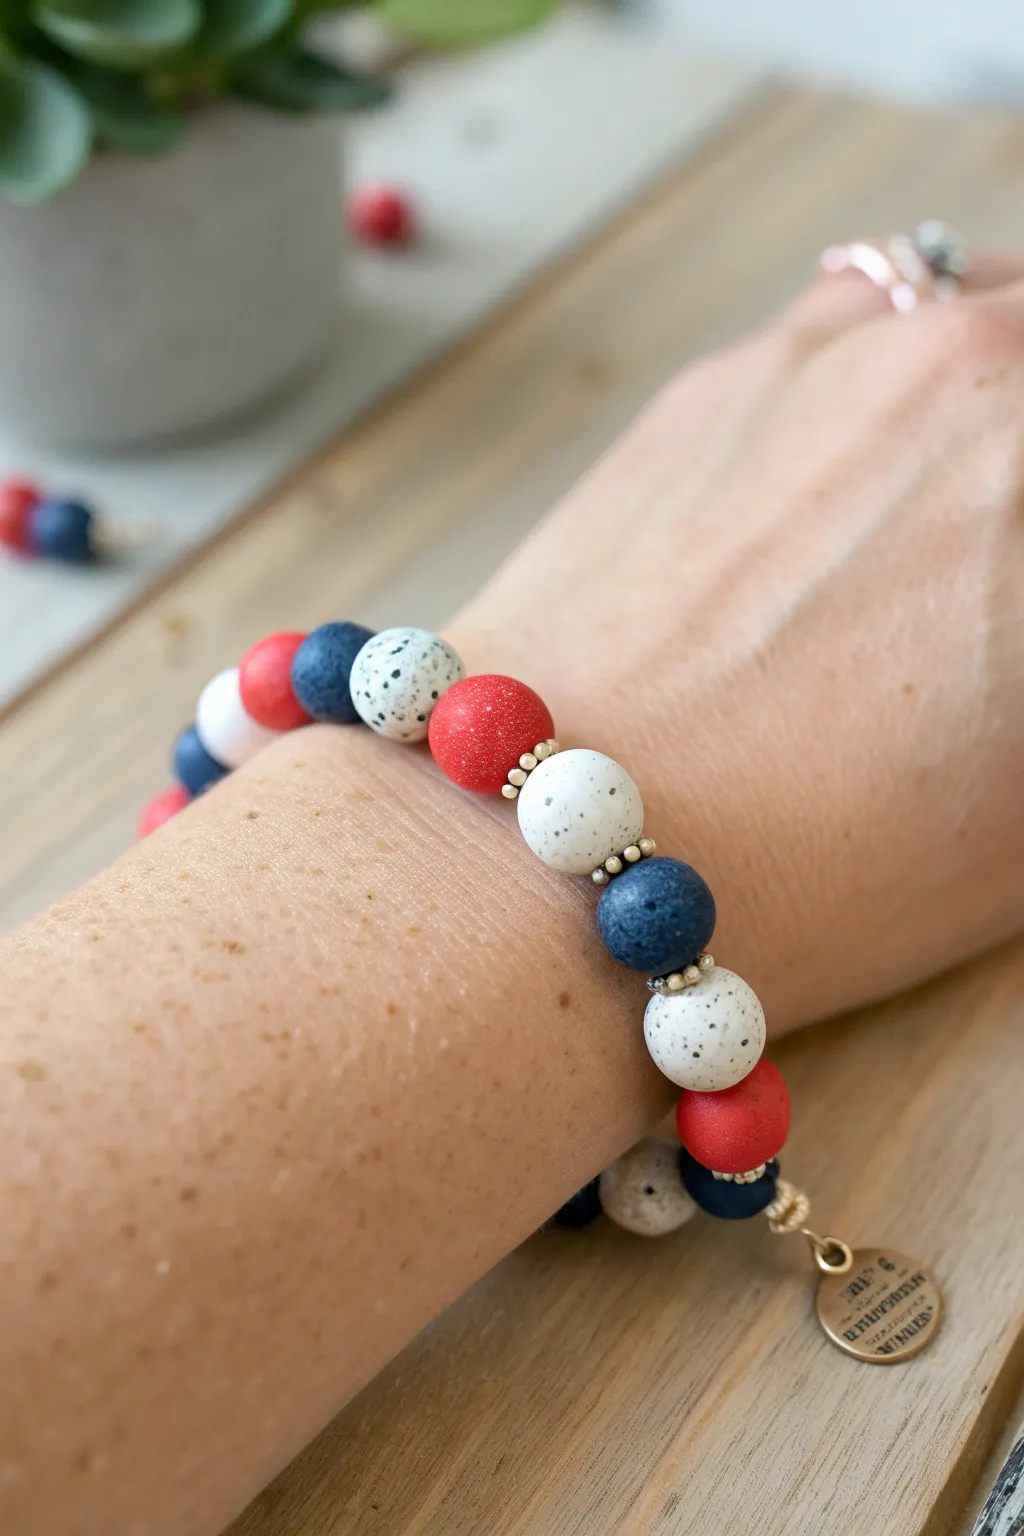
Celebrate the stars and stripes with this charming polymer clay bead bracelet that features a playful “confetti” look. The mix of solid reds, granite-style whites, and textured blues creates a sophisticated yet festive accessory perfect for Independence Day gatherings.
Step-by-Step
Materials
- Red polymer clay beads (8mm or 10mm, round)
- Speckled white polymer clay beads (often called ‘granite’ or ‘terrazzo’, 8mm or 10mm)
- Textured or speckled blue polymer clay beads (8mm or 10mm)
- Small gold spacer beads (daisy spacers or tiny rounds)
- Elastic cord (0.8mm or 1.0mm depending on bead hole size)
- Gold charm (coin style) with jump ring
- Scissors
- Jewelry glue (e.g., G-S Hypo Cement)
- Bead stopper or scotch tape
- Flat nose pliers (optional, for the jump ring)
Step 1: Preparation and Design
-
Measure your wrist:
Before cutting any cord, wrap a measuring tape around your wrist to find your size. Add about 1/2 to 1 inch to this measurement depending on how loose you like your bracelets to fit. -
Cut the elastic:
Cut a piece of elastic cord roughly 10 inches long. This extra length will give you plenty of room to tie a secure knot later without struggling with tiny tails. -
Secure the end:
Attach a bead stopper to one end of the elastic cord. If you don’t have a stopper, a piece of scotch tape folded over the end works perfectly to keep beads from sliding off. -
Plan your pattern:
Lay your beads out on a bead design board or a soft towel. The pattern shown uses a repeating sequence: Red, Spacer, White, Spacer, Blue, Spacer. I like to arrange the full length before stringing to ensure the colors are balanced.
Step 2: Stringing the Beads
-
Start stringing:
Begin threading your beads onto the elastic cord. Start with a main clay bead closest to your stopper so the knot can eventually hide inside it (if the hole is large enough). -
Add spacer accents:
Between each clay bead, thread on one or two small gold spacer beads. In the image, some sections have two tiny gold spacers between the larger beads for extra shine. -
Check the fit:
Once you have strung about 6.5 to 7 inches of beads (or your target length), wrap the strand around your wrist to check the fit. The beads physically take up space, so it might feel tighter than the bare string did. -
Insert the charm carrier:
Decide where you want your charm to hang. Often, it looks best opposite the knot, or you can place it near the knot to distract from the closure. -
Add the charm:
Thread the jump ring with the gold coin charm onto the elastic cord at your chosen spot. Make sure it sits securely between two beads or spacers.
Knot Slipping?
If your surgeon’s knot feels slippery, try rubbing the elastic ends with a bit of beeswax or even roughing them slightly with sandpaper before tying for extra grip.
Step 3: Finishing Touches
-
Pre-stretch the cord:
Before tying, gently pull on both ends of the elastic cord to stretch it out slightly. This pre-stretching prevents the bracelet from loosening up and sagging after you wear it a few times. -
Tie the first knot:
Remove the bead stopper and bring the two ends of the elastic together. Tie a simple overhand knot, pulling it tight so there are no gaps between beads. -
Secure with a surgeon’s knot:
For the main security, tie a surgeon’s knot. Make a loop like a normal knot, but pass the tail end through the loop twice instead of once. Pull all four strands (the two tails and the two loop sides) firmly to lock it. -
Apply adhesive:
Dab a tiny drop of jewelry glue directly onto the knot. Be careful not to get glue on the beads themselves, as it can mar the polymer clay finish. -
Hide the knot:
While the glue is still tacky, gently pull the elastic so the knot slides inside the hole of the nearest large bead. Let it dry completely in this position. -
Trim the ends:
Once the glue is fully dry (usually wait at least 15 minutes), use sharp scissors to trim the excess elastic tails close to the bead hole. Be careful not to snip the main knot.
Make It Matte
For a more rustic, pottery-like vibe, lightly sand your finished polymer clay beads with distinct fine-grit sandpaper (1000 grit) to remove any factory sheen.
Now slip on your patriotic creation and enjoy the festive flair it adds to your holiday outfit
Star Charm Dangle Accent
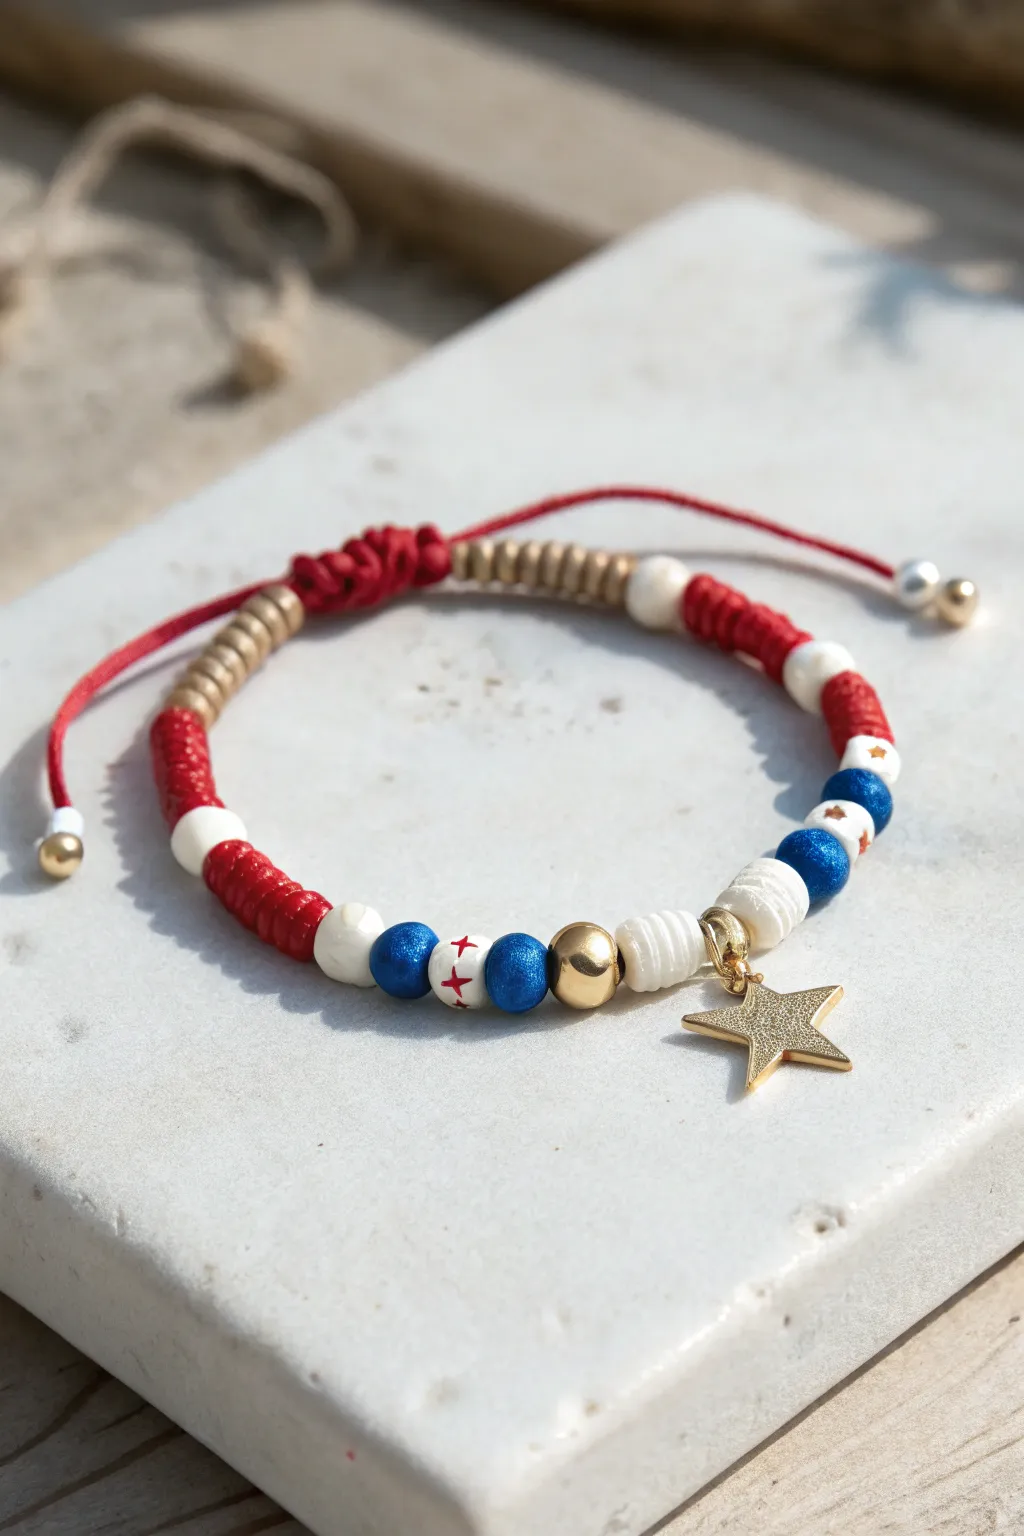
Celebrate Independence Day with this beautifully threaded bracelet that balances patriotic colors with elegant gold accents. The design features a mix of Heishi beads, playful patterned spheres, and a striking golden star charm that is sure to catch the light at your next barbecue.
Step-by-Step Tutorial
Materials
- Red satin nylon cord (1mm thickness)
- Small gold Heishi spacer beads (approx. 4mm)
- White Heishi beads (polymer clay or shell, approx. 6mm)
- Red Heishi beads (vinyl or polymer clay, approx. 6mm)
- Round polymer clay beads: Blue shimmer/glitter
- Round polymer clay beads: White with red stars
- Round polymer clay beads: White with tiny gold stars
- Large gold round spacer bead
- Gold star charm with jump ring
- Two gold crimp beads (or small gold spacing beads) for the ends
- Scissors
- Lighter or thread burner
- Measuring tape
- Jewelry pliers
Step 1: Setting the Foundation
-
Prepare the Cord:
Cut a length of red nylon cord approximately 12-14 inches long. This generous length gives you plenty of room to work with the macramé closure later. -
Seal the Ends:
Briefly run a lighter flame over both ends of the cord to melt them slightly. Quickly tap them with your fingers (carefully!) to form a stiff, needle-like point for easier threading. -
Secure the Start:
Tie a simple overhand knot regarding 4 inches from one end of the cord. This acts as a stopper while you bead.
Step 2: Creating the Pattern
-
The Gold Heishi Section:
Begin by threading on about 10 to 12 small gold Heishi spacer beads. This creates a metallic flank for the adjustable closure area. -
First Red Segment:
Add a stack of red Heishi beads, approximately 6 or 7 distinct discs deep. -
White Transition:
Thread on a single, slightly larger white Heishi bead to separate the colors. -
Second Red Segment:
Repeat with another stack of 6-7 red Heishi beads. I like to double-check that this stack matches the length of the first one for symmetry. -
Pattern Introduction:
Thread one single white Heishi bead, followed by one blue glitter round bead. -
Star Pattern Beads:
Add a white round bead featuring the red star pattern. Follow this immediately with another blue glitter round bead. -
The Centerpiece:
Slide on the large gold round spacer bead. -
Charm Placement:
Thread three white Heishi spacers. Then, slide the loop of your gold star charm onto the cord. Follow it with two more white Heishi spacers to nestle the charm in place. -
Mirroring the Pattern:
Now, reverse the previous pattern sequence. Add a blue glitter round bead, followed by a white round bead with small gold stars, and then another blue glitter bead.
Tight Knot Trouble?
If your slide knot is too stiff to adjust, you may have tied the square knots too tightly around the core strands. Carefully undo it with a needle and retry with slightly less tension.
Step 3: Finishing the Loop
-
White and Red Transition:
Add a single white Heishi bead, followed by a stack of 6-7 red Heishi beads. -
Final Red Stack:
Add one white spacing bead, then the final block of 6-7 red Heishi beads. -
Closing Gold Section:
Finish the main beading sequence with another set of 10-12 gold Heishi spacers, matching the count from step 1. -
Secure the Beads:
Tie an overhand knot flush against the last gold bead. Ensure the beads have a tiny bit of wiggle room so the bracelet can curve around a wrist without buckling.
Make It Sparkle
Swap the plain gold spacer bead for a rhinestone-encrusted pave bead. This adds a disco-ball effect that looks fantastic under fireworks.
Step 4: The Macramé Closure
-
Form the Circle:
Cross the two tail ends of the cord so they overlap parallel to each other. -
Macramé Set Up:
Cut a separate 6-inch piece of red cord. Tie it around the two overlapped main cords. -
Square Knots:
Create a series of square knots (macramé slide knot) with this new cord for about half an inch. This creates the adjustable mechanism. -
Trim and Melt:
Trim the excess from the knotting cord (not the main bracelet cords!) and carefully melt the tips with a lighter to obscure them into the knot. -
Detailing the Tails:
On each dangling tail end, thread a small white bead followed by a small gold bead or crimp. -
Final Knots:
Tie a knot at the very end of each tail to keep these beads on, trim any excess, and lightly singe the tips to prevent fraying.
Slip on your handcrafted accessory and enjoy the patriotic flair it adds to your holiday outfit


What Really Happens Inside the Kiln
Learn how time and temperature work together inside the kiln to transform clay into durable ceramic.
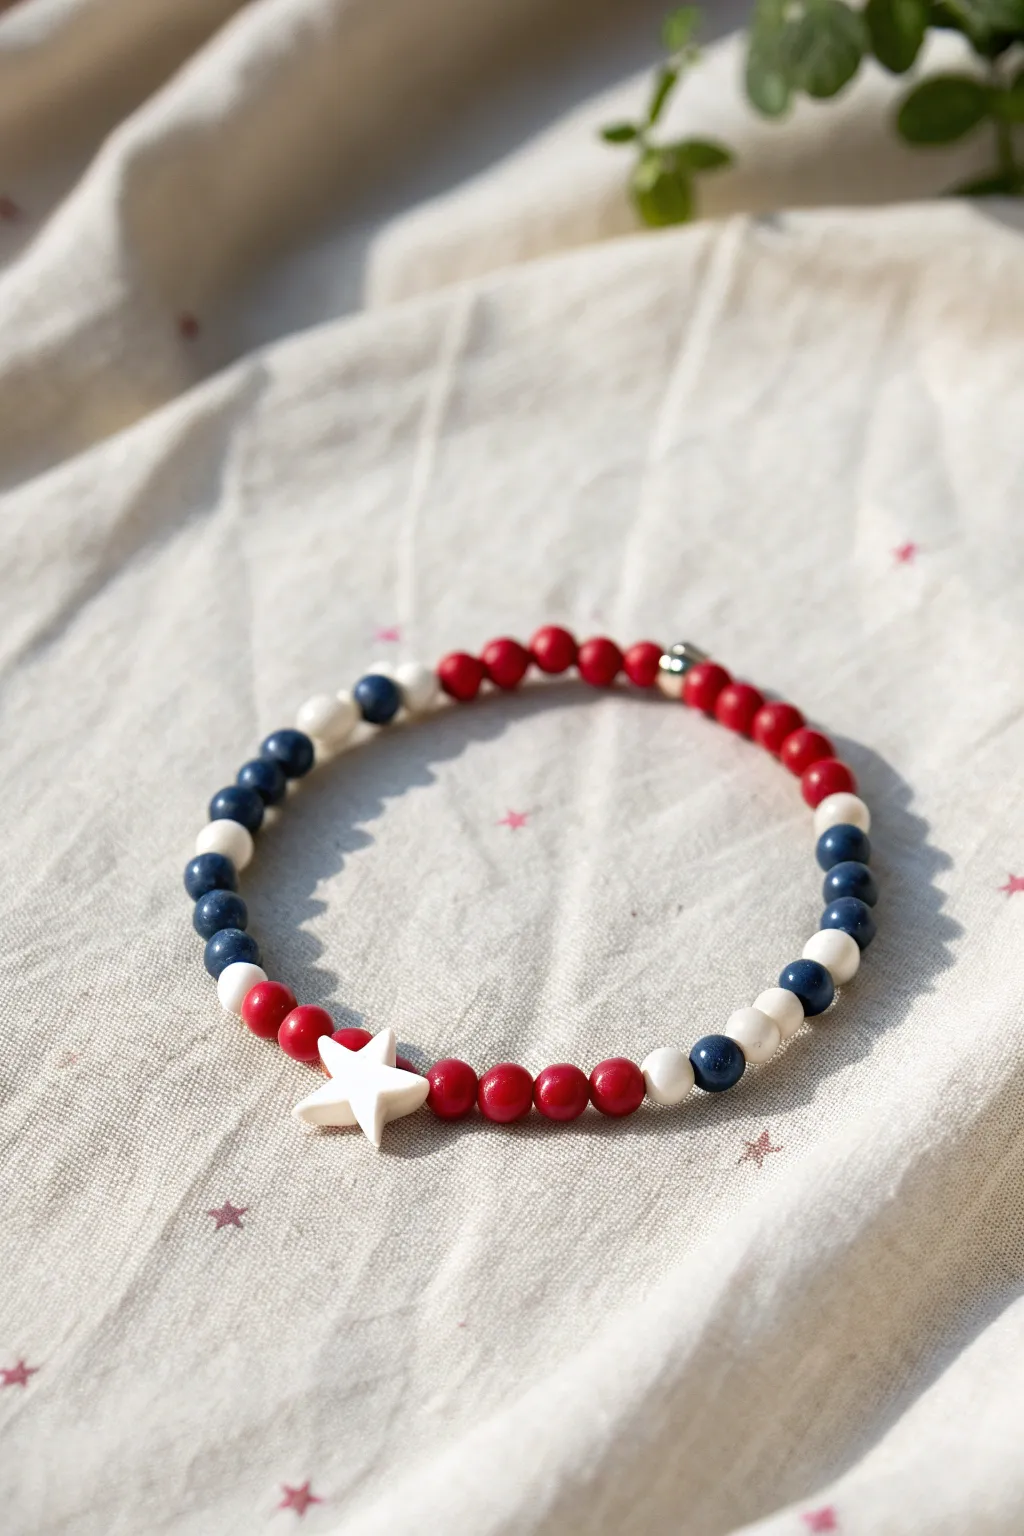
Star-Shaped Clay Bead Mix-In
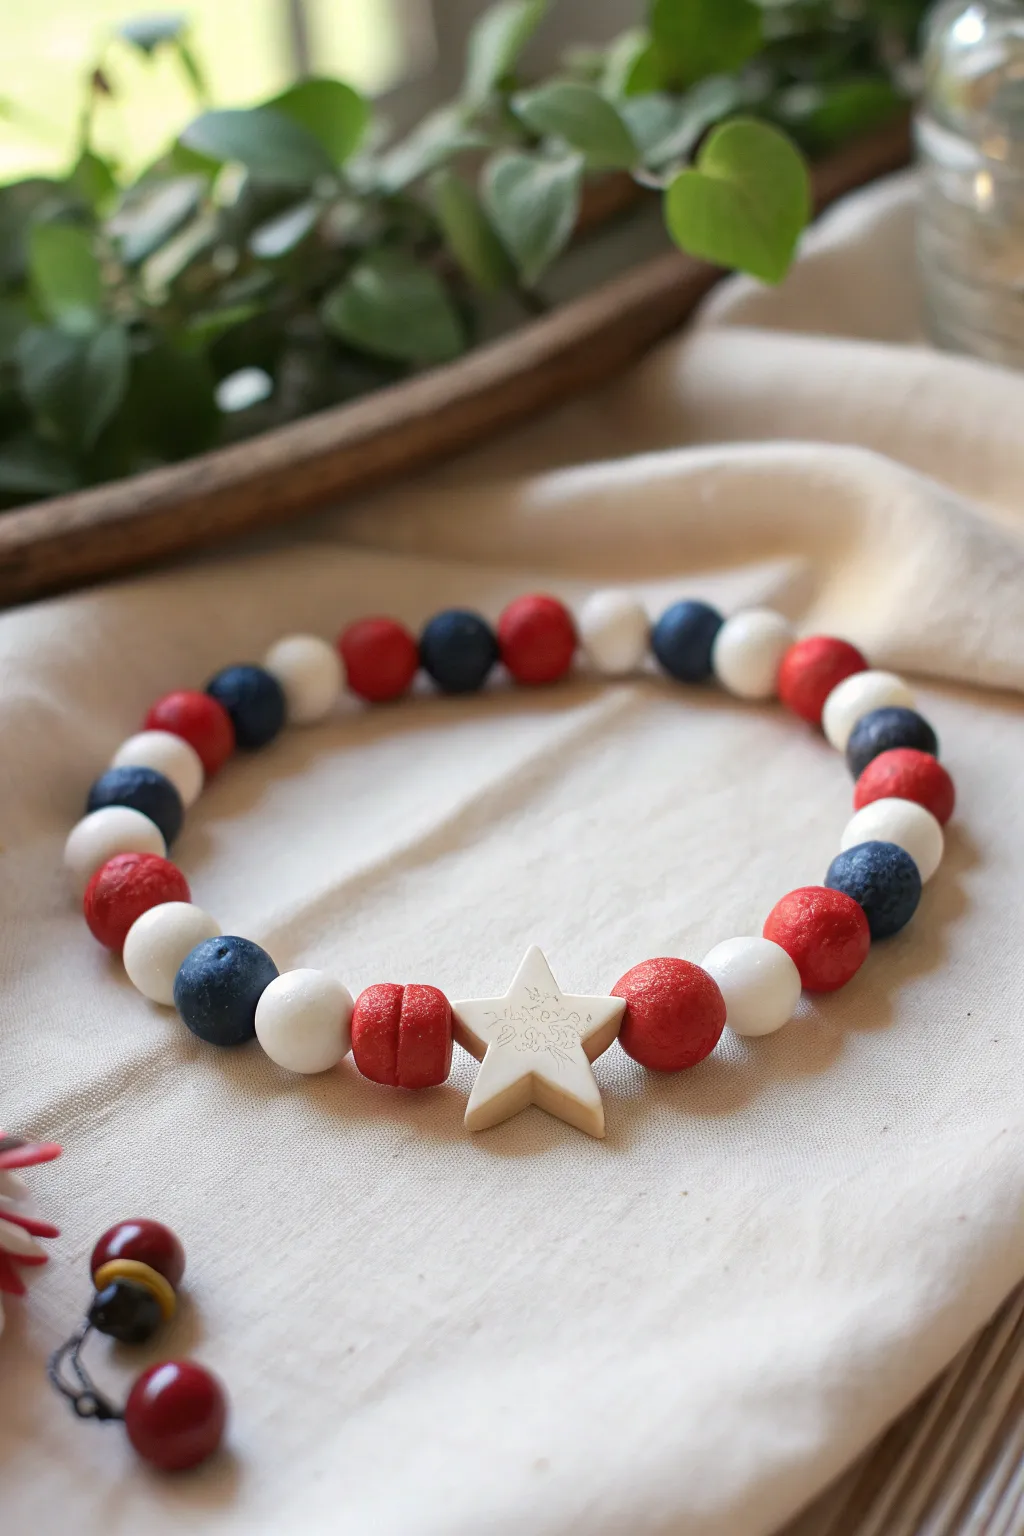
Celebrate Independence Day with a handcrafted accessory that combines classic Americana colors with a charming celestial centerpiece. This textured clay bead bracelet features a unique white star focal point surrounded by a rhythmic pattern of red, white, and blue, perfect for adding a festive touch to your holiday outfit.
Step-by-Step
Materials
- Polymer clay in Red (with glitter/mica effects), White, and Navy Blue
- Star-shaped clay cutter (approx. 1 inch)
- Bead piercing tool or toothpick
- Acrylic rolling pin
- Elastic beading cord (0.8mm or 1mm)
- Super glue or jewelry adhesive
- Sandpaper (fine grit)
- Gloss glaze (optional for the blue beads)
- Baking sheet and parchment paper
- Scissors
Step 1: Crafting the Beads
-
Condition the Clay:
Start by warming up your red, white, and blue polymer clay separately in your hands. Knead each color until it is soft, pliable, and free of cracks. -
Roll the Rounds:
Pinch off small amounts of clay to form the round beads. Aim for pieces that roll into balls roughly 10-12mm in diameter. You will need about 8-10 of each color depending on your wrist size. -
Add Texture:
For the red beads specifically, mixing in a touch of glitter or using a glitter-effect clay adds that lovely sparkle seen in the original. Keep the surface slightly organic rather than perfectly smooth to mimic the stone-like texture. -
Create the Star Focal:
Roll out a slab of white clay to about 5mm thickness. Use your star cutter to punch out a single shape. Smooth the edges gently with your finger to remove any sharp cutter marks. -
Detail the Star:
If you want to replicate the subtle etching on the star, use a needle tool to lightly scratch a faint, swirly pattern onto the surface before baking. -
Pierce the Beads:
Using your bead piercing tool, create holes in all your round beads. Ensure the hole is centered and wide enough for your elastic cord. -
Drill the Star:
Carefully pierce the star bead horizontally through the center. This can be tricky, so rotate your tool slowly as you push through to avoid distorting the star’s points. -
Bake the Clay:
Arrange all pieces on a parchment-lined baking sheet. Bake according to your clay manufacturer’s instructions (usually 275°F/135°C for 15-30 minutes). -
Cool and Inspect:
Allow the beads to cool completely before handling. I like to let them sit for an hour to ensure they harden fully. Lightly sand any rough spots near the holes if necessary.
Step 2: Assembly
-
Prepare the Cord:
Cut a piece of elastic cord about 10-12 inches long. Pre-stretch the cord by pulling on it gently a few times; this prevents the bracelet from loosening up later. -
Start with the Pattern:
Begin threading your beads. The pattern shown alternates consistently: White, Blue, Red. Start threading this sequence until you have completed about half the length needed. -
Insert the Star:
Thread the white star bead onto the cord. Frame it immediately with two red beads on either side to make it pop, as shown in the project image. -
Finish the Sequence:
Continue the alternating pattern (White, Blue, Red) on the other side of the star until the strand wraps comfortably around your wrist. -
Check the Fit:
Wrap the unfinished strand around your wrist to check the size. Add or remove a bead or two if needed for a perfect fit, keeping the pattern as consistent as possible. -
Knot the Cord:
Tie a surgeon’s knot (right over left, then left over right twice) to secure the bracelet. Pull the knot tight. -
Secure the Knot:
Apply a tiny dab of super glue or jewelry adhesive to the knot. Let it dry for a distinct moment before trimming the excess cord. -
Hide the Knot:
Gently pull the knot inside one of the adjacent beads to hide it from view for a professional finish.
Stay Sparkly
Can’t find glitter clay? Mix loose cosmetic glitter into translucent clay and wrap a thin layer of it around a solid red core ball.
Level Up: USA Accents
Use a fine-point gold paint pen to trace the edges of the star or add tiny polka dots to the blue beads for a deeper patriotic theme.
Wear your new patriotic creation with pride and enjoy the festive spirit you’ve crafted by hand
Gold Spacer Sparkler Shine
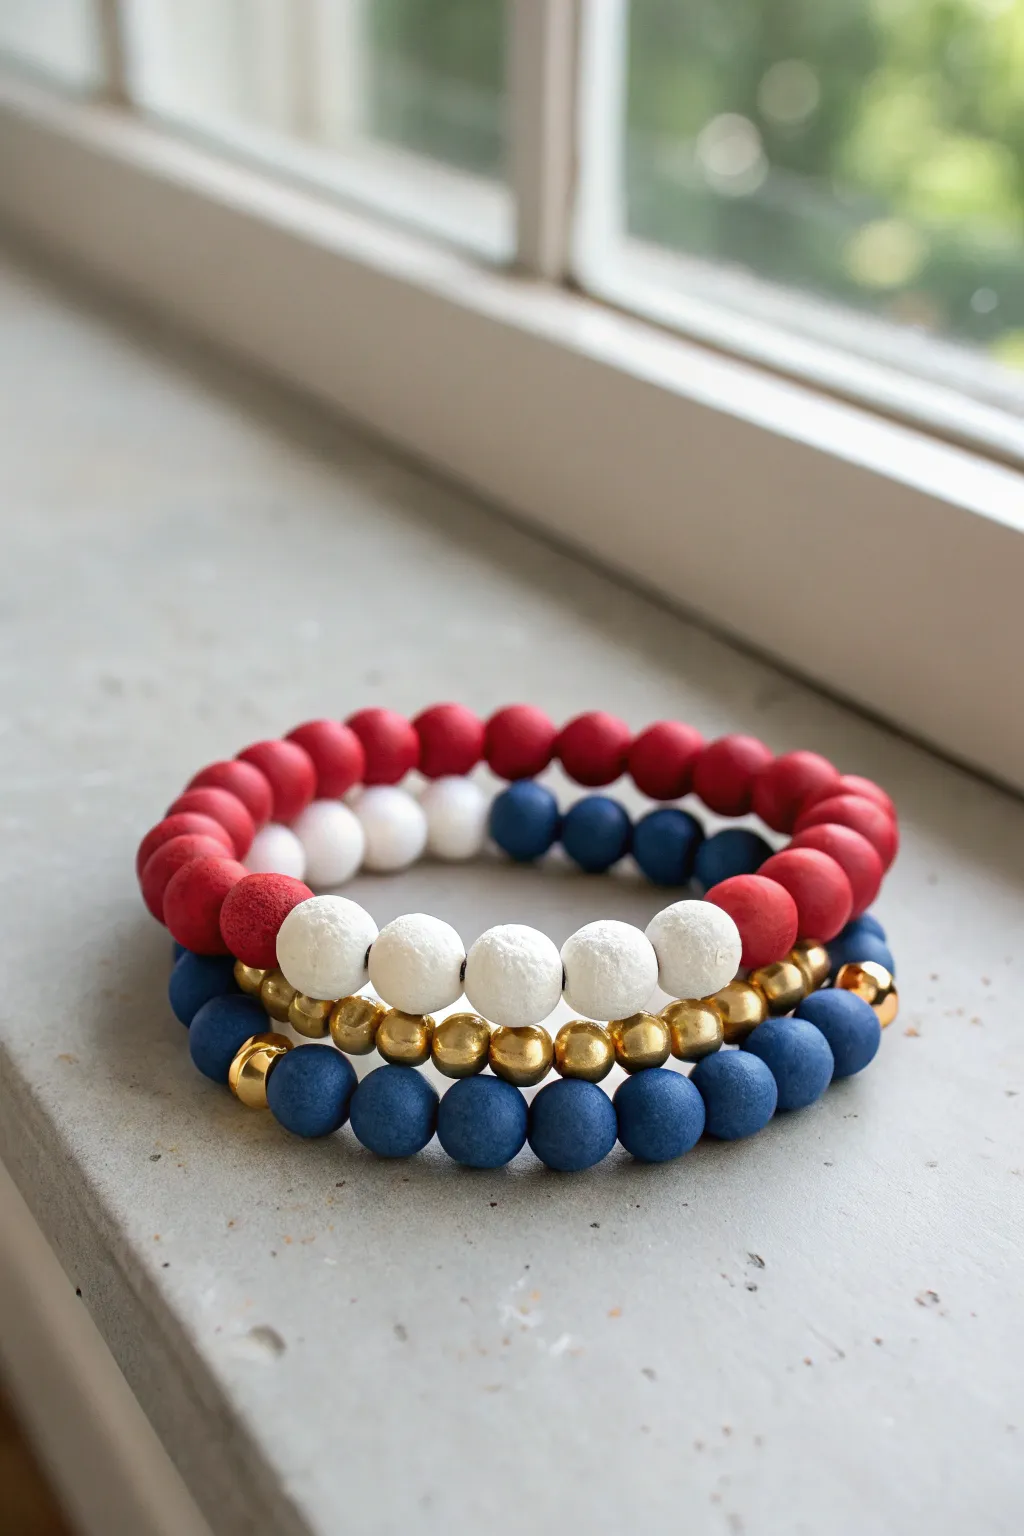
Elevate your Fourth of July wrist stack with this trio of bracelets that perfectly balances matte color with metallic shimmer. The combination of deep navy, vibrant red, crisp white, and gold spacer beads creates a sophisticated yet festive look perfect for holiday celebrations.
How-To Guide
Materials
- 10mm matte polymer clay or wooden beads (Red, Navy Blue, White)
- 6mm gold spherical spacer beads
- 8mm gold spherical spacer beads
- 0.8mm elastic cord (clear or white)
- Super glue or jewelry cement
- Scissors
- Beading needle (optional but helpful)
- Tape or bead stopper
Step 1: Preparation
-
Measure and Cut:
Measure your wrist with a flexible tape measure, then add about 3-4 inches to account for the knots. Cut three lengths of your elastic cord to this size. -
Pre-stretch the Cord:
Gently pull the cut pieces of elastic cord several times. Pre-stretching is a crucial step that prevents the bracelet from loosening up immediately after you wear it. -
Secure the Ends:
Place a piece of tape or a bead stopper on one end of each cord to stop your beads from sliding right off while you work.
Step 2: Bracelet 1: The Color Block Patriot
-
Start the Pattern:
Begin threading your red matte beads onto the first cord. You will need enough red beads to cover roughly 75% of the bracelet’s length. -
Add the Accent:
Create the color-block section by adding three white beads, followed by three navy blue beads. Finish the circle with three more red beads if necessary to reach your size. -
Check fit:
Wrap the strand around your wrist to ensure the red section dominates while the white and blue serve as a distinct ‘flag’ accent.
Hide That Knot
Position your knot next to one of the large matte beads rather than a small gold spacer. The matte beads usually have larger holes, making it easier to tuck the knot inside.
Step 3: Bracelet 2: The Gold & White Feature
-
Create the Gold Center:
On the second cord, we’re building the focal point first. Thread on five of the 6mm gold spacer beads. -
Frame with White:
On either side of your gold cluster, thread three large white matte beads. These will sit prominently on top of the wrist. -
Complete the Circle:
Finish the rest of the bracelet strand using navy blue beads until you reach the desired length. The contrast between the rugged texture of the matte beads and the shiny gold spacers is what makes this design pop.
Texture Play
Swap the plain matte beads for lava stone beads. You can add a drop of essential oil to the lava stones, turning your holiday bracelet into a clandestine diffuser.
Step 4: Bracelet 3: The Golden Navy Stack
-
Establish the Base:
For the final bracelet, string navy blue beads for the majority of the length. This dark base grounds the whole stack. -
Insert Gold Highlights:
In the center section, add a pattern of: one navy bead, one 8mm gold spacer, one navy bead, one 8mm gold spacer, and one navy bead. -
Optional Variation:
If you prefer a simpler look, you can group three gold spacers together in the center instead of alternating them.
Step 5: Finishing Touches
-
Tie the Knots:
Remove the tape from your first bracelet. Bring the ends together and tie a standard square knot (right over left, left over right). Pull tight. -
Secure with Glue:
Dab a tiny drop of super glue or jewelry cement directly onto the knot. I usually let this dry for about 30 seconds before moving on. -
Hide the Knot:
If the hole of the adjacent bead is large enough, gently tug the elastic so the knotted section pulls inside the bead, hiding it completely. -
Repeat for All:
Repeat the tying and gluing process for the remaining two bracelets. Trim any excess cord close to the knot with your scissors.
Enjoy wearing your new patriotic stack that combines classic Americana colors with a touch of golden elegance

TRACK YOUR CERAMIC JOURNEY
Capture glaze tests, firing details, and creative progress—all in one simple printable. Make your projects easier to repeat and improve.
Pearl and Clay Americana Blend
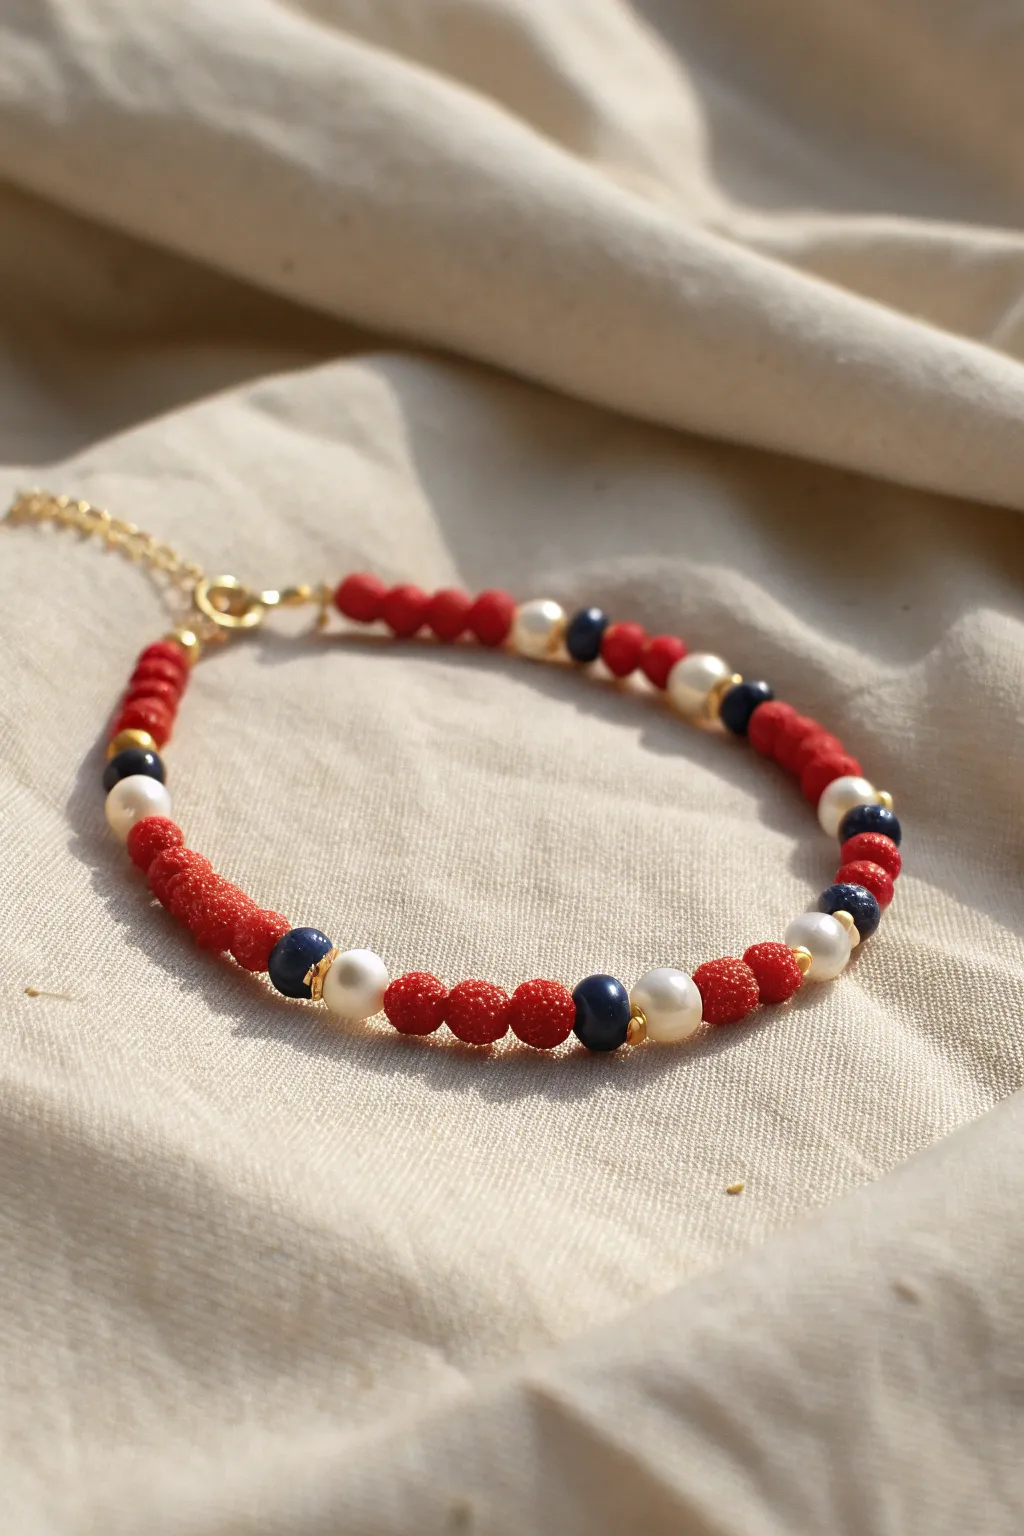
This elegant Fourth of July bracelet combines the rustic texture of red clay beads with the classic sheen of faux pearls and deep navy accents. It is a sophisticated take on Americana style that feels handmade yet polished enough for a summer party.
Detailed Instructions
Materials
- Red textured round beads (approx. 4-6mm, polymer clay or stardust beads)
- White or cream faux pearl beads (approx. 6mm)
- Dark blue round beads (approx. 4mm, lapis lazuli or glass)
- Gold seed beads or tiny spacer beads
- Gold beading wire or strong jewelry cord
- 2 Gold crimp beads
- 2 Gold crimp covers (optional)
- Gold lobster clasp
- Gold extension chain (approx. 1-2 inches)
- 2 Gold jump rings
- Wire cutters
- Chain nose pliers
- Crimping pliers
Step 1: Preparation & First Connection
-
Measure and cut:
Cut a piece of beading wire approximately 9-10 inches long. This gives you plenty of extra room to work with the ends so you aren’t struggling to crimp later. -
Attach the clasp:
Thread one crimp bead onto the wire, followed by the loop of your lobster clasp. Loop the wire back through the crimp bead to create a secure hold. -
Secure the crimp:
Use your crimping pliers to flatten the crimp bead securely. Give the wire a gentle tug to ensure it won’t slip out. If you have a crimp cover, place it over the flattened bead and gently close it with pliers for a finished look.
Step 2: Creating the Pattern
-
Start the sequence:
Begin by feeding the tail of the wire through the first few beads to hide it. Start with a small gold spacer bead to act as a buffer against the clasp. -
The red section:
String on three of the red textured beads. These beads have a wonderful gritty surface that contrasts beautifully with the smooth pearls. -
Add the pearl accent:
Follow the red trio with one white faux pearl. The pearl should be slightly larger than the other beads to create a gentle focal point. -
The blue transition:
After the pearl, add one dark blue bead. Then, place a tiny gold spacer bead, followed by another dark blue bead. This small gold spacer adds a hint of sparkle between the navy tones. -
Close the segment:
Finish this pattern segment with another single white pearl. -
Repeat the pattern:
Start the sequence again: three red beads, one pearl, blue-gold-blue, one pearl. I find it helpful to lay out my beads on a mat first to ensure I don’t mix up the order. -
Check the length:
Continue repeating this full sequence until the beaded portion creates a length that wraps comfortably around your wrist, usually about 6 to 6.5 inches before adding the final hardware. -
Final bead adjustment:
End your pattern symmetrically if possible. Based on the photo, ending with a section of red beads balances the design nicely. -
Add final spacer:
Place one last tiny gold spacer bead on the wire to finish the beaded section.
Wire Tension Tip
Don’t pull the wire 100% tight before crimping. Leave a hairline gap so the bracelet curves naturally around the wrist instead of acting like a stiff stick.
Step 3: Finishing the Closure
-
Prepare the end:
Thread a crimp bead onto the wire, followed by a jump ring or the first link of your extension chain. -
Loop back:
Loop the wire back through the crimp bead and pull it tight, but leave just enough slack so the beads can move freely and the bracelet remains flexible. -
Secure the end:
Flatten the crimp bead with your pliers. Trim the excess wire tail closely with your wire cutters. -
Attach the chain:
If you used a jump ring in the previous step, use your pliers to open it and attach the golden extension chain now. -
Double-check connections:
Give both ends of the bracelet a firm tug to ensure all crimps are holding tight before wearing.
Level Up: Charm It
Add a tiny gold star charm to the end of the extension chain. It adds a professional dangle effect and reinforces the patriotic theme subtly.
Now you have a chic piece of jewelry perfect for celebrating the holiday in style
Tiny Blue Section With White Stars
Celebrate the stars and stripes with this charming, handcrafted bracelet that balances bold red sections with delicate blue and white accents. The centerpiece is a prominent white star bead that ties distinct color block patterns together for a festive, wearable accessory.
Step-by-Step
Materials
- Red wooden or clay beads (approx. 6mm)
- Blue wooden or clay beads (approx. 6mm, slightly variegated)
- White or cream wooden or clay beads (approx. 6mm)
- Large white 5-point star bead (approx. 10-12mm)
- Small silver spacer bead or crimp bead cover (optional)
- Elastic stretch cord (0.7mm or 0.8mm)
- Scissors
- Super glue or jewelry adhesive
- Bead stopper or tape
Step 1: Preparation and Planning
-
Measure your cord:
Cut a piece of elastic cord about 10-12 inches long. This gives you plenty of extra room for tying knots without struggling against tension. -
Secure the end:
Place a bead stopper or a piece of tape on one end of the cord to prevent your beads from sliding off while you design. -
Sort your beads:
Separate your red, white, and blue beads into piles so you can easily grab them to maintain your pattern rhythm.
Step 2: Stringing the Pattern
-
Start with the centerpiece:
Slide the large white star bead onto the cord first. This will act as the focal point of the bracelet. -
Begin the left side pattern:
To the left of the star, thread on two red beads. -
Add separation:
Follow those two red beads with a single white bead to create a bright break in the color. -
String the blue section:
Add one blue bead, followed by a white bead, then three consecutive blue beads. -
Finish the left color block:
After the three blue beads, add one white bead, one blue bead, and then one white bead again. -
Start the right side pattern:
Now, working on the other side of the star (or continuing the loop if stringing in a circle), add two red beads. -
Create the symmetry:
Add a single white bead, then a single blue bead to mirror the color transition. -
Build the back section:
Thread on a longer sequence of red beads to form the back of the bracelet. Based on the image, use about seven to nine red beads here. -
Add a metallic touch:
Slip on the small silver spacer bead after the red section. This adds a tiny glint of professional polish. -
Complete the loop:
Finish the pattern by adding seven to nine more red beads, until the strand is long enough to wrap comfortably around your wrist.
Knot Slipping?
If your elastic knot feels insecure, try wetting the knot slightly with water before pulling it tight. This creates friction and helps the knot lock into place permanently before gluing.
Step 3: Finishing Touches
-
Check the fit:
Carefully wrap the unfinished bracelet around your wrist to ensure it fits. Add or remove red beads from the back section if needed. -
Pre-stretch the cord:
Gently pull the ends of the elastic cord apart a few times. I find this helps prevent the bracelet from sagging later on. -
Tie the knot:
Tie a surgeon’s knot (right over left, left over right, looping through twice on the second pass) to secure the bracelet firmly. -
Glue the knot:
Apply a tiny dot of super glue or jewelry adhesive directly to the knot and let it dry for a minute. -
Hide the mechanism:
If one of your beads has a large enough hole, gently tug the elastic so the knot slides inside a bead to hide it. -
Trim the excess:
Use your scissors to trim the excess cord tails close to the knot, being careful not to nick the main structural thread.
Add Sparkle
Replace the plain white spacer beads with crystal rondelles or silver spacers between the blue and red sections for a glitzier, more evening-ready Americana look.
Wear your new star-spangled accessory with pride at your next summer barbecue
Firework Burst Pattern Sections
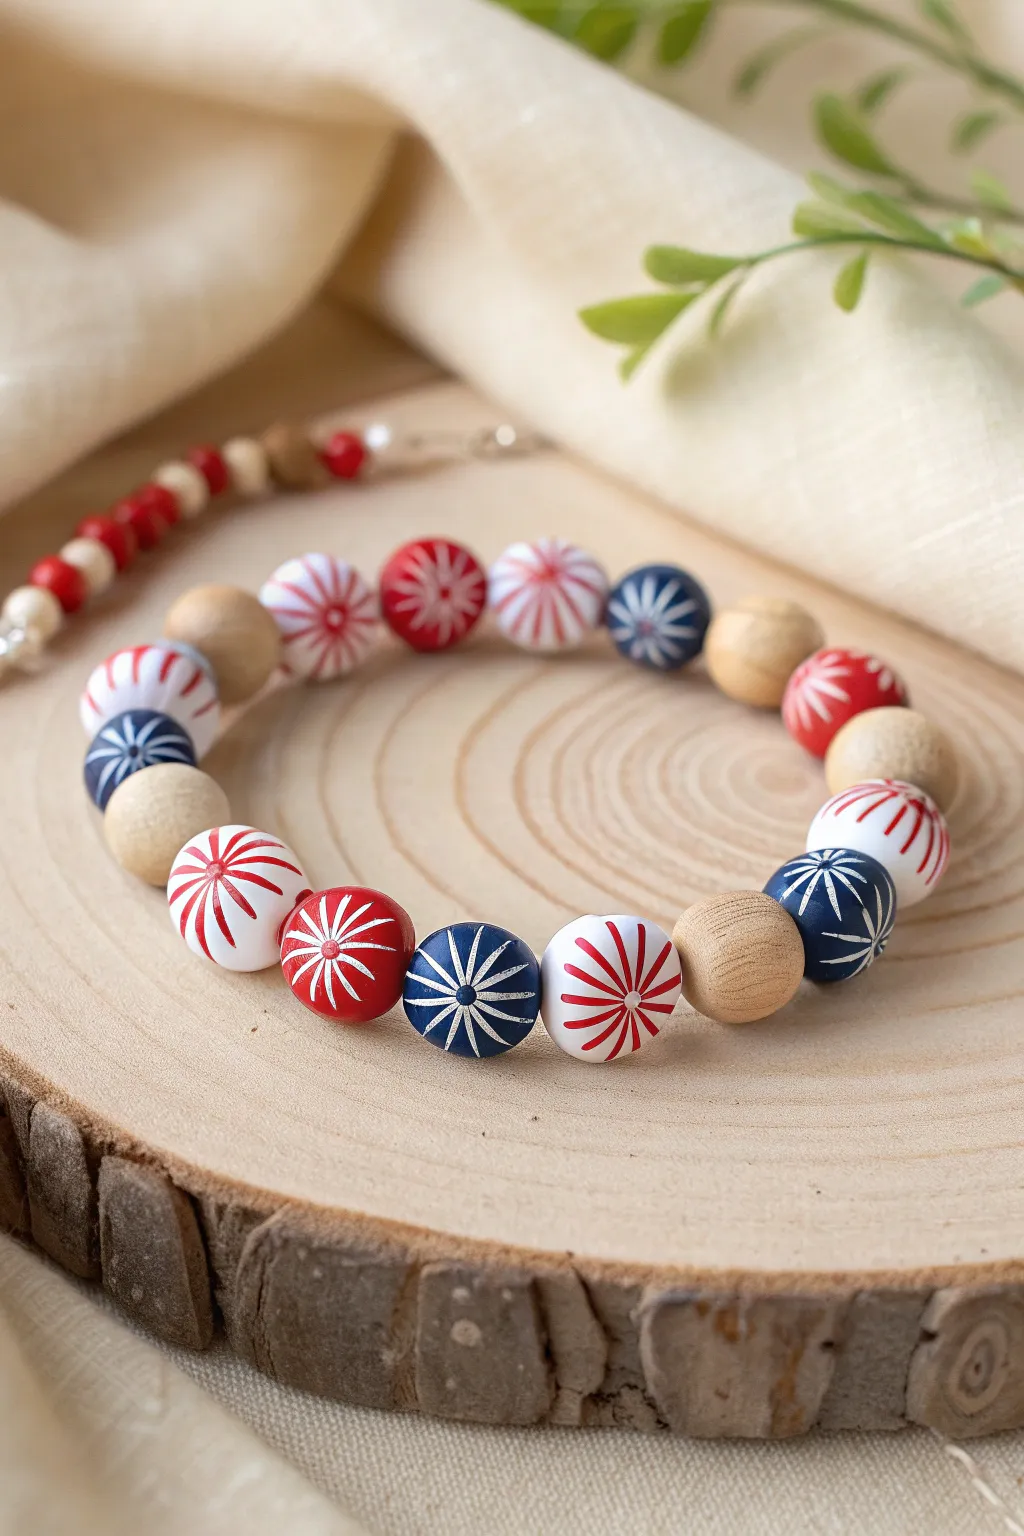
Capture the explosive magic of Fourth of July pyrotechnics right on your wrist with this stunning polymer clay bead bracelet. Featuring large, round beads with intricate etched starburst designs in festive red, white, and blue, this accessory is the perfect handmade touch for your holiday celebrations.
Step-by-Step Tutorial
Materials
- Polymer clay (Red, White, Dark Blue, and translucent or beige for wood-look)
- Elastic beading cord (0.8mm or 1mm)
- Acrylic paint (White and Silver)
- Bead rolling tool or acrylic block
- Pointed detailing tool or needle tool
- Small paintbrush
- Bead piercing pin or toothpick
- Sandpaper (fine grit)
- Gloss or matte varnish (optional)
- Super glue or jewelry glue
- Wet wipes
Step 1: Creating the Clay Canvas
-
Condition the polymer clay:
Start by warming up your red, white, dark blue, and beige polymer clay in your hands. Knead each color separately until it is soft, pliable, and free of any air bubbles. -
Form the base spheres:
Pinch off equal-sized portions of each color clay. I generally aim for beads that are about 12-14mm in diameter for a chunky look. Roll them into smooth, perfect spheres using the palms of your hands or a bead roller. -
Refrigerate briefly:
Since the next step involves carving, place your rolled spheres in the refrigerator for about 10-15 minutes. This firms up the clay slightly so it won’t deform while you are etching the patterns.
Step 2: Etching the Firework Pattern
-
Mark the center point:
Take a chilled bead—let’s start with a red one—and use your needle tool to make a tiny dot right in the center of the face of the bead. -
Carve the primary lines:
Using the needle tool, carve lines radiating outward from that center dot, like slicing a pizza. Create about 8 evenly spaced long lines that curve slightly around the contour of the bead. -
Add secondary bursts:
In between the longer lines, carve shorter lines starting from the center but ending halfway down the previous lines. This creates density and depth in your firework burst. -
Repeat for all colored beads:
Repeat this carving process for all your red, blue, and white beads. Leave the beige ‘wood-look’ beads smooth and uncarved as spacers. -
Pierce the bead holes:
Carefully insert your bead piercing pin or a toothpick through the side of each bead to create the stringing hole. Rotate the pin as you push to avoid squishing the bead. Ensure the hole runs perpendicular to your carved design so the firework faces outward.
Fixing Smudged Paint
If paint dries on the surface before you can wipe it, lightly sand the bead face with fine-grit sandpaper (400+) to remove the surface paint without damaging the grooves.
Step 3: Baking and Painting
-
Bake the beads:
Arrange your beads on a baking sheet lined with parchment paper or cardstock. Bake according to the manufacturer’s instructions for your specific brand of clay (usually 275°F/135°C for 15-30 minutes). -
Cool completely:
Allow the beads to cool down completely before handling them. They will be slightly soft when hot but harden as they cool. -
Apply the white/silver wash:
Mix a small amount of silver and white acrylic paint. Brush this mixture generously over the carved faces of the red and blue beads, ensuring the paint gets deep into the etched grooves. -
Wipe away excess paint:
Before the paint dries, swiftly wipe the surface of the bead with a damp paper towel or wet wipe. The paint should remain inside the carved lines but be removed from the raised surface, revealing the crisp firework pattern. -
Paint the white beads:
For the white beads, use bright red or blue paint for the inlay to make sure the pattern stands out against the light background.
Pro Tip: Depth Control
Vary the depth of your carving lines. Making the center point deeper and tapering the lines shallower as they go outward creates a more dynamic, explosive visual effect.
Step 4: Assembly
-
Prep the layout:
Lay out your beads on a bead board or soft cloth to plan your pattern. The image shows a repeating sequence: Patterned Bead, Patterned Bead, Wood/Beige Spacer. -
Measure the cord:
Cut a piece of elastic cord about 10-12 inches long. Pre-stretch the elastic by pulling on it gently a few times; this prevents the bracelet from stretching out permanently later. -
String the beads:
Thread the beads onto the elastic according to your planned design. Alternating colors creates a balanced patriotic rhythm. -
Tie the knot:
Tie a surgeon’s knot (right over left, left over right twice). Pull it tight so there are no gaps between beads. -
Secure and finish:
Add a tiny drop of super glue or jewelry glue to the knot. Let it dry, then trim the excess cord, tucking the knot inside the hole of a neighboring bead if possible.
Enjoy wearing your burst of creativity and showing off your patriotic spirit all summer long.
Smiley Beads in Patriotic Colors
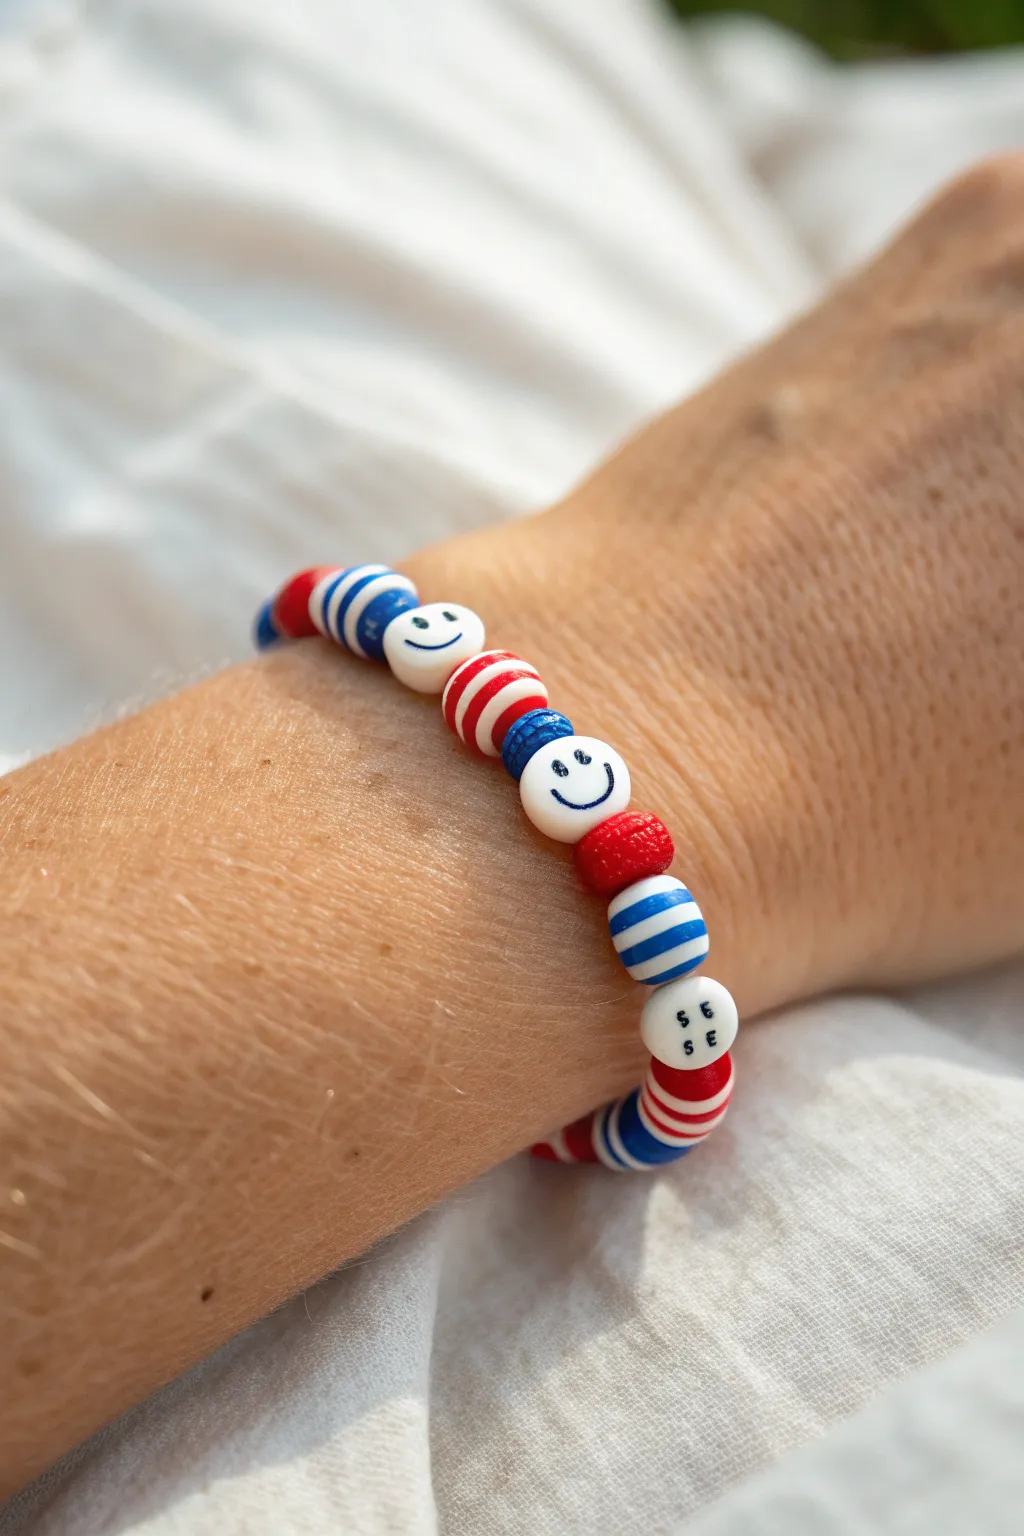
This cheerful accessory adds a dose of happiness to your Fourth of July ensemble with its classic red, white, and blue palette. The combination of textured striped beads and simple smiley faces creates a playful, handcrafted look perfect for summer celebrations.
Detailed Instructions
Materials
- Elastic jewelry cord (0.8mm or 1mm)
- White round beads with blue smiley faces (approx. 8mm)
- Red and white striped round clay beads
- Blue and white striped round clay beads
- Solid red textured clay or acrylic round beads
- Solid blue textured clay or acrylic round beads
- White alphabet beads with black letters ‘S’, ‘E’
- Scissors
- Super glue or jewelry cement
- Bead stopper or tape
Step 1: Preparation
-
Measure your cord:
Cut a piece of elastic cord about 10-12 inches long. This generous length gives you plenty of room to tie knots later without struggling. -
Secure the end:
Attach a bead stopper to one end of the cord, or tape it down to your table. This prevents your beads from sliding off while you design your pattern. -
Sort your beads:
Organize your red, white, and blue beads into piles so you can easily grab them. Having a separate pile for your smiley faces and letter beads helps you visualize the spacing.
Step 2: Creating the Pattern
-
Start the sequence:
Begin threading with a solid red textured bead followed by a blue and white striped bead. This anchors the playful design with some varied texture. -
Add a letter bead:
Thread on a white bead with the letter ‘S’, followed by another ‘E’ bead if you are spelling a specific word, or just use them as spacers. -
Continue the pattern:
Add a red and white striped bead next. I try to alternate between the red-striped and blue-striped beads to keep the colors balanced. -
Insert the first smiley:
Slide on one of the white smiley face beads. Make sure the face is oriented correctly relative to how you want it to sit on your wrist. -
Build the middle section:
Thread a blue and white striped bead, followed by a red and white striped bead. Then add a solid blue textured bead to break up the stripes. -
Add the second smiley:
Place your second smiley face bead onto the cord. Visualizing the spacing now is key; you generally want the feature beads spaced somewhat evenly. -
Complete the loop:
Finish the strand by repeating your striped and solid bead pattern until the bracelet measures the correct circumference for your wrist (usually around 6.5 to 7 inches for an adult). -
Check the fit:
Wrap the unfinished strand around your wrist to check the size. It should be snug but comfortable, not leaving marks on your skin.
Stripe Strategy
Mix up horizontal and vertical stripe directions on your beads for a visually dynamic, confetti-like texture.
Step 3: Finishing Touches
-
Pre-stretch the cord:
Give the elastic a gentle tug from both ends. This ‘pre-stretching’ helps prevent the bracelet from loosening up after the first few wears. -
Tie the first knot:
Remove the bead stopper and bring the two ends together. Tie a simple overhand knot, pulling it tight against the beads. -
Secure with a surgeon’s knot:
Tie a second knot, but loop the cord through twice before pulling tight. This is a surgeon’s knot and is much more secure for elastic jewelry. -
Apply adhesive:
Dab a tiny drop of super glue or jewelry cement directly onto the knot. Be careful not to get glue on the neighboring beads. -
Hide the knot:
If one of your beads has a larger hole, like the smiley face or a striped bead, gently pull the knot inside it while the glue is still tacky. -
Trim the excess:
Once the glue is fully dry, use yours scissors to trim the excess cord ends close to the knot.
Loose Knot?
If your elastic keeps slipping, try a square knot (right over left, left over right) before adding your drop of glue.
Slip on your new bracelet and enjoy the festive spirit it brings to your holiday outfit
Ombre Red to White to Blue Fade
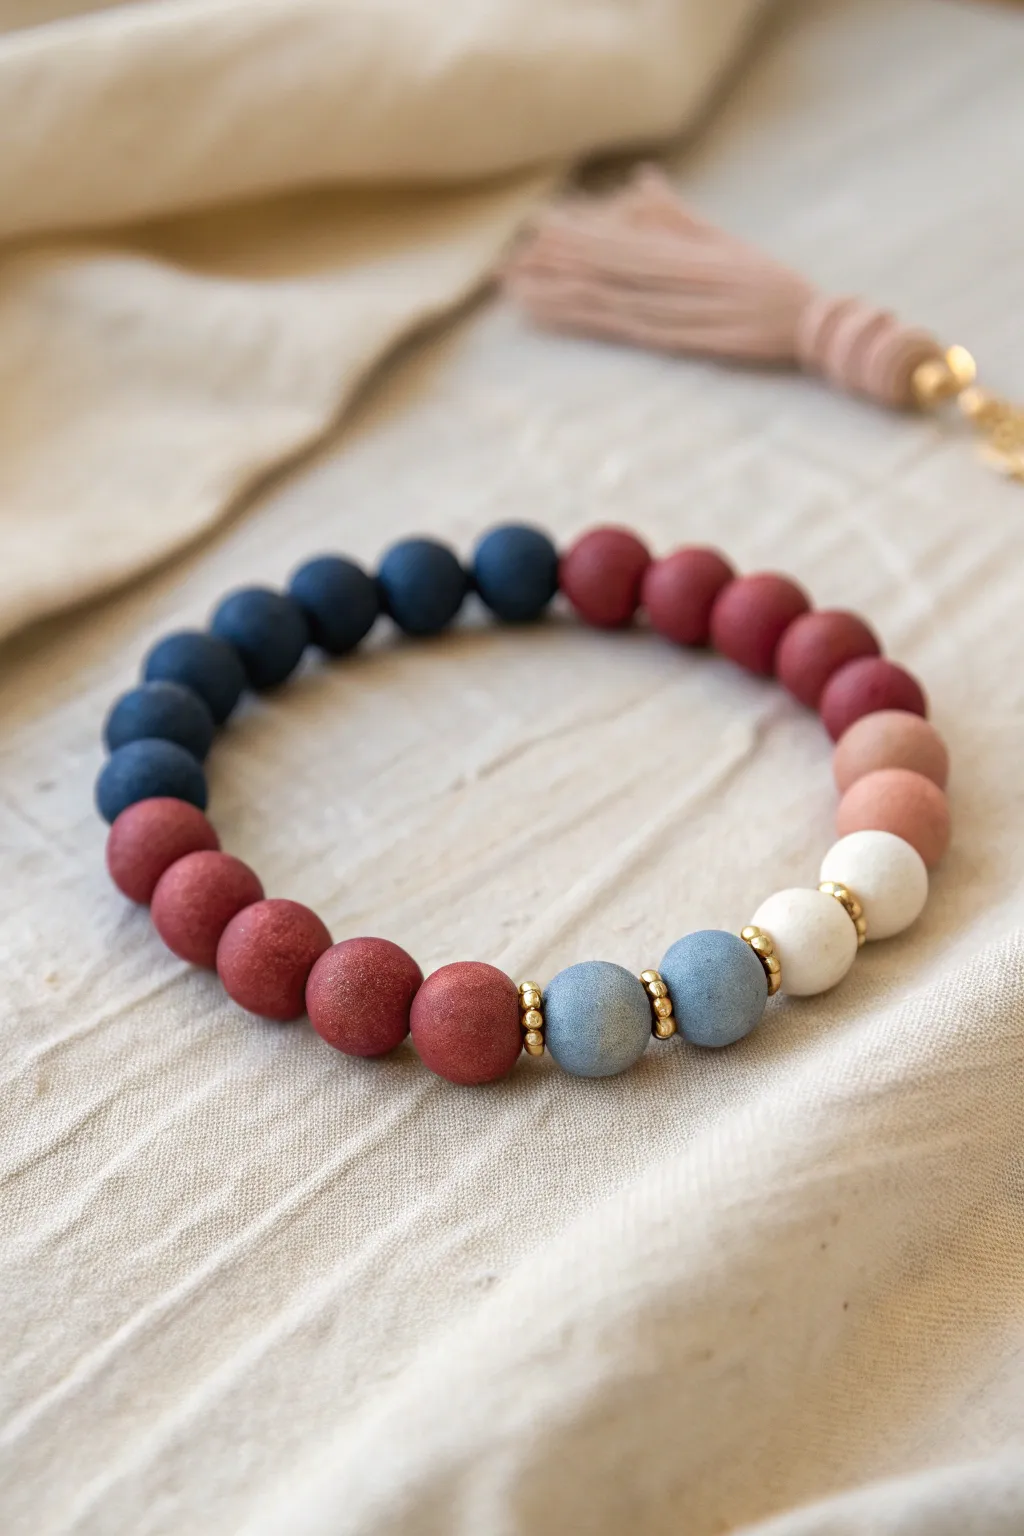
Capture the spirit of Independence Day with this subtle and sophisticated clay bead bracelet. Rather than disjointed stripes, this design uses a seamless ombre technique to transition gently from deep navy to soft whites and earthy reds.
Step-by-Step Guide
Materials
- Polymer clay (Dark Blue, Red, White, and a tiny bit of Brown or Black for toning)
- Small gold spacer beads (flower or disc shape)
- Stretch cord (0.8mm or 1mm)
- Bead rolling tool or acrylic block
- Pin tool or toothpick
- Jewelry glue (e.g., G-S Hypo Cement)
- Oven for baking clay
- Baking sheet with parchment paper
- Ruler
- Clay blade or knife
Step 1: Color Mixing and Prep
-
Condition the clay:
Start by warming up your primary blocks of clay—Dark Blue, Red, and White—in your hands until they are soft and pliable. -
Create the Navy shade:
If your blue is too bright, mix in a tiny pinch of black to deepen it into a rich navy tone. -
Mix the Stonewashed Blue:
Take a pea-sized amount of your Navy mix and blend it with a larger chunk of white to create a soft, dusty light blue shade for the transition area. -
Prepare the Muted Red tones:
For that sophisticated, earthy look, mix a speck of brown into your primary red. This removes the ‘candy apple’ brightness and gives it a matte, rustic finish. -
Create the Fade Red:
Mix a small portion of your Muted Red with white to create a lighter, terracotta-pink shade that will bridge the gap between the dark red and the white beads.
Clean Hands, Clean Beads
Polymer clay picks up everything! Wipe your hands with a baby wipe when switching from dark colors (like navy) to light colors (like white) to avoid color transfer.
Step 2: Forming the Beads
-
Portion the clay:
Roll your mixed clay colors into logs of equal thickness. Use a clay blade to slice equal-sized segments so all your finished beads will be the same size. -
Roll spheres:
Roll each segment between your palms to create a rough ball. I like to finish rolling them on a flat surface using an acrylic block in a circular motion to get them perfectly spherical. -
Create the texture:
To mimic the matte, stone-like texture in the photo, gently roll the unbaked beads over a piece of coarse sandpaper or dab them lightly with a toothbrush. -
Pierce the holes:
Using a pin tool or toothpick, carefully pierce a hole through the center of each bead. Twist the tool gently as you push through to avoid deforming the sphere. -
Check the hole size:
Ensure the hole is wide enough to accommodate your elastic cord. If necessary, wiggle the tool slightly to widen the opening. -
Bake the beads:
Arrange the beads on a parchment-lined baking sheet. Bake according to the manufacturer’s instructions for your specific brand of polymer clay (usually around 275°F/135°C for 15-30 minutes). -
Cool down:
Let the beads cool completely before handling them. They harden fully as they cool.
Step 3: Assembly
-
Cut the cord:
Cut a piece of stretch cord about 10 inches long. Pre-stretch the cord by pulling it gently a few times; this prevents the bracelet from stretching out later. -
Secure one end:
Place a piece of tape or a bead stopper on one end of the cord so your beads don’t slide off while you work. -
Begin the sequence:
Start threading with your Dark Muted Red beads. Add about 5-6 of these depending on your wrist size. -
Transition to blue:
Thread 7-8 Navy Blue beads next. This creates the dark half of the bracelet loop. -
Begin the fade section:
Now, thread your lighter terracotta-pink beads (about 2), followed by 2 pure White beads. -
Add gold accents:
Place a small gold spacer bead, followed by one Stonewashed Blue bead, another gold spacer, the second Stonewashed Blue bead, and a final gold spacer. This highlights the lightest part of the design. -
Tie the knot:
Remove the tape and bring the ends together. Tie a surgeon’s knot (right over left twice, then left over right twice) and pull tight. -
Secure and hide:
Apply a tiny dot of jewelry glue to the knot. Once distinctively tacky but nearly dry, trim the excess cord and tuck the knot inside the hole of the nearest bead.
Add a Matte Finish
If your baked beads look too shiny or plastic-like, brush on a layer of matte varnish or liquid polymer clay meant for matte finishes to get that organic stone look.
Now you have a stylish accessory perfect for the holiday weekend that matches almost any summer outfit
Mini Checkerboard Americana
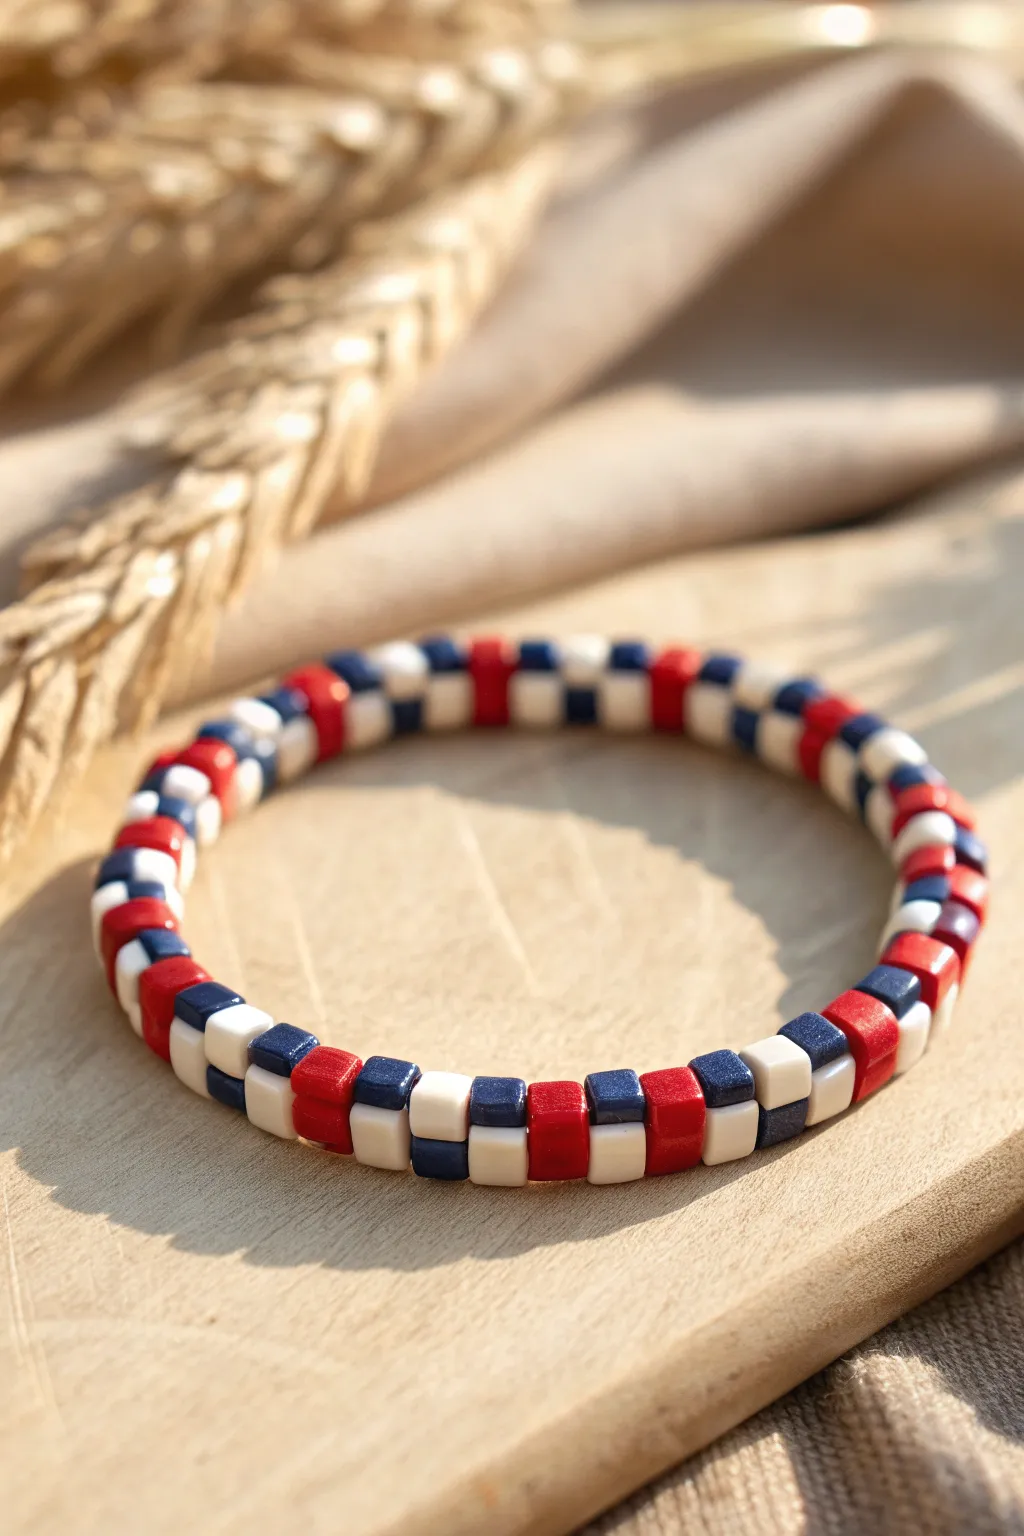
Show off your patriotic spirit with this sleek and modern bracelet featuring a classic checkerboard pattern. Using square tile beads in red, white, and blue creates a crisp, geometric look that pairs perfectly with casual summer outfits.
How-To Guide
Materials
- Red square tile beads (2-hole Tila beads or similar)
- White/Cream square tile beads (2-hole Tila beads or similar)
- Navy blue square tile beads (2-hole Tila beads or similar)
- 0.5mm clear stretch cord (elastic)
- Beading needle (optional but helpful)
- Scissors
- G-S Hypo Cement or super glue
Step 1: Planning the Pattern
-
Measure your wrist:
Before you begin, wrap a piece of string or tape measure around your wrist to determine the desired length. Add about half an inch for a comfortable fit that isn’t too tight. -
Check your beads:
Inspect your tile beads. These specific beads often have two parallel holes running through them. Ensure both holes are clear of debris. -
Lay out the design:
Arrange your beads on a bead mat or soft cloth in pairs. Stack two identical beads on top of each other to create a ‘column’. The pattern shown is: a red column, a blue column, a white column, a blue column. Repeat this specific sequence to visualize the final look.
Twisted Bracelet?
If your bracelet twists, check your tension. Ensure both elastic cords are pulled with equal tightness before knotting final knots.
Step 2: Stringing the First Strand
-
Cut the cord:
Cut two lengths of stretch cord, each about 10-12 inches long. You need two separate strands to pass through the top and bottom holes of the tile beads. -
Pre-stretch the elastic:
Briefly pull on both cords to pre-stretch them. I find this helps prevent the bracelet from sagging later on. -
Start the first hole:
Take one piece of cord. This will be your ‘top’ cord. Begin treading it through the *top* hole of your first pair of red beads. -
Continue the pattern:
Following your laid-out design, thread the top cord through the top hole of the next pair (blue), then the next (white), and so on. -
Maintain alignment:
As you string, ensure the beads are facing the same way so the smooth, glossy sides are all uniform. -
Check length:
String until you have reached your desired wrist length. Keep the beads centered on the cord.
Step 3: Adding the Second Strand
-
Secure the first strand:
Place a piece of tape or a bead stopper on the ends of your first cord so beads don’t slide off while you work on the second step. -
Thread the second cord:
Take your second piece of elastic cord. Thread it through the *bottom* hole of the very first pair of red beads you strung. -
Weave through:
Continue passing this second cord through the bottom holes of every bead pair in the same order. It can be tricky, so take your time to align the holes. -
Tighten the stack:
Once both cords are through all beads, gently pull the ends of both cords to snug the beads together. They should stack perfectly into little squares.
Clean Bead Holes
Tila beads can have clogged holes. Use a thin needle or pin to clear any coating from the holes before trying to string them.
Step 4: Finishing Touches
-
Prepare to knot:
Bring the ends of the top cord together and the ends of the bottom cord together. You will knot them separately. -
Tie the first knot:
Tie a surgical knot (right over left, left over right) with the top cord strands. Pull tight, but not so tight that the beads buckle. -
Tie the second knot:
Repeat the surgical knot with the bottom cord strands. Ensure the tension matches the top strand so the bracelet lies flat. -
Secure with glue:
Apply a tiny dot of G-S Hypo Cement or super glue to each knot. Be careful not to get glue on the visible face of the beads. -
Hide the knots:
While the glue is still slightly tacky but not wet, gently pull the cord so the knots slide inside the hole of the nearest bead. -
Trim excess:
Once the glue is fully dry (wait at least 15 minutes), trim the excess cord ends close to the bead hole carefully.
Wear your new geometric accessory with pride and enjoy the festive splash of color it adds to your day
Negative Space White With Color Pops
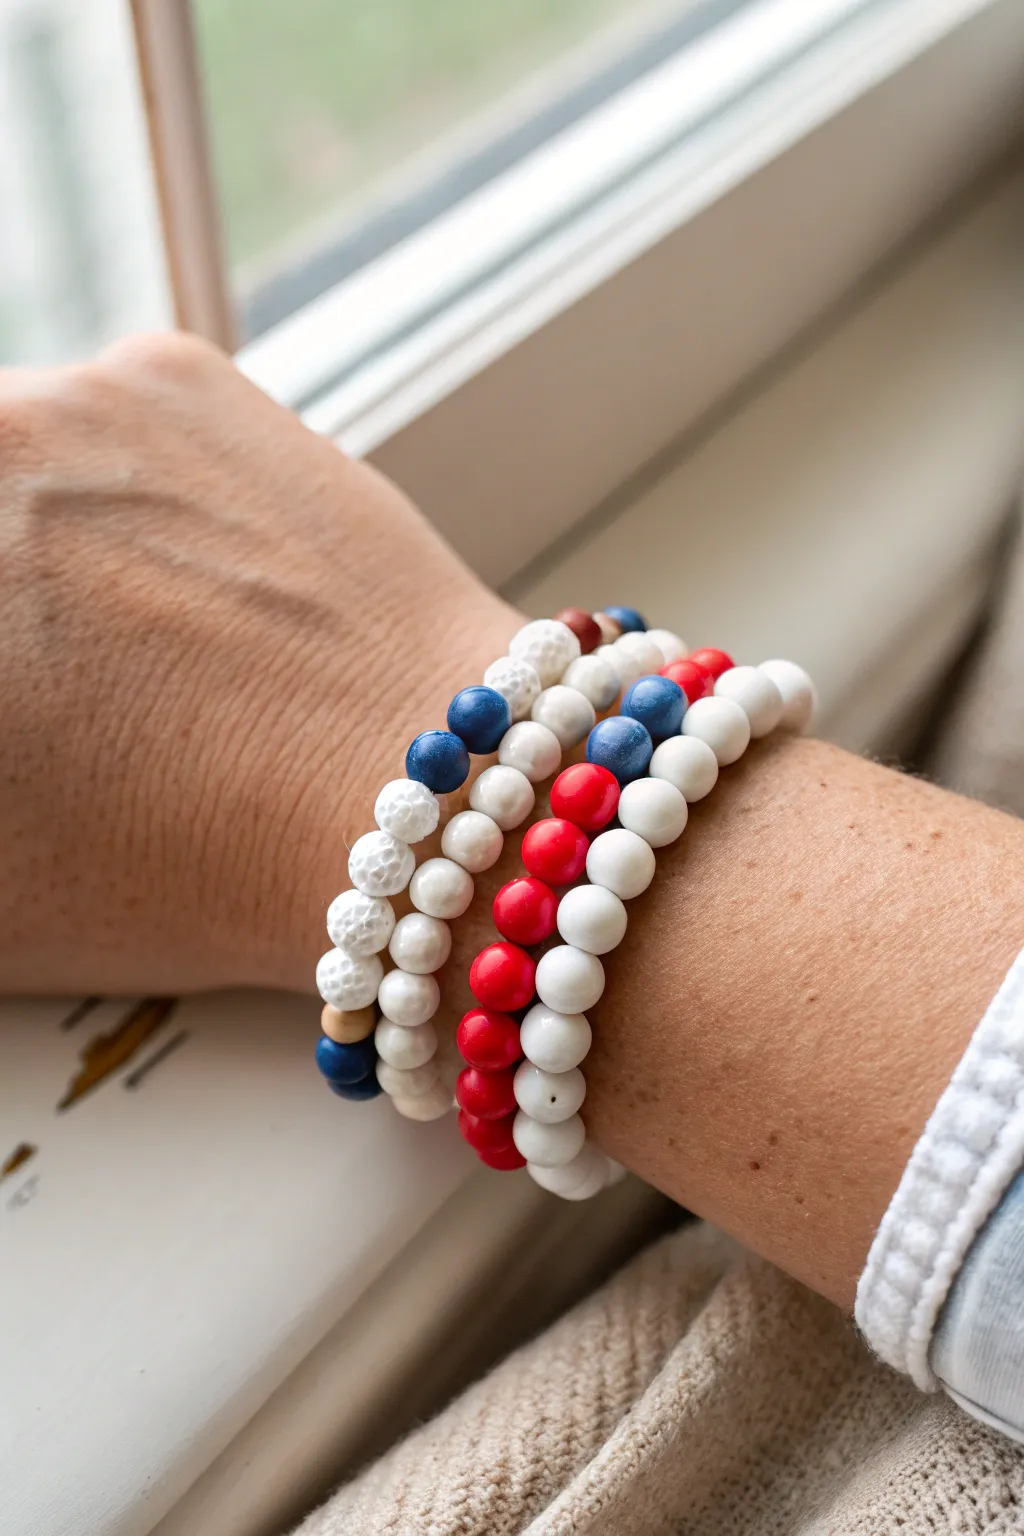
Embrace the “negative space” trend with this chic trio of bracelets that uses white as a canvas for bold red and blue accents. By mixing matte lava stones, shiny pearls, and smooth acrylic beads, you create a sophisticated texture clash perfect for Independence Day.
Step-by-Step Guide
Materials
- White lava stone beads (8mm)
- White glass pearl beads (8mm)
- Red smooth round beads (8mm, acrylic or glass)
- Dark blue smooth round beads with slight shimmer (8mm)
- Dark blue matte or textured beads (8mm)
- Natural wood spacer beads (small disc or round)
- Elastic stretch cord (0.8mm or 1mm)
- Jewelry glue or clear nail polish
- Scissors
- Bead stopper or tape
- Ruler or measuring tape
Step 1: Planning Your Stack
-
Measure your wrist:
Before cutting any cord, wrap a measuring tape around your wrist where you want the bracelets to sit. Add about half an inch to this measurement for a comfortable fit that isn’t too tight. -
Cut the cord:
Cut three lengths of elastic cord, each about 10-12 inches long. This extra length is crucial for tying secure knots later without struggling. -
Secure the ends:
Place a bead stopper or a piece of masking tape on one end of each cord to prevent your beads from sliding off while you design.
Hidden Knot Trick
If you can’t pull the knot inside a bead, start and end your design with two beads that have larger holes (like the wooden ones) next to each other to conceal the tie.
Step 2: Bracelet 1: The Blue & White Lava
-
Start the pattern:
Begin by threading about 5-6 white lava stone beads onto your first cord. The texture of these beads adds a nice rustic touch. -
Add the focal section:
Add a small natural wood spacer, followed by a dark blue matte bead, then two dark blue smooth shimmering beads. -
Complete the circle:
Finish the strand by adding more white lava beads until you reach your target length. -
Check the fit:
Wrap the unfinished strand around your wrist to verify the size. Add or remove a lava bead if necessary.
Scent Infusion
Add a drop of essential oil to the white lava stone beads! The porous surface absorbs the oil, turning your patriotic accessory into a subtle diffuser.
Step 3: Bracelet 2: The Red & White Pearl
-
Establish the white base:
For the second bracelet, switch to the glossy white glass pearls. Thread on a long section of white pearls to act as your negative space. -
Create the red pop:
Interrupt the white sequence by adding a block of 4-5 bright red smooth beads. I find that grouping these together rather than spacing them out creates a stronger visual impact. -
Finish the strand:
Continue adding white pearls until the length matches your first bracelet.
Step 4: Bracelet 3: The Mixed Patriot
-
Mix your whites:
This bracelet ties the other two together. Alternate between a white lava bead and a white pearl for the main body of the bracelet to blend the textures. -
Add the tri-color accent:
Create a focal point by adding one blue shimmering bead, followed by one white pearl, and then one red bead. -
Balance the design:
Ensure the rest of the bracelet is primarily white to maintain that fresh look shown in the photo.
Step 5: Finishing Touches
-
Pre-stretch the cord:
Before tying, give each bracelet a gentle tug. This pre-stretching helps prevent the elastic from loosening up the first time you wear it. -
Tie the surgeon’s knot:
Remove the tape/stopper. Cross the ends, loop one under the other twice, and pull tight. Repeat this knotting process 2-3 times for security. -
Secure with glue:
Dab a tiny drop of jewelry glue or clear nail polish directly onto the knot. Let it dry completely before touching it. -
Hide the knot:
Once dry, trim the excess cord close to the knot. If the hole of a neighboring bead is large enough, gently pull the knot inside to hide it.
Stack them up together and enjoy your custom patriotic wrist candy.
Bead Size Mix With Chunky Rondelles

This rustic yet elegant bracelet combines matte red rounds with creamy white heishi disks and striking ceramic accent beads for a sophisticated Fourth of July look. The mix of shapes creates a wonderful tactile experience while keeping the color palette perfectly patriotic.
How-To Guide
Materials
- 8mm matte red wooden or ceramic round beads (approx. 10-12)
- 6mm cream or antique white wood rondelle/heishi beads (approx. 8)
- 8mm cream or white wood round beads (approx. 2)
- 8mm blue wooden round beads (approx. 2-3)
- 8mm blue and white patterned ceramic/porcelain beads (2 focal beads)
- 0.8mm elastic stretch cord (clear)
- Super glue or jewelry adhesive
- Scissors
Step 1: Preparation
-
Measure your wrist:
Before cutting any cord, wrap the elastic around your wrist loosely to determine the perfect fit. Add about 3-4 inches of extra length to give yourself plenty of room for tying the finishing knot. -
Pre-stretch the cord:
Give your length of elastic cord a few firm tugs. This crucial step prevents the bracelet from sagging or stretching out permanently after the first time you wear it. -
Secure the end:
Place a piece of tape or a bead stopper on one end of your cut cord so your beads don’t slide right off while you are working on the design.
Step 2: Beading the Pattern
-
Start with the focal section:
Begin by threading one red matte round bead, followed by one of the special blue and white patterned ceramic beads. -
Create the first transition:
Next, add a single plain white round bead. This acts as a visual buffer between the patterned bead and the rest of the strand. -
Build the red segment:
Thread on two of the matte red round beads. Notice how the texture on these is slightly rough, adding to the rustic feel. -
Add the white rondelles:
Now, stack three of the cream-colored heishi or rondelle beads together. These smaller, flatter beads create a nice rhythm break in the pattern. -
Continue the pattern:
Follow the group of three rondelles with another matte red round bead to balance the colors. -
Insert the second focal element:
Thread on your second blue and white patterned ceramic bead. I like to check the orientation here to ensure the pattern looks good next to its neighbors. -
Mirror the design:
Add a solid blue wooden bead, followed by a white round bead, and then another red matte bead. -
Complete the back section:
Finish the rest of the strand by alternating the remaining red beads with small groups of cream rondelles. In the image, there is a section with a solid blue bead followed by a cream rondelle and then red, creating an asymmetrical charm. -
Check the length:
Wrap the beaded strand around your wrist to check the fit. If it’s too tight, add another red round or a pair of cream rondelles near the end.
Knot Slipping?
If your elastic knot feels loose, try tying it while the cord is under tension. Have a friend hold the first loop tight while you tie the second part of the knot.
Step 3: Finishing Touches
-
Prepare the knot:
Bring both ends of the elastic cord together, removing the tape or bead stopper carefully. Ensure there are no gaps between the beads. -
Tie the surgeon’s knot:
Cross the ends, loop one under the other twice, and pull tight. Repeat this process to secure the bracelet firmly. -
Secure with glue:
Apply a tiny drop of jewelry adhesive or super glue directly onto the knot. This ensures it won’t slip over time. -
Hide the knot:
While the glue is still slightly tacky but not wet, gently pull the knot inside the hole of the nearest large bead (like one of the red rounds) to hide it from view. -
Trim the excess:
Once the glue is fully dry, precise-cut the excess elastic cord close to the bead hole using your scissors.
Add Sparkle
Make the design pop by swapping one white rondelle in each stack for a gold or silver spacer bead. This adds a subtle metallic shine perfect for holiday festivities.
Enjoy wearing your new handcrafted accessory at your next summer gathering
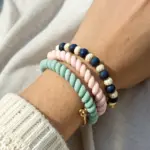
Patriotic Pastels for a Soft Look
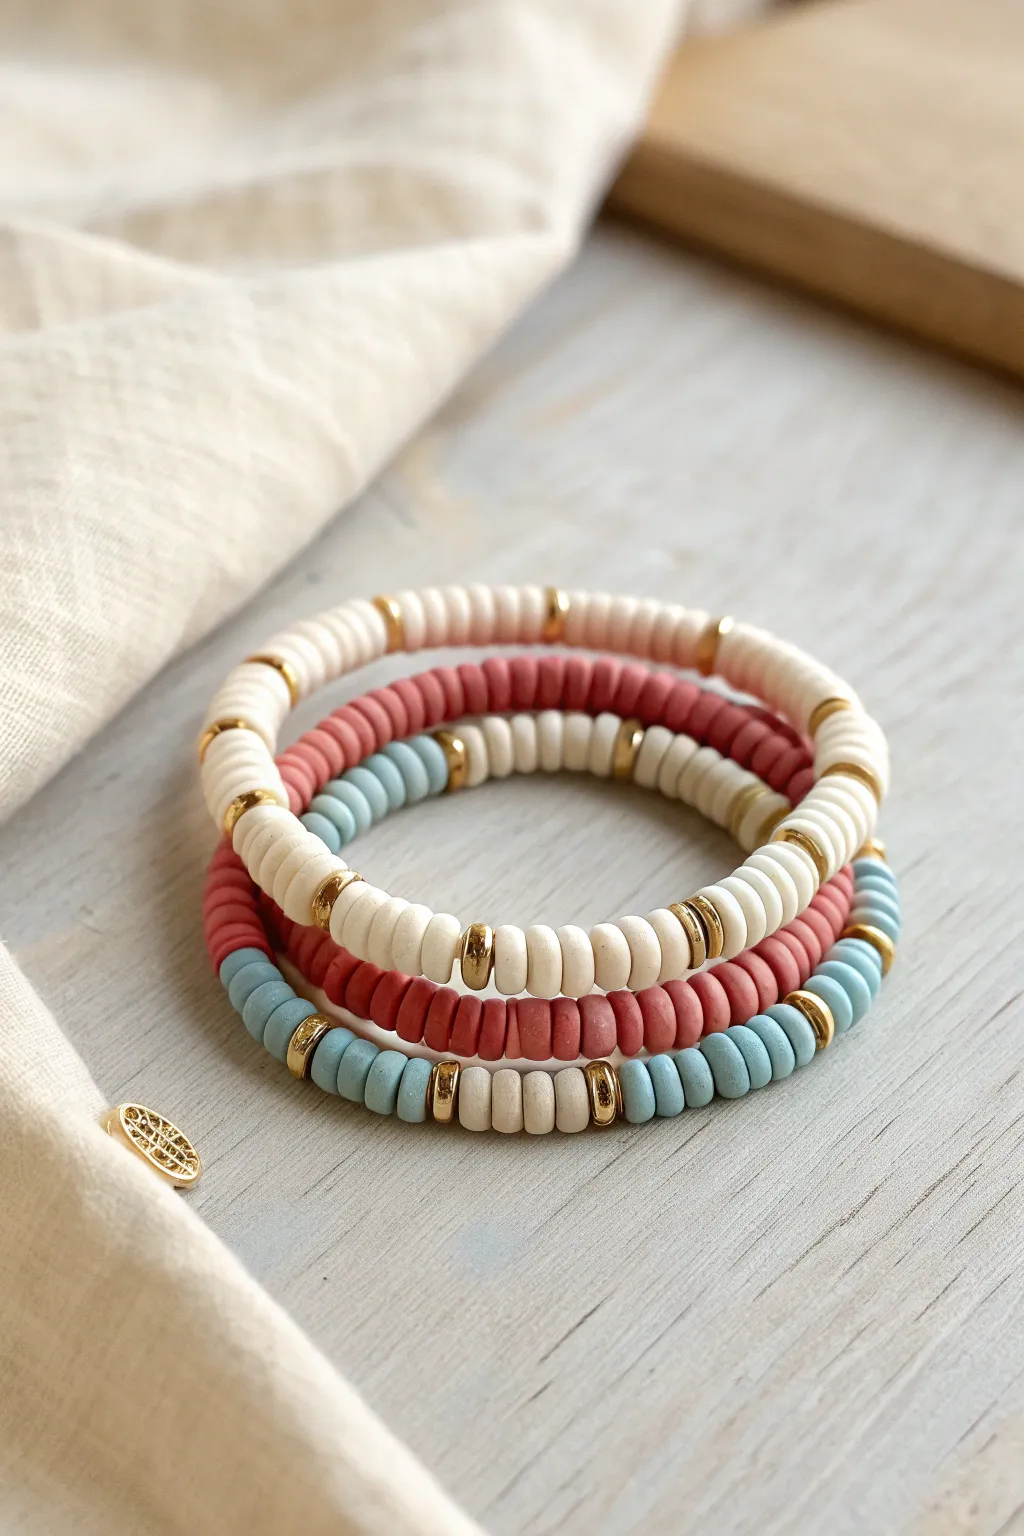
Move away from bold primaries with this understated, sophisticated take on patriotic jewelry. These bracelets feature soft cream, desaturated brick red, and calming slate blue heishi, accented with elegant gold spacers for a look that works well beyond the holiday.
Step-by-Step
Materials
- 6mm Heishi polymer clay beads in creamy white
- 6mm Heishi polymer clay beads in muted brick red
- 6mm Heishi polymer clay beads in slate blue
- 6mm Gold disc spacer beads (heishi style)
- 0.8mm clear elastic stretch cord
- Jewelry glue or clear nail polish
- Scissors
Step 1: Planning Your Patterns
-
Measure your wrist:
Wrap a piece of string around your wrist to find your comfortable size, then add about half an inch for a good fit. This helps you know exactly how long your bead strand needs to be. -
Prepare your workspace:
Lay out a bead design board or a soft towel. This prevents your round beads from rolling away while you plan your sequences. -
Establish the color palette:
Separate your beads into piles. Notice that this design relies on blocks of solid color rather than random mixing. You will be making three distinct bracelets that coordinate.
Knot Slipping?
If your elastic knot feels slippery, add a tiny drop of clear nail polish to the knot center. It acts just like glue but remains slightly flexible.
Step 2: Creating the Solid Cream Bracelet
-
Cut the cord:
Cut a piece of elastic cord about 10-12 inches long. Having extra length makes tying the final knot much easier than struggling with short ends. -
Stretch the cord:
Pre-stretch your elastic by giving it a few firm tugs. This is a crucial step that prevents the bracelet from stretching out and becoming loose after you wear it a few times. -
Start beading:
Begin threading the cream-colored heishi beads. Add about 10-12 beads to start the sequence. -
Add gold accents:
After your first block of cream beads, slide on one gold disc spacer. This breaks up the solid color and adds a touch of shine. -
Continue the pattern:
Repeat the pattern of 10-12 cream beads followed by one gold spacer until the strand reaches your desired length. -
Check the fit:
Wrap the unfinished strand around your wrist to ensure it sits comfortably. Add or remove a few beads if necessary.
Step 3: Designing the Mixed Block Bracelets
-
Start the second bracelet:
Cut and pre-stretch another length of cord. For this bracelet, you will create large sections of different colors. -
Create color blocks:
Thread a long section (about 2 inches) of the brick red beads. Follow this with a gold spacer. -
Switch colors:
Add a shorter section (about 1 inch) of the slate blue beads, followed by another gold spacer. -
Complete the sequence:
Finish with a section of cream beads to balance the look. Repeat these blocks until the bracelet is full. -
Build the final bracelet:
For the third piece, try alternating smaller segments. Thread 5 blue beads, a gold spacer, and then 5 cream beads. Repeat this alternating pattern for 30% of the bracelet, filling the rest with solid red to create an asymmetrical design.
Mix It Up
Add a single pearl or a wood bead into the cream sections for texture variety without changing the harmonious color scheme.
Step 4: Finishing Touches
-
Tie the knot:
Bring the ends of your first bracelet together. Tie a surgeon’s knot: cross right over left, loop it through twice, pull tight, then cross left over right and pull tight again. -
Secure the knot:
I always put a tiny dab of jewelry glue on the knot for security. Let it dry for a few minutes before trimming. -
Trim the excess:
Once dry, cut the excess cord close to the knot. If possible, gently tug the bracelet so the knot hides inside the hole of a neighboring bead. -
Repeat for all bracelets:
Tie off the remaining two bracelets using the same method to complete your stack.
Wear your new stack with pride and enjoy the subtle nod to patriotic colors
Glow-Inspired White With Midnight Blue

Capture the magic of Independence Day fireworks against a night sky with this sophisticated design. Combining creamy white beads with deep midnight blues and a touch of sparkling red, this bracelet features a stunning silver star charm as its centerpiece.
How-To Guide
Materials
- 10mm creamy white round gemstone beads (like white turquoise or magnesite)
- 8mm dark midnight blue round beads (lapis lazuli or dyed agate)
- 10mm dark blue sandstone beads (glittery/sparkly)
- 8mm red crackle glass or painted wood beads
- Small red seed beads (approx. size 6/0 or 8/0)
- Silver star charm (approx. 15mm)
- Small silver jump ring (5mm or 6mm)
- Two silver spacer beads or bead caps (optional, featured near the focal point)
- Strong elastic beading cord (0.7mm or 0.8mm)
- Jewelry adhesive (like E6000 or G-S Hypo Cement)
- Scissors
Step 1: Preparation
-
Measure and cut:
Cut a piece of elastic cord about 9-10 inches long. This gives you plenty of extra room to tie the knot comfortably without losing tension. -
Pre-stretch the cord:
Hold both ends of the elastic and give it a firm tug a few times. This prevents the bracelet from loosening up after you’ve worn it for a while. -
Secure the end:
Place a piece of tape or a bead stopper on one end of the cord so your beads don’t slide off while you work.
Knot Slipping?
If your elastic knot feels slippery, try a surgeon’s knot instead. It’s like a square knot, but you loop the cord through twice on the first pass for extra grip.
Step 2: Creating the Focal Point
-
Attach the charm:
Using pliers or your fingers, open the jump ring slightly sideways, slip on the silver star charm, and close the ring securely. -
Start the center sequence:
Thread the 8mm red bead onto the elastic cord first; this will sit directly above the charm in the final design. -
Add sparklers:
On either side of that central red bead, add a silver spacer bead followed by a 10mm glittery dark blue sandstone bead. -
Add accent accents:
Now, thread a single small red seed bead onto both sides of this central cluster. This tiny pop of color transitions the design into the main bracelet body. -
Place the charm:
Slide the jump ring of your star charm over the red center bead so it dangles freely. I usually do this now to check the balance, but you can also attach it to the cord directly next to the red bead if the ring is small.
Step 3: Building the Pattern
-
The white section:
On the right side of your focal point, thread on approximately 6 of the creamy white 10mm beads. -
Mirror the left:
Repeat on the left side, adding another 6 creamy white beads. Adjust this number based on your wrist size; for larger wrists, add more white here. -
Transition to blue:
At the ends of your white sections, you will now switch to the midnight blue beads. -
The blue section:
Add the 8mm midnight blue beads to both ends until the strands meet at the back. For an average wrist, this is usually about 4-5 beads per side. -
Check the fit:
Carefully wrap the unfinished circle around your wrist. The ends should meet comfortably without gaps, but shouldn’t be too loose.
Patriotic Sparkle
Swap the solid white beads for white crackle quartz or opalite. These catch the light beautifully and give the bracelet a subtle, glowing effect in the sun.
Step 4: Finishing Touches
-
Prepare the knot:
Remove the tape or bead stopper, holding both ends of the elastic firmly. -
Tie the knot:
Tie a standard square knot (right over left, left over right). Pull the elastic tight—you want the beads to hug each other snugly. -
Secure with glue:
Apply a tiny dot of jewelry adhesive directly onto the knot. Be careful not to get glue on the visible parts of the beads. -
Hide the knot:
While the glue is still slightly tacky but not wet, pull the knot inside one of the larger 10mm white beads or blue sandstone beads adjacent to the closure point. -
Trim ends:
Once the glue is fully dry (I like to wait at least 30 minutes), trim the excess elastic tails close to the beads.
Now you have a stunning piece of arm candy ready for the holiday weekend