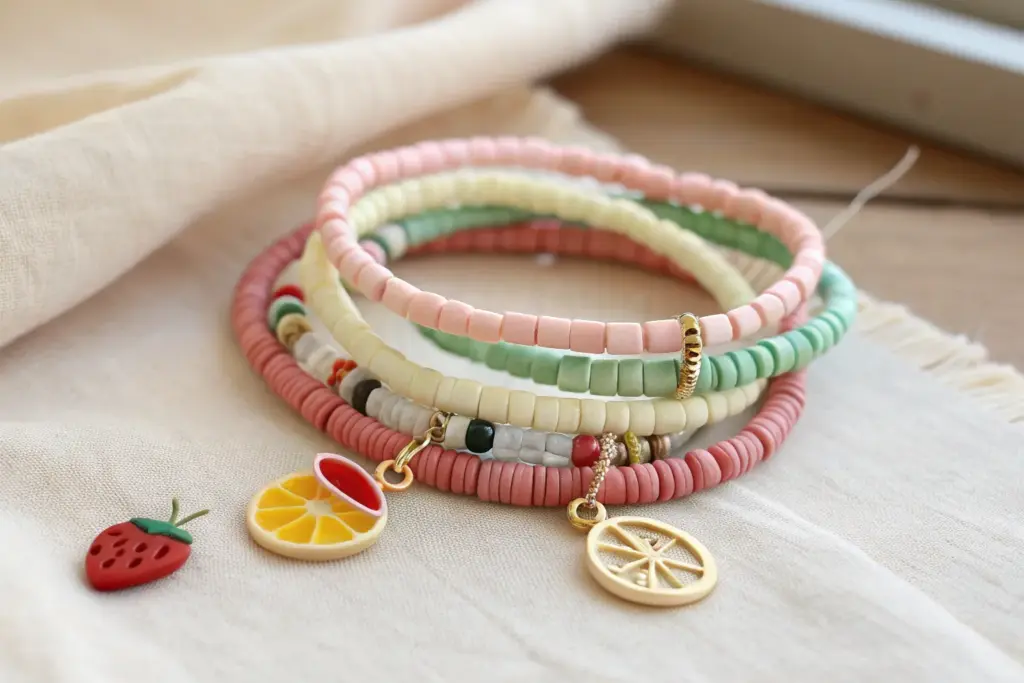
Fruit clay bead bracelets are my favorite quick-mood-boost project because they look playful, colorful, and totally wearable. Here are a bunch of fruit clay bead bracelet ideas you can mix, match, and stack for that juicy, happy vibe.
Classic Strawberry Slice Bracelet
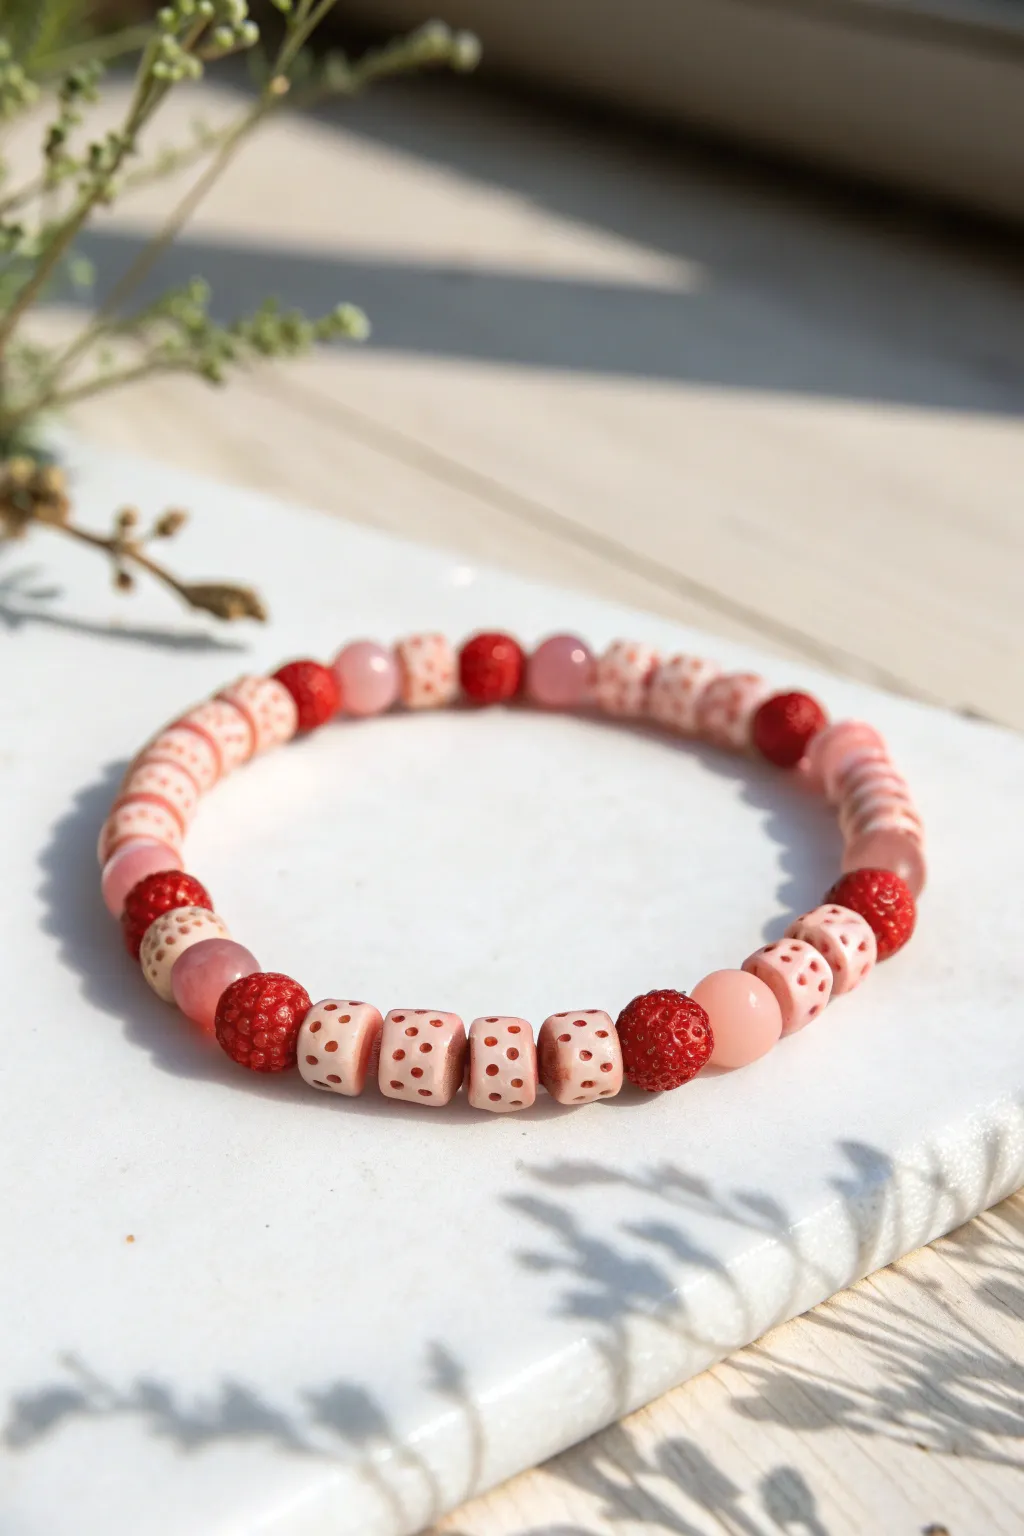
Capture the sweetness of summer with this charming bracelet featuring handmade clay strawberry beads mixed with soft pink accents. The combination of textured whole berries and playful sliced segments creates a unique, organic look perfect for sunny days.
Step-by-Step
Materials
- Polymer clay (red, pale pink, and white)
- Texture tool (needle tool or toothpick)
- Razor blade or tissue blade
- Bead piercing pins or rigid wire
- Elastic beading cord (0.7mm or 0.8mm)
- Jewelry glue (GS Hypo Cement or similar)
- Additional accent beads (10mm round pink quartz or glass)
- Oven for baking clay
- Gloss glaze (optional)
Step 1: Sculpting the Whole Berries
-
Preparing the red clay:
Condition a small block of red polymer clay until it is soft and pliable. Roll it into a smooth log roughly the thickness of a large blueberry. -
Forming the spheres:
Cut the log into equal segments and roll each piece between your palms to create perfect spheres. Aim for a size of about 8-10mm in diameter. -
Adding texture:
Using a needle tool or toothpick, gently poke small indentations all over the surface of each red sphere. These pockmarks mimic the seeds of a strawberry. -
Piercing the beads:
Gently insert a bead pin or wire through the center of each textured berry. Verify the hole is wide enough for your elastic cord later.
Seed Detailing
For ultra-realism, mix a tiny bit of yellow or brown acrylic paint into the pockmarks of the red berries after baking, then wipe the surface clean, leaving color only in the holes.
Step 2: Creating the Strawberry Slices
-
Making the cane center:
Roll a cylinder of pale pink clay about 1/2 inch thick. -
Adding the ‘rind’:
Roll out a thin sheet of slightly darker pink or reddish-pink clay. Wrap this sheet around the pale pink cylinder and smooth the seam to create the outer skin of the berry. -
Reducing the cane:
Gently squeeze and roll the cylinder on your work surface to reduce its diameter to match your whole berry beads (approx 8-10mm). -
Slicing the beads:
Use a sharp tissue blade to cut the cane into thick slices. These should look like small, cylindrical drums rather than thin wafers. -
Detailing the interior:
Use your needle tool to poke a pattern of holes around the side of the cylinder (the ‘rind’). Then, poke a few random holes on the flat faces to represent the interior structure. -
Drilling the holes:
Pierce these slice beads through the center, going from one flat face to the other so they will stack like coins on the string.
Adding Greenery
Make small green clay leaves or sepals and thread them right next to the red berry beads to look like freshly picked fruit stems.
Step 3: Baking and Assembly
-
Baking:
Arrange all your clay beads on a baking sheet or tile. Bake according to your polymer clay package instructions (usually 275°F/135°C for 15-30 minutes). -
Cooling:
Allow the beads to cool completely before handling. This hardens the clay and prevents distortion during stringing. -
Planning the layout:
Lay out your beads on a bead board or soft cloth. I like to alternate clusters of 3-4 slice beads with a single accent bead (either a whole berry or a glass bead). -
Stringing:
Cut a piece of elastic cord about 10 inches long. Pre-stretch it a few times to prevent sagging later. -
Adding beads:
Thread your pattern onto the elastic. A typical adult wrist needs about 6.5 to 7 inches of beads. -
Checking the fit:
Wrap the strung beads around your wrist to check the size. Add or remove slice beads as necessary for a comfortable fit. -
Finishing the knot:
Tie a surgeon’s knot (right over left twice, then left over right). Pull tight to secure the beads together. -
Securing:
Apply a tiny dab of jewelry glue to the knot. Let it dry, then trim the excess cord ends, tucking the knot inside a larger bead hole if possible.
Enjoy wearing your new accessory that brings a fresh, fruity touch to any outfit


Watermelon Pop With Black “Seed” Accents
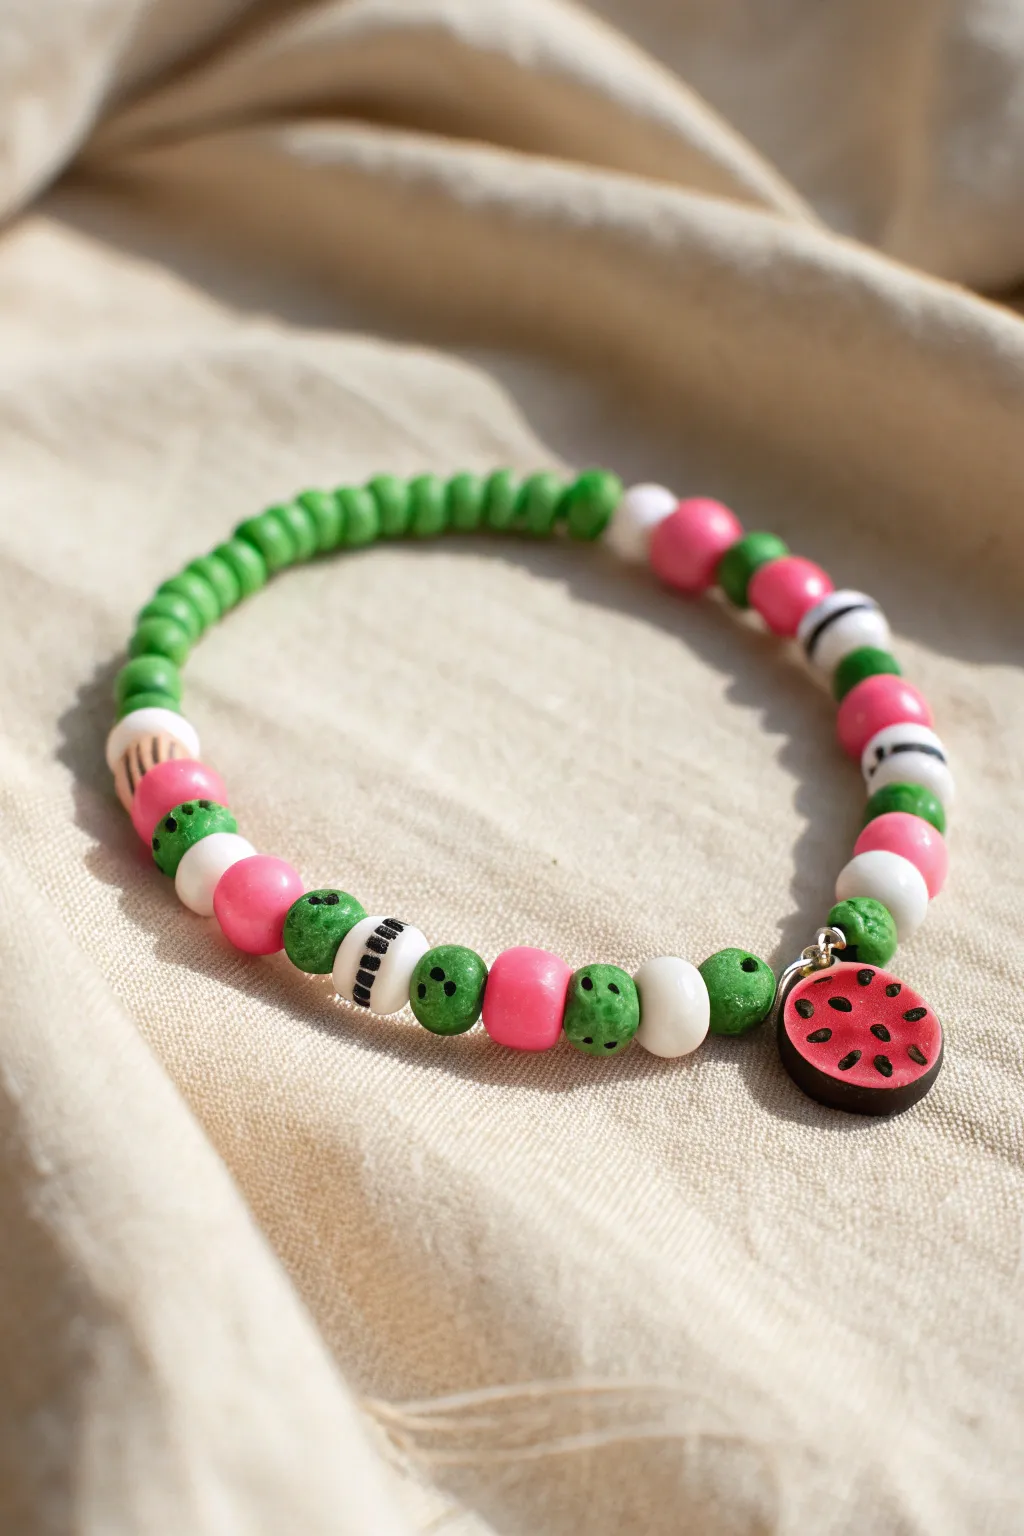
Embrace the summery vibes with this cheerful bracelet that uses a mix of flat clay spacers and custom-shaped beads to mimic the juicy look of a watermelon. The standout feature is a charming fruit slice charm, making it a playful accessory for sunny days.
How-To Guide
Materials
- Polymer clay (green, white, bright pink, black)
- Elastic cord (0.8mm or 1mm)
- Clay carving tools or a toothpick
- Small metal jump ring (silver)
- Needle nose pliers
- Rolling pin or pasta machine for clay
- Oven for baking clay
- Clear nail polish or clay gloss varnish
- Super glue (optional)
Step 1: Crafting the Beads
-
Green heishi base:
Start by conditioning your green clay until it is soft. Roll it into a long, thin snake approximately 4-5mm in diameter. Slice this snake into many small, thin discs to create heishi-style spacer beads. You will need about 20-30 of these for the back section of the bracelet. -
Texturing the green:
Before baking, you can gently roll the textured handle of a tool or a piece of sandpaper over the green discs if you want a more organic look, though keeping them smooth is perfectly fine too. -
Forming the round colors:
Roll small balls of pink, green, and white clay. Aim for these beads to be slightly larger and rounder than the heishi spacers, about 6-8mm in diameter each. Make about 6-8 of each color. -
Adding texture to round beads:
Take your green round beads and lightly prick the surface multiple times with a needle or toothpick. This stippling effect gives them a rind-like texture similar to the outside of a watermelon. -
Creating the seed beads:
For the seed accents, take your white round beads. Roll tiny, almost microscopic slivers of black clay into thin lines and press them onto the white beads to look like stripes or abstract seeds. -
Piercing the beads:
Using a toothpick or a bead piercing tool, carefully poke a hole through the center of every bead you have created. Ensure the hole is wide enough for your elastic cord.
Hole Distortion?
If your bead holes squish when piercing raw clay, let the beads sit in the fridge for 10 minutes to firm up before poking them.
Step 2: Making the Charm
-
Layering the cane:
To make the charm, start with a thick log of pink clay. Wrap a thin sheet of white clay around it, followed by a slightly thicker sheet of dark green clay. This forms a classic watermelon cane structure. -
Slicing the charm:
Carefully slice a thick disc from your cane. Cut this disc in half to create a semi-circle slice shape. Smooth the cut edge so it looks clean. -
Adding the seeds:
Roll tiny teardrop shapes out of black clay. Press these flat onto the pink face of your watermelon slice in a random pattern to mimic seeds. -
Attaching the hardware:
Insert a small metal eye pen or make a hole near the top of the rind (the curved part) where the jump ring will eventually go. Ensure the hole is sturdy. -
Baking time:
Arrange all your beads and the charm on a parchment-lined baking sheet. Bake according to your polymer clay package instructions (usually 275°F/135°C for 15-30 minutes). Let them cool completely.
Glossy Rind Finish
Make the charm look juicy by coating just the pink part and the black seeds with a coat of UV resin or glossy varnish after baking.
Step 3: Assembly
-
Pre-stretching cord:
Cut a piece of elastic cord about 10-12 inches long. Give it a few firm tugs to pre-stretch it; this prevents the bracelet from loosening up later. -
Stringing the back:
Thread all your green heishi-style discs onto the cord first. This will form the solid green back section of the bracelet. -
Pattern building:
Begin your pattern on the other side. A great sequence shown here is: white, pink, green (textured), white (striped/seeded). Repeat this sequence, mixing in plain pink or white spacer beads occasionally for variety. -
Attaching the charm:
Once you reach the center point opposite the green heishi section, slide on the jump ring holding your watermelon charm. I usually like to flank the charm with two textured green beads to frame it. -
Finishing the loop:
Continue the beading pattern until the bracelet reaches your desired wrist size. -
Tying the knot:
Bring the two ends of the elastic together. Tie a surgeon’s knot (a square knot with an extra loop through) and pull tight. -
Securing:
Add a tiny drop of super glue to the knot for extra security. Let it dry for a minute before trimming the excess cord close to the knot.
Slide this bracelet on your wrist for an instant pop of color that pairs perfectly with summer outfits.


Lemon Slice Sunshine Stack
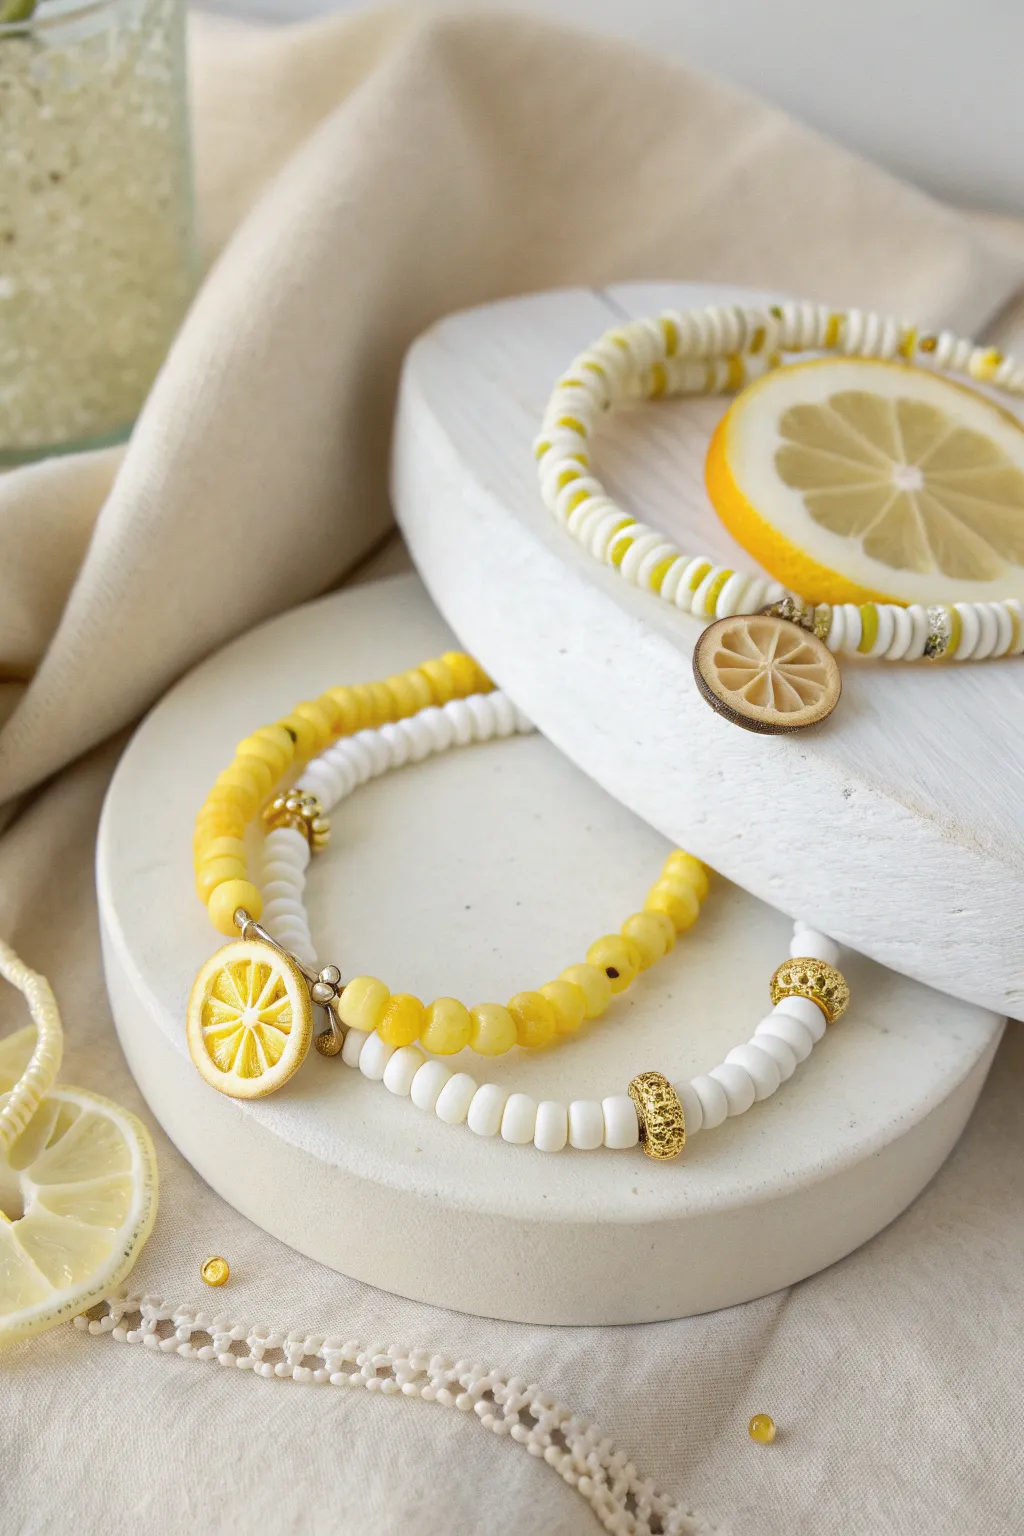
Brighten up your jewelry collection with this refreshing trio of lemon-themed bracelets, featuring a mix of polymer clay heishi beads, yellow jade-style rounds, and adorable citrus slice charms. The combination of textures and sunny hues makes this stack perfect for summer days or whenever you need a splash of cheer.
Step-by-Step
Materials
- Elastic stretch cord (0.7mm or 0.8mm)
- White polymer clay heishi beads (6mm)
- Yellow agate or jade round beads (6mm – 8mm)
- Small gold spacer beads (flower or round shape)
- Gold-tone textured barrel or large hole spacer beads
- Lemon slice charms (polymer clay or enamel/metal)
- Wooden or brown textured slice charm (optional)
- Small gold jump rings (4mm or 5mm)
- Jewelry glue or clear nail polish
- Scissors
Step 1: The Classic Heishi Lemon
-
Measure and cut:
Cut a piece of elastic cord about 10-12 inches long. This gives you plenty of extra room to tie knots comfortably. -
Pre-stretch the cord:
Before you start beading, give the elastic a few gentle tugs. This pre-stretching prevents the bracelet from loosening up immediately after you wear it. -
Anchor the end:
Place a piece of tape or a bead stopper on one end of the cord so your beads don’t slide off while you work. -
Start the pattern:
Thread about 2 inches of white heishi beads onto the cord. -
Add yellow accents:
Insert a small yellow seed bead or a thin yellow heishi bead every 5-6 white beads if you want a subtle speckled look, otherwise stick to solid white for a crisp base. -
Attach the focal charm:
Slide on your realistic lemon slice charm. If the hole is side-drilled, thread it directly; if it has a top loop, attach it using a small gold jump ring. -
Finish the strand:
Continue beading with the white heishi pattern until the bracelet measures about 6.5 to 7 inches, or fits your wrist comfortably.
Fresh Twist
Mix up your citrus! Swap yellow beads for orange or lime green and use orange slice or lime charms for a mixed fruit salad stack.
Step 2: The Mixed Texture Strand
-
Prepare the second cord:
Cut another length of elastic and pre-stretch it just like the first one. -
Begin the color block:
Start by threading about 10-12 bright yellow round stone beads. These add a nice weight and contrast to the flat clay beads. -
Add a gold accent:
Slide on a textured gold barrel bead or a decorative gold spacer to separate the yellow section from the white. -
Switch to white:
Add a section of white round beads or white heishi beads, approximately 2 inches long. -
Introduce the charm:
Thread on a vibrant yellow enamel lemon slice charm. I like to flank the charm with tiny gold spacer beads to make it pop. -
Close the loop:
Finish the pattern with more yellow round beads until the length matches your first bracelet.
Step 3: Finishing Touches
-
Tie the knots:
For each bracelet, remove the tape/stopper. Bring the ends together and tie a standard square knot (right over left, left over right). -
Secure the knots:
Pull the cords tight. Add a tiny drop of jewelry glue or clear nail polish to the knot itself to fuse it permanently. -
Hide the knot:
If possible, slide a nearby large-hole bead over the knot to conceal it. Let the glue dry completely before cutting the excess cord. -
Trim the ends:
Once dry, trim the excess elastic close to the knot, being careful not to snip the main cord.
Knot Security
Use a surgeon’s knot for extra security on slippery elastic: loop the line through twice on the first pass effectively creating a double overhand knot.
Step 4: Optional Beaded Chain
-
Create a simpler accent:
If you have extra supplies, create a quick single-strand bracelet using white round beads and gold textured spacer beads placed symmetrically every 6 beads for a uniform look.
Now you have a refreshing set of bracelets ready to wear or gift to a friend who loves summer style


Orange Slice Creamsicle Palette
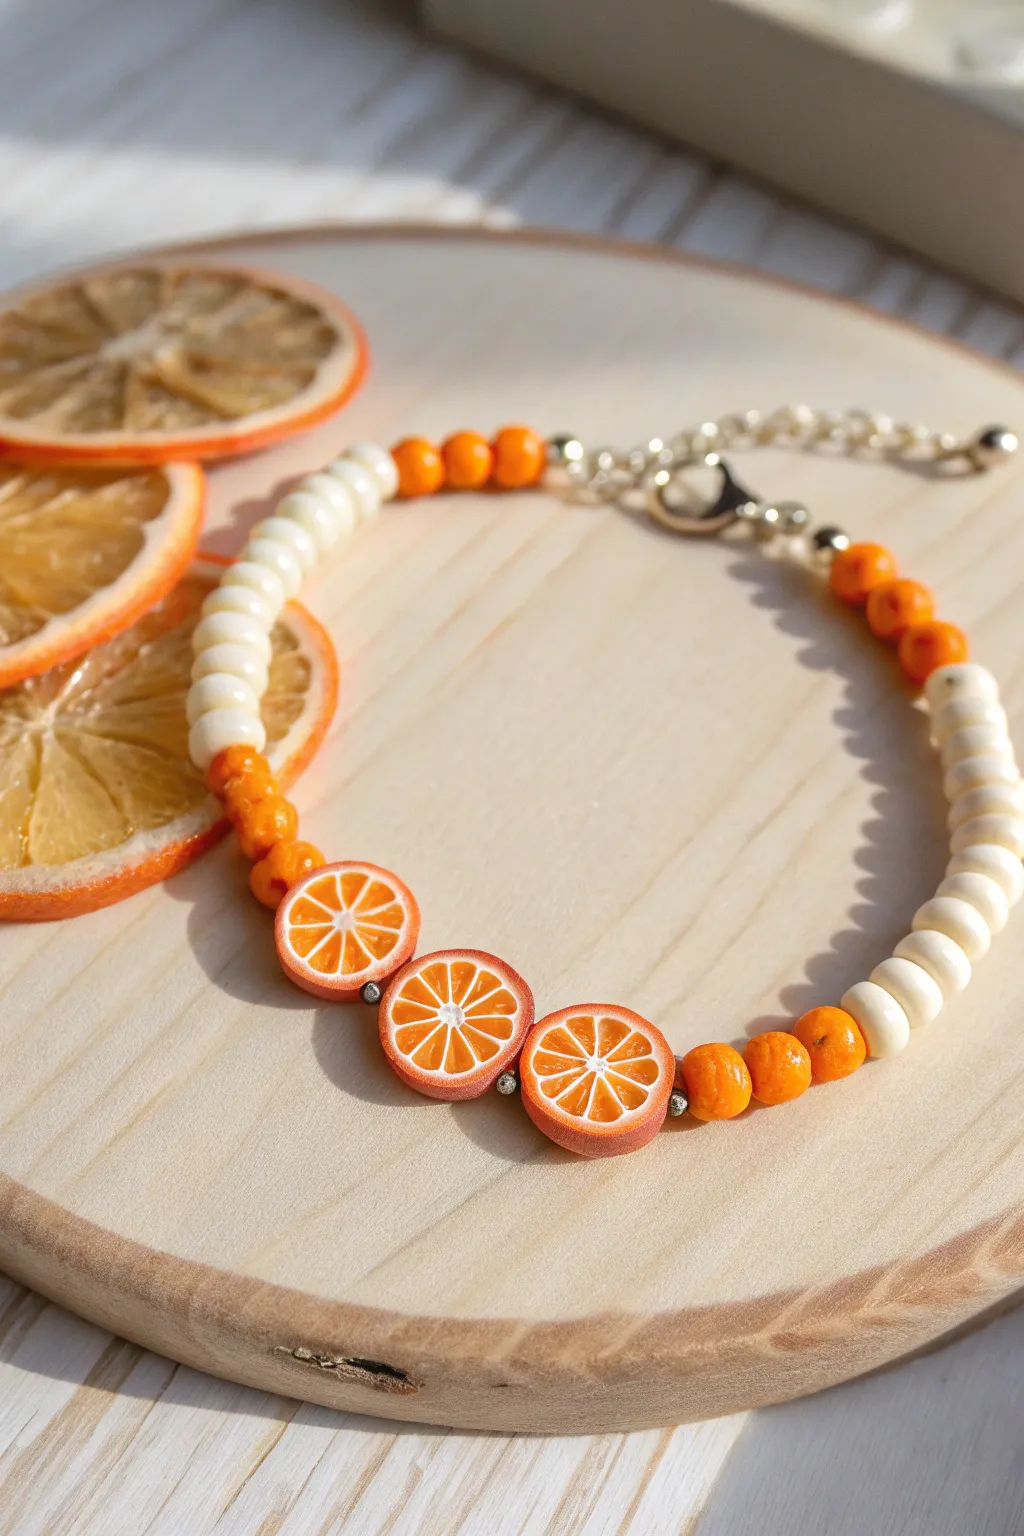
Capture the essence of a refreshing summer treat with this delightful beaded bracelet featuring realistic clay orange slices. The combination of textured citrus beads and smooth cream accents creates a playful yet polished accessory perfect for sunny days.
Step-by-Step Tutorial
Materials
- Polymer clay orange slice beads (approx. 10mm)
- Small textured orange spacer beads (approx. 4-6mm)
- Cream or off-white round beads (wood or acrylic, approx. 6mm)
- Tiny silver spacer beads (metal or glass seed beads)
- Beading wire or strong elastic cord
- 2 Crimp beads
- 2 Crimp bead covers (optional)
- 2 Wire protectors (optional)
- Lobster clasp
- Extension chain
- Chain nose pliers
- Wire cutters
- Measuring tape
Step 1: Planning and Preparation
-
Measure your wrist:
Wrap a measuring tape loosely around your wrist to determine the desired length. For a standard bracelet, aim for about 6.5 to 7 inches excluding the clasp assembly. -
Cut the wire:
Cut a piece of beading wire approximately 12 inches long. This extra length mimics the freedom I like to have when manipulating the ends, ensuring you aren’t struggling to tie or crimp a short strand. -
Attach the first clasp:
Thread a crimp bead onto one end of the wire, followed by a wire protector. Loop the wire through the lobster clasp hook, go back through the protector, and pass the tail back down through the crimp bead. -
Secure the start:
Use your chain nose pliers to flatten the crimp bead securely. Give it a gentle tug to ensure it holds tight, then trim the excess short tail wire close to the bead.
Fixing Gaps
If your bracelet feels stiff, you crimped too tight! Leave a tiny 1-2mm gap of bare wire at the end before crimping; the beads settle into this space when curved.
Step 2: Creating the Bead Pattern
-
Start with cream:
Begin beading your non-focal section first. Thread on about 10-12 of the cream-colored round beads. This will form the side of the bracelet that sits against the wrist. -
Transition with texture:
Add three of the textured orange spacer beads. These act as a vibrant bridge between the creamy white section and the main orange slices. -
Place spacers:
Thread a single tiny silver spacer bead. This small metallic accent adds a professional touch and prevents the larger clay beads from rubbing directly against the round beads. -
Add first slice:
Thread your first polymer clay orange slice bead. Ensure the hole runs horizontally through the slice so it sits flat against the wrist when worn. -
Create separation:
Add another tiny silver spacer bead immediately after the orange slice. -
Add center slice:
Thread the second orange slice bead. This will act as the center point of your design. -
Complete the focal point:
Add one more silver spacer, followed by the third and final orange slice bead. -
Mirror the spacers:
Finish the focal section by adding a final silver spacer bead after the third orange slice. -
Mirror the orange accents:
Thread on three more of the textured orange spacer beads to match the other side. -
Finish with cream:
Complete the strand by adding the remaining cream-colored beads until you reach your measured length.
Make it a Set
Create matching earrings using headpins! Stack one cream bead, one textured orange bead, and one clay slice, then create a loop and attach to ear wires.
Step 3: Finishing Touches
-
Check the fit:
Wrap the unfinished strand around your wrist one last time to verify the sizing. Add or remove cream beads from the ends if necessary to adjust the fit. -
Prepare the closer:
Thread a crimp bead onto the wire, followed by a wire protector and the extension chain. -
Loop back:
Feed the wire back through the wire protector and down into the crimp bead on the main strand. -
Crimp and trim:
Pull the wire snug so there are no large gaps between beads, but leave just enough slack so the bracelet stays flexible. Flatten the crimp bead firmly with pliers and trim the excess wire. -
Optional covers:
If you are using crimp bead covers, place them over the flattened crimp beads and gently close them with pliers to make them look like smooth round silver beads.
Enjoy styling your fresh, fruity accessory with your favorite summer outfits

The Complete Guide to Pottery Troubleshooting
Uncover the most common ceramic mistakes—from cracking clay to failed glazes—and learn how to fix them fast.
Kiwi Slice With Fresh Green Contrast
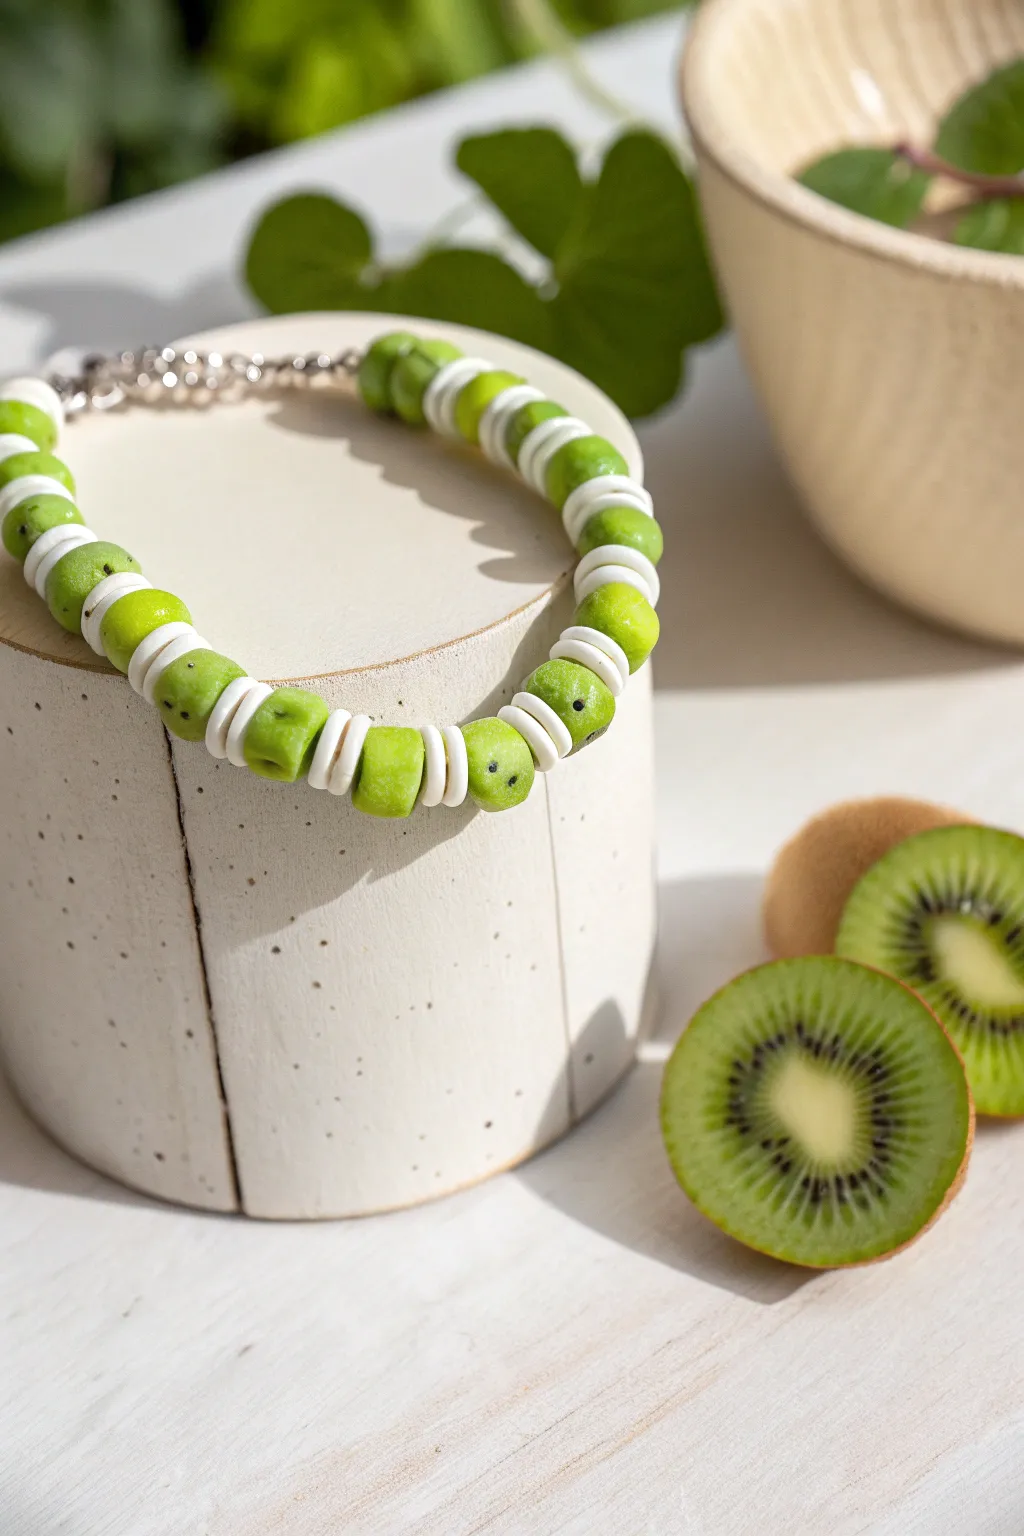
Capture the zesty spirit of fresh fruit with this vibrant bracelet featuring handmade kiwi-inspired beads. The interplay between the lime-green clay and crisp white heishi spacers creates a refreshing accessory perfect for summer styling.
Step-by-Step
Materials
- Polymer clay (translucent green or Granny Smith green)
- Polymer clay (white)
- Black acrylic paint or black polymer clay
- Silver crimp beads
- Silver lobster clasp and jump rings
- Beading wire or strong elastic cord
- White heishi beads (disc beads), approx. 4-6mm
- Needle tool or toothpick
- Polymer clay slicer blade
- Small round cutter (approx. 8-10mm)
- Rolling pin or pasta machine
- Oven for baking
Step 1: Making the Kiwi Cane Log
-
Preparing the Green Base:
Begin by conditioning your green polymer clay until it is soft and pliable. Roll it into a thick log, about 1 inch in diameter. This will form the juicy flesh of your kiwi beads. -
Creating the Core:
Condition a smaller amount of white clay and roll it into a thin snake. Press this gently down into the center of your green log length-wise to simulate the white core of a kiwi slice. -
Adding the Seeds:
You can add seeds two ways: either mix black clay into tiny specks and embed them near the center, or follow the simpler method of painting them later. For this specific look, we will paint them after forming the beads to get that organic speckled effect. -
Reducing the Cane:
Gently squeeze and roll your green log to reduce its diameter. Aim for a thickness of about 8-10mm, which matches the scale of the bracelet shown. Keep rolling until it is smooth and consistent. -
Cutting the Segments:
Using your sharp clay slicer, cut the long cane into individual bead segments. Each segment should be roughly equal in length to create a cube-like or cylindrical bead shape.
Shape Distortion?
If beads squish while piercing holes, pop the raw clay beads in the fridge for 15 minutes first. Cold clay holds its shape much better against the needle tool.
Step 2: Shaping and Detailing
-
Refining the Shape:
Take each green segment and gently roll it between your fingers to soften the sharp cut edges. You want a slightly rounded, organic barrel shape rather than a perfect geometric cylinder. -
Adding Texture:
To mimic the skin texture or fruit surface, lightly tap the outside of each bead with a clean toothbrush or sandpaper. This subtle step adds realism to the finished piece. -
Piercing the Beads:
Use your needle tool to pierce a hole through the center of each bead. I find it helpful to twist the needle as I push to prevent the clay from squashing out of shape. -
Initial Baking:
Arrange your beads on a baking tile or parchment paper. Bake according to your clay manufacturer’s instructions (usually 275°F/135°C for 15-30 minutes). Let them cool completely. -
Painting the Seeds:
Once cool, use a fine-point tool or toothpick dipped in black acrylic paint to create the tiny seeds. Place 2-3 small dots on the outer faces of the beads. This simple detail instantly transforms green blobs into recognizable fruit. -
Sealing (Optional):
If you want extra durability for the paint, apply a very thin coat of matte varnish over the beads and let them dry fully.
Make It Glossy
Coat the tiny black ‘seeds’ with a drop of UV resin or glossy glaze. It makes them look wet and juicy, adding a high-end finish to your fruit beads.
Step 3: Assembly
-
Starting the Strand:
Cut a length of beading wire about 10 inches long. Attach a crimp bead and one half of your clasp to one end, squeezing the crimp tight with pliers to secure it. -
Creating the Pattern:
Thread your beads in a repeating pattern. Slide on one handmade green kiwi bead followed by three white heishi spacer beads. The spacers act like the white pith of the fruit and brighten the design. -
Continuing the Rhythm:
Repeat this pattern—one kiwi, three spacers—until the bracelet reaches your desired length. For a standard fit, you will likely need about 15-18 kiwi beads. -
Checking the Fit:
Wrap the unfinished strand around your wrist to check the size. Remember the clasp will add a small amount of length, so factor that in. -
Finishing the Clasp:
Thread a crimp bead and the second part of your clasp (or a jump ring) onto the end. Loop the wire back through the crimp bead and pull it snug, but leave a tiny bit of slack so the bracelet creates a fluid circle. -
Final Trim:
Crush the final crimp bead flat with pliers. Snip off any excess wire tail close to the bead for a clean, professional finish.
Enjoy wearing your fresh and fruity creation all summer long
Grape Cluster Colors in Purple and Green
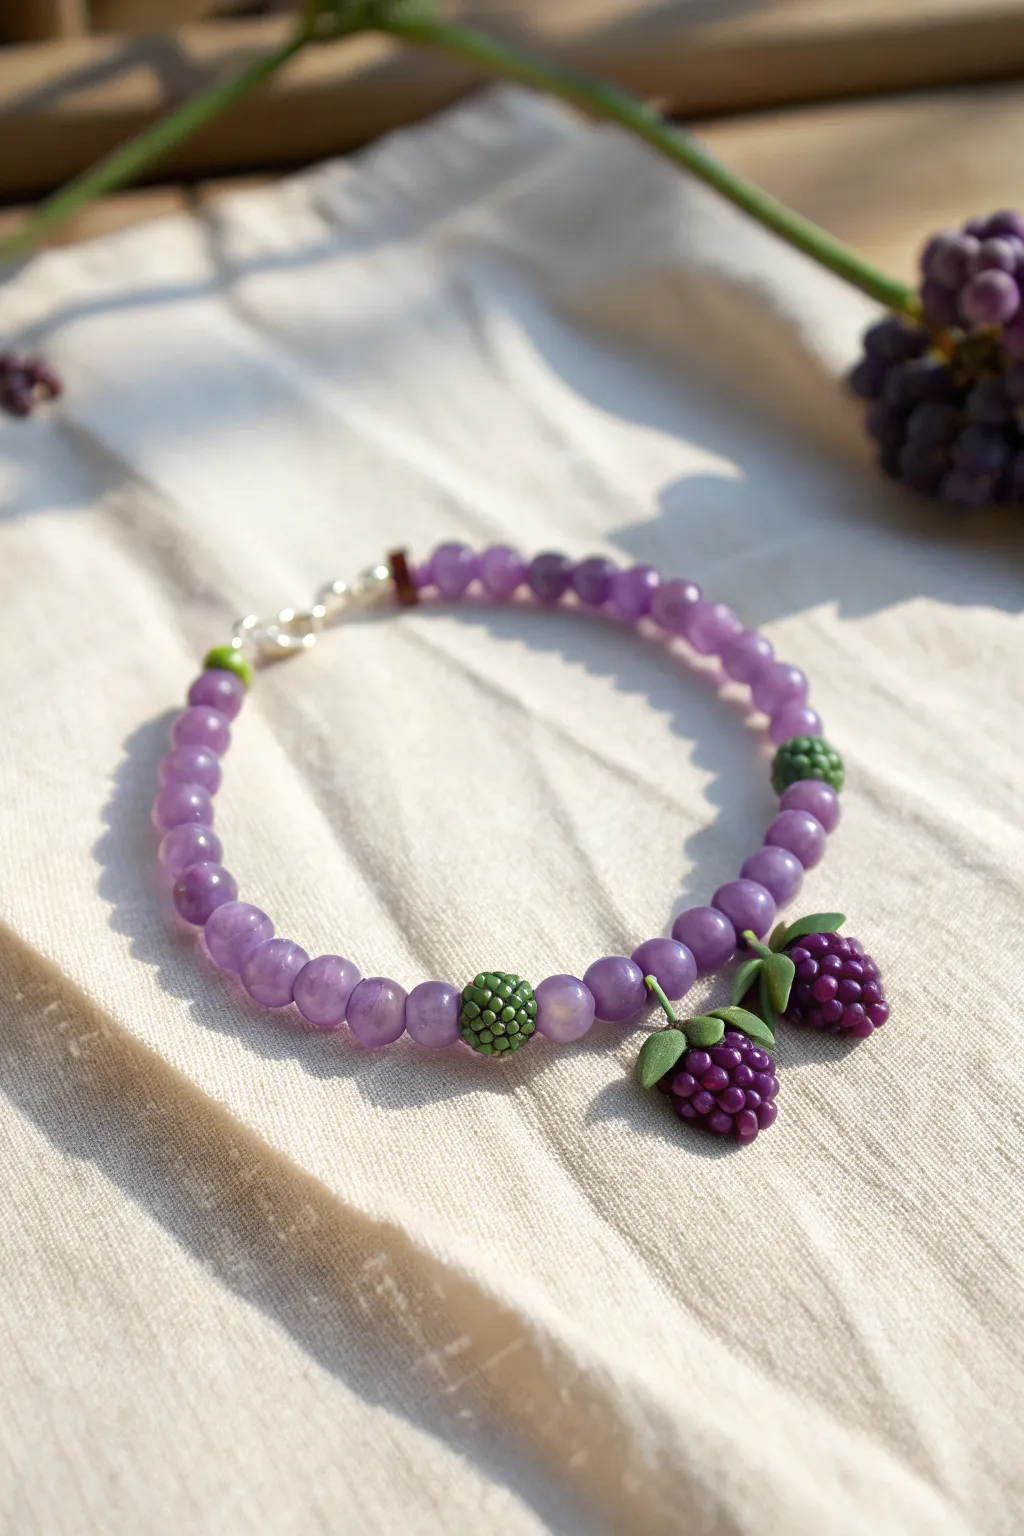
Capture the essence of a vineyard harvest with this charming beaded bracelet featuring handcrafted clay fruit charms. The combination of translucent purple gemstone beads and detailed polymer clay berries creates a delightful, nature-inspired accessory perfect for spring and summer.
Step-by-Step Guide
Materials
- Purple polymer clay (grape/berry shade)
- Olive green polymer clay (leaf/stem shade)
- 8mm round purple gemstone beads (like amethyst or purple jade)
- Silver crimp beads
- Silver lobster clasp and jump ring
- Beading wire (flexible nylon-coated)
- Headpins or eyepins (silver)
- Small needle tool or toothpick
- Wire cutters
- Round nose pliers
- Gloss varnish or resin (optional)
Step 1: Sculpting the Clay Berries
-
Prepare the base:
Start by rolling two small balls of purple clay, approximately 8-10mm in diameter, to serve as the core for your berry charms. -
Create tiny spheres:
Roll many tiny spheres of purple clay, about 1-2mm each. You will need a few dozen of these to cover your base cores. -
Assemble the cluster:
Gently press the tiny spheres onto the base ball, starting from the bottom and working your way up until the entire surface resembles a bumpy blackberry or grape cluster. -
Add the stem:
Insert a headpin or eyepin through the center of the berry before baking. Ensure the loop stays at the top. -
Sculpt leaves:
Flatten tiny teardrop shapes of green clay. Use a needle tool to drag a gentle center vein down the middle of each leaf. -
Attach greenery:
Press two or three small leaves onto the top of the berry, wrapping slightly around the pin to secure them visually.
Sticky Situation?
If your tiny clay spheres are getting flattened by your fingerprints, chill the clay in the fridge for 10 minutes before rolling to make it firmer.
Step 2: Creating Texture Beads
-
Form the green beads:
Roll two balls of green clay, slightly smaller than your berry charms, to create the textured spacer beads. -
Texturize the surface:
Using a blunt needle tool or the end of a small straw, gently press an all-over stippled pattern into the green spheres to mimic a unripe berry or textured seed pod. -
Pierce the beads:
Carefully poke a hole through the center of these green beads with a toothpick or needle tool to create the stringing channel. -
Bake the clay:
Bake all your clay pieces according to the manufacturer’s instructions—usually around 275°F (130°C) for 15-30 minutes. Let them cool completely.
Berry Shine
After baking, brush a thin layer of satin or gloss varnish on just the purple ‘fruit’ parts to make them look juicy, leaving the leaves matte.
Step 3: Stringing the Design
-
Cut the wire:
Cut a length of beading wire about 10-12 inches long to give yourself plenty of room to work with the clasp. -
Begin stringing:
Secure one end of the wire to a crimp bead and a jump ring or loop part of the clasp, crimping tightly. -
Pattern layout:
String approximately 10-12 purple gemstone beads. I recommend double-checking wrist size here to ensure the charms will sit centered. -
Add first texture bead:
Slide on one of your handcrafted green textured beads, followed by 3-4 more purple gemstone beads. -
Attach the charms:
Thread on your baked berry charms. Since they are on headpins, they will dangle. Placing a small spacer bead between the two berries helps them hang nicely without clumping. -
Complete the pattern:
Mirror the design on the other side: 3-4 purple beads, the second green texture bead, and finally the remaining purple gemstone beads. -
Finish the ends:
Thread the end through a crimp bead and the lobster clasp. Loop the wire back through the crimp and a few adjacent beads. -
Secure the clasp:
Flatten the crimp bead firmly with pliers and trim any excess wire close to the beads for a neat finish.
Enjoy wearing your new harvest-inspired bracelet, a lovely handmade accessory to brighten up any outfit


What Really Happens Inside the Kiln
Learn how time and temperature work together inside the kiln to transform clay into durable ceramic.
Avocado Green With “Pit” Center Bead
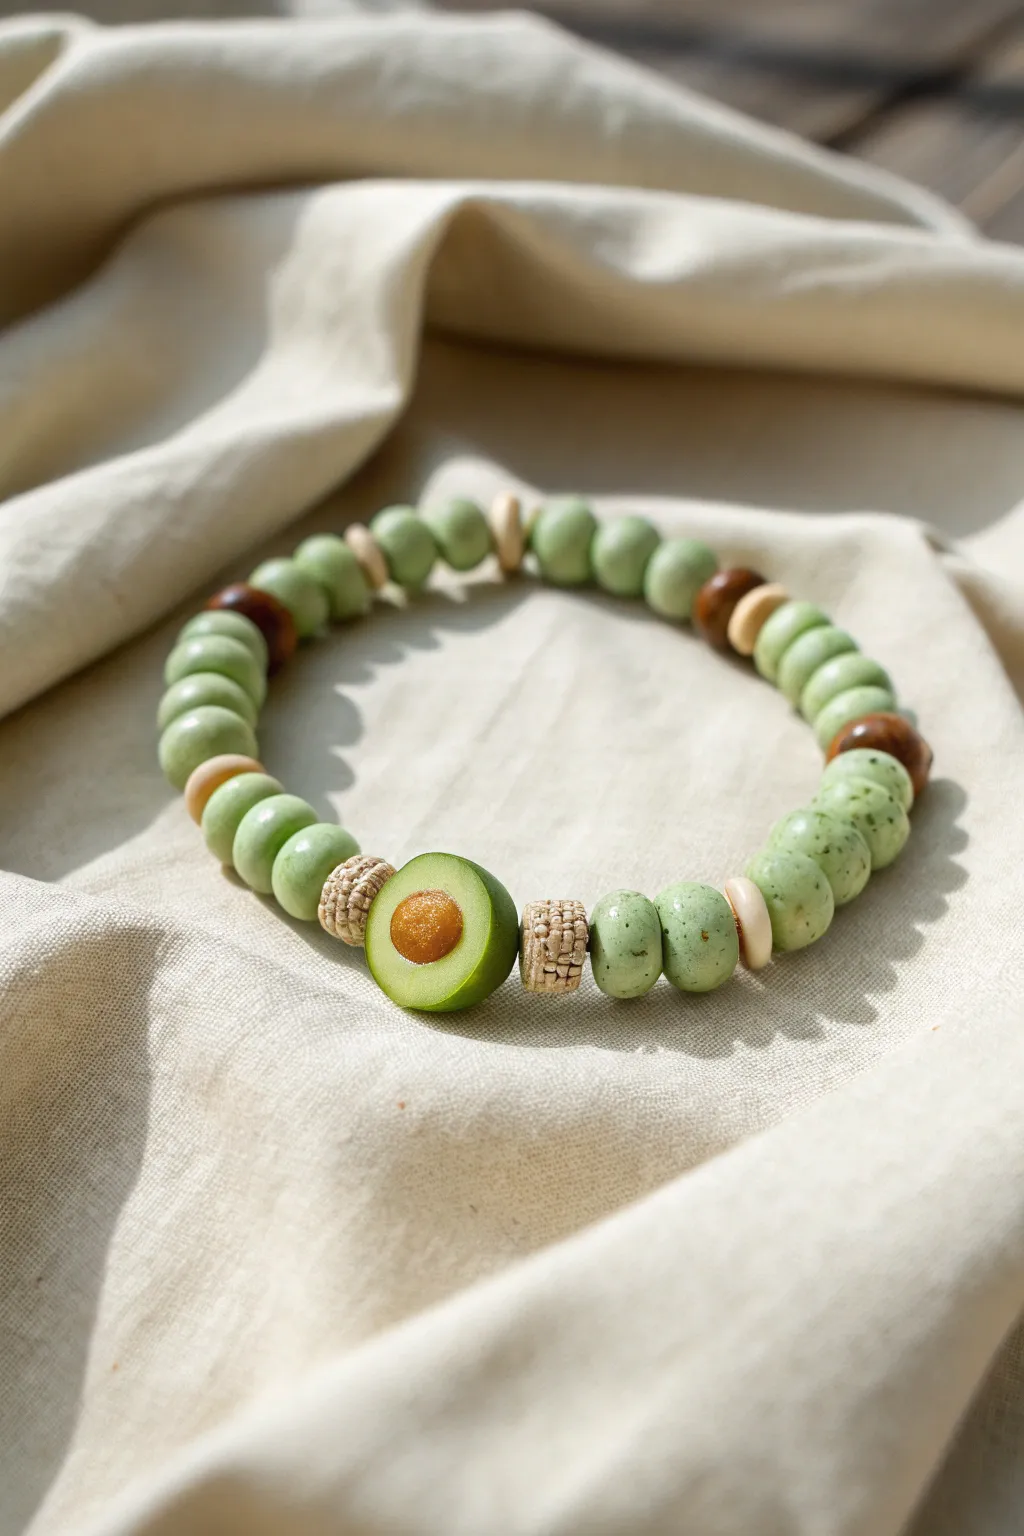
Embrace the freshness of your favorite fruit with this creamy, green-toned clay bead bracelet featuring a delightful avocado focal bead. The mix of speckles, textures, and earthy browns creates a wearable piece of art that looks almost good enough to eat.
Step-by-Step
Materials
- Polymer clay (Avocado green, translucent white, caramel brown, dark brown, sandy beige)
- Acrylic roller
- Bead piercing pins or toothpicks
- Flexible tissue blade
- Sandpaper or texturing sponge
- Elastic beading cord (0.8mm clear)
- Small round cutter or straw
- Matte water-based varnish
- Needle nose pliers (for knotting assistance)
Step 1: Focal Bead Creation
-
Mixing the flesh tone:
Start by mixing your avocado green polymer clay with a very small amount of translucent white. This gives the clay a more realistic, slightly waxy depth rather than a flat plastic look. -
Forming the shape:
Roll a ball of the green mix about the size of a large marble, then flatten it slightly into a thick disk. gently pinch the top to create the classic pear-like avocado silhouette. -
Making the pit:
Roll a smaller ball of caramel brown clay for the pit. Press it firmly into the center of your green form, embedding it slightly so it looks nestled rather than just sitting on top. -
Adding the skin:
Roll a very thin sheet of dark green clay. Wrap a narrow strip around the outer edge of your avocado shape to mimic the skin, trimming the excess neatly at the back. -
Texturing the pit:
Use a toothbrush or a crumpled piece of foil to gently tap texture onto the brown pit, giving it a rough, organic surface. -
Drilling the focal bead:
Carefully pierce the bead horizontally, going through the green flesh just below the center pit. Rotate the pin as you push to avoid squishing the shape.
Step 2: Crafting the Green Spacer Beads
-
Preparing the speckles:
Take a tiny pinch of dark green or brown clay and chop it into microscopic dust-like particles using your blade. -
Marbling the clay:
Mix these tiny specks into your remaining light green clay. Don’t over-mix; you want distinct specks visible, resembling real fruit pulp. -
Rolling small beads:
Portion the speckled clay into roughly 20-24 equal pieces. Roll each into a smooth, round ball approximately 8mm in diameter. -
Piercing the rounds:
Piercing can distort round beads, so I like to let them sit for ten minutes first. Then, gently drill a hole through the center of each, reshaping slightly if they flatten.
Pro Tip: Surface Detail
Before baking, lightly brush the green beads with cornstarch. This prevents fingerprints and creates a velvety, matte texture after baking that mimics real avocado skin.
Step 3: Making the Textured Accents
-
Creating fabric-texture beads:
Roll two short cylinders from sandy beige clay. These will sit on either side of the avocado. -
imprinting texture:
Roll these cylinders over a piece of velcro, window screen, or coarse sandpaper to emboss a deep, woven texture into the surface. -
Making flat spacers:
Roll out a thin sheet of light beige or cream clay. Puncture holes, then use a small round cutter to punch out flat disc beads. -
Baking:
Arrange all your beads on a baking tile or sheet. Bake according to your brand of polymer clay instructions (usually 275°F/135°C for 15-30 minutes). Let them cool completely.
Troubleshooting: Wonky Holes
If your bead holes distort during piercing, bake the beads first for 10 minutes, then use a hand drill to make the holes. The semi-hardened clay holds its shape perfectly.
Step 4: Assembly
-
Finishing touches:
Once cool, coat the avocado focal bead with a matte varnish to protect the surface, especially the pit. -
Stringing the center:
Cut a 10-inch length of elastic cord. Thread the avocado bead first, followed by one textured beige cylinder on each side. -
Building the pattern:
Continue stringing beads, alternating between your speckled green rounds and the flat beige spacers. Add dark wooden beads occasionally for visual contrast if you have them. -
Closing the loop:
Check the fit on your wrist. Tie a strong surgeon’s knot, pull tight, and add a dab of super glue to the knot before trimming the excess cord.
Enjoy styling your fresh, fruity accessory with your favorite summer outfits
Dragon Fruit Speckle Bracelet
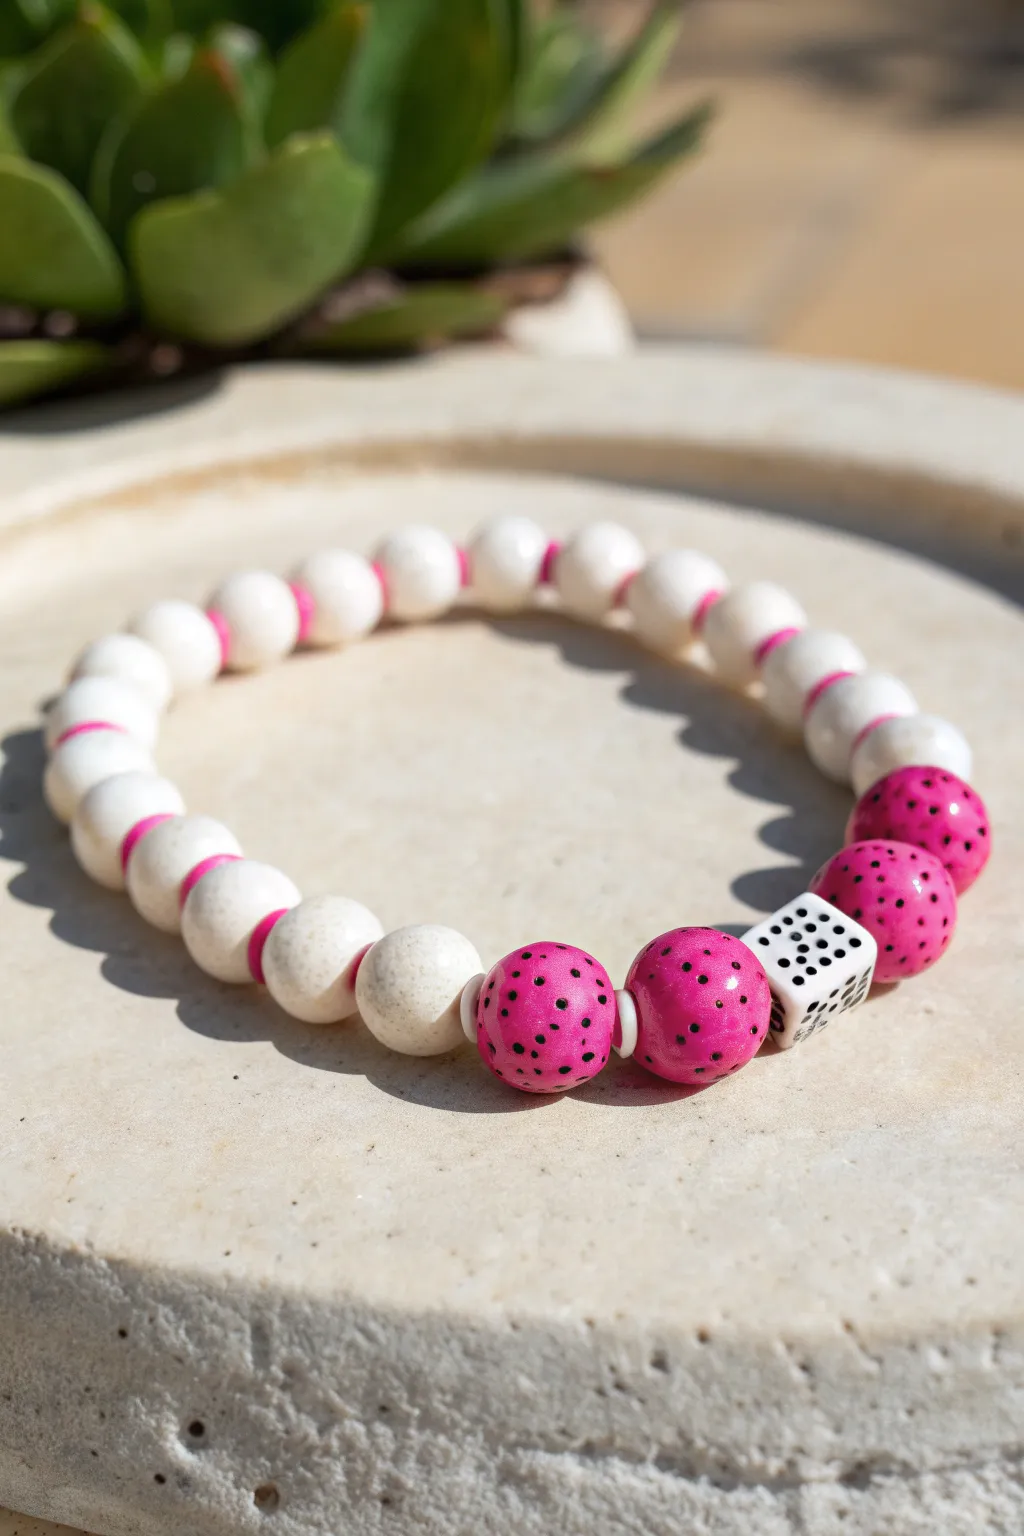
This playful bracelet combines the vibrant aesthetic of dragon fruit with a fun gaming twist. The speckled hot pink beads pop beautifully against the creamy white stones, creating a summer-ready accessory that’s good enough to eat.
How-To Guide
Materials
- White or cream-colored round stone beads (approx. 8mm)
- Hot pink polymer clay beads with black speckles (approx. 10mm)
- Small hot pink Heishi spacer beads (approx. 4mm)
- White square die bead with black pips
- Strong elastic beading cord (0.8mm recommended)
- Beading needle (optional, but helpful)
- Jewelry glue or clear nail polish
- Scissors
Step 1: Preparation
-
Cut the Cord:
Measure a length of elastic cord about 10-12 inches long. This extra length will make tying the knot much easier later on. Pre-stretch the elastic by pulling it gently a few times; this prevents the bracelet from stretching out immediately after you finish it. -
Plan the Layout:
Before threading, lay out your beads on a bead board or a soft towel. The pattern relies on symmetry, so place your white die bead in the center. -
Arrange the Focal Section:
On either side of the die bead, place two of the speckled hot pink ‘dragon fruit’ beads. Between the die and the pink beads, you might want to add a tiny white spacer if your die hole is large, though direct contact works too.
Knot Slipping Out?
If the knot keeps popping out of the bead hole, try widening the hole slightly with a bead reamer tool, or simply use a slightly larger bead right next to the knot location.
Step 2: Stringing the Core
-
Start with the Die:
Thread your elastic through the central white die bead first. Slide it to the middle of your cord length. -
Add the Dragon Fruit:
Thread two pink speckled beads onto the right side of the die. -
Mirror the Fruit:
Thread the other two pink speckled beads onto the left side of the die. Your focal point is now complete and centered. -
Insert Spacers:
Add a single small pink Heishi spacer bead next to the last pink bead on both the left and right sides. These tiny pops of color help transition the design.
Step 3: Completing the Circle
-
Start the White Pattern:
Begin adding the cream-colored round beads. Add one white bead to the right side, followed immediately by a pink Heishi spacer. -
Continue the Pattern:
Repeat this ‘one white bead, one pink spacer’ pattern on the right side for about half the remaining length needed for your wrist size. -
Balance the Other Side:
Now switch to the left side cord. Replicate the same pattern: one white bead followed by one pink spacer. -
Check the Fit:
Continue alternating sides until the strand wraps comfortably around your wrist. I suggest checking the fit frequently so you don’t over-string. The ends should meet without gaps. -
Final Bead Adjustment:
Make sure your last bead on one end is a white bead and the last on the other is a spacer (or vice versa) so the pattern flows seamlessly when closed.
Level Up: Fruit Salad
Mix up the ‘fruit’ theme by swapping hot pink dragon fruit beads for yellow speckled ones (lemon) or green ones (kiwi) to create a multi-fruit stack.
Step 4: Finishing Up
-
Tie the Base Knot:
Bring the two ends of the elastic together carefully. Tie a simple overhand knot, pulling it tight enough to remove slack between beads but not so tight that the bracelet puckers. -
Secure with a Surgeon’s Knot:
Perform a surgeon’s knot for extra security. Loop the elastic through twice before pulling tight. This extra loop creates friction that holds the knot in place. -
Apply Glue:
Dab a tiny drop of jewelry glue or clear nail polish directly onto the knot. This is the secret to longevity. -
Hide the Knot:
While the glue is still tacky, gently tug on the elastic to slide the knot inside the hole of the nearest large bead. -
Trim the Excess:
Once the glue has fully dried (wait a few minutes), use your scissors to snip the excess cord ends as close to the bead hole as possible.
Now you have a zesty, eye-catching bracelet ready to enhance any summer outfit

TRACK YOUR CERAMIC JOURNEY
Capture glaze tests, firing details, and creative progress—all in one simple printable. Make your projects easier to repeat and improve.
Pineapple Gold Spacer Bracelet
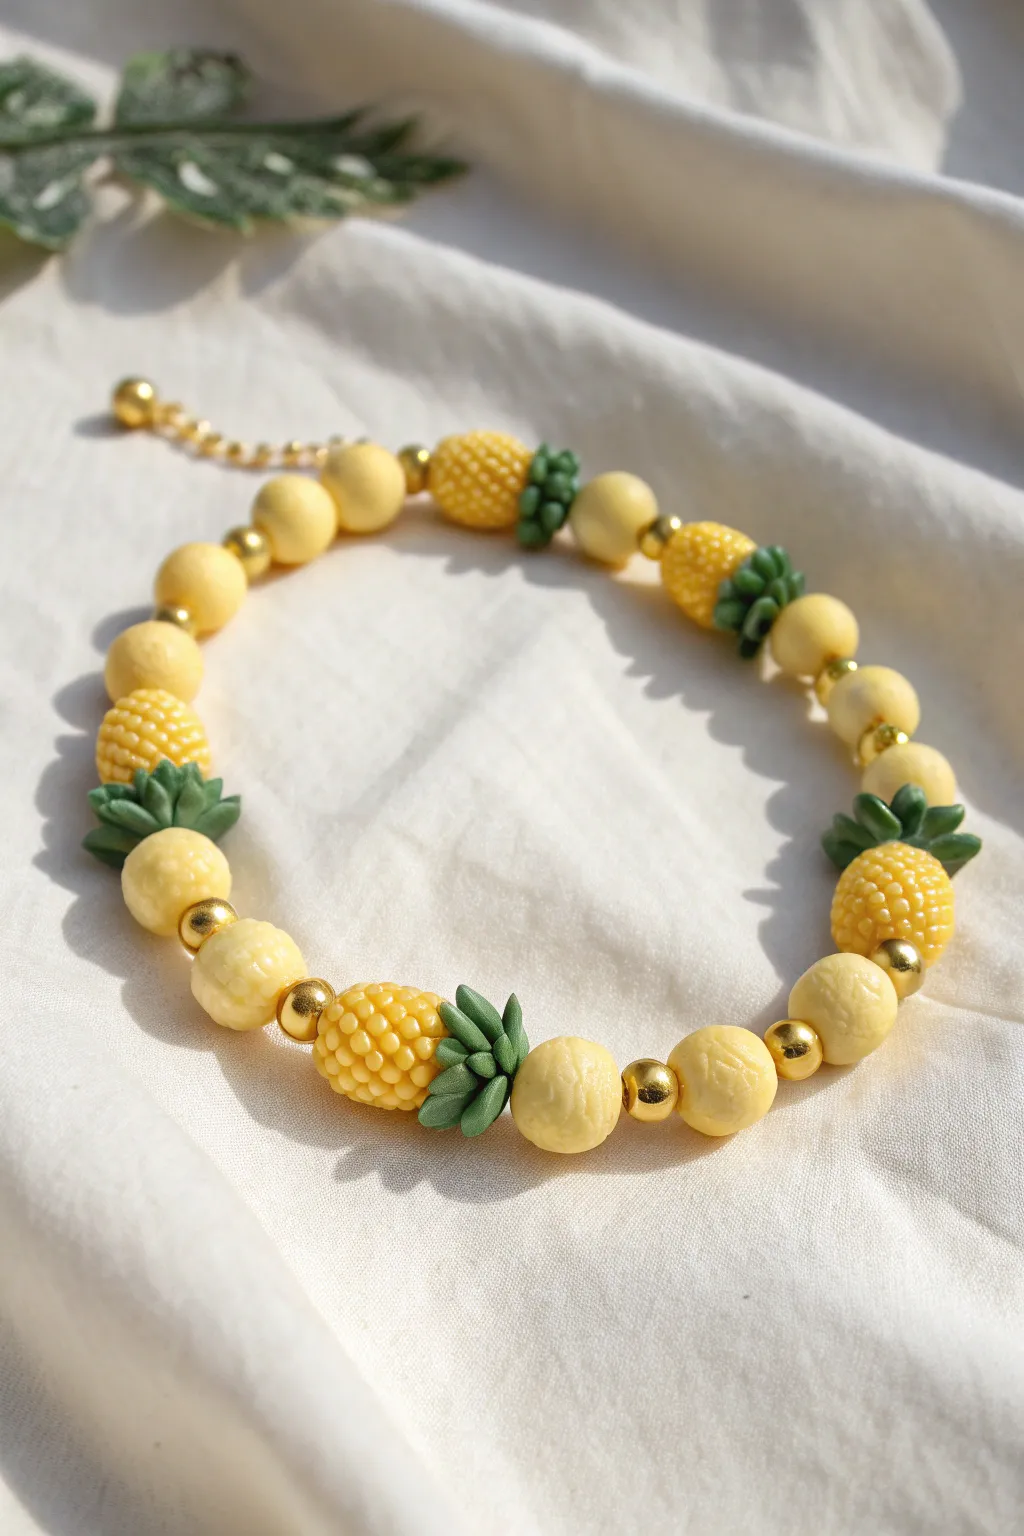
Capture the warmth of summer with this elegant accessory that combines playful fruit motifs with sophisticated gold accents. This bracelet features textured yellow clay beads and realistic pineapple charms, creating a piece that feels both handcrafted and high-end.
Step-by-Step Guide
Materials
- Yellow polymer clay (two shades: lemon yellow for bodies, paler butter yellow for round beads)
- Green polymer clay (leaf green)
- Small gold round spacer beads (approx. 4mm)
- Gold beading wire or strong elastic cord
- Gold crimp beads and covers (if using wire)
- Gold lobster clasp and extension chain
- Needle tool or toothpick
- Clay sculpting tools (optional but helpful for texture)
- Oven for baking clay
- Pliers (chain nose and flat nose)
Step 1: Sculpting the Clay Beads
-
Mix the colors:
Start by conditioning your polymer clay. You’ll need a vibrant lemon yellow for the pineapple bodies and a softer, pale yellow for the round filler beads. If your yellow is too bright, mix in a tiny pinch of white to soften it. -
Form the round beads:
Roll the pale yellow clay into small, uniform spheres about 8mm in diameter. Make about 14-16 of these, depending on your wrist size. -
Texturize the round beads:
To mimic the organic look in the photo, gently roll the spheres over a piece of sandpaper or use a crumpled ball of aluminum foil to press a subtle texture into the surface so they aren’t perfectly smooth. -
Shape the pineapple bodies:
Take the lemon yellow clay and roll 5 oval shapes, slightly smaller than your round beads. Gently flatten the bottom and round off the top to create the fruit shape. -
Add pineapple texture:
Using a needle tool, press a cross-hatch or diamond pattern into the sides of the yellow ovals to replicate the pineapple’s skin. I find pressing gently rather than dragging the tool gives a cleaner look.
Step 2: Adding Details and Baking
-
Create the leaves:
Roll tiny snakes of green clay and taper one end to a point. Flatten them slightly to resemble leaves. -
Assemble the crowns:
Attach 4-5 small green leaves to the top of each yellow pineapple body. Press them firmly to ensure they fuse, arranging them so they flare out naturally. -
Pierce the beads:
Carefully use a needle tool or bead reamer to poke a hole through the center of every bead—both the round ones and the pineapples. Ensure the hole goes horizontally through the center of the pineapples. -
Bake the clay:
Arrange all your clay pieces on a baking tile or parchment-lined tray. Bake according to the manufacturer’s instructions for your specific brand of clay—usually around 275°F (130°C) for 15-30 minutes. -
Cool down:
Let the beads cool completely before handling them. They harden fully as they cool.
Needle Tool Trick
When piercing raw clay beads, twist the needle as you push through. This prevents the bead from squishing out of shape.
Step 3: Assembly
-
Prepare the stringing material:
Cut a length of beading wire or elastic cord about 10 inches long to give yourself plenty of room to work. -
Secure the first end:
If using wire, thread a crimp bead and one half of the clasp onto the end. Loop the wire back through the crimp bead and squash it flat with pliers. Cover with a crimp cover for a polished look. -
Begin the pattern:
Start threading your beads. The pattern shown uses pairs of pale round beads separated by gold spacers. -
Incorporate the pineapples:
Integrate the pineapple charms periodically. The sequence in the image is: Pineapple -> Round Bead -> Gold Spacer -> Round Bead -> Pineapple. Adjust this rhythm to fit your wrist size. -
Check the fit:
Wrap the unfinished strand around your wrist to ensure the length is correct before securing the end. -
Finish the strand:
Thread on a crimp bead and the extension chain or jump ring. Loop the wire back through the crimp bead and pull tight (but not stiff). Flatten the crimp bead securely. -
Trim excess wire:
Snip off any excess wire tail close to the crimp bead, tucking the tiny end inside the nearest bead if possible.
Add Subtle Shading
Before baking, lightly brush orange soft pastel powder onto the pineapple grooves for realistic depth and ripeness.
Wear your sunny creation with pride or wrap it up as a delightful handmade gift for a friend
Cherry Red Bracelet With Sweet Symmetry
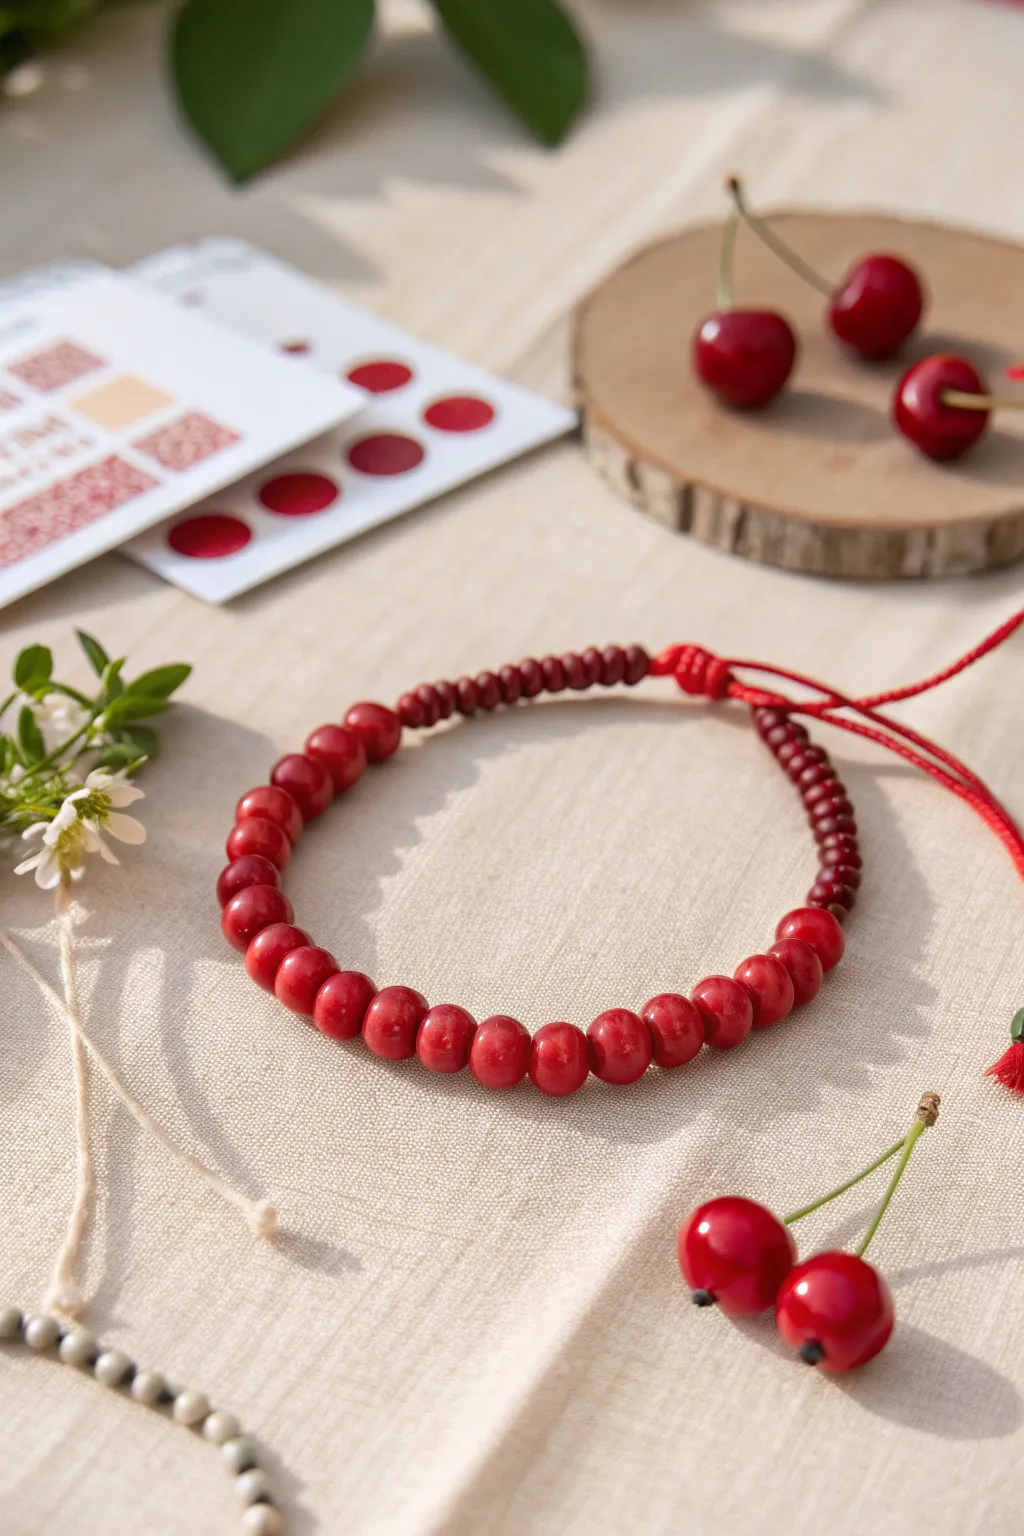
Capture the luscious vibrancy of summer fruit with this stunning bracelet featuring glossy, cherry-red beads accented by deeper burgundy tones. Its symmetrical design balances bold, round focal beads with smaller spacer segments for a piece that looks good enough to eat.
Detailed Instructions
Materials
- Polymer clay (Cherry Red and Deep Burgundy/Maroon)
- Glossy polymer clay glaze or UV resin
- Soft red nylon cord (0.8mm or 1mm thickness)
- Bead reamer or toothpick
- Clay roller or pasta machine
- Small round cutter or measuring spoons (for consistent sizing)
- Baking sheet and parchment paper
- Sandpaper (fine grit)
- Soft brush for glazing
- Lighter (for sealing cord ends)
- Oven (for baking clay)
Step 1: Crafting the Beads
-
Condition the clay:
Start by thoroughly kneading your Cherry Red polymer clay until it is soft and pliable. Do the same for a smaller amount of the Deep Burgundy clay. -
Portion the main beads:
For the main focal section, create about 18-20 equal-sized portions of the Cherry Red clay. I find using a small measuring spoon helps keep them consistent. Roll them into smooth, perfect spheres between your palms. -
Create the spacer beads:
Take the Deep Burgundy clay and form roughly 20-25 much smaller, disc-like or small round beads. These will sit at the ends near the closure. -
Pierce the holes:
Using a bead reamer or a thick toothpick, carefully pierce a hole through the center of each bead. Rotate the tool gently as you push through to avoid distorting the round shape. -
Bake the beads:
Arrange your beads on a parchment-lined baking sheet. Bake them according to the manufacturer’s instructions for your specific brand of clay (usually around 275°F/135°C for 15-30 minutes). -
Cool and refine:
Allow the beads to cool completely. If there are any rough spots around the holes or fingerprints, lightly sand them with fine-grit sandpaper used under water. -
Apply the glaze:
To get that juicy, cherry-skin shine, coat each red bead with a high-gloss polymer clay glaze. You can skewer them on toothpicks stuck into a foil ball to let them dry without touching surfaces. Let the glaze cure fully.
Sticky Glaze?
If your glaze feels tacky after drying, wipe beads with a little rubbing alcohol or recoat with a thin layer of UV resin and cure under a UV lamp.
Step 2: Assembly
-
Prepare the cord:
Cut a length of red nylon cord approximately 24 inches long. This generous length allows plenty of room for knotting and the adjustable closure. -
Seal the tip:
Use a lighter to quickly melt the very tip of one end of the cord, twisting it carefully (and quickly!) to form a stiff needle-like point. This makes threading much easier. -
Start threading:
Begin by threading about 10-12 of the small Deep Burgundy beads onto the cord. Slide them down to the center temporarily. -
Add the focal beads:
Next, thread on all of your large glossy Cherry Red beads. These will form the main body of the bracelet. -
Finish the symmetry:
String the remaining 10-12 small Deep Burgundy beads after the red ones, mirroring the start of the pattern. -
Center the design:
Slide all the beads to the center of the cord so there represent equal lengths of empty cord on either side. -
Secure the ends:
Tie a simple overhand knot tightly against the last bead on both ends of the beaded section to keep the beads snugly in place.
Step 3: Creating the Closure
-
Form the overlap:
Cross the two tail ends of the cord over each other to form a circle. Hold the overlap point steady. -
Tie a sliding knot:
Cut a separate 6-inch piece of red cord. Create a square knot or a macramé sliding knot over the overlapped section. Tie about 3-4 knots to create a sturdy slider. -
Trim and melt:
Trim the excess string from your sliding knot (not the main bracelet cords!) and carefully melt the ends with a lighter to fuse the knot so it doesn’t unravel. -
Finish the tails:
Tie a small knot at the very end of each bracelet tail cord. You can add one extra small burgundy bead before the knot for a decorative touch. Trim any final excess.
Mix It Up
Marbelize your red clay with a tiny bit of translucent clay before rolling to give the beads a realistic, organic fruit skin depth.
Wear your fresh cherry bracelet solo or stack it for a delightful pop of color on your wrist
Fruit Salad Mix on One Bracelet
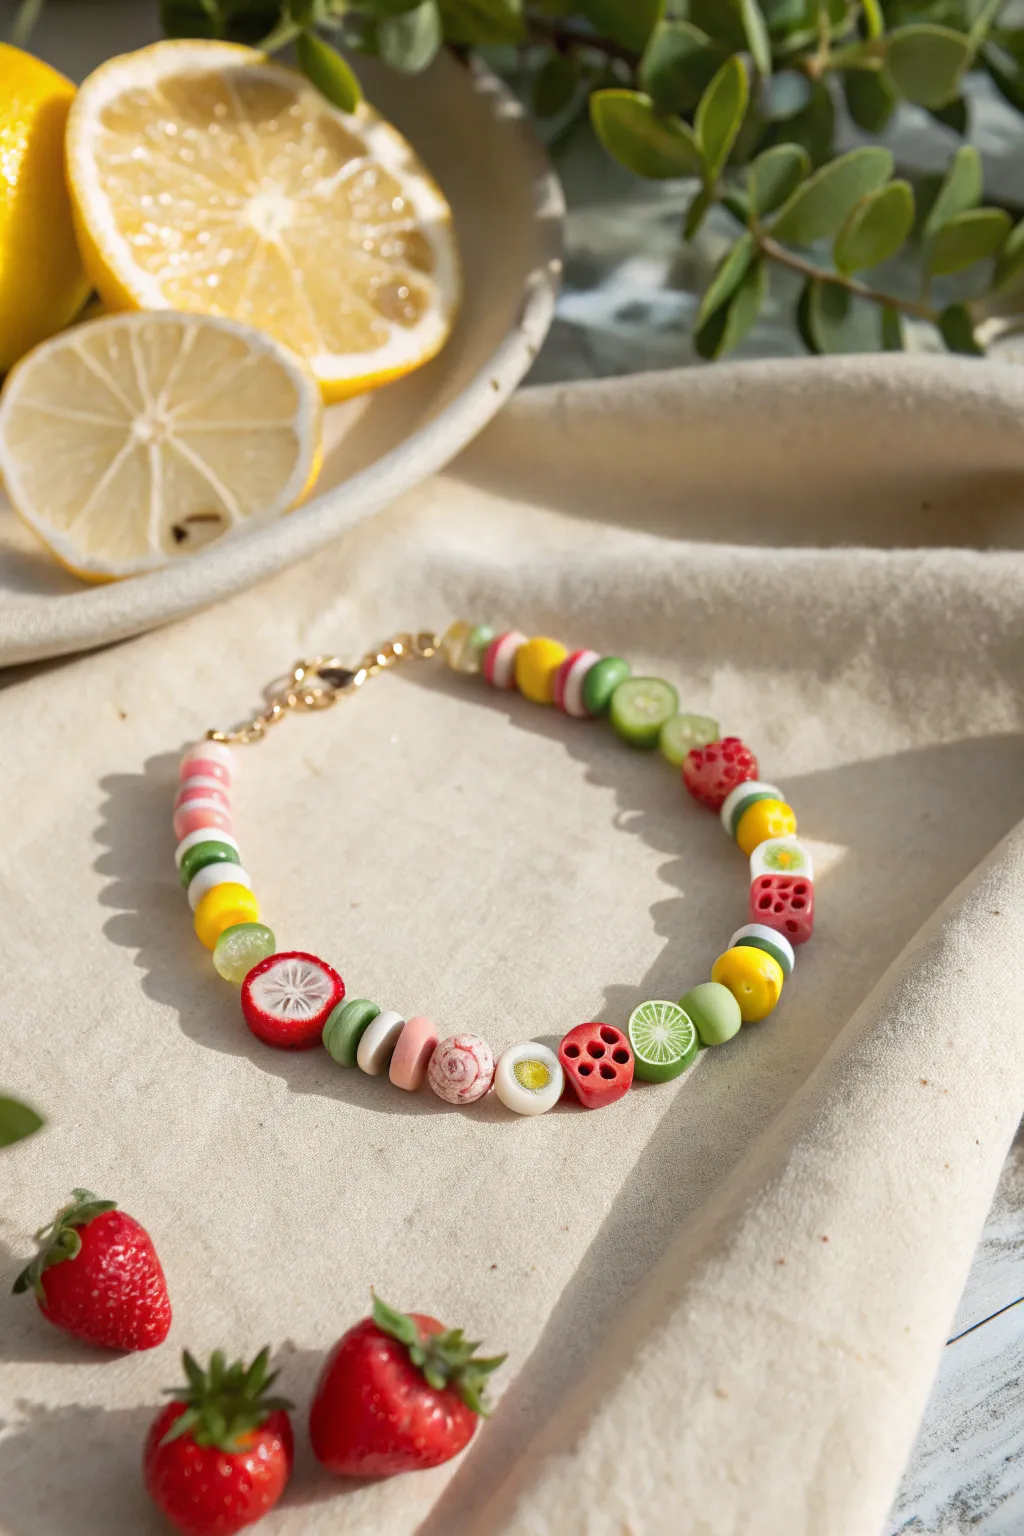
Capture the essence of a summer picnic with this vibrant ‘fruit salad’ bracelet that mixes citrus slices, berries, and abstract fruit shapes. The eclectic combination of polymer clay beads creates a playful, textured accessory perfect for sunny days.
Step-by-Step
Materials
- Polymer clay fruit slice beads (lemon, lime, grapefruit, kiwi, dragonfruit, strawberry)
- Round polymer clay beads (yellow, green, pink, red)
- Disc-shaped spacer beads (white, pink, light green)
- Gold-plated lobster clasp
- Gold-plated jump rings (4mm and 6mm)
- Beading wire (flexible nylon-coated, 0.38mm or 0.45mm)
- 2 Gold crimp beads (2mm)
- 2 Gold crimp bead covers (3mm)
- Chain nose pliers
- Flush cutters
- Crimping pliers
Step 1: Preparation and Design
-
Measure your wrist:
Wrap a measuring tape around your wrist to find your size, then add about 1 inch (2.5 cm) to account for the bulk of the larger clay beads. -
Cut the wire:
Cut a piece of beading wire approximately 10 inches long. It’s always better to have extra length to work with than to come up short. -
Sort your fruit:
Lay out all your fruit beads on a bead mat or soft cloth. Identify your ‘feature’ beads (the detailed slices like dragonfruit, kiwi, and strawberry) and your ‘filler’ beads (solid rounds and discs). -
Plan the pattern:
Arrange your beads in a line before stringing. The key to this ‘fruit salad’ look is organized chaos. Alternate between detailed fruit slices, solid round beads, and stacks of flat disc spacers to create rhythm.
Freshness Factor
Mix opaque and translucent clay beads (like the ‘jelly’ lime slice) to add depth and make the fruit look juicy and realistic.
Step 2: Stringing the Salad
-
Start the strand:
Thread one crimp bead onto one end of the wire, followed by a jump ring or the loop of your clasp. Loop the wire back through the crimp bead. -
Secure the first end:
Use your crimping pliers to flatten the crimp bead securely, locking the wire in place. Cover this crimp with a gold crimp cover for a polished finish. -
The anchor beads:
String a few smaller beads first—like the pink and white disc spacers—to hide the tail of your wire and transition smoothly from the delicate clasp to the chunky fruit beads. -
Add texture with stacks:
Begin your main pattern. Notice how the bracelet uses small stacks of 2-3 disc beads (white, pink, green) between the larger fruit pieces. Thread these on now. -
Insert the first fruit:
Slide on a yellow round bead followed by a larger fruit slice, perhaps a dragonfruit or lemon slice. The contrast in shape is what makes the design pop. -
Mix up the shapes:
Continue stringing, but avoid repeating the exact same sequence. Follow a fruit slice with a solid round bead, then a different fruit slice (like a kiwi), then a disc stack. -
Incorporate the strawberry:
When you reach the midway point, add a chunky strawberry bead or a red lotus-root style bead as a focal point to draw the eye. -
Check the fit:
Occasionally lift the wire and curve it around your wrist. The large beads take up inner circumference space, so ensure it isn’t becoming too tight. -
Finish the pattern:
Complete your design by mirroring the ‘anchor’ method you used at the start—finish with a few smaller disc spacers to taper the end near the clasp.
Stiff Bracelet Syndrome
If the bracelet feels rigid, you strung it too tight. Leave a tiny 1-2mm gap of slack wire before crimping the second end to allow the beads to roll.
Step 3: Final Assembly
-
Add the final crimp:
Thread a crimp bead onto the remaining tail of the wire, followed by a jump ring (which the clasp will hook onto). -
Loop back:
Pass the wire tail back through the crimp bead and through the first couple of beads on your strand. Pull the wire until the loop is small but has enough movement for the jump ring to wiggle. -
Crimp to close:
Use the crimping pliers to crush the crimp bead flat. Give it a gentle tug to ensure it is completely secure. -
Add the cover:
Place a crimp cover over the flattened crimp bead and gently squeeze it closed with your chain nose pliers until it looks like a round gold bead. -
Trim the excess:
Get your flush cutters as close as possible to the bead hole where your wire tail exits and snip off the excess wire cleanly.
Enjoy wearing your refreshing accessory that brings a sweet pop of color to any outfit
Monochrome Match-the-Fruit Strands
These delightful bracelets pair vibrant polymer clay fruit slices with matching cord and beads for a cohesive, stylish look. Whether you choose zesty citrus, sweet strawberry, or a kiwi-cherry mix, this project is perfect for adding a pop of summer color to your wrist.
Step-by-Step Tutorial
Materials
- Polymer clay fruit canes (lemon/lime, kiwi) or pre-made fruit beads
- Polymer clay (red, green) to sculpt custom shapes if not using canes
- Waxed cotton cord (bright yellow and red, approx. 1mm thick)
- Wooden or plastic round beads (yellow, bright red)
- Silver crimp beads or large-hole spacer beads (optional)
- Scissors
- Jewelry glue or clear nail polish
- Needle tool or toothpick (for piercing beads)
- Lighter (optional, for sealing cord ends)
Step 1: Preparation & Bead Selection
-
Choose your fruit theme:
Decide on your fruit combination first. For the lemon bracelet, you’ll need yellow cord and lime slices. For the strawberry, red cord and a focal strawberry bead. For the kiwi, use red cord with red beads and kiwi slices. -
Cut the cord:
Cut a length of your waxed cotton cord about 12-14 inches long. This generous length makes it easier to tie the adjustable knots later. -
Prepare the fruit beads:
If you are using polymer clay canes, slice them carefully into thick discs (about 4-5mm). Use a needle tool to create a hole horizontally through the center of the slices so they string flat.
Pro Tip
Make the holes in your clay fruit slices slightly larger than the cord. If the fit is too tight, the clay disc won’t lay flat against the wrist and might twist awkwardly.
Step 2: Creating the Lemon-Lime Bracelet
-
Start the knot:
On your yellow cord, tie a simple overhand knot about 4 inches from one end to act as a stopper for your beads. -
String the first accent bead:
Thread a single solid yellow round bead onto the cord and slide it down to the knot. -
Add the citrus slices:
String four of your lemon or lime slice beads. Ensure they are facing the same direction for a uniform look. -
Finish the bead row:
Add a second solid yellow round bead after the fruit slices to frame the design perfectly. -
Secure the beads:
Tie another tight overhand knot snugly against the last yellow bead to keep everything centered and secure on the wrist.
Level Up
Add tiny seed beads between the fruit slices as spacers. Golden glass seed beads add a touch of sparkle that mimics sunlight hitting fresh fruit.
Step 3: Creating the Strawberry Focal Bracelet
-
Center the cord:
Take your red cord and fold it in half to find the exact center, then unfold it. -
Thread the silver spacers:
Slide one large-hole silver spacer bead onto the cord. -
Add the strawberry:
Thread your large strawberry focal bead. If creating this from scratch, mold a red triangle of clay, add texture with a needle, and add a green clay ‘cap’ before baking and drilling. -
Complete the centerpiece:
Add a second silver spacer bead on the other side of the strawberry. -
Knot carefully:
Tie a knot on either side of this silver-strawberry-silver cluster to keep the focal point from sliding around.
Step 4: Creating the Kiwi-Cherry Mix
-
Establish the pattern:
This design alternates fruit and round beads. Start with your red cord and tie a stopper knot. -
Begin with red beads:
String a series of red round beads—roughly 8 to 10 depending on wrist size—to form one half of the bracelet. -
Add the kiwi accents:
string two polymer clay kiwi slices. I find placing them back-to-back or slightly spaced adds visual interest. -
Finish with more red:
String an equal number of red round beads on the other side of the kiwis, mirroring the first side. -
Secure the strand:
Tie a finishing knot at the end of the bead sequence to hold the pattern in place.
Step 5: Finishing Touches
-
Create the sliding closure:
Place the two tail ends of the cord parallel to each other, overlapping. -
Tie the square knots:
Use a short scrap piece of matching cord to tie 3-4 square knots (macramé style) around the overlapped main cords. This creates a sliding mechanism. -
Trim and seal:
Trim the excess from your sliding knot piece. Carefully dab a tiny drop of glue on the knot ends or briefly singe them with a lighter to prevent fraying. -
Final end knots:
Tie a small knot at the very tip of each tail end to prevent the slider from slipping off completely.
Once you’ve sealed your knots, your trio of fruity bracelets is ready to wear stacked or shared with friends
White Heishi “Fruit Pops” With Bold Spacers
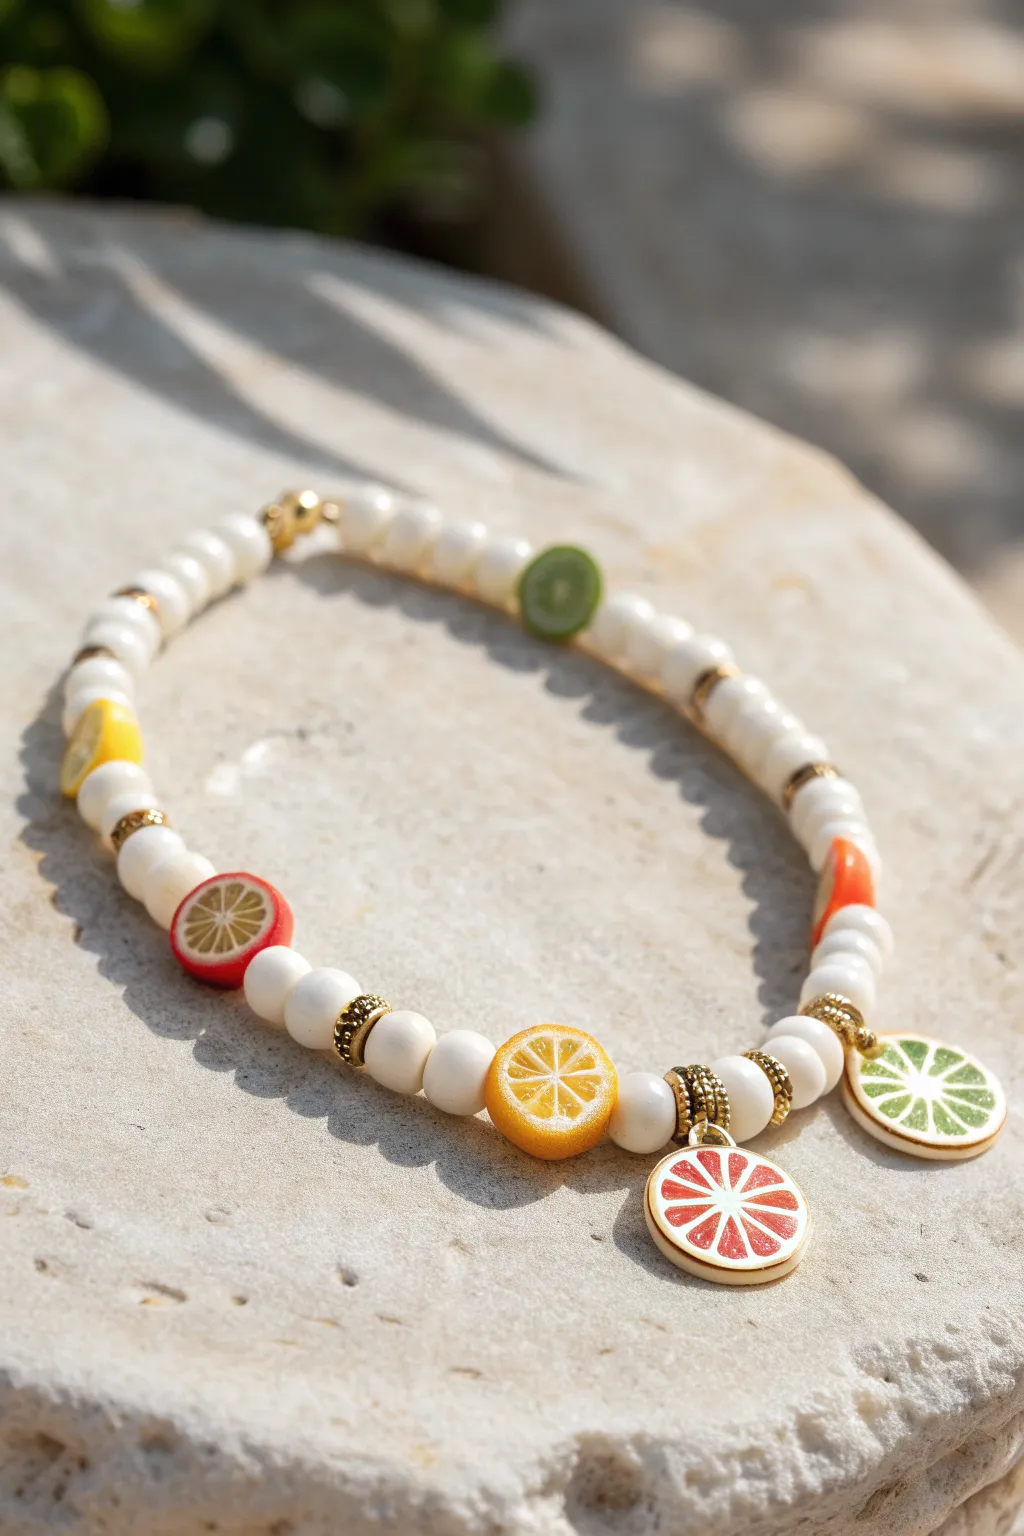
Embrace a fresh, summery vibe with this cheerful bracelet that combines creamy white heishi beads with vibrant polymer clay fruit slices. The addition of bold gold textured spacers and dangling enamel fruit charms elevates the design from playful to chic.
How-To Guide
Materials
- White heishi beads or 6mm white wooden/stone round beads
- Polymer clay fruit slice beads (lemon, lime/kiwi, orange, grapefruit, etc.)
- Gold textured rhondelle spacer beads (approx. 4-6mm)
- Gold enamel fruit slice charms (lemon/lime and orange/grapefruit)
- Gold jump rings (open, 4-6mm)
- Elastic beading cord (0.7mm or 0.8mm)
- Jewelry adhesive or clear nail polish
- Scissors
- Flat-nose pliers (optional, for jump rings)
- Bead stopper or tape
Step 1: Planning and Preparation
-
Measure your wrist:
Cut a piece of elastic cord about 10-12 inches long to give yourself plenty of room to work. An effortless fit is key, so measure slightly larger than your actual wrist size. -
Secure the end:
Attach a bead stopper or a piece of tape to one end of the cord to prevent your beads from sliding off while you design. -
Pre-stretch the cord:
I always give the elastic a few gentle tugs before I start beading; this pre-stretching helps prevent the bracelet from sagging later on. -
Sort your fruity mix:
Lay out your polymer clay fruit slices and gold spacers. Decide on a pattern—alternating colors like yellow lemon, red grapefruit, and green kiwi keeps the look dynamic.
Knot Security
When tightening the final knot, pull all four strands (the two tail ends and the two bracelet loop sides) simultaneously to lock the knot firmly in place.
Step 2: Creating the Beaded Pattern
-
Start with white beads:
String about 4 to 5 white heishi (or round) beads onto the cord to begin the base. -
Add the first spacer section:
Slide on a gold textured rhondelle spacer bead. These spacers add a lovely metallic contrast to the matte white beads. -
Insert a polymer fruit slice:
Thread a polymer clay fruit bead (like a lemon slice) next to the gold spacer. -
Close the fruit section:
Follow the fruit slice immediately with another gold spacer, framing the colorful bead perfectly. -
Build the white sections:
Add a longer section of white beads, approximately 8 to 10 beads, to create visual breathing room between the colorful accents. -
Continue the pattern:
Repeat the sequence: gold spacer, fruit slice, gold spacer, followed by a section of white beads. Rotate through your different fruit types as you go. -
Prepare the focal point:
Once you have completed about two-thirds of the bracelet, pause to add the hanging charms section.
Step 3: Attaching Charms and Finishing
-
Attach charms to jump rings:
Using your fingers or flat-nose pliers, carefully open two gold jump rings. Slide an enamel fruit charm onto each ring. -
Integrate the charms:
Instead of stringing a clay slice, slide a gold spacer onto the main cord, followed by the jump ring holding the charm, and then another gold spacer. -
Space out the charms:
Add just 2 or 3 white beads between the charm sections so they hang close together but don’t tangle. -
Check the fit:
Wrap the strand around your wrist to check the size. Add or remove white beads at the ends until the ends meet comfortably without gaps. -
Tie the knot:
Remove the bead stopper and tie a strong surgeon’s knot (right over left, left over right) or a triple square knot. Pull tight to secure. -
Secure the knot:
Apply a tiny dab of jewelry glue or clear nail polish to the knot to prevent it from slipping. -
Hide the knot:
Trim the excess cord ends closely. If the hole size permits, gently tug the knot inside one of the adjacent white beads to hide it.
Summer Stack
Create a matching set by making two more bracelets: one utilizing only the white heishi beads and gold spacers, and another using entirely fruit slices.
Enjoy wearing your vibrant fruit bracelet as a sweet accessory for any warm-weather outfit
Name Beads Plus Tiny Fruit Slices
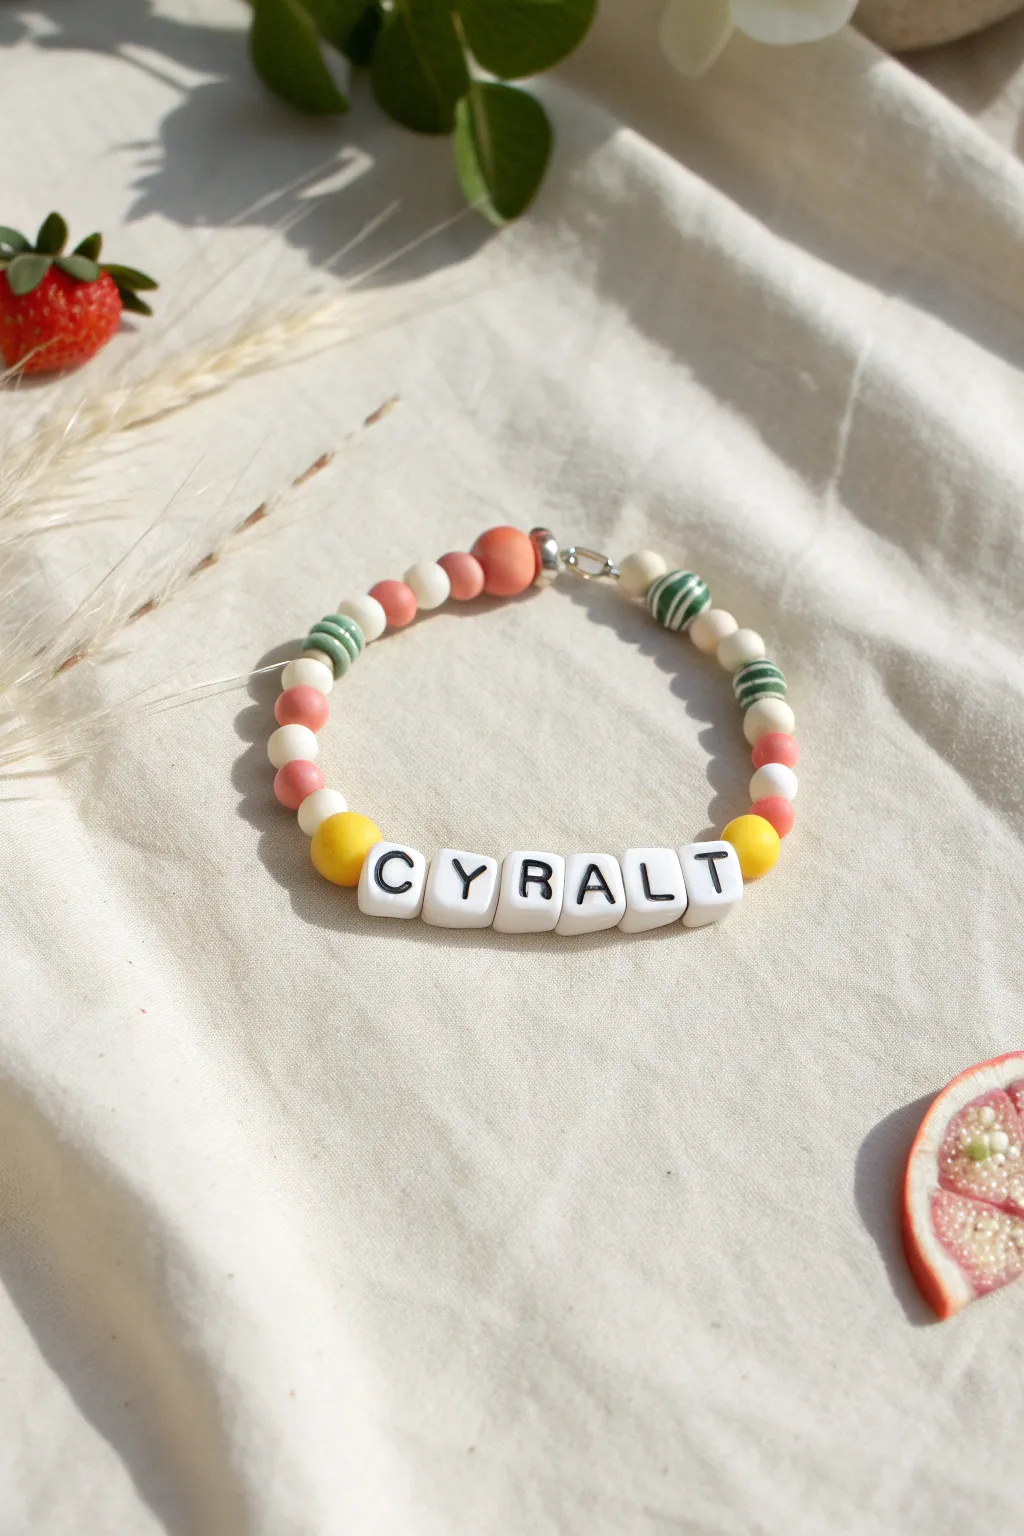
Celebrate summer vibes with this personalized bracelet featuring a mix of matte finish beads in coral, cream, and green tones. The playful letter beads make it unique, while the simple pattern keeps the aesthetic fresh and modern, perfect for stacking or wearing alone.
Detailed Instructions
Materials
- Elastic beading cord (0.8mm clear)
- White square letter beads (spelling your chosen name or word)
- 8mm matte round acrylic or clay beads (Coral/Salmon color)
- 8mm matte round acrylic or clay beads (Cream/Off-white color)
- 10mm matte round beads (Yellow)
- Striped polymer clay beads (Green and white)
- Small silver crimp bead cover
- Silver knot cover or bead tip (clam shell style)
- Scissors
- Super glue or jewelry cement
- Beading needle (optional but helpful)
Step 1: Planning and Preparation
-
Measure your wrist:
Before cutting any cord, wrap a measuring tape around your wrist to determine the desired length. Add about 1 inch to this measurement to ensure a comfortable fit that isn’t too tight. -
Cut the cord:
Cut a piece of elastic cord about 10-12 inches long. This extra length will make it much easier to tie the final knot securely without fumbling. -
Arrange your name:
Select the letter beads for your chosen word or name. Lay them out on a bead board or soft cloth so they are ready to string in the correct order. -
Pre-stretch the elastic:
Gently pull on the length of elastic cord a few times. This helps prevent the bracelet from stretching out permanently after you’ve worn it a few times.
Loosey Goosey?
If your knot slips, try a surgeon’s knot instead. Loop the cord through twice on the first pass before pulling tight for extra grip on slippy elastic.
Step 2: Stringing the Design
-
Start with the focal point:
Thread your letter beads onto the center of the cord first. For this design, I strung ‘C-Y-R-A-L-T’, but you will string your custom name. -
Add the yellow accents:
Place one large yellow matte bead on each side of your letter block. These act as bright bookends that frame the name beautifully. -
Begin the side pattern:
On the left side of the yellow bead, thread a pattern of: one coral bead, one cream bead, one coral bead, and one cream bead. -
Repeat on the right:
Repeat the exact same sequence on the right side to keep the design symmetrical: coral, cream, coral, cream. -
Insert texture beads:
Add a green and white striped bead to both ends of the strand. This introduces a fun texture change that breaks up the solid colors. -
Continue the pattern:
Continue adding beads to both sides, alternating between cream and coral beads. You can deviate slightly here for a more organic look, perhaps doing two creams or a larger coral bead. -
Check fit periodically:
Wrap the unfinished strand around your wrist occasionally. Stop adding beads when the bracelet ends almost touch, leaving just a tiny gap for the knot.
Step 3: Finishing Touches
-
Tie the knot:
Bring both ends of the elastic together. Tie a standard square knot (right over left, left over right) and pull it tight. The elastic should stretch slightly as you secure it. -
Secure with glue:
Apply a tiny drop of super glue or jewelry cement directly onto the knot. Be careful not to get glue on the surrounding beads. -
Hide the knot:
Once the glue is tacky but not fully hard, slide a silver crimp cover or a larger bead (like the silver bead shown at the back) over the knot to conceal it. -
Trim excess cord:
Use sharp scissors to trim the tails of the elastic cord close to the knot or bead cover. Be careful not to nick the main structural knot. -
Final inspection:
Give the bracelet a gentle tug to ensure everything is secure and the beads are sitting correctly next to the knot cover.
Pattern Harmony
To get the look in the photo, use matte or ‘frosted’ finish beads rather than glossy ones. The soft texture makes the colors look more muted and high-end.
Slip on your new custom accessory and enjoy the personalized pop of color on your wrist
Half-and-Half Citrus Color Block Bracelet
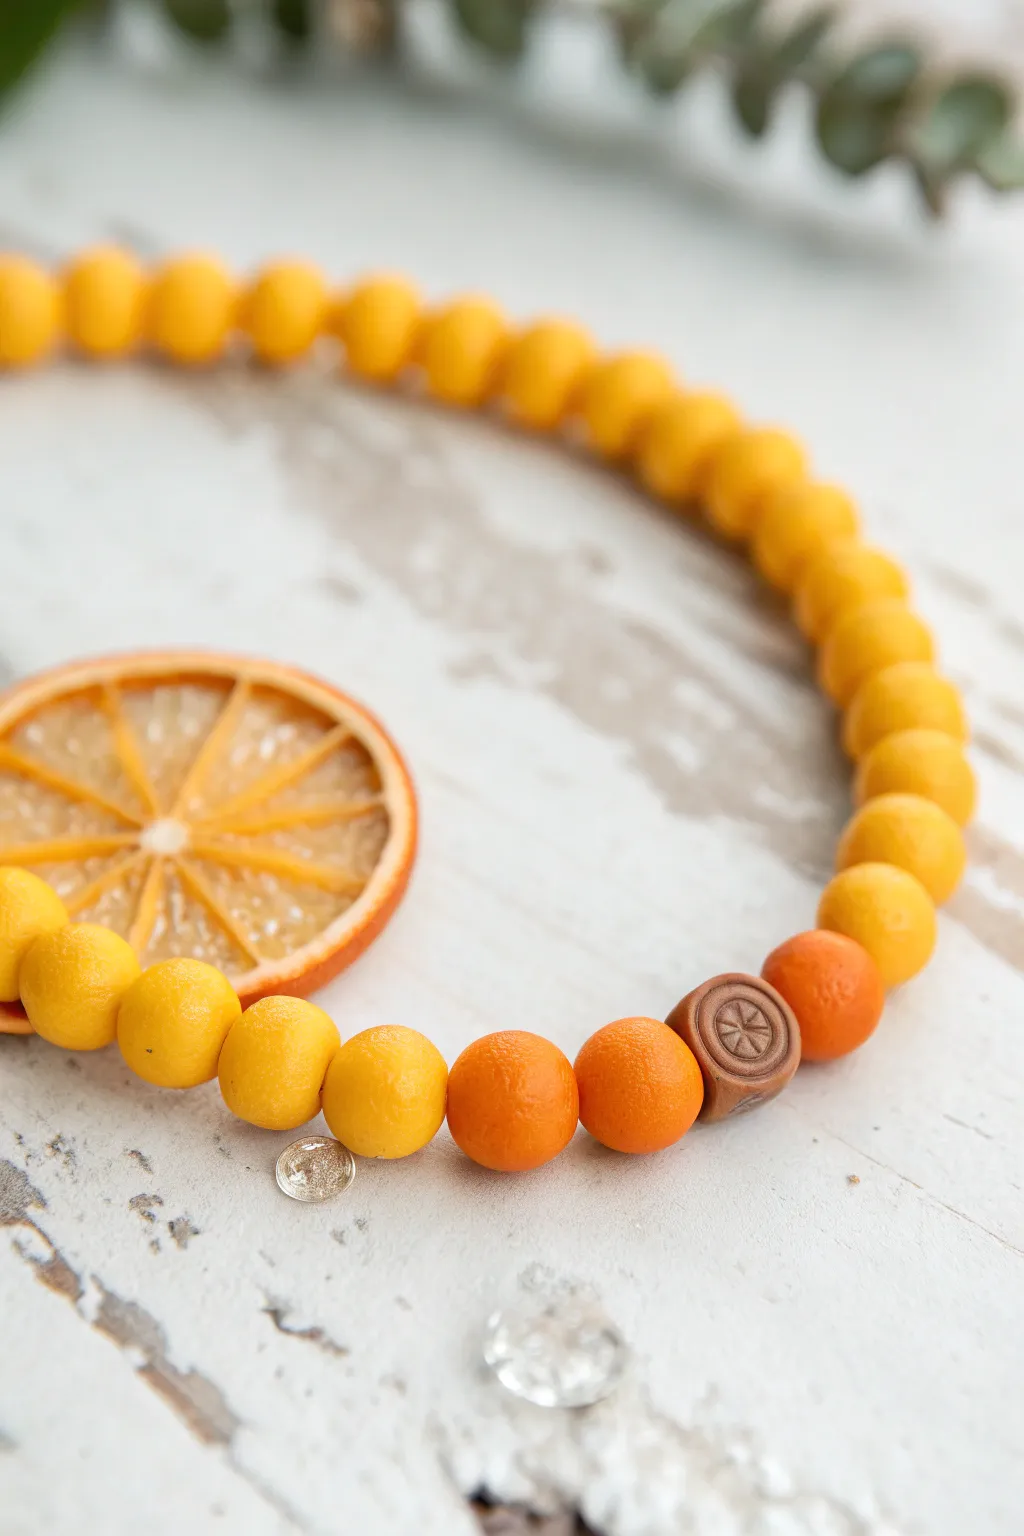
Capture the essence of summer with this vibrant polymer clay bracelet that mimics the texture of fresh citrus peel. The design features a bold contrast between sunny lemon yellow and juicy orange, accented by a unique handmade citrus slice bead.
Step-by-Step
Materials
- Polymer clay (lemon yellow, tangerine orange, chocolate brown)
- Bead piercing pins or toothpicks
- Elastic beading cord (0.8mm)
- Cutter blade or craft knife
- Texture sponge or sandpaper (for peel effect)
- Small needle tool
- Oven for baking
- Gloss varnish (optional)
- Super glue (optional for knot)
Step 1: Creating the Citrus Beads
-
Condition the yellow clay:
Start by warming the lemon yellow polymer clay in your hands until it is soft and malleable. Roll it into a long, even log snake. -
Section the clay:
Using your cutter blade, slice the yellow log into roughly equal segments. For a standard bracelet, you’ll need about 20-30 segments depending on your wrist size. -
Form the spheres:
Roll each yellow segment between your palms to create perfectly round spheres. Aim for a diameter similar to a large pea or small marble. -
Texture the surface:
To mimic the look of citrus rind, gently roll the surface of each bead over a piece of coarse sandpaper or dab it with a texture sponge. This slight pitting adds crucial realism. -
Condition the orange clay:
Repeat the conditioning process with your tangerine orange clay. You will need fewer of these, perhaps only 5-8 beads, to act as the accent color block. -
Shape and texture orange beads:
Roll the orange clay into spheres matching the size of your yellow beads and apply the same citrus-skin texture. -
Pierce the beads:
Carefully insert a bead piercing pin or toothpick through the center of each bead. Rotate the pin as you push to avoid squishing the shape.
Uneven Bead Sizes?
Use a small circle cutter to punch out identical amounts of clay from a flat sheet before rolling. This guarantees every bead has exactly the same volume.
Step 2: Crafting the Feature Bead
-
Prepare the brown base:
Take a small amount of chocolate brown clay and form a slightly flattened, cylindrical bead, roughly the same diameter as your fruit spheres. -
Carve the citrus detail:
Using a needle tool, gently impress a circle into the flat face of the brown bead. Then, press lines radiating from the center to the edge of the circle to create wheel-like segments, mimicking a dried orange slice. -
Add texture:
Lightly stipple the inside of the segments with your needle tool for extra detail, giving it an organic, dried look. -
Create the bead hole:
Pierce this feature bead horizontally through the side so the citrus design faces outward when strung.
Step 3: Baking and Assembly
-
Bake the beads:
Arrange all your beads on a baking sheet or parchment paper. Follow the temperature and timing instructions on your specific brand of polymer clay packaging. -
Cool down:
Once baked, I like to let them cool completely inside the oven with the door slightly ajar to prevent any thermal shock cracking. -
Optional varnishing:
If you prefer a juicy, wet look, brush a thin layer of gloss varnish over the beads. For a matte, natural rind look, you can skip this step. -
Begin stringing:
Cut a length of elastic cord about 10 inches long. Start by threading your brown feature bead onto the cord. -
Add the accent color:
Thread 2-3 orange beads on one side of the feature bead, and 1-2 on the other side. This creates the ‘color block’ transition. -
Complete the strand:
Fill the rest of the cord with your yellow lemon beads until the bracelet reaches your desired length. -
Tie the knot:
Tie a secure surgeon’s knot with the elastic ends. Pull it tight, snip the excess cord, and optionally dab a tiny drop of super glue on the knot for security.
Scented Jewelry
Mix a drop of citrus essential oil into the clay before baking, or rub oil onto the finished (unvarnished) baked beads for a scratch-and-sniff accessory.
Enjoy wearing your fresh squeeze of citrus style all year round
3D Fruit Charm Centerpiece Bracelet
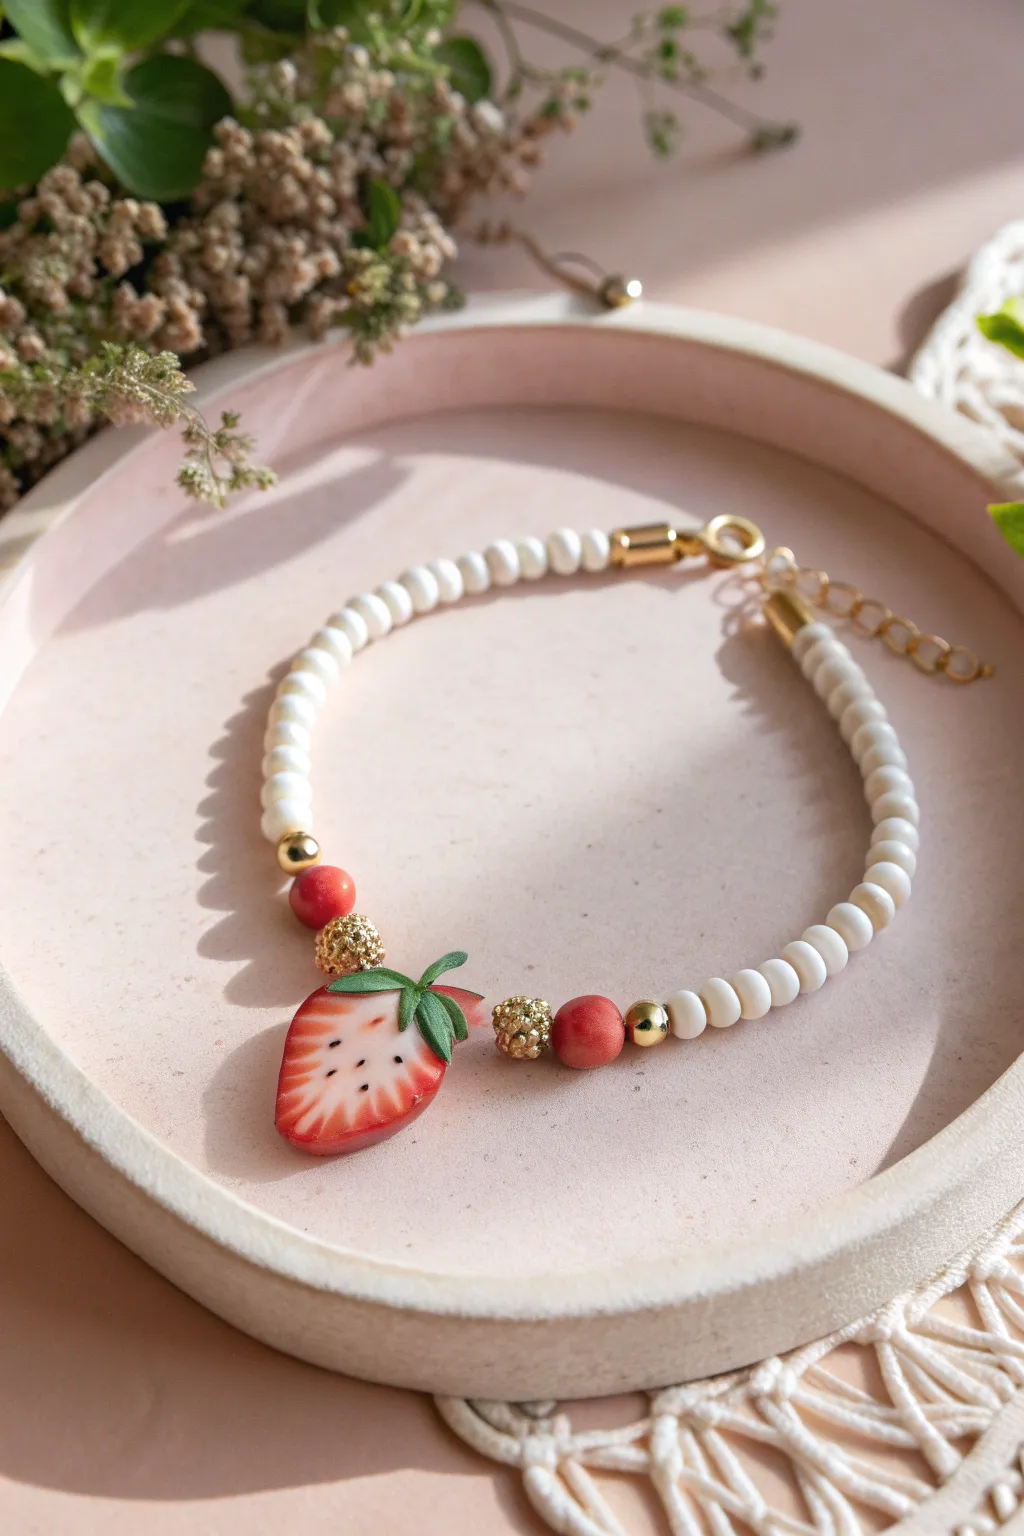
This charming bracelet features a realistic, half-slice strawberry pendant flanked by gold accents and soft white beads. It’s the perfect balance of playful fruit motifs and elegant jewelry design.
Step-by-Step Tutorial
Materials
- Polymer clay (translucent white, red, green)
- Small black seed beads or black acrylic paint
- Gold ball spacer beads (approx. 4mm)
- Gold stardust or textured round beads (approx. 6mm)
- Red wooden or matte acrylic round beads (approx. 6mm)
- White shell heishi beads or cylindrical white beads
- Beading wire or strong elastic cord
- Gold crimp beads and covers (if using wire)
- Gold lobster clasp and extender chain
- Headpin or eye pin
- Jewelry pliers (round nose, flat nose, cutters)
- Gloss varnish or resin (optional)
Step 1: Sculpting the Strawberry Charm
-
Mix the clay base:
Start by mixing a small amount of translucent white polymer clay with a tiny speck of red. You want a pale, fleshy pink color for the center of the strawberry, not a solid white. -
Shape the core:
Form this pale pink mixture into a teardrop shape that has been slightly flattened, resembling the cross-section of a strawberry. -
Add the red exterior:
Roll out a thin sheet of red polymer clay. Carefully wrap this around the curved edges of your teardrop shape to create the strawberry’s skin, leaving the flat face open. -
Texture the center:
Using a needle tool, gently drag lines from the center of the white core outwards toward the red skin to mimic the fibrous texture of real fruit. -
Insert the seeds:
Press tiny black seed beads into the clay near the red border, or use a needle tool to make small divots that you can paint black after baking. -
Create the leafy top:
Fashion tiny leaves from green clay. Attach these to the wider, top end of your strawberry slice, letting them drape naturally over the top edge. -
Add the attachment point:
Carefully insert a headpin or eye pin vertically through the center of the strawberry, entering between the leaves and exiting at the bottom tip (or halfway down if preferred). If inserting horizontally near the top allows for better hanging, do that instead. -
Bake the charm:
Bake the strawberry according to your polymer clay package instructions. I typically bake at a slightly lower temperature for longer to prevent scorching the white parts. -
Varnish for shine:
Once cooled, apply a coat of gloss varnish or UV resin to the cut face of the strawberry to give it a juicy, wet look.
Juicy Realism
For ultra-realism, mix translucent liquid clay with red chalk pastel and paint it over the fruit face before baking.
Step 2: Assembling the Bracelet
-
Prepare the wire:
Cut a length of beading wire about 9 inches long. Secure one end with a crimp bead and attach one half of your clasp or a jump ring. -
String the first section:
Thread on your white shell heishi beads until you have covered about 2.5 to 3 inches of the wire. -
Add the gold accent:
Slide on a smooth gold spacer bead to mark the transition to the centerpiece. -
Add color and texture:
Thread on a red round bead, followed by a textured gold ‘stardust’ bead. This creates a rich frame for the fruit charm. -
Attach the strawberry:
Thread the wire through the loop of your strawberry charm’s eye pin. The charm should hang freely in the center. -
Mirror the pattern:
On the other side of the strawberry, add another textured gold bead, then a red round bead, and finish the centerpiece cluster with a smooth gold spacer bead. -
Finish the beading:
Complete the bracelet by stringing white shell beads on the remaining side to match the length of the first side. -
Secure the end:
Add a crimp bead and the other half of your clasp or extender chain. Loop the wire back through the crimp bead and pull tight. -
Final touches:
Flatten the crimp bead with your pliers to secure the design. Trim any excess wire and cover the crimp with a crimp cover for a professional finish.
Make it a Set
Make two smaller versions of the strawberry charm and attach them to ear wires for matching earrings.
Now you have a refreshing accessory that adds a sweet touch to any outfit
“Jelly” Transparent Beads With Fruit Slices
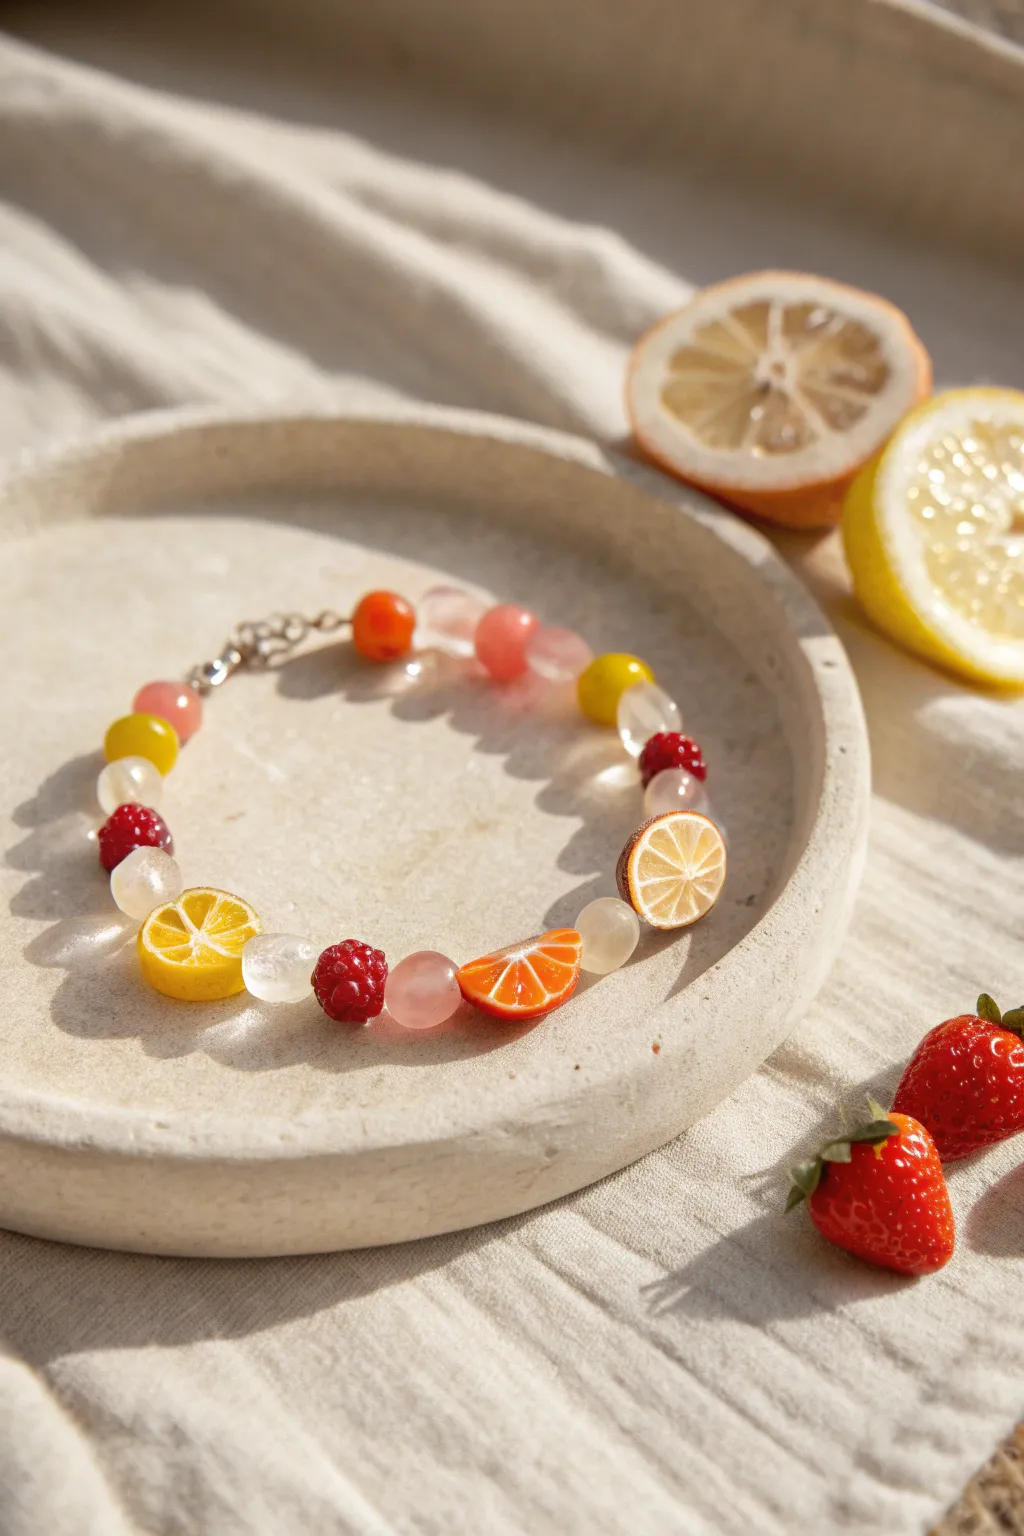
Capture the refreshing essence of a summer fruit salad with this delightful bracelet project. By mixing realistic polymer clay fruit slices with semi-transparent frosted beads, you create a juicy, jelly-like texture that looks good enough to eat.
How-To Guide
Materials
- Polymer clay fruit beads (lemon slices, orange slices, grapefruit slices, raspberries)
- 8mm or 10mm frosted glass or quartz round beads (white/clear)
- 8mm round glass beads (yellow, pink, orange)
- Strong elastic beading cord (0.8mm recommended)
- Jewelry adhesive (e.g., E6000 or G-S Hypo Cement)
- Scissors or jewelry snips
- Bead stopper or tape
- Optional: Crimp beads and crimp covers (if not tying a knot)
- Optional: Jump rings and clasp (if not making a stretch bracelet)
Step 1: Planning the Pattern
-
Sort your fruity mix:
Begin by laying out your polymer clay fruit beads. You’ll want a variety: lemon slices, mandarin wedges, and textured raspberries are key to this look. -
Select the jelly filler:
Choose semi-transparent, frosted white round beads to act as the ‘jelly’ component. These should be slightly cloudy to mimic the look of fruit suspended in gelatin. -
Arrange the color palette:
On a bead board or soft cloth, lay out a sequence. Aim for an alternating pattern where fruit beads are separated by one or two round jelly beads. -
Balance the visuals:
Intersperse the plain white jelly beads with occasional colored glass beads—think soft pinks, sunny yellows, or coral—to echo the colors of the fruit slices without overwhelming them.
Sticky Situation?
If the polymer fruit beads have holes that are clogged with residue, use a T-pin or a heated needle to gently clear the path before stringing.
Step 2: Stringing the Beads
-
Prepare the cord:
Cut a length of elastic cord about 10-12 inches long. This gives you plenty of extra room for tying knots later. Pre-stretch the cord by pulling it gently a few times to prevent sagging later. -
Secure the end:
Attach a bead stopper to one end of the cord, or simply tape it down to your table so your beads don’t slide off while you work. -
Start with a round bead:
Thread a round frosted bead first. I find starting with a round bead makes hiding the final knot much easier than starting with a flat fruit slice. -
Add a citrus slice:
Thread on a lemon or orange slice. Note that these beads act as spacers but also have a directional orientation, so ensure the slice is facing the way you want it to sit. -
Create a jelly section:
Add two distinct round beads next. For example, use one clear frosted bead followed by a translucent pink bead to create a gradient effect. -
Insert a berry accent:
Thread on a textured raspberry bead. These often have slightly larger holes, so ensure it sits snugly against the round beads. -
Continue the pattern:
Repeat your planned sequence—fruit, jelly bead, colored accent bead—until the bracelet reaches your desired length (usually around 6.5 to 7 inches for an average wrist). -
Check the fit:
Wrap the strung beads around your wrist to check the sizing. Remember that the chunky fruit beads take up a bit more inner circumference, so you might need it slightly looser than a plain bead bracelet.
Add Some Sparkle
Incorporate tiny 3mm gold or silver spacer beads on either side of the fruit clices. This frames the fruit and adds a polished, high-end jewelry finish.
Step 3: Finishing Touches
-
Prepare to knot:
Remove the bead stopper carefully, holding both ends of the elastic firmly. -
Tie the first knot:
Tie a simple overhand knot and pull it tight, bringing the beads together so there are no gaps. -
Secure with a surgeon’s knot:
Tie a surgeon’s knot (looping the cord through twice before pulling tight) on top of the first knot. This prevents slipping. -
Apply adhesive:
Dab a tiny drop of jewelry glue onto the knot. Be careful not to get glue on the fruit beads, as it can ruin the finish. -
Hide the knot:
While the glue is still slightly tacky, gently tug on the cord to pull the knot inside the hole of the nearest round bead. -
Trim the excess:
Once dry, use sharp scissors to trim the excess cord as close to the bead as possible without cutting the knot.
Slip on your new fruity accessory and enjoy the fresh pop of color it brings to your outfit
Seasonal Market Mix: Berry to Citrus Gradient
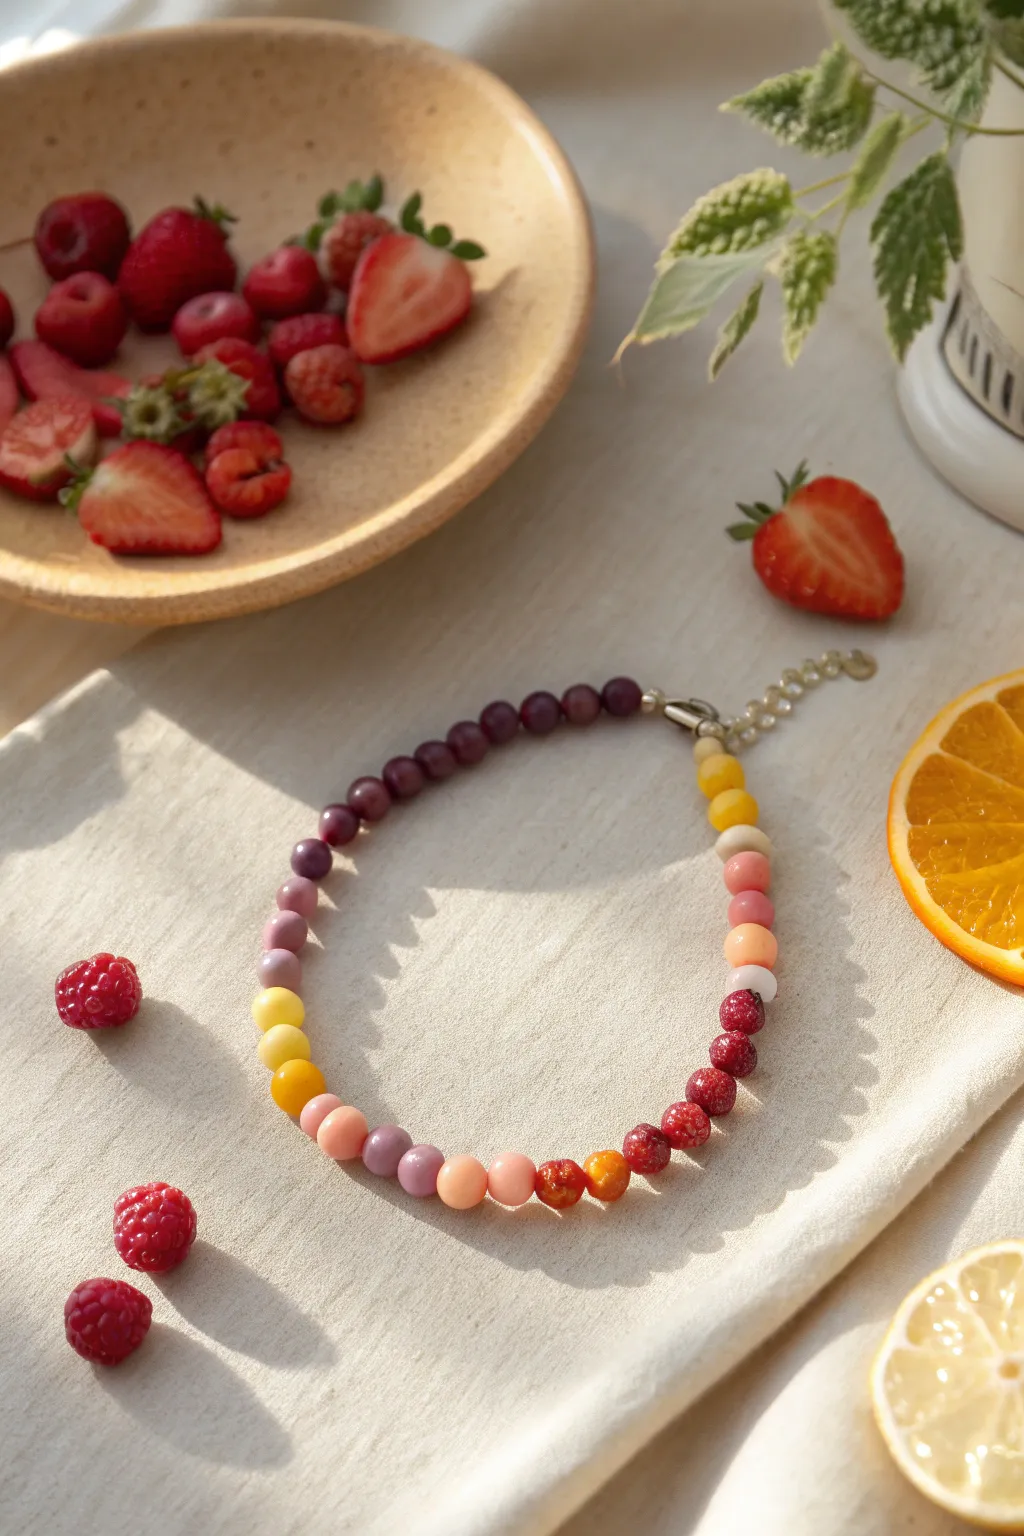
Capture the transition from deep summer fruits to bright citrus zest with this playful beaded bracelet. This project combines smooth matte beads with textured, berry-like accents to create a stunning, wearable spectrum of color.
Detailed Instructions
Materials
- Polymer clay (plum, lavender, yellow, coral pink, crimson)
- Texturing tool (needle tool, toothpick, or crumpled foil)
- Beading wire or elastic cord (0.8mm recommended)
- Wire cutters
- Crimp beads (if using wire)
- Lobster clasp and jump rings
- Extension chain
- Flat nose pliers
- Baking sheet and parchment paper
- Gloss glaze (optional for the berry beads)
Step 1: Sculpting the Clay Beads
-
Prepare your color palette:
Begin by conditioning your polymer clay blocks. You will need a distinct gradient: deep plum, muted lavender, bright sunshine yellow, soft tangerine orange, pastel pink, and rich berry red. Mix shades if necessary to get soft, matte intermediate tones. -
Roll the smooth beads:
Pinch off small, equal-sized pieces of clay roughly the size of a pea (about 6-8mm). Roll them between your palms to create perfectly smooth spheres. You’ll need about 10-12 deep plum, 2-3 lavender, 3 yellow, 2 orange, and 3-4 pink beads. -
Create the signature berry beads:
For the berry section, roll about 5-6 spheres using the crimson and deep red clay. These should be slightly irregular to look organic. -
Texture the berries:
Using a needle tool or a dull toothpick, gently poke small indentations all over the surface of your red spheres. Don’t smooth them out; the roughness mimics the drupelets of a raspberry or strawberry. I like to vary the depth of the pokes for realism. -
Pierce the beads:
Carefully pierce a hole through the center of every bead using your needle tool. Rotate the bead as you push the needle through to prevent deformation. Ensure the hole is wide enough for your selected cord.
Sticky Texturing?
If the needle tool sticks to the clay while making berry textures, dip the tip in water or cornstarch before poking. This keeps the detailed ‘drupelets’ clean and sharp.
Step 2: Baking and Finishing
-
Bake the beads:
Arrange all your beads on a parchment-lined baking sheet. Bake according to your polymer clay package instructions (usually 275°F/130°C for 15-30 minutes). Let them cool completely before handling. -
Glazing option:
If you want your berry beads to look juicy, apply a thin coat of gloss glaze just to the textured red beads. Leave the other colored gradient beads matte for a nice textural contrast.
Step 3: Assembly
-
Lay out the design:
Before stringing, lay your beads on a detailed board or cloth. Arrange them in the gradient shown: Deep Plum → Lavender → Pale Yellow → Bright Yellow → Orange → Pink → Textured Red Berries. -
Cut the cord:
Cut a length of beading wire or elastic about 9-10 inches long to allow plenty of room for finishing knots or crimps. -
Attach the first clasp component:
If using beading wire, thread a crimp bead and one end of the clasp (or a jump ring) onto the wire. Loop the wire back through the crimp bead and flatten it securely with your pliers. -
String the gradient:
Thread your beads following your layout. Start with the dark plum section, transition through the pastels, and finish with the vibrant textured berries. -
Check the length:
Wrap the strand around your wrist to verify fit. Add or remove plum beads at the back if adjustment is needed, keeping the focal gradient intact. -
Close the loop:
Thread a crimp bead and the extension chain or jump ring onto the end. Feed the wire back through the crimp bead and the last few beads on the strand. -
Secure the crimp:
Use your flat nose pliers to crush the crimp bead firmly. Trim any excess wire tails close to the beads so they don’t poke the wearer. -
Final touches:
Attach the lobster clasp to the jump ring if you haven’t already. Give the bracelet a gentle tug to ensure all connections are secure.
Level Up: Scented Style
Mix a tiny drop of fruit-scented essential oil into the clay before baking (check compatibility first) or add a rough lava stone bead in the stack to hold perfume.
Enjoy wearing your vibrant slice of fruit-inspired jewelry all season long