Whenever I need a mood boost in the studio, I reach for clay and make something small, cute, and ridiculously satisfying. These fun clay ideas are all about easy shapes, bold color, and little details that give your pieces instant personality.
Smiley Pinch Pot Trinket Dishes
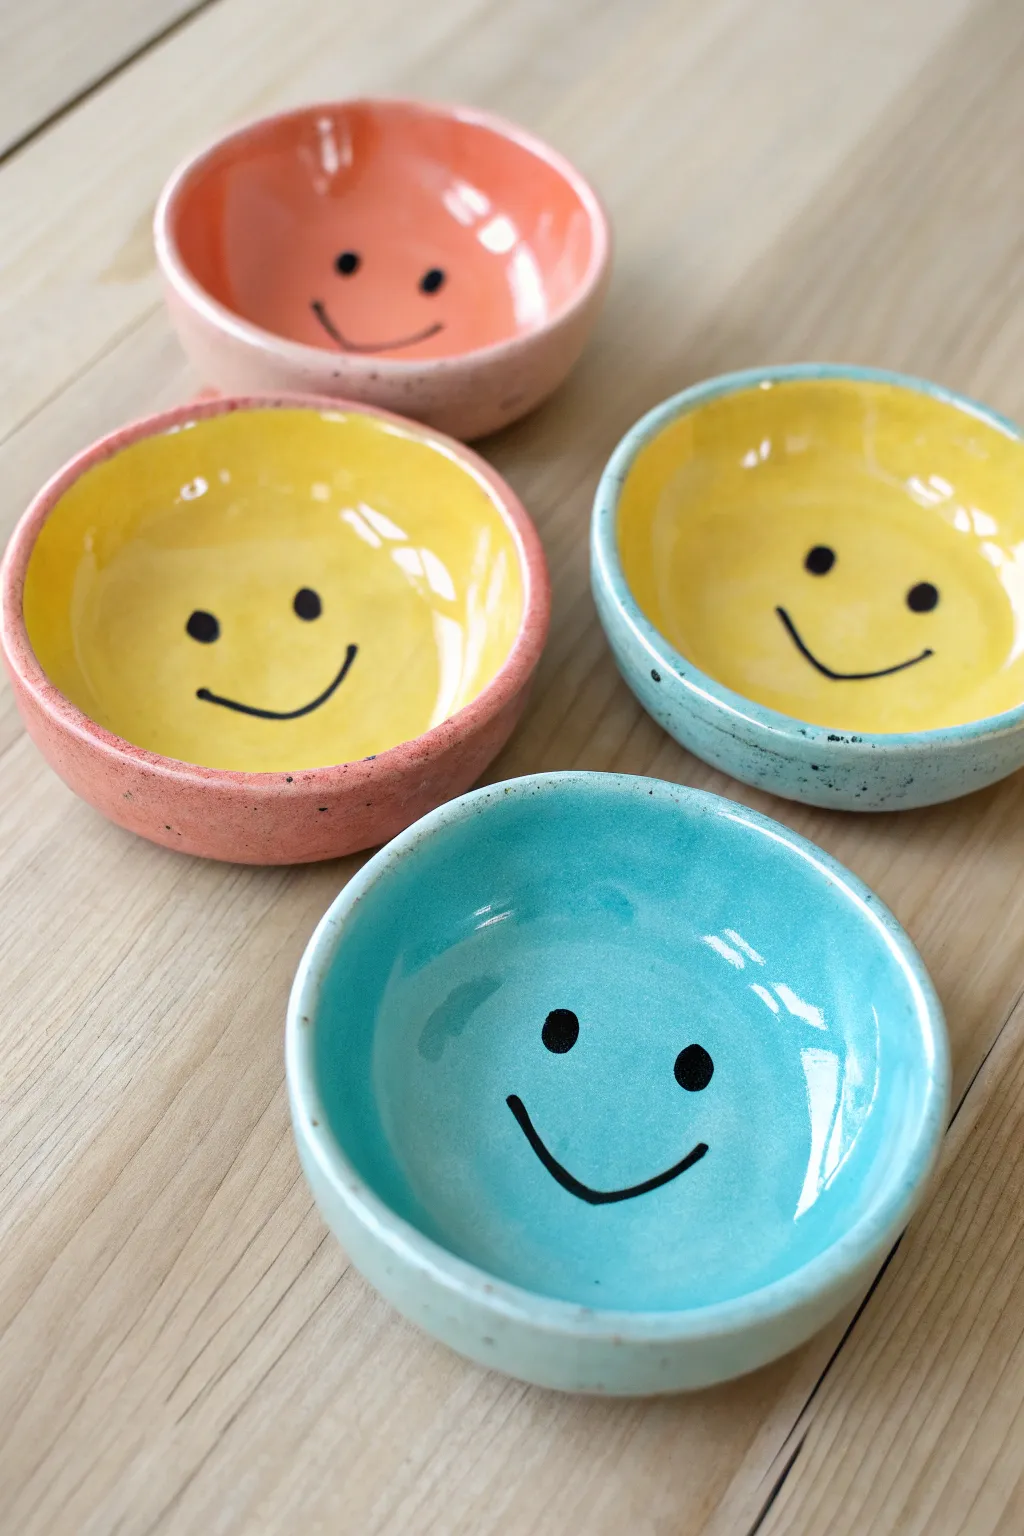
Brighten up your desk or vanity with these cheerful ceramic pinch pots featuring hand-painted smiley faces. The glossy glaze finishes and contrasting interior colors give these simple forms a polished, modern look perfect for holding rings or coins.
Step-by-Step Tutorial
Materials
- Air-dry clay or kiln-fire clay (white works best)
- Small bowl of water
- Sponge
- Clay carving tools or a pin tool
- Fine-grit sandpaper
- Ceramic underglazes or acrylic paints (if using air-dry clay)
- Colors needed: Yellow, Turquoise, Coral/Pink, Black
- Clear gloss glaze or sealant
- Small round paintbrush
- Fine-tip detail brush
- Rolling pin (optional)
Step 1: Forming the Bowl
-
Prepare your clay:
Start with a ball of clay roughly the size of a golf ball or slightly larger depending on your desired dish size. Knead it briefly to ensure it is smooth and free of air bubbles. -
Start the pinch method:
Hold the clay ball in one hand and push your thumb into the center, stopping about a half-inch from the bottom. This initial indentation sets the depth of your bowl. -
Shape the walls:
Gently pinch the clay between your thumb and fingers, rotating the ball as you go. Work your way from the bottom up to the rim, aiming for an even thickness of about 1/4 inch all around. -
Refine the rim:
If the rim becomes uneven or cracks, dip your finger in a tiny bit of water and smooth it out. Gently tap the rim upside down on a flat surface to level it if you prefer a flat top edge. -
Smooth the surface:
Using a slightly damp sponge, wipe down the interior and exterior of the bowl to remove fingerprints and create a silky smooth canvas for your painting later. -
Dry the clay:
Set your pots aside to dry completely. For air-dry clay, this usually takes 24-48 hours. If you are using kiln clay, follow your specific firing schedule for bisque firing now.
Step 2: Painting & Glazing
-
Sand imperfections:
Once dry (or bisque fired), check for any rough spots. Lightly sand the rim or exterior with fine-grit sandpaper to ensure a professional finish, then wipe away the dust. -
Apply interior base color:
Select a bright color for the inside of the bowl, like sunshine yellow or coral orange. Using a soft round brush, apply 2-3 coats to get solid coverage, letting each coat dry briefly in between. -
Apply exterior color:
Paint the outside of the bowl a contrasting color. For the yellow interior bowl, try a soft pink or speckled blue exterior. Be careful near the rim to keep a clean line where the two colors meet. -
Paint the face details:
Using a very fine detail brush and black paint (or underglaze), carefully paint two small ovals for eyes and a simple U-shape for the smile in the center of the bowl’s interior. -
Let the paint set:
Allow your painted designs to dry completely. If you are using underglazes, this ensures they won’t smear during the glazing step. -
Add the speckled effect:
I like to create that trendy speckled pottery look by flicking a toothbrush loaded with slightly watered-down black or brown paint over the exterior. Test on a paper towel first to control the splatter size. -
Apply clear glaze:
Once all paint is dry, apply a coat of clear gloss glaze over the entire piece. This protects the paint and gives it that shiny, finished ceramic look. -
Final drying or firing:
If using air-dry clay, let the sealant cure for the time recommended on the bottle. If using ceramic clay, place the piece in the kiln for the final glaze firing.
Smooth Operator
To get perfectly round eyes without a brush, dip the non-brush end (the handle) of your paintbrush into black paint and stamp it onto the clay.
Function First
Make these food-safe by using appropriate kiln-fire clay and food-safe glazes, turning them into perfect little sauce dishes for dipping.
Now you have a set of delightful little dishes ready to hold your treasures and smile back at you every day


Tiny Miniature Food Charms With Faces
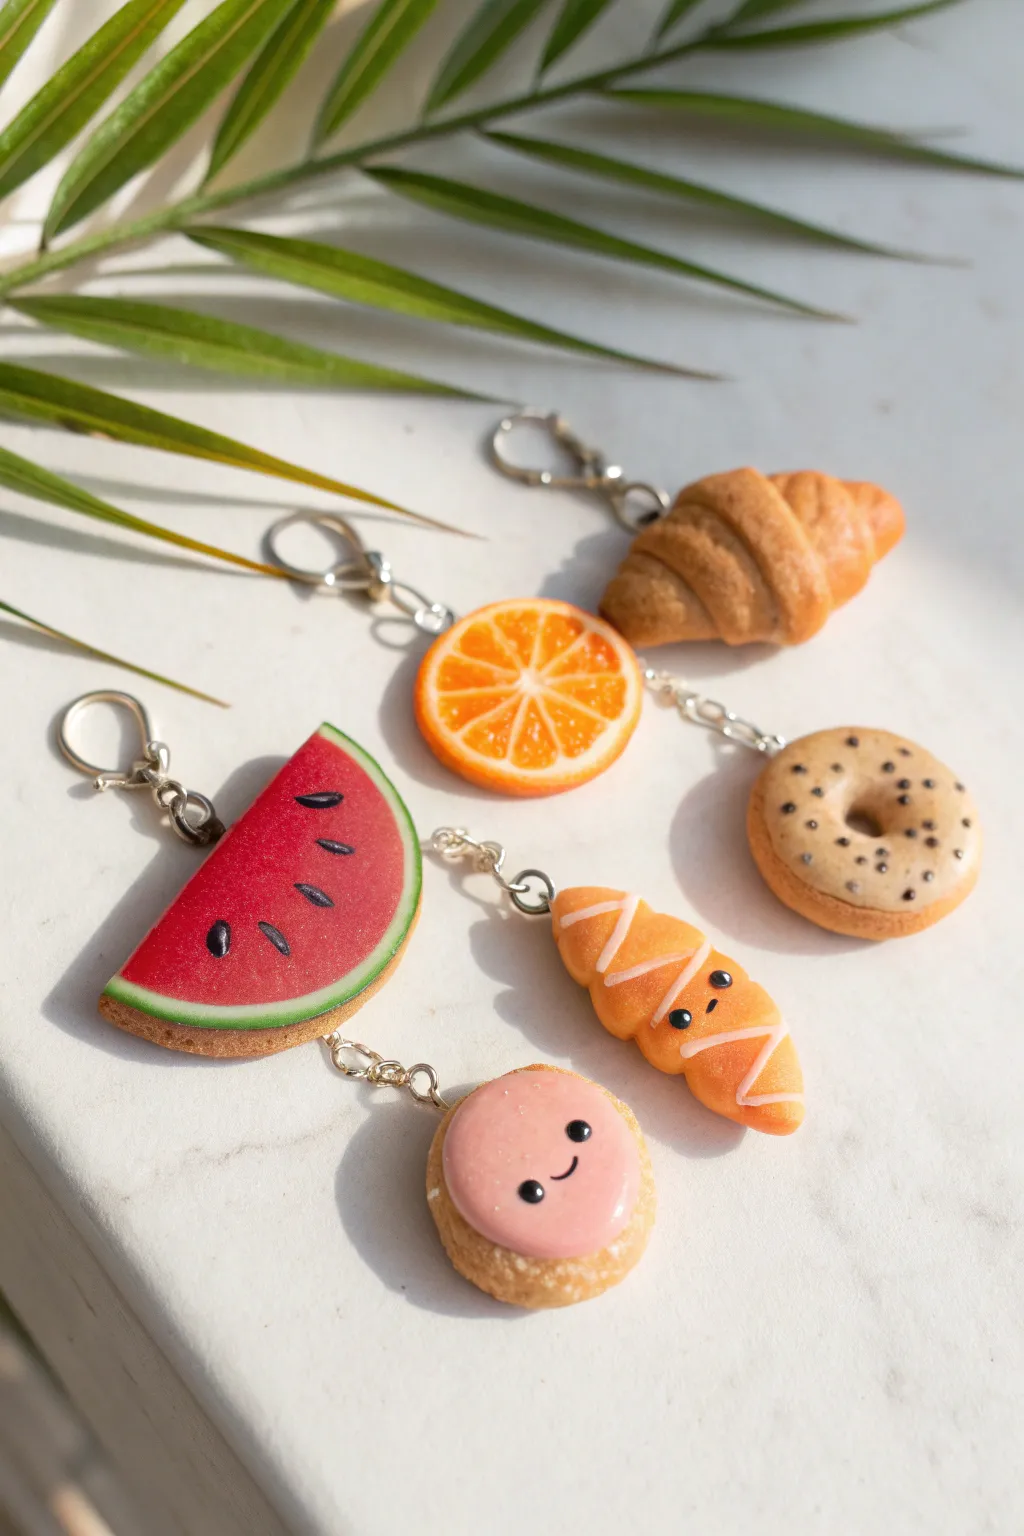
These delightful polymer clay charms combine realistic textures with undeniably cute kawaii faces for a unique accessory. You’ll learn to sculpt miniature croissants, fruity slices, and sweet treats, assembling them into hanging keychains perfect for bags or gifts.
Detailed Instructions
Materials
- Polymer clay (translucent white, orange, red, green, beige, pink, black)
- Liquid polymer clay (translucent)
- Pastel chalks (browns, oranges, yellows for shading)
- Gloss glaze or UV resin
- Silver eye pins and jump rings
- Lobster clasp keychains
- Needle tools and dotting tools
- Small paintbrush for shading
- X-acto knife or clay blade
- Toaster oven or clay oven
Step 1: Sculpting the Pastries
-
Mix the Dough Color:
Start by mixing translucent white clay with a tiny bit of beige and yellow to create a realistic ‘baked goods’ base color. This translucency is key for that flaky pastry look. -
Form the Croissant:
Roll a small snake of your dough-colored clay, tapering the ends so they are pointless than the middle. Flatten it slightly. -
Roll the Shape:
Roll the flattened snake up from the center, creating the classic croissant spiral. Gently curve the ends inward to form a crescent moon shape. -
Texture the Surface:
Use a needle tool or a balled-up piece of aluminum foil to gently dab the surface, giving it a porous, baked texture rather than leaving it perfectly smooth. -
Shade for Golden Brown:
Shave some brown and orange pastel chalk into a powder. With a dry paintbrush, gently dust the ridges of the croissant to mimic a perfectly baked crust. -
Add a Little Face:
For the kawaii version, roll two microscopic balls of black clay for eyes and a tiny thin snake for a mouth. Press them gently onto the center of one croissant. -
Connect the Loop:
Insert a metal eye pin into the top of each pastry. I like to add a dab of liquid clay to the pin first to act as glue.
Step 2: Creating the Donut & Cookie
-
Shape the Donut:
Roll a ball of beige clay and flatten it into a thick disc. Use a large dotting tool to push a hole through the center, smoothing the edges. -
Add the Seeds:
Take tiny specs of black clay or real poppy seeds and press them randomly into the top of the donut for a savory bagel look. -
Sculpt the Cookie:
Create a textured round disc for the cookie base. Mix pink clay with a drop of liquid clay to make a thick ‘frosting’ paste and spread it on top. -
Give it Personality:
Just like the croissant, add a tiny smiling face to the pink frosting using minuscule bits of black clay.
Sticky Situation?
If your clay gets too soft and sticky to detail, pop it in the fridge for 10 minutes. This firms it up, making tiny details like eyes much easier to handle.
Step 3: Fruit Slices & Assembly
-
Make the Orange Cane:
Create a cylinder of orange clay wrapped in thin white clay. Surround this with orange ‘skin’. Slice a thin round off this cane to get your orange slice. -
Texture the Orange:
Use a needle tool to scratch radiating lines and tiny dots into the orange flesh to simulate juice sacs. -
Build the Watermelon:
Form a flat semi-circle of red clay. Wrap the curved edge with a thin strip of white, followed by a strip of green clay for the rind. -
Add Seeds and Texture:
Texture the red area with a toothbrush or foil. Press small black teardrop shapes into the red clay for seeds. -
Bake the Charms:
Insert eye pins into all remaining pieces. Bake everything according to your clay package instructions (usually 275°F/135°C for 15-30 minutes). -
Glaze for Shine:
Once cool, apply a coat of gloss glaze or UV resin to the fruit interiors and the pink frosting to make them look wet and sweet. -
Assemble the Chains:
Use jump rings and pliers to connect the charms together in a vertical chain under the lobster clasps.
Glaze Technique
Use UV resin instead of varnish for the fruit slices. Cure with a UV lamp for 60 seconds to get a hard, glass-like ‘juicy’ finish that won’t turn sticky later.
Now you have an adorable set of custom accessories ready to organize your keys or decorate your backpack


Cute Animal Ring Holders
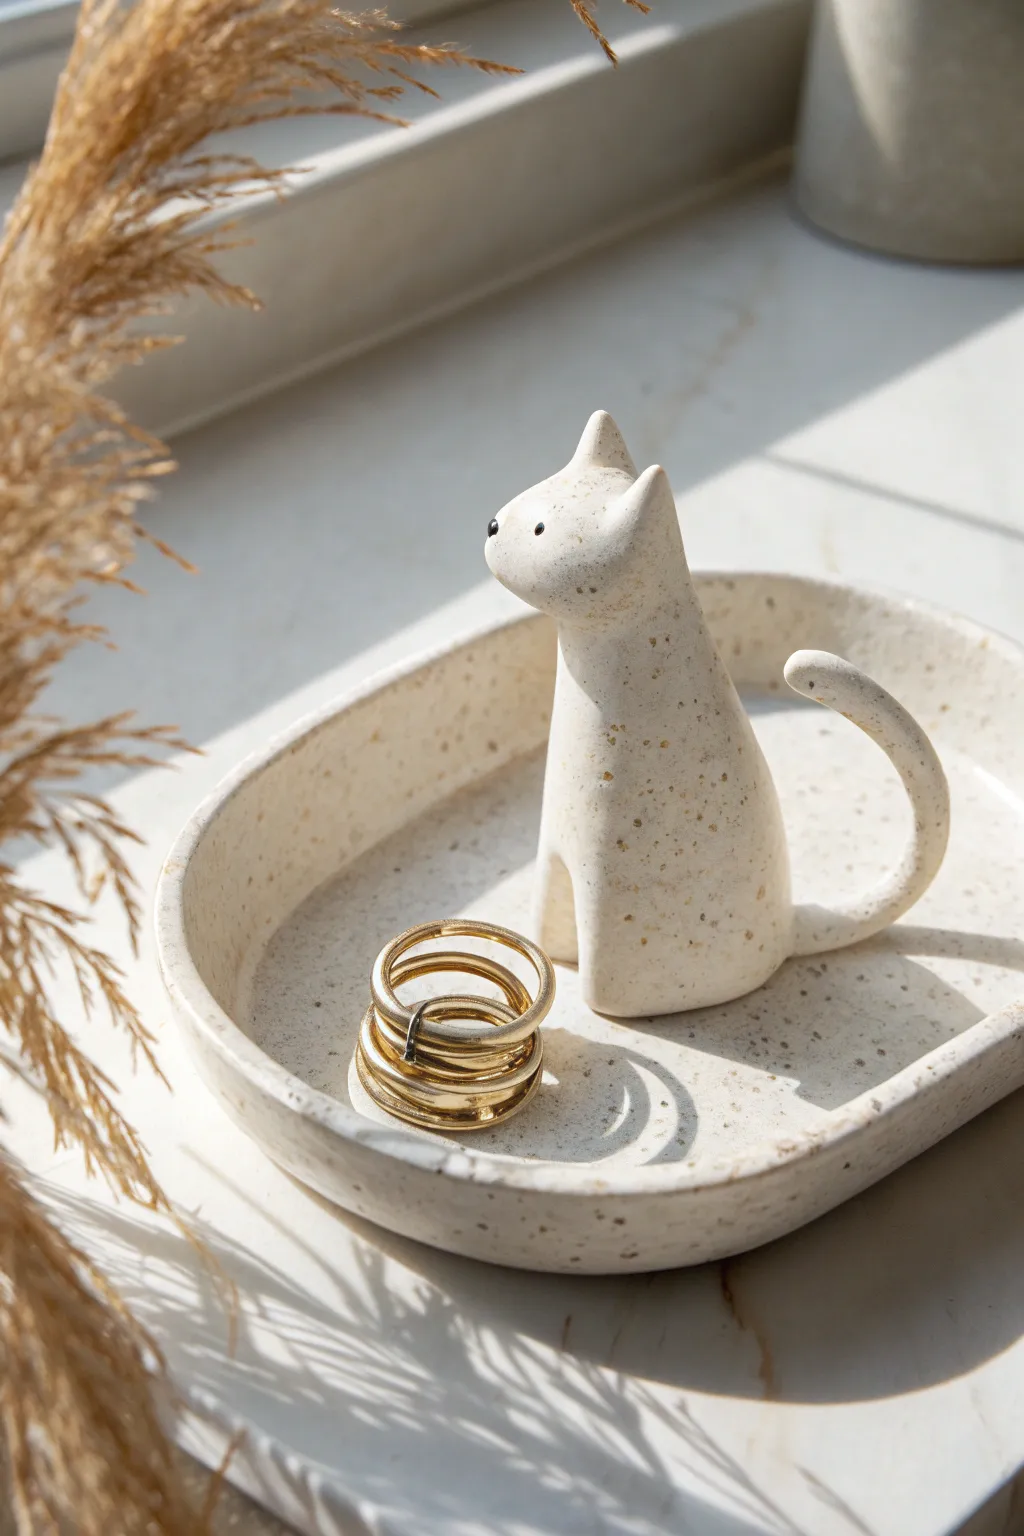
This elegant ring holder combines functional storage with whimsical charm, featuring a stylized cat standing guard over your precious jewelry. Its creamy, speckled finish gives it a trendy ceramic pottery look without needing a kiln.
Step-by-Step
Materials
- Air-dry clay (white or cream)
- Speckled clay additive (or coarse black pepper/sand)
- Acrylic rolling pin
- Precision craft knife
- Small bowl or water for smoothing
- Needle tool or toothpick
- Fine-grit sandpaper
- Glossy varnish or sealant
- Black acrylic paint (tiny amount for eyes/nose)
- Fine detail paintbrush
Step 1: Preparation & Dish Base
-
Prepare the Clay:
Start by kneading a handful of air-dry clay until it is soft and pliable. If your clay isn’t pre-speckled, fold in a pinch of speckle additive, black sand, or even coarse black pepper to achieve that stone-like texture. -
Roll the Slab:
Roll your clay out on a smooth surface to an even thickness of about 1/4 inch. Lift and rotate the clay occasionally to prevent sticking. -
Cut the Base Shape:
Using a craft knife, freehand cut an oval shape for the dish base. Aim for something roughly 4-5 inches long; imperfections add to the organic look. -
Create the Wall:
Roll a separate long snake or coil of clay, approximately 1/4 inch thick. This will become the raised edge of your dish. -
Attach the Wall:
Score (scratch) the outer edge of your oval base and brush on a little water. Place the coil on top of the scored edge, pressing gently to adhere. -
Blend the Seams:
Using your finger or a smoothing tool, blend the clay coil down into the base on both the inside and outside so it looks like one solid piece rather than two joined parts.
Cracking Up?
If small cracks appear while drying, mix a tiny bit of fresh clay with water to make a paste (slip) and fill the cracks. Smooth it over and let it dry again.
Step 2: Sculpting the Cat
-
Form the Body:
Roll a smooth, elongated cone shape for the cat’s body. The bottom should be wide enough to be stable, tapering slightly toward the neck. -
Shape the Head:
Form a smaller, slightly flattened sphere for the head. Pinch two small triangles at the top to create the ears. -
Attach Head to Body:
Score the top of the body cone and the bottom of the head. Apply a dab of water and press them together firmly, blending the clay at the neck so the join is invisible. -
Refine the Face:
Use your fingers to gently pull the front of the face outwards, creating a subtle snout profile. -
Sculpt the Tail:
Roll a thin, long tapered coil for the tail. It needs to be sturdy enough to act as a ring hook, so don’t make it too fragile. -
Attach the Tail:
Attach the thicker end of the tail to the lower back of the cat body using the score-and-slip method. Curl the tail upwards and outwards in a gentle ‘C’ curve. -
Cut the Legs:
Using your craft knife, cut an inverted ‘V’ or ‘U’ shape at the very bottom front of the cone to suggest two front legs.
Pepper Perfection
If adding coarse black pepper for speckles, seal the piece very thoroughly with varnish. Exposed pepper can mold over time if the clay absorbs humidity.
Step 3: Assembly & Finishing
-
Position the Cat:
Decide where you want the cat to sit within the dish—off-center usually looks best. Score the dish surface and the bottom of the cat. -
Secure the Figurine:
Press the cat firmly into the dish. Use a small tool to blend the bottom edges of the cat into the dish floor for a seamless, strong bond. -
Smooth Everything:
Dip your finger in water and run it over the entire piece to remove fingerprints and harsh edges. I find this step crucial for that polished, ceramic look. -
Drying Time:
Let the piece dry completely. This creates a stronger end result, so be patient—it usually takes 24-48 hours depending on humidity. -
Sanding:
Once bone dry, gently sand any rough spots or sharp edges with fine-grit sandpaper until the surface feels satin-smooth. -
Detailing:
Use a fine point brush or a toothpick dipped in black acrylic paint to create two tiny dots for eyes and a small dot for the nose. -
Seal:
Finish by applying 1-2 coats of a glossy varnish. This protects the clay and gives it that shiny, kiln-fired ceramic appearance.
Now you have a chic, custom organizer ready to keep your rings safe and stylish.


Happy Little Fridge Magnets
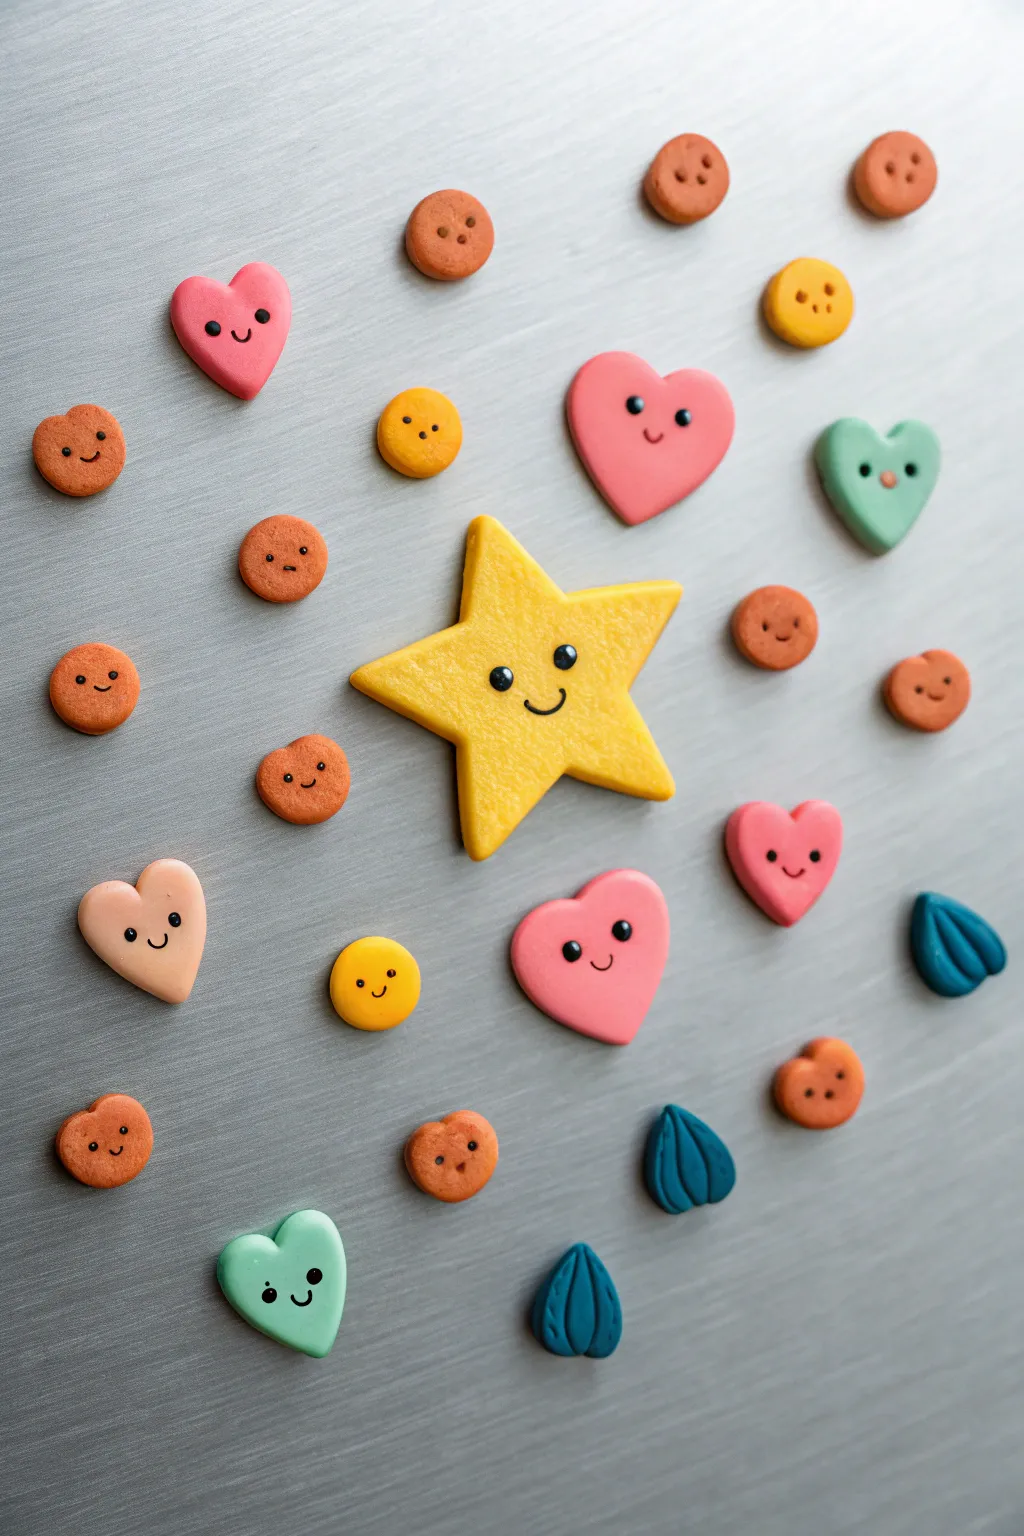
These adorable little magnets bring a touch of whimsy to your kitchen with sunny smiles and vibrant colors. Featuring a big cheerful star surrounded by a galaxy of happy hearts and friendly cookie-buttons, this polymer clay set is perfect for brightening up any metal surface.
Step-by-Step Guide
Materials
- Polymer clay (yellow, pink, peach, mint green, orange, dark blue/teal, black)
- Acrylic rolling pin or pasta machine
- Small heart-shaped cutter
- Small circle cutter
- Star-shaped cutter (medium/large)
- Needle tool or toothpick
- Small ball tool (dotting tool)
- Strong craft glue or E6000
- Small round magnets
- Parchment paper-lined baking sheet
- Oven
Step 1: Shaping the Base Forms
-
Condition the Clay:
Start by warming the polymer clay in your hands, kneading each color separately until it is soft and pliable. This prevents cracks and makes shaping much easier. -
Roll Your Sheets:
Using your acrylic roller or a pasta machine, roll the clay out into even sheets. Aim for a thickness of about 1/4 inch (6mm) so the magnets feel substantial but aren’t too heavy. -
Cut the Star:
Press your large star cutter firmly into the bright yellow clay sheet. Wiggle it slightly to ensure a clean cut, then gently push the shape out. Smooth any rough edges with your finger. -
Cut the Hearts:
Use your heart cutter on the pink, peach, and mint green clay sheets. Make a variety of colors to create a diverse group. -
Create the Cookies and Buttons:
Cut several circles from the orange and yellow clay. For a more organic ‘cookie’ look, you can also roll small balls of clay and flatten them gently with your thumb instead of using a cutter. -
Form the Teardrops:
Take small amounts of dark blue or teal clay, roll them into balls, and pinch one side to create a teardrop or seed shape. Flatten slightly.
Eyes Falling Out?
If the tiny black eyes won’t stick to the raw clay, use a tiny dab of liquid polymer clay (like Bake & Bond) in the socket before pressing the black ball in.
Step 2: Adding Faces and Details
-
Texture the Star:
Take a clean toothbrush or a crumpled ball of aluminum foil and gently tap it over the surface of the yellow star. This gives it a soft, sugary texture. -
Add Cookie Texture:
Repeat the texturing process on the orange and yellow circle shapes to mimic the look of baked goods. -
Create Eye Sockets:
Using a small ball tool, press two shallow divots into the upper half of every shape where you want the eyes to go. Spacing them widely apart adds to the cute factor. -
Insert the Eyes:
Roll tiny, equal-sized balls of black clay. I find it easiest to roll a very thin snake of black clay and cut tiny segments to ensure they are the same size. Press these gently into the eye sockets. -
Detail the Buttons:
For the orange and yellow circles, use a needle tool to poke four small holes in a square pattern (or two holes) to make them look like buttons, positioning the holes around the face area. -
Detail the Teardrops:
Use a needle tool or knife to press a central line down the teal teardrop shapes to define them as leaves or seeds. -
Carve the Smiles:
Use a needle tool or a small curved tool to impress a simple ‘u’ shape mouth between the eyes on every character. Vary the angles slightly to give them different expressions.
Glossy Finish
After baking, paint a thin layer of gloss glaze or UV resin over just the eyes to make them shine and look more alive against the matte clay.
Step 3: Baking and Assembly
-
Bake the Clay:
Arrangement your pieces on a parchment-lined baking sheet. Bake according to your brand of polymer clay instructions (usually 275°F/135°C for 15-30 minutes per 1/4 inch of thickness). -
Cool Down:
Allow the pieces to cool completely on the baking sheet. Keep into mind that polymer clay hardens fully as it cools, so don’t worry if they feel slightly soft right out of the oven. -
Attach Magnets:
Flip each character over. Place a small dot of strong craft glue or E6000 on the back. -
Secure and Dry:
Press a magnet firmly into the glue. Let them dry undisturbed for at least 24 hours to ensure a permanent bond.
Arrange your happy new friends on the fridge to greet you every morning

The Complete Guide to Pottery Troubleshooting
Uncover the most common ceramic mistakes—from cracking clay to failed glazes—and learn how to fix them fast.
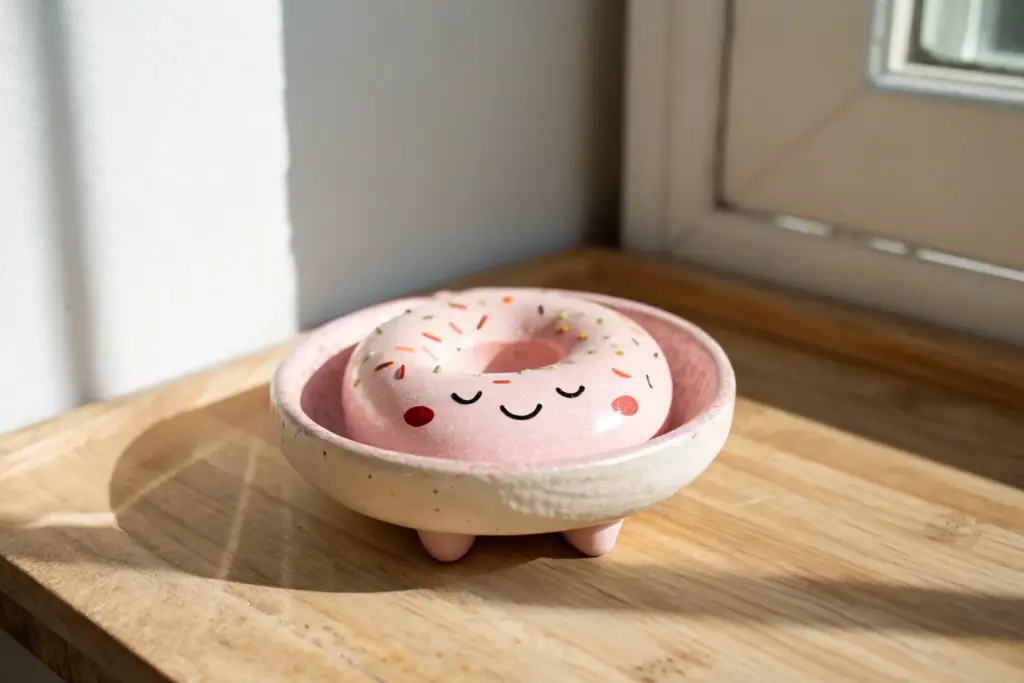
Blob-Character Toothbrush Holder
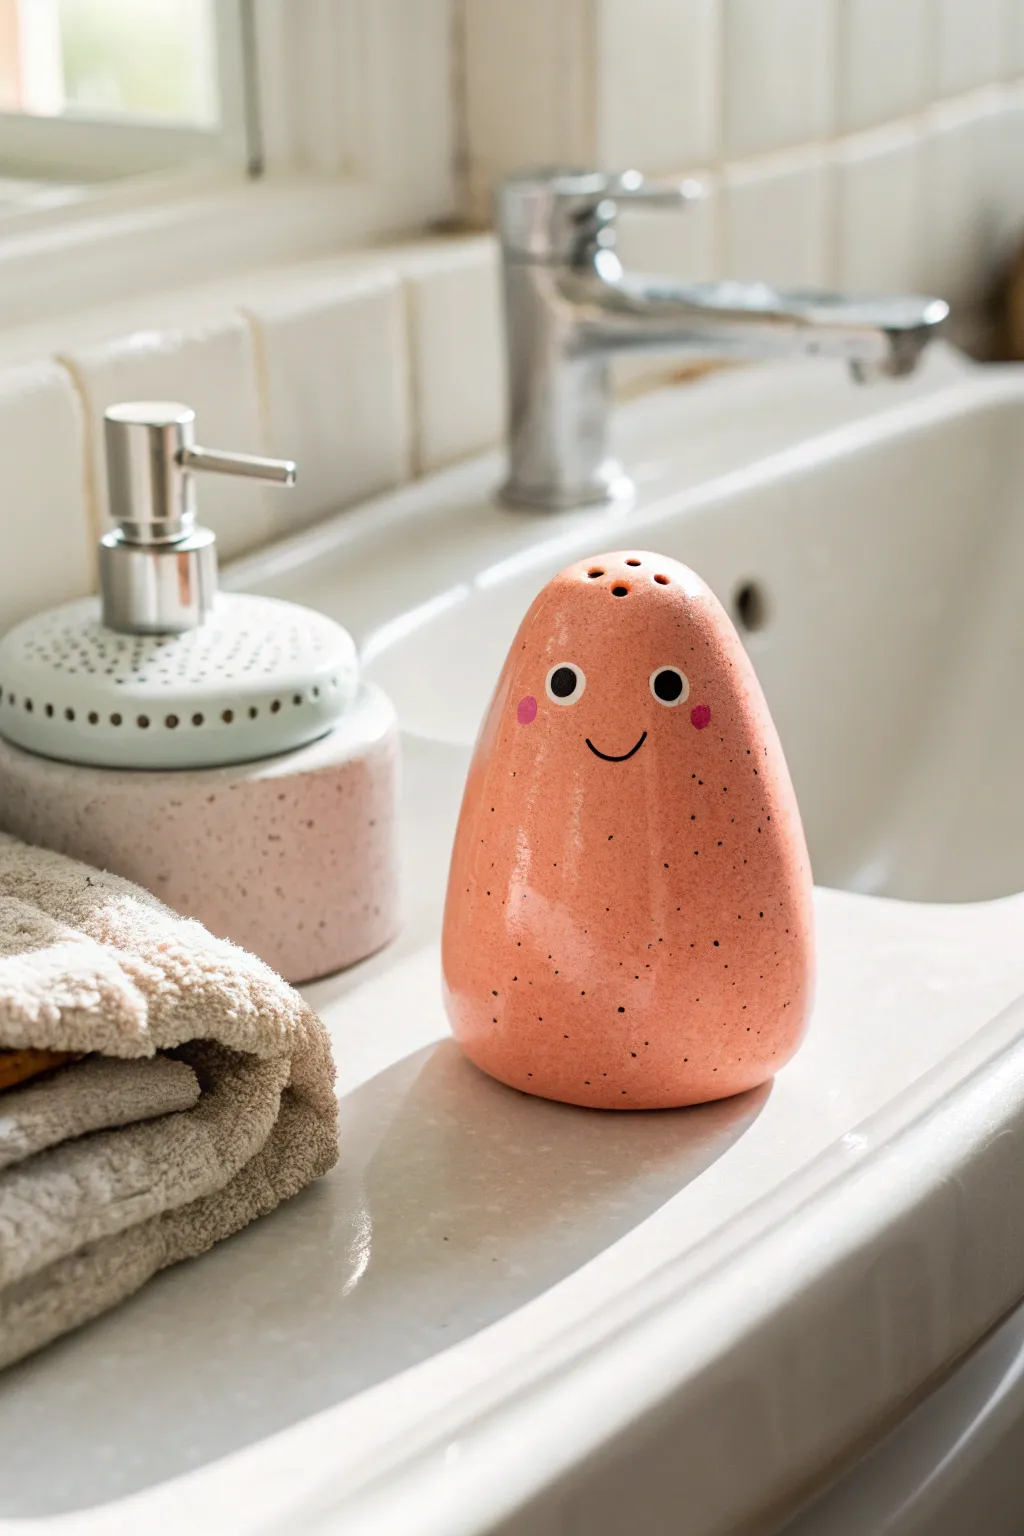
This charming little bathroom buddy is a simple yet delightful project that adds personality to your sink. With its quirky, potato-shaped silhouette and friendly painted face, this coral-colored holder features drainage holes and specks for a modern terrazzo feel.
Step-by-Step Guide
Materials
- Polymer clay or air-dry clay (white)
- Acrylic paints (coral pink, black, hot pink)
- Glossy varnish or sealant (waterproof)
- Pottery needle tool or toothpick
- Medium diameter straw or carving tool (for holes)
- Fine grit sandpaper
- Small round paintbrush
- Old toothbrush (for splattering paint)
- Water cup and paper towels
Step 1: Sculpting the Form
-
Prepare the clay:
Start with a ball of clay roughly the size of a large orange. Knead it thoroughly until it is soft, pliable, and free of air bubbles, which helps prevent cracks later. -
Shape the base:
Roll the clay into a smooth sphere, then gently tap it against your work surface to create a flat, stable bottom. The holder needs to stand firmly without wobbling. -
Form the cone:
Using your palms, gently taper the top half of the sphere to create a rounded cone shape. Aim for an organic, slightly asymmetrical look—like a happy little blob or potato—rather than a perfect geometric cone. -
Smooth the surface:
Dip your finger in a tiny bit of water (for air-dry clay) or baby oil (for polymer) and smooth out any fingerprints or bumps. Take your time here to get a nice, clean finish. -
Create the brush holes:
Identify the very top of your blob. Using a straw or a carving tool, punch two or three vertical holes straight down into the clay. Make them deep enough to hold a toothbrush handle securely, about 1.5 to 2 inches deep. -
Enlarge the holes:
Wiggle your tool slightly to widen the openings just a bit, ensuring a standard toothbrush fits easily even after the clay shrinks slightly during drying. -
Add drainage (optional):
If you plan to use this near water often, push a long needle tool from the bottom of the brush holes all the way through to the base to prevent water pooling inside.
Clean Hole Trick
When punching the toothbrush holes, twist your straw or tool while inserting it. This cutting motion prevents the clay from compressing and deforming.
Step 2: Refining and Painting
-
Dry or bake:
Follow the manufacturer’s instructions for your specific clay. If air-drying, let it sit for at least 24-48 hours. If baking polymer clay, use the temperature recommended on the package. -
Sand for smoothness:
Once fully cured and cooled, use fine-grit sandpaper to buff away any rough imperfections, especially around the rim of the holes. -
Apply the base coat:
Mix a warm coral or salmon pink acrylic paint. Apply two to three thin, even coats over the entire shape, letting each layer dry completely before adding the next. -
Paint the eyes:
Using a small round brush or a dotting tool, place two solid black circles near the upper middle of the blob. I prefer to space them slightly wide apart for a cuter look. -
Add the eye shine:
Once the black is dry, add a tiny dot of white paint to the upper right corner of each black eye. This ‘catchlight’ brings the character to life. -
Create the cheeks:
Dip a rounded tool or brush handle into hot pink paint and stamp two small circles just below and to the outside of the eyes. -
Draw the smile:
With a very fine liner brush or a black paint pen, draw a simple, small ‘u’ shape directly between the cheeks for a subtle smile. -
Create the speckled effect:
Dilute a small mount of black paint with water. Dip an old toothbrush into this mixture, aim it at your sculpture, and run your thumb across the bristles to flick tiny specks all over the surface. -
Seal the deal:
Since this will live in a bathroom, apply two coats of a high-quality waterproof glossy varnish. Ensure you coat inside the holes as well to protect the clay from moisture.
Is The Paint Streaky?
If your coral base coat looks uneven, switch to a soft synthetic sponge instead of a brush. Dabbing the paint on creates a flawless, textured finish.
Place your new cheerful friend by the sink and enjoy a brighter morning routine
Face Planters With “Hair” (Plants!)
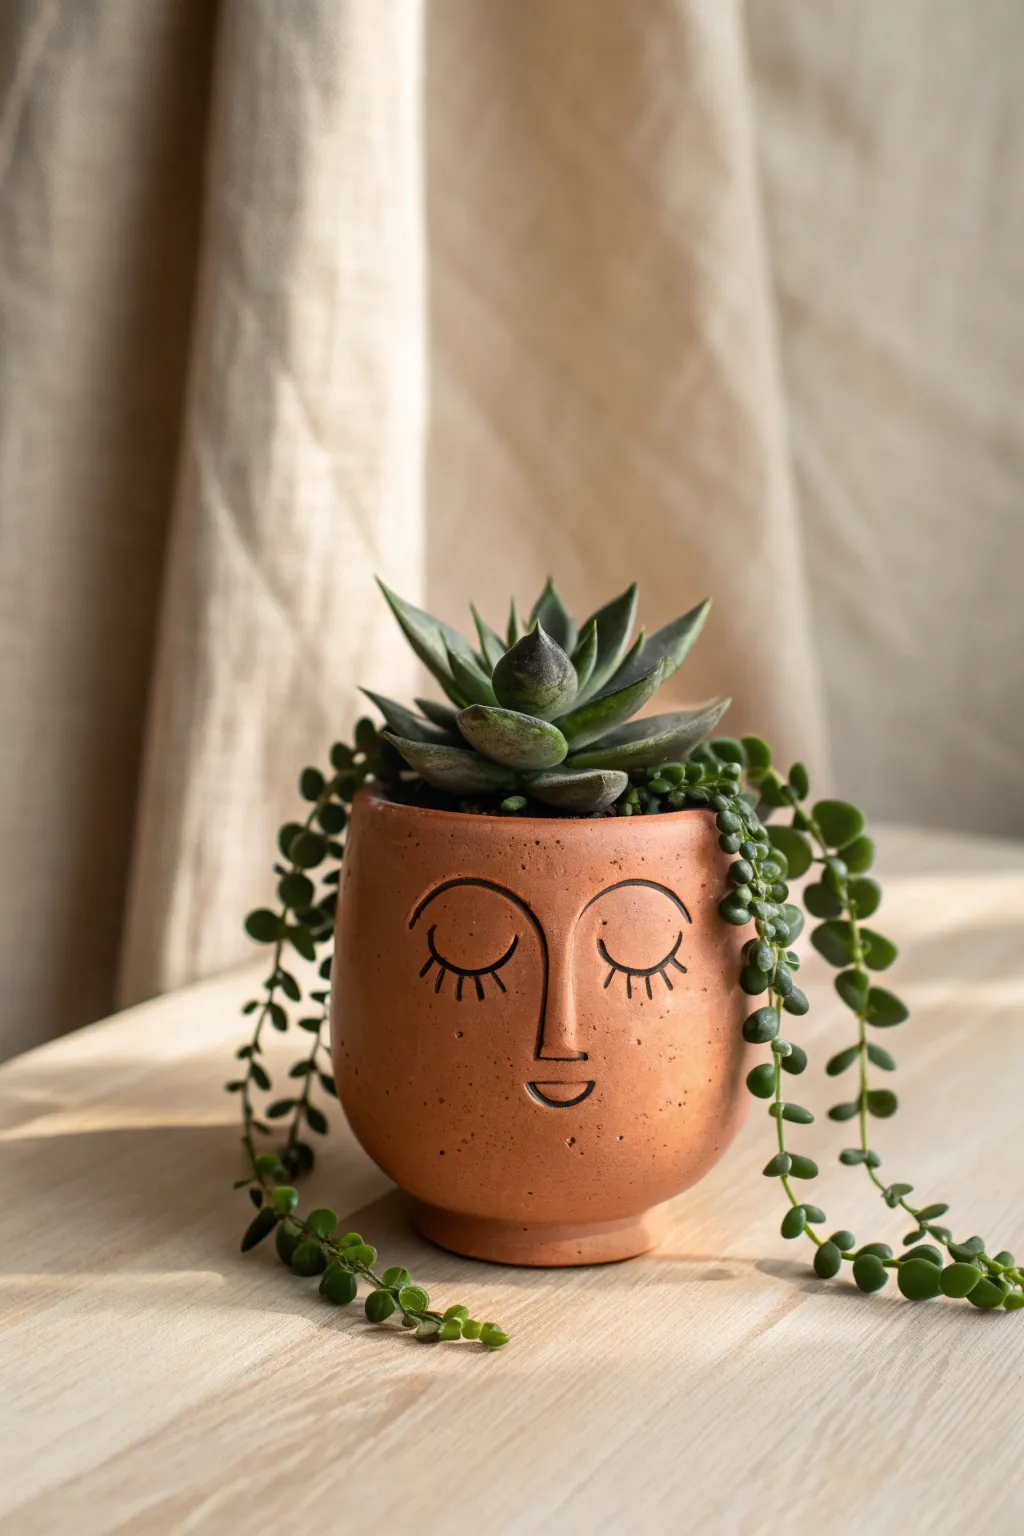
Transform a simple lump of clay into a peaceful companion for your favorite plants. This charming terracotta-style planter features a minimalist sleeping face design that lets trailing vines and spiky succulents act as a wild, natural hairstyle.
Step-by-Step Tutorial
Materials
- Air-dry clay (terracotta color recommended)
- Rolling pin
- Clay carving tools or a toothpick
- Small bowl or cup (to use as a mold)
- Plastic wrap
- Fine-grit sandpaper
- Acrylic matte sealer or varnish
- Small paintbrush
- Water in a small cup
- Sponge
Step 1: Forming the Pot Base
-
Prepare your mold:
Select a small bowl or cup that has the rounded shape you want for the planter’s base. Wrap the outside of this mold completely with plastic wrap to prevent the clay from sticking later. -
Roll the slab:
Take a generous ball of terracotta-colored air-dry clay and roll it out on a flat surface until it is about 1/4 inch thick. Aim for an even thickness to prevent cracking during drying. -
Cut the base:
Place your mold upside down on the clay slab and cut a circle around the rim. This will become the flat bottom of your pot. -
Create the walls:
Cut a long rectangular strip from the remaining clay slab. The height should match how tall you want your pot to be, plus a little extra for trimming. -
Assemble the structure:
Wrap the rectangular strip around the plastic-covered mold. Where the two ends meet, score the edges (scratch them up), add a little water, and press them firmly together to create a seam. -
Attach the bottom:
Score and slip the bottom edge of your wall and the edge of your circular base. Press the base onto the cylinder, smoothing the clay with your fingers so it looks like one solid piece. -
Refine the shape:
Gently rub a damp sponge over the exterior to smooth out the seam line and any fingerprints. I like to slightly round the bottom edge where the wall meets the base for a softer silhouette. -
Add a foot ring:
Roll a small snake of clay and form it into a ring. Attach this to the very bottom of the pot to give it a little lift and stability, blending the clay upwards into the pot body.
Fixing Cracks
If small cracks appear while drying, don’t panic. Mix a small amount of fresh clay with water to make a paste (slip) and fill the cracks, then sand smooth once dry.
Step 2: sculpting the Face
-
Sketch lightly:
Before carving deep, use a toothpick to very lightly sketch the placement of the eyes, nose, and mouth. The eyes should be semi-circles curving downward for a sleeping look. -
Carve the features:
Using a finer carving tool or the toothpick, go over your sketch lines with confident, darker strokes. Press deep enough that the design remains visible even if you sand it later. -
Add eyelashes:
Draw small, straight lines radiating downward from the eyelid curves to create the lashes. Keep them evenly spaced for a graphic, illustrative style. -
Define the nose:
Create the nose using a simple ‘L’ shape or a long vertical line that curves slightly at the bottom. This minimalist connection to the eyebrow line adds character. -
Shape the mouth:
Carve a small semi-circle for the mouth. Add a straight line across the top of the curve to give the impression of a gentle smile. -
Add texture:
To mimic the natural stone look in the photo, take a stiff-bristled toothbrush or a crumpled ball of foil and lightly press it randomly vertically against the clay surface to add subtle pitting.
Plant Styling
To get the look in the photo, place a spiky succulent (like Echeveria) in the center for ‘height’ and tuck ‘String of Turtles’ or ‘String of Pearls’ cuttings around the edges for long hair.
Step 3: Finishing Touches
-
Let it dry:
Allow the pot to dry completely on the mold for at least 24-48 hours. Once the outside is hard, carefully remove the mold and plastic wrap from the inside. -
Sand the rim:
Use fine-grit sandpaper to smooth out the top rim of the pot. It should be flat and even so it doesn’t distract from the plants. -
Clean the lines:
If any clay crumbs got stuck in your carved facial features during sanding, use a dry paintbrush or needle tool to gently sweep them out. -
Blacken the lines:
Dilute a tiny drop of black acrylic paint with water. Carefully run this wash into the carved grooves of the face to make the features pop, wiping away any excess on the surface immediately. -
Seal the pot:
Apply two coats of matte acrylic sealer to the inside and outside. This is crucial for air-dry clay to prevent moisture damage from the soil.
Now you have a serene little vessel ready to be crowned with nature’s greenery


What Really Happens Inside the Kiln
Learn how time and temperature work together inside the kiln to transform clay into durable ceramic.
Cute Photo Holders With Mini Characters
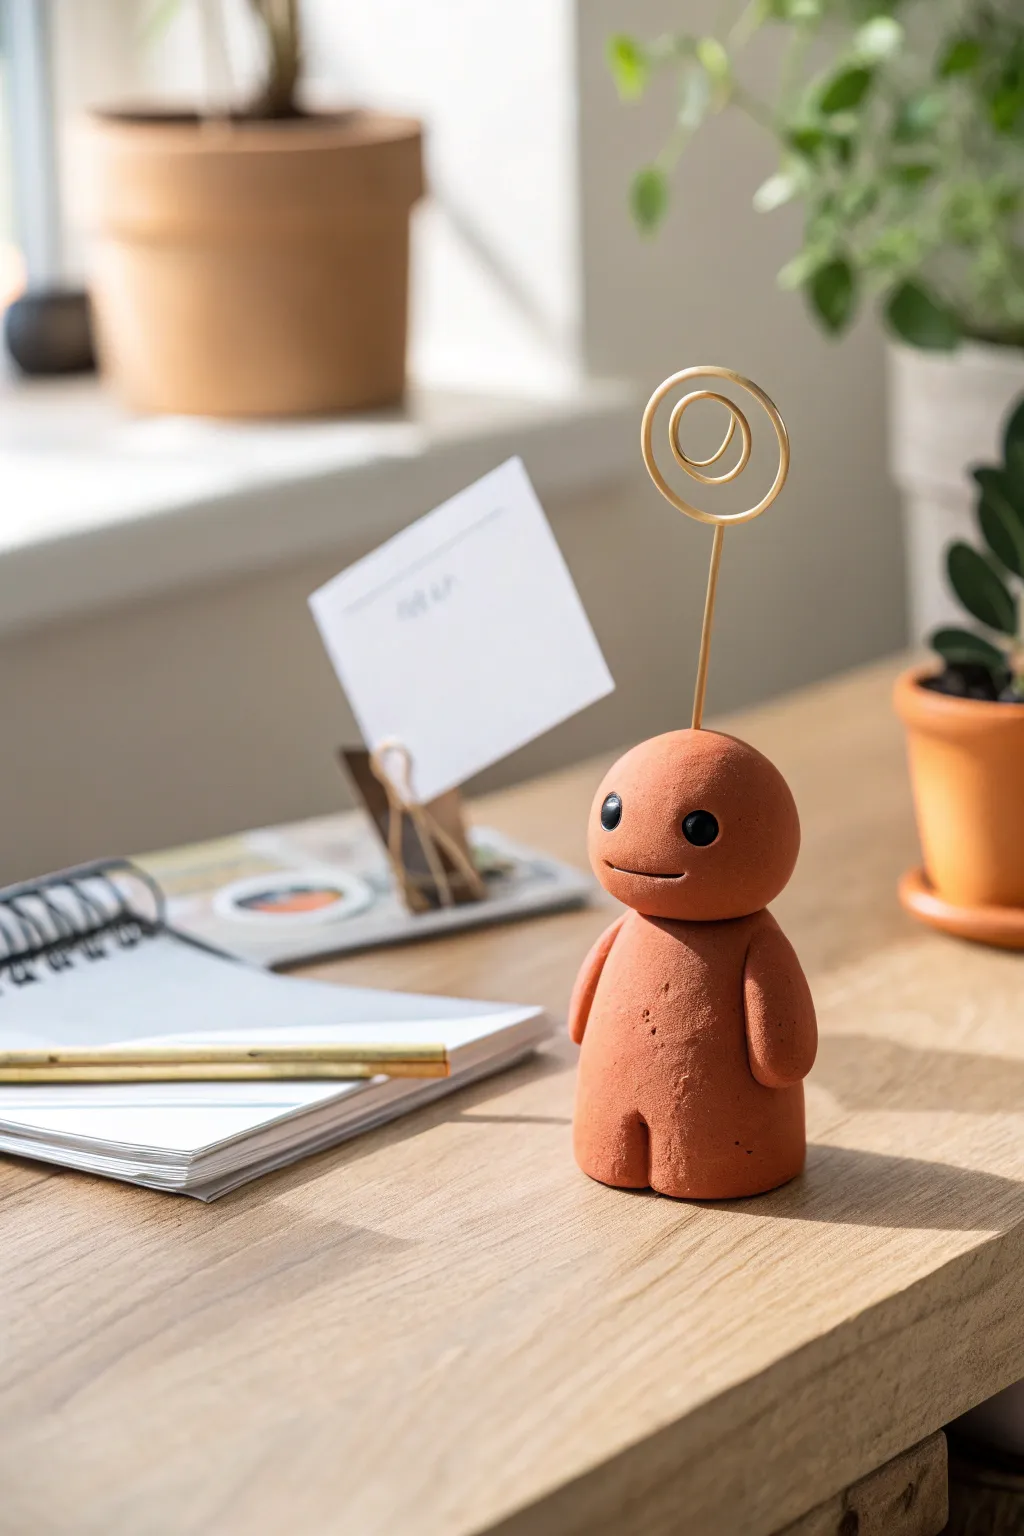
Bring a touch of whimsy to your desk with this adorable, minimalist character photo holder. Crafted from clay with a warm terracotta finish, this simple figure holds your favorite memories or important reminders with a charming smile.
How-To Guide
Materials
- Air-dry clay (terracotta color) or polymer clay
- Gold crafting wire (approx. 16-18 gauge)
- Wire cutters
- Needle-nose pliers
- Fine-grit sandpaper
- Small round tool or ball stylus
- Black acrylic paint
- Fine detail paintbrush
- Cylindrical object (like a marker) for wire coiling
- Clear matte varnish (optional)
Step 1: Shaping the Base Figure
-
Condition the clay:
Begin by kneading a fist-sized amount of terracotta clay until it is warm, pliable, and free of cracks. If you’re using polymer clay, this might take a few minutes of working it in your hands. -
Divide the clay:
Separate your clay into two main portions: a larger chunk for the body (about 2/3) and a smaller sphere for the head (about 1/3). -
Form the body cylinder:
Roll the body portion into a thick, smooth cylinder. Tap the bottom gently on your work surface to create a flat base so the figure stands stably. -
Round the shoulders:
Use your fingers to gently smooth and round off the top edges of the body cylinder, creating a soft, sloping shoulder area where the head will attach. -
Create the legs:
Using a modeling tool or the side of a ruler, press a vertical indentation into the bottom center of the front of the body. This suggests separated legs without fully cutting through the clay. -
Shape the arms:
Take two small pieces of extra clay and roll them into elongated sausages. Press these firmly onto the sides of the body, blending the top seam into the shoulders so they look integrated. -
Prepare the head:
Roll the head portion into a perfect sphere. Gently press it down slightly so it isn’t perfectly round, giving it a friendly, slightly squashed look. -
Attach the head:
Place the head securely onto the rounded shoulders. If using air-dry clay, score both joining surfaces and add a dab of water (slip) before pressing them together to ensure a strong bond.
Loose Wire?
If the wire feels wobbly after the clay dries, remove it carefully, add a drop of superglue to the tip, and re-insert it into the hole for a permanent hold.
Step 2: Adding Details and Hardware
-
Create the face:
Use a small ball stylus or the end of a paintbrush to press two indentations for the eyes. Carefully carve a simple, straight horizontal line for the mouth using a needle tool. -
Prepare the wire holder:
Cut a length of gold wire about 6-8 inches long. Using your needle-nose pliers, start creating a spiral at one end. -
Coil the spiral:
Wrap the wire around a marker or thick dowel to create a neat, double-loop circle. This clip mechanism will hold your photo later. -
Insert the wire:
Insert the straight end of the wire directly into the top center of the clay head. Push it down deep enough (at least an inch) to be stable. -
Smooth the entry point:
Gently push the clay back around the base of the wire to secure it and hide the insertion hole. -
Dry or bake:
If using air-dry clay, let the figure sit for 24-48 hours. If using polymer clay, bake according to the package instructions (usually 275°F/135°C for 15-30 minutes).
Step 3: Finishing Touches
-
Sand imperfections:
Once fully cured and cool, check for any rough fingerprints or uneven spots. Use fine-grit sandpaper to gently buff the surface until it looks like smooth stone. -
Paint the button eyes:
Dip a fine detail brush or a dotting tool into black acrylic paint. Carefully fill in the eye indentations you made earlier to create shiny, prominent black eyes. -
Paint the smile:
I prefer to use a very fine liner brush for this step. Carefully run a thin line of black paint into the mouth groove to define the smile. -
Optional sealing:
To protect the paint and give the clay a finished look, apply a coat of clear matte varnish over the entire figure, avoiding the wire.
Personality Pop
Give your buddy more character by painting rosy cheeks with diluted pink paint or sculpting tiny accessories like a hat or scarf before baking.
Place a favorite photo in the gold spiral and enjoy your new little desk companion
Tiny Desk Organizers Disguised As Creatures
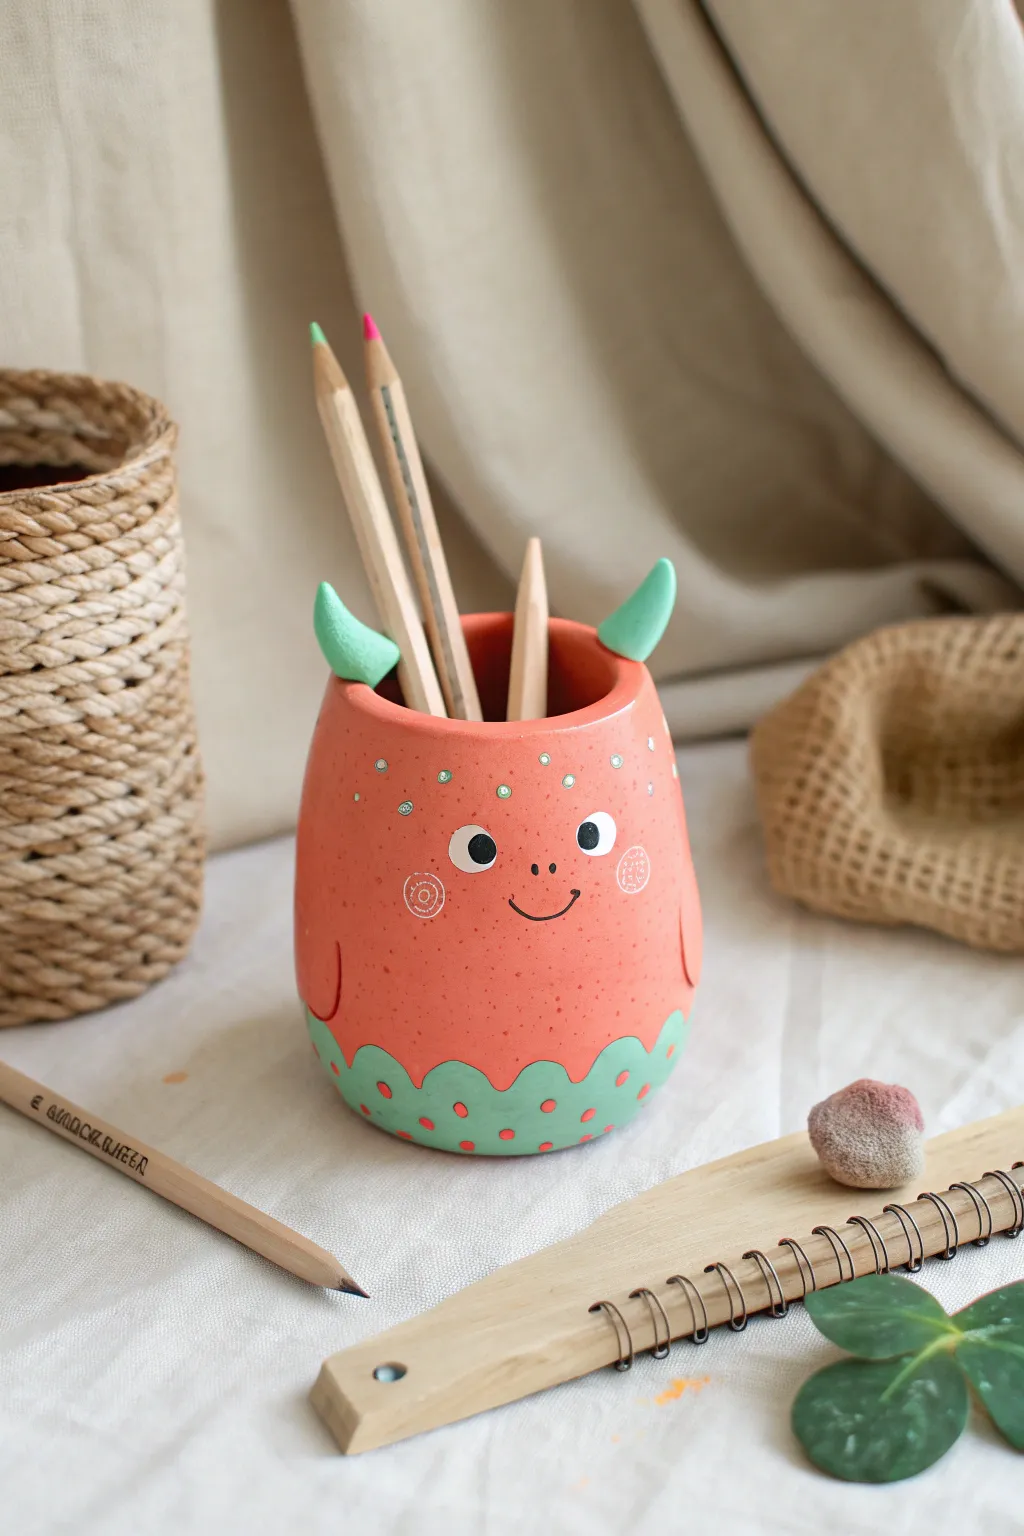
Transform a simple lump of clay into this adorable, coral-colored desk companion ready to guard your favorite pencils. With its tiny teal horns and scalloped belly, this friendly monster adds a playful touch to any workspace.
Detailed Instructions
Materials
- Air-dry clay (white or terracotta)
- Acrylic paints (coral/salmon, teal/mint green, white, black)
- Rolling pin
- Clay knife or craft knife
- Small cup or jar (to use as a mold)
- Water and sponge for smoothing
- Fine-grit sandpaper
- Paintbrushes (medium flat, small round, fine liner)
- Dotting tool or toothpick
- Matte varnish or sealant
Step 1: Shaping the Base
-
Roll the slab:
Begin by rolling out a portion of your air-dry clay into a smooth, even slab, approximately 1/4 inch thick. Aim for a long rectangular shape that is tall enough to hold pencils comfortably. -
Cut the walls:
Measure the circumference of your chosen mold (a jar or cup works well). Cut a rectangle from your clay slab that matches this length plus a tiny overlap area. -
Form the cylinder:
Wrap the clay rectangle around your mold (you can assist removal later by wrapping the mold in paper first). Score the edges where the clay meets, add a dab of water, and press the seam together firmly to join. -
Create the bottom:
Roll a smaller piece of clay and cut out a circle slightly larger than your cylinder’s diameter. Place your cylinder on top of this circle. -
Secure the base:
Blend the edges of the circle upward into the walls of the cylinder using your thumb or a modeling tool until the seam disappears completely.
Cracked Clay Rescue
If small cracks appear while drying, don’t panic. Make a paste of clay and water (slip) and fill the cracks. Let it dry again, then sand smooth before painting.
Step 2: Adding Character Details
-
Sculpt the horns:
Roll two small, equal-sized balls of clay. Gently taper one end of each ball to create cone shapes. Curve the tips slightly inward. -
Attach the horns:
Score the bottom of each horn and the rim of the pot where you want them to sit. Apply a little water slip and press them securely onto the rim, blending the clay downward for a strong bond. -
Refine the surface:
Check the entire piece for lumps or fingerprints. Dip your finger or a sponge in water and gently smooth everything out. Let the clay dry completely for 24-48 hours. -
Sand for smoothness:
Once fully dry, use fine-grit sandpaper to buff away any remaining rough spots, especially around the rim and the join of the horns.
Step 3: Painting the Monster
-
Base coat:
Paint the main body of the pot with a vibrant coral or salmon pink acrylic paint. Look for good coverage; I usually apply two thin coats rather than one thick one to avoid brushstrokes. -
Paint the horns:
Using a smaller brush, carefully paint the horns in a soft teal or mint green color. -
Create the scalloped bottom:
Using the same teal green, paint a wavy line around the bottom third of the pot. Fill in the area below the wave to create the monster’s patterned belly. -
Add the dots:
Dip the handle end of a paintbrush or a dotting tool into your coral paint and add small dots inside the teal scallop section. Conversely, add tiny teal or white dots to the upper coral section for texture. -
Paint the face:
Use white paint to create two circles for eyes. Once dry, add smaller black circles inside, placing them slightly off-center for a goofy look. -
Fine details:
Using your finest liner brush or a black paint pen, draw a small smile, two nostrils, and rosy cheek swirls in white or light pink. -
Seal the deal:
Finish by applying a coat of matte varnish over the entire piece to protect your paint job from scratches and dust.
Make It Weighted
Before attaching the bottom piece, drop a flat stone or a few non-rusting washers into the base clay layer. This keeps the pot from tipping over when full of pens.
Now gather your favorite stationery to fill up your delightful new desk buddy

TRACK YOUR CERAMIC JOURNEY
Capture glaze tests, firing details, and creative progress—all in one simple printable. Make your projects easier to repeat and improve.
Easy Incense Holders With A Silly Twist
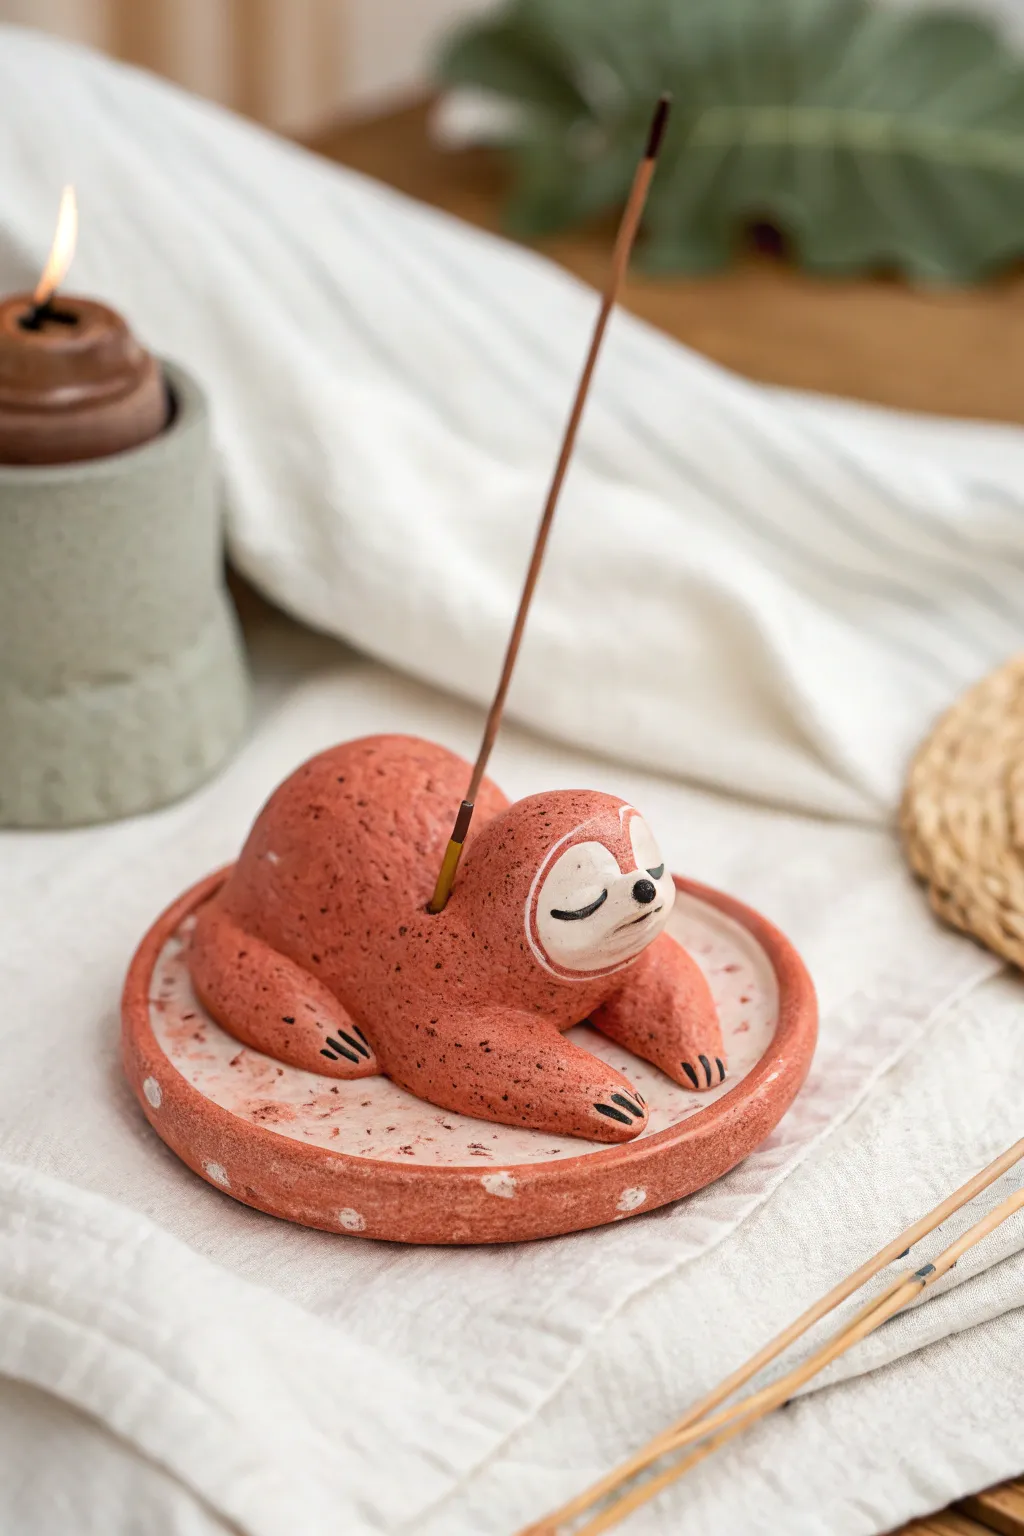
Embrace the slow life with this adorable, sleepy sloth incense burner that adds a touch of whimsy to your relaxation routine. Made from terracotta-colored clay with speckled details, this functional sculpture catches ash on a matching round tray while holding your favorite stick upright.
Step-by-Step Guide
Materials
- Terracotta-colored polymer clay (or air-dry clay)
- White polymer clay
- Rolling pin
- Circle cutter (approx. 4 inches)
- Small ball tool or toothpick
- Needle tool
- Black acrylic paint
- Fine detail paintbrush
- Brown speckled paint or an old toothbrush for spattering
- Matte varnish
- Oven (if using polymer) or drying space
Step 1: Forming the Base
-
Condition the clay:
Begin by kneading your terracotta clay until it is soft, pliable, and free of cracks. -
Roll the slab:
Roll out a portion of the clay to a consistent thickness of about 1/4 inch using a rolling pin. -
Cut the tray:
Use your circle cutter or a bowl template to cut out a perfect circle for the incense ash catcher base. -
Create the rim:
Roll a long, thin snake of clay. Attach this around the perimeter of your circle base, blending the seam on the inside so it forms a slightly raised lip to contain ash. -
Prepare the surface:
Smooth out any fingerprints on the base carefully, as this area will be visible.
Angle Check
Before baking, test fit an incense stick in the hole to make sure it leans at an angle where the ash will actually fall into the tray below.
Step 2: Sculpting the Sloth
-
Shape the body:
Roll a medium-sized ball of terracotta clay into an oval shape for the sloth’s main body. Flatten the bottom slightly so it sits stable. -
Form the head:
Create a slightly smaller ball for the head and attach it to one end of the oval body, smoothing the clay together so the neck joint is seamless. -
Add the arms:
Roll two small logs of clay for the front arms. Attach them reaching forward from the shoulders, blending the seams into the body. -
Add the legs:
Repeat the process for the back legs, having them tucked slightly underneath or alongside the body. -
Add the face mask:
Take a tiny pinch of white clay, flatten it into a heart or kidney bean shape, and gently press it onto the front of the head to create the sloth’s distinctive face mask. -
Create the incense hole:
Using a needle tool or an actual incense stick (slightly wiggled to widen the hole), poke a hole into the center of the sloth’s back. Ensure it goes deep enough to hold a stick securely but doesn’t pierce all the way through the bottom. -
Attach to base:
Place the sloth onto the center of your prepared tray base. Press firmly to adhere, or use a little liquid clay/slip as ‘glue’ to ensure a permanent bond.
Uneven speckles?
If your toothbrush spatter creates blobs that are too large, quickly dab them with a paper towel while wet to create a softer, mottled texture.
Step 3: Details & Finishing
-
Bake or Dry:
If using polymer clay, bake according to the package instructions (usually 275°F for 15-30 minutes). If using air-dry clay, allow it to dry fully for 24-48 hours. -
Paint facial features:
Once cool or dry, use a fine detail brush and black acrylic paint to add two curved lines for sleeping eyes, a small triangular nose, and a tiny mouth on the white face mask. -
Add the claws:
Paint three small black lines at the end of each paw to represent the claws. -
Create texture:
Mix a small amount of brown paint with water. Dip an old toothbrush into it and run your thumb across the bristles to flick tiny speckles over the sloth and the tray, giving it a stone-like texture. -
Add white accents:
Paint small, irregular white polka dots around the rim of the tray for extra decorative flair. -
Seal the piece:
Apply a coat of matte varnish over the entire piece to protect the paint and give the clay a finished professional look.
Now you have a charming little companion to help you relax and unwind
Whimsical Clay Whistles You Can Turn Into Anything
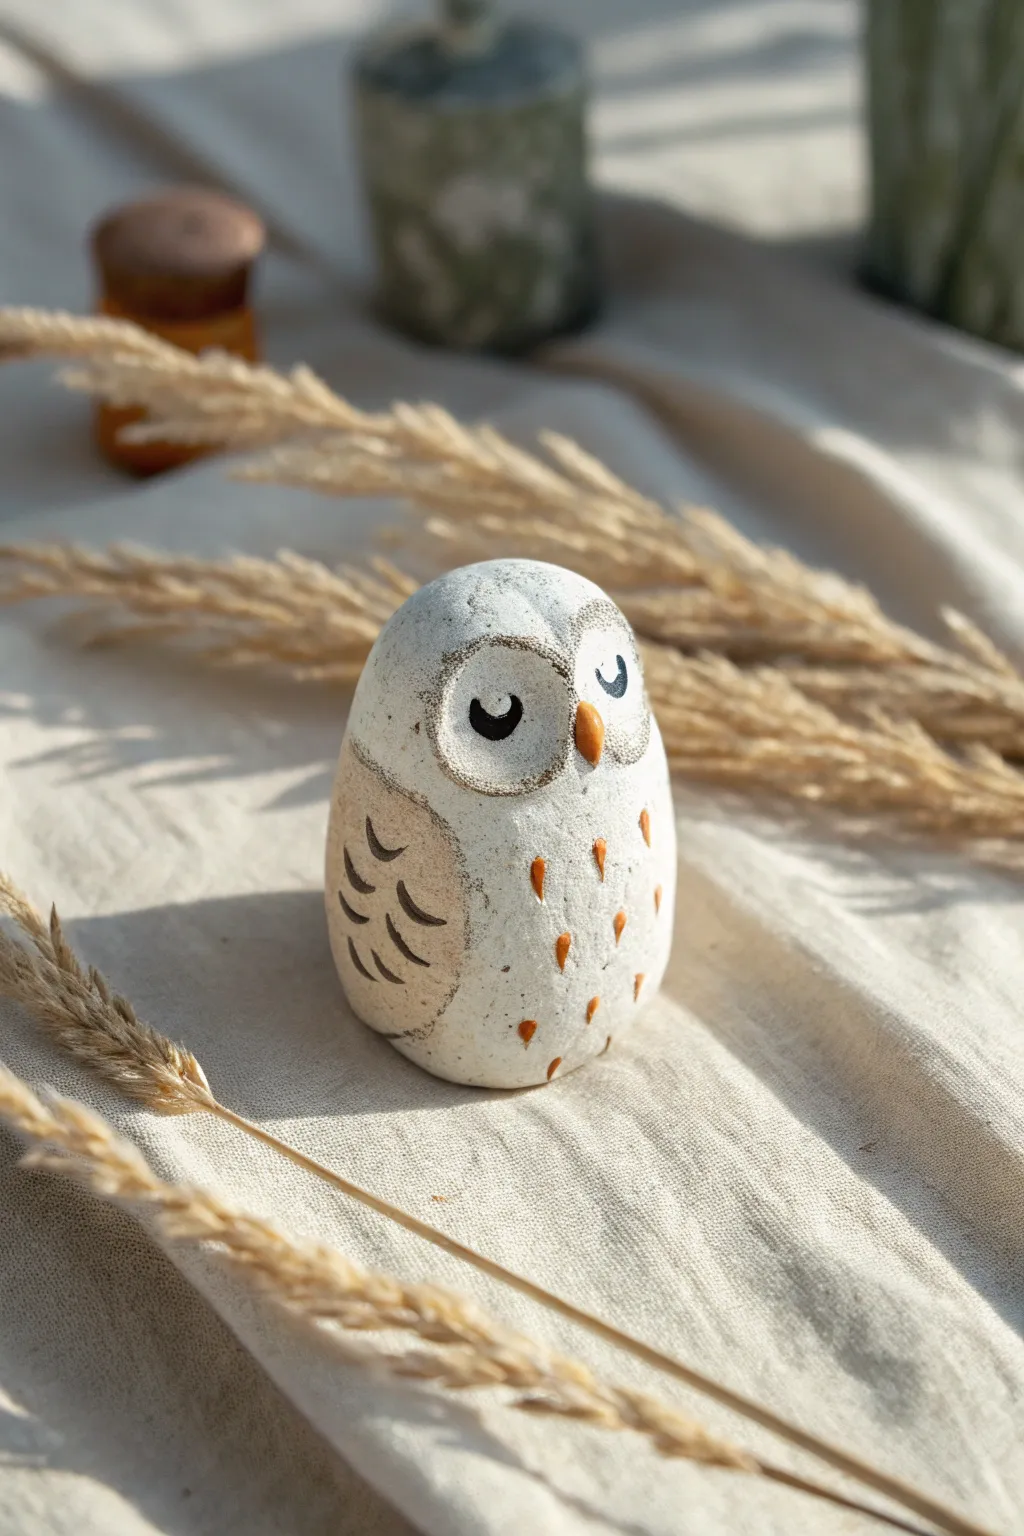
Craft a charming woodland companion with this simple yet delightful clay whistle project. This sleepy, snow-white owl features sweet painted details and a soothing, rounded form that fits perfectly in the palm of your hand.
Step-by-Step Tutorial
Materials
- White polymer clay or air-dry clay (stone texture preferred)
- Clay sculpting tools (specifically a needle tool and a small loop tool)
- Popsicle stick or flat modeling tool
- Acrylic paints (Black, Orange, Warm Brown)
- Fine detail paintbrush
- Small piece of paper or cardstock
- Sandpaper (fine grit)
- Matte varnish or sealant
Step 1: Forming the Whistle Body
-
Shape the Base:
Begin with a ball of clay about the size of a tangerine. Roll it until smooth, then gently gentle taper the top slightly to create an egg-like shape, but keep the bottom flat so it stands on its own. -
Create the Pinch Pot:
Hold the egg shape in your non-dominant hand. Press your thumb into the bottom center to create a hollow opening, pinching the walls evenly as you rotate the clay. You want a hollow interior with walls about 1/4 inch thick. Leave the top dome intact. -
Close the Base:
Once the interior is hollowed out, carefully close up the bottom hole by pinching the clay back together or adding a thin slab over the opening. Smooth the join completely so the air is trapped inside.
Clear Sound Secret
The sharper the ‘splitting edge’ on your whistle window, the clearer the sound. Take extra time cleaning this edge with a craft knife before drying.
Step 2: Creating the Whistle Mechanism
-
Cut the Airway:
Choose the back side of your owl (about halfway up). Use a square-edged tool or popsicle stick to slice a small rectangular block out of the clay wall. This creates the ‘fipple’ or window. -
Form the Mouthpiece:
Shape a small rectangular piece of clay and attach it firmly to the back of the owl, leading up to the window you just cut. This will be the mouthpiece. -
Create the Air Channel:
Insert a flat tool (like a popsicle stick) through the mouthpiece and push it straight toward the window. The goal is to direct the air to hit the sharp edge of the window exactly. -
Refine the Splitting Edge:
The bottom edge of your window needs to be sharp. Use your needle tool to carefully bevel this edge at a 45-degree angle. This sharpness splits the air and creates the sound. -
Test the Sound:
Before sculpting details, blow gently through the mouthpiece. If it hisses, adjust the angle of the air channel slightly until you get a clear tone. I find small adjustments make a huge difference here.
No Sound?
If you only hear rushing air, the airway is likely blocked or misaligned. Re-insert the stick and ensure the airflow hits the exact center of the sharp edge.
Step 3: Sculpting Owl Details
-
Refine the Shape:
Smooth out the connection between the mouthpiece and body so it looks like a natural tail feather extension or blends into the round body. -
Define the Eyes:
On the front face, use a loop tool or the back of a pen to gently press two large circles side-by-side for the eye sockets. They should be shallow indentations. -
Add Texture:
If your clay isn’t already textured, you can lightly tap the surface with a stiff toothbrush or a textured stone to give it that natural, stony appearance. -
Dry or Bake:
Follow the manufacturer’s instructions for your specific clay. Ensure it is fully cured or dry before starting any painting.
Step 4: Painting and Finishing
-
Base Coat (Optional):
If your clay isn’t naturally white, apply a coat of matte white or off-white acrylic paint over the entire piece. Let it dry completely. -
Paint the Sleeping Eyes:
Using a fine detail brush and black paint, draw two downward-curving crescents (U-shapes) in the center of the eye indentations to create the sleepy eyelids. -
Add the Beak:
Paint a small, inverted orange triangle right between the eyes. Keep the edges crisp for a neat look. -
Outline the Eyes:
Mix a very watery brown paint. Carefully outline the circular eye indentations you pressed earlier. The wash should look faint and organic, not like a harsh line. -
Detail the Wings:
On the left and right sides, paint curved outlines for wings using a light brown or beige. Add three or four small black or dark brown curved strokes inside the wing area to suggest feathers. -
Add Chest Feathers:
Dab small, teardrop-shaped spots of orange paint scattered across the owl’s white chest. Vary their spacing slightly for a natural look. -
Seal:
Finish with a matte varnish to protect the paint without making the owl look shiny or plastic.
Enjoy the gentle hoot of your new handmade friend nestled on your shelf