If you love making cute things that actually get used, functional polymer clay is your best friend. I’m sharing my go-to ideas that solve little everyday problems while still letting you play with color, pattern, and texture.
Lightweight Statement Earrings
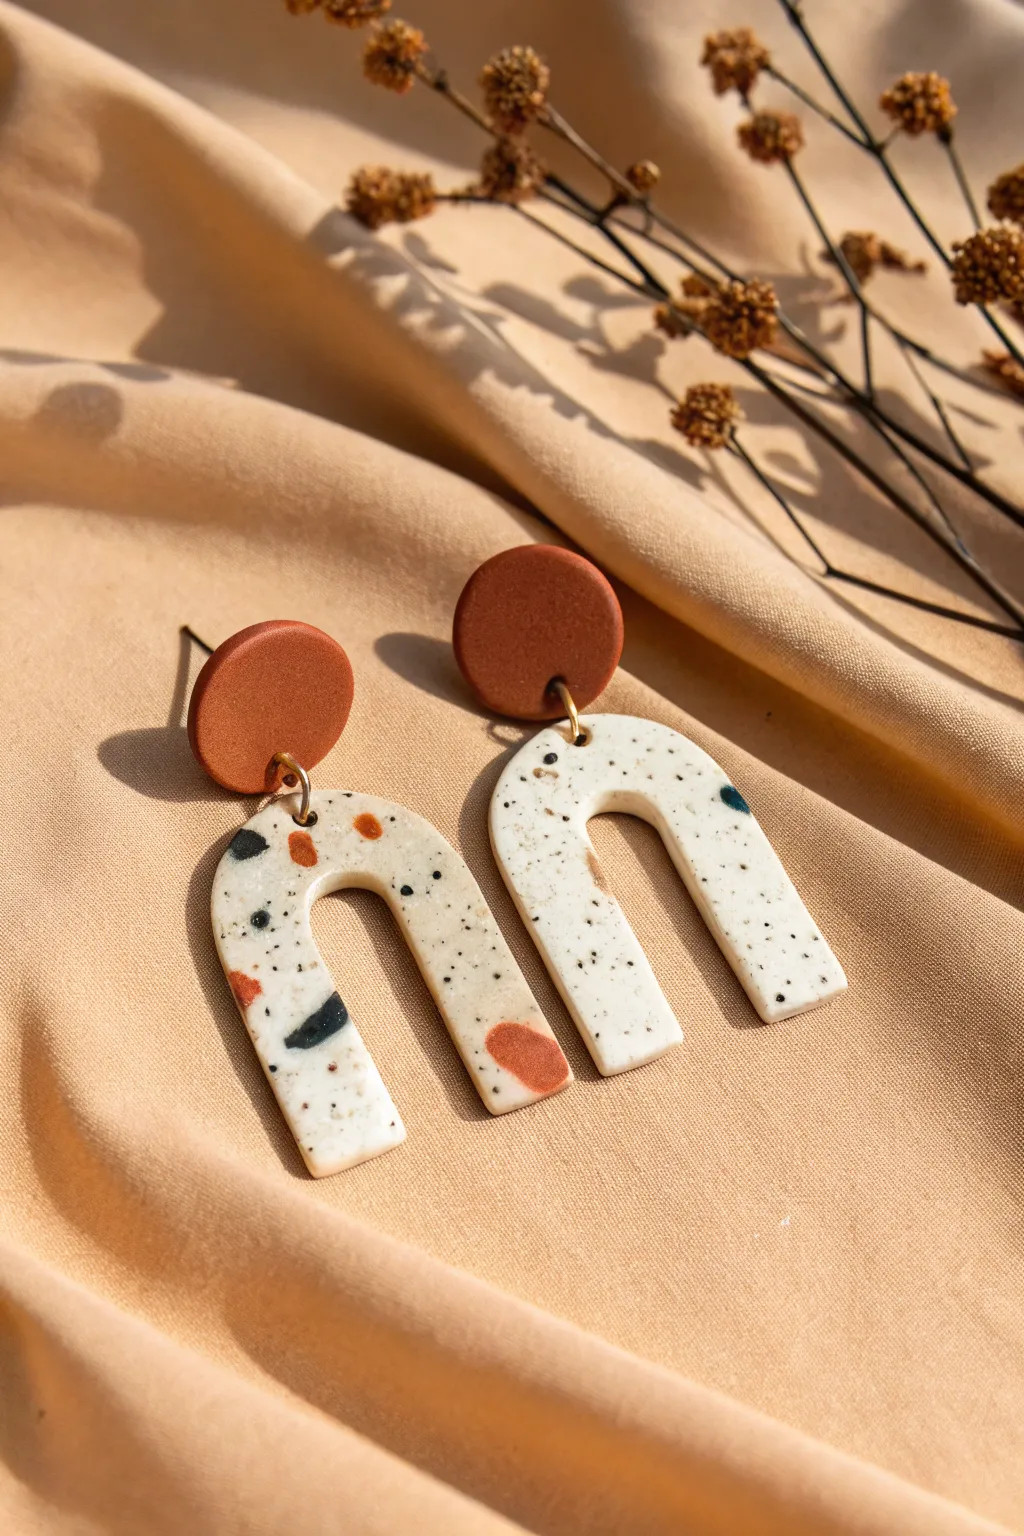
These lightweight statement earrings feature a warm terracotta stud paired with a classic terrazzo arch, blending speckled cream clay with pops of burnt orange and black. The organic shapes and earthy color palette make them a versatile accessory perfect for everyday wear or dressing up an outfit.
Detailed Instructions
Materials
- Polymer clay (terracotta, white, black, translucent, beige)
- Acrylic roller or pasta machine
- Tissue blade or X-Acto knife
- Circle clay cutter (approx. 10-12mm)
- U-shape or Arch clay cutter
- Needle tool or toothpick
- Parchment paper or ceramic tile
- 2 small jump rings (gold or brass)
- 2 earring posts and backs
- Jewelry pliers
- Super glue or liquid polymer clay (optional)
- Sandpaper (400-1000 grit) or buffing tool
Step 1: Preparing the Clay Slab
-
Condition the Base:
Begin by conditioning your white polymer clay. To achieve the speckled stone look seen in the photo, mix in a tiny amount of beige and translucent clay to soften the stark white color. -
Add Black Specules:
Finely grate or chop a very small amount of black clay into dust-like particles. Knead this into your cream base until the black specks are evenly distributed, resembling granite or pepper. -
Roll the Slab:
Roll your speckled cream clay into a slab approximately 3mm thick using an acrylic roller or the thickest setting on a pasta machine. -
Create Terrazzo Chips:
Take small pieces of terracotta, black, and perhaps a dark teal or sage clay. Roll them into very thin sheets, then use your blade to chop them into irregular, jagged confetti pieces. -
Apply the Chips:
Scatter the colored chips onto your cream slab. Aim for a random, organic pattern, leaving plenty of negative space so the background isn’t overwhelmed. -
Embed the Pattern:
Place a sheet of parchment paper over the slab and gently use your roller to press the chips flat into the base clay so the surface becomes smooth again.
Sticky Situation
If clay sticks to your cutters, dip them in cornstarch or water before pressing down. This acts as a release agent and keeps your shapes crisp.
Step 2: Cutting and Baking
-
Cut the Top Studs:
Roll out a separate slab of plain terracotta clay, matching the thickness of your terrazzo slab. Use your small circle cutter to punch out two circles. -
Cut the Arches:
Using your U-shape cutter, punch out two arch shapes from the terrazzo slab you created earlier. Check that the pattern placement looks pleasing on each piece. -
Pierce Holes:
Use a needle tool to create a small hole at the very bottom edge of each terracotta circle and the top center of each terrazzo arch. Ensure the holes are large enough for your jump rings. -
Smooth Edges:
Before baking, gently run your finger dipped in a little cornstarch or water around the edges of the cut shapes to smooth out any rough seams. -
Initial Bake:
Place your clay pieces on a ceramic tile or baking sheet lined with parchment paper. Bake according to your brand’s package instructions—usually around 275°F (135°C) for 30 minutes.
Gloss It Up
For a ceramic look, coat the baked and sanded pieces with a thin layer of UV resin or glossy polyurethane varnish to make the terrazzo colors pop.
Step 3: Finishing and Assembly
-
Sand and Buff:
Once the pieces have fully cooled, use wet sandpaper to smooth the edges and surface. This step is crucial for the terrazzo effect, as it helps reveal the crisp edges of the embedded chips. -
Drill Holes (If Needed):
If your pre-made holes shrunk during baking, carefully re-drill them using a hand drill or pin vise. -
Attach Earring Posts:
Glue the flat pad of the earring post to the back of the terracotta circle studs. For extra durability, I sometimes add a tiny drop of liquid clay over the pad and bake again briefly to seal it in. -
Assemble with Jump Rings:
Open a jump ring by twisting the sides apart with two pairs of pliers. Thread it through the hole in the arch and the corresponding hole in the stud. -
Close the Ring:
Twist the jump ring back into a closed position, ensuring the ends meet perfectly so the connection is secure. -
Final Polish:
Give the earrings a quick rub with a denim cloth or soft fabric to remove any fingerprints and bring out a slight sheen.
You now have a beautiful pair of custom earrings ready to make a statement


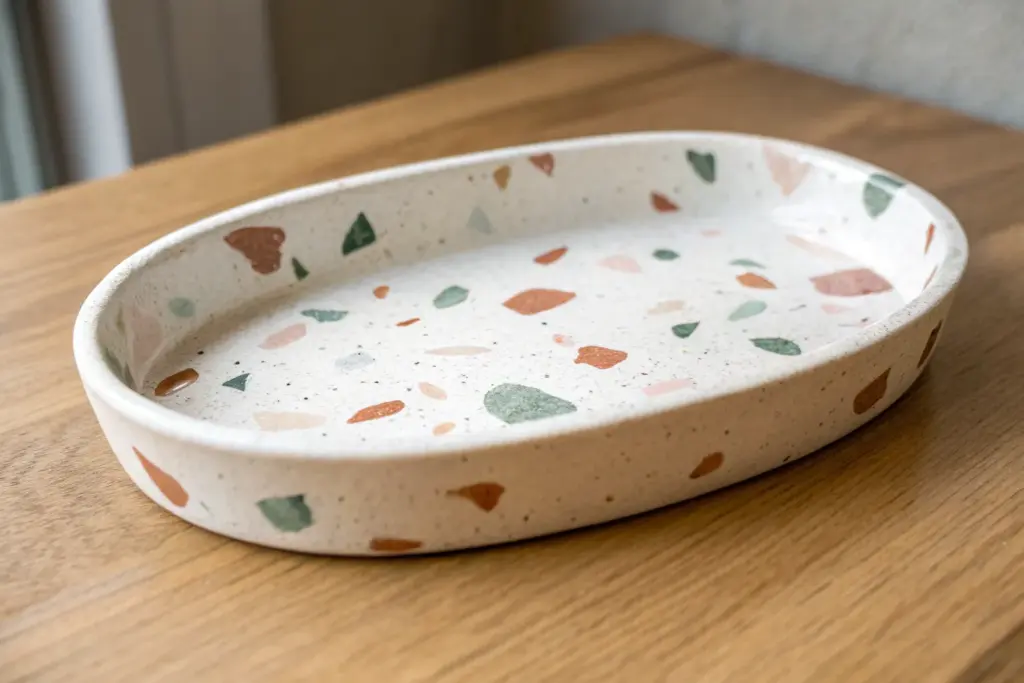
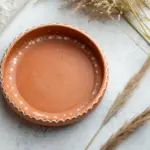
Terrazzo Trinket and Ring Dish
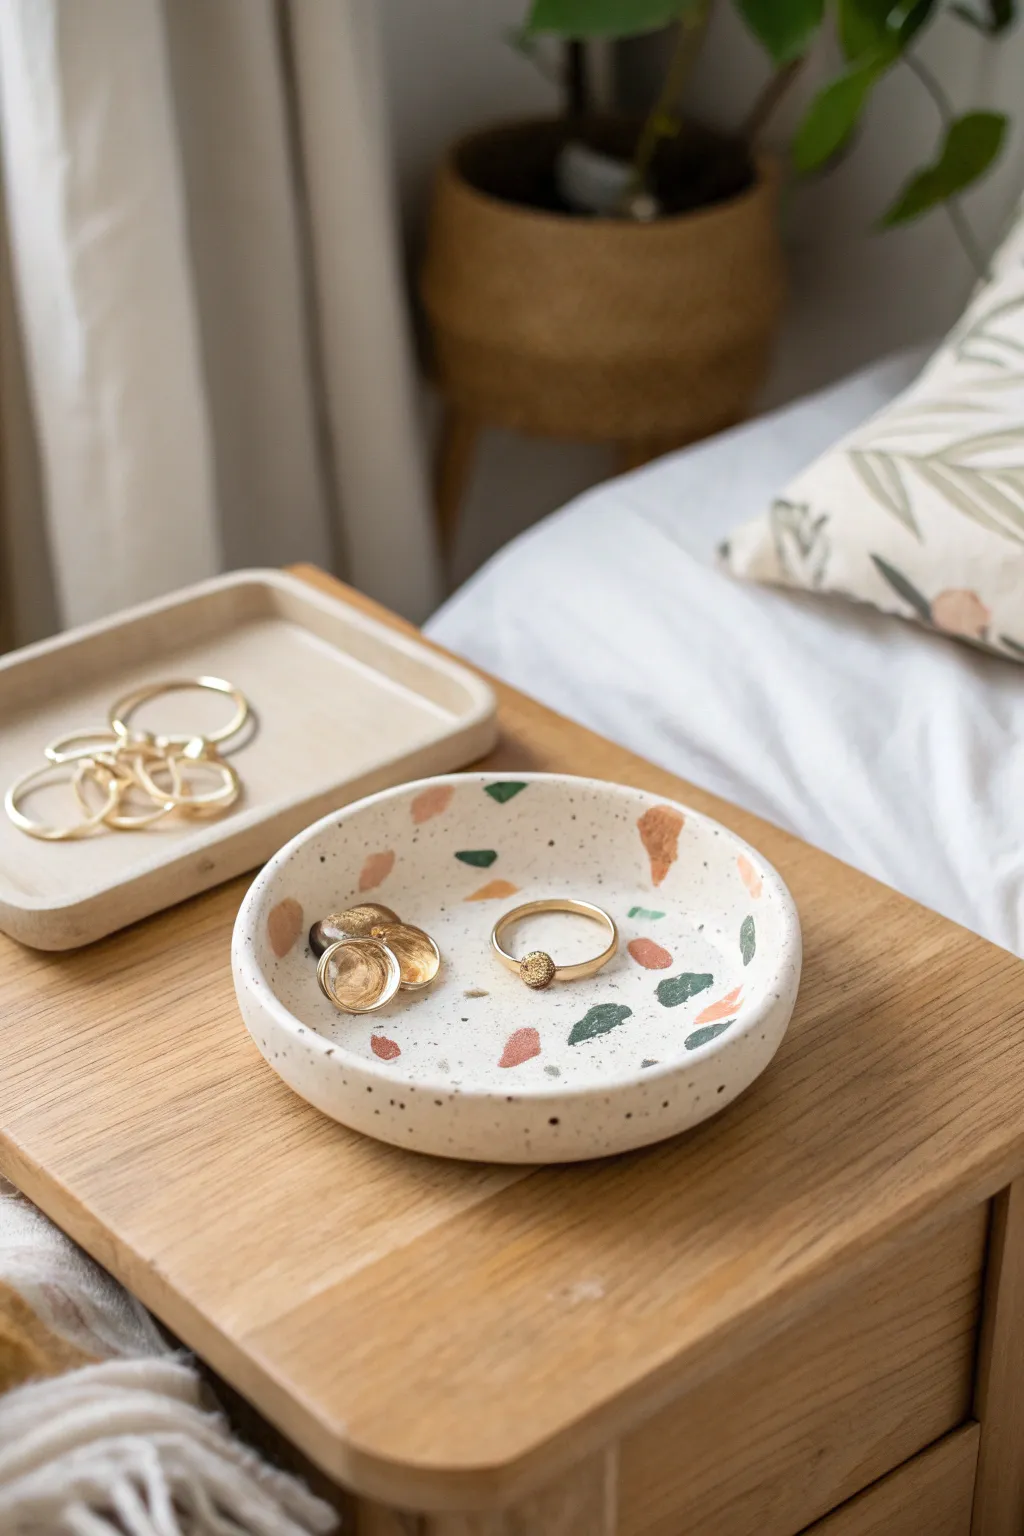
Capture the trendy, architectural look of real terrazzo without the heavy stonework using this simple polymer clay technique. This chic circular dish features a crisp white base dotted with organic fragments of earthy coral, deep green, and black, perfect for holding your favorite rings and studs.
How-To Guide
Materials
- Polymer clay (White, Coral/Terracotta, Deep Green, Black)
- Acrylic rolling pin or clay machine
- Circle cookie cutter (approx. 4-5 inches)
- Blade or X-Acto knife
- Oven-safe bowl (for shaping)
- Parchment paper
- Fine-grit sandpaper (400 to 1000 grit)
- Polymer clay varnish or matte glaze (optional)
- Soft brush
Step 1: Preparing the Terrazzo Chips
-
Condition the colors:
Start by conditioning your colored clays—the coral, deep green, and black—until they are soft and pliable. You don’t need much of each color relative to the white base. -
Flatten the colors:
Roll each colored piece of clay into a very thin sheet. The thinner these sheets are, the more delicate your final terrazzo chips will look. -
Bake the sheets:
Place these thin colored sheets on a baking tray lined with parchment paper. Bake them for about 10–15 minutes according to your package directions. We want them hard enough to chop up into distinct shards. -
Cool and crumble:
Once baked and fully cooled, use your fingers to crumble the sheets or a blade to chop them into irregular, angular fragments. Aim for a mix of sizes for a natural stone look.
Step 2: Creating the Base
-
Condition the white clay:
While your chips are cooling, thoroughly condition a large block of white polymer clay until it is smooth and free of air bubbles. -
Roll out the slab:
Roll the white clay into a thick slab, approximately 1/4 inch thick. This will be the main body of your dish. -
Apply the chips:
Scatter your pre-baked colored chips generously over the white clay slab. I like to press them down gently with my fingers first to ensure they stick before rolling. -
Embed the pattern:
Using your acrylic roller, roll over the slab again with firm pressure. This forces the hard chips into the soft white clay, creating a flush surface. -
Roll to final thickness:
Continue rolling until the surface is smooth and the chips are fully integrated. The slab should end up slightly thinner than before, but still sturdy.
Clean Slate Trick
Keep baby wipes or rubbing alcohol nearby to clean your hands and roller between colors. White clay picks up lint and dust easily, so work on a spotless surface.
Step 3: Shaping and Finishing
-
Cut the circle:
Place your large circle cutter onto the patterned slab and press down firmly to cut out your dish shape. Remove the excess clay from around the edges. -
Smooth the edges:
Run your finger gently around the rim of the circle to smooth out any sharp cutting lines or drag marks. -
Form the curve:
Gently drape your clay circle inside an oven-safe bowl. Ensure it is centered so the curve is even on all sides. Press gently so it takes the bowl’s shape. -
Final bake:
Place the bowl with the clay inside into the oven. Bake for the full duration recommended by the clay manufacturer (usually 30–45 minutes) to ensure durability. -
Cool down:
Let the dish cool completely inside the bowl before attempting to pop it out to prevent warping. -
Sand for stone effect:
Once cool, use wet sandpaper to sand the surface. This removes the thin layer of white clay over the chips, making the colors pop vividly. -
Seal (optional):
If you prefer a glossy finish or want extra protection, apply a thin coat of matte or satin varnish using a soft brush.
Chips Won’t Stick?
If the baked chips keep popping out while rolling, your white base clay might be too dry. Try rolling the slab slightly thicker initially so the chips have more depth to sink into.
Place your new dish on your nightstand to add a modern, artistic touch to your daily routine


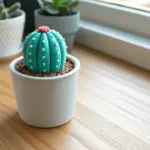
Ring Cone Jewelry Stand
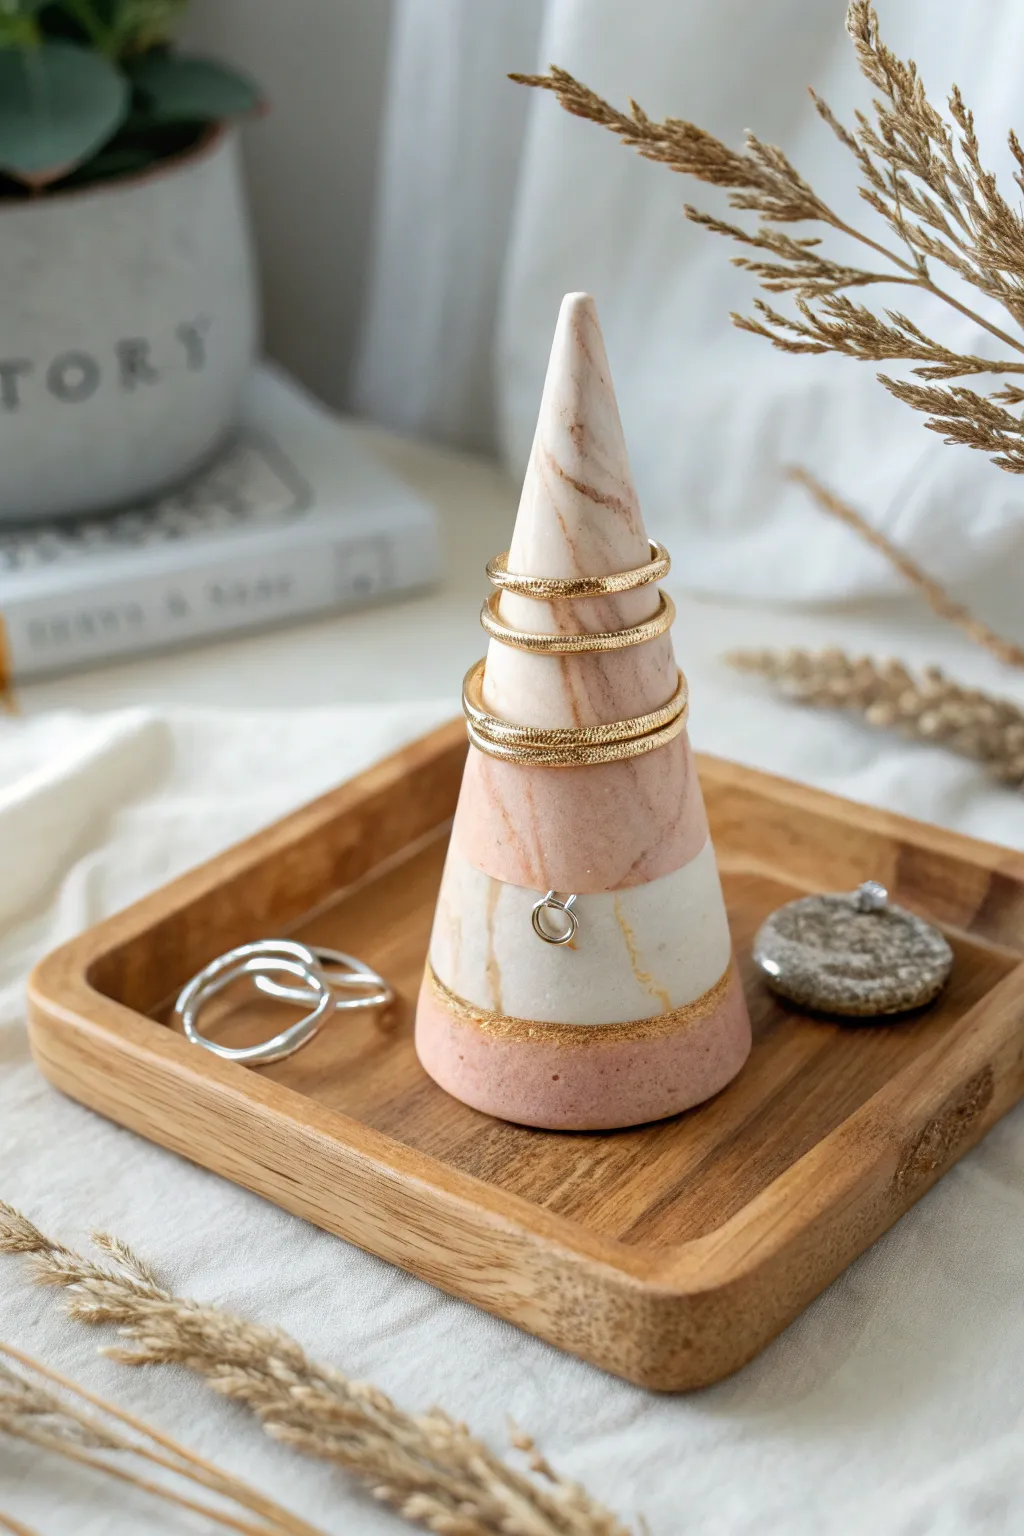
Showcase your favorite rings with this elegant cone stand that perfectly mimics the look of high-end pink marble. The gold leaf detailing adds a luxurious touch, making it a functional piece of art for your vanity.
Detailed Instructions
Materials
- Polymer clay (translucent white, granite/speckled beige, and dusty pink)
- Gold leaf sheets
- Gold leaf adhesive (sizing)
- Small soft brush
- Rolling pin or acrylic roller
- Clay blade or craft knife
- Gloss glaze or varnish
- Cardstock paper
- Tape
Step 1: Marbling the Clay
-
Condition the Clay:
Begin by thoroughly conditioning your three colors of polymer clay—translucent white, granite beige, and dusty pink—until they are soft and pliable. You’ll want roughly equal parts of the white and pink, but use slightly less of the beige to keep the pattern delicate. -
Create Snakes:
Roll each color into long, thin snakes, about 5 inches long and 1/4 inch thick. -
Twist Together:
Group the snakes together in a bundle and twist them tightly, like you are wringing out a towel, to start combining the colors. -
Fold and Roll:
Fold the twisted log in half, roll it back into a single log, and twist again. Repeat this process 4-5 times. -
Check the Pattern:
Stop manipulating the clay once you see thin, organic streaks of color running through the white. Be careful not to over-mix, or the colors will muddy into a single shade. -
Form a Ball:
Once satisfied with the marbling, roll the clay into a smooth, seamless ball to prepare it for shaping.
Step 2: Shaping the Cone
-
Start the Cone Shape:
Place the ball on your work surface and begin rolling it back and forth using the palm of your hand, applying more pressure to one side to create a tapered carrot shape. -
Refine the Height:
Stand the cone upright and gently press down on the base to flatten it. Use your fingers to smooth the sides upward, refining the point at the top. -
Smooth the Surface:
Inspect the cone for any fingerprints. I find that lightly rolling the cone on a smooth piece of paper helps remove texture marks without distorting the shape. -
Slice the Base:
For a perfectly flat bottom, use your clay blade to slice a thin layer off the base of the cone. This ensures it won’t wobble on your tray. -
Insert Support (Optional):
If your cone is tall (over 3 inches), you can insert a toothpick through the bottom center to provide internal stability during baking. -
Bake:
Bake the cone according to your clay manufacturer’s instructions, usually at 275°F (130°C) for 15-30 minutes depending on thickness. -
Cool Down:
Allow the piece to cool completely inside the oven or on a wire rack before moving to the decoration phase.
Stone Texture Trick
Mix a tiny pinch of black pepper or dried used coffee grounds into your white clay before marbling. It adds realistic speckling that mimics real granite.
Step 3: Adding Gold Accents
-
Apply Adhesive:
Using a small brush, paint a thin, irregular stripe of gold leaf adhesive around the bottom third of the cone. You can also add tiny dabs near the tip for extra sparkle. -
Wait for Tacky Stage:
Let the adhesive sit for about 10-15 minutes until it becomes tacky but not wet. -
Apply Gold Leaf:
Gently press a sheet of gold leaf onto the sticky areas. Don’t worry about being neat; the organic, jagged edges look more natural. -
Brush Off Excess:
Use a clean, dry soft brush to buff the gold leaf, removing the looser flakes that didn’t stick to the adhesive. -
Seal the piece:
Apply a coat of gloss glaze over the entire cone to protect the gold leaf and give the faux stone a polished, realistic shine.
Fixing Fingerprints
If you notice fingerprints after baking, lightly sand the cone with fine-grit sandpaper (400+) under running water, then buff it with a soft cloth.
Now you have a chic organizer ready to hold your daily jewelry rotation


Personalized Keychain or Bag Tag
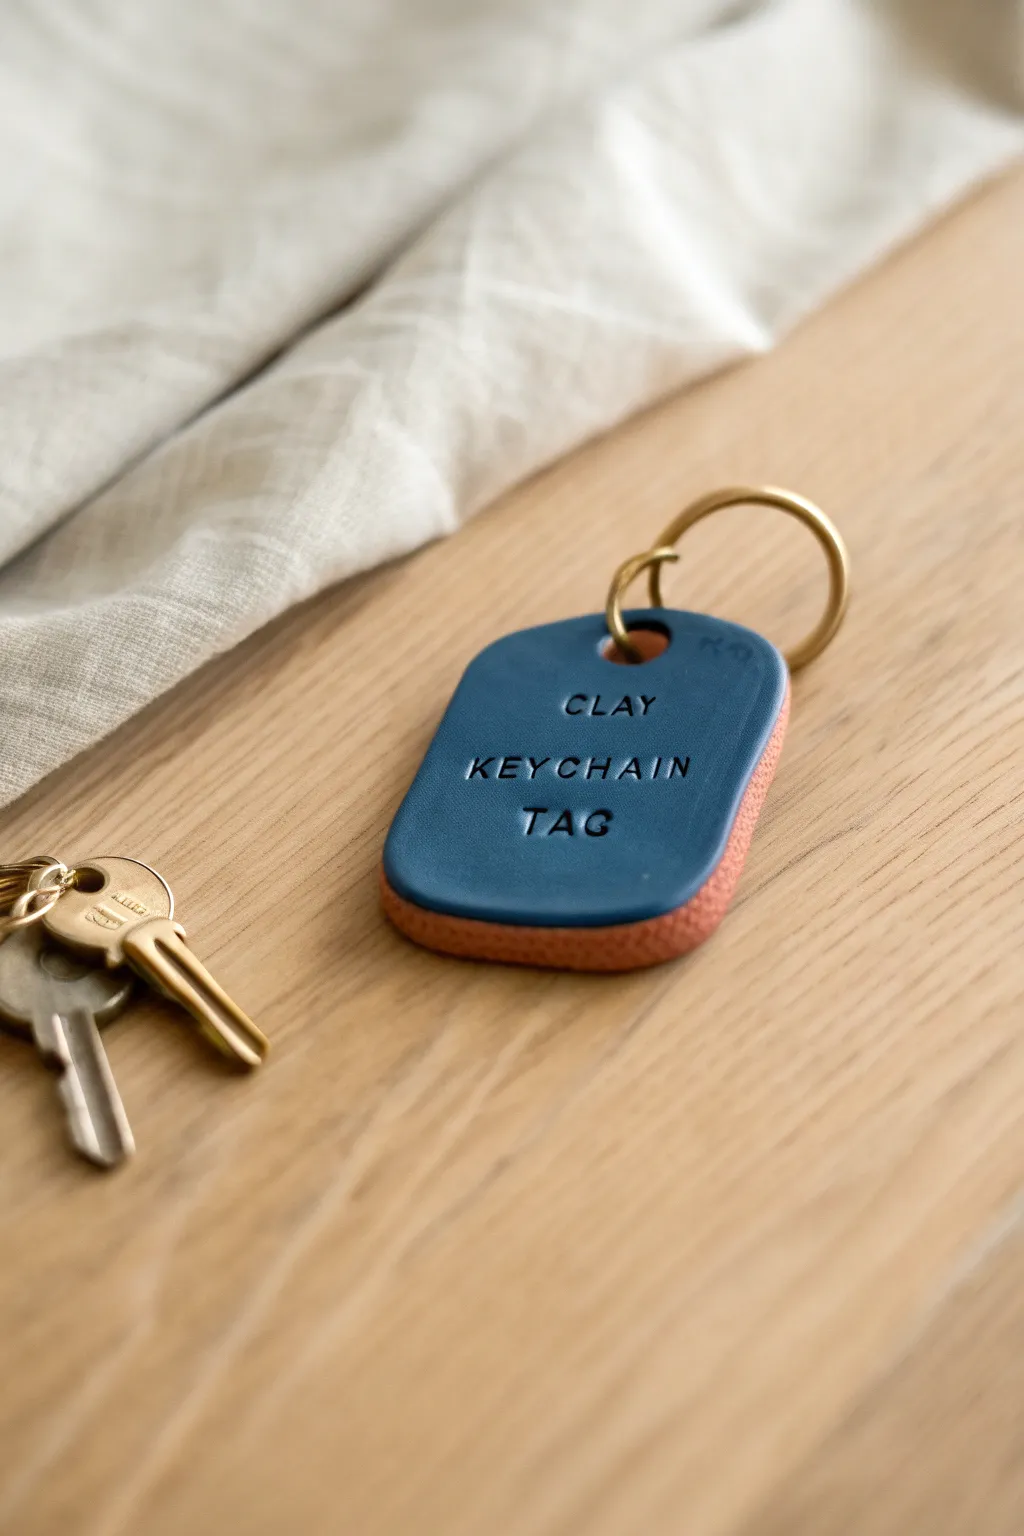
Create a sleek, minimalist keychain that looks professionally made but comes together right in your home oven. This dual-tone tag features a rich terracotta base topped with a smooth blue face, finished with crisp stamped lettering.
How-To Guide
Materials
- Polymer clay in blue (navy or teal) and terracotta/brick red
- Rolling pin or pasta machine
- Rectangular clay cutter with rounded corners (approx. 1.5″ x 2″)
- Small circular cutter or straw (for the hole)
- Letter stamp set (small font)
- Sandpaper (fine grit)
- Gold split ring keychain hardware
- Clean work surface (tile or glass mat)
- Parchment paper or baking tray
- Oven
Step 1: Preparing the Layers
-
Condition the base clay:
Start with the terracotta-colored clay. Knead it thoroughly in your hands until it becomes soft, pliable, and free of cracks. -
Roll the base thickness:
Roll the terracotta clay out into a sheet. Aim for a thickness of about 4mm or slightly more than 1/8 inch, as this will provide the structural strength for the keychain. -
Condition the top clay:
Clean your hands or switch rollers to avoid color transfer, then condition the blue clay just like the terracotta. -
Roll the top layer:
Roll the blue clay out much thinner than the base, aiming for roughly 1-2mm thickness. This is just a veneer for the color. -
Stack the layers:
Carefully place the thin blue sheet on top of the thicker terracotta sheet. I like using a roller gently over the combined stack to bond them together without distorting the shape too much.
Clean Imprints
Dust your letter stamps lightly with cornstarch before pressing them into the clay. This prevents the stamps from sticking and pulling up the clay when you remove them.
Step 2: Shaping and Stamping
-
Cut the main shape:
Position your rectangular cutter over a section that is free of air bubbles. Press down firmly and evenly to cut through both layers at once. -
Smooth the edges:
Gently lift the tag from your work surface. Use your fingertip to lightly smooth the cut edges, blurring the seam between the two colors slightly for a cohesive look. -
Add the hardware hole:
Use a small circular cutter or a sturdy straw to punch a hole at the top left corner (or your preferred spot). Make sure it’s not too close to the edge to prevent tearing. -
Plan your text:
Before stamping, lay out your letter stamps on the table to check spelling. Practice pressing them into a throwaway scrap of clay first to gauge how hard you need to push. -
Stamp the design:
Press the letters into the blue surface of your tag. For this design, center the words ‘CLAY’, ‘KEYCHAIN’, and ‘TAG’ in three separate lines. -
Refine the surface:
If the stamping caused any slight bulging around the letters, very gently tap it down with a flat acrylic block or your finger.
Uneven Stacking?
If air bubbles appear between your clay layers, pierce the bubble with a needle tool and gently smooth the air out with your finger before cutting your final shape.
Step 3: Baking and Assembly
-
Prepare for baking:
Place the tag on a parchment-lined baking sheet or a ceramic tile. -
Bake the clay:
Bake according to your specific brand’s package instructions. Usually, this is around 275°F (135°C) for 30 minutes per 1/4 inch of thickness. -
Cool down:
Allow the tag to cool completely in the oven with the door cracked, or remove and let sit at room temperature. Do not handle it while hot as polymer clay is fragile until cool. -
Sand the edges:
Once fully cooled, take a piece of fine-grit sandpaper and gently run it along the outside edges to remove any sharp bits or cutting residues. -
Clean the surface:
Wipe the tag with a slightly damp cloth to remove any sanding dust. -
Attach hardware:
Thread a small jump ring through the hole you punched earlier, then attach the larger gold split ring.
Now you have a custom, durable accessory ready to organize your keys with style

What Really Happens Inside the Kiln
Learn how time and temperature work together inside the kiln to transform clay into durable ceramic.
Patterned Hair Clip Topper
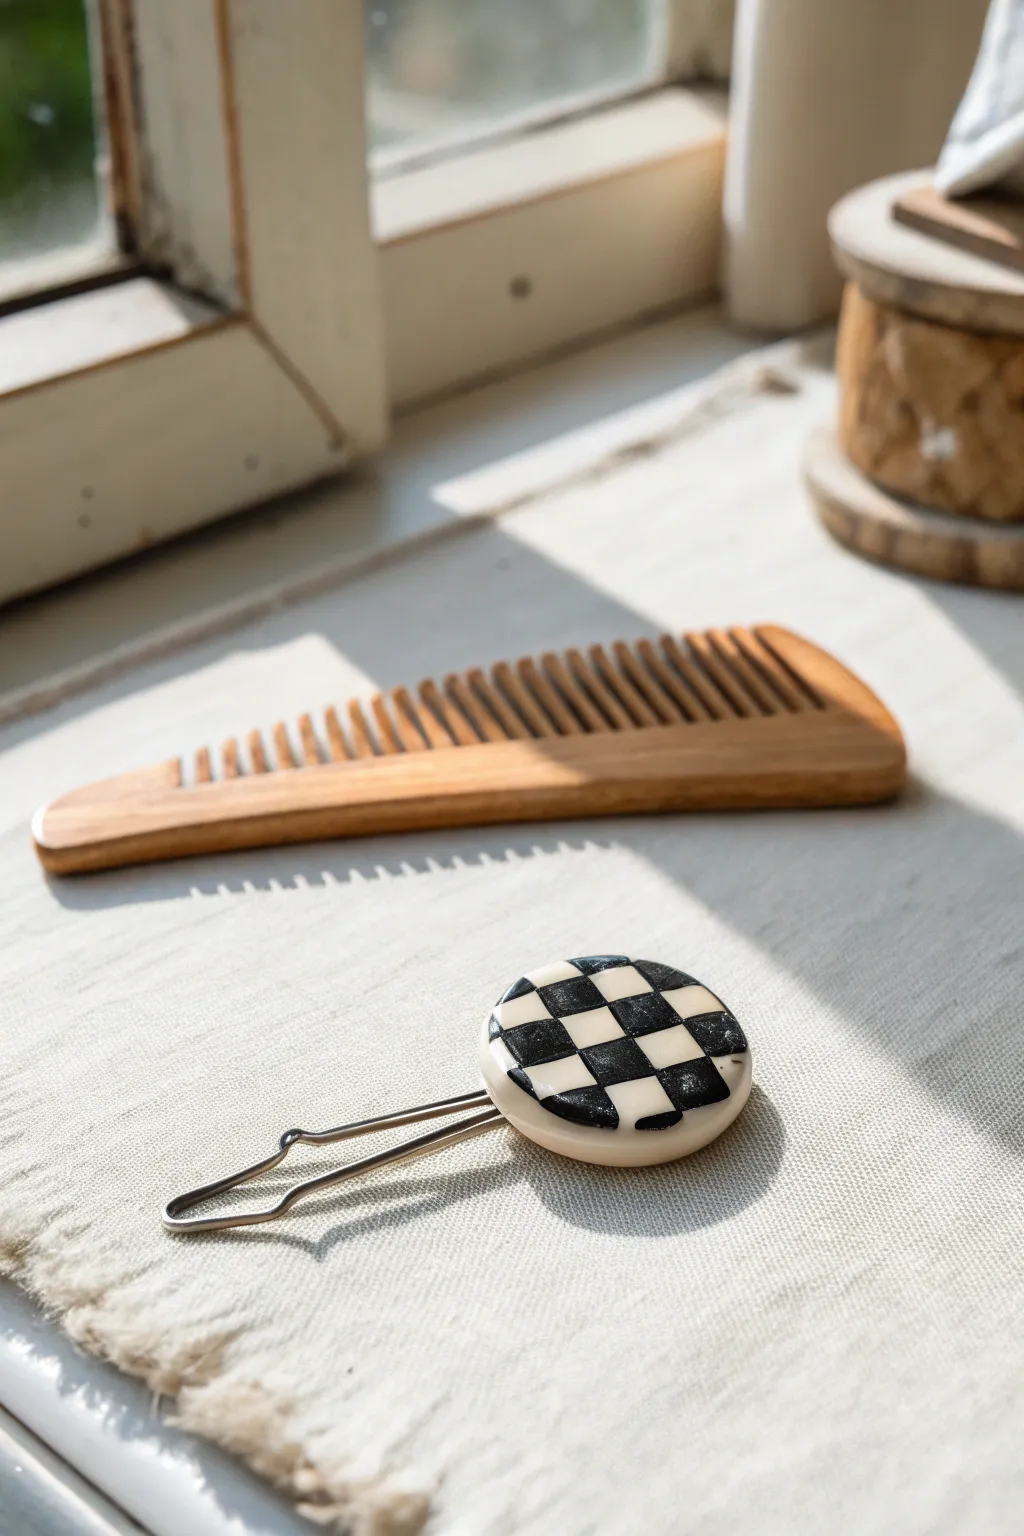
Add a touch of retro flair to your hairstyle with this classic black and white checkerboard hair clip. This functional polymer clay project transforms a simple metal finding into a stylish accessory that looks effortlessly cool.
Step-by-Step Tutorial
Materials
- White polymer clay
- Black polymer clay
- Circular metal hair clip blank (or bobby pin with pad)
- Clay blade or craft knife
- Rolling pin or pasta machine
- Small round cutter (approx. 1 inch)
- Ruler or grid mat
- Super glue or E6000 adhesive
- Oven for baking
- Sandpaper (optional)
- UV resin or gloss glaze (optional)
Step 1: Prepping the Base
-
Condition the clay:
Begin by thoroughly conditioning both the white and black polymer clay separately until they are soft and pliable. This prevents cracks and makes blending easier later on. -
Create even sheets:
Roll out a portion of the white clay and the black clay into flat sheets of equal thickness. A pasta machine on a medium setting works best here, but a rolling pin with guide rings works beautifully too.
Clean Cuts Only
Chill your clay block in the fridge for 15 minutes before swaying slices. Firm clay resists squishing, keeping your checkerboard lines crisp and straight.
Step 2: Creating the Checkered Cane
-
Cut strips:
Using your blade and a ruler, cut several long, straight strips from both the white and black sheets. These strips should be rectangular and identical in width and height. -
Stack the first layer:
Lay a white strip on your work surface. Place a black strip directly next to it, pressing them gently together so they adhere without distorting the shape. Repeat this alternating pattern (white, black, white, black) until you have a flat striped sheet. -
Cut cross-sections:
Slice across your newly made striped sheet to create multiple striped bars. The width of these slices should match the initial thickness of your strips to ensure creating squares, not rectangles. -
Assemble the checkerboard:
Take one stripe bar and lay it down. Take a second bar and place it on top of the first, but offset the colors so that black sits on top of white and white sits on top of black. -
Build the stack:
Continue stacking the striped bars, always alternating the alignment, until you have a block that reveals a checkerboard pattern on the end face. -
Consolidate the cane:
Gently press the block together from all four sides to close any air gaps between the squares. I like to be very gentle here to keep the grid lines straight.
Warped Illusion
After stacking the block, gently twist it before slicing the veneer. This creates a trippy, distorted checkerboard effect for a more psychedelic aesthetic.
Step 3: Shaping and Baking
-
Slice a veneer:
Use your sharpest blade to slice a thin, even veneer from the end of your checkerboard block. -
Prepare the backing disc:
Roll out a plain sheet of white clay (about 3mm thick) to serve as the structural base. -
Attach the pattern:
Place your checkerboard veneer onto the plain white backing sheet. Roll over it gently with an acrylic roller to fuse the two layers together smoothly. -
Cut the circle:
Position your round cutter over the pattern so the grid is aligned how you like it. Press down firmly to cut out your circle shape. -
Smooth the edges:
Use your fingertip to gently smooth the cut edges of the circle, softening any sharpness left by the cutter. -
Bake the piece:
Place the clay circle on a ceramic tile or baking sheet. Bake according to your brand of clay’s specific instructions (usually around 275°F/135°C for 15-30 minutes).
Step 4: Assembly
-
Cool and finish:
Allow the piece to cool completely. If you want a glossy finish like the inspiration photo, apply a thin layer of UV resin or polymer clay glaze now, or sand it for a matte look. -
Sand the back:
Lightly sand the back of the clay circle and the metal pad of the hair clip to create a textured surface for better adhesion. -
Glue the clip:
Apply a dot of strong adhesive (like E6000) to the clip pad and press it firmly onto the back of the clay circle. -
Final cure:
Let the glue cure fully according to the manufacturer’s directions (often 24 hours) before wearing your new accessory.
Enjoy styling your hair with this custom handmade piece that blends geometric precision with everyday function
Beaded Bracelet With Custom Shapes
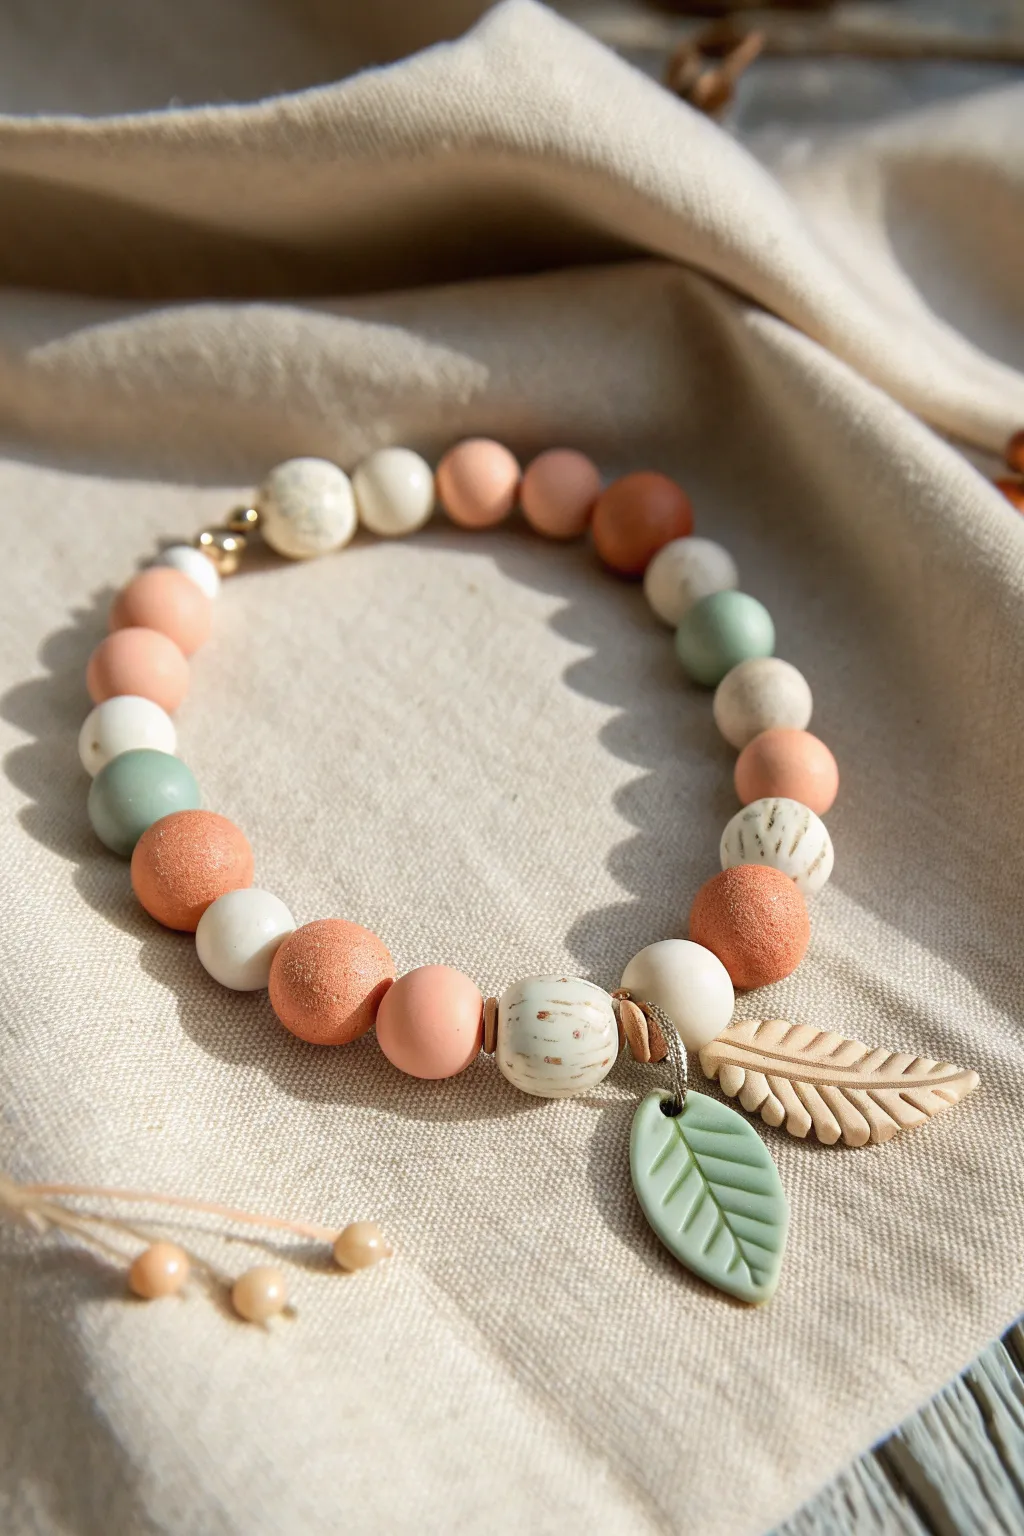
This earthy, bohemian bracelet combines handcrafted polymer clay beads in soft peach, sage, and terracotta tones with custom-sculpted leaf charms. The mix of smooth, speckled, and textured surfaces gives the piece a sophisticated, organic feel that looks professional yet handmade.
Step-by-Step Guide
Materials
- Polymer clay (peach, terracotta, sage green, white, beige/translucent mix)
- Acrylic rolling pin or clay conditioning machine
- Small round bead roller (optional but helpful)
- Needle tool or toothpick
- Coarse sandpaper or a texture sponge
- Leaf-shaped clay cutters (small) or craft knife
- Small jump rings (gold or silver)
- Elastic jewelry cord (0.8mm)
- Jewelry glue (e.g., E6000)
- Gold spacer beads (optional)
- A baking sheet and parchment paper
- Oven
Step 1: Prepping and Mixing Colors
-
Condition the clay:
Begin by conditioning all your clay colors separately. Knead them in your warm hands until they are soft and pliable. This prevents cracks later on. -
Create custom shades:
Mix a small amount of white into your peach and sage green to create softer, pastel versions. For the ‘speckled’ white beads, you can mix in a tiny pinch of black pepper or dried coffee grounds into white clay for an organic look.
Clean Piercing Tip
To prevent bead distortion, let the raw clay beads sit in the fridge for 15 minutes before piercing. The firmer clay holds its round shape much better against the pressure of the tool.
Step 2: Forming the Beads
-
Measure the clay:
Roll your clay into logs of equal thickness. Slice uniform segments from each color log to ensure your beads will be roughly the same size. -
Roll spheres:
Roll each segment between your palms to form smooth spheres. Using a bead roller here ensures perfect uniformity, but hand-rolling works well for a more organic feel. -
Add texture:
Select a few of the terracotta and white beads to be textured. Gently roll these specific beads over coarse sandpaper or dab them with a stiff texture sponge to create a pitted, stone-like surface. -
Pierce the beads:
Use a needle tool to poke holes through the center of every bead. I find it helps to twist the needle as you push it through to avoid squashing the spherical shape.
Step 3: Sculpting the Leaf Charms
-
Flatten the clay:
Roll out a small slab of sage green clay and a slab of beige clay to about 3mm thickness. -
Cut the shapes:
Use a small leaf cutter or a craft knife to cut out two leaf shapes. Smooth the edges of the cut clay with your finger to remove any sharp burrs. -
Detail the veins:
Take your needle tool or the back of a knife and gently press vein lines into the leaves. For the beige leaf, create a fern-like pattern; for the green leaf, simple diagonal veins work best. -
Add hanger holes:
Poke a hole at the top of each leaf stem, ensuring it is large enough for your jump rings to fit through later. -
Bake everything:
Arrange all your beads and charms on a parchment-lined baking sheet. Bake according to your brand of polymer clay instructions (usually 275°F/135°C for 15-30 minutes). Let them cool completely before handling.
Scent Diffuser Upgrade
Leave the textured terracotta beads unsealed after baking. You can add a drop of essential oil to them, effectively turning your jewelry into a wearable aromatherapy diffuser.
Step 4: Assembly
-
Plan your layout:
Lay out your cooled beads on a bead board or towel. Alternate colors and textures to create a pleasing pattern, mixing the smooth pastels with the textured terracotta beads. -
Attach the charms:
Open your jump rings with pliers. Thread one through the hole of the green leaf and another through the beige leaf. Loop these jump rings onto a larger central ring or directly onto the cord later. -
String the beads:
Cut a piece of elastic cord about 10 inches long. Thread your beads onto the cord. Add a few gold spacer beads near where you want the charms to hang for a touch of elegance. -
Add the focal point:
Thread the jump rings holding your leaf charms onto the cord between two contrasting beads. -
Tie the knot:
Pull the cord snug (but not too tight) and tie a strong surgeon’s knot. Add a tiny dot of jewelry glue to the knot for security. -
Hide the knot:
Once the glue is dry, trim the excess cord and gently pull the knot inside the hole of the nearest large bead to hide it.
Now you have a stunning, custom-made accessory ready to wear or gift to a friend


The Complete Guide to Pottery Troubleshooting
Uncover the most common ceramic mistakes—from cracking clay to failed glazes—and learn how to fix them fast.
Flexible Faux Leather Bookmark
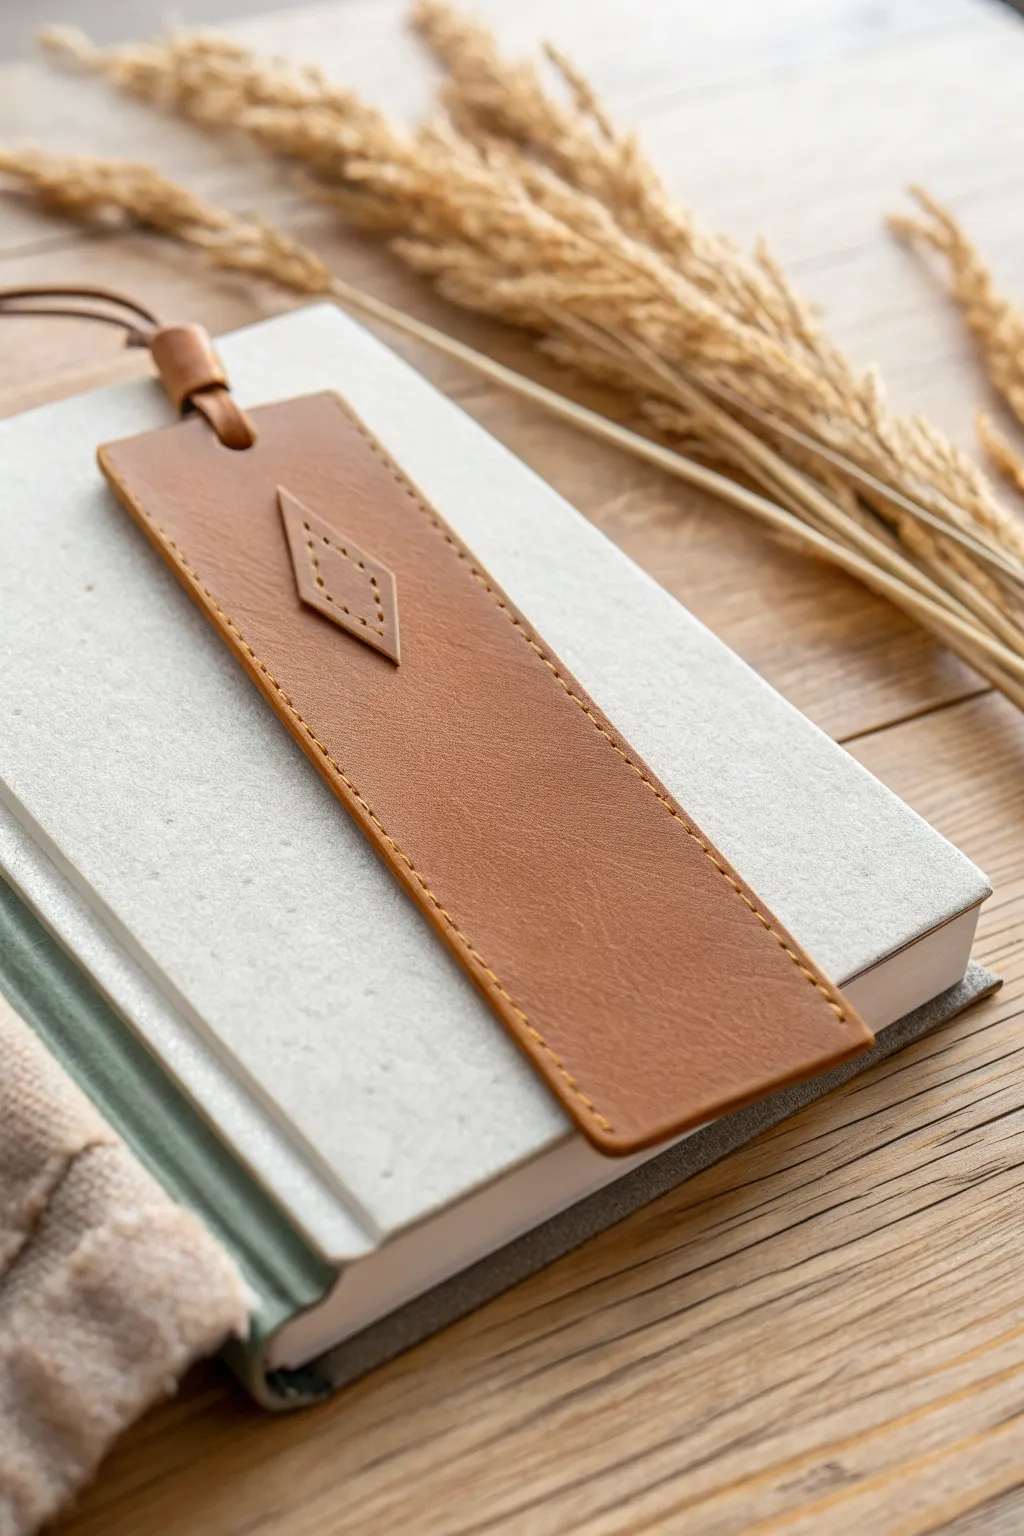
Transform polymer clay into a warm, rustic bookmark that looks and feels remarkably like real leather. This project utilizes a special technique to keep the baked clay flexible, making it perfect for marking your place without damaging delicate book spines.
Step-by-Step
Materials
- Cernit or Soufflé polymer clay (Caramel or Tan color)
- Fimo liquid gel or Sculpey Bake & Bond
- Rolling pin or pasta machine
- Texture sheet (leather grain) or scrunched aluminum foil
- Sharp blade or hobby knife
- Ruler
- Needle tool or awl
- Strong yellow-gold thread
- Sewing needle
- Leather cord or thonging
- Brown acrylic paint (Burnt Umber)
- Paper towel or baby wipes
- Sandpaper (fine grit)
Step 1: Preparation & Conditioning
-
Choose your clay:
Select a brand known for flexibility after baking, like Cernit or Sculpey Soufflé. Ordinary clay may be too brittle for a thin bookmark. -
Mix for flexibility:
Condition the clay thoroughly by kneading it warm. Here I like to mix in a few drops of liquid polymer clay (like Fimo Liquid) during conditioning; this changes the plasticizer ratio and ensures the final sheet remains pliable rather than snapping. -
Roll the sheet:
Roll your clay out into a long, even sheet. Aim for ‘medium-thin’—about 1.5mm to 2mm thickness. Too thick and it won’t sit flat in a book; too thin and it might tear during stitching.
Fixing Brittle Clay
If your baked strip snaps when bent, the clay wasn’t conditioned enough or the brand is too hard. Bake vertically in a prop next time to test flexibility.
Step 2: Texturing & Cutting
-
Apply leather texture:
Place your clay sheet on a work surface. Press a leather-grain texture sheet firmly over the clay. If you don’t have a texture tool, press a ball of scrunched-up aluminum foil repeatedly over the surface to create organic, wrinkled patterns. -
Measure the rectangle:
Use a ruler to mark out a rectangle approximately 1.5 inches wide by 6 inches long. -
Cut the shape:
With a sharp blade and your ruler as a guide, make clean, straight cuts to define the main body of the bookmark. -
Create the emblem:
From the scrap clay, cut a small diamond shape (rhombus). Texture it heavily to match the main piece. -
Attach the emblem:
Apply a tiny dot of liquid clay to the back of the diamond and press it firmly onto the upper third of the bookmark base. -
Punch the hole:
Use a small circle cutter or a drinking straw to punch a hole at the very top center for the leather cord later.
Pro Tip: Softening Effect
After baking while the clay is still warm, gently rub the surface with a tiny bit of baby oil. It removes the ‘chalky’ finish and deepens the clay color.
Step 3: Stitching Prep & Detail
-
Mark stitch lines:
Lightly impress a ‘stitching guide’ line about 2mm from the edge all around the perimeter using a ruler, just to help you keep holes straight. -
Pierce the holes:
Take your needle tool or a sharp awl. Pierce holes evenly along the guide line, spacing them about 3-4mm apart. Do the same for the inner diamond shape. -
Detail the emblem:
Add a second, smaller diamond impression inside the applied diamond piece using a dull tool for extra visual depth. -
Bake the clay:
Bake according to manufacturer’s instructions. Because thickness is minimal, allow it to cool completely flat under a heavy book to prevent warping.
Step 4: Finishing Touches
-
Antiquing wash:
Once cool, mix a little brown acrylic paint with water. Brush it over the textured surface and immediately wipe it off with a paper towel. The dark paint will stay in the foil textures, enhancing the leather look. -
Actual stitching:
Thread a needle with gold or heavy tan thread. Do a simple running stitch through the pre-punched holes. This adds authentic texture that looks far better than painted stitches. -
Secure the thread:
Tie off the thread on the back side. A tiny dab of superglue on the knot will ensure it never unravels. -
Add the cord:
Fold a length of leather cord in half, push the loop through the top hole, and pull the tails through the loop to create a lark’s head knot.
Now you have a durable, handsome accessory ready to accompany your next reading adventure
Textured Phone Case Panel
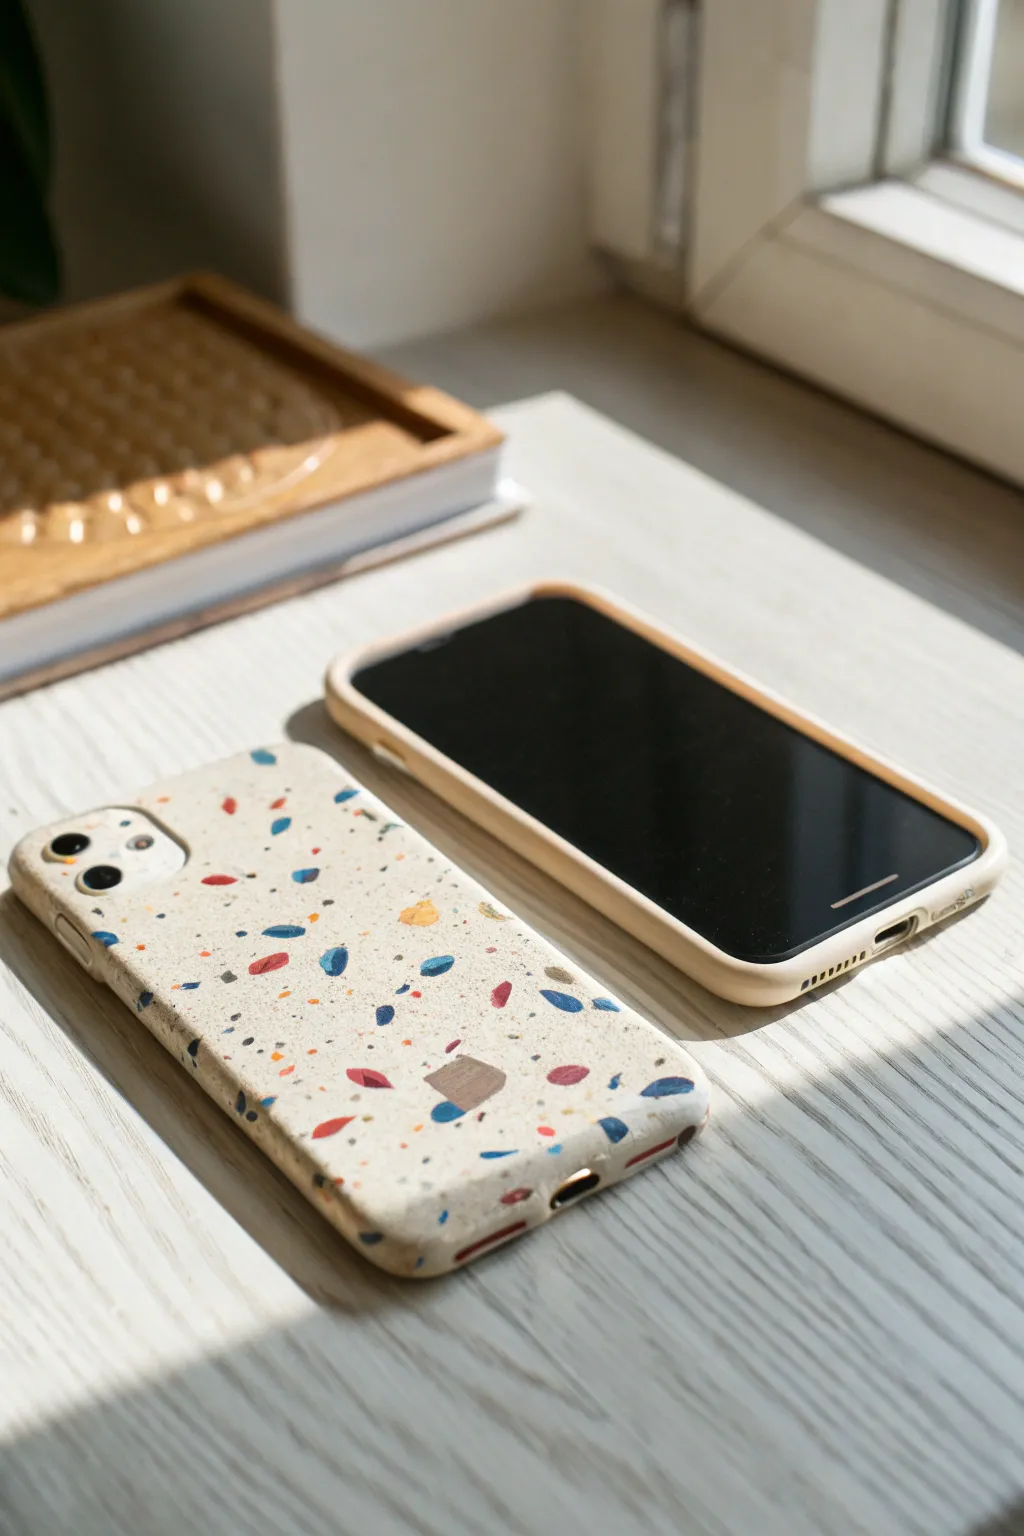
Transform a plain phone case into a trendy, speckled masterpiece using this terrazzo technique. The matte, stone-like finish and scattered colorful chips give your device a high-end, artistic look while adding a layer of durability.
Step-by-Step Guide
Materials
- Plain hard phone case (plastic or polycarbonate base)
- Beige or off-white polymer clay (base color)
- Small amounts of red, blue, navy, and yellow polymer clay
- Liquid polymer clay (clear or translucent)
- Acrylic rolling pin or clay machine
- Craft knife or tissue blade
- Sandpaper (grits from 400 to 1000)
- Oven (for curing)
- Isopropyl alcohol and wipes
Step 1: Preparing the Base
-
Condition the clay:
Start by thoroughly conditioning your beige base clay until it is soft and pliable. Warm clay adheres better to the case structure. -
Clean the case:
Wipe down the hard plastic phone case with isopropyl alcohol to remove any oils or fingerprints. This ensures a strong bond. -
Apply bonding agent:
Brush a thin, even layer of liquid polymer clay over the entire back surface of the phone case. This acts as the glue between the plastic and the solid clay. -
Roll out the base:
Roll your beige clay into a sheet approximately 2mm thick. You want it thick enough to hide the case underneath but thin enough not to add bulk. -
Cover the case:
Carefully lay the clay sheet over the back of the case. Gently press from the center outward to smooth out any trapped air bubbles.
Sticky Situation
Use parchment paper between your roller and the clay when embedding the chips. This prevents the colorful design from lifting off or smearing.
Step 2: Creating the Terrazzo Effect
-
Prepare colored chips:
Roll out thin sheets of your red, blue, navy, and yellow clay. The thinner these sheets are, the more delicate your terrazzo chips will look. -
Bake the chips (partial):
For easier chipping, I like to partially bake these thin color sheets for about 5-8 minutes so they become brittle and easy to crumble. -
Fragment the colors:
Once cool, crumble or chop the colored sheets into irregular, jagged fragments of varying sizes. Mix the colors together in a small pile. -
Scatter the chips:
Press the colored fragments randomly onto the raw beige clay on your phone case. Don’t overthink the placement; randomness is key to the natural terrazzo look. -
Embed the texture:
Cover the case with a piece of parchment paper and use your roller to press the chips firmly into the base clay until the surface is flat and seamless.
Step 3: Refining and Finish
-
Trim the edges:
Using your craft knife, carefully trim away the excess clay around the camera hole, buttons, and outer edges of the case. Keep the blade flush against the plastic for a clean cut. -
Smooth the seams:
Use your finger or a clay tool to smooth the raw edges down so they blend seamlessly with the plastic rim of the case. -
Bake the project:
Place the case on a ceramic tile or baking sheet. Bake according to your clay manufacturer’s instructions, usually around 275°F (135°C) for 30 minutes. -
First sand:
Once completely cool, wet sand the surface lightly with 400-grit sandpaper to reveal the sharp edges of the terrazzo chips. -
Polish to finish:
Move to a higher grit sandpaper (800 or 1000) and wet sand again to buff out scratches and create a smooth, matte finish that feels great in the hand.
Camera Fit Fix
If the clay is too thick near the camera hole, the lens might be obscured. Ensure you taper the clay layer very thin specifically around the camera cutout.
Enjoy the satisfying texture and unique pop of color every time you pick up your phone

TRACK YOUR CERAMIC JOURNEY
Capture glaze tests, firing details, and creative progress—all in one simple printable. Make your projects easier to repeat and improve.
Fridge Magnets for Notes and Photos
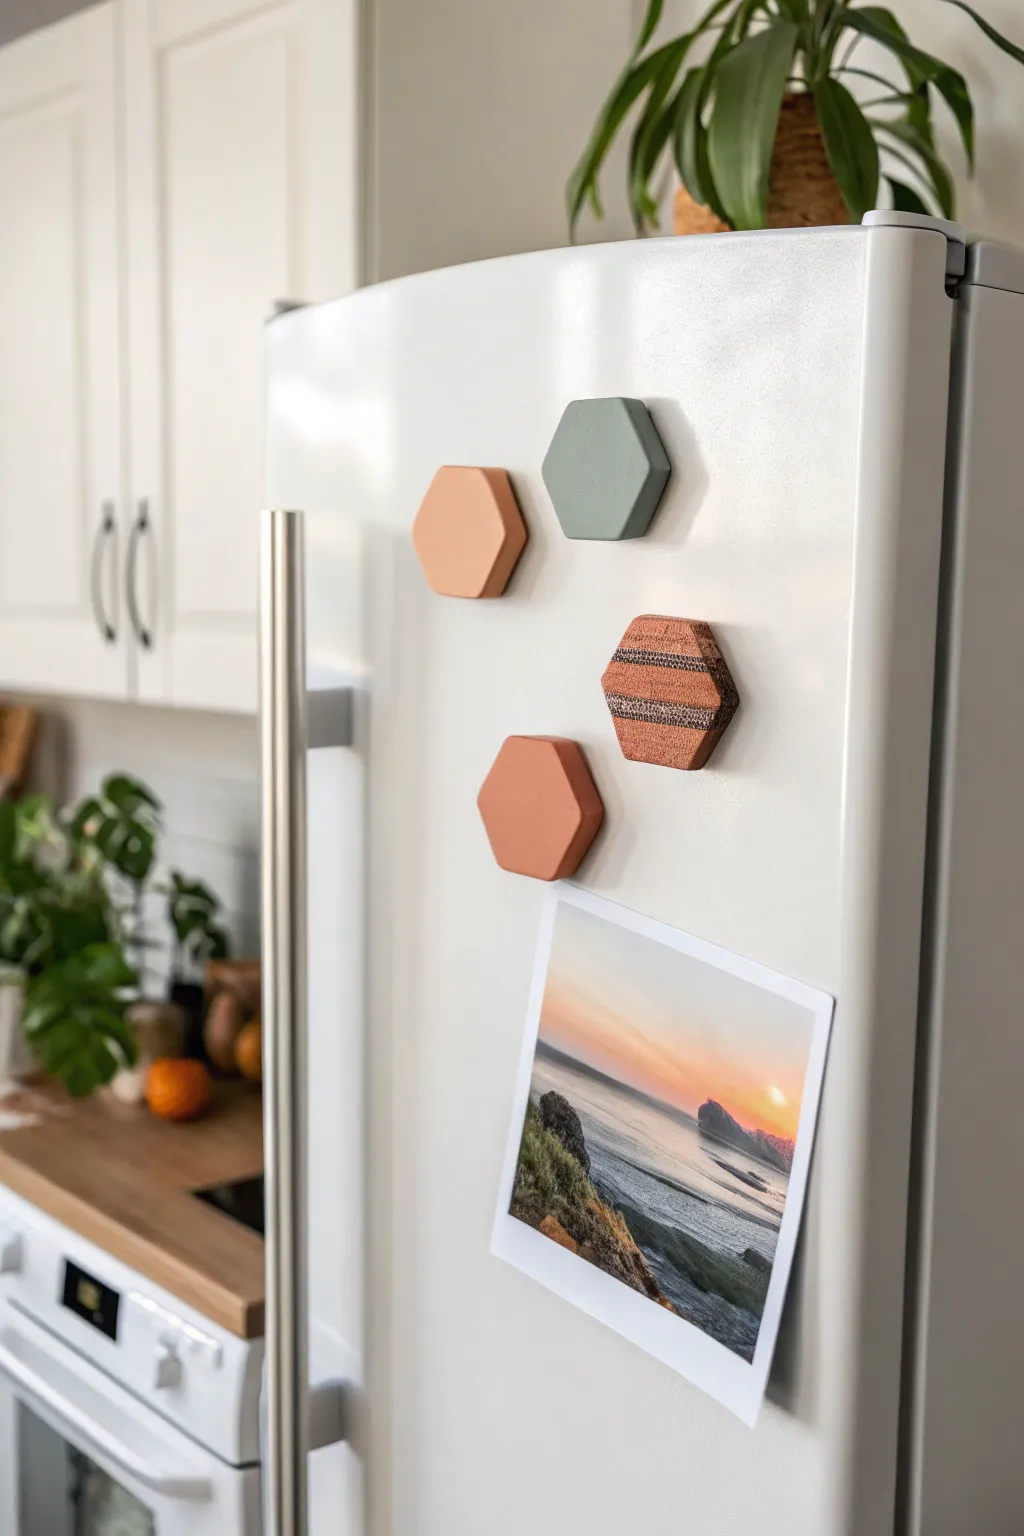
Add a touch of modern minimalism to your kitchen with these sleek hexagonal magnets. Featuring matte pastel tones and textured accents, they transform your fridge from a cluttered message board into a curated display for your favorite memories.
Detailed Instructions
Materials
- Polymer clay (terracotta/rust, sage green, and light peach)
- Small hexagon cookie cutter (approx. 1.5 – 2 inches)
- Acrylic rolling pin or pasta machine
- Ceramic tile or baking sheet
- Parchment paper
- Strong craft magnets (neodymium recommended)
- Super glue or E6000 adhesive
- Sandpaper (fine grit)
- Black and white acrylic paint (optional for patterns)
- Fine detail paintbrush (optional)
- Clear matte varnish (optional)
Step 1: Shaping the Hexagons
-
Condition the Clay:
Begin by warming the polymer clay in your hands. Knead each color separately until it is soft and pliable. This conditioning step is crucial to prevent cracking later. -
Roll Out the Slab:
Using your acrylic roller or a pasta machine, roll the clay out into a thick slab. Aim for a thickness of about 1/4 inch (6mm) to give the magnets a substantial, high-quality feel. -
Cut the Shapes:
Place your hexagon cutter onto the clay slab and press down firmly. Give the cutter a slight wiggle before lifting to ensure a clean cut. -
Repeat for All Colors:
Create a variety of hexagons in your chosen color palette. For the set shown, you’ll want at least one sage green, one light peach, and two rust-colored pieces. -
Smooth the Edges:
Gently run your finger along the cut edges of each hexagon to soften any sharp ridges or loose bits left by the cutter.
Uneven Surfaces?
If your clay surface isn’t perfectly flat after rolling, lay completely flat plastic wrap over the clay before using the cutter. This creates a lovely domed, pillow-like edge.
Step 2: Adding Texture & Baking
-
Impress Texture (Optional):
If you want the textured look seen on one of the rust magnets, gently press a piece of coarse fabric or sandpaper onto the surface before baking. -
Prepare for Baking:
Transfer your clay hexagons onto a parchment-lined baking sheet or a ceramic tile. -
Bake the Pieces:
Bake according to the manufacturer’s instructions on your specific brand of polymer clay. Usually, this is around 275°F (135°C) for 15-30 minutes depending on thickness. -
Cool Down:
Remove the tray from the oven and allow the clay pieces to cool completely. Do not handle them while hot, as they are still slightly soft.
Step 3: Finishing and Assembly
-
Sand for Perfection:
Once cool, use a fine-grit sandpaper to lightly buff the edges and surface if there are any fingerprints or imperfections. -
Painting the Detail:
For the patterned hexagon, mix a small amount of black and white paint to create a dark grey. I like to use a very fine brush to create small stippled dots in horizontal bands across the shape. -
Seal the Design:
If you painted a design, let it dry completely, then apply a thin coat of matte varnish to protect the paint from chipping. -
Attach the Magnet:
Flip the hexagons over. Apply a drop of strong adhesive, like E6000 or super glue, to the back of the clay. -
Press and Hold:
Press a magnet firmly into the glue. Hold it in place for 30 seconds to ensure a good initial bond. -
Final Cure:
Let the glue cure fully (usually 24 hours for E6000) before placing them on your fridge to ensure they can hold the weight of photos.
Level Up: Terrazzo
Save your clay scraps! Chop different colored leftovers into tiny irregular chunks, press them into a white clay slab, and roll flat for a trendy terrazzo effect.
Now you have a stylish spot to showcase your latest snapshots or keep track of your grocery list
Easy Drink Coasters With Clean Edges
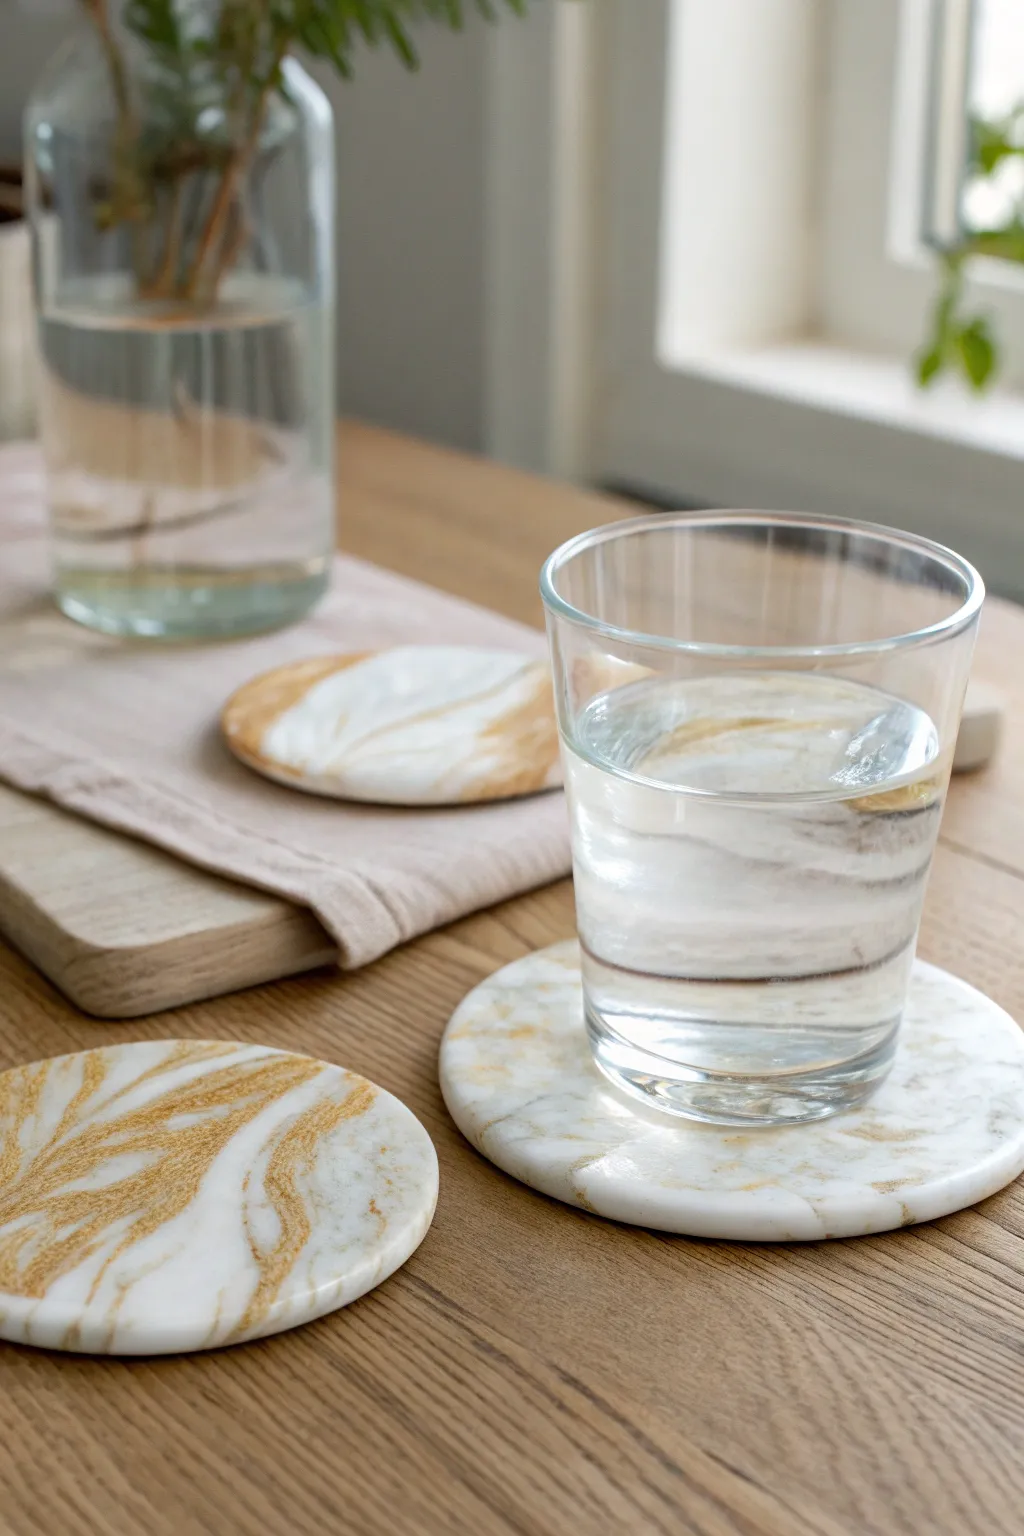
Elevate your coffee table with these stunning polymer clay coasters that mimic the look of high-end white marble with veins of shimmering gold. They are surprisingly simple to make and feature perfectly smooth, rounded edges that give them a professional finish.
How-To Guide
Materials
- White polymer clay (approx. 2oz per coaster)
- Gold or bronze metallic polymer clay
- Translucent polymer clay (optional, for depth)
- Acrylic rolling pin or pasta machine
- Large circular cookie cutter (approx. 3.5 – 4 inches)
- Small piece of cling wrap (plastic wrap)
- Ceramic tile or baking sheet
- Sandpaper (grits 400, 600, 800)
- Glossy polyurethane varnish or resin (optional)
Step 1: Preparing the Clay
-
Condition the base:
Begin by thoroughly conditioning your white polymer clay. Knead it in your hands until it is soft, pliable, and warm. This prevents cracking later. -
Prepare the accent color:
Take a smaller amount of the gold or bronze metallic clay (about 1/10th the amount of the white) and condition it as well. Roll it into a few thin snakes or ropes. -
Add translucency:
If you want a more realistic stone depth, I like to mix a tiny bit of translucent clay into half of the white clay, just until combined but not fully blended.
Pro Tip: Cling Wrap Trick
Using cling wrap between the cutter and clay is crucial. It creates that soft, ‘pillowed’ edge instantly, saving you hours of sanding sharp corners later.
Step 2: Creating the Marbling
-
Combine clays:
Form the white clay into a thick log. Place the thin ropes of gold clay randomly along the length of the white log. -
Twist the log:
Grasp both ends of the log and twist them in opposite directions. Keep twisting until you have tight candy-cane stripes. -
Fold and roll:
Fold the twisted log in half and roll it smooth again. Repeat this twist-and-fold process 2-3 times. Be careful not to over-mix, or the colors will turn muddy instead of marbled. -
Check the pattern:
Slice the log specifically where you think the pattern looks best to check the cross-section. Gather the clay into a ball, trying to keep the best looking veins on the outside.
Step 3: Shaping and Cutting
-
Roll out the slab:
Using your acrylic roller or pasta machine, roll the marbled ball into a sheet approximately 1/4 inch thick. You want it substantial enough to hold a glass securely. -
The cling wrap trick:
This is the secret to those clean, rounded edges: lay a piece of cling wrap gently over the top of your rolled clay sheet. Smooth out any air bubbles. -
Cut the shape:
Position your round cutter over the cling wrap. Press down firmly through the plastic into the clay. The plastic pulls the clay down slightly, creating a naturally domed edge rather than a sharp cut. -
Remove the cutter:
Lift the cutter and gently peel away the cling wrap. Use your finger to lightly smooth any minor imperfections on the rim.
Troubleshooting: Bubbles
If you see air bubbles in your rolled slab, gently pierce them with a needle and smooth the air out with your finger before cutting your shape.
Step 4: Baking and Finishing
-
Bake:
Place your coasters on a ceramic tile or parchment-lined baking sheet. Bake according to your specific clay brand’s instructions (usually 275°F for 30 minutes). -
Cool down:
Allow the coasters to cool completely inside the oven or on a wire rack. Do not try to sand them while they are still warm. -
Wet sanding:
Dip your coaster and sandpaper in water. Sand the edges and top surface lightly, starting with 400 grit and moving up to 800 grit for a silky smooth feel. -
Buff or seal:
For a natural stone look, buff the surface vigorously with a denim cloth. For a high-shine finish like the photo, apply a thin coat of gloss varnish or UV resin.
Enjoy your sophisticated handmade coasters that look ready for a home decor magazine feature
Spoon Rest for Messy Cooking Days
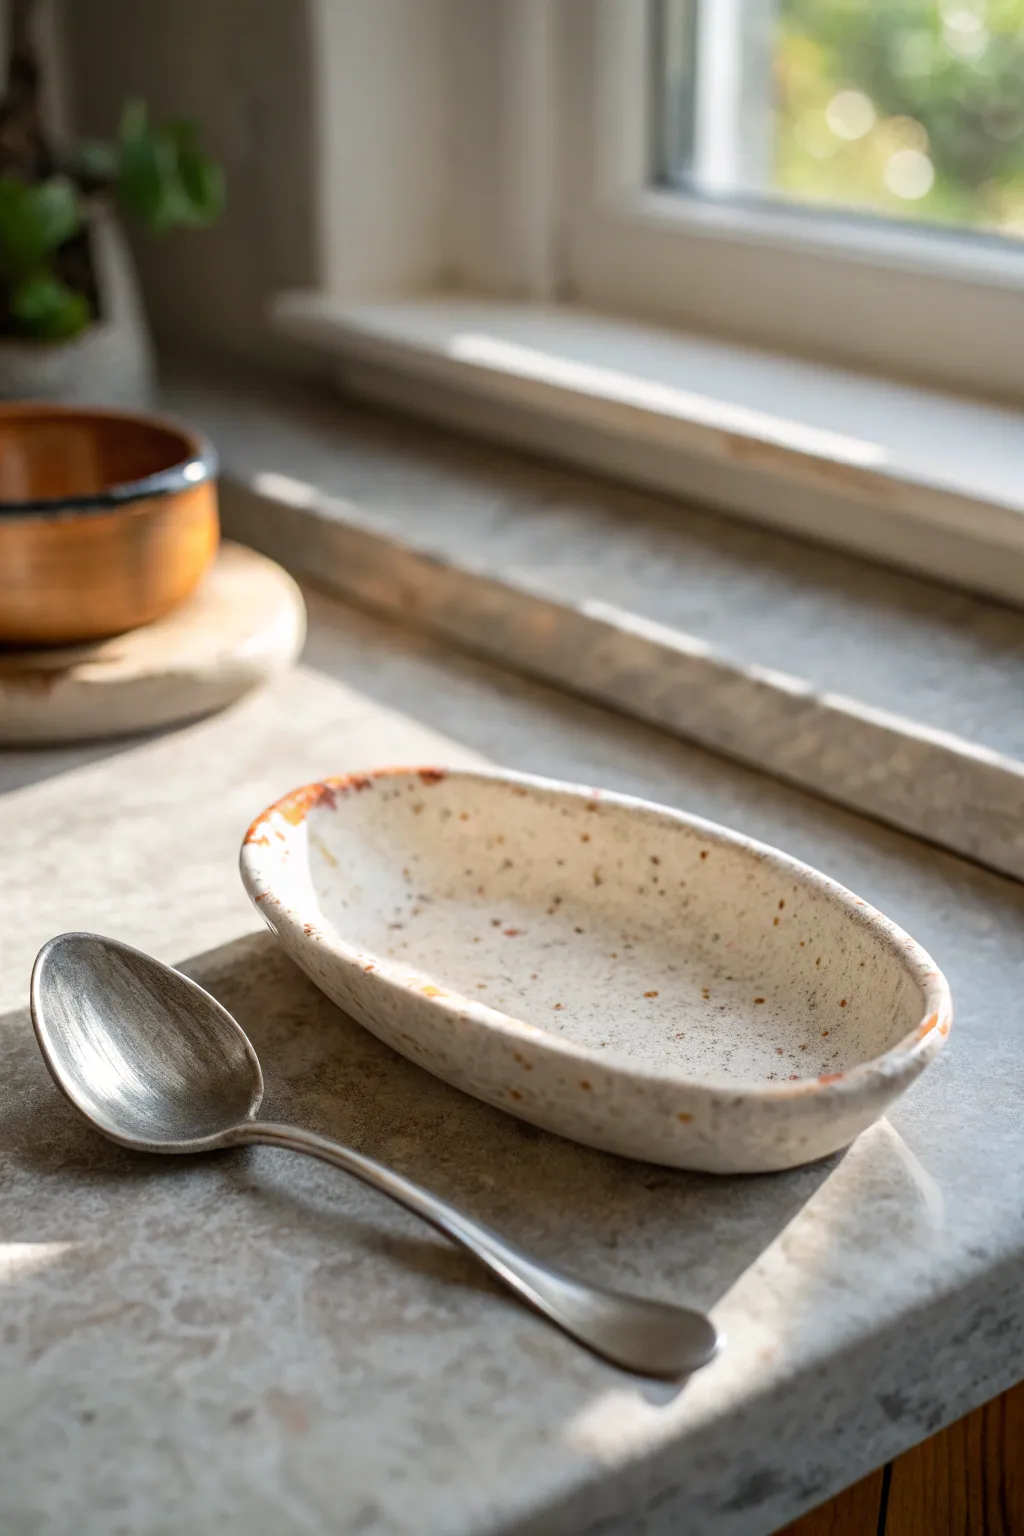
This rustic, ceramic-style spoon rest adds instant farmhouse charm to your countertop while keeping messes contained. The gentle oval shape and faux-speckle glaze effect make it look like a piece of hand-thrown pottery.
Step-by-Step Tutorial
Materials
- White or translucent white polymer clay
- Granite’ or speckled effect polymer clay (optional)
- Acrylic rolling pin
- Oval cutter or paper template with craft knife
- Small sea sponge or stiff bristle brush
- Burnt orange and brown acrylic paint
- Coarse black pepper or dried coffee grounds (for texture)
- Water-based polyurethane varnish (gloss or satin)
- Fine grit sandpaper
Step 1: Shaping the Base
-
Condition the Clay:
Begin by thoroughly kneading your white polymer clay until it is warm and pliable. If you want a built-in speckled look immediately, mix in a small amount of granite-effect clay or a pinch of coarse black pepper at this stage. -
Roll the Slab:
Roll out the clay into a smooth, even slab that is approximately 1/4 inch thick. A slightly thicker slab ensures the final spoon rest is durable enough for daily kitchen use. -
Cut the Shape:
Place your oval template onto the clay or use a large oval cutter. Carefully cut out the shape with a craft knife, peeling away the excess material. -
Smooth the Edges:
Dip your finger in a little baby oil or water and run it along the cut edge to soften any sharp angles left by the blade. -
Create the Lip:
Gently pinch and lift the outer rim of the oval upwards to create a raised lip. You want a shallow bowl shape that can cradle a spoon without it sliding off. -
Refine the Form:
Smooth out the interior transition between the base and the raised lip so it curves gently rather than sitting at a sharp 90-degree angle. I like to use a large ball tool or the back of a spoon for this.
Step 2: Adding Texture and Detail
-
Prepare the Paints:
Squeeze a small amount of burnt orange and dark brown acrylic paint onto a palette. You want a rusty, earthy terracotta tone. -
Apply rim details:
Using a small piece of sea sponge or a stiff brush, dab the orange-brown paint unevenly along the very top edge of the rim. -
Feather the Color:
While the paint is wet, wipe some of it slightly downward into the bowl and onto the exterior to simulate a worn, glazed ceramic edge. -
Speckling Method:
Dilute a drop of brown paint with water. Load a toothbrush with the mixture and run your thumb across the bristles to flick tiny speckles across the entire surface. -
Baking:
Place your spoon rest on a ceramic tile or baking sheet lining. Bake according to your brand of clay’s instructions—usually 275°F (135°C) for about 30 minutes. -
Cooling:
Allow the piece to cool completely in the slightly cracked oven to prevent any thermal shock.
Uneven Shape?
If your oval warping during the lifting phase, place the slab into a real shallow bowl or curved dish to support the shape while baking.
Step 3: Finishing Touches
-
Sanding:
Once cool, check the bottom and rim for rough spots. Use fine-grit sandpaper under running water to gently smooth them out. -
Sealing:
Apply a coat of water-based polyurethane varnish to seal the paint and protect the clay from kitchen oils. -
Apply Second Coat:
Let the first coat dry fully, then apply a second thin layer for extra durability. -
Final Cure:
Let the varnish cure for at least 24 hours before placing it next to your stove.
Get Creative
Mix real dried herbs like rosemary or thyme into the clay body before baking. The bits will darken in the oven, creating an authentic organic texture.
Now you have a charming, handmade spot to rest your utensil while stewing your next masterpiece
Napkin Rings for a Handmade Table
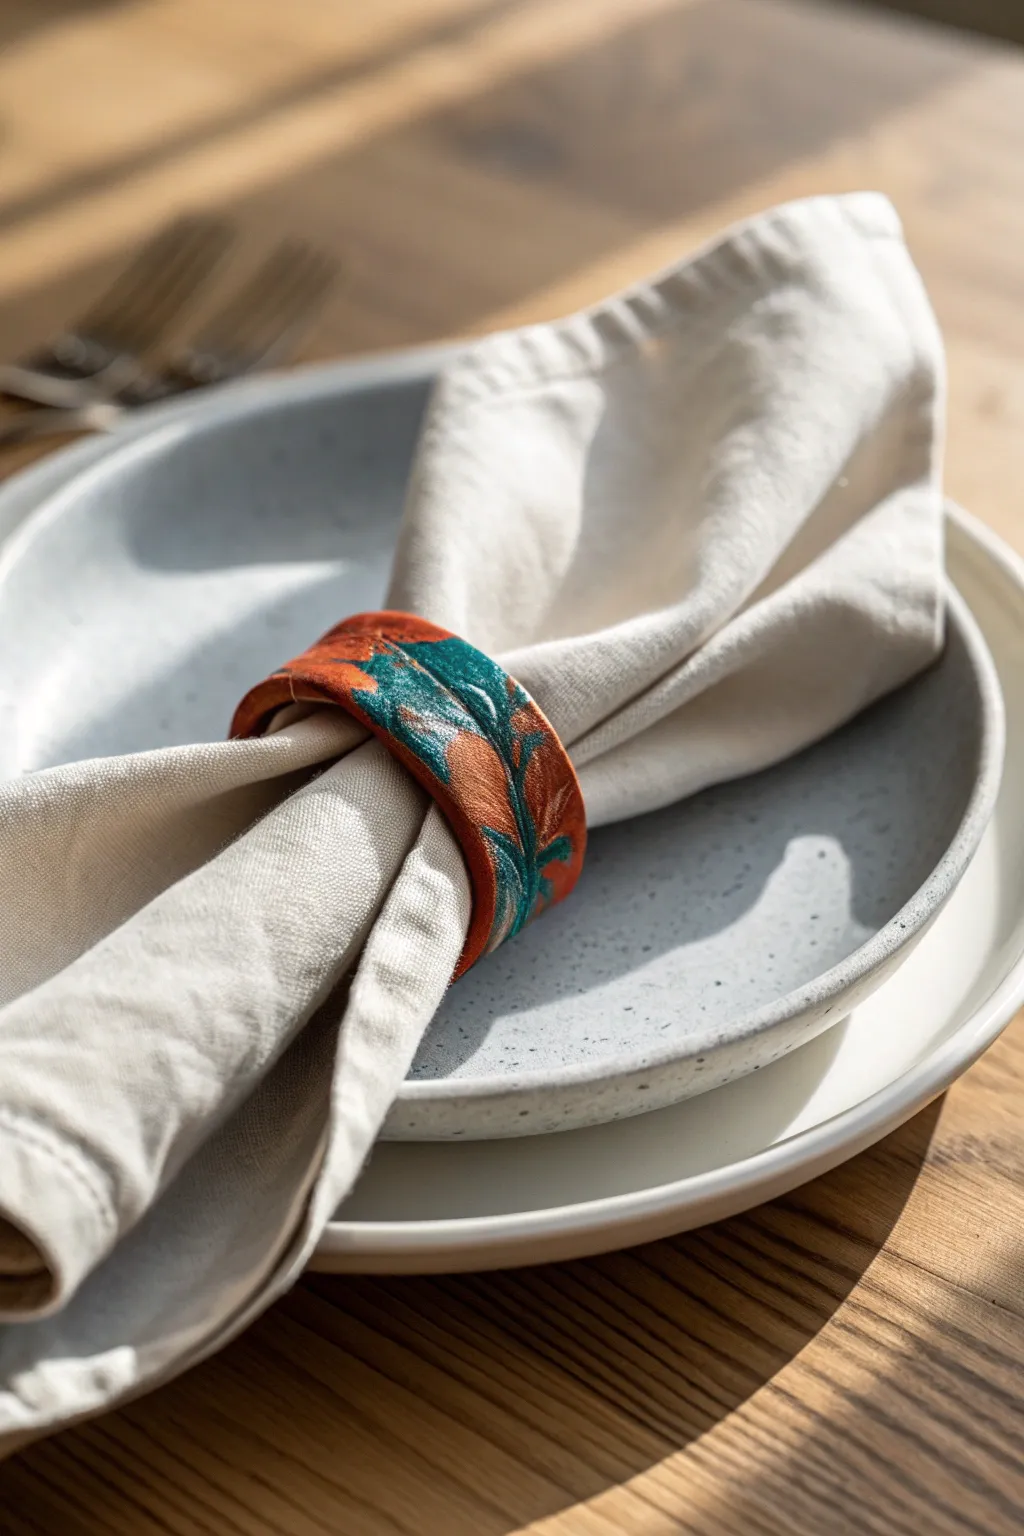
Bring a touch of rustic elegance to your table setting with these faux leather napkin rings made entirely from polymer clay. The clever use of texture and acrylic washes creates a convincing, aged leather look with beautiful teal botanical accents.
Step-by-Step Guide
Materials
- Terracotta or saddle brown polymer clay
- Empty paper towel roll or sturdy cardboard tube
- Texture sheet or rubber stamp (floral/leaf motif)
- Acrylic paints: Burnt Umber, Teal/Turquoise, Metallic Copper (optional)
- Clay roller or pasta machine
- Flexible clay blade or craft knife
- Small stiff paintbrush
- Paper towels or soft rag
- Sandpaper (fine grit)
- Matte or satin polymer clay varnish
Step 1: Preparing the Base
-
Condition the clay:
Start by thoroughly conditioning your terracotta or brown polymer clay until it is soft and pliable. This prevents cracking later. -
Roll out a sheet:
Roll the clay into a long, even sheet about 1/8 inch thick. A pasta machine set to a medium-thick setting works perfectly here for uniformity. -
Cut the strips:
Using a flexible blade or a ruler and craft knife, cut long rectangular strips. Aim for about 1.5 inches wide by 6 inches long for a standard napkin ring.
Leather Texture Trick
Before stamping your pattern, gently ball up a piece of aluminum foil and roll it over the clay surface. This adds a subtle, pebbled skin texture that looks exactly like real leather.
Step 2: Texturing and Shaping
-
Apply the texture:
Lightly mist your texture sheet or stamp with water to prevent sticking. Press it firmly into the clay strip to emboss the floral or leaf pattern deep into the surface. -
Prepare the form:
Wrap a piece of parchment paper around your cardboard tube. This ensures the clay won’t bond to the cardboard during baking. -
Form the ring:
Carefully lift a textured clay strip and wrap it around the prepared tube. Overlap the ends slightly. -
Seal the seam:
Gently press the overlapped ends together. I like to use a angled sculpting tool to blend the seam on the inside so the outside pattern remains undisturbed. -
Bake carefully:
Bake the clay on the tube according to your clay manufacturer’s instructions. Usually, this is around 275°F (135°C) for 30 minutes. Let it cool completely on the tube before removing.
Stitched Edge Detail
Use a needle tool or a rotary spur tool to make tiny, evenly spaced holes along the top and bottom edges of the strip before baking to mimic heavy-duty stitching.
Step 3: Painting and Finishing
-
Apply the antique wash:
Mix a small amount of Burnt Umber acrylic paint with water to create a thin wash. Brush this over the entire ring, ensuring it gets into all the textured crevices. -
Wipe back:
Immediately wipe the surface with a damp paper towel. The dark paint will stay in the recessed lines of the pattern, highlighting the ‘tooled’ effect, while the high points return to the clay color. -
Paint the accents:
Using a small detail brush and teal acrylic paint, carefully fill in the leaf or floral impressions. You don’t need to be perfectly opaque; a slightly translucent look mimics dyed leather well. -
Add highlights:
Once the teal is dry, you can lightly dry-brush a tiny bit of metallic copper over the very highest points of the texture to give it a worn, kissed-by-light look. -
Seal the piece:
Protect your paint job with a coat of matte or satin varnish. This also deepens the colors and makes the ‘leather’ look richer. -
Final cure (optional):
If your varnish requires heat setting, pop them back in the oven for a brief period as directed by the bottle, or simply let them air dry completely before use.
Set your table with these unique rings and enjoy the warmth they add to your dining experience
Minimal Incense Holder Tray
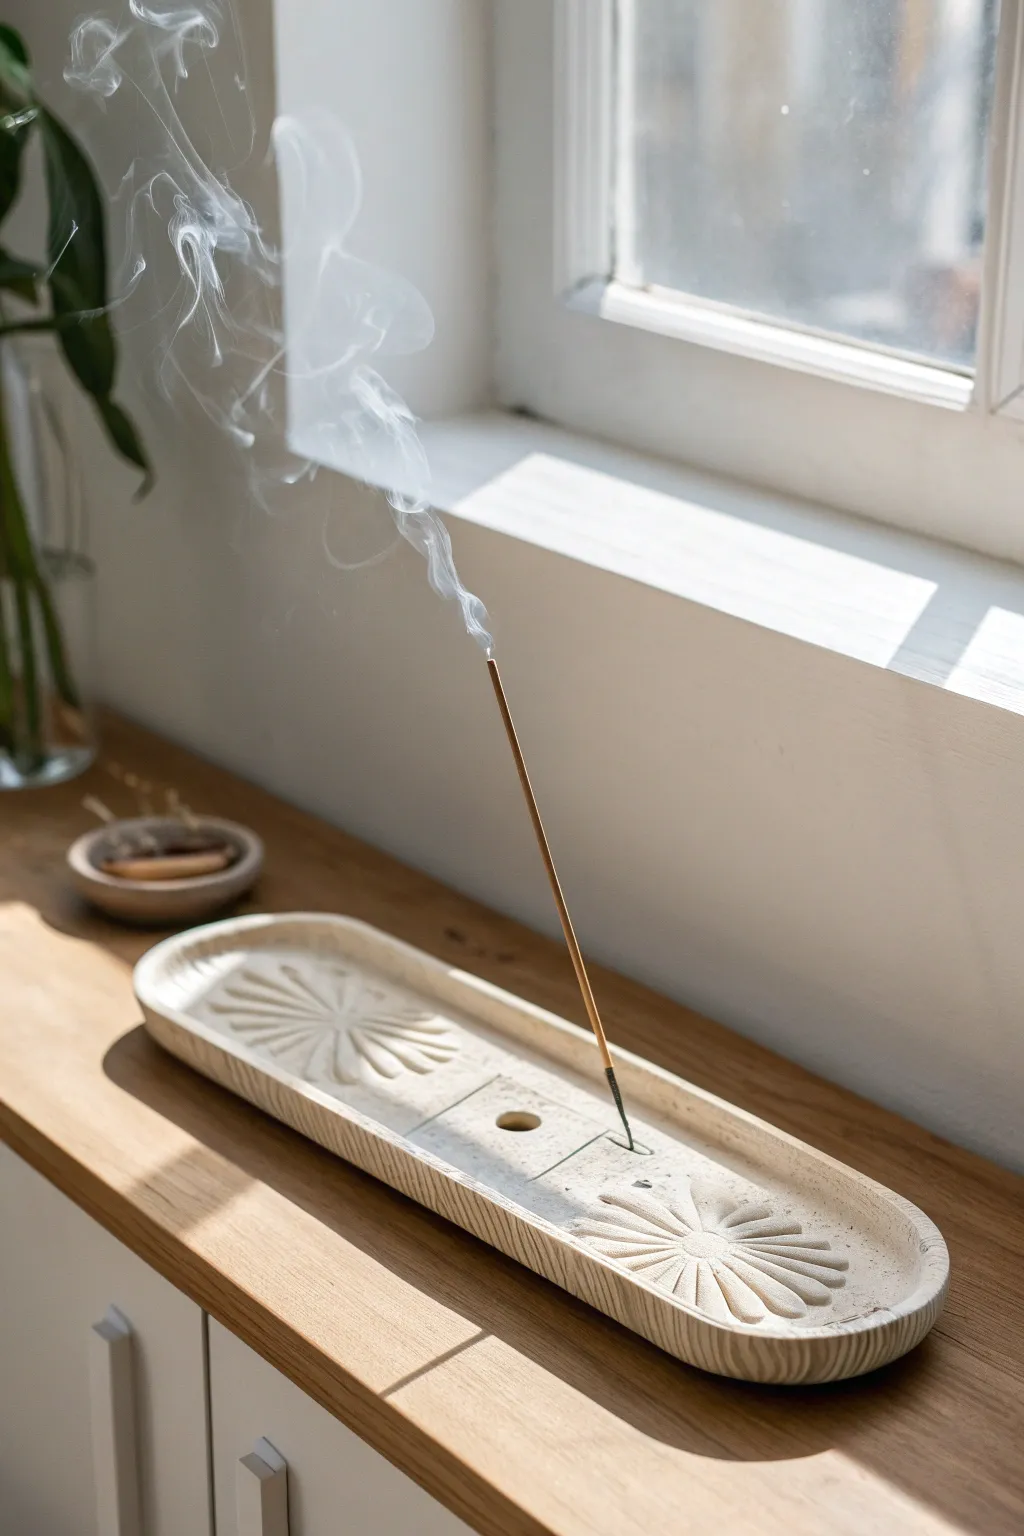
Bring a touch of serene minimalism to your space with this elegant, elongated incense holder featuring subtle sunburst reliefs. The faux-stone texture adds an earthy, organic feel while keeping the design modern and functional.
Step-by-Step Tutorial
Materials
- White or beige polymer clay (approx. 4-6 oz)
- Black pepper or dried tea leaves (for speckling)
- Acrylic rolling pin
- Long oval cutter or template/craft knife
- Texture tools (needle tool, ball stylus, or blunt knife)
- Small round cutter (approx. 1/2 inch)
- Incense stick (for sizing the hole)
- Fine grit sandpaper
- Matte varnish (optional)
Step 1: Preparing the Faux Stone Clay
-
Condition the Clay:
Begin by thoroughly conditioning your white or beige polymer clay until it is soft and pliable. Warm clay is essential for preventing cracks during the texturing phase. -
Add Texture Elements:
To achieve that natural stone look, I like to sprinkle a pinch of ground black pepper or finely crushed dried tea leaves onto the flattened clay. Fold the clay over itself multiple times to distribute the speckles evenly throughout the block. -
Roll out the Slab:
Use your acrylic roller or a pasta machine to roll the clay out to a uniform thickness, ideally around 1/4 inch (6mm). You want it thick enough to hold the relief pattern without becoming flimsy.
Clean Cuts Pro-Tip
Before cutting your oval shape, place a piece of plastic wrap over the clay. Press your cutter down through the plastic. This creates softly rounded edges instead of sharp, blocky cuts.
Step 2: Shaping and Sculpting
-
Cut the Base Shape:
Using a long oval cutter or a paper template with a craft knife, cut out the main tray shape. Smooth the cut edges with your fingertip to remove any harsh lines. -
Create the Rim:
Gently pinch the outer edge of the oval all the way around, lifting it slightly to create a shallow rim. This ensures ash stays contained within the tray. -
Define the Center:
Lightly mark a rectangular section in the very center of the tray using a dull knife. This space will remain flat and houses the incense stick holder. -
Add Detailed Lines:
Using a needle tool, draw two definitive lines bordering that central rectangle. Create small, perpendicular tick marks along these lines to mimic a stitched or chiseled detail. -
Create the Holder Mound:
Take a small ball of excess clay and flatten it slightly into a dome. Place this in the exact center of your rectangular section, blending the edges seamlessly into the base. -
Pierce the Hole:
Use your actual incense stick or a tool of the same diameter to poke a hole into the central mound. Insert it at a slight angle so the stick will lean over the tray rather than standing straight up.
Step 3: Carving the Relief Pattern
-
Mark the Sunburst Centers:
On the left and right sides of the tray (the empty spaces outside the central rectangle), find the center point. Press a small round cutter or cap gently into the clay to create a central circle for your sunburst. -
Carve Primary Rays:
Using a sculpting tool or the back of a knife, press manageable grooves radiating outward from the central circle to the tray’s rim. Think of these like the main hours on a clock face. -
Detail the Petals:
Between your primary rays, press wider, spoon-shaped indentations. You can use a ball stylus or a modeling tool to give these ‘petals’ a concave, scooped-out look. -
Texture the Rim:
For added visual interest, use a needle tool to create short vertical striations all along the outer vertical edge of the tray rim. -
Final Smooth:
Inspect the piece for fingerprints. Lightly brush a little baby oil or cornstarch over the surface to smooth out unintended marks before baking.
Level Up: Marble Blend
Mix a tiny amount of translucent and grey clay into your white base but don’t blend fully. This creates subtle translucent streaks that look like genuine quartz veins.
Step 4: Baking and Finishing
-
Bake the Piece:
Place your tray on a ceramic tile or parchment-lined baking sheet. Bake according to your specific clay brand’s instructions (usually 275°F/135°C for 30 minutes per 1/4 inch of thickness). -
Cool Down:
Allow the piece to cool completely in the oven. Removing it while hot can cause warping, especially with this elongated shape. -
Sand for Stone Effect:
Once cool, use fine-grit sandpaper under running water to lightly sand the surface. This exposes more of the pepper/tea speckles and enhances the stone illusion. -
Seal (Optional):
If you prefer a sealed finish, apply a thin coat of matte varnish. However, leaving the clay raw often provides a more convincing stone texture.
Now you have a serene, custom-made resting place for your favorite scents to drift from
Toothbrush or Razor Stand
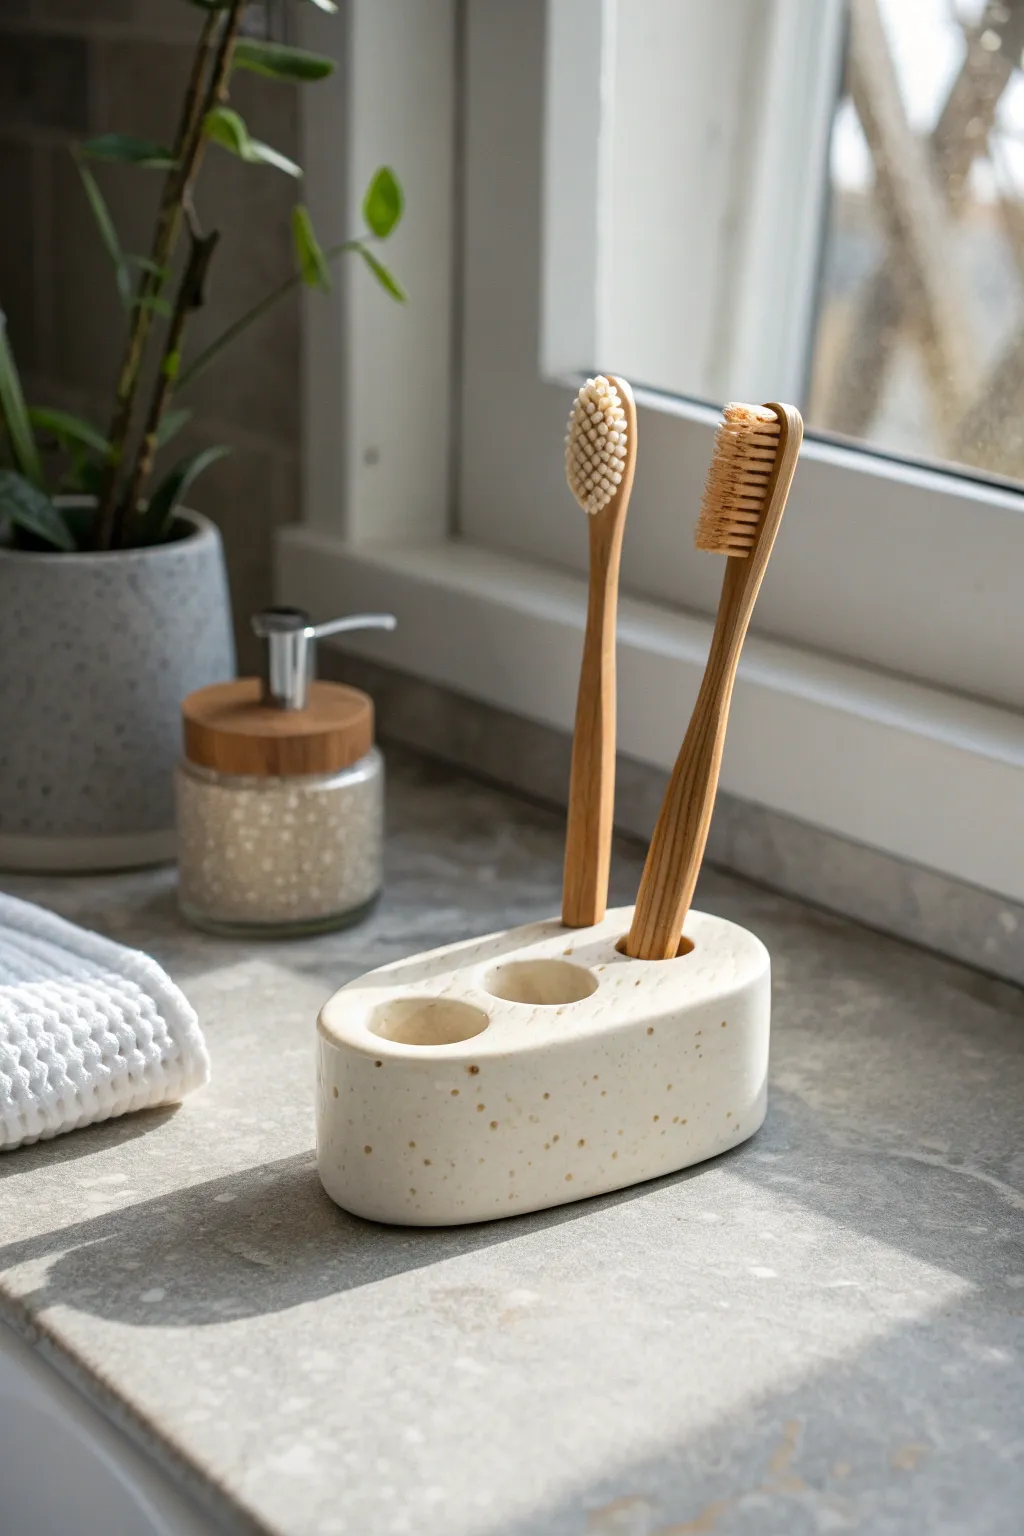
Bring a touch of organic minimalism to your bathroom with this sturdy, stone-effect stand. Designed with a smooth oval silhouette and custom-sized slots, it keeps toothbrushes or razors upright and drying hygienically while mimicking the look of artisan ceramics.
Detailed Instructions
Materials
- White or beige polymer clay (approx. 2-3 standard blocks)
- Black pepper or coarse sand (for speckling)
- Acrylic rolling pin
- Oval cookie cutter (large) or sturdy paper template
- Craft knife
- Circle cutters (sized to your toothbrush handles) or a bottle cap
- Sandpaper (various grits: 400, 600, 1000)
- Water-based polyurethane varnish (matte or satin)
- Oven
- Baking sheet and parchment paper
- Cornstarch (optional release agent)
Step 1: Preparing the Clay Base
-
Condition the clay:
Begin by thoroughly kneading your white or beige polymer clay until it is soft and pliable. Warm clay is essential for avoiding cracks later on. -
Add the speckles:
Flatten the clay slightly and sprinkle a generous pinch of ground black pepper or clean coarse sand over the surface. Fold the clay over itself and knead until the specks are distributed evenly throughout the block. -
Form the main block:
Shape the conditioned, speckled clay into a thick log. You want significant height for this project to ensure the toothbrushes stand up straight, so aim for a thickness of at least 1.5 to 2 inches. -
Create the oval shape:
Place the thick log on your parchment paper. Gently press it into an oval shape using your hands. Alternatively, if you have a deep oval cutter, press it through now, or use a paper template and a sharp craft knife to slice the vertical walls cleanly. -
Smooth the exterior:
Use your fingers and a little cornstarch to smooth the vertical sides and the top surface. Gently round the top edge where the vertical wall meets the flat surface for a softer, ceramic look.
Step 2: Creating the Functional Slots
-
Mark hole placement:
With the solid clay block formed, decide where your tools will sit. Lightly pressing a circle cutter into the top surface to mark the positions of two or three holes is a helpful trick to visualize the spacing. -
Cut the cores:
Using a small circle cutter, press straight down into the clay block. Do not go all the way through; stop about a half-inch from the bottom to create a cup rather than a tunnel. Carefully twist the cutter and pull it out to remove the core of clay. -
Refine the openings:
Smooth the inside rim of each hole with your fingertip or a clay tool. If the holes distorted the oval shape during cutting, gently reshape the exterior walls now. -
Check the fit:
I like to test the hole size with the actual toothbrush handle at this stage (clean it off immediately after) to ensure the fit isn’t too tight, keeping in mind clay doesn’t shrink much but you want wiggly room.
Clay Too Soft?
If your thick block of clay is slumping under its own weight while you work, pop it in the fridge for 20 minutes. The cold firms it up, making it much easier to carve clean holes.
Step 3: Baking and Finishing
-
Bake the piece:
Place the stand on parchment paper on a baking sheet. Bake according to your clay manufacturer’s instructions, typically around 275°F (135°C). Since this is a very thick piece, you should bake it for at least 60 to 75 minutes to ensure the center cures fully. -
Cool slowly:
Turn the oven off and let the piece cool down inside the oven with the door slightly ajar. This prevents thermal shock and cracking in such a dense object. -
Sand for stone effect:
Once fully cool, wet sand the piece under a trickle of water. Start with 400 grit to remove fingerprints, then move to 600 and 1000 grit until the surface feels incredibly smooth. -
Seal the surface:
Since this will live in a humid bathroom, applying a sealer is crucial. Brush on a thin coat of matte or satin water-based polyurethane varnish. -
Seal the interior:
Don’t forget the inside of the holes. Use a smaller brush to coat the interior walls and bottom of the toothbrush slots to prevent water from soaking into microscopic pores. -
Final cure:
Let the varnish dry completely according to the bottle instructions, often 24 hours required for full water resistance before placing it near your sink.
Drainage Hack
Make cleaning easier by poking a small drainage hole through the bottom of each slot before baking. This stops water from pooling inside if you put a wet brush away.
Your new faux-stone organizer is ready to add a spa-like vibe to your morning routine
Perpetual Desk Calendar Blocks
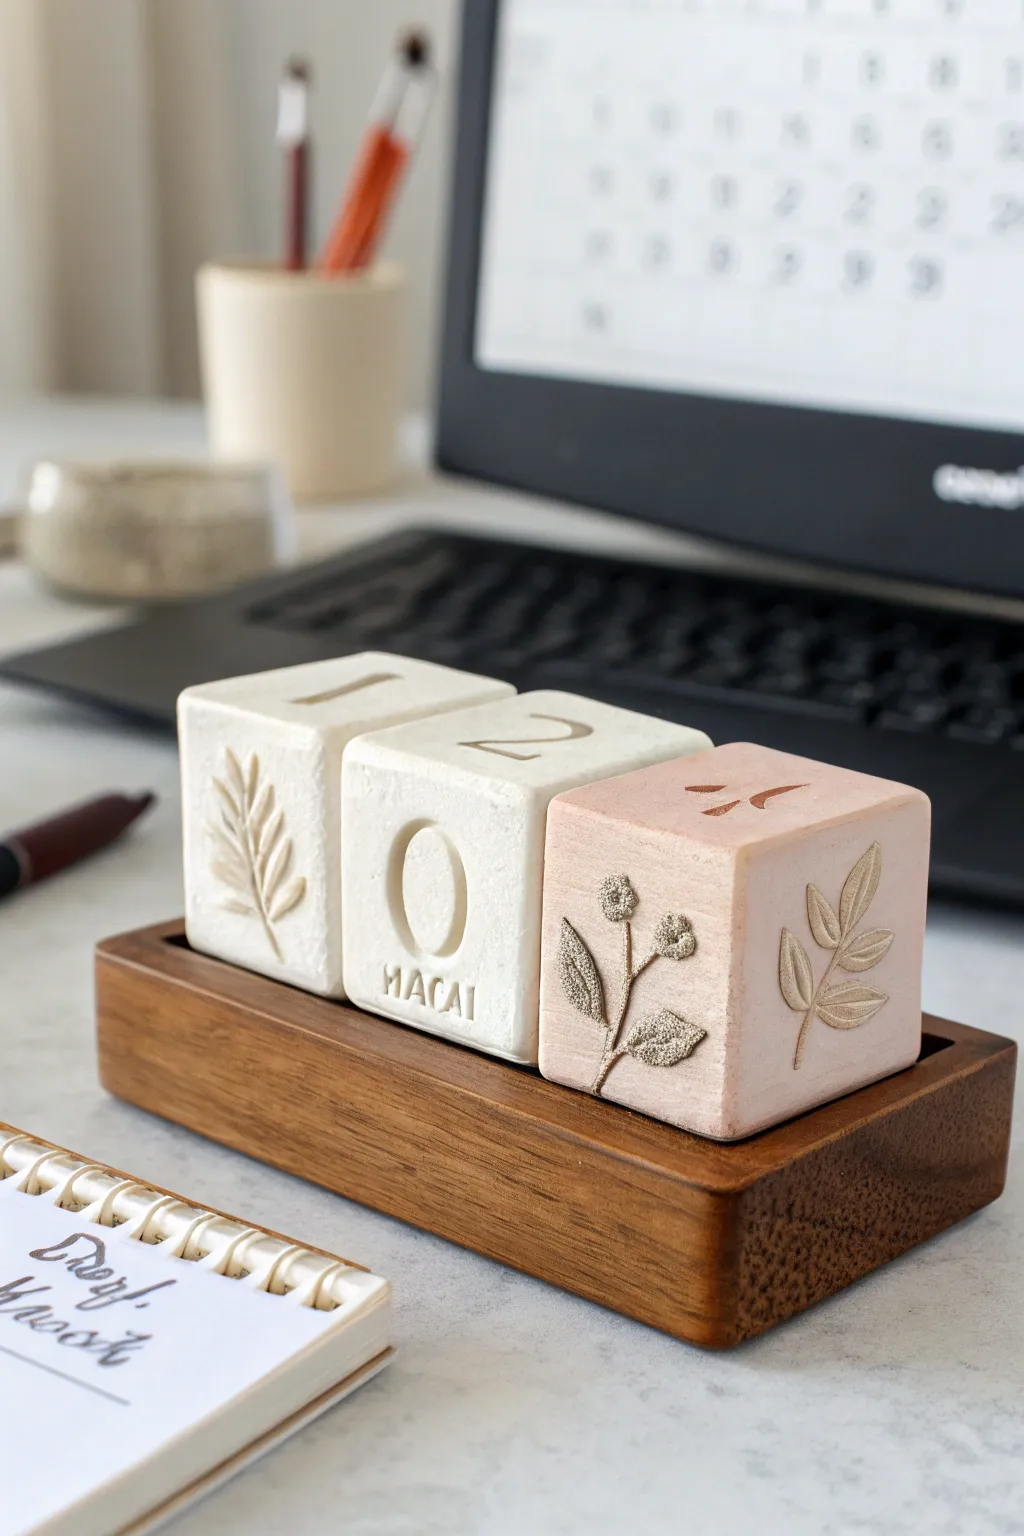
Bring a touch of organic elegance to your workspace with this handmade perpetual calendar featuring delicate fern and floral imprints. The combination of creamy white and soft blush pink clay, resting on a sturdy wood base, creates a timeless and functional piece of desk decor.
Step-by-Step Tutorial
Materials
- Polymer clay (white, beige, and soft pink)
- Wooden tray or base (approx. 6 inches long)
- Acrylic rolling pin or clay machine
- Square clay cutters (sized to fit your wooden base)
- Rubber stamps (numbers and letters)
- Small botanical sprigs, leaves, or high-quality floral stamps
- Craft knife or blade
- Fine grit sandpaper
- Clear matte varnish (optional)
- Brown acrylic paint (for antiquing)
- Paper towels or wipes
Step 1: Planning and Base Preparation
-
Measure the base:
Before touching any clay, measure the interior width and length of your wooden tray. You need to calculate the exact size your three cubes need to be to sit comfortably side-by-side with a tiny bit of wiggle room. -
Prepare the clay:
Condition your polymer clay thoroughly. I like to mix a little beige into the white to warm it up, creating a ‘stoneware’ look rather than a stark bright white. Prepare a separate batch of soft blush pink. -
Determine cube structure:
Decide if you will make solid clay cubes (heavy and durable) or cover wooden/foil cores (lighter and uses less clay). If using cores, ensure they are slightly smaller than your final planned dimension.
Step 2: Forming the Calendar Blocks
-
Roll the slabs:
Roll out thick slabs of your cream and pink clay. If you are making solid cubes, you can layer slabs together to achieve the necessary height, smoothing the seams completely. -
Cut the cubes:
Using a sharp blade or a square cutter, cut three perfect cubes. You will need two cream-colored cubes for numbers and one pink cube for decorative elements or additional months. -
Refine the shape:
Gently tap each side of the cubes on a flat surface to ensure they are perfectly square. Smooth out any fingerprints with a light touch or a bit of cornstarch. -
Plan the numbering:
This is crucial: one cube needs numbers 0, 1, 2, 3, 4, 5. The second cube needs 0, 1, 2, 6, 7, 8. (The 6 doubles as a 9). Without this specific combination, you cannot make every date of the month. -
Stamp the numbers:
Press your number stamps gently into the center of the appropriate faces. Aim for a clean, deep impression but be careful not to distort the cube’s shape. -
Add text details:
If you want to include month names or words like ‘MACAI’ as seen in the inspiration, use smaller letter stamps along the bottom edge of specific faces.
Clean Impressions
Dust your rubber stamps or botanical sprigs with a tiny amount of cornstarch or baby powder before pressing into the clay. This acts as a release agent and prevents the clay from sticking to delicate details.
Step 3: Botanical Texturing
-
Select your botanicals:
Choose small, real fern leaves or deeply etched floral stamps. The texture needs to be deep enough to catch the antique finish later. -
Imprint the sides:
On the non-numbered sides of the cream cubes and the faces of the pink cube, press your botanical elements firmly into the clay. Rock the stamp or leaf gently to capture the full detail. -
Clean edges:
The stamping process might push the clay out slightly at the edges. Use your blade to slice off any excess bulge and return the block to a perfect cube. -
Texture matching:
For a cohesive look, I prefer to ensure the depth of the floral impressions matches the depth of the numbers.
Weighted Core
Make the cubes feel high-end by embedding a heavy hex nut or a few washers inside the center of the clay before forming the cube. The added weight gives them a satisfying, quality feel.
Step 4: Baking and Finishing
-
Bake the blocks:
Place the cubes on a ceramic tile or cardstock. Bake according to the manufacturer’s instructions for your specific brand of clay, usually around 275°F (130°C) for 30-45 minutes per half-inch of thickness. -
Cool and sand:
Allow the blocks to cool completely inside the oven to prevent cracking. Once cool, lightly sand the corners and edges to remove any sharp ridges. -
Apply the wash:
Dilute brown acrylic paint with water. Brush it liberally over the imprinted areas (numbers and flowers), ensuring it gets into all the crevices. -
Wipe back:
Before the paint dries completely, wipe the surface with a damp paper towel. This leaves the dark paint inside the impressions while cleaning the surface, highlighting the details. -
Final arrangement:
Once the paint is fully dry, place your finished blocks into the wooden tray. Arrange them to display today’s date.
Now you have a stunning, reusable calendar that will last for years to come
Wall Key Holder With Clay Hooks
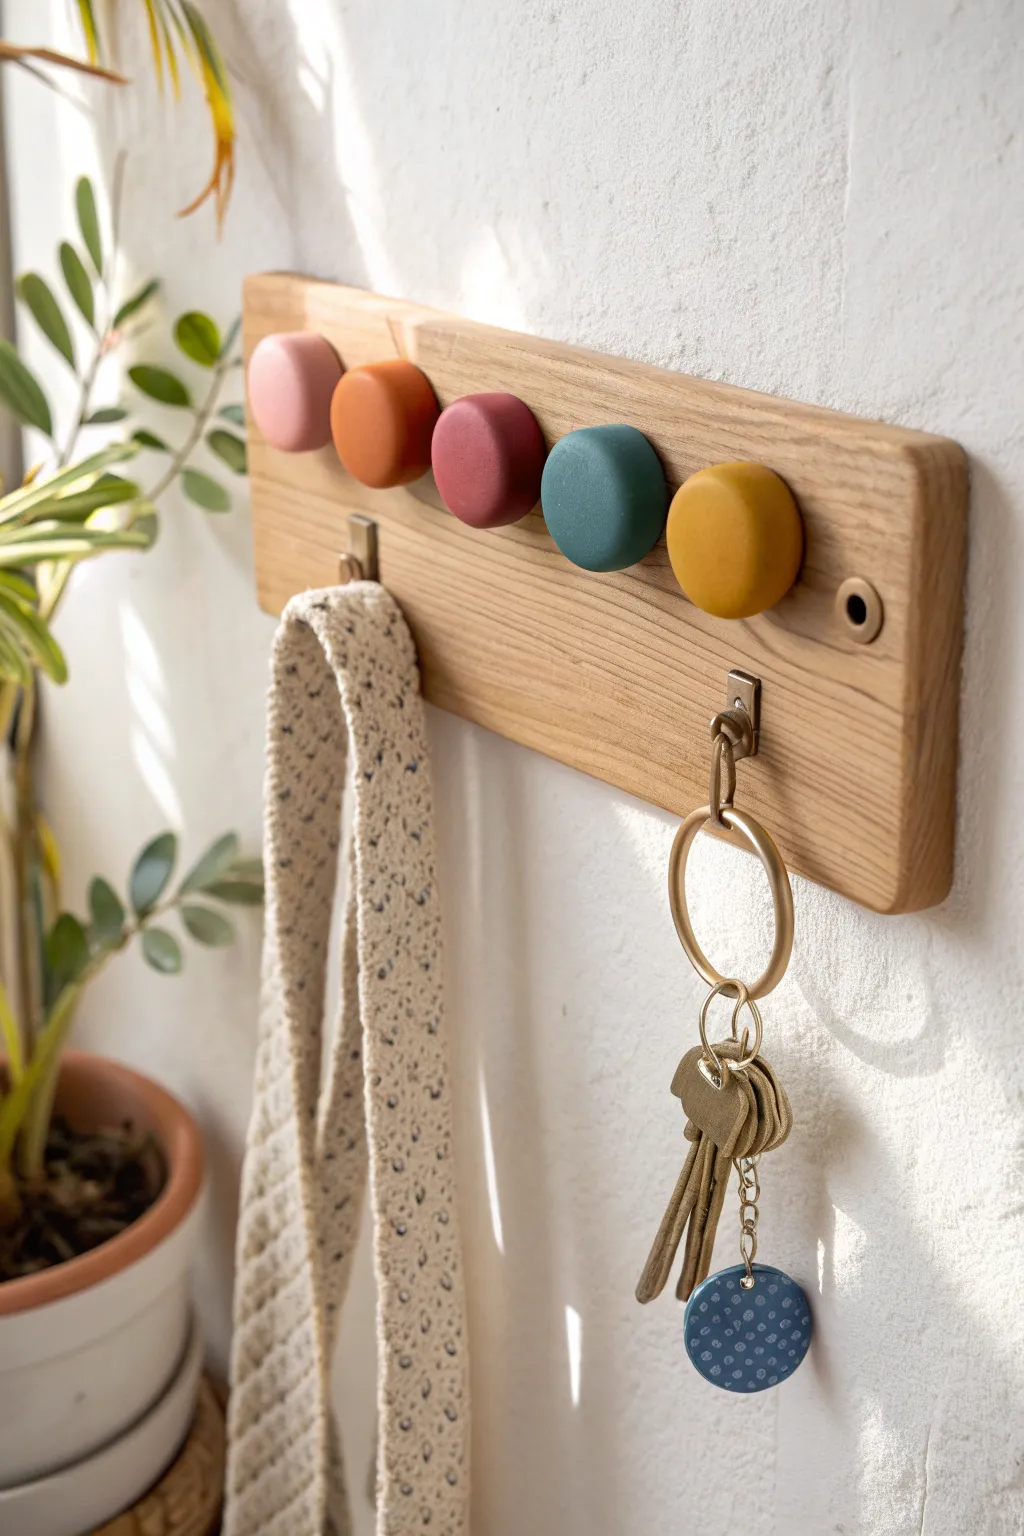
Transform a simple plank of wood into a stylish entryway organizer featuring custom-colored polymer clay knobs. This project combines the natural warmth of oak with soft, matte clay textures for a functional piece that keeps your keys and essentials right where you need them.
Step-by-Step Guide
Materials
- Solid wood plank (oak or pine), approx. 12 x 4 inches
- Polymer clay in 5 colors (dusty pink, terracotta, maroon, teal, mustard)
- Small round cookie cutter (approx. 1.5 inch)
- Liquid polymer clay or strong super glue
- Ceramic tile or glass baking sheet
- Sandpaper (medium and fine grit)
- Drill with bits suitable for wood
- 2 screw-in metal L-hooks (brass or antique gold finish)
- Ruler and pencil
- Varnish (optional, matte finish)
- Wall mounting hardware (screws and anchors)
Step 1: Preparing the Wood Base
-
Select and cut the wood:
Choose a nice piece of hardwood like oak for a premium look. Cut it to your desired length, roughly 12 inches long and 4 inches tall, ensuring the ends are square. -
Sand the surface:
Using medium-grit sandpaper, smooth down all the faces and edges of the wood. Switch to fine-grit paper to get a silky finish, paying special attention to rounding the sharp corners slightly. -
Mark hook positions:
Using a ruler, measure and mark five evenly spaced points across the upper middle section of the board for your clay knobs. Mark two additional spots below them for the metal hooks. -
Pre-drill holes:
Drill pilot holes for the metal hooks to prevent the wood from splitting. If you plan to screw the clay knobs in from behind (for extra strength), drill holes at the five upper marks now as well.
Step 2: Creating the Clay Knobs
-
Condition the clay:
Start with your first color spread. Knead the polymer clay thoroughly until it is soft and pliable. This conditioning step prevents cracks during baking. -
Form the base shapes:
Roll the clay into a thick sheet, approximately 3/4 inch thick. Use your round cutter to punch out a perfect circle, or roll a ball and flatten it gently to get that organic, rounded edges look. -
Refine the edges:
Smooth the edges of your clay circle with your finger. I find that dipping a finger in a little cornstarch helps smooth fingerprints without sticking. -
Create the mounting divot:
Flip the clay piece over. Use a tool to create a small indentation or hole in the center of the back. This will help it bond with the glue or sit over a screw head later. -
Repeat for all colors:
Repeat this process for the dusty pink, terracotta, maroon, teal, and mustard colors. Ensure all knobs are roughly the same diameter and thickness for a cohesive look. -
Bake the clay:
Place your five knobs on a ceramic tile or baking sheet. Bake them according to the package instructions (usually 275°F for 15–30 minutes depending on thickness). -
Cool and sand:
Allow the clay pieces to cool completely. Once cool, lightly sand the bottoms to ensure they are perfectly flat for adhesion. You can also lightly sand the tops if you want a stone-like matte finish.
Sticky Situation?
If clay knobs pop off later, use 2-part epoxy resin instead of super glue. It creates a much stronger bond specifically for non-porous materials like baked clay.
Step 3: Assembly and Finishing
-
Attach the metal hooks:
Screw the two metal L-hooks into the pre-drilled holes on the lower section of the wood board until they are flush and secure. -
Glue the clay knobs:
Apply a strong dab of super glue or construction adhesive to the back of each clay knob. Press them firmly onto the five marked spots on the wood board. -
Secure firmly:
Hold each knob in place for 30–60 seconds to ensure the initial bond sets. Let the adhesive cure fully according to the manufacturer’s timeframe before hanging any weight. -
Add wall mounts:
Drill holes on the far left and right sides of the board for wall mounting. You can use brass washers (as seen in the image) purely for decoration around the screw heads to elevate the look. -
Make the keychain tag:
Use leftover blue clay to make a small round tag. Flatten a small ball, poke a hole near the edge for a jump ring, and texture it with a needle tool if desired before baking. -
Mount to wall:
Position the finished rack on your wall, using a level to keep it straight. Screw it in securely using wall anchors if you aren’t drilling into studs.
Texture Play
Before baking, gently press a piece of coarse sandpaper or a textured fabric onto the clay surface to give the knobs a stone-like or fabric-imprinted finish.
Enjoy the satisfaction of seeing your keys organized on this beautiful, handmade display every time you walk through the door
Cute Cable and Cord Organizer Clips
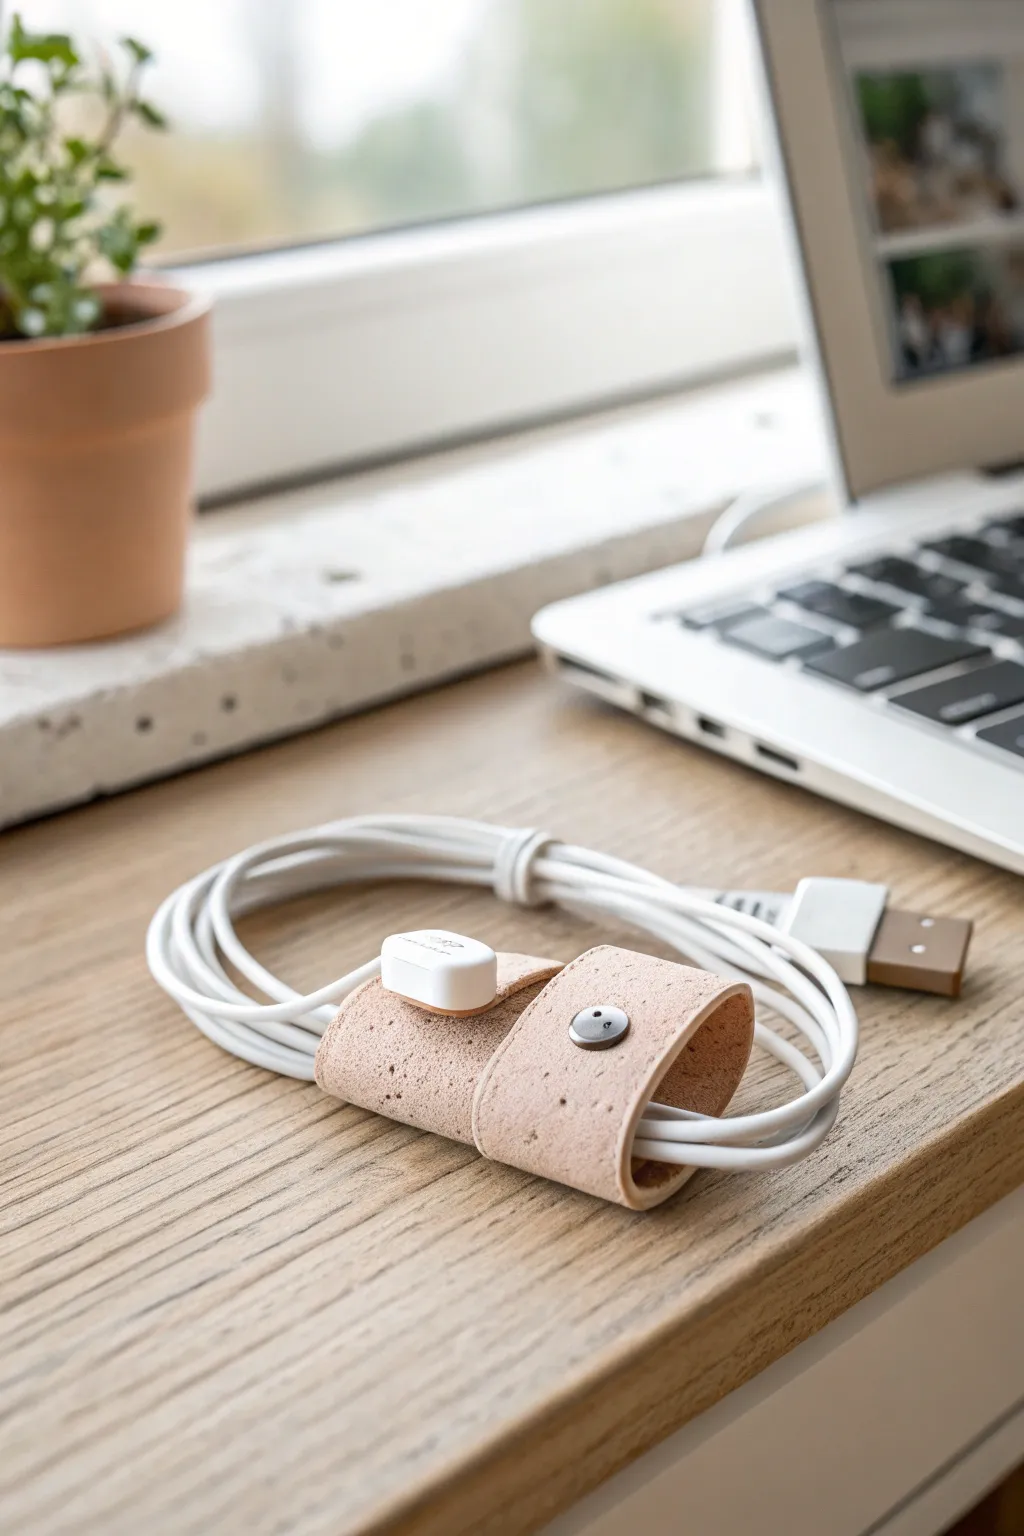
Tame your tech clutter with style using this clever polymer clay cord organizer that mimics the look of natural cork. This simple yet sophisticated project creates a durable, flexible strap perfect for keeping your charging cables tidy at your desk or on the go.
Step-by-Step Tutorial
Materials
- Polymer clay (beige or light tan)
- Polymer clay (dark brown and black for inclusions)
- Small rolling pin or clay machine
- Craft knife or clay blade
- Ruler
- Texture sponge or stiff brush
- Circle cutter (optional, for rounded ends)
- Button stud closure (screw-back type)
- Small leather hole punch or drill bit
- Baking tile or parchment paper
- Oven
Step 1: Creating the Faux Cork
-
Condition the base:
Start by thoroughly conditioning your beige or tan polymer clay until it is soft and pliable. This will be the main body of your ‘cork’. -
Prepare the inclusions:
Take a very small amount of dark brown and black clay. Use a blade to chop these into tiny, sand-like particles. You want fine specks, not large chunks. -
Incorporate the texture:
Sprinkle the chopped dark clay over your flattened beige clay. Fold the clay over and roll it out, then fold again. Repeat this process until the specks are distributed evenly throughout the block. -
Roll the sheet:
Roll your speckled clay out into a long, flat sheet. Aim for a thickness of about 2mm to 3mm—thick enough to be durable but thin enough to wrap around a cord.
Cracking Clay?
If your strap cracks when bending, use a flexible polymer clay brand like Sculpey Soufflé or Premo and ensure it is baked fully at the correct temperature.
Step 2: Shaping the Strap
-
Cut the strip:
Using your ruler and craft knife, cut a rectangular strip approximately 1 inch wide and 4 to 5 inches long. Before cutting, wrap a scrap piece of paper around your intended cable bundle to measure the ideal length. -
Round the ends:
Use a craft knife or a small circle cutter to gently round off the corners of the strip. Rounded corners are less likely to catch or chip than sharp right angles. -
Add surface texture:
To enhance the organic cork effect, lightly press a coarse texture sponge or a stiff-bristled brush onto the surface. Don’t press too deep; just mark the surface slightly. -
Smooth the edges:
Run your finger gently along the cut edges of the clay to smooth out any roughness from the blade cuts. A polished edge makes the final piece look much more professional.
Level Up
Stamp initials or a small icon onto the strap before baking for a personalized touch, or use gold leaf flakes instead of black clay for a marble effect.
Step 3: The Closure System
-
Mark hole placement:
Decide where your button stud will go. You’ll need holes at both ends of the strap. Mark the center point about half an inch from each end. -
Punch the holes:
Using a small hole punch or a cutter tube, remove a small circle of clay at your marked spots. Ensure the hole is slightly larger than the screw post of your button stud. -
Keyhole cut:
On *one* end only, make a tiny slit with your blade extending from the hole towards the center of the strap. This creates a ‘keyhole’ shape that makes fastening easier.
Step 4: Baking and Assembly
-
Curve form:
I prefer to bake this piece draped over a curved surface, like an empty soda can or a cardboard tube. This pre-shapes the clay so it isn’t stressed when you wrap it later. -
Bake:
Bake the piece according to your polymer clay package instructions. Since this needs to be flexible, ensure you do not underbake it; fully cured clay is stronger. -
Cool and assemble:
Once fully cooled, remove from the oven. Insert the screw post of the button stud through the hole without the slit. Screw the top distinct button knob onto the post securely. -
Test the fit:
Gather your cable into a neat coil. Wrap your new clay strap around it and push the button stud through the keyhole on the opposite end to secure it.
Enjoy your organized workspace with these custom-made cable keepers
Drawer Knobs With Custom Color Swirls
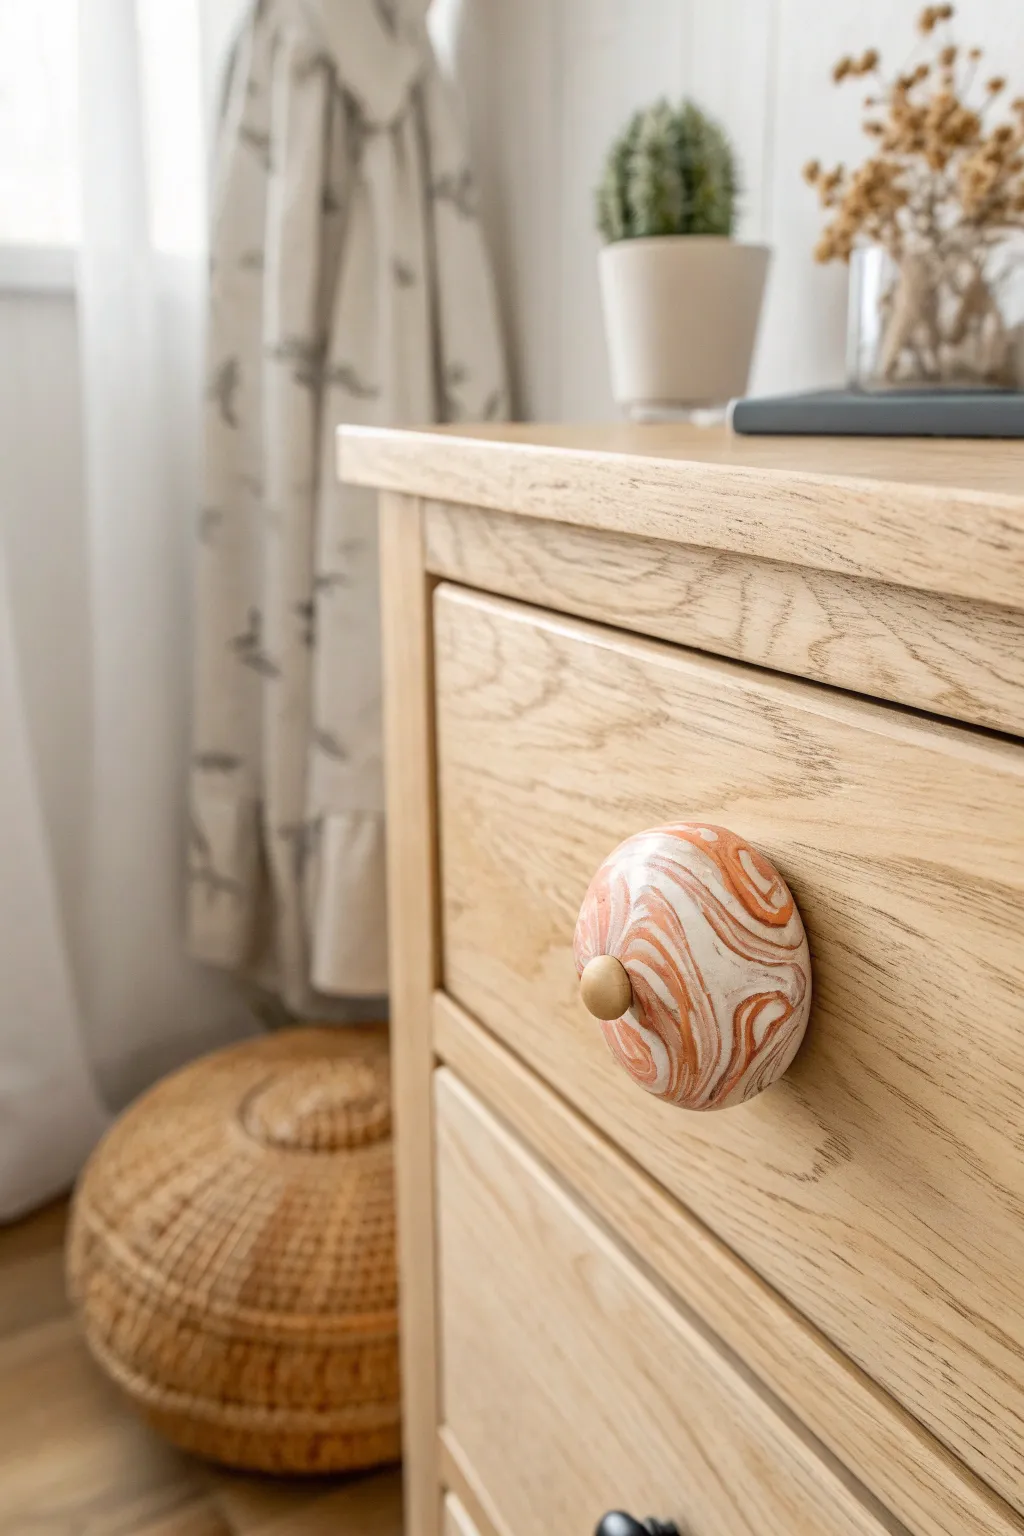
Transform ordinary furniture with these bespoke, faux-marble knobs that add an earthy, artisanal touch to your decor. Using polymer clay allows you to match the terracotta and cream swirls perfectly to your room’s color palette.
Detailed Instructions
Materials
- White polymer clay
- Terracotta or burnt orange polymer clay
- Translucent polymer clay (optional, for depth)
- Plain wooden drawer knobs (mushroom shape)
- Small brass screw-cap nuts or decorative brass beads
- Strong craft adhesive (E6000 or similar)
- Liquid polymer clay (optional)
- Fine-grit sandpaper (400 to 1000 grit)
- Gloss or satin polyurethane varnish
- Acrylic roller
- Sharp clay blade
- Oven
Step 1: Creating the Swirl Pattern
-
Condition the clay:
Start by warming up your white and terracotta polymer clay in your hands until it becomes soft and pliable. If you want a bit more depth, mix a small amount of translucent clay into the white. -
Create logs:
Roll each color into long, thin snakes, roughly 5 inches in length and varying in thickness to create a more organic marble effect. -
Twist together:
Gather your clay snakes into a bundle and twist them together tightly like a candy cane. Fold the twisted log in half and twist it again. -
Refine the marble:
Roll this twisted bundle into a smooth ball, then roll it back out into a thick log. Repeat the twisting and folding process 2-3 times until the colors have started to blend into varied striations, being careful not to over-mix into a single muddy color. -
Flatten the sheet:
Using your acrylic roller, flatten your marbled clay log into a sheet about 3mm thick. I like to check both sides of the sheet and choose the side with the most pleasing swirl pattern to face outward.
Uneven Swirls?
If your pattern looks too striped rather than marbled, try rolling the clay into a ball and flattening it from a different angle to disrupt the lines.
Step 2: Shaping the Knob
-
Cut to size:
Use a round cutter or your clay blade to cut a circle from your marbled sheet that is large enough to cover the face of your wooden knob with some overhang. -
Prepare the base:
Apply a very thin layer of liquid polymer clay or bake-safe adhesive to the top surface of the wooden knob to help the clay bond securely. -
Cover the knob:
Center the clay circle over the wooden knob. Gently press the center down first, then slowly smooth the clay down the sides, working out any air bubbles as you go. -
Trim the edges:
Once the clay is smoothed over the curve, use your sharp blade to trim away excess clay at the base or underneath the rim of the knob for a clean finish. -
Smooth the surface:
Use your finger or a smoothing tool to gently rub out any fingerprints or uneven spots. The heat from your finger will help polish the clay slightly before baking.
Step 3: Finishing Details
-
Create the center hole:
Locate the exact center of the knob face. Gently press a small indentation where your decorative brass cap will eventually go, ensuring it sits flush. -
Bake the knobs:
Place your knobs on a baking tray lined with parchment paper. Bake according to your polymer clay manufacturer’s instructions, usually around 275°F (135°C) for 30 minutes, keeping in mind the wood creates extra insulation. -
Cool and sand:
Let the knobs cool completely. Once hard, wet-sand the clay surface lightly with fine-grit sandpaper (starting at 400 and moving to 1000) under running water to achieve a silky smooth feel. -
Seal the surface:
Brush on a thin layer of satin or gloss polyurethane varnish to protect the clay and make the marble colors pop. -
Attach the hardware:
Place a dab of strong adhesive into the center indentation you made earlier. Press the small brass ball nut or decorative bead into the glue and let it cure fully before installing on your dresser.
Go Geometric
Instead of round knobs, use square or hexagonal wooden blocks as your base. The sharp edges contrast beautifully with organic marble swells.
Install your new custom hardware and enjoy the subtle, sophisticated upgrade to your furniture