
If you’ve ever wanted your jewelry to crack you up mid-day, funny clay bead bracelets are the easiest little win. I love how a handful of clay heishi beads and letter beads can turn a simple bracelet stack into an inside joke you can wear.
Sassy One-Word Mood Bracelets
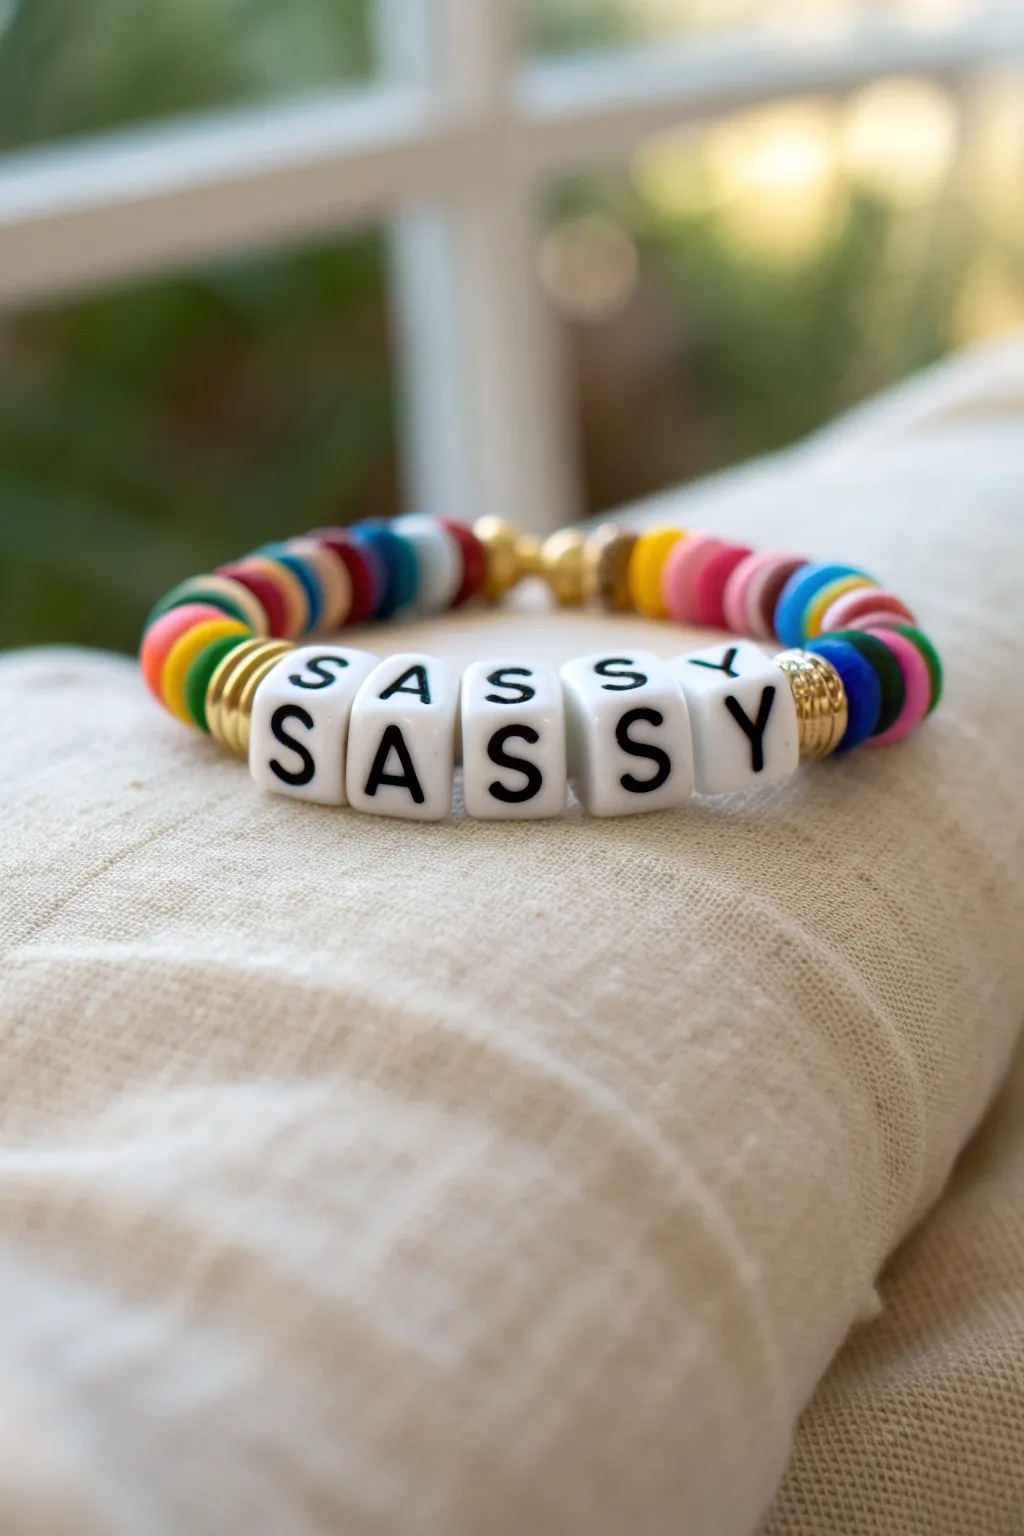
Wear your mood on your sleeve—literally—with this vibrant, easy-to-make piece that combines bold colors with a cheeky message. The classic white letter beads pop against a rainbow of polymer clay heishi discs, accented with elegant gold touches for a polished finish.
Detailed Instructions
Materials
- Polymer clay heishi beads (assorted rainbow colors: pink, blue, green, yellow, red, white/cream)
- White square alphabet beads with black lettering (S, A, S, S, Y)
- Gold disc spacer beads (heishi style)
- Gold round crimp beads (2mm)
- Gold knot covers (clam shell style) or large gold beads for ends
- Clear elastic beading cord (0.8mm recommended for durability)
- Jewelry glue or clear nail polish
- Scissors or jewelry snips
- Bead stopper or tape
Step 1: Planning and Prep
-
Measure the wrist:
Before you cut anything, wrap a piece of string around your wrist to find the circumference. Add about one inch to this measurement to ensure the bracelet fits comfortably without being too tight. -
Cut the cord:
Cut a length of elastic cord about 3-4 inches longer than your final measurement. This extra length creates tails that make tying the finishing knot significantly easier. -
Secure the end:
Attach a bead stopper or simply place a piece of masking tape on one end of your stretchy cord to prevent your colorful beads from sliding straight off while you work. -
Sort your message:
Find your ‘S’, ‘A’, ‘S’, ‘S’, and ‘Y’ beads. Set them aside in order so you don’t accidentally spell your sassy word backward during stringing.
Loosey Goosey?
If your letter beads flip around too much, try adding slightly thicker heishi beads next to them or tightening your knot to increase tension on the strand.
Step 2: Stringing the Design
-
Start the pattern:
Beginning on the side opposite your tape, start threading your heishi beads. This design uses a random, scrappy mix of colors. Alternate between pinks, blues, greens, and yellows. -
Add gold accents:
Every half-inch or so, slide on a gold disc spacer bead. This adds a sophisticated break to the solid colors and adds that metallic shine visible in the photo. -
Check the length:
Continue stringing the colorful mix until you have completed nearly half of the bracelet’s total length. -
Frame the word:
Slide on a stack of 3 to 4 gold disc spacers. This creates a bold metallic cuff that will frame the left side of your word. -
Spell it out:
Thread your letter beads onto the cord in order: S-A-S-S-Y. Make sure they are all facing the correct direction and not upside down. -
Close the frame:
Add another stack of 3 to 4 gold disc spacers immediately after the ‘Y’. Your word is now perfectly centered between gold highlights. -
Finish the strand:
Resume your colorful random pattern on the other side. Continue adding mixed heishi beads and occasional single gold spacers until the bracelet reaches your desired length. -
Verify the fit:
Wrap the unfinished strand around your wrist to check the size. Ideally, the ends should touch comfortably without stretching the cord yet.
Step 3: Finishing Touches
-
Remove the stopper:
Carefully remove the tape or bead stopper from the beginning end while holding the cord firmly so the beads don’t escape. -
Tie the first knot:
Bring the two ends of the elastic together and tie a standard overhand knot. Pull it gently but firmly to bring the beads together. -
Secure with a surgeon’s knot:
For the second knot, loop the cord end through the loop twice before pulling tight. This extra pass creates friction that prevents slipping. -
Add adhesive:
Place a tiny dab of jewelry glue (I sometimes use clear nail polish in a pinch) directly onto the knot. This seals the deal and ensures longevity. -
Hide the knot:
If you used a large-hole bead or a crimp cover near the end, you can gently tug the knot inside it to conceal your work. Otherwise, snip the excess cord close to the knot after the glue dries.
Color Coordination
To make the ‘random’ colors look cohesive, pick 4-5 core colors and repeat them in different sequences rather than using every color in the kit.
Now you have a custom accessory that tells everyone exactly what kind of day you’re having


Snack Pun Bracelet Ideas
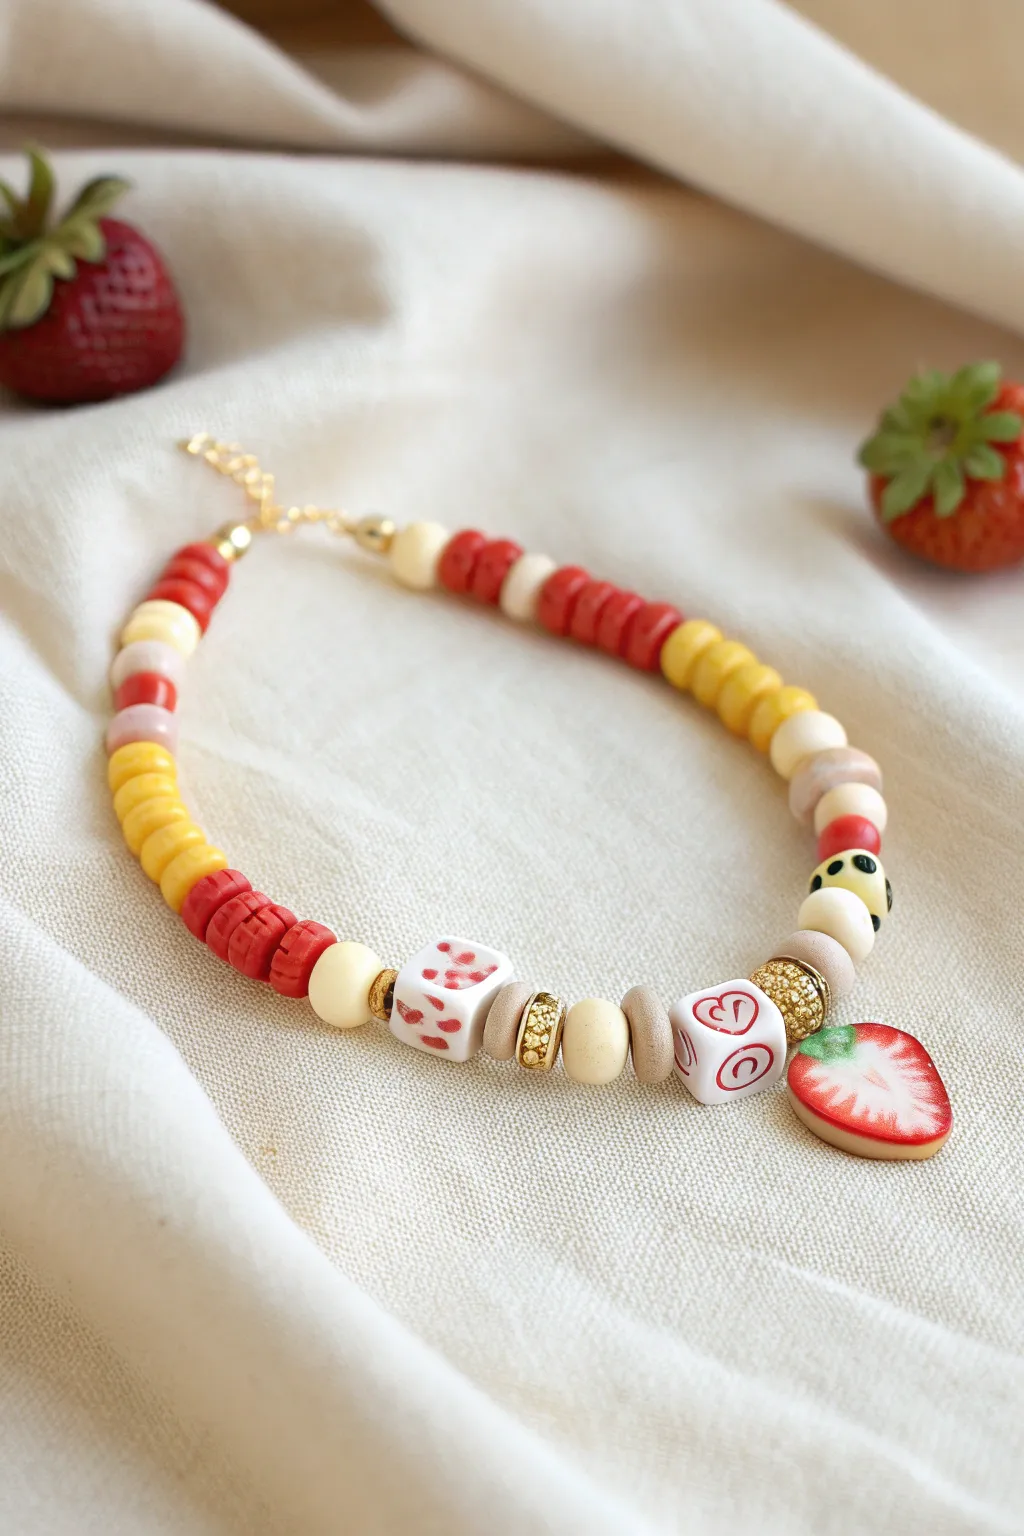
This whimsical beaded jewelry piece captures the essence of summer with its vibrant red and yellow palette and adorable strawberry charm. Combining polymer clay disc beads with unique focal beads creates a playful, textured accessory perfect for adding a pop of sweetness to any outfit.
Step-by-Step Tutorial
Materials
- Polymer clay Heishi beads (red, yellow, cream/off-white, light pink)
- Strawberry slice pendant or charm
- Square alphabet-style beads (with red heart/pattern)
- Round wooden or ceramic beads (cream/natural)
- Gold tone spacer beads (textured/rhinestone rondelles)
- Small gold crimp beads
- Gold finish lobster clasp and extension chain
- Beading wire (flexible nylon-coated)
- Flat nose pliers
- Wire cutters
- Crimping tool (optional but recommended)
Step 1: Preparation & Pendant Setup
-
Measure your wire:
Cut a length of beading wire approximately 18-20 inches long. This gives you plenty of slack for a standard choker length plus room for finishing the ends comfortably. -
Secure the starting end:
Thread a crimp bead onto one end of the wire, followed by the jump ring attached to your extension chain. Loop the wire back through the crimp bead and use your flat nose pliers or crimping tool to flatten it securely. -
Establish the focal point:
Before stringing the main pattern, locate the center of your wire. We will build the design outwards from the strawberry charm to ensure perfect symmetry.
Wire Tension Tips
Don’t pull the wire too tight before crimping! The necklace needs ‘wiggle room’ to curve around your neck. If it’s too stiff, it will stick out straight and look rigid.
Step 2: Creating the Centerpiece
-
Thread the strawberry:
Slide your strawberry slice pendant onto the wire so it rests right in the middle. Ensure the fruit side is facing forward. -
Add gold accents:
On the immediate left and right of the strawberry, thread a textured gold rondelle spacer bead. This frames the fruit adds a touch of sparkle. -
Add wood texture:
Next, slide a natural wooden or matte ceramic bead onto both sides of the gold spacers. I find this helps transition from the shiny gold to the colorful clay. -
Insert the square beads:
Add your square novelty beads next. In the reference, these are white cubes with red hearts or abstract red patterns. Place one on each side. -
More gold spacing:
Add a second gold rondelle spacer after each square bead to bookend the focal section.
Mix It Up
For a ‘fruit salad’ vibe, swap the red and yellow sections for green and pink, and replace the central strawberry charm with a watermelon slice or a little clay kiwi.
Step 3: Stringing the Pattern
-
Begin the yellow segment:
On both sides, start stringing the yellow Heishi clay beads. Use about 8-10 discs to create a solid block of sunny yellow color. -
Transition with creams:
Follow the yellow block with 2-3 cream or light pink disc beads to act as a soft separator before the next bold color. -
Create the red segment:
Now add your block of red Heishi beads. Use approximately 10-12 discs here to mimic the bold red of a strawberry. -
Repeat the pattern:
Continue this pattern: yellow block, creamy separator, red block. Repeat this sequence moving up both sides of the wire. -
Check length frequently:
Pause occasionally to hold the necklace up to your neck. You want the beaded portion to end just before the back of your neck where the clasp will sit.
Step 4: Finishing Touches
-
Add final gold beads:
Once you reach your desired length, finish each end with a single small gold round bead or crimp cover for a polished look. -
Attach the clasp:
Thread a crimp bead onto the unfinished end. Add your lobster clasp. -
Secure the loop:
Loop the wire back through the crimp bead and the last few beads on the strand. Pull it tight enough to remove gaps, but loose enough that the necklace drapes naturally. -
Crimp and trim:
Flatten the crimp bead firmly with your pliers. Trim the excess wire tail close to the beads so it doesn’t poke your skin.
Now you have a sweet, summer-ready accessory that looks good enough to eat


Introvert Battery Level Bracelets
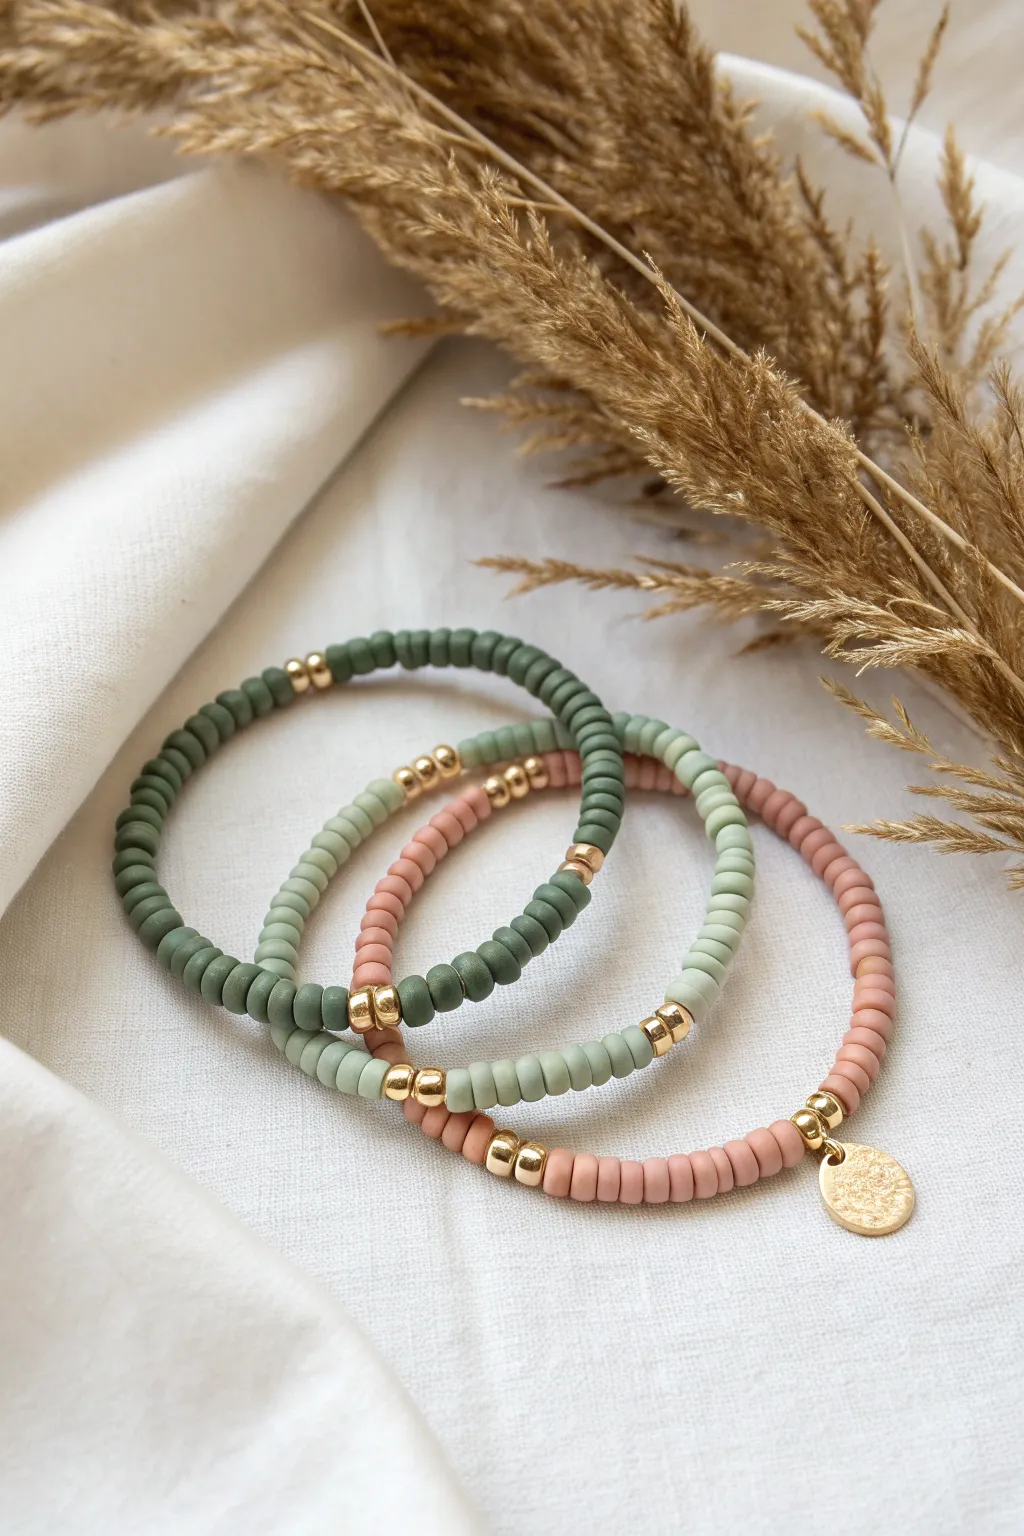
Create a soothing stack of muted tone bracelets that perfectly captures a calm, grounded aesthetic. These simple yet elegant accessories use matte heishi beads and gold accents to form a versatile set you can wear together or mix and match.
Step-by-Step
Materials
- Matte polymer clay disc beads (heishi beads) in olive green
- Matte polymer clay disc beads in sage green
- Matte polymer clay disc beads in muted pink or terracotta
- Gold tone spacer beads (approx. 4mm round or tube shape)
- Small gold disc charm or pendant
- Gold jump ring (4-6mm)
- Elastic beading cord (0.8mm clear)
- Jewelry glue or clear nail polish
- Scissors
Step 1: Preparation
-
Measure your wrist:
Before cutting any cord, wrap a measuring tape loosely around your wrist to find your comfortable size. Add about half an inch to this measurement to ensure the bracelets aren’t too tight. -
Prepare the cord:
Cut three strands of elastic cord, making each one about 8-10 inches long. Having this extra length makes the final knotting process much easier than working with short ends. -
Pre-stretch the elastic:
Gently pull on each strand of elastic a few times. This pre-stretching step helps prevent the bracelets from sagging or stretching out permanently after wearing them a few times. -
Secure one end:
Tape one end of your first cord to your work surface or use a bead stopper. This saves you the headache of beads sliding right off while you work.
Knot Pro Tip
To prevent heishi beads from pinching your skin, tie the knot slightly looser than usual. The flat beads need wiggle room to sit comfortably against the wrist.
Step 2: Olive Green Bracelet
-
Start the pattern:
Begin threading the dark olive green clay discs. String about 15-20 beads onto the cord. -
Add gold accents:
Slide on two gold spacer beads. These metallic breaks add a touch of elegance to the matte finish of the clay. -
Continue the pattern:
Repeat this pattern—a section of olive beads followed by two gold spacers—until the strand reaches your desired length. -
Check the fit:
Wrap the strand around your wrist to verify the size. Add or remove a few clay discs if necessary to get the perfect fit.
Step 3: Sage & Pink Bracelets
-
Create the sage strand:
For the lighter green bracelet, follow a similar method but vary the placement of your gold beads. Try placing three individual gold spacers randomly or symmetrically around the bracelet for variety. -
Start the pink strand:
For the final bracelet, thread your muted pink or terracotta beads. This one will feature the charm, so the bead count needs to be balanced. -
Thread the charm base:
String the beads until you reach the halfway point of the bracelet. Add two gold spacer beads here to frame the charm area. -
Attach the charm:
Using your pliers, open a jump ring and slide on your gold disc charm. Close the jump ring securely around the cord between the two gold spacers you just added. -
Finish the pink strand:
Continue adding pink beads until this bracelet matches the length of the other two.
Level Up Your Stack
Make the ‘battery level’ theme explicit by using a white paint pen to draw a small battery icon on the gold charm, or add letter beads spelling ‘LOW BATTERY’.
Step 4: Finishing Touches
-
Tie the knots:
For each bracelet, remove the tape or stopper. Bring the ends together and tie a square knot (right over left, left over right). Pull tight. -
Secure with glue:
Place a tiny dot of jewelry glue or clear nail polish on the knot. I find waiting a few minutes here ensures the knot is fully bonded before proceeding. -
Hide the knot:
Once dry, trim the excess elastic close to the knot. Unlike round beads, flat heishi beads don’t easily hide knots inside, so try to slide the knot next to a gold spacer to camouflage it. -
Final stack:
Roll the bracelets gently onto your wrist one by one to avoid overstretching the elastic.
Enjoy wearing your new customized stack that speaks volumes without saying a word


Color-Coded Setup And Punchline
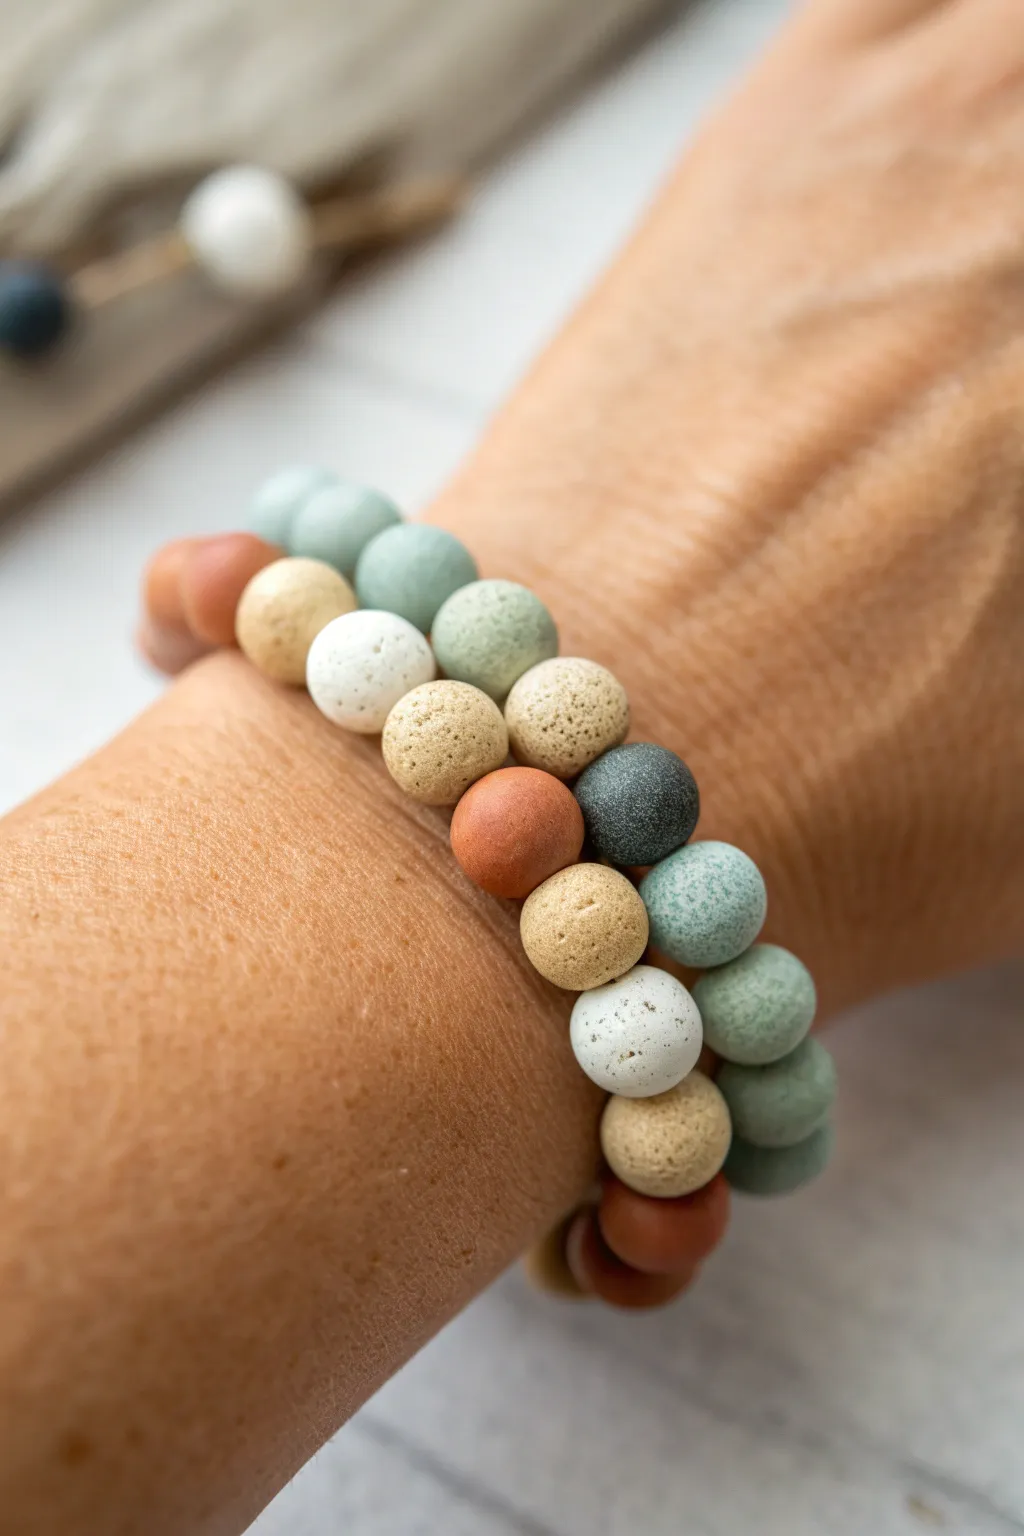
Create a sophisticated yet earthy set of bracelets using handmade polymer clay beads with a natural, stone-like texture. These matte beads in sage, terracotta, sand, and charcoal create a cozy, organic look perfect for stacking.
Detailed Instructions
Materials
- Polymer clay in Sage Green, Terracotta, Beige, White, and Black
- Coarse black pepper or dried coffee grounds (for speckling)
- Old toothbrush or sandpaper (for texturing)
- Bead piercing pin or thick needle
- Strong elastic cord (0.8mm)
- Super glue or jewelry cement
- Scissors
- Baking sheet and parchment paper
- Oven
Step 1: Prepping the Clay
-
Condition the clay:
Start by kneading each block of polymer clay separately until it is soft and malleable. This prevents cracking later. -
Create custom shades:
Mix a little white into your sage green and terracotta to soften them into matte pastel tones. -
Add texture material:
For the stone effect, sprinkle a tiny pinch of coarse black pepper or dried coffee grounds into the beige, white, and sage clays. Knead it in thoroughly so the specks are distributed evenly.
Step 2: Forming the Beads
-
Roll a log:
Roll your conditioned clay into a long snake, roughly the thickness you want your final beads to be. -
Cut uniform segments:
Use a blade to slice the log into equal-sized chunks. This ensures your beads are all relatively the same size. -
Roll spheres:
Take each chunk and roll it between your palms to form a smooth ball. -
Apply surface texture:
I like to gently tap the surface of each bead with an old toothbrush or roll it lightly on sandpaper to remove the glossy synthetic look and mimic real stone. -
Pierce the holes:
Using your bead pin, carefully poke a hole through the center of each sphere. Twist the pin gently as you push to avoid squashing the bead shape.
Fixing Distortion
If your beads squash while piercing holes, pop them in the fridge for 10 minutes before piercing. The firmer clay holds its shape against the needle pressure much better.
Step 3: Baking and Assembly
-
Bake the beads:
Arrange the beads on a parchment-lined baking sheet and bake according to your clay package’s instructions (usually 275°F/135°C for 15-30 minutes). -
Cool completely:
Let the beads cool fully before handling; they harden as they cool. -
Plan your pattern:
Lay out two separate strands. For the first strand, alternate sections of sage green with occasional white accents. For the second, mix terracotta, sand, and charcoal in a random organic pattern. -
String the beads:
Cut a piece of elastic cord about 10 inches long. Thread your beads onto the cord according to your layout. -
Check the fit:
Wrap the strand around your wrist to ensure it sits comfortably without gaps. -
Knot the cord:
Tie a surgeon’s knot (right over left twice, then left over right twice) and pull tight to secure. -
Glue the knot:
Apply a tiny drop of super glue or jewelry cement directly onto the knot. -
Hide the knot:
While the glue is still tacky, gently pull the knot inside one of the adjacent beads to hide it. -
Trim excess:
Once the glue is dry, snip off the excess elastic tails close to the bead.
Scent Diffuser Upgrade
Swap one clay bead for a raw lava stone bead. It looks similar but holds essential oils, turning your bracelet into a wearable aromatherapy diffuser.
Now you have a custom set of stone-effect bracelets that add a natural touch to any outfit

The Complete Guide to Pottery Troubleshooting
Uncover the most common ceramic mistakes—from cracking clay to failed glazes—and learn how to fix them fast.
Secret Joke Messages In Bead “Morse Code”
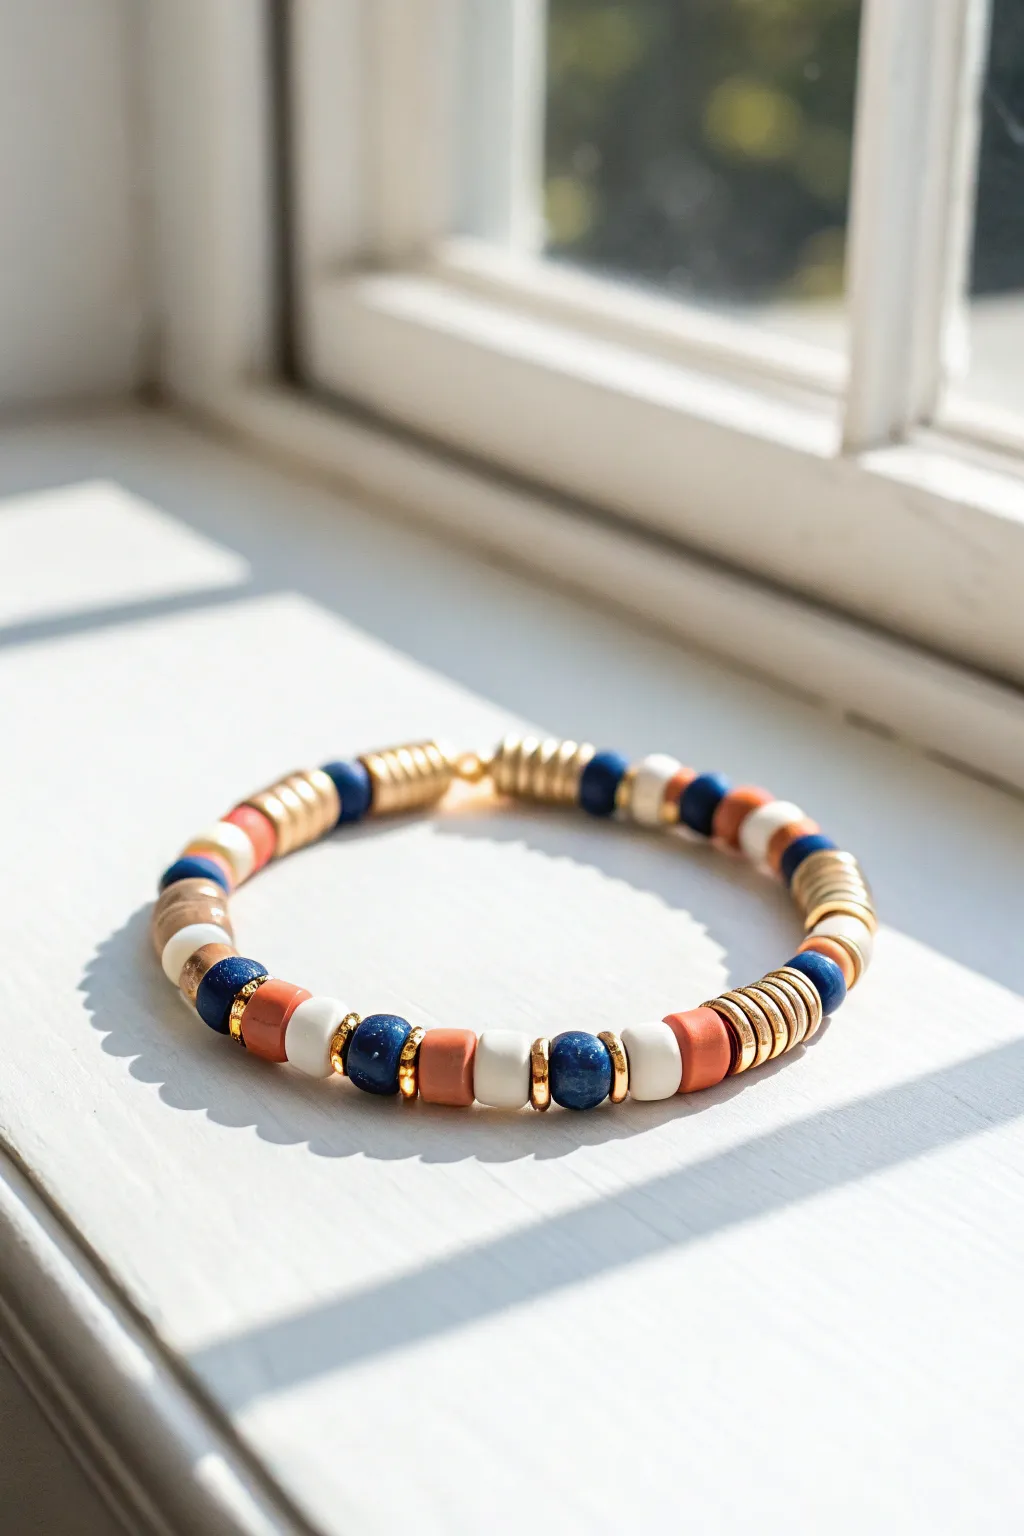
Create a stylish accessory with a secret twist by using alternating bead colors to spell out funny or meaningful messages in Morse code. This design features a sophisticated palette of terracotta, navy, cream, and gold, making your secret code look like high-end jewelry.
Step-by-Step Tutorial
Materials
- Polymer clay heishi beads (Terracotta/Rust, Navy Blue, Cream/White)
- Gold thick spacer disc beads (metallic)
- Strong elastic stretch cord (0.8mm or 1mm)
- Jewelry glue or clear nail polish
- Scissors
- Tape or bead stopper
- Morse code chart
Step 1: Decoding Your Message
-
Choose your phrase:
Decide on the short, funny word or phrase you want to hide in plain sight. Keep it relatively short so the pattern doesn’t get too long for your wrist. -
Map the code:
Using a Morse code chart, write down the dot (.) and dash (-) sequence for your message. Assign a bead color to each element. For this look, use the Navy Blue beads for dots and the Cream beads for dashes (or vice versa). -
Assign spacers:
Decide on a ‘spacer’ bead to separate your letters. In this design, the Rust/Terracotta beads act as the separators between letters.
Step 2: Stringing the Pattern
-
Prepare your cord:
Cut a piece of elastic cord about 10-12 inches long. This gives you plenty of room to work. I always secure one end with a piece of tape or a bead stopper so beads don’t slide off while I’m working. -
Start with gold accents:
Begin your pattern with a cluster of gold disc beads. The image shows blocks of about 5-8 gold discs grouped together. This adds a luxurious metallic touch and hides the knot later. -
String the first letter:
Thread on your first letter’s code. For example, if your letter starts with a dot, slide on a Navy bead. To add definition, place a thin gold spacer bead on either side of the functional code beads so they stand out. -
Add the letter separator:
After completing one full letter in code, slide on a Rust/Terracotta bead to signal a break before the next letter begins. -
Continue the pattern:
Repeat the process for the rest of your word: Code Beads (Navy/Cream) separated by Divider Beads (Rust), using gold accents to flank specific code segments for that polished look. -
Check the length:
Periodically wrap the strand around your wrist. If your message is short and doesn’t encircle your whole wrist, fill the remaining space with symmetrical blocks of gold discs and solid color sections. -
Balance the design:
If you have extra space, mimic the gold blocks seen in the photo. Group 6-8 gold discs together to create shiny ‘bars’ that break up the matte clay texture.
Clean Code Tip
Use gold wafer beads between every single dot and dash bead. It makes the code easier to read and adds a high-end shimmer to the piece.
Step 3: Finishing Touches
-
Pre-stretch the cord:
Before tying, give the ends of the elastic a gentle tug. This pre-stretching prevents the bracelet from loosening up significantly after the first wear. -
Tie the knot:
Remove the tape/stopper and bring the ends together. Tie a strong surgeon’s knot (right over left, left over right) and pull tight. -
Secure with glue:
Dab a tiny drop of jewelry glue or clear nail polish onto the knot. Let it dry completely before trimming the excess cord. -
Hide the knot:
Gently slide one of the larger gold bead clusters over the knot to conceal it seamlessly.
Stack ‘Em Up
Make a set of three bracelets: one with the coded message, and two others in solid coordinating colors (like all-navy or all-gold) to wear as a stack.
Now you have a chic bracelet that holds a secret joke only you know how to read