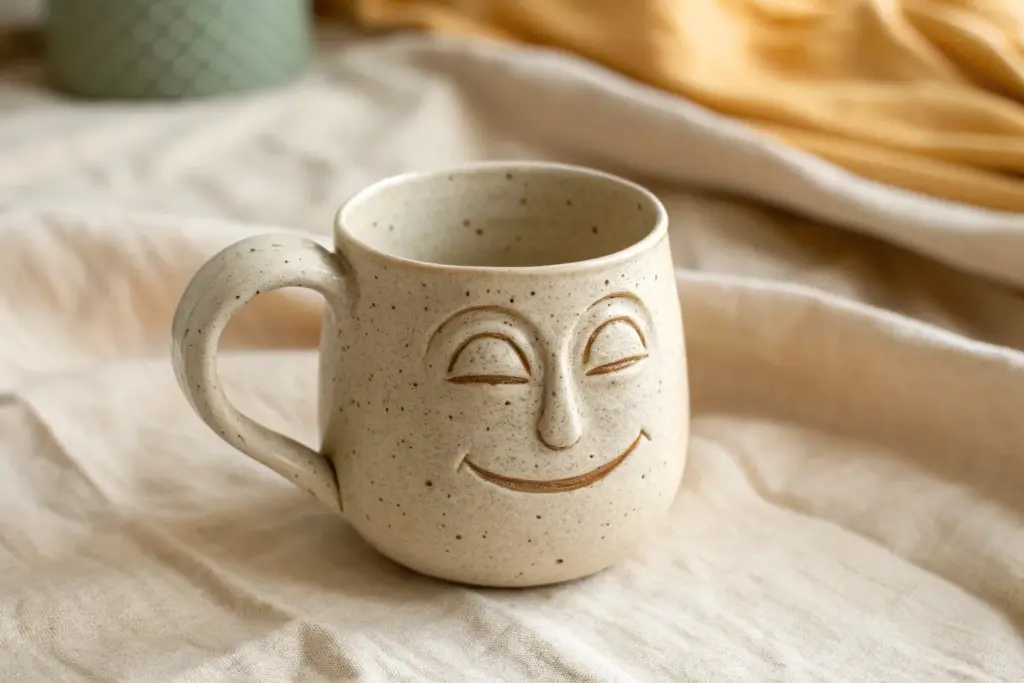
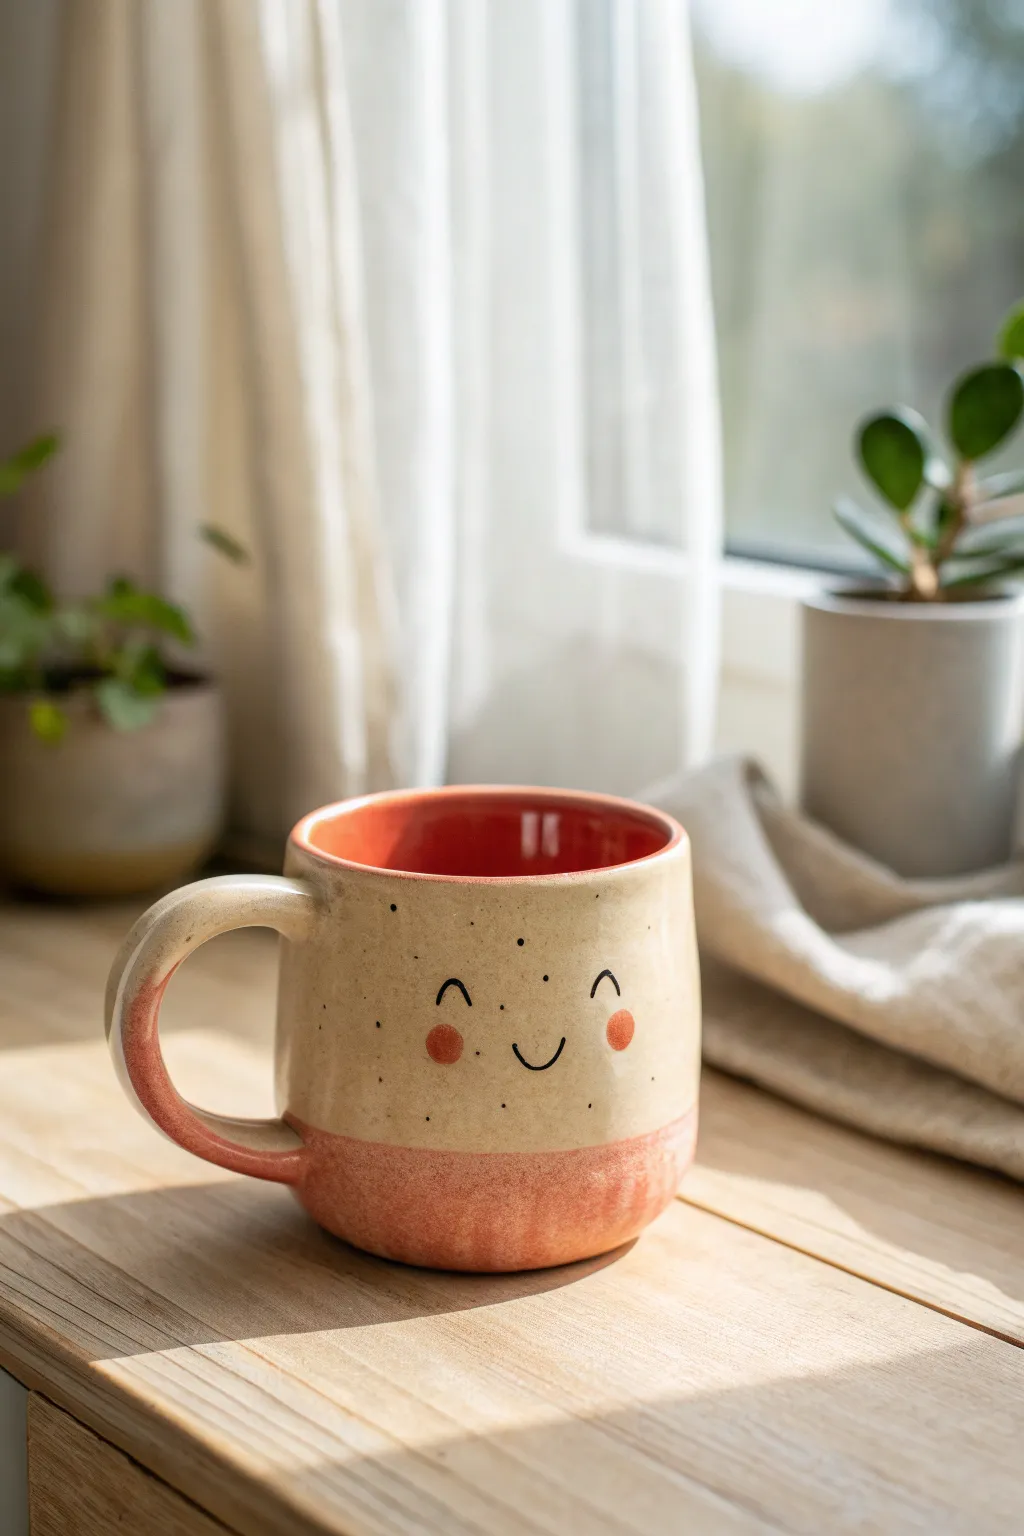
If you’ve ever wanted your morning drink to stare back at you, you’re in the right place—funny clay mugs are basically tiny sculptures you can sip from. I love how a few exaggerated features can turn a simple cup into a full-on character mug with a ridiculous personality.
The Oversized Teeth Grin Mug
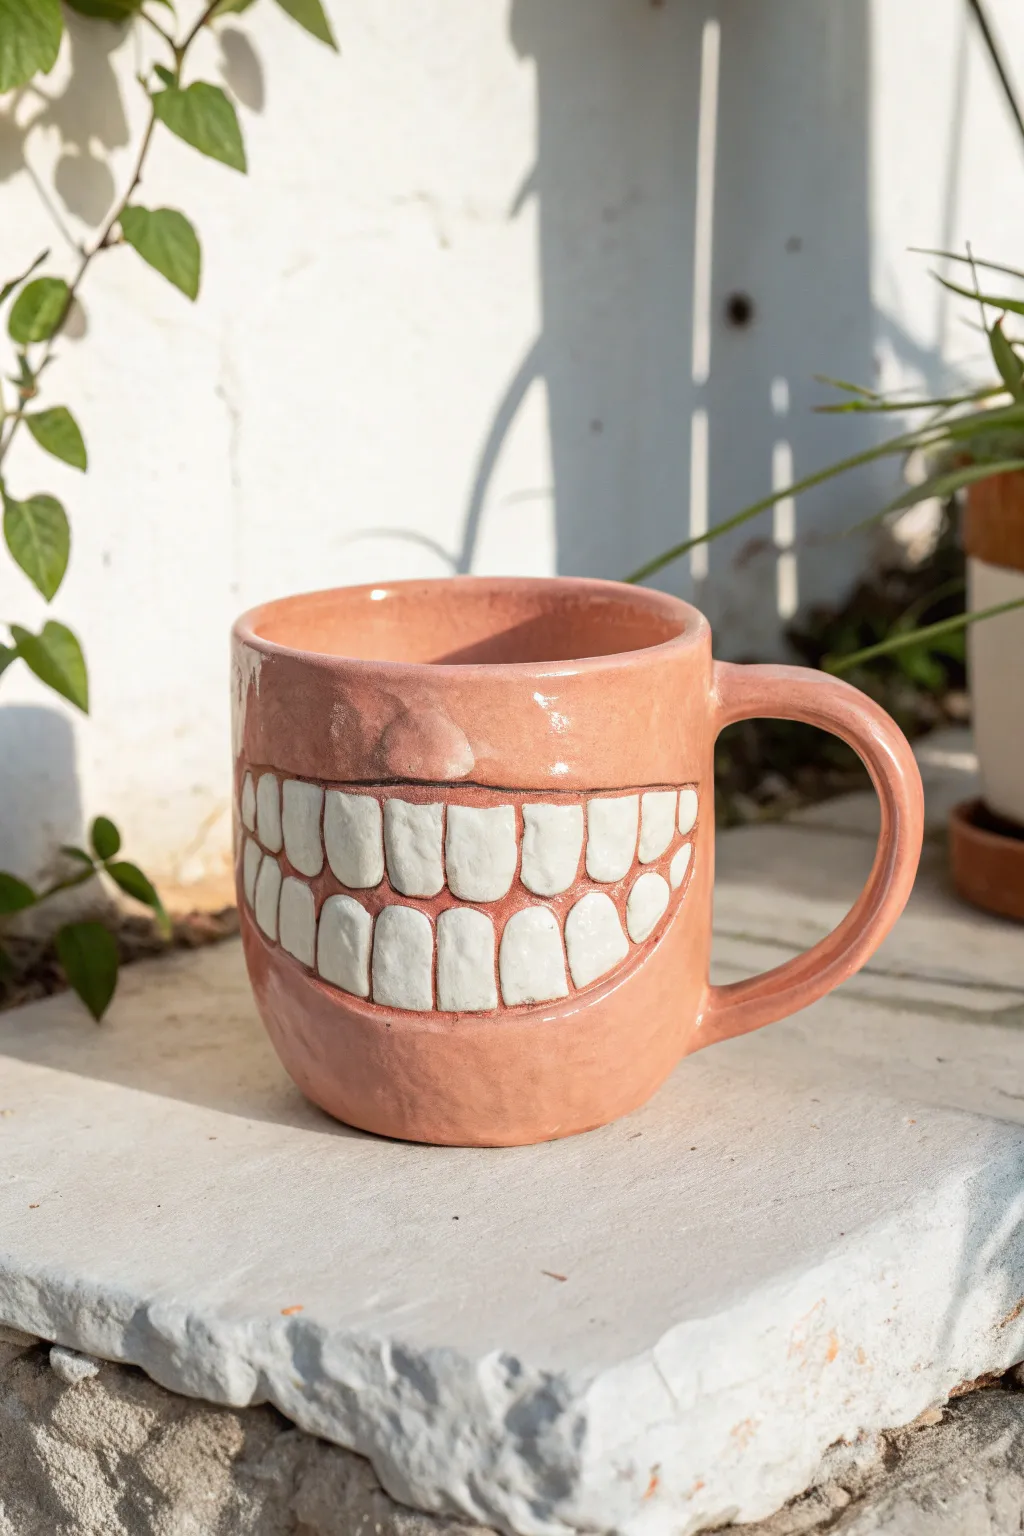
This whimsical ceramic project transforms a standard cylinder into a cheeky character with an oversized, toothy smile. The fleshy pink glaze and distinctively sculpted white teeth create a playful 3D texture that makes your morning coffee feel a little more friendly.
How-To Guide
Materials
- Stoneware clay (cone 5/6 recommended)
- Flesh-tone or salmon pink ceramic glaze
- White underglaze or white glaze
- Rolling pin and guide sticks
- Clay knife or needle tool
- Scoring tool (serrated rib)
- Slip (clay mixed with water)
- Sponge
- Small flat brush for glazing
- Modeling tool for sculpting
Step 1: Building the Mug Body
-
Roll the slab:
Begin by wedging your clay to remove air bubbles. Roll out a consistent slab about 1/4 inch thick using guide sticks to ensure evenness. -
Cut the rectangle:
Measure and cut a rectangle approximately 4 inches high by 10 inches long. This will form the walls of your mug. -
Form the cylinder:
Score the short ends of your rectangle and apply slip. Curve the slab into a cylinder, overlapping the scored ends slightly, and press them firmly together to create a seam. -
Smooth the seam:
Use a modeling tool or your fingers to smooth the seam inside and out until it is invisible. I like to run a rib tool over the surface to compress the clay here. -
Attach the base:
Roll a small piece of clay for the base. Place your cylinder on top, trace around it, and cut out the circle. Score and slip both the bottom edge of the cylinder and the base circle, then join them securely. -
Add a handle:
Pull or roll a coil of clay for the handle. Shape it into a ‘C’ or ear shape. Score and slip the attachment points on the side of the mug (opposite where the face will be) and press the handle on firmly.
Teeth Popping Off?
If teeth detach during drying, you likely didn’t score enough. Reattach bone-dry pieces with vinegar or ‘paper clay’ slip for a stronger bond.
Step 2: Sculpting the Face
-
Define the mouth area:
On the front of the mug, lightly sketch a wide, oblong shape for the mouth using a needle tool. It should wrap slightly around the curve of the mug. -
Add the gums:
Roll two thin coils of clay. Score and slip the sketched lines, then press these coils onto the mug to define the upper and lower lip boundaries, blending the outer edges into the mug wall smoothly. -
Create the nose bump:
Form a small, rounded triangular lump of clay. Attach this just above the center of the upper lip to create a subtle nose shape, smoothing the edges downward. -
Sculpt the teeth:
Roll a flat strip of clay and cut it into small rectangular chiclet shapes. You’ll need about 10-12 for the top and bottom rows combined. -
Attach the teeth:
Score the area inside the lip coils excessively. Apply slip and press each tooth individually into place. Make sure they touch each other but maintain distinct separation lines. -
Refine the details:
Use a small tool to press slightly between the teeth, enhancing the gap definition. Smooth the surfaces of the teeth with a damp fingertip to remove sharp edges.
Step 3: Finishing and Glazing
-
Bisque fire:
Allow the mug to dry completely (bone dry) before bisque firing it in the kiln according to your clay’s specifications. -
Apply wax resist:
Carefully paint wax resist over the white teeth if you plan to use a dipping glaze, or skip this if applying glaze by brush. -
Paint the teeth:
Apply 2-3 coats of bright white glaze or underglaze specifically to the teeth patches. Be careful not to get white on the gums. -
Glaze the body:
Apply your pink or flesh-tone glaze to the entire rest of the mug—inside, outside, handle, and the lips surrounding the teeth. Ensure you get glaze into the crevices between the teeth for definition. -
Check the bottom:
Wipe the bottom of the mug clean with a sponge to ensure no glaze sticks to the kiln shelf. -
Final smooth:
Check the rim of the mug for any rough glaze spots and smooth them with a finger. Fire the mug a second time at the glaze temperature.
Clean Lines
Use a very fine liner brush to apply a dark wash or brown underglaze between the teeth before the final glaze. It makes the individual teeth pop visually.
Enjoy sipping from your delightfully weird creation knowing it will always smile back at you


The Bug-Eyed Crossed-Eyes Mug

This whimsical speckled mug features oversized, expressive eyes that instantly add personality to your morning coffee routine. With its simple cylindrical form and charming, slightly goofy smile, this project is perfect for beginners looking to practice adding sculptural elements to their wheel-thrown or hand-built pottery.
Step-by-Step Tutorial
Materials
- Speckled stoneware clay (e.g., cone 5/6)
- Pottery wheel (or rolling pin for slab building)
- Throwing tools (sponge, rib, wire cutter)
- Needle tool
- Scoring tool (or serrated rib)
- Slip (clay slurry)
- Small loop tool
- Underglaze (white, bright blue, black)
- Small detail brushes
- Clear glaze (transparent)
- Kiln
Step 1: Forming the Body
-
Prepare the Clay:
Wedge about 1 to 1.5 pounds of speckled stoneware clay thoroughly to remove air bubbles. This specific clay body gives the final piece that lovely, natural dotted texture without needing extra glaze effects. -
Center and Open:
Center your clay on the wheel head. Open the clay to create a flat floor, leaving about a 1/4 inch thickness for the base. -
Pull the Walls:
Pull the walls up into a straight cylinder. Aim for an even thickness of about 1/4 inch. The pictured mug has a classic, straight-sided profile with just a subtle curve at the very bottom. -
Refine the Rim:
Compress the rim using a chamois or your finger to ensure it is smooth and pleasant to drink from. I find that taking extra time here saves sanding later. -
Trim and Cut:
Use a wood knife to trim excess clay from the foot. Run a wire tool under the base to detach it, then carefully set the cylinder aside on a ware board until it reaches a leather-hard state.
Smooth Seams
When attaching the eyes, use a tiny coil of clay around the connection point and blend it out. This ensures the eyes don’t pop off during firing.
Step 2: Adding the Features
-
Pulling Basic Handles:
While the body stiffens, pull a handle from a small lug of clay. Aim for a simple strap shape that matches the scale of your mug. -
Create the Handles:
Form the handle into a ‘C’ shape and let it set up until it holds its form but is still flexible. -
Attach the Handle:
Score and slip both the attachment points on the mug body and the handle ends. Press the handle firmly onto the mug, smooth the seams, and verify the alignment is straight. -
Sculpt the Eyes:
Roll two small balls of clay, roughly the size of large marbles or gumballs. Gently flatten them against a table so they look like thick buttons. -
Attach the Eyes:
Score and slip the back of the eye discs and the front of the mug. Position them side-by-side near the upper middle of the face area. Press them on securely so no air gets trapped behind them. -
Refine the Eyes:
Use a damp brush or fingertip to smooth the transition between the eye disc and the mug body slightly, though leaving a distinct raised edge adds to the cartoonish look. -
Carve the Smile:
Using a needle tool or small loop tool, carve a simple, thin curved line for the mouth. Keep it slightly asymmetrical to enhance the goofy expression. -
Fill the Smile:
Take a tiny amount of black underglaze or a dark clay slip and carefully paint it into the carved smile line. Wipe away any excess on the surface with a damp sponge so the line remains crisp.
Expression Twist
Give your mug different moods by changing the eyebrows! A tiny arched clay eyebrow above the eyes can make it look surprised, angry, or worried.
Step 3: Glazing and Finishing
-
Bisque Fire:
Once bone dry, fire the mug to bisque temperature (usually Cone 04) to prepare it for glazing. -
Underglaze the Whites:
Paint the raised eye discs with 2-3 coats of white underglaze. Be careful to stay neatly on the raised clay circle. -
Paint the Irises:
Paint a large blue circle in the center of each white eye. To get the ‘bug-eyed’ look, make the irises quite large relative to the white space. -
Add the Pupils:
Paint a solid black circle in the center of the blue iris. For a vacant or silly expression, you can place them slightly off-center or fixated on a specific point. -
Wax Resist:
Apply wax resist to the bottom foot of the mug to prevent the glaze from adhering to the kiln shelf. -
Clear Glaze Application:
Dip the entire mug into a clear, transparent glaze. This will showcase the natural speckles of the clay body and seal the underglaze details. -
Final Firing:
Fire the mug to the maturity temperature of your clay and glaze (typically Cone 5 or 6 for stoneware). Let the kiln cool completely before unloading.
Enjoy sipping from your new goofy friend and don’t forget to give it a name.


The Tongue-Out Sipper Mug
Brighten up your morning coffee routine with this adorable, speckled ceramic mug featuring a friendly face and a warm, two-tone glaze. The combination of creamy beige and coral pink creates a cozy, handmade feel that is perfect for sipping your favorite hot beverage by a sunny window.
Detailed Instructions
Materials
- Stoneware clay (smooth, light-firing body)
- Pottery wheel (or rolling pin for hand-building)
- Sponge
- Wire cutter
- Rib tool
- Loop trimming tool
- Needle tool
- Underglaze (black for details, coral pink)
- Small round detail brush
- Clear glaze (food safe)
- Coral pink dipping glaze or brush-on glaze
- Cream/speckled beige brush-on glaze
Step 1: Forming the Mug Body
-
Prepare your clay:
Begin by wedging about 1-1.5 lbs of stoneware clay to remove any air bubbles. Pat it into a ball shape before throwing it onto the wheel head. -
Center and open:
Use your palms and water to firmly center the clay on the wheel. Once centered, press your thumbs into the middle to open the vessel, leaving about a 1/4-inch thickness for the floor. -
Pull the walls:
Gradually pull the clay walls upward into a cylinder shape. Aim for a slightly wider base that gently tapers inward just a bit at the rim, keeping the walls even. -
Smooth the surface:
Use a rib tool on the exterior while supporting the inside wall to smooth out throwing lines and refine the silhouette. I like to leave the rim slightly rounded for drinking comfort. -
Create the handle:
Pull a strap of clay for the handle, tapering it slightly. Curve it into a ‘C’ or ear shape and set it aside to stiffen until it’s leather-hard.
Creating Crisp Lines
For the sharpest face details, apply wax resist over your underglaze drawing before dipping or brushing the main body glaze. The glaze will bead off the face instantly.
Step 2: Trimming and Assembly
-
Trim the base:
Once the mug body is leather-hard, flip it over on the wheel. Use a loop tool to trim away excess weight from the bottom and carve a neat foot ring. -
Attach the handle:
Score the attachment points on both the mug and the handle, then apply slip. Press the handle firmly onto the side, smoothing the seams with your thumb or a wooden tool. -
Refine the handle joint:
Wipe away excess slip with a damp sponge and ensure the handle attachment looks seamless and fluid. -
Bisque fire:
Let the mug dry completely (bone dry) before loading it into the kiln for a bisque firing (usually to Cone 04).
Glaze Running?
If the bottom pink glaze runs onto the kiln shelf, try dipping slightly less of the base next time, or use a ‘cookie’ (a flat clay disc) under your pot as a safety catcher.
Step 3: Glazing and Decorating
-
Underglaze the face:
On the bisque-fired mug, use a fine detail brush and black underglaze to paint two small upward-curved arches for eyes and a small ‘U’ for the smile. -
Add the cheeks:
Dip a small round sponge or brush into coral pink underglaze and dab two circles just below the eyes for rosy cheeks. -
Glaze the interior:
Pour liquid coral pink glaze inside the mug, swirl it around to coat the entire interior, and pour out the excess. -
Dip the bottom:
Hold the mug by the rim and dip the bottom third into the same coral pink glaze. Hold it there for 3 seconds to get an even coat, then lift and let it drip. -
Glaze the top section:
Carefully brush a creamy beige speckled glaze onto the exterior top section, avoiding the painted face initially if the glaze is opaque, or use a semi-transparent glaze over the face. -
Re-emphasize details:
If your beige glaze is thick, gently wipe it back over the black lines of the face so they show through, or apply the face decoration *over* the raw glaze using a glaze-compatible pigment (majolica style). -
Apply speckles:
If your beige glaze isn’t pre-speckled, flick a stiff toothbrush dipped in iron oxide or a dark brown underglaze lightly over the top section. -
Clean the foot:
Use a damp sponge to wipe any glaze off the very bottom foot ring to prevent it from sticking to the kiln shelf. -
Final firing:
Load the mug into the kiln for the glaze firing (typically Cone 5 or 6 depending on your clay and glaze). Let the kiln cool completely before opening.
Now you have a charming, personalized mug ready to hold your warmest drinks


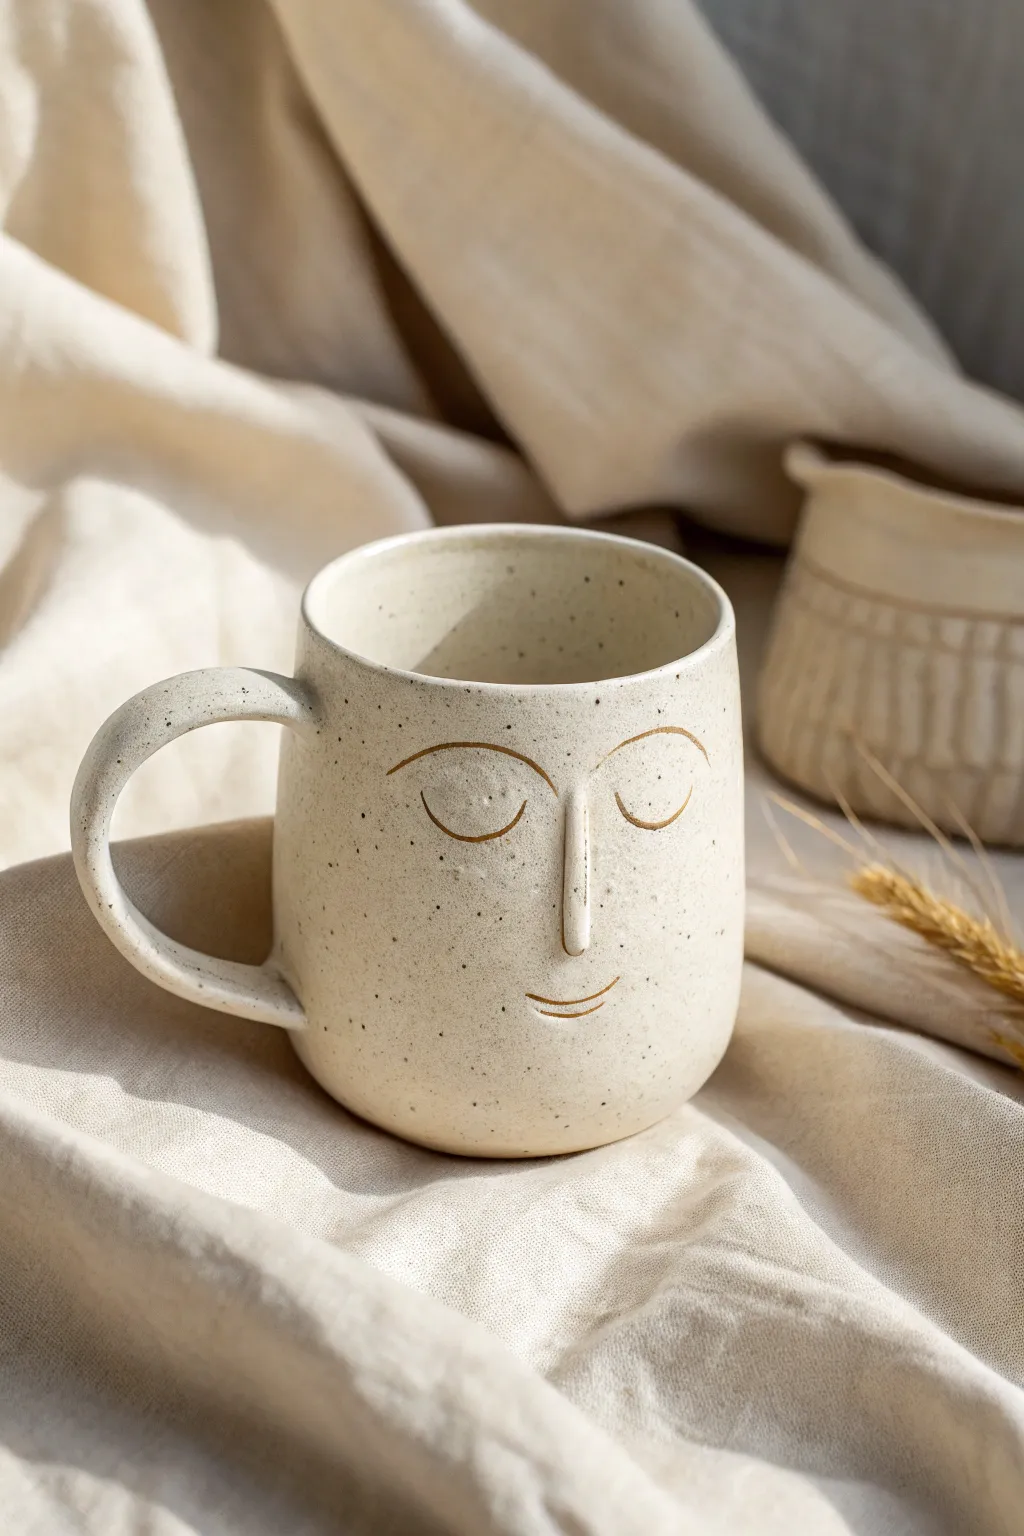
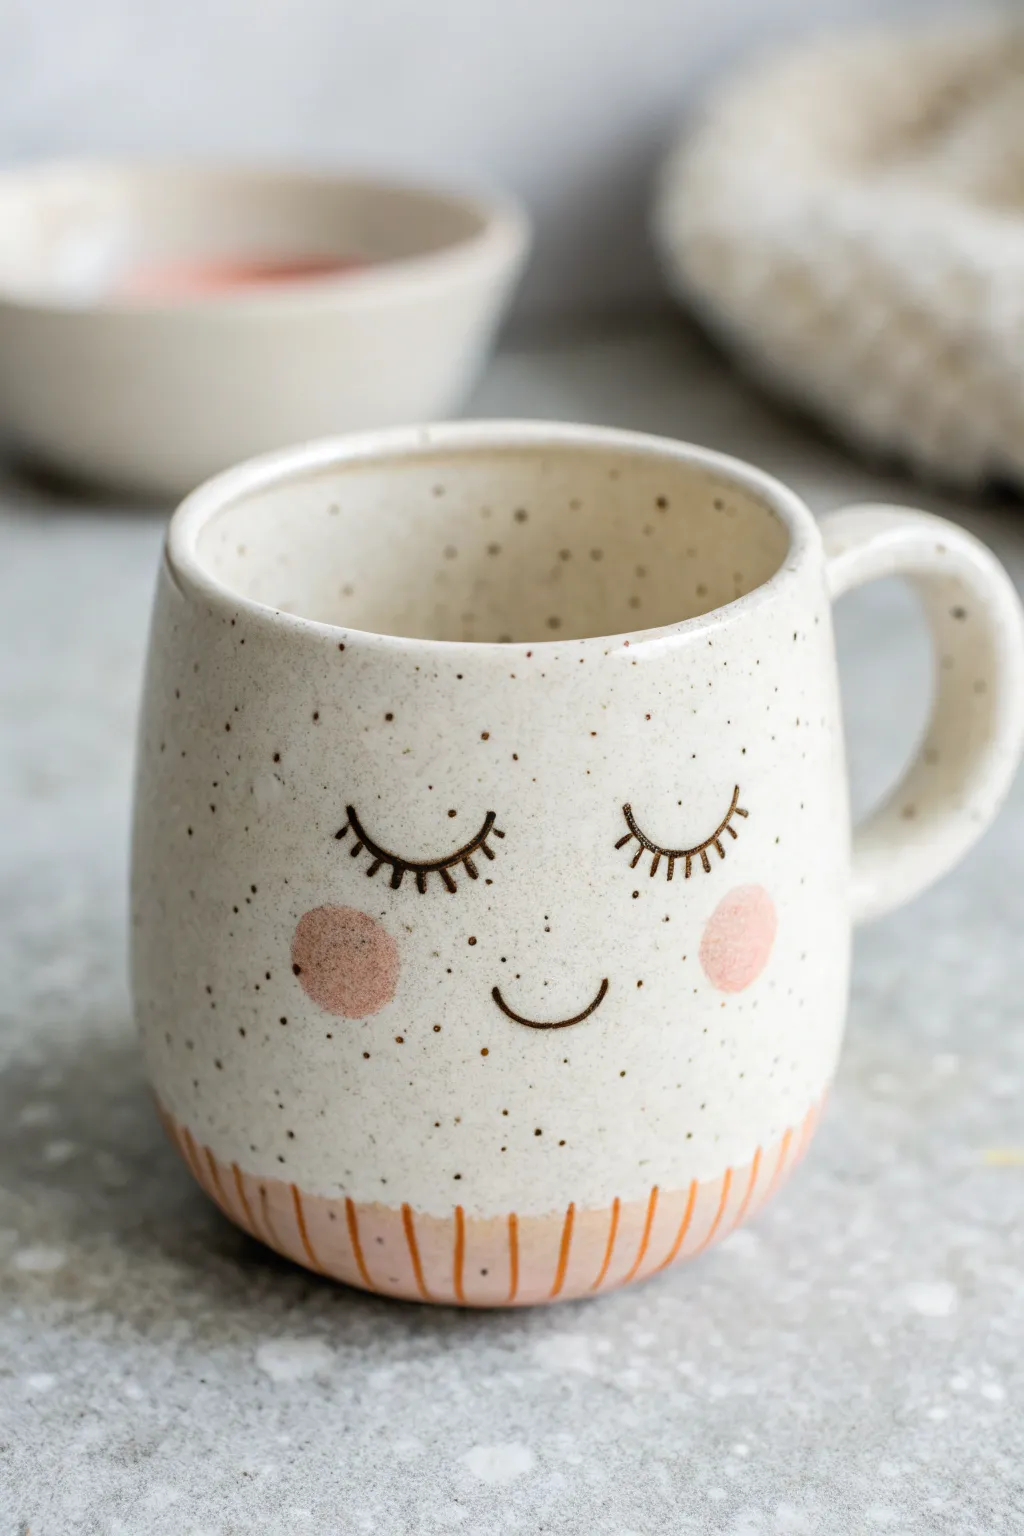
The Sleepy Eyelids Cozy Mug
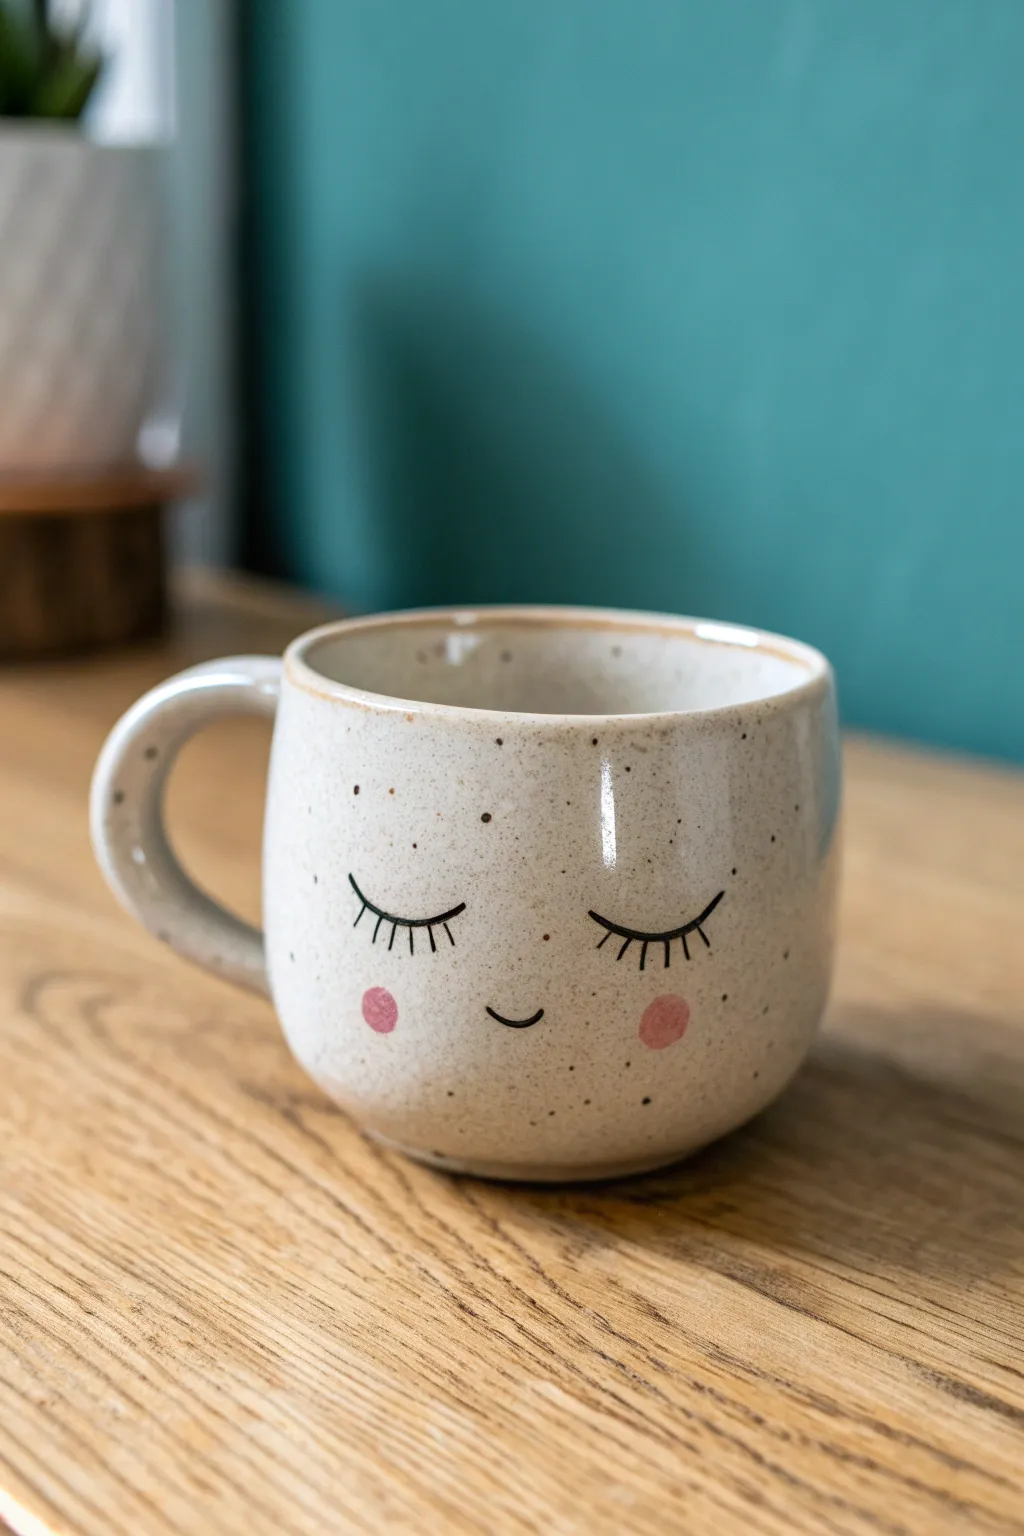
Embrace the quiet mornings with this charming ceramic mug featuring sleepy, lashed eyes and rosy cheeks. The speckled oatmeal clay body and simple line art create a calming, minimalist aesthetic perfect for your favorite warm beverage.
Step-by-Step
Materials
- Speckled stoneware clay (mid-fire)
- Pottery wheel (or slab roller for hand-building)
- Rib tool
- Sponge
- Wire cutter
- Needle tool
- Trimming tools
- Underglaze (Black and Pink)
- Fine detail brush (00 or 000 size)
- Small round brush
- Clear or transparent glossy glaze
- Kiln
Step 1: Forming the Mug Body
-
Prepare your clay:
Begin by wedging about 1 to 1.5 pounds of speckled stoneware clay to remove air bubbles and ensure consistency. -
Center and open:
On the pottery wheel, center your clay mound and open it up, creating a flat floor inside that is roughly 3 inches wide. -
Pull the walls:
Pull the walls up to create a cylinder. Aim for a slightly rounded, bulbous shape near the bottom that tapers just slightly inward at the rim for that cozy, cupped feel. -
Smooth the surface:
Use a rib tool on the exterior while spin the wheel to smooth out any finger ridges and compress the clay, highlighting the natural texture. -
Refine the rim:
Use a chamois or a dampened sponge to gently round over the drinking rim so it feels comfortable against your lips. -
Cut and dry:
Wire the mug off the wheel bat and set it aside to dry until it reaches a leather-hard state.
Smudged Lines?
If your black underglaze lines look messy or bleed, your brush likely had too much water. Use a ‘dryer’ brush load or gently scrape off mistakes with a needle tool once the underglaze dries.
Step 2: Handle and Trimming
-
Trim the foot:
Once leather-hard, place the mug upside down on the wheel. Trim away excess weight from the bottom and carve a neat foot ring. -
Pull a handle:
Pull a strap of clay for the handle. For this design, a simple C-shape loop works best. Let it stiffen slightly so it holds its curve. -
Attach the handle:
Score and slip both the attachment points on the mug and the handle ends. Press them firmly together, blending the clay seams until invisible. Make sure the handle loop is large enough for a comfortable grip.
Step 3: Painting the Face
-
Sketch the placement:
Lightly sketch the closed eyes and mouth with a dull pencil directly onto the leather-hard clay. The pencil marks will burn off in the kiln. -
Paint the lashes:
Using black underglaze and your finest detail brush, carefully paint the downward curved eyelids. Add several vertical dashes for the lashes—notice in the photo specifically how the central lashes are longest. -
Add the smile:
Paint a very small, subtle U-shape between the eyes for the smile. Keep the line thin and delicate to match the lashes. -
Apply rosy cheeks:
Switch to the small round brush and pink underglaze. Dab two soft circles just below the outer corners of the eyes. I like to pounce the brush slightly to keep the edges soft rather than painting a hard outline. -
Bisque fire:
Allow the mug to dry completely to bone dry, then load it into the kiln for a bisque firing (usually to cone 04).
Make it a Set
Make a partner mug using the same shape and glaze, but paint ‘awake’ eyes with open irises and raised eyebrows for a cute morning/evening set.
Step 4: Glazing and Finishing
-
Wax the foot:
Apply wax resist to the bottom foot ring to prevent glaze from adhering to the kiln shelf. -
Clear glaze application:
Dip the entire mug into a transparent glossy glaze. This will seal the clay and make the black and pink underglaze pop while revealing the beautiful speckles in the clay body. -
Clean up:
Wipe away any glaze drips from the waxed foot with a damp sponge. -
Final firing:
Fire the mug again to the maturation temperature of your clay and glaze (typically cone 5 or 6 for mid-fire stoneware).
Once cooled from the kiln, settle in with your cozy new mug.

The Complete Guide to Pottery Troubleshooting
Uncover the most common ceramic mistakes—from cracking clay to failed glazes—and learn how to fix them fast.
The Side-Eye Grumpy Mustache Mug
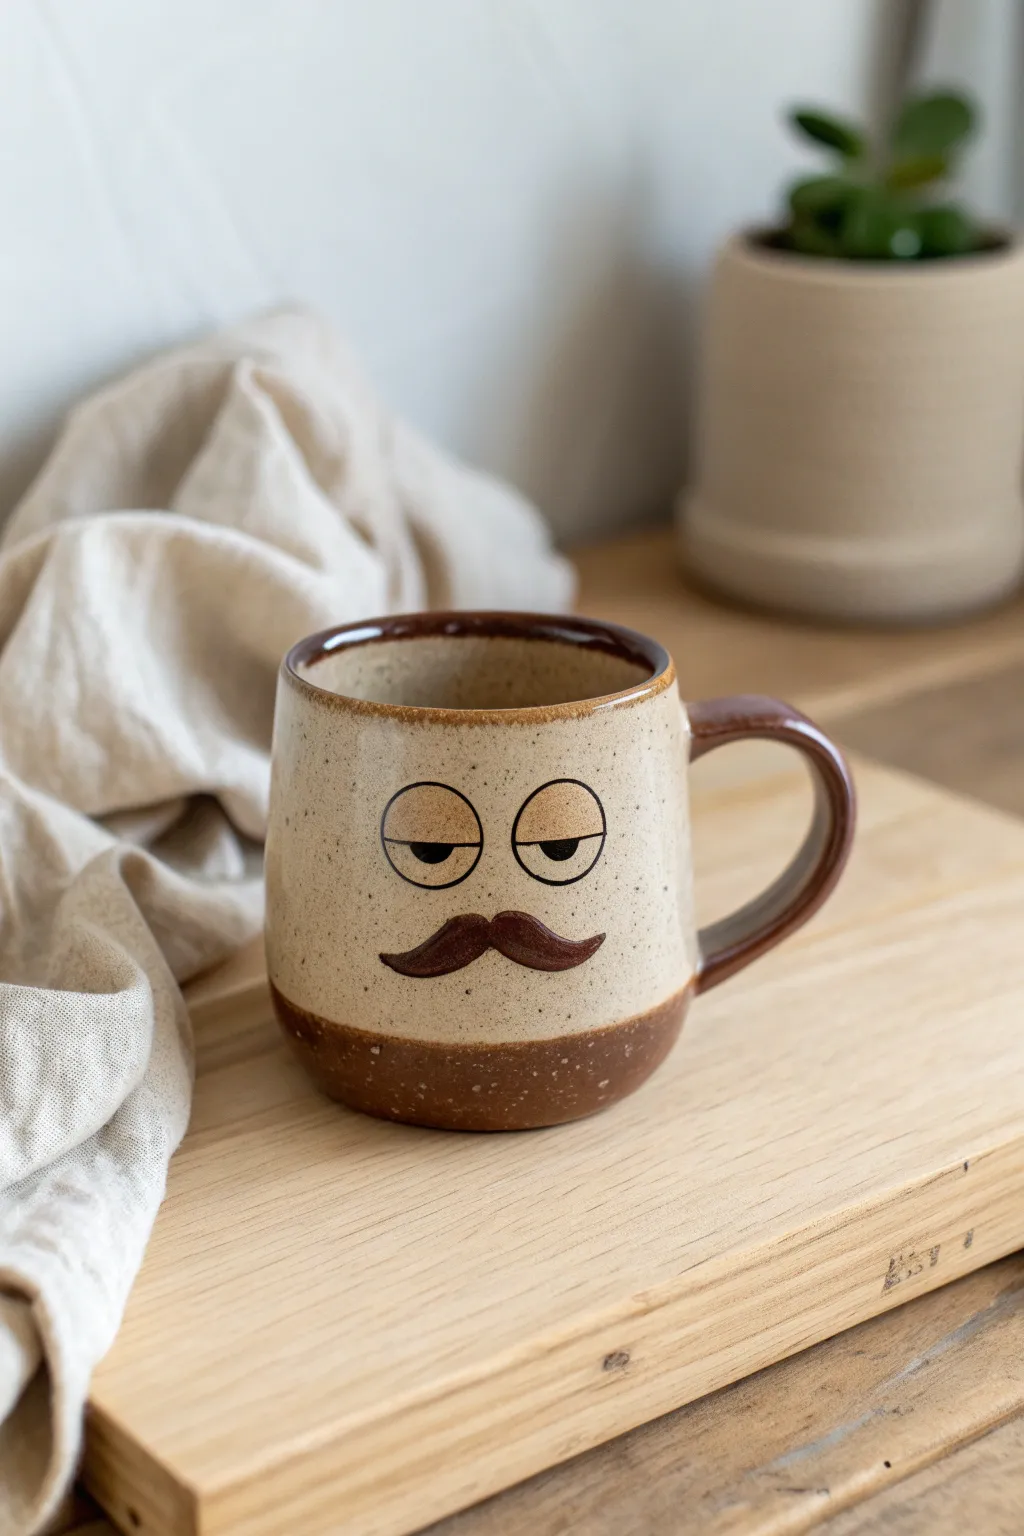
This mug exudes personality with its weary, side-eyed expression and perfectly groomed mustache, turning your morning coffee into a mood. The combination of speckles, warm oatmeal glaze, and a classic brown dip creates a timeless piece that feels both rustic and hilariously animate.
Step-by-Step Tutorial
Materials
- Stoneware clay (buff or light speckle)
- Pottery wheel (or rolling pin for slab building)
- Throwing tools (sponge, rib, needle tool, wire)
- Loop tool for trimming
- Underglaze pencil or fine brush (black)
- Dark brown underglaze
- Clear or oatmeal speckle glaze (food safe)
- Dark brown glaze (for the base/lip/handle)
- Small paintbrush
- Kiln
Step 1: Throwing and Shaping
-
Center the clay:
Start by throwing a medium-sized cylinder on the wheel using about 1 lb of clay. Aim for a flat bottom rather than a rounded bowl shape to match the image’s structure. -
Define the walls:
Pull the walls straight up, keeping them relatively thick (around 1/4 inch) to support the handle and carving later. The silhouette should be slightly tapered inward near the rim. -
Refine the rim:
Compress the rim with your chamois or sponge. I like to give it a slight outward flair or keep it perfectly round to ensure a comfortable sip. -
Trim the foot:
Once leather hard, trim a distinct foot ring at the bottom. This separates the dipped base from the body of the mug.
Glaze Crawling?
If glaze pulls away from the underglaze eyes, your underglaze might be too thick. Apply thin, even layers or bisque fire the underglaze on before dipping the final coat.
Step 2: Handle and Detailing
-
Pull the handle:
Pull a strap handle that is slightly thicker at the attachment points. Shape it into a classic ‘ear’ curve that allows for a three-finger grip. -
Attach the handle:
Score and slip the attachment points on the mug body. Secure the handle firmly, blending the clay seamlessly so it looks like it grew from the mug. -
Sculpt the mustache:
Roll a small coil of clay and taper both ends. Attach this to the face area using slip. Use a modeling tool to press it flat and carve hair texture, curving the tips slightly upward.
Step 3: Painting the Expression
-
Sketch the eyes:
On the bisque-fired or bone-dry mug (depending on your underglaze preference), lightly pencil in two large half-circles for eyelids and pupils looking to the side. -
Outline in black:
Using a fine liner brush and black underglaze, paint the outlines of the eyes. Make the upper eyelid heavy and straight to convey that bored, sleepy look. -
Fill the pupils:
Paint the pupils as semi-circles nestled in the corner of the eyes, creating the signature ‘side-eye’ glance. -
Color the mustache:
Paint the raised mustache element with a rich, dark brown underglaze. Ensure you get into the textured grooves you carved earlier.
Expression Sculpting
For extra dimension, gently press the eye area inwards with your thumb before the clay dries. This subtle indentation makes the painted eyes feel more integrated.
Step 4: Glazing and Firing
-
Wax resist:
Apply wax resist over the painted eyes and the brown mustache so the main glaze doesn’t obscure the details. -
Dip the top:
Dip the entire mug (stopping just short of the bottom inch) into a creamy oatmeal or speckled matte glaze. This mimics the skin tone. -
Dip the base:
Dip the bottom inch of the mug into a glossy dark brown glaze. This creates the ‘dipped’ shoe effect seen in the photo. -
Paint the rim and handle:
Carefully paint the same dark brown glaze onto the rim and the entire handle to frame the face. -
Final fire:
Load the mug into the kiln for the final glaze firing according to your clay and glaze cone specifications.
Enjoy sipping your morning brew with a companion who understands exactly how you feel before 9 AM
The Laugh-Cry Drippy Tear Mug
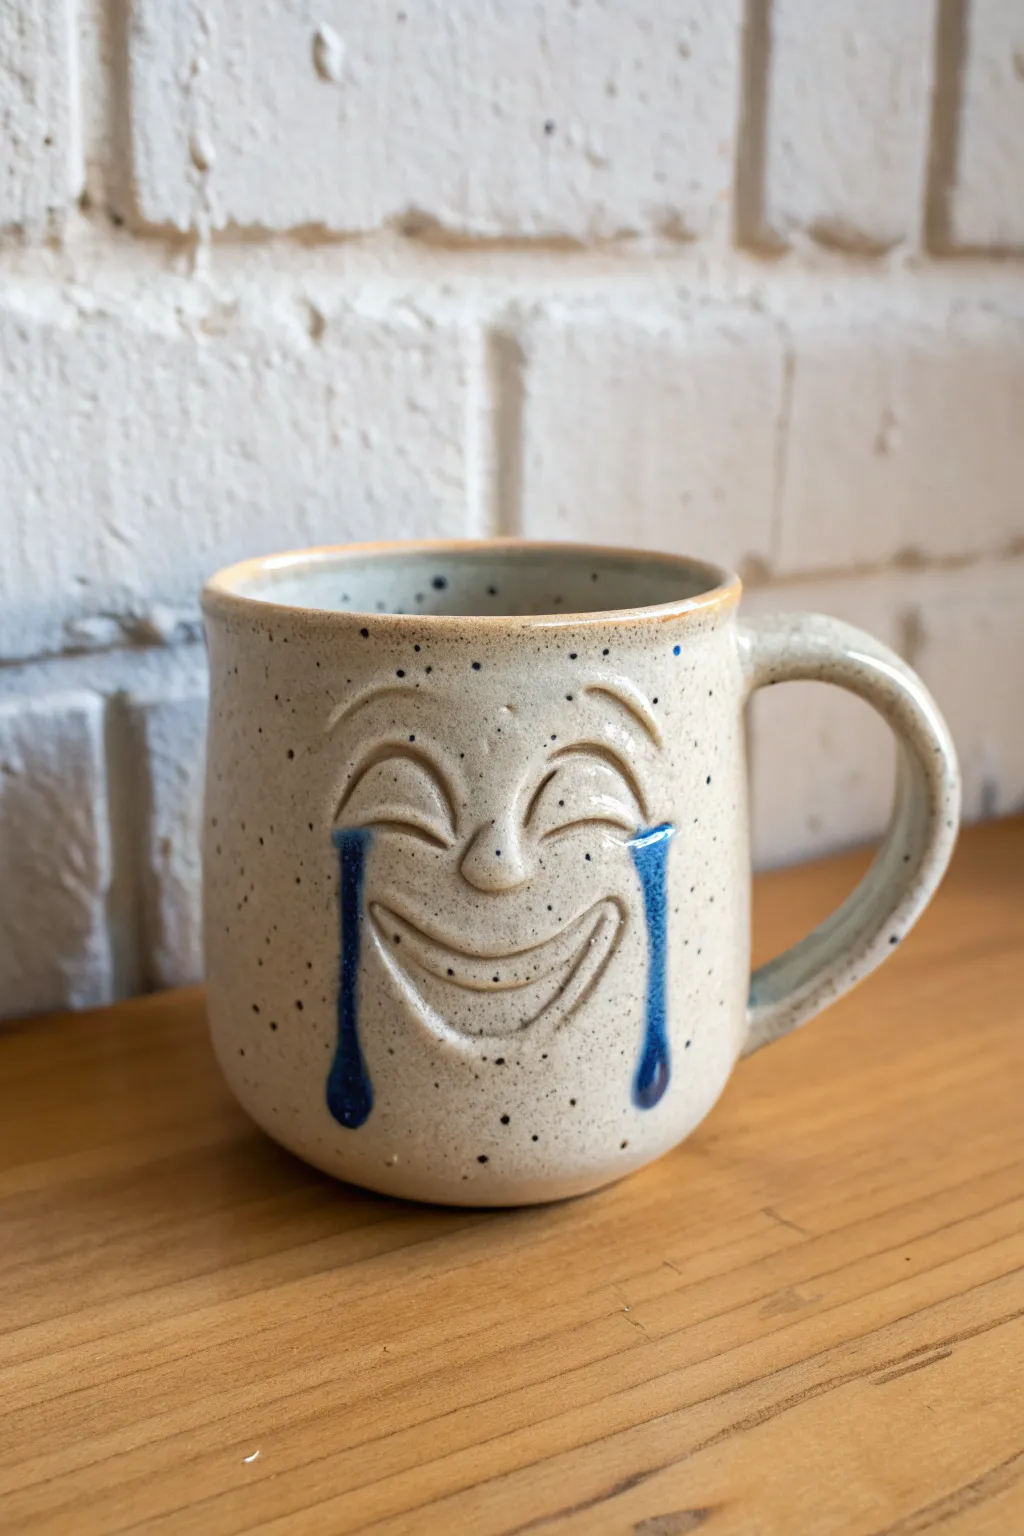
Capture the emotion of hilarious hysteria with this sculpted stoneware mug featuring a classic laughing face. The speckled clay body gives it a rustic charm, while the bold, glossy blue tears create a striking contrast against the warm ceramic.
Step-by-Step
Materials
- Speckled stoneware clay body (cone 5/6)
- Pottery wheel (or slab roller/rolling pin for hand-building)
- Throwing tools (sponge, wire cutter, ribs)
- Needle tool
- Small loop tool for carving
- Modeling tool with a small ball end
- Scoring tool (or serrated rib)
- Slip
- Cobalt blue underglaze or glaze
- Clear or transparent dipping glaze
- Small detail paintbrush
Step 1: Forming the Mug Body
-
Wedge the clay:
Begin with a ball of speckled stoneware clay, wedging it thoroughly to remove air bubbles and ensure even consistency. -
Throw the cylinder:
Center your clay on the wheel and open it up. Pull the walls to create a straight-sided cylinder with a slightly rounded bottom, aiming for about 4-5 inches in height. -
Shape the rim:
Compress the rim with a chamois or sponge to make it smooth and pleasant for drinking. -
Set up to dry:
Wire the mug off the bat and let it firm up to a leather-hard state. I find this usually takes overnight under plastic, or a few hours uncovered depending on humidity. -
Trim the foot:
Once leather-hard, place the mug back on the wheel (or use a Giffin Grip) to trim a clean foot ring, removing excess weight from the bottom.
Smooth Moves
Use a damp paintbrush to smooth out carving marks inside tight spaces like the corners of the mouth or eyes where fingers don’t fit.
Step 2: Sculpting the Face
-
Sketch the features:
Using a needle tool, lightly scratch the outline of the laughing face onto the front of the mug. Mark the eyes, the nose placement, and the wide, open grin. -
Add volume for the nose:
Score the nose area and a tiny ball of fresh clay. Apply slip, attach the clay ball, and smooth the edges down seamlessly to create a small, button nose. -
Carve the eyes:
Use a small loop tool to carve out two crescent shapes for the closed, joyful eyes. Smooth the edges with a damp sponge or finger. -
Sculpt the smile:
Carve the main crescent for the mouth. Use a modeling tool to define the upper and lower lips, creating a deep recess for the mouth cavity to capture the ‘laughing’ spacing. -
Create the eyebrows:
Instead of adding clay, use your loop tool to carve arched lines above the eyes to imply raised eyebrows. -
Add the tear tracks:
Take two small coils of clay, tapering them at the top. Score and slip them onto the cheeks, starting from the outer corner of the eyes and dripping down. Flatten them slightly to look like liquid trails. -
Form the teardrops:
Attach a larger, teardrop-shaped piece of clay at the bottom of each track. Smooth the connections so it looks like one continuous stream of fluid.
Step 3: Handle & Finishing
-
Pull the handle:
Pull a strap of clay for the handle. Let it stiffen slightly until it can hold an arch shape without collapsing. -
Attach the handle:
Score and slip the attachment points on the side of the mug. Press the handle firmly on, blending the clay for a strong bond. -
Bisque fire:
Allow the mug to dry completely (bone dry). Fire it in the kiln to a bisque temperature (usually Cone 04). -
Paint the tears:
Using a small detail brush, carefully apply cobalt blue underglaze or glaze only to the sculpted tear tracks and droplets. Apply 2-3 coats for opacity. -
Glaze and fire:
Dip the entire mug into a clear or transparent glaze. Wipe the foot clean and fire to the maturity temperature of your clay (likely Cone 5 or 6).
Level Up: Texture
Leave the exterior unglazed (raw clay) and glaze only the inside and the blue tears for a stunning tactile contrast.
Enjoy your morning coffee with a dose of humor once your masterpiece cools from the kiln


What Really Happens Inside the Kiln
Learn how time and temperature work together inside the kiln to transform clay into durable ceramic.
The Pouty Lips Kiss Mug
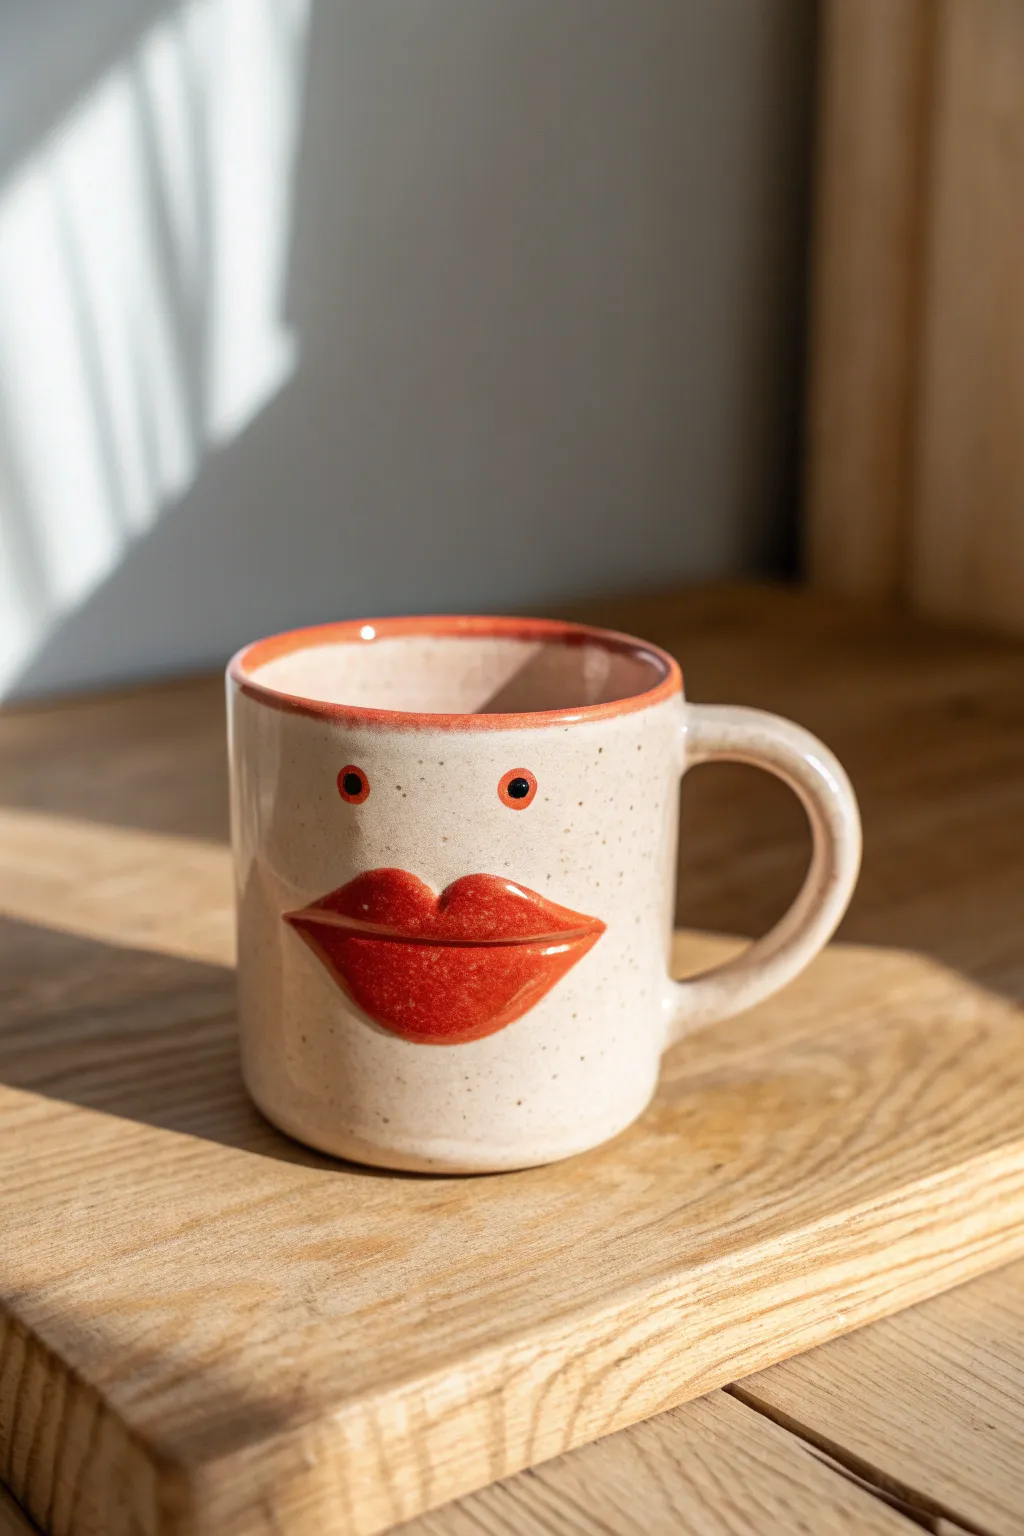
Add a dash of sass to your morning coffee with this quirky ceramic masterpiece. Featuring a speckled creamy base, bold relief-sculpted lips, and tiny wide-set eyes, this mug is practically begging for a kiss.
Step-by-Step Tutorial
Materials
- Stoneware clay body (speckled buff recommended)
- Pottery wheel (or rolling pin for slab building)
- Needle tool
- Scoring tool (serrated rib)
- Slip (liquid clay)
- Small sponge
- Basic sculpting tools (wooden knife, rubber rib)
- Underglazes: Bright Red, Black
- Clear or Transparent Gloss Glaze
- Fine detail brush
- Kiln
Step 1: Forming the Mug Body
-
Throw the cylinder:
Begin by centering about 1-1.5 lbs of clay on the wheel. Open and pull the walls to create a straight-sided cylinder roughly 4 inches tall. Aim for an even thickness, but leave the walls slightly thicker than usual to support the added weight of the lips. -
Refine the rim:
Compress the rim well with a chamois or sponge. This area will be highlighted later, so smoothness is key. -
Trim and add handle:
Once the cylinder is leather hard, trim the bottom. Pull a simple C-shaped handle and attach it securely using the score and slip method. Smooth the connection points until they are seamless.
Cracked Lips?
If the added lip clay cracks away from the mug while drying, you likely didn’t score deeply enough. Compress the attachment area firmly next time.
Step 2: Sculpting the Famous Pout
-
Shape the lip mound:
Roll a small coil of fresh clay, roughly the thickness of your pinky finger. Taper the ends slightly to form a long almond shape. -
Position the feature:
Score a spot on the front of the mug, centered horizontally but situated slightly below the midpoint vertically. Apply slip and press your clay coil onto the mug. -
Blend the edges:
Using a wooden modeling tool, dragging the clay from the outer edges of the coil onto the mug body to seal it completely. You want the lips to look like they are emerging from the mug, not just stuck on. -
Define the mouth line:
Use a needle tool or a thin wooden tool to press a horizontal line across the center of the mound. Gently rock the tool up and down to open the mouth slightly and create the separation between the top and bottom lip. -
Refine the cupid’s bow:
Press down gently in the center of the top lip to create the ‘M’ shape of a cupid’s bow. Smooth the contours with a damp finger or a small piece of sponge. -
Smooth everything:
Go over the lips with a damp brush to erase any tool marks. The surface needs to be pristine for that glossy red finish later.
Make It Yours
Try adding different expressions! A tongue sticking out or a gold luster tooth added in a third firing can add hilarious personality.
Step 3: Adding Character
-
Bisque fire:
Allow the mug to dry completely slowly. Once bone dry, fire the piece to bisque temperature (usually cone 04). -
Paint the lips:
Using a bright red underglaze, carefully paint the sculpted lips. Apply 2-3 coats for solid, opaque coverage, letting each coat dry in between to avoid streaking. -
Add the rim detail:
Use the same red underglaze and a steady hand (or a banding wheel) to paint a thin, consistent line along the very top edge of the rim. -
Create the eyes:
For the eyes, visualize where they should sit—wide set and fairly high up. Dip the back end of a paintbrush handle into the red underglaze and stamp two circles. -
Add the pupils:
Once the red circles are dry, use a smaller tool tip or fine brush to clearer add a black dot in the center of each red circle. The wide gaze gives it that funny, stunned expression.
Step 4: Glazing and Finishing
-
Apply clear glaze:
Dip the entire mug into a clear or transparent gloss glaze. If you used a speckled clay body, this transparency is crucial to let those beautiful speckles show through. -
Check for drips:
Inspect the lip area carefully. Glaze can pool around relief sculptures, so use a finger to gently rub down any thick spots of glaze around the mouth crevices. -
Final wipe:
Wipe the bottom of the mug (and a millimeter up the side) clean with a sponge to prevent it from sticking to the kiln shelf. -
Glaze fire:
Fire the mug to the final maturity temperature of your clay and glaze (often cone 5 or 6). I always open the kiln eagerly to see if the expression shifted during firing.
Now you have a charming, expressive companion for your morning brew that is sure to start conversations
The Raised Brow Skeptical Mug
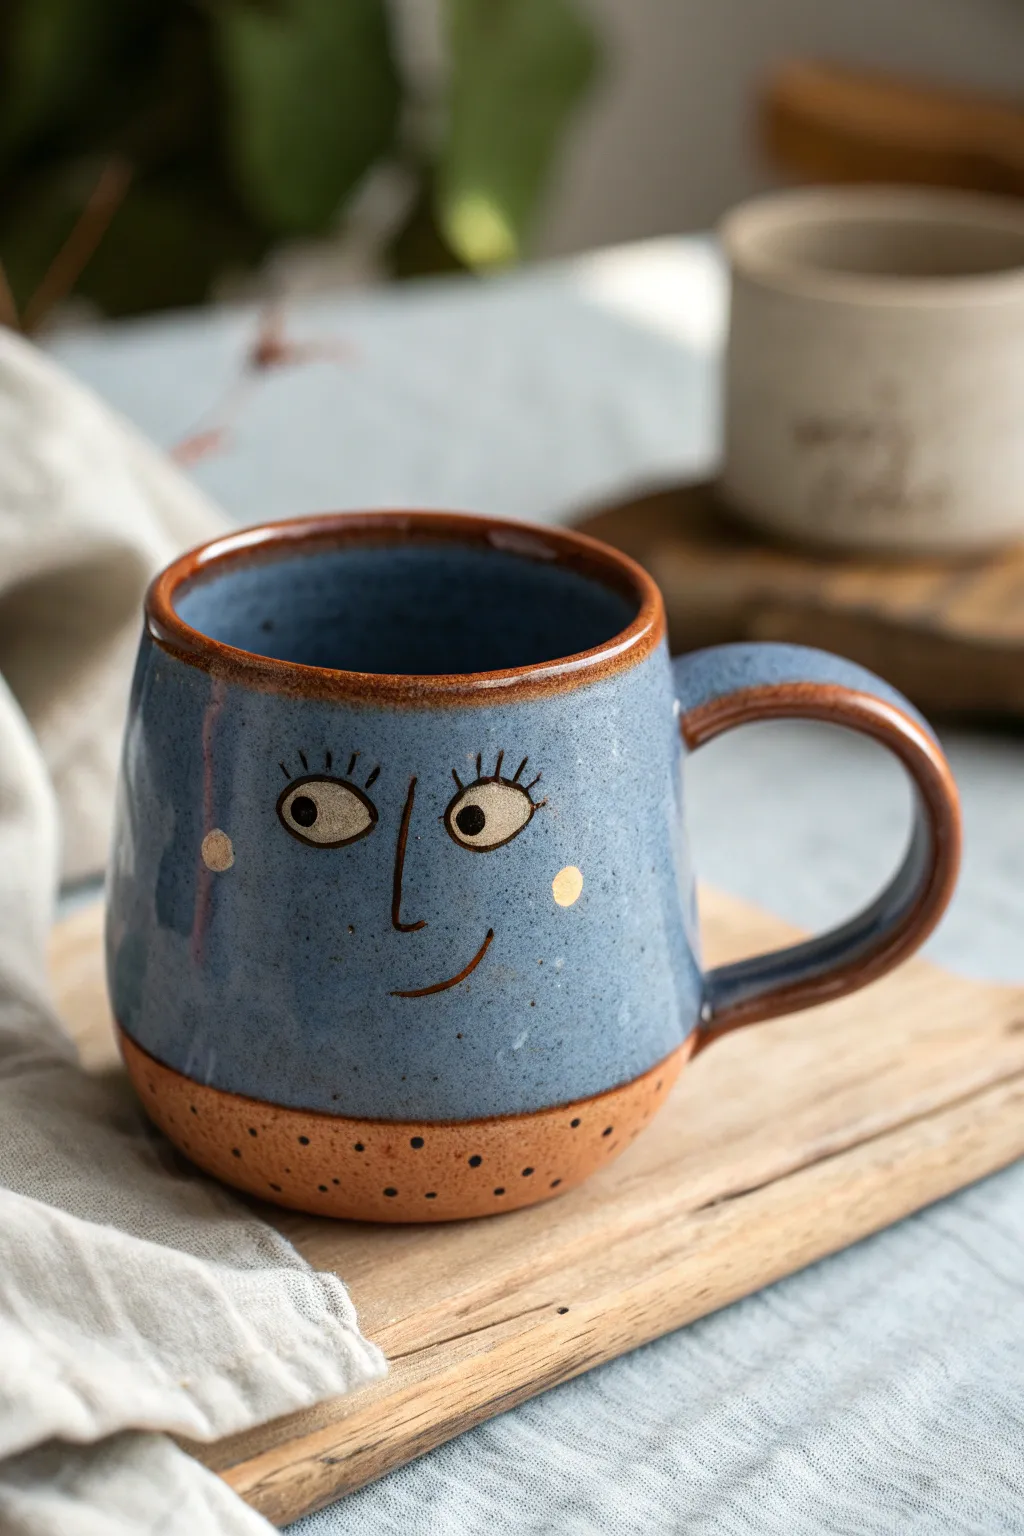
Capture a moment of playful judgment with this charming ceramic project. Featuring a speckled clay base, a serene blue glaze, and an adorably dubious facial expression painted with underglaze, this mug is perfect for your morning coffee contemplation.
Step-by-Step Guide
Materials
- Speckled stoneware clay (mid-fire)
- Pottery wheel or slab roller guide sticks
- Rib tool
- Kemper tool or pin tool
- Sponge
- Small trimming tool
- Black underglaze (or stain)
- White or cream underglaze
- Light peach or pink underglaze (for cheeks)
- Speckled blue dipping glaze
- Clear glaze (optional, for face detail)
- Wax resist
- Fine detail brush
Step 1: Forming the Body
-
Prepare the clay:
Begin by wedging about 1 to 1.5 lbs of speckled stoneware clay. The speckles are crucial for achieving that textured, rustic look on the bottom section. -
Throw or build the cylinder:
If using a wheel, center your clay and pull up a standard cylinder. Aim for a slightly rounded belly rather than perfectly straight walls to give the face a softer canvas. If hand-building, roll a slab and form a clean cylinder, smoothing the seam invisible. -
Refine the shape:
Use a rib tool to smooth the exterior and slightly taper the rim inward. This keeps your beverage hot and frames the face nicely. Ensure the walls are even to prevent cracking. -
Create the handle:
Pull a medium-thickness handle from a separate lump of clay. Create a simple ‘C’ or ear shape. Attach it securely when the mug is leather hard using the score and slip method. -
Trim the foot:
Once leather hard, trim away excess weight from the bottom. Define the bottom curve sharply so there is a clear distinction where the glaze will stop later.
Glaze Crawling?
If glaze beads up too much on the wax and won’t wipe off cleanly, let the wax dry longer (20+ mins) before dipping. Use a clean, barely damp sponge for cleanup.
Step 2: Painting the Face
-
Sketch the expression:
Before committing with underglaze, lightly sketch your skeptical face onto the leather-hard clay with a pencil. The graphite will burn off in the kiln. -
Apply the white eyes:
Using a small brush, paint two ovals with white or cream underglaze. They don’t need to be perfectly symmetrical; a little offset adds character. -
Outline and detail:
With a very fine liner brush and black underglaze, carefully outline the eyes. Draw the pupils looking sideways to create that ‘side-eye’ effect. -
Brows and nose:
Paint the long, thin nose line connecting to one eyebrow. Add the eyelashes—three or four distinct vertical lines above each eye. Crucially, draw the ‘skeptical’ eyebrows: one higher than the other. -
Cheeks and mouth:
Dab two small circles of peach underglaze for the cheeks. Finish the expression with a simple, slightly smirked line for the mouth. Let the underglaze dry completely. -
Bisque fire:
Load the mug into the kiln for a bisque firing (usually Cone 04) to set the shape and the underglaze decoration.
Add a hidden message
Before the final firing, paint a tiny word like “Really?” on the inside bottom of the mug with black underglaze so it reveals itself as you finish your drink.
Step 3: Glazing and Finishing
-
Apply wax resist:
This is the most critical step for the design. Paint wax resist over the entire face illustration and the two cheek dots. Also, wax the bottom quarter of the mug, creating a wavy line where the raw clay meets the glazed area. -
Wax the rim:
If you want a pronounced brown rim like the example, apply a thin line of wax resist along the very edge of the lip, or plan to wipe the glaze back later. -
Prepare the glaze:
Stir your speckled blue glaze thoroughly. You want a consistent consistency, roughly like heavy cream, to ensure an even coat. -
Dip the mug:
Holding the mug by the foot (or using tongs), dip the entire piece into the blue glaze. The wax over the face and bottom will repel the glaze. -
Clean up:
Once the glaze dries to the touch, use a damp sponge to wipe any tiny droplets of blue glaze off the waxed face area or the raw bottom. The face should be raw clay with underglaze, surrounded by blue. -
Add speckles (optional):
If your raw clay doesn’t have enough natural speckles, you can flick a toothbrush with thinned iron oxide or black underneath stain onto the bottom unglazed section. -
Glaze fire:
Fire the mug to maturity (Cone 5 or 6 depending on your clay body). The wax will burn off, revealing the matte clay face surrounded by the glossy blue glaze.
Enjoy using your new mug which silently judges everyone around you while keeping your coffee warm

TRACK YOUR CERAMIC JOURNEY
Capture glaze tests, firing details, and creative progress—all in one simple printable. Make your projects easier to repeat and improve.
The Handle as an Ear Character Mug

Bring a touch of whimsy to your morning coffee with this charming, speckled character mug. Featuring a simple carved face and a distinctively shaped handle, this wheel-thrown (or hand-built) project celebrates the beauty of raw clay bodies and minimalist expression.
How-To Guide
Materials
- Speckled stoneware clay body (buff or beige firing)
- Pottery wheel (or rolling pin for slab building)
- Needle tool
- Loop trimming tools
- Serrated rib or scoring tool
- Small carving loop tool (for the face)
- Slip (clay mixed with water)
- Sponge
- Clear gloss glaze (cone 5/6 or suitable for your clay)
- Kiln
Step 1: Forming the Body
-
Throwing the cylinder:
Begin by centering about 1-1.5 lbs of speckled stoneware clay on your wheel. Open the ball and pull up the walls to create a straight-sided cylinder, aiming for a consistent thickness of about 1/4 inch. -
Shaping the profile:
While the wheel is spinning slowly, use a rib tool on the outside to gently smooth the walls straight up, keeping a slight curve at the bottom where the wall meets the floor for a sturdy foot. -
Refining the rim:
Use a chamois or your fingertips to compress the rim, rounding it over so it will be comfortable to drink from. -
Drying to leather hard:
Wire the pot off the bat and let it dry slowly until it reaches a leather-hard state—firm enough to handle without deforming, but soft enough to carve. -
Trimming the foot:
Place the mug upside down on the wheel, center it, and trim a clean foot ring. Defined, angled cuts at the base help give the mug a ‘lifted’ appearance.
Smooth Operator
After carving the face, let the mug dry for 30 more minutes, then rub the carved lines with a dry finger. This burnishes the edges without washing away detail.
Step 2: Adding Character
-
Carving the eyes:
Plan the placement of the face. Using a small, circular loop tool or a sharp needle tool, carve two circles for the eyes. Don’t just draw them; gently remove a shallow layer of clay to create relief. -
Adding pupils:
Press a small, round tool or the back of a drill bit into the center of each eye circle to create the pupil divots. -
Sculpting the nose:
Carve a simple ‘L’ shape or vertical line between the eyes for the nose. I like to make this line slightly deeper at the bottom for emphasis. -
Carving the smile:
Carve a gentle, wide U-shape for the mouth. Keep the line weight consistent with the eyes to unify the expression. -
Smoothing the burrs:
Once the carving is done, use a soft finger or a slightly damp sponge to gently smooth down any sharp clay burrs created by the tools.
Make it Pop
Before glazing, rub a tiny amount of iron oxide wash into the carved lines of the face and wipe away the excess. This will make the expression dark and distinct under the clear glaze.
Step 3: The Handle & Finishing
-
Pulling the handle:
Pull a thick, sturdy strap of clay for the handle. For this character mug, a slightly ‘c-shaped’ ear aesthetic works well, so keep the coil relatively round in cross-section. -
Attaching the handle:
Score the side of the mug (roughly in line with where an ear would be relative to the face) and the ends of your handle. Apply slip and press the handle firmly into place. -
Blending seams:
Use a modeling tool to blend the clay from the handle onto the mug body, ensuring a seamless, strong connection. Smooth over with a damp sponge. -
Bisque firing:
Allow the mug to dry completely to the bone-dry stage. Load it into the kiln for a bisque fire (usually Cone 04 or 06). -
Glazing:
Dip the entire mug into a clear gloss glaze. The clear glaze is crucial as it allows the natural speckles of the clay body to show through, acting as ‘freckles’ for the face. -
Wiping the foot:
Use a sponge to wipe the glaze completely off the bottom foot ring to prevent it from sticking to the kiln shelf. -
Final firing:
Fire the mug to the maturity temperature of your clay and glaze (typically Cone 5 or 6 for stoneware). Let the kiln cool naturally before unloading.
Enjoy the cozy feeling of wrapping your hands around this friendly face every morning
The Big Nose Thumb-Rest Mug
Create a peaceful companion for your morning coffee with this minimalist speckled mug. Featuring a prominent sculpted nose that doubles as a tactile thumb rest, its charming, sleepy expression brings a calm artistic touch to functional pottery.
Step-by-Step Guide
Materials
- Speckled stoneware clay (white or cream base)
- Pottery wheel (or rolling pin for hand-building)
- Needle tool
- Rib tool (kidney)
- Sponge
- Score and slip tool (or serrated rib)
- Loop tool (for trimming)
- Small paintbrush
- Clear or transparent glossy glaze
- Kiln
Step 1: Forming the Base Vessel
-
Throw the Cylinder:
Begin by centering about 1-1.5 lbs of speckled clay on your wheel. Pull up a standard cylinder shape, aiming for a slightly pear-shaped bottom that tapers gently toward the rim. Keep the walls even, about 1/4 inch thick. -
Refine the Shape:
Use a rib tool to smooth the outside and define that subtle curve at the base. The mug should feel cozy and rounded in the hand. -
Finish the Rim:
Compress the rim with a piece of chamois or your sponge to ensure it’s smooth for drinking. A rounded lip is key for comfort. -
Wire Off and Dry:
Wire the mug off the bat and set it aside until it reaches a leather-hard state. It needs to be firm enough to handle without warping.
Step 2: Sculpting the Features
-
Form the Nose:
Roll a small coil of fresh clay into a long, tapered teardrop shape. This will be the prominent nose bridge. -
Score and Slip:
Identify the center front of your mug. Score the surface where the nose will go and score the back of your clay nose. Apply slip generously to both surfaces. -
Attach the Nose:
Press the nose firmly onto the mug wall. Use a small wooden modeling tool or your finger to blend the edges of the nose seamlessly into the mug body, leaving the bridge distinct and raised. -
Outline the Eyes:
Using a needle tool, lightly sketch two downward-curving crescents on either side of the nose bridge to mark the closed eyelids. I like to position them slightly high to give a peaceful, dreaming look. -
Carve the Features:
Once you’re happy with the placement, retrace your sketch lines with deeper intention. Use a carving tool to gently incise the eyelids and a small, upward-curving smile below the nose. -
Pull and Attach Handle:
Pull a classic ‘C’ shaped handle from a lug of clay. Let it stiffen slightly, then score and slip it onto the side of the mug, ensuring it balances well with the weight of the nose.
Nose Troubleshooting
If the nose cracks away from the mug during drying, your mug body was likely too dry when attaching. Try wrapping the join in plastic for a day to re-homogenize moisture.
Step 3: Finishing Touches
-
Smoothing:
Take a slightly damp sponge and gently wipe over the carved lines and the nose attachment. This softens any sharp burrs left by the needle tool. -
Bisque Fire:
Allow the mug to dry very slowly to prevent cracking around the added nose. Once bone dry, bisque fire it to Cone 04 (or your clay body’s specifications). -
Highlighting Features:
To make the face pop, you can brush a small amount of iron oxide wash or dark underglaze into the carved lines of the eyes and mouth, then wipe away the excess with a damp sponge. -
Glazing:
Dip the entire mug into a clear or transparent glossy glaze. This allows the natural speckles of the clay body to shine through and serve as the ‘skin’ texture. -
Final Fire:
Load the kiln carefully and glaze fire to the maturity temperature of your clay (typically Cone 6 for stoneware). Let it cool completely before removing.
Level Up: Pink Cheeks
Before the bisque firing, dab a very sheer wash of pink underglaze on the ‘cheeks’ area to give the sleeper a rosy, flushed complexion.
Now you have a wonderfully serene mug ready to cradle your warmest beverages
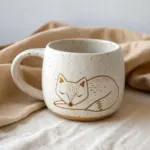
The Whiskered Cat Face Mug
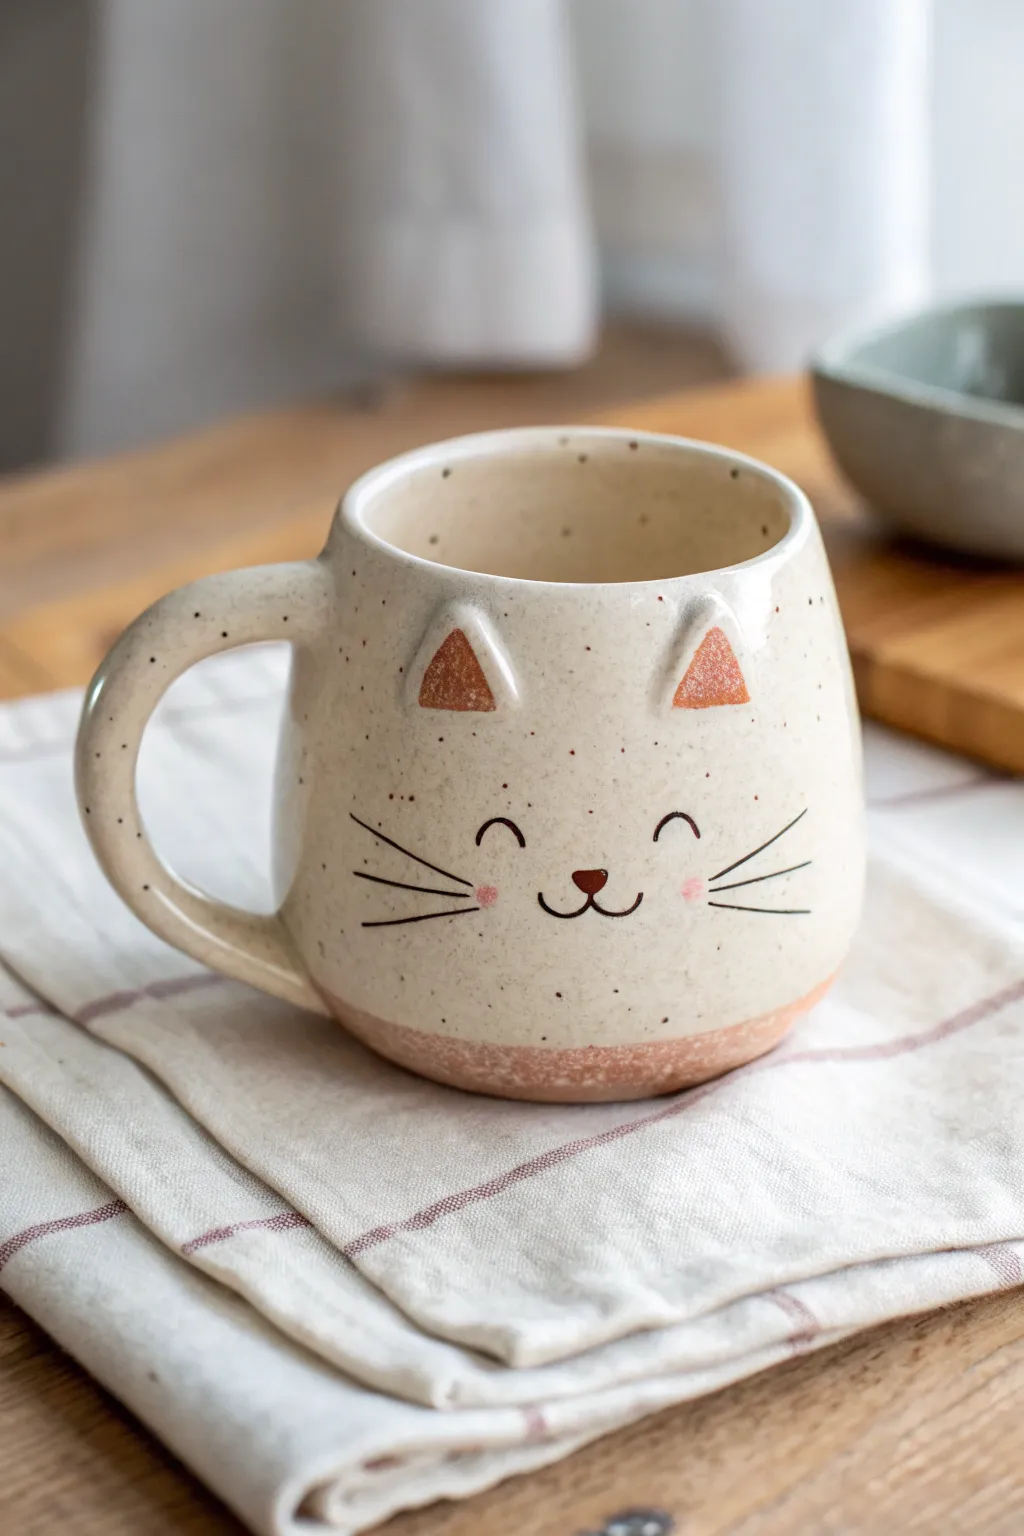
This charming ceramic mug features a speckled cream glaze and adorable sculpted cat ears that peek out from the rim. With its hand-painted whiskers and sweet expression, it transforms your morning coffee routine into a cozy moment with a feline friend.
Detailed Instructions
Materials
- Stoneware clay (speckled or buff)
- Pottery wheel (or tools for pinch/coil method)
- Needle tool
- Scoring tool (or fork)
- Slip (clay mixed with water)
- Sponge
- Underglazes: Black, Rust/Terracotta, Light Pink
- Clear or Cream Speckled Glaze (food safe)
- Small detail brush
- Rib tool
- Wire cutter
- Kiln
Step 1: Forming the Body and Handle
-
Throw the cylinder:
Begin by centering about 1 pound of speckled clay on the wheel. Open the clay and pull up the walls to form a cylinder that is slightly wider at the bottom than the top, creating a gentle curve. -
Refine the shape:
Use a rib tool to smooth the outside and inside walls, ensuring the belly of the mug feels round and comfortable to hold. Keep the rim slightly thick to support the ears later. -
Trim the base:
Once leather hard, trim a clean foot ring on the bottom. I like to leave the bottom curve somewhat rounded to match the softness of the cat’s face. -
Pull the handle:
Pull a strap of clay for the handle. It should be thick and sturdy. Curve it into a ‘C’ shape and let it stiffen slightly until it holds its form without drooping. -
Attach the handle:
Score the mug body and the attachment points of the handle. Apply slip generously, press the handle firmly into place, and smooth the seams with a damp sponge or modeling tool.
Uneven Whiskers?
Sketch the face lightly with a pencil first. Graphite burns off in the kiln, so you can adjust your guide lines until the expression is perfectly symmetrical.
Step 2: Sculpting the Cat Features
-
Shape the ears:
Roll two small triangles of clay. Gently curve them to mimic the cupped shape of a cat’s ear. They should be roughly the size of a thumbnail. -
Attach the ears:
Score and slip the areas just below the rim on the front of the mug. Press the ears on securely, blending the clay at the base downward so they appear to grow out of the mug wall. -
Smooth the transition:
Use a small, damp brush or your finger to smooth the join lines around the ears, ensuring there are no sharp edges that could chip later. -
Add texture (optional):
If your clay isn’t naturally speckled, you can flick a stiff toothbrush dipped in iron oxide wash gently over the surface now to mimic the speckled look seen in the photo.
Step 3: Painting and Glazing
-
Bisque fire:
Let the mug dry completely (bone dry) and fire it to bisque temperature (usually cone 04) to prepare it for glazing. -
Paint the ears and cheeks:
Using a rust or terracotta underglaze, paint triangular patches inside the sculpted ears. Dab two small, soft circles of light pink underglaze on the cheeks. -
detail the face:
With a very fine liner brush and black underglaze, carefully paint the upside-down ‘U’ shapes for eyes, a small triangular nose, the ‘w’ mouth, and three long whiskers on each side. -
Wax resist the details:
Once the underglaze is dry, apply a wax resist over the painted face and ear details. This prevents the main glaze from obscuring your fine line work. -
Dip the base:
Dip the bottom half inch of the mug into the rust/terracotta glaze or underglaze to create the contrasting darker band shown at the base. -
Apply the main glaze:
Dip the entire mug into a transparent or semi-transparent cream glaze. If using a speckled glaze, ensure it’s not too opaque, or you’ll lose the face details. -
Final wipe:
Wipe the foot ring completely clean with a wet sponge to prevent the mug from sticking to the kiln shelf. -
Glaze fire:
Fire the mug to the maturity temperature of your clay and glaze (typically cone 5 or 6). Allow the kiln to cool naturally before retrieving your finished piece.
Don’t Smudge The Ink
For crisper lines on the whiskers and eyes, use an underglaze pencil or a needle-tip applicator bottle instead of a brush. It offers much better control.
Fill your new mug with your favorite warm beverage and enjoy the cozy charm of your handmade creation
The Frog Mouth Rim Mug
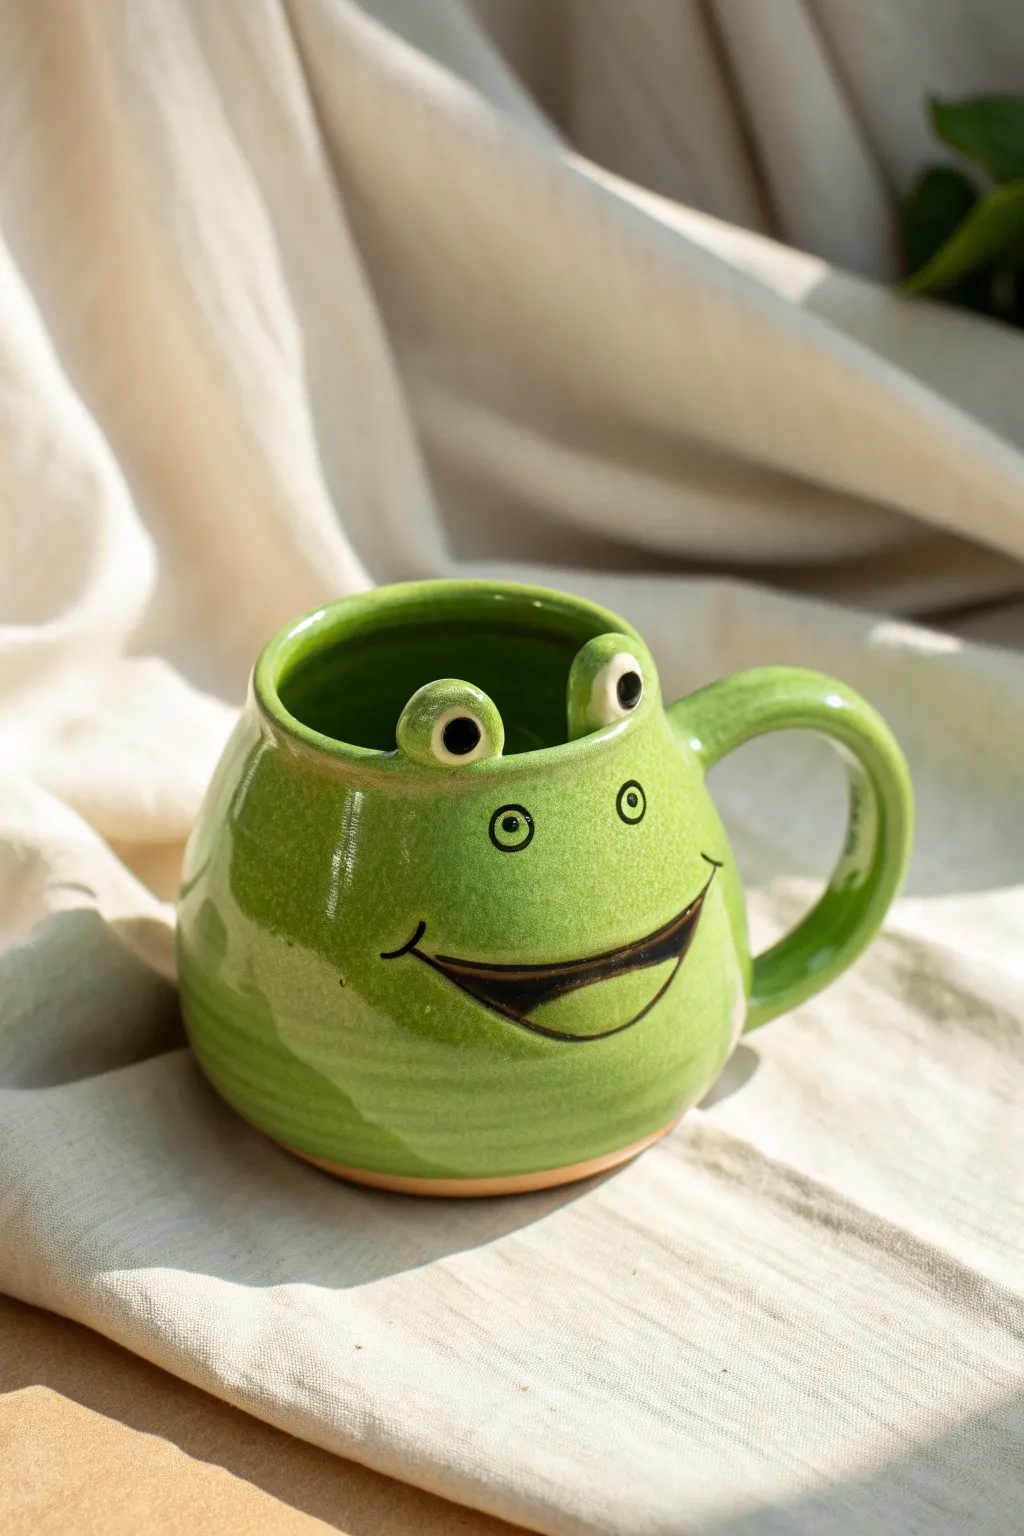
This delightful frog mug features a satisfyingly round belly and quirky eyes that peek right over the rim as you sip. Its bright green glaze and goofy, wide grin bring a dose of amphibian joy to your morning coffee routine.
How-To Guide
Materials
- Stoneware clay body
- Pottery wheel (or coil building tools)
- Rib tool (wooden or silicone)
- Needle tool
- Sponge
- Score and slip tool
- Underglaze pencil or fine brush (black)
- Frog green glossy celadon glaze
- Clear glaze (optional)
- Kiln
Step 1: Throwing the Body
-
Center the clay:
Start by centering a pound and a half of stoneware clay on your wheel, ensuring it feels stable and smooth. -
Open the vessel:
Open the centered clay and pull up the walls, aiming for a cylinder height of about 4 inches initially. -
Belly out the form:
Using a rib tool on the inside and a sponge on the outside, gently push the clay outward from the inside to create a round, bulbous ‘belly’ shape, while keeping the rim slightly narrower. -
Smooth the rim:
Pay special attention to the rim, compressing it with a chamois or sponge to ensure it is smooth and comfortable for sipping later. -
Trim and dry:
Wire the pot off the bat and let it dry to a leather-hard state; usually, I like to leave it covered loosely overnight so the moisture distributes evenly.
Eye Placement Trick
Place the eyes slightly closer together than you think necessary. As the clay shrinks during drying and firing, wider-set eyes can end up looking like ears instead of eyes.
Step 2: Sculpting the Features
-
Form the eyes:
Roll two small balls of leftover clay, about the size of large marbles, which will become the iconic frog eyes. -
Attach the eyes:
Score the top rim of the mug and the bottom of your eye-balls, add slip, and firmly press the eyes onto the rim so they protrude upward. -
Refine the connection:
Use a modeling tool to blend the clay from the back of the eyes down into the mug body, ensuring they are seamless and won’t pop off during firing. -
Indent the pupils:
With the back of a small paintbrush or a rounded tool, gently press into the center of each eyeball to create a shallow socket for the pupil. -
Pull a handle:
Pull a traditional strap handle from a lump of clay, tapering it slightly. -
Attach the handle:
Score and slip the back of the mug opposite the eyes and attach your handle, creating a generous curve that mimics the roundness of the frog’s body.
Add a Lily Pad
Create a matching coaster shaped like a lily pad using a slab of clay. Carve veins into the leaf and glaze it a darker forest green for the perfect set.
Step 3: Glazing and Finishing
-
Bisque fire:
Once the mug is bone dry, fire it in the kiln to cone 04 (or your clay’s specific bisque temperature). -
Draw the face:
Using a black underglaze pencil or a very fine liner brush with black underglaze, draw the wide smile. Make sure the corners of the mouth curve up high towards the eyes. -
Define the nostrils:
Add two small circles for nostrils right between the eyes and the smile. -
Fill the pupils:
Carefully paint the indented pupils black with your underglaze. -
Apply the green:
Dip or brush the entire mug (except the foot ring) with a translucent celadon green glaze. This type of glaze often breaks beautifully over texture. -
Glaze fire:
Fire the mug to maturity (Cone 5, 6, or 10 depending on your clay/glaze combo) to vitrify the clay and melt the glaze into that shiny froggy skin.
Enjoy your new hopp-y mug with your favorite warm beverage
The Pig Snout Oink Mug
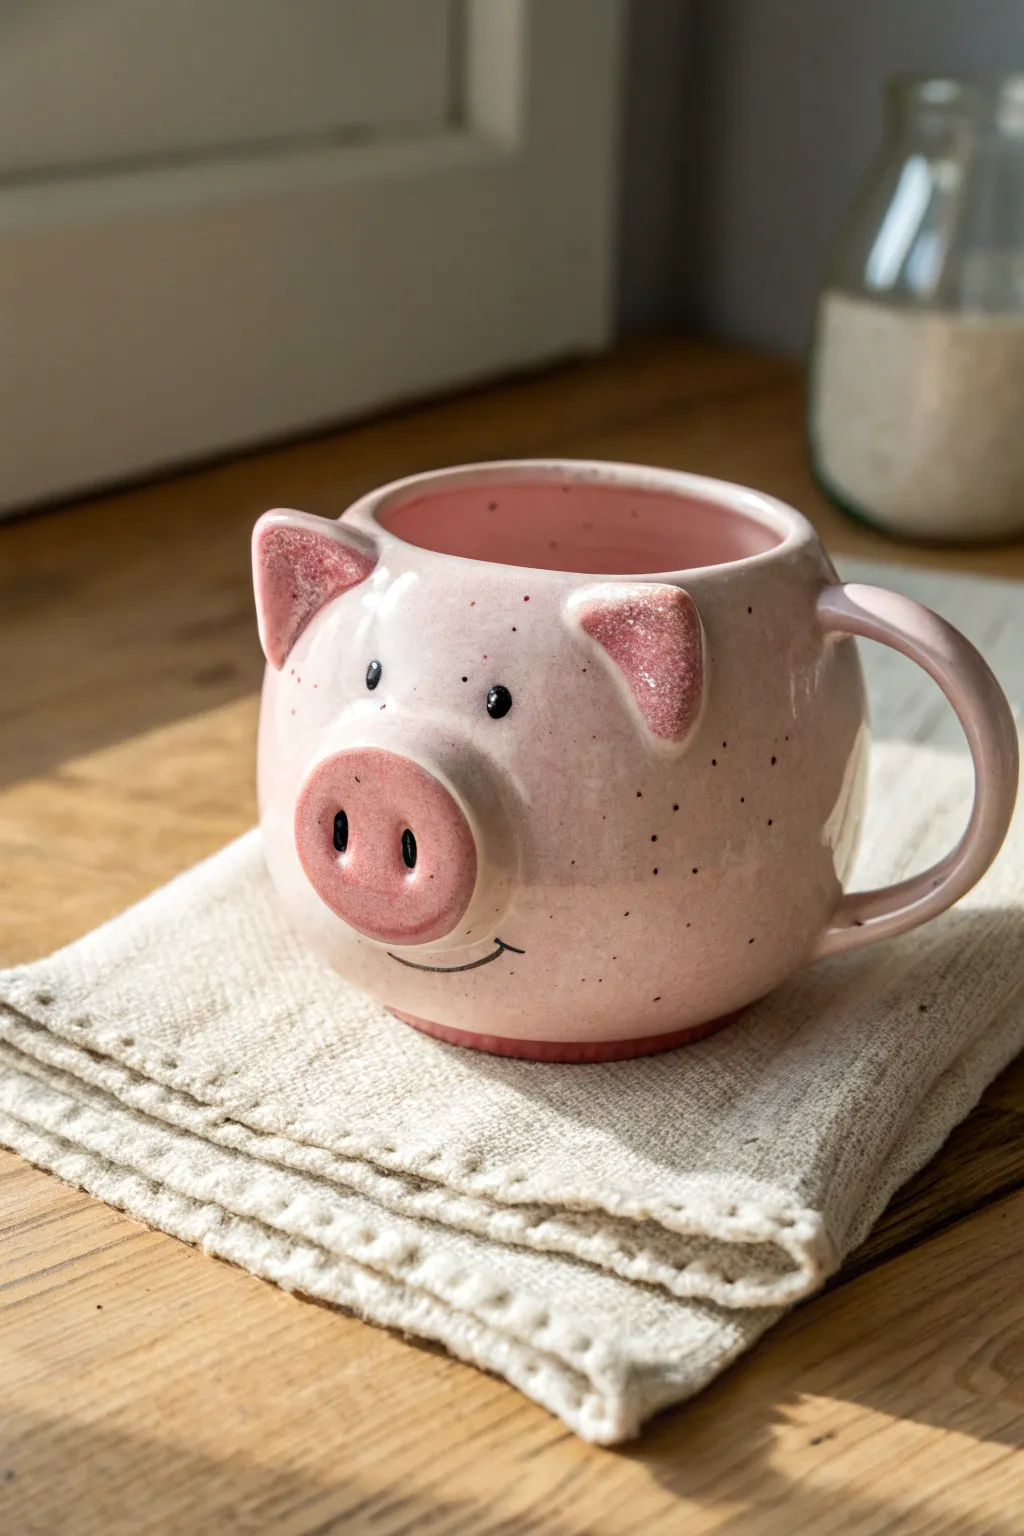
This adorable handmade mug features a perfectly round body, a distinctively prominent snout, and charming perky ears that make sipping your morning coffee a delight. With its speckled pink glaze and sweet, simple expression, it captures the essence of a friendly barnyard piglet in functional ceramic form.
Step-by-Step Guide
Materials
- Stoneware clay (light or white body)
- Pottery wheel (or slab roller/rolling pin for hand-building)
- Rib tool (metal and rubber)
- Needle tool
- Scoring tool (or serrated rib)
- Slip (clay slurry)
- Sponge
- Loop tool for trimming
- Pink underglaze (light and medium shades)
- Black underglaze
- Cote-style clear glaze (transparent)
- Small liner brush
- Medium soft bristle brush
- Kiln
Step 1: Forming the Body
-
Throw or Build the Base:
Begin with about 1 pound of wedged clay. If throwing on the wheel, center your clay and open it up, keeping the floor about 1/4 inch thick. If hand-building, create a pinch pot or join two pinch pots together to form a hollow sphere, then slice the top off. -
Shape the Belly:
Belly out the walls gently from the inside to create a rounded, spherical shape. You want the mug to look plump and pig-like, so ensure the widest point is in the middle-lower section, tapering slightly inward toward the rim. -
Refine the Rim:
Compress the rim with a chamois or your sponge to make it smooth and comfortable for drinking. Ensure the wall thickness is even throughout. -
Trim the Foot:
Once the body is leather hard, trim a small, tidy foot ring at the bottom to give the mug a little lift and definition. This also creates a nice stopping point for your glaze later.
Step 2: Adding the Pig Features
-
Create the Snout:
Roll a small ball of clay and flatten it into a thick oval disc (about 3/4 inch thick). This will be the distinct snout. Gently tap the edges to keep them rounded rather than sharp. -
Attach the Snout:
Score the back of the snout and the spot on the mug where it will sit (centered, lower middle). Apply slip and press the snout firmly onto the body. Use a small modeling tool to blend the seam where the snout meets the mug so it looks integrated, not just stuck on. -
Detail the Nostrils:
Use the rounded end of a paintbrush or a large embossing tool to press two deep, vertical oval indentations into the snout for nostrils. Smooth the edges of these indentations with a damp finger. -
Form the Ears:
Shape two small triangles from a slab of clay. Soften the points so they aren’t sharp. Gently curve them forward slightly to give them a ‘cupped’ look. -
Attach the Ears:
Score and slip the attachment points near the rim. Place the ears high on the ‘forehead’ area, spacing them widely. I find angling them slightly outward adds more personality. Blend the seams thoroughly on the back and inside of the ears. -
Pull the Handle:
Pull a strap handle or roll a coil of clay. Attach it to the side of the mug (opposite the face or slightly to the side). Ensure the handle loop is large enough for fingers but balanced with the round body.
Snout Hollow Trick
Before attaching the snout, slightly hollow out the back of the clay disc. This reduces weight and prevents the thick clay from cracking during firing due to uneven drying.
Step 3: Decorating and Glazing
-
Bisque Fire:
Allow the mug to dry completely to bone dry stage, then bisque fire it according to your clay body’s specifications (usually Cone 04). -
Apply Base Color:
Mix a very light pink underglaze. Apply 2-3 coats to the entire exterior and interior of the mug. For the speckled look seen in the image, you can use a glaze that has speckles built-in, or flick a stiff toothbrush dipped in iron oxide wash or brown underglaze over the surface. -
Accent the Snout and Ears:
Use a slightly darker, rosier pink underglaze for the flat front surface of the snout. Paint the inside triangle of the ears with a darker, textured pink glaze to create depth and contrast. -
Paint the Face:
Using a fine liner brush and black underglaze, paint two small, vertical oval eyes just above the snout. Add small white highlights (using white underglaze) to the eyes for a spark of life. -
Add the Smile:
Paint a very thin, curved line underneath the snout for the mouth. Adding a tiny vertical tick mark at the end of the smile line gives it a quirky, smirking expression. -
Final Glaze and Fire:
Once the underglaze designs are dry, dip the entire mug into a clear, transparent glaze. Wipe the foot ring clean with a sponge. Fire to the final temperature (likely Cone 5 or 6 depending on your clay).
Curly Tail Upgrade
Instead of a standard strap handle, roll a long coil and twist it into a pigtail spiral shape against the back of the mug to serve as a whimsical, decorative handle.
Pull your finished pig mug from the kiln and get ready to enjoy the most cheerful cup of tea you’ve ever had
The Sloth Hugging Handle Mug
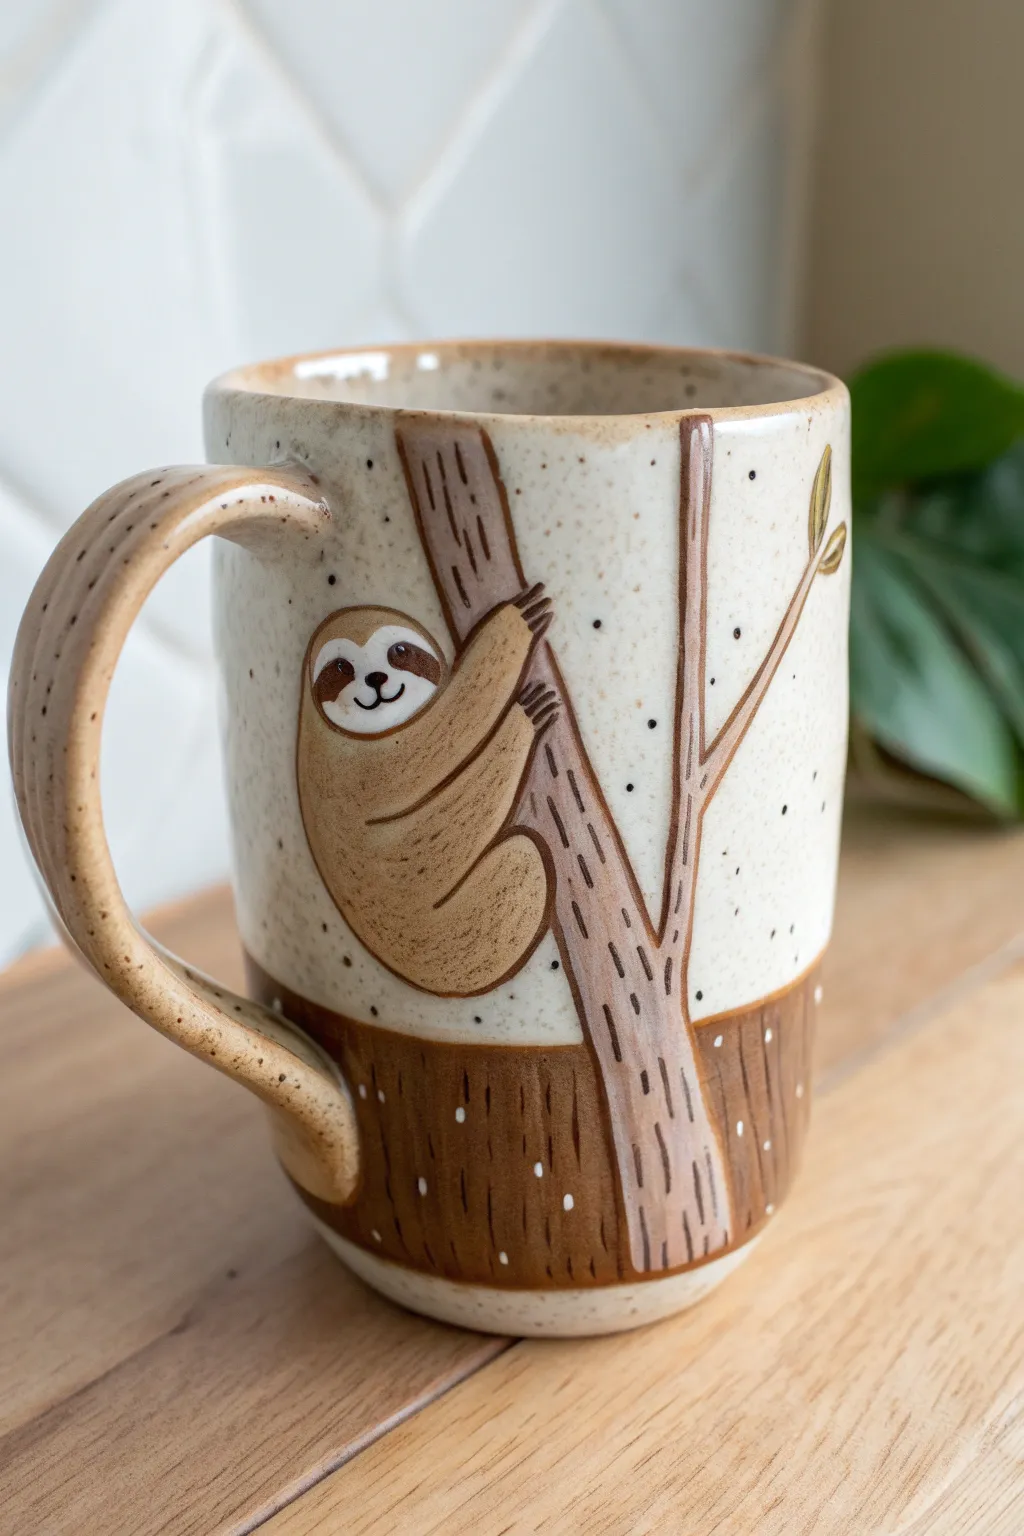
Embrace the slow life with this charming ceramic mug featuring a contented sloth clinging to a tree branch. The mix of hand-carved textures, warm earth tones, and speckled glaze creates a cozy vessel perfect for lazy Sunday mornings.
Step-by-Step
Materials
- Stoneware clay (speckled or buff)
- Pottery wheel (or slab roller for hand-building)
- Needle tool
- Rib tool
- Underglazes (chocolate brown, tan/beige, white, black)
- Small detailing brushes
- Loop tool for carving
- Sponge
- Clear or transparent satin glaze
- Kiln
Step 1: Forming the Mug Body
-
Throw or Build the Cylinder:
Begin by throwing a tall, straight-sided cylinder on the wheel using about 1 lb of clay. Aim for a slightly narrower base that widens gently towards the rim. If hand-building, roll a slab and form a clean cylinder. -
Shape the Base:
While the clay is soft, use a rib tool to curve the bottom portion slightly inward, creating a gentle taper at the foot of the mug. -
Attach the Handle:
Pull a sturdy, C-shaped handle. Attach it securely to the side opposite where your sloth will go. Make the handle generous in size, allowing for a comfortable grip. -
Refine the Rim:
Smooth the lip of the mug with a chamois or sponge to ensure it’s comfortable for drinking. -
Standardize Texture:
Wait for the mug to reach leather-hard consistency. Sponge the surface smooth to prepare it for decoration.
Oops! Smudged Underglaze?
If you accidentally smear the black facial details, let it dry completely. Then, gently scrape the mistake off with an X-Acto knife or needle tool instead of wiping it wet.
Step 2: Creating the Sloth Design
-
Sketch the Outline:
Lightly trace the outline of a tree trunk growing vertically up the mug. Position a secondary branch angling off to the right. -
Position the Sloth:
Sketch the oval body of the sloth wrapping around the main trunk. Add the head looking back over the shoulder and draw the arms and legs gripping the tree. -
Carve the Background (Optional):
For a slight relief effect, use a small loop tool to gently recess the area around the sloth and tree, making the design pop forward slightly. Alternatively, you can leave the surface flush. -
Incise Details:
Use a needle tool or sharp pencil to scratch vertical lines into the tree trunk for bark texture. Add small tick marks on the sloth’s body to suggest fur direction.
Step 3: Underglazing & Finishing
-
Paint the Lower Section:
Apply a chocolate brown underglaze to the bottom quarter of the mug. Create an uneven, wavy horizon line rather than a straight stripe to mimic the ground or lower trunk. -
Detail the Base Texture:
Once the brown base underglaze is dry, use a needle tool to scratch through it (sgraffito style) to create vertical grass or bark lines revealing the clay body underneath. -
Color the Tree:
Use a diluted brown underglaze to wash over the tree trunk. The color should settle into the incised bark lines, making them darker. -
Paint the Sloth Body:
Fill in the sloth’s body with a tan or beige underglaze. Apply two coats for solid coverage. -
Paint the Face:
Carefully paint the face area white. Once dry, use a very fine brush and black underglaze to add the eye mask patches, smiling mouth, and nose. -
Add Claws and Leaves:
Use the dark brown to paint three small claws on each paw gripping the tree. Add a couple of small green or brown leaves to the branch tip. -
Bisque Fire:
Load the thoroughly dried mug into the kiln and bisque fire to cone 04 (or your clay’s specific bisque temp). -
Clear Glaze Application:
Dip the entire mug into a clear or transparent satin glaze. This will seal the underglaze work and allow the speckles in the clay (or fake speckles if you added them) to show through. -
Final Firing:
Glaze fire the mug to cone 6 (or your clay’s maturity temperature). Ensure the foot is wiped clean so it doesn’t stick to the kiln shelf.
Pro Tip: Wax Resist
Apply wax resist over the finished sloth painting before dipping in the clear glaze. This keeps the design crisp and prevents the glaze from blurring the fine fur lines.
Now you have a delightfully slow companion to join you for your morning coffee
The Friendly Horned Monster Mug
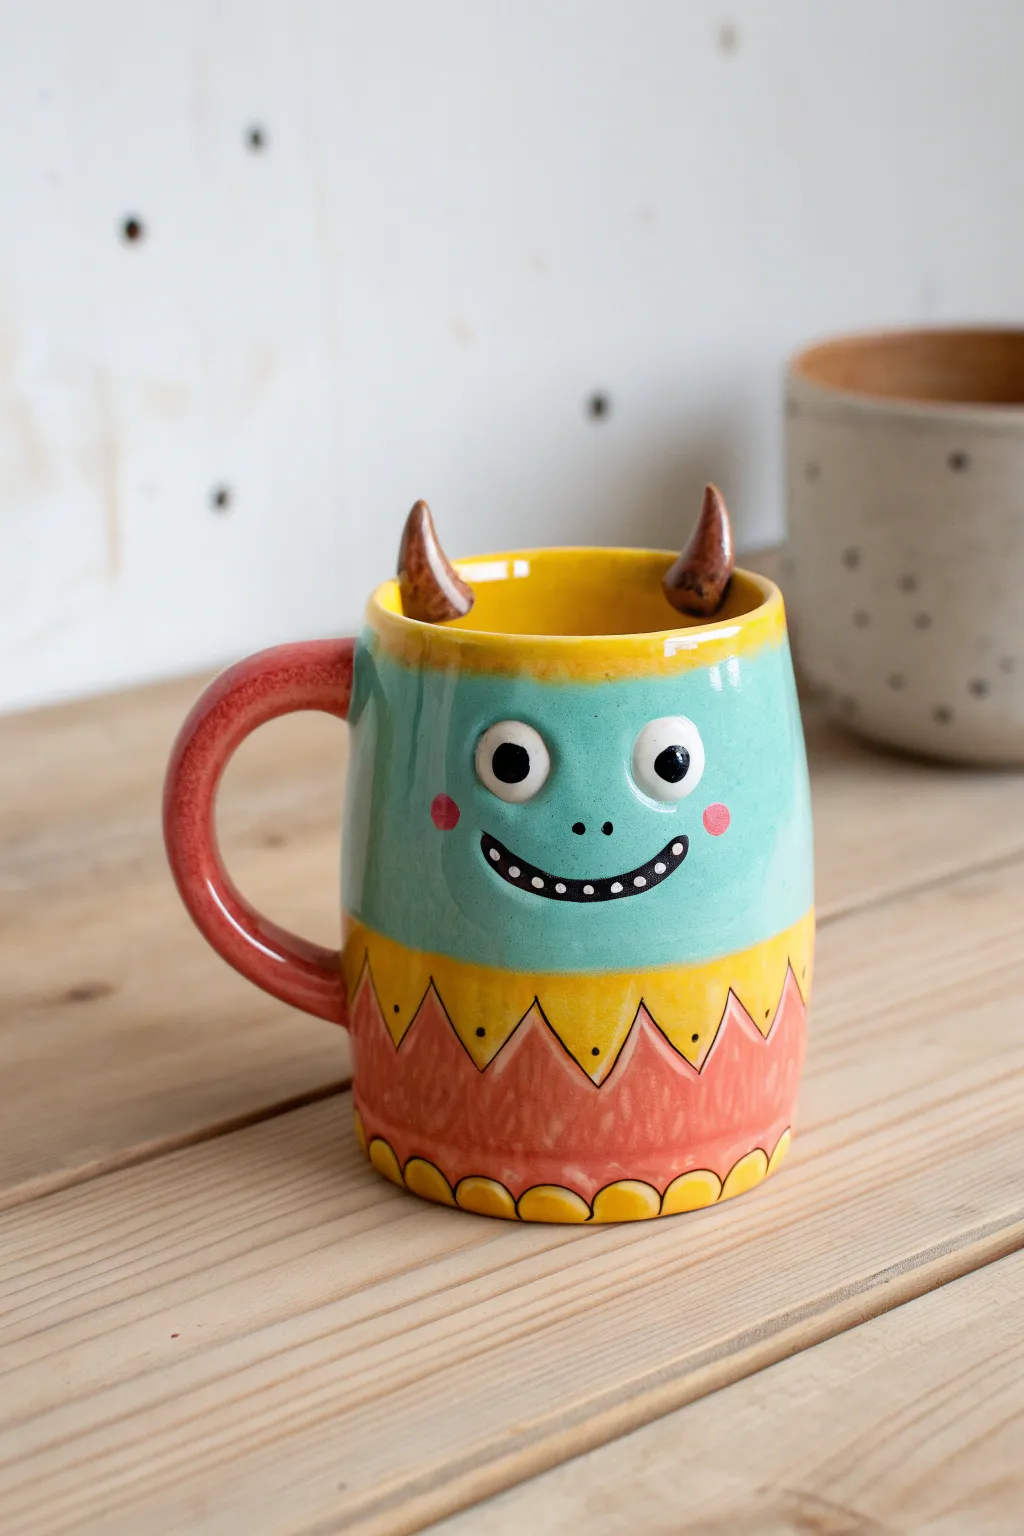
This whimsical ceramic mug features a cheerful monster face with big eyes, tiny horns, and a vibrant color palette that brightens any morning coffee. Its jagged geometric patterns and playful expression make it a delightful project for intermediate potters looking to practice surface decoration and handle attachments.
How-To Guide
Materials
- Stoneware clay body
- Rolling pin and guide sticks (for slab)
- Pottery wheel (optional, can be hand-built)
- Fettling knife
- Scoring tool and slip
- Sponge
- Underglazes: Teal/Turquoise, Bright Yellow, Coral/Red-Orange, Brown, Black, White
- Clear transparent glaze
- Small round brushes (sizes 2 and 4)
- Kiln
Step 1: Forming the Mug Body
-
Create the Cylinder:
Begin by either throwing a basic cylinder on the wheel or construct one using a slab-building technique. Aim for a height of about 4-5 inches and ensure the walls are even. If wheel-throwing, trim the foot once leather hard. -
Shape the Base:
While the clay is still workable, gently smooth the sides. The walls should be relatively straight but can curve slightly inward at the top for a softer look. -
Pull the Handle:
Pull a strap of clay for the handle. It should be thick enough to support the mug but comfortable to hold. Curve it into a ‘C’ shape and let it set up until it holds its form without sagging. -
Attach the Handle:
Once both the mug body and handle are leather hard, score and slip the attachment points. Press the handle firmly onto the side opposite where you plan to put the face. Smooth the joins with a modelling tool or your finger to ensure a strong bond.
Don’t Smudge the Smile
When painting the white teeth over the black mouth line, wait for the black underglaze to be bone dry. This prevents the colors from bleeding into a gray mess.
Step 2: Sculpting the Features
-
Form the Horns:
Roll two small cones of clay between your fingers, about an inch long, tapering to a soft point. These will be the monster’s horns. -
Attach the Horns:
Score the top rim of the mug where you want the horns to sit. Slip and press the base of each horn onto the rim, blending the clay downward so they appear to grow out of the mug. Curve them slightly for character. -
Smooth the Surface:
Wipe the entire mug with a damp sponge to remove any burrs or rough spots. This creates a clean canvas for the underglaze painting.
Step 3: Decoration and Underglazing
-
Sketch the Design:
Lightly pencil the design onto the leather-hard or bisque-fired clay. Draw a horizontal line separating the bottom third, and sketch the zigzag ‘teeth’ pattern for the monster’s shirt or fur at the bottom. -
Base Color: Teal:
Using a wide brush, apply 2-3 coats of teal underglaze to the upper two-thirds of the mug, carefully painting around the horns if you want them a different color. -
Base Color: Coral:
Paint the handle and the bottom section (below the zigzag line) with a coral or reddish-orange underglaze. I find that three thin coats give a much more solid, opaque color than one thick one. -
Yellow Elements:
Fill in the zigzag band between the teal and coral sections with bright yellow underglaze. Also, paint the inside of the mug yellow for a surprising pop of color when drinking. -
Paint the Horns:
Use a brown underglaze to paint the horns. You can add a little texture by dappling a darker brown near the base. -
Add the Scaly Detail:
At the very bottom edge of the mug, paint small semi-circles in yellow to create a scalloped border over the coral base. -
Create the Eyes:
Paint two large white circles in the center of the teal section. Once dry, add smaller black circles for pupils. A tiny dot of white in the black pupil adds life and sparkle. -
Paint the Mouth:
Using a thin detail brush and black underglaze, paint a wide, curved smile. carefully add small white dots along the smile line to represent teeth. -
Refine Details:
Add two small pink circles for cheeks. Use a fine liner brush to outline the yellow zigzag band and add small dots inside the points for extra decoration.
Make it 3D
Instead of painting the eyes flat, shape small balls of clay and attach them to the surface before painting. This makes the eyes bulge out for a goofier look.
Step 4: Finishing
-
Bisque Fire:
If you painted on greenware, bisque fire the mug to cone 04 (or your clay body’s specifications). -
Clear Glaze Application:
Dip the entire mug into a clear transparent glaze. Ensure the glaze doesn’t pool too thickly in the textured areas or around the handle join. -
Final Firing:
Fire the mug to maturity (likely cone 5 or 6 for stoneware). Allow the kiln to cool completely before removing your new monster friend.
Now you have a charming, slightly mischievous mug ready to hold your favorite warm beverage
The Two-Faced Mood Mug
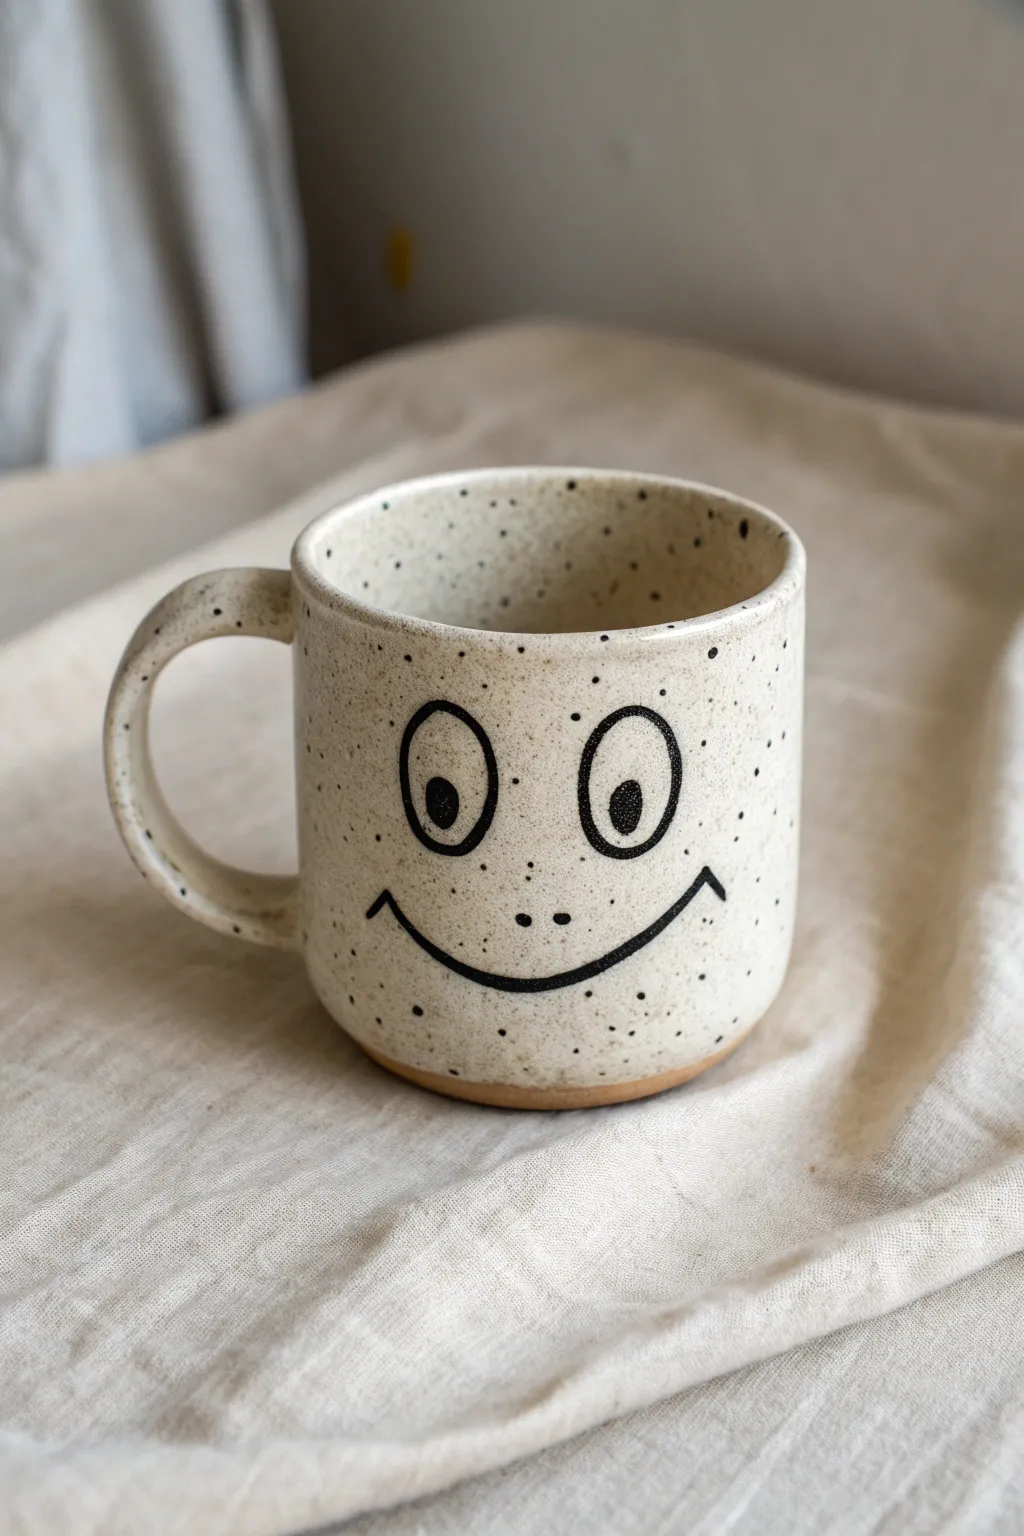
This whimsical handmade mug features a beautifully speckled cream glaze and a simple, bold line drawing of a goofy smiling face. The charming imperfections in the hand-thrown form give it plenty of character, perfect for brightening up your morning coffee routine.
Step-by-Step
Materials
- Stoneware clay (speckled or buff)
- Pottery wheel
- Throwing tools (sponge, rib, wire cutter)
- Loop tool for trimming
- Serrated rib or scoring tool
- Slip
- Underglaze pencil or fine liner brush
- Black underglaze
- Glossy clear glaze (transparent)
- Kiln
Step 1: Throwing the Form
-
Center the clay:
Start with a ball of clay about the size of a large orange. Secure it to your wheel head and center it effectively before opening it up. -
Pull the cylinder:
Create the floor of your mug, compressing it well to prevent cracking. Begin pulling up the walls to form a straight-sided cylinder. -
Shape the body:
Unlike a perfectly straight modern mug, this one has a subtle, friendly curve. Use a rounded rib inside the cylinder to gently push the belly out, leaving the rim slightly narrower than the mid-section. -
Finish the rim:
Use a chamois or your sponge to smooth and round the lip of the mug so it will be comfortable to drink from later. -
Wire off:
Run your wire tool underneath the base and set the cylinder aside on a ware board until it reaches a leather-hard state.
Step 2: Trimming and Handle
-
Trim the foot:
Once leather hard, center the inverted mug on the wheel. Use a loop tool to trim away excess weight from the bottom, creating a distinct foot ring. -
Pull a handle:
Take a separate lug of clay and pull a classic strap handle. You want it substantial enough to hold, but not clunky. Let it curve naturally into a ‘C’ or ear shape. -
Attach the handle:
Score the side of the mug and the contact points of your handle. Apply slip generously and press the handle firmly onto the mug body, smoothing the seams so they disappear. -
Refine the surface:
I like to take a soft, slightly damp sponge over the entire piece to smooth out any fingerprints or rough spots before decorating, keeping that nice speckled texture visible.
Clay Choice Matters
To get the natural spots shown in the photo without a special glaze, use a clay body specifically labeled ‘speckled buff’ or ‘speckled stoneware’.
Step 3: Decorating and Glazing
-
Bisque fire:
Place the bone-dry mug into the kiln for a bisque firing (usually cone 04 or 06) to prepare it for glazing. -
Outline the face:
Using a pencil, lightly sketch the placement of the eyes and mouth. The eyes should be large ovals set slightly wide apart, and the mouth a wide, gentle curve. -
Apply black underglaze:
Using a very fine liner brush loaded with black underglaze, carefully trace your sketch. Create thick, confident lines for the eye outlines and the smile. -
Add details:
Fill in the pupils, placing them slightly off-center or cross-eyed for that goofy look. Add two small dots for nostrils right in the center. -
Apply clear glaze:
Once the underglaze is dry, dip the entire mug into a glossy clear glaze. If you used plain clay instead of speckled clay, use a ‘speckled vanilla’ glaze instead. -
Clean the foot:
Wipe the glaze off the very bottom of the foot ring with a damp sponge so it doesn’t stick to the kiln shelf. -
Final fire:
Fire the mug to maturity (usually cone 6 for stoneware). The clear glaze will seal the black drawing and reveal the beautiful clay speckles underneath.
Double the Fun
Since this is the ‘Two-Faced’ mug, paint a completely different emotion (like grumpy or sleepy) on the opposite side of the handle.
Now you have a charming, durable mug ready to hold your favorite warm beverage
The Hidden Teeth Inside Surprise Mug
Create a cozy, handmade ceramic mug that greets you with a peaceful, sleepy smile every morning. This project features a speckled creamy finish, delicate hand-painted facial features, and a charming striped base for a touch of texture and color.
Detailed Instructions
Materials
- White stoneware clay (speckled variety recommended)
- Pottery wheel (or rolling pin for slab building)
- Rib tool
- Needle tool
- Loop tool for trimming
- Underglaze (black and soft pink/coral)
- Fine liner brush
- Small round brush
- Clear or food-safe transparent glaze
- Sponge
- Kiln access
Step 1: Forming the Mug Body
-
Throw the Cylinder:
Begin by centering about 1 pound of speckled stoneware clay on your wheel. Open the form and pull up the walls to create a cylinder approximately 4 inches tall. -
Shape the Belly:
Using a rib tool on the outside and your fingers inside, gently push the walls outward to create a slightly rounded, bell-bellied shape. The top rim should curve inward just slightly to hold heat. -
Refine the Rim:
Compress the rim with a chamois or your finger to ensure it’s smooth and pleasant to drink from. -
Wiring Off:
Run a wire tool under the base to separate it from the wheel head, then set the cylinder aside on a ware board to dry to leather-hard.
Step 2: Trimming and Handle
-
Trim the Foot:
Once leather-hard, center the mug upside down on the wheel. Use a loop tool to trim away excess clay at the base, refining the curve so it flows seamlessly into the rounded bottom. -
Pull a Handle:
With a small lump of fresh clay, pull a handle that tapers slightly. Aim for a comfortable C-shape that complements the roundness of the mug. -
Attach the Handle:
Score the attachment points on both the mug and the handle. Apply slip and press the handle firmly onto the side of the mug. Smooth the seams with a damp sponge or modeling tool.
Clean Lines Pro Tip
If you struggle with shaky hands for the fine eyelashes, try using a squeeze bottle with a fine metal tip filled with underglaze instead of a brush.
Step 3: Decorating the Base
-
Mark the Base Line:
Lightly sketch a line around the bottom circumference of the mug, about an inch up from the foot, to guide your decoration area. -
Paint Vertical Stripes:
Using the soft pink or coral underglaze and a small round brush, paint vertical stripes around the bottom inch of the mug. Space them evenly to mimic the fluted look in the reference.
Level Up: Texture
Instead of painting the stripes on the base, use a carving tool to physically carve vertical flutes into the clay for a tactile, ribbed texture.
Step 4: Painting the Face
-
Sketch the Face:
Lightly sketch the sleepy face design with a pencil directly onto the leather-hard clay. The pencil lines will burn off in the kiln, so don’t worry about mistakes. -
Paint the Eyelashes:
Dip a fine liner brush into black underglaze. With a steady hand, paint two downward-curving arcs for the eyes. -
Add Lash Details:
Add small, delicate vertical ticks along the lash line to create the sleepy eyelashes. I find it helps to brace my pinky against the mug for stability here. -
Paint the Smile:
Paint a small, simple U-shape centered below the eyes for the smile. -
Add Cheeks:
Using the same pink/coral underglaze used for the base, dab two soft, round circles on the cheeks using a slightly larger brush or a round sponge dabber.
Step 5: Glazing and Firing
-
Bisque Fire:
Let the mug dry completely until bone dry. Fire it in a electric kiln to cone 04 (or your clay’s specific bisque temperature). -
Wax Resist (Optional):
If you want the raw clay feel on the very bottom foot ring, apply wax resist there. -
Apply Clear Glaze:
Dip the entire mug into a clear or transparent glaze. If you used speckled clay, a transparent glaze is crucial to let those beautiful natural speckles show through. -
Glaze Fire:
Fire the mug again to the maturity temperature of your clay and glaze (typically cone 5 or 6 for stoneware).
Now you have a wonderfully sweet mug ready for your favorite warm beverage