When I’m styling outdoor spaces, garden pottery is my favorite shortcut to instant character—before you even add a single bloom. Here are my go-to garden pottery ideas that turn patios, steps, and planting beds into little outdoor art moments.
Classic Terracotta Planter Groupings
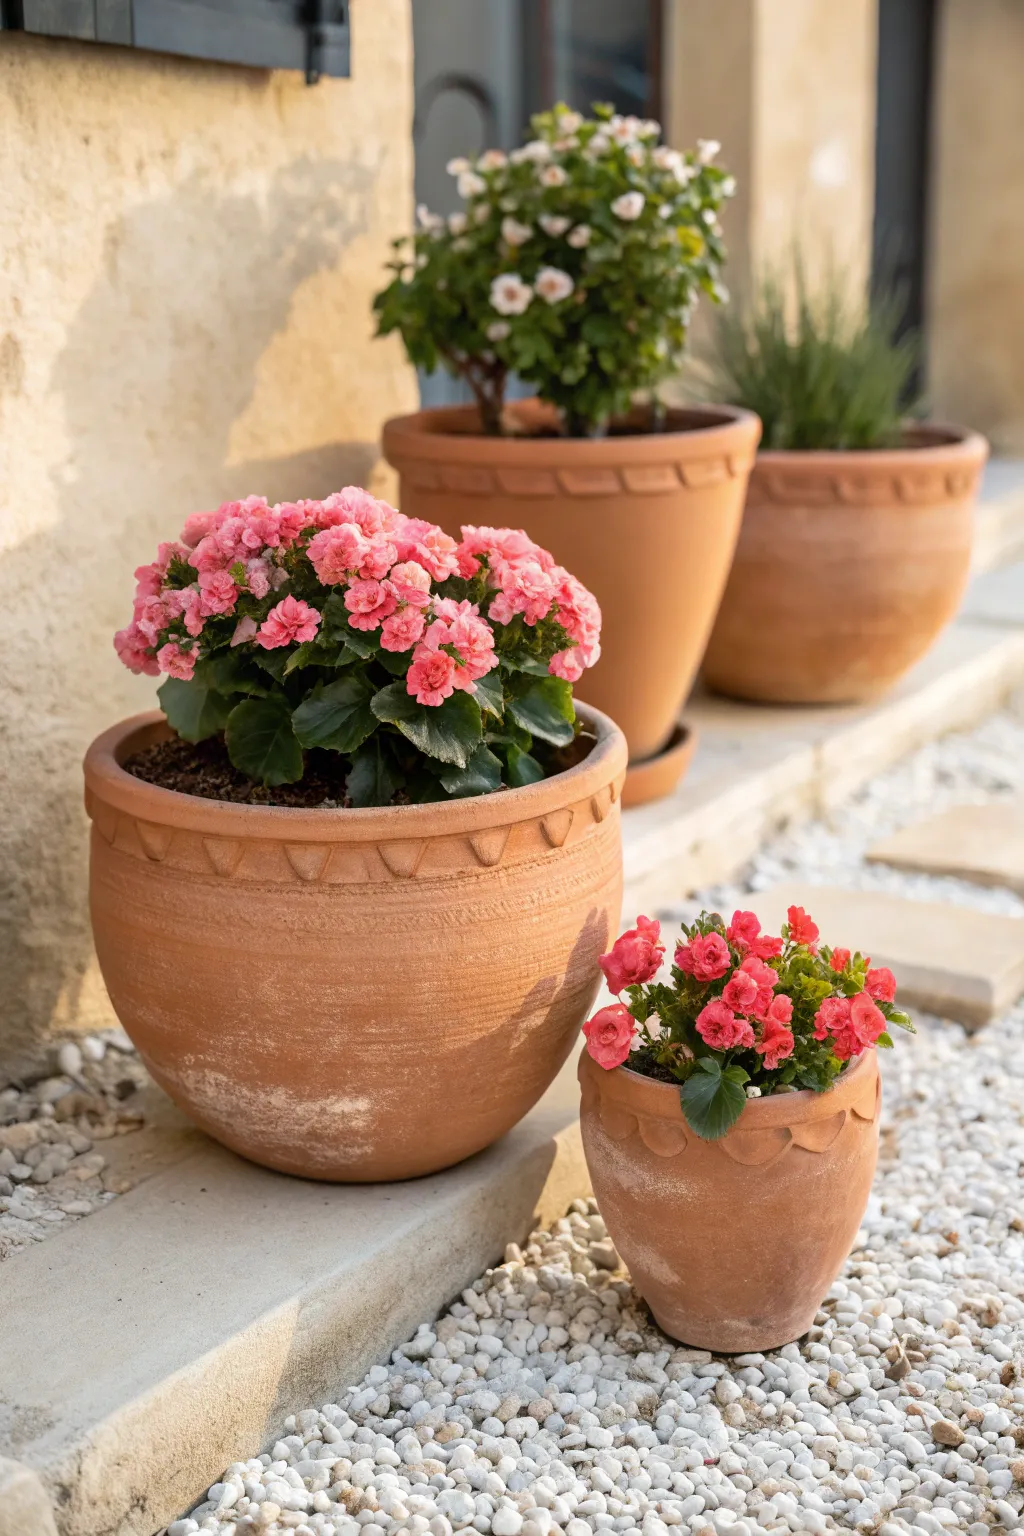
Recreate the warm, sun-baked charm of a Mediterranean garden with this classic grouping of terracotta planters. By combining pots of varied sizes with vivid pink blooms and white stones, you’ll establish an inviting focal point that feels both curated and natural.
How-To Guide
Materials
- Various terracotta pots (large bowl style, medium standard pot, small bowl style)
- Potting soil mix (well-draining)
- Pink Kalanchoe plant (large)
- Pink Kalanchoe plant (small)
- White or pale pink shrub rose bush (e.g., drift rose or miniature rose)
- Green foliage plant (optional, like rosemary or ornamental grass)
- White landscaping pebbles or gravel
- Trowel
- Gardening gloves
- Watering can
- Saucer for the medium pot (terracotta)
Step 1: Setting the Scene
-
Choosing the Location:
Begin by selecting a sunny spot near a wall or walkway with a beige or warm-toned background. The light-colored wall in the photo reflects sunlight, enhancing the warmth of the terracotta, so try to find a similar masonry backdrop. -
Preparing the Ground:
Clear a small area on the ground or a low concrete step. Ensure the surface is level so your pots won’t wobble. -
Adding the Stone Base:
Pour your white landscaping pebbles over the cleared area. Spread them evenly to create a bright, textured carpet that will contrast beautifully with the clay pots.
White Residue?
Terracotta is porous and may develop white mineral deposits (efflorescence) over time. Wipe with a diluted vinegar solution to restore that warm orange glow.
Step 2: The Main Focal Point
-
Selecting the Large Pot:
Choose your largest terracotta vessel for the foreground. Look for a wide, bowl-shaped planter with a decorative rim detail—a simple sawtooth or rope pattern works best to mimic the image. -
Filling with Soil:
Fill this main pot about two-thirds full with your quality potting mix. Press it down lightly to remove air pockets but keep it airy enough for roots. -
Planting the Large Kalanchoe:
Gently remove the large pink Kalanchoe from its nursery container. Tease the roots slightly if they are pot-bound. -
Positioning the Plant:
Place the Kalanchoe in the center of the large pot. Add more soil around the sides until the root ball is covered and the soil level is about an inch below the rim. -
Watering In:
Give the plant a good drink of water immediately to help settle the soil around the roots.
Color Harmony
To nail this look, ensure your pink blooms are a warm, coral-pink tone rather than a cool magenta, which harmonizes better with the orange clay.
Step 3: The Supporting Cast
-
Potting the Background Shrub:
For the medium-sized standard terracotta pot, selecting the right plant is key. Here I recommend a white or pale pink shrub rose or similar bushy flowering plant. Plant it securely in the pot, ensuring it stands taller than the foreground Kalanchoe. -
Arranging the Background:
Place this medium pot on the saucer behind your main large pot. Position it slightly to the right so it peeks out, creating depth without blocking the view. -
Adding the Third Element:
If you have a third large pot available, plant a green foliage plant like ornamental grass or rosemary. Set this pot further back to the right to complete the triangular composition seen in the background.
Step 4: The Gentle Accent
-
Prepping the Small Pot:
Take your smallest terracotta bowl planter—ideally one that matches the style of the large one. -
Planting the Small Bloom:
Plant the smaller pink Kalanchoe here. This echoes the color of the main pot but on a diminutive scale, creating visual harmony. -
Final Placement:
Nestle this small pot onto the white pebbles in the foreground, to the right of the large pot. This breaks up the negative space and connects the arrangement to the ground.
Step 5: Finishing Touches
-
Cleaning Up:
Brush off any loose soil from the rims and sides of the terracotta pots. A clean pot looks much more polished against the white stones. -
Final Adjustments:
Step back and check your spacing. Ensure the leaves of the foreground plants don’t obscure the beautiful terracotta textures too much. Rotate the pots until you find their ‘best side’. -
Watering the Group:
Give everything a final light sprinkle of water, careful not to soak the Kalanchoe leaves too much, as they prefer drier conditions.
Enjoy the rustic elegance of your new pottery display as the sunlight enhance the colors throughout the day

Oversized Statement Urn Focal Point
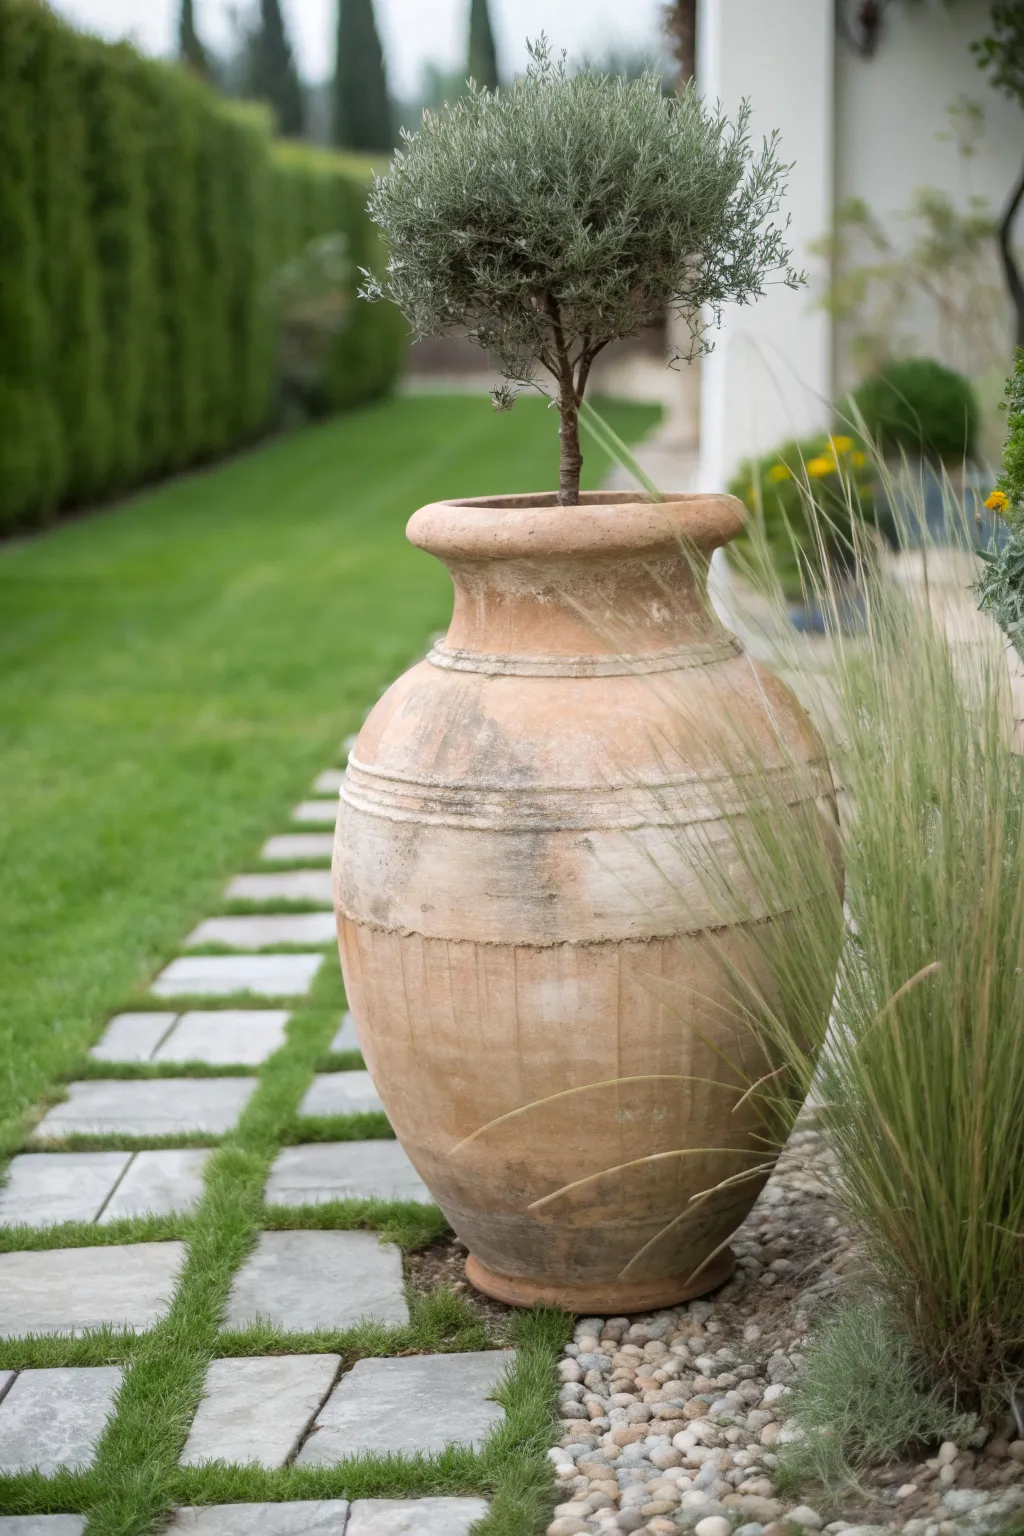
Transport your garden to the Italian countryside with this stunning oversized urn project. By applying specialized aging techniques to a standard terracotta planter, you will achieve that authentic, sun-baked patina that usually takes decades to develop.
Detailed Instructions
Materials
- Large terracotta amphora/urn (24-36 inches tall)
- Standard terracotta pot (matches rim diameter of urn)
- Garden lime (hydrated lime)
- Water
- Plain yogurt (full fat)
- Moss spores or buttermilk (optional for greening)
- Matte clear acrylic sealer (spray)
- Sandpaper (80 and 120 grit)
- Clean rags
- Chip brushes (2-3 widths)
- Potting soil mix
- Standard olive tree or topiary
- Gravel for drainage
- Plastic pot liner (optional)
Step 1: Preparation and Cleaning
-
Select your vessel:
Begin by finding a large, unglazed terracotta urn. The surface needs to be porous for the aging materials to adhere properly, so avoid anything glazed or sealed. -
Surface abrasion:
Take your 80-grit sandpaper and vigorously scuff the entire exterior of the pot. You want to knock down any factory-smooth finish to give the lime wash plenty of ‘tooth’ to grab onto. -
Wipe it down:
Use a damp rag to completely remove all clay dust created by sanding. Let the pot dry until it’s back to its original light terracotta color.
Step 2: Creating the Patina
-
Mix the lime wash:
In a bucket, mix garden lime with water until you achieve a consistency similar to heavy cream or pancake batter. I prefer it slightly thick so it builds texture. -
First application:
Using a chip brush, apply the lime wash generously over the pot. Don’t aim for perfection; messy, uneven strokes look more natural and authentically aged. -
Partial removal:
Wait about 10–15 minutes until the wash is tacky but not fully dry. Take a damp rag and wipe away sections of the lime, focusing on raised ribs and the rim where natural wear would occur. -
Second coat for depth:
Once the first layer is dry, dab a second, thinner layer of lime wash into the crevices and horizontal grooves of the urn to emphasize its shape. -
Sanding for weathering:
After the lime is fully bone-dry (usually overnight), use 120-grit sandpaper to distress the finish further. Sand harder in the middle ‘belly’ of the urn to reveal the orange clay underneath.
Natural Greenery Trick
To get real moss growing on the clay quickly, blend a handful of living moss with buttermilk in a blender and paint the slurry onto the shaded side of the pot.
Step 3: Adding Biological Texture
-
The yogurt technique:
Mix a cup of plain yogurt with a small amount of garden soil or crushed moss. This creates a bio-active paste that encourages natural aging. -
Strategic application:
Brush this yogurt mixture spotarily onto the pot, particularly near the base and under the rim where moisture would naturally collect. -
Curing period:
Ideally, place the pot in a shady, damp corner of your garden for a week. The yogurt enzymes will interact with the clay and lime to create a fascinating, crusty texture. -
Sealing the look:
If you want to freeze the look exactly as it is (and stop moss growth), spray the exterior with a matte clear acrylic sealer. If you want it to keep evolving, skip this step.
Preventing Frost Cracks
Terracotta is prone to cracking in freezes. Ensure perfect drainage by elevating the pot on ‘pot feet’ or flat stones so the drainage hole never sits flush against the ground.
Step 4: Planting and Staging
-
Internal drainage:
Fill the bottom third of the urn with gravel or crushed stone. This is crucial for large vessels to prevent the soil from becoming waterlogged. -
Insert the liner:
For easier maintenance, place a plastic liner pot inside the neck of the urn if the opening allows. This keeps the urn lighter and prevents root expansion from cracking the clay. -
Planting the tree:
Plant your olive tree or topiary into the pot using a high-quality potting mix. Ensure the root flare is level with the soil surface. -
Positioning:
Move the heavy pot into its final position on your patio or gravel path. I suggest doing this with a dolly or a friend to save your back. -
Final wipe:
Give the rim one last gentle wipe with a dry cloth to clean off any potting soil dust, ensuring the weathered white finish is the star of the show.
Enjoy the timeless elegance this weathered vessel brings to your outdoor sanctuary


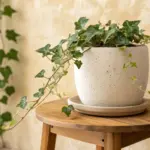
Matching Pots and Saucers for Clean Lines
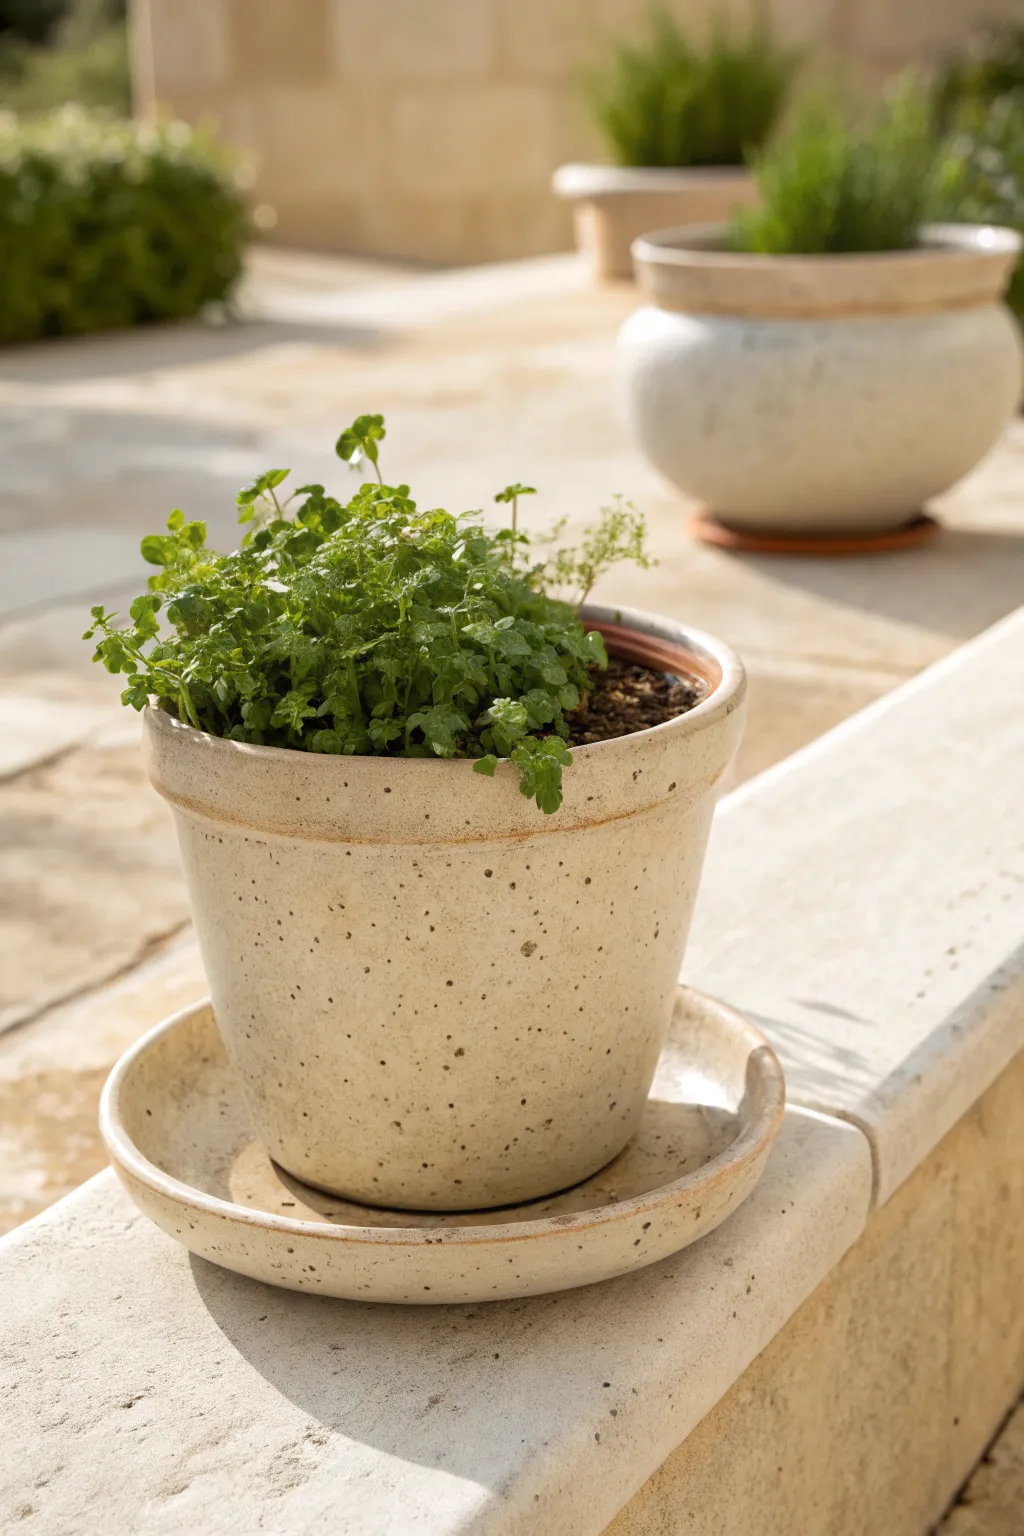
Recreate the look of high-end stoneware by transforming a plain terracotta pot and saucer into a unified, speckled cream masterpiece. This finish mimics the texture of kiln-fired pottery for a clean, cohesive garden display.
Step-by-Step Tutorial
Materials
- Standard terracotta pot (6-inch)
- Matching terracotta saucer
- Cream or off-white acrylic craft paint (matte)
- Black or dark brown acrylic paint
- Water-based polyurethane sealer (matte finish)
- Foam sponge brush
- Small stiff-bristled brush or old toothbrush
- Sandpaper (medium grit)
- Potting soil mix
- Small herb plant (creeping thyme or similar)
Step 1: Base Preparation
-
Clean the surfaces:
Before painting, ensure your terracotta pot and saucer are completely clean and dry. If you are reusing old pots, scrub them thoroughly to remove any soil residue or mineral deposits. -
Sand for texture:
Lightly sand the exterior of the pot and the saucer with medium-grit sandpaper to smooth out any large imperfections, but don’t polish it too much; a little roughness helps the paint adhere and mimics natural stone. -
Apply the first coat:
Using a foam sponge brush, apply a generous layer of cream acrylic paint to the entire exterior of the pot and the visible surfaces of the saucer. I like to paint about an inch down the inside rim of the pot as well. -
Let it dry:
Allow this initial base coat to dry completely, which usually takes about 20 to 30 minutes depending on humidity. -
Add a second coat:
Apply a second layer of cream paint to ensure full coverage so the orange terracotta doesn’t peek through, keeping your brush strokes horizontal for a uniform look.
Natural Texture
Mix a teaspoon of baking soda into your cream base paint. This adds a gritty, realistic stoneware texture that feels rough to the touch.
Step 2: Creating the Stone Effect
-
Prepare the speckle mix:
Squeeze a small amount of black or dark brown paint onto a palette or paper plate. Add a tiny drop of water to thin it slightly, making it easier to flick. -
Load the tool:
Dip just the tips of your stiff-bristled brush or old toothbrush into the thinned dark paint. Test the consistency on a scrap piece of paper first. -
Apply the speckles:
Hold the brush near the pot and run your thumb across the bristles to flick tiny droplets of paint onto the cream surface. Move around the pot to ensure even distribution. -
Vary the density:
Create a natural look by clustering speckles slightly more densely near the base of the pot and the rim, leaving the middle section a bit more sparse. -
Speckle the saucer:
Repeat the flicking process on the saucer, ensuring the density matches the pot for a perfect pairing. -
Correct mistakes:
If you get a blob that is too large, quickly blot it gently with a paper towel or wait for it to dry and dab a little cream paint over it to conceal it.
Custom Glaze Look
After speckling, apply a high-gloss spray sealer just on the top rim. This creates a faux ‘dip-glazed’ ceramic pottery effect.
Step 3: Sealing and Planting
-
Dry thoroughly:
Let the speckled paint dry completely for at least an hour to prevent smearing during the sealing process. -
Apply sealer:
Brush on a coat of matte water-based polyurethane sealer over all painted areas. This protects the finish from water damage and UV fading outdoors. -
Protect the rim:
Pay special attention to the rim and the saucer, as these areas will have the most contact with water and soil. -
Prepare for planting:
Once the sealer is cured (check the bottle for specific times), fill the bottom inch of the pot with your potting soil mix. -
Insert the plant:
Gently remove your herb from its nursery container, loosen the roots slightly, and place it into the new pot. -
Top up soil:
Fill the gaps around the root ball with more soil, pressing down gently to remove air pockets, leaving about half an inch of space at the top for watering. -
Water and place:
Give the plant a light initial watering to settle the soil, then place the pot onto its matching saucer in a sunny spot.
Now you have a chic, coordinated planter set that looks like expensive ceramic but costs a fraction of the price


Herb Pot Cluster by the Kitchen Door

Transform mismatched or plain terracotta pots into a cohesive, charming country-style herb garden right at your kitchen door. By mixing raw textures with soft, matte paints, create a welcoming vignette perfect for fresh culinary clippings.
Detailed Instructions
Materials
- Three terracotta pots (varying heights, preferably with horizontal rim ridges)
- Acrylic craft paint or chalk paint (Teal/Sage Green)
- Acrylic craft paint or chalk paint (Dusty Pink/Terracotta)
- Acrylic craft paint or chalk paint (Cream/Off-White)
- A small piece of cardstock or heavy kraft paper
- Fine jute twine
- Black fine-liner pen
- Potting soil mixed with grit
- Three herb plants (examples: Lemon Verbena, Rosemary, Winter Savory)
- Medium flat paintbrush
- Small detail paintbrush
- Painter’s tape (optional)
- Clear matte sealer spray
Step 1: Prepping and Painting
-
Clean the surfaces:
Begin by thoroughly cleaning your terracotta pots. If they are reused, scrub off any old soil or salt deposits with a stiff brush and water. Let them dry completely, as terracotta is porous and holds moisture that can affect paint adhesion. -
Paint the teal pot:
Select your tallest pot for the teal design. Using a medium flat brush, apply a coat of teal or sage green chalk paint over the entire exterior. I like to brush horizontally to follow the natural ridges of the pot. -
Add a second coat:
Once the first coat is dry to the touch, apply a second coat for solid opacity. Ensure you paint just over the inner rim so the terracotta doesn’t show when filled with soil. -
Prepare the two-tone pot:
For the smallest pot, we are creating a dipped look. You can use painter’s tape to mark a line about two inches below the rim, or go freehand for a more organic, rustic feel. -
Paint the base border:
Paint the bottom section of this smallest pot with your dusty pink or dark terracotta color. Leave the top rim section bare for now. -
Paint the cream rim:
Using a clean brush, paint the upper rim section with cream or off-white paint. Carefully meet the pink line. If they overlap slightly, it adds to the hand-crafted charm. -
Distress (Optional):
If you want a weather-worn look, lightly sand the painted ridges of both pots with fine-grit sandpaper once fully dry to reveal hints of the raw clay underneath. -
Leave one natural:
Take the medium-sized pot and leave it completely unpainted. This raw terracotta grounds the color palette and provides warmth to the trio. -
Seal the pots:
Spray the exteriors of the painted pots with a clear matte sealer. This protects the finish from water stains when you water your herbs.
Paint Choice
Use outdoor-rated acrylic patio paint if these will be fully exposed to rain, rather than standard indoor craft paint.
Step 2: Planting the Herbs
-
Prepare the drainage:
Place a few shards of broken poetry or large stones over the drainage holes at the bottom of each pot to prevent clogging. -
Fill with soil:
Fill the pots about halfway with a gritty potting mix suitable for Mediterranean herbs. Good drainage is key for plants like rosemary. -
Plant the Rosemary:
Place the rosemary plant into the medium, unpainted terracotta pot. Backfill with soil, firming it gently around the base of the stem. -
Plant the Leafy Herb:
In the teal pot, plant your taller, leafy herb, such as lemon verbena or mint. Add soil until it sits about an inch below the rim. -
Plant the Low Herb:
Plant the low-growing herb, like savory or creeping thyme, into the small two-toned pot. It should look full and slightly overflow the edges.
Step 3: Finishing Touches
-
Create the tag template:
Cut a small rectangle from your cardstock or kraft paper, approximately 1 inch by 2 inches. Snip the top two corners at an angle to create a traditional tag shape. -
Punch a hole:
Use a hole punch or a sharp skewer to create a small hole at the top center of the tag. -
Write the label:
With a fine black pen, write the name of the herb (e.g., ‘SAVORY’ or ‘THYME’) on the tag. A slightly messy, handwritten font looks best here. -
Attach the tag:
Cut a short length of jute twine. Thread it through the tag and tie it loosely around a sturdy stem of the herb in the small pot, letting the tag hang over the cream rim. -
Arrange the scene:
Place the pots in a cluster near your door or on a step. Keep the tallest pot at the back, the medium one slightly forward, and the smallest one in the front for visual balance.
Level Up: Saucers
Paint matching terracotta saucers for each pot using the same colors to protect your flooring from water runoff.
Now you have a practical and pretty corner garden ready for your next recipe

The Complete Guide to Pottery Troubleshooting
Uncover the most common ceramic mistakes—from cracking clay to failed glazes—and learn how to fix them fast.
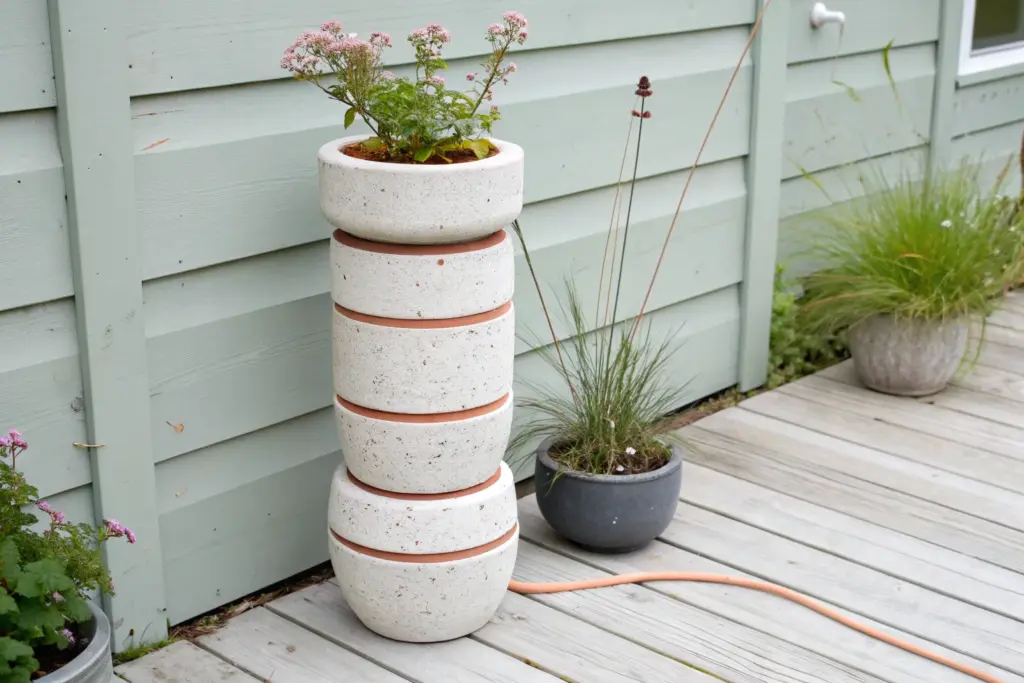
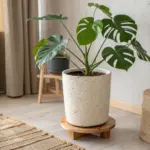
Tall Cylinder Planters for Height

Achieve elegant verticality in your garden space by creating a custom-finished tall cylinder planter. This project mimics the warm, earthy tones of traditional terracotta while providing a structured, modern home for a statement olive tree.
How-To Guide
Materials
- Large, tall cylindrical planter (fiberstone, concrete, or heavy plastic)
- Terracotta or clay-colored exterior latex paint
- White exterior latex paint (for washing)
- Medium-grit sandpaper
- Clean rags or sponge
- Paintbrush (wide bristle)
- Potting soil mix (well-draining)
- Perlite or gravel for drainage
- Olive tree sapling (or similar standard tree)
- Pot feet or risers (optional)
Step 1: Preparing the Vessel
-
Clean surface:
Begin by thoroughly cleaning your base planter to remove any dust, oils, or manufacturing residue. If the surface is very glossy, scuff it lightly with sandpaper to help the paint adhere. -
Base coat application:
Apply the primary terracotta-colored exterior paint. Use long, horizontal strokes to mimic the turning lines of a wheel-thrown pot. -
Second coat:
Once the first coat is dry to the touch, apply a second layer for full opacity. I like to keep the brush strokes visible here to add texture. -
Create the wash:
Mix a small amount of white paint with water (about 1 part paint to 4 parts water) to create a milky, translucent whitewash. -
Apply the patina:
Dip a rag or sponge into the whitewash and wipe it horizontally across the dried terracotta base. Focus on the center band of the pot to create that sun-bleached, aged look. -
Blend the finish:
Before the wash dries, use a clean, dry cloth to wipe away excess paint, leaving behind subtle streaks that simulate salt blooming on clay.
Step 2: Planting and Styling
-
Drainage layer:
Fill the bottom 2-3 inches of the planter with gravel or large stones to ensure water doesn’t pool at the roots, which is crucial for olive trees. -
Soil preparation:
Mix high-quality potting soil with perlite or coarse sand. Olive trees prefer soil that is not too dense or moisture-retentive. -
Filling the base:
Add soil to the planter until the level is appropriate for the root ball of your tree. Measure by placing the pot inside temporarily. -
Positioning the tree:
Remove the tree from its nursery pot and gently loosen the roots. Place it centrally in your new planter, ensuring the trunk stands perfectly straight. -
Backfilling:
Fill the remaining space around the root ball with your soil mix, pressing down firmly but gently to eliminate air pockets. -
Top dressing:
Leave about 1-2 inches of space at the top of the rim for watering. The soil surface should look dark and rich against the terracotta rim. -
Initial watering:
Water the tree thoroughly until you see water just starting to exit the drainage holes. -
Placement:
Position the finished planter against a white or light-colored wall to make the foliage pop, just like in the inspiration photo.
Weathering Hack
To add authentic age, rub a little garden soil or dark wax into the dried whitewash grooves. It instantly makes new paint look centuries old.
Enhance the Look
Add ‘pot feet’ under the cylinder. This improves drainage airflow and adds a subtle floating effect that looks very high-end.
Now you have a stunning architectural element that brings Mediterranean warmth to your patio year-round
Hanging Ceramic Pots on a Porch Beam
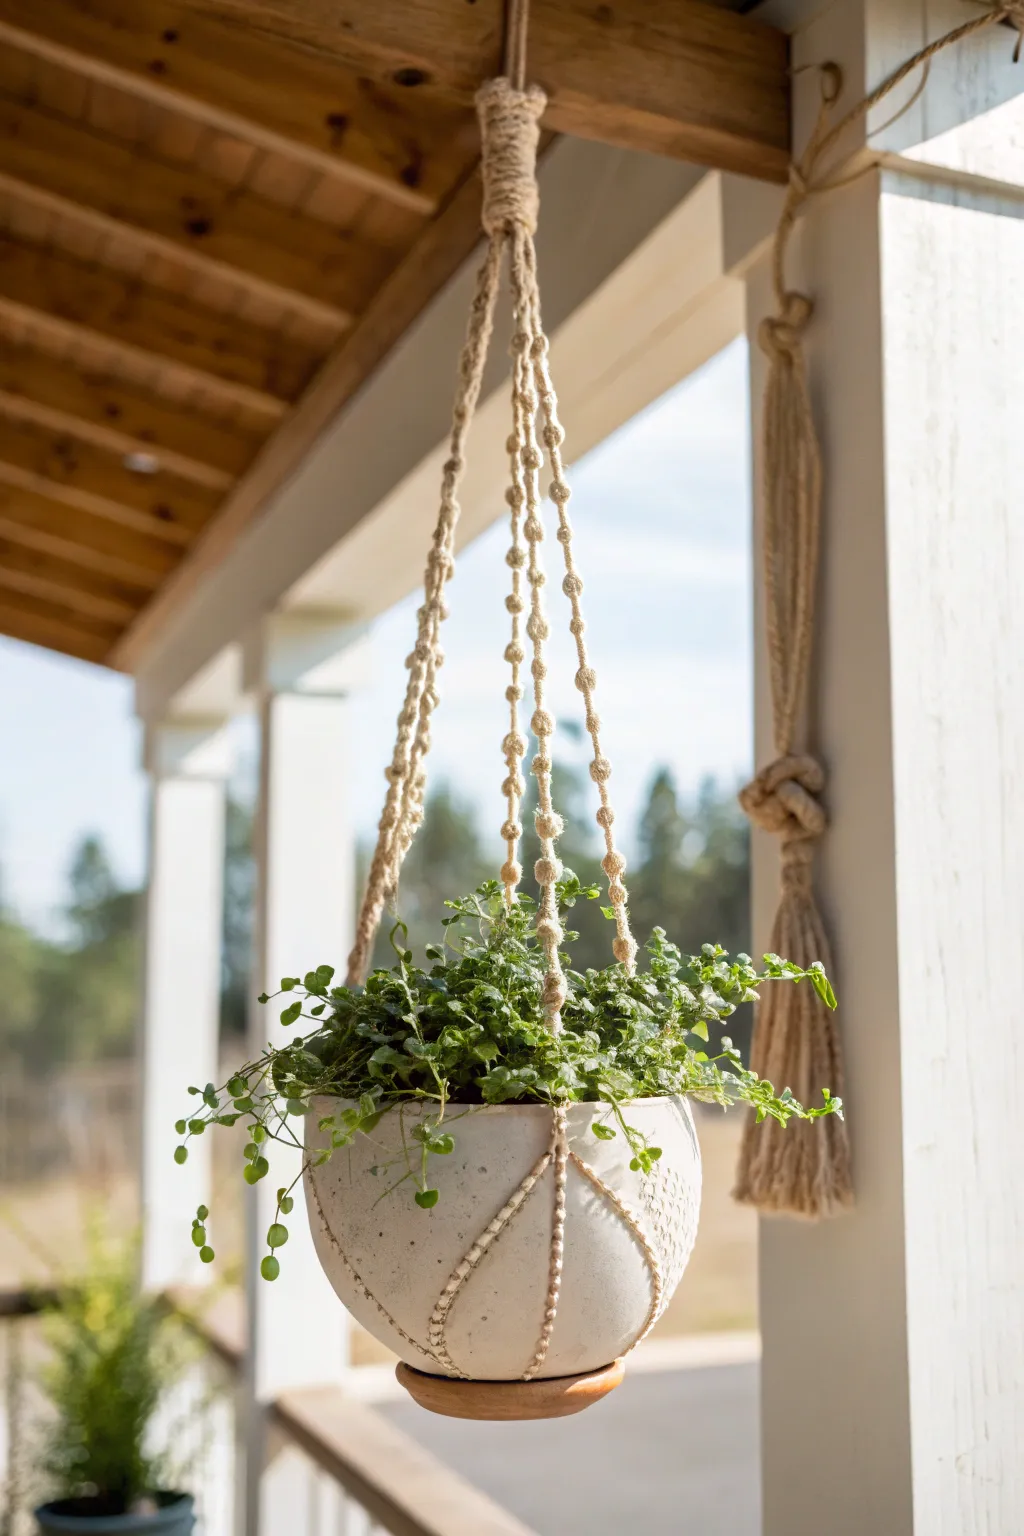
Elevate your porch decor with this charming suspended planter that combines rustic jute textures with sleek ceramic pottery. This project creates a sturdy yet delicate-looking cradle for your favorite trailing vines, bringing height and life to outdoor spaces.
Step-by-Step Tutorial
Materials
- Round, textured white ceramic planter (approx. 8-10 inches)
- Wooden saucer or coaster (sized to match pot base)
- Natural jute twine (medium thickness)
- Wooden ring (2-inch diameter)
- Strong outdoor craft glue (e.g., E6000)
- Scissors
- Measuring tape
- S-hook for hanging
- Potted trailing plant (like Creeping Jenny or String of Pearls)
Step 1: Planning the Structure
-
Prepare the connection point:
Begin by selecting a sturdy wooden ring. This will act as the primary anchor point from which the entire planter will suspend, so ensure it is free of cracks. -
Measure the jute lengths:
Cut four equal lengths of jute twine. For a standard porch height, I usually measure these out to about 8 feet each to allow plenty of room for knotting and draping. -
Attach to the ring:
Fold all four strands in half to find their center loops. Pass these loops through the wooden ring, then pull the loose ends through the loops to create a tight Lark’s Head knot. -
Secure the top wrap:
To create the sleek, wrapped neck seen in the image, take a separate 2-foot piece of jute. Place one end vertically against the main ropes, wrap the long end tightly around the bundle for about 3 inches, and tuck the end back under the wrap to secure it.
Uneven Hanging?
If the pot tilts, your knots might be misaligned. Don’t retie everything! Instead, gently tug the fabric of the individual jute strands on the ‘high’ side to stretch them slightly until level.
Step 2: Creating the Knotted Hanger
-
Separate the strands:
You now have eight strands hanging down. Separate them into four groups of two strands each. These pairs will form the four arms of your hanger. -
The first knot series:
On the first pair of strands, tie simple overhand knots every 2 inches. Repeat this down the length of the rope for about 18 inches. This creates the decorative ‘beaded’ look without using actual beads. -
Repeat for all arms:
Do exactly the same knotting pattern for the other three pairs. Try to keep the knots aligned horizontally across all four arms so the pot hangs straight later. -
Check the length:
Hold the hanger up to your porch beam. Ensure the knotted section ends just above where you want the rim of the pot to sit.
Add Rustic Beads
Slide large wooden beads onto the distinct rope arms in between your overhand knots. This breaks up the visual line and complements the wooden saucer at the base.
Step 3: Preparing the Pottery
-
Attach the base:
Flip your ceramic pot over. Apply a generous amount of strong outdoor craft glue to the bottom of the wooden saucer, then center it on the base of the pot. Press firmly and let it cure fully according to the glue instructions. -
Why add the wood?:
This wooden accent not only adds a aesthetic warmth but creates a lip that helps secure the bottom holding ropes, preventing them from slipping off the rounded ceramic bottom. -
Pot your plant:
Once the glue is dry, plant your greenery into the pot. Doing this before putting it in the hanger is much easier than trying to wrestle soil into a swinging target.
Step 4: Assembly and Hanging
-
Form the basket:
Below your decorative knots, separate the strands again. This time, take one strand from a pair and knot it with a strand from the neighboring pair about 3 inches down. This creates a net shape. -
Create the cradle:
Repeat this ‘neighbor-swapping’ knotting process for one or two more rows, creating a diamond pattern that will cup the pot securely. -
Final gathering knot:
Gather all strands together at the bottom center. Tie a massive, tight overhand knot. This is the seat your pot will rest on. -
Insert the pot:
Gently spread the jute arms and slide your planted pot into the cradle. Adjust the strands so they sit evenly between the texture on the ceramic surface. -
Level everything:
Lift the planter by the ring. If it tilts, slide the pot within the netting until it sits perfectly level on that bottom knot. -
Hang it up:
Use an S-hook to suspend the wooden ring from a sturdy eye-hook or beam on your porch.
Step back and enjoy the breezy elegance your new hanging garden brings to the porch space


What Really Happens Inside the Kiln
Learn how time and temperature work together inside the kiln to transform clay into durable ceramic.
Wall-Mounted Pottery Pocket Planters
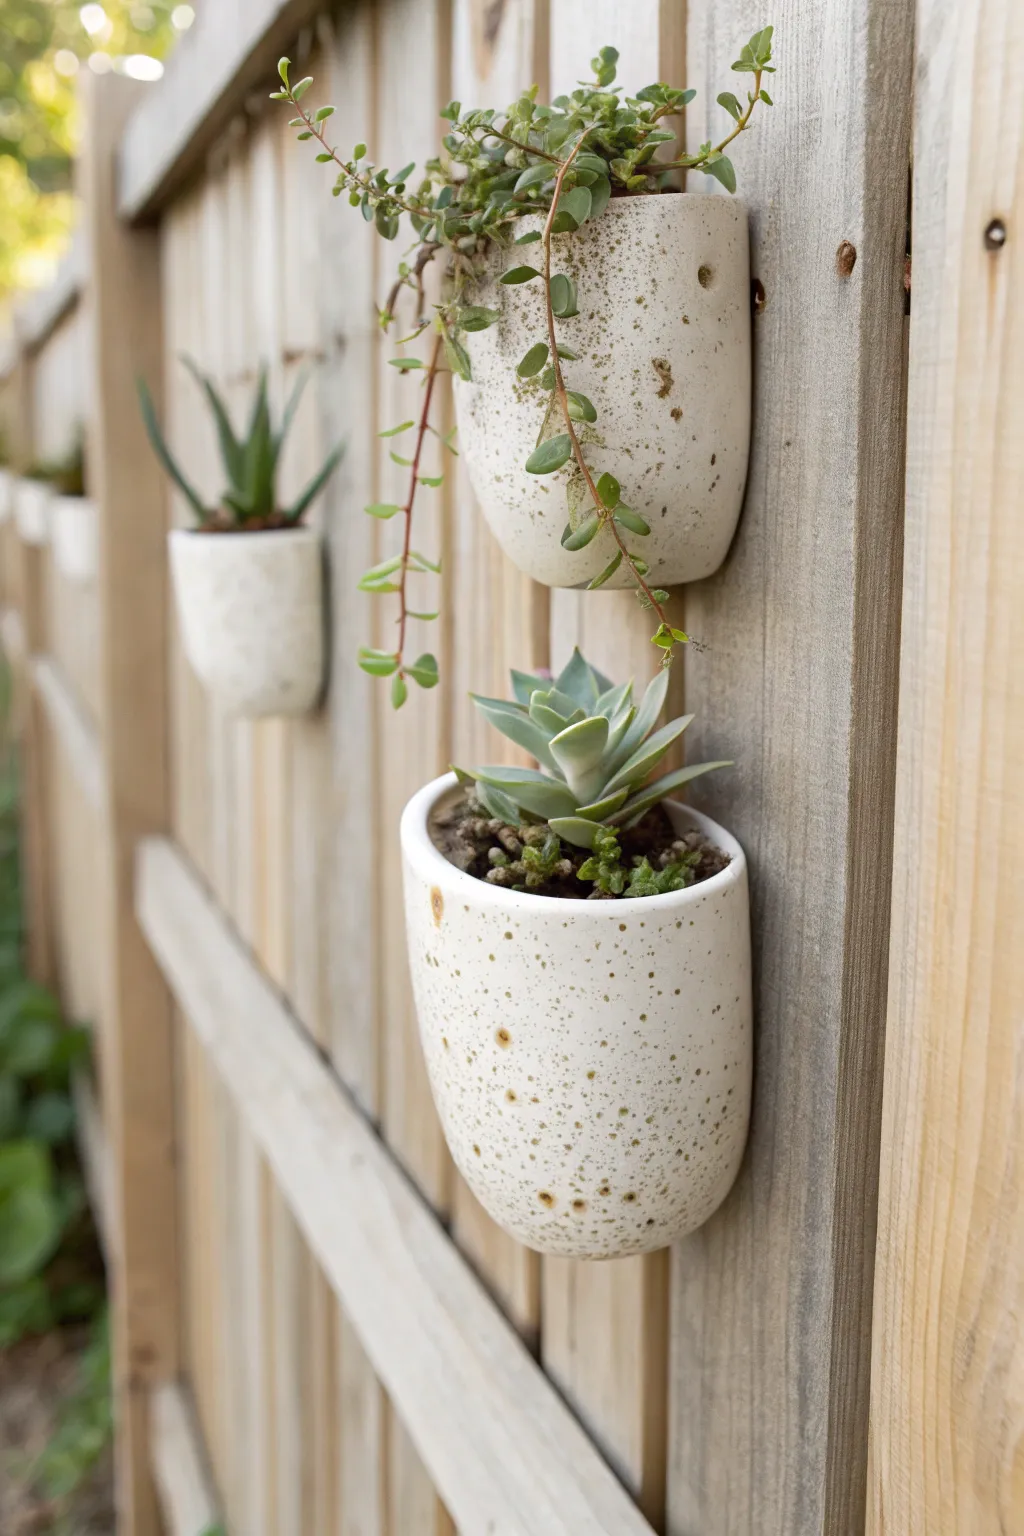
Bring your garden vertical with these handmade ceramic wall pockets, featuring a soft organic shape and a charming speckled glaze finish. Even if you don’t have a wheel, these can be easily hand-built using slab techniques for a rustic, modern look.
Step-by-Step
Materials
- White stoneware clay with grog
- Rolling pin
- Canvas mat or slab roller
- Paper template (semi-circle shape)
- Needle tool
- Scoring tool or fork
- Slip (clay and water mixture)
- Sponge
- Smoothing rib (wood or rubber)
- Small circle cutter (for hanging hole)
- Speckled white glaze
- Kiln access
- Succulent potting mix
- Mounting screws (outdoor rated)
Step 1: Forming the Pocket
-
Prepare the Clay:
Begin by wedging your white stoneware clay thoroughly to remove air bubbles. This ensures your planters won’t crack during firing. -
Roll the Slab:
Roll out a slab of clay on your canvas mat to a consistent thickness of about 1/4 inch. I find using wooden guide strips on either side helps keep it perfectly even. -
Cut the Shapes:
Using a needle tool and a paper template, cut out a large semi-circle (like a taco shape) for the main body and a smaller semi-circle for the back panel. -
Texture the Surface:
If you want extra texture before assembling, gently press a rough sponge or fabric onto the clay surface now while it is flat. -
Curve the Body:
Gently curve the larger slab piece to form the U-shaped pocket front. Check that the edges align with your back panel piece. -
Score the Edges:
Use your scoring tool to scratch up the contact points: the curved edge of the back panel and the side edges of the front pocket piece. -
Apply Slip and Join:
Generously apply slip to the scored areas. Press the pieces together firmly, ensuring a strong bond along the entire seam. -
Reinforce the Seam:
Roll a very thin coil of clay and press it into the interior seam where the pieces join. Smooth this out with your finger or a modeling tool for extra durability.
Slumping Planters?
If the clay is too soft and the pocket collapses, stuff the inside with crumpled newspaper creating a temporary support form until the clay stiffens.
Step 2: Refining and Finishing
-
Smooth the Outside:
Use a wooden rib or damp sponge to smooth the exterior seam where the two slabs meet, blending them until the join is invisible. -
Shape the Rim:
Run a damp sponge or a chamois cloth along the top rim of the planter to round off any sharp edges. -
Create the Hanging Hole:
Use a small circle cutter to punch a hole in the back panel near the top center. Make it slightly larger than your screw head to account for clay shrinkage. -
Dry Slowly:
Let the planters dry slowly under loose plastic for the first day, then uncover them to dry completely to the bone-dry stage. This prevents warping. -
Bisque Fire:
Load the bone-dry pieces into the kiln for a bisque firing to roughly cone 04. -
Glaze Application:
Dip or brush your speckled white glaze onto the bisque-fired planter. Wipe the bottom clean or use kiln stilts to prevent sticking. -
Final Firing:
Fire the glazed pieces again to the temperature recommended for your specific clay and glaze body (usually cone 5 or 6 for stoneware). -
Plant and Mount:
Once cool, fill the pockets with succulent soil and your chosen plants. Mount them to your fence or wall using outdoor-rated screws through the pre-cut hole.
Glazing Trick
To get that speckled look without special glaze, mix plain white glaze with a tiny pinch of granular ilmenite material.
Enjoy the clean, modern touch these handmade pockets add to your outdoor space
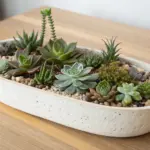
Rectangular Ceramic Trough Succulent Garden
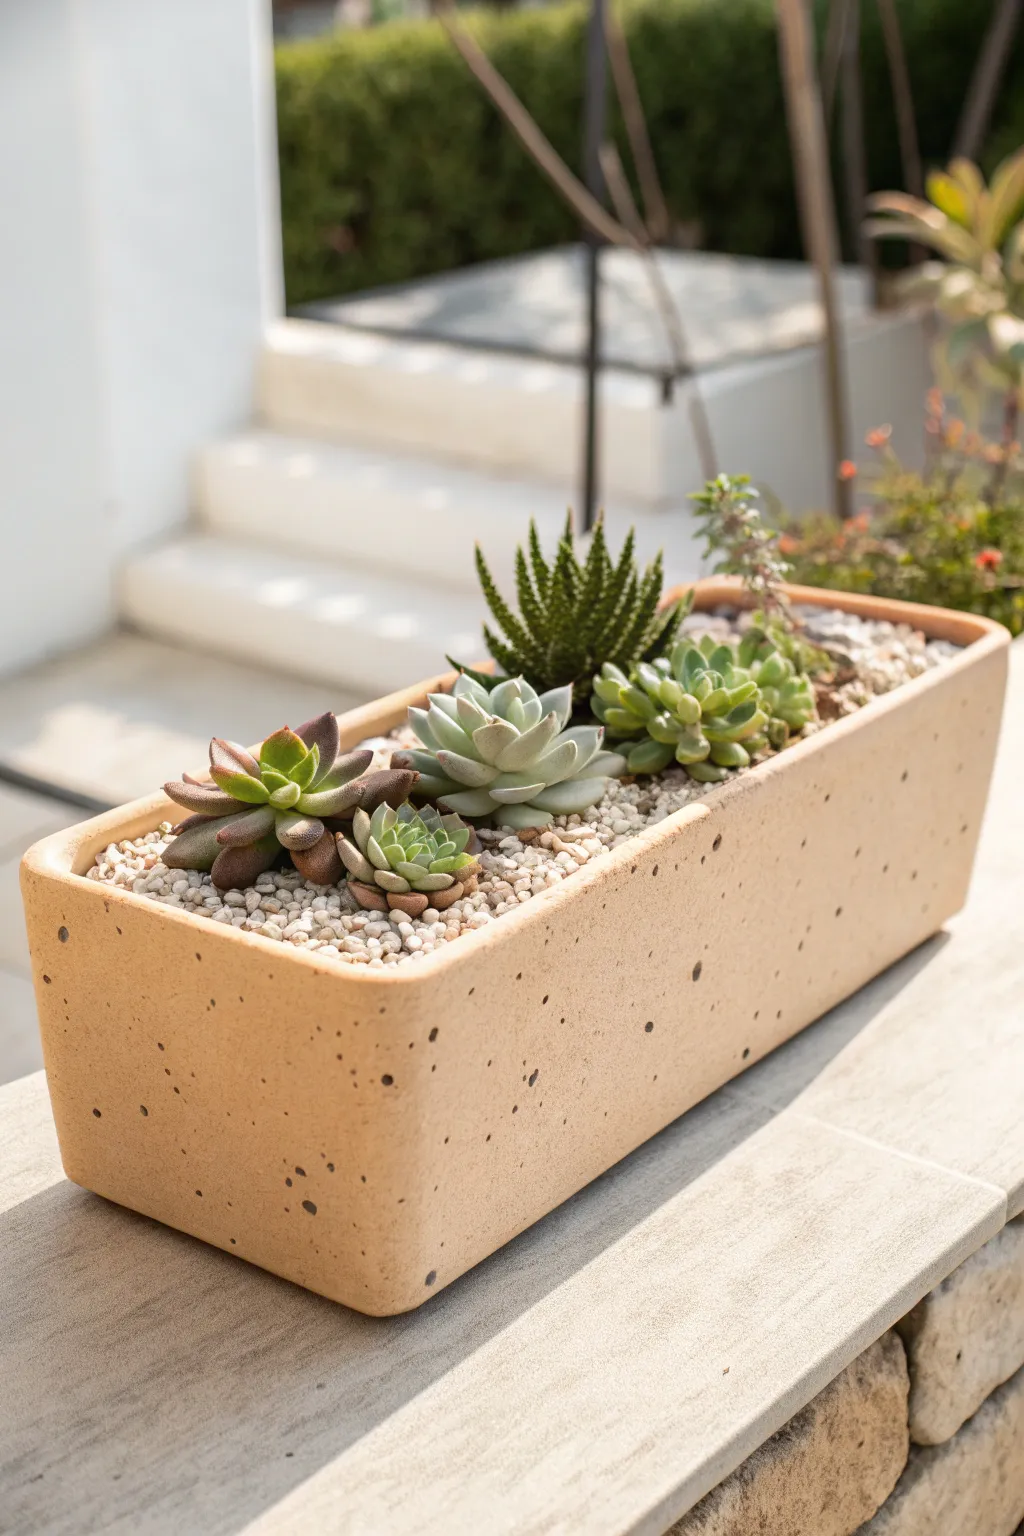
Bring a touch of modern desert elegance to your patio with this speckled rectangular planter arrangement. This low-maintenance project combines the clean lines of a ceramic trough with the textural variety of rosette and structural succulents for a balanced, architectural look.
Step-by-Step Guide
Materials
- Rectangular ceramic trough planter (beige/tan with speckles)
- Succulent and cactus potting mix
- Small white/beige decorative pebbles or gravel (top dressing)
- Small piece of mesh screen (for drainage holes)
- Haworthia fasciata (Zebra Plant)
- Echeveria ‘Lola’ or similar pale rosette succulent
- Echeveria purpusorum or similar dark-leafed succulent
- Sempervivum (Hens and Chicks)
- Small trailing Sedum variety
- Garden trowel or scoop
- Soft paintbrush (for cleaning leaves)
- Long tweezers (optional but helpful)
Step 1: Preparing the Vessel
-
Check drainage:
Examine your rectangular planter to ensure it has adequate drainage holes at the bottom. Succulents hate standing water, so if the pot lacks holes, you will need to drill one or two carefully. -
Screen the holes:
Cut small squares of mesh screen and place them over the drainage holes inside the pot. This keeps your soil in the planter while allowing excess water to flow out freely. -
Add the base layer:
Fill the bottom third of the trough with your specialized succulent potting mix. I like to lightly pat this layer down to create a stable base, but avoid packing it too tightly.
Step 2: Arranging the Plants
-
Plan your layout:
Before removing plants from their nursery pots, arrange them inside the trough to test the spacing. Place the tallest plant, likely the Haworthia, slightly off-center to create a focal point. -
Prepare the Haworthia:
Gently remove the Haworthia from its nursery pot. Massage the root ball delicately to loosen the tight roots and shake off excess old soil. -
Plant the anchor:
Place the Haworthia into the trough, ensuring the base of the plant sits about half an inch below the rim of the pot. Backfill with a little soil to hold it upright. -
Add the rosette centerpiece:
Take your pale Echeveria rosette and nestle it next to the Haworthia. The contrast between the spiky vertical leaves and the soft, flower-like rosette is key to this look. -
Incorporate color contrast:
Position the darker Echeveria or reddish-tinged succulent on the opposite side. This balances the visual weight across the length of the container. -
Fill the gaps:
Tuck the smaller Sempervivum and trailing Sedum into the remaining spaces. Don’t worry if it looks a bit sparse right now; these plants will grow to fill the rectangle.
Loose Leaf Fix
If a lower leaf pops off during planting, don’t throw it away. Let the end dry for a few days, then place it on top of soil to propagate a brand new baby succulent.
Step 3: Finishing Touches
-
Top off soil:
Use your trowel or a small scoop to fill the remaining voids with potting mix, bringing the soil level just up to the base of the plant necks. -
Secure the plants:
Gently press the soil down around the base of each succulent to eliminate large air pockets and ensure the roots make good contact. -
Apply top dressing:
Scoop the small beige pebbles onto the surface of the soil. Aim for a layer about half an inch thick to completely hide the dirt below. -
Detail work:
Use a spoon or your fingers to push the pebbles gently under the leaves of the rosettes. This keeps the leaves off the damp soil, preventing rot. -
Clean up:
Take a soft, dry paintbrush and dust off any soil or stray pebbles that may have gotten stuck in the crevices of the succulent leaves. -
First watering:
Wait about a week before watering to allow any broken roots to callus over. When you do water, soak the soil thoroughly until water runs out the bottom.
Sun Stressing
To get more vibrant reds and purples in your succulents, slowly acclimate the planter to more direct sunlight. The UV exposure brings out ‘sun stress’ colors.
Place your finished trough in a sunny spot and enjoy the serene, modern vibe it brings to your space

TRACK YOUR CERAMIC JOURNEY
Capture glaze tests, firing details, and creative progress—all in one simple printable. Make your projects easier to repeat and improve.
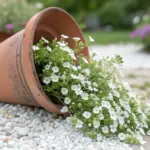
Spilled Pot “River” Flowerbed
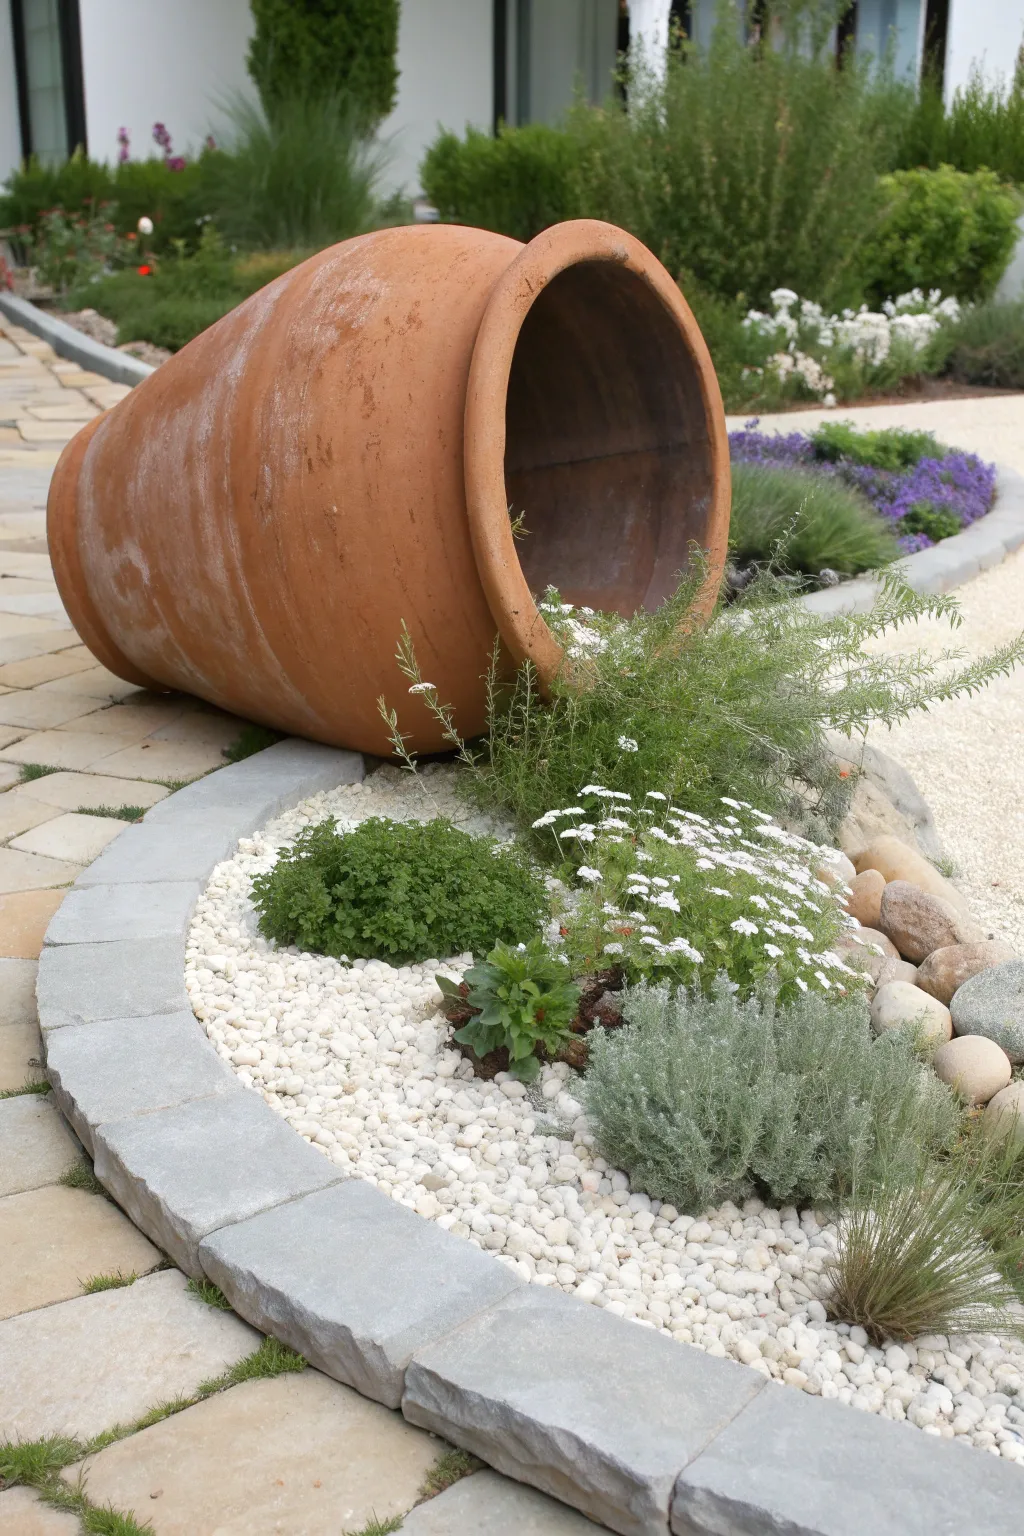
Transform a large terracotta vessel into a dynamic garden feature that creates the whimsical illusion of flowers spilling onto a river of white stones. This landscape project combines rustic pottery with soft greenery and structured hardscaping to bring artistic movement to a corner of your yard.
Detailed Instructions
Materials
- Large terracotta amphora or planter (2-3 feet tall)
- White rounded landscape pebbles (river rock style)
- Curved stone or concrete edging pavers
- Landscape fabric (weed barrier)
- Topsoil and compost mix
- River rocks (medium to large sizes)
- Assorted plants: Creeping thyme, white yarrow, green santolina, lavender
- Shovel and trowel
- Rubber mallet
- Sand (for leveling pavers)
Step 1: Preparing the Hardscape
-
Outline the bed shape:
Mark a curved perimeter on the ground where you want your new flowerbed to be. The shape should resemble a sweeping crescent or a large kidney bean to mimic a pooling liquid effect. -
Dig the trench:
Along your marked line, dig a trench about 4 inches deep and slightly wider than your edging pavers. Remove sod and level the bottom of the trench. -
Add leveling sand:
Pour a 1-inch layer of sand into the trench. This provides a stable base that prevents the stones from shifting over time. -
Install the edging:
Place your curved concrete edging pavers into the trench. Use a rubber mallet to tap them level and ensure they sit snugly against one another to form a clean, continuous border.
Anchor It Down
Terracotta is heavy but round. Wedge two large, unseen rocks on either side of the pot’s belly beneath the soil level to act as chocks and prevent it from rolling during high winds.
Step 2: Positioning the Pot and Soil
-
Prepare the base area:
Clear the grass and soil from inside the bordered area to a depth of about 2-3 inches. Lay down landscape fabric across the entire interior space to suppress weeds. -
Situate the container:
Dig a slight depression into the soil at the back, higher end of the bed. Place your large terracotta pot on its side here. I find digging it in just a few inches helps stabilize it and makes it look like it has been there for years. -
Fill the pot partially:
Pack soil tightly inside the bottom half of the sideways pot. This adds weight to prevent rolling and provides a rooting medium for the plants that will sit right at the mouth. -
Create planting pockets:
Cut X-shaped slits into the landscape fabric where you intend to place your plants. Focus on areas near the mouth of the pot and in small clusters downstream. -
Mound the soil:
Add rich soil around the mouth of the pot and under the slits you cut, creating a raised effect that makes the plants look like they are tumbling out.
Step 3: Planting the Flow
-
Plant the ‘spill’:
Plant taller, wispier plants like white yarrow or rosemary directly inside the lower lip of the pot and immediately in front of it to create the initial burst of the spill. -
Add texture mid-stream:
Place mound-forming plants like green santolina or small lavender bushes a foot or two away from the pot mouth to create islands of greenery. -
Ground the composition:
Tuck low-growing creeping thyme or sedum near the front edge of the border. Ensure all plants are watered thoroughly immediately after planting.
Nighttime Glow
Tuck a small, waterproof solar spotlight deep inside the pot, aiming outward. At night, the light will cast a glow that silhouettes the spilling plants.
Step 4: Adding the Pebble River
-
Layer the white stones:
Pour the white landscape pebbles over the remaining exposed landscape fabric. Spread them evenly, ensuring the black fabric is completely hidden. -
Create the spill effect:
Carefully pile extra white pebbles inside the pot’s mouth, tapering them out to merge with the main river. This continuity is key to the ‘spilled’ illusion. -
Place accent rocks:
Nestle a few medium-sized natural river rocks along the right side of the bed, burying the bottom third of each rock so they look naturally embedded rather than just sitting on top. -
Clean the edges:
Brush any loose soil off your edging pavers and use a hose to perform a final rinse of the white stones, making them sparkle against the greenery.
Step back and enjoy the serene, flowing movement this unique garden feature brings to your landscape
Whimsical Face Planters in Garden Nooks
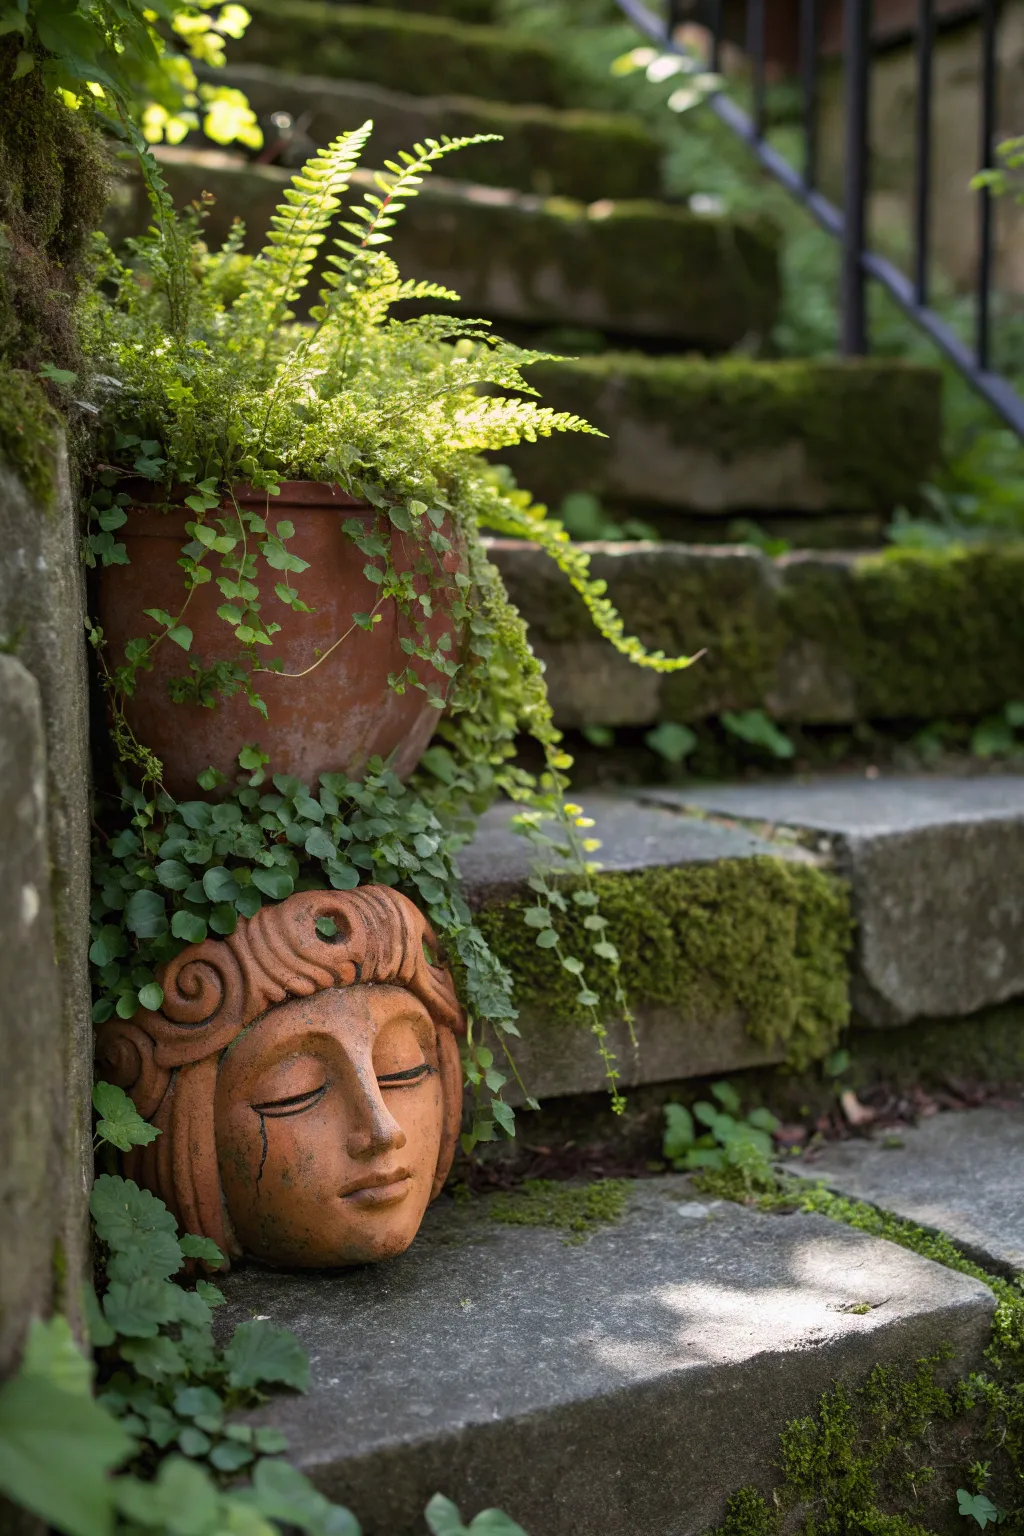
Transform a quiet garden corner into a meditative sanctuary with this vertical planter arrangement. By stacking a detailed terracotta face sculpture beneath a lushly planted pot, you create the illusion of an ancient, moss-kissed statue crowned with living greenery.
How-To Guide
Materials
- Terracotta face planter or garden head sculpture (flat top essential)
- Standard terracotta pot (sized to match the head’s circumference)
- Strong outdoor construction adhesive (e.g., E6000 or landscape block adhesive)
- Ferns (Boston or Maidenhair)
- Creeping Jenny or Ivy
- Potting soil mix
- landscape fabric or mesh
- Small gravel or pottery shards
- Water spray bottle
- Garden trowel
Step 1: Preparing the Components
-
Select your pieces:
Find a terracotta head sculpture with a sturdy, flat upper rim. The standard pot you choose for the top needs to have a base diameter that is slightly smaller than or equal to the opening of the head sculpture to ensure stability. -
Clean surface areas:
Wipe down the top rim of the head planter and the bottom rim of the standard pot with a damp cloth to remove any dust or moss spores, ensuring a clean bond. -
Test the fit:
Dry stack the pots first to check stability. If the top pot wobbles, you may need to sand down high spots on the clay or choose a different pot. -
Drainage check:
Ensure the bottom face sculpture has drainage holes. If not, carefully drill one using a masonry bit, or plan to use it as a decorative base only (not filled with soil).
Step 2: Assembly and Bonding
-
Apply adhesive:
Apply a generous, continuous bead of outdoor construction adhesive to the top rim of the face sculpture. I like to keep about a half-inch away from the very edge to prevent messy squeeze-out. -
Join the pots:
Center the standard terracotta pot directly onto the adhesive-lined rim. Press down firmly and twist slightly back and forth to seat the glue. -
Clean the seams:
If any glue seeps out, wipe it away immediately with a damp rag or a popsicle stick before it cures. -
Curing time:
Let the stacked structure sit undisturbed for at least 24 hours (or as per adhesive instructions) to reach full strength before moving or filling.
Natural Aging Pro-Tip
Rub the new terracotta with garden soil before applying the yogurt-moss mixture. The dirt settles into the pores and provides an immediate ‘weathered’ base color.
Step 3: Planting the Crown
-
Prepare drainage layer:
Place a small piece of landscape fabric over the hole in the top pot, then add a layer of gravel or pottery shards to prevent clogging. -
Fill with soil:
Add potting mix to the top pot, filling it about two-thirds full. Loosen the soil slightly to prepare for the root balls. -
Position the fern:
Plant your main fern in the center. Tease the roots gently before placing it to encourage outward growth. -
Add trailing elements:
Surround the central fern with creeping ivy or Creeping Jenny. Position these plants near the edges so they will spill over the rim. -
Fill the gaps:
Add more soil around the roots, pressing down gently but firmly to remove air pockets.
Level Up: The Necklace
Instead of gluing, leave a gap between the pots and plant trailing succulents like String of Pearls in the lower head, creating a living ‘necklace’ beneath the main pot.
Step 4: Styling the Nook
-
Positioning the totem:
Place your finished sculpture in a sheltered garden corner, preferably on stone steps or near a wall where moss naturally grows. -
Encouraging moss growth:
To age the terracotta quickly, blend plain yogurt with a handful of moss and paint this mixture onto the face and pot. -
Water and mist:
Water the plants thoroughly. Mist the outside of the terracotta daily if you are trying to encourage the moss patina. -
Adding ground cover:
If there is space around the base of the head, tuck in small plugs of baby’s tears or moss to ground the sculpture into the scenery.
With time and moisture, your new garden guardian will gather moss and character, looking as though she has watched over your steps for decades
Glazed Ceramic Luminary Lanterns
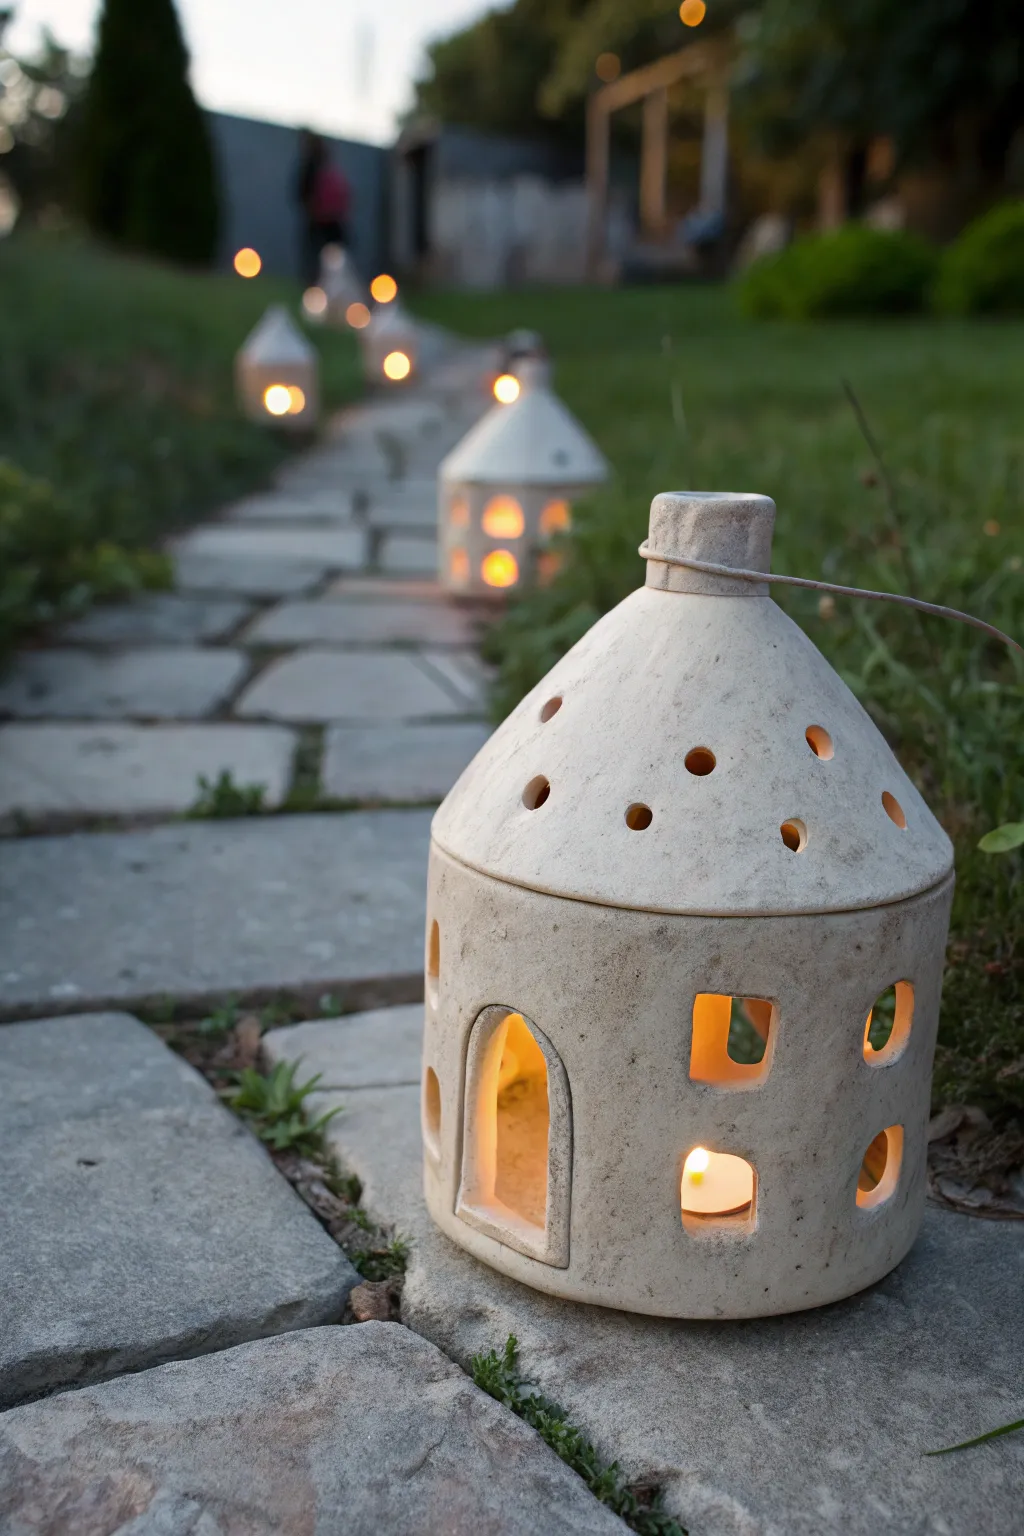
These enchanting house-shaped lanterns add a warm, fairytale glow to any garden path or patio. Crafted from stoneware clay with a rustic, stone-like finish, their cutout windows create inviting silhouettes when lit from within.
Step-by-Step
Materials
- High-groc stoneware clay (buff or white)
- Rolling pin
- Canvas mat or slab roller
- Needle tool
- Fettling knife
- Cardboard or paper templates (roof and body)
- Small circle cutter
- Square or rectangular cutters (optional)
- Slip and scoring tool (or serrated rib)
- Sponges
- Wooden sculpting tool
- Matte stone-texture glaze (or leave bare for firing)
- Tea lights or LED candles
Step 1: Forming the Structure
-
Roll the Slabs:
Begin by rolling out your clay on a canvas mat to a uniform thickness, ideally around 1/4 inch thick. Ensuring even thickness is crucial for structural integrity during firing. -
Cut the Shapes:
Using your predetermined paper templates, cut out one long rectangular strip for the cylindric body and a semicircle-and-cone shape for the roof. A fettling knife works best for clean, sharp edges. -
Form the Body Cylinder:
Stand the rectangular strip on its long edge and curl it into a cylinder. There shouldn’t be corners yet; keep it round like a silo. Overlap the edges slightly. -
Join the Seam:
Score the overlapping edges thoroughly and apply clay slip. Press the seam firmly together, supporting the wall from the inside with your other hand. Smooth the seam inside and out so it effectively disappears. -
Create the Cone Roof:
Take your roof slab and form it into a wide cone shape. It needs to be slightly wider than your cylinder body to create a small overhang. Score and slip this seam just like the body. -
Add the Chimney Detail:
I like to roll a small coil or a tiny cylinder of clay and attach it to the peak of the roof. Not only does this look cute, but it also creates a sturdy loop for a wire handle later.
Step 2: Adding Details and Windows
-
Wait for Leather Hard:
Let both the roof and the body dry to a ‘leather hard’ state. The clay should be firm enough to hold its shape when cut, but still cool to the touch. This prevents the walls from collapsing while you carve. -
Plan the Windows:
Lightly sketch your window and door placement on the cylinder wall with a needle tool. Keep the spacing random for that charming, folk-art aesthetic seen in the photo. -
Cut the Openings:
Use a sharp fettling knife to cut out the arched doorway and rectangular windows. For the round windows on top, a small circle cutter makes consistent holes cleanly. -
Vent the Roof:
Don’t forget to cut small holes in the roof cone as well. These are decorative but also functional, allowing heat from a real candle to escape safely. -
Smooth the Edges:
Take a slightly damp sponge and gently wipe specifically around the cut edges of every window and door. This softens the look and removes any sharp burrs that could snag later. -
Attach Roof to Body (Optional):
You can choose to score and slip the roof permanently to the body, or create a ‘gallery’ rim so the roof sits on top like a lid. For the look in the photo, joining them permanently creates a solid, weather-resistant lantern. -
Add Handle Holes:
If you plan to hang these or want the wire detail shown, pierce horizontal holes through the chimney block or the top section of the roof before the clay dries further.
Clean Cuts Pro-Tip
When cutting windows, wait until the clay is stiff leather-hard. If the clay drags or smears, it’s too wet. Wait an hour and try again for crisp, architectural lines.
Step 3: Finishing and Firing
-
Dry Slowly:
Cover the completed house with plastic loosely, allowing it to dry slowly over several days. Uneven drying forces stresses onto the seams which causes cracks. -
Bisque Fire:
Fire the piece in a kiln to cone 04 (or your clay’s specific bisque temperature). This turns the fragile clay into durable ceramic. -
Glaze Application:
To achieve the stone effect, use a matte, speckled cream or grey glaze. Alternatively, if your clay body is naturally beautiful, you can leave the exterior unglazed and just seal the inside. -
Add the Wire Handle:
Once the final firing is complete and the piece is cool, thread a rustic piece of stiff metal wire through the chimney holes to complete the look. -
Illuminate:
Place a tea light or a weather-resistant LED puck inside the house and set it along your garden path.
Texture All The Way
Before cutting the slabs, roll them onto a piece of coarse fabric or burlap. This imprints a subtle, weathered texture that looks amazing when glaze breaks over it.
Now step back and enjoy the inviting, village-like atmosphere your handcrafted lanterns create as twilight falls
Mini Pottery Mushrooms and Plant Markers
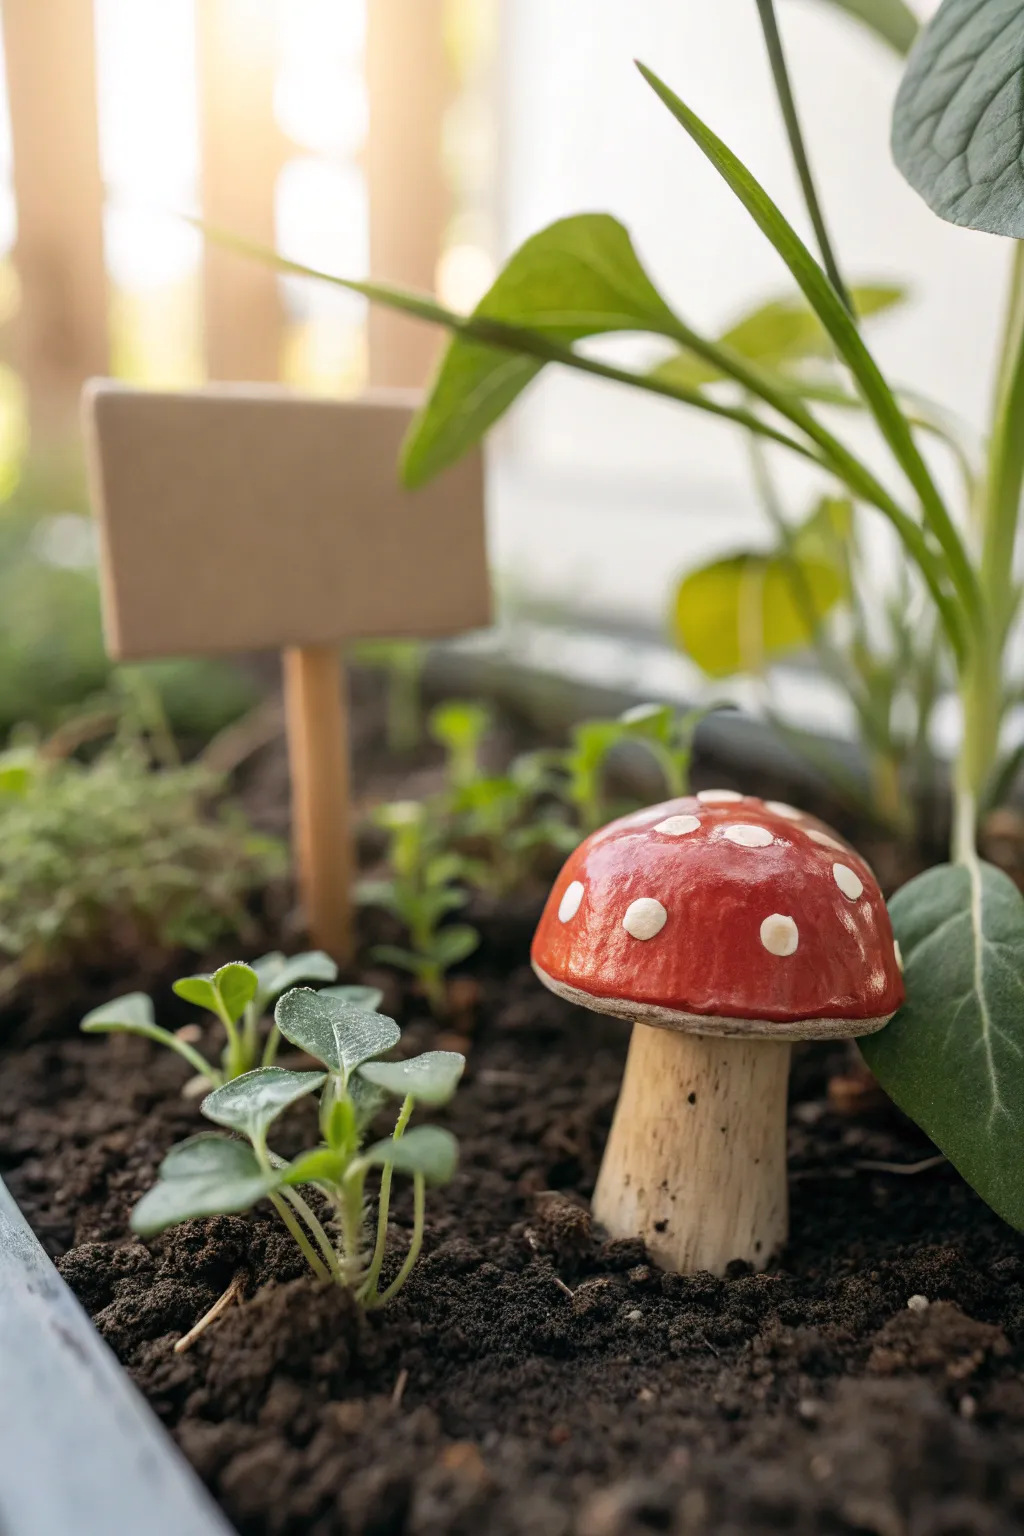
Add a touch of storybook charm to your planters with these handmade ceramic accents. This project teaches you how to sculpt a classic red-capped toadstool and a simple signpost, perfect for labeling your herbs or just adding a little magic.
Step-by-Step Guide
Materials
- Polymer clay or air-dry clay (white or beige)
- Acrylic paints (bright red, white, beige/tan, dark brown)
- Small craft paintbrush
- Fine detail paintbrush or dotting tool
- Clear matte or satin varnish (waterproof)
- Clay sculpting tools (or a toothpick)
- Small wooden dowel or popsicle stick
- Rolling pin
- Craft knife
- Aluminum foil
Step 1: Sculpting the Mushroom Cap
-
Form the core:
Start by rolling a small ball of aluminum foil, about the size of a walnut. This saves clay and keeps the mushroom lightweight, which helps it stand upright in soil later. -
Cover the cap:
Roll out a sheet of clay to about 1/4 inch thickness. Place your foil ball in the center and wrap the clay over it, smoothing the edges underneath to form a dome shape. -
Refine the shape:
Gently press the dome onto a flat surface to create a slight lip at the bottom edge. Smooth out any fingerprints with a drop of water if using air-dry clay, or baby oil for polymer clay.
Uneven Paint?
If your red paint looks streaky, don’t keep brushing wet paint. Let it fully dry, then apply a second thin coat in the opposite direction for a smooth, opaque finish.
Step 2: Creating the Stem and Sign
-
Roll the stalk:
Roll a thick cylinder of clay for the stem. It should be slightly wider at the base than at the top to mimic a natural mushroom growth pattern. -
Add texture:
Use a toothpick or a needle tool to scratch vertical lines up and down the stem. I like to vary the depth of these lines to make it look like organic bark or fibrous mushroom stalk. -
Join the pieces:
Score the top of the stem and the underside of the cap (scratch both surfaces up). Add a dab of clay slip or liquid clay, then press them firmly together. Blend the seam slightly underneath for stability. -
Make the sign:
Roll out a small rectangle of clay, about 1.5 inches by 1 inch. Smooth the edges so they look neat but slightly rustic. -
Attach the post:
Press a small wooden dowel or popsicle stick into the back of your clay rectangle while it’s still soft. Ensure it’s embedded deep enough to hold securely once dry. -
Curing time:
Bake your polymer clay according to package directions, or let your air-dry clay sit for 24-48 hours until completely hard and white.
Step 3: Painting and Finishing
-
Base coat the stem:
Mix beige paint with a tiny drop of brown to create a creamy tan color. Paint the entire stem, pushing the bristles into the textured grooves you carved. -
Weathering the stem:
Once the base is dry, dilute some dark brown paint with water to make a wash. Brush it over the stem and quickly wipe the surface with a paper towel, leaving the dark color only in the deep grooves. -
Painting the cap:
Apply two coats of bright red acrylic paint to the mushroom cap, letting the first coat dry completely before adding the second for solid coverage. -
Adding the spots:
Dip the handle end of a paintbrush, a dotting tool, or a Q-tip into white paint. Gently press dots onto the red cap once it’s dry. Vary the pressure to create slightly different sized spots for a natural look. -
Painting the sign:
Paint the rectangle sign with a solid tan or kraft-paper color. If you want to write a plant name on it later, keep this background light. -
Sealing the work:
Since these will live near damp soil, apply two coats of waterproof matte or satin varnish to the entire mushroom and the clay part of the sign. -
Planting:
Once fully cured, press the mushroom stem slightly into the dirt of your planter so it looks like it sprouted there naturally.
Glossy Magic
Swap the matte varnish on just the red cap for a high-gloss glaze. This makes the mushroom look wet and dewy, contrasting beautifully with the matte, textured stem.
Now your garden pots have a delightful little resident to keep your plants company