If you love cute clay bead bracelets, this is the kind of project that instantly makes your whole day feel brighter. I’m sharing my go-to ideas for girls who want colorful, sweet, wearable designs that are easy to mix into a fun bracelet stack.
Classic Pastel Preppy Stack
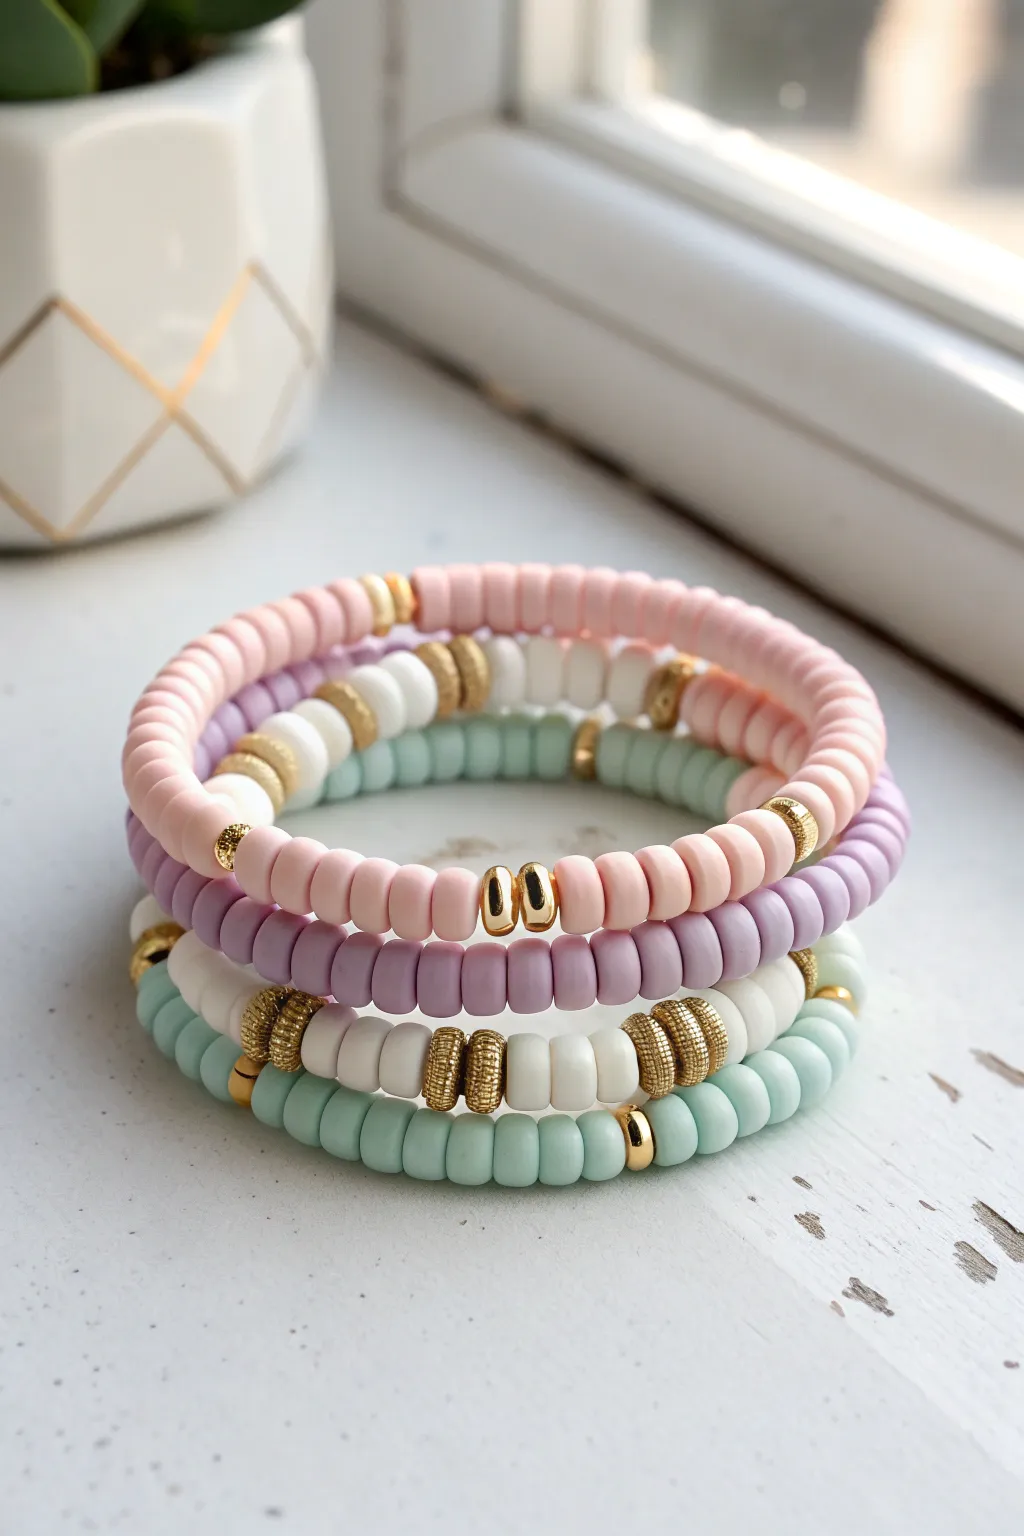
These four stretchy bracelets combine soft, matte heishi beads with shiny gold accents for a classic preppy look that goes with everything. The mix of pink, lavender, white, and mint green creates a soothing palette perfect for stacking.
How-To Guide
Materials
- 6mm flat disc polymer clay heishi beads (pastel pink, lavender, white, mint green)
- Gold spacer beads (mix of smooth rounds and textured discs)
- 0.8mm clear elastic stretch cord
- Super glue or jewelry cement
- Scissors
- Beading needle (optional but helpful)
- Bead tray or stopper clip
Step 1: Preparation
-
Measure and Cut:
Cut four lengths of elastic cord, each about 10-12 inches long. This generous length gives you plenty of room to tie secure knots later without struggling with tight ends. -
Pre-stretch the Cord:
Before adding a single bead, give each piece of elastic a few firm tugs. This “pre-stretching” prevents the bracelet from loosening up and becoming baggy after the first time you wear it. -
Secure the End:
Attach a bead stopper or simply use a piece of tape on one end of your first cord to stop beads from sliding off while you work.
Step 2: Pink Bracelet Assembly
-
Basics First:
Start by threading about 2 inches of simple pink clay discs onto the cord. -
Add Accents:
Slide on a small gold textured disc, followed by a smooth gold round bead, and another textured disc. This creates a little gold focal point. -
Continue patterning:
Fill the rest of the cord with pink beads until the bracelet measures roughly 6.5 to 7 inches (or your desired wrist size), adding one or two more scattered gold sections if you like symmetry.
Knot Security Tip
When tightening your knot, pull on all four strands (the two tail ends AND the two bracelet loop sides) simultaneously to lock it tight.
Step 3: Lavender & Mint Bracelets
-
Lavender Base:
For the purple strand, string primarily lavender clay beads. Break up the solid color by inserting single smooth gold beads roughly every inch for a dainty, distributed sparkle. -
Mint Setup:
Repeat the process for the mint green bracelet. I find that placing the gold accents at slightly different intervals than the lavender one makes the stack look more organic when worn together.
Stiff Beads?
If the finished bracelet feels rigid or kinks, you tied it too tight. String it slightly looser next time so beads can rotate freely.
Step 4: White Focal Bracelet
-
Create the Pattern:
The white bracelet uses a heavier gold pattern. Thread about 10 white beads, then add a gold textured disc, a white bead, and another gold textured disc. -
Repeat the Motif:
Continue this specific pattern (10 white, gold spacer, 1 white, gold spacer) for the entire length of the strand. This will be the “brightest” bracelet in the stack.
Step 5: Finishing Touches
-
Check the Fit:
Wrap each unfinished strand around your wrist to verify the size. Add or remove a few clay discs if needed to ensure a comfortable fit that isn’t too tight. -
Tie the Knot:
For each bracelet, tie a surgeon’s knot: cross left over right and loop through twice, pull tight, then cross right over left and loop through once. -
Secure with Glue:
Apply a tiny drop of super glue or jewelry cement directly onto the knot. Let this dry completely before moving it; patience here prevents the cord from snapping later. -
Hide the Evidence:
Once the glue is dry, trim the excess cord ends close to the knot. If possible, gently tug the knot so it slides inside one of the larger beads to hide it.
Slip your new stack onto your wrist and enjoy the soft pop of pastel color


Rainbow Stripe Heishi Bracelet
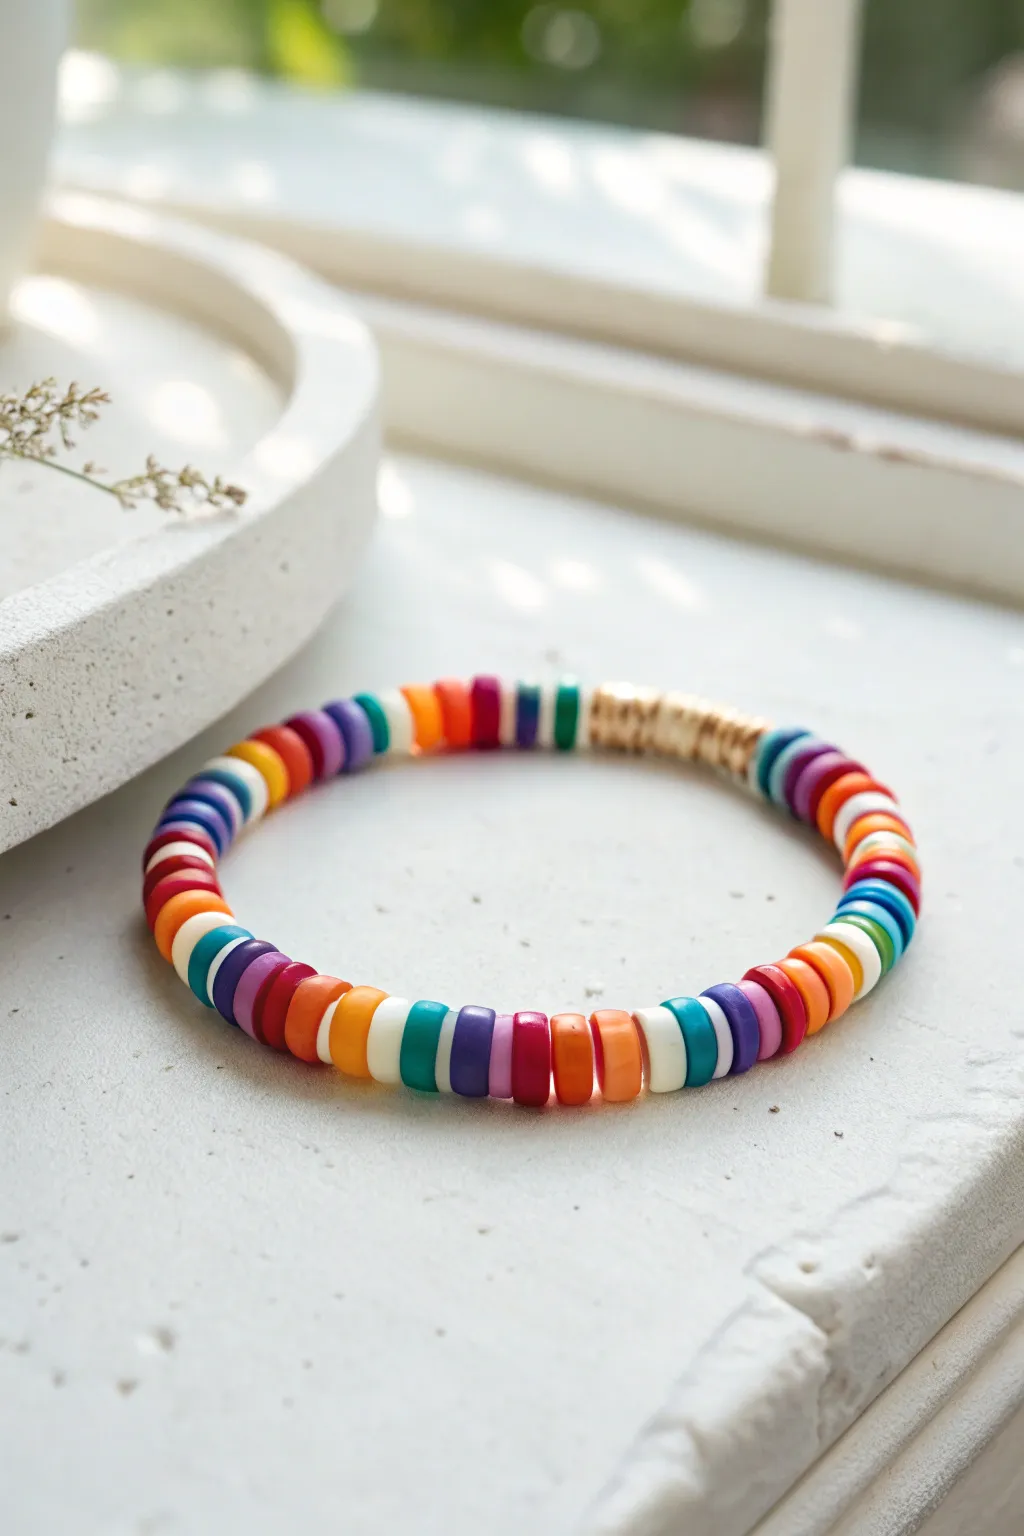
This cheerful bracelet combines vibrant pops of color with a chic gold accent for a look that is both playful and polished. The flat clay disc beads create a wonderful smooth texture that feels comfortable on the wrist all day long.
Detailed Instructions
Materials
- Polymer clay Heishi disc beads (6mm) in white, teal, yellow, orange, red, purple, and dark blue
- Gold tone flat disc spacer beads (6mm)
- Stretch cord (0.8mm or 1mm thickness)
- Super glue or jewelry glue
- Scissors
Step 1: Planning and Stringing
-
Measure your wrist:
Before cutting any cord, wrap the elastic around your wrist to find your comfortable size, then add about 3-4 inches of extra length to allow for easy tying later. -
Cut the cord:
Snip your elastic cord to length. I like to give the cord a gentle pre-stretch by pulling on both ends firmly; this helps prevent the bracelet from stretching out too much after you wear it. -
Start with the gold accent:
Begin your pattern by threading on the gold disc spacers. Use approximately 8 to 10 gold discs to create a distinct metallic focal section. -
Begin the color pattern:
After the gold, start your color sequence. The pattern here relies on small blocks of color separated by single darker beads. Slide on two teal beads. -
Add a separator:
Thread one dark blue bead next. This acts as a visual break between your color blocks. -
Continue the patchwork:
Add a block of two purple beads, followed by a single white bead as a separator. -
Shift to warm tones:
Slide on two red beads, followed by a single orange separator bead to transition into the warmer side of the spectrum. -
Build the pattern:
Continue this rhythm: generally use 2-3 beads of a main color (like teal, purple, or red) followed by 1 bead of a contrasting color (like white, orange, or dark blue) to break it up. -
Check the fit:
Periodically wrap the beaded cord around your wrist. You want to stop adding beads when the ends touch comfortably without squeezing your skin. -
Create variation:
Don’t be afraid to make some color blocks slightly larger (3 beads) or vary the separator colors. The charm of this design is its slightly irregular, handmade feel. -
Finish the circle:
String beads until you reach the other side of your gold accent section. Ensure the last bead you string contrasts nicely with the gold for a clean finish.
Loosey Goosey?
If your bracelet feels loose after tying, you likely didn’t pull the elastic tight enough while knotting. The elastic should be stretched slightly when you tie the knot.
Step 2: Securing the Bracelet
-
Pre-tie preparation:
Bring both ends of the elastic together carefully so the beads don’t slide off. -
Tie the first knot:
Cross the ends and make a simple overhand knot, pulling it down tight against the beads to remove any slack in the cord. -
Tie a surgeon’s knot:
For the second knot, loop the end through twice instead of once before pulling tight. This extra friction helps the slippery elastic hold securely. -
Apply adhesive:
Place a tiny drop of super glue or jewelry glue directly onto the knot. Be careful not to get glue on the surrounding beads, as it can discolor the clay. -
Hide the knot:
While the glue is still slightly tacky but not wet, try to slide the knot inside the hole of the nearest bead if the hole is large enough. This hides the mechanics of the bracelet. -
Trim the excess:
Once the glue is fully dry, use your small scissors to trim the excess elastic tails as close to the knot as possible without cutting the knot itself.
Add Some Charm
Attach a small gold seashell or star charm to the gold spacer section using a 4mm jump ring. It adds movement and makes the bracelet feel more personalized.
Slip on your new colorful accessory and enjoy the burst of brightness it brings to your outfit


Name Bracelet With Letter Beads
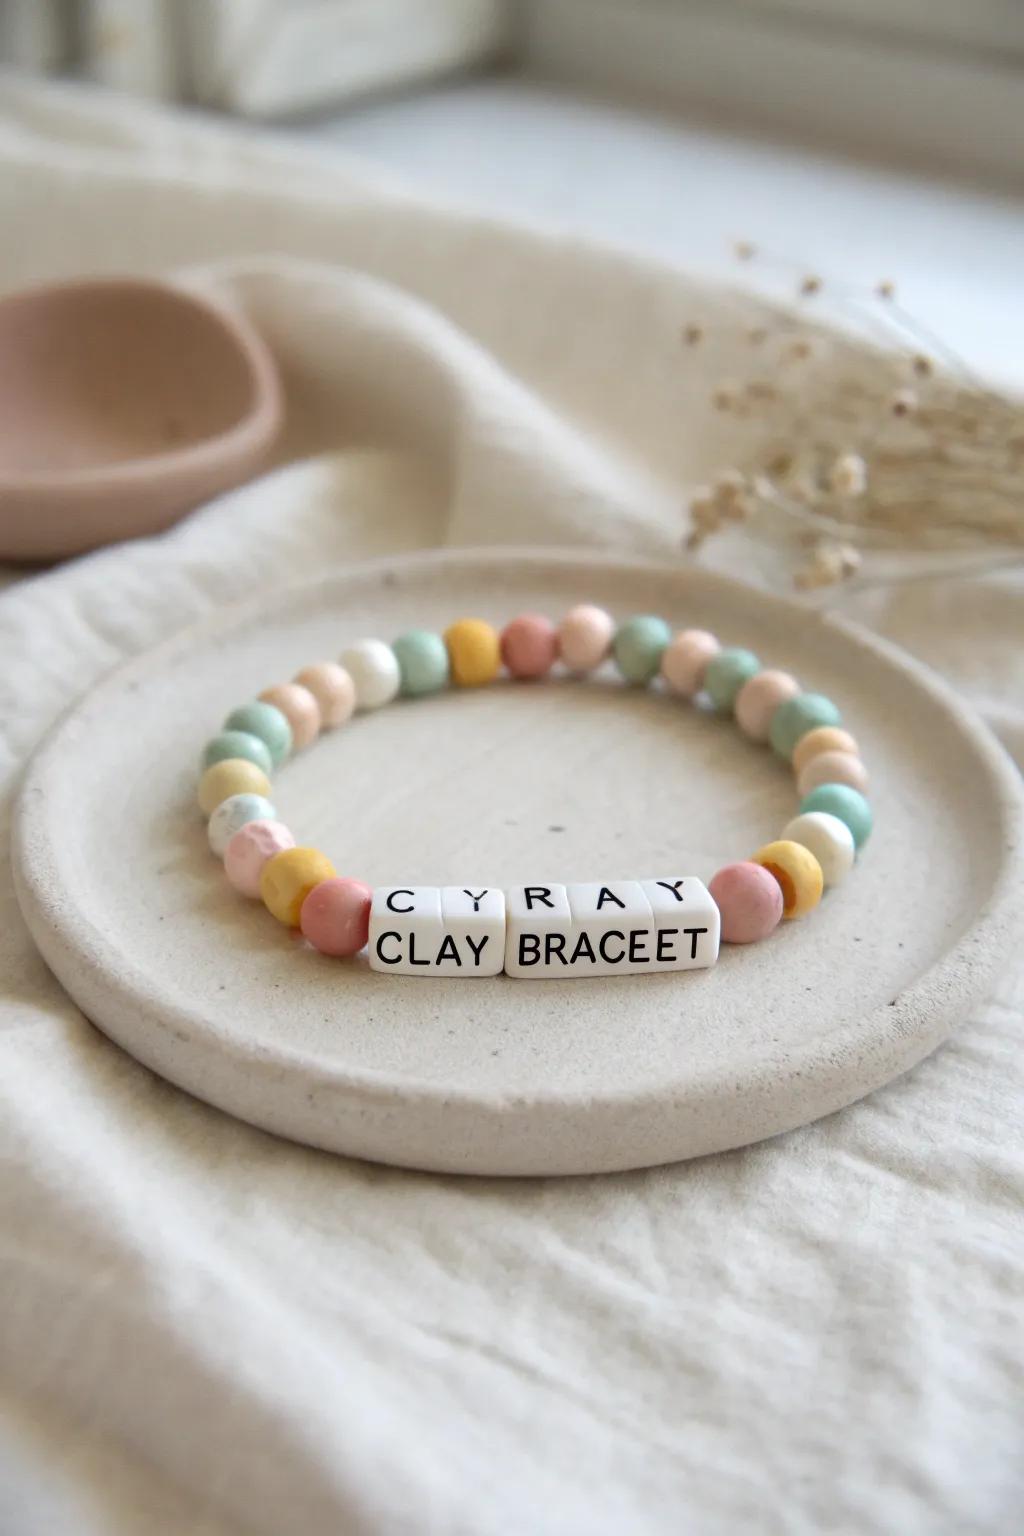
This charming bracelet combines soft, muted pastels with bold letter beads for a personalized accessory that is both sweet and stylish. The uniquely stacked letter blocks add a playful, modern twist to the classic name bracelet design.
How-To Guide
Materials
- Polymer clay (muted pink, mustard yellow, sage green, cream, light peach)
- White polymer clay (for the letter blocks)
- Black acrylic paint or fine-tip permanent marker
- Clear satin glaze (optional)
- Elastic beading cord (approx 0.8mm)
- Toothpick or bead piercing tool
- Baking sheet
- Parchment paper
- Letter stamps (small size) or sculpting needle
- Jewelry glue
- Scissors
Step 1: Crafting the Beads
-
Condition the clay:
Start by kneading each color of polymer clay separately until it is soft and pliable. This step is crucial to prevent cracking later. -
Form the round beads:
Pinch off small pieces of the colored clays—pink, yellow, green, cream, and peach. Roll them between your palms to create uniform spheres, aiming for about 6mm in diameter. -
Create holes:
Using a toothpick or a dedicated piercing tool, gently push a hole through the center of each round bead. Twist the tool slightly as you remove it to keep the hole clean. -
Shape the letter blocks:
Take the white clay and form a long, rectangular log. Slice this log into equal square-ish segments. Gently tap each side on your work surface to sharpen the edges into neat blocks. -
Add the letters:
Use small letter stamps to impress ‘CLAY’ and ‘BRACEET’ (or your chosen words) into the front face of the blocks. I also like to stamp separate single letters like ‘C’, ‘Y’, ‘R’, ‘A’, ‘Y’ on smaller spacer cubes if you want that top row effect shown in the inspiration. -
Pierce the specific holes:
For the main word blocks, carefully pierce a horizontal hole all the way through the side so they can be strung. Ensure the hole is low enough not to distort the top letters if you are stacking them. -
Bake the clay:
Arrange all your beads on a baking sheet lined with parchment paper. Follow the temperature and timing instructions on your specific brand of polymer clay packaging.
Uneven Bead Holes?
If your holes deform while piercing, let the clay sit for 15 minutes to firm up slightly before trying again. Twist, don’t just push.
Step 2: Finishing and Assembly
-
Highlight the text:
Once the beads have cooled completely, use a fine-tip permanent marker or a tiny brush with black acrylic paint to fill in the stamped letter indentations. -
Clean up edges:
If you got any paint on the surface of the white bead, quickly wipe it away with a damp cloth or a little rubbing alcohol before it dries, leaving color only in the grooves. -
Optional glazing:
For a bit of shine and protection, apply a thin coat of satin glaze to the beads and let them dry. -
Measure the cord:
Cut a piece of elastic cord about 10-12 inches long. This extra length makes tying the knot much easier at the end. -
Start stringing:
Begin threading your round silicone-style clay beads onto the elastic. Alternate the pastel colors in a random, organic pattern to mimic the carefree look of the original. -
Integrate the centerpiece:
Thread the main word blocks (like ‘CLAY’ and ‘BRACEET’) onto the cord. If you made the smaller top-row letters, you can glue them to the top of the main blocks now using a tiny dab of jewelry glue for that stacked look. -
Finish the pattern:
Continue adding the colored round beads until the bracelet reaches your desired length. -
Secure the bracelet:
Bring the two ends of the elastic together. Tie a surgeon’s knot (right over left twice, then left over right) and pull it tight. -
Final touches:
apply a small drop of jewelry glue on the knot to secure it. Once dry, snip off the excess cord close to the knot, and tuck the knot inside one of the larger beads if possible.
Smooth Lettering Hack
Use a black polymer clay ‘snake’ pressed into the letter grooves before baking instead of paint for a super clean, permanent finish.
Now you have a totally unique, handmade accessory ready to wear or gift to a friend


BFF Matching Half-and-Half Set
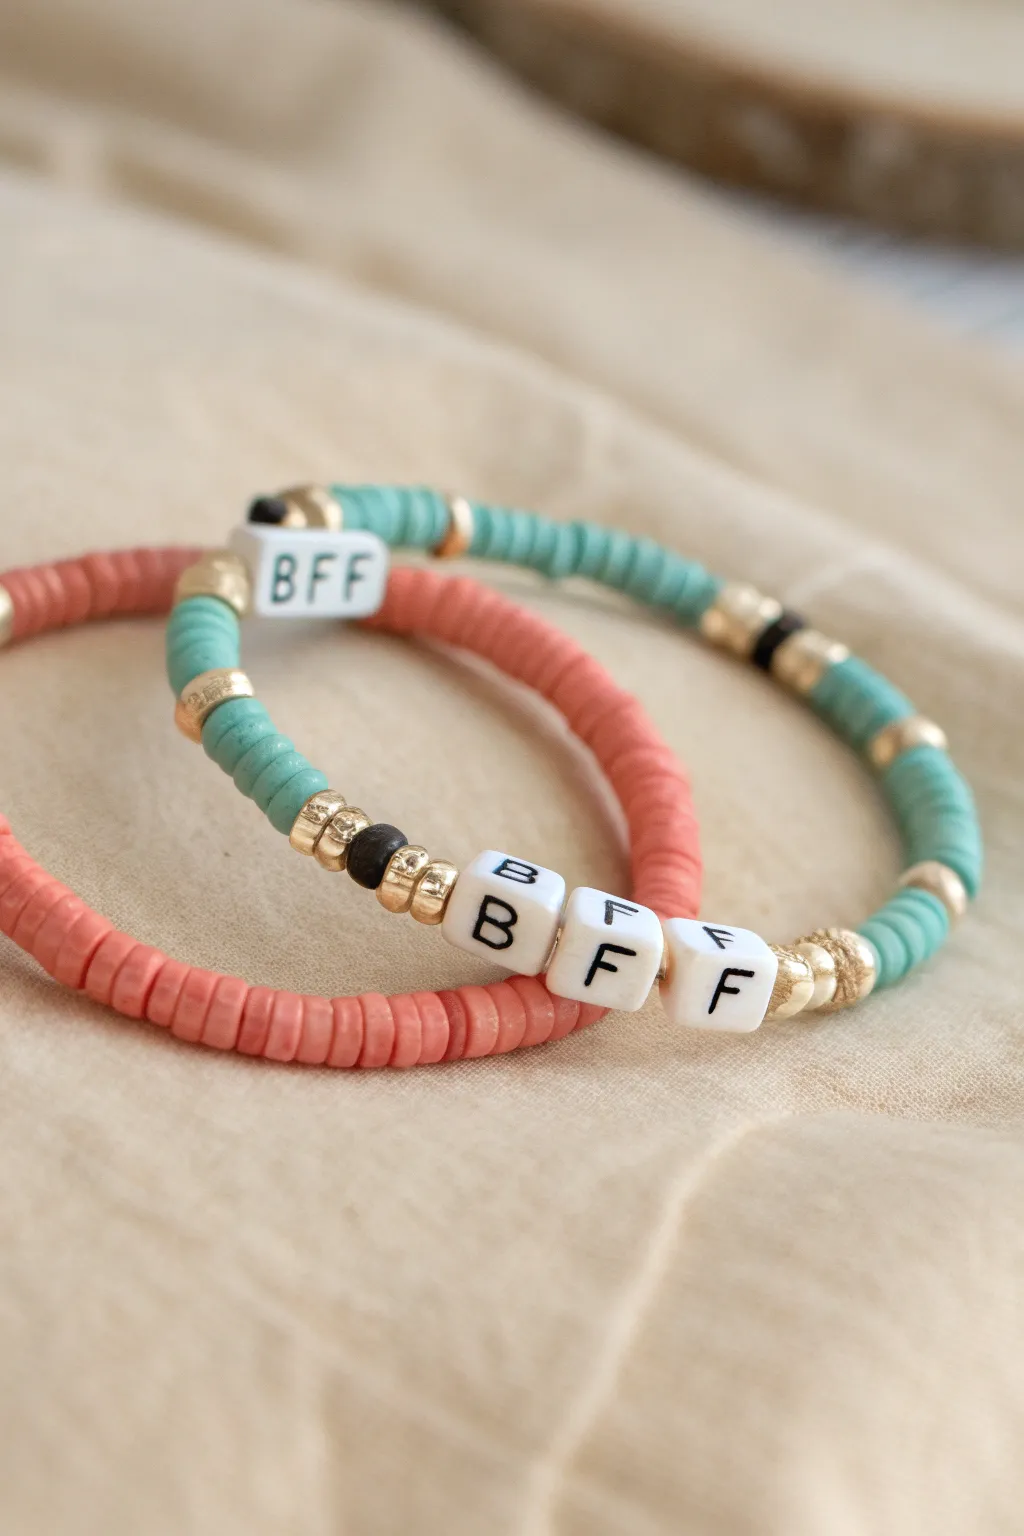
Celebrate your friendship with these chic, color-blocked bracelets that are designed to be shared. Featuring a trendy mix of matte clay heishi beads and gleaming gold accents, these matching accessories are a sweet, stylish way to stay connected to your bestie.
Step-by-Step Tutorial
Materials
- Flat clay heishi beads (coral pink)
- Flat clay heishi beads (turquoise or teal)
- Stretch elastic cord (0.8mm recommended)
- White square letter beads (‘B’, ‘F’, ‘F’)
- Gold round spacer beads (3mm and 4mm)
- Gold faceted spacer beads
- Small black flat disc beads or accents
- Jewelry glue or clear nail polish
- Scissors
- Bead stopper or masking tape
Step 1: Preparation and Sizing
-
Measure the cord:
Cut two lengths of elastic cord, each about 10-12 inches long. This generous length gives you plenty of room to tie knots later without the beads slipping off. -
Secure the ends:
Attach a bead stopper or simply place a piece of masking tape on one end of each cord. This prevents your hard work from sliding off while you string. -
Pre-stretch the elastic:
Give your elastic cord a few gentle tugs before you start beading. I find this simple trick helps prevent the bracelet from loosening up after you wear it for the first time.
Loose Beads?
If your knot slips, try a surgeon’s knot: loop the elastic through twice on the first tie instead of once. This adds friction and holds tight.
Step 2: Designing the Pattern
-
Establish the focal point:
Locate the center of your cord. This is where your ‘BFF’ message will sit. Thread on the three letter beads: B, F, and F. -
Add gold accents:
On either side of the letter block, thread one or two gold faceted spacer beads. These act as bright, shiny brackets for your text. -
Create the two-tone transition:
Decide on your color split. For the mixed version shown (the blue bracelet), you will bead one half in turquoise and the other half in coral. For the solid version (the pink bracelet), you will stick to one primary color.
Level Up: Charm It
Add personalization by attaching a small gold heart charm or a tiny tassel on a jump ring next to the BFF letters for extra movement.
Step 3: Stringing the Beads
-
Start the first color block:
Begin stringing your clay heishi beads on the left side of the letters. Thread about 1 inch of your first color choice. -
Insert decorative spacers:
Break up the solidity of the clay beads by adding a small cluster. Thread a gold round bead, a single black disc bead, and another gold round bead. -
Continue the color block:
Resume stringing the same color of clay heishi beads for another 2-3 inches, depending on wrist size. This completes one ‘half’ of the bracelet. -
Switch sides:
Move to the right side of your ‘BFF’ letters. Begin stringing your second color choice (or continue with the same color if making the solid bracelet). -
Mirror the design:
Repeat the pattern from the first side: bead about 1 inch of clay beads, add your gold-black-gold spacer cluster, and then finish with more clay beads until both sides are equal length. -
Check the fit:
Wrap the unfinished strand around your wrist to check the size. Ideally, the two ends should meet comfortably with a little bit of slack.
Step 4: Finishing Touches
-
Remove the stopper:
Carefully remove the tape or bead stopper while holding the open ends tightly so no beads escape. -
Tie the knot:
Tie a square knot (right over left, left over right). Pull the elastic tight enough so there are no gaps between beads, but not so tight that the bracelet puckers. -
Double security:
Tie one or two more overhand knots on top of the square knot for extra durability considering these will be worn daily. -
Apply adhesive:
Dab a tiny drop of jewelry glue or clear nail polish onto the knot. Let this dry completely before moving to the next step. -
Hide the knot:
Trim the excess elastic cord close to the knot. If possible, gently tug the bracelet to slide the knot inside the hole of a nearby bead to hide it.
Slip these on your wrists and enjoy your custom matching set with your best friend

The Complete Guide to Pottery Troubleshooting
Uncover the most common ceramic mistakes—from cracking clay to failed glazes—and learn how to fix them fast.
Heart Centerpiece Bracelet
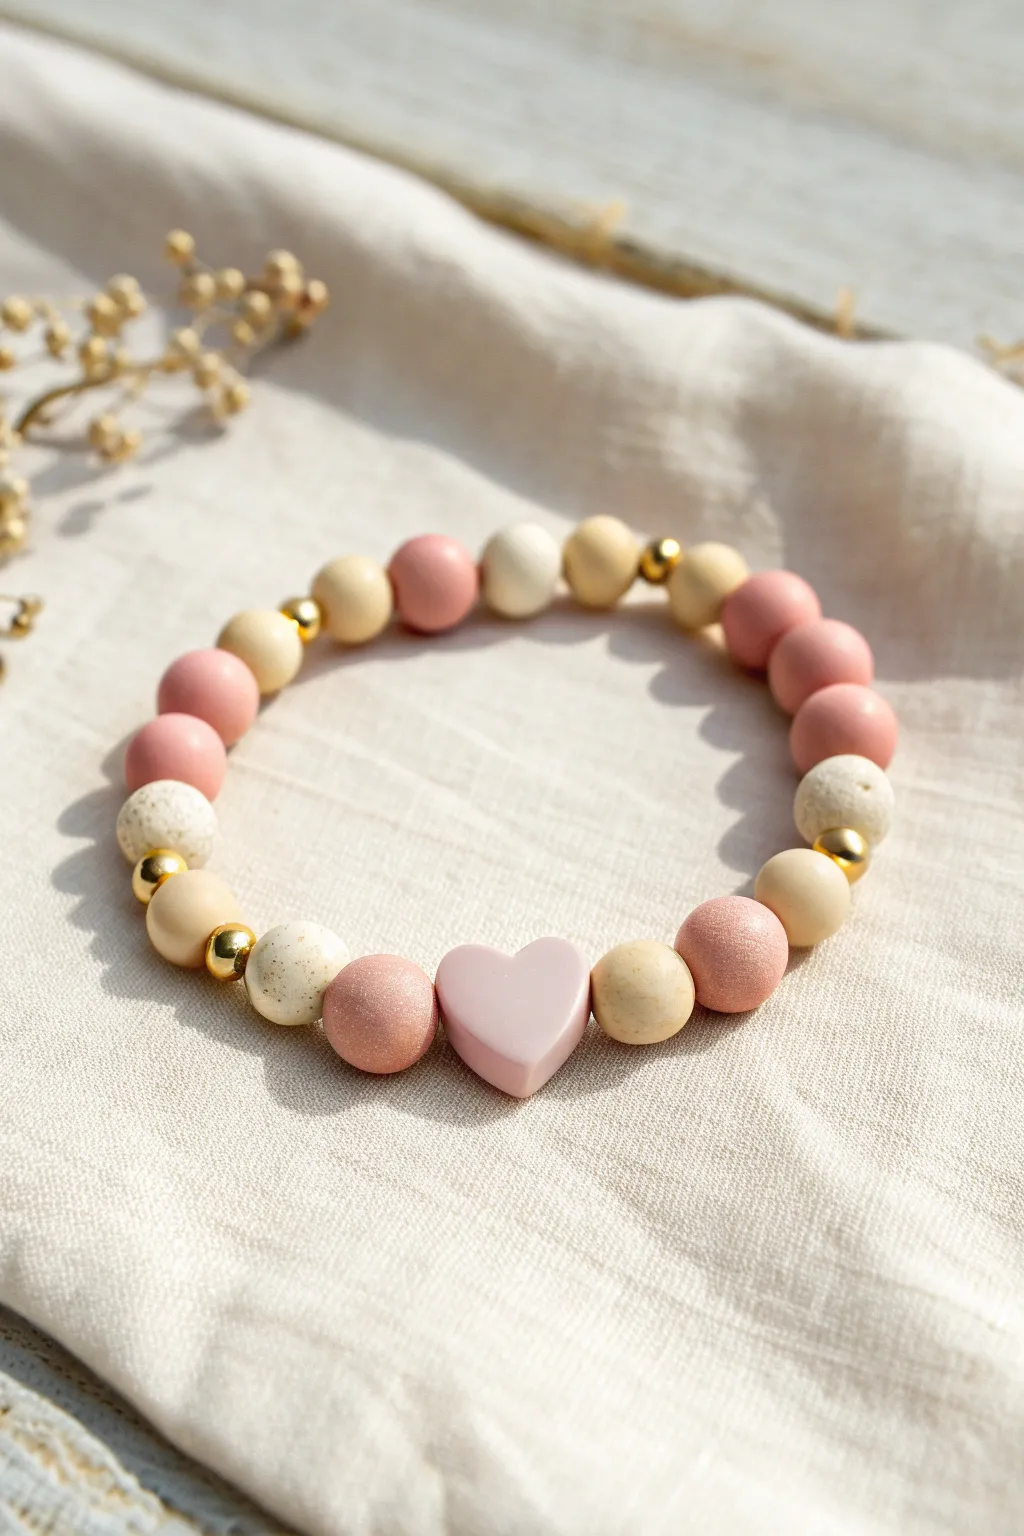
This charming bracelet features a lovely mix of matte and speckled polymer clay beads centered around a soft pink heart. With its gentle color palette of cream, blush, and natural clay tones accented by golden spacers, it makes for a sophisticated yet sweet accessory.
Detailed Instructions
Materials
- Stretch cord (0.8mm or 1mm clear elastic)
- Pink heart-shaped polymer clay bead (centerpiece)
- 10mm round polymer clay beads (matte pink)
- 10mm round polymer clay beads (cream/off-white)
- 10mm round polymer clay beads (speckled cream)
- 10mm round polymer clay beads (matte blush)
- Small gold spacer beads (approx. 3-4mm, metal or plated)
- Scissors
- Jewelry glue or clear nail polish
- Beading needle (optional but helpful)
- Tape or bead stopper
Step 1: Preparation and Layout
-
Measure and cut:
Begin by measuring your wrist and adding about 3-4 inches to that length to allow ample room for tying the knot later. Cut a piece of your stretch cord to this length. -
Secure the end:
Attach a piece of tape or a bead stopper to one end of the cord. This simple step saves you the heartbreak of beads sliding off while you work. -
Pre-stretch the cord:
Gently tug on the elastic cord a few times. Pre-stretching helps prevent the bracelet from loosening up and sagging immediately after you wear it for the first time. -
Sort your beads:
Lay out your beads on a soft surface or a bead board. I like to group them by color: matte pink, blush, cream, speckled cream, and the gold spacers.
Sticky Situation
If the knot keeps slipping while you try to tie it, ask a friend to hold a finger on the first loop, or clamp it gently with tweezers while you complete the second loop.
Step 2: Designing the Pattern
-
Place the centerpiece:
Start your layout by placing the heart bead directly in the center of your workspace. This will determine the symmetry of the design. -
Flank the heart:
Place one matte blush bead on immediate left and one matte cream bead on the immediate right of the heart to start an alternating color flow. -
Add first spacers:
It looks best to add a small gold spacer bead after the second or third bead from the center to break up the matte texture. -
Create the rhythm:
Continue laying out beads in a semi-random but balanced pattern. Looking at our inspiration, mix the speckled cream beads with the solid pinks and creams. -
Insert gold accents:
Intersperse the gold spacer beads irregularly. Don’t put one between every single clay bead; instead, space them out every 3-5 beads to keep them as special accents. -
Check the length:
Once you have a full line of beads laid out, wrap the design around your wrist to check the fit before threading. Add or remove beads from the ends as needed.
Step 3: Assembly
-
Start threading:
Begin threading the beads onto the cord. If you are struggling with the hole size, a collapsible eye needle can be a lifesaver here. -
Thread the heart:
When you reach the middle of your pattern, slide the heart bead on. Ensure it faces the correct direction relative to how you want it to sit on your wrist. -
Finish the strand:
Continue threading the remaining beads until your pattern is complete. Double-check that you haven’t missed any of those tiny gold spacers. -
Verify sizing:
Wrap the beaded strand around your wrist one last time. The beads should touch comfortably without gaps, but shouldn’t feel tight or pinch your skin.
Make It Yours
For a personalized touch, replace the gold spacer beads with small letter beads to spell out a name or word on the opposite side of the heart.
Step 4: Finishing Touches
-
Prepare to tie:
Remove the tape or bead stopper carefully. Bring the two ends of the cord together, ensuring there is no slack between the beads. -
The surgeon’s knot:
Tie a surgeon’s knot. This is like a standard overhand knot, but you loop the end through twice before pulling tight. This extra loop adds significant security. -
Tighten securely:
Pull the knot tight. You should see the elastic stretch slightly as you pull. Create a second standard knot on top for extra safety. -
Secure with glue:
Place a tiny drop of jewelry glue or clear nail polish directly onto the knot. Let it dry for a moment to bond the elastic. -
Hide the knot:
Once dry, trim the excess cord ends close to the knot (but not too close!). Gently pull the adjacent bead over the knot to hide it inside.
Now you have a beautifully handcrafted accessory ready to wear or gift to someone special
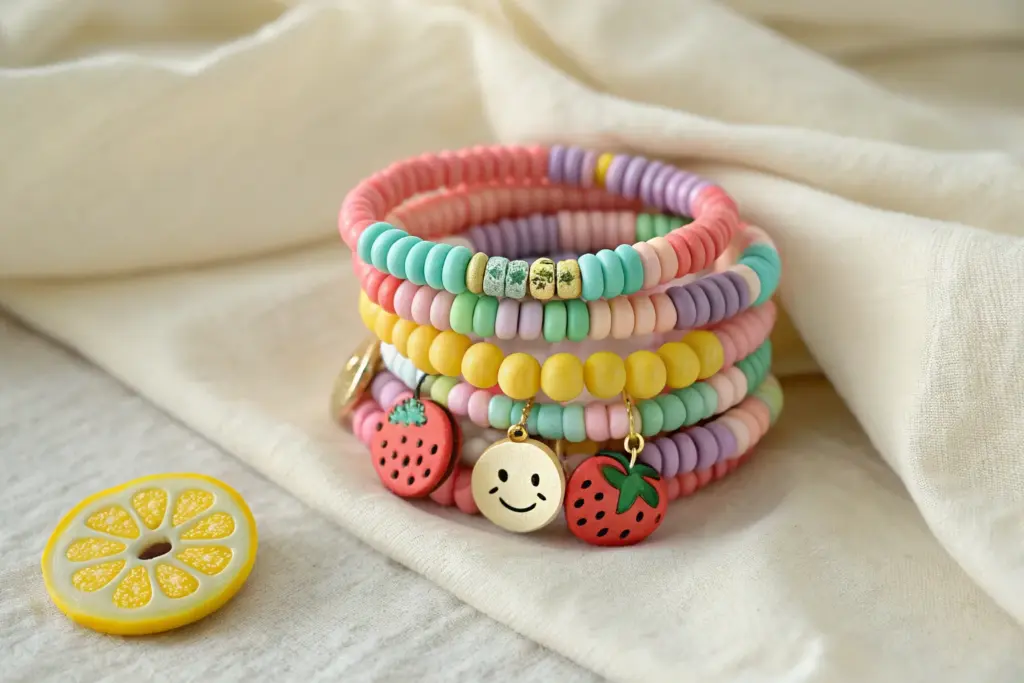
Smiley Face Pop Bracelet
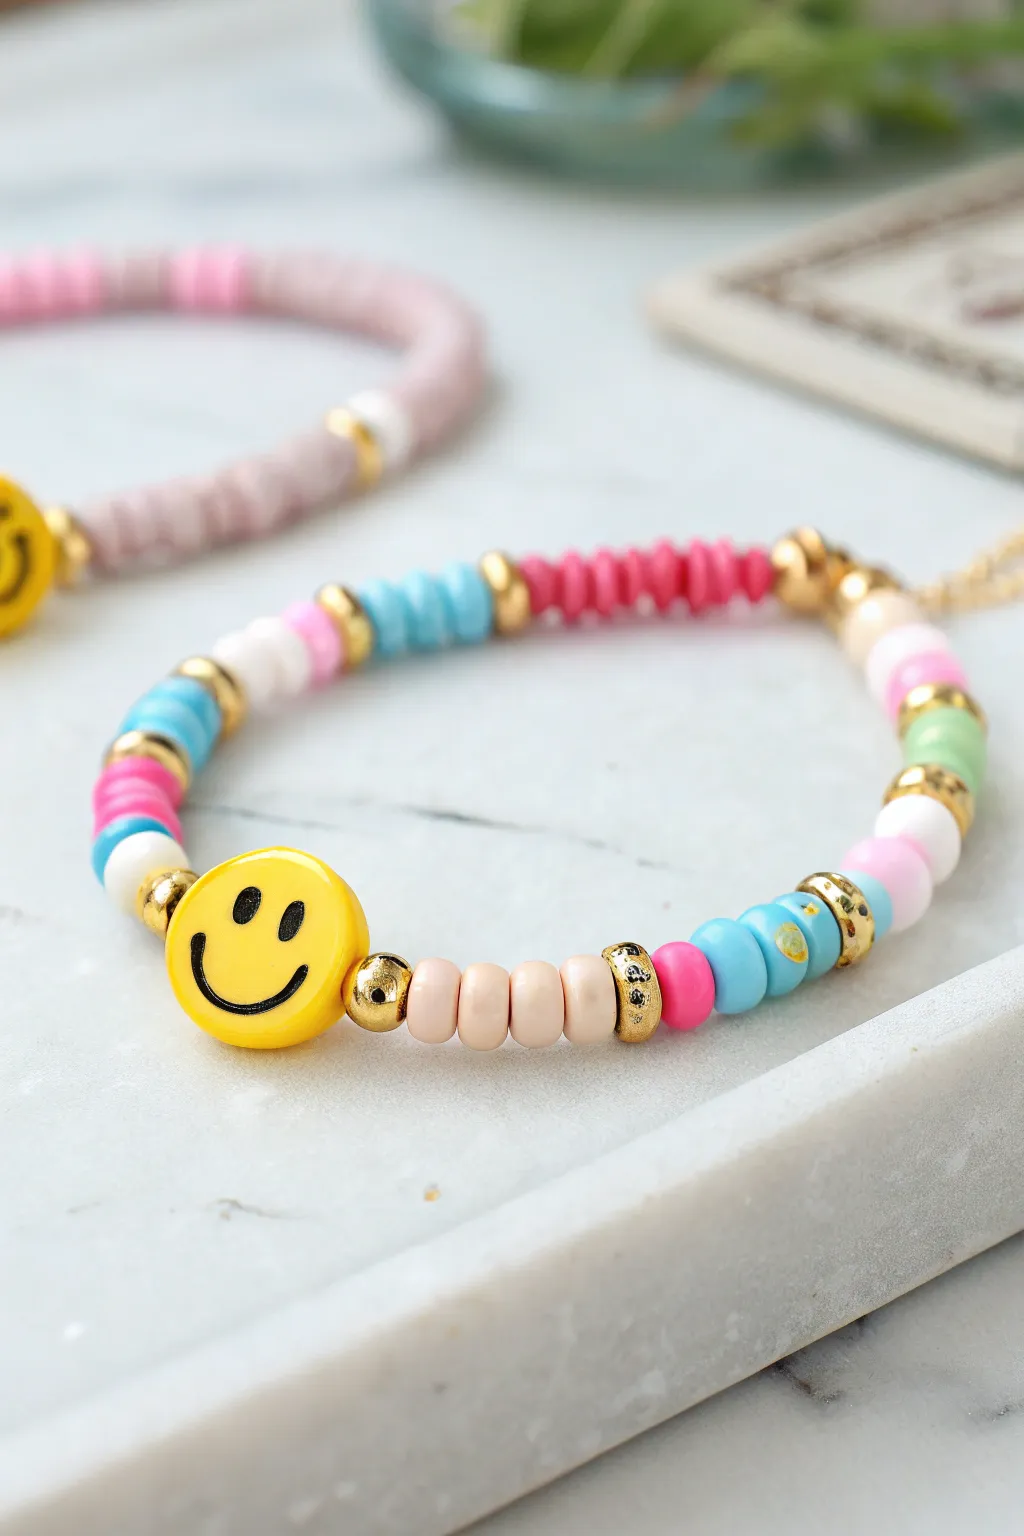
Bring a burst of joy to your wrist with this cheerful DIY bracelet featuring a sunny yellow smiley face. Using colorful polymer clay disc beads and elegant gold accents, this accessory strikes the perfect balance between playful and polished.
Step-by-Step
Materials
- Elastic beading cord (0.5mm or 0.8mm)
- Polymer clay Heishi beads (Pink, Light Blue, White, Peach/Beige)
- Yellow smiley face bead (polymer clay or acrylic)
- Gold tone spacer beads (various: simple round beads, saucer beads, and rhinestone roundells)
- Scissors
- Super glue or jewelry cement
- Beading needle (optional)
- Tape or binder clip
Step 1: Preparation & Planning
-
Measure your wrist:
Wrap a piece of string around your wrist to find your size, then add about an inch to that measurement for comfort. Cut a piece of elastic cord about 3-4 inches longer than this total length so you have plenty of room to tie the knot later. -
Secure the end:
Place a piece of tape or a binder clip on one end of your elastic cord. This prevents your beads from sliding right off while you work. -
Pre-stretch the cord:
Give your elastic cord a few gentle tugs. Pre-stretching helps prevent the bracelet from sagging or loosening up after you’ve worn it a few times. -
Plan your pattern:
Lay out your beads on a bead board or a towel to visualize the sequence. The design relies on color blocking, so group your heishi beads by color.
Knot Security
When tying elastic, pull the cord taut (but not fully stretched) while making your knot. This tension keeps the beads snug against each other with no gaps showing.
Step 2: Creating the Bead Sequence
-
Start with the focal point:
Thread the yellow smiley face bead onto the center of your cord. This ensures your happy face stays front and center. -
Add gold accents:
On the left side of the smiley face, thread one small gold round spacer bead. Repeat on the right side so the smiley face is framed by gold. -
Begin the peach section:
On the right side of the smiley bead, add four peach-colored heishi beads. -
Insert a sparkle spacer:
Follow the peach beads with a gold rhinestone rondelle spacer. This adds a touch of glitz to break up the matte clay texture. -
Start the blue segment:
Next, add a single bright pink heishi bead for a pop of contrast, followed by three light blue heishi beads. -
Add a gold saucer spacer:
Slide on a decorative gold saucer spacer bead or a patterned gold rondelle. -
Create the white segment:
Thread two or three white heishi beads, followed by another gold spacer bead. -
Build the pink section:
Add a longer run of about 8-10 bright pink heishi beads. This larger block of color helps anchor the design toward the back/side of the wrist. -
Mirror the design:
Go back to the left side of your smiley face and replicate a similar pattern in reverse, or mix up the color blocks for an asymmetrical look like the example. Try adding a blue section immediately to the left. -
Check the fit:
Once you have beaded most of the length, wrap it around your wrist to check the size. Add or remove beads from the ends until it fits comfortably without squeezing.
Step 3: Finishing Touches
-
Tie the knot:
Remove the tape or clip. Bring the two ends of the elastic together and tie a surgeon’s knot (right over left, left over right, and loop through an extra time) to secure it tightly. -
Hide the knot:
If one of your beads has a large enough hole, try to gently tug the knot inside it to conceal the join. -
Secure with glue:
I like to add a tiny drop of super glue or jewelry cement to the knot for extra security. Let it dry completely before trimming any excess cord. -
Trim the ends:
Use sharp scissors to trim the excess elastic close to the knot, being careful not to cut the knot itself.
Stack Attack
Make 3-4 variations using different smiley face colors (pink, blue, etc.) and swap the color block order to create a cohesive arm candy stack.
Wear your new smiley bracelet as a daily reminder to smile and spread positivity.


What Really Happens Inside the Kiln
Learn how time and temperature work together inside the kiln to transform clay into durable ceramic.
Ombre Fade From Dark to Light
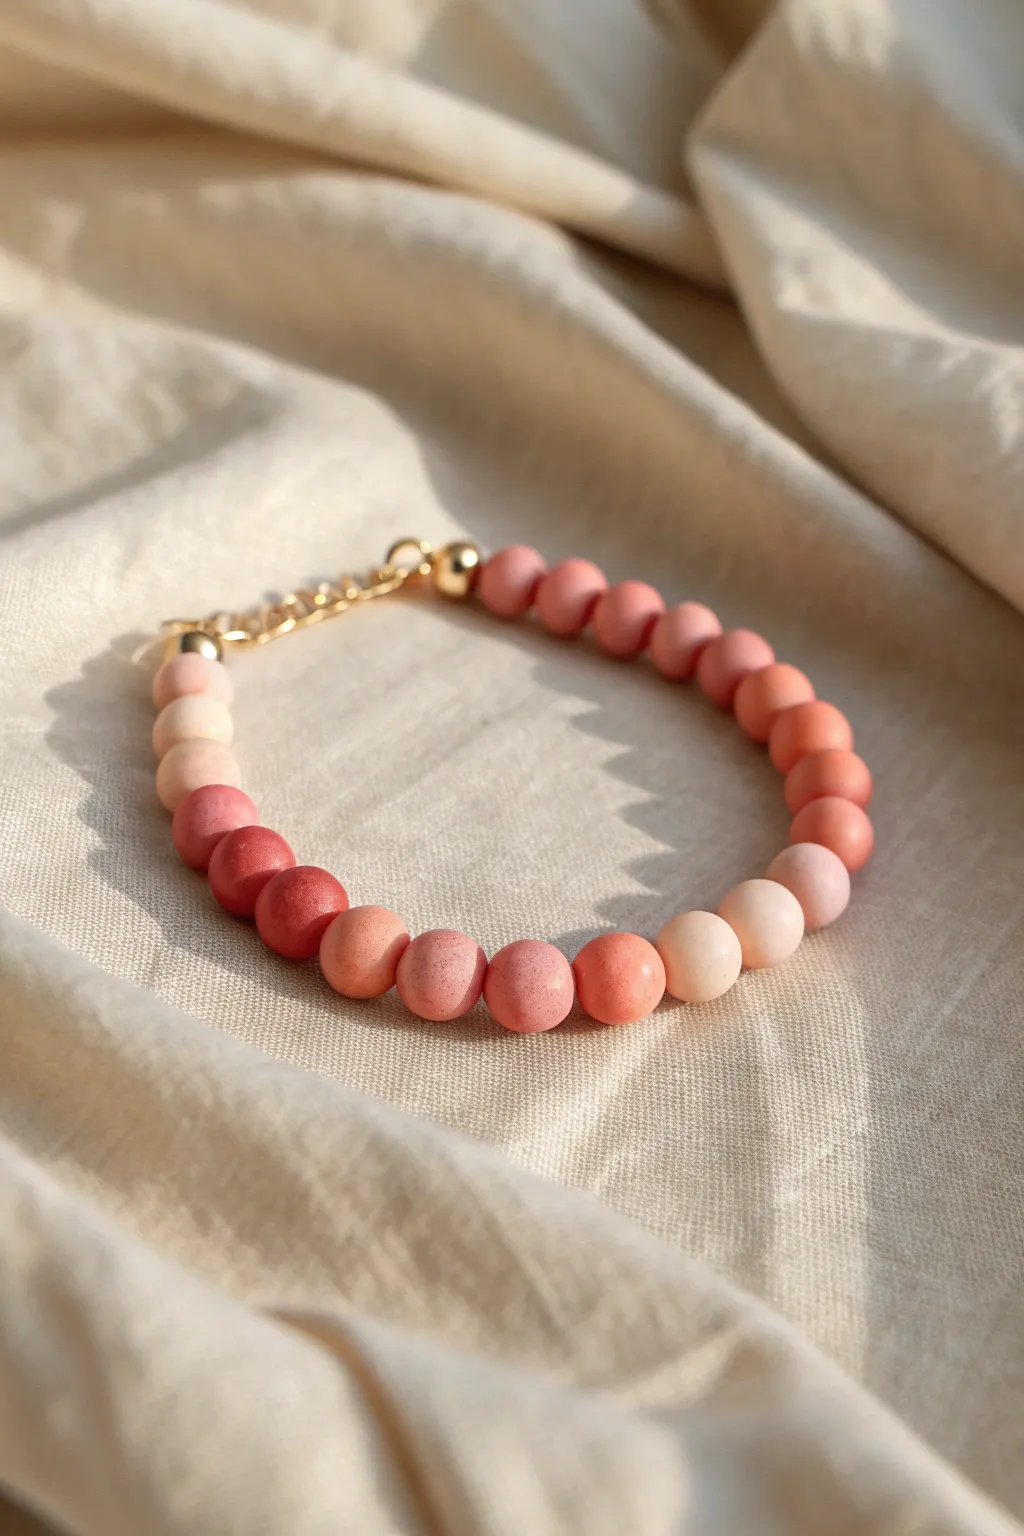
Capture the soft, fading hues of twilight on your wrist with this elegant ombre bracelet. By blending custom polymer clay shades from deep terracotta to the palest blush, this project creates a sophisticated gradient that looks beautiful against any skin tone.
Step-by-Step Guide
Materials
- Polymer clay (white, coral/terracotta, raspberry/dark pink)
- Bead roller tool (optional but recommended for uniform size)
- Bead piercing pins or toothpicks
- Baking sheet and parchment paper
- Oven
- Gold beading wire or strong stretch jewelry cord (0.7mm)
- 2 Gold crimp beads
- 2 Gold crimp covers (optional)
- 2 Gold jump rings
- Gold lobster clasp
- Gold extension chain
- Jewelry pliers (flat nose and cutting tools)
- Fine-grit sandpaper (optional)
Step 1: Mixing the Gradient Palette
-
Prepare the base colors:
Condition your white, coral, and raspberry polymer clays by kneading them until they are soft and pliable. Start with clean hands to keep the white pure. -
Create the darkest shade:
Mix a small amount of raspberry with the coral clay to create a deep, rich terracotta red. This will be your anchor color for the ombre. -
Mix the mid-tone:
Take a portion of your plain coral clay. This will serve as the transition color. If it feels too bright, add a tiny speck of the raspberry mix to mute it slightly. -
Blend the lighter shades:
Mix coral clay with an equal amount of white to create a soft salmon pink. Set this ball of clay aside. -
Create the palest tone:
Mix a large amount of white clay with just a pinch of the coral to achieve a very faint, creamy blush color. This is your highlight shade. -
Organize the transition:
Line up your mixed clay balls from darkest to lightest on your work surface to ensure the gradient looks smooth to the eye before rolling.
Smooth Roll Secret
To prevent fingerprints on your clay, dust your hands lightly with cornstarch before rolling. It creates a velvety matte texture.
Step 2: Forming and Baking the Beads
-
Portion the clay:
Pinch off equal-sized pieces from each color mix. You will need about 5-6 beads of each shade to complete the circle, depending on wrist size. -
Roll spheres:
Roll each piece of clay between your palms or use a bead roller to create smooth, round spheres approximately 8mm in diameter. -
Pierce the holes:
Gently twist a bead pin or toothpick through the center of each sphere. I find rotating the bead while pushing the pin helps keep the shape round. -
Refine the shape:
Once pierced, lightly roll the bead again with the pin still inside to smooth out any fingerprints or distortion. -
Arrange for baking:
Place the pierced beads on a parchment-lined baking sheet. You can bake them on the pins effectively, or carefully slide them off. -
Bake the clay:
Bake according to your specific clay brand’s instructions (usually 275°F/135°C for 15-30 minutes). Let them cool completely before handling. -
Sand for finish (optional):
If there are any rough spots around the holes, lightly buff them with fine-grit sandpaper for a professional matte finish.
Fixing Wonky Holes
If the hole deforms the bead shape, re-roll the bead gently on your work surface *while* the toothpick is still inserted.
Step 3: Assembly
-
Lay out the design:
Arrange your cooled beads in the ombre pattern: Darkest clump -> Medium -> Lightest -> Medium -> Darkest. This creates the continuous fade shown in the photo. -
Start the wire:
Cut a length of beading wire. Thread on a crimp bead and one end of the extension chain or a jump ring. -
Secure the first end:
Loop the wire back through the crimp bead and use your flat nose pliers to squash the crimp flat, securing the chain. -
String the beads:
Thread all your beads onto the wire in the pre-arranged gradient order. Keep tension consistent but not too tight so the bracelet drapes well. -
Add the clasp:
Thread a crimp bead and the lobster clasp onto the open end of the wire. Loop the wire back through the crimp and the last bead. -
Secure and trim:
Pull the wire taut, flatten the crimp bead firmly with pliers, and trim the excess wire tail close to the bead.
Enjoy wearing this warm, sunset-inspired accessory that transitions perfectly from day to night
Chunky Color-Block Sections
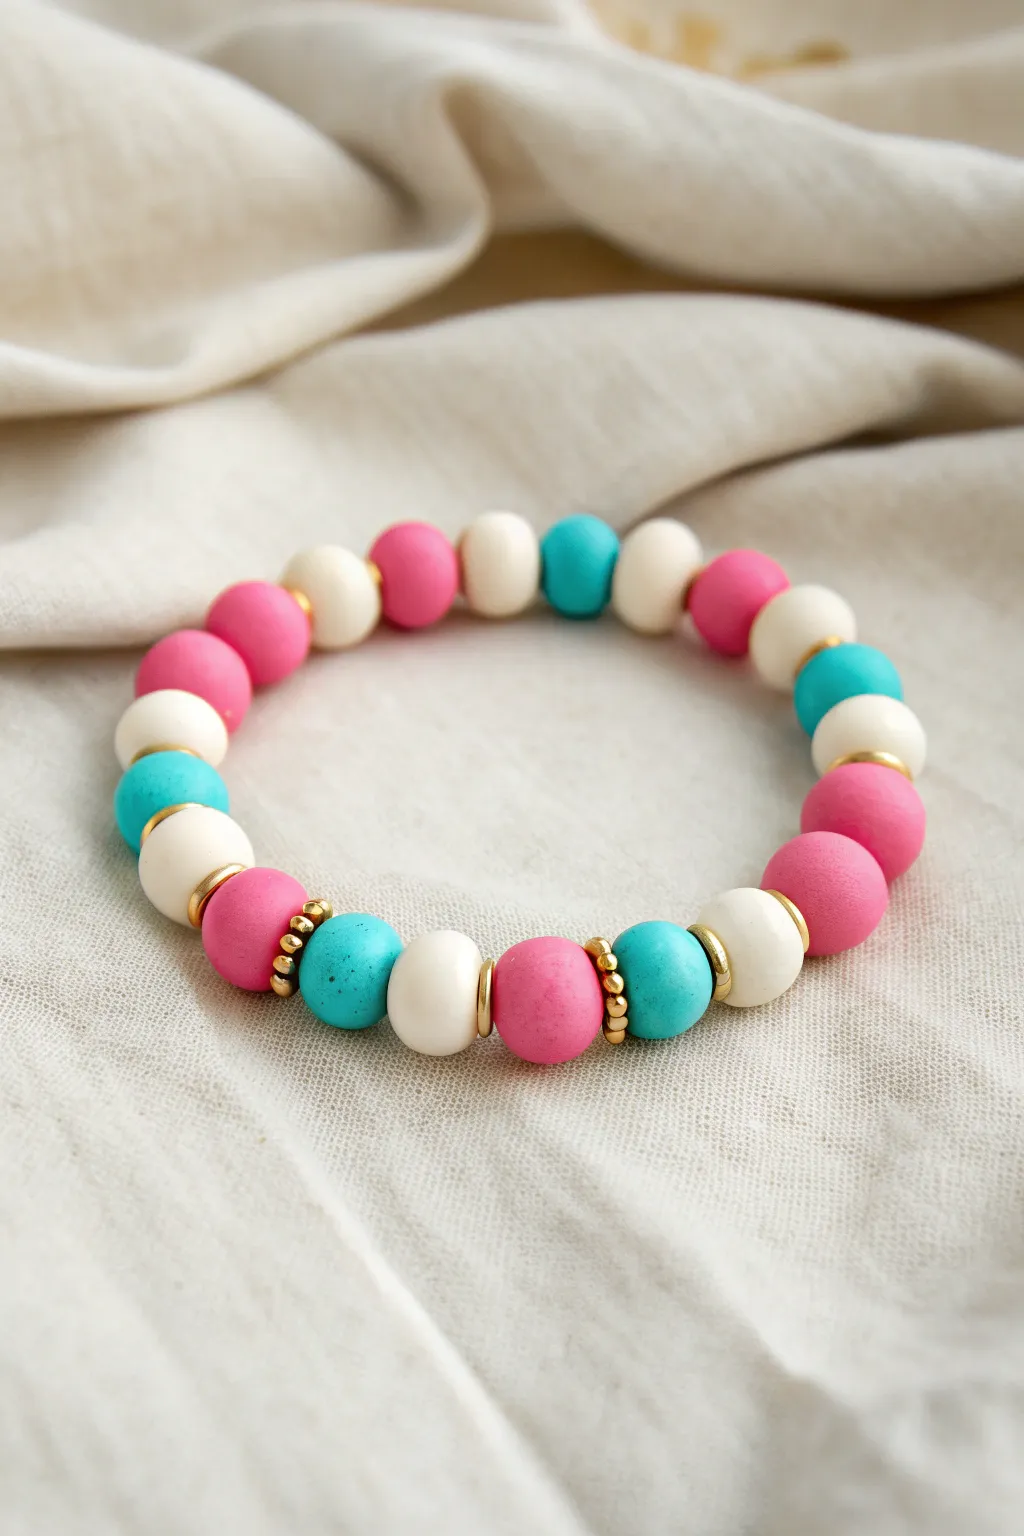
This trendy bracelet combines chunky, matte finish beads in playful teal, pink, and cream hues with elegant gold accents. The irregular, handcrafted texture of the beads gives it a unique, artisanal charm perfect for stacking or wearing solo.
Detailed Instructions
Materials
- Matte polymer clay or acrylic beads (10mm-12mm): Teal, Hot Pink, Cream/White
- Gold plated spacer beads: flat discs or small rondelles
- Gold plated beaded spacers (textured rings)
- Strong elastic cord (0.8mm or 1mm)
- Jewelry glue (e.g., G-S Hypo Cement)
- Scissors
- Bead stopper or tape
- Ruler
Step 1: Preparation & Design
-
Measure your wrist:
Start by measuring your wrist with a flexible tape measure. Add about 0.5 to 1 inch to this measurement depending on how loose you want the fit. -
Cut the cord:
Cut a piece of elastic cord about 10-12 inches long. Having extra length makes tying the final knot much easier. -
Secure the end:
Attach a bead stopper or a piece of tape to one end of the cord so your beads don’t slide off while you work. -
Pre-stretch the cord:
Gently pull tight on the elastic cord a few times. This pre-stretching step helps prevent the bracelet from loosening up after you start wearing it. -
Sort your pattern:
Lay out your beads on a table or bead board to visualize the sequence. The pattern shown uses blocks of color separated by single beads, rather than a perfect 1-2-3 repeating pattern.
Sticky Situation?
If the knot won’t slide into a bead, gently ream the hole of a clay bead with a T-pin or wide needle to slightly enlarge the opening.
Step 2: Stringing the Pattern
-
The focal section:
Start stringing with the main detailed section shown at the bottom of the image. Slide on a pink bead, followed by a textured gold spacer ring. -
Add the teal accent:
Next, add a teal bead, then a simple gold disc spacer, a cream bead, another gold disc spacer, a pink bead, a textured gold spacer, and finally a teal bead again. -
Transition beads:
After that initial detailed block, follow with a flat gold spacer and a single cream bead. -
The pink block:
Create the heavy pink section by stringing two pink beads next to each other without a spacer. -
Teal and white mix:
Continue around the bracelet, threading a cream bead (plus a tiny gold spacer if desired), a teal bead, and then a cream bead. -
Back section:
String a pink bead, a cream bead, and a teal bead. Use thin gold spacers between these if you want more shine, or leave them touching for a cleaner look. -
Closing the loop:
Finish the strand with two pink beads followed by a cream bead. Check the length against your wrist now to ensure it fits comfortably.
Make It Luxe
Swap the matte acrylic beads for semi-precious stones like matte Amazonite or Rhodonite for a heavier, higher-quality feel and natural look.
Step 3: Finishing Touches
-
Prepare the knot:
Remove the bead stopper and bring the two ends of the elastic together carefully. -
Tie a surgeon’s knot:
Tie a surgeon’s knot: cross right over left and loop under, then cross left over right and loop under twice. This double loop makes it much more secure than a standard knot. -
Tighten securely:
Pull all four strands (the two main loop sides and the two tail ends) simultaneously to tighten the knot firmly. -
Apply adhesive:
Dab a tiny drop of jewelry glue directly onto the knot. I find waiting about 30 seconds for it to get tacky helps it set better. -
Hide the knot:
Once the glue is semi-dry but still pliable, slide the knot inside the hole of the nearest large bead to hide it. -
Trim excess:
Use sharp scissors to trim the tail ends of the elastic as close to the bead hole as possible without cutting the knot itself.
Enjoy your stylish new bracelet that adds a perfect pop of matte color to any outfit

TRACK YOUR CERAMIC JOURNEY
Capture glaze tests, firing details, and creative progress—all in one simple printable. Make your projects easier to repeat and improve.
Gold Spacers Every Few Beads
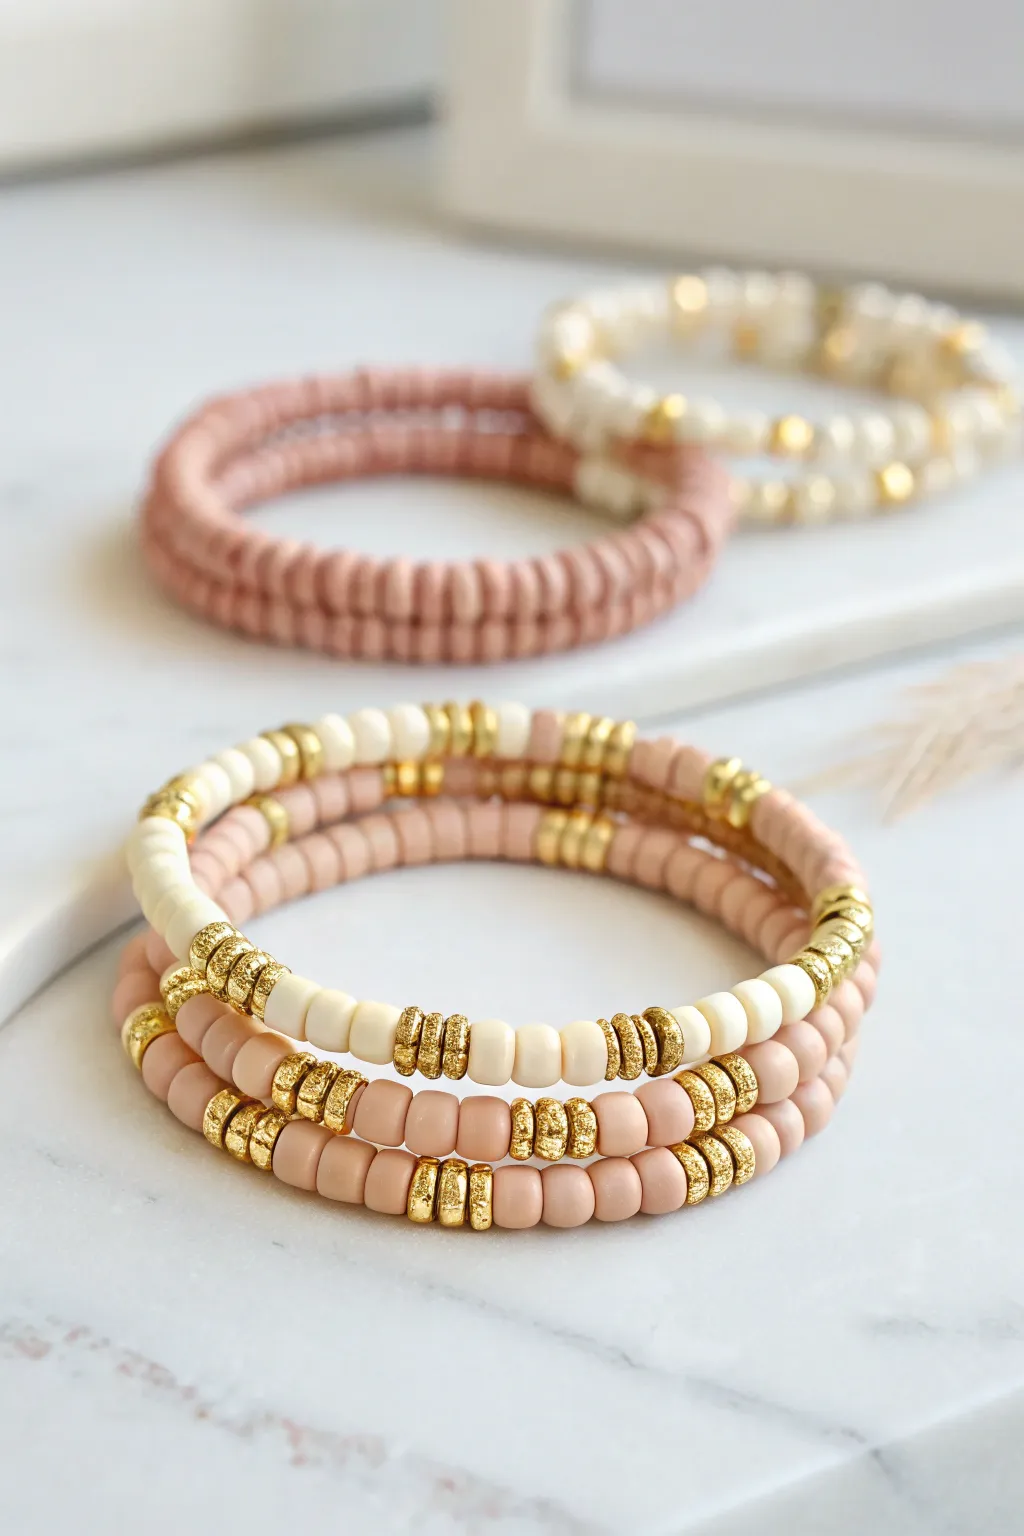
Elevate simple polymer clay strands with the luxurious touch of gold spacer beads arranged in rhythmic patterns. This tutorial specifically guides you through creating the striking three-bracelet stack shown in the foreground, blending creamy white and soft blush pink tones with textured gold accents.
Step-by-Step Tutorial
Materials
- Polymer clay heishi beads (6mm) in soft blush pink
- Polymer clay heishi beads (6mm) in cream/off-white
- Gold embellishment rondelle spacer beads (textured/stardust finish, approx. 5-6mm)
- Strong elastic stretch cord (0.7mm or 0.8mm)
- Bead stopper or masking tape
- jewelry glue (optional, like G-S Hypo Cement)
- Scissors
Step 1: Preparation
-
Measure and cut:
Begin by measuring your wrist and cutting three lengths of elastic cord. Add about 3-4 inches of extra length to each piece to make tying knots easier later. -
Secure the ends:
Attach a bead stopper or simply place a piece of masking tape on one end of each cord. This prevents your beads from sliding off while you work on your patterns.
Spacer Sizing Trouble
If the gold spacers are swallowing your knot or look too bulky, switch to a flat distinct disc shape instead of the rounded rondelle shape for a sleeker profile.
Step 2: Bracelet 1: The Cream & Gold Pattern
-
Start the base:
For the top bracelet in the stack, start by threading onto your first cord. -
Create the first segment:
String on 5 cream clay beads. -
Add gold accents:
Slide on 3 textured gold spacer beads. These should sit snugly against the cream beads. -
Repeat the pattern:
Continue this pattern—5 cream beads followed by 3 gold spacers—until you reach your desired wrist length minus a small gap for stretching.
Level Up: Color Block
Try a ‘half-and-half’ design: do one half of the bracelet entirely in pink clay beads and the other half in the alternating gold/cream pattern for a modern twist.
Step 3: Bracelet 2: The Pink & Gold Mix
-
Set up the second cord:
Pick up your second piece of elastic. -
String the pink base:
Thread on 4 soft blush pink clay beads. -
Insert spacers:
Add 3 gold spacer beads. -
Complete the loop:
Repeat the sequence of 4 pink beads and 3 gold spacers. I like to check the fit against the first bracelet occasionally to ensure they are roughly the same size.
Step 4: Bracelet 3: The Pink & Gold Variation
-
Begin the final strand:
For the bottom bracelet, we will use a slightly different count to add visual interest to the stack. -
Thread the segments:
String on 3 blush pink clay beads. -
Add heavy gold accents:
Thread on 3 gold spacers. Because the pink segments are shorter here, the gold will appear more prominent. -
Check length:
Continue alternating 3 pink and 3 gold until the strand matches the length of the previous two bracelets.
Step 5: Finishing Touches
-
Pre-stretch the cord:
Before tying, gently pull on the ends of each bracelet. This pre-stretches the elastic so it won’t sag later. -
Tie the knot:
Remove the bead stopper and tie a strong surgeon’s knot (right over left, left over right) for each bracelet. Pull tight. -
Secure with glue:
Dab a tiny drop of jewelry glue on the knots for extra security. Let this dry completely before moving on. -
Hide the knot:
Once dry, trim the excess cord close to the knot. Carefully slide the knot inside one of the larger-hole gold spacer beads to hide it from view.
Now you have a chic, coordinated set ready to wear together or mix and match with other favorites
All-White With a Sweet Accent

Embrace a minimalist aesthetic with this crisp, all-white heishi bead bracelet featuring a single pop of romance. The soft pink heart center adds a lovely focal point to an otherwise understated accessory, making it perfect for stacking or wearing solo.
How-To Guide
Materials
- White polymer clay heishi beads (approx. 4-6mm)
- One pink polymer clay heart bead
- Beading wire (approx. 10 inches)
- 2 Gold crimp beads
- 2 Gold wire guardians (optional but recommended)
- 2 Gold jump rings (4mm or 5mm)
- Gold lobster clasp
- Gold extension chain (optional)
- Jewelry pliers (flat nose and cutting)
- Crimping tool (optional)
Step 1: Preparation
-
Measure your wrist:
Wrap a measuring tape loosely around your wrist to find your desired length. Standard bracelets are usually around 6.5 to 7.5 inches. -
Cut the wire:
Cut a piece of beading wire approximately 10 inches long. Having extra length makes it much easier to finish the ends later without struggling. -
Prepare your beads:
Pour out some white heishi beads onto a bead mat or tray. Locate your single pink heart bead and keep it handy.
Clean Lines Tip
Use crimp covers—small C-shaped metal beads—to close over your flattened crimp beads. This makes them look like just another gold bead for a seamless finish.
Step 2: Stringing the Beads
-
Start the first side:
Begin threading the white disc beads onto the wire one by one. I find it therapeutic to pick them up directly with the wire end. -
Check the length:
Periodically hold the strung beads against your ruler. You want to string enough white beads to cover almost half of your total desired bracelet length. -
Add the accent:
Slide on your pink heart bead. Ensure it is orientated correctly so it sits flat against the wrist among the disc beads. -
Complete the beading:
Continue stringing white heishi beads on the other side of the heart. Try to match the length of the first section so the heart stays centered. -
Final sizing check:
Wrap the unfinished strand around your wrist to verify the fit, keeping in mind that the clasp will add about half an inch to the total length.
Level It Up
Create a matching stack by making two more bracelets: one entirely gold beads and one with alternating pink and white sections.
Step 3: Attaching the Clasp
-
Thread the crimp bead:
On one end of the wire, slide on a gold crimp bead. -
Add the wire guardian:
Thread the wire through a U-shaped wire guardian to protect it from abrasion. If you aren’t using one, simply create a small loop. -
Loop back:
Pass the wire back through the crimp bead and pull it taut, leaving just a tiny bit of slack so the connection isn’t stiff. -
Flatten the crimp:
Use your crimping pliers or flat nose pliers to squash the crimp bead firmly, securing the loop. Give it a gentle tug to test security. -
Attach the jump ring:
Open a gold jump ring by twisting it sideways with pliers. Hook it onto the loop you just created and attach one half of the clasp or the extension chain. -
Close the jump ring:
Twist the jump ring back into a closed circle, ensuring the ends meet perfectly so the wire cannot slip out.
Step 4: Finishing Up
-
Repeat on the other side:
Push all beads down towards the finished end. Thread a crimp bead and wire guardian onto the remaining open tail of the wire. -
Secure the final loop:
Thread the wire back through the crimp bead and through the first few white beads next to it. -
Pull tight:
Pull the wire end to remove slack, but don’t pull so tight that the bracelet becomes rigid; it needs to drape naturally. -
Crimp and trim:
Flatten the second crimp bead securely. Use your flush cutters to trim the excess wire tail close to the beads so it doesn’t poke the skin. -
Add the clasp:
Use another jump ring to attach the lobster clasp to this end loop.
Enjoy wearing your handcrafted bracelet that balances sweet simplicity with a touch of playful color
Bubblegum Pink Monochrome
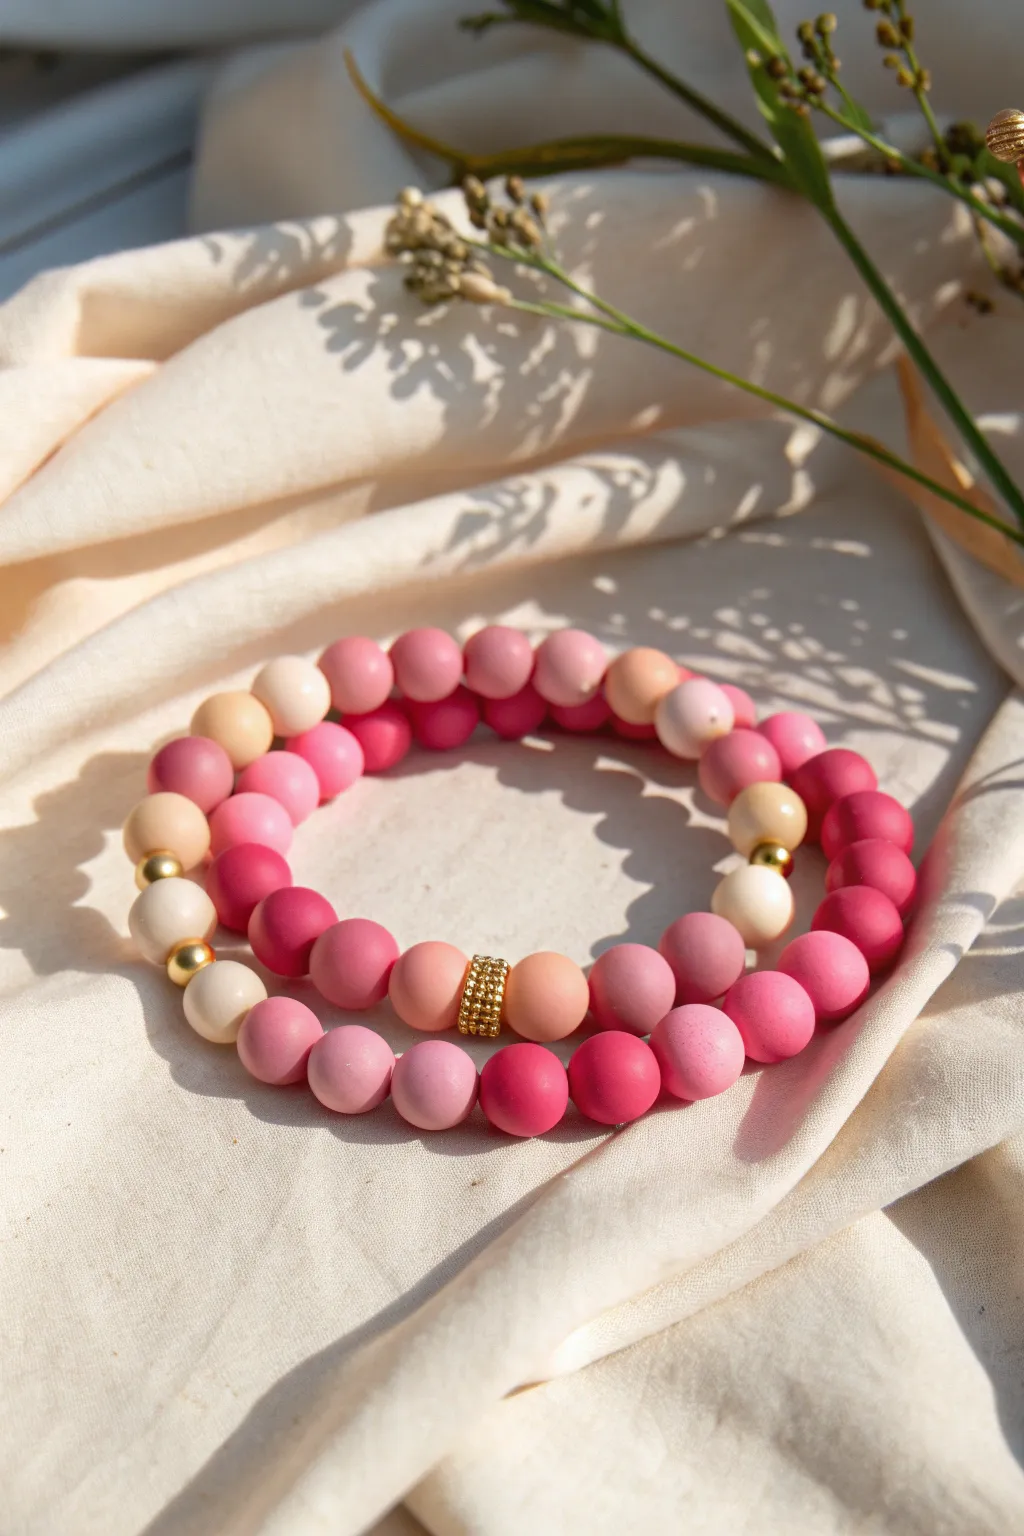
These charming bracelets mix the matte, soft texture of polymer clay beads with shining gold accents for a sophisticated take on the whimsical bubblegum aesthetic. The gentle gradient of pinks, from deep berry to soft blush and cream, creates a harmonious palette perfect for stacking.
Step-by-Step Tutorial
Materials
- Polymer clay round beads in assorted pink shades (Hot Pink, Bubblegum, Mauve, Rose)
- Polymer clay round beads in Cream/Off-White
- Polymer clay round beads in Peach/Light Orange
- Gold tone spacer beads (small spherical smooth beads)
- Gold tone textured spacer bead (cylindrical or rondelle shape)
- Elastic stretch cord (0.8mm clear)
- Jewelry glue or clear nail polish
- Scissors
Step 1: Planning Your Layout
-
Measure and Cut:
Measure your wrist and cut a piece of elastic cord about 3-4 inches longer than that circumference. This extra length makes tying the final knot much easier. -
Pre-stretch the Cord:
Gently pull on the elastic cord perfectly a few times. This pre-stretching prevents the bracelet from loosening up immediately after you wear it. -
Secure the End:
Tape one end of your elastic to your table or clamp it with a binder clip so beads don’t slide off while you work.
Step 2: Assembling Bracelet One (Top/Outer)
-
Start the Pattern:
For the outer bracelet, we want a random but balanced mix. Begin threading your beads, alternating between the darker pinks, lighter mauves, and soft peach tones. -
Adding Cream Accents:
Interject a cream or beige bead every 5 or 6 pink beads to break up the color field and add lightness. -
Insert Gold Spheres:
Select two points in your circle to place a small gold spherical spacer bead. I like placing them next to the cream beads for maximum contrast. -
Check Length:
Wrap the strand around your wrist to check the fit. It should sit comfortably without digging into your skin.
Knot Ninja Tip
Can’t hide the knot in a clay bead? Place the knot next to a gold spacer bead. The larger hole of a metal metal bead often swallows the knot more easily.
Step 3: Assembling Bracelet Two (Bottom/Inner)
-
Centerpiece Focus:
This bracelet features a focal point. Thread your textured gold cylindrical bead onto the middle of your cord first to center your design around it. -
Flanking the Gold:
On either side of the gold cylinder, thread a soft peach or light pink bead to create a gentle transition. -
Build the Gradient:
Continue adding beads symmetrically on both sides, moving from lighter pinks near the center gold piece to darker hot pinks as you move outward. -
Add Side Accents:
About halfway around the bracelet on the left side, add a small gold spherical spacer between a cream bead and a dark pink bead. -
Balance the Design:
Repeat this on the right side with another gold spacer to keep the look cohesive with the first bracelet.
Texture Twist
Mix in a few matte-finish glass beads or frosted acrylics alongside the clay. The subtle shift in sheen adds depth without changing the colors.
Step 4: Finishing Touches
-
Tie the Knot:
Once beads are strung, remove the tape/clip. Bring ends together and tie a surgeon’s knot (right over left, left over right loop twice). -
Secure with Glue:
Apply a tiny dot of jewelry glue or clear nail polish to the knot to seal it. Let it dry completely before touching it. -
Hide the Knot:
Trim the excess string close to the knot, but leave about 1-2mm. Gently tug the cord to pull the knot inside one of the adjacent clay beads to hide it.
Now you have a bouncy, colorful set ready to brighten up any outfit
Beachy Shell Accent Bracelet
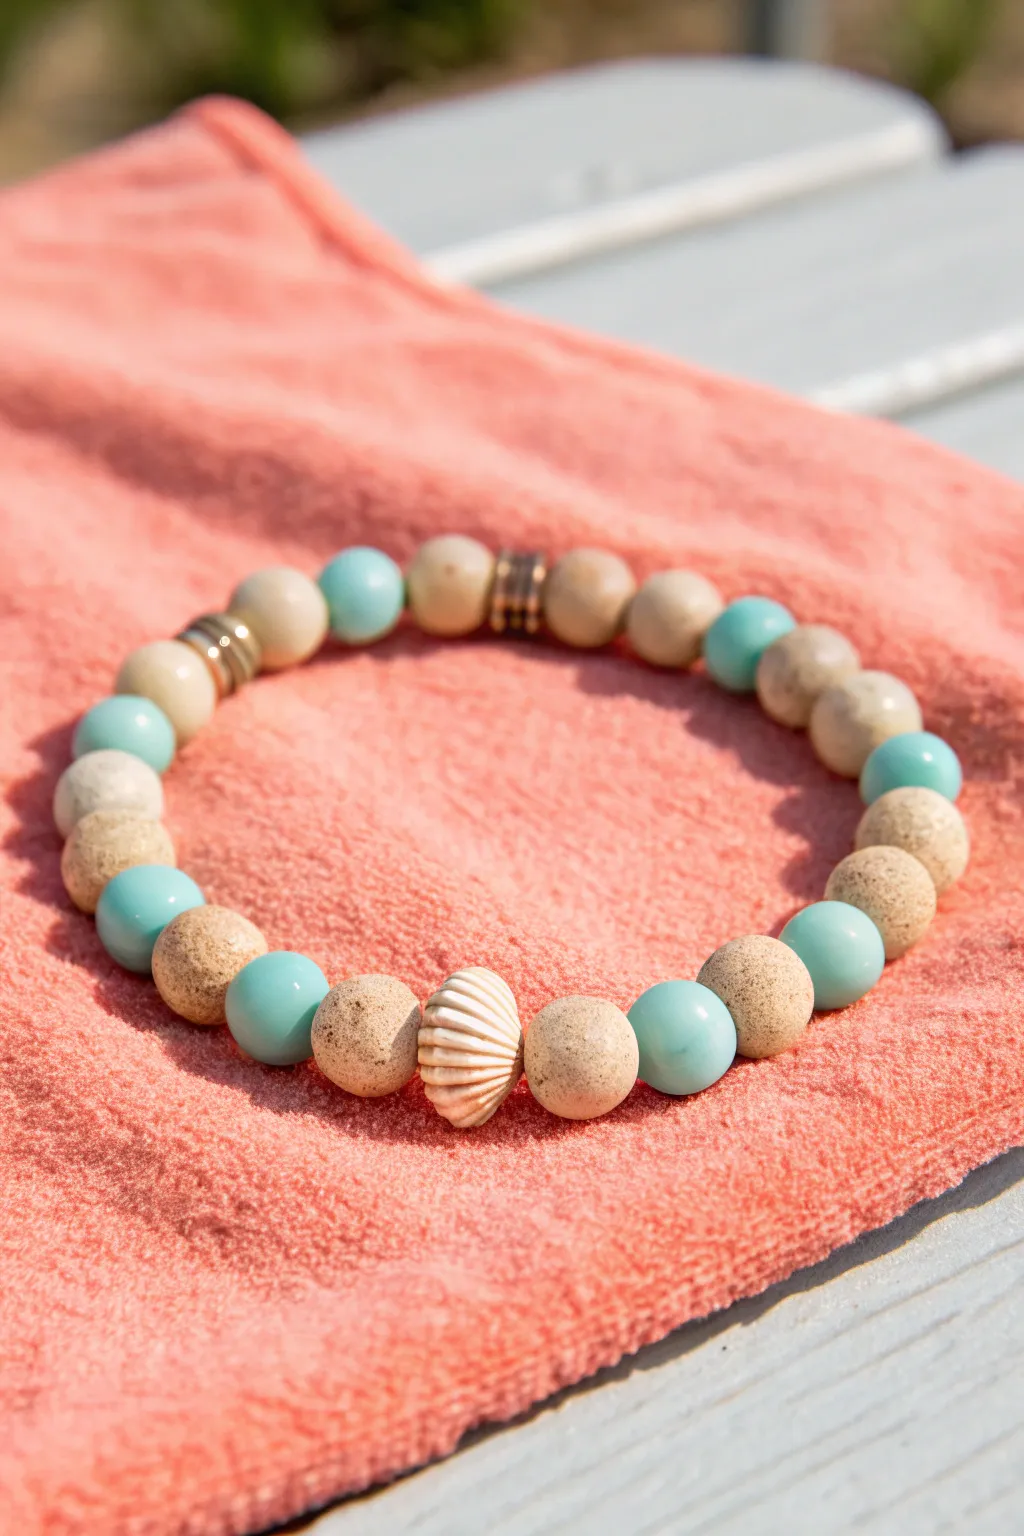
Capture the essence of a day at the shore with this textured, nautical-inspired bracelet featuring sandy hues and pops of ocean blue. The centerpiece is a unique white shell bead that perfectly ties together the coastal theme.
Detailed Instructions
Materials
- Elastic stretch beading cord (0.7mm or 0.8mm)
- Light turquoise round beads (8mm or 10mm, ceramic or stone)
- Textured sand/beige round beads (8mm or 10mm, clay or pumice looks)
- White shell focal bead (drilled through the side)
- 2 bronze or gold spacer beads (flat disc or ring style)
- Super glue or jewelry adhesive
- Scissors
Step 1: Preparation
-
Measure your wrist:
Before you begin stringing, wrap a piece of string or a flexible measuring tape around your wrist to determine the circumference. Add about half an inch to this measurement to ensure the bracelet fits comfortably without being too tight. -
Cut the cord:
Cut a length of elastic cord about 10-12 inches long. Having this extra length makes it much easier to tie secure knots at the end without struggling with tiny tails. -
Pre-stretch the elastic:
I always give the elastic cord a few firm tugs before starting. This pre-stretching helps prevent the bracelet from loosening up and sagging after you wear it a few times. -
Secure the end:
Attach a piece of tape or a bead stopper clip to one end of your cord so your beads don’t slide off while you are working.
Knot Strength
Use a surgeon’s knot (looping through twice) instead of a regular square knot. It grips slippery elastic much better and prevents unraveling.
Step 2: Creating the Layout
-
Begin the pattern:
Start by threading on one textured sand bead, followed by a turquoise bead. This alternating pattern is the foundation of the design. -
Continue the pattern:
Repeat this sequence—sand, turquoise, sand, turquoise—until you have roughly half the length of your bracelet completed. -
Add the metallic accents:
Locate the section opposite where your shell clasp will be. Thread on three sand beads, then one metal spacer, followed by a sand bead, another metal spacer, and finally a sand bead. This creates a subtle metallic detail at the back or side of the wrist. -
Verify length:
Continue adding beads in your alternating turquoise and sand pattern until you have nearly reached your desired length, leaving about an inch of space for the focal section.
Step 3: Adding the Shell Accent
-
Prepare the focal area:
Ensure that the last bead you strung on the cord is a textured sand bead. If your pattern ended on a blue one, add one more sand bead for symmetry. -
Thread the shell bead:
Take your white shell focal bead and thread the elastic cord through its hole. Orient it so the ridges of the shell run vertically, aligned with the direction of the bracelet. -
Close the loop:
Add one final textured sand bead on the other side of the shell. This frames the white shell perfectly between two sandy tones, mimicking a shell resting on the beach. -
Final fit test:
Wrap the unfinished strand around your wrist one last time to check the fit. Add or remove the standard beads if it feels too loose or too snug.
Ocean Scent
Place a drop of essential oil on the unfinished ‘sand’ beads. Their porous texture acts as a natural diffuser for a relaxing scent.
Step 4: FInishing Touches
-
Tie the first knot:
Remove the tape or clip from the end. Bring the two ends of the elastic together and tie a basic overhand knot, pulling it tight to bring the beads together. -
Secure with a surgeon’s knot:
For extra security, tie a surgeon’s knot. This is just like a standard square knot, but you loop the elastic through twice before pulling tight. It holds much better on slippery elastic. -
Glue the knot:
Apply a tiny drop of super glue or jewelry adhesive directly onto the knot. Be careful not to get glue on the neighboring beads, as it can ruin their finish. -
Hide the knot:
While the glue is still slightly tacky but not wet, slide the knot inside the hole of the nearest textured sand bead. This hides the mechanics and gives the bracelet a professional, seamless look. -
Trim excess cord:
Once the glue is fully dry, use your small scissors to trim the remaining tails of the elastic cord as close to the bead hole as possible without cutting the knot itself.
Enjoy wearing your new bracelet that carries a little piece of summer with you everywhere
Strawberry and Lemon Cute Mix
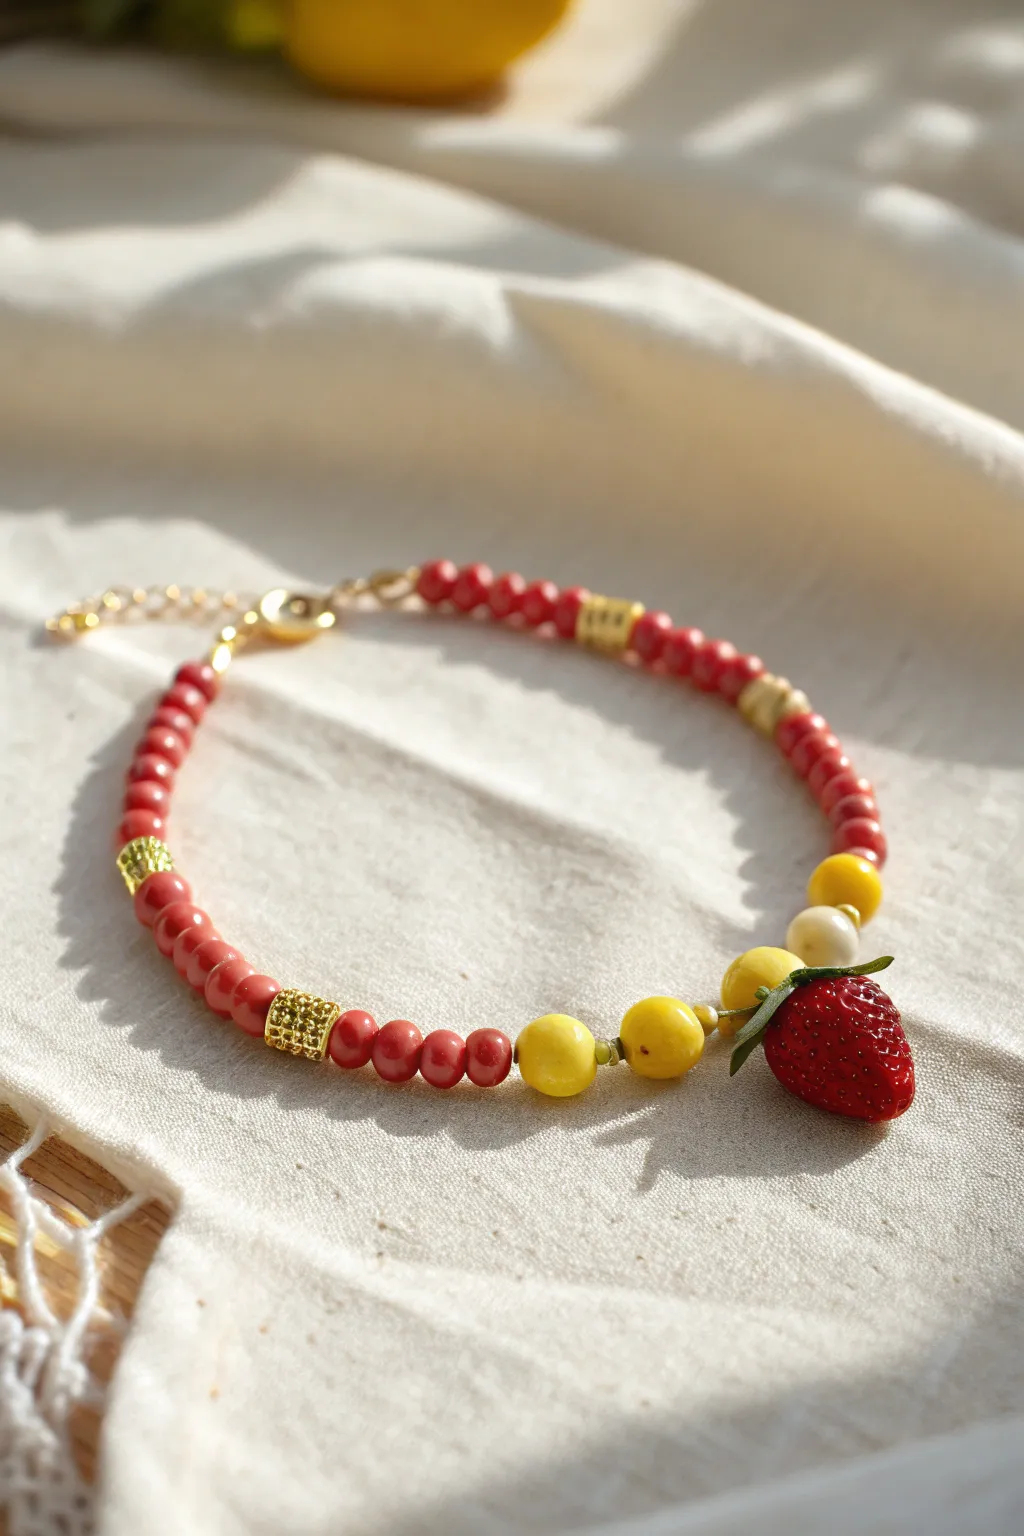
This cheerful bracelet combines the zest of summer with a sweet cottagecore vibe. Featuring a glossy strawberry charm and bright lemon-yellow accents among coral-red beads, it’s the perfect accessory to brighten up any outfit.
How-To Guide
Materials
- Small coral-red round beads (approx. 4mm, glass or ceramic)
- Larger lemon-yellow round beads (approx. 6mm-8mm)
- One pearlescent white round bead (approx. 6mm)
- Realistic strawberry charm (polymer clay or resin)
- Three decorative gold tube spacers (textured)
- Small gold spacer disc beads
- Gold tone lobster clasp and jump rings
- Gold tone extension chain
- Beading wire (flexible, 7-strand or similar)
- Two gold crimp tubes
- Two gold crimp covers (optional but recommended)
- Wire cutters
- Crimping pliers
Step 1: Planning and Prep
-
Measure the wire:
Cut a length of beading wire approximately 10 to 12 inches long. This gives you plenty of slack to work with on both ends so beads don’t slide off accidentally. -
Secure the first end:
Thread one crimp tube onto one end of the wire, followed by a jump ring attached to your lobster clasp. Loop the wire back through the crimp tube. -
Crimp it closed:
Use your crimping pliers to flatten the crimp tube securely, ensuring the wire is locked tight. Cover it with a crimp cover if you want a polished, round bead look. -
Lay out the design:
Before stringing, arrange your beads on a bead board or soft cloth. The pattern uses symmetry, starting from the back and meeting at the central strawberry charm.
Charm Checking
Make sure your strawberry charm has a horizontal hole through the top (a bead) rather than a hanging loop, or it will dangle too low compared to the other beads.
Step 2: Stringing the Band
-
Start the red sequence:
Begin by feeding your wire end through the first few beads to hide it. String on about 8 to 10 of the small coral-red beads. -
Add first gold accent:
Slide on one of the textured gold tube spacers. This breaks up the red and adds a touch of elegance. -
Continue the red beads:
Add a longer section of coral-red beads, approximately 12 to 15 beads, depending on your desired wrist size. -
Add second gold accent:
Place your second gold tube spacer onto the wire. -
The final red section:
String on another small group of coral-red beads—about 4 or 5—to lead into the focal section.
Juicy Details
Swap the plain yellow beads for tiny lemon slice polymer clay beads to enhance the fruit theme, or use green faceted beads near the strawberry to mimic leaves.
Step 3: The Focal Point
-
Transition to yellow:
Now, thread on one of the larger yellow lemon-colored beads. Follow this immediately with a very small gold spacer disc bead. -
Add the second yellow bead:
Add another large yellow bead, followed by another tiny gold spacer disc. -
Create the center cluster:
Thread on a third yellow bead. Instead of a gold spacer, thread on the single pearlescent white bead next. -
Attach the strawberry:
Slide your strawberry charm onto the wire so it sits right next to the pearl bead. The weight of the charm will naturally make this the bottom center of the bracelet. -
Mirror the pattern:
Now work backward from the center. Add a yellow bead, a decorative gold tube spacer (this differs slightly from the other side solely for visual balance), and then your long strand of coral-red beads. -
Finish the bead stringing:
Complete the loop by mirroring the bead counts from the first half: red beads, gold tube spacer, then the final short segment of red beads.
Step 4: Finishing Touches
-
Add the end hardware:
Thread a crimp tube onto the end of the wire, followed by the jump ring attached to the extension chain. -
Create the loop:
Pass the wire back through the crimp tube and pull it taut against the last beads—but not so tight that the bracelet becomes stiff; it needs to drape. -
Secure the final crimp:
Use the crimping pliers to flatten the tube. Make sure to tug gently to test the security. -
Trim excess wire:
Ideally, feed the tail of the wire back through a couple of beads before trimming it flush with your wire cutters. This prevents sharp ends from scratching your wrist.
Now you have a refreshing piece of jewelry ready for sunny days
Star and Moon Dreamy Bracelet

Capture the magic of a twilight sky with this dreamy combination of pastel purple and blue clay beads. Punctuated by shining silver stars, this bracelet adds a celestial touch to any outfit and is a perfect beginner-friendly beading project.
Step-by-Step
Materials
- Polymer clay disc beads (heishi beads) in matte lavender/purple
- Polymer clay disc beads (heishi beads) in matte sky blue
- 3 Small silver star charms
- 1 Larger silver star charm (optional, for side accent)
- Silver spacer beads (rounded rings)
- 3-4 Silver jump rings
- Clear elastic beading cord (0.7mm or 0.8mm)
- Jewelry glue or clear nail polish
- Scissors
Step 1: Planning Your Pattern
-
Measure your wrist:
Wrap a piece of string around your wrist to find your size, then add about an inch to the total length to account for the thickness of the beads. Cut a piece of elastic cord roughly 4 inches longer than this measurement to give yourself plenty of room for tying knots later. -
Pre-stretch the cord:
Give your elastic cord a few gentle tugs. This helps prevent the bracelet from stretching out permanently after you wear it a few times. -
Lay out the design:
Before threading, arrange your beads on a flat surface or bead board. The pattern in the image alternates between sections of single colors: a block of purple, a silver spacer, and a block of blue.
Step 2: Stringing the Beads
-
Start the first section:
Begin by threading about 8-10 sky blue heishi beads onto the elastic. I suggest using a bead stopper or simply taping the end of the cord to the table so beads don’t slide off. -
Add a spacer:
After your first blue block, slide on one silver ring spacer bead. This adds a nice metallic break between the matte clay textures. -
Create the purple section:
Thread on a section of the lavender clay beads. Aim for roughly the same length as your blue section, usually 8-10 beads, to keep the symmetry balanced. -
Add the star charms:
For the focal point, you’ll want to place your charms. If your charms don’t have jump rings attached yet, use pliers to open a jump ring, slide on the star, and close it. Thread the jump ring directly onto the elastic between two blue beads or spacer beads. -
Spacing the charms:
Notice how the charms in the photo are clustered? Thread a few blue beads, add a star charm, thread one or two more beads, and add the next star. This creates focused movement rather than spreading them all around the wrist. -
Continue the pattern:
Resume your pattern of alternating color blocks separated by silver spacers. Continue until you reach your measured length.
Knot Slipping?
If your elastic knot feels loose, try tying it while the elastic is stretched taut. This creates tension that locks the knot in place once released.
Step 3: Finishing Touches
-
Check the fit:
Wrap the unfinished strand around your wrist to ensure it sits comfortably. It should be snug but not tight. Add or remove a few beads if necessary. -
Tie the knot:
Tie the two ends of the elastic together using a surgeon’s knot. This is just a standard square knot looped through an extra time for security. -
Secure the knot:
Pull the elastic tight to cinch the knot. Dab a tiny drop of jewelry glue or clear nail polish onto the knot and let it dry for a few minutes. -
Hide the knot:
Once dry, trim the excess tail of the elastic. If the hole of a neighboring bead is large enough, gently tug the knot inside that bead to hide it completely.
Celestical Upgrade
Mix in a few glow-in-the-dark beads within the blue sections. By day they blend in, but at night your starry bracelet will actually glow!
Enjoy wearing your new celestial accessory or gift it to a friend who loves gazing at the night sky.
Daisy-Inspired Flower Colors
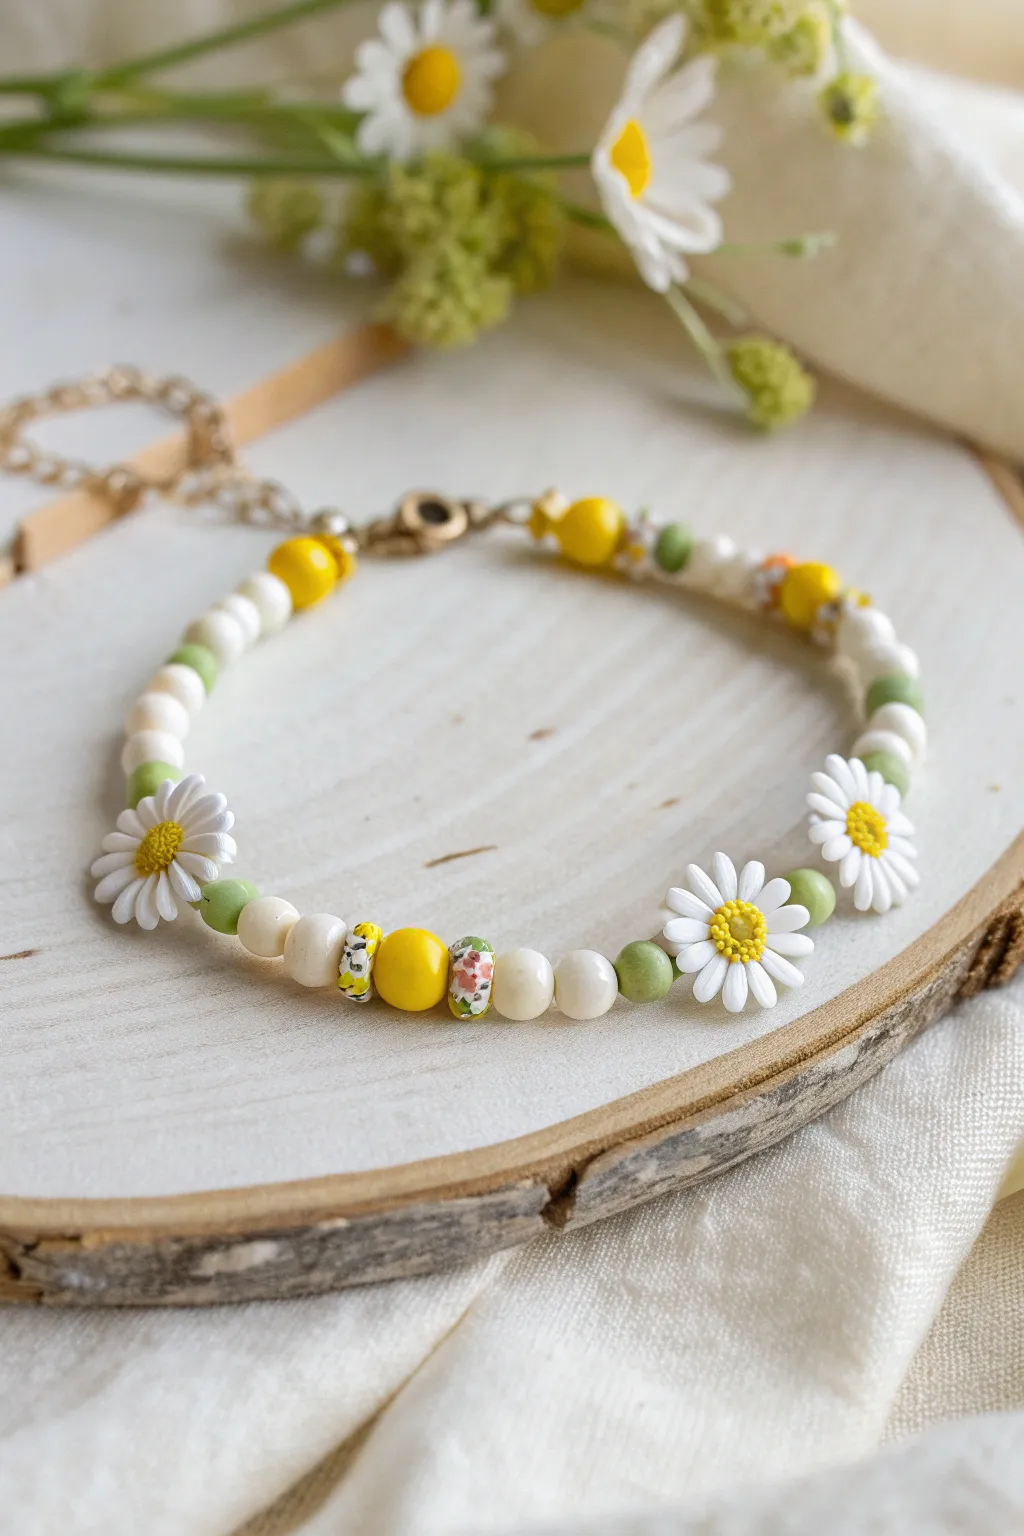
Capture the essence of a bright spring afternoon with this cheerful beaded bracelet featuring delicate polymer clay daisies. The soothing palette of creamy white, soft green, and sunny yellow makes it a versatile accessory that feels fresh and fun.
Detailed Instructions
Materials
- Polymer clay daisy beads (approx. 8-10mm)
- White or cream round beads (wood, ceramic, or clay, 6mm and 8mm)
- Yellow round beads (6mm and 8mm)
- Sage green round beads (6mm)
- Small floral patterned accent beads (barrel or round shape)
- Small gold spacer beads (2-3mm)
- Beading wire or strong elastic cord
- Gold tone crimp beads and covers
- Gold tone lobster clasp and extension chain
- Jewelry pliers (round nose and flat nose)
- Wire cutters
- Bead design board (optional but helpful)
Step 1: Planning and Preparation
-
Measure the wrist:
Before selecting your beads, measure your wrist to determine the needed length, typically around 6.5 to 7 inches for an average adult size. -
Layout the design:
Arrange your beads on a design board or a piece of felt cloth. Place three daisy beads evenly spaced out—one in the center and one on either side of the ‘front’ section. -
Establish the pattern:
Start building the pattern around the daisies. Flank each daisy with small sage green beads, then transition into white round beads. -
Add accent sections:
Between the main white sections, plan specific focal points. Notice the detail in the image: a central large yellow bead flanked by floral patterned barrel beads and small gold spacers.
Smooth Strands
If you are using beading wire, make sure to use wire guards at the ends where the clasp attaches. This prevents the metal clasp from wearing down the wire over time.
Step 2: Stringing the Core Design
-
Prepare the wire:
Cut a length of beading wire about 10-12 inches long. This gives you plenty of extra room to work with the clasps later. -
Attach the first clasp:
Thread a crimp bead onto one end, followed by the lobster clasp. Loop the wire back through the crimp bead and use your flat nose pliers to squash it flat securely. -
Cover the crimp:
Place a crimp cover over the flattened crimp bead and gently close it with pliers to make it look like a seamless gold bead. -
Start loosely:
Begin stringing from one end of your laid-out pattern. Start with the smaller beads near the clasp—perhaps a pattern of white, green, yellow, and a spacer. -
Thread the first section:
Add your first sequence leading up to a daisy. I like to use the white beads here to build length. -
Add the first daisy:
Slide on a green bead, followed by your first clay daisy, and another green bead to frame it perfectly.
Step 3: Creating the Focal Points
-
Build the middle section:
Continue stringing white beads until you reach the center focal point. Thread a small gold spacer, a floral barrel bead, a large yellow bead, another floral barrel, and a final spacer. -
Thread the second daisy:
Mirror the first side by adding white beads, then the green-daisy-green combination for the second flower. -
Add the third daisy:
Continue the pattern to add the third and final flower, ensuring the spacing between them looks balanced on the strand. -
Finish the beadwork:
Complete the strand with your remaining pattern of white, yellow, and green beads until you reach the desired length.
Texture Play
Mix finishes for depth! Use matte polymer clay for the daisies but shiny ceramic or glass for the yellow beads to make the ‘pollen’ centers pop visually.
Step 4: Final Assembly
-
Prepare the closure:
Thread a crimp bead onto the open wire end, followed by the extension chain ring. -
Secure the wire:
Pass the wire back through the crimp bead and pull it taut—but leave just a tiny bit of slack so the bracelet creates a nice circle without being stiff. -
Crimp and trim:
Flatten the crimp bead securely with your pliers. Trim the excess wire flush carefully using wire cutters. -
Apply the final cover:
Add the last crimp cover over the crimp bead, closing it gently to match the other side.
Wear your new bracelet stacked with other gold accessories or let it shine on its own as a happy nature-inspired statement piece
Candy Sprinkle Confetti Pattern
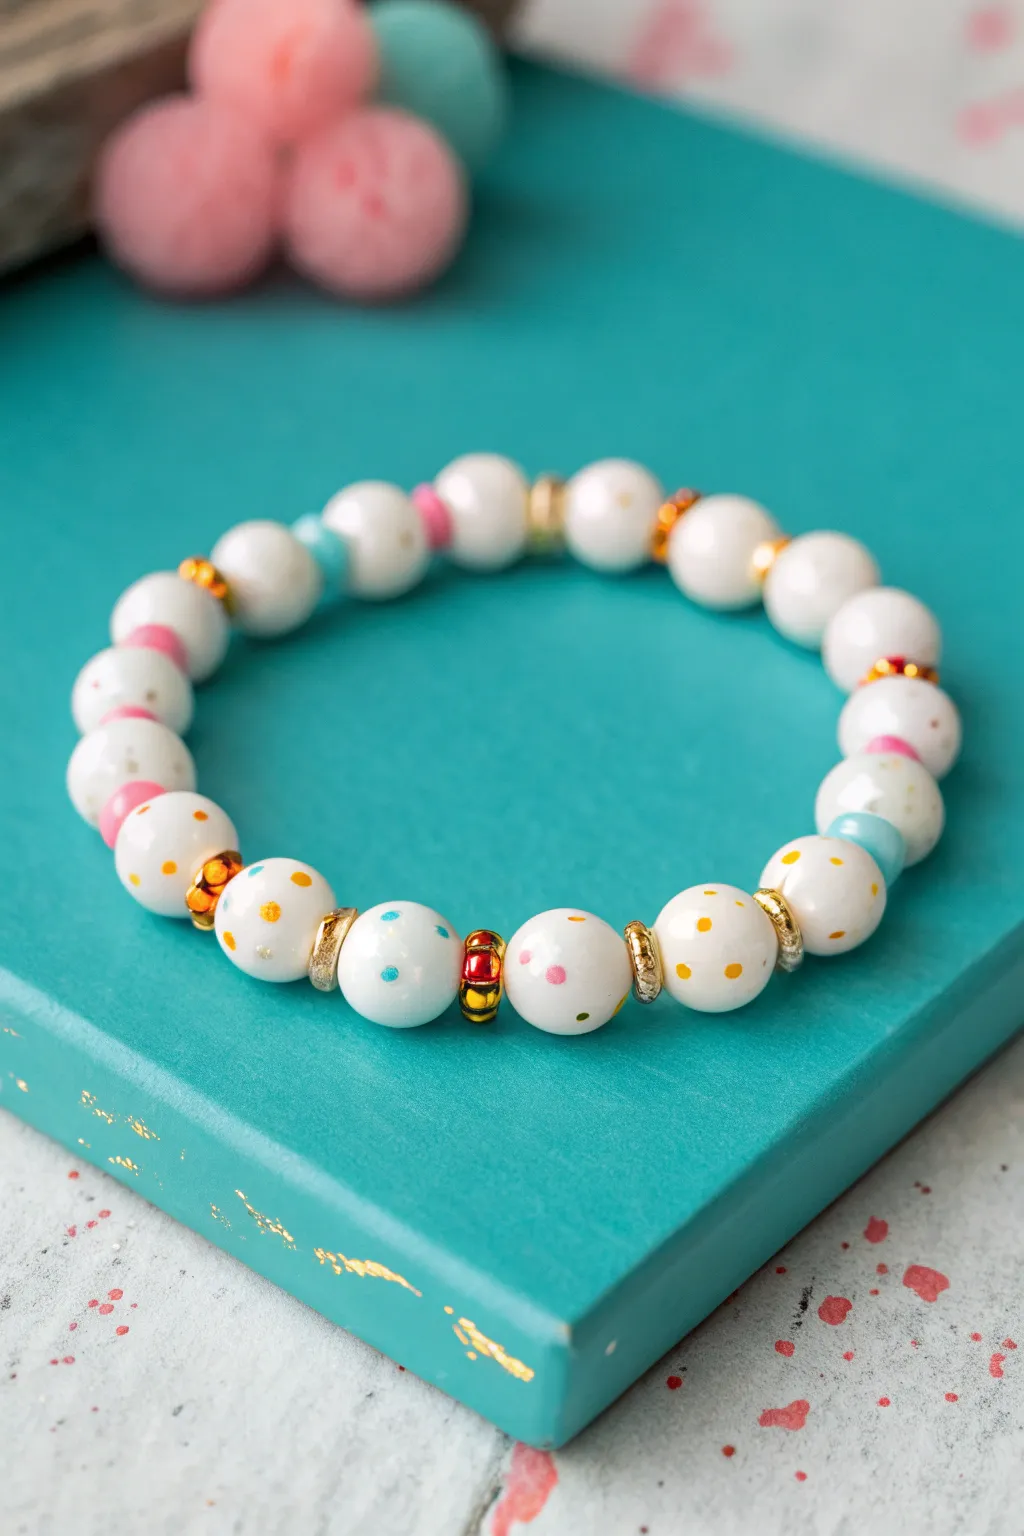
This charming bracelet looks good enough to eat with its white beads speckled like frosting and colorful candy-inspired spacers. The mix of polka dots and gold accents creates a playful yet polished accessory perfect for adding a pop of fun to any outfit.
Step-by-Step Tutorial
Materials
- White round polymer clay or acrylic beads (approx. 8mm or 10mm)
- Small gold spacer beads (daisy or rondelle style)
- Thin flat disc beads/heishi beads in pink and light blue
- One focal gold bead with red stripe detail (or similar accent bead)
- Acrylic paint pens or fine-tip paint brushes (yellow, blue, pink, orange)
- Clear sealant or gloss varnish
- Elastic stretch beading cord (0.7mm or 0.8mm)
- Jewelry glue or clear nail polish
- Scissors
- Beading needle (optional)
- Masking tape or bead stopper
Step 1: Prepping the Confetti Beads
-
Set up your workspace:
Gather your white round beads. To make painting easier, I find it helpful to string them loosely on a spare piece of wire or a toothpick, or simply hold them carefully with tweezers. -
Add first color dots:
Take your yellow paint pen or brush and dab small, random dots onto a few of the white beads. Keep the dots tiny to mimic sprinkles. -
Incorporate more colors:
On other white beads, add dots in blue, pink, or orange. You can make some beads multi-colored with a confetti mix, while keeping others simpler with just one or two colors. -
Create variation:
Notice in the image that some beads have gold-ish orange dots while others have pastel speckles. Variety is key here, so don’t make every bead identical. -
Seal the design:
Allow the paint to dry completely. Once dry, coat the painted beads with a thin layer of clear gloss varnish or sealant to protect the ‘sprinkles’ from scratching off.
Paint Slipping?
If paint beads up on plastic, lightly buff the surface with fine sandpaper or a nail file first to help the pigment grip the smoother surface.
Step 2: Designing the Pattern
-
Measure your cord:
Cut a length of elastic cord about 10-12 inches long. This gives you plenty of extra room for tying knots later. -
Secure the end:
Place a piece of masking tape or a bead stopper on one end of the cord to prevent your hard work from sliding off. -
Start the sequence:
Begin threading your beads. Start with a section of simple white beads alternating with colorful spacers to build the back of the bracelet. -
Add candy accents:
Insert the pink and blue flat disc beads between the larger white rounds periodically. This adds those pops of solid color seen in the reference. -
Insert gold spacers:
Place the gold daisy or rondelle spacers on either side of selected white beads to add a touch of sparkle and separate the segments. -
Create the focal point:
Thread on your special focal bead—the gold one with the red stripe—flanked by two speckled white beads. This acts as the centerpiece of the design. -
Check the fit:
Wrap the strand around your wrist to check the size. Add or remove beads as necessary until it fits comfortably without being too tight.
Perfect Polka Dots
Use the head of a sewing pin dipped in paint instead of a brush. It creates perfectly round, uniform dots every single time.
Step 3: Finishing Touches
-
Prepare to tie:
Remove the tape or bead stopper carefully, holding both ends of the elastic cord firmly. -
Pre-stretch the cord:
Gently pull tightly on the ends of the cord a few times. This pre-stretching step helps prevent the bracelet from sagging or loosening after you wear it. -
Knot the ends:
Tie a surgeon’s knot (right over left, left over right) or a strong square knot. Pull it very tight so the beads press snugly together. -
Secure with glue:
Dab a tiny drop of jewelry glue or clear nail polish onto the knot. Let it dry for a few minutes to ensure it won’t slip. -
Hide the knot:
Trim the excess cord ends close to the knot, then gently tug the bracelet so the knot slides inside the hole of a neighboring bead.
Wear your new confetti bracelet solo or stack it with others for a sweet and colorful arm party
Checkerboard Color Alternation
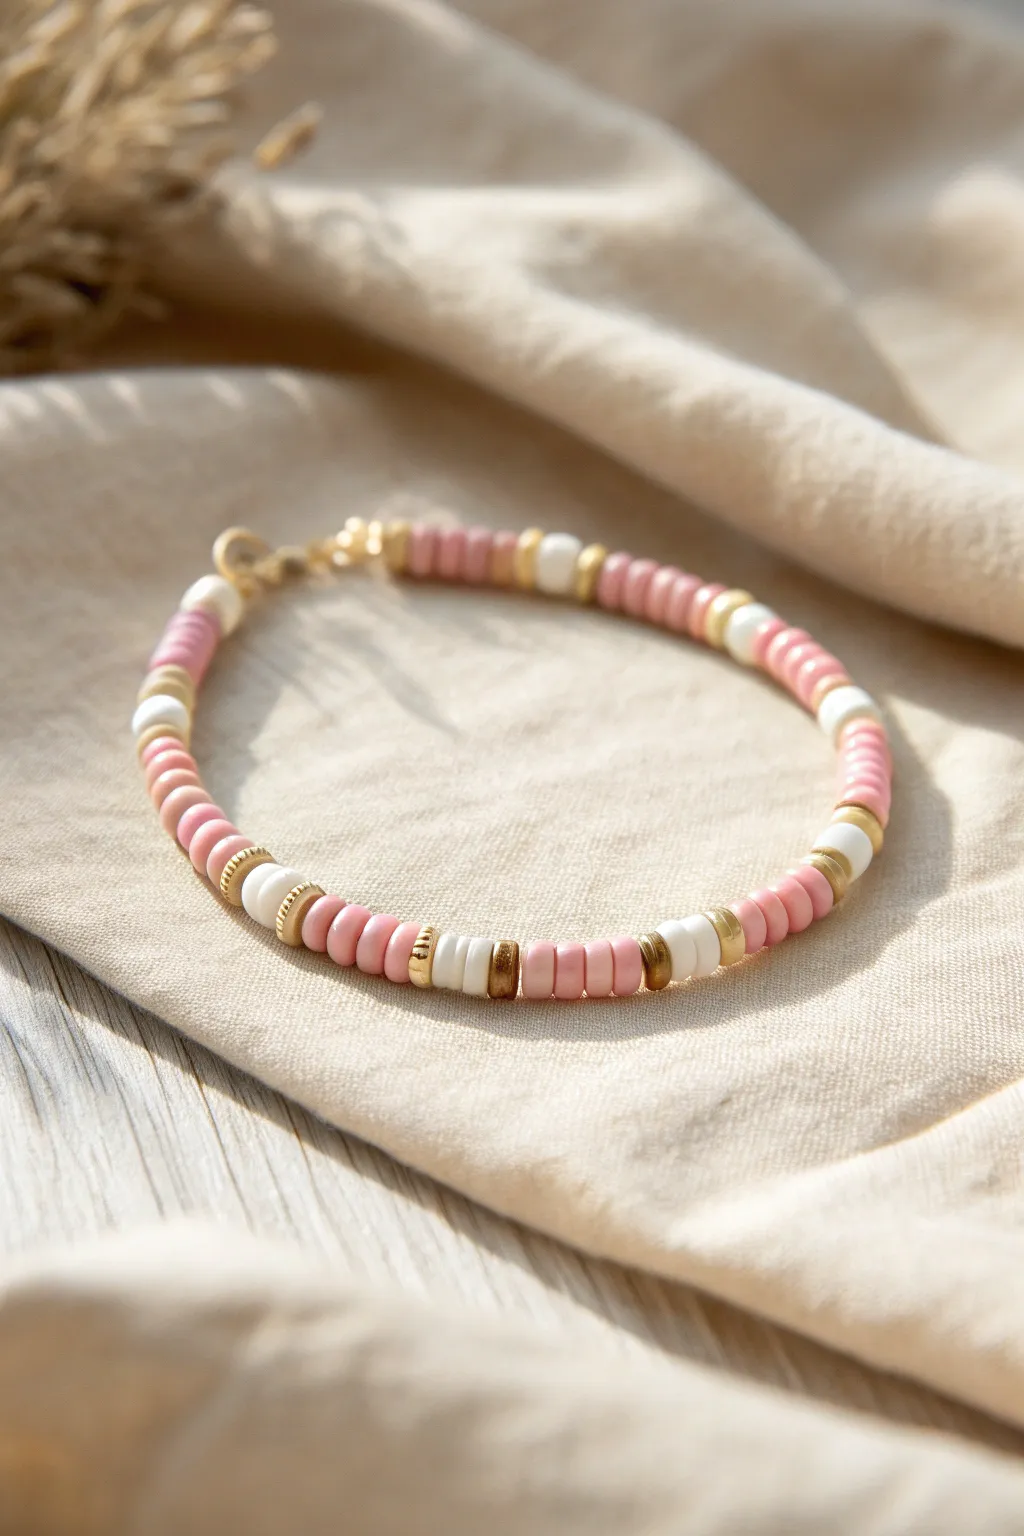
This charming bracelet combines delicate pink clay heishi beads with crisp white accents and warm gold spacers for a sophisticated yet playful look. The soft, repeating pattern creates an effortless rhythm that looks beautiful worn solo or stacked with other favorites.
Detailed Instructions
Materials
- Pink polymer clay heishi beads (approx. 4-6mm)
- White polymer clay heishi beads (approx. 4-6mm)
- Thick gold spacer beads or disc beads (3-4mm)
- Elastic beading cord (0.5mm clear)
- Gold tone jump ring
- Gold tone lobster clasp
- Gold tone crimp beads or knot covers
- Scissors or a bead cutter
- Jewelry pliers
- Bead design board (optional)
Step 1: Preparation
-
Measure your cord:
Cut a piece of elastic cord about 10-12 inches long. This gives you plenty of extra room to work with the ends without losing your beads. -
Secure the end:
Place a piece of tape on one end of your cord or attach a bead stopper. This prevents your beads from sliding right off while you are deep in the rhythm of stringing. -
Sort your beads:
Pour out small piles of your pink, white, and gold beads onto a soft surface or bead mat so they don’t roll away.
Step 2: Creating the Pattern
-
Start the sequence:
Begin stringing with a section of pink heishi beads. Add approximately 4 to 5 pink beads to create a solid block of color. -
Add the first divider:
Slide on one gold spacer bead. These thicker metal spacers add a nice visual weight compared to the flat clay beads. -
Create the contrast:
Add two white heishi beads. This small white section acts as a bright ‘pop’ against the pink. -
Complete the motif:
Finish this specific pattern block with another single gold spacer bead. -
Repeat the pattern:
Return to the pink beads. String another set of 4-5 pink beads, followed by a gold spacer, two white beads, and another gold spacer. -
Check consistency:
Continue this alternating sequence (Pink Block -> Gold -> White Pair -> Gold) until you reach your desired length. I usually aim for about 6.5 to 7 inches for an average wrist. -
Test the fit:
Wrap the unfinished strand around your wrist to check the sizing. Remember the clasp will add about half an inch to the final length, so stop stringing just short of the ends meeting.
Design Rhythm
Vary the number of pink beads slightly (3-5) between sections for an organic feel, or count exactly for precision.
Step 3: Finishing Touches
-
Prepare the first end:
Slide a crimp bead onto one end of the elastic, followed by your jump ring. Loop the elastic back through the crimp bead to create a loop holding the ring. -
Secure the crimp:
Use your jewelry pliers to flatten the crimp bead firmly. Make sure the wires aren’t crossed inside the crimp for the strongest hold. -
Attach the clasp:
On the other end of the bracelet, repeat the crimping process, but this time slide on the lobster clasp instead of a jump ring. -
Double check security:
Give the ends a gentle tug to ensure your crimps are holding tight. If you prefer a simpler finish, you can tie a surgeon’s knot with the elastic ends instead of using hardware, gluing the knot securely. -
Trim excess cord:
If you used crimp beads, trim the excess tail of the elastic cord close to the crimp bead. If you tied a knot, trim the ends and tuck the knot inside a nearby bead if the hole is large enough.
Loose Elastic?
Pre-stretch your elastic cord firmly before stringing. This prevents the bracelet from sagging after the first wear.
Now you have a lovely, custom-sized accessory ready to wear or gift
Glow-in-the-Dark Accent Surprise
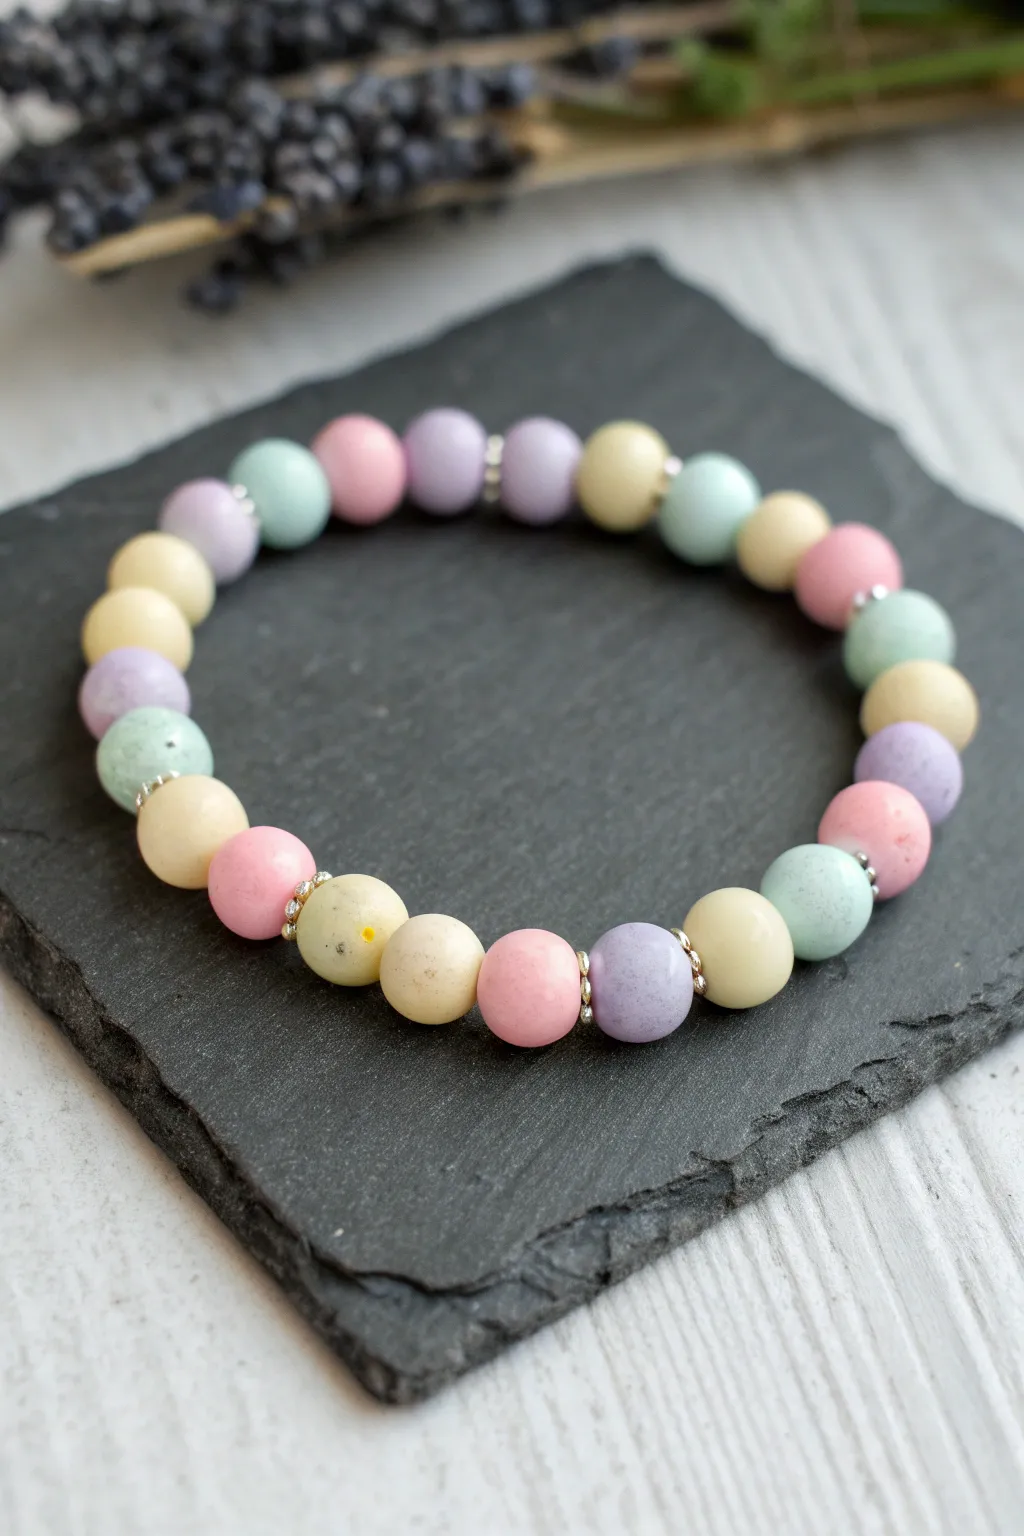
This charming bracelet combines soft pastel hues with a fun hidden feature that reveals itself when the lights go down. Its matte finish gives it a sophisticated candy-like appearance, perfect for stacking or wearing as a sweet solo statement piece.
How-To Guide
Materials
- 10mm polymer clay beads (matte finish) in pastel pink, yellow, lavender, and mint green
- Silver rhinestone spacer beads (rondelle shape)
- 0.8mm crystal styling elastic cord
- Glow-in-the-dark acrylic paint (neutral/clear drying)
- Fine tip paintbrush
- Bead stopper or masking tape
- Jewelry glue (e.g., G-S Hypo Cement)
- Scissors
Step 1: Prepping the Beads
-
Sort your palette:
Begin by separating your pastel clay beads into color groups. You will need approximately 5-6 beads of each color: yellow, pink, lavender, and mint green. -
Apply the glow:
This is the secret ingredient. Select the ‘mint green’ and ‘yellow’ beads for the glow effect. Using a fine-tip brush, apply a very thin, even coat of neutral glow-in-the-dark paint to these specific beads. -
Let them cure:
Allow the painted beads to dry completely according to the paint manufacturer’s instructions. I usually let them sit for at least an hour to ensure the surface isn’t tacky. -
Check the finish:
Once dry, the beads should retain their matte look. If they look too glossy, you can lightly buff them with a piece of denim or a very fine polishing cloth to knock back the shine.
Sticky Situation?
If the glow paint feels tacky after drying, dust the beads lightly with cornstarch or translucent setting powder to restore that smooth, matte feel.
Step 2: Stringing the Pattern
-
Measure the cord:
Cut a piece of elastic cord about 10-12 inches long. This gives you plenty of extra room for tying knots later without struggling. -
Secure the end:
Attach a bead stopper or a piece of masking tape to one end of the cord to prevent your beads from sliding off while you work. -
Begin the sequence:
Start threading your beads. The pattern shown follows a loose rotation: Lavender, Yellow, Pink, Silver Spacer, Mint Green. -
Add the spacers:
Notice the silver rhinestone spacers aren’t between *every* bead. Place one roughly after every third or fourth pastel bead to create little pockets of sparkle without overwhelming the design. -
Check the fit:
Wrap the strand around your wrist to check the size. You want a snug but comfortable fit; add or remove beads as needed to close the gap. -
Verify the pattern:
Before tying off, ensure your pattern looks balanced. Make sure you don’t have two of the same color touching at the ends where the knot will be.
Step 3: Finishing Touches
-
Pre-stretch the cord:
Gently pull on both ends of the elastic a few times. This pre-stretching step is crucial because it prevents the bracelet from sagging immediately after you wear it. -
Tie the knot:
Remove the bead stopper and bring the ends together. Tie a surgeon’s knot: cross left over right, then right over left, looping the end through twice before pulling tight. -
Secure with glue:
Apply a tiny drop of jewelry glue directly onto the knot. Be careful not to get glue on the surrounding beads, as it can ruin the matte finish. -
Hide the knot:
While the glue is still tacky, slide the knot inside the hole of the nearest large bead. This creates a seamless, professional look. -
Final trim:
Once the glue has fully hardened (wait about 15 minutes), trim the excess elastic cord close to the bead hole carefully.
Charge It Up
For the brightest glow, ‘charge’ your finished bracelet under a UV flashlight or strong LED lamp for 30 seconds before turning off the lights.
Enjoy the gentle pastel look by day and the fun surprise glow by night
Mixed Texture With Pearly Accents
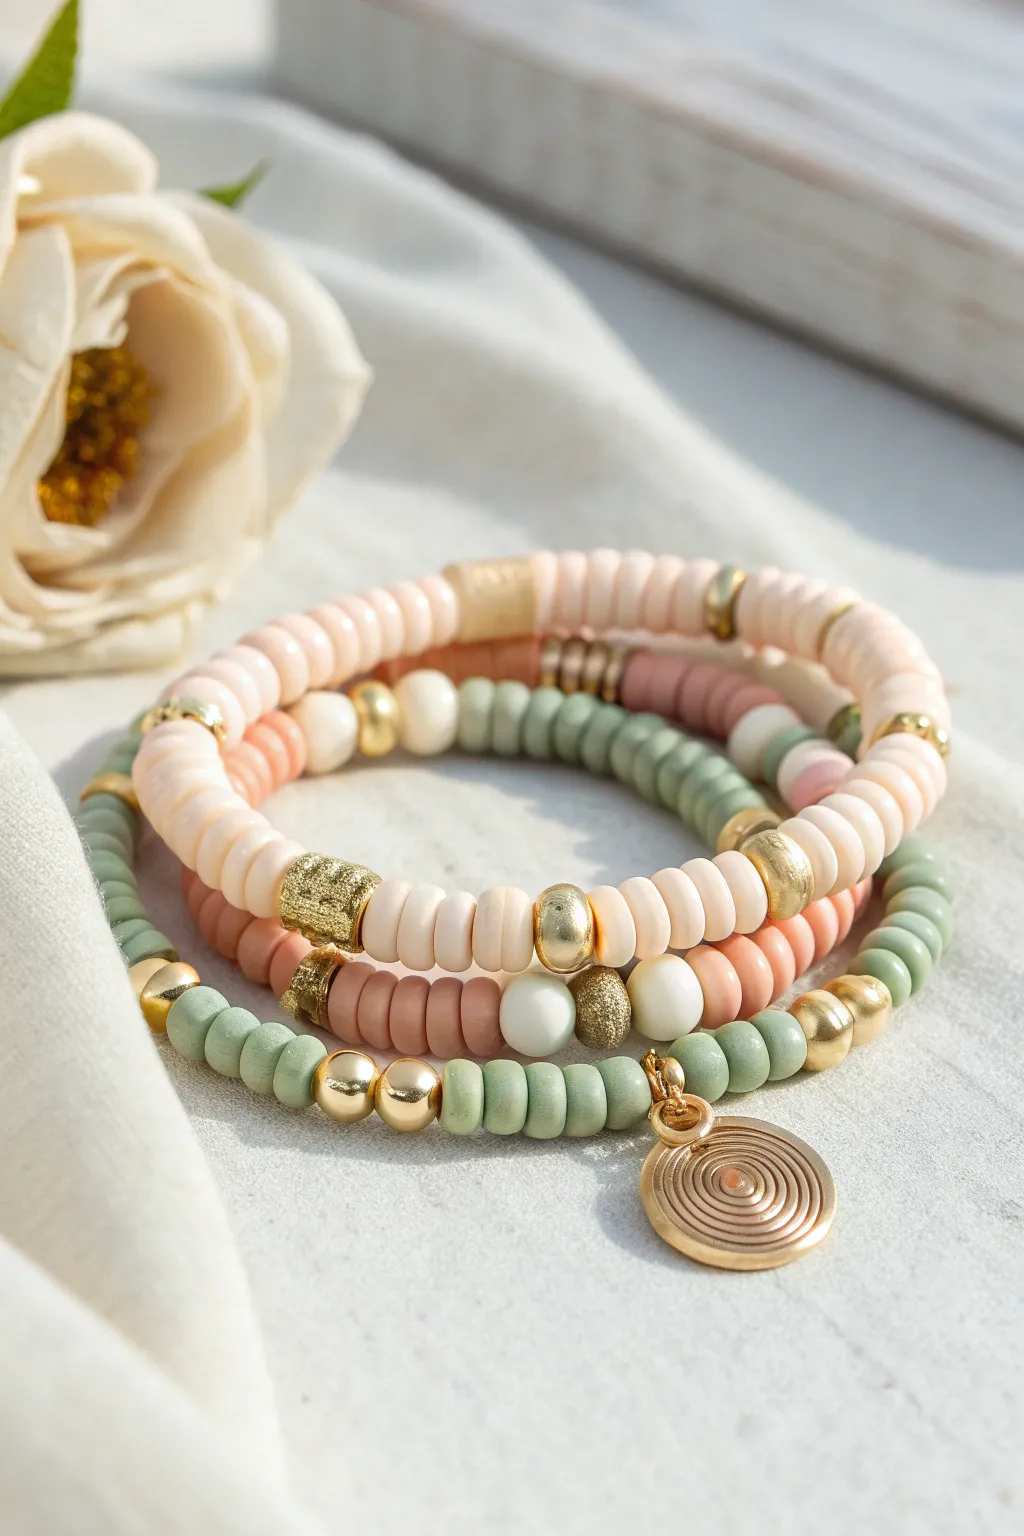
This dreamy bracelet trio combines soft sage greens, dusty peach tones, and creamy neutrals with elegant gold accents. The mix of matte Heishi beads, shimmering gold spacers, and pearlescent touches creates a sophisticated texture that looks professionally designed.
Step-by-Step Guide
Materials
- Polymer clay Heishi disc beads (pale pink/peach, dusty rose, sage green, cream)
- Small round gold spacer beads (3mm-4mm)
- Textured gold accent beads (barrel or round shape)
- Faux pearl round beads (6mm)
- Gold tone spiral pendant charm
- Gold jump ring (6mm)
- Elastic beading cord (0.8mm crystal string)
- Jewelry glue or clear nail polish
- Scissors
Step 1: The Sage Green Charm Bracelet
-
Cut the cord:
Cut a piece of elastic cord about 10-12 inches long to give yourself plenty of room for knotting later. -
Start the pattern:
Begin threading your sage green clay Heishi beads. I like to string about 10-12 green discs to start the base section. -
Add gold accents:
Slide on one glowing gold round spacer bead, followed by three more sage green discs, and then another gold spacer. -
Create the focal section:
Thread on a larger faux pearl or cream bead, followed by a textured gold accent bead, and another cream bead. -
Continue the pattern:
After your focal beads, mirror the pattern: add a gold spacer, three green discs, another gold spacer, and then fill the rest of the strand with green Heishi beads until it fits your wrist comfortably. -
Attach the charm:
Open a gold jump ring using pliers (or your fingers if it’s soft enough), slide on your spiral pendant, and loop it onto the bracelet cord before tying the knot. -
Secure the knot:
Tie a strong surgeon’s knot (right over left, left over right), pull it tight, and dab a tiny drop of jewelry glue on the knot before trimming the excess string.
Step 2: The Mixed Color Strand
-
Prepare the second cord:
Cut another length of elastic cord, keeping it the same length as your first one for consistency. -
Alternate colors:
Create color-blocked sections. Thread 8-10 dusty rose Heishi beads, followed by a textured gold barrel bead or a stack of 3 thin gold disc spacers. -
Switch to green:
Thread a section of 8-10 sage green beads. The contrast between the pink and green is what makes this set pop. -
Add pearl details:
Between one of your color changes, slide on a single faux pearl bead flanked by small gold rounds to break up the flat texture of the clay discs. -
Complete the loop:
Continue alternating pink and green sections, separated by gold accents, until you reach the desired length, then tie and glue your knot securely.
Hiding the Knot
Try to position your final knot next to a bead with a larger hole (like the pearl or textured gold bead). You can gently tug the knot inside to hide it completely.
Step 3: The Solid Peach Strand
-
Start the final bracelet:
Cut your third piece of elastic. This bracelet will be the simplest to let the others shine. -
Thread the base:
String on a long section of pale peach or cream Heishi beads. This neutral tone anchors the colorful stack. -
Insert gold highlights:
Every inch or so, insert a textured gold bead. I prefer using the sparkly or ‘stardust’ finish beads here for extra visual interest. -
Add a creamy accent:
Place one cream-colored round bead in the center of the design, framed by two gold flat disc spacers. -
Finish up:
Fill the rest of the string with your pale peach beads, double-check that it matches the size of the previous two bracelets, and tie off with a glued knot to finish.
Uneven Tensions?
If your bracelet twists or curls, the string might be too tight. Before tying the final knot, stretch the bracelet gently a few times to settle the beads naturally.
Stack these three bracelets together to show off your beautiful new accessory set
Theme Stack: Color Palettes With Words
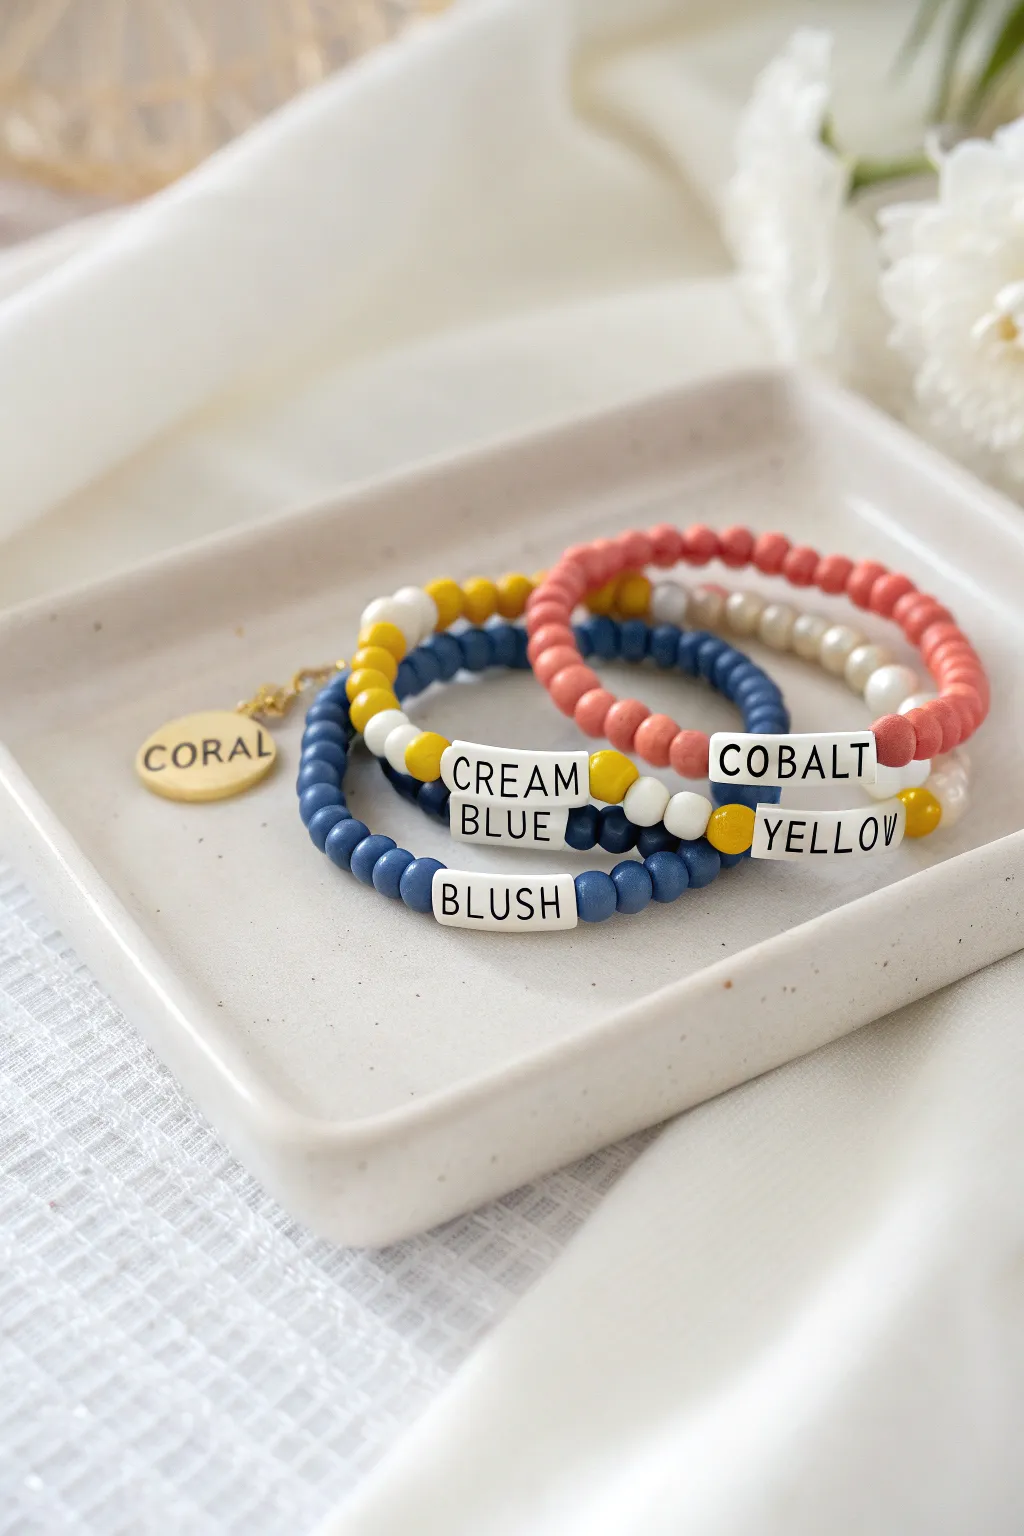
Show off your favorite color combinations with this chic stack of bracelets that literally spells out your style. Using matte round beads and crisp letter cubes, you’ll create a coordinated set that looks professionally designed and incredibly trendy.
How-To Guide
Materials
- Matte round beads (6-8mm) in: Navy/Cobalt Blue, Mustard Yellow, Cream/Off-White, Coral/Salmon Pink
- Square white letter beads with black text
- Elastic beading cord (0.8mm or 1mm recommended)
- Scissors or jewelry snips
- Super glue or clear beading cement (optional but recommended)
- Beading needle (optional for threading)
- Tape or a bead stopper
- Gold round charm (optional)
- Jump ring (optional)
Step 1: Preparation & Planning
-
Map your palette:
Before stringing, lay out your four distinct color themes. For this specific look, you’ll need a Cobalt Blue strand, a Mustard Yellow strand, a Cream strand, and a simple Coral strand. -
Sort your letters:
Find the letters needed for your words. To recreate the image exactly, spell out ‘COBALT’, ‘YELLOW’, ‘CREAM’, ‘BLUE’, and ‘BLUSH’. Note that some beads share strings, like ‘CREAM’ and ‘BLUE’ on the navy strand. -
Pre-stretch the cord:
Cut a piece of elastic cord about 10-12 inches long. Give it a few gentle stretched tugs before you begin; this pre-stretching prevents the bracelet from loosening up after you wear it. -
Secure the end:
Place a piece of tape or a bead stopper on one end of your cut cord so your beads don’t slide off while you work. I find masking tape works perfectly for this.
Knot Slipping?
If your elastic knot feels insecure, try pulling it very tight—almost to the breaking point—which makes the elastic grip itself. A surgeon’s knot is much stronger than a standard square knot.
Step 2: The Cobalt & Cream Strands
-
Start the Cobalt strand:
Begin threading the navy blue matte beads onto your first cord. Add about 2-3 inches of solid blue beads. -
Insert the first word:
Thread the letter beads for ‘COBALT’. Make sure they are all facing the same direction so the word is legible. -
Pattern mixing:
After the word ‘COBALT’, add a small accent section. Thread three cream beads, then continue with navy blue beads until the bracelet reaches your desired length (usually 6.5-7 inches total). -
Start the ‘Cream Blue’ strand:
On a new cord, start with navy beads again. Thread about 1 inch of blue, then switch to the word ‘CREAM’. -
Create the color block:
Immediately after ‘CREAM’, add three mustard yellow accent beads to break up the pattern. -
Finish the phrase:
Thread the word ‘BLUE’ right after the yellow accent, then finish the rest of the strand with navy beads to match the first bracelet.
Step 3: The Mixed & Solid Strands
-
Draft the ‘Yellow’ strand:
This strand uses a mix of cream and yellow. Start with cream beads for about 2 inches. -
Add the text:
Thread the word ‘YELLOW’ clearly in the center. -
Complete the mix:
After the word, transition to the mustard yellow beads for the remainder of the bracelet. This two-tone effect adds visual depth to the stack. -
Create the ‘Blush’ strand:
The final text bracelet uses the navy base again. String navy beads, add the word ‘BLUSH’, and finish with navy beads. -
Make the solid pop:
Create one final bracelet using only the coral/salmon pink beads. This solid color strand without text acts as a vibrant frame for the other wordy bracelets.
Texture Twist
Swap standard round beads for wooden or lava stone beads for a more organic, earthy texture. Lava beads also work as diffusers if you add a drop of essential oil.
Step 4: Finishing Touches
-
Tie the knots:
Remove the tape from one bracelet. Bring the ends together and tie a surgeon’s knot (right over left, left over right, and loop through an extra time). -
Secure with glue:
Dab a tiny drop of super glue or jewelry cement onto the knot. This step is crucial for longevity. -
Hide the knot:
While the glue is still tacky, gently pull the knot inside one of the adjacent matte beads if the hole is large enough. If not, trim the ends very close to the knot once fully dry. -
Add the charm (Optional):
If you have a customized hang tag like the ‘CORAL’ charm shown, used pliers to open a jump ring, slide it onto the coral bracelet, and attach the charm before closing the ring.
Stack them all together on your wrist for a bold, personalized statement piece