
When I’m in a girly clay mood, I’m reaching for soft pastel colors, tiny details, and the cutest little faces I can manage. These ideas are all about sweet, handheld projects that feel like pocket-size happiness.
Pastel Heart Charm Stack
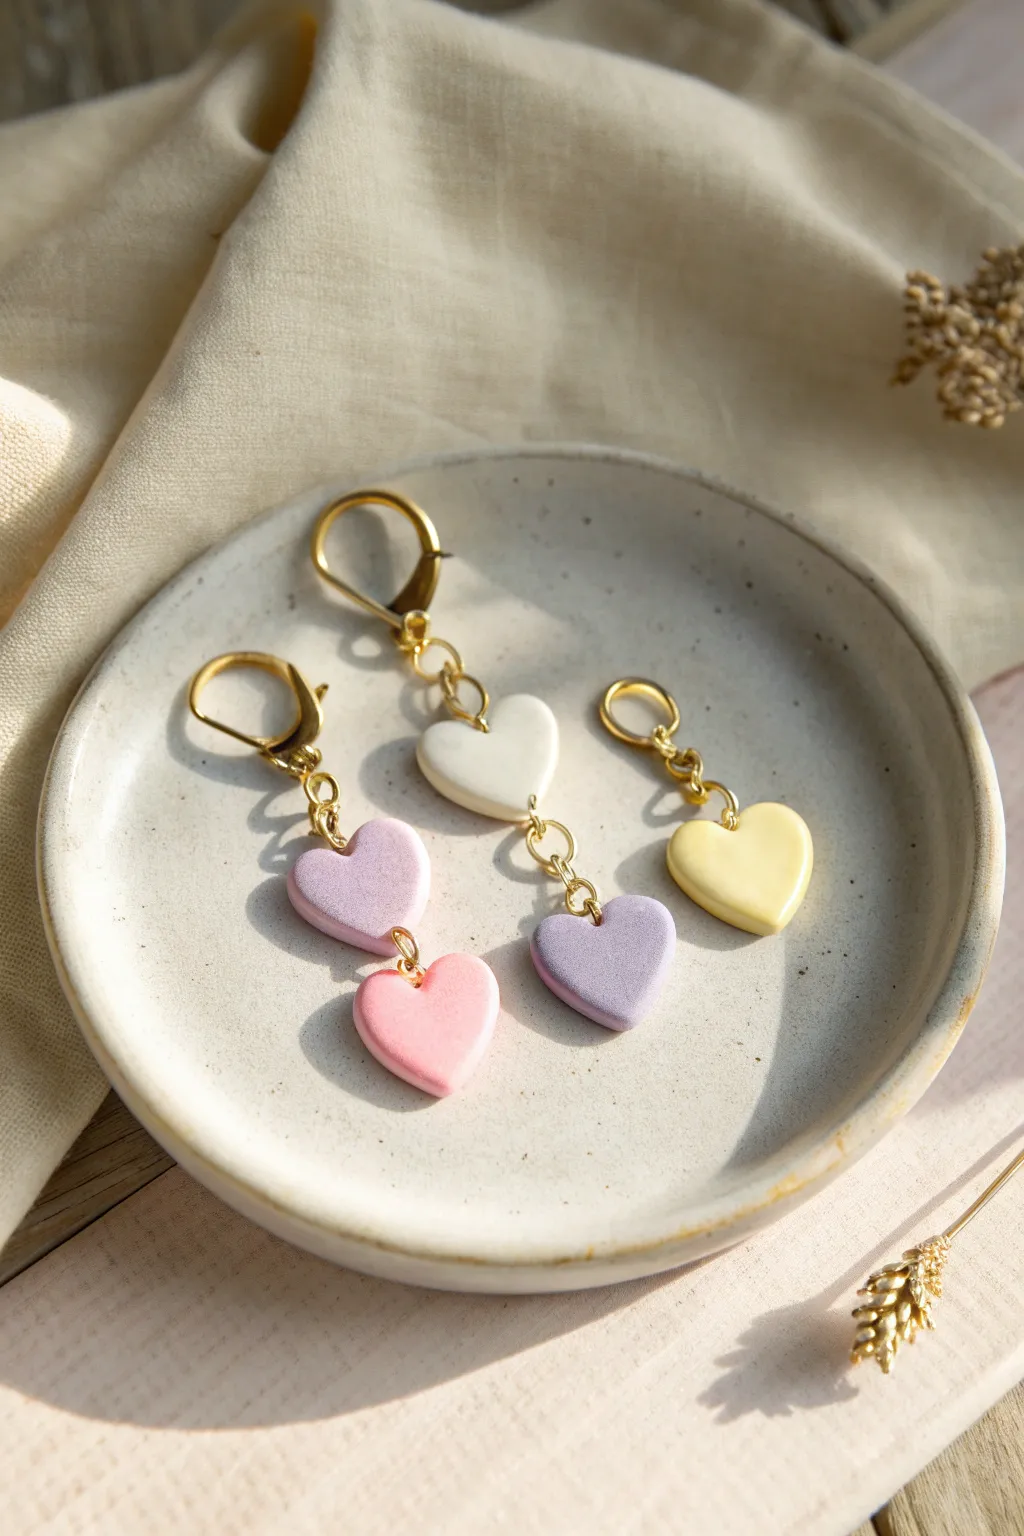
Create a dreamy set of stackable charms featuring smooth, puffed hearts in soft pastel shades. These delicate clay pieces make perfect accessories for bags, planners, or simply as a sweet handmade gift for a friend.
Step-by-Step
Materials
- Polymer clay in pastel pink, lavender, white, and pale yellow
- Small heart-shaped clay cutter (approx. 1.5 cm – 2 cm wide)
- Acrylic rolling pin or clay machine
- Ceramic tile or glass work surface
- Detail needle tool or toothpick
- Gold jump rings (6mm and 4mm)
- Gold lobster clasps or keychain findings
- Two pairs of flat-nose jewelry pliers
- Cornstarch or baby powder (for release)
- Fine-grit sandpaper (optional)
- Gloss or matte varnish (optional)
Step 1: Shaping the Hearts
-
Condition the clay:
Begin by taking small amounts of your pastel pink, lavender, white, and yellow clay. Knead each color individually until it is soft, pliable, and warm to the touch. -
Roll out the slab:
Roll the clay out on your work surface to a thickness of about 4mm to 5mm. We want these hearts to be chubby and substantial, not thin wafers. -
Cut the shapes:
Dip your heart cutter into a little cornstarch to prevent sticking. Press firmly into the clay slab to cut out your heart shapes. You will need pairs for the stacked charms or singles for the smaller ones. -
Soften the edges:
Once cut, the edges might be sharp. Gently run your fingertip along the rim of each heart to smooth and round it over, giving it that soft, pillowy look seen in the photo. -
Add holes:
Use your needle tool to pierce a hole at the top center of every heart. For hearts that will have another hanging below them (like the white and lavender ones), pierce a second hole at the bottom center point. -
Final check:
Inspect your clay pieces for any fingerprints. If you find any, lightly buff them away with a tiny bit of baby oil or cornstarch.
Step 2: Baking and Finishing
-
Bake the pieces:
Place your clay hearts on a ceramic tile or baking sheet. Bake according to your brand’s package instructions—usually around 275°F (130°C) for 15-30 minutes. -
Cool down:
Allow the pieces to cool completely in the oven or on a wire rack. They are fragile while hot, so resist the urge to handle them immediately. -
Sand edges (optional):
If there are any rough spots left after baking, dip the piece in water and use wet/dry sandpaper to gently smooth them out. -
Varnish (optional):
For a glossy finish like ceramic, apply a thin coat of polymer clay glaze. For a matte look like the photo, you can leave them raw or use a matte varnish.
Fixing Distortion
If your hearts warp while moving them to the baking sheet, bake them directly on the ceramic tile you cut them on. This keeps the back perfectly flat.
Step 3: Assembly
-
Prepare jump rings:
Open your jump rings by twisting them sideways (never pull them apart outward). This maintains their circle shape. -
Connect the stack:
For the double-heart charms, insert a jump ring into the bottom hole of the top heart and the top hole of the bottom heart. Close the ring securely with pliers. -
Attach the clasp:
Slide a jump ring through the top hole of your uppermost heart. Before closing it, thread on the loop of your lobster clasp or keychain finding. -
Secure chain links:
If you want a longer drop, like the white-and-lavender example, add a short chain of 2-3 jump rings between the clasp and the first heart. -
Final tighten:
Go over every jump ring connection with your two pliers to ensure the gap is perfectly closed so your charms don’t slip off.
Level Up: Letter Stamping
Before baking, use tiny alphabet stamps to press initials or words like ‘LOVE’ into the center of the hearts for personalization.
Clip your new pastel stack onto your keys and enjoy the gentle pop of color throughout your day


Tiny Bow Stud Earrings
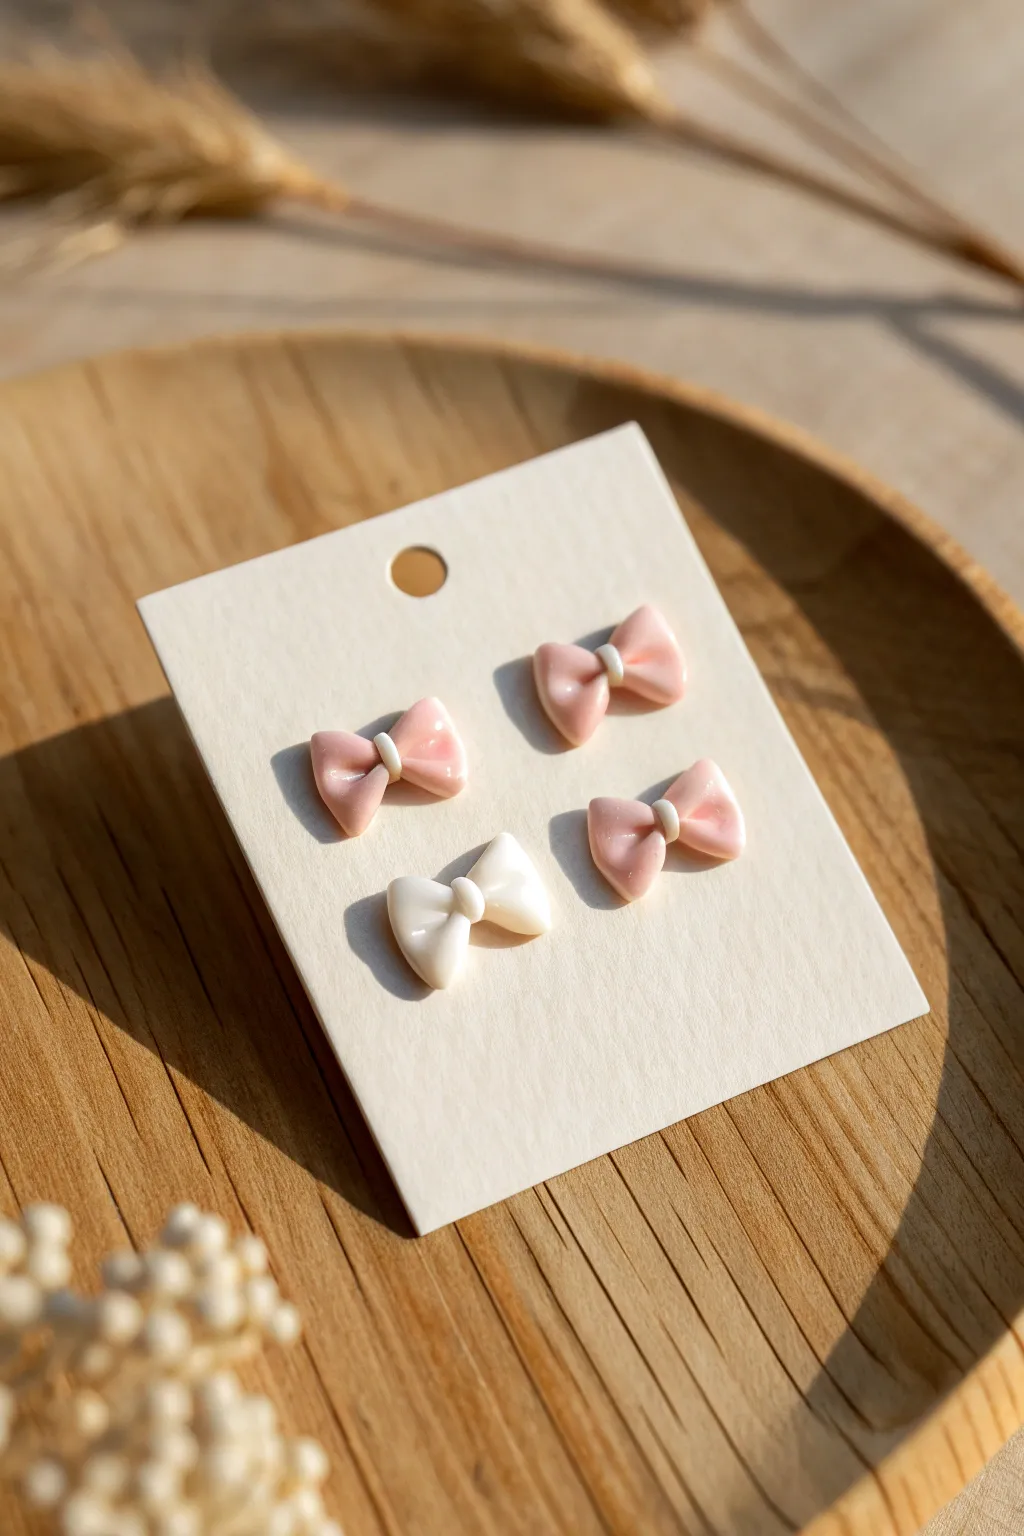
These darling little bow earrings are the epitome of sweet simplicity, offering a glossy, candy-like finish that catches the light beautifully. Perfect for beginners, this project transforms tiny amounts of clay into wearable art that adds a feminine touch to any outfit.
Detailed Instructions
Materials
- Polymer clay (soft pink and white)
- Liquid polymer clay or bake and bond (optional)
- Gloss glaze or UV resin
- UV lamp (if using resin)
- Small paintbrush
- Craft knife or scalpel
- Needle tool or toothpick
- Earring stud posts (stainless steel or gold-plated)
- Strong craft glue (E6000) or superglue
- Ceramic tile or baking sheet
- Roller or pasta machine
Step 1: Prepping the Clay
-
Condition the clay:
Start by warming the polymer clay in your hands. Knead the pink and white clay separately until they are soft, pliable, and free of cracks. -
Roll it out:
Using an acrylic roller or a pasta machine on a medium setting, roll out a sheet of pink clay. You want it to be thin but sturdy, approximately 2mm thick. -
Cut base strips:
Use your craft knife to cut a long, narrow strip of clay for the bows. For tiny studs like these, the strip should be about 4-5mm wide. -
Prepare the center tie:
Roll out a very thin snake of white clay (or matching pink if you prefer a monochrome look). Flatten it slightly to create a tiny ribbon for the center knot.
Squashed Loops?
If your bow loops collapse while cutting or handling, try popping the raw clay in the fridge for 10 minutes. The firmer clay holds its shape beautifully while you cut and fold.
Step 2: Shaping the Bows
-
Cut sections:
Cut your pink strip into small segments, about 1.5 cm long each. These segments will form the loops of your bows. -
Fold the ends:
Take one segment and gently fold both ends inward so they meet in the exact center. Do not flatten the loops; keep them puffy and rounded. -
Pinch the center:
Gently pinch the middle where the ends meet to create the narrowed ‘knot’ area of the bow shape. Use your needle tool to help define the crease if your fingers are too large for this tiny work. -
Add the center band:
Take a tiny piece of your flattened white snake and wrap it vertically around the pinched center of the pink bow. -
Secure the band:
Trim any excess white clay at the back with your craft knife and gently press it to secure. I find smooth tools work best here to avoid leaving fingerprints. -
Refine the shape:
Use a needle tool to gently fluff up the loops from the inside if they got squished. Make sure the bow looks symmetrical. -
Repeat for the set:
Repeat the process to create three pink bows and one white bow (reversing the colors for the white bow’s center band), or make matching pairs.
Level Up: Pattern Play
Before cutting your strips, press a texture sponge or piece of lace into the raw clay sheet. The glaze will pool in the texture, adding subtle detail to your bows.
Step 3: Baking and Finishing
-
Bake:
Place your tiny bows on a ceramic tile or baking sheet. Bake according to your polymer clay manufacturer’s instructions (usually 275°F/130°C for 15-30 minutes). Let them cool completely. -
Prepare for glazing:
Once cool, wipe the bows gently with a lint-free cloth or a baby wipe to remove any dust or oils before glazing. -
Apply gloss:
Using a small brush, apply a generous cost of UV resin or polymer clay gloss glaze to the front and sides of each bow. -
Check for bubbles:
Watch closely for tiny air bubbles in the glaze. Pop them with a lighter flame (for resin) or a clean needle tool before the finish sets. -
Cure or dry:
If using UV resin, cure under a UV lamp for 2-3 minutes until hard and non-tacky. If using glaze, let it air dry completely according to the bottle instructions. -
Attach posts:
Flip the bows over. Apply a small dab of strong glue (like E6000) to the flat pad of an earring post and press it firmly onto the back of the bow. -
Final dry:
Allow the glue to cure fully (usually 24 hours for maximum strength) before wearing or attaching them to a display card.
Enjoy styling these adorable accessories that prove the smallest details often make the biggest impact


Strawberry Bunny Mini Charm
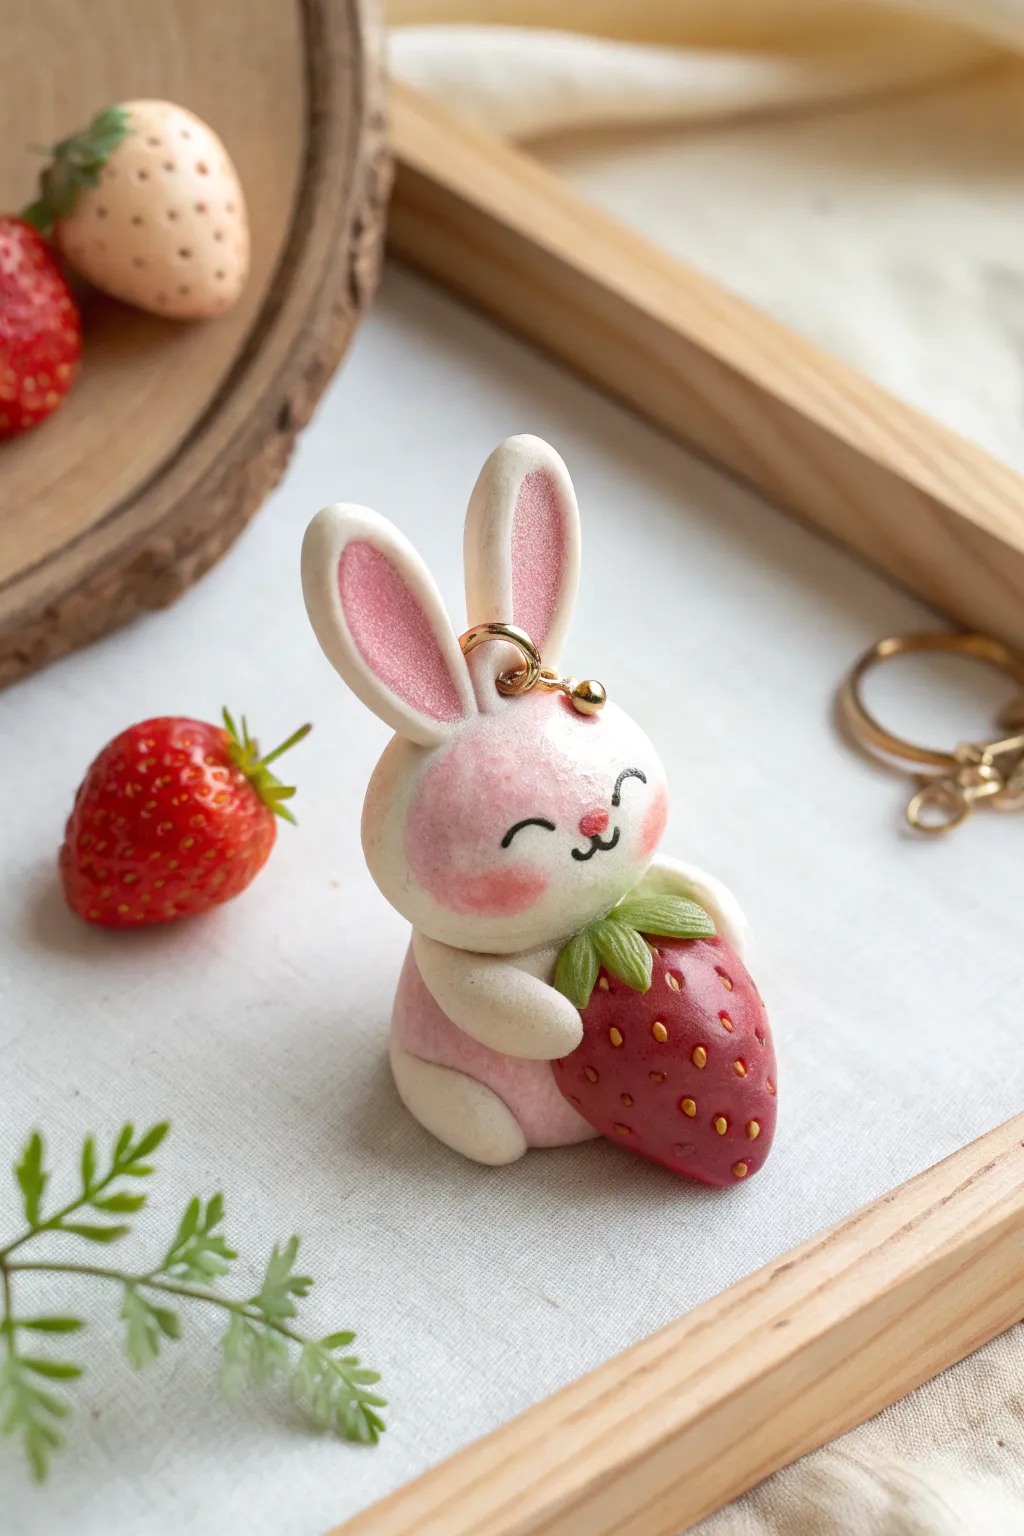
Capture the essence of spring with this adorable polymer clay charm featuring a smiling bunny hugging a giant strawberry. Its soft pink shading and glossy finish make it a perfect accessory for keychains or a delightful handmade gift.
Step-by-Step Guide
Materials
- Polymer clay (white, pink, red, green)
- Gold screw eye pin and jump ring
- Basic sculpting tools (dotting tool, needle tool)
- Soft artist pastels (pink)
- Small fluffy brush
- Black acrylic paint
- Fine detail brush
- Gloss glaze or UV resin
- Oven for baking
Step 1: Shaping the Bunny
-
Form the head:
Start by conditioning a ball of white clay until it is smooth and pliable. Roll it into a slightly flattened sphere to create the bunny’s head. -
Create the body base:
Roll a slightly smaller ball of white clay for the body. Gently press it into a rounded cone shape and attach it firmly to the bottom of the head. -
Add pink accents:
Take a small pinch of pink clay and flatten it into a very thin, rounded patch. Press this onto the tummy area of the body to create a soft pink belly. -
Sculpt the ears:
Roll two small white logs of clay, tapering one end of each. Flatten them slightly. Add a smaller, thinner strip of pink clay inside each ear for the inner ear detail. -
Attach the ears:
Attach the ears to the top of the head using a tiny bit of liquid clay or by blending the seams carefully with a tool. Make sure they stand up straight. -
Insert hardware:
Carefully screw the gold eye pin into the top center of the head, between the ears. I find doing this now ensures it’s secure before the clay hardens.
Sticky Fingerprints?
If you leave fingerprints on the white clay, use a cotton swab dipped in a tiny amount of rubbing alcohol or baby oil to gently smooth them away before baking.
Step 2: Adding the Strawberry
-
Form the berry:
Condition a piece of red clay and roll it into a strawberry shape—broad at the top and tapering to a soft point at the bottom. -
Texture the berry:
Use a needle tool or small dotting tool to gently press tiny indents all over the strawberry surface to mimic seed pockets. -
Add seeds:
Roll microscopic balls of yellow or light brown clay. Place one into each indent you just made on the strawberry for realistic seeds. -
Create the leaves:
Flatten a small piece of green clay and cut out a small star or flower shape. Attach this to the top of the strawberry as the calyx. -
Attach to bunny:
Press the finished strawberry firmly against the bunny’s belly, slightly off-center so it looks like it’s being hugged. -
Add arms and feet:
Roll four small white teardrop shapes. Attach two as feet at the base of the body and two as arms wrapping around the strawberry to hold it in place.
Blush Control
Apply the pastel blush in very light layers. It is much easier to add more color gradually than to wipe off excess powder once it stains the raw white clay.
Step 3: Finishing Details
-
Shade the face:
Scrape a little pink artist pastel into a powder. Using a soft, fluffy brush, gently dust cheeks onto the bunny’s face and add a tiny bit of shading to the top of the head. -
Paint facial features:
Using a very fine detail brush and black acrylic paint, draw two curved happiness eyes and a small ‘w’ mouth. Add a tiny pink clay dot for the nose. -
Bake the charm:
Bake the piece according to your polymer clay package instructions. Let it cool completely before handling. -
Glaze:
Apply a coat of gloss glaze or UV resin to the bunny’s eyes and the strawberry to make them shine, leaving the bunny’s fur matte for contrast.
Your charming little bunny is now ready to hop onto a bag or keyring


Mini Donut Sprinkle Charms
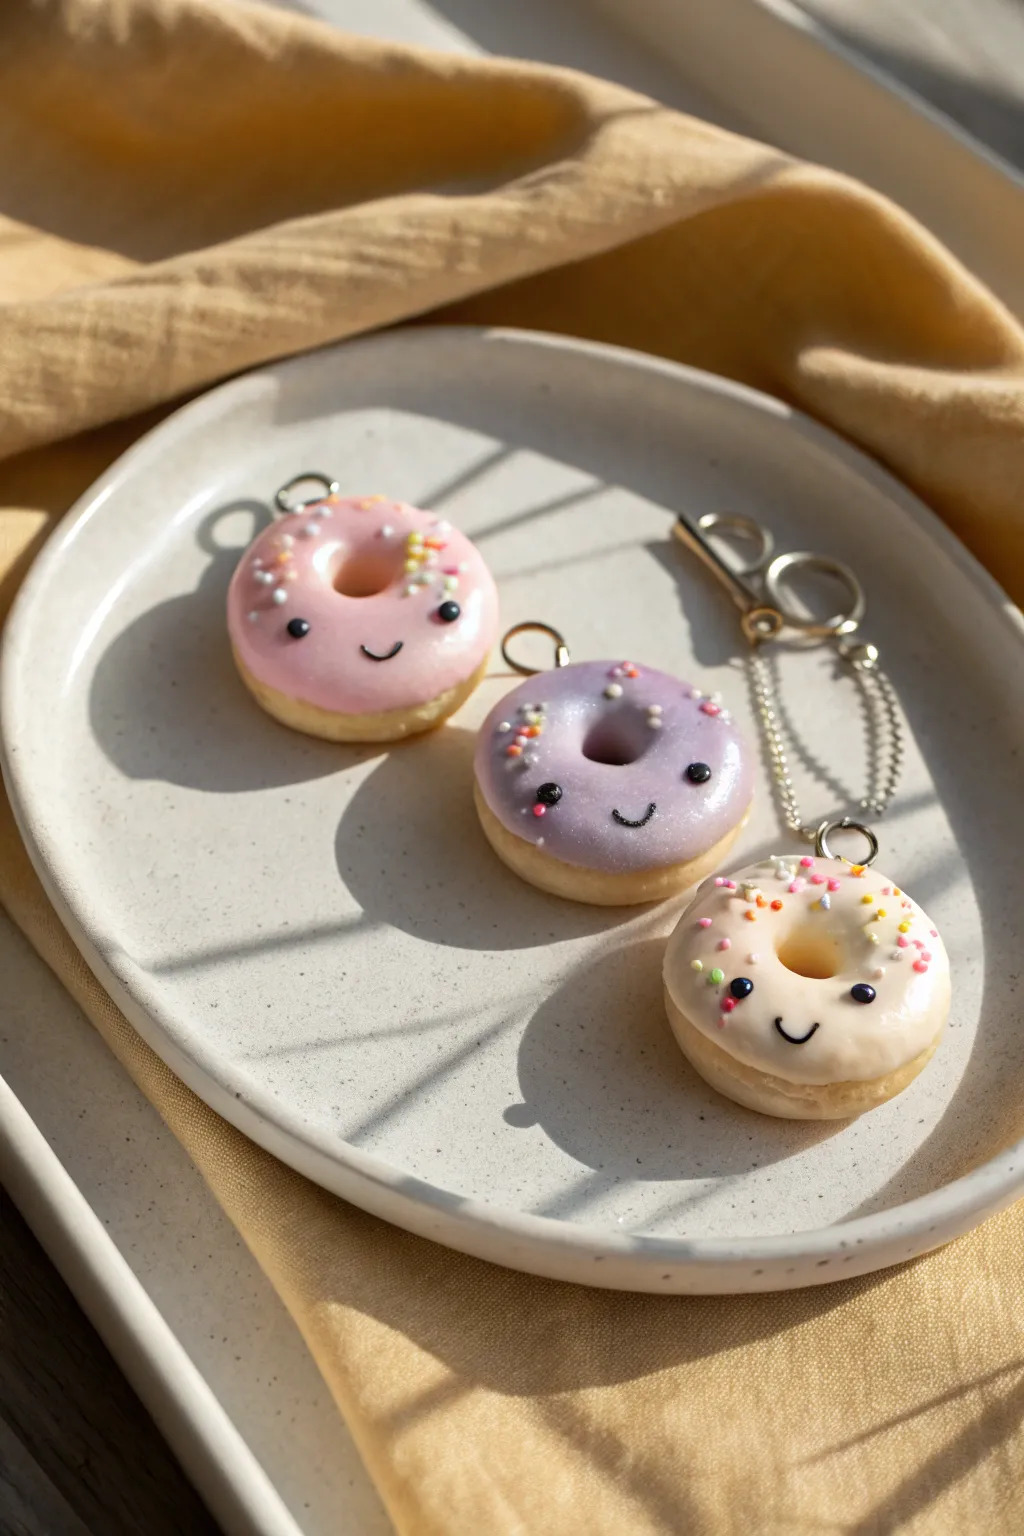
These adorable mini donut charms are the perfect blend of sweet and stylish, featuring glossy, pearlescent icing and tiny smiling faces. They make delightful keychains, zipper pulls, or matching best friend necklaces.
Detailed Instructions
Materials
- Polymer clay (beige/tan for dough, pink, lavender, and cream for icing)
- Polymer clay liquid (translucent or white)
- Small eye pins (silver or gold)
- Black acrylic paint or clay for eyes
- Detail brush or needle tool
- Gloss glaze (polyurethane or resin)
- Pearl powder (optional, for shimmer)
- Miniature sprinkles (polymer clay slices or microbeads)
- Jump rings and keychain hardware
- Molding tool / ball stylus
Step 1: Shaping the Dough
-
Condition the clay:
Begin by thoroughly conditioning your beige or tan polymer clay until it is soft and malleable. This prevents cracks during baking. -
Form the base:
Roll three small balls of the tan clay, each about the size of a marble or slightly larger, depending on your desired charm size. -
Flatten slightly:
Gently press down on each ball with your thumb to create a thick disc shape. Don’t make them too flat; you want them to look fluffy. -
Create the center hole:
Using a dotting tool or the back of a paintbrush, press directly into the center of the disc to create the donut hole. Wiggle it slightly to widen the opening. -
Refine the edges:
Smooth out the outer edges with your finger to ensure the donut looks round and baked, not sharp or angular. -
Texture the dough (optional):
For added realism, you can gently tap the surface with a toothbrush to simulate a baked cake texture.
Clean Lines Tip
Make sure your hands are clean when switching from colored icing to the tan dough. Baby wipes are great for preventing color transfer.
Step 2: Creating the Icing
-
Prepare the colors:
Take small amounts of pink, lavender, and cream clay. If you want the pearlescent look shown in the photo, mix a tiny pinch of pearl powder into the colored clay. -
Mix liquid clay:
I like to mix the colored clay with a few drops of liquid polymer clay until it reaches a thick, frosting-like consistency. It should be spreadable but not runny. -
Apply the frosting:
Carefully spread your clay frosting onto the top of each donut base using a toothpick or small spatula. Let it drip slightly down the sides naturally. -
Clear the center:
Use your needle tool to poke through the frosting at the center hole so the dough beneath is visible again. -
Add sprinkles:
While the frosting is still ‘wet’, gently press miniature polymer sprinkles or microbeads into the top surface. -
Insert hardware:
Insert a small metal screw eye or eye pin into the top edge of the donut. Ensure it goes deep enough to be secure.
Step 3: Face Details & Finishing
-
Pre-bake shape check:
Before adding faces, make sure your eye pin hasn’t distorted the donut’s shape. Adjust if necessary. -
Bake the charms:
Bake your donuts according to the instructions on your specific brand of polymer clay (usually 275°F/130°C for 15-30 minutes). -
Cool down:
Let the donuts cool completely before painting. Painting on hot clay can make the paint dry clumpy. -
Paint the face:
Using a very fine detail brush and black acrylic paint, add two small dots for eyes and a tiny ‘u’ shape for the smile. -
Add cheek blush:
Dip a cotton swab into pink pastel chalk dust and gently dab it next to the smile for rosy cheeks. -
Glaze:
Apply a coat of high-gloss polyurethane varnish or UV resin over the entire donut (or just the icing part) to seal the paint and give it that tasty shine. -
Attach hardware:
Once the glaze is cured/dry, use pliers to open a jump ring and attach your donut to the keychain hardware.
Scentsation!
Mix a tiny drop of vanilla or strawberry essential oil into the clay before baking to make your donuts smell as sweet as they look.
Enjoy your sweet little creations and don’t forget to attach them to your favorite bag

The Complete Guide to Pottery Troubleshooting
Uncover the most common ceramic mistakes—from cracking clay to failed glazes—and learn how to fix them fast.
Flower Petal Trinket Dish
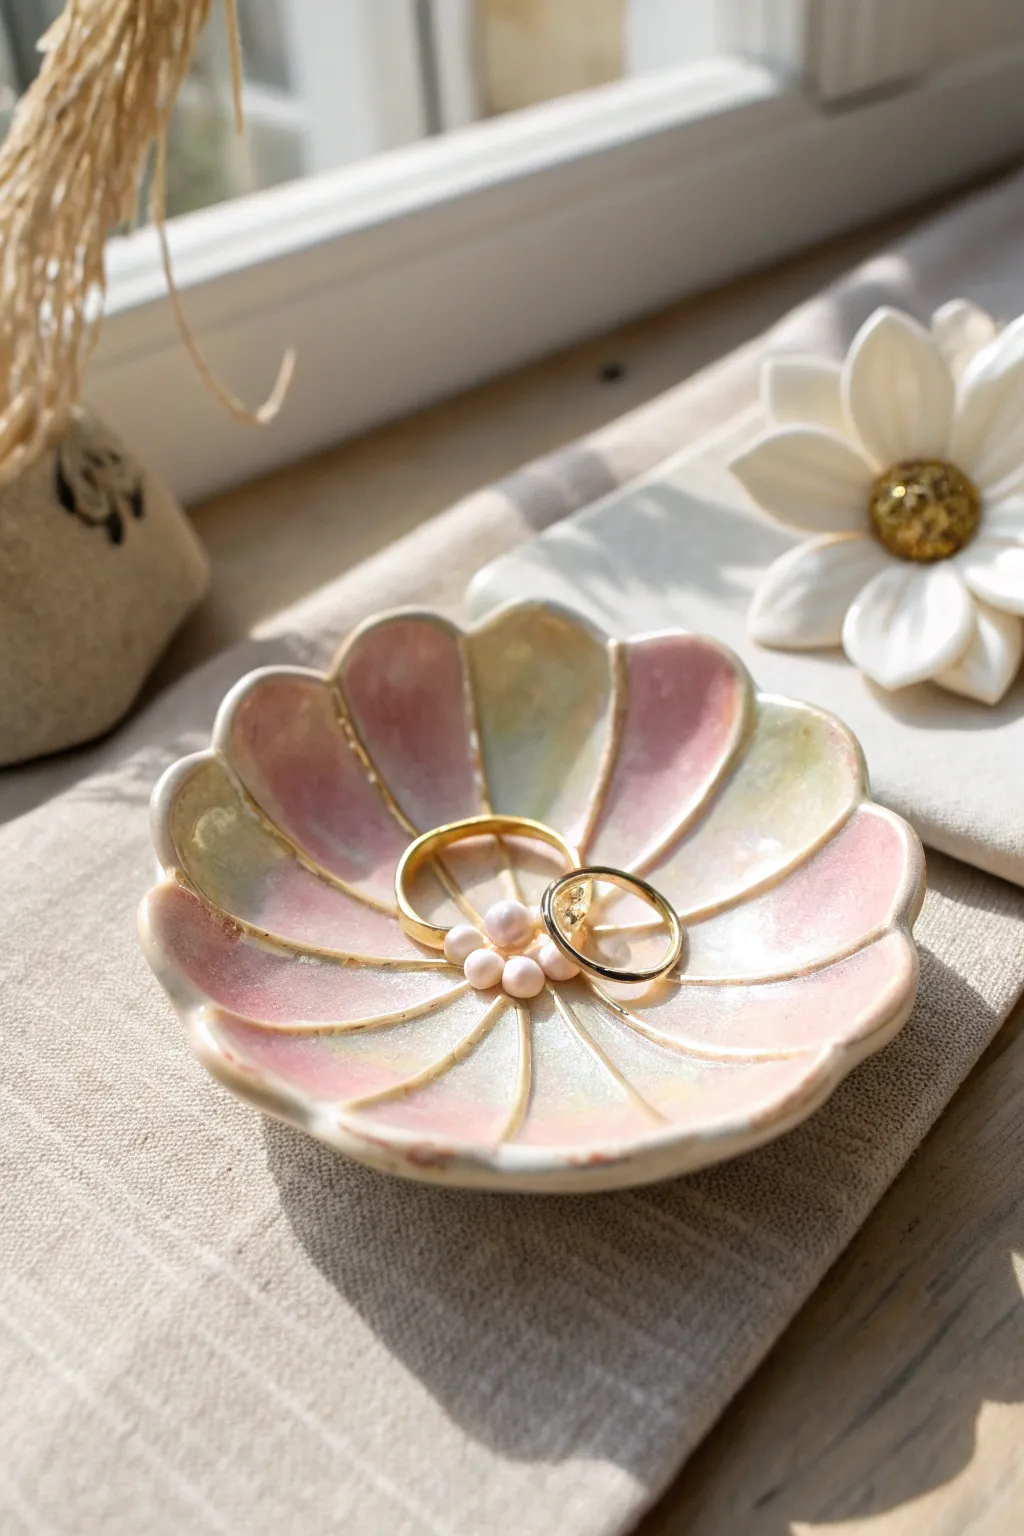
Capture the delicate beauty of a blooming flower with this ceramic-style trinket dish. Featuring soft, alternating hues of blush pink and pale yellow beneath a glossy glaze, it’s the perfect resting spot for your favorite rings.
Step-by-Step
Materials
- Air-dry clay or polymer clay (white porcelain style preferred)
- Rolling pin
- Flower-shaped cookie cutter (large) or paper template
- Small bowl (for shaping)
- Clay knife or needle tool
- Sponge or fine-grit sandpaper
- Acrylic paints (pastel pink, pale yellow/cream)
- Iridescent medium or pearlescent glaze
- High-gloss varnish
- Small paintbrush
- Gold paint (optional for rim)
Step 1: Shaping the Base
-
Condition the clay:
Begin by kneading your white clay until it is soft, pliable, and free of air bubbles. If using polymer clay, warm it in your hands first. -
Roll it out:
Roll the clay into a smooth slab about 1/4 inch thick. Use guides or playing cards on either side of your roller to ensure an even thickness throughout. -
Cut the flower shape:
Press a large flower-shaped cutter firmly into the clay. If you don’t have a cutter, trace a paper template onto the clay lightly and cut around it with a clay knife. -
Refine the edges:
Dip your finger in a little water (for air-dry clay) or baby oil (for polymer) and gently smooth the cut edges of each petal to remove any harshness.
Smooth Operator
Use a damp makeup sponge instead of a brush to apply the initial paint wash. This prevents brush strokes and creates a softer, airbrushed look on the petals.
Step 2: Sculpting Details
-
Define the petals:
Using a dull knife or a sculpting tool, gently press radial lines from the center of the flower out to the notches between petals. This creates the individual segments. -
Form the curve:
Carefully lift your clay flower and drape it inside a small, shallow bowl. Gently press the center down so the petals curve upward naturally, mimicking a blooming flower. -
Enhance the rim:
While in the bowl, use your thumb to slightly thin out the tips of the petals, giving them a delicate, organic look rather than a chunky edge. -
Dry or bake:
If using air-dry clay, leave it in the bowl to dry for 24-48 hours. For polymer clay, bake it in an oven-safe bowl according to the package instructions.
Gilded Edge
For a luxe touch, use liquid gold leaf on the very rim of the dish after sealing. The metallic contrast against the soft pastels looks incredibly high-end.
Step 3: Painting & Glazing
-
Sand for smoothness:
Once fully cured or dried, remove the dish from the bowl. Lightly sand any rough spots or fingerprints with fine-grit sandpaper until the surface is silky smooth. -
Base wash:
Water down your acrylic paints slightly to create a watercolor effect. Paint alternating petals with a soft wash of pastel pink and a creamy pale yellow. -
Create the gradient:
While the paint is still damp, gently blend the edges where the pink and yellow meet near the center or edges, creating a dreamy, indistinct transition rather than hard stripes. -
Add pearlescent sheen:
I like to mix a tiny drop of iridescent medium into a clear glaze for this step. Brush a thin layer over the entire inside of the dish to give it that magical, mother-of-pearl shimmer. -
Highlight the rim:
Using a very fine brush, dab a small amount of pale gold or a slightly darker pink along the very edge of the rim to define the flower shape. -
Seal the piece:
Finish with two coats of high-gloss varnish to protect the paint and give the dish a ceramic-like glassiness. Let it dry completely between coats.
Place this lovely little dish on your vanity to keep your daily jewelry safe and stylish
Cute Mushroom Fridge Magnets
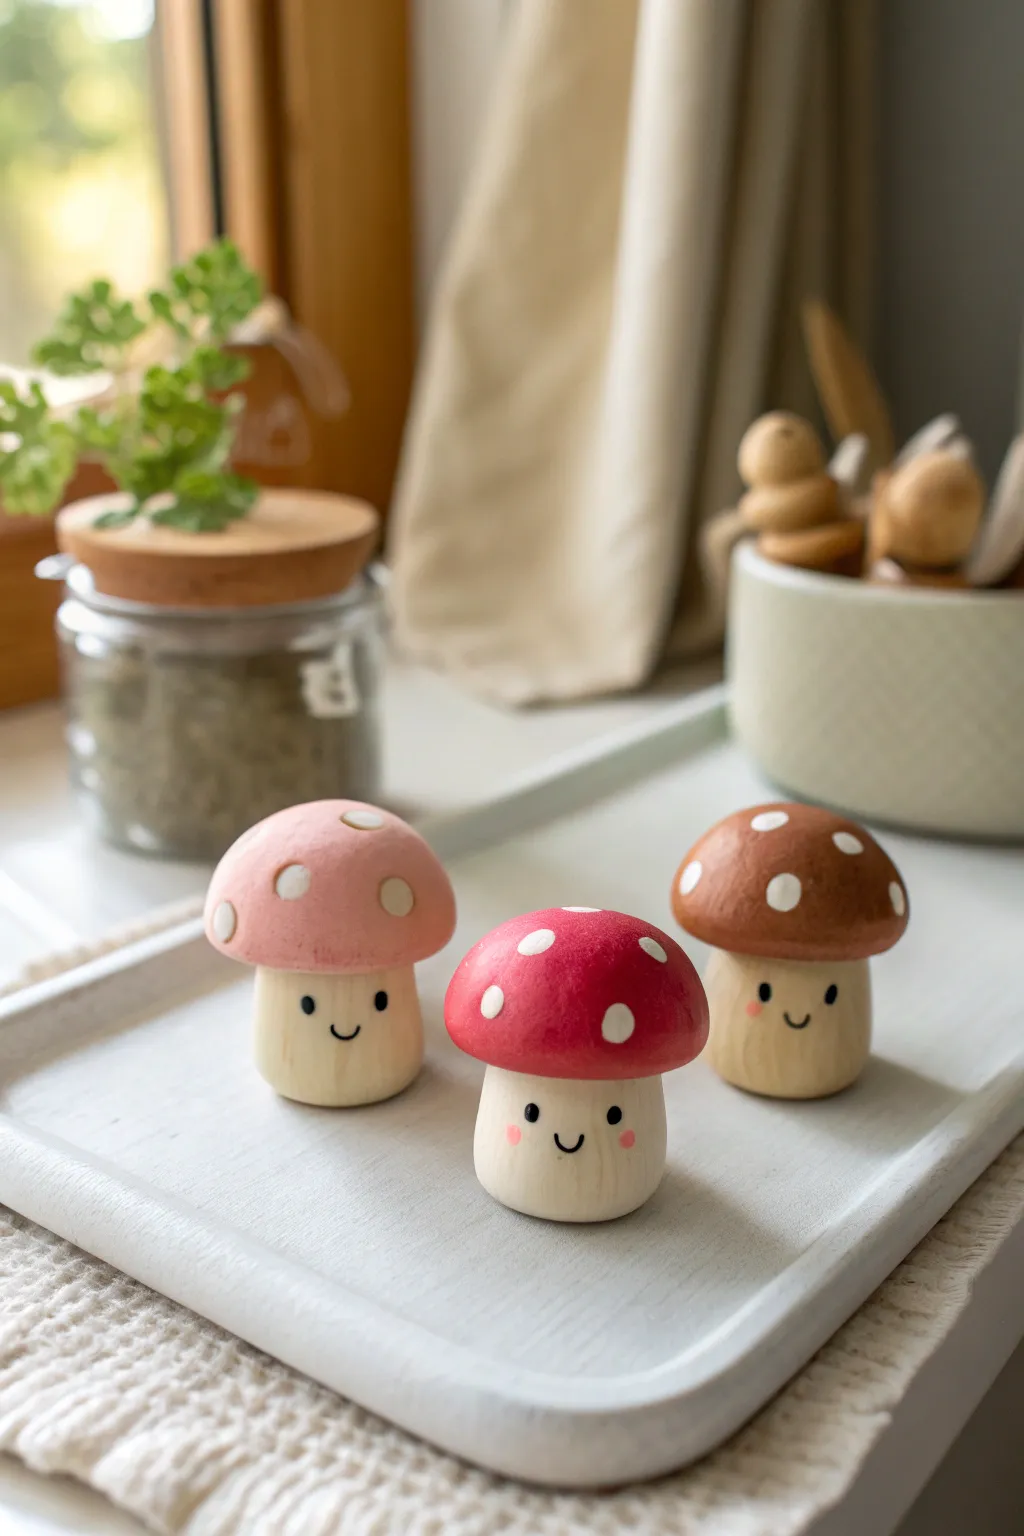
These charming little mushroom magnets bring a touch of woodland magic right to your kitchen. With their smooth wooden bases, colorful spotted caps, and sweet smiling faces, they are as fun to make as they are to display.
How-To Guide
Materials
- Unfinished wooden peg doll bodies (mushroom shape)
- Acrylic paints (pastel pink, bright red, warm brown, white, black, rosy pink)
- Small flat paintbrush
- Fine detail paintbrush or toothpick
- Dotting tool or the end of a paintbrush handle
- Matte finish sealant spray or varnish
- Strong round ceramic magnets
- Strong craft glue (E6000 or similar)
Step 1: Painting the Caps
-
Prepare the surface:
Start by wiping down your wooden mushroom shapes with a dry cloth to remove any dust. If the wood feels rough, give it a quick sanding with fine-grit sandpaper for a smoother finish. -
First coat of color:
Using a small flat brush, paint the entire rounded cap of the first mushroom with pastel pink acrylic paint. Apply the paint smoothly, following the curve of the wood. -
Create the set:
Repeat the previous step for your other two mushrooms, painting one cap a bright cherry red and the third a warm, earthy brown. I like to do two thin coats rather than one thick one to avoid brush strokes. -
Cleanup edges:
Carefully check the underside of the caps. Use a clean, slightly damp brush to wipe away any paint that might have smudged onto the stem area, keeping that natural wood look clean. -
Add the spots:
Once the base colors are completely dry, dip a dotting tool or the handle end of a paintbrush into white acrylic paint to create the classic mushroom Polka dots. -
Vary the sizes:
Press gently to create different sized dots scattered randomly across the caps. For the pink mushroom, make larger, softer dots; keep the red and brown ones slightly smaller and more uniform.
Paint Consistency Tip
If your acrylics are too thick, water them down slightly. You want the consistency of heavy cream so the paint self-levels on the rounded cap without leaving ridges.
Step 2: Bringing Them to Life
-
Map out the face:
Visualize where the face should go on the unpainted stem. It should be centered vertically on the stalk, leaving enough room for the blush cheeks. -
Paint the eyes:
Using your finest detail brush or a toothpick, dip into black acrylic paint. Create two small, widely spaced dots for the eyes. Keep them relatively small to maintain the ‘cute’ proportion. -
Add the smile:
With the very tip of your detail brush and black paint, draw a tiny, shallow ‘U’ shape right between the eyes. A shaky hand actually adds character here, so don’t stress about perfection. -
Rosy cheeks:
Mix a very tiny amount of red with white to make a soft rosy pink, or use a pre-mixed shade. Dip a Q-tip or a small dotting tool into the paint and blot it on paper first to remove excess. -
Apply the blush:
Gently stamp the rosy color slightly below and outside the eyes to create adorable blushing cheeks. -
Seal the wood:
Allow the painted faces to dry completely for at least an hour. Once dry, coat the entire mushroom (cap and stem) with a matte varnish to protect the wood and paint from kitchen moisture.
Step 3: Magnetizing
-
Prep the magnet:
Flip your finished mushroom over so the flat bottom of the stem is facing up. Verify that your magnet fits within the diameter of the stem base. -
Apply adhesive:
Squeeze a pea-sized amount of strong craft glue like E6000 onto the center of the wooden base. Avoid hot glue, as the magnet can eventually peel off the smooth wood. -
Attach and cure:
Press the magnet firmly into the glue. Let the mushrooms sit upside down for full 24 hours to ensure the bond is completely secure before sticking them to your fridge.
Make it a Fairy House
Add a tiny painted door and windows to the stem instead of a face to turn these into miniature fairy houses for a magnetic garden scene.
Now you have an adorable trio of forest friends ready to hold up your grocery lists and photos.


What Really Happens Inside the Kiln
Learn how time and temperature work together inside the kiln to transform clay into durable ceramic.
Chubby Pastel Dino Buddy
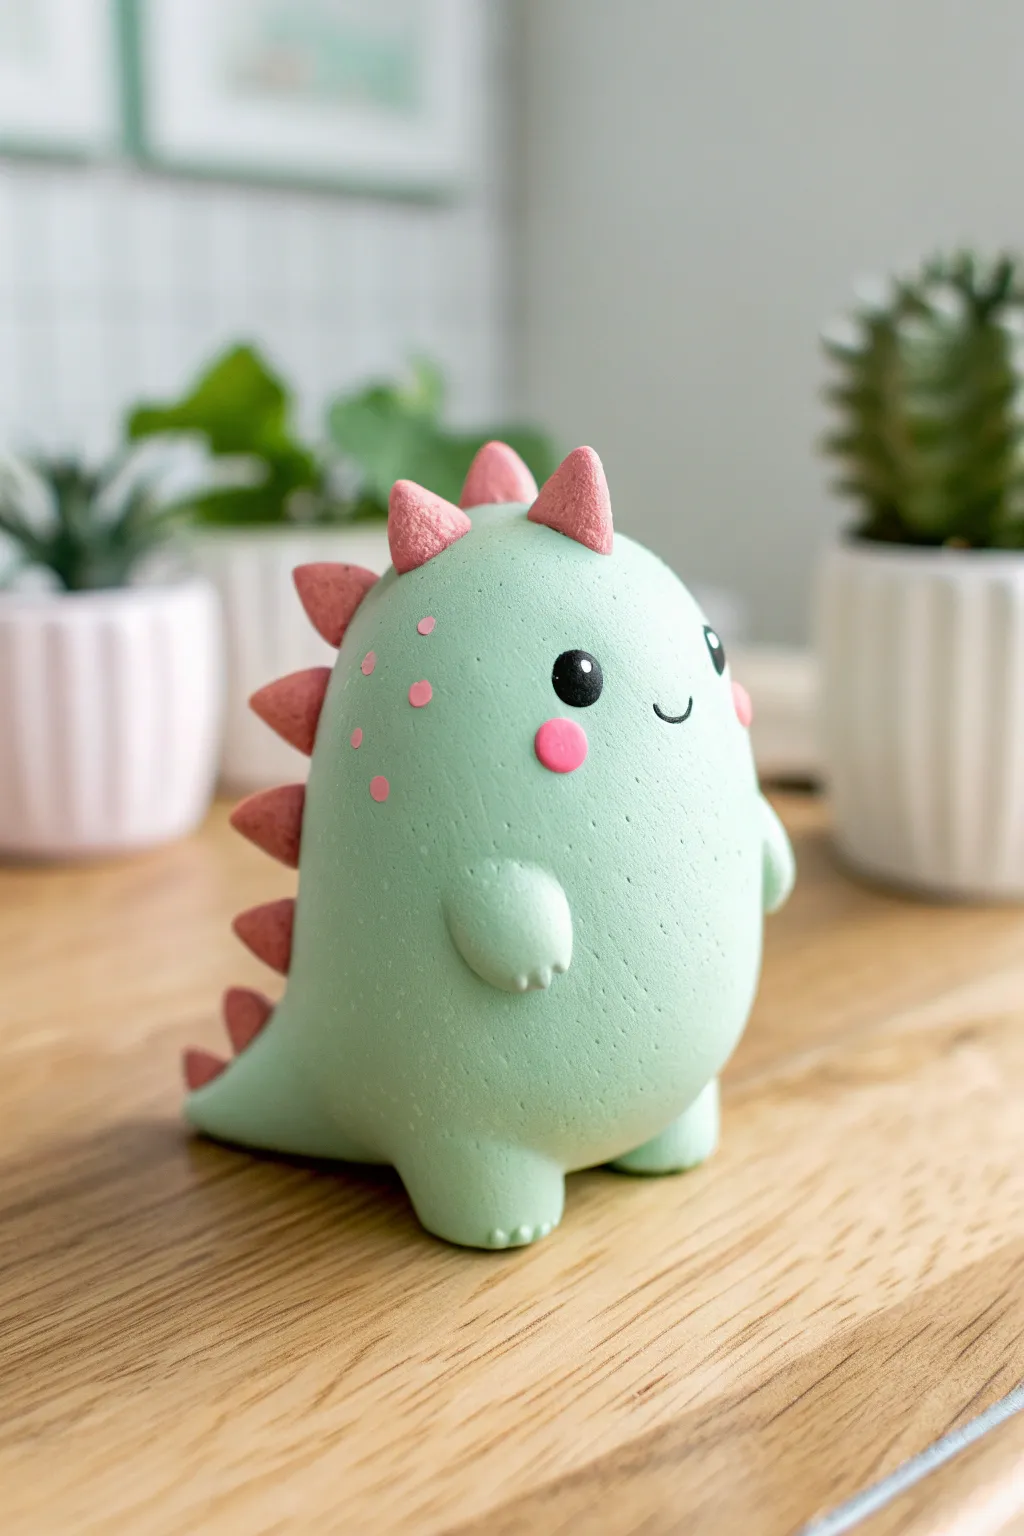
Create a desk companion that exudes cuteness with this mint-green dinosaur tutorial. Its rounded, huggable shape and soft pastel spikes make it a perfect beginner-friendly project for adding charm to your workspace.
Step-by-Step Guide
Materials
- Polymer clay (Mint Green, Light Pink, Black, White)
- Clay sculpting tools (dotting tool, needle tool)
- Blade or craft knife
- Rolling pin
- Aluminum foil (for the core)
- Oven for baking
- Clear matte varnish (optional)
Step 1: Body Construction
-
Prepare the core:
Crumple a small ball of aluminum foil into a tear-drop egg shape. This saves clay and keeps the figurine lightweight. -
Condition the clay:
Take a generous amount of mint green clay and knead it until it’s soft and pliable. Warm hands make this much easier. -
Cover the form:
Flatten the mint clay into a thick sheet and wrap it completely around your foil core. Smooth out any seams or fingerprints by gently rubbing the clay with your thumb. -
Shape the body:
Roll the covered form on your work surface to create a smooth, chubby egg shape. The bottom should be slightly wider so the dino sits stable.
Step 2: Adding Extremities
-
Form the feet:
Roll two small balls of mint clay. Flatten them slightly into stump shapes and attach them to the bottom front of the body for feet. -
Make the tail:
Roll a medium cone of mint clay. Press the wider end onto the lower back of the body, blending the seam with a sculpting tool so it looks like one continuous piece. -
Create the arms:
Form two small teardrop shapes from mint clay. Attach them to the sides of the body, creating little chubby arms that rest against the tummy. -
Add tiny details:
Use a needle tool or knife to gently press three little indentations onto the tips of the feet and hands to suggest claws.
Fixing Fingerprints
Before baking, lightly brush your dino with bit of baby oil or cornstarch. This smoothes out fingerprints without changing the shape.
Step 3: Spikes & Decoration
-
Prepare the spikes:
Take light pink clay and roll it into a thin rope. Cut this rope into 6-8 small, equal segments. -
Shape the triangles:
Roll each pink segment into a ball, then pinch one side to form a soft triangle or cone shape. -
Attach the spine:
Starting from the top of the head and working down to the tail, press the pink spikes firmly onto the center of the distinct back ridge. -
Add speckles:
Roll tiny, almost microscopic balls of pink clay. Press these randomly onto the upper back and sides to create cute little spots.
Glitter Glam
Mix a tiny amount of iridescent glitter into the pink clay before shaping the spikes for a magical, shimmering dragon effect.
Step 4: Face & Baking
-
Place the eyes:
Roll two small balls of black clay. Press them onto the face area, spacing them widely apart for maximum cuteness. -
Add the sparkle:
Roll two tiny specks of white clay and place one on the upper right side of each black eye pupil for a life-like glint. -
Make the mouth:
Roll an incredibly thin thread of black clay. Cut a tiny U-shape and gently press it between the eyes to form a smile. -
Rosy cheeks:
Flatten two small circles of pink clay and place them right below the eyes. -
Baking time:
Bake your dino according to the polymer clay package instructions (usually 275°F/135°C for 15-30 minutes). I recommend tenting it with foil to prevent scorching.
Once cooled, your little pastel friend is ready to guard your desk
Frog Ring Holder With Blush Cheeks

This adorable little amphibian serves a double purpose: keeping you company and holding your precious rings safe. With its perfectly round belly, rosy cheeks, and distinct red polka dots, this hand-sculpted piece adds a quirky, charming touch to any dresser.
Step-by-Step
Materials
- Polymer clay (white or light beige)
- Acrylic paints (pink, red, black, white, gold)
- Glossy glaze or UV resin
- Aluminum foil
- Clay sculpting tools (needles, ball styluses)
- Small disk or cookie cutter (for base)
- Fine detail paintbrushes
- Oven (for baking polymer clay)
Step 1: Sculpting the Base
-
Roll the base:
Start by conditioning a small amount of white clay and rolling it into a flat sheet about 1/4 inch thick. Use a circular cutter or a jar lid to stamp out a perfect circle—this will be the sturdy platform for your frog. -
Form the foil core:
To save clay and keep the frog lightweight, crumple a small ball of aluminum foil into a rough egg shape. This armature helps the body bake evenly. -
Build the body mass:
Roll a smooth sheet of your beige or white clay and wrap it completely around the foil core. Smooth out any seams with your thumbs until you have a seamless, vaguely pear-shaped lump that sits flat on one end. -
Secure body to base:
Place your pear-shaped body onto the center of the circular base. Blend the clay at the bottom slightly using a sculpting tool so the frog attaches firmly to the platform.
Smooth Moves
Before baking, brush a tiny amount of baby oil or clay softener over the raw clay with your finger. This removes fingerprints and creates a flawless surface.
Step 2: Adding Froggy Features
-
Shape the eyes:
Roll two small balls of clay for the eyes. Place them high on the head, spaced slightly apart, and blend the bottom edges into the head so they look like protrusions rather than attached marbles. -
Add the legs:
Create two small sausage shapes for the back legs. Press them onto the sides of the body, bending them at the ‘knee’ and blending the clay against the torso so they look folded. -
Sculpt the arms:
Roll two thinner logs of clay for the front arms. Position them coming from the shoulders down towards the belly. -
Create the ring-holding hands:
This is crucial functionality: join the two hands together at the center of the belly. Press them gently so they create a small loop or gap where a ring can rest, or shape them as if they are holding a small object. -
Make the holding treasure:
Roll a tiny ball of clay and place it securely between the frog’s joined hands. This little ‘gem’ acts as the stopper to keep rings from sliding off. -
Carve the smile:
Using a needle tool or a very thin blade, carefully impress a wide, curved smile across the face. Make small indents at the corners for extra cuteness. -
Bake the piece:
Bake your creation according to the polymer clay package instructions (usually 275°F/135°C for 15-30 minutes). Let it cool completely before painting.
Step 3: Painting & Glazing
-
Apply base wash:
I like to water down a tiny bit of light beige or soft pink acrylic paint to give the frog a slightly translucent, organic skin tone rather than a solid plastic look. Apply a sheer coat and let dry. -
Dot the details:
Using a small detail brush or the back of a paintbrush, dab distinct red or dark pink spots randomly across the back and sides of the frog. -
Blush the cheeks:
Paint two large, soft pink circles right under the eyes for that signature blushing look. -
Define the face:
Paint the eye bumps solid black, leaving a tiny white dot in each for a sparkle reflection. Use a very fine liner brush to trace the smiling mouth line in black. -
Gild the treasure:
Paint the tiny ball held in the frog’s hands with metallic gold paint to make it look like a precious nugget or jewel. -
Seal with gloss:
Once all paint is bon-dry, coat the entire frog (but not necessarily the matte base) with a high-gloss glaze or UV resin. This gives it that wet, ceramic-like shine shown in the photo.
Royal Treatment
Instead of a simple ball, sculpt a tiny crown for the frog’s head or replace the held object with a faux pearl bead for an extra fancy touch.
Now you have a loyal little friend ready to keep your jewelry organized and safe

TRACK YOUR CERAMIC JOURNEY
Capture glaze tests, firing details, and creative progress—all in one simple printable. Make your projects easier to repeat and improve.
Cloud-and-Star Hair Clip Toppers
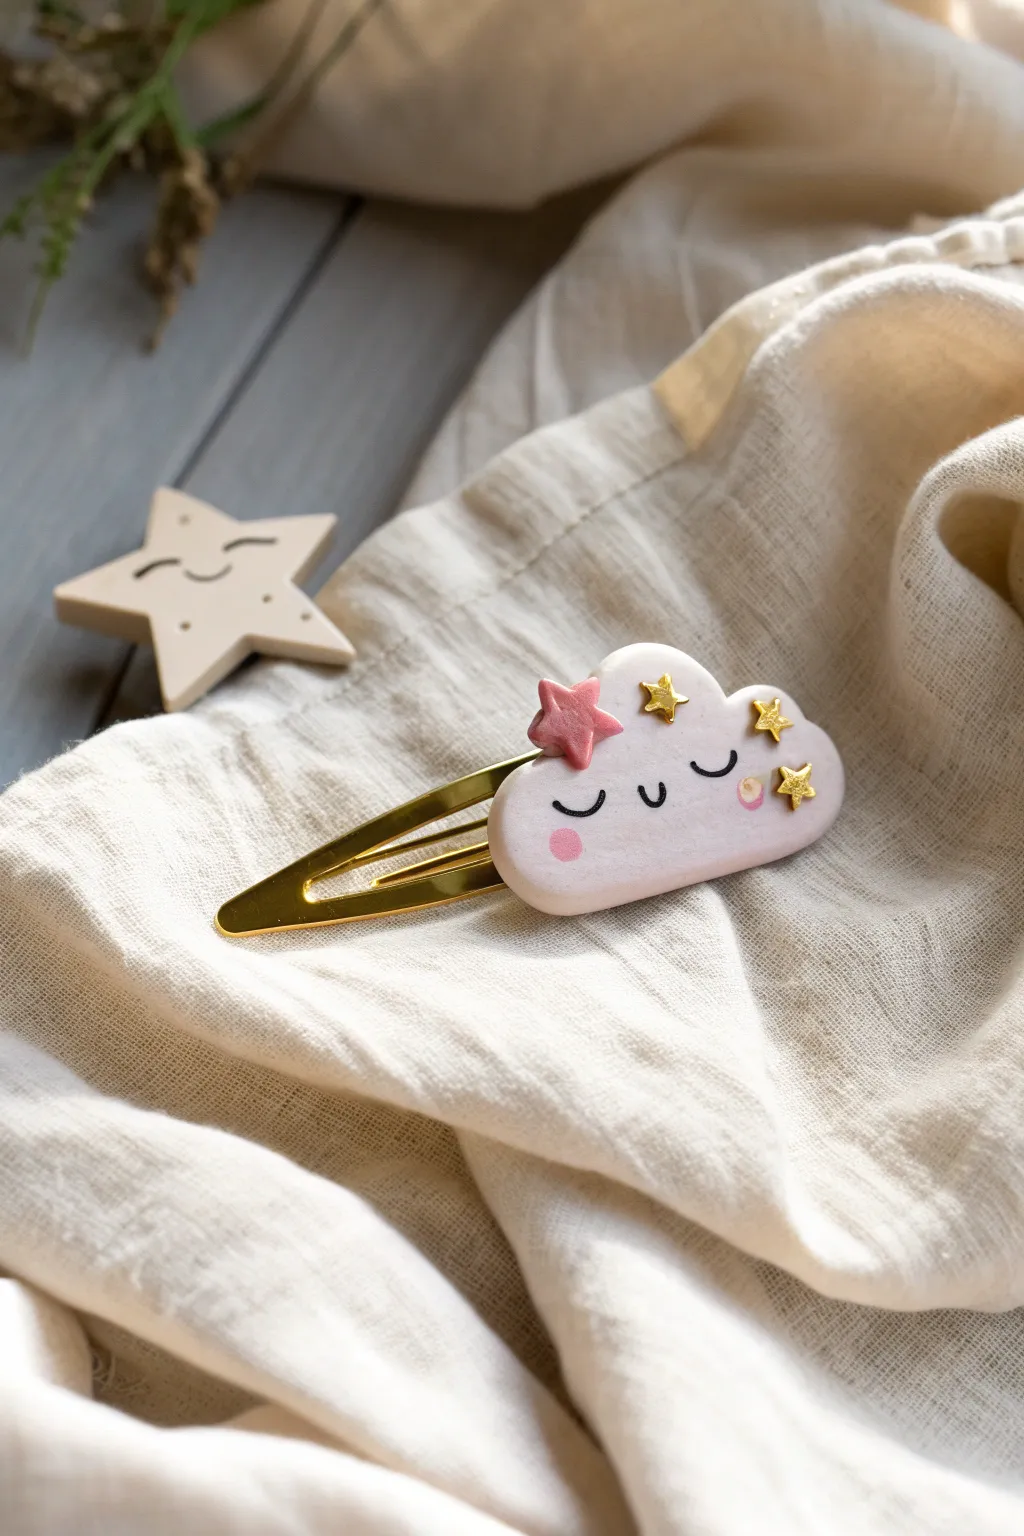
This adorable hair accessory brings a touch of whimsy to any outfit, featuring a smiling cloud with rosy cheeks and sparkling gold star accents. The soft pastel pink hues and glossy finish make it a perfect, cheerful addition to your collection of handmade clay treasures.
Step-by-Step Guide
Materials
- Polymer clay in white and soft pink
- Gold star confetti or clay glitter flakes
- Gold alligator hair clip base (approx. 5-6cm)
- Black acrylic paint or a fine-tip permanent marker
- Pink acrylic paint or soft pastel chalk (for cheeks)
- Gloss glaze or UV resin
- E-6000 glue or strong craft adhesive
- Rolling pin or pasta machine
- Cloud-shaped clay cutter or X-acto knife
- Needle tool or toothpick
- Small paintbrush
- Oven (for baking)
- Small star cutter (optional)
Step 1: Shaping the Base
-
Prepare the Clay:
Begin by conditioning the white polymer clay until it is soft and pliable. Once it’s ready, mix in a tiny trace of pink clay to achieve a very pale, marshmallow-pink base color. -
Roll It Out:
Roll your light pink clay out to an even thickness of about 4-5mm. You want it substantial enough to hold the clip but not too heavy. -
Cut the Shape:
Use a cloud-shaped cutter to punch out your main shape. Alternatively, sketch a cloud lightly onto the clay with a needle tool and carefully cut it out freehand using an X-acto knife. -
Smooth the Edges:
Gently run your finger around the perimeter of the cloud to soften the sharp cut edges, giving it a puffy, friendly look.
Sticky Fingerprints?
If you see fingerprints on your raw clay, lightly brush them with a little baby oil or cornstarch before baking to smooth them out perfectly.
Step 2: Adding Details
-
Make the Pink Star:
Take a small piece of darker pink clay and rolling it out thinner than the base. Cut a small star shape using a tiny cutter or knife. -
Attach the Clay Star:
Press the pink star gently onto the upper left curve of the cloud. You can use a dab of liquid sculpey or gentle pressure to ensure it bonds. -
Apply Gold Stars:
Take your gold star confetti pieces. Press three or four of them into the clay surface around the top and right side. Make sure they are embedded flush with the surface so they don’t pop off later. -
Bake the Clay:
Place your cloud on a ceramic tile or baking sheet lined with parchment paper. Bake according to your brand of clay’s instructions (usually around 275°F/135°C for 15-30 minutes). Let it cool completely.
Step 3: Painting & Finishing
-
Draw the Face:
Using a very fine detail brush and black acrylic paint (or a fine-tip marker), carefully paint two small U-shapes for closed sleepy eyes and a tiny smile in the center. -
Add Rosy Cheeks:
Dip a toothpick or small dotting tool into pink paint and add two sweet dots below the eyes for cheeks. I like to keep these soft and pastel to match the vibe. -
Seal the piece:
Once the paint is fully dry, coat the front and sides of the cloud with a gloss glaze or a thin layer of UV resin to protect the paint and give it a shiny, finished look. -
Attach the Hardware:
Flip the hardened clay piece over. Apply a strong adhesive like E-6000 to the flat pad of the gold alligator clip. -
Final Assembly:
Press the clip firmly onto the back of the cloud. Let the glue cure for at least 24 hours before wearing to ensure a secure hold.
Moonlight Magic
Create a nocturnal twin by using pale blue clay for the cloud and dusting the surface with pearlescent mica powder for a shimmery moonbeam effect.
Now you have a charming custom hair clip ready to wear or gift to a friend
Marbled Pastel Bead Bracelet
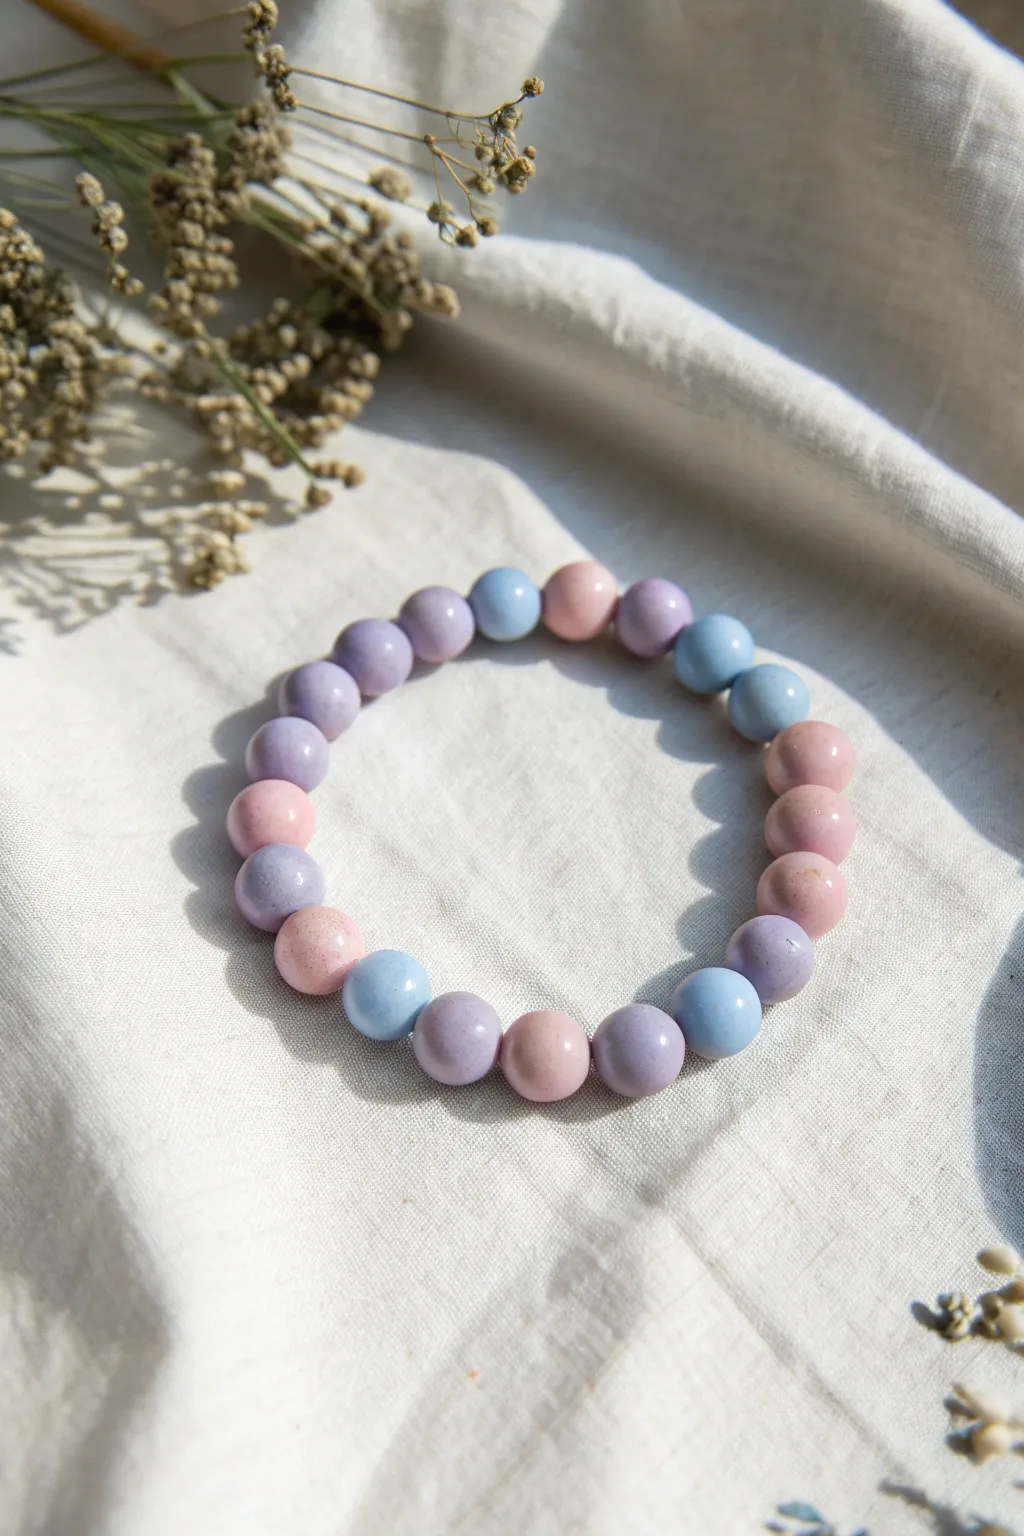
Soft pinks, creamy purples, and sky blues come together in this dreamy, handcrafted bracelet. The high-gloss finish gives these clay beads a polished, gemstone-like quality perfect for everyday wear.
How-To Guide
Materials
- Polymer clay (pastel pink, pastel purple, light blue, and white)
- Acrylic roller or pasta machine
- Circle cutters (small)
- Needle tool or bead piercing pins
- Bead baking rack or cornstarch
- Wet/dry sand paper (400-800 grit)
- Glossy polyurethane varnish or UV resin
- Small paintbrush
- Elastic beading cord (0.8mm or 1mm)
- Super glue or jewelry knot cement
- Scissors
Step 1: Creating the Clay Colors
-
Condition the Clay:
Begin by warming up your polymer clay in your hands. Knead the pink, purple, blue, and white blocks separately until they are soft and pliable. -
Mix Custom Pastels:
To achieve the soft tones seen in the photo, mix a small amount of white clay into each colored block. Create variations by leaving some pure and mixing others to be milder. -
Create a Marbled Effect:
For the subtle speckled look, take a pea-sized amount of a contrasting color (like purple into pink) and chop it finely. Mix it briefly into the base color, stopping before it blends completely.
Fixing Fingerprints
Did you squish your bead while piercing it? Gently re-roll it between your palms while the pin is still inside to reshape it into a perfect sphere.
Step 2: Forming the Beads
-
Roll Snakes:
Roll each color batch into a thick snake or log, aiming for a consistent diameter of about half an inch. -
Measure Sections:
Use a tissue blade or knife to cut equal-sized segments from your logs. Keeping the volume of clay consistent is key to getting uniform beads. -
Roll Spheres:
Take each segment and roll it vigorously between your palms. Use a circular motion until the bead is perfectly round and smooth, eliminating any seams. -
Chill the Clay:
If your clay has become too warm and sticky from handling, pop the raw beads in the fridge for 10 minutes. This prevents fingerprint distortion during piercing. -
Piercing the Holes:
Gently hold a bead and insert a needle tool through the center. I find twisting the needle while pushing works best to avoid squishing the sphere. -
Refining the Holes:
Once the needle is through, spin it gently to slightly enlarge the hole, ensuring your elastic cord will fit later, then carefully slide the bead off.
Super Glossy Finish
For that glass-like shine seen in the photo, apply two thin coats of glaze rather than one thick one. Let the first coat dry fully before adding the second.
Step 3: Baking and Finishing
-
Prepare for Baking:
Place your beads on a baking rack or a bed of cornstarch. Cornstarch helps cradle the rounds so they don’t develop a flat spot on the bottom. -
Bake:
Bake according to your clay manufacturer’s instructions (usually 275°F/135°C for 30-45 minutes). Let them cool completely before handling. -
Wet Sanding:
Submerge the cooled beads in a bowl of water and sand them lightly with 400 or 600 grit sandpaper to remove any fingerprints or lint. -
Apply Glaze:
Skewer the beads on toothpicks or pins. Apply a coat of glossy varnish or UV resin. If using resin, cure under a UV lamp; if varnish, let dry for at least an hour.
Step 4: Assembly
-
Arrange the Pattern:
Lay out your beads on a cloth in your desired order. The image shows a random mix of colors rather than a strict repeating pattern. -
String the Beads:
Cut a piece of elastic cord about 10 inches long. Pre-stretch the cord by pulling on it firmly a few times, then thread all your glazed beads onto it. -
Check the Fit:
Wrap the strand around your wrist to ensure it fits comfortably without large gaps between beads. Add or remove beads as necessary. -
Tie the Knot:
Tie a surgeon’s knot (right over left twice, then left over right twice) and pull tight. Apply a tiny drop of super glue or jewelry cement to the knot. -
Hide the Knot:
Once dry, trim the excess tail of the cord. Gently tug the bracelet so the knot slides inside the hole of the nearest bead.
Enjoy wearing your beautiful new accessory or gift it to a friend who loves gentle colors
Tiny Makeup Palette Trinket Box
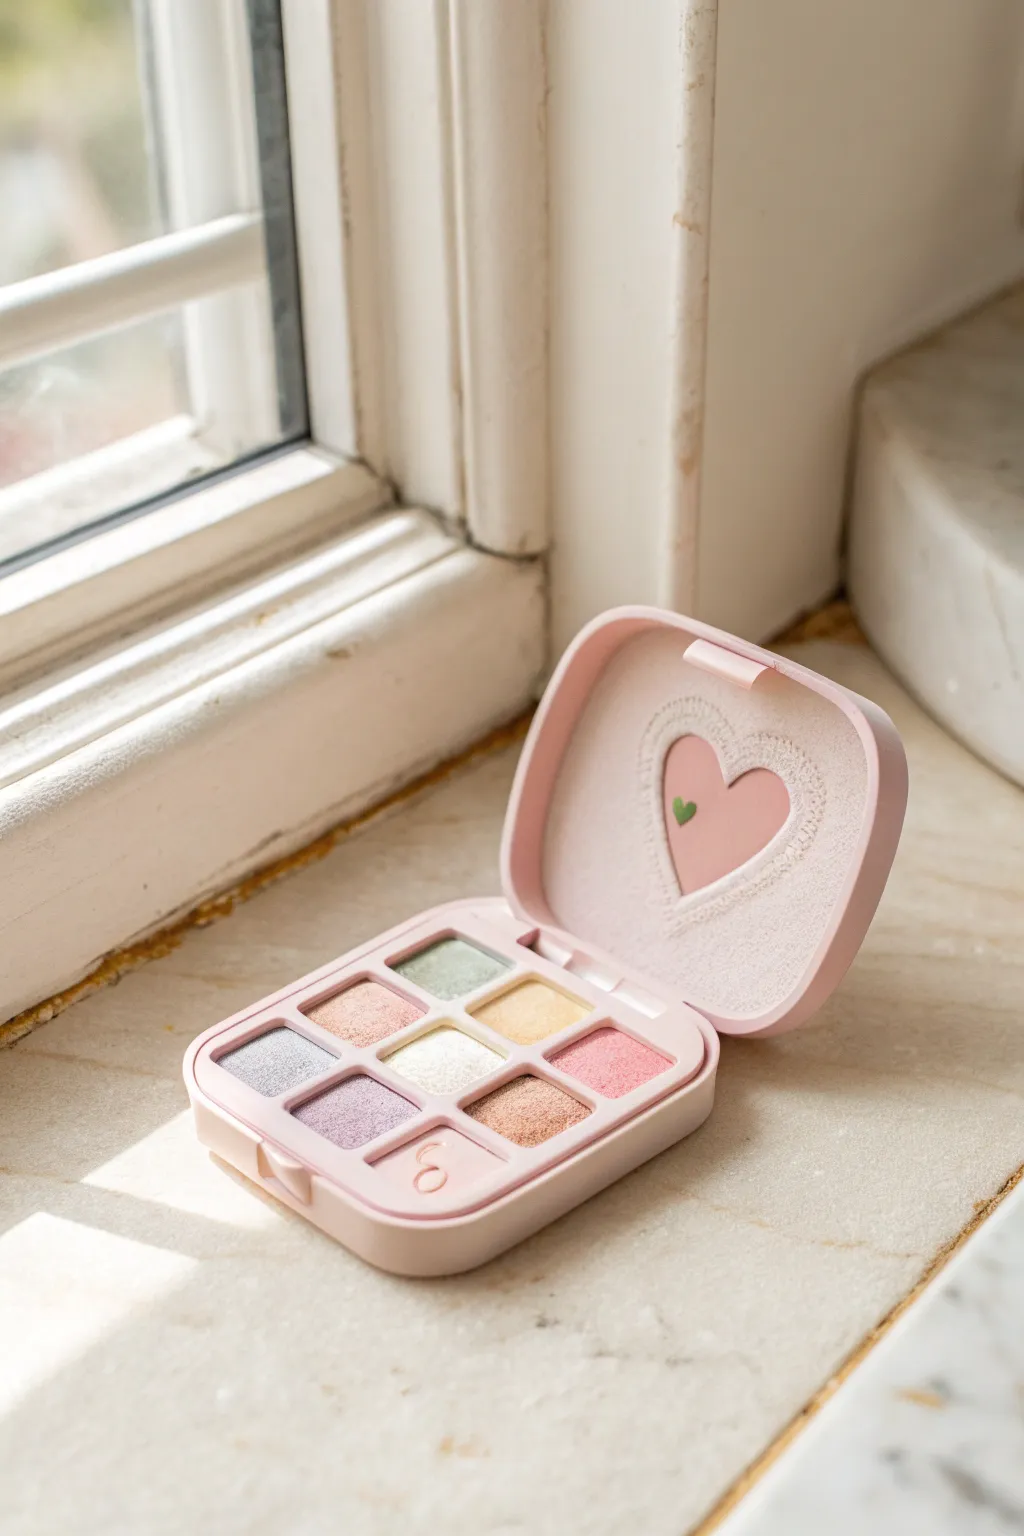
Create the ultimate vanity accessory with this adorable faux-makeup palette made entirely of clay. With shimmering pastel pans and a sweet lace-trimmed heart mirror, it’s perfect for storing rings or tiny studs.
Detailed Instructions
Materials
- Light pink polymer clay
- Liquid polymer clay (translucent or pink)
- Mica powders (pastel pink, gold, lavender, blue, green)
- Small heart-shaped cutter
- Square clay cutter (approx. 1 cm)
- Small mirror piece or silver mirrored cardstock
- Glossy polyurethane varnish
- Needle tool or toothpick
- White acrylic paint (for lace detail)
- Fine detail brush
- Rolling pin
- Craft knife
- Super glue or strong craft adhesive
Step 1: Shaping the Case
-
Condition the Clay:
Begin by conditioning your light pink polymer clay until it is soft and pliable. I find that warming it in my hands for a few minutes makes it much easier to work with without cracking. -
Roll the Base Slab:
Roll out a slab of clay to about 5mm thickness. This needs to be sturdy enough to hold the ‘pans’ of makeup. -
Cut the Base Shape:
Cut a rounded square or rectangle from the slab. Smooth the edges with your finger to remove any sharp cutting lines. -
Create the Pan Grid:
Using your small square cutter, gently press into the clay base to create a 3×2 grid of indentations. Do not cut all the way through; imply the depth of the pans. -
Refine the Indentations:
If the cutter didn’t make a deep enough impression, scoop out a tiny bit of clay from each square with a sculpting tool to create a proper reservoir. -
Form the Lid:
Roll a second slab of pink clay, slightly thinner than the base (about 3-4mm). Cut it to the exact same shape and size as your base. -
Make the Heart Cutout:
Use a small heart cutter to remove the center of the lid piece. Save the cutout for another project, as we want a window here. -
Add Side Walls:
Roll a long snake of clay and flatten it into a strip. Wrap this strip around the perimeter of the lid piece to create a lip, blending the seams on the inside so they aren’t visible.
Fixing Smudges
If mica powder dusts onto the pink frames during filling, wipe it away immediately with a baby wipe or a Q-tip dipped in rubbing alcohol before baking.
Step 2: Filling and Decorating
-
Prepare the ‘Makeup’:
Mix small amounts of liquid polymer clay with your different mica powders. You want a thick, shimmery paste consistency. -
Fill the Pans:
Carefully drip the colored liquid clay mixtures into the square indentations in your base. Use a toothpick to guide the mixture into the corners. -
Create the Hinge Mechanism:
Fashion a small clay tube or hinge shape at the back of both the base and lid, or simply prepare to glue them together later with a piece of ribbon for a faux hinge. -
Bake the Pieces:
Bake all clay parts according to your clay package instructions (usually 275°F/135°C for 15-30 minutes). Let them cool completely.
Step 3: Assembly and Detailing
-
Add the Mirror:
Cut a piece of mirrored cardstock or a small craft mirror to fit behind the heart cutout on the inside of the lid. Glue it securely in place. -
Paint the Lace:
Using white acrylic paint and your finest brush, paint delicate scallops and dots around the border of the heart cutout to mimic vintage lace. -
Emboss or Paint Logo:
If you want a brand logo, paint a tiny symbol on the bottom right corner of the palette base. -
Attach Lid to Base:
Glue the lid to the base. Since this is a trinket box, you can stick them in a fixed open position, or use a strip of fabric glued to the back for a functional hinge. -
Seal the Exterior:
Apply a coat of matte varnish to the pink clay parts to protect the paint, but be careful not to paint over the shimmery mica pans. -
Gloss the Pans:
For an extra wet-look shine, apply a drop of UV resin or glossy glaze specifically over each colored square.
Textured Shadows
Before baking the liquid clay ‘makeup,’ texture the surface slightly with a piece of rough sandpaper or a toothbrush to make it look like pressed powder.
Display your shimmering creation on your dresser for a distinctively cute touch.
Teacup Planter With a Kawaii Face
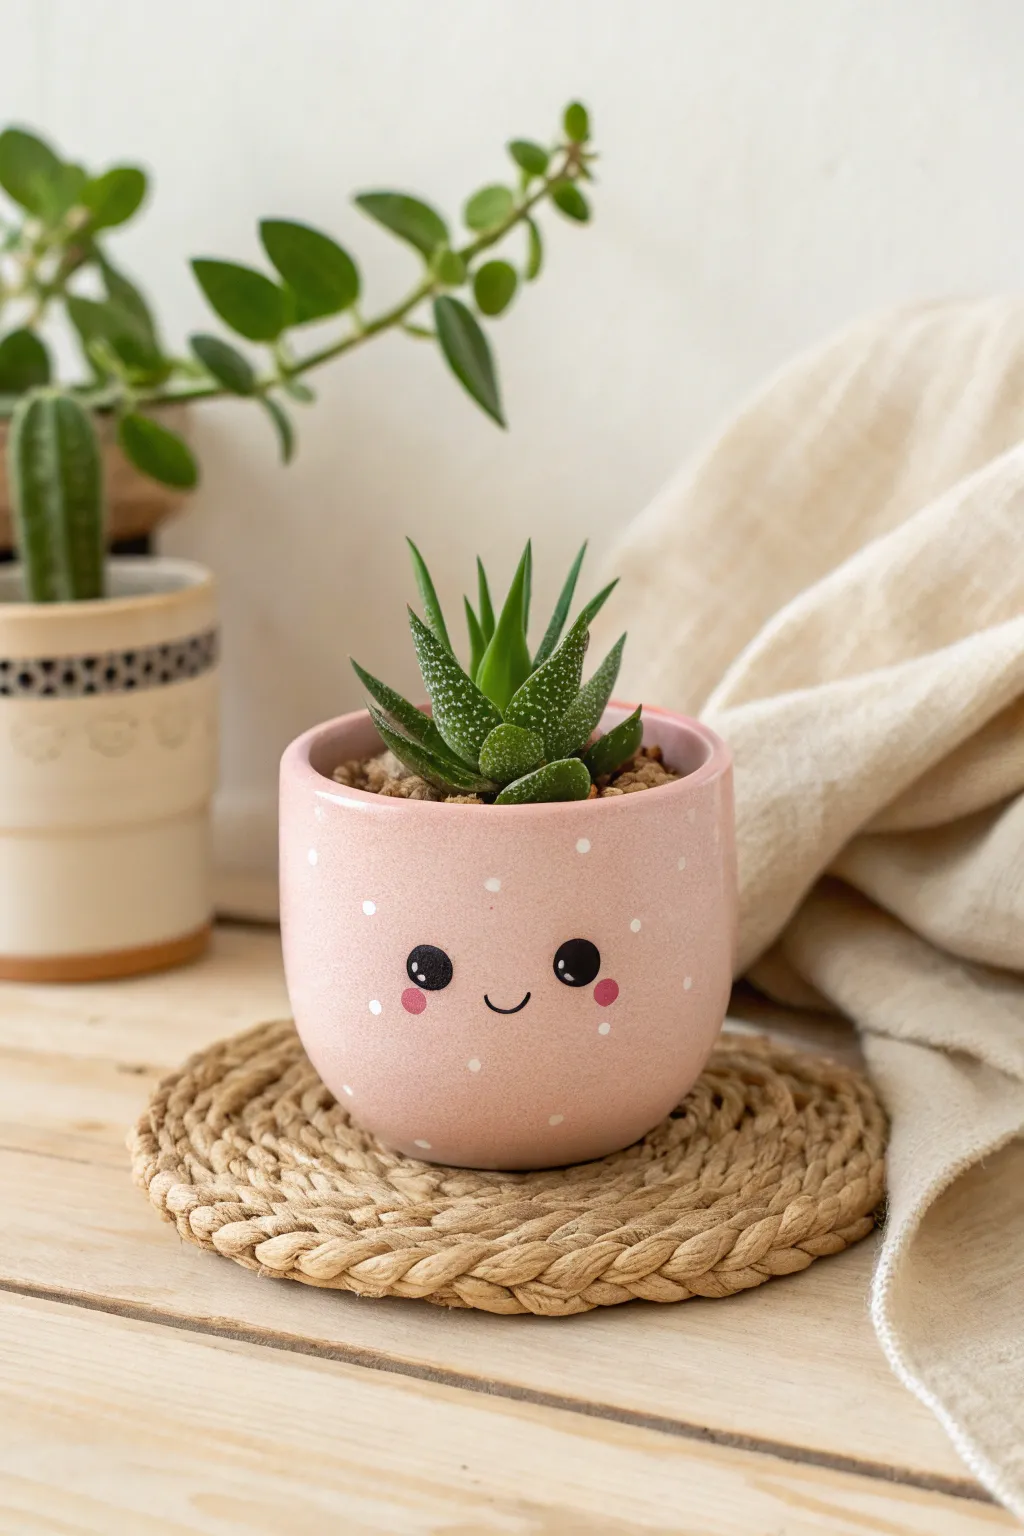
Transform a plain ceramic pot into an adorable character with this simple painting project. The soft pink base, scattered polka dots, and sweet little face create a charming home for your favorite succulent.
Detailed Instructions
Materials
- Small cylindrical ceramic or clay pot (cleaned and dried)
- Acrylic paints: Baby pink, white, black, rosy pink
- Medium flat paintbrush
- Small round detail brush (size 0 or 00)
- Dotting tool or the handle end of a paintbrush
- Matte or glossy clear sealant spray
- Palette for mixing
- Water cup and paper towels
- Pencil
Step 1: Base Coat Application
-
Clean surface:
Begin by ensuring your pot is completely free of dust or grease. Wipe it down with a damp cloth and let it dry fully so the paint adheres properly. -
Mix base color:
Squeeze out a generous amount of baby pink acrylic paint. If you want a softer look like the reference, mix in a tiny bit of white to create a pastel shade. -
First coat:
Using your flat brush, apply a smooth, even layer of pink paint over the entire exterior of the pot. Don’t worry if it looks streaky; acrylics often need layers. -
Dry and repeat:
Allow the first coat to dry for about 15-20 minutes. Apply a second or third coat until you have a solid, opaque pink finish with no clay showing through. -
Inner rim:
Paint just inside the top rim of the pot with the pink color so the clay doesn’t show when you add soil later.
Clean Lines Hack
If you struggle painting perfect circles for eyes, use the eraser end of a pencil as a stamp. Dip it in paint, stamp it on paper to remove excess, then stamp your pot.
Step 2: Painting the Face
-
Sketch placement:
Once the pink base is completely dry, very lightly sketch where you want the eyes and mouth to go using a pencil. Aim for the lower middle of the pot for maximum cuteness. -
Paint eyes:
Load your small round brush or a large dotting tool with black paint. Create two solid black circles for the eyes. I find dabbing gently in a circular motion helps keep the edges clean. -
Paint mouth:
Using your thinnest detail brush (size 00 is perfect here) and black paint, carefully draw a small ‘U’ shape exactly between the eyes for the smile. -
Add cheeks:
Dip a medium-sized dotting tool or a Q-tip into rosy pink paint. Stamp a small circle just below the outer edge of each eye to create blushing cheeks. -
Eye highlights:
Let the black paint dry completely. Dip a tiny dotting tool or toothpick into white paint and add two small white dots to the upper right area of each black eye pupil for a glistening effect.
Step 3: Details and Finish
-
Polka dots:
Dip a small dotting tool or the wrong end of a brush into white paint. Tap random, scattered dots all over the pink surface, avoiding the immediate face area. -
Vary density:
Keep the dots irregular and spaced out for a whimsical feel rather than a strict geometric pattern. -
Final drying time:
Allow all your detailed painting work to dry for at least an hour to ensure nothing smudges during the sealing process. -
Seal the pot:
Take the pot outdoors or to a ventilated area. Spray the entire exterior with a clear acrylic sealant. A matte finish looks very modern, while gloss will make it shine like ceramic. -
Planting:
Once the sealer is cured (check your can’s instructions), fill your pot with cactus soil and tuck in a small succulent like the Haworthia shown in the photo.
Mix It Up
Try pastel blue or mint green for the base color to create a whole set of friends. Give them different expressions like winking or sleeping eyes.
Place your new cheerful planter on a sunny windowsill where its smile can greet you every morning
Ombré Rainbow Phone Charm Drops
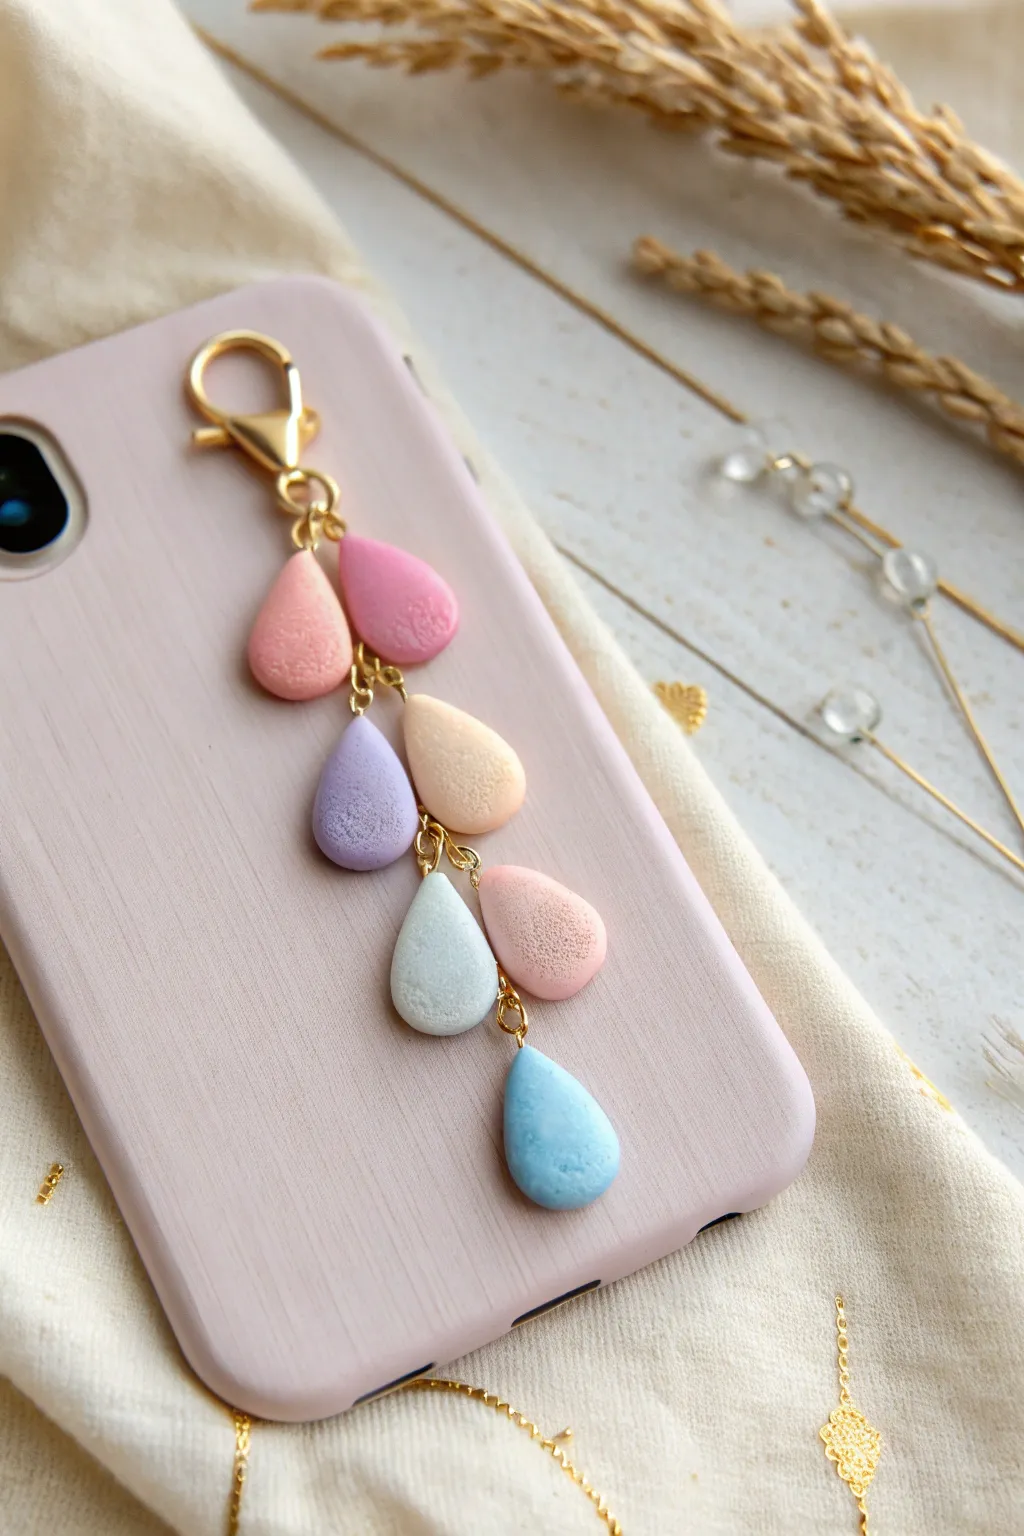
Soft pastels cascade like gentle rain in this adorable polymer clay phone charm. With its textured, matte finish and delicate gold hardware, this accessory adds a touch of dreamy elegance to your everyday tech.
How-To Guide
Materials
- Polymer clay in pastel shades: baby pink, lilac, peach, soft coral, sky blue
- Gold tone chain (small link)
- Gold lobster clasp
- Gold eye pins (approx. 20mm)
- Small gold jump rings (4mm or 5mm)
- Round nose pliers
- Chain nose pliers
- Wire cutters
- Toothbrush or texturing sponge
- Rolling pin or pasta machine
- Gloss or matte varnish (optional)
- Baking tile or parchment paper
- Oven
Step 1: Shaping the Clay
-
Condition the clay:
Begin by taking small amounts of each pastel polymer clay color. Knead each piece thoroughly in your hands until it becomes soft, pliable, and warm to the touch. -
Create base spheres:
Roll small balls of clay for each raindrop. You will need about 7-8 balls total. Aim for a diameter similar to a large pea, keeping them relatively uniform in size. -
Form the teardrop shape:
Take one ball and gently roll it between your palms, applying slightly more pressure on one side to taper it into a cone. Refine the shape so it has a rounded bottom and a pointed top, mimicking a raindrop. -
Flatten the drops:
Place the teardrops on your work surface and gently press them flat with your finger or an acrylic block. They should be about 3-4mm thick, not paper-thin. -
Add texture:
To achieve the stone-like finish seen in the photo, gently tap the surface of each clay drop with an old clean toothbrush or a coarse sponge. This removes fingerprints and adds a lovely organic matte texture.
Pin Keep Falling Out?
If the eye pin feels loose after baking, pull it out, add a dab of superglue to the wire stem, and slide it quickly back into the hole.
Step 2: Assembly Prep & Baking
-
Insert eye pins:
Take your eye pins and trim them if they are too long; usually, 1cm of wire stem is sufficient. Carefully push the straight end into the pointed top of each clay teardrop. -
Secure the wire:
Ensure the loop of the eye pin sits flush against the top of the clay text. If the clay distorts while inserting, gently reshape the top with your fingers. -
Bake the pieces:
Place all your textured drops on a baking tile or parchment-lined tray. Bake according to your specific brand of clay’s instructions—usually around 230°F to 275°F (110°C to 135°C) for 30 minutes. -
Cool down:
Once baked, turn the oven off and let the pieces cool down completely inside or on the counter before handling to prevent cracking. -
Optional varnish:
If you want extra protection, apply a very thin layer of matte varnish now. However, leaving them raw maintains that sugary, stone-like texture.
Clean Edges
Before baking, use a cotton swab dipped in a tiny bit of rubbing alcohol to smooth away any rough edges or lint for a flawless finish.
Step 3: Jewelry Assembly
-
Prepare the main chain:
Cut a segment of gold chain approximately 2 to 3 inches long. This will act as the spine created for the drops to hang from. -
Attach the clasp:
Using a jump ring, attach the large gold lobster clasp to the very top link of your chain segment. -
Start attaching drops:
Open a small jump ring using two pairs of pliers (twist sideways, don’t pull apart). Slide on your first clay charm—I usually start with the top pink one. -
Connect to chain:
Hook that jump ring onto the chain, just a few links down from the clasp, and close the ring securely. -
Create the cascade:
Continue adding charms down the length of the chain. Space them out by skipping 1-2 links between each attachment so they cluster naturally without bunching too much. -
Alternate colors:
Follow the ombré pattern: pinks at the top, transitioning into peach, purple, and finally blues at the bottom. -
Final charm placement:
Attach the very last blue drop to the absolute bottom link of the chain to finish the varying lengths.
Clip your new handmade charm onto your phone case and enjoy the subtle swing of colors
Mini Fairy Cottagecore Charm Set

Capture the whimsy of a fairy garden with this adorable set of handmade polymer clay charms. Featuring a mushroom, a smiling house, and sweet floral designs, this project brings earthy tones and cottagecore vibes right to your keychain or jewelry.
Step-by-Step Guide
Materials
- Polymer clay (white, blush pink, terracota/rust, beige, moss green, yellow)
- Clay sculpting tools (needle tool, ball stylus)
- Liquid polymer clay (optional, for adhesion)
- Eyepin hooks or jewelry jump rings
- Small lobster clasps
- Rolling pin or pasta machine
- Soft pastel chalks (white, dark brown)
- Small paintbrush
- Oven for baking
- Glaze or UV resin (optional for shine)
Step 1: Preparation & Palettes
-
Conditioning the Clay:
Begin by thoroughly kneading your clay colors until they are soft and pliable. This prevents cracking later. Create your color palette: you’ll need a soft beige for the neutral bases, a dusty pink, a warm terracotta rust, and a muted moss green. -
Mixing Custom Shades:
To achieve that muted, earthy ‘cottagecore’ look, I like to mix a tiny dot of brown or beige into my bright pinks and greens. This desaturates them slightly for a more natural finish.
Step 2: Sculpting the Mushroom
-
Forming the Cap:
Roll a ball of pink clay and flatten the bottom to create a dome shape. Use your fingers to gently pull the corners out slightly into a subtle triangular shape. -
Adding Spots:
Take tiny pinched pieces of dark grey or brown clay. Roll them into minuscule balls and press them firmly onto the pink cap. Flatten them flush with the surface for an inlaid look. -
Creating the Stalk:
Roll a thick log of white or cream clay. Taper the top slightly so it fits neatly under the cap. Gently curve the bottom to give it an organic, growing feel. -
Assembly:
Attach the stalk to the center of the cap. Insert an eyepin into the top of the mushroom cap before baking.
Clean Slate Tip
Keep separate baby wipes nearby for light and dark colors. Dust shows up easily on white clay, so wipe hands and tools thoroughly before sculpting the house or mushroom stem.
Step 3: Sculpting the Happy House
-
Building the Base:
Cut a thick rectangle from beige or white clay. Soften the edges with your fingertip so they aren’t perfectly sharp. -
Adding the Roof:
Shape a triangle of terracotta clay that is slightly wider than your house base. Press it onto the top of the beige rectangle. -
Roof Texture:
Use a needle tool or the back of a knife to gently score grid lines onto the roof, mimicking shingles or tiles. -
Adding the Face:
Use a small ball tool to indent two eye sockets. Place tiny balls of black clay inside. For the smile, press a curved tool or a cut straw piece into the clay.
Make it Sparkle
After baking, brush a thin layer of UV resin or glossy varnish over just the eyes and the mushroom spots. This contrast between matte clay and shiny details looks pro.
Step 4: Making the Floral Charms
-
Pink Daisy Petals:
Roll 8 small balls of pink clay. Flatten them into teardrops and arrange them in a circle, points facing inward. Use a needle tool to press a line down the center of each petal for texture. -
Daisy Face:
Place a cream-colored ball in the center. Add tiny black clay eyes and a nose to give the flower a personality. -
Cookie Flower Base:
For the round charm, flatten a ball of beige clay into a thick cookie shape. Indent the center slightly. -
Cookie Flower Details:
Fill the indentation with a flattened white circle. Use a needle tool to scratch radiating lines to resemble petals. Add a textured yellow center using a toothbrush or needle tool for a pollen effect. -
Attaching the Stem:
Roll a thin green snake of clay for the stem and attach two textured leaves. Press this assembly onto the back or bottom of the round cookie flower.
Step 5: Finishing
-
Inserting Hardware:
Carefully trim your eyepins to the correct length and insert them into the top of each charm. Adding a dab of liquid clay or ‘Bake and Bond’ on the pin helps secure it permanently. -
Baking:
Bake the pieces according to your clay package instructions (usually 275°F/130°C for 15-30 minutes). Let them cool completely before handling. -
Assembly:
Once cool, use pliers to attach jump rings and lobster clasps to the eyepins.
Clip these sweet miniatures onto your zipper or bag to carry a little garden magic wherever you go