Halloween is basically air dry clay’s time to shine—simple shapes turn into instant seasonal magic. Here are my favorite Halloween air dry clay projects that kids can make proudly, without anything too scary or fussy.
Cute Sheet Ghost Figurines
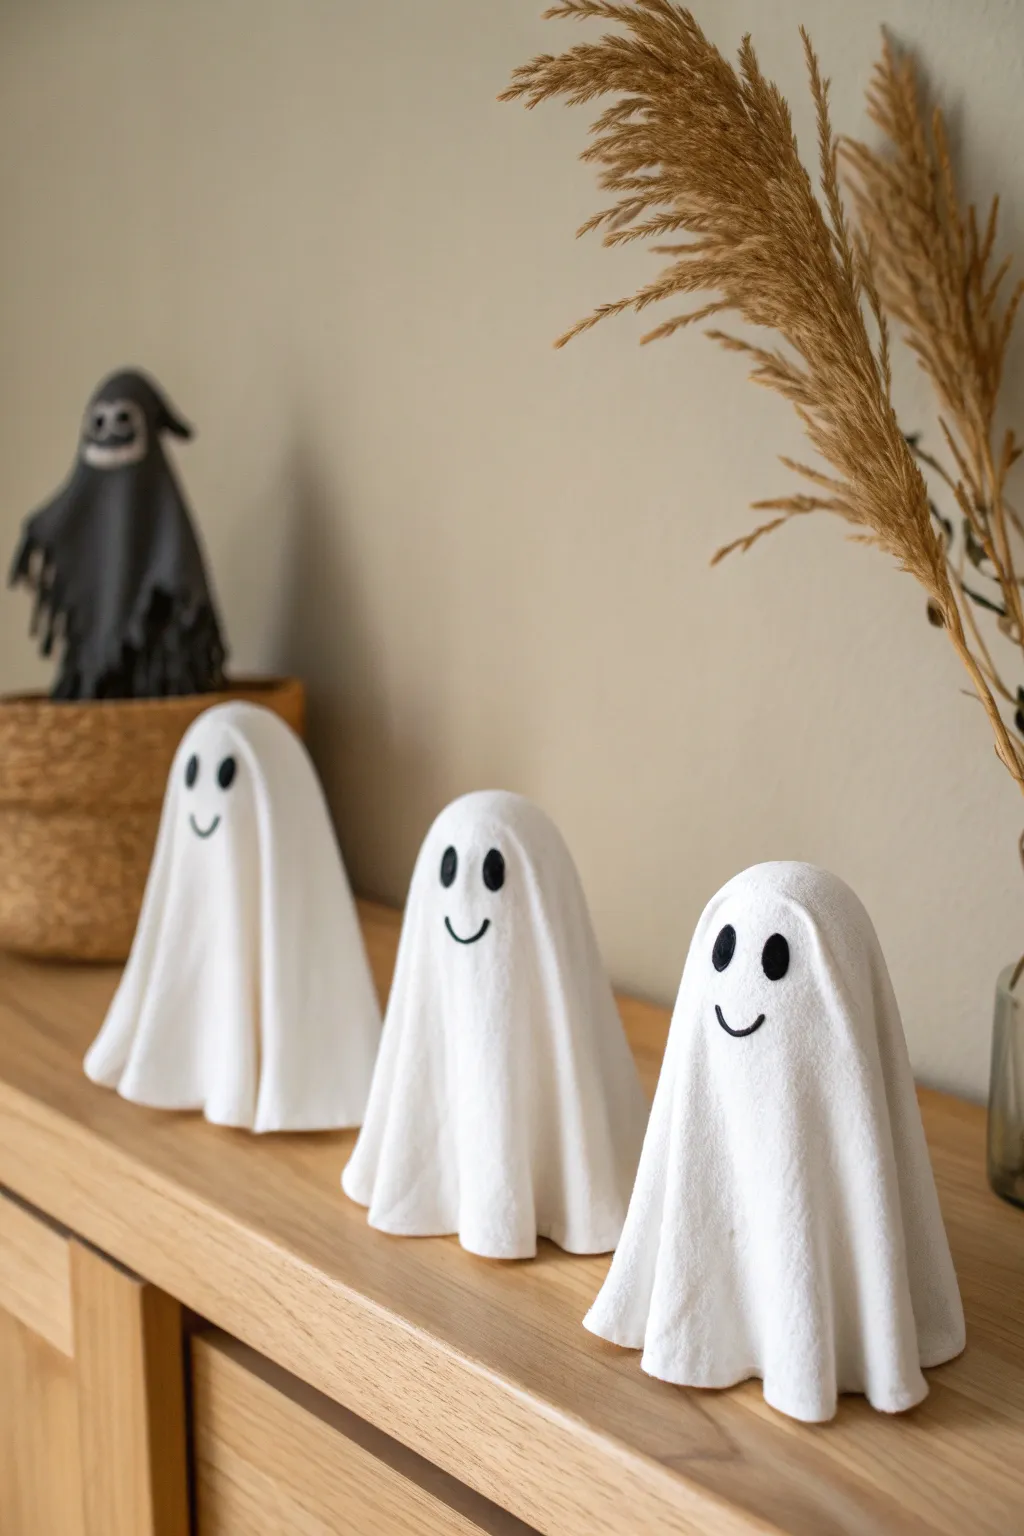
These adorable ghost figurines capture the classic look of a bedsheet costume frozen in time. With their smooth, draped folds and simple smiling faces, they make for a charmingly spooky addition to any shelf or mantelpiece.
Step-by-Step
Materials
- White smooth air dry clay
- Aluminum foil
- Rolling pin
- Rolling guides or wooden slats (approx. 3-4mm thickness)
- Small round object for forming (like a ping pong ball, large wooden bead, or egg cup)
- Clay knife or plastic cutting tool
- Black acrylic paint or black Posca marker
- Fine detail paintbrush
- Small bowl of water
- Sandpaper (fine grit)
Step 1: Creating the Base Structure
-
Form the armature:
Crumple a piece of aluminum foil into a cone-like shape with a rounded top. This will be the support structure underneath your ghost while it dries. Make three of these in slightly different heights to create a varied family of ghosts. -
Prepare the forming stand:
Place your foil armature on your work surface. If you want the ghosts to be hollow later, you can place a small ball on top of a narrow cup or bottle neck instead of using foil, but foil is easiest for beginners.
Smoother Drapes
For ultra-realistic fabric folds, lightly dust your foil armature with cornstarch before draping. This lets the clay slide into natural folds without sticking to the support.
Step 2: Shaping the Clay Ghost
-
Prepare the clay:
Take a generous handful of air dry clay and knead it until it’s soft and pliable. Warm hands help make the conditioning process faster. -
Roll out the sheet:
Using your rolling pin, flatten the clay into a circle. Use guide slats on either side if you have them to ensure an even thickness of about 3-4mm. You want it thin enough to drape naturally, but thick enough to hold its shape. -
Cut the circle:
Use a round template (like a bowl) or freehand a rough circle shape with your clay knife. The edges don’t need to be perfect circles as they will become the dragging hem of the sheet. -
Drape the clay:
Gently lift your clay circle and center it over the top of your foil armature. Let gravity do most of the work as you lower the edges down. -
Arrange the folds:
Using your fingers, gently guide the clay to create vertical folds. Pinch the fabric-like waves slightly at the bottom to accentuate the draped look. I like to twist the bottom hem ever so slightly to give it movement. -
Smooth the surface:
Dip your finger in a little water and smooth out any fingerprints or rough texture on the surface of the ghost. The goal is for it to look like soft fabric. -
Check the balance:
Ensure the bottom edge of the clay sheet touches the table evenly all around so the ghost will stand stable once the foil is removed. -
Repeat the process:
Create the other two ghosts using the same technique, perhaps varying the width of the drapes or the tilt of the ‘head’ for personality.
Glow Up
Make your ghosts functional by leaving them hollow and placing a battery-operated tea light underneath. Poke small holes for eyes instead of painting them.
Step 3: Finishing Touches
-
Allow to dry:
Let the ghosts dry completely. This usually takes 24-48 hours depending on humidity. Keep them on their armatures during this time to prevent collapsing. -
Remove the armature:
Once fully hard, carefully remove the foil from underneath. If it’s stuck, you can use a tool to gently pry it out, or just leave it inside if it isn’t visible. -
Sand imperfections:
Take a piece of fine-grit sandpaper and gently buff away any rough edges on the bottom hem or surface bumps. -
Painting the eyes:
Using black acrylic paint and a fine brush, paint two vertical oval shapes for the eyes. Position them slightly higher up on the head. -
Adding the smile:
Paint a simple, thin U-shape curve for the mouth. Place it relatively high, close to the eyes, which gives the ghost that cute, innocent expression. -
Final sealing (optional):
For a finished look that mimics ceramic, you can apply a layer of matte or satin varnish over the entire ghost.
Group your new ghostly family together for a display that is equal parts spooky and sweet


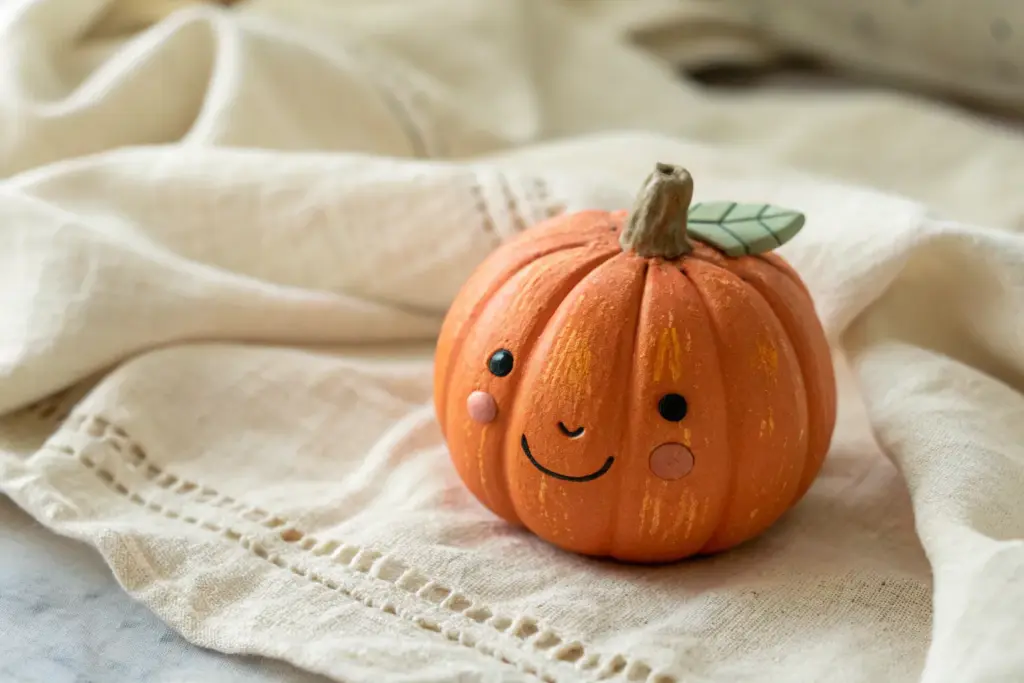
Pinch Pot Jack-o’-Lanterns

Transform a simple ball of clay into a festive, smiling pumpkin that radiates rustic charm. This project uses the beginner-friendly pinch pot technique to create a hollow center, perfect for housing a battery-operated tea light on Halloween night.
How-To Guide
Materials
- Air dry clay (terracotta color preferred, or white)
- Acrylic paint (burnt orange, forest green, black)
- Clay carving tools or a plastic knife
- Small cup of water
- Sponge
- Rolling pin
- Paintbrushes (medium flat brush, small detail brush)
- Battery-operated tea light (optional)
Step 1: Forming the Pumpkin Base
-
Create the clay ball:
Start by taking a generous handful of air dry clay and rolling it between your palms. Aim for a smooth sphere about the size of an orange. If the clay feels dry or cracks, dip your fingers in water and smooth it out. -
Begin the pinch pot:
Hold the ball in one hand and press your thumb deep into the center, but stop before pushing through the bottom. This central hole is the start of your hollow pumpkin. -
Widen the walls:
Gently pinch the clay between your thumb (inside) and fingers (outside). Rotate the ball as you pinch, working your way up the sides to create a hollow bowl shape with even walls. -
Close the shape:
Once you have a bowl, gently curve the top rim inward to make the opening smaller. You want it to look more like a sphere with a hole on top rather than an open bowl. -
Refine the surface:
Dip a sponge in a little water and wipe it over the exterior walls. This smooths out fingerprints and gives the pumpkin a clean, finished look. -
Add vertical grooves:
Use the side of a modeling tool or a dull pencil to press vertical lines down the sides of the pumpkin. These grooves mimic the natural ribs of a real gourd.
Step 2: Carving the Face & Lid
-
Flatten the top:
Gently tap the top opening against your table or smooth it with your fingers to create a flat rim. This is where the lid will eventually sit. -
Create the lid:
Roll a smaller ball of clay and flatten it slightly into a thick disk that matches the size of your pumpkin’s opening. -
Attach the stem:
Form a small, twisted cone of clay for the stem. Score (scratch) the bottom of the stem and the center of the lid, add a drop of water, and press them firmly together. -
Sketch the face:
Lightly trace your desired Jack-o’-lantern face onto the side of the pot using a toothpick or needle tool. I find simple triangular eyes work best for this scale. -
Carve the features:
Using a small clay knife, carefully cut out the eyes and nose triangles. Push the cut pieces inward or pull them out delicately to remove them. -
Sculpt the mouth:
Cut a wide, curved mouth. To add charm, leave a small square of clay intact in the middle of the bottom lip to create a single tooth. -
Smooth the cut edges:
Dip your finger or a wet brush into water and run it along the cut edges of the eyes and mouth to remove any sharp burrs or crumbs.
Cracking Up?
If small surface cracks appear while the clay is drying, simply fill them with a mixture of wet clay slip (clay mixed with water into a paste) and smooth it over with your finger.
Step 3: Finishing Touches
-
Dry thoroughly:
Set the pumpkin and its lid aside in a dry, ventilated area. Depending on the thickness, it will need 24 to 48 hours to dry completely. -
Base coat painting:
If you didn’t use terracotta clay, paint the entire exterior with burnt orange acrylic paint. You might need two coats for full opacity. -
Detailing the stem:
Paint the stem with a forest green color. You can bring a little of the green down onto the top of the lid for a realistic transition. -
Adding shadow:
Mix a tiny bit of black or brown paint with water to make a thin wash. Paint this into the vertical grooves and wipe away the excess with a paper towel to create depth. -
Insert light:
Once the paint is completely dry, place a battery-operated tea light inside to make your creation glow.
Pro Tip: Thickness Check
Keep the walls of your pinch pot about 1/4 inch thick. If they are too thin, the pumpkin might collapse; too thick, and it will be difficult to carve the facial features cleanly.
Place your little terracotta pumpkin on a windowsill or shelf to add a warm, handmade touch to your autumn decor


Bat Wall or Door Hangers
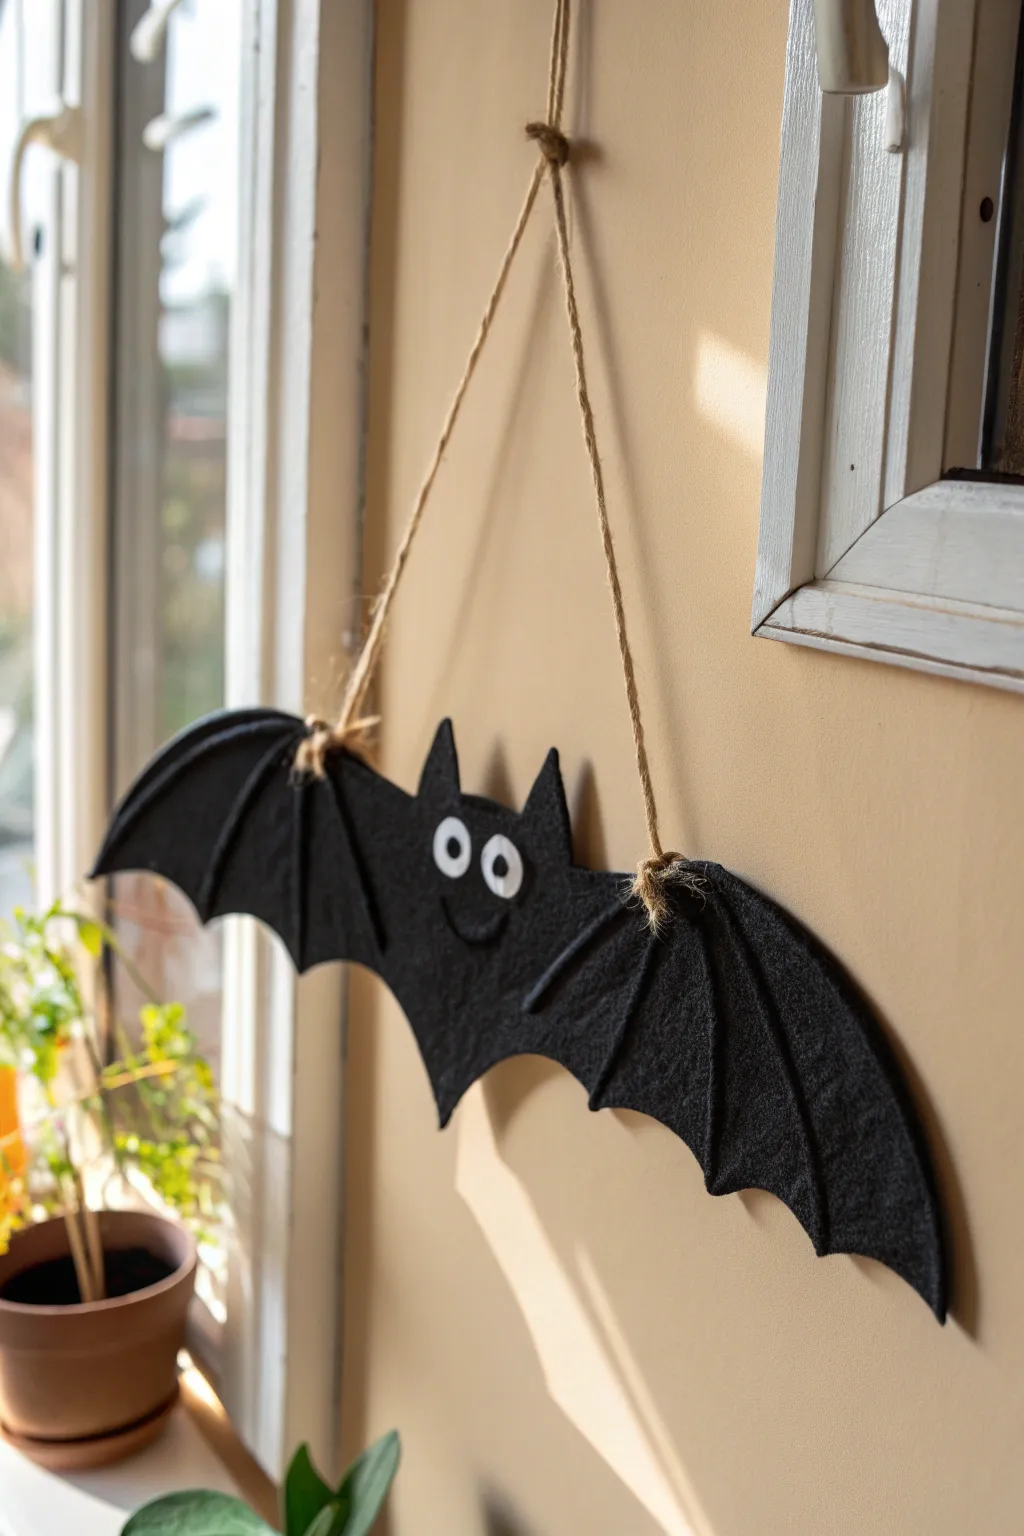
This friendly flying bat adds a touch of spooky charm to any wall or door. With its textured black wings and goofy wide eyes, it strikes the perfect balance between handmade rustic style and Halloween fun.
Step-by-Step Guide
Materials
- Air dry clay (white or grey)
- Rolling pin
- Parchment paper or craft mat
- Bat wing template (printed or hand-drawn)
- Craft knife or clay tools
- Black acrylic paint
- White acrylic paint
- Paintbrushes (flat and fine tip)
- Jute twine or rustic string
- Mod Podge or clear sealant (matte)
- Toothpick or skewer
Step 1: Shaping the Bat
-
Prepare your workspace:
Lay down parchment paper or a non-stick craft mat to protect your table and prevent the clay from sticking. -
Roll out the clay:
Take a large handful of air dry clay and condition it by kneading it slightly. Roll it out into an even slab about 1/4 inch thick. You want it sturdy enough to hang but not so heavy it cracks. -
Cut the shape:
Place your bat template lightly on top of the clay slab. Use a craft knife or a sharp clay tool to carefully trace and cut out the entire bat silhouette, including the pointed ears and scalloped wing bottoms. -
Smooth the edges:
Dip your finger in a little bit of water and run it along the cut edges to smooth out any roughness or jagged bits left by the knife. -
Add wing details:
To mimic the bat’s skeletal wing structure, roll three or four thin ‘snakes’ or coils of clay. Gently press these onto the wings, fanning out from the body to the bottom points of the wings. -
Secure the coils:
Use a little slip (clay mixed with water) to help these coils adhere firmly. Blend them slightly into the wing surface so they look like raised veins rather than loose pieces. -
Create hanging holes:
While the clay is still wet, use a skewer or the end of a paintbrush to poke two holes near the top joint of each wing. Make sure the holes are wide enough for your jute twine to pass through later. -
Create the eyes:
Roll two small balls of clay and flatten them slightly into discs. Press these onto the center of the bat’s face for eyes. Add a tiny snake of clay for a smile if you like. -
Texture the surface:
For that matte, almost fabric-like look shown in the photo, gently tap the surface of the wet clay with a crumpled ball of aluminum foil or a stiff bristle brush. This removes the perfect smoothness and adds character. -
Let it dry:
Allow the clay to dry completely. This usually takes 24-48 hours depending on thickness. Flip it over halfway through the drying process to ensure the back dries evenly and prevents warping.
Fixing Cracks
If small cracks appear while drying, mix a tiny amount of clay with water to make a paste. Fill the cracks, smooth it out, and let it dry again before painting.
Step 2: Painting and Assembly
-
Base coat:
Once fully dry, paint the entire front and sides of the bat with black acrylic paint. You may need two coats to get a solid, opaque black coverage. -
Paint the eyes:
Carefully paint the raised eye discs white. Let the white dry completely before adding small black dots for pupils to bring the character to life. -
Seal the piece:
I usually apply a coat of matte Mod Podge or clear sealant over the whole bat. This protects the paint and enhances that dark, matte finish without making it too glossy. -
Prepare the hanger:
Cut a long piece of jute twine, about 24 inches long. This will form the triangle hanger shape. -
Thread the twine:
Feed one end of the twine through the left wing hole from front to back, and tie a secure knot at the front. Repeat on the right side. -
Create the top loop:
Find the center of your twine slack and tie a small loop or knot at the very top so it can hang easily on a hook or nail. -
Final adjustments:
Trim any excess twine tails near the knots on the wings for a neat finish. Your bat is now ready to fly.
Glow in the Dark
Use glow-in-the-dark paint for the eyes instead of plain white. It adds a surprising and spooky effect when the lights go out!
Hang your new nocturnal friend in a window or on a door to welcome visitors.


Black Cat Mini Sculptures
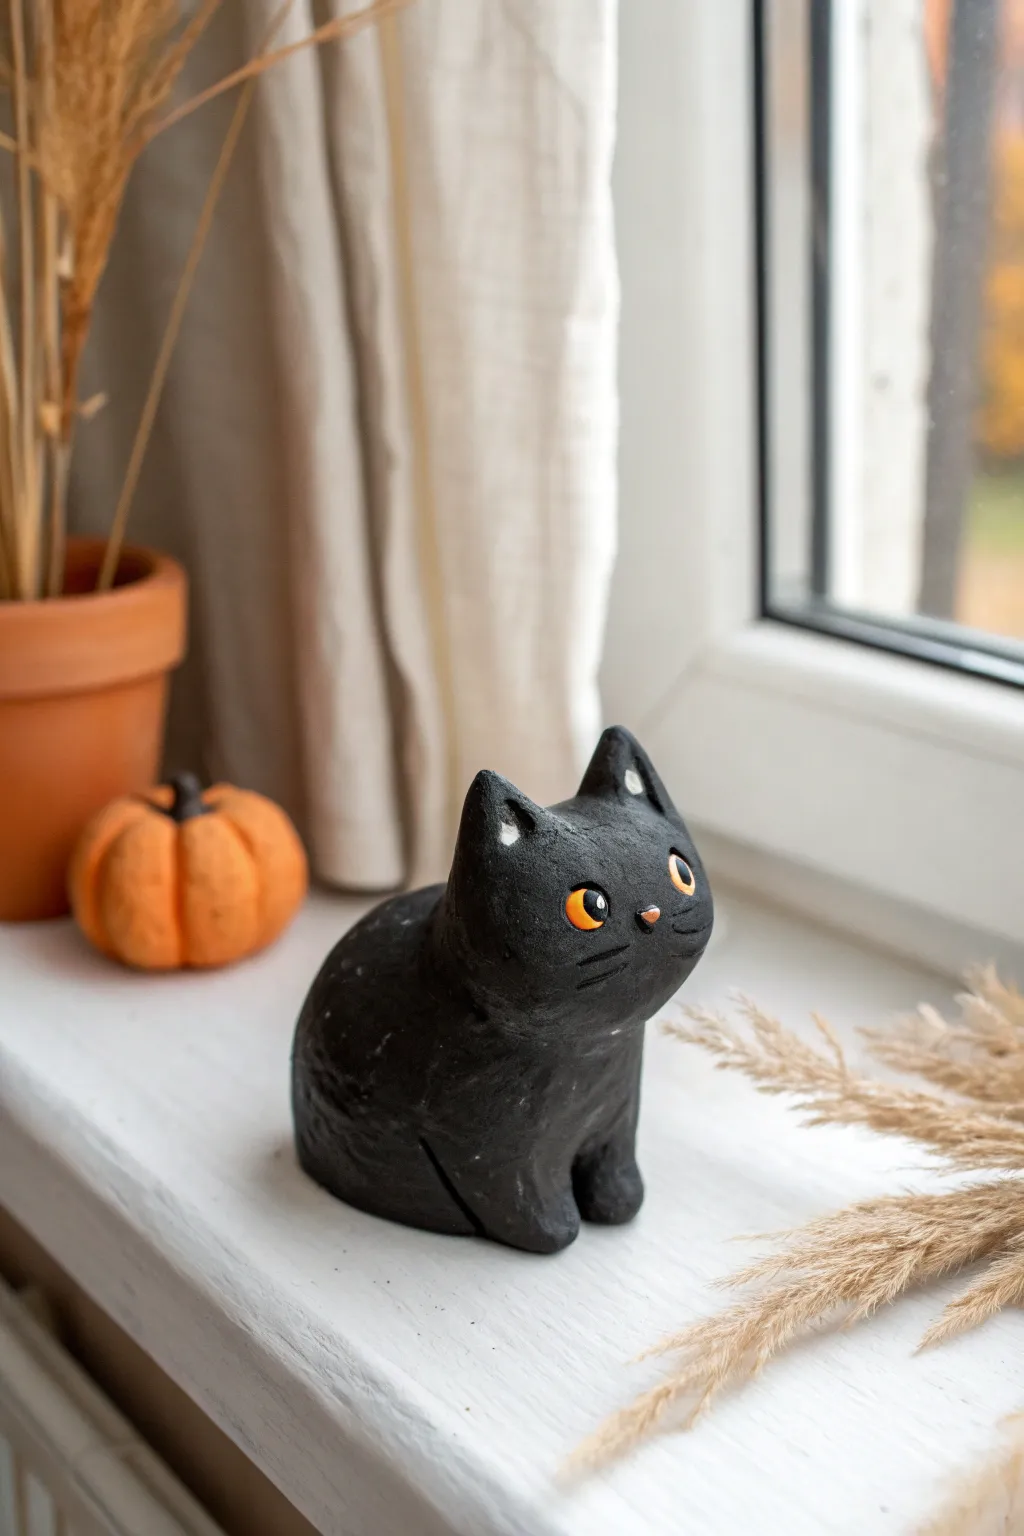
This adorable mini black cat sculpture adds a touch of friendly spookiness to any windowsill. With its smooth, rounded features and bright orange eyes, it’s a perfect beginner project that balances Halloween vibes with undeniable cuteness.
How-To Guide
Materials
- Black air dry clay (or white clay + black acrylic paint)
- Small amount of water
- Modeling tools (or toothpicks/plastic knife)
- Orange and white acrylic paint
- Fine detail paintbrush
- Matte or satin varnish (optional)
Step 1: Sculpting the Body
-
Prepare the Base:
Start with a lime-sized ball of clay. Knead it well to warm it up so it’s pliable and crack-free. -
Form the Torso:
Shape the ball into a smooth, slightly flattened teardrop or pear shape. The wider bottom will be the cat’s seated haunches, and the narrower top will support the head. -
Shape the Head:
Roll a second, slightly smaller ball for the head. Gently press it slightly flat so it isn’t perfectly spherical. -
Attach the Head:
Score (scratch) the top of the body and bottom of the head with a toothpick. Add a drop of water to the scored areas and press them firmly together. -
Blend the Seams:
Use your thumb or a modeling tool to smooth the clay where the neck meets the body. I like to blend downwards to create a strong seal so the head doesn’t pop off later. -
Create the Ears:
Pinch off two tiny, pea-sized bits of clay. Roll them into balls, then flatten them into triangles to form the ears. -
Attach the Ears:
Score and wet the top of the head, then press the ears into place. Smooth the seams at the base of the ears so they look like they grew naturally from the head.
Cracked Clay?
If small cracks appear while drying, don’t panic. Mix a tiny bit of fresh clay with water to make a paste (slip) and fill in the cracks, then smooth over.
Step 2: Adding Details & Feet
-
Make the Front Paws:
Roll two small cylindrical shapes for the front legs. Attach them vertically to the front of the chest, blending the top part into the body but leaving the bottom paws distinct. -
Define the Haunches:
Use a modeling tool to gently press a curved line into the side of the body. This suggests the curvature of the back leg folded in a sitting position. -
Add the Tail:
Roll a thin snake of clay. Wrap it around the base of the cat’s body, blending one end underneath and curling the tip slightly upward against the side. -
Refine the Surface:
Dip your finger in a tiny bit of water and rub it over the entire sculpture to smooth out any fingerprints or cracks. -
Carve the Face:
Using a toothpick or clay tool, gently press indentations where the eyes will go. Carve wispy whisker lines on the cheeks. -
Dry Time:
Let the sculpture sit in a safe, dry place for 24-48 hours until it is completely hard and lighter in color.
Glow in the Dark
Swap the regular orange eye paint for glow-in-the-dark acrylics. Your little cat will look spooky and watchful when the lights go out at night!
Step 3: Painting & Finishing
-
Base Coat (If needed):
If you used white clay, paint the entire cat black now. If you used black clay, you can skip this, though a coat of black paint often evens out the texture. -
Paint the Eyes:
Using a fine brush, carefully fill the eye indentations with bright orange paint. You might need two coats for opacity. -
Add Pupils:
Once the orange is dry, paint a vertical black slit in the center of each eye for that classic feline look. -
Highlighting:
Add a tiny dot of white inside the ear triangles and a tiny dot on the eyes for a ‘glint’ of life. Paint the sculpted nose a soft pink or subtle grey. -
Seal it Up:
Apply a coat of matte varnish to protect your new friend, or use gloss varnish just on the eyes to make them shine.
Place your finished kitty near a pumpkin or dried flowers to complete your festive display

The Complete Guide to Pottery Troubleshooting
Uncover the most common ceramic mistakes—from cracking clay to failed glazes—and learn how to fix them fast.
Frankenstein Face Magnets
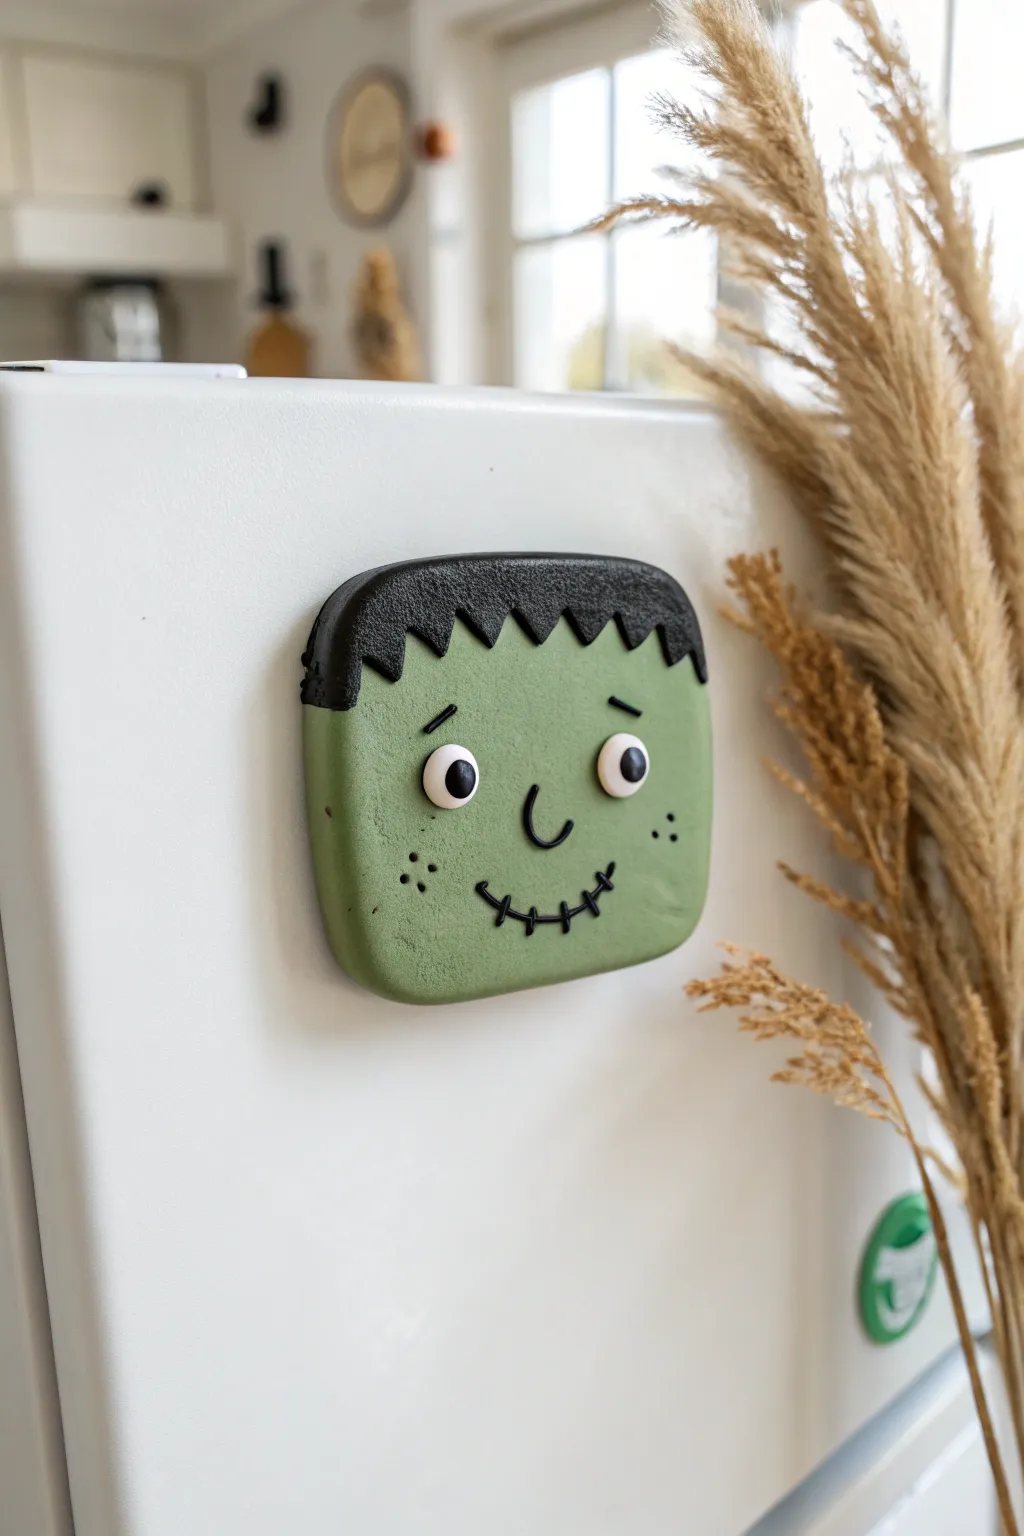
Bring a little spooky charm to your kitchen with this adorable Frankenstein face magnet. This project uses simple shapes and bold clay colors to create a friendly monster that stares right back at you.
Step-by-Step
Materials
- Green air dry clay (mid-tone olive or sage)
- Black air dry clay
- White air dry clay
- Strong craft magnet or adhesive magnetic sheet
- Rolling pin
- Square cookie cutter (optional, or a knife)
- Small round cutter or straw (for eyes)
- Mod Podge or clay varnish (matte or satin)
- Super glue or strong craft glue
- Fine-point black marker or black acrylic paint
Step 1: Shaping the Base
-
Condition the green clay:
Start by taking a golf-ball-sized chunk of green air dry clay. Knead it in your hands until it feels soft, warm, and pliable to prevent cracking later. -
Roll out the slab:
Using your rolling pin, flatten the green clay into a smooth slab. You want it to be roughly 1/4 inch thick—thick enough to be sturdy, but light enough for a magnet. -
Cut the face shape:
Use a square cookie cutter with rounded corners if you have one. If not, cut a square with a knife and gently press down the corners with your finger to round them off nicely. -
Smooth the edges:
Dip your finger in a tiny bit of water and run it along the cut edges of your green square to smooth out any roughness or loose bits of clay.
Clean Lines Pro Tip
Wash your hands thoroughly or use baby wipes between switching from black clay back to lighter colors. The black pigment can smudge easily and stain the white eyes or green face.
Step 2: Adding the Hair
-
Roll out black clay:
Take a smaller amount of black clay and roll it out into a thin strip. It should be slightly thinner than your green face base. -
Create the jagged hairline:
Use a knife or plastic clay tool to cut a zig-zag pattern along one long edge of the black strip. This creates Frankie’s iconic jagged bangs. -
Attach the hair:
Lay the black strip over the top edge of the green face. Press it down gently to adhere it. -
Trim the excess:
Trim off any black clay that hangs over the sides or top edge so it aligns perfectly with the green square outline.
Level Up: Mix & Match
Make a whole monster squad! Try using purple clay for a vampire or orange for a pumpkin face, using the same square base shape to create a matching set.
Step 3: Creating the Features
-
Make the eyes:
Roll two small balls of white clay. Press them flat onto the face, spaced slightly apart. I usually place them just below the hairline for a cute look. -
Add pupils:
Roll two tiny specks of black clay into balls. Press these into the center of the white eyes to create the pupils. -
Sculpt the nose:
Roll a very thin ‘snake’ of black clay. Cut a small curved piece, shaped like a ‘u’ or a nose bridge, and press it gently into the center of the face. -
Create the stitched mouth:
Roll another thin black snake for the mouth. Curve it into a smile and press it onto the face. -
Add the stitches:
Roll extremely tiny, short pieces of black clay. Lay these vertically across the mouth line to create the stitched appearance. -
Add eyebrows:
Place two small, slanted black lines of clay above the eyes to give him a slightly worried or surprised expression. -
Add freckle details:
Use a needle tool or toothpick to gently poke sets of three small dots onto the cheeks for texture.
Step 4: Finishing Touches
-
Let it dry:
Allow the clay to dry completely according to package instructions. This usually takes 24-48 hours. Flip it over halfway through to ensure the back dries evenly. -
Seal the piece:
Once bone dry, apply a coat of matte varnish or Mod Podge to protect the clay and keep the colors vibrant. -
Attach the magnet:
Using super glue or a strong craft adhesive, attach a strong magnet to the center of the back.
Now your fridge has a slightly spooky new guardian to hold up your shopping lists and photos
Candy Corn Characters
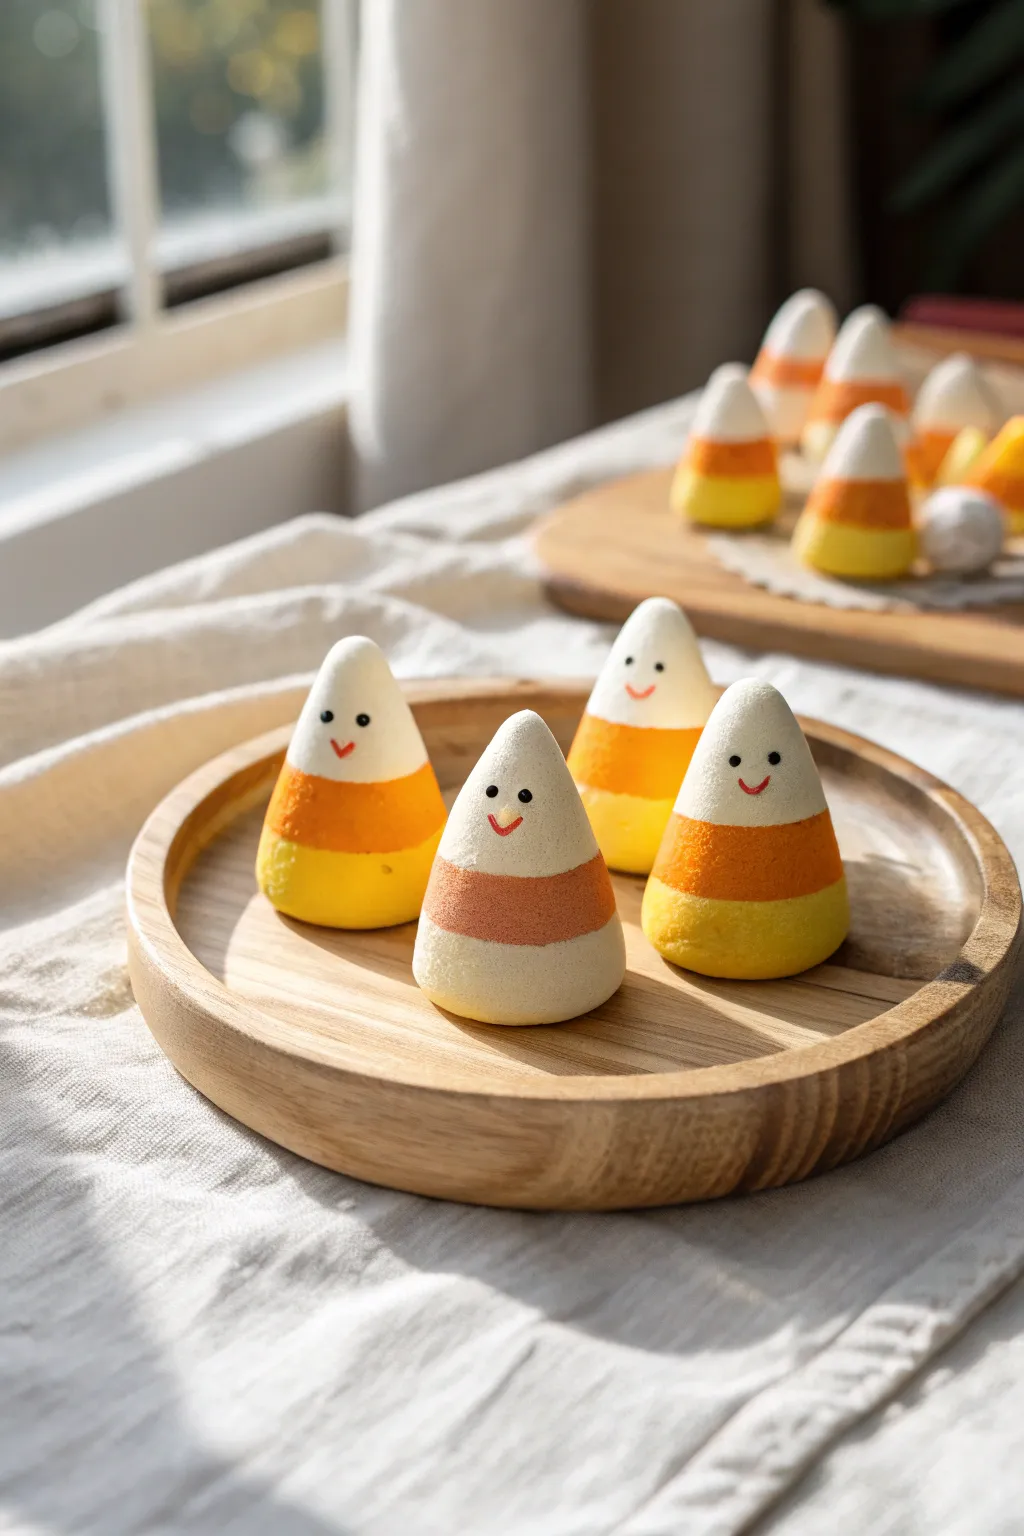
These cheerful little candy corn characters add a sweet, sugar-free touch to your Halloween decor with their soft, matte finish and tiny smiles. They are incredibly simple to shape, making them perfect for little hands to practice their molding skills.
How-To Guide
Materials
- White lightweight air dry clay
- Yellow and orange acrylic paint (or pre-colored clay)
- Black fine-point marker or paint pen
- Red fine-point marker or paint pen
- Smooth work surface or silicone mat
- Small bowl of water
- Soft paintbrush (optional for smoothing)
Step 1: Coloring the Clay
-
Divide the clay:
Start by taking a large ball of white air dry clay and dividing it into three equal piles. Keep one pile white and cover it so it doesn’t dry out. -
Mix the yellow:
Take the second pile of clay and add a few drops of yellow acrylic paint. Knead the clay thoroughly until the color is even and pastel-bright. If it gets sticky, let it sit for a minute or dust your hands with a tiny bit of cornstarch. -
Mix the orange:
Repeat the mixing process with the third pile using orange paint. You want a clear distinction between the yellow and orange, so add enough pigment to make it pop.
Cracking Seams?
If the color layers separate while drying, use a barely-wet finger to smudge the clay across the seam line before it fully hardens to bond them better.
Step 2: Shaping the Candy Corn
-
Form the base:
Pinch off a walnut-sized piece of yellow clay. Roll it into a smooth ball first, then gently flatten the newly formed sphere into a thick disk to create a sturdy base. -
Add the middle layer:
Take a similar amount of orange clay and roll it into a ball. Place this on top of the yellow base. -
Top perfectly:
Take a slightly smaller amount of white clay, roll it into a ball, and place it on top of the orange section. You should now have a little snowman-like stack. -
Create the cone shape:
Cup your hands around the stack and gently roll and press it into a cone shape. Use your palms to smooth the seams where the colors meet so they bond together into one solid piece. -
Refine the form:
Place the cone on your work surface. Gently tap the top to round it slightly—real candy corn isn’t perfectly sharp—and ensure the bottom is flat so it stands upright easily. -
Check the variation:
Notice in the photo that one character has a white bottom and yellow top? Feel free to swap the color order on one or two figures for a playful, mixed-bag look. -
Smooth the surface:
Dip your finger or a soft brush in a tiny drop of water and run it over the clay to erase any fingerprints or cracks. This gives them that smooth, fondant-like appearance. -
Let them dry:
Set your characters aside on a clean surface. Let them dry completely for at least 24 hours. I usually rotate them once halfway through ensuring the bottom dries evenly.
Step 3: Adding Personality
-
Draw the eyes:
Once fully dry, use a black fine-point marker or paint pen to dot two small eyes on the white section of the cone. Keep them wide-set for extra cuteness. -
Add a smile:
Switch to a red fine-point marker. Draw a tiny, simple curved line between the eyes to give your candy corn a happy expression. -
Optional texture:
If you want a sugary look, you can lightly dust the exterior with a dry sponge or leave them smooth and matte as shown in the inspiration photo.
Make It Sparkle
Before the clay dries, brush a thin layer of white glue over the exterior and sprinkle with extra-fine clear glitter for a sugar-coated effect.
Your adorable candy corn troop is now ready to sweeten up a shelf or table display


What Really Happens Inside the Kiln
Learn how time and temperature work together inside the kiln to transform clay into durable ceramic.
Spooky Spider Handprint Plaques
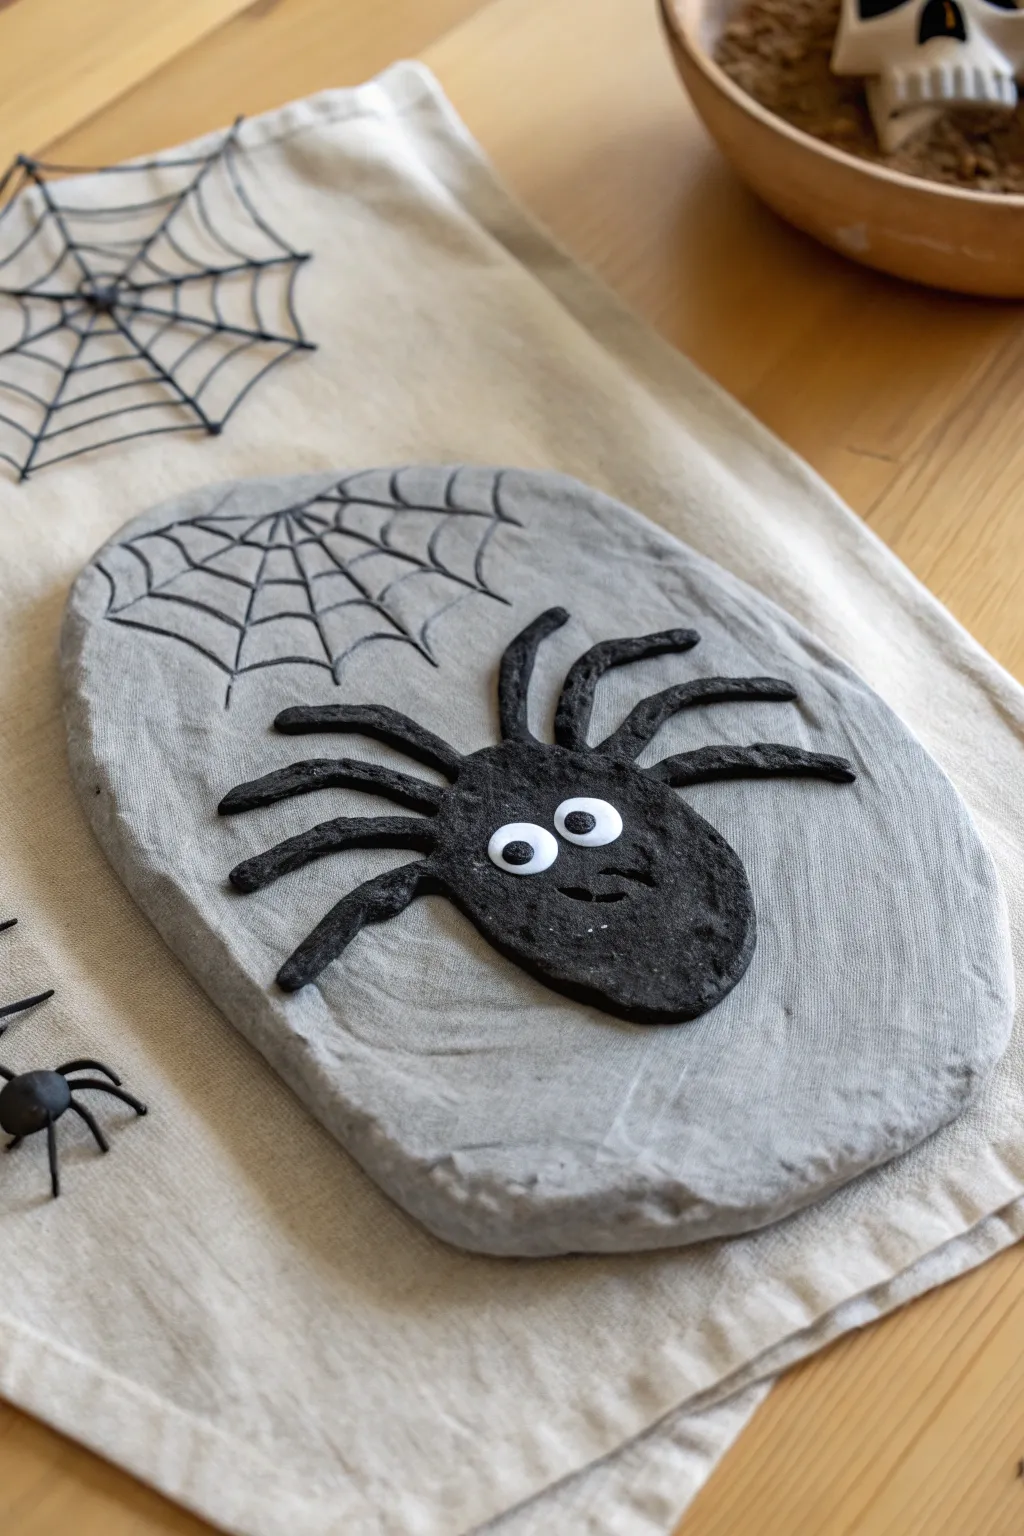
Immortalize the spooky season with this textured oval plaque featuring a friendly black spider and its intricate web. The combination of embossed details and raised relief creates a wonderful 3D effect that kids will love to display.
Detailed Instructions
Materials
- Air dry clay (grey)
- Air dry clay (black or dark grey)
- Rolling pin
- Clay sculpting tool or toothpick
- Oval template (paper or cardboard)
- PVA glue or craft glue
- Googly eyes (small pair)
- Black acrylic paint (optional, if using only grey clay)
- Small paintbrush
- Water in a small cup
- Parchment paper or craft mat
Step 1: Base Construction
-
Prepare the workspace:
Lay down parchment paper or a craft mat to prevent the clay from sticking to your table. -
Roll the base clay:
Take a large handful of the grey air dry clay and knead it until soft. Roll it out into a flat slab, approximately 1/4 to 1/2 inch thick. -
Shape the oval:
Place your oval template on top of the clay and cut around it using a sculpting tool. Alternatively, you can shape the oval by hand and smooth the edges with a little water on your finger. -
Smooth the surface:
Dip your finger in water and gently run it over the surface of the oval to erase any fingerprints or cracks.
Smooth Operator
Keep a small bowl of water nearby. Wet fingers are the best tool for smoothing out cracks or seamlessly joining the spider legs to the body.
Step 2: Web Carving
-
Etch the main lines:
Using a sharp sculpting tool or a toothpick, gently carve 4 or 5 straight lines radiating from the top left area of the oval. These shouldn’t go all the way through the clay, just deep enough to be visible. -
Connect the web:
Draw curved lines connecting the radiating spokes to create the classic spiderweb pattern. Press firmly enough to create a distinct groove. -
Clean up crumbs:
If the carving created any little clay crumbs, gently brush them away with a dry, soft paintbrush.
Make it Hangable
before drying, poke a hole near the top of the plaque with a straw. Once dry, you can thread orange or black ribbon through it for easy hanging.
Step 3: Creating the Spider
-
Form the spider body:
Take a piece of black air dry clay (or grey clay if you plan to paint it later) and roll it into a slightly flattened oval shape for the spider’s body. -
Attach the body:
Score the back of the spider body and the area on the plaque where it will sit. Add a dab of water or slip to join them, pressing the body firmly onto the grey base. -
Roll the legs:
Roll out eight thin snakes of black clay for the legs. I find it easiest to roll one long snake and cut it into eight equal segments. -
Attach the legs:
Attach four legs to each side of the spider’s body. Bend them slightly at the ‘knees’ to make them look like they are crawling. Use a sculpting tool to smooth the connection points where the legs meet the body. -
Texture the spider:
Take a stiff bristle brush or a rough stone and gently tap it over the black clay of the spider to give it a fuzzy, organic texture.
Step 4: Finishing Touches
-
Initial drying:
Let the piece sit for about 24-48 hours until completely hardened. Turn it over halfway through the process to ensure the back dries evenly. -
Painting (Optional):
If experiencing color fade or if you used all grey clay, carefully paint the spider body and legs with black acrylic paint. Let the paint dry fully. -
Add the face:
Using a small amount of craft glue, attach two googly eyes to the front of the spider’s body. -
Carve a smile:
If the clay is still slightly soft, execute a small indented smile with a tool. If dry and painted, you can paint a small white or grey smile.
Now you have a wonderfully spooky decoration ready to guard your home for Halloween
Ghost Footprint Keepsake
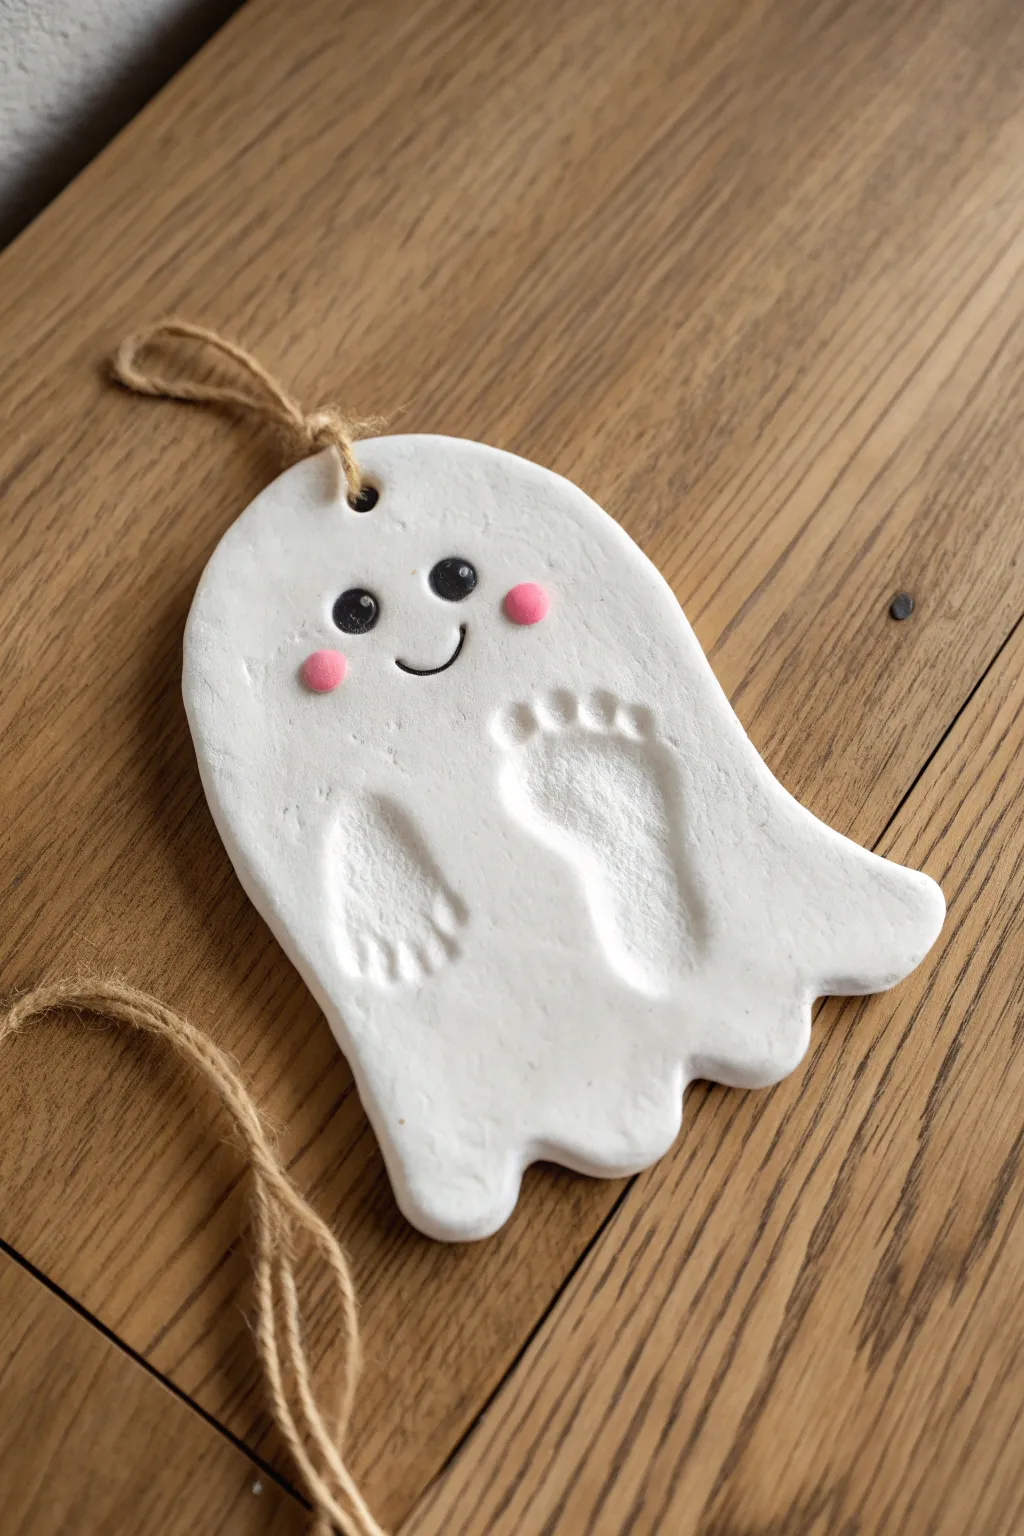
Preserve those tiny toes forever with this adorable ghost-shaped keepsake made from air-dry clay. This project transforms a simple footprint and handprint impression into a friendly white ghost with rosy cheeks, perfect for hanging up every Halloween.
Step-by-Step Tutorial
Materials
- White air-dry clay
- Rolling pin
- Parchment paper or craft mat
- Clay knife or plastic cutting tool
- Drinking straw or skewer
- Water (in a small cup)
- Black acrylic paint
- Pink acrylic paint
- Fine detail paintbrush
- Small dotting tool or toothpick
- Jute twine or ribbon
- Baby wipes (essential for clean-up!)
Step 1: Preparing the Clay Base
-
Condition the clay:
Start by taking a generous amount of white air-dry clay and kneading it in your hands until it feels soft, warm, and pliable. If the clay feels too dry or crumbly, add a tiny drop of water to smooth it out. -
Roll it out:
Place the clay on a sheet of parchment paper to prevent sticking. Use a rolling pin to flatten the clay into an oval shape about 1/4 inch to 1/2 inch thick. -
Check thickness:
Ensure the slab is even. You want it thick enough to take a deep impression without breaking through to the other side, but not so thick that it takes weeks to dry.
Step 2: Creating the Impressions
-
Capture the footprint:
This is the ghost’s body. Gently but firmly press a child’s foot into the right side of the clay oval. You want the heel at the bottom and the toes pointing upward. Wiggle the toes slightly to get a clear print. -
Capture the handprint:
For the ghost’s arm, press the child’s hand (or just four fingers depending on size) into the left side of the clay, angling it slightly outward. This creates the ‘bOO-ing’ gesture. -
Smooth the edges:
Dip your finger in a little water and gently run it over any rough ridges created by the impression to soften them, ensuring the print looks clean and smooth.
Little Wiggles
Work quickly once you start getting impressions! If the clay gets too dry, the prints won’t be deep enough. Keep baby wipes nearby to clean tiny feet immediately.
Step 3: Shaping the Ghost
-
Cut the outline:
Using a clay knife or plastic tool, cut a wavy, ghost-like outline around the impressions. Leave plenty of room at the top for the head and create a scalloped, flowing edge at the bottom. -
Refine the border:
Pick up the excess clay. Then, use a damp finger to smooth the cut edges of the ghost so they are rounded and polished rather than sharp and jagged. -
Add a hanging hole:
Use a drinking straw to punch a clean hole near the top center of the ghost’s head. Make sure the hole isn’t too close to the very edge, or the clay might snap later.
Crack Prevention
To prevent curling or cracking, dry the clay slowly away from direct heat sources. Flip the ghost over every few hours so moisture evaporates from both sides evenly.
Step 4: Drying and Decorating
-
Let it dry:
Leave the ghost on a flat surface to dry completely. Depending on humidity and thickness, this usually takes 24-48 hours. Carefully flip it over halfway through the process to let the back dry evenly. -
Correct imperfections:
Once fully hard and white, check for any rough spots. You can use a very fine-grit sanding sponge to buff the edges if needed. -
Paint the eyes:
Using black acrylic paint and a fine brush or large dotting tool, paint two solid black circles for eyes near the top of the ghost’s head. -
Add the smile:
With a very thin brush, paint a simple, curved ‘U’ shape between the eyes for a happy smile. Add tiny tick marks at the ends of the smile for extra cuteness. -
Add highlights:
Dip the tip of a toothpick into white paint (or leave a tiny unpainted spot if using markers) to add a tiny white reflection dot inside the black eyes. This brings the ghost to life. -
Rosy cheeks:
Dip a fingertip or a round sponge dabber into pink paint. Dab off the excess, then gently press two soft pink circles onto the cheeks, just outside the smile. -
Attach the hanger:
Cut a length of jute twine or ribbon. Thread loop it through the hole you made earlier and tie a secure knot to finish the ornament.
Hang your friendly ghost on a door handle or wall to start your spooky season decorations

TRACK YOUR CERAMIC JOURNEY
Capture glaze tests, firing details, and creative progress—all in one simple printable. Make your projects easier to repeat and improve.
Witch Hat Table Decorations
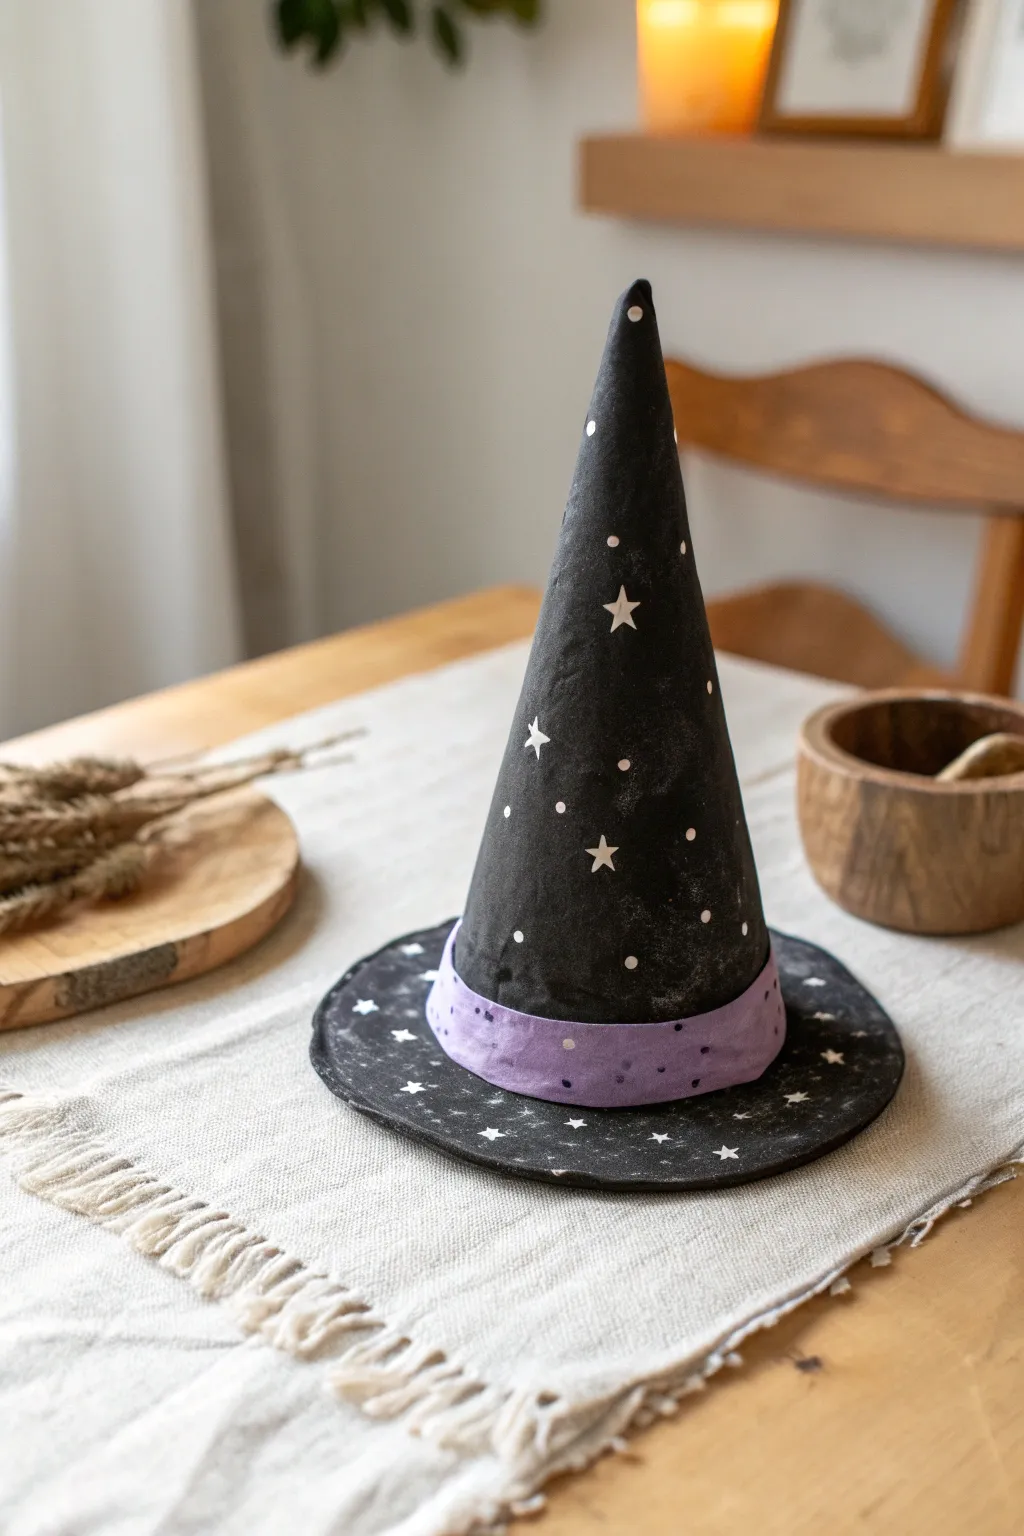
Cast a spell on your Halloween table with this charming, celestial witch hat made entirely from air dry clay. Painted in a matte black finish with delicate white stars and a soft purple band, it creates a whimsical yet spooky focal point.
Detailed Instructions
Materials
- Air dry clay (white or terracotta)
- Rolling pin
- Cardstock or stiff paper (for cone template)
- Tape
- Parchment paper or craft mat
- Clay knife or craft knife
- Water and small sponge
- Acrylic paints (Matte Black, White, Lavender/Purple)
- Paintbrushes (medium flat brush, fine detail brush)
- Sandpaper (fine grit)
- Matte varnish or sealant (optional)
Step 1: Forming the Structure
-
Create a Cone Template:
Start by rolling a piece of cardstock into a tall, narrow cone shape to use as an internal support. Tape it securely so it holds its shape. This prevents the heavy clay from collapsing while you work. -
Roll Out the Clay:
Take a large handful of air dry clay and roll it out on your parchment paper to a thickness of about 1/4 inch. If the clay feels too dry, I like to dampen my hands slightly before kneading. -
Wrap the Cone:
Cut a large triangle or fan shape from the rolled clay and drape it over your cardstock form. Gently press the seam together where the clay meets, using a little water to smooth the join so it becomes invisible. -
Make the Brim:
Roll out a second ball of clay into a flat circle, roughly 6-7 inches in diameter. You can use a bowl as a guide to cut a perfect circle, or leave the edges slightly uneven for a rustic, handmade look. -
Attach Cone to Brim:
Place the cone structure onto the center of your circular brim. Score the bottom edge of the cone and the center of the brim with a clay tool, apply a dab of water (slip), and press them firmly together to bond. -
Add the Hat Band:
Roll a long, thin strip of clay about 1 inch wide. Wrap this around the base of the cone where it meets the brim to create the hat band. Smooth the ends together at the back. -
Refine the Shape:
Use a damp sponge to smooth out any fingerprints or cracks over the entire surface. You want the clay to look relatively seamless before it starts to dry. -
Dry Completely:
Let the hat sit in a cool, dry place for 24-48 hours. Remove the internal cardstock support carefully once the outside feels firm to allow the inside to dry thoroughly.
Smooth Seams
Use a little water on your finger to smooth the seams where clay parts join. This ‘slip’ acts like glue and ensures no cracks appear later.
Step 2: Painting and Decoration
-
Sand Imperfections:
Once fully dry, lightly sand any rough edges or bumps with fine-grit sandpaper. Wipe away the dust with a dry cloth. -
Base Coat:
Apply a solid coat of matte black acrylic paint to the cone and brim. Avoid painting the band for now to keep the colors clean. Let the first coat dry and apply a second if needed for opaque coverage. -
Paint the Band:
Paint the clay band in a soft lavender or purple shade. You may need two coats here as well, especially if any black paint accidentally touched this area. -
Create the Starry Pattern:
Dip a fine detail brush into white acrylic paint. Paint small, five-pointed stars scattered randomly across the black cone and brim. -
Add Celestial Dots:
Using the handle end of a paintbrush, dip it into white paint and dot it onto the black surface to fill the empty spaces between stars. This mimics a starry night sky. -
Detail the Band:
For extra texture, you can add tiny, faint purple or darker violet dots onto the lavender band itself to give it a fabric-like appearance. -
Distress (Optional):
If you want a dusty, vintage look like the example, lightly dry-brush a tiny amount of white or grey paint over the black areas. It softens the stark black color. -
Seal the Project:
Finish by applying a matte varnish or sealant spray. This protects the paint and gives the hat a unified, finished sheen.
Spooky Variations
Make a crooked witch hat by bending the tip of the cone slightly before the clay dries for a more rugged, character-filled silhouette.
Place your mystical hat on the mantle or dining table for a touch of handmade magic
Mini Cauldron Trinket Bowls
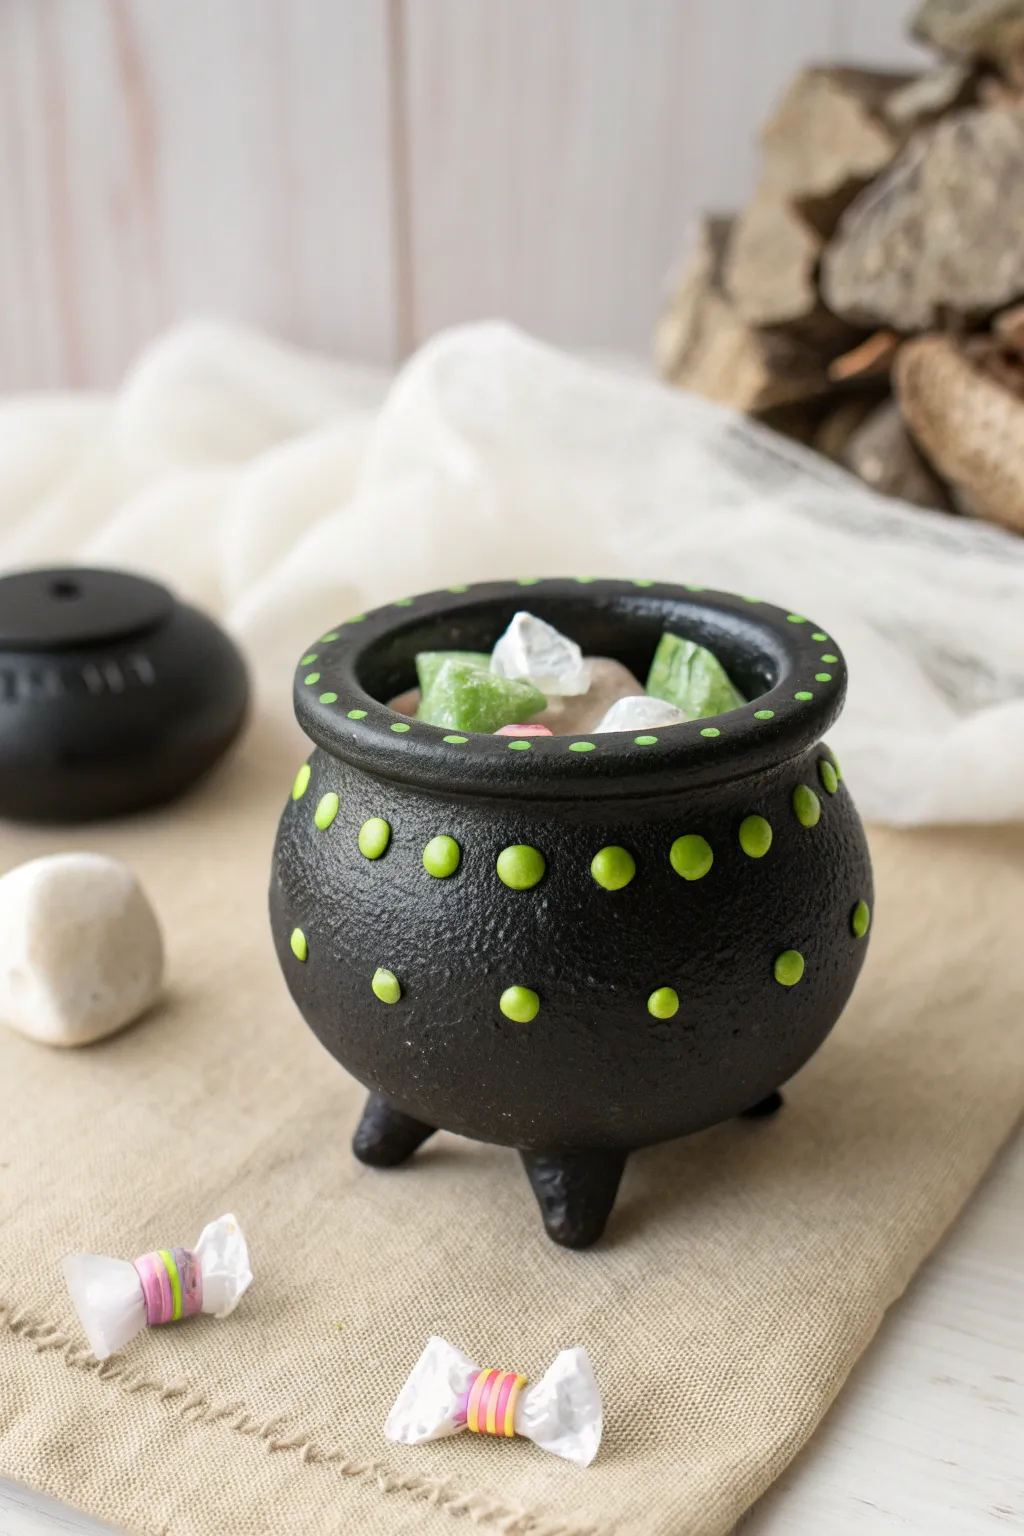
Brew up some spooky fun with this adorable mini cauldron trinket bowl, perfect for holding small candies or treasures. Its matte black finish and vibrant neon green textured dots make it a standout Halloween decoration that kids will love sculpting.
Step-by-Step Tutorial
Materials
- Air dry clay (white or grey)
- Acrylic paint: Black (matte finish recommended)
- Acrylic paint: Neon lime green
- Small bowl of water
- Clay sculpting tools (or a butter knife)
- Rolling pin
- Paintbrushes (flat shader and fine detail)
- Dotting tool or the back of a paintbrush
- Fine-grit sandpaper (optional)
- Varnish or sealant (matte)
Step 1: Sculpting the Base
-
Create the main sphere:
Start by taking a fist-sized ball of air dry clay and conditioning it in your hands until it’s soft and pliable. Roll it into a smooth, even ball on your work surface. -
Form the pinch pot:
Gently press your thumb into the center of the ball, but not all the way through to the bottom. Rotate the ball while pinching the clay between your thumb and fingers to open up the bowl shape. -
Shape the belly:
Work your way around the pot, pushing the walls outward slightly to give the cauldron a rounded, bulbous ‘belly’ rather than straight sides. -
Flatten the rim:
Gently tap the top edge of your bowl against your table to flatten it slightly, creating a wide, distinct rim.
Keep It Smooth
Keep a small sponge or your finger damp while working. smoothing the clay as you go saves lots of sanding time later!
Step 2: Adding Details
-
Roll the rim coil:
Roll a separate snake of clay that is about the thickness of a pencil and long enough to circle the top of your bowl. -
Attach the rim:
Score (scratch) the top edge of the bowl and the underside of the coil. Add a dab of water to the scratched areas and press the coil firmly onto the rim. -
Smooth the transition:
Use your thumb or a modeling tool to smooth the inside seam where the coil meets the bowl so it looks like one solid piece. -
Create the feet:
Roll three small marbles of clay, all exactly the same size. Gently shape them into slightly tapered rough cones. -
Attach the feet:
Flip the cauldron upside down. Score and wet the bottom spots where the feet will go, arranging them in a triangle pattern. Press the feet on and smooth the clay seams to secure them. -
Balance check:
Flip the cauldron back over and gently press it down onto the table to ensure it sits level on its new feet. -
Make the decorative dots:
Roll many tiny, pea-sized balls of clay. You will need enough to go around the belly of the pot and smaller ones for the rim. -
Apply the dot texture:
Use a little water to attach the clay dots. Place larger dots around the middle ‘belly’ section and smaller dots along the top rim coil. Press them gently so they stick but keep their raised shape. -
Drying time:
Set your cauldron aside to dry completely. This usually takes 24-48 hours depending on humidity. Rotate it occasionally so all sides dry evenly.
Step 3: Painting and Finishing
-
Smooth imperfections:
Once fully dry, check for any rough spots. You can use fine-grit sandpaper to gently smooth the surface, being careful not to sand off your clay dots. -
Base coat:
Paint the entire cauldron—inside, outside, and bottom—with black acrylic paint. I find a matte black gives the best ‘cast iron’ look. Let this coat dry completely. -
Second coat:
Apply a second coat of black to ensure full coverage, making sure to get into the crevices around the clay dots. -
Paint the dots:
Using a fine detail brush, carefully paint just the raised clay dots with neon lime green paint. -
Layer the neon:
Neon paints can be sheer, so you will likely need 2-3 layers of the green to make the color pop against the black background. Let each layer dry before adding the next. -
Seal the work:
Finish with a coat of matte varnish or sealant to protect the paint and give the cauldron a finished, unified texture.
Cracked Clay?
If small cracks appear as the clay dries, mix a tiny bit of fresh clay with water to make a paste (slip) and fill them in before painting.
Fill your finished cauldron with sweet treats or spooky trinkets to complete the magical look
Monster Mouth Pencil Holders
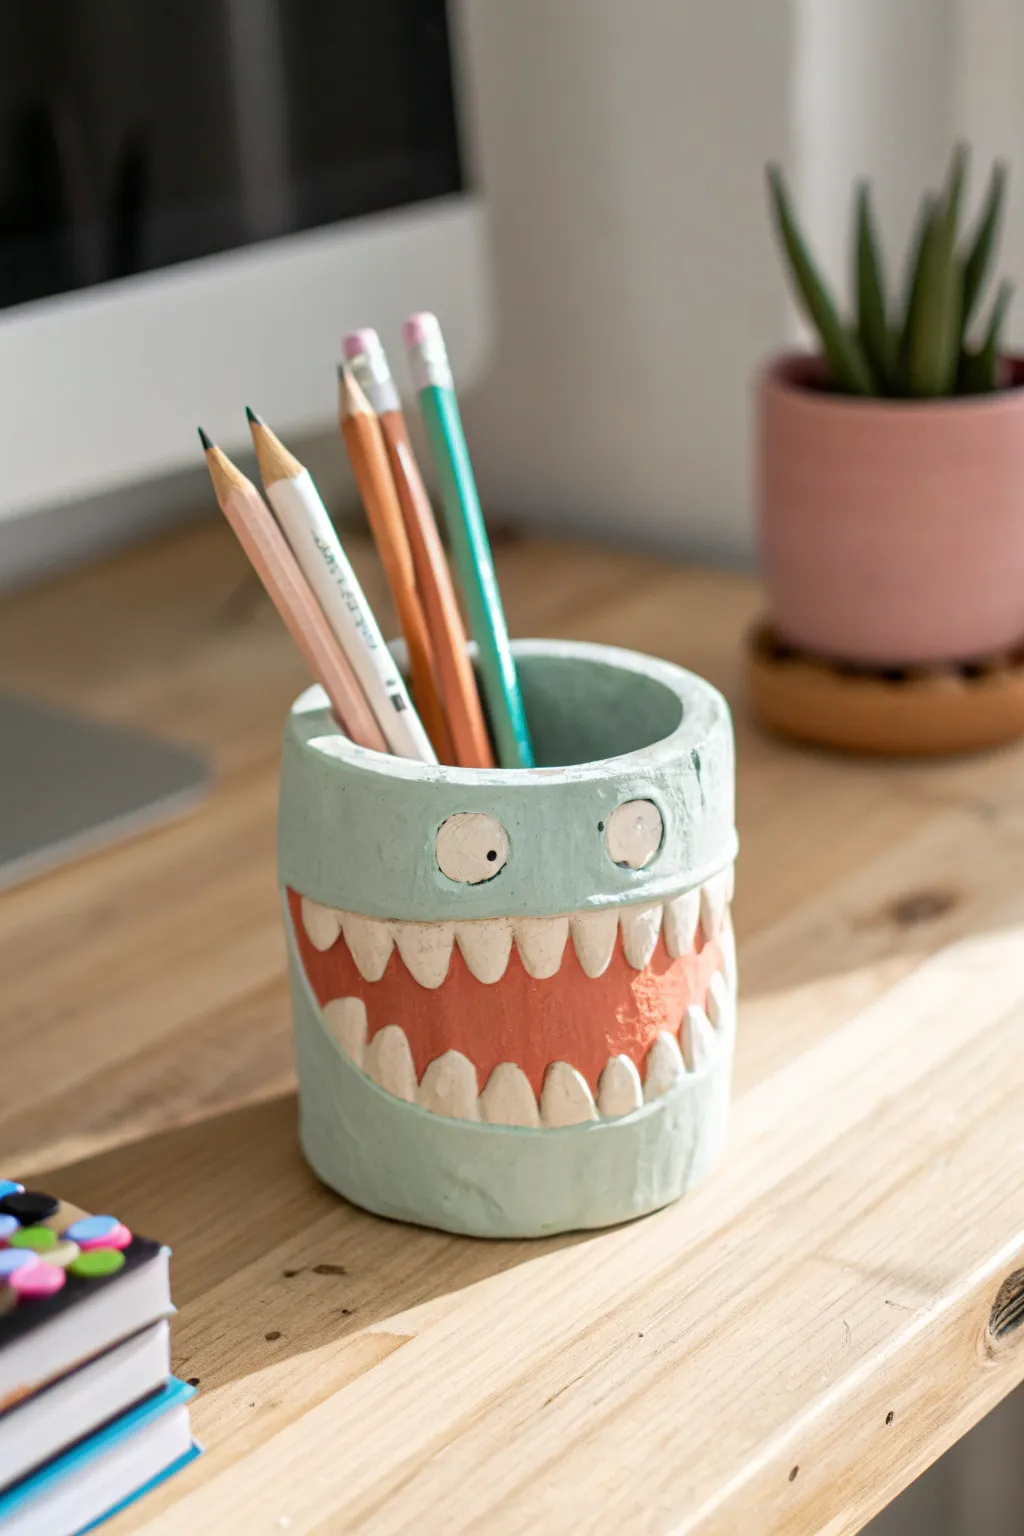
Transform your desk into a scene from a friendly monster movie with this chomping pencil holder. With its oversized jagged teeth and surprised expression, this chunky teal sculpture is the perfect mix of spooky and silly.
Detailed Instructions
Materials
- Air dry clay (white or grey)
- Rolling pin
- Empty soda can or sturdy glass jar (for shaping mold)
- Clay sculpting tools (plastic knife or needle tool)
- Small bowl of water
- Acrylic paints (teal/mint green, reddish-orange, white, black)
- Parchment paper or craft mat
- Fine grit sandpaper (optional)
- Paintbrushes (medium flat and small detail)
Step 1: Building the Base Structure
-
Prepare the workspace:
Lay down parchment paper on your work surface to prevent sticking. Take a large ball of air dry clay and knead it until it is soft and pliable. -
Roll the slab:
Use your rolling pin to flatten the clay into a long, rectangular slab. Aim for a thickness of about 1/4 to 1/2 inch to ensure the walls remain sturdy. -
Prepare the mold:
Wrap your soda can or glass jar loosely in a piece of parchment paper. This cylinder will act as the internal structure while the clay dries. -
Cut to size:
Trim your clay slab into a rectangle that is tall enough to hold pens (about 4 inches) and long enough to wrap completely around your can. -
Form the cylinder:
Wrap the clay slab around the parchment-covered can. Where the two ends meet, score (scratch) both edges, add a dab of water, and press them firmly together to create a seamless join. -
Add the bottom:
Roll out a separate circular piece of clay slightly larger than the cylinder’s diameter. Place your cylinder on top, score the connecting areas, and blend the clay upward to seal the bottom.
Cracks happen!
If small cracks appear as the clay dries, don’t panic. Make a paste of clay and water (called slip) and smooth it into the cracks, then let it dry again.
Step 2: Sculpting the Monster Face
-
Carve the mouth outline:
Use a needle tool or plastic knife to lightly draw a large, wide football shape on the front of the cylinder. This will be the gaping mouth. -
Relieve the mouth area:
Carefully scrape away or compress the clay inside that outline so it sits deeper than the rest of the ‘skin.’ You want a recessed area for the mouth. -
Shape the teeth:
Roll tiny cones of clay for the teeth. Vary the sizes slightly to give it a goofy, uneven look. -
Attach the teeth:
Score and slip (add water) to the back of each tooth. Press the top row of teeth hanging down from the upper lip, and the bottom row pointing up from the lower jaw. -
Create the eyes:
Roll two small balls of clay and flatten them slightly into discs. Attach them just above the mouth corners using a drop of water. -
Smooth and refine:
Dip your finger in water and smooth out any rough edges or fingerprints on the main body, being careful not to smudge the sharp points of the teeth. -
Drying time:
Carefully slide the can out now if possible, or wait until the clay is leather-hard. Let the project dry completely for 24-48 hours until hard and white.
Step 3: Painting the Monster
-
Base coat the skin:
Paint the entire exterior (except the eyes and inside the mouth) with a minty teal or light blue acrylic paint. You might need two coats for full opacity. -
Color the mouth:
Use a medium paintbrush to fill the recessed mouth area, behind the teeth, with a reddish-orange or terracotta color. I find using a small angled brush helps get into the corners. -
Brighten the teeth:
Carefully paint the jagged teeth pure white. If you get any orange on them, just wait for it to dry and paint over it. -
Detail the eyes:
Paint the eye discs white. Once dry, use the handle end of a paintbrush dipped in black paint to dot on the pupils. -
Final touches:
Add tiny white highlights to the black pupils to bring the monster to life. Let all paint dry completely before loading it up with pencils.
Smoother Finish
Before painting, you can gently sand the dried clay surface with fine-grit sandpaper to remove fingerprints and make the ‘skin’ look polished.
Now your desk has a hungry little guardian ready to protect your best pens
Glow-Style Tea Light Ghost Covers
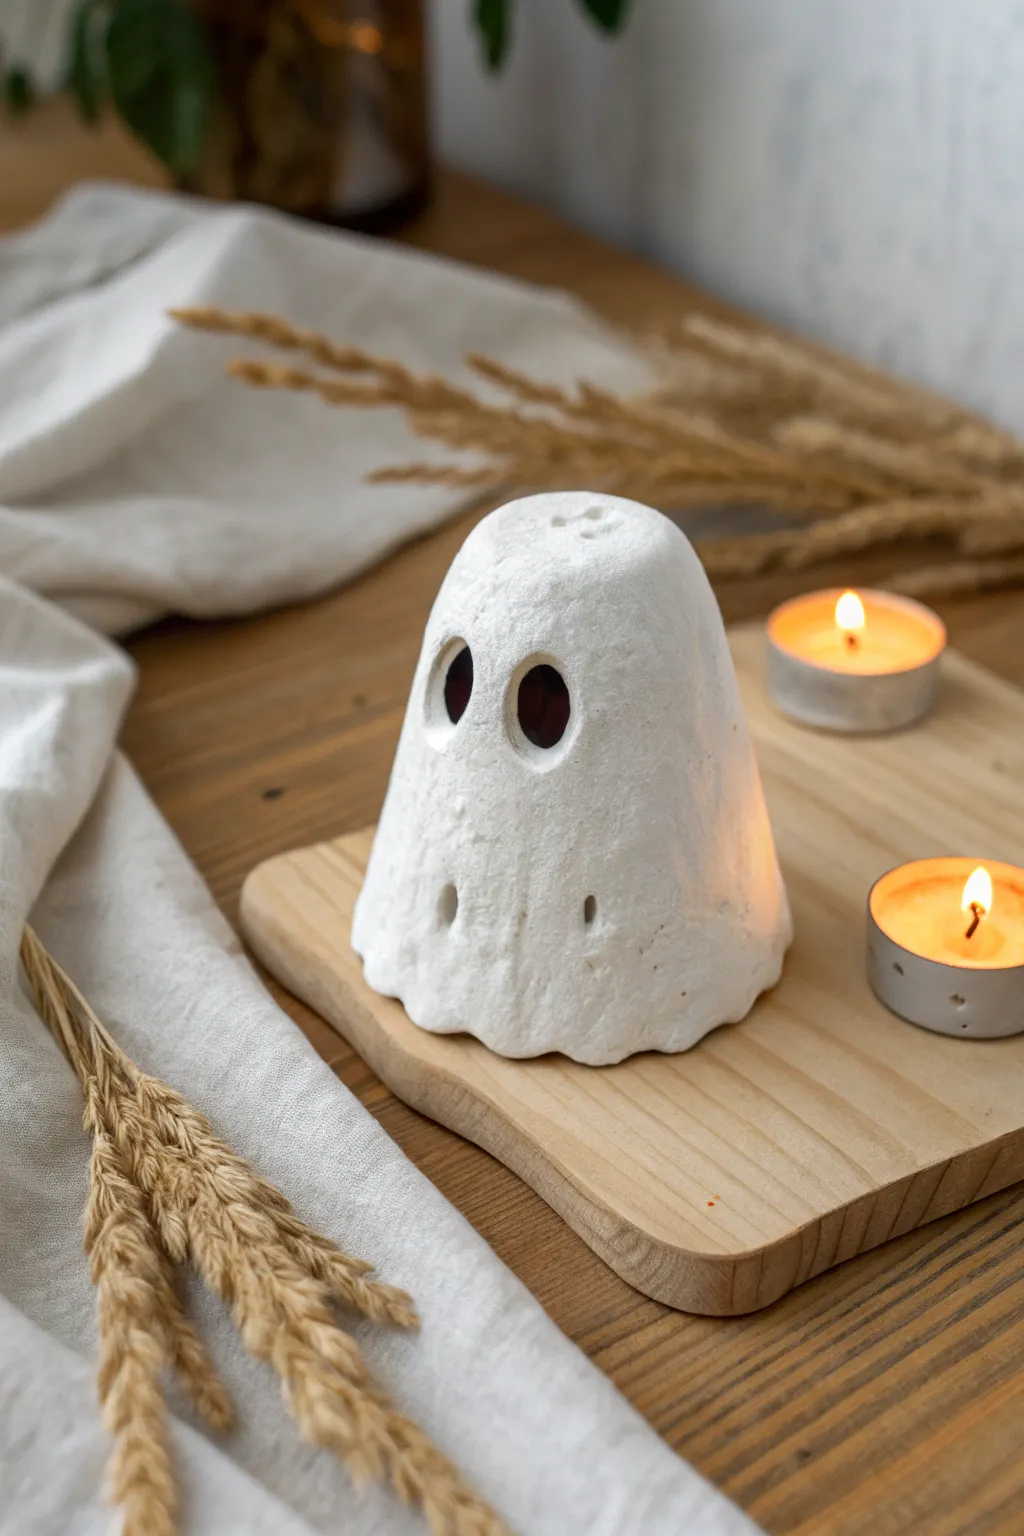
Transform simple air dry clay into a hauntingly cute luminary that casts a gentle glow. This ghost features a unique, speckled texture and classic black eyes, perfect for setting a cozy Halloween mood.
Step-by-Step
Materials
- White classic air dry clay (Das or Crayola)
- Small rolling pin
- Small cup or shot glass (for wrapping the shape)
- Texturing tool (stiff bristle brush, sponge, or crumpled foil)
- Clay knife or plastic cutting tool
- Straw or round cutter (small size)
- Black acrylic paint
- Small detail paintbrush
- LED tea light
- Parchment paper
Step 1: Shaping the Ghost Body
-
Prepare the workspace:
Lay down a sheet of parchment paper to prevent sticking. Grab a fist-sized ball of white air dry clay and knead it in your hands until it feels warm and pliable. -
Roll out the slab:
Using your rolling pin, flatten the clay ball into a rough circle or oval shape. You’ll want it to be about 1/4 inch thick—thick enough to stand up, but thin enough to mold. -
Create the form:
Find a small cup, shot glass, or spice jar to use as a temporary mold. Drape the flattened clay sheet over the top of the overturned cup. -
Shape the drape:
Gently press the clay down the sides of the cup. Allow the bottom edges to flare out slightly and unevenly to create that classic ‘floating sheet’ look. -
Trim the hem:
Use your clay knife to trim the excessive bottom dough. Instead of a straight line, cut a wavy, undulating pattern to mimic fluttering fabric. -
Refine the top:
Smooth out the very top of the ghost so it’s rounded but slightly flattened, removing any sharp peaks created by the cup underneath.
Pro Tip: Stick-Free Removal
Before draping your clay, wrap your cup or mold loosely in plastic wrap or cling film. This guarantees the clay won’t bond to the cup surface.
Step 2: Adding Texture and Features
-
Add surface texture:
The ghost in the photo has a distinct, stony texture. Take a stiff toothbrush or a ball of crumpled aluminum foil and gently press it all over the wet clay surface to create little pits and bumps. -
Carve the eyes:
Using your knife or a large round sculpting tool, carve out two tall, oval-shaped eye sockets near the top third of the ghost. Smooth the inner edges with a damp finger. -
Add breathing holes:
Near the bottom hem, puncture two very small holes using a straw or a thin tool. This adds detail and helps light escape. -
Poke the top vents:
Create three tiny punctures on the very top of the head. This serves a decorative purpose but also helps air circulate if you use a real candle (though LEDs are safer). -
Remove the form:
Once the shape holds itself but is still damp (usually after 30-45 minutes), carefully slide the cup out from underneath. Don’t wait until it’s fully dry or it might stick. -
Final shaping:
If the removal warped the ghost, gently push the waviness back into the bottom hem so it sits flat on the table.
Level Up: Spooky Glaze
Mix a tiny drop of glow-in-the-dark paint into a matte varnish and seal the ghost. It will look like stone by day and emit a green aura by night!
Step 3: Finishing Touches
-
Let it dry:
Allow the ghost to dry completely for 24 to 48 hours. I find that turning it upside down halfway through helps the inside dry faster. -
Paint the eyes:
Using a small detail brush, paint the inside of the eye sockets jet black. Be careful to keep the paint strictly inside the hollows for a neat look. -
Highlight the texture:
To enhance that stony look, you can lightly dry-brush a tiny amount of grey or cream paint over the textured surface, though leaving it natural white works too. -
Light it up:
Once dry and painted, place an LED tea light on your surface and set the ghost over it to see it glow.
Enjoy the cozy ambiance created by your new little spectral friend
Pumpkin Tea Light Lanterns
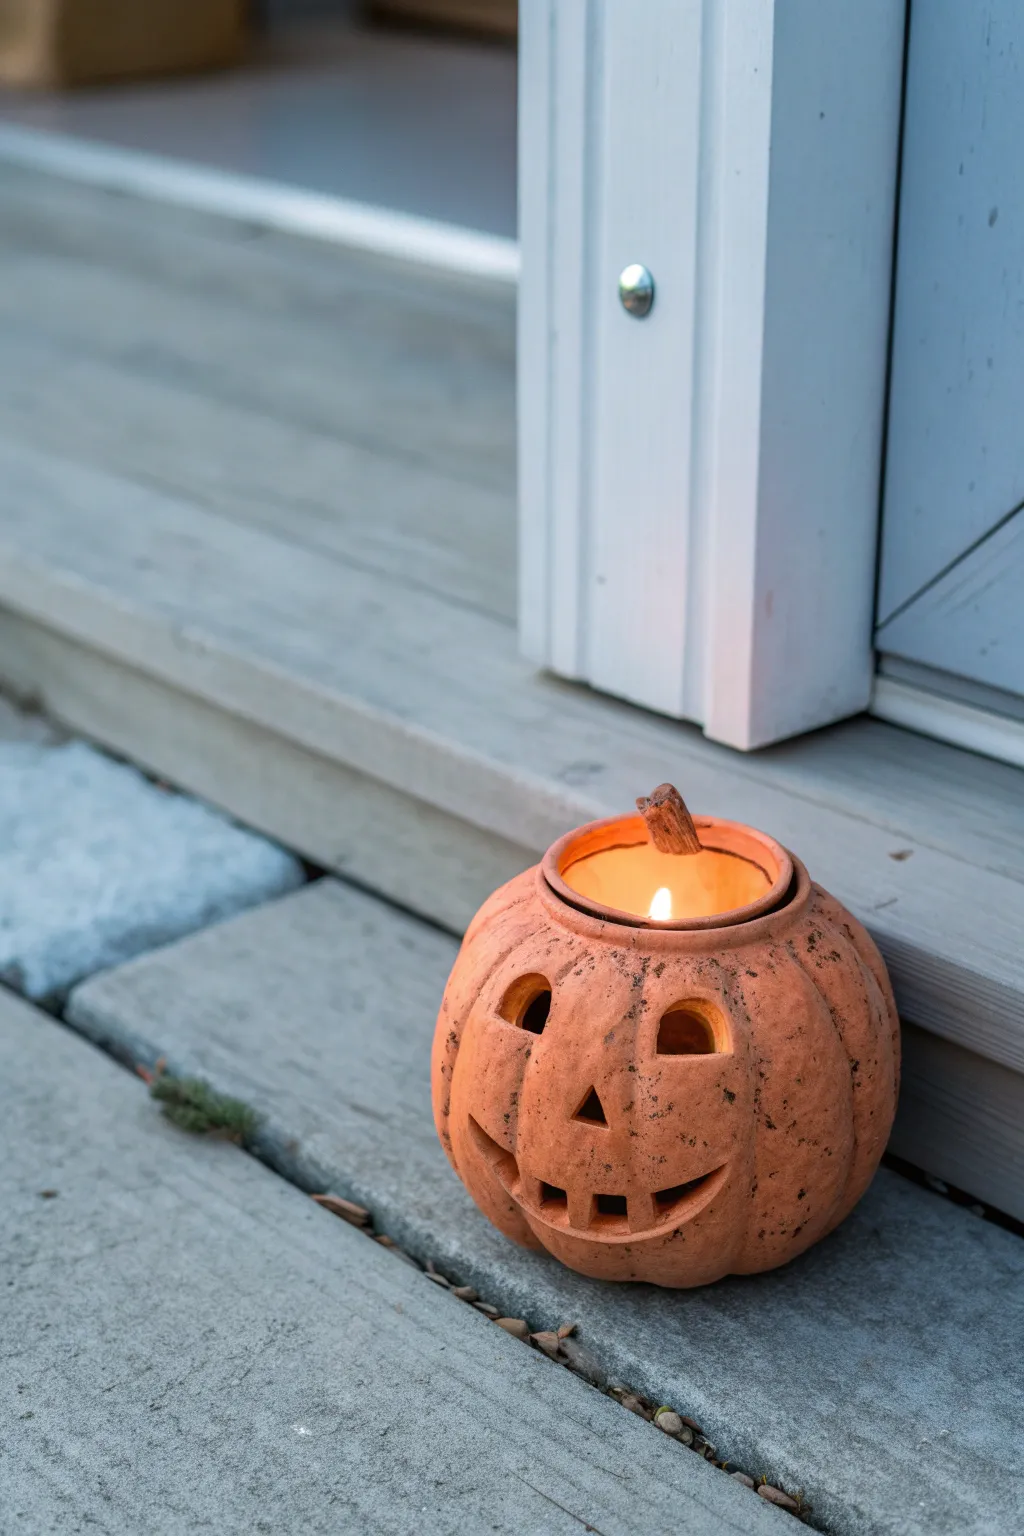
Create a cozy, rustic addition to your porch with this charming little pumpkin lantern. Made to look like classic unglazed pottery, this air-dry clay project warms up any spooky corner with its friendly, flickering grin.
How-To Guide
Materials
- Terracotta-colored air dry clay
- Rolling pin
- Small bowl (for shaping support)
- Clay carving tools or a plastic knife
- Small circular cookie cutter (optional)
- Water (for smoothing)
- Sponge or textured cloth
- Small twig or piece of dried wood (for the stem)
- Battery-operated tea light
Step 1: Forming the Base
-
Prepare the Clay:
Start with a ball of terracotta air-dry clay roughly the size of a large orange. Knead it well until it is soft, pliable, and free of any large air bubbles. -
Create the Pinch Pot:
Press your thumb into the center of the ball and gently pinch the clay walls while rotating. Aim for an even thickness of about a quarter-inch all around to ensure sturdy walls for your lantern. -
Check the Fit:
Before closing the top too much, test that your battery-operated tea light fits easily inside the base. It needs to sit flat on the bottom. -
Shape the Shoulders:
Gently curve the top edges of your pot inward to create that classic rounded pumpkin shape. You want the opening at the top to offer enough space to drop the light in later. -
Smooth the Rim:
Dip your finger in a little water and run it along the top rim to smooth out any cracks that formed while shaping the shoulders.
Crack Control
If you see tiny hairline cracks appearing as the clay dries, mix a small amount of fresh clay with water to make a paste (slip) and fill them in immediately.
Step 2: Ribbing and Texturing
-
Mark the Vertical Lines:
Use a modeling tool or the back of a plastic knife to lightly score vertical lines from the top rim down to the base. Space them evenly around the sphere to mimic pumpkin ribs. -
Deepen the Grooves:
Go back over your vertical lines and press a bit deeper to create distinct sections. Gently smooth the edges of these grooves with a damp finger so they look organic, not sharp. -
Add Rustic Texture:
Take a rough sponge or a textured cloth and dab it all over the surface. The goal here is to make the clay look like weathering garden pottery rather than perfectly smooth plastic. -
Weather the Clay:
Sprinkle a tiny pinch of dry clay crumbs or sand onto the surface and press them in lightly for extra speckling and character.
Spooky Shadows
Cut the facial features slightly larger on the inside of the pumpkin wall than the outside. This beveling allows more candlelight to shine through the holes.
Step 3: Carving the Face
-
Plan the Features:
Lightly sketch the face onto the clay using a toothpick. Draw two triangle eyes, a small triangle nose, and a curved grinning mouth. -
Cut the Eyes:
Carefully cut out the eye shapes using a small clay knife. Work slowly to keep the corners sharp. -
Carve the Mouth:
Cut along the mouth line. To create teeth, leave small square tabs of clay attached to the gum line while removing the empty space around them. -
Refine Cutouts:
Use a damp paintbrush or finger to smooth the rough edges inside the eye and mouth holes. This cleans up the look and prevents cracking as it dries.
Step 4: Finishing Touches
-
Embed the Stem:
While the clay is still minimal soft, press a small, genuine wooden twig into the rim at the back or side, or shape a small clay tab to hold it. This adds a wonderful mixed-media realism. -
Final Shape Check:
Give the pumpkin a gentle squish from top to bottom if you want it to look slightly more squat and realistic, rather than perfectly round. -
Drying Process:
Let the pumpkin dry slowly away from direct heat sources. This usually takes 24-48 hours depending on humidity. -
Adding the Dirt Effect:
Once fully dry, you can rub a tiny bit of dark brown paint or diluted potting soil into the deepest crevices and wipe away the excess to enhance the aged terracotta look. -
Light It Up:
Place your battery-operated candle inside and enjoy your handmade autumn glow.
Place your little terracotta pumpkin on the doorstep to welcome visitors with a warm autumn smile
Haunted House Facade Plaques
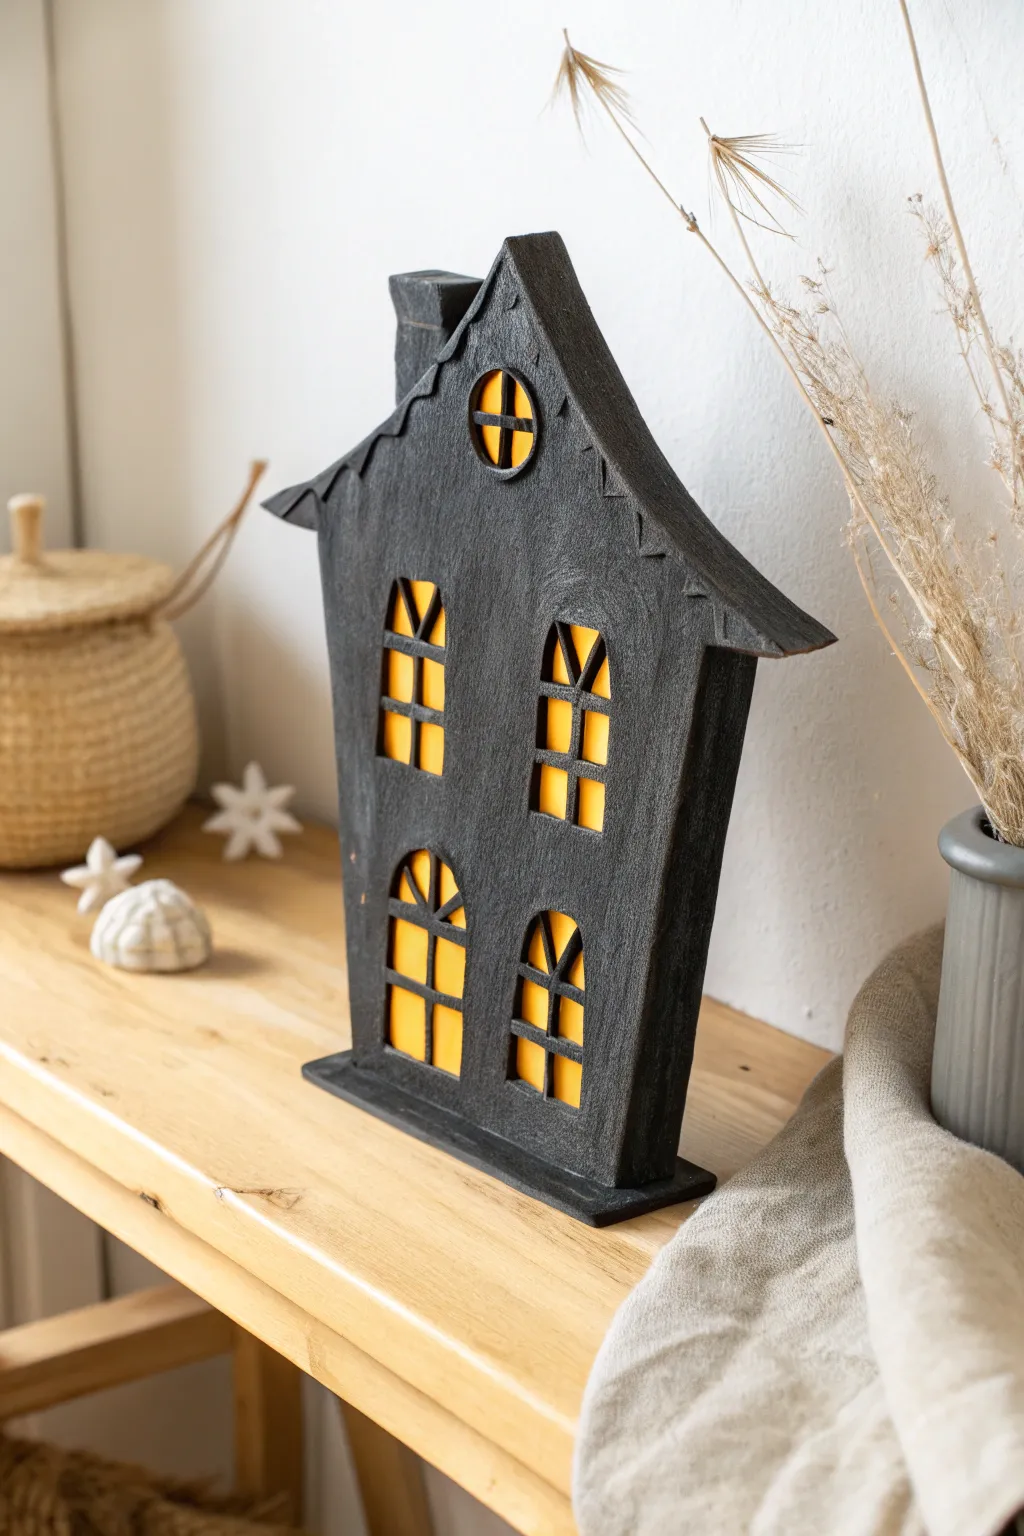
This striking monochromatic project creates a moody, shadowed haunted house silhouette that glows warmly from within just like a jack-o’-lantern. It stands upright on its own base, making it perfect for a mantel or shelf display.
Step-by-Step Guide
Materials
- Air dry clay (white or terracotta)
- Rolling pin
- Fettling knife or plastic clay tool
- Ruler
- Yellow vellum, tissue paper, or translucent craft plastic
- Black acrylic paint (matte finish)
- Paintbrushes (flat and fine detail)
- Strong craft glue or hot glue
- Cardboard or cardstock (for template)
- Sandpaper (fine grit)
Step 1: Shaping the Facade
-
Sketch your blueprint:
Begin by drawing a tall, narrow house shape on a piece of piece of cardstock to create a template. Include a steep pitched roof and a chimney on one side. -
Roll the clay slab:
Roll out a substantial amount of air dry clay onto a non-stick surface until it is an even slab, approximately 1/4 to 1/2 inch thick. Keep it slightly thick to ensure the house can stand up later. -
Cut the silhouette:
Place your cardstock template over the clay slab and trace around it with a fettling knife or clay tool. Remove the excess clay. -
Window layout:
Use your ruler to lightly impress grid lines where your windows will go. You want two arched windows on the bottom, two arched windows in the middle, and a small round window near the peak. -
Carve the openings:
Carefully cut out the window shapes completely. Remove the clay inside the arches and the circle, leaving clean, empty holes. -
Create the base:
Roll a second, smaller strip of clay that is slightly wider and deeper than the bottom of your house. This rectangular strip will serve as the stand-alone base.
Step 2: Adding Details & Assembly
-
Add texture:
Before the clay dries, use a sculpting tool to scratch vertical wood grain textures into the surface. Add a zig-zag trim pattern under the roofline for extra character. -
Create mullions:
Roll very thin snakes of clay. Cut them to size and press them gently into the window openings to create the crossbars (mullions). I find adding a tiny dab of water helps them stick to the window frame edges. -
Dry thoroughly:
Allow both the house facade and the base piece to dry completely. This usually takes 24-48 hours depending on thickness. Flip them occasionally to prevent warping. -
Sand the edges:
Once bone dry, use fine-grit sandpaper to smooth out any rough burs on the edges of the roof and window frames. -
Connect to base:
Using strong craft glue or hot glue, attach the bottom of the house facade to the center of the rectangular base strip. Hold it steady until the bond is secure.
Clean Cuts
If your clay drags while cutting the windows, stick the slab in the freezer for 15 minutes to firm it up before carving.
Step 3: Painting & Illumination
-
Base coat:
Paint the entire structure—front, back, and base—with matte black acrylic paint. You may need two coats to get that solid, deep dark finish. -
Dry brush texture:
If you want a weather-beaten look, lightly dry brush a tiny amount of grey paint over the wood grain texture you carved earlier. -
Prepare the glow:
Cut pieces of yellow vellum or translucent craft paper just slightly larger than your window openings. -
Install the lights:
Glue the yellow paper strips to the *back* side of the house facade, covering the window holes. Make sure the glue doesn’t seep through to the front. -
Final touch:
Place an LED tea light behind the structure to make the yellow windows glow eerily.
Spooky Shingles
Instead of a smooth roof, use a sculpting tool to press overlapping ‘U’ shapes into the roof area for a textured slate shingle effect.
Now you have a mysterious haunted manor ready to cast long shadows across your Halloween decor
Friendly Skull and Bones Charms
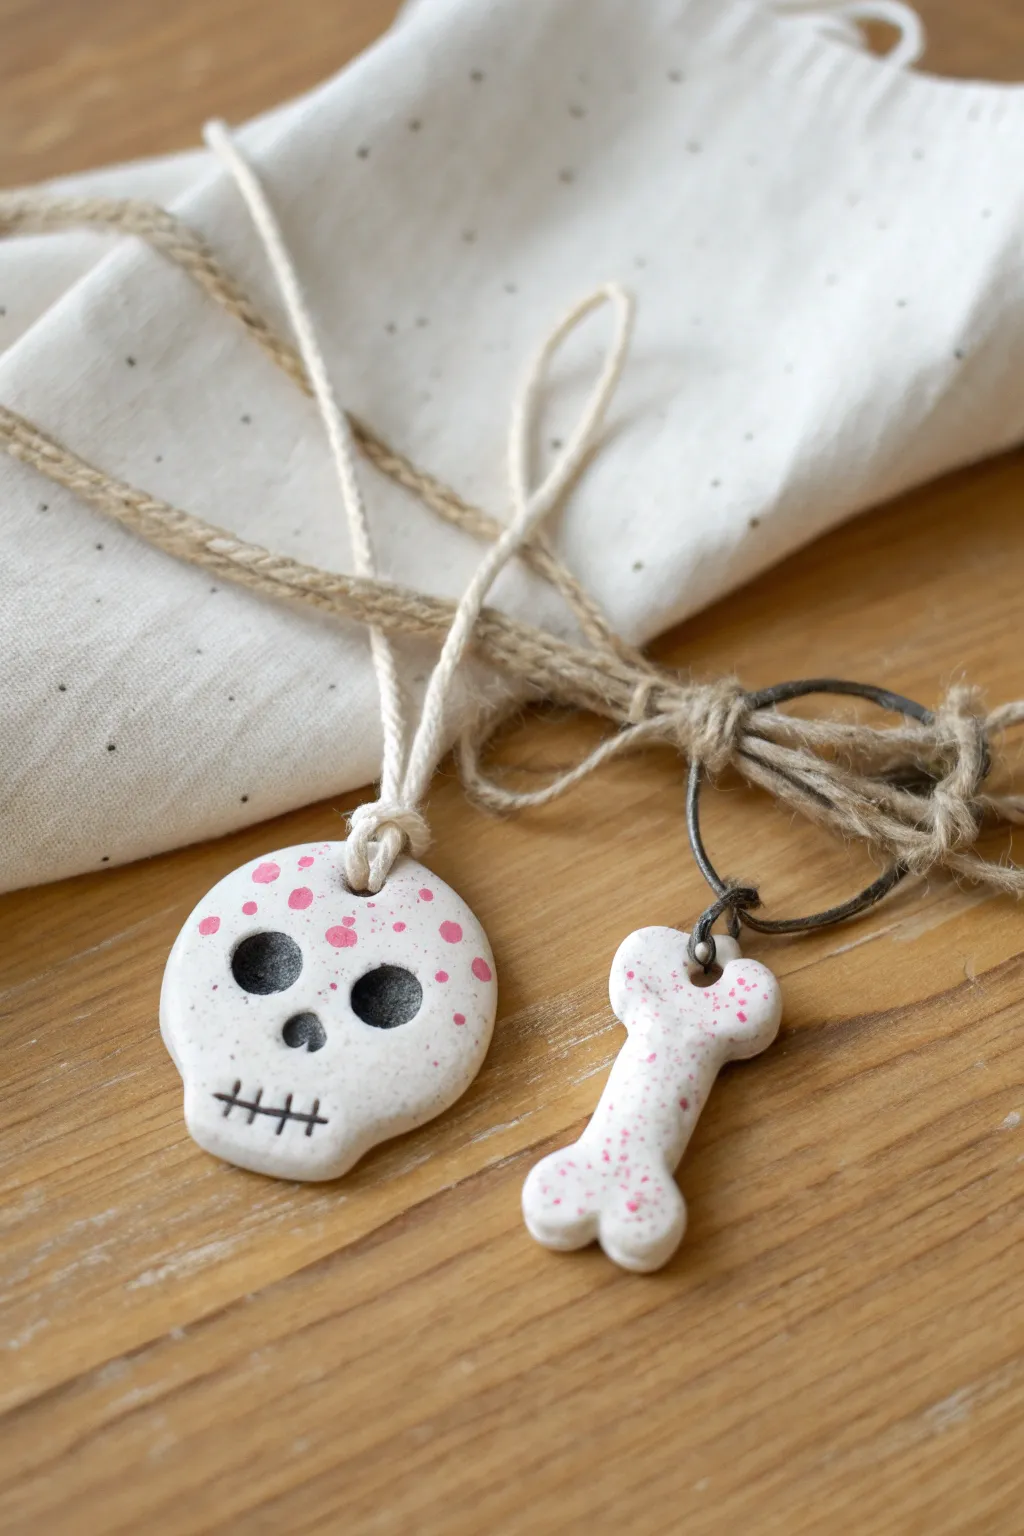
These charmingly spooky accessories strike the perfect balance between festive and sweet, featuring a whimsical splatter effect. The rustic jute finish makes them ideal for Halloween twig trees, gift tags, or even a quirky necklace.
Step-by-Step Tutorial
Materials
- White polymer clay or ceramic-look air dry clay
- Rolling pin
- Small circle cutter (approx. 2 inches)
- Small bone-shaped cookie cutter (or molding tools)
- Craft knife or clay shaping tool
- Stylus tool or cocktail stick
- Black acrylic paint
- Pink acrylic paint (bright or neon)
- Old toothbrush or stiff paintbrush
- Fine-grit sandpaper
- Natural jute twine
- White cotton cord
- Small metal jump ring
- Needle nose pliers
- Matte varnish (optional)
Step 1: Shaping the Clay
-
Condition the Clay:
Begin by kneading a chunk of your white clay until it is soft, pliable, and free of cracks. Warm clay is much easier to work with, especially for little hands. -
Roll It Out:
Roll the clay onto a smooth surface until it is about 1/4 inch thick. Aim for an even thickness so the pieces dry at the same rate. -
Cut the Skull Base:
Use a small circle cutter to punch out a round shape. Gently gently gently pinch the bottom third of the circle to elongate it slightly, creating that classic jawline shape for the skull. -
Create the Features:
Use your thumb or a rounded tool to press indentations where the eyes will go. Then, use a smaller tool to press a tiny upside-down heart or triangle shape for the nose. -
Make the Hanging Hole:
While the clay is still wet, use a straw or a larger stylus tool to poke a generous hole at the very top of the skull for the cord. -
Cut the Bone:
Roll out a separate piece of clay. If you have a bone cutter, press it in. If not, cut a thick rectangle and use your fingers to round out two knobs at each end to form a cartoon bone shape. -
Pierce the Bone:
Create a small hole near the top of one of the bone’s rounded ends. This one can be smaller than the skull’s hole since it will just hold a jump ring. -
Dry Completely:
Set both pieces aside on a flat surface to dry. Air dry clay typically takes 24-48 hours depending on humidity; turn them over halfway through to prevent warping.
Step 2: Decorating & Assembly
-
Sand the Edges:
Once fully dry, lightly run fine-grit sandpaper around the edges of both charms to remove any sharp burrs or rough spots. -
Paint the Details:
Using a very fine brush and black acrylic paint, fill in the indented eye sockets and the nose cavity. Paint a simple stitched mouth line across the jaw area. -
prepare the Splatter:
Mix a small amount of bright pink acrylic paint with a drop of water to thin it slightly. It should run off the brush easily but not be completely watery. -
Apply the Splatters:
I like to test this on paper first: dip an old toothbrush or stiff brush into the pink paint. Run your thumb across the bristles to flick tiny speckles of paint over the white surface of both the skull and bone. -
Seal (Optional):
If these will be handled often, apply a coat of matte varnish to protect the paint. -
String the Skull:
Cut a length of white cotton cord. Fold it in half, push the loop through the skull’s hole, and pull the tails through the loop to create a lark’s head knot. -
Attach the Bone:
Using pliers, open a metal jump ring and thread it through the hole in the bone charm. Before closing it, hook it onto a larger metal ring or directly onto a piece of rustic jute twine. -
Bundle Together:
Tie your jute twine and cotton cord together loosely if desired, or use the thicker jute to create a messy bow that ties the whole aesthetic together.
Splatter Control
To keep the black facial features crisp, cover the eyes and mouth with small bits of masking tape or paper scraps before you start flicking the pink paint speckles.
Cracked Clay?
If small cracks appear as the clay dries, mix a tiny bit of fresh clay with water to make a paste. Fill the cracks, let it dry, and sand it smooth before painting.
Now you have a set of delightfully detailed charms ready to hang on a treat bag or wear as a costume accessory
Mummy Wrap Texture Figurines
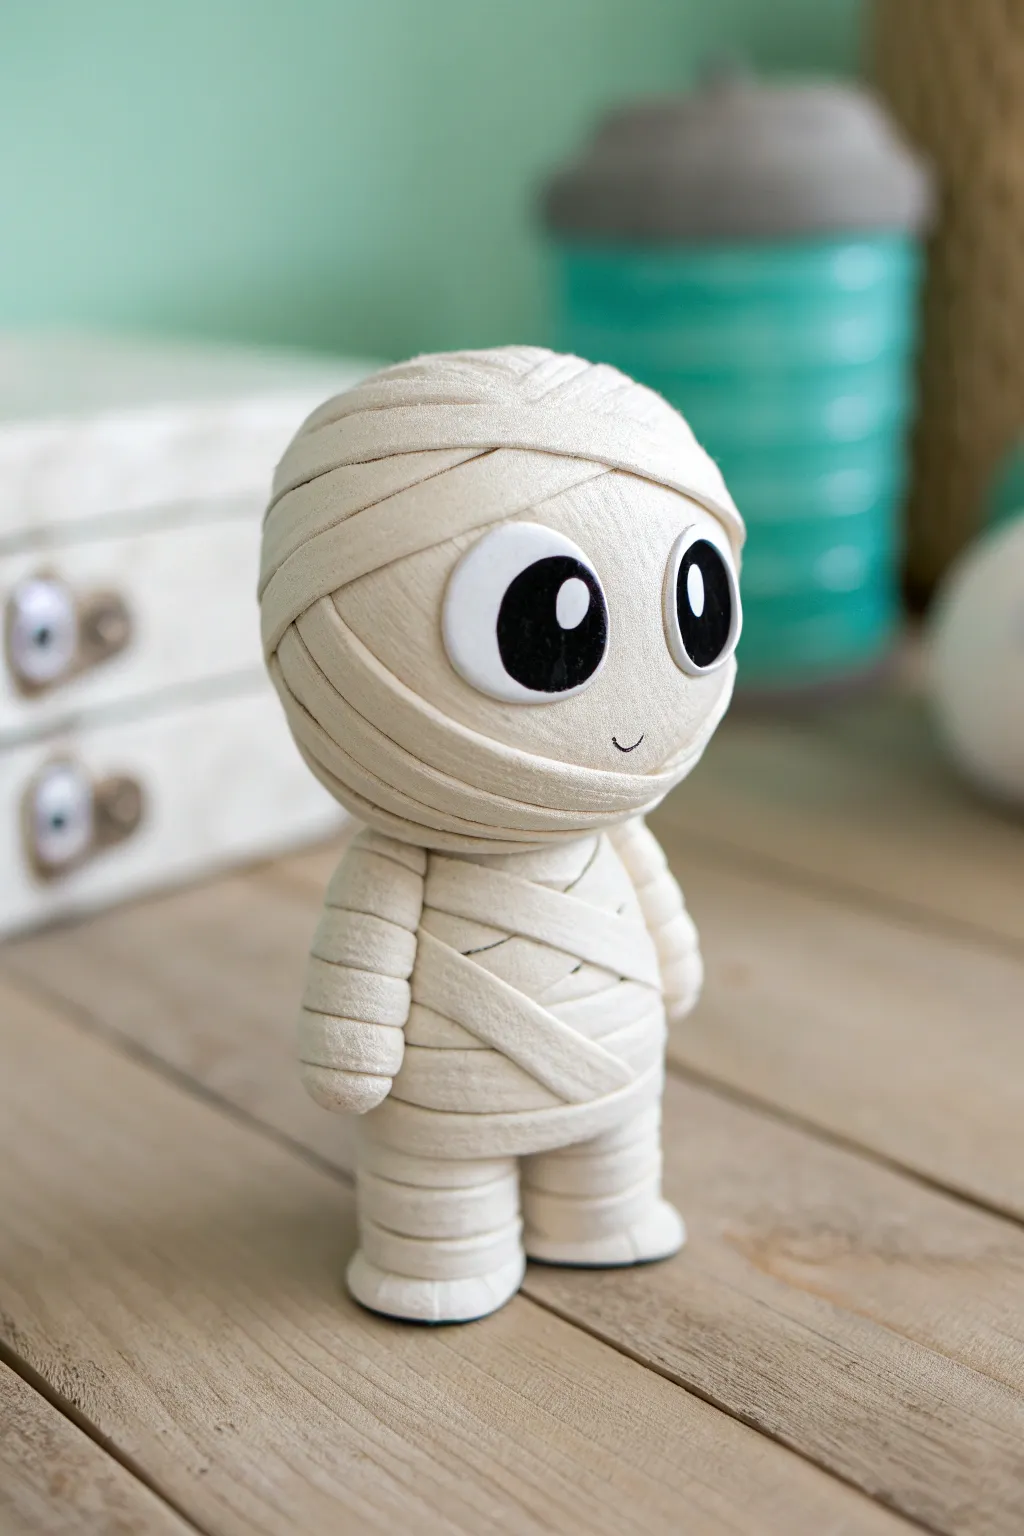
This adorable little mummy isn’t scary at all; in fact, he’s ready to charm his way into your Halloween display. By creating faux bandages out of flattened clay strips, you achieve a wonderfully textured, wrapped look that feels solid and durable.
Detailed Instructions
Materials
- White polymer clay or air dry clay (lightweight preferred)
- Small styrofoam ball (for the head core)
- Rolling pin or clay pasta machine
- Plastic modeling tool or butter knife
- Black cardstock or permanent marker
- White paint pen or small white sticker dots
- Liquid clay adhesive or craft glue
- Toothpick or short dowel
Step 1: Building the Structure
-
Prepare the Body Core:
Start by rolling a cylinder of clay for the body. It should be slightly shorter than you want the final figure to be, as the wrappings will add bulk. Ensure it’s sturdy enough to stand on its own. -
Form the Limbs:
Roll two shorter, stubby cylinder logs for the legs and press them firmly onto the bottom of the body. Create two smaller logs for the arms but keep them separate for now; it’s easier to wrap them before attaching. -
Prepare the Head:
Take your styrofoam ball and cover it with a thin, even layer of clay. This keeps the head lightweight so the figure doesn’t tip over. Insert a toothpick halfway into the neck area of the body and push the head onto the other end to connect them insecurely.
Pro Tip: Hidden Texture
Before cutting your strips, roll your clay over a piece of denim or canvas. This transfers a realistic fabric weave pattern onto the ‘bandages’ for extra detail.
Step 2: The Wrapping Technique
-
Create Bandage Strips:
Roll out a sheet of white clay very thinly. Use a ruler and a knife (or a dedicated clay slicer) to cut long, even ribbons about 5-6mm wide. This is simpler if you slice many at once. -
Texture the Strips:
Before wrapping, lightly press a piece of rough fabric or a stiff bristle brush onto the strips. This gives them a fabric-like weave texture rather than looking like smooth plastic. -
Wrap the Legs:
Start at the bottom of the feet. Take a clay strip and wind it around one leg, working your way up. Slightly overlap each turn to mimic real bandages. -
Wrap the Body:
Continue using longer strips to wrap the main torso. Crisscross the clay ribbons occasionally across the chest to break up the horizontal pattern and add visual interest. -
Wrap and Attach Arms:
Wrap your reserved arm logs individually. Once wrapped, press them firmly against the sides of the body. You can use a dab of liquid clay or glue if the clay has started to dry. -
Wrap the Head:
This is the most visible part. Wrap strips horizontally around the head, but make sure to leave a slight gap or smoother area where the eyes will go. Angle a few strips diagonally across the top of the head for a messy, authentic look. -
Smooth the Seams:
Where strips end at the back or bottom, gently blend the clay edge into the layer below it so it doesn’t peel off later.
Step 3: Details & Finish
-
Create the Eyes:
Cut two large ovals from white clay or use pre-made flat plastic eyes. Place them on the ‘face’ area you left open. -
Add Pupils:
For that cute, wide-eyed look, cut large circles from black cardstock and glue them onto the white ovals. Alternatively, paint them with black acrylic paint. -
The Sparkle:
Add a tiny dot of white paint or a small white sticker to the upper right corner of each pupil. This ‘catchlight’ brings the character to life instantly. -
Tiny Smile:
Use a fine-point black marker or a very thin thread of black clay to create a tiny ‘u’ shape mouth right between the bandages. -
Dry Completely:
Let the figure sit undisturbed in a dry, warm spot. If using air-dry clay, this might take 24-48 hours due to the thickness of the layers.
Troubleshooting: Cracking strips?
If your thin clay strips are cracking as you wrap them, your clay is too dry. Spritz it lightly with water or knead a tiny amount of water into the batch before rolling.
Once he is fully dry, you can set him on a shelf to guard your Halloween candy stash
Mix-and-Match Monster Parts Set
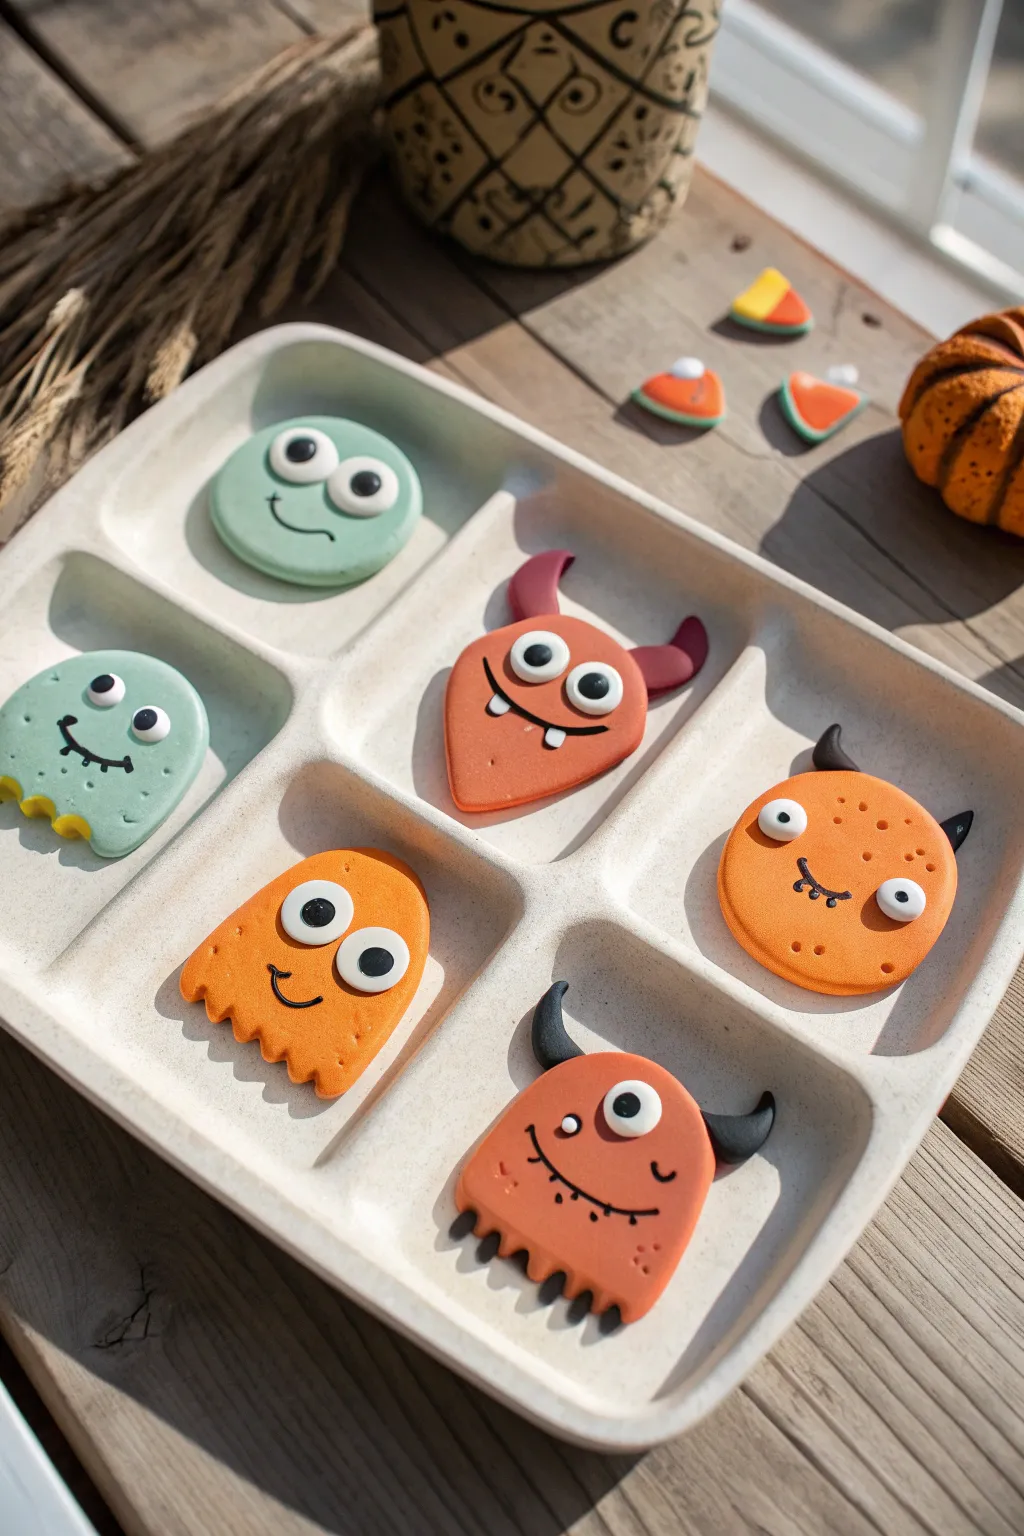
These adorable, cartoonish monster magnets add a pop of Halloween fun to your fridge without being too spooky. The smooth, matte finish and expressive faces give them a professional, store-bought look that’s surprisingly easy to achieve at home.
Step-by-Step
Materials
- White air dry clay
- Acrylic paints (orange, teal/mint, black, white, burgundy)
- Clay roller or rolling pin
- Round cookie cutters (various sizes)
- Clay modeling tools or a plastic knife
- Small round piping tip or straw (for eyes)
- Sandpaper (fine grit)
- Strong craft glue
- Small round magnets
- Mod Podge or matte varnish (optional)
Step 1: Shaping the Bodies
-
Prepare the Clay:
Pinch off a varied amount of air dry clay for each monster, keeping in mind you’ll need orange, teal, and burgundy tones eventually. Knead the clay until it is soft, warm, and pliable to prevent cracking later. -
Roll It Out:
Roll your clay out onto a non-stick surface or parchment paper until it is an even slab, about 1/4 inch thick. You want them thick enough to be sturdy but light enough for a magnet. -
Cut Basic Shapes:
Use round cookie cutters to stamp out perfect circles for the round monsters. For the ghost-like or blob shapes, you can lightly trace the outline with a tool first and then cut it out with a craft knife. -
Add Texture:
For the monsters with ‘feet’ or scalloped bottoms (like the orange ghost and one-eyed monster), use a small rounded tool or the back of a paintbrush to gently push up indentations along the bottom edge. -
Smooth the Edges:
Dip your finger in a tiny bit of water and run it along the cut edges of your clay shapes. This smooths out any harsh lines or jagged bits left by the cutter.
Cracked Clay Crisis?
If small cracks appear while drying, don’t panic! Mix a tiny bit of fresh clay with water to make a paste and fill the crack, then smooth it over.
Step 2: Creating Features
-
Form the Horns:
Hand-roll tiny cones of clay for horns. For the single-eyed monster, create two curved, black-colored horns. For the red monster, shape softer, rounded horns. -
Attach Appendages:
Score the attachment points (scratching the surface slightly) where the horns will go, add a dab of water or liquid clay, and press the horns firmly onto the main body shapes. -
Make the Eyes:
Roll very small balls of white clay and flatten them into discs. I find using two different sizes for one monster adds a lot of goofy character. -
Create Pupils:
Roll even tinier balls of black clay (or paint them later) and press them onto the white eye discs. Place them slightly off-center or looking in different directions for a silly expression. -
Details and Drying:
Press the eyes onto the monsters. Let all pieces dry completely for 24-48 hours on a wire rack, flipping them halfway through to ensure even drying.
Make It Interactive
Skip the glue! Put magnets on the back of the eyes, mouths, and horns separately so kids can mix and match faces on the fridge.
Step 3: Painting and Finishing
-
Base Colors:
Once fully dry, paint the bodies with matte acrylics. Use a soft mint green for the round face, a bright orange for the ghosts and circles, and a terracotta red/orange for the pointed one. -
Defining Horns:
Paint the horns carefully. Use black for the sharp horns and a deep burgundy or dark red for the softer, rounded horns. -
Drawing Mouths:
Use a very fine detail brush or a black paint pen to draw the mouths. Add little quirks like a crooked smile, jagged teeth, or a tiny tongue sticking out. -
Highlighting:
Dip the back end of a paintbrush into white paint and add a tiny dot to the black pupils. This ‘catchlight’ brings the eyes to life instantly. -
Freckles and Warts:
Add extra personality by dotting on little freckles or warts using a slightly darker shade of the body color (like dark orange dots on the orange monster). -
Protective Coat:
If you want them to last longer, brush on a layer of matte varnish or Mod Podge. This seals the paint and prevents chipping. -
Magnetize:
Flip the dried monsters over and use strong craft glue to attach a round magnet to the center of the back.
Your quirky monster squad is now ready to guard the refrigerator with style