Halloween is basically the perfect excuse to make extra-cute jewelry, and clay bead bracelets are the fastest way to get that spooky vibe on your wrist. Here are my favorite Halloween clay bead bracelet ideas—from classic color combos to quirky charms you’ll want to stack all month.
Classic Orange, Black, and White Heishi Stack
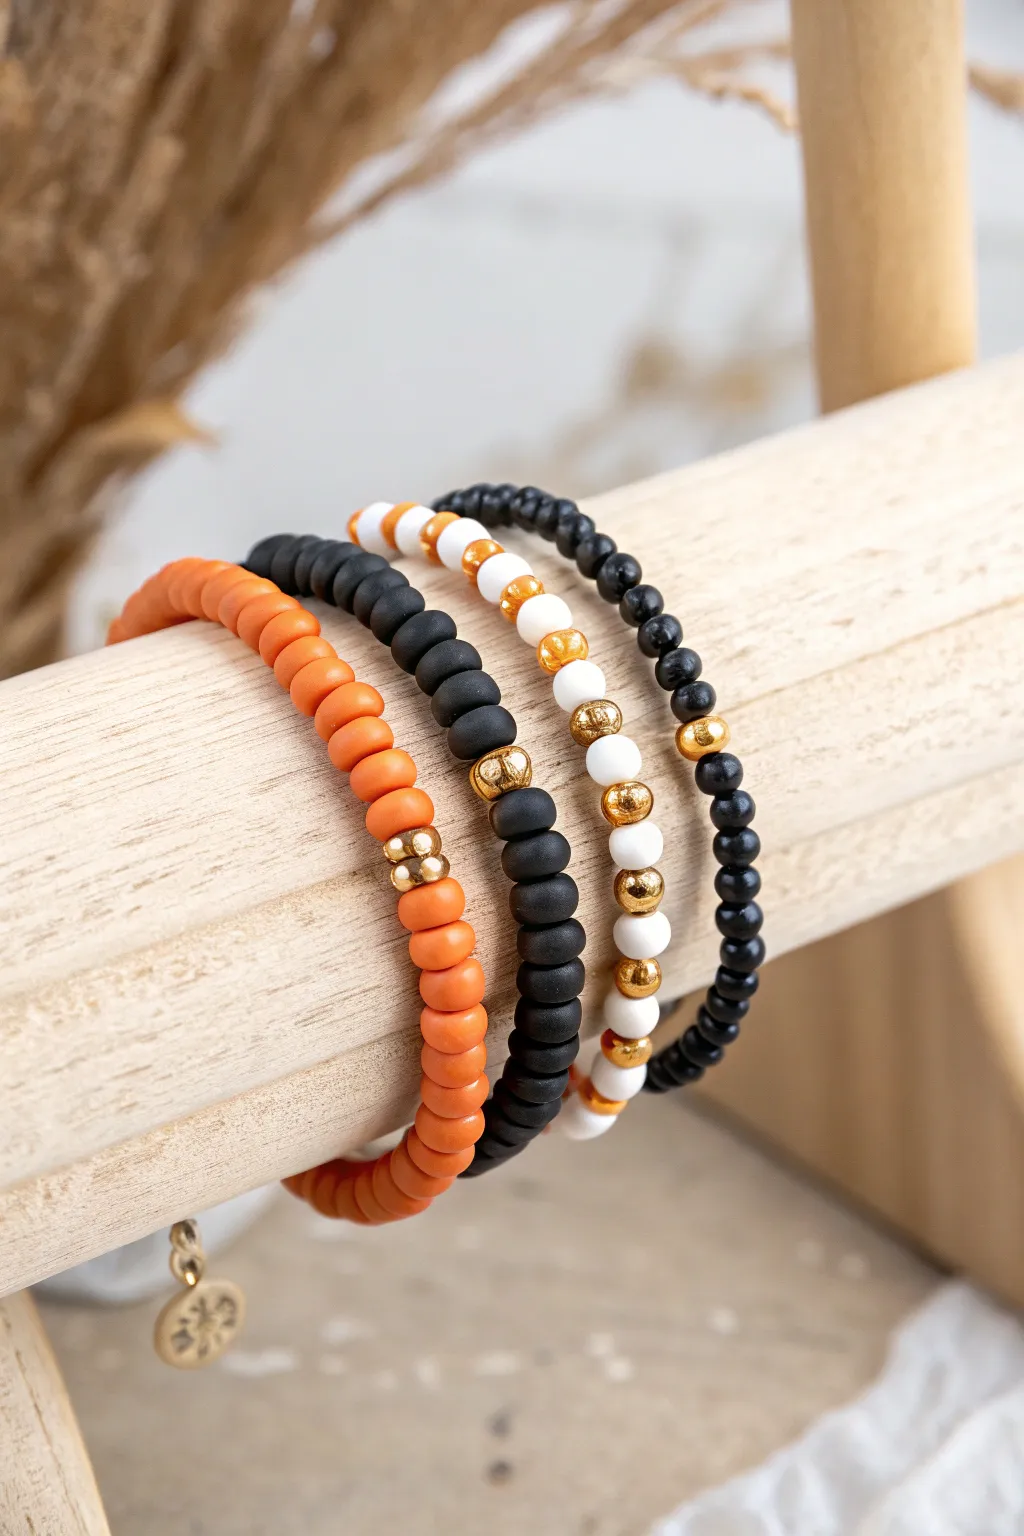
Embrace the Halloween spirit with this sophisticated stack featuring a mix of matte textures and shiny gold accents. By combining solid color strands with alternating patterns, you create a balanced set that feels festive without being overly costume-like.
Detailed Instructions
Materials
- Orange polymer clay heishi beads (approx. 6mm)
- Black polymer clay heishi beads (approx. 6mm)
- White polymer clay heishi beads (approx. 6mm)
- Small black wooden or matte beads (approx. 4mm round)
- Gold tone spacer beads (various sizes: small rondelle and larger round)
- Gold tone charm (starburst or floral design)
- Jump ring (gold tone)
- Elastic beading cord (0.8mm recommended)
- Super glue or jewelry cement
- Scissors
- Bead stopper or tape
Step 1: The Solid Orange Strand
-
Prepare the cord:
Cut a piece of elastic cord about 10-12 inches long. Stretch it pre-emptively to prevent sagging later, and place a bead stopper or piece of tape on one end. -
String the base color:
Begin threading the orange heishi beads onto the cord. Continue until you’ve covered about half of your desired wrist circumference. -
Add the gold accent:
Slide on three gold spacer beads. I prefer using slightly rounded spacers here to break up the flat profile of the clay discs. -
Finish the strand:
Continue stringing orange heishi beads until the bracelet reaches your desired length (usually 6.5 to 7 inches for an average wrist). -
Attach the charm:
Open a jump ring with pliers, slide on your gold charm, and loop it around the elastic cord near the gold spacers before tying off, or attach it to the spacers themselves if they have loops.
Pro Tip: Texture Mix
Mix matte clay beads with shiny gold metals and wooden rounds. This variety prevents the stack from looking flat and adds a high-end feel.
Step 2: The Solid Black Strand
-
Start the black layer:
Cut a new length of cord and secure the end. Begin stringing your matte black heishi beads. -
Insert the focal point:
Once you hit the halfway mark, thread on a larger, textured gold bead. This mirrors the design of the orange bracelet but simplifies it to a single bold accent. -
Complete the length:
Fill the rest of the cord with black heishi beads until it matches the length of your first orange bracelet.
Level Up: Ghostly Glow
Swap the white heishi beads for glow-in-the-dark clay beads. In daylight, it looks classic, but at night, it reveals a spooky surprise.
Step 3: The Patterned Mix Strand
-
Create the pattern:
This strand uses a repeating pattern. Slide on about 5-6 white heishi beads followed by one large gold bead. -
Alternate textured beads:
For the next section, string 5-6 white beads again, but follow them with a small translucent or amber-colored spacer bead for variety. -
Repeat until full:
continue this pattern—white section, gold bead, white section, amber bead—until the bracelet is complete. This adds a lighter, airy element to the dark stack.
Step 4: The Detailed Accent Strand
-
Switch to round beads:
For the final bracelet, switch from heishi discs to small round black beads (wood or matte acrylic works well) for a texture change. -
Build the center detail:
String the black round beads for the majority of the bracelet, leaving a 2-inch gap in the center. -
Create the focal pattern:
In that center gap, create a striped pattern: three white heishi beads, one gold spacer, three white heishi beads, one gold spacer, followed by a few orange heishi beads. -
Finalize the stack:
Finish filling any remaining space with the round black beads.
Step 5: Securing the Knots
-
Tie the knots:
For each bracelet, remove the bead stopper and tie a surgeon’s knot (a square knot with an extra loop) to secure the ends tight. -
Glue and hide:
Dab a tiny drop of super glue on each knot. Once dry, trim the excess cord and gently tug the knot inside a neighboring bead if the hole is large enough.
Slip on your new stack and enjoy the perfect balance of Halloween colors and everyday style


Candy Corn Stripe Pattern Bracelet
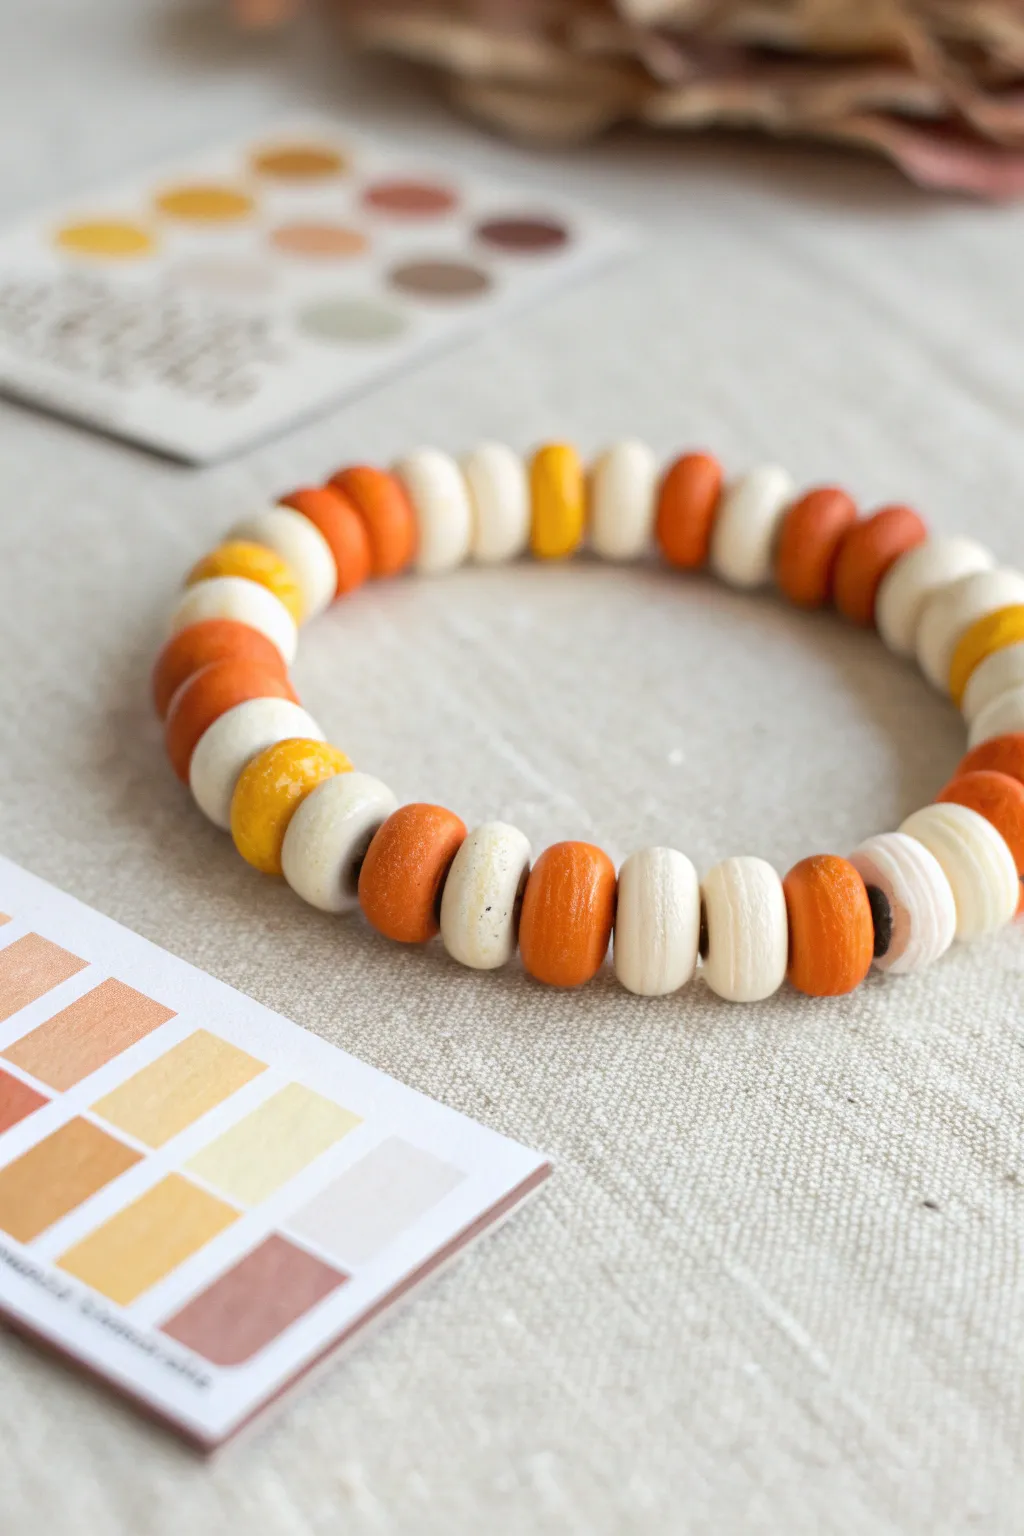
Capture the classic nostalgia of Halloween treats with this chunky, candy corn-inspired bracelet. Using hand-formed clay beads in warm yellow, vibrant orange, and creamy white creates a playful accessory that feels organic and stylish rather than mass-produced.
Step-by-Step Tutorial
Materials
- White polymer clay (approx. 2 oz)
- Yellow polymer clay
- Orange polymer clay
- Elastic beading cord (0.8mm or 1mm thickness)
- Needle tool or toothpick
- Acrylic roller
- Super glue or jewelry cement
- Scissors
- Parchment paper and baking sheet
- Oven (for curing)
Step 1: Bead Formation
-
Condition the Clay:
Begin by warming up your white, orange, and yellow polymer clay in your hands separately. Knead each color until it is soft, pliable, and free of cracks. -
Portion the Dough:
Roll each color into a long snake about uniform thickness. Cut the snakes into equal-sized segments, aiming for pieces roughly the size of a large pea or small marble. -
Shape the Rounds:
Take each segment and roll it between your palms to create a smooth sphere. You want these to be slightly imperfect for that handmade, organic look seen in the photo. -
Create the Donut Shape:
Gently press each sphere down onto your workspace to flatten it slightly into a thick disc. It shouldn’t be paper-thin; keep it chunky. -
Pierce the Center:
Using a needle tool or a toothpick, pierce the center of each disc to create the bead hole. Wiggle the tool slightly to widen the hole enough for your elastic cord. -
Smooth the Edges:
After piercing, the clay might deform slightly. Gently reshape the bead with your fingers, smoothing any rough edges around the hole. -
Check Consistency:
Repeat this process until you have enough beads for your wrist size. I find it helpful to make a few extra of each color just in case one breaks or looks wonky after baking.
Hole Sizing Tip
Make your bead holes slightly larger than you think you need. Clay can sometimes shrink or swell slightly during baking, and a tight fit makes stringing difficult.
Step 2: Baking and Assembly
-
Prepare for Baking:
Arrange your formed beads on a baking sheet lined with parchment paper. Ensure they aren’t touching each other so they bake evenly. -
Bake the Beads:
Bake the clay according to the manufacturer’s instructions on your specific package (usually around 275°F or 135°C for 15-30 minutes). Do not overbake, or the white beads may yellow. -
Cool Down:
Once baked, remove the tray from the oven and let the beads cool completely. They will harden fully as they cool. -
Plan the Pattern:
Lay out your beads on a table to verify the pattern. The classic candy corn sequence is White, then Orange, then Yellow. Repeat this sequence for the entire length. -
String the Beads:
Cut a piece of elastic cord (about 10 inches). Thread the beads onto the cord following your planned pattern. -
Test the Fit:
Wrap the strung beads around your wrist to check the sizing. Add or remove a full set of three colors if adjustments are needed. -
Tie the Knot:
Pre-stretch the elastic slightly, then tie a sturdy surgeon’s knot (looping the elastic through twice before pulling tight). -
Secure the Knot:
Add a tiny drop of super glue or jewelry cement to the knot to ensure it never slips. Let it dry completely. -
Hide the Ends:
Trim the excess cord close to the knot. If the holes are large enough, gently tug the knot inside one of the adjacent beads to hide it.
Texture Twist
Before baking, gently roll the edges of your clay discs over a piece of sandpaper or a textured sponge to give the beads a stone-like, matte finish.
Now you have a sweet, festive accessory ready to wear for trick-or-treating or fall gatherings


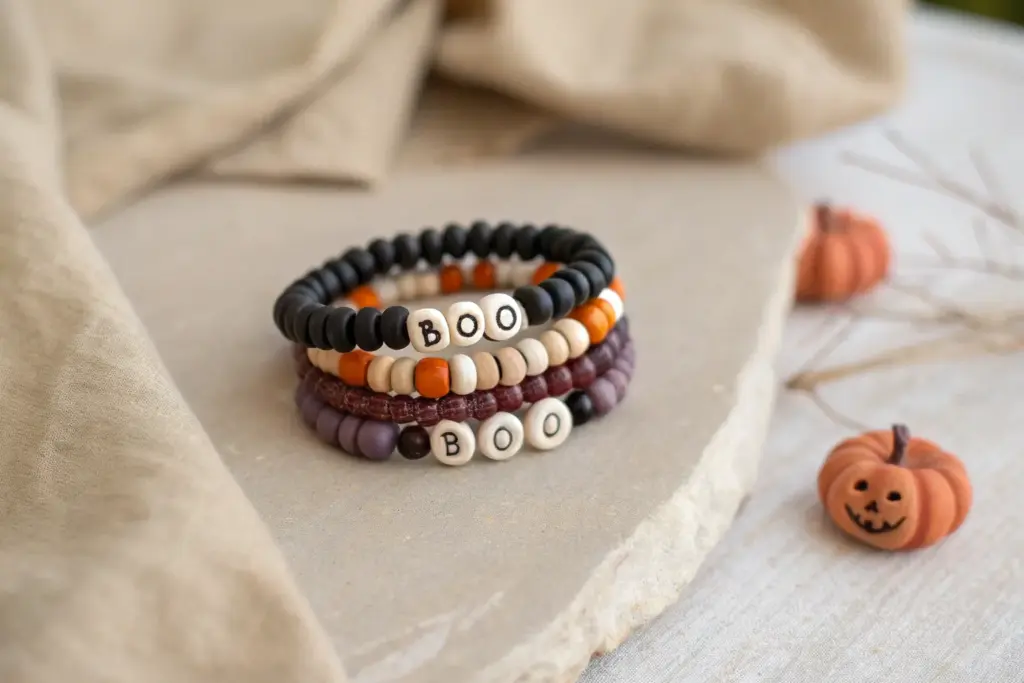
“BOO” Letter Bead Center With Spooky Colors

This minimalist Halloween accessory strikes the perfect balance between festive and understated. Using a classic adjustable cord design, it features warmth from wooden accents alongside stark black and orange beads that highlight the playful “BOO” centerpiece.
Detailed Instructions
Materials
- Black nylon beading cord (0.8mm or 1mm)
- White square letter beads (letters B, O, O)
- Round wooden beads (approx. 4-6mm)
- Round black beads (approx. 4-6mm, wood or acrylic)
- Round orange beads (approx. 4-6mm, wood or acrylic)
- Scissors
- Lighter or thread zapper (for sealing cord ends)
- Tape or a clipboard (optional, to hold the cord while working)
Step 1: Preparing the Base cord
-
Measure the cord:
Cut a piece of black nylon cord approximately 12-14 inches long. This generous length ensures you have plenty of room for knots and adjustability. -
Prepare the starting point:
Tie a simple overhand knot roughly 4 inches from one end of the cord. -
Secure the cord:
Tape the cord down to your work surface just above the knot you just made so it stays taught while you thread.
Clean Threading Tip
If the nylon cord frays while threading, quickly burn the tip with a lighter and roll it between your fingers (careful, it’s hot!) to create a needle-like point.
Step 2: Beading the Design
-
Start the left pattern:
Begin threading beads onto the longer loose end. Start with one orange round bead. -
Alternating colors:
Add a black round bead, followed by a natural wooden bead. -
Continue the sequence:
Repeat the pattern with another black bead and then an orange bead. -
Add the centerpiece:
Thread on your letter beads to spell out “BOO”. Ensure the letters are all facing the correct direction and orientation before moving on. -
Mirror the pattern:
On the other side of the “BOO”, thread an orange bead first. -
Finish the right side:
Continue mirroring the left side: add a black bead, a natural wooden bead, another black bead, and finally one last orange bead. -
Secure the beads:
Tie another simple overhand knot tight against the last orange bead to lock the entire design in place.
Step 3: Creating the Adjustable Closure
-
Form a circle:
Bring the two loose ends of the cord together so they overlap, forming the bracelet’s circle shape. -
Prepare the sliding knot cord:
Cut a shorter piece of black cord, about 6 inches long. -
Position the knot cord:
Place this short cord underneath the two overlapping main cords. -
Tie the first square knot:
Take the right end of the short cord, cross it over the main cords. Take the left end, cross it over the right end, go under the main cords, and up through the loop on the right. Pull tight. -
Complete the square knot:
Repeat the previous step but start with the left side to complete a full square knot cycle. Make 2-3 full square knots total to create a sturdy slider. -
Trim the slider:
Cut off the excess tails of the knotting cord (not the main bracelet cords) very close to the knot. -
Seal the knot:
I prefer to use a lighter to carefully melt the tiny cut ends of the knotting cord, pressing them flat against the knot so it doesn’t unravel.
Glow Up
Swap the white letter beads for glow-in-the-dark acrylic letter beads. It makes the ‘BOO’ message pop during nighttime trick-or-treating or parties.
Step 4: Finishing Touches
-
Check the length:
Extend the bracelet to its maximum desired width to see how long the tails should be. -
Add stopper knots:
Tie a small knot at the very end of each main cord tail to prevent them from slipping through the sliding closure. -
Final trim:
Cut any remaining excess cord past the stopper knots and lightly singe the tips to prevent fraying.
Slide your new spooky creation onto your wrist and adjust the fit for instant Halloween style


Pumpkin Charm Bracelet With Orange Bead Runs
This festive bracelet features long runs of matte orange heishi beads interrupted by striking black and white accents to perfectly frame a cheerful pumpkin charm. It captures the classic Halloween color palette in a sleek, wearable accessory that is simple to string together for crafters of all levels.
Detailed Instructions
Materials
- Orange polymer clay disc/heishi beads (4mm or 6mm)
- Black polymer clay disc/heishi beads
- Cream/White polymer clay disc/heishi beads
- Orange pumpkin charm (enamel or alloy)
- Gold-tone charm bail or jump ring
- Gold-tone textured spacer bead (tube or large rondelle style)
- Elastic beading cord (0.8mm crystal string recommended)
- Scissors
- Super glue or jewelry cement
- Bead stopper or masking tape
Step 1: Setting the Centerpiece
-
Prepare the Cord:
Cut a piece of elastic cord approximately 10-12 inches long. This generous length gives you plenty of room to tie knots later without struggling. -
Secure the End:
Attach a bead stopper to one end of the cord, or tape it down to your table to prevent beads from sliding off while you design. -
Attach the Charm:
If your pumpkin charm doesn’t already have one, attach a gold charm bail or a sturdy jump ring to the loop at the top of the pumpkin. -
String the Charm Holder:
Thread the cord through your gold textured spacer bead. This bead acts as the carrier for your charm. -
Hang the Charm:
Slide the jump ring or bail of the pumpkin charm onto the spacer bead so it dangles freely from the center.
Sticky Situation?
If the knot is too bulky to hide inside a flat clay bead, try sliding on a metal crimp cover over the knot and pressing it closed with pliers for a polished finish.
Step 2: Creating the Pattern
-
Start the Center Pattern:
On the immediate left side of the gold spacer, thread one black clay bead. -
Match the Right Side:
On the immediate right side of the gold spacer, thread one black clay bead to create symmetry. -
Begin the Orange Run:
Continuing on the right side, add a long sequence of orange clay beads. For the look in the photo, string about 8 to 10 orange beads. -
Add the First Accent:
After the orange run, slide on one black bead, followed by two cream/white beads, and finish the accent with another black bead. -
Repeat on the Left:
Go back to the left side of your center charm. Replicate the pattern: 8-10 orange beads, followed by the black-white-white-black accent combo. -
Check for Length:
Continue adding alternating sections—an orange run followed by an accent section—on both sides until the bracelet reaches your desired wrist size (standard is usually 6.5 to 7 inches). -
Final Symmetry Check:
Ensure your pattern ends evenly. Ideally, you want to finish with an orange run on both ends so the closure hides seamlessly within a block of color.
Make It Glow
Swap the standard cream/white beads for glow-in-the-dark polymer clay beads. The design looks identical in daylight but reveals a spooky secret at night.
Step 3: Finishing Touches
-
Pre-stretch the Cord:
Before tying, give the ends of the elastic a few gentle tugs. I find this pre-stretching step crucial as it prevents the bracelet from loosening up the first time you wear it. -
Tie the Knot:
Remove the bead stopper and bring the two ends together. Tie a strong surgeon’s knot (right over left, left over right, looping through twice). -
Secure with Glue:
Apply a tiny dot of jewelry cement or super glue directly onto the knot. Let it dry for about a minute to ensure it bonds fully. -
Hide the Evidence:
Once dry, trim the excess cord ends close to the knot. Carefully pull the beads apart slightly to tuck the knot inside of the hole of a neighboring bead.
Now you have a charming accessory ready to wear for trick-or-treating or fall festivities

The Complete Guide to Pottery Troubleshooting
Uncover the most common ceramic mistakes—from cracking clay to failed glazes—and learn how to fix them fast.
Ghost Charm Bracelet With White-Heavy Palette
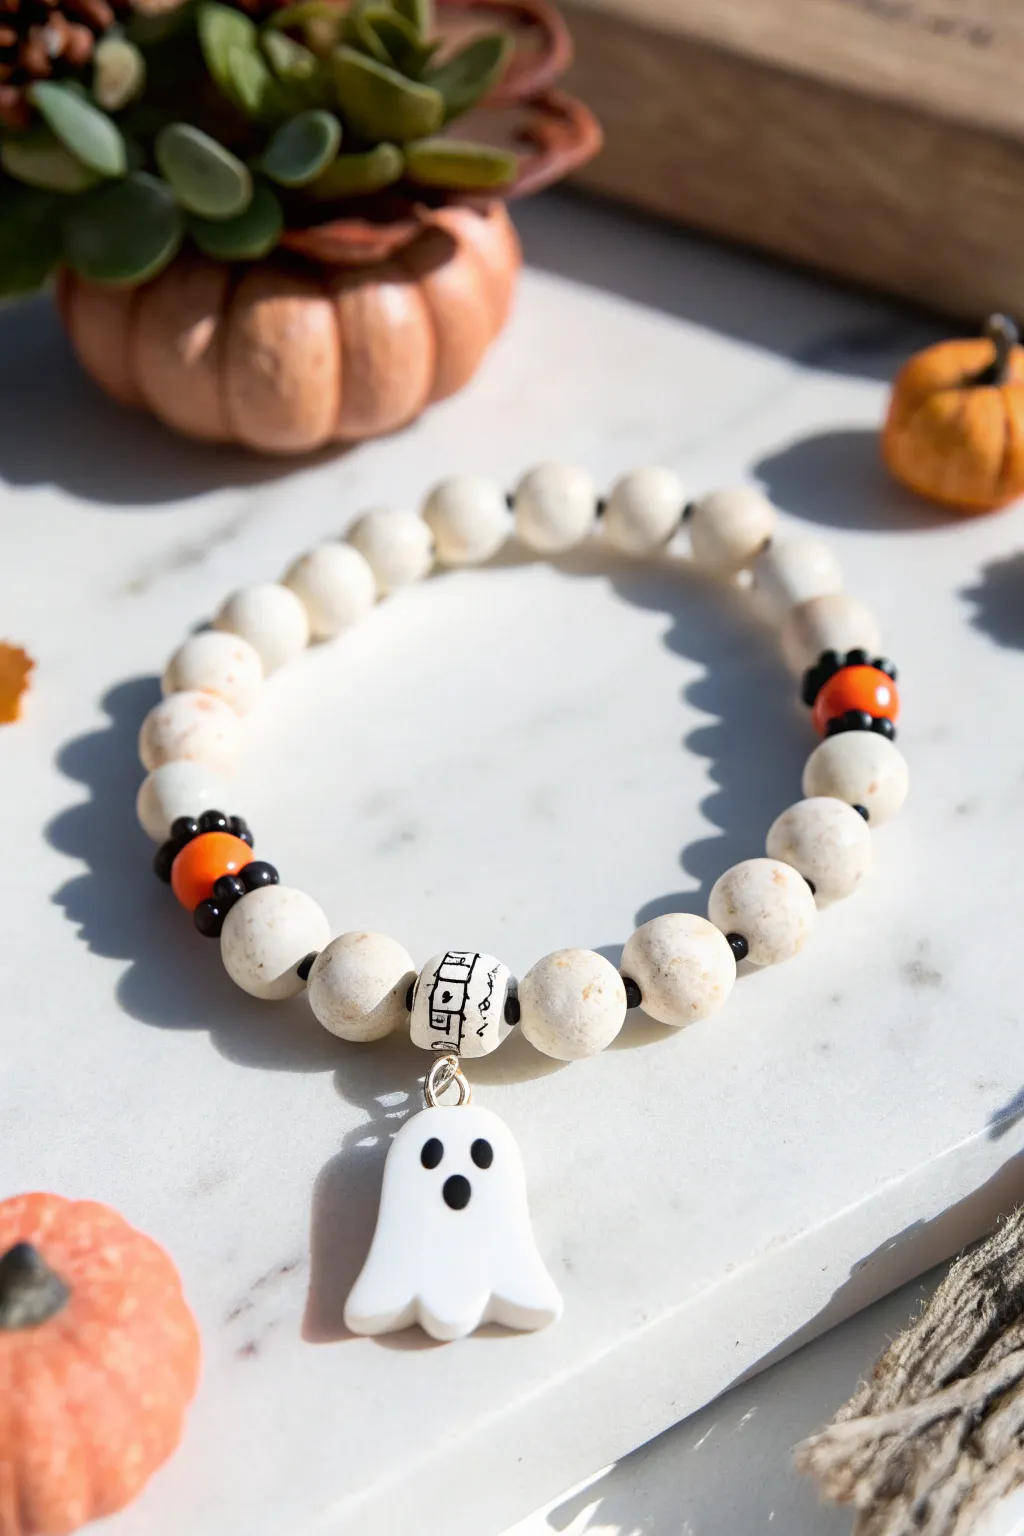
Embrace a subtle Halloween aesthetic with this predominantly white beaded bracelet featuring a charming little ghost. This design balances textured stone beads with pops of classic orange and black for a sophisticated yet spirited accessory.
How-To Guide
Materials
- White textured stone beads (round, approx. 8mm or 10mm, matte finish)
- Orange acrylic or glass beads (round, approx. 8mm)
- Small black seed beads (size 6/0 or 8/0)
- White cylinder bead with black line drawing (approx. 10mm)
- White ghost charm (resin or enamel)
- Silver jump ring (6mm or 8mm)
- Elastic beading cord (0.8mm or 1mm, clear)
- Jewelry glue (e.g., E6000 or G-S Hypo Cement)
- Scissors
- Measuring tape
- Bead stopper or decorative clip
Step 1: Preparation & Charm Setup
-
Measure the Wrist:
Begin by wrapping your measuring tape around your wrist to determine the desired size. Add about half an inch to this measurement to ensure the bracelet fits comfortably without stretching the elastic too tight. -
Prepare the Elastic:
Cut a piece of elastic cord roughly 10-12 inches long. This extra length gives you plenty of room to tie knots securely later on. -
Pre-stretch the Cord:
Hold the ends of the elastic and give it a few firm tugs. Pre-stretching helps prevent the bracelet from sagging or loosening after you’ve worn it a few times. -
Attach the Bead Stopper:
Place a bead stopper or simply a piece of strong tape on one end of the cord. This crucial step saves you from the frustration of beads sliding off while you design. -
Prepare the Ghost Charm:
Locate the small metal loop at the top of your ghost charm. Using jewelry pliers or your fingers, gently open the silver jump ring sideways (not pulling it apart) and slide the ghost charm onto it. -
Close the Charm Jump Ring:
Close the jump ring securely so the gap is completely flush. You can now set the charm aside for a moment or slide it onto the cord if you prefer to build from the center out.
Knot Slipping?
If the knot won’t stay inside the bead, gently ream the bead hole with a bead reamer tool to widen it slightly, allowing the knot to tuck inside effortlessly.
Step 2: Stringing the Pattern
-
Start the Centerpiece:
Thread the silver jump ring holding your ghost charm onto the center of the elastic cord. -
Add the Central Bead:
Immediately next to the charm, thread on the unique white cylinder bead decorated with the black line drawing. This acts as the anchor for your focal point. -
Create the First White Section:
On either side of that central setup, string two of the white textured stone beads. I find that starting symmetrically helps keep the pattern balanced. -
Add Spacer Beads:
Slide one small black seed bead onto the cord next to the white stone beads. -
Build the Orange Accent:
Place one orange round bead next to the black seed bead. Follow this immediately with another black seed bead to sandwich the orange color. -
Continue the White Pattern:
Thread on approximately 6 to 8 white stone beads, depending on your wrist size. This creates the main body of the bracelet that will sit on top of your wrist. -
Repeat the Accent:
Add another black seed bead, followed by an orange bead, and then a final black seed bead. This mirrors the design on the other side. -
Fill the Remaining Length:
Finish stringing the rest of the white stone beads until you reach the desired length based on your initial measurement. Check the fit by wrapping it loosely around your wrist.
Texture Tip
Use ‘lava stone’ or ‘sugar’ beads for the white portions. Their porous, pitted surface mimics the texture in the photo perfectly and adds a nice tactile feel.
Step 3: Securing the Design
-
Check Symmetry:
Lay the bracelet flat on your work surface to ensure the pattern looks even and the charm is positioned exactly where you want it relative to the orange accents. -
Tie the First Knot:
Remove the bead stopper carefully. Bring both ends of the elastic together and tie a simple overhand knot, pulling it tight to bring the beads together without puckering. -
Secure with a Surgeon’s Knot:
Tie a surgeon’s knot for extra security. To do this, cross the ends like a normal knot, but loop the end through twice before pulling tight. -
Apply Glue:
Dab a tiny amount of jewelry glue directly onto the knot. This prevents the elastic from slipping over time. -
Hide the Knot:
While the glue is still tacky but not wet, pull the knot gently inside the hole of the nearest large bead to hide it from view. -
Trim Excess Cord:
Once the glue has fully dried (check your glue instructions for time), use sharp scissors to trim the excess elastic as close to the bead hole as possible.
Now you have a delightfully subtle Halloween accessory ready to pair with your favorite cozy sweater
Black Cat Vibes With Gold Spacer Accents
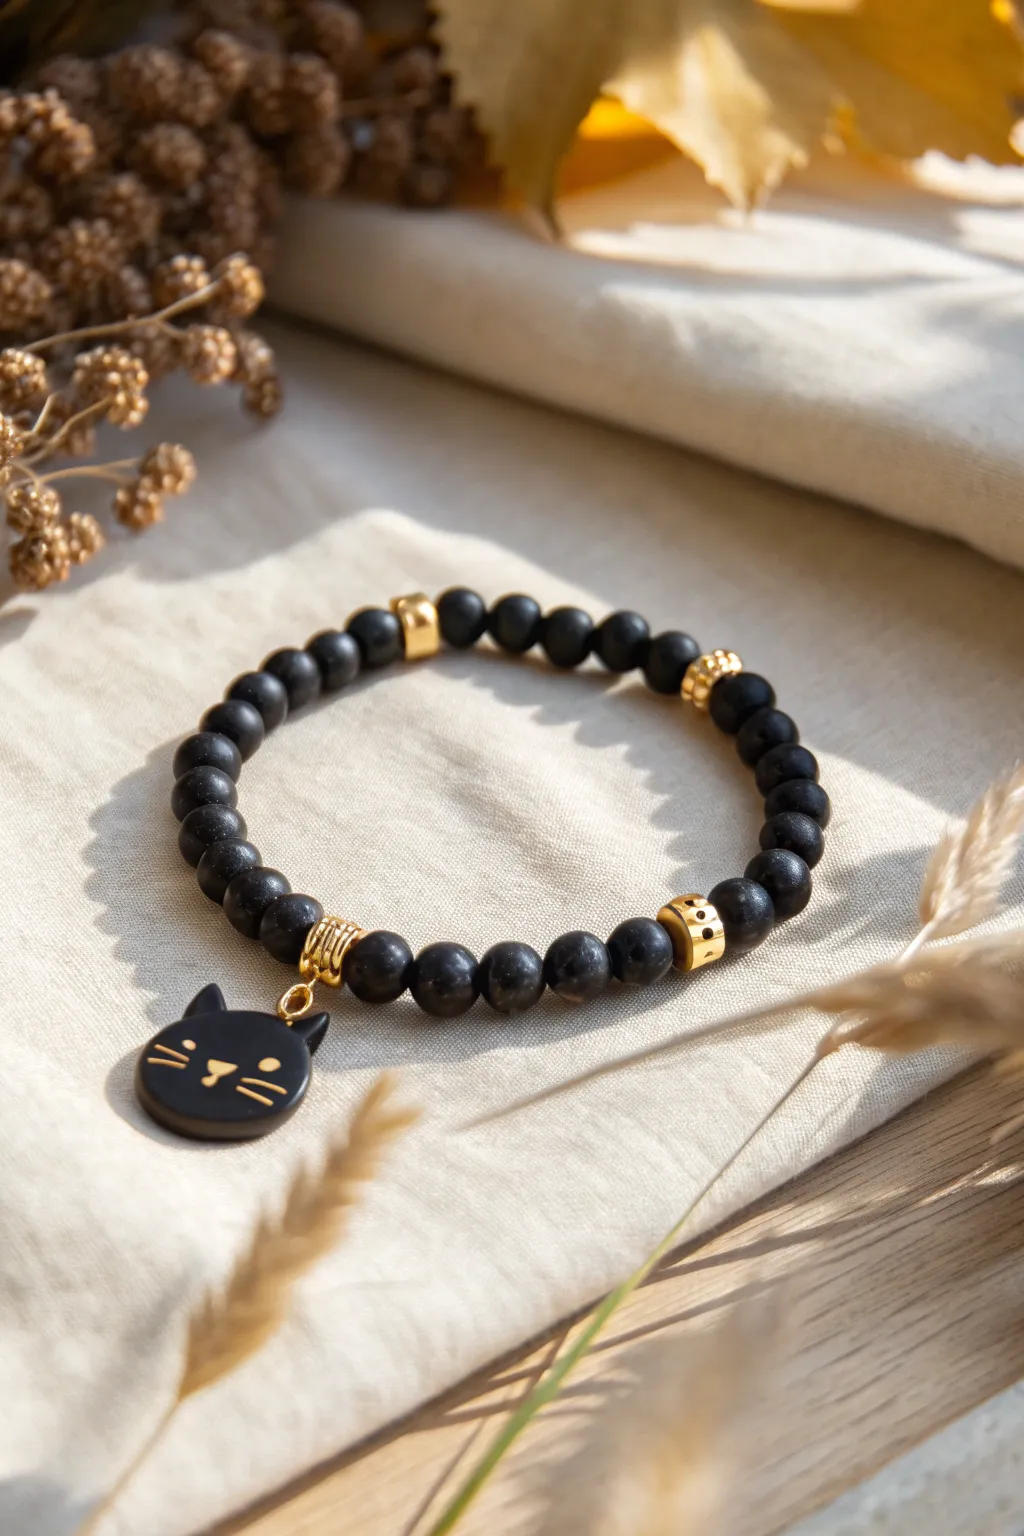
Embrace the sophisticated side of spooky season with this elegant charm bracelet. Featuring matte black beads and a striking gold-embellished cat charm, this accessory balances Halloween spirit with everyday chic.
Detailed Instructions
Materials
- Matte black round beads (6mm or 8mm, clay or agate)
- Elastic stretch beading cord (0.8mm clear)
- Black polymer clay
- Gold acrylic paint or paint pen
- Fine detail paintbrush
- Gold jump ring (6mm or 8mm)
- Gold spacer beads (various textures/shapes)
- Jewelry pliers
- Super glue or jewelry adhesive
- Clay rolling pin
- Small round cutter (approx. 1.5cm)
- Needle tool or toothpick
- Clear varnish (optional)
Step 1: Crafting the Cat Charm
-
Condition the clay:
Begin by kneading a small amount of black polymer clay until it is soft and pliable. This ensures your charm won’t crack during baking. -
Roll and cut:
Roll the clay out into a flat sheet, about 3mm thick. Use your small round cutter to punch out a perfect circle for the cat’s face. -
Add the ears:
Take tiny pinched bits of the remaining black clay and shape them into small triangles. Gently press and blend these onto the top of your circle to form the cat ears. -
Smooth the seams:
Use a silicone tool or your finger to smooth the join where the ears meet the head so it looks like one solid piece. -
Add a hanging hole:
IMPORTANT: Before baking, use a needle tool or toothpick to carefully pierce a hole through the top of the charm, right between the ears. Make it wide enough for your jump ring. -
Bake the charm:
Place your clay piece on a baking sheet or tile. Bake according to your polymer clay package instructions (usually 275°F/135°C for 15-30 minutes). Let it cool completely. -
Paint the details:
Using a very fine brush or a gold paint pen, carefully draw three whiskers on each cheek, a cute triangular nose, and two eye dots. Let the paint dry. -
Seal the charm:
For longevity, I like to brush a light coat of matte or satin varnish over the charm to protect the gold paint.
Golden Whisker Tip
If you struggle painting fine lines with a brush, use a gold gel pen or a fine-tip permanent metallic marker for easier control on the whiskers.
Step 2: Assembling the Bracelet
-
Prepare the cord:
Cut a length of elastic cord about 10-12 inches long. This extra length makes tying the knot easier later. -
Pre-stretch the elastic:
Give the cord a few gentle tugs. This helps prevent the bracelet from loosening up after you first wear it. -
Attach the charm:
Use your pliers to open the gold jump ring. Slide it through the hole in your cat charm, then loop it onto the center of your elastic cord. Close the jump ring securely. -
Add gold focal beads:
Thread a decorative gold spacer bead onto the cord on either side of the charm. This frames the cat face beautifully. -
Start beading:
Begin threading your plain black beads onto the cord, alternating sides to keep the charm centered. -
Insert spacers:
After every 6 to 8 black beads, add a different gold spacer bead (like the flat disc or textured ring shown) to add visual rhythm. -
Check the fit:
Wrap the strand around your wrist to check the size. Add or remove black beads until it sits comfortably. -
Tie the knot:
Tie a secure surgeon’s knot (right over left, left over right, and loop through an extra time). Pull it tight. -
Secure and trim:
Apply a tiny dot of super glue to the knot. Once dry, trim the excess cord ends close to the knot, and if possible, tuck the knot inside a neighboring bead.
Set the Mood
Try using iridescent or ‘cat eye’ beads instead of matte black stones. These reflect light in a way that mimics a feline’s gaze in the dark.
Now you have a sleek, handmade accessory that subtly celebrates the season


What Really Happens Inside the Kiln
Learn how time and temperature work together inside the kiln to transform clay into durable ceramic.
Spiderweb Focal Bead With Alternating Mini Patterns
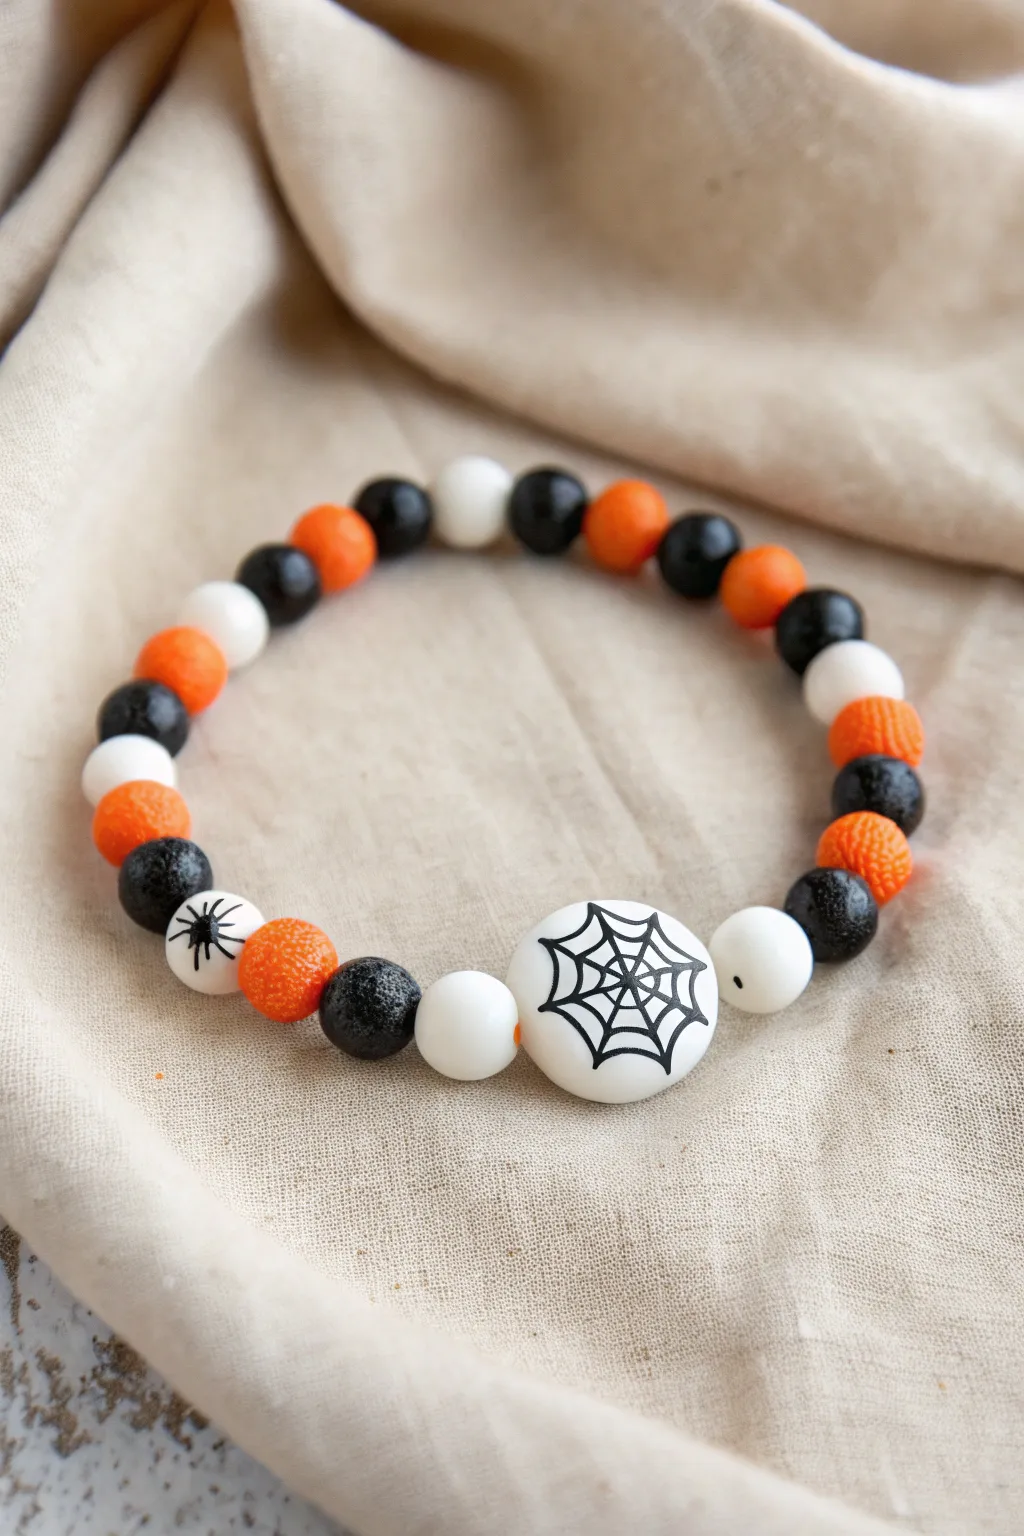
This classic Halloween bracelet balances creepy and cute with a stark spiderweb focal point and a rhythmic pattern of orange, black, and white. The alternation of smooth and textured beads adds a delightful tactile element perfect for festive wear.
How-To Guide
Materials
- Large white round flat disc bead (approx. 18-20mm)
- Medium white round bead (approx. 12mm)
- Set of small round beads (approx. 8mm): glazed black, textured/sugar-coated black, glazed orange, textured/sugar-coated orange, plain white
- Fine-point black permanent marker or acrylic paint pen
- Elastic stretch cord (0.8mm or 1mm)
- Jewelry adhesive (e.g., G-S Hypo Cement)
- Scissors
Step 1: Creating the Custom Beads
-
Prepare the focal bead:
Take your large white disc bead. Using your fine-point black marker or paint pen, start by drawing a small dot in the very center of one flat side. -
Draw the main spokes:
Draw 6 to 8 straight lines radiating outward from the center dot to the edge of the bead, spacing them as evenly as you can. -
Connect the web:
Starting near the center, draw curved lines connecting the spokes. Continue moving outward, drawing larger concentric swoops to create the classic spiderweb effect. -
Create the spider bead:
Select a medium-sized plain white round bead. Draw a small black oval for the spider’s body. -
Add spider legs:
Carefully draw four tiny L-shaped legs coming off each side of the body. Let both custom beads dry completely before handling.
Ink Sealing Secret
To prevent your marker drawings from rubbing off the smooth beads, seal the designs with a thin coat of matte varnish or clear nail polish after the ink dries completely.
Step 2: Designing the Pattern
-
Start the stringing:
Cut a length of elastic cord about 10-12 inches long. Give it a gentle pre-stretch to prevent future sagging. Secure one end with a piece of tape or a bead stopper. -
Place the center:
Thread your custom spiderweb disc bead onto the cord first so it acts as the centerpiece. -
Build the right side:
To the right of the spiderweb, add one plain white bead (8mm) followed by a textured black bead. -
Continue the pattern:
Continue the pattern on the right: textured orange, smooth black, smooth orange, plain white, smooth black, textured orange, smooth black. Stop here for a moment. -
Build the left side:
Now move to the left of the spiderweb bead. Thread on one plain white bead (8mm), followed by a textured black bead and a textured orange bead. -
Add the spider:
Thread your custom spider-drawn bead next. This asymmetry adds character to the design. -
Complete the loop:
Finish the strand by filling in the remaining length with alternating black and orange beads (mixing smooth and textured finishes) until the bracelet reaches your desired wrist size, usually about 7 inches total.
Step 3: Finishing Touches
-
Check the fit:
Wrap the unfinished strand around your wrist to ensure it sits comfortably. Add or remove a bead from the back section if necessary. -
Tie the knot:
Remove the tape/stopper. Bring the two ends together and tie a surgeon’s knot (a square knot with an extra loop through). -
Secure the bond:
Gently pull the knot tight. Apply a tiny dot of jewelry adhesive directly onto the knot. -
Final trim:
Allow the glue to dry for the recommended time. Trim the excess cord ends close to the knot, and if possible, tuck the knot inside the hole of a neighboring bead to hide it.
Smudging Prevention
If your marker spiderweb smudges while you draw the outer rings, work from the center outward and rotate the bead, keeping your hand resting on the table surface, not the bead.
Wear your new spooky accessory with pride or stack it with other orange and black bracelets for a full Halloween arm party
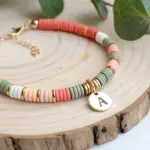
Witchy Purple and Green “WITCH” Bracelet
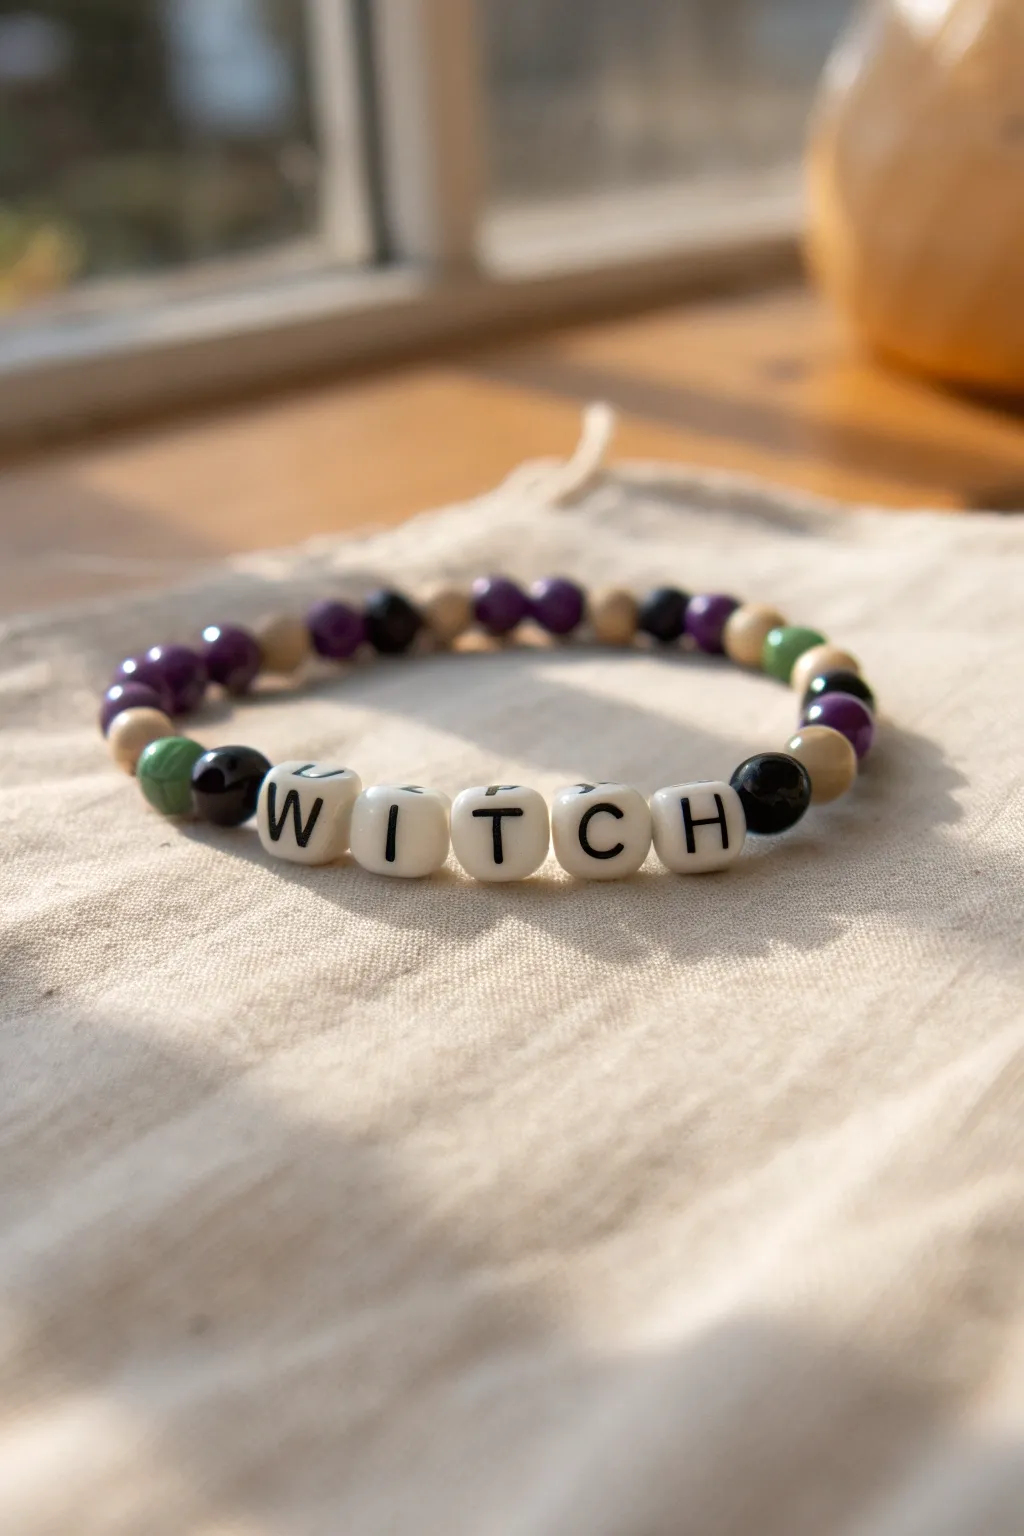
Embrace a subtle spooky aesthetic with this classic beaded stretch bracelet featuring purple, green, and black accents alongside natural wood tones. The bold letter beads spell out a seasonal sentiment, making it a perfect accessory for October and beyond.
Step-by-Step Tutorial
Materials
- White cube letter beads (W, I, T, C, H)
- 6mm or 8mm round purple beads (amethyst or glass)
- 6mm or 8mm round black beads (onyx or glass)
- 6mm or 8mm round matte green beads (malachite or dyed stone)
- 6mm or 8mm round natural wood beads
- Clear elastic jewelry cord (0.8mm recommended)
- Scissors
- Super glue or jewelry cement (optional)
- Bead tray or soft cloth surface
- Tape (to secure the cord end)
Step 1: Preparation & Layout
-
Measure your cord:
Cut a piece of elastic cord about 10-12 inches long. This extra length is crucial for tying the final knot comfortably without struggling to hold the tension. -
Secure the end:
Place a piece of tape over one end of the cord or clip a binder clip to it. This prevents your beads from sliding off while you work, which is a lifesaver when you’re in the zone. -
Draft your pattern:
Lay out your beads on a tray or cloth before stringing. Start by centering the letter beads spelling ‘WITCH’ to ensure you like the spacing. -
Arrange the flanking beads:
On either side of the word, create a repeating pattern. Based on the inspiration, alternate between purple, wood, black, and green beads to establish an earthy, mystical palette.
Knot Security Tip
When tightening your knot, pull on all four strands (the two loose tails and the bracelet loop itself) to ensure the knot seats deeply and won’t slip undone.
Step 2: Stringing the Design
-
Start the sequence:
Begin stringing from the left side of your layout. String about 8-10 patterned beads first; this eventually places the knot at the back of the bracelet rather than right next to the message. -
Add focal beads:
Thread on a specific anchor bead sequence right before the word. In the photo, a black bead sits directly next to the ‘W’, providing a nice contrast. -
Spell the word:
Slide on the white cube letter beads: W, I, T, C, H. Double-check that they are all facing the correct direction and aren’t upside down. -
Finish the contrast connection:
Add a black bead immediately after the ‘H’ to mirror the other side. Symmetry around the word helps frame the text beautifully. -
Complete the loop:
Continue stringing the remaining colored and wood beads in your alternating pattern until the beaded section measures about 6.5 to 7 inches, or your desired wrist size.
Level Up: Charm Accents
Add a small silver star or crescent moon charm on a jump ring next to the letter beads for extra celestial flair.
Step 3: Finishing Touches
-
Check the fit:
Wrap the unfinished strand around your wrist to verify the size. Remember that the knot will take up a tiny bit of space, so a slightly loose fit is better than too tight. -
Prepare the knot:
Remove the tape or clip. Bring both ends of the elastic together and carefully stretch the cord just a little bit to ‘pre-stretch’ it, which helps prevent sagging later. -
Tie the closure:
Tie a surgeon’s knot. To do this, cross the ends like a normal overhand knot, but loop the top strand through the bottom loop twice before pulling tight. -
Secure the join:
Pull the knot firmly tight. If you have jewelry cement or super glue, dab a tiny pinhead-sized drop directly onto the knot. -
Hide the mechanics:
Once the glue is dry, trim the excess cord ends close to the knot. If the hole of a neighboring bead is large enough, gently tug the knot inside it to hide it completely.
Slip on your new creation and enjoy the subtle witchy vibes it brings to your daily outfit

TRACK YOUR CERAMIC JOURNEY
Capture glaze tests, firing details, and creative progress—all in one simple printable. Make your projects easier to repeat and improve.
Midnight Bat Bracelet With Black-on-Black Layers
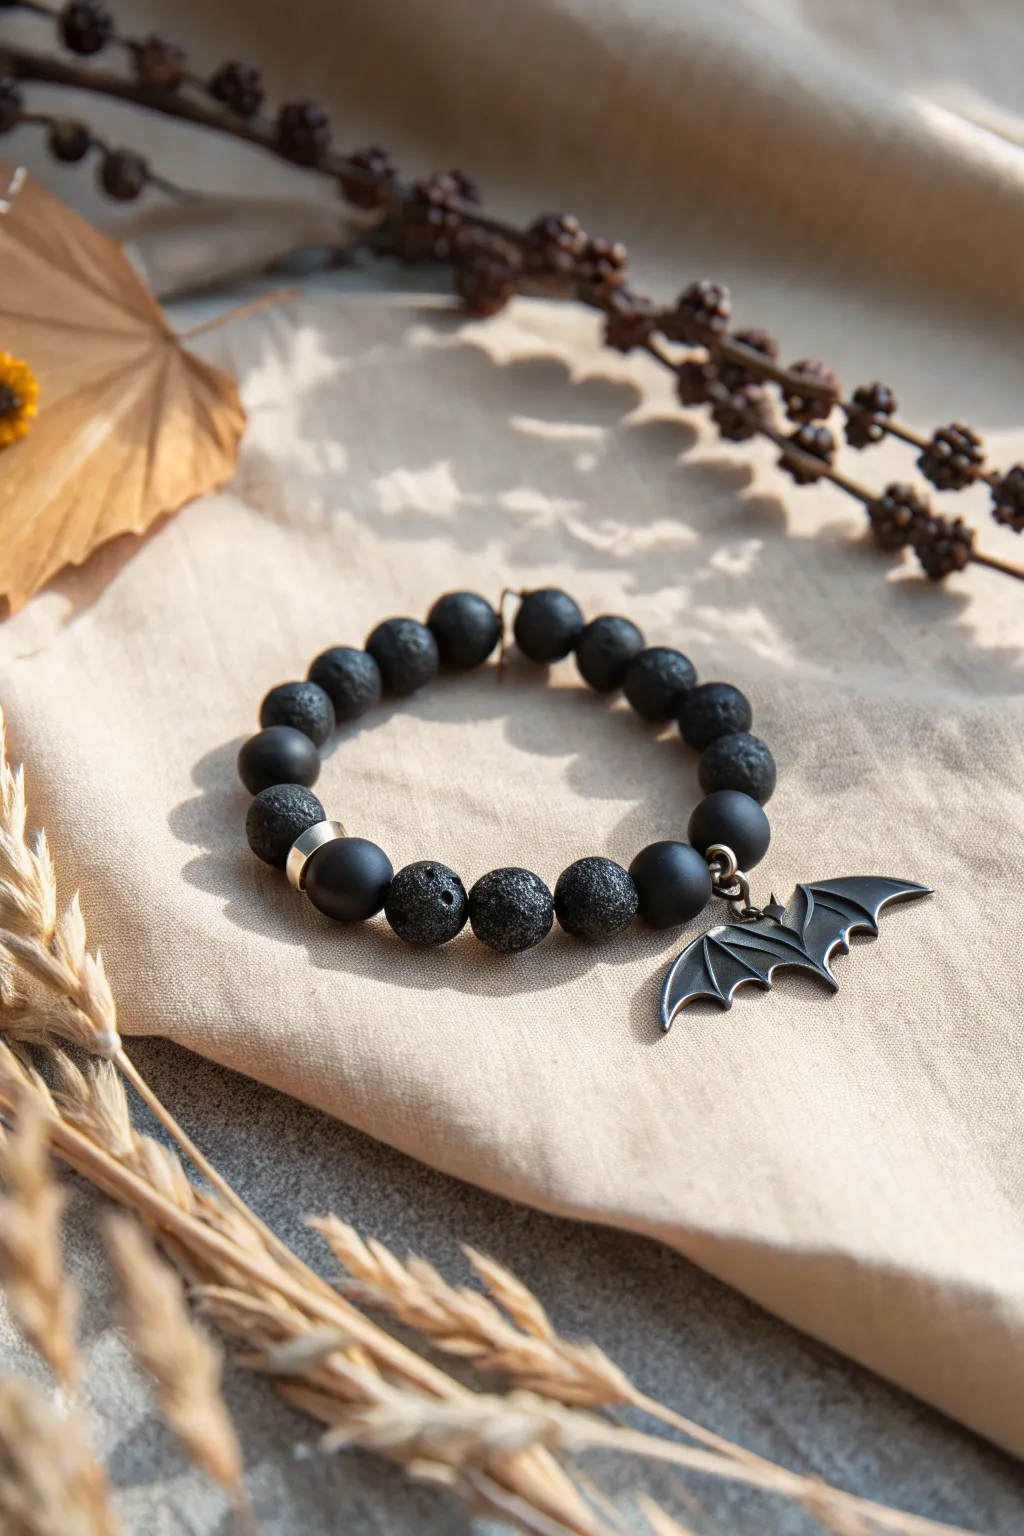
Embrace the spooky elegance of Halloween with this sophisticated black-on-black bracelet design. Combining matte black beads, textured glitter-effect accents, and a striking metal bat charm creates a piece that is subtle enough for daily wear but perfect for the haunting season.
Step-by-Step Guide
Materials
- Black polymer clay (matte finish)
- Black polymer clay with glitter or stone-effect texture
- Silver metal bat charm (with jump ring)
- Rondelle metal accent beads (silver, thin)
- Small silver jump ring (heavy gauge)
- Elastic beading cord (0.8mm or 1mm robust strength)
- Bead rolling tool (acrylic block or hands)
- Needle tool or toothpick
- Super glue or jewelry adhesive
- Scissors
Step 1: Crafting the Beads
-
Condition the clay:
Start by thoroughly conditioning your plain black polymer clay until it is soft and pliable. Do the same separately for your specialty textured or glitter-black clay. -
Portion the clay:
Pinch off equal-sized pieces of the plain black clay. I aim for chunks that will roll into beads roughly 8-10mm in diameter. -
Roll matte beads:
Roll these plain black pieces between your palms or using an acrylic block to create perfectly round spheres. -
Portion textured clay:
Repeat the portioning process with your textured or glittery clay, aiming for the same size as your matte beads. -
Roll textured beads:
Form these textured pieces into spheres. If using a lava-stone effect clay, gently press a coarse sponge against the surface to enhance the pitted look. -
Pierce the beads:
Using a needle tool or toothpick, carefully pierce a hole through the center of each bead. Twist the tool gently as you push through to avoid deforming the sphere. -
Bake the beads:
Arrange all your raw beads on a baking sheet or tile. Bake according to the specific temperature and time instructions on your brand of polymer clay package. -
Cool down:
Allow the beads to cool completely before handling them. This hardening phase is crucial for their durability.
Sticky Situation?
If the knot won’t slide into a bead, gently ream the hole of the hiding bead with a small drill bit or file to widen the opening slightly.
Step 2: Assembly Design
-
Cut the cord:
Cut a length of elastic cord about 10-12 inches long. This gives you plenty of slack for tying the final knot. -
Pre-stretch the elastic:
Give the elastic cord a few firm tugs. This pre-stretching helps prevent the bracelet from loosening up after you start wearing it. -
Plan the pattern:
Lay out your cooled beads on a designated board or towel. Create a repeating pattern, such as alternating two matte beads with one textured bead. -
Add metal accents:
Intersperse a thin silver rondelle bead occasionally within your pattern to break up the black silhouette. Placing one near where the charm will hang adds a nice focal point. -
String the beads:
Thread your beads onto the elastic cord following your planned layout. Use a bead stopper or simply tape down one end of the cord to stop beads from sliding off. -
Attach the charm:
Select the center point of your design. Slide on the silver bat charm using its attached loop or a sturdy jump ring, positioning it between two matte beads for contrast.
Make It Glow
Use glow-in-the-dark polymer clay for the ‘textured’ beads. Paint them black with a sponge so the glow only shows through the porous cracks.
Step 3: Finishing Touches
-
Check the fit:
Wrap the strung beads around your wrist to check the size. Add or remove beads as necessary for a comfortable fit. -
Tie the knot:
Tie the ends of the elastic together using a surgeon’s knot (loop the cord through twice before tightening). Pull tightly to secure it. -
Secure with glue:
Place a tiny drop of super glue or jewelry adhesive directly onto the knot. Wait a moment for it to become tacky. -
Hide the knot:
Trim the excess cord ends carefully. Gently tug on the bracelet to slide the knot inside the hole of the nearest bead to conceal it.
Now you have a darkly delightful accessory ready to compliment any spooky outfit
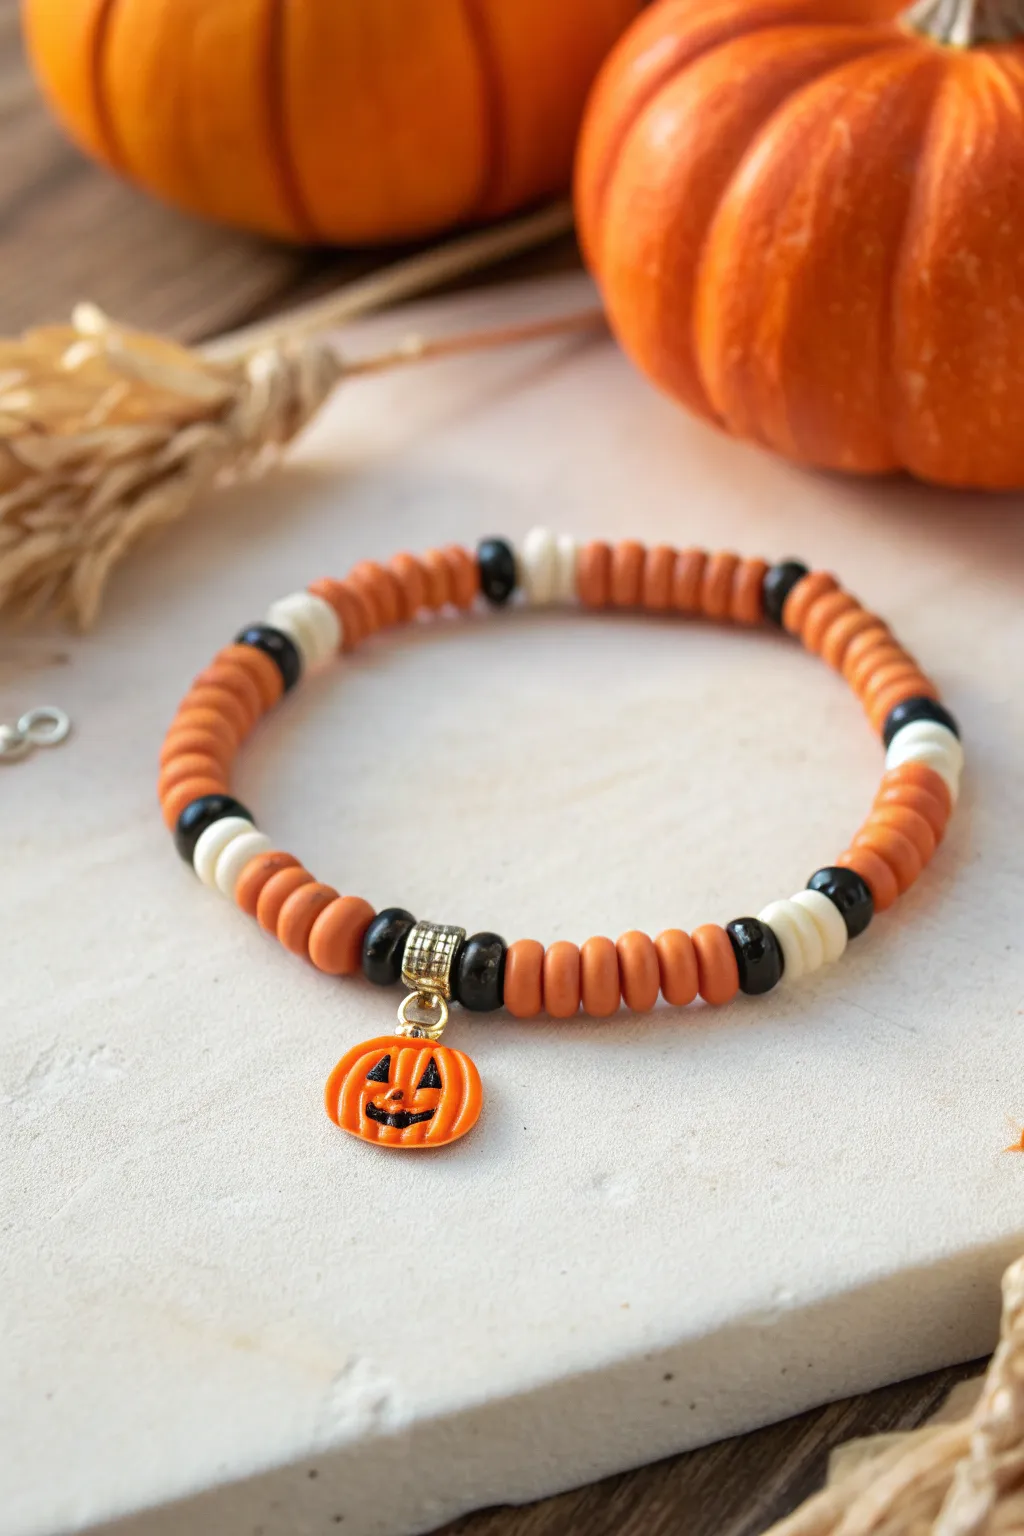
Jack-o’-Lantern Face Bead as a Centerpiece
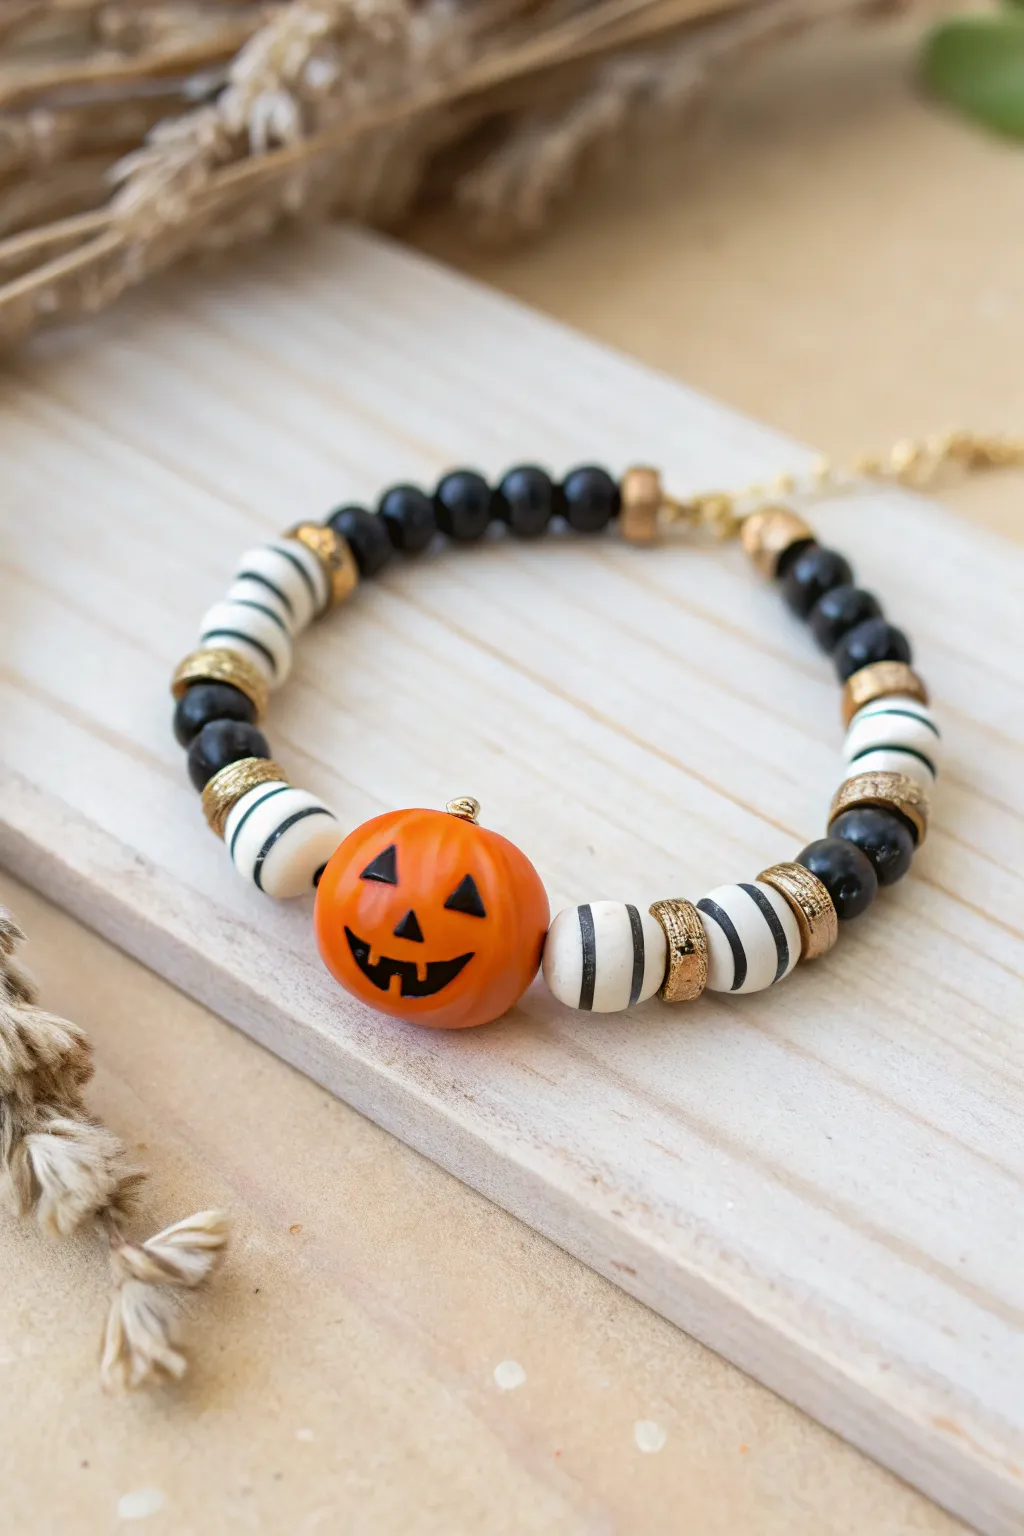
Embrace the spooky spirit with this striking bracelet centered around a cheerful, bright orange jack-o’-lantern bead. The design balances the bold pumpkin focal point with classic black beads and striped clay spacers, creating a stylish accessory perfect for Halloween festivities.
Step-by-Step Tutorial
Materials
- Orange jack-o’-lantern polymer clay bead (focal bead)
- Black round beads (approx. 6mm, matte or gemstone like onyx)
- White and black striped polymer clay tube beads (heishi style)
- Gold tone spacer beads (textured, rondelle shape)
- Elastic cord (0.8mm or 1mm)
- Jewelry adhesive (e.g., E6000 or Hypo Cement)
- Scissors
Step 1: Preparation
-
Measure your wrist:
Before cutting anything, wrap the elastic cord gently around your wrist to find a comfortable fit, then add an extra 3-4 inches to this measurement. This extra length ensures you have plenty of room for tying secure knots later. -
Cut the cord:
Cut your elastic cord according to the measurement you just took. Pre-stretching the cord by giving it a few gentle tugs helps prevent the bracelet from stretching out immediately after you finish it. -
Plan the layout:
Lay out your beads on a bead board or a soft towel. Start with the pumpkin bead in the center, then arrange the striped clay beads, gold spacers, and black rounds symmetrically on either side to visualize the final pattern.
Secure That Knot
For maximum durability, use a flexible jewelry glue like GS Hypo Cement. It has a pinpoint applicator that lets you get right inside the knot without gluing the beads together.
Step 2: Stringing the Centerpiece
-
Secure the end:
Place a piece of tape or a bead stopper on one end of your elastic cord so your beads don’t slide off while you work. -
Add the focal bead:
Thread the large orange jack-o’-lantern bead onto the cord first. Slide it down to the center of your working area, as we will build the design outwards from this main attraction. -
Add the first striped beads:
To the right of the pumpkin, slide on one white and black striped polymer clay bead. Repeat this step on the left side of the pumpkin to maintain symmetry.
Step 3: Building the Pattern
-
Place gold spacers:
Next to each striped bead you just added, threading a textured gold spacer bead. These gold accents add a touch of warmth and define the sections of the bracelet. -
Add secondary striped beads:
On both sides again, add another striped clay bead followed by another gold spacer. You should now have a pattern of [Striped-Gold-Striped-Gold] radiating from both sides of the pumpkin. -
Transition to black:
Now, add two round black beads to the right side of your pattern, followed by a gold spacer. Repeat this exactly on the left side. -
Create the striped accent section:
On the right side, add a striped bead, a gold spacer, and another striped bead. Mirror this arrangement on the left side. This breaks up the solid black sections beautifully. -
Final gold touch:
Place one gold spacer bead after the striped section on both the right and left ends of the cord.
Glow Up
Swap the solid white stripes for glow-in-the-dark clay beads. When the lights go out for trick-or-treating, the striped sections will glow alongside the pumpkin face.
Step 4: Completing the Band
-
Fill with black beads:
Continue stringing the round black beads onto both ends of the cord until the bracelet reaches your desired length. Check the fit periodically by wrapping it around your wrist. -
Final check:
Ensure both ends end with black beads so the pattern looks seamless when tied together. If one side has more beads, adjust them now so the pumpkin stays perfectly centered. -
Tie the first knot:
Remove the tape or bead stopper. Bring the two ends of the elastic together and tie a simple overhand knot to bring the beads into a circle. -
Secure with a surgeon’s knot:
Tie a surgeon’s knot for extra security. Loop the elastic through twice before pulling it tight. Pull firmly on all four strands (the two tails and the bracelet loop) to cinch the knot down. -
Add adhesive:
Apply a tiny dot of jewelry adhesive directly onto the knot. I find a toothpick works best for applying just the right amount without making a mess. -
Hide the knot:
While the glue is still slightly tacky, gently slide a nearby bead (preferably one of the black rounds with a larger hole) over the knot to conceal it. -
Trim the excess:
Once the glue has fully dried (check your glue’s instructions for timing), trim the excess elastic tails with sharp scissors, being careful not to nick the main knot.
Wear your new festive accessory with pride or stack it with other gold bracelets for a complete seasonal look
Skull and Bone Bead Mix for a Spooky-Neutral Look
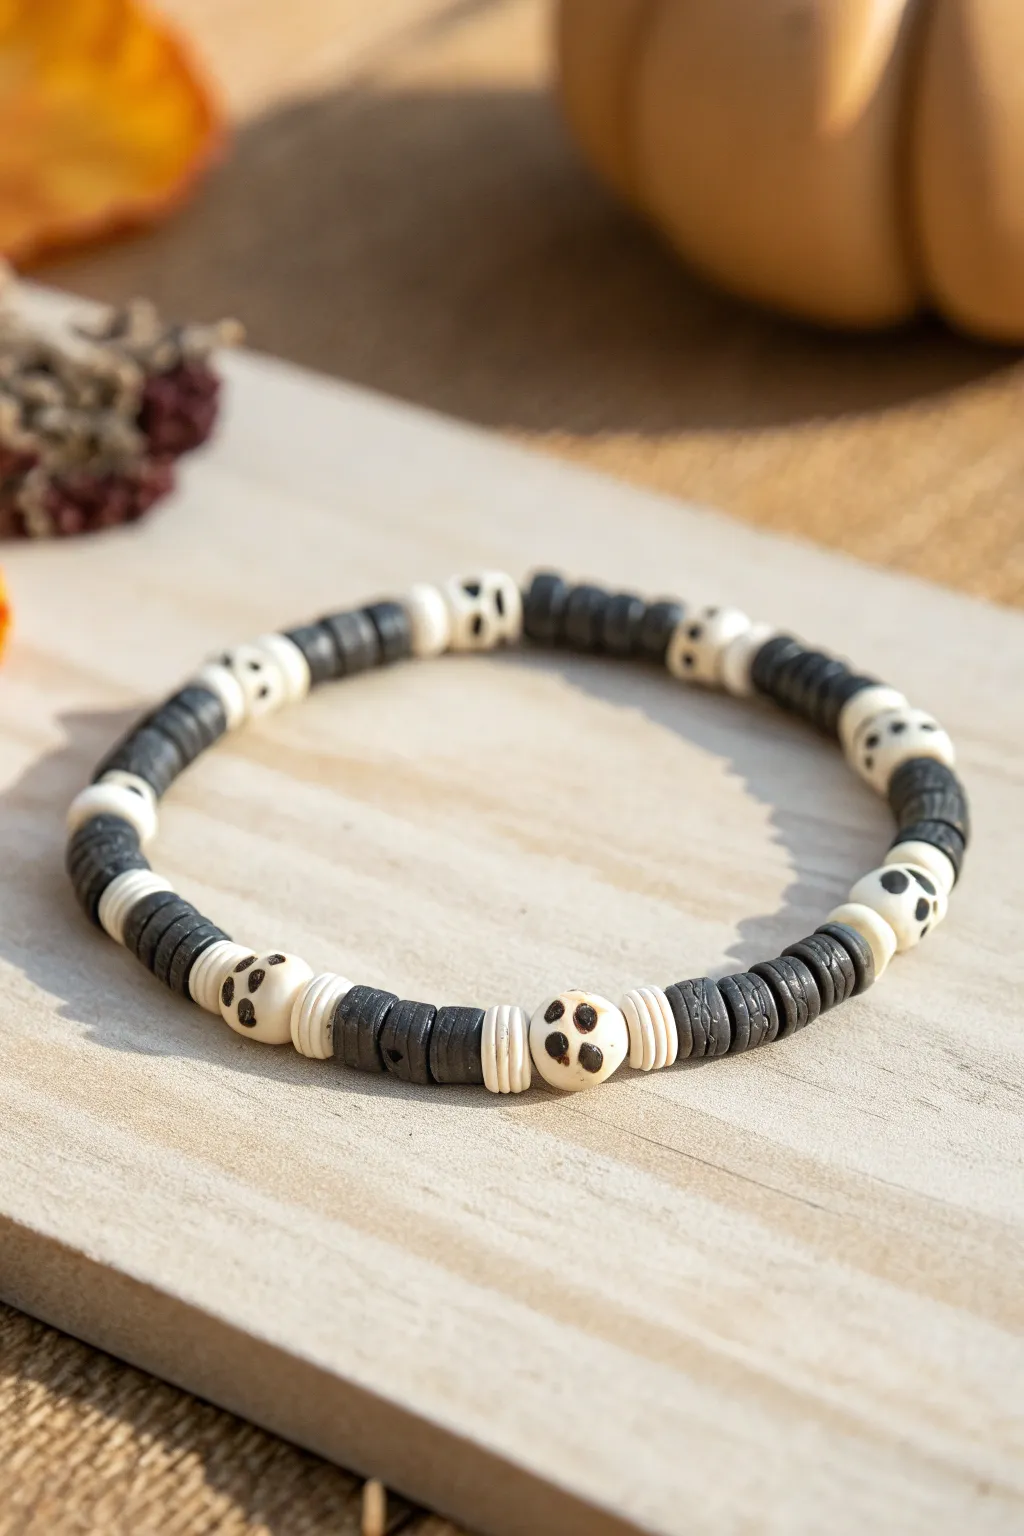
For a Halloween look that leans more sophisticated than screaming, this understated design pairs classic black heishi discs with carved bone-style skull beads. It creates a spooky-neutral accessory perfect for stacking or wearing alone as a subtle seasonal nod.
Detailed Instructions
Materials
- Black polymer clay heishi beads (approx. 5-6mm)
- White or cream polymer clay heishi beads (narrow spacers, approx. 3-4mm)
- Carved bone or imitation bone skull beads (cream with dark inlay)
- Strong elastic beading cord (0.8mm recommended)
- Super glue or jewelry adhesive
- Scissors
- Bead stopper or decorative tape
- Ruler or measuring tape
Step 1: Planning and Prep
-
Measure your wrist:
Wrap a flexible measuring tape around your wrist bone to find your exact size. Add about half an inch to this measurement to ensure the bracelet fits comfortably without pinching. -
Prepare the elastic:
Cut a length of elastic cord about 10-12 inches long. This might seem excessive, but I always find having extra tail makes the final knot-tying process significantly less stressful. -
Secure the end:
Attach a bead stopper or a piece of tape to one end of your cut elastic to prevent your hard work from sliding off while you design.
Knot Security
When hiding the knot, try to slide it inside one of the skull beads rather than the heishi discs. The larger hole of the skull bead accommodates the bulk of a knot much better.
Step 2: Creating the Pattern
-
Start with the black foundation:
Thread on 5 to 7 black heishi beads. The exact number can vary slightly depending on your wrist size, but aim for a segment length of about 1/4 inch. -
Add the spacers:
Slide on three of the thinner white/cream heishi spacer beads. These act as a bright frame for the main feature bead. -
Place the feature bead:
Thread one of the skull beads onto the cord. Ensure the face is oriented correctly if the bead has a specific top and bottom. -
Close the frame:
Add three more white heishi spacer beads immediately after the skull bead to complete the highlighted section. -
Repeat the sequence:
Go back to the black beads. Thread another group of 5-7 black heishi discs. Try to keep this count consistent with your first group for a symmetrical look. -
Continue building:
Repeat the full pattern: black segment, 3 white spacers, skull bead, 3 white spacers. Continue until you reach your target bracelet length. -
Check the fit:
Wrap the unfinished strand around your wrist to check the length. You want the pattern to end just before the two ends meet. -
Final adjustment:
If there’s a gap, add a few more black heishi beads to either end so the pattern flows seamlessly when closed.
Level Up: Texture Play
Swap the plain black heishi beads for black lava stone beads to add a porous, organic texture that enhances the ‘bone and earth’ vibe and can hold essential oils.
Step 3: Finishing Touches
-
Pre-stretch the cord:
Gently pull on both ends of the elastic cord a few times. This pre-stretching prevents the bracelet from becoming loose after the first time you wear it. -
Tie the knot:
Remove the bead stopper and tie a surgeon’s knot (cross right over left and loop under twice, then left over right and loop under once). Pull it tight. -
Secure with glue:
Place a tiny drop of super glue or jewelry adhesive directly onto the knot. Let this dry completely before moving it. -
Hide the knot:
Trim the excess elastic cord close to the knot, then gently slide an adjacent bead over the knot to conceal it inside the hole.
Enjoy wearing your subtly spooky creation throughout the autumn season
“SPOOKY” Pastel Halloween Bracelet

Move away from the traditional orange and black with this soft, playful take on Halloween jewelry. This charming bracelet combines mint green, lavender, and peach tones with gold accents for a sweet, not scary, accessory.
How-To Guide
Materials
- Elastic cord (0.7mm or 0.8mm clear stretch cord)
- 6mm round clay or acrylic beads in pastel peach/coral
- 6mm round clay or acrylic beads in pastel lavender/purple
- 6mm round clay or acrylic beads in pastel mint green
- 4mm gold spherical spacer beads
- Square white alphabet beads with black lettering (S-P-O-O-K-Y)
- Small dab of jewelry glue or clear nail polish
- Scissors
Step 1: Planning and Prep
-
Measure the Cord:
Cut a piece of elastic cord about 10-12 inches long. This gives you plenty of extra room to tie knots later without struggling. -
Pre-stretch the Elastic:
Hold both ends of the cord and give it a few firm tugs. This helps prevent the bracelet from stretching out immediately after you wear it. -
Secure the End:
Place a piece of tape or a bead stopper on one end of the cord so your beads don’t slide right off while you work. -
Sort the Letters:
Locate your letter beads to spell ‘SPOOKY’ and set them aside in order so they are ready to grab.
Knot Slipping?
If your knot slips while tying, try keeping tension on the strands or ask a friend to hold a finger on the first knot while you tie the second.
Step 2: Stringing the Left Side
-
Start with Mint:
Begin by stringing 3 of the pastel mint green beads onto the cord. -
Add a Gold Accent:
Slide on one gold spherical spacer bead next to the mint beads. -
Start the Peach Section:
Add 3 pastel peach/coral beads. -
Transition to Purple:
Add 5 pastel lavender beads. This section sits near the back of the wrist, so it can be a bit longer if you need a larger size. -
Another Gold Touch:
Place a second gold spacer bead onto the cord.
Glow Up
Swap the white alphabet beads for glow-in-the-dark letter beads to make the bracelet truly shine during trick-or-treating.
Step 3: Creating the Centerpiece
-
Add More Color:
Add 4 pastel peach/coral beads. These will sit directly next to the word. -
String the Word:
Thread on your alphabet beads in order: S – P – O – O – K – Y. Double-check that they are all facing the correct direction. -
Balance the Color:
Immediately following the ‘Y’, add 3 pastel mint green beads. -
Final Gold Accent:
Add your last gold spacer bead. -
Close the Loop:
Finish the strand with 2 or 3 more pastel mint beads to connect back to the start. Adjust bead counts here to fit your specific wrist size perfectly.
Step 4: Finishing Touches
-
Tie the Knot:
Remove the tape or bead stopper. Bring the two ends together and tie a standard overhand knot, pulling it tight to minimize gaps between beads. -
Secure with a Surgeon’s Knot:
For extra security, tie a surgeon’s knot. This is just like a regular knot, but you loop the cord through twice before pulling tight. -
Glue the Knot:
I always like to add a tiny dab of jewelry glue or clear nail polish right onto the knot to keep it fused permanently. -
Hide the Knot:
While the glue is tacky, gently pull the knot inside one of the adjacent beads (the hole of a letter bead or one of the color beads usually works best). -
Trim Excess:
Once dry, carefully trim the excess cord ends close to the bead, being careful not to cut your main knot.
Enjoy wearing your sweetly spooky creation all October long
Monochrome Orange Bracelet With Tiny Black Pops
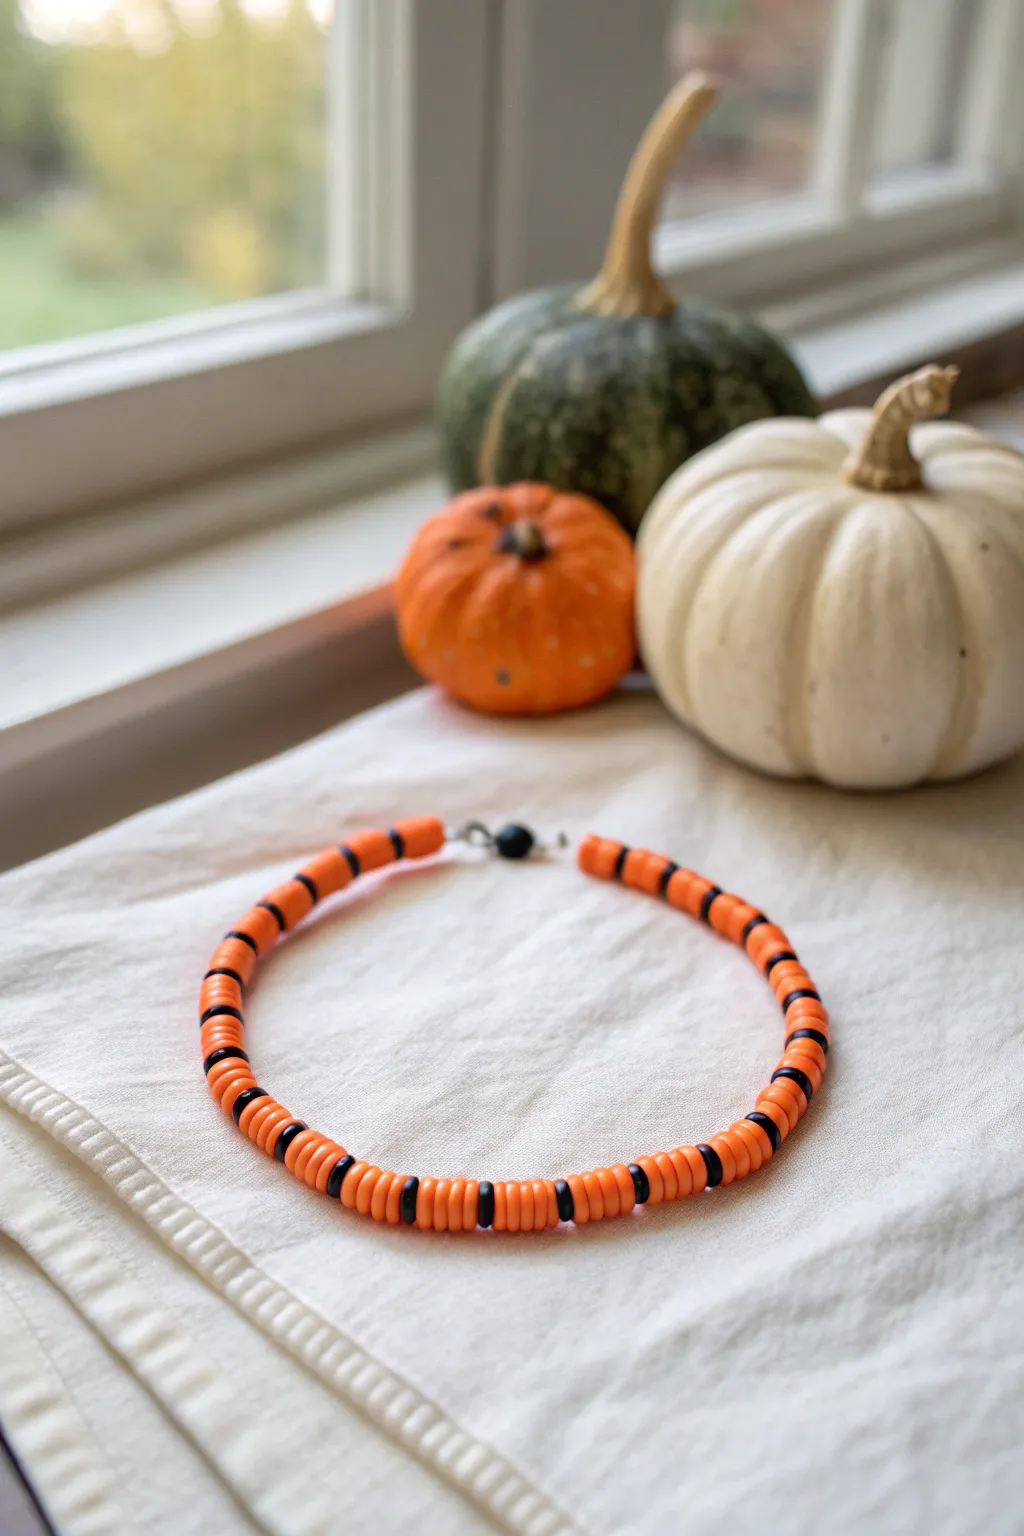
Embrace the understated side of Halloween style with this sophisticated heishi bead necklace. The design focuses on rich, monochrome orange tones broken up by delicate black accents, creating a versatile accessory perfect for the entire autumn season.
Step-by-Step Tutorial
Materials
- Orange polymer clay heishi beads (approx. 6mm)
- Black polymer clay heishi beads (approx. 6mm)
- Elastic beading cord (0.8mm clear)
- Black crimp bead or knot cover (optional)
- Silver tone jewelry clasp (lobster claw or spring ring)
- Jump rings
- Jewelry pliers (round nose/flat nose)
- Scissors or wire cutters
- Measuring tape
- Bead stopper or masking tape
Step 1: Preparation & Planning
-
Measure your fit:
Begin by measuring your neck or wrist, depending on whether you want a choker or a bracelet; for the necklace shown, aim for about 16-18 inches. -
Prepare the cord:
Cut a length of elastic cord about 4-5 inches longer than your desired finished length to allow ample room for knotting. -
Secure the end:
Place a bead stopper or a piece of masking tape on one end of the cord so your beads don’t slide off while you work. -
Establish the pattern:
The pattern here is simple but effective: create long segments of orange interrupted by single black beads. I find laying out a small section first helps visualize the spacing.
Gaps in the Strand?
If you see cord showing between beads, your elastic is too tight or the knot is too bulky. Restring slightly looser and use a crimp cover to hide the knot cleanly.
Step 2: Stringing the Beads
-
Start with orange:
Thread on your first section of orange heishi beads. To replicate the photo, aim for a block of about 5 or 6 orange discs. -
Add the accent:
Slide on a single black heishi bead. This sharp contrast is the key to the graphic look. -
Repeat the block:
Add another block of 5 or 6 orange beads. Keep your count consistent if you want a uniform look, or vary it slightly for an organic feel. -
Check the tension:
As you string, occasionally push the beads down gently to ensure they sit flush against each other, but don’t pull so tight that the cord stretches out. -
Continue the pattern:
Repeat the ‘orange block, single black bead’ sequence until you are within an inch of your desired finished length. -
Ending the strand:
Finish your stringing with a final block of orange beads to maintain symmetry with the starting end.
Jack-o’-Lantern Vibe
Swap the single black spacer bead for a tiny gold star or a green bead every third rotation to hint at pumpkin stems or starry Halloween nights.
Step 3: Finishing Touches
-
Prepare for closure:
Remove the bead stopper or tape, being careful not to let the strand slip. -
Tie the knot:
Tie a sturdy surgeon’s knot (right over left, left over right) to secure the loop. Pull it tight. -
Add security:
For extra durability, you can add a drop of jewelry glue or clear nail polish to the knot and let it dry. -
Hide the knot:
If using a crimp cover or a large-hole bead, slide it over the knot now to conceal it. -
Attach hardware:
Open a jump ring with your pliers and loop it through the cord end (or crimp loop if you used crimp beads). -
Add the clasp:
Slide the lobster claw clasp onto the jump ring before closing the ring securely with your pliers. -
Finish the other side:
Repeat the jump ring process on the other end of the necklace to create the receiving ring for the latch. -
Trim excess:
Carefully trim any remaining tails of the elastic cord, ensuring you don’t snip too close to the knot if it isn’t glued.
You now have a chic, minimalist piece of autumn jewelry ready to wear
Glow-In-The-Dark Bead Mix for Nighttime Halloween
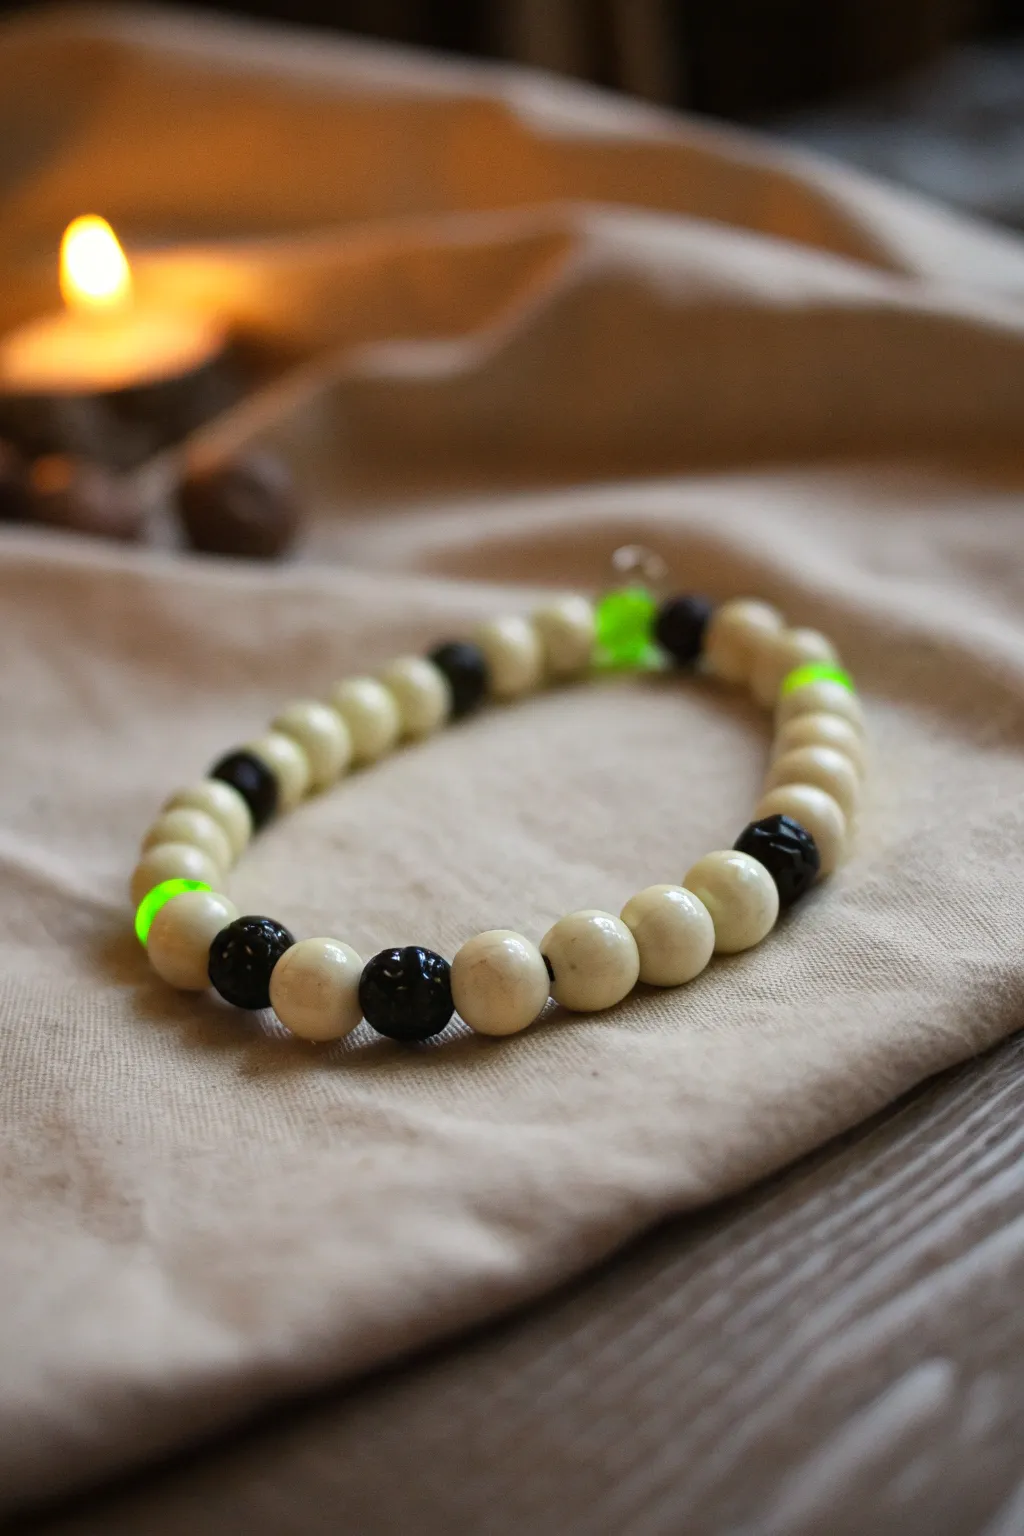
Channel the spooky spirit of Halloween nights with this simple yet striking beaded bracelet that features a rhythmic pattern of cream, black, and special glow-in-the-dark accents. The contrast between the matte black lava-style beads and the smooth cream ones creates a sophisticated look that turns playful when the lights go out.
Detailed Instructions
Materials
- Cream/off-white round wooden or acrylic beads (approx. 8-10mm)
- Black textured lava rock beads or pitted wooden beads (approx. 8-10mm)
- Neon green glow-in-the-dark acrylic beads (approx. 8-10mm)
- Clear elastic stretch cord (0.8mm or 1mm thickness)
- Jewelry adhesive or clear super glue
- Scissors
- Bead stopper or tape
- Ruler or measuring tape
Step 1: Preparation & Planning
-
Measure your wrist:
Wrap a measuring tape loosely around your wrist to find your size. Add about half an inch to this measurement to ensure the bracelet fits comfortably without pinching. -
Cut the cord:
Cut a piece of elastic cord about 10-12 inches long. Having this extra length makes tying the final knot much easier than struggling with short ends. -
Pre-stretch the elastic:
Give your cut piece of elastic a few gentle tugs. This is a crucial step that prevents the bracelet from loosening up and sagging after you wear it a few times. -
Secure the end:
Place a bead stopper or a piece of tape on one end of the cord to stop your beads from sliding off while you design your pattern.
Super Charge Tip
To visualize the final look while stringing, lay your pattern out on a bead board or towel first. Charge the neon beads under a UV flashlight to test their brightness before knotting.
Step 2: Creating the Pattern
-
Start with the base sequence:
Begin threading your beads. The primary pattern seen here relies on small groups of cream beads separated by single black beads. Thread two cream beads followed by one black textured bead. -
Continue the rhythm:
Repeat that sequence—two cream, one black—a few times. I find that keeping the darker beads spaced out helps them stand out more clearly. -
Insert the glow accent:
Now, introduce the ‘spooky’ element. Instead of a black bead, slide on one neon green glow-in-the-dark bead after a set of cream ones. -
Vary the spacing:
Look closely at the design; sometimes there are three cream beads between colors, sometimes two. Add a sequence of three cream beads, then a black bead, then two cream beads. -
Place the second glow bead:
Add your second neon green bead. Try to position it roughly opposite the first one, or at least a third of the way around the loop, to balance the glowing effect. -
Check the fit:
Wrap the unfinished strand around your wrist. The ends should touch comfortably. If it’s too short, continue the cream-and-black pattern until you reach the desired length.
Step 3: Finishing Touches
-
Prepare to tie:
Remove the bead stopper or tape carefully, holding both ends of the elastic firmly so no beads escape. -
Tie the first knot:
Cross the right strand over the left and pull tight to create a simple overhand knot. Pull it snug against the beads to remove any slack. -
Secure with a surgeon’s knot:
For the second knot, loop the elastic through twice before pulling tight. This extra loop creates friction that holds the elastic much better than a standard square knot. -
Apply adhesive:
Place a tiny drop of jewelry glue or super glue directly onto the knot. You don’t need much; just enough to fuse the elastic strands together. -
Hide the knot:
While the glue is still slightly tacky, pull the elastic so the knot slides inside the hole of the nearest large bead. This creates a seamless, professional finish. -
Trim the excess:
Once the glue has fully dried (check your glue’s instructions for timing), use your scissors to snip off the remaining tail ends close to the bead hole.
Variant Upgrade
Swap the plain cream beads for bone-shaped spacer beads or use skull-shaped Howlite beads instead of the round ones for an extra literal skeletal Halloween theme.
Wear your new bracelet alone or stack it with others for a glowing wrist stack that lights up the night
Mini Charm Cluster: Ghost, Bat, and Pumpkin Together
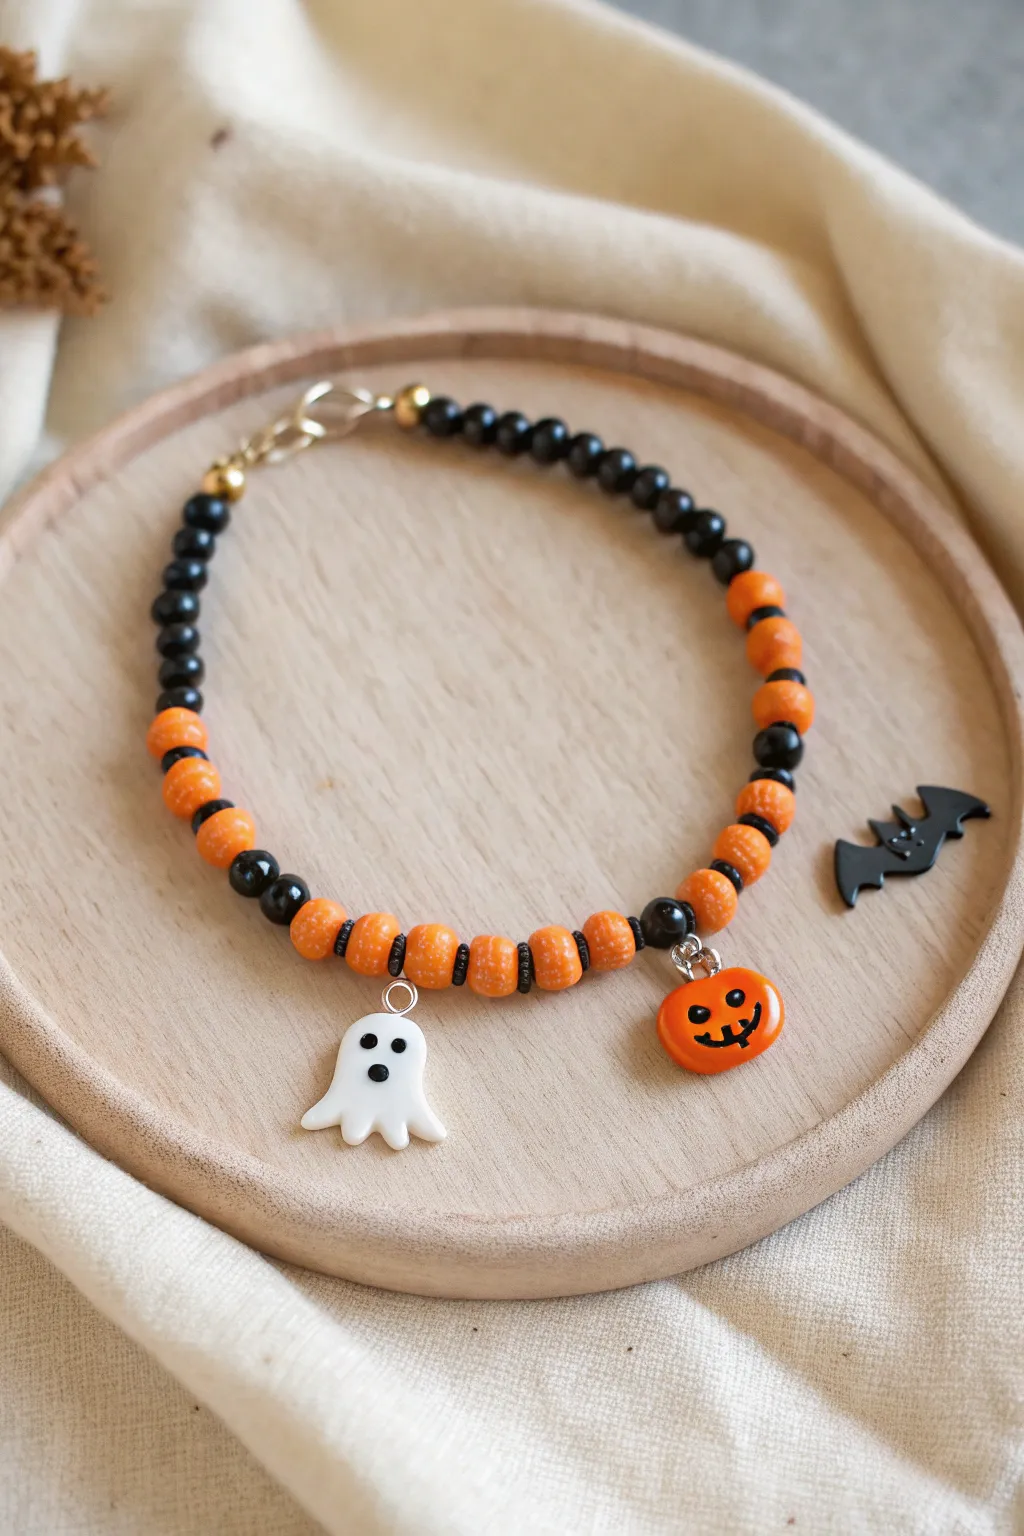
This adorable Halloween bracelet combines classic orange and black tones with a delightful pair of mismatched charms. By alternating textures and adding playful ghost and pumpkin accents, you’ll create a festive accessory perfect for trick-or-treating season.
Step-by-Step Tutorial
Materials
- 6mm black round glass beads
- 6mm-8mm orange textured clay or acrylic beads (sugar-coated or stardust finish)
- Small black seed beads (size 11/0 or 15/0)
- White ghost charm with silver jump ring
- Orange pumpkin charm with silver jump ring
- Flexible beading wire (e.g., 0.38mm)
- 2 crimp beads (gold or silver)
- 2 crimp bead covers (gold)
- Lobster clasp and jump ring for closure
- Wire cutters
- Chain nose pliers
- Crimping pliers
Step 1: Planning and Preparation
-
Measure your wrist:
Wrap a measuring tape loosely around your wrist to determine the desired length. Add about 1 inch to this measurement to account for the bulk of the beads. -
Cut the wire:
Cut a length of beading wire approximately 4 inches longer than your final bracelet size. This extra length gives you plenty of room to work with the clasps comfortably. -
Secure one end:
String a crimp bead onto one end of the wire, followed by a jump ring (which will attach to your clasp later). Loop the wire back through the crimp bead. -
Crimp and cover:
Use your crimping pliers to flatten the crimp bead securely. Place a gold crimp cover over the flattened crimp and gently close it with pliers to make it look like a round gold bead.
Uneven Charm Hanging?
If charms twist or won’t lay flat, add two tiny seed beads on either side of the charm’s jump ring. This acts as a buffer and helps the charm face forward properly.
Step 2: Creating the Bead Pattern
-
Start the black section:
Begin by stringing approximately 18-20 of the smooth black round beads. This section will sit at the back of the wrist, opposite the charms. -
Transition to color:
After the solid black section, add one textured orange bead, followed by one black bead. -
Establish the pattern:
Start your main alternating pattern: one textured orange bead, then one small black seed bead. Repeat this sequence. -
Continue the pattern:
Keep adding orange beads separated by seed beads until you have about 5 or 6 orange beads in this specific run. -
Insert the spacing bead:
Add one larger round black bead to act as a spacer before the charm section begins.
Step 3: Adding the Charms
-
The central cluster:
String a sequence of approximately 5 textured orange beads, separating each one with a small black seed bead to mimic the texture of pumpkin vines. -
Attach the ghost:
Locate the second or third orange bead in this central group. Slide the jump ring of your ghost charm directly onto the wire so it hangs between an orange bead and a seed bead. -
Continue the center:
String two more orange beads (with seed bead spacers) to create distance between the charms. -
Attach the pumpkin:
Slide the pumpkin charm onto the wire now. I usually like to spacing them about an inch apart so they don’t clink together constantly. -
Finish the central pattern:
Add one or two final orange beads with seed bead spacers to complete the focal section.
Pro Tip: Texture Mix
The charm of this piece comes from mixing matte or ‘sugar’ texture orange beads with glossy black glass. Avoid using all glossy beads to keep that tactile contrast.
Step 4: Finishing the Design
-
Mirror the transition:
Add one large round black bead, followed by a short sequence of orange beads separated by black beads to mirror the other side. -
Complete with black:
Finish the strand with smooth black round beads until the bracelet reaches your desired total length. -
Check the fit:
Wrap the unfinished strand around your wrist to ensure the charms sit centered on top and the length is comfortable. -
Add final crimp:
String a crimp bead and your lobster clasp onto the end of the wire. -
Secure the closure:
Thread the wire back through the crimp bead and pull tight, leaving just a tiny bit of slack so the bracelet moves fluidly. Flatten the crimp bead. -
Apply crimp cover:
Place the second gold crimp cover over the crimp bead and close it gently. Trim any excess wire close to the bead.
Now your wrist is ready to celebrate the season with a perfect balance of spooky and sweet style
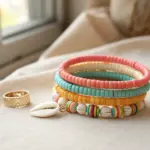
Mismatch “Arm Party” Set With One Theme Per Bracelet
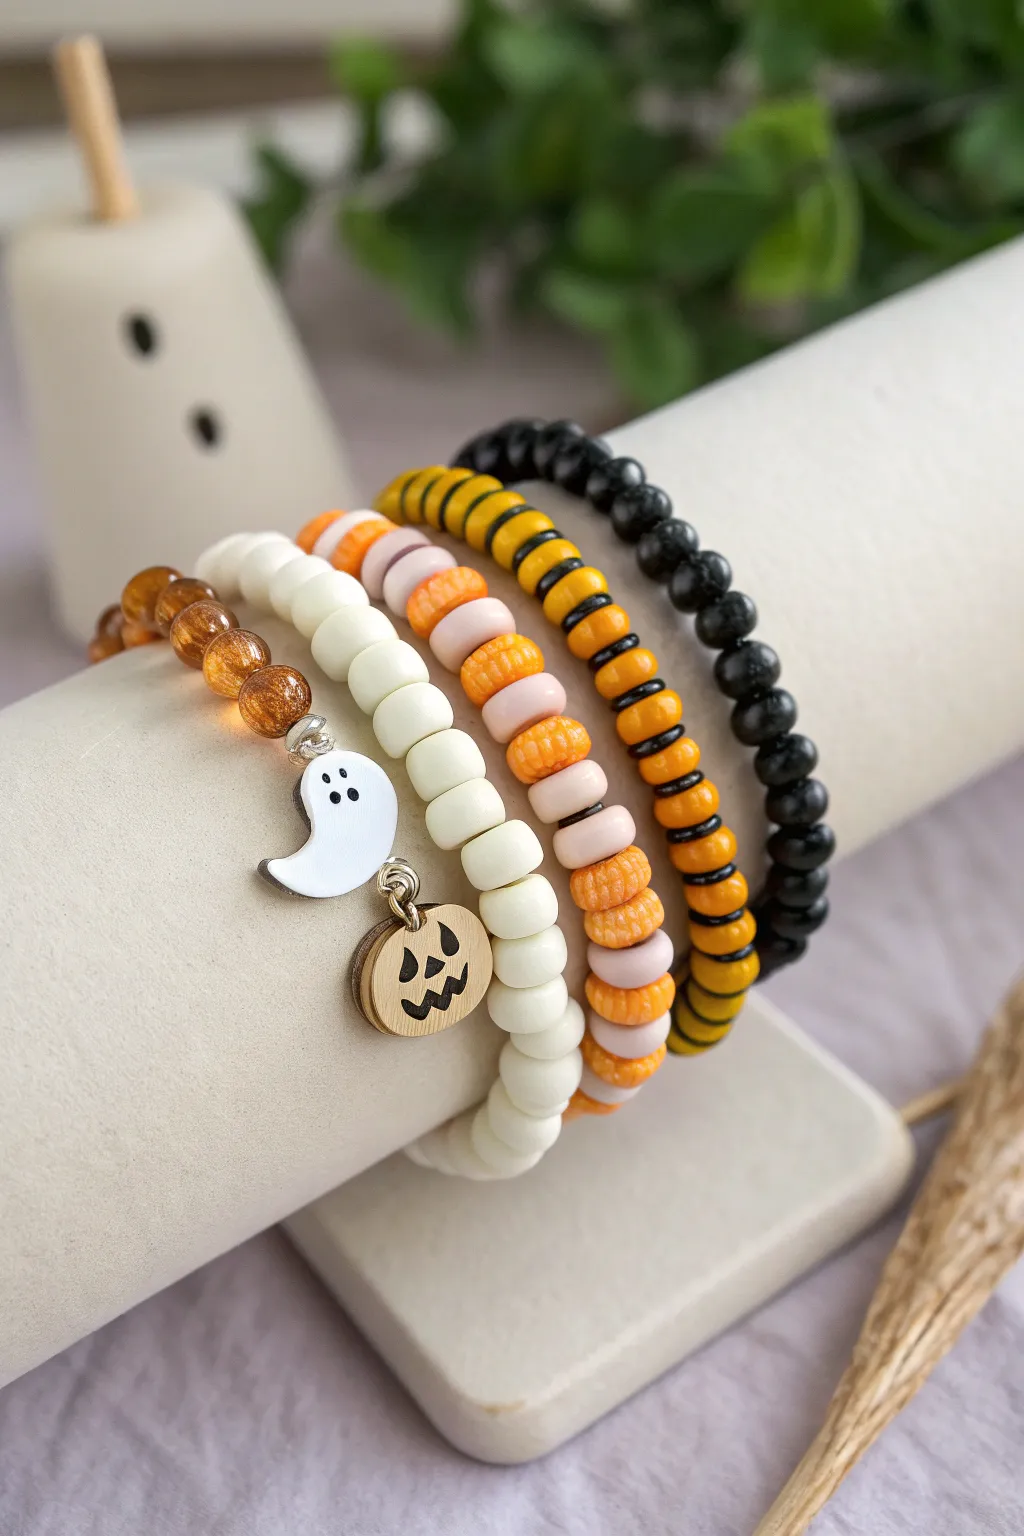
Embrace the chaotic fun of an ‘arm party’ with this mismatched set of five distinct Halloween-themed bracelets. Ranging from classic pumpkins and ghosts to abstract candy corn stripes, this stack combines varying textures like glass, wood, and polymer clay for a sophisticated yet festive look.
Detailed Instructions
Materials
- Elastic stretch cord (0.7mm or 0.8mm)
- Amber/brown crackle glass beads (8mm)
- White polymer clay heishi beads (6mm)
- Orange polymer clay heishi beads (textured/ribbed)
- Pale pink or lavender matte heishi beads
- Yellow polymer clay heishi beads
- Black thin spacer discs
- Black wooden round beads (8mm)
- Gold pumpkin charm
- White enamel ghost charm
- Jump rings (gold or silver tone)
- Jewelry glue (e.g., E6000 or Hypo Cement)
- Scissors
Step 1: The Charm Bracelet
-
Measure and Cut:
Cut a piece of elastic cord about 10-12 inches long. This gives you plenty of slack for tying knots later without losing your beads. -
String Glass Beads:
Thread your amber crackle glass beads onto the cord until you have filled about half the length needed for your wrist. -
Attach Charms:
Using pliers, open two jump rings. Attach the white ghost charm to one and the gold pumpkin charm to the other. Slide these jump rings directly onto the elastic cord, placing them in the center of your bead strand. -
Finish Beading:
Continue adding the amber glass beads until the bracelet reaches your desired wrist size, typically about 6.5 to 7 inches for an average adult. -
Secure the Knot:
Tie a secure surgeon’s knot (right over left, left over right, loop through twice). Add a tiny dab of jewelry glue to the knot, pull it tight, let it dry, and trim the excess cord.
Step 2: The Solid & Striped Clay Layers
-
Create the Ghostly White Layer:
For the second bracelet, simply string the solid white heishi beads continuously. I find spinning the beads in your hand helps find the hole faster. Tie off and glue as before. -
Pattern the ‘Candy’ Strand:
For the third bracelet, create an alternating pattern. Thread three ribbed orange heishi beads followed by three pale pink/lavender matte beads. Repeat this ABA pattern for the entire length. -
Assemble the Bumblebee Stripe:
Start the fourth bracelet using yellow heishi beads. Between every three to four yellow beads, insert a single thin black spacer disc to create a distinct striped effect reminiscent of a bee or hazard tape.
Knot Hiding Trick
If the bead hole allows, gently tug the elastic so the glued knot slips inside a bead. This hides the mechanics and gives a seamless professional finish.
Step 3: The Midnight Wooden Strand
-
String the Black Beads:
For the final, darkest element, use the 8mm black wooden beads. Their larger size and matte texture add weight to the stack. -
Final Assembly:
Tie off the black bracelet securely. Once the glue on all knots is fully cured (usually 24 hours for full strength), stack them together on your wrist or a display stand to admire your spooky handiwork.
Stretching Issues?
Pre-stretch your elastic cord before beading! pulling it firmly a few times prevents the finished bracelet from sagging or loosening after the first wear.
Now you have a perfectly coordinated yet eclectic set of wrist candy ready for trick-or-treating or a spooky party