Halloween bracelets are my favorite kind of clay jewelry because you can go bold and spooky or sweet and subtle with just a few color tweaks. Here are some Halloween clay bracelet ideas I’d absolutely make in my studio when we want quick wins with major festive vibes.
Classic Orange, Black, and White Stripes
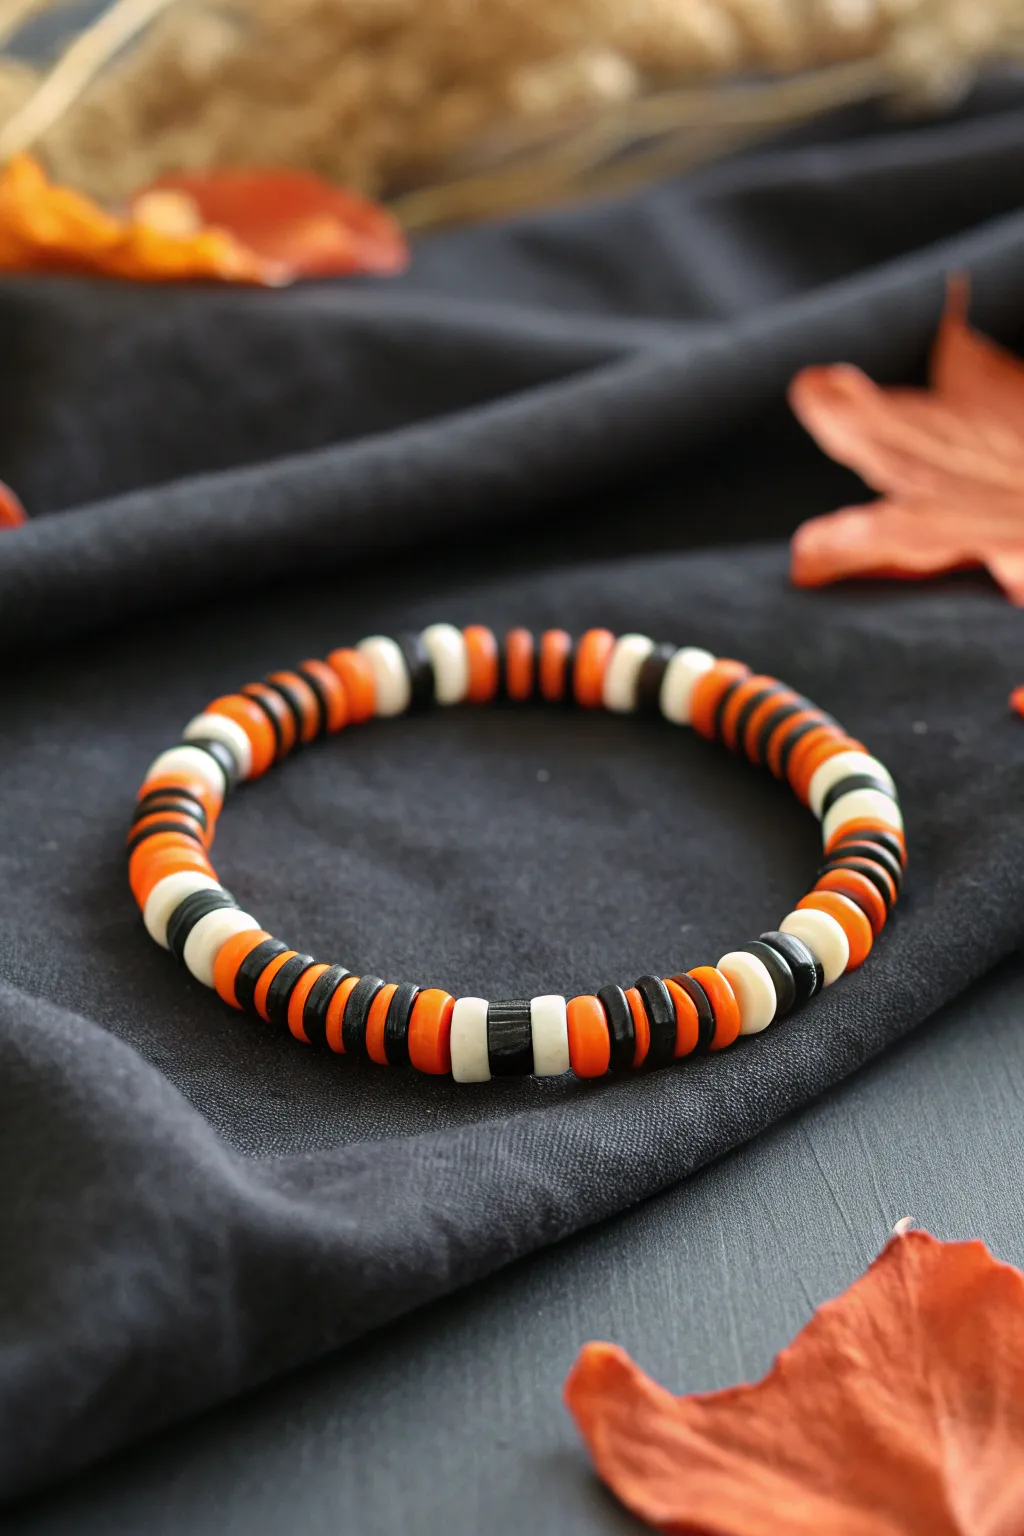
Embrace the quintessence of Halloween style with this bold and graphic heishi bead bracelet. Featuring a timeless repeating pattern of orange, black, and white clay discs, this accessory adds a festive pop to any autumn outfit without being overly flashy.
Step-by-Step
Materials
- 6mm Polymer clay heishi beads (Orange)
- 6mm Polymer clay heishi beads (Black)
- 6mm Polymer clay heishi beads (White)
- 0.8mm clear elastic stretch cord
- Jewelry glue or clear nail polish
- Scenic scissors
- Measuring tape
- Bead stopper or binder clip
- Beading needle (optional, for easier threading)
Step 1: Preparation
-
Measure your wrist:
Wrap the measuring tape comfortably around your wrist to find your size. Add about half an inch to this measurement to ensure the finished bracelet fits comfortably without pinching. -
Cut the cord:
Cut a length of elastic cord about 10-12 inches long. Having this extra length makes it much easier to tie the final knot securely later on. -
Pre-stretch the elastic:
Hold the cord ends and give them a few firm tugs. This pre-stretching step helps prevent the bracelet from sagging or loosening immediately after you wear it. -
Secure the end:
Attach a bead stopper or a binder clip to one end of the cord so your beads don’t slide right off while you work.
Clean Cuts Only
When trimming the excess elastic, pull the cord slightly taut before snipping. This snaps the end back inside the bead hole for an invisible finish.
Step 2: Creating the Pattern
-
Start the sequence:
Begin threading your beads. The core unit of this pattern relies on blocks of color rather than single beads. Start with a block of orange. -
Build the orange block:
Thread approximately 3 to 4 orange heishi beads onto the cord. Keep them snug against each other. -
Add the contrast:
Next, thread on 3 black beads. This creates a bold, dark stripe that defines the Halloween look. -
Add the highlight:
Thread on 2 to 3 white beads. The white section acts as a bright highlight to separate the heavier orange and black colors. -
Create variation:
Thread another small group of 3 black beads. This creates a symmetrical frame around the white section before returning to orange. -
Repeat the pattern:
Continue repeating this sequence: Orange Block -> Black Block -> White Block -> Black Block. I find it helpful to lay the pattern out on a board first to check the visual flow. -
Check the length:
Periodically wrap the beaded cord around your wrist to check the fit. Continue adding full pattern sequences until you reach your desired length.
Step 3: Finishing Touches
-
Check for gaps:
Push all beads together gently to ensure there are no gaps, but don’t pull so tight that the bracelet buckles or stiffens. -
Tie the knot:
Remove the bead stopper. Tie a surgeon’s knot (right over left, left over right, looping through twice) to secure the ends together tightly. -
Secure with glue:
Apply a tiny drop of jewelry glue or clear nail polish directly onto the knot. Let this dry completely before moving it. -
Hide the knot:
Trim the excess cord ends close to the knot using your scissors. Gently slide an adjacent bead over the knot to conceal it inside the hole.
Add Some Sparkle
Replace the central white section with gold spacer beads or a single gold heishi bead to add a touch of metallic elegance to the spooky theme.
Enjoy wearing your new festive accessory throughout the spooky season


Jack-o’-Lantern Charm Centerpiece
This charming beaded bracelet centers around a handcrafted clay jack-o’-lantern that adds a festive touch to any autumn outfit. The combination of textured black beads, creamy white accents, and classic orange tones creates a sophisticated yet playful Halloween accessory.
Step-by-Step Guide
Materials
- Orange polymer clay
- Back polymer clay
- Green or brown polymer clay (for stem)
- Acrylic rolling pin
- Clay sculpting tools (needle tool, small ball stylus)
- Black acrylic paint
- Fine tip paintbrush
- Elastic jewelry cord (0.8mm or 1mm)
- Textured black beads (lava stone or similar)
- Cream/white wooden or clay beads
- Orange smooth round beads
- Cyanoacrylate glue (Super glue)
- Beading needle (optional)
Step 1: Sculpting the Jack-o’-Lantern
-
Prepare the base:
Condition your orange polymer clay by kneading it until soft and pliable. Roll a piece into a smooth ball about 20mm in diameter, slightly flattening the top and bottom to create a pumpkin shape. -
Add ribbing:
Use a needle tool or the side of a toothpick to press vertical indentations around the sphere. Start from the center top and press down to the bottom, creating the classic ribbed pumpkin texture. -
Shape the stem:
Take a tiny pinch of green or dark brown clay and roll it into a small cone. Attach this firmly to the top center of your pumpkin, pressing slightly to blend the seam. -
Create the Bead Channel:
Before the clay hardens or is baked, carefully pierce the pumpkin horizontally using a thick needle or toothpick. Ensure the hole is wide enough for your elastic cord to pass through twice if needed. Wiggle the tool slightly to ensure a clean opening. -
Carve the face:
Using a very fine needle tool, gently carve out the triangular eyes, nose, and a jagged mouth. You want these areas to be slightly recessed.
Texturing Tip
To make smooth clay beads match the ‘lava stone’ look of the black beads, gently poke the raw clay surface repeatedly with a stiff toothbrush or a ball of aluminum foil before baking.
Step 2: Baking and Painting
-
Bake the charm:
Place your pumpkin on a ceramic tile or baking sheet. Bake according to your specific clay manufacturer’s instructions (usually 275°F/135°C for 15-30 minutes). -
Cool down:
Allow the clay to cool completely. It is important not to paint warm clay as the paint may bubble or peel. -
Define the features:
Dip a fine paintbrush into black acrylic paint. Carefully fill in the recessed eyes, nose, and mouth. If you get paint on the orange surface, quickly wipe it away with a damp paper towel before it dries. -
Seal (Optional):
If desired, apply a thin coat of matte varnish to the pumpkin to protect the paint and give it a finished look. Let this dry fully.
Step 3: Assembling the Bracelet
-
Measure the cord:
Cut a piece of elastic cord about 10-12 inches long. This gives you plenty of extra room for tying knots later. -
Start with the centerpiece:
Thread your prepared pumpkin charm onto the center of the cord. -
Create the pattern:
On the right side of the pumpkin, add an arrangement of one small orange bead, one textured black bead, one cream bead, and so on. I like to mirror this exact pattern on the left side for symmetry. -
Continue beading:
Continue adding beads in your alternating pattern (black textured, cream smooth, orange smooth) until the bracelet reaches your desired wrist size, usually about 6.5 to 7 inches. -
Check the fit:
Wrap the strand around your wrist to check the size. Remember that the large pumpkin charm takes up a bit of inner circumference, so fit it slightly looser than a standard flat bracelet. -
Tie the knot:
Bring the two ends of the cord together. Tie a surgeon’s knot (right over left twice, then left over right) and pull tight to secure. -
Secure with glue:
Place a tiny drop of super glue on the knot. Allow it to dry for a minute, then trim the excess cord ends close to the knot. -
Hide the knot:
Gently pull the elastic so the knot slides inside the hole of one of the adjacent beads, hiding it from view.
Glow Up
Use glow-in-the-dark polymer clay for the pumpkin base, or fill the carved facial features with glow paint instead of black for a bracelet that lights up at night.
Now you have a custom autumn accessory ready to wear for the spooky season


Ghostly White and Black Minimal Stack
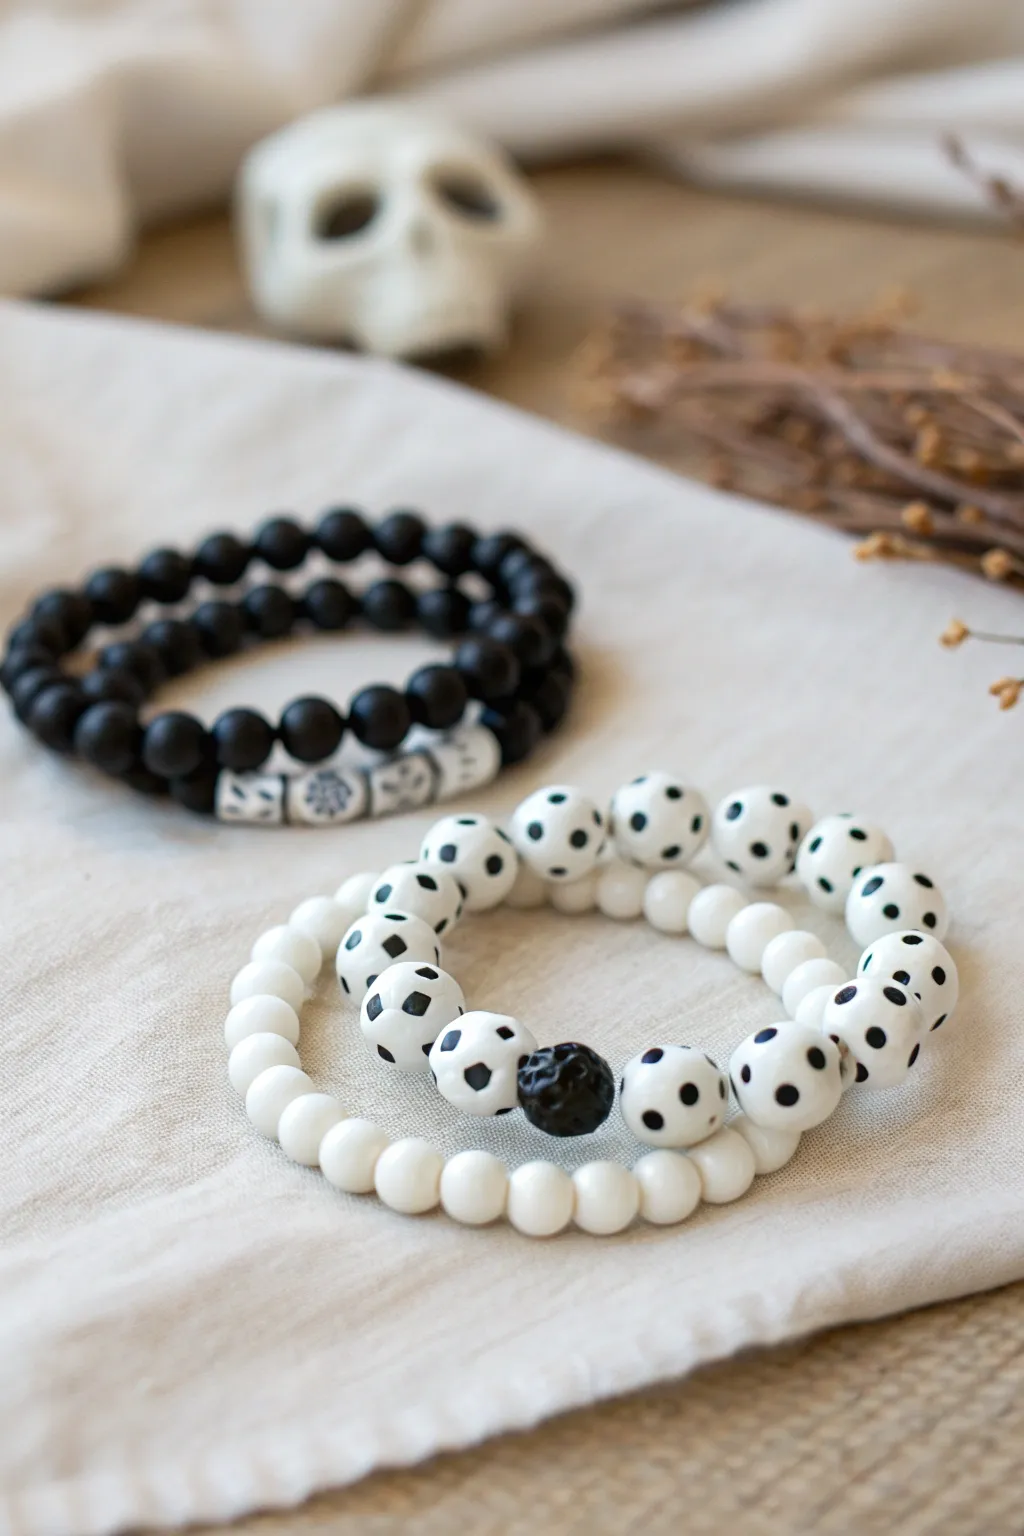
Embrace the spooky season with a sophisticated twist using this monochromatic bracelet set. Featuring matte black textures, eerie skull details, and fun polka-dot phantom beads, this project creates a wearable stack that balances creepy and chic effortlessly.
Step-by-Step
Materials
- Matte black onyx or agate round beads (8mm)
- White clay or howlite skull beads
- Large white wooden or clay round beads (10mm – 12mm)
- Small white glass or stone spacer beads (6mm)
- Black acrylic paint
- Small round paintbrush or dotting tool
- Matte sealant spray or varnish
- Elastic stretch cord (0.8mm or 1mm thickness)
- Jewelry glue or clear nail polish
- Scissors
- Bead stopper or tape
- One textured black lava bead (optional focal point)
Step 1: Painting the Polka-Dot Ghost Beads
-
Prepare the workspace:
Before restringing any beads, you’ll need to create the custom polka-dot beads. Set up a clean painting area and secure your large white wooden or clay beads so they don’t roll away; placing them on spare toothpicks stuck into foam works wonders. -
Apply the dots:
Dip your dotting tool or the stick end of a paintbrush into black acrylic paint. Press gently onto the bead surface to create evenly spaced circular dots. -
Vary the pattern:
Rotate the bead carefully as you work. The goal isn’t perfect symmetry, but rather an organic scatter of dots that mimics a dice or a graphical ghost pattern. -
Seal the design:
Allow the paint to dry completely for at least 30 minutes. Once dry, apply a light coat of matte sealant to protect the design from chipping during wear.
Step 2: Assembling the Black Skull Stack
-
Measure your cord:
Cut a length of elastic cord about 10-12 inches long. Is slightly stretch it beforehand to prevent it from loosening later. -
Secure the end:
Place a bead stopper or a piece of tape at one end of the cord to stop your beads from sliding off while you design. -
String the base:
Thread approximately 20-22 matte black beads onto the cord. I find that matte finishes look much higher quality for Halloween jewelry than glossy ones. -
Add the focal point:
Finish the strand by adding three to four white skull beads in a row. These will sit together as a standout design element. -
Knot and secure:
Tie the cord ends together using a surgeon’s knot (looping it through twice). Pull tight, add a tiny drop of glue to the knot, and trim the excess cord once dry. Repeat this process to make a second plain black bracelet if you want a fuller stack.
Knot Hiding Trick
Make the hole of one bead slightly larger using a bead reamer, or choose a bead with a large bore. Slide this bead over your knot to hide it completely immediately after gluing.
Step 3: Creating the White Phantom Stack
-
Start the dotted bracelet:
Cut another length of elastic cord. Begin threading your custom painted polka-dot beads. -
Insert the contrast bead:
Midway through stringing the dotted beads, add a single textured black lava bead. This provides a grounding visual center to the white bracelet. -
Check the fit:
Wrap the unfinished strand around your wrist to check the size. Add or remove beads as necessary to ensure a comfortable fit. -
Tie off the dotted strand:
Secure this bracelet with a strong knot and a dab of glue, just like the previous ones. -
Assemble the companion bracelet:
For the final piece in the stack, use the smaller 6mm white spacer beads. String them until you reach the desired length. -
Finalize the set:
Knot and glue the final white bracelet. Allow all glue to cure for 24 hours before stretching the bracelets onto your wrist.
Glow Up
Swap the white paint on the skull beads or the base color of the dotted beads with glow-in-the-dark acrylic paint for a surprise effect when the lights go out.
Slide on your new stack and enjoy the subtle nod to the haunted holiday


Candy Corn Color-Block Bracelet
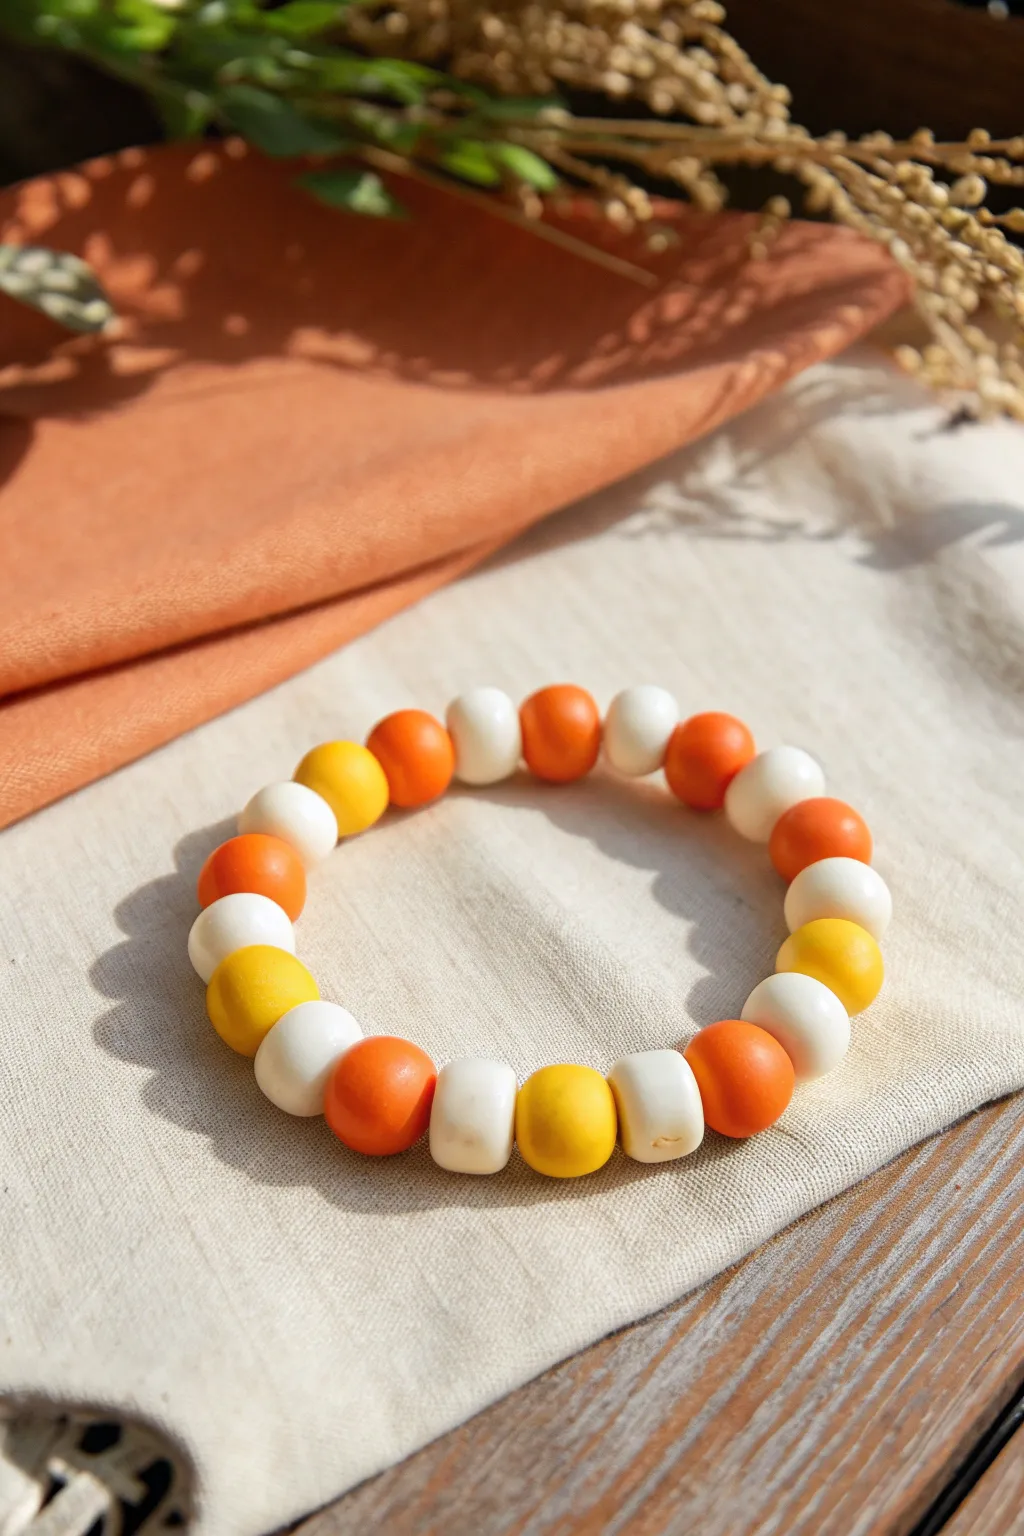
Celebrate the sweetness of Halloween with this charming beaded bracelet inspired by classic candy corn. Using simple polymer clay techniques, you’ll create a mix of round and cylindrical beads in a festive palette of white, orange, and sunshine yellow.
Step-by-Step Guide
Materials
- Polymer clay in White, Orange, and Yellow
- Elastic jewelry cord (0.8mm or 1mm)
- Clay rolling tool or acrylic roller
- Toothpick or bead piercing pin
- Baking sheet
- Parchment paper
- Jewelry glue or clear nail polish
- Scissors
- Cornstarch (optional, for smoothing)
Step 1: Shaping the Beads
-
Condition the clay:
Start by kneading each color of polymer clay separately until it is soft, pliable, and easy to work with. -
Portion the clay:
Pinch off small pieces of clay in roughly equal sizes. Aim for pieces that are about the size of a large pea or a small marble. -
Create round beads:
Roll the pieces between your palms to form smooth, uniform spheres. Make approximately 6-8 spheres in each color. -
Form cylinder beads:
Take several of your white and yellow spheres and gently flatten the top and bottom against your work surface. Roll the sides lightly to create a squat cylinder or thick wheel shape. -
Smooth imperfections:
Inspect each bead for fingerprints. I like to lightly dust my fingers with a tiny bit of cornstarch to buff away any prints without distorting the shape.
Step 2: Piercing and Baking
-
Pierce the holes:
Using a toothpick or a bead piercing tool, carefully poke a hole through the center of each bead. Rotate the bead as you push to keep the shape from squashing. -
Refine the holes:
Pierce from the opposite side as well to ensure the exit hole is neat and clean, removing any little pushed-out bits of clay. -
Arrange for baking:
Place your beads on a baking sheet lined with parchment paper. Leave a little space between them so they don’t stick together. -
Bake the beads:
Bake according to your clay manufacturer’s instructions. This is typically usually around 275°F (135°C) for 15-30 minutes, but check your package. -
Cool down:
Allow the beads to cool completely on the baking sheet before handling them. They harden fully as they cool.
Fixing Fingerprints
If you notice fingerprints after baking, you can lightly sand the surface with high-grit sandpaper to restore that matte, smooth finish.
Step 3: Assembly
-
Measure your cord:
Cut a length of elastic cord about 10-12 inches long. This gives you plenty of extra room for tying knots. -
Pre-stretch the elastic:
Firmly pull on the elastic cord a few times. This pre-stretching prevents the bracelet from loosening up after you wear it. -
Plan your pattern:
Lay your cooled beads out on a table to design your pattern. The example uses a mix of white, orange, and yellow in varied sequences, alternating sphere and cylinder shapes. -
String the beads:
Thread the beads onto the elastic cord according to your pattern. Check the length around your wrist as you go to ensure a good fit. -
Tie the knot:
Once you are happy with the length, tie a secure surgeon’s knot (right over left, then left over right) to close the loop. -
Secure the knot:
Add a tiny drop of jewelry glue or clear nail polish to the knot to keep it from slipping. -
Hide the end:
Trim the excess cord close to the knot, and gently tug the cord so the knot slides inside one of the larger beads to hide it.
Add Some Sparkle
Mix a tiny amount of translucent or glitter clay into your orange mixture for a sugary, jelly-bean texture that catches the light.
Now you have a sweet, handmade accessory perfect for the spooky season

The Complete Guide to Pottery Troubleshooting
Uncover the most common ceramic mistakes—from cracking clay to failed glazes—and learn how to fix them fast.
Witchy Purple, Green, and Black Mix

Conjure up some magic with this spellbinding bracelet that mixes classic witchy colors. The combination of deep violet, crackled green, and textures ranging from matte to sparkly black creates a perfect accessory for the spooky season.
Step-by-Step Tutorial
Materials
- Purple dyed jade or agate beads (8mm)
- Green turquoise or dyed howlite beads with black matrix (8mm)
- Matte black onyx or agate beads (8mm)
- Black lava stone beads (8mm)
- Black sparkle or galaxy beads (optional variation)
- Strong elastic bead cord (0.8mm or 1mm)
- Silver rhinestone spacer beads (rondelle shape)
- Silver jump ring (6mm or 8mm)
- Silver crescent moon charm
- Small black star charm
- Jewelry adhesive (e.g., G-S Hypo Cement)
- Scissors
Step 1: Planning and Sorting
-
Assess your beads:
Lay out all your different bead types on a bead mat or soft towel. This prevents them from rolling away while you design your pattern. -
Determine the pattern:
Observe the bracelet’s asymmetrical but balanced rhythm. Notice how it alternates between sections of solid purple and mixed green/black segments. -
Measure your wrist:
Wrap a piece of string around your wrist to find your size, then add about an inch for comfort. For an average adult wrist, you’ll likely need 20-22 beads total.
Knot Slipping?
If your elastic knot keeps slipping undone while you tie it, try stringing your beads onto two strands of thinner elastic instead of one thick one. The friction holds the knot better.
Step 2: Stringing the Pattern
-
Prepare the cord:
Cut a length of elastic cord about 10-12 inches long. I always like to pre-stretch the elastic by pulling it firmly a few times; this prevents the bracelet from loosening up later. -
Start the focal point:
String one silver rhinestone spacer bead, followed by a sparkly black bead or matte black bead, and then a second silver spacer. This section will frame your charm later. -
Build the right side:
To the right of your focal section, thread on a green crackle bead, a purple bead, another green crackle bead, and a purple bead. -
Transition to texture:
Add two textured black lava beads. The rough surface of these stones contrasts beautifully with the smooth glass or stone beads. -
Continue the pattern:
Add a green crackle bead, followed by a purple bead, and then a darker purple or violet bead to create a slight gradient effect. -
Build the left side:
Go back to the other end of your cord (the left side of the spacers). Add a green crackle bead, a purple bead, a green crackle bead, and two matte black beads. -
Finish the loop:
Continue adding alternating purple and green beads until the strand reaches your desired length. Check the fit by wrapping it around your wrist before tying.
Step 3: Attaching Charms and Finishing
-
Prepare the charms:
Open your silver jump ring using two pairs of pliers (or your fingers if the metal is soft enough), twisting the ends away from each other rather than pulling apart. -
Assemble the dangle:
Slide the silver crescent moon charm and the small black star charm onto the open jump ring. -
Attach to bracelet:
Hook the jump ring onto the bracelet cord right between the first silver spacer and the center black bead you strung in the beginning. -
Close the ring:
Twist the jump ring ends back together ensuring there is no gap for the charms to slip through. -
Tie the knot:
Bring the two ends of your elastic cord together. Tie a standard surgeon’s knot: right over left and under, then left over right and under. Pull tight. -
Secure the knot:
Dab a tiny drop of jewelry adhesive or clear nail polish onto the knot. This ensures it won’t unravel with daily wear. -
Hide the mechanics:
Once the glue is tacky but not fully set, verify you can slide the knot inside one of the adjacent beads (preferably a larger hole bead like the lava stone). -
Final trim:
Once dry, trim the excess elastic tail close to the bead, being careful not to cut the main cord.
Essential Oil Diffuser
The black lava beads are porous! Add a drop of patchouli, sage, or cedarwood essential oil to the lava stones to turn this witchy accessory into an aromatherapy diffuser.
Now your wrist is ready to cast stylish spells all season long
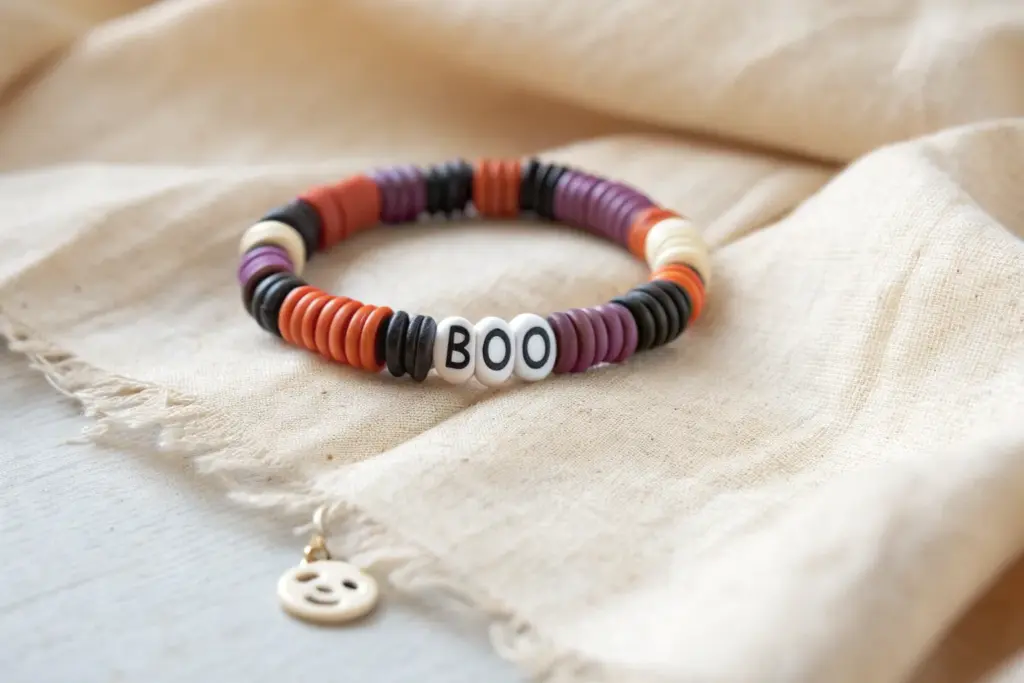
Spooky Word Bracelet With Letter Beads
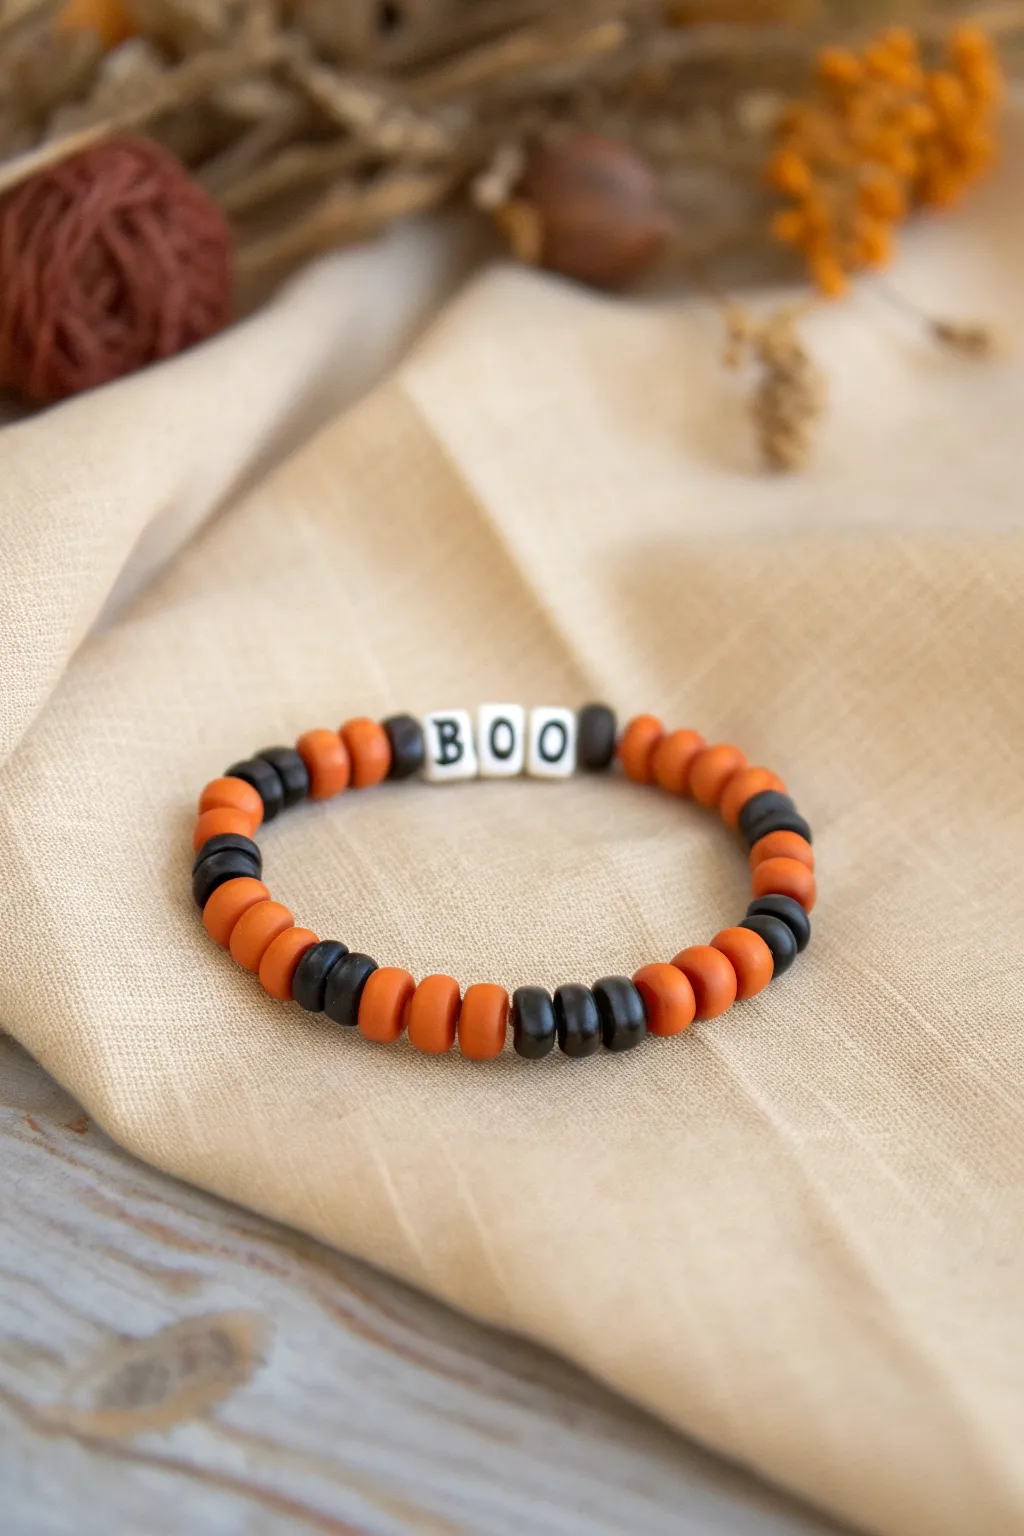
This simple yet striking bracelet combines the classic Halloween colors of orange and black with a playful message. Using polymer clay disc beads gives it a trendy texture that looks great stacked or worn solo.
Detailed Instructions
Materials
- Orange polymer clay heishi (disc) beads (approx. 6mm)
- Black polymer clay heishi (disc) beads (approx. 6mm)
- White square letter beads (‘B’ and ‘O’)
- Clear elastic jewelry cord (0.7mm or 0.8mm)
- Scissors
- Hypo cement or clear jewelry glue
- Bead stopper or tape
Step 1: Preparation & Planning
-
Measure the Cord:
Cut a piece of elastic cord about 10-12 inches long. This generous length makes tying the knot at the end much easier than struggling with short tails. -
Secure the End:
Attach a bead stopper to one end of your cord, or simply tape it down to your table. This critical step prevents your hard work from sliding off while you design. -
Sort Your Letters:
Locate one ‘B’ bead and two ‘O’ beads from your letter stash. Set them aside so they are ready for the focal point of the bracelet.
Step 2: Pattern Design
-
Start with Black:
Begin threading by adding a small section of black disc beads. Start with about 3 or 4 beads. -
Transition to Orange:
Switch to orange beads. Thread on a slightly longer section, perhaps 5 or 6 beads, to create a block of color. -
Establish the Rhythm:
Continue alternating blocks of color. The pattern in the inspo image isn’t perfectly symmetrical, which adds charm. Some black sections are just 2 beads wide, while others are 3 or 4. -
Create Varied Blocks:
Try a pattern of: 3 black, 4 orange, 2 black, 5 orange, 3 black. I find that varying the numbers slightly makes the bracelet look more organic and handmade. -
Check Length:
Pause when you have beaded approximately 3 inches of the bracelet. This is the first half before you add the word.
Knot Security Tip
When pulling your knot tight, pull on the elastic tails AND the bracelet loop itself. This four-way pull ensures the knot is as small and tight as possible.
Step 3: Adding the Message
-
Frame the Word:
Before adding letters, place a single black disc bead. This acts as a visual ‘bookend’ for your word. -
Thread the Letters:
Slide on your ‘B’, then the first ‘O’, and finally the second ‘O’. Make sure they are all facing the same direction so the word is legible. -
Close the Frame:
Add another single black disc bead immediately after the last ‘O’. Now your word is neatly framed between two black discs.
Level Up: Ghostly Glow
Swap the standard white letter beads for glow-in-the-dark ones. It adds a secret spooky element that only reveals itself when the lights go out.
Step 4: Completing the Loop
-
Resume Patterning:
Go back to your color blocking. Start with an orange section to contrast with the black frame bead you just placed. -
Mirror or Freestyle:
Continue adding alternating sections of orange and black. You can try to mirror the first half exactly, or just keep the general rhythm of 3-5 beads per color block. -
Final Sizing:
Wrap the strand around your wrist to check the fit. Clay beads sit differently than round glass beads, so ensure it feels comfortable and not too tight. Add or remove discs as needed.
Step 5: Finishing Touches
-
Pre-stretch the Cord:
Before tying, give the ends of the elastic a gentle tug. This ‘pre-stretching’ helps prevent the bracelet from sagging later on. -
Tie the Knot:
Remove the bead stopper and tie a surgeon’s knot (right over left, left over right, and loop through an extra time). Pull it tight. -
Secure with Glue:
Dab a tiny drop of hypo cement or jewelry glue onto the knot. This ensures it won’t unravel with wear. -
Hide the Knot:
Let the glue dry for a moment, then trim the excess cord close to the knot. Gently slide the beads so the knot tucks inside the hole of one of the nearest beads.
Now you have a festive accessory ready to wear all October long


What Really Happens Inside the Kiln
Learn how time and temperature work together inside the kiln to transform clay into durable ceramic.
Spiderweb Bead Pattern Bracelet
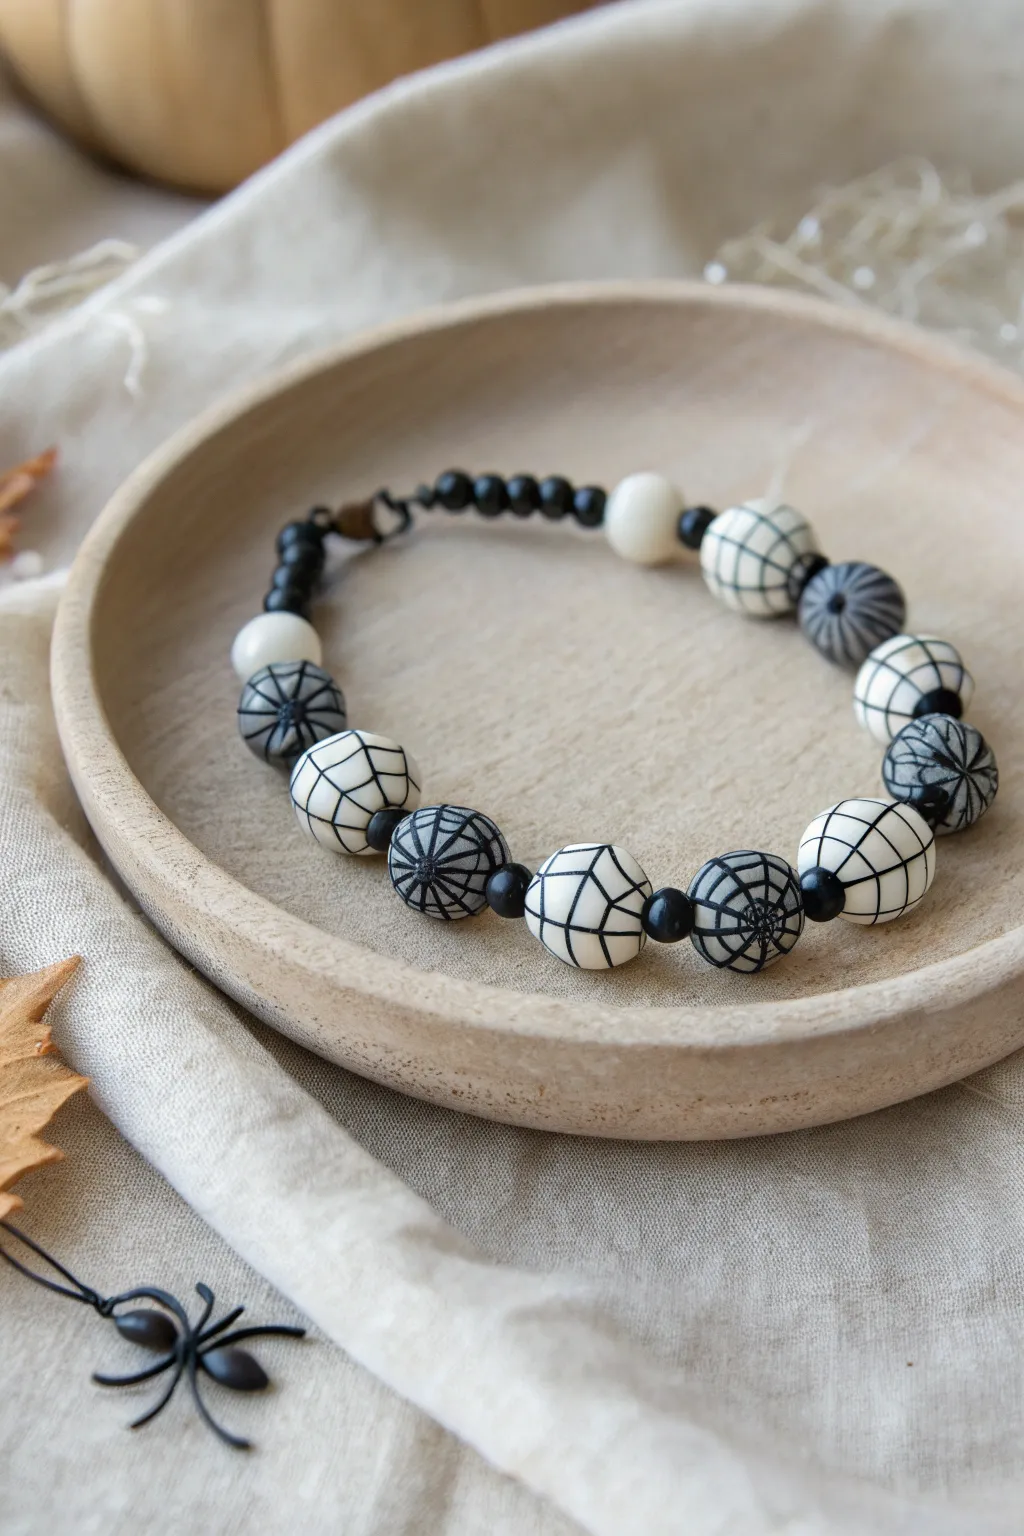
Elevate your Halloween accessory game with this sophisticated monochromatic clay bracelet featuring intricate spiderweb designs. The mix of hand-painted webs and sleek matte black spacers creates a modern, festive look perfect for the season.
Detailed Instructions
Materials
- White or translucent polymer clay
- Grey or silver polymer clay
- Small black glass seed beads
- Medium round wooden or black beads (optional spacer beads)
- Black fine-point permanent marker or black acrylic paint with fine liner brush
- Beading wire or strong elastic cord
- Jewelry clasp (lobster claw) and jump rings
- Crimp beads
- Pliers (crimping and round-nose)
- Toothpicks or bead piercing tool
- Oven for baking clay
- Gloss or matte glaze (optional)
Step 1: Shaping the Beads
-
Condition the clay:
Start by warming up your white and grey polymer clay in your hands until it becomes soft and pliable. This prevents cracks when rolling. -
Roll main beads:
Form roughly 8-10 spheres from the white clay and 3-4 spheres from the grey clay. Aim for a diameter of about 12-14mm for a chunky statement look. -
Refine the shape:
Roll each sphere gently between your palms to ensure they are perfectly round. Smooth out any fingerprints lightly. -
Create smaller spacers:
Roll two small plain white beads (about 8mm) to sit near the clasp ends of your bracelet. -
Pierce the beads:
Carefully insert a toothpick or piercing pin through the center of each bead to create the stringing hole. Rotate the tool as you push to avoid squashing the bead’s shape.
Ink Stability Pro-Tip
If using permanent marker, let it set for 24 hours before glazing. Some glazes react with ink; test on a scrap bead first or use water-based polyurethane.
Step 2: Baking and Decorating
-
Bake the clay:
Arrange your unpainted beads on a baking sheet or suspended on a bead rack. Bake according to your specific clay package instructions (usually around 275°F/135°C for 15-30 minutes). -
Cool down:
Allow the beads to cool completely before attempting to draw on them. Painting on warm clay can ruin your marker nibs or cause paint to smear. -
Draw radial lines:
Using a fine-point black marker or liner brush, draw an asterisk shape (*) on the bead. I usually start with a vertical line, then a horizontal one, and fill in the diagonals. -
Connect the webs:
Draw small curved lines connecting the radial spokes. Start near the center and work your way outward in concentric rings to form the web pattern. -
Vary the design:
Apply the web pattern to the white beads. For the grey beads, create a denser, darker web or a starburst pattern to add contrast to the strand. -
Seal the design:
Once the ink is perfectly dry, apply a thin coat of glaze if you want to protect the design, though leaving them matte gives a lovely organic texture.
Step 3: Assembly
-
Prepare the wire:
Cut a length of beading wire or elastic cord about 9 inches long to give yourself plenty of working room. -
Plan your pattern:
Lay out your beads on a tray. A great sequence is: large white web, small black spacer, large grey web, small black spacer. Repeat until the length is right. -
Start strong:
If using wire and a clasp, thread a crimp bead and one half of your clasp onto the wire. Loop the wire back through the crimp bead and flatten it securely with pliers. -
String the beads:
Thread your beads onto the wire following your laid-out pattern. Start with a sequence involving smaller black beads near the clasp for a tapered look. -
Add the spacers:
Ensure you place a small black seed bead or spacer between every large clay bead. This prevents the large beads from grinding against each other. -
Finish the strand:
Once all beads are added, finish the other end with a crimp bead and the receiving jump ring or clasp loop. Pull tight enough to remove gaps but loose enough for the bracelet to drape naturally.
Level Up: Spider Charm
Don’t just stop at beads—attach a small black plastic or metal spider charm near the clasp using a jump ring for an extra spooky dangly detail.
Now you have a stylish custom accessory that adds just the right amount of haunt to your autumn wardrobe
Bat Charm With Midnight Colors
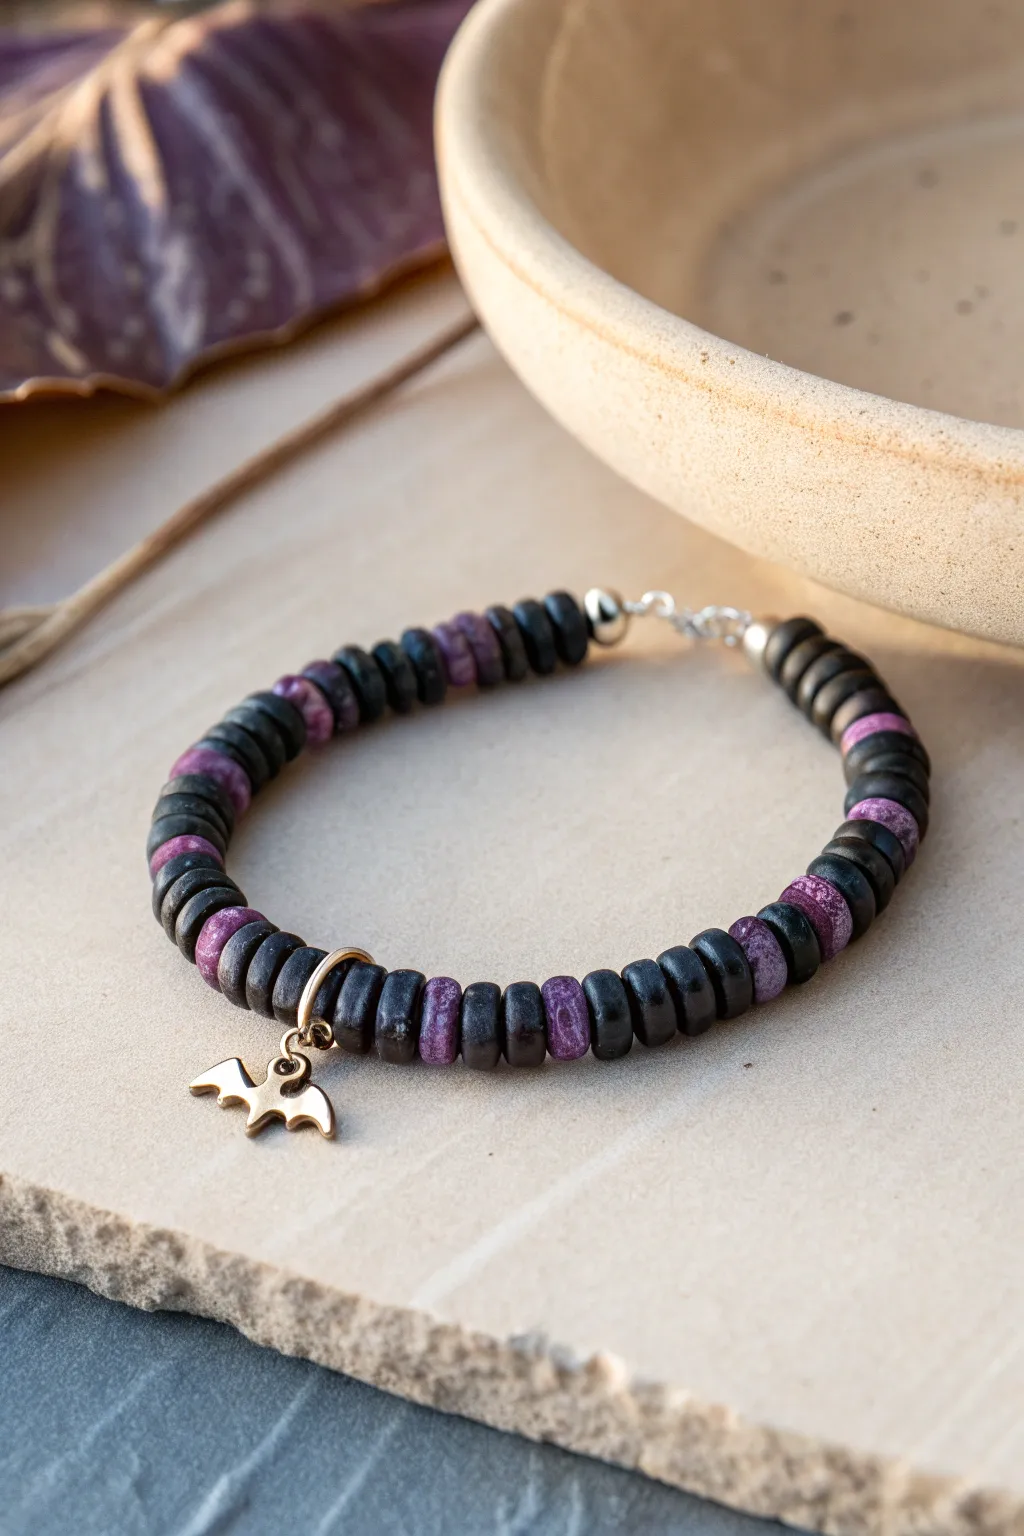
Embrace the spooky elegance of Halloween with this simple yet striking beaded bracelet. Alternating matte black and mottled purple clay disc beads create a dark, rhythmic pattern perfectly accented by a playful gold bat charm.
How-To Guide
Materials
- Black polymer clay heishi beads (disk beads), approx. 4-6mm
- Purple marbled or mottled polymer clay heishi beads, approx. 4-6mm
- Elastic beading cord (0.8mm or 1mm depending on bead hole size)
- Gold tone bat charm with jump ring
- 2 Silver crimp beads
- 2 Silver bead tips (clam shells)
- Silver lobster clasp
- Silver jump ring (for clasp)
- Jewelry pliers (flat nose and chain nose)
- Scissors or jewelry cutters
- Super glue or jewelry adhesive (optional)
- Beading needle (optional but helpful)
Step 1: Planning and Preparation
-
Measure your wrist:
Before cutting any cord, wrap a measuring tape around your wrist to find your size. Add about 1/2 inch to this measurement for a comfortable fit, then cut a piece of elastic cord about 4-5 inches longer than that total length to give yourself room to tie knots. -
Stretch the cord:
Pre-stretch your elastic cord by pulling it gently a few times. This crucial step prevents the bracelet from stretching out and becoming loose immediately after you wear it. -
Secure the end:
Place a piece of tape or a bead stopper on one end of your cut cord. This stops your beads from sliding right off while you work on your design.
Knot Slipping?
If using a knot instead of crimps, try a surgeon’s knot (looping through twice). Add a dab of GS Hypo Cement on the knot and let it dry fully before trimming the ends.
Step 2: Stringing the Beads
-
Sort your pattern:
Lay out your beads on a tray or cloth. The pattern shown here uses small groups of black beads separated by single or double purple beads, but you can plan any rhythm you like. -
Begin the sequence:
Thread on your first section. I usually start with about 3 or 4 black disk beads to establish the dark base color. -
Add the accent color:
Slide on one or two purple mottled beads. These provide that subtle pop of color that gives the bracelet its ‘midnight’ Halloween vibe. -
Continue the pattern:
Repeat your established pattern—alternating between the black clusters and purple accents—until you reach the halfway point of your desired bracelet length. -
Attach the charm holder:
At the center point, slide on a gold jump ring. You don’t need to attach the bat charm itself just yet, but having the ring in place now ensures it’s perfectly centered later. -
Finish the strand:
Continue your beading pattern on the other side of the jump ring until the strand reaches the full measured length you determined in the first phase. -
Check the fit:
Carefully wrap the beaded strand around your wrist to verify the size. Add or remove a few beads if necessary to get that perfect comfortable fit.
Level Up: Glow Effect
Swap the purple mottled beads for glow-in-the-dark polymer clay beads. The bracelet will look sleek and dark by day, but eerily luminous during trick-or-treating.
Step 3: Finishing Touches
-
Prepare the closer:
Thread one end of the elastic through the bottom hole of a silver bead tip (clam shell) so the cup faces the beads. -
Add a crimp bead:
Slide a silver crimp bead onto the cord, nestling it inside the cup of the bead tip. -
Flatten the crimp:
Using your flat nose pliers, squeeze the crimp bead completely flat. For extra security, I like to add a tiny drop of super glue on the flattened crimp before closing the shell. -
Close the bead tip:
Gently use your pliers to close the two halves of the bead tip over the crimp bead, creating a neat little silver sphere at the end of your strand. Trim any excess wire sticking out. -
Repeat on the other side:
Perform the same crimp and bead tip process on the other end of the elastic cord, ensuring the beads are snug but not so tight that the bracelet buckles. -
Attach the clasp:
Open the loop on one of your bead tips using pliers. Hook the lobster clasp onto it and close the loop securely. -
Add the receiving ring:
On the opposite bead tip, attach a larger silver jump ring to act as the catch for the lobster clasp. -
Hang the bat:
Finally, locate the jump ring you strung in the middle of the bracelet. Open the small ring attached to your bat charm, hook it onto the bracelet’s center ring, and close it tightly with pliers.
Enjoy wearing your subtle yet spooky accessory all October long

TRACK YOUR CERAMIC JOURNEY
Capture glaze tests, firing details, and creative progress—all in one simple printable. Make your projects easier to repeat and improve.
Skull Bead Accents for a Spooky Pop
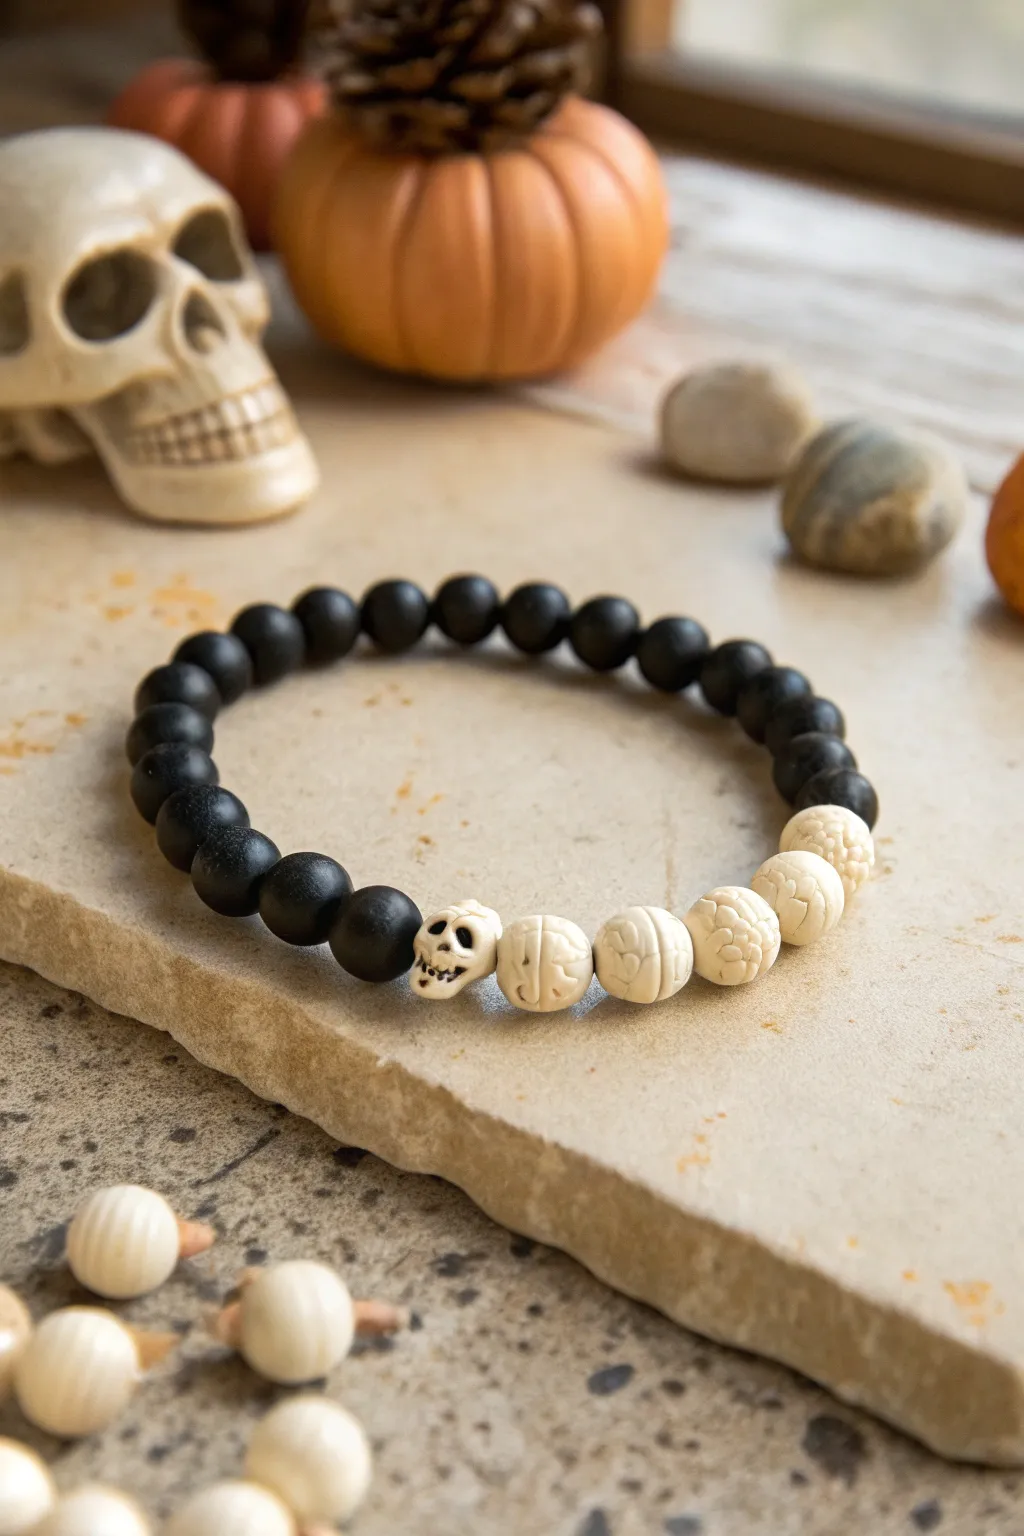
This striking bracelet combines the sleek look of matte black beads with the eerie texture of carved bone-style accents. It features a central skull bead flanked by detailed ‘brain’ or textured beads, perfect for adding a subtle Gothic touch to your Halloween attire.
Step-by-Step
Materials
- Matte black round beads (8mm or 10mm)
- White or cream bone-style skull bead (centerpiece)
- 5 textured white/cream round beads (brain pattern or carved bone style)
- Strong elastic bead cord (0.8mm or 1mm)
- Jewelry glue or clear nail polish
- Scissors
- Bead stopper or tape
- Measuring tape
Step 1: Preparation
-
Measure your wrist:
Wrap a measuring tape comfortably around your wrist where you want the bracelet to sit. Add about half an inch to this measurement to ensure the bracelet isn’t too tight once the beads are added. -
Cut the cord:
Cut a piece of elastic cord roughly 10-12 inches long. Having this extra length makes tying the final knot much easier than struggling with short ends. -
Pre-stretch the elastic:
Hold the cord firmly at both ends and give it several gentle tugs. Pre-stretching prevents the bracelet from becoming loose and gaping shortly after you start wearing it. -
Secure the end:
Place a bead stopper on one end of your cord, or simply use a piece of strong tape folded over the end to stop beads from sliding off while you work.
Knot Slipping?
If your elastic knot refuses to stay tight while glueing, have a friend hold their finger on the first loop of the knot while you tie the second, keeping tension constant.
Step 2: Designing the Pattern
-
Select your focal beads:
Gather your cream-colored focal beads. You will need one skull bead and five textured round beads (often sold as ‘carved bone’ or ‘brain’ beads). -
Plan the center sequence:
Lay out your design on a bead board or flat surface first. The pattern should be: Skull Bead in the center, followed by three textured beads on the right side, and two textured beads on the left side (or vice versa). -
Check the asymmetry:
Notice in the reference image that the white section is slightly asymmetrical—the skull leads into a longer trail of white beads on one side. Recreate this by placing the skull at one end of your white bead group. -
Fill with black beads:
Count out enough matte black beads to complete the rest of the loop based on your wrist measurement. Usually, this will be around 14-18 black beads depending on size.
Step 3: Stringing the Bracelet
-
Thread the skull first:
Thread the skull bead onto the cord first. Ensure the face is oriented outward so it looks correct when worn. -
Add the ‘brain’ beads:
Thread the five textured white beads onto the cord next to the skull. I find it looks best if you group them all on one side of the skull to match the photo, creating a ‘block’ of color. -
Thread the black beads:
String all the matte black beads onto the cord. These will form the back and sides of the bracelet. -
Check the fit:
Wrap the unfinished strand around your wrist to check the size. If it’s too loose, remove a black bead; if too tight, add another one. The beads should touch comfortably without gaps.
Level Up: Weathering
Mix a tiny amount of brown acrylic paint with water and wash over the white beads, then wipe off quickly. This leaves grime in the crevices for an ancient look.
Step 4: Finishing Touches
-
Prepare to knot:
Remove the bead stopper or tape carefully, holding both ends of the elastic securely. -
Tie a surgeon’s knot:
Cross the ends, wrap one end under the other twice, and pull tight. Repeat this process but wrap the other way. This extra wrap creates friction that holds the elastic better than a standard square knot. -
Secure with glue:
Dab a tiny drop of jewelry glue or clear nail polish directly onto the knot. Be careful not to get glue on the neighboring beads, as it can ruin the matte finish. -
Hide the knot:
While the glue is still tacky, gently pull the cord so the knot slides inside the hole of the nearest large bead (ideally one of the black ones with a larger hole). -
Trim the excess:
Once the glue is fully dry (wait at least 15 minutes), use sharp scissors or flush cutters to trim the excess cord as close to the bead hole as possible without cutting the knot itself.
Slip on your spooky new accessory and enjoy the tactile mix of smooth matte and carved textures
Metallic Spacers for Glam Halloween
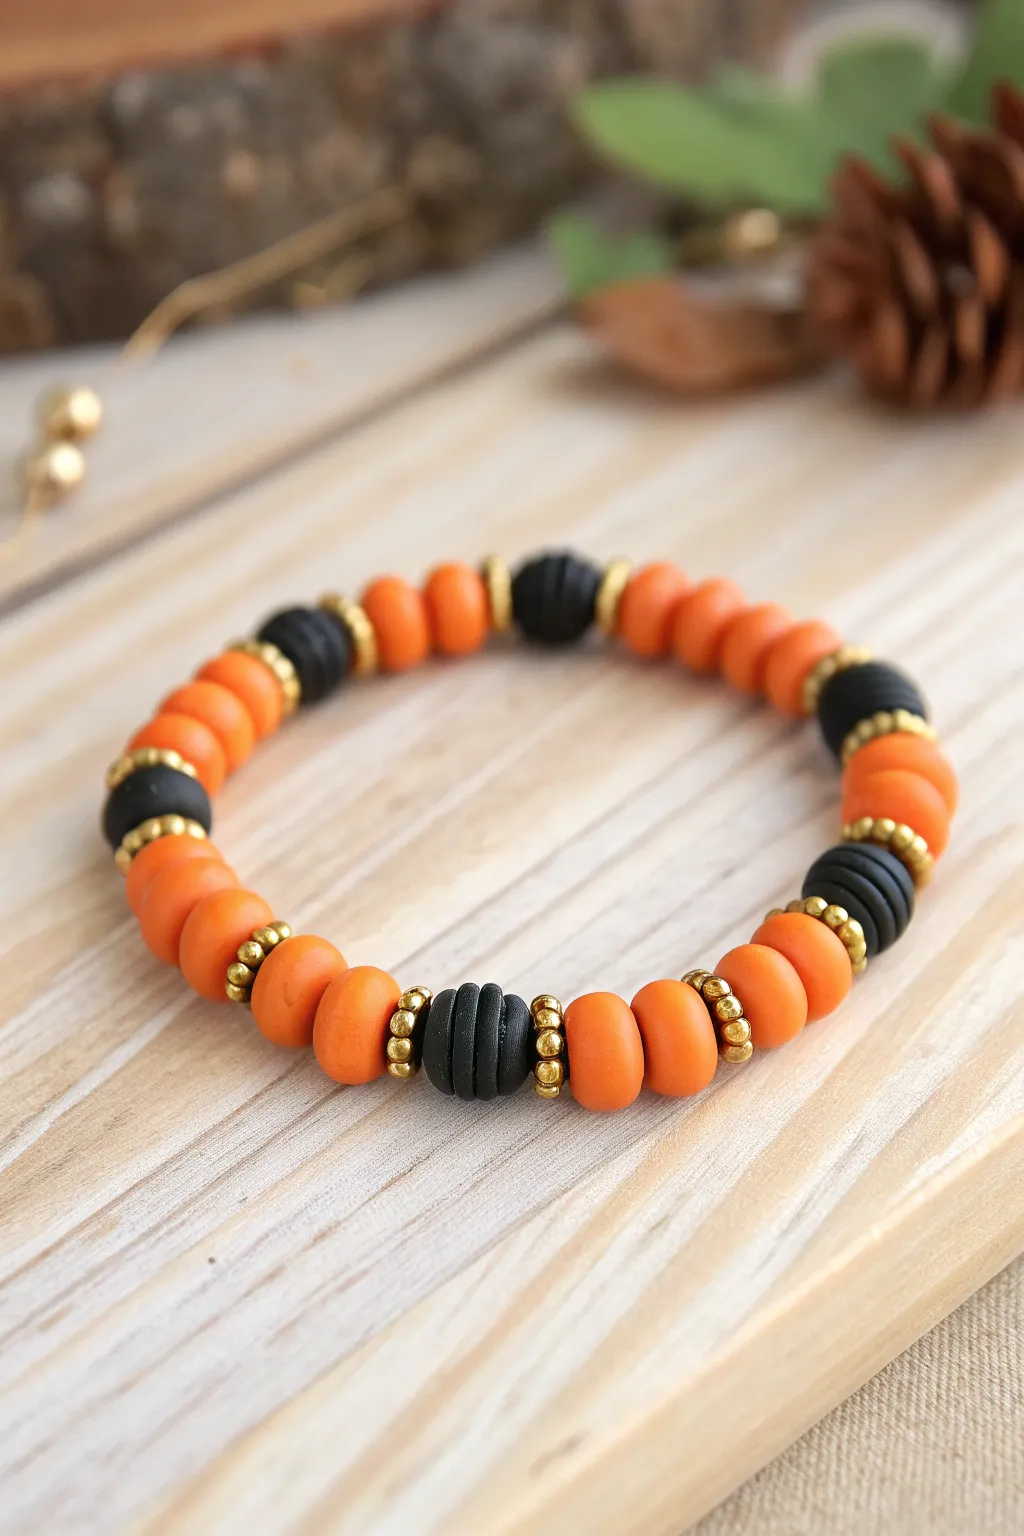
Elevate your spooky season accessories with this sophisticated take on traditional Halloween colors. By combining matte polymer clay discs with shimmering gold spacers, you create a piece that feels both festive and high-end.
Detailed Instructions
Materials
- Orange polymer clay (pumpkin shade)
- Black polymer clay
- Gold metallic spacer beads (daisy spacer style or small rounds)
- Elastic beading cord (0.8mm or 1mm)
- Clay roller or pasta machine
- Small circular clay cutter (approx. 8-10mm)
- Toothpick or bead piercing tool
- Superglue or jewelry adhesive
- Scissors
Step 1: Creating the Clay Beads
-
Condition the Clay:
Start by warming up your orange and black polymer clay separately in your hands until they are soft and pliable. This prevents cracking later. -
Roll out Sheets:
Using a clay roller or pasta machine, roll the orange clay into a thick sheet, about 4-5mm thick. Repeat this process with the black clay, aiming for the same thickness. -
Cut the Discs:
Use your small circular cutter to punch out numerous discs from both colors. For the pattern shown, you will need significantly more orange discs than black ones. -
Smooth the Edges:
Since raw cut edges can be sharp, gently rub the edges of each disc with your finger to round them off slightly creating a softer, stone-like look. -
Texture the Black Beads:
To mimic the texture seen in the photo, take your black discs and use a needle tool or toothpick to gently press vertical lines into the sides, giving them a ribbed appearance. -
Pierce the Center:
carefully pierce a hole directly through the center of every bead using your piercing tool. Ensure the hole is wide enough for your elastic cord. -
Bake the Clay:
Arrange your beads on a baking sheet lined with parchment paper. Bake according to your brand’s specific package instructions (usually around 275°F/135°C for 15-30 minutes). Let them cool completely before handling.
Step 2: Assembly & Finishing
-
Measure the Cord:
Cut a length of elastic cord about 10-12 inches long. I always cut extra length to make the final knot tying frustration-free. -
Pre-stretch the Elastic:
Give the cord a few firm tugs. This pre-stretching step is crucial to prevent the bracelet from sagging or expanding after you wear it a few times. -
Begin the Pattern:
Start threading. The pattern relies on segments. Thread four orange clay beads onto the cord. -
Add the Gold Accent:
Slide on one gold metallic spacer bead, followed by a black textured clay bead, and then another gold spacer bead. -
Repeat the Sequence:
Continue this alternating pattern: four orange beads, one gold spacer, one black bead, one gold spacer. Repeat until the strand is long enough to fit comfortably around your wrist. -
Check the Size:
Wrap the unfinished strand around your wrist to check the fit. It should sit flush against the skin without digging in. -
Tie the Knot:
Bring the two ends of the elastic together. Tie a standard surgeon’s knot (looping the cord through twice before pulling tight) to secure the beads. -
Secure with Glue:
Place a tiny drop of superglue directly onto the knot. Let it dry for a minute to fuse the threads together permanently. -
Trim the Excess:
Once dry, use scissors to trim the excess cord ends close to the knot. If possible, gently tuck the knot inside one of the black clay beads to hide it.
Sticky Situation?
If your clay feels too soft or sticky to cut clean circles, pop the rolled sheet in the fridge for 10 minutes. The cold firms it up, resulting in sharper, cleaner cuts.
Level It Up
For extra glam, brush a tiny amount of gold mica powder onto the black textured beads before baking to highlight the ribbed details.
Enjoy wearing your chic new accessory to add a touch of handcrafted luxury to your Halloween ensemble
Potion Bottle Color Gradient Bracelet
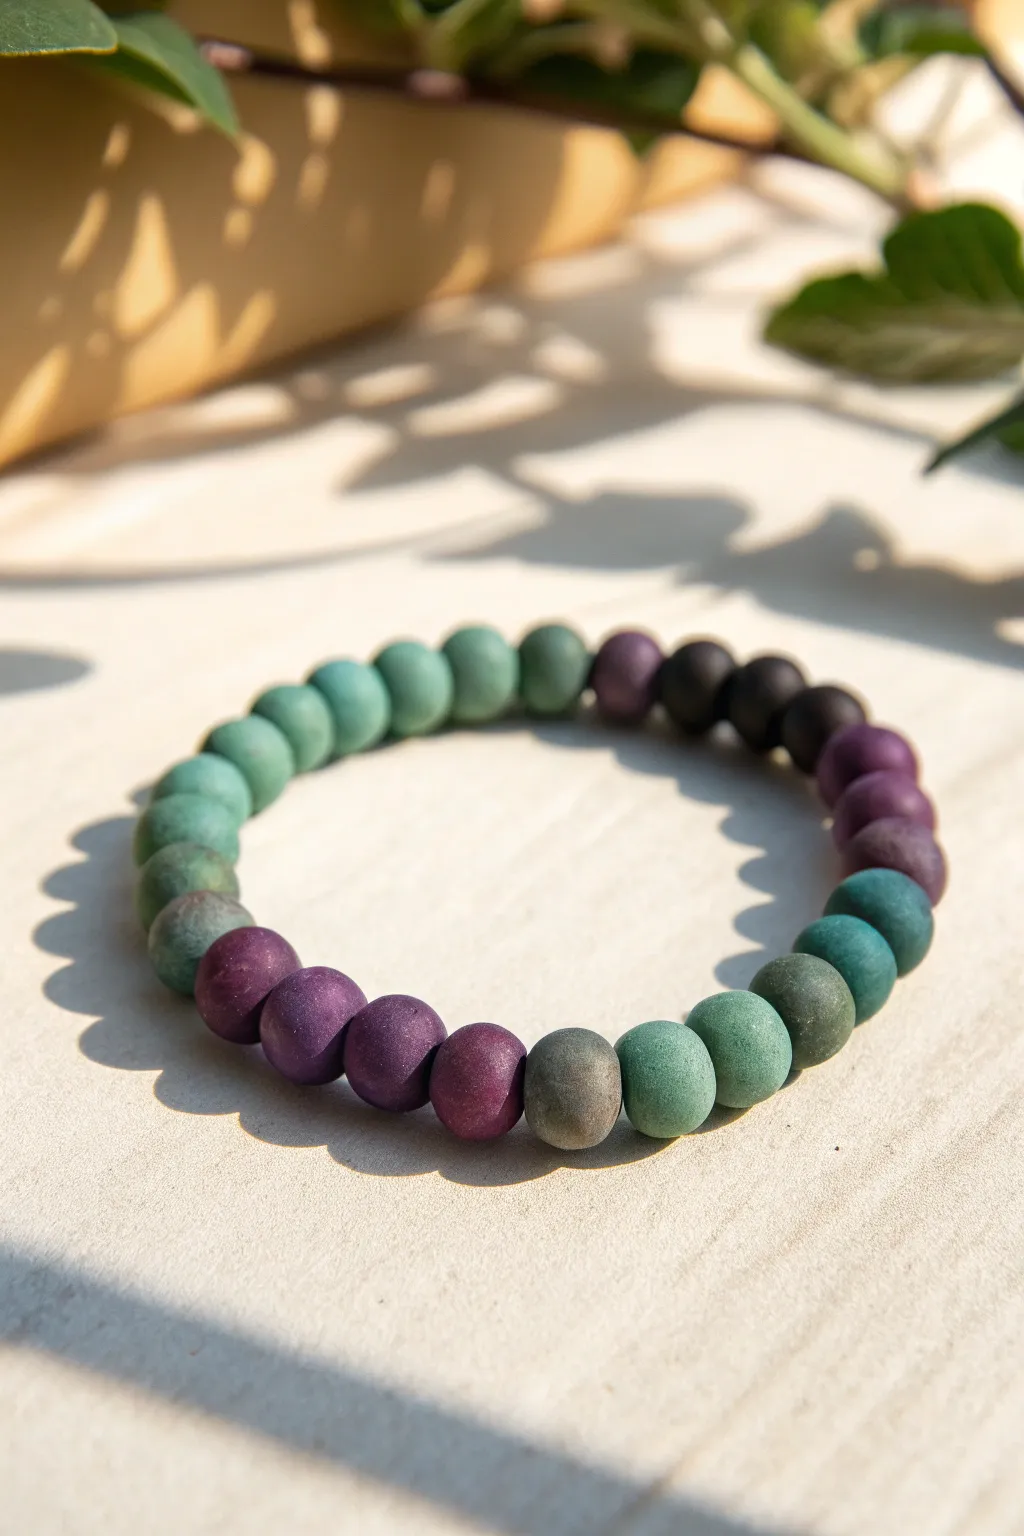
Capture the essence of mysterious bubbling brews with this sophisticated polymer clay bracelet. The matte finish and smooth color transitions mimic the swirling depths of a witch’s cauldron, moving from deep teals to mystical purples and shadowy blacks.
Step-by-Step Guide
Materials
- Polymer clay (Teal, Forest Green, Purple, Black, White)
- Acrylic roller or pasta machine
- Circle cutters (small, uniform size)
- Bead piercing pins or toothpicks
- Baking sheet and parchment paper
- Elastic jewelry cord (0.7mm or 0.8mm)
- Super glue or jewelry adhesive
- Fine-grit sandpaper (400-600 grit)
- Cornstarch (optional, for smoothing)
Step 1: Color Mixing & Preparation
-
Create base colors:
Condition your polymer clay blocks until they are soft and pliable. You will need four main piles: teal, purple, forest green, and black. -
Mix custom shades:
To achieve that specific potion look, mute your bright colors. Mix a tiny pinch of black into the teal to deepen it, and a touch of purple into the green to make it swampier. I like to keep a pure black aside for the darkest point of the gradient. -
Prepare intermediate blends:
Create transition shades by mixing equal parts of your neighboring colors. Mix teal with green for a sea-foam look, and purple with black for a deep plum. This ensures a smooth gradient around the wrist. -
Check your palette:
Line up small balls of your mixed colors in a circle to visualize the flow. You want a sequence like: Light Teal → Dark Teal → Swamp Green → Olive → Black → Deep Purple → Light Purple.
Step 2: Forming the Beads
-
Roll a uniform sheet:
Roll out each of your mixed clay colors into sheets of equal thickness. Using the thickest setting on a pasta machine or about 1/4 inch thickness with an acrylic roller works best. -
Cut equal portions:
Use a small circle cutter to punch out discs from your clay sheets. This is the secret to getting beads that are exactly the same size without weighing them. -
Roll into spheres:
Take each punched circle and roll it vigorously between your palms. Apply firm pressure at first to compress the clay, then lighten your touch to perfect the sphere. -
Smooth the surface:
If you notice fingerprints, lightly dust your palms with a tiny amount of cornstarch and give the beads a final gentle roll. This creates that lovely velvety matte texture shown in the photo. -
Verify sizing:
Line up all your rolled spheres again. If any look significantly larger or smaller, pinch off a bit of clay or add a sliver and re-roll now.
Seamless Sphere Tip
To avoid flat spots during baking, bury your raw clay beads in a bed of baking soda or cornstarch in an oven-safe dish. They will come out perfectly round with no shiny flat bottoms.
Step 3: Piercing & Baking
-
Pierce the beads:
Hold a bead gently between your thumb and finger. Insert a bead pin or toothpick into the center, twisting slightly as you push through to avoid squishing the perfectly round shape. -
Refine the holes:
Once the pin pokes through the other side, remove it and re-insert it from that exit hole. This keeps the hole opening clean and prevents the clay from puckering outward. -
Arrangement for baking:
Place your pierced beads on a baking sheet lined with parchment paper. If you have a bead rack, use it; otherwise, lay them directly on the paper, maybe nesting them in a pleated fold of paper so they don’t roll flat. -
Bake the clay:
Bake according to your specific brand’s temperature instructions (usually 275°F/135°C) for about 30-45 minutes. A longer bake makes the beads more durable. -
Cool down:
Allow the beads to cool completely in the oven with the door cracked, or take them out and let them sit for at least an hour before handling.
Make It Magical
Add a ‘magical shimmer’ to your potion beads by brushing a small amount of mica powder (pearl or iridescent green) onto just the teal and purple beads before you bake them.
Step 4: Finishing & Assembly
-
Matte finishing:
To get that stone-like texture, lightly buff the cooled beads with fine-grit sandpaper used wet. This removes any shine and surface imperfections. -
Wash and dry:
Rinse the sanding dust off the beads with soapy water and dry them thoroughly with a lint-free towel. -
Plan the stringing:
Lay out your beads on a layout board or towel in the final color sequence shown in the image: Teal section, fading into dark greens, transitioning to black, then brightening into purple. -
String the beads:
Cut a piece of elastic cord about 10-12 inches long. Pre-stretch the cord by pulling it firmly a few times to prevent it from sagging later. String your beads following your pattern. -
Secure the knot:
Tie a surgeon’s knot (right over left, left over right twice). Pull tight gently. Add a tiny dot of super glue to the knot for security. -
Final trim:
Let the glue dry for a few minutes, then trim the excess cord ends close to the knot. If possible, tug the knot inside one of the bead holes to hide it.
Now you have a subtle, wearable piece of Halloween magic to stack with your other accessories
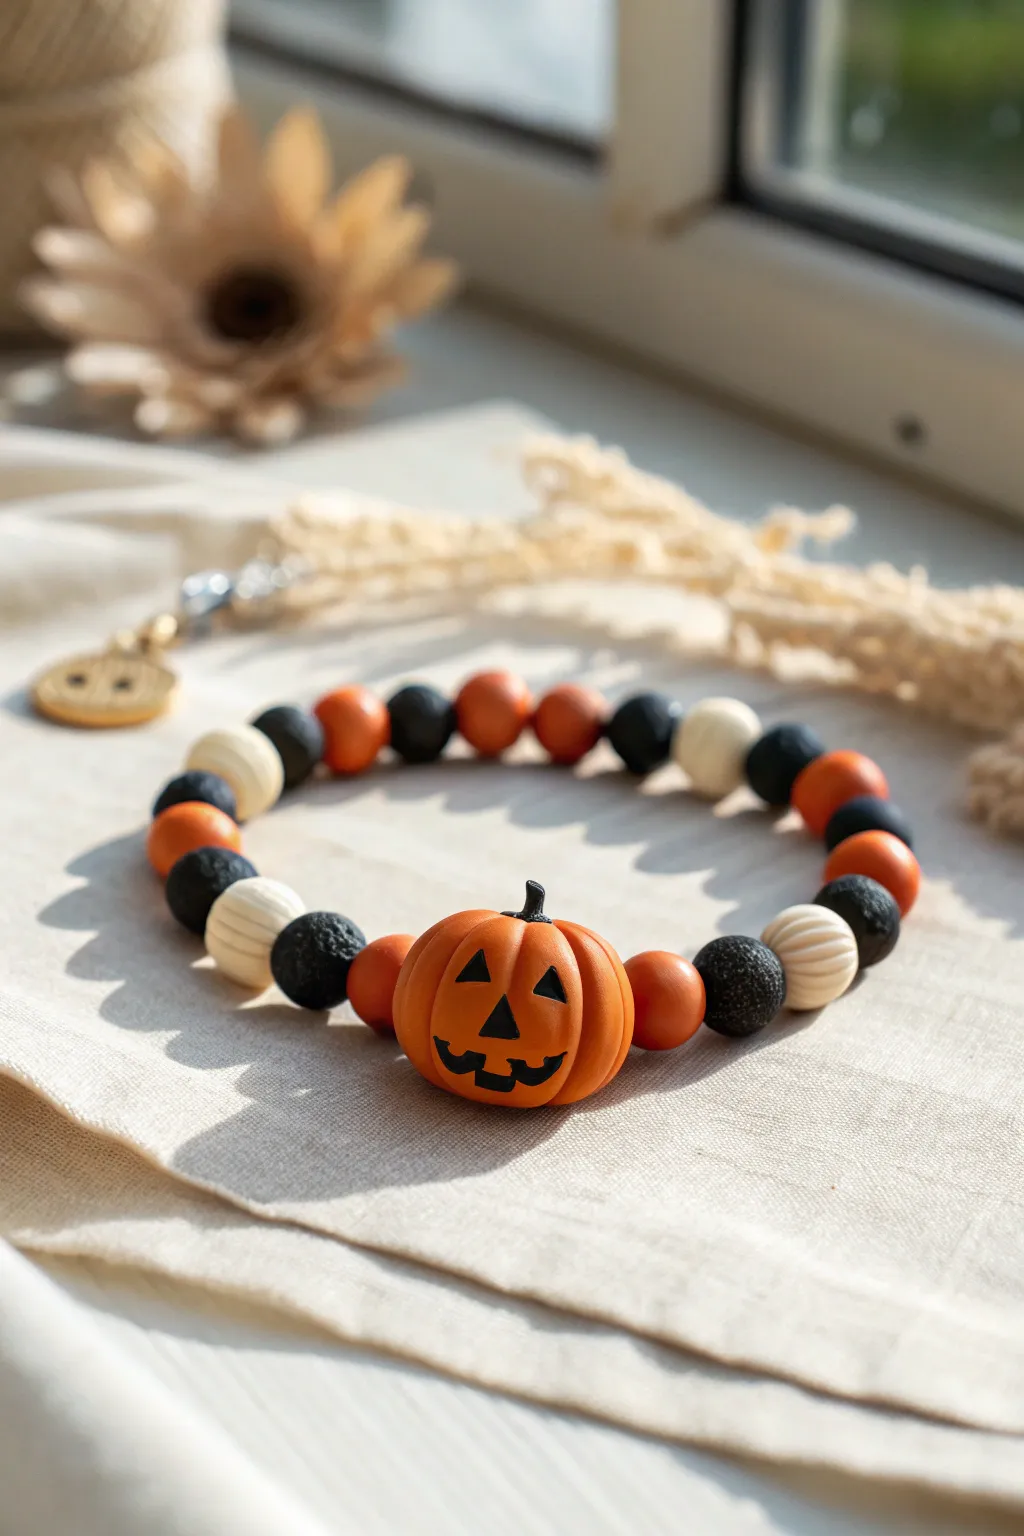
Trick-or-Treat Charm Cluster Bracelet
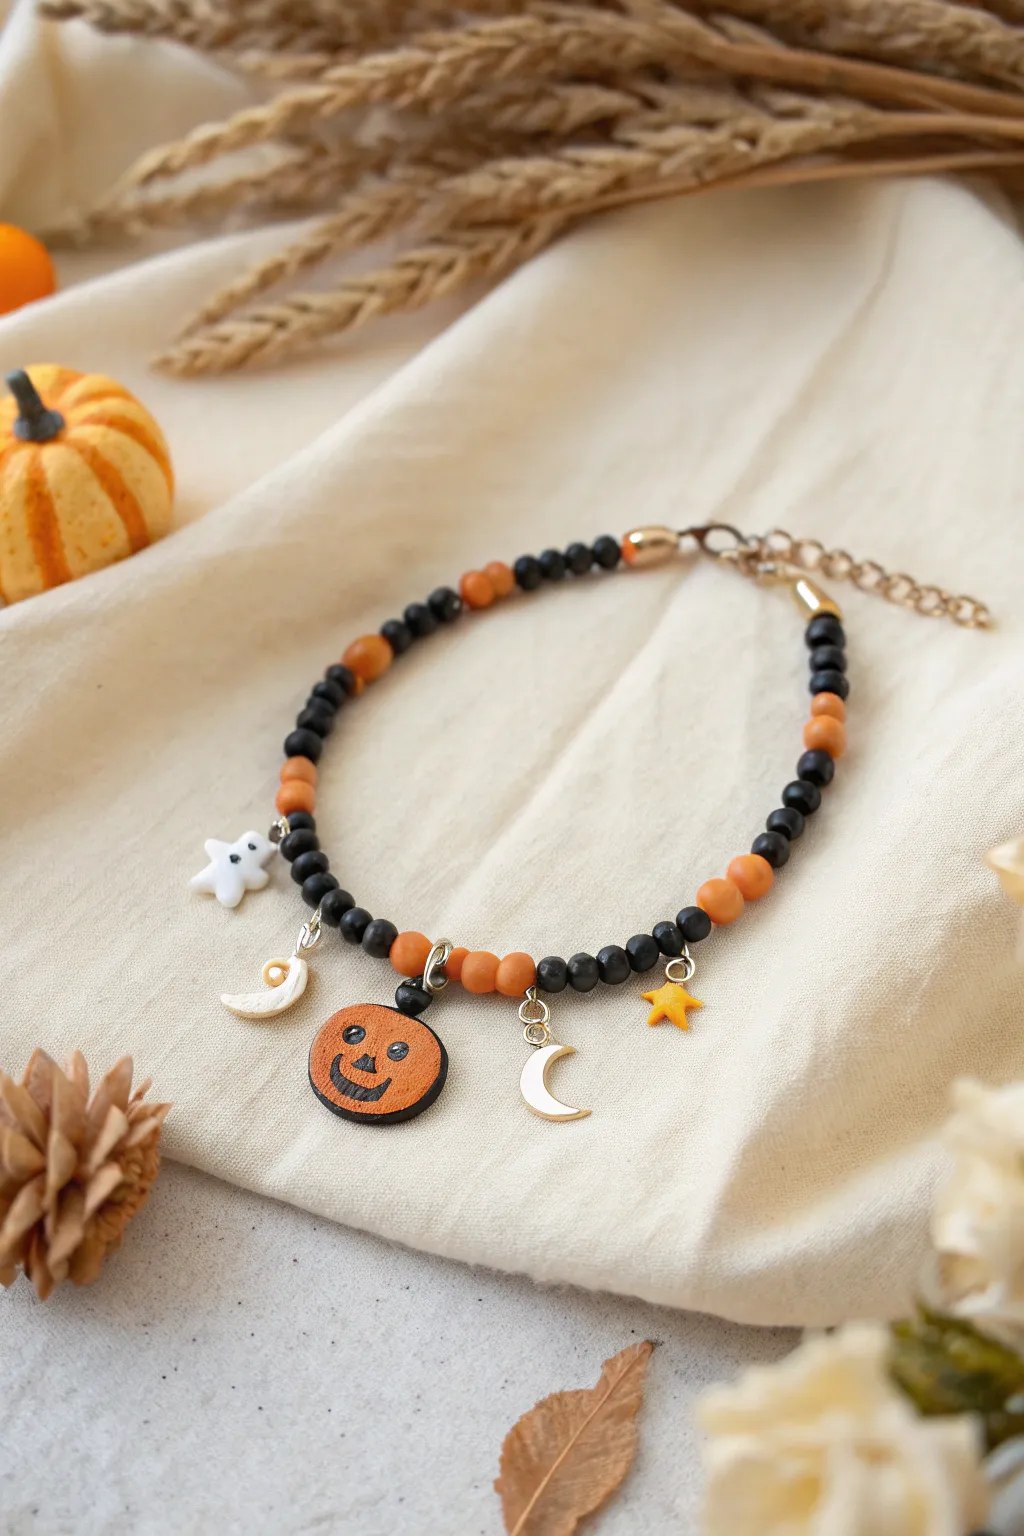
Embrace the playful side of Halloween with this charming beaded bracelet featuring handmade clay pendants. The mix of matte black and rustic orange beads creates the perfect backdrop for a friendly jack-o’-lantern, crescent moons, and a tiny ghost.
How-To Guide
Materials
- Polymer clay (orange, black, white, pale yellow)
- Matte black beads (4mm or 6mm)
- Rust orange or wooden beads (6mm)
- Beading wire or strong nylon cord
- Crimp beads and crimp covers
- Jump rings (silver and gold tones)
- Lobster clasp and extender chain
- Eye pins or small screw eyes
- Jewelry pliers (round nose, flat nose)
- Clay sculpting tools (dotting tool, needle tool)
- Clay varnish or glaze (optional)
Step 1: Sculpting the Charms
-
Shape the pumpkin:
Start with a small ball of orange clay, flattening it slightly into a disc shape. Use a needle tool to gently impress vertical lines around the edge to mimic pumpkin ribs. -
Add pumpkin features:
Roll tiny snakes of black clay for the mouth and small triangles for the eyes. Press them gently onto the orange disc to create a classic smiling jack-o’-lantern face. -
Create the ghost:
Form a small blob of white clay into a classic ghost shape with wiggly arms. Use a dotting tool to indent eyes and a mouth, filling the holes with tiny bits of black clay. -
Form the moons and star:
Cut or mold two small crescent shapes from white or pale yellow clay. Create a small star from orange or yellow clay. Insert eye pins or screw eyes into the top of every charm before baking. -
Bake the clay:
Place all your sculpted pieces on a baking tile or parchment paper. Bake according to your brand of polymer clay instructions (usually 275°F/135°C for 15-30 minutes).
Loose Eye Pins?
If an eye pin pulls out after baking, don’t panic. Put a tiny drop of cyanoacrylate (super glue) on the pin shaft and push it back into the hole. Let it cure fully.
Step 2: Finishing the Charms
-
Cool and inspect:
Let the pieces cool completely. If any clay edges are rough, gently sand them with a fine-grit nail buffer. -
Secure the hardware:
Check that your eye pins are secure. If any feel loose after baking, I usually pull them out, add a dab of superglue, and reinsert them for extra durability. -
Add jump rings:
Using two pairs of pliers, twist open your jump rings. Attach a jump ring to the loop of each charm. Notice the mix of silver and gold findings in the original design—feel free to mix metals for an eclectic look.
Step 3: Assembling the Bracelet
-
Measure your wire:
Cut a length of beading wire about 2 inches longer than your desired wrist size to allow room for crimping. -
Start the crimp:
Thread a crimp bead onto one end, followed by the loop of your extender chain. Loop the wire back through the crimp bead and flatten it tightly with flat-nose pliers. -
Begin the bead pattern:
String on your beads. A good pattern to replicate this look is about 6-8 black beads followed by 1 or 2 orange beads. Repeat this rhythm. -
String the center section:
Once you reach the middle, slide the charms directly onto the wire between beads if their jump rings are large enough, or simply attach them later to the wire itself. Space them out with 2-3 orange beads in between each charm. -
Finish the strand:
Continue the beading pattern until you reach the other end. Check the length against your wrist before closing. -
Close the bracelet:
Add a final crimp bead and your lobster clasp. Loop the wire back through the crimp bead and a few adjacent beads. Crimp it shut securely. -
Final adjustments:
Trim any excess wire close to the beads. If you didn’t string the charms directly, use pliers to attach their jump rings onto the wire between the designated beads now.
Glow Up
Swap the standard white clay for glow-in-the-dark polymer clay for the ghost and moon charms. It adds a fun surprise when the lights go out for trick-or-treating.
Wear your new festive accessory with pride or gift it to a friend who loves the spooky season
Haunted House Neutrals With a Pop of Orange
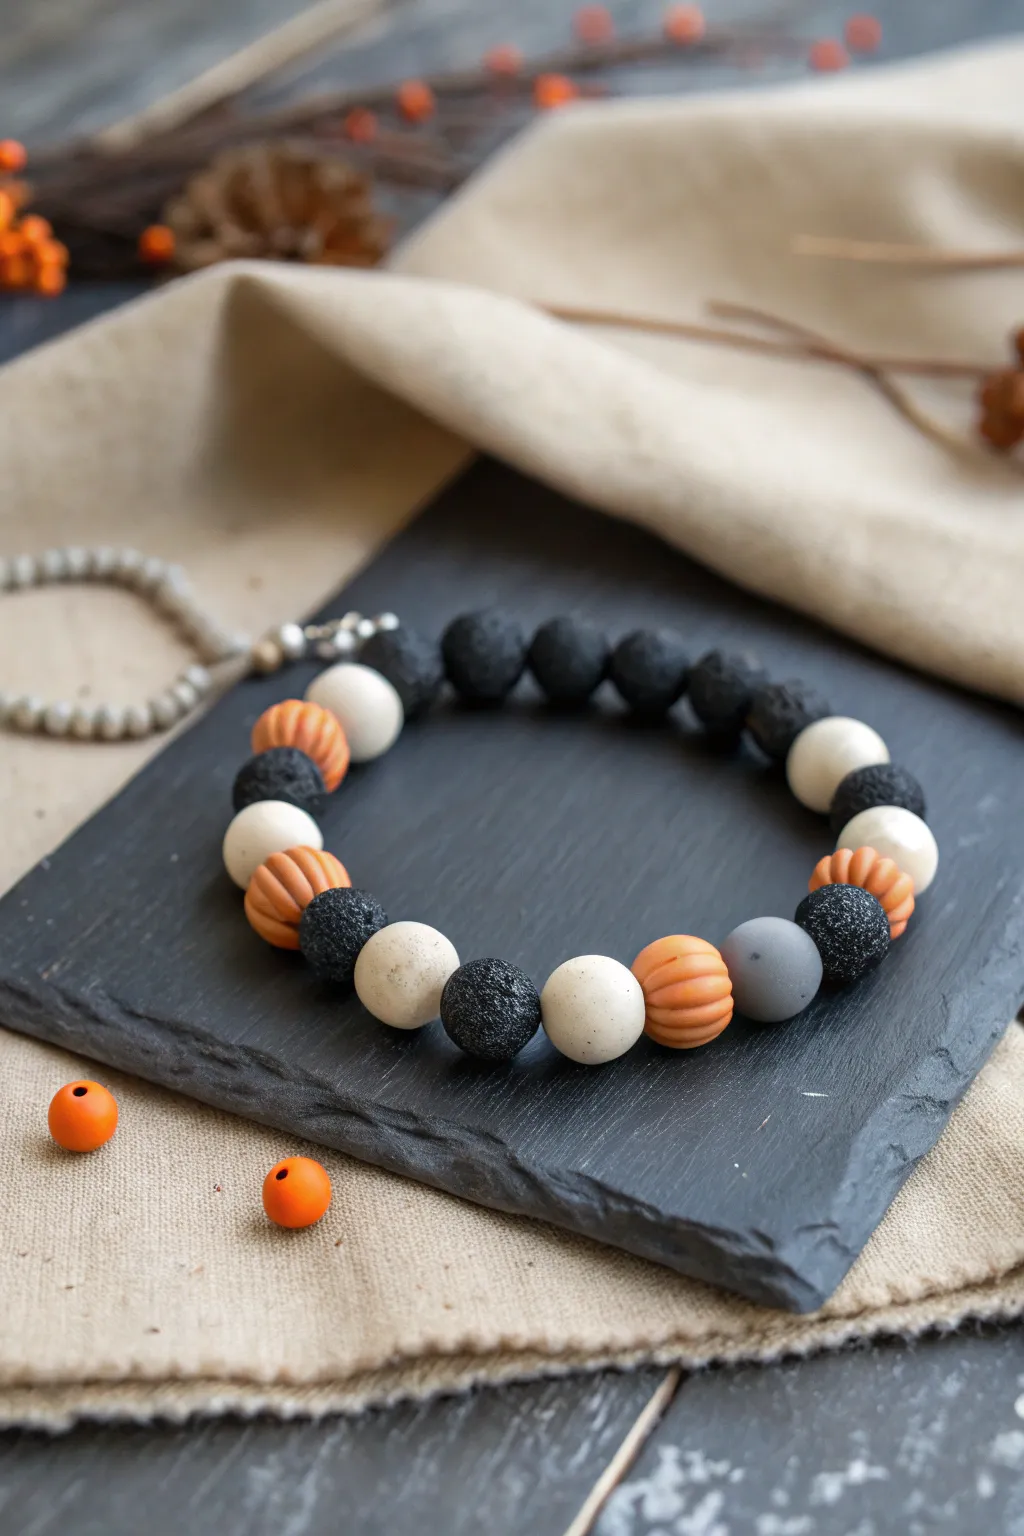
Capture the essence of a sophisticated Halloween with this textured bead bracelet. Blending matte black lava stones with handmade polymer clay pumpkins and speckled accents creates a wearable piece that is both festive and subtly elegant.
Step-by-Step Guide
Materials
- Polymer clay (white, pumpkin orange, black, grey)
- Black lava stone beads (10mm or similar size)
- Coarse black pepper or black sand (for speckling)
- Elastic jewelry cord (0.8mm or 1mm)
- Super glue or jewelry adhesive
- Sculpting tools (needle tool or toothpick)
- Clay roller
- Bead reamer or large needle (for piercing)
- Baking sheet and parchment paper
- Gloss glaze (optional)
Step 1: Crafting the Clay Beads
-
Condition the clay:
Start by warming and kneading your white, orange, and black polymer clay separately until they are soft and pliable. -
Create the speckled white mix:
Take a portion of white clay and mix in a pinch of coarse black pepper or fine black sand. Fold the clay repeatedly until the specks are evenly distributed, giving it a stone-like appearance. -
Roll the base spheres:
Roll small balls of your speckled white clay, aiming for a size that matches your lava beads, roughly 10mm in diameter. -
Shape the pumpkin beads:
Roll balls of orange clay slightly smaller than the white ones. Gently flatten the top and bottom just a tiny bit to create a squat pumpkin shape. -
Add pumpkin ribs:
Using a needle tool or toothpick, press vertical indentations around the sides of the orange balls to mimic the ribs of a pumpkin. -
Make the textured black beads:
Roll balls of black clay. To differentiate them from the lava stones, roll them over a piece of sandpaper or gently stipple the surface with a toothbrush for a subtle, grainy texture. -
Create the grey accent:
Mix a tiny dot of black clay into white clay to create a solid grey shade, then roll one single smooth bead for an asymmetrical accent pop. -
Pierce the holes:
Carefully insert your bead reamer or a thick needle through the center of each clay bead. Rotate the tool as you push through to prevent the clay from squishing out of shape. -
Bake the clay:
Arrange all your clay beads on a parchment-lined baking sheet. Bake according to your specific clay package’s instructions (usually around 275°F / 135°C for 15-30 minutes). -
Cool completely:
Allow the beads to cool fully before handling. I usually leave them on the tray for an hour so they harden completely.
Holes Closing Up?
If bead holes shrink during baking, re-drill them carefully with a small manual hand drill or twist a bead reamer through while the clay is still slightly warm.
Step 2: Assembly
-
Plan your pattern:
Lay out your design on a bead board or flat surface. Start with a section of 5-6 real lava stones, then alternate your handmade clay pumpkins, speckled white beads, and textured black beads. -
Pre-stretch the cord:
Cut a piece of elastic cord about 10-12 inches long. Give it a few firm tugs to pre-stretch it; this prevents the bracelet from sagging later. -
String the beads:
Thread your beads onto the elastic in your chosen pattern. If the holes in the clay beads are tight, wiggle the cord through patiently. -
Check the fit:
Wrap the strand around your wrist to ensure it fits comfortably. Add or remove a lava bead if adjustment is needed. -
Tie the knot:
Tie a secure surgeon’s knot—this is like a standard overhand knot but you loop the end through twice before pulling tight. -
Secure with glue:
Place a tiny drop of super glue or jewelry adhesive right on the knot. Let it dry for a few moments, keeping the beads away from the glue. -
Hide the knot:
Trim the excess cord ends closely, then gently tug the bracelet so the knot slides inside the hole of the nearest large bead.
Pro Tip: Aromatherapy
Add a drop of pumpkin spice or clove essential oil to the black lava beads. The porous stone holds the scent, turning your accessory into a diffuser.
Enjoy wearing your custom handcrafted jewelry that brings a touch of spooky elegance to any outfit
Glow-In-The-Dark Spooky Bracelet
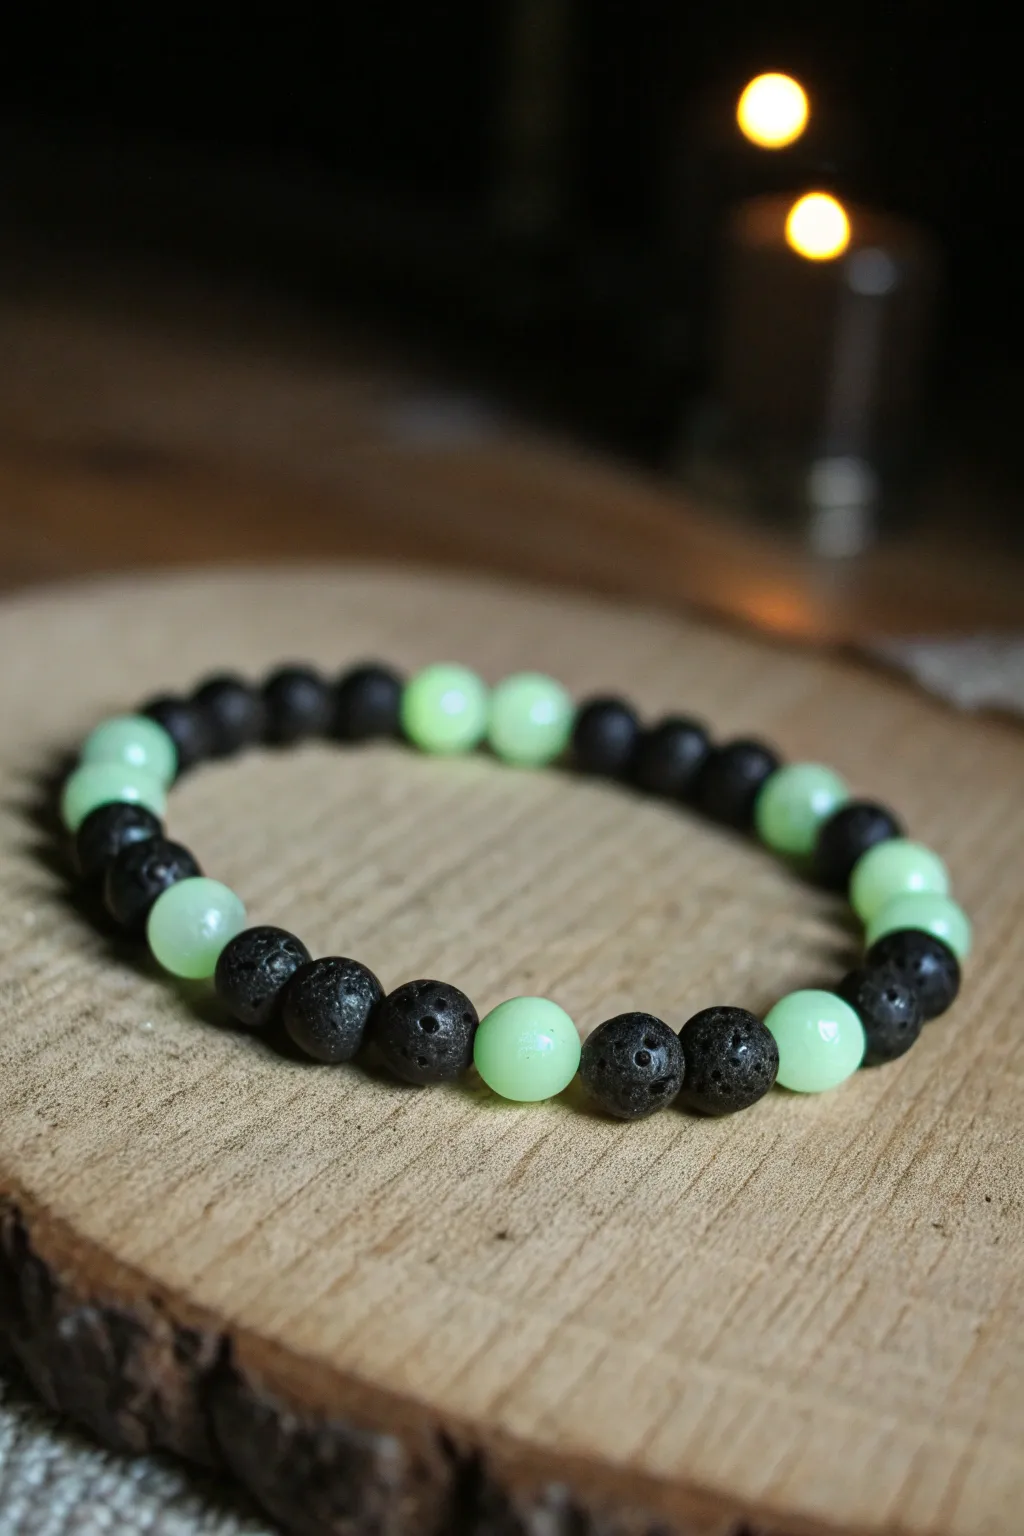
This versatile Halloween accessory combines the dark, textured look of porous lava rocks with eerie, translucent green beads that naturally glow in the dark. The contrast between jagged, matte black and smooth, luminous green creates a perfect spooky-yet-stylish vibe for October nights.
Step-by-Step Tutorial
Materials
- Black lava rock beads (approx. 8mm or 10mm)
- Glow-in-the-dark polymer clay (translucent green or yellow-green)
- Cornstarch or baby powder (for rolling)
- Bead piercing pin or needle tool
- Baking sheet with parchment paper
- Oven (for baking clay)
- Sandpaper (fine grit, optional)
- Gloss glaze (optional for extra shine)
- Strong elastic bead cord (0.8mm or 1.0mm recommended)
- Scissors
Step 1: Crafting the Glow Beads
-
Condition the glow clay:
Start by taking a chunk of your glow-in-the-dark polymer clay and working it in your hands until it becomes soft, pliable, and warm. -
Portion the clay:
Pinch off small pieces of clay and roll them into a long snake shape, roughly the same thickness as your lava beads. -
Cut equal segments:
Use a clay blade or knife to slice the snake into equal segments to ensure your beads will be a uniform size. -
Roll spheres:
Roll each segment between your palms to form perfect spheres. If the clay gets sticky, I like to dust my hands lightly with a bit of cornstarch. -
Create the holes:
Gently hold a sphere without squishing it and push your bead piercing tool through the center. Rotate the tool as you push to keep the shape round. -
Refine the openings:
Poke the tool through from the opposite side as well to ensure a clean, wide opening for the elastic cord later. -
Bake the beads:
Arrange the clay beads on a parchment-lined baking sheet and bake according to the manufacturer’s instructions (usually around 275°F for 15-30 minutes). -
Cool and inspect:
Let the beads cool completely before handling. Check for any rough edges and lightly sand them if necessary.
Essential Aromatherapy
Since lava rocks are porous, you can add a drop of essential oil (like pumpkin spice or patchouli) to the black beads. They will act as a natural diffuser all day long.
Step 2: Assembling the Design
-
Measure the proper length:
Cut a piece of elastic cord about 10-12 inches long, giving yourself plenty of extra slack for tying complications. -
Stretch the cord:
Pre-stretch your elastic by pulling it firmly several times. This prevents the bracelet from sagging or loosening after the first wear. -
Plan the pattern:
Lay out your design on a bead board or towel. The image shows an irregular pattern: groupings of 3-7 black lava beads separated by single or double glow beads. -
String first section:
Begin threading. For this look, start with a grouping of three black lava beads. -
Add a glow accent:
Thread on a single glowing clay bead next. -
Continue the pattern:
Add another cluster of black porous beads, followed by one or two glow beads. Varying the number of glow beads (some single, some pairs) adds an organic feel. -
Check fitment:
Wrap the strung beads around your wrist to check the size. Add or remove lava beads as needed to get a comfortable fit. -
Secure the ends:
Tie the elastic ends together using a surgeon’s knot (loop it through twice before pulling tight) for maximum security. -
Hide the knot:
Apply a tiny dab of jewelry glue to the knot, let it dry for a moment, and then gently tug the knot inside the hole of one of the lava beads to hide it. -
Trim excess:
Carefully snip off the excess elastic cord close to the bead, being extremely careful not to cut the main knot.
Level Up: Texture Match
Before baking your glow beads, gently roll them over a piece of coarse sandpaper or a clean rock surface. This adds a pitted texture that matches the lava stones perfectly.
Charge your finished bracelet under a bright lamp for a few minutes and watch it light up the dark
Mini Clay Charm Beads You Sculpt Yourself
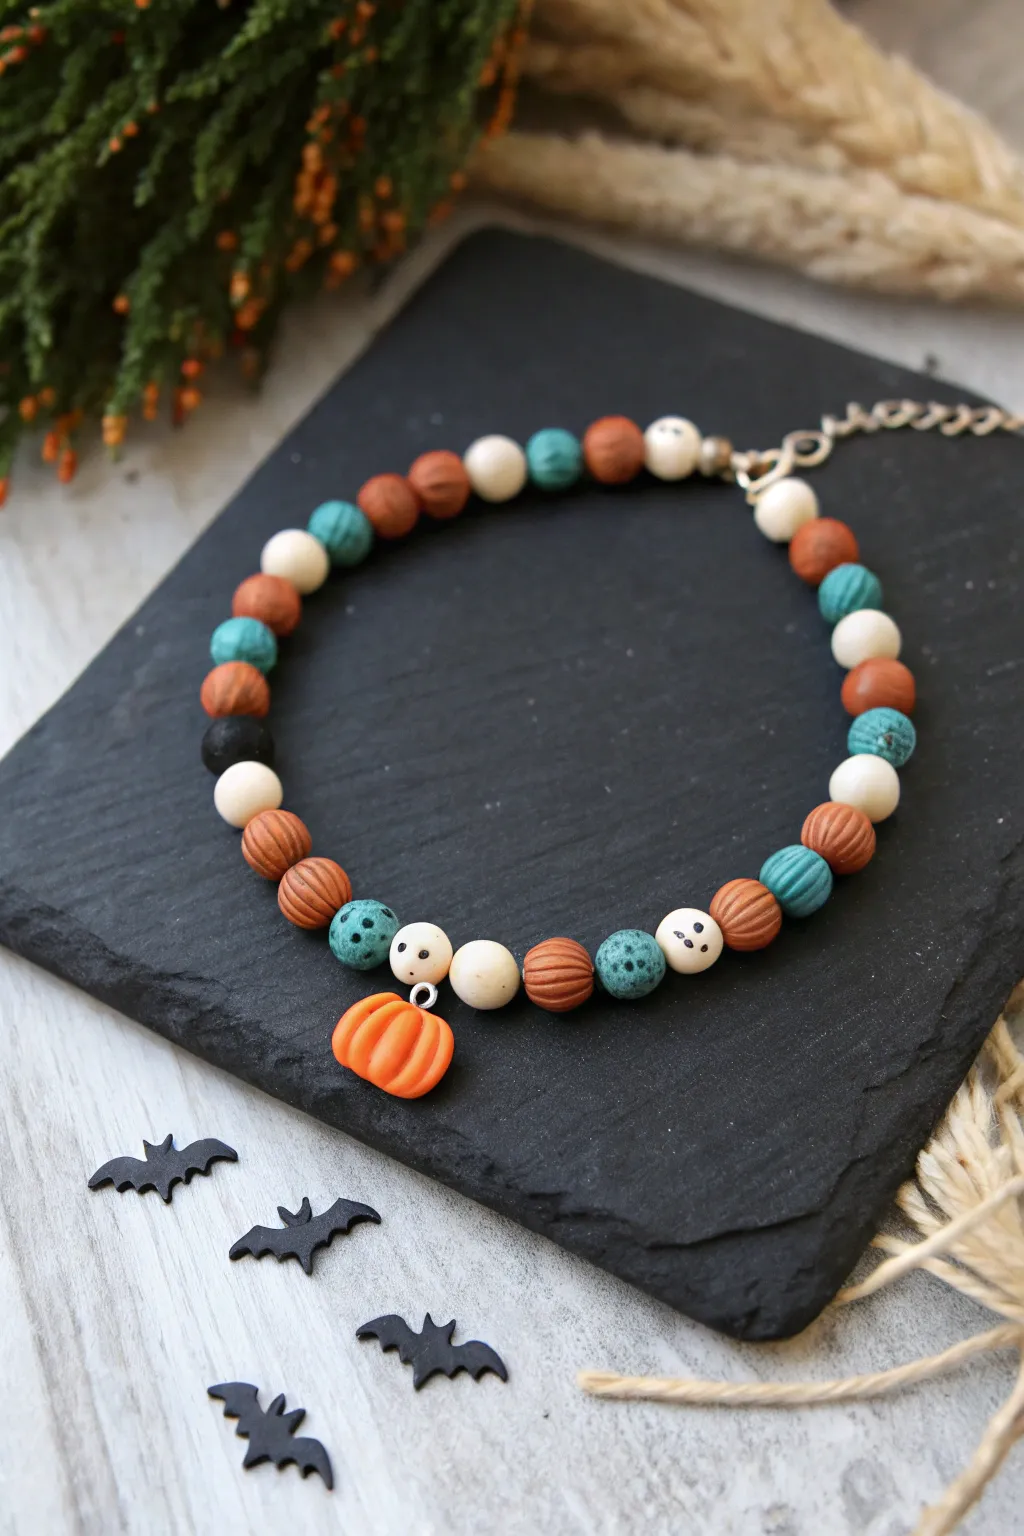
Embrace the Halloween spirit with this handmade polymer clay bracelet featuring miniature textured pumpkins, ghostly white beads, and speckled teal accents. This project combines simple sculpting techniques with bead stringing for a charming accessory that’s perfect for autumn.
How-To Guide
Materials
- Polymer clay (terracotta/dark orange, teal/turquoise, white, black)
- Black acrylic paint or black polymer clay (for ghost faces)
- Gloss glaze or polyurethane varnish (optional)
- Beading wire or strong cord
- Crimp beads and crimp tool
- Jump rings (small)
- Lobster claw clasp and extender chain
- Needle tool or toothpick
- Small dotting tool or ball stylus
- Clay roller or pasta machine
- Blade or craft knife
- Oven for baking
Step 1: Sculpting the Pumpkin Beads
-
Prepare the Clay:
Condition your terracotta or dark orange polymer clay until it is soft and pliable. Roll it into a smooth, even log to ensure your beads will be similar in size. -
Size the Beads:
Cut the log into equal segments using your blade. Roll each segment into a round ball between your palms, aiming for a diameter of about 8-10mm. -
Add Texture:
To create the pumpkin ridges, hold a clay ball gently and press the side of a needle tool or toothpick vertically into the clay. Repeat this all around the bead to mimic the segments of a pumpkin. -
Pierce the Holes:
Carefully insert your needle tool through the center of each pumpkin bead to create the stringing hole. Rotate the tool as you push to avoid distorting the shape.
Step 2: Creating the Specialty Beads
-
Mix the Teal Texture:
Take your teal clay and mix in a very small amount of black sand or finely cracked black pepper for a speckled ‘stone’ look. Alternatively, you can mix in tiny flecks of black clay. Roll these into smooth, round beads. -
Texture the Teal Beads:
Using a stiff toothbrush or a textured sponge, gently tap the surface of the teal beads to give them a rough, stone-like appearance. Pierce holes through the center. -
Form the Ghost Beads:
Condition white polymer clay and roll it into smooth, round beads slightly smaller than your pumpkin beads. Pierce them centered. -
Add Ghost Details:
Using a very small dotting tool dipped in black paint (or tiny bits of black clay), add two eyes and a mouth to several of the white beads to create cute ghost faces.
Sticky Situation
If your needle tool gets stuck while piercing beads, dust it with a little cornstarch or dip it in water before inserting it into the clay.
Step 3: Making the Pumpkin Charm
-
Shape the Charm:
Create a slightly larger, flattened pumpkin shape from the orange clay. Use your needle tool to create deep indentations for the pumpkin ribs. -
Add Hardware:
Insert a metal eye pin into the top of the pumpkin charm before baking. I like to add a tiny drop of liquid clay or Bake & Bond to the pin to ensure it stays secure. -
Bake Everything:
Arrange all your beads and the charm on a tile or baking sheet. Bake according to the manufacturer’s instructions for your specific brand of clay (usually around 275°F/130°C for 15-30 minutes). Let them cool completely.
Glow Up
Use glow-in-the-dark polymer clay for the white ghost beads instead of plain white. This makes your bracelet extra spooky when the lights go out!
Step 4: Assembly
-
Prepare the Wire:
Cut a length of beading wire approximately 9-10 inches long to allow extra room for finishing the ends. -
Plan your Pattern:
Lay out your beads on a bead board or towel. A nice pattern is: pumpkin, teal stone, pumpkin, white ghost, repeating. Check the length against your wrist. -
String the Beads:
Thread the beads onto the wire following your pattern. Ensure the ghost faces are all pointing outward or in a consistent direction. -
Attach the Charm:
Find the center point of your bracelet. Attach the pumpkin charm to the wire between two center beads using a jump ring. -
Finish the Ends:
Thread a crimp bead onto one end of the wire, followed by one half of the clasp or a jump ring. Loop the wire back through the crimp bead and use your crimping tool to secure it flattened. -
Attach Clasp:
Repeat the crimping process on the other end, attaching the lobster claw clasp or the extender chain. Trim any excess wire close to the crimp bead.
Enjoy wearing your custom spooky accessory all season long
Mismatch Halloween Bracelet Set for Trading
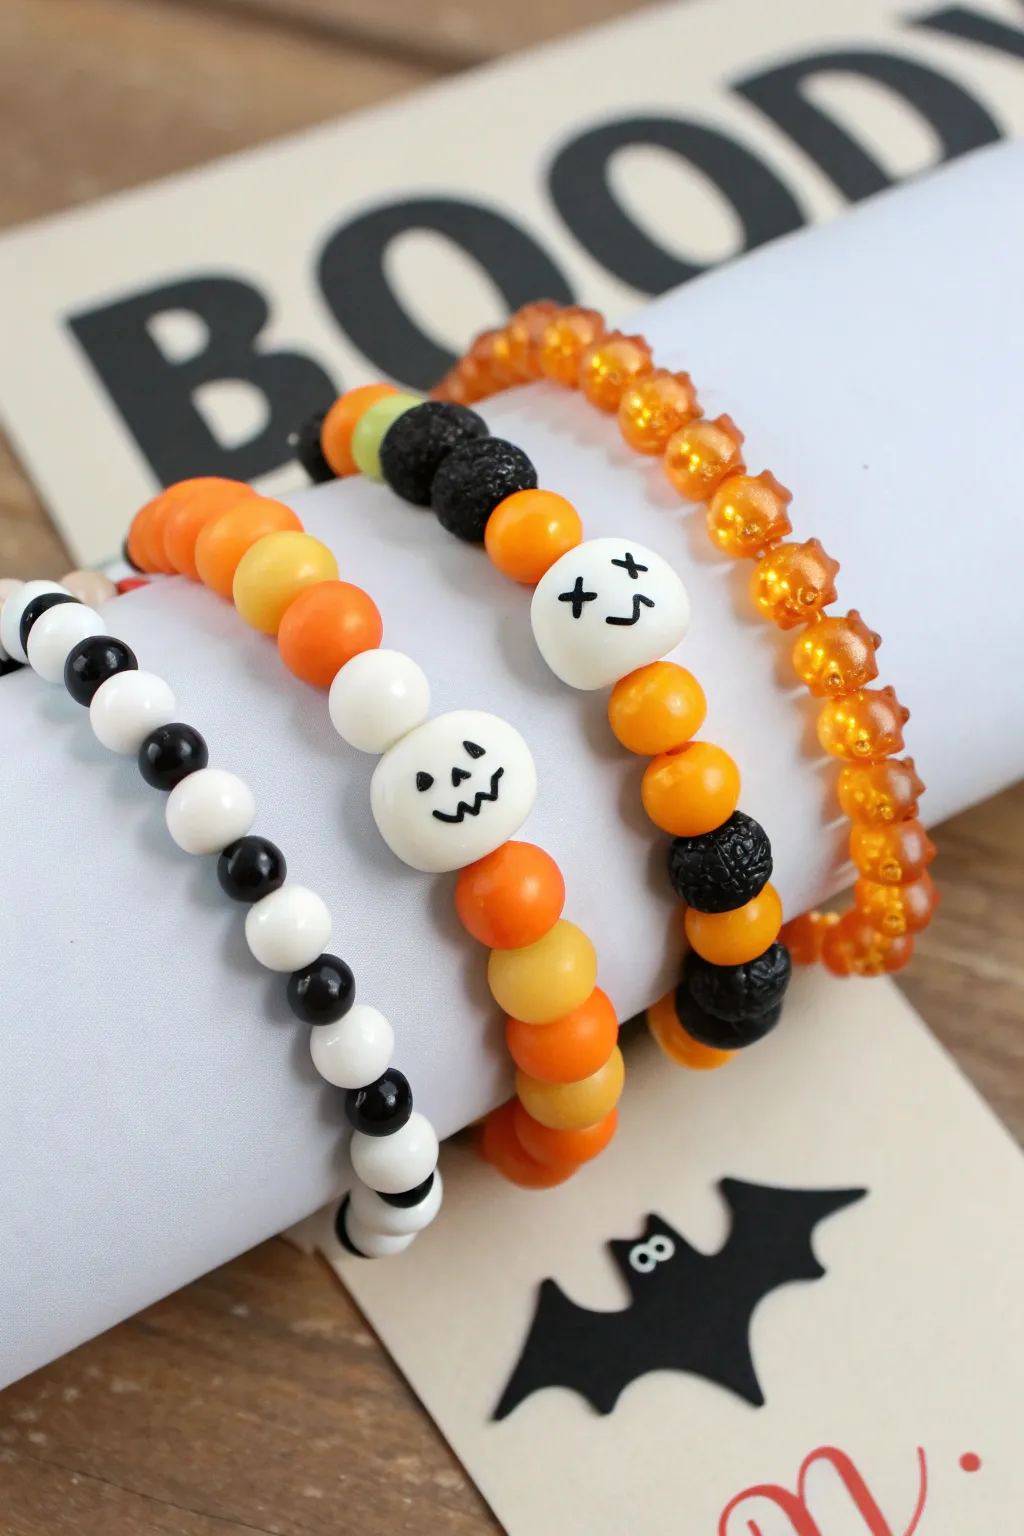
Embrace the Halloween spirit with this eclectic set of four mismatching yet perfectly coordinated beaded bracelets. Featuring classic candy corn colors, playful ghost and pumpkin characters, and a mix of textures from smooth beads to rugged lava stones, this stack is the ultimate festive accessory.
Detailed Instructions
Materials
- Elastic stretch cord (0.8mm or 1mm recommended)
- Round beads, 8mm (opaque white, black, orange, yellow)
- Small translucent faceted orange beads (approx. 4-6mm)
- Black lava stone beads (8mm or 10mm)
- Polymer clay character beads (white pumpkin face, white ghost/skull face)
- Scissors
- Super glue or jewelry cement (optional)
- Beading needle (optional, for easier threading)
- Tape or bead stopper
Step 1: Preparation & Setup
-
Measure and cut:
Cut four lengths of elastic cord, each about 10-12 inches long. This generous length gives you plenty of room to knot securely later without struggling with tight ends. -
Pre-stretch the cord:
Hold each piece of cord firmly and give it a few gentle tugs. Pre-stretching prevents the bracelets from stretching out and becoming loose after the first few times you wear them. -
Secure the ends:
Place a piece of tape or a bead stopper at one end of each cord to stop your beads from sliding right off as you work.
Knot Slipping?
If your elastic knots won’t hold, try a surgeon’s knot: pass the end through the loop twice instead of once before pulling tight. This extra friction locks it in place.
Step 2: Creating the Monochome B&W Bracelet
-
Start the pattern:
For the first bracelet, begin threading alternating black and white opaque beads. I find a pattern of two white, one black creates a nice rhythm, though simple alternating works too. -
Check length:
Continue until the strand measures approximately 6.5 to 7 inches, or comfortably fits around your wrist. -
Tie it off:
Tie a surgeon’s knot (loop the cord through twice before pulling tight). Add a tiny dot of glue to the knot, pull tight, let dry, and trim the excess cord.
Hiding the Knot
Plan your design so the knot ends up next to a bead with a large hole (like the lava stone). You can gently tug the knot inside that bead for a seamless finish.
Step 3: Assembling the Candy Corn Character Bracelet
-
Centerpiece focus:
For the second bracelet, locate your polymer clay pumpkin face bead. This will be the focal point. -
Build the gradient:
Create a candy corn gradient pattern radiating out from the center bead. Thread three white beads, then transition to orange beads, then yellow beads. -
Repeat the pattern:
Continue this color blocking around the rest of the bracelet to mimic the look of the classic Halloween treat. -
Finish the strand:
Once the length matches the first bracelet, tie off with a surgeon’s knot, glue, and trim.
Step 4: Constructing the Spooky Lava Bead Bracelet
-
Add the ghost bead:
Thread your white character bead with the ‘X’ eyes onto the third cord. Surround it immediately with bright orange opaque beads. -
Incorporate texture:
After about four or five orange beads, add a textured black lava stone bead. This contrast in texture creates visual interest against the smooth plastic beads. -
Alternate colors:
Continue the pattern, perhaps adding a small splatter of green or yellow beads near the back to break up the orange and black, as seen in the inspiration piece. -
Secure the knot:
Knot firmly, apply adhesive to the knot, and trim the ends close.
Step 5: Stringing the Translucent Orange Bracelet
-
Select faceted beads:
For the final bracelet, use the translucent, faceted orange beads. These catch the light differently than the opaque beads. -
Simple stringing:
String these beads continuously. Since these are smaller, you will need more beads to reach the same length as the previous three bracelets. -
Final knotting:
Tie your final surgeon’s knot. Hide the knot inside the hole of one of the beads if the hole size permits. -
Final check:
Give all bracelets a gentle tug to ensure knots are secure before wearing them out.
Now you have a delightfully spooky stack ready to trade or wear all October long