When I’m in a Halloween clay mood, I always reach for the cute stuff first—tiny characters, sweet faces, and classic spooky shapes that aren’t actually scary. These ideas are all about beginner-friendly wins you can make small enough for charms, earrings, or little desk buddies.
Classic Jack-o’-Lantern Mini Charm
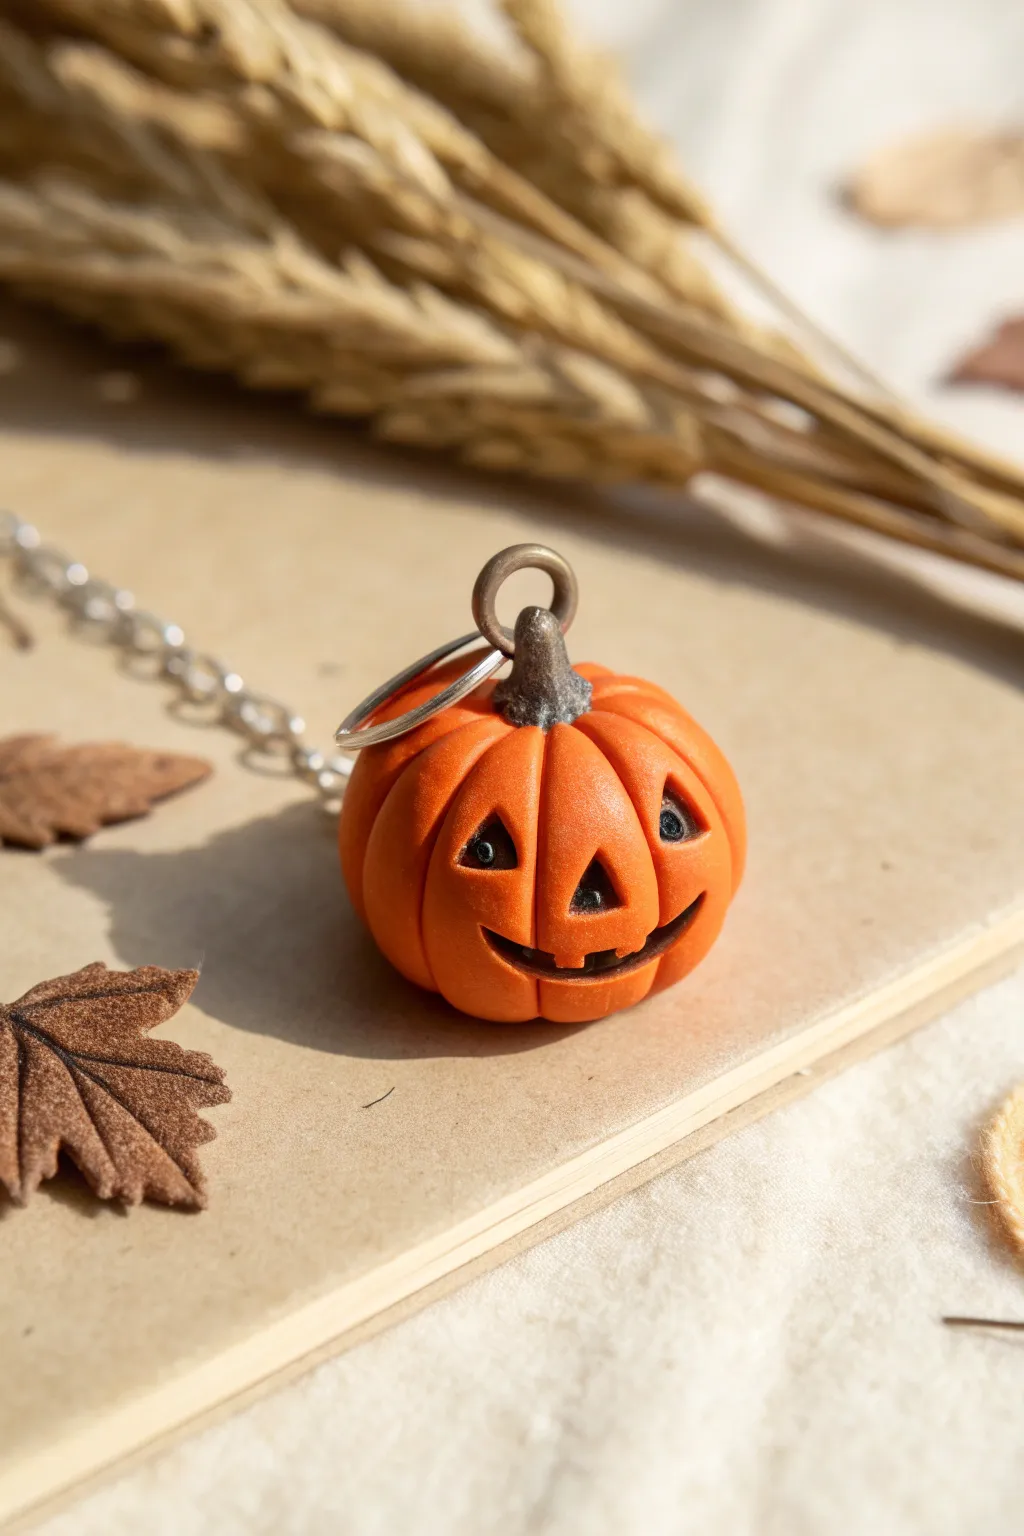
Capture the spirit of Halloween with this delightfully petite pumpkin charm, perfect for necklaces or keychains. Its classically carved face features deep-set eyes and a toothy grin, all crafted with precise detailing on vibrant orange polymer clay.
Detailed Instructions
Materials
- Orange polymer clay (true pumpkin shade)
- Brown polymer clay (for the stem)
- Black acrylic paint
- Fine-grit sandpaper
- Needle tool or dental pick
- Small ball stylus tool
- Razor blade or craft knife
- Metal eye pin screw
- Gloss or matte varnish (optional)
- Fine paintbrush
Step 1: Shaping the Base
-
Condition the clay:
Start by warming the orange polymer clay in your hands, kneading it until it is soft, pliable, and free of air bubbles or cracks. -
Form the sphere:
Roll the clay into a smooth, tight ball about the size of a large marble or a small grape, ensuring the surface is perfectly round. -
Flatten slightly:
Gently press the ball onto your work surface to flatten the bottom just enough so it stands upright without rolling away. -
Create the segments:
Using the back of your craft knife or a needle tool, press vertical indentations from the top center down to the bottom, creating the classic pumpkin ridges all around the sphere. -
Soften the ridges:
Gently rub your finger over the indented lines to smooth any sharp edges, giving the pumpkin a plump, organic appearance.
Antiquing Made Easy
For that realistic shadowy look, don’t skip the paint wash! Use burnt umber instead of pure black for a softer, earthier ‘fresh from the patch’ appearance.
Step 2: Carving the Face
-
Mark the features:
Lightly sketch the position of the triangular eyes, nose, and smiling mouth onto the clay surface with a needle tool before cutting. -
Indent the eyes:
Press a small triangular tool or the tip of your knife deep into the clay to form the eye sockets; leave the bottom of the socket rough for texture. -
Add pupils:
Roll two tiny specks of black clay (or paint later) and press them into the corners of the eye sockets to create a lively gaze. -
Carve the nose:
Create a smaller triangle for the nose centered below the eyes, pressing deeply to match the depth of the eye sockets. -
Sculpt the mouth:
Using a needle tool, carefully carve out a wide, crescent smile. I find it easier to remove the clay in small bits rather than one long strip. -
Refine the teeth:
Use the needle tool or a very small blade to square off sections within the mouth to create the look of carved teeth, one on the bottom and perhaps one on the top.
Fingerprint Troubles?
If you notice fingerprints on your smooth orange clay before baking, lightly brush the surface with a swirl of baby oil or cornstarch to smooth them away.
Step 3: Adding the Stem & Hardware
-
Form the stem:
Take a small pinch of brown clay and roll it into a cone shape. Twist it slightly to give it a withered, natural look. -
Texture the stem:
Scratch vertical lines into the brown clay using your needle tool to mimic the woody texture of a pumpkin stem. -
Attach the stem:
Press the stem firmly onto the top center of the pumpkin. You can use a tiny dab of liquid clay or bake-and-bond for extra security. -
Insert the eye pin:
Carefully screw a metal eye pin into the center of the stem. Ensure it goes deep enough to hold the weight of the charm.
Step 4: Finishing Touches
-
Bake the charm:
Bake the piece according to your polymer clay package instructions (usually 275°F/135°C for about 15-20 minutes depending on thickness). -
Cool down:
Let the pumpkin cool completely before handling it to prevent leaving fingerprints on the warm clay. -
Apply the wash:
Dilute black acrylic paint with water and brush it over the entire pumpkin, letting it settle into the grooves and carved features. -
Wipe away excess:
Immediately wipe the surface with a damp paper towel or cloth. This leaves the dark paint only in the ridges and face carving, highlighting the details. -
Seal:
Once dry, apply a thin coat of matte varnish to protect the paint job, or leave it natural for a matte clay finish.
Now you have a spooky little friend ready to hang on a chain or add to your Halloween decor collection


Chubby Pumpkin Patch Minis in Mixed Sizes
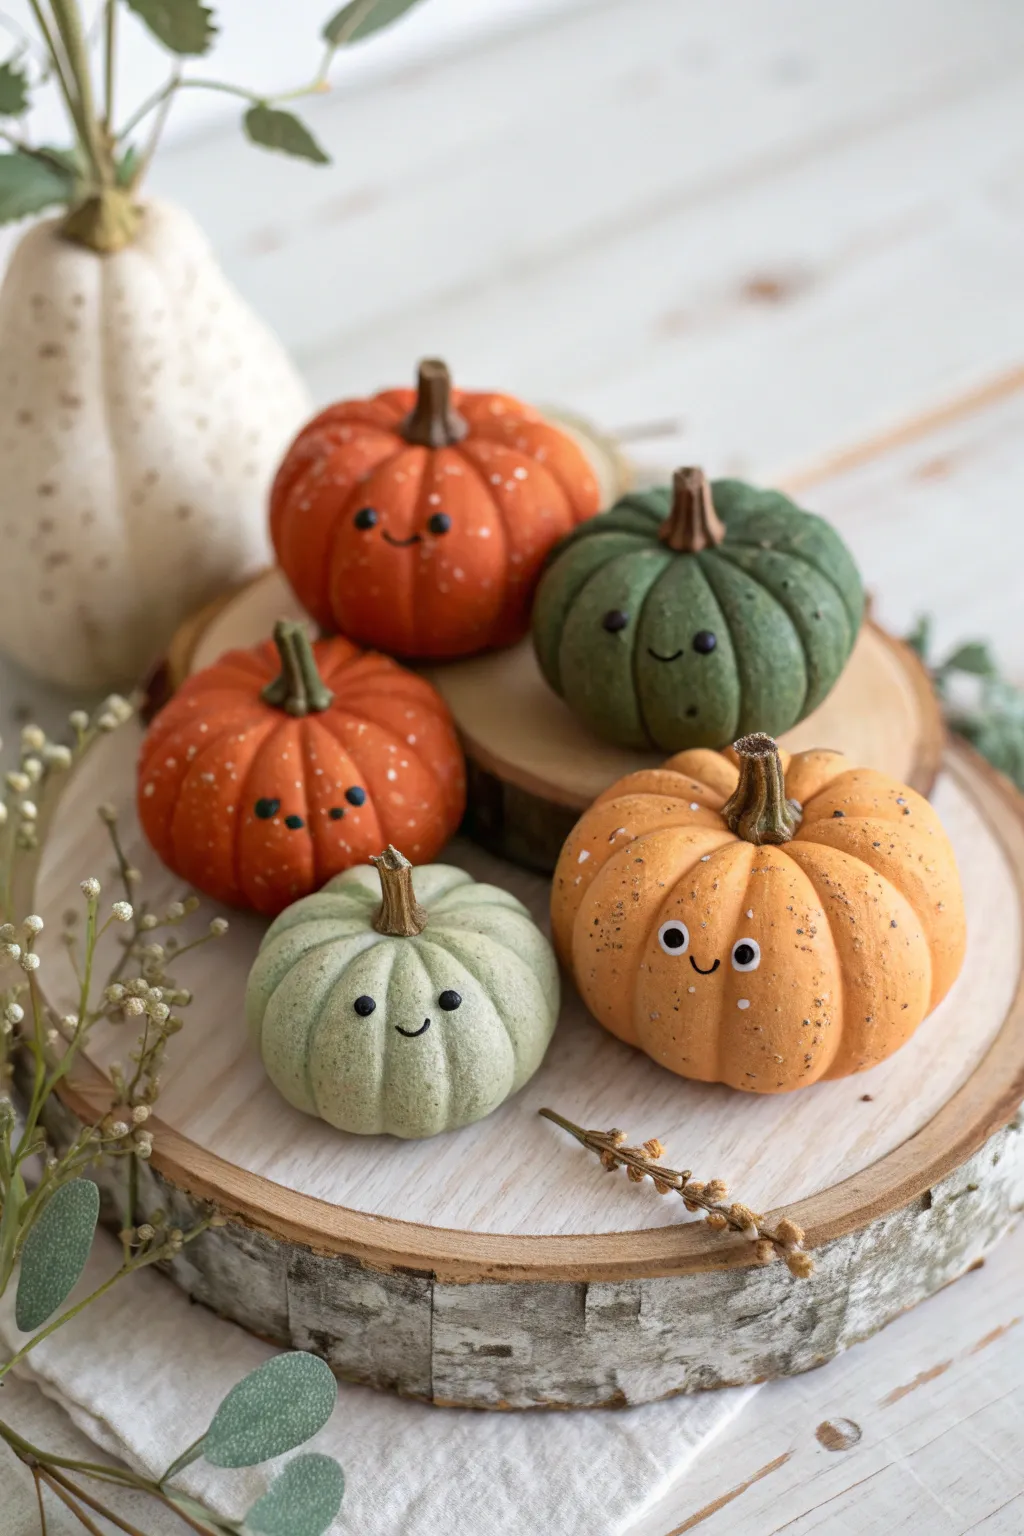
Create a charming autumn harvest with these delightful polymer clay pumpkins, each featuring a unique personality and expression. Their mixed sizes, speckled textures, and chubby segments make them perfect for nestling onto a festive tiered tray or wooden slice display.
Step-by-Step
Materials
- Polymer clay (burnt orange, soft peach, sage green, forest green, and dark brown)
- Acrylic rolling pin
- Pottery needle tool or toothpick
- Ball stylus tool (small)
- Chalk pastels (brown, ochre, orange) for shading
- Soft paintbrush
- Old toothbrush
- Brown and white acrylic paint
- Gloss glaze or UV resin (optional for eyes)
- Aluminum foil (for armature on larger pumpkins)
- Baking sheet and parchment paper
Step 1: Shaping the Bodies
-
Condition the clay:
Start by thoroughly kneading your orange, peach, and green clay blocks separately until they are soft, pliable, and free of cracks. Warm hands help this process significantly. -
Form the base spheres:
Roll balls of clay in varying sizes. For the larger orange pumpkins, form a core of tightly scrunched aluminum foil first and cover it with clay to save material and ensure even bulk. -
Create the segments:
Using your needle tool or the dull side of a dull knife, press vertical indentations from the top center to the bottom center all way around the ball. I find about 6-8 lines create the chubby look shown. -
Soften the edges:
Gently rub your finger over the indented lines to smooth the sharp grooves. You want the segments to look pillowy and puffed out, not sliced. -
Flatten slightly:
Press each pumpkin gently onto your work surface to create a flat bottom for stability, and tap the top lightly to give it a squat, realistic pumpkin silhouette. -
Indent the stem area:
Use a medium ball tool to press a deep indentation into the very top center of each pumpkin where the stem will eventually sit.
Keep it Clean
Baby wipes are essential! Clean your hands and tools thoroughly when switching from the dark green or brown clays to the light peach colors to prevent smearing.
Step 2: Adding Texture & Stems
-
Apply speckles:
Dip an old toothbrush into slightly watered-down brown acrylic paint. Run your thumb over the bristles to flick tiny speckles onto the raw clay bodies for an organic, speckled eggshell effect. -
Adding depth with pastels:
Scrape some brown or dark orange chalk pastel into a powder. With a soft brush, dust this powder into the grooves of the segments and around the top indentation to emphasize the chubby shape. -
Sculpt the stems:
Roll small snakes of brown clay. Taper one end and twist the clay slightly to mimic wood grain texture. -
Attach the stems:
Insert the thicker end of the stem into the top indentation. Use your needle tool to blend the clay at the seam lightly, or use a dab of liquid clay for extra security, giving the tip a jaunty curve.
Level Up: Vine Details
Roll extremely thin coils of green clay and wrap them around a toothpick to create spiraled tendrils. Attach these near the stem base before baking for extra realism.
Step 3: Faces & Finishing
-
Mark eye placement:
Decide on the personality for each pumpkin. Use a needle tool to faintly mark where the eyes and mouth will go before committing with clay. -
Create clay eyes:
For the simple eyes, roll tiny balls of black clay and press them flat onto the pumpkin face. I prefer using a tiny dab of liquid clay or water to help them adhere. -
Add googly-style eyes:
For the expressive ‘googly’ style eyes (like the peach pumpkin), place a flat white clay circle first, then add a smaller black dot on top, positioning the pupil to look sideways or up. -
Shape the mouths:
Roll an incredibly thin thread of black clay for the smile. Curve it gently into a ‘U’ shape and press it onto the face between the eyes using a tool, not your fingers, to keep the shape crisp. -
Bake the batch:
Place all pumpkins on a parchment-lined baking sheet. Bake according to your specific clay manufacturer’s instructions (usually 275°F for 15-30 minutes depending on thickness). -
Cool and highlight:
Allow them to cool completely. Once hard, add a tiny dot of white paint to the black clay eyes for a ‘sparkle’ of life. -
Varnish touches:
For a finished look, brush a little gloss glaze or UV resin just over the eyes to make them shine, leaving the pumpkin body with its natural matte clay finish.
Arrange your charming little patch on a rustic wood slice and enjoy the cozy autumn vibes they bring to your space


Sweet Ghost Figurines With Dot Eyes
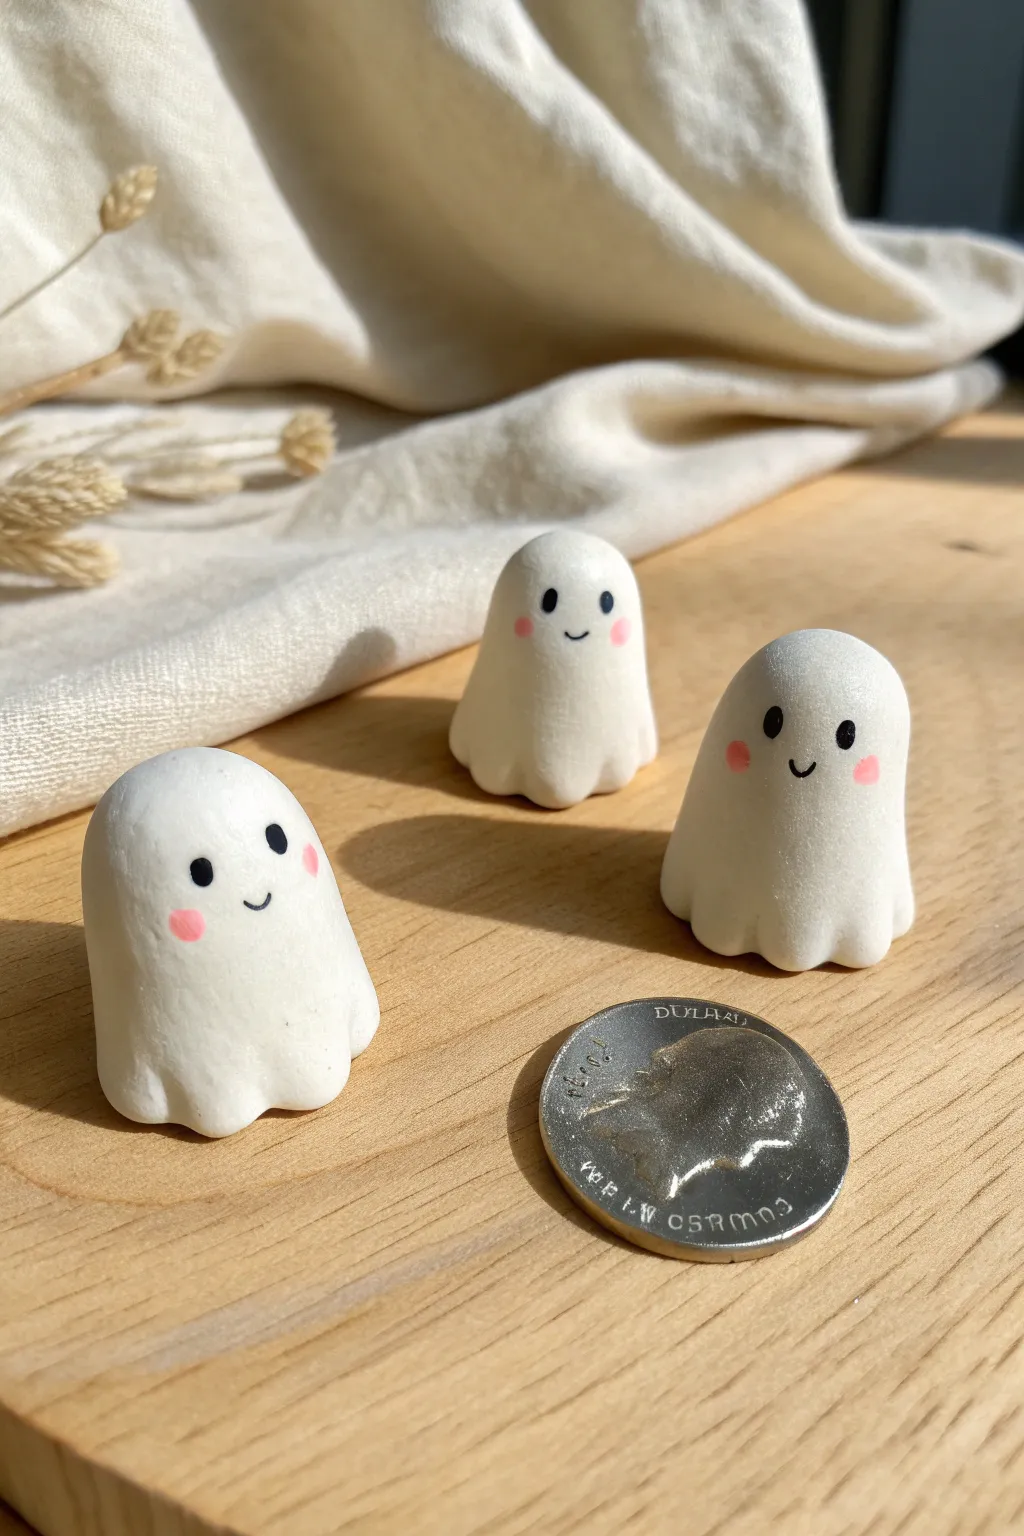
These thumb-sized specters prove that spooky season can be incredibly sweet. Modeled from smooth white clay, their minimal features and rosy cheeks give them a shy, gentle personality perfect for desk decor or tiny terrariums.
How-To Guide
Materials
- White polymer clay (e.g., Sculpey or Fimo)
- Black acrylic paint
- Pink acrylic paint
- Fine detail paintbrush (000 size)
- Dotting tool or toothpick
- Smooth ceramic tile or baking sheet
- Aluminum foil (optional)
- Oven (for baking polymer clay)
Step 1: Shaping the Bodies
-
Conditioning the clay:
Start by taking a small amount of white polymer clay, roughly the size of a large marble or a grape. Knead it in your hands until it becomes warm, soft, and pliable to prevent cracks later. -
Rolling a sphere:
Roll the conditioned clay between your palms to form a perfectly smooth sphere. Inspect it closely to ensure there are no fingernail marks or dust particles trapped in the surface. -
Forming the dome:
Place the sphere on your work surface and gently press down while rolling the top slightly to elongate it. You want a rounded dome shape, slightly taller than it is wide, resembling a gumdrop. -
Creating the base folds:
Using your fingertips, gently pinch and pull the very bottom edge of the clay outward to create the illusion of draped fabric. -
Adding movement:
Press a rounded tool or your pinky finger lightly into the bottom edge at three or four intervals to create soft waves. This makes the ghost look like it’s floating or pooling on the floor. -
Smoothing the surface:
I like to do a final pass with a slightly damp finger to smooth out any fingerprints on the dome, ensuring the ghost looks seamless and porcelain-like. -
Repeat for friends:
Create two or three more ghosts, varying their heights and widths slightly so they look like a natural little group rather than identical factory clones.
Clean Clay Tip
White clay picks up dust instantly. Wipe your hands and work surface with a baby wipe before starting, and consider wearing latex gloves to avoid fingerprints.
Step 2: Baking & Finishing
-
Preheating:
Preheat your oven according to the specific instructions on your package of polymer clay (usually around 275°F or 130°C). -
Baking the figures:
Place your ghosts on a ceramic tile or a baking sheet lined with parchment paper. Bake for approximately 15 minutes per 1/4 inch of thickness. -
Cooling down:
Remove them from the oven and let them cool completely. The clay is fragile while hot, so don’t touch them until they are room temperature. -
Planning the faces:
Visualize where the face will go. These ghosts look cutest when the features are placed slightly higher up on the dome rather than dead center. -
Painting the eyes:
Dip a fine dotting tool or the non-pointy end of a toothpick into black acrylic paint. Carefully impress two small dots for eyes, spacing them somewhat wide apart for that innocent look. -
Painting the mouth:
Using your finest detail brush (000 size), paint a tiny, thin ‘U’ shape between the eyes for a smile. Keep the stroke very delicate. -
Adding blush:
Mix a tiny drop of pink paint with a lot of water to create a wash, or use the paint dry for a solid look. Dip a toothpick or small dotting tool in the pink. -
Applying the cheeks:
Dab the pink paint just under and to the outside of each eye. These rosy cheeks are essential to the ‘sweet’ aesthetic. -
Sealing (Optional):
If you want a glossy finish or extra protection for the paint, apply a thin coat of water-based polyurethane varnish once the paint is fully dry.
Glow Up
Swap standard white clay for glow-in-the-dark polymer clay. Your cute figurines will reveal their spooky spectral nature as soon as you turn out the lights.
Now you have a trio of friendly spirits ready to haunt your shelf with cuteness


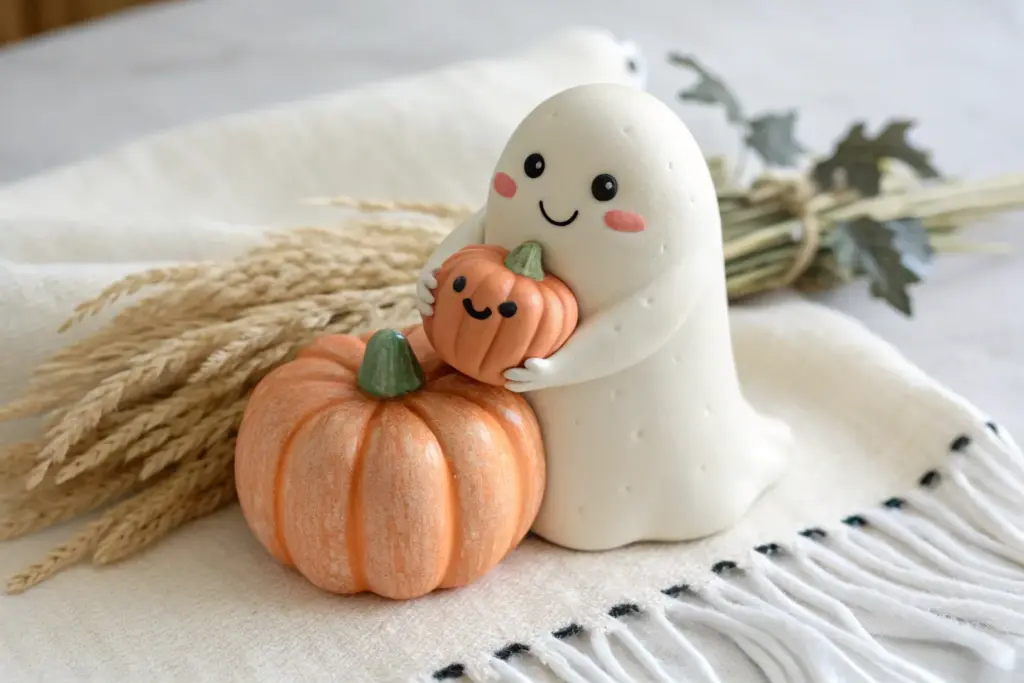
Ghost Popping Out of a Pumpkin
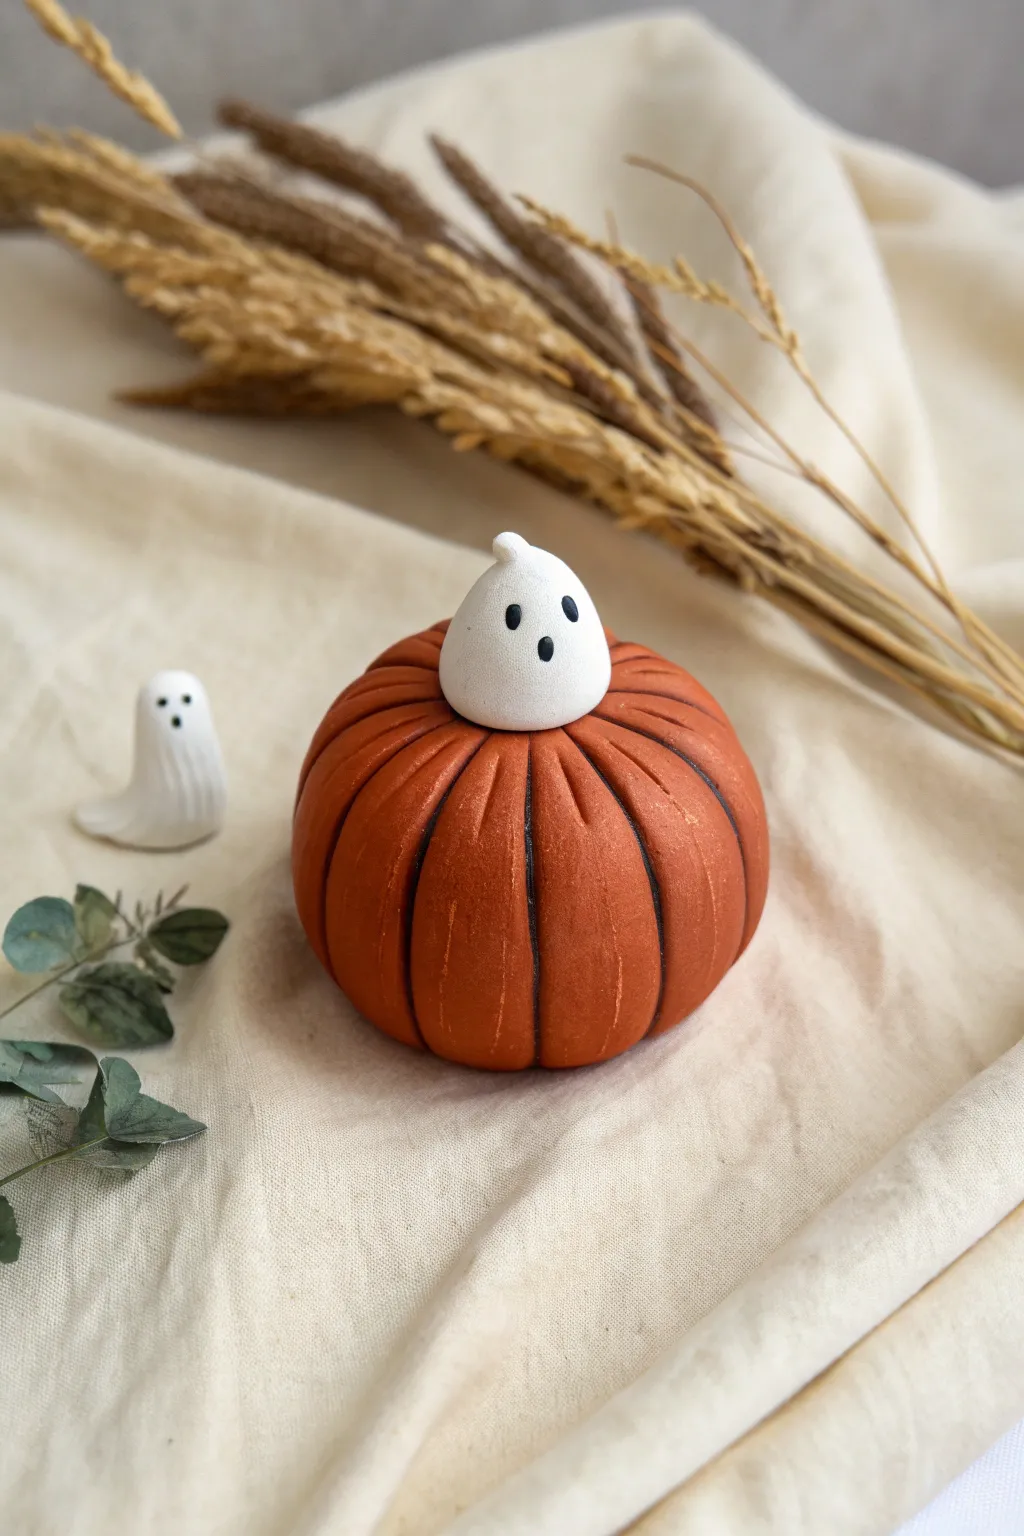
This whimsical Halloween decoration features a classic ridged pumpkin with a cheeky little ghost popping out of the top instead of a stem. The matte finish and deep grooves create a cozy, handmade look perfect for autumn vignettes.
Detailed Instructions
Materials
- Orange polymer clay (terracotta or pumpkin shade)
- White polymer clay
- Black acrylic paint
- Soft paint brush
- Paring knife or clay needle tool
- Ball stylus tool (very small)
- Clean work surface (tile or glass mat)
- Oven for baking (if using polymer clay)
Step 1: Forming the Pumpkin Base
-
Condition the Clay:
Begin by kneading a ball of orange clay until it is soft and pliable. Warm hands make this much easier and prevent cracking later. -
Create the Core Shape:
Roll your conditioned orange clay into a smooth sphere, roughly the size of a tangerine or a golf ball depending on your preference. Flatten the bottom slightly by tapping it against your work surface so it sits stable without rolling. -
Make the Top Indentation:
Press your thumb or a large ball tool into the very top center of the sphere to create a shallow well. This is where our ghost friend will eventually sit. -
Mark the Sections:
Using the back of a knife or a needle tool, lightly score vertical lines from the top center down to the bottom center, dividing the pumpkin into quarters first, then eighths. -
Deepen the Grooves:
Go back over your guide lines with your tool, pressing deeper to create distinct lobes. Rock the tool slightly side-to-side to round off the edges of each slice so they look plump rather than sharp. -
Refine the Shape:
Smooth out any fingerprints on the pumpkin’s surface with your fingers. The texture should look organic but intentional.
Clean Clay Pro-Tip
White clay picks up dust instantly. Always wash your hands and wipe down tools with a baby wipe before switching from the orange clay to the white clay to keep your ghost pristine.
Step 2: Sculpting the Ghost
-
Shape the Ghost Body:
Take a smaller amount of white clay, roughly one-quarter the volume of your pumpkin. Roll it into a smooth ball. -
Form the Teardrop:
Gently pinch one side of the white ball to create a rounded teardrop or gumdrop shape. The bottom should be wide enough to fill the indentation you made on the pumpkin. -
Add the Wisp:
Pinch the very top of the ghost’s head and curl it slightly to the side to create a little wisp, giving the ghost a playful sense of movement. -
Test the Fit:
Place the white shape into the well on top of the orange pumpkin. Gently press down so the bottom of the ghost molds to the top of the pumpkin, ensuring a seamless connection. -
Create the Face:
Using your smallest ball stylus or a needle tool, gently indent three holes for the face: two for eyes and a taller oval for the mouth. Position them slightly lower on the shape to make it look cute.
Step 3: Finishing and Baking
-
Bake the Piece:
Following your specific clay manufacturer’s instructions, bake the sculpture in an oven. Usually, this is around 275°F (130°C) for 15-30 minutes. -
Cool Down:
Let the piece cool completely before handling. Polymer clay is fragile when hot and hardens fully as it cools. -
The Antique Wash:
Water down a tiny drop of black acrylic paint until it’s very thin. Paint this wash into the deep grooves of the pumpkin. -
Wipe Away Excess:
Immediately use a paper towel or damp cloth to wipe the paint off the raised surface of the pumpkin. The dark paint will remain only in the cracks, adding instant depth. -
Paint the Ghost Face:
Dip a fine-point tool or toothpick into undiluted black paint. Carefully dab it into the indented eye and mouth holes of the ghost. -
Optional Matte Sealer:
For a finish like the photo, you can leave the clay raw or apply a matte varnish. Avoid glossy glazes if you want that natural, earthy terracotta look. -
Make a Tiny Companion:
If you have leftover white clay, quickly roll a tiny, standalone ghost with a sweeping tail to sit next to your pumpkin masterpiece.
Level Up: Glow in the Dark
Swap standard white clay for glow-in-the-dark polymer clay for the ghost body. It looks innocent by day but becomes a spooky beacon at night.
Now you have an adorable pumpkin pal ready to haunt your desk or mantle

The Complete Guide to Pottery Troubleshooting
Uncover the most common ceramic mistakes—from cracking clay to failed glazes—and learn how to fix them fast.
Tiny Black Cat Sitting on a Pumpkin
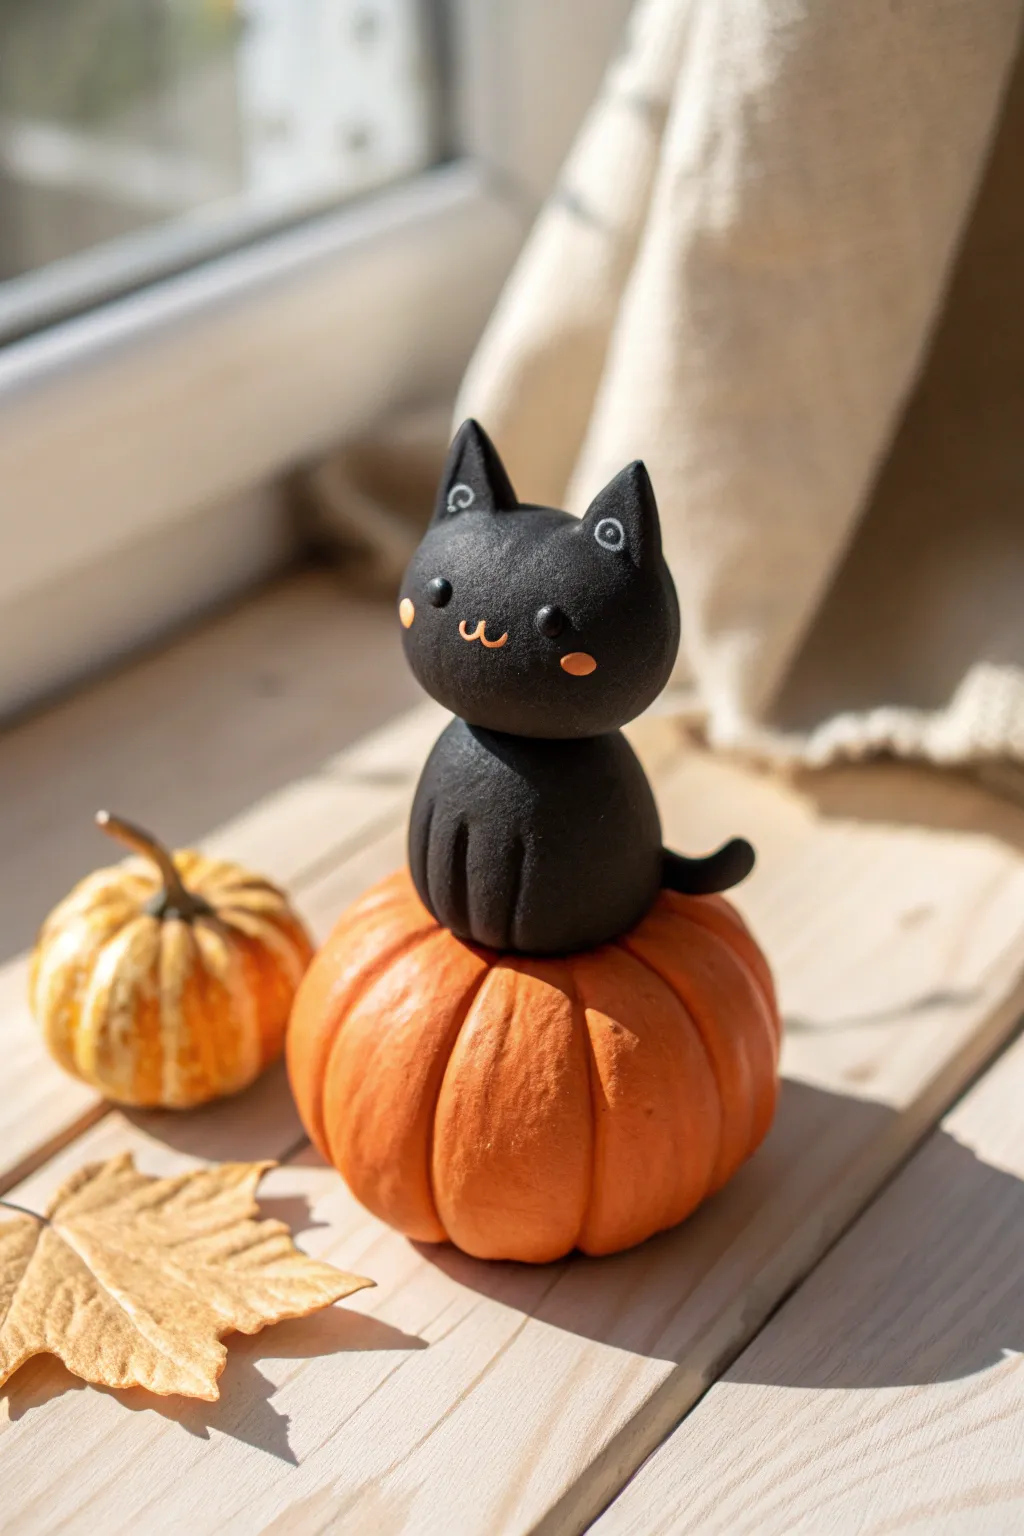
This adorable polymer clay project features a chubby black cat resting contentedly atop a textured orange pumpkin. Its matte finish and tiny painted details give it a sweet, modern look perfect for cheering up a windowsill or desk during the autumn season.
How-To Guide
Materials
- Polymer clay (black, orange, dark green)
- Acrylic paint (white, pink/salmon)
- Fine detail paintbrush or dotting tool
- Sculpting tools (needle tool, ball stylus)
- Aluminum foil (optional, for core)
- Work surface (ceramic tile or glass mat)
- Oven for baking
Step 1: Sculpting the Pumpkin Base
-
Prepare the Orange Clay:
Start by conditioning a generous amount of orange polymer clay until it is soft and pliable. Roll it into a smooth ball about the size of a walnut or a little larger, depending on how big you want the base to be. -
Shape the Form:
Flatten the ball slightly on both the top and bottom to create a squat, pumpkin-like shape. It needs to be stable enough to hold the cat later. -
Create Segments:
Using a needle tool or the back of a butter knife, press vertical indentations all around the sides of the orange form. These lines should start from the bottom center and curve up to the top center, creating the classic ribbed pumpkin look. -
Refine the Pumpkin:
Soften the edges of your indentations with your finger so the segments look puffy and organic rather than sharply cut. Press a small dip into the center of the top where the cat will sit.
Smudge Marks?
Black clay shows fingerprints easily. Before baking, lightly brush the sculpture with a little baby oil or cornstarch to smooth imperfections and remove dust.
Step 2: Creating the Cat
-
Form the Body:
Roll a piece of black clay into a smooth ball slightly smaller than your pumpkin. Gently shape it into a rounded teardrop or gumdrop shape for the body. -
Define the Paws:
Using a modeling tool, press two vertical indentations into the front of the body to suggest front legs sitting close together. Round off the bottom of these sections to look like paws. -
Make the Head:
Roll a slightly larger ball of black clay for the head—making the head a bit oversized creates that cute ‘chibi’ style. Flatten the bottom slightly where it will join the body. -
Attach the Ears:
Make two tiny triangles of black clay. Press them gently onto the top of the head, smoothing the seams at the back with a sculpting tool so they don’t fall off. -
Join Head and Body:
I usually insert a small piece of wire or a toothpick cut to size into the neck area for stability before pressing the head onto the body. -
Add the Tail:
Roll a thin snake of black clay. Attach it to the back of the body, curving it upwards and outwards slightly for a dynamic pose. -
Mount on Pumpkin:
Place the assembled cat securely into the dip you made on the top of the pumpkin. Press down gently to ensure a strong bond between the black and orange clay.
Step 3: Details & Baking
-
Add Eye Sockets:
Use a medium-sized ball stylus to press two indentations into the face for the eyes. This helps the painted details sit nicely later. -
Bake the Piece:
Bake the sculpture according to your clay manufacturer’s instructions (usually 275°F/135°C for 15-30 minutes). Let it cool completely before painting. -
Paint the Face:
Using a fine detail brush or a toothpick, paint two small pink ovals for blush cheeks. Paint a small ‘w’ shape in pink or white for the mouth. -
Draw the Eyes:
Paint small black circles inside the eye indentations if they aren’t dark enough, then add tiny white sparkles to bring the face to life. -
Ear Details:
Paint delicate white circles or outlines on the ears to match the stylized look in the reference image.
Texture Play
Before baking, gently dab the pumpkin surface with a toothbrush or stiff bristles. This adds a realistic skin texture that contrasts beautifully with the smooth cat.
Place your finished kitty near a window to catch the autumn light
Mini Witch Hat Charms With a Curved Tip
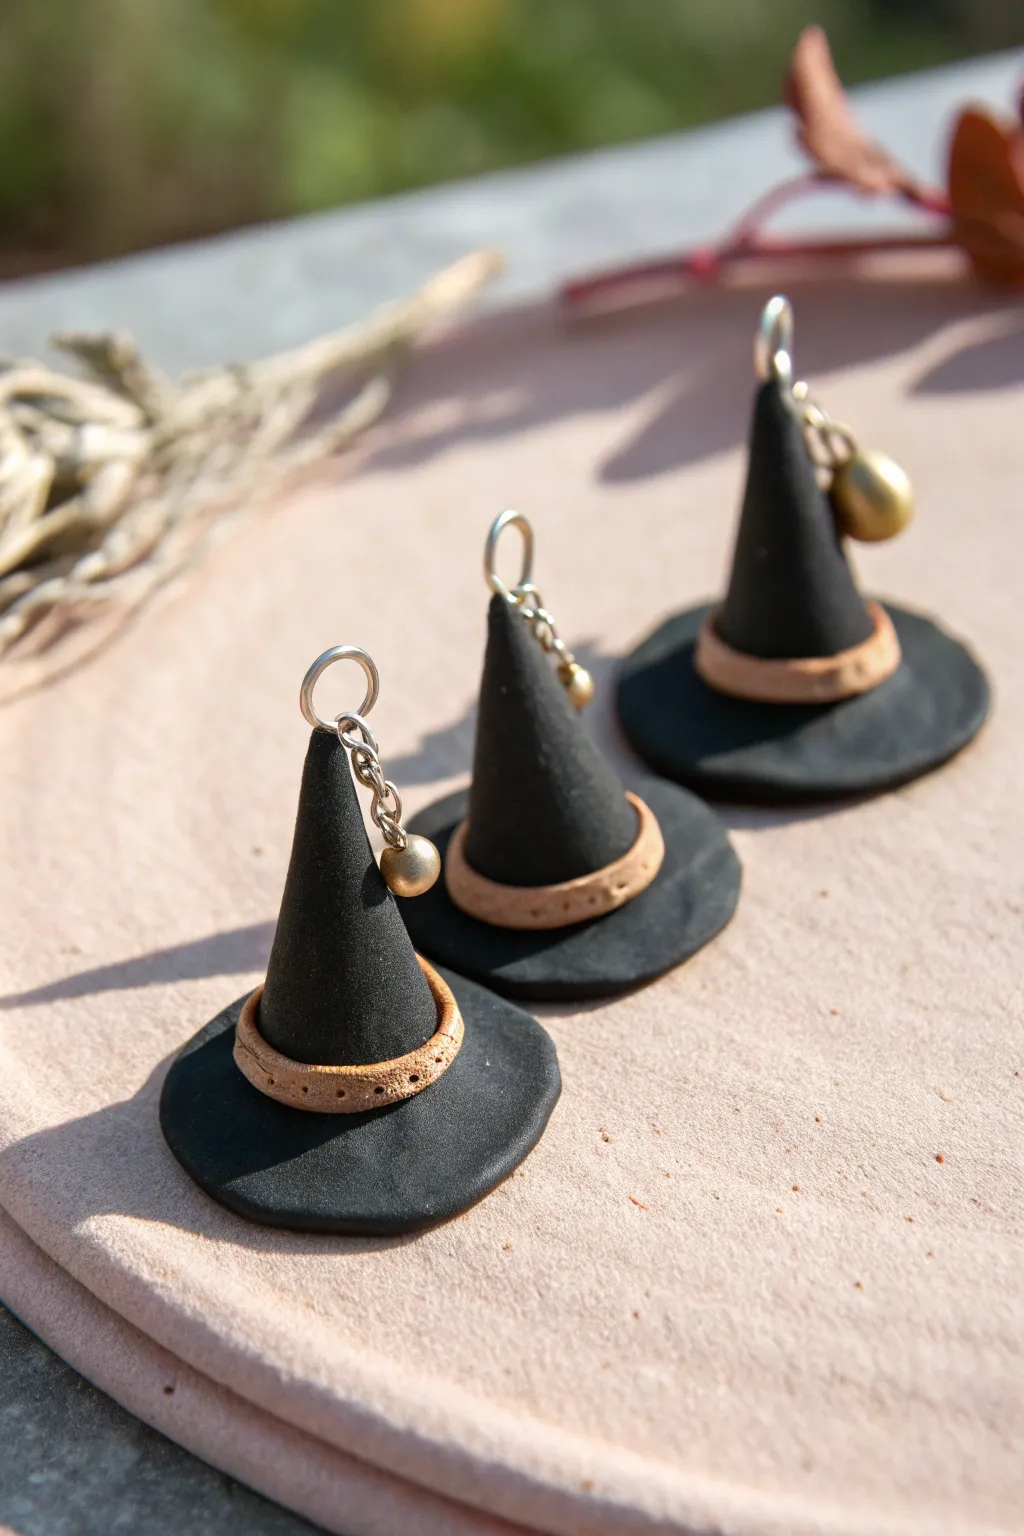
These miniature witch hats are the perfect spooky accessory, crafted from polymer clay to create a clean, matte finish. With their textured bands and tiny bell accents, they make charming earrings or pendant necklaces for the Halloween season.
Step-by-Step Tutorial
Materials
- Black polymer clay
- Tan/beige polymer clay (cork or granite effect works well)
- Needle tool or toothpick
- Ball stylus tool
- Silver eye pins
- Silver jump rings
- Small gold or brass bells
- Jewelry pliers
- Clay roller
- Round cookie cutter (small)
- Craft knife
- Oven for baking
Step 1: Sculpting the Hat Base
-
Condition the Black Clay:
Start by kneading your black polymer clay until it is soft and pliable. This prevents cracking later on. -
Cut the Brim:
Roll out a sheet of black clay to about 2-3mm thickness. Use your small round cutter to punch out circles for the hat brims. If the edges are sharp, gently smooth them with your fingertip. -
Form the Cone:
Take a separate ball of black clay and roll it into a cone shape. Make sure the base of the cone is slightly smaller than your brim circle. -
Attach Cone to Brim:
Place the cone in the center of the brim. Press down firmly but gently to bond the pieces. You can use a modeling tool to smooth the seam where they meet if necessary. -
Adjust the Shape:
While the clay is still workable, you can gently curve the very tip of the cone for a jaunty, characterful look, or keep it straight and pointy like the classic silhouette.
Fingerprint Fix
Are fingerprints ruining the smooth black finish? Lightly brush the raw clay with a little baby oil or cornstarch before baking to smooth them out effortlessly.
Step 2: Adding Details
-
Create the Band:
Roll out a thin snake of the tan or beige clay. Flatten it slightly with your finger or a roller so it looks like a ribbon. -
Position the Band:
Wrap this flattened strip around the base of the cone, right where it meets the brim. Trim off any excess with your craft knife and blend the seam at the back. -
Texture the Band:
Using a needle tool, poke small holes unevenly across the surface of the tan band. I like to vary the depth slightly to mimic the look of cork or rough leather. -
Secure the Eye Pin:
Trim an eye pin to about half an inch long. Dip the end in a tiny bit of liquid clay or bake-and-bond (optional for extra strength) and push it straight down into the tip of the hat until only the loop is visible.
Clean Edges
If your black clay leaves residue on the light tan band, wipe your hands and tools with a baby wipe or alcohol swab before switching colors.
Step 3: Finishing Touches
-
Bake the Clay:
Place your charms on a tile or baking sheet. Bake according to your clay manufacturer’s instructions—usually around 275°F (130°C) for 15-30 minutes. -
Cool Down:
Allow the hats to cool completely before handling. Polymer clay is fragile when hot and hardens as it cools. -
Prepare the Chain:
Using your jewelry pliers, open a small jump ring and attach a short segment of silver chain (about 3-4 links). -
Attach the Bell:
Add a small gold or brass bell to the bottom of the chain segment. -
Assemble the Charm:
Hook the top of the chain segment onto the eye pin loop embedded in the hat. Close the jump ring securely with your pliers.
Now you have a set of bewitching accessories ready to wear or gift for the haunting season


What Really Happens Inside the Kiln
Learn how time and temperature work together inside the kiln to transform clay into durable ceramic.
Mini Bat Stud-Style Shapes With Rounded Wings
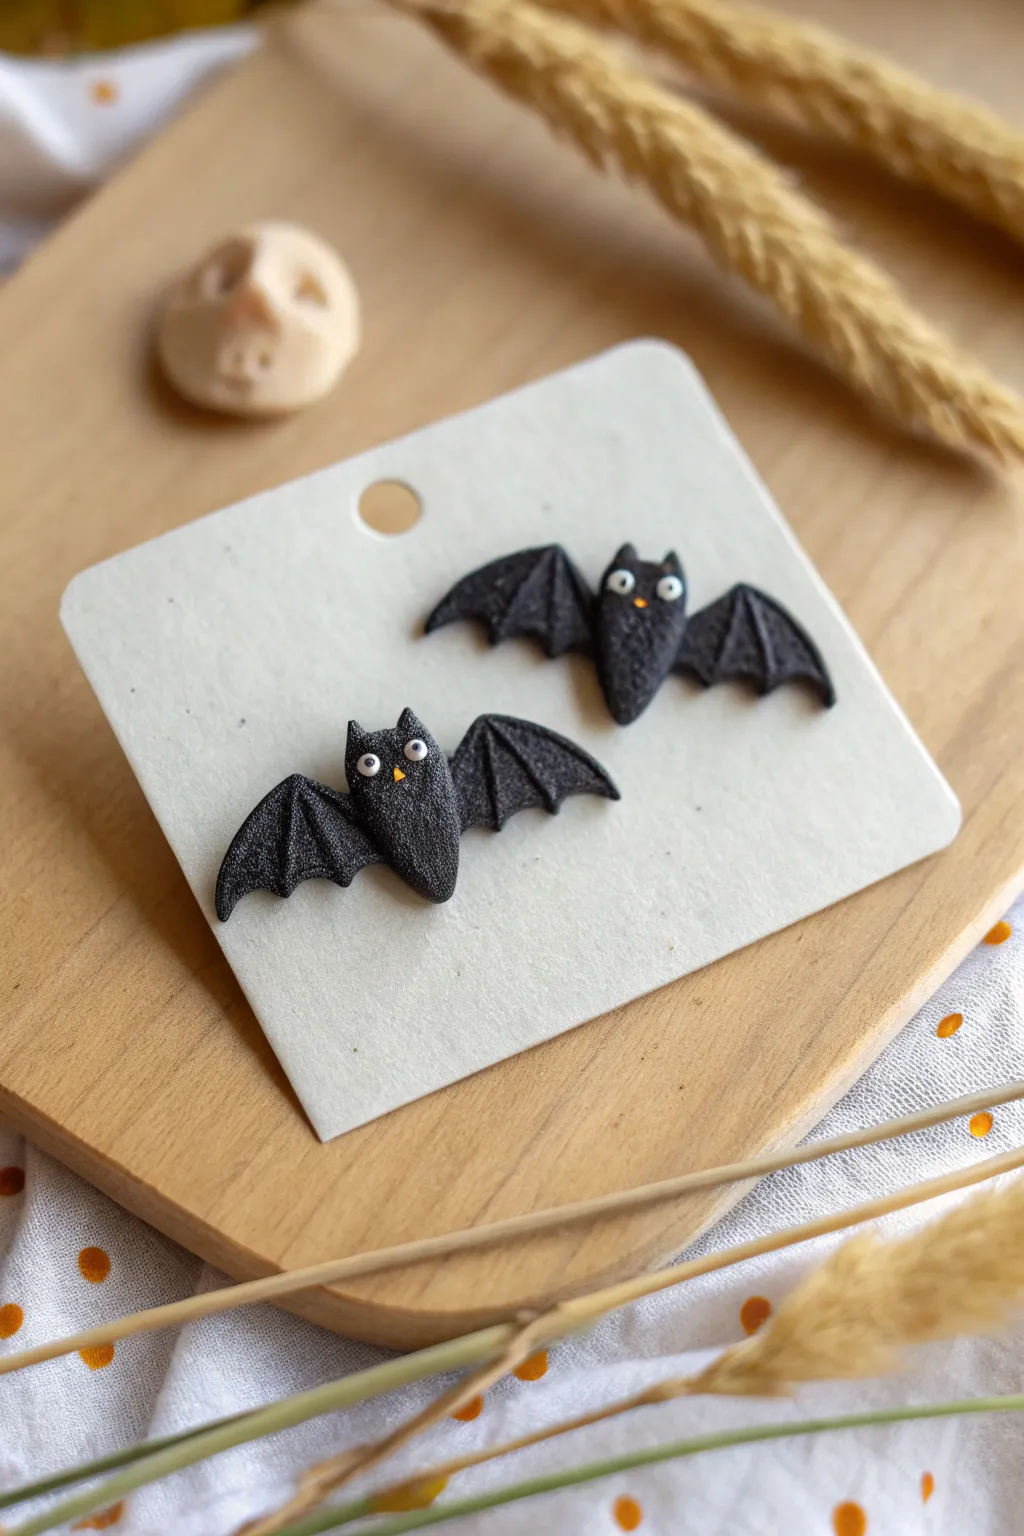
These adorable mini bat studs feature a textured, glittery finish and charmingly wide eyes, making them a sweet rather than spooky addition to your Halloween wardrobe. Their rounded wings and tiny size give them a playful character perfect for seasonal ear candy.
How-To Guide
Materials
- Black polymer clay (pre-glittered or standard black)
- Fine silver glitter (if not using effect clay)
- White polymer clay (tiny scrap)
- Yellow or orange polymer clay (tiny scrap)
- Black acrylic paint or black clay scrap (for pupils)
- Clay roller or pasta machine
- Ball stylus tool (small and medium)
- Needle tool or toothpick
- Scalpel or craft knife
- Sandpaper or texture sponge (coarse)
- Earring stud posts
- Superglue or E6000
- Oven for baking
Step 1: Body Basics
-
Condition the Clay:
Begin by thoroughly kneading your black clay until it’s soft and pliable. If you want that subtle sparkle shown in the photo, mix in a pinch of fine silver glitter now, or use a ‘galaxy’ effect clay straight from the package. -
Shape the Heads:
Roll two small balls of black clay, roughly the size of a peppercorn. Flatten them slightly into ovals to form the main body and head section. -
Form the Ears:
Pinch the top two corners of your oval shapes gently to create pointed ears. You want them to look distinct but not too sharp. -
Press and Smooth:
Press the bodies gently onto your ceramic work tile or baking surface. Ensure the back stays flat for the earring post later. -
Create Texture:
Take a piece of coarse sandpaper or a rough texture sponge. Gently press it over the surface of the bat bodies to give them a stone-like, matte texture. This removes fingerprints and adds visual interest.
Step 2: Wing Work
-
Prepare Wing Slabs:
Roll out a small sheet of black clay to about 2mm thickness. It needs to be sturdy enough to hold its shape but thin enough to look like a wing. -
Cut Out Wings:
Using your craft knife, cut out four triangles. You’ll need two for the left and two for the right, or you can cut a single wide ‘M’ shape if you prefer connected wings. -
Scallop the Edges:
On the bottom edge of each triangle, use a small round cutter or the side of your needle tool to indent three scallops. This creates that classic bat-wing silhouette. -
Define the Bones:
Use a needle tool to gently press lines extending from the scallops up toward the top corner of the wing. These indentations mimic the wing structure. -
Attach the Wings:
Press the wings against the sides of the bat bodies. I like to blend the seam slightly on the back side to ensure a strong bond. -
Shape the Span:
Gently curve the wings slightly upward or downward to give them a sense of movement, rather than having them lie perfectly flat. -
Texture the Wings:
Don’t forget to apply your sandpaper texture to the wings as well so they match the body perfectly.
Clean Clay Tip
Black clay shows every speck of dust! Keep a pack of baby wipes nearby to clean your hands and tools often, ensuring your dark bats stay lint-free.
Step 3: Tiny Details
-
Socket Indentation:
Use a medium ball tool to press two small indents where the eyes will go. This helps seat the eyes so they don’t look like they are bulging out too far. -
Add Whites:
Roll two minuscule balls of white clay. Place them into the sockets and flatten them gently with your finger or a flat tool. -
Pupil Placement:
Using the smallest tip of your needle tool or a very fine dotting tool, place a microscopic dot of black clay (or black paint) into the center of the white circles. -
The Beak:
Take a tiny speck of yellow or orange clay and roll it into a cone. Place this between and slightly below the eyes to form a cute little nose or beak. -
Final Inspection:
Check for any lint or dust on the black clay. You can remove it with a piece of tape or a quick wipe of baby oil before baking.
Glow Up
Swap the white clay eyes for glow-in-the-dark polymer clay. Your bats will look cute by day, but their eyes will eerily shine green in the dark!
Step 4: Baking and Assembly
-
Bake:
Bake the clay pieces according to the manufacturer’s instructions on your package (usually around 275°F/130°C for 15-30 minutes). -
Cool Down:
Allow the bats to cool completely before trying to move them, as polymer clay is fragile while hot. -
Attach Posts:
Apply a small drop of strong glue (like E6000 or superglue gel) to the flat pad of an earring post. -
Secure:
Press the post firmly onto the center back of the bat. Let the glue cure fully according to the bottle directions (usually 24 hours for full strength).
Now you have a pair of delightful winged companions ready to wear all October long
Spiderweb Trinket Dish With a Friendly Little Spider
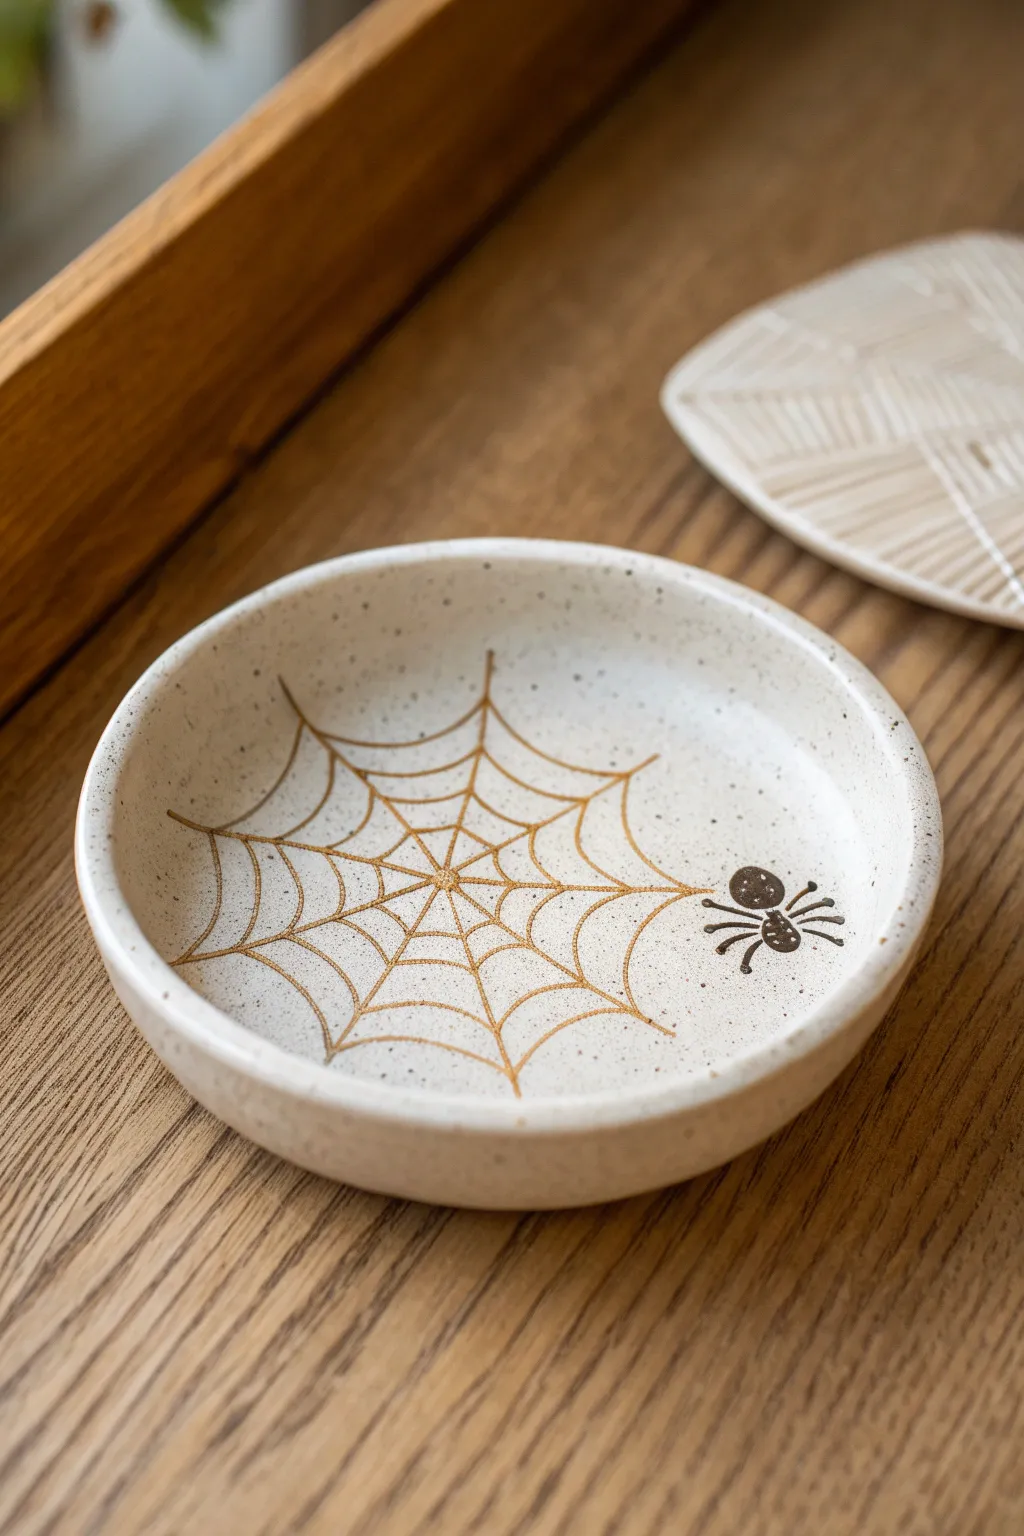
This charming trinket dish combines a speckled cream finish with delicate spiderweb line work for a subtle Halloween touch. The minimalist design features a golden-brown web and a whimsical little spider, making it perfect for holding rings or small seasonal candies.
Step-by-Step Guide
Materials
- Air-dry clay or polymer clay (white or cream)
- Speckled cream acrylic paint (or cream paint + toothbrush for splattering)
- Fine-point gold or bronze paint pen
- Fine-point black permanent marker or detail brush
- Glossy varnish or glaze (polyurethane or clay-specific)
- Small rolling pin
- Round cookie cutter or bowl (approx. 4-5 inches)
- Sandpaper (fine grit)
- Small sponge
Step 1: Sculpting the Base
-
Prepare the Clay:
Start by conditioning your clay, kneading it until it’s soft and pliable. Roll it out on a smooth surface to an even thickness of about 1/4 inch. -
Cut the Circle:
Use your round cookie cutter or trace around a small bowl to cut a perfect circle from the rolled slab. -
Form the Rim:
Gently lift the edges of the circle and pinch them upward to create a rim. Smooth the transition between the base and the wall with your thumb so there are no sharp angles inside. -
Smooth the Form:
Use a slightly damp sponge to smooth out any fingerprints or cracks on the surface and rim. I find this step crucial for getting that professional ceramic look. -
Dry Completely:
Allow the dish to dry fully according to your clay’s instructions. For air-dry clay, this usually takes 24-48 hours; for polymer, bake as directed. -
Sand for Smoothness:
Once dry (and cool, if baked), gently sand the edges and surface with fine-grit sandpaper to remove any remaining rough spots.
Clean Lines Hack
If your paint pen tip feels too thick for the web, squeeze a puddle of the ink onto paper and use a fine liner brush to apply it to the dish instead.
Step 2: Painting and Detailing
-
Apply Base Color:
Paint the entire dish with a cream-colored acrylic paint. You may need two coats for opaque coverage. -
Create the Speckles:
To mimic the speckled stoneware look in the photo, dip an old toothbrush into diluted brown or grey paint. Run your thumb over the bristles to flick tiny specks onto the dish. Let this dry completely. -
Draft the Web:
Using a pencil very lightly, mark a center point near the bottom left quadrant of the dish. This off-center placement creates a more dynamic composition. -
Draw the Radial Lines:
Take your gold or bronze paint pen. Draw 7-9 straight lines radiating outward from your center point toward the rim, like spokes on a wheel. -
Connect the Web:
Starting near the center, draw curved lines connecting the spokes. Keep the curves drooping slightly toward the center to create that classic sticky web shape. -
Expand the Web:
Continue adding concentric rows of curved connecting lines until you reach the outer edges of the web design. -
Draw the Spider Body:
Using a black fine-point marker or detail brush, draw a small oval shape for the spider’s abdomen on the right side of the dish, separate from the web. -
Add Spider Details:
Draw a smaller circle for the head attached to the abdomen. Add two tiny white dots for eyes if you have a gel pen, or leave them dark. -
Give Him Legs:
Draw four small, curved legs coming off each side of the body. Keep them simple and illustrative rather than realistic. -
Connect the Spider:
Draw a single thin line connecting the spider back to the main web, as if he is dangling or crawling away. -
Seal the Dish:
Finish by applying a coat of glossy varnish or glaze over the entire piece. This protects the paint and gives it that shiny, fired-ceramic appearance.
Glow Up
Mix a tiny amount of glow-in-the-dark powder into your cream base paint. The dish will look normal by day but reveal a ghostly glow at night.
Now you have a stylish piece of Halloween decor that works perfectly all through autumn

TRACK YOUR CERAMIC JOURNEY
Capture glaze tests, firing details, and creative progress—all in one simple printable. Make your projects easier to repeat and improve.
Adorable Mummy Charm With Wrapped Texture
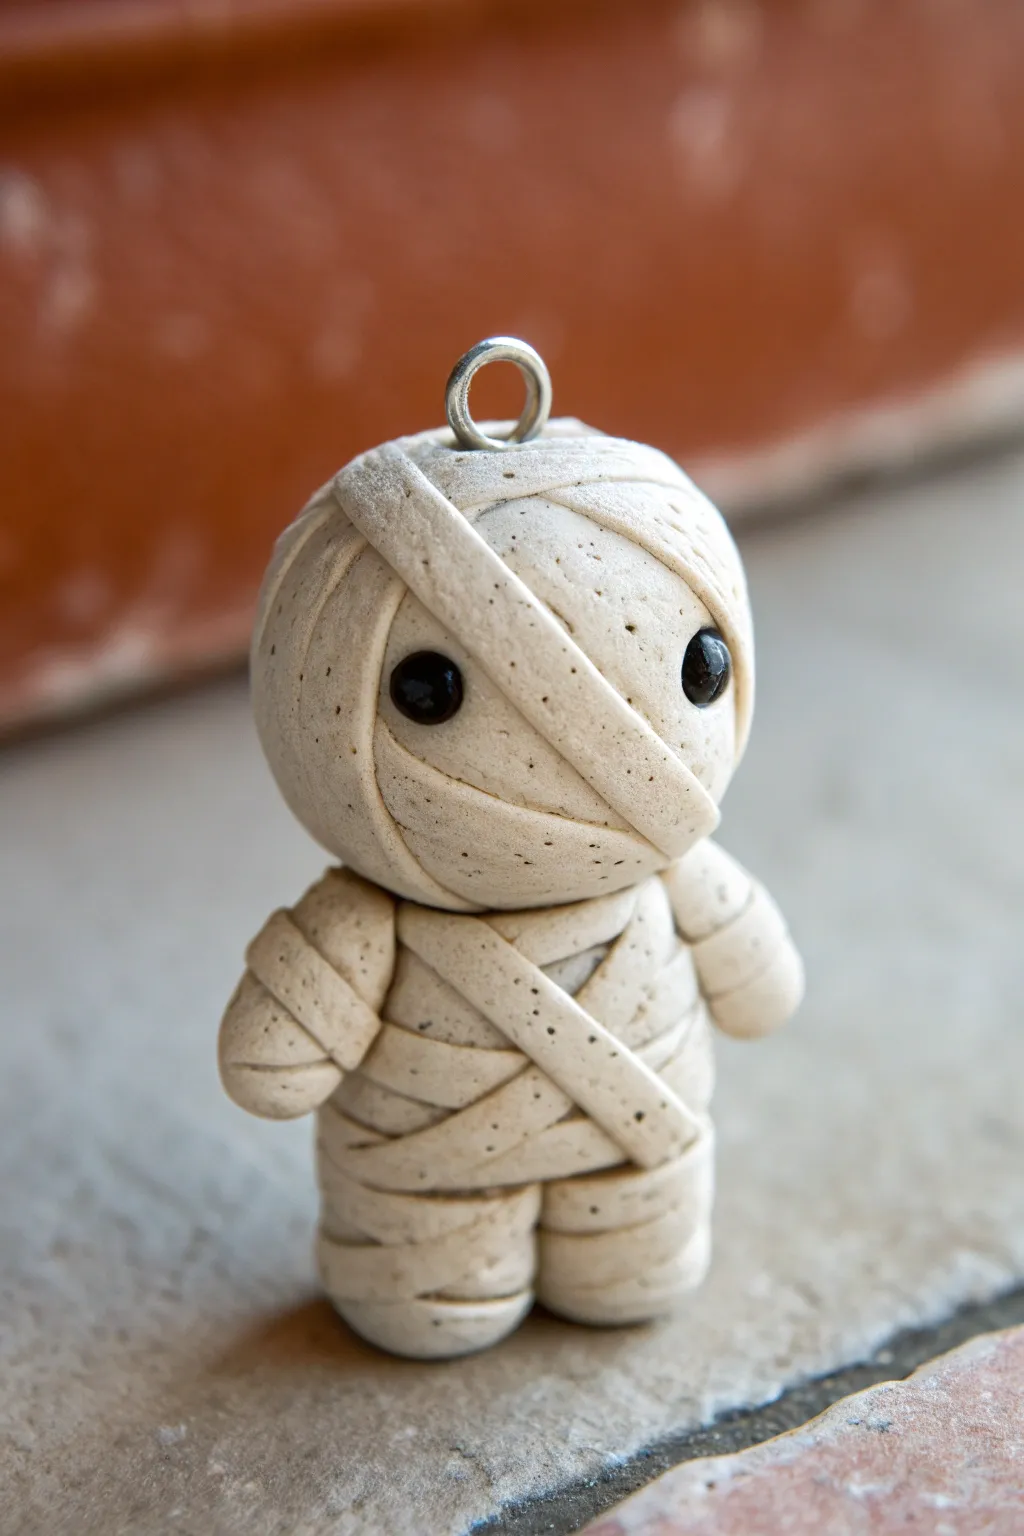
Create a spooky yet adorable companion for Halloween with this tiny mummy charm. Featuring a realistic wrapped bandage texture and a speckled finish reminiscent of ancient stone, this polymer clay project is perfect for necklaces or zipper pulls.
Detailed Instructions
Materials
- Polymer clay (granite, beige, or white with black pepper mixed in)
- Black glass seed beads (2mm or 3mm)
- Metal eye screw or jewelry loop
- Rolling pin or acrylic roller
- Craft knife or clay blade
- Needle tool or toothpick
- Gloss glaze (optional for eyes)
- Oven for baking
Step 1: Forming the Base
-
Condition the clay:
Begin by thoroughly kneading your chosen clay until it is soft and pliable. For this project, a granite-effect clay works beautifully to mimic an aged, stony look. -
Shape the head:
Roll a ball of clay approximately 1 inch in diameter. Slightly flatten the back so the head won’t roll away while you work on it, but keep the front round. -
Shape the body:
Roll a cylinder of clay slightly smaller than the head. Gently press it into a rectangular block shape with rounded edges to serve as the torso. -
Create limbs:
Roll two small sausages for arms and two short, stubby cylinders for legs. Keep them simple; the detailing will come from the wrapping later. -
Assemble the figure:
Gently press the head onto the body. Attach the arms to the sides of the torso and press the legs onto the bottom. You can use a small piece of toothpick inside to strengthen the connection if needed. -
Insert the hardware:
Push the metal eye screw into the top center of the head. Removing it, adding a dab of liquid clay or bake-and-bond, and reinserting it ensures it won’t fall out after baking.
Sticky Strips?
If your clay strips are too soft and sticking to your fingers, pop the rolled sheet in the fridge for 10 minutes before slicing. This firms it up for easier handling.
Step 2: The Wrapping Technique
-
Prepare the bandages:
Roll out a thin sheet of your clay. Use your craft knife to slice long, uneven strips about 3-4mm wide. Varying the width slightly adds to the ancient, ragged look. -
Wrap the legs:
Start applying the strips to the legs first. Wrap a strip around each leg horizontally, pressing gently to adhere it to the base form without squishing the shape. -
Wrap the body:
Layer strips across the torso. Place some horizontally and one or two diagonally across the chest to create that classic ‘mummy’ pattern. -
Add arm detail:
Wrap small pieces of the strip clay around the arms. Ensure the ends of the strips are tucked under or blended so they don’t peel up. -
Begin the head wrap:
Apply strips around the back of the head first, bringing them forward. -
Create the eye gap:
Place strips across the forehead and chin area, leaving a distinct horizontal gap in the middle of the face where the eyes will go. I find leaving a deeper recess here makes the eyes look much cuter. -
Final diagonal wrap:
Place one prominent strip diagonally across the forehead, overlapping the previous layers to add dimension and seal the forehead area.
Step 3: Finishing Touches
-
Add the eyes:
Press two black glass seed beads firmly into the facial gap you created. Push them in deep enough so they look embedded within the wrappings. -
Texture the surface:
Using a needle tool or an old toothbrush, gently tap the surface of the clay strips to remove fingerprints and add a porous, fabric-like texture. -
Bake:
Bake the figurine according to your clay manufacturer’s instructions (usually 275°F/130°C for 15-30 minutes). -
Cool and seal:
Let the charm cool completely. For extra polish, you can dab a tiny dot of gloss glaze onto the black eyes to make them shine, keeping the rest of the body matte.
Ancient Artifact Look
After baking, apply a wash of watered-down brown acrylic paint. Wipe it off immediately with a paper towel, leaving pigment only in the crevices for an aged look.
Now you have a timeless little friend ready to haunt your keychain or jewelry collection
Kawaii Stitched Monster Face Badge
This adorable mint-green monster badge proves that spooky season can be sweet too. With its gentle sleeping expression and faux-stitched edges, it adds a subtle touch of Halloween whimsy to any jacket or bag.
Step-by-Step Guide
Materials
- Polymer clay (mint green or sage green)
- Polymer clay (black and coral pink)
- Circle cutter (approx. 2 inches diameter)
- Needle tool or toothpick
- Rolling pin (acrylic roller)
- Brown acrylic paint
- Fine detail paintbrush
- Gloss varnish or UV resin (optional)
- Pin back or brooch finding
- Strong craft glue (e.g., E6000)
- Oven for baking
Step 1: Shaping the Base
-
Condition the Clay:
Begin by kneading your mint green polymer clay until it is soft and pliable. Warm clay is much less likely to crack during the shaping process. -
Roll the Sheet:
Roll the green clay out into a smooth, even sheet. Aim for a thickness of about 4-5mm to ensure the badge is sturdy enough to hold the pin back later. -
Cut the Circle:
Using your circle cutter, punch out a clean disc. Gently push it out of the cutter, smoothing any rough edges along the perimeter with your finger. -
Smooth the Surface:
Before adding details, check the surface for fingerprints. I like to lightly buff the top with a piece of parchment paper to make it perfectly smooth.
Sticky Situation?
If your black clay ‘threads’ stick to your fingers instead of the badge, lightly dust your fingertips with cornstarch before handling the tiny pieces.
Step 2: Creating the Stitches
-
Mark Stitch Guide:
Mentally visualize the rim of the circle like a clock face. You want to create evenly spaced indentations all the way around the edge. -
Indent the Stitches:
Take a needle tool or the dull side of a craft knife. Gently press small, vertical lines into the very edge of the clay, angling them slightly inward towards the center to mimic thread pulling tight. -
Paint the Stitches:
Dip a very fine brush (or use a toothpick) into brown acrylic paint. Carefully fill just the indented lines you created. If you get paint on the green surface, wipe it away quickly with a damp wipe. -
Soften the Thread:
For a softer, more integrated look, you can also use tiny snakes of brown clay pressed into the indentations instead of paint, though paint is easier for beginners.
Glow Up
Use glow-in-the-dark polymer clay for the base color. In the daylight, it’s a cute monster, but at night, the floating ghost face appears.
Step 3: Adding the Face
-
Outline the Eyes:
Using your needle tool, very lightly sketch two curved crescents for the sleeping eyes. Make sure they are symmetrical. -
Create Black Clay Threads:
Roll out an impossibly thin snake of black clay. It needs to be thread-thin. Cut two small pieces for the eyelids. -
Apply Eye Details:
Carefully lay the black threads over your sketched lines. Use the needle tool to gently tap them into place so they bond with the green base. -
Add Eyelashes:
Cut tiny snippets of the black clay thread for eyelashes—three for each eye usually looks best. Attach them to the outer corners of the eyelids. -
Form the Smile:
Create a small, subtle ‘u’ shape with another piece of thin black clay and place it centrally below the eyes for the mouth. -
Add Rosy Cheeks:
Taking your coral pink clay, roll two tiny balls. Flatten them into thin discs and press them onto the cheeks, just below the outer edges of the eyes. -
Texturize the Cheeks:
To give the cheeks a softer, felt-like appearance, gently tap them with a toothbrush or a crumpled piece of foil to create a stippled texture.
Step 4: Finishing Touches
-
Final Bake:
Bake the piece according to your polymer clay manufacturer’s instructions (usually 275°F/130°C for 15–30 minutes). Let it cool completely inside the oven to prevent thermal shock. -
Attach the Hardware:
Once cool, flip the badge over. Apply a strong dab of E6000 or similar glue to the back of the clay. -
Secure the Pin:
Press the metal pin finding firmly into the glue. Let it cure for at least 24 hours before wearing to ensure it doesn’t pop off.
Now your gentle monster is ready to be pinned onto a backpack or gifted to a friend who needs a smile
Mini Skull Charm With Heart Eyes (Not Scary)
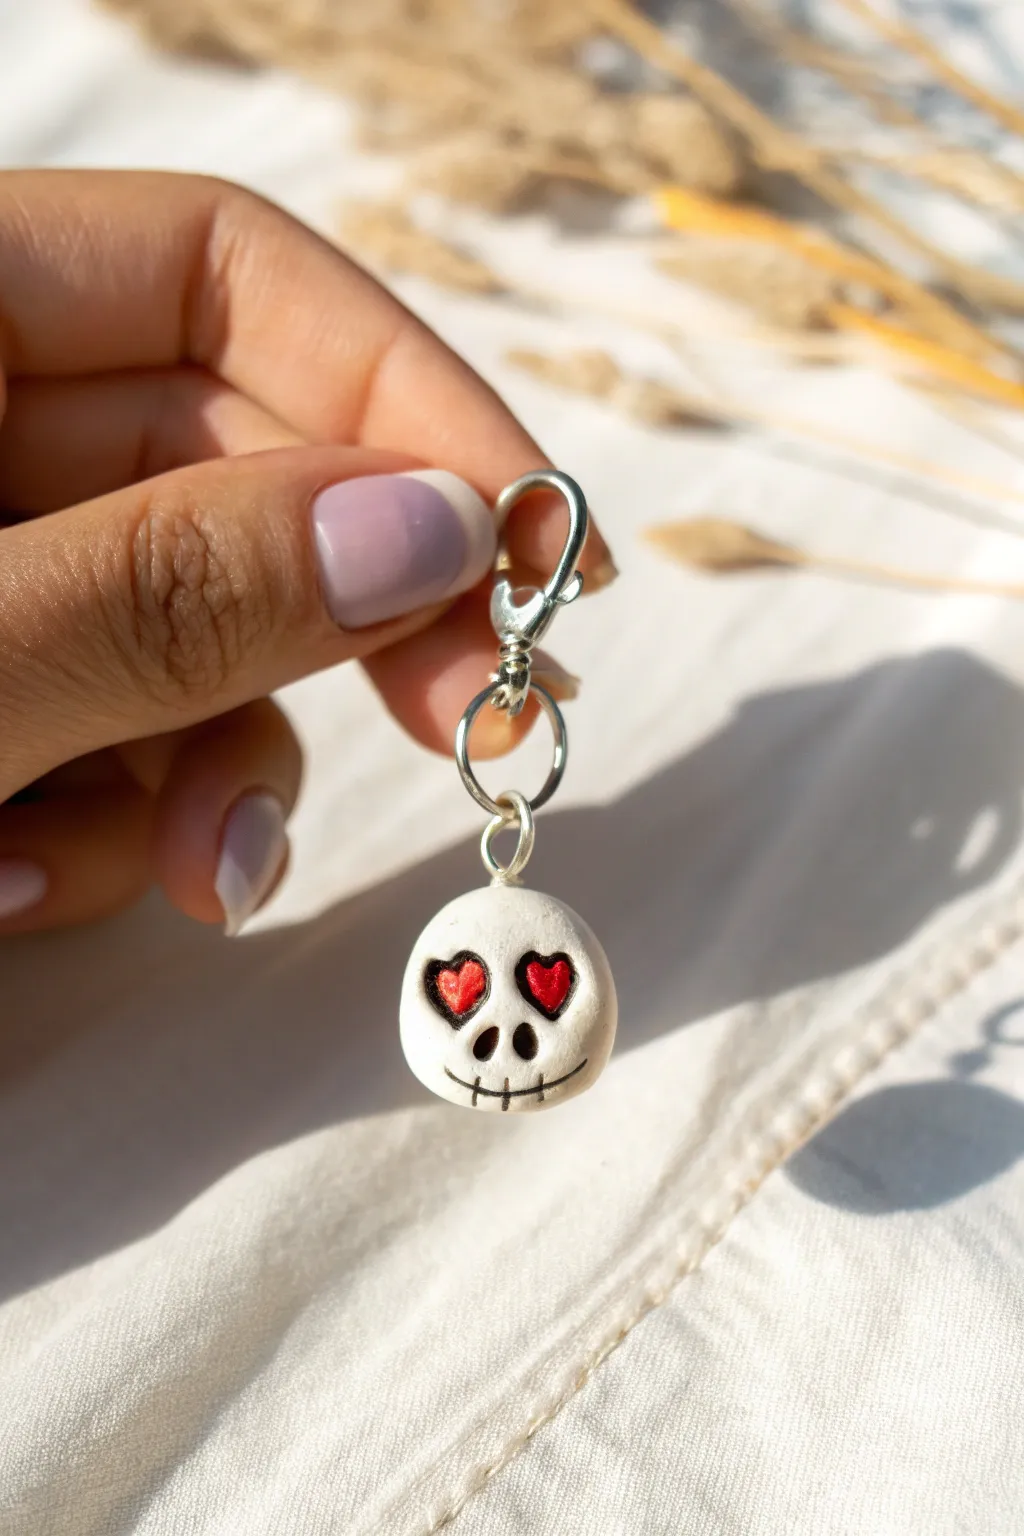
Add a touch of spooky sweetness to your autumn accessories with this adorable mini skull charm. Featuring bright red heart eyes and a friendly stitched smile, this polymer clay creation strikes the perfect balance between Halloween spirit and cute charm.
Detailed Instructions
Materials
- White or off-white polymer clay
- Red polymer clay
- Silver eye pin
- Silver lobster clasp
- Jumps rings (6mm)
- Black acrylic paint
- Needle tool or toothpick
- Fine-point detail brush
- Small ball stylus tool
- Flexible clay blade
- Gloss glaze or polyurethane varnish (optional)
- Pliers (round nose and flat nose)
- Oven for baking
Step 1: Sculpting the Base
-
Prepare the Clay:
Start by conditioning a small chunk of white polymer clay. Knead it in your hands until it becomes soft and pliable, which prevents cracking later. -
Form the Skull Shape:
Roll the clay into a smooth ball, roughly the size of a grape. Gently press it to flatten it slightly, forming a thick disc that is still rounded on the edges, somewhat like a marshmallow. -
Refine the Outline:
Pinch the bottom third of the disc very subtly to create a slightly narrower jaw area, giving it that classic, though stylized, skull silhouette. -
Add Hardware:
Insert a silver eye pin into the top center of the skull. Ensure the loop sits flush against the clay surface. You can add a dab of liquid clay or Bake & Bond on the pin for extra security.
Clean Lines Pro Tip
Keep baby wipes or rubbing alcohol nearby. Wipe your hands and tools before switching from red to white clay to avoid pink smudges on your pristine white skull.
Step 2: Creating the Features
-
Indenting Eye Sockets:
Using a small ball stylus or the rounded end of a paintbrush, press two indentations into the upper half of the face where the eyes will go. These serve as guides for your heart inserts. -
Adding Nares:
Use a needle tool to poke two small, vertical teardrop shapes in the center of the face for the nose cavity. Keep them close together for a cuter look. -
Shaping the Hearts:
Takes a tiny amount of red clay and condition it well. Divide it into two equal, tiny spheres. -
Inserting the Hearts:
Press the red spheres into the eye sockets you created earlier. Use your needle tool to gently gently push and shape the red clay into hearts, ensuring the pointed end faces downward. -
Define the Heart Shape:
Refine the top of the hearts by pressing the needle tool into the center of the upper curve, creating a distinct ‘V’ dip.
Step 3: Baking and Details
-
Bake the Charm:
Place your charm on a baking tile or parchment-lined tray. Bake according to your brand of polymer clay’s instructions (usually 275°F/135°C for about 15-20 minutes for this size). -
Cool Down:
Let the piece cool completely before handling. Polymer clay is fragile while hot. -
Painting the Mouth:
Using a very fine brush and black acrylic paint, draw a thin, curved line across the lower jaw area for the smile. -
Adding Stitches:
Paint small vertical hash marks along the smile line to create the stitched mouth effect shown in the original design. -
Darkening the Nose:
Carefully paint inside the nose indentations with black paint to give them depth. -
Sealing (Optional):
Once the paint is fully dry, you can coat the skull with a gloss glaze to protect the paint and give the hearts a shiny, wet look.
Level Up: Glow Time
Swap the standard white clay for glow-in-the-dark polymer clay! The hearts will remain dark while the skull glows green for an extra spooky surprise.
Step 4: Assembly
-
Open Jump Ring:
Use two pairs of pliers to twist open a jump ring. Never pull them apart; twist one side toward you and one away. -
Connect to Clasp:
Thread the open jump ring through the eye pin loop on top of the skull and also through the loop of the lobster clasp. -
Secure the Charm:
Twist the jump ring back ensuring the ends meet perfectly flush so the heavy charm doesn’t slip off.
Clip this lovely little skeleton onto your zipper or bag and enjoy your handmade Halloween flair.
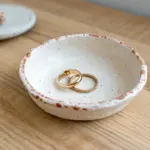
Eyeball Ring Dish With Pastel “Spooky Cute” Vibes
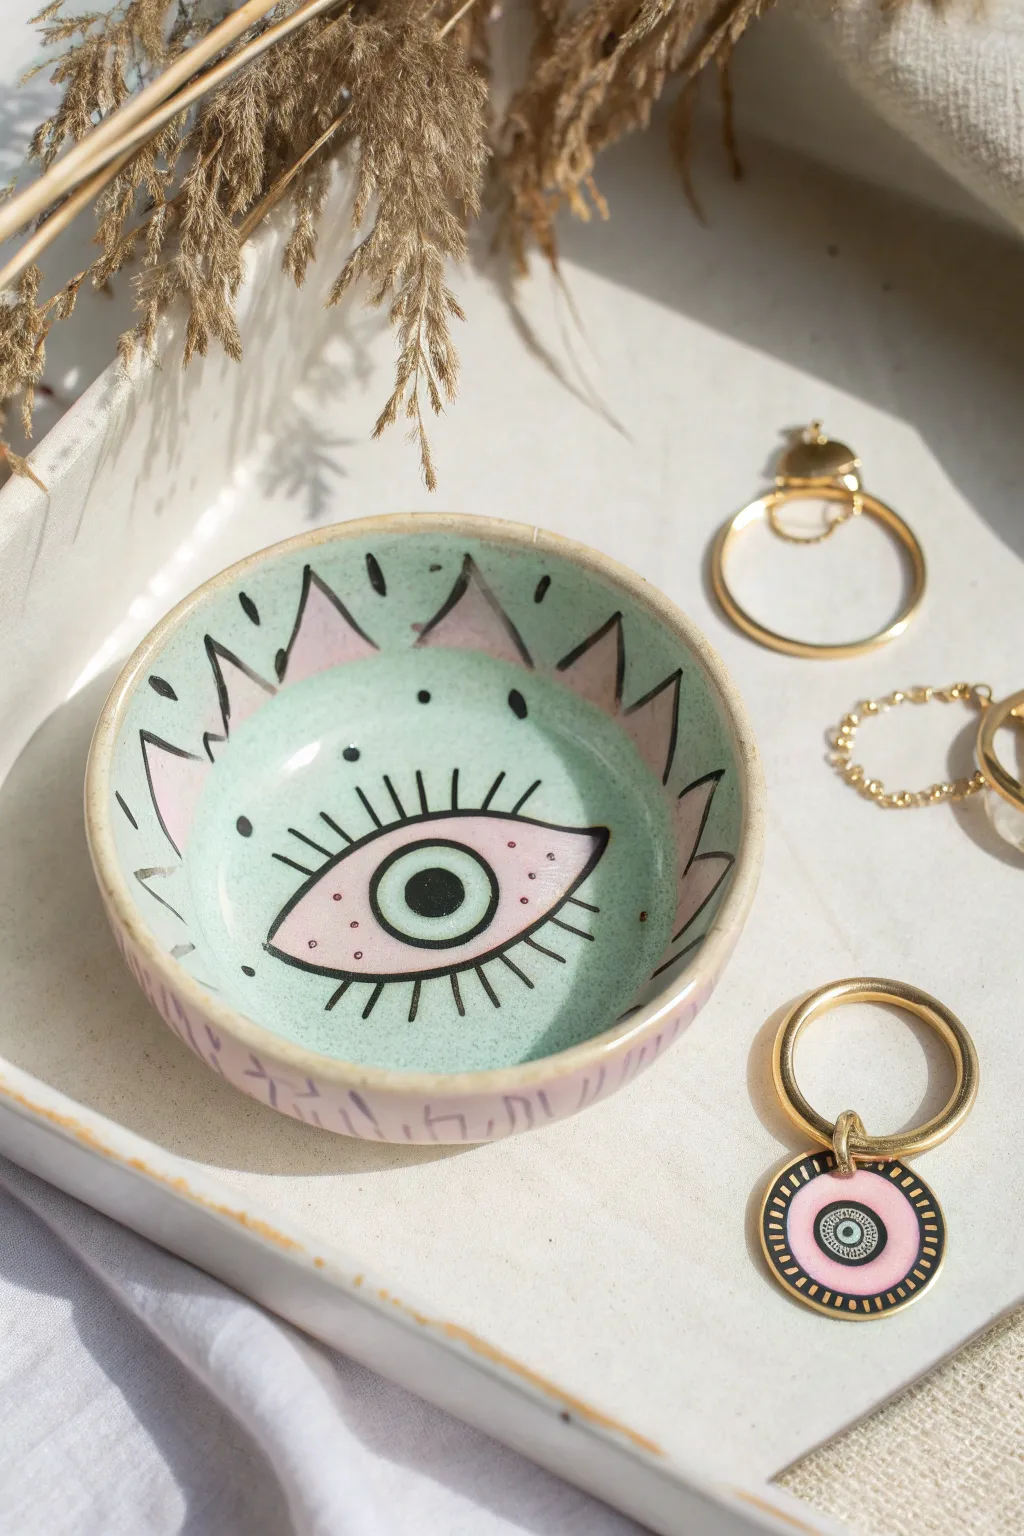
Channel mystical vibes with this whimsical eye-themed ring dish, perfect for holding your favorite trinkets. The design features a trendy pastel mint and pink palette with bold black brushwork for a look that is both enchanting and modern.
Step-by-Step
Materials
- Air-dry clay or polymer clay (white)
- Small rolling pin
- Round cookie cutter or bowl (approx. 4 inches)
- Small bowl for molding (oven-safe if using polymer)
- Acrylic paints: Mint green, soft pink, black, white
- Fine detail paintbrushes (size 0 and 00)
- Gloss varnish or glaze
- Sandpaper (fine grit)
- Palette for mixing
Step 1: Forming the Base
-
Condition the clay:
Start by warming up a ball of white clay in your hands until it becomes soft and pliable, ensuring there are no air bubbles trapped inside. -
Roll it out:
Use your rolling pin to flatten the clay into an even slab, aiming for a thickness of about 1/4 inch so it’s sturdy but not too heavy. -
Cut the circle:
Press a round cookie cutter or use a knife to trace around a small bowl to cut out a perfect circle from your slab. -
Shape the dish:
Gently lift the clay circle and place it inside a small, shallow bowl to give it a curved shape. Smooth out any fingerprints with a drop of water. -
Cure the clay:
Allow the clay to dry completely (for air-dry) or bake it according to the package instructions (for polymer). Once hard, remove it from the mold and sand rough edges lightly.
Fixing Wobbly Lines
If your black outlines get messy, wait for them to dry completely. Then, use the base color (mint or pink) to carefully paint over the mistake and reshape the line.
Step 2: Painting the Design
-
Base coat:
Paint the entire interior surface of the dish with a creamy mint green acrylic paint. You may need two thin coats for full opacity. -
Paint the eye shape:
Using the soft pink paint and a small brush, paint a large almond or football shape in the center of the dish; this will be the white of the eye. -
Add rim triangles:
While the center dries, use the same pink to paint small triangles pointing inward along the upper rim of the dish. -
Paint the iris:
Mix a tiny dot of black into your mint green to darken it slightly (or use the original mint) and paint a circle inside the pink eye shape. -
Add the pupil:
carefully paint a smaller, solid black circle in the very center of the iris. -
Outline the eye:
Switch to your finest detail brush and black paint. Outline the pink eye shape with a steady hand, varying the line thickness slightly for a hand-drawn look. -
Draw the lashes:
Paint long, straight lines radiating outward from the eye outline to create dramatic lashes—make the top ones longer than the bottom ones. -
Detail the rim:
Outline your pink rim triangles in black, and add small tick marks or dashes in the spaces between the triangles. -
Outer rim accents:
Paint small vertical dash marks along the outside edge of the bowl to finish the patterned look. -
Highlight and seal:
Add a tiny white dot to the black pupil for a ‘sparkle’ effect. Once all paint is bone dry, coat the entire dish with a high-gloss varnish to seal it and give it a ceramic-like shine.
Add Gold Accents
For a luxe touch, swap the black rim dashes for metallic gold leaf paint. It catches the light beautifully and makes the pastel colors pop even more.
Place this mystical dish on your dresser or nightstand to keep your treasures safe and stylish
Mini Coffin Trinket Box With a Sweet Face

This whimsical ceramic trinket box adds a gentle touch to spooky season decor with its creamy speckled finish and adorable sleepy face handle. Its simple rectangular shape makes it a perfect beginner sculpting project that feels special enough to gift or keep for your favorite treasures.
Detailed Instructions
Materials
- Speckled cream stoneware clay (or polymer clay with faux speckles)
- Small rolling pin
- Fettling knife or craft blade
- Slab roller or guide sticks (approx. 1/4 inch thick)
- Ruler
- Slip and score tool (needle tool or serrated rib)
- Small round paintbrush
- Yellow underglaze or acrylic paint (if using polymer)
- Clear glaze (if firing) or matte varnish (if polymer)
- Small sponge for smoothing
- Plastic wrap
Step 1: Forming the Box Structure
-
Prepare your slabs:
Begin by rolling out your speckled clay into an even slab, aiming for a thickness of about 1/4 inch. If you are using guide sticks, place them on either side of your clay to ensure the thickness is perfectly uniform across the entire surface. -
Cut the base and walls:
Using a ruler and your fettling knife, measure and cut a rectangular base (approx. 4 x 2 inches). Then, cut two long strips for the sidewalls and two shorter strips for the end walls, ensuring they are tall enough to create a deep vessel. -
Miter the edges (optional):
For cleaner corners, you can cut the vertical edges of your wall pieces at a 45-degree angle. If this feels too tricky, simple butt joints work well too, just make sure to blend them thoroughly later. -
Score and slip:
Rough up the edges of the base and the contact points of your walls using your scoring tool. Apply a generous dab of slip (clay mixed with water) to these rough areas to act as glue. -
Assemble the walls:
Press the walls firmly onto the base and against each other. I like to use a small wooden tool to smooth the interior seams immediately so they disappear completely. -
Smooth the exterior:
Once the box is constructed, use a slightly damp sponge to wipe away excess slip and soften the sharp corners, giving the box that gentle, handmade feel seen in the photo.
Uneven Lid?
If the lid wobbles after assembly, place a piece of plastic wrap between the box and lid while the clay is leather hard. Gently press down on the lid to re-align the fit without sticking.
Step 2: Creating the Lid and Face
-
Measure the lid:
Roll out another slab of clay, slightly thicker than the walls. Measure it against your finished box base—it should have a slight overhang, so cut it just a tiny bit larger than the box perimeter. -
Add a flange:
To keep the lid from sliding off, attach a smaller rectangle of clay or a coil to the underside of the lid slab. This inner rim should fit snugly inside the box opening. -
Sculpt the head:
Roll a small ball of clay, roughly the size of a large marble or walnut. Gently flatten the bottom so it sits flush against the center of the lid. -
Attach the head:
Score and slip the center of the lid and the bottom of the head, then press them firmly together. Use a modeling tool to verify the connection is strong all the way around the neck. -
Refine the shape:
Smooth the top of the head into a rounded dome. If needed, use your damp sponge to ensure the surface is perfectly bead-like and free of fingerprints.
Spooky Surprise
Paint the interior of the box a contrasting charcoal gray or deep pumpkin orange. It adds a pop of hidden color when the ‘coffin’ is opened!
Step 3: Decoration and Finishing
-
Paint the face details:
Using a very fine detail brush and black underglaze (or acrylic), paint two simple, curved lines for sleepy eyes and a tiny ‘U’ shape for the nose. -
Add the smile:
With a touch of yellow paint or underglaze, add a tiny curved smile just below the nose. This minimal expression is key to the box’s sweet character. -
Pattern the sides:
Dip the non-brush end of a small paintbrush into your yellow color. Gently dot a grid pattern around the exterior vertical walls of the box. -
Drying:
Let both pieces dry slowly under loose plastic. If they dry too fast, the lid might warp and no longer fit the box. -
Bisque fire:
If using ceramic clay, fire the piece to bisque temperature once bone dry. If using polymer clay, bake according to the package instructions. -
Glazing:
Apply a clear, matte, or satin glaze over the entire piece to seal the clay and make the speckles pop. Avoid glassy, high-gloss finishes to keep the soft aesthetic. -
Final Fire:
Fire the glazed piece one last time. If using polymer clay, simply seal your paint decoration with a matte varnish.
Now you have a charming little vessel ready to hold candy corn or tiny keepsakes on your desk
Costumed Critter: A Tiny Animal in a Witch Outfit
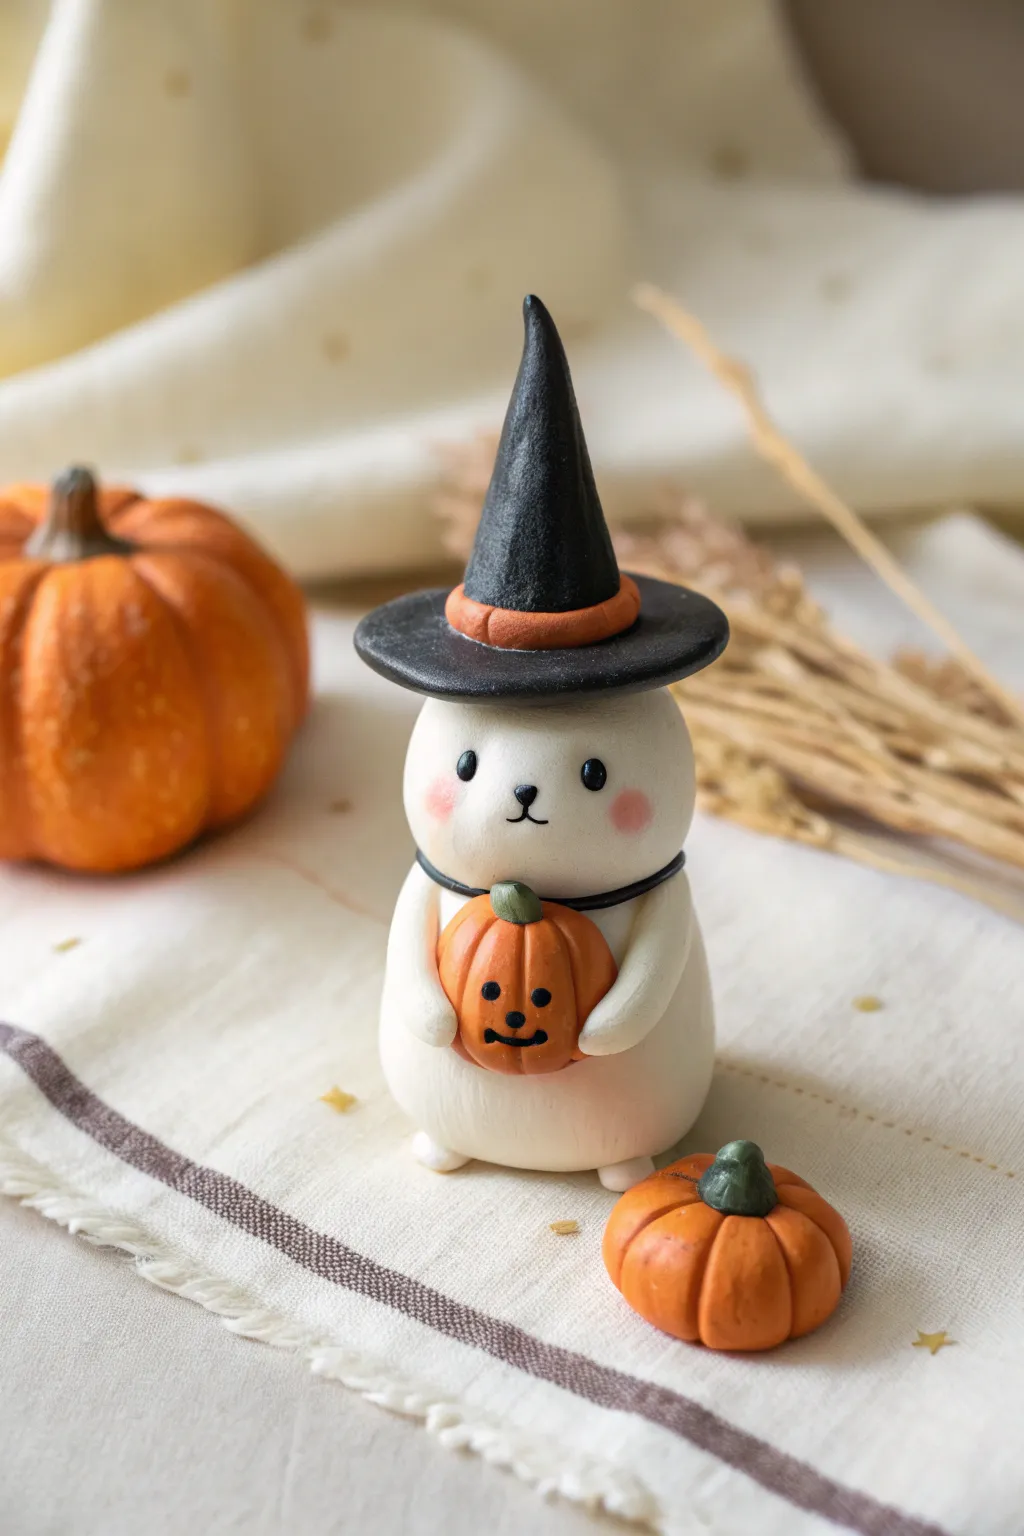
This adorable polymer clay project features a chubby white creature donning a classic witch’s hat and clutching a tiny jack-o’-lantern. Its simple, rounded shapes and sweet expression make it a perfect beginner-friendly decoration for the spooky season.
Step-by-Step
Materials
- White polymer clay
- Black polymer clay
- Orange polymer clay
- Green polymer clay
- Pink chalk pastel or blush
- Black acrylic paint
- Needle tool or toothpick
- Ball tool (small and large)
- Small paintbrush
- Craft knife
- Oven for baking clay
Step 1: Sculpting the Creature
-
Base Body Shape:
Start with a large ball of white polymer clay about the size of a walnut. Roll it until it is perfectly smooth, removing any lint or fingerprints. -
Creating the Torso:
Gently shape the ball into a soft pear or gumdrop shape, flattening the bottom slightly so it stands securely on your work surface. This forms the combined head and body. -
Adding Arms:
Roll two small sausage shapes of white clay for the arms. They should be slightly tapered at one end where they will attach to the body. -
Attaching the Limbs:
Press the tapered ends of the arms onto the sides of the body, about halfway down. Allow them to curve forward as if the creature is ready to hold something. -
Tiny Feet:
Create two very small flattened balls of white clay and attach them under the front of the body to peek out as little feet.
Clean Clay Tip
White clay picks up everything! Keep baby wipes nearby to frequently clean your hands and tools before touching the white clay parts.
Step 2: Making the Pumpkin
-
Orange Base:
Roll a ball of orange clay that fits comfortably between the creature’s arms. Press it slightly to flatten the poles. -
Pumpkin Ribs:
Use a needle tool or the back of a craft knife to press vertical indentations all around the orange ball, creating the classic ribbed pumpkin texture. -
The Stem:
Take a tiny pinch of green clay, roll it into a cone, and place it on top of the pumpkin. Use your needle tool to texture it slightly if desired. -
Positioning:
Place the pumpkin against the creature’s belly and gently press the white arms inward so they look like they are holding it tight. -
Jack-o’-lantern Face:
You can use tiny bits of black clay for the pumpkin face now, or paint them on after baking. In the reference, small black balls form the eyes and a thin snake forms the mouth.
Step 3: The Witch Hat
-
Hat Brim:
Roll a piece of black clay into a ball, then flatten it into a thin, circular disc. This will be the brim of the witch’s hat. -
Hat Cone:
Form a cone shape from black clay. I like to curve ‘tip’ slightly to give it a bit of character and movement. -
Hat Band:
Roll a thin snake of orange clay. Wrap it around the base of the black cone, trimming any excess and smoothing the seam. -
Assembly:
Place the cone onto the center of the brim and press gently to bond them. Then, place the finished hat onto the creature’s head.
Make It Glow
Use glow-in-the-dark polymer clay for the little ghost body to make this decoration really stand out when the lights go down.
Step 4: Face and Finishing Details
-
Eye Sockets:
Use a small ball tool to make two shallow indentations on the face where the eyes will go. This helps the clay eyes sit flush. -
Clay Eyes and Nose:
Roll two tiny specks of black clay for eyes and place them in the sockets. Add a tiny triangular or oval nose in the center between them. -
Mouth Detail:
Use a very sharp needle tool or knife to gently impress a small inverted ‘Y’ shape under the nose for the mouth. -
Rosy Cheeks:
Using a dry paintbrush, dab a small amount of pink chalk pastel dust onto the cheeks to give a soft, blushing effect. -
Baking:
Bake the figurine according to your clay manufacturer’s instructions (typically 275°F/130°C for 15-30 minutes). -
Final Touches:
Once cooled, you can add a dot of white paint to the eyes for a highlight, or glaze the eyes and pumpkin for a shiny finish.
Your little witch is now ready to haunt a shelf or desk with cuteness