When I want a quick creative win, I reach for polymer clay and lean into classic Halloween shapes that are easy to sculpt and hard to mess up. Here are my favorite spooky-cute ideas you can make small enough for charms, earrings, and little shelf decor.
Polymer Clay Jack-o’-Lantern Charms
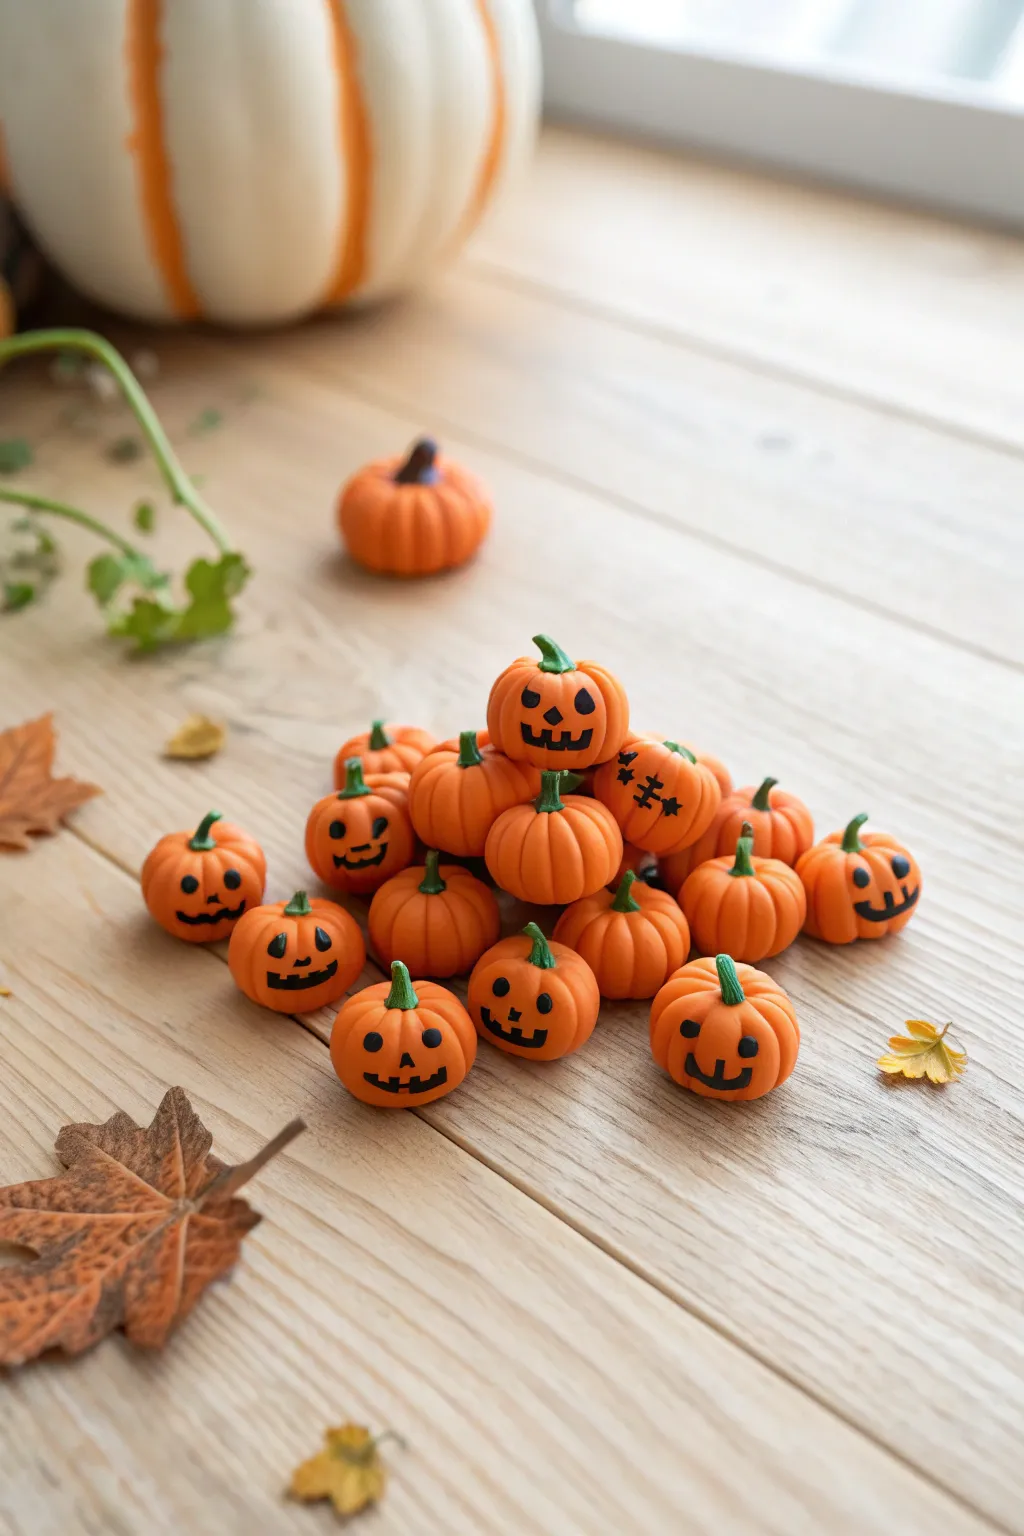
Create an adorable heap of tiny jack-o’-lanterns perfect for seasonal jewelry or charm bracelets. These bright orange miniatures feature hand-painted expressions and realistic green stems, bringing a festive touch to your autumn crafting.
Detailed Instructions
Materials
- Orange polymer clay (Premo or Fimo Soft recommended)
- Green polymer clay
- Basic sculpting tools (needle tool, ball stylus)
- Black acrylic paint
- Fine detail paintbrush (sizes 00 or 000)
- Eye pins (if making charms)
- Gloss or matte glaze (optional)
- Baking sheet and parchment paper
- Soft pastel chalks (orange/brown for shading)
Step 1: Sculpting the Pumpkins
-
Condition the clay:
Begin by warming the orange polymer clay in your hands. Knead and roll it until it becomes soft, pliable, and free of cracks. -
Form the base shapes:
Pinch off small pieces of clay, roughly the size of a blueberry or large pea. Roll each piece between your palms to create smooth, round spheres. -
Flatten slightly:
Gently press down on the top and bottom of each sphere to create that classic squat pumpkin shape. Don’t flatten them too much; just enough so they sit flat. -
Create the ribs:
Using a needle tool or the dull side of a craft knife, press vertical indentations around the outside of the sphere. Start from the center of the top and curve down to the bottom center to mimic pumpkin ribs. -
Indent the top:
Press a small ball stylus or the end of a paintbrush into the center top of the pumpkin to create a divot where the stem will sit. -
Add subtle shading:
For a bit of depth, I like to create some orange or brown dust by scraping a soft pastel chalk. Brush a tiny amount of this dust into the ribbed grooves before baking.
Step 2: Adding Stems & Baking
-
Shape the stems:
Roll a very thin snake of green clay. Cut it into tiny sections, about 3-4mm long. -
Refine the stem shape:
Gently taper one end of each green segment so it’s slightly thinner at the top. Twist it slightly to give it an organic, vine-like appearance. -
Attach the stems:
Place a green stem into the indentation you made earlier on top of each orange pumpkin. Press gently to secure the bond; polymer clay sticks to itself well when raw. -
Insert hardware (optional):
If you plan to use these as charms, insert a metal eye pin directly through the green stem and into the body of the pumpkin now. -
Bake the clay:
Arranged your pumpkins on a parchment-lined baking sheet. Bake according to your specific clay brand’s instructions (usually 275°F/130°C for 15-30 minutes per 1/4 inch thickness). -
Cool down:
Once baked, remove from the oven and allow the pumpkins to cool completely before handling. The clay is fragile while hot.
Fingerprint Fix
If you notice fingerprints on your raw clay, brush them with a tiny amount of baby oil or rubbing alcohol before baking to smooth them out completely.
Step 3: Adding Faces
-
Prepare the paint:
Squeeze a small dot of black acrylic paint onto a palette. Add a minuscule drop of water to improve the flow for fine lines. -
Paint triangle eyes:
Using your finest detail brush, carefully paint two small triangles for eyes on some of the pumpkins. Vary the sizes to give them different personalities. -
Add the mouths:
Paint a curved line below the eyes. Add details like square teeth or jagged edges to create classic jack-o’-lantern grins. -
Try variations:
Don’t feel the need to paint every pumpkin. Leaving some plain, like the ones in the background of the photo, creates a nice variety for a clustered display. -
Different expressions:
Experiment with different faces—try ‘stitched’ mouths (a line with vertical dashes) or happy, round eyes instead of spooky triangles. -
Seal the work:
Once the paint is fully dry, apply a thin coat of water-based glaze (matte or gloss depending on preference) to protect the paint and give the pumpkins a finished look.
Glow Up
Use glow-in-the-dark polymer clay for the pumpkin bodies or neon yellow paint for the eyes to make your charms light up when the lights go out.
Now you have a whole harvest of tiny pumpkins ready to be turned into earrings or scattered as festive table decor


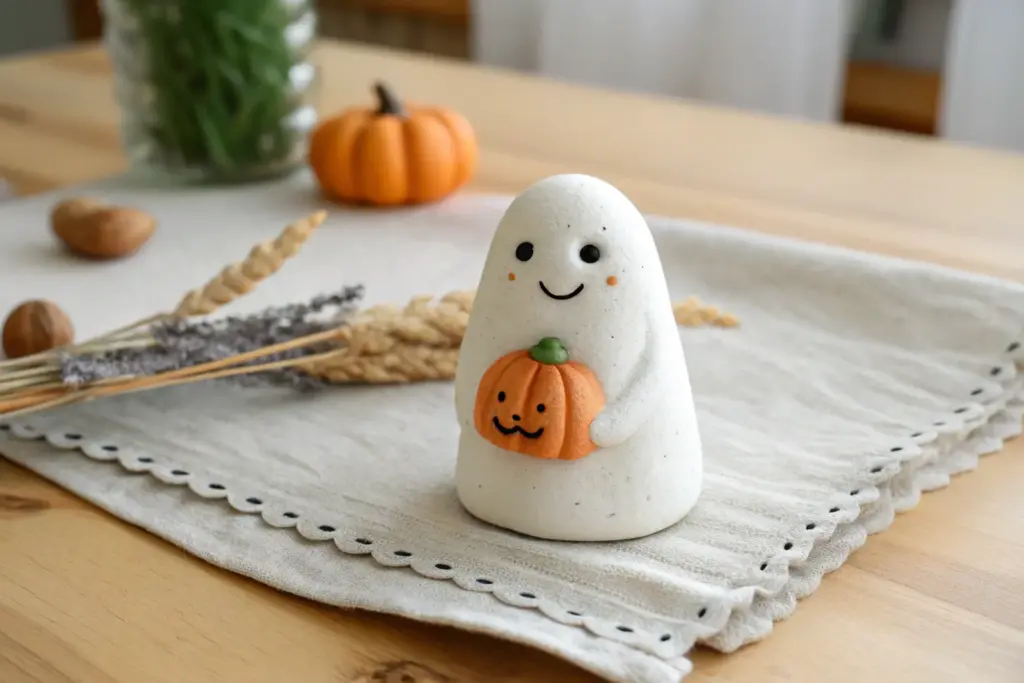
Cute Ghost Mini Figurines
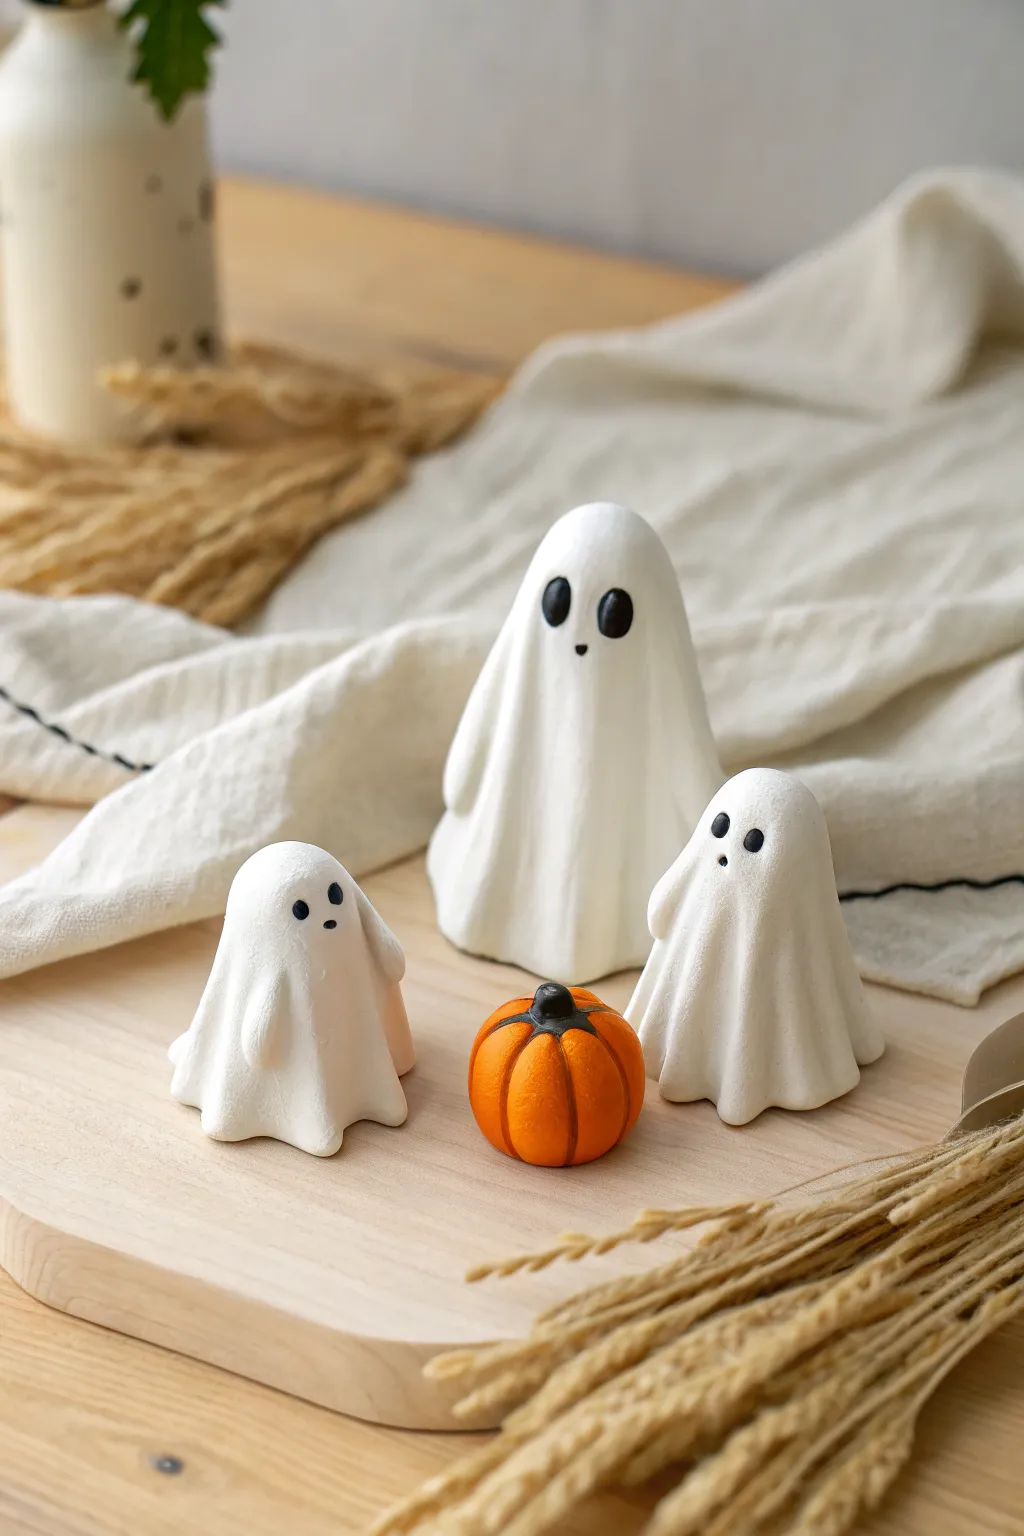
Create a charming little family of ghosts and their pumpkin companion with this simple yet effective polymer clay project. These figurines feature a smooth, matte finish and soft, draped folds that give them a classic floating appearance perfect for Halloween decor.
Step-by-Step Tutorial
Materials
- White polymer clay (approx. 2-3 oz)
- Orange polymer clay
- Black polymer clay
- Green or brown polymer clay (tiny amount for pumpkin stem)
- Aluminum foil
- Clay roller or acrylic rolling pin
- Small ball tool or dotting tool
- Needle tool or toothpick
- Soft brush (for smoothing)
- Matte varnish (optional)
Step 1: Shaping the Ghost Bodies
-
Create the armatures:
Since the ghosts are solid shapes, start by balling up three pieces of aluminum foil into cone-like mounds. Make one larger (about 2 inches tall) and two smaller ones (about 1.5 inches tall). This saves clay and keeps them lightweight. -
Prepare the base layer:
Roll out a thick sheet of white clay and wrap it around your foil cones completely. Smooth the seams with your fingers until you have three solid white cone shapes that stand on their own. -
Form the drape effect:
Roll a thinner circle of white clay, large enough to drape over the largest cone. Gently lay it over the top, letting gravity help you position the fold lines. -
Sculpt the folds:
Using your fingers, gently press and pinch the bottom edges of the clay to create deep, wavy folds. I like to pull the clay slightly outward at the base to make it look like fabric hitting the floor. -
Add the arms:
Before the drape is fully set, gently push from the inside or pinch small nubs on the sides to suggest hidden arms raising the sheet, giving them a whimsical, hovering posture. -
Repeat for smaller ghosts:
Repeat the draping and folding process for the two smaller figurines. Try varying the fold patterns slightly so each ghost has a unique personality. -
Smooth the surface:
Use a very soft brush or your finger with a tiny drop of baby oil to buff out any fingerprints. The finish should look like smooth, uninterrupted fabric.
Lint Magnet Warning
White clay attracts dust like magic! Keep wet wipes nearby and clean your hands thoroughly before handling the white clay. If dust gets stuck, carefully scrape it off.
Step 2: Adding Faces and the Pumpkin
-
Create eye sockets:
Use a ball tool to gently indent where the eyes will go. Place them somewhat high on the ‘head’ area for that cute factor. -
Insert the eyes:
Roll tiny balls of black clay. Flatten them slightly and press them into the indents. Add a microscopic dot of black clay for a mouth if desired, though just eyes work perfectly. -
Shape the pumpkin base:
Roll a ball of orange clay about the size of a large marble. Press it down slightly onto your work surface to flatten the bottom. -
Detail the pumpkin ribs:
Using the side of a needle tool or toothpick, press vertical lines from the top center down to the bottom to create the pumpkin’s segments. -
Add the stem:
Roll a tiny heavy cylinder of black or dark brown clay. Press it into the center top of the pumpkin. You can add a speck of green for a vine leaf if you wish. -
Texture the pumpkin:
Lightly tap the orange surface with an old toothbrush or stiff brush to give it a realistic, organic skin texture compared to the smooth ghosts.
Natural Drapery
To make the folds look more realistic, don’t press them flat. Let the clay curl naturally at the bottom hem, creating shadows under the ‘fabric’ edge.
Step 3: Baking and Finishing
-
Pre-bake check:
Give everything one last look. Ensure the ghosts stand flat and haven’t leaned over during sculpting. -
Bake the batch:
Bake according to your specific clay brand’s instructions (usually 275°F/135°C for 15-30 minutes). Use an oven thermometer to ensure accuracy. -
Cool down:
Let the figurines cool completely in the oven with the door slightly ajar. This prevents thermal shock and cracking. -
Optional matte finish:
To protect your work while keeping that chalky ghost look, apply a thin coat of matte varnish. Avoid glossy finishes, as these ghosts look best with a soft, non-reflective appearance.
Set up your little haunted scene on a shelf or tabletop for instant Halloween cheer


Bat Stud Earrings
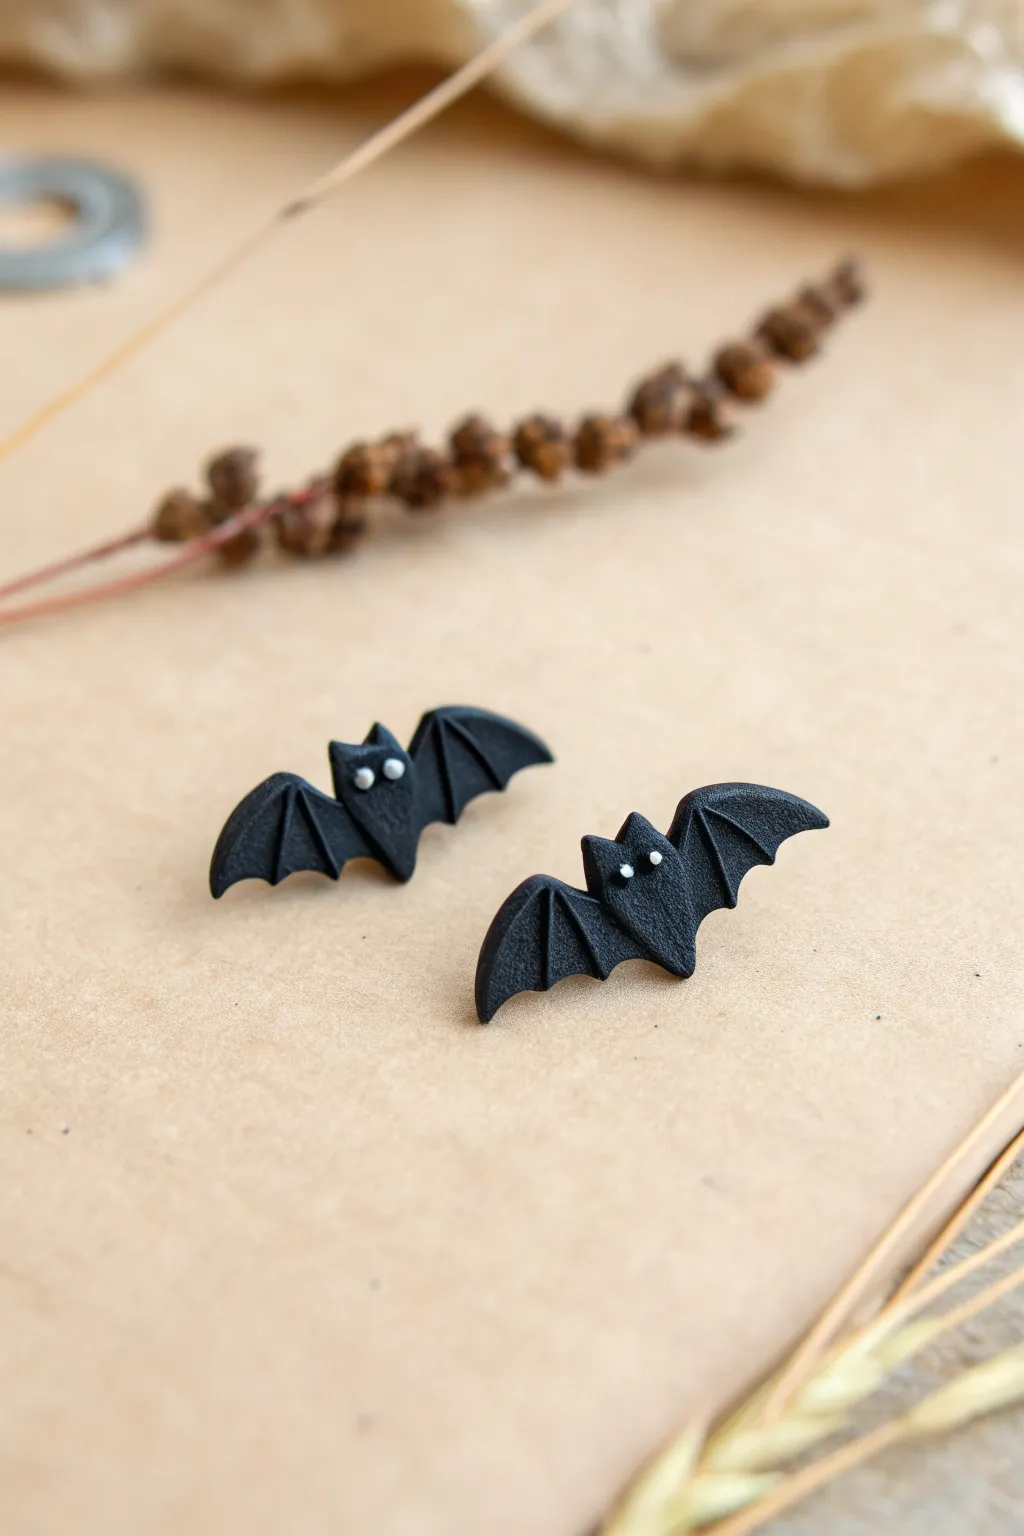
These minuscule bat earrings strike the perfect balance between eerie and adorable with their textured black wings and tiny staring eyes. They make for a subtle nod to Halloween that you can wear all day long.
Step-by-Step
Materials
- Black polymer clay
- White acrylic paint
- Black stud earring posts
- Liquid polymer clay or strong glue (E6000)
- Needle tool or toothpick
- Scalpel or craft knife
- Small dotting tool or pinhead
- Fine-grit sandpaper (optional)
- Gloss varnish (optional)
Step 1: Shaping the Bat Body
-
Condition the clay:
Start by taking a small amount of black polymer clay and kneading it thoroughly until it is soft and pliable. Warm clay is essential for getting smooth edges without cracking. -
Cut the main shape:
Roll the clay out into a small, flat sheet, about 3mm thick. Use a small cutter if you have one, or freehand cut a rough diamond-like shape for the torso and head. -
Create the ears:
Using your craft knife, carefully trim two small triangles out of the top of the head area to form pointy bat ears. Soften the cut edges gently with your fingertip. -
Form the wings:
Form two small, flat triangles of clay for the wings. Attach one to each side of the body, blending the joining seam on the back so it’s secure. -
Scallop the edges:
Use your needle tool or knife to cut shallow scalloped curves along the bottom edge of each wing to mimic the classic bat-wing silhouette.
Texturing Tip
Use a piece of medium-grit sandpaper to gently press texture onto the raw clay before cutting the shapes. This creates a consistent, grainy surface that mimics leather perfectly.
Step 2: Adding Texture and Detail
-
Texture the surface:
These bats look best with a bit of organic texture rather than being perfectly smooth. Gently tap the surface with an old toothbrush or a piece of crumpled foil to give the ‘skin’ a leathery look. -
Detail the wing structure:
Take your needle tool and press lines into the wings, starting from the body and radiating out to the points of the scallops. These indentations represent the bat’s finger bones. -
Smooth the edges:
Check the perimeter of your bat. If the clay has spread from texturing, gently nudge the edges back into a sharp shape with the side of your knife. -
Bake firmly:
Place your bats on a ceramic tie or parchment-lined baking sheet. Bake according to your specific clay brand’s instructions (usually 275°F/135°C for 15-30 minutes). -
Cool down:
Let the bats cool completely before handling. Polymer clay is fragile when hot and needs to harden fully as it returns to room temperature.
Glow in the Dark Upgrade
Swap the white acrylic paint for glow-in-the-dark paint for the eyes. In daylight, they look normal, but at a Halloween party, your little bats will stare back from the shadows.
Step 3: Assembly and Finishing
-
Prepare the eyes:
Dip a very fine dotting tool or the head of a sewing pin into white acrylic paint. You need only the tiniest amount. -
Paint the eyes:
Carefully dot two tiny white circles onto the bat’s face. If you aren’t confident, practice dotting on a scrap piece of paper first. -
Protect the paint:
Once the paint is totally dry, I prefer to dab a minuscule drop of varnish just over the eyes to seal them, though you can varnish the whole bat if you want a glossy look. -
Attach the posts:
Turn the bats over. Apply a small drop of strong glue or liquid polymer clay to the flat pad of your earring post. -
Secure the back:
Press the earring post firmly onto the back of the bat. If using liquid clay, you will need to bake the piece again briefly to set the bond.
Now you have a pair of tiny nocturnal friends ready to accompany you everywhere


Witch Hat Charms
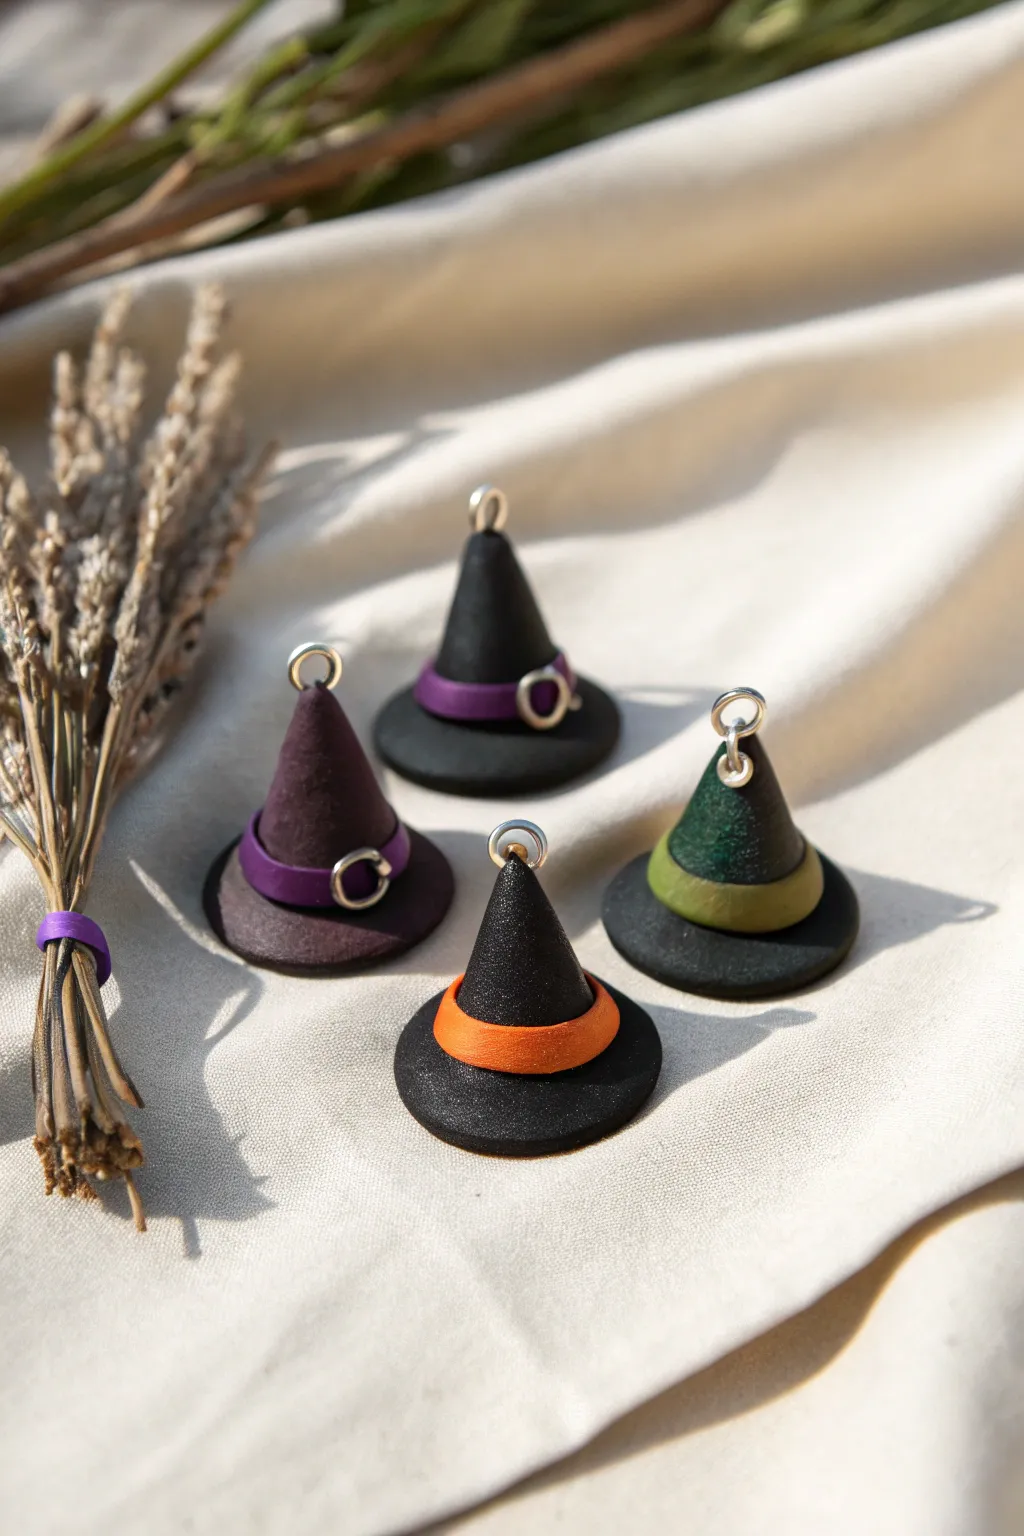
These enchanting little charms are the perfect spooky accessory for necklaces, earrings, or stitch markers. With their tiny buckles and textured finishes, they capture a classic Halloween vibe in a manageable miniature size.
Detailed Instructions
Materials
- Polymer clay (Black, Dark Purple, Orange, Dark Green)
- Silver jump rings (small, around 4-6mm)
- Silver wire (20-22 gauge) for buckles
- Rolling pin or pasta machine
- Small circle cutter (approx. 2cm)
- Blade or X-Acto knife
- Needle tool or awl
- Jewelry pliers (round nose and flat nose)
- Liquid polymer clay (optional, for bonding)
- Texture sponge or stiff brush (optional)
Step 1: Forming the Base
-
Condition the clay:
Start by thoroughly kneading your black clay (or purple for the solid purple hat) until it is soft and pliable. This prevents cracks later on. -
Cut the brim:
Roll out a sheet of clay to about 2mm thickness. Use your small circle cutter to punch out the base for each hat. -
Smooth the edges:
Gently run your finger around the edge of the cut circle to soften the sharp cut line, giving the brim a more natural look. -
Texture the brim:
If you want the textured look seen in the photo, lightly dab the surface of the circle with a coarse sponge or a toothbrush. This removes fingerprints and adds a fabric-like quality.
Floppy Brims?
If the brim droops too much during baking, support the edges with a bed of polyester fiberfill or cornstarch to hold the shape.
Step 2: Sculpting the Cone
-
Shape the cone:
Roll a ball of clay slightly smaller than your base, then shape it into a cone by rolling one side against your work surface with your finger. -
Check proportions:
Place the cone onto the center of your brim to check the fit. It should leave a visible rim of brim around the bottom. Adjust the size if necessary. -
Attach the cone:
Apply a tiny dot of liquid polymer clay to the center of the brim for a strong bond. Press the cone firmly onto the base. Use a blending tool to smooth the seam where they meet if you want a seamless look, though the band will cover most of this area. -
Curve the tip:
Gently grasp the very tip of the cone and give it a slight bend or twist. This adds character and makes the hat look worn and witchy.
Step 3: Adding the Band & Buckle
-
Create the band:
Roll out a very thin strip of colored clay (purple, orange, or green). Cut a narrow ribbon that is long enough to wrap around the base of the cone. -
Make the buckle:
Take a small piece of silver wire and wrap it around a small tool handle or mandrel to create a tiny ring. Flatten it slightly with pliers to mimic a buckle shape. -
Thread the band:
Thread your clay ribbon through the wire buckle before attaching it to the hat. Position the buckle where you want the front to be. -
Apply the band:
Wrap the colored strip around the base of the cone, pressing gently to adhere it to the black clay. Trim any excess at the back and smooth the seam. -
Refine the texture:
I like to go back over the cone and band with my texture sponge very lightly to unify the surface finish.
Sparkle Magic
Mix a tiny amount of mica powder or fine glitter into the translucent liquid clay before attaching parts for a magical, shimmering seam.
Step 4: Finishing Touches
-
Insert the hardware:
Take a sturdy jump ring and push the opening directly into the top of the clay hat cone. Ensure it goes deep enough to be secure. -
Secure the ring:
Use a needle tool to gently push the clay back around the insertion point of the jump ring so it is snugly embedded. -
Pre-bake check:
Do a final inspection for lint or fingerprints. Use a bit of baby oil or rubbing alcohol on a brush to smooth away any imperfections. -
Bake:
Bake the charms according to your clay manufacturer’s instructions (usually 275°F/135°C for 15-30 minutes). I recommend tenting them with foil to prevent the light colors from darkening. -
Cool down:
Allow the pieces to cool completely before handling, as polymer clay is fragile when hot.
String these onto a cord or attach ear wires for a bewitching handmade accessory

The Complete Guide to Pottery Troubleshooting
Uncover the most common ceramic mistakes—from cracking clay to failed glazes—and learn how to fix them fast.
Black Cat Pocket Totems
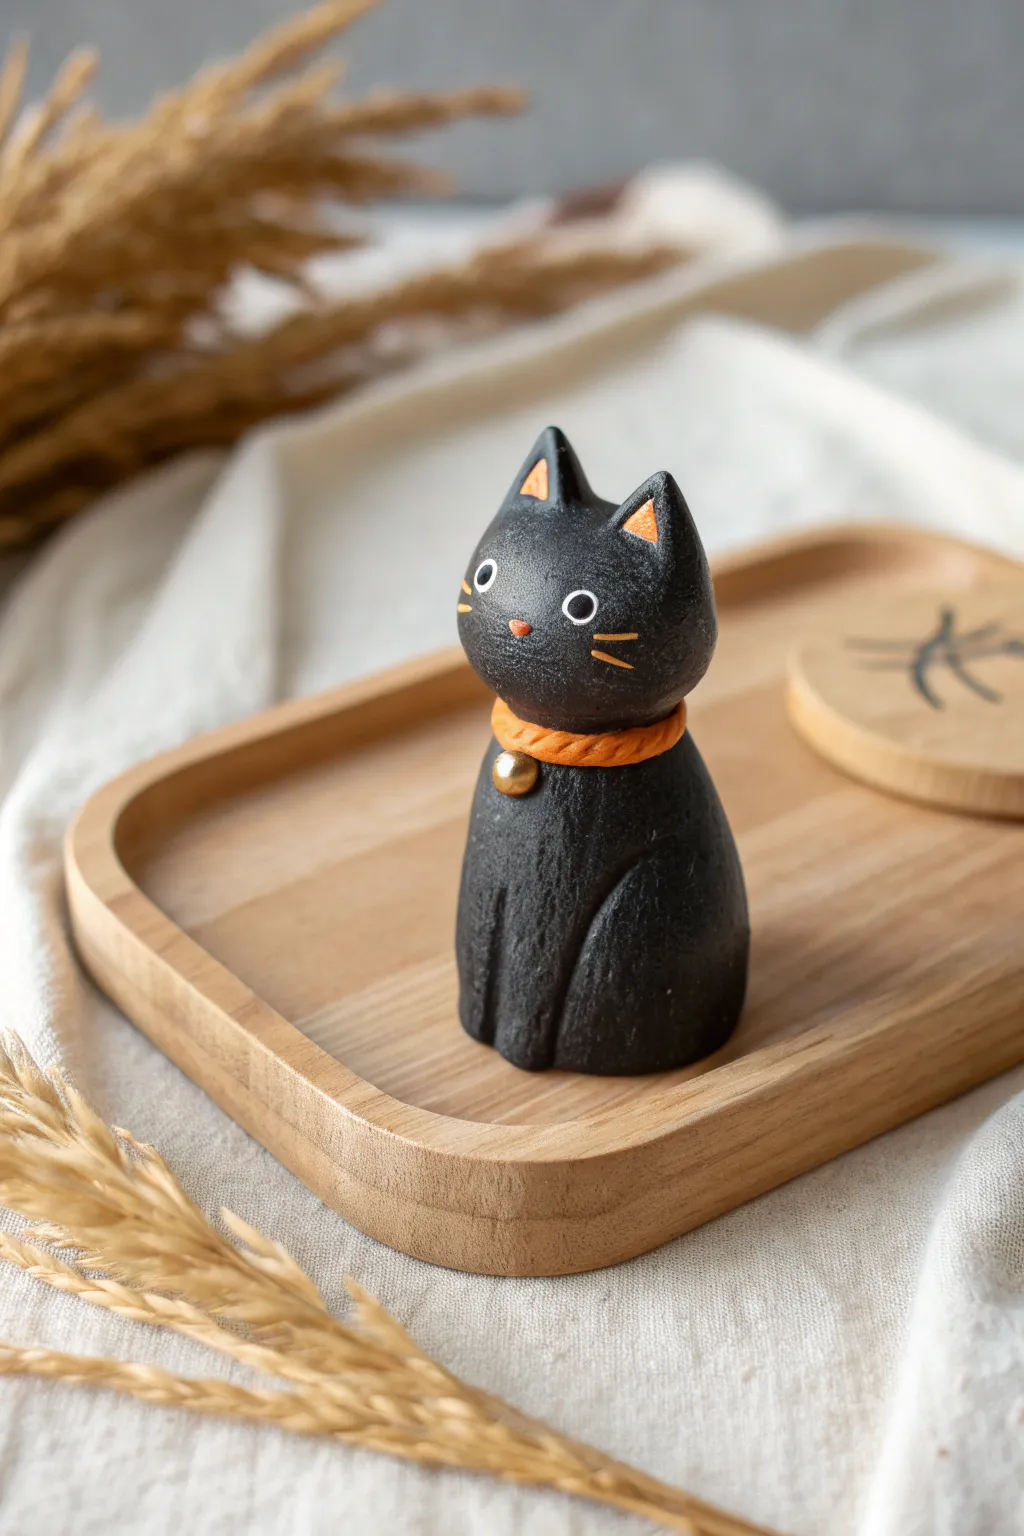
This charming little figurine captures the mysterious spirit of Halloween in a bite-sized package. With its textured finish, bright orange collar, and curious expression, this black cat makes for a perfect desk companion or a pocket-sized good luck charm.
How-To Guide
Materials
- Black polymer clay
- Orange polymer clay
- White acrylic paint
- Gold or metallic yellow bead (tiny)
- Texture sponge or toothbrush
- Clay sculpting tools (needle tool, small ball tool)
- Oven
- Foil or parchment paper
- Clear matte varnish (optional)
Step 1: Shaping the Base
-
Condition the clay:
Start by warming up your black polymer clay in your hands. Knead it thoroughly until it’s soft, pliable, and free of any air bubbles. -
Form the body:
Roll a piece of black clay into a smooth ball about the size of a walnut. Gently shape this into a tapered cone or teardrop shape for the body. -
Flatten the base:
Tap the wider bottom of your cone against your work surface. You want the figurine to sit flat and stable without tipping over. -
Create the head:
Roll a second, slightly smaller ball of black clay for the head. It should be proportional to the body but slightly oversized for that cute, illustrative look. -
Join body and head:
Press the head firmly onto the narrow top of the body. Wiggle it slightly to ensure a good bond between the two pieces of clay.
Fingerprint Troubles?
Black clay shows every fingerprint! If you smooth an area and lose texture, lightly brush it with a tiny bit of baby oil before re-applying your sponge texture.
Step 2: Adding Details
-
Shape the ears:
Pinch two tiny triangles of black clay. Gently round off the tips so they aren’t dangerously sharp. -
Attach the ears:
Place the triangular ears on top of the head. Use a shaping tool to smooth the seams where the ears meet the skull so they look like one continuous piece. -
Add inner ear color:
Take extremely tiny amounts of orange clay and flatten them into triangles. Press these into the front face of each ear. -
Sculpt the front legs:
Roll two small, thin logs of black clay. Press these vertically onto the front of the body to suggest sitting front legs, blending the top edges into the body. -
Create the collar:
Roll a thin snake of orange clay. Wrap this around the neck seam where the head meets the body. -
Texture the collar:
Using a needle tool, press small diagonal lines all around the orange snake to give it a twisted rope or woven fabric texture. -
Add the bell:
Press your tiny gold bead into the center of the collar. If you don’t have a bead, a ball of gold clay works beautifully here too.
Glow-in-the-Dark twist
For extra spooky vibes, swap the white eye paint for glow-in-the-dark pigment or paint. The cat will look normal during the day but watch you in the dark
Step 3: Texture and Finishing
-
Apply stone texture:
To mimic the finish in the photo, take a rough texture sponge or an old toothbrush. Gently tap it all over the black clay surfaces to create a matte, stone-like texture. -
Bake carefully:
Place your cat on a baking sheet lined with foil or parchment paper. Bake according to your specific clay brand’s instructions (usually around 275°F/135°C for 15-30 minutes). -
Cool down:
Let the figurine cool completely inside the oven with the door open. This prevents thermal shock and cracking. -
Paint the eyes:
Dip a small ball tool or the end of a paintbrush handle into white paint. Dot two wide-set eyes onto the face. -
Add the pupils:
Once the white is dry, use a fine-tip black marker or a needle tool with black paint to add the tiny pupils. -
Paint whiskers and nose:
Using a very fine brush and orange paint (or watered-down clay), carefully paint on the whiskers and a tiny inverted triangle for the nose.
Enjoy your new tiny feline friend sitting proudly on your shelf
Spiderweb Texture Pendants
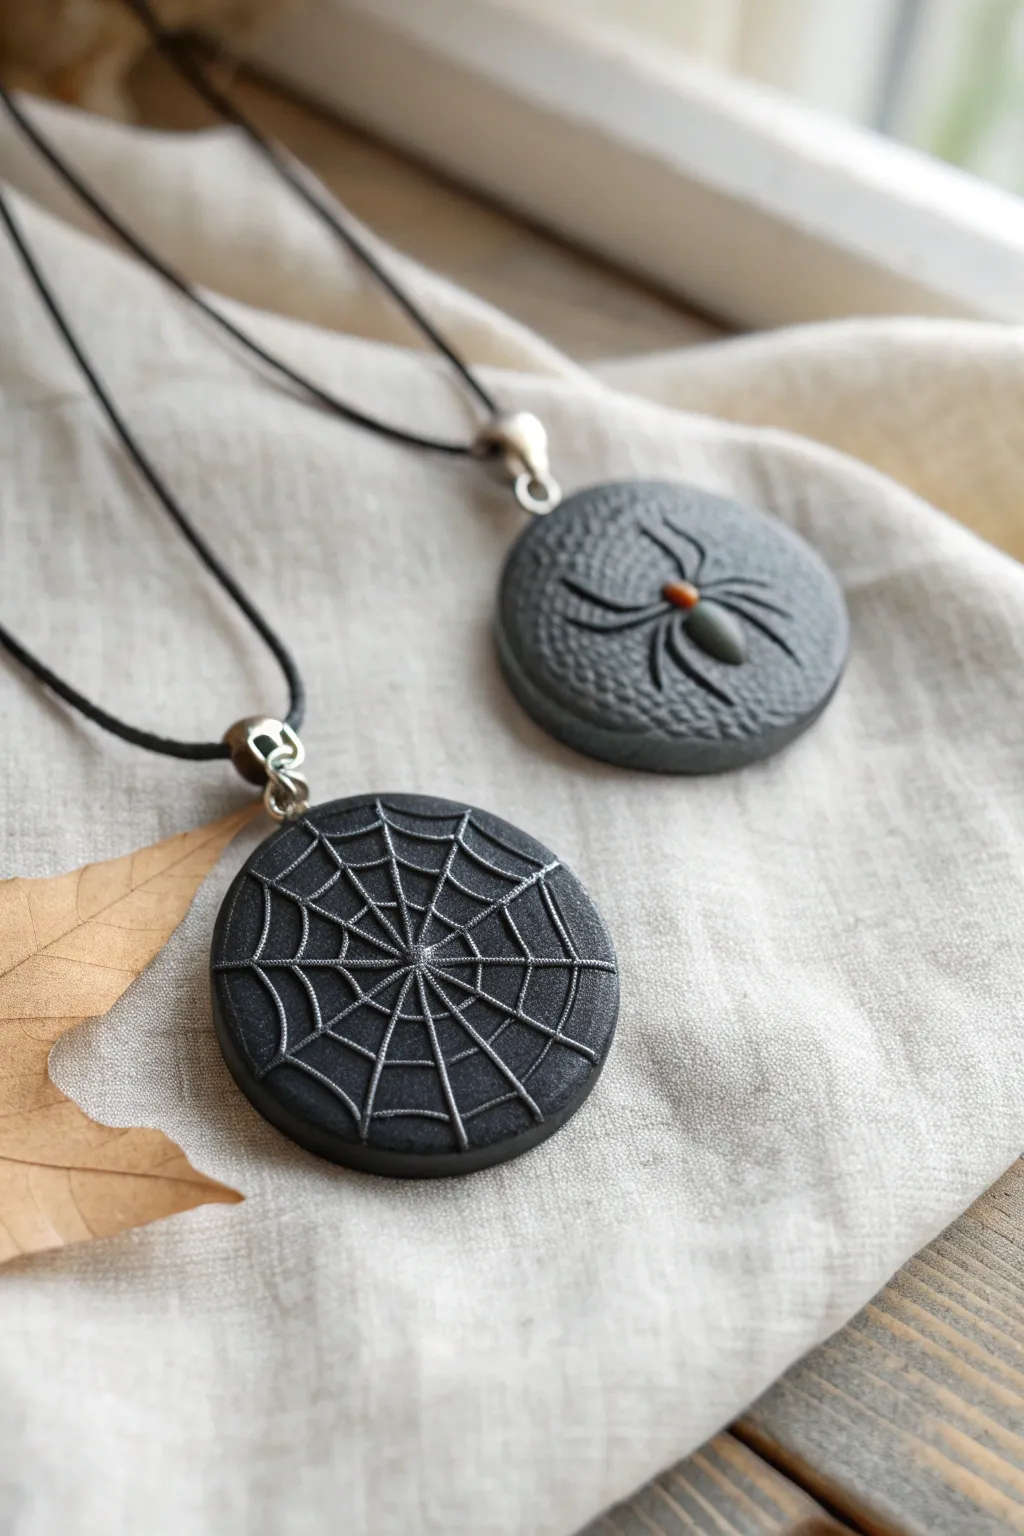
These dark, dramatic pendants feature raised designs that capture the essence of a haunted night. Whether you choose the intricate spiderweb or the creeping spider, the monochromatic black-on-black look adds subtle gothic elegance to your Halloween ensemble.
How-To Guide
Materials
- Black polymer clay
- Silver or gunmetal mica powder
- Polymer clay extruder (for the web)
- Small round circle cutter (approx. 1.5 – 2 inches)
- Needle tool or toothpick
- Ball stylus tool
- Orange acrylic paint (tiny amount for spider detail)
- Fine detail brush
- Gloss varnish (optional)
- Black jewelry cord
- Jump rings and bails
- Acrylic rolling pin
- Texture sheet or sandpaper (for the spider pendant background)
Step 1: Preparing the Base
-
Condition the Clay:
Begin by thoroughly conditioning your black polymer clay until it is soft and pliable. Warm clay prevents cracking later on. -
Roll the Sheets:
Roll out a sheet of clay to a medium thickness, roughly 1/4 inch (about 4-5mm). This thickness ensures the pendant feels substantial but isn’t too heavy. -
Cut the Circles:
Use your round circle cutter to punch out two clean discs. Smooth the edges with your finger to remove any sharp cut marks or stray bits of clay.
Sticky Situation?
If your thin clay strings for the web keep breaking, mix a drop of liquid clay or baby oil into the black clay before extruding. This creates a softer mix that stretches without snapping.
Step 2: Creating the Spiderweb Pendant
-
Extrude the Strings:
Load a small amount of conditioned black clay into an extruder fitted with the smallest round disc. Extrude long, thin strings of clay. -
Place Main Spokes:
Lay strings across the circle like slicing a pie. Start with a vertical line, then a horizontal one, intersecting in the exact center. Add two diagonal lines to create an eight-spoke structure. -
Trim the Edges:
Gently press the ends of the spokes into the edge of the circle and trim any excess flush with the pendant’s rim using a craft knife. -
Create the Webbing:
Take a small segment of the extruded string and gently curve it between two spokes. Press it down lightly. Continue creating these concentric scalloped lines, working from the center outward. -
Secure the Junctions:
Use a needle tool to very gently press down where the web lines cross the spokes. This ensures a strong bond so pieces don’t pop off after baking. -
Apply Mica:
Dip your finger or a soft brush into silver or gunmetal mica powder. Lightly graze it over the raised web lines. This highlights the texture against the dark background.
Step 3: Creating the Spider Project
-
Texture the Background:
For the second pendant, press a texture sheet or even a piece of coarse sandpaper into the surface of the raw clay disc to give it a pockmarked, organic look. -
Form the Body:
Roll two small balls of black clay—one slightly larger for the abdomen and a smaller one for the head (cephalothorax). Press them onto the center of the textured disc. -
Add Legs:
Roll eight tiny tapering snakes of clay. Attach four on each side of the body, bending them at ‘knee’ joints to look like they are crawling. Use a needle tool to blend the attachment points underneath the body. -
Add the Detail:
Press a small indentation into the center of the spider’s back if you want to add a jewel tone later, or keep it smooth. -
Highlighting:
Just like the web, brush a tiny amount of metallic mica powder over the raised spider and the textured background to make the details pop.
Level-Up Tip
Make the spider’s body out of a dark glass bead or a piece of polished obsidian embedded into the clay before baking for a mixed-media shine that looks extra creepy.
Step 4: Finishing Touches
-
Make the Hole:
Before baking, use a tool to pierce a hole near the top edge for the jump ring. I prefer inserting a small metal eye pin instead for a cleaner look, but a hole works fine too. -
Baking:
Bake the pendants according to your clay package instructions (usually 275°F/130°C for 30 minutes). Let them cool completely in the oven. -
Painting Details:
Once cool, use a fine brush to add a tiny dot of orange or red paint to the spider’s back for a classic ‘black widow’ vibe. -
Assembly:
Thread a jump ring through the hole (or eye pin) and attach a bail. String the black cord through the bail to complete the necklace.
Wear these monochromatic talismans to bring a sophisticated touch of darkness to your day


What Really Happens Inside the Kiln
Learn how time and temperature work together inside the kiln to transform clay into durable ceramic.
Mini Skull Beads

Create a subtle yet striking Halloween accessory with these minimalistic polymer clay skull beads strung on bright orange cord. This adjustable bracelet combines the rustic look of bone-like polymer clay with simple macramé knots for a wearable piece of spooky art.
Detailed Instructions
Materials
- White or beige polymer clay (e.g., Fimo or Sculpey)
- Translucent polymer clay (optional, for a bone effect)
- Black acrylic paint
- Fine-point dotting tool or a toothpick
- 1mm orange waxed cotton cord or nylon macramé cord
- Beading awl or large needle
- Small paintbrush
- Paper towel or wet wipe
- Scissors
Step 1: Sculpting the Skulls
-
Mix the clay:
Begin by conditioning your polymer clay. To achieve that realistic ‘bone’ color shown in the photo, I like to mix a small amount of translucent clay into white or beige clay. This gives the beads a slight depth rather than a flat plastic look. -
Form the base beads:
Roll the conditioned clay into a thin log or snake, roughly 1cm in diameter. Slice the log into equal segments to ensure your skulls will be uniform in size. -
Shape the rounds:
Roll each segment into a smooth ball between your palms. Slightly flatten the ball just a tiny bit so it isn’t a perfect sphere; an organic, slightly irregular shape looks more like carved bone. -
Create the eye sockets:
Using a medium-sized ball tool or the rounded end of a paintbrush, press two indentations into the front of each bead for the eye sockets. Make them slightly larger than you think necessary, as the paint will fill them later. -
Add the nose cavity:
With a smaller tool or a toothpick, press a single indentation below and between the eyes to create the nose cavity. -
Pierce the holes:
Use a bead piercing pin or a thick needle to create a hole running horizontally through the skull (from ear to ear). Twist the tool gently as you push through to avoid distorting the face shape. -
Bake:
Place your beads on a baking sheet or tile. Bake according to your clay manufacturer’s instructions (usually around 275°F/130°C for 15-30 minutes). Let them cool completely before handling.
Paint Smudges?
If the black paint stains the ‘bone’ surface too much, use a Q-tip dipped in rubbing alcohol or nail polish remover to gently clean the high points while leaving the dark recesses intact.
Step 2: Painting and Finishing
-
Apply the wash:
Dilute a small drop of black acrylic paint with water. Brush this wash over the entire front of the bead, ensuring it gets deep into the eye and nose crevices. -
Wipe away excess:
Immediately wipe the surface of the bead with a damp paper towel. The black paint should remain trapped in the indentations, defining the skull features, while the surface returns to the bone color. -
Drill clean (optional):
If paint clogged the bead holes, use a small hand drill or your piercing tool to clear the channel gently.
Step 3: Assembling the Bracelet
-
Cut the cord:
Cut one long piece of orange cord (about 12 inches) for the base and a shorter piece (about 8 inches) for the clasp. -
String the beads:
Thread all your finished skull beads onto the center of the longer cord. Tie a simple overhand knot tightly against the beads on both sides to keep them centered and clustered together. -
Form the circle:
Bring the two ends of the bracelet cord together so they overlap parallel to each other, forming a circle that fits over your hand. -
Create the sliding knot:
Using the shorter piece of cord, tie a series of square knots (macramé style) over the overlapped base cords. This creates the adjustable sliding mechanism shown in the picture. -
Secure the clasp:
Once the sliding knot is about 0.5 inches long, trim the ends of the knotting cord and carefully melt them with a lighter or secure with a dab of glue. -
Finish the ends:
Tie a small knot at the very end of each tail of the base cord to prevent them from slipping through the clasp. Trim any excess length.
Glow Up
Use glow-in-the-dark polymer clay instead of white for the base. Your bracelet will look like normal bone during the day but reveal glowing skulls when the lights go out.
Enjoy wearing your subtle, skeletal creation all season long
Tombstone Name Tags
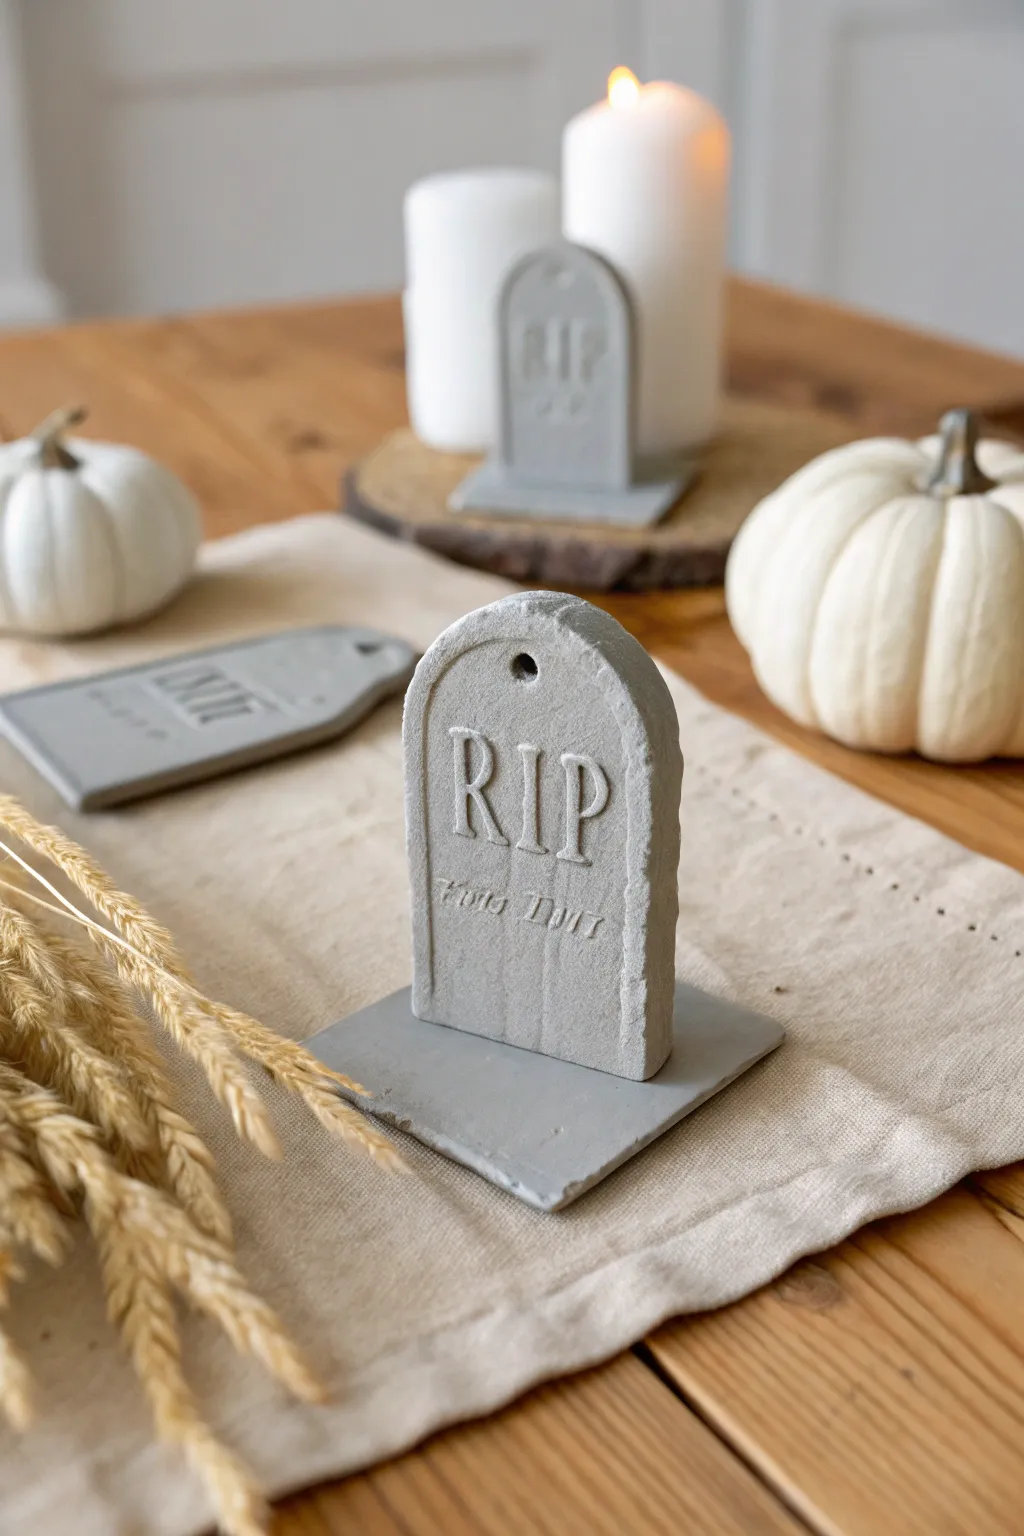
These delightfully dreary tombstone name tags add a touch of graveyard elegance to your Halloween table setting. The faux stone texture and classic arched shape make them perfect for guiding guests to their final resting place—at the dinner table, that is.
Step-by-Step Guide
Materials
- Gray polymer clay (or white and black mixed)
- Rolling pin or clay machine
- U-shaped clay cutter or craft knife
- Cardstock for template (optional)
- Needle tool or toothpick
- Letter stamps or small alphabet pasta
- Round cutter or straw (for hole)
- Toothbrush or crumpled foil (for texturing)
- Acrylic paint (black and white)
- Paintbrush
- Paper towel
Step 1: Prepping the ‘Stone’
-
Mix your gray:
Start by conditioning your gray polymer clay until it is soft and pliable. If you don’t have pre-mixed gray, combine white clay with a very small amount of black until you achieve a light, stony shade. -
Roll out the slab:
Roll the clay out to a consistent thickness of about 1/4 inch (6mm). You want it thick enough to stand upright securely without bending. -
Cut the tombstone shape:
Use a U-shaped cutter to punch out the main body of the tombstone. If you don’t have a cutter, sketch an arched shape on cardstock, cut it out, and use it as a template to trace and cut with a craft knife. -
Create the base:
Roll a second piece of clay slightly thinner than the tombstone body. Cut a square or rectangle that is slightly wider than the base of your arched piece to serve as a stand. -
Add a hole:
Using a small round cutter or a drinking straw, punch a small hole near the top center of the arch. This adds a realistic tag detail and allows you to string them later if desired.
Granite Grit
Mix coarse black pepper or black sand into your clay before rolling it out. This creates natural specks that mimic real granite without extra painting.
Step 2: Adding Details & Texture
-
Texture the surface:
To get that weathered stone look, gently press a toothbrush or a ball of crumpled aluminum foil all over the surface of the clay. Don’t forget the edges and the back. -
Refine the edges:
Use your finger to gently soften any sharp cut marks on the edges, blending them into the textured surface so it looks like worn stone rather than fresh clay. -
Imprint the main text:
Press your letter stamps firmly into the center of the tombstone to spell ‘RIP’. Ensure the impression is deep enough to catch paint later. -
Add names or dates:
Below the main text, use smaller stamps or a needle tool to delicately scratch in a guest’s name or a spooky date like ‘Oct 31’. I find that scratching feels more like chiseled stone than stamping. -
Assemble the stand:
Place the tombstone upright onto the center of the base square. Blend the clay at the seam on the back side to secure it, or use a little liquid polymer clay (Bake & Bond) to adhere the two pieces together firmly.
Mossy Ruins
Dab bits of green acrylic paint or glue tiny pieces of dried moss into the crevices after baking for an ancient, overgrown cemetery look.
Step 3: Baking & Finishing
-
Bake the clay:
Place your assembled tombstones on a baking sheet lined with parchment paper. Bake according to your specific clay brand’s instructions—usually around 275°F (130°C) for 15-30 minutes per 1/4 inch of thickness. -
Cool completely:
Remove from the oven and let the pieces cool completely before handling. The clay is fragile when hot. -
Apply a dark wash:
Water down some black acrylic paint until it’s very thin. Brush this wash over the entire piece, making sure it gets into the stamped letters and texture pits. -
Wipe away excess:
Immediately wipe the surface with a paper towel. This leaves the dark paint in the crevices (like the ‘RIP’ letters) while cleaning off the high points. -
Dry brush highlights:
Dip a dry brush into a tiny amount of white paint, blot almost all of it off on a paper towel, and lightly brush over the raised textures to simulate highlighting on stone.
Now your guests can find their designated seats with a spooky yet sophisticated memento to take home

TRACK YOUR CERAMIC JOURNEY
Capture glaze tests, firing details, and creative progress—all in one simple printable. Make your projects easier to repeat and improve.
Mini Coffin Trinket Boxes
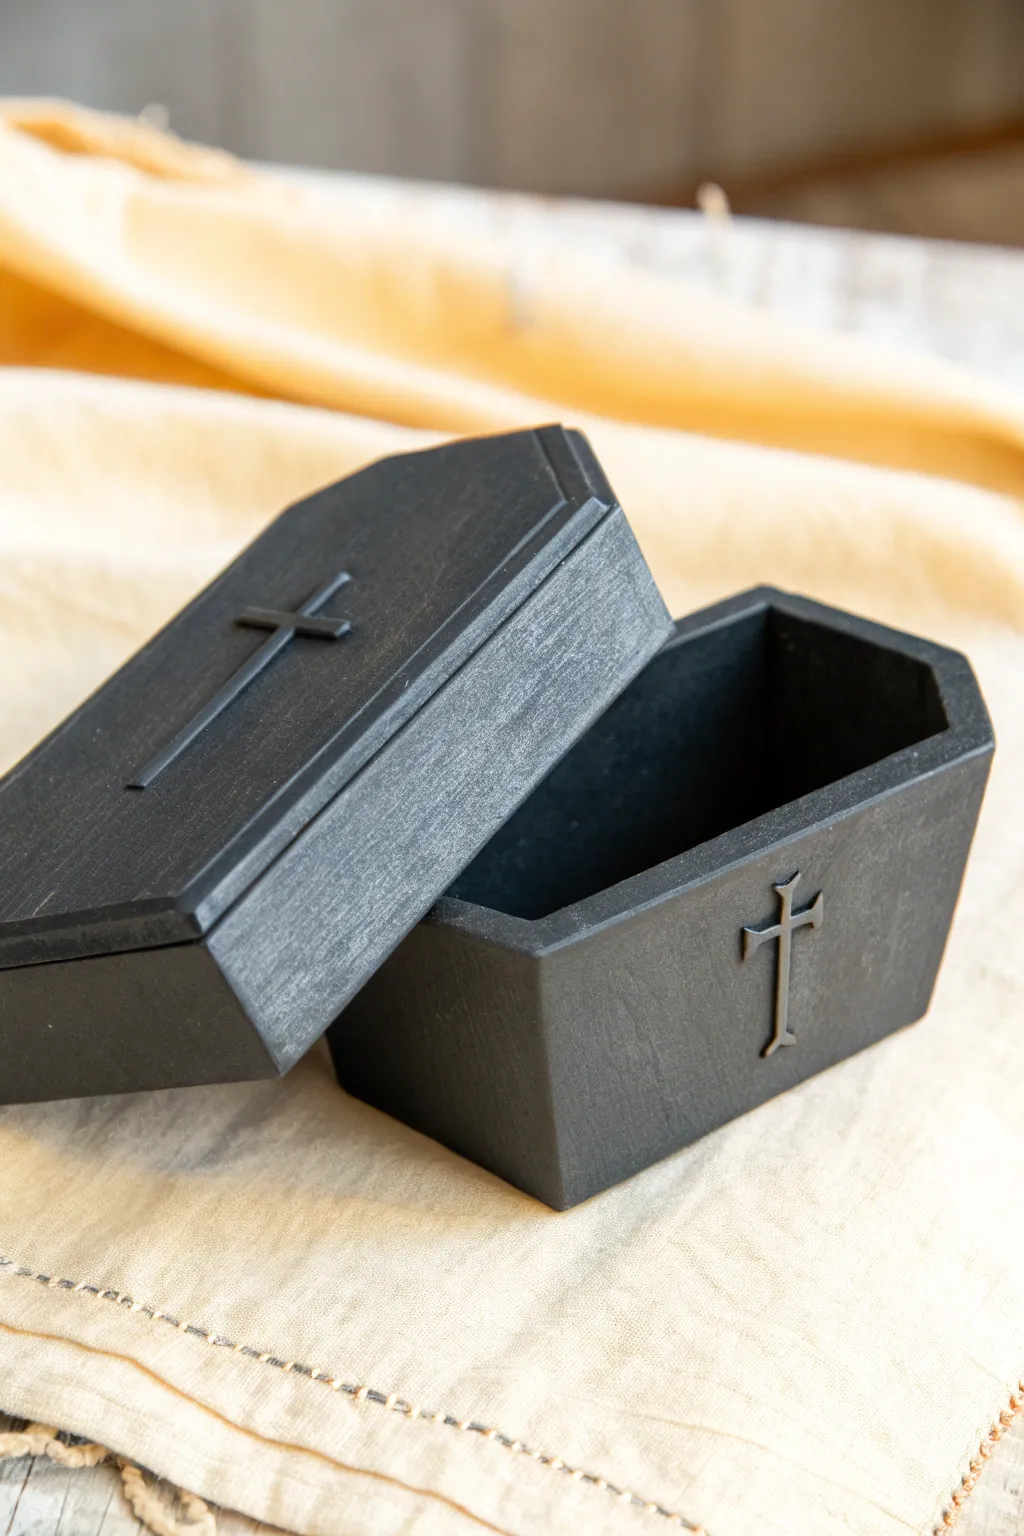
Embrace the macabre with this sleek, matte black polymer clay coffin box adorned with minimalist crosses. This trinket box features a perfectly fitted lid and a subtle textured finish that gives it the look of painted wood or cast iron.
Step-by-Step Tutorial
Materials
- Black polymer clay (approx. 2-3 blocks)
- Paper template (coffin shape)
- Clay roller or pasta machine
- sharp craft knife or tissue blade
- Ruler or straight edge
- Liquid polymer clay (black or clear)
- Texture sponge (coarse) or sandpaper
- Needle tool
- Black acrylic paint (matte)
- Paintbrush (flat shader)
- Oven for baking clay
Step 1: Preparation & Base Construction
-
Draft your template:
Sketch a classic six-sided coffin shape on cardstock and cut it out. Create a second template for the sides: a long rectangle strip about 1.5 inches tall. -
Condition the clay:
Throughly condition your black polymer clay until it is soft and pliable. I find warm hands make this much easier with stubborn black pigments. -
Roll the slabs:
Roll out a large slab of clay to a uniform thickness, roughly 1/4 inch (or a #1 setting on a pasta machine). You need enough surface area for the bottom, the lid, and the wall strips. -
Cut the base:
Place your coffin template on the clay slab and cut around it cleanly with your craft knife to create the box floor. -
Cut the walls:
Use your ruler to cut long strips for the walls. Ensure they are perfectly consistent in height so your lid will sit flat later.
Step 2: Assembling the Box
-
Prepare the edges:
Apply a very thin line of liquid polymer clay (acting as glue) around the perimeter of the coffin base. -
Attach the walls:
Place the wall strips onto the base. Instead of wrapping one long strip around corners, it is often cleaner to cut individual segments for each of the six sides. -
Miter the corners:
Where the wall segments meet at the angles, cut the clay at an angle (mitering) so they press together seamlessly without gaps. -
Blend the seams:
Use a modeling tool or the back of your fingernail to smooth the seams on the outside and inside walls, merging the clay so the joints disappear. -
Reinforce the inside:
Roll a very thin snake of clay and press it into the bottom interior corner where the wall meets the floor to strengthen the bond.
Clean Cuts Pro Tip
Chill your rolled clay slab in the fridge for 10 minutes before cutting. Firm clay resists dragging and results in much sharper, straighter edges for the geometric shape.
Step 3: Creating the Lid & Details
-
Cut the lid slab:
Using your original template again, cut a second coffin shape for the top. -
Add a lip (optional):
To make the lid secure, you can add a smaller coffin shape of clay to the *underside* of the lid, sized to fit snugly inside the box opening. -
Sculpt the crosses:
Roll extremely thin strips of clay. Cut two segments, one longer than the other, and cross them. Press them gently onto the center of the lid and the front side of the box base. -
Add beveled details:
For the raised border on the lid seen in the photo, cut another coffin shape, hollow out the center leaving a rim, and attach this frame to the top of the lid. -
Texturizing:
Lightly dab the entire surface with a coarse sponge or scrunched aluminum foil to remove fingerprints and give it a stone-like texture. -
Baking:
Bake the pieces according to your clay package instructions (usually 275°F for 15-30 minutes). Support the walls with plain paper stuffing so they don’t sag.
Lid Fit Troubleshooting
If the lid is too tight after baking, use a nail file or emery board to gently sand the inside lip of the lid until it slides comfortably onto the base.
Step 4: Finishing Touches
-
Cooling:
Let the clay cool completely inside the oven to prevent thermal shock cracks. -
Sanding imperfections:
Once hard, use fine-grit sandpaper to smooth out any sharp edges or uneven corners. -
Painting:
Even though the clay is black, applying a coat of matte black acrylic paint unifies the finish and hides any sanding marks. -
Dry brushing (Optional):
To highlight the texture, you can very lightly dry brush a dark grey over the edges and the cross.
Fill your new miniature coffin with candy or spooky keepsakes for the perfect Halloween display
Glow-in-the-Dark Ghost Set
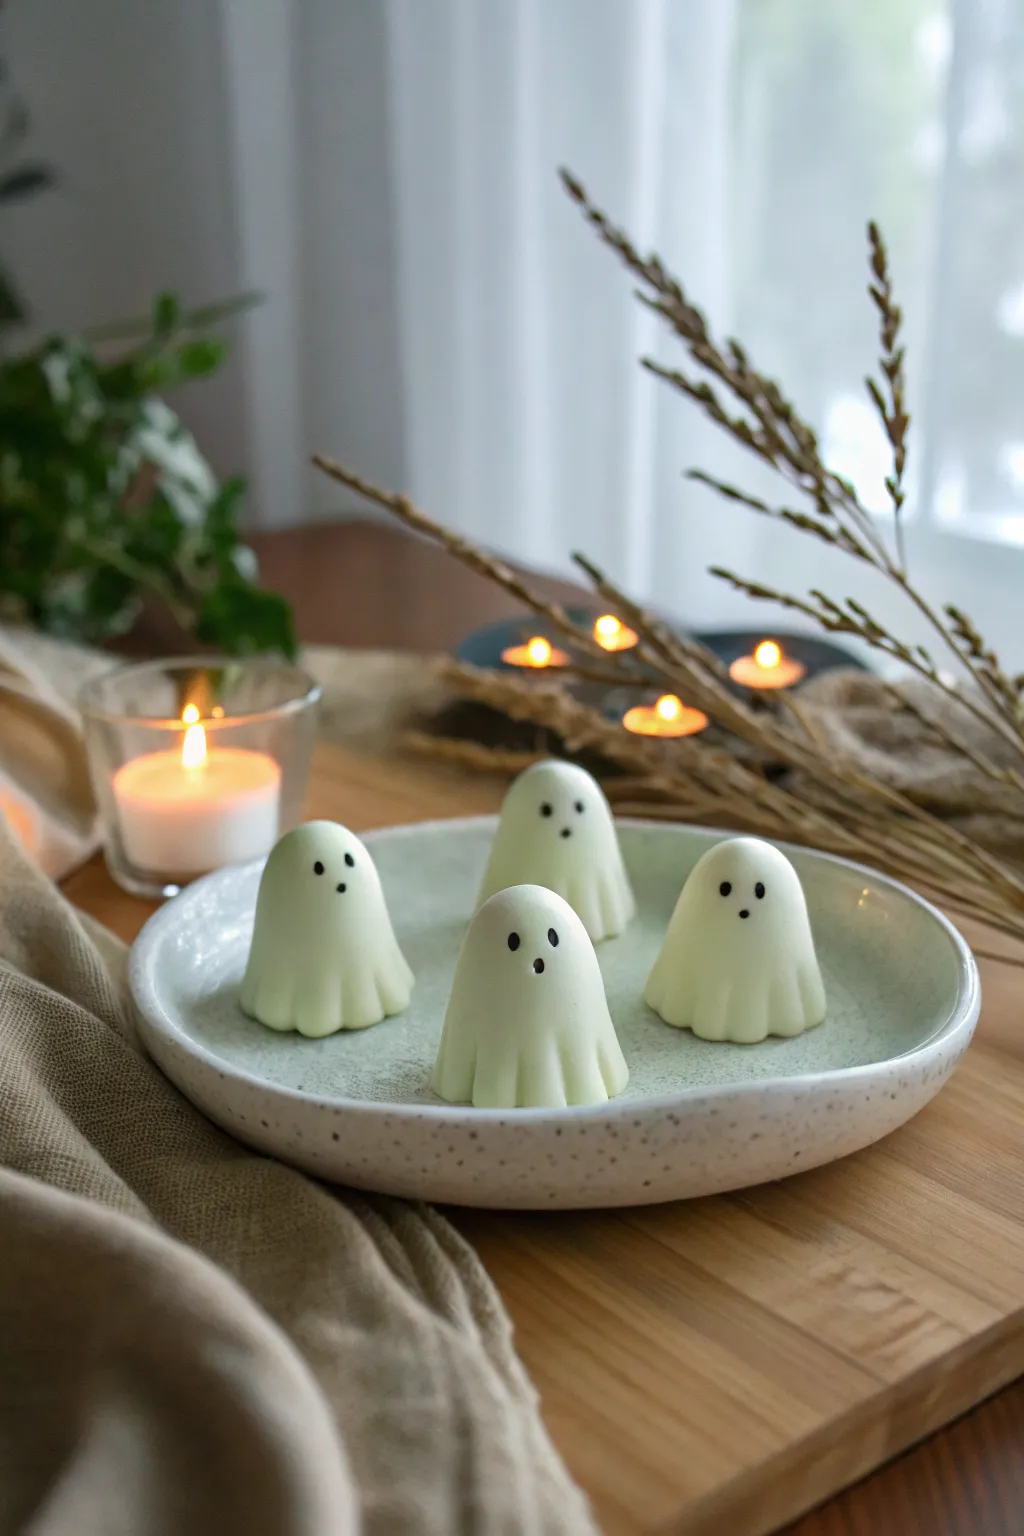
Create a charming set of minimalist phantom friends that look sweet by day and eerie by night. These smooth, matte ghosts are surprisingly simple to sculpt and make for perfect, subtle Halloween decor on a mantle or tablescape.
Detailed Instructions
Materials
- Glow-in-the-dark polymer clay
- White polymer clay (optional, for mixing)
- Black polymer clay (tiny amount)
- Small ball stylus tool
- Needle tool or toothpick
- Smooth work surface (glass or ceramic tile)
- Wet wipes
- Oven and baking sheet
- Parchment paper
Step 1: Shaping the Bodies
-
Condition the Clay:
Begin by thoroughly kneading your glow-in-the-dark polymer clay until it is soft and pliable. If you want a more pastel daytime look, you can mix in a small amount of regular white clay, though this will slightly dim the glow. -
Form Base Spheres:
Divide your clay into four equal portions. Roll each portion between your palms to create smooth, crack-free balls about the size of a walnut. -
Create the Cone Shape:
Take one sphere and gently roll it into a thick, rounded cone shape. The top should be domed rather than pointy, resembling a classic cartoon ghost silhouette. -
Flatten the Base:
Press the wide bottom of the cone onto your work surface to ensure it stands upright without wobbling. Gently smooth out any fingerprints. -
Refine the Silhouette:
Using your fingers, gently pull the clay downward slightly to lengthen the ghost’s body, maintaining that soft, rounded dome at the top.
Step 2: Adding Details
-
Mark the Scallops:
use a needle tool or the side of a toothpick to lightly mark vertical indentations around the very bottom edge of the ghost. This guides where the folds will be. -
Sculpt the Folds:
Using the side of your finger or a rounded modeling tool, press into the indentations to create the ruffled, scalloped look of a sheet dragging on the floor. -
Smooth the Edges:
Soften the ridges of the scallops with your fingertip so the folds look like draped fabric rather than sharp cuts. -
Mark the Face:
Decide where the face will go. Use a small ball stylus to gently press three indentations: two small ones for the eyes and a slightly larger oval for the mouth. -
Repeat for the Group:
Repeat the shaping and sculpting process for the remaining three ghosts. I like to vary the height or tilt of the head slightly for each one to give them individual personalities.
Clean Clay Tip
Glow clay picks up dust easily! Wash hands thoroughly and use a piece of scrap white clay to ‘blot’ your hands and work surface before starting.
Step 3: Facial Features and Finishing
-
Prepare Black Clay:
Condition a tiny speck of black polymer clay. You need very little—literally crumbs. -
Roll Eye Orbs:
Roll two microscopic balls of black clay for the eyes. They should be just big enough to fit into the eye indentations you made earlier. -
Insert Eyes:
Place the black balls into the eye sockets and gently press them flat with your finger or a tool so they are flush with the face surface. -
Create the Mouth:
Roll a slightly larger, oval-shaped piece of black clay for the ‘0’ shaped mouth. Insert it into the mouth indentation and flatten it gently. -
Clean Up:
Before baking, wipe the ghosts gently with a baby wipe or a bit of rubbing alcohol on a brush to remove any dust or fingerprints. -
Bake:
Place the ghosts on a parchment-lined baking sheet. Bake according to your clay package instructions (usually 275°F/135°C for 15-30 minutes). -
Cool Down:
Turn off the oven and open the door slightly, letting the ghosts cool completely inside the oven. This gradual cooling helps prevent cracking.
Floating Illusion
Before baking, insert a toothpick into the bottom of each ghost. Bake, remove the pick, and glue them onto thin wire stands for a floating effect.
Turn off the lights and watch your new little friends light up the room with their spectral glow
Mummy Wrap-Texture Charms
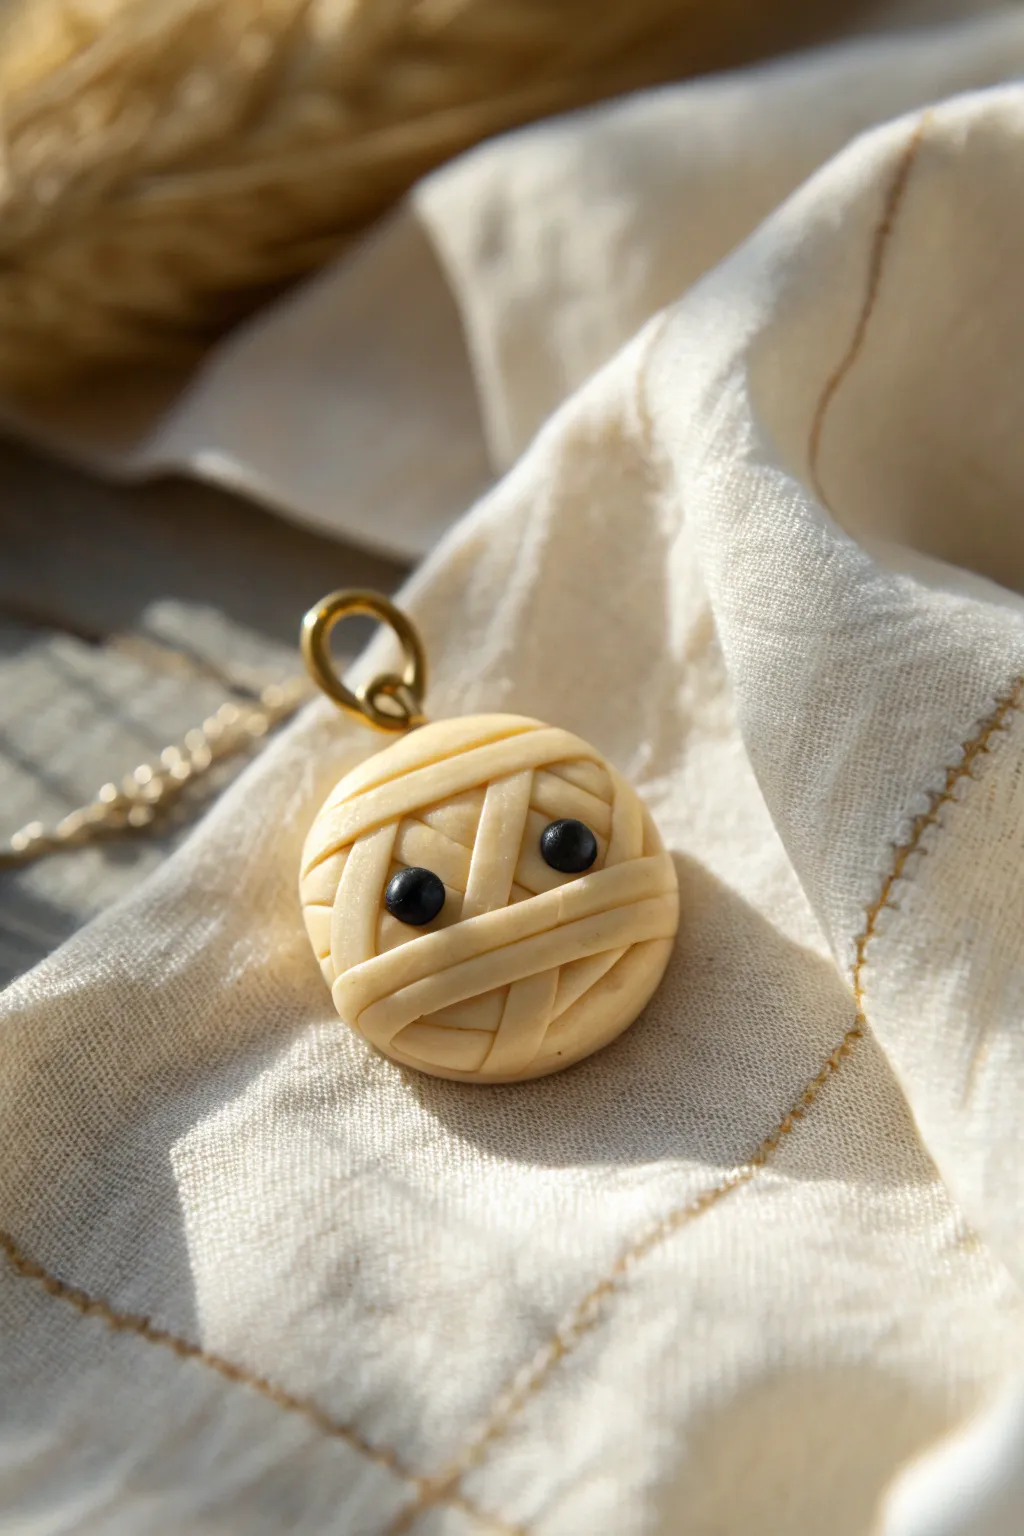
These adorable little mummy charms are a spooky yet sweet addition to any Halloween jewelry collection. Using simple strips of polymer clay, you’ll create a textured, bandaged effect that looks wonderfully ancient yet cute.
Step-by-Step
Materials
- Polymer clay in beige or antique white
- Polymer clay in black (for eyes)
- Circle cutter (approx. 1 inch)
- Rolling pin or pasta machine
- Sharp craft knife or tissue blade
- Needle tool or toothpick
- Metal jump ring (gold or brass tone)
- Eye pin (optional, for hanging)
- Gloss glaze (optional)
Step 1: Base Preparation
-
Condition the Clay:
Begin by conditioning your beige or antique white polymer clay until it is soft and pliable. Warm clay is essential for getting those smooth, crack-free strips later. -
Roll the Base Sheet:
Roll out a portion of the beige clay to a medium thickness, roughly 3mm or an 1/8th of an inch. This will carry the weight of the charm. -
Cut the Foundation:
Use your circle cutter to punch out a clean round disc. Smooth the edges with your finger to remove any sharp cut marks. -
Insert Hardware:
At this point, you can gently insert a gold eye pin into the top of the disc if you prefer embedded hardware. Alternatively, you can drill a hole later for a jump ring, like the one pictured.
Step 2: Creating the Mummy Wrap
-
Prepare the Strips:
Roll out another sheet of the same beige clay, but much thinner than your base—about 1mm thick. -
Cut the Bandages:
Using your sharp craft blade, slice this thin sheet into narrow strips of varying widths. I find uneven widths make the wrapping look more organic and realistic. -
Place the Eyes:
Roll two very tiny balls of black polymer clay. Press them gently onto the base disc near the upper middle section, spacing them slightly apart. -
Start Wrapping:
Take a clay strip and lay it across the base, perhaps covering a very small portion of one eye to make it look like he’s peeking out. Press the edges of the strip gently to adhere it to the base. -
Layering:
Continue adding strips in a crisscross pattern. Ensure you leave the black eyes visible, framing them with the ‘bandages’. -
Trimming Edges:
As you lay down each strip, use your blade to trim the excess clay flush with the edge of the round base so the circle shape is maintained. -
Adding Depth:
Overlay strips on top of each other. Don’t smooth them down perfectly flat; let them sit slightly raised to create that wrapped texture. -
Checking the Profile:
Look at the charm from the side. Ensure the strips are adhered well but haven’t made the charm too bulky or dome-shaped unintentionally. -
Texturing (Optional):
For an older look, you can lightly press a piece of actual fabric or a toothbrush bristles against the strips to give them a linen texture.
Pro Tip: Antique Look
Brush a light dusting of brown pastel chalk powder into the crevices between the bandage strips before baking to add instant age and depth.
Step 3: Finishing Touches
-
Define the Eyes:
If the eyes got squashed during the wrapping process, use a needle tool to gently reshaped them into distinct round bumps. -
Pierce the Hole:
If you didn’t use an eye pin, use a straw or a needle tool to pierce a hole near the top edge for the large jump ring. -
Bake:
Bake the charm according to your specific polymer clay manufacturer’s instructions, usually around 275°F (130°C) for 15-30 minutes. -
Cool Down:
Let the piece cool completely before handling. Polymer clay is fragile when hot. -
Assemble:
Open a large gold jump ring with pliers and thread it through the hole you created. Close it securely. -
Glaze (Optional):
For a little extra pop, dab a tiny dot of gloss glaze only on the black eyes to make them look wet and alive.
Troubleshooting: Fingerprints
If you smudge the tiny black eyes or leave prints on the bandages, lightly brush the unbaked clay with a little baby oil to smooth them out.
Now you have a charmingly spooky friend ready to haunt your necklace or bracelet
Halloween Animal Costume Minis
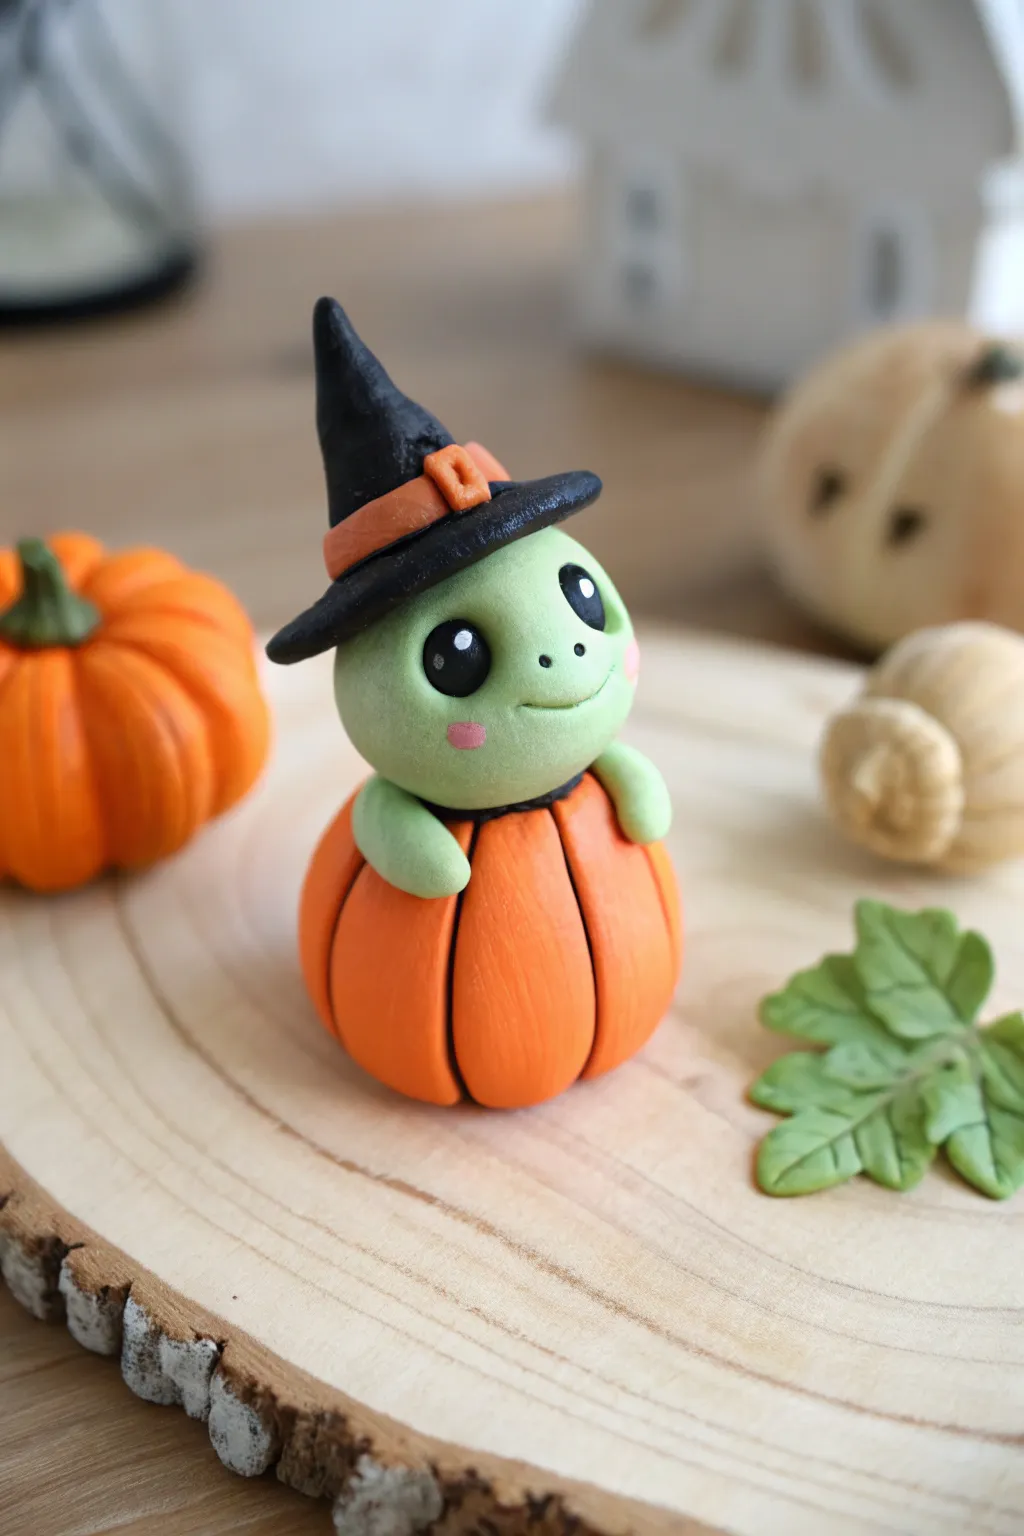
This adorable miniature features a sweet green turtle peeking out of a pumpkin costume, ready for trick-or-treating. With its tiny witch hat and rosy cheeks, this polymer clay figurine adds a touch of whimsical charm to your Halloween decor.
Step-by-Step Guide
Materials
- Polymer clay (light sage green, bright orange, black, pink)
- Black acrylic paint
- White acrylic paint
- Dotting tools or ball stylus
- Needle tool or toothpick
- Craft knife
- Small rolling pin
- Gloss glaze (optional)
Step 1: Creating the Pumpkin Body
-
Form the base:
Start by conditioning a ball of bright orange clay about the size of a walnut. Roll it into a smooth sphere. -
Create the segments:
Using a needle tool or the back of a craft knife, press vertical indentations all around the sphere to mimic the ribs of a pumpkin. -
Shape the opening:
Gently flatten the top of the pumpkin slightly, then use a large ball tool to create a shallow depression where the turtle’s body will sit. -
Texture the surface:
For a realistic look, lightly brush the distinctive lines of the pumpkin with a soft toothbrush or texture tool to give it a skin-like texture rather than completely smooth plastic look.
Step 2: Sculpting the Turtle
-
Head shape:
Roll a ball of sage green clay slightly smaller than your pumpkin. This will be the head. Gently flatten the bottom so it sits flush. -
Attach the head:
Place the green head into the depression on top of the orange pumpkin. Press down gently to secure it. -
Make the flippers:
Roll two small pea-sized balls of green clay. Shape them into teardrops and flatten them slightly. -
Place the flippers:
Attach the flippers to the rim of the pumpkin, right under the head, so it looks like the turtle is pulling itself up or resting its hands on the edge. -
Facial features:
Use a medium ball tool to press two eye sockets into the face. Add a small smile using a needle tool or a curved clay shaper.
Fingerprint Freedom
To avoid leaving fingerprints on your smooth clay surfaces, wipe your clay lightly with a bit of baby oil or cornstarch before the final bake.
Step 3: Fashioning the Witch Hat
-
Make the brim:
Flatten a small piece of black clay into a thin circle. This will be the brim of the witch hat. -
Form the cone:
Roll another piece of black clay into a cone shape. Gently curve the tip to give it a floppy, worn character. -
Assemble the hat:
Press the cone onto the center of the brim. Smooth the seam if necessary using a silicone tool. -
Add the band:
Roll a very thin snake of orange clay and wrap it around the base of the cone. Add a tiny square of orange clay for a buckle if desired. -
Position the hat:
Place the finished hat on the turtle’s head, tilting it slightly to one side for a jaunty, cute expression.
Glow Up
Use glow-in-the-dark polymer clay for the pumpkin body so your little turtle looks like it’s sitting inside a lit jack-o’-lantern at night.
Step 4: Final Details and Baking
-
Add rosy cheeks:
Take two minuscule amounts of pink clay, roll them into dots, and press them onto the turtle’s cheeks below the eyes. -
Bake the piece:
Bake your creation according to the instructions on your specific brand of polymer clay (usually around 275°F or 130°C for 15-30 minutes). -
Paint the eyes:
Once cool, fill the eye sockets with black acrylic paint. I usually let this dry completely before adding the white highlights. -
Add highlights:
Using a fine dotting tool, add one large white dot and one smaller white dot to each eye to bring the character to life. -
Seal:
Finish by applying a coat of gloss glaze to the eyes (and the pumpkin if you want it shiny) for a wet, sparkly look.
Now you have a charming little desk companion to keep you company through the spooky season
Mini Halloween Diorama Charm Scene
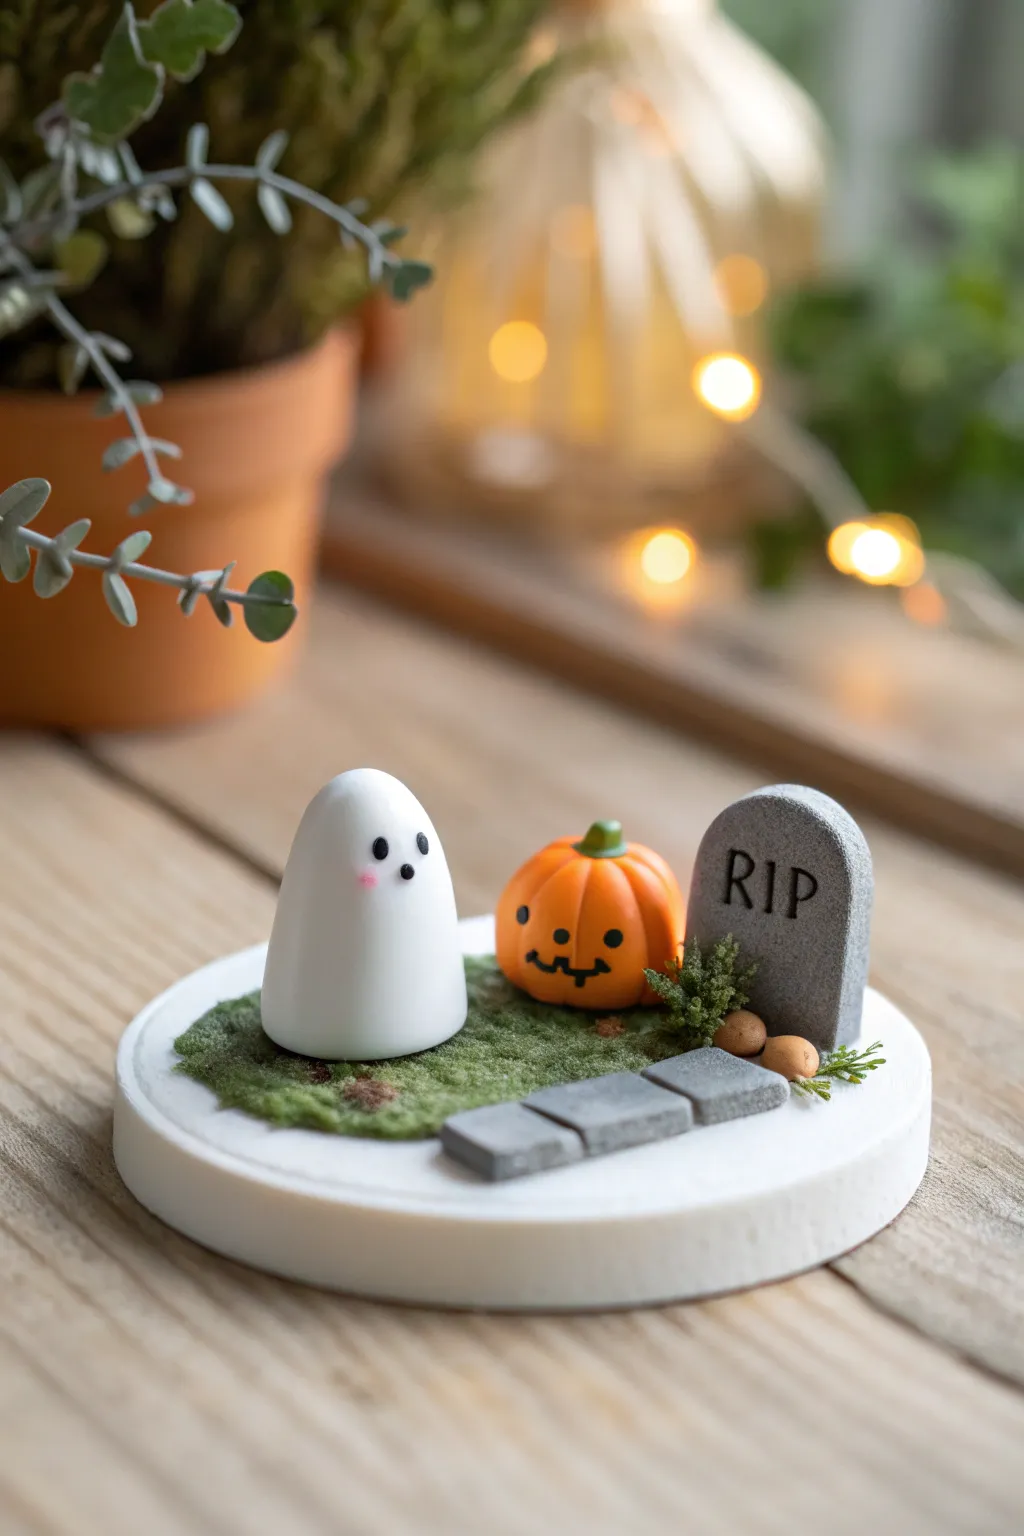
Capture the spooky spirit in miniature form with this adorable Halloween diorama. Featuring a blushing ghost, a classic pumpkin, and a tiny tombstone, this scene rests on a clean white base that makes the colors pop.
Step-by-Step
Materials
- White polymer clay (base and ghost)
- Orange polymer clay (pumpkin)
- Grey polymer clay (tombstone and path)
- Green polymer clay (stem)
- Black acrylic paint or clay marker
- Pink soft pastel or blush (for ghost cheeks)
- Green flocking powder or dried moss
- Liquid polymer clay (Bake & Bond)
- Small round cutter (approx. 2-3 inches)
- Needle tool or toothpick
- Clay roller
- Small paint brush
- Texture sponge or toothbrush
Step 1: Setting the Scene
-
Create the Base:
Condition a large portion of white clay until soft. Roll it out to a thickness of about 1/4 inch (6mm). Use your round cutter to stamp out a clean circle. Smooth the edges with your finger to remove any sharp cut marks. -
Add Texture:
Lightly press a texture sponge or an old toothbrush onto the center of the white base where the grass will go. This helps the flocking powder adhere better later on. -
Form the Path:
Roll out a small amount of grey clay into a thin sheet. Cut out three small squares or rectangles. Place them onto the white base, leading from the edge toward the center, pressing them down gently so they bond.
Uneven Standing?
If figures tip over, press a small divot into the white base before baking to nestle them in securely. Liquid clay acts as a strong glue during baking.
Step 2: Sculpting the Characters
-
Shape the Ghost:
Take a walnut-sized ball of white clay and roll it into a smooth, rounded cone shape. Flatten the bottom so it stands upright securely. -
Add Ghost Details:
Using a dotting tool or the end of a paintbrush, make two small indentations for eyes. Roll two tiny specks of black clay and press them into the sockets. For the blush, I like to use a dry paintbrush to dust a tiny amount of pink pastel powder onto the cheeks. -
Form the Pumpkin:
Roll a ball of orange clay. Using a needle tool, press vertical lines from the top center down to the bottom to create the pumpkin’s ribs. Press gently to give it a slightly squat, realistic shape. -
Carve the Face:
Carefully use a needle tool to etch a smiling face into the orange clay. You can fill these grooves with a tiny bit of black clay or paint them after baking. -
Top the Pumpkin:
Form a tiny cone of green clay for the stem and attach it to the top of the pumpkin. Press a textured tool into the top of the stem for a severed vine look.
Glow Up
Use glow-in-the-dark polymer clay for the ghost body to make your diorama truly spooky when the lights go out at night.
Step 3: Making the Tombstone
-
Shape the Stone:
Condition grey clay and shape it into a thick arch. Press the bottom flat so it stands up on its own. Use a toothbrush to heavily texture the surface, giving it an aged, stone-like appearance. -
Engrave the Text:
Use a very fine needle tool to carve the letters R-I-P into the upper half of the stone. Deep impressions work best here so they can be filled with paint later. -
Create Tiny Accents:
Roll two miniscule balls of tan or light brown clay to resemble small pebbles or mushrooms, ready to be placed near the tombstone base.
Step 4: Assembly and Finish
-
Secure Components:
Apply a dab of liquid polymer clay to the bottom of the ghost, pumpkin, and tombstone. Place them onto the textured area of your white base. Arrange the tiny pebbles near the tombstone. -
Apply the Moss:
Brush a thin layer of liquid clay on the base around the figures, avoiding the grey path stones. Sprinkle green flocking powder or press bits of dried hobby moss onto the liquid clay to create a grassy texture. -
Bake the Project:
Bake the entire piece according to your clay manufacturer’s instructions (usually 275°F/135°C for 15-30 minutes). Let it cool completely before handling. -
Final Painted Details:
Once cool, use a fine brush and diluted black acrylic paint to darken the R-I-P lettering. Wipe away excess surface paint quickly with a damp cloth, leaving the dark pigment inside the grooves.
Place your finished miniature on a shelf or desk to add a touch of handmade charm to your autumn decor