When you want clay magic without a wheel, handbuilding is where it’s at—simple, flexible, and ridiculously satisfying. Here are my favorite hand building clay ideas that start easy and classic, then wander into the extra-fun, quirky zone.
Pinch Pot Snack Bowls

Create a rustic set of snack bowls that feels right at home on any countertop. This project features a classic pinch pot form finished with a warm oatmeal speckled glaze and a dipping technique for that lovely irregular rim.
Step-by-Step Guide
Materials
- Stoneware clay (a speckled clay body works best)
- Pottery wheel or banding wheel (helpful but not mandatory)
- Wooden modeling tool
- Metal rib or rubber rib
- Sponge
- Cutting wire
- Needle tool
- Oatmeal/Cream speckled glaze
- Soft blush/pink glaze (for rim)
- Kiln
Step 1: Forming the Pinch Pot
-
Prepare the Clay:
Start with a ball of clay roughly the size of a large orange. Wedge it thoroughly to remove air bubbles and ensure consistency, then pat it into a smooth, round sphere. -
Open the Form:
Hold the ball in one hand and press your thumb into the center, stopping about a half-inch from the bottom. This base thickness is crucial for stability later. -
Pinch the Walls:
Rotate the ball slowly while rhythmically pinching between your thumb (inside) and fingers (outside). Start at the bottom and work your way up to the rim. -
Even Out the Thickness:
Continue pinching and turning until the walls are an even thickness—aim for about ¼ inch throughout. Don’t worry if the rim is a bit uneven; that adds character. -
Shape the Curve:
As you pinch, gently push the walls outward to create a wider, open bowl shape rather than a tall cup. Use your palm to cradle the outside curve.
Step 2: Refining and Drying
-
Compress the Rim:
Run a damp chamois or your finger along the rim to smooth it out. This prevents sharp edges after firing and helps prevent future cracking. -
Smooth the Surface:
Use a flexible rubber rib or a damp sponge to smooth the interior and exterior surfaces. You can leave faint finger marks for a tactile handmade feel or smooth them completely. -
Define the Bottom:
Gently tap the pot on a flat surface to create a small, flat foot so it sits stable. I like to press my thumb into the bottom center inside just slightly to echo the curve. -
Slow Dry:
Allow the bowls to dry slowly under loose plastic for a day to reach leather-hard stage, then uncover to bone dry before bisque firing. -
Bisque Fire:
Fire the bone-dry pieces in a kiln to Cone 04 (or your clay’s specific bisque temperature) to prepare them for glazing.
Cracking Up?
If you see cracks on the rim while drying, your clay might be drying unevenly. Wrap the rim tightly with plastic while leaving the bottom exposed to balance the moisture levels.
Step 3: Glazing Technique
-
Wax the Foot:
Apply wax resist to the bottom of the bowl and roughly 1/8 inch up the side wall to prevent glaze from running onto your kiln shelf. -
Apply the Base Glaze:
Pour your oatmeal speckled glaze inside the bowl, swirl it to coat, and pour out the excess. Then, dip the entire exterior into the same glaze bucket. -
Clean the Rim:
Once the base glaze is dry to the touch, use a damp sponge to gently wipe just the very edge of the rim if the glaze is too thick. -
Dip the Rim:
Hold the bowl upside down and dip just the top ½ inch into the blush pink glaze. Hold it at a slight angle or tilt it while lifting to create a natural, drippy uneven line. -
Check Glaze thickness:
If the rim glaze looks too heavy, give it a gentle shake while upside down to encourage any excess drops to fall off rather than run down the pot. -
Final Fire:
Load the glazed bowls into the kiln and fire to the maturity temperature of your clay and glaze combination (typically Cone 5 or 6 for stoneware).
Make it a Set
Create a nesting set by weighing your clay balls before starting: try 1lb, 1.5lbs, and 2lbs of clay. As long as the wall thickness is consistent, they will look like a family.
Once cooled, fill your new handmade bowls with nuts or treats and enjoy the simple beauty of your work


Wavy-Rim Dinner Plates
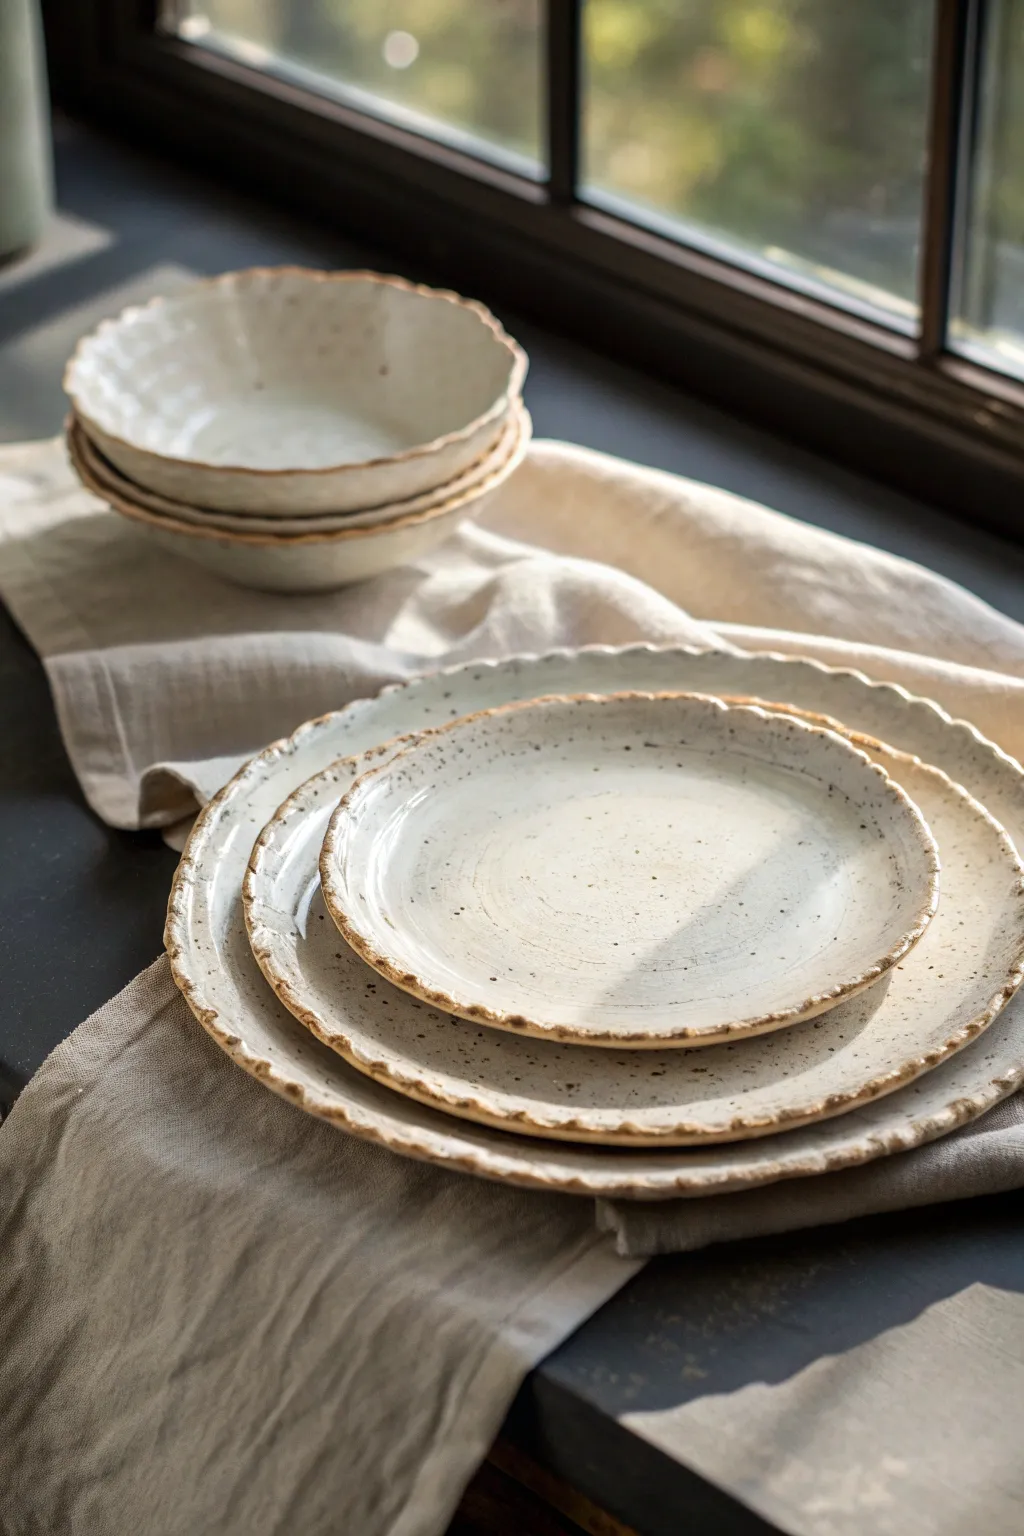
Create a stunning set of organic, farmhouse-style plates and bowls that celebrate the beauty of imperfection. These slab-built pieces feature gentle, undulating rims and a speckled glaze that highlights their handcrafted nature.
Step-by-Step
Materials
- Speckled stoneware clay (approx. 5-7 lbs)
- Rolling pin
- Canvas mat or slab roller
- Circle templates or improvised round objects (various sizes)
- Needle tool or fettling knife
- Soft rib tool (rubber or silicone)
- Sponge
- GR Pottery Forms or plaster hump molds (optional but helpful)
- White or cream speckled glaze
- Iron oxide wash or dark stain
- Flat shader brush
- Kiln
Step 1: Preparing the Slabs
-
Wedge the clay:
Begin by thoroughly wedging your speckled stoneware clay to remove air bubbles and ensure particle alignment. This is crucial for avoiding cracks later. -
Roll out a slab:
Using a rolling pin and guide sticks (or a slab roller if available), roll the clay out to a consistent thickness, roughly 1/4 inch. Flip the slab periodically on your canvas to prevent sticking and ensure even compression. -
Smooth the surface:
Take a soft rib tool and compress both sides of the slab firmly. This smooths out canvas texture and strengthens the clay structure for the forming process.
Warping Worries?
If plates warp during drying, place a small sandbag or a weighted bag of rice in the center while drying to hold the base flat against the board.
Step 2: Cutting and Shaping
-
Cut the circles:
Place your circle templates or plates onto the slab. Using a needle tool, cut out the base shapes for your dinner plate, salad plate, and bowl. I prefer to cut slightly larger than the finished size to account for shrinkage. -
Form the plates:
Transfer the clay circles onto a slump mold or simply use a shallow curved surface. If you don’t have molds, you can place the slab on a piece of foam and gently press the center down with a damp sponge to curve the edges upward. -
Create the wave effect:
While the clay is still plastic but supporting its own weight, use your thumb and forefinger to gently gently pinch and disturb the rim. Create subtle undulations rather than sharp ruffles for that organic look shown in the photo. -
Form the bowl:
For the bowl, drape your smaller clay circle over a hump mold or inside a bowl lined with plastic wrap. Smooth it down to take the shape, then similarly distress the rim with a gentle waving motion. -
Refine the edges:
Run a damp sponge or a piece of chamois leather over the rims to soften any sharp cutting marks. The goal is a smooth, rounded lip that feels good to the touch.
Step 3: Drying and Bisque
-
Add a foot ring (optional):
Once the pieces are leather hard, flip them over. You can score and slip a coil onto the bottom to create a foot ring, or simply smooth the bottom flat for a modern, flush look. -
Slow drying:
Cover your pieces loosely with plastic to ensure slow, even drying. The rims are thinner and will dry faster than the centers, so slow drying prevents warping. -
Bisque fire:
Once bone dry, load the greenware into the kiln and bisque fire to cone 04 (or your clay body’s recommendation).
Level Up: Texture
Before cutting your circles, roll the slab onto a textured fabric or lace. The subtle imprint will break nicely under the glaze for added depth.
Step 4: Glazing and Finishing
-
Wipe down bisque:
After the kiln cools, wipe the bisque-ware with a damp sponge to remove any dust that might resist the glaze. -
Apply the oxide rim:
Dip a brush into iron oxide wash or a dark brown underglaze. carefully paint the very edge of the wavy rim. Sponge it back slightly so the color stains the clay texture without being a solid, heavy line. -
Apply main glaze:
Dip, brush, or pour your white speckled glaze over the entire piece. If you want the oxide rim to show through clearly, wipe the glaze back slightly from the edge, or ensure your white glaze is semi-translucent. -
Clean the foot:
Thoroughly wipe the bottom of each piece (and the foot ring) with a wet sponge to remove all glaze. This prevents the plate from fusing to your kiln shelf. -
Glaze fire:
Load the kiln carefully and fire to the maturity temperature of your clay and glaze (typically Cone 5 or 6 for stoneware). -
Final inspection:
Once cooled, check the rims. If the exposed clay feels rough where the oxide was applied, you can briefly sand it with high-grit wet/dry sandpaper for a professional finish.
Now you have a stunning, cohesive set of dinnerware ready for your next gathering


Textured Trinket Dishes
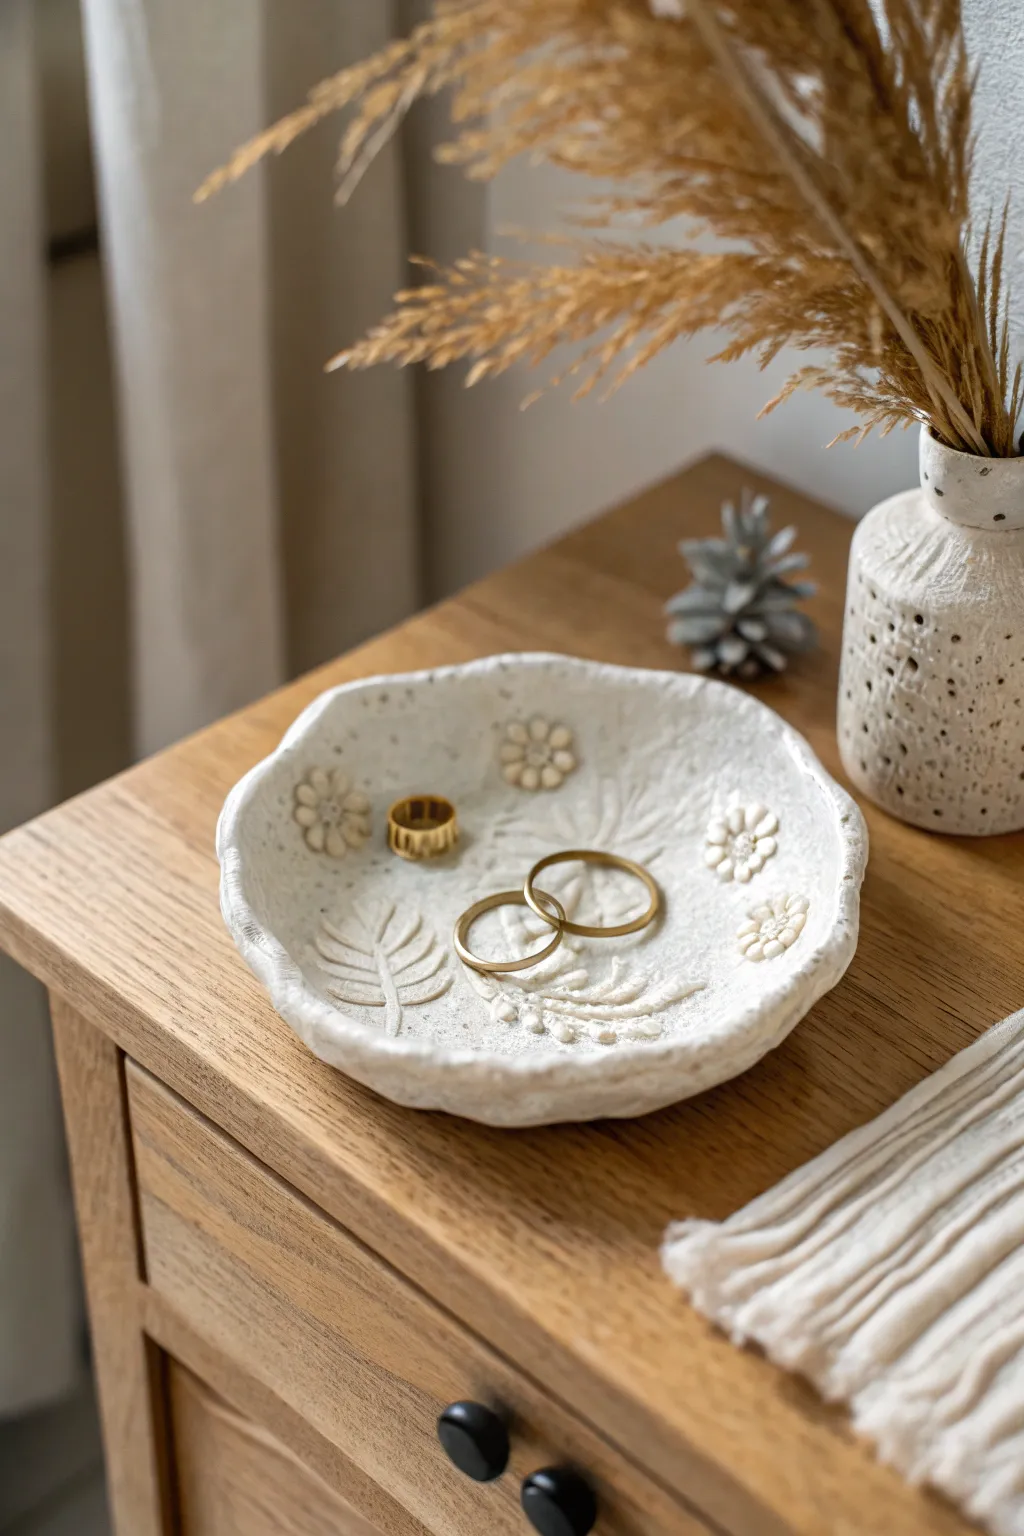
Capture the delicate beauty of nature with this textured trinket dish, perfect for holding your favorite rings. Featuring embossed leaf patterns and tiny sculpted daisies on a creamy, speckled clay body, this project embraces an organic, hand-touched aesthetic.
Detailed Instructions
Materials
- White or light speckled stoneware clay
- Rolling pin
- Canvas or cloth mat (for rolling)
- Small bowl (roughly 4-5 inches diameter, to use as mold)
- Needle tool
- Variety of small leaves or ferns (fresh or artificial)
- Scoring tool (or an old toothbrush)
- Slip (clay mixed with water)
- Sponge
- Small paintbrush
- Matte white or clear glaze (food safe if desired)
Step 1: Forming the Base
-
Prepare the Clay:
Start by wedging a ball of clay about the size of a large orange to remove air bubbles and ensure consistency. -
Roll the Slab:
Flatten the ball slightly with your palm, then use a rolling pin to roll it out into an even slab, approximately 1/4 inch thick. Work on a canvas mat to prevent sticking. -
Texture the Surface:
Before cutting the shape, gently press your chosen leaves or ferns into the clay surface. Use the rolling pin lightly over them to make a clear impression, or leave them as raised relief if you plan to sculpt them on top instead. -
Cut the Circle:
Place a bowl or circular template lightly on the clay. Using your needle tool, cut a freehand circle around it. Don’t worry about being perfect; a wavy, organic edge adds to the charm. -
Shape the Dish:
Lift the clay circle carefully and drape it inside your small bowl mold. Gently press it down to take the curve of the bowl. -
Refine the Rim:
With the clay inside the mold, use your fingers to pinch and thin the rim slightly, creating subtle undulations for that wavy, handmade look.
Cracks Appearing?
If tiny cracks appear while attaching flowers, your clay might be too dry. Use a little vinegar on your brush instead of water to help re-hydrate and bond the clay more securely.
Step 2: Adding Details
-
Sculpt Tiny Leaves:
If you aren’t using impressions, roll very thin coils of clay to create leaf stems. Flatten small balls of clay to make leaf shapes and score shallow veins into them with your needle tool. -
Create Daisy Petals:
For the flowers, roll five or six tiny rice-sized balls of clay. Flatten them slightly and press them together in a circle to form petals. -
Add Flower Centers:
Roll a small ball for the center of each flower. Press it into the middle of your petal arrangement, using the back of a paintbrush to create a dimpled texture. -
Attach the Decorations:
Score the surface of the dish where you want your flowers and leaves. Apply a dab of slip, then press your clay decorations firmly onto the dish. I like to arrange them asymmetrically for a more natural feel. -
Smooth the Connections:
Use a small, slightly damp paintbrush to smooth the edges where your added clay pieces meet the dish, ensuring a solid bond and cleaning up any excess slip. -
Final Surface Texturing:
Take a rough sponge or a stiff brush and gently tap the background areas of the clay to give it a stone-like, pitted texture.
Step 3: Drying and Firing
-
Slow Drying:
Leave the dish in the mold until it is leather hard so it holds its shape. Then remove it and let it dry completely on a shelf, covered loosely with plastic to prevent warping. -
Bisque Fire:
Fire the bone-dry piece in a kiln to cone 04 (or according to your clay’s instructions) to harden it into bisque ware. -
Glazing:
Dip or brush your dish with a matte white or clear glaze. Because of the texture, a glaze that breaks over edges works beautifully to highlight the floral details. -
Wipe Back (Optional):
If using a colored glaze, you might want to wipe it back slightly with a sponge so the glaze stays in the recesses of the texture but reveals the clay body on the high points. -
Glaze Fire:
Fire the piece again to the maturity temperature of your clay and glaze (typically cone 5 or 6 for stoneware).
Add Gold Luster
For an extra touch of luxury, apply a real gold overglaze to the center of the daisies or the rim after the glaze firing, then fire again to cone 018.
Once cooled, your dish is ready to beautifully display your daily jewelry pieces


Slab-Built Mugs With Handles
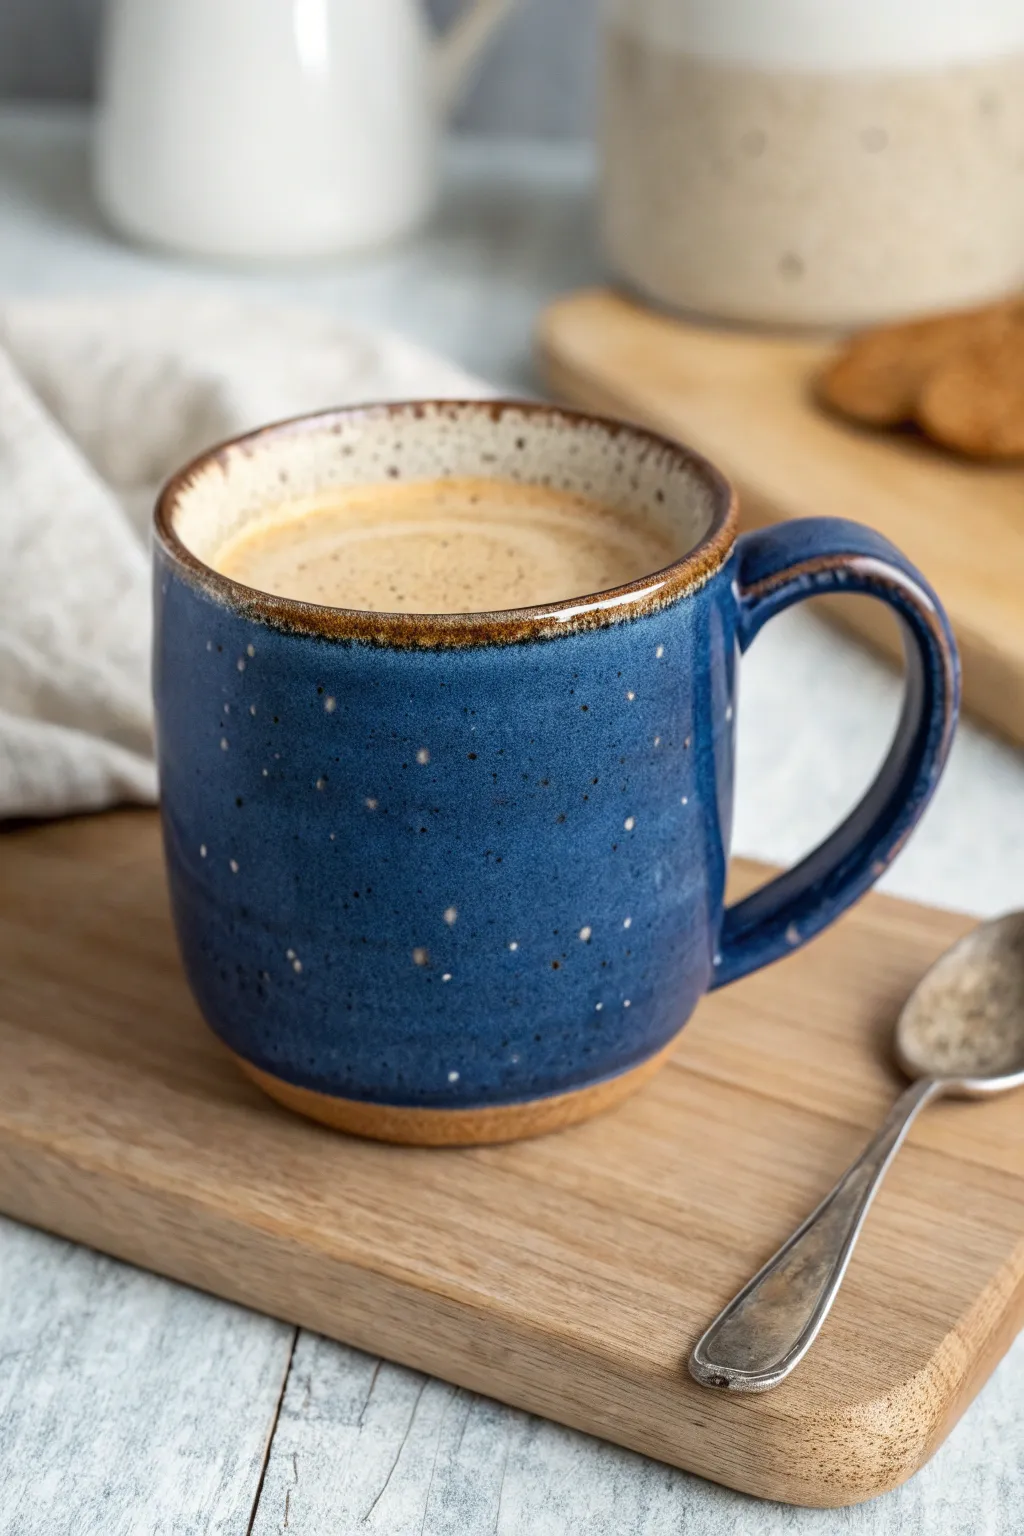
Recreate the charm of a cozy café right in your studio with this speckled, slab-built mug. The combination of a deep, galaxy-blue glaze over a rustic, grogged clay body creates a stunning contrast that highlights the exposed rim and base.
Step-by-Step Guide
Materials
- Speckled stoneware clay (mid-fire)
- Rolling pin and guide strips (approx. 1/4 inch thick)
- Can or PVC pipe (3-4 inch diameter) for use as a mold
- Newsprint or paper
- Fettling knife
- Scoring tool or serrated rib
- Slip (clay slurry)
- Wooden modeling tool
- Rubber kidney rib
- Sponge
- Deep glossy blue glaze
- Clear glaze (optional)
Step 1: Forming the Body
-
Roll the slab:
Begin by wedging your speckled clay to remove air bubbles. Roll it out into a smooth, even slab about 1/4 inch thick using guide strips to ensure consistency. -
Cut the rectangle:
Measure the circumference of your PVC pipe or can mold. Cut a rectangle from your slab that matches this length plus a slight overlap, and is as tall as you want your mug to be (around 4-5 inches). -
Prepare the mold:
Wrap your PVC pipe or can in a sheet of newsprint. This simple step prevents the clay from sticking to the mold and makes removal effortless later. -
Wrap the slab:
Gently lift your clay rectangle and wrap it around the paper-covered mold. Bring the two short ends together. -
Bevel and join:
For a seamless look, cut both ends at a 45-degree angle where they overlap. Score the beveled edges, apply slip, and press them firmly together to create a cylinder. -
Smooth the seam:
Use a wooden modeling tool to blend the clay across the seam on the outside. Repeat this on the inside if you can reach, or roll the mold gently on the table to compress the join.
Smooth Rim Trick
Before firing, run a piece of chamois leather or a soft plastic bag strip over the mug’s rim. This compresses the clay and ensures it feels soft against your lips.
Step 2: Adding the Base and Handle
-
Cut the base:
Roll a small piece of slab for the bottom. Place your cylinder on top of it and trace around the edge with a needle tool, then cut out the circle. -
Attach the bottom:
Score and slip both the bottom edge of your cylinder and the edge of the circular base. I like to press the cylinder down onto the base firmly, then use a tool to drag clay from the base up onto the wall to lock it in. -
Refine the form:
Once the bottom is secure, use a rubber rib to smooth the entire outside surface. gently curve the bottom edge slightly outward to create that soft, rounded ‘foot’ seen in the photo. -
Make the handle:
Cut a strip of clay about 3/4 inch wide. Smooth the edges with a damp sponge so they are rounded, not sharp. Bend it into a ‘C’ shape or ear shape that fits 2-3 fingers comfortably. -
Attach the handle:
Score and slip the attachment points on both the mug body and the handle ends. Press the handle firmly onto the mug, blending the clay at the joints for a strong bond. -
Dry slowly:
Cover the mug loosely with plastic to let it dry slowly to the leather-hard stage. This prevents the handle from cracking away from the body.
Step 3: Glazing the Mug
-
Bisque fire:
Fire the mug to bisque temperature (usually cone 04 or 06) to prepare it for glazing. -
Wax the accents:
Apply wax resist to the bottom half-inch of the mug and the very top rim. This will keep these areas bare, exposing the beautiful toasted, speckled clay body. -
Dip the glaze:
Dip the mug into a deep, glossy blue glaze. The wax resist will prevent glaze from sticking to the rim and base, but if any beads up there, wipe it away with a damp sponge. -
Check the interior:
Ensure the inside is fully coated. If you dipped it, pour out excess glaze promptly to avoid a thick, runny layer. -
Final wipe:
Double-check the foot of the mug is completely clean of glaze so it doesn’t fuse to the kiln shelf. -
Glaze fire:
Fire to the maturation temperature of your clay and glaze (likely cone 5 or 6). The heat will turn the speckles in the clay dark and flux the blue glaze into that starry-night finish.
Cosmic Galaxy Look
Flick white glaze onto the wet blue glaze with a stiff toothbrush before firing. This creates tiny white stars for a true galaxy effect.
Now you have a stunning custom mug ready for your morning coffee that highlights the natural beauty of the clay

The Complete Guide to Pottery Troubleshooting
Uncover the most common ceramic mistakes—from cracking clay to failed glazes—and learn how to fix them fast.
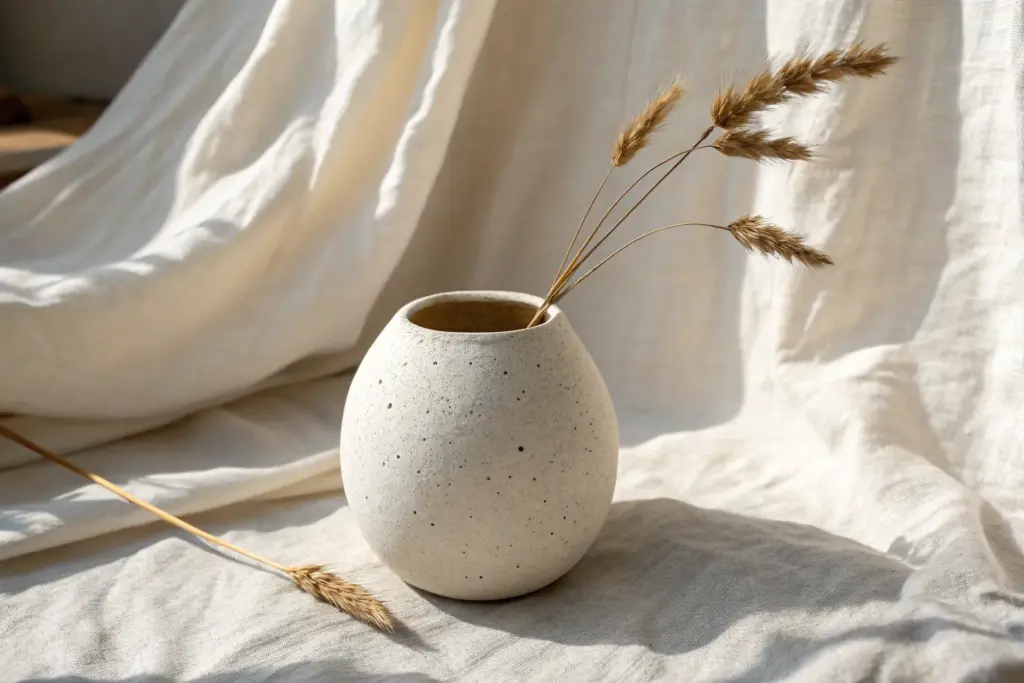
Coil-Built Vase With Soft Curves
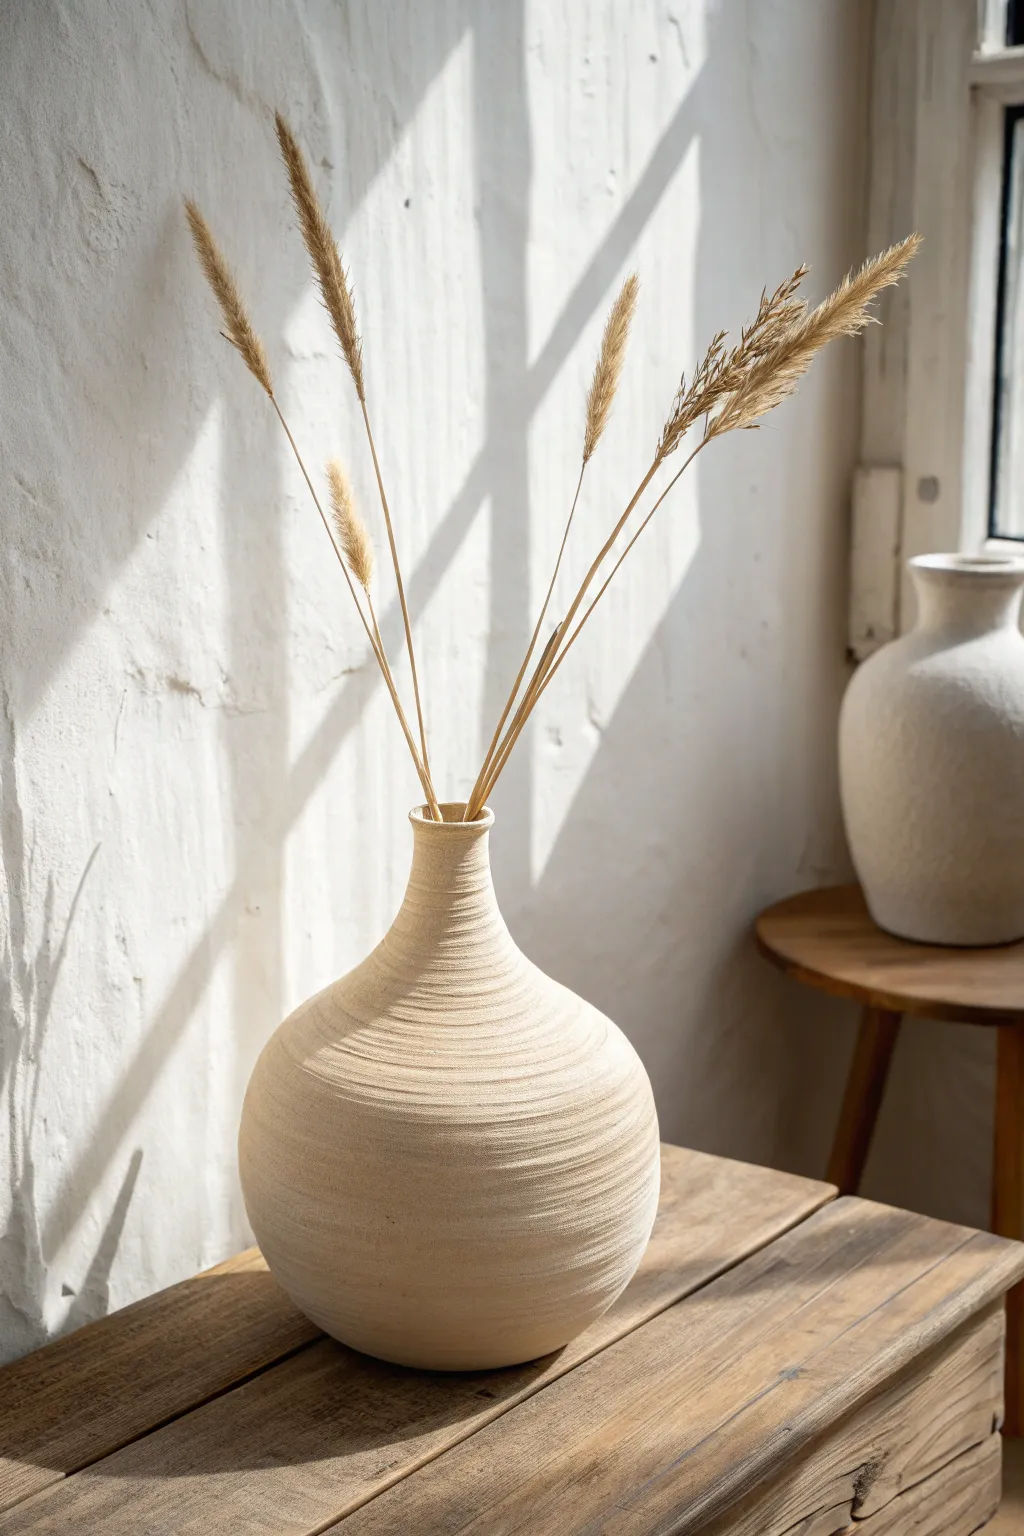
Capture the essence of organic pottery with this stunning coil-built vase, featuring a bulbous body and a gracefully tapered neck. The defining characteristic is the preserved coil texture, which creates horizontal ribs that catch the light beautifully.
How-To Guide
Materials
- Stoneware clay (buff or speckled)
- Scoring tool or fork
- Slip (clay mixed with water)
- Wooden modeling tool
- Paddle (wooden spatula)
- Sponge
- Cutting wire
- Banding wheel (optional but recommended)
Step 1: Creating the Base
-
Prepare the slab:
Start by flattening a ball of clay into a circular slab about 1/4 to 1/2 inch thick. This will serve as the heavy bottom for your vase. -
Smooth the foundation:
Compress the slab on both sides with a kidney tool or rib to prevent cracking later. Cut a clean circle, approximately 4-5 inches in diameter, to define the footprint of the pot. -
Prepare the first coil:
Roll out a thick coil of clay, roughly the width of your thumb. Ensure it is long enough to circle the entire base. -
Attach the base coil:
Score the outer edge of your base slab and the bottom of your first coil. Apply slip, place the coil on top of the slab edge, and firmly press it down.
Step 2: Building the Belly
-
Roll consistent coils:
Roll out several long, even ropes of clay. Try to keep them consistent in thickness, slightly thinner than the base coil, to create that uniform ribbed look seen in the photo. -
Score and slip:
Before adding each new layer, thoroughly score the top of the previous coil and the bottom of the new one. Apply a generous amount of slip to act as glue. -
Layer outward:
Place the next coil slightly on the *outer* edge of the coil below it. This stacking technique gradually widens the form to create the bulbous belly. -
Blend the interior only:
To maintain structural integrity while keeping the outer texture, use a wooden tool or your thumb to smudge the coils together on the *inside* of the vase only. Leave the outside coils distinct. -
Support the shape:
As the belly gets wider, support the outside with one hand while blending the inside with the other to prevent the wall from collapsing. -
Refine the curve:
Once you reach the widest point, pause to check the silhouette. You can gently paddle the exterior with a wooden spoon to round out any lumpy areas without destroying the texture.
Sagging Walls?
If the belly starts to slump, stop building immediately. Stuff the interior with crumpled newspaper or plastic bags to support the shape, then let it stiffen before adding more height.
Step 3: Tapering the Neck
-
Shift inward:
Begin placing coils slightly on the *inner* edge of the coil below. This reverses the direction, narrowing the opening to form the shoulder of the vase. -
Control the drying:
If I feel the lower body is too soft to support the narrowing neck, I like to let the piece stiffen up for about 30 minutes under loose plastic before continuing. -
Create the vertical neck:
Once the shoulder curve is tight enough, stack the final 3-4 coils directly on top of each other vertically to create the straight neck section. -
Smooth the lip:
Use a damp chamois or sponge to gently compress and round the very top rim. Avoid leaving sharp edges here.
Level Up: Exposed Joinery
Instead of smoothing the inside perfectly, leave the coil texture visible on the interior rim for a fully rustic feel, or use a darker clay body with a translucent white glaze.
Step 4: Finishing Touches
-
Enhance the texture:
If the exterior coils lost some definition during handling, use a wooden tool to gently re-groove the lines between the layers. -
Final wipe down:
Clean up any messy slip drips on the exterior with a barely damp sponge, but be careful not to wash away the ribbed texture. -
Dry slowly:
Cover the vase loosely with plastic for the first few days. Slow drying is crucial for coil pots to ensure the joints don’t pull apart. -
Bisque and glaze:
Once bone dry, bisque fire the piece. Apply a matte cream or beige glaze that breaks over texture to highlight the ridges, then glaze fire to the clay’s maturity temperature.
Fill your beautiful new vessel with dried pampas grass or wheat for a timeless, earthy display
Oval Serving Platter
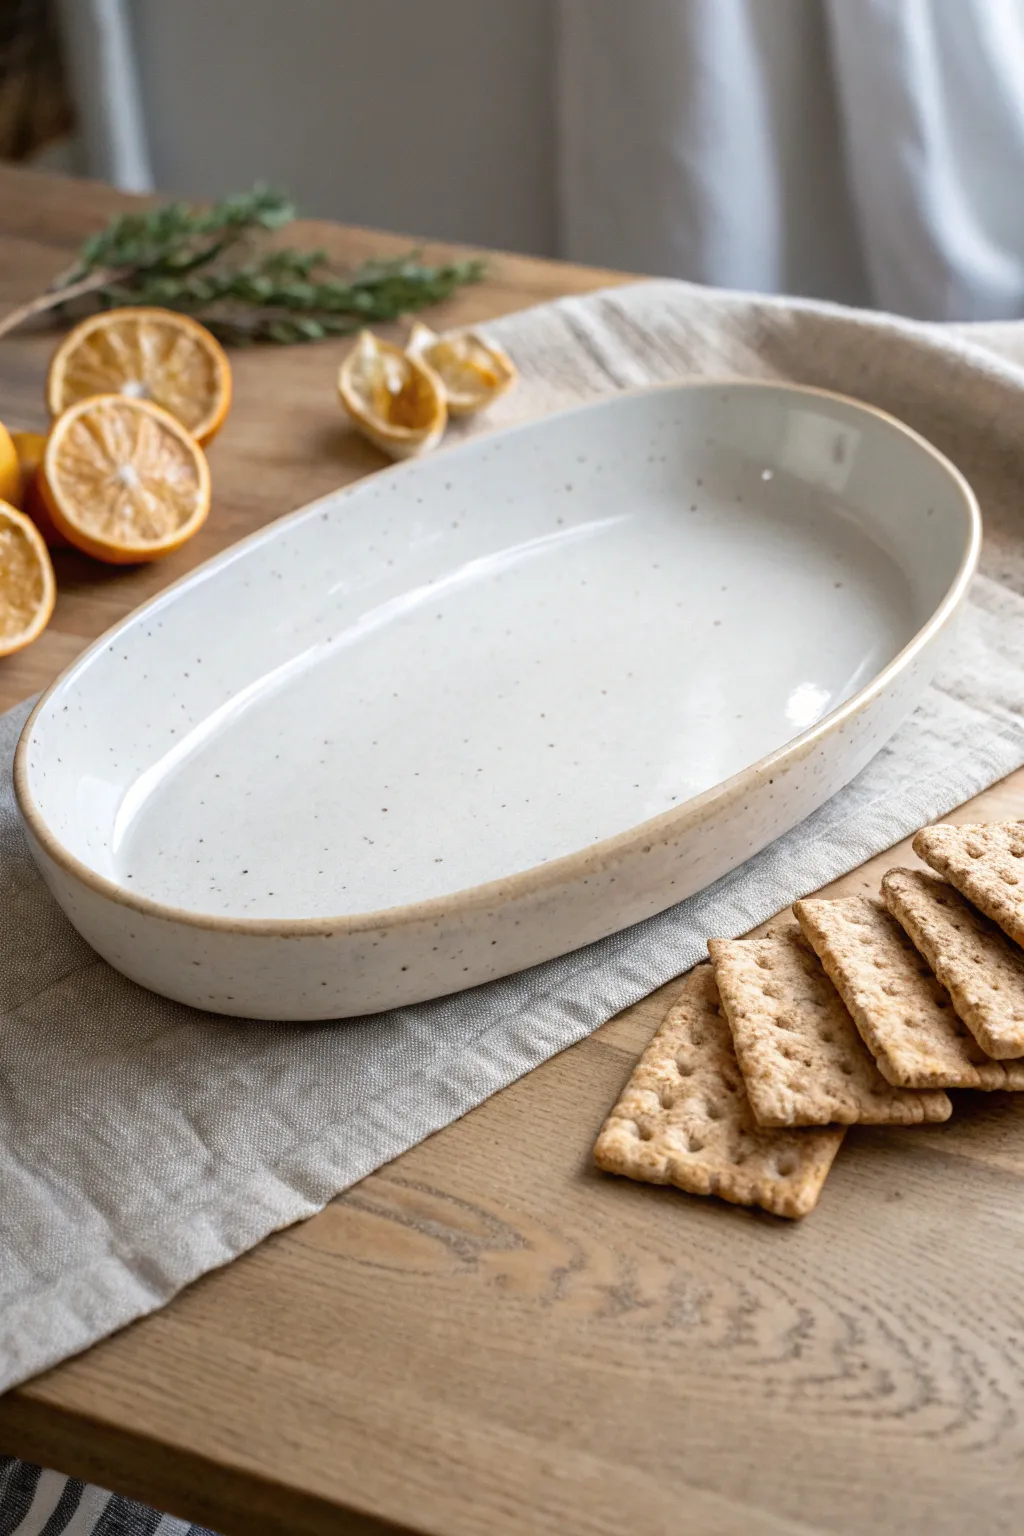
Bring a touch of organic elegance to your table with this lovely oval serving platter, featuring softened edges and a classic speckled finish. This hand-built project embraces the beauty of imperfection, making it the perfect vessel for sharing appetizers or grazing boards.
Step-by-Step Tutorial
Materials
- Stoneware clay (speckled or white with added grog)
- Rolling pin
- Canvas working board or slab mat
- Oval paper template (approx. 12×8 inches)
- Needle tool
- Fettling knife
- Rib tool (soft yellow polymer or rubber)
- Sponge
- Serrated rib or scoring tool
- Slip (clay mixed with water)
- Creamy white speckle glaze
- Clear glaze (optional for rim)
- Wax resist
Step 1: Creating the Slab Base
-
Wedge the clay:
Begin by wedging about 2-3 pounds of clay thoroughly to remove any air bubbles. This step is crucial for preventing cracks during firing. -
Roll out the slab:
Roll the clay out onto your canvas or slab mat until it is an even ¼-inch thickness. Rotate the slab and roll in different directions to compress the clay particles well. -
Smooth the surface:
Take your soft rib tool and gently compress the surface of the clay on both sides. This removes the canvas texture and aligns the clay platelets for a stronger finish. -
Apply the template:
Place your oval paper template onto the smooth slab. Lightly trace around it with a needle tool without cutting all the way through yet to ensure you are happy with the placement. -
Cut the shape:
Using your fettling knife held vertically, cut cleanly around the template. Remove the excess clay and set it aside for recycling.
Warp Watch
Oval platters love to warp. Dry very slowly under plastic for the first 2-3 days, and consider drying it on foam to support the center.
Step 2: Building the Rim
-
Prepare the coils:
Roll out a long, even coil of clay, roughly the thickness of your pinky finger. You may need two coils to span the entire circumference of the oval. -
Score the connection points:
Using a serrated rib or needle tool, rough up the outer edge of your oval slab base. Do the same to one side of your clay coil. -
Apply slip and attach:
Brush a generous amount of slip onto the scored edge of the base. Place the coil on top of the scored area, pressing down firmly to secure the bond. -
Blend the coil inside:
Use your thumb or a modeling tool to smear the clay from the coil down onto the base on the interior side. This seam must disappear completely to be food safe. -
Blend the coil outside:
Repeat the blending process on the exterior, smoothing the coil downwards to merge with the slab edge. -
Shape the wall:
I like to pinch the wall gently between my thumb and forefinger while pulling slightly upward to gain height and refine the thickness. -
Smooth the rim:
Run a damp sponge or a chamois over the top edge of the rim to round it off. The goal is a soft, comfortable edge rather than a sharp one.
Step 3: Finishing and Glazing
-
Dry slowly:
Cover the platter loosely with plastic and let it dry slowly to the leather-hard stage. This prevents warping, which oval shapes are prone to. -
Refine the foot:
Once leather hard, flip the platter over gently. Smooth out the bottom with a rib tool to ensure it sits flat on a table without rocking. -
Bisque fire:
Once completely bone dry, fire the piece in the kiln to a bisque temperature (usually cone 04). -
Wax the rim (optional):
If you want the exposed raw clay rim shown in the example, carefully apply wax resist to the very top edge of the platter. -
Apply glaze:
Pour a creamy white speckled glaze into the interior, swirl to coat, and pour out the excess. Dip or brush the exterior with the same glaze. -
Clean the foot:
Wipe away any glaze from the bottom of the platter with a wet sponge so it doesn’t stick to the kiln shelf. -
Glaze fire:
Fire the platter to the maturity temperature of your clay body (likely cone 5 or 6 for stoneware).
Rim Cracks?
Small cracks on the rim mean the clay was too dry when bent. Mist the coil slightly before shaping or smooth cracks immediately with slip.
Your finished platter will be a durable, beautiful centerpiece ready for your next gathering


What Really Happens Inside the Kiln
Learn how time and temperature work together inside the kiln to transform clay into durable ceramic.
Nesting Prep Bowls
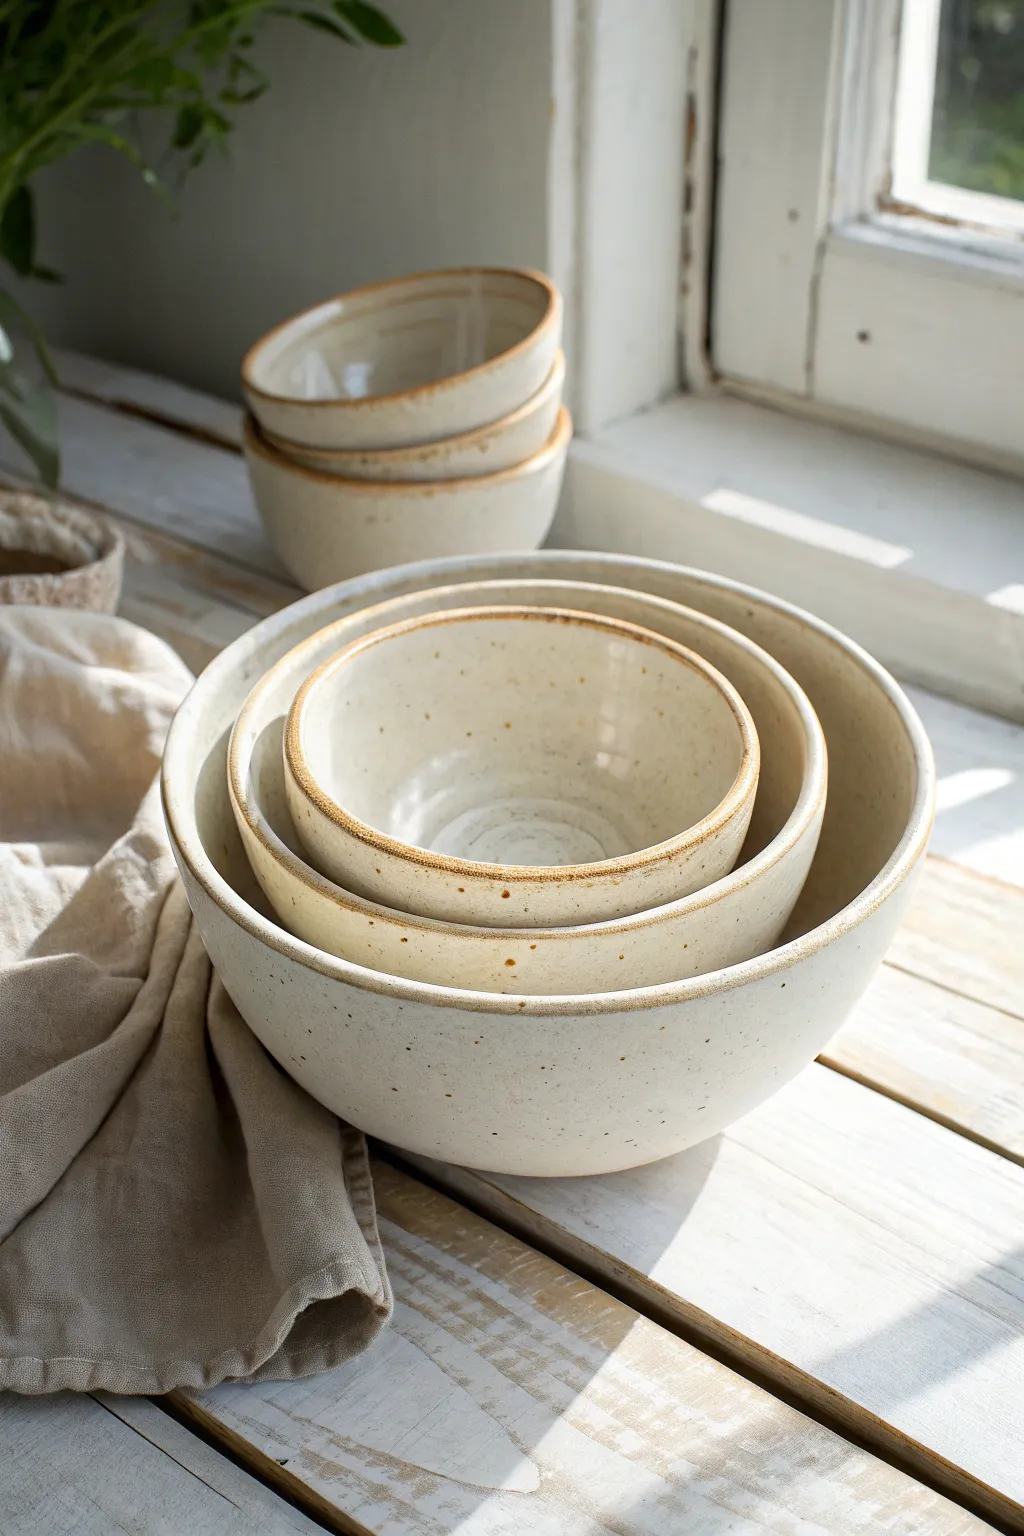
These elegant, hand-built bowls feature a warm cream glaze with delicate speckles and a subtle toasted rim, perfect for kitchen prep or serving. Their organic, slightly irregular shape highlights the beauty of handmade ceramics, while the nesting capability makes them functionally compact.
Step-by-Step
Materials
- Speckled stoneware clay (mid-fire)
- Rolling pin
- Wooden guide strips or slats (approx. 1/4 inch thick)
- Set of plain nesting mixing bowls (for use as hump molds)
- Cornstarch or cheesecloth
- Potter’s needle tool or fettling knife
- Rubber kidney rib (soft)
- Sponge
- Cream or oatmeal matte glaze
- Kiln (or access to a studio firing service)
Step 1: Preparation and Rolling
-
Wedge the clay:
Begin by thoroughly wedging your speckled stoneware clay to remove any air bubbles. Since this is a set, you’ll need a fairly large chunk—about 5-6 pounds to ensure you have enough for the largest bowl. -
Set up your workspace:
Place a canvas cloth on your table to prevent sticking. Arrange your wooden guide strips on either side of the clay to ensure an even thickness. -
Roll out the slab:
Using the rolling pin, flatten the clay into a large slab. Roll from the center outwards, turning the clay periodically, until the pin rests on the guide strips. -
Compress the slab:
Take your rubber kidney rib and drag it smoothly across the surface of the clay in multiple directions. This aligns the clay particles, preventing warping during firing, and removes the canvas texture.
Rim Technique
To get that specific brown edge, gently wipe a damp sponge along the very rim immediately after dipping in glaze. This exposes the clay body, which will burnish to a toasted color during firing.
Step 2: Forming the Bowls
-
Prepare your molds:
Select three standard kitchen bowls that nest well together to use as hump molds. Lightly dust the outside of these bowls with cornstarch or drape a piece of cheesecloth over them so the clay doesn’t stick. -
Cut the clay circles:
Place your molds upside down on the slab to estimate the size needed. Use your needle tool to cut rough circles about 2 inches wider than the rim of each mold. -
Drape the clay:
Gently lift a clay circle and drape it over the corresponding overturned mold. Let gravity do most of the work initially, allowing the clay to settle. -
Shape against the mold:
Starting from the top (which will practice the bottom of your bowl), gently press the clay down the sides of the mold with a damp sponge or soft rib. Avoid pulling or stretching the clay; instead, compress it onto the form. -
Define the rim:
While the clay is on the mold, use your needle tool to trim the excess clay at the bottom (the future rim), creating a clean, level edge parallel to the table. -
Smooth the exterior:
Use the soft rubber rib again to smooth the exterior walls. This is where I like to pay extra attention to erasing any fingerprints or tool marks for that professional finish. -
Stiffen the clay:
Allow the bowls to rest on the molds until they are leather hard—stiff enough to hold their shape but still cool to the touch. This usually takes a few hours depending on humidity.
Level Up: Texture
Before draping the clay, lightly press a coarse linen fabric onto the slab. The glaze will break beautifully over the subtle weave pattern, adding more rustic charm to the exterior.
Step 3: Refining and Glazing
-
Remove from molds:
Carefully lift the clay bowls off the molds. If they resist, let them dry a little longer. Flip them over onto their bases. -
Smooth the rim:
Use a damp sponge to round over the cut edge of the rim. The image shows a soft, organic lip, so simply wipe away any sharpness without trying to make it geometrically perfect. -
Compress the interior:
Run your smooth rib along the inside curve of the bowl to compress the clay one last time, ensuring a strong, watertight surface. -
Bisque fire:
Once the bowls are bone dry (chalky and room temperature), load them into the kiln for a bisque firing to roughly Cone 04. -
Apply the glaze:
Dip or pour a creamy matte glaze over the bowls. To achieve the look in the photo, choose a glaze that breaks translucent over edges, which will allow the toasted color of the stoneware clay to peek through at the rim. -
Wipe the foot:
Use a wet sponge to completely clean the glaze off the bottom of each bowl so they don’t fuse to the kiln shelf. -
Glaze fire:
Fire the bowls again to the maturation temperature of your specific clay and glaze, likely Cone 5 or 6 for stoneware.
Enjoy the satisfaction of stacking your completely custom set of nesting bowls on your kitchen shelf
Spoon Rest With Thumb Prints

This charming oval spoon rest combines rustic unglazed clay with a creamy, speckled glaze for a beautiful contrast. The distinctive rim features vertical hash marks that give it a hand-carved, tactile quality perfect for holding your favorite wooden spoon.
Step-by-Step Guide
Materials
- Stoneware clay (terracotta or reddish-brown body recommended for contrast)
- Rolling pin
- Canvas or slab mat
- Oval template (paper or carboard)
- Fettling knife or needle tool
- Scoring tool (serrated rib or needle tool)
- Slip (clay mixed with water)
- Modeling tool with a flat edge or a wooden knife
- Sponge
- Creamy white speckled glaze (glossy finish)
- Small paintbrush
- Clear glaze (optional)
Step 1: Creating the Base Form
-
Roll the slab:
Begin by wedging your clay to remove air bubbles, then roll out a slab to an even thickness of about 1/4 inch. Using guide sticks on either side of your roller helps keep the thickness consistent. -
Cut the base:
Place your oval template onto the slab. Using your fettling knife, cut around the template to create the floor of your spoon rest. Smooth the cut edges gently with your finger. -
Prepare the wall strip:
From the remaining slab, cut a long strip of clay, roughly 1 inch tall. Ensure it is long enough to wrap around the entire circumference of your oval base. -
Score and slip:
Score the outer edge of your oval base and the bottom edge of your clay strip. Apply a generous amount of slip to the scored areas on the base. -
Attach the wall:
Carefully place the clay strip onto the base, pressing it firmly into the slipped area. Where the two ends of the strip meet, cut them at an angle (beveled cut), score, slip, and join them together for a seamless loop.
Fixing Warp
If your oval shape warps during drying, try drying it slower next time, or place a weighted bag of sand inside the form while it’s in the leather-hard stage.
Step 2: Refining and Texturing
-
Reinforce the join:
Use a small wooden tool or your finger to smooth the seam on the inside bottom where the wall meets the floor. A tiny coil added here can double-check strength if needed. -
Shape the rim:
Support the wall from the outside with one hand and gently pinch or smooth the rim to ensure it is level and has a pleasant, rounded thickness. I like to run a slightly damp sponge over the rim to soften any sharp edges. -
Create the texture:
Using the flat edge of a wooden modeling tool or the side of a dull knife, press vertical indentations into the outside of the rim. Space them evenly, about 1/4 inch apart, pressing deep enough to create a texture that will catch the glaze later. -
Refine the exterior:
Check the exterior wall near the base. If any slip has squished out, clean it up with a damp sponge so the transition from the textured rim to the bare clay base is crisp. -
Slow drying:
Loosely cover the piece with plastic to let it dry slowly to the leather-hard stage. Once leather-hard, you can refine the bottom and smooth any rough spots with a rib. -
Bisque fire:
Once the piece is bone dry, fire it in the kiln to bisque temperature (usually cone 04 or 06).
Step 3: Glazing
-
Clean the bisque:
Wipe the bisque-fired piece with a damp sponge to remove any dust that might prevent the glaze from adhering properly. -
Wax the exterior base:
Apply wax resist to the bottom of the piece and up the side wall, stopping right where the textured rim marks begin. This ensures the rustic clay body remains visible on the lower half. -
Pour the interior:
Pour your creamy white speckled glaze into the interior of the dish. Swirl it around carefully to coat the floor and inner walls completely, then pour out the excess. -
Glaze the rim:
Using a brush or by carefully dipping just the top edge, apply the same glaze to the rim and the textured area. The glaze should settle into the vertical indentations. -
Creating the break:
Use a damp sponge to wipe back the glaze on the raised high points of the exterior texture if you want the clay color to peek through more, or leave it thick for a dripping effect like in the photo. -
Clean up:
Double-check the bottom and lower walls to ensure no stray drips of glaze are on the unglazed sections or the foot. -
Glaze fire:
Fire the piece again to the maturation temperature of your glaze and clay body (often cone 5 or 6 for stoneware).
Make It a Set
Create nesting serving dishes by using three different sizes of oval templates. The consistent rim texture will tie the whole set together visually.
Once fired, this lovely dish is ready to be a functional and stylish addition to your kitchen counter

TRACK YOUR CERAMIC JOURNEY
Capture glaze tests, firing details, and creative progress—all in one simple printable. Make your projects easier to repeat and improve.
Ring Cone and Jewelry Tray Set
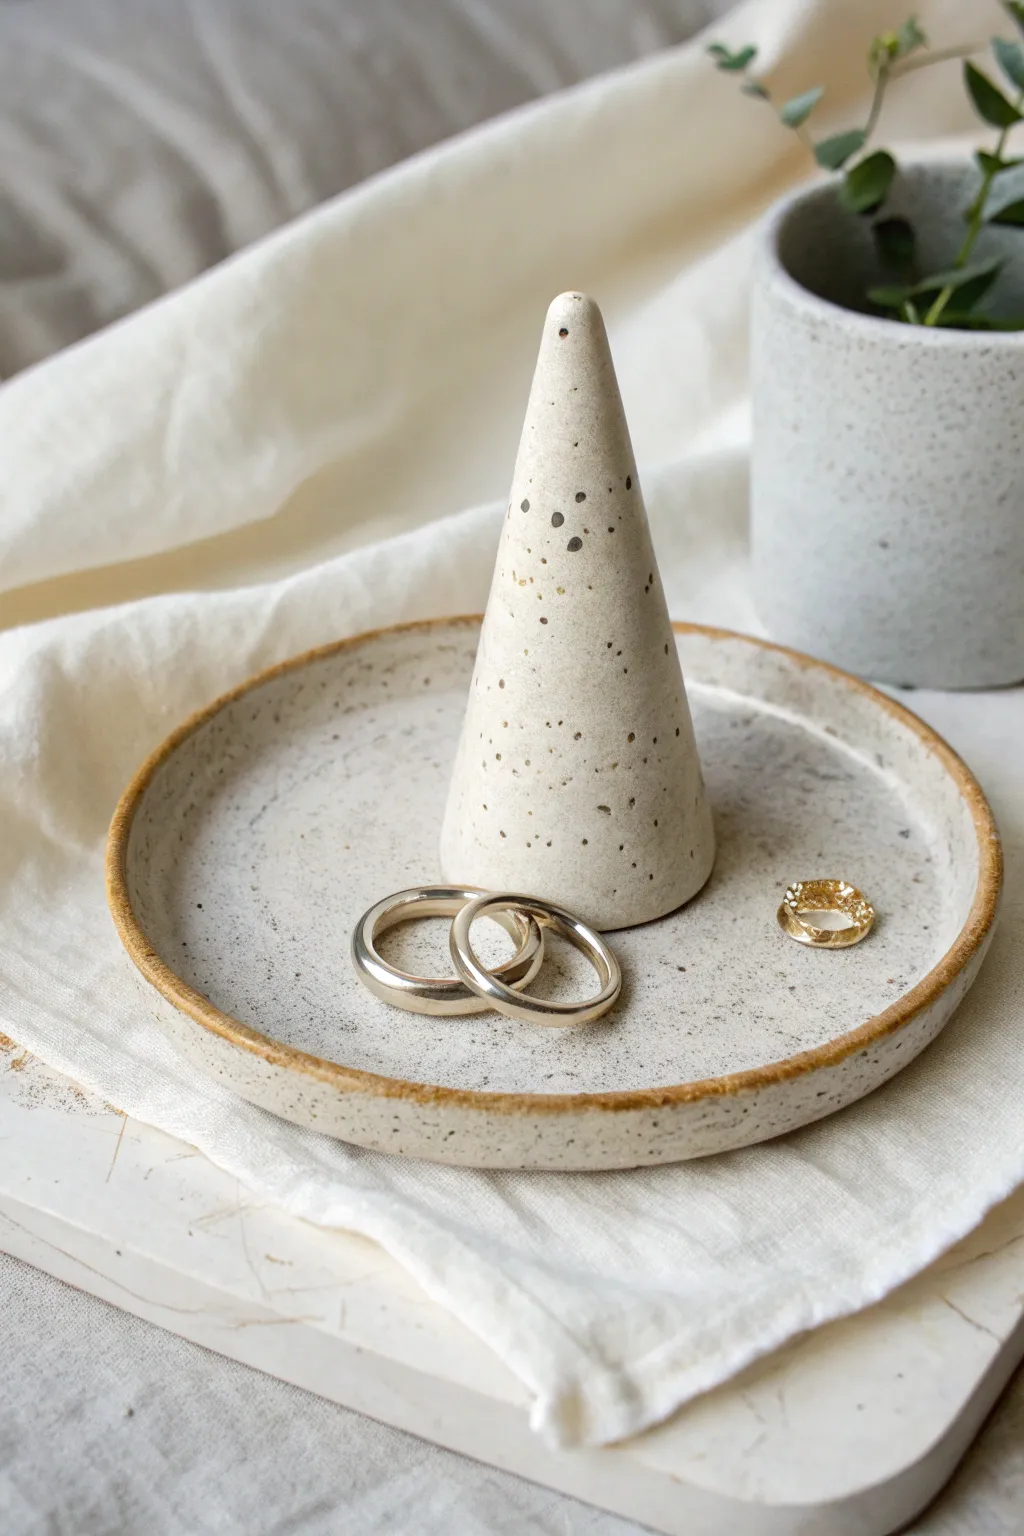
This elegant duo combines a classic ring cone with a matching catch-all tray, perfect for keeping your daily jewelry organized. The natural speckled clay body is left unglazed on the cone for a matte, stone-like texture, while the tray features a warm, glazed rim for a subtle pop of contrast.
Detailed Instructions
Materials
- Speckled stoneware clay (white or light grey base)
- Rolling pin
- Canvas mat or cloth (to prevent sticking)
- Needle tool or sharp craft knife
- Rib tool (flexible metal or rubber)
- Sponge
- Slip (clay mixed with water)
- Scoring tool or fork
- Small paintbrush
- Transparent matte glaze (optional)
- Brown iron oxide wash or amber glaze (for the rim)
Step 1: Shaping the Ring Cone
-
Roll a coil:
Start by taking a plum-sized ball of clay and rolling it into a thick coil on your canvas. You want it to be slightly tapered, thicker at one end and thinner at the other. -
Form the cone shape:
Stand the coil up on its thickest end. Use your hands to gently gently stroke the clay upwards, refining the cone shape. It should be wide enough at the base to be stable but narrow enough at the top to hold rings. -
Refine the surface:
Using a slightly damp sponge, smooth out any finger marks. I like to run a flexible rib tool up the sides to get that perfectly straight, geometric profile. -
Level the base:
Pick up the cone and tap the bottom firmly against your work surface a few times. This flattens the base so it won’t wobble. -
Create a hollow (optional):
If your cone is quite thick, use a loop tool to hollow out the bottom slightly. This helps it dry evenly and reduces the risk of cracking in the kiln.
Smoother Surfaces
Burnish the cone with the back of a spoon when leather hard. This aligns the clay particles, making the raw clay feel silky smooth even without glaze.
Step 2: Building the Tray
-
Roll the slab:
Take a larger amount of clay and roll it out into an even slab, approximately 1/4 inch thick. Make sure to roll in multiple directions to compress the clay platelets. -
Cut the circle:
Find a round object to use as a template (like a cereal bowl or small plate) roughly 5-6 inches wide. Place it on the slab and cut around it cleanly with your needle tool. -
Smooth the edges:
Dip your finger in a little water and run it along the cut edge to soften the sharpness. This prevents the rim from being brittle later. -
Form the rim:
Gently pinch the outer edge of the circle upwards to create a raised lip. You aren’t adding a coil; you are just curving the existing slab edge up to contain small items. -
Refine the shape:
Use a damp sponge to smooth the transition between the flat base and the raised rim. The goal is a seamless, organic curve rather than a sharp angle.
Step 3: Drying and Firing
-
Slow drying:
Loosely cover both pieces with plastic wrap. Let them dry slowly over several days to the ‘bone dry’ stage. If the tray dries too fast, the rim might warp. -
Bisque fire:
Load the bone-dry pieces into the kiln for a bisque firing (usually around Cone 04 or 06, depending on your clay). -
Clean the bisque:
Once fired and cooled, wipe the pieces with a damp sponge to remove any kiln dust. This ensures the glaze adheres properly. -
Wax resist the cone:
For the look in the photo, the cone is left unglazed to show off the raw stone texture. Apply wax resist to the bottom of the cone. -
Glaze the tray rim:
Dip a small brush into your amber glaze or iron oxide wash. Carefully paint a thin line along the very top edge of the tray’s rim to create that warm halo effect. -
Clear glaze application:
Dip the entire tray into a transparent matte glaze. When applying glaze, I check for drips immediately to keep the surface smooth. Wipe the bottom of the tray clean. -
Final firing:
Fire the pieces to the temperature required by your clay and glaze (often Cone 5 or 6 for stoneware). The heat will bring out the natural speckles in the clay body.
Preventing Warping
Place a small weighted bag of rice or sand in the center of the tray while it dries. This keeps the flat bottom from bowing upward as the rim shrinks.
Now you have a chic, minimalist set ready to display your favorite rings and studs
Stamped Mini Appetizer Plates
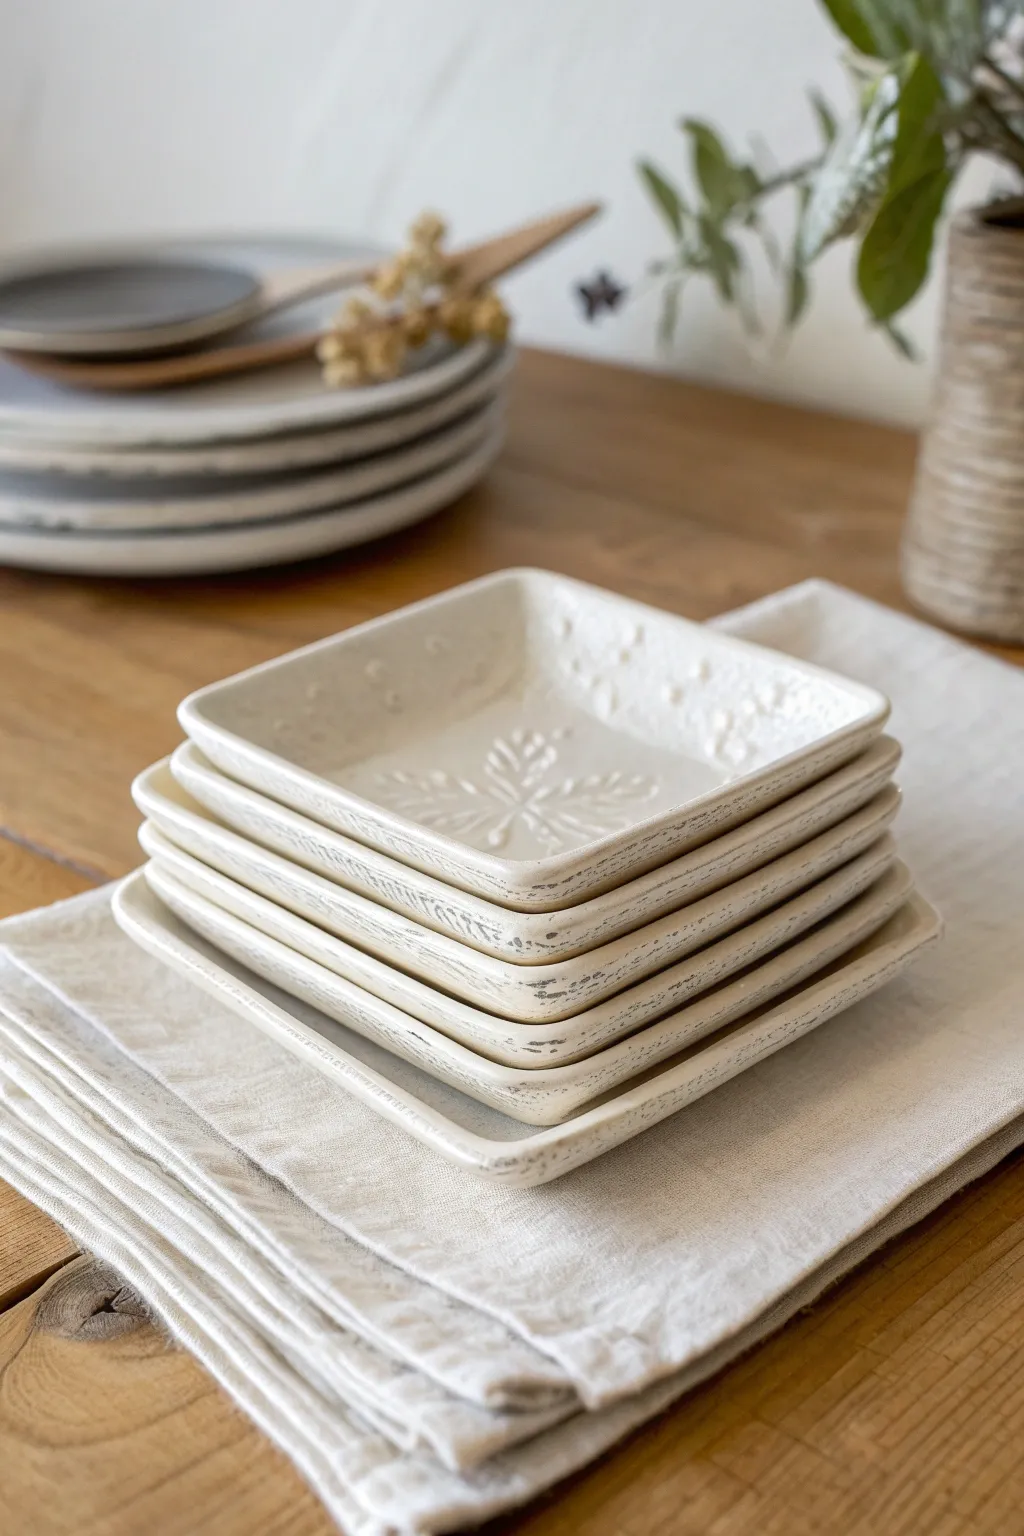
Create a charming set of mini appetizer plates that feature delicate botanical impressions and a beautifully distressed finish. These hand-built square dishes combine a creamy glaze with rustic, darkened edges for a timeless, farmhouse aesthetic.
Step-by-Step Guide
Materials
- White or buff stoneware clay
- Rolling pin
- Guide sticks or slats (approx. 1/4 inch thick)
- Square paper template (approx. 5×5 inches)
- Fettling knife or needle tool
- GR Pottery Form (square) or a DIY drape mold
- Botanical stamps or actual leaves
- Soft rib tool
- Sponge
- Black or dark brown underglaze
- White gloss or satin glaze
- Kiln
Step 1: Preparing the Slabs
-
Wedge the clay:
Begin by thoroughly wedging your clay to remove any air bubbles and ensure an even consistency. This is crucial for preventing cracks during firing. -
Set up your rolling station:
Place your guide sticks on either side of your canvas or work surface. These will ensure your clay slab is perfectly even in thickness. -
Roll out the slab:
Roll the clay out until the rolling pin rests on the guide sticks. Flip the slab occasionally as you roll to prevent it from sticking to the canvas. -
Smooth the surface:
Run a soft rib tool over the surface of the clay slab to compress the particles and create a smooth canvas for your texture.
Stamp Clarity Tip
Dust your stamps or leaves with cornstarch before pressing them into wet clay. This acts as a release agent and ensures a clean, crisp impression without sticking.
Step 2: Cutting and Stamping
-
Cut the rough squares:
Place your square paper template onto the slab. Using your needle tool or fettling knife, cut around the template. Repeat for as many plates as you wish to make. -
Soften the edges:
Use a damp sponge or your finger to gently round over the sharp cut edges of each square. This prevents chipping later and gives a higher-quality finish. -
Apply the center stamp:
Position your botanical stamp or fresh leaf in the exact center of a square. Press firmly and evenly to leave a deep, crisp impression without pushing all the way through the clay. -
Add rim texture:
If desired, lightly press a smaller texture tool or stamp around the perimeter of the square to create the subtle border seen in the example.
Step 3: Forming the Plates
-
Prepare the mold:
Dust your square pottery form or drape mold lightly with cornstarch to prevent the clay from sticking. -
Shape the plate:
Gently lift the clay slab and place it over the mold (or inside, depending on your mold type). Press the clay down gently to conform to the shape. -
Define the rim:
I like to gently lift the edges slightly outward to give the plate a nice curve, ensuring it isn’t too flat. -
Dry to leather hard:
Allow the plates to stiffen up on the molds until they are leather hard. This usually takes a few hours depending on the humidity. -
Remove and refine:
Once stiff, remove the plates from the molds. Use a damp sponge to smooth any rough spots on the rim or the underside.
Warping Woes?
If your plates warp during drying, place a small weighted bag (like a sandbag) in the center as they dry slowly under plastic. Even drying is key.
Step 4: Glazing and Finishing
-
Bisque fire:
Load the bone-dry plates into the kiln and bisque fire them to cone 04 (or your clay body’s recommendation). -
Apply underglaze wash:
Mix black or dark brown underglaze with a little water. Brush it onto the rims and into the stamped design, then wipe it back with a damp sponge so the color remains only in the crevices and textures. -
Glaze application:
Dip or brush a creamy white glaze over the entire piece. Ensure the glaze isn’t too thick, or it might obscure the lovely stamped details. -
Distress the rim:
Before the glaze dries completely, gently wipe the very edge of the rim with a sponge to reveal the dark underglaze or clay body beneath, creating that rustic framed look. -
Final wipe:
Clean the foot of the plate thoroughly to prevent it from fusing to the kiln shelf. -
Glaze fire:
Fire the plates for the final glaze firing according to your glaze and clay specifications, typically cone 5 or 6.
Now you have a stunning stack of handmade dishes perfect for your next gathering
Wall Pocket Planter
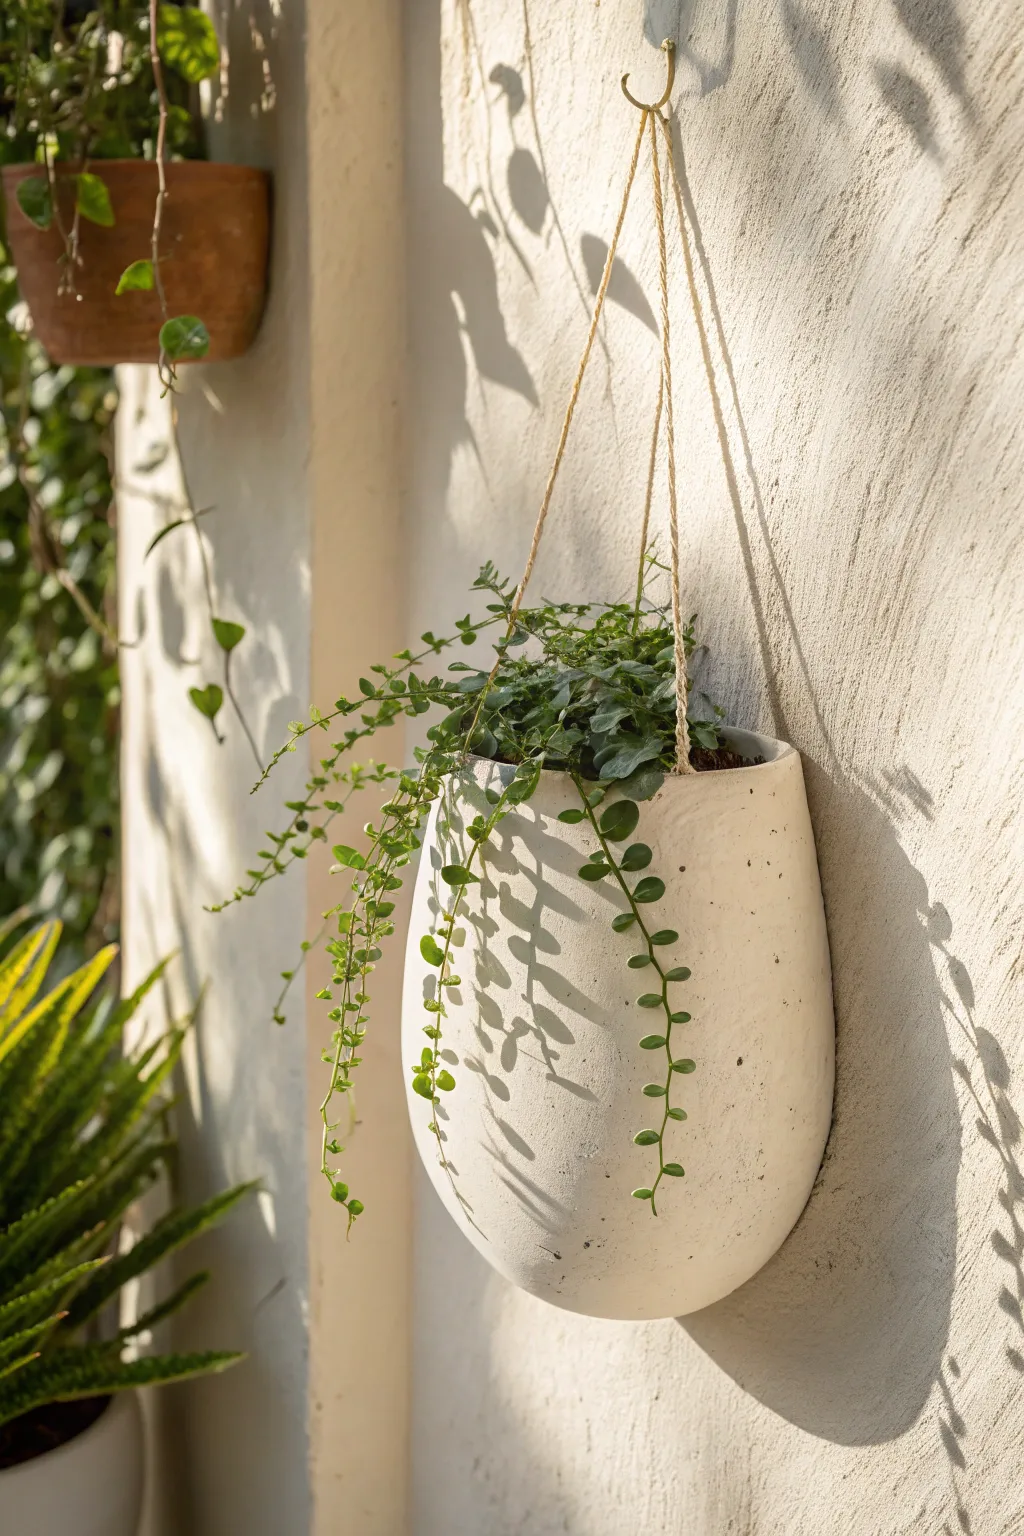
Enhance your vertical garden space with this elegant, minimalist wall pocket planter crafted from speckled clay. Its elongated, curved form and matte white finish provide a beautiful contrast to cascading green vines, creating a serene botanical display on any wall.
Detailed Instructions
Materials
- Speckled clay body (buff/white stoneware with grog)
- Rolling pin
- Canvas work surface or slab mat
- Paper template (elongated oval shape)
- Needle tool or fettling knife
- Scoring tool or serrated rib
- Slip (clay mixed with water)
- Wooden spoon or paddle
- Sponge
- Small hole punch tool or drill bit
- Matte white glaze
- Natural jute twine or hemp cord
Step 1: Creating the Slab Components
-
Prepare the template:
Begin by sketching your shape on paper. You need a large, elongated arch or tombstone shape for the back plate, and a slightly wider, shorter version of that shape for the front pocket. Cut these out to use as guides. -
Roll out the slab:
Take a workable amount of speckled clay and roll it out on your canvas. Aim for a thickness of about 1/4 to 3/8 of an inch. Ensure the thickness is consistent, as this helps prevent warping during drying. -
Compress the clay:
Use a rib tool (rubber or metal) to smooth both sides of the slab. This compression aligns the clay particles, which significantly reduces the chance of cracking later on. -
Cut the shapes:
Lay your paper templates onto the smoothed slab. Using your needle tool or fettling knife, carefully trace around the edges to cut out the back plate and the front pocket piece.
Step 2: Forming and Assembling
-
Form the pocket curve:
Take the front piece and gently bend it into a ‘U’ curve. Do not fold it; you want a voluminous, rounded belly that will hold soil. You can drape it over a loosely bunched newspaper or a foam form to help it hold this shape while it stiffens slightly. -
Score the connection points:
Score the outer edges of the back plate (where the pocket will attach) and the corresponding inner edges of the front pocket piece. Make the score marks deep and cross-hatched. -
Apply slip:
Brush a generous amount of slip onto the scored areas. The slip acts as the glue that bonds the two clay pieces together. -
Attach the pieces:
Press the front pocket onto the back plate firmly. Start at the bottom center and work your way up the sides, ensuring a tight seal without squashing the rounded form of the pocket. -
Reinforce the seam:
Roll a very thin coil of clay and press it into the seam where the pieces join on the inside. Smooth this coil down with your finger or a modeling tool to create a seamless transition and extra strength. -
Smooth the exterior:
On the outside, use a wooden tool or your thumb to blend the seam so the connection line disappears. The pot should look like one continuous unit.
Warped Back Panel?
If the back plate curls during drying, place a small sandbag or a weighted board inside the pocket (wrapped in plastic) to gently hold the back flat against the table while it dries.
Step 3: Refining and Finishing
-
Refine the shape:
Once assembled, use a wooden paddle or spoon to gently tap the bottom and sides. This helps round out any flat spots and perfects the organic, egg-like curve shown in the photo. -
Create hanging holes:
Using a hole punch tool or a small drill bit, create two holes near the top edge of the back plate. Position them symmetrically, about an inch down from the rim. Make sure the holes are large enough to accommodate your twine, keeping in mind clay shrinks when fired. -
Clean the edges:
Take a slightly damp sponge and run it along the top rim and the hanging holes to soften any sharp edges. This prevents the fired clay from cutting into your twine later. -
Dry slowly:
Place plastic loosely over the planter to let it dry slowly for the first day or two. This is crucial for wall pockets, as uneven drying can cause the back plate to warp or pull away from the pocket. -
Bisque fire:
Once bone dry, fire the piece to bisque temperature (usually cone 04) according to your clay body’s specifications. -
Glaze application:
Apply a matte white glaze. I prefer dipping specifically for this shape to get an even coat inside and out, but brushing 3 steady coats works too. Wipe the bottom clean or use stilts if glazing the very bottom curve. -
Final firing:
Fire the piece again to the glaze temperature (likely cone 5 or 6 for stoneware). The speckles in the clay should show through the matte white glaze beautifully. -
Add suspension:
Cut a long length of jute twine. Thread the ends through the holes from front to back and tie secure knots. Adjust the length to suit your wall space before hanging.
Add Texture
Before assembling, gently press a piece of rough linen or canvas into the damp clay slab. The subtle fabric weave will catch the glaze and add organic character to the surface.
Hang your new planter in a sunny spot and enjoy the clean, modern touch it adds to your wall
Lidded Jar for Salt or Tea
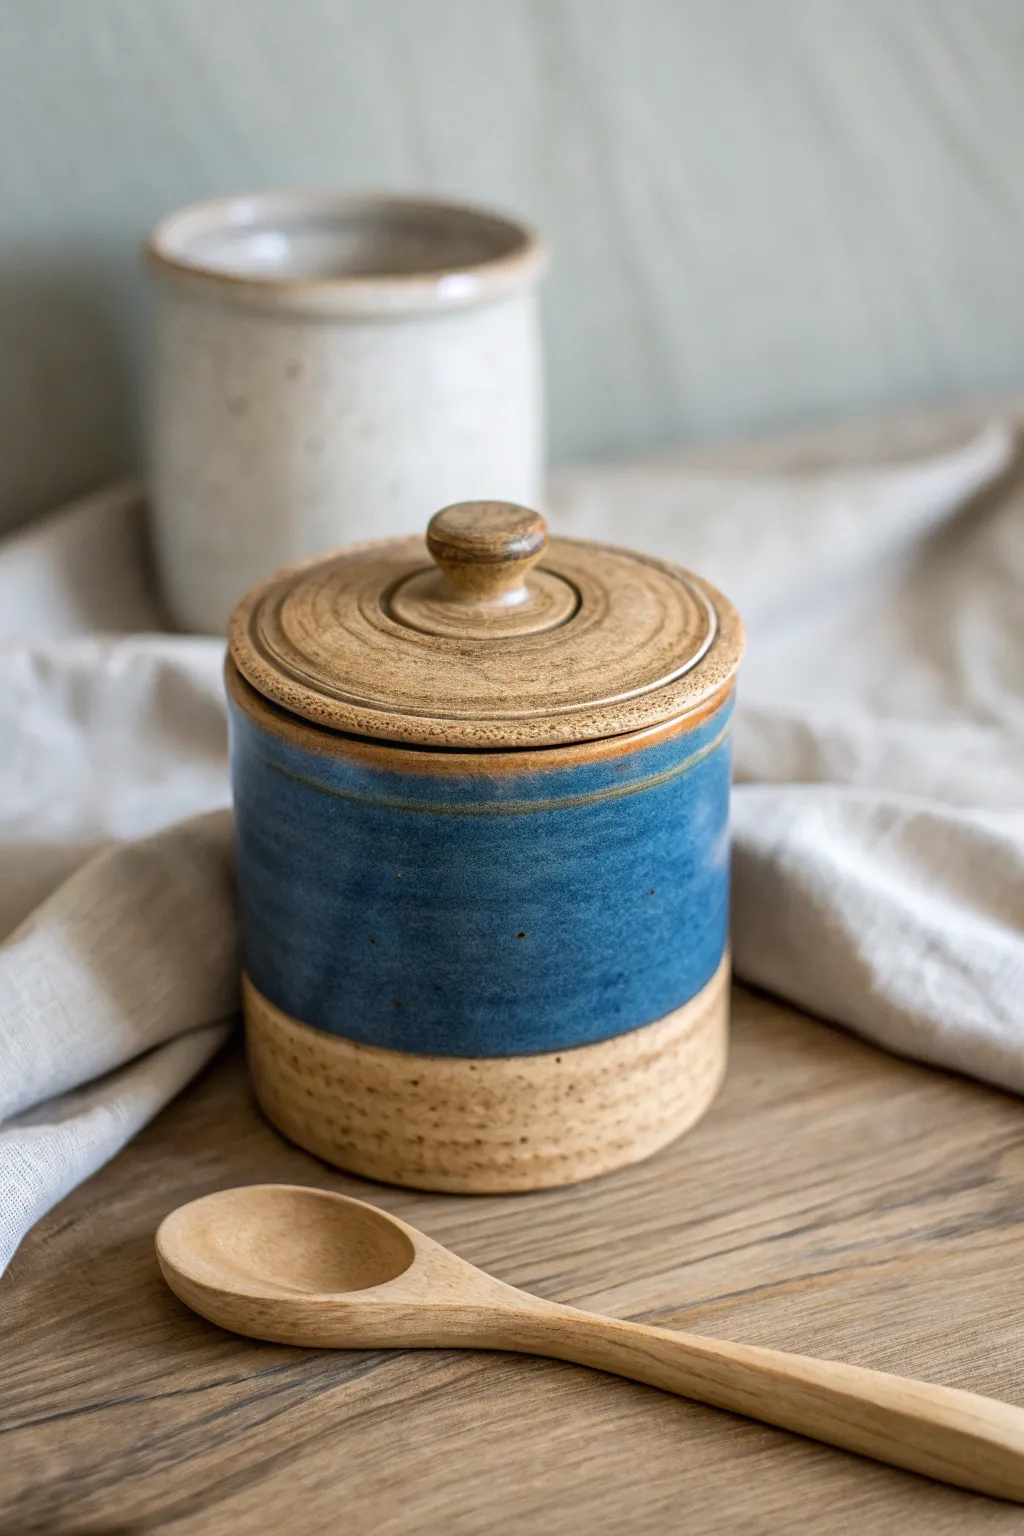
This charming, multi-functional jar features a distinct two-toned look with an earthy, speckled raw clay base and a deep blue glazed body. It’s the perfect size for storing sea salt or loose-leaf tea on your kitchen counter.
How-To Guide
Materials
- Speckled stoneware clay (mid-fire)
- Rolling pin and guide strips (approx. 1/4 inch)
- Circular templates (or cookie cutters/can lids)
- Needle tool
- Scoring tool or serrated rib
- Slip (clay and water slurry)
- Wooden modeling tool
- Sponge
- Fettling knife
- Deep blue glaze
- Small paintbrush for wax resist
- Wax resist emulsion
Step 1: Building the Cylinder Body
-
Roll the Slab:
Start by rolling out a generous slab of speckled stoneware clay. Use guide strips to ensure an even thickness of about 1/4 inch, which gives the jar a sturdy but refined feel. -
Cut the Components:
Using a rectangle template (roughly 4 inches by 10 inches, depending on your desired circumference) and a circular template for the base, cut out your clay shapes with a needle tool. -
Score and Slip:
Score the short edges of the rectangle and the outer edge of the circular base. Apply a generous amount of slip to these roughened areas. -
Form the Cylinder:
Stand the rectangle up and curve it into a cylinder, overlapping the scored ends slightly. Press the seam firmly together from both the inside and outside. -
Attach the Base:
Place the cylinder onto the scored circular base. Use a wooden tool to smudge the clay from the base up onto the wall to create a seamless, watertight join. -
Refine the Seams:
Smooth out the vertical seam and the bottom connection using a serrated rib followed by a sponge. You want the outside to look consistent, though I like to leave a little texture to show the hand-built nature.
Warped Lid Woes?
If your lid rocks after drying, it likely dried unevenly. Always dry lids directly on the jar (with a paper towel between) or flat on a board with a weighted bag on top.
Step 2: Creating the Lid and Glazing
-
Measure the Opening:
Measure the inner diameter of your cylinder. You need a circular slab that is slightly larger than the outer rim (the lid top) and a smaller circle or ring that fits inside the jar to keep the lid from sliding off. -
Assemble the Lid:
Cut the two circles. Score and slip the center of the larger circle and attach the smaller one (the flange) to it. Center them perfectly. -
Form the Knob:
Roll a small ball of clay and shape it into a simple mushroom or button knob. Score the top center of the lid deeply and attach the knob securely. -
Create the Concentric Texture:
Place the lid on a banding wheel if you have one. As you rotate it, gently press a wooden tool into the top surface to create the subtle concentric rings seen in the photo. -
Bisque Fire:
Allow the jar and lid to dry slowly under plastic to prevent warping. Once bone dry, bisque fire the pieces according to your clay’s instructions. -
Wax the Base and Rim:
Using wax resist, carefully paint a line around the bottom third of the jar’s exterior. Also, wax the very top rim of the jar and the flange of the lid where they will touch. -
Glaze the Body:
Dip the top two-thirds of the jar (up to the wax line) into a deep blue glaze. The wax will repel the glaze, leaving the crisp line between the blue and the raw clay. -
Glaze the Lid Detail:
For the lid, you can wash a very thin layer of iron oxide or a diluted brown stain into the concentric grooves to accentuate them, wiping away the excess so the raw clay body still shines through. -
Final Fire:
Load the kiln, making sure the lid is not placed on the jar unless you have thoroughly waxed the contact points to prevent sticking. Fire to the glaze maturity temperature.
Clean Lines Pro Tip
For that super crisp horizon line between the raw clay and the blue glaze, use automotive masking tape instead of wax resist; peel it off immediately after dipping.
Now you have a stunning, functional vessel ready to add a touch of handmade warmth to your countertop
Butter Dish With Crisp Edges
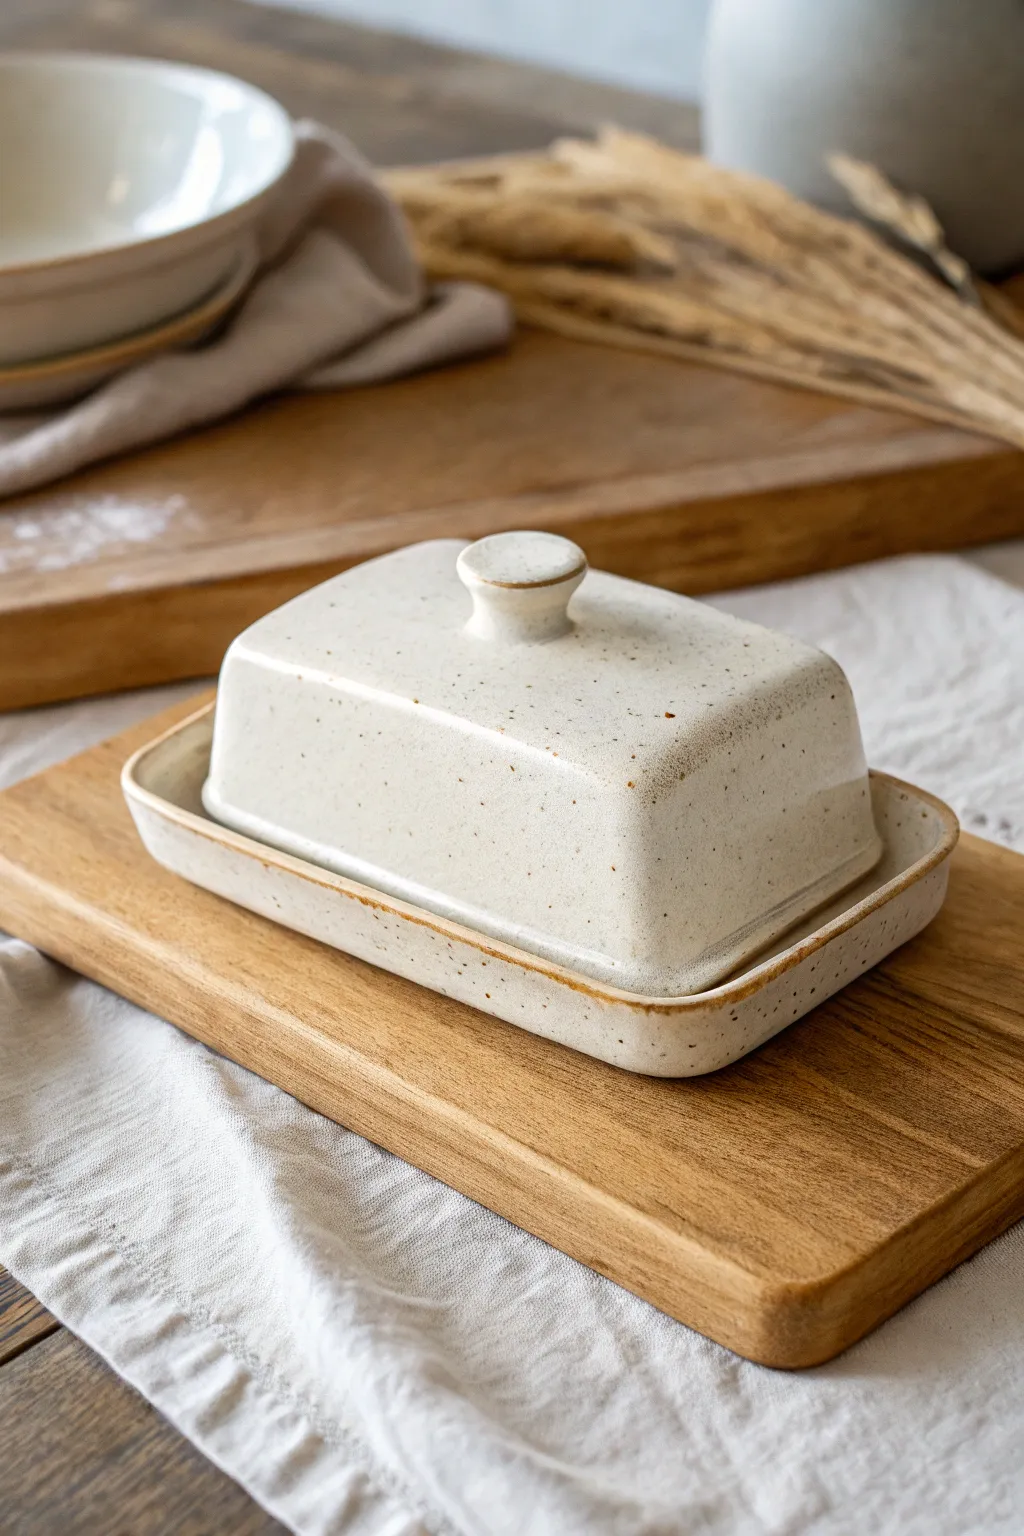
This classic butter dish blends functional simplicity with rustic charm, featuring a creamy speckled glaze and clean, sharp lines. The project consists of a precise rectangular cover and a matching base tray, perfect for keeping your butter fresh on the counter.
Step-by-Step Tutorial
Materials
- Speckled stoneware clay body (e.g., Laguna Speckled Buff)
- Rolling pin with 1/4 inch guide strips
- Fettling knife or X-Acto blade
- Ruler or straight edge
- Paper templates (rectangular)
- Scoring tool or serrated rib
- Slip (clay mixed with water)
- Small wooden modeling tool
- Rectangular sponge or chamois
- Creamy matte white glaze
Step 1: Preparing the Slabs
-
Roll out the clay:
Begin by wedging your speckled clay thoroughly to remove air bubbles. Using your guide strips, roll the clay out into a large, even slab about 1/4 inch thick. -
Compress the slab:
Take a rib tool and firmly compress the clay on both sides. This is crucial for slab building as it aligns the clay particles, preventing warping during the firing process. -
Create templates:
While the clay sets up to leather-hard, cut paper templates. You will need a large rectangle for the base tray, top, and side walls of the cover. Measure a standard stick of butter to ensure you leave plenty of clearance. -
Cut the shapes:
Once the clay is firm enough to hold its shape but still workable (leather-hard), lay your templates on the slab. Cut out the base tray, the four walls of the cover, and the top roof piece using a sharp fettling knife.
Warping Walls?
If walls bow inward, the clay was too soft during assembly. Stuff the interior with crumpled newspaper to support the shape while it stiffens up.
Step 2: Building the Cover
-
Bevel the edges:
For the crispest 90-degree corners, cut 45-degree bevels on the vertical edges of your four wall pieces where they will join together. Leave the top and bottom edges flat for now. -
Score and slip:
Rough up the beveled edges with your scoring tool and apply a generous amount of slip. This ‘velcro’ texture ensures a strong bond. -
Assemble the walls:
Stand the walls up and press the beveled corners together to form a rectangle. Gently wiggle them to lock the joint, wiping away excess slip from the inside. -
Attach the roof:
Score the top edges of your rectangular wall structure and the underside of your roof piece. Place the roof on top, pressing down firmly to seal the box. -
Refine the corners:
Use a wooden paddle to gently tap the outside walls, sharping the corners and ensuring the box is perfectly rectangular. I like to run a damp finger along the seams to smooth them completely.
Step 3: Base, Handle & Details
-
Form the base tray:
Take your base rectangle slab and gently curve the very edges upward to create a shallow rim. You can pinch the corners slightly to create a contained lip that will catch any melted butter. -
Create the key:
To keep the lid from sliding, roll a very thin coil of clay. Score a rectangle onto the floor of the base tray that fits exactly inside the lid’s footprint, and attach the coil there. -
Make the knob:
Roll a small ball of clay and slightly flatten it into a thick button shape. Roll a tiny coil for the stem underneath it to create a mushroom-like knob. -
Attach the knob:
Score the center of the lid and the bottom of your knob. Press firmly to attach, smoothing the clay downward with a modeling tool to seamlessy blend the knob into the lid. -
Dry slowly:
Cover the pieces loosely with plastic. Slow drying is essential for box form shapes to prevent the walls from pulling apart at the seams.
Clean Bevels
Use a wire clay cutter held taut at an angle to slice your bevels. It creates a cleaner, more uniform angle than cutting freehand with a knife.
Step 4: Finishing
-
Bisque fire:
Once bone dry, fire the pieces in a bisque kiln to prepare them for glazing. -
Wax the gallery:
Apply wax resist to the foot of the base and the bottom rim of the lid so they don’t fuse to the kiln shelf. -
Glaze application:
Dip or brush a creamy, satin-matte white glaze over the entire piece. If you want the exposed clay rim look shown in the photo, wipe the glaze off the edges with a damp sponge. -
Final fire:
Glaze fire to the temperature appropriate for your clay body (likely Cone 5 or 6) to reveal the speckles through the creamy white surface.
Enjoy the satisfaction of serving breakfast from a handmade piece that feels both modern and timeless
Geometric Candle Holder Set
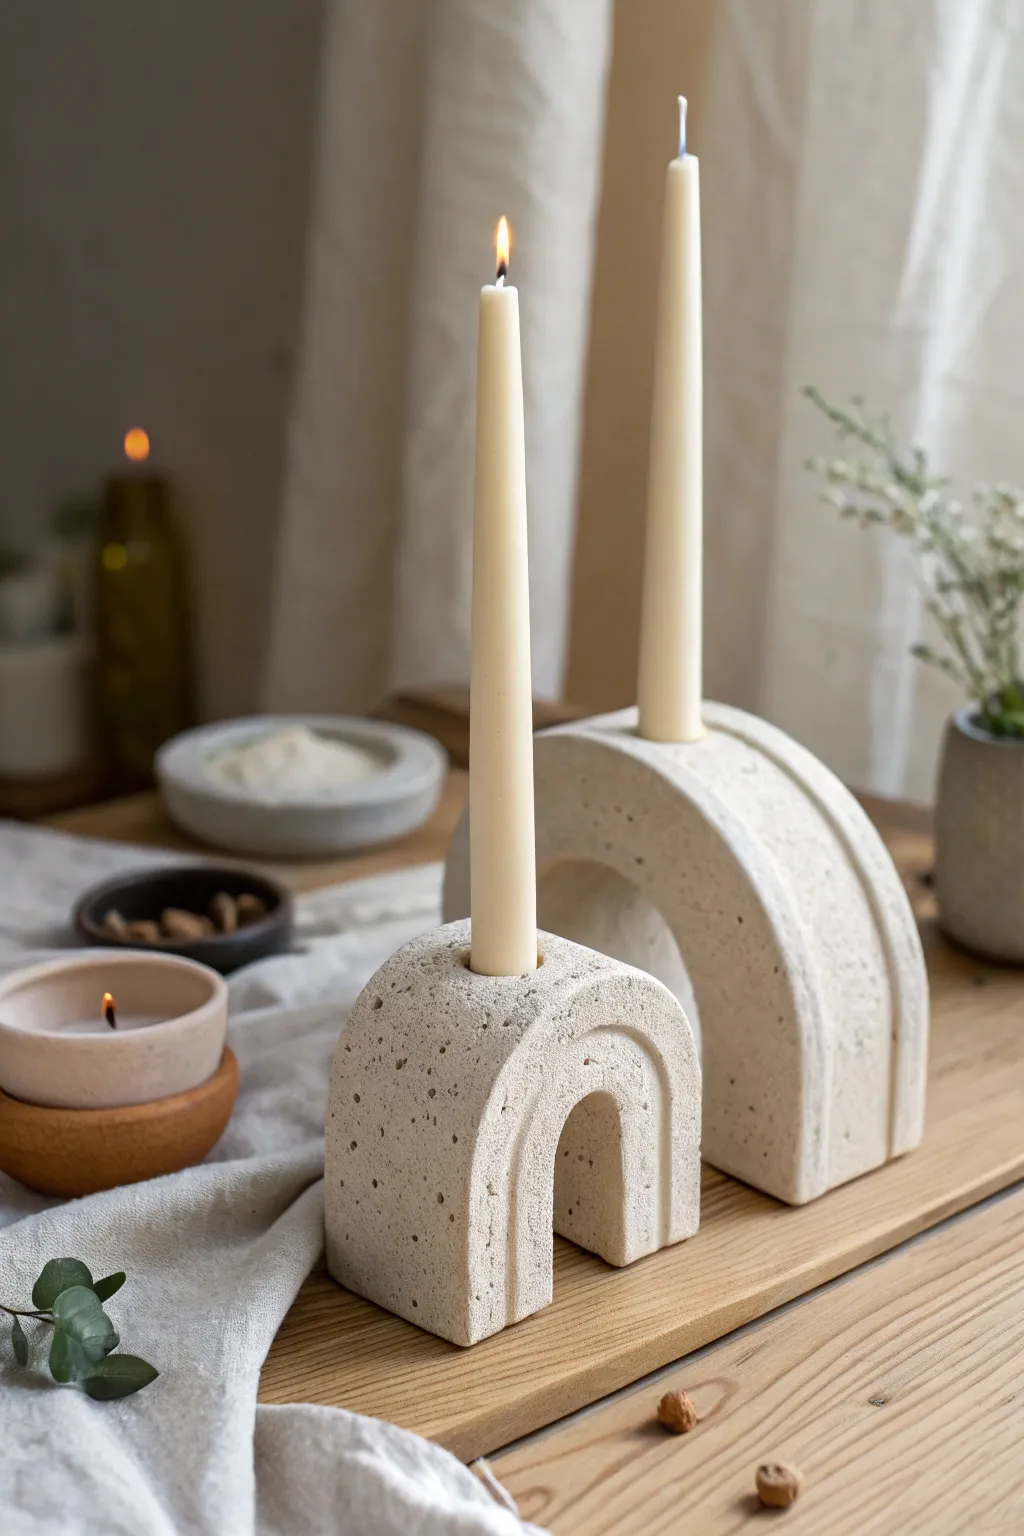
Bring an architectural touch to your home decor with this minimalist candle holder set featuring sleek arches and a lovely speckled stone finish. The clean lines and textural detail make these pieces look high-end, yet they are surprisingly approachable to construct using basic slab-building techniques.
Step-by-Step
Materials
- Speckled stoneware clay (mid-fire or high-fire)
- Canvas or slab mat
- Rolling pin
- Guide sticks (1/4 inch thick)
- Needle tool
- Fettling knife
- Rib tool (metal or rubber)
- Ruler
- Cardboard or paper for templates
- Slip and scoring tool
- Masking tape
- Sanding sponge
- Wax resist (optional)
Step 1: Preparation & Slab Rolling
-
Create Templates:
Begin by designing your arches on paper or stiff cardboard. For the larger holder, draw a prominent arch shape (approx. 5-6 inches tall). For the smaller one, draw a wider, shorter squat arch (approx. 3-4 inches tall). Cut these out perfectly, as they will dictate your final form. -
Prepare Clay Slabs:
Take a generous portion of your speckled clay and wedge it thoroughly to remove air bubbles. Place it on your canvas. -
Roll to Thickness:
Using your guide sticks on either side of the clay, roll out a consistent slab that is 1/4 inch thick. Compress the slab on both sides with a rib tool; I always find this crucial for preventing warping later on.
Clean Cuts Pro Tip
When cutting your arch curves, keep your needle tool vertical and drag it towards you. Don’t saw back and forth, as this creates ragged edges that are harder to smooth later.
Step 2: Cutting Components
-
Cut the Faces:
Place your paper templates onto the slab. For each candle holder, you need a front face and a back face. Carefully trace around the template with a needle tool and cut them out. -
Cut the Side Walls:
Measure the outer curve of your arch template. Cut a long rectangular strip of clay that matches this length and is about 1.5 to 2 inches wide. This will form the solid body of the holder. -
Cut the Inner Supports:
If your arch has a hollow center (like the small one), measure the inner curve and cut a corresponding strip. If the arch is solid at the bottom, cut a rectangular base piece. -
Leather Hard Stage:
Let all your cut pieces sit until they reach a ‘leather hard’ state. They should be stiff enough to hold their shape upright without flopping, but still soft enough to score and join.
Step 3: Assembly
-
Scoring Edges:
Score the edges of your front and back arch faces, as well as the long edges of your rectangular strips. Apply clay slip generously to these roughed-up areas. -
Attach the Walls:
Start with the back face lying flat on your workspace. Gently curve the long rectangular strip along the edge of the arch, pressing it firmly into place. If doing the hollow center arch, attach the inner strip now as well. -
Close the Form:
Apply slip to the exposed edges of the walls you just attached. Place the front face on top, sandwiching the walls between the two arch shapes. Press gently but firmly to seal. -
Create the Candle Hole:
While the clay is still slightly workable, stand the arch up. Use a circle cutter or knife to cut a hole in the absolute top center. Test the fit gently with a standard taper candle, leaving a tiny bit of extra room solely for shrinkage.
Make it Weighted
Before sealing the final face of your arch, hide a small pinch pot filled with sand inside the structure. This adds weight and stability so tall candles won’t tip it over.
Step 4: Detailing & Finishing
-
Adding Dimension:
To recreate the layered look seen in the photo, roll tiny, thin coils or cut very narrow strips of slab. Score and attach these in concentric arches on the flat faces of your holders to mimic architectural molding. -
Smoothing Seams:
Use a soft wooden tool or your finger to smooth out all the connection seams. You want the piece to look like a solid block of stone, so erasing the join lines is key. -
Adding Texture:
If you want that pitted, stone-like texture shown in the image, gently tap the surface with a stiff bristle brush or a piece of coral sponge while the clay is still damp. -
Slow Drying:
Loosely cover your finished pieces with plastic to let them dry slowly. This prevents the seams from cracking as the clay shrinks. -
Bisque Fire:
Once bone dry, fire the pieces to bisque temperature (usually Cone 04). -
Glazing:
For the look in the photo, you might skip a glossy glaze. Instead, leave the raw speckled clay (if it’s vitrified) or use a very matte, dry white glaze. Wipe away any glaze from the bottom before the final firing.
Light your candles once the piece has cooled completely and enjoy the warm architectural ambiance they add to your space
Luminary With Cutout Windows
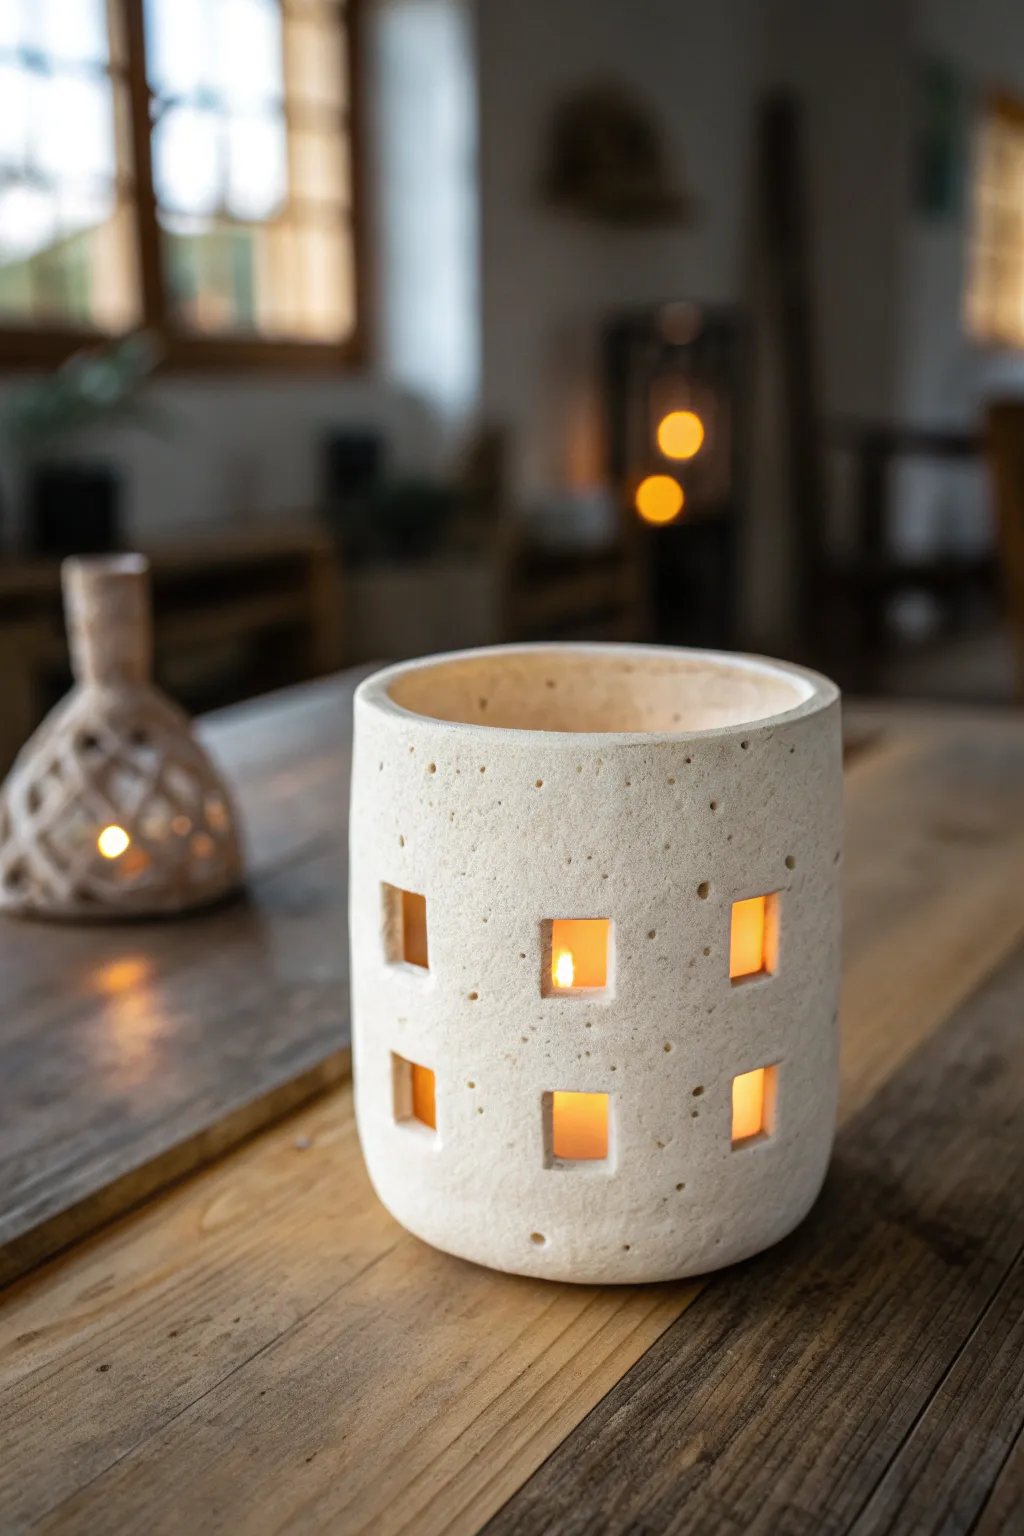
This rustic, hand-built cylinder mimics the look of ancient stone architecture with its textured surface and precisely cut rectangular windows. It casts a warm, inviting glow that transforms any table setting into a cozy retreat.
Step-by-Step Guide
Materials
- Speckled or groggy stoneware clay
- Rolling pin
- Canvas work surface
- Sharp fettling knife or X-Acto blade
- Metal ruler
- Cylindrical form (like a PVC pipe or mailing tube) to use as a mold
- Newspaper or paper towel
- Square cookie cutter (small) or square template
- Serrated rib or scoring tool
- Slip (clay and water mixture)
- Sponge
- Matte white or transparent glaze
Step 1: Preparing the Slab
-
Roll the clay:
Begin by wedging your clay to remove air bubbles, then roll it out into a long rectangular slab. Aim for a thickness of about 1/4 to 3/8 of an inch, ensuring it is uniform throughout. -
Texture the surface:
Before cutting, gently dab or roll a coarse sponge or a crumpled ball of aluminum foil over the surface. This creates that porous, stone-like texture seen in the photo. -
Measure and cut:
Determine the circumference of your cylindrical mold and add an inch for overlap. Use your metal ruler and knife to cut a clean, straight rectangle from your textured slab. -
Prepare the mold:
Wrap your cylindrical form (PVC pipe or tube) with a sheet of newspaper. This prevents the clay from sticking to the form and allows the clay to shrink slightly as it dries without cracking.
Clean Cuts Tip
Wait until the clay is truly leather-hard to cut the squares. If the clay drags or deforms, it’s too wet. Let it dry 30 more minutes.
Step 2: forming the Cylinder
-
Wrap the slab:
Carefully lift your clay slab and wrap it around the paper-covered mold. Bring the two short ends together to meet. -
Score and slip:
Where the ends overlap or meet, score both surfaces deeply with your serrated tool and apply a generous amount of slip. -
Join the seam:
Press the scored ends firmly together. I like to use a wooden moodeling tool to smooth the seam on both the inside and outside ensuring the join is invisible and strong. -
Create the base:
Roll out a small separate piece of clay for the base. Place your cylinder on top of it and trace around the bottom edge. -
Attach the base:
Score and slip the bottom edge of the cylinder and the edge of the base circle. Join them, pressing firmly and smoothing the clay upwards from the base to the wall to seal it.
Make it Shine
After the final firing, line the interior with gold leaf. This will reflect the candlelight and make the windows glow with a warmer, richer light.
Step 3: Cutting the Windows
-
Stiffen the form:
Leathe-hard clay cuts cleanest. Let your cylinder sit until it is firm to the touch but not dry. It should hold its shape perfectly without the mold inside. -
Mark the grid:
Use a ruler to lightly mark where your windows will go. The example uses two rows of offset squares, but you can align them in a grid if you prefer structured symmetry. -
Punch the holes:
Using a small square cutter or a sharp knife, carefully cut out the windows. If using a knife, cut the corners first to ensure they are crisp, then connect the lines. -
Clean the edges:
Once the windows are cut, wait a few minutes for the edges to firm up, then gently smooth the inside cuts with a slightly damp sponge or your finger to remove sharp burrs.
Step 4: Finishing Touches
-
Wait for bone dry:
Allow the piece to dry slowly under loose plastic for a day, then uncover it until it is completely bone dry. White clay turns chalky when ready. -
Bisque fire:
Fire the piece in a kiln to bisque temperature (usually cone 04) to prepare it for glazing. -
Glaze application:
For this specific look, dip the piece or brush on a matte white or clear matte glaze. Wipe the bottom clean with a sponge. -
Final firing:
Fire the luminary again to the glaze temperature appropriate for your clay body.
Now you have a timeless piece of decor ready to light up your evenings