When I’m craving that slow, cozy clay time, I always reach for handbuilding pottery—no wheel, just hands, simple tools, and a little patience. Here are my go-to hand building pottery ideas that feel super doable, whether you’re brand-new or ready to push into more creative shapes.
Pinch Pot Snack Bowls With Wavy Rims
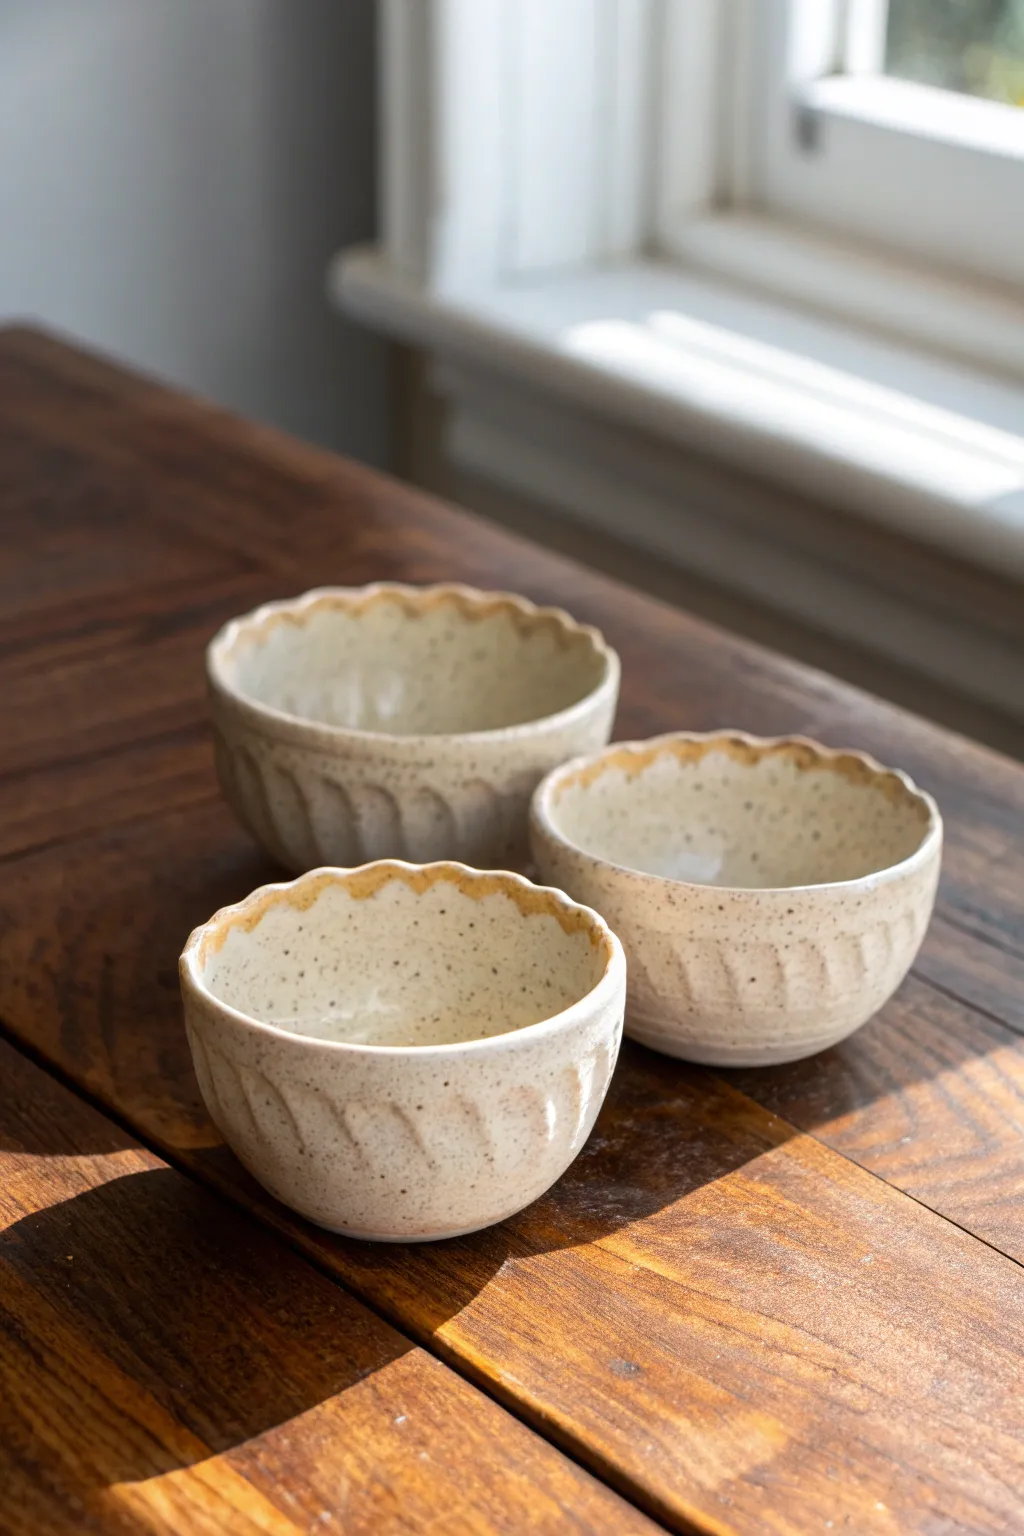
Create a set of charming, rustic snack bowls with wonderful tactile texture and organic movement. These pinch pots feature gentle fluting along the sides and a scalloped rim that catches the glaze beautifully, making them perfect for nuts, dips, or mis en place.
Detailed Instructions
Materials
- Speckled Stoneware Clay (e.g., Laguna B-Mix with Speckles or a groggy stoneware)
- Water in a small cup
- Sponge
- Modelling tool or wooden rib
- Loop tool (small, rounded profile)
- Smooth white or cream glaze
- Kiln for bisque and glaze firing
Step 1: Forming the Base
-
Prepare Clay Balls:
Start by wedging your clay to remove air bubbles. Divide the clay into three equal portions, rolling each into a smooth sphere roughly the size of a tangerine. -
Open the Pot:
Hold a clay ball in your non-dominant hand. Press your thumb into the center, stopping about a half-inch from the bottom to ensure a sturdy base. -
Pinch the Walls:
Using your thumb on the inside and fingers on the outside, gently pinch and rotate the clay. Work from the bottom upward in a spiral motion to thin the walls evenly. -
Refine the Shape:
Continue pinching until the walls are roughly 1/4 inch thick. Aim for a slightly open, U-shaped profile rather than a closed sphere. Tap the bottom gently on the table to flatten it slightly so the bowl sits stable. -
Smooth the Surface:
Use a slightly damp sponge or a flexible rib to smooth out deep fingerprints or cracks on both the interior and exterior, but don’t overwork it—some hand marks add character.
Step 2: Adding Texture & Detail
-
Dry to Leather Hard:
Let the bowls sit until they are leather hard. They should be firm enough to hold their shape without bending but still soft enough to carve into easily. -
Carve the Fluting:
Take your small loop tool. Starting about halfway down the exterior wall, drag the tool upward toward the rim to carve a shallow vertical channel. -
Repeat the Pattern:
Continue carving these vertical channels around the entire circumference of the bowl. Space them closely so the ridge between cuts is sharp and distinct. -
Create the Wavy Rim:
Using your thumb and forefinger, gently pinch the rim at the top of each uncarved ridge. Press down slightly in the carved valleys to exaggerate the scalloped, wavy look. -
Refine the Lip:
Run a damp sponge or a chamois cloth over the rim to soften any sharp edges created by the carving tool. The rim should feel comfortable to the touch. -
Clean Up:
Brush away any clay crumbs from the carving process. Check the foot of the bowl to ensure it is clean and sits flat.
Cracking Rims?
If the rim cracks while pinching the waves, the clay is too dry. Mist it lightly with water, cover with plastic for 30 minutes to rehydrate, then try shaping again.
Step 3: Glazing & Finishing
-
Bisque Fire:
Allow the bowls to dry completely (bone dry) before loading them into the kiln for a bisque fire (typically cone 04 or 06 depending on your clay body). -
Wipe Down:
Once bisqued, wipe the pots with a damp sponge to remove any kiln dust, which can prevent the glaze from adhering properly. -
Apply Glaze:
Dip or brush a smooth, creamy white glaze over the entire bowl. I find that dipping ensures an even coat that breaks nicely over the texture. -
Expose the Rim:
Immediately after glazing, effectively wipe the very top edge of the wavy rim with a damp sponge. This reveals the speckled clay body beneath for that contrasting brown edge shown in the photo. -
Clean the Foot:
Wipe the bottom of the bowl clean of any glaze so it doesn’t stick to the kiln shelf. -
Glaze Fire:
Fire the bowls again to the maturation temperature of your clay and glaze (likely cone 5 or 6 for stoneware).
Enhance the Texture
Use a glaze known as ‘breaking’ or semi-translucent. It will pool in the carved grooves and thin out on the ridges, highlighting your carving work perfectly.
Once cooled, these durable little bowls are ready to hold your favorite snacks or jewelry


Slab-Built Mugs With Textured Panels
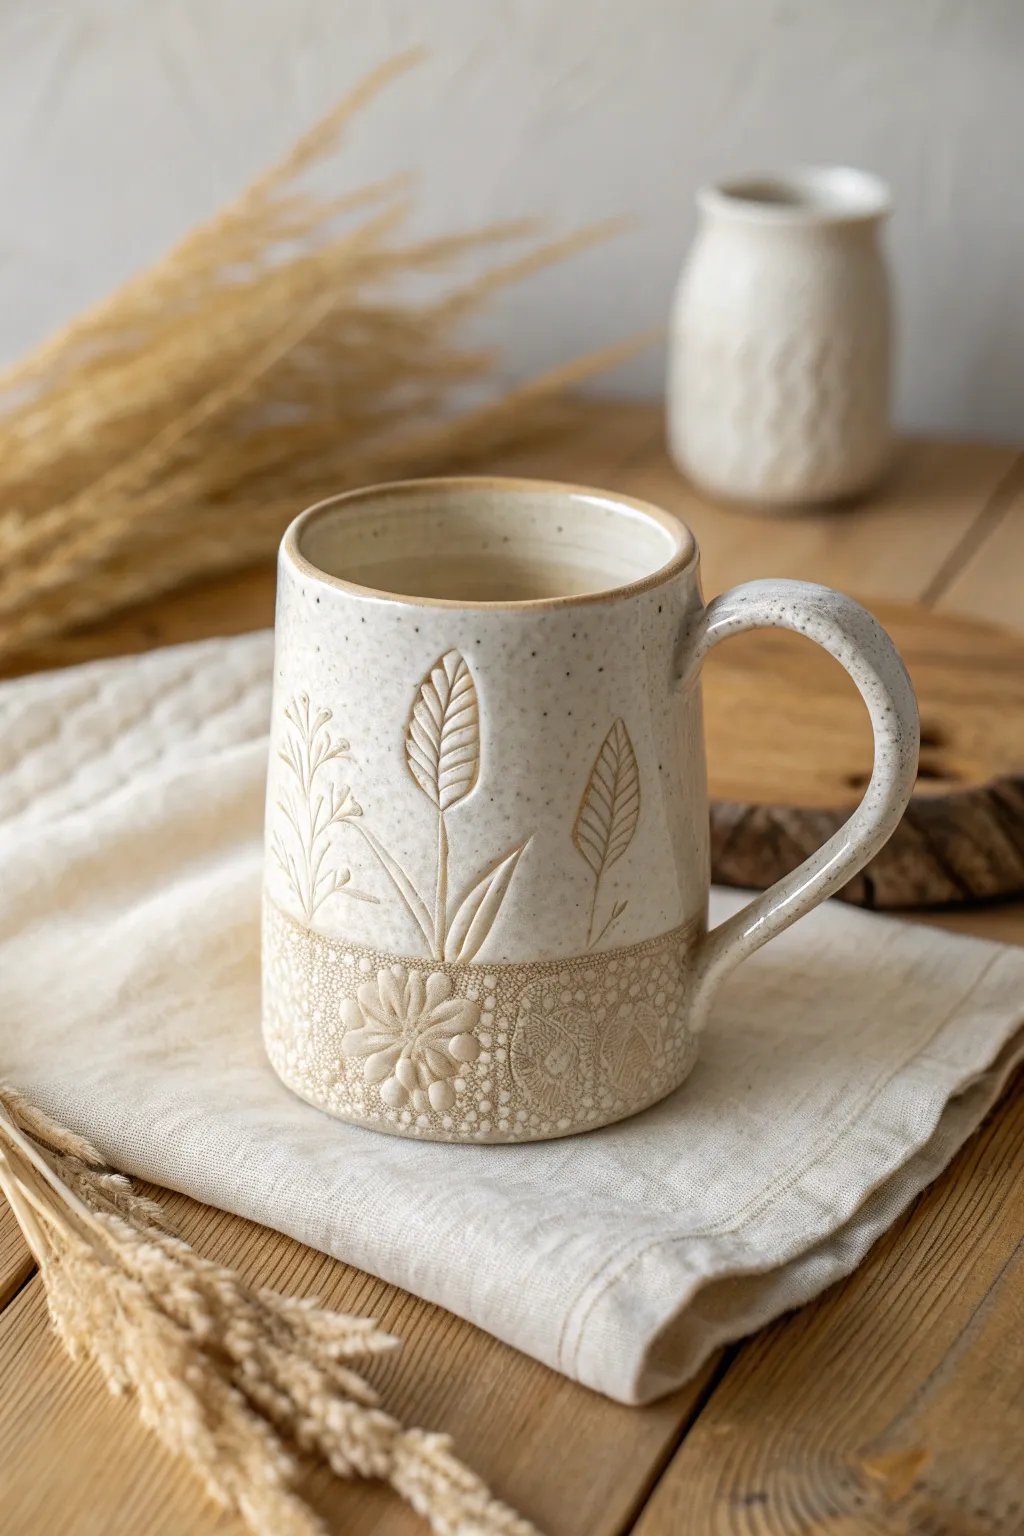
This charming, rustic mug features a dual-texture design, combining delicate carved botanical motifs with an intricate stamped floral border. The creamy speckled glaze highlights the subtle relief of the wheat stalks and lace patterns for a timeless, earthy feel.
Step-by-Step
Materials
- Speckled stoneware clay (mid-fire)
- Rolling pin
- Canvas work surface or slab mat
- Needle tool
- Fettling knife
- Textured floral stamp, lace doily, or embossed roller
- Carving tools (loop tool or stylus)
- Serrated rib or scoring tool
- Slip (clay mixed with water)
- Smooth wooden rib
- Cylindrical form (like a PVC pipe or rolling pin) for shaping
- Matte cream or white glaze
Step 1: Preparing the Slab
-
Roll out the clay:
Begin by wedging your speckled stoneware clay to remove air bubbles. Roll it out into a consistent slab about 1/4 inch thick. I suggest rolling in multiple directions to ensure the clay particles are compressed. -
Create the base texture:
Decide on the height of your mug. For the bottom third (the border), press your floral stamp, lace, or textured roller firmly into the slab along the bottom edge. Ensure the impression is deep enough to catch the glaze later. -
Cut the rectangle:
Measure a rectangle that will form the body of your mug. A standard size is roughly 10-11 inches long by 4-5 inches high. Use a ruler to ensure your top and bottom cuts are perfectly straight. -
bevel the edges:
On the short sides of your rectangle (the ends that will join), cut 45-degree angles in opposite directions. This allows for a stronger, seamless overlap connection.
Step 2: Forming the Cylinder
-
Score and slip:
Score the beveled edges thoroughly with a serrated rib and apply a generous amount of slip. This ‘glue’ is crucial for a mug that won’t crack during firing. -
Shape the body:
Carefully lift the slab and wrap it around your cylindrical form or simply curl it by hand. overlaps the beveled edges and press them firmly together. -
Reinforce the seam:
Use a wooden tool or your thumb to smooth the seam on the inside and outside. If the texture gets smudged on the outside seam, you can carefully re-stamp that small area. -
Create and attach the base:
Roll a small piece of clay for the base. Place your cylinder on top, trace around it, and cut out the circle. Score and slip both the bottom of the cylinder and the edge of the base, then join them, compressing the connection well.
Warped Cylinder?
If your cylinder goes oval whilst working, keep a rigid tube inside it while the clay is soft. Remove it only when the clay is firm enough to hold its shape.
Step 3: Carving and Handling
-
Sketch the design:
Once the cylinder is leather-hard (stiff but still cool to the touch), use a needle tool to faintly sketch the wheat stalks and leaf outlines on the smooth upper section. -
Carve the relief:
Using a small loop tool or carving stylus, gently carve out the negative space inside your leaves and wheat grains. The goal is to create a slightly recessed area that looks embossed. -
Pull the handle:
Pull a strap of clay or roll a coil for the handle. Shape it into a classic ear curve that complements the vertical lines of the wheat design. -
Attach the handle:
Score and slip the attachment points on both the mug and the handle. Press firm to attach, smoothing the clay where the handle meets the body for a seamless transition. -
Refine the rim:
Use a damp sponge or chamois to smooth the drinking rim. It should be rounded and comfortable for the lips.
Make It a Set
Vary the botanical carvings for a cohesive set. Try ferns, lavender, or wildflowers on different mugs while keeping the bottom texture consistent.
Step 4: Finishing
-
Drying:
Cover the mug loosely with plastic to let it dry slowly. This prevents the handle from pulling away from the body as the clay shrinks. -
Bisque fire:
Once bone dry, fire the mug to bisque temperature (usually cone 04) to prepare it for glazing. -
Glazing:
Dip or brush your matte cream glaze over the entire piece. The speckled clay body will naturally show through the lighter glaze, adding that lovely rustic spotting. -
Wiping back (optional):
If your glaze is thick, gently wipe a damp sponge over the textured areas (the carved wheat and the stamped bottom) to highlight the relief. -
Final Fire:
Fire the mug to maturity (likely cone 5 or 6, depending on your clay). Once cooled, sand the bottom if necessary to protect your table.
Enjoy your morning coffee in this beautifully tactile, handcrafted vessel


Ruffled-Edge Salad Plates Made From Slabs
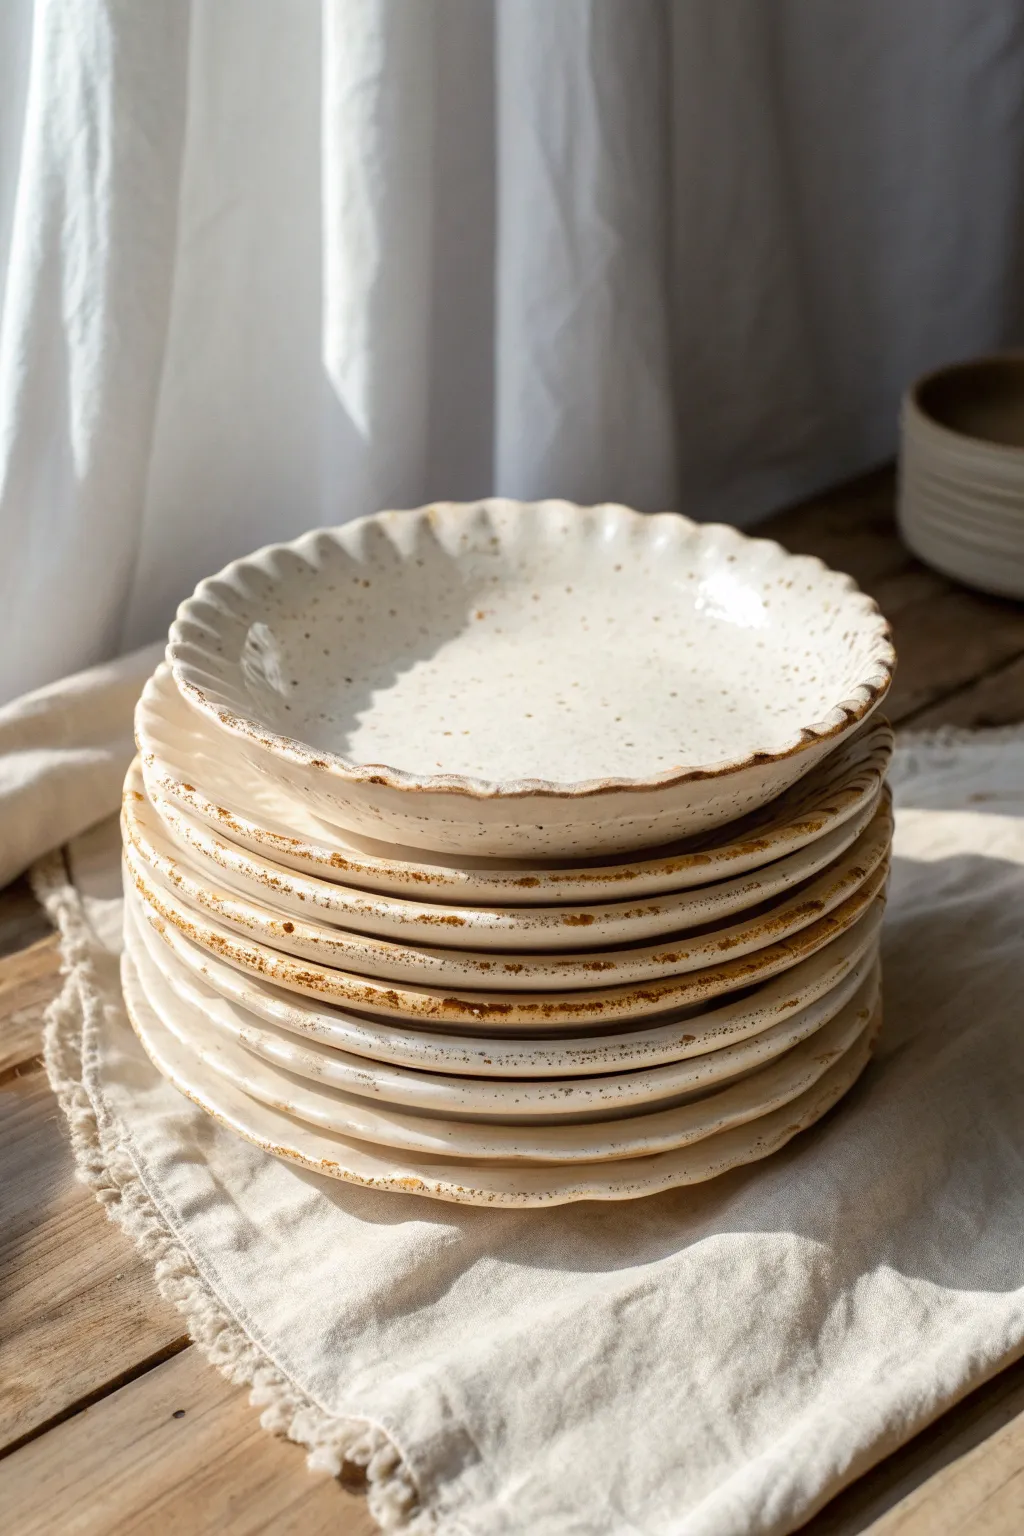
These charming salad plates feature a soft, scalloped rim that mimics the crimped edge of a pie crust, adding a touch of rustic elegance to your table setting. The key to their handmade appeal is the organic, fluted texture combined with a speckled creamy glaze that highlights the warm brown clay beneath.
Step-by-Step Guide
Materials
- Stoneware clay (speckled or warm buff body recommended)
- Rolling pin
- Canvas work surface or slab mat
- Guide sticks (1/4 inch thickness)
- Round template (paper or cardboard, approx. 8-9 inches)
- Needle tool or fettling knife
- GR Pottery Form (or a simple bisque slump mold/inverted bowl)
- Smoother rib (red rubber or soft silicone)
- Sponge
- Pottery wheel (optional, for banding) or banding wheel
- Speckled cream or matte white glaze
- Iron oxide wash (optional)
Step 1: Creating the Slab
-
Wedge the clay:
Start by thoroughly wedging your clay to remove any air bubbles and ensure an even consistency. For a set of 4 plates, you’ll need roughly 3-4 pounds of clay. -
Shape the block:
Pat the wedged clay into a roughly circular or square block on your canvas. This pre-shaping helps the slab stay rounder as you roll. -
Roll the slab:
Place your 1/4-inch guide sticks on either side of the clay. Roll the clay out firmly, flipping the slab and rotating it often to ensure even compression and thickness.
Rim Support
If the ruffles are drooping while wet, place small chunks of foam or rolled-up paper towels under the rim for support while the clay dries to leather hard.
Step 2: Forming the Plate
-
Compress the surface:
Using a soft rubber rib, compress the surface of the slab on both sides. This aligns the clay particles which helps prevent warping later and creates a silky smooth canvas for your glaze. -
Cut the circles:
Lay your 8 or 9-inch circular template onto the slab. Using a needle tool, cut straight down around the template to create your plate disc. -
Smooth the edges:
Take a damp sponge or your finger and run it along the cut edge of the clay circle to round it off. A sharp, square edge can feel harsh on a finished plate. -
Place on the mold:
Gently lift the clay circle and center it over your slump mold or GR Pottery Form. Press the center down lightly to establish the base of the plate. -
Shape the curve:
Starting from the center and working spirally outward, use a soft rib or damp sponge to smooth the clay down the sides of the mold, eliminating any air pockets between the clay and the form.
Texture Play
Before cutting your circle, roll a piece of lace or a textured fabric into the slab. The glaze will break beautifully over the pattern, adding depth to the surface.
Step 3: Adding the Ruffle
-
Mark the intervals:
Visually divide the rim of the plate into even sections. You don’t need to measure perfectly; an organic look is part of the charm. -
Create the flutes:
Support the underside of the rim with two fingers of your left hand. With your right index finger, gently press down between your supporting fingers to create a dip. -
Repeat the pattern:
Move your hands along the rim, repeating this ‘support and press’ motion to create a continuous wave or pie-crust pattern all the way around the edge. -
Refine the shape:
Go back around the rim and gently soften the peaks and valleys of your ruffles with a slightly damp sponge so they aren’t too sharp. -
Dry slowly:
Let the plates stiffen on the molds until they are leather hard. Don’t rush this; removing them too early can cause the ruffles to flop.
Step 4: Glazing and Finishing
-
Bisque fire:
Once bone dry, fire the plates to cone 04 (or your clay’s specific bisque temperature). -
Highlight the rim (optional):
To get that dark, defined edge seen in the photo, brush a thin layer of iron oxide wash just along the very edge of the ruffled rim and wipe back any excess with a sponge. -
Apply the glaze:
Dip or brush your speckled cream glaze over the entire plate. I find that pouring the glaze over the center and swirling it to the edges gives a nice even coat. -
Clean the foot:
Wipe the bottom foot of the plate completely clean of glaze using a wax resist or a wet sponge to prevent it from fusing to the kiln shelf. -
Final firing:
Glaze fire to cone 5/6 (or your clay body’s maturity temperature) to finish the piece.
Once fired, stack your new set of plates and enjoy the beautiful rhythm of those handmade edges at your next meal


Organic Trinket Dishes With Thumb-Pressed Corners
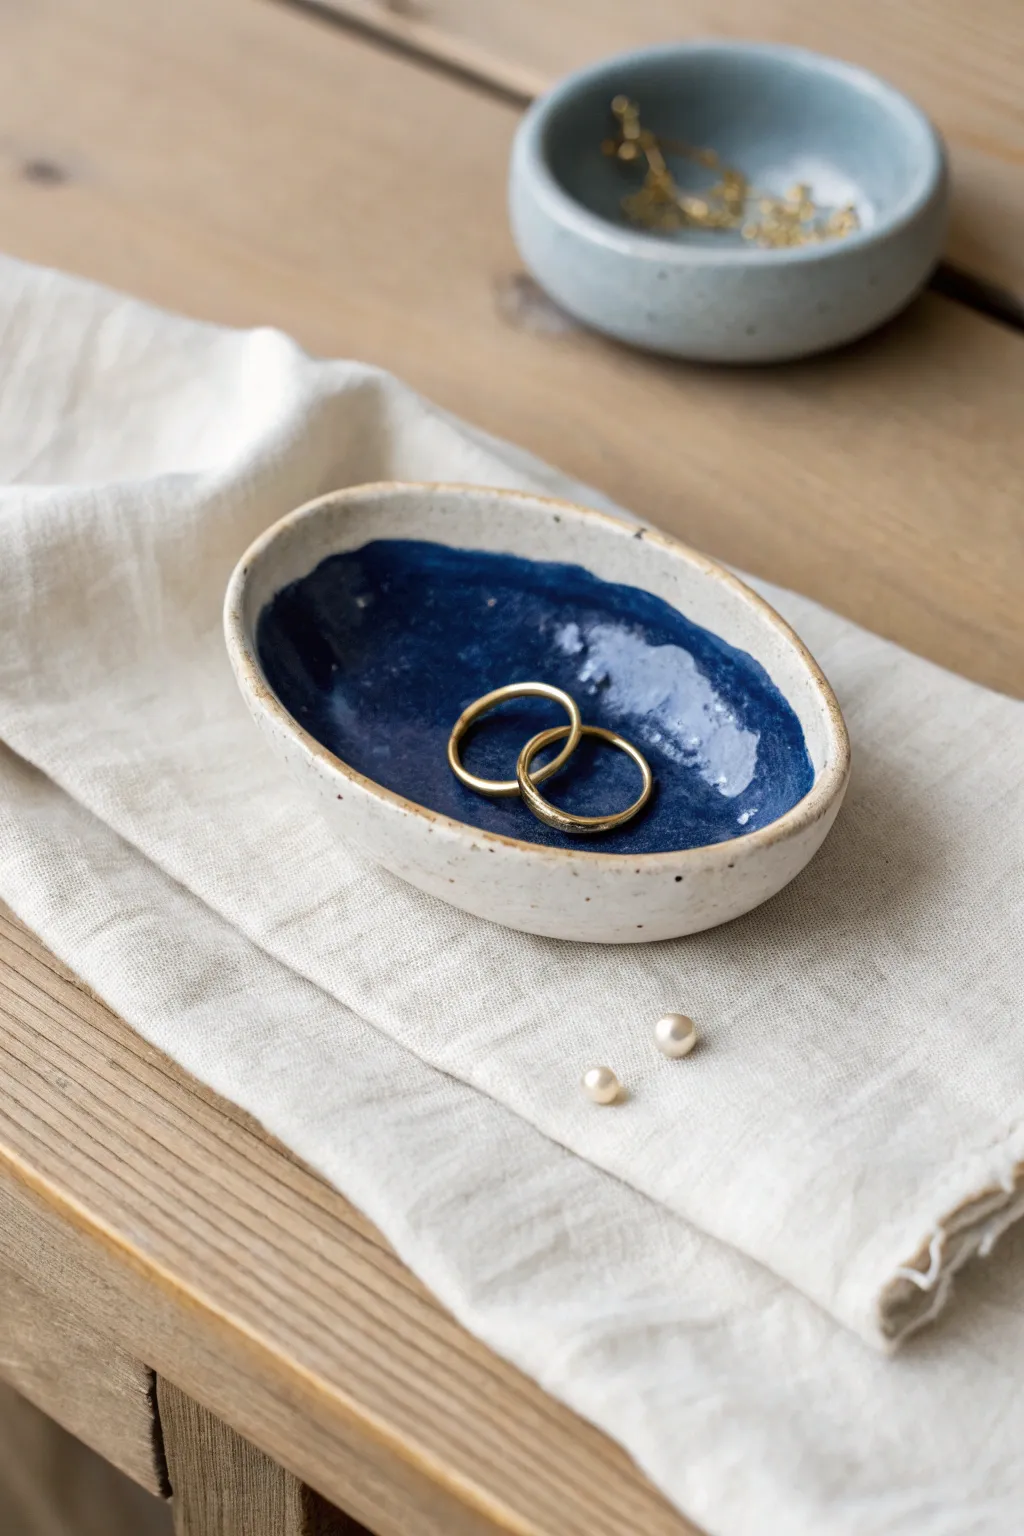
This charming, organically shaped dish contrasts the raw, speckled beauty of stoneware clay with a deep, glossy indigo pool. It creates a perfect resting spot for your everyday gold rings or delicate pearls.
Step-by-Step
Materials
- Speckled stoneware clay (mid-fire recommended)
- Rolling pin
- Canvas working mat
- Fettling knife or needle tool
- Kidney scraper (smooth, soft rubber)
- Sponge
- Bowl of water
- Deep blue/indigo gloss glaze
- Soft fan brush
- Wax resist (optional)
Step 1: Forming the Base
-
Prepare the Clay:
Start with a ball of speckled stoneware clay roughly the size of a tangerine. Wedging it well is crucial to remove any air bubbles. -
Initial Flattening:
Place the clay on your canvas mat and pat it down slightly with your palm to create a thick puck shape. -
Roll a Slab:
Use your rolling pin to roll the clay out evenly. You want a slab that is about 1/4 to 1/3 inch thick. Don’t go too thin, or the rim might warp during firing. -
Smooth the Canvas Marks:
Take your rubber kidney scraper and gently compress the surface of the clay slab. This removes the canvas texture and aligns the clay particles. -
Cut the Oval:
Freehand cut an oval shape using your needle tool or fettling knife. Aim for a shape about 4-5 inches long. It doesn’t need to be mathematically perfect; organic is better.
Fixing a Wobbly Dish
If the dish rocks after drying, rub the bottom gently on a flat sheet of sandpaper or drywall screen before firing to create a stable, flat foot.
Step 2: Shaping the Dish
-
Soften the Edges:
Use a damp sponge or your finger to smooth the sharp cut edge of your oval. This prevents chipping later on. -
Start Pinching:
Hold the oval in your palm. Gently start pinching the edges upward to create a rim. I prefer to work in a spiral, pinching lightly all the way around before going deeper. -
Refine the Curve:
Continue pinching and pressing lightly with your thumbs to create a gentle interior curve. The walls should rise about half an inch high. -
Smooth the Interior:
Use your slightly damp sponge to wipe the interior smooth, erasing any deep fingerprints while leaving some subtle undulations for character. -
Re-compress the Rim:
Look at the rim from the side. If it’s uneven, tap it gently upside down on the table to level it, then smooth the lip again with a damp finger/chamois. -
Slow Drying:
Cover the piece loosely with plastic for a day to let it dry slowly to the leather-hard stage, then uncover to dry completely to bone dry. -
Bisque Fire:
Fire the piece in a kiln to cone 04 (or your clay’s specific bisque temperature).
Step 3: Glazing
-
Clean the Bisqueware:
Wipe the fired piece with a damp sponge to remove any kiln dust. This ensures the glaze adheres properly. -
Apply Wax Resist (Optional):
Carefully paint wax resist along the top rim and the exterior of the dish to keep your lines crisp. Let it dry for 15 minutes. -
First Coat:
Stir your deep blue gloss glaze thoroughly. Using a soft fan brush, apply a generous layer to the *interior only*, stopping carefully at the inner rim. -
Dry and Repeat:
Wait until the first coat loses its sheen and is dry to the touch. Apply a second coat, and potentially a third if the glaze manufacturer recommends it for full opacity. -
Check the Rim:
Use a damp sponge to meticulously wipe away any glaze that strayed onto the rim or exterior. The contrast relies on that clean line. -
Glaze Fire:
Fire the piece to the maturation temperature of your clay and glaze (likely Cone 5 or 6 for mid-fire stoneware).
Make it a Set
Create a nesting effect by making three dishes in graduating sizes. Use different shades of blue glaze for an ombre waterfall effect.
Enjoy styling your new handmade dish on a bedside table or vanity

The Complete Guide to Pottery Troubleshooting
Uncover the most common ceramic mistakes—from cracking clay to failed glazes—and learn how to fix them fast.
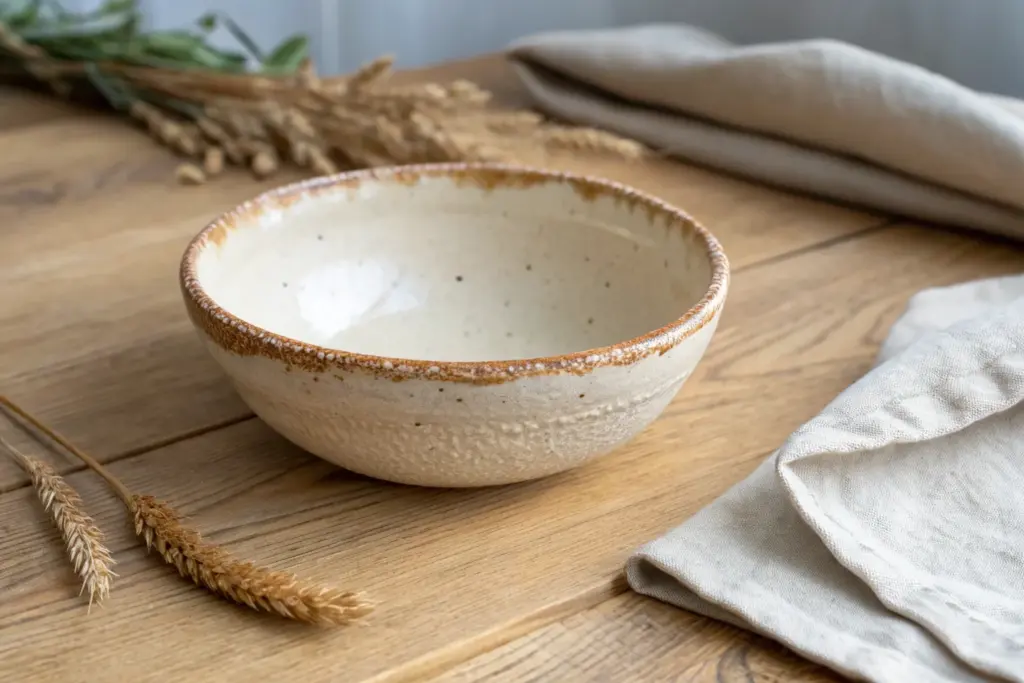
Nesting Handbuilt Bowls in a Matching Set
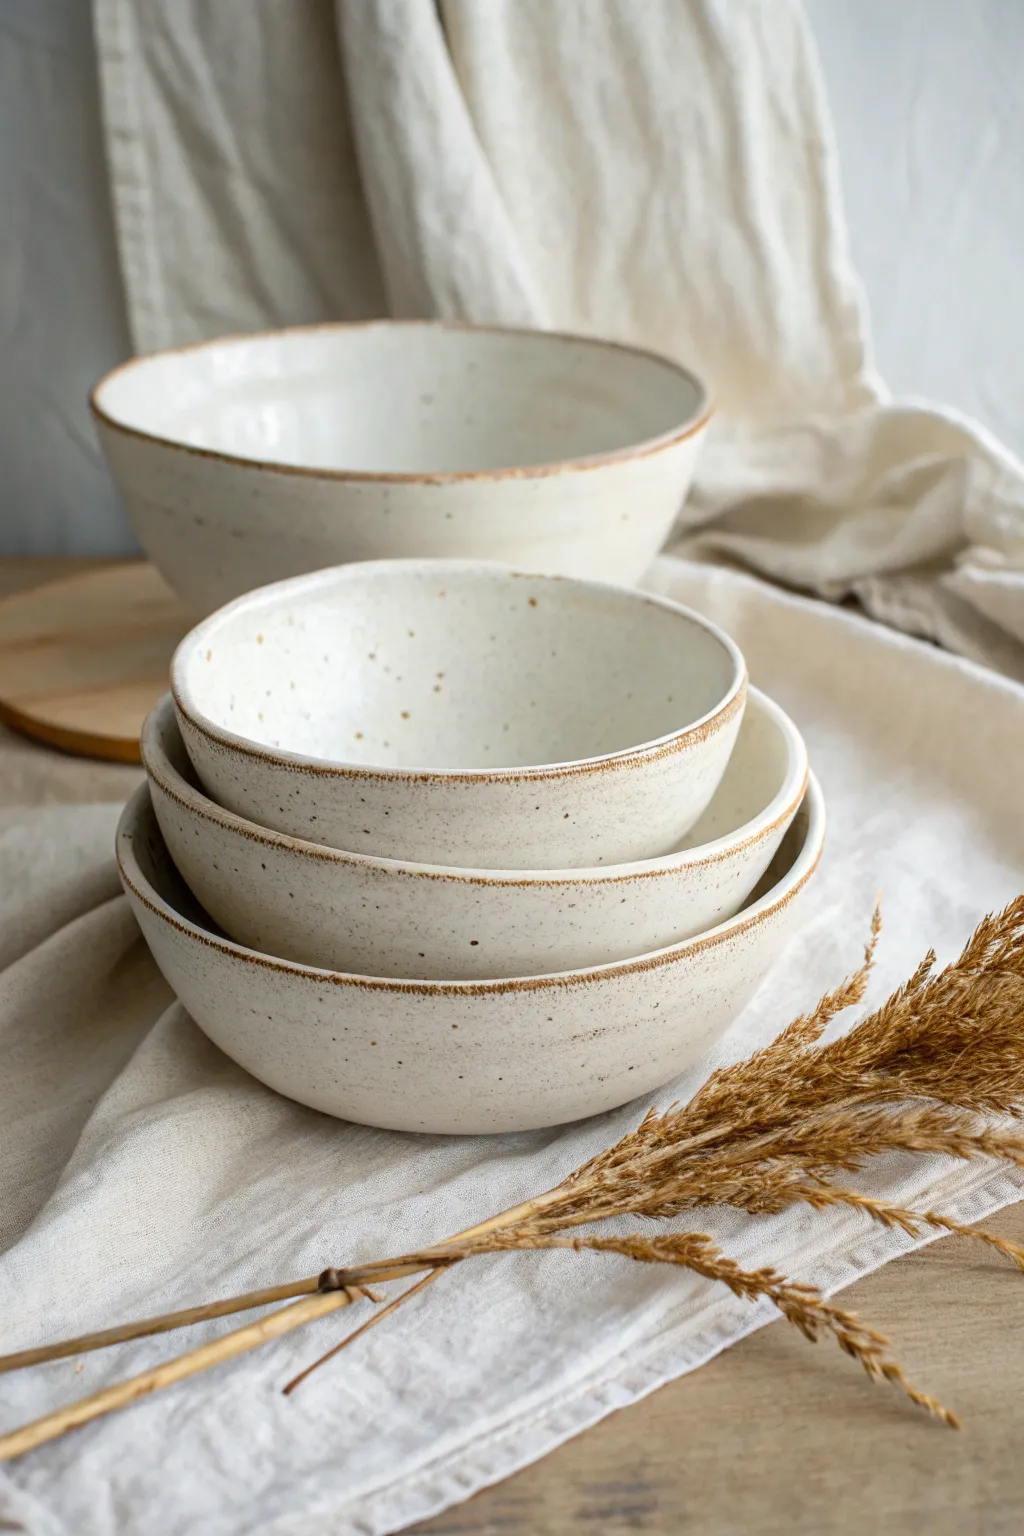
These charming nesting bowls feature a milky white glaze that allows the natural speckle of the clay to shine through, finished with a raw, toasted rim for earthy contrast. The organic, slightly imperfect shape highlights the hand-built process, making each bowl feel personal and grounded.
How-To Guide
Materials
- Speckled stoneware clay (mid-fire)
- Pottery work surface (canvas or ware board)
- Rolling pin and guide strips (approx. 1/4 inch)
- Toothed rib (serrated kidney)
- Smooth rubber rib (soft)
- Needle tool
- Slump molds or simple household bowls (small, medium, large)
- Sponge
- White or cream dipping glaze (semi-opaque)
- Wax resist (optional)
Step 1: Preparing the Slabs
-
Wedge the clay:
Begin by thoroughly wedging your speckled stoneware clay. Since we are making a nesting set, ensure you have a large enough ball of clay to accommodate at least three bowls of varying sizes—roughly 3-4 pounds total. -
Roll out the slab:
Flatten the clay slightly with your palms on a canvas surface. Use a rolling pin and guide strips to roll out a large, even slab. Aim for a thickness of about 1/4 inch for a durable but elegant weight. -
Compress the clay:
Take a smooth rubber rib and run it firmly over the surface of the slab in multiple directions. This compression is crucial to prevent warping during firing and creates a nice, smooth canvas for the glaze later.
Clean Rim Hack
For a perfect raw rim, dip the bowl’s rim into melted wax before glazing. This is faster than painting wax on and creates an even, consistent line.
Step 2: Forming the Bowls
-
Select your molds:
Choose three household bowls or plaster slump molds that nest inside each other well. Cover the inside of the bowls with a thin layer of plastic wrap or cheesecloth to prevent sticking if they are non-porous. -
Drape or slump the clay:
You can either drape the slab over the *outside* of an upside-down bowl (hump mold style) or slump it into the *inside* to encourage that deep, rounded shape. For this specific organic look, slumping into the inside of a bowl works beautifully to keep the curves gentle. -
Press and shape:
Gently press the clay into the bottom and up the sides of your first mold. Use a damp sponge to smooth the clay against the form, ensuring there are no air pockets trapped between the clay and the mold. -
Trim the excess:
Using a needle tool, trim the excess clay at the rim of the mold. Don’t worry about making it perfectly level; a slight undulation adds to the organic wabi-sabi aesthetic seen in the photo. -
Refine the rim:
While the clay is still in the mold but slightly firm, use a damp finish chamois or your finger to soften the sharp cut edge of the rim. This rounded edge is key for the final unglazed look. -
Repeat for all sizes:
Repeat the pressing and trimming process for the remaining two molds to complete your nesting trio. Set them aside to dry until they are leather hard.
Warped Rims?
If your bowls warp significantly during drying, dry them upside down (rim down) on a ware board. This uses gravity to keep the rim level as moisture leaves the clay.
Step 3: Finishing and Firing
-
Unmold the bowls:
Once the clay is leather hard and holds its shape without slumping, carefully remove each bowl from its mold. Smooth out any marks left by the plastic wrap or mold texture using a soft rubber rib. -
Bisque fire:
Let the bowls dry completely. This is the most critical drying phase; if they feel cool to the touch, they aren’t dry yet. Load them into the kiln for a bisque firing (typically Cone 04). -
Wax the rim (optional technique):
To achieve the raw rim shown in the image, apply a steady line of wax resist along the very top edge of the rim. Alternatively, you can simply wipe the glaze off later, but wax creates a crisp, clean break. -
Glaze application:
Stir your white or cream glaze thoroughly. Dip each bowl fully into the glaze using tongs, or pour the glaze inside, pour it out, and then dip the exterior. The goal is full coverage except for the foot and rim. -
Clean the rim:
If you used wax, simply wipe away any glaze beads that sat on top of the wax. If you didn’t use wax, take a damp sponge and carefully wipe the glaze off the rim to expose the raw clay body underneath. -
Glaze fire:
Load the glazed bowls into the kiln. Ensure they aren’t touching each other. Fire to the maturation temperature of your specific clay and glaze (likely Cone 5 or 6 for speckled stoneware). -
Sand the bottoms:
After the kiln has cooled and you’ve unloaded, check the bottoms. I prefer to lightly sand the unglazed foot ring with high-grit sandpaper to ensure it won’t scratch any table surfaces.
Now step back and admire how the simple glaze pairs with the raw edges to create a set that feels inviting and beautifully handmade
Coil-Built Planters With a Simple Saucer

This charming, earthy planter features a textured, speckled clay body enhanced by rhythmic horizontal grooves that catch the light. Sitting on a custom-fitted saucer, it creates a cohesive home for your favorite small houseplants.
Step-by-Step Tutorial
Materials
- Speckled stoneware clay (e.g., Lagunitas or speckled buff)
- Fettling knife
- Serrated rib tool
- Smooth rubber rib
- Needle tool
- Wooden modeling tool
- Loop tool or ribbons tool (flat head)
- Sponge
- Slip (clay and water mixture)
- Clear matte glaze
Step 1: Creating the Base and Coils
-
Roll the base slab:
Start by rolling out a slab of clay to about 1/4 inch thickness. Use a circular template or a jar lid to cut out a perfect circle, roughly 4-5 inches in diameter, to serve as the floor of your pot. -
Prepare the coils:
Roll out several long, even snakes of clay on your work surface. Aim for coils that are roughly the thickness of your pinky finger. Consistency is key here to ensure the walls rise evenly. -
Score and slip:
Take your serrated rib or needle tool and rough up the outer edge of your circular base. Apply a generous amount of slip to the scored area to act as your glue. -
Attach the first coil:
Lay your first coil directly on top of the scored edge. Gently press it down, cutting the ends at an angle where they meet to create a seamless join.
Pro Tip: Hidden Texture
Iron oxide wash applied before the clear glaze can settle into the grooves, making the carved lines pop with a darker, rusty contrast.
Step 2: Building the Walls
-
Blend the clay:
Using your thumb or a wooden tool, smudge the clay from the coil down onto the base on the inside of the pot. Then, support the inside with one hand and smooth the exterior contour upwards to bond the coil to the base. -
Stack and build:
Score the top of your attached coil and add slip. Place the next coil on top. Continue this process—score, slip, attach, and blend—until you reach your desired height, likely around 5-6 inches for this design. -
Smooth the exterior:
Once the basic cylinder form is built, use a serrated rib to scrape the exterior walls diagonally. This helps unify the coils and remove lumpy transitions. -
Refine the surface:
Follow up with a flexible metal or rubber rib. Hold it curved against the pot while supporting the inside wall, and compress the clay to create a clean, smooth canvas for your texture.
Level Up: Double Saucer
Make a second, larger slab without a lip to sit under the saucer (like the image). It acts as a trivet to protect wooden surfaces from condensation.
Step 3: Adding Texture and Details
-
Carve the grooves:
Wait until the clay is leather hard. Using a loop tool or the rounded end of a modeling tool, slowly carve horizontal lines around the circumference. Vary the pressure slightly to give them a hand-drawn, organic feel rather than perfect machine lines. -
Clean the rim:
Use a damp sponge or a strip of chamois leather to gently compress and round the top rim of the pot. A smooth rim prevents chipping later on. -
Make the saucer:
Roll another slab slightly larger than your pot’s base. Cut a circle and gently curve the edges upward to create a shallow lip that will catch water drainage. -
Add drainage holes:
Don’t forget to use a hole cutter or needle tool to poke a few drainage holes in the bottom of the main planter pot.
Step 4: Finishing and Glazing
-
Bisque fire:
Allow both the pot and saucer to dry completely. This takes patience, but I always ensure it’s bone dry before the first firing (bisque fire) to prevent cracks. -
Apply glaze:
Dip or brush a clear matte glaze over the entire piece. The clear glaze allows the natural speckles of the clay body to shine through, while a matte finish keeps the earthy aesthetic. -
Wipe the carved lines:
For a subtle two-tone effect, you can gently wipe the glaze off the high points of the grooves with a damp sponge, leaving more glaze in the recesses. -
Wipe the foot:
Clean off any glaze from the absolute bottom of both the pot and saucer so they don’t fuse to the kiln shelf. -
Final firing:
Fire the pieces again to the temperature required by your specific clay and glaze combination (usually Cone 5 or 6 for stoneware).
Once fired, pot your favorite greenery for a stunning display of handmade craftsmanship


What Really Happens Inside the Kiln
Learn how time and temperature work together inside the kiln to transform clay into durable ceramic.
Pinch-and-Slab Bud Vases for Single Stems
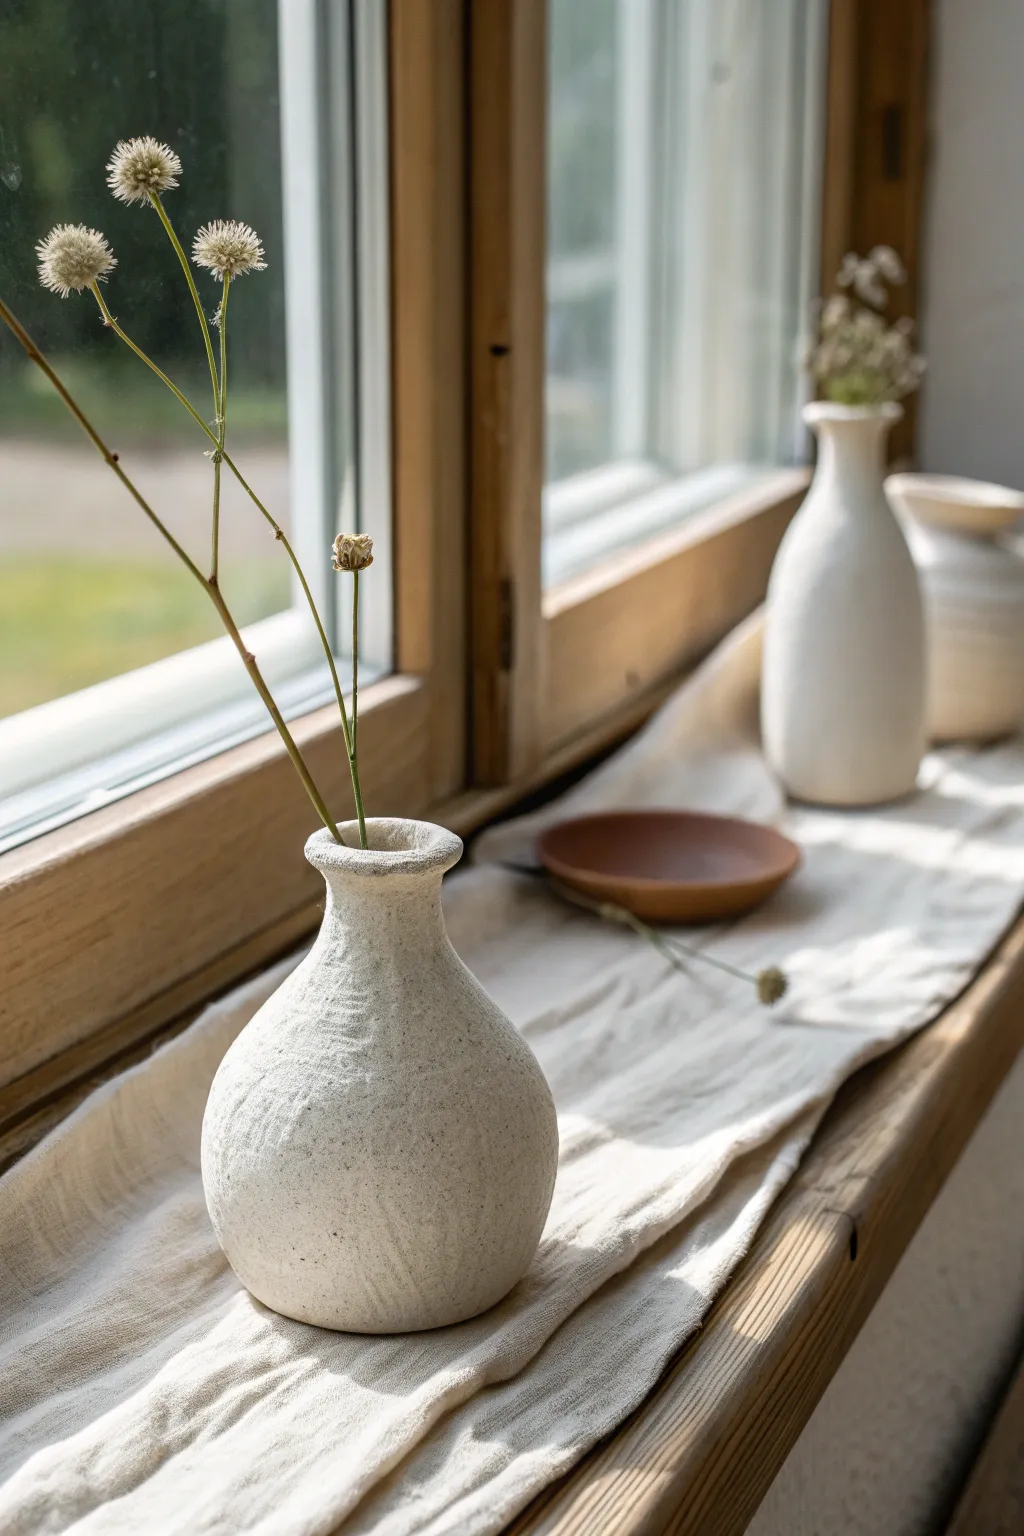
Capture the rustic charm of organic pottery with this narrow-necked bud vase, featuring a heavily textured surface that mimics weathered stone. Its bulbous base and delicate rim make it the perfect vessel for showcasing fragile dried stems.
How-To Guide
Materials
- White stoneware clay with grog (for texture)
- Potter’s needle tool
- Serrated rib tool or stiff brush
- Wooden modeling tool
- Sponge
- Canvas work surface
- Slip (clay mixed with water)
- Matte white glaze
- Kiln
Step 1: Forming the Base
-
Prepare the Clay:
Start with a ball of white stoneware clay roughly the size of a tennis ball. Wedge it thoroughly to remove air bubbles and ensure particle alignment. -
Open the Pinch Pot:
Hold the clay ball in one hand and profound your thumb into the center, leaving about half an inch of thickness at the bottom for stability. -
Pinch the Walls:
Gently pinch the clay between your thumb and fingers, rotating the ball as you go. Work from the bottom up to thin the walls evenly. -
Shape the Bulb:
Aim for a rounded, bulbous shape. Don’t worry about smoothing the outside perfectly; the unevenness adds to the organic look shown in the photo. -
Narrow the Opening:
As you reach the top third of the pot, angle your pinching inward to start collaring the clay, creating a smaller opening for the neck.
Uneven Drying?
If the neck dries much faster than the thick base, wrap just the neck in a damp paper towel and plastic while the base catches up to avoid cracks.
Step 2: Adding the Neck
-
Create a Coil:
Roll out a thick coil of clay, slightly thicker than a pencil. This will become the narrow neck of the vase. -
Score and Slip:
Score the top rim of your pinch pot base and the bottom of your coil using a needle tool. Apply a generous amount of slip to the scored areas. -
Attach the Coil:
Place the coil onto the rim of the base. Gently press it down to adhere it securely without squashing the form. -
Blend the Seams:
Using a wooden modeling tool or your thumb, drag the clay from the coil down onto the body on the outside, and pull the body clay up onto the coil on the inside to seal the join completely. -
Refine the Neck:
Pinch the added coil upwards to extend the neck height. Keep it slightly flared at the very top to create that delicate lip seen in the image.
Pro Tip: Weighted Bottom
Leave the bottom floor slightly thicker than the walls. This adds physical weight, preventing the vase from tipping over when holding tall stems.
Step 3: Surface Treatment & Finishing
-
Add Texture:
I find this step crucial for character: take a serrated rib or a stiff bristle brush and drag it vertically up the sides of the vase. This replicates the rough, scratched texture. -
Detail the Rim:
Lightly sponge the very top edge of the rim to soften it, ensuring it isn’t sharp, but leave the rest of the surface rough and tactile. -
Dry Slowly:
Cover the vase loosely with plastic to let it dry slowly over a few days. This prevents the neck from cracking away from the body. -
Bisque Fire:
Once bone dry, fire the piece to bisque temperature (usually Cone 04 or 06, depending on your clay body). -
Glaze Application:
Dip the vase into a matte white glaze. The glaze should break over the texture you created, highlighting the vertical scratches. -
Glaze Firing:
Fire the vase a final time to the maturity temperature of your clay and glaze (likely Cone 5 or 6 for stoneware).
Place your finished vase near a window where natural light can accentuate the beautiful surface texture you created
Spoon Rests With Cozy Fingerprint Texture

Embrace the beauty of imperfection with this elegantly curved spoon rest, featuring a natural, speckled stoneware body and a smooth matte glaze. Its elongated oval shape and gentle lip keep messy ladles secure while adding a touch of rustic modern charm to your countertop.
Detailed Instructions
Materials
- Speckled Stoneware Clay (e.g., Laguna Speckled Buff)
- Rolling pin
- Canvas mat or cloth
- Potter’s knife or needle tool
- Soft rib (rubber or silicone)
- Sponge
- Glaze (transparent or satin matte white)
- Paper template (oval shape)
- Ware board
Step 1: Forming the Base
-
Prepare the Clay:
Begin by wedging a small ball of speckled stoneware clay, about the size of a large orange, to remove air bubbles. -
Roll the Slab:
Place the clay on your canvas mat and use the rolling pin to flatten it into an even slab. -
Check Thickness:
Aim for a thickness of about 1/4 inch. It shouldn’t be too thin, or the rim might warp during drying. -
Cut the Shape:
Lay your paper oval template onto the clay or freehand an elongated teardrop shape with a needle tool. -
Smooth the Edges:
Run a damp sponge or your finger along the cut edge to soften the sharp angle created by the knife.
Step 2: Shaping and Refining
-
Lift the Rim:
Gently pinch the edges of the slab upwards with your thumb and forefinger to create a shallow wall. -
Pinch the Spout:
At the narrower end of the oval, pinch the clay slightly tighter and higher to create the distinct tapered point seen in the photo. -
Smooth the Interior:
Use a soft rubber rib to compress the inside floor of the spoon rest, ensuring a seamless transition from the floor to the walls. -
Refine the Lip:
Go around the rim one last time with a damp chamois or sponge to ensure it feels smooth to the touch. -
Dry Slowly:
Place the piece on a ware board and cover it loosely with plastic to let it dry to a leather-hard state.
Smooth Moves
Use a damp sponge to smooth the rim immediately after cutting the slab. This prevents sharp edges that become brittle and chip easily after firing.
Step 3: Finishing
-
Bisque Fire:
Once fully bone dry, fire the piece in a kiln to cone 04 (or your clay’s specific bisque temperature). -
Wipe Down:
After the kiln cools, wipe the bisque ware with a damp sponge to remove any dust that might resist the glaze. -
Glaze Application:
Dip the spoon rest into a satin matte white or clear glaze. The speckled clay body will show through best with translucent options. -
Clean the Foot:
Use a sponge to wipe the bottom of the spoon rest completely clean of glaze so it doesn’t stick to the kiln shelf. -
Glaze Fire:
Fire the piece a second time to the maturation temperature of your clay and glaze (typically cone 5 or 6 for stoneware).
Texture Twist
Before curving the edges up, press a piece of lace or linen into the wet slab to add a subtle tactile pattern to the interior surface.
Enjoy using your new handmade spoon rest to keep your kitchen surfaces clean and stylish

TRACK YOUR CERAMIC JOURNEY
Capture glaze tests, firing details, and creative progress—all in one simple printable. Make your projects easier to repeat and improve.
Leaf-Impressed Serving Platters With Organic Edges
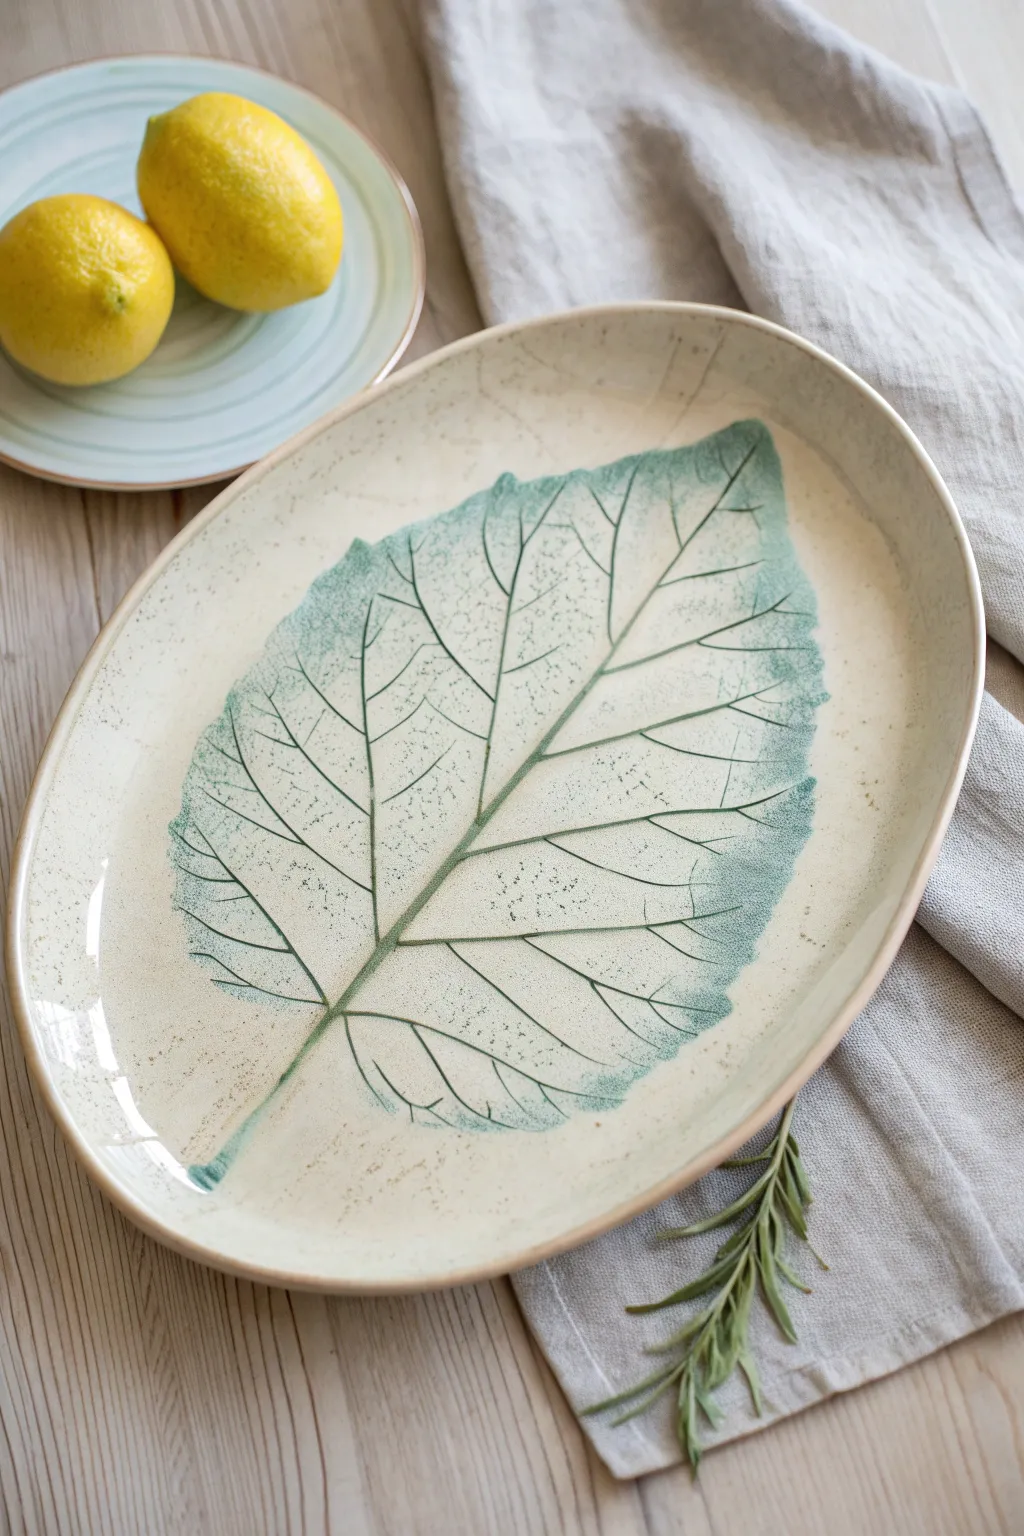
Capture the delicate veins and organic beauty of a real leaf in this stunning hand-built serving platter. Using a simple slab technique, you’ll create a functional piece of art with soft edges and a striking, washed-back underglaze finish that highlights every natural detail.
Step-by-Step
Materials
- White or speckled stoneware clay
- Large, fresh leaf with prominent veins (like burdock, hydrangea, or hosta)
- Rolling pin
- Canvas mat or slab roller
- Fettling knife or needle tool
- Rib tool (soft silicone or rubber)
- Sponge
- Green underglaze (forest or teal shade)
- Clear transparent glaze
- Large soft brush
- Clean bucket of water
- Large shallow slump mold or foam support
Step 1: Preparing the Slab
-
Roll the clay:
Begin by wedging your clay to remove air bubbles. Roll it out on your canvas mat into a large, even slab approximately 1/4 to 3/8 inch thick. Ensure the slab is large enough to accommodate your chosen leaf with at least an inch border around it. -
Smooth the surface:
Take your soft rib tool and gently compress the clay surface. Run the rib across the slab in multiple directions to align the clay particles, which helps prevent warping later and creates a pristine canvas for your impression. -
Position the leaf:
Place your fresh leaf vein-side down onto the clay slab. The vein side usually has the most texture, which ensures a crisp impression. Position it carefully, as you won’t be able to move it once you start rolling.
Step 2: Creating the Impression
-
Roll the leaf:
With the leaf in place, gently roll over it with your rolling pin. Apply firm, even pressure to press the veins deep into the clay, but be careful not to make the slab too thin. The leaf should become flush with the clay surface. -
Cut the shape:
Using a fettling knife or needle tool, cut an oval or organic shape around the leaf. Leave a generous margin of clay around the leaf’s edge to frame the impression nicely, just like the reference photo demonstrates. -
Refine the edges:
Remove the excess clay from around your shape. Dip your finger or a slightly damp sponge in water and run it along the cut edge to smooth any sharpness. I like to gently round the rim here to give it that finished, professional pottery feel. -
Remove the leaf:
Find the stem of the leaf and carefully use it to peel the leaf away from the clay. Do this slowly to avoid tearing the delicate impression. This creates that magical ‘reveal’ moment where the texture appears.
Sticky Leaf Solution
If your leaf keeps sticking to the rolling pin, place a piece of newsprint or paper towel over the leaf before rolling. This protects the leaf integrity while pressing.
Step 3: Forming and Bisque
-
Shape the platter:
Lift your clay slab and carefully place it into a shallow slump mold or over a foam support to give it a gentle curve. This transforms it from a flat tile into a functional serving vessel. -
Dry slowly:
Loosely cover the piece with plastic to ensure slow, even drying. This is crucial for flat pieces to prevent warping. Once bone dry, bisque fire the piece to cone 04 (or your clay’s specific bisque temperature). -
Clean the bisque:
Once fired, wipe the bisqueware down with a damp sponge to remove any kiln dust. This ensures the glaze will adhere properly.
Pro Tip: Vein Depth
For deeper, more dramatic veins, choose a leaf that is slightly wilted rather than freshly picked. The rigid structure of a slightly dried leaf presses deeper into the clay.
Step 4: Glazing Technique
-
Apply the underglaze:
Mix a forest green or teal underglaze to a creamy consistency. Using a large soft brush, paint a coat over the entire leaf impression area. Be sure to push the color into all the deep vein crevices. -
Wipe back:
Allow the underglaze to dry until it’s just matte. Take a clean, damp sponge and gently wipe across the surface of the leaf. The goal is to remove the color from the high points (the flat parts of the leaf) while leaving the pigment trapped in the depressed veins. -
Check the effect:
Rinse your sponge frequently and continue wiping until you have a soft, stained effect rather than a solid block of color. The veins should look dark and distinct against the lighter clay body. -
Apply clear glaze:
Once the underglaze is fully dry, dip the entire platter into a clear transparent glaze, or brush on three even coats. This will seal the clay and make the green color pop. -
Final wipe:
Wipe the foot (bottom) of the platter clean with a sponge to prevent it from sticking to the kiln shelf. -
Glaze fire:
Fire the piece again to your clay body’s maturity temperature (e.g., cone 5 or 6). Let the kiln cool completely before opening to reveal your finished serving platter.
This beautiful platter is now ready to bring a touch of the outdoors to your dining table
Wall Pocket Vases Built From Slabs
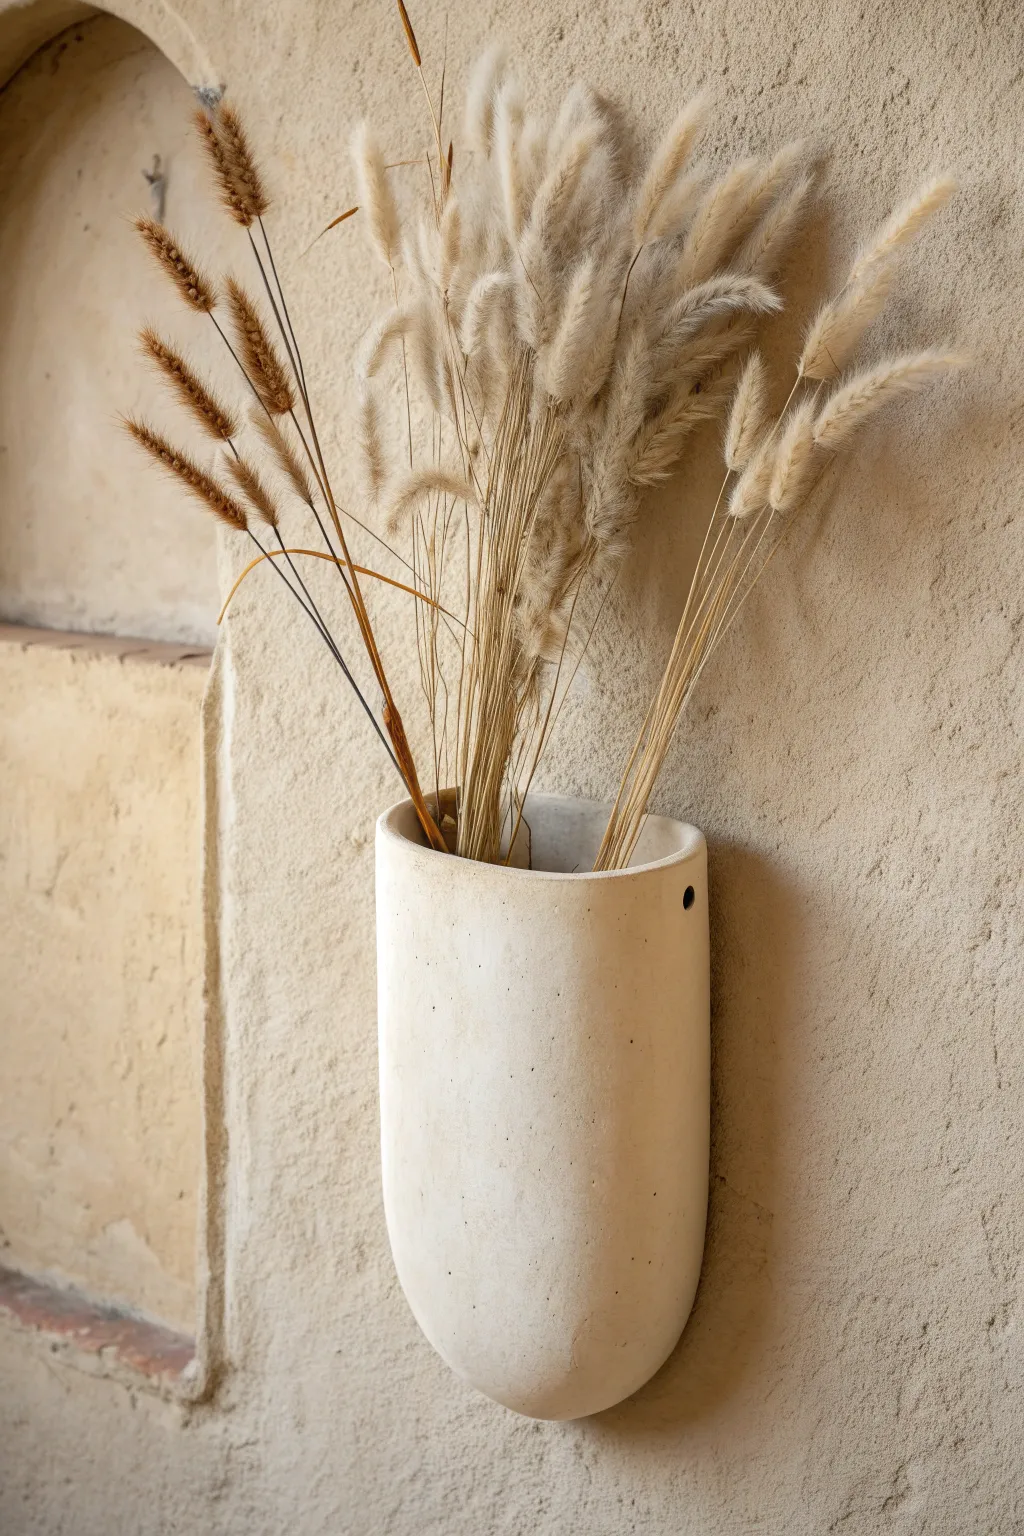
This elegant, capsule-shaped wall pocket brings a touch of modern simplicity to any space with its smooth curves and matte finish. Perfect for displaying dried pampas grass or wheat, its clean lines are achieved through precise slab building and careful smoothing.
Step-by-Step Tutorial
Materials
- White stoneware clay body (grog-free for smoother finish)
- Rolling pin
- Canvas or slab mat
- Fettling knife or needle tool
- Paper template (cardstock works best)
- Score and slip tool (serrated rib)
- Slip (clay slurry)
- Wooden spoon or paddle
- Smooth rib (rubber or metal)
- Sponge
- Drill bit or hole cutter tool (small diameter)
Step 1: Preparation and Cutting
-
Create templates:
Design your paper template first. You will need a tall U-shape for the front and a matching U-shape for the back. The back piece should be slightly taller if you want it flush against the wall, but for this rounded style, identical pieces often work best with a strong seam. -
Roll the slab:
Roll out a slab of clay to an even thickness, approximately 1/4 inch thick. Compress the slab on both sides with a rib to align the clay particles and prevent warping. -
Texture application (optional):
If you want the subtle, natural texture seen in the photo, lightly press a piece of canvas or linen into the surface before cutting. Otherwise, smooth it perfectly for a clean look. -
Cut the forms:
Place your template on the slab and cut out two identical U-shapes. Save the excess clay for reinforcing coils later. -
Firm up:
Allow the slabs to stiffen slightly to a soft leather-hard stage. This makes them easier to handle without flopping over while still being pliable enough to curve.
Step 2: Assembly
-
Score edges:
On both slab pieces, deeply score the outer edges where they will connect (the sides and rounded bottom), leaving the top edge smooth. -
Apply slip:
Apply a generous amount of slip to the scored areas. It should be creamy, not runny. -
Join the slabs:
Gently curve the front slab piece so it bows outward, creating volume. This is crucial—you don’t contest flat slabs; you need that convex curve. Press the edges against the flat back slab. -
Secure the seam:
Firmly press the seams together. I like to use a small wooden paddle to gently tap the edges to ensure a tight bond. -
Reinforce with coils:
Roll a very thin coil of clay. Place it along the interior seam (if your hand fits) or press it into the exterior seam to ensure it doesn’t split during drying.
Slumping Issues?
If the rounded front keeps collapsing, stuff the inside with crumpled newspaper or plastic bags to support the shape while it stiffens to leather hard.
Step 3: Refining and Finishing
-
Shape the volume:
Insert a soft sponge or a balloon into the pocket while the clay is still workable to gently push the front wall outward, establishing that nice, rounded belly. -
Smooth the seams:
Using a metal or soft rubber rib, smooth the exterior seams until the join line completely disappears. The transition from front to back should look seamless. -
Round the rim:
use a damp chamois strip or a wet sponge to compress and round off the top rim. It should look soft, not sharp. -
Create the hanging hole:
Using a hole cutter or drill bit, create a clean hole on the back or side panel near the top rim. Ensure it is centered and large enough to fit a nail head after shrinkage. -
Final smooth:
Once the piece is fully leather hard, do a final pass with a finishing sponge to remove any fingerprints or grog marks. -
Dry slowly:
Dry the piece slowly under loose plastic to prevent the seams from cracking due to uneven drying rates. -
Everything else:
Bisque fire the piece. For the look in the image, apply a matte white glaze or leave the exterior as raw high-fire clay, then complete the final firing.
Clean Edges
When drilling the hanging hole, support the clay wall from behind with a wooden block or your finger to prevent the clay from tearing or deforming.
Once fired and mounted, fill your new pocket with dried botanical stems for an effortless organic display
Lidded Pinch Jars for Salt or Jewelry
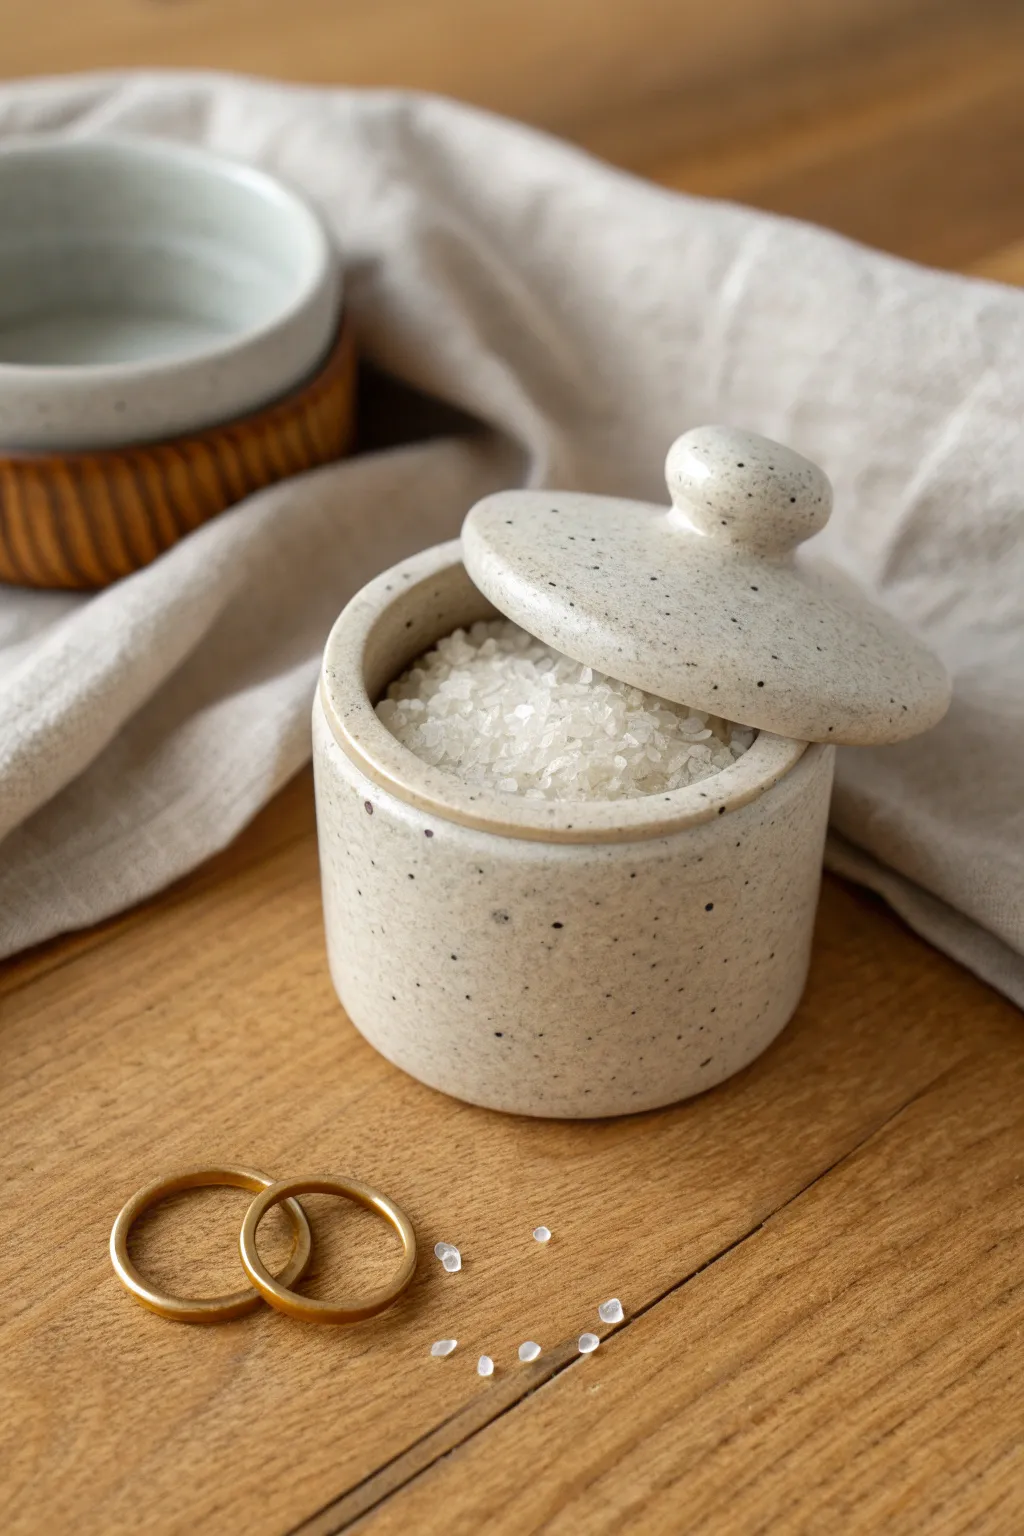
This charming, petite vessel features a naturally speckled clay body and a perfectly fitted lid, making it ideal for storing sea salt or precious rings. Its organic shape and glossy white interior glaze provide a beautiful contrast against the raw, earthy exterior.
Step-by-Step Guide
Materials
- Speckled Stoneware Clay (e.g., Laguna Speckled Buff)
- Pottery Wheel (optional) or Hand-building tools (for pinch method)
- Needle Tool
- Loop Tool for trimming
- Rib tool (metal or wood)
- Sponge
- Calipers (optional but helpful)
- Glossy White Glaze
- Clear Matte Glaze (optional for exterior)
- Kiln
Step 1: Forming the Jar Base
-
Prepare the clay:
Begin with a small ball of speckled clay, roughly the size of a tangerine. Ensure it is well-wedged to remove any air bubbles. -
Open the form:
Press your thumb into the center of the ball, leaving about a half-inch of thickness at the bottom for stability. -
Pinch the walls:
Gently pinch and rotate the clay to raise the walls. Keep your pressure even to maintain a consistent cylinder shape, aiming for walls about 1/4 inch thick. -
Define the gallery:
At the rim, slightly flare the clay and use your thumb or a modeling tool to create a small internal ledge (gallery). This is crucial; it’s where your lid will sit. -
Smooth and refine:
Use a damp sponge or a flexible rib to smooth the exterior and interior surfaces. I like to keep the rim slightly rounded for a softer look.
Wobbly Lid Fix
If the lid rocks after drying, place a piece of sandpaper on a flat surface and gently rub the rim of the jar (and lid bottom) in circles to level them.
Step 2: Creating the Lid
-
Measure the opening:
If you have calipers, measure the diameter of your jar’s gallery. If not, you can visually estimate, aiming slightly larger so you can trim it down later. -
Shape the lid slab:
Flatten a smaller piece of clay into a thick disk. It needs to be slightly wider than your jar’s opening. -
Add the flange:
On the underside of the lid, add a small coil or pinch the clay downwards to create a flange that will fit inside the jar’s gallery to keep the lid from sliding off. -
Test the fit:
Once the clay is leather hard, gently place the lid on the jar. It should sit flush. If it wobbles, you may need to trim the flange or the jar rim. -
Add the knob:
Roll a small sphere of clay for the handle. Score and slip the center of the lid, then attach the sphere firmly. Smooth the connection point so it looks seamless.
Step 3: Finishing and Glazing
-
Trim the foot:
Turn the jar over and use a loop tool to trim a clean foot ring. This adds elegance and visual lift to the piece. -
Bisque fire:
Allow the pieces to bone dry completely, then load them into the kiln for a bisque firing (usually Cone 04). -
Clean surface:
Wipe the bisque-fired pieces with a damp sponge to remove any dust that might resist the glaze. -
Glaze the interior to perfection:
Pour a glossy white glaze into the interior of the jar, swirl it around to coat evenly, and pour out the excess. Wipe the rim clean. -
Exterior glazing choice:
For the look in the photo, leave the exterior unglazed to show off the speckles, or apply a very thin coat of clear matte glaze to seal it without hiding the texture. -
Glaze the lid:
Glaze the underside of the lid (avoiding the flange/contact points) and the top if desired, or leave the top raw like the example image. -
Final Fire:
Fire the jar and lid in the kiln to the maturity temperature of your clay body (typically Cone 5 or 6 for stoneware).
Add a Spoon Notch
Before drying, cut a small U-shape out of the jar’s rim and the lid’s flange. This creates a perfect slot for a tiny salt spoon to rest permanently.
Once cooled, fill your new bespoke vessel with sea salt or jewelry and enjoy the tactile beauty of handmade ceramics
Mini Slab Tile Coasters With Stamped Patterns
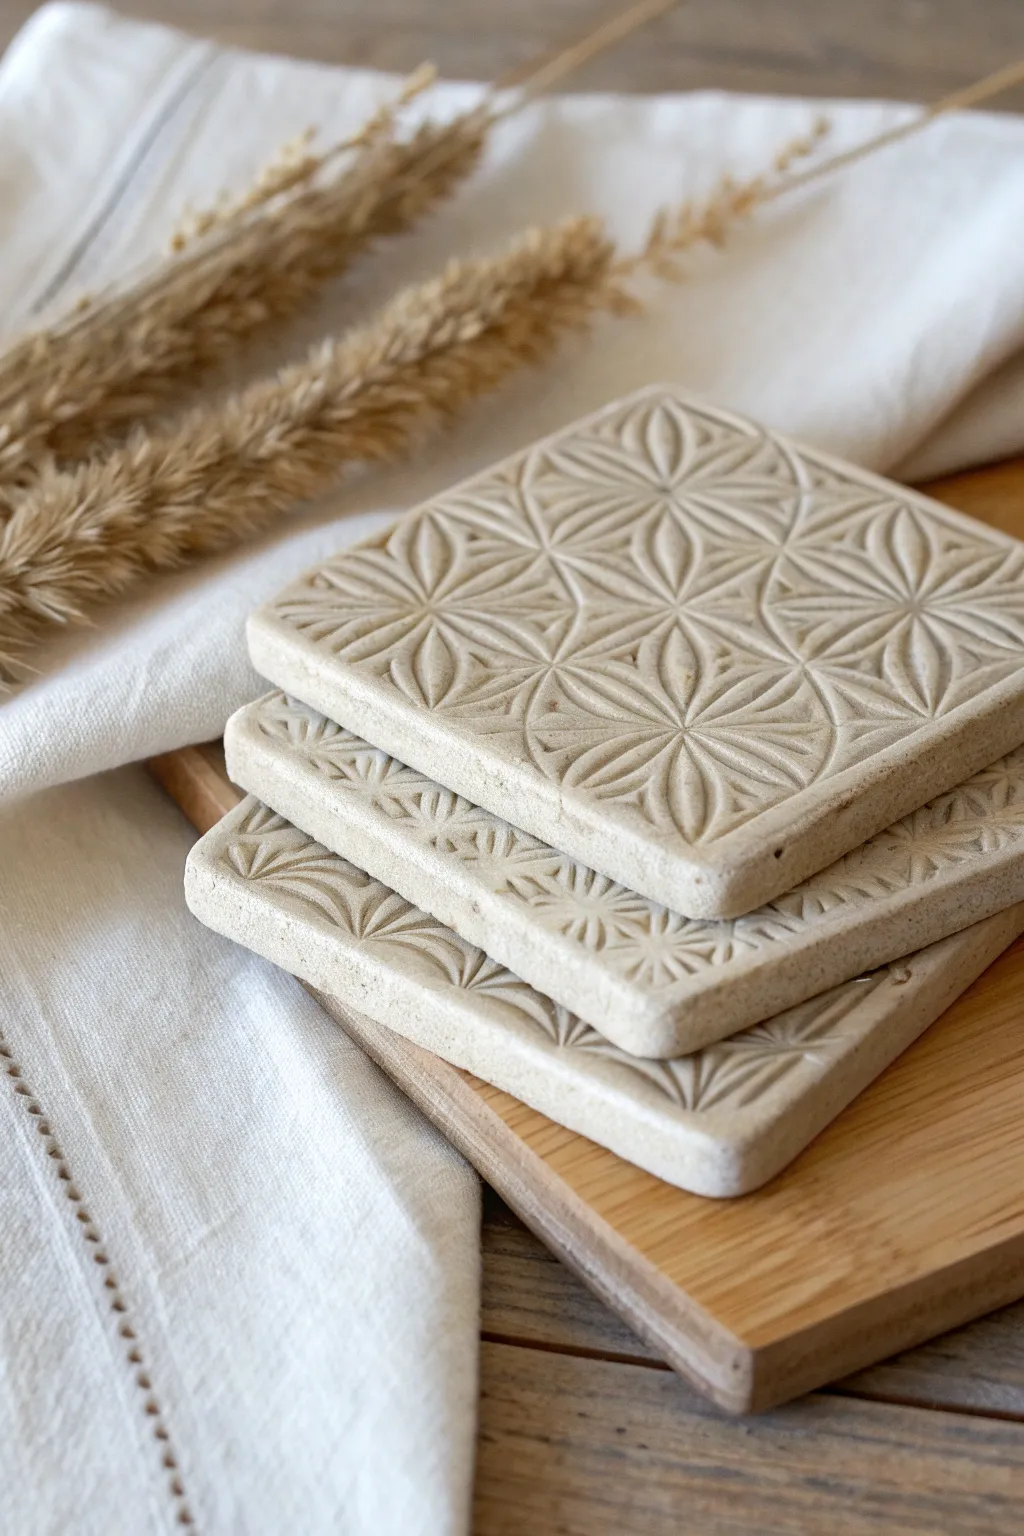
These elegant, earthy coasters are the perfect entry point into hand-building with clay slabs. Their repetitive geometric pattern creates a sophisticated texture that begs to be touched, highlighting the raw beauty of speckled stoneware.
How-To Guide
Materials
- Speckled stoneware clay (mid-fire)
- Wooden rolling pin
- Two wooden guide slats (approx. 1/4 inch thick)
- Canvas mat or slab mat
- Square cookie cutter (4-inch) or ruler and needle tool
- Geometric texture mat, rubber stamp, or carved rolling pin
- Cornstarch (for dust release)
- Clean sponge
- Small ware board
- Matte clear glaze (optional)
- Felt pads (for the bottom)
Step 1: Preparing the Slab
-
Wedge the clay:
Start with a ball of speckled stoneware clay about the size of a grapefruit. Wedge it thoroughly to remove air pockets and align the clay particles, ensuring a smooth, uniform consistency. -
Setup the workspace:
Place your canvas mat on a sturdy table to prevent sticking. Position your two wooden guide slats parallel to each other, slightly wider than the width of your desired slab. -
Roll out the slab:
Flatten the clay ball slightly with your palm between the slats. Using the rolling pin, roll the clay out until the pin rests on the wooden guides, ensuring a perfectly even thickness of 1/4 inch. -
Compress the slab:
Take a rib tool or a stiff spatula and firmly compress the surface of the slab on both sides. This strengthens the clay to prevent warping later and creates a smooth canvas for your texture.
Step 2: Adding Texture and Cutting
-
Prepare the stamp:
Lightly dust your geometric texture tool—whether it’s a large block stamp or a textural rolling pin—with a small amount of cornstarch. This acts as a release agent so the intricate pattern doesn’t get stuck in the clay. -
Apply the pattern:
Press the stamp firmly and evenly into the clay slab. If using a smaller stamp, align the edges carefully to create a seamless repeating pattern like the floral geometry shown in the photo. -
Check the depth:
Lift a corner of the stamp to peek. You want a deep, crisp impression that catches the light, but be careful not to press so hard that you thin the clay drastically. -
Cut the shapes:
Position your square cookie cutter over the most pleasing parts of the pattern. Press straight down, then lift off the excess clay around the outside before removing the coaster itself. -
Refine the edges:
Once the squares are cut, the edges might be slightly sharp. Run a damp finger or a slightly moist sponge along the rim to soften the corner without distorting your straight lines.
Warping Woes?
If coasters curl while drying, flip them over every few hours allowing both sides to dry evenly. Weighting them down with a board while leather-hard also ensures flatness.
Step 3: Drying and Finishing
-
Slow drying setup:
Transfer your wet coasters onto a ware board. I normally place a sheet of drywall or wood over the top to sandwich them lightly, which helps keep them perfectly flat as they dry. -
Bisque fire:
Once the coasters are bone dry (chalky and room temperature to the touch), load them into the kiln for a bisque firing to Cone 04 to harden the clay. -
Sanding (Optional):
After the bisque fire, check for any sharp burrs on the bottom. Lightly sand them away with 200-grit sandpaper in a well-ventilated area or using wet-sanding techniques. -
Glazing choice:
To mimic the natural look in the image, you can leave the clay unglazed if it is fully vitrified stoneware, or apply a very thin coat of matte transparent glaze just to seal the surface against coffee drips. -
Final wipe back:
If glazing, wipe the textured high points firmly with a damp sponge. This leaves glaze in the recesses to highlight the pattern while letting the raw speckled clay show on top. -
Glaze fire:
Fire the coasters again to the maturation temperature of your specific clay body (likely Cone 5 or 6 for stoneware). -
Add protection:
Once cool, adhere small felt or cork pads to the four bottom corners of each coaster to protect your wooden furniture from scratches.
Level Up: Color Inlay
Brush black or navy underglaze into the texture while wet, then sponge the surface clean. This ‘Mishima’ style technique makes the geometric lines pop dramatically.
Stack your finished set on the coffee table and enjoy the tactile satisfaction of handmade ceramics
Sculpted Candle Holders With Drippy, Carved Details
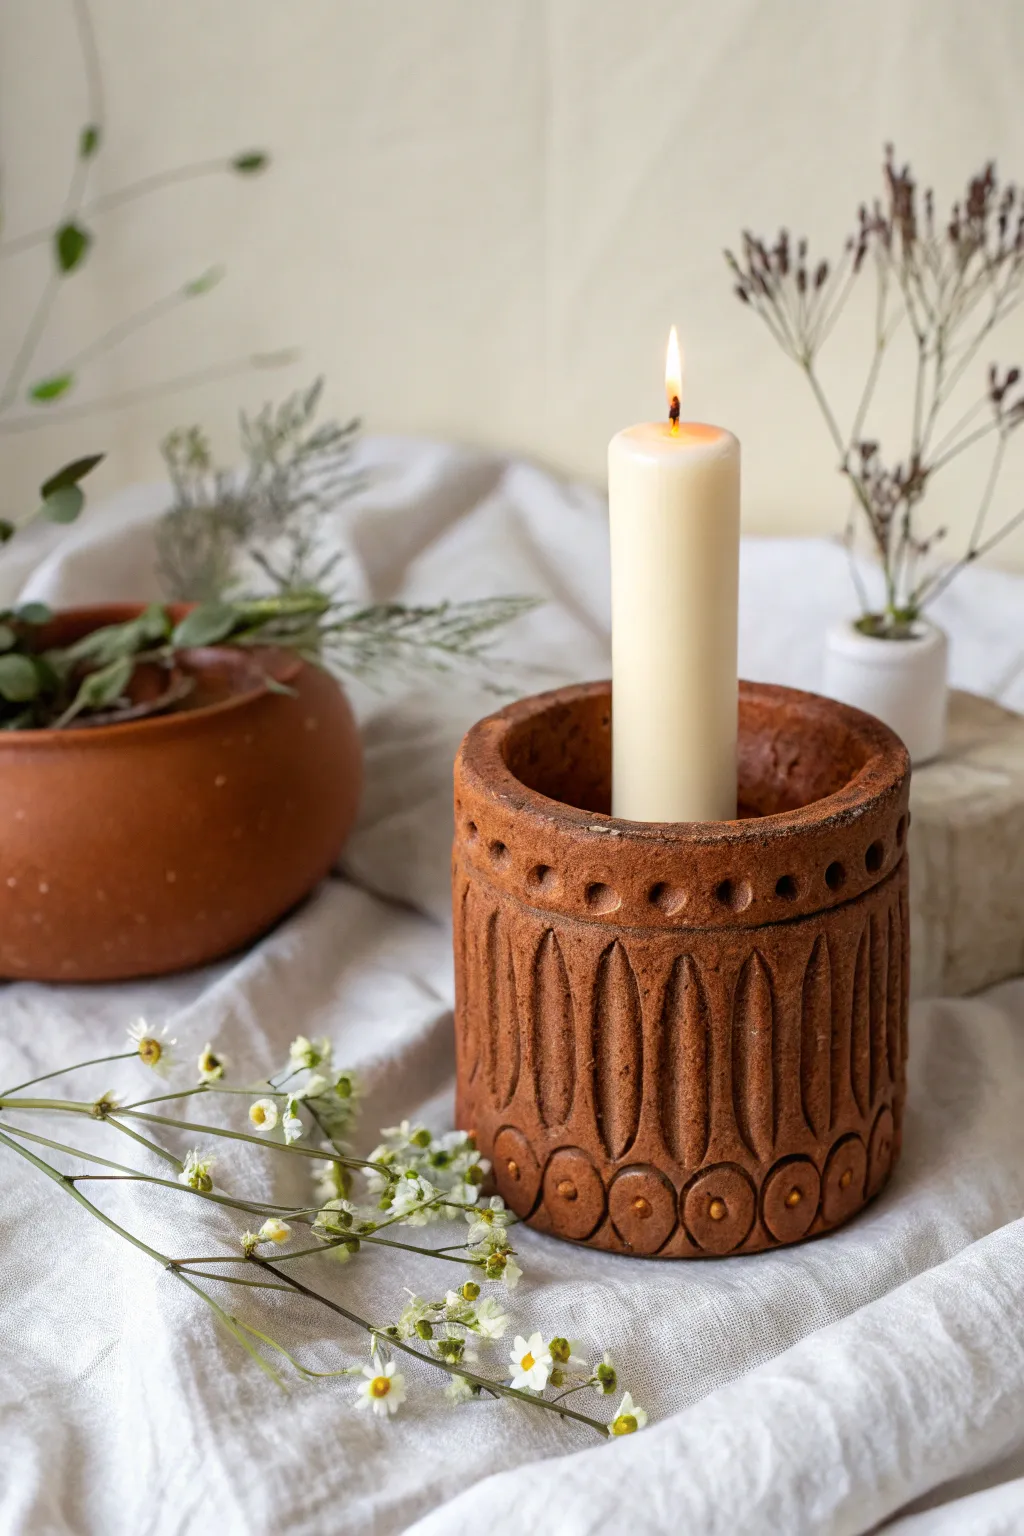
This rustic, textured candle holder brings an earthy warmth to any table setting with its rich terracotta tone and intricate carvings. You will learn to hand-build a sturdy cylinder and use sgraffito-like carving techniques to create the repeating oval and dot motifs.
Detailed Instructions
Materials
- Terracotta stoneware clay (or any groggy mid-fire clay)
- Rolling pin
- Canvas work surface or slab mat
- Circular template (approx. 4-inch diameter)
- Rectangular template (approx. 12×4 inches)
- Fettling knife or needle tool
- Scoring tool or serrated rib
- Slip (clay mixed with water)
- Loop carving tools (small and medium sizes)
- Wooden modeling tool with a rounded tip
- Sponge
- Ruler
Step 1: Building the Cylinder Form
-
Roll the slab:
Begin by wedging your terracotta clay to remove air bubbles. Roll it out into an even slab that is roughly 1/4 to 1/2 inch thick. Keep the thickness consistent for structural integrity. -
Cut the components:
Using your paper templates and a fettling knife, cut out a circular base and a long rectangular strip which will become the walls of the candle holder. If you want a wider rim like the reference, cut the strip slightly wider than your final desired height. -
Texture preparation:
Before assembling, you can lightly smooth the surface with a rib, but leave some of the natural clay tooth visible to match the rustic aesthetic shown in the photo. -
Score and slip the base:
Score the outer edge of your circular base and the bottom long edge of your rectangular strip. Apply a generous amount of slip to the scored areas. -
Assemble the wall:
Wrap the rectangular slab around the circular base. Join the two short ends of the rectangle first by scoring, slipping, and pressing them firmly together to create a seam. -
Reinforce the seams:
Blend the clay across the vertical seam on both the inside and outside using a wooden tool or your thumb. Do the same for the bottom seam where the wall meets the floor to ensure it is watertight. -
Shape the rim:
Use your fingers or a flat wooden paddle to gently compress the rim inward. The reference image shows a thick, flat rim, so you may want to fold a small strip of clay over the top edge to add bulk before smoothing it down.
Step 2: Carving the Details
-
Leather hard stage:
Allow the cylinder to dry slowly until it reaches a leather-hard state. I find this stage crucial because if the clay is too soft, the carving won’t be crisp; if it’s too dry, it will chip. -
Mark the design grid:
Lightly trace horizontal guidelines around the cylinder. You’ll need a central band for the long ovals, and narrower bands at the top and bottom for the circular motifs. -
Carve the central ovals:
Using a U-shaped loop tool, carve vertical oval shapes into the central band. Press deeper in the middle of each oval and taper out at the top and bottom to create that scooped, fluted look. -
Define the ridges:
Leave a consistent ridge of uncarved clay between each vertical oval. These raised lines define the pattern. -
Carve the top border:
Switch to a smaller loop tool or a rounded wooden tool. Carve a row of small, equidistant divots around the upper rim area. These look like small, scooped half-circles. -
Carve the bottom border:
Repeat the process for the bottom border, creating a matching row of circular circular or semi-circular indentations. -
Add the dot details:
Take a small, blunt tool (like the back of a drill bit or a small dowel) and press a single dot into the center of each top and bottom circle indentation. -
Clean up burrs:
Once the piece is bone dry, use a slightly damp sponge or a stiff brush to gently knock off any sharp clay crumbs or ‘burrs’ left from carving. Don’t over-wet the clay.
Cracking Seams?
If your vertical seam initiates a crack while drying, score it deeply, add fresh soft slip, and compress it again. Slow down the drying process by covering the piece loosely with plastic.
Step 3: Finishing and Firing
-
Bisque fire:
Fire the piece to cone 04 (or your clay’s specific bisque temperature). This prepares it for glazing or staining. -
Apply a wash (optional):
To enhance the carving, you can apply a red iron oxide wash or a dark underglaze. Brush it into the textures and wipe it back with a sponge, leaving darkness only in the recessed carvings. -
Glaze firing:
If you prefer the raw clay look shown, you might skip a full glaze and just fire to maturity (cone 5/6 or 10 depending on clay). If glazing, apply a matte clear glaze to keep the earthy feel.
Make It a Set
Create a trio of holders at varying heights (e.g., 4″, 6″, and 8″) but keep the carving pattern identical. This creates a cohesive, professional-looking centerpiece collection.
Place a pillar candle inside your fired vessel and enjoy the warm glow illuminating your hand-carved textures
Cutout Slab Luminary Lanterns With Simple Shapes
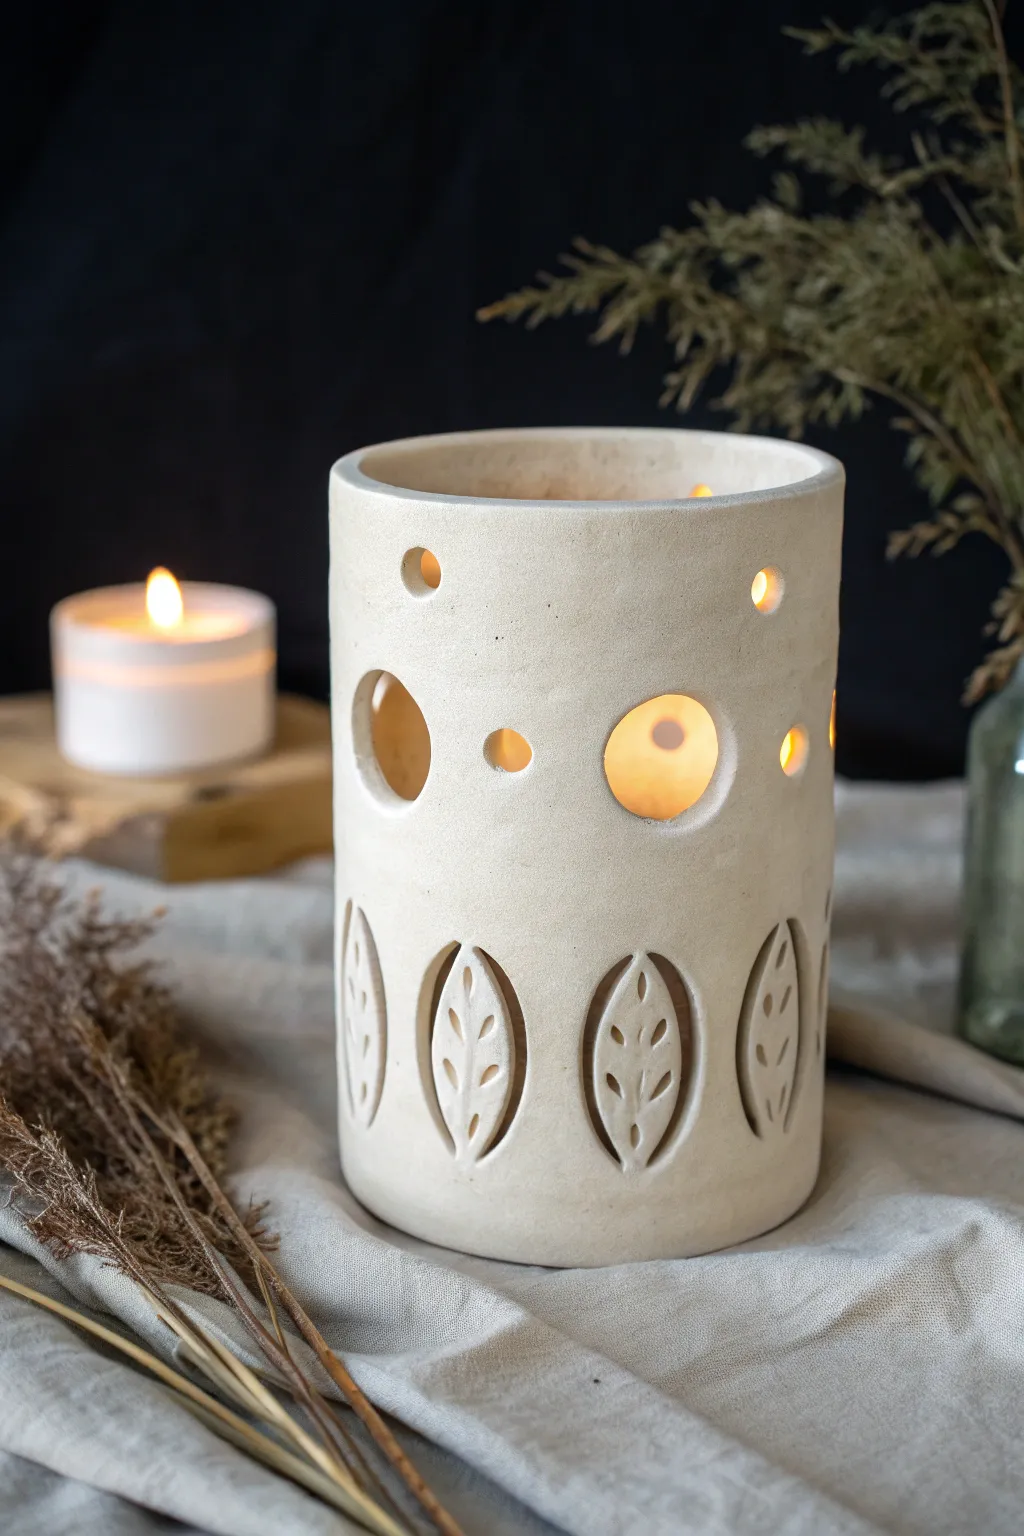
Illuminate your living space with this cozy, cream-colored ceramic luminary that casts a warm glow through playful geometric cutouts. Using simple slab-building techniques, you’ll construct a sturdy cylinder and carve distinctive leaf and circle motifs for a polished, professionally crafted look.
Step-by-Step
Materials
- White or speckled stoneware clay (smooth texture recommended)
- Canva or denim cloth for rolling
- Rolling pin
- Two guide sticks or slats (approx. 1/4 inch thick)
- Fettling knife or needle tool
- Straight edge ruler
- Slip (clay and water slurry)
- Serrated rib or scoring tool
- Wooden sculpting tool with leaf-shaped end
- Circle hole cutters (various sizes)
- Sponge
- Kiln for firing
Step 1: Preparing the Slab
-
Roll out the clay:
Begin by wedging your clay thoroughly to remove air bubbles. Place it on your canvas and roll it into a seamless slab. Use your 1/4 inch guide sticks on either side of the clay to ensure the slab is perfectly even in thickness from edge to edge. -
Cut the rectangle:
Measure and cut a long rectangle from your slab. For a lantern similar to the photo, aim for a rectangle approximately 12-14 inches long and 6-7 inches tall. Save the excess clay for testing your cutout tools. -
Dry slightly:
Let the slab sit for 15-20 minutes until it firms up slightly to ‘soft leather hard.’ It needs to be flexible enough to bend without cracking, but stiff enough to stand upright on its own.
Step 2: Designing the Cutouts
-
Plan the bottom border:
While the slab is flat, lightly trace a horizontal guideline about 1.5 inches from the bottom edge. This will help align your decorative leaf motifs. -
Carve the leaf outlines:
Using a needle tool, gently sketch tall, narrow oval shapes along the bottom border. Space them evenly, leaving about an inch of clay between each oval. -
Sculpt the leaf details:
Instead of cutting the leaf shapes out completely, press a leaf-shaped wooden tool or loop tool into the clay inside your oval sketches. Carve out distinct ‘veins’ or small divots, leaving the negative space intact to create a relief texture. -
Punch the circles:
For the upper section, use circular hole cutters in two different sizes. Punch a larger circle (approx. 1 inch) in the center of the upper area, and scatter smaller circles (approx. 1/2 inch) randomly around it to create the airy, bubbly effect. -
Clean the edges:
Once all holes are punched, gently smooth the raw edges of your cutouts with a fingertip or a slightly damp soft brush to remove any sharp burrs/crumbs of clay.
Clean Cuts Every Limit
Wait until the clay is leather-hard before cleaning up the cutouts. If you try to smooth the holes while the clay is too wet, you risk distorting the perfect circular shapes.
Step 3: Assembling the Cylinder
-
Bevel the seams:
Cut the short vertical ends of your slab at a 45-degree angle. Bevel one end slanting inward and the opposite end slanting outward so they will overlap flush when joined. -
Score and slip:
Rough up the beveled edges using your serrated rib tool and apply a generous amount of clay slip to both textured surfaces. -
Form the cylinder:
Stand the slab upright and gently curve it into a cylinder, bringing the scored edges together. Press the seam firmly from both the inside and outside to ensure a solid bond. -
Reinforce the seam:
Roll a very thin coil of clay and press it into the interior seam. Smear it flat with your thumb or a wooden tool to completely hide the join line inside. -
Smooth the exterior:
On the outside, use a rubber rib to smooth over the seam line until it is invisible, rotating the cylinder to keep it round.
Level Up: Double Walls
Create a slightly smaller, solid cylinder to place inside the cutout one. This creates a shadow box effect and hides the candle while still letting the warm light glow through.
Step 4: Finishing Touches
-
Level the rim:
If the top rim looks uneven after bending, use a needle tool to trim a thin strip off the top while rotating the piece (or use a cheese cutter tool) to get a perfectly level edge. -
Refine the surface:
Wipe the entire piece down with a barely damp sponge. I find this helps smooth out the gritty texture of the clay and softens the edges of the cutouts one last time. -
Dry slowly:
Loosely cover the lantern with plastic for the first day to let the moisture equalize, preventing warping. Then, uncover and let it dry completely to the bone-dry stage. -
Bisque fire:
Fire the piece in the kiln to bisque temperature (usually cone 04). -
Glaze and final fire:
Dip the piece in a matte cream or white glaze. Wipe the bottom clean and fire to the final temperature required by your clay body (e.g., cone 5 or 6) to achieve that soft, stone-like finish.
Now create a cozy atmosphere by placing a tealight inside your beautiful new handmade lantern