Handbuilding is the easiest way to get into pottery because you can make real, usable pieces without a wheel or fancy equipment. I’m sharing my favorite hand built pottery projects that help you learn the big three—pinch pots, slab building, and coil building—while ending up with something you’ll actually want to keep.
Classic Pinch Pot Bowl
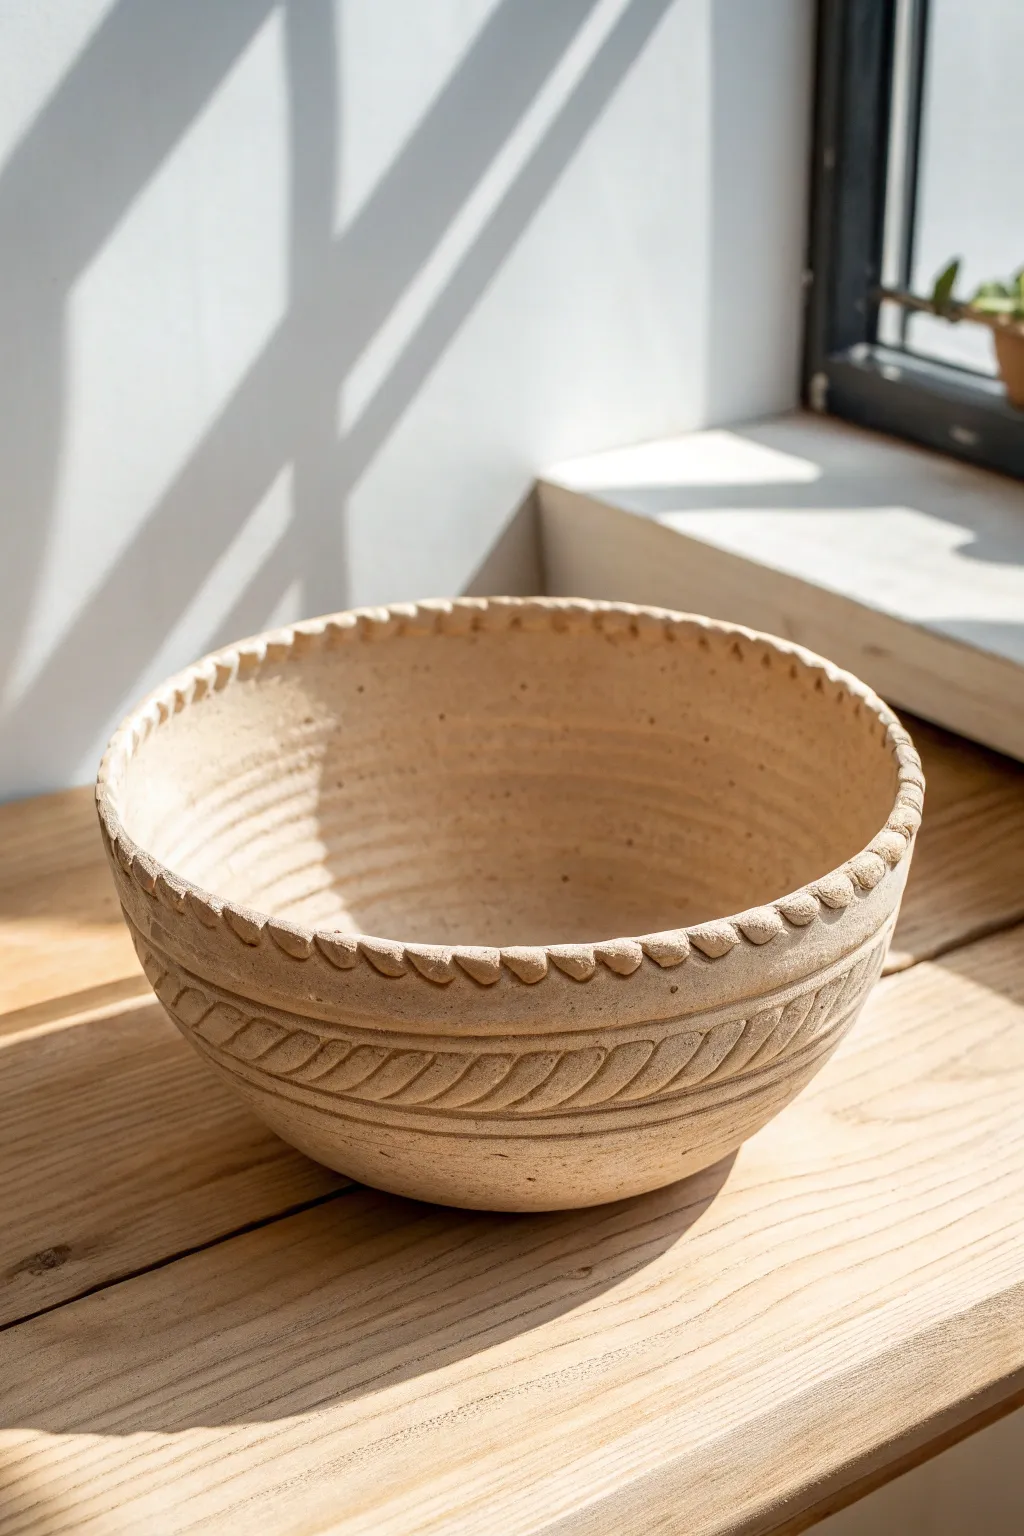
This classic pinch pot project creates a wonderfully tactile bowl with a textured exterior and a smooth, inviting interior. The natural speckled clay body shines through a creamy white glaze, giving it a timeless, earthy feel perfect for your morning oatmeal.
How-To Guide
Materials
- Speckled Stoneware Clay (e.g., Laguna Speckled Buff)
- Wooden Modeling Tool
- Serrated Rib or Scoring Tool
- Soft Yellow Sponge
- Needle Tool
- Creamy White Gloss Glaze
Step 1: Forming the Base
-
Prepare the Clay:
Start by cutting a piece of clay roughly the size of a tennis ball or large orange. Pat and roll it between your palms until you have a smooth, round sphere. -
Open the Sphere:
Hold the clay ball in your non-dominant hand. Gently push your thumb into the center of the ball, stopping about a half-inch from the bottom. This thickness is crucial for a sturdy base. -
Pinch the Walls:
Begin pinching the clay between your thumb (inside) and fingers (outside). Start at the bottom and work your way up in a spiral motion. -
Keep Rotating:
Rotate the ball in your hand after every few pinches to ensure even wall thickness. Aim for walls that are about a quarter-inch thick throughout. -
Check the Curve:
As the bowl widens, gently cup the exterior with your palm to maintain a rounded curve rather than letting it flare out too flat.
Step 2: Refining and Texturing
-
Level the Rim:
Once you have the height you want, place the bowl rim-down on the table gently. Look for high spots. Use your needle tool to trim the rim level if it’s extremely uneven, or simply compress the high spots. -
Smooth the Interior:
Take a slightly damp sponge and wipe the inside of the bowl. You want to remove finger marks and create a smooth surface for food, but avoid adding too much water which weakens the clay. -
Create Exterior Texture:
This is the fun part. Using a serrated rib or a wooden tool, gently scrape or tap the outside walls. You want to leave some directed roughness to mimic that organic, stone-like feel shown in the photo. -
Refine the Rim shape:
Use a damp chamois or your finger wrapped in plastic to compress the rim. It should be rounded and smooth to the touch, as this is where your lips will touch. -
Dry and Fire:
Let the bowl dry slowly under plastic for a day, then uncover until bone dry. Fire it to bisque temperature (Cone 04 usually).
Iron Speckles
If you don’t have speckled clay, sprinkle granular Ilmenite or iron oxide into your white clay wedge before forming to get those dark spots.
Step 3: Glazing
-
Apply Wax Resist:
Paint a layer of wax resist on the very bottom foot of the bowl and about 1/8th inch up the side to prevent sticking to the kiln shelf. -
Pour the Interior:
Pour your creamy white glaze inside the bowl. Roll it around quickly to coat the entire interior surface, then pour the excess back into your bucket. -
Dip the Exterior:
Holding the foot, dip the exterior of the bowl into the glaze. Lift it out quickly. The speckled clay seen in the photo usually comes from a thinner application, allowing the iron spots to burn through. -
Wipe the Rim:
As seen in the image, the rim has a lovely toasted color where the glaze breaks. Often, I wipe a tiny bit of glaze off the sharpest edge of the rim with a sponge to encourage this break. -
Final Fire:
Fire the piece to the maturity temperature of your clay (likely Cone 5 or 6 for stoneware). The heat will brown the exposed clay and melt the glaze into that milky finish.
Cracking Issues?
Rim cracks happen if the rim dries much faster than the base. Dry your bowl upside down for the first day to even out the moisture loss.
Enjoy using your beautifully handmade bowl for your next meal or as a cozy decorative piece


Easy Slab Trinket Dish
This charming, organically shaped trinket dish features a gentle, shallow curve and earthy speckled details that make it feel perfectly homespun. It’s an ideal beginner project for holding jewelry or keys, showcasing the beauty of simple slab pottery.
Step-by-Step
Materials
- Speckled stoneware clay (white or buff)
- Rolling pin
- Two wooden guide strips (approx. 1/4 inch thick)
- Oval paper template or cookie cutter
- Fettling knife or needle tool
- Smooth ribs (rubber and wood)
- Sponge
- Small foam cushion or sandbag (optional)
- Creamy white glaze (transparent or semi-opaque)
Step 1: Preparing the Slab
-
Wedge the clay:
Begin by thoroughly wedging a grapefruit-sized ball of speckled stoneware clay to remove any air bubbles and ensure an even consistency. -
Set up guides:
Place your wooden guide strips on either side of your workspace. These will ensure your slab is perfectly uniform in thickness. -
Roll out the clay:
Using your rolling pin, roll the clay ball into a smooth, flat slab, resting the pin on the guides as you work. I like to flip the clay over once or twice to prevent it from sticking to the canvas. -
Compress the slab:
Take a rubber rib and firmly drag it across the surface of the clay in multiple directions. This compression aligns the clay particles and helps prevent warping later.
Rim Definition
To get that highlighted rim effect, wipe away the glaze gently with a damp sponge just on the crest of the lip before firing, exposing the clay body underneath.
Step 2: Shaping the Form
-
Cut the shape:
Place your oval template onto the slab. Using a needle tool or fettling knife, cut vertically around the template to create your base shape. -
Soften the edges:
Once cut, run a slightly damp sponge or your fingertip along the sharp cut edge to round it off gently. You don’t want sharp corners on the finished rim. -
Create the curve:
Lift the oval slab and place it onto a piece of foam or a sandbag. Gently press the center down with a soft rib or your fingers to encourage the edges to rise slightly. -
Refine the rim:
Pinch the very edge of the rim slightly to define it, ensuring the lift is even all the way around the oval. -
Smooth the interior:
Use a soft rubber rib on the inside of the dish to erase any finger marks and distinguish the spiral pattern if you choose to leave throwing lines, though for this slab piece, we want a smooth, clean basin. -
Dry slowly:
loosely cover the dish with plastic and allow it to dry to a leather-hard state. This slow drying prevents the rim from warping as it sets.
Texture Play
Press a piece of coarse linen or lace into the wet clay slab before cutting out your oval. The glaze will break beautifully over the imprinted texture.
Step 3: Finishing and Glazing
-
Bisque fire:
Once the piece is bone dry, fire it in the kiln to bisque temperature (usually cone 04 or 06) to prepare it for glazing. -
Prep for glazing:
Wipe the bisque-fired dish with a damp sponge to remove any kiln dust ensuring the glaze adheres properly. -
Apply wax resist:
Paint a thin line of wax resist along the very top rim of the dish if you want to achieve the raw clay edge look shown in the photo. Also, wax the foot or bottom. -
Dip or brush glaze:
Dip the dish into a creamy white glaze. If the clay lacks natural speckles, choose a glaze that includes iron speckles. -
Clean the rim:
If glaze got onto the waxed rim, wipe it away immediately with a damp sponge so the raw clay body frames the piece. -
Glaze fire:
Fire the piece again to the maturation temperature of your specific clay and glaze (often cone 5 or 6 for stoneware). -
Sand the bottom:
After firing, check the bottom for any rough patches and lightly sand them with wet-dry sandpaper to protect your furniture.
Place your finished dish on a bedside table or entryway console to add a touch of handmade warmth to your daily routine


Simple Spoon Rest With a Thumb Indent
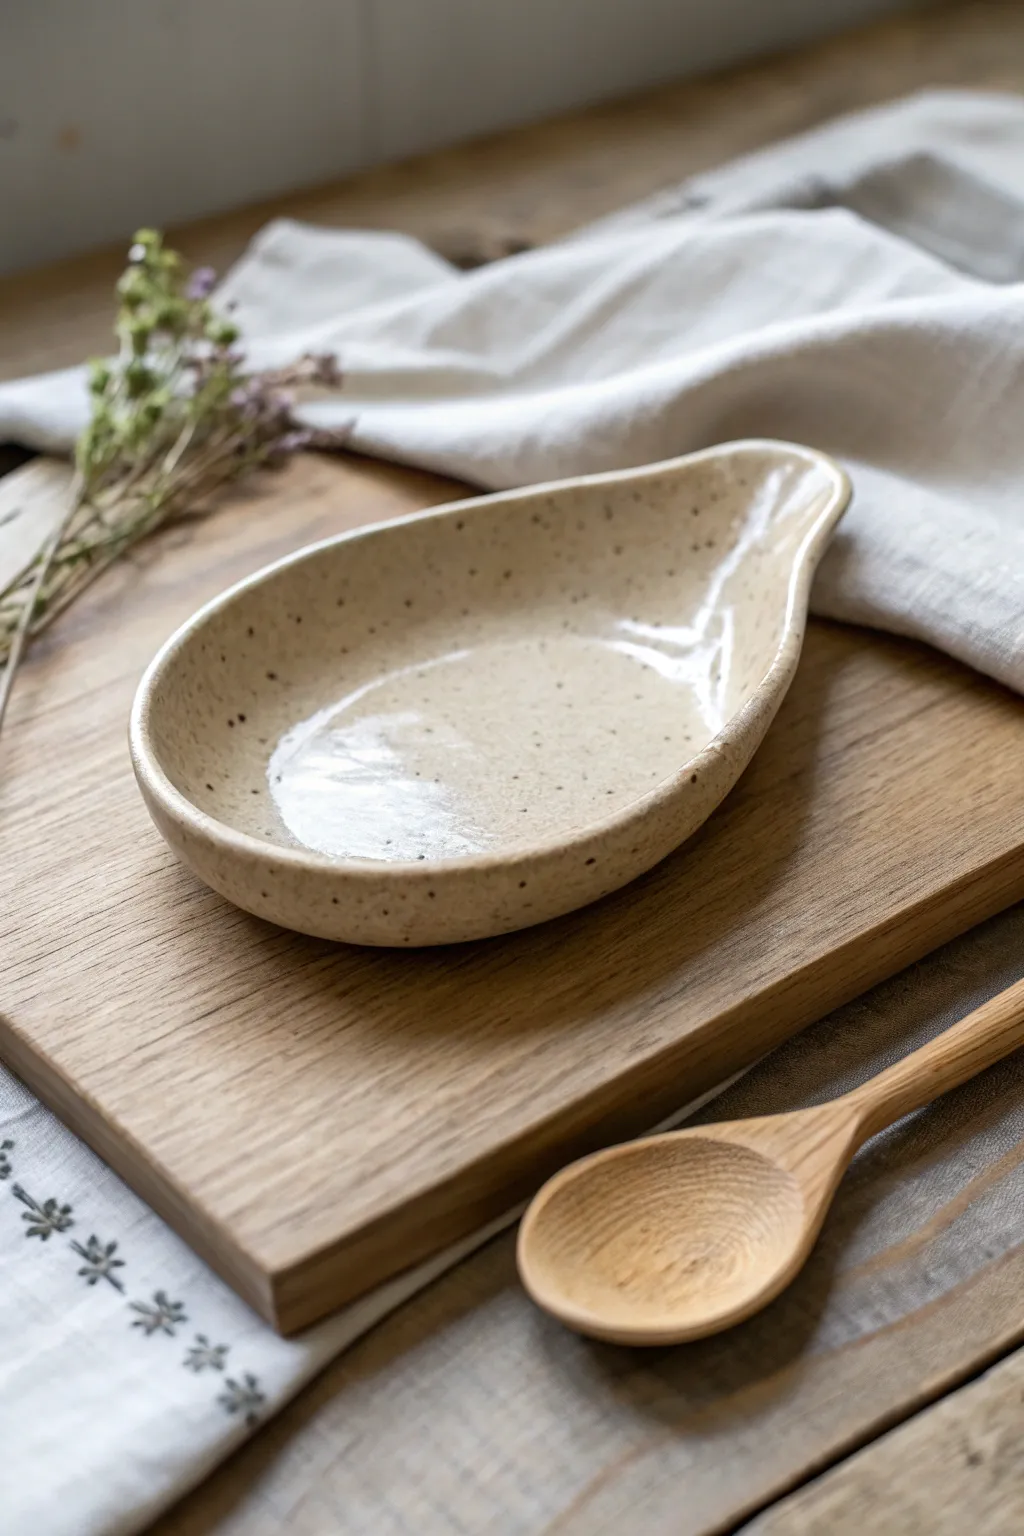
This rustic, elegant spoon rest combines functionality with a charming organic aesthetic. The gentle teardrop shape and glossy speckled finish make it a perfect beginner project that looks right at home next to a wooden cutting board.
Step-by-Step Guide
Materials
- Speckled cone 6 stoneware clay
- Rolling pin with guide strips (approx. 1/4 inch)
- Needle tool or fettling knife
- Small sponge
- Rib tool (soft kidney)
- Modeling tool or wooden spoon handle
- Paper template (teardrop shape)
- Clear or transparent cream glaze
- Canvas working surface
- Water slip or vinegar
Step 1: Shaping the Form
-
Prepare the Clay:
Begin with a ball of speckled stoneware clay about the size of a large orange. Wedge it thoroughly to remove air bubbles and ensure particle alignment. -
Roll the Slab:
Place your clay on the canvas. Using your rolling pin and guide strips, roll the clay out into an even slab approximately 1/4 inch thick. Compress the slab on both sides with a rib tool to smooth the texture. -
Cut the Shape:
Lay your paper teardrop template onto the slab. Using your needle tool, trace around the template, holding the tool perpendicular to the table for a clean edge. Remove the excess clay. -
Soften the Edges:
Before manipulating the clay further, take a damp sponge or your finger and gently run it along the cut edge to rounds off the sharp corners created by the knife. -
Lift the Rim:
Gently lift the edges of the slab all the way around. Use your thumbs on the inside and fingers on the outside to pinch up a low wall, about half an inch high. -
Define the Spout:
At the narrow, pointed end of the teardrop, pinch the clay slightly tighter to create a distinct resting point for the spoon handle. You can curve this tip upward slightly for a graceful look. -
Refine the Basin:
Use your rib tool or a damp sponge to smooth the interior bottom of the spoon rest, ensuring it is slightly concave so any liquids will pool in the center rather than running off.
Warping Worries
If the spoon rest rocks on the table after drying, the bottom isn’t flat. While the clay is leather-hard, gently press it down onto a flat board to re-align the base.
Step 2: Detailing and Drying
-
Create the Rest Point:
At the narrow neck of the spoon rest, use the handle of a wooden spoon or your index finger to press a gentle indentation into the rim. This creates a secure spot for the spoon handle to sit. -
Final Smoothing:
Inspect the rim for any cracks or unevenness. Use a slightly damp chamois cloth or sponge to compress the rim one last time, ensuring it feels smooth to the touch. -
Dry Slowly:
Place the finished piece on a ware board. Cover it loosely with plastic for the first 24 hours to ensure even drying, then uncover to let it reach bone dry status. -
Bisque Fire:
Once bone dry, load the piece into the kiln for a bisque firing (usually to cone 04 or 06, depending on your clay body).
Step 3: Glazing and Finishing
-
Initial Wipe Down:
After the bisque fire, wipe the piece with a clean, damp sponge to remove any kiln dust that might interfere with glaze adhesion. -
Wax the Foot:
Apply wax resist to the bottom of the spoon rest and about 1/8 inch up the side wall. This prevents the glaze from sticking to the kiln shelf. -
Apply Glaze:
Dip the piece into a transparent clear or milky cream glaze. This type of glaze is crucial as it allows the natural speckles of the clay body to show through. -
Check Consistency:
If I notice the glaze looks too thick, I quickly shake the piece gently to remove excess. You want an even coat that won’t pool too heavily in the center. -
Clean the Bottom:
Use a sponge to wipe away any stray droplets of glaze from the waxed bottom area. -
Glaze Fire:
Fire the piece to the maturity temperature of your clay and glaze (typically cone 6 for stoneware). Allow the kiln to cool completely before unloading.
Pro Tip: Texture
For a rustic finish, lightly sand the exterior after bisque firing but before glazing. This creates a tactile contrast between the raw clay outside and the glossy inside.
Place your new spoon rest by the stove and enjoy the handmade charm it adds to your daily cooking routine


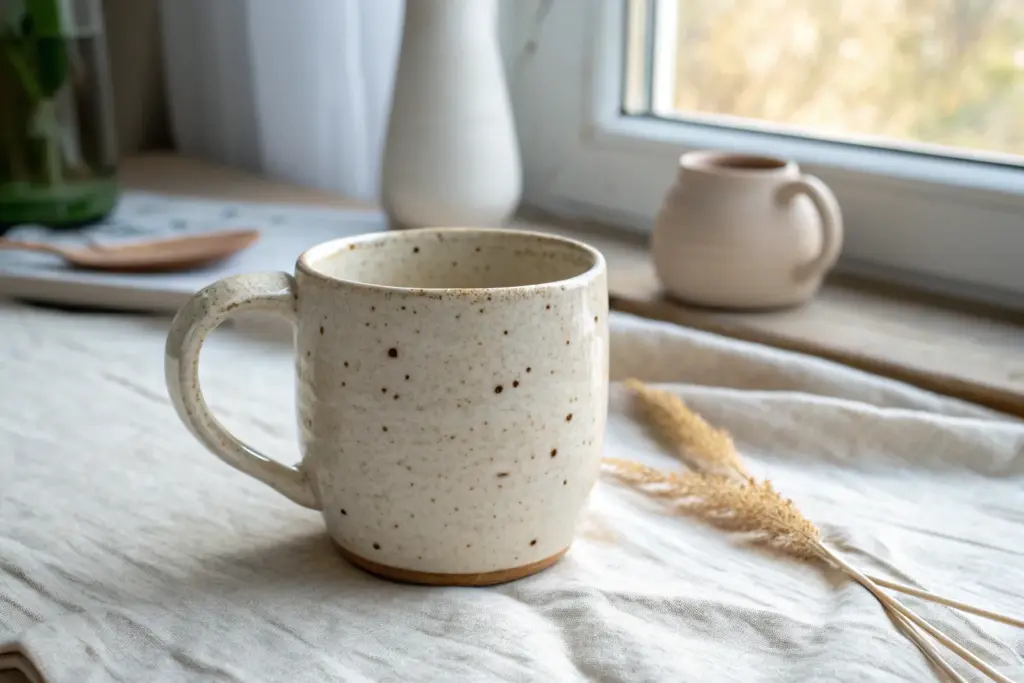
Slab-Built Mug With a Simple Strap Handle
This charming, hand-built mug combines the crisp structure of slab building with the soft, organic feel of speckled stoneware. The design features a lovely contrast between the exposed raw clay at the base and a drippy, glossy cream glaze, making it a cozy addition to any kitchen.
Step-by-Step
Materials
- Speckled stoneware clay (1-2 lbs)
- Rolling pin
- Two guide sticks (approx. 1/4 inch thick)
- Fettling knife or needle tool
- Scoring tool or serrated rib
- Slip (clay mixed with water)
- Wooden modeling tool
- Soft rib (kidney shape)
- Sponge
- Ruler
- Glossy cream or almond dip glaze
- Wax resist
Step 1: Preparing the Slab
-
Roll the clay:
Begin by wedging your speckled stoneware clay to remove air bubbles. Place the clay on a canvas board between your two guide sticks and roll it out into a smooth, even slab. I like to flip the slab over once or twice during rolling to ensure the clay particles are compressed on both sides. -
Cut the rectangle:
Using a ruler, measure a rectangle approximately 10-11 inches long and 4-5 inches tall purely depending on how tall you want your final mug. This size accounts for the overlap when joining the seam. -
Create the base:
From the remaining slab scraps, use a circular cookie cutter or trace around a jar lid to cut out a circle for the floor of the mug. This should be roughly 3.5 inches in diameter. -
Drying to leather hard:
Let your slab pieces sit for about 30-60 minutes until they reach a ‘soft leather hard’ stage. They should be firm enough to stand up without slumping but still flexible enough to bend into a cylinder without cracking.
Clean Seams
To hide the vertical seam completely, paddle the join gently with a wooden spatula after connecting it. This compresses the clay and helps align the particles for a stronger bond.
Step 2: Forming the Cylinder
-
Score the edges:
Score (scratch up) the two short ends of your rectangle slab and the outer edge of your circular base. Apply a generous amount of slip to these roughed-up areas. -
Join the cylinder:
Stand the rectangle up and curve it into a cylinder, overlapping the scored ends. Press firmly along the seam to join them. You can use a wooden tool to blend the clay across the seam line inside and out so it disappears. -
Attach the base:
Score the bottom rim of your cylinder. Place the cylinder onto the scored circular base. Use your wooden tool to drag clay from the base up onto the wall of the mug to seal the connection. -
Smooth the form:
Support the inside of the mug with one hand while using a soft rib on the outside to smooth out the surface and shaping. Gently gently bulge the walls outward slightly if you want a softer, rounder profile like the example image. -
Compress the rim:
Use a damp sponge or piece of chamois leather to compress and round off the top rim. This prevents sharp edges that are uncomfortable to drink from later.
Step 3: Adding the Handle
-
Cut the strap:
From your remaining slab, cut a strip of clay about 3/4 inch wide and 5 inches long. Smooth the sharp edges of the strip with a damp sponge. -
Shape the curve:
Gently bend the strip into a ‘C’ shape or ear shape. Hold it up to your mug to check the proportions; trim the ends if it looks too large for the body. -
Score and attach:
Mark where the handle will attach on the mug body. Score both the handle ends and the attachment points, add slip, and press the handle firmly into place. -
Reinforce the joints:
Roll tiny distinct coils of clay for reinforcement. Place these thin coils around the attachment points where the handle meets the mug, and smooth them down with your modeling tool to create a seamless transition.
Textured Rim
Just before glazing, gently sand the bare rim area with fine grit sandpaper to expose more speckles, creating a darker, toasted effect right at the lip after firing.
Step 4: Finishing and Glazing
-
Bisque fire:
Allow the mug to dry slowly and completely (covered loosely with plastic for the first day) before bisque firing it in the kiln. -
Wax the base:
Once bisque fired, apply wax resist to the bottom 3/4 inch of the mug exterior and the entire underside. This creates the raw, unglazed band seen in the photo. -
Dip glazing:
Hold the mug by the foot (or use glazing tongs) and dip it into your cream glaze for about 3 seconds. The wax will repel the glaze at the bottom, creating a clean line. -
Clean up:
Wait for the glaze to dry to the touch, then use a damp sponge to wipe any stray droplets off the waxed area at the bottom to ensure a neat finish like the reference. -
Final firing:
Fire the mug to the temperature recommended for your specific clay and glaze (likely Cone 5 or 6). This will melt the glaze and mature the clay, bringing out those beautiful iron speckles.
Enjoy your morning coffee in the warm, tactile comfort of your new favorite mug

The Complete Guide to Pottery Troubleshooting
Uncover the most common ceramic mistakes—from cracking clay to failed glazes—and learn how to fix them fast.
Pinch Pot Bud Vase
This charming little vase combines the simplicity of a pinch pot with a refined, narrow neck, making it perfect for holding delicate stems like baby’s breath. The finish features a creamy, speckled glaze that contrasts beautifully with the raw, unglazed rim for a natural, rustic look.
Step-by-Step Tutorial
Materials
- Stoneware clay (buff or light brown)
- Small bowl of water
- Pointed wooden modeling tool
- Metal or rubber rib
- Sponge
- Creamy white speckled glaze (cone 6 or compatible with your clay)
- Wax resist (optional)
- Potter’s needle tool
Step 1: Forming the Base
-
Ball preparation:
Start with a ball of clay roughly the size of a tennis ball. Pat it back and forth between your hands to ensure it is round and compact. -
Opening the center:
Hold the ball in your non-dominant hand. Press your thumb into the center of the ball, stopping about half an inch from the bottom to leave enough base thickness. -
Pinching the walls:
Ideally, maintain a steady rhythm while rotating the ball. Pinch the clay between your thumb and fingers, starting at the bottom and working upward to thin the walls evenly. -
Shaping the belly:
As you pinch, gently push the clay outward from the inside to create a rounded, bulbous belly shape. The opening should naturally get wider as you do this.
Collaring Tip
Keep your hands slightly damp when narrowing the neck. If the clay is too dry, collaring can cause the rim to buckle or fold instead of shrinking smoothly.
Step 2: Collaring the Neck
-
Gathering the rim:
Now, begin to narrow the opening. Form a gentle ‘C’ shape with both hands around the rim and squeeze inwards very gently while rotating the pot. -
Adding height:
As you collar the clay inward, the rim will thicken. Use your thumb and forefinger to pinch this thickened clay upward, creating a short vertical neck. -
Refining the neck:
Repeat the collaring and lifting process until the opening is about an inch wide. Keep the neck short and distinct from the rounded body. -
Smoothing the surface:
Use a flexible metal or rubber rib to smooth the outside of the pot, removing your fingerprints and refining the transition from the belly to the neck. -
Flattening the bottom:
Tap the pot gently on your work surface to create a flat, stable base so the vase won’t wobble.
Step 3: Refining and Drying
-
Trimming the rim:
If the rim has become uneven during shaping, use a needle tool to cut it level. Smooth the cut edge with a slightly damp sponge or piece of chamois leather. -
Drying:
Let the vase dry slowly under loose plastic for a day to equalize the moisture, then uncover it to dry completely to the bone-dry stage. -
Bisque firing:
Fire the bone-dry vase in a kiln to bisque temperature (usually Cone 04 or 06, depending on your clay body).
Uneven Thickness?
If one side feels thicker, don’t just pinch that spot. Pinch the surrounding areas gently to distribute the clay, moving the excess towards the thinner zone.
Step 4: Glazing
-
Waxing the foot:
Apply wax resist to the bottom of the vase to prevent glaze from sticking to the kiln shelf. -
Waxing the rim:
To achieve the look in the photo, specifically apply a neat band of wax resist to the top rim of the neck. This will keep that area unglazed. -
Applying the glaze:
Dip the vase into a bucket of speckled creamy white glaze. Hold it there for about 3 seconds to get an even coat. I find that a quick dip prevents the glaze from getting too thick on small items. -
Cleaning up:
Once the glaze is dry to the touch, use a damp sponge to wipe away any stray droplets of glaze that may have beaded up on the waxed rim or bottom. -
Final firing:
Fire the vase again to the glaze temperature recommended for your specific clay and glaze combination.
Fill your new handmade vessel with dried wildflowers or a few fresh stems to display on your windowsill
Folded Slab Tray With Crisp Corners
Create a stunning jewelry dish that captures the depth of the night sky with this simple folded slab technique. The combination of a speckled stoneware body and glossy, varied blue glazes creates a mesmerizing contrast perfect for holding your favorite rings.
How-To Guide
Materials
- Speckled stoneware clay (white or buff)
- Rolling pin
- Two guide sticks (approx. 1/4 inch thick)
- Fettling knife or needle tool
- Paper template (square, approx. 5×5 inches)
- Small sponge
- Rib tool (wooden or silicone)
- Deep sapphire blue high-fire glaze
- Ocean teal or lighter blue accent glaze
- Clear glaze (optional)
- Canvas working surface
- Kiln
Step 1: Preparing the Slab
-
Roll out the clay:
Begin by wedging a softball-sized piece of speckled stoneware clay to remove air bubbles. Place it on your canvas surface between two guide sticks to ensure an even thickness. -
Creating the slab:
Use your rolling pin to flatten the clay, rolling from the center outwards. Rotate the clay occasionally to prevent sticking and to stretch it evenly in all directions until it is a uniform 1/4 inch thick. -
Smooth the surface:
Take a damp rib tool and gently compress the surface of the slab on both sides. This aligns the clay particles to prevent warping later and creates that smooth, professional finish we’re looking for. -
Cut the shape:
Place your square paper template onto the smooth slab. Using a fettling knife or needle tool held vertically, cut cleanly around the perimeter. Remove the excess clay.
Step 2: Folding and Shaping
-
Lift the edges:
Wait until the clay is stiff enough to hold its shape but still pliable—often called ‘soft leather hard’. Gently lift all four sides of the square upwards. -
Pinch the corners:
At each corner, bring the two adjacent sides together. Instead of cutting out a notch, pinch the excess clay at the corner to seal it. You can pinch it so the excess folds to the outside or inside, but for this crisp look, try to compress the corner seam firmly so it becomes part of the wall. -
Refine the corners:
Once the corners are joined, use your fingers or a wooden tool to smooth the seam inside and out. If you have too much bulk, you can trim a tiny sliver away before smoothing, but I find simply compressing it creates a stronger corner. -
Shape the rim:
With the walls standing, gently press down on the rim with a damp sponge to round it off slightly. Ensure the walls are straight and the corners are distinct and sharp, reflecting the square base. -
Final smoothing:
Check the interior floor of the tray. If your fingers left marks while lifting the sides, use a damp sponge or your rib tool to smooth the bottom flat again. -
Dry slowly:
Loosely cover the tray with plastic to let it dry slowly. This is critical for flat-bottomed pieces to prevent the corners from curling up as they dry.
Clean Corner Trick
Use a cosmetic sponge wedge to smooth the inside corners. Their triangular shape fits perfectly into tight angles where fingers can’t reach.
Step 3: Glazing the Cosmic Effect
-
Bisque fire:
Once bone dry, fire the piece to bisque temperature (usually centered around cone 04) to prepare it for glazing. -
Wipe down:
Use a damp sponge to wipe any dust off your bisqueware. This ensures the glaze adheres properly without crawling. -
Apply wax resist:
Brush liquid wax resist onto the bottom foot of the tray and slightly up the exterior side if you want a raw clay border. For the fully glazed exterior shown, just wax the very bottom where it sits on the kiln shelf. -
Base coat interior:
Pour a deep sapphire blue glaze into the interior of the tray. Swirl it quickly to coat the entire inside and pour the excess back out. Wipe any drips off the rim immediately. -
Glaze the exterior:
Brush or dip the exterior in a clear or white semi-matte glaze that allows the speckles of the clay body to show through. The example shows a lovely creamy, speckled exterior that contrasts with the dark interior. -
Add the ocean wave effect:
On one side of the interior, brush a diagonal sweep of a lighter ocean teal or white float glaze over the wet dark blue. This reaction during firing will create the ‘breaking wave’ look shown in the image. -
Rim detail:
If your glaze tends to run away from sharp edges, carefully dab a little extra of the dark blue glaze right on the rim, or leave it slightly thinner to let the brown clay body break through naturally. -
Final firing:
Fire the piece to the maturity temperature of your clay and glaze (likely cone 5 or 6). Let the kiln cool completely before opening to reveal your deep blue pool.
Starry Night Effect
Flick a stiff toothbrush loaded with gold luster or white overglaze onto the fired blue center for permanent ‘stars’ on the night sky surface.
Place your finished tray on a bedside table to catch your daily treasures


What Really Happens Inside the Kiln
Learn how time and temperature work together inside the kiln to transform clay into durable ceramic.
Press-Textured Slab Plate
Create a rustic, modern dinner set featuring subtle organic textures and a distinctly handmade rim. These slab-built plates offer a professional look with minimal equipment, perfect for bringing a warm, artisanal feel to your dining table.
Step-by-Step
Materials
- Speckled Stoneware Clay (mid-fire)
- Rolling Pin or Slab Roller
- Canvas or Heavy Fabric (for texture)
- Round Template (paper or MDF)
- Needle Tool or Fettling Knife
- Rib Tool (wood or silicone)
- Sponge
- Small Bowl (for water)
- GR Pottery Form or improvised mold (optional)
Step 1: Preparing the Slab
-
Wedge the Clay:
Start by thoroughly wedging your speckled stoneware clay to remove air bubbles and ensure consistency. For a set like the one pictured, you’ll need about 2-3 pounds of clay per large plate. -
Roll the Slab:
Place your clay on a canvas surface. Roll it out into a slab using a rolling pin. Aim for a thickness of about 1/4 to 3/8 of an inch. Ensure you roll in multiple directions to compress the clay platelets, which helps prevent warping later. -
Smooth the Surface:
Using a rib tool held at a 45-degree angle, compress the clay surface on both sides. This smooths out canvas marks and aligns clay particles for strength. -
Cut the Shape:
Place your round template (roughly 10-11 inches for a dinner plate) onto the slab. Trace around it with a needle tool held vertically to get a clean cut, then peel away the excess clay.
Step 2: Forming the Plate
-
Soften the Rim:
Before shaping, run a barely damp sponge or your finger along the sharp cut edge to round it off slightly. This prevents chipping after firing. -
Create the Lift:
If using a slump mold or GR pottery form, gently drape the slab over it. If working freehand, place the slab on a banding wheel and gently lift the edges with your fingers, pinching lightly to create a distinct rim. -
Define the Lip:
The plates in the image have a slightly raised, defined lip. Use a damp sponge to slightly compress the outer 1/2 inch of the rim upward, differentiating it from the flat eating surface. -
Dry to Leather Hard:
Let the plates dry slowly under plastic until they reach a leather-hard state. I find this usually takes about 24 hours depending on humidity.
Warped Plates?
If plates warp during drying, place a weighted bag of sand or rice in the center while they dry. Dry them extremely slowly away from drafts.
Step 3: Finishing and Glazing
-
Refine the Rim:
Once leather hard, use a sponge to do a final smoothing of the rim. This exposes the grit in the speckled clay, which creates that beautiful toasted edge effect. -
Bisque Fire:
Fire the bone-dry plates to cone 04 (or your clay’s specific bisque temperature). -
Apply Wax Resist:
Apply a band of wax resist to the very edge of the rim if you want a precise raw clay line, or simply wipe the glaze back later. -
Glaze Application:
Dip or brush a satin white or cream glaze onto the plate. The glaze should be somewhat translucent to let the clay’s speckles show through. -
Expose the Rim:
Immediately after glazing, use a damp sponge to wipe the glaze off the rim. This reveals the raw clay body, creating the distinctive brown detailed edge seen in the photo. -
Final Fire:
Glaze fire to cone 5 or 6 (adjust based on your clay body). The heat will darken the exposed rim and melt the glaze into a durable surface.
Make it a Set
Use the same technique but smaller templates to create matching nesting bowls. Vary the wall height for soup vs. serving bowls.
Enjoy serving your first meal on your beautiful, handmade pottery.
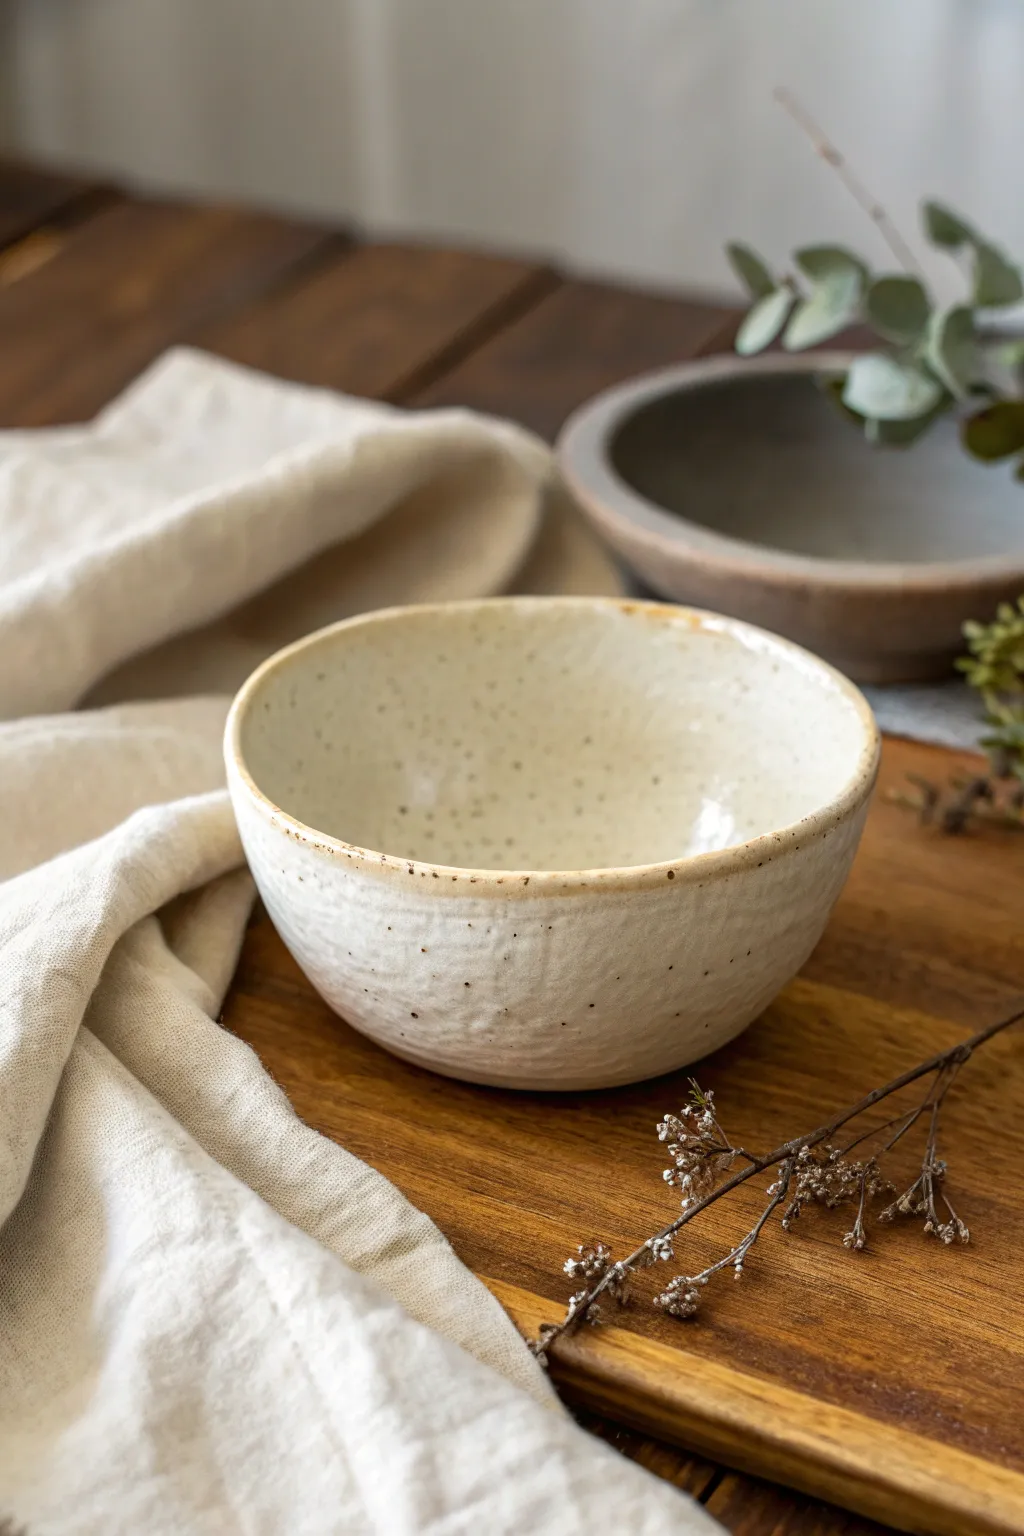
Coil Bowl With Intentional Wabi-Sabi Waves
This rustic, sandy-hued bowl celebrates the natural texture of clay with rhythmic carved patterns and a notched rim. By combining basic coil building with thoughtful subtractive decoration, you can create a vessel that feels both ancient and modern.
Step-by-Step Tutorial
Materials
- Stoneware clay (buff or speckled)
- Scoring tool or serrated rib
- Slip (clay mixed with water)
- Wooden modeling tool or butter knife
- Loop tool (small)
- Sponge
- Canvas or ware board
Step 1: Building the Form
-
Create the base:
Start by rolling a slab of clay about 1/4 inch thick. Cut a perfect circle approximately 4-5 inches in diameter for your base using a needle tool or knife. -
Roll your coils:
Roll out several long ropes of clay, aiming for the thickness of your pinky finger. Keep them consistent to ensure even walls. -
Score and slip first layer:
Rough up the outer edge of your base and the underside of your first coil. Apply a dab of slip and press the coil onto the base edge. -
Build the walls:
Continue stacking coils one on top of another. As you stack each ring, gently smudge the clay downward on the inside surface to bond the coils together completely. -
Smooth the interior:
Use a rib tool or your fingers to smooth the interior. For this specific look, I prefer to leave faint horizontal ridges from the smoothing process rather than making it perfectly glass-smooth. -
Shape the exterior profile:
Once you have reached your desired height (about 4-5 inches), smooth the exterior seams just enough to join them, but keep the overall round shape. Use a wooden paddle to gently tap the form if it gets lopsided. -
Refine the rim:
Level off the top rim with a knife or needle tool so it is perfectly horizontal. Compress it gently with a damp sponge.
Keep it Steady
Use a banding wheel or Lazy Susan while building. Rotating the piece constantly helps you spot asymmetry early and makes carving consistent patterns much easier.
Step 2: Adding Textures and Patterns
-
Mark the design bands:
Lightly trace two horizontal lines around the belly of the pot to demarcate where your diagonal carving will go later. Leave about an inch of space between them. -
Leather hard stage:
Let the bowl sit until it is leather hard. It should be firm enough to handle without warping but soft enough to carve easily. -
Carve the diagonal band:
Using a small loop tool or a wooden modeling tool, carve diagonal slashes between your guidelines. Press deeper in the center of each slash and taper out at the ends to create a rope-like effect. -
Add bordering lines:
Use a needle tool or dull pencil to incise a distinct line directly above and below your diagonal carving to frame the pattern. -
Notch the rim:
Work your way around the top rim. Press the side of a round wooden tool or the handle of a paintbrush into the clay at even intervals to create the scalloped ‘pie crust’ edge. -
Refining the foot:
Flip the bowl over gently. If the bottom is heavy, trim away excess clay to create a slight foot ring, which lifts the bowl slightly off the table. -
Final texture check:
If you want that sandy appearance, sponge the surface lightly with a damp sponge to expose the grog (the gritty particles) in the clay body. -
Drying:
Cover the bowl loosely with plastic for the first day to equalize moisture, then uncover to dry completely before firing.
Glaze Technique
To mimic the photo, skip the glaze! Fire to maturity and apply a matte sealant, or use a dry, matte beige glaze that breaks over texture to highlight your carving.
Once fired, this textured bowl makes a stunning centerpiece that highlights the raw beauty of the earth it came from.

TRACK YOUR CERAMIC JOURNEY
Capture glaze tests, firing details, and creative progress—all in one simple printable. Make your projects easier to repeat and improve.
Pinch Pot Animal Planter

This adorable planter combines the simple organic shape of a pinch pot with charming animal features for a sweet, functional piece. The textured speckled clay and sleepy expression give this pot a cozy, rustic personality perfect for housing a small succulent.
Detailed Instructions
Materials
- Speckled stoneware clay (approx. 1 lb)
- Pottery tool kit (needle tool, rib tool, loop tool)
- Small sponge
- Slip (clay mixed with water)
- Black underglaze
- Fine detail brush
- Matte clear glaze
- Wax resist (optional)
Step 1: Forming the Body
-
Prepare the Clay:
Start by wedging your clay thoroughly to remove air bubbles, then roll it into a smooth, even ball about the size of a large orange. Pat it gently to ensure it’s spherical. -
Open the Pot:
Hold the clay ball in one hand and push your thumb into the center, stopping about a half-inch from the bottom. This base thickness is crucial for stability. -
Pinch the Walls:
Working rhythmically, pinch the clay between your thumb and fingers, rotating the ball as you go. Aim for even walls about 1/4 inch thick, gently pulling the clay upwards to form a rounded cup shape. -
Smooth the Form:
Use a rubber or metal rib tool on the outside while supporting the inside with your hand to smooth out fingerprints and refine the rounded curve of the pot. -
Refine the Rim:
Gently tap the rim with a flat wooden tool or your fingers to ensure it is level, though a slight organic wave is perfectly fine for this rustic style.
Clean Lines
For the crispest painted details, let the underglaze dry for a moment, then gently scratch away any mistakes or fuzzy edges with a sharp needle tool.
Step 2: Adding Feet and Features
-
Shape the Feet:
Roll three small balls of clay, roughly the size of marbles. Flatten them slightly to create stout, stable nub feet. -
Attach the Feet:
Score the bottom of your pot and the tops of the feet with a needle tool. Apply a dab of slip, then press the feet firmly onto the base in a tripod arrangement. Smooth the seams with a modeling tool. -
Check for Balance:
Set the pot down on a flat surface to make sure it stands level. Adjust the feet by pressing down gently if it wobbles. -
Create the Ears:
Fashion two triangular tabs of clay. Use your thumb to create a small indentation in the center of each, giving them a cupped ear shape similar to what you see in the photo. -
Attach the Ears:
Score and slip the top rim where the ears will go. Press the ears on securely, blending the clay downwards on the back side so the attachment is invisible. -
Add the Nose:
Roll a tiny ball of clay for the nose. Score the center of the ‘face’ area and attach the nose, pressing it on securely so it protrudes slightly.
Step 3: Surface Decoration
-
Texturing:
Before the clay dries too much, take a needle tool or a stiff brush and gently poke random, shallow holes across the upper two-thirds of the pot to enhance the speckled texture. -
Wait for Leather Hard:
Allow the pot to dry until it is leather hard. It should be firm to the touch but still cold. -
Glazing the Eyes:
Using a very fine detail brush and black underglaze, paint two simple ‘U’ shapes for the sleepy closed eyes. Keep your hand steady and use the nose as a centering guide. -
Painting the Mouth:
Paint a small vertical line down from the nose, splitting into a small anchor shape to create the mouth. I prefer to keep these lines very thin for a delicate look. -
Painting the Nose:
Paint the clay nose nub solid black with the underglaze. -
Bisque Fire:
Once bone dry, fire the piece to bisque temperature (usually Cone 04) to prepare it for glazing. -
Glazing:
Apply a clear matte glaze to the inside of the pot for water resistance. For the outside, you can leave the bottom third unglazed (raw clay) for that two-tone effect, and brush clear glaze over the face area. -
Final Fire:
Fire the piece again to your clay body’s maturity temperature (Cone 5 or 6 for stoneware) to finish the piece.
Cracking Ears?
Thin details like ears dry faster than the body. Wrap them loosely in plastic or apply a little wax resist on the edges to slow their drying time.
Now you have a charming little friend ready to hold your favorite succulent
Incense Holder Dish With a Center Hole
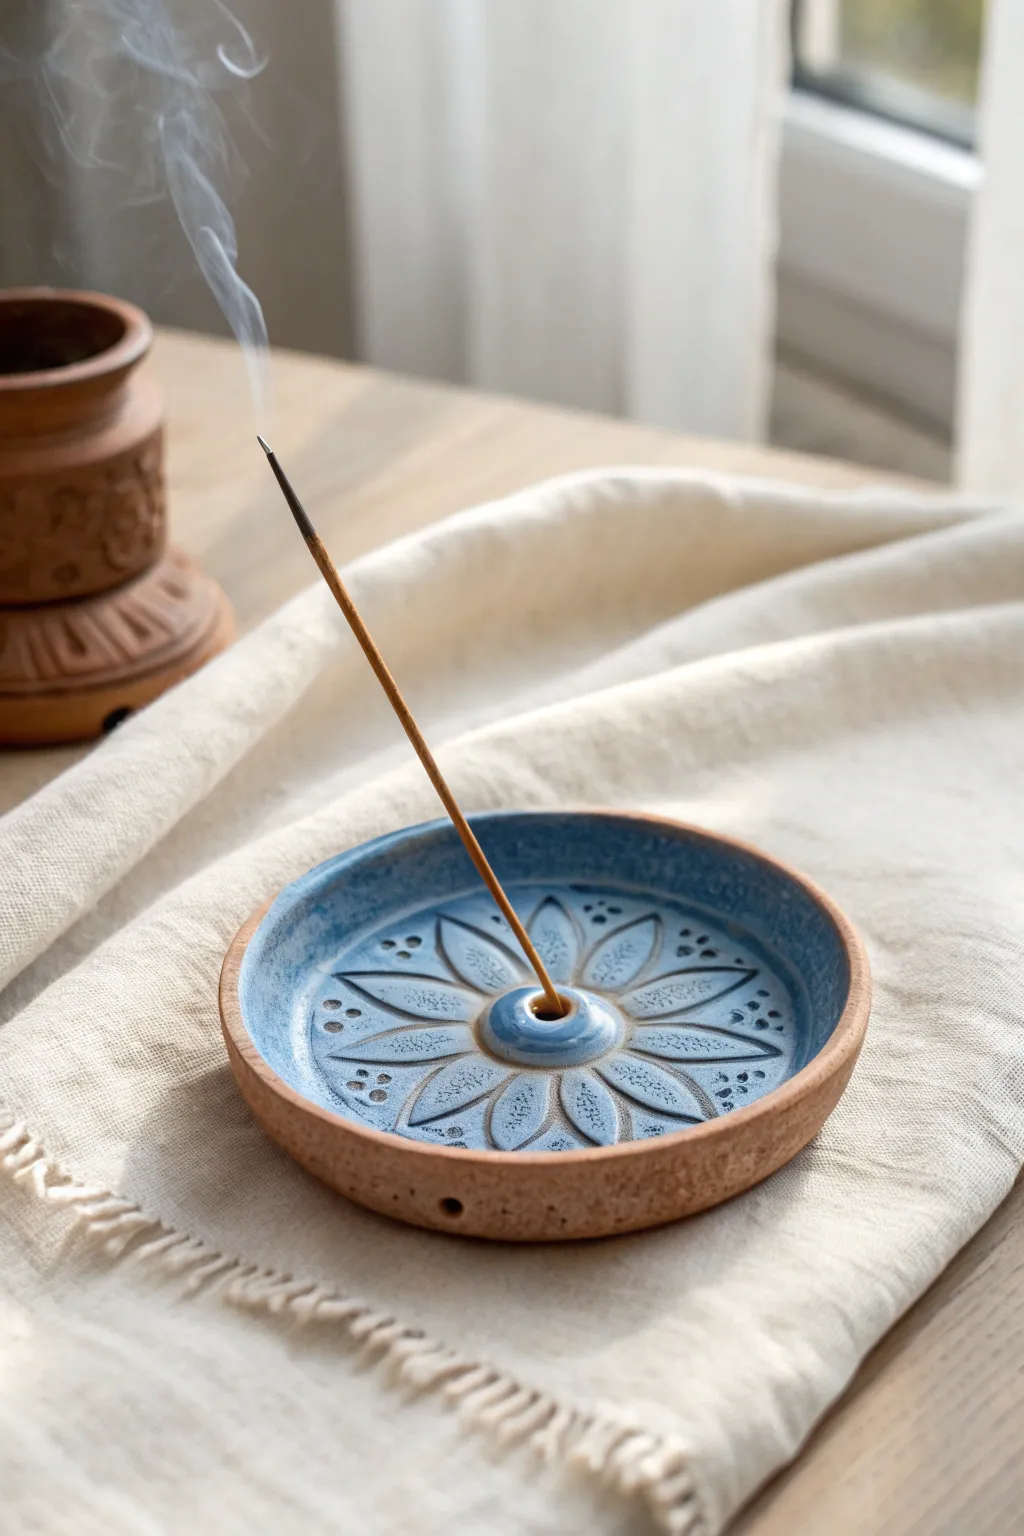
This charming incense holder combines a rustic, speckled clay body with a soothing blue glaze to create a functional piece of art. The carved petal texture radiates from the center, guiding the eye toward the single incense stick held perfectly upright.
Step-by-Step Tutorial
Materials
- Speckled stoneware or grogged clay
- Rolling pin
- Canvas work surface
- Round template (about 4-5 inches)
- Fettling knife or needle tool
- Small carving loop tool
- Sponge
- Wooden modeling tool with a rounded end
- Clear or semi-transparent blue glaze
- Loop tool for trimming
- Paintbrush
Step 1: Forming the Base
-
Roll out your slab:
Begin by wedging your clay to remove air bubbles. Lay it on your canvas and roll it out into an even slab, aiming for a thickness of about 1/4 to 3/8 inch. -
Cut the circle:
Place your round template on the slab. Using your needle tool held vertically, cut around the template to create a perfect circle. -
Smooth the edges:
Run a damp finger or a slightly moist sponge along the sharp cut edge of your circle to round it off and compress the clay particles. -
Create the rim:
Gently pinch the outer edge of the circle between your thumb and forefinger, lifting it slightly upwards to create a shallow dish shape. You want a rim that will catch ash, not a tall bowl wall. -
Refine the shape:
Place the dish on a banding wheel if you have one, or just turn it by hand, using a wooden rib to smooth the interior curve where the floor meets the wall.
Step 2: Creating the Center and Texture
-
Add the center mound:
Roll a small ball of clay, roughly the size of a marble. Score the center of your dish and the bottom of the ball, apply a dab of slip, and press the ball firmly into the center. -
Blend the mound:
Use a modeling tool to blend the bottom edges of the ball into the floor of the dish so it looks seamless, like it grew out of the bottom. -
Make the hole:
Take a standard incense stick (or a tool of similar diameter) and poke a hole directly into the center of the mound. I usually wiggle it slightly to ensure the fit isn’t too tight after the clay shrinks. -
Dry to leather hard:
Set the piece aside until it reaches a leather-hard state. It should be firm enough to carve without deforming, but soft enough to cut easily. -
Sketch the pattern:
Using a needle tool with a very light touch, lightly scratch a flower petal design radiating from the center mound. Aim for symmetrical petals that reach almost to the rim. -
Carve the relief:
Use a small carving loop tool to gently scrape away the clay *inside* the petals (or around them, depending on if you want raised or recessed petals). The example shows recessed lines defining the petals. -
Add details:
Use a small stylus or the back of a drill bit to press small dots pattern near the tips of the petals for extra texture. -
Clean up burrs:
Once bone dry, use a stiff brush or a slightly damp sponge to remove any sharp clay crumbs (burrs) created during carving.
Hole shrinking?
Clay shrinks significantly during drying and firing. Make the incense hole about 20% larger than the stick you plan to use to ensure it still fits later.
Step 3: Glazing and Finishing
-
Bisque fire:
Fire the piece in a kiln to cone 04 (or your clay’s specific bisque temperature). -
Wax the exterior:
Apply wax resist to the bottom and the outer walls of the dish. This ensures the raw clay body remains visible on the outside, providing a nice contrast. -
Protect the hole:
Carefully dab a tiny bit of wax inside the incense hole to prevent glaze from clogging it during firing. -
Apply the glaze:
Pour a customized blue glaze into the interior of the dish. Swirl it around to cover the floor and texture, then pour the excess out quickly. -
Wipe the rim:
If any glaze dripped over the rim onto the raw clay exterior, wipe it away cleanly with a damp sponge. -
Glaze fire:
Fire the piece again to the maturity temperature of your clay and glaze (likely cone 5 or 6 for stoneware).
Breaking surface tension
If your glaze pools too thickly in the carved recesses, gently blow on the wet glaze immediately after pouring to help reveal the texture details.
Once cooled, place it on your table and enjoy the peaceful drift of smoke from your handmade creation
Tile Coasters Made From Simple Slabs
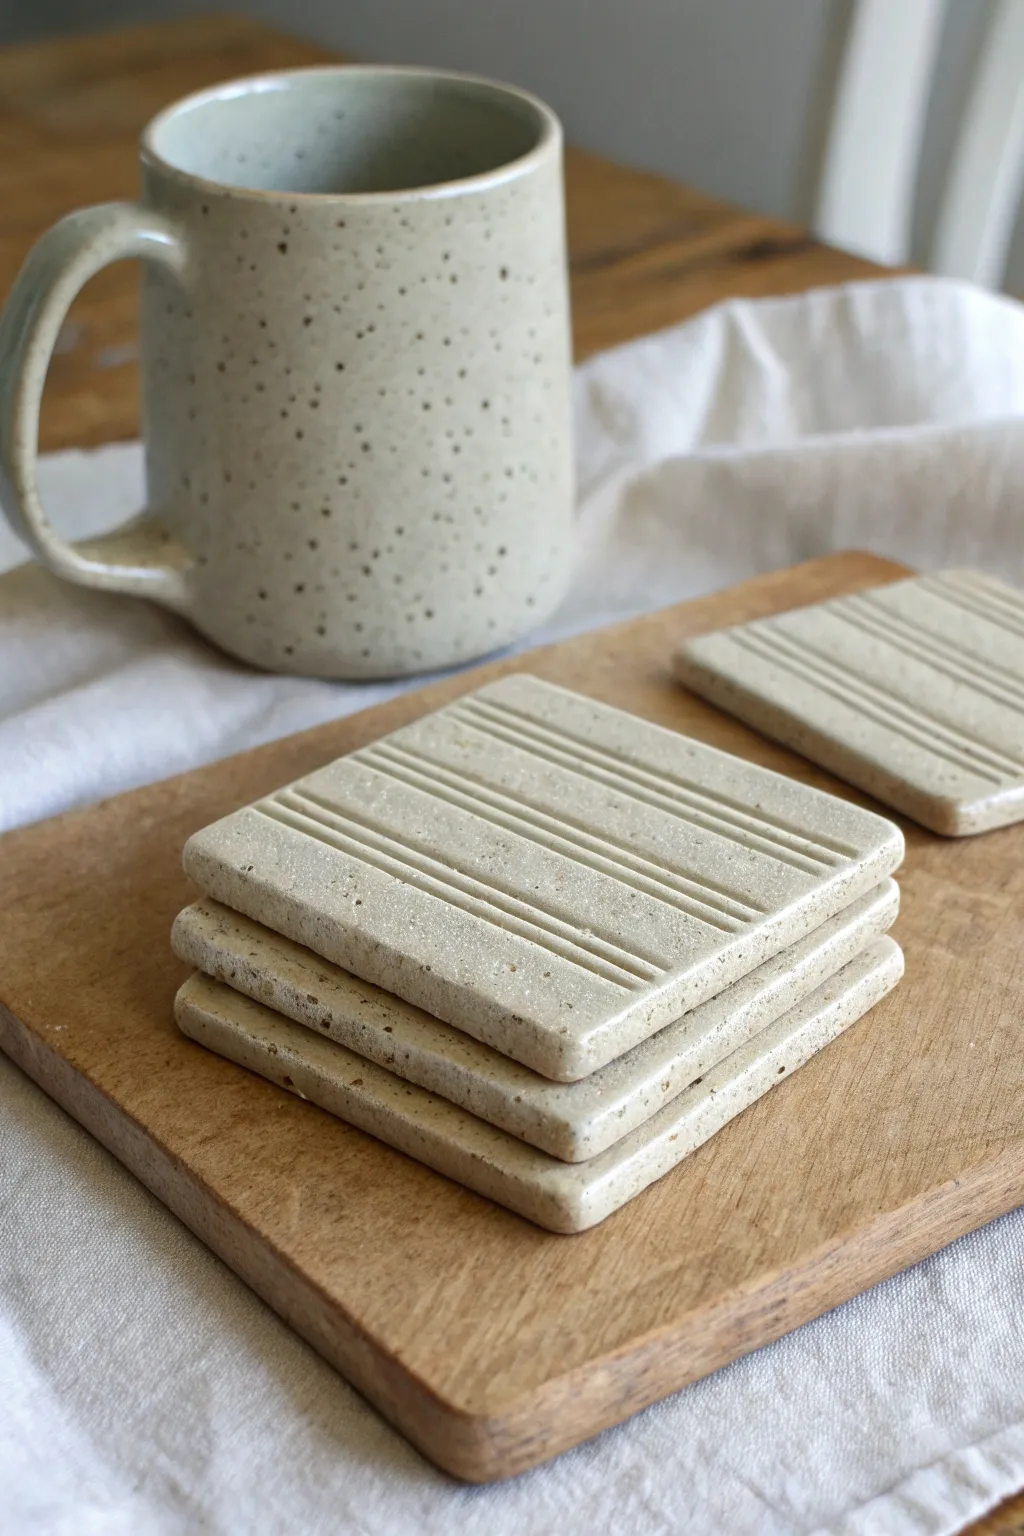
These elegant, understated coasters feature a classic speckled clay body and simple incised lines that add a touch of modern texture. They are the perfect beginner project to practice rolling consistent slabs and creating uniform sets.
How-To Guide
Materials
- Speckled Stoneware Clay (e.g., Laguna Speckled Buff)
- Canvas or slab mat
- Rolling pin
- Two wooden guide strips (approx. 1/4 inch thick)
- Square template (cardboard or sturdy paper, approx. 4×4 inches)
- Needle tool or fettling knife
- Rib tool (rubber or metal)
- Modeling tool or dull pencil (for creating lines)
- Sponge
- Clear or transparent glossy glaze
Step 1: Creating the Slabs
-
Prepare the Clay:
Begin by wedging a softball-sized ball of speckled stoneware clay to remove any air bubbles. Wedge until the consistency is smooth and uniform. -
Set Up Guides:
Place your canvas or slab mat on your work surface. Layout your two wooden guide strips parallel to each other, wide enough apart to fit your rolling pin. -
Roll the Slab:
Place the wedged clay between the guide strips. Using the rolling pin, roll the clay out until the pin rests on the wooden strips, ensuring an even quarter-inch thickness across the entire slab. -
Compress the Clay:
Take a rubber or metal rib and drag it smoothly over the surface of the clay slab. This compresses the clay particles, which helps prevent warping later, and creates a nice smooth canvas for your texture.
Weighted Drying
To guarantee perfectly flat coasters, place a piece of drywall or a wooden board directly on top of the coasters while they dry to physically prevent curling.
Step 2: Cutting and Texturing
-
Cut the Shapes:
Place your 4×4 inch cardboard template onto the slab. Using your needle tool or fettling knife, cut vertically around the template. Repeat this process to create four identical squares. -
Smooth the Edges:
Lift each square gently. Run a slightly damp sponge or your finger along the sharp cut edges to round them off slightly; sharp edges in pottery can chip easily after firing. -
Mark the Lines:
Use a ruler to lightly mark where your decorative lines will go. For this design, you want three grouped lines running horizontally across the center. -
Incise the Texture:
Using a modeling tool with a rounded tip or a dull pencil, press firmly into the clay along your ruler guide to create the grooves. I like to use steady, medium pressure so the lines are deep enough to catch the glaze but don’t cut through the slab. -
Clean Up Burrs:
After carving the lines, you might see little crumbs or ‘burrs’ of clay. Wait for the clay to stiffen slightly, then gently brush them away with a soft brush rather than smudging them immediately.
Warping Woes?
If your coasters curl up at the corners, you likely dried them unevenly. Next time, flip them more often or dry them between two pieces of drywall.
Step 3: Drying and Glazing
-
Slow Drying:
Place your coasters on a board covered with a sheet of newspaper or drywall ware board. Cover them loosely with plastic to let them dry slowly. This is crucial for flat items like tiles to prevent corners from curling up. -
Flip While Drying:
Every day, flip the coasters over so air can reach both sides evenly. Continue this until they are bone dry. -
Bisque Fire:
Once bone dry, bisque fire the coasters to Cone 04 (or according to your clay body’s instructions). -
Wax the Bottoms:
After the bisque firing, apply wax resist to the bottom of each coaster to prevent glaze from sticking to the kiln shelf. -
Apply Glaze:
Dip each coaster into a clear or transparent glossy glaze. A transparent glaze is essential here to let those beautiful clay speckles show through. -
Glaze Firing:
Fire the glazed pieces to Cone 5/6 (or your clay’s specific temperature). Ensure the coasters are flat on the kiln shelf to maintain their shape.
Now you have a durable, custom set of coasters ready for your morning coffee.
Lidded Pinch Pot Keepsake Box
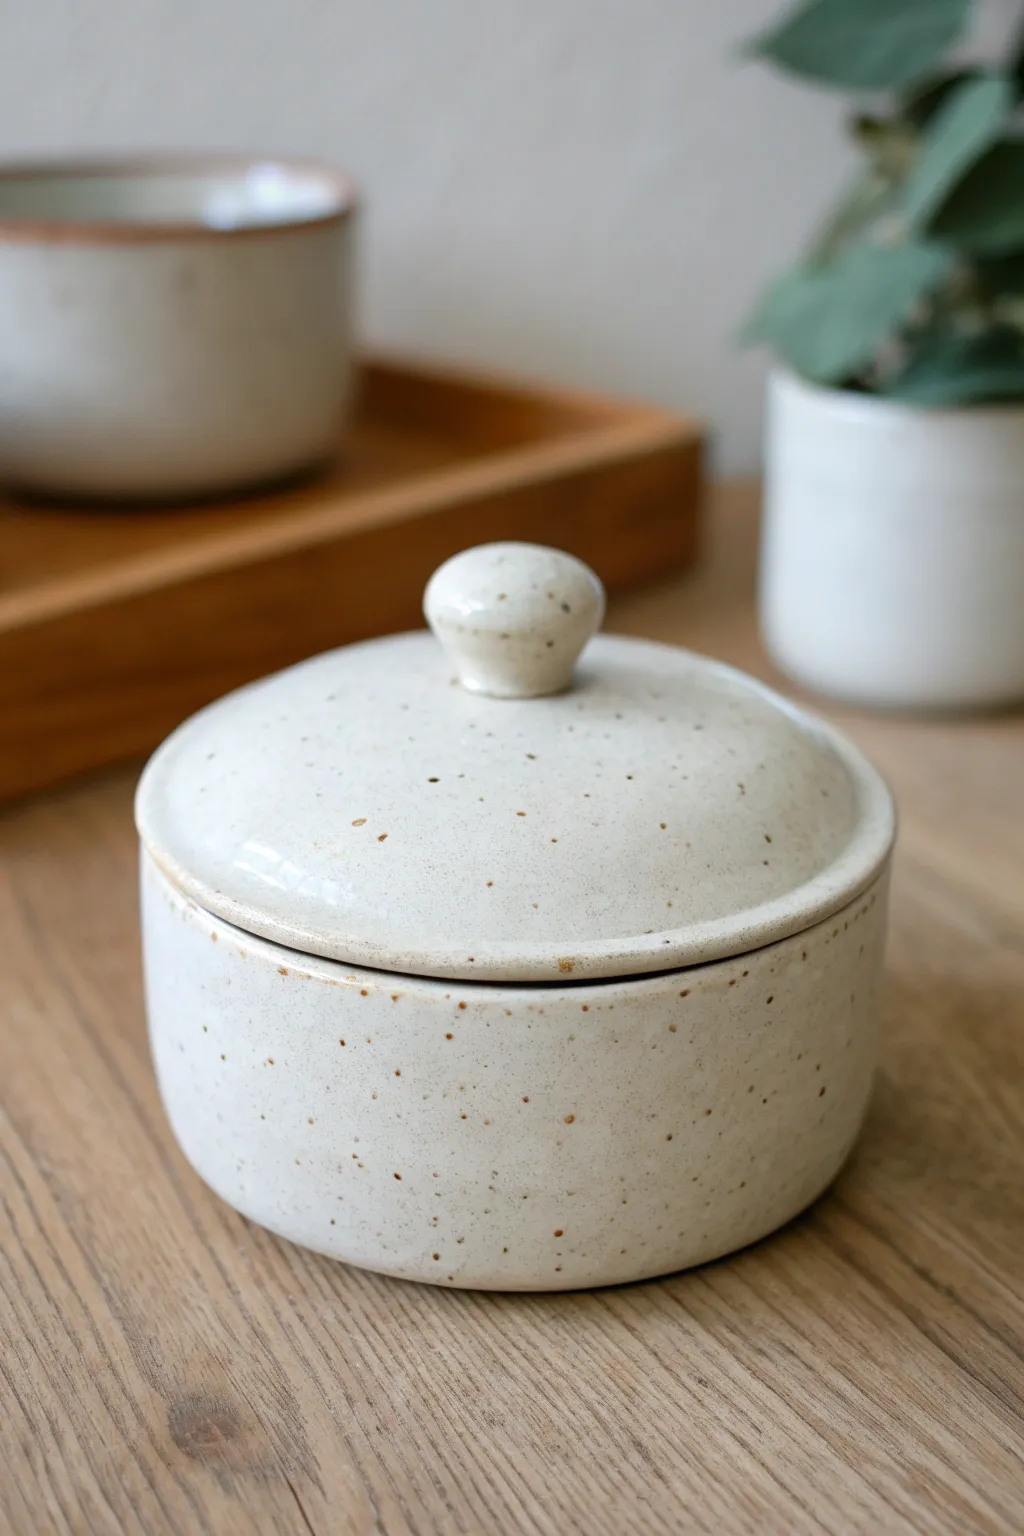
This charming, rustic lidded jar combines the simplicity of a pinch pot with the clean lines of slab building. The finished piece features a creamy, speckled glaze that gives it a wonderfully tactile, organic feel perfect for storing small treasures.
Step-by-Step Tutorial
Materials
- White stoneware clay (preferably with speckles)
- Pottery needle tool
- Wooden rib tool
- Serrated metal rib (optional)
- Scoring tool or fork
- Slip (clay and water slurry)
- Rolling pin
- Canvas or cloth work surface
- Sponge
- Creamy white speckled glaze (cone 6 or similar)
- Kiln
Step 1: Forming the Base
-
Prepare the Clay:
Start by wedging a ball of white stoneware clay roughly the size of a large orange. Break this into two uneven pieces—a larger one for the base and a smaller one for the lid. -
Open the Pot:
Take the larger ball and cradle it in one hand. Press your thumb into the center, stopping about a half-inch from the bottom. This thickness is crucial for a sturdy base. -
Pinch the Walls:
methodically pinch the clay between your thumb and fingers, rotating the ball as you go. Work from the bottom up, aiming for even wall thickness. Instead of flaring out like a bowl, try to keep your fingers straight to encourage a cylindrical, jar-like shape. -
Flatten the Bottom:
Once pinched to shape, gently tap the bottom of the pot against your work surface to create a flat, stable foot. -
Refine the Profile:
Use a wooden rib tool on the outside while supporting the inside with your hand. Smooth out the pinch marks and straighten the walls until you have a clean, cylindrical form with a defined rim. -
Level the Rim:
Place the pot on a flat surface. Use your needle tool to trim the top rim unevenness, ensuring it’s perfectly level so the lid will sit flat.
Clean Rims Matter
Apply wax resist to the rim of the pot and the underside flange of the lid before glazing. This ensures the lid won’t fuse to the pot during the firing.
Step 2: Creating the Lid
-
Measure the Opening:
Before making the lid, measure the diameter of your pot’s opening. Write this down or use calipers to hold the measurement. -
Roll a Slab:
Take your smaller piece of clay and roll it out into a slab about 1/4 inch thick. It needs to be slightly wider than your pot’s opening. -
Cut the Lid Shape:
Use a circle cutter or your needle tool to cut a circle that is slightly larger than the pot’s rim. I like to smooth the edges of this circle immediately with a damp sponge. -
Dome the Lid:
To match the photo’s gentle curve, place your clay circle on a piece of foam or cup it in your hand and gently press from the center out to create a slight dome shape. -
Add the Flange:
Roll a small coil of clay. Score and slip the underside of the lid (the concave side) and attach the coil in a circle that fits *inside* the pot’s rim. This flange prevents the lid from sliding off. -
Make the Knob:
Roll a very small ball of clay for the handle. Pinch the bottom to create a small neck, giving it a mushroom or door-knob shape. -
Attach the Knob:
Score and slip the center of the top of your lid and the base of your knob. Press them firmly together, smoothing the seam with a modeling tool so it looks like one continuous piece.
Texture Play
Before the clay dries, gently press a piece of linen or burlap onto the exterior walls. The glaze will break over the texture, highlighting the speckles.
Step 3: Finishing and Glazing
-
Slow Drying:
Place the lid on the pot (with a small piece of paper towel in between to prevent sticking) and wrap the whole piece loosely in plastic. Let it dry slowly to the leather-hard stage. -
Final Smooth:
Once bone dry, use a slightly damp sponge to wipe away any sharp burrs or rough spots. -
Bisque Fire:
Fire the piece in the kiln to bisque temperature (usually Cone 04) to prepare it for glazing. -
Dip Glazing:
Dip the entire piece into a creamy white glaze. The speckles shown in the image usually come from the clay body itself showing through a semi-opaque glaze, or from a specific speckled glaze formula. -
Clean the Foot:
Wipe the glaze off the bottom of the pot and the rim where the lid touches the body. This is distinct in the photo—you can see the raw clay line where the lid meets the jar. -
Glaze Fire:
Fire the piece again to the maturation temperature of your clay and glaze (often Cone 6) to achieve that glossy, durable finish.
Once the kiln cools, you’ll have a delightful, functional piece of art ready to hold your jewelry or spices.
Hanging Wall Tiles With Simple Cutouts
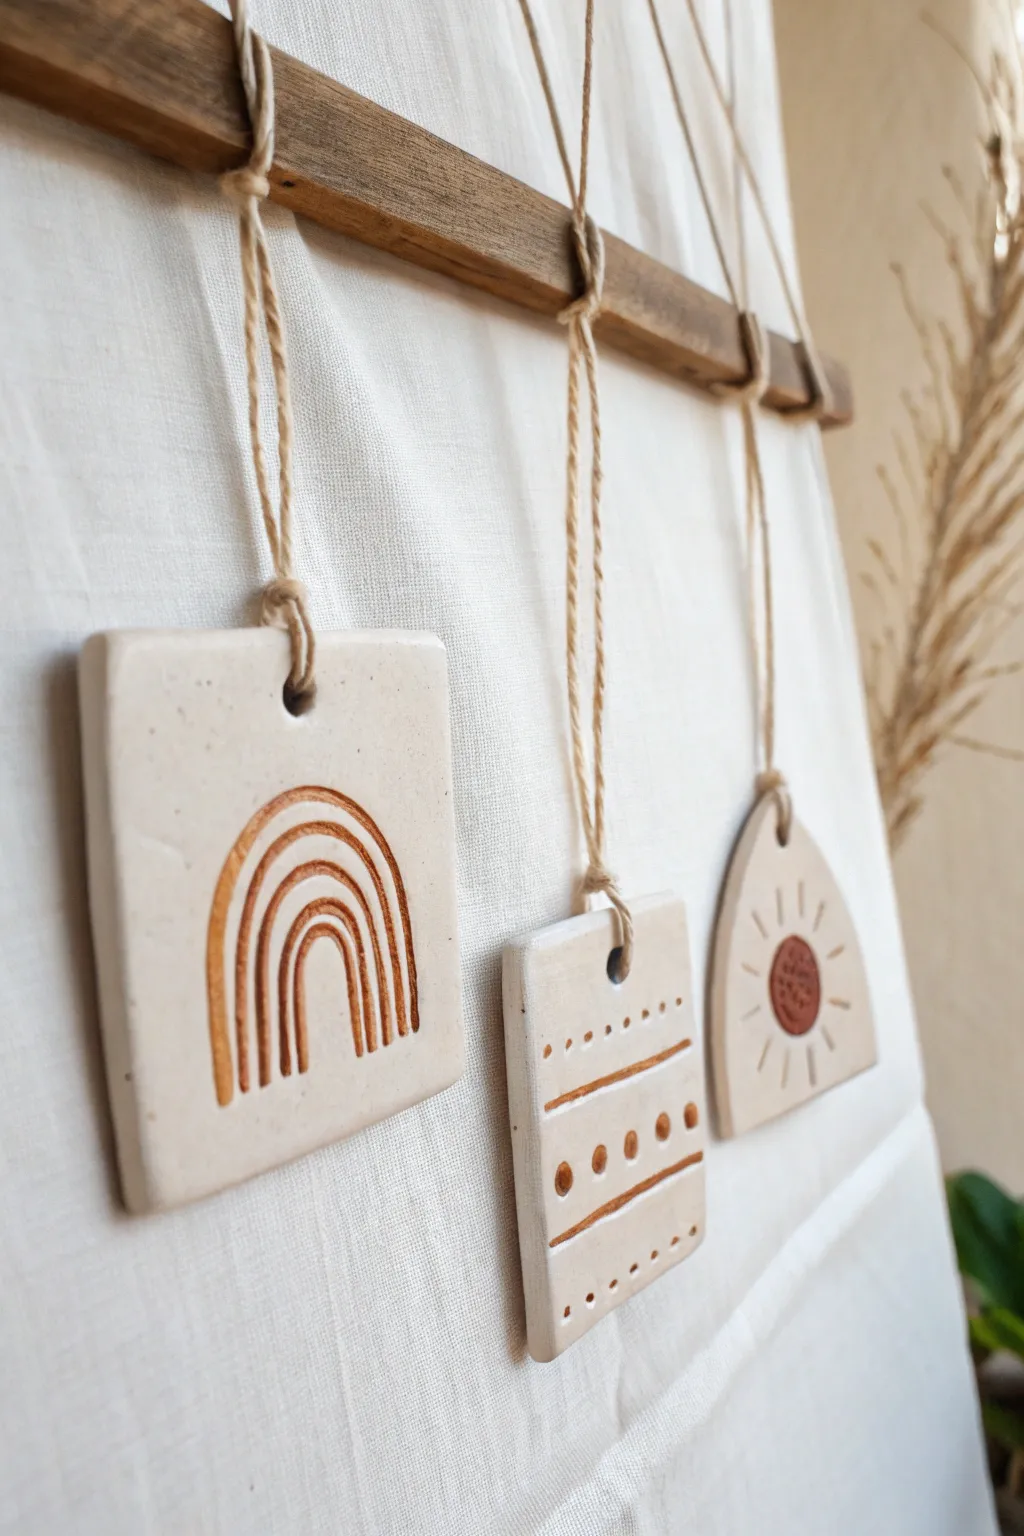
These charming hanging tiles bring a touch of earthy warmth and minimalist design to any wall space. Featuring simple geometric shapes and carved motifs filled with rich oxide tones, this project is a perfect introduction to slab building and surface decoration.
Detailed Instructions
Materials
- White or speckled stoneware clay
- Rolling pin
- Two wooden guide slats (approx. 1/4 inch thick)
- Needle tool or sharp knife
- Carving tools (loop tool or stylus)
- Straw or hole punch tool
- Red iron oxide wash or brown underglaze
- Small paintbrush
- Damp sponge
- Wooden dowel or driftwood branch
- Jute twine or hemp cord
- Clear matte glaze (optional)
Step 1: Preparing the Slabs
-
Roll the clay:
Begin by wedging your clay to remove air bubbles, then place it between two wooden guide slats. Roll the clay out into a smooth, even slab about 1/4 inch thick. -
Smooth the surface:
Before cutting, take a rubber rib or a slightly damp sponge and compress the surface of the clay to smooth out any canvas texture or imperfections. -
Cut the shapes:
Using a needle tool, cut out your desired shapes. For this set, cut one square (approx. 3×3 inches), one slightly smaller rectangle, and one arch shape. -
Refine the edges:
Once cut, gently run your finger or a damp sponge along the sharp edges of each tile to round them off slightly. This prevents them from being sharp after firing. -
Add hanging holes:
Use a drinking straw or a hole punch tool to create a clean hole centered near the top of each tile. Make sure the hole is not too close to the edge to prevent cracking.
Uneven Drying?
If your flat tiles start curling up at the edges while drying, flip them over daily and dry them slowly under a sheet of plastic to keep them perfectly flat.
Step 2: Carving the Designs
-
Let it firm up:
I like to let the slabs sit until they are ‘leather hard’—firm enough to hold their shape but soft enough to carve easily. This usually takes a few hours. -
Sketch lightly:
Use a needle tool to very faintly scratch your design onto the surface. For the square, sketch a rainbow arch; for the rectangle, lines and dots; and for the arch, a sunburst. -
Carve the rainbow:
For the rainbow tile, use a small loop tool to carve out deep, consistent grooves following your sketch lines. Aim for a confident, continuous stroke. -
Create the patterned tile:
On the rectangular tile, carve horizontal lines and press a rounded tool into the clay to create rows of indented dots between the lines. -
Sculpt the sunburst:
For the arch tile, carve radiating lines for sun rays. In the center, you can either carve a circle or slightly depress a circular area to hold more color later. -
Clean the crumbs:
Use a soft brush to gently sweep away any little clay crumbs created by the carving process.
Step 3: Decoration and Assembly
-
Apply color (Bisque Phase):
After your pieces have been bisque fired, apply red iron oxide wash or brown underglaze directly into the carved grooves and the sun center. -
Wipe back excess:
Use a clean, damp sponge to wipe the surface of the tile. This removes the color from the high points but leaves the rich brown pigment settled deep within the carved lines. -
Final wipe:
Continue wiping with a rinsed sponge until the surface is clean and the clay body’s natural white color contrasts sharply with the filled lines. -
Glaze and Fire:
You can leave the rest of the tile unglazed for a matte, stone-like finish, or dip the whole piece in a clear matte glaze before the final firing. -
Prepare the hanging rod:
While the ceramics are firing, find a piece of flat wood, a dowel, or a sturdy piece of driftwood. It should be wider than your three tiles combined. -
Attach the twine:
Cut three lengths of jute twine. Tie a loop through the hole of each finished tile using a secure knot like a lark’s head or a simple square knot. -
Mount designs:
Tie the other ends of the twine to your wooden rod, varying the heights slightly to create visual interest. The center tile usually looks best hanging slightly lower. -
Add master hanger:
Finally, tie a longer piece of twine to both ends of the wooden rod to create the main hanger for the wall.
Textured Touch
Before carving, gently press a piece of coarse linen or canvas onto the wet clay slab. This adds a subtle fabric texture that catches glaze beautifully.
Now you have a custom piece of ceramic art ready to warm up your favorite room
Mini Matcha Bowl With a Finger Notch Pour Spout

This beginner-friendly project guides you through creating your own ceremonial matcha bowl using simple hand-building techniques. The result is a charming, speckled vessel with an earthy two-tone glaze that feels wonderful in your hands.
Step-by-Step Guide
Materials
- Speckled buff stoneware clay
- Wooden sculpting tool
- Needle tool
- Sponge
- Water
- Rib tool (kidney)
- Celadon glaze (soft green)
- White or cream glaze (glossy)
- Small bowl layout for water
Step 1: Forming the Base
-
Prepare the Clay:
Start with a ball of clay roughly the size of a tennis ball. Wedge it thoroughly to remove any air bubbles, ensuring the clay is consistent and workable. -
Open the Pinch Pot:
Hold the ball in your non-dominant hand. Press your thumb gently into the center, stopping about a half-inch from the bottom to leave enough thickness for the base. -
Shape the Walls:
Using a rhythmic pinching motion, work your way around the clay. Pinch with your thumb on the inside and fingers on the outside, slowly rotating the ball to thin the walls evenly. -
Establish the Height:
Continue pinching upwards rather than just outwards. You want to create a slightly vertical wall profile typical of traditional matcha bowls (chawan), rather than a wide soup bowl shape. -
Level the Rim:
Once you have your desired height, set the bowl on a flat surface. Gently tap the rim with a flat wooden paddle or rulers to even out any high spots.
Step 2: Refining and Drying
-
Smooth the Surface:
Wait until the clay stiffens slightly to a leather-hard state. Use a damp sponge to wipe away fingerprints and smooth the exterior texture. -
Shape the Curve:
Take a flexible rib tool and run it along the interior curve. This compresses the clay and ensures a smooth, sweeping inside surface which is crucial for whisking matcha without trapping powder. -
Create the Foot:
Flip the bowl over carefully. With a sculpting tool, carve a shallow ring into the base to define a slight foot, or simply smooth the bottom flat if you prefer a modern look. -
Bisque Fire:
Let the bowl dry slowly under plastic for several days to prevent cracking. Once bone dry, fire the piece in a kiln to bisque temperature (usually Cone 04).
Uneven Walls?
If one side feels thicker while pinching, focus pressure only on that area. Use a needle tool to gauge thickness if you aren’t sure.
Step 3: Glazing
-
Wax the Bottom:
Apply wax resist to the bottom inch of the exterior and the underside of the foot. This creates that beautiful raw clay band shown in the image. -
Interior Glaze Pour:
Pour a glossy soft green glaze into the bowl, swirl it quickly to coat the entire interior, and pour the excess out immediately. -
Exterior Dipping:
Hold the bowl by the foot (or using tongs) and dip the exterior into a cream or white glaze, stopping exactly where the wax line begins. I like to hold it there for three seconds for good coverage. -
Clean Up:
Once the glaze is dry to the touch, use a damp sponge to clean any stray drips off the waxed bottom section. The unglazed clay needs to be perfectly clean before firing. -
Final Fire:
Fire the piece for a second time to your clay body’s maturity temperature (likely Cone 5 or 6) to vitrify the clay and melt the glaze.
Add Texture
Before the clay dries, gently press a coarse fabric or linen towel against the outside to create a subtle, tactile pattern.
Now you have a tranquil vessel ready for your morning tea ritual