If you love the feel of clay in your hands, these ideas are all about shaping satisfying projects with simple hand-building—no wheel, no fancy setup. I’m sharing my favorite beginner-friendly makes you can pull off at a kitchen table with air-dry clay, kiln clay, or polymer clay, letting those sweet little fingerprints be part of the magic.
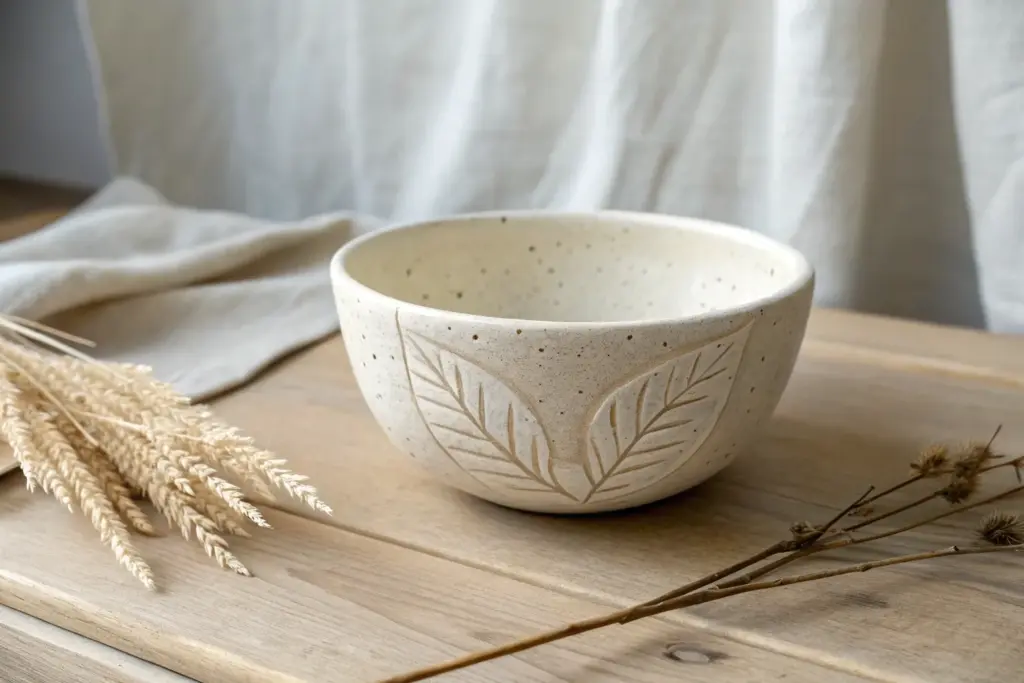
Pinch Pot Trinket Bowls
Embrace the organic beauty of handmade pottery with these charming pinch pot trinket bowls. Featuring a natural speckled clay body and a creamy white glaze, they make the perfect minimalist home for your favorite rings and small treasures.
Step-by-Step Guide
Materials
- Speckled clay body (stoneware or polymer clay with speckles)
- Pottery sponge
- Water cup
- Wooden modeling tool or old spoon
- Fettling knife or needle tool
- Creamy white glaze (food safe if using for food)
- Kiln (if using real clay) or oven (if using polymer)
- Small paintbrush
Step 1: Forming the Base
-
Prepare your clay:
Cut off a small lump of clay, roughly the size of a tangerine. Pat it firmly between your palms until it forms a smooth, round ball without any cracks. -
Open the center:
Hold the clay ball in your non-dominant hand. Gently press your thumb directly into the center of the ball, stopping about a half-inch from the bottom to ensure a sturdy base. -
Pinch the walls:
Starting at the bottom and working your way up, gently pinch the clay between your thumb (inside) and fingers (outside). rotate the ball slightly with each pinch to keep the thickness even. -
Shape the vessel:
Continue rotating and pinching until the walls are about 1/4 inch thick. Aim for a gently curving, open shape rather than perfectly straight walls to mimic the organic feel in the photo. -
Tap the bottom:
Gently tap the pot’s base against your work surface. This flattens the bottom just enough so it sits stable without tipping over.
Uneven Walls?
If one side feels thicker, don’t just pinch that spot. Gently push clay from the thick area toward a thinner area to redistribute the mass evenly.
Step 2: Refining and Drying
-
Smooth the lip:
Dampen a small sponge slightly. Run it gently over the rim of the bowl to soften any sharp edges, but don’t over-smooth; a little irregularity adds character. -
Refine the surface:
If I want a cleaner look, I use the rounded back of a spoon to burnish the outside, smoothing out any obvious fingerprints while leaving the pleasant handmade texture. -
Check density:
Feel the walls again to ensure there aren’t any dangerously thin spots or uneven lumps. Use your thumb to gently press out any inconsistencies. -
Slow drying:
If using stoneware clay, cover the bowl loosely with plastic for the first day to let it dry slowly, then uncover it until it reaches the bone-dry stage. If using polymer, proceed to baking instructions. -
Bisque fire:
For ceramic clay, fire the piece to bisque temperature (usually cone 04 or 06) according to your clay manufacturer’s instructions.
Smooth Rims
Use a strip of soft leather or a chamois cloth dampened with water to compress the rim. It smooths cracks better than a sponge without removing too much grit.
Step 3: Glazing and Finishing
-
Clean the bisque:
Once fired and cooled, wipe the bisque ware with a damp sponge to remove any kiln dust that might resist the glaze. -
Apply glaze:
Dip your brush into a creamy, opaque white glaze. Coat the interior of the bowl thoroughly. -
Glaze the exterior:
Paint the exterior walls, stopping just short of the rim to leave a thin line of exposed clay texturing at the very edge if you like that contrast. -
Create the exposed foot:
Wipe away any glaze about half an inch up from the bottom on the outside. This exposed ‘foot’ reveals the beautiful toasted color of the raw clay. -
Final wipe:
Ensure the absolute bottom that touches the shelf is completely free of glaze to prevent sticking. -
Glaze fire:
Load the kiln carefully and fire to the glaze maturity temperature (often cone 5 or 6 for stoneware) to melt the glass and seal the clay.
Once cooled, your durable little bowl is ready to safeguard your jewelry on a bedside table or vanity


Coil-Built Snack Bowls
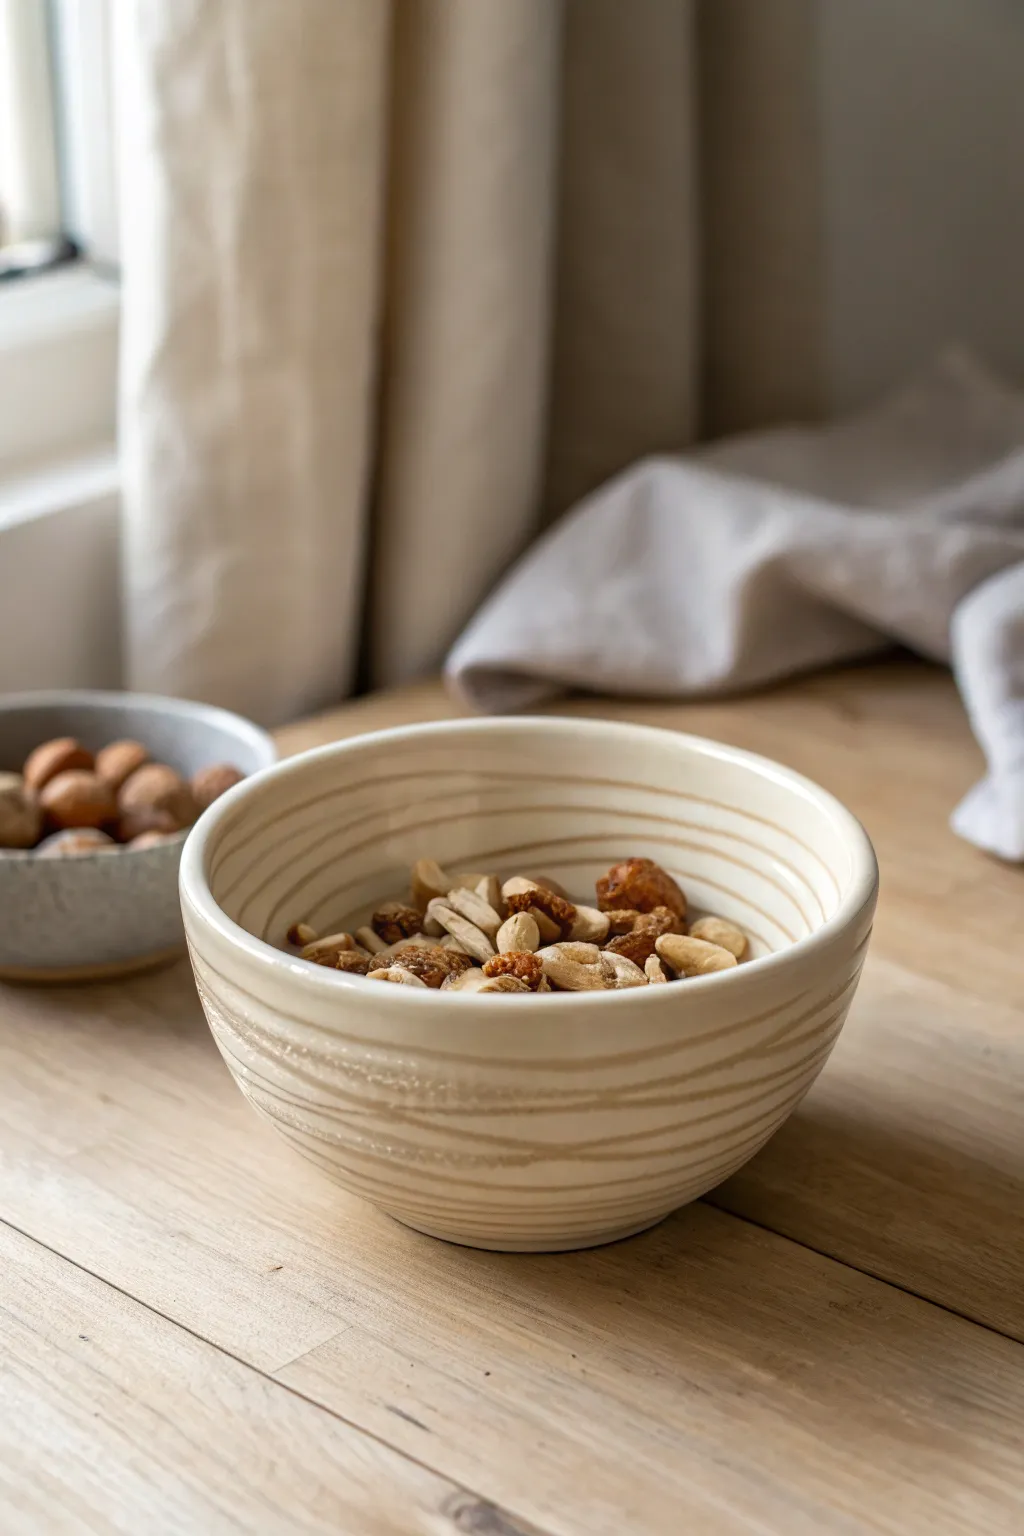
Create a charmingly rustic snack bowl that balances organic texture with clean design lines. This project uses the traditional coil-building method to form a sturdy vessel, finished with hand-painted horizontal stripes for a modern farmhouse aesthetic.
Detailed Instructions
Materials
- Stoneware clay (buff or white)
- Clay cutting wire
- Rolling pin
- Serrated rib tool
- Smooth kidney rib tool (rubber or metal)
- Needle tool
- Sponge
- Slip (clay mixed with water)
- Underglaze (soft brown or taupe)
- Small round paintbrush
- Bandings wheel (optional but helpful)
- Clear dipping glaze
Step 1: Forming the Base
-
Prepare the Clay:
Begin by wedging a ball of stoneware clay thoroughly to remove any air pockets and ensure an even consistency. -
Roll the Slab:
Roll out a slab of clay to about 1/4 inch thickness. This will serve as the flat bottom of your bowl. -
Cut the Base:
Use a needle tool or a round cookie cutter to cut a perfect circle roughly 3-4 inches in diameter. -
Score and Slip:
Using your serrated rib, score the outer edges of your circle base and apply a generous amount of slip.
Step 2: Building the Walls
-
Roll Coils:
Roll out several long, snake-like coils of clay. Aim for a thickness similar to your pinky finger for a delicate but sturdy wall. -
Attach First Coil:
Place the first coil on the scored edge of the base. Gently press it down to ensure good contact. -
Blend the Clay:
Using your thumb or a wooden modeling tool, smudge the clay from the coil down onto the base on the inside. Repeat on the outside to seamlessly join the pieces. -
Build Height:
Score the top of the first coil, add slip, and stack the next coil. Continue this process, slightly widening the diameter of each ring to create an outward-flaring bowl shape. -
Shape while Building:
As you add height, pause to smooth and compress the walls. I find it helpful to support the outside with one hand while smoothing the inside with a rib to maintain the curve. -
Smooth the Surface:
Once the bowl reaches your desired height (about 3-4 inches), use a flexible metal rib to scrape away all coil lines on both the interior and exterior until the surface is uniform and smooth. -
Refine the Rim:
Use a damp chamois or a wet sponge to gently compress and round off the top rim for a comfortable, finished edge.
Cracks Appearing?
If you see cracks forming while coil building, your clay might be too dry. Score the area deeply, add extra slip, and compress the clay firmly.
Step 3: Decorating and Glazing
-
Bisque Fire:
Allow the bowl to dry slowly under plastic to prevent warping, then bisque fire it in the kiln. -
Prepare for Painting:
Wipe the bisque-fired bowl with a damp sponge to remove any kiln dust. -
Position the Bowl:
Place the bowl on a banding wheel. If you don’t have one, just place it on a scrap of paper you can easily rotate manually. -
Paint the Stripes:
Load a small round brush with brown underglaze. Hold your hand steady against the table and gently spin the wheel, allowing the brush to drag across the surface to create organic, slightly wavy horizontal lines. -
Vary the Line Weight:
Embrace the imperfection; let some lines be thicker and others thinner or slightly undulating, just like the reference photo. -
Glaze Application:
Once the underglaze is dry, dip the entire bowl into a clear gloss glaze to seal it and make it food-safe. -
Final Firing:
Fire the piece again to the appropriate temperature for your specific glaze and clay body.
Pro Tip: Seamless Walls
Hold a wooden spoon against the inside wall while paddling the outside with a flat tool. This compresses the clay coils tightly for a super-strong vessel.
Fill your new handmade bowl with your favorite trail mix and enjoy the natural beauty of your craftsmanship


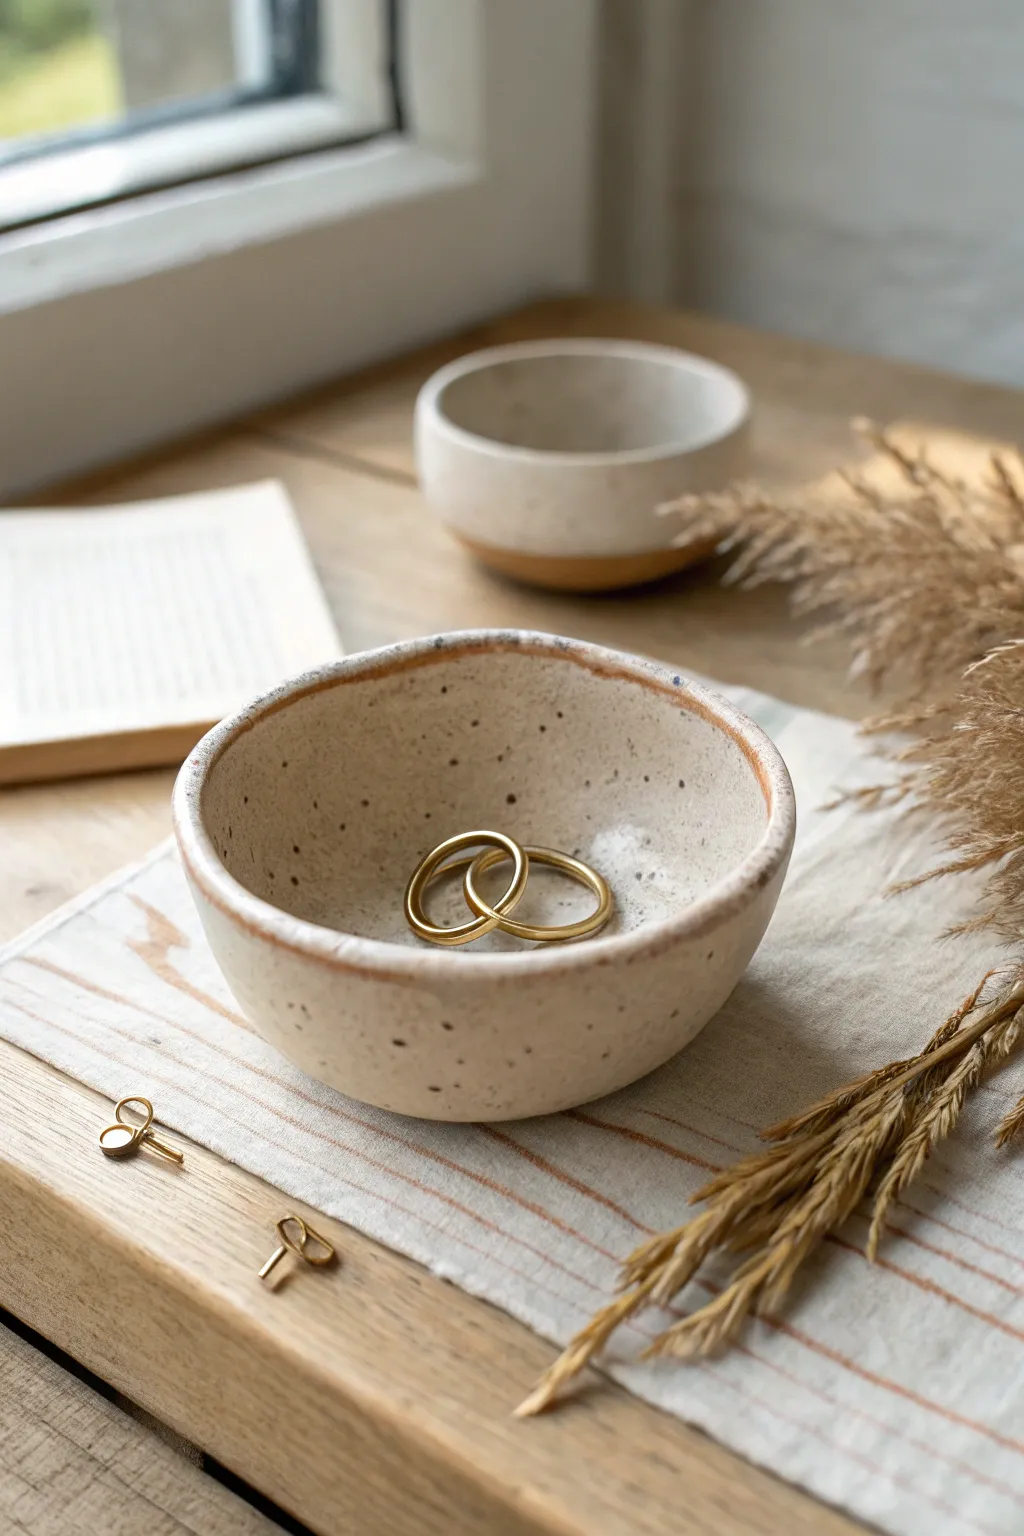
Slab-Built Ring Dishes

This charming, minimalist ring dish features a soft square shape with gently lifted edges, perfect for holding your daily jewelry. The natural speckled clay body shines through a milky white glaze, accented by a warm, toasted rim that gives it a rustic, handmade elegance.
Step-by-Step Guide
Materials
- Speckled buff stoneware clay
- Rolling pin
- Canvas work surface or slab mat
- Two wooden guide strips (1/4 inch thick)
- Needle tool or fettling knife
- Square paper template (approx. 4×4 inches)
- Small soft sponge
- Rib tool (flexible rubber or metal)
- Milky white or semi-transparent cream glaze
- Small paintbrush (for rim accent, optional)
- Kiln (or access to firing services)
Step 1: Creating the Slab Base
-
Prepare the clay:
Start with a ball of speckled buff clay about the size of a tennis ball. Wedge it thoroughly to remove any air bubbles and ensure the consistency is even throughout. -
Set up guides:
Place your canvas or slab mat on a flat work surface. Position your two wooden guide strips on either side of the clay ball to ensure a consistent thickness. -
Roll the slab:
Using your rolling pin, roll the clay out until the rolling pin rests on the guide strips. Roll in multiple directions to compress the clay particles, which helps prevent warping later. -
Smooth the surface:
Take your flexible rib tool and gently drag it across the surface of the slab. This compresses the clay further and removes the canvas texture, creating a smooth canvas for your glaze. -
Cut the shape:
Place your square paper template gently onto the clay slab. Using a needle tool or fettling knife, trace around the template, holding the tool perpendicular to the table for a straight edge. -
Round the corners:
Once the square is cut, use your finger or a tool to gently round off the sharp corners. This gives the dish that soft, organic look seen in the photo rather than a harsh geometric shape.
Rim Definition Tip
For that distinct brownish rim, try using a clay body that naturally toasts dark at the edges, or lightly sponge an iron oxide wash onto the rim after glazing.
Step 2: Forming and Refining
-
Soften the edges:
Dip your finger in a tiny bit of water and run it along the cut edges of the square to smooth them down. You want to remove any sharp burrs left by the cutting tool. -
Lift the rim:
Place the square on a piece of foam or cup it in your hand. Gently press the center of the square down with your thumb while using your other fingers to lift the edges upward. -
Define the curve:
Work your way around the perimeter, ensuring the lift is gradual. The edges should curve up gently like a shallow bowl, not bend sharply at a 90-degree angle. -
Check the profile:
Set the dish down on a flat surface to check its form. Adjust the rim height to be consistent all the way around. I like to tap the bottom gently to ensure it sits flat without rocking. -
Dry slowly:
Cover the dish loosely with plastic and let it dry slowly to the bone-dry stage. Rushing this can cause warping, especially with flat slab pieces. -
Bisque fire:
Once bone dry, fire the piece in a kiln to cone 04 (or your clay body’s recommended bisque temperature).
Step 3: Glazing the Dish
-
Clean the bisque:
Wipe the bisque-fired dish with a damp sponge to remove any dust. This step is crucial for preventing pinholes in the glaze. -
Apply the glaze:
Dip the dish or brush on a semi-transparent cream or milky white glaze. You want a glaze that breaks over texture so the speckles of the clay body can show through. -
Create the rim:
To achieve the toasted rim effect, gently wipe away the glaze from the very edge of the rim with a damp sponge, exposing the raw clay. Alternatively, brush a thin line of iron oxide wash on the edge. -
Clean the foot:
Ensure the bottom of the dish is completely free of glaze. Wipe it with a clean, damp sponge up to about 1/8 inch from the bottom edge. -
Final fire:
Place the glazed dish in the kiln for the glaze firing, typically cone 5 or 6 depending on your clay and glaze specifications.
Warping Woes?
If your slab dishes curl up during drying, weigh them down gently with a small sandbag in the center during the leather-hard stage to keep the bottom flat.
Now you have a serene little spot to keep your favorite rings safe


Hand-Shaped Catchall Trays
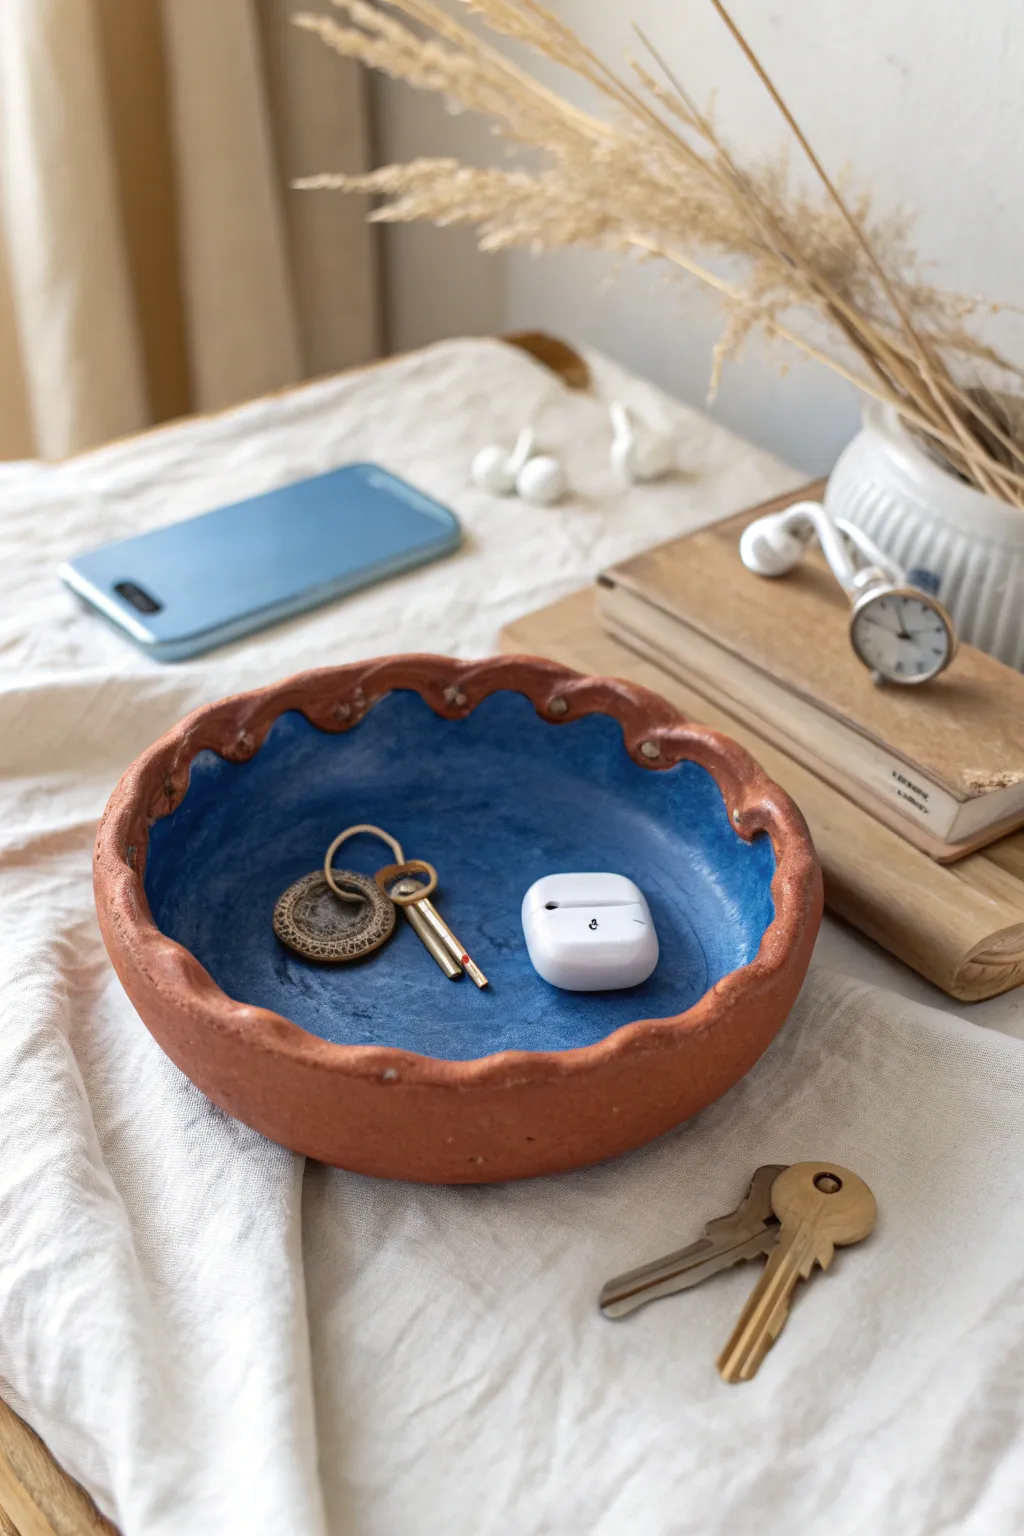
This rustic yet refined catchall tray combines the warmth of terracotta with a striking pop of indigo blue. Its organic, wavy rim and hand-molded texture make it a perfect landing spot for keys and daily essentials.
Detailed Instructions
Materials
- Terracotta air-dry clay (or oven-bake polymer clay)
- Rolling pin
- Circle template (a bowl or plate, approx. 6-7 inches)
- Small knife or clay cutting tool
- Small bowl for molding (slump mold)
- Sponge
- Water cup
- Acrylic paint (Cobalt Blue or Ultramarine)
- Medium flat paintbrush
- Matte or satin varnish
Step 1: Forming the Base
-
Roll the slab:
Begin with a large handful of terracotta clay. Knead it until soft and pliable, then roll it out to a consistent thickness of about 1/4 inch on a clean, flat surface. -
Cut the circle:
Place your circle template (a bowl or plate) onto the clay slab. Use your knife or cutting tool to trace around it, creating a clean clay disc. -
Smooth the edges:
Dip your finger in a little water and run it along the cut edge of the clay disc to smooth out any roughness or sharp debris.
Smooth Operator
Use a barely damp sponge during the smoothing step. Too much water weakens air-dry clay and can cause cracking as it shrinks during drying.
Step 2: Shaping the Bowl
-
Place on the mold:
Take the clay disc and gently place it inside your molding bowl. Press it down lightly so it conforms to the concave shape, establishing the bowl’s depth. -
Create the scalloped rim:
Using your thumb and forefinger, pinch the rim of the clay at regular intervals. Push inward with your index finger while supporting the clay on either side with your thumbs to create a rhythmic wave pattern. -
Refine the waves:
Go around the rim a second time to deepen the scallops. I like to make sure the peaks are rounded rather than sharp for a softer, organic look. -
Detail the peaks:
Use the back of a small paintbrush or a rounded tool to press a small indentation or dot into the center of every other wave peak for added texture. -
Smooth surface:
Use a slightly damp sponge to wipe down the interior surface, removing inevitable fingerprints and ensuring a smooth area for painting later. -
Initial drying:
Let the clay dry inside the mold for roughly 24 hours (or according to package directions) until it is firm enough to hold its shape. -
full cure:
Once firm, remove the clay from the mold carefully. Turn it upside down to allow the bottom to dry completely. Wait until the clay turns a lighter, chalky color.
Step 3: Painting and Finishing
-
Outline the interior:
Using your blue acrylic paint and a medium brush, carefully paint a line just below the scalloped rim on the inside. Leave the very top edge and the outer rim unpainted to show the raw terracotta. -
Fill the basin:
Paint the rest of the interior bowl surface with the blue paint. Apply smooth strokes from the center outward toward your rim line. -
Second coat:
Let the first layer dry for 20 minutes. Apply a second coat of blue to achieve an opaque, vibrant finish that contrasts sharply with the clay. -
Dry completely:
Allow the paint to fully cure for at least an hour before touching it. -
Seal the piece:
Apply a coat of matte or satin varnish over the entire painted interior. This protects it from scratches when you toss your keys in.
Rim Variations
Instead of pinching, try using the handle of a wooden spoon to press indentations into the rim for a more uniform, mechanical scallop pattern.
Place this stylish organizer on your entryway table and enjoy a clutter-free space

The Complete Guide to Pottery Troubleshooting
Uncover the most common ceramic mistakes—from cracking clay to failed glazes—and learn how to fix them fast.
Thumb-Pressed Tea Light Holders
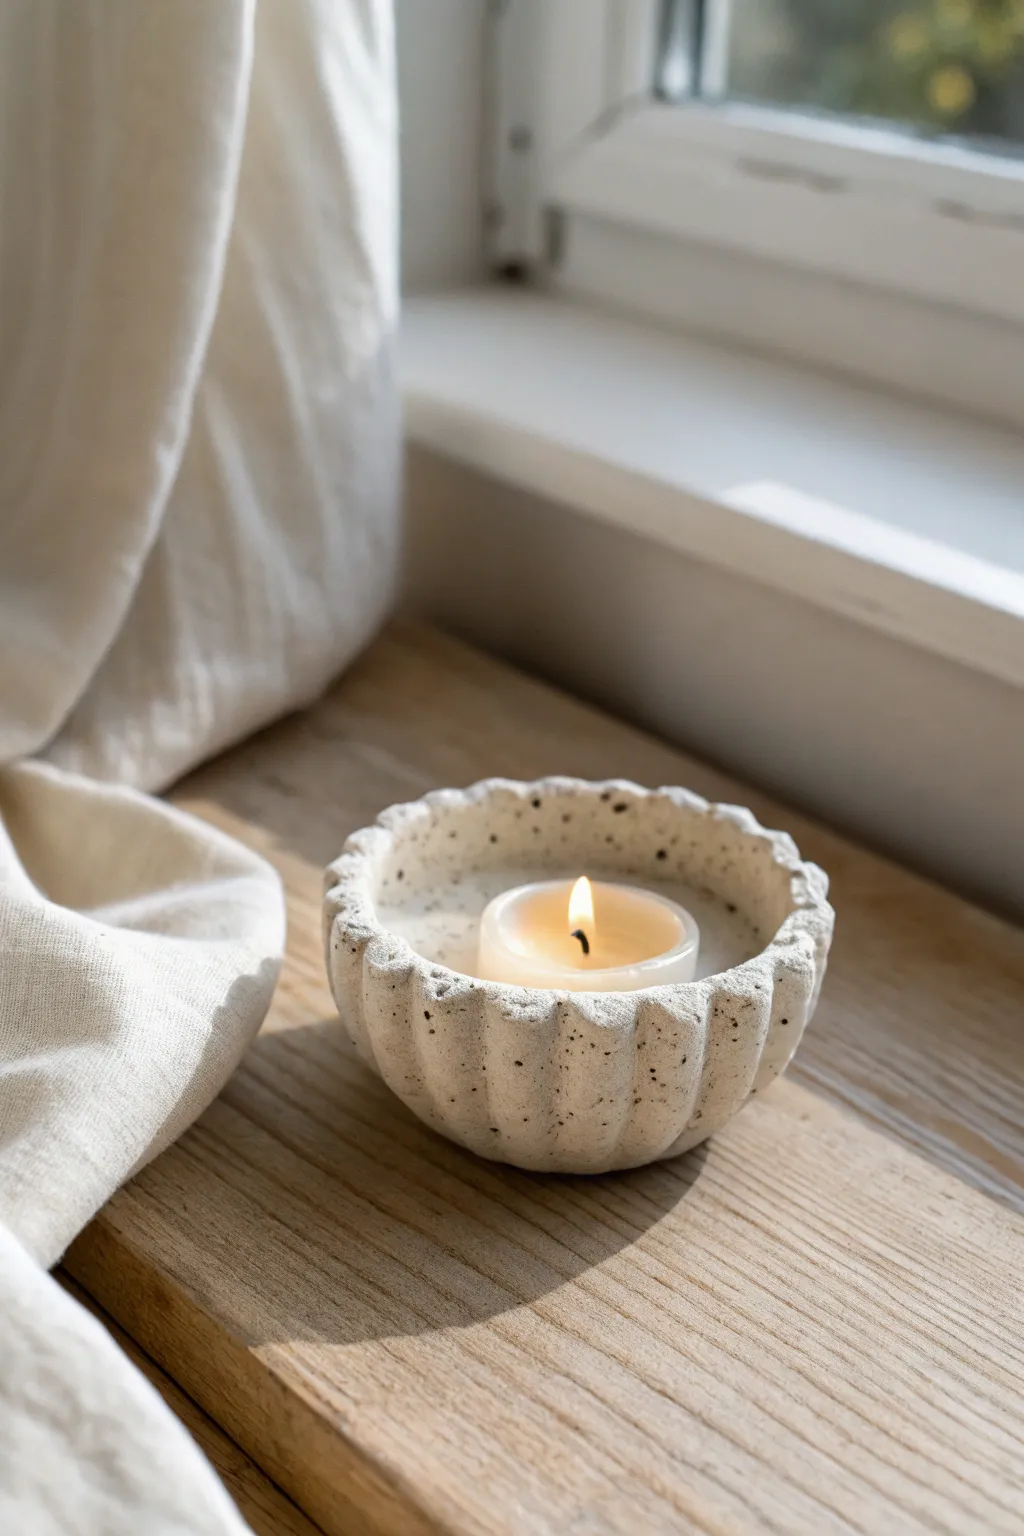
Embrace the imperfect beauty of hand-building with this charming, pebble-textured tea light holder. Its organic, fluted rim and creamy speckled finish create a cozy, minimalist accent perfect for warming up a windowsill.
Step-by-Step Guide
Materials
- Speckled stoneware clay (white or cream)
- Canvas mat or work surface
- Rolling pin
- Circle cutter (approx. 3-4 inches diameter) or a cup to trace
- Needle tool or fettling knife
- Small sponge
- Bowl of water
- Tea light candle (for sizing)
- Wooden modeling tool (optional)
Step 1: Forming the Base
-
Prepare the clay:
Begin by wedging a small ball of speckled stoneware clay to remove air bubbles. You want a piece roughly the size of a large tangerine. -
Roll a slab:
On your canvas mat, roll the clay out into an even slab. Aim for a thickness of about 1/4 inch—not too thin, as the walls need stability. -
Cut the circle:
Use your circle cutter or place a wide-mouthed cup onto the clay to trace a circle. Cut it out cleanly with your needle tool or knife. -
Soften the edges:
Before shaping, run a slightly damp finger around the raw cut edge of the circle to smooth away any sharp burrs or crumbs.
Step 2: Shaping the Bowl
-
Pinch the walls:
Gently lift the edges of the circle. Using your thumb on the inside and fingers on the outside, pinch lightly to curve the clay upward, creating a shallow bowl shape. -
Check the size:
Place your tea light candle loosely inside the form. Ensure there is at least a half-inch of clearance on all sides to allow for shrinkage during drying and firing. -
Refine the curve:
Smooth the interior floor of the bowl with your thumb so the candle will sit flat. Work the walls until they are an even height all around.
Clean Edges
Use a piece of thin plastic wrap over the clay when cutting your initial circle. The plastic pulls the edges down slightly, creating a naturally rounded rim that needs less smoothing.
Step 3: Creating the Texture
-
Mark the intervals:
Visualize the rim like a clock face to help space out your fluting evenly. You don’t need to mark it physically, just get a sense of the rhythm. -
Press the flutes:
Support the outside of the wall with two fingers. With your other hand, use a finger or the handle of a wooden tool to press an indentation gently from the inside out. -
Repeat the pattern:
Move along the rim, pressing indentations at regular intervals. I find that rocking my finger slightly helps create that soft, rounded scallop shape shown in the image. -
Adjust the rim:
After pressing all the flutes, the rim might look a bit jagged. Gently tap the top edge with a flat tool or your finger to level it back out. -
Define the grooves:
Go back over the vertical grooves on the outside of the bowl. Deepen them slightly with a modeling tool to emphasize the pillar-like texture.
Go Translucent
Try using porcelain clay instead of stoneware. When fired high, the thin scalloped walls will become slightly translucent, glowing beautifully when the candle is lit.
Step 4: Surface Finishing
-
Smooth the imperfections:
Take your damp sponge—make sure it’s squeezed out well—and gently wipe the rim and the exterior. This softens the look and exposes more of the clay’s speckled grit. -
Refine the bottom:
Flip the piece over carefully. Use your thumb to slightly concave the bottom center; this ensures the holder sits stable on its outer rim rather than spinning on a bulging center. -
Final smooth:
Give the piece one last look. Smooth away any fingerprints, as the glaze will highlight rather than hide them.
Step 5: Drying and Firing
-
Dry slowly:
Loosely cover the finished piece with plastic for the first day to equalize the moisture, then uncover and let it dry completely to the bone-dry stage. -
Bisque fire:
Fire the piece in a kiln to cone 04 (or your clay’s specific bisque temperature). -
Glaze application:
Dip the piece in a matte white or clear glaze. The speckled clay body does most of the decorative heavy lifting here, so a transparent or semi-transparent glaze works best. -
Final firing:
Fire again to the clay’s maturity temperature (likely cone 5 or 6 for stoneware) to finish the piece.
Now you have a serene little vessel ready to hold a warm glow in your favorite corner
Simple Soap Dishes With Drain Holes
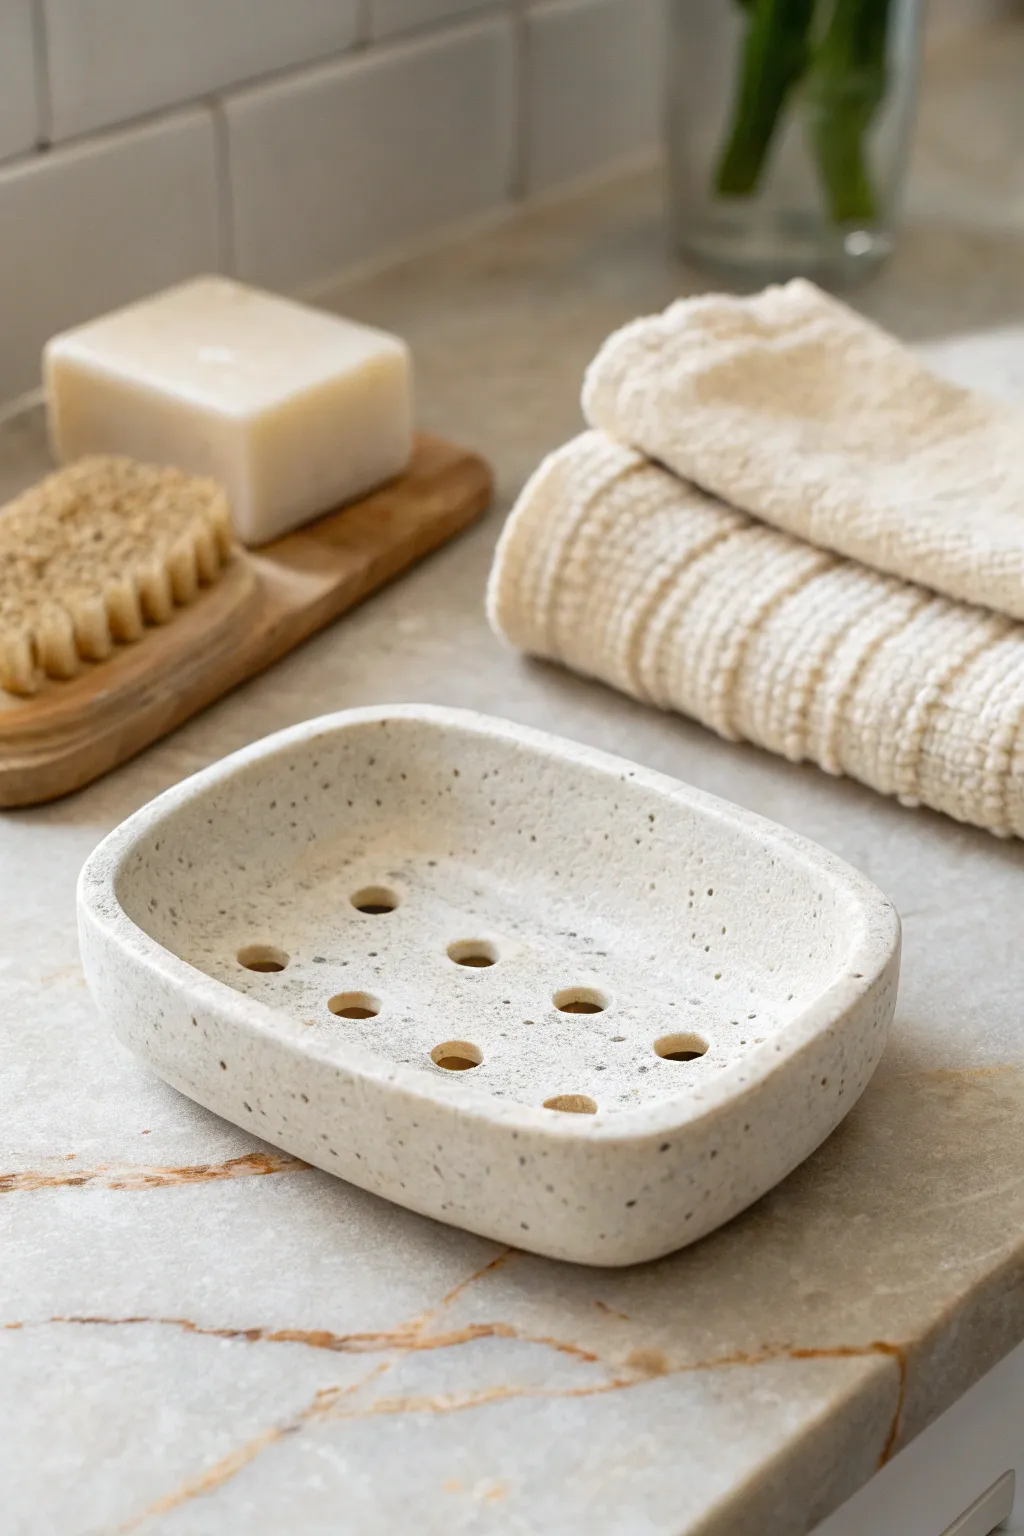
Bring a touch of organic minimalism to your bathroom with this sturdy, speckled ceramic soap dish. The design features a gently curved rim to keep soap in place and essential drainage holes to extend the life of your favorite bars.
Detailed Instructions
Materials
- Speckled stoneware clay (or polymer clay with granite effect)
- Rolling pin
- Two wooden guide strips (approx. 1/4 inch thick)
- Kidney scraper (metal or rubber)
- Needle tool or fettling knife
- Small circular cookie cutter or bottle cap (approx. 1/4 inch diameter)
- Oval template (paper or cardboard)
- Sponge
- Canvas mat or work surface
- Small bowl relative to your template size (for shaping)
- Sandpaper (optional, for post-firing)
Step 1: Preparing the Slab
-
Wedge the clay:
Begin by thoroughly wedging a ball of speckled clay to remove air bubbles and ensure an even consistency. A ball roughly the size of a large orange should be sufficient. -
Set up guides:
Place your canvas mat on a flat work surface. Lay down your two wooden guide strips parallel to each other, slightly wider than you plan to roll the clay. -
Roll the slab:
Place the clay ball between the guides and use your rolling pin to flatten it. Roll smoothly back and forth until the pin rests on the wooden strips, ensuring a perfectly even thickness. -
Compress the surface:
Take a rubber or metal kidney scraper and firmly drag it across the surface of the clay slab. This compresses the particles, preventing warping later, and creates that smooth finish we want.
Warping Woes
If your dish rocks or wobbles after drying, gently sand the bottom flat on a piece of drywall screen before the first firing to level it out.
Step 2: Shaping the Form
-
Cut the oval:
Place your oval paper template onto the slab. Using a needle tool or fettling knife, trace around the edge, holding the tool perpendicular to the table for a clean, straight cut. -
Smooth the edges:
Dip your finger or a small piece of sponge in water and run it gently around the cut rim to soften the sharp angle left by the knife. -
Create the curve:
To get that gentle, enclosed shape seen in the photo, lift your clay oval and gently press it into a shallow, foam-lined mold or drape it into a shallow bowl lined with plastic wrap. You don’t want a deep bowl shape, just a subtle lift at the edges. -
Refine the lip:
While it sits in the slight curve, use a damp sponge to compress the rim again. I find this step crucial for making the dish look professional rather than handmade.
Raised Feet
Add four tiny balls of clay to the underside corners before drying. This lifts the dish off the counter, improving air circulation underneath.
Step 3: Adding Details & Finishing
-
Mark the holes:
Using a ruler, lightly mark a grid of dots in the center of the dish where the drainage holes will go. Aim for symmetrical spacing to match the clean aesthetic. -
Punch drainage holes:
Use a small circular cutter, a straw, or a specialized hole-punch tool to remove the clay at your marked spots. Twist the tool as you push through to keep the circle clean. -
Clean the undersides:
Flipping the piece over (carefully, so you don’t lose the curve), engage any ragged bits of clay pushed through from the punching process using a fettling knife or sponge. -
Dry slowly:
Cover the dish loosely with plastic to let it dry slowly over a few days. This prevents the rim from warping as the moisture evaporates. -
Bisque fire:
Once bone dry, fire the piece to bisque temperature (usually Cone 04) based on your specific clay body’s instructions. -
Glaze application:
For the look in the photo, apply a matte, transparent glaze or a satin white glaze that allows the natural speckles of the clay to show through. Avoid thick, opaque glazes. -
Wipe the foot:
Ensure the bottom of the dish is free of glaze so it doesn’t stick to the kiln shelf. -
Final firing:
Fire the piece to its final maturity temperature (often Cone 5 or 6 for stoneware). Let the kiln cool completely before retrieving your new soap dish.
Place your finished dish by the sink and enjoy the clean, functional beauty it adds to your daily routine


What Really Happens Inside the Kiln
Learn how time and temperature work together inside the kiln to transform clay into durable ceramic.
Mini Pinch Pot Planters
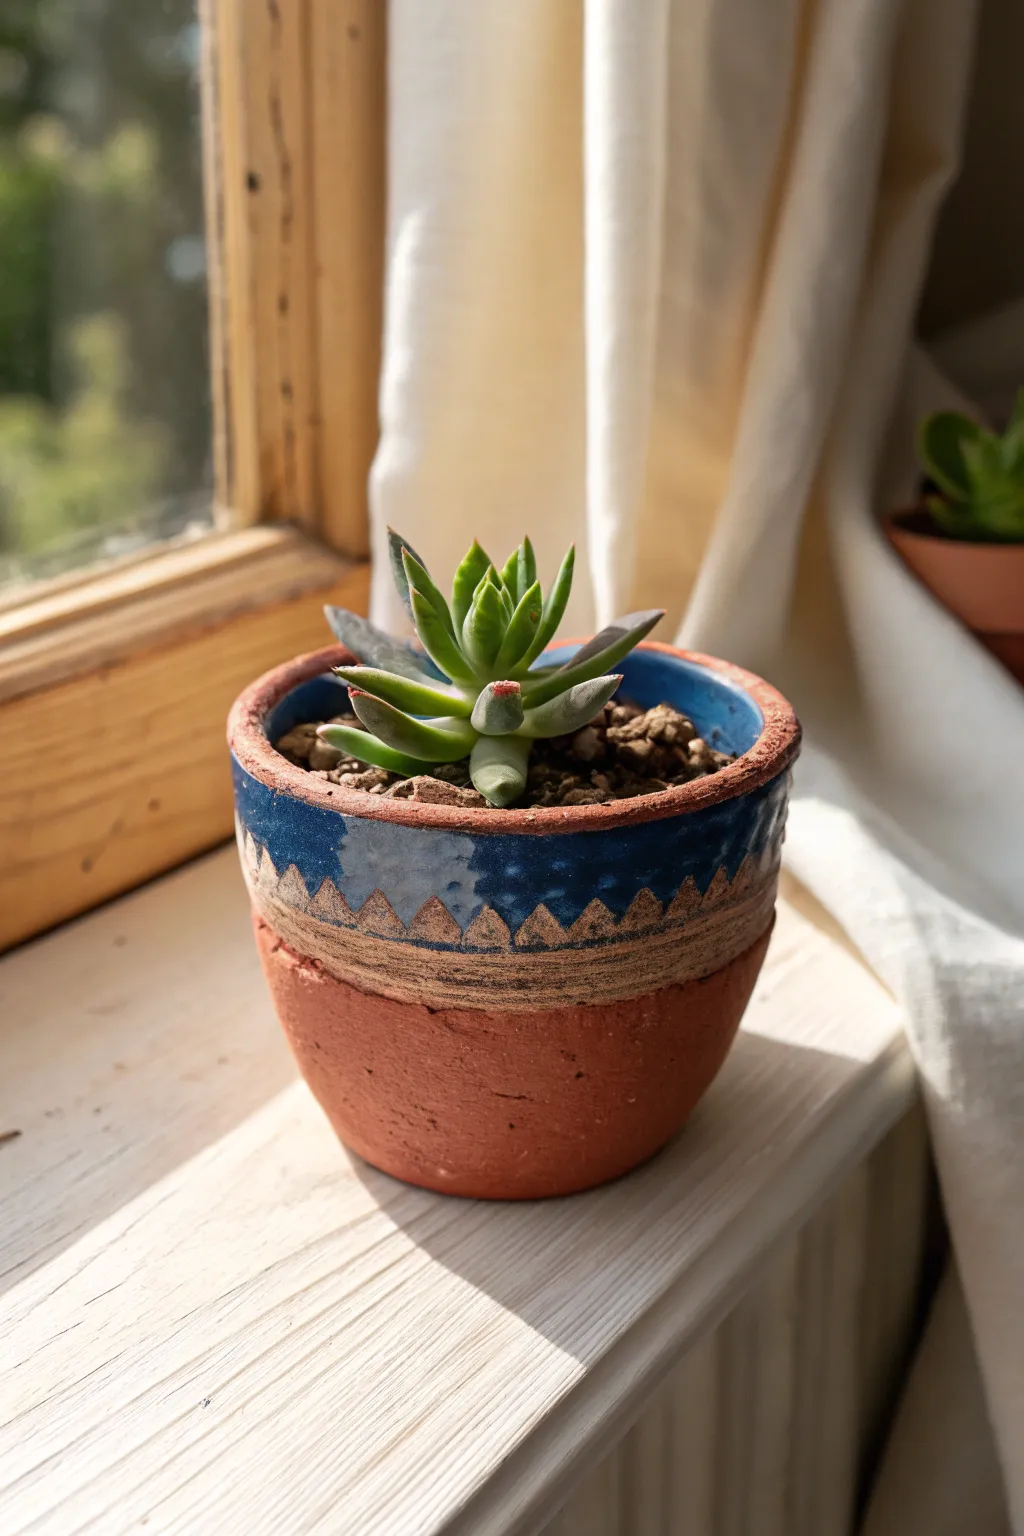
This charming mini planter combines the rustic warmth of unglazed terra cotta with a striking band of deep blue glaze. The carved geometric details around the rim add a delightful texture that makes this tiny pot feel like a treasured artifact.
Detailed Instructions
Materials
- Terra cotta clay (air-dry or kiln-fire depending on access)
- Clay carving tools (needle tool or small loop tool)
- Deep blue ceramic glaze or acrylic paint (if using air-dry)
- Earth-tone brown glaze or acrylic paint
- Small paintbrush
- Sponge and water
- Clear sealant (if using air-dry clay)
Step 1: Forming the Base
-
Prepare the Clay:
Start with a ball of terra cotta clay roughly the size of a tangerine. Wedge it well to remove air bubbles, ensuring the consistency is smooth and pliable. -
Make the Pinch Pot:
Hold the ball in one hand and press your thumb into the center, stopping about a half-inch from the bottom. Gently pinch the clay between your thumb and fingers, rotating the ball as you go to thin the walls evenly. -
Shape the Cylinder:
Once the hole is established, gently pull the walls upward to create a slight cylindrical shape rather than a perfect bowl. The sides should be relatively straight but can taper slightly inward at the bottom. -
Flatten the Rim:
Tap the rim gently against a flat surface to level it, or use a flat wooden tool to paddle it flat. You want a distinct lip for the decoration later. -
Smooth the Surface:
Use a slightly damp sponge to smooth out any fingerprints or cracks on the exterior. I find that smoothing it now saves a lot of sanding time later.
Step 2: Carving and Details
-
Define the Glaze Line:
Using a needle tool, lightly score a horizontal line around the circumference of the pot, about one-third of the way down from the rim. This marks where the glazed section will end. -
Carve the Lower Band:
Just above your scored line, carve a second horizontal line about a quarter-inch higher. This creates a narrow band that will separate the main body from the blue upper section. -
Sketch the Zig-Zags:
Lightly scratch a zig-zag or triangular pattern into the clay inside the top band area. Don’t dig too deep yet; just plan out the spacing so the triangles meet up nicely. -
Deepen the Pattern:
Go back over your zig-zag lines with a carving tool to make them distinct grooves. The goal is to create a physical texture that the glaze will break over or fill into. -
Dry the Pot:
Let the clay dry completely. If you are using kiln-fire clay, this is the bisque firing stage. If using air-dry clay, wait 24-48 hours until it is bone dry and hard.
Clean Lines
Use masking tape to mark off the bottom section of the pot before painting. This ensures your glaze line stays perfectly crisp and doesn’t smudge onto the raw clay base.
Step 3: Adding Color
-
Base Glazing:
Dip your brush in the deep blue glaze (or paint). Carefully fill in the top section of the pot, painting right over the carved zig-zags. Stop exactly at the upper carved line of the horizontal band. -
Wipe Back (Optional):
If you want the carved lines to show the clay color vividly, gently wipe the raised surfaces of the zig-zags with a damp cloth while the paint is still tacky, leaving color in the recesses. -
Paint the Band:
Use a small brush to apply the earth-tone brown color to the narrow horizontal band you carved earlier. This acts as a border between the blue top and the raw clay bottom. -
Clean the Interior:
Paint the interior rim with the blue glaze to match the exterior, extending down about an inch inside the pot for a finished look. -
Final Fire or Seal:
If using ceramic glazes, fire the pot in the kiln according to the glaze instructions. For air-dry clay, apply a coat of clear sealant or varnish to protect the paint and make it water-resistant.
Double Dip
Try layering two different shades of blue on the top section. Paint a dark blue first, let it dry, then dry-brush a lighter blue on top to highlight the carved texture.
Now your pot is ready to be filled with gritty soil and a happy little succulent for a perfect windowsill display
Coil Vases With Finger-Rib Texture
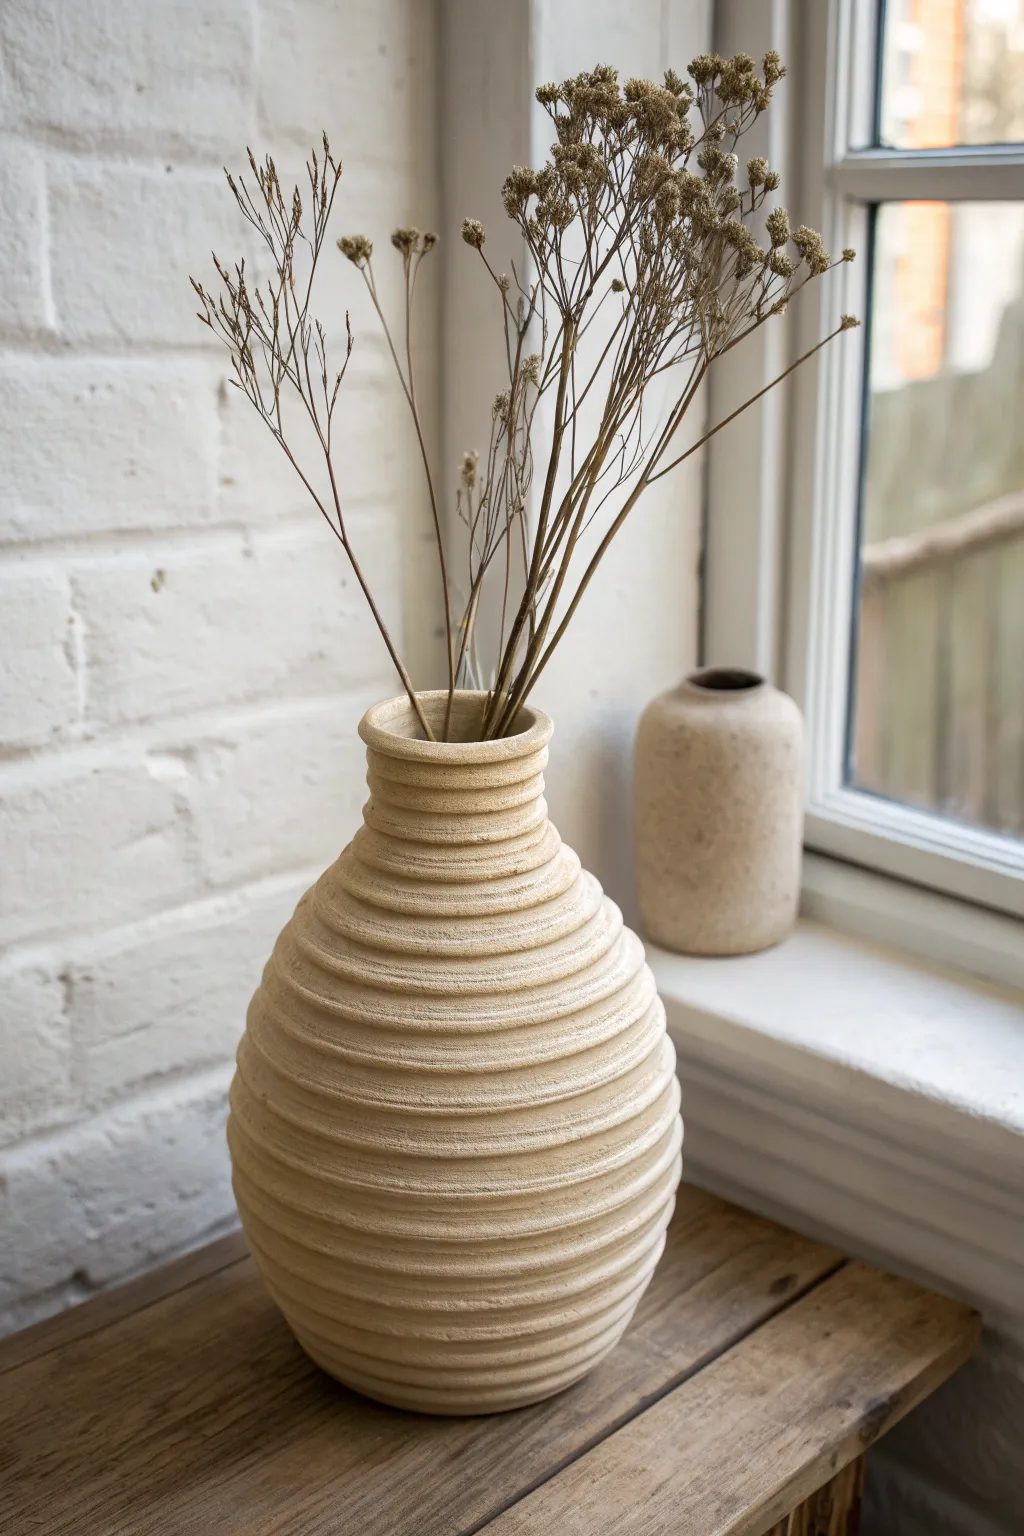
Create a stunning statement piece with mesmerizing texture using the ancient and meditative technique of coil building. This vase features distinct, uniform horizontal ridges that celebrate the hand-building process, resulting in a naturally organic, beehive-like silhouette.
Step-by-Step
Materials
- Stoneware clay (groggy clay holds structure well)
- Scoring tool or fork
- Slip (clay and water slurry)
- Wooden modeling tool or spoon back
- Sponge
- Cutting wire
- Turn-table / banding wheel (optional but recommended)
- Rolling pin (for the base)
Step 1: Building the Foundation
-
Prepare the base:
Start by rolling out a slab of clay to about 1/2 inch thickness. Cut a circle roughly 4 inches in diameter to serve as the sturdy footprint of your vase. -
Roll your first coils:
Take a chunk of clay and roll it on your work surface into a long snake. Aim for a thickness similar to a large finger or a thick marker. Keep your rolling pressure even to avoid lumpy sections. -
Attach the first ring:
Score the outer edge of your circular base and apply a generous amount of slip. Lay your first coil on top of this scored area, cutting the ends at an angle to join them seamlessly. -
Blend the interior:
This is crucial for structural integrity: using your thumb or a wooden tool, smear the inside edge of the coil down into the base. Do not smooth the outside; we want that definition to remain visible.
Uneven Tapering?
If one side is higher, tap the rim gently with a paddle or wooden spoon to level it. Don’t push too hard or walls may buckle.
Step 2: Growing the Form
-
Stack and widen:
Prepare several more coils. As you add the next few layers, place each coil slightly outward from the center of the one below it. This will make the vase belly out into that wide, round shape. -
Joining the layers:
For every new coil added, score and slip the contact points. Once placed, only smooth the interior seams downward. Leave the exterior untouched to maintain the ribbed look. -
Refining the texture:
As you build, run your finger gently along the exterior groove of the coils to compress them slightly and ensure they are uniform, without erasing the deep lines between them. -
Reaching the widest point:
Continue building outward until you are happy with the width of the belly. step back often to ensure the profile is symmetrical on all sides.
Step 3: Tapering and Finishing
-
Begin the inward slope:
Now, start placing your coils slightly inward relative to the layer below. This begins the taper towards the neck. -
Control the curve:
Don’t rush the taper. If you stepped out gradually, you must step in gradually to create a harmonious curve. I find it helpful to look at the vase from eye level to judge the silhouette. -
Support the walls:
As the vase gets taller and the opening narrower, support the outside wall with one hand while you smooth the inside coils with the other to prevent warping. -
Form the neck:
Once the shoulders are formed, stack the final 2-3 coils directly vertically on top of each other to create the upright neck. -
Finish the rim:
Smooth the very top coil carefully with a damp sponge or a piece of chamois leather to create a soft, rounded lip that is pleasant to touch. -
Refine the surface:
Wait until the clay is leather hard. Gently brush over the exterior with a dry, stiff brush to remove any sharp crumbs or burrs without smoothing out the distinct coil texture. -
Slow drying:
Cover the vase loosely with plastic for the first day or two to let the moisture even out, preventing cracks between the coils before firing.
Level Up: Oxide Wash
After bisque firing, apply a dark oxide wash and wipe it back. The color will stay in the deep coil grooves, accentuating the ribs.
Once fired and glazed in a neutral tone, your vase will be ready to hold dried botanicals or stand alone as a sculptural object

TRACK YOUR CERAMIC JOURNEY
Capture glaze tests, firing details, and creative progress—all in one simple printable. Make your projects easier to repeat and improve.
Slab Mugs With Strap Handles
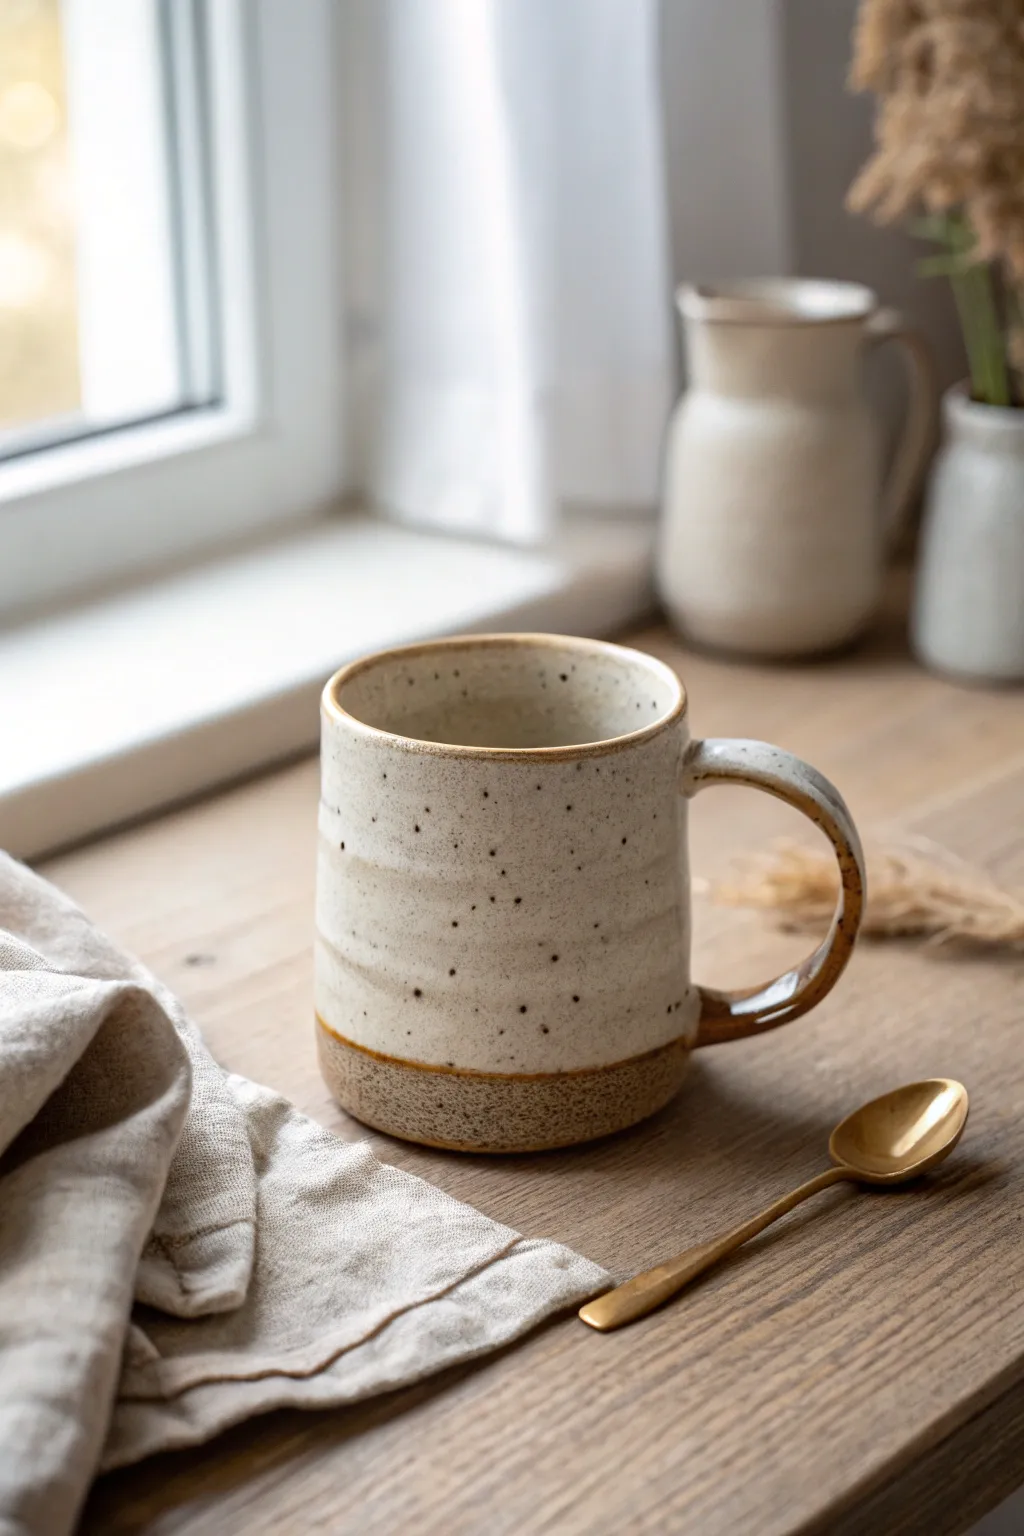
Embrace the beauty of imperfection with this cozy, farmhouse-style mug featuring a distinct exposed clay base and a comfortable strap handle. The creamy, speckled glaze contrasts beautifully with the raw toasted stoneware, creating a piece that feels warm and grounded in your hands.
How-To Guide
Materials
- Speckled stoneware clay (mid-fire)
- Clay slab roller or rolling pin
- Two 1/4 inch wooden guide strips
- Fettling knife
- Needle tool
- Flexible metal rib
- Serrated rib or scoring tool
- Slip (clay mixed with water)
- Cylindrical form for template (e.g., oatmeal container or PVC pipe)
- Paper for template making
- Sponge
- Creamy matte white glaze (mid-fire)
- Wax resist
Step 1: Creating the Slab Body
-
Roll the slab:
Begin by wedging your speckled stoneware clay to remove air bubbles. Using your guide strips on either side of the clay, roll out a consistent slab about 1/4 inch thick. -
Smooth the texture:
Before cutting, take your flexible metal rib and compress the clay on both sides. This aligns the clay particles to prevent warping later and creates a nice canvas for your glaze. -
Cut the rectangle:
Using a paper template measured to fit around your cylindrical form (leaving a slight overlap), cut a rectangle from the slab with your fettling knife. -
Bevel the edges:
On the short sides of your rectangle, cut 45-degree bevels in opposite directions. This allows the seam to overlap seamlessly without creating a thick lump. -
Form the cylinder:
Wrap the slab around your cylindrical form. Score the beveled edges aggressively with your serrated tool and apply slip. -
Join the seam:
Press the beveled edges together firmly. Use a wooden modeling tool or your thumb to blend the clay across the seam line until it disappears completely.
Slumping Walls?
If your slab collapses while forming the cylinder, the clay is likely too wet. Let the slab sit on a wooden board for 20-30 minutes to firm up to leather-hard before building.
Step 2: Adding the Base and Handle
-
Attach the bottom:
Place your cylinder onto a fresh piece of slab. Trace around the outside with a needle tool, cut out the circle, score and slip both contact surfaces, and press them together firm. Smooth the connection with a rib. -
Texture the base:
To mimic the sandy look in the photo, lightly press a coarse sponge or serrated rib against the bottom inch of the mug’s exterior. This creates that distinct raw clay texture. -
Make the strap:
Cut a strip of clay about 3/4 inch wide and 5 inches long. Smooth the edges with a damp sponge so they are rounded and comfortable to hold. -
Shape the handle:
Bend the strip into a ‘C’ or ear shape. I like to let it stiffen for about 15 minutes so it holds its arch better during attachment. -
Attach the handle:
Score and slip the attachment points on both the mug and the handle. Press the handle firmly onto the mug body, blending the clay at the joins for a strong bond.
Step 3: Glazing and Finishing
-
Bisque fire:
Allow the mug to dry slowly under plastic for a day, then uncovered until bone dry. Fire to cone 04 (or your clay’s bisque temperature). -
Wax the base:
Apply wax resist to the bottom of the mug and up the side about 1 inch. This masking is crucial to achieve the two-tone look where the raw clay meets the glaze. -
Dip the glaze:
Stir your creamy matte white glaze well. Hold the mug by the foot (or use tongs) and dip it quickly in and out of the glaze bucket. The wax will repel the glaze at the bottom. -
Clean the edges:
Use a damp sponge to wipe away any stray droplets of glaze that may have beaded up on the waxed area, ensuring a clean, crisp line. -
Glaze fire:
Fire the mug to maturity (likely cone 5 or 6 depending on your clay body). When cool, sand the unglazed base lightly if it feels too rough.
Glaze Accents
To enhance the rustic look, lightly overlap a rim of oatmeal or honey-colored glaze just at the lip. It melts down slightly during firing, adding a beautiful toasted effect.
Pour yourself a hot drink and enjoy the tactile warmth of your handmade creation
Ruffled-Edge Dessert Plates

Embrace the imperfect beauty of wabi-sabi with this set of three nesting dessert plates. Featuring charmingly fluted edges and a creamy, speckled glaze finish, these hand-built pieces bring a warm, artisanal touch to your table setting.
Step-by-Step Guide
Materials
- White stoneware clay body (speckled variety recommended)
- Rolling pin
- Canvas guide strips or wooden slats (approx. 1/4 inch thick)
- Canvas cloth or mat for rolling
- Round templates (paper or bowls in 3 graduating sizes: approx. 5″, 7″, and 9″)
- Fettling knife or needle tool
- Sponge
- Rib tool (flexible rubber)
- Small wooden modeling tool or chopstick
- Speckled white glaze (food safe)
- Kiln
Step 1: Preparing the Slabs
-
Wedge the Clay:
Begin with a fresh block of stoneware clay. Wedge it thoroughly to remove air bubbles and align the clay particles, ensuring a smooth, workable consistency. -
Set Up Your Workspace:
Lay down your canvas cloth to prevent sticking. Place your wooden guide strips on either side of your working area to ensure an even thickness when rolling. -
Roll the Primary Slab:
Roll out a large slab of clay, moving the rolling pin steadily across the guide strips. You want a uniform thickness of about 1/4 inch, which provides durability while maintaining a delicate look. -
Smooth the Surface:
Take your flexible rubber rib and gently compress the slab on both sides. This step is crucial for removing canvas textures and aligning the surface particles to prevent cracking later.
Uneven Rims?
If your rims slump flat while drying, prop the edges up with small balls of foam or crumpled newspaper underneath the curve. This supports the shape until the clay stiffens.
Step 2: Forming the Plates
-
Cut the Largest Circle:
Place your largest template (approx. 9 inches) onto the slab. Using your fettling knife or needle tool, cut vertically around the template for the dinner-sized plate. -
Cut the Remaining Sizes:
Repeat the cutting process with your medium (7-inch) and small (5-inch) templates. Store excess clay under plastic to re-wedge later. -
Soften the Rims:
Run a damp sponge or your finger along the freshly cut edges of each circle to round them off. Sharp edges become razor-sharp after firing, so smoothness here is key. -
Lift the Rims:
Place each clay circle on a foam pad or a simple work board. Gently lift the outer inch of the rim upward with your fingers to create a shallow bowl or plate profile.
Enhance the Speckles
To get that rustic look if your clay isn’t naturally speckled, try a ‘Speckled White’ glaze specifically, or lightly flick iron oxide onto a standard white glaze with a toothbrush.
Step 3: Creating the Ruffles
-
Mark Fluting Spacing:
Visualizing the spacing helps keep things symmetrical. I like to lightly tap the rim at 12, 3, 6, and 9 o’clock positions first, then fill in the gaps between them. -
Form the Ruffles:
Using your thumb and forefinger, pinch the rim while simultaneously pressing down gently with the side of a wooden tool or chopstick between pinch points. This creates the undulating, fluted wave pattern. -
Refine the Curves:
Go around the rim a second time, smoothing the indentations with a slightly damp sponge to ensure the ruffles look organic rather than mechanical. -
Drying Process:
Cover the plates loosely with plastic sheeting. Let them dry very slowly to the leather-hard stage to prevent warping, especially at the thin rims.
Step 4: Glazing and Finishing
-
Bisque Fire:
Once bone dry, load the plates into the kiln for a bisque firing (usually Cone 04 or 06, depending on your clay body instructions). -
Clean the Bisqueware:
Wipe the fired plates with a clean, damp sponge to remove any kiln dust. This ensures the glaze adheres properly without crawling. -
Apply Glaze:
Dip or brush your speckled white glaze onto the plates. If brushing, apply 2-3 even coats, letting each layer dry to the touch before adding the next. -
Wipe the Foot:
Clean the bottom of each plate with a sponge to remove all glaze where it touches the kiln shelf, preventing the piece from fusing to the shelf during firing. -
Glaze Fire:
Fire the plates again to the maturation temperature of your clay and glaze (typically Cone 5 or 6 for stoneware).
Now you have a stunning, stackable set ready for your next cozy gathering or afternoon tea
Botanical Impression Serving Trays
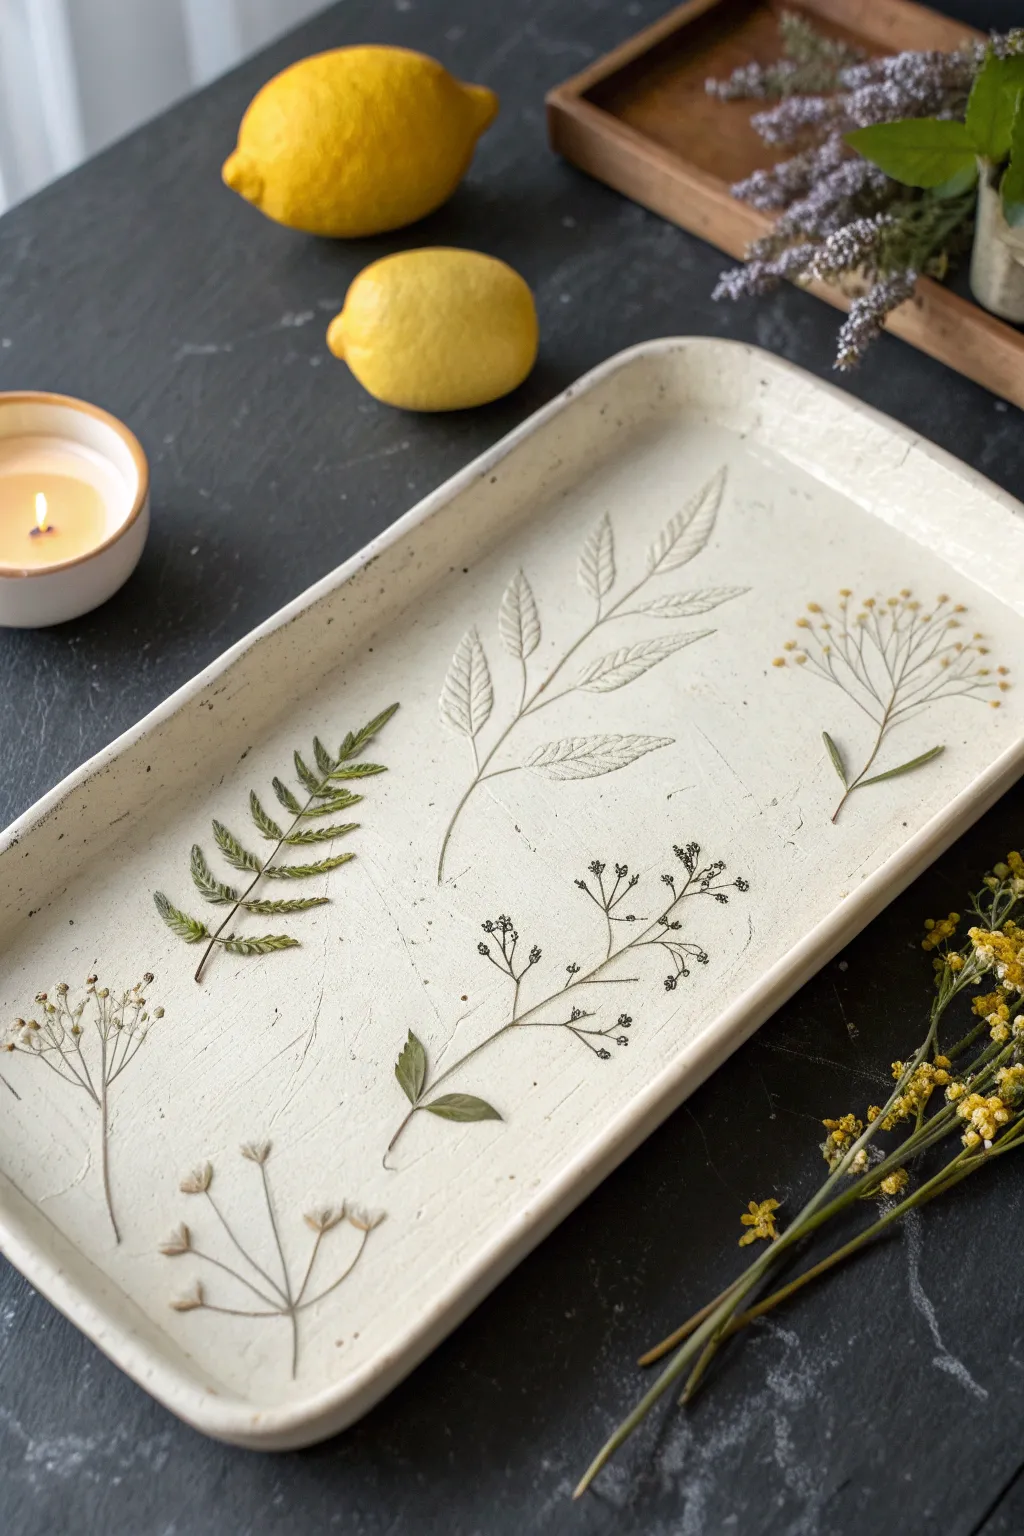
Capture the delicate beauty of nature with this elegant serving tray featuring real botanical impressions. The creamy, textured finish and subtle plant reliefs create a timeless piece perfect for display or light use.
How-To Guide
Materials
- White stoneware or air-dry clay
- Rolling pin
- Two wooden guide strips (approx. 1/4 inch thick)
- Rectangular template (paper or cardstock)
- Assorted fresh or dried botanical sprigs (fern, small flowers, leaves)
- Small craft knife or needle tool
- Sponge and water
- Pottery glaze (cream or matte white) – if firing
- Acrylic paint and varnish – if using air-dry clay
- Kiln access (for stoneware)
Step 1: Preparation and Rolling
-
Prepare your workspace:
Begin by cleaning a flat surface and covering it with canvas or a heavy cloth to prevent the clay from sticking. Place your ball of clay in the center. -
Set up guides:
Position your two wooden guide strips on either side of the clay. These will ensure your slab is perfectly even in thickness, which is crucial for a flat drying process. -
Roll the slab:
Using your rolling pin, roll the clay out until the pin rests on the guide strips. Flip the clay occasionally to ensure uniform texture on both sides. -
Compress the clay:
Take a rubber rib or a slightly damp sponge and gently smooth the surface. This compression aligns the clay particles and helps prevent warping later.
Use Fresh Stems
Use fresh, green plants rather than dry, brittle ones. Fresh stems are flexible and leave a cleaner, deeper impression without crumbling into the clay.
Step 2: Botanical Impressions
-
Arrange your composition:
Lightly place your chosen botanical sprigs onto the clay slab to test the layout. Don’t press them in yet; just find a balanced arrangement that pleases you. -
Press the botanicals:
Once happy with the placement, use the rolling pin to gently roll over the plants one time with firm, even pressure. This embeds them into the clay surface. -
Deepen the details:
For thicker stems or delicate flower heads, I like to gently press them further with my fingers to ensure every detail is captured in the clay. -
Remove the plants:
Carefully peel the plant material away from the clay. Use tweezers if small bits get stuck. It’s okay if tiny fragments remain; they will burn out in the kiln or add texture.
Step 3: Shaping the Tray
-
Cut the shape:
Place your rectangular paper template over the impressed area. Use a needle tool or craft knife to cut vertically around the template for clean, straight edges. -
Create the rim:
To form the raised edge, gently lift the perimeter of the slab. You can use long strips of foam or rolled towels under the edges to support them while the clay stiffens. -
Smooth the edges:
Dip your finger in a little water and run it along the cut rim to soften the sharp angles. A rounded edge looks more finished and professional. -
Refine the corners:
If corners overlap or bulge, pinch them slightly to round them off or trim excess clay to maintain a sleek rectangular silhouette.
Warped Edges?
If edges curl up while drying, place small weighted bags (filled with sand or rice) gently on the center of the tray to hold it flat against the table.
Step 4: Finishing and Firing
-
Slow drying:
Loosely cover the tray with a plastic sheet. Allow it to dry slowly over several days to prevent cracking or warping, especially at the rim. -
Bisque fire:
Once bone dry, fire the piece to bisque temperature (usually cone 04) if using stoneware. This prepares it for glazing. -
Apply wash or glaze:
To highlight the impressions, you can wipe a dark iron oxide wash into the recesses and sponge off the excess, or simply apply a semi-opaque cream glaze over the entire piece. -
Glaze firing:
Fire the tray again to the maturity temperature of your clay body (e.g., cone 6). If using air-dry clay, paint with cream acrylics and seal with a matte varnish instead.
Enjoy using your custom tray to hold trinkets or serve light snacks at your next gathering
Texture-Stamped Coaster Sets
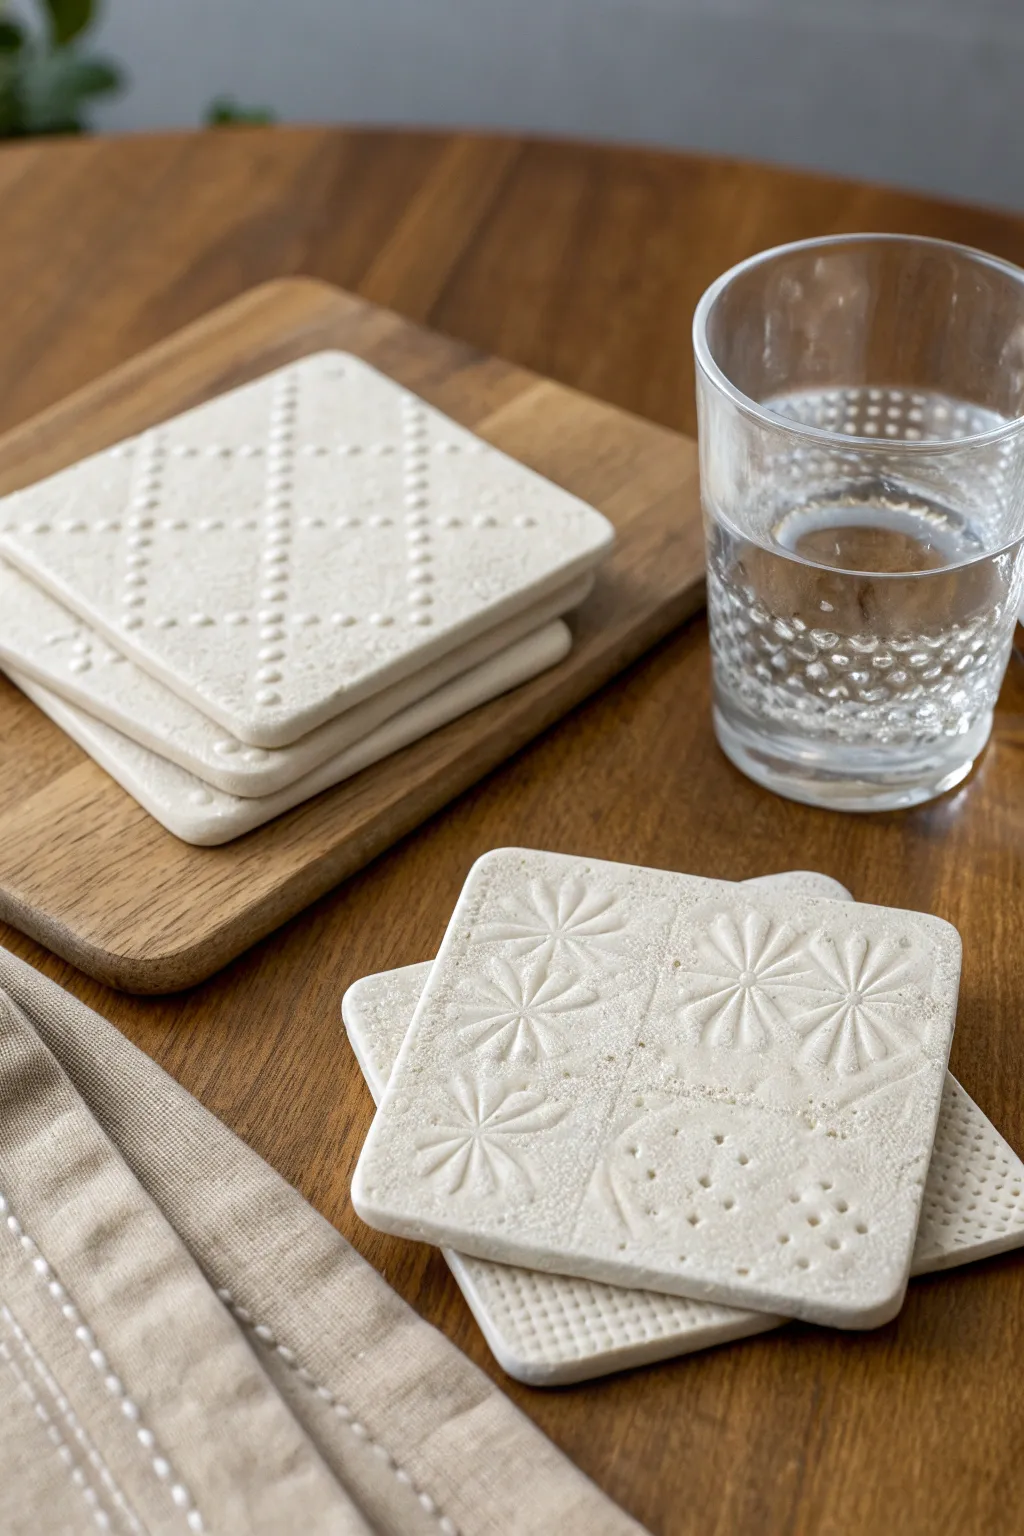
These elegant, minimalist coasters bring a touch of handcrafted warmth to any table setting with their delicate embossed patterns. The project uses air-dry clay or self-hardening stone clay to create durable, absorbent squares featuring geometric and floral motifs.
Step-by-Step
Materials
- White self-hardening clay (stone clay preferred for durability)
- Square cookie cutter (approx. 3.5 – 4 inches)
- Acrylic rolling pin
- Two 1/4 inch wooden guide strips (for even thickness)
- Texture tools: lace, stamps, or embossed rolling pins
- Fine-grit sandpaper (220-400 grit)
- Canvas mat or parchment paper
- Clear matte acrylic sealer (water-resistant)
- Felt pads or cork backing
Step 1: Preparation & Rolling
-
Prepare your workspace:
Lay down a piece of canvas or parchment paper on a flat surface. This prevents the clay from sticking and picking up unwanted debris while you work. -
Condition the clay:
Take a handful of your self-hardening clay and knead it in your hands until it becomes pliable and warm. If the clay feels too dry, you can wet your hands slightly, but avoid making it sticky. -
Set up guides:
Place your two wooden guide strips on either side of your clay ball. These are essential for ensuring every coaster is perfectly uniform in thickness. -
Roll the slab:
Using your acrylic rolling pin, roll the clay out until the pin rests flat on both wooden guides. Roll from the center outward to ensure the clay compresses evenly without air pockets.
Clean Impressions
Dust your stamps or texture mats with a tiny bit of cornstarch before pressing them into the clay. This acts as a release agent and prevents the clay from sticking.
Step 2: Texturing & Cutting
-
Choose your pattern:
Decide on your design approach. The example shows two main styles: a repeating diamond dot pattern and a quadrant design with floral stamps. -
Apply texture (Option A: Diamond Grid):
For the diamond pattern, gently press a textured rolling pin or a specialized texture mat into the decorative surface. Apply firm, even pressure so the impression is deep enough to see but doesn’t distort the slab thickness. -
Apply texture (Option B: Stamps):
For the floral quadrant design, lightly mark a cross in the center to divide the space. Press a floral stamp firmly into three of the quadrants, and use a dotting tool or toothpick to stipple the fourth quadrant for contrast. -
Cut the shape:
Position your square cookie cutter over the textured area. Press down firmly and wiggle slightly to ensure a clean cut through the clay. -
Release the shape:
Lift the cutter away. If the clay stays in the cutter, gently push it out from the edges. Peel away the excess scrap clay surrounding your square. -
Smooth the edges:
Dip your finger in a little water and run it along the cut edges of the coaster to smooth out any sharpness or roughness left by the cutter.
Fixing Warp
If your coaster curls up at the edges while drying, place a heavy book on top of it (sandwich it between parchment paper first) while it is still slightly damp.
Step 3: Finishing
-
Initial slow drying:
Place the coasters on a flat wire rack or a clean board to dry. To prevent curling, I suggest flipping them over every few hours during the first day so both sides dry at the same rate. -
Wait for full cure:
Allow the coasters to dry completely. Depending on humidity and clay type, this usually takes 24 to 48 hours. The clay will turn a lighter shade of white when fully dry. -
Sand for perfection:
Once bone dry, take your fine-grit sandpaper and lightly buff the edges and corners. You can also very lightly sand the surface if there are any tiny burrs, but be careful not to erase your texture. -
Seal the surface:
Apply a thin coat of matte clear acrylic sealer. This is crucial for coasters as it repels moisture from condensation. Let the first coat dry, then apply a second thin coat. -
Add protective backing:
Flip the finished coasters over and attach small felt pads to the corners, or glue a square of thin cork sheet to the bottom to protect your furniture.
Enjoy your beautiful new set of custom-textured coasters for your next coffee break
Carved Line-Art Bud Vases
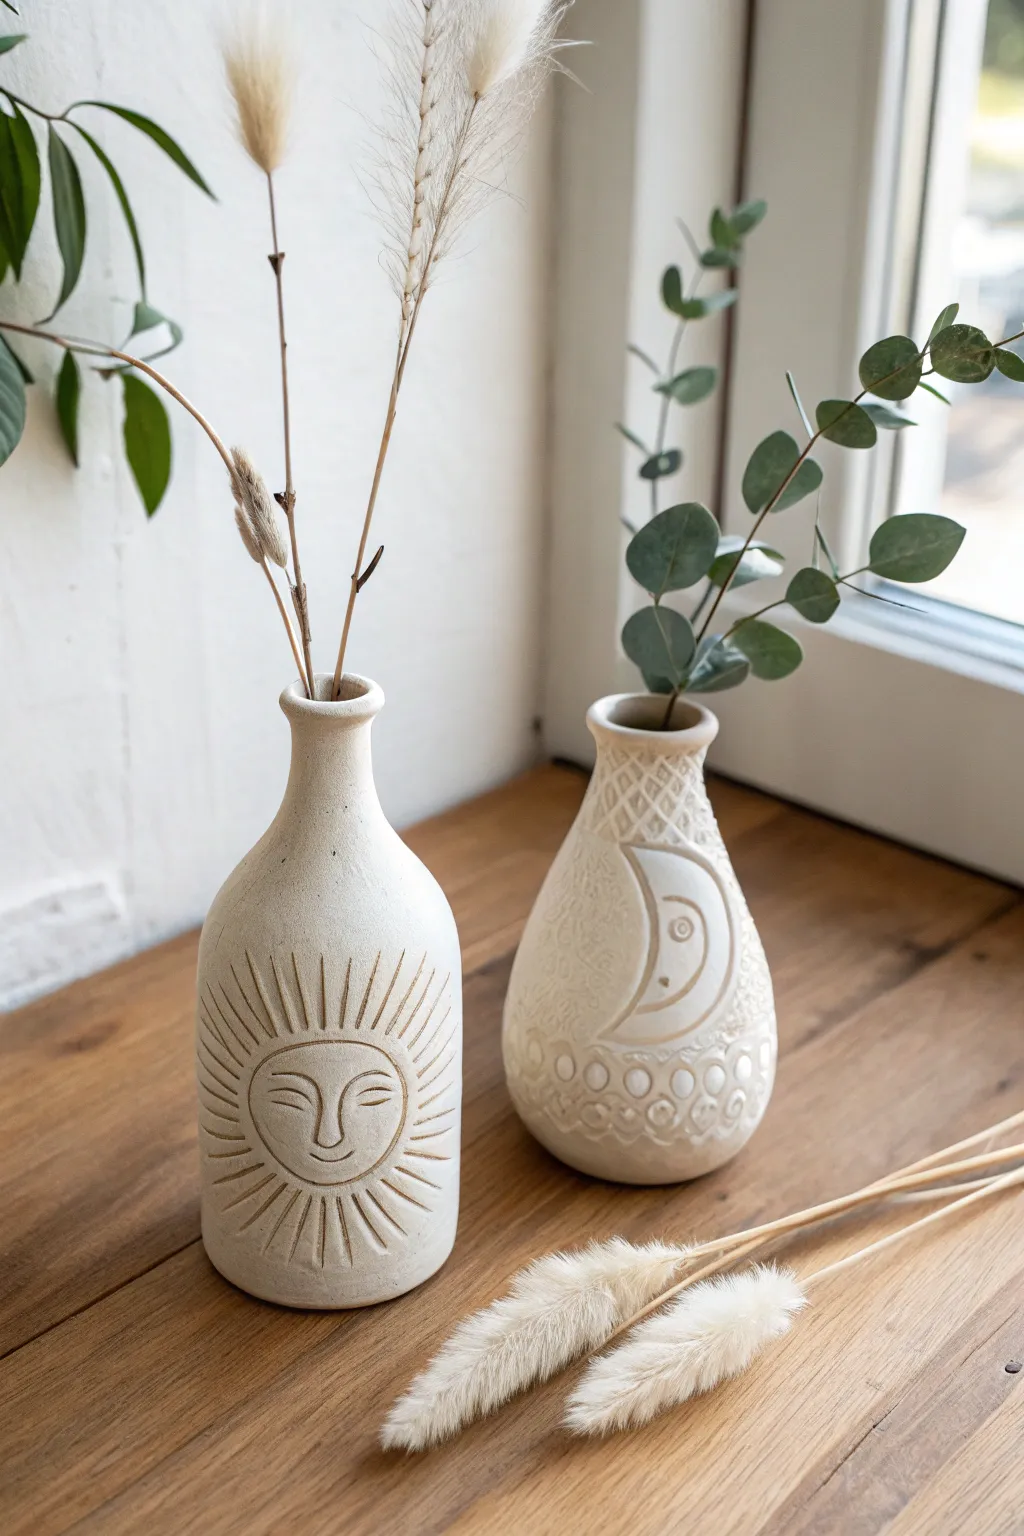
Bring a touch of cosmic charm to your home with these serene, hand-carved clay vases featuring sun and moon motifs. The natural, unglazed finish highlights the carved lines for a modern, bohemian aesthetic perfect for dried florals.
Detailed Instructions
Materials
- Air-dry clay (white or light beige)
- Rolling pin
- Clay carving tools (needle tool, small loop tool)
- Sponge and cup of water
- Fine-grit sandpaper (220-400 grit)
- Acrylic rolling pin or glass bottle
- Slip (clay mixed with water into a paste)
- Small paintbrush
- Matte spray varnish (optional)
Step 1: Shaping the Vase Base
-
Condition the clay:
Begin by wedging your air-dry clay thoroughly to remove air bubbles and make it pliable. Divide the clay into two equal portions if you plan to make both the sun and moon vases. -
Create a pinch pot:
Roll one portion into a smooth ball. Insert your thumb into the center and gently pinch the walls while rotating the ball. Aim for an even thickness of about a quarter-inch. -
Elongate the form:
Instead of keeping the pot round, gently squeeze and pull the walls upward to create a taller, cylindrical base. Keep the bottom slightly wider for stability. -
Form the neck:
As you move toward the top third of the vase, gradually pinch the clay inward to narrow the opening. This creates the classic bottle neck shape seen in the sun vase. -
Refine the rim:
Flare the very top rim slightly outward for a finished look. Dip your finger in a little water and smooth the rim so it’s perfectly round and free of cracks. -
Smooth the surface:
Use a damp sponge to wipe down the entire exterior of the vase. You want a very smooth canvas for your carving, so take your time removing thumbprints and bumps.
Step 2: Carving the Celestial Designs
-
Leather hard stage:
Let the vases dry for about 1-2 hours until they are ‘leather hard’—firm to the touch but still cool and slightly damp. This is the crucial texture for clean carving without dragging. -
Sketch the sun:
On the first vase, lightly scratch the outline of a circle with a needle tool. Add a simple face inside with closed, curved eyes, a U-shaped nose, and a gentle smile. -
Carve the sun rays:
Using a small carving tool or the needle tool, etch lines radiating outward from the circle. Vary the lengths slightly to mimic the organic feel of the reference image. -
Carve the moon:
For the second vase, sketch a crescent moon shape. Inside the crescent, add a sleeping eye and a small smile. I like to add decorative cross-hatching or small geometric patterns above the moon for extra texture. -
Deepen the lines:
Go back over your initial sketches with a slightly wider tool or by pressing firmer. The goal is to create deep grooves that will catch shadows. -
Clean up burrs:
Carving often creates little crumbs of clay (burrs) along the edges. Wait until the clay feels bone dry, then gently brush these away with a dry, soft brush rather than smudging them while wet.
Clean Lines
For the sharpest details, wipe your carving tool tip clean with a damp cloth after every few strokes to prevent clay buildup.
Step 3: Finishing Touches
-
Dry thoroughly:
Allow your vases to dry completely for at least 24-48 hours. The clay should turn a lighter, chalky white color and feel room temperature. -
Sand for smoothness:
Use fine-grit sandpaper to gently buff the surface. Be careful around your carved lines so you don’t sand the details away completely, but smooth out any remaining imperfections. -
Remove dust:
Wipe the vases down with a barely damp cloth or a dry microfiber towel to remove all sanding dust. -
Optional sealing:
If you want to protect the finish without adding shine, apply a coat of matte spray varnish. Note that air-dry clay is not waterproof, so these are strictly for dried florals only.
Cracking Issues?
If small cracks appear while drying, mix a tiny amount of clay paste (slip) and fill the crack, then smooth over with a damp finger.
Pop in some dried eucalyptus or bunny tails and admire your soothing new decor
Nesting Pinch Bowl Sets
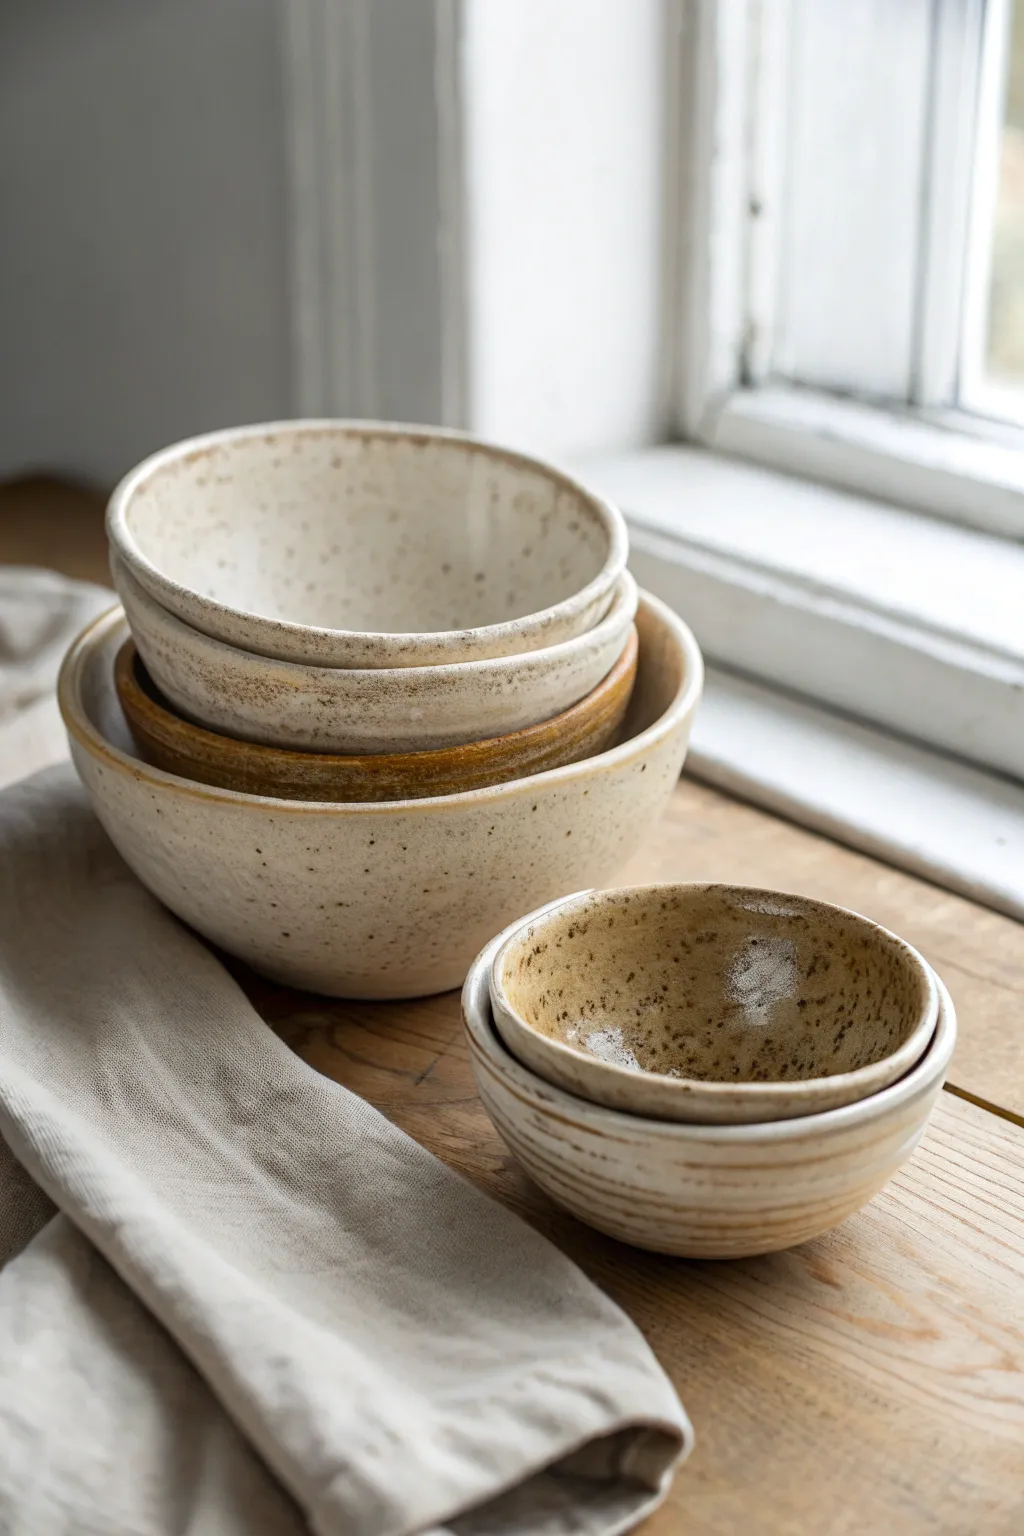
Create a charming set of speckled nesting bowls that bring organic warmth to any table setting. These stoneware-inspired pieces rely on simple hand-building techniques to achieve their delightful irregularities and perfectly imperfect stacked form.
Step-by-Step Tutorial
Materials
- Speckled buff stoneware clay (or polymer clay with faux speckles)
- Potter’s needle tool
- Wooden rib tool
- Sponge
- Bucket of water
- Canvas mat or work surface
- Clear or matte white glaze (if using ceramic clay)
- Caramel/amber glaze (for the middle bowl)
- Kiln (if using ceramic clay)
Step 1: Shaping the Base Forms
-
Portion the clay:
Begin by cutting three distinct sizes of clay from your block. You want a clear graduation in volume—think of a papa bear, mama bear, and baby bear ratio so they will nestle comfortably inside one another. -
Form the spheres:
Roll each portion of clay briskly between your palms. Aim for a tight, smooth ball without cracks, as this foundational sphere dictates how even your final bowl will be. -
Open the clay:
Hold the largest ball in your non-dominant hand. Gently press your thumb into the center, stopping about a quarter-inch from the bottom. This prevents the base from becoming too thin. -
Pinch the walls:
Starting at the bottom and working your way up spirally, pinch the clay between your thumb and fingers. Rotate the clay continuously to ensure an even wall thickness. -
Refine the curve:
As the walls grow taller, gently gently gently bell them outward. I prefer to keep the curve quite open and wide rather than tall and vertical, which helps them stack better later. -
Repeat for all sizes:
Create the medium and small bowls using the same technique. Test the fit frequently by placing the smaller bowls inside the larger ones to ensure they nest without getting stuck.
Step 2: Texturing and Refining
-
Smooth the interior:
Dampen a sponge slightly—don’t soak it—and run it smoothly along the inside of each bowl. This compresses the clay particles and removes any distracting fingerprints. -
Shape the rim:
The rims in the reference image are slightly uneven and organic. Instead of cutting them perfectly flat, run a damp finger or a piece of chamois leather over the rim to soften the edge while maintaining that gentle wave. -
Add exterior texture:
For the smallest bowl, use a wooden rib or a serrated tool to gently scrape around the lower half of the exterior. This creates those subtle horizontal groove lines visible in the example. -
Dry slowly:
Place the bowls upside down on a board to dry to a leather-hard state. Check them after a few hours; if the bottoms are slightly rounded, tap them gently on the table to create a stable foot.
Smooth Operator
Use a damp chamois leather strip to compress the rims. It smooths sharp edges better than a sponge and prevents future chipping.
Step 3: Glazing and Finishing
-
Bisque fire:
Once fully bone dry, fire the pieces in a kiln to bisque temperature (usually vertically cone 04). If using polymer clay, bake according to package instructions instead. -
Wax the bottoms:
Apply wax resist to the foot of each bowl. This ensures the glaze doesn’t run onto your kiln shelf during the final firing. -
Glaze the main set:
Dip the largest bowl and the smallest bowl into a matte cream or clear glaze. The goal is to let the natural speckles of the clay body shine through, so avoid opaque, heavy glazes. -
Accent the middle bowl:
For the middle bowl, dip it into an amber or caramel-colored glaze. This contrast creates that beautiful ‘sandwich’ effect when the set is stacked. -
Glaze the interior of the smallest bowl:
In the reference, the tiny bowl has a richer, perhaps glossy interior finish. Pour a small amount of clear glossy glaze inside, swirl to coat, and pour out the excess. -
Wipe the rims:
Take a damp sponge and very lightly wipe the glaze off the very edge of the rims. This exposes the raw toasted clay for a beautiful outline effect. -
Final wipe down:
Check the bottoms of all bowls to ensure no glaze droplets are sticking to the waxed areas or the foot ring. -
Glaze fire:
Fire the pieces to the maturity temperature of your clay and glaze (often cone 5 or 6 for stoneware). Allow the kiln to cool completely before opening to prevent thermal shock.
Double Dip
Dip the rim of the white bowls partially into the caramel glaze for just a second to create a beautiful, drippy ombre transition.
Once cooled, stack your new bowls by the window locally to catch the light and admire your handiwork.
Lidded Trinket Boxes by Hand
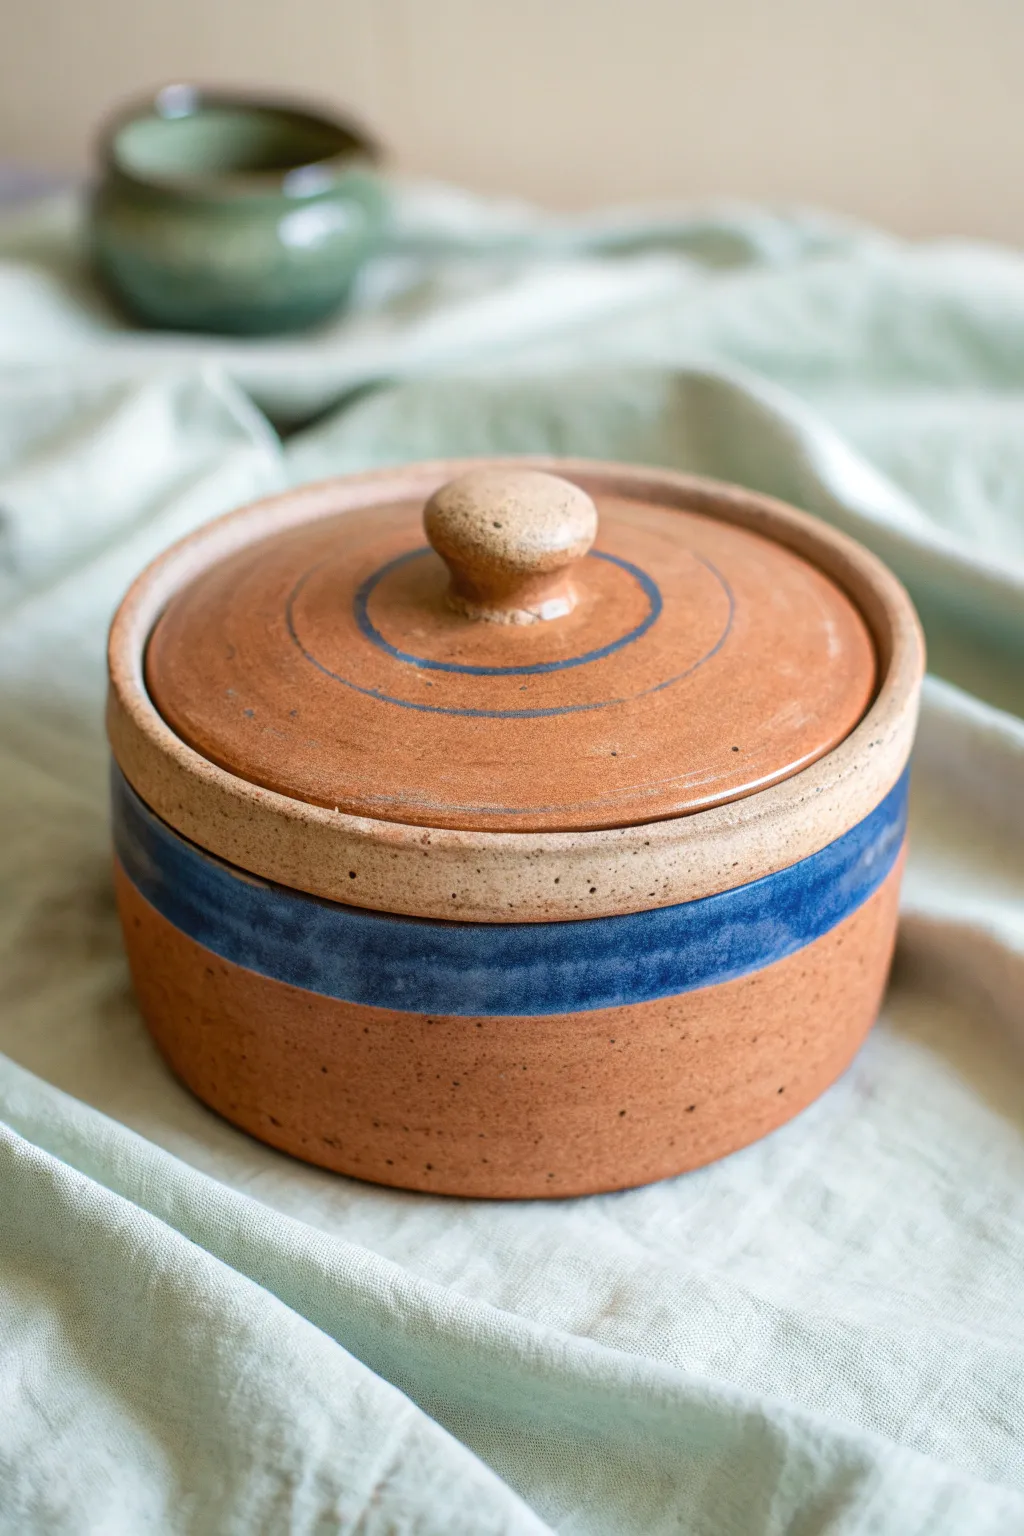
This charming, wheel-thrown or hand-built trinket box features warm terracotta tones accented by a striking indigo blue stripe. Its snug-fitting lid and gentle knob handle give it a timeless, earthy feel perfect for storing small treasures.
How-To Guide
Materials
- Terracotta stoneware clay (or groggy stoneware)
- Pottery wheel (or slab roller/rolling pin for hand-building)
- Throwing tools (sponge, rib, needle tool, wire cutter)
- Trimming tools
- Underglaze (Cobalt Blue or Indigo)
- Clear matte or satin glaze
- Soft fan brush
- Calipers (essential for lid fit)
- Bat system
Step 1: Forming the Base
-
Throw the cylinder:
Center about 1-1.5 lbs of clay on the wheel. Open the clay and pull up a short, wide cylinder with straight vertical walls. Aim for a height of about 3 inches and a width of 5-6 inches. -
Refine the rim:
Compress the rim well with a chamois or sponge. Create a defined gallery (a small internal shelf) inside the rim where the lid will eventually sit. Keep this gallery shelf flat and square. -
Smooth the walls:
Use a metal or wood rib to scrape the exterior walls smooth, removing throwing lines if desired, though leaving a slight texture adds to the rustic look seen here. -
Measure immediately:
While the clay is wet, use calipers to measure the exact diameter of the gallery shelf opening. Lock the calipers at this measurement—do not change it. -
Cut underneath:
Run a wire tool under the pot to separate it from the bat, but leave it on the bat to firm up to leather-hard.
Step 2: Creating the Lid
-
Throw the lid off the hump:
Center a larger mound of clay. Isolate a small amount at the top to form the lid. Flatten it into a disk shape slightly wider than your caliper measurement. -
Shape the flange:
Carefully carve or press a flange underneath the disk that matches your caliper measurement. I like to make the flange just a hair narrower than the measurement to account for shrinkage and fit. -
Form the knob:
While the lid is still attached to the hump, shape a small, rounded knob in the center. Give it a slight mushroom shape for easy gripping. -
Check the fit:
If your base is sturdy enough, you can very gently test fit the upside-down lid. Otherwise, rely on your trusty calipers. Cut the lid off the hump with a needle tool or wire.
Shrinkage Woes
Lid doesn’t fit after firing? If the lid is too big, use a wet diamond sanding pad to grind down the flange. If it’s too loose, the wobble is part of the charm.
Step 3: Trimming and Assembly
-
Trim the base:
Once leather-hard, center the base upside down on the wheel. Trim away excess clay from the bottom to create a clean, flat foot or a slight undercut. -
Refine the lid:
Place the lid upside down (knob down) in a chuck or on a foam bat. Trim the underside/flange area to ensure it is crisp and fits perfectly into the base’s gallery. -
Texture the lid surface:
While trimming or cleaning up the top of the lid, you can drag a tool lightly to create the subtle concentric circles seen on the top surface.
Crisp Lines
For the sharpest blue stripe, burnish the edge of your masking tape with a fingernail before painting to prevent underglaze from bleeding underneath.
Step 4: Decoration and Glazing
-
Bisque fire:
Let both pieces bone dry completely, then bisque fire them to your clay body’s specifications (usually Cone 04 or 06). -
Apply masking:
Wipe the bisque ware with a damp sponge. To get the sharp blue stripe, you can use masking tape or wax resist to define a horizontal band around the middle of the base. -
Paint the blue band:
Using a soft brush, apply 2-3 coats of cobalt blue or indigo underglaze into the masked area. Peel the tape away immediately while the underglaze is still damp to keep the edge crisp. -
Add lid details:
On the lid, hand-paint a thin concentric blue circle halfway between the knob and the edge. You can use a banding wheel to keep the line steady. -
Clear glaze application:
Dip both the lid and the base into a clear matte or satin glaze. WIP the bottom of the base and the contact points (flange and gallery) completely clean of glaze to prevent sticking. -
Final firing:
Fire the kiln to the maturity temperature of your clay and glaze (likely Cone 5 or 6 for stoneware). Allow the kiln to cool naturally.
Place your finished box on a side table or vanity to enjoy the warmth of handmade pottery every day.
Wall Hanging Tiles With Cutouts
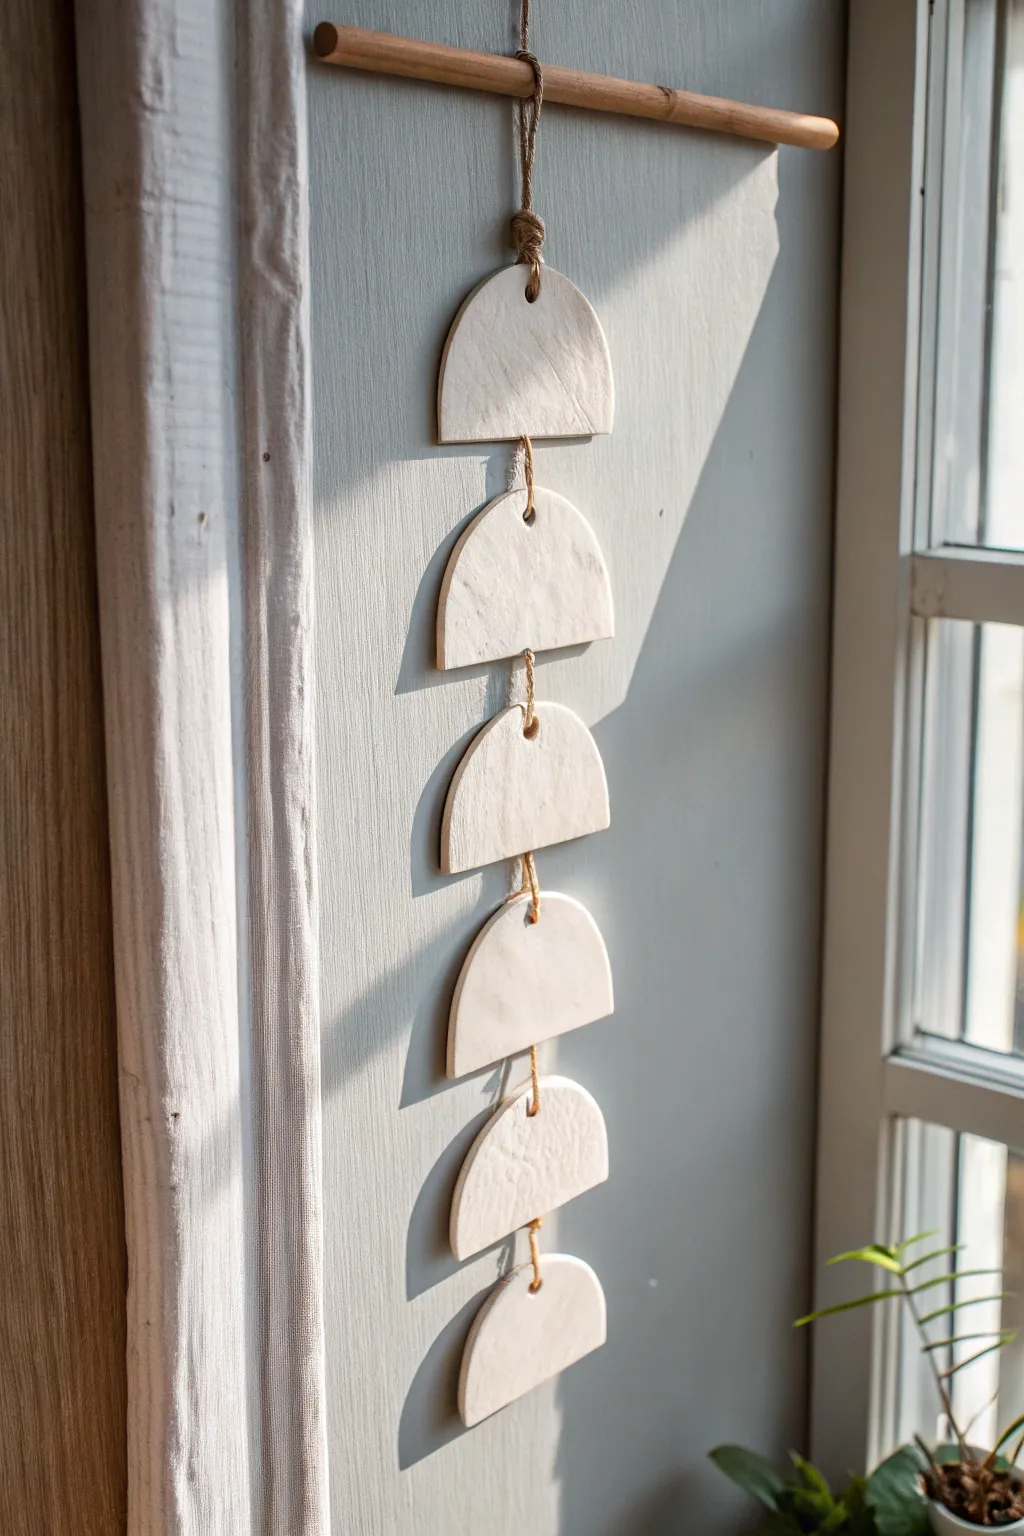
Bring texture and movement to a blank wall with this minimalist mobile made from cascading clay semi-circles. The uneven, handmade edges and sun-drenched white finish give it an organic charm perfect for boho or modern interiors.
Step-by-Step Guide
Materials
- White polymer clay or air-dry clay (approx. 1lb)
- Rolling pin or clay roller
- Round cookie cutter (approx. 3-4 inches diameter) or large glass
- Sharp crafting knife
- Parchment paper or canvas mat
- Thin drinking straw or toothpick
- Sandpaper (fine grit)
- Jute twine or hemp cord
- Wooden dowel (12 inches)
- Scissors
Step 1: Shaping the Clay Tiles
-
Condition the clay:
Start by warming up your clay in your hands. Knead it thoroughly until it is soft, pliable, and free of any air bubbles that could cause cracks later. -
Roll it out:
Place the clay onto a sheet of parchment paper. Use your rolling pin to flatten it into an even slab, aiming for a thickness of about 1/4 inch so the tiles are sturdy but not too heavy. -
Cut circles:
Using your round cookie cutter or the rim of a large glass, press firmly into the clay to cut out three full circles. You’ll need six semi-circles total, so three whole circles are enough. -
Halve the circles:
Carefully slice each clay circle directly down the center using a sharp crafting knife to create two equal semi-circles. You should now have six half-moon shapes. -
Create hanging holes:
Use a straw or toothpick to pierce a hole near the top center of the curved edge of each semi-circle. Make sure the hole isn’t too close to the edge to prevent tearing. -
Add connecting holes:
For the top five tiles, create a second hole centered along the straight bottom edge. The very last tile—the bottom of your mobile—only needs the top hole. -
Smooth the edges:
Dip your finger in a little water (for air-dry clay) or baby oil (for polymer) and gently run it along the cut edges to soften any sharp corners or burrs.
Twisting Tiles?
If the tiles keep spinning sideways, apply a tiny dot of clear glue to the knot on the back of the clay. This freezes the string in position.
Step 2: Finishing and Assembly
-
Dry or bake:
Follow the specific instructions for your clay type. Bake polymer clay in the oven at the recommended temperature, or let air-dry clay sit undisturbed for 24-48 hours until fully hardened. -
Sand for perfection:
Once hardened, lightly sand the edges and the flat surfaces with fine-grit sandpaper to remove any fingerprints or roughness. Wipe away the dust with a damp cloth. -
Prepare the dowel string:
Cut a piece of jute twine about 20 inches long. Tie each end to the wooden dowel to create the main hanger that will go on the wall. -
Start the vertical strand:
Cut a separate length of twine, roughly 24 inches long. Tie one end securely to the center of the wooden dowel using a lark’s head knot or a simple double knot. -
Attach the first tile:
Thread the loose end of the twine through the top hole of your first semi-circle. Slide it up, leaving a few inches of space below the dowel. -
Secure with a knot:
Tie a sturdy knot in the twine right at the top hole to keep the tile in place, then feed the string down the back of the tile and out, if needed, or simply thread the next section. -
Link the tiles:
Actually, the cleanest look is to use individual short loops. Cut five small pieces of twine (about 3 inches each). Tie a loop connecting the bottom hole of the first tile to the top hole of the second tile. -
Continue the chain:
Repeat this linking process down the line. I find keeping the knots loose adds to the rustic vibe, but ensure they are secure enough to hold the weight. -
Attach the final piece:
Tie the last tile onto the bottom of the fifth tile. Trim any excess twine tails close to the knots for a neat finish. -
Final adjustment:
Hang the piece on the wall and gently rotate the tiles so they all face forward. The rustic twine might twist, so just manual adjustment usually settles it.
Texture Tip
Before baking, gently press a piece of linen or canvas fabric onto the wet clay surface. This imitates a stone texture and reduces shine.
Hang your new clay sculpture near a window to catch the shifting shadows throughout the day