If you’ve got a lump of clay and your two hands, you’ve already got everything you need to make something really satisfying. These hand molding clay ideas are the kind I love teaching—simple to start, easy to personalize, and full of that cozy handbuilt charm.
Pinch Pot Trinket Dish
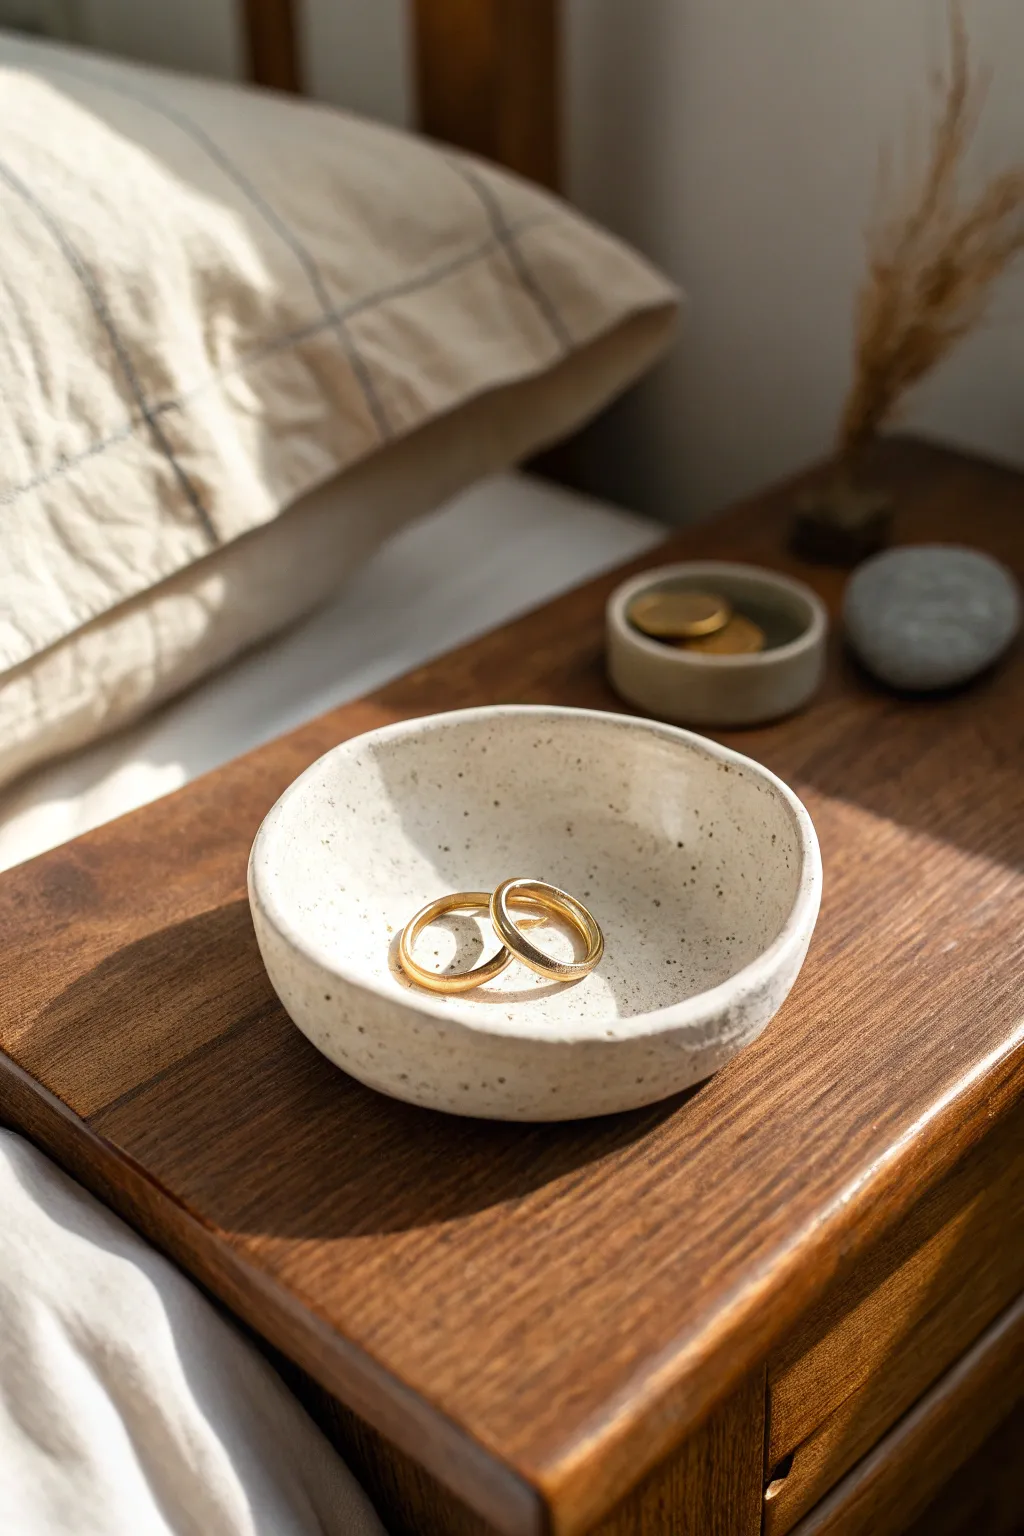
Create a minimal and modern home for your jewelry with this organic pinch pot trinket dish. The speckled white finish mimics high-end stoneware, giving it a cozy, earthy feel perfect for any bedside table.
Step-by-Step
Materials
- Air-dry clay (white)
- Acrylic paint (warm white/cream)
- Acrylic paint (black or dark brown for speckling)
- Gloss varnish or sealant
- Old toothbrush
- Small bowl of water
- Fine-grit sandpaper
- Sponge
Step 1: Forming the Shape
-
Prepare the Clay:
Start with a ball of air-dry clay roughly the size of a golf ball. Knead it in your hands for a minute to warm it up and ensure it is pliable without any cracks. -
Start the Pinch:
Hold the ball in your non-dominant hand. With your dominant thumb, press gently into the center of the sphere, stopping about a quarter-inch from the bottom. -
Open the Walls:
Using a pinching motion with your thumb on the inside and fingers on the outside, slowly rotate the ball while gently squeezing the clay walls thinner. -
Shape the Curve:
Aim for a shallow, open curvature rather than tall vertical walls. I usually flare the rim outward slightly as I pinch to create that welcoming, bowl-like shape. -
Refine the Thickness:
Work your way around the bowl until the walls are an even thickness, approximately 1/4 inch thick. Don’t worry about perfection; organic unevenness adds charm. -
Smooth the Rim:
Inspect the rim for any sharp cracks. Dip your finger in a tiny bit of water and run it along the edge to smooth it out, keeping the slightly wavy, handmade aesthetic. -
Flatten the Base:
Gently tap the bottom of your dish against your work surface to create a small flat spot. This ensures the finished dish will sit level on your nightstand.
Step 2: Finishing and Decorating
-
Dry Completely:
Set the dish aside in a cool, dry place. Let it dry for at least 24-48 hours. It should turn a chalky white and feel room temperature (not cold) when fully dry. -
Sand Imperfections:
Once bone dry, use fine-grit sandpaper to gently buff away any harsh fingerprints or rough patches on the rim and interior. -
Wipe Clean:
Use a barely damp sponge or cloth to wipe away the clay dust created by sanding so the paint adheres properly. -
Apply Base Color:
Paint the entire dish with a warm white or cream acrylic paint. You may need two coats for full, opaque coverage, letting it dry between layers. -
Prepare the Speckle:
Dilute a small dollop of black or dark brown paint with water until it has an inky, fluid consistency. -
Flick the Texture:
Dip an old toothbrush into the diluted dark paint. Hold it over the dish and run your thumb across the bristles to flick tiny speckles onto the surface. -
Control the Density:
Add speckles sparingly at first; you can always add more. Focus on the interior bowl where the jewelry will sit. -
Dry the Paint:
Allow the speckled paint layer to dry completely. -
Seal the Dish:
Apply a coat of gloss varnish to give the dish a ceramic-like sheen and protect the paint from chipping.
Rim Smoothing Trick
If the rim keeps cracking while you pinch, your clay is too dry. Dip your fingers in water, but don’t soak the clay—just rehydrate the surface slightly.
Uneven Speckles?
Test your toothbrush flicking technique on a piece of scrap paper first. This helps you gauge how much water to add to avoid large, runny blobs.
Place your finished dish on your bedside table to catch your favorite treasures at the end of the day


Coil-Built Bowl With Wavy Rim
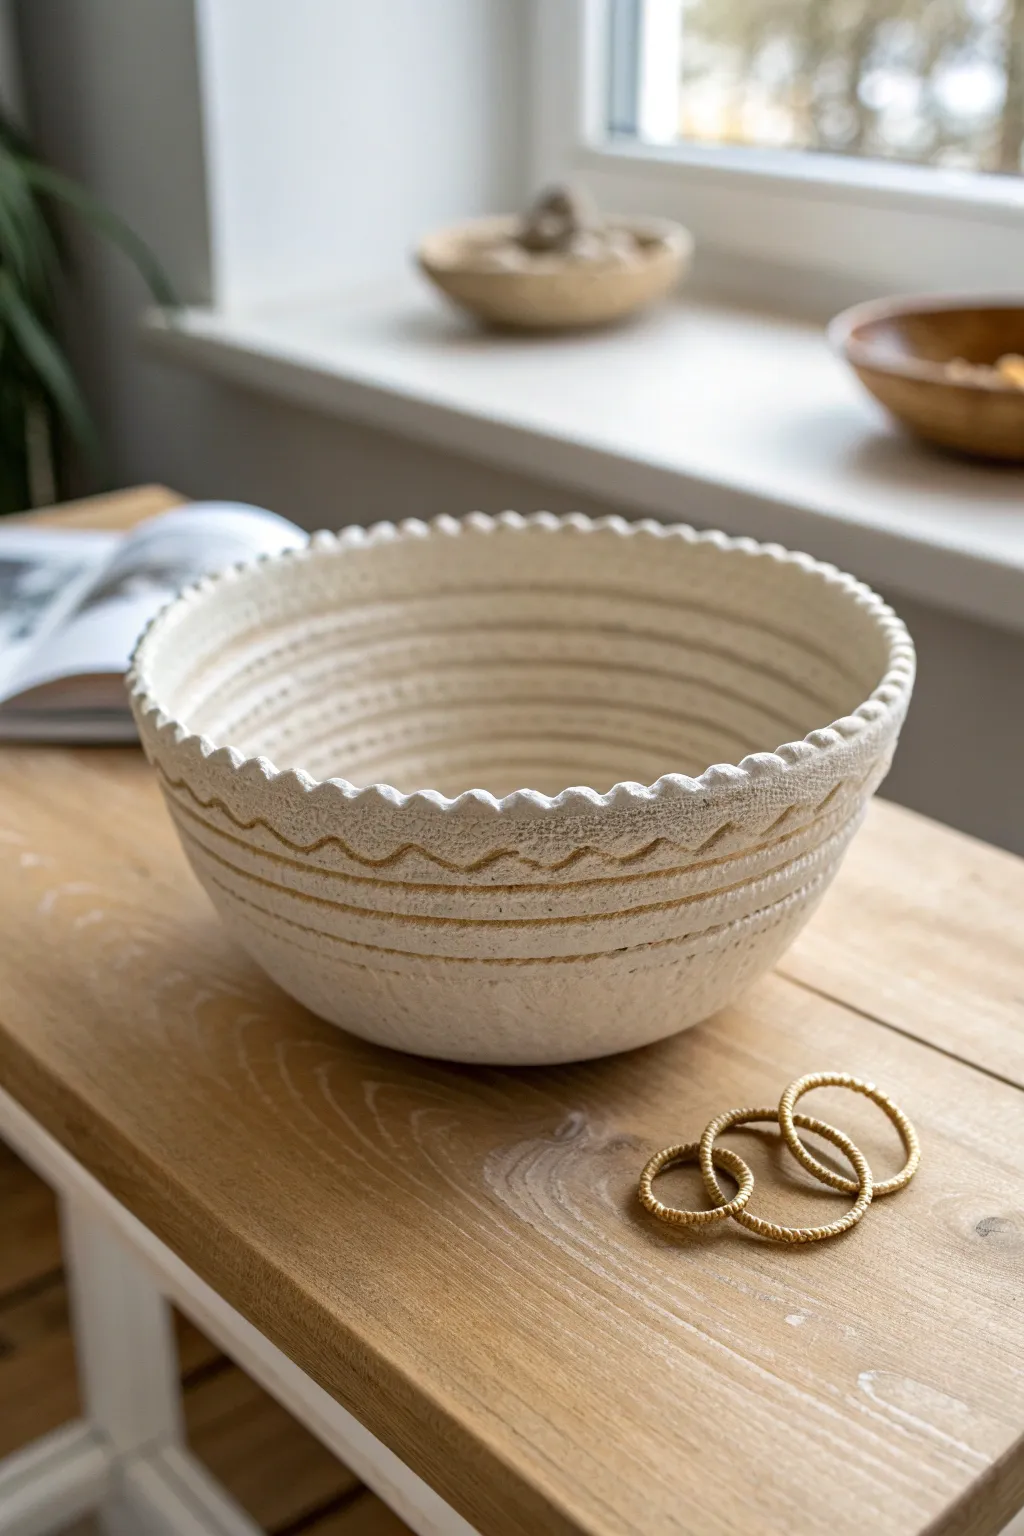
This charming, rustic bowl offers a perfect introduction to coil-building, turning simple ropes of clay into a functional piece of art. The creamy white texture and delicate scalloped rim give it a natural, organic feel that looks beautiful on any table.
Step-by-Step Guide
Materials
- Light-colored stoneware clay (with fine grog for texture)
- Clay scoring tool or serrated rib
- Slip (clay mixed with water)
- Wooden modeling tool with a rounded end
- Sponge
- Rolling pin or flat working surface
- Canvas mat or ware board
- Needle tool
- Matte white glaze or underglaze
Step 1: Forming the Base
-
Prepare your clay:
Start by wedging your clay thoroughly to remove air pockets. This ensures your coils will roll out smoothly without cracking later. -
Create the floor:
Roll out a slab of clay to about 1/4 inch thickness. Use a needle tool to cut a circle approximately 4-5 inches in diameter for the base of your bowl. -
Score the edge:
Rough up the outer edge of your circular base using a scoring tool or a serrated rib. Apply a small amount of slip to the scored area to act as glue.
Seamless Splice
When joining coil ends, cut them at a 45-degree angle rather than blunt ends. This creates more surface area for the join and prevents weak spots in the wall during firing.
Step 2: Building the Walls
-
Roll the first coil:
Take a chunk of clay and roll it on your surface until you have a long snake-like coil, roughly the thickness of your pinky finger. -
Attach the first layer:
Place the coil directly on top of the scored edge of the base. Cut off any excess length and join the ends of the coil together seamlessly. -
Blend the interior:
Using your thumb or a wooden tool, smear the inside edge of the coil down onto the base to bond them completely. I find smoothing the inside right away gives the structure better stability. -
Stack upwards:
Continue rolling coils and stacking them on top of the previous layer. As you stack, place each coil slightly outward from the one below it to create the widening bowl shape. -
Texture preservation:
Unlike typical coil pots where you smooth both sides, for this design, leave the exterior coils largely un-smoothed to keep those defined horizontal ridges. -
Refining the shape:
Once you reach the desired height, use a damp sponge to gently wipe the interior smooth, ensuring there are no sharp ridges inside.
Step 3: Detailing the Rim
-
Add the final rim coil:
Add one final, slightly thicker coil at the very top. Smooth it onto the wall below on the inside, but leave the outside distinct. -
Create the scallops:
Using your thumb and forefinger, gently pinch the rim at regular intervals to create the wavy, scalloped edge. Try to keep the spacing consistent. -
Add the wave detail:
Just below the rim, use a small loop tool or the back of a paintbrush to carve a shallow, wavy line that mimics the movement of the scalloped edge. -
Enhance the texture:
Lightly dab a dry sponge over the exterior surface. This adds a subtle, sandy texture that mimics stone and softens any harsh fingerprints.
Slumping Walls?
If the bowl starts to sag or widen too much while building, stop adding coils. Let the piece stiffen up for about 30 minutes under a loose plastic sheet, then resume building.
Step 4: Finishing
-
Slow drying:
Loosely cover the bowl with plastic to let it dry slowly to a leather-hard stage. This prevents warping, especially around the delicate rim. -
Bisque fire:
Once bone dry, fire the piece in a kiln to bisque temperature according to your clay body’s specifications. -
Glazing:
Apply a matte off-white or cream glaze. If you want maximum texture, wipe back the glaze slightly with a sponge so it stays in the crevices but reveals the clay texture on the ridges. -
Final firing:
Fire the bowl a second time to the glaze temperature listed on your glaze container.
Your finished bowl will be a stunning centerpiece ready to hold fruit or gathered trinkets


Slab-Built Catchall Tray
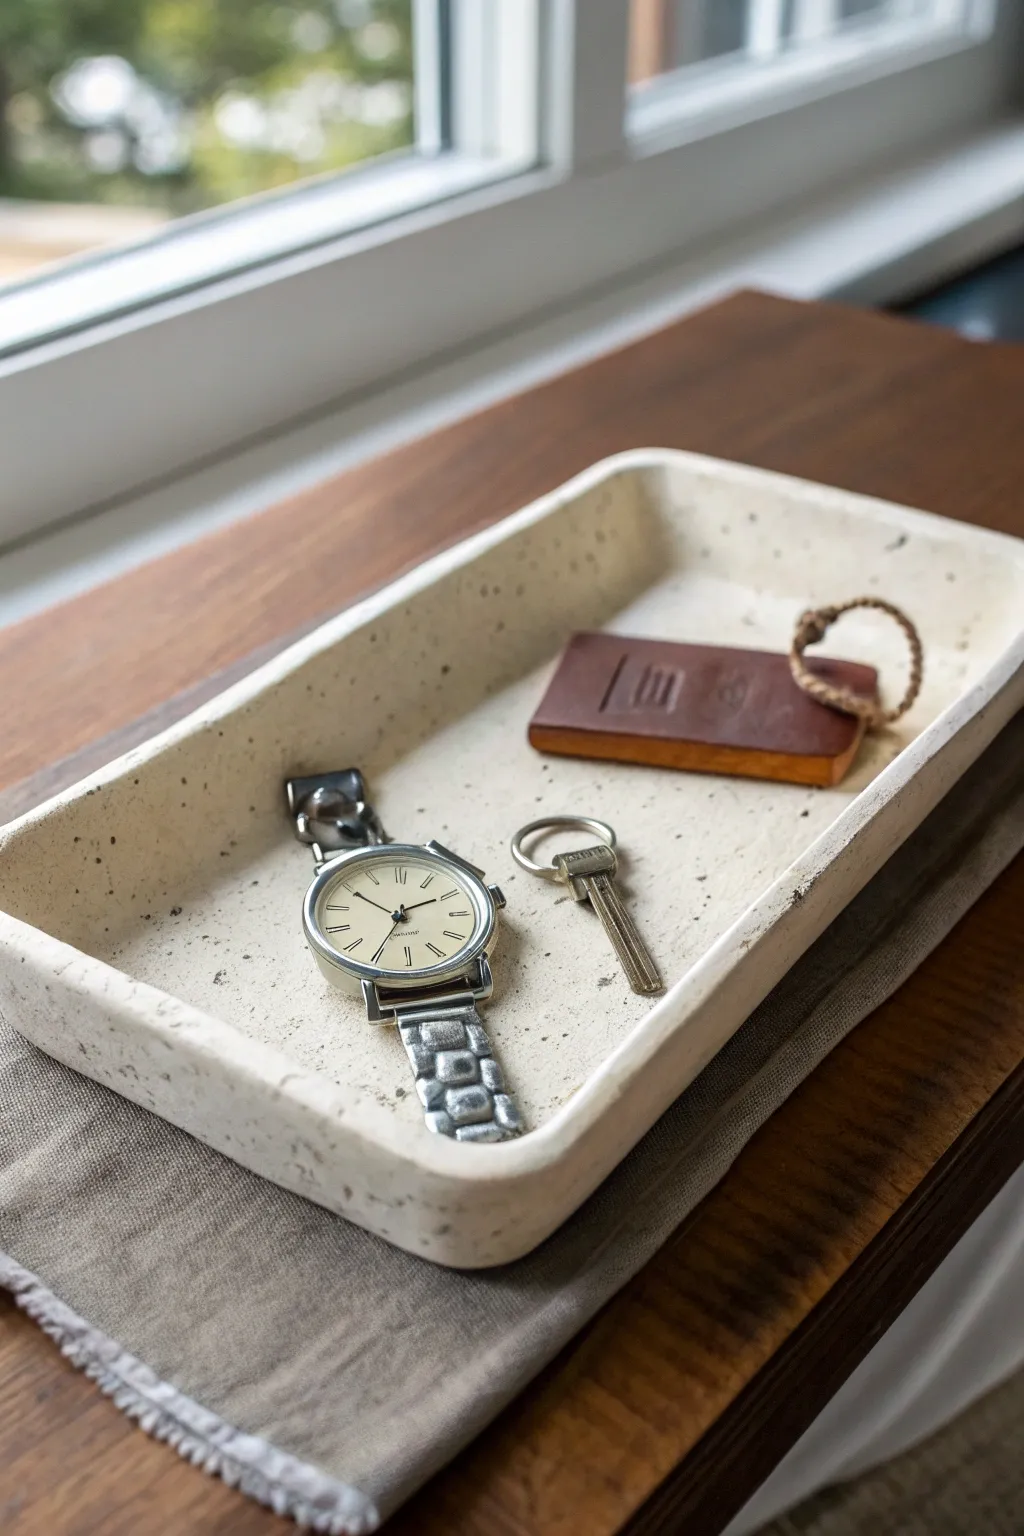
This minimalist catchall tray features a natural, stone-like speckled finish and clean, modern lines perfect for organizing your entryway essentials. Created using simple slab-building techniques, its low profile and softly rounded corners offer a sophisticated spot for your keys and watch.
How-To Guide
Materials
- Speckled stoneware clay (or white clay with speckles added)
- Rolling pin
- Two wooden guide slats (approx. 1/4 inch thick)
- Canvas mat or heavy fabric (to roll on)
- Rectangular paper template (approx. 6” x 9”)
- Needle tool or fettling knife
- Serrated rib or scoring tool
- Slip (clay mixed with water)
- Wooden modeling tool
- Sponge
- Clear matte glaze
Step 1: Preparing the Slabs
-
Wedge the Clay:
Begin by wedging your speckled clay thoroughly to remove air pockets and align the particles, ensuring a smooth working surface. -
Set Up Guides:
Place your canvas mat on a flat work surface. Position your two wooden guide slats parallel to each other on the canvas, wide enough to fit your intended tray size. -
Roll the Base:
Place a ball of clay between the slats and use the rolling pin to flatten it. Roll until the pin rides on top of the slats, creating a perfectly even slab. -
Compress the Slab:
Take a rubber rib (or a smooth credit card) and firmly stroke across the surface of the clay in multiple directions. I find this compression step crucial for preventing warping later on. -
Cut the Base:
Lay your rectangular paper template onto the slab. Using your needle tool, cut vertically around the template to create the floor of your tray. -
Cut the Wall Strips:
From the remaining clay (re-roll if necessary), cut long strips that are approximately 1.5 inches tall. These will form the walls of the tray.
Step 2: Assembling the Form
-
Score the Edges:
Rough up the top outer edge of your rectangular base using a serrated rib or scoring tool. Do the same to the bottom edge of your wall strips. -
Apply Slip:
Dab a generous amount of slip onto the scored areas of the base to act as your glue. -
Attach the Walls:
Place the wall strips onto the base. Gently press them down to ensure good contact. You can wrap a single long strip around the perimeter or use four separate pieces. -
Join the Seams:
If you used multiple strips, score and slip the vertical ends where they meet. Press them together firmly. -
Reinforce the Inside:
Roll a very thin coil of wet clay. Place it into the interior seam where the wall meets the floor. Smear this coil downward into the floor and upward into the wall to create a seamless transition. -
Smooth the Joints:
Use a wooden modeling tool to blend the outside seams, smoothing the clay so the connection line disappears completely.
Clean Corner Hack
Use the rounded handle of a paintbrush to smooth inside corners. It provides a perfect radius that is hard to achieve with just fingers.
Step 3: Refining and Finishing
-
Shape Corners:
Gently press your thumb into the interior corners to round them out slightly, mimicking the soft curve seen in the reference image. -
Level the Rim:
Flip the tray upside down gently for a moment to help level the top rim, or trim any uneven high spots with your needle tool. -
Smooth Surfaces:
Wipe a damp sponge over all surfaces, paying special attention to the rim to soften any sharp edges. -
Expose Speckles:
As you sponge, wipe away a slight layer of fine clay particles. This helps reveal the coarser speckles underneath, enhancing the texture. -
Slow Dry:
Loosely cover the tray with plastic and let it dry slowly over several days to prevent warping before firing. -
Glaze Application:
Once bisque fired, apply a clear matte glaze. This protects the clay while letting the natural speckles show through beautifully.
Add Depth
Before the clay dries, stamp a small personal logo or maker’s mark into the center of the tray floor for a custom touch.
Once fired, place this functional art piece on your console table for an instantly organized entryway
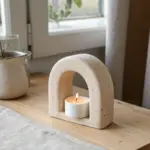


Hand-Molded Ring Cone Holder
This project combines geometric simplicity with organic warmth, featuring a tall, terracotta-hued cone nestled perfectly inside a matching shallow dish. The textured, speckled finish gives it a bespoke, artisan feel while keeping your favorite bands secure and displayed beautifully.
Detailed Instructions
Materials
- Terracotta-colored polymer clay (or air-dry clay mixed with burnt sienna acrylic)
- Small rolling pin
- Precision craft knife or clay blade
- Small bowl or round cookie cutter (approx. 3-4 inches diameter)
- Medium grit sandpaper
- Soft sponge
- Water (if using air-dry clay) or clay softener
- Cardstock or thick paper (for the cone template)
- Tape
- Old toothbrush or stiff bristle brush
Step 1: Shaping the Base Dish
-
Prepare the clay:
Begin by conditioning your clay. Knead a palm-sized amount until it is pliable and warm. If you want that speckled pottery look shown in the photo, you can mix in some dried coffee grounds or coarsely ground black pepper at this stage. -
Roll the slab:
Roll out the clay on a flat surface to an even thickness of about 1/4 inch. Ensure the thickness is consistent to prevent warping later. -
Cut the circle:
Use your round cookie cutter or trace around a small bowl with your craft knife to cut a perfect circle from the slab. -
Form the rim:
Gently curve the outer edges of the circle upwards to create a shallow lip. I like to use my thumbs to pinch and smooth the inner wall, ensuring the rise is gradual and organic. -
Refine the surface:
Dip a sponge lightly in water (or baby oil for polymer) and smooth out any fingerprints on the dish. The texture should look matte and earthy, not glossy.
Cracks Appearing?
If you see tiny fissures while drying, create a ‘slip’ paste of clay and water. Fill the cracks, smooth with a finger, and let it dry slowly away from direct heat.
Step 2: Sculpting the Cone
-
Create a template:
Cut a semi-circle out of cardstock. The radius of this semi-circle will determine the height of your cone; aim for about 4-5 inches for a dramatic look. -
Roll clay for the cone:
Roll out another slab of clay, slightly thinner than the base dish. Lay your cardstock template on top and cut around it with the craft knife. -
Form the cone shape:
This part requires a delicate touch. Gently roll the clay semi-circle into a cone shape, bringing the straight edges together. -
Seal the seam:
Press the seam together firmly. Use a modeling tool or your finger to blend the clay across the join line until it disappears completely. -
Check the fit:
Place the cone into the center of your raw dish. It should sit flush. If the bottom of the cone is uneven, gently sand or slice it flat. -
Adjust the tip:
Soften the very tip of the cone so it isn’t dangerously sharp. A slight rounding looks more professional and prevents chipping.
Step 3: Finishing Touches
-
Add texture:
Take an old toothbrush and gently tap the surface of both the cone and the dish. This creates the subtle, stone-like porosity seen in the image. -
Final smoothing:
Do one last inspection for unwanted fingernail marks. Run a damp finger over the rim of the dish to make sure it looks intentional and soft. -
Dry or Bake:
If using air-dry clay, let the pieces dry separately for 24-48 hours. If using polymer clay, bake according to the package instructions (usually 275°F for 15-30 minutes). -
Sanding:
Once fully cured and cooled, lightly sand any rough edges, particularly the bottom of the dish and the base of the cone, to ensure they don’t scratch your furniture.
Pro Tip: Weighted Base
Before sealing the cone, stuff a small ball of aluminum foil or a pebble inside the bottom. This adds weight and stops it from tipping when holding heavy rings.
Now you have a functional sculpture that organizes your jewelry with quiet elegance

The Complete Guide to Pottery Troubleshooting
Uncover the most common ceramic mistakes—from cracking clay to failed glazes—and learn how to fix them fast.
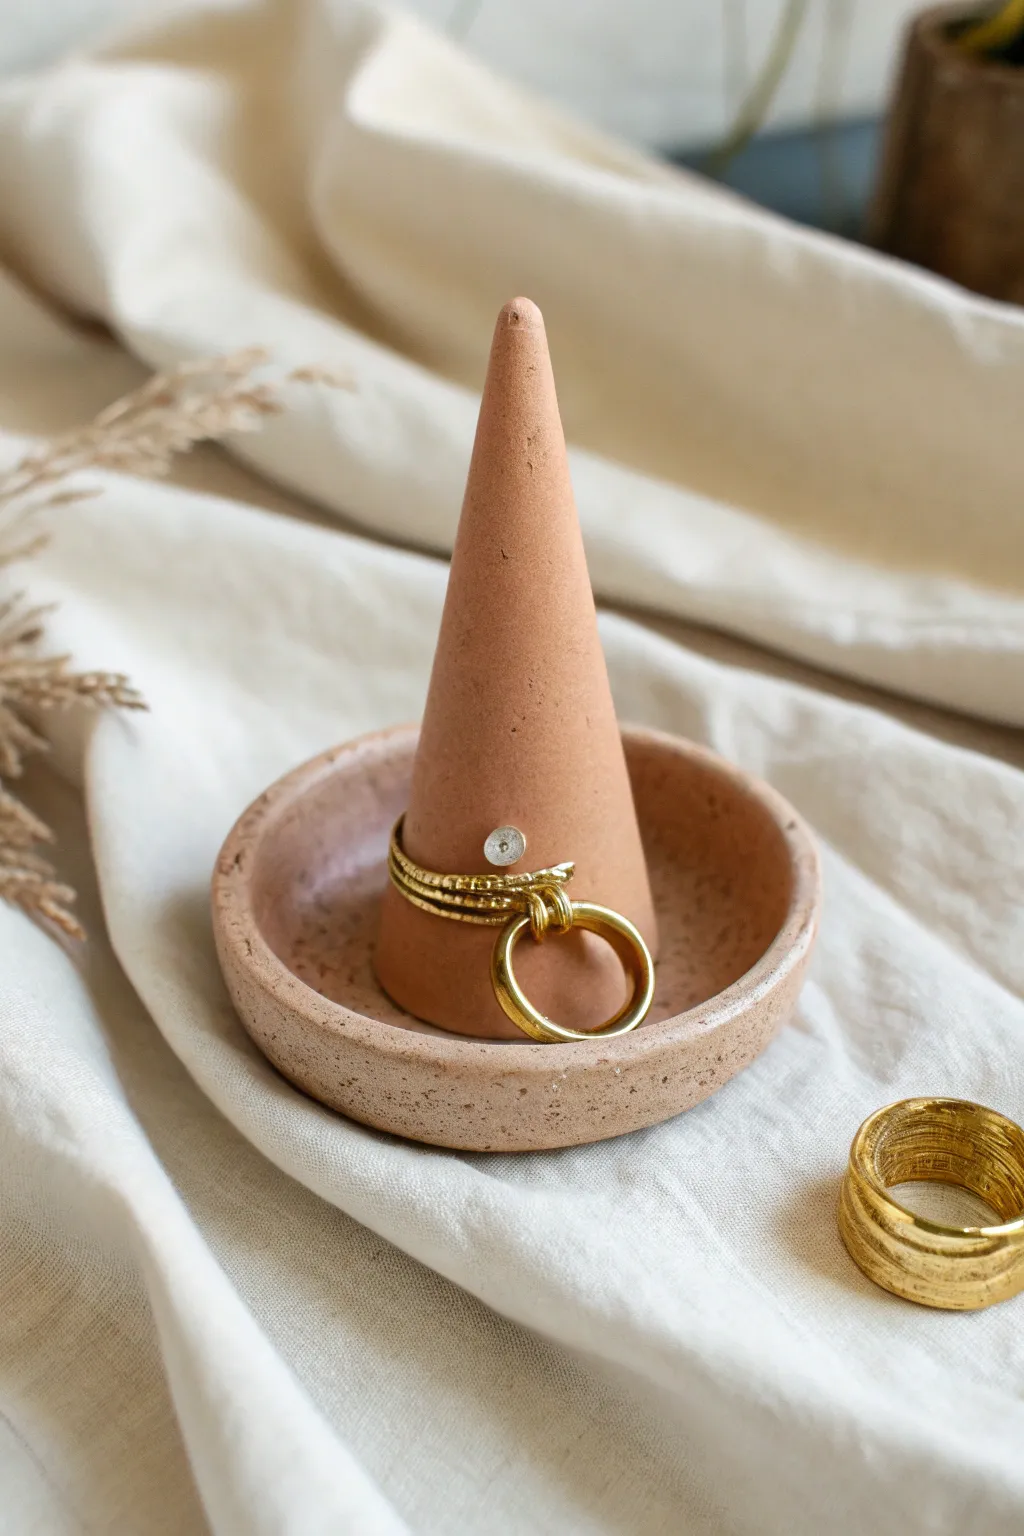
Thumb-Pressed Tealight Holders
Recreate the rustic charm of weathered river stones with these textured tealight holders. Using a simple mixture and clever texturing technique, you’ll craft organic, spherical vessels that look like they were carved from pumice or limestone.
How-To Guide
Materials
- White or cream-colored air-dry clay (or polymer clay)
- Medium grit sea salt or coarse kosher salt
- Standard tealight candles (for sizing)
- Small bowl of water
- Sandpaper (medium to fine grit)
- Rolling pin (optional)
- Stiff bristle brush (like an old toothbrush)
- Matte sealant or varnish
Step 1: Preparing the Textured Clay Base
-
Condition the clay:
Begin by taking a chunk of your air-dry clay roughly the size of a tennis ball. Knead it thoroughly in your hands until it becomes warm, soft, and pliable to prevent cracking later. -
Incorporate texture:
Flatten the clay slightly into a pancake shape. Sprinkle a generous pinch of coarse sea salt into the center of the clay. -
Blend the inclusions:
Fold the clay over the salt and knead it again. The salt crystals are the secret ingredient that will eventually dissolve or fall out to create those realistic stone-like pockmarks. Repeat this process 2-3 times until the salt is evenly distributed but not dissolving yet. -
Divide the portions:
Separate your prepared clay into four even sections. Roll each section between your palms to form smooth, tight balls.
Step 2: Shaping the Candle Holders
-
Create the opening:
Hold a clay ball in one hand. using your thumb, press gently but firmly directly into the center of the sphere. Rotate the ball slightly as you press to keep the hole centered. -
Size the interior:
Take a real tealight candle (removing the wick if you’re worried about damaging it, or just use the metal casing) and check the fit. Gently push the candle casing into your thumb indentation. -
Widen gently:
Wiggle the casing slightly to ensure the hole is just a millimeter wider than the candle itself, allowing for shrinkage as the clay dries. -
Refine the exterior:
With the hole established, cup the sphere in your hands to fix any distortion. You want a rounded, organic shape that curves inward at the top rim rather than a straight-sided cup. -
Smooth the rim:
Dip your finger in a little water and run it along the top edge of the opening to smooth out any sharp ridges or cracks, blending the clay for a seamless look. -
Establish the base:
Tap the bottom of the sphere gently on your work surface to create a small, flat spot. This ensures your candle holder won’t roll away once finished.
Cracks appearing?
If small fissures appear while drying, mix a tiny amount of clay with water to make a paste (slip) and fill the cracks. Smooth over with a finger and let dry again.
Step 3: Finishing and Texturing
-
Enhance the texture:
While the clay is still damp, take your stiff bristle brush and stipple the surface gently. This pushes the clay around the salt crystals and removes fingerprints. -
Initial drying:
Set the spheres aside to dry. I prefer to let them sit for at least 24-48 hours depending on humidity, ensuring they are bone dry and hard. -
Revealing the craters:
Once fully dry, take your sandpaper and gently sand the outer surface. This abrasion will knock loose the surface salt crystals, leaving behind deep, realistic pits. -
Clean surface:
Use the stiff brush again to sweep away the loose salt and dust. If some salt is stubborn, you can use a slightly damp cloth to dissolve surface crystals, deepening the pitted effect. -
Soften edges:
Do a final pass with fine-grit sandpaper around the rim to make it feel smooth to the touch. -
Seal the stone:
Apply a coat of matte sealant or varnish. This protects the clay and gives it a finished ceramic feel without adding unnatural gloss.
Simulate Aging
For a dirtier, aged look, mix a drop of brown acrylic paint with water and wash over the dry piece, then immediately wipe it off. The dark color will stay inside the pits.
Now you have a serene set of tactile candle holders ready to bring warmth to any room
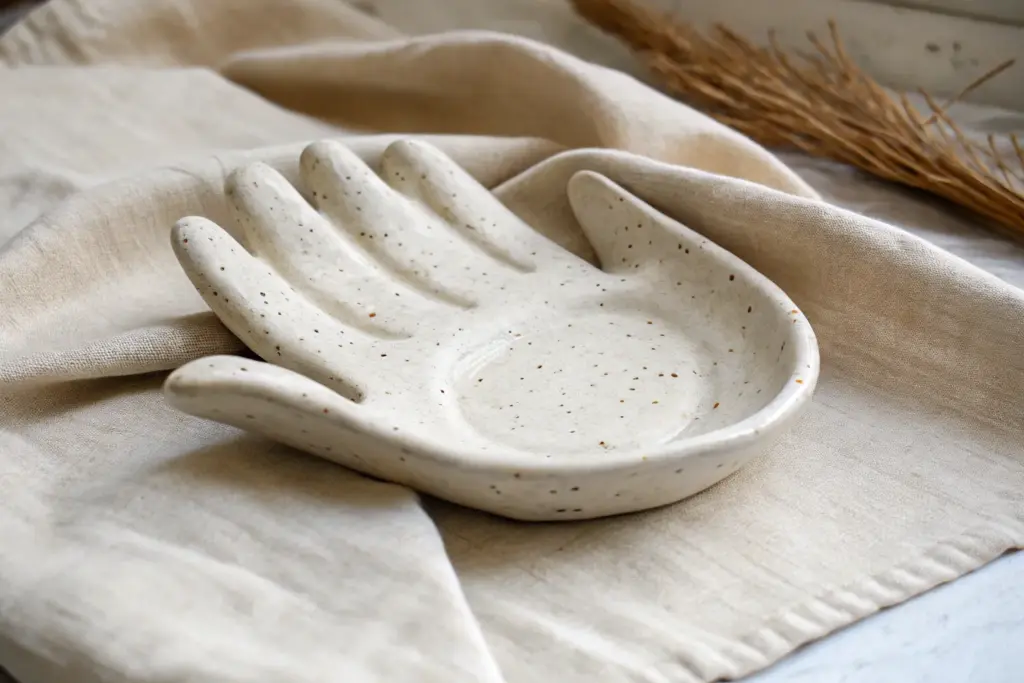
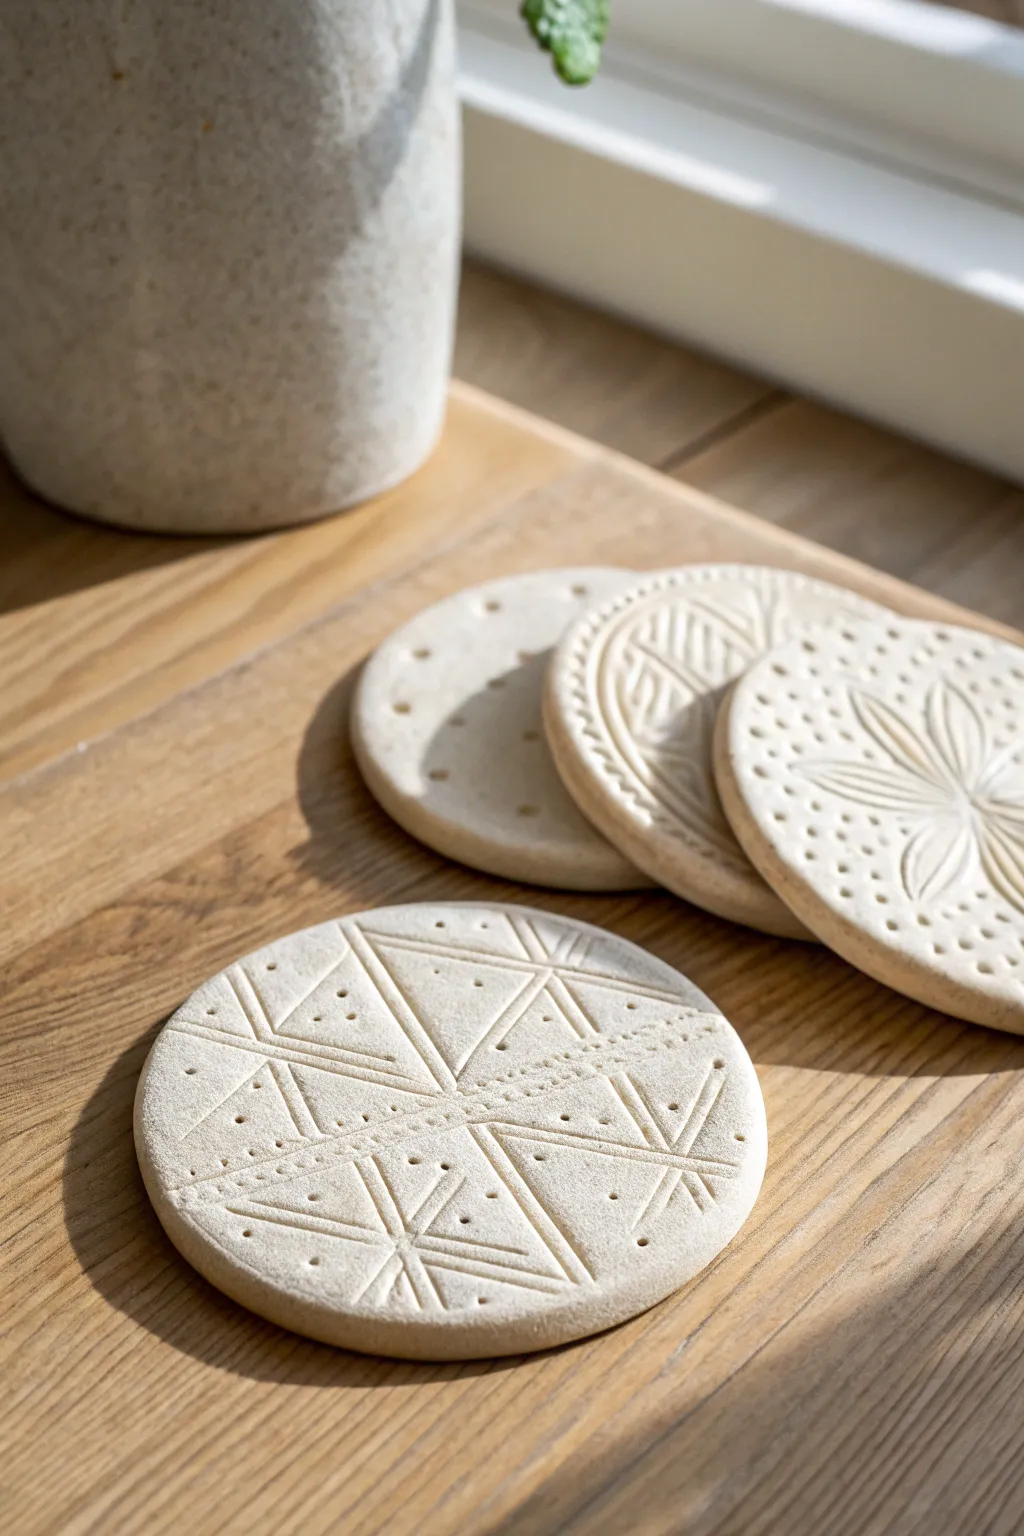
Leaf-Imprinted Jewelry Dish

Embrace organic beauty with this simple yet elegant jewelry dish, featuring a creamy white finish and natural speckled texture. Its gentle oval shape creates the perfect resting place for your favorite rings and small treasures.
Step-by-Step Tutorial
Materials
- White polymer clay or air-dry clay (approx. 200g)
- Dried oregano or coarse black pepper (for speckles)
- Rolling pin
- Oval template or cookie cutter (approx. 5-6 inches)
- Small sponge or smoothing tool
- Water (if using air-dry clay)
- Sandpaper (fine grit)
- Matte varnish or sealant
Step 1: Preparing and Shaping
-
Condition the Clay:
Begin by warming up a handful of white clay in your hands. Knead it thoroughly until it is soft, pliable, and free of any cracks. -
Add Texture:
Flatten the clay slightly and sprinkle a small pinch of dried oregano or coarse black pepper onto the surface. Fold the clay over itself to trap the spices inside. -
Mix Thoroughly:
Knead the clay again until the speckles are evenly distributed throughout the white base. I prefer using oregano because it mimics the look of stoneware pottery without needing a kiln. -
Roll it Out:
Place your clay on a smooth work surface. Use your rolling pin to flatten the clay into a slab about 1/4 inch thick, ensuring the thickness is consistent from edge to edge. -
Cut the Shape:
Place your oval template onto the clay or use an oval cookie cutter. Carefully cut around the shape with a craft knife or press down the cutter. Remove the excess clay. -
Smooth the Edges:
Dip your finger or a small sponge in water (for air-dry clay) or baby oil (for polymer) and gently run it along the cut edges to round them off and remove any sharp angles.
Step 2: Forming the Dish
-
Create the Curve:
Lift the clay oval and gently curl the edges upward with your fingertips. You are aiming for a shallow bowl shape rather than a steep wall. -
Refine the Form:
Place the clay into a shallow curved bowl if you need support to keep the shape while it sets, or simply pinch and mold the rim until it looks organic and pleasing. -
Smooth the Interior:
Check the inside surface for any fingerprints. Lightly buff them away with your smoothing tool or finger so the bed of the dish is perfectly smooth. -
Initial Drying/Baking:
If using polymer clay, bake according to the package instructions. If using air-dry clay, set it aside in a dry area for 24-48 hours until fully hardened.
Natural Speckle Hack
Don’t have spices? Used dried tea leaves from a tea bag or actual decorative sand mixed into the clay for a coarser, more rustic stone effect.
Step 3: Finishing Touches
-
Sand for Smoothness:
Once fully cured or dry, inspect the rim. If there are any rough spots, take a piece of fine-grit sandpaper and gently sand the edges in a circular motion. -
Wipe Clean:
Use a slightly damp cloth or a dry soft brush to remove any dust created by the sanding process. -
Seal the Dish:
Apply a thin coat of matte varnish over the entire piece. This protects the clay and the embedded speckles while maintaining that natural, unglazed pottery look. -
Let it Cure:
Allow the varnish to dry completely according to the manufacturer’s time guidelines. -
Add the Leaf Element:
To match the reference photo perfectly, place a real, dried skeletal leaf inside the dish. It adds a delicate textural contrast to the smooth clay.
Imprint Variation
Instead of placing a loose leaf on top, press a fresh leaf with heavy veins into the wet clay before drying to permanently deboss a botanical pattern.
Now gather your favorite jewelry pieces and display them beautifully in your new handcrafted dish


What Really Happens Inside the Kiln
Learn how time and temperature work together inside the kiln to transform clay into durable ceramic.
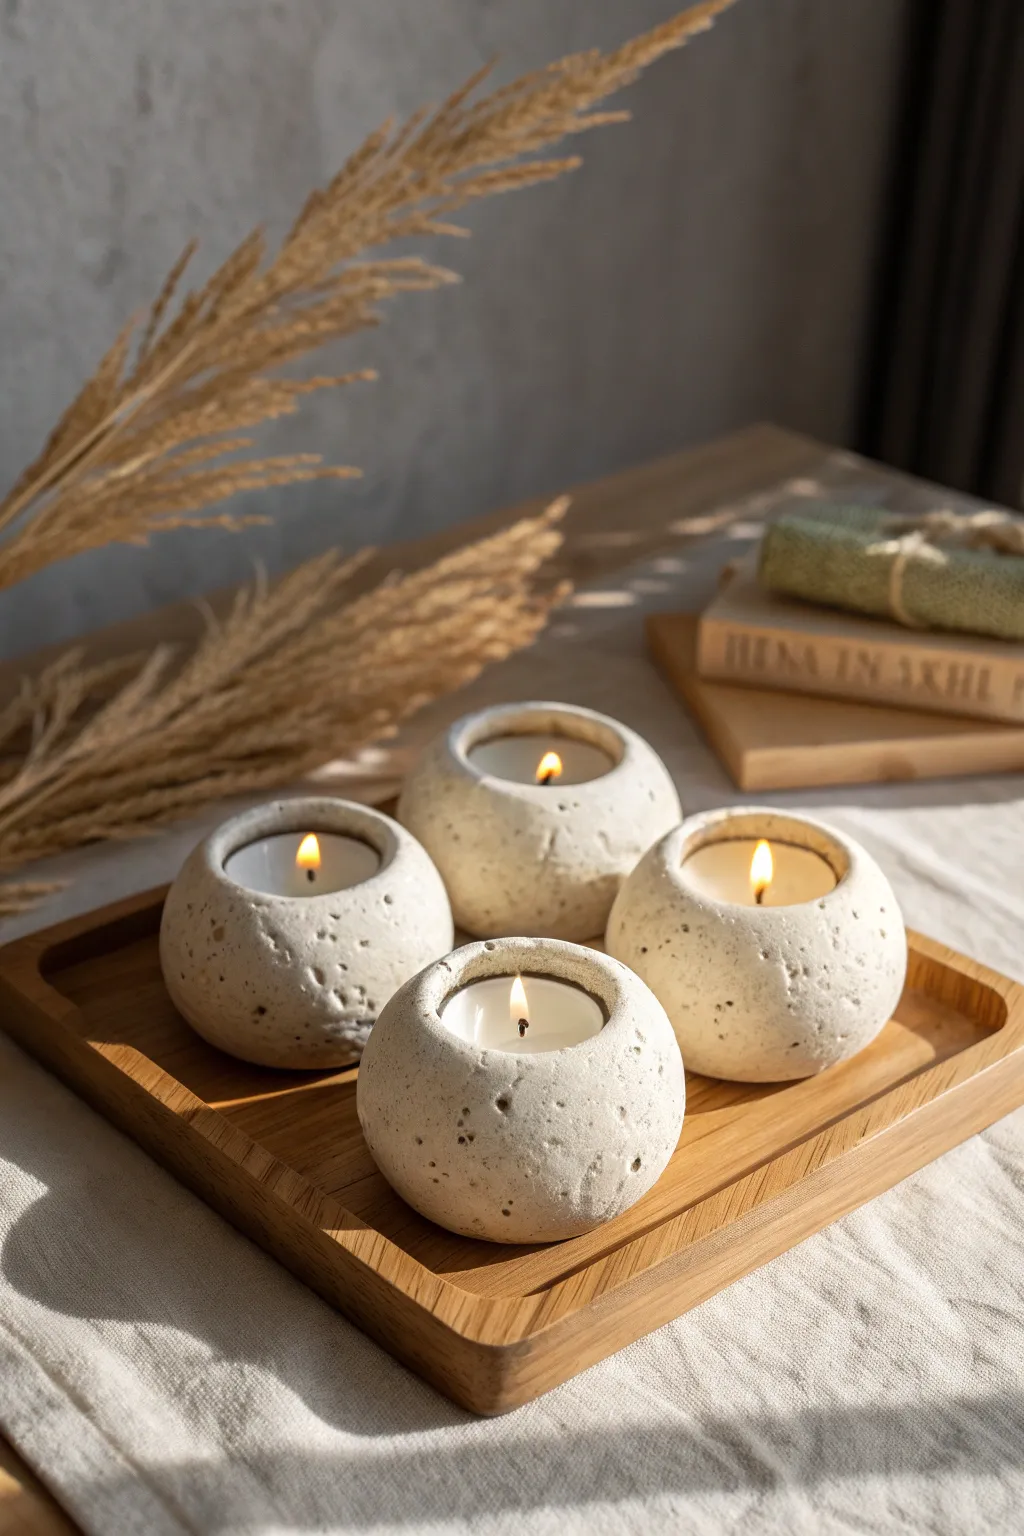
Stamped Texture Coaster Set
Capture the warmth of minimal design with these elegant, handcrafted coasters featuring deep textural patterns. Their muted tone and tactile surface make them a sophisticated addition to any coffee table setting.
How-To Guide
Materials
- White air-dry clay or polymer clay
- Rolling pin
- Circle cookie cutter (approx. 3.5-4 inches)
- Wooden guide strips or two magazines (for even thickness)
- Needle tool or toothpick
- Ruler
- Fine grit sandpaper
- Stamp tools (or found objects like pen caps/buttons)
- Small sponge and water
- Matte acrylic sealant (optional)
Step 1: Clay Preparation
-
Knead the clay:
Begin by taking a generous handful of clay and kneading it thoroughly in your hands until it feels warm and pliable. This removes air bubbles and prevents cracking later. -
Set up guides:
Place your wooden guide strips or two magazines of equal height on either side of your workspace. This ensures your coasters will be perfectly flat and uniform. -
Roll out the slab:
Place the ball of clay between the guides and use your rolling pin to create a smooth, even slab. Aim for a thickness of about 1/4 inch so the coasters feel substantial. -
Smooth the surface:
Before cutting, gently wipe the surface of the clay with a slightly damp sponge to remove any canvas marks or fingerprints, creating a pristine canvas for your design.
Stamp Hunting
Look around your house for unique textures. The ends of markers, lace fabric, burlap, or even carved erasers make incredible and unique impression tools.
Step 2: Shaping and Patterning
-
Cut the circles:
Using your large circle cutter, press firmly into the clay slab. Don’t remove the excess clay yet; leaving it in place supports the edges while you stamp the design. -
Draft the geometric lines:
For the foreground coaster shown in the image, lightly score a horizontal line across the center using a ruler. Add two diagonal lines crossing through the center to create six triangular sections. -
Deepen the main lines:
Go back over your scored guide lines with a needle tool or the edge of a ruler, pressing deeper to create distinct grooves that separate the geometric zones. -
Add inner triangles:
Inside each large triangle created by your main lines, use the needle tool to freehand smaller inscribed triangles. Vary the sizes to create visual interest. -
Create the dotted texture:
Using the blunt end of a small paintbrush or a dedicated dotting tool, press small holes into specific sections. In the reference, dots are clustered inside the smallest triangles and along the central band. -
Try floral or curved patterns:
For the other coasters, experiment with different textures. Create a flower motif by pressing the side of a spoon gentle into the clay, or use a pen cap to make consistent ring patterns. -
Refine the impressions:
Check your stamped marks. If the clay has lifted around the edges of your holes or lines, gentlty pat it down with a finger to keep the surface flat.
Step 3: Finishing Touches
-
Release the shapes:
Carefully peel away the excess clay from around your circles. If the coasters are stuck to the table, slide a taught piece of fishing line or wire underneath to slice them free. -
Smooth the edges:
Dip your finger in a little water and run it around the circumference of each coaster to round off sharp edges and smooth out any cutting imperfections. -
Initial drying phase:
Place the coasters on a wire rack or between two clean boards. I find flipping them over every few hours during the first day helps prevent curling as moisture evaporates. -
Full cure:
Allow the coasters to dry completely for 24-48 hours. The clay will turn a lighter shade of white or beige when fully dry. -
Sand for perfection:
Once bone dry, take fine-grit sandpaper and lightly buff the edges and surface. This removes any final burrs and gives the coaster a professional, stone-like feel. -
Seal for protection:
To protect against drink condensation, apply two thin coats of a matte acrylic sealant or a waterproofing varnish, allowing ample drying time between layers.
Natural Tint
Knead a small amount of coffee grounds or cinnamon into the wet clay before rolling. It adds a speckled, organic texture and a subtle stone-like color to the finish.
Enjoy styling these versatile pieces in your home or wrapping them up as a thoughtful handmade gift
Simple Slot Photo Holder
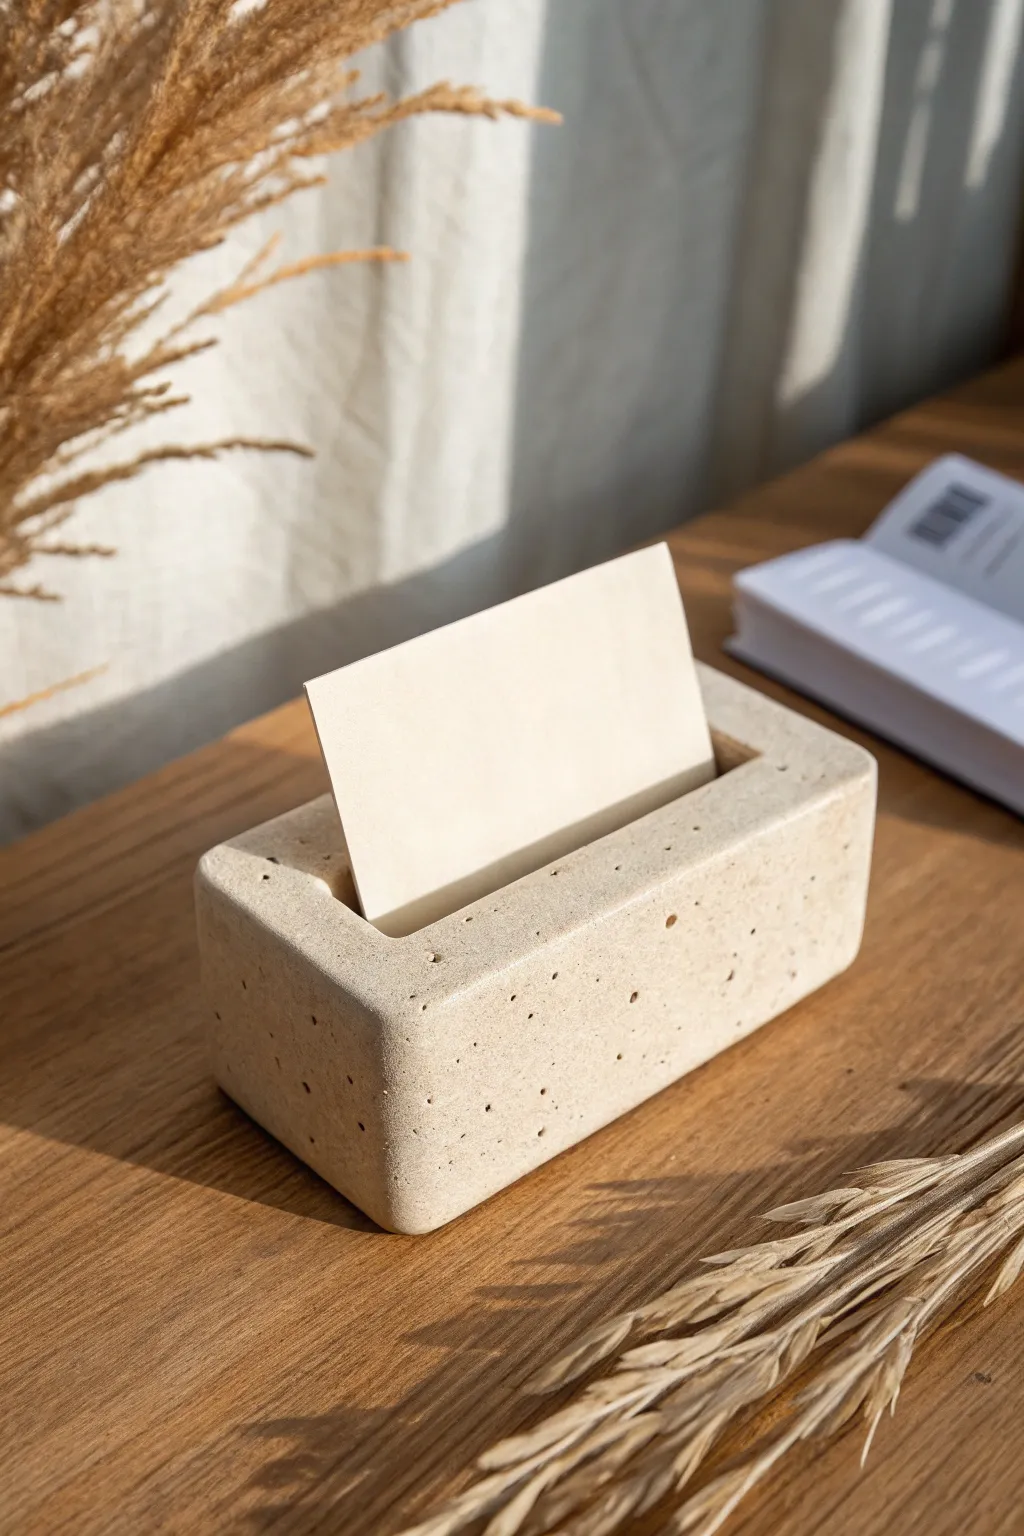
Achieve the high-end look of raw travertine or sandstone with this surprisingly simple clay project. The clean, rectangular design features a subtle speckled texture and a perfectly centered slot, making it an elegant way to display photos, business cards, or table numbers.
Step-by-Step
Materials
- Air-dry clay (stone, granite effect, or white/beige)
- Rolling pin
- Ruler
- Sharp craft knife or clay blade
- Two guide strips or scrap wood (approx. 1.5 inches thick) for height
- Thick piece of cardstock or a credit card (to create the slot)
- Coarse black pepper or dried coffee grounds (for texture)
- Fine-grit sandpaper (220-400 grit)
- Small bowl of water
- Matte sealant or varnish (optional)
Step 1: Preparing the Clay Body
-
Condition the clay:
Begin by taking a substantial block of air-dry clay. Knead it thoroughly in your hands to warm it up and remove any trapped air bubbles, which helps prevent cracking later. -
Add texture:
Flatten the clay slightly and sprinkle a pinch of coarse black pepper or dry coffee grounds onto the surface. Fold the clay over itself and knead again to distribute these flecks evenly throughout the block, mimicking the look of natural stone. -
Form the basic shape:
Shape the clay roughly into a rectangular brick with your hands. It doesn’t need to be perfect yet, but try to keep the sides relatively flat. -
Establish thickness:
Place your two guide strips (wood or similar) on either side of the clay block to serve as height restrictors. I like to use guides about 1.5 inches tall to give the piece a weighty, substantial feel. -
Shape the block:
Using a flat surface or a rolling pin, gently press or roll the top of the clay until it is level with your guides. Use your ruler to tap and straighten the sides, creating sharp 90-degree angles. -
Refine the edges:
Use a sharp craft knife to slice off any uneven ends or bulging sides. You want a crisp, clean rectangular prism shape, roughly 4 inches long by 2 inches wide.
Cracks Appearing?
If hairline cracks appear while drying, mix a small amount of fresh clay with water to create a paste (slip). Fill the cracks, smooth over, and let dry again.
Step 2: Creating the Slot
-
Mark the center:
Using your ruler, lightly score a line exactly down the lengthwise center of the top surface. This will ensure your card stands straight. -
Insert the slot tool:
Take a doubled-up piece of thick cardstock or a spare plastic card. Grease it very lightly with a drop of oil or water to prevent sticking. -
Press the groove:
Press the card vertically into the clay along your center line. Push it down about 0.5 to 0.75 inches deep—far enough to hold a photo securely, but not so deep it weakens the base. -
Wiggle for width:
Gently wiggle the card forward and backward just a tiny fraction of a millimeter to widen the slot slightly. This accounts for the clay shrinking as it dries. -
Smooth the opening:
Carefully remove the card. Dip your finger in water and very gently smooth the edges of the slot opening so they aren’t sharp or ragged.
Step 3: Detailing and Finishing
-
Add surface pits:
To enhance the raw stone effect, use a toothpick or the bristles of an old toothbrush to poke tiny, random holes into the surface. Some should be shallow and others slightly deeper. -
Soften the corners:
Dampen your fingertip and run it lightly over the sharp outer corners of the block to round them ever so slightly, giving it a tumbled stone appearance. -
Initial drying:
Let the piece dry for 24 hours. Placing it on a wire rack helps air circulate underneath, ensuring the bottom dries at the same rate as the top. -
Flip and continue drying:
After the first day, carefully flip the block over. Let it dry for another 24-48 hours until the clay is completely hard and lighter in color. -
Sand for texture:
Using fine-grit sandpaper, lightly sand the entire surface. This reveals more of the ‘speckles’ you added earlier and creates a smooth, matte finish akin to polished concrete. -
Dust and seal:
Wipe away all sanding dust with a dry cloth. If you want to protect the holder from stains, apply a thin coat of matte varnish.
Color Wash
Mix a tiny drop of brown or gray acrylic paint into a cup of water. Brush this wash over the dry clay and wipe it off immediately to darken the pits and textures.
Place your favorite minimalist print or memory in the slot and enjoy the organic warmth this piece brings to your desk.

TRACK YOUR CERAMIC JOURNEY
Capture glaze tests, firing details, and creative progress—all in one simple printable. Make your projects easier to repeat and improve.
Press-Molded Shape Magnets

Bring a touch of modern art to your kitchen with these earthy, press-molded magnets. Their matte, textured finish and muted color palette create a warm, organic look that turns your refrigerator into a canvas.
Detailed Instructions
Materials
- Air-dry clay (white or terra cotta)
- Acrylic paints (sage green, dusty pink, mustard yellow, terracotta, beige)
- Rolling pin
- Cookie cutters (circles, arches) or a craft knife
- Sandpaper (fine grit)
- Strong round magnets or magnetic tape
- Super glue or E6000 adhesive
- Matte sealant spray or matte Mod Podge
- Parchment paper or silicone mat
- Small sponge or foam brush
Step 1: Shaping the Clay
-
Prepare your workspace:
Lay down parchment paper or a silicone mat to protect your surface and prevent sticking. Take a handful of air-dry clay and knead it until it is soft and pliable. -
Roll out the slab:
Using your rolling pin, flatten the clay to an even thickness of about 1/4 inch. If you want a uniform look, place guide sticks on either side of the clay while rolling. -
Cut the shapes:
Use cookie cutters to punch out perfect circles. For the rectangles and triangles, use a craft knife and a ruler to cut clean geometric lines. -
Create the rainbows:
For the rainbow shapes, cut out a large circle, then use a slightly smaller cutter to remove the center, creating an arch. Use the craft knife to cut distinct bands or layer thin strips of clay together. -
Refine the edges:
Dip your finger in a little water and gently smooth any rough edges or burrs left by the cutters. This softening step gives the finished piece a more polished look. -
Add texture (optional):
To mimic the slight stone-like texture seen in the photo, gently dab the surface of the wet clay with a crumpled piece of aluminum foil or a stiff-bristled brush. -
Let them dry:
Place your shapes on a flat surface to dry. I find flipping them over halfway through the drying process helps them cure evenly and prevents curling. Allow 24-48 hours depending on humidity.
Uneven drying?
If your clay shapes start to curl up at the edges while drying, place a light book on top of them (with parchment paper in between) to weigh them down flat.
Step 2: Painting and Finishing
-
Sand for smoothness:
Once fully dry, lightly sand any remaining sharp edges or bumps with fine-grit sandpaper. Wipe away the clay dust with a damp cloth or soft brush. -
Mix your palette:
Prepare your acrylic paints. Mix in a tiny bit of white or grey to mute standard colors into the earthy sage, terracotta, and mustard tones shown in the project. -
Apply the base coat:
Paint the top and sides of each shape using a foam brush or sponge. Dabbing the paint on rather than stroking it can enhance the matte, textured ceramic effect. -
Detail the rainbows:
For the rainbow magnets, paint each arch band a different complementary color. Use a small detail brush to keep the lines crisp between the colors. -
Dry and seal:
Allow the paint to dry completely. Finish with a coat of matte sealant spray or matte Mod Podge to protect the surface without adding unwanted gloss. -
Attach the magnets:
Flip the shapes over. Apply a dab of strong adhesive like E6000 to the back of a round magnet and press it firmly onto the center of the clay shape. -
Final cure:
Let the glue set for at least 24 hours before placing your new art pieces on the fridge to ensure the bond is secure.
Terrazzo Effect
Mix tiny chips of dried, colored clay into your fresh white clay before rolling it out. Sanding after drying will reveal a beautiful embedded terrazzo pattern.
Now you have a custom set of magnets that organizes your space with style and texture
Face Pinch Pot Planter
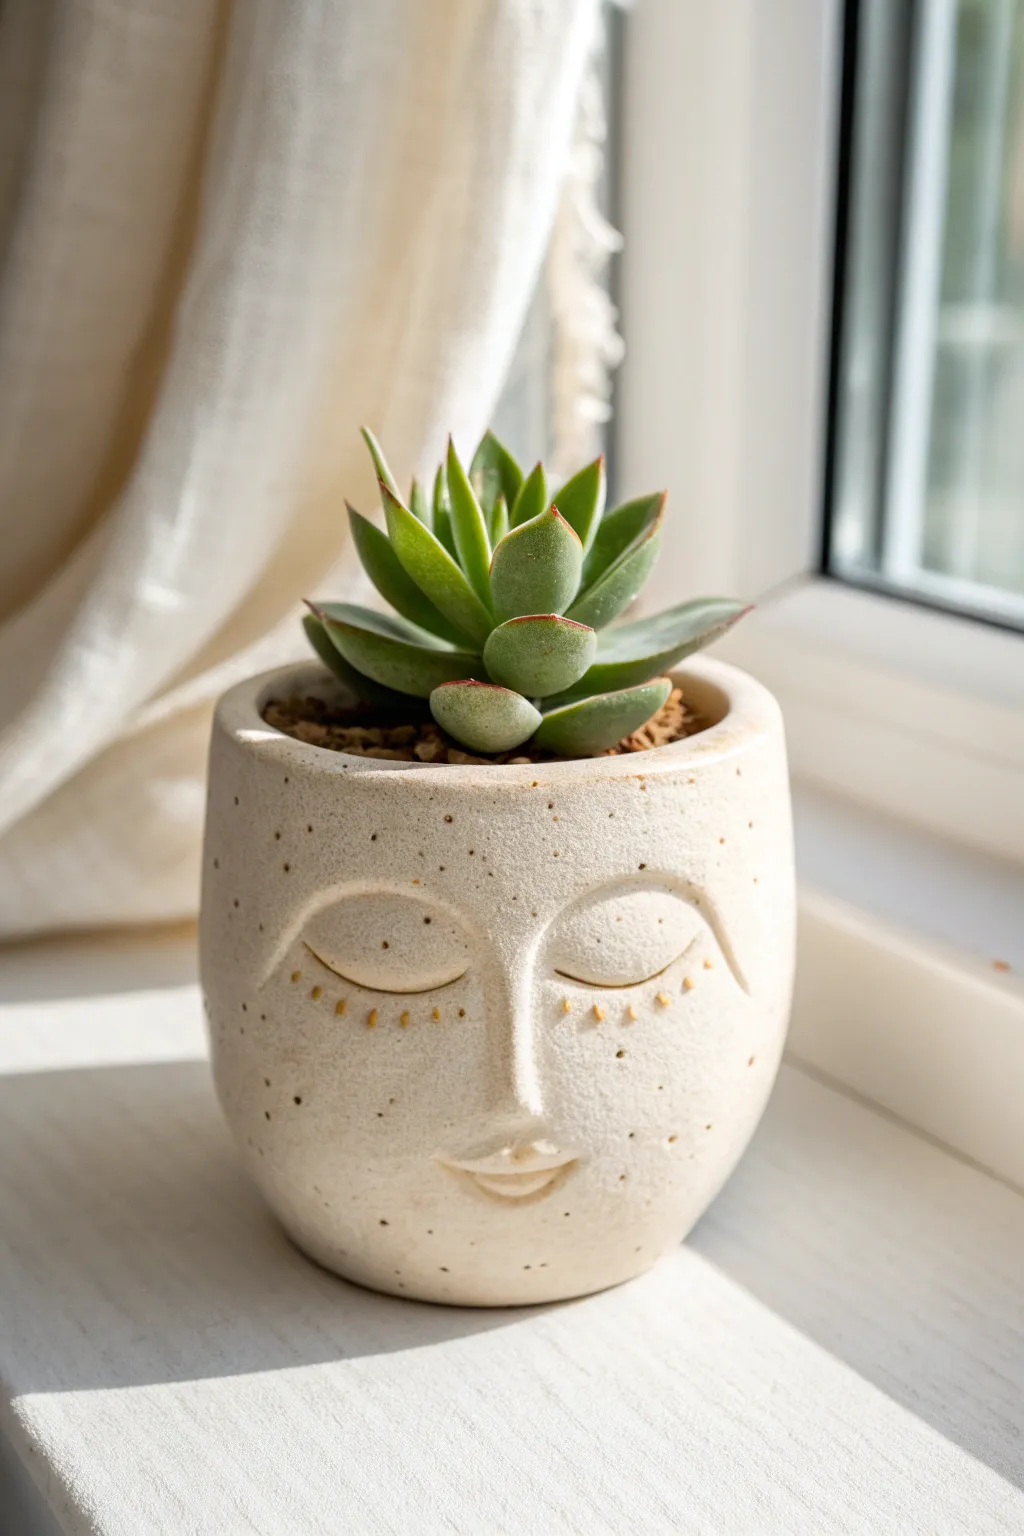
Bring a sense of calm to your windowsill with this beautifully minimal face planter. Featuring stylized features and a speckled finish, this project transforms a simple pinch pot into a peaceful character perfect for housing succulents.
Detailed Instructions
Materials
- Speckled stoneware clay (or beige polymer clay with faux speckles)
- Clay sculpting tools (needle tool, wooden modeling tool)
- Small bowl of water
- Sponge
- Rolling pin
- Clear matte glaze (if firing) or matte varnish
Step 1: Creating the Base
-
Form the pinch pot:
Start with a ball of clay about the size of a large orange. Insert your thumb into the center and gently pinch the walls while rotating the ball to create an even, cup-like shape. -
Shape the cylinder:
Since this planter has slightly straighter sides than a standard bowl, work the clay upwards rather than outwards. Gently paddle the outside with a flat wooden tool or your hand to flatten the walls slightly. -
Smooth the surface:
Use a damp sponge or your fingers to smooth out any cracks or fingerprints on the exterior. The surface needs to be relatively pristine before adding features.
Nose Falling Off?
If facial features detach during drying, you didn’t score deeply enough. Roughly scratch both surfaces (cross-hatching) and add slip before joining.
Step 2: Sculpting the Features
-
Add the nose:
Roll a small snake of clay for the nose. Score the center of the pot face and the back of the nose piece, apply a little water or slip, and press firmly into place. -
Blend the nose bridge:
Using a modeling tool or your thumb, drag the clay from the top of the nose bridge upwards into the forehead area so it blends seamlessly. Keep the bottom of the nose distinct. -
Create the eyelids:
Form two small, flat semi-circles of clay. Attach them on either side of the nose bridge, positioning them slightly lower than the brow line to look like sleeping eyes. -
Refine the eyes:
Smooth the top edges of the eyelids completely into the forehead so only the bottom curve—the lash line—remains defined. -
Sculpt the brows:
Roll two very thin coils of clay. Curve them into gentle arches and attach them just above the eyelids. Blend the top edges slightly so they don’t look stuck-on, but rather raised from the surface. -
Form the mouth:
Add a small, flattened oval of clay below the nose. Use a needle tool or knife to gently press a horizontal line across the middle to separate the lips. -
Define the smile:
Use a small modeling tool to gently push up the corners of the mouth, creating a subtle, peaceful smile. Smooth the edges of the lips into the surrounding cheek area. -
Add decorative details:
Using a needle tool, gently impress tiny vertical lines or dots along the bottom of the eyelid curve to suggest eyelashes.
Step 3: Finishing Touches
-
Final smoothing:
Check the entire piece for rough spots. I like to run a slightly damp finger over the nose and lips one last time to soften any harsh tool marks. -
Create drainage (optional):
If you plan to plant directly inside, use a straw or tool to poke a drainage hole in the bottom center. -
Drying:
Let the clay dry slowly, loosely covered with plastic for the first day to prevent the added features from cracking away from the pot. -
Firing or sealing:
If using ceramic clay, bisque fire and then glaze with a clear matte glaze to show off the speckles. If using polymer clay, bake according to package instructions. -
Adding texture (Polymer Clay):
If you used plain polymer clay without speckles, you can splatter a tiny bit of diluted brown acrylic paint with an old toothbrush now to mimic the stoneware look. -
Plant:
Once finished and cured, fill with soil and nestle your favorite succulent inside to give the face a green hairstyle.
Pro Tip: Symmetry Check
Look at the pot upside down while positioning the eyes. This perspective shift helps your brain spot unevenness that you might miss when it’s right-side up.
Now you have a tranquil piece of decor ready to sit peacefully on your shelf
Animal Pinch Pot Planter
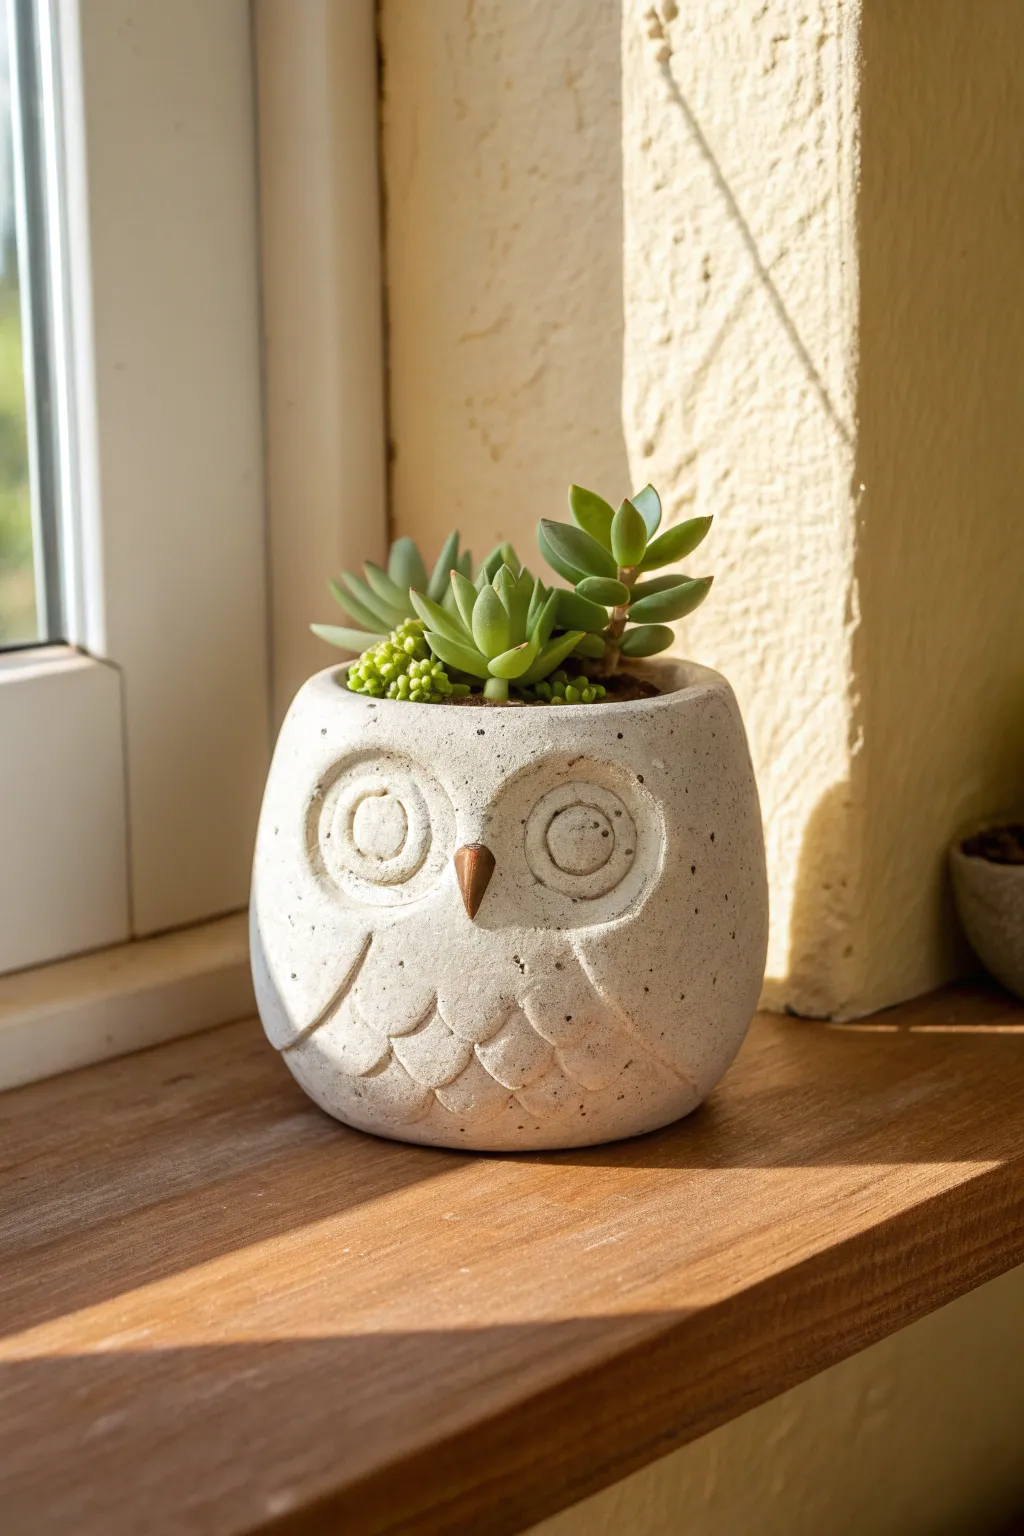
Bring a touch of woodland whimsy to your windowsill with this adorable owl pinch pot. Its textured, stone-like finish and sweet expression make it the perfect cozy home for your favorite succulents.
How-To Guide
Materials
- Air-dry clay or polymer clay (white or light grey)
- Small bowl of water
- Modeling tools (or a toothpick and a popsicle stick)
- Small circular cookie cutters (or different sized bottle caps)
- Sponge
- Acrylic paint (thinned black or grey for weathering)
- Small pointed brush
- Clear matte sealant
- Succulents and potting soil
Step 1: Basic Form
-
Form the base:
Start with a ball of clay roughly the size of a large orange. Hold it in your palm and press your thumb into the center, gently pinching and rotating to open up a deep pot shape. -
Shape the body:
Continue pinching the walls until they are an even thickness, about a quarter of an inch. Gently flatten the bottom on your work surface so the pot stands stable. -
Create the silhouette:
Instead of a perfect circle, gently squeeze the top rim into a slight oval shape. Press down slightly on the top rim to create a smooth, flat edge. -
Smooth the surface:
Dip your finger in water and smooth out any cracks or fingerprints on the exterior. Aim for a clean, organic roundness.
Sponge Stippling
Use a coarse sea sponge rather than a makeup sponge. Pressing it gently into soft clay replicates the porous look of concrete or sandstone instantly.
Step 2: Facial Features
-
Mark the eyes:
Using a large circular cutter or bottle cap, press two large circles side-by-side into the upper half of the pot. Don’t cut through; just create a deep indentation. -
Define the eye sockets:
With a smaller circular tool, press a second, concentric circle inside the first ones to create the rims of the owl’s glasses-like eyes. -
Add pupils:
Use a small, round tool end or the back of a paintbrush to indent the very center of each eye for the pupils. -
Add the beak:
Roll a very small cone of clay. Score the back of it and the space between the eyes with a needle tool. -
Attach the beak:
Apply a dab of water (slip) and press the cone securely between the eyes, pointing downward. Smooth the edges slightly to blend it.
Drainage Hole
If using real plants, poke a hole in the bottom center before drying. Cover it with a small mesh piece before adding soil to keep dirt in and let water out.
Step 3: Feather Texture
-
Outline the wings:
Use a modeling tool to lightly sketch a curved line on either side of the body, creating a defined area for the owl’s folded wings. -
Create breast feathers:
Using a U-shaped loop tool or the end of a popsicle stick, press a row of scalloped shapes into the clay below the beak area. -
Layer the feathers:
Add a second row of scalloped indentations beneath the first, offsetting them like brickwork to mimic layered plumage. -
Add speckling:
To achieve that stony texture, gently stipple the smooth areas of the clay with a dry sponge or a toothbrush. -
Refine the details:
Go back over your indented lines with a damp brush to soften any sharp ridges, ensuring the clay looks like carved stone.
Step 4: Finishing Touches
-
Dry the piece:
Allow the clay to dry completely according to the package instructions. This usually takes 24-48 hours for air-dry clay. -
Paint the beak:
Using a small brush, paint just the beak with a warm brown or copper acrylic paint. -
Apply a wash:
Mix a tiny drop of black or grey paint into a lot of water. Brush this wash over the entire piece, letting it settle into the grooves. -
Wipe back:
Immediately wipe the surface with a paper towel. The dark paint will stay in the feather lines and eye crevices, making the texture pop. -
Seal and plant:
Coat the pot with a matte water-resistant sealer. Once dry, fill with soil and arrange your small succulents inside.
Place your little owl in a sunny spot and enjoy the charming personality it adds to your room
Pinch Pot Bell Or Wind Chime
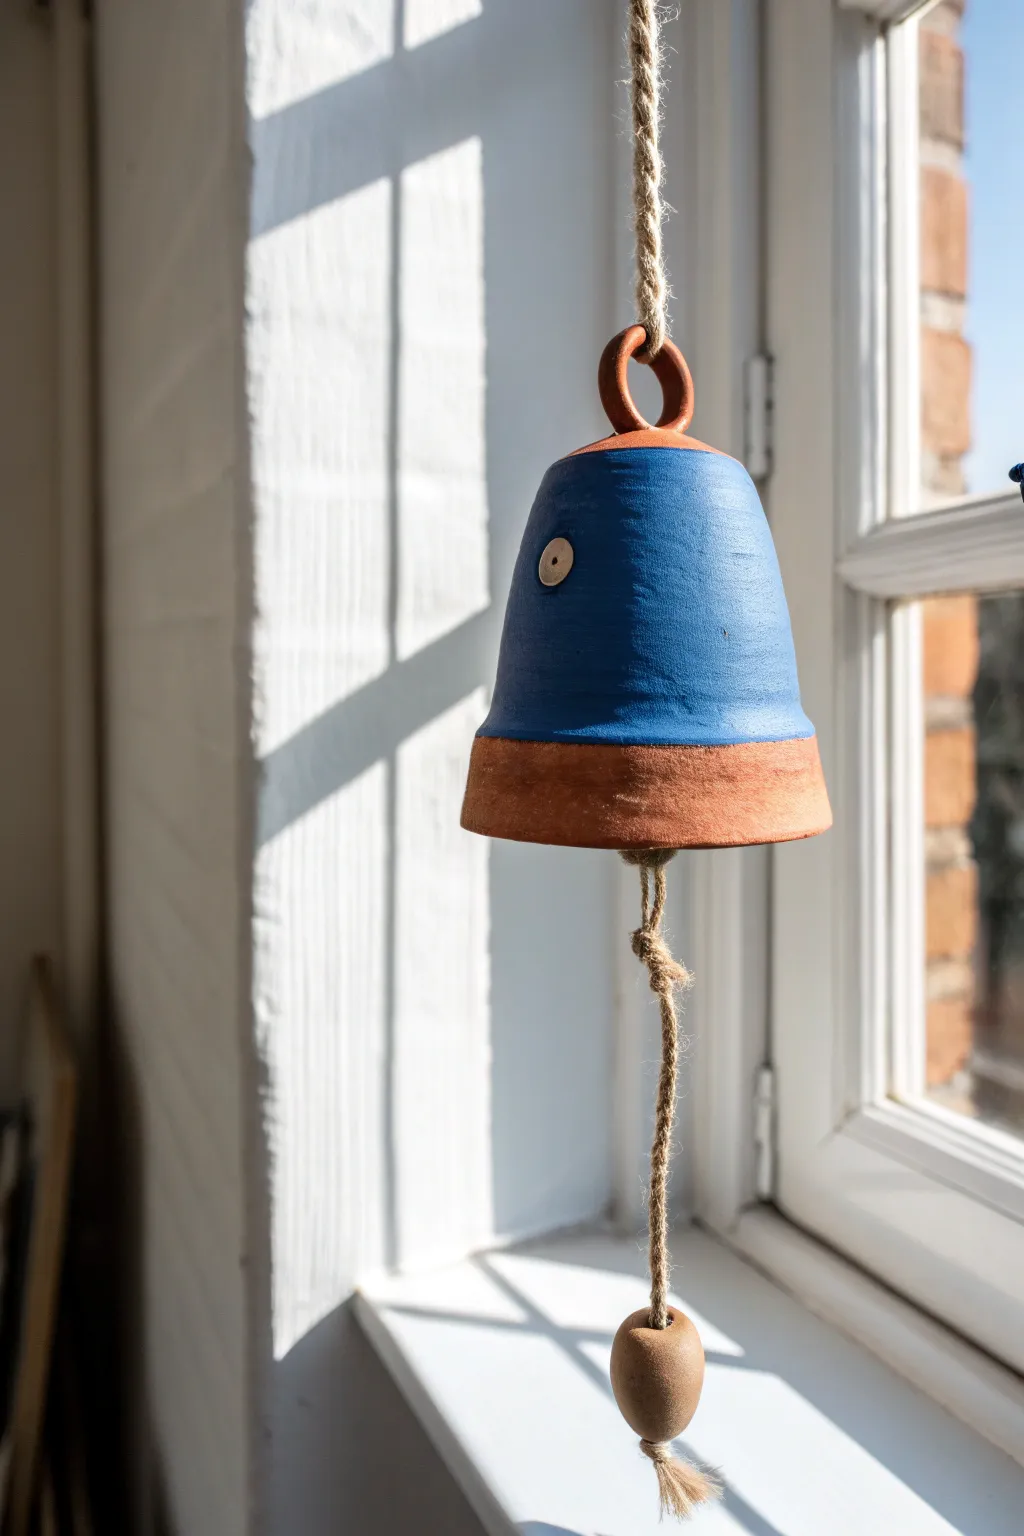
Brighten up your window or garden with this charming handmade bell, featuring a striking contrast between matte blue glaze and raw terracotta. This project starts with a simple pinch pot and evolves into a functional wind chime with a lovely, earthy aesthetic.
Step-by-Step Guide
Materials
- Earthenware or terracotta clay
- Rolling pin
- Needle tool or fettling knife
- Wooden modeling tool
- Sponge
- Jute twine or rustic rope
- Matte blue ceramic glaze
- Paintbrush
- Small wooden button or clay bead (optional)
- Small spherical weight or clay bead (for the clapper)
Step 1: Forming the Bell Body
-
Prepare the clay:
Start by wedging a baseball-sized ball of terracotta clay to remove air bubbles. This ensures your bell won’t crack during firing. -
Create the pinch pot base:
Insert your thumb into the center of the ball and gently pinch the clay walls between your thumb and fingers. Rotate the ball as you pinch to create an even, cup-like shape. -
Elongate the form:
Instead of keeping it a bowl shape, squeeze and stroke the clay upwards to create a taller, bell-like silhouette. Keep the walls about ¼ inch thick throughout. -
Flatten the top:
Gently tap the closed end (the bottom of your pot) on a table to flatten it slightly. This creates a shoulder for the loop. -
Flare the rim:
Using your fingers, gently flare the open rim of the bell outwards just a little bit to give it that classic bell curve. -
Smooth the surface:
Use a damp sponge or a rubber rib to smooth out any fingerprints or bumps on the exterior. I find that taking time here makes the glazing step much easier later.
Step 2: Adding Details and Attachments
-
Roll a coil loop:
Roll a small snake of clay about the thickness of a pencil. Form it into a ring with a diameter of about 1 inch. -
Attach the top loop:
Score (scratch) the top of the bell and the bottom of your clay ring. Apply slip and press the ring firmly onto the flattened top. Smooth the connection point with a wooden tool. -
Create the clapper bead:
Roll a separate small ball of clay (roughly walnut-sized) for the clapper that will hang inside. Poke a hole entirely through it for the rope. -
Add decorative elements:
If desired, score and slip a tiny clay disc onto the side of the bell as an accent, resembling a button. -
Pierce the bell:
Carefully poke a hole through the top of the bell, right underneath or inside the loop attachment, so the rope can pass through later.
Uneven drying?
If the rim is drying faster than the thicker top, drape a piece of plastic loosely over the rim to slow it down. This prevents warping or cracking.
Step 3: Finishing and Glazing
-
Dry and bisque fire:
Let the clay dry slowly to leather hard, then bone dry. Once completely dry, fire it in a kiln to the bisque stage. -
Masking tape line:
To get that crisp line seen in the photo, apply a strip of masking tape around the circumference of the bell, about one-third of the way up from the rim. -
Apply the glaze:
Paint the matte blue glaze onto the top two-thirds of the bell, covering the loop and the body down to the tape line. Apply 2-3 coats for opacity. -
Remove tape and refine:
Peel off the tape immediately after painting. Use a damp sponge to wipe any stray glaze off the raw terracotta bottom section. -
Glaze fire:
Fire the piece again according to the glaze manufacturer’s instructions. -
Assembly:
Cut a length of jute rope. Tie a large knot at one end and thread the clapper bead onto it. -
Hang it up:
Tie another knot a few inches up the rope to hold the clapper in the right spot, then thread the rope up through the inside of the bell and out the top loop.
Texture twist
Before the clay dries, press a piece of lace or burlap into the raw terracotta band for a beautiful tactile contrast against the smooth glaze.
Hang your finished bell in a sunny spot to enjoy the visual contrast and soft sound
Marbled Polymer Clay Charms
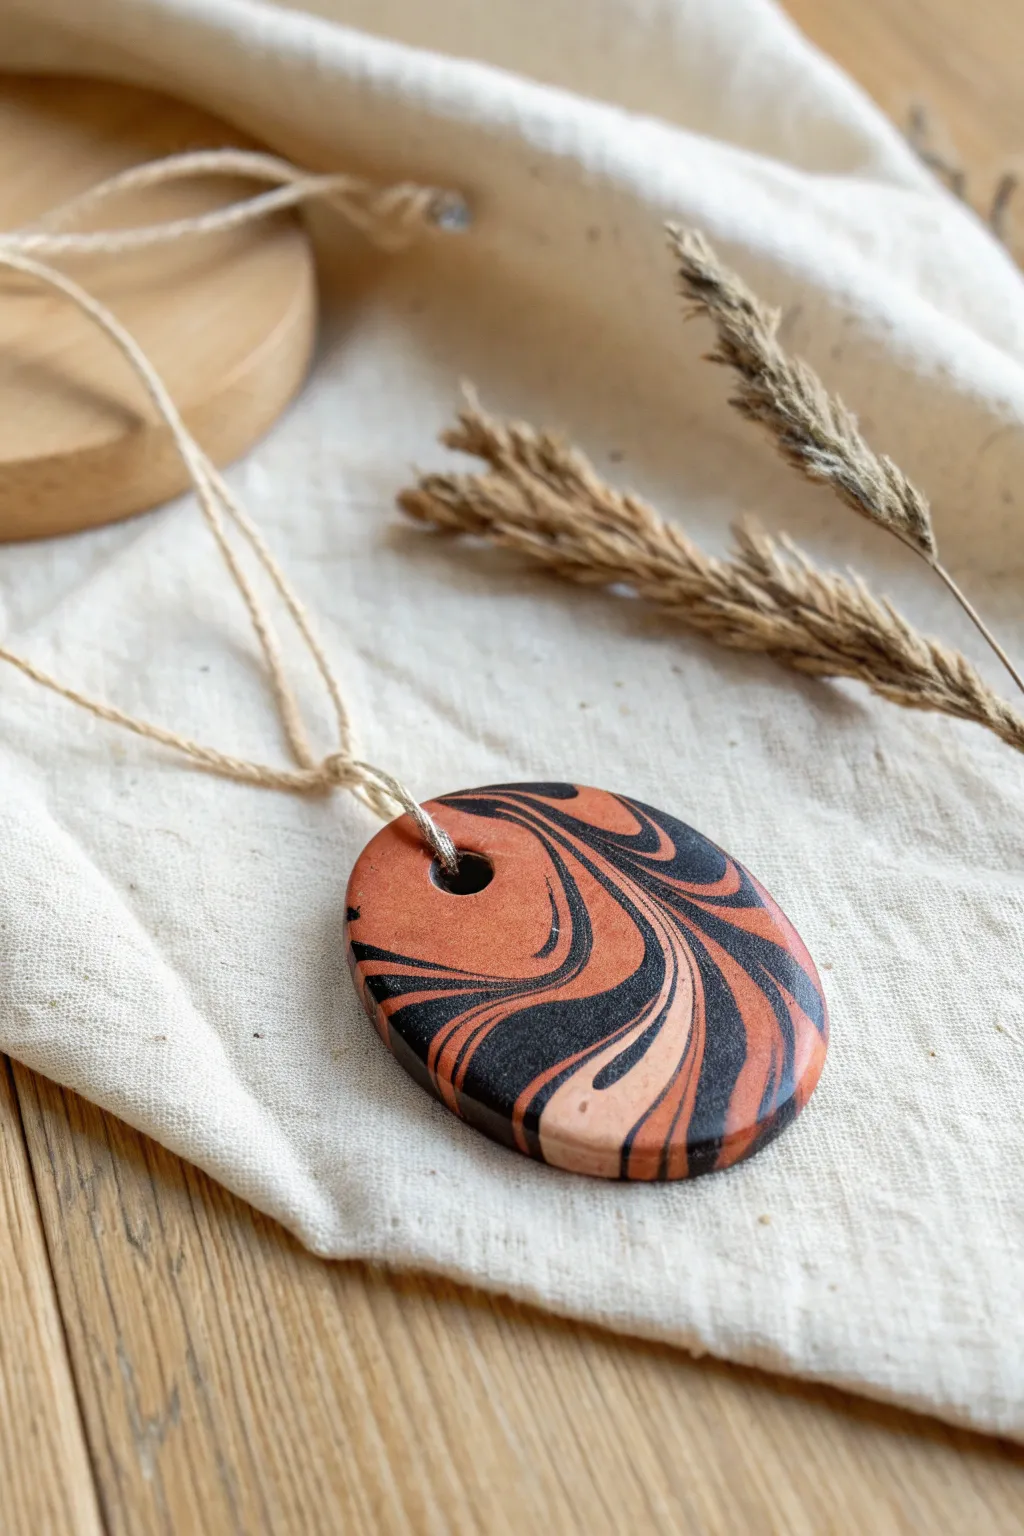
Create a stunning statement piece with the mesmerizing technique of clay marbling. This oval pendant features a flowing dance of terracotta and black, suspended on rustic twine for a natural, grounded aesthetic.
Step-by-Step
Materials
- Polymer clay (Terracotta/Burnt Orange)
- Polymer clay (Black)
- Polymer clay (Light Beige or Cream)
- Acrylic roller or pasta machine
- Oval cookie cutter (approx. 2 inches)
- Small straw or round tool (for the hole)
- Wet/dry sandpaper (400-1000 grit)
- Gloss or matte varnish (optional)
- Natural jute twine
- Blade or craft knife
- Ceramic tile or baking sheet
- Oven
Step 1: Preparing the Clay
-
Condition the clay:
Start by warming up each block of clay in your hands. Knead the terracotta, black, and beige clays separately until they are soft, pliable, and free of cracks. This ensures they will mix smoothly. -
Create snakes:
Roll each color into a long, thin cylinder (snake shape). Aim for the terracotta snake to be the thickest, as it’s the dominant color, with slightly thinner snakes for the black and beige. -
Twist together:
Gather your three snakes and bundle them together. Twist the bundle gently from both ends, like you are wringing out a towel, to start combining the colors. -
Fold and roll:
Fold the twisted log in half and roll it out into a snake again. I like to repeat this fold-and-twist motion about 3-4 times. Be careful not to over-twist, or the colors will become muddy grey instead of distinct swirls.
Muddy Colors?
If your colors are turning grey or brown instead of distinct swirls, stop mixing immediately. You likely twisted too many times. Stop when lines are distinct.
Step 2: Effective Marbling
-
Compress into a ball:
Once you have distinct striations in your log, roll it tightly into a smooth ball. Ensure there are no air pockets trapped inside. -
Flatten the slab:
Using your acrylic roller, flatten the ball into a slab approximately 1/4 inch thick. Roll in different directions to stretch the pattern out evenly. -
Check the pattern:
Examine both sides of your slab. Simply flip it over to see which side has the most pleasing design; usually, one side captures the ‘movement’ better than the other.
Add Sparkle
Mix a tiny amount of gold leaf or metallic mica powder into the translucent or beige clay before marbling creates shimmering veins that mimic real geological strata.
Step 3: Shaping and Baking
-
Cut the shape:
Place your oval cutter over the chosen area of the pattern. Press down firmly and wiggle slightly to cut through the clay, then lift the cutter. Remove the excess clay surrounding your pendant. -
Smooth the edges:
Dip your finger in a little cornstarch or water and gently run it along the cut edge of the oval to smooth out any sharp ridges left by the cutter. -
Create the hole:
Use a small straw or a round tool to punch a hole near the top of the oval. Make sure the hole is large enough to accommodate your jute twine. -
Bake:
Place the pendant on a ceramic tile or parchment-lined baking sheet. Bake according to your polymer clay package instructions (usually around 275°F/135°C for 30 minutes). -
Cool down:
Let the piece cool completely in the oven with the door open. This gradual cooling helps strengthen the clay.
Step 4: Finishing Touches
-
Sand for smoothness:
Once cool, use wet/dry sandpaper under running water to gently sand the edges and surface. Start with a lower grit and move to a higher grit for a polished feel. -
Apply varnish (Optional):
If you want a glossy finish like polished stone, apply a thin layer of polymer clay glaze. For a more matte, earthen look like the photo, you can skip this step. -
String the pendant:
Cut a length of natural jute twine. Fold it in half to create a loop. -
Create a larks head knot:
Push the folded loop of twine through the pendant hole from front to back. Then, thread the loose ends of the twine through the loop and pull tight to secure the pendant.
Wear your new organic-style jewelry with a simple linen outfit to highlight its natural beauty
Faux Terrazzo Handbuilt Tray
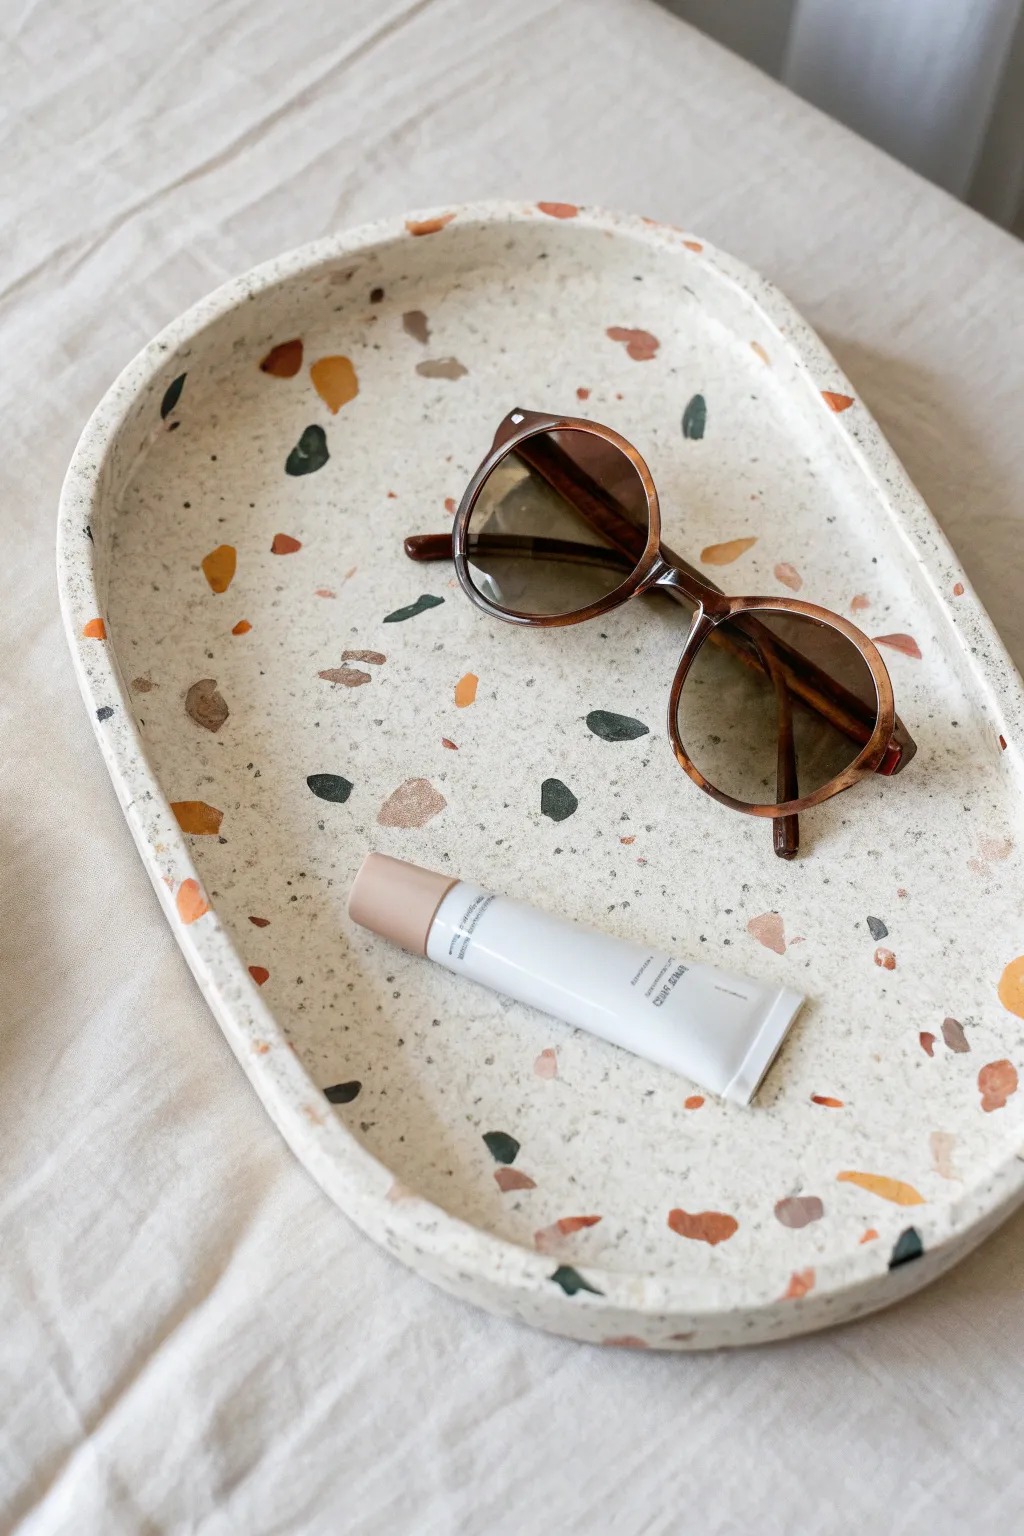
Achieve the high-end look of terrazzo without the weight or cost of stone using this clever clay technique. This handbuilt oval tray features a creamy base speckled with earthy tones like rust, sage, and mocha, creating a modern home for your sunglasses and daily essentials.
Detailed Instructions
Materials
- White or cream polymer clay (for base)
- Assorted colored polymer clays (terracotta, hunter green, mustard yellow, dark brown)
- Acrylic rolling pin or glass jar
- Craft knife or tissue blade
- Parchment paper or silicone mat
- Oval paper template
- Smooth work surface
- Sandpaper (various grits from 400 to 1000)
- Gloss or matte varnish (optional)
Step 1: Creating the Terrazzo Chips
-
Condition the colors:
Start by conditioning your small blocks of colored clay (terracotta, green, yellow, brown) until they are soft and pliable. -
Flatten the colors:
Roll each colored piece into a very thin sheet, roughly the thickness of cardstock. -
Bake the thin sheets:
Place these thin colored sheets on a baking tray and bake them for only about 10–12 minutes at the manufacturer’s recommended temperature. They should be hard but not fully cured. -
Create the chips:
Once cool, crumble and chop the baked sheets into irregular fragments. Aim for a mix of sizes—some tiny specks and some larger, chunky shards.
Uneven Surface?
If chips are sticking out after rolling, don’t worry. The sanding phase is crucial—it grinds the surface flat and reveals the sharp geometric shapes of the chips within the clay.
Step 2: Forming the Base
-
Prepare the base clay:
Condition a large block of your white or cream clay. This needs to be soft enough to accept the chips. -
Roll out the slab:
Roll the white clay into a thick slab, approximately 1/4 inch thick, on your parchment paper. -
Apply the chips:
Scatter your pre-baked colored chips generously over the surface of the raw white clay. Don’t be shy; cover about 60-70% of the surface. -
Embed the texture:
Place a piece of parchment paper over the chips and roll over them with your acrylic roller. Apply firm pressure to press the hard chips flush into the soft base clay. -
Repeat if necessary:
If the surface looks uneven or sparse, sprinkle more chips into the gaps and roll again until the surface is smooth and flat.
Step 3: Shaping and Finishing
-
Cut the shape:
Place your oval paper template onto the terrazzo slab and cut around it cleanly with your craft knife. -
Create the rim:
Roll a long snake of plain white clay. Then, roll it flat into a long strip about 3/4 inch wide. -
Add texture to the rim:
Press more chips into this long strip and roll flat, just as you did for the base, so the pattern continues up the sides. -
Attach the wall:
Wrap the strip around the edge of your oval base, standing it upright. Gently smudge the clay on the inside seam to join the wall to the floor of the tray. -
Refine the shape:
Smooth the outside seam and use your fingers to gently curve the walls outward slightly for an organic, hand-molded look. -
Final bake:
Bake the assembled tray according to package directions, usually 30 minutes at 275°F (130°C) for most polymer clays. -
Sanding:
Once fully cooled, wet-sand the piece starting with 400 grit and moving to 1000 grit. This reveals the sharp edges of the chips and makes the surface buttery smooth. -
Seal:
Wipe away any sanding dust and apply a thin coat of varnish if you prefer a glossy finish, though the sanded matte look is very chic.
Luxe Gold Accents
Mix small flakes of gold leaf into the raw white clay along with your colored chips. When you sand carefully later, you’ll reveal subtle metallic glimmer alongside the colors.
Place your finished tray on a console table or vanity to instantly elevate your decor organization
Hand Keepsake Sculpture And Gestures
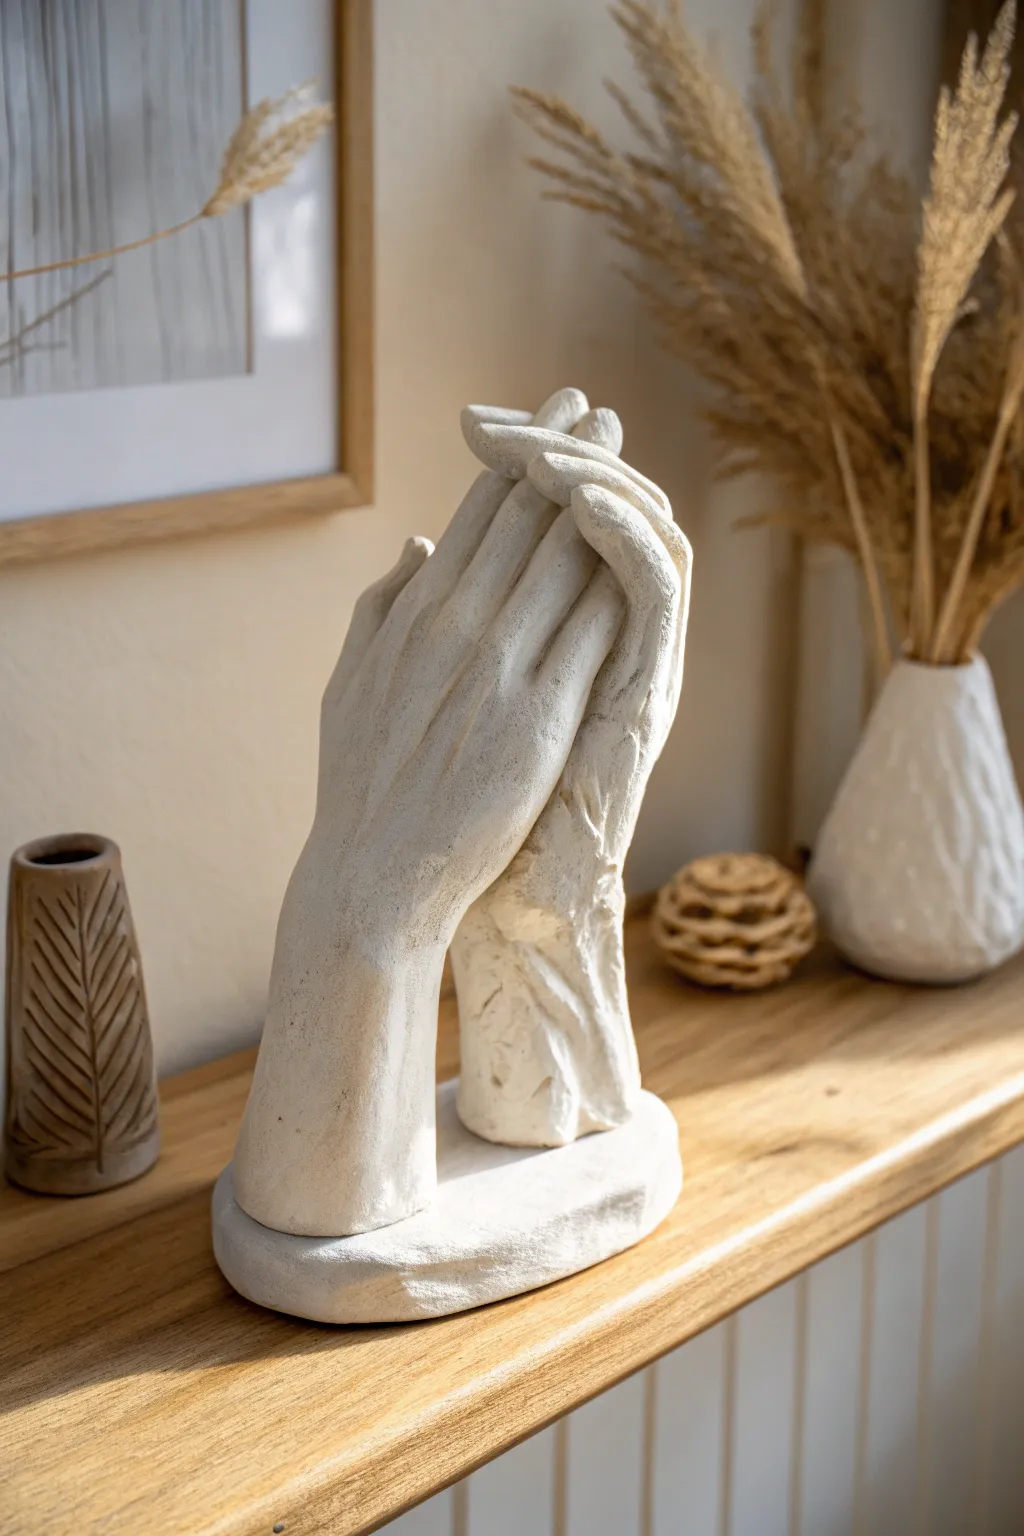
This elegant sculpture captures an intimate gesture of connection with two hands gently clasped together, mounted on a simple oval base. The finished piece features a beautiful, slightly rough texture that mimics the look of carved sandstone or aged plaster.
How-To Guide
Materials
- Alginate molding powder
- Casting plaster (Plaster of Paris or hydrocal)
- Large bucket or container (bucket needs to fit two hands comfortably)
- Mixing stick or electric drill with mixing paddle
- Utility knife or sculpture tools
- Sandpaper (medium and fine grit)
- White or cream acrylic paint (matte)
- Stone texture spray paint (optional)
- Matte sealant spray
- Cardboard or plastic for the base mold
- Strong craft glue or epoxy
Step 1: Creating the Mold
-
Prepare the Alginate:
Measure your water and alginate powder according to the package instructions. Use cold water to give yourself more working time before the mixture sets. -
Mix Thoroughly:
Combine the powder and water in your large bucket. Use an electric drill mixer or vigorous hand mixing to ensure there are no lumps, aiming for a smooth, pancake-batter consistency. -
Pose the Hands:
Have your hand models (or yourself and a partner) clasp hands in the desired pose. Ensure the fingers are interlaced naturally but slightly loosened to allow the mold material to flow between them. -
Submerge:
Dip the clasped hands into the alginate bucket. Ensure they are suspended in the middle, not touching the bottom or sides of the bucket. Hold perfectly still. -
Wait for Set:
Hold the pose until the alginate turns rubbery and firm (usually 3-5 minutes). Test by gently poking the surface; it should bounce back. -
Remove Hands:
Gently wiggle fingers and wrists to break the air seal. Slowly pull the hands out one by one, being careful not to tear the delicate mold.
Broken Fingers?
If a finger breaks during demolding, don’t panic. Use a tiny dab of superglue or wood glue to reattach it, then sand the seam slightly once dry.
Step 2: Casting the Sculpture
-
Mix the Plaster:
Mix your casting plaster with water in a separate container until it reaches a creamy, pourable consistency similar to heavy cream. Tap the bowl to release air bubbles. -
Pour the Plaster:
Pour a small amount of plaster into the mold and rotate the bucket to coat the fingertips and crevices. Then, fill the rest of the mold to the top. -
Release Air Bubbles:
Tap the sides of the bucket firmly and repeatedly for a minute to force air bubbles up and out of the mold. -
Let it Cure:
Allow the plaster to dry completely. Although it may feel hard quickly, I prefer waiting at least 2-3 hours or overnight to ensure it is fully solid.
Step 3: Reveal and Refine
-
Demold:
Turn the bucket upside down or cut the alginate away carefully with a knife. Peel the rubbery material off the plaster casting to reveal your hands. -
Clean Up Imperfections:
Use a small pick or knife to carefully pick out any beads of plaster (bubbles) that formed in the crevices or between fingers. -
Create the Base:
Mix a small batch of plaster. Pour it into a simple oval plastic container or a cardboard mold lined with plastic wrap to serve as the sculpture’s base. -
Attach to Base:
Before the base plaster fully sets (while it’s tacky but firm), press the bottom of the hand sculpture onto it. If both are already dry, bond them with strong epoxy. -
Adding Texture:
To achieve the stone look seen in the photo, mix a thick paste of plaster and dab it onto the smooth surfaces with a sponge, or lightly coat with a stone-texture spray paint. -
Final Sanding:
Once the texture layer is dry, lightly sand high spots to smooth them out, leaving a natural, eroded stone appearance. -
Seal the Piece:
Apply a clear matte sealant to protect the plaster from moisture and dust, preserving that soft, chalky white finish.
Getting Rid of Bubbles
Pre-wet the hands with water or a little baby oil before dipping them in alginate. This reduces surface tension and helps prevent air bubbles from sticking to the skin.
Place your finished sculpture on a shelf where the light can catch the textures of the clasped hands