If you’ve been craving handbuilt clay ideas that feel doable but still look special, you’re in the right headspace. I’m sharing my go-to projects that celebrate slab building, pinch pots, and coil building—all that satisfying, no-wheel magic.
Wavy-Edge Slab Plates
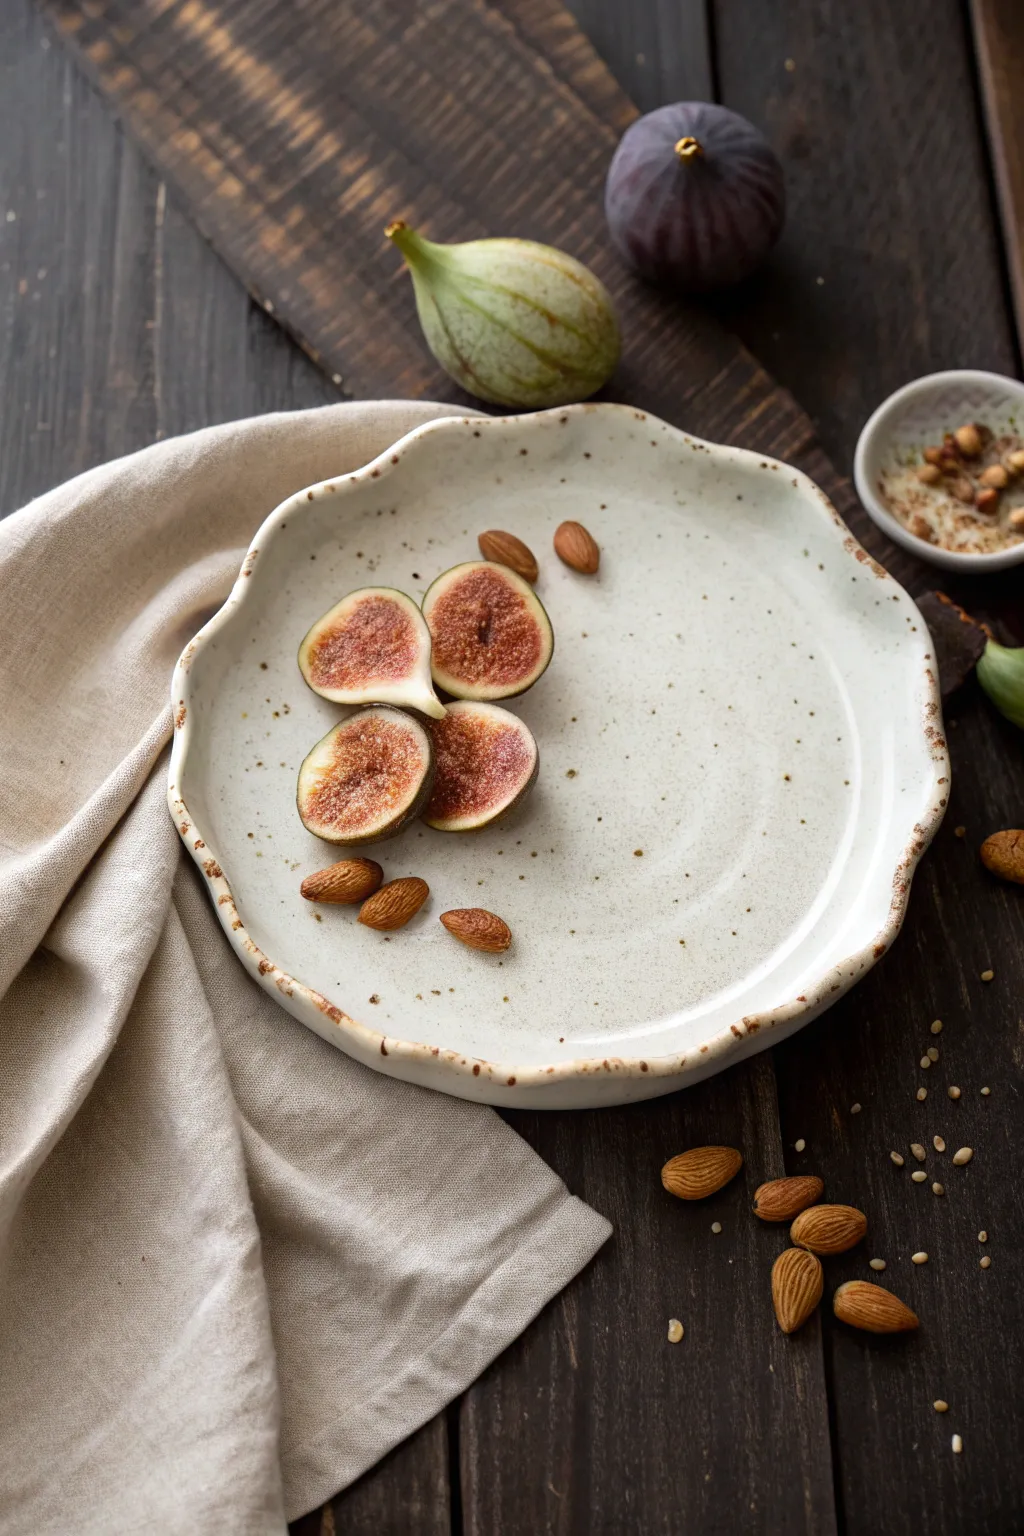
Embrace the imperfect beauty of handbuilding with this organic, wavy-rimmed plate. Featuring a creamy speckled glaze and a subtly distressed rustic rim, this piece is perfect for serving small appetizers or desserts.
Step-by-Step
Materials
- Stoneware clay (preferably a speckled buff body)
- Circular bat or template (approx. 8-10 inches)
- Rolling pin
- Guide sticks or slab roller (approx. 1/4 inch thickness)
- Needle tool
- Fettling knife
- Smooth kidney rib (rubber or metal)
- Large foam styling cushion or shallow slump mold
- Creamy white stoneware glaze (semi-opaque)
- Iron oxide wash or dark brown underglaze
- Sponge
Step 1: Forming the Slab
-
Roll the clay:
Begin by rolling out a slab of your speckled stoneware clay. Use guide sticks on either side to ensure an even thickness of about 1/4 inch, which provides substantial weight without being too heavy. -
Compress the surface:
Take your smooth kidney rib and run it firmly over the surface of the clay in multiple directions. This compression is crucial for preventing warping later and aligning the clay particles. -
Cut the circle:
Place your circular template or bat onto the slab. Holding your needle tool perpendicular to the table, trace around the template to cut out your basic disc shape.
Step 2: Shaping the Rim
-
Soften the edge:
Run a damp sponge or your finger along the sharp cut edge of the circle. You want to round it off completely so there are no sharp angles. -
Create the lift:
Transfer your slab onto a large foam styling cushion. Gently press the center of the plate down into the foam, encouraging the edges to lift slightly upwards. -
Form the waves:
Using your thumb and forefinger, gently pinch and lift sections of the rim at irregular intervals. I like to vary the height of these waves to keep the look organic rather than uniform. -
Refine the curve:
Smooth out the transitions between the raised points. The rim should float upwards and undulate gently, rather than looking crimped or jagged. The interior floor should remain relatively flat for functional use.
Oxide Wash Tip
If you don’t have iron oxide, a mix of manganese dioxide and water works well for a darker, near-black rim that contrasts beautifully with white glaze.
Step 3: Drying and Bisque
-
Slow drying:
Loosely cover the plate with plastic to let it dry slowly to the leather-hard stage. This helps maintain the lifted rim shape without cracking. -
Final smoothing:
Once bone dry, do a final check for any rough spots and sponge them away gently. Fire the piece to cone 04 (or your clay body’s bisque temperature).
Add Texture
Before cutting your circle, roll the slab onto canvas or a linen towel. The fabric texture will catch the glaze and add subtle depth to the plate’s surface.
Step 4: Glazing and Finishing
-
Apply the oxide rim:
Mix a small amount of iron oxide wash or watered-down dark brown underglaze. Using a small brush or sponge, dab this along the very edge of the rim. -
Wipe back:
Immediately wipe the rim with a clean, damp sponge. You want the dark color to remain only in the texture and slightly staining the clay body, creating that rustic, burnt-edge look. -
Dip or brush glaze:
Dip the entire plate into a creamy white semi-opaque glaze. Alternatively, brush on 2-3 coats, ensuring even coverage. -
Reveal the rim:
While the glaze is powdery but dry, take a damp sponge and very gently wipe the glaze off just the high points of the wavy rim. This reveals the oxide-stained clay underneath, creating the brown border seen in the image. -
Glaze firing:
Fire the plate to cone 6 (or your clay/glaze maturation temperature). The heat will interact with the iron oxide and the speckles in the clay to create the integrated rustic finish.
Your finished plate is now ready to bring a touch of earthy elegance to your table setting


Pinch Pot Snack Bowls
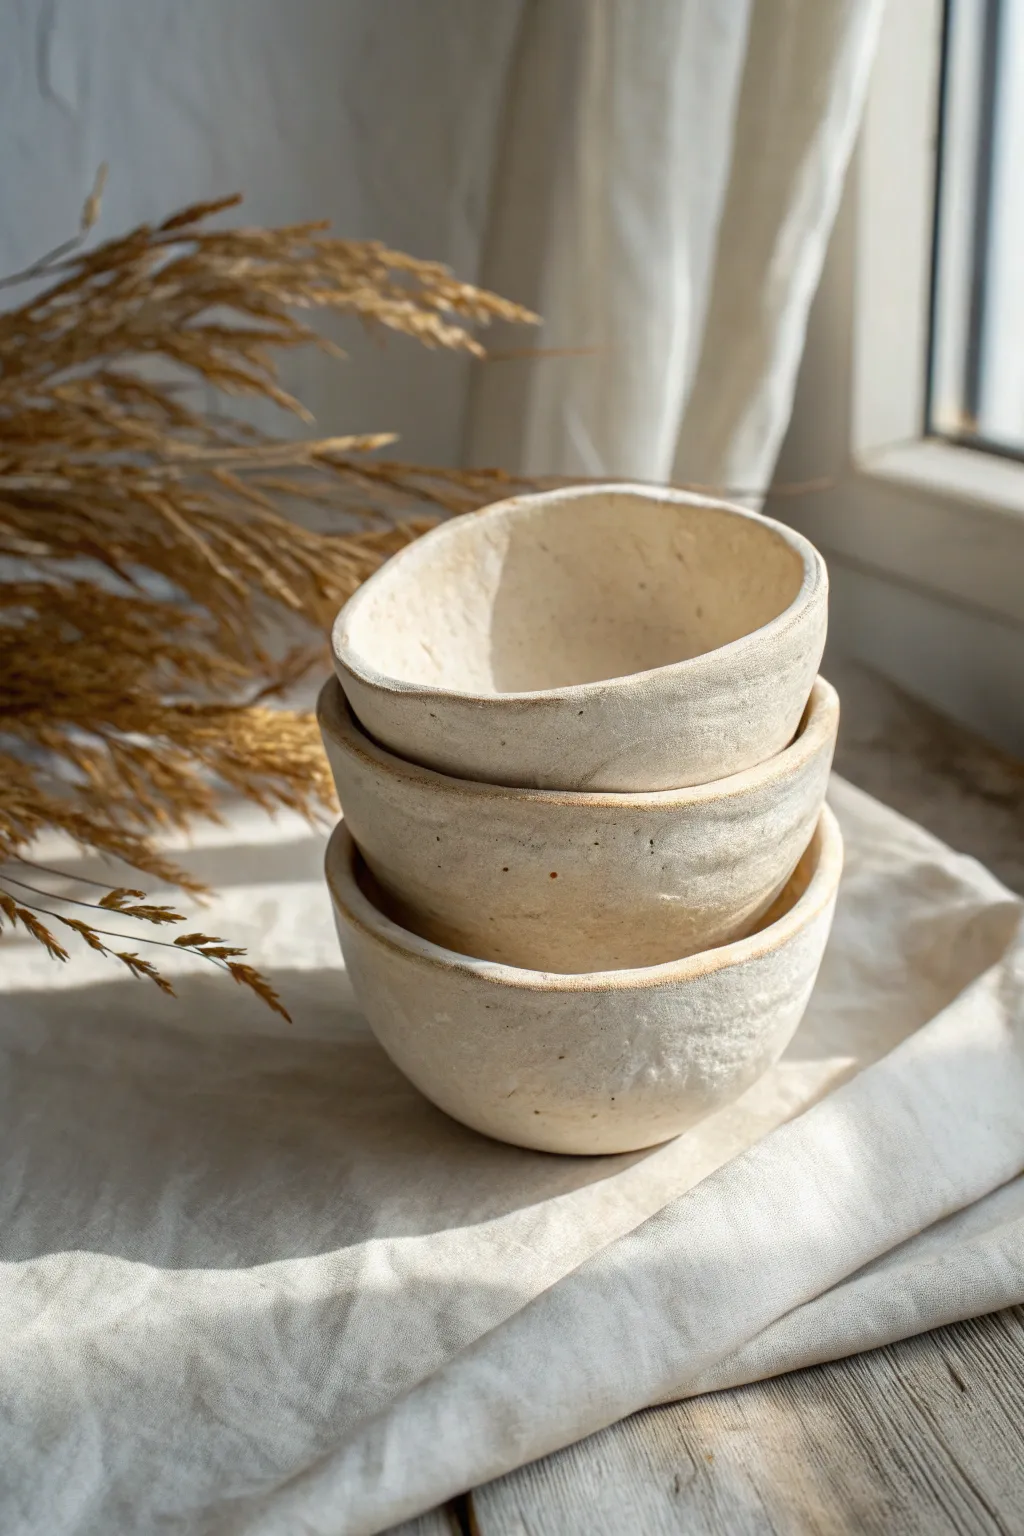
Embrace the imperfect beauty of handbuilding with these organic, stone-like snack bowls. Their slightly irregular rims and matte, textured finish give them an earthy charm that looks wonderful stacked on open shelving.
Detailed Instructions
Materials
- Stoneware clay (smooth or with fine grog)
- Small bowl of water
- Synthetic sponge
- Wooden rib tool
- Metal kidney scraper
- Needle tool
- Matte white or cream glaze
- Kiln (or access to a firing service)
Step 1: Forming the Base
-
Prepare your clay:
Start with a ball of clay roughly the size of a tennis ball. Wedge it thoroughly to remove any air bubbles, as these can cause cracking later. -
Open the form:
Hold the ball in your non-dominant hand. Press your thumb into the center, stopping about a half-inch from the bottom to leave a sturdy base. -
Begin pinching:
Rotate the ball slowly while gently pinching the clay between your thumb and fingers. Start at the bottom and work your way up the walls in a spiral motion. -
Even out the walls:
Continue pinching until the walls are roughly 1/4 inch thick. Aim for consistency, but don’t worry about perfection; the organic look is part of the appeal. -
Shape the curve:
Gently press outwards from the inside with your thumb to create a rounded, open curve rather than a straight-walled cup shape.
Cracks in the Rim?
If the rim starts splitting while pinching, your clay is too dry. Compress the cracks immediately with a damp finger or sponge, and use slightly less pressure as you thin the walls.
Step 2: Refining and Texturing
-
Clean up the bottom:
Tap the bottom of the pot gently on your work surface to create a small flat spot so the bowl sits stably without rocking. -
Refine the interior:
Use a damp sponge to smooth out any deep finger marks inside the bowl, but leave some subtle undulations to maintain the handmade character. -
Scrape the exterior:
Once the clay has stiffened slightly (leather hard), drag a metal kidney scraper or a serrated rib gently across the exterior. This removes lumpy fingerprints and adds a subtle, stony texture. -
Address the rim:
Instead of compressing the rim perfectly flat, use your fingers to softly round it off. Allow it to dip and rise naturally for that organic silhouette. -
Create a set:
Repeat the process to make two more bowls. I find it helpful to vary the sizes slightly so they nestle visually when stacked.
Natural Speckling
To get the speckled look shown in the photo without a special glaze, use a clay body with Manganese speckles or fine grog. When fired, these minerals bleed through.
Step 3: Firing and Glazing
-
Slow drying:
Cover your bowls loosely with plastic and let them dry slowly over several days. Slow drying prevents warping. -
Bisque fire:
Once bone dry, fire the bowls in a kiln to bisque temperature (usually cone 04 or 06). -
Clean before glazing:
Wipe the bisque-fired bowls with a damp sponge to remove any kiln dust, which helps the glaze adhere properly. -
Apply glaze:
Pour a matte white or cream glaze into the bowl, swirl it to coat the interior, and pour out the excess. For the outside, you can dip it or brush it on. -
Enhance the texture:
If your glaze is thick, wipe it back slightly with a damp sponge on the exterior high points to reveal the gritty clay texture underneath. -
Final wipe:
Ensure the very bottom of the bowl is completely free of glaze, or it will fuse to the kiln shelf. -
Glaze fire:
Fire the bowls again to the final maturity temperature for your specific clay and glaze combination.
Enjoy using your quiet, minimalist bowls for everything from morning nuts to holding jewelry


Textured Slab Mugs With Handles
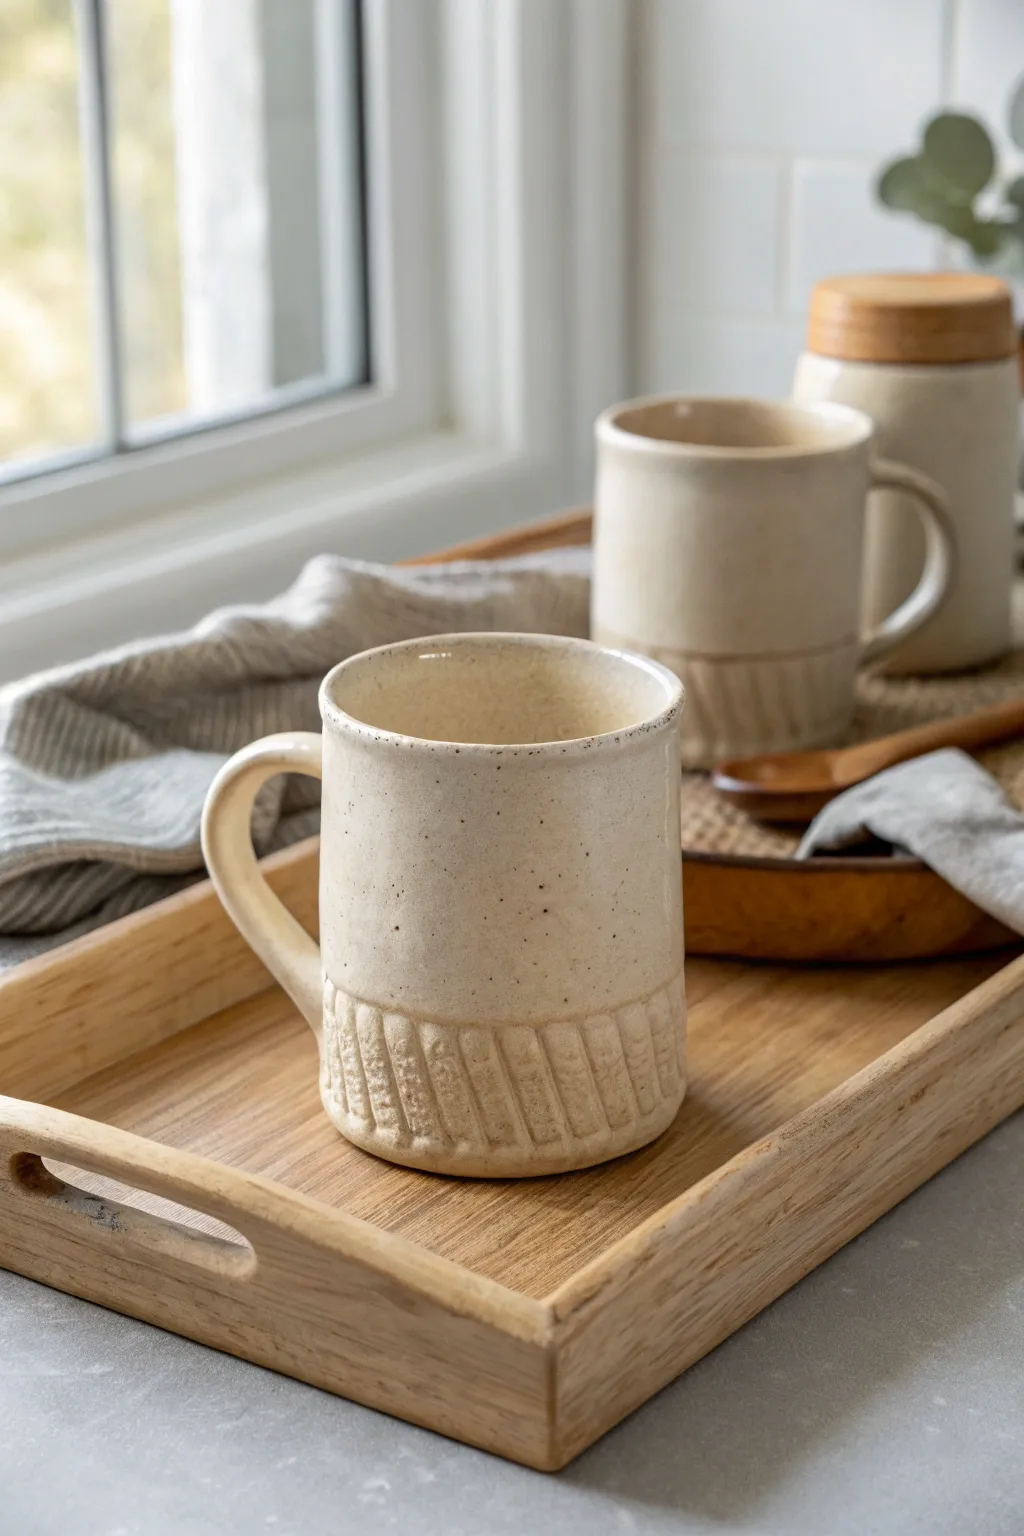
These charming slab-built mugs feature a rustic speckled finish and a distinctively carved textural band at the base. Their straight-walled silhouette and earthy cream glaze make them a timeless addition to any morning coffee ritual.
How-To Guide
Materials
- Speckled stoneware clay (mid-fire)
- Slab roller or rolling pin with thickness strips (1/4 inch)
- Fettling knife or needle tool
- Ruler
- Scoring tool (ribbed kidney or serrated rib)
- Slip (clay mixed with water)
- Carving tool (loop tool or modeling tool)
- Wooden modeling tool for smoothing
- Sponge
- Kiln
- Satin matte cream/oatmeal glaze
Step 1: Creating the Slab Body
-
Roll the clay:
Begin by rolling out your speckled stoneware clay into a consistent slab. Aim for a thickness of about 1/4 inch. If you’re using a rolling pin, guide sticks are incredibly helpful to keep it even. -
Measure and cut:
Using a ruler, measure a rectangle that will form the cylinder of your mug. A standard size is roughly 12 inches long by 4.5 inches tall, but adjust based on your desired shrinkage and final size. -
Bevel the edges:
Cut the two shorter ends of your rectangle at a 45-degree angle. Beveling opposite sides allows the seam to overlap cleanly without adding extra bulk to the wall. -
Form the cylinder:
Gently curve the slab into a cylinder shape. Score the beveled edges aggressively and apply a generous amount of slip. -
Join the seam:
Press the scored edges together firmly. Use a wooden modeling tool inside and outside the cylinder to compress the seam until it is invisible.
Seam Splitting?
If your main seam cracks during drying, you likely didn’t score deep enough. In the future, scratch the surface until it’s really rough before applying slip.
Step 2: Base and Texture
-
Cut the base:
Roll a small piece of clay for the floor. Place your cylinder on top of it and trace around the outside with a needle tool, then cut out the circle. -
Attach the floor:
Score and slip the bottom edge of the cylinder and the outer edge of the circular base. Join them, smoothing the clay upwards from the base to the wall to create a seal. -
Define the texture zone:
Lightly mark a horizontal line around the mug, about 1 to 1.5 inches up from the bottom. This will be the upper boundary for your texture. -
Add the texture:
Use a carving tool or a wooden knife to press or carve repeating diagonal lines into this bottom section. I like to vary the pressure slightly to give it that handmade, organic feel. -
Refine the rim:
Use a damp chamois or sponge to compress and round off the drinking rim so it feels comfortable against the lips.
Texture Twist
Instead of carving, try pressing a piece of coarse rope or burlap into the bottom section before assembling the cylinder for a textile-like impression.
Step 3: Handle and Finish
-
Pull a strap:
Roll a thick coil or cut a strip of clay for the handle. Flatten it slightly into a strap shape that complements the mug’s wall thickness. -
Shape the ear:
Curve the strap into a ‘C’ or ear shape. Let it stiffen up for about 20 minutes so it holds its curve without sagging. -
Attach the handle:
Score and slip the attachment points on both the mug and the handle. Press the handle firmly onto the mug body, opposite the vertical seam. -
Clean connection points:
Use a small brush or tool to wipe away excess slip around the handle joints. Smooth the clay so the handle looks like it grew out of the mug. -
Bisque fire:
Allow the mug to dry slowly under plastic to prevent warping, then bisque fire to Cone 04 (or your clay’s specific bisque temperature). -
Glaze application:
Dip or brush your satin matte cream glaze. The textured area at the bottom will catch the glaze differently, highlighting the carving. -
Final firing:
Glaze fire the piece to the recommended temperature for your stoneware, usually Cone 5 or 6.
Once cooled, your new textured mug is ready to hold your favorite warm beverage


Coil-Built Bud Vases
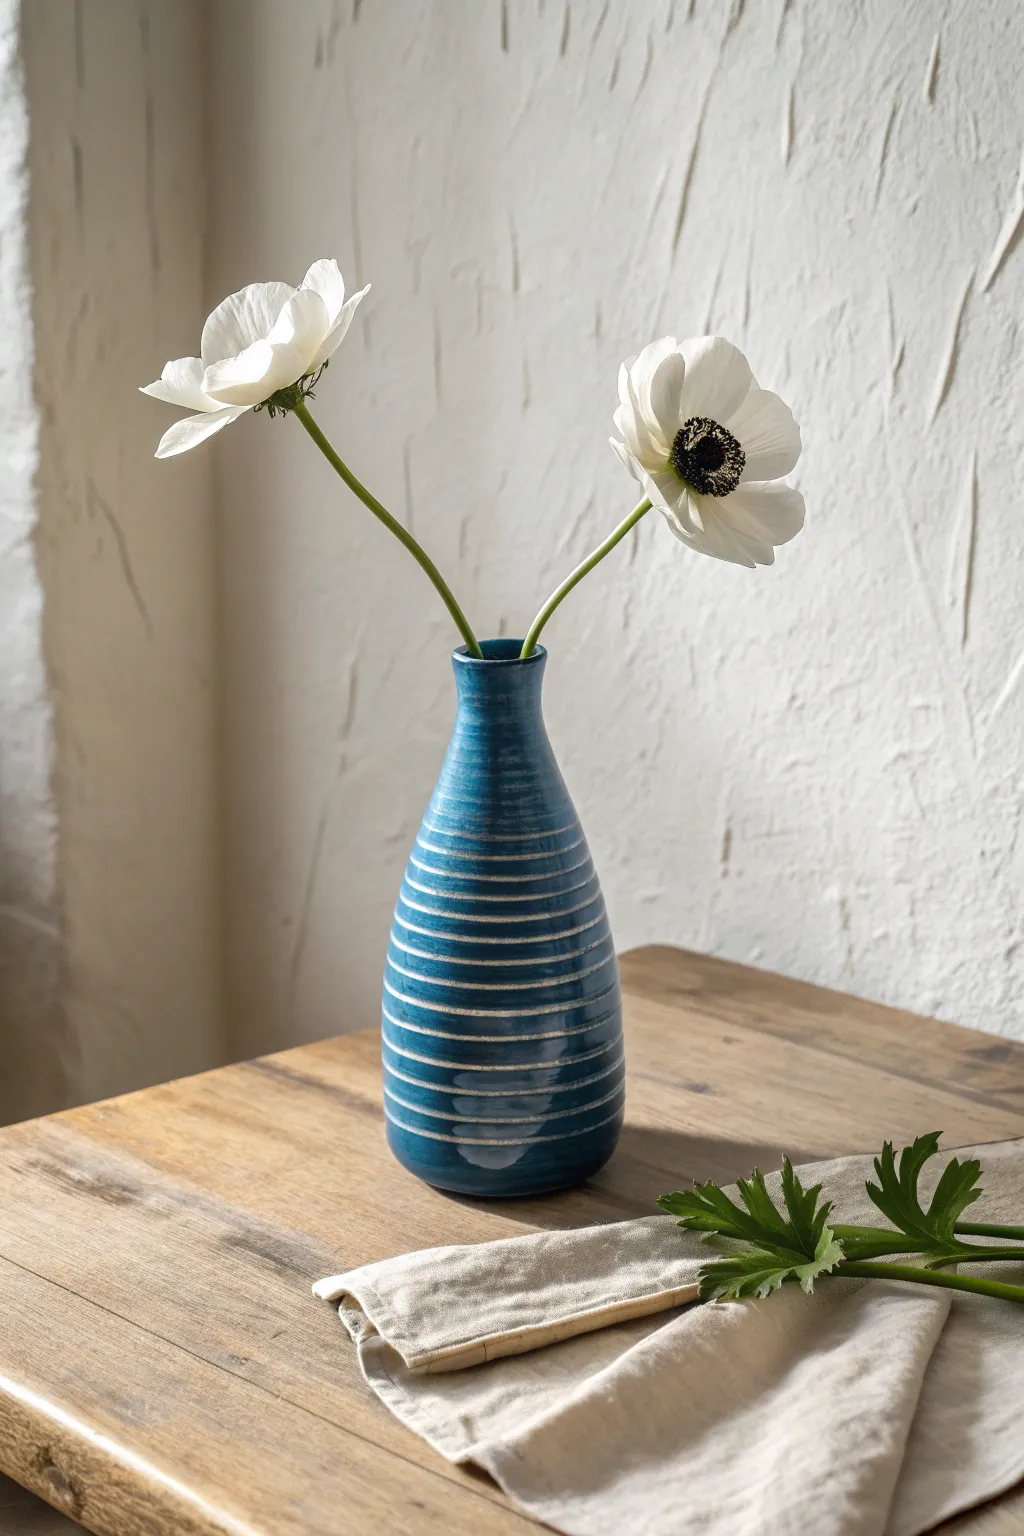
This elegant bud vase features a classic teardrop form with a narrow neck, perfect for showcasing delicate stems like anemones. The rich teal-blue surface is punctuated by rhythmic, horizontal sgraffito lines that reveal the raw clay body beneath.
Step-by-Step Guide
Materials
- White or light buff stoneware clay
- Clay scoring tool or fork
- Slip (clay slurry)
- Wooden modeling tool
- Metal kidney rib
- Sponge
- Teal or deep blue underglaze
- Carving tool (loop tool or needle tool)
- Clear transparent glaze
- Pottery wheel (banding wheel)
- Small paintbrush
Step 1: Building the Form
-
Create the base:
Start by rolling a small ball of clay about the size of a golf ball and flattening it into a disk about 1/4 inch thick. This will be the floor of your vase. -
Roll your first coils:
Roll out several snake-like coils of clay, aiming for a thickness similar to your pinky finger. Keep them consistent for even walls. -
Attach the first layer:
Score the outer edge of your base and apply a dab of slip. Lay your first coil around the perimeter, cut the ends at an angle, and join them together. -
Blend the clay:
Using your thumb or a wooden tool, smear the inside of the coil down onto the base to seal it. Then, smooth the outside seam upward. I find blending in both directions ensures the strongest bond. -
Build upward and outward:
Continue adding coils, stacking each slightly toward the outside of the previous ring to widen the form into a belly shape. -
Smooth the walls:
After every 3-4 coils, support the wall with one hand inside and use a rib or wooden scraper on the outside to compress the coils and remove visible seams. -
Narrow the neck:
Once you reach the vase’s widest point (about halfway up), begin stacking coils slightly inward to taper the shape back toward the center. -
Form the rim:
As the opening gets very narrow, you may need to pinch the clay upward rather than adding full coils. Finish the lip by smoothing it with a damp sponge or a piece of chamois. -
Refine the surface:
Let the vase dry to a leather-hard state. It should be firm but still cool to the touch. Use a metal kidney tool to shave off any bumps and make the exterior perfectly smooth.
Uneven Drying?
If the neck dries faster than the thick base, cover the top rim loosely with plastic while the bottom catches up to prevent cracking.
Step 2: Decorating and Glazing
-
Apply underglaze:
Brush 2-3 even coats of teal-blue underglaze onto the leather-hard clay. Allow the surface to dry until it’s no longer tacky. -
Carve the lines:
Place the vase on a banding wheel. Hold a carving tool steady against the pot while slowly spinning the wheel to create continuous horizontal lines that cut through the blue layer to reveal the white clay. -
Vary the pressure:
To get the look in the photo, allow for slight variations in line thickness and spacing; it adds an organic, handmade feel rather than looking machine-made. -
Bisque fire:
Once the piece is bone dry, fire it in the kiln to cone 04 (or your clay body’s bisque temperature). -
Apply clear glaze:
Wipe the bisque-fired vase with a damp sponge to remove dust, then dip it into (or brush on) a clear transparent glaze. -
Glaze fire:
Fire the piece a second time to the maturation temperature of your clay and glaze (typically cone 5 or 6 for stoneware).
Sharper Lines
Use a carving tool with a U-shaped tip rather than a V-shape. This removes a wider strip of underglaze without digging too deep into the wall.
Place a few stems of your favorite wildflowers inside to see how the white lines echo the organic shapes of nature

The Complete Guide to Pottery Troubleshooting
Uncover the most common ceramic mistakes—from cracking clay to failed glazes—and learn how to fix them fast.
Pressed-Botanical Trinket Dishes
Capture the delicate details of nature forever with this simple yet elegant handbuilt clay project. Using real botanicals to create texture results in a one-of-a-kind jewelry holder that feels both organic and modern.
Step-by-Step
Materials
- White stoneware clay or polymer clay (speckled or plain white)
- Faux speckles (ground coffee, black pepper, or clay inclusions) if using plain clay
- Dried fern frond or similar botanical
- Rolling pin
- Canvas mat or parchment paper
- Round cookie cutter or bowl (approx. 4-5 inches)
- Small sponge
- Water dish
- Pottery knife or needle tool
- Clear matte or satin glaze (if using ceramic clay)
- Kiln (for ceramic) or oven (for polymer)
Step 1: Preparing the Clay Slab
-
Wedge and Prep:
Begin by wedging your clay to remove air bubbles. If you are using plain clay and want that organic speckled look shown in the photo, knead in a small amount of ground black pepper or specialized clay speckles now. -
Roll it Out:
Place your clay on a canvas mat or between parchment paper sheets. Roll it out into an even slab, aiming for a thickness of about 1/4 inch. -
Check Consistency:
Run your fingers over the surface to ensure it is smooth and free of major bumps before proceeding to the imprint stage.
Fixing Shallow Prints
If the print is too faint, lay the fern back exactly in the grooves. Place parchment paper over it and rub firmly with the back of a spoon.
Step 2: Creating the Botanical Impression
-
Place the Fern:
Gently lay your dried fern frond onto the clay slab. Position it slightly off-center for a more artistic composition, leaving room for jewelry. -
Roll the Texture:
Using the rolling pin, roll firmly over the fern one single time. Do not roll back and forth, as this creates a double image. Apply enough pressure to embed the veins deep into the clay. -
Reveal the Design:
Carefully find the stem of the fern and slowly peel it away from the clay. I love this moment because you finally get to see the crisp detail left behind.
Gold Leaf Accent
For a luxe touch, paint the very rim of the finished dish with liquid gold leaf or luster after the final firing is complete.
Step 3: Shaping the Dish
-
Cut the Circle:
Place your round cutter or a bowl upside down over the imprinted area. Use a needle tool or knife to cut out a clean circle. -
Smooth the Edges:
Dip your finger or a small sponge in a tiny bit of water and gently run it along the cut rim to soften any sharp angles left by the knife. -
Form the Curve:
Place the clay circle into a shallow, curved bowl lined with plastic wrap or a foam mold. Gently press the center down so the sides curve upward to form the dish shape.
Step 4: Finishing and Firing
-
Dry Slowly:
Leave the dish in the mold until it is leather hard. Then, remove it and let it dry completely on a shelf away from direct drafts to prevent warping. -
Bisque Fire:
If using ceramic clay, fire the piece to cone 04 (or according to your clay’s instructions) once fully bone dry. -
Glaze Application:
Apply a clear matte or satin glaze over the entire piece. Avoid thick, opaque glazes, as they will fill in the fern texture and hide the details. -
Final Fire:
Fire the piece a final time to the temperature required by your glaze and clay body. -
Polymer Option:
If using polymer clay, bake according to the package directions (usually 275°F for 15-30 minutes), then finish with a light sanding or a matte varnish.
Now you have a serene little spot to keep your favorite rings safe
Simple Slab Soap Dishes
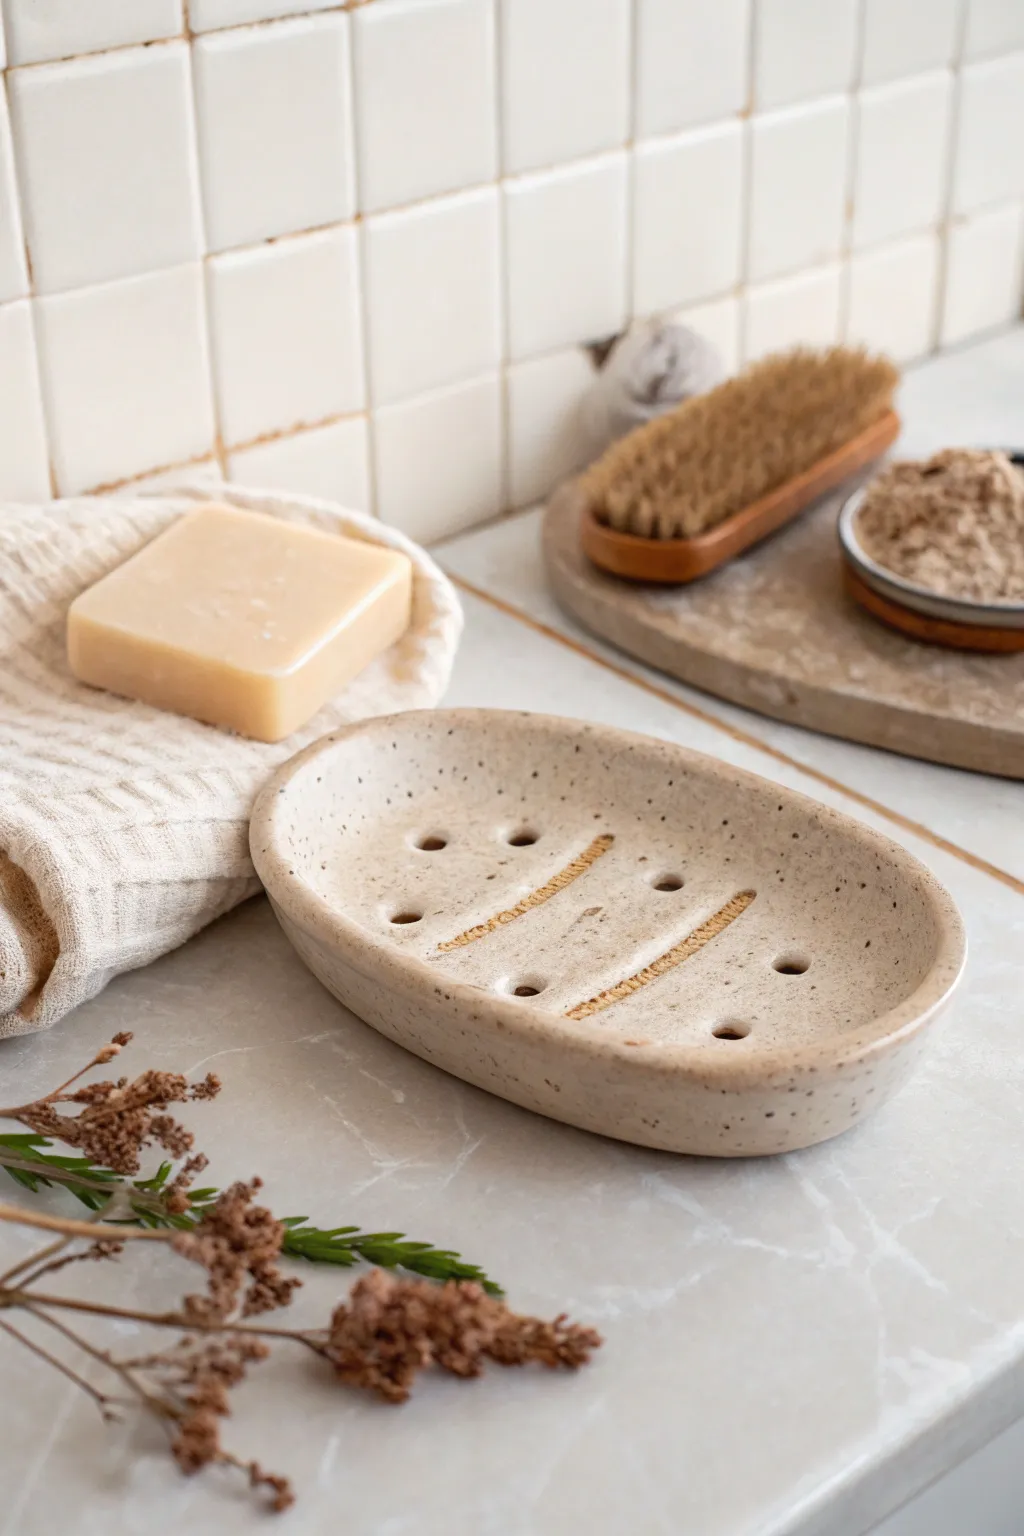
Elevate your bathroom counter with this serene, speckled ceramic soap dish that combines functionality with organic beauty. This project uses simple slab-building techniques to create a sturdy, elegant resting spot for your favorite soap bars.
How-To Guide
Materials
- Speckled Stoneware Clay
- Rolling Pin
- Canvas or Clay Mat
- Guide Sticks (approx. 1/4 inch thick)
- Needle Tool
- Oval Template (paper or cardstock)
- Fettling Knife
- Small Hole Punch or Straw
- Sponge
- Modeling Tool or Rib
- Clear Glaze (cone appropriate for your clay)
Step 1: Preparing the Slab
-
Wedge the Clay:
Begin by thoroughly wedging a ball of speckled stoneware clay to remove any air bubbles. This ensures your final piece is strong and won’t crack during firing. -
Set Up Guides:
Place your canvas or clay mat on a flat work surface. Lay your 1/4 inch guide sticks on either side of the clay ball to ensure an even thickness. -
Roll the Slab:
Roll the clay out smoothly with your rolling pin, moving from the center outward until the rolling pin rests on the guide sticks. -
Smooth the Surface:
Take a rubber or metal rib and gently compress the clay surface on both sides. This aligns the clay particles and removes the canvas texture for a sleeker finish.
Step 2: Shaping the Form
-
Cut the Base:
Place your oval template onto the slab. Using a needle tool held vertically, trace around the template to cut out your main shape. -
Create the Rim:
Cut a second strip of clay from the remaining slab, about 3/4 inch wide and long enough to go around the circumference of your oval. -
Score and Slip:
Score the outer edge of the oval base and one side of the clay strip. Apply a generous amount of slip to the scored areas. -
Attach the Wall:
Carefully place the strip onto the base edge, pressing firmly to join them. Overlap the ends of the strip slightly, cut through both layers at an angle, and join the seam. -
Blend the Seams:
Use a modeling tool or your thumb to blend the clay form the wall down into the base on the inside, and from the base up into the wall on the outside. Smooth it until the seam is invisible.
Clean Hole Punching
When punching drainage holes, twist the tool as you push through. Let the clay stiffen to leather-hard first for cleaner, less jagged holes.
Step 3: Adding Details
-
Form the Ridges:
Roll two small coils of clay, about the thickness of a pencil. These will become the raised bars that hold the soap up. -
Attach Ridges:
Score and slip two parallel lines in the center of the dish. Attach the coils firmly, then flatten them slightly so they aren’t round, but have a gentle plateau shape. -
Texture the Ridges:
I like to gently press a rough texture onto just the tops of these ridges using a tool or stamp, which adds visual interest and helps grip the soap. -
Add Drainage Holes:
Using a small hole cutter or a sturdy straw, punch several holes in the base between the ridges and near the edges to allow water to drain away. -
Refine the Rim:
Use a damp sponge to soften the top edge of the rim and smooth out any sharp angles created during the joining process.
Sculpted Feet
Add four tiny clay balls to the underside as feet. This lifts the dish off the counter, improving air circulation and drainage underneath.
Step 4: Finishing
-
Slow Dry:
Loosely cover the dish with plastic and let it dry slowly over a few days to prevent warping as the clay shrinks. -
Bisque Fire:
Once bone dry, fire the piece to bisque temperature (usually Cone 06 or 04, depending on your clay). -
Glaze Application:
Dip or brush a clear or semi-transparent glaze over the entire piece. This highlights the natural speckles of the clay body. -
Wax the Bottom:
Wipe away any glaze from the very bottom foot of the dish to prevent it from sticking to the kiln shelf. -
Final Fire:
Fire the piece to the maturity temperature of your clay body (likely Cone 5 or 6) for a durable, waterproof finish.
Once fired, place a fresh bar of soap on your new creation and enjoy the spa-like atmosphere.


What Really Happens Inside the Kiln
Learn how time and temperature work together inside the kiln to transform clay into durable ceramic.
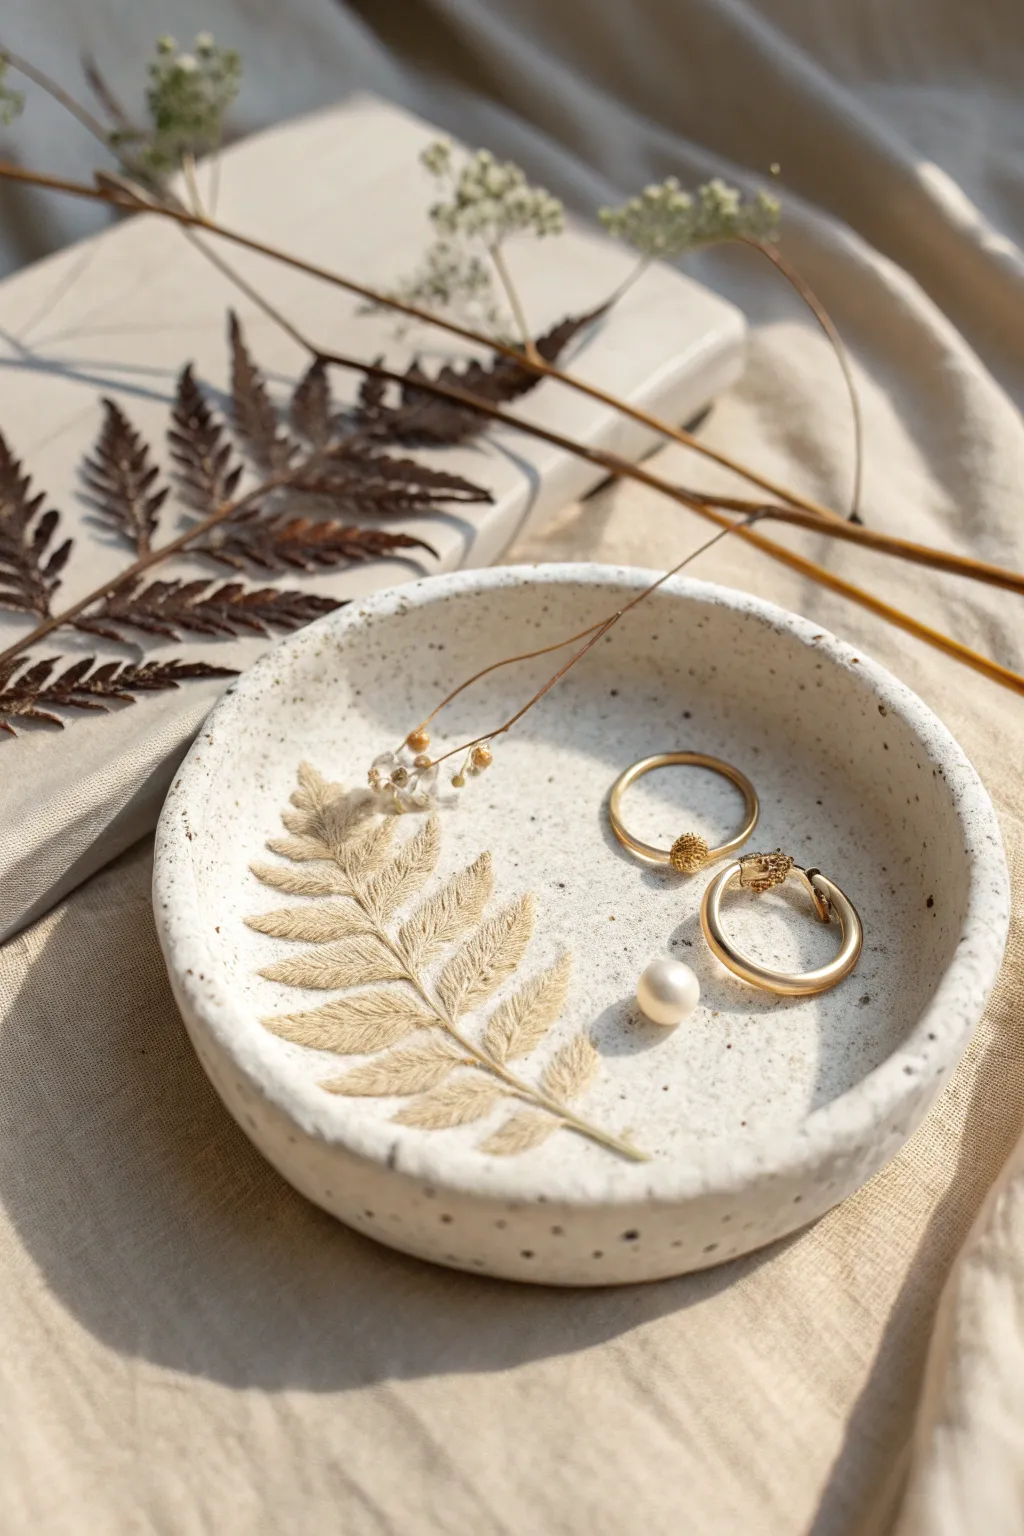
Ring Cones and Jewelry Trays
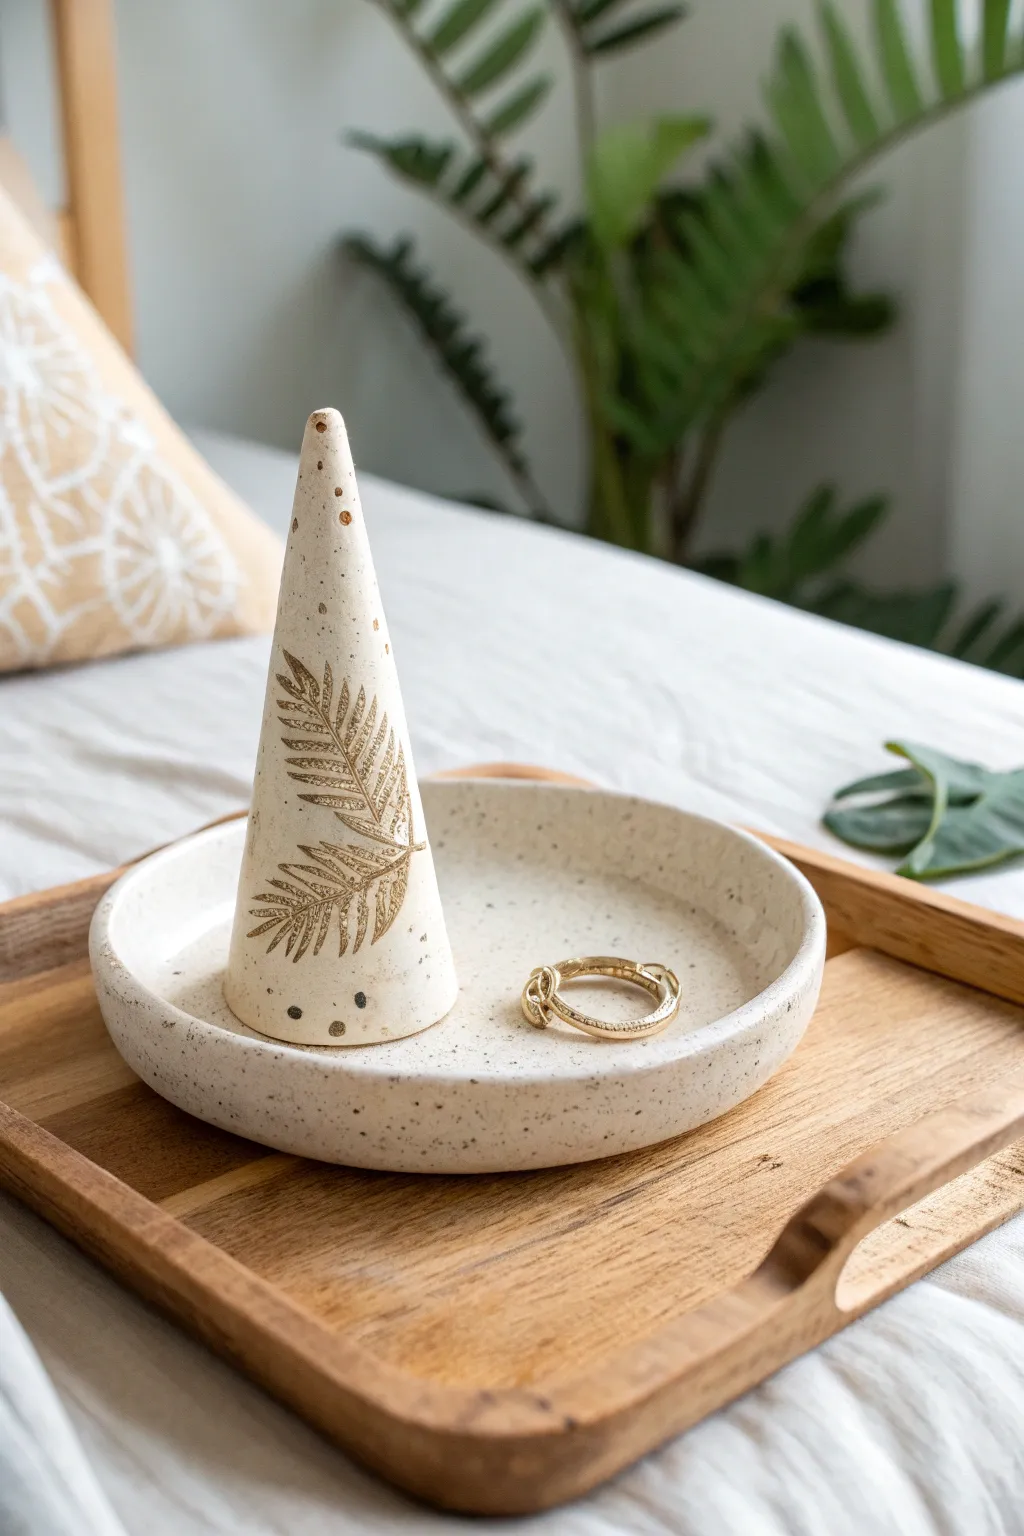
This elegant duo combines a functional shallow catch-all dish with a sculptural ring holder, showcasing the raw beauty of speckled clay. The set features a delicate botanical imprint and subtle earthy accents, making it a perfect minimalist addition to any bedside table.
Detailed Instructions
Materials
- Speckled stoneware clay (e.g., Laguna Speckled Buff)
- Real fern leaf or deep-texture rubber stamp
- Rolling pin
- Canvas work surface or slab mat
- Needle tool
- Fettling knife
- Circle cutter (approx. 4-5 inches) or a bowl to trace
- Small sponge
- Iron oxide wash or brown underglaze
- Small paintbrush
- Clear transparent glaze
- Slip or vinegar for joining
Step 1: Forming the Tray
-
Roll the Slab:
Begin by wedging a baseball-sized ball of speckled clay to remove air bubbles. Roll it out into a smooth, even slab about 1/4 inch thick. I find turning the clay over frequently helps prevent it from sticking to the canvas. -
Cut the Base:
Use your circle cutter or place a bowl upside down on the slab to trace a perfect circle. Cut along the line with a needle tool and remove the excess clay. -
Create the Rim:
Roll a long, thin coil of clay, roughly the thickness of a pencil. Score the outer edge of your circular base and the bottom of the coil using a serrated rib or needle tool. -
Attach and Smooth:
Apply a little slip or vinegar to the scored areas and press the coil onto the base’s edge. Use your thumb or a modeling tool to blend the inside of the coil down into the base until the seam disappears seamlessley. -
Refine the Wall:
Pinch the coil gently to raise it slightly, creating a low wall. Smooth the outside seam as well. Use a damp sponge to refine the rim, making it rounded and smooth to the touch.
Uneven Rim?
If your tray rim looks wavy, flip the tray upside down on a flat board while it’s leather hard. Gently press down on the bottom to level the rim against the flat surface.
Step 2: Sculpting the Ring Cone
-
Shape the Cone:
Take a smaller lump of clay and roll it into a thick ball. Begin rolling it back and forth on one side only, applying more pressure to one end to taper it into a cone shape. -
Refine the Height:
Stand the cone up and check its stability. If it’s too tall or wobbly, tap the base gently on the table to flatten it. Smooth the sides with a rib tool or damp fingers. -
Impress the Texture:
While the clay is still soft (leather hard is best, but workable soft is okay), press a fresh fern leaf or stamp firmly into the side of the cone. Rock it gently to ensure the stem and leaves leave a deep impression, then carefully peel it away. -
Hollow the Base (Optional):
If your cone is quite thick (over an inch at the base), use a loop tool to hollow out the bottom slightly. This helps prevent cracking during firing by ensuring even wall thickness.
Level Up: Gold Luster
For a luxe finish, apply a tiny amount of real gold luster accent over the fern imprint after the glaze firing, then fire a third time to cone 018.
Step 3: Decorating and Finishing
-
Dry Slowly:
Place both the tray and the cone under loose plastic to dry slowly to the bone-dry stage. This prevents warping, especially on the flat tray. -
Bisque Fire:
Fire the pieces to cone 04 (or your clay’s specific bisque temperature). -
Apply Oxide Wash:
Mix a small amount of iron oxide with water (or use a watered-down brown underglaze). Paint this wash into the fern impression and dab a few dots near the top and bottom of the cone for extra organic detail. -
Wipe Back:
Using a slightly damp sponge, wipe away the excess oxide from the surface. The color should remain trapped only in the deep recesses of the leaf texture and the small dots. -
Glaze:
Dip or brush a clear transparent glaze over both the tray and the cone. This will make the speckles in the clay pop and seal the surface. -
Glaze Fire:
Fire the pieces again to the maturity temperature of your clay body (typically cone 5 or 6 for stoneware).
Once cooled, arrange your favorite jewelry on this custom handmade set that brings a touch of nature indoors
Salt Cellars and Pinch Bowls
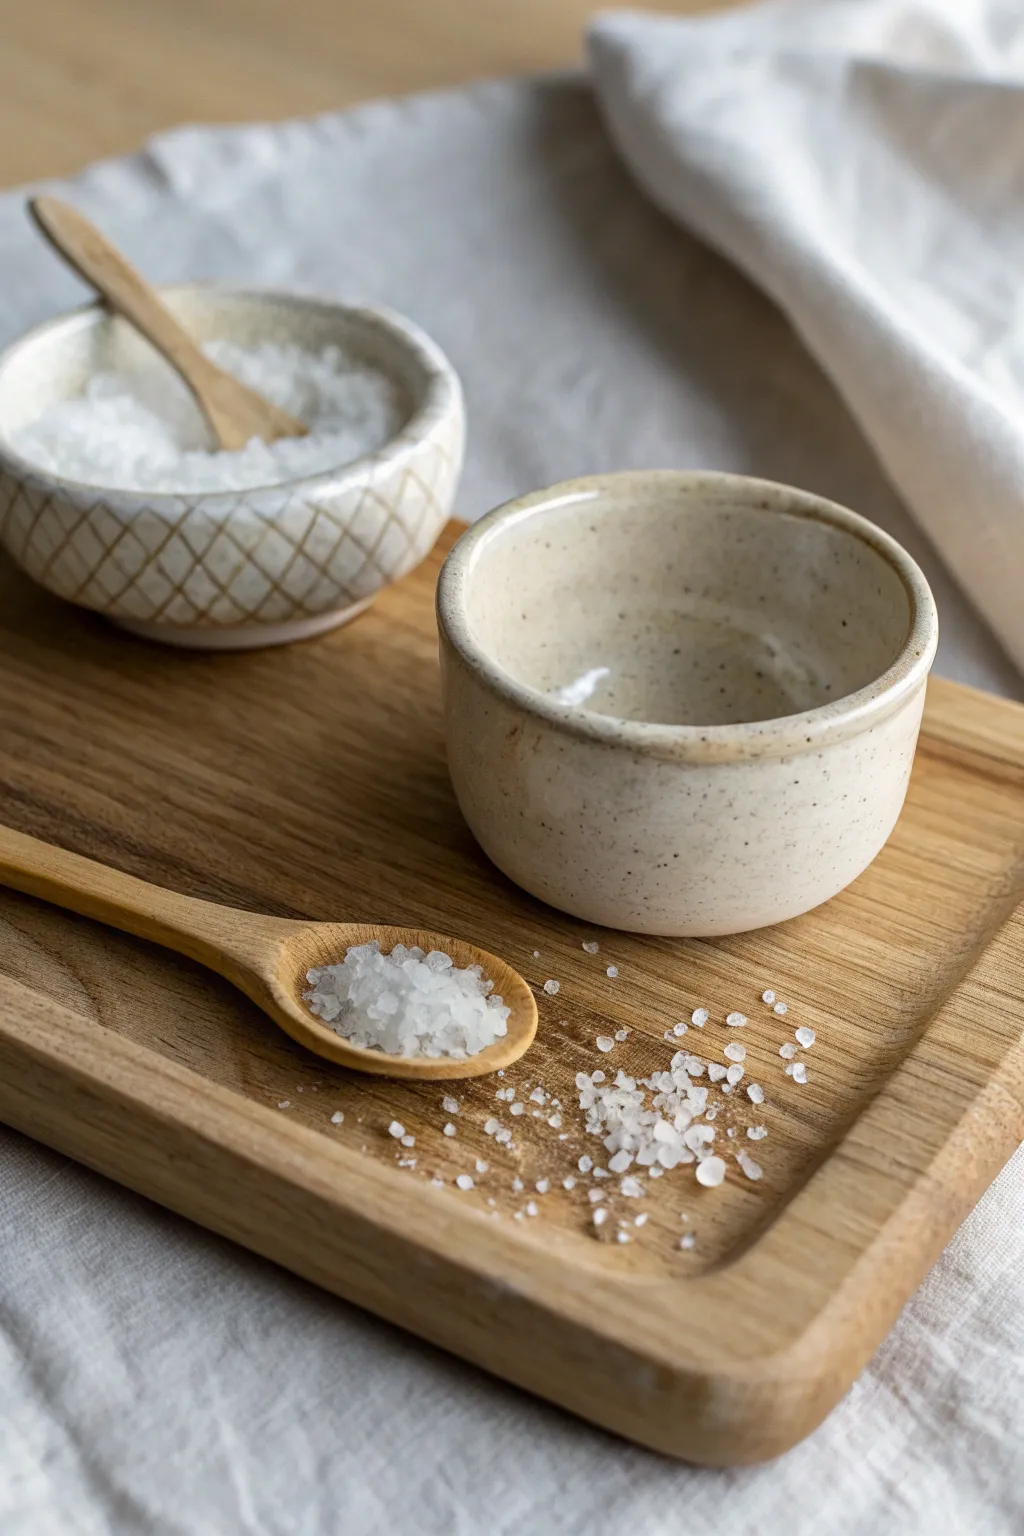
These charming, rustic clay vessels are perfect for keeping artisanal salts close at hand in the kitchen. Featuring a natural speckled clay body and a simple carved lattice texture on the salt cellar, this project embraces the organic beauty of hand-built ceramics.
Step-by-Step
Materials
- Speckled stoneware clay (mid-fire)
- Small wooden clay knife or needle tool
- Metal rib tool
- Sponge
- Bowl of water
- Loop tool (for carving)
- Clear or semi-transparent matte glaze
- Kiln access
Step 1: Forming the Pinch Pots
-
Prepare the clay:
Cut two balls of speckled stoneware clay, roughly the size of a tangerine. Pat them into smooth rounds to remove any initial lumps or air pockets. -
Make the initial opening:
Hold one ball in your non-dominant palm. Press your dominant thumb into the center, stopping about a half-inch from the bottom. This will ensure your base is substantial enough. -
Pinch the walls:
Gently pinch and rotate the clay ball between your thumb (inside) and fingers (outside). Work your way from the bottom up to the rim in a rhythmic spiral. -
Shape the vessel:
Aim for a wall thickness of about 1/4 inch. For the salt cellar (the patterned bowl), try to encourage a slightly rounded, enclosing shape rather than a wide flare. -
Create the second bowl:
Repeat the process for the second bowl, which acts as a pinch bowl or prep dish. You can make this one slightly taller with straighter sides as seen in the foreground vessel. -
Refine the rims:
Use a slightly damp sponge to compress and smooth the rims of both pots. A gentle touch here prevents the clay from getting too saturated and floppy. -
Flatten the bases:
Tap the bottom of each pot gently against your work surface to create a flat, stable foot so they won’t wobble on the tray.
Clean Lines
When carving the diamond lattice, pull the tool toward you rather than pushing away. This gives you better control over the depth and straightness of the lines.
Step 2: Texturing and Refining
-
Leather hard stage:
Allow both pots to dry to a leather-hard state. This is crucial—the clay should be firm enough to carve without bending, but still cool to the touch. -
Mark the lattice grid:
On the rounded salt cellar, lightly scratch diagonal lines in one direction using a needle tool. I like to space them about a half-inch apart. -
Complete the diamond pattern:
Cross those lines with diagonal scratches in the opposite direction to create a diamond grid pattern around the exterior belly of the pot. -
Carve the relief:
Using a small carving tool or loop tool, gently deepen these lines. Don’t dig too violently; just create enough groove for the glaze to break over later. -
Smooth the plain bowl:
For the taller pinch bowl, use a metal rib to scrape the exterior walls smooth. This emphasizes the natural speckles of the clay body. -
Final sponge wipe:
Run a barely damp sponge over any sharp carving burrs on the lattice pattern to soften the edges before firing.
Step 3: Glazing and Firing
-
Bisque fire:
Once bone dry, fire the pieces in a kiln to bisque temperature (usually cone 04) to prepare them for glazing. -
Clean the bisque:
Wipe the bisque-fired pieces with a wet sponge to remove any kiln dust, which can prevent glaze adherence. -
Glaze application:
Dip the pieces into a clear or milky-white semi-transparent matte glaze. This type of glaze is essential for letting the clay’s natural speckles show through. -
Wipe the feet:
Thoroughly sponge off any glaze from the bottom of the pots so they don’t fuse to the kiln shelf. -
Glaze fire:
Fire the pieces to the maturation temperature of your specific clay and glaze (likely cone 5 or 6 for stoneware).
Wobble Worries
If your pot rocks after drying, rub the base in a circular motion on a piece of coarse sandpaper. Do this outside and wear a mask to avoid inhaling clay dust.
Fill your new handmade cellar with flaky sea salt and enjoy the tactile pleasure of adding a pinch to your cooking

TRACK YOUR CERAMIC JOURNEY
Capture glaze tests, firing details, and creative progress—all in one simple printable. Make your projects easier to repeat and improve.
Slab-Built Butter Dishes

Bring a touch of farmhouse charm to your kitchen counter with this slab-built butter dish, featuring subtle iron speckles and a warm, matte finish. This project balances clean lines with organic imperfections for a piece that feels both modern and handmade.
Step-by-Step Tutorial
Materials
- Speckled Stoneware Clay (mid-fire)
- Rolling pin with guide strips (1/4 inch)
- Canvas or slab mat
- Cardstock or craft foam (for templates)
- Needle tool
- Scoring tool or serrated rib
- Slip (clay and water slurry)
- Wooden modeling tool
- Smooth yellow sponge
- Matte White or Oatmeal glaze
Step 1: Designing and Measuring
-
Draft your templates:
Measure a standard stick of butter you plan to use, adding about an inch of clearance on all sides. Sketch a rectangular base template and a corresponding rectangular top template that is slightly smaller to account for wall thickness. -
Calculate the walls:
Create long rectangular strips for the walls. For the base tray, you’ll need a strip about 1 inch tall. For the lid, you’ll want taller walls, approximately 2.5 to 3 inches, to comfortably clear the butter.
Keep it Straight
Use a straight edge or a set square while building the vertical walls to ensure they don’t flare outward or cave inward during the drying process.
Step 2: Forming the Base Tray
-
Roll the slab:
Roll your speckled clay out on canvas to a consistent 1/4 inch thickness. Compress the slab on both sides with a rubber rib to align the clay particles and prevent warping later. -
Cut the components:
Using your templates, cut out the large base rectangle and the long strip for the tray wall. I like to cut the wall strip slightly longer than necessary and trim the excess during assembly. -
Attach the tray walls:
Score the outer edge of the base rectangle and the bottom edge of your wall strip. Apply slip generously. Place the strip on top of the base edge, guiding it around the corners. You may need to gently curve the corners rather than making sharp 90-degree angles for this softer look. -
Seal the seams:
Where the two ends of the wall strip meet, cut them at a 45-degree angle (bevel cut) for a stronger join. Score, slip, and press them together. Use a wooden tool to blend the clay from the wall down onto the base floor on the inside to ensure a watertight seal. -
Soften the rim:
Run a damp sponge or a piece of chamois leather over the top rim of the tray to round it off slightly. This prevents chipping later.
Make it Yours
Swap the simple knob for a sculpted handle like a loop, a geometric cube, or even a sculpted animal for a fun twist on the classic design.
Step 3: Constructing the Lid
-
Cut lid pieces:
Cut out the top rectangle for the lid and the taller wall strips. Let these stiffen to ‘leather hard’ for about an hour so they hold their shape better during construction. -
Assemble the box:
Similar to the tray, attach the walls to the top rectangle piece. However, gravity is working against you here, so you might need to support the inside with crumpled newspaper or a small foam block while the seams set. -
Refine the shape:
Once the box structure is stable, paddle the outside gently with a wooden spatula to straighten the walls and soften the sharp corners into that rounded, organic shape seen in the photo. -
Add a flange (Optional):
Check the fit. If the lid slides around too much on the tray, add a small coil of clay to the underside of the lid or the inside of the tray to act as a ‘stop’ or gallery.
Step 4: Adding Details and Finishing
-
Make the knob:
Roll a small ball of clay into a mushroom or tapered cylinder shape. Flatten the bottom where it will attach to the lid. -
Attach the handle:
Find the center of your lid. Score and slip both the lid surface and the knob base. Press the knob down firmly and wiggle it slightly to seat it. Use a small modeling tool to smooth the seam so it looks like one continuous piece. -
Final smoothing:
Once both pieces are leather hard, use a serrated rib followed by a smooth rib to remove any canvas texture. Use a damp sponge to expose the natural grog or speckles in the clay body. -
Drying:
Dry the lid on top of the base tray (with a piece of paper towel in between to prevent sticking). This ensures they shrink and warp together, maintaining a perfect fit. -
Glazing:
After bisque firing, apply a matte white or oatmeal glaze. If using a brushable glaze, apply 3 even coats to get that solid, creamy opacity while letting the iron speckles bleed through.
Once fired, fill with your favorite butter and enjoy the simple luxury of handmade ceramics at breakfast.
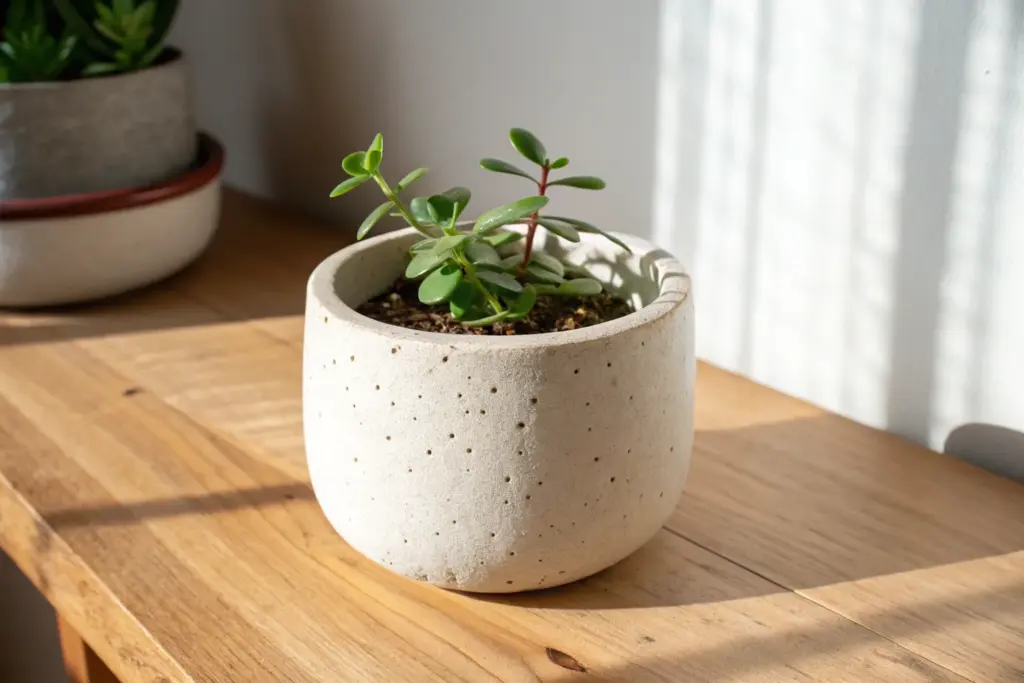
Wall Pocket Planters
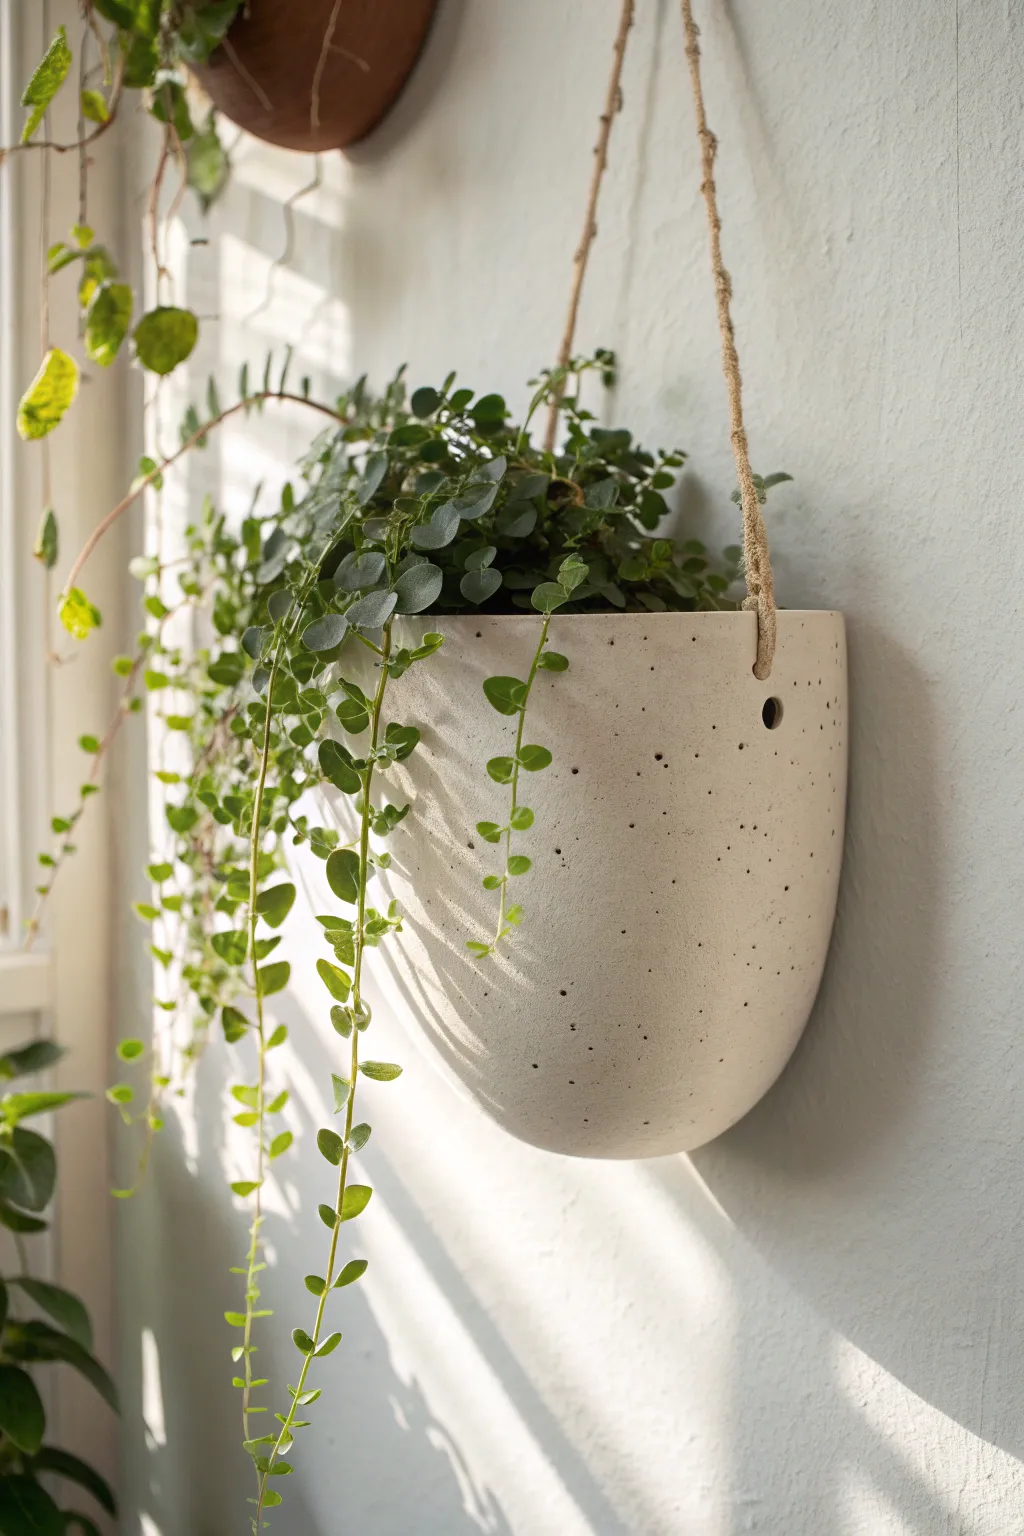
Bring a touch of organic modernism to your walls with this softly tapered, hand-built clay pocket. The creamy, speckled finish and natural twine hanging system create the perfect minimalist home for trailing succulents or vines.
How-To Guide
Materials
- White stoneware clay (preferably groggy or speckled)
- Rolling pin
- Guide sticks or slats (approx. 1/4 inch thick)
- Canvas work surface or clay mat
- Needle tool or fettling knife
- Paper template (semi-circle shape)
- Scoring tool or serrated rib
- Slip (clay mixed with water)
- Sponge
- Small circle cutter or straw
- Matte white glaze (if using non-speckled clay, add iron oxide speckles)
- Rough twine or hemp rope
Step 1: Shaping the Pocket
-
Prepare your template:
Sketch a template on cardstock first. You want a shape that looks somewhat like a rounded triangle or a cone that has been flattened. The wider top edge will become the opening. A width of about 8-10 inches creates a nice medium-sized planter. -
Roll the slab:
Wedge your clay thoroughly to remove air bubbles. Place it on your canvas and roll it out into a slab using guide sticks to ensure an even thickness of about 1/4 inch. I like to flip the slab once distinct during rolling to keep the texture consistent on both sides. -
Cut the form:
Place your paper template onto the slab and trace around it with a needle tool. Cut out the shape cleanly. Save the excess clay for the back reinforcement. -
Create the curve:
Gently lift the clay slab and drape it over a rounded form, like a rolling pin wrapped in newspaper or a large PVC pipe, just to encourage a curve. You aren’t closing a cylinder, just creating a convex ‘belly’ so the pocket puffs out from the wall. -
Make the back wall:
Roll a second, smaller slab for the back. This should be a flat piece that fits the width of your curved front piece. It acts as the flat surface that will rest against the wall. -
Score and slip:
Score the side and bottom edges of both the curved front piece and the flat back piece. Apply a generous amount of slip to the scored areas. -
Assemble the pocket:
Press the curved front piece onto the flat back piece. Use your fingers or a modeling tool to firmly blend the seams together on the outside. Working from the inside can be tricky, so use a long wooden tool to apply pressure to the inner seam if your fingers don’t fit. -
Smooth and refine:
Once connected, use a damp sponge to smooth out the joined seams until they are invisible. Pay special attention to the bottom curve so it looks like one continuous organic shape rather than two joined slabs.
Step 2: Finishing Details
-
Add hanging holes:
While the clay is leather hard, use a small circle cutter or a sturdy straw to punch two holes near the top rim—one on each side. Place them about an inch down from the rim to ensure they can support the weight of the soil later. -
Texturing (Optional):
If your clay isn’t naturally speckled, you can gently flick stiff brush bristles dipped in iron oxide wash against the surface to create artificial speckles before bisque firing. -
Dry slowly:
Cover the planter loosely with plastic to let it dry very slowly. This shape is prone to warping if the front dries faster than the thicker seams. -
Bisque fire:
Fire the piece to cone 04 (or your clay body’s specifications). Ensure the kiln is loaded so nothing touches the delicate rim. -
Glaze application:
Apply a matte white glaze. Pour the glaze inside the pocket, swirl it to coat, and pour it out. Then, dip or brush the exterior. Wipe the bottom clean or use wax resist to prevent sticking to the kiln shelf. -
Glaze fire:
Fire to the maturation temperature of your glaze and clay (typically cone 5 or 6 for stoneware). -
Add the suspension:
Cut a length of natural hemp or jute twine. Thread one end through the left hole from the outside in, and knot it securely on the inside. Repeat on the right side, adjusting the length of the loop to fit your wall space.
Slumping Issues?
If the ‘belly’ collapses while gentle drying, stuff the pocket lightly with crumpled newspaper or plastic bags to support the curve until the clay becomes leather hard.
Make it Level
Before firing, hang the leather-hard pot on a nail to test the balance. Only trim/sand the back flat once you see how it naturally hangs to ensure it won’t tilt forward.
Fill your new pocket with a draping plant and enjoy the living art on your wall
Whimsical Face Planters
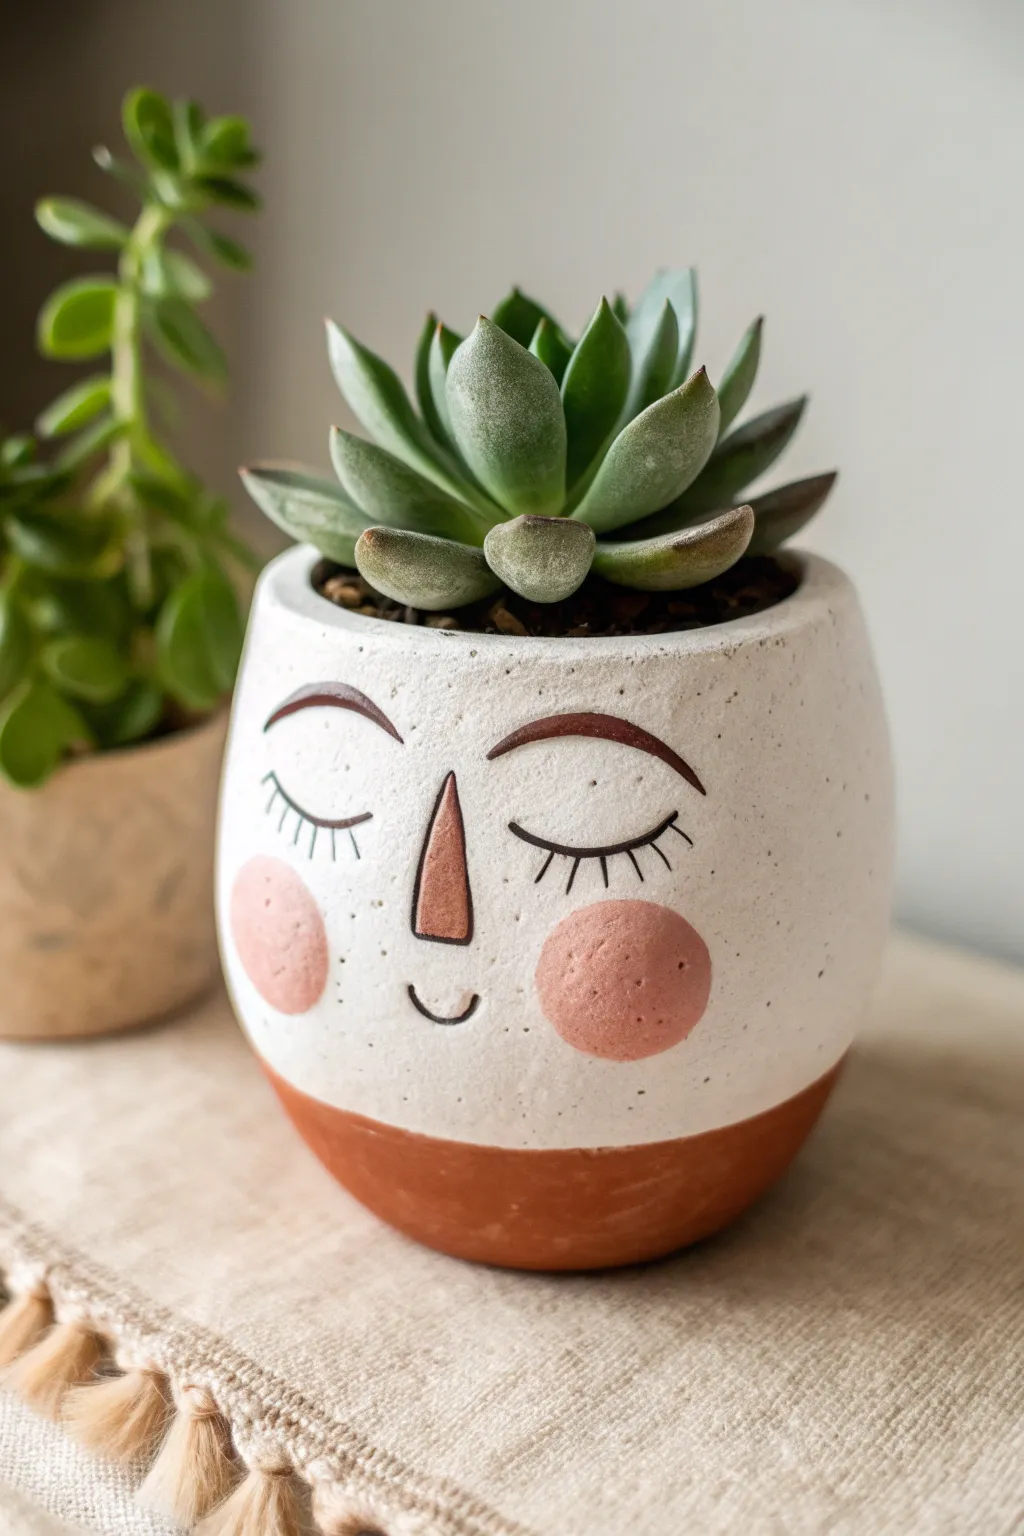
This adorable face planter brings a sense of calm to any corner with its peaceful expression and soft, speckled finish. The contrast between the creamy, glazed upper half and the raw, earthy base adds a lovely tactile element that feels both modern and handmade.
Step-by-Step
Materials
- Stoneware clay (speckled or white)
- Small rolling pin
- Carving tool or needle tool
- Pottery sponge
- Slip (clay and water mixture)
- Underglazes (Dark Brown, Terracotta/Rust, Pink)
- Fine detail paintbrush
- Matte white glaze (semi-opaque)
- Clear glaze (optional)
- Loop tool for trimming
- Canvas or mat for rolling
Step 1: Forming the Base
-
Prepare the Clay:
Begin with a ball of clay roughly the size of a large orange. Wedge it thoroughly to remove air bubbles, ensuring the clay is consistent and workable. -
Pinch Pot Method:
Push your thumb into the center of the ball, stopping about half an inch from the bottom. Gently pinch the clay between your thumb and fingers, rotating the ball as you go to open up the shape. -
Shape the Walls:
Continue pinching upward to thin out the walls. Aim for a thickness of about 1/4 inch. Shape the pot into a rounded curve, slightly tapering near the rim to create a gentle, enclosed feeling. -
Smooth the Surface:
Use a damp sponge or a flexible rib tool to smooth the outside and inside surfaces. Remove any deep fingerprints, but don’t worry about being perfect; a little organic texture adds character. -
Create the Bottom:
Tap the pot gently on your work surface to create a flat, stable base. Then, use a small circular cutter or a needle tool to punch a drainage hole in the very center.
Step 2: Sculpting the Face
-
Position the Features:
Lightly sketch the face placement with a needle tool. The eyes should be closed ‘U’ shapes in the middle of the pot, with the nose centered between them. -
Build the Nose:
Roll a very small triangular wedge of clay. Score the back of the nose and the spot on the pot where it will go. Apply slip, press firmly to attach, and blend the edges seamlessy into the face. -
Define the Cheeks:
You can slightly push the clay outward from the inside of the pot where the cheeks will be to give them a subtle 3D puffiness, though painting them later works too. -
Clean Up:
Go over the attached nose area with a barely damp brush to ensure smooth transitions. Let the pot dry to a leather-hard state before moving to decoration.
Clean Lines
For perfectly round cheeks, use a round foam stippler or the eraser end of a pencil as a stamp instead of freehand painting.
Step 3: Painting & Glazing
-
Painting the Face:
On the leather-hard clay, use a fine brush and dark brown underglaze to paint the arched eyebrows, the closed eyelids with lashes, and the small curved smile. -
Coloring the Nose:
Paint the triangle of the nose with a rust or terracotta-colored underglaze. I find that outlining it first helps keep the shape crisp. -
Adding the Blush:
Dip a round brush or sponge dabber into pink underglaze. Apply circular rosy cheeks on either side of the nose. You may need two coats for vibrancy. -
Bisque Fire:
Allow the piece to dry completely (bone dry) and fire it to bisque temperature (usually Cone 04) based on your clay specifications. -
Waxing the Bottom:
Apply wax resist to the bottom third of the pot. This will create that distinct line where the glaze stops and the raw clay begins. -
Glazing:
Dip the top two-thirds of the pot into a matte white glaze. If your clay isn’t naturally speckled, choose a white glaze with speckles in it. -
Reveal the Face:
If the white glaze is too opaque, gently wipe it back over the painted facial features with a sponge so the underglaze shows through clearly. -
Final Firing:
Fire the piece again to the glaze temperature (usually Cone 5 or 6). Once cool, plant your favorite succulent inside.
Smudged Glaze?
If the face details blur under the white glaze, use a wax resist over the underglazed features before dipping into the white overglaze.
Now you have a serene little companion ready to keep your plants happy
Appliqué Floral Tumblers
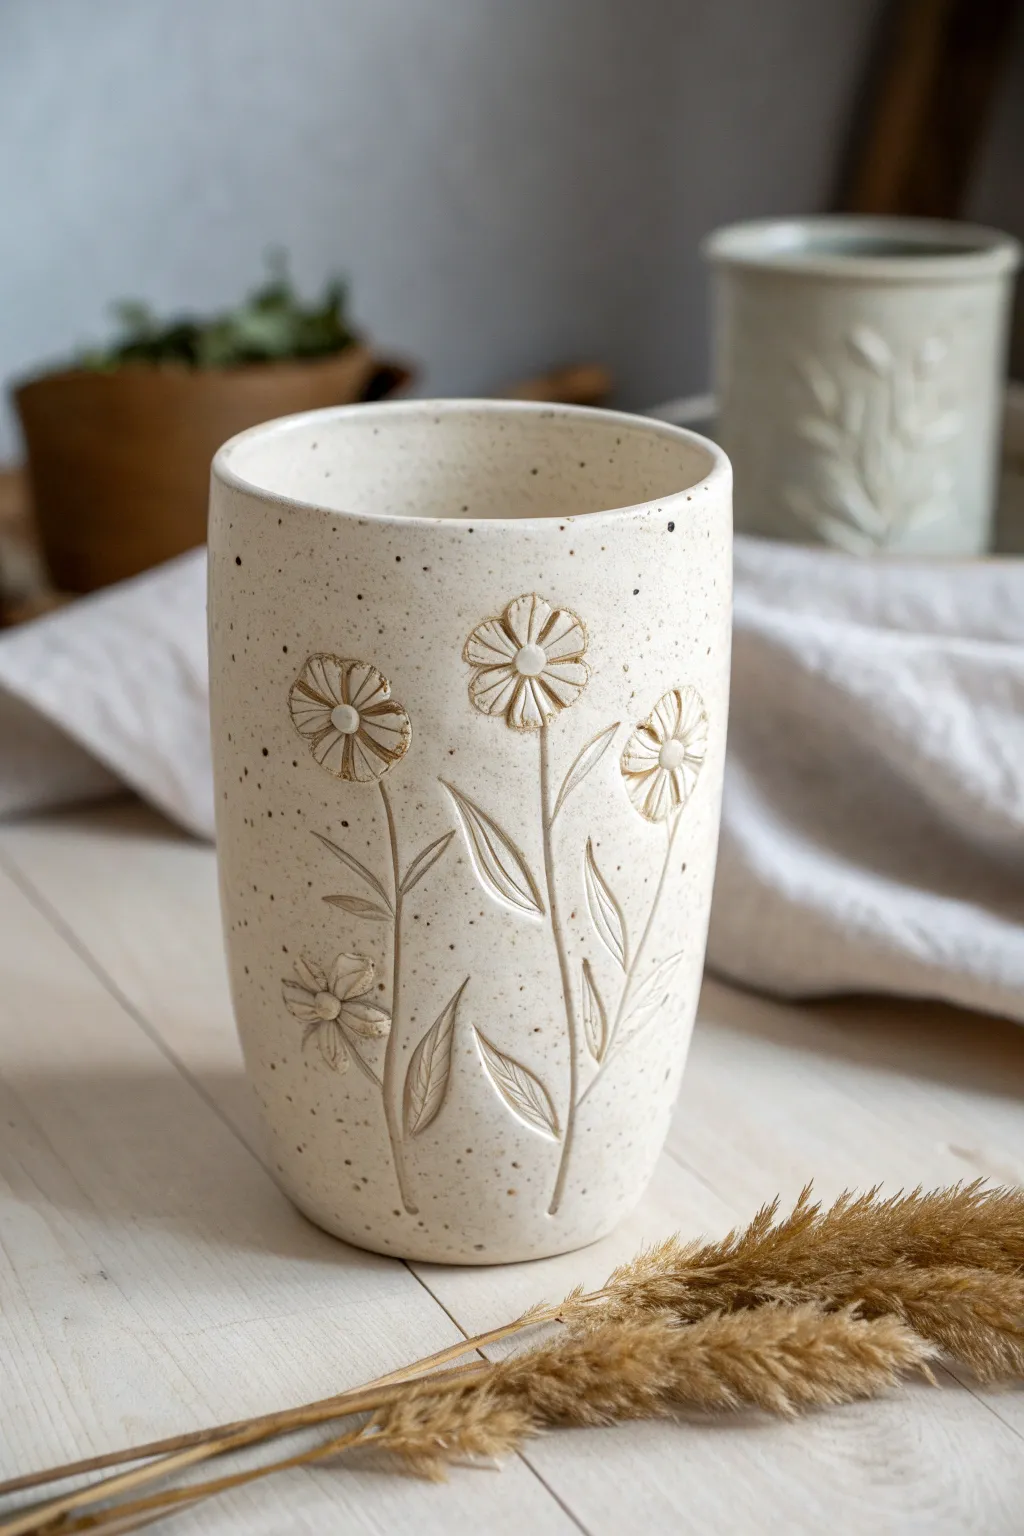
Embrace the imperfect beauty of handbuilding with this charming speckled clay tumbler featuring carved floral motifs. This project combines simple slab construction with a satisfying subtractive decorating technique to create a tactile drinking vessel with a rustic, organic feel.
Step-by-Step Guide
Materials
- Speckled stoneware clay (pyrite or manganese speckle)
- Rolling pin
- Canvas work surface or slab mat
- Cylindrical form or bisque mold (approx. 3-4 inches diameter)
- Fettling knife
- Serrated rib and rubber kidney rib
- Needle tool
- Small loop tool or carving set
- Slip and scoring tool
- Clear or transparent matte glaze
- Sponge and water cup
Step 1: Forming the Cylinder
-
Roll the Slab:
Begin by wedging your speckled clay to remove air bubbles. Roll out a slab that is roughly 1/4 inch thick. Compress the clay on both sides using a rubber rib to align the particles and prevent warping later. -
Cut the Template:
Using a ruler or paper template, cut a rectangle that matches the circumference of your mold plus a slight overlap, and a height of about 5-6 inches. You will also need to cut a circle for the base. -
Bevel the Edges:
Carefully bevel the short ends of your rectangle at a 45-degree angle. They should slant in opposite directions so they will overlap seamlessly to create a hidden joint. -
Score and Slip:
Score the beveled edges aggressively and the perimeter of your base circle. Apply a generous amount of slip to these roughened areas. -
Assemble the Wall:
Wrap the rectangle around your cylindrical mold or form. Press the beveled edges together firmly to create the cylinder wall. Use a wooden tool to blend the seam inside and out until it disappears. -
Attach the Base:
Place the cylinder onto the scored base circle. Press down gently to secure it. Use your thumb or a modeling tool to smooth the clay from the base up onto the wall, ensuring a watertight seal. -
Refine the Rim:
Remove the mold. Use a damp sponge to smooth the rim of the tumbler. Here I prefer to check for sharpness and gently round it over, as this will be where your lips touch.
Step 2: Carving the Design
-
Wait for Leather Hard:
Allow the tumbler to dry slowly under plastic until it reaches a firm leather-hard state. The clay should be stiff enough to handle without deforming but soft enough to carve easily. -
Sketch the Composition:
Using a needle tool, very lightly sketch your floral design directly onto the clay surface. Draw three main stems with daisy-like heads at varying heights to create movement. -
Outline the Flowers:
Deepen the outline of the petals and stems using your needle tool or a fine point carving tool. You want a crisp, definition line that separates the flower from the background. -
Carve the Petals:
Using a small loop tool, gently carve away the interior of the petals to give them a concave shape, or carve around them to make them pop out in relief. The image shows an impressed or carved-in look, so press into the clay to define the petal shapes. -
Add Texture Layers:
For the flower centers, press a small circular tool or the back of a drill bit into the clay. Add faint lines inside the petals to suggest veins using a sharp blade. -
Detail the Leaves:
Carve simple, elongated leaf shapes branching off the main stems. Create a central vein in each leaf by carving a shallow channel down the middle. -
Clean Up Burrs:
Once the carving is complete, let the piece dry slightly more. Then, rub the surface gently with a scouring pad or stiff brush to knock off any sharp clay crumbs or ‘burrs’ created during carving.
Sticky Situation?
If your clay sticks to the mold, try wrapping the form in a single layer of newspaper before building. The paper burns away in the kiln.
Step 3: Firing and Glazing
-
Bisque Fire:
Allow the tumbler to dry completely (bone dry) before bisque firing it in the kiln to approximately Cone 04. -
Apply Glaze:
Dip the entire tumbler into a clear or semi-transparent matte glaze. This type of glaze is crucial as it allows the natural speckles of the clay body to show through. -
Wipe the Foot:
Use a damp sponge to clean any glaze off the very bottom of the tumbler so it doesn’t fuse to the kiln shelf. -
Final Fire:
Glaze fire the piece to the maturity temperature of your clay (usually Cone 5 or 6). The heat will bring out the lovely iron speckles evident in the reference photo.
Add Subtle Color
Before the clear glaze, brush a thin wash of iron oxide or diluted underglaze into the carved lines, then wipe back to accentuate the drawing.
Once cooled, your tumbler is ready to hold your morning coffee, complete with a tactile design that fits perfectly in the hand
Lidded Trinket Boxes
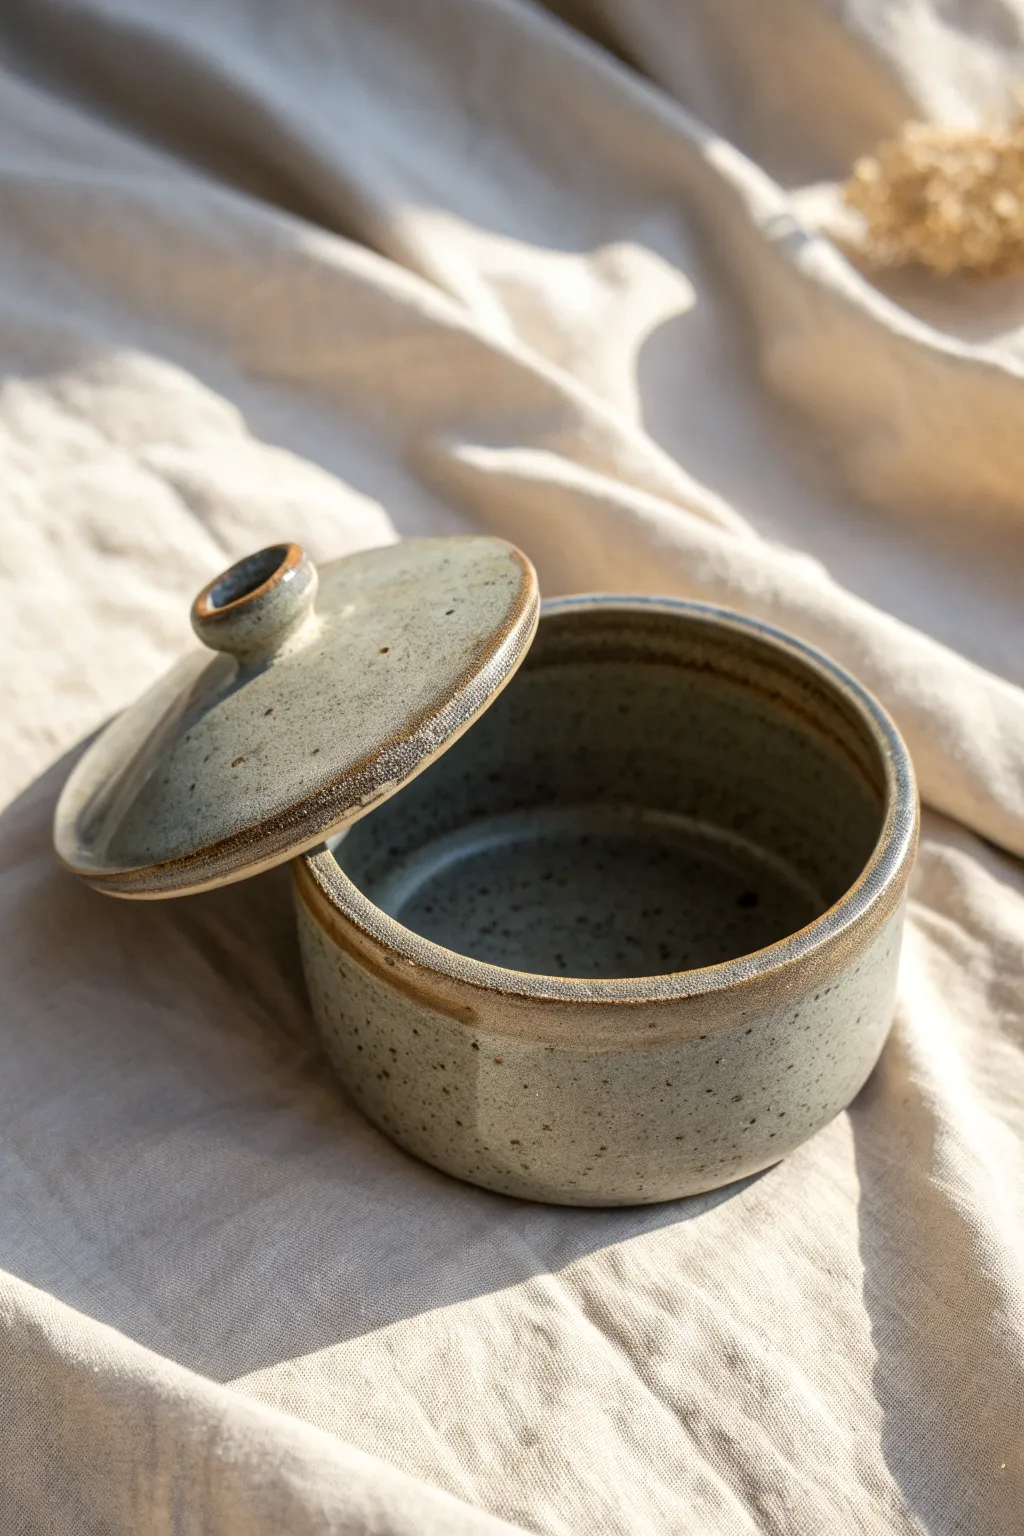
This charming lidded vessel features a serene grey-blue glaze on speckled stoneware clay, accented by warm, raw edges where the clay body peeks through. Its compact, cylindrical form makes it perfect for storing jewellery, salt, or special keepsakes.
Step-by-Step Tutorial
Materials
- Speckled stoneware clay (mid-fire)
- Rolling pin
- Canvas work surface
- Needle tool
- Fettling knife
- Ware board
- Slip and scoring tool (or serrated rib)
- Small sponge
- Ruler
- Loop tool (for trimming)
- Grey-blue speckled glaze
- Pottery wheel (optional, but instructions will focus on handbuilding)
Step 1: Forming the Base and Walls
-
Roll the Slabs:
Begin by rolling out a medium-sized slab of speckled clay to an even thickness of about 1/4 inch. Smooth both sides with a rib to compress the clay particles. -
Cut the Base:
Using a circle template or a jar lid as a guide, cut out a perfect circle for the base of your box. Set this aside on a small ware board. -
Measure and Cut the Wall:
Calculate the circumference of your base circle (diameter x 3.14). Cut a long rectangular strip from your slab that matches this length plus a tiny bit for overlap, and decide on your desired height—about 3 inches looks proportional. -
Score and Slip:
Score the outer edge of your circular base and the bottom edge of your rectangular strip thoroughly. Apply slip to the scored areas. -
Assemble the Cylinder:
Carefully wrap the rectangular strip around the base. I find it easiest to join the vertical seam of the wall first by scoring, slipping, and blending the overlapping ends together. -
Secure the Bottom Seam:
Once the wall is a ring, press it firmly onto the base. Use a modeling tool handle or your thumb to smudge the clay from the wall down onto the base on the outside to create a seamless seal. -
Reinforce the Interior:
Roll a very thin coil of clay and press it into the interior corner where the wall meets the floor. Smooth this out with a rounded tool or your finger to ensure a watertight bond.
Step 2: Crafting the Lid
-
Measure the Opening:
Measure the outer diameter of your now-assembled box. You want the lid to slightly overhang, so add about 1/4 inch to this measurement. -
Cut the Lid Slab:
Cut a circle from your remaining slab using your new measurement. Smooth the edges with a damp sponge so they are rounded, not sharp. -
Create the Flange:
To keep the lid from sliding off, you need a flange. Roll a coil or cut a thin strip of clay. Measuring against the *inside* of your box rim, attach this ring to the underside of your lid slab so it fits snugly inside the box. -
Make the Knob:
Roll a small ball of clay and slightly flatten it. Shape it into a concave button or mushroom shape that feels comfortable to grip. -
Attach the Knob:
Score the center of the lid top and the bottom of your knob. Slip and press them together firmly. Clean up any excess slip with a brush.
Lid Fit Troubleshooting
If the lid is too tight after drying, carefully sand the inner flange with fine-grit sandpaper before firing. Clay shrinks, so a tight fit beforehand often becomes perfect later.
Step 3: Finishing and Glazing
-
Refine the Edges:
Once the piece is leather hard, use a damp sponge to smooth the rims. This is crucial—glaze tends to pull away from sharp corners, which is how we get that lovely brown rim effect. -
Bisque Fire:
Let the piece dry completely (slowly, to prevent warping) and bisque fire it according to your clay body’s instructions. -
Wax the Contact Points:
Apply wax resist to the bottom of the box, the underside of the lid where it touches the rim, and the very top rim of the box itself if you want raw clay contact. -
Glaze Application:
Dip or brush your grey-blue glaze onto the piece. If you want the specific look in the photo, wipe the glaze carefully off the sharpest angle of the lid’s rim with a sponge to reveal the clay underneath. -
Final Fire:
Glaze fire the piece to cone 5 or 6 (or whatever your clay and glaze require). The heat will interact with the iron in the clay to create those beautiful speckles.
Level Up: Texture
Before assembling, gently press a piece of coarse linen or canvas onto your soft slabs. This subtle texture will catch the glaze beautifully, adding depth to the surface.
Once cooled, your handmade box is ready to hold your tiny treasures on your dresser or shelf
Handbuilt Citrus Juicers

Brighten your kitchen with this sunny, handbuilt citrus juicer that combines vintage charm with practical utility. This project features a functional reaming cone centered in a deep catchment bowl, finished with a classic yellow glaze and an oxide-stained rim.
How-To Guide
Materials
- Stoneware clay (smooth or lightly grogged)
- Pottery wheel (optional, but handbuilding instructions provided)
- Wooden rib
- Pin tool or needle tool
- Sponge
- Scoring tool (serrated rib)
- Slip
- Yellow glossy glaze
- Iron oxide wash or dark brown underglaze
- Carving tool or loop tool (for reamer ridges)
- Clear glaze (optional)
Step 1: Forming the Base Bowl
-
Roll the slab:
Begin by rolling out a slab of clay to a consistent 1/4-inch thickness. Compress the clay on both sides with a rib to prevent warping later. -
Cut the circle:
Using a template or freehand, cut a circle approximately 6-7 inches in diameter. This will become the body of your juice catcher. -
Shape the bowl:
Place the clay circle over a hump mold or inside a slump mold to create a gentle curve. Alternatively, you can pinch the edges upward to form a bowl shape, smoothing the walls as you go to ensure even thickness. -
Create the spout:
While the clay is still soft, use your thumb and forefinger to gently pull and shape a pouring spout on one side of the rim. Ensure it has a sharp, defined edge to prevent dripping. -
Add a handle (optional):
If desired, form a small lug or loop handle and attach it opposite the spout using the score and slip method. The example shows a small tab-style handle.
Sharp Ridges Matter
Make the sculpting ridges on the center cone deeper than you think necessary. Glaze naturally softens edges, so deep cuts ensure it still juices effectively.
Step 2: Sculpting the Reamer Cone
-
Form the cone:
Roll a ball of clay into a harmonious cone shape. The base should be wide enough to remain stable, tapering to a rounded point at the top. -
Hollow the cone:
Turn the cone over and carefully hollow out the underside with a loop tool. This ensures the clay is not too thick, which could cause explosions in the kiln, but keep walls sturdy. -
Attach the cone:
Score the bottom of the hollowed cone and the center of your bowl heavily. Apply slip generously and press the cone firmly into the center of the bowl. -
Reinforce the seam:
Use a small coil or a modeling tool to blend the seam where the cone meets the bowl, ensuring a watertight and strong connection. -
Carve the ridges:
Using a carving tool or the edge of a wooden tool, press deep vertical ridges into the cone. Start from the tip and drag down to the base. These ridges are crucial for extracting juice, so make them well-defined.
Step 3: Glazing and Finishing
-
Bisque fire:
Allow the piece to dry slowly and completely before bisque firing it to cone 04 (or your clay’s specific bisque temperature). -
Apply oxide to rim:
Dip a sponge or brush into iron oxide wash or dark brown underglaze. Wipe this along the rim of the bowl and the spout to create that rustic, darkened definition seen in the image. -
Glaze the interior:
Pour a glossy yellow glaze into the interior, swirling it to coat the cone and bowl evenly. Pour out the excess. I prefer to wipe back a tiny bit of glaze on the sharpest ridges of the cone to let the clay body show through slightly. -
Glaze the exterior:
Dip or brush the exterior with the same yellow glaze. Leave the foot unglazed or wax it to prevent sticking to the kiln shelf. -
Glaze fire:
Fire the piece to maturity (Cone 5/6 or Cone 10, depending on your clay and glaze choice).
Warping Woes
If the bowl warps during drying, weigh down the rim gently with small sandbags or dry it slowly under plastic to keep the circular shape true.
Once fired, you’ll have a durable kitchen tool ready for lemonade duty
Sculptural Candle Holders
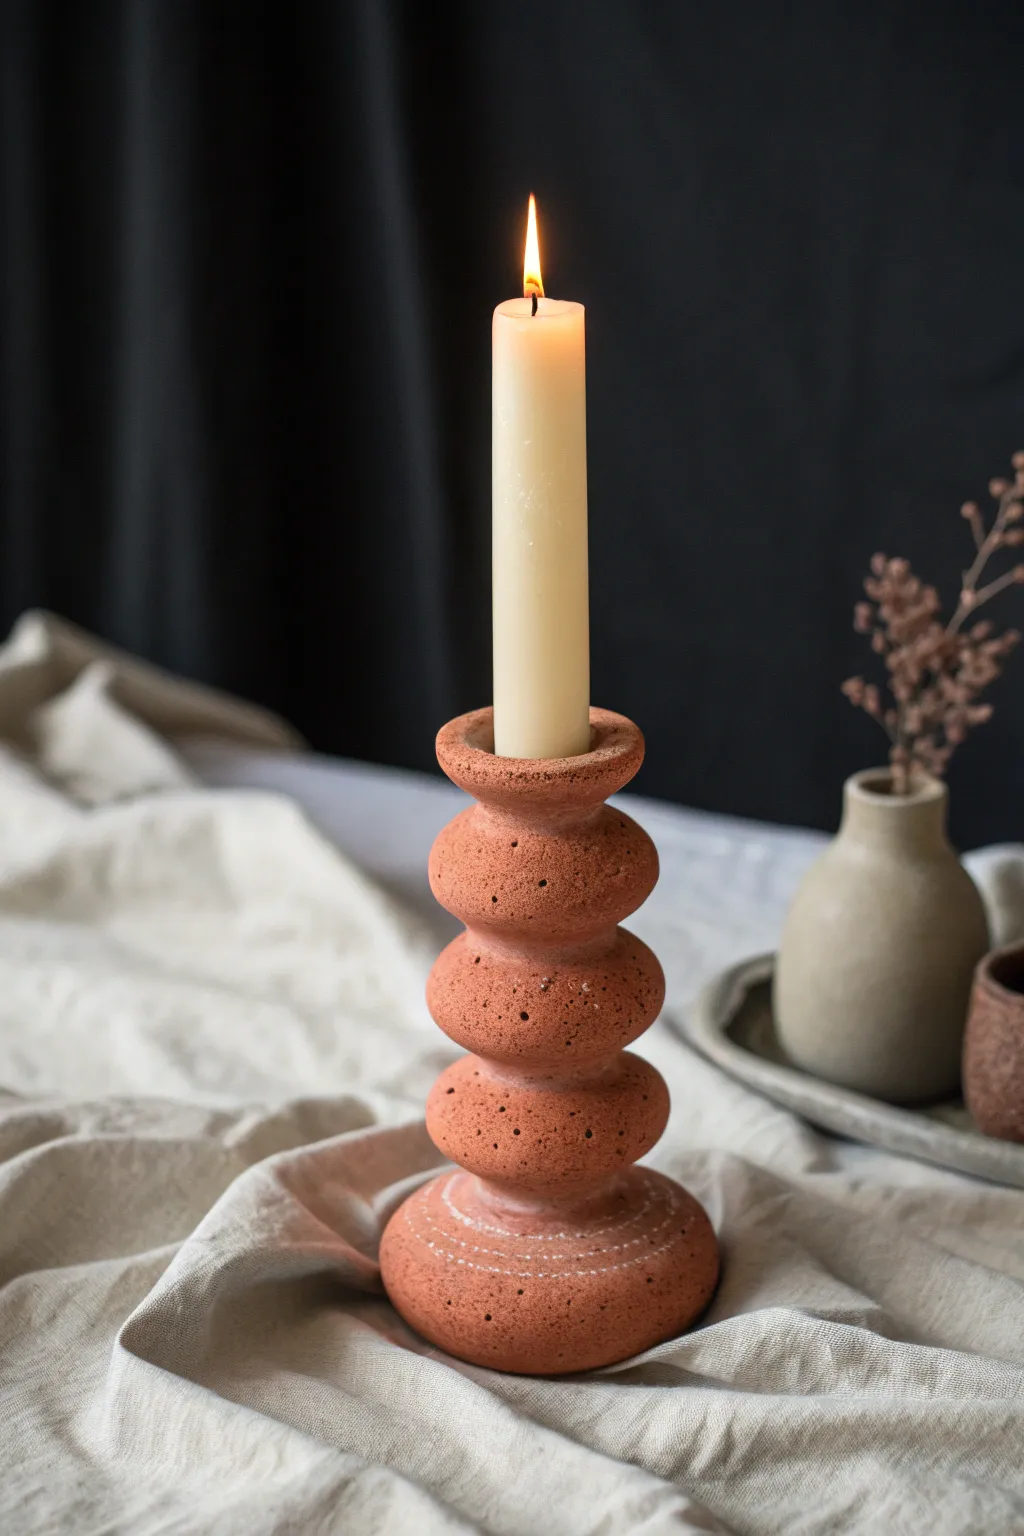
Embrace the raw, earthy beauty of unglazed clay with this structural candle holder, featuring a stacked geometric design that feels both ancient and modern. The distinctive porous texture adds incredible depth and tactility, making it a striking centerpiece even when unlit.
Step-by-Step
Materials
- Red stoneware or terracotta clay (groggy for texture)
- Wooden dowel (slightly wider than your candle)
- Needle tool
- Serrated rib or scoring tool
- Slip (clay mixed with water)
- Sponge
- Bubble wrap (optional for texture)
- Coarse salt or coffee grounds (optional for porosity)
- Wire cutter
- Standard taper candle for testing fit
Step 1: Creating the Base Forms
-
Prepare the Clay:
Begin by wedging your clay thoroughly to remove air bubbles. If you want that exaggerated porous texture seen in the photo, knead in a small handful of coarse salt or coffee grounds now—these will burn out in the kiln, leaving distinctive little pits. -
Form the Base Sphere:
Roll a ball of clay roughly the size of a tangerine for the very bottom section. Flatten the bottom slightly by tapping it on your work surface so it sits stable without wobbling. -
Create the Stacked Segments:
Roll three more spheres, each slightly smaller than the base one. These will form the rising column of the candle holder. Aim for a gradual decrease in size, but keep them substantial enough to support the weight above. -
Form the Top Cup:
Roll a final, slightly smaller sphere for the top. Gently press your thumb into the center to start a hollow, or use your wooden dowel to create a straight vertical hole that goes about halfway through this top sphere.
Step 2: Assembly and Refining
-
Score and Slip the Base:
Take your flattened base sphere and the first stacked segment. Use your serrated rib or needle tool to aggressively score the top of the base and the bottom of the next sphere. Apply a generous dab of slip to both scored areas. -
Connect the Segments:
Press the pieces together firmly with a slight twisting motion to lock the clay particles together. I find this twisting action is crucial for a strong bond that won’t crack later. -
Blend the Seams:
Using a wooden modeling tool or your finger, drag a little clay across the seam to merge the two spheres. However, since we want distinct ‘beads,’ define the crease again afterward with a rounded tool to keep that stacked look sharp. -
Build the Tower:
Repeat the scoring, slipping, and blending process for the remaining spheres, ending with the cup piece on top. Step back frequently to ensure your tower isn’t leaning; it needs to be perfectly vertical for safety. -
Secure the Candle Fit:
Insert your wooden dowel (or candle wrapped in plastic) into the top hole. Gently rotate it to ensure the opening is perfectly round and deep enough (at least 1 inch) to hold a taper candle securely.
Texturing Tip
Gently rolling a real rock or piece of coral over the leather-hard clay creates a far more natural, organic texture than purely manual carving tools.
Step 3: Surface Treatment
-
Initial Texturing:
While the clay is leather hard, use a stiff brush or a scouring pad to tap over the surface. This removes smooth fingerprints and enhances the stony, organic quality. -
Creating the Pores:
To mimic the deep pitting in the reference image, take a needle tool or the tip of a stiff brush handle and randomly poke small, shallow holes all over the surface. Vary the depth and spacing so it doesn’t look like a machine pattern. -
Adding the Lower Detail:
On the widest part of the bottom base sphere, create horizontal bands of texture. You can roll a textured fabric or use a needle tool to scratch subtle horizontal lines around the circumference. -
Refining the Rim:
Smooth the very top rim of the candle holder with a damp sponge or piece of chamois leather. A smooth rim makes inserting the candle easier and provides a clean visual finish. -
Drying:
This piece has varying thicknesses, so slow drying is essential. Cover it loosely with plastic for the first two days, then uncover it to let it dry completely bone dry before firing. -
Firing:
Bisque fire the piece. If you used coffee or salt for texture, ensure good kiln ventilation. You can choose to leave it unglazed for that raw terracotta look, or apply a very dry, matte oxide wash to enhance the textures.
Level Up: Color Wash
After bisque firing, rub a black or dark brown iron oxide wash into the textures and wipe it back with a damp sponge to make the pitting pop.
Once fired, place this sculptural piece on a linen runner to let its earthy warmth set the mood for your next dinner
Closed-Form Rattles
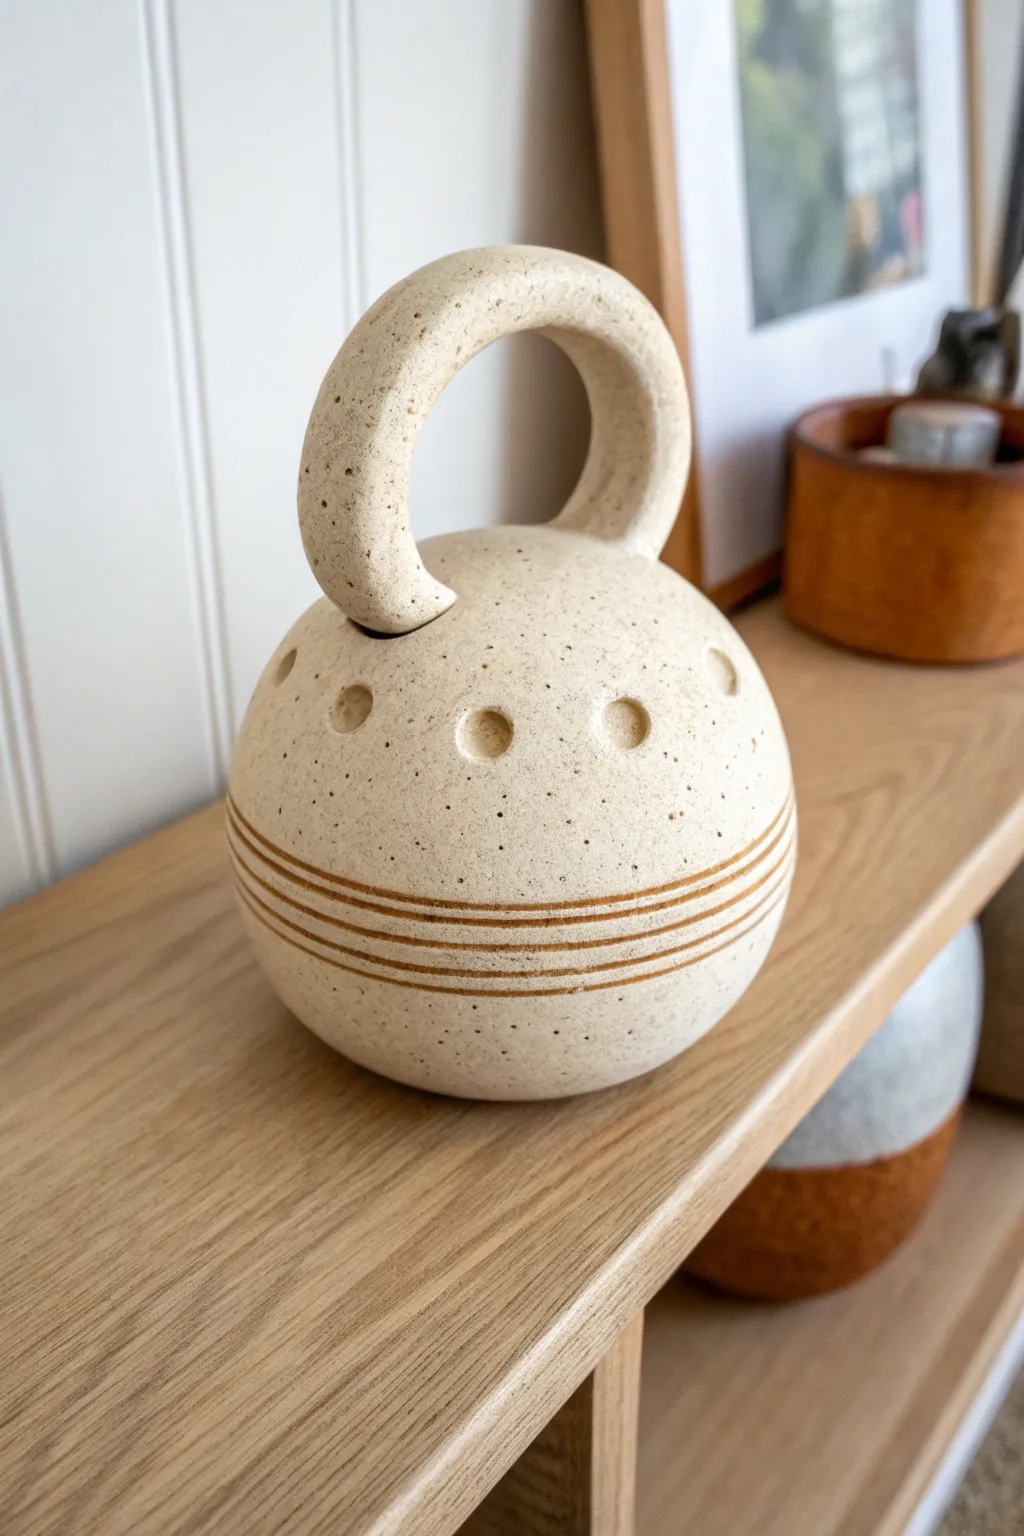
This whimsical, handheld percussion instrument combines the weighted look of a kettlebell with the delicate sound of a rattle. Finished with a creamy, speckled glaze and earthy pinstripes, it serves as both a musical tool and a striking sculptural object for your shelf.
Step-by-Step Tutorial
Materials
- Stoneware clay (speckled or buff)
- Small clay beads or dried beans (for the rattle)
- Newspaper or paper towel
- Pin tool
- Serrated rib or scoring tool
- Slip (clay mixed with water)
- Loop tool (small radius)
- Banding wheel (optional but helpful)
- Underglaze (brown or iron oxide wash)
- Fine liner brush
- Matte or satin cream glaze
Step 1: Forming the Body
-
Make the pinch pots:
Start by dividing a fist-sized ball of clay into two equal halves while wedging to remove air bubbles. Shape each half into a smooth ball, then insert your thumb and pinch rhythmic walls to create two matching hemispheres. -
Refine the rims:
Gently tap the rim of each hemisphere on a flat surface to level them out. You want them to meet flush, so hold them together to check the fit and adjust as needed. -
Insert the rattle mechanism:
Wrap 5-7 small, pre-dried clay beads or balls in a small scrap of newspaper or paper towel. Place this packet inside one of the hemispheres; the paper prevents the beads from sticking to the walls while you work and will burn away in the kiln. -
Join the sphere:
Score the rims of both pinch pots aggressively and apply a generous amount of slip. Press the two halves together firmly, twisting slightly to lock the clay particles together. -
Smooth the seam:
Using a serrated rib, drag clay across the seam to knit the two halves together. Smooth the surface afterward with a soft rubber rib or a damp sponge until the join is invisible and the sphere is perfectly round.
Silent Rattle?
If your rattle doesn’t make noise after firing, the glaze likely dripped inside or the beads fused to the wall. Use much harder ‘high-fire’ clay bits for the internal beads to avoid melting.
Step 2: Adding the Handle
-
Roll the coil:
Roll out a thick coil of clay, roughly the thickness of a large marker. I like to taper the ends slightly so they integrate better with the curved surface of the sphere. -
Shape the arch:
Bend the coil into a tight U-shape. Hold it against the top of your sphere to gauge the proportions; it should look sturdy but not top-heavy. -
Attach the handle:
Mark the attachment points on the sphere. Score both the sphere and the coil ends, apply slip, and press firmly into place. Use a modeling tool to smooth the clay from the handle down onto the body for a seamless transition.
Step 3: Detaling and Surface Decoration
-
Create the dimples:
Using a small loop tool or the rounded end of a paintbrush, gently press into the clay to create circular indentations. Arrange these in a ring around the upper shoulder of the sphere, just below the handle. -
Vent the rattle:
This is crucial: create a tiny, hidden hole (perhaps inside the handle attachment or on the bottom) to allow air to escape during firing so the trapped air doesn’t cause an explosion. -
Bisque fire:
Allow the piece to dry slowly to the bone-dry stage, then bisque fire it according to your clay body’s specifications. -
Apply the pinstripes:
Once bisqued, place the object on a banding wheel. hold a liner brush loaded with brown underglaze or iron oxide steady against the surface while spinning the wheel to create clean, parallel horizontal lines around the middle. -
Highlight the dimples:
Dab a tiny amount of the brown underglaze into the center of the indented circles to create depth, wiping away any excess on the rim. -
Glazing:
Dip or brush the entire piece in a matte or satin cream glaze. Ensure the glaze isn’t too thick over the pinstripes so the brown color can burn through. -
Final wipe:
Wipe the bottom of the piece clean of any glaze with a damp sponge to prevent it sticking to the kiln shelf. -
Glaze fire:
Fire the piece for the final time. The paper inside will burn away, leaving the clay beads free to rattle.
Use Texture
Swap the smooth pinstripes for carved lines. Use a fine carving tool at the leather-hard stage to incise the lines, then fill them with dark oxide after bisque firing for a tactile finish.
Give your new creation a gentle shake and enjoy the deep, earthy sound of your handmade ceramic instrument