
If you’ve got a little clay and a little curiosity, you’ve already got everything you need to make something beautiful. These handmade clay ideas are the kind of projects I love sharing in the studio—simple, satisfying, and totally doable at home.
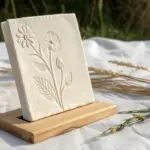
Leaf-Imprint Trinket Dishes
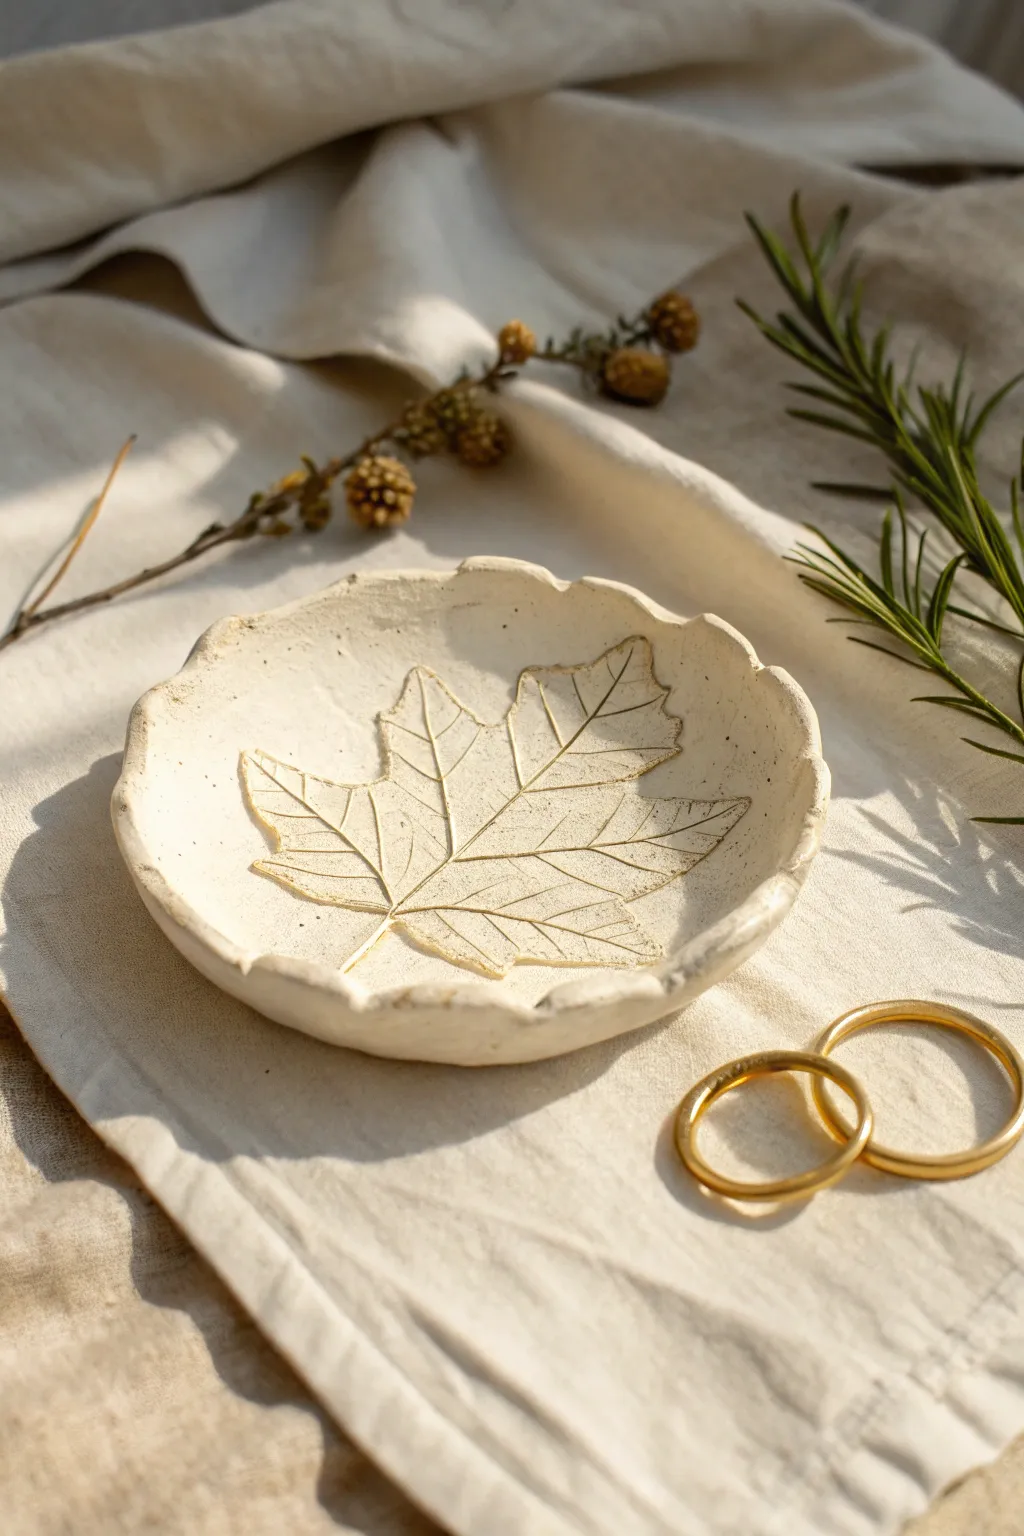
Capture the delicate beauty of nature in clay with this simple yet elegant trinket dish project. The finished piece features raw, organic edges and a stunningly detailed leaf skeleton impression that makes a perfect home for your favorite rings.
Detailed Instructions
Materials
- White creative paper clay or air-dry clay
- Rolling pin
- Fresh leaf with prominent veins (maple or similar)
- Small craft knife or clay needle tool
- Small bowl (to use as a slump mold)
- Plastic wrap
- Fine grit sandpaper
- Acrylic sealer or matte varnish
- Optional: Gold paint or brown antique wax for highlighting
Step 1: Preparation & Impression
-
Condition the Clay:
Start by taking a handful of air-dry clay and kneading it in your hands until it becomes warm and pliable. Eliminating air bubbles now prevents cracks later. -
Roll the Slab:
Place the clay on a smooth surface or canvas mat. Use your rolling pin to flatten it into an even slab, aiming for a thickness of about 1/4 inch. -
Select the Leaf:
Choose a fresh, sturdy leaf. Dried leaves tend to crumble, while fresh ones leave a clean impression. Flip the leaf over so the vein-heavy underside is facing down towards the clay. -
Create the Imprint:
Position the leaf in the center of your clay slab. Gently roll over the leaf with the rolling pin, applying firm, even pressure to push those veins deep into the clay surface. -
Remove the Leaf:
Carefully find the stem of the leaf and slowly peel it away from the clay to reveal the detailed impression left behind.
Step 2: Shaping the Dish
-
Cut the Shape:
Using a needle tool or craft knife, freehand cut a rough circle around the leaf imprint. I prefer to follow the general shape of the leaf but keep it wide enough to form a bowl, leaving the edges wavy and organic rather than perfectly round. -
Soften the Edges:
Dip your finger in a little water and gently run it along the cut rim of the clay to smooth out any sharp or jagged bits left by the knife. -
Prepare the Mold:
Take a small bowl that has a curve you like. Line the inside of this bowl loosely with plastic wrap to prevent sticking. -
Slump the Clay:
Lift your clay slab carefully and place it inside the lined bowl. Let gravity pull it down gently to take the curved shape of the bowl bottom. Press very lightly if needed, but be careful not to smudge your beautiful leaf texture.
Vein Definition Secret
For deeper textures, place a sheet of paper over the leaf before rolling. This prevents the roller from sticking and allows you to press harder.
Step 3: Finishing Touches
-
Slow Drying:
Leave the clay in the bowl to dry. Air-dry clay needs patience; let it sit for at least 24-48 hours in a cool, dry place away from direct sunlight. -
Unmold:
Once the clay feels hard and looks chalky white, lift it out of the bowl and remove the plastic wrap. Check the bottom center to ensure it is fully dry. -
Sanding:
If there are any remaining rough spots on the rim, use fine-grit sandpaper to buff them away gently. Wipe away the dust with a barely damp cloth or dry brush. -
Enhance Detail (Optional):
To make the veins pop like the photo, you can dilute a tiny drop of brown paint or gold pigment with water. Brush it into the grooves and immediately wipe the surface with a paper towel, leaving pigment only in the deep veins. -
Seal the piece:
Protect your dish by applying a coat of matte varnish or acrylic sealer. This is crucial if you plan to use it for jewelry, as it prevents the clay from absorbing oils or moisture.
Cracking Issues?
If small cracks appear while drying, mix a tiny bit of fresh clay with water to make a paste (slip) and smooth it into the cracks with your finger.
Now you have a serene, nature-inspired resting spot for your daily treasures


Ring Cones and Ring Dishes
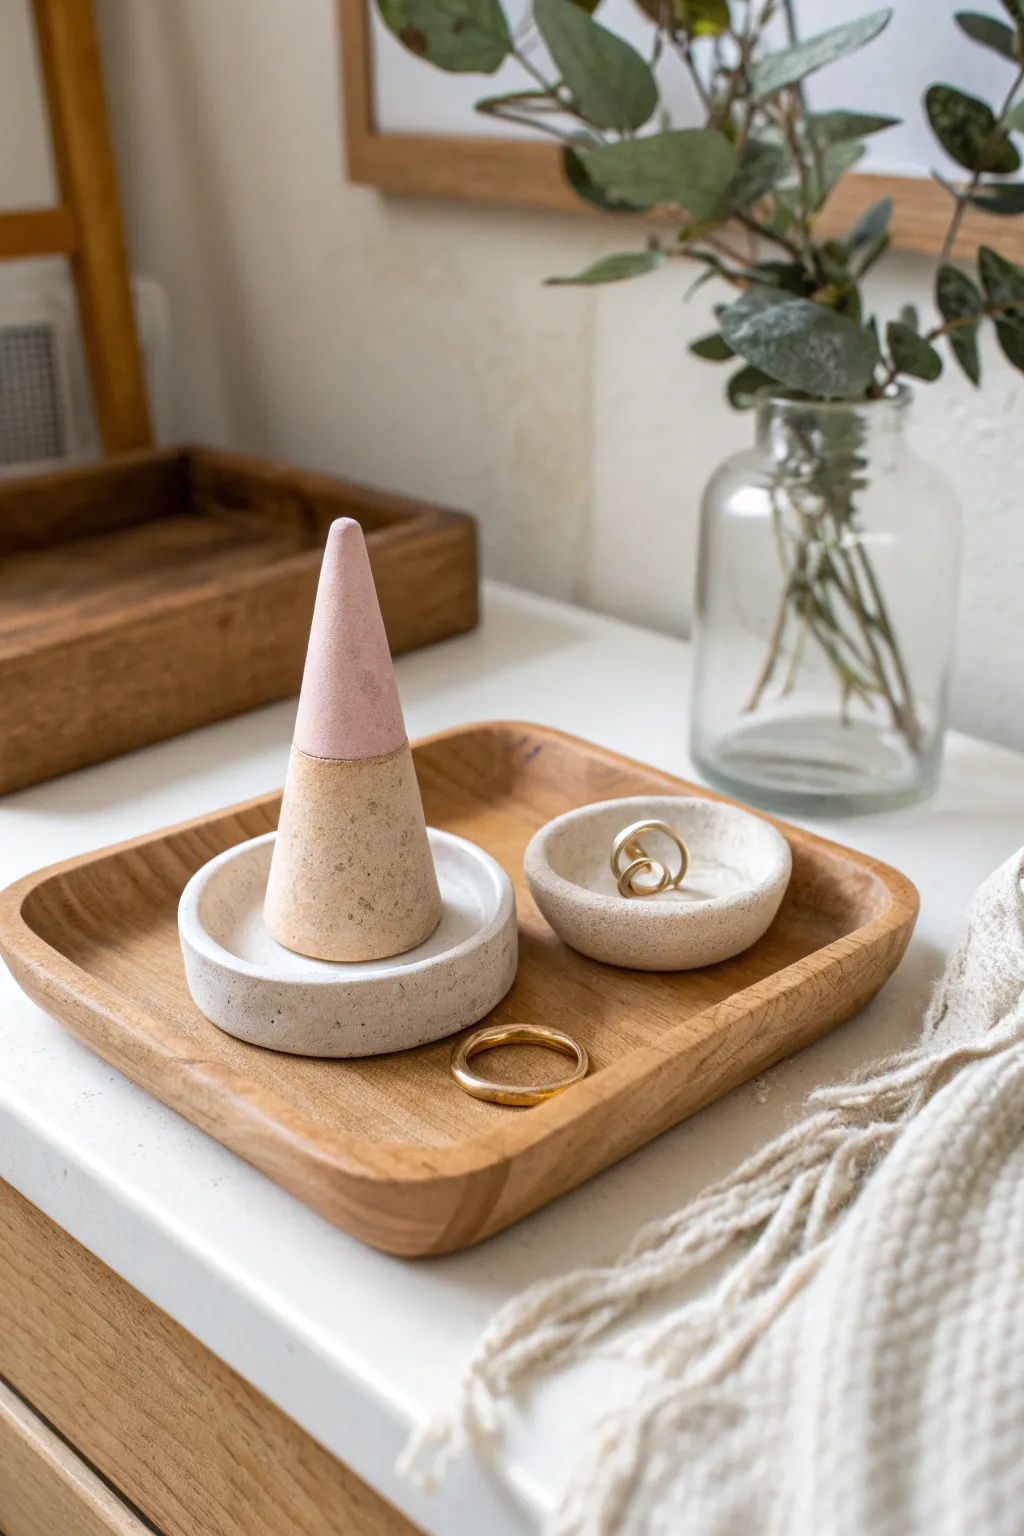
Create a minimalist and functional home for your favorite jewelry with this modern clay ring cone and matching dish set. The speckled, natural finish combined with a soft pink accent brings a calm, earthy aesthetic to any vanity or bedside table.
Step-by-Step Guide
Materials
- Polymer clay (white or beige)
- Speckled clay effects (black pepper or dried herbs)
- Pastel pink acrylic paint
- Rolling pin or clay roller
- Circle cookie cutters (small and medium)
- Sharp blade or clay knife
- Sandpaper (fine grit)
- Matte varnish or sealant
- Small paintbrush
- Oven (for baking polymer clay) or air-dry time
Step 1: Preparing the Speckled Clay
-
Mix your base:
Start by conditioning your white or beige polymer clay until it is soft and pliable. If you want that natural stone look from the start, you can mix in a tiny pinch of black pepper or dried herbs to create a faux-speckle effect directly in the clay body. -
Roll it out:
Roll out a portion of the clay into a smooth slab, roughly 1/4 inch thick. Keep the thickness consistent so your pieces bake evenly.
Step 2: Forming the Ring Cone
-
Shape the cone body:
Take a ball of clay roughly the size of a golf ball and begin rolling it between your palms to form a smooth cylinder. -
Taper the top:
Focus the pressure of your rolling on just one end of the cylinder to create a tapered point. Continue rolling and smoothing until you have a tall, consistent cone shape. -
Flatten the base:
Gently tap the wider bottom of the cone onto your work surface to create a flat, stable base. Check that it stands straight without wobbling. -
First smoothing:
Use your fingers or a smoothing tool to erase any fingerprints from the cone’s surface. A little drop of clay oil or baby oil can help smooth out stubborn ridges.
Use Cornstarch
Dust your work surface and tools with a little cornstarch before rolling. This prevents the clay from sticking without altering its color or texture.
Step 3: Creating the Dishes
-
Cut the bases:
Using your medium circle cutter, punch out a round base from your rolled slab. This will be the base for the cone holder. -
Build the rim:
Roll a long, thin snake of clay. Attach this snake around the perimeter of the circle base to form a low wall or rim. -
Blend the seams:
Use a clay tool or your finger to blend the snake into the base on both the inside and outside, ensuring a seamless transition. The rim should look like part of the dish, not just stuck on top. -
Shape the small dish:
Repeat the process with a slightly smaller circle cutter to create the separate little ring dish shown on the right. -
Final texture check:
Before baking, give everything a once-over. Lightly press a sponge or toothbrush against the surface if you want to add more stone-like texture.
Marbled Effect
Mix a tiny amount of grey or beige into your white clay but stop before it’s fully blended. This creates subtle marble veins for a high-end stone look.
Step 4: Baking and Finishing
-
Bake the pieces:
Place your cone and dishes on a parchment-lined baking sheet. Bake according to your clay package instructions (usually around 275°F or 135°C for 15-30 minutes). -
Cool down:
Let the pieces cool completely in the oven or on a wire rack. Don’t rush this, as warm clay can be brittle. -
Sand for smoothness:
Once cool, use fine-grit sandpaper to smooth out any rough edges on the rims or the tip of the cone. I find dipping the sandpaper in water helps keep the dust down. -
Paint the accent:
Using masking tape, tape off the bottom two-thirds of the cone to create a crisp line. Paint the exposed top tip with your pastel pink acrylic paint. You may need two coats for opaque coverage. -
Remove tape:
Peel off the tape carefully while the paint is still slightly tacky to ensure a sharp, clean edge. -
Seal the deal:
Finish all pieces with a coat of matte varnish to protect the clay and the paint, giving it that finished ceramic look. -
Assemble:
Place the cone inside the larger of the two dishes. You can glue it in place for stability or leave it loose so you can rearrange them later.
Enjoy styling your new minimalist jewelry display on your dresser or nightstand.


Terrazzo-Style Drink Coasters
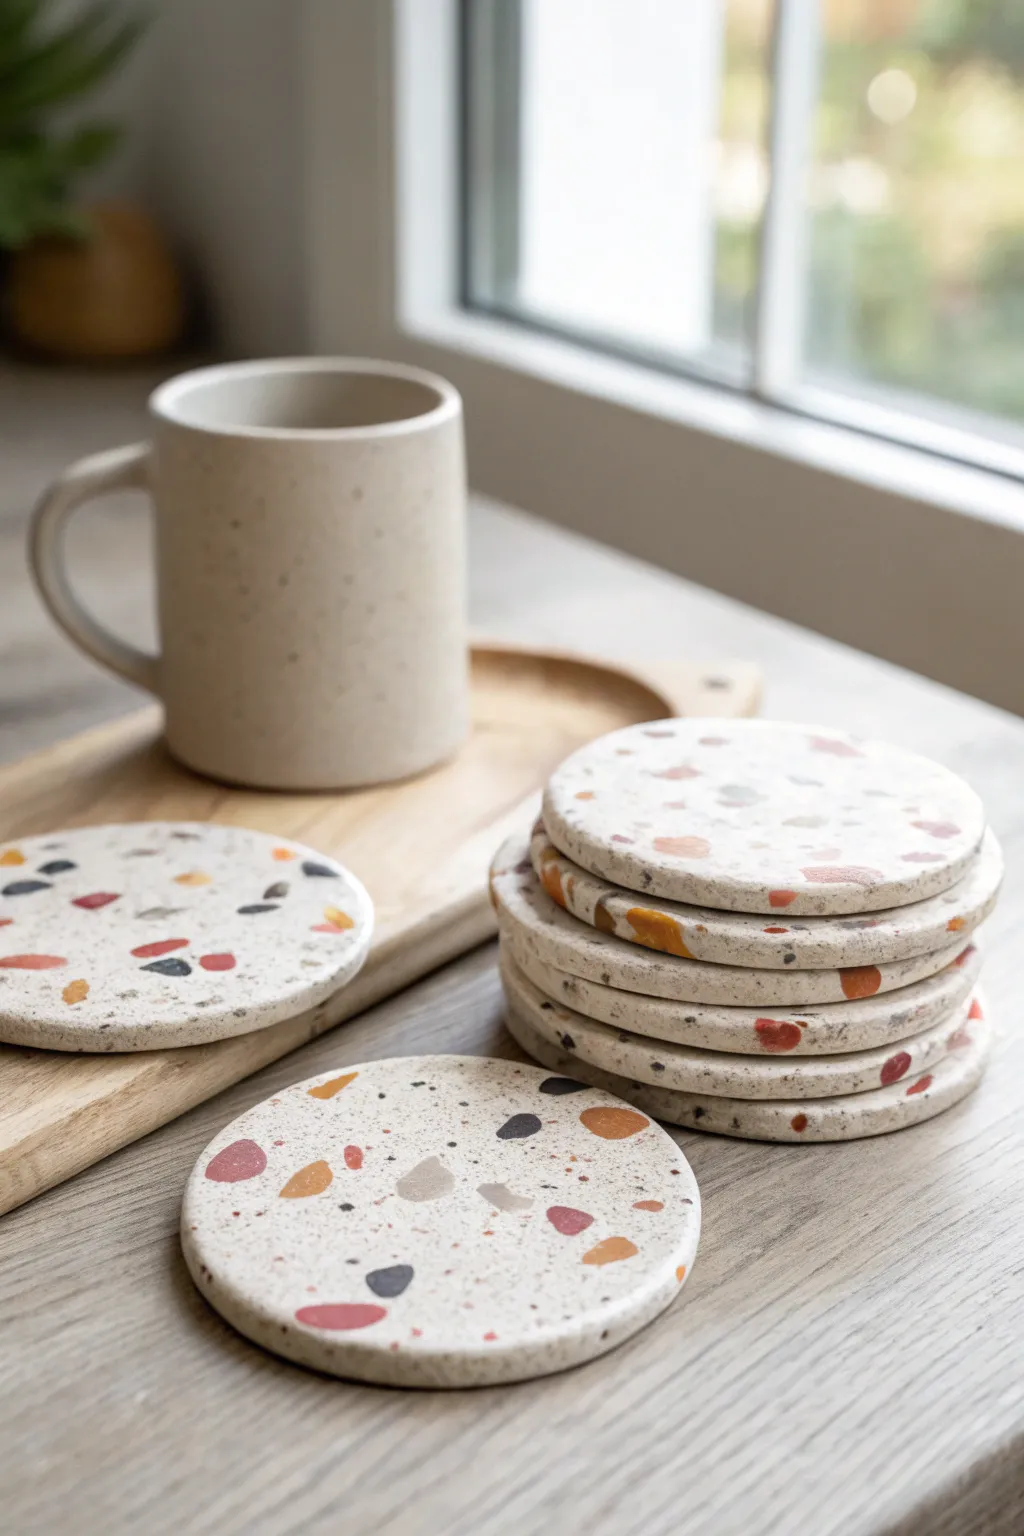
Bring the timeless elegance of terrazzo into your home with these handmade clay coasters featuring colorful chips in an earthy, speckled base. They are surprisingly simple to make and add a sophisticated, modern touch to any coffee table setup.
Step-by-Step Tutorial
Materials
- White or cream polymer clay (base)
- Various colored polymer clays (terracotta, grey, mustard, black)
- Acrylic rolling pin
- Course grit sandpaper (80-100 grit)
- Fine grit sandpaper (400-600 grit)
- Round cookie cutter (approx. 4 inches)
- Parchment paper
- Baking sheet
- Ceramic tile or glass sheet (for smooth rolling)
- Clay slicing blade
- Matte sealant or varnish (optional)
Step 1: Preparing the Terrazzo Chips
-
Color Selection:
Choose a color palette of 4-5 shades for your chips. For the look in the photo, mix muted earth tones like terracotta orange, mustard yellow, dark grey, and charcoal black. -
Flatten Clay:
Condition each colored clay block by kneading it until soft, then roll each color out onto parchment paper into very thin, flat sheets, about 1-2mm thick. -
Bake Sheets:
Place these thin sheets of colored clay onto a baking tray. Bake them for just 5–10 minutes at the temperature recommended on your clay package to harden them slightly. -
Cool and Crumble:
Let the sheets cool completely. Once cool enough to handle, use your hands or a craft knife to chop and break the clay into small, irregular shards. Keep the pieces varied in size for a natural stone look. -
Create Speckle Dust:
To get the tiny speckles seen in the base, take a small amount of black or dark brown unbaked clay and grate it or chop it into almost dust-like particles.
Uneven Surface?
If sanding by hand isn’t revealing the chips enough, the chips were pushed too deep. Sand longer with heavy grit, or use a Dremel tool carefully.
Step 2: Assembling the Coasters
-
Base Clay Prep:
Take a large block of white or cream polymer clay. Condition it thoroughly by kneading until it is warm and pliable. -
Mix in Speckles:
Sprinkle the tiny dark dust particles you created earlier into the white clay and knead until they are evenly distributed, creating a subtle granite effect. -
Roll the Base:
Roll your speckled white clay out on a ceramic tile or smooth surface until it is about 1/4 inch thick. Make sure it’s thick enough to be sturdy. -
Add Chips:
Scatter your pre-baked colored chips generously over the surface of the wet clay slab. Press them gently so they stick. -
Embed the Chips:
Using your acrylic roller, roll over the slab again with firm pressure. You want to force the hard chips down into the soft clay until the surface is flat and flush. -
Roll Smooth:
Continue rolling in different directions to ensure the chips are fully embedded and the clay remains an even thickness. The chips will stretch slightly, creating organic shapes. -
Cutting the Shape:
Position your round cookie cutter over the best-looking section of the slab. Press down firmly to cut your coaster circle. -
Final Cleanup:
Lift away the excess clay. Gently smooth the edges of the circle with your finger to remove any sharp ridges created by the cutter.
Make a Set
Use the leftover clay scraps to create a matching handle for a mug, or roll thin snakes to create coiled trivets for larger pots.
Step 3: Finishing Touches
-
Baking:
Transfer the coasters to a parchment-lined baking sheet. Bake according to the manufacturer’s instructions, usually 30-45 minutes at 275°F (135°C), to ensure they are fully cured and durable. -
Cooling:
Allow the coasters to cool completely on a flat surface. placing a heavy book on top while cooling can ensure they stay perfectly flat. -
Sanding the Surface:
Place your coarse sandpaper on a flat surface and rub the face of the coaster against it in a circular motion. This reveals the crisp shapes of the chips. -
Polishing:
Switch to the fine-grit sandpaper and wet-sand the surface (add a drop of water) until the coaster feels incredibly smooth and velvety to the touch. -
Sealing:
To protect the coasters from coffee stains, apply a thin layer of matte sealant or varnish to the top surface and edges.
Enjoy your durable, stylish coasters that look just like real stone but weigh a fraction of the amount


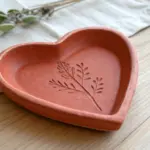
Easy Pinch Pot Snack Bowls
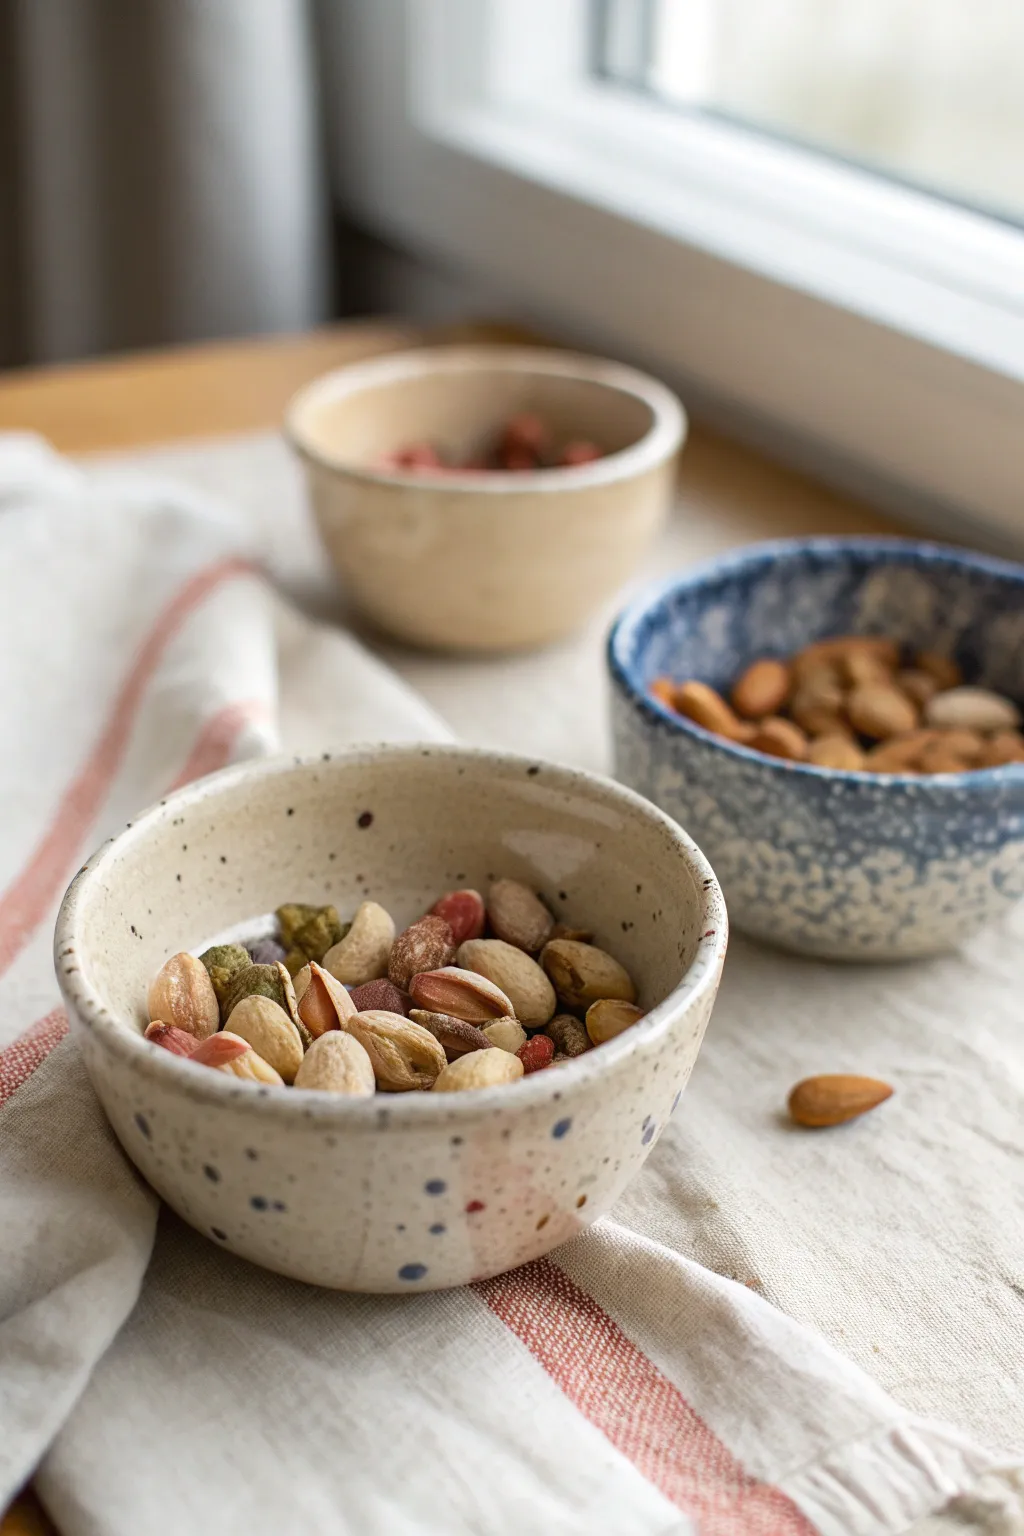
These charming, organic snack bowls embrace the beauty of imperfection with their simple pinch pot construction and earthy, speckled glaze finishes. Perfect for holding almonds or pistachios, their slightly uneven rims and tactile surfaces give them a cozy, handmade feel.
Detailed Instructions
Materials
- Speckled stoneware clay (or white clay with speckles added)
- Pottery sponge
- Pin tool or needle tool
- Wooden sculpting tool
- Rib tool (kidney shaped)
- Clear or transparent matt glaze
- Deep blue glaze (for optional variation)
- Kiln (or access to a firing service)
Step 1: Forming the Base
-
Prepare the Clay:
Cut a fist-sized chunk of speckled stoneware clay. Wedge it thoroughly on a canvas board to remove air bubbles and ensure a uniform consistency. -
Shape a Sphere:
Roll the clay between your palms or on the table until you have a smooth, tight ball. Aim for something slightly larger than a tennis ball for the bowl size shown. -
Open the Pot:
Hold the clay ball in your non-dominant hand. Press your thumb gently but firmly into the center of the ball, stopping about a half-inch from the bottom. -
Pinch the Walls:
With your thumb inside and fingers on the outside, begin to pinch the clay wall. Rotate the ball slightly with each pinch to ensure even thickness all the way around.
Cracks on the rim?
If the rim cracks while pinching, your clay is too dry. Dip your fingers in water (sparingly) and smooth the crack together immediately with a sponge or rib tool.
Step 2: Refining the Shape
-
Open and Lift:
Continue pinching upwards and outwards to widen the bowl. Don’t worry about perfect symmetry here; the charm lies in the organic variances. -
Smooth the Interior:
Use a damp pottery sponge to gently wipe the inside of the bowl. This compresses the clay and removes finger marks, though I sometimes like leaving faint ridges for texture. -
Create the Foot (Optional):
If you want the bowl to sit higher, gently tap the bottom against your work surface to flatten it slightly, or use a wooden tool to carve a small ring foot underneath. -
Define the Rim:
Run a damp chamois or your sponge over the rim. Keep it slightly rounded and soft rather than sharp, maintaining the relaxed, wavering edge seen in the photo. -
Dry to Leather Hard:
Let the bowls sit loosely covered with plastic for a day until they reach a leather-hard state. They should be firm enough to handle without warping.
Step 3: Glazing and Firing
-
Bisque Fire:
Load your bone-dry greenware into the kiln and fire to Cone 04 (or according to your clay’s bisque specifications). Let the kiln cool completely. -
Prep for Glazing:
Once cool, wipe the bisque-fired bowls with a damp sponge to remove any kiln dust. This helps the glaze adhere properly. -
Glaze the Speckled Bowl:
For the front bowl, dip the entire piece into a transparent matte or satin clear glaze. This allows the natural clay speckles to show through prominently. -
Glaze the Blue Bowl:
For the blue variation, dip the bowl into a textured blue glaze. If you want the spotted look, layer a ‘crackle’ or ‘crystalline’ glaze over a solid blue base. -
Add Decorative Details (Optional):
For added interest on the beige bowl, you can flick a stiff brush loaded with blue or iron oxide glaze against the side to create additional larger spots. -
Clean the Bottoms:
Use a sponge or wax resist to ensure the bottom of the bowl is completely free of glaze, or it will fuse to the kiln shelf. -
Glaze Fire:
Fire the pieces a second time to Cone 5 or 6 (mid-range), or whichever temperature your specific glaze and clay body requires.
Mix & Match Sets
Make a cohesive set by using different glazes on the same clay body. Try dipping just the top rim in a contrasting color for a ‘dipped’ modern look.
Once cooled, fill your new handmade bowls with your favorite snacks and enjoy the tactile feel of your work

The Complete Guide to Pottery Troubleshooting
Uncover the most common ceramic mistakes—from cracking clay to failed glazes—and learn how to fix them fast.
Simple Candle Holders With Texture
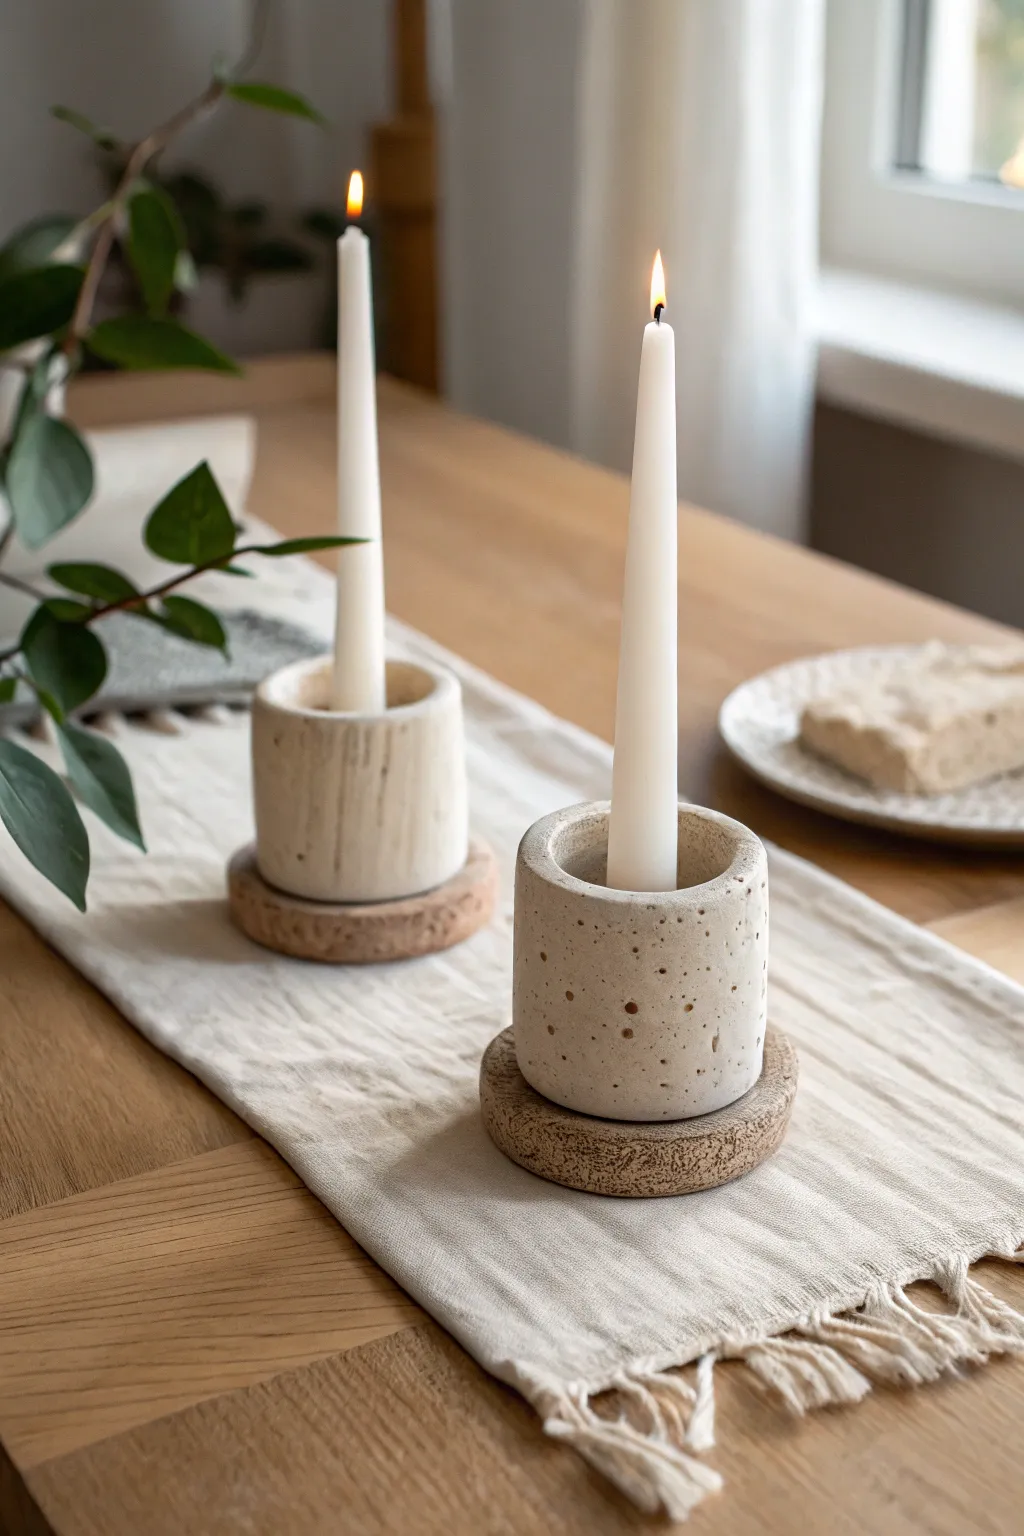
Achieve a high-end, rustic minimalist aesthetic with these simple cylindrical candle holders. The combination of faux-stone texture and warm cork bases creates a cozy Scandinavian vibe perfect for any dining table.
How-To Guide
Materials
- Air-dry clay (white or light grey)
- Coffee grounds (dried)
- Empty toilet paper roll or cardboard tube (for forming)
- Taper candle (to be used as a mold)
- Thick cork sheet or cork coasters
- Rolling pin
- Craft knife or X-Acto knife
- Fine-grit sandpaper
- Strong craft glue (e.g., E6000)
- Matte finish sealant spray
- Ruler
Step 1: Preparing the Textured Clay
-
Condition the Clay:
Begin by taking a substantial chunk of air-dry clay and kneading it in your hands to warm it up and make it pliable. -
Create the Speckle Mix:
Flatten the clay slightly and sprinkle about a teaspoon of dried coffee grounds onto the surface. Fold the clay over itself to trap the grounds inside. -
Knead Thoroughly:
Continue kneading and folding the clay until the coffee grounds are evenly distributed throughout the mass, mimicking the look of speckled stoneware or concrete. -
Roll It Out:
Using a rolling pin, flatten the speckled clay into a long, rectangular slab. Aim for a consistent thickness of about 1/4 inch to ensure stability.
Step 2: Forming the Cylinder
-
Prepare the Form:
Cut your cardboard tube to the desired height of your candle holder. I usually aim for about 2.5 to 3 inches. -
Measure and Cut Clay:
Measure the circumference of your tube and cut a strip of clay from your slab that is slightly longer than that circumference and tall enough to cover the tube. -
Wrap the Tube:
Carefully wrap the clay strip around the cardboard tube. Where the ends meet, score the edges with your knife (make little hash marks) and add a tiny bit of water. -
Seal the Seam:
Press the scored edges together firmly. Use a modeling tool or your finger to smooth the seam completely so it becomes invisible. -
Create the Top Rim:
If the clay extends past the top of the tube, fold it gently inward to create a thick, rounded rim. Smooth this area with a damp finger. -
Make the Candle Well:
Take your actual taper candle and press it gently into the center of the cylinder to create the perfect-sized opening. Wiggle it slightly to ensure fit, then remove it carefully. -
Add Surface Texture:
For that pitted, stone-like look, gently press the blunt end of a paintbrush into the clay surface randomly to create small craters and imperfections.
Natural Texture Hack
Instead of manual poking, roll a crumpled ball of aluminum foil over the wet clay surface. This stamps immediate, realistic stone texture.
Step 3: Base and Finishing
-
Initial Drying:
Let the clay cylinder dry upright for 24-48 hours. Keep it away from direct heat sources to prevent cracking. -
Remove the Form:
Once fully dry, carefully slide or peel the cardboard tube out from the inside. If it’s stuck, you can carefully cut the cardboard away. -
Sand Smooth:
Using fine-grit sandpaper, gently sand any rough edges, particularly around the rim and the bottom, to ensure it sits flat. -
Seal the Clay:
Spray the entire piece with a matte sealant. This protects the clay and keeps the coffee grounds from molding over time. -
Cut the Cork Base:
Place your finished clay cylinder onto the cork sheet and trace a circle slightly larger than the cylinder (about 1/4 inch wider all around). -
Assemble:
Cut out the cork circle. Apply a strong craft glue to the bottom rim of the clay cylinder and press it firmly onto the center of the cork base. -
Final Set:
Allow the glue to cure completely according to the manufacturer’s instructions before placing your candles inside.
Level Up: Ombre Effect
Mix two batches of clay—one plain, one with extra dark coffee grounds. Layer them when rolling out your slab for a subtle marble or stone gradient.
Enjoy the warm glow of your new handcrafted decor on your next cozy evening
Polymer Clay Statement Earrings

Embrace earthy elegance with these three-tiered statement earrings featuring a warm terracotta arch sandwiched between two textured cream circles. The speckled, stone-like finish gives them an organic, modern feel perfect for everyday wear.
How-To Guide
Materials
- Polymer clay in terracotta/burnt orange
- Polymer clay in cream or white
- Small round clay cutter (approx. 1 cm)
- Medium round clay cutter (approx. 3-4 cm)
- Clay roller or pasta machine
- Texture tool (sandpaper, toothbrush, or coarse sponge)
- Tissue blade or craft knife
- Needle tool or toothpick
- 4 gold jump rings (6-8mm)
- 2 gold earring hooks
- Jewelry pliers (flat nose and round nose)
- Ceramic tile or baking sheet with parchment paper
- Oven
Step 1: Clay Preparation
-
Condition the Clay:
Begin by warming the terracotta and cream clays separately in your hands. Knead and roll them until they are soft, pliable, and free of air bubbles. -
Roll Out Slabs:
Use your roller or pasta machine to roll both colors into flat slabs. Aim for a thickness of about 3mm—thick enough to be sturdy but light enough for ears. -
Add Texture:
Before cutting shapes, gently press your chosen texturing tool (like coarse sandpaper or a toothbrush) onto the surface of both clay slabs. This creates that lovely organic, stone-like finish visible in the photo.
Step 2: Cutting Components
-
Cut the Top Circles:
Using the small round cutter, punch out two circles from the textured cream clay. These will be the top studs that connect to the earring hook. -
Cut the Bottom Circles:
Punch out two more identical small circles from the cream clay for the dangling bottom detail. -
Create the Terracotta Arches:
Take your medium round cutter and punch out two full circles from the terracotta clay. -
Bisect the Circles:
Using your tissue blade, carefully slice each terracotta circle exactly in half. You will need two of these semi-circles for the project; set the other halves aside for later use. -
Refine Edges:
Gently smooth the cut edges of all pieces with your fingertip to remove any sharp ridges or loose clay bits.
Fixing Fingerprints
If you notice fingerprints before baking, lightly brush the raw clay with a little baby oil or cornstarch to smooth them out without losing your texture.
Step 3: Piercing & Baking
-
Pierce Top Holes:
Use a needle tool to poke a hole near the top edge of the two upper cream circles and near the top straight edge of the terracotta arches. -
Pierce Connection Holes:
Poke a hole at the bottom of the upper cream circles, another hole centered in the rounded bottom of the terracotta arches, and a single hole at the top of the lower cream circles. -
Check Hole Size:
Ensure your holes are large enough for your jump rings to move freely. I find giving the needle a little wiggle helps widen them slightly. -
Bake:
Arrange pieces on a ceramic tile or baking sheet. Bake according to your brand of clay’s specific instructions (usually 275°F/130°C for 15-30 minutes per 1/4 inch thickness). -
Cool Down:
Allow the pieces to cool completely inside the oven or on the counter before handling to prevent snapping while the clay is still warm.
Speckled Stone Look
Mix a tiny pinch of black pepper or black glitter into the clay during the conditioning phase for a realistic granite or speckled pottery effect.
Step 4: Assembly
-
Connect Colors:
Open a gold jump ring using two pairs of pliers. Thread it through the bottom hole of the top cream circle and the top hole of the terracotta arch, then close it securely. -
Attach the Dangle:
Use a second jump ring to connect the bottom of the terracotta arch to the final cream circle. -
Add Hardware:
Finally, open the loop on your earring hook and attach it to the top hole of the upper cream circle. Repeat all assembly steps for the second earring.
Now you have a stunning pair of architectural earrings ready to complement any outfit with their warm tones


What Really Happens Inside the Kiln
Learn how time and temperature work together inside the kiln to transform clay into durable ceramic.
Initial and Icon Fridge Magnets
Create a personalized touch for your kitchen with these thick, glossy fridge magnets that mimic the look of fired ceramic. This project features a bold initial letter alongside charming icon shapes like hearts and donuts, all finished with a high-shine glaze for a professional feel.
How-To Guide
Materials
- Air-dry clay (white or terracotta)
- Rolling pin
- Parchment paper or craft mat
- Alphabet cookie cutters (large)
- Small shape cutters (hearts, circles)
- Sandpaper (fine grit)
- Acrylic paints (dark blue, warm orange, brown, yellow)
- Round paintbrushes (small and medium)
- High-gloss varnish or dimensional glaze (like Mod Podge Dimensional Magic or resin)
- Strong craft magnets
- Super glue or E6000
- Toothpick or sculpting tool
Step 1: Shaping the Clay
-
Condition and roll:
Begin by taking a handful of air-dry clay and kneading it until it is soft and pliable. Place it on a sheet of parchment paper and use your rolling pin to flatten it. Aim for a substantial thickness, about 1/4 inch to 3/8 inch, to give the magnets that chunky ceramic look. -
Cut the Initial:
Press a large alphabet cutter firmly into the clay to create your main letter. Wiggle it slightly to ensure a clean cut all the way through before lifting the cutter away. If the clay sticks, gently push it out from the back. -
Smooth the Edges:
Dip your finger in a little water and run it along the cut edges of the letter. This helps round off the sharpness and mimics the soft edges of kiln-fired pottery. -
Create Icon Shapes:
Roll out more clay if needed and use your smaller cutters to make accompanying shapes. For the donut shape seen in the photo, cut a circle, then use a smaller cutter or a straw to remove the center. -
Add Texture Details:
For the hearts or decorative circles, use a toothpick or a small sculpting tool to lightly press patterns into the clay surface. You can create wavy lines or small dots now, which will guide your painting later. -
Dry Completely:
Transfer your clay pieces to a clean, flat surface to dry. This usually takes 24-48 hours depending on humidity. Flip them over halfway through the drying process to prevent warping.
Step 2: Painting and Glazing
-
Sand Imperfections:
Once fully dry, the clay will turn white (or light gray). Use fine-grit sandpaper to gently smooth any rough spots on the sides or surface. Wipe away the dust with a slightly damp cloth. -
Base Color for Letter:
Paint the entire surface and sides of your letter magnet with a deep, rich blue acrylic paint. You may need two coats to get an opaque, solid finish. Let the first coat dry completely before applying the second. -
Create the Speckled Effect:
To achieve the stone-like texture visible on the blue ‘A’, dip an old toothbrush or stiff brush into white or light grey paint. Run your thumb over the bristles to flick tiny specks of paint onto the blue surface. Keep it subtle. -
Paint the Icons:
Paint your heart shapes in a warm mustard yellow or terracotta orange. For the donut shape, mix a soft brown. Use a very fine brush to trace over your indented patterns with a contrasting color, like purple waves on a yellow heart. -
Leave Edges Raw (Optional):
For a rustic touch, you can leave the very back edge unpainted or lightly distress the painted edges with sandpaper to reveal the clay color underneath. -
Apply the Glaze:
This is the most critical step for the ceramic look. Pour a dimensional glaze or high-gloss varnish over the top of the dry paint. I like to use a toothpick to guide the liquid to the very edges without letting it drip over the side. This creates a domed, glass-like finish. -
Cure the Glaze:
Allow the glaze to set perfectly flat in a dust-free area. Dimensional glazes can take several hours or overnight to cure fully hard.
Smooth Surface Secret
Before drying, gently rub the clay surface with a tiny bit of baby oil on your finger. This eliminates fingerprints and achieves a porcelain-smooth base.
Step 3: Assembly
-
Select Magnets:
Choose strong magnets suitable for the weight of your clay. Ceramic/ferrite magnets are usually stronger than the flexible strip kind. -
Attach Backing:
Apply a dab of strong adhesive like E6000 or super glue to the back of the clay piece. Press the magnet firmly into the glue. -
Final Set:
Let the glue cure completely according to the package instructions before placing your new art on the fridge.
Faux Enamel Look
Mix a tiny drop of your acrylic paint directly into the clear dimensional glaze for a semi-translucent, jelly-like enamel finish on the smaller icons.
Arrange your glossy collection on the fridge to hold up your favorite photos or grocery lists
Embossed Ornaments and Garland Shapes
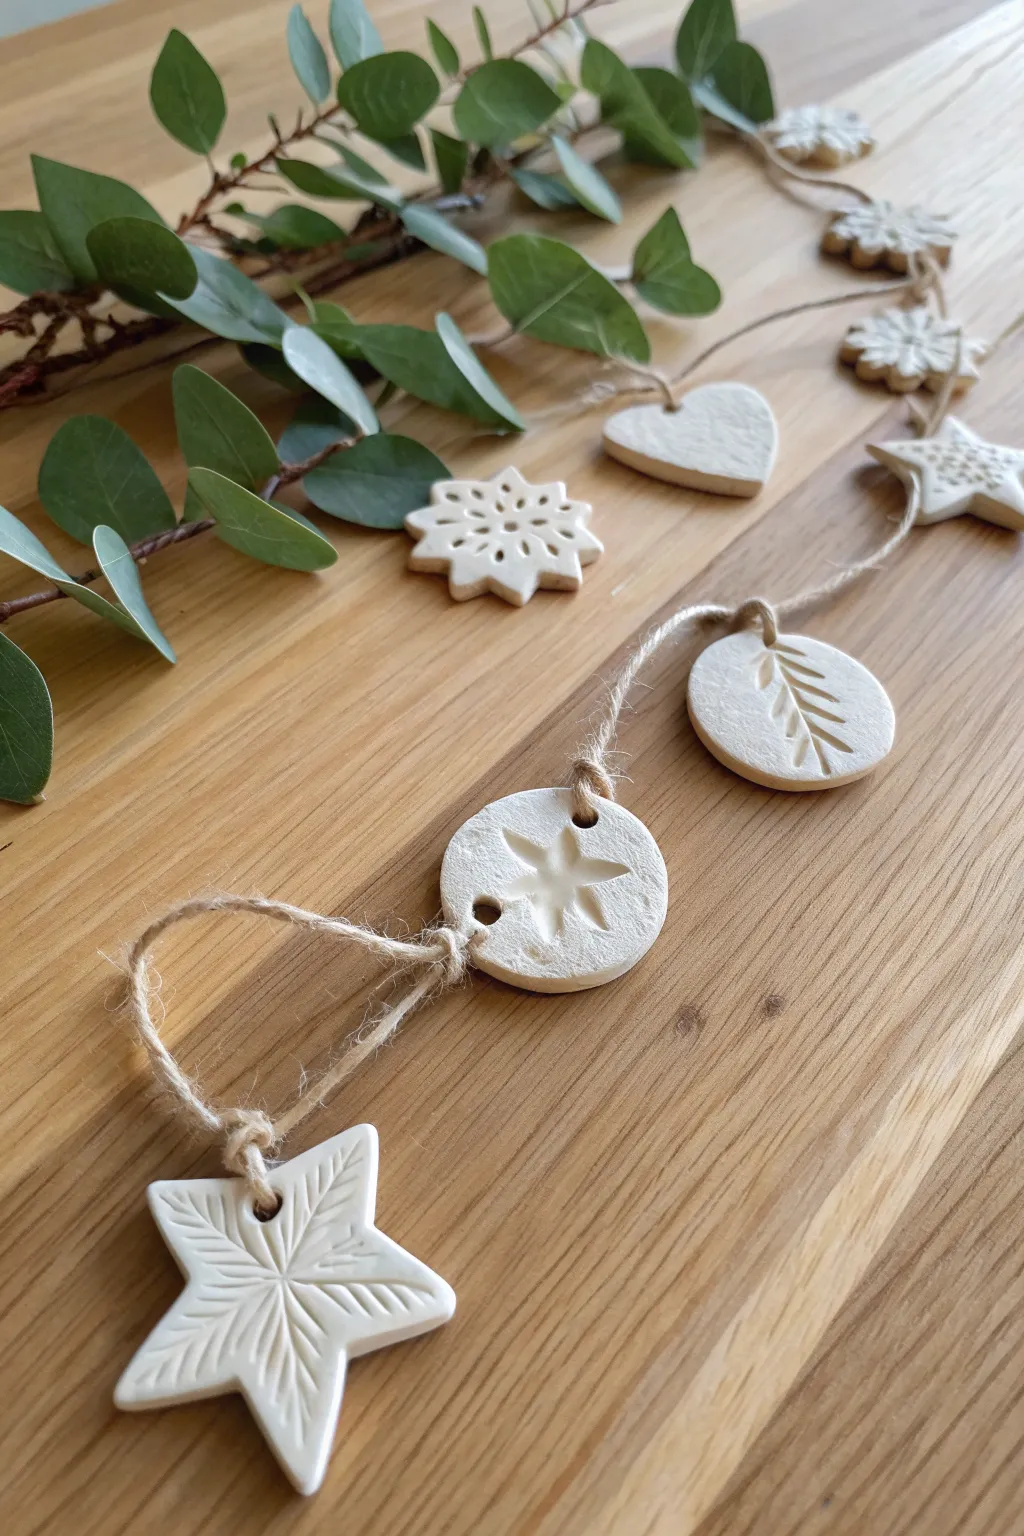
Bring a touch of minimalist Scandinavian charm to your home with this delicate clay garland. Featuring embossed stars, hearts, and botanical motifs, these air-dry clay ornaments offer a soft, natural aesthetic that looks beautiful draped over a mantel or doorway.
Step-by-Step Guide
Materials
- White or light gray air-dry clay (or polymer clay)
- Rolling pin
- Parchment paper or canvas mat
- Cookie cutters (stars, hearts, circles, snowflake shapes)
- Embossing tools (stamps, sprigs of pine/rosemary, lace, or textured rolling pins)
- Drinking straw or small circular cutter (for stringing holes)
- Fine-grit sandpaper
- Natural jute twine or hemp cord
- Scissors
Step 1: Shaping the Clay
-
Prepare your workspace:
Lay down your parchment paper or canvas mat on a flat surface to prevent sticking. This ensures a smooth release later. -
Condition the clay:
Take a handful of air-dry clay and knead it in your hands until it becomes pliable and warm. If it feels too sticky, you can dust your hands lightly with cornstarch. -
Roll out the slab:
Using your rolling pin, flatten the clay to an even thickness of about 1/4 inch (approx. 5-6mm). Try to keep it uniform so all pieces dry at the same rate and hang evenly. -
Cut the shapes:
Press your chosen cookie cutters firmly into the clay slab. Create a variety of shapes like the five-pointed stars, rounded hearts, and simple circles seen in the project. -
Clean edges:
Gently lift the shapes away from the excess clay. Use a finger dipped in a tiny bit of water to smooth down any rough or jagged edges left by the cutter.
Step 2: Adding Texture and Detail
-
Create the hanging holes:
Before the clay starts to dry, use a drinking straw or a small circular tool to punch a hole near the top of each ornament. Make sure the hole isn’t too close to the edge to prevent cracking. -
Emboss center motifs:
For the circular ornaments, press a smaller star cutter gently into the center—don’t cut all the way through, just enough to leave a growing impression. -
Add botanical details:
To recreate the leaf pattern, lightly press a real leaf or a carving tool into the clay surface. If using a tool, scratch shallow, branching lines to mimic a pine or fern frond. -
Texture the snowflakes:
For the snowflake shapes, use the end of a paintbrush or a toothpick to poke small decorative holes or indentations in a radial pattern. -
Detail the stars:
Using a modeling tool or the dull side of a knife, gently score lines radiating from the center of the stars to the tips to add dimension.
Use Lace for Texture
For intricate backgrounds, roll a piece of vintage lace over the clay slab before cutting your shapes. It leaves a stunning, detailed imprint.
Step 3: Drying and Assembly
-
Begin drying:
Place all your finished shapes on a clean sheet of parchment paper in a cool, dry place. Let them sit undisturbed for 24 hours. -
Flip for evenness:
After the first day, gently flip the ornaments over. This helps them dry evenly on both sides and prevents curling. -
Sand for perfection:
Once fully cured (usually 24-48 hours depending on humidity), take your fine-grit sandpaper and lightly buff the edges and surfaces to remove any remaining imperfections or fingerprints. -
Prepare the twine:
Cut a long length of jute twine, measuring the space where you intend to hang the garland and adding at least 12 inches for slack and knots. -
Thread the first piece:
Feed the twine through the hole of your first ornament. I find it easiest to wrap a small piece of tape around the twine end to stop it from fraying while threading. -
Secure with knots:
Tie a simple overhand knot around the top of the ornament hole to secure it in place, or knot the twine on either side of the ornament if you want them fixed at specific intervals. -
Complete the strand:
Continue adding ornaments, spacing them out evenly (about 3-4 inches apart looks nice). Vary the shapes as you go—alternating between stars, hearts, and circles for visual interest.
Scent Infusion
Add drops of essential oil (like cinnamon or pine) to the clay while kneading. Your garland will release a subtle, festive scent as it hangs.
Hang your new rustic garland in a cozy spot and enjoy the handmade warmth it brings to your space

TRACK YOUR CERAMIC JOURNEY
Capture glaze tests, firing details, and creative progress—all in one simple printable. Make your projects easier to repeat and improve.
Boho Clay Wall Hanging Tiles
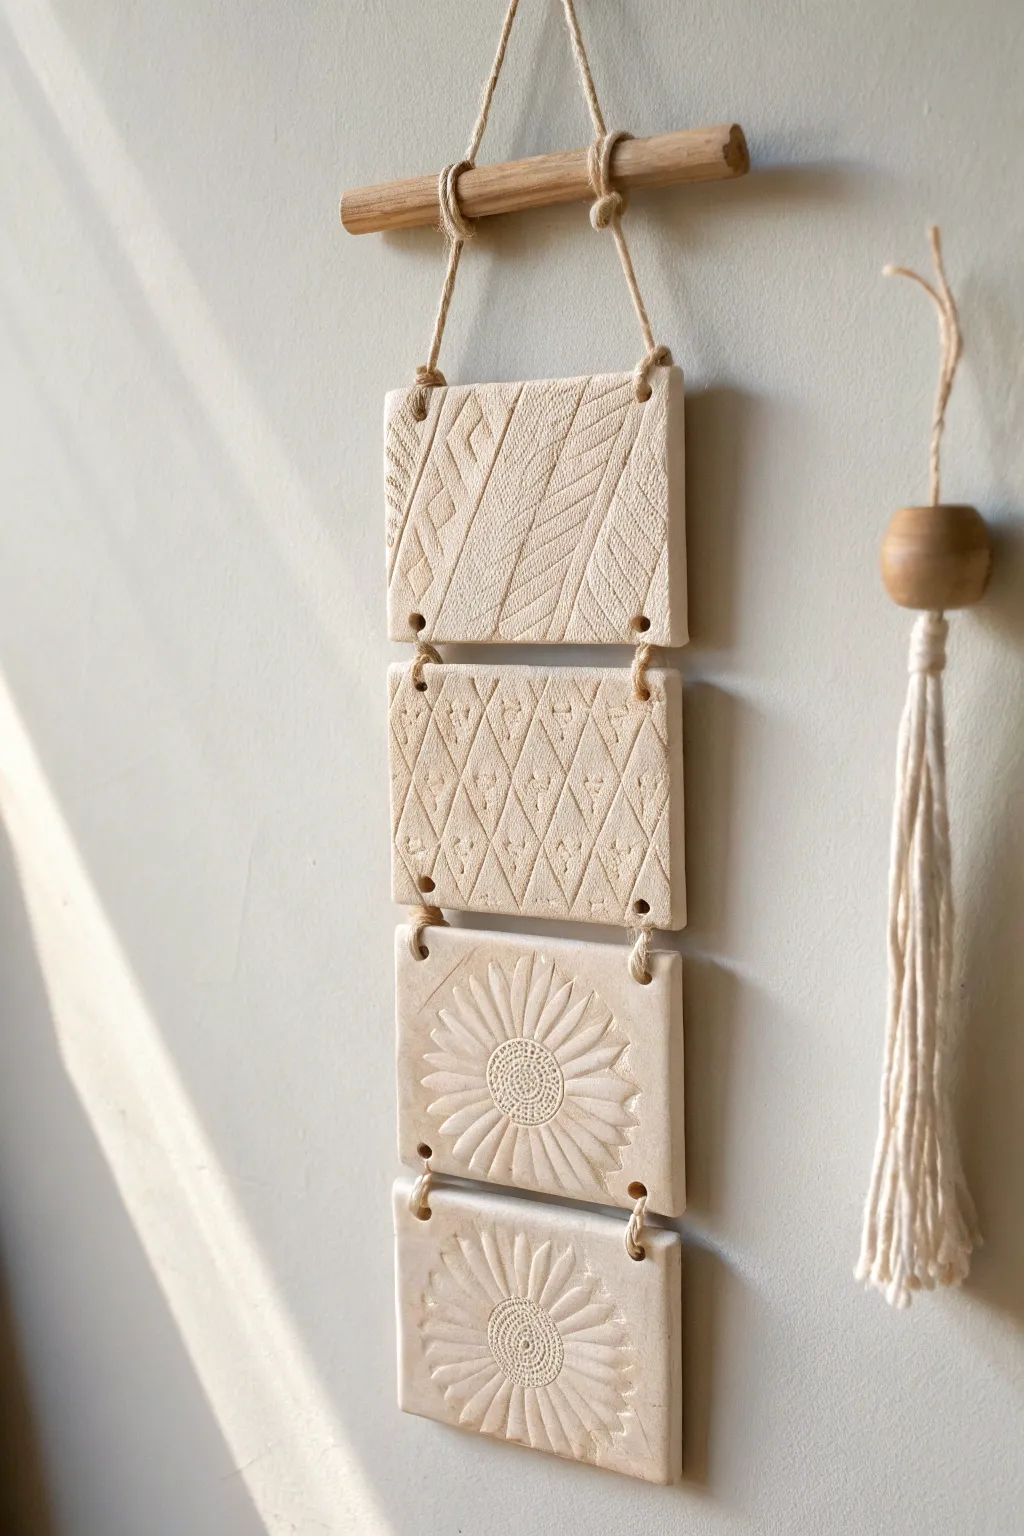
Bring natural, earthy vibes into your home with this four-tier clay wall hanging. Featuring varied imprinted textures and a simple wooden dowel suspension, this project balances rustic warmth with modern design.
Detailed Instructions
Materials
- White air-dry clay or polymer clay (oven-bake)
- Rolling pin
- Ruler
- Craft knife or clay slicer
- Texture tools (e.g., patterned rollers, lace, stamps, or real leaves)
- Wooden dowel (approx. 6 inches long)
- Natural jute twine or hemp cord
- Straw or small circular cutter (for holes)
- Fine-grit sandpaper
- Bowl of water (for smoothing)
- Clear matte varnish (optional)
Step 1: Preparing the Clay Tiles
-
Condition the clay:
Start by kneading your clay until it is soft, pliable, and free of air bubbles. If you are using air-dry clay, keep your hands slightly damp to prevent cracking. -
Roll out the slab:
Roll the clay out on a smooth surface to an even thickness of about 1/4 inch (6mm). Using depth guides or two stacks of playing cards on either side of your rolling pin ensures a perfectly uniform slab. -
Measure the rectangles:
Using a ruler, lightly mark out four identical rectangles on your clay slab. A size of 3 inches wide by 2.5 inches tall works well for a balanced look, but you can adjust based on preference. -
Cut the shapes:
Use a sharp craft knife or clay slicer to cut along your marked lines. Keep the edges as straight and clean as possible. -
Smooth the edges:
Dip your finger in a little water and gently run it along the cut edges of each rectangle to soften any sharpness or potential burrs.
Step 2: Adding Texture & Details
-
Imprint the top tile pattern:
For the first tile, use a tool or stamp to create diagonal linear patterns. Press firmly enough to leave a clear impression but not so hard that you distort the rectangle’s shape. -
Create the geometric design:
For the second tile down, press a geometric diamond or trellis pattern into the surface. A patterned rolling pin creates this texture instantly, or you can hand-carve it with a needle tool. -
Press the floral motifs:
For the bottom two tiles, center a large sunflower or daisy stamp. Press it deeply into the clay so the petals and seed pod center are well-defined. -
Punch assembly holes:
Use a straw to punch four holes in the top three tiles: two at the top corners and two at the bottom corners. For the very bottom tile, only punch two holes at the top corners. -
Refine the holes:
Make sure the holes are clean and large enough for your twine to pass through easily once the clay shrinks slightly during drying.
Warping Worries?
If air-dry tiles curl while drying, place a heavy book on top of them once they are partially dry (leather hard) to press them flat again.
Step 3: Finishing and Assembly
-
Dry or bake:
If using polymer clay, bake according to package instructions. For air-dry clay, lay the tiles flat on a wire rack to dry for 24-48 hours, flipping them occasionally to prevent warping. -
Sand the imperfections:
Once fully cured or dry, use fine-grit sandpaper to gently smooth out any rough edges or uneven spots on the surface. -
Prepare the hanging mechanism:
Take your wooden dowel and tie a length of twine to each end to create the main hanging loop. Secure the knots firmly. -
Connect the first tile:
Cut two equal lengths of twine. Loop them around the wooden dowel and thread them down through the top two holes of the first (top) tile. Tie knots underneath the holes to secure the tile in place. -
Chain the remaining tiles:
Cut short lengths of twine to connect the bottom holes of the first tile to the top holes of the second tile. Tie knots on the backside to keep the spacing uniform. -
Complete the vertical strand:
Repeat the connecting process for the third and fourth tiles, ensuring the tiles hang straight and have a small, even gap between them. -
Seal the piece:
Optionally, brush a thin coat of clear matte varnish over the tiles to protect the texture and make dusting easier in the future.
Texture Pro Tip
To prevent stamps from sticking to sticky clay, lightly dust the clay surface with cornstarch or use a spritz of water as a release agent.
Hang your new textured artwork in a spot that gets good natural light to really highlight those beautiful imprinted details
Stackable Desk Organizer Trays
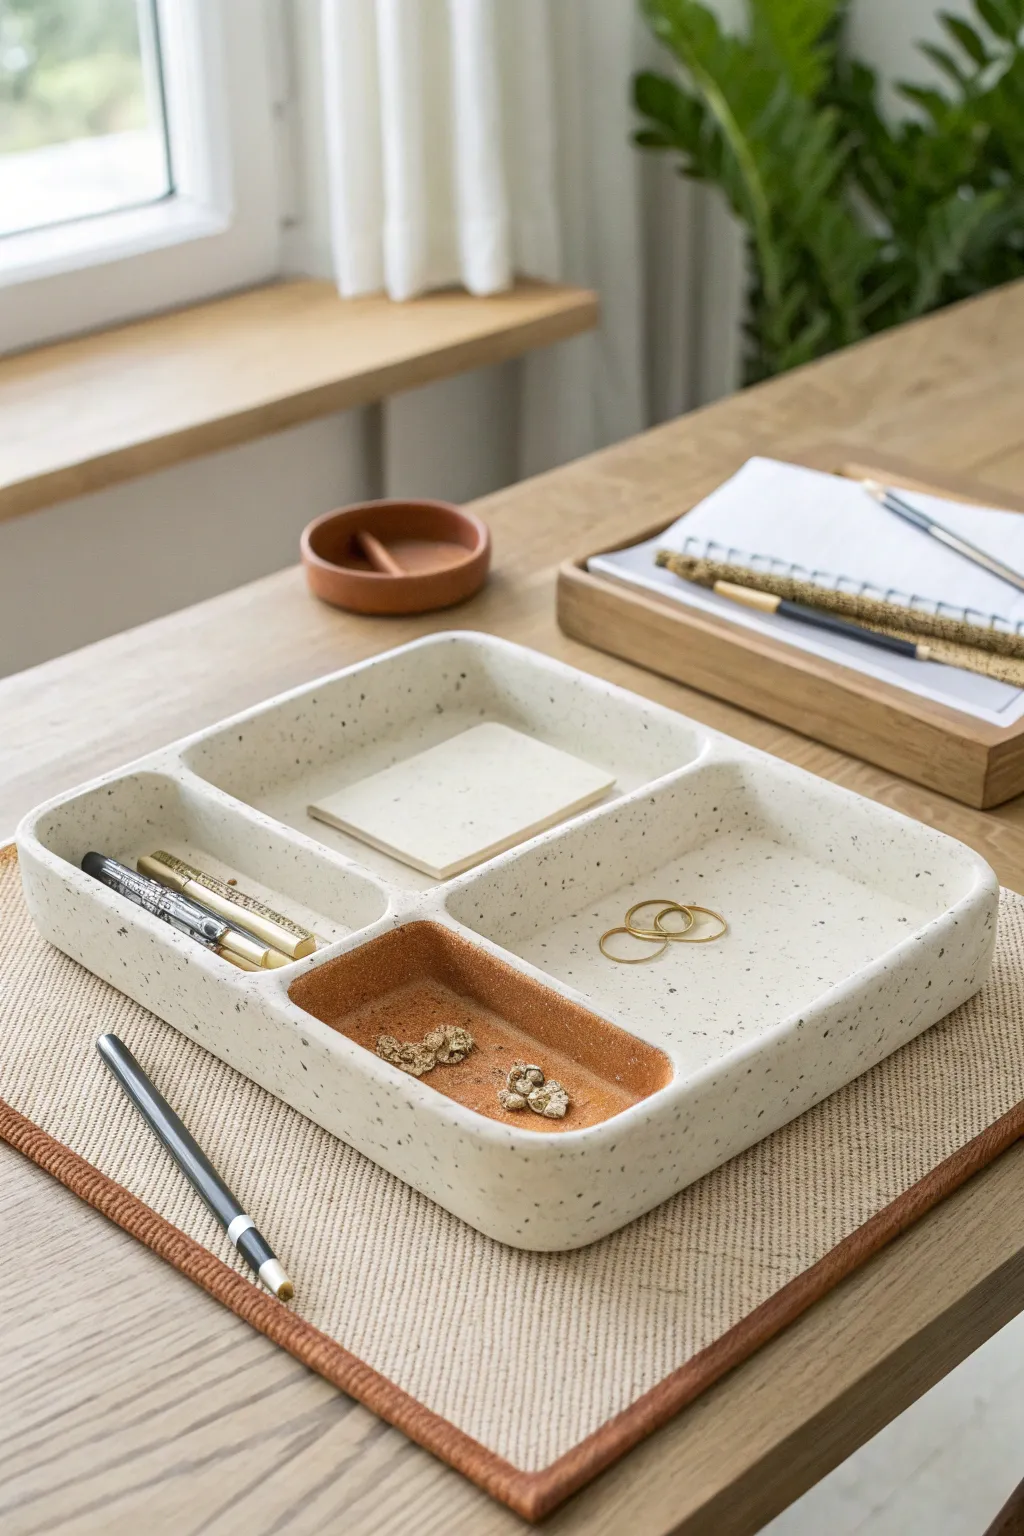
This minimal, modern desk organizer features a chic speckled finish and a dedicated terracotta-toned accent section. Perfect for keeping pens, clips, and notes tidy, it combines sleek lines with a rustic, handmade texture that elevates any workspace.
Step-by-Step
Materials
- White air-dry clay or polymer clay (approx. 1 kg)
- Terracotta-colored air-dry clay or polymer clay (small amount)
- Dried coffee grounds or black pepper (for speckling)
- Rolling pin
- Ruler
- Craft knife or clay slicer
- Clay slip (water mixed with clay)
- Smooth work surface or clay mat
- Sandpaper (fine grit)
- Matte spray sealant or matte varnish
Step 1: Preparing the Speckled Clay
-
Condition the base:
Begin by kneading your white clay until it is soft, pliable, and free of cracks. Warm clay is much easier to work with, especially for a larger slab like this. -
Add texture:
Flatten the white clay slightly and sprinkle a generous pinch of dried coffee grounds or coarse black pepper over it. These will create the faux-stone speckled look. -
Incorporate the speckles:
Fold the clay over the grounds and knead thoroughly until the speckles are evenly distributed throughout the entire block. Add more if you want a denser pattern.
Step 2: Shaping the Base and Walls
-
Roll the slab:
Roll out the prepared speckled clay to an even thickness of about 1/4 inch (6mm). Aim for a large rectangular shape. -
Cut the base:
Use a ruler and craft knife to cut a precise large rectangle for the base. I usually recommend about 8×10 inches to fit standard sticky notes and pens comfortably. Save the scraps. -
Cut outer walls:
From the remaining rolled clay, cut four long strips for the outer walls. These should be the same thickness as the base and about 1.5 inches tall. -
Attach outer walls:
Score the edges of the base and the bottom of the wall strips with a needle tool. Apply a little clay slip or water to the scored areas. -
Secure and smooth:
Press the walls firmly onto the base edges. Use your thumb or a modeling tool to blend the seams on both the inside and outside until the join is invisible.
Pro Tip: Clean Cuts
Let the rolled slab sit for 15 minutes before cutting. Slightly firmer clay drags less under the knife, giving you crisper, straighter edges.
Step 3: Creating Internal Compartments
-
Measure the dividers:
Decide on your layout. The example uses a central cross shape to make four uneven sections. Measure the interior width and length to cut your dividing strips accurately. -
Form the accent section:
For the terracotta section, roll out a small amount of terracotta clay. Cut a strip equal to the length of one of the smaller compartments and lay it over the existing white base in that specific corner, pressing it down to laminate it. Alternatively, construct this small section entirely from terracotta clay. -
Install the dividers:
Score, slip, and attach the internal dividing walls. Ensure they connect seamlessly to the outer walls and to each other in the center. -
Refine the edges:
Run a damp sponge or finger along all top rims to soften the sharp cut edges. This gives it that professional, molded look akin to ceramic ware. -
Initial curve adjustment:
Gently press into the corners of each compartment with a rounded tool or your finger to create soft, curved inner corners rather than sharp 90-degree angles. This makes getting small items out easier.
Troubleshooting: Cracking
If hairline cracks appear while drying, don’t panic. Mix a tiny paste of clay and water, fill the crack, smooth it over, and let it dry again.
Step 4: Finishing Touches
-
Dry slowly:
Place the organizer in a cool, dry spot away from direct sunlight. To prevent warping, I like to place a light board on top or flip it carefully once the rim is stiff enough to support the weight. -
Sand for perfection:
Once fully dry (24-48 hours depending on humidity), use fine-grit sandpaper to smooth out any fingerprints, bumps on the rim, or rough seams. -
Seal carefully:
Spray the entire piece with a matte sealant. This protects the clay from moisture and stains without adding an unnatural glossy shine, preserving the stone-like aesthetic.
Fill your new organizer with your favorite stationery and enjoy a clutter-free desk