If you can make a basic mug shape, you can make a mug that feels totally you with a few smart tweaks to the surface, rim, and handle. Here are my favorite handmade clay mug ideas I keep coming back to in the studio when I want something simple, satisfying, and just a little bit special.
Clean Two-Tone Dip Glaze Mug

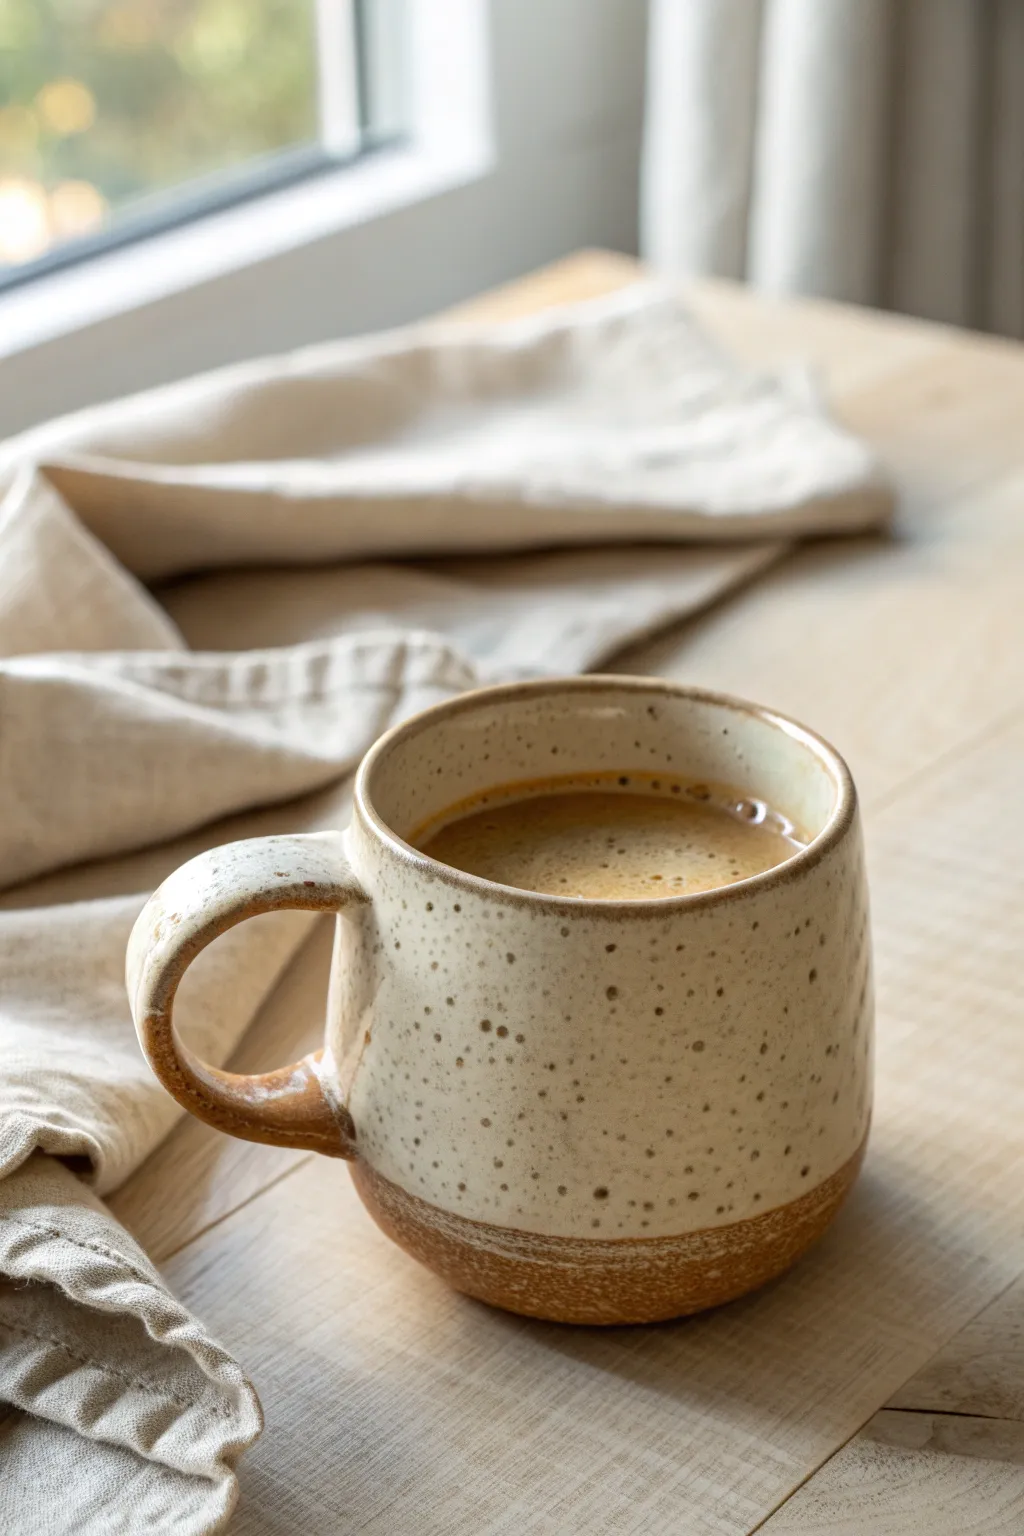
Embrace the beauty of raw clay with this understated dipping technique, balancing exposed unglazed warmth with a creamy, speckled finish. This project yields a sturdy cylinder mug that feels as comforting in the hand as the coffee it holds.
Step-by-Step Tutorial
Materials
- Cone 5/6 Red Stoneware Clay (speckled variety preferred)
- Pottery wheel
- Throwing tools (sponge, wooden rib, wire cutter)
- Trimming tools (loop tool)
- Needle tool
- Serrated kidney or scoring tool
- Slip (liquid clay)
- Soft paintbrush
- Wax resist (liquid)
- Creamy white speckle glaze (Cone 5/6, dipping consistency)
- Kiln
Step 1: Throwing the Form
-
Center the clay:
Start with about 1 to 1.5 pounds of well-wedged red stoneware clay. Secure it to the wheel head and center it using firm, steady pressure, ensuring the mound is perfectly symmetrical and smooth. -
Open the form:
Drill your thumb or fingers into the center, leaving a base thickness of about a quarter-inch. Pull the clay outward to establish the floor width, compressing the bottom well to prevent S-cracks later. -
Pull the walls:
With even pressure from inside and outside hands, pull the walls upward. Unlike a tapered bowl, you want a fairly straight-sided cylinder for this design, perhaps with the slightest inward curve at the very top rim. -
Refine the surface:
Use a wooden rib on the outside while supporting the inside wall. Run it up the side to straighten the profile and remove excess slurry, leaving the clay smooth and prepped for that raw aesthetic we want later. -
Define the rim:
Using a chamois or a small strip of plastic, compress and round the rim. A comfortable drinking edge is crucial for a mug, so take a second pass here if needed. -
Wire off:
Use your wire cutter to slice underneath the mug, severing it from the wheel head. Carefully set it aside on a ware board until it reaches a leather-hard state.
Clean Resist Lines
For a razor-sharp glaze line, use masking tape instead of freehanding the wax. Apply tape around the circumference, wax below it, then peel the tape before dipping.
Step 2: Trimming and Handle Attachment
-
Trim the base:
Once leather-hard (firm but carveable), center the mug upside down on the wheel. Use a loop tool to trim away excess weight from the bottom and define a clean, flat foot ring. -
Pull a handle:
Take a separate lug of the same clay and pull a handle using plenty of water. You want a D-shaped profile that is thick enough to hold comfortably but not clunky. Let it stiffen slightly on a board until it curves without collapsing. -
Score connection points:
Hold the handle up to the mug to gauge placement. Use a needle tool to scratch (score) the attachment zones on the mug body and the ends of the handle. -
Attach the handle:
Apply slip to the scored areas. Press the handle firmly onto the mug body. I usually attach the top first, smooth that connection, then curve it down to attach the tail end. -
Clean the seams:
Use a damp sponge or your finger to wipe away excess slip around the handle joints. Ensure the transition looks seamless, as this will be highlighted by the glaze later. -
Bisque fire:
Allow the mug to dry completely (bone dry). Load it into the kiln and bisque fire to Cone 04 (or your clay body’s specific bisque temperature).
Pinholing Issues?
If you see tiny holes in the glaze surface, try a ‘drop and soak’ firing schedule or hold the peak temperature for 15-20 minutes to let gases escape fully.
Step 3: Glazing and Finishing
-
Wipe down:
Once the bisque ware is cool, wipe it down with a damp sponge to remove any kiln dust. This ensures the glaze adheres properly. -
Apply wax resist:
This is the critical step for the two-tone look. Paint liquid wax resist onto the bottom third of the mug, including the bottom of the handle. Make the line where the wax stops intentional and reasonably straight, though a little organic wobble adds character. -
Let wax dry:
Allow the wax resist to dry completely. It should feel tack-free. This barrier will repel the glaze, keeping the red clay exposed. -
Mix the glaze:
Stir your creamy white speckle glaze thoroughly. You want a consistency similar to heavy cream for a good, opaque coat. -
Dip the mug:
Using glazing tongs or your hand (if careful), dip the entire mug into the bucket. The wax resist on the bottom will repel the liquid. Hold it submerged for about 3 seconds, then lift it out. -
Clean the resist line:
As the glaze dries, beads of glaze might cling to the waxed area. Use a damp sponge to gently wipe these off, sharpening the line between the white glaze and the raw clay. -
Glaze fire:
Load the glazed mug into the kiln. Fire to maturity (likely Cone 5 or 6). Once cooled, sand the unglazed foot lightly if needed to prevent scratching tables.
Once cool, pour your favorite drink and enjoy the tactile contrast of smooth glaze against warm, gritty clay.


Speckled Stoneware-Style Cozy Mug
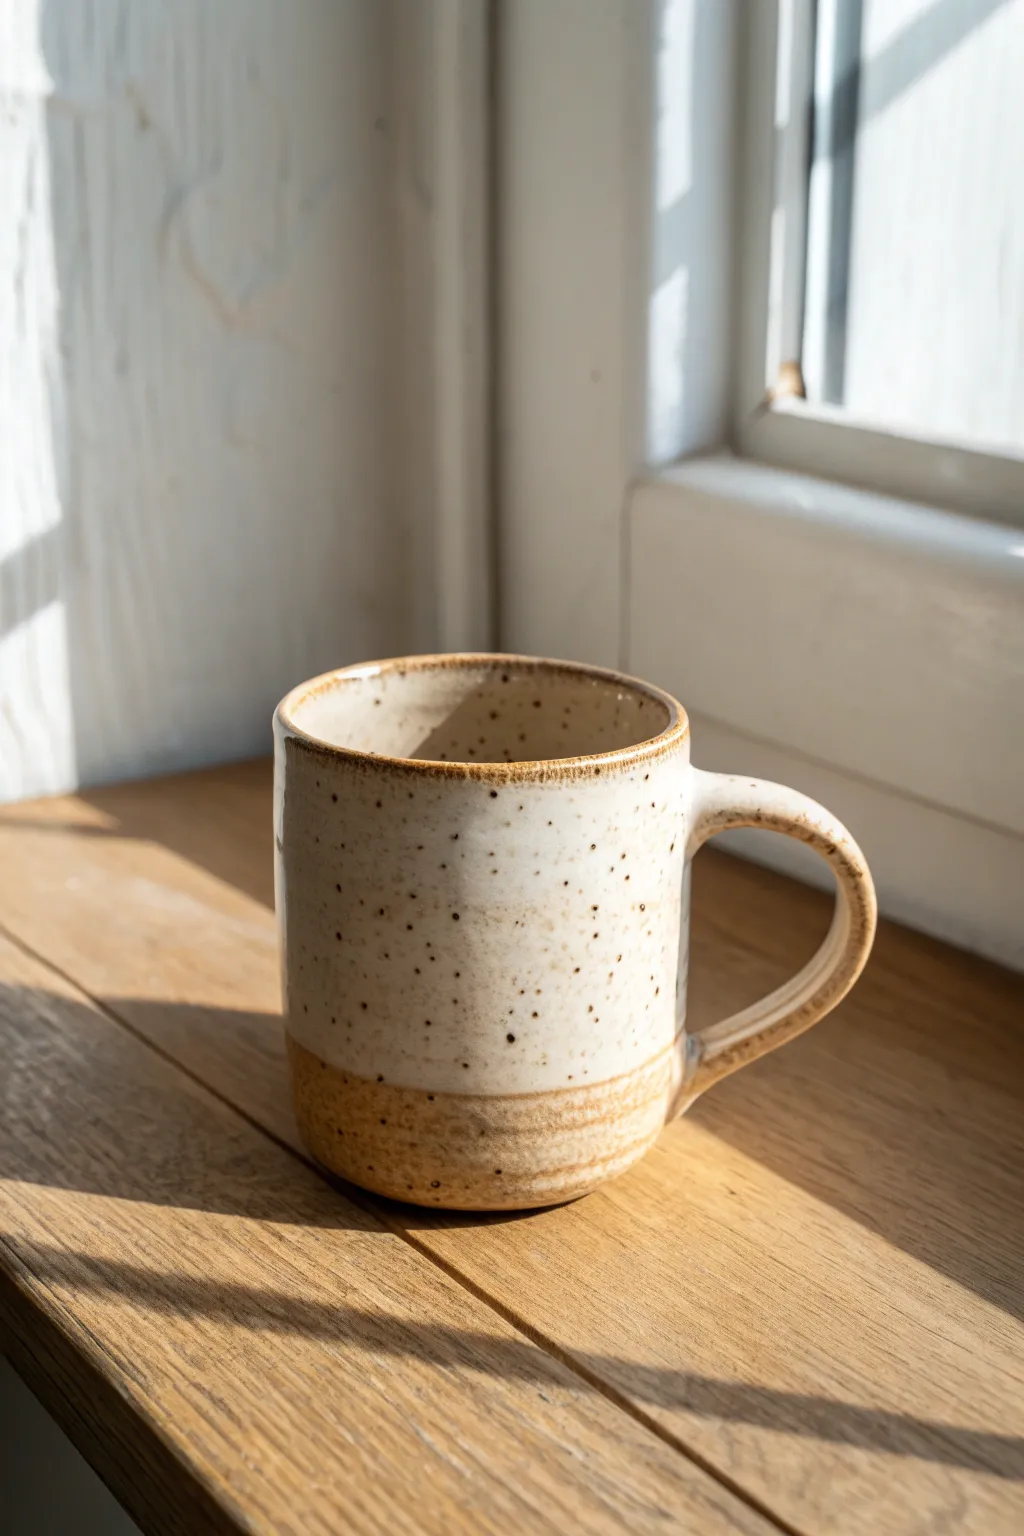
Capture the warmth of a morning sunbeam with this handcrafted ceramic mug, featuring organic speckling and a raw clay base. This project balances the rustic charm of unglazed pottery with the smooth finish of a creamy white glaze to create a piece that feels as cozy as it looks.
Step-by-Step Guide
Materials
- Speckled clay body (Stoneware, cone 5/6 recommended)
- Potter’s wheel (or slab roller/hand-building tools)
- Wire cutter tool
- Rib tool (wooden or silicone)
- Needle tool
- Trimming tools
- Sponge
- Creamy white stoneware glaze (glossy or satin)
- Small paintbrush
- Kiln
Step 1: Throwing and Shaping
-
Prepare the Clay:
Wedge about 1 to 1.5 pounds of speckled clay thoroughly to remove air bubbles. This specific clay body is crucial for achieving that spotted texture that will peek through the glaze later. -
Center on the Wheel:
Slam the clay onto the wheel head and center it using water and steady pressure. Ensure the mound is perfectly symmetrical before proceeding to open it. -
Open and Pull Walls:
Open the clay mound and begin pulling up the walls. Aim for a straight cylinder shape, keeping the walls even in thickness from bottom to top. Leave the rim slightly thicker for durability. -
Refine the Profile:
Use a rib tool on the exterior while supporting the interior with your other hand. Gently smooth the sides to remove throwing lines for a cleaner, modern silhouette, but don’t overwork it. -
Undercut the Base:
Use a wooden knife tool to make a slight undercut at the very bottom of the mug. This creates a visual separation and makes it easier to wire off later. -
Wire Off:
Run a wire cutter firmly across the wheel head to separate the mug. Carefully lift it off and place it on a ware board to dry until leather-hard.
Glaze Crawling?
If the glaze pulls back from spots, your bisqueware might have had dust or oil from hands on it. Always wipe with a clean damp sponge before glazing.
Step 2: Trimming and Handling
-
Trim the Foot:
Once leather-hard, center the mug upside down on the wheel. Trim away excess weight from the bottom, carving a distinct foot ring if desired, or just smoothing the curve where the wall meets the floor. -
Pull a Handle:
Hold a small carrot-shaped piece of clay and use wet hands to pull a long, tapered strip. I usually aim for a width that feels comfortable for three fingers. -
Attach the Handle:
Score the mug wall and the attachment points of the handle. Apply a dab of slip (clay slurry) and press the handle firmly onto the mug. Smooth the seams with a small tool or your finger. -
Dry Slowly:
Cover the mug loosely with plastic to ensure the handle and body dry at the same rate. This prevents cracking at the seams. Once bone dry, bisque fire the piece to cone 04.
Iron Speckle Pop
To get more pronounced dark spots, try a ‘reduction’ firing or choose a clay body specifically labeled ‘heavy speckle’ or ‘iron-rich’.
Step 3: Glazing and Finishing
-
Clean the Bisqueware:
Wipe the fired mug with a damp sponge to remove any kiln dust, which can cause glaze defects like crawling. -
Wax Resist Method:
Apply liquid wax resist to the bottom inch of the mug’s exterior and the entire foot. This masking technique keeps the bottom raw and exposed, creating that beautiful two-tone design. -
Dip the Glaze:
Holding the mug by the foot, dip it upside down into your creamy white glaze. Use a pair of tongs if you prefer, submerging it just past the wax line for a crisp overlap. -
Clean the Drips:
Wait a few seconds for the glaze to set, then use a damp sponge to wipe any glaze droplets that beaded up on the waxed area. The line between glazed and unglazed should be sharp. -
Final Fire:
Load the mug into the kiln and glaze fire to cone 5 or 6 (depending on your specific clay and glaze specifications). Let the kiln cool completely before opening. -
Sand the Bottom:
After firing, inspect the raw clay bottom. If it feels rough, sand it lightly with 400-grit sandpaper under running water to ensure it won’t scratch your tabletops.
Fill your new creation with coffee or tea and enjoy the tactile contrast of smooth glaze and raw earth


Carved Band Rim Detail Mug
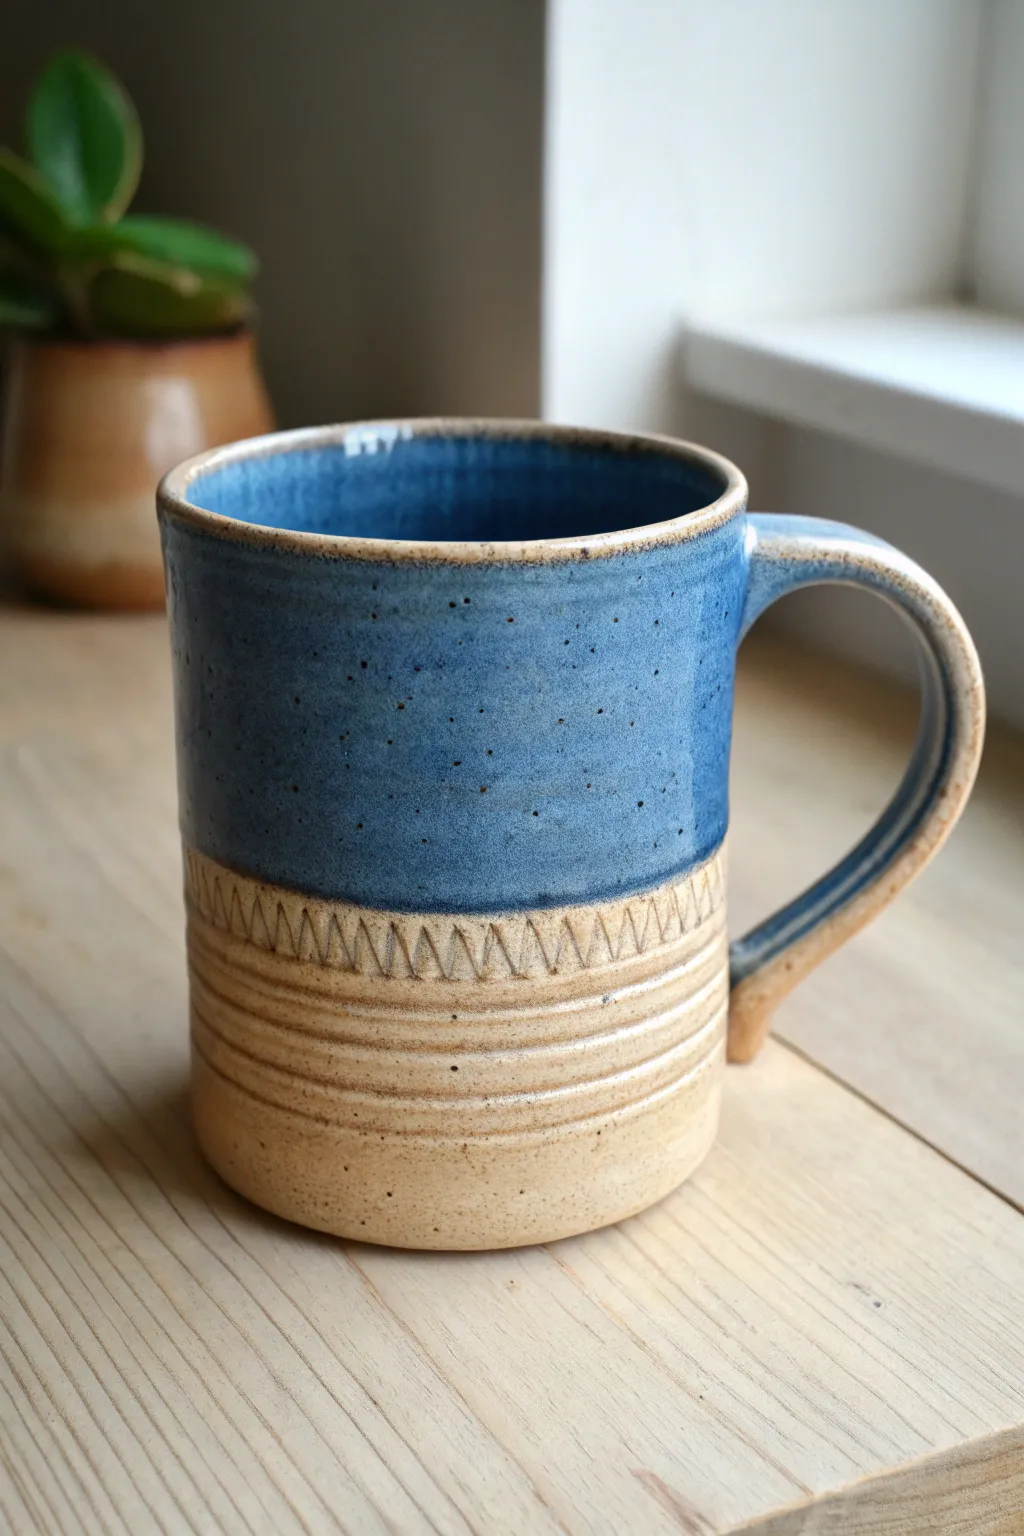
This rustic mug combines the tactile warmth of raw stoneware with a smooth, speckled blue glaze. The defining feature is a carved chevron band that creates a striking transition between the glazed and unglazed sections.
Step-by-Step Tutorial
Materials
- Speckled stoneware clay (approx. 1 lb)
- Pottery wheel
- Throwing tools (sponge, rib, intricate wire tool)
- Trimming tools
- Carving tool (pin tool or small loop tool)
- Serrated rib or modeling tool for grooves
- Wax resist
- Speckled blue glaze
- Kiln
Step 1: Throwing the Form
-
Prepare the clay:
Begin by wedging your speckled stoneware clay thoroughly to remove air bubbles. Center the clay on the wheel head, ensuring it feels stable and symmetrical before you begin opening. -
Open and pull walls:
Open the centered clay and pull up the walls to form a cylinder. Aim for a consistently vertical shape, about 4-5 inches tall. Keep the rim slightly thickened for durability and drinking comfort. -
Shape the profile:
Use a rib tool on the inside and outside to refine the shape, creating a straight-sided cylinder with a flat bottom. Smooth the surface to remove throwing lines from the top two-thirds, as this area will be glazed. -
Create the heavy grooves:
While the wheel is spinning slowly, use a rounded modeling tool or the corner of a wood rib to press three distinct horizontal grooves into the bottom third of the mug. These should be evenly spaced and deep enough to be felt.
Step 2: Trimming and Handle
-
Leather hard drying:
Allow the cylinder to dry to a leather-hard state. It should be firm enough to handle without deforming but still hold moisture for carving. -
Trim the foot:
Invert the mug on the wheel and trim the bottom. Create a clean foot ring that mirrors the sharpness of the cylinder walls. I like to make sure the foot is well-defined to stop glaze drips later. -
Pull the handle:
Pull a strap handle from a separate lug of clay. Aim for a C-shape that allows for a comfortable three-finger grip. Let it stiffen slightly on a board until it holds its curve. -
Attach the handle:
Score and slip the attachment points on both the mug and the handle. Attach the top of the handle near the rim and the bottom just above the carved grooves. Smooth the joins blending the clay seamlessly.
Iron Wash Accent
Before waxing, brush a very diluted iron oxide wash over the carved chevron area and wipe it back. The oxide will stay in the rhythmic cuts, darkening the pattern.
Step 3: Carving and Bisque
-
Mark the transition:
Locate the smooth band of clay just above your horizontal grooves but below where the glaze line will start. This is your carving zone. -
Carve the chevron pattern:
Using a sharp carving tool or pin tool, carefully cut a repeating zigzag or chevron pattern around the circumference. Cut deeply enough to create shadow, pressing into the clay to displace it slightly for texture. -
Clean up burrs:
Once the carving is bone dry, gently brush away any sharp clay burrs with a stiff paintbrush or your finger. Don’t use a wet sponge, or you’ll lose the crispness of the carving. -
Bisque fire:
Load the thoroughly dried mug into the kiln and bisque fire to Cone 04 (or your clay body’s specific bisque temperature).
Glaze Break Tip
Choose a glaze known to ‘break’ over texture. When the glaze melts away from the sharp rim and handle edges, it reveals the clay color underneath for added depth.
Step 4: Glazing
-
Wax resist application:
Apply wax resist carefully to the bottom third of the mug, covering the foot, the horizontal grooves, and the carved chevron band. The wax ensures the raw clay remains exposed. -
Clean the wax line:
Double-check your wax application. Any wax on the upper section will resist glaze where you don’t want it, so scrape away errors with a knife. -
Dip into glaze:
Hold the mug by the foot and dip it upside down into your speckled blue glaze. Submerge it until the glaze reaches the wax line at the top of the chevron pattern. -
Shake and drip:
Hold the mug upside down for a few seconds and give it a gentle shake to remove excess glaze. Turn it right side up and immediately wipe any beads of glaze off the waxed chevron area with a damp sponge. -
Glaze fire:
Fire the mug to maturity (typically Cone 5 or 6 for stoneware). The glaze should melt and break beautifully over the rim, while the unglazed bottom fires to a warm, sandy beige.
Enjoy your morning coffee with the satisfaction of holding a piece of art you crafted from the earth up


Sgraffito Line Art Mug
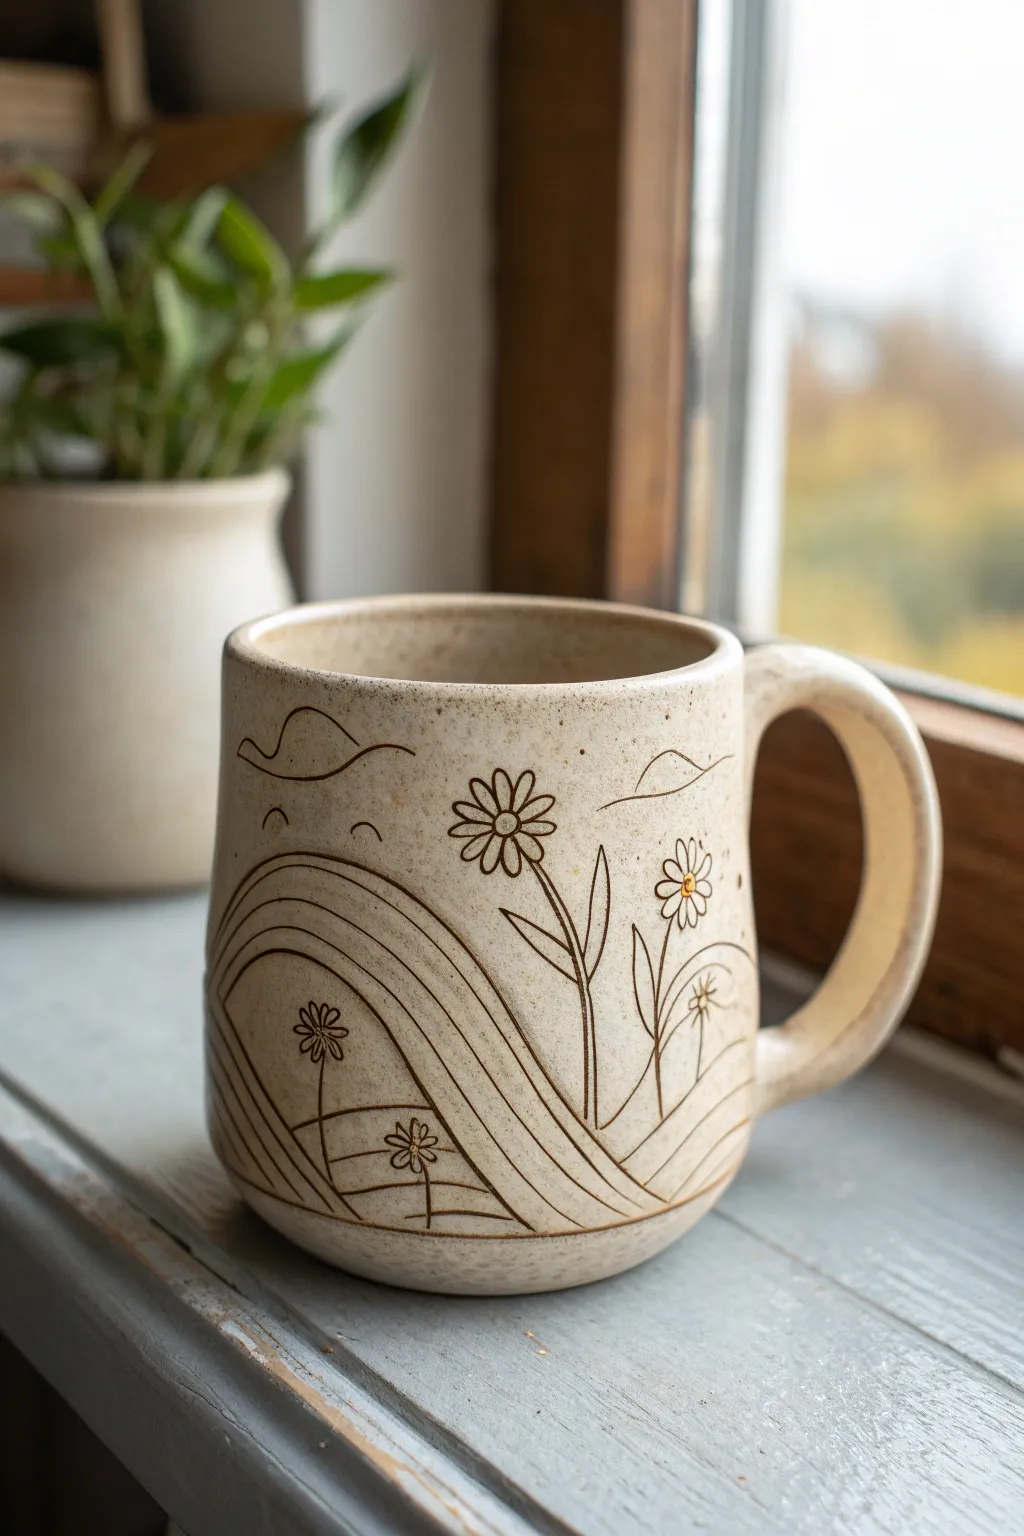
Create a cozy, nature-inspired vessel featuring delicate etched line art of rolling hills and cheerful daisies. This project uses sgraffito and inlay techniques on speckled clay to achieve a rustic, hand-drawn illustration style that feels perfectly at home on a windowsill.
Step-by-Step
Materials
- Speckled buff stoneware clay
- Pottery wheel (or slab roller/rolling pin for hand-building)
- Small loop trimming tool
- Needle tool or sgraffito carver
- Dark brown or black underglaze
- Small sponge
- Clear matte or satin glaze
- Kiln
- Water bowl
- Rib tool (metal and rubber)
- Paintbrush (small and medium)
Step 1: Forming the Vessel
-
Throw the Cylinder:
Begin by centering about 1-1.5 lbs of speckled buff clay on your wheel. Pull the walls to create a straight-sided cylinder with a slightly rounded bottom, aiming for a height of about 4-5 inches. -
Shape the Curve:
Gently belly out the bottom third of the mug using your inside hand and a rib on the outside to create that soft, rounded base seen in the photo. -
Refine the Rim:
Compress the rim with a chamois or your finger to ensure it’s smooth and comfortable for drinking. Create a slight inward taper at the very top to hold heat. -
Attach the Handle:
Pull a strap handle that is thick enough to match the rustic feel of the mug. Attach it while the mug is leather hard, creating a large ‘C’ shape that allows for a comfortable three-finger grip. -
Smooth Connections:
Use a damp sponge or your finger to blend the handle attachments seamlessly into the body, checking that the top attachment flows directly from the rim line.
Clean Lines Pro-Tip
When wiping back the underglaze, wipe diagonally across your carved lines rather than parallel to them. This prevents the sponge from scooping the color out of the grooves.
Step 2: Sketching and Carving
-
Wait for Leather Hard:
The most crucial timing step is ensuring the mug is a firm leather hard—firm enough to carve without warping, but soft enough to cut cleanly. -
Map the Design:
Lightly scratch your design layout with a needle tool. Draw a sweeping arc on the left side for the rainbow/hill shape and position three main flower stems on the right. -
Carve the Hills:
Using a fine sgraffito tool or a sharp needle tool, carve deep, consistent lines for the rainbow arch. Press firmly to create a groove that will hold glaze later. -
Detail the Flowers:
Carve the daisy petals and centers. Make sure the lines intersect cleanly. I find it helpful to rotate the mug constantly to keep my hand angle consistent for the petals. -
Add Atmosphere:
Etch in small details like clouds above the rainbow, little grass blades at the base, and stray dots to fill empty negative space and balance the composition. -
Clean the Burrs:
Once carved, gently brush away any clay crumbs or ‘burrs’ with a soft, dry brush. Do not use water yet, as it will just smudge the clay back into the grooves.
Smudged Lines?
If your lines look smeared after wiping, your sponge is too wet or dirty. Rinse it thoroughly, squeeze it out until it’s barely damp, and try again with a light touch.
Step 3: Inlay and Glazing
-
Apply Underglaze:
Paint a generous coat of dark brown underglaze directly over your carved lines. Don’t worry about being neat; you want the liquid to fill the grooves completely. -
The Wipe Back:
Once the underglaze is touch-dry (chalky), take a slightly damp sponge and wipe the surface of the mug. This removes the surface color but leaves the dark underglaze trapped in the carved lines (the Mishima/inlay effect). -
Clean and Dry:
Continue wiping with clean sections of the sponge until the speckled clay natural color is visible again and the lines are crisp dark chocolate brown. -
Bisque Fire:
Let the mug dry completely (bone dry) and fire it to bisque temperature (usually cone 04 or 06 depending on your clay body). -
Glaze Application:
Dip the entire mug into a clear matte or clear satin glaze. Avoid glossy glazes if possible, as the matte finish complements the earthy, rustic texture better. -
Final Firing:
Fire the mug to maturity (Cone 5/6 for stoneware). The clear glaze will seal the clay and make the dark inlay pop against the creamy, speckled background.
Enjoy your morning coffee in a piece of art that brings a touch of the outdoors into your kitchen

The Complete Guide to Pottery Troubleshooting
Uncover the most common ceramic mistakes—from cracking clay to failed glazes—and learn how to fix them fast.
Mishima Inlaid Pattern Mug
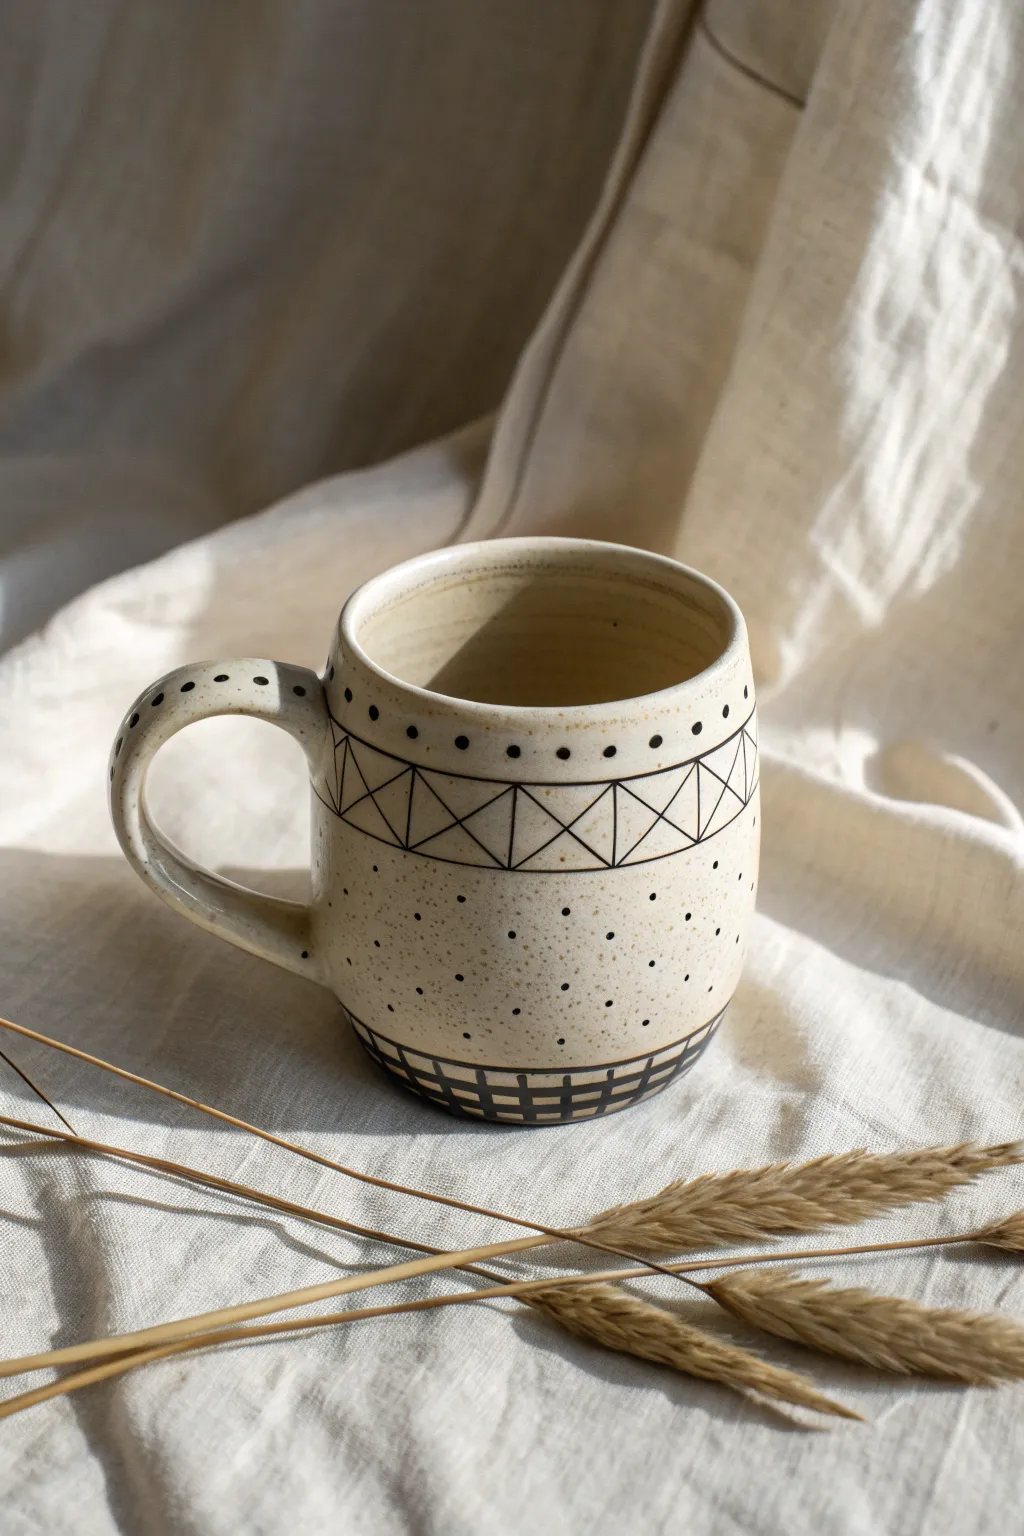
This project explores the satisfying technique of Mishima to create delicate, crisp black lines on a creamy speckled clay body. The result is a beautifully modern mug featuring geometric triangles, grids, and playful dots that feels both rustic and refined.
Step-by-Step Guide
Materials
- Speckled stoneware clay (white or buff)
- Pottery wheel
- Throwing tools (sponge, rib, wire cutter)
- Trimming tools
- Carving tool (needle tool or fine sgraffito loops)
- Black underglaze or black slip
- Small paintbrush
- Metal kidney rib (flexible)
- Clear glaze
- Kiln
Step 1: Throwing and Shaping
-
Center and throw:
Start with a well-wedged ball of speckled clay. Center it on the wheel and open it up, pulling the walls into a standard cylinder shape. -
Shape the belly:
Gently balloon the sides outward slightly to create a soft curve, narrowing just a bit at the rim to help keep liquids warm. -
Finish the rim:
Compress the rim with a chamois or sponge to ensure it is smooth and pleasant to drink from. -
Dry to leather hard:
Wire the pot off the wheel and let it dry slowly until it reaches a leather-hard state—firm enough to hold its shape but soft enough to carve. -
Attach handle:
Pull a simple, comfortable strap handle. Attach it securely to the leather-hard mug, smoothing the joints well.
Smudged Lines?
If scraping smears the black slip, your underglaze is still too wet. Wait 10-15 minutes. Alternatively, your scraping tool might be dull—swap for a fresh, sharp metal rib.
Step 2: Carving the Mishima Pattern
-
Mark guidelines:
Using a needle tool, lightly etch horizontal rings around the mug to define your pattern zones: one near the rim, a main band in the upper third, and a border at the base. -
Carve the triangles:
In the upper band, carve a series of zigzag lines to create a row of triangles. Add vertical lines inside each triangle to connect the points, forming a geometric truss pattern. -
Add detail dots:
Use a small drill bit or the tip of your carving tool to make small, uniform indentations for dots. Place a row of dots above the triangle band and scatter sporadic dots in the large open space below. -
Carve the base grid:
At the very bottom, carve a grid pattern consisting of two horizontal lines intersected by evenly spaced vertical lines. -
Decorate the handle:
Don’t forget the handle; carve a simple line of dots running down the spine of the handle for continuity. -
Clean up burrs:
VERY lightly brush away large clay crumbs, but don’t worry about smoothing perfectly yet.
Color Pop
Instead of black underglaze, try a deep navigational blue or forest green for the inlay. You can also mix colored mason stains into white slip for a pastel geometric look.
Step 3: Inlaying and Finishing
-
Apply underglaze:
Paint a generous coat of black underglaze or slip over all the carved areas. I like to make sure the indentations are completely filled, even if it looks messy. -
Let it firm up:
Allow the underglaze to dry until it is no longer shiny and wet, but don’t let it become bone dry. -
Scrape away excess:
Using a sharp metal rib, carefully scrape the surface of the mug. You are shaving off the excess black slip on the surface, leaving behind only the slip trapped inside the carved lines. -
Final wipe:
If a slight haze remains, use a damp (not wet) sponge to wipe the surface clean, being careful not to drag slip out of the grooves. -
Bisque fire:
Once the mug is bone dry, load it into the kiln for a bisque firing. -
Glaze and final fire:
Dip the bisqued mug into a transparent clear glaze to make the clay body shine and seal the surface, then fire to the clay’s final temperature.
Enjoy your morning coffee in a vessel that perfectly balances graphic sharpness with handmade warmth
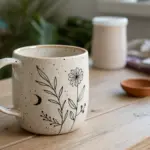
Botanical Underglaze Painting Mug
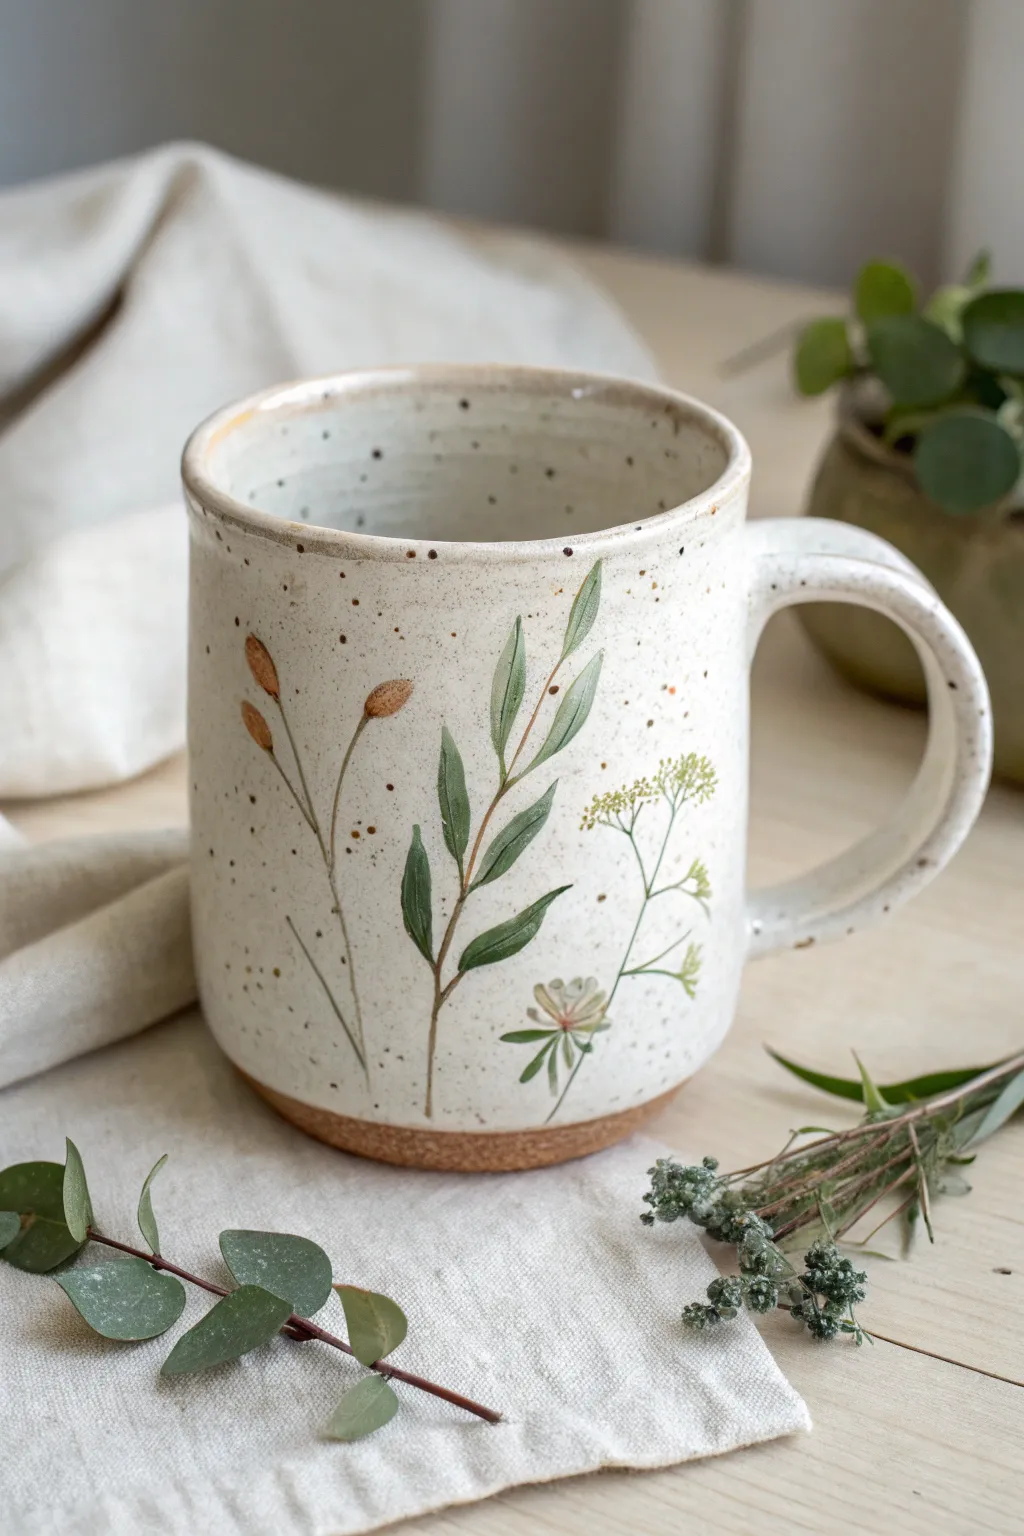
Bring the quiet beauty of a summer meadow to your morning routine with this hand-built ceramic mug. Featuring delicate underglaze illustrations on speckled clay, this project balances rustic warmth with fine, botanical detailing.
Detailed Instructions
Materials
- Speckled stoneware clay (mid-range cone 5/6)
- Slab roller or rolling pin with guide strips
- Mug template (paper or cardstock)
- Scoring tool and slip
- Wooden modeling tool
- Fettling knife
- Underglazes: olive green, sage green, rust brown, cream/white
- Fine liner brushes (size 0 and 00)
- Sponge
- Clear glossy glaze
- Kiln access
Step 1: Forming the Mug Body
-
Roll the slab:
Begin by rolling out your speckled clay to a consistent thickness, around 1/4 inch. If you want that lovely, organic feel, don’t worry if the surface texture isn’t perfectly glass-smooth. -
Cut the shapes:
Lay your template onto the slab and cut out the rectangular body and a circular base. Be sure to cut straight down with your fettling knife to ensure the walls stand vertical later. -
Texture the surface (optional):
Before assembling, you can lightly compress the surface with a rib. The speckles in the clay will provide most of the texture, so keep manual texturing subtle. -
Assemble the cylinder:
Score and slip the short ends of your rectangle. Bring them together to form a cylinder, pressing the seam firmly. I find using a wooden tool on the inside seam helps reinforce the bond without denting the outside. -
Attach the base:
Score and slip the bottom edge of the cylinder and the edge of the circular base. Join them, smoothing the clay upward from the base onto the wall to create a seamless transition.
Smudged Lines?
If underglaze smears during handling, let it dry completely, then gently scratch the mistake off with an X-Acto knife rather than wiping it wet.
Step 2: Handle and Refinement
-
Pull or roll a handle:
Roll a coil for the handle, slightly tapering it. Curve it into a comfortable ‘C’ shape that mimics the gentle curves of the plants you’ll be painting. -
Attach the handle:
Score and slip the attachment points on both the mug body and handle. Press firmly to attach, blending the clay with your wooden tool. Ensure the top attachment is near the rim for balance. -
Define the rim and foot:
Smooth the drinking rim with a damp sponge or chamois. At the bottom, leave a small band of unpainted clay just above the base to create that raw, earthy contrast shown in the photo.
Level Up: Wax Resist
Apply wax resist over your painted botanicals before glazing. This keeps the plants matte while the rest of the mug is glossy for tactile contrast.
Step 3: Botanical Illustration
-
Sketch the layout:
Once the mug is leather-hard, lightly sketch your plant placement using a dull pencil. The graphite will burn off in the kiln, leaving only your painted lines. -
Paint the stems:
Using a thin liner brush and watered-down brown underglaze, paint the main vertical stems. Keep your hand loose to create natural, slightly wavering lines rather than rigid sticks. -
Add the leaves:
Mix olive and sage green underglazes. Paint the elongated leaves on the central stalk, pressing down at the base of the leaf and lifting as you pull outward to create a sharp point. -
Add the buds:
On the left stalk, dab small, teardrop shapes using rust-brown underglaze. These seed pods should look heavy, so place them at the ends of the thin stems. -
Paint the wildflowers:
For the delicate white flowers on the right, use a cream or white underglaze. Use the very tip of your smallest brush to stipple tiny dots for the flower head and faint lines for the petals. -
Add speckles (optional):
If your clay isn’t heavily speckled enough, you can flick a stiff toothbrush loaded with iron oxide or brown underglaze to add extra ‘nature’ spots around the white background.
Step 4: Glazing and Firing
-
Bisque fire:
Allow the mug to dry completely (bone dry) before loading it into the kiln for the bisque firing (usually cone 04). -
Apply clear glaze:
After the bisque fire, wipe the mug with a damp sponge to remove dust. Dip or brush a clear, glossy glaze over the entire interior and exterior, stopping just above the raw clay foot you defined earlier. -
Wipe the foot:
Clean the bottom of the mug and the exposed clay band thoroughly with a sponge to ensure no glaze sticks to the kiln shelf. -
Glaze fire:
Fire the mug to maturity (Cone 5 or 6 depending on your clay body). The clear glaze will seal the artwork and make the distinctive clay speckles pop.
Now you have a functional piece of art that makes every cup of tea feel like a garden escape


What Really Happens Inside the Kiln
Learn how time and temperature work together inside the kiln to transform clay into durable ceramic.
Wrapped Slip Trailing Mug
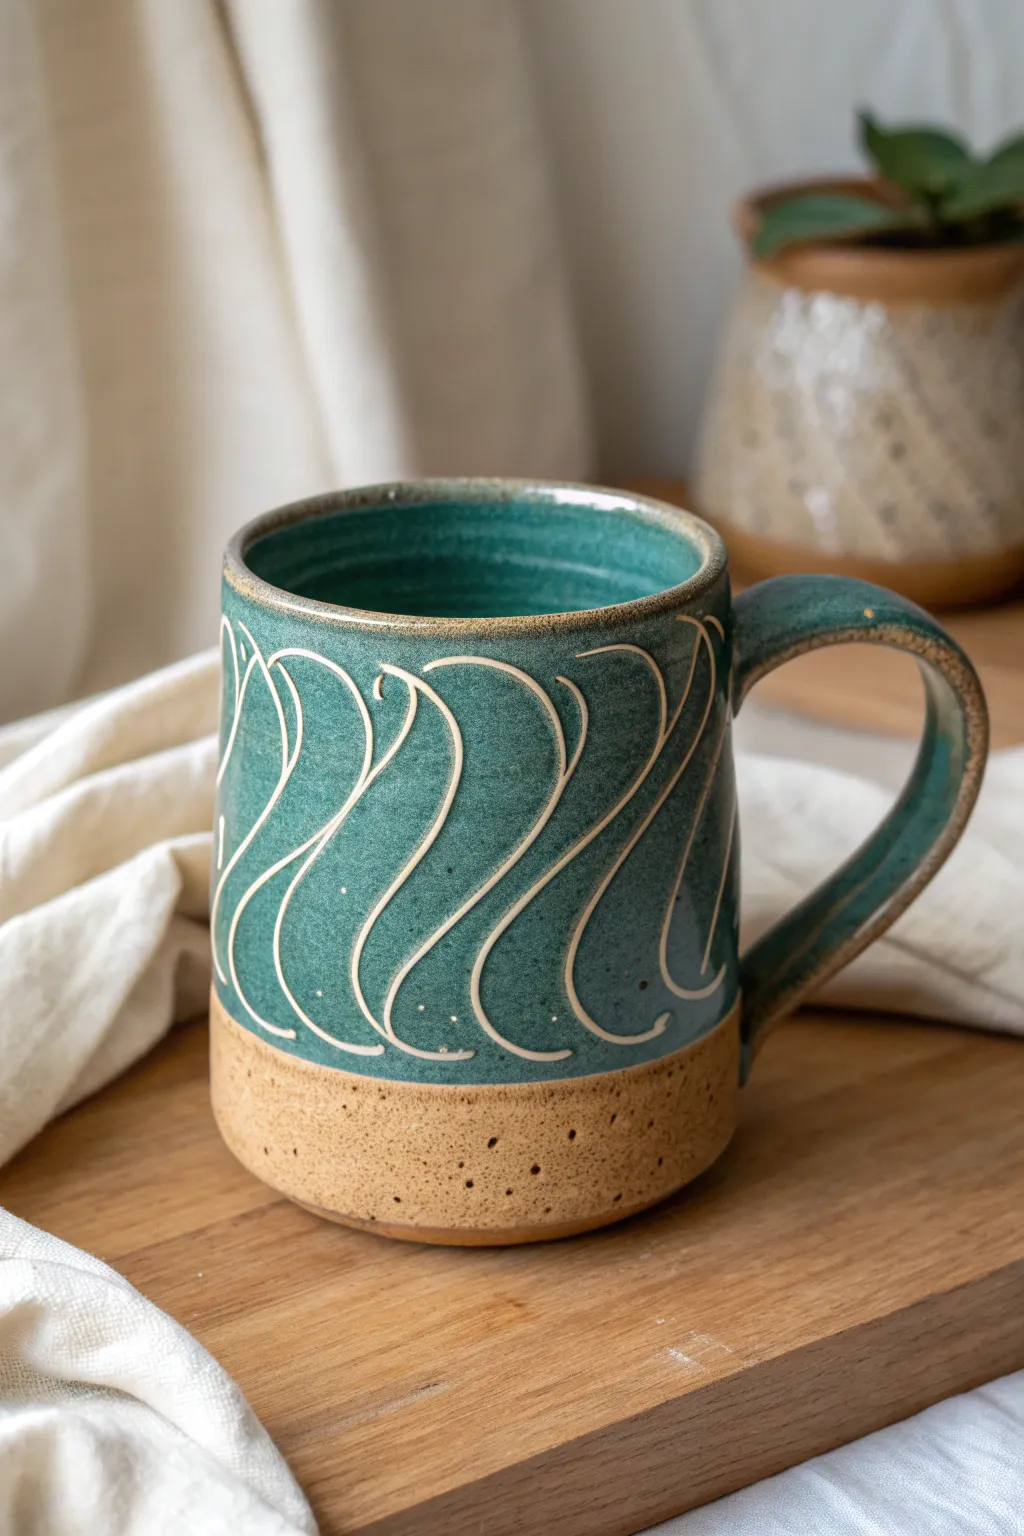
This rustic yet refined mug features a speckled stoneware base contrasted with a deep teal glaze and elegant, rhythmic wave patterns. The white carved lines dance across the surface, creating movement and highlighting the beautiful interaction between the raw clay and the rich glaze.
Step-by-Step
Materials
- Speckled stoneware clay (approx. 1 lb)
- Pottery wheel
- Throwing tools (sponge, rib, wire cutter)
- Trimming tools
- Carving tool (small loop or sgraffito tool)
- White underglaze or slip (optional, if carving through slip)
- Wax resist
- Teal/Green reactive glaze
- Paintbrush for glazing or bucket for dipping
- Kiln
Step 1: Throwing and Trimming
-
Center the clay:
Start with about 1 pound of speckled stoneware clay. Wedge it thoroughly to remove air bubbles, then slam it onto the wheel head. Center the clay using firm pressure and water. -
Open and pull the walls:
Open the centered mound and compress the bottom. Pull the walls up to create a cylinder, aiming for a consistent thickness of about a quarter-inch. Shape the body with a slight outward curve for a comfortable hold. -
Refine the rim:
Use a chamois or a small strip of plastic to compress and round the rim. This makes the mug pleasant to drink from later. -
Trim the foot:
Allow the cylinder to dry to a leather-hard state. Place it back on the wheel (upside down), center it, and trim the bottom to create a neat foot ring. Smooth the transition from the foot to the wall. -
Pull and attach the handle:
Pull a handle from a small nugget of clay, tapering it slightly. Attach it to the leather-hard mug by scoring and slipping the contact points. Blend the seams well and shape the curve so it fits two to three fingers.
Clean Lines Pro-Tip
For super crisp white lines, apply wax resist using a very thin liner brush directly onto the leather-hard clay BEFORE dipping. The glaze will seamlessly slide off the pattern.
Step 2: Design and Pattern
-
Mask the bottom:
Decide where you want your glaze line to end. For the look in the photo, leave the bottom inch and a half of the mug as bare clay. You can apply wax resist here now to keep it clean, or just be careful later. -
Plan the waves:
The pattern consists of repeating, curved wave-like shapes. You can lightly sketch these onto the leather-hard clay with a needle tool or pencil just to guide your hand. -
Carve the relief:
Use a small carving tool to incise the wave patterns into the clay. The lines should be deep enough to hold glaze or to reveal the clay body beneath. In this specific style, we are essentially creating ‘channels’ for the glaze to break over or to fill. -
Using wax inlay (Resist Method):
To achieve the specific white-line look shown, paint the carved lines carefully with wax resist (or use a latex resist). This will prevent the main glaze from adhering to the lines, letting the lighter clay body (or a white underglaze, if you applied one first) show through. -
Alternative: Mishima:
Alternatively, you could carve the lines, fill them with white slip, let it dry, and scrape back the surface before glazing. However, the image suggests a resist technique where the glaze pulls away from the high points or specific lines. -
Bisque fire:
Once the mug is bone dry, load it into the kiln for a bisque firing (usually to cone 04 or 06). This hardens the clay and prepares it for glazing.
Level Up: Texture
Try carving the background space between the waves slightly deeper. This dimensionality encourages the glaze to pool and creates varied color saturation.
Step 3: Glazing and Finishing
-
Prep for glazing:
Wipe the bisque-fired mug with a damp sponge to remove any dust. If you didn’t wax the bottom foot earlier, apply wax resist now to the bottom inch or so of the exterior and the entire underside. -
Apply the liner glaze:
Pour the teal glaze inside the mug, roll it around to coat the entire interior, and pour out the excess. Wipe any drips off the rim immediately. -
Glaze the exterior:
Dip the exterior of the mug into the teal glaze bucket, stopping exactly at your wax line (the unglazed bottom section). Hold it there for 2-3 seconds to get a good thickness. -
Reveal the pattern:
If you used wax resist on the wave lines, the glaze will naturally bead off them. I like to gently wipe these lines with a damp sponge just to ensure they are crisp and clean of any stray glaze droplets. -
Glaze fire:
Load the mug into the kiln for the glaze firing, typically cone 5 or 6 for stoneware. Ensure it doesn’t touch other pots. -
Sand the bottom:
After the kiln has cooled and you’ve unloaded, use fine-grit sandpaper (wet) to smooth the unglazed bottom of the mug so it won’t scratch your table.
Now brew your favorite tea and enjoy the tactile comfort of your new handmade mug
Appliqué Floral Cluster Mug

Embrace the warmth of raw clay with this beautifully speckled mug design featuring delicate, hand-painted floral motifs. The combination of creamy white glaze and rusty red underglazes creates a cozy, vintage-inspired aesthetic perfect for your morning coffee.
Step-by-Step Tutorial
Materials
- Speckled buff stoneware clay
- Pottery wheel (or slab roller/rolling pin for hand-building)
- Throwing tools (sponge, rib, wire cutter)
- Trimming tools
- Underglaze (Rust/Terracotta color)
- Underglaze (Dark Brown/Chocolate)
- Small round detail brush (size 0 or 1)
- Fine liner brush
- Clear or Creamy White semi-opaque glaze (cone 5/6 compatible)
- Wax resist
- Kiln
Step 1: Forming the Mug Body
-
Prepare the Clay:
Begin by wedging about 1 to 1.5 lbs of speckled buff clay. This clay body is essential because the natural iron flecks will bleed through the glaze later to create that signature speckled look. -
Throw the Cylinder:
Center your clay on the wheel and open it up. Pull the walls to create a cylinder about 4-5 inches tall. Aim for a slightly rounded bottom curve that tapers gently inward at the rim to keep your coffee warm. -
Shape the Belly:
Using a rib tool on the inside, gently push outwards to give the mug a soft, rounded belly. Smooth the rim with a chamois or your sponge to ensure it’s comfortable for drinking. -
Dry to Leather Hard:
Cut the mug off the bat and let it dry slowly until it reaches a leather-hard state. It should be firm enough to handle without deforming but still have some moisture. -
Trim the Foot:
Invert the mug on the wheel and trim the bottom. Create a distinct separation line about 3/4 of an inch up from the base; this will mark where the glaze stops and the raw clay begins.
Step 2: Handle & Surface Prep
-
Pull the Handle:
Pull a strap of clay for the handle. Keep it relatively thick and sturdy to match the rustic vibe of the mug. Curve it into a ‘C’ or ear shape and let it set up slightly. -
Attach the Handle:
Score the mug body and the handle attachment points vigorously. Apply slip and press the handle firmly onto the mug. Smooth the seams with a modeling tool or wet finger, ensuring a seamless transition. -
Bisque Fire:
Allow the mug to dry completely (bone dry). Load it into the kiln for a bisque firing (usually Cone 04) to prepare it for glazing.
On-Glaze Painting Tip
Painting underglaze on top of raw glaze (majolica style) requires a gentle touch. Only mix a tiny drop of water into your underglaze so it glides without dissolving the base glaze layer.
Step 3: Decorating & Glazing
-
Apply Wax Resist:
Once bisque fired, apply wax resist to the bottom foot of the mug, extending it up to that trim line you created. This keeps the raw, speckled clay exposed at the base. -
Dip in Base Glaze:
Dip the entire mug (holding it by the foot) into a creamy white or transparent matte glaze. Shake off excess drips locally and let the glaze dry on the surface for a few minutes. -
Outline the Stems:
Using a fine liner brush and dark brown underglaze (mixed with a tiny bit of water for flow), paint thin, delicate vertical lines for the flower stems directly on top of the unfired glaze. -
Paint the Leaves:
With a small round brush dipped in rust-colored underglaze, press down and lift to create almond-shaped leaves branching off the stem. I find that reloading the brush frequently keeps the color solid. -
Create the Flower:
Paint a small circle for the flower center. Then, paint radiating petals using the rust color. Keep the petals slightly spaced apart so they look distinct. -
Add Leaf Details:
Wait for the leaf color to dry to the touch. Then, take your finest brush with the dark brown underglaze and carefully paint a central vein and tiny scratches on the leaves and flower petals for texture. -
Final Fire:
Load the mug into the kiln for the final glaze firing (typically Cone 5 or 6, depending on your clay and glaze). The heat will fuse the on-glaze decoration into the surface.
Glaze Crawling?
If your painted design pulls away during firing, you may have applied the underglaze too thickly or the base glaze was too dusty. Wipe bisque with a damp sponge before dipping to prevent this.
Now you have a perfectly cozy vessel ready for your favorite hot beverage

TRACK YOUR CERAMIC JOURNEY
Capture glaze tests, firing details, and creative progress—all in one simple printable. Make your projects easier to repeat and improve.
Faceted Slab-Built Mug

This project combines the clean lines of modern design with the rustic charm of speckled stoneware. By carving deep geometric facets into a thick leather-hard form, you reveal a sculptural, diamond-like pattern that feels wonderful in the hands.
Step-by-Step
Materials
- Speckled stoneware clay (e.g., Laguna Speckled Buff)
- Slab roller or rolling pin with guide sticks (approx. 3/8 inch thickness)
- Fettling knife
- Surform tool or rasp
- Wire loop trimming tool (sharp)
- Scoring tool and slip
- Flexible metal rib
- Sponge
- White or clear semi-transparent glaze (cone 5/6 recommended)
Step 1: Forming the Cylinder
-
Roll the slab:
Begin by rolling out a substantial slab of speckled clay. For this project, you want it slightly thicker than a standard mug—aim for about 3/8 of an inch—to allow enough wall thickness for carving away material later without breaking through. -
Cut the template:
Measure and cut a rectangle from your slab, approximately 11 inches long by 4.5 inches tall. This size will shrink during firing, resulting in a nice standard mug size. Bevel the short ends at 45-degree angles to create a seamless join. -
Join the walls:
Score the beveled edges thoroughly and apply slip. Bring the two ends together to form a cylinder, pressing the seam firmly. Use your fingers or a wooden tool to blend the clay across the seam on both the inside and outside, ensuring it is invisible. -
Attach the base:
Roll a smaller slab for the floor of the mug. Score and slip the bottom edge of your cylinder and place it onto the slab. Cut away the excess clay around the base, then use a tool to smooth the connection completely. -
Refine the rim:
While the clay is still plastic, gently smooth the rim with a damp sponge or piece of chamois leather. It’s much harder to fix a sharp or uneven rim after the facets are carved, so take time to round it off now. -
Stiffen to leather-hard:
This is crucial: let the cylinder dry slowly until it reaches a firm leather-hard state. It needs to be sturdy enough to withstand the pressure of carving tools without warping the round shape.
Step 2: Carving the Facets
-
Map out the design:
Lightly sketch a zigzag pattern around the mug using a needle tool. Create triangular peaks and valleys; essentially, you want large triangles pointing up meeting large triangles pointing down. -
Begin the primary cuts:
Using a sharp wire loop tool or a cheese cutter, slice away the clay following your sketched triangles. Make bold, confident slices. Start from the thickest part (the center of the wall) and slice outward toward the rim or foot. -
Create the lower facets:
For the bottom row of facets, angle your tool to cut inward toward the foot of the mug. Don’t be afraid to cut deep enough to create a distinct angle, but be mindful of the interior wall thickness. -
Define the mid-section:
Now cut the upward-pointing triangles. The goal is to leave a raised ridge where the top and bottom facets meet, creating that sharp geometric line around the mug’s belly. -
Smooth the surfaces:
Once the main facets are cut, use a slightly damp sponge to soften just the sharpest burrs of clay, but try to keep the facet edges crisp. If you over-sponge, you’ll lose that beautiful angular look.
Uneven Facets?
If your cuts look choppy, your clay is likely too soft. Let it dry for another hour. If the tool drags, the clay is too dry—mist it lightly and wrap it in plastic for a bit.
Step 3: Handle and Finish
-
Pull a strap handle:
Pull a thick strap of clay for the handle. I like to let this stiffen into a slight curve before attaching it, forming a simple ‘C’ shape that complements the geometric body without competing with it. -
Attach the handle:
Score and slip the attachment points on the mug body. Position the handle so the top attachment sits just below the rim and the bottom curve lands comfortably against the faceted wall. Press firmly to secure. -
Final wipe down:
Check the interior for any crumbs of clay and wipe the rim one last time. Allow the mug to dry very slowly under loose plastic to ensure the handle doesn’t pull away as it shrinks. -
Bisque fire:
Once bone dry, bisque fire the mug to Cone 04 (or your clay body’s recommendation). -
Glaze application:
Dip or brush on a semi-transparent white or cream glaze. Avoid thick, opaque glazes, as they will fill in the facets and obscure the sharp lines you worked so hard to carve. -
Glaze firing:
Fire to maturity (typically Cone 5 or 6 for stoneware). The heat will cause the speckles in the clay to bleed through the glaze, creating that lovely spotted texture.
Sharper Lines
Use a metal rib to burnish the flat planes of your facets after cutting. This compresses the clay and makes the geometric edges pop significantly more after glazing.
Now you have a stunning, architectural piece that highlights the natural beauty of the clay body
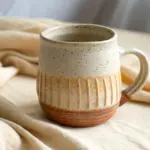
Pinched Belly Comfort Mug
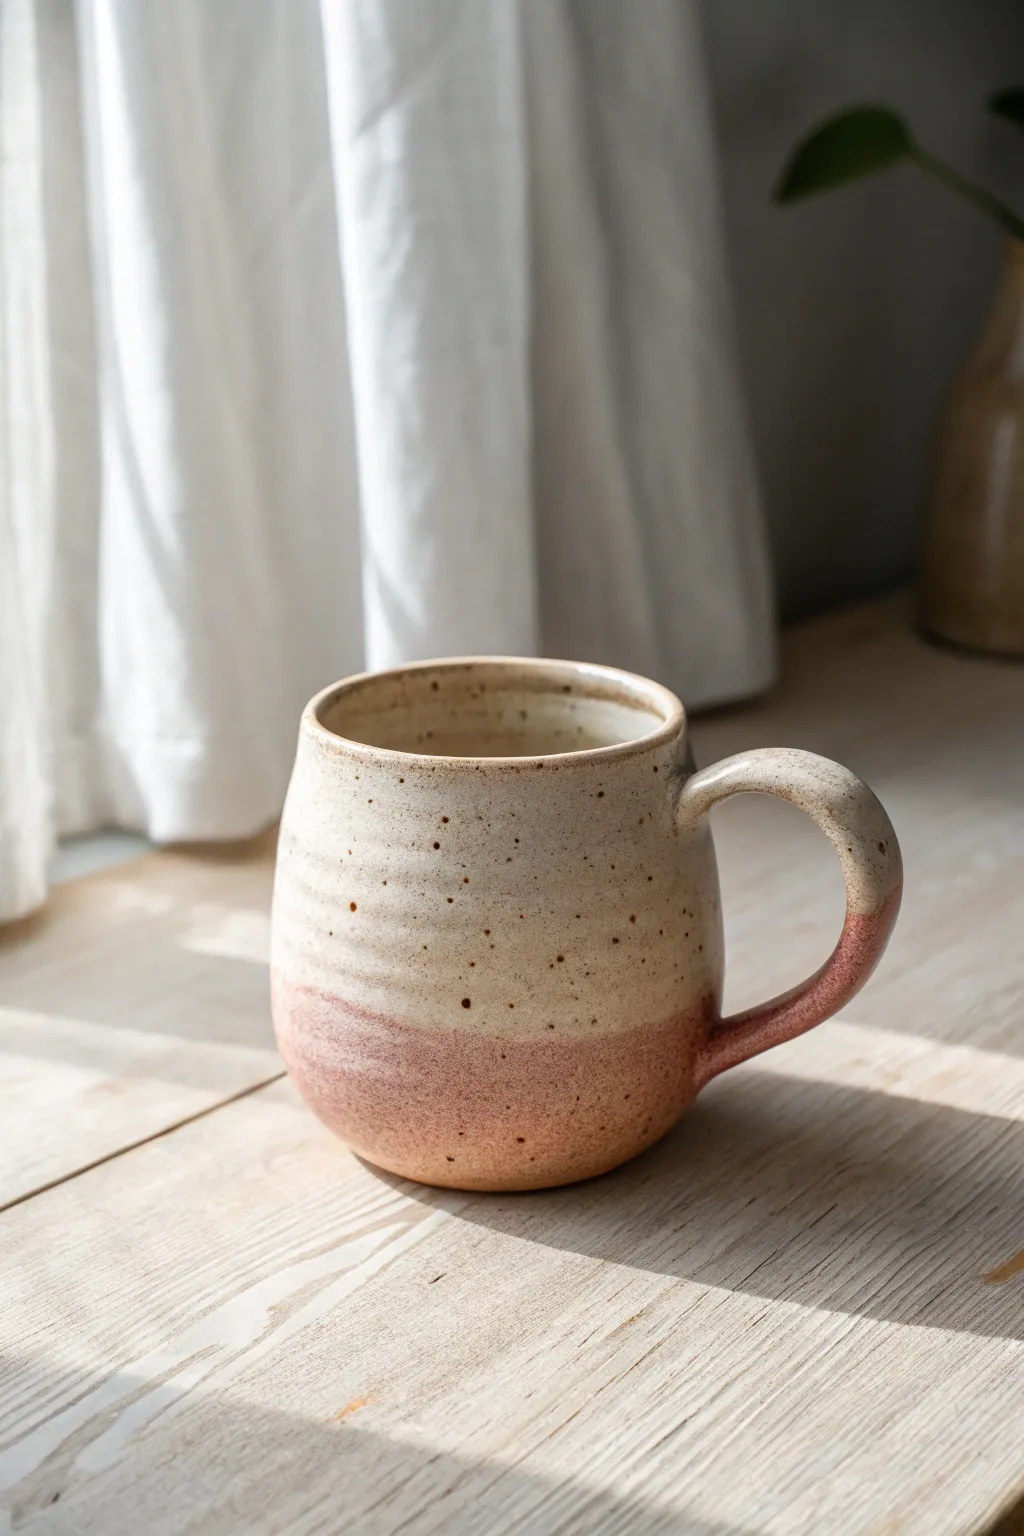
This cozy, rounded mug features a comforting “belly” shape perfect for cupping in your hands. The finish combines a natural speckled clay body with a soft pink dipped bottom, creating a warm, organic feel.
Step-by-Step Tutorial
Materials
- Speckled stoneware clay (approx. 1 lb)
- Pottery wheel
- Throwing sponge
- Wooden throwing rib
- Needle tool
- Wire cutter
- Trimming tools
- Serrated rib or scoring tool
- Slip
- Clear glaze (food safe)
- Peachy-pink glaze (opaque or semi-opaque)
- Soft fan brush (optional)
Step 1: Throwing the Form
-
Center the Clay:
Begin with a well-wedged ball of speckled clay on the wheel head. Use steady pressure and water to center the clay into a low mound. -
Open and Widen:
Drill your thumbs down into the center, leaving about 1/4 inch for the floor. Pull the clay outward to establish the width of the base, keeping it slightly narrower than the eventual belly. -
Pull the Cylinder:
Slowly pull the walls upward. Keep the walls even, but allow the clay to be slightly thicker at the bottom to support the eventual curve. -
Shape the Belly:
Place one hand inside and one outside. Apply gentle pressure from the inside hand to push the clay outward, creating a rounded, bulbous belly in the lower half of the mug. -
Collar the Rim:
As you near the top, gently collar the clay inward to create a slightly narrower opening. This traps heat and enhances the cozy aesthetic. -
Smooth the Surface:
While the wheel is spinning slowly, run a wooden rib or damp sponge up the exterior to remove throwing lines and refine the curve. I find this really helps the speckles show through later.
Pro Tip: Speckles
If you don’t have pre-speckled clay, knead granular ilmenite or manganese into plain stoneware. Wear a mask when mixing powders.
Step 2: Handle and Trimming
-
Create a Pulled Handle:
With a separate lump of clay, pull a strip of clay vertically with wet hands until it creates a tapered, strap-like shape. Set it aside to firm up into a ‘leather hard’ state. -
Trim the Foot:
Once the mug body is leather-hard, flip it over on the wheel. Trim away excess weight from the bottom, creating a clean foot ring that mirrors the curve of the belly. -
Shape the Handle Curve:
Curve your handle strip into a ‘C’ shape. The top attachment should be thicker, tapering down to the bottom attachment. -
Attach the Handle:
Score and slip both the mug body and the handle endpoints. Press the handle firmly onto the mug, blending the seams with your thumb or a wooden tool until invisible. -
Final Smooth and Dry:
Run a damp sponge over the handle and attachments to ensure smoothness. Let the mug dry slowly to the ‘bone dry’ stage before bisque firing.
Level Up: Ombré Effect
Use an airbrush to spray the pink glaze lightly upward onto the clear section for a soft, seamless gradient fade.
Step 3: Glazing and Finishing
-
Bisque Fire:
Fire the mug in a kiln to cone 04 (or your clay’s specific bisque temperature). -
Apply Interior Glaze:
Pour clear glaze into the interior of the mug, swirl it to coat the entire inside, and pour out the excess. Wipe the rim clean. -
Dip the Bottom:
Hold the mug by the rim and dip the bottom third into the peachy-pink glaze at an angle. Hold it there for 3-5 seconds to build opacity, then lift. -
Glaze the Top Exterior:
Brush or dip the top two-thirds of the exterior in clear glaze. Be careful not to overlap heavily with the pink section unless you want a blended effect. -
Clean the Foot:
Using a damp sponge, meticulously wipe all glaze off the very bottom foot ring to prevent it from sticking to the kiln shelf. -
Final Fire:
Load the mug into the kiln for the final glaze firing (typically Cone 5 or 6 depending on your clay and glaze choice).
Enjoy your warm beverage in this comforting, perfectly tailored mug
Scalloped Rim Tea Mug
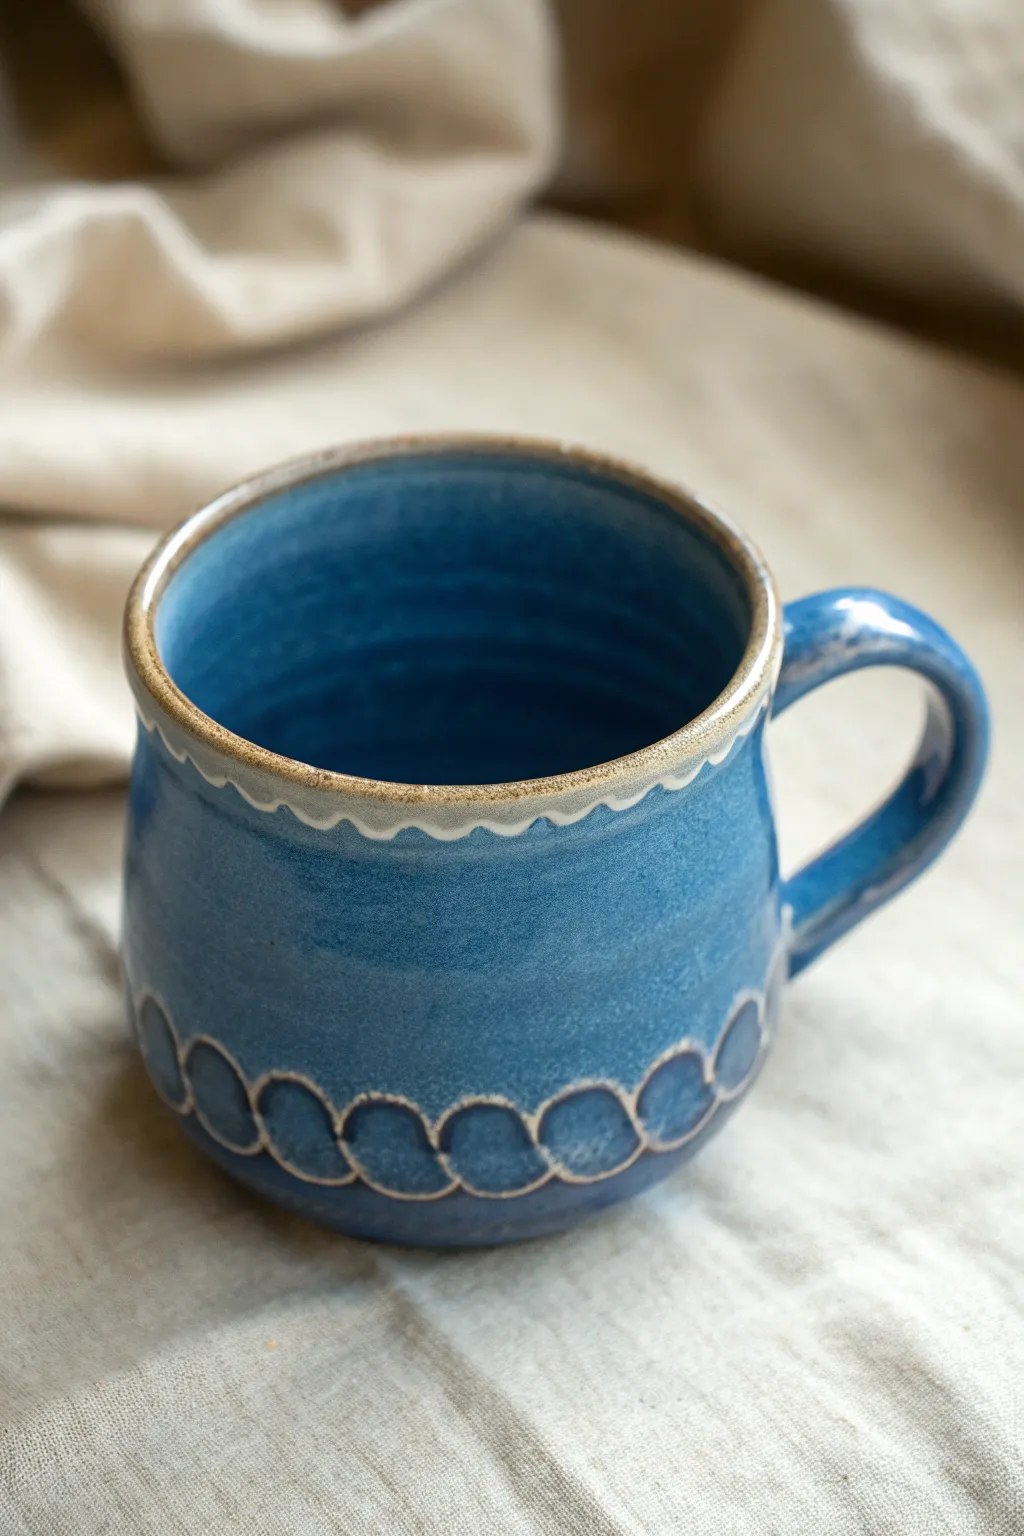
This charming handmade mug features a deep ocean blue glaze accented by delicate scalloped carving at the rim and base, revealing the raw clay body beneath. Its rounded, huggable shape and sturdy handle make it perfect for cozy mornings with a hot cup of tea.
Step-by-Step
Materials
- Stoneware clay (buff or speckled)
- Pottery wheel
- Throwing tools (sponge, wire, ribs)
- Trimming tools
- Creating tools (pointed loop tool or sgraffito tool)
- Small paintbrush
- Wax resist
- Deep glossy blue glaze
- Kiln for bisque and glaze firing
Step 1: Throwing and Shaping
-
Center the Clay:
Begin with about 1-1.5 lbs of wedged stoneware clay. Slam it onto the center of your wheel head and use wet hands to coning up and down until the clay is perfectly centered and spinning smoothly. -
Open and Pull:
Open the clay to create the floor, leaving it about 1/2 inch thick for later trimming. Pull the walls up into a cylinder, keeping your hand speed consistent to avoid twisting. -
Belly Out the Form:
Using a rib tool on the inside and a gentle hand on the outside, push the belly of the pot outward to create a rounded, bulbous shape. Keep the rim slightly narrower than the widest part of the belly to trap heat. -
Refine the Rim:
Compress the rim with a chamois or sponge. I like to leave the rim slightly thickened and rounded, as this feels best against the lips.
Step 2: Trimming and Handle
-
Leather Hard Stage:
Let the mug dry to a leather-hard state. It should be firm enough to handle without deforming but still cool to the touch. This usually takes overnight under loose plastic. -
Trim the Foot:
Invert the mug on the wheel and trim away excess weight from the bottom. Carve distinct foot ring, creating a clear stopping point for your glaze about a quarter-inch up from the bottom. -
Pull a Handle:
Pinch a carrot-shaped piece of clay and wet-pull it into a long, tapered strap. Curve it into a question-mark shape and let it stiffen up slightly on a board until it holds its arch. -
Attach the Handle:
Score and slip the contact points on both the mug and the handle. Press the handle firmly onto the mug body, smoothing the seams with a damp finger or wooden tool until they are invisible.
Uneven Scallops?
If your hand is shaky, lightly sketch the wave pattern with a pencil first. The pencil graphite will burn off in the kiln, leaving no trace.
Step 3: Carving the Scallops
-
Mark the Guidelines:
While spinning the wheel slowly, lightly etch two horizontal bands: one just below the rim and one just above the foot. These will be the boundaries for your scalloped patterns. -
Carve the Top Wave:
Using a small loop tool or carving stylus, carve a continuous wavy line just below the rim guideline. Dig slightly into the clay to create a texture that will break the glaze later. -
Carve the Bottom Arches:
Near the foot, carve a repeating pattern of arches or semi-circles. Connect them end-to-end to form a chain of scallops that wraps around the entire base of the mug. -
Smooth the Burrs:
Once the carving crumbs are bone dry, gently rub over the carved areas with a soft scrubby or finger to knock off any sharp clay burrs without blurring the design.
Level Up
Try using a different color slip (like white or black) inside the carved lines before glazing to create higher contrast against the blue.
Step 4: Glazing and Firing
-
Bisque Fire:
Load the bone-dry mug into the kiln and bisque fire to cone 04. This hardens the clay and prepares it for glazing. -
Wax Resist Application:
Apply liquid wax resist to the very bottom foot ring and, crucially, carefully paint a thin line of wax over the raised raw clay edge of your rim. This prevents glaze from adhering there, creating that toasted brown lip. -
Wax the Carved Lines (Optional):
If you want the carved white lines to be very crisp raw clay like the photo, you can carefully apply wax resist over your carved scratches. Alternatively, rely on the glaze ‘breaking’ (thinning out) over the sharp edges. -
Dip in Glaze:
Using tongs or your hand, dip the entire mug into a bucket of deep blue stoneware glaze. Hold it for 3-5 seconds to get an even coat. Shake off excess drips before turning it upright. -
Clean Up:
Use a damp sponge to wipe any glaze droplets off the waxed foot ring. If you waxed the rim, wipe away any beads of glaze sitting on top of the wax. -
Glaze Fire:
Fire the mug to maturity (likely cone 5 or 6 depending on your clay body). The heat will melt the blue glaze, causing it to pool in the carved textures and break brown over the rim.
Enjoy the warmth of your new favorite mug as you sip your morning brew.
Thumb Rest Handle Mug
This cozy, handmade mug features a beautifully ergonomic handle with a built-in thumb rest, perfect for securely cradling your morning coffee. The finish uses a speckled clay body glaze contrasted against a raw, exposed clay base for a rustic, earthy aesthetic.
Step-by-Step Guide
Materials
- Speckled stoneware clay (mid-fire)
- Pottery wheel
- Throwing tools (sponge, wire cutter, rib, needle tool)
- Trimming tools
- Scoring tool (serrated rib)
- Slip (made from your clay body)
- Clear or white glossy glaze
- Kiln
- Rolling pin or slab roller
Step 1: Throwing and Shaping the Body
-
Center the clay:
Start with about 1 to 1.5 lbs of speckled stoneware clay. Wedge it thoroughly to remove air bubbles, then slam it onto the center of your wheel head. Use your palms and water to cone the clay up and down until it is perfectly centered and spinning without wobble. -
Open the form:
Press your thumbs into the center of the mound to open it, leaving about a half-inch of thickness at the bottom for the foot. Pull the floor out until it’s the desired width of your mug. -
Pull the walls:
Using your sponge and fingers, gently pull the clay walls upward. Aim for an even thickness from bottom to top. As you pull, slightly taper the form inward near the top rim to help keep beverages warm. -
Refine the shape:
Use a metal or wooden rib on the outside while supporting the inside with your hand. Gently bold the bottom section slightly to give it that rounded, ‘cupped’ feel seen in the image. -
Finish the rim:
Compress the rim using a chamois or a damp sponge to smooth it out. This ensures it will feel comfortable against the lips. -
Cut and dry:
Run your wire cutter under the base to separate it from the wheel head. Carefully lift it onto a ware board and let it dry to a ‘leather hard’ stage.
Step 2: Trimming and Handle Creation
-
Trim the foot:
Once leather hard, center the mug upside down on the wheel. Use a trimming tool to carve away excess weight from the bottom and define a foot ring. I like to leave the texture slightly rough here to match the raw aesthetic. -
Pull a strap handle:
Take a separate lug of clay and pull a traditional strap handle using water and wet hands. The strap should be wide enough to support the weight of a full mug. -
Form the thumb rest:
While the handle is still plastic but firming up, curve the top section. Instead of a simple curve, press your thumb firmly into the top arch where it will attach to the mug, creating a specific depression or flat spot. -
Attach the handle:
Score the mug surface and the handle attachment points vigorously. Apply slip generously. -
Blend the seams:
Press the handle onto the mug. Use a modeling tool or your finger to smooth the clay from the handle onto the mug body, ensuring a seamless connection. Verify the thumb rest feels natural in your hand. -
Bisque fire:
Allow the mug to dry completely (bone dry). Fire it in the kiln to cone 04 (or your clay’s specific bisque temperature).
Comfort Check
Before the clay dries, actually hold the mug. Adjust the thumb depression while the clay is soft to fit your specific grip for maximum ergonomics.
Step 3: Glazing and Finishing
-
Wax the base:
Apply wax resist to the bottom third of the mug’s exterior and the entire foot ring. This crucial step creates the two-tone look seen in the photo. -
Dip the glaze:
Stir your clear or white glaze well. Hold the mug by the foot and dip it upside down into the glaze bucket, stopping exactly where the wax line begins. Dip quickly to avoid thick buildup. -
Clean up:
Use a damp sponge to wipe any stray glaze droplets off the waxed area or the foot ring. The raw clay section should be completely clean. -
Glaze fire:
Load the mug into the kiln and fire to the mature temperature of your clay (usually Cone 5 or 6 for stoneware). The heat will interact with the iron in the clay to create those lovely specks throughout the glaze. -
Sand the bottom:
After firing and cooling, use a diamond sanding pad or wet-dry sandpaper to smooth the unglazed raw clay section at the bottom so it won’t scratch your table.
Uneven Drying Cracks
Handles dry faster than bodies. Cover the handle with plastic or wax resist to slow its drying speed so it matches the mug body, preventing separation cracks.
Now brew your favorite drink and enjoy the tactile comfort of your new custom creation.
Twisted Rope Handle Mug
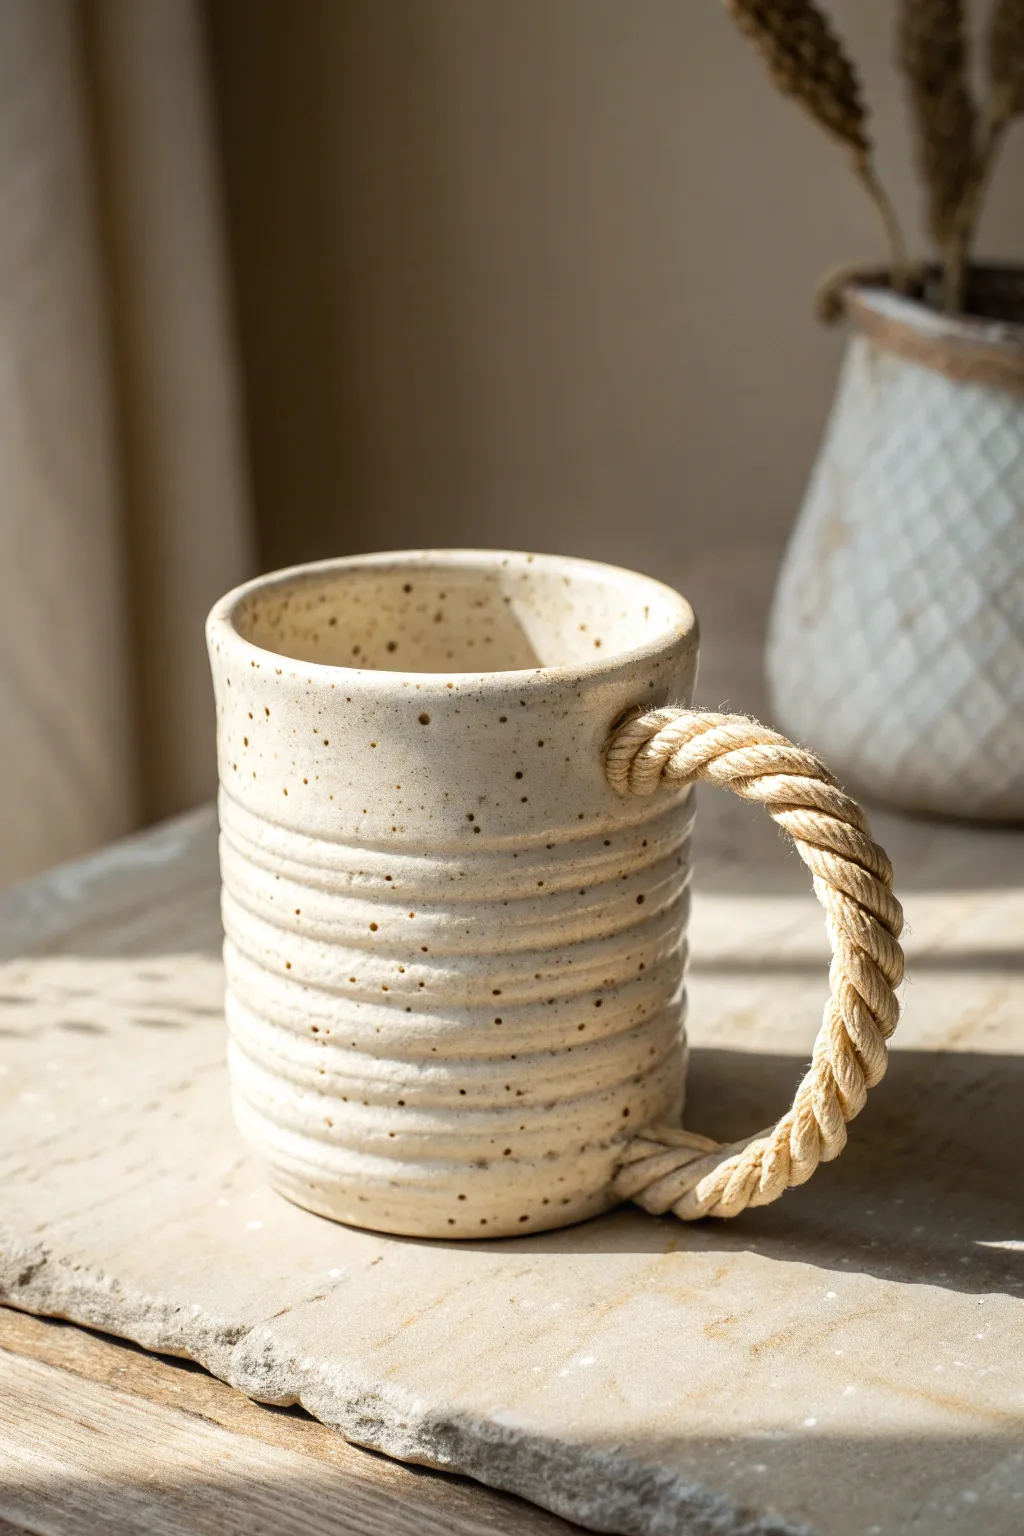
This project combines the raw, speckled beauty of stoneware with a unique trompe-l’œil effect. You will create a sturdy, functional mug featuring a handle that looks remarkably like twisted natural rope, permanently captured in clay.
How-To Guide
Materials
- Speckled stoneware clay (e.g., buff speckled or oatmeal)
- Pottery wheel (or slab roller for hand-building)
- Clay carving tools (needle tool, modeling tool)
- Sponge
- Wire cutter
- Slip (clay slurry)
- Scoring tool (or serrated rib)
- Clear matte or satin glaze
- Kiln
Step 1: Forming the Mug Body
-
Prepare the clay:
Begin by wedging about 1.5 to 2 pounds of speckled stoneware clay to remove air bubbles and ensure consistency. -
Throw the cylinder:
Center your clay on the wheel and open it up. Pull the walls up into a straight cylinder, aiming for a height of about 4-5 inches. Keep the walls even, but leave them slightly thicker than a standard delicate teacup to match the rustic aesthetic. -
Create the texture:
While the wheel is spinning slowly, use a rounded wooden modeling tool or your finger to gently press horizontal grooves into the clay. These ridges should spiral up the entire body of the mug, giving it a ribbed, hand-thrown appearance. -
Refine the rim:
Smooth the rim with a chamois or a damp sponge to make sure it’s comfortable for drinking. I like to slightly flare the rim inward just a hair to hold heat better. -
Trim the base:
Once the mug is leather-hard, trim the bottom to create a clean foot ring. This elevates the form and adds to the professional finish.
Step 2: Sculpting the Rope Handle
-
Roll coils:
Roll out two long, even coils of clay, each about the thickness of a pencil. Ensure they are long enough to form a generous handle loop when twisted. -
Twist the rope:
Lay the two coils side-by-side. Gently twist them around each other to simulate the look of rope. Don’t twist too tightly, or it will look rigid; aim for a relaxed, natural ply. -
Reinforce the twist:
Once twisted, gently roll the combined rope on your table surface just once to secure the strands together without flattening the texture. -
Detail the texture:
Using a needle tool or a stiff brush, lightly scratch fine lines along the length of each strand to mimic the fibers of hemp or jute rope. -
Shape the arch:
Bend the twisted clay into a ‘C’ shape or ear shape that fits comfortably in your hand. Let this stiffen up slightly so it doesn’t flop when attached.
Cracking Up?
If the rope handle cracks while bending, the clay is too dry. Spray it lightly with water, wrap it in plastic for 20 minutes to rehydrate, and try twisting again.
Step 3: Assembly and Finishing
-
Score the attachment points:
Hold the handle up to the mug to determine placement. Use your scoring tool to rough up the clay on the mug body and the ends of the handle. -
Apply slip:
Dab a generous amount of slip onto the scored areas. This acts as the glue for your join. -
Attach the handle:
Firmly press the handle onto the mug body. Wiggle it slightly to ensure a solid bond is formed between the surfaces. -
Clean the connection:
Instead of blending the clay smooth, carefully pack tiny bits of clay around the join if needed, but try to maintain the distinct look of the ‘rope’ ending directly against the mug wall. Use a small brush to clean away excess slip. -
Bisque fire:
Allow the mug to dry slowly and evenly to prevent handle cracks. Once bone dry, bisque fire the piece according to your clay body’s specifications (usually Cone 04). -
Glaze application:
Dip the entire mug into a clear matte or satin glaze. This is crucial as it allows the natural speckles of the clay to shine through, mimicking the sandy color of the reference image. -
Wipe the foot:
Use a damp sponge to wipe any glaze off the very bottom of the foot ring so it doesn’t stick to the kiln shelf. -
Final firing:
Glaze fire to maturity (likely around Cone 5 or 6). This final firing will vitrify the clay and seal the surface, making it food safe.
Knotted Nuance
For a nautical touch, tie actual knots in the clay coils at the attachment points before sticking them to the mug. It adds complex realism.
Once cooled, your mug is ready to bring a touch of earthy charm to your morning coffee routine
Branch-Inspired Sculptural Handle Mug
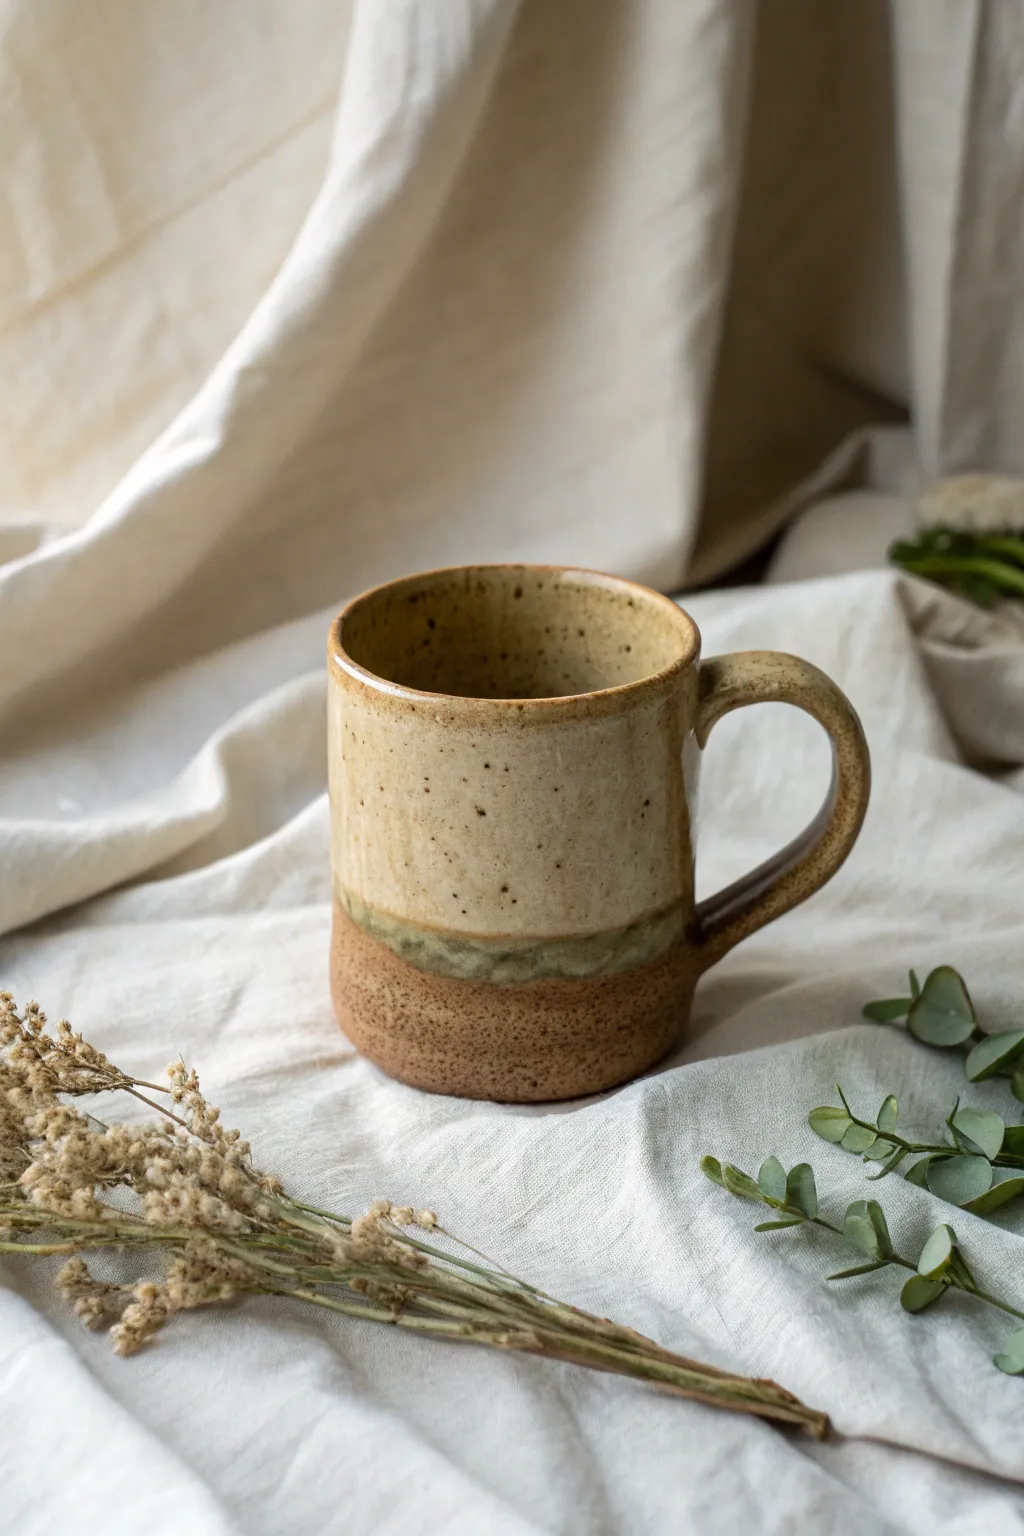
Embrace the beauty of raw earth with this textured wheel-thrown mug, featuring a comforting contrast between smooth, speckled glaze and gritty, exposed clay. This project highlights the natural character of stoneware, creating a cozy vessel perfect for your morning brewed coffee or tea.
Step-by-Step Tutorial
Materials
- Speckled stoneware clay (mid-fire)
- Pottery wheel
- Throwing sponges
- Wire cutting tool
- Ribs (wooden and metal)
- Needle tool
- Trimming tools (loop tool)
- Serrated rib or scoring tool
- Slip
- Oatmeal or speckled cream glaze
- Wax resist (optional)
- Kiln
Step 1: Throwing the Form
-
Center the clay:
Begin with about 1 pound of speckled stoneware clay. Wedge it thoroughly to remove air bubbles, then slam it onto the wheel head. Using water and steady pressure, center the clay until it runs smooth without wobbling. -
Open and pull:
Open the centered clay to create the floor, leaving it about a quarter-inch thick. Compress the floor with your fingers or a flat tool to prevent cracking later. Begin pulling up the walls to form a cylinder, keeping your hand speed consistent with the wheel rotation. -
Shape the body:
Using a rib on the inside and your hand on the outside, gently belly out the form slightly if desired, or keep it straight-sided for a classic cylinder look. Aim for an even thickness from bottom to top. -
Refine the rim:
Use a chamois or a small strip of plastic to compress and round the rim. This makes the mug comfortable to drink from and strengthens the edge against chipping. -
Cut from the wheel:
Run a wire tool under the mug to separate it from the bat. Allow it to firm up to a leather-hard state, which usually takes a day or two depending on humidity.
Fixing Handle Cracks
If hairline cracks appear at the join during drying, score the crack, add a tiny coil of soft clay, and compress it back in with a rubber rib.
Step 2: Trimming and Handle Making
-
Trim the foot:
Once leather hard, center the mug upside down on the wheel. Secure it with clay lugs. Use a loop tool to trim away excess weight from the bottom, creating a designated foot ring. I like to leave the texture quite rough here to enhance the rustic aesthetic. -
Pull a handle:
Take a separate lug of clay and hold it vertically. Wet your hand and pull the clay downward in a milking motion to create a long, tapered strip that is oval in cross-section. -
Form the curve:
Cut the pulled strip to your desired length. Gently curve it into a ‘C’ shape or an ear shape, placing it on a board to stiffen slightly until it holds its form but is still flexible. -
Attach the handle:
Score the attachment points on both the mug body and the handle ends vigorously with a serrated tool. Apply slip to both scored areas. -
Blend the seams:
Press the handle firmly onto the mug. Use your thumb or a modeling tool to blend the clay from the handle onto the mug body, ensuring a seamless connection. Wipe away excess slip with a damp sponge.
Step 3: Glazing and Finishing
-
Bisque fire:
Allow the mug to dry completely (bone dry). Load it into the kiln and bisque fire it to roughly Cone 04 to prepare it for glazing. -
Wax the bottom:
Apply wax resist to the bottom third of the mug’s exterior and the foot ring. This creates the distinct line where the glaze stops and the raw clay begins. -
Dip the glaze:
Using dedicated tongs or your hand, dip the mug into a bucket of oatmeal or speckled cream glaze. Submerge it just until the glaze reaches your wax line or stop strictly at the 2/3rds mark if dipping by hand. -
Clean the line:
Even with wax, checks the edges. Use a damp sponge to wipe back any glaze drips that crossed onto the raw clay area to ensure a crisp, clean transition line. -
Glaze fire:
Load the mug into the kiln for the final glaze firing (usually Cone 5 or 6 for stoneware). Ensure the unglazed bottom doesn’t touch other pots.
Add Earthy Texture
Before bisque firing, tap the bottom third of the mug with a stiff brush or a textured rock to enhance the raw, gritty look shown in the photo.
Once cooled, your mug is ready to bring a touch of handcrafted warmth to your daily routine
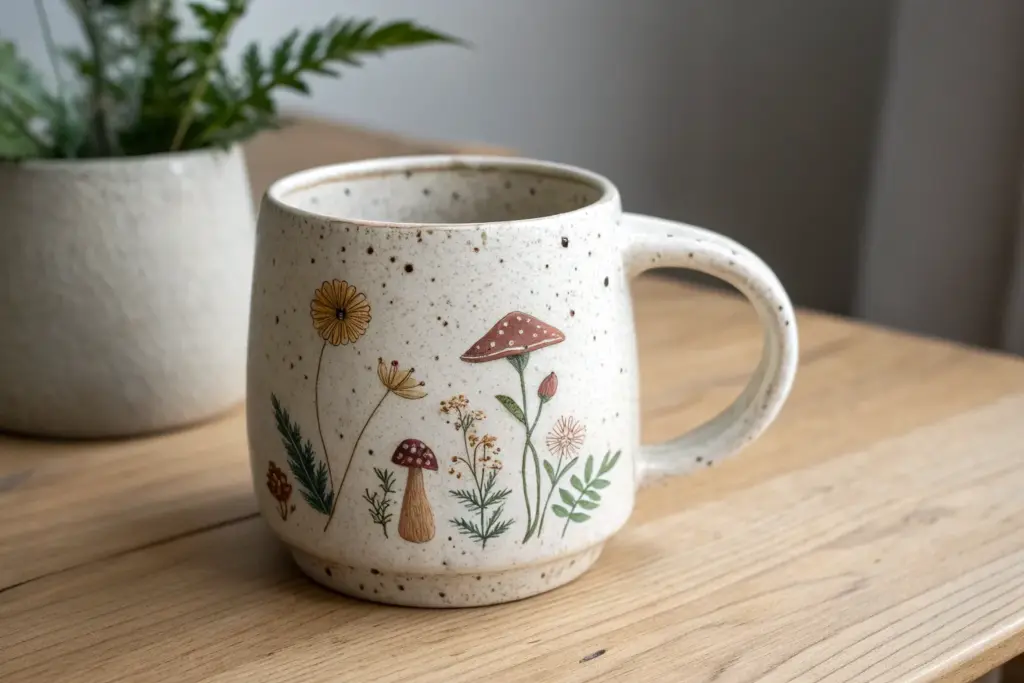
Mushroom Rim Whimsy Mug
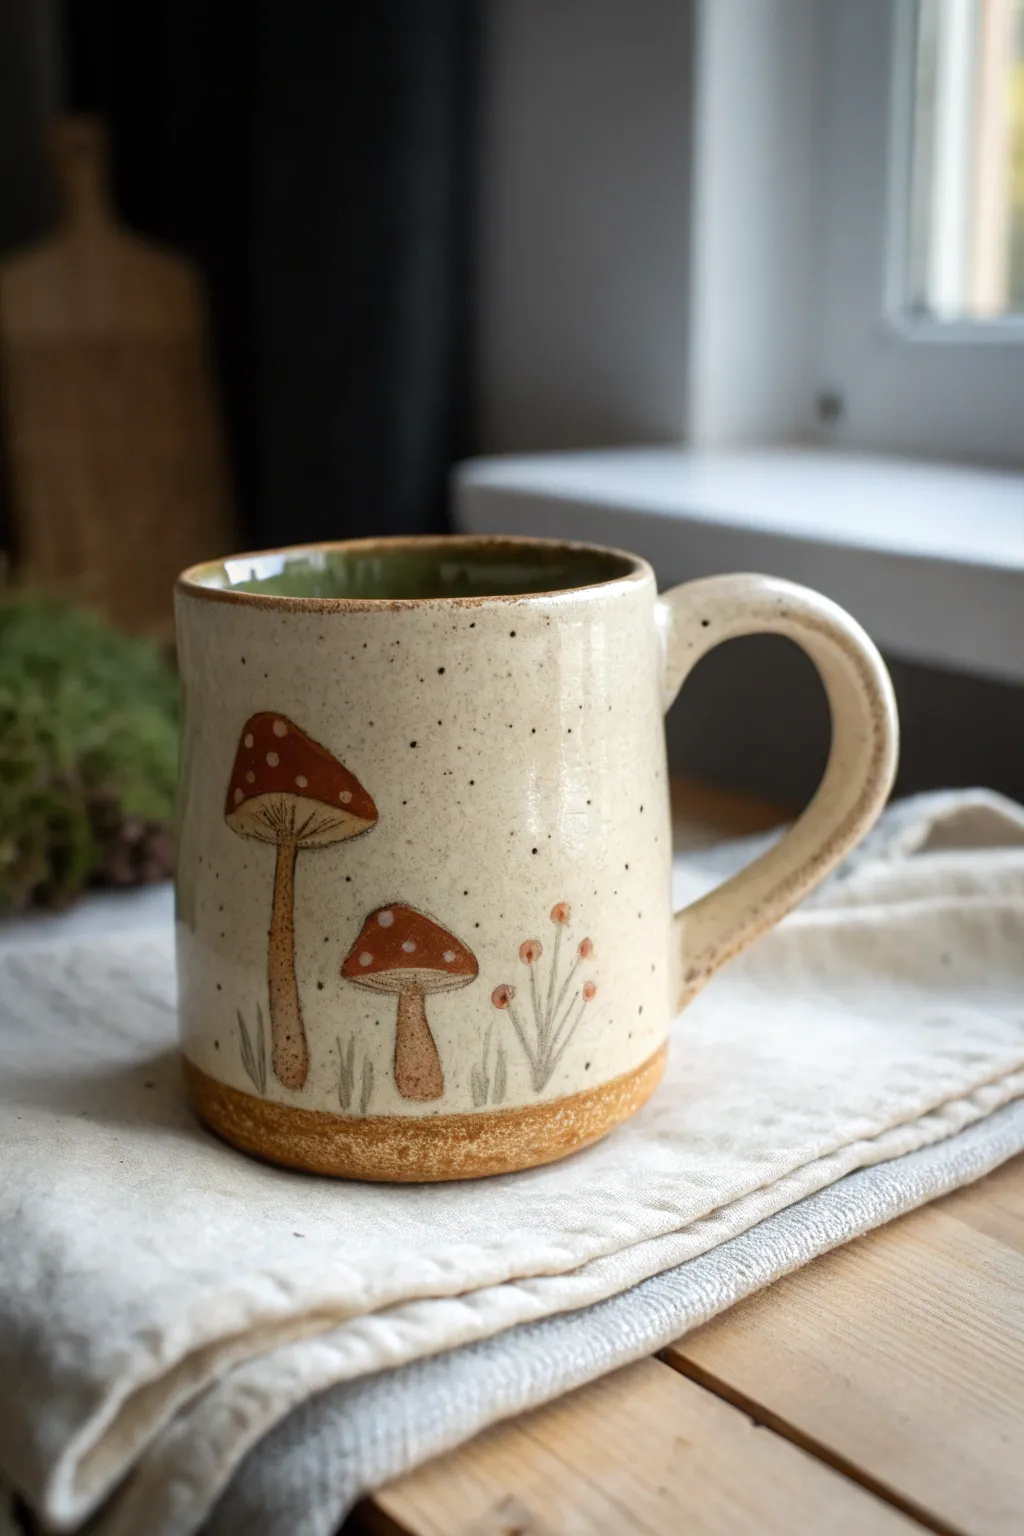
This charming ceramic piece brings the whimsy of the forest floor right to your morning coffee routine. With its speckled clay body, hand-painted fly agaric mushrooms, and a peekaboo green interior, it feels both rustic and lovingly detailed.
Step-by-Step
Materials
- Speckled stoneware clay (white or light beige)
- Pottery wheel (or slab roller/rolling pin for hand-building)
- Pottery tools (rib, sponge, wire tool, needle tool)
- Underglaze (Red, Orange, White, Brown, Sage Green, Forest Green)
- Fine liner brushes (size 0 and 00)
- Clear transparent glaze (cone 5/6 or compatible with your clay)
- Wax resist
Step 1: Forming the Mug Body
-
Throwing or Building:
Begin with about 1 lb of clay. If throwing on the wheel, center your clay and pull a cylinder approximately 4-5 inches tall. I like to keep the walls relatively straight with just a slight inward taper at the top to hold the heat. -
Refining the Shape:
Use a rib tool to smooth the exterior walls, removing any throwing rings if you prefer a smooth canvas for your illustration. Compress the rim with a piece of chamois or plastic for a comfortable drinking edge. -
Trimming the Foot:
Once the mug is leather hard, trim the bottom. For this specific look, leave the bottom quarter-inch slightly thicker and unglazed later to create that raw, textural contrast at the base. -
Creating the Handle:
Pull a handle from a small lug of clay. Aim for a comfortable C-shape that allows for a three-finger grip. Attach it securely by scoring and slipping both the mug body and the handle endpoints. -
Smooth Connections:
Using a barely damp sponge or modeling tool, smooth the connection points of the handle so it looks seamless, then let the entire mug dry slowly to the bone-dry stage.
Step 2: Designing the Scene
-
Sketching the Outline:
Lightly sketch your design onto the bone-dry clay using a standard graphite pencil. Don’t worry about mistakes; the graphite will burn off in the kiln. Outline two mushrooms of varying heights. -
Base Coating the Stems:
Using a diluted brown underglaze, wash in the stems. Keep this layer semi-transparent so the speckles of the clay body still show through, giving it an organic feel. -
Painting the Caps:
Apply a rusty red or terracotta underglaze to the mushroom caps. You may need two coats for opacity, but avoiding thick blobs ensures a smooth finish. -
Adding Details:
With your thinnest liner brush and a darker brown underglaze, outline the stems and add the gills under the caps. Use quick, light strokes for the grass blades at the base. -
The Signature Spots:
Dip the non-brush end (the handle tip) of a paintbrush into white underglaze. Dot the red caps to create the classic ‘fly agaric’ mushroom spots. -
Floral Accents:
Paint fine lines for taller stems next to the mushrooms and use a dotting technique with orange or soft peach underglaze to create the tiny wildflowers. -
Bisque Firing:
Once all underglaze is completely dry, load the mug into the kiln for a bisque fire (usually cone 04 or 06).
Smudged Underglaze?
If you smudge your design on bone-dry clay, don’t scrub it with water! This can damage the wall. Instead, let it dry completely and gently scrape the error off with an X-Acto knife.
Step 3: Glazing and Finishing
-
Wax Resist Application:
Apply wax resist carefully to the bottom half-inch of the mug’s exterior. This preserves the raw, sandy texture seen at the base of the example image. -
Interior Glazing:
Pour a forest green or sage green glaze into the interior of the mug. Swirl it quickly to coat the entire inside and pour out the excess immediately. -
Wiping the Rim:
Use a damp sponge to wipe any green glaze drips off the rim, ensuring a clean transition to the exterior. -
Clear Glazing the Exterior:
Dip the exterior of the mug into a clear transparent glaze. The wax resist at the bottom will repel the glaze, keeping that section raw. -
Cleanup:
Even with wax resist, little droplets of glaze can stick. Wipe the waxed foot ring effectively with a sponge to ensure no glaze touches the kiln shelf. -
Final Firing:
Fire the mug to maturity (usually cone 5 or 6 depending on your clay body). This melts the clear glaze over your drawing, sealing it forever.
Add Texture
Before painting, use a needle tool to gently scratch vertical lines into the mushroom stems. This physical texture will catch the glaze and add tactile depth to the stems.
Enjoy your cozy new vessel, perfect for tea or coffee on a rainy afternoon
Stackable Totem Mug Set Idea
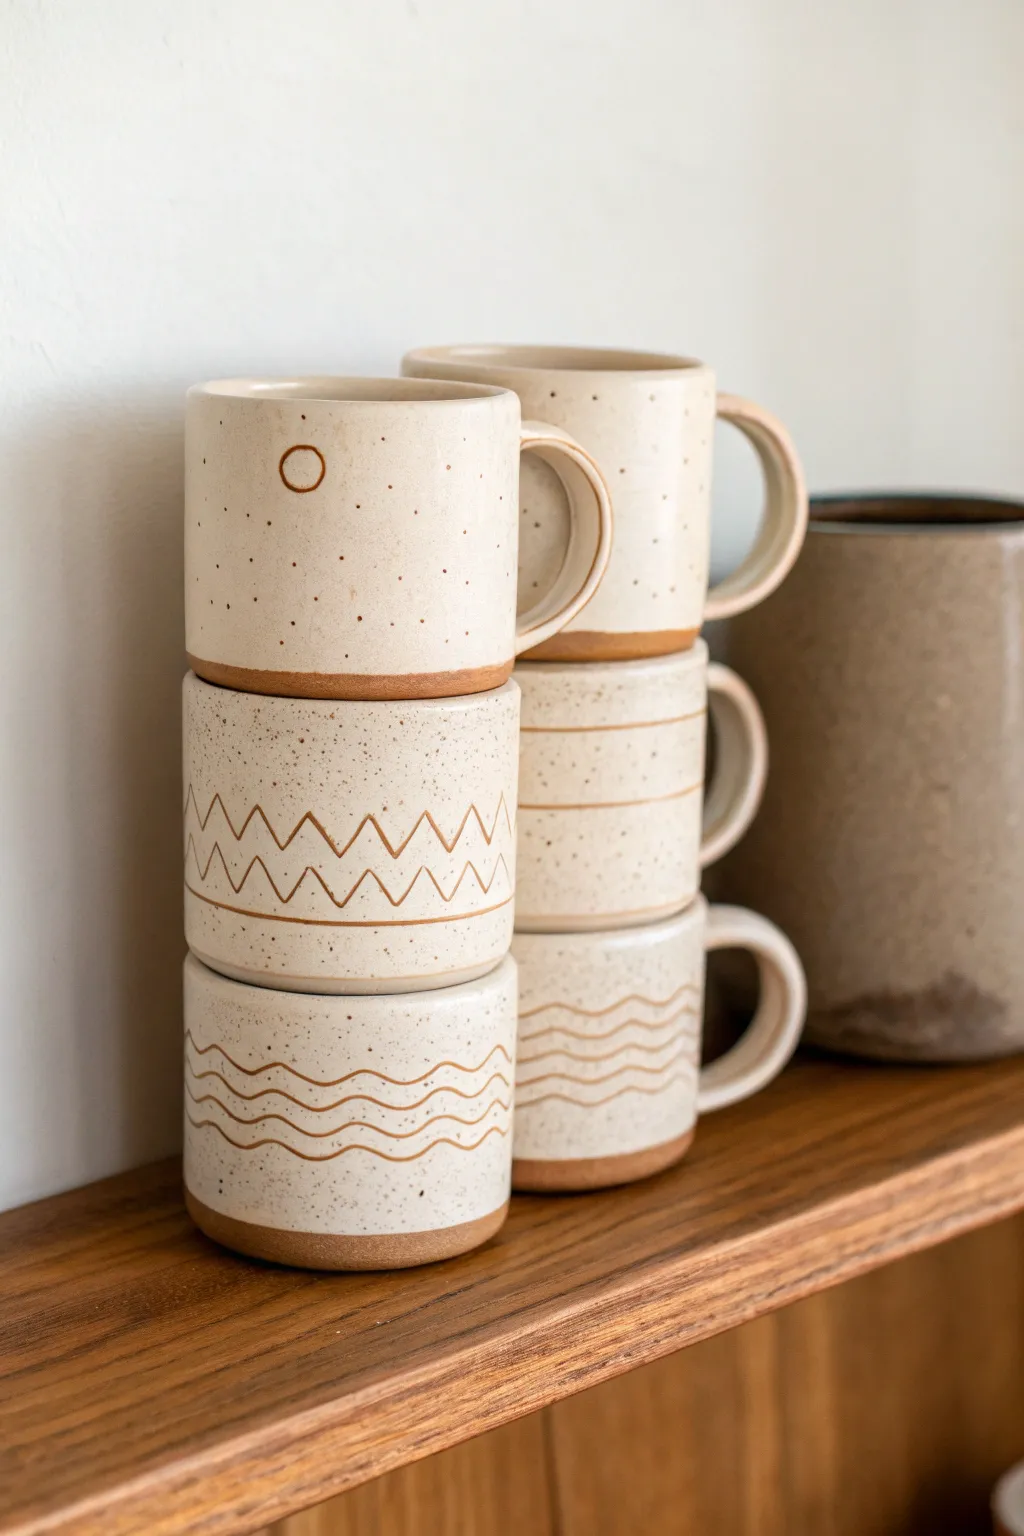
Embrace the warmth of modern ceramics with these stackable totem mugs, featuring unglazed raw clay bottoms and simple, rhythmic sgraffito patterns. The speckled cream glaze and minimalist designs create a beautiful, cohesive set that looks just as good on a shelf as it does in your hand.
How-To Guide
Materials
- Stoneware clay body (speckled buff, approximately 3-4 lbs)
- Pottery wheel
- Throwing tools (sponge, eerie, ribs, cutoff wire)
- Trimming tools
- Needle tool
- Carving tool or sgraffito loop tool
- White or cream speckled glaze (stoneware temperature)
- Wax resist
- Kiln
- Small paintbrush
Step 1: Throwing Uniform Cylinders
-
Weigh and Wedge:
Begin by weighing out three to six equal balls of speckled stoneware clay, approximately 450-500g each. Wedge them thoroughly to remove air bubbles and ensure the clay is homogenous, which makes throwing strictly identical forms much easier. -
Center and Open:
Secure a ball of clay on the wheel head and center it. Open the clay to establish a flat bottom, keeping the floor thickness consistent (around 1/4 inch) to avoid S-cracks later. -
Pull the Walls:
Pull the clay up into a straight-sided cylinder. Focus on keeping the walls straight and vertical rather than curving out. Aim for a height of about 3.5 inches and a consistent diameter. Use a straight rib on the outside to refine the shape and remove throwing lines. -
Create a Stacking Gallery (Optional):
If you want them to lock together securely, use your wooden rib to create a very subtle indentation inside the rim, or ensure the foot ring you trim later is slightly narrower than the top rim diameter. For simple stacking like the photo, just ensure the rims are perfectly flat and level. -
Repeat for the Set:
Repeat this process for all your mugs. I find it helpful to use a ruler or custom gauge to check that the height and width of each cylinder match the previous one exactly.
Step 2: Trimming and Handle Attachment
-
Dry to Leather Hard:
Allow the cylinders to dry slowly to a leather-hard state. The clay should be firm enough to hold its shape without distorting but soft enough to carve and attach handles. -
Trim the Foot:
Center a cylinder upside down on the wheel. Trim away excess clay from the bottom, creating a distinct foot ring. This unglazed area at the bottom is a key aesthetic feature of these mugs, so define a sharp line where the foot ends and the body begins. -
Pull Handles:
Pull strips of clay for your handles. Aim for a simple strap shape or a rounded oval profile. Let them stiffen slightly into a curve on a board until they match the moisture content of your mugs. -
Attach Handles:
Score and slip the attachment points on both the mug and the handle. Press the handle firmly onto the mug, smoothing the seams completely so the handle looks like it ‘grew’ out of the pot. Ensure the handle loops fit comfortably within the straight profile for tidy stacking.
Clean Lines Pro Tip
After waxing the carved lines, if glaze still sticks to the wax, simply wait for the glaze to dry completely, then gently wipe the waxed areas with a damp finger to reveal crisp clay lines.
Step 3: Surface Decoration
-
Plan the Totem Designs:
Decide on your patterns. The image shows three distinct themes: a simple circle ‘sun’, geometric zig-zags representing mountains or earth, and wavy lines for water or dunes. -
Carve the ‘Sun’ Mug:
For the top mug, use a needle tool or small loop tool to carve a single, small circle near the upper rim. Press gently to create an outline without punching through the wall. -
Carve the ‘Mountain’ Mug:
On the next mug, carve two parallel horizontal lines around the circumference. In between these lines, carve a zig-zag pattern. Work slowly to keep the spacing even as you rotate the mug. -
Carve the ‘Water’ Mug:
For the bottom design, carve a series of horizontal wavy lines. Keep the waves parallel to each other to maintain a graphic, modern look. Clean up any clay crumbs with a soft brush. -
Smooth the Burrs:
Once the carving is done, gently run a damp finger or a soft sponge over the carved lines to soften any sharp edges or burrs created by the tool.
Level Up: Iron Wash
Before waxing your carved lines, paint a thin red iron oxide wash into the grooves. This will make the raw clay lines turn a deeper, richer brown after firing for higher contrast.
Step 4: Glazing and Firing
-
Bisque Fire:
Load the bone-dry mugs into the kiln specifically for a bisque firing (usually Cone 04). This hardens the clay and prepares it for glazing. -
Wax the Pattern:
This is the crucial step for the ‘inlaid’ look. Using a fine brush and wax resist, carefully paint inside all your carved lines (the sun, the zig-zags, the waves). This prevents glaze from filling these lines, allowing the raw clay color to show through. -
Wax the Foot:
Apply wax resist to the bottom foot ring and about 1/4 inch up the side of the mug to create that clean, raw clay base seen in the photo. -
Dip Glaze:
Dip each mug into your speckled cream stoneware glaze. Hold it for about 3 seconds, then lift and shake off the excess. The wax in the lines will repel the glaze. -
Clean Up:
Use a damp sponge to wipe away any beads of glaze that might be sitting on top of the waxed lines or the foot ring. -
Glaze Fire:
Load the mugs into the kiln for the final glaze firing (typically Cone 5 or 6, depending on your clay and glaze). Ensure they don’t touch each other.
Stack your finished mugs to admire your modern ceramic totem art