If you’ve been craving handmade clay pottery ideas that feel doable (and actually useful), you’re in the right headspace. These are the kinds of projects I love teaching—simple forms you can personalize with texture, shape, and a little bit of playful detail.
Pinch Pot Bowls With Thumbprint Texture
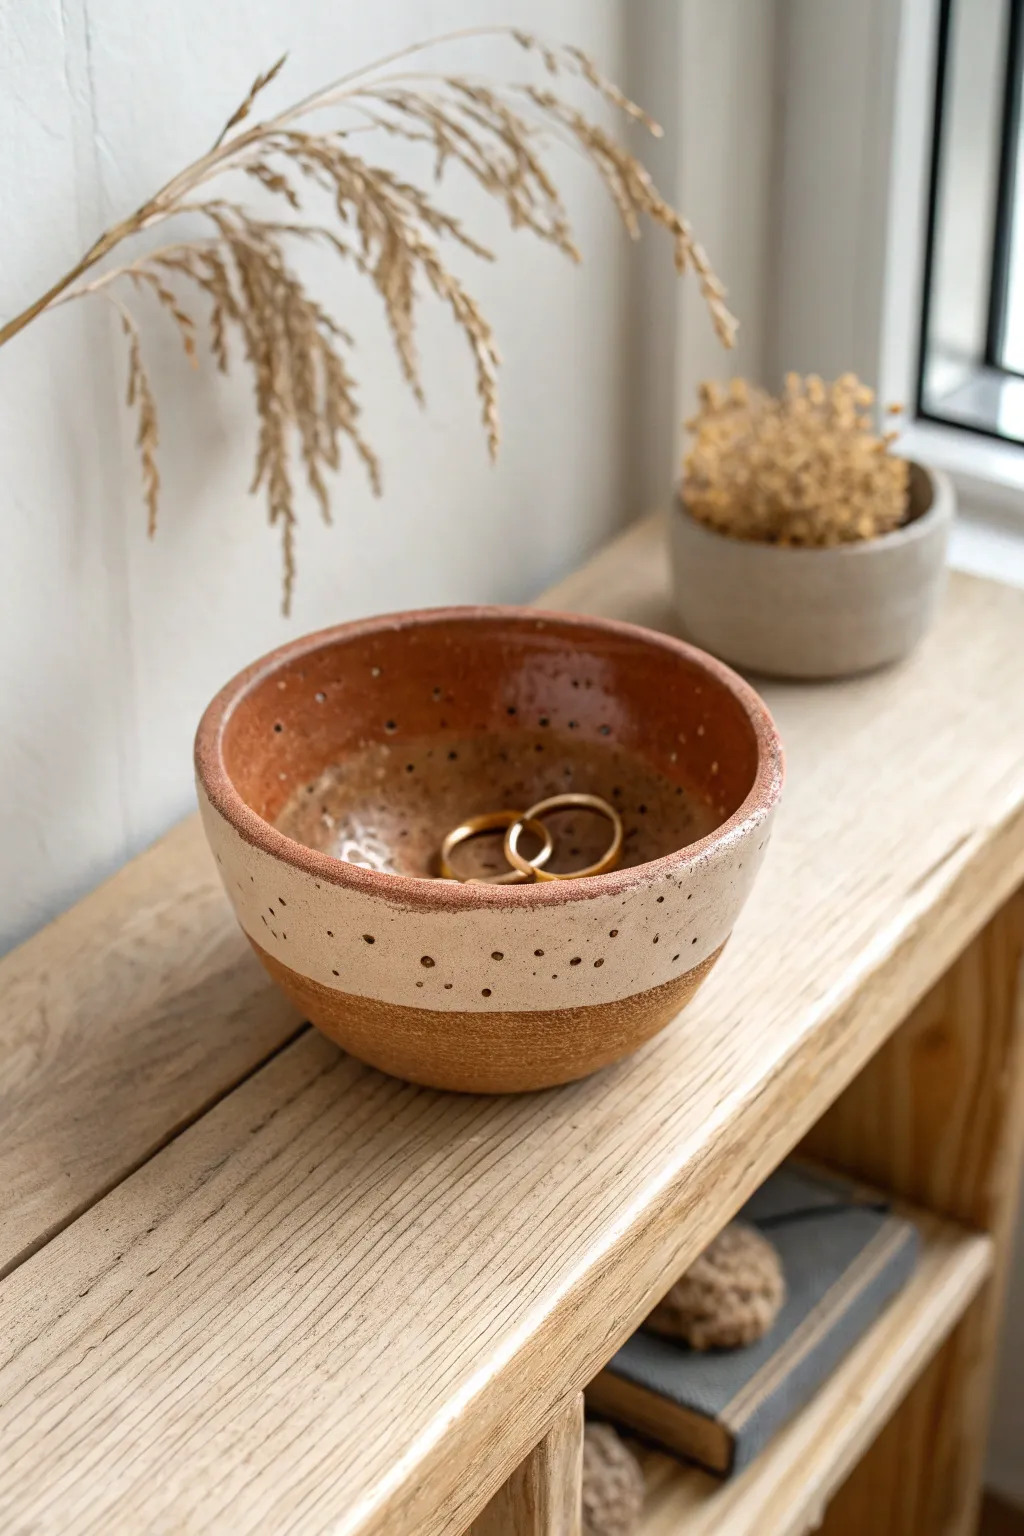
This charming, rustic bowl combines raw texture with glossy finishes for a grounded, earthy aesthetic. By layering unglazed clay with a dipped cream band and a rich amber interior, you’ll create a functional piece perfect for holding rings or small treasures.
How-To Guide
Materials
- Terracotta or red stoneware clay bod
- Cream or oatmeal colored dipping glaze
- Amber or honey brown interior glaze
- Needle tool or toothpick
- Sponge
- Bowl of water
- Flat work surface
- Kiln (or access to a firing service)
Step 1: Forming the Bowl
-
Prepare the Clay:
Start with a ball of terracotta clay roughly the size of a tennis ball. Wedge it thoroughly to remove any air bubbles, ensuring a uniform consistency before you begin shaping. -
Open the Center:
Hold the clay ball in one palm. Gently press your thumb into the center, pushing down until you are about a half-inch from the bottom. This establishes the internal depth of your bowl. -
Pinch the Walls:
Using a rhythmic pinching motion between your thumb (inside) and fingers (outside), rotate the ball while gently squeezing the clay upwards. aim for walls of even thickness, about a quarter-inch thick. -
Broaden the Shape:
As you pinch upwards, slightly angle your pressure outward to create a wider, open bowl shape rather than a tall cup. Smooth the rim with your finger to prevent any sharp edges. -
Flatten the Base:
Once satisfied with the shape, tap the bottom of the pot gently against your work surface. This creates a stable, flat foot so the bowl won’t rock or tip over. -
Refine the Surface:
Take a slightly damp sponge and run it over the exterior and interior walls. This smooths out fingerprint marks while keeping that lovely handmade character intact.
Uneven Drying?
If the rim dries faster than the base, flip the bowl upside down during the leather-hard stage. This helps equalize moisture loss and prevents warping.
Step 2: Adding Texture & Firing
-
Create the Texture:
While the clay is leather-hard, use a needle tool to poke small, random holes through the upper portion of the wall. Keep the holes relatively small to maintain structural integrity. -
Clean the Piercings:
After piercing, you might see small burrs of clay. wait a few minutes for them to stiffen, then brush them away gently so the holes look clean and deliberate. -
Drying Phase:
Set your bowl aside to dry slowly. Cover it loosely with plastic for the first day, then uncover it to let it reach a bone-dry state. Hurrying this step can cause cracks. -
Bisque Fire:
Load the bone-dry piece into the kiln for a bisque fire. This initial firing hardens the clay into ceramic, making it porous and ready to accept the glaze application.
Step 3: Glazing
-
Clean the Bisqueware:
Wipe the fired pot with a damp sponge to remove any kiln dust. This ensures the glaze adheres properly to the surface without crawling. -
Glaze the Interior:
Pour your amber glaze inside the bowl, swirl it to coat the entire inner surface, and pour out the excess. Wipe away any drips that land on the rim immediately. -
Dip the Band:
Hold the bowl by the foot (bottom). partially dip the bowl upside down into the cream glaze, submerging it until the glaze covers the top two-thirds of the exterior wall. -
Reveal the Texture:
Check the pierced holes. If glaze has filled them completely, use your needle tool to gently clear the opening again, or leave some filled for variety. -
Clean the Foot:
I always meticulously wipe the bottom inch of the bowl and the underside base with a wet sponge. Any glaze left here will fuse your bowl to the kiln shelf. -
Final Fire:
Place the bowl in the kiln for the final glaze firing. The heat will melt the cream and amber glazes, creating that beautiful contrast against the raw clay base.
Add Metallic Flair
After the final firing, apply a gold twisting luster to the rim or inside the little poke holes, then fire one last time at a low temperature for sparkle.
Enjoy the tactile pleasure of using your custom-made bowl for jewelry or simply as a decorative accent.


Handmade Mugs With Chunky Handles
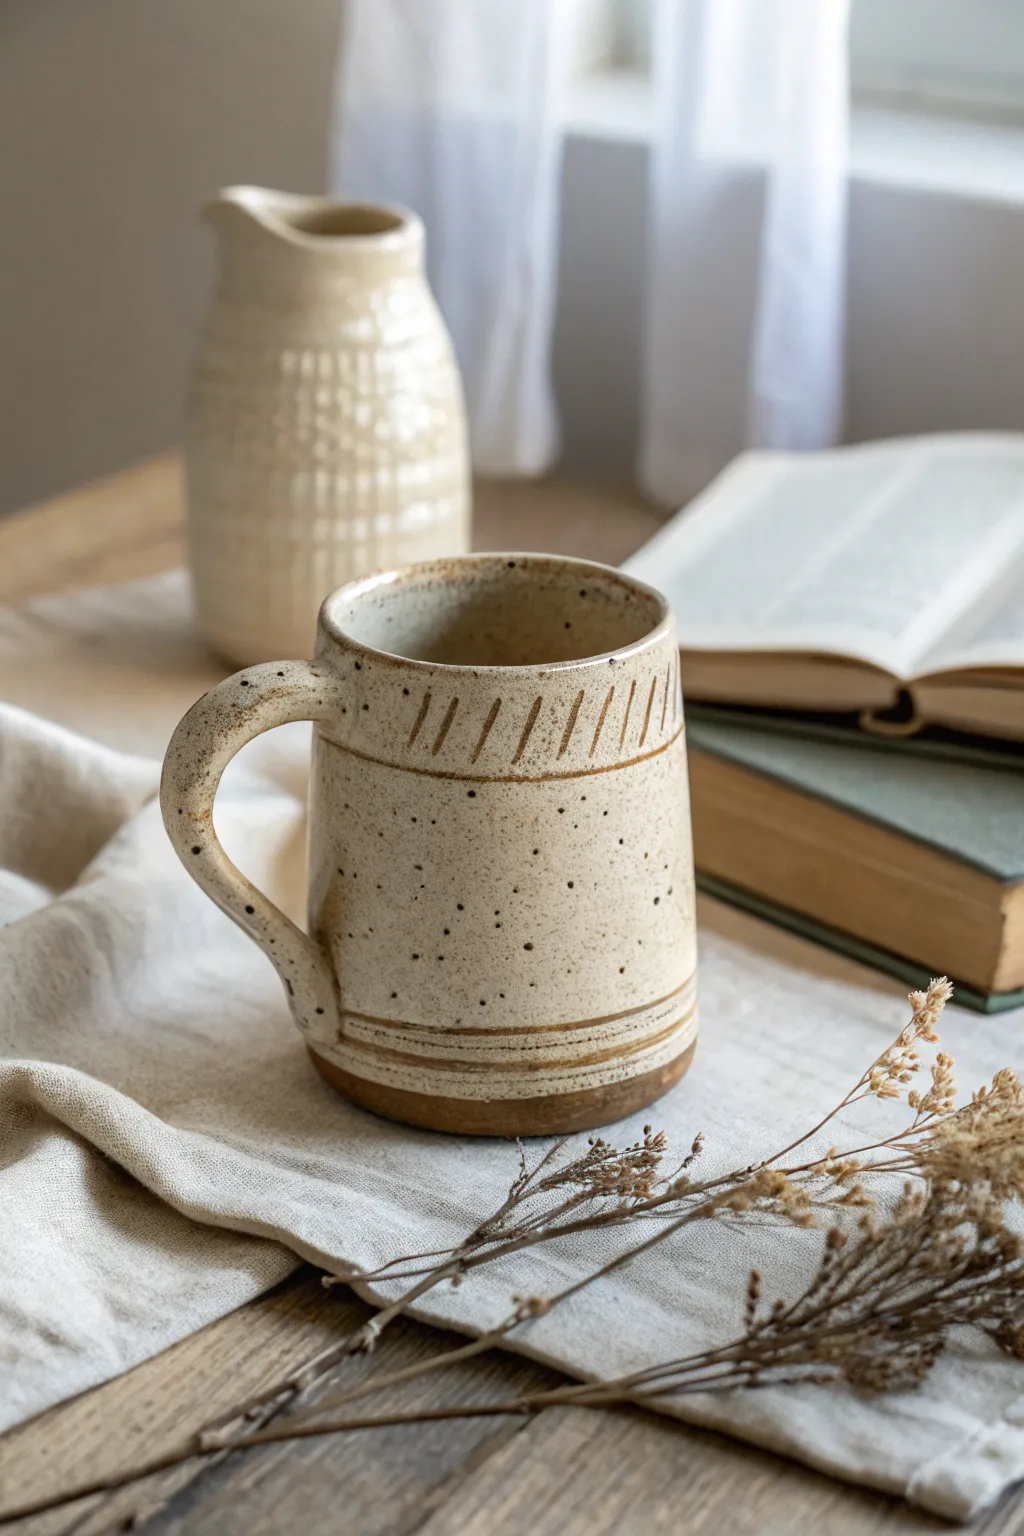
This charming, earthy mug features a lovely speckled clay body, simple carved geometric accents, and a comfortable, sturdy handle. The natural, raw clay base contrasts beautifully with the milky white glaze, creating a timeless piece perfect for your morning coffee.
Step-by-Step Guide
Materials
- Speckled stoneware clay (mid-fire)
- Slab roller or rolling pin with thickness strips
- Template for mug body (rectangle approx. 12×5 inches)
- Scoring tool or serrated rib
- Slip (clay and water mixture)
- Fettling knife
- Wooden modeling tool or chamois
- Needle tool or small carving loop
- Sponge
- Matte or satin white glaze (food safe)
Step 1: Forming the Body
-
Prepare the slab:
Begin by rolling out your speckled clay to a uniform thickness of about 1/4 inch. Ensure the clay is free of air bubbles by compressing it with a rib on both sides. -
Cut the shapes:
Using your paper template and a fettling knife, cut a rectangle for the body wall and a circle for the base that matches the desired diameter of your mug. -
Create the cylinder:
Score the short ends of your rectangular slab and apply a generous amount of slip. Bring the ends together to form a cylinder, overlapping slightly or beveling the edges for a seamless join. -
Join the seam:
Press the seam firmly together. Use a wooden modeling tool to blend the clay across the join line on both the inside and outside, then smooth it over with a slightly damp sponge until the seam disappears. -
Attach the base:
Score and slip the bottom edge of your cylinder and the outer edge of your circular base. Press the cylinder onto the base firmly. Use a modeling tool to smudge the clay from the base up onto the wall to secure the connection.
Step 2: Adding Handle & Details
-
Shape the handle:
Roll a thick coil or cut a strip of clay for the handle. Shape it into a curve that fits comfortably in the hand. I prefer to flatten it slightly for a more stable grip. -
Attach the handle:
Score and slip the contact points on both the mug body and the handle ends. Press the handle firmly onto the mug, ensuring it is straight. Use a small coil of clay to reinforce the attachment points if needed, creating a smooth transition. -
Refine the rim:
Use a piece of damp chamois or a soft sponge to compress and round the rim of the mug. This makes it smooth and pleasant to drink from. -
Leather hard stage:
Allow the mug to dry slowly to a leather-hard state. The clay should be firm enough to handle without warping but soft enough to carve. -
Carve the rim pattern:
Using a needle tool, gently score two horizontal lines around the upper section of the mug, about an inch apart. Inside this band, carve short, diagonal hash marks evenly spaced around the circumference. -
Carve the base lines:
Near the bottom of the mug, carve two or three parallel horizontal lines to frame the base area. Vary the pressure slightly to give it a hand-drawn, rustic feel.
Clean Lines Pro-Tip
For crisper carved lines, let the mug get slightly firmer than usual leather-hard. Brush away the clay crumbs with a soft, dry paintbrush immediately after carving.
Step 3: Glazing & Finishing
-
Bisque fire:
Once the mug is bone dry, fire the piece in a kiln to bisque temperature (usually cone 04 or 06) to prepare it for glazing. -
Wax resist:
Apply wax resist to the bottom inch of the mug, covering the carved lines at the base and the foot itself. This will leave the raw, speckled clay exposed after firing. -
Wipe down:
Use a damp sponge to wipe any dust off the bisque ware before dipping. This ensures the glaze adheres properly. -
Apply glaze:
Dip the mug into a matte or satin white glaze. Hold it upside down by the foot and submerge it up to the wax line. Hold for 3 seconds and lift out. -
Clean up:
Wait for the glaze to dry to the touch, then use a sponge to wipe away any glaze drips that may have beaded up on the waxed area. -
Glaze fire:
Fire the mug again to the maturity temperature of your clay and glaze (likely cone 5 or 6). This final firing brings out the iron speckles through the white glaze.
Avoid Warping
If your mug tends to warp into an oval shape while drying, place a lightweight circular object (like a yogurt cup lid) gently on the rim to hold its shape as it stiffens.
Enjoy using your new rustic mug for a cozy morning coffee or tea


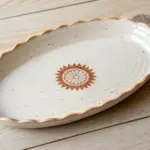
Ruffled Edge Side Plates
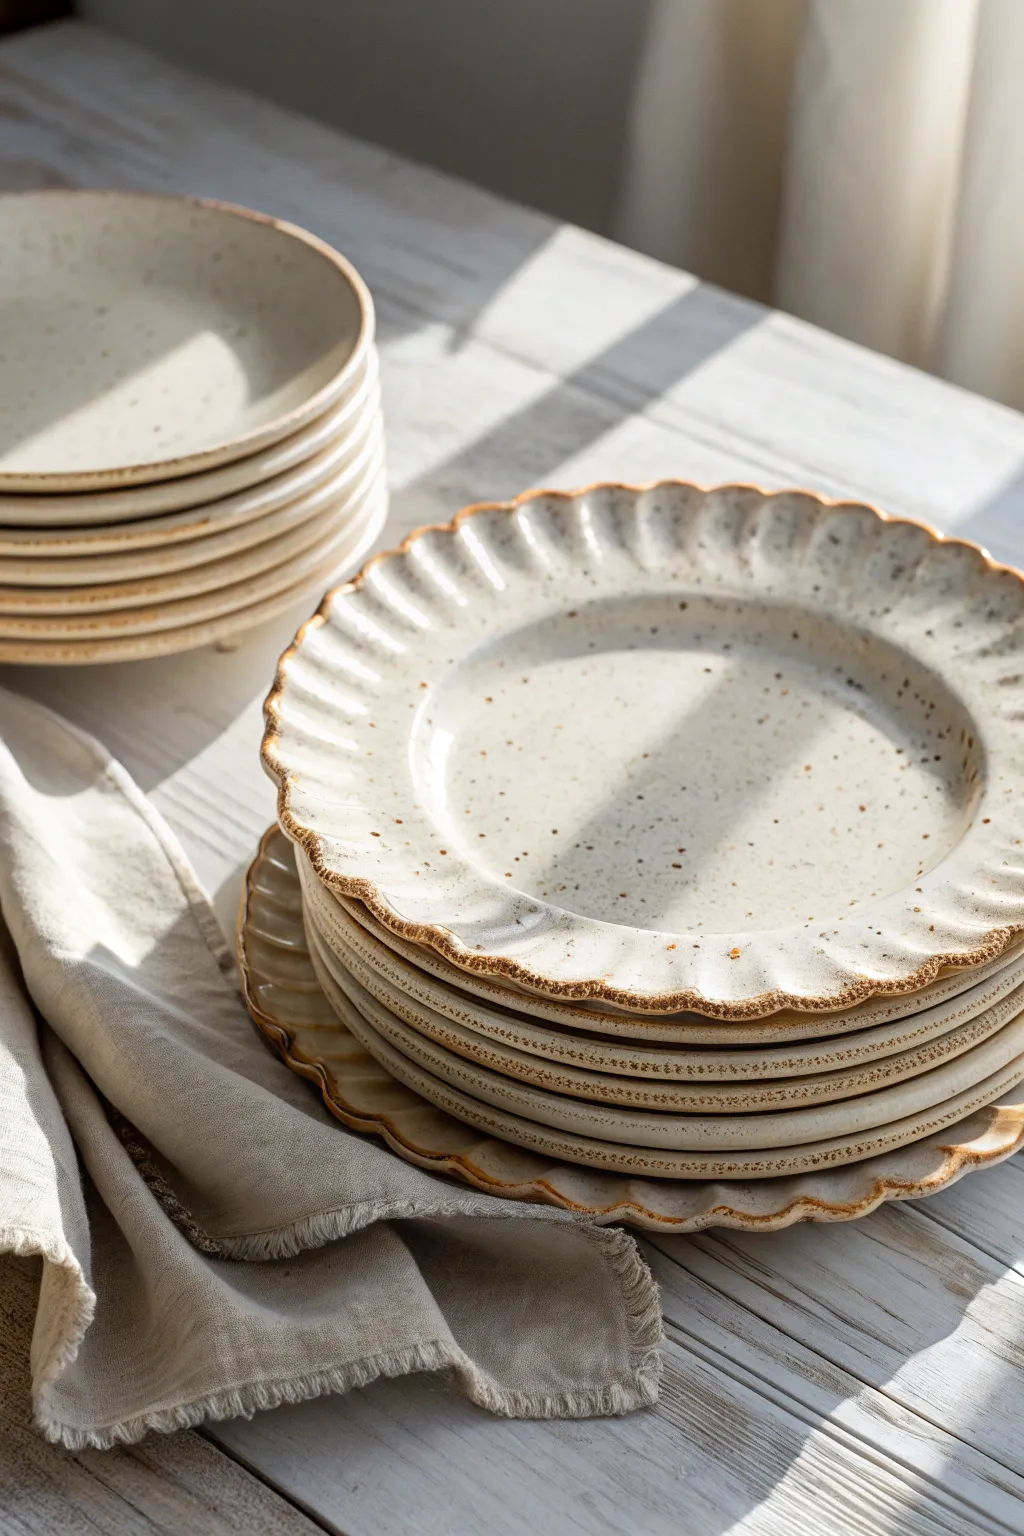
These charming side plates combine a classic dinnerware shape with a whimsical ruffled edge that feels organic and inviting. Finished in a warm oatmeal glaze with iron speckles and a toasted rim, they bring a cozy, farmhouse aesthetic to any table setting.
Step-by-Step
Materials
- Speckled stoneware clay (white or buff)
- Rolling pin
- Thickness strips or guides (approx. 1/4 inch)
- Round template or cookie cutter (approx. 8 inches)
- Sponge
- Rib tool (flexible rubber or metal)
- Fettling knife
- Surform tool (for refining edges)
- Wide, soft paintbrush
- Glossy cream or oatmeal glaze
- Iron oxide wash or brown underglaze
Step 1: Forming the Slab
-
Wedge the clay:
Begin by wedging your speckled stoneware clay thoroughly to remove any air bubbles and ensure the particles are aligned for strength. -
Roll out the slab:
Place thickness strips on either side of your clay ball on a canvas surface. Roll the clay out into a smooth slab, rotating it occasionally to keep the thickness even. -
Compress the surface:
Use a flexible rib tool to compress the clay surface on both sides. This aligns the clay platelets and creates a smooth canvas for your glaze later. -
Cut the circles:
Place your round template over the slab. Use a fettling knife to cut straight down around the perimeter to create your plate blanks. If making a set, cut them all now so they dry at the same rate.
Warping Woes?
If rims warp during drying, place a small, lightweight bag of sand or rice in the center of the plate while it dries to hold the base flat against the board.
Step 2: Creating the Ruffles
-
Smooth the edges:
Before shaping, take a damp sponge and run it along the sharp cut edge of your circle to round it off gently. This prevents chipping later. -
Lift the rim:
Place the clay circle on a foam board or a banding wheel. Gently lift the outer 1-2 inches of the distinctive rim to create the plate’s depth. -
Form the scallops:
Using your thumb and forefinger, gently pinch the rim at regular intervals. Twist your wrist slightly outward as you pinch to create the flared ripple effect seen in the photo. -
Refine the shape:
Go around the rim a second time to ensure the waves are uniform; I find that softening the peaks with a damp finger helps them look more organic and less mechanical. -
Dry slowly:
Cover the plates loosely with plastic to let them dry slowly to leather-hard. This prevents the rims from warping or cracking as they shrink.
Variation: Texture Transfer
Before cutting your circles, press a piece of lace or a textured mat into the slab to give the interior of the plate a subtle, vintage pattern under the glaze.
Step 3: Glazing and Finishing
-
Bisque fire:
Once bone dry, fire the plates in the kiln to a bisque temperature (usually cone 04 or 06, depending on your clay). -
Expose the rim:
Wipe the bisque ware with a damp sponge to remove dust. If you want the raw clay texture on the very edge, apply liquid wax resist carefully just along the ruffled rim. -
Apply base glaze:
Dip the plate into your glossy cream or oatmeal glaze, or brush on three even coats, allowing each coat to dry to the touch before adding the next. -
Accent the edge:
If you didn’t use wax resist and want the darker rim shown in the image, dip a small sponge into iron oxide wash or brown underglaze and lightly dab it along the very edge of the ruffles. -
Clean the foot:
Wipe the bottom of the plate (the foot ring) completely clean of glaze to prevent it from sticking to the kiln shelf. -
Glaze fire:
Load the kiln and fire to the maturity temperature of your clay and glaze (often cone 5 or 6 for stoneware).
Now you have a stunning set of custom dinnerware ready to elevate your next meal


Scalloped Trinket Dishes For Jewelry

This charming, flower-shaped trinket dish features delicate scalloped edges and a dreamy pink speckled glaze that adds a touch of organic elegance to any dresser. It is the perfect size for holding your everyday rings and studs while showing off a beautiful handmade aesthetic.
Detailed Instructions
Materials
- Light-colored stoneware clay (smooth body)
- Rolling pin
- Canvas mat or slab roller
- Paper template (flower shape)
- Needle tool
- Fettling knife
- Rib tool (soft rubber)
- Small sponge
- Slab mold or small bowl (for shaping)
- Glossy blush pink glaze
- Speckled clay body wash or iron oxide (optional for speckles)
- Clear glaze (optional)
- Small paintbrush
- Kiln
Step 1: Forming the Shape
-
Prepare the slab:
Begin by wedging your clay to remove air bubbles, then roll out a smooth slab about 1/4 inch thick. I find rolling carefully in multiple directions helps keep the thickness consistent. -
Draft your template:
Draw a simple flower shape with 8-10 petals on a piece of cardstock. Cut it out to use as your reusable guide. -
Trace and cut:
Place your paper flower template onto the clay slab. Use a needle tool to trace lightly around the edge, then cut through cleanly with a fettling knife held vertically. -
Smooth the edges:
Dip your finger or a small piece of chamois in water and run it along the cut rim. It is crucial to round off the sharp cut marks now so they don’t chip after firing. -
Add texture (optional):
Use a soft rib to compress the clay surface. If you want a more organic look, you can gently press a fabric texture into the clay before shaping. -
Define the petals:
Using a modeling tool or the back of a paintbrush, press gently into the center of the dish and drag outward toward the ‘V’ between each petal. This accentuates the scalloped effect.
Uneven Petals?
If petals warp during drying, place a small weighted bag of sand or rice in the center of the dish while it’s leather hard to hold the base flat.
Step 2: Shaping and Drying
-
Slump into form:
Gently lift your clay flower and place it into a shallow bowl or onto a slump mold. Press the center down softly so the petals curve upward naturally. -
Refine the curve:
Check that the petals curl up evenly. You can prop up individual petals with small bits of sponge or crumpled paper if they are drooping too much. -
Slow drying:
Cover the dish loosely with plastic to ensure slow, even drying. This prevents warping, especially at the delicate petal tips. -
Bisque fire:
Once bone dry, fire the piece to bisque temperature (usually Cone 06 or 04) to prepare it for glazing.
Natural Speckles
Use a clay body labeled ‘Speckled Buff’ or similar. The iron spots occur naturally during firing, requiring no extra painting steps.
Step 3: Glazing and Finishing
-
Clean the bisque:
Wipe the bisqued dish with a damp sponge to remove any dust, which can prevent glaze from adhering properly. -
Check for speckles:
If your clay body doesn’t have natural speckles, you can splatter a very small amount of iron oxide wash or a specialized speckled underglaze onto the raw bisque before the main glaze. -
Apply the base color:
Dip the dish or brush on 2-3 coats of a translucent blush pink glaze. Let each coat dry slightly before applying the next. -
Create the rim detail:
The glaze will naturally break over the high points of the rim, creating that lighter edge. Ensure the glaze isn’t too thick on the very tips of the scallops. -
Clean the foot:
Wipe the bottom of the dish completely clean of glaze with a damp sponge so it won’t stick to the kiln shelf. -
Glaze fire:
Fire the piece again to your glaze’s maturity temperature (e.g., Cone 5/6). This will melt the glaze into that glossy, durable finish.
Once cooled, your dish is ready to organize your favorite jewelry pieces with artisan flair

The Complete Guide to Pottery Troubleshooting
Uncover the most common ceramic mistakes—from cracking clay to failed glazes—and learn how to fix them fast.
Soap Dishes With Drainage Ridges
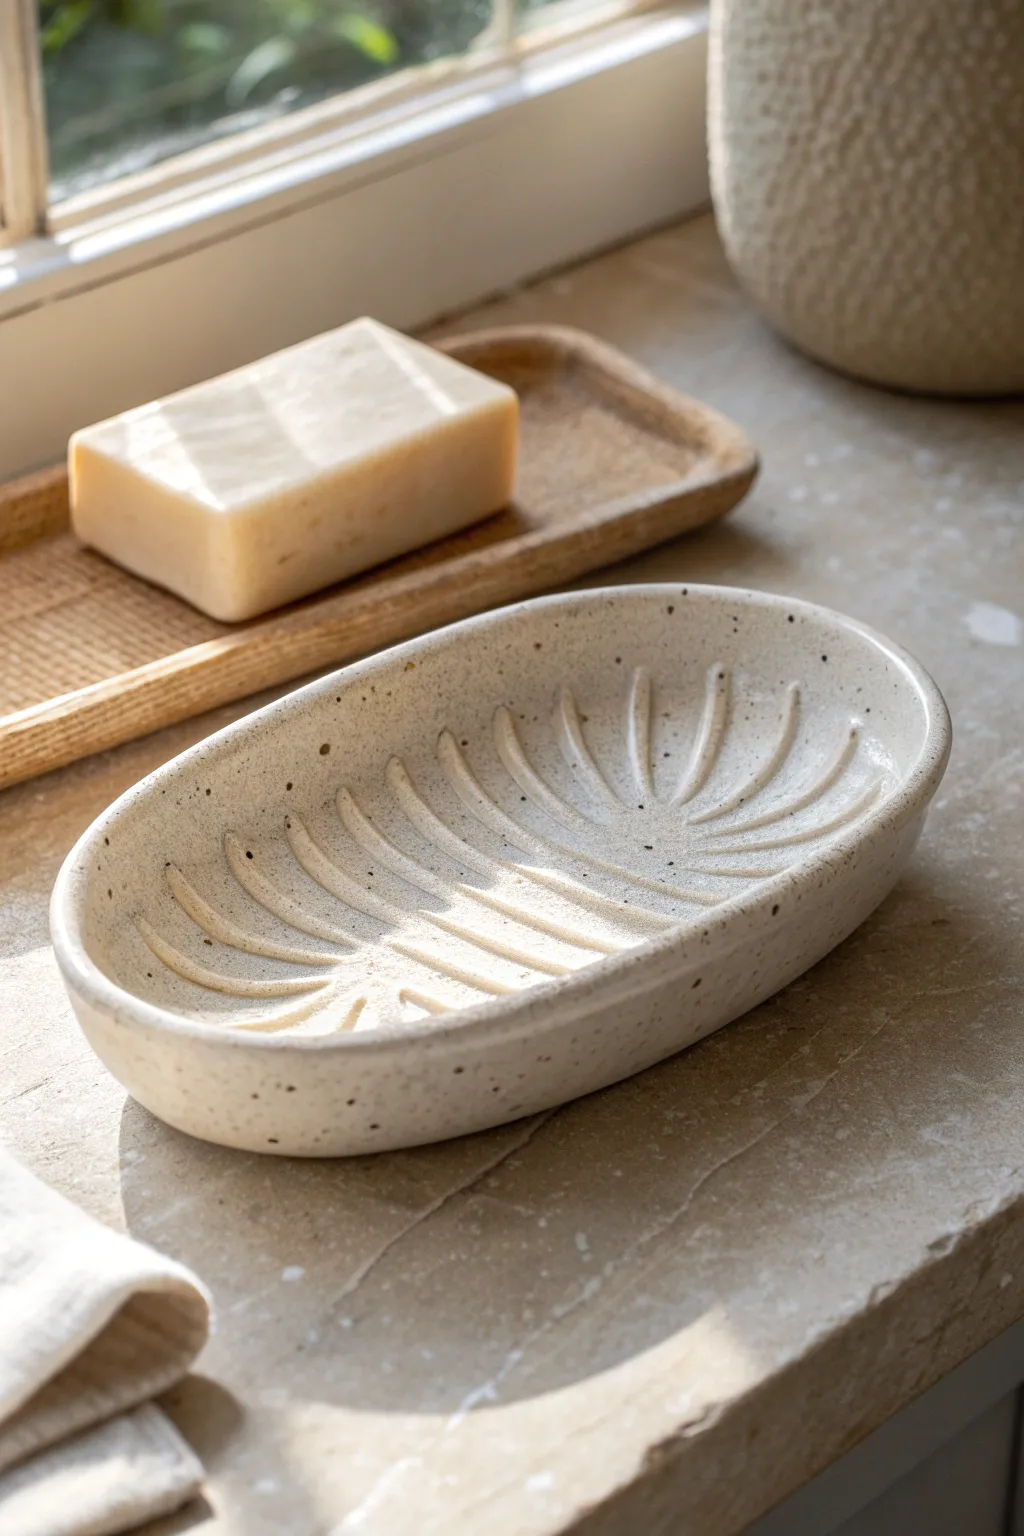
This elegant soap dish combines functionality with a minimalist aesthetic, featuring a beautifully speckled clay body and a distinct radiating ridge pattern. The raised ridges act as a drainage system to keep your soap dry, while the soft oval shape adds a touch of organic warmth to any bathroom counter.
Step-by-Step
Materials
- Speckled stoneware clay (or buff clay with iron speckles)
- Rolling pin
- Oval template (paper or flexible plastic)
- Pottery knife or needle tool
- Rib tool (smooth wood or silicone)
- Small loop carving tool or modeling tool
- Sponge
- Board for drying
- Canvas or cloth work surface
- Clear matte or satin glaze
Step 1: Shaping the Form
-
Prepare the slab:
Begin by wedging your speckled clay to remove air bubbles. Roll out a slab to a consistent thickness of about 1/4 inch (6-7mm). Use guide sticks if needed to keep it even. -
Compress the clay:
Before cutting, take a smooth rib tool and gently compress the slab on both sides. This aligns the clay particles, making the piece stronger and helping to prevent warping later. -
Cut the oval:
Place your oval template onto the clay slab. Using your needle tool or fettling knife, trace around the template to cut out your base shape. -
Soften the edges:
Once cut, run a damp finger or a small piece of chamois along the sharp cut edge to round it slightly. This makes the next shaping steps more comfortable. -
Form the curve:
Gently lift the clay oval and place it onto a shallow foam mold or simply cup it in your hands to press the center down, encouraging the edges to rise. You want a shallow bowl shape. -
Refine the rim:
While supporting the outside with one hand, use a damp sponge to smooth the rim, ensuring it is even and slightly rounded. I find it helpful to look at the profile from eye level to check for symmetry.
Clean Carving Lines
Wait until the clay is truly leather hard before carving. If it’s too wet, the clay will drag and create rough ragged edges instead of smooth ridges.
Step 2: Carving the Drainage Pattern
-
Leather hard stage:
Allow the shaped dish to dry to a leather-hard state. It should be firm enough to handle without deforming but still soft enough to carve easily. -
Mark the center:
Identify the drainage point. In this design, the ridges radiate from the center, but leave a small smooth spine down the middle. -
Plan the ridges:
Lightly sketch your pattern with a needle tool. Draw curved lines originating from the central spine and fanning out towards the rim. -
Carve the first side:
Using a small loop tool, carve out the clay between your sketched lines. Use slow, confident strokes to create deep, smooth channels. -
Carve the second side:
Repeat the carving process on the opposite side of the central spine. Try to mirror the depth and curve of the first side for a balanced look. -
Smooth the ridges:
Once the major carving is done, use a soft, damp brush or your finger to smooth down any sharp clay burrs left by the carving tool. -
Check the depth:
Ensure your carved channels are deep enough to allow water to flow away from the soap, but not so deep that they weaken the base.
Preventing Warping
For flat-ish pieces like this, dry them slowly under plastic or weigh down the center lightly with a small sandbag during the leather-hard stage.
Step 3: Finishing and firing
-
Final drying:
Place the dish on a ware board, loosely covered with plastic to let it dry slowly and evenly. Slow drying is crucial for flat pottery to prevent warping. -
Bisque fire:
Once bone dry, fire the piece in a kiln to bisque temperature (usually Cone 04 or 06). -
Glazing:
To highlight the speckles and natural clay tone, choose a translucent or clear glaze. Dip or brush the glaze onto the piece, ensuring it gets into the carved grooves. -
Wipe the foot:
Clean off any glaze from the very bottom of the dish so it doesn’t stick to the kiln shelf. -
Glaze fire:
Fire the piece again to the maturity temperature of your clay and glaze (often Cone 5 or 6 for stoneware).
Once cooled, your custom soap dish is ready to bring a touch of spa-like serenity to your bathroom sink
Spoon Rests With Organic Curves
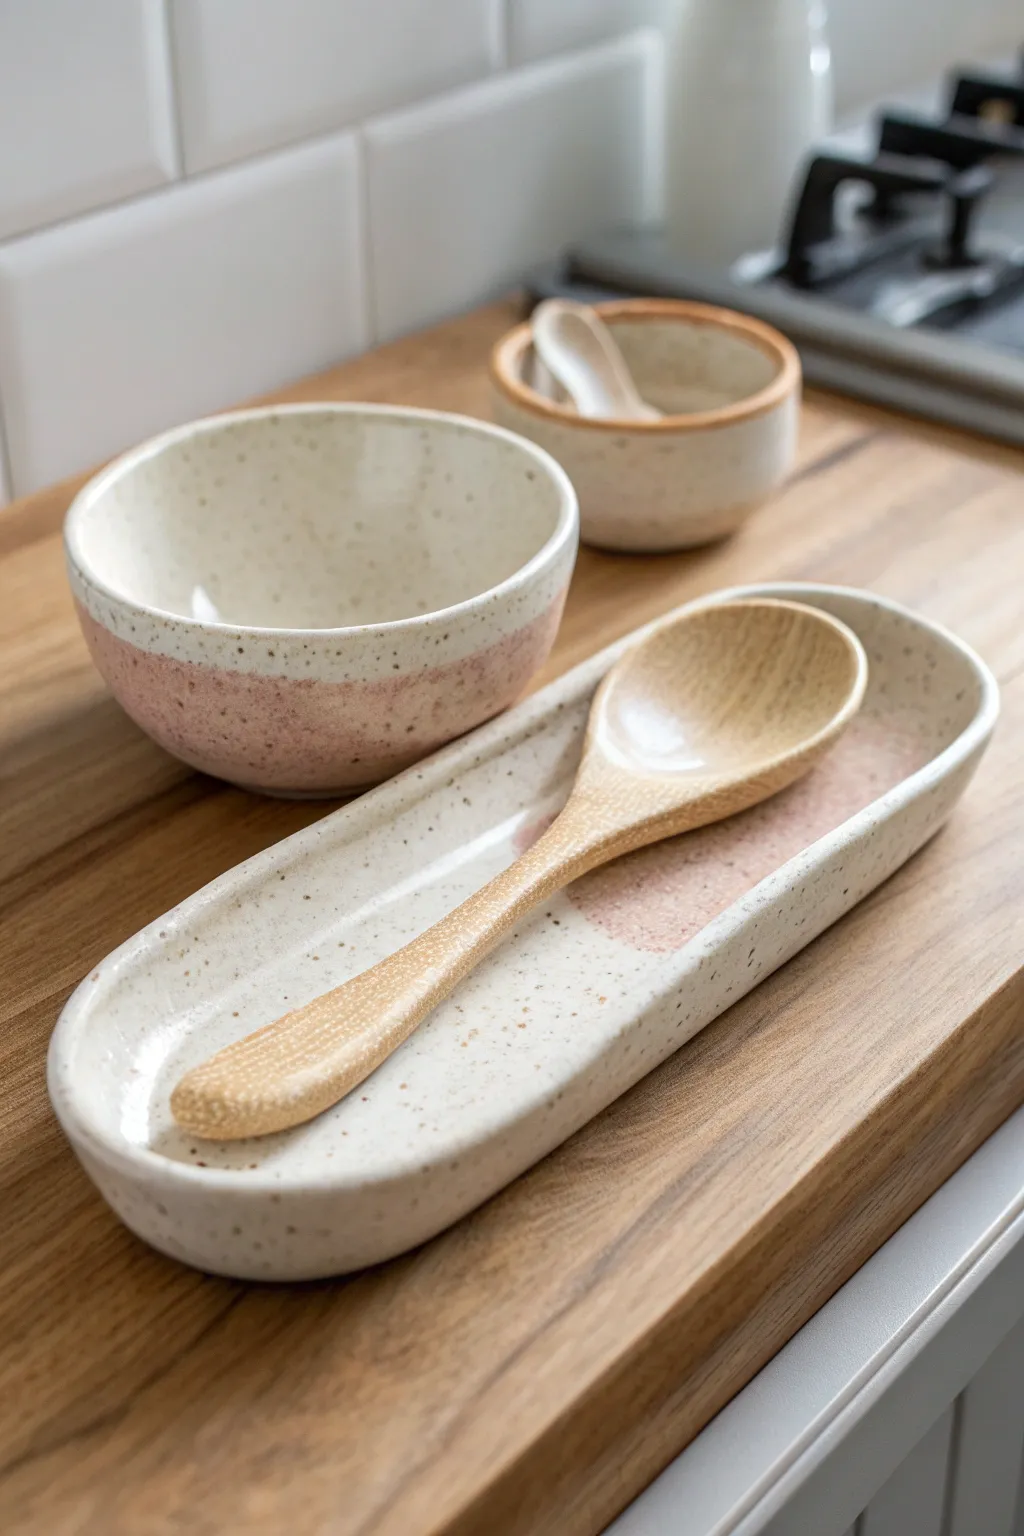
This elegant spoon rest embraces the beauty of imperfection with its organic oval shape and speckled clay body. The subtle dip of pink glaze adds a modern, feminine touch to the earthy stoneware, creating a functional piece that doubles as countertop art.
How-To Guide
Materials
- Speckled stoneware clay (mid-fire)
- Rolling pin
- Canvas mat or slab roller
- Oval paper template (approx. 9″ x 4″)
- Needle tool or fettling knife
- Sponge
- Rib tool (soft kidney)
- Small loop tool
Step 1: Forming the Slab
-
Prepare the Clay:
Begin by wedging a ball of speckled stoneware clay to remove air bubbles. You’ll want a piece roughly the size of a grapefruit. -
Roll the Slab:
Place the clay on your canvas mat. Using a rolling pin, flatten the clay into an even slab about 1/4 inch thick. I find turning the slab over occasionally helps prevent it from sticking. -
Compress the Surface:
Run a soft rib tool over the surface of the clay in multiple directions. This compression step is crucial for preventing warping later and aligning the clay particles. -
Cut the Shape:
Lay your oval paper template onto the smooth slab. Trace around it gently with a needle tool or fettling knife to cut out your base shape. -
Smooth the Edges:
Run a damp sponge or your finger along the cut edge to soften the sharp corner left by the knife.
Step 2: Creating the Curve
-
Lift the Rim:
With the slab still flat, gently pinch and lift the outer perimeter. You want to create a shallow wall, curving the edges upward to hold any potential spills. -
Refine the Form:
Use your thumb to smooth the inside curve where the wall meets the floor, ensuring a seamless transition rather than a sharp angle. -
Check the Profile:
Look at the piece from eye level. Adjust the rim so it undulates slightly for that organic feel, but ensure the base remains flat against the table.
Warping Woes
If the rest rocks on the table after firing, weigh it down with a sandbag during the drying phase to keep the bottom perfectly flat.
Step 3: Finishing and Firing
-
Dry Slowly:
Cover the piece loosely with plastic and let it dry to the leather-hard stage. This allows the shape to set without cracking. -
Bisque Fire:
Once bone dry, fire the piece in a kiln to cone 04 (or your clay’s specific bisque temperature). -
Apply Clear Glaze:
Dip the entire bisque-fired piece into a clear, glossy glaze. Shake off excess drips and let it dry to the touch. -
Add the Pink Accent:
Dip just one end or a diagonal section into a soft mauve or dusty pink glaze. Alternatively, brush this accent color on for a more painterly look. -
Wipe the Foot:
Use a damp sponge to meticulously wipe all glaze off the very bottom of the piece so it doesn’t fuse to the kiln shelf. -
Glaze Fire:
Fire the piece again to the maturity temperature of your clay body (likely cone 5 or 6 for stoneware).
Pro Tip
Use a damp chamois strip on the rim during the wet stage. It compresses the edge better than a sponge for a super-smooth, professional finish.
Place your finished spoon rest near the stove to bring a moment of handmade calm to your cooking routine


What Really Happens Inside the Kiln
Learn how time and temperature work together inside the kiln to transform clay into durable ceramic.
Coil-Built Planters With Simple Faces
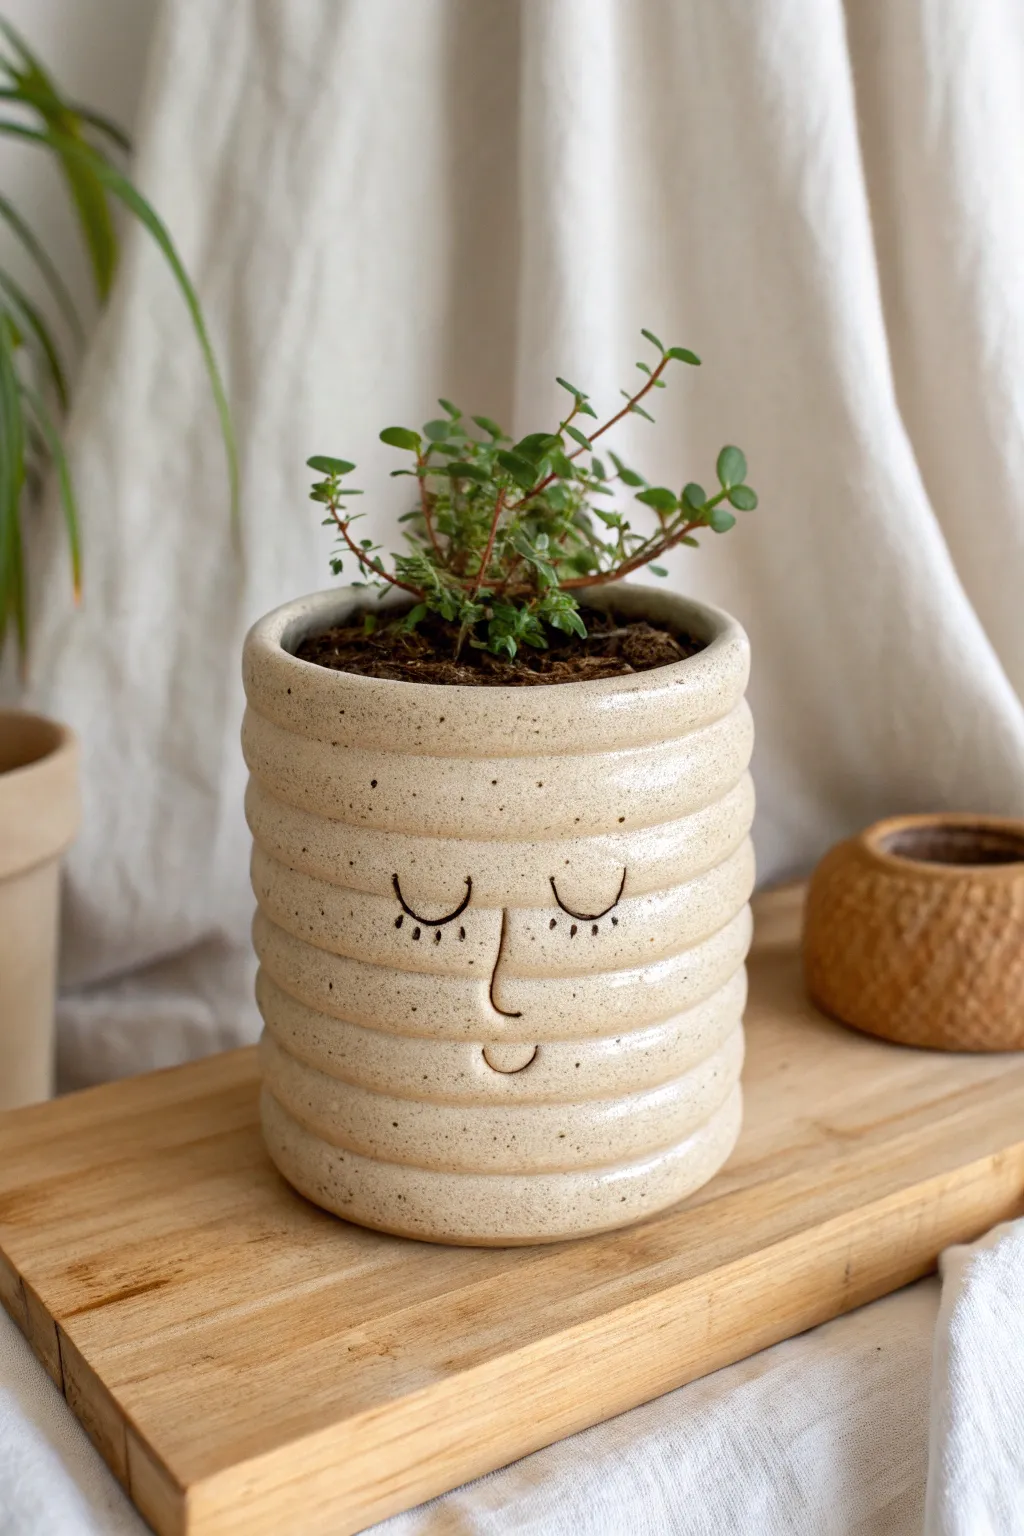
This charming planter combines the tactile beauty of exposed coils with a minimalist, sleeping face design. The creamy speckled clay and gentle ridges give it a warm, organic feel perfect for housing small succulents or herbs.
Step-by-Step Guide
Materials
- Speckled buff stoneware clay
- Rolling pin
- Canvas mat or wooden board
- Needle tool
- Scoring tool (or an old fork)
- Slip (clay mixed with water)
- Small sponge
- Black underglaze
- Fine detail paintbrush
- Clear glossy glaze (brush-on or dip)
- Modeling tool or wooden rib
Step 1: Building the Base
-
Prepare the slab base:
Begin by rolling out a thick slab of your speckled clay, about 1/4 inch thick. Use a circular object or template to cut out a round base for your pot, roughly 4-5 inches in diameter. -
Roll your coils:
Take fresh clay and roll out long, even snakes (coils) on your canvas. Aim for a thickness similar to your pinky finger. You will need several of these to build the height of the walls. -
Attach the first coil:
Score the outer edge of your circular base and brush on a little slip. Place your first coil on top of the scored area, pressing it gently to adhere. -
Blend the interior:
To ensure structural integrity, use your thumb or a wooden modeling tool to smear the clay from the coil downwards onto the base *on the inside only*. Leave the outside distinct to keep the ring shape visible.
Step 2: Stacking and Shaping
-
Continue stacking coils:
Score the top of the previous coil, add slip, and lay the next coil on top. Repeat this process, stacking vertically to create straight walls. -
Smooth the inside walls:
As you build upward, stop every few layers to smooth the interior coils together completely. This makes the pot watertight and strong, even though the outside retains the ridged texture. -
Refine the exterior:
Once you reach the desired height (about 5-6 inches), gently run a damp sponge or your finger along the exterior grooves. You want to soften the join lines without erasing the beautiful coil definition. -
Finish the rim:
Smooth the final top coil with a sponge to create a comfortable, rounded lip. Ensure the rim is level; you can slice off uneven bits with a needle tool if necessary.
Uneven Walls?
If your pot starts getting wider as you stack coils, you are likely placing coils slightly toward the outer edge. To fix, place the next coil slightly inward to pull the wall back to vertical.
Step 3: Adding the Face
-
Plan the face placement:
Let the pot stiffen to leather-hard so it’s firm to the touch. Look for the smoothest or most pleasing side of the pot to serve as the ‘front’. -
Carve the lines:
Using a needle tool, lightly incise the facial features. Ideally, position the sleeping eyes on one coil ridge and the nose bridging across the customized gap below it. I find keeping the design simple works best. -
Deepen the incision:
Go over your initial sketch lines once more to ensure they are deep enough to hold the underglaze later. Clean up any clay crumbs (burrs) with a damp sponge. -
Apply underglaze:
Using a fine detail brush, carefully paint black underglaze into the carved lines for the eyes, lashes, nose, and mouth. Don’t worry if it looks messy right now. -
Clean up the lines:
Once the underglaze is dry, take a clean, slightly damp sponge and wipe the surface of the face. This removes the excess black paint from the high points, leaving crisp black lines inside the carved grooves.
Add Cheeks
For an extra cute touch, dab two small circles of pink underglaze on the coil ridge just below the eyes before bisque firing to give your face faint, blushing cheeks.
Step 4: Firing and Glazing
-
Bisque fire:
Let the pot dry completely (bone dry) before loading it into the kiln for a bisque firing. -
Glaze application:
After the first firing, apply a clear, glossy glaze over the entire piece. This will make the speckled clay pop and protect the surface. -
Final firing:
Fire the piece again to glaze maturity temperature. Once cool, your plan will be ready for planting.
Now you have a whimsical, custom home for your favorite green friend
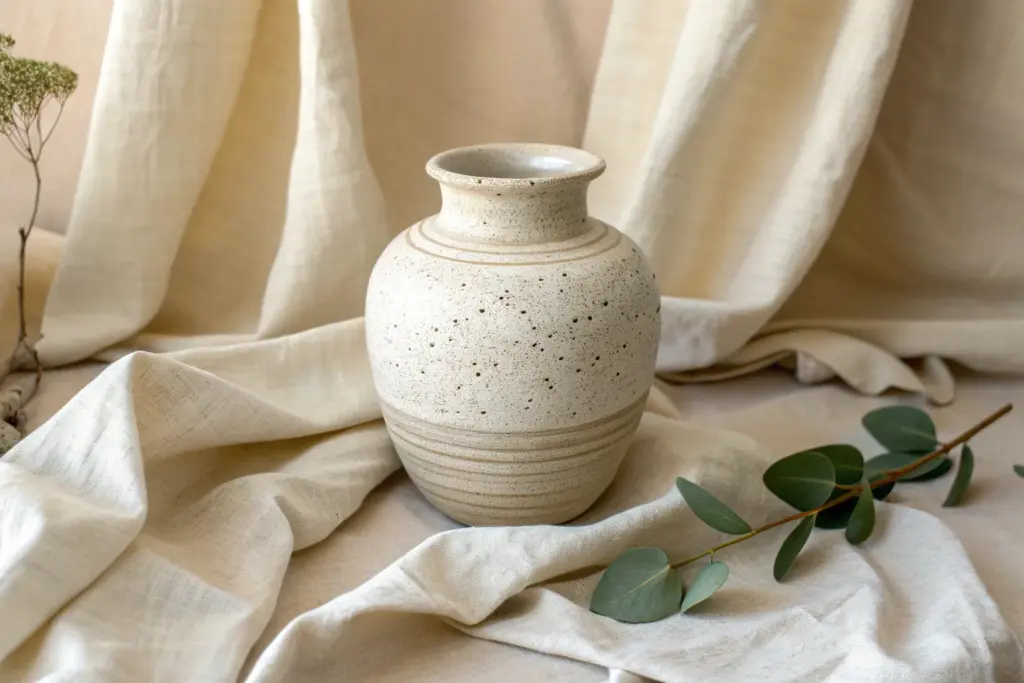
Slab-Built Bud Vases For Single Stems
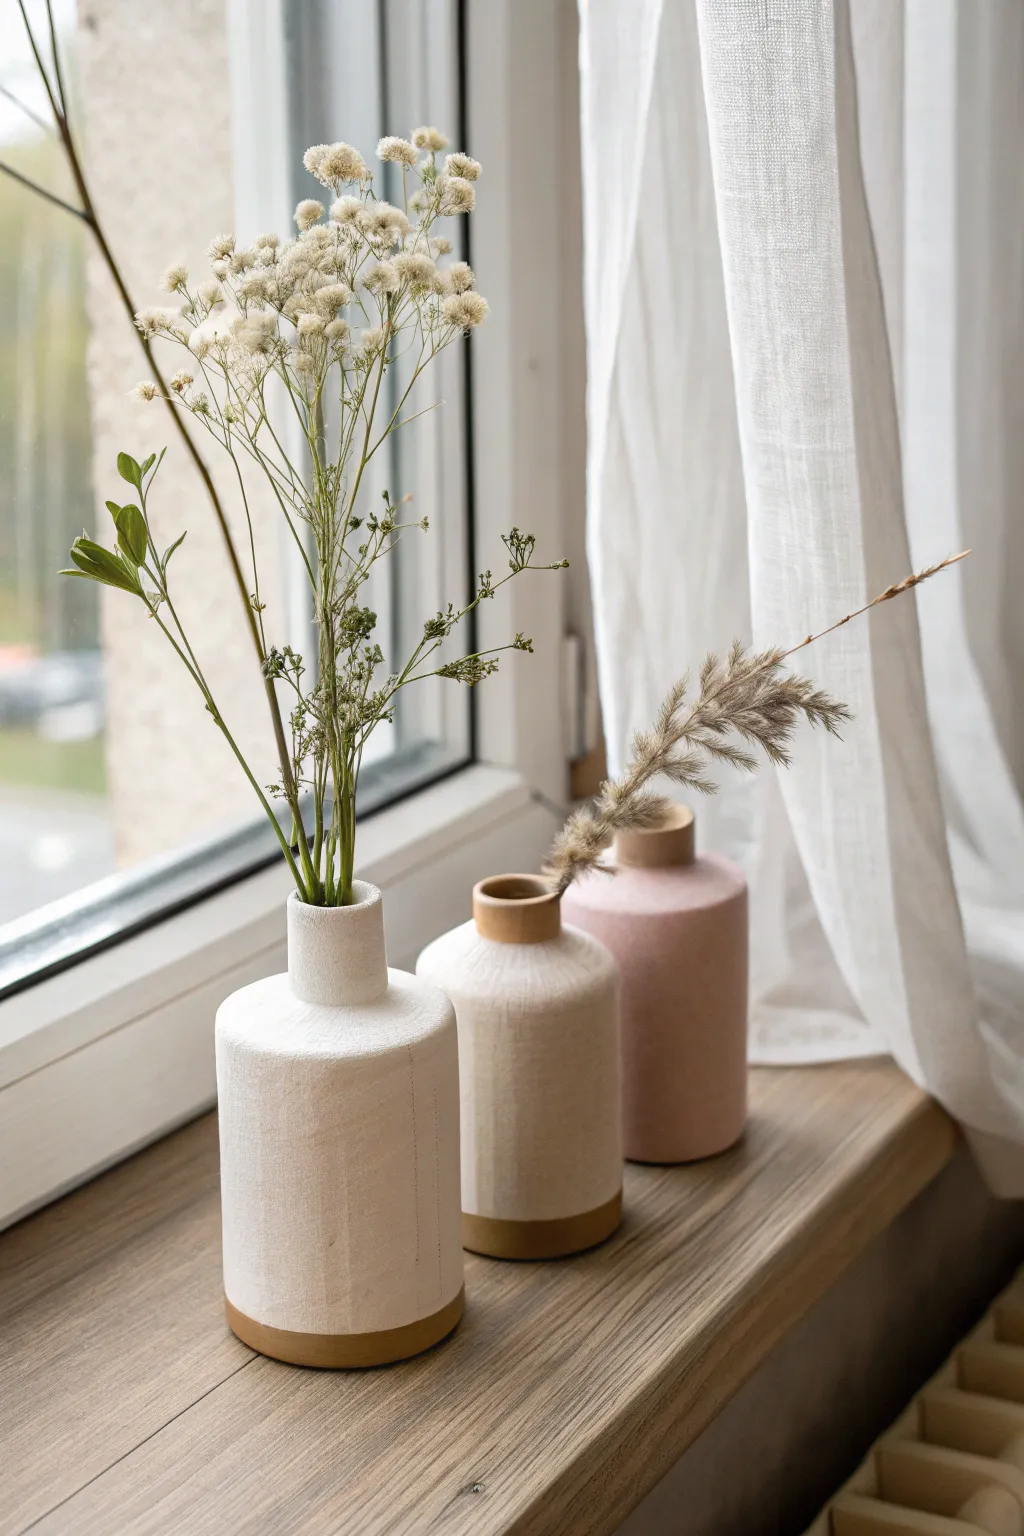
These elegant, matte-textured bud vases feature a modern cylindrical shape with distinct, narrow necks perfect for displaying dried stems. Their charm lies in the visible but subtle slab-building seams and the contrast between the textured glaze and the exposed raw clay base.
Step-by-Step Tutorial
Materials
- Stone-speckled clay body (cone 5/6)
- Rolling pin
- Canvas work surface or slab roller
- Clay knife or fettling knife
- Scoring tool (serrated rib or needle tool)
- Slip (clay slurry)
- Ruler/Straight edge
- Paper templates (rectangular)
- Wooden paddle
- Matte white or blush glaze
- Wax resist
- Sponge
Step 1: Planning and Surface Prep
-
Draft your templates:
First, create paper templates for your forms to ensure consistency, especially if making a trio. You will need a large rectangle for the body (about 9-10 inches wide by 5 inches tall), a smaller strip for the neck (about 3 inches wide by 1.5 inches tall), and distinct circular templates for the base and the shoulder (top of the body). -
Roll the slabs:
Roll out your clay on a canvas surface until it is approximately a quarter-inch thick. Keep the thickness consistent across the entire slab to prevent warping during drying. -
Add texture (optional):
Before cutting, you can lightly roll a canvas texture or linen cloth over the surface if you want a subtle fabric impression on your finished vase.
Seam Success
Don’t try to hide the vertical seam completely. A slightly visible join line emphasizes the slab-built nature and adds visual height to the form.
Step 2: Forming the Body Cylinder
-
Cut the components:
Using your paper templates and a sharp fettling knife, cut out the rectangular body piece, the neck strip, and the circular base. -
Bevel the edges:
On the short sides of your main rectangular slab (where the seam will be), cut 45-degree angles. This miter joint creates a stronger bond and a cleaner vertical seam. -
Score and slip:
Rough up the beveled edges with a scoring tool and apply a generous amount of slip. -
Form the cylinder:
Bend the slab into a cylinder, pressing the slipped beveled edges together firmly. Use a wooden modeling tool or your fingers to smooth the seam on the inside and outside. -
Attach the base:
Score the bottom edge of your cylinder and the outer rim of your circular base piece. Slip both, press the cylinder onto the base, and smooth the clay upwards from the base to the wall to seal the connection.
Color Contrast
For maximum impact, use a dark stoneware or speckled clay body. The contrast between deep, raw clay and a bright white matte glaze is stunning.
Step 3: Crafting the Neck and Shoulder
-
Cut the shoulder and neck pieces:
Cut a circle that matches the diameter of your main cylinder (the shoulder). Then, cut a smaller hole directly in the center of this circle—this hole should match the diameter of your neck cylinder. -
Assemble the neck cylinder:
Create a small cylinder using your neck strip template, following the same beveling and slipping process used for the main body. -
Attach neck to shoulder:
Score and slip the bottom edge of the small neck cylinder and the area around the hole on the shoulder piece. Join them securely, smoothing the seam where the neck rises from the flat shoulder disc. -
Final assembly:
Wait until both the main body and the shoulder assembly are leather hard—this is crucial for support. Score the top rim of the body and the underside of the shoulder disc. Place the shoulder/neck unit on top of the body and compress the seam.
Step 4: Refining and Glazing
-
Refine the surface:
Once the piece is fully leather hard, use a metal rib or a damp sponge to smooth out any unintentional rough patches, but feel free to leave the vertical seam slightly visible for handmade character. -
Dry and bisque fire:
Allow the vases to dry slowly under plastic for a day or two to equalize moisture, then uncover to bone dry. Fire to bisque temperature (usually Cone 04). -
Apply wax resist:
To achieve the look in the photo, brush a band of wax resist around the bottom half-inch of the vase exterior. This will keep the raw clay exposed. -
Glaze application:
Dip or brush your vases with a matte white or soft blush glaze. The wax will repel the glaze at the bottom, creating that clean, sharp line. -
Clean and fire:
Wipe away any stray glaze droplets from the waxed bottom area with a damp sponge. Fire the pieces to their final maturity temperature (Cone 5 or 6).
Once fired, fill your trio of vases with dried pampas grass or delicate wildflowers to complete the serene, architectural look

TRACK YOUR CERAMIC JOURNEY
Capture glaze tests, firing details, and creative progress—all in one simple printable. Make your projects easier to repeat and improve.
Lace-Pressed Coasters With Soft Edges
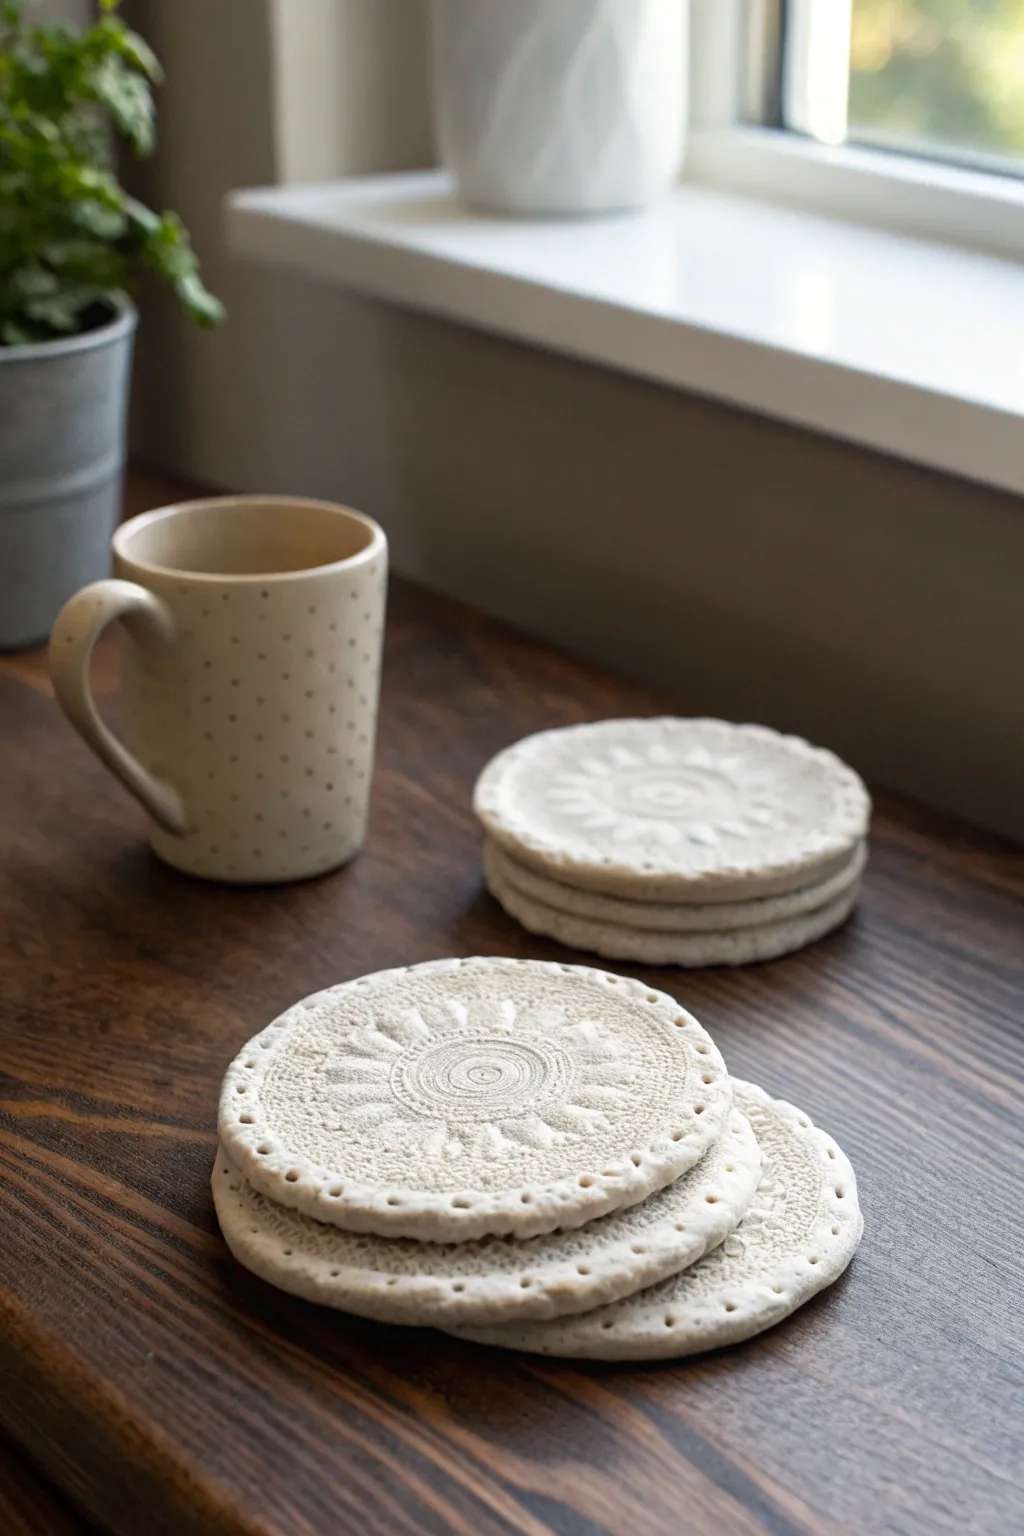
These charming coasters combine the rustic appeal of air-dry clay with the intricate elegance of vintage lace patterns. The soft, rounded edges and decorative dotted border create a finished piece that feels both handcrafted and polished.
How-To Guide
Materials
- White polymer clay or air-dry clay
- Rolling pin or acrylic roller
- Vintage lace doilies or textured lace fabric
- Round cookie cutter (approx. 3.5 – 4 inches)
- Small wooden skewer or large needle tool
- Fine-grit sandpaper (optional)
- Parchment paper or non-stick craft mat
- Clear matte varnish or sealant
Step 1: Preparing the Clay Base
-
Condition the clay:
Begin by taking a handful of your white clay and kneading it thoroughly in your hands until it becomes warm, soft, and pliable. This prevents cracks later on. -
Roll out the slab:
Place the clay on a sheet of parchment paper. Using your rolling pin, roll the clay out evenly to a thickness of about 1/4 inch (6mm). Aim for a uniform surface without dips. -
Check thickness:
Ensure the clay isn’t too thin, as coasters need some heft to be durable. If you have thickness guides or slats, use them to keep the height consistent.
Sticky Situation?
If the lace sticks to the clay, lightly dust the clay surface with cornstarch or baby powder before laying down the fabric. It acts as a release agent.
Step 2: Creating the Texture
-
Position the lace:
Lay your chosen lace doily or fabric flat over the rolled-out clay. Smooth it gently with your fingers to ensure there are no wrinkles or folds. -
Press the pattern:
Take your rolling pin and roll firmly over the lace one single time. While I find multiple passes can blur the image, a single confident roll presses the intricate thread details deep into the clay. -
Reveal the design:
Carefully peel back the lace from one corner to reveal the imprinted texture underneath. Set the lace aside.
Step 3: Cutting and Refining
-
Cut the shape:
Position your round cookie cutter over the most interesting part of the imprinted pattern. Press down firmly to cut the circle, then twist slightly to release it. -
Remove excess clay:
Peel away the scrap clay from outside the ring. You can ball this up to reuse for the next coaster. -
Soften the edges:
Dip your finger in a tiny bit of water and gently run it around the cut edge of the circle to smooth out any sharpness or burrs left by the cutter. -
Slightly round the rim:
Gently press the very edge of the rim downward with your thumb to curb the harsh 90-degree angle, giving it that soft, pillowy look seen in the photo.
Lace Illusions
Don’t have vintage doilies? Use a plastic lace placemat or even a textured silicone fondant mat. These often leave deeper, sharper impressions than fabric.
Step 4: Adding Details and Finishing
-
Create the border:
Using a wooden skewer or a needle tool, press small, evenly spaced holes around the entire perimeter of the coaster, about 1/8 inch from the edge. -
Dry the coasters:
Place the finished rounds on a clean, flat surface to dry. If using air-dry clay, let them sit for 24-48 hours, flipping them halfway through to prevent curling. -
Bake (if polymer):
If using polymer clay, bake according to the manufacturer’s instructions on the package, usually at a low temperature for 15-30 minutes. -
Sand imperfections:
Once fully dry or cured and cooled, use fine-grit sandpaper to lightly buff the edges if any rough spots remain. -
Seal the surface:
Apply a coat of clear matte varnish or sealant to protect the clay from moisture and stains, essential for functional drink coasters.
Stack your set of beautiful, textured coasters and enjoy using your handmade creation with your next cup of coffee
Textured Rolling Patterns On Serving Platters
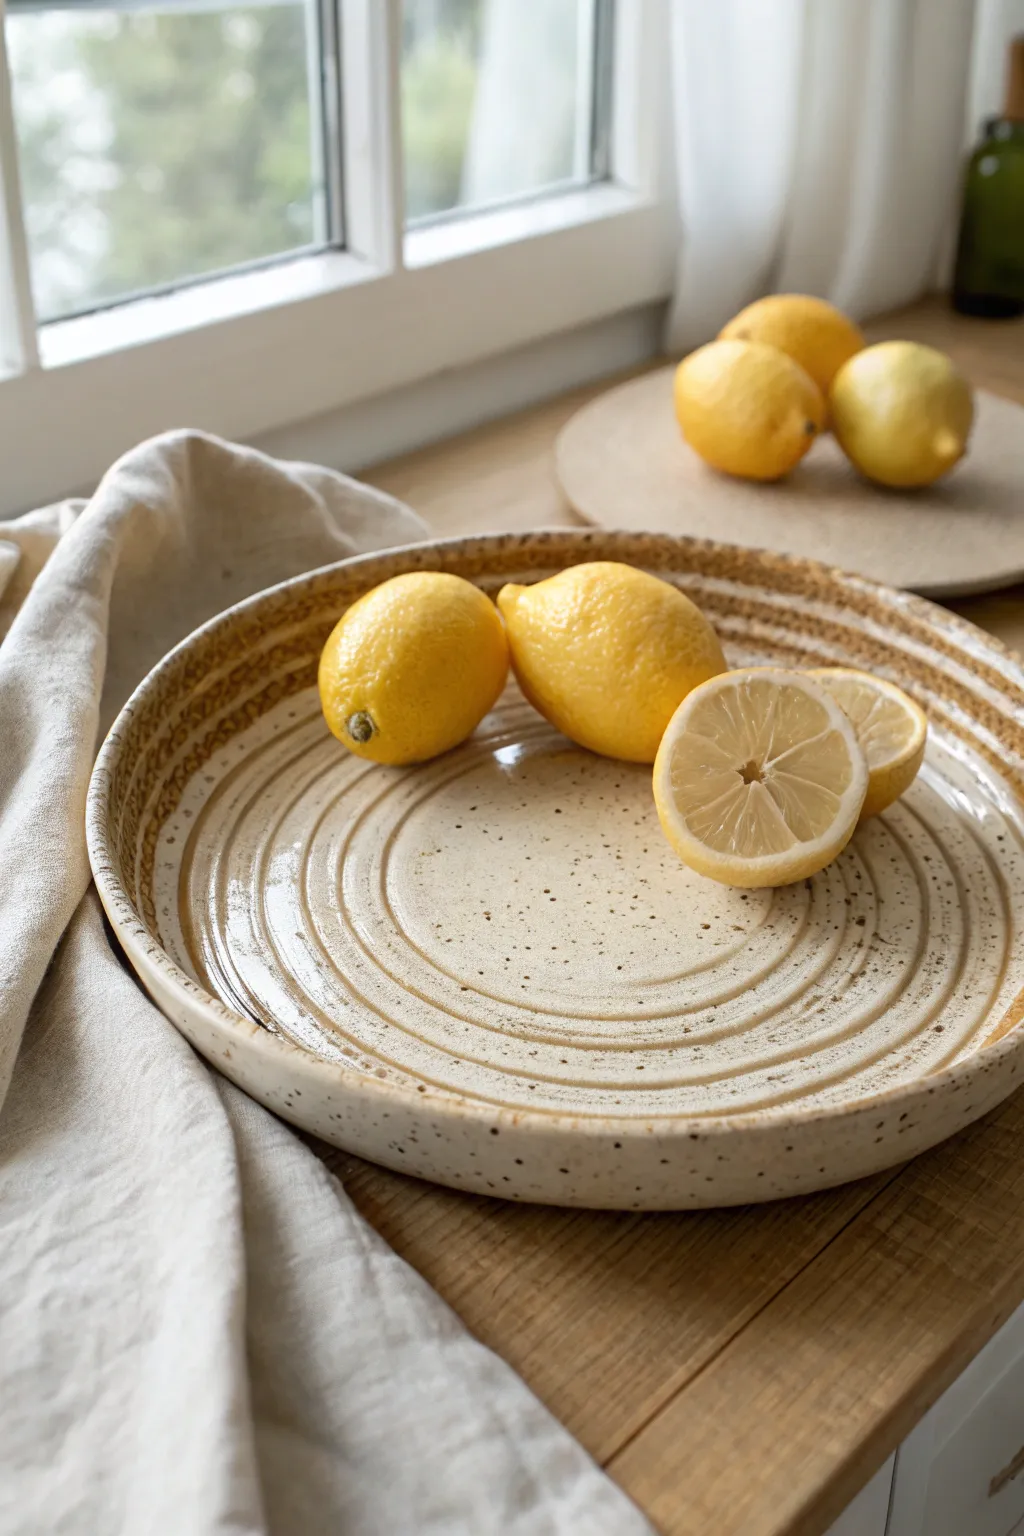
This rustic, low-profile serving platter features mesmerizing concentric ridges that catch the glaze beautifully, creating a visual rhythm perfect for displaying fresh fruit. The speckled cream finish adds an organic, earthy charm that elevates any table setting.
Step-by-Step Tutorial
Materials
- Speckled stoneware clay body (5-7 lbs)
- Potter’s wheel
- Wooden throwing rib
- Serrated metal rib
- Wire clay cutter
- Sponge
- Bat for the wheel head
- Trimming tools (loop tool)
- Clear or translucent cream dipping glaze
- Kiln
Step 1: Throwing the Form
-
Center the Clay:
Begin by wedging your speckled clay thoroughly to remove air bubbles. Slam the ball onto the center of a clean bat attached to your wheel head. Using wet hands and firm pressure, center the clay until it spins without wobbling. -
Open the Mound:
Open the centered clay by pressing your thumbs into the middle, leaving about 1/2 inch of clay at the bottom for the floor. Widen the opening by pulling the clay toward your body until you reach the desired diameter of your platter. -
Compress the Floor:
This is crucial for preventing cracks. Using a sponge or wooden rib, compress the wide floor of the platter by moving from the center out to the rim several times. -
Raise the Rim:
Pull up a short, vertical wall at the edge. This platter has a low profile, so the wall only need be about 1 to 1.5 inches high. Ensure the transition from floor to wall is a smooth, gentle curve rather than a sharp angle.
Step 2: Creating the Texture
-
Establish the Rim:
Use a chamois or sponge to round over the top lip of the rim so it is smooth to the touch. -
Start the Spiral:
Here is the key technique: instead of smoothing the interior, we are intentionally leaving throwing lines. Starting from the very center, press your fingertips or the corner of a wooden rib into the clay floor. -
Pull the Ridges:
Slowly move your tool outward towards the rim while the wheel spins at a moderate speed. Apply steady, heavy pressure to create deep grooves. Varying the speed of your hand movement relative to the wheel speed will change the tightness of the spiral. -
Refine the Wall Texture:
Continue the spiral pattern all the way up the short vertical wall. I prefer to use a serrated rib gently here to add a bit of extra ‘tooth’ to the upper rim texture. -
Clean the Undercut:
Use a wooden knife to trim away excess clay at the base where the platter meets the bat, creating a slight undercut to make wire cutting easier later. -
Cut and Dry:
Run a wire cutter underneath the platter while the wheel is spinning very slowly. Leave the platter on the bat and set it aside to dry to a leather-hard state.
Warping Woes?
Platters love to warp. Dry very slowly by covering the rim loosely with plastic while leaving the center exposed. Ensure your floor compression is thorough.
Step 3: Trimming and Glazing
-
Flip and Center:
Once leather hard, flip the platter over onto the wheel. Center it and secure it with lugs of soft clay. -
Trim the Foot:
Using a sharp loop tool, trim away excess weight from the bottom. Carve a distinct foot ring so the platter sits slightly elevated on the table. Smooth the foot with a damp sponge. -
Bisque Fire:
Allow the piece to bone dry completely. Load it into the kiln for a bisque firing (usually Cone 06 or 04). -
Clean and Wax:
Wipe the bisque-fired platter with a damp sponge to remove dust. Apply wax resist to the bottom foot ring to prevent glaze from sticking to the kiln shelf. -
Glaze Application:
Pour a translucent cream or clear glaze over the interior, swirling it to cover all the textured ridges. Pour out the excess. Use tongs or dip the exterior if preferred. The glaze should pool slightly in the grooves, highlighting the spiral. -
Final Fire:
Fire the piece to maturity (often Cone 5 or 6 for stoneware). Let the kiln cool naturally before unloading to reveal your speckled, textured platter.
Color Break
Use a glaze known to ‘break’ over texture. Amber celadon or rutile-based glazes will turn dark in the deep grooves and light on the ridges.
This simple technique turns basic throwing lines into a stunning design feature you can use every day
Paint Palette Dishes With Water Cup Well
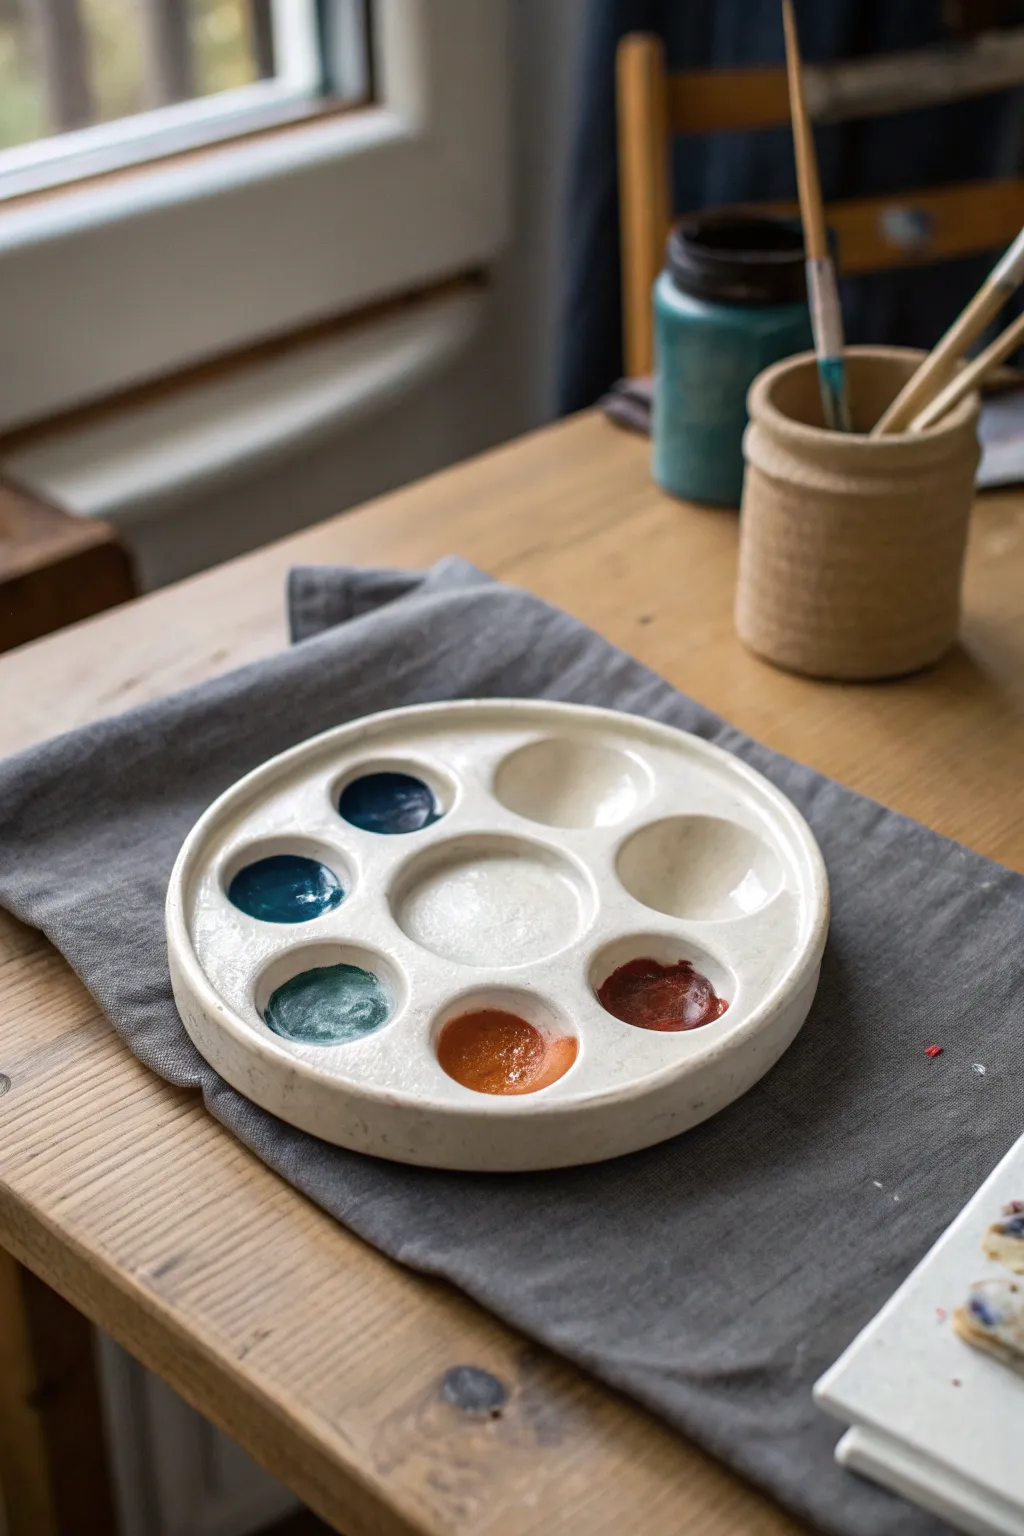
Elevate your studio space with this creamy white ceramic palette featuring deep, rounded wells perfect for mixing watercolor or gouache. Its substantial weight prevents tipping, while the neutral glaze ensures you see your colors truly as you mix them.
Step-by-Step Guide
Materials
- Light-colored stoneware clay (smooth body)
- Rolling pin
- Canvas board or cloth for rolling
- Needle tool
- Round cookie cutter or template (approx. 6-7 inches)
- Small sponge
- Loop trimming tool
- Pottery rib (wood or rubber)
- Kiln (or access to a firing service)
- White or clear gloss glaze
- Bowl of water
Step 1: Forming the Base
-
Prepare your clay:
Start by wedging a ball of light stoneware clay thoroughly to remove any air bubbles. You want a consistent consistency, roughly the size of a large grapefruit. -
Roll the slab:
Roll the clay out on your canvas to a thickness of about 3/4 of an inch. We need this substantial thickness to carve out deep wells without breaking through the bottom. -
Compress the slab:
Use a rubber rib to smooth and compress the surface of the slab in all directions. This aligns the clay particles and helps prevent warping later during firing. -
Cut the circle:
Place your circular template or cookie cutter on the slab and cut out the main disc shape using a needle tool. Peel away the excess clay. -
Refine the edges:
With a damp sponge or your finger, soften the sharp cut edge of the circle. I prefer to round this over slightly now so it’s comfortable to hold later.
Sticky Brushes?
If your brush gets caught or snagged in the wells, the clay wasn’t smoothed enough. burnish the wells with the back of a spoon when leather-hard for a glass-smooth finish.
Step 2: Creating the Wells
-
Mark the layout:
Lightly trace a smaller circle in the absolute center of your slab. Then, mark six evenly spaced points around that center circle to guide where the outer wells will go. -
Start carving the center:
Using a loop tool, gently begin scooping clay out of the center mark. Work in a circular motion, leaving a wall thickness of at least 1/4 inch at the bottom. -
Carve the outer ring:
Move to the outer six marks. Carefully scoop out each well, aiming for a rounded, bowl-like shape for each depression. These should be independent of each other. -
Check the depth:
Pause frequently to check the depth. You want deep reservoirs for water and paint, but be careful not to go too deep and weaken the structural integrity of the base. -
Smooth the interior:
Once the bulk of the clay is removed, use a slightly damp sponge or your fingertip to seamlessy smooth the inside of every well. Remove any carving marks or grog that might rough up your brushes. -
Refine the ridges:
Smooth the flat areas (lands) between the wells. Ensure there are no sharp ridges that would trap paint.
Step 3: Finishing and Firing
-
Dry slowly:
Loosely cover the palette with plastic and let it dry very slowly over several days. Solid slabs like this are prone to warping if they dry unevenly. -
Bisque fire:
Once bone dry, fire the piece to bisque temperature (usually cone 04 or 06, depending on your clay body). -
Clean the bisque:
Wipe the fired piece with a damp sponge to remove any kiln dust before glazing. -
Apply glaze:
Pour a white or clear gloss glaze over the piece, or dip it if you have a large enough container. Ensure the wells are fully coated. -
Wipe the foot:
Meticulously wipe all glaze off the bottom of the palette so it doesn’t fuse to the kiln shelf. -
Glaze fire:
Fire the piece again to the maturity temperature of your clay and glaze (often cone 5 or 6 for stoneware).
Pure White Pro Tip
Use a bright white porcelain slip over stoneware before the first firing. It makes colors pop more than stoneware clay alone, helping you mix accurately.
Once cooled, fill the wells with your favorite pigments and enjoy the feeling of painting from a true handcrafted tool.
Animal-Shaped Mini Planters
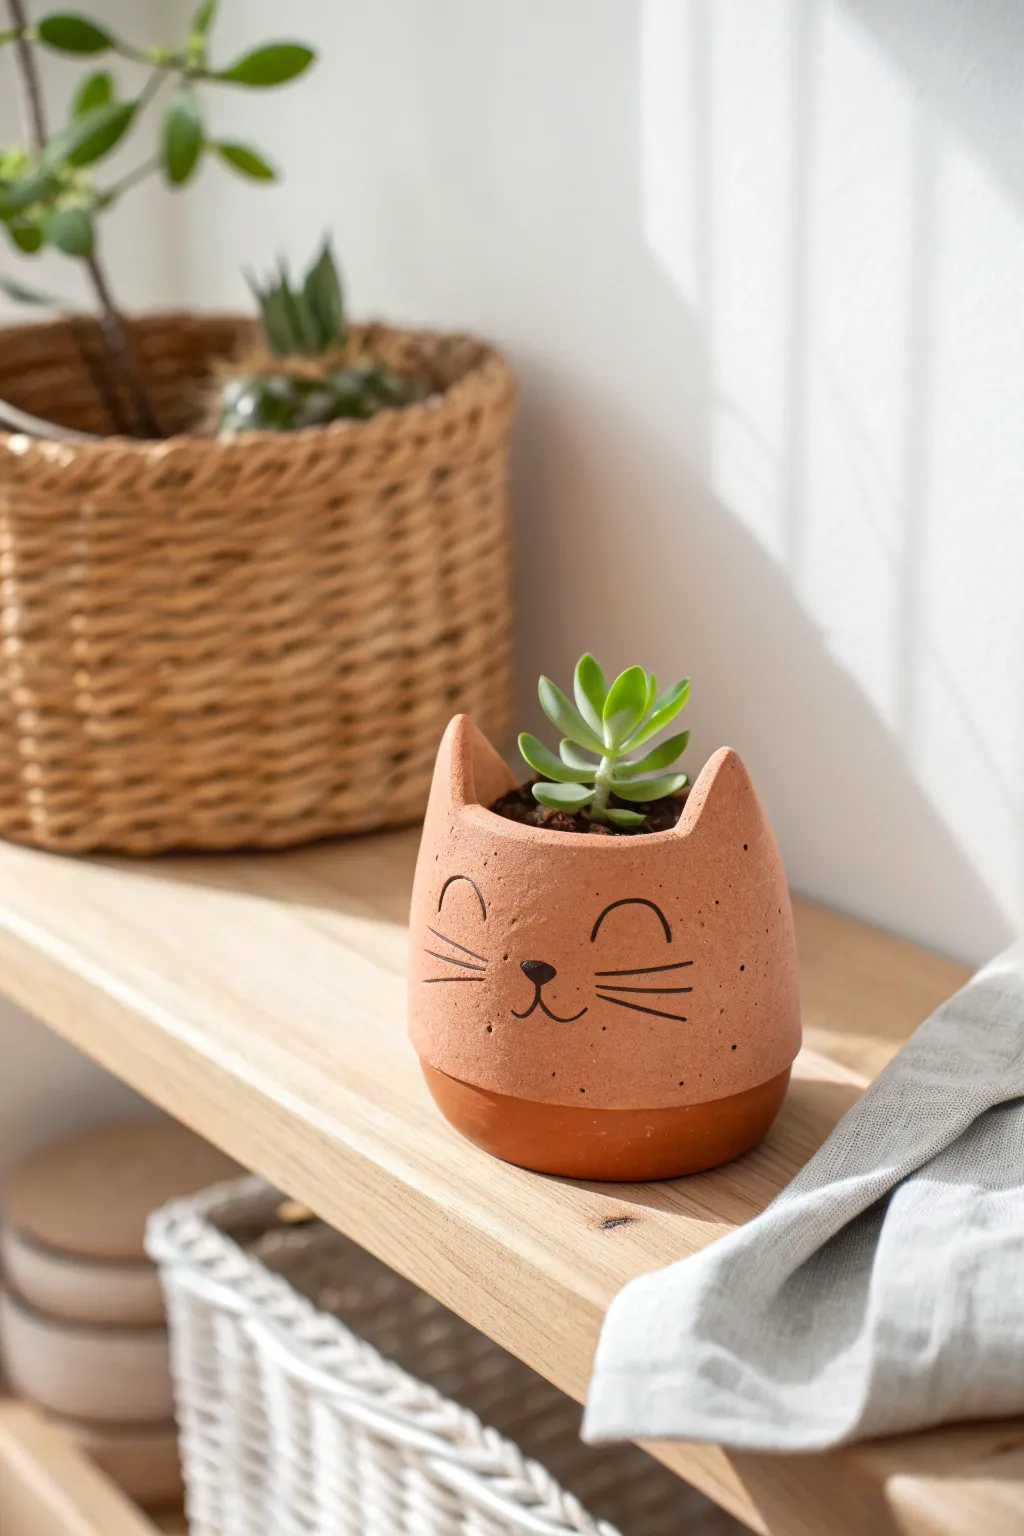
This adorable mini planter brings a touch of whimsy to any succulent collection with its sleeping cat face and perky ears. The raw terracotta texture combined with simple black line work creates a charming, minimalist aesthetic perfect for modern shelving.
Step-by-Step Tutorial
Materials
- Terracotta air-dry clay or kiln-fire clay
- Rolling pin
- Small bowl or cup (for molding)
- Clay knife or craft knife
- Scoring tool (or needle tool)
- Slip (water mixed with clay scraps)
- Sponge
- Fine grit sandpaper
- Black acrylic paint or black underglaze
- Fine detail paintbrush (size 0 or linear)
- Clear matte sealant (if using air-dry clay)
- Terracotta-colored glaze (optional, for the base)
Step 1: Shaping the Base
-
Prepare the clay:
Begin by wedging your terracotta clay to remove air bubbles. This ensures a smooth, crack-free finish later. Roll out a slab of clay to approximately 1/4 inch thickness. -
Create the cylinder:
Cut a rectangular strip from your slab. The length should wrap around your chosen mold (a small cup works well) with a little overlap, and the height should be about 3 inches. -
Form the walls:
Wrap the clay strip around your mold to form a cylinder. Where the ends meet, score the edges by making cross-hatch marks, apply a dab of slip, and press them firmly together to seal the seam. -
Add the bottom:
Cut a circle of clay slightly larger than your cylinder’s diameter. Score and slip the bottom edge of your cylinder and the edge of the circle, then join them. Smooth the clay upwards on the outside to blend the seam completely. -
Smooth the surface:
Remove the mold gently. Use a damp sponge to smooth out any fingerprints or rough textures on the outside of the pot.
Uneven Seams?
If the seam where you joined the cylinder is visible, roll a thin ‘snake’ of clay, place it over the seam line, and smooth it vigorously with a damp sponge until it vanishes.
Step 2: Sculpting the Cat Face
-
Cut the ears:
From your remaining clay slab, cut two matching triangles. They should be roughly equilateral but slightly rounded at the tips for a softer look. -
Curve the ears:
Gently curve the triangles vertically so they aren’t perfectly flat. This gives them a natural, cupped appearance like a real cat’s ear. -
Attach the ears:
Score the bottom edge of each ear and the top rim of the pot where you want them to sit. Apply slip and press the ears firmly onto the rim, blending the clay downward onto the pot’s interior and exterior for a strong bond. -
Refine the shape:
Smooth the transitions around the ears with your fingers or a modeling tool. I find using a slightly wet finger helps create that seamless curve from the forehead to the ear tip. -
Create drainage (optional):
If you plan to plant directly inside, use a straw or small circular tool to punch a drainage hole in the center of the bottom.
Make it a Set
Make two more pots in graduating sizes: a medium dog and a large bear. Keep the base style identical but change the ear shapes and facial features for a cohesive family.
Step 3: Finishing Touches
-
Dry the piece:
Allow the clay to dry completely. For air-dry clay, this takes 24-48 hours; if firing, follow your kiln’s specific schedule. -
Sand for smoothness:
Once bone dry (and before firing if using kiln clay), gently sand the exterior with fine-grit sandpaper to remove any small bumps or rough patches. -
Create the base detail:
To mimic the two-tone look in the reference, tape off the bottom half-inch of the pot. Verify the tape is pressed down firmly to prevent leaks. -
Paint or glaze the base:
Apply a darker terracotta glaze or a wash of diluted darker acrylic paint to the bottom section. Let this dry slightly before peeling off the tape to reveal a crisp line. -
Draw the face features:
Using a fine detail brush and black paint (or underglaze), paint two curved arches for closed, sleeping eyes about midway down the pot. -
Add nose and mouth:
Paint a small, inverted soft triangle for the nose centered between the eyes. From the bottom point of the nose, draw two curved lines branching out to form the mouth anchors. -
Whiskers and freckles:
On either cheek, paint three horizontal whiskers. Add a few tiny dots around the cheek area for freckles to add character. -
Seal the pot:
If using air-dry clay, coat the entire piece (inside and out) with a waterproof sealant to protect it from moisture when watering your plant.
Now you have a charming little feline friend ready to cradle your favorite succulent
Kintsugi-Inspired Crack Details For Decor Pieces
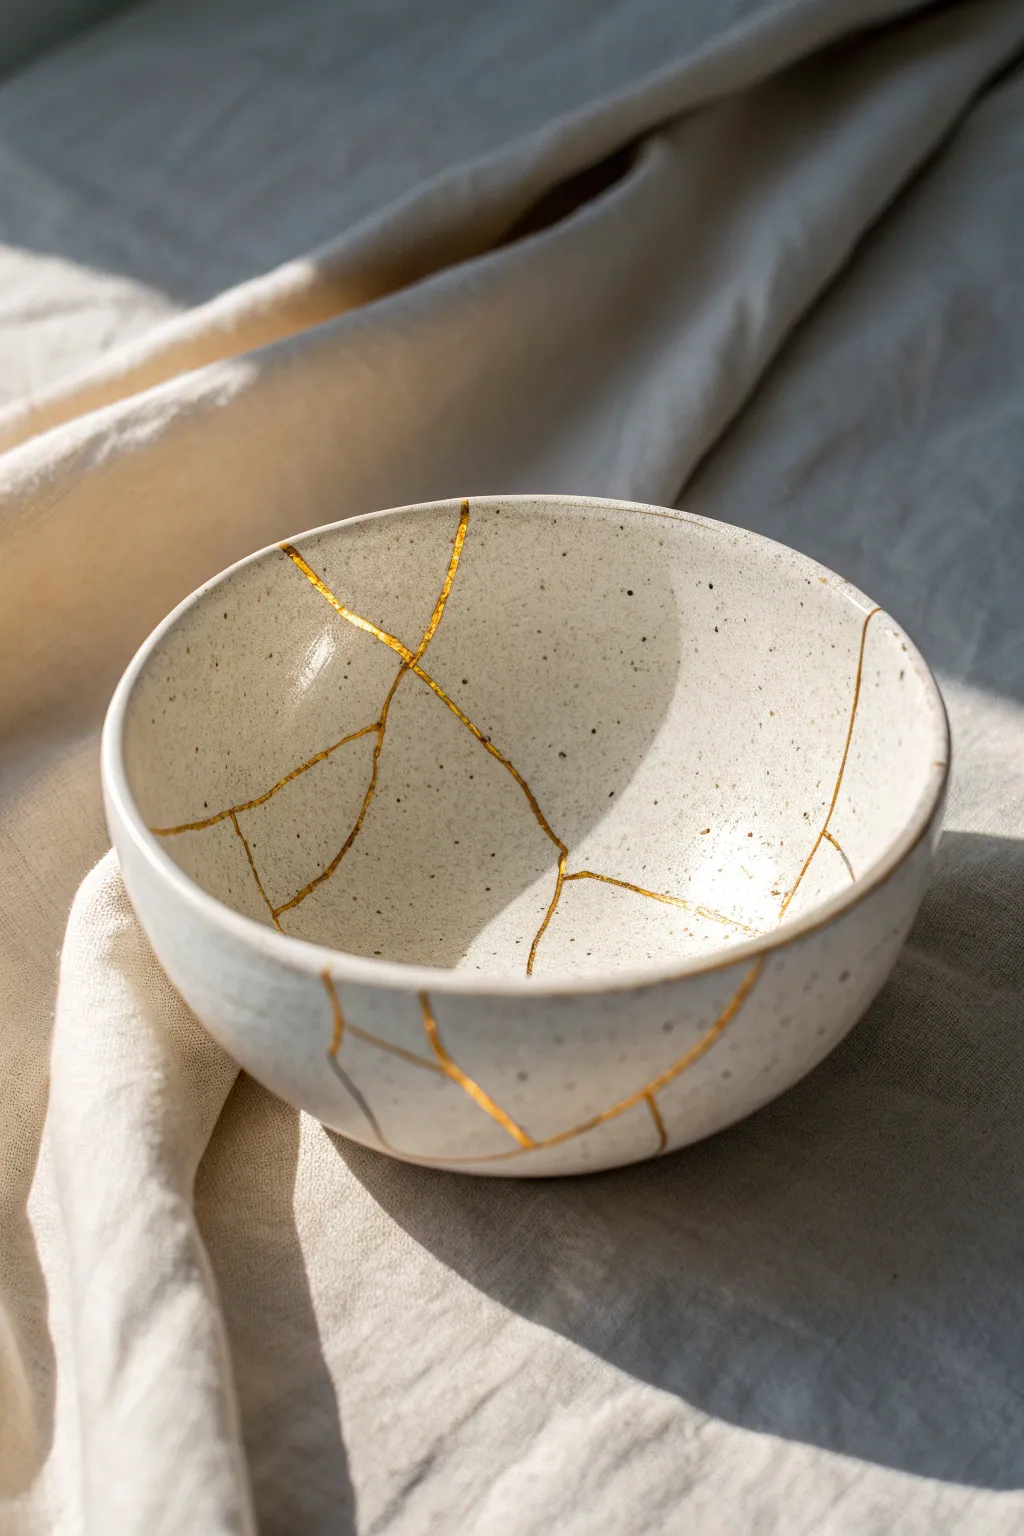
Embrace the beauty of imperfection with this stunning Kintsugi-inspired project that turns ordinary clay into a work of art. The delicate gold lines traversing the speckled white surface create an elegant, high-end look without needing to actually break anything.
Step-by-Step Guide
Materials
- Air-dry clay (white or light grey)
- Speckled pottery clay (optional, or use white)
- Acrylic rolling pin
- Small bowl for molding (to use as a form)
- Plastic wrap (cling film)
- Pottery needle tool or X-Acto knife
- Sponge
- Sandpaper (fine grit)
- Gold leaf adhesive size
- Gold leaf sheets or metallic gold powder
- Small, fine-tipped paintbrush
- Soft brush (for dusting gold)
- Gloss varnish or clear sealant (food safe if using for food)
Step 1: Forming the Bowl Base
-
Prepare the workspace:
Lay down a clean canvas cloth or parchment paper to prevent the clay from sticking to your table. Take a large handful of clay and knead it until it’s pliable and warm. -
Roll out the slab:
Using your acrylic rolling pin, flatten the clay into a smooth, even slab about 1/4 inch thick. Try to keep the thickness consistent so the bowl dries evenly. -
Add texture (optional):
If you are using plain white clay but want the speckled look from the photo, gently press ground pepper or dried tea leaves into the surface with the rolling pin. -
Prepare the mold:
Take your existing bowl that will serve as the form. Turn it upside down and cover the exterior tightly with plastic wrap to ensure the clay doesn’t stick. -
Shape the clay:
Drape your rolled clay slab over the plastic-covered bowl. Gently press the clay against the bowl’s curve, smoothing it down with your hands to remove air pockets. -
Trim the edges:
Use a needle tool or knife to trim the excess clay around the rim of the bowl, striving for a clean, straight edge, though a little organic waviness adds character. -
Smooth the surface:
Dip a sponge lightly in water and run it over the clay to smooth out any fingerprints or rough textures.
Messy Gold Lines?
If the gold leaf stuck to spots outside the crack, the clay wasn’t clean. Use a stiff paintbrush or an X-Acto knife to gently scrape away stray flecks.
Step 2: Creating the Faux-Breaks
-
Carve the cracks:
While the clay is still damp but firm, use your needle tool to carve shallow veins into the surface. I like to start from the rim and wander downwards, mimicking natural fracture lines. -
Deepen the lines:
Go over your carved lines a second time, pressing slightly deeper to create a distinct channel or groove where the gold will eventually sit. -
Initial drying phase:
Let the clay sit on the mold for about 24 hours until it holds its shape on its own, then carefully remove it from the mold. -
Full cure:
Allow the clay bowl to dry completely (usually another 24-48 hours) until it is bone dry and turns a lighter color. -
Refine the surface:
Once fully dry, use fine-grit sandpaper to gently smooth the rim and any rough patches on the body, being careful not to sand away your carved grooves.
Go Geometric
Instead of organic cracks, try carving precise geometric patterns or constellations before adding the gold for a modern starry night aesthetic.
Step 3: Applying the Gold Detail
-
Clean dust:
Wipe the entire bowl with a slightly damp cloth or dry brush to remove all sanding dust before painting. -
Apply adhesive:
Using a very fine paintbrush, carefully paint the gold leaf adhesive (size) strictly inside the carved grooves. Let it sit until it becomes tacky (usually 15-20 minutes). -
Lay the gold:
Press the gold leaf sheets over the tacky grooves. Use a soft, dry brush to pounce the leaf down into the recessed lines ensuring full adhesion. -
clean up edges:
Vigorously brush away the excess gold leaf. The gold will stick only where you applied the size, leaving crisp, bright veins. -
Alternative method:
If using gold powder and mixing medium instead of leaf, simply mix a thick metallic paste and paint it precisely into the grooves. -
Seal the piece:
Finish by applying a coat of gloss varnish over the entire bowl to protect the gold and give the clay a fired ceramic look.
Place your finished bowl in a spot where it catches the light to truly show off those shimmering golden details