If you can shape a simple form, you can make a stunning vase—most of the magic is in the details you add on top. Here are my favorite handmade clay vase ideas, starting with the classics and drifting into the fun, quirky stuff that always gets compliments on the shelf.
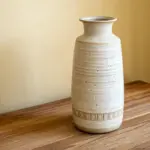
Simple Minimal Cylinder Vase
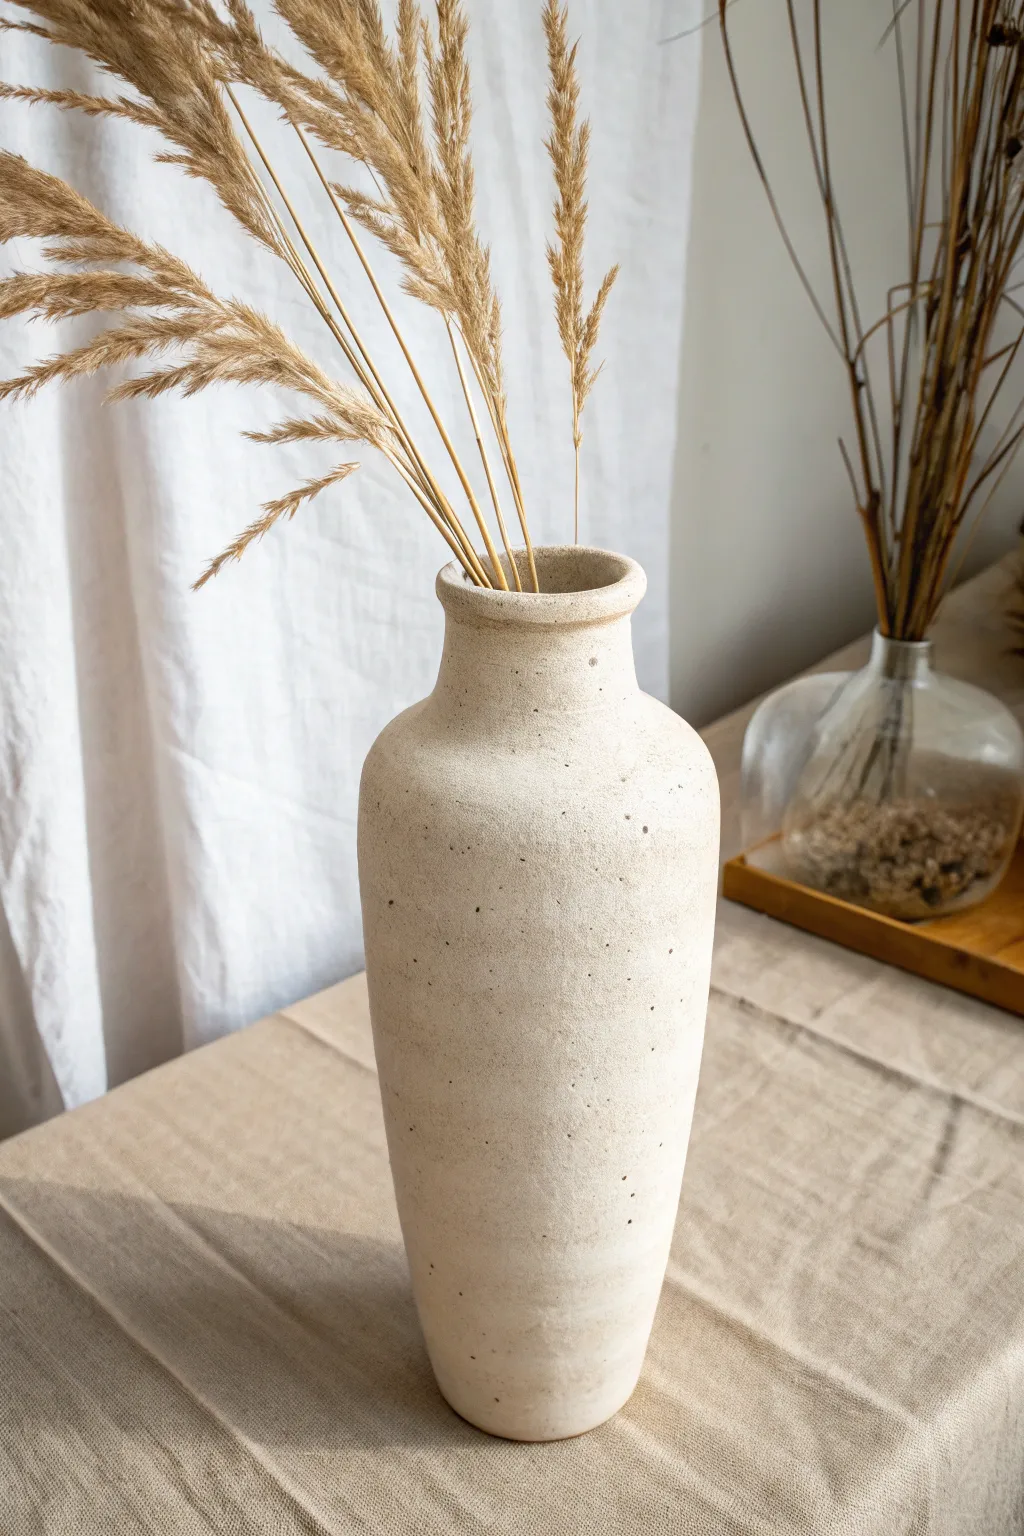
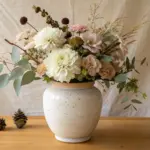
Embrace the serene beauty of minimalism with this tall, slender vessel that perfectly mimics the look of high-end stoneware. With its gentle curves and rustic speckled finish, this piece brings an earthy, organic warmth to any corner of your home, especially when styled with dried natural grasses.
Step-by-Step Tutorial
Materials
- Air-dry clay (white or cream)
- Acrylic rolling pin
- Clay cutting tool or knife
- Slip (clay mixed with water)
- Sponge
- Pottery rib or old credit card
- Needle tool
- Cream acrylic paint (matte)
- Dark brown or black acrylic paint (for speckling)
- Old toothbrush
- Fine-grit sandpaper
- Matte varnish or sealant
- Two large cylindrical forms (like PVC pipe or mailing tubes) for support
Step 1: Forming the Base Structure
-
Roll the slab:
Begin by rolling out a large, even slab of your air-dry clay to about 1/4 inch thickness. You want this sturdy enough to stand tall but not overly heavy. -
Cut the body:
Measure and cut a large rectangle. The height of the rectangle will determine your vase’s height, and the width should be enough to wrap around your desired diameter with a little overlap. -
Create the cylinder:
Stand the rectangle up and curve it into a cylinder. Score the meeting edges with a needle tool (scratching up the surface) and apply a little slip. -
Join the seam:
Press the edges together firmly. Smooth the seam inside and out using your thumb or a wooden tool so the join becomes invisible. -
Add the bottom:
Place your cylinder on a remaining patch of rolled clay. Trace around the bottom, cut out the circle, score and slip the edges, and attach the base securely.
Slumping Walls?
If your cylinder starts to buckle under its own weight while wet, stuff the inside loosely with crumpled newspaper or plastic bags to provide internal support while it firms up.
Step 2: Shaping and Refining
-
Taper the form:
To create the gentle “shoulder” near the top, gently press the clay inward as you rotate the vase. You can remove small V-shaped wedges of clay from the top rim if you need to drastically reduce the diameter, smoothing the seams afterward. -
Form the neck:
Once the shoulders curve inward, build a short, vertical neck. You can do this by adding a smaller coil of clay or manipulating the existing top edge upward. -
Flare the rim:
Gently gently pinch and flare the very top lip of the vase outward to create that classic finished rim look found on wheel-thrown pottery. -
Smooth the surface:
Use a slightly damp sponge to wipe down the entire exterior. I find this is the best time to fix any fingerprints or uneven textures. -
Dry thoroughly:
Let the vase dry slowly away from direct heat. This is crucial for height; if it dries too fast, it might crack. Rotate it occasionally.
Pro Tip: Faux Grog
Mix dried coffee grounds directly into your wet clay or paint. This adds actual physical texture that mimics ‘grog’ (fired clay particles) often found in rustic stoneware.
Step 3: Creating the Stone Finish
-
Sand for perfection:
Once bone dry, use fine-grit sandpaper to smooth out any rough patches, paying special attention to the rim and the shoulder curve. -
Base coat:
Apply two coats of matte cream acrylic paint. Let the first coat dry completely before adding the second to ensure solid coverage. -
Prepare the speckle:
Dilute a small amount of dark brown paint with water until it’s quite thin and fluid. -
Apply the texture:
Dip an old toothbrush into the diluted paint. Hold it near the vase and run your thumb across the bristles to flick tiny specks onto the surface. Practice on paper first to control the spray. -
Seal the work:
Finished with a coat of matte varnish to protect the paint and give it that true ceramic feel minus the kiln firing.
Place your finished vase in a spot with soft natural light to highlight the organic texture you’ve created


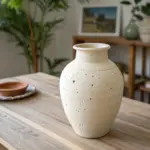
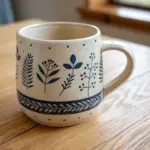
Pinch-Pot Bud Vase

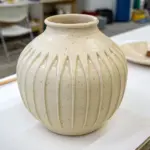
This charming, petite bud vase features a beautifully rounded spherical body and a tactile, pebbled surface texture. Its creamy white glaze and rustic pinch-pot construction give it an organic warmth perfect for displaying a few sprigs of dried grasses.
Step-by-Step Guide
Materials
- White stoneware clay with grog or speckles
- Pottery sponge
- Pin tool or needle tool
- Wooden modeling tool
- Serrated rib or kidney tool
- Soft paintbrush
- Matte white glaze
- Dark wash or oxide (optional for rim)
Step 1: Forming the Sphere
-
Prepare the clay:
Start with a ball of clay about the size of a tennis ball. Pat it firmly between your hands to ensure it is dense, round, and free of air bubbles. -
Open the hole:
Hold the ball in your non-dominant hand. Push your thumb gently into the center of the ball, stopping about half an inch from the bottom to leave a solid base. -
Pinch the walls:
Begin pinching the clay between your thumb (inside) and fingers (outside). Rotate the ball slightly with each pinch to ensure even thickness all around, working from the bottom up. -
Shape the roundness:
As you pinch, gently push the walls outward from the inside to create a bulbous, spherical volume. Keep the opening slightly narrower than the body. -
Refine the curve:
Use a wooden spoon or paddle to gently tap the exterior if it gets too lumpy. You want a distinct round shape that sits stable on a flattened bottom.
Step 2: Creating the Rim and Texture
-
Collar the neck:
Gently squeeze the clay at the opening to narrow it further, creating a defined neck. I like to use the webbing between my thumb and index finger to compress this area. -
roll a coil:
Roll a very small, thin coil of clay, just enough to circle the opening. Score and slip the rim, then attach this coil to add a little height and structure. -
Blend the rim:
Smooth the attached coil down onto the body on the outside and inside, leaving a slightly thickened, distinct lip at the very top. -
Texture the surface:
Take a stiff bristle brush or a piece of coarse sandpaper. Gently tap or press it all over the exterior surface to create a pitted, stone-like texture. -
Enhance the dimples:
For deeper craters like the ones in the photo, use the dull end of a needle tool or a small wooden stick to press random, deeper speckles into the clay. -
Smooth the lip:
While the body is textured, run a damp finger or soft sponge specifically over the very top rim to keep it smooth and finished, providing contrast to the rough body.
Collapsing Walls?
If the clay starts slumping while you shape the sphere, it’s too wet or thin. Stuff the inside with crumpled newspaper or paper towels to support the shape while it stiffens up.
Step 3: Finishing and Firing
-
Slow drying:
Cover the vase loosely with plastic for a day to let the moisture even out, then uncover it to dry completely to the bone-dry stage. -
Bisque fire:
Fire the piece in a kiln to bisque temperature (usually cone 04 or 06). This prepares the clay to accept the glaze without dissolving. -
Apply glaze:
Dip the vase into a matte white glaze. Shake off excess drips so the layer isn’t too thick, which allows the texture to show through. -
Detail the rim:
For the specific look in the photo, wipe a tiny amount of iron oxide or dark glaze just along the groove where the neck meets the rim. -
Glaze fire:
Fire the piece again to the final temperature for your clay body (likely cone 5 or 6). Once cool, sand the bottom if needed to prevent scratching furniture.
Rustic Rim Aesthetic
Don’t over-smooth the neck connection. Leaving a slight, shadowy groove or seam line under the rim adds character and makes the piece look more distinctively handmade.
Now you have a serene little vessel ready to hold your favorite dried botanicals
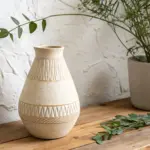


Coil-Built Rustic Vase

Capture the essence of earthy simplicity with this textured terracotta vase, perfect for displaying dried wheat or wildflowers. Its distinct rigid surface is achieved through a controlled coil-building technique that leaves the process visible, celebrating the hand of the maker.
Detailed Instructions
Materials
- Terracotta stoneware clay (about 3-4 lbs)
- Scoring tool or serrated rib
- Slip (clay mixed with water)
- Wooden modeling tool
- Sponge
- Plastic bat or banding wheel
- Canvas or cloth for rolling coils
- Spray bottle with water
Step 1: Forming the Base
-
Prepare the foundation:
Begin by wedging your terracotta clay thoroughly to remove air bubbles. Take a ball about the size of an orange and flatten it onto your bat to create a circular base roughly 4-5 inches in diameter. I like to keep this about 1/2 inch thick for stability. -
Smooth the bottom:
Use a damp sponge to smooth out the edges of your base disc, compacting the clay slightly. -
Score the edge:
Take your scoring tool and rough up the outer 1/2 inch of the base’s top surface. Apply a generous amount of slip to the scored area.
Coil Consistency
If your coils are drying out while you work, keep them under a damp paper towel. Dry coils won’t bond well and may crack during firing.
Step 2: Building the Body
-
Roll the first coils:
Roll out several snake-like coils of clay on your canvas. Aim for a thickness similar to your pinky finger. Try to keep them consistent, but slight irregularities add to the rustic charm. -
Lay the first ring:
Place your first coil onto the slipped edge of the base. Cut the ends at an angle to join them seamlessly. -
Blend the interior:
This is crucial: Using your thumb or a wooden tool, smear the clay from the coil *down* onto the base on the *inside* only. Do not blend the outside, as those ridges create the vase’s signature look. -
Build outward:
Continue adding coils, stacking each new one slightly toward the outside of the previous ring. This will widen the form to create the belly of the vase. Remember to score and slip between every single layer. -
Maintain texture:
As you stack, gently press the coils together to adhere them, but be careful not to flatten the outer texture. The horizontal lines are the main design feature here. -
Reaching the widest point:
Continue building outward until the vase is as wide as you desire (the example is quite bulbous). Pause here to let the clay stiffen slightly if it feels wobbly.
Make it watertight
Since the outside is unglazed, pour a clear glaze inside the finished vase and swirl it around to coat the interior. This lets it hold water for fresh flowers.
Step 3: Narrowing and Refining
-
Begin tapering:
Now, start placing your coils slightly toward the *inside* of the previous ring. This creates the shoulder of the vase and narrows the form toward the neck. -
Support the wall:
As you narrow the shape, support the outside with one hand while blending the coils downward on the inside with the other. This prevents the wall from collapsing. -
Form the neck:
Once the opening narrows to about 3 inches, stack the coils vertically (straight up) for about 2-3 inches to create the elongated neck shown in the image. -
Flare the rim:
For the final coil, gently flare it outward to create a soft, inviting lip. Smooth this top edge carefully with a damp sponge or piece of chamois so it isn’t sharp. -
Accentuate the ridges:
Take a wooden tool or your finger and run it horizontally along the grooves between the outer coils. This deepens the shadows and emphasizes that beautiful, ribbed texture. -
Surface detailing:
If the clay is too smooth, you can lightly drag a serrated rib horizontally around the belly to add extra rough texture that mimics stone or aged pottery.
Step 4: Finishing Touches
-
Dry slowly:
Cover the vase loosely with plastic. Because of the varying thickness of the coils, drying it too fast can cause cracks. Let it dry slowly over several days. -
Bisque fire:
Once bone dry, bisque fire the vase to cone 04. -
Staining (Optional):
To enhance the rustic look without glazing, wash the fired piece with an iron oxide wash or a diluted dark underglaze, then wipe most of it off with a sponge. This leaves dark color in the deep crevices. -
Final wipe:
Ensure the high points of the texture reveal the raw terracotta color for that sun-baked aesthetic seen in the photo.
Enjoy the timeless beauty of your handmade vessel as it brings a touch of warmth to your home
Slab-Built Square Vase
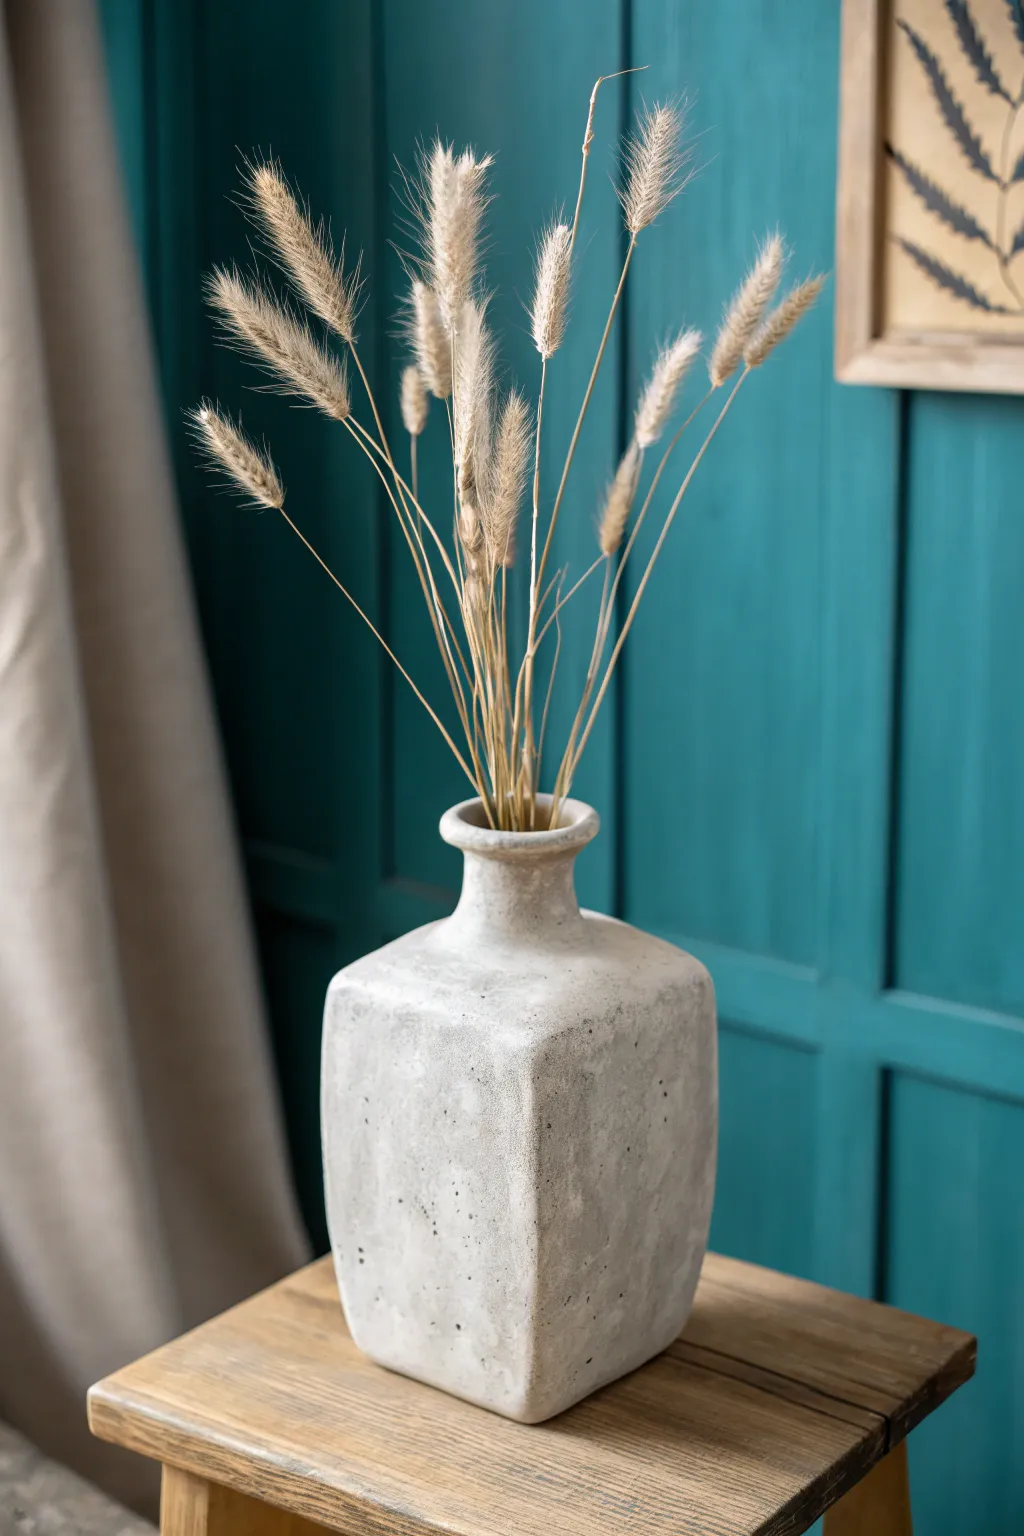
Embrace the imperfect beauty of this tall, squared vessel that mimics the look of weathered concrete or natural stone. Built using simple slab construction, its textured white glaze and sturdy form make it the perfect minimalist home for your favorite dried grasses.
How-To Guide
Materials
- Stoneware clay (groggy/speckled body recommended)
- Rolling pin
- Two long wooden guide strips (approx 1/4 inch thick)
- Ruler
- Fettling knife or sharp clay tool
- Slip and scoring tool (or fork)
- Wooden paddle
- Sponge
- Matte white glaze (stone texture preferred)
- Optional: Black iron oxide wash for speckling
Step 1: Preparing the Slabs
-
Roll the main slab:
Begin by wedging your clay to remove air bubbles. Roll out a large slab of clay between your wooden guide strips to ensure an even thickness of about 1/4 inch. -
Cut the body panels:
Using a ruler and your fettling knife, measure and cut four identical tall rectangles. For the proportions in the image, aim for roughly 4 inches wide by 8-9 inches tall. -
Cut the base:
Cut a square base piece that is slightly larger than the width of your side panels. A 4.5-inch square works well here. -
Cut the shoulder pieces:
Cut four trapezoidal pieces for the top shoulders. The bottom width should match your side panels (4 inches), and the top width should be narrow (about 1.5 inches) to create the taper. -
Leather hard stage:
Find a flat board and let all your cut pieces sit until they reach ‘leather hard’—stiff enough to hold their shape without slumping, but soft enough to join. This is crucial for a tall, square form.
Miter Those Corners
For sharper, professional corners, cut the vertical edges of your slabs at a 45-degree angle before joining. This creates a seamless miter joint that hides the connection line.
Step 2: Assembling the Body
-
Score and slip the base:
deeply score the edges of your square base and the bottom edges of your four wall panels. Apply clay slip generously to the scored areas. -
Attach the first walls:
Attach one wall panel to the base, pressing firmly. I find it helpful to reinforce the interior seam immediately with a thin coil of soft clay, smoothing it down with your thumb. -
Complete the box:
Attach the remaining three walls, scoring and slipping the vertical seams where the walls meet. Use a wooden paddle to gently tap the outside corners, creating a distinct, squared edge rather than a rounded one. -
Attach the shoulders:
Once the main box is sturdy, score and slip the top edges. Attach the four trapezoidal pieces, leaning them inward so their sides touch. This forms the angled ‘roof’ of the vase. -
Smooth the seams:
Use a rib tool or your finger to blend the seams on the shoulder area completely smooth so they look like one continuous piece of clay.
Step 3: Neck and Finishing
-
Form the neck:
Roll a small rectangular strip of clay and curve it into a cylinder. Attach this cylinder to the opening at the top of the shoulders to create the neck. -
Add the rim:
Roll a small coil of clay and attach it to the very top of the neck cylinder. Flare it outward slightly with your fingers to create the distinct lip seen in the photo. -
Refine the shape:
Paddle the entire form gently again. This step helps compress the clay particles and gives the vase that slightly organic, not-quite-perfect geometry. -
Texture the surface:
To achieve the stone effect, lightly tap the surface with a rough sponge or a stiff bristle brush. Don’t smooth it out perfectly; the imperfections catch the glaze later. -
Dry and Bisque:
Allow the vase to dry slowly under plastic for a few days to prevent warping, then bisque fire it according to your clay body’s instructions.
Make It Ancient
Before the clay fully dries, gently rub coarse sand or grog into the exterior walls. This physical texture will break up the glaze surface for an even more convincing weathered stone look.
Step 4: Glazing
-
Apply the base glaze:
Dip or brush on a matte white or light grey glaze. A glaze formula described as ‘stony’ or ‘dry matte’ will work best to replicate this finish. -
Add speckling:
If your clay body doesn’t have speckles, you can flick a toothbrush dipped in iron oxide wash or watered-down black underglaze over the raw glaze surface. -
Final wipe:
Wipe the foot of the vase clean with a sponge to prevent it from sticking to the kiln shelf. -
Glaze fire:
Fire for a second time to the maturation temperature of your glaze and clay.
Your finished vase will bring a touch of serene, architectural elegance to any corner of your home

The Complete Guide to Pottery Troubleshooting
Uncover the most common ceramic mistakes—from cracking clay to failed glazes—and learn how to fix them fast.
Clay-Covered Bottle Vase
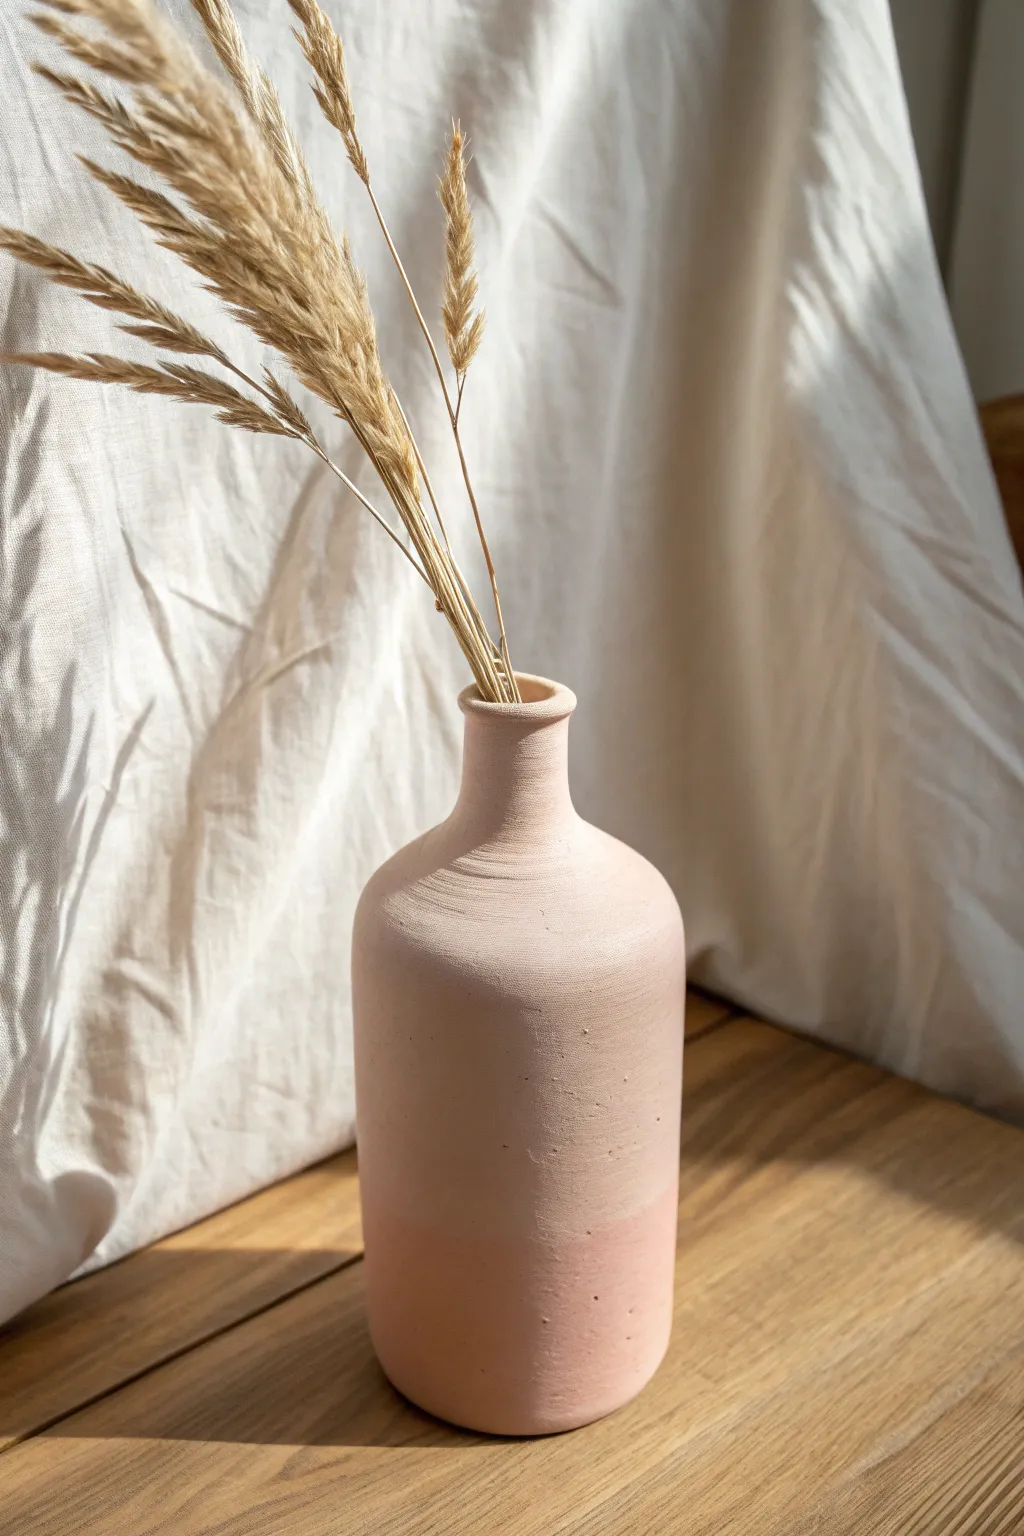
Transform an ordinary glass bottle into a high-end, pottery-style masterpiece using nothing but air-dry clay or a textured medium. This project results in a beautiful, matte-finish vase with a gentle peach ombré effect that looks perfectly at home in minimalist decor.
Step-by-Step Tutorial
Materials
- Clean glass bottle (wine or juice bottle)
- White acrylic primer or gesso
- Baking soda or plaster powder
- Acrylic paint (Pale blush and warm peach tones)
- Sponge brush
- Medium-grit sandpaper
- Matte sealant spray
Step 1: Preparation & Base Coat
-
Clean the vessel:
Begin by thoroughly washing your glass bottle. Soak it in warm, soapy water to remove any labels and adhesive residue. Dry it completely with a lint-free cloth. -
Prime the surface:
Apply a thin, even layer of white primer or gesso over the entire exterior of the bottle. This step is crucial because glass is slippery, and the primer gives your textured mixture something to grip onto. -
Let it cure:
Allow the primer to dry fully according to the manufacturer’s instructions, usually about an hour. You want a solid, non-tacky surface before moving on.
Step 2: Creating the Clay Texture
-
Mix your base color:
Pour a generous amount of pale blush acrylic paint into a mixing bowl. This will be the lighter, top color of your vase. -
Add the texturizer:
While stirring, slowly add baking soda or plaster powder to the paint. Aim for a ratio of roughly 1 part powder to 2 parts paint. You want a consistency similar to fluffy mousse or thick pancake batter. -
Apply the first layer:
Using a sponge brush, dab—don’t drag—the mixture onto the bottle. Dabbing creates that earthy, ceramic-like texture seen in the photo. Cover the top two-thirds of the bottle. -
Mix the darker tone:
In a separate container, mix a slightly darker, warmer peach paint with your baking soda texturizer using the same ratio. -
Apply the bottom section:
Dab this darker mixture onto the bottom third of the bottle. Where the two colors meet, use your sponge to gently blend them, creating a soft transition rather than a hard line. -
Dry and repeat:
Let this first textured layer dry for at least 2-3 hours. It needs to be firm to the touch. -
Second coat for depth:
Apply a second layer of your textured paint mixes over the respective areas to build up the ‘clay’ wall thickness and hide any glass showing through.
Cracking Up?
If the paint cracks while drying, don’t panic. This often adds to the aged clay look. If gaps are too big, simply dab a little more textured mix into the fissures.
Step 3: Finishing Touches
-
Smooth the imperfections:
Once the bottle creates a completely hard shell (overnight is best), inspect the surface. If any peaks are too sharp, very lightly brush them with medium-grit sandpaper to knock them down. -
Clean the dust:
Wipe the vase gently with a dry microfiber cloth to remove any sanding dust without wetting the baking soda mixture. -
Seal the work:
To prevent the baking soda from yellowing or crumbling over time, spray the entire vase with a clear matte sealant. This locks in the texture while keeping that powdery, unglazed look. -
Style the vase:
Arrange a handful of dried pampas grass or wheat stems in the vase to complement the warm, natural tones of your new vessel.
Handle Effect
Before painting, sculpt small clay handles and superglue them to the neck. Paint over them with your textured mix to make the vase look like a distinct pottery jug.
Place your new faux-ceramic vase in a sunny spot to let the shadows play across that beautiful texture
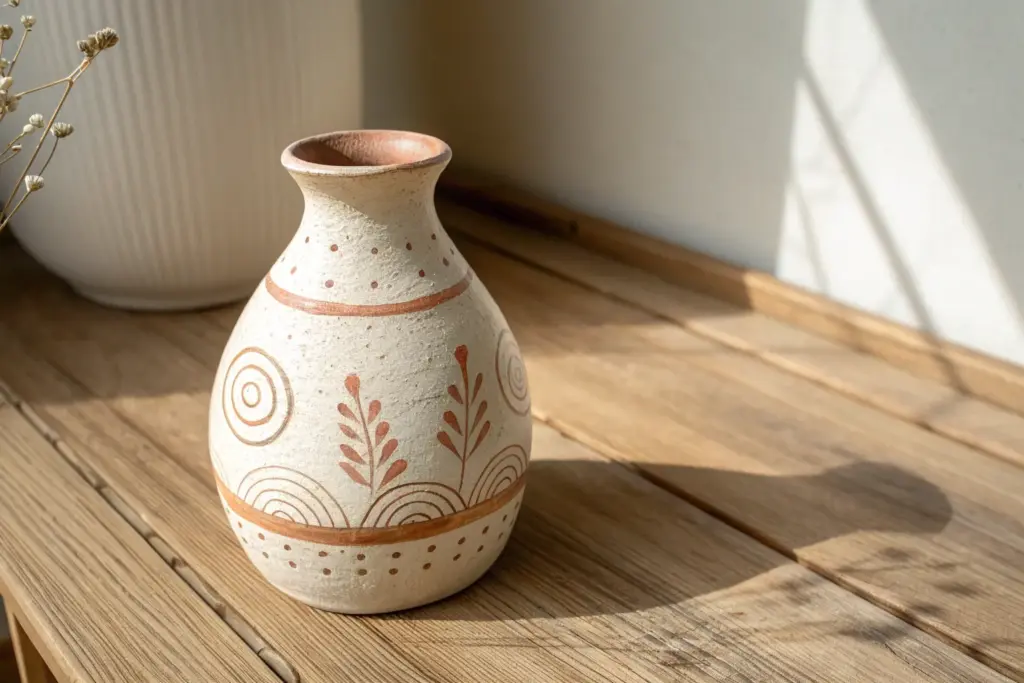
Scalloped Rim Flower Vase
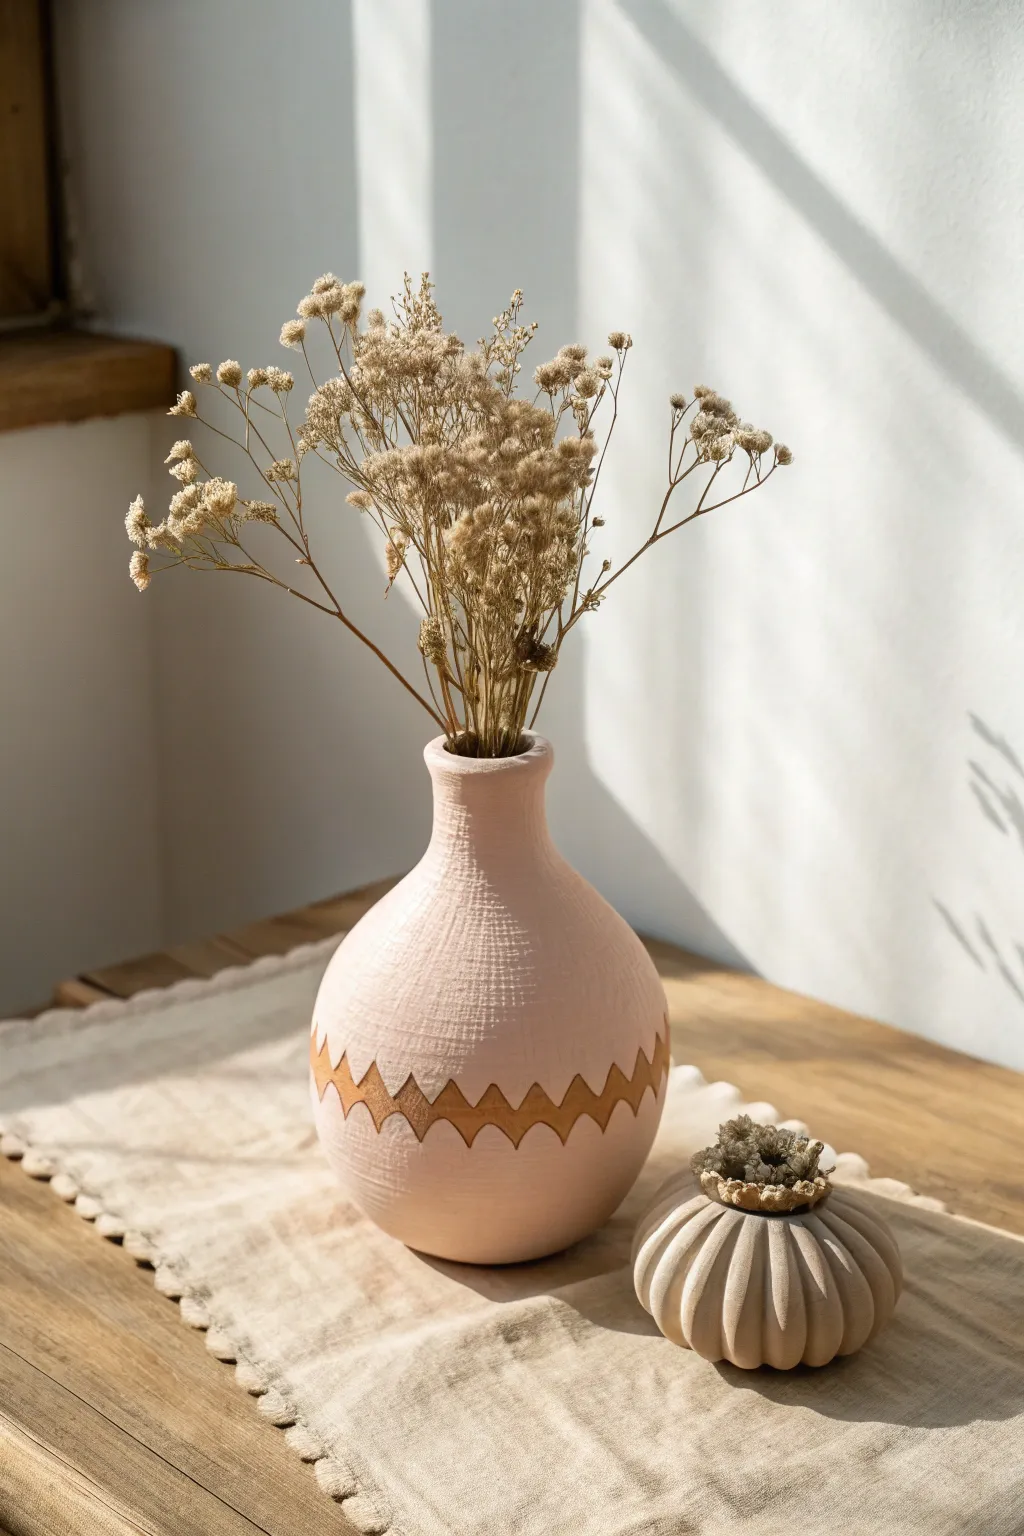
Embrace the beauty of raw texture with this charming clay vessel, featuring a soft pink finish and an exposed zigzag detail. Its gentle, rounded form and tactile surface make it the perfect home for delicate dried florals.
Step-by-Step
Materials
- Air-dry clay (white or light grey)
- Pottery tools (needle tool, rib tool, loop tool)
- Burlap or cheesecloth (for texture)
- Acrylic paint (pale peach/blush)
- Matte sealant or varnish
- Rolling pin
- Sponge
- Water cup
- Fine grit sandpaper
Step 1: Forming the Vessel
-
Roll the Base:
Start by conditioning a large ball of air-dry clay until it’s pliable. Roll out a flat circle about a half-inch thick to serve as the sturdy base of your vase. -
Build the Walls:
Create long, even coils of clay. Score and slip the outer edge of your base, then begin stacking the coils, smoothing them together on the inside and outside as you go to create a seamless wall. -
Shape the Belly:
As you build upward, gradually place your coils slightly outward to create the rounded, bulbous belly of the vase. Smooth constantly with a rib tool to ensure structural integrity. -
Taper the Neck:
Once you reach the widest point, begin placing coils slightly inward to taper the shape back in, creating a narrower neck. Finish with a straight vertical section for the rim. -
Smooth the Surface:
Use a damp sponge to smooth out any major bumps. The surface doesn’t need to be perfect glass-smooth yet, as we will be adding texture.
Uneven Drying?
If cracks appear while drying, fill them with a ‘slip’ made of clay scraps mixed with water and vinegar, then smooth over.
Step 2: Adding Texture & Detail
-
Apply Fabric Texture:
While the clay is still leather-hard (firm but not dry), take a piece of burlap or coarse cheesecloth. Gently press it onto the entire exterior surface of the vase to imprint a woven texture. -
Carve the Zig-Zag:
Using a needle tool, lightly sketch a horizontal line around the belly of the vase. Below this, sketch a zig-zag pattern. I find it helpful to mark the peaks and valleys first to keep them even. -
Reveal the Raw Clay:
Use a loop tool to carefully carve out the clay within the zig-zag band. Go deep enough to remove the fabric texture you just added, creating a smooth, recessed band. -
Refine the Edges:
Go back over the edges of your carved zig-zag with a small tool or brush to clean up any clay crumbs, keeping the lines sharp and geometric. -
Rim Adjustments:
Check the rim of your vase. If you want a slightly organic look, you can leave it slightly uneven, or trim it sharp for a cleaner finish. -
Dry Time:
Let the vase dry completely. This usually takes 24-48 hours depending on humidity. Rotate it occasionally to ensure even drying.
Go for Gold
Instead of leaving the zig-zag raw, paint the recessed area with liquid gold leaf for a glamorous, modern twist.
Step 3: Painting & Finishing
-
Sanding:
Once fully dry, use fine-grit sandpaper to gently smooth the rim and the recessed zig-zag area. Be careful not to sand away the fabric texture on the main body. -
Mix Your Color:
Mix a pale peach acrylic paint. You want a very soft, matte pastel shade to match the reference. -
First Coat:
Paint the textured areas of the vase with the pink mixture. Use a slightly dry brush technique to ensure the paint gets into the texture but doesn’t pool too heavily. -
Defining the Band:
Carefully paint up to the edge of the zig-zag carve. Leave the recessed zig-zag strip unpainted (or paint it a contrasting warm ochre if your clay isn’t naturally that color) to create the two-tone effect. -
Second Coat:
Apply a second coat of pink if necessary for opacity, ensuring the color looks solid and chalky. -
Sealing:
Apply a clear matte varnish over the entire piece, including the raw clay strip. This protects the finish and deepens the natural clay tone slightly.
Place your favorite dried stems inside and enjoy the warm, handmade aesthetic you’ve created


What Really Happens Inside the Kiln
Learn how time and temperature work together inside the kiln to transform clay into durable ceramic.
Carved Fluted Groove Vase
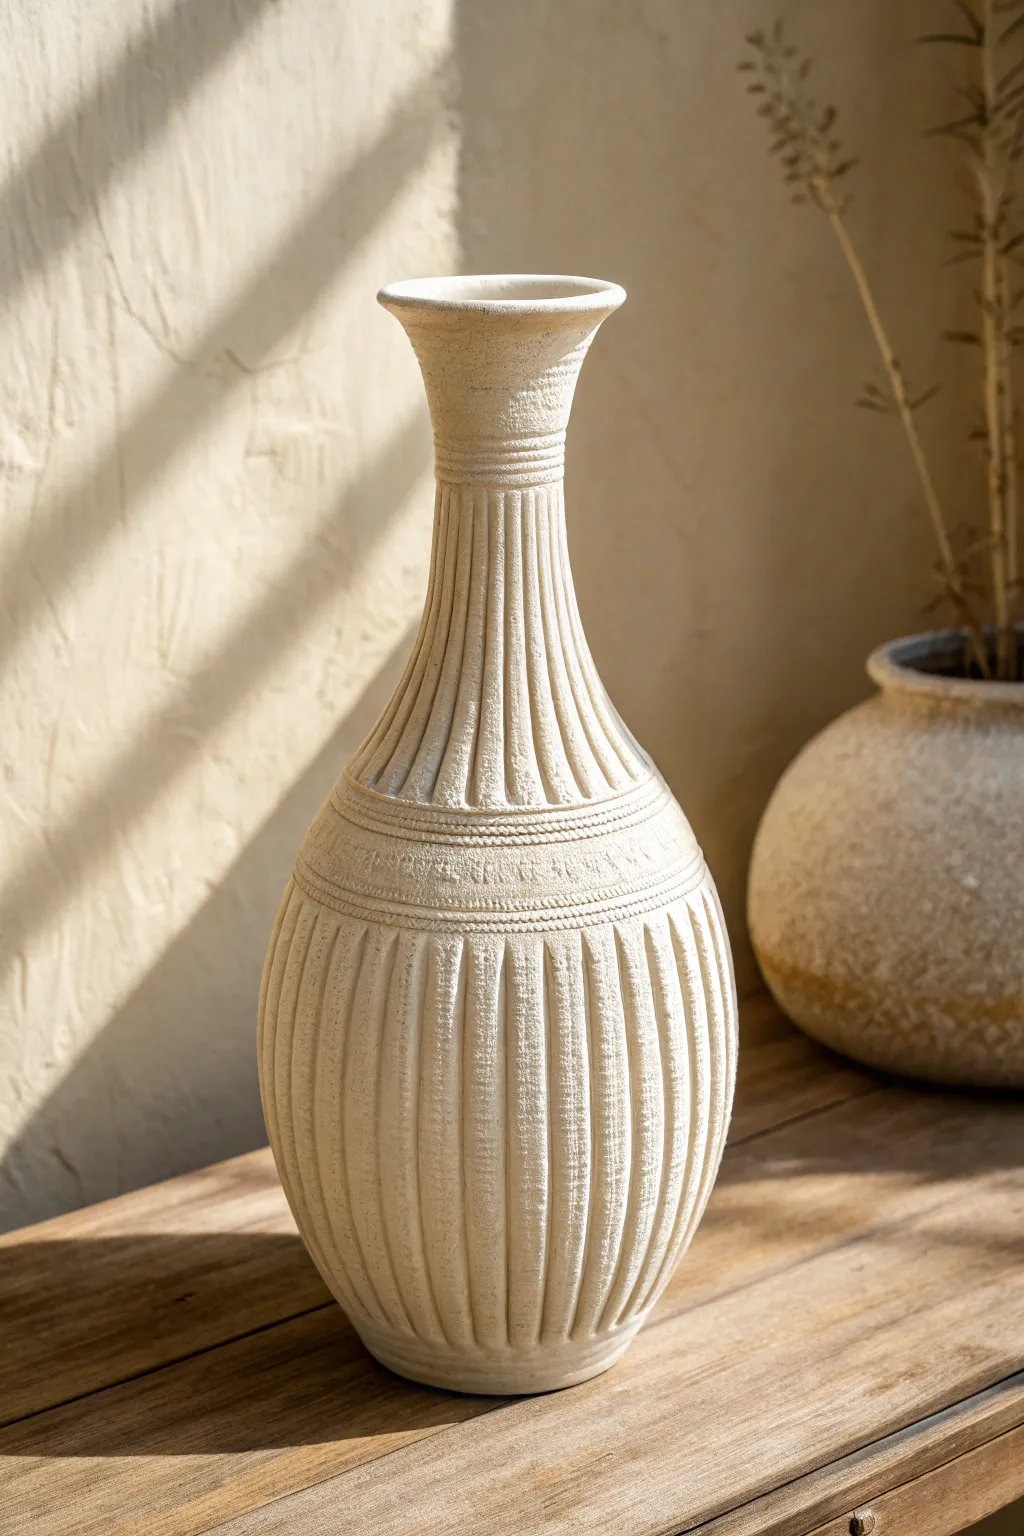
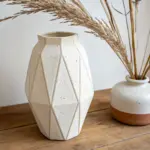
This elegant vessel combines the timeless appeal of ancient amphorae with a modern, textured finish. The vertical fluted grooves create beautiful shadow lines, while the gritty, sandy surface gives it an earthy, sun-baked charm perfect for minimalist decor.
Step-by-Step Tutorial
Materials
- Light stoneware or grogged clay (approx. 5-7 lbs)
- Potter’s wheel
- Throwing tools (sponge, needle tool, rib, wire cutter)
- Small loop tool or fluting tool
- Carving tool with a U-shaped tip
- Surform or rasp
- Soft brush
- Matte white or desert sand glaze
- Sponge for texturing (optional)
Step 1: Throwing the Form
-
Center and open:
Start with a well-wedged ball of clay on the wheel. Center it firmly, then open it up, leaving the base slightly thicker than usual to support the tall height. -
Effective coning:
Pull the walls up into a tall, narrow cylinder first. Use the coning technique (bringing the clay up and in) to keep the clay centered and compressed as you gain height. -
Shape the belly:
From the inside, gently push the clay outward to form the bulbous lower section. Maintain a graceful curve but ensure the walls don’t get too thin given the carving you’ll do later. -
Collar the neck:
Slowly collar the top section inward to create the long, slender neck. I find it helpful to use wet hands and slow wheel speed to prevent the clay from twisting or collapsing. -
Refine the rim:
Create a slightly flared rim at the very top. Use a chamois or sponge to smooth the lip so it is comfortable to touch. -
Refine profile and dry:
Use a metal rib to remove throwing lines and smooth the exterior surface. Wire cut the base and let the vase dry to a sturdy leather-hard stage.
Clean Lines Pro-Tip
Carve when clay is firm leather-hard. If it’s too wet, the tool will drag and create ragged crumbs; too dry, and it will chip.
Step 2: Carving & Texturing
-
Mark your spacing:
Before carving, lightly scratch vertical guidelines around the pot to ensure your flutes will be evenly spaced. You can do this by eye or use a decorating disk. -
Delineate the bands:
Carve two horizontal bands around the shoulder (where the neck meets the body). These bands will separate the neck fluting from the body fluting. -
Carve the body flutes:
Using a U-shaped loop tool, carve vertical grooves from the bottom of the horizontal band down to the base. Press firmly to create deep shadows but ease up pressure as you near the foot. -
Texture the grooves:
Don’t smooth the carved lines too much. The rough, pulled texture of the clay inside the grooves is part of the aesthetic. -
Carve the neck flutes:
Repeat the vertical carving process on the neck, moving from under the rim down to the top horizontal band. Try to align these with the body flutes, though a slight offset adds character. -
Detail the mid-band:
Between the two horizontal divide lines, add small texture marks. You can use a needle tool to create tiny vertical dashes or a small stamping tool for a repetitive pattern. -
Roughen the surface:
For that aged, stone-like look, gently dab a coarse sponge or a stiff brush over the uncarved ridges. This breaks up the smooth clay surface.
Level Up: Oxide Wash
Before glazing, apply an iron oxide wash and wipe it back. The dark oxide will stay in the deep grooves, maximizing contrast and depth.
Step 3: Finishing
-
Bisque fire:
Allow the vase to dry completely. It must be bone dry before you load it into the kiln for the bisque firing (usually cone 04 or 06). -
Glaze application:
Choose a matte glaze that breaks over texture. A ‘desert sand’ or matte white works best. Dip or spray the glaze, ensuring it gets into the deep grooves. -
Wipe back technique:
Once the glaze is dry to the touch, use a damp sponge to wipe away some glaze from the raised ridges. This highlights the carving height difference. -
Final wipe:
Clean the foot of the vase thoroughly so no glaze touches the kiln shelf. -
Glaze fire:
Fire the piece to the maturity temperature of your clay body (likely cone 5/6 or cone 10).
Place your finished vase near a window where the shifting daylight can play across the textured fluting
Squiggle Noodle Texture Vase
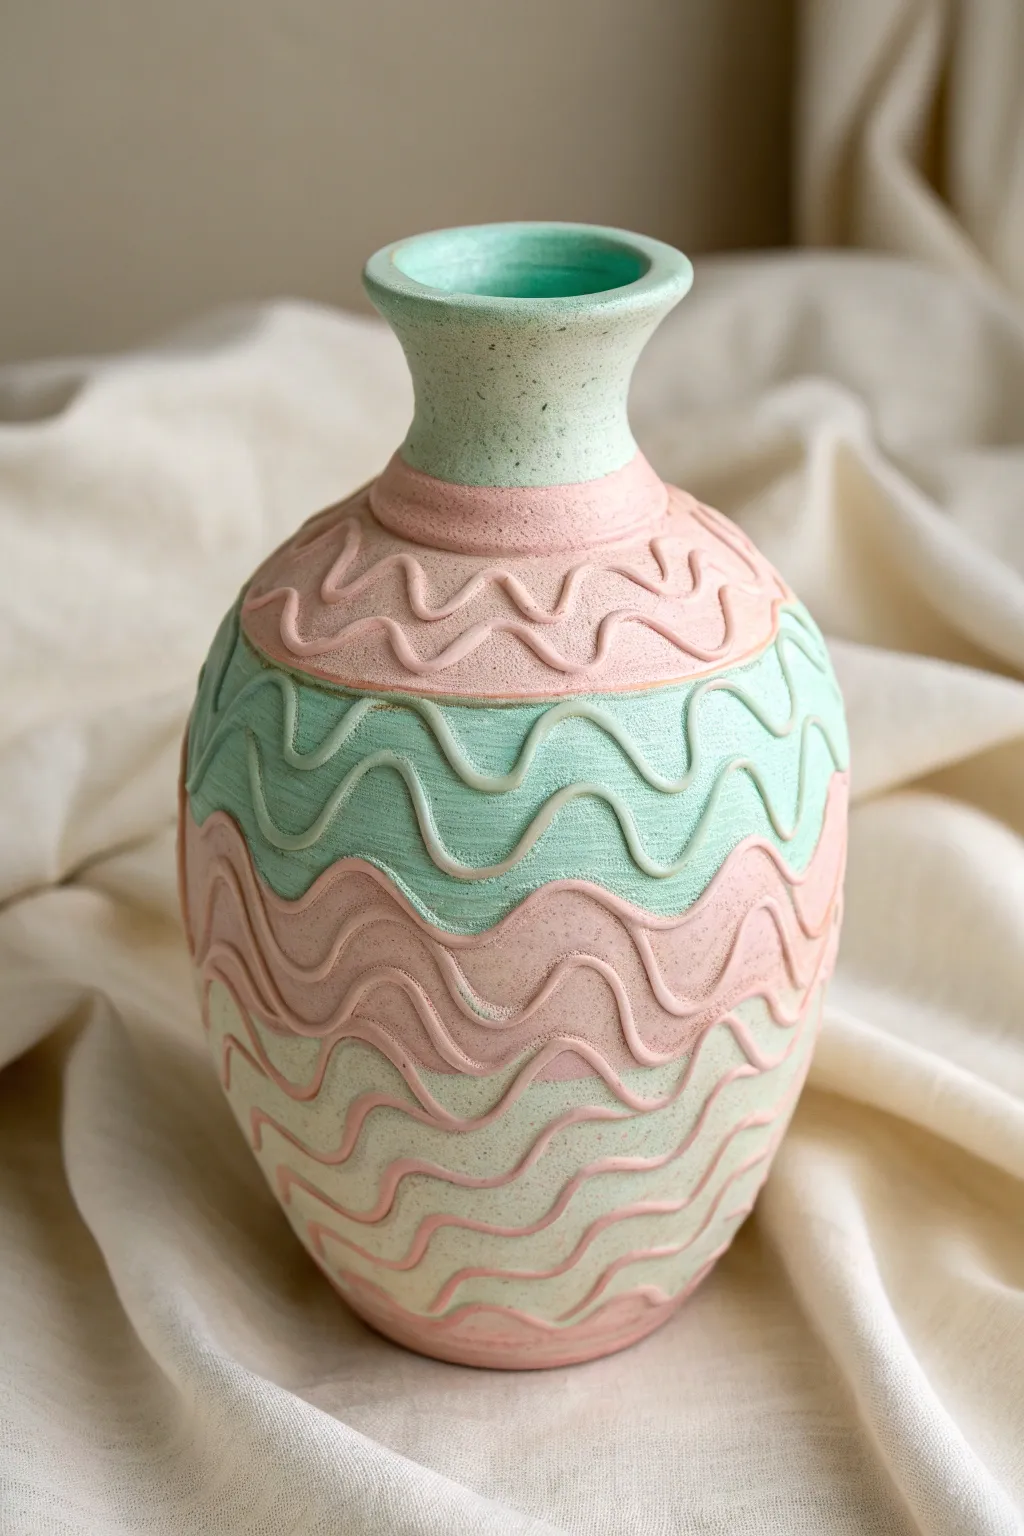
Embrace the playful charm of this squiggle noodle texture vase, featuring soft pastel blocks of mint green and blush pink. The raised, wavy clay coils create a delightful tactile experience that adds whimsical movement to a classic vessel shape.
Step-by-Step
Materials
- Air-dry clay or white stoneware clay
- Rolling pin
- Pottery wheel (optional, for base form) or coil-building tools
- Clay extruder (for the noodles) or a flat surface for rolling coils
- Needle tool
- Scoring tool or serrated kidney scraper
- Slip (clay and water slurry)
- Sponge
- Pastel mint green underglaze or acrylic paint
- Pastel blush pink underglaze or acrylic paint
- Clear matte glaze or sealant
- Small round paintbrush
- Smoothing rib
Step 1: Forming the Base Vessel
-
Prepare your clay:
Start by wedging your clay throughly to remove any air bubbles. You want a smooth, consistent texture before you begin shaping. -
Build the main body:
If using a wheel, throw a rounded, bulbous shape that tapers slightly at the top. If hand-building, use the pinch pot method or coil building to create a hollow sphere, roughly 6-8 inches tall. -
Shape the neck:
Create a distinct neck for the vase. Flare the rim slightly outwards and ensure the transition from the shoulder to the neck is smooth but defined. -
Smooth the surface:
Use a flexible rib or kidney tool to smooth the exterior walls perfectly. The canvas needs to be clean before applying the texture, so take your time erasing any fingerprints. -
Define the color zones:
Using a needle tool, lightly etch horizontal guidelines around the vase where the color blocks will change. This helps keep your painting and texture application organized later.
Noodle Know-How
Keep your clay noodles under a damp paper towel while working. If they dry out even slightly, they will crack when you try to bend them into those tight squiggles.
Step 2: Applying Color and Texture
-
Paint the background layer:
Apply your underglaze or base paint now, before adding texture. Paint the neck mint green, the shoulder pink, the mid-section mint, and the lower section pink again, following your etched lines. -
Create clay noodles:
While the paint sets, create your ‘noodles.’ I find using a small clay extruder with a medium round die creates the most consistent lines, but you can also hand-roll thin, even snakes. -
Score the attachment path:
Starting at the top pink section, lightly score a wavy path where your first noodle will sit. Apply a small amount of slip along this path. -
Attach the first wave:
Gently press a clay noodle onto the scored path, shaping it into regular, rhythmic undulations. Don’t flatten it too much; you want that raised, rounded profile. -
Paint the noodle:
Using a fine brush, carefully paint this attached clay coil to match the pink background it sits on. It’s often easier to paint the coil after attaching it to ensure the color blends with the base. -
Create the contrasting wave:
Move down to the mint green section. Score a new wavy line that roughly mirrors or offsets the previous one. Attach a new clay noodle here. -
Color the second wave:
Paint this new noodle a creamy white or very pale pastel shade to create contrast against the mint background. This makes the texture pop. -
Continue the pattern:
Repeat this process down the vase. Alternate your wavy lines so they nestle near each other without touching, creating a sense of movement. -
Detail the lower section:
For the bottom pink section, attach more noodles. Paint these a lighter pink or cream color to distinguish them from the darker pink noodles on the shoulder.
Go 3D
Instead of matching the noodle color to the background, try painting all the squiggles in a metallic gold or copper for a glamorous Art Deco twist on the pastel look.
Step 3: Finishing and Sealing
-
Clean up edges:
Check the ends of your noodles where they wrap around the vase. Blend the seams carefully so the pattern looks continuous. -
Dry slowly:
Cover the vase loosely with plastic to let it dry slowly. Uneven drying can cause the thin applied coils to crack away from the main body. -
Bisque fire or dry completely:
If using ceramic clay, bisque fire the piece to cone 04. If using air-dry clay, allow it to dry completely for 24-48 hours. -
Apply clear coat:
Brush on a clear matte glaze (for ceramics) or a matte acrylic sealant (for air-dry clay). A matte finish preserves the soft, velvety look of the pastels better than a high gloss. -
Final smooth check:
Once the sealant is dry, run your hand gently over the waves. If any rough spots remain on the air-dry version, a very fine grit sandpaper can knock them back without damaging the paint.
Place your finished vase near a window where the light can catch the ridges of the waves and create beautiful shadows

TRACK YOUR CERAMIC JOURNEY
Capture glaze tests, firing details, and creative progress—all in one simple printable. Make your projects easier to repeat and improve.
3D Dot and Ball Appliqué Vase

This charming, chubby vase combines rustic earthenware texture with whimsical 3D dots for a distinctively tactile finish. The sandy beige glaze and terracotta-hued appliqués create a warm, organic feel that perfectly suits dried florals or stands beautifully on its own.
Detailed Instructions
Materials
- Stoneware clay (buff or speckled)
- Small amount of terracotta clay (for dots)
- Pottery wheel (or coil building tools)
- Serrated rib tool
- Pointed wooden modeling tool
- Scoring tool (or needle tool)
- Slip (clay mixed with water)
- Sponge
- Matte cream or sandy beige glaze
- Clear matte sealer (optional for unglazed exterior)
- Small paintbrush
Step 1: Forming the Base Vessel
-
Prepare your clay:
Begin by wedging your main body clay thoroughly to remove air bubbles. For a vase of this size (roughly 6-8 inches), start with about 3-4 pounds of clay. -
Center and open:
Throw the clay onto the wheel head and center it. Open the form, keeping the base somewhat narrow to emphasize the round belly later. -
Pull the walls:
Pull the walls up into a cylinder first. Ensure you leave enough thickness in the walls to stretch the belly outward without collapsing. -
Shape the belly:
Using a rib or your fingers from the inside, gently push the clay outward to create a spherical, bulbous shape. Move slowly from the bottom up to maintain structural integrity. -
Define the neck:
Collaring the clay inward at the top, create a narrow neck. Use your fingers to flare the rim slightly, creating a distinct, rounded lip that looks soft rather than sharp. -
Add surface texture:
Before taking the pot off the wheel, run a serrated rib or a rough sponge lightly over the exterior while it spins slowly. This creates the subtle, stone-like horizontal grooves seen in the reference. -
Trim the base:
Wire the pot off the wheel and let it dry to leather hard. Once firm, turn it over and trim a neat foot ring, or simply smooth the bottom flat if you prefer a modern look.
Dots Falling Off?
If balls pop off during drying, you likely didn’t score deep enough. Re-attach with ‘vinegar slip’ (magic mud) or paper clay slip for a stronger bond.
Step 2: Creating the Appliqué Dots
-
Roll the clay balls:
Switch to your terracotta colored clay. Roll out dozens of small spheres, aiming for the size of a large pea or small marble. Variation in size adds to the handmade charm. -
Keep them moist:
As you roll them, place the finished balls under a damp paper towel or plastic wrap. If they dry out too much, they won’t adhere properly to the vase. -
Plan the placement:
Lightly mark a grid or spiral pattern on your leather-hard vase with a needle tool, or eyeball it for a more organic, scattered look like the original image. -
Score the attachment points:
At each spot where a dot will go, vigorously scratch the surface of the vase with your scoring tool to rough it up. -
Score the dots:
Take a clay ball and scratch one side of it as well. Proper scoring is crucial to prevent the appliqués from popping off during firing. -
Apply slip:
Dab a generous amount of slip onto the scored spot on the vase using a small brush. -
Attach and compress:
Press the ball firmly onto the slipped area. Give it a tiny wiggle to lock the clay particles together, but try not to flatten the dome shape too much. -
Clean up edges:
If excess slip squishes out, use a small, damp paintbrush to wipe around the base of the dot immediately for a clean connection. -
Repeat carefully:
Continue this process around the entire vase. I find it helpful to work in rows from the bottom up so I don’t accidentally squash the dots I’ve already placed.
Make it Ombré
Use three different clay bodies for the dots, starting with dark clay at the bottom and transitioning to lighter clay near the top for a gradient effect.
Step 3: Finishing and Firing
-
Slow drying:
Cover the finished piece loosely with plastic. Let it dry very slowly; because the dots and the body have different thicknesses, fast drying can cause cracks. -
Bisque fire:
Once bone dry, fire the piece to bisque temperature (usually cone 04 or 06) in the kiln. -
Glaze application:
Brush a sandy, matte beige glaze onto the main body of the vase. You can carefully paint around the dots to leave the raw terracotta exposed, or wipe the glaze off the dots with a sponge after dipping. -
Final fire:
Fire again to the maturity temperature of your clay and glaze. The result should be a durable, textured vessel with popping geometric details.
Place your finished vase near a sunny window where the shadows will highlight the delightful texture of every little dot
Leaf-Imprint Texture Vase
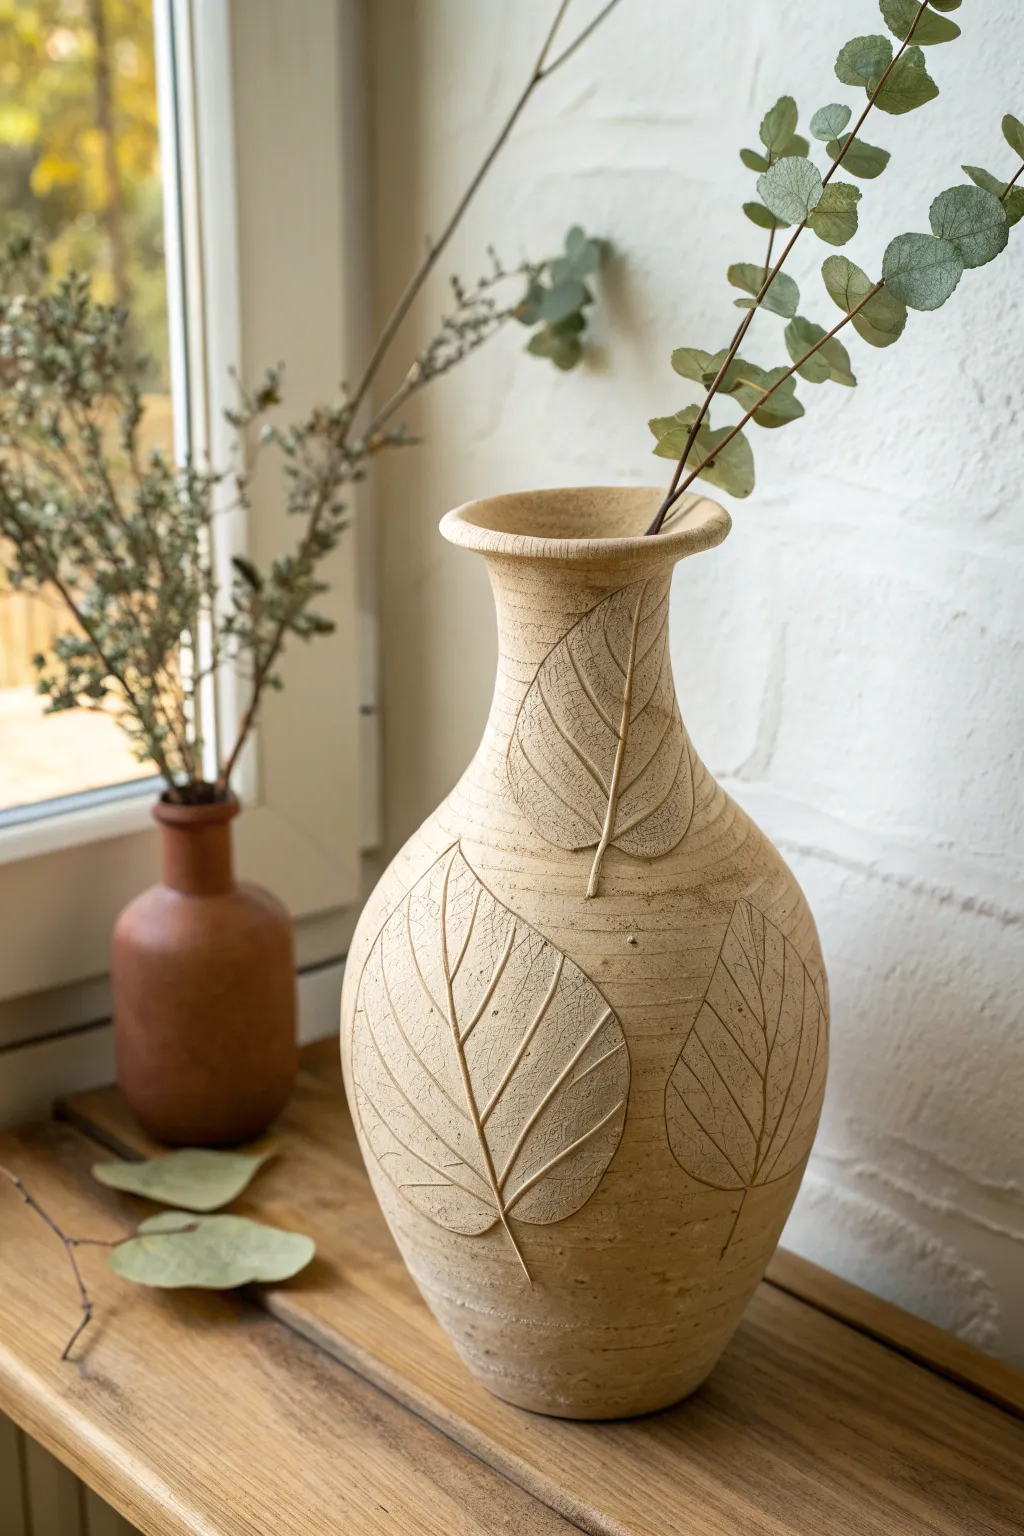
This project captures the delicate beauty of nature directly into stoneware, creating a tall, elegant vessel with raised leaf motifs. The natural clay body and matte finish emphasize the organic textures, making it a timeless centerpiece for dried botanicals.
Step-by-Step Guide
Materials
- Light stoneware clay (groggy texture recommended)
- Pottery wheel (or coil building supplies)
- Large, fresh leaves with prominent veins (e.g., hydrangea or hosta)
- Needle tool
- Rib tools (wood and metal)
- Scoring tool or serrated kidney
- Slip (liquid clay)
- Modeling tool or small spoon
- Sponge
- Plastic wrap
Step 1: Forming the Base Vessel
-
Prepare the clay:
Begin by wedging about 3-4 pounds of light stoneware clay to ensure it is free of air bubbles. A clay with fine grog adds that lovely earthy texture seen in the photo. -
Throw the cylinder:
Center the clay on your wheel and open it up. Pull the walls up to create a tall, narrow cylinder, keeping the walls relatively thick (about 1/4 to 3/8 inch) to support the later additions. -
Shape the belly:
Gently push the clay outward from the inside to create a rounded belly at the bottom, tapering upwards towards a narrower neck. -
Flare the rim:
At the top, pull the clay slightly outward to create a distinct, flared rim. Smooth it with a chamois or sponge for a professional finish. -
Refine the surface:
Use a metal rib to remove throwing lines and create a smooth, blank canvas for your leaves. Let the piece dry to a soft leather-hard stage.
Vein Definition Tip
If your leaf impression is weak, dilute black underglaze and wash it over the leaf, then sponge it off. The dark color will stay in the veins.
Step 2: Creating the Leaf Reliefs
-
Roll slab for leaves:
Roll out a separate slab of fresh clay to about 1/8 inch thickness. It needs to be thinner than the vase walls. -
Imprint the veins:
Place your selected leaves vein-side down onto the slab. Use a rolling pin to firmly press the leaves into the clay so the veins transfer clearly. -
Cut out the shapes:
Using a needle tool, cut around the perimeter of each leaf. I find leaving a slightly rough, organic edge looks more natural than a perfect surgical cut. -
Score the vase:
Identify where you want to place the leaves on your leather-hard vase. Score the surface thoroughly in those areas. -
Apply slip:
Brush a generous amount of slip onto the scored areas of the vase.
Step 3: Assembly and Detailing
-
Attach the leaves:
Carefully lift your clay leaves and press them onto the slipped areas. Use a sponge to gently press from the center outward to remove trapped air. -
Enhance the veins:
If the rolling process flattened the veins too much, use a dull pencil or modeling tool to re-carve and deepen the main central vein and side veins. -
Detail the edges:
Use a modeling tool to blend the very edges of the leaf slightly into the vase, or undercut them slightly to make them pop, depending on how much relief you want. -
Etch additional details:
For a texture like the photo, use a needle tool to scratch fine lines or ‘ghost’ leaf skeletons directly into the vase surface around the applied leaves. -
Dry slowly:
Cover the vase loosely with plastic wrap. This is crucial because the added leaves are wetter than the vase; slow drying prevents them from popping off. -
Bisque fire:
Once bone dry, bisque fire the piece to cone 04 (or your clay’s specific recommendation). -
Finishing touch:
To mimic the image, leave the exterior unglazed to show off the clay’s texture, or apply a very dry, matte wash. Glaze only the interior for water tightness.
Creative Twist
Instead of rolling a slab, apply thick slip directly to the vase in a leaf shape, let it stiffen, and carve the veins out for a bas-relief look.
Place complete dried stems in your new vessel to celebrate the changing seasons
Terrazzo Speckled Clay Vase
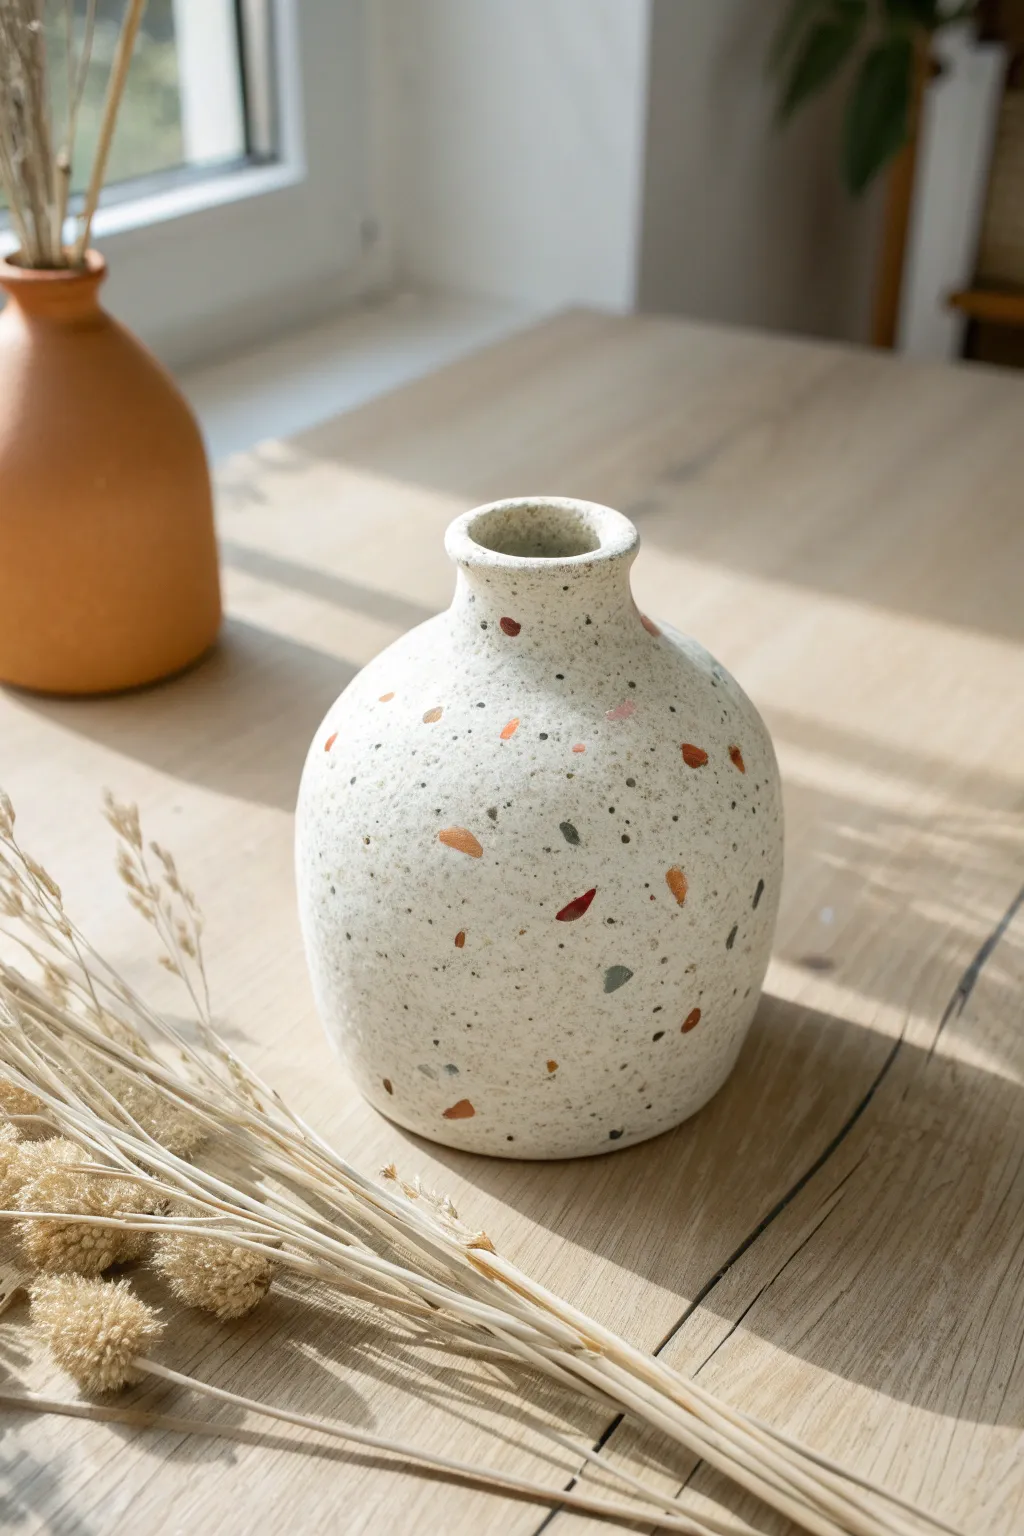
Bring a touch of modern artistry to your home with this faux terrazzo vase, featuring playful chips of color embedded in a creamy white base. This project captures the trendy speckled look of authentic terrazzo without the need for heavy concrete or expensive equipment.
Step-by-Step Tutorial
Materials
- White air-dry clay or polymer clay (approx. 500g)
- Small amounts of colored clay (terracotta, slate blue, mustard yellow, dark grey)
- Rolling pin
- sharp craft knife or clay blade
- Sponge and water
- Sandpaper (various grits: 120, 220, 400)
- Gloss or matte varnish (optional)
- Startched canvas or clay mat to work on
Step 1: Preparing the Terrazzo Chips
-
Flatten colored clay:
Take your small amounts of colored clay (terracotta, blue, deep grey, etc.) and roll them out into very thin sheets. They should be paper-thin for the best effect. -
Create the chips:
Use your craft knife to chop these thin sheets into tiny, irregular fragments. Aim for a variety of sizes—some like coarse sand, others like small pebbles. -
Don’t overmix:
Keep the colors somewhat separate on your work surface initially so you can control the distribution later. If the bits are too soft, I like to let them air dry for 10 minutes to harden slightly, making them easier to handle without smearing.
Muddy Colors?
If your colored chips are streaking into the white clay, your chips were too soft. Let the chopped bits sit for 15-20 mins to firm up before mixing them in.
Step 2: Forming the Base
-
Condition the white clay:
Take your large block of white clay and knead it until it is soft, pliable, and free of cracks. A warm workspace helps if the clay is stiff. -
Incorporate the chips:
Sprinkle your colored clay chips onto your work surface. Roll your ball of white clay over them, pressing firmly so they stick to the outside. -
Embed the colors:
Fold the clay and knead gently just a few times to distribute the chips throughout the body of the clay, not just the surface. Be careful not to over-knead, or the colors will streak and turn muddy instead of staying as distinct chips. -
Shape the main body:
Roll the clay into a smooth ball. Using your palms, gently shape it into a rounded, bulbous form. You want a heavy bottom that tapers slightly toward the top.
Pro Tip: Depth Illusion
Mix chips of varying translucency if using polymer clay. Adding some slightly translucent clay chips adds incredible visual depth to the final terrazzo pattern.
Step 3: Building the Vase Structure
-
Hollow the form:
Use your thumb to press into the center of the ball, creating an opening. Pinch the walls gently and evenly, rotating the piece as you go to maintain a consistent wall thickness. -
Refine the shape:
Continue pinching and smoothing upward to create the swollen belly of the vase. Use a little water on your fingers to smooth out any surface cracks immediately. -
Form the neck:
Gently squeeze the upper portion of the clay to narrow it, pulling the clay upward to form a short, distinct neck. -
Create the rim:
Flare the very top edge outwards slightly to create a finished lip. It should look sturdy, not fragile. -
Smooth the surface:
Use a damp sponge to wipe down the entire exterior. This helps level the surface and exposes some of the colored chips that might be hidden under a thin layer of white clay.
Step 4: Finishing Touches
-
Dry thoroughly:
Allow the vase to dry completely. For air-dry clay, this may take 24-48 hours depending on humidity. Rotate it occasionally so the bottom dries evenly. -
Initial coarse sanding:
Once bone dry, sand the entire surface with 120-grit sandpaper. This is the magic step where the terrazzo effect truly comes to life, as you sand away the top layer of white clay to reveal the sharp edges of the colored chips. -
Fine sanding:
Switch to 220-grit and then 400-grit sandpaper to polish the surface until it feels smooth to the touch. -
Dust off:
Wipe the vase with a slightly damp cloth or a tack cloth to remove all fine clay dust. -
Seal (Optional):
If you want a waterproof finish or a slight sheen, apply a coat of matte or satin varnish. This also helps pop the colors of the terrazzo chips.
Place your new vase in a spot with good natural light to show off those lovely speckles
Color-Blocked Pastel Vase
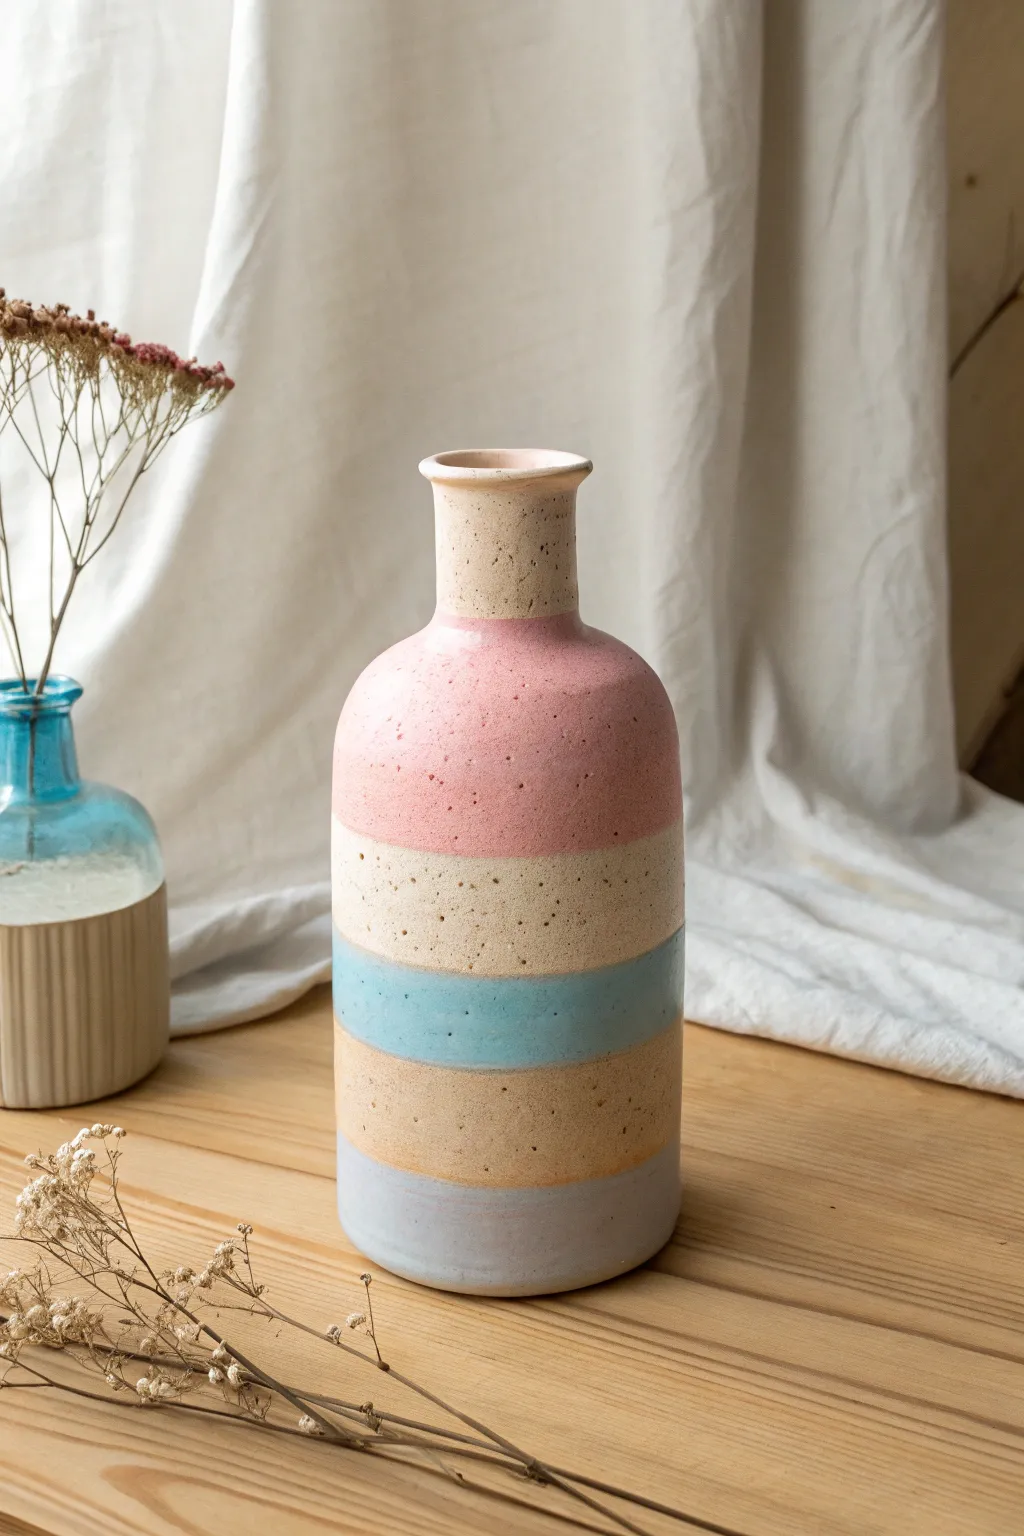
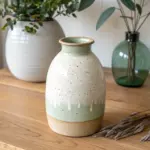
This charming vase features soft, horizontal bands of pastel glazes separated by sections of exposed, speckled clay. Its bottle shape and gentle color palette create a soothing, modern aesthetic perfect for dried florals.
Step-by-Step
Materials
- Stoneware clay (preferably a speckled buff body)
- Pottery wheel
- Throwing tools (sponge, wooden rib, wire cutter)
- Trimming tools
- Loop tool
- Wax resist or masking tape
- Glazes: Pastel Pink, Pastel Blue, Pastel Grey/Lilac
- Soft fan brushes
- Clear matte glaze (optional)
- Pencil
Step 1: Throwing and Shaping
-
Center the clay:
Start with about 2-3 pounds of speckled stoneware clay. Wedge it thoroughly to remove air bubbles, then center it firmly on the pottery wheel head. -
Open and pull:
Open the clay and begin pulling the walls into a tall cylinder. Focus on keeping the walls even in thickness as you gain height. -
Shape the belly:
Using a wooden rib on the outside and your hand on the inside, gently push the belly of the vase outward to create a soft, rounded cylindrical form. -
Collar the neck:
Slowly collar the clay inward at the top third of the form to create a narrow neck. Do this gradually to avoid buckling the clay walls. -
Refine the rim:
Flare the very top edge slightly outward to create a defined lip. Smooth the rim with a chamois or sponge for a professional finish. -
Dry to leather hard:
Cut the vase from the wheel and let it dry slowly under plastic until it reaches a leather-hard state, firm enough to be handled without warping.
Wobbly Lines?
If you struggle with steady lines, use automotive masking tape instead of free-handing the wax resist. Peel the tape off *before* firing.
Step 2: Trimming
-
Trim the foot:
Place the leather-hard vase upside down on the wheel (using a grip or chunks of clay to hold it). Trim the bottom to create a neat foot ring. -
Smooth the surface:
While the vase is spinning, run a metal rib or a smooth stone over the exterior to compress the clay and bring out the natural speckles, ensuring a clean canvas for glazing.
Step 3: Glazing Design
-
Bisque fire:
Fire the vase in the kiln to bisque temperature (usually Cone 04 or 06). Wipe the fired piece with a damp sponge to remove dust. -
Mark the bands:
Place the vase on a banding wheel. While spinning it, lightly hold a pencil against the side to mark five even horizontal sections: Top (neck), Upper Upper Middle, Middle, Lower Middle, and Bottom. -
Apply wax resist:
Carefully paint wax resist over the areas you want to remain raw clay: the very top rim/neck interior, the section just below the pink band, and the section just below the blue band. Let the wax dry completely. -
Glaze the pink section:
Using a soft fan brush, apply 2-3 coats of pastel pink glaze to the upper shoulder section of the vase. Ensure the glaze is opaque enough to cover the clay but lets the texture show. -
Glaze the blue band:
Apply the pastel blue glaze to the middle band section. I find steadying my hand on a stack of books helps keep the brush level while rotating the banding wheel. -
Glaze the bottom band:
Paint the lowest section with a pastel grey or lilac glaze. Be careful not to let the glaze run onto the foot of the vase; leave a small gap or wax the foot itself. -
Clean up edges:
If any glaze dripped onto the waxed ‘raw’ sections, wipe it away cleanly with a sponge. The lines between glaze and bare clay should be crisp. -
Final smooth:
Check the thickness of your glaze application. If it looks too thin, add one final light coat to ensure the colors pop after firing.
Add Texture
Before bisque firing, gently press a varied texture, like sandpaper or canvas, into the raw clay bands for extra tactile contrast.
Step 4: Final Firing
-
Glaze fire:
Fire the vase to the maturity temperature of your clay and glaze (likely Cone 5 or 6 for stoneware). Allow the kiln to cool naturally before removing your finished piece.
Now you have a stunning, minimalist vase ready to hold your favorite dried botanicals
Minimal Line Art Vase
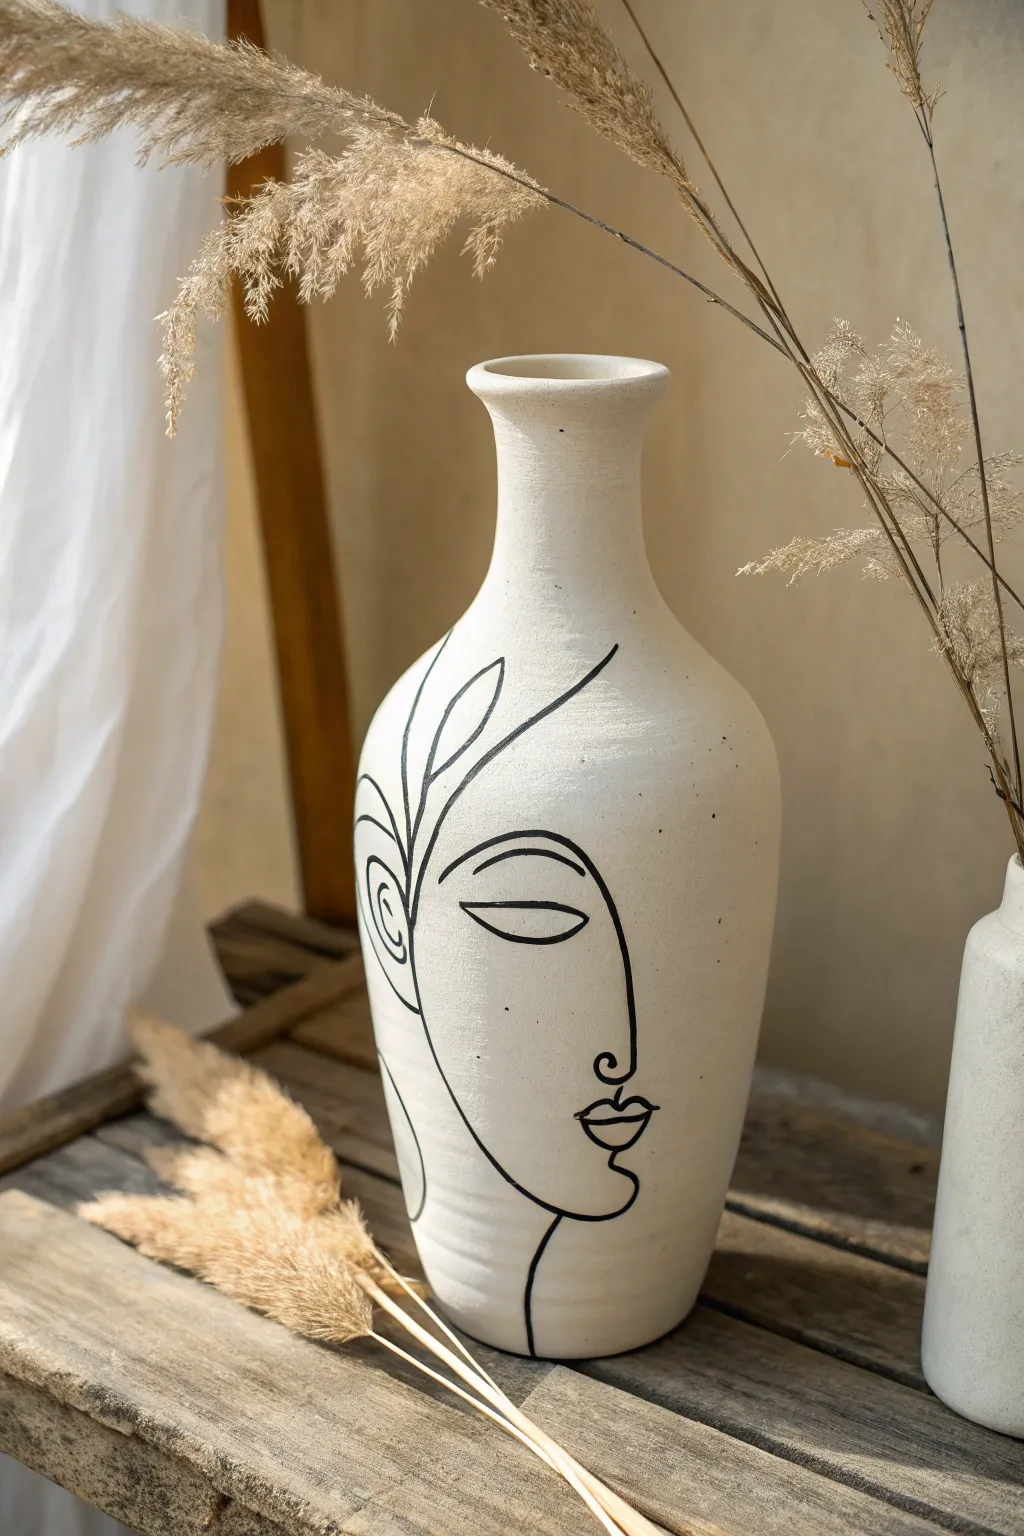
Embrace the elegance of minimalism with this stunning line art vase, characterized by its creamy matte texture and striking, fluid facial portrait. This project transforms a simple vessel into a modern masterpiece using basic painting techniques to mimic the look of high-end ceramic art.
Detailed Instructions
Materials
- Bisque ceramic vase or upcycled glass vase (narrow neck)
- White chalk paint or matte acrylic paint (warm cream/off-white)
- Baking soda (if using acrylic paint)
- Black acrylic paint pen (medium tip)
- Fine liner brush
- Carbon paper and pencil (optional for transfer)
- Matte spray sealer or varnish
- Mixing bowl and spoon
- Soft synthetic paintbrush
Step 1: Faux Ceramic Base
-
Prep the surface:
Begin by cleaning your chosen vase thoroughly with soap and water to remove any grease or dust. Dry it completely to ensure the paint adheres properly. -
Mix the texture:
To achieve that authentic, stone-like pottery feel, mix your white or cream acrylic paint with baking soda. I like to aim for a ratio of about 1 part baking soda to 2 parts paint, stirring until it resembles fluffy frosting. -
Apply the first coat:
Using a soft synthetic brush, apply a thick layer of the textured paint mixture to the entire exterior of the vase. Use horizontal strokes that wrap around the curvature. -
Let it cure:
Allow this first layer to dry completely. Because of the baking soda, it may dry faster than regular paint, but give it at least an hour to be safe. -
Build the texture:
Apply a second coat of the mixture. This time, use a dabbing motion or cross-hatch strokes to build up random, organic texture, particularly around the neck and base. -
Smooth the neck:
While the paint is still slightly tacky, lightly brush the rim and the very top of the neck to smooth out any overly large clumps for a refined finish. -
Final dry:
Let the vase dry overnight. The baking soda paint needs to be rock hard and completely moisture-free before you attempt to draw on it.
Clean Lines Trick
If the porous texture makes the paint pen snag or bleed, lightly sand the area where you plan to draw with high-grit sandpaper to create a smoother writing track.
Step 2: The Line Art Design
-
Practice the sketch:
Draft your face design on paper first. The style relies on continuous, fluid lines—focus on a strong brow, a closed eye, and full lips in profile. -
Map the layout:
Lightly sketch the design onto the dried vase using a pencil. If you aren’t confident freehanding, tape carbon paper over the vase and trace your paper sketch onto the surface. -
Start the brow:
Shake your black paint pen well. Begin at the forehead area, drawing the bold arch of the eyebrow first to anchor the face’s position. -
Draw the eye:
Move down to create the eye. Use a sweeping curve for the eyelid and a simpler, straight line for the closed eye slit. -
Outline the profile:
Create the nose and lips. This should ideally be one fluid line if possible, accentuating the curve of the nostril and the fullness of the mouth. -
Add abstract flair:
Draw the abstract leaf or hair shapes extending from the forehead area. Keep these lines slightly looser and more organic. -
Thicken the lines:
Go back over your design. Thickening specific areas, like the underside of the brow or the bottom lip, adds weight and dimension to the illustration. -
Refine with a brush:
For the sharpest points of the leaves or eye corners, dip a fine liner brush into a tiny bit of black acrylic paint to sharpen any blunt edges left by the marker. -
Seal the work:
Once the black ink is fully dry, finish the piece with a light misting of matte spray sealer to protect the texture and prevent the line work from smudging.
Earthy Variations
Mix a tiny drop of brown or beige paint into your white base coat. This creates a speckled, unbleached canvas look that feels more like raw stoneware.
Place your dried pampas grass inside and enjoy the sophisticated, gallery-wrothy vibe this piece brings to your space
Sculpted Face Vase
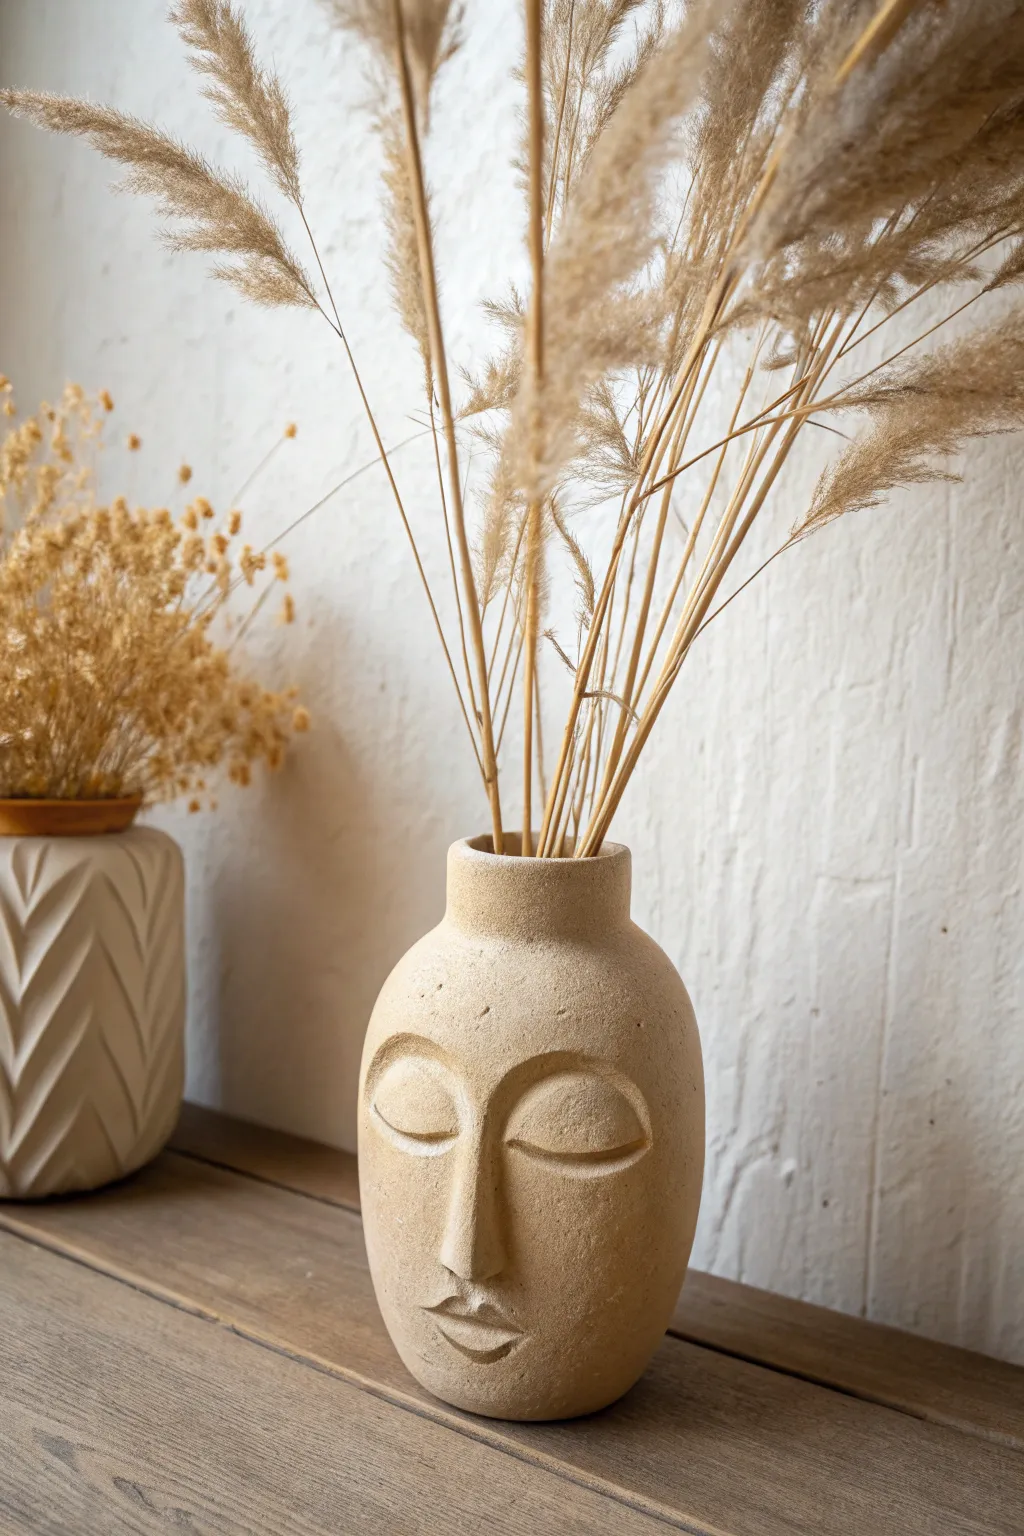
Bring an artistic touch to your home decor with this peaceful, sculpted face vase that mimics the look of carved sandstone. With its calming expression and natural texture, this vessel is perfect for displaying dried pampas grass or wheat.
Step-by-Step Tutorial
Materials
- Air-dry clav (stone or natural color) or low-fire ceramic clay
- Rolling pin
- Cylindrical mold (like a large glass jar or PVC pipe)
- Plastic wrap
- Needle tool or toothpick
- Loop sculpting tool
- Sponge
- Slip (clay mixed with water)
- Fettling knife
- Old toothbrush (for texture)
- Matte sealant spray
Step 1: Forming the Base Vessel
-
Prepare your mold:
Wrap your chosen cylindrical mold (a jar or pipe usually works best) tightly in plastic wrap. This ensures the clay won’t stick and slides off easily later. -
Roll the slab:
Roll out a slab of clay to an even thickness, approximately 1/4 inch. You want it sturdy enough to hold its shape but not too heavy. -
Cut to size:
Measure the height and circumference of your mold. Cut a rectangle from your clay slab that fits these dimensions, adding a small overlap for the seam. -
Build the cylinder:
Wrap the clay rectangle around your mold. Score the overlapping edges with your needle tool, apply a dab of slip, and press firmly to join the seam. Smooth the join until it’s invisible. -
Add the bottom:
Cut a circle of clay for the base. Score and slip the bottom edge of your cylinder and the edge of the circle, then join them together. Use a modeling tool to blend the clay upwards from the base to the wall. -
Form the bottleneck:
With the clay still on the mold (if the mold shape allows) or carefully freehand, gently taper the top inch of the cylinder inward to create the neck. Add a separate, smaller coil or ring of clay to the rim to create the defined, thick lip shown in the photo.
Slumping Face?
If facial features slide down while working, the clay is too wet. Let the base vase firm up to leather-hard before attaching heavy additions like the nose.
Step 2: Sculpting the Features
-
Map the face:
Lightly trace the locations for the eyebrows, eyes, nose, and mouth onto the clay using a needle tool. Placement is key for that serene look—place the eyes slightly lower than the midpoint. -
Build the nose:
Form a small, triangular wedge of clay. Score the center of the face and the back of the nose piece. Slip and attach it, blending the edges seamlessly into the cheeks so it looks like it emerges from the surface. -
Add the brow bone:
Roll two small, curved snakes of clay. Attach them above the eyes to create the prominent, arched brow ridge seen in the image. Blend the top edge upward into the forehead but leave the bottom edge slightly more defined. -
Create the eyelids:
Shape two semi-circles of clay. Attach these below the brow bone. Use a loop tool to gently carve out the separation between the eyelid and the cheek, creating that heavy-lidded, sleeping expression. -
Shape the lips:
Add a small, flattened oval of clay below the nose. Use a fine tool to press a horizontal line for the mouth opening, and gently shape the cupid’s bow. I find creating a slight pout gives the face more character. -
Initial smoothing:
Take a slightly damp sponge and gently wipe over the features to remove harsh tool marks, softening the transition between the added features and the base vase.
Faux Stone Finish
Mix a small amount of coffee grounds or coarse sand into your clay body before rolling it out. This adds internal speckling that looks incredibly realistic.
Step 3: Texturing and Finishing
-
Create stone texture:
To achieve the aged, sandstone look, take an old toothbrush over the entire surface. Use a stippling motion (tapping up and down) rather than brushing, which adds realistic pitting. -
Add imperfections:
Use a needle tool to create a few deeper pockmarks or tiny random scratches. Perfection is the enemy here; these little flaws make it look authentic. -
Remove the mold:
Once the clay is leather-hard (firm but cool to the touch), carefully slide the interior mold out. Be gentle so you don’t distort the bottleneck. -
Dry completely:
Allow the vase to dry slowly away from direct sunlight or heat sources. This slow drying prevents cracking, especially around the added facial features. -
Sand and seal:
If using air-dry clay, lightly sand any sharp edges once fully dry. Finish with a matte spray sealant to protect the surface and enhance the stone-like finish.
Now you have a timeless, sculptural piece ready to bring a sense of calm to any corner of your room
Draped Fabric Texture Vase
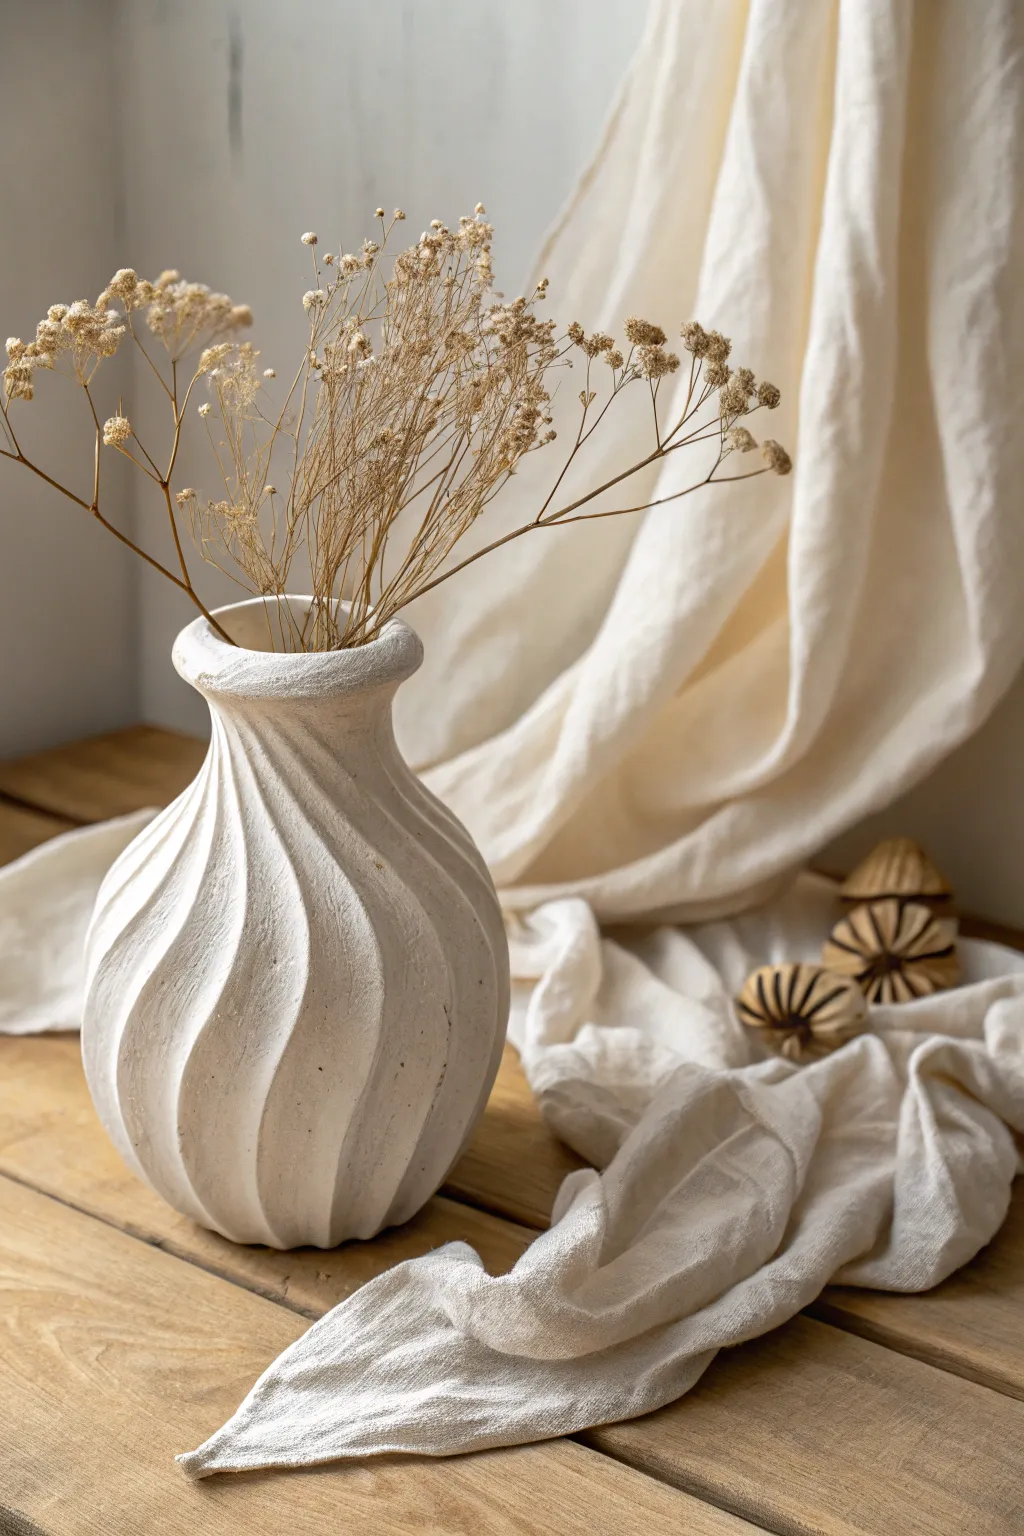
Transform a simple glass container into a high-end sculptural piece using draped fabric and plaster. This technique creates elegant, organic ridges that mimic the look of professional ceramic twisting without needing a kiln.
Step-by-Step
Materials
- Glass vase or jar (curvy shape works best)
- Old T-shirt or jersey fabric strips
- Plaster of Paris
- Water
- Mixing bowl and spoon
- White acrylic paint (optional)
- Matte sealant spray
- Fine-grit sandpaper
- Disposable gloves
Step 1: Preparing the Structure
-
Clean the base:
Start by thoroughly cleaning your glass vase or jar with glass cleaner to remove any oils or dust. This ensures the plaster mixture adheres properly to the surface. -
Cut fabric strips:
Cut your old t-shirt or jersey fabric into long strips, approximately 1-2 inches wide. The slight stretch of jersey material is perfect for creating smooth curves around the vase. -
Soak the fabric:
Mix a small batch of Plaster of Paris with water according to the package instructions until it reaches a pancake batter consistency. Dip your fabric strips into the mixture, ensuring they are completely saturated but not dripping excessively.
Step 2: Creating the Spiral Texture
-
Anchor the base:
Take a saturated fabric strip and press one end firmly against the bottom of the vase. This will serve as your starting point for the spiral design. -
Begin the twist:
Twist the fabric strip tightly as you guide it upwards diagonally across the vase’s surface. The twisting action creates the raised ridge effect seen in the final piece. -
Layering the ridges:
Continue adding twisted strips, spacing them evenly around the vase. I like to leave about an inch of negative space between each ridge so the vase shape remains visible beneath the texture. -
Wrap the rim:
Once your vertical spirals reach the top, use a separate flat (untwisted) strip of plaster-soaked fabric to wrap around the rim. This creates a neat, finished lip that hides the jagged ends of your spirals. -
Initial dry time:
Allow these structural strips to set for about 30-45 minutes until they are hard to the touch. This foundational layer needs to be solid before we add the surfacing.
Cracking Up?
Small hairline cracks are normal as plaster dries. To fix, mix a tiny amount of plaster paste and rub it into the cracks with your finger, then sand smooth once dry.
Step 3: Surfacing and Refining
-
Thick plaster coat:
Mix a fresh, slightly thicker batch of Plaster of Paris. Using your gloved fingers or a small spatula, apply this mixture over the entire vase, filling the gaps between the twisted fabric ridges. -
Sculpting the curves:
While the plaster is still wet, run your wet finger along the ‘valleys’ between the ridges to smooth them out. You want to soften the transition between the twisted fabric and the glass base so it looks like one solid piece. -
Building the rim:
Add extra plaster to the rim area to build up that thick, rounded mouth seen in the reference image. Smooth it carefully with a wet fingertip. -
Full cure:
Let the vase dry completely in a warm, dry spot. This usually takes 24 hours depending on humidity; the plaster will turn a bright, chalky white when fully cured.
Pro Tip: Weighted Base
Before starting, pour a little sand or rice into the bottom of your glass jar base. Glass gets top-heavy with plaster; this weight adds crucial stability.
Step 4: Finishing Touches
-
Sand for texture:
Gently sand the surface with fine-grit sandpaper. Don’t aim for perfect smoothness; you want to knock off sharp spikes while keeping that beautiful, organic stone texture. -
Wipe down:
Use a dry bristle brush or a tack cloth to remove all the plaster dust from the sanding process. Any leftover dust will affect the final finish. -
Paint touch-up:
If the natural plaster color is uneven, sponge on a coat of matte white acrylic paint. This unifies the color while maintaining the matte, stone-like appearance. -
Seal the work:
Finish with a light coat of matte spray sealant. This protects the plaster from moisture and prevents it from chalking off on your hands when you move the vase.
Place your dried botanicals inside and enjoy the sculptural elegance you’ve created.
Cut-Out Lattice Luminary Vase
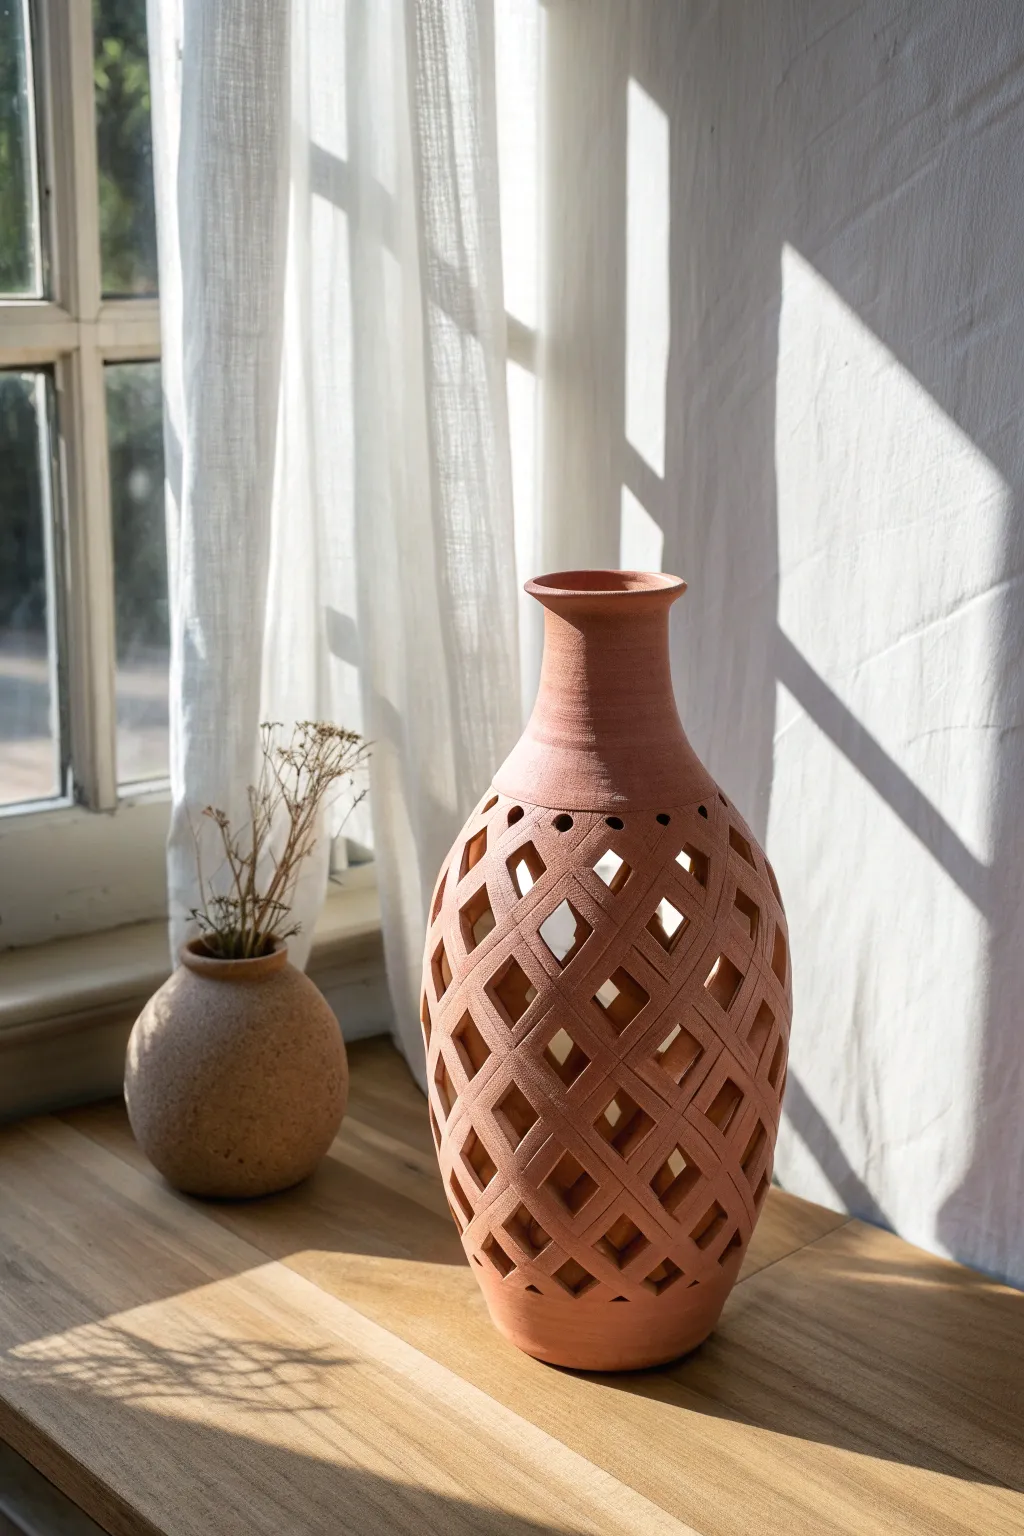
Embrace the warmth of natural earthenware with this stunning lattice-cut vase. The distinctive diamond pattern allows light to filter through, creating beautiful shadow play while maintaining a classic, elongated amphora shape.
How-To Guide
Materials
- Terracotta stoneware clay (smooth body)
- Pottery wheel
- Throwing tools (sponge, rib, wire cutter)
- Ruler or soft measuring tape
- Needle tool
- Sharp fettling knife or X-Acto blade
- Banding wheel (optional but helpful)
- Smoothing sponge
- Plastic sheet
Step 1: Forming the Base Vessel
-
Center the clay:
Start with a generous ball of terracotta clay (approx. 3-4 lbs) on your wheel. Center it firmly, ensuring a wide, stable base to support the eventual height of the piece. -
Open and pull:
Open the clay and begin pulling your walls. Aim for a cylinder first, keeping the walls slightly thicker than usual (about 1/4 to 3/8 inch) to maintain structural integrity once you start carving the lattice. -
Shape the belly:
Gently push the clay outward from the inside to create a bulbous belly section. The widest part should be just below the midpoint of the vessel. -
Collar the neck:
Slowly collar the clay inward as you move up past the belly. Compress the clay frequently to prevent ripples or buckling as you narrow the form into a slender, elegant neck. -
Flare the rim:
Once the neck is the desired height, use your fingers or a chamois to gently flare the rim outward, creating a classic lip that balances the visual weight of the base. -
Smooth the surface:
While the wheel is spinning slowly, run a metal or rubber rib along the exterior to remove throwing lines and create a perfectly smooth canvas for your carving. I find this step crucial for a professional finish. -
Dry to leather hard:
Cut the pot from the bat but leave it in place. Cover the rim loosely with plastic to keep it moist while letting the body dry to a firm leather-hard stage. The clay must be stiff enough to cut without warping.
Slumping Walls?
If the clay sags while cutting, it’s too wet. Stop immediately and let it dry longer. If it’s too dry/brittle, mist it lightly and wrap in plastic for a few hours.
Step 2: Carving the Lattice
-
Trim the foot:
Once leather hard, flip the vase and trim a clean foot ring. This adds stability and lifts the form slightly off the table. -
Map the grid:
Using a soft measuring tape and a needle tool, lightly score a grid of diagonal lines across the belly of the vase. Ensure the lines intersect to create uniform diamond shapes. -
Define the boundaries:
Decide where the lattice pattern will start and end. Leave a solid band of clay at the bottom for stability and a solid section at the neck for the handle and rim. -
Punch the corners:
Use a small circular hole punch or drill bit to create small holes at the top and bottom corners of your planned diamond cut-outs. This acts as a ‘stop cut’ to prevent cracks from running later. -
Begin the cuts:
Using a very sharp fettling knife or X-Acto blade, carefully cut out the diamond shapes between your grid lines. Support the wall from the inside with your other hand. -
Work systematically:
Don’t cut out adjacent diamonds immediately. Skip every other diamond around the circumference, then go back and do the remaining ones. This keeps the pot strong as you work. -
Refine the edges:
Once all shapes are removed, use a slightly damp sponge or a soft brush to smooth the sharp edges of the cut-outs. Be gentle to avoid distorting the thin lattice strips. -
Add decorative punctures:
At the very top of the lattice section, just below the solid neck, use a small hole punch tool to add a single row of small circular perforations for a delicate transition detail.
Step 3: Finishing and Firing
-
Slow drying:
Cover the entire vase loosely with plastic. Because the lattice dries much faster than the solid base and neck, you must dry the piece very slowly over several days to prevent tension cracks. -
Bisque fire:
Once bone dry, bisque fire the vase to Cone 04. Load it carefully in the kiln, ensuring nothing is touching the fragile lattice work. -
Sanding (Optional):
After the bisque firing, you can lightly sand any rough edges inside the cut-outs if needed. Always wear a mask if sanding dry clay or bisque. -
Final firing:
Since this vase relies on the natural beauty of the terracotta, you may choose to leave it unglazed or apply a clear matte glaze to the interior only for water tightness. Fire to the maturity temperature of your specific clay body (usually Cone 04-6).
Level Up: Texture
Before cutting the lattice, use a wire tool to score vertical lines across the entire belly. When you cut the diamonds, the remaining strips will have a rich, corduroy texture.
Place a small LED candle inside or fill it with dried botanicals to see how the light dances through your beautiful craftsmanship
Arch Rainbow-Shaped Vase
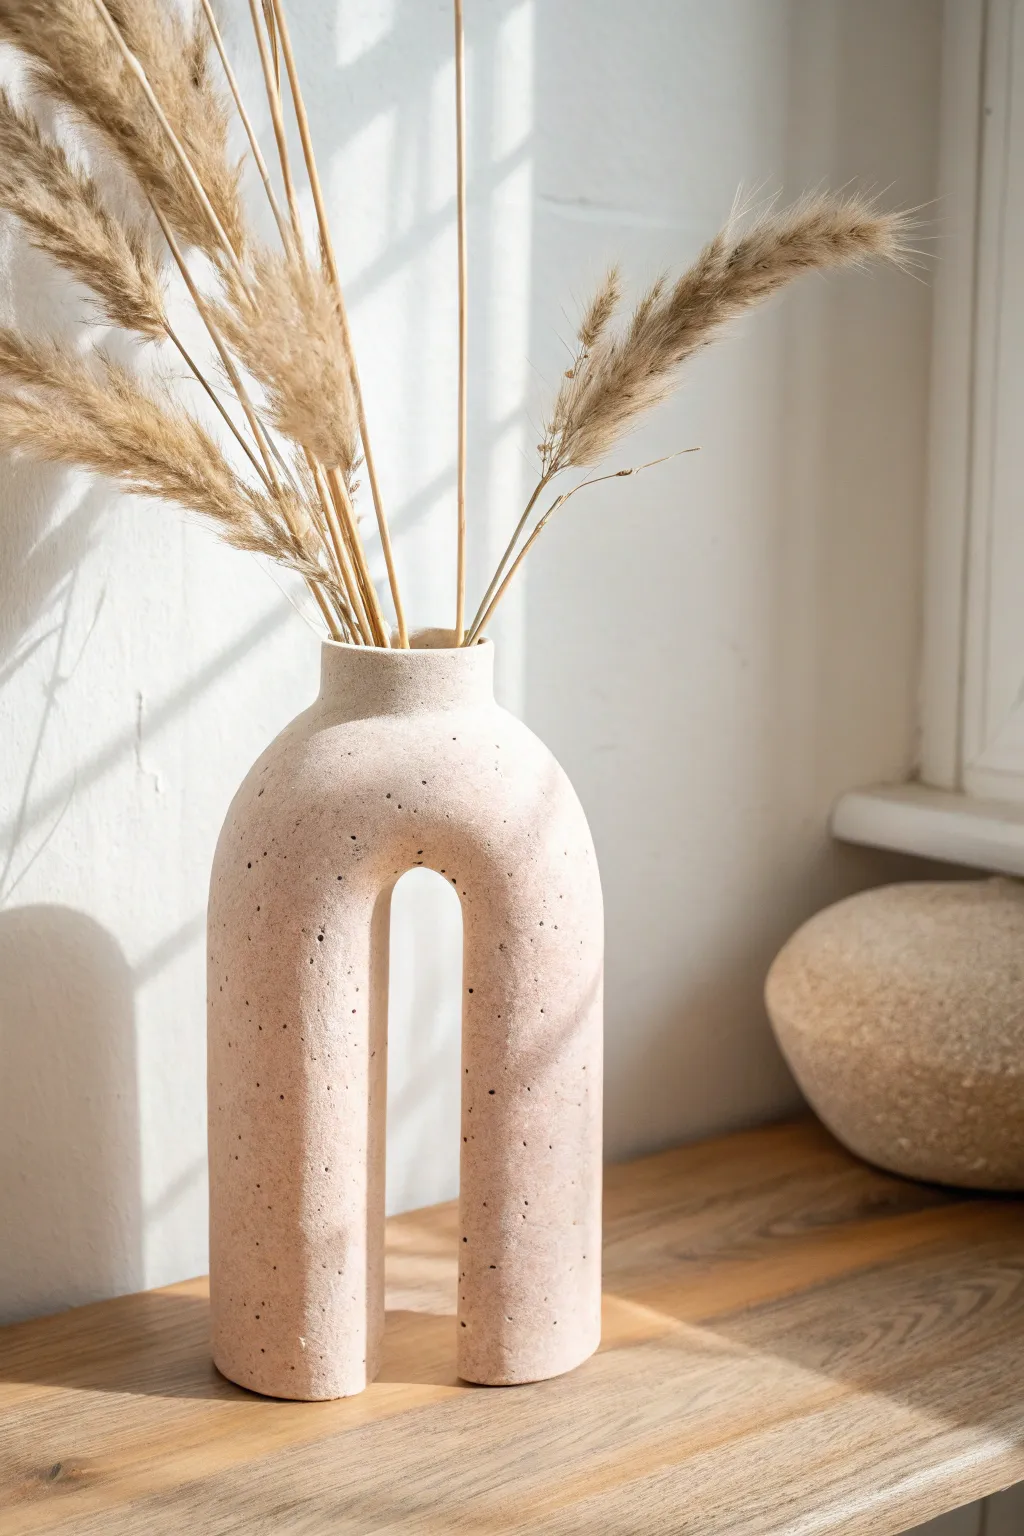
Embrace the sculptural trend with this minimalist U-shaped vase that mimics the look of high-end stoneware. Its organic arch silhouette and faux-speckle finish make it a striking modern vessel for your favorite dried botanicals.
Step-by-Step Tutorial
Materials
- Air-dry clay (white or terra cotta)
- Rolling pin
- PVC pipe or sturdy cardboard tube (approx. 2-inch diameter)
- Craft knife or clay cutter
- Sponge and water
- Slip (clay mixed with water)
- Acrylic paint (pale beige or blush pink)
- Black acrylic paint
- Old toothbrush
- Matte sealant spray
- Sandpaper (fine grit)
Step 1: Forming the Arch Base
-
Prepare your clay:
Begin by conditioning your air-dry clay. Knead a large block until it is pliable and smooth, removing any air bubbles that might cause cracks later. -
Roll the slabs:
Use your rolling pin to flatten the clay into a large, even slab about 1/4 inch thick. Aim for a consistent thickness to ensure the vase stands evenly. -
Create the legs:
Cut two rectangular sheets of clay. These need to be wide enough to wrap around your PVC pipe or cardboard tube completely with a slight overlap. -
Wrap the forms:
Use two identical tubes as forms for the legs. Wrap the clay sheets around each tube. Score the overlapping edges with a craft knife, apply a little water or slip, and press firmly to create a seam. Smooth the seam with your finger. -
Join the legs:
Stand the two tubes upright, spacing them about an inch apart. Cut a smaller strip of clay to bridge the gap at the top, curving it over to connect the two legs into an arch shape. -
Secure the bridge:
Score and slip the contact points heavily where the bridge meets the legs. Blend the clay downwards using a modeling tool or your fingers until the seam is invisible and the U-shape is seamless.
Smooth Operator
Keep a small bowl of water nearby while sculpting. Dip your finger in it to constantly smooth out cracks as they appear, which saves hours of sanding later.
Step 2: Adding the Neck
-
Form the spout:
Roll a small strip of clay into a cylinder to create the vase’s neck. The diameter should be smaller than the arch width to give it that distinct bottle shape. -
Cut the opening:
Cut a hole in the very center of your arch bridge that matches the size of your neck piece. -
Attach the neck:
Place the cylinder over the hole. Score and slip the bottom edge of the neck and the area around the hole on the arch. Press them together firmly. -
Smooth the transition:
Use a wet sponge or your thumb to smooth the clay where the neck meets the body, creating a gentle, organic slope rather than a sharp angle. -
Cap the bottom:
Flip the vase gently (while still on the supports if needed). Trace the bottom of the legs onto a fresh clay slab, cut out the circles, and attach them to seal the bottom of the legs so it can stand.
Step 3: Finishing and Painting
-
Let it dry completely:
Allow the sculpture to dry for 24-48 hours. Remove the inner tubes carefully once the clay is leather-hard but before it’s fully rigid to prevent cracking as it shrinks. -
Sand the surface:
Once fully dry, use fine-grit sandpaper to smooth out any bumps, fingerprints, or rough seams. Wipe away the dust with a slightly damp cloth. -
Base coat:
Paint the entire vase with your pale beige or blush pink acrylic paint. It may take two coats to get an opaque, solid finish. -
Create the texture:
Mix a tiny amount of black paint with water to make it runny. Dip an old toothbrush into the mixture. -
Apply the speckles:
Hold the toothbrush near the vase and run your thumb across the bristles to flick tiny droplets of paint onto the surface. I find it helps to practice on paper first to control the spray. -
Seal the piece:
Finished with a matte sealant spray to protect the paint and give it a finished, ceramic-like feel.
Weighted Base
Before sealing the bottom layout, drop a few small, clean pebbles into the hollow legs. This adds weight and stability, preventing your vase from tipping over.
Now you have a stunning architectural piece ready to display your dried pampas grass or wheat stems
Stacked Pebble Form Vase
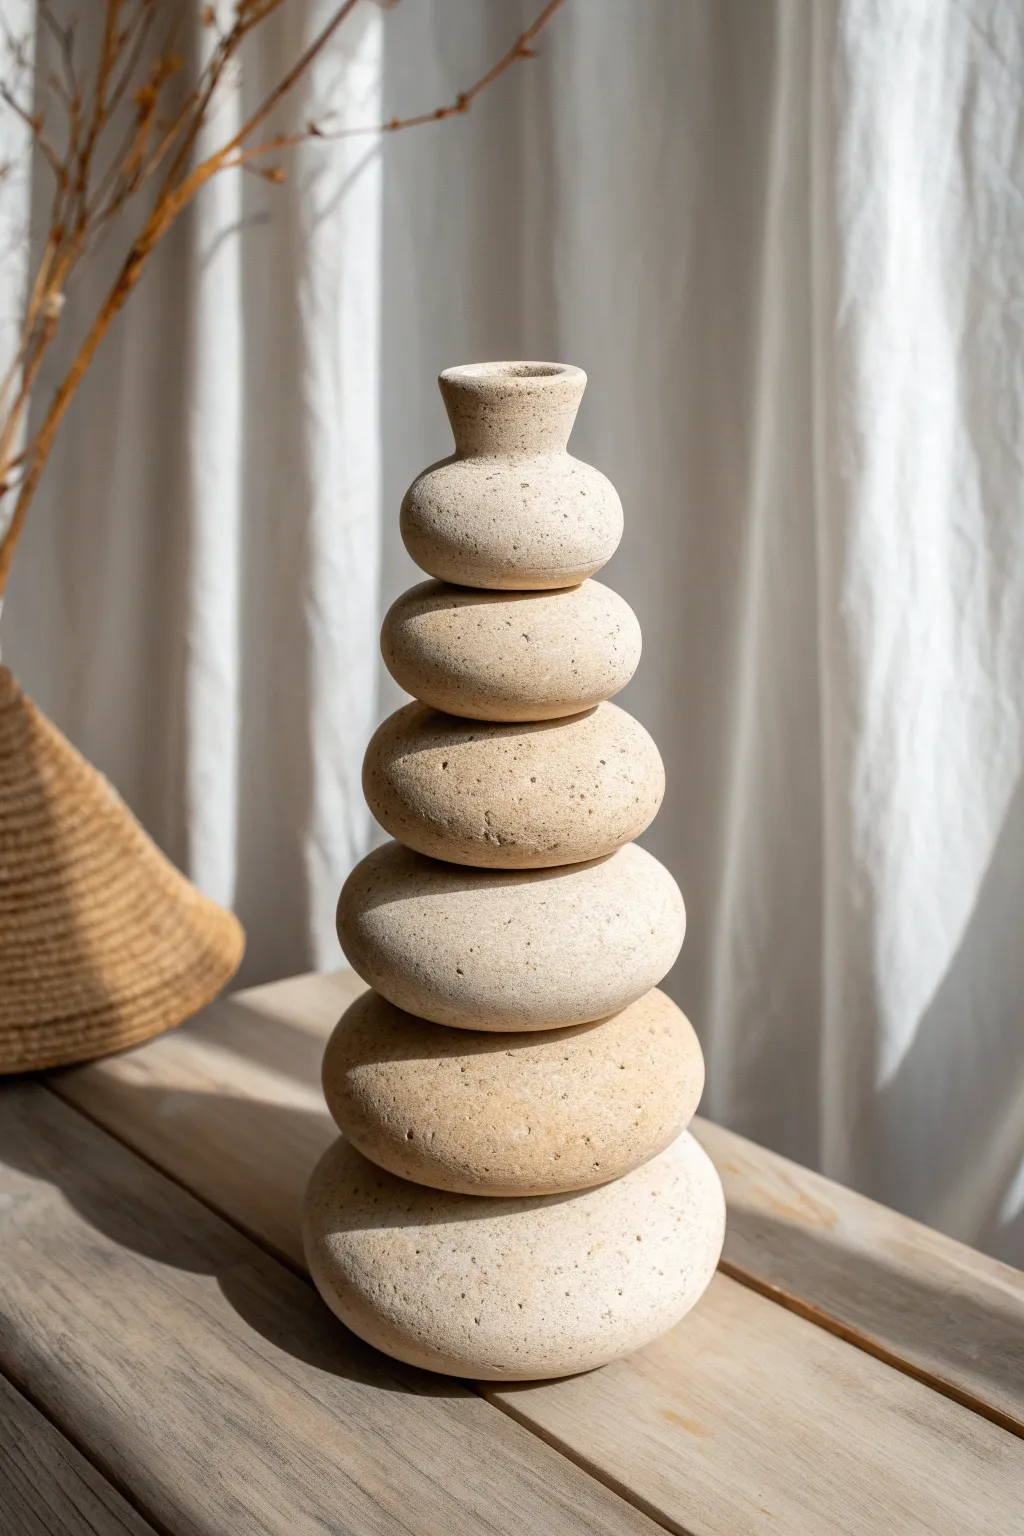
Mimicking the Zen art of rock balancing, this ceramic vase creates a harmonious, tapered silhouette that looks as though it defies gravity. The speckled, sandy clay body gives the piece an authentic, weathered texture that perfectly complements minimalist or bohemian decor.
Step-by-Step
Materials
- Speckled stoneware clay (sandy/groggy texture)
- Pottery wheel (optional, can be hand-built)
- Needle tool
- Rib tool (kidney)
- Sponge
- Score and slip tool (or fork)
- Clay slip
- Cutting wire
- Rolling pin (if hand-building)
- Matte clear glaze
Step 1: Forming the Pebble Sections
-
Prepare your clay:
Wedge your speckled clay thoroughly to remove air bubbles. Since this vase relies on graduated sizes, prepare six distinct balls of clay, ranging from large to small for the stack. -
Shape the base pebble:
If using a wheel, throw a low, wide enclosed form (donut shape) that is hefty enough to support the tower. If hand-building, pinch two large pinch pots and join them rim-to-rim to create a hollow ‘stone’ shape. -
Flatten the contact points:
Gently tap the top and bottom of your base clay ball to create flat surfaces. This ensures stability when you begin stacking later on. -
Create the middle stones:
Repeat the shaping process for the next four stones, making each slightly smaller in diameter than the last. Aim for organic, imperfect roundness rather than perfect spheres to mimic real river rocks. -
Form the neck:
For the very top piece, shape a small hollow ball but pull the top upwards to form a flared neck opening. This is where your flower stems will eventually rest. -
Allow soft leather hard drying:
Let all your separate components dry until they are soft leather hard. They need to be firm enough not to squish under weight, but soft enough to join securely.
Step 2: Construction and Assembly
-
Open the airways:
Before joining, use your needle tool or a small circular cutter to create a hole in the top of the base stone, and through the top and bottom of every middle stone. This creates the continuous channel for the vase. -
Score the first connection:
Take your base stone and the next largest stone. Heavily score the flat top of the base and the flat bottom of the second stone using a serrated tool. -
Apply slip:
Apply a generous amount of thick clay slip to the scored areas. I find using vinegar-based slip helps create an even stronger bond for structural pieces like this. -
Join and compress:
Press the second stone firmly onto the base. twist it slightly back and forth to lock the clay particles together. -
Smooth the seam:
Use a modeling tool or your finger to smooth the seam where the stones meet. You want it to look like they are touching, but the connection must be sealed airtight so water doesn’t leak. -
Refine the ‘kiss’ point:
Once sealed, you can use a small tool to re-define the crease between the stones, making it look like a precarious stack rather than one solid lump. -
Continue stacking:
Repeat the scoring, slipping, and joining process for the remaining three middle stones, working your way up in decreasing size.
Wobbly Tower?
If the stack leans while building, insert a wooden dowel through the center holes temporarily to act as a spine while the slip sets and stiffens.
Step 3: Finishing Touches
-
Attach the neck:
Finally, attach the flared neck piece to the top of the stack. Ensure the opening is smoothed and the rim is comfortable to the touch. -
Texture enhancement:
Take a slightly damp sponge and wipe down the exterior. This exposes the grog (sand) in the clay body to enhance that stone-like texture. -
Slow drying:
Cover the vase loosely with plastic to let it dry very slowly. Because the wall thickness varies at the joints, drying too fast can cause cracks. -
Bisque fire:
Once bone dry, fire the piece to bisque temperature (usually cone 04 or 06). -
Glazing:
Apply a thin layer of matte clear glaze. You want to seal the clay so it holds water, but you don’t want a glossy finish that ruins the illusion of raw stone. -
Final firing:
Fire to the maturity temperature of your clay body (likely cone 5 or 6 for stoneware).
Make it Ancient
Rub iron oxide or a dark wash into the crevices between the ‘stones’ before glazing to create depth and an aged, shadowed appearance.
Place a few dried stems or a single fresh branch in your new vase to emphasize its serene balance
Hanging Wall Pocket Vase
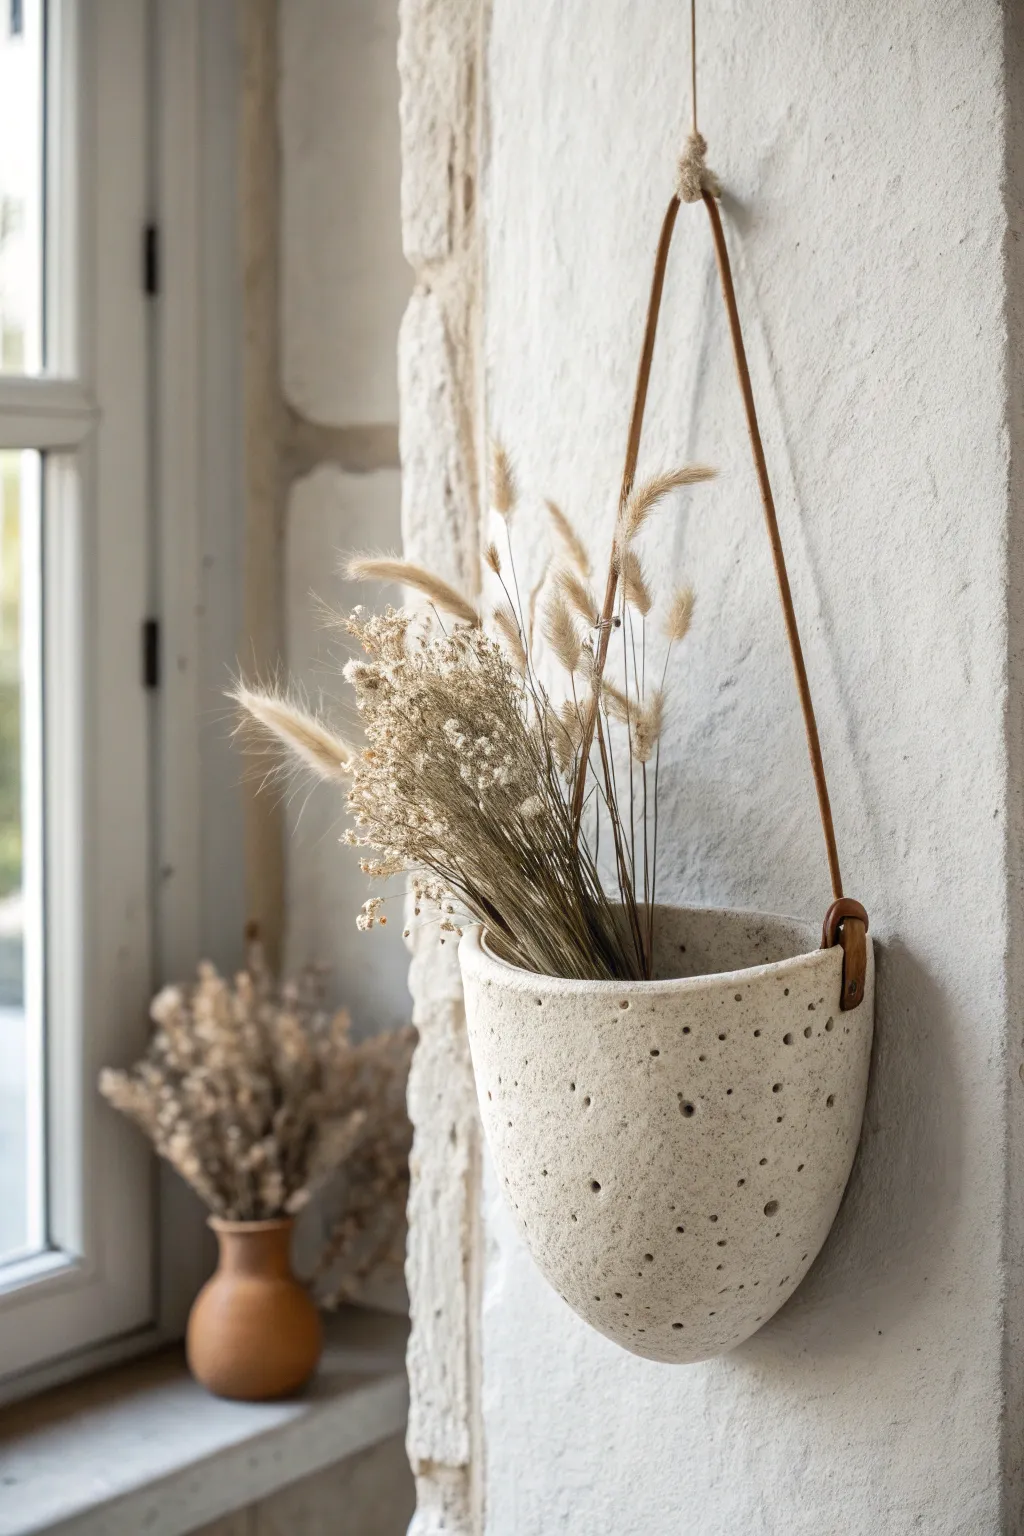
This charming, cone-shaped wall pocket adds earthy texture to any vertical space with its speckled finish and delicate puncture design. The simple leather hanging strap and organic form make it the perfect vessel for displaying dried grasses or airy botanicals.
Step-by-Step Tutorial
Materials
- Speckled stoneware clay (approx. 2-3 lbs)
- Rolling pin
- Canvas mat or slab roller
- Paper template (cone shape)
- Needle tool or fettling knife
- Scoring tool (or fork)
- Slip (clay and water mixture)
- 2-inch spherical flowing sponge or smooth stone (for shaping)
- Dowel or hole punch tool (approx. 3mm diameter)
- Hole punch tool (approx. 5-6mm for strap holes)
- Brown leather cord or flat leather strap (approx. 24 inches)
- Sponge and water bucket
- Kiln and glaze (matte white or clear satin)
Step 1: Forming the Cone Body
-
Prepare the Clay:
Begin by wedging your speckled stoneware clay thoroughly to remove air pockets. I like to slap it down on the canvas a few times to compress the particles before rolling. -
Roll the Slab:
Roll out a slab of clay to an even thickness of about 1/4 to 3/8 inch. Ensure the slab is large enough to accommodate your cone template. -
Create a Template:
Cut a paper template in the shape of a wide, rounded triangle or a sector of a circle. This will fold into your cone shape. -
Cut the Shape:
Place the template on your clay slab and trace around it with a needle tool. Carefully cut out the shape, keeping the edges perpendicular to the work surface. -
Score the Edges:
Identify the two straight sides that will meet to form the seam. Score these edges aggressively with a serrated rib or needle tool. -
Apply Slip:
Dab a generous amount of slip onto the scored areas. This acts as the glue that bonds the clay together. -
Form the Cone:
Gently lift the clay and bring the scored edges together, overlapping them slightly to create the conical pocket shape. -
Reinforce the Seam:
Press the seam firmly from both the inside and outside. Use a wooden modeling tool to smooth the clay over the join line so it disappears completely.
Seam Splitting?
If the main seam cracks during drying, score it deeply, add vinegar to your slip for a stronger bond, and patch with fresh soft clay. Compress firmly.
Step 2: Refining and Detailing
-
Shape the Interior:
Use a damp sponge to smooth the interior rim. Gently press outwards from the inside to create a slight bulge or curve, making the form look more organic and less rigid. -
Smooth the Surface:
Go over the exterior with a slightly damp sponge or a flexible rib to remove any canvas texture and refine the shape. -
Create the Strap Holes:
Using the larger hole punch, create two clean holes on opposite sides of the upper rim. These must be large enough for your leather strap to pass through after the clay shrinks in the kiln. -
Create the Leather Loops:
Alternatively, fashion small loops of clay and attach them securely to the sides if you prefer loops over punched holes for the handle. -
Add Texture Details:
Using a smaller dowel or blunt tool, gently press random indentations into the surface. Vary the pressure; some can be deep punctures while others are shallow divots. -
Dry and Fire:
Allow the piece to dry slowly under plastic to prevent warping. Once bone dry, bisque fire the vase according to your clay body’s specifications. -
Glaze Application:
Apply a matte white or clear satin glaze. If using a clear glaze, the natural speckles of the clay will shine through beautifully. -
Final Firing:
Glaze fire the piece. Ensure the strap holes remain clear of glaze so they don’t seal shut. -
Attach the Strap:
Once cool, thread your leather cord through the side holes. Knot the ends securely on the outside so the knots act as stoppers.
Clean Punctures
When punching the decorative texture holes, twist the tool slightly as you withdraw it. This prevents the clay from pulling up and creating jagged edges.
Hang your new pocket vase near a window to let the light play across the textured surface