If you’ve been craving fresh handmade pottery inspiration, you’re in the right place—these ideas are all about making pieces that feel personal, useful, and a little bit magical. I’m sharing my favorite handmade pottery ideas that start classic and practical, then wander into more playful, texture-heavy, artsy territory.
Everyday Handmade Mugs With Cozy Handles
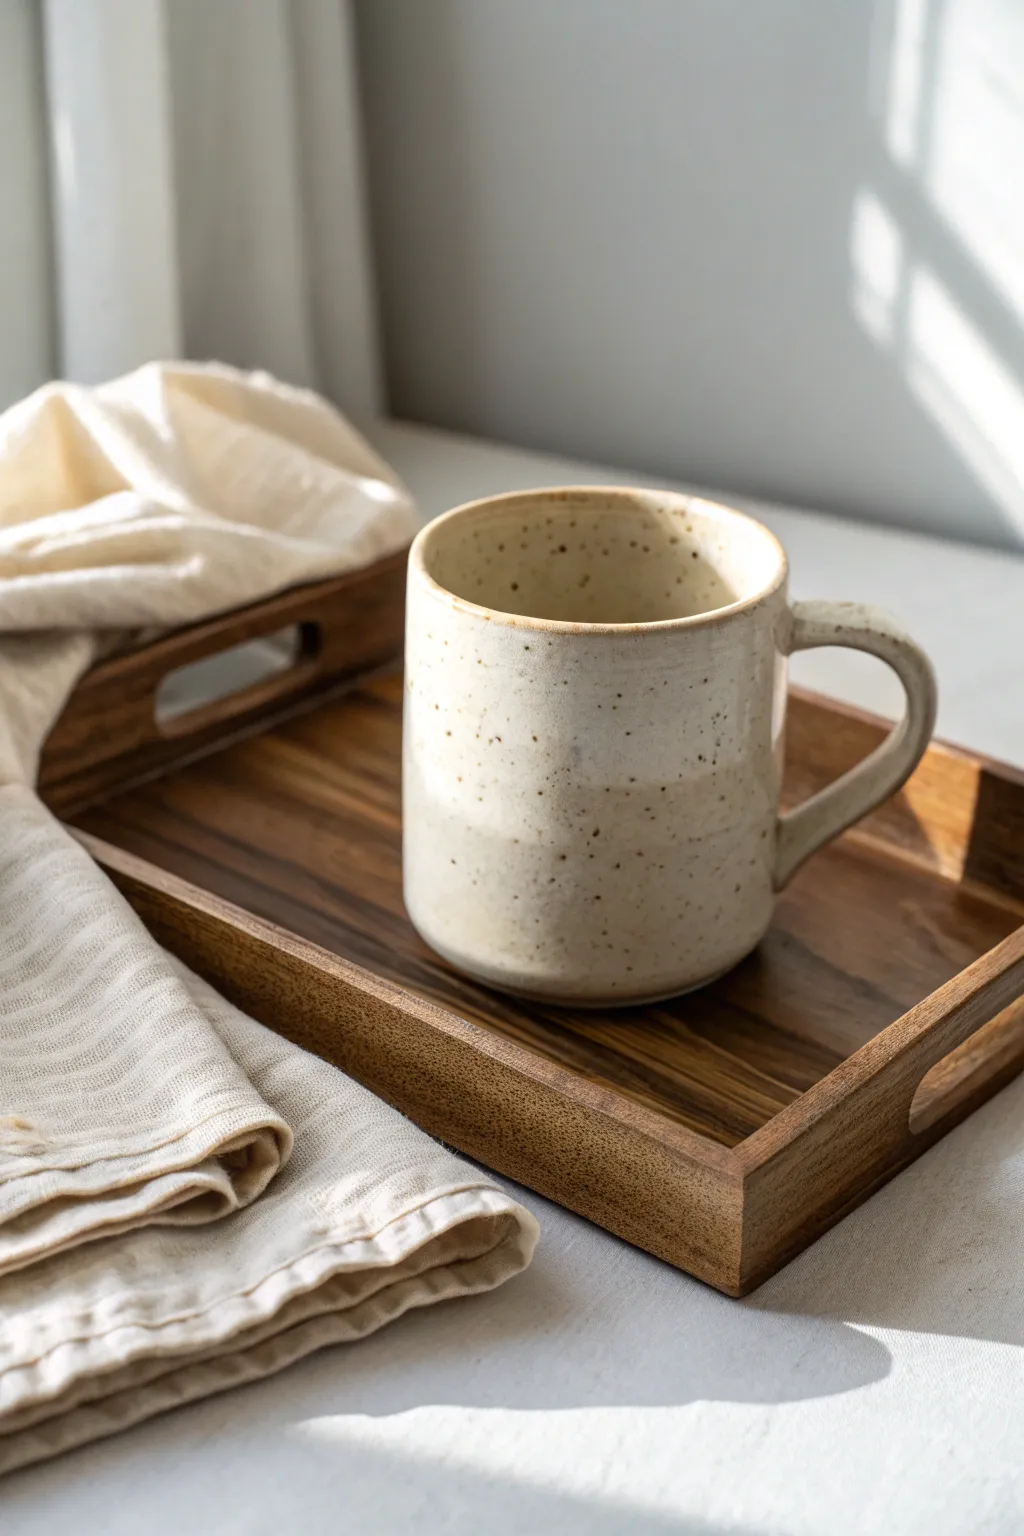
This rustic, hand-thrown mug features a comforting, earthy aesthetic with its speckled beige glaze and sturdy form. The generous handle is designed specifically for curling your fingers around on a slow morning, making it the ultimate vessel for your daily coffee ritual.
How-To Guide
Materials
- Stoneware clay (speckled or buff)
- Pottery wheel
- Throwing sponge
- Wire cutter
- Pin tool
- Rib tool (wooden or metal)
- Trimming tools
- Serrated rib or scoring tool
- Slip
- Cream/Oatmeal speckled glaze (mid-fire)
- Kiln
Step 1: Throwing the Cylinder
-
Center the Clay:
Begin with about 1 to 1.5 pounds of speckled stoneware clay. Wedge it thoroughly to remove air pockets, then slam it onto the center of your wheel head. Using moistened hands and steady pressure, cone the clay up and down until it runs perfectly smooth and centered. -
Open the Form:
Press your thumbs into the center of the mound to open the floor. Establish a flat bottom appropriate for a standard mug width—aim for about 3 inches across—leaving roughly a quarter-inch of thickness for the base. -
Pull the Walls:
Slow the wheel speed slightly. Using a knuckle pull or finger pull, bring the clay up into a cylinder. Perform three to four pulls to get the height you want. For this cozy style, keep the walls even but not paper-thin; a little heft adds to the rustic feel. -
Shape the Belly:
Once you have height, use a rib tool on the inside and a sponge on the outside to gently push the belly of the mug out. This specific mug has a very subtle, straight-walled profile with just a hint of tapering at the bottom, so don’t round it out too much. -
Refine the Rim:
Compress the rim with a chamois or your sponge to make it smooth and drinkable. Ensure the lip is slightly rounded, as sharp edges are uncomfortable. -
Cut and Dry:
Use your wire cutter to slice under the mug. Lift it off with bat pins or by hand if you are careful, and set it aside to dry until leather hard.
Cracks at the Handle?
Handle cracks happen if clay dries unevenly. Wrap the handle tightly in plastic while leaving the body exposed for slow, even drying.
Step 2: Trimming and Handle Making
-
Trim the Foot:
Once leather hard, center the mug upside down on the wheel. Use a trimming loop tool to clean up the bottom, carving a slight foot ring. This lifts the visual weight and gives the mug a finished look. -
Pull a Handle Blank:
Take a separate lug of clay and pull a long, thick strip using plenty of water. Keep the cross-section oval-shaped. I usually pull a bit more length than I need to allow for curves. -
Form the ‘Ear’:
Let the pulled handle stiffen slightly until it can hold an arch without collapsing. Curve it into a ‘C’ shape or ‘ear’ shape that allows three to four fingers to fit comfortably inside. -
Attach the Handle:
Score the attachment points on both the mug and the handle ends vigorously with a serrated tool. Apply slip generously. Press the handle firmly onto the mug, smoothing the clay at the joints for a seamless transition. -
Check Alignment:
Hold the mug in front of you to ensure the handle is straight vertically. Clean up any excess slip with a damp sponge.
Step 3: Glazing and Firing
-
Bisque Fire:
Allow the mug to bone dry completely, which may take several days depending on humidity. Load it into the kiln for a bisque fire (usually Cone 04 or 06). -
Wax the Bottom:
Once the bisque firing is cool, wipe the mug down with a damp sponge to remove dust. Apply wax resist to the foot ring and bottom to prevent glaze from sticking to the kiln shelf. -
Apply Glaze:
Dip the entire mug into a bucket of cream or oatmeal-colored glaze. Shake it gently to remove excess drips. If your clay body is plain but you want the look in the photo, ensure your glaze has iron speckles in the formula. -
Clean the Rim:
Check the rim for any thick drips that might run during firing. Smooth them out with a finger to ensure an even coat. -
Glaze Fire:
Load the glazed mug into the kiln for the final glaze firing (typically Cone 5 or 6 for stoneware). Ensure the mug doesn’t touch any other pots.
Make it Yours
Leave the bottom third of the mug unglazed. The contrast between the raw, toasted clay and the milky glaze adds incredible tactile texture.
Once cool, your new favorite mug is ready to hold warm tea on a quiet afternoon


Simple Handmade Bowls for Snacks, Soup, or Trinkets
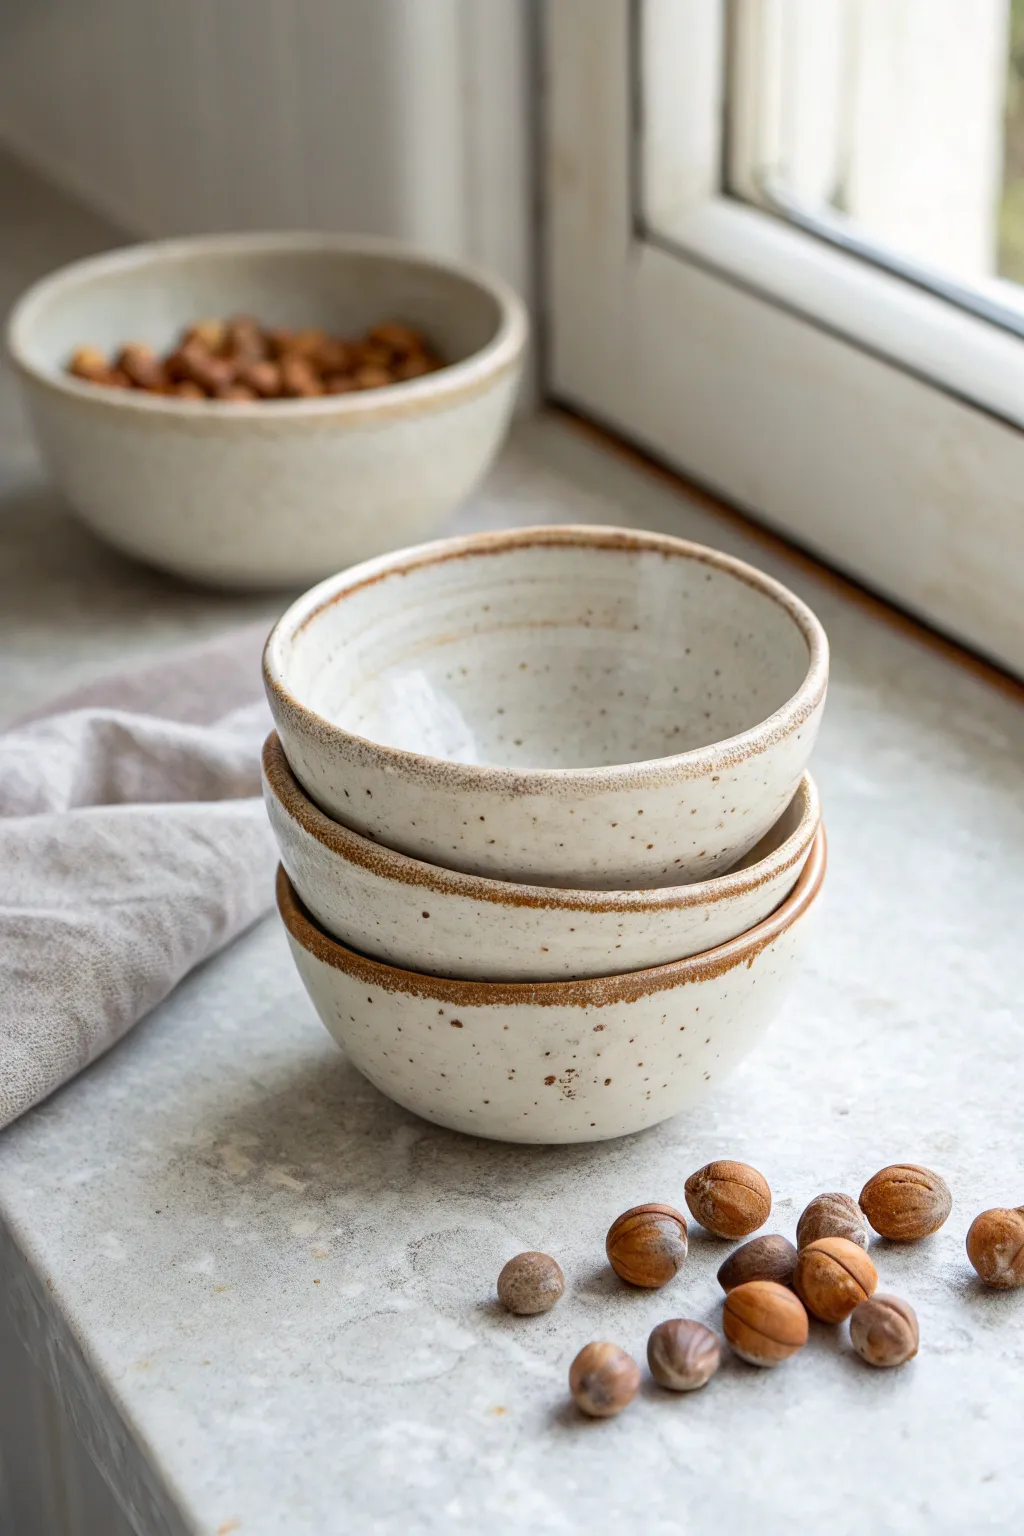
Create a charming set of nesting bowls perfect for morning yogurt or evening snacks. These wheel-thrown vessels feature a cozy creamy-white speckled glaze highlighted by an earthy iron-oxide rim that adds depth and definition.
Step-by-Step Guide
Materials
- Stoneware clay (speckled or buff)
- Pottery wheel
- Medium sponge
- Wooden throwing ribs
- Wire cutter
- Trimming tools (loop tool)
- Cream/White speckled glaze (cone 5/6)
- Iron oxide wash or dark brown stain
- Small liner brush or sponge for rim
- Kiln
- Bat for wheel
Step 1: Throwing the Form
-
Prepare the clay:
Begin by wedging about 1 to 1.5 pounds of stoneware clay for each bowl. Ensure the clay is free of air bubbles to prevent explosions in the kiln and wobbles on the wheel. -
Center specifically:
Drop the clay onto the center of the wheel bat. Seal the bottom edge, then cone up and down until the clay feels completely steady and centered in your hands. -
Open the vessel:
Press your thumbs into the center to open the floor. For this shape, aim for a curved bottom rather than a flat, perpendicular corner; this helps create that gentle, cupped look. -
Pull the walls:
Pull the walls up gently, keeping your hands steady. Aim for a slightly thicker rim than usual, as this adds to the rustic aesthetic and makes the bowls durable for daily use. -
Shape the profile:
Using a wooden rib on the inside and a sponge on the outside, support the curve. I like to push gently from the inside out to create a generous, rounded belly. -
Refine the rim:
Compress the rim with a piece of chamois or your sponge. A slightly rounded, smooth lip is essential since this will be the focal point where the brown wash sits. -
Cut and dry:
Run a wire tool under the bowl to release it from the bat. Leave the bowl on the bat or transfer carefully to a board to dry until leather hard.
Wobbly Rims?
If your rims feel uneven, use a needle tool to cut the top edge level before your final smoothing pass. Always compress the lip afterward to prevent cracking.
Step 2: Trimming and Glazing
-
Flip and center:
Once the clay is leather hard (firm but you can still dent it with a fingernail), invert the bowl onto the wheel head and center it again. Secure it with small coils of clay. -
Trim the foot:
Using a sharp loop tool, trim away excess weight from the bottom. Define a small foot ring that lifts the bowl slightly off the table, giving it a lighter appearance. -
Smooth the outside:
Use a smooth metal rib or the back of a spoon to burnish the trimmed areas slightly, removing grog marks and unifying the texture. -
Bisque fire:
Place the dried greenware bowls into the kiln for a bisque firing (usually Cone 04). This hardens the clay and prepares it for glaze application. -
Wipe down:
After the bowls cool, wipe them with a damp sponge to remove any dust, which could cause pinholes in your final glaze. -
Apply the main glaze:
Dip the bowl into a bucket of creamy white speckled glaze. Hold it by the foot with tongs or your hand, dipping for about 3 seconds to get an even coat. -
Clean the foot:
Before moving on, meticulously wipe the bottom foot ring clean with a sponge so it doesn’t fuse to your kiln shelf. -
Apply the oxide rim:
Mix a small amount of iron oxide with water. Dip a small sponge or brush into the wash and carefully run it along the very edge of the rim. Let it bleed slightly down the side for a natural look. -
Final Fire:
Load the glazed bowls into the kiln for the glaze firing (typically Cone 5 or 6, depending on your clay and glaze). Ensure they don’t touch each other.
Make it a Set
To create a nesting set, weigh your clay balls in decreasing increments (e.g., 1.5lbs, 1lb, 0.75lb) before throwing to ensure graduated sizes.
Once cooled, these durable bowls are ready to add a touch of handcrafted warmth to your kitchen table


Handmade Trinket Dishes for Rings and Tiny Treasures
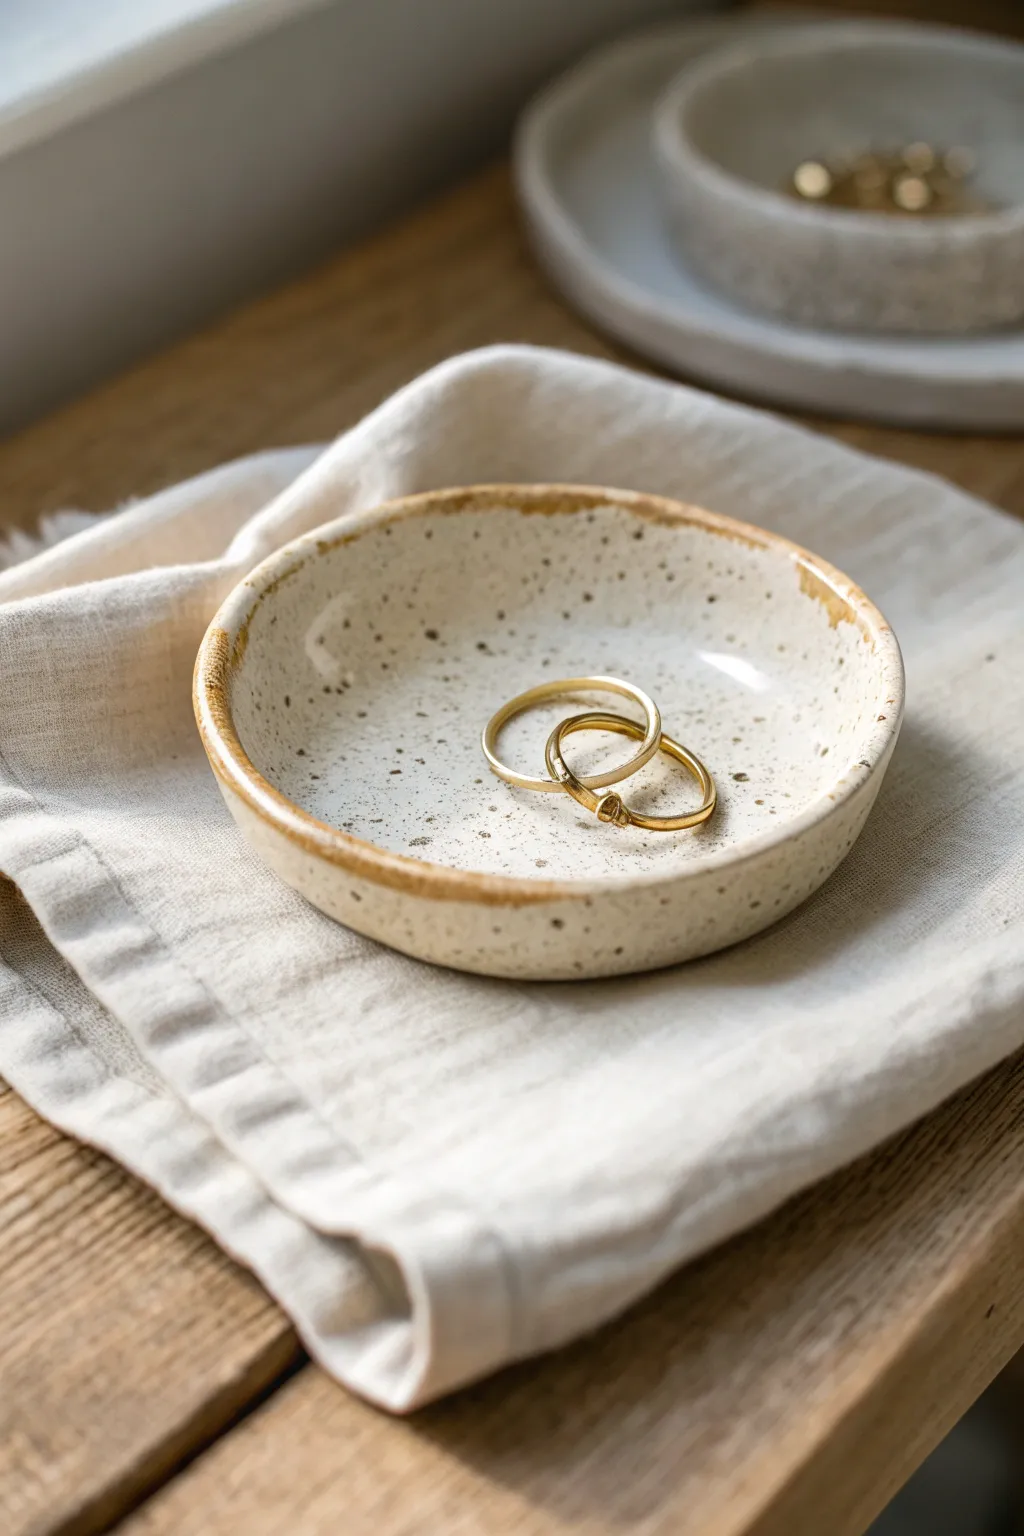
This charming, petite trinket dish is the perfect resting place for your daily jewelry, showcasing the raw beauty of speckled clay. The simple, slightly irregular rim and warm glaze accent give it an earthy, organic feel that looks beautiful on any bedside table.
Step-by-Step Tutorial
Materials
- Speckled stoneware clay body (e.g., Laguna Speckled Buff or similar)
- Small rolling pin
- Canvas mat or cloth for rolling
- Needle tool or fettling knife
- Round cookie cutter (approx. 3-4 inches) or a small bowl to trace
- Small sponge
- Rib tool (rubber or wooden)
- Carving tool or loop tool (optional for foot trimming)
- Clear glaze (satin or glossy)
- Iron oxide wash or amber celadon glaze (for the rim)
- Kiln access (biscuit and glaze firing)
Step 1: Forming the Dish
-
Prepare the Clay:
Start with a small ball of speckled stoneware clay, about the size of a golf ball or slightly larger. Wedge it thoroughly to remove any air bubbles and ensure the clay is consistent. -
Roll the Slab:
Place the clay on your canvas mat. Using the rolling pin, roll the clay out into an even slab. Aim for a thickness of about 1/4 inch—not too thin, as you want the dish to feel substantial. -
Smooth the Surface:
Before cutting, take your rib tool and gently compress the clay slab on both sides. This aligns the clay particles, strengthens the slab, and creates a nice smooth canvas for your glaze later. -
Cut the Shape:
Use a round cookie cutter or place a small bowl upside down on the clay as a template. Cut around it with a needle tool to create a perfect circle. -
Softening the Edges:
I like to take a slightly damp sponge or just my fingertip and run it along the cut edge immediately to round off the sharp 90-degree angle left by the cutter. -
Shape the Curve:
Place the clay circle into the palm of your hand. Gently cup your hand to curve the clay upwards. Alternatively, you can press the clay into a small foam mold or a shallow bowl lined with paper to establish the curve. -
Refine the Rim:
While holding the curved form, gently pinch the rim between your thumb and forefinger to slightly thin it and give it that handmade, wavering edge seen in the photo. Avoid making it razor-sharp; a rounded edge holds glaze better. -
Dry Slowly:
Set the dish aside to dry to a leather-hard state. Placing it loosely covered with plastic will help it dry evenly and prevent warping.
Oxide Magic
If you don’t have amber glaze, pure iron oxide mixed with water creates that burnt-orange rustic edge.
Step 2: Finishing and firing
-
Sponge and Smooth:
Once bone dry, take a slightly damp sponge (wring it out well!) and wipe down the entire piece to remove any dust or rough spots created during drying. -
Bisque Fire:
Load the bone-dry dish into the kiln for a bisque firing (usually Cone 04 or 06, depending on your clay). -
Apply Clear Glaze:
After the bisque firing, wipe the pot with a damp sponge to remove dust. Dip the entire dish into a clear glaze (glossy or satin works well to show off the specks). Wipe the bottom clean for the kiln shelf. -
Accent the Rim:
Dip a small brush into an iron oxide wash or an amber glaze. Carefully paint a thin band along the very edge of the rim. Don’t worry if it’s not perfectly straight; the variation adds character. -
Glaze Fire:
Fire the piece again to the maturity temperature of your clay and glaze (typically Cone 5 or 6 for stoneware). The heat will melt the rim color, allowing it to break beautifully over the edge. -
Final Inspection:
Once cool, sand the bottom if necessary to ensure it won’t scratch your furniture.
Add Texture
Press a piece of lace or a leaf into the clay slab before cutting the circle for subtle interior texture.
Your finished dish is now ready to hold your favorite rings and bring a touch of handmade warmth to your home


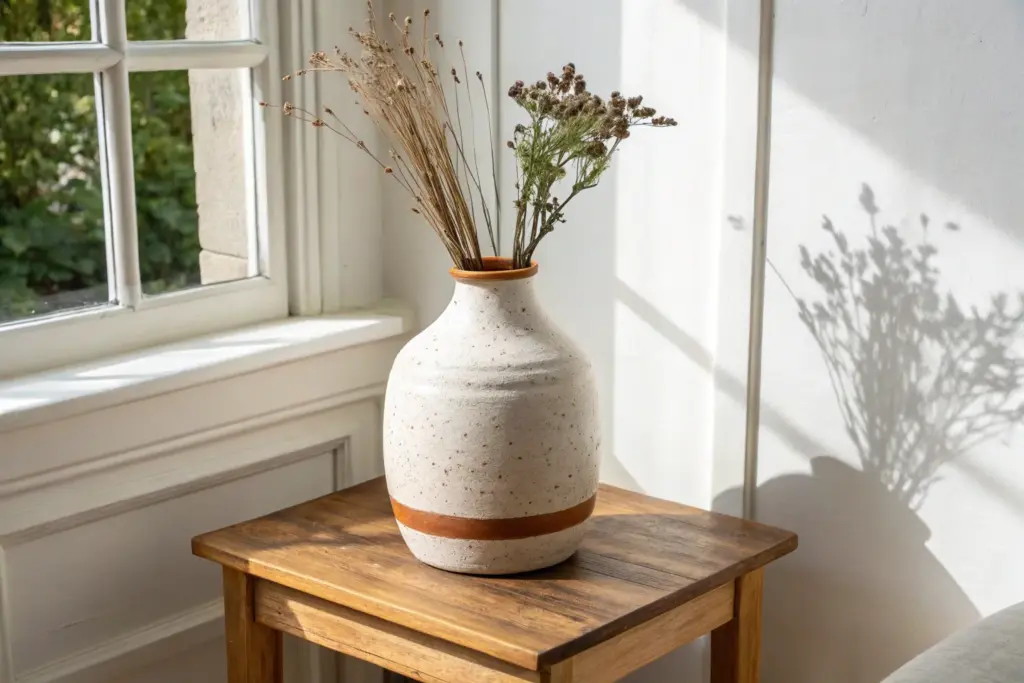
Handmade Vases That Make Grocery-Store Flowers Look Fancy
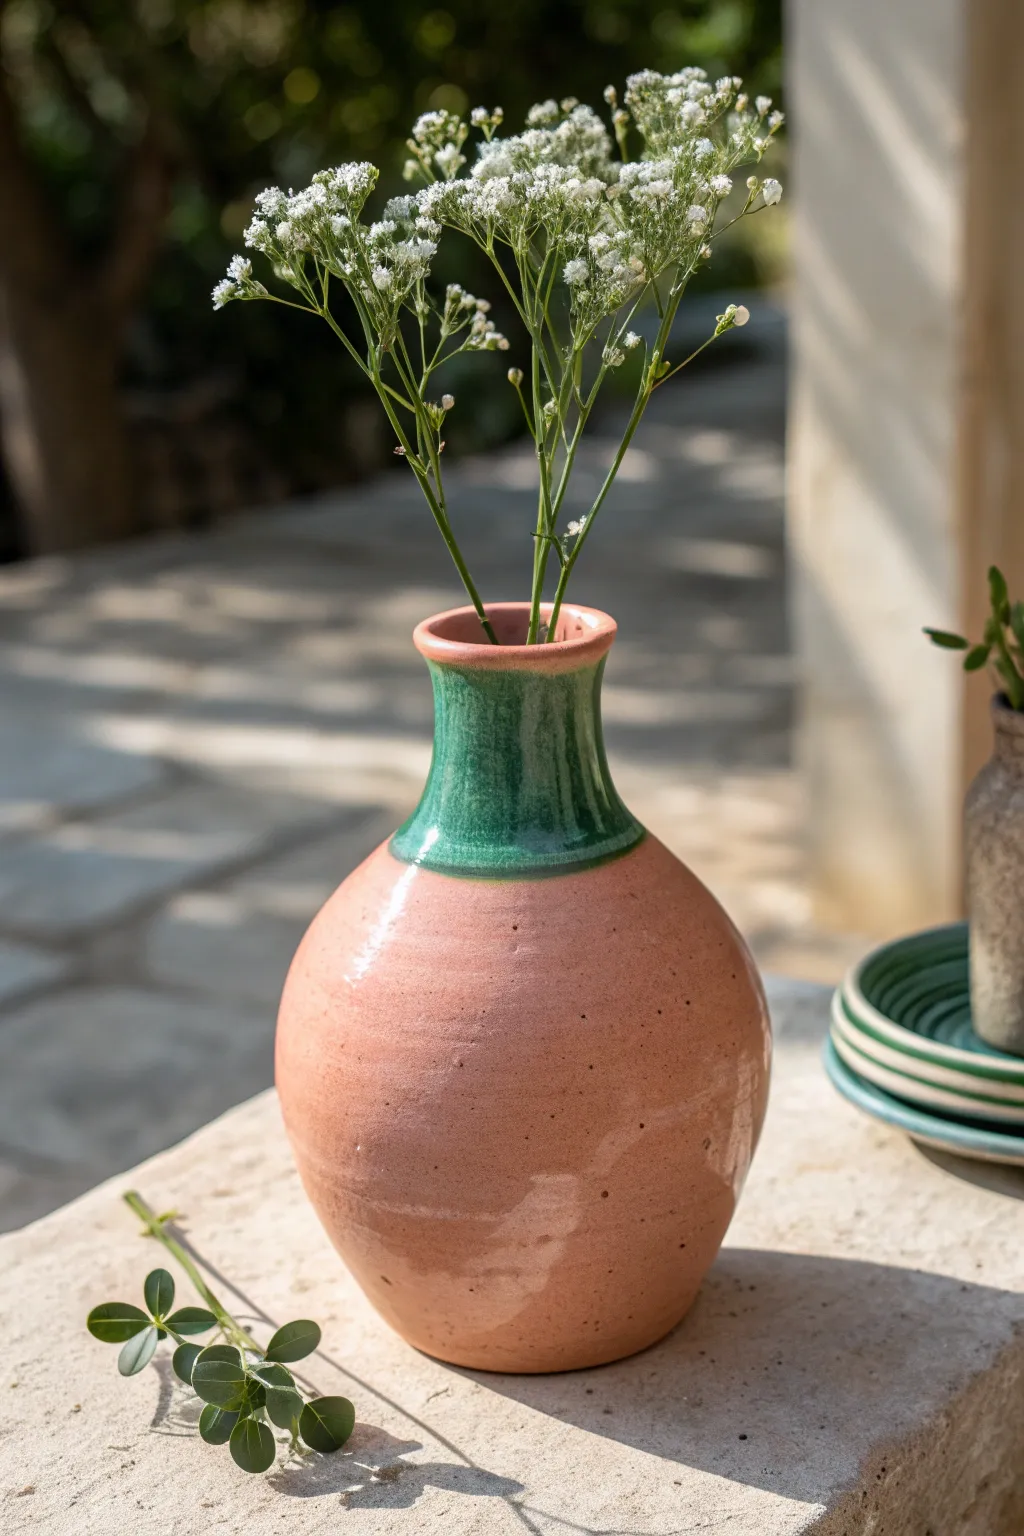
This charming wheel-thrown vase features a warm, speckled terracotta-colored body contrasted with a striking emerald green neck. Its organic, bulbous shape and hand-dipped glaze technique give it a sophisticated artisanal feel perfect for elevating simple floral arrangements.
Step-by-Step Guide
Materials
- Speckled stoneware clay (approx. 2-3 lbs)
- Potter’s wheel
- Throwing sponge
- Pin tool
- Wooden rib tool
- Wire cutter
- Trimming tools
- Clear glossy glaze
- Emerald green glossy glaze
- Wax resist
- Paintbrush for wax
- Kiln
Step 1: Throwing the Form
-
Center the clay:
Begin by firmly slamming your ball of speckled stoneware clay onto the center of the wheel head. Use water and steady pressure to cone the clay up and down until it is perfectly centered and running smooth. -
Open the vessel:
Press your thumb or fingers into the center to open the clay, leaving about a half-inch of thickness for the floor. Pull the opening outward to establish the width of the base. -
Pull the walls:
Slow the wheel speed slightly. Using your fingers (one hand inside, one outside), compress the clay and pull the walls upward into a cylinder. Keep the walls even in thickness from top to bottom. -
Shape the belly:
Place one hand inside the cylinder to push the clay gently outward while the outside hand supports it. Create a voluminous, round belly shape, keeping the top third of the clay relatively vertical for now. -
Collar the neck:
Encircling the top third of the clay with both hands, gently squeeze inward while the wheel spins to narrow the opening. This is called ‘collaring.’ Do this gradually to avoid buckling the clay. -
Refine the curve:
Use a wooden rib on the outside of the pot to smooth the transition between the round belly and the narrowing neck. This also compresses the clay and removes throwing lines for a cleaner surface. -
Form the rim:
Once the neck is sufficiently narrow, use your fingertips or a chamois cloth to gently flare the very top lip outward. A slightly thickened rim adds visual weight and durability. -
Cut off the wheel:
Run a wire cutter underneath the vase to separate it from the wheel head. Carefully lift it off using pot lifters or dry hands and set it aside to dry to a leather-hard state.
Clean Collaring
When narrowing the neck, lubricate your hands well but keep the clay relatively dry. Too much water weakens thin walls and causes the neck to collapse or twist during collaring.
Step 2: Trimming and Firing
-
Trim the foot:
Once leather-hard, center the vase upside down on the wheel. Use trimming tools to carve away excess weight from the bottom and define a clean foot ring. Smooth the surface with a damp sponge. -
Bisque fire:
Load the bone-dry vase into the kiln for a bisque firing (typically Cone 04 or 06). This initial firing hardens the clay and prepares it for glazing. -
Clean the bisque:
Wipe the fired vase with a damp sponge to remove any kiln dust, which can prevent the glaze from adhering properly.
Step 3: Glazing the Two-Tone Look
-
Apply wax resist:
Brush wax resist onto the bottom of the foot to prevent glaze from sticking to the kiln shelf. I also like to apply a thin ring of wax right where the neck meets the shoulder if I want a super crisp line, though freehand dipping is more organic. -
Dip the Clear Coat:
Prepare a bucket of transparent clear glaze. Holding the vase by the foot, dip the entire vessel into the clear glaze. Shake it gently to remove excess drips and let it dry completely. -
Dip the Green Neck:
Once the clear coat is dry to the touch, hold the vase upside down by the belly. Carefully dip just the neck and rim into the emerald green glaze. Hold it there for 3-5 seconds to build opacity. -
Check the overlap:
As you lift the vase out, twist it slightly to stop drips. The green glaze will sit on top of the clear glaze, creating a beautiful interaction where they meet at the vase’s shoulder. -
Clean the foot:
Double-check the bottom of the vase. Even with wax resist, use a sponge to wipe away any stray droplets of glaze on the foot ring. -
Glaze fire:
Fire the vase again to the temperature required by your clay and glaze (often Cone 5 or 6 for stoneware). This final firing melts the glass and brings out the speckles in the clay body.
Pinholes in Glaze?
If you see tiny pinholes in the fired glaze, try a ‘drop and hold’ firing schedule next time. Holding the top temperature for 15-20 mins allows gas bubbles to heal over.
Fill your new vase with baby’s breath or wildflowers to admire how the green neck complements the natural stems

What Really Happens Inside the Kiln
Learn how time and temperature work together inside the kiln to transform clay into durable ceramic.
Mini Bud Vases as a Mix-and-Match Handmade Pottery Set
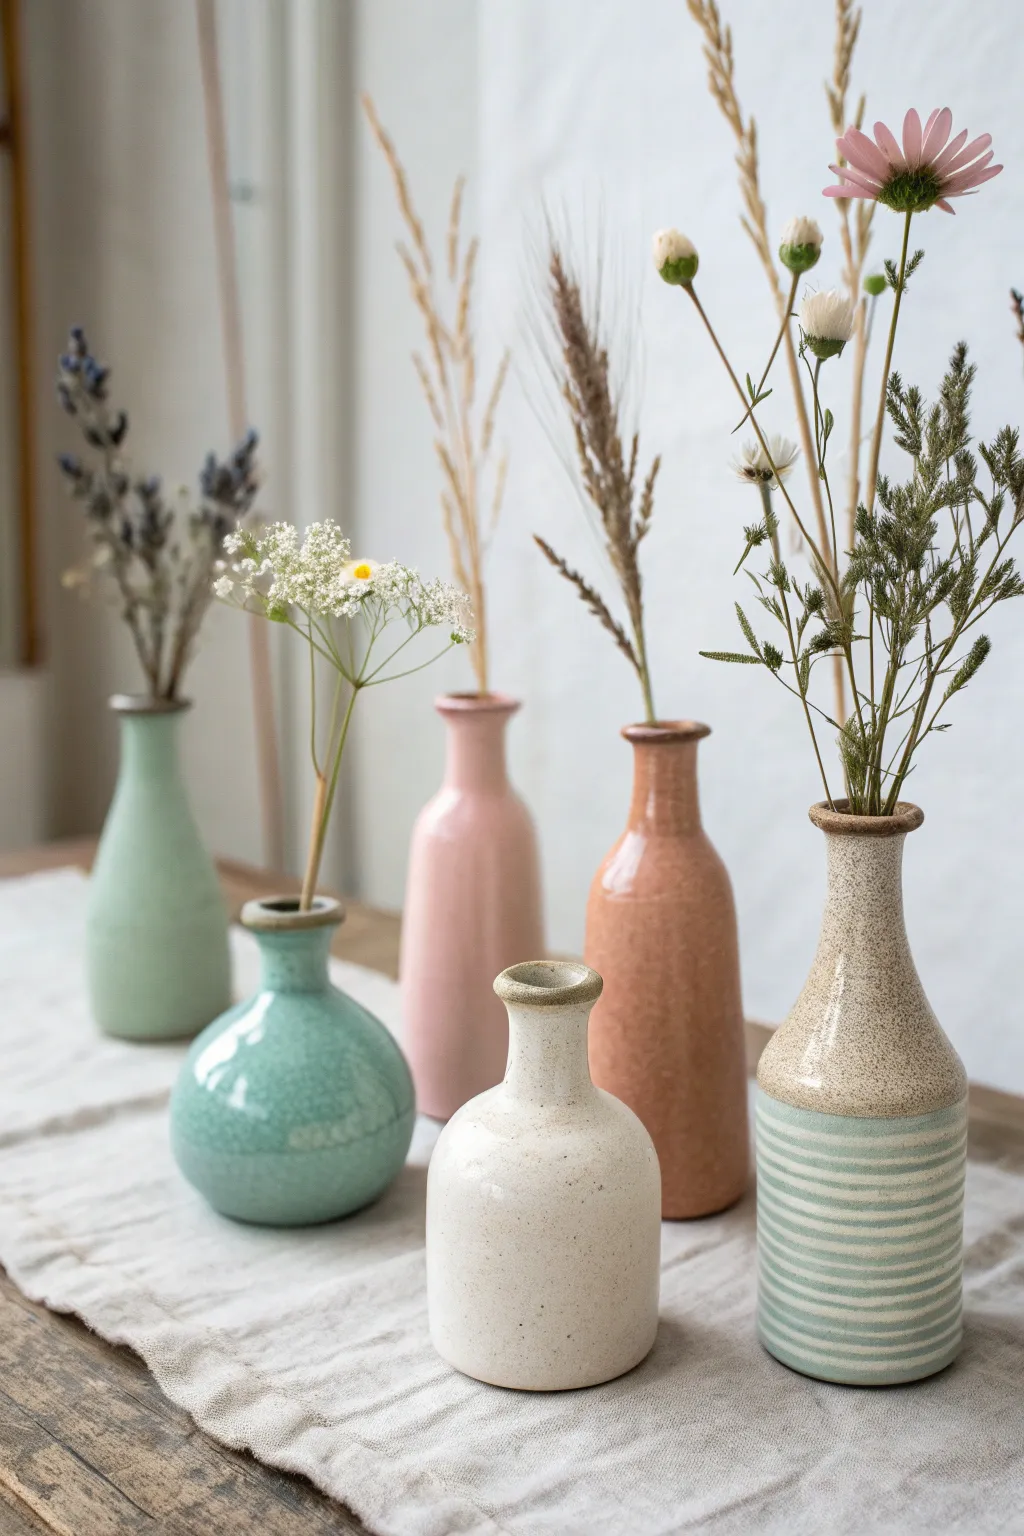
Create a charming collection of small-scale vessels that celebrate variety in form and finish. This project guides you through throwing miniature shapes and decorating them with a soft, complementary palette of glazes to create a harmonious mix-and-match set.
Step-by-Step Tutorial
Materials
- White stoneware or porcelain clay body
- Pottery wheel
- Small throwing tools (wood knife, sponge, rib)
- Pin tool
- Wire cutter
- Trimming tools
- Underglaze (optional for stripes)
- Variety of cone 5/6 glazes: Mint Green, Crackle Turquoise, Pale Pink, Speckled Oatmeal, Transparent
- Wax resist
- Loop tool (small)
Step 1: Throwing the Forms
-
Prepare the clay:
Since these are bud vases, you’ll want to work small. Wedge about 6-8 balls of clay, weighing approximately 0.5 to 0.75 lbs each. Working with smaller amounts of clay can be deceptively tricky, so ensure they are well-centered. -
Open the clay:
Center a ball on the wheel and open it deeply but narrowly. For bud vases, you don’t need a wide floor; aim for an interior width of about an inch to support single stems. -
Shape the teardrop form:
For the taller vases (like the pink and mint ones), pull the walls up vertically. Keep the neck narrow by collaring in gently with wet hands after every pull. Aim for a total height of 5-6 inches. -
Create the bulbous form:
For the round turquoise vase, pull the clay outward to create a belly, then collar it back in dramatically at the top to form a tight, narrow neck. -
Throw the bottle shape:
For the striped vase, keep a cylindrical base for the bottom 3 inches, then taper sharply into a long, narrow neck. This provides a flat canvas for the stripes later. -
Refine the rims:
Use a shammy or a small piece of soft plastic to compress and smooth the rims. I like to flare some slightly and keep others straight to add visual variety to the set. -
Wire off:
Clean up the base with a wood knife, cut underneath with a wire tool, and carefully remove the pots from the bat. Let them dry to leather-hard.
Chuck It Up
Make a clay “chuck” (a thick, open cylinder) to hold narrow-necked vases upside down during trimming. It supports the shoulder rather than the fragile rim.
Step 2: Trimming and Bisque
-
Trim the foot rings:
Once leather-hard, center each vase upside down on the wheel (using a grip/chuck if the necks are too narrow) and trim away excess weight. A small, clean foot ring elevates the form literally and visually. -
Smooth the surface:
Use a damp sponge or a soft rib to remove any throwing lines if you want a smooth look (like the pink vase), or leave them subtle for texture. -
Dry and bisque:
Allow the vases to dry completely slowly to prevent warping. Fire them in a bisque kiln to cone 04.
Uneven Glazing?
Since bud vases have small openings, air bubbles often get trapped during dip glazing. Use a syringe to inject glaze inside, or shake vigorously after pouring.
Step 3: Glazing and Decoration
-
Clean the bisque:
Wipe down all bisque-ware with a damp sponge to remove dust and ensure the glaze adheres properly. -
Glaze the interiors:
Pour a liner glaze (clear or white) into each vase, swirl to coat the inside completely, and pour out the excess. -
Apply the celadon crackle:
For the round vase, dip it into a transparent turquoise glaze known for crazing (crackle). This gives it that gem-like, watery depth. -
create the matte pastels:
Dip the tall vases into smooth, matte glazes—one in pale millennial pink and another in soft sage green. Keep the dip quick to avoid runs. -
Detail the striped bottle:
For the striped vase, dip the bottom half in a translucent celadon or pale blue. The top half gets a speckled oatmeal glaze. To get the faint lines, you can either wipe away glaze with a tool or paint lines with underglaze before dipping. -
Address the rims:
For a rustic touch, you can leave the very rim of the vases unglazed (wipe it back with a sponge) or dip just the rim in a contrasting dark iron oxide glaze to create a ‘toasted’ edge. -
Final Fire:
Load the kiln, ensuring no vases touch. Fire to cone 5 or 6 depending on your clay and glaze specifications. Let the kiln cool completely before unloading.
Now gather some dried grasses or simple wildflowers to bring your cheerful ceramic landscape to life
Handmade Soap Dishes With Drainage Ridges
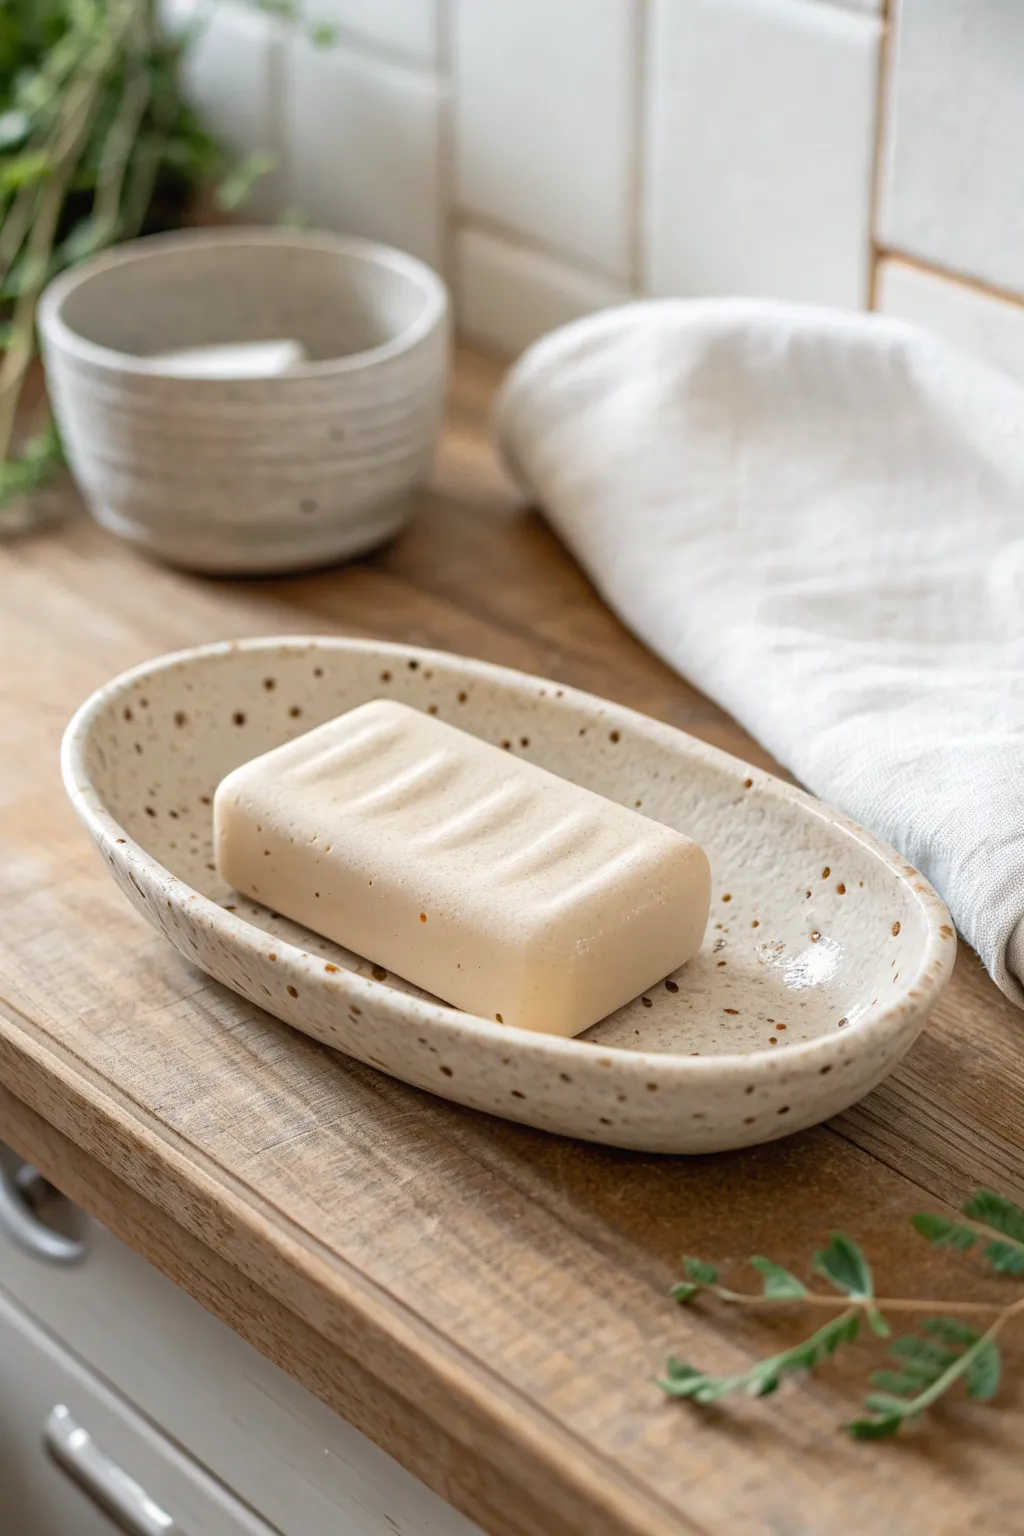
This charming, oval soap dish brings a touch of organic elegance to any bathroom sink with its creamy, speckled finish and gently curved form. Simple to construct yet wonderfully functional, it’s the perfect project for beginners looking to create something beautiful and useful.
Detailed Instructions
Materials
- Light-colored stoneware clay (speckled clay body recommended)
- Rolling pin
- Canvas or wooden board
- Oval template (paper or flexible plastic)
- Potter’s needle tool
- Rib tool (kidney shaped, soft rubber)
- Sponge
- Modeling tool or old credit card
- Cream or oatmeal speckled glaze
- Kiln
Step 1: Creating the Base Form
-
Prepare the slab:
Begin by wedging your clay thoroughly to remove air bubbles. Roll it out into a smooth, even slab about 1/4 inch thick. I like to flip the slab once or twice during rolling to ensure the clay particles are compressed evenly on both sides. -
Cut the shape:
Place your oval template onto the clay slab. Using your needle tool held vertically, trace around the template to cut out the base shape. -
Create the walls:
Roll a separate coil of clay, roughly the thickness of a pencil. Score the outer edge of your oval base and apply a small amount of slip. -
Attach the rim:
Place the coil onto the scored edge of the base. Gently pinch the coil onto the base, blending the clay downwards on both the inside and outside to create a seamless connection. -
Shape the curve:
Using your thumb and fingers, gently pinch and pull the wall upwards and slightly outwards. Aim for a shallow, boat-like shape rather than a tall bowl.
Step 2: Refining and Adding Detail
-
Smooth the surface:
Take a damp sponge and run it along the rim to soften any sharp edges. Use your rubber rib tool to smooth the interior floor and the exterior walls, removing fingerprints and refining the curve. -
Add drainage ridges:
While the clay is still leather-hard, use a modeling tool or the edge of an old credit card to press or carve shallow ridges into the center of the dish. This prevents the soap from sitting in a puddle. -
Level the rim:
Place the dish upside down on a flat board for a moment to check if the rim is relatively level, or embrace the organic wave if you prefer a rustic look. -
Dry slowly:
Cover the dish loosely with plastic and allow it to dry slowly to the leather-hard stage. This helps prevent warping, especially with oval shapes. -
Final smoothing:
Once bone dry, use a slightly damp sponge or a green scrubby pad to gently sand away any final rough spots or burrs.
Smooth Operator
Use a damp chamois leather strip to compress the rim as you finish shaping. This creates that professional, ultra-smooth edge that feels great to touch.
Step 3: Glazing and Firing
-
Bisque fire:
Load your bone-dry piece into the kiln for a bisque firing (usually Cone 04). This prepares the clay to accept the glaze. -
Prepare the glaze:
Stir your chosen cream or oatmeal speckled glaze thoroughly. If your clay body isn’t naturally speckled, choose a glaze that includes iron flecks or speckles. -
Dip or pour:
Dip the entire dish into the glaze bucket for an even coat. Alternatively, pour the glaze inside, swirl to coat, pour out the excess, and then brush or pour glaze over the exterior. -
Wipe the foot:
Use a damp sponge to meticulously wipe all glaze off the bottom of the dish where it will touch the kiln shelf. Any glaze left here will fuse the pot to the shelf. -
Glaze fire:
Fire the piece again to the temperature recommended for your specific clay and glaze combination (often Cone 5 or 6 for stoneware).
Texture Play
Before glazing, gently sponge away a bit of glaze on the rim or the raised drainage ridges to let the raw, toasted clay color peek through for added depth.
Once cooled, your new ceramic dish is ready to hold your favorite bar of soap by the sink.


The Complete Guide to Pottery Troubleshooting
Uncover the most common ceramic mistakes—from cracking clay to failed glazes—and learn how to fix them fast.
Spoon Rests That Make Your Kitchen Feel More Handmade
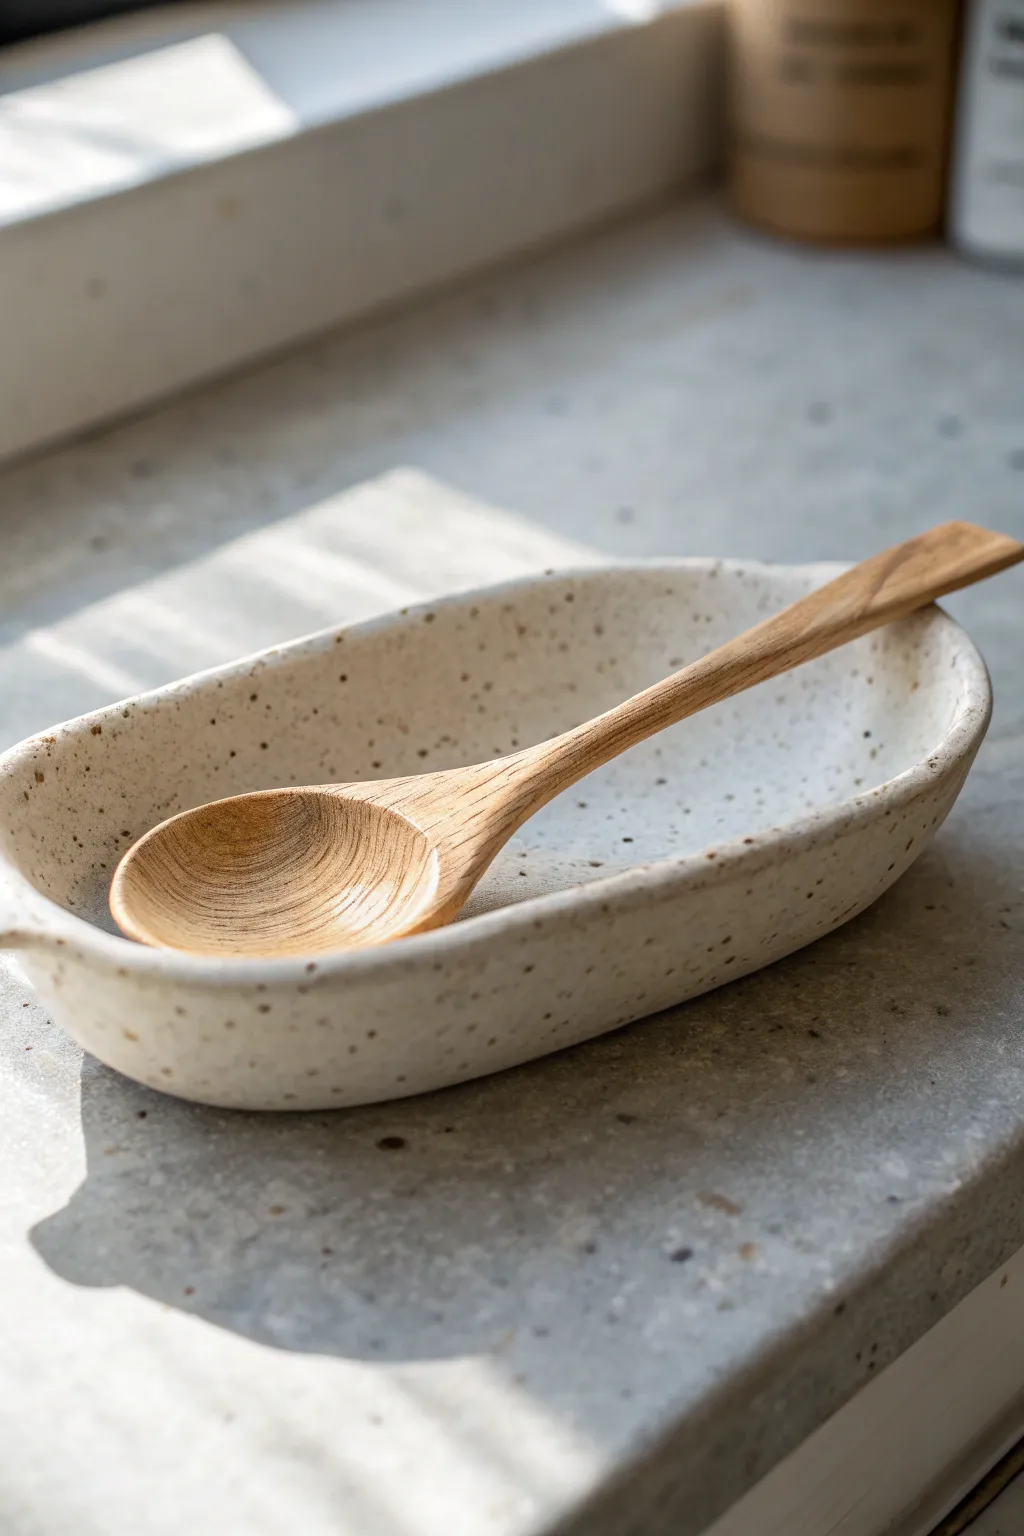
Embrace the imperfect beauty of hand-building with this charming, oval-shaped spoon rest featuring a subtle speckled finish. Its organic, boat-like form keeps messy utensils contained while adding a minimalist, artisanal touch to your countertop.
Step-by-Step Tutorial
Materials
- Speckled stoneware clay (mid-fire)
- Small rolling pin
- Canvas mat or slab roller
- Rib tool (wooden or rubber)
- Fettling knife or needle tool
- Oval paper template (approx. 5 x 8 inches)
- Sponge
- Small bowl of water
- Clear or satin matte glaze
- Kiln
Step 1: Forming the Base
-
Roll the Slab:
Begin by wedging your speckled clay to remove air bubbles. Roll it out into an even slab, aiming for a thickness of about 1/4 inch. I find that using guide sticks can help keep the thickness consistent. -
Smooth the Surface:
Before cutting, take a rubber rib and compress the clay slab on both sides. This creates a smooth canvas for the speckled texture to shine through later and removes any canvas textures. -
Cut the Shape:
Place your oval paper template onto the clay. Using a Fettling knife or needle tool held vertically, trace around the template to cut out your base shape. -
Soften the Edges:
Run a damp finger or a slightly moist sponge along the fresh cut edge to remove sharp burrs or crumbs of clay.
Iron Spot Magic
To enhance speckling, choose a clay body labeled ‘reduction look’ or simply ‘speckled’ stoneware. A plain clear glaze magnifies these spots best.
Step 2: Shaping the Walls
-
Lift the Sides:
Gently cup the clay oval in your hands. Slowly lift the long sides upwards to create a curved, boat-like profile. -
Pinch the Ends:
At the narrower ends of the oval, gently pinch the clay to encourage the walls to stand up higher, forming a contained vessel shape. -
Shape the Rim:
Use your thumb and forefinger to pinch and compress the rim all the way around. It should be slightly uneven and organic, not perfectly machine-straight. -
Refine the Curve:
Use a wooden rib inside the curve to smooth out the interior transition from the floor to the wall, ensuring there are no sharp angles for food to get stuck in. -
Level the Base:
Set the piece down on a flat board. Gently press the center down to ensure it sits flat and won’t wobble on your counter.
Step 3: Finishing and Firing
-
Dry Slowly:
Cover the piece loosely with plastic to let it dry slowly to a leather-hard state. This prevents the rim from warping. -
Sponge Trim:
Once bone dry, take a lightly damp sponge and give the entire piece a final wipe down to smooth any remaining rough spots. -
Bisque Fire:
Load the bone-dry spoon rest into the kiln for a bisque firing (usually to Cone 04). -
Glaze Application:
Dip or brush a clear or satin matte glaze over the entire piece. Because the clay itself is speckled, a transparent glaze allows those natural iron spots to pop through. -
Clean the Foot:
Wipe the bottom of the spoon rest completely clean of glaze to prevent it from fusing to the kiln shelf. -
Final Fire:
Fire the piece again to the maturation temperature of your specific clay body (typically Cone 5 or 6 for speckled stoneware).
Warping Walls?
If the sides slump down while wet, prop them up with small chunks of foam or rolled-up newspaper until the clay stiffens to leather-hard.
This simple, functional piece brings a quiet elegance to your daily cooking routine
Handmade Planters for Succulents and Small Houseplants
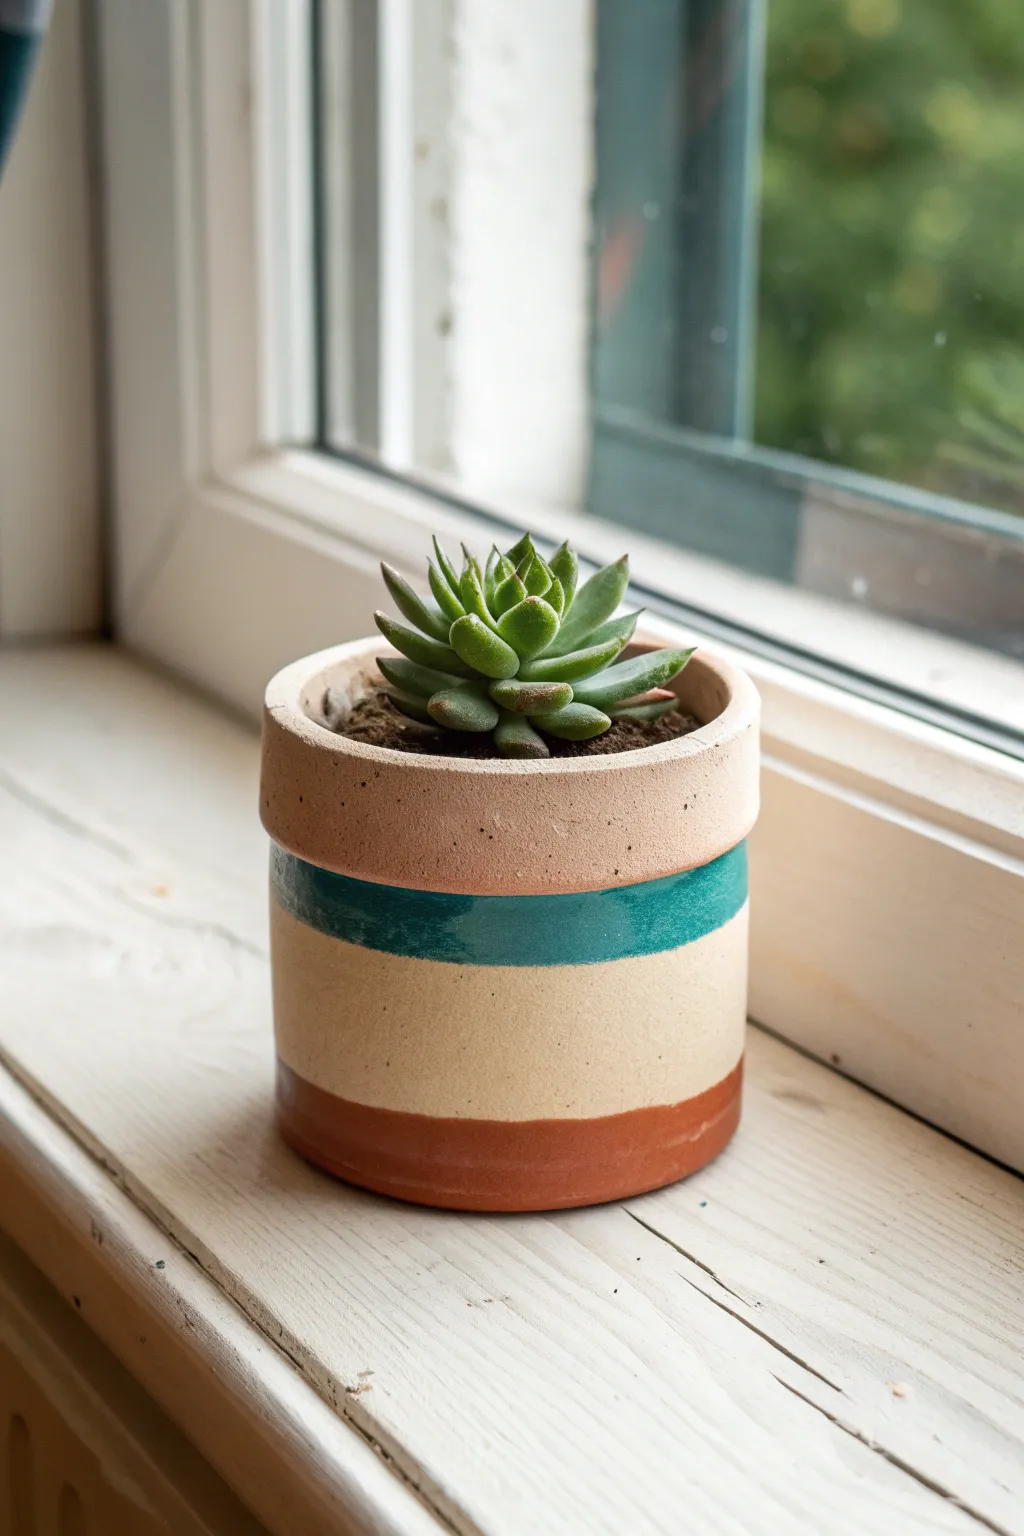
This charming succulent planter features distinct bands of raw clay and glossy glaze, creating a modern, earthy aesthetic perfect for small houseplants. The cylindrical form is accentuated by a thick, textural rim and a vibrant pop of teal that contrasts beautifully with the warm terracotta tones.
Step-by-Step
Materials
- Stoneware clay (buff or speckled)
- Pottery wheel (or rolling pin for hand-building)
- Clay cutting wire
- Modeling tool or rib
- Sponge
- Needle tool
- Teal/Turquoise glaze (glossy)
- Red-brown underglaze or terracotta colored glaze
- Wax resist
- Paintbrushes
- Kiln
Step 1: Forming the Pot
-
Center the clay:
Start with a ball of clay about the size of a large orange. Throw it onto the wheel head and center it firmly, ensuring your hands are wet to reduce friction. -
Open the form:
Press your thumbs into the center to open the clay, leaving about a half-inch of thickness at the bottom for the base. Pull the floor out to determine the inner width of your pot. -
Pull the walls:
Squeeze the clay gently and pull the walls upward. Unlike a bowl, aim for straight, vertical walls to achieve that modern cylinder shape. Keep the walls even, approximately 1/4 inch thick. -
Create the rim detail:
When you reach the top, leave a slightly thicker band of clay. Fold the very top edge outward and down slightly, smoothing it back into the wall to create that distinct, cuff-like rim seen in the photo. It should be visibly thicker than the body below it. -
Refine the surface:
Use a smooth kidney rib or a moist sponge to clean up the outside of the pot, removing throwing lines if you prefer a smoother look, or leaving them subtle for texture. -
Trim the base:
Once the pulling is done and the clay is leather hard, trim away excess clay from the bottom to create a neat, flat foot. -
Bisque fire:
Allow the pot to dry completely (bone dry) before loading it into the kiln for the first bisque firing. This prepares the clay for glazing.
Step 2: Glazing and Finishing
-
Plan your bands:
Look at the pot and mentally divide it. The top thick rim will stay bare. Below that, mark a thin guideline with a pencil for where the teal stripe will go. -
Apply wax resist:
Brush liquid wax resist over the areas you want to remain raw clay—specifically the distinct top rim and the creamy middle section. This ensures your glaze lines stay incredibly sharp. -
Glaze the teal stripe:
Using a soft brush, apply the glossy teal glaze in the band directly under the rim. Apply 2-3 coats as your specific glaze requires, letting each coat dry matte before adding the next. -
Color the bottom:
For the bottom reddish-brown stripe, you have two options. You can use a terracotta-colored glaze or an iron oxide wash. Paint a neat band around the very bottom edge of the pot, about half an inch high. -
Clean up:
Use a damp sponge to wipe away any stray droplets of glaze that may have landed on the waxed areas. The wax resists the glaze, but wiping ensures a pristine finish. -
Glaze fire:
Load the pot into the kiln for the final glaze firing. Ensure the pot doesn’t touch other items, as the glaze will melt and become sticky. -
Final inspection:
Once cool, check the bottom for any rough spots. I like to sand the base briefly with wet-dry sandpaper to ensure it won’t scratch my windowsill. -
Add your plant:
Fill with succulent potting mix and nestle your favorite Echeveria or succulent into its new home.
Crisp Lines
For ultra-sharp lines between glaze and raw clay, use automotive painter’s tape instead of wax resist. Remove the tape immediately after glazing before it dries.
Glaze Running?
If your teal stripe runs into the beige section, apply the glaze slightly thinner near the bottom edge of the stripe, or choose a stiffer, non-running glaze formula.
Your finished pot now combines raw texture with sleek color for a truly professional handcrafted look

TRACK YOUR CERAMIC JOURNEY
Capture glaze tests, firing details, and creative progress—all in one simple printable. Make your projects easier to repeat and improve.
Whimsical Handmade Animal Planters With Personality
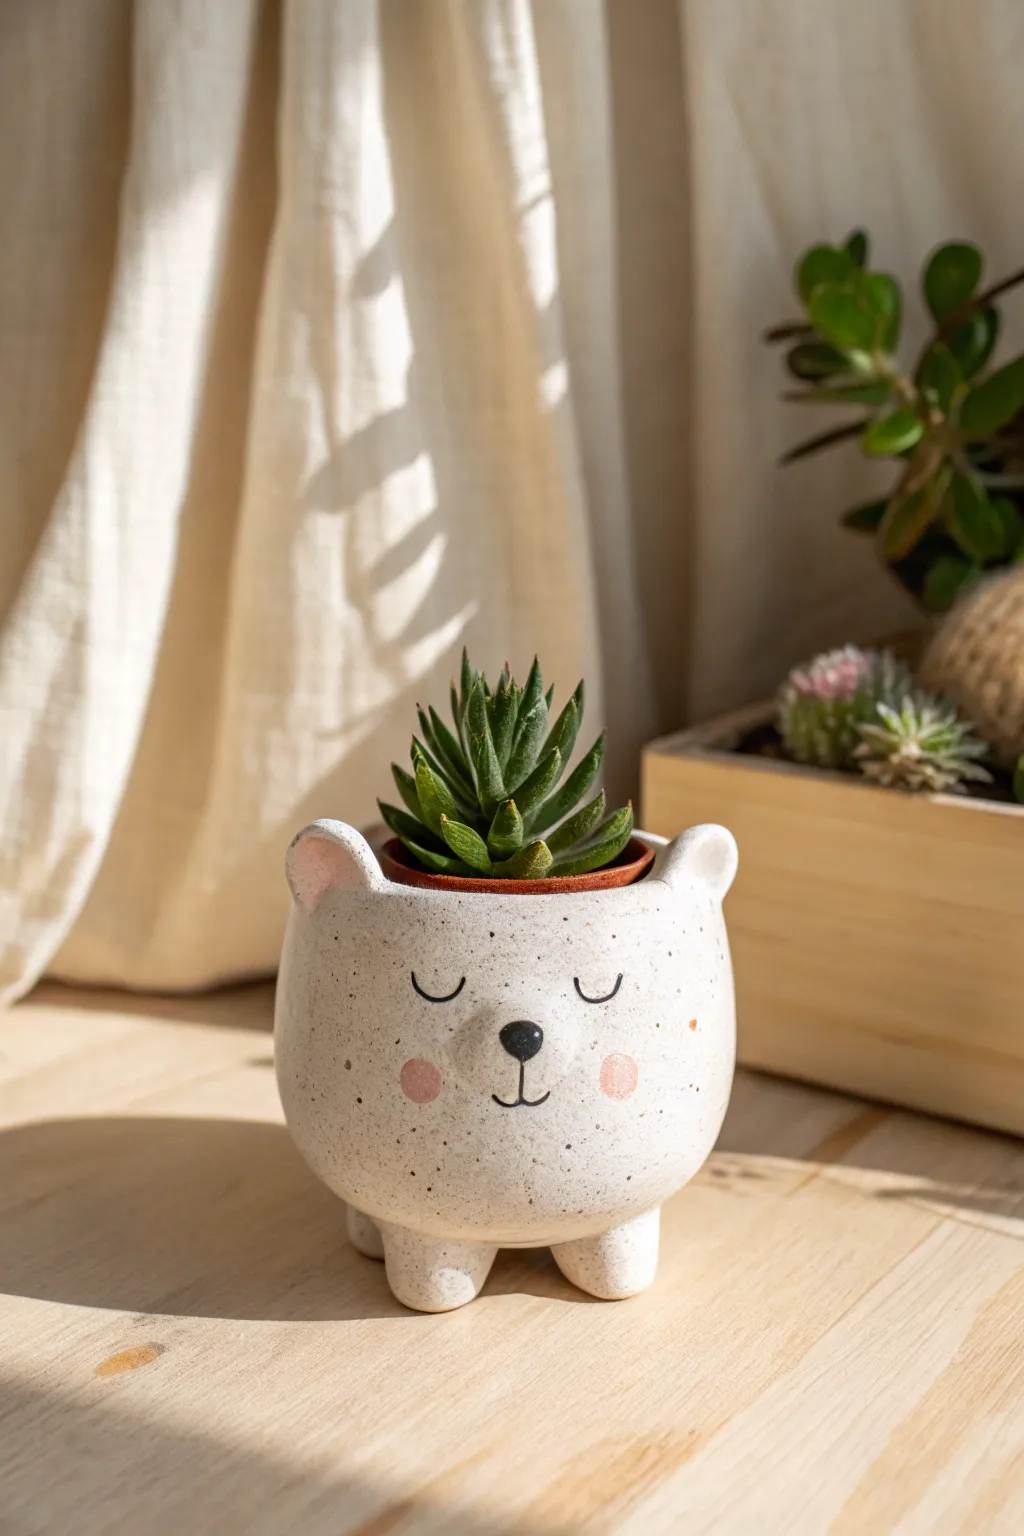
Bring a touch of sweetness to your succulent collection with this adorable bear-shaped planter. Crafted using simple pinch pot techniques, its speckled finish and gentle expression add a cozy, handmade charm to any windowsill.
How-To Guide
Materials
- White speckled clay body (e.g., stoneware with manganese specks)
- Small rolling pin
- Pin tool or needle tool
- Scoring rib or serrated kidney tool
- Slip (made from the same clay)
- Underglaze (Black and Pink)
- Fine detail paintbrush
- Small sponge
- Clear matte glaze
Step 1: Forming the Body
-
Prepare the clay:
Start with a ball of white speckled clay about the size of a large orange. Wedging it thoroughly removes air bubbles, which is crucial for structural integrity. -
Open the pinch pot:
Push your thumb into the center of the ball, stopping about half an inch from the bottom. This base thickness will support the feet later. -
Pinch the walls:
Gently pinch and rotate the clay between your thumb and fingers, working from the bottom up. Aim for an even wall thickness of about 1/4 inch. -
Shape the belly:
As you pinch, gently push the walls outward to create a rounded, chubby belly shape. The top rim should curve inward slightly to hold the soil securely. -
Smooth the surface:
Use a flexible rib or a slightly damp sponge to smooth the exterior walls, but don’t over-wet the clay as it can weaken the structure.
Smooth Operator
Use a metal rib when smoothing the outside to compress the clay particles. This aligns the speckles and prevents cracking during the drying phase.
Step 2: Adding Character Features
-
Create the legs:
Roll four small, equal-sized balls of clay (about the size of marbles) for the feet. Flatten the tops slightly where they will attach to the pot. -
Attach the legs:
Score the bottom of the pot and the top of each foot deeply with your serrated tool. Apply slip generously and press the feet firmly into place. -
Blend the seams:
Use a wooden modeling tool or your fingertip to smudge the clay from the feet onto the body, erasing the seam completely for a strong bond. -
Level the planter:
Gently tap the pot on your work surface to flatten the bottom of the feet, ensuring the bear sits level and won’t wobble. -
Form the ears:
Roll two small balls of clay and flatten them into rounded tabs. Indent the center slightly with your thumb to create the inner ear shape. -
Attach the ears:
Score and slip the rim of the pot and the base of the ears. Attach them securely, smoothing the clay downward into the rim to integrate them fully.
Wobbly Legs?
If a leg keeps popping off during drying, you likely didn’t score deep enough. Re-score aggressively and add more slip before reattaching.
Step 3: Finishing and Decoration
-
Refine the rim:
Run a damp chamois or sponge over the top rim and ear edges to ensure they are soft and rounded, removing any sharp angles. -
Add drainage:
Use a hole cutter or drill bit to create a drainage hole in the center bottom of the pot. This is essential for succulent health. -
Bisque fire:
Let the piece dry slowly under plastic for a day, then fully uncover until bone dry. Fire to cone 04 (or your clay’s bisque temperature). -
Paint the face:
Using a fine liner brush and black underglaze, paint two small U-shapes for sleeping eyes and a nose-and-mouth combo. I find steadying my hand against the table helps with these fine lines. -
Add blush:
Dip a brush or a small round sponge dauber into watered-down pink underglaze. Gently dab purely on the cheeks and inside the ears for a soft, watercolor effect. -
Glaze and final fire:
Dip the entire piece in a clear matte glaze to seal the clay while letting the natural speckles show through. Fire to the final maturity temperature of your clay body (likely Cone 5/6).
Once cooled, pot up your favorite prickly plant and enjoy your new ceramic friend
Handmade Candle Holders That Glow Through Cutouts

Create a cozy atmosphere with this textured ceramic orb, featuring playful circular cutouts that cast dancing shadows when lit from within. The naturally speckled clay body and unglazed surface give it an organic, earthy feel that fits perfectly in any modern home.
Detailed Instructions
Materials
- Stoneware clay with grog/speckles (buff or light color)
- Pottery wheel (optional, can be pinch-built)
- Rolling pin (if hand-building)
- Circular clay cutters (various small sizes)
- Needle tool
- Sponge
- Rib tool (wooden or metal)
- Kiln
- Clear matte glaze (optional for interior only)
Step 1: Forming the Base Shape
-
Prepare the clay:
Begin by wedging about 1 to 1.5 pounds of speckle-rich stoneware clay to remove air bubbles and ensure consistency. -
Create the body (Method A: Wheel):
Center your clay on the wheel and throw a rounded cylinder. Belly it out gently into a spherical shape, bringing the rim inward to create a partially enclosed orb. -
Create the body (Method B: Pinch Pot):
Alternatively, form two equal-sized pinch pots. Score and slip the rims, then join them together to form a sealed ball. Paddle it gently to round out the shape. -
Open the top:
If you used the pinch method, cut a circular opening at the very top wide enough to insert a tea light or votive candle comfortably. -
Refine the surface:
Use a metal rib to smooth the exterior while the wheel is turning slowly, or by hand. Aim for a smooth curve but keep the natural texture of the grogged clay visible.
Step 2: Adding the Cutouts
-
Let it firm up:
Allow the piece to dry to a ‘leather hard’ stage. This is crucial; if the clay is too soft, the walls will collapse when you cut them. -
Plan your pattern:
Lightly trace where you want your circles to go using a needle tool. I find a random, scattered arrangement looks more organic than a rigid grid. -
Select your tools:
Choose 2-3 different sizes of circular hole cutters or basic cookie cutters to create visual variety in the light projection. -
Punch the holes:
Gently press the cutter into the leather-hard wall while supporting the clay from the inside with your other hand to prevent warping. -
Extract the clay:
Remove the cut circles. If a piece sticks, use your needle tool to carefully hook it and pull it out. -
Vary the sizes:
Alternate between large and small holes around the circumference, leaving enough solid clay between them to maintain structural integrity.
Repairing Cracks
If you see hairline cracks forming between holes while drying, compress the area with a rib tool immediately. Slow down drying by covering loosely with plastic.
Step 3: Finishing Touches
-
Clean the edges:
Once the clay is slightly drier, use a semi-damp sponge or a clean finger to smooth the sharp edges of every cutout. This prevents snagging later. -
Refine the interior:
Check the inside floor of the holder ensuring it is flat so your candle will sit level. -
Texture the surface (optional):
If you lost the clay’s natural texture during smoothing, gently dab the exterior with a coarse sponge to bring back that stone-like feel. -
Bisque fire:
Let the piece create completely bone dry, which may take up to a week. Fire it in the kiln to your clay’s bisque temperature (usually cone 04). -
Glazing decision:
For the look in the image, leave the exterior raw to show off the clay toasty color. You can brush a clear matte glaze strictly on the inside floor for easier wax cleanup. -
Final firing:
Fire the piece a second time to the maturity temperature of your stoneware clay (often cone 5 or 6). -
Sand the bottom:
After firing, use wet-dry sandpaper or a grinding stone on the base to ensure it won’t scratch your furniture.
Make it Glow
Brush a glossy white or gold luster glaze on the INSIDE only. This reflective surface will amplify the candlelight and make the orb glow brighter.
Place a tea light inside and enjoy the warm, shifting patterns of light
Handmade Incense Holders for a Calm Little Corner
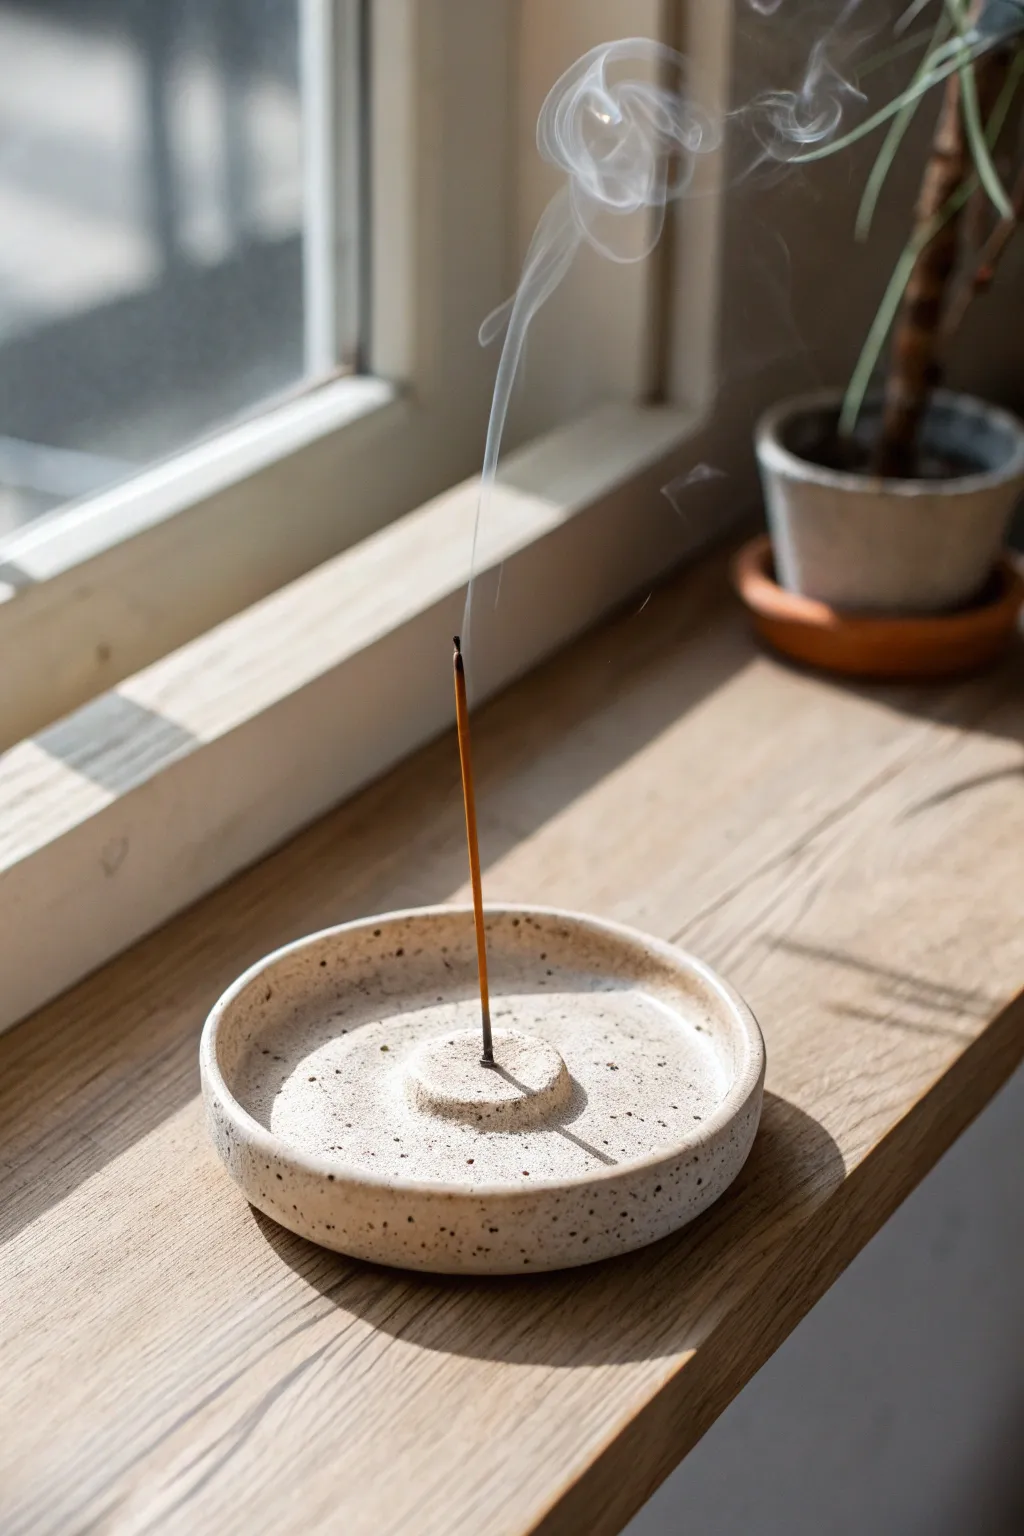
Capture the essence of tranquility with this wonderfully simple speckled incense holder. The design features a shallow, practical catch-dish and a centralized anchor point, all showcasing the raw beauty of spotted clay under a subtle matte finish.
How-To Guide
Materials
- Speckled stoneware clay (mid-fire)
- Pottery wheel (or can be hand-built)
- Wooden rib tool
- Sponge
- Wire cutter
- Pin tool or needle tool
- Trimming tools
- Small drill bit or skewer (approx. 2-3mm)
- Matte transparent glaze
- Kiln
Step 1: Throwing the Base Form
-
Prepare the Clay:
Begin by wedging about 1 to 1.5 pounds of speckled stoneware clay to remove air bubbles. Center the ball of clay firmly on the wheel head. -
Open the Form:
Press your thumbs into the center to open the clay, leaving a floor thickness of about half an inch. You need a thicker floor than usual to carve out the raised center later. -
Establish the Rim:
Pull the walls outwards to create a wide, low dish shape. The walls should be about an inch high and vertical with a slight outward flare. -
Compress the Floor:
Use a wooden rib to compress and flatten the floor area surrounding the center. Do not flatten the very center; leave a small mound of clay there. -
Refine the Middle:
Using your fingertips or a small trimming tool, shape that central mound into a neat, raised button about 1 inch wide. -
Smooth the Rim:
Run a chamois or a damp sponge over the rim of the dish to soften the edge and make it pleasant to the touch. -
Cut Off:
Run your wire cutter under the pot and carefully lift it off the wheel onto a ware board. Let it dry to a leather-hard state.
Step 2: Trimming and Details
-
Center for Trimming:
Once leather hard, place the dish upside down on the wheel. Secure it with clay lugs to keep it centered. -
Trim the Exterior:
Use a sharp trimming tool to refine the outer walls and the underside, creating a clean, vertical profile that matches the interior curve. -
Create a Foot Ring:
Carve out a shallow recess in the bottom to create a defined foot ring. This adds elegance and stability to the piece. -
Smooth the Surface:
Burnish the trimmed areas slightly with a smooth rib or your finger to push any grog back into the clay body. -
Add the Incense Hole:
Flip the piece right-side up. Using a needle tool or a small drill bit, carefully bore a hole into the center of the raised mound. I prefer to angle it slightly so the ash falls directly into the dish. -
Check the Fit:
Test the hole size with a standard incense stick. It should fit loosely enough to account for clay shrinkage during firing. -
Bisque Fire:
Allow the piece to dry completely (bone dry) before loading it into the kiln for a bisque firing (usually cone 04).
Wobbly Stick?
If your incense stick leans too far or falls out, the hole is too shallow. Deepen the hole, or add a tiny ball of unfired clay inside to grip the stick.
Step 3: Glazing and Finishing
-
Clean the Bisque:
Wipe the fired piece with a damp sponge to remove any dust that might interfere with glaze adhesion. -
Apply Glaze:
Dip the piece into a matte transparent glaze. If you want the raw clay texture on the outside, only pour glaze into the interior. -
Clear the Hole:
Immediately after glazing, use a pin tool to ensure the incense hole is not clogged with glaze. This is crucial. -
Wipe the Foot:
Clean the bottom foot ring with a sponge to prevent the pot from sticking to the kiln shelf. -
Glaze Fire:
Fire the piece to the maturity temperature of your clay body (likely cone 5 or 6 for stoneware).
Make it Organic
Instead of wheel-throwing, try pinching this form by hand. The irregular edges and finger marks add a wabi-sabi aesthetic that pairs perfectly with incense.
Now you have a serene, functional object ready to fill your space with calming scents
Leaf-Imprint Handmade Plates With Nature Texture
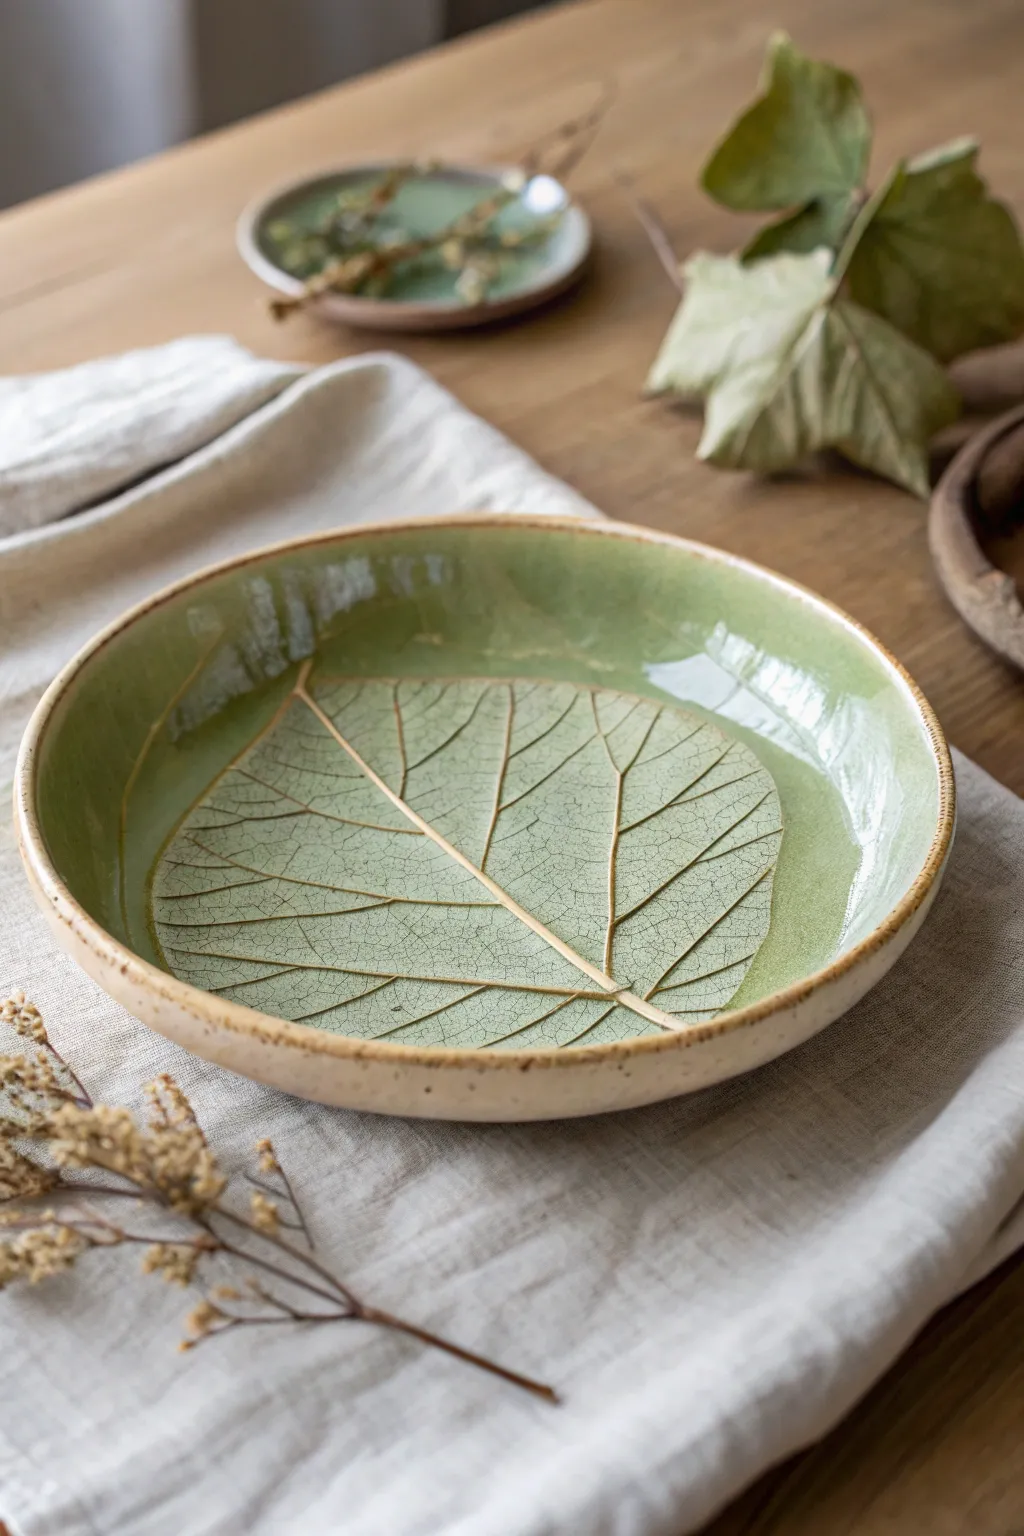
Capture the delicate details of nature forever by pressing a real leaf directly into clay to create a stunning, rustic bowl. This project highlights the intricate vein structure of a leaf, accentuated by a pooling green celadon-style glaze.
Detailed Instructions
Materials
- Stoneware clay (speckled or buff)
- Fresh leaf with strong veins (e.g., hydrangea, grape, or fig)
- Rolling pin
- Guide sticks (optional, for even thickness)
- Bowl mold or slump mold
- Fettling knife or needle tool
- Small sponge
- Rib tool
- Transparent green celadon glaze
- Clear glaze (optional)
- Iron oxide wash or dark underglaze
Step 1: Creating the Slab
-
Prepare the clay:
Wedge your stoneware clay thoroughly to remove air bubbles. Since the rim shows speckling, a clay body with grog or manganese speckles works beautifully here. -
Roll out the slab:
Roll the clay out onto a canvas or cloth surface. Aim for a thickness of about 1/4 to 3/8 inch. Using guide sticks on either side of your rolling pin ensures the slab is perfectly even. -
Smooth the surface:
Before adding texture, use a soft rib tool to compress the clay and smooth away any canvas marks. This provides a clean canvas for your leaf impression.
Choosing the Leaf
Look for leaves with rigid, protruding veins like hydrangea, rhubarb, or oak. Soft, fleshy leaves like hostas often don’t leave a deep enough impression to hold the glaze well.
Step 2: Impressing and Forming
-
Position the leaf:
Place your chosen leaf vein-side down onto the center of the slab. The vein side is usually the back of the leaf and provides the deepest, crispest texture. -
Secure the leaf:
Gently roll over the leaf with your rolling pin. Apply firm, even pressure to embed the veins into the clay without making the slab too thin. The leaf should be flush with the clay surface. -
Cut the shape:
Place a circular template or a bowl slightly larger than your mold over the leaf area. Use a needle tool or fettling knife to cut a perfect circle around the leaf design. -
Smooth the edges:
Run a damp sponge or your finger along the cut edge to round it off. A sharp, square edge is prone to chipping later, so I always take a moment to soften it now. -
Form the bowl:
Carefully lift the slab and place it over your slump mold (hump mold) or into a depressions mold. Gently press the clay to conform to the curve, being careful not to smudge the leaf impression. -
Remove the leaf:
Use a needle tool to carefully lift the stem of the leaf and peel it away from the clay. Do this slowly to ensure no organic material is left behind in the deep crevices.
Step 3: Drying and Bisque Firing
-
Slow drying:
Allow the bowl to dry slowly under loose plastic. Uneven drying can cause warping, especially with flat-bottomed bowls. Once leather hard, you can refine the foot or bottom if desired. -
Bisque fire:
Once fully bone dry, fire the piece in the kiln to a bisque temperature (usually cone 04 or 06). This prepares the clay to accept glaze.
Glaze Crazing?
If your transparent green glaze develops tiny cracks (crazing) after firing, the glaze and clay fit isn’t compatible. Try a different clear base or adjust the firing cooling rate.
Step 4: Glazing and Final Fire
-
Highlight the veins:
Mix a small amount of iron oxide wash or dark underglaze with water. Paint this into the leaf impression, ensuring it gets into all the tiny veins. -
Wipe back:
Take a clean, damp sponge and wipe away the excess oxide from the surface. The dark color should remain only in the recessed lines of the leaf, creating contrast. -
Apply rim wax:
If you want the raw, speckled clay rim shown in the photo, carefully apply wax resist to the very top edge of the bowl. -
Apply the green glaze:
Dip or pour a translucent green celadon glaze over the interior. The glaze should pool slightly in the texture, amplifying the depth. Avoid opaque glazes, or you’ll lose the leaf detail. -
Exterior glazing:
For the exterior, you can either leave it bare to show off the speckled clay body or apply a very thin coat of clear glaze. Wipe the foot clean. -
Glaze fire:
Load the kiln and fire to the maturity temperature of your clay and glaze (often cone 5 or 6 for stoneware). Allow the kiln to cool naturally before unloading.
Serve your favorite salad or fruit in this dish and enjoy the permanent touch of autumn on your table.
Handmade Pottery With Carved Line Patterns and Sgraffito Vibes
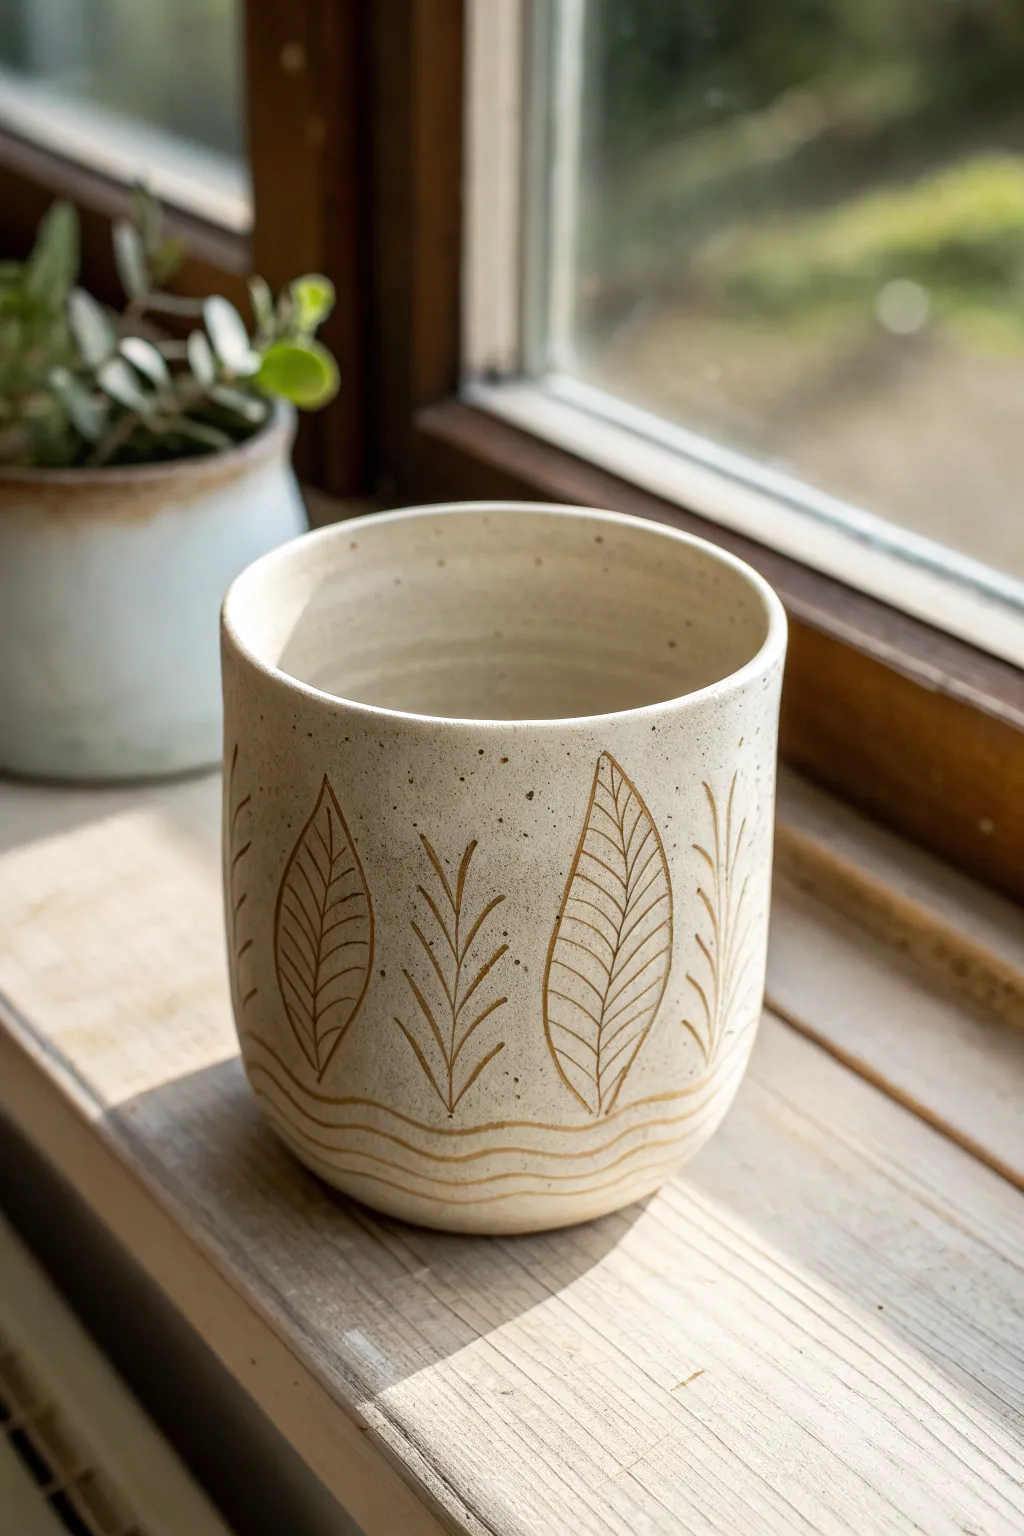
This charming planter combines the natural warmth of speckled clay with clean, stylized botanical carvings. The contrasting raw clay lines against a creamy white surface create a calm, organic aesthetic perfect for any windowsill garden.
Step-by-Step Guide
Materials
- Speckled Stoneware Clay (e.g., Laguna B-Mix with Speckles)
- Pottery Wheel (or rolling pin for hand-building)
- Cylinder Bat
- Pin Tool
- Rib Tool (metal and rubber)
- Loop Trimming Tools
- Sgraffito or fine carving tool (small U-gouge)
- Sponge
- Wire cutter
- Creamy White Underglaze or Engobe
- Clear Matte Glaze
- Soft Fan Brush
Step 1: Forming the Cylinder
-
Throw the Base Shape:
Begin by centering about 1.5 to 2 pounds of speckled clay on the wheel. Open the clay and pull the walls up to form a straight-sided cylinder, aiming for a height of about 4-5 inches depending on your desired final size. -
Refine the Walls:
Use a metal rib on the exterior and your supporting hand on the interior to compress the walls and ensure they are even and straight. A slight inward curve at the bottom adds elegance to the profile. -
Finish the Rim:
Using a chamois or sponge, gently compress the rim to make it smooth and rounded. Cut the pot from the bat with a wire tool but leave it in place to stiffen slightly. -
Initial Drying:
Allow the piece to dry to a ‘leather-hard’ stage. It should be firm enough to handle without deforming but still hold moisture for carving.
Clean Lines Tip
Don’t flick the carving tool up at the end of a stroke. Instead, lift it straight up or ease pressure gradually to avoid chipping the underglaze layer at the exit point.
Step 2: Preparing the Surface
-
Trimming the Foot:
Center the leather-hard cylinder upside down on the wheel. Use a trimming tool to define the bottom curve and create a neat foot ring, removing any excess weight from the base. -
Smooth the Canvas:
Wipe the exterior surface with a very slightly damp sponge to remove trimming marks and create a pristine surface for your design. -
Apply the Base Coat:
With the wheel spinning slowly or using a banding wheel, brush on 2-3 even coats of a creamy white underglaze or engobe. I usually let each coat dry until it loses its sheen before applying the next to prevent streaking. -
Resting Period:
Wait until the underglaze is dry to the touch but the clay underneath is still leather-hard. This is critical for crisp lines.
Too Dry to Carve?
If the clay crumbles or the underglaze chips off in flakes rather than smooth ribbons, your pot is too dry. Mist it lightly and wrap it in plastic for a few hours to rehydrate.
Step 3: Carving the Design
-
Planning the Layout:
Lightly sketch your design using a dull pencil or just visualize quadrants. The design features alternating motifs: a broad, veined leaf and a thinner, fern-like branch. -
Carving the Leaves:
Using a fine circular carving tool or sgraffito stylus, carve the outline of the large, oval-shaped leaves. Apply steady pressure to cut through the white layer and reveal the raw speckled clay beneath. -
Adding Veins:
Carefully carve a central spine down the middle of the leaf, then add curved diagonal lines branching out for the veins. Keep your hand steady and pull the tool towards you for better control. -
Carving the Ferns:
In the spaces between the large leaves, carve a central vertical stem. Add small, upward-curving strokes on either side to create the fern-like or wheat-stalk appearance. -
The Wave Base:
Finish the design by carving two or three horizontal, wavy lines that wrap around the entire base of the pot. These ‘ground’ the botanical elements. -
Clean Up Burrs:
Once the carving is totally dry (bone dry), use a stiff, dry brush or a very slightly damp sponge to gently sweep away any clay crumbs or sharp burrs left from carving.
Step 4: Firing and Glazing
-
Bisque Fire:
Place the fully dry greenware into the kiln for a bisque firing (typically Cone 04). This sets the shape and makes the underglaze permanent. -
Clear Glaze Application:
Wipe the bisqued piece with a damp sponge to remove dust. Dip the entire piece into a clear matte or satin glaze. This will seal the pot while letting the carving and speckles show through clearly. -
Final Firing:
Fire the piece to the maturity temperature of your clay body (likely Cone 5 or 6 for stoneware). Allow the kiln to cool naturally.
Once fired, plant a trailing succulent or jade plant inside to complement those earthy, hand-carved details
Textured Handmade Bowls Using Fabric or Knit Impressions
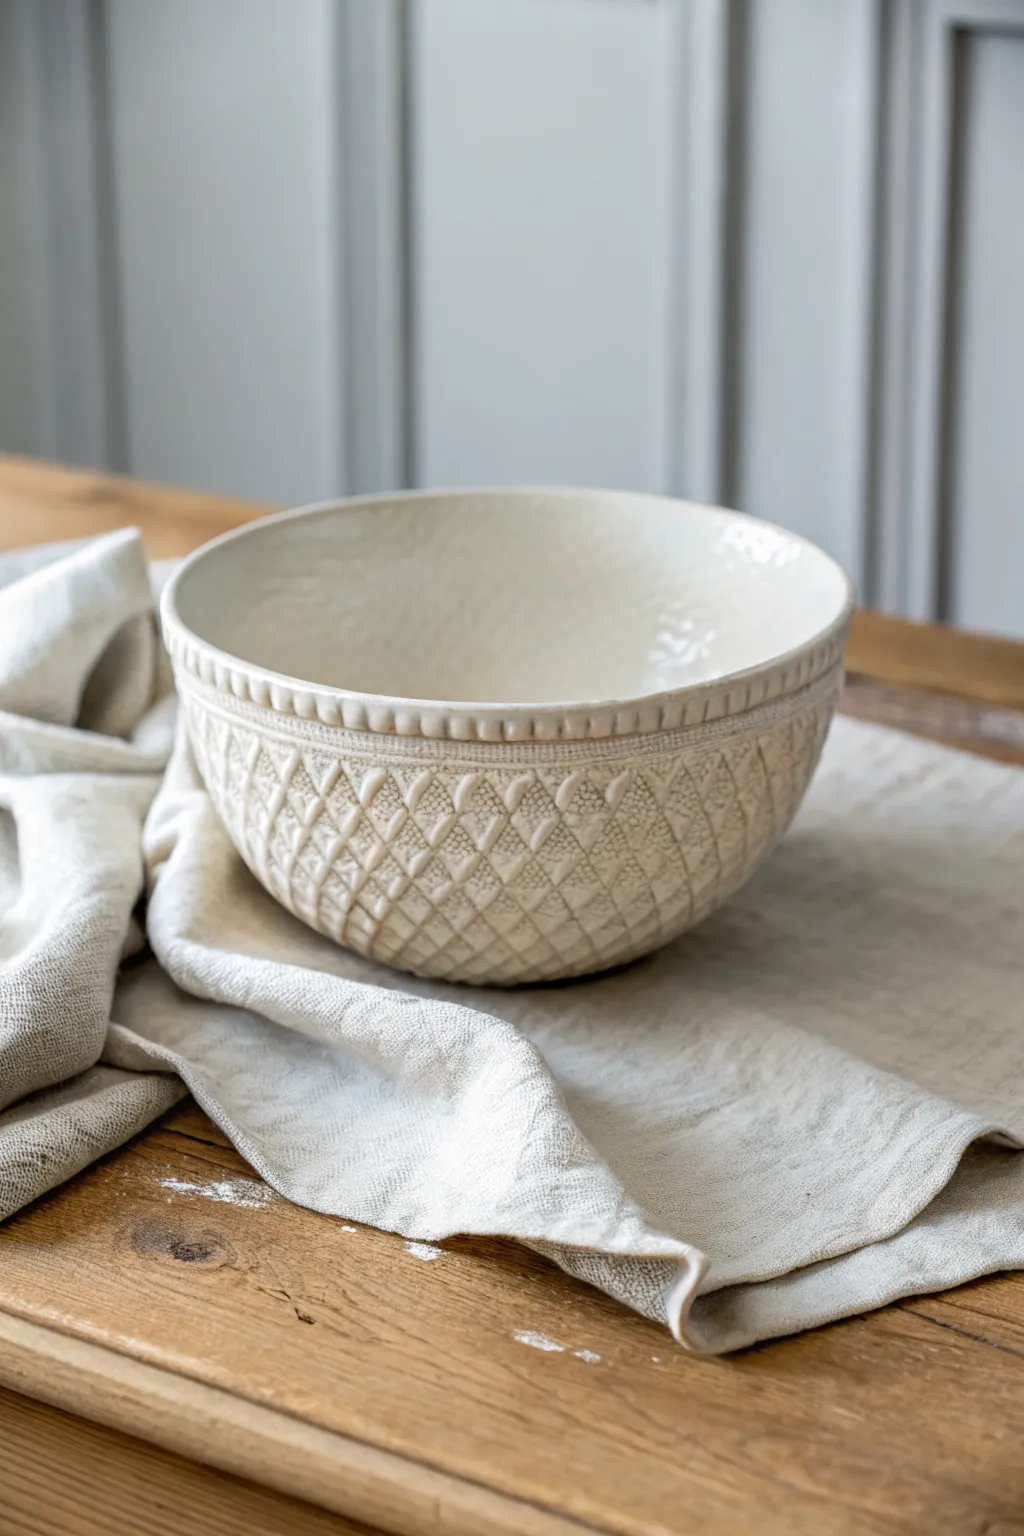
Capture the warmth of a favorite sweater in ceramic form with this elegant textured bowl project. By pressing a textured fabric into clay, you can create an incredible diamond-pattern relief that is highlighted beautifully by a creamy white glaze.
How-To Guide
Materials
- White stoneware clay (mid-fire)
- Textured fabric (knit sweater, thermal waffle weave, or heavy lace)
- Rolling pin and guide sticks (1/4 inch thickness)
- Bowl mold (plaster hump mold or a thrifted bowl)
- Pony roller or small brayer
- Rib tool (soft rubber)
- Needle tool or fettling knife
- Slip and scoring tool
- Wooden modeling tool (for the rim detail)
- Cream or antique white glaze
Step 1: Preparing the Textured Slab
-
Roll the base slab:
Begin by wedging your white stoneware clay thoroughly to remove air bubbles. Roll it out into a large, even slab using your guide sticks to maintain a consistent 1/4 inch thickness. -
Smooth the surface:
Before adding texture, take a soft rubber rib and compress the clay slab on both sides. This aligns the clay particles and removes any canvas marks from your workspace. -
Select your fabric:
Choose a fabric with a deep, distinct weave. A chunky knit or a diamond-patterned quilt fabric works perfectly to replicate the look in the example image. -
Imprint the texture:
Lay the fabric gently over the slab. use a pony roller or rolling pin to firmly press the fabric into the clay. Roll in one direction only to avoid shifting the fabric and creating a ‘ghost’ image. -
Reveal the pattern:
Carefully peel back a corner of the fabric to check the depth. If it looks good, slowly peel the entire piece of fabric away to reveal your textured surface.
Uneven Texture?
If the texture is faint in spots, the slab might have been uneven. Roll from the center outward next time, or use a smaller roller for targeted pressure.
Step 2: Forming the Bowl
-
Prepare the mold:
If using a non-porous bowl as a mold, cover it with thin plastic wrap or a piece of pantyhose to prevent the clay from sticking. A plaster hump mold doesn’t need a release agent. -
Drape the clay:
Lift your textured slab and gently drape it over your hump mold, texture side facing out (away from the mold). I prefer to do this slowly to ensure the pattern doesn’t distort too much near the rim. -
Secure the shape:
Gently press the clay against the mold with a soft sponge, working from the top center down towards the rim. Be careful not to smudge or flatten your beautiful texture. -
Trim the excess:
Using a needle tool or fettling knife, cut away the excess clay at the base of the mold to establish a clean, level rim for your bowl. -
Refine the form:
Allow the clay to stiffen slightly to leather-hard on the mold before removing it. This ensures it holds its shape when you flip it over.
Step 3: Refining and Rimming
-
Apply the rim coil:
Roll a thin, consistent coil of clay. Score and slip the top edge of your bowl, then attach the coil securely to create a defined lip. -
Add rim detail:
Using a small wooden modeling tool or the handle of a paintbrush, press small vertical indentations into the attached coil. Create these marks at even intervals to mimic a decorative stitched hem. -
Smooth the interior:
While the exterior is textured, the interior needs to be smooth for food safety. Use a damp sponge to wipe the inside, ensuring a clean finish where the food fits. -
Slow drying:
Cover the bowl loosely with plastic to let it dry slowly. Uneven drying can cause warping, especially with textured slabs.
Try Oxide Washes
After bisque firing, apply an iron oxide wash and wipe it back before glazing. This darkens the recesses and makes the woven pattern pop dramatically.
Step 4: Glazing and Finishing
-
Bisque fire:
Fire your piece to cone 04 (or your clay’s bisque temperature). Once cool, wipe down the bisque ware with a damp sponge to remove dust. -
Glaze application:
Pour a creamy white glaze into the interior and swirl to coat, pouring out the excess. For the exterior, brush or dip the glaze carefully. -
Enhancing the texture:
The glaze should naturally break over the high points of the texture and pool slightly in the recesses, highlighting the diamond pattern. Avoid applying the glaze too thickly on the outside, or you’ll lose the detail. -
Clean the distinct rim:
Ensure the indented rim detail isn’t clogged with glaze. You can gently wipe the high points with a sponge if the glaze is too thick there. -
Final firing:
Glaze fire to the appropriate cone for your clay and glaze combination (usually cone 5 or 6 for stoneware).
Once fired, this piece will bring a comforting tactile element to your table setting perfect for serving warm dishes.
Handmade Coasters With Pressed Botanicals and Soft Edges
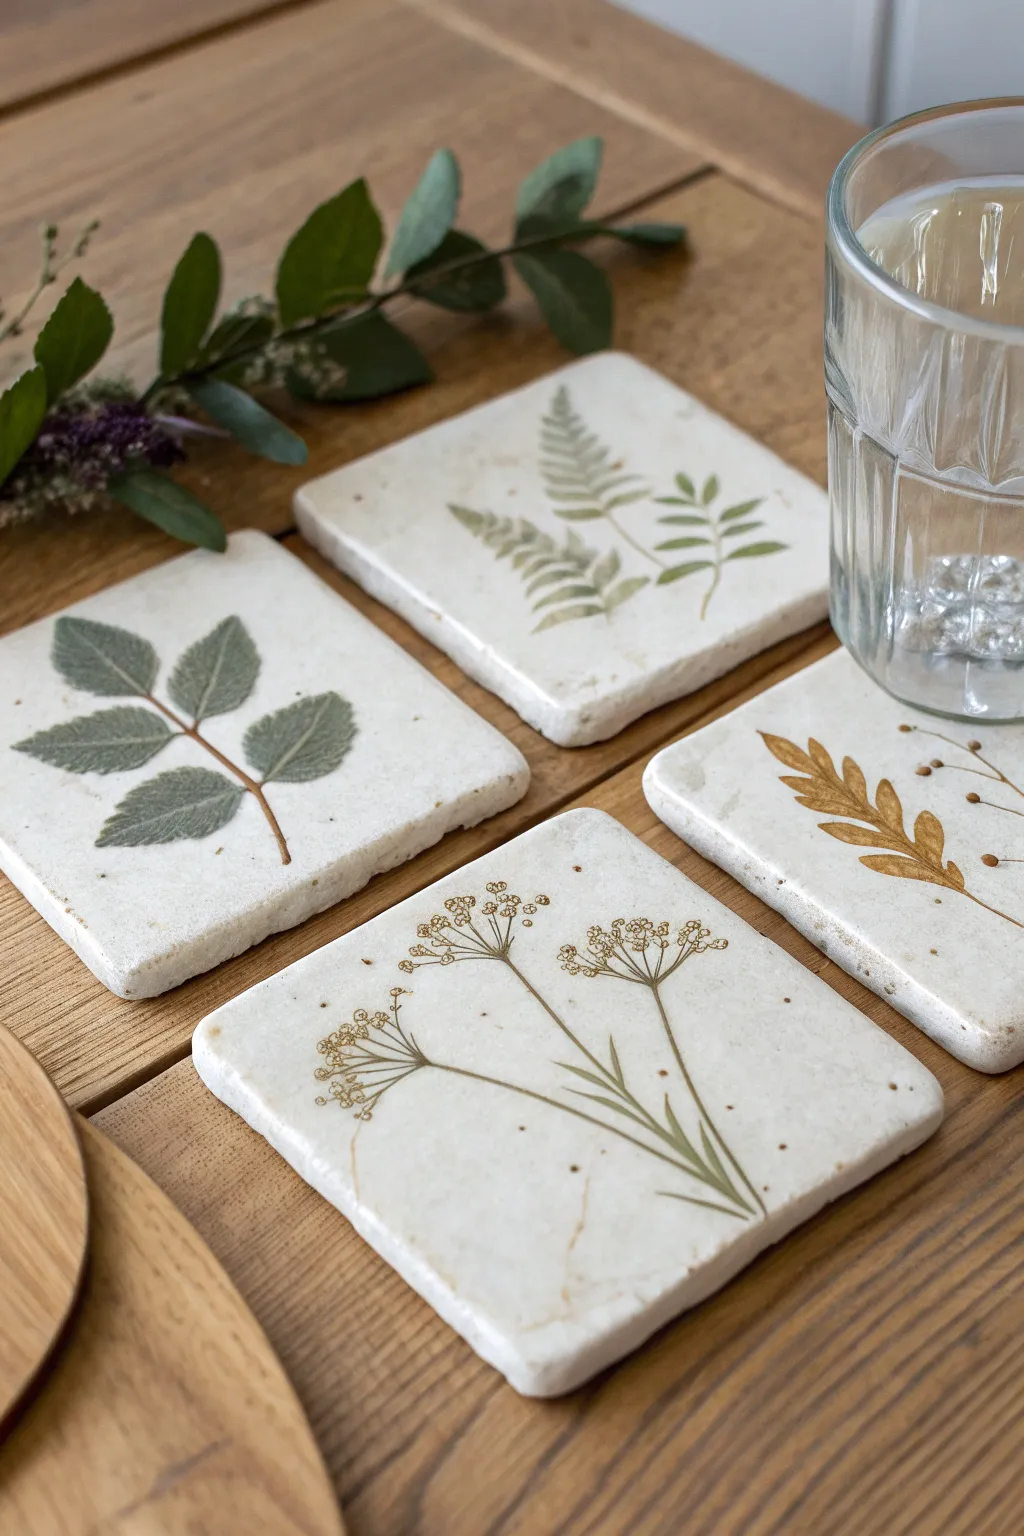
Capture the delicate beauty of nature with these rustic, handmade coasters. By pressing real leaves and flowers into air-dry or polymer clay, you create a timeless botanical relief that brings an earthy elegance to your table.
Detailed Instructions
Materials
- White or cream air-dry clay (or polymer clay)
- Fresh or dried leaves, ferns, and flower stems
- Rolling pin or smooth glass jar
- Square cookie cutter (approx. 4×4 inches) or a knife and ruler
- Fine-grit sandpaper (220 grit)
- Acrylic paints (brown, olive green, ochre)
- Fine detail paintbrush
- Water-based sealant (matte or satin finish)
- Sponge or paper towels
- Parchment paper or non-stick silicone mat
Step 1: Shaping the Base
-
Prepare your workspace:
Lay down your parchment paper or silicone mat on a flat surface. This prevents the clay from sticking and ensures a smooth underside for your coasters. -
Roll out the clay:
Take a handful of clay and knead it briefly to soften it. Roll it out to a uniform thickness, aiming for about 1/4 inch to ensure sturdiness without being too bulky. -
Cut the shape:
Using your square cookie cutter or a ruler and knife, cut out your coaster shapes. Don’t worry if they aren’t mechanically perfect; a little irregularity adds to the organic charm. -
Soften the edges:
Dip your finger in a little water and gently run it along the cut edges of the clay. You want to round them off slightly so the final coaster feels soft in the hand, mimicking the tumbled look of stone.
Clean Impressions
If your leaves are sticking to the roller, place a piece of parchment paper over the botanicals before rolling. This keeps the impression crisp without tearing the delicate leaves.
Step 2: Botanical Impressions
-
Select your greenery:
Choose leaves and stems with distinct vein patterns, like ferns, rose leaves, or dill. Lay them out on a spare piece of paper first to plan your composition for each coaster. -
Position the botanicals:
Place your chosen plant material onto the wet clay surface. Gently tap it down with your finger to make sure it is flat against the surface. -
Create the impression:
Gently roll over the plant material with your rolling pin. Apply firm, even pressure just enough to embed the leaves flush with the clay surface, but not so deep that it distorts the coaster’s shape. -
Remove the plants:
Carefully lift the edge of the leaf or stem with a needle tool or tweezers and peel it away from the clay. I find peeling slowly from the stem end works best to preserve the tiny details. -
Dry the clay:
Allow the coasters to dry completely according to your clay package instructions. This usually takes 24 to 48 hours for air-dry clay. Flip them over halfway through to ensure even drying and prevent curling.
Step 3: Finishing and Painting
-
Sand for smoothness:
Once fully dry, lightly sand the edges and the surface with fine-grit sandpaper to remove any rough spots or fingerprints. -
Mix your colors:
Prepare a watery wash of acrylic paints. You want the consistency of watercolor. Mix greens for leaves and browns or ochres for dried flower stems. -
Paint the impression:
Using a fine detail brush, carefully paint inside the debossed botanical lines. The watery paint should naturally settle into the deeper crevices, highlighting the texture. -
Add an antique effect:
For that aged, stone-like look, dip an old toothbrush into watered-down brown paint and gently flick it over the coasters to create subtle speckles. -
Seal the piece:
Apply two coats of a water-resistant sealant (like Mod Podge or a spray varnish). This is crucial to protect the artwork from condensation when holding cold drinks. -
Add protective backing:
Stick small felt or cork pads to the bottom corners of your coasters to protect your furniture surfaces from scratches.
Gilded Edges
For a luxe touch, paint the rounded rim of the coaster with liquid gold leaf or metallic copper paint. This creates a stunning contrast with the rustic botanical centers.
Arrange your set of coasters on a wooden tray or bundle them with twine for a beautiful handmade gift
Handmade Paint Palettes for Your Art Desk
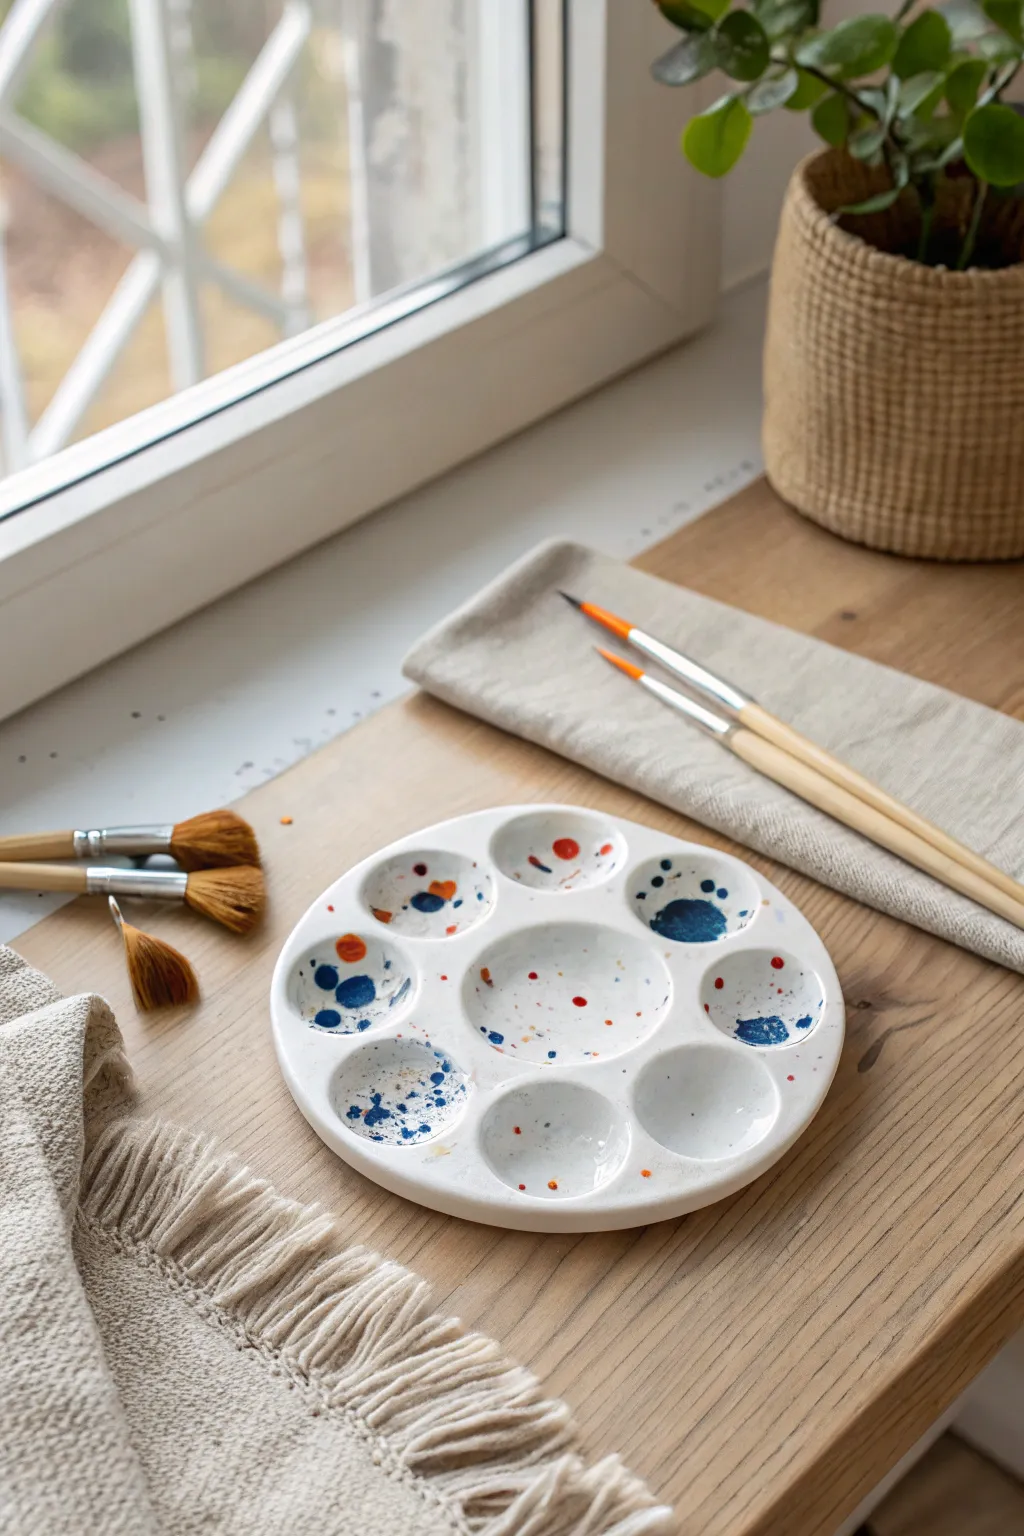
Elevate your art studio with a handcrafted ceramic palette that is as beautiful as it is functional. This classic circular design features a generous central mixing area surrounded by individual wells, finished in a clean, glossy white glaze that makes color mixing a joy.
How-To Guide
Materials
- White stoneware clay body (approx. 1 lb)
- Rolling pin
- Canvas mat or cloth
- Circular template or bowl (approx. 6-7 inches diameter)
- Needle tool or fettling knife
- Sponge
- Rib tool (metal or rubber)
- Large round forming tool (like a smooth stone, wooden spoon back, or clay shaper)
- Glossy white glaze
- Kiln access
Step 1: Preparation and Forming the Base
-
Prepare the Clay:
Begin by thoroughly wedging your white stoneware clay to remove air bubbles and ensure a uniform consistency. This prevents cracking later in the kiln. -
Roll out a Slab:
On your canvas mat, roll the clay into a smooth slab. Aim for an even thickness of about 3/8 to 1/2 inch. You want it sturdy enough to handle indentations without becoming too thin at the bottom. -
Smooth the Surface:
Use a rib tool to compress the clay surface on both sides. This aligns the clay particles, strengthens the slab, and creates that ultra-smooth finish needed for mixing paint. -
Cut the Circle:
Place your circular template onto the slab. Using your needle tool held vertically, cut around the template to create a perfect circle. -
Refine the Edges:
Take a damp sponge and gently smooth the cut rim of the circle to round off any sharp edges. I usually run my finger along the edge to ensure it feels comfortable to hold.
Warping Worries?
If the edges curl up during drying, place a weighted board on top of the rim (with paper in between) while it dries to keep it perfectly flat.
Step 2: Creating the Wells
-
Mark the Layout:
Lightly sketch the position of your wells with a tool, but don’t dig in. Plan for one large central well and about 7-8 smaller wells orbiting it, leaving enough wall thickness between each. -
Form the Central Well:
Using your large round forming tool or the back of a spoon, gently press into the center of the slab. Use a circular motion to widen the depression while pressing down, creating a shallow bowl shape. -
Check Thickness:
Be mindful not to press too deep; stop before the bottom becomes too thin or breaks through. -
Create Surround Wells:
Move to the outer circle. Press smaller indentations for the individual paint wells using a smaller rounded tool or your thumbs. Ensure they are deep enough to hold fluid washes. -
Smooth the Transitions:
Use a damp sponge or finger to smooth the ridges between the wells. The transition from the wells to the flat surface should be soft and seamless to prevent glaze crawling.
Step 3: Finishing and Firing
-
Slow Drying:
Loosely cover the palette with plastic and let it dry slowly over several days to the bone-dry stage. This helps prevent warping, which is common with flat slabs. -
Bisque Fire:
Fire the piece in the kiln to bisque temperature (usually Cone 04 or 06, depending on your clay body). -
Clean and Glaze:
Wipe the bisque-fired piece with a damp sponge to remove dust. Apply 2-3 even coats of glossy white glaze. A white background is crucial for accurately judging paint colors. -
Wipe the Bottom:
Carefully wipe all glaze off the bottom of the palette so it doesn’t fuse to the kiln shelf. -
Glaze Fire:
Fire the palette a final time to the maturity temperature of your clay and glaze (often Cone 5 or 6). Once cooled, it’s ready for your first painting session.
Add a Thumb Hole
Before drying, use a small circular cutter to punch a hole near the edge. This allows you to hold the palette securely like a traditional painter while working.
Enjoy the satisfaction of mixing your watercolors on a surface you crafted with your own hands
Handmade Lidded Jars for Salt, Tea, or Little Secrets
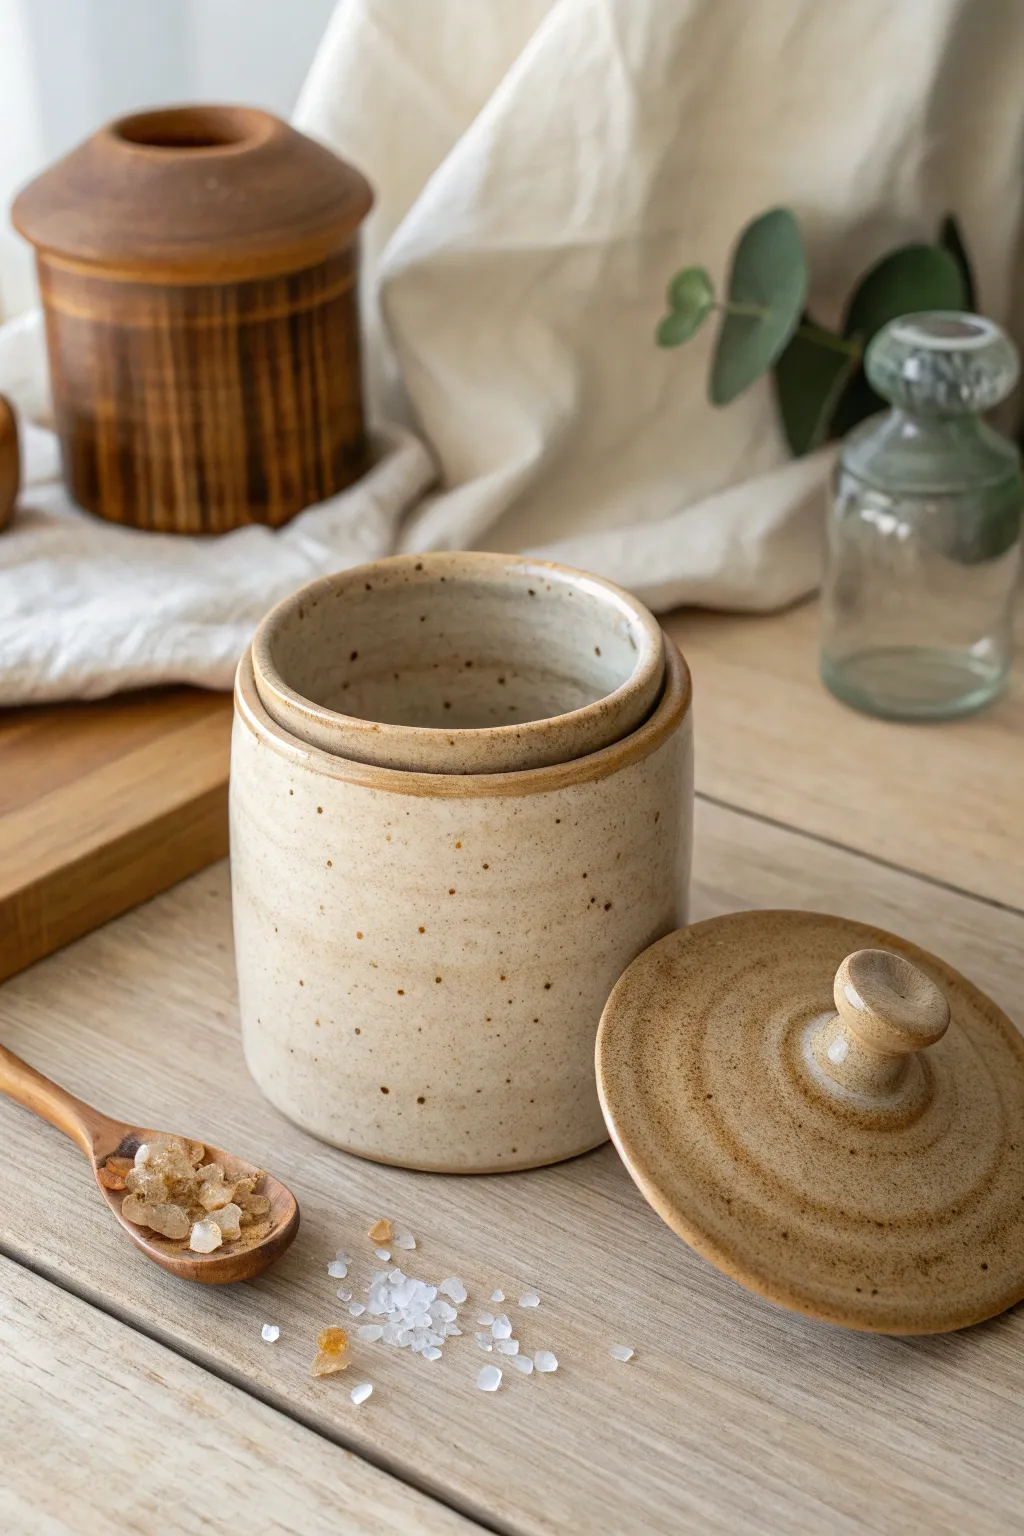
This charming, rustic jar features a double-walled gallery rim and a snugly fitting lid with a mushroom knob, perfect for storing precious salts or loose-leaf teas. The aesthetic relies on a beautiful speckled buff clay body and a transparent or satin glaze that lets the natural clay character shine through.
Step-by-Step
Materials
- Speckled buff stoneware clay (approx. 2 lbs)
- Pottery wheel
- Throwing sponge
- Pin tool
- Rib tool (metal and wood)
- Wire cutter
- Trimming tools
- Calipers
- Clear or satin matte glaze
- Kiln
Step 1: Throwing the Gallery Body
-
Center the clay:
Start with about 1.5 lbs of well-wedged speckled clay. Center it firmly on the wheel head, ensuring it feels balanced and steady before you begin opening. -
Open and widen:
Open the clay down to the bat, leaving about a 1/4-inch floor. Pull the floor out until it’s roughly 3-4 inches wide, compressing heavily with a rib to prevent S-cracks later on. -
Pull the walls:
Slowly pull the walls up into a straight cylinder. Aim for an even thickness of about 3/8 inch throughout the body, keeping the sides vertical. -
Create the split rim:
At the top rim, you need to create a gallery for the lid to sit in. Use your thumb or a wooden tool to gently press down into the center of the rim wall, essentially splitting it into an inner and an outer wall. -
Form the gallery shelf:
Flatten the separation between the split walls to create a horizontal shelf inside the rim. The vertical inner wall should be slightly lower than the outer wall so the lid sits flush. -
Refine the shape:
Use a metal rib on the outside to smooth the surface and ensure the cylinder is perfectly round. Clean up the gallery shelf with a square-ended tool to make it sharp and precise. -
Measure with calipers:
Before cutting the pot off the wheel, take your calipers and measure exactly the inner diameter of the gallery shelf where the lid will rest. Lock the calipers at this measurement. -
Cut and dry:
Wire the pot off the wheel and set it aside to dry to a leather-hard state.
Step 2: Creating the Fitted Lid
-
Center the lid clay:
Take the remaining small lump of clay (about 0.5 lbs). Center it low and wide, creating a puck shape. -
Establish the width:
Using the measurement from your locked calipers, mark the width on your clay puck. This ensures your lid will perfectly match the jar’s gallery. -
Throw the lid structure:
Shape the clay into a low dome. I find it helpful to throw lids upside down initially if you want a complex underside, but for this simple design, you can throw it right-side up as a solid shape. -
Form the knob:
While the wheel spins, pinch and pull a small amount of clay from the exact center upwards. Shape this into a classic mushroom-style knob with a comfortable undercut for gripping. -
Refine the lid surface:
Use a wooden rib to compress the surface of the lid, creating the subtle concentric throwing lines visible in the example. These texture lines catch glaze beautifully. -
Check the fit:
Double-check your caliper measurement against the outer edge of the lid. It’s better to leave it slightly wider than needed; you can trim it down later, but you can’t add clay back. -
Wire off:
Cut the lid from the hump or bat and let it dry to leather hard alongside the jar.
Shrinkage Rates
Remember clay shrinks! If measuring a wet lid for a leather-hard pot, add about 10-12% to your measurement to account for the drying difference.
Step 3: Trimming and Glazing
-
Trim the jar base:
Once leather hard, center the jar upside down on the wheel. Trim the bottom to create a clean foot ring and remove any excess weight from the lower walls. -
Trim the lid fit:
If the lid is slightly too large, place it upside down on the wheel (secured in a generated chuck or clay wads) and carefully trim the outer edge until it fits perfectly into the jar’s gallery. -
Bisque fire:
Place both pieces in the kiln for a bisque firing (usually cone 04 or 06). Ensure the lid is not on the jar during this firing. -
Apply glaze:
Dip the jar and lid into a clear or satin matte glaze. Avoid glazing the gallery shelf on the jar and the contact points on the lid where they touch. Wax resist is excellent for this. -
Final firing:
Fire to the maturation temperature of your clay (likely Cone 5 or 6). Once cooled, test the fit and enjoy your new storage vessel.
Wobbly Lids?
If your lid rattles after firing, use a little diamond grinding paste or a grinding stone on the contact gallery. Rotate the lid back and forth to grind snugly.
This simple yet elegant form will serve as a lovely tactile addition to your kitchen counter for years to come
Patchwork Handmade Pottery Using Mixed Glaze Blocks
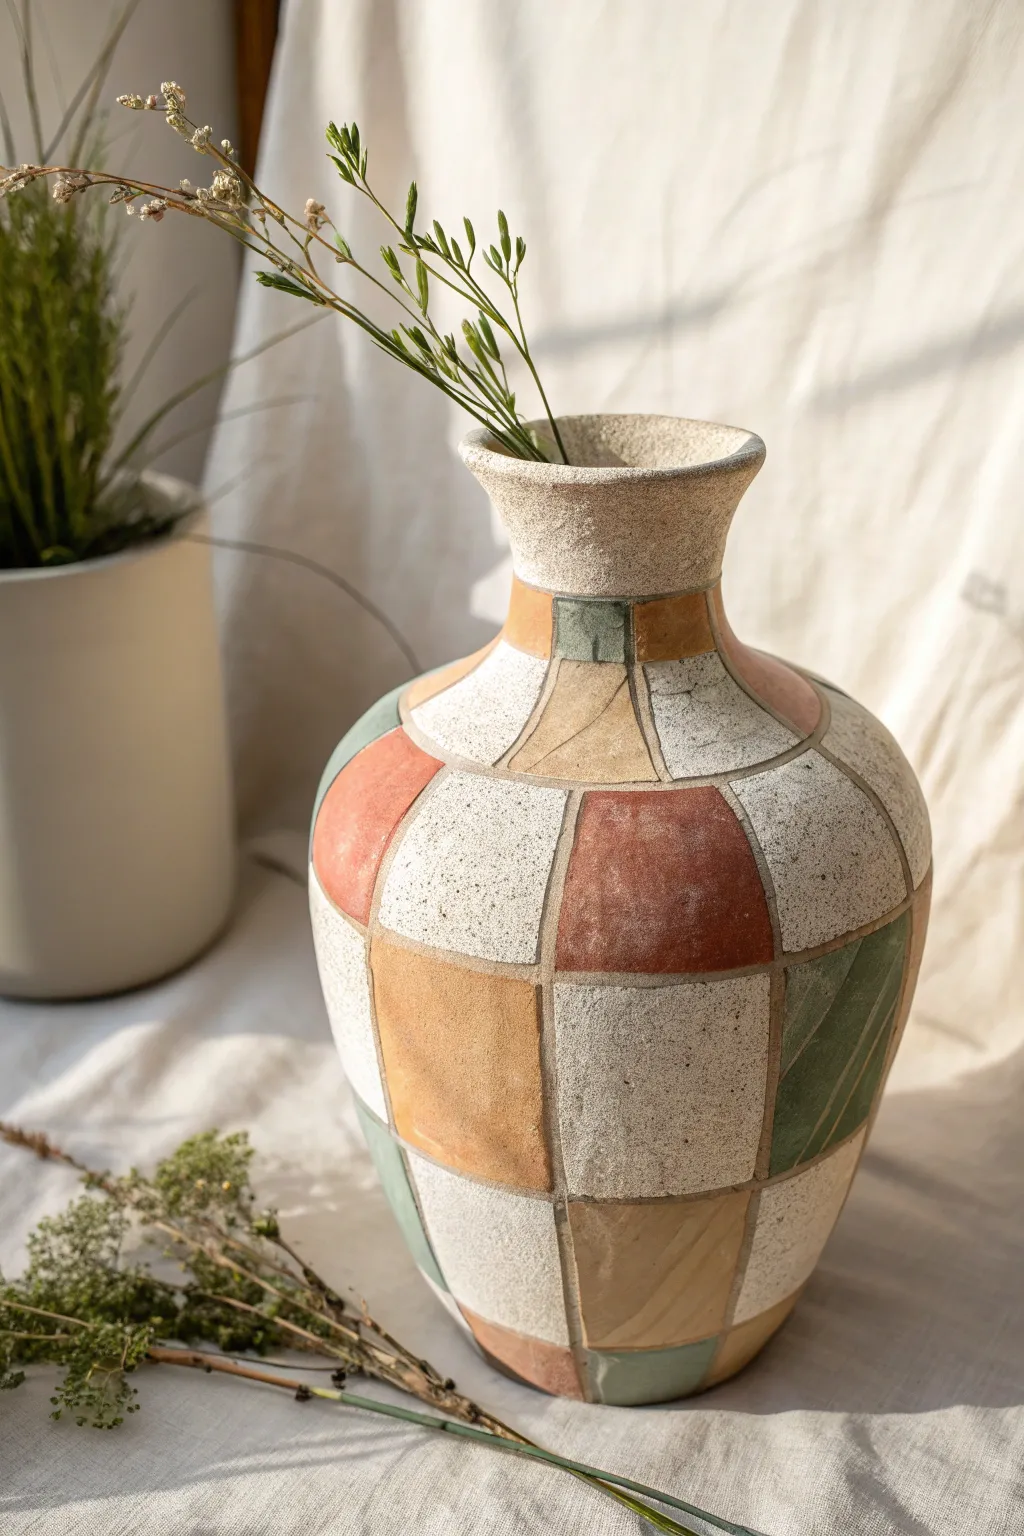
Bring the warmth of rustic masonry into your home with this textured patchwork vase. By layering stone-effect glazes in geometric blocks, you will create a vessel that feels like an unearthed artifact with a modern, structured twist.
Detailed Instructions
Materials
- Stoneware clay body (white or buff)
- Pottery wheel or slab roller (depending on construction method)
- Needle tool
- Flat carving tool or wire loop tool
- Stone-effect or matte textural glazes (cream, terracotta, sage green, sandy beige)
- Wax resist
- Small flat shader brushes
- Sponge
- Rib tool
- Kiln
Step 1: Forming the Vessel
-
Throw or Build the Base:
Begin by throwing a medium-sized vase form on the wheel, approximately 8-10 inches tall. Aim for a generous, rounded shoulder that tapers into a narrower neck and flared rim, as this shape best displays the grid pattern. -
Refine the Surface:
Once the piece is leather hard, trim the foot and use a metal rib to smooth the exterior walls perfectly. You want a clean canvas, but don’t burnish it too smooth; a little tooth helps the textural glaze adhere. -
Map the Grid:
Lightly sketch your grid pattern directly onto the clay using a needle tool. Start with vertical lines that curve gently with the form of the pot, then add horizontal lines to create trapezoids and squares. -
Deepen the Grooves:
Go back over your sketched lines with a V-tipped carving tool or a wire loop tool. Carve shallow channels to create physical separation between the ‘blocks,’ mimicking grout lines between tiles. -
Softening Edges:
After carving, use a slightly damp sponge to wipe down the edges of your carved lines. This removes sharp clay burrs and gives the ‘stone’ blocks a weathered, tumbled look rather than a sharp, manufactured one. -
Bisque Fire:
Allow the vase to dry slowly and completely to prevent warping. Load it into the kiln and bisque fire to cone 04 (or your clay’s specific bisque temperature).
Step 2: Glazing the Textures
-
Prepare the Surface:
Wipe the bisque-fired vase with a damp sponge to remove any kiln dust. This ensures your glaze bonds properly to the ceramic surface. -
Wax the Grout Lines:
Using a very fine brush, carefully apply wax resist into all the carved channels. This is crucial for keeping the raw clay body visible between the colored blocks, which provides that essential varied texture. -
Select Your Palette:
Prepare your stone-effect glazes. Pour a small amount of cream, terracotta, sage green, and beige into separate cups. I find it helpful to test the flowing consistency on a scrap tile first. -
First Coat: The Cream Blocks:
Start with your lightest color, the cream stone glaze. Paint alternating blocks on the grid using a small flat shader brush. Apply a thick, even coat, staying within the waxed ‘grout’ lines. -
Adding Warmth:
Next, fill in random blocks with the terracotta or rust-colored glaze. Try to space these out so no two red blocks touch, creating a balanced visual rhythm. -
Earth Tones:
Apply the sandy beige glaze to roughly a third of the remaining empty blocks. This neutral tone bridges the gap between the stark white and the darker colors. -
Cool Touches:
Fill the final remaining spots with the sage green glaze. The cool tone adds depth and contrasts beautifully with the warm terracotta. -
Second Coats:
Once the first layer is dry to the touch, apply a second and potentially third coat to each block depending on the glaze opacity. Stone texture glazes often need thickness to develop their rough finish. -
Clean Up:
Use a damp sponge to gently wipe any glaze beads that may have sat on top of the wax resist lines. The wax should have repelled most of it, but a clean wipe ensures crisp definition. -
Glaze Fire:
Load the vase into the kiln and fire to the maturity temperature of your glazes (typically Cone 5 or 6 for stoneware). Ensure the piece is stilted if you glazed near the bottom foot. -
Final Polish:
After the kiln cools, remove the vase. If the exposed raw clay lines feel expanding rough, you can lightly sand them with wet-dry sandpaper to finish the piece.
Messy Lines?
If you struggle with steady lines, try using automotive pinstriping tape to mask the grid before glazing. Peel it off carefully before firing.
Speckled Effect
Mix smooth glazes with granular ilmenite or coarse sand. This adds a physical grit that mimics real sandstone or granite blocks.
Now you have a stunning, timeless vessel that showcases the beauty of raw geometry and texture
Broken-and-Beautiful Handmade Pottery With Mosaic-Style Repair
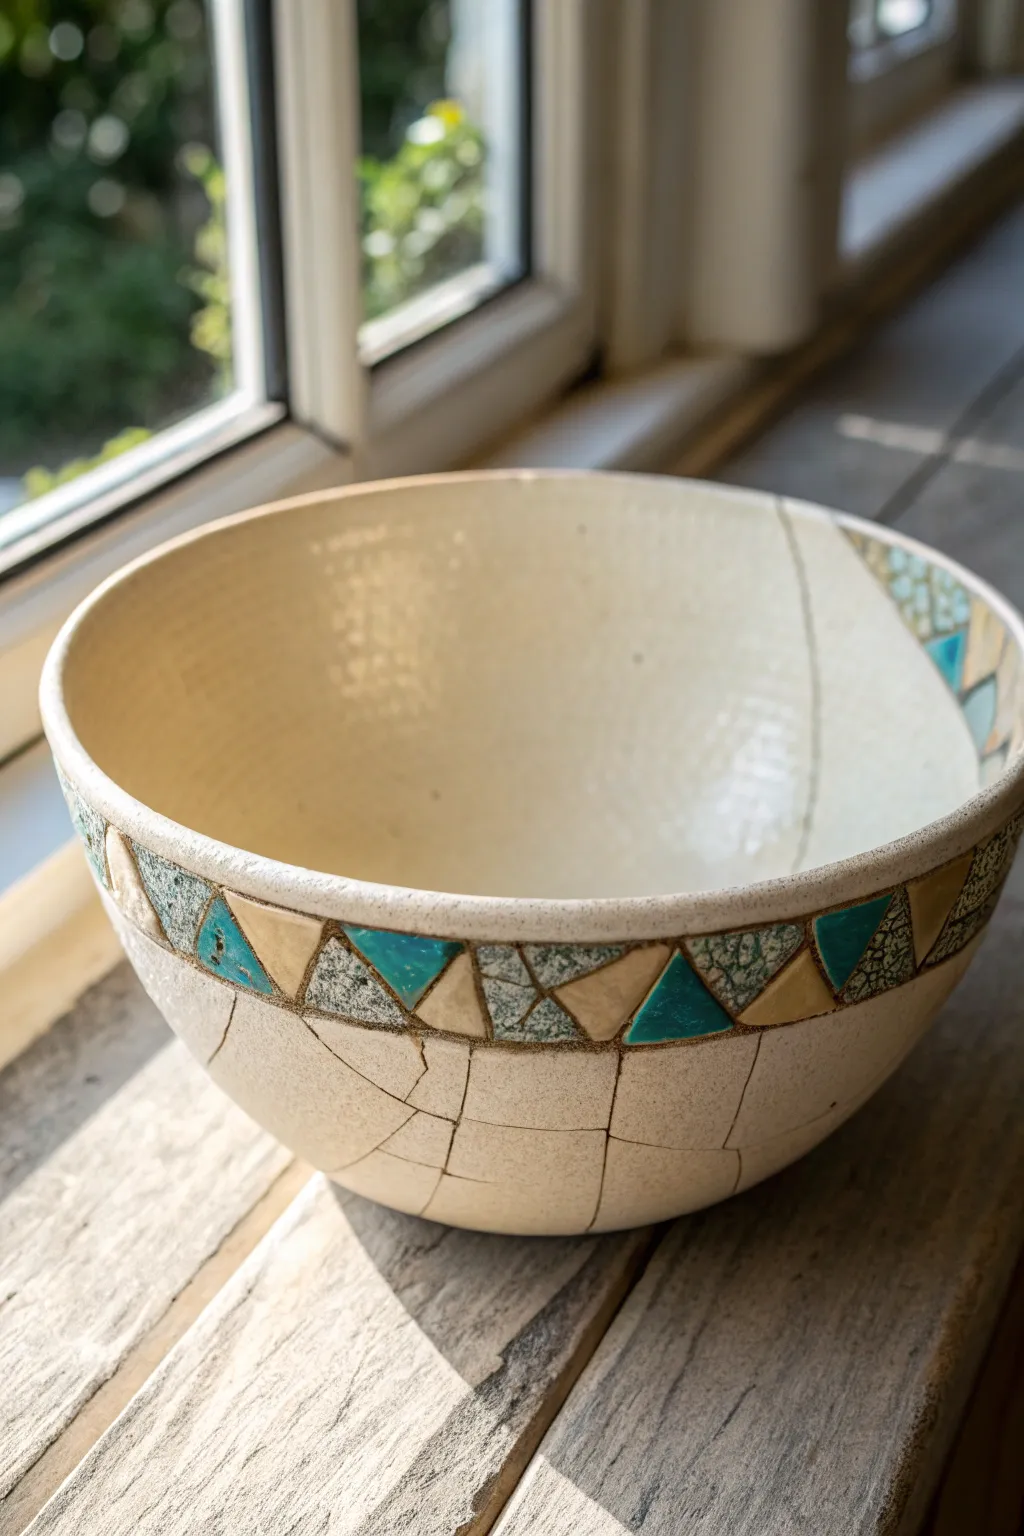
Embrace the beauty of imperfection with this stunning ceramic bowl that turns cracks into features. By combining traditional kintsugi-inspired aesthetics with a vibrant triangular mosaic rim, you’ll create a piece that feels both ancient and refreshingly modern.
How-To Guide
Materials
- Bisque-fired ceramic bowl (wheel-thrown or hand-built)
- Small triangular ceramic tiles (teal, bright blue, tan, speckled green)
- Ceramic tile adhesive or mortar
- Pre-mixed grout (sanded, dark beige or light brown)
- Grout sponge and bucket of water
- Tile nippers (optional, to resize tiles)
- Cream or off-white ceramic glaze
- Carving tool or needle tool
- Paintbrush for glazing
- Kiln access
Step 1: Preparation and Planning
-
Select your vessel:
Start with a leather-hard clay bowl. A simple hemispherical shape works best for this project as it allows the rim decoration to stand out without competing with complex curves. -
Carve the faux cracks:
Before firing your clay to bisque, use a needle tool or carving tool to gently score random, branching lines into the exterior surface. These will simulate the ‘broken’ aesthetic later without compromising structural integrity. -
Define the mosaic channel:
Carve a shallow recess, about 3-4mm deep, around the exterior rim of the bowl. This channel should be wide enough to accommodate the height of your triangular tiles, ensuring they sit flush with the bowl’s surface once adhered. -
Bisque fire:
Once your carving is complete and the clay is bone dry, fire the bowl to bisque temperature (usually cone 04 or 06) to prepare it for glazing and tiling.
Clean Lines Tip
Use masking tape along the edges of your mosaic channel before grouting. This keeps the surrounding glazed ceramic clean and creates a crisp, professional edge.
Step 2: Glazing the Base
-
Wax resist application:
Apply wax resist carefully to the recessed channel you carved around the rim. This prevents glaze from adhering to the area where you will place your mosaic tiles. -
Apply the main glaze:
Dip or brush a satin cream or off-white glaze onto the entire bowl. Ensure the glaze settles slightly into the faux crack lines you carved earlier to accentuate them. -
Clean the lines:
After the glaze dries slightly, I like to gently run a damp sponge over certain ‘crack’ lines to thin the glaze there, allowing the darker clay body to show through subtly after firing. -
Glaze fire:
Fire the bowl again to the maturation temperature of your chosen glaze (e.g., cone 5 or 6). Let the piece cool completely before moving to the mosaic phase.
Step 3: Applying the Mosaic
-
Arrange your pattern:
Lay out your triangular tiles on a flat surface to plan your sequence. Alternate between teal, speckled green, and tan tiles, orienting the triangles up and down to form a continuous geometric band. -
Apply adhesive:
Spread a thin, even layer of tile adhesive into the unglazed recessed channel on the bowl’s rim. Work in small sections so the adhesive doesn’t dry out before you place the tiles. -
Place the tiles:
Press each triangular tile firmly into the adhesive. Adjust the spacing as you go to ensure consistent gaps for grouting later. -
Let it cure:
Allow the adhesive to dry fully according to the manufacturer’s instructions. This usually takes at least 24 hours to ensure the tiles won’t shift during grouting.
Gold Dust Luxe
Mix a tiny amount of gold mica powder or gold leaf flakes into your grout before applying it to the cracks for a true kintsugi-inspired shimmer.
Step 4: Grouting and Finishing
-
Prepare the grout:
Mix your sanded grout until it reaches a peanut butter consistency. A dark beige or light brown color works beautifully to unite the creamy bowl with the earthy tile tones. -
Apply grout:
Push the grout into the spaces between the mosaic tiles using a gloved finger or a small rubber float. Make sure every crevice is filled. -
Fill the cracks:
Rub a small amount of grout into the carved ‘crack’ lines on the main body of the bowl. This darkened line mimics the look of a repaired break. -
Clean the surface:
Wait about 15 minutes for the grout to set slightly, then use a damp sponge to wipe away the excess haze from the tiles and the bowl surface. Rinse your sponge frequently. -
Final polish:
Once the grout is fully dry (usually after another 24 hours), buff the tiles with a soft, dry cloth to remove any lingering haze and make the colors pop.
Display your new bowl in natural light to really show off the texture and color variations