If you love that classic wizard-school vibe, clay bead bracelets are such a fun way to wear it on your wrist in a super doable, hobby-friendly way. I’m sharing my favorite house color palette patterns, letter bead combos, and a few magical little twists that still feel simple enough to make on a chill craft night.
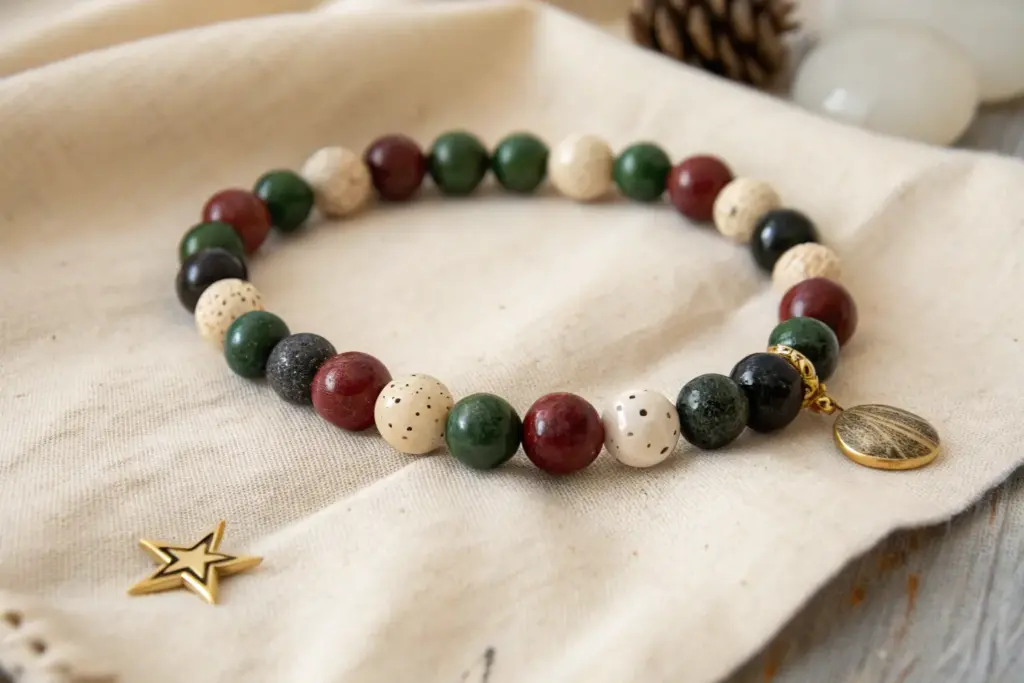
Scarlet-and-Gold Lion House Stack
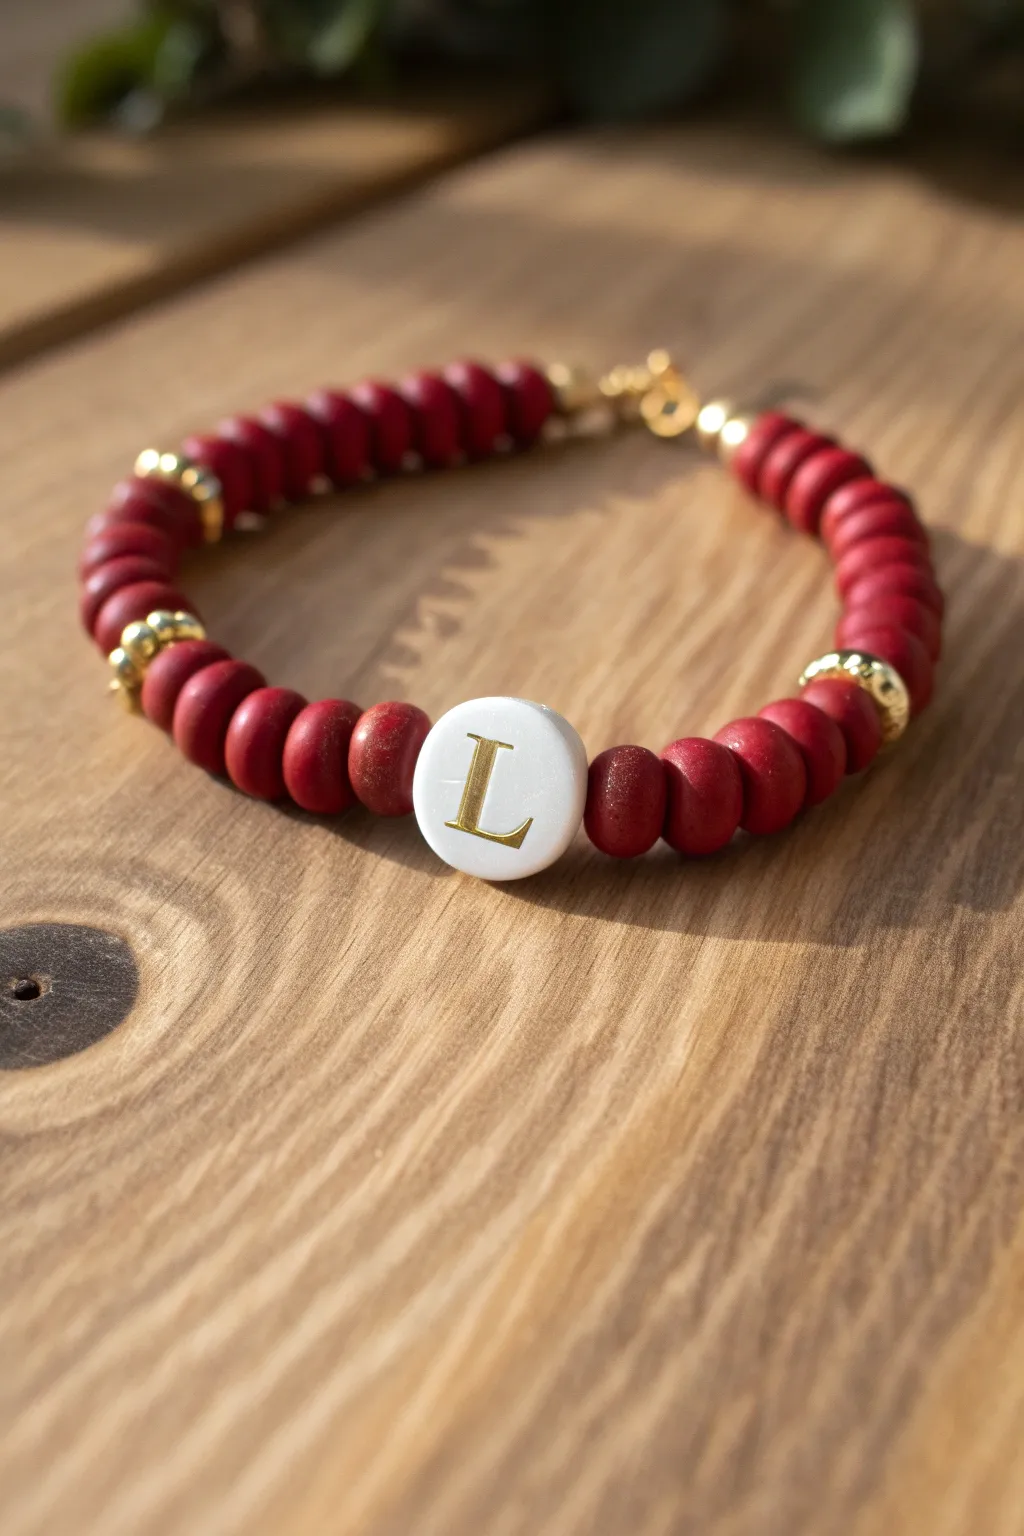
Show off your house pride with this elegant scarlet and gold bracelet featuring a personalized initial charm. This simple yet striking design uses matte clay beads accented with shining gold spacers to create a wearable tribute to the brave at heart.
Step-by-Step Guide
Materials
- Scarlet red polymer clay heishi beads (6mm or 8mm)
- White 10-12mm round ceramic or acrylic bead with gold ‘L’ (or your initial)
- Gold tone metal spacer beads (heishi/disc shape)
- Gold tone metal spacer beads (rounded/lantern shape)
- Strong elastic beading cord (0.7mm or 0.8mm)
- Scissors
- Hypo-cement or super glue (optional)
- Beading needle (optional but helpful)
- Bead stopper or tape
Step 1: Preparation & Planning
-
Measure your wrist:
Cut a piece of elastic cord about 10-12 inches long. This generous length gives you plenty of room to tie knots without struggling. -
Pre-stretch the cord:
Hold both ends of your cut cord and give it a few firm tugs. This seemingly small step prevents the bracelet from loosening up after you wear it for the first time. -
Secure the end:
Place a bead stopper or a piece of masking tape on one end of the cord so your beads don’t slide right off as you work.
Knot Hiding Trick
If your knot won’t hide inside the clay beads, try starting and ending your design next to one of the larger gold lantern beads, which usually have bigger holes.
Step 2: Creating the Central Focus
-
Start from the middle:
I prefer to build the design outward from the center charm to ensure perfect symmetry. Locate the midpoint of your cord. -
Thread the initial bead:
Slide your white and gold initial bead onto the cord -
Add immediate accents:
On the right side of the letter bead, thread three scarlet clay beads. -
Repeat on the left:
Thread three scarlet clay beads on the left side of the letter bead to match. -
Adding the first gold accents:
After the three red beads on the right side, add one flat gold disc spacer bead followed by three more red clay beads. -
Mirror the pattern:
Repeat that exact sequence on the left side: one flat gold spacer followed by three red clay beads.
Step 3: Building the Rest of the Strand
-
Insert larger gold spacers:
On the right strand, add one of the larger, rounded gold lantern beads. This adds a lovely texture break. -
Create the main red sections:
Thread approximately 10-12 scarlet clay beads onto the right side. The exact number will depend on your wrist size. -
Add a second gold accent:
Slide on another flat gold disc spacer followed by another small set of 2-3 red clay beads on the right side. -
Complete the left side:
Mirror all those steps on the left cord: add the large lantern bead, followed by the 10-12 red beads, then the final gold spacer and red accents. -
Check the fit:
Wrap the unfinished strand around your wrist. The two ends should touch comfortably without stretching the cord too much. Add or remove red beads from the ends equally until it fits perfectly.
Stack It Up
Create two companion bracelets using only the gold spacers and red clay beads without letters, or swap colors to represent other houses for a full Hogwarts set.
Step 4: Finishing Touches
-
Prepare to knot:
Remove the bead stopper or tape carefully, holding both ends of the elastic securely. -
Tie the surgeon’s knot:
Cross the ends, wrap one side around the other twice (instead of once like a regular knot), and pull tight. Repeat this process for security. -
Secure with glue:
Apply a tiny dab of jewelry glue or hypo-cement directly onto the knot. Let it dry for a few minutes before moving on. -
Hide the knot:
If one of your gold spacer beads or the clay beads has a hole large enough, gently tug the cord so the knot slides inside a bead, disappearing from view. -
Trim the excess:
Snip off the excess cord tails close to the knot, being careful not to cut the main bracelet structure.
Your spirited new accessory is ready to wear to your next Quidditch match or potion class


Emerald-and-Silver Serpent House Stack
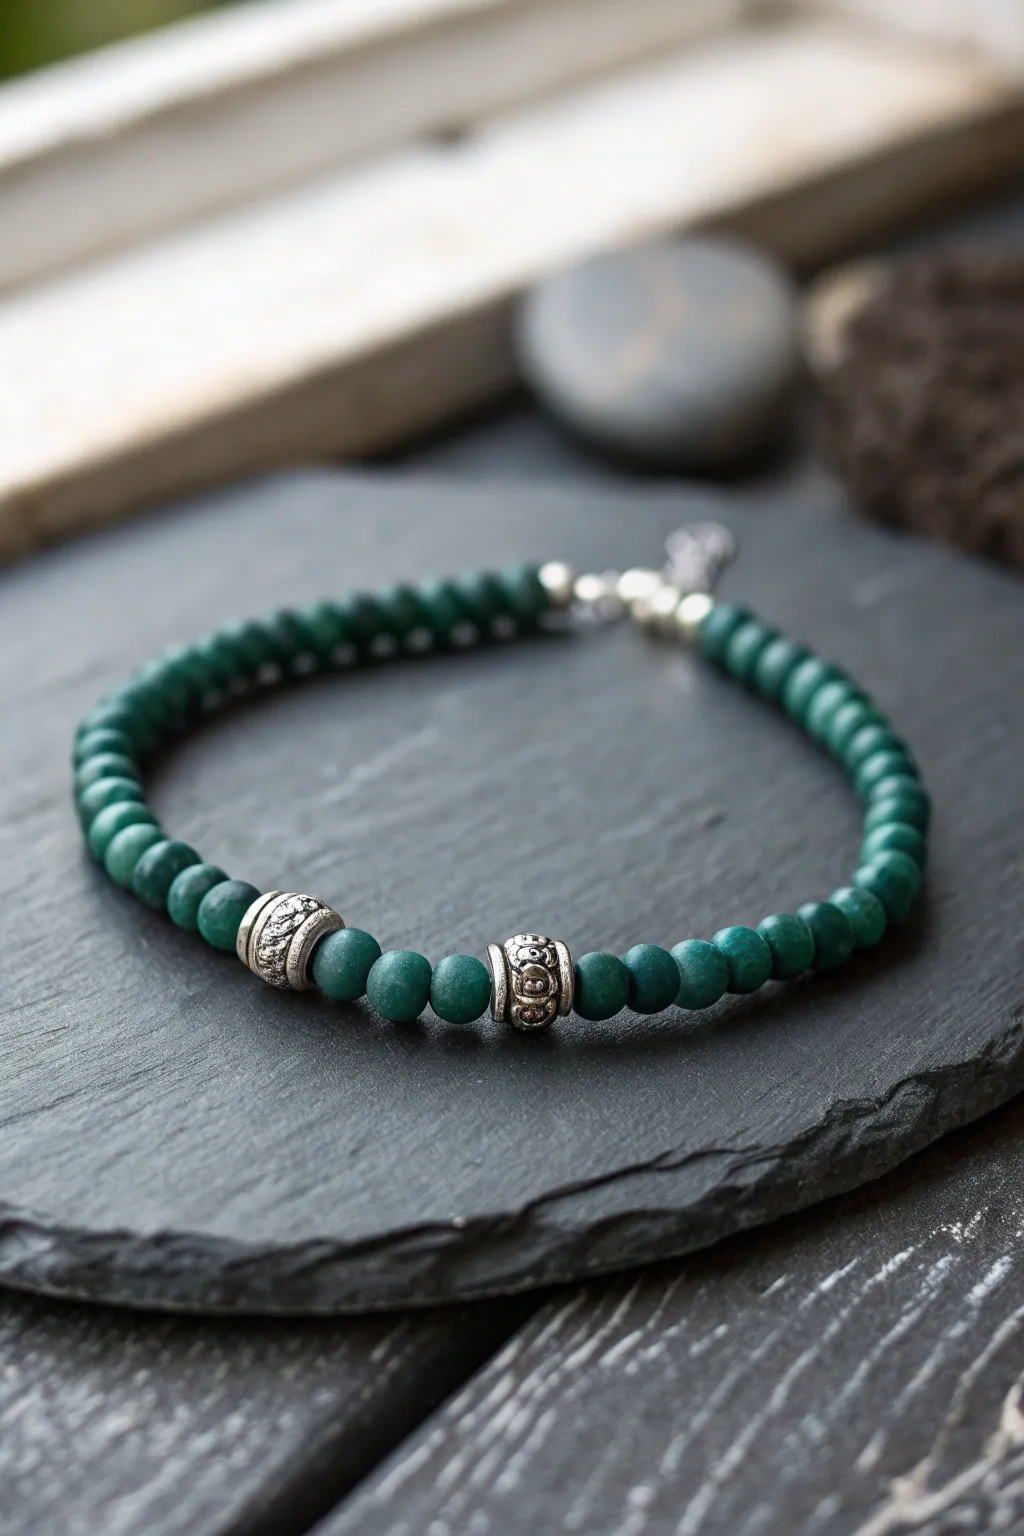
Evoke the cunning ambition of the serpent house with this sophisticated bracelet design that pairs deep, matte emerald beads with intricately detailed silver accents. The finished piece has a weighted, premium feel that works perfectly as a subtle nod to your Hogwarts house or as part of a larger stack.
How-To Guide
Materials
- Matte dark green round beads (6mm, approx. 30-40 beads)
- 2 Antique silver spacer beads (barrel or cylinder shape with scrollwork detail)
- Strong beading wire or elastic cord (0.8mm recommended)
- 2 Silver crimp beads (if using wire)
- 2 Silver crimp bead covers (optional)
- 2 Silver jump rings (4mm or 5mm)
- 1 Silver lobster clasp
- Wire cutters
- Crimping pliers (or flat nose pliers)
- Bead design board or masking tape
Step 1: Planning Your Layout
-
Establish the pattern:
Begin by laying out your beads on a design board or a soft towel to prevent them from rolling away. The goal is to create a symmetrical design centered around the two silver accents. -
Center the focal point:
Place three or four matte green beads in the very center of your layout. -
Add silver accents:
flank that center group of green beads with your two antique silver barrel beads—one on the left and one on the right. This creates the main visual interest of the bracelet. -
Fill the length:
Continue adding green beads to both sides evenly until you reach your desired wrist length, usually about 6.5 to 7 inches for an average fit. -
Check symmetry:
Double-check that you have an equal number of green beads on either side of your central motif before you start stringing.
Stone Effect
To mimic the matte look of real stone using polymer clay, lightly sand your baked beads with fine-grit sandpaper, or simply buy ‘frosted’ glass beads for an easier alternative.
Step 2: Stringing the Serpent
-
Prepare your cord:
Cut a piece of beading wire approximately 10-12 inches long. It’s always better to have too much wire than too little. -
Secure the first end:
Thread a crimp bead onto one end of the wire, followed by a jump ring. Loop the wire back through the crimp bead. -
Crimp firmly:
Use your crimping pliers to flatten the crimp bead securely, locking the loop in place. I prefer to tug on it gently to ensure it won’t slip. -
Start stringing:
Begin threading your beads onto the wire. Start from one end of your layout and work your way across. -
Hide the tail:
As you string the first few green beads, thread them over the short tail of excess wire left from the crimp to hide it inside the beads. -
Verify the pattern:
Once you reach the silver barrel beads, pause to ensure they are framing the central bead cluster correctly just like in your layout. -
Finish stringing:
Continue until all beads are on the wire. Hold both ends up to let the beads settle naturally against each other, minimizing gaps.
Step 3: Finishing Touches
-
Prepare the closure end:
Thread a crimp bead onto the remaining open end of the wire. -
Add the clasp:
Slide on the jump ring attached to your lobster clasp (or thread the wire directly through the clasp loop). -
Loop it back:
Feed the wire end back down through the crimp bead and into the last 2-3 green beads you strung. -
Tighten the slack:
Pull the wire taut so the beads are snug but not stiff—the bracelet needs to remain flexible enough to curve around a wrist. -
Final crimp:
Flatten the final crimp bead with your pliers to lock the bracelet structure. -
Trim excess:
Use your wire cutters to snip off the excess wire flush against the beads so no sharp end pokes out. -
Add covers (optional):
If you want a polished professional look, gently close a crimp cover over each flattened crimp bead to make them look like small silver rounds.
Stiff Bracelet?
If the finished bracelet feels rigid or kinks, you pulled the wire too tight before crimping. Leave a tiny gap (about 1mm) of slack near the clasp to allow movement.
Slip this sophisticated piece onto your wrist and wear your house colors with subtle pride


Blue-and-Bronze Eagle House Stack
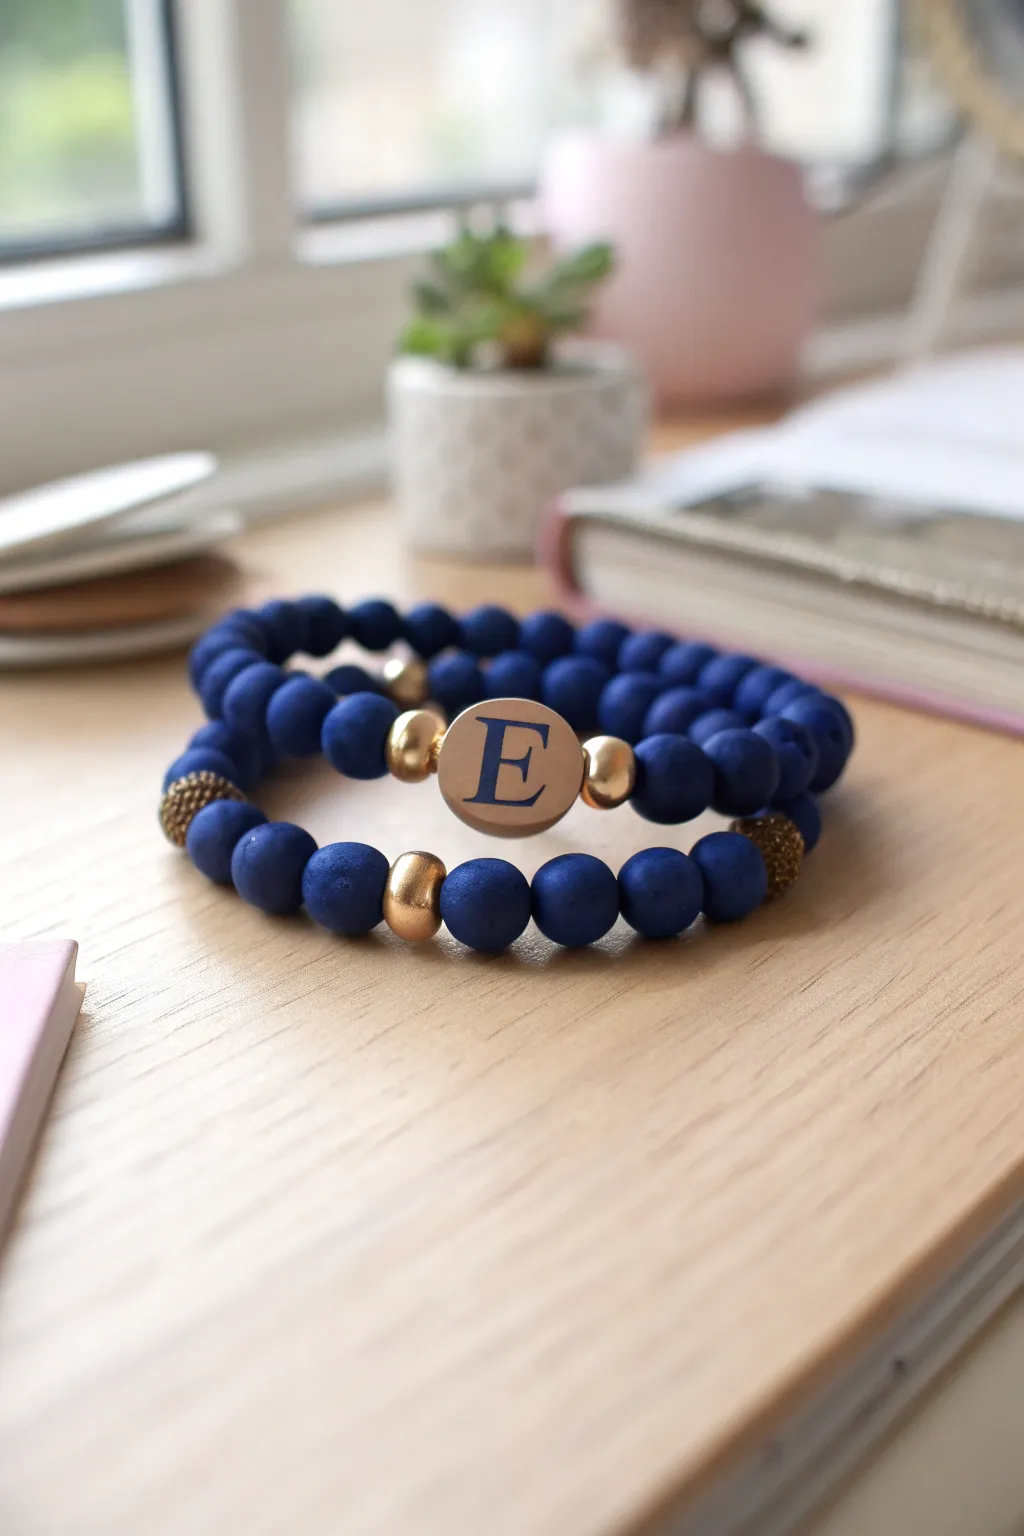
Celebrate the wit and wisdom of the eagle house with this sophisticated stack of blue and bronze bracelets. Featuring matte cobalt beads and metallic accents, this set is a subtle yet stylish nod to Ravenclaw pride.
Step-by-Step Guide
Materials
- Matte dark blue round beads (8mm or 10mm)
- Small gold spacer beads (round)
- Large flat gold disc charm with initial (or blank to customize)
- Dark blue paint pen or vinyl letter (if charm is blank)
- Dark brass or textured bronze beads (for the secondary bracelet)
- Strong elastic stretch cord (0.7mm or 0.8mm)
- Jewelry glue or clear nail polish
- Scissors
- Bead stopper or tape
- Ruler or tape measure
Step 1: The Initial Charm Bracelet
-
Prepare the Charm:
If you don’t have a pre-made initial charm, take a large flat gold disc bead. Carefully write or stick a dark blue ‘E’ (or your chosen initial) in a serif font on the center. Let it dry completely if using paint. -
Measure and Cut:
Measure your wrist and add about 3 inches to that length. Cut a piece of elastic cord, making sure to avoid overstretching the cord while cutting. -
Secure the End:
Place a bead stopper or a piece of tape on one end of the cord to prevent your beads from sliding off while you design. -
Center the Focal Point:
Thread the gold flat disc charm onto the cord first. This will help you balance the design symmetrically. -
Add Gold Shoulders:
Immediately slide one small gold spherical spacer bead onto the cord on either side of the flat charm. These act as bright highlights framing the letter. -
Fill the Strand:
Begin threading the matte blue beads onto the cord. Alternate adding them to each side of the central charm to keep the design centered, or just string them continuously until you reach your desired length. -
Check the Fit:
Wrap the unfinished strand around your wrist to ensure a comfortable fit. The beads should touch all the way around without gaps, but shouldn’t dig into your skin. -
Tie the Knot:
Remove the stopper and bring the ends together. Tie a standard surgeon’s knot (right over left, left over right) and pull tight to secure. -
Cement the Bond:
Dab a tiny drop of jewelry glue onto the knot. I find waiting about 30 seconds for it to become tacky helps it hold better. Slide a nearby bead over the knot to hide it if the hole is large enough.
Matte Magic
To keep matte beads looking velvety, avoid getting lotion or heavy oils on them, which can turn the finish shiny over time.
Step 2: The Textured Accent Bracelet
-
Cut the Second Cord:
Cut another length of elastic cord, keeping it the same length as your first one for consistency. -
Start the Pattern:
Thread on a section of the matte blue beads. Unlike the first bracelet, this one relies on asymmetry or repeating patterns. -
Insert Texture:
After about 8-10 blue beads, slide on a textured dark brass or bronze bead. This adds a gritty, antique feel that contrasts nicely with the smooth blue. -
Add Subtle Shine:
Thread a single smooth gold spacer bead next to the textured bead, then another section of blue beads. -
Create a Third Focal Point:
Repeat the gold spacer and texturized bead combination on the opposite side of the bracelet so the accents sit roughly at a ‘4 o’clock’ and ‘8 o’clock’ position when worn. -
Complete the Circle:
Fill the remaining space with matte blue beads until it matches the circumference of your first bracelet perfectly. -
Final Secure:
Tie off this bracelet with another strong surgeon’s knot, applying glue as before. Trim any excess cord carefully with sharp scissors, getting as close to the knot as possible without nicking it.
Knot Slipping?
If your elastic knot refuses to stay tight, try ‘pre-stretching’ the cord firmly before stringing. This removes slack and helps the knot grip.
Slip on your new stack and show off your house colors with subtle elegance


Yellow-and-Black Badger House Stack
Channel the loyal and hardworking spirit of the Badger House with this striking gemstone bracelet. Featuring cheerful crackled yellow beads interspersed with textured black accents and a delicate heart charm, this piece is a subtle yet stylish nod to Hufflepuff pride.
How-To Guide
Materials
- 10mm yellow crackle agate or yellow turquoise beads (approx. 16-18 beads)
- 8mm or 10mm textured black lava stone or black acrylic spacer beads (5-6 beads)
- Stretch cord (0.8mm or 1.0mm thickness)
- Small heart charm with white enamel detail
- Gold tone jump ring (4mm or 5mm)
- Gold tone charm connector loop (optional, or attach directly to string)
- Jewelry adhesive or clear nail polish
- Scissors
Step 1: Preparation & Design Layout
-
Measure Your Wrist:
Wrap a flexible measuring tape around your wrist to find your size. Add about 0.5 inches to this measurement to ensure the bracelet fits comfortably without being too tight. -
Cut the Elastic:
Cut a piece of stretch cord roughly 10-12 inches long. Having this extra length makes tying the final knots much easier than struggling with short ends. -
Pre-stretch the Cord:
Hold the cord ends and give them a few gentle pulls. This ‘pre-stretching’ helps prevent the bracelet from sagging or loosening up immediately after you wear it. -
Secure One End:
Place a piece of tape or a bead stopper on one end of your cord so your beads don’t slide right off while you work. -
Plan the Pattern:
Lay your beads out on a bead board or soft towel. The pattern shown uses a sequence of two yellow beads, one textured black bead, two yellow beads, and so on, but notice the variation on the back half which is solid yellow. -
Adjust Symmetry:
For the front section, I like to arrange the sequence as: Black – Yellow – Yellow – Black – Yellow – Yellow – Black. The rest of the strand will be solid yellow to fill out the back of the wrist.
Use Textured Beads
Using pitted lava stones for the black beads adds tactile variety. You can even add a drop of essential oil to them for a scented aromatherapy bracelet.
Step 2: Stringing the Beads
-
Start Stringing:
Begin threading your beads onto the cord, following the layout you created. Start with the solid yellow section that will sit at the back of your wrist. -
Check Length:
Once about half the yellow beads are on, wrap the strand around your wrist to double-check the sizing before you commit to the patterned section. -
Add Patterned Section:
Continue threading the sequence of black and yellow beads. The contrast between the smooth, bright yellow and the pitted, dark texture of the black beads is key to this look. -
Prepare the Charm:
Open a gold jump ring using two pairs of pliers. Slide your white heart charm onto the ring. -
Attach the Jump Ring:
Instead of stringing the jump ring directly onto the thick cord (which can make it stick out oddly), attach it to a small charm connector or bail if you have one. If not, carefully slide the jump ring onto the cord between two central beads. -
Center the Charm:
Ensure the charm is placed exactly in the middle of your patterned section, typically hanging between a black bead and a yellow bead for visual interest. -
Verify Fit:
Bring the two ends of the cord together to form a circle. Test the fit on your wrist one last time. It should roll over your hand without too much struggle but sit snugly.
Step 3: Finishing Touches
-
Tie the Initial Knot:
Remove the tape or bead stopper. Bring the ends together and tie a simple overhand knot to bring the beads into a circle. -
Secure with a Surgeon’s Knot:
Tie a surgeon’s knot for extra security. Loop the cord through twice before pulling tight. This extra loop provides friction that holds the elastic in place. -
Add Adhesive:
Apply a tiny drop of jewelry glue or clear nail polish directly onto the knot. Be careful not to get glue on the neighboring beads. -
Hide the Knot:
While the glue is still tacky, pull the elastic firmly so the knot slides inside the hole of the nearest large bead. This creates a seamless, professional finish. -
Trim Excess:
Once the glue has fully dried (usually 10-15 minutes), use your scissors to snip off the excess cord as close to the bead hole as possible.
Knot Slipping Out?
If the bead hole is too small to hide the knot, try ending your pattern near a bead with a larger hole, or simply dab clear polish on the knot and trim it neatly.
Wear your badger pride with joy and remember that loyalty is your strongest accessory

The Complete Guide to Pottery Troubleshooting
Uncover the most common ceramic mistakes—from cracking clay to failed glazes—and learn how to fix them fast.
Four-House Colorblock Bracelet
Show off your school spirit without having to choose just one side with this elegant color-block design. Combining deep scarlet, forest green, and sapphire blue clay beads with stunning gold accents, this piece brings the magic of Hogwarts together on a single wrist.
Detailed Instructions
Materials
- Polymer clay disc beads (heishi beads) in deep scarlet/burgundy
- Polymer clay disc beads in forest green
- Polymer clay disc beads in royal blue
- 4 large gold spacer beads (smooth finish, 4-6mm)
- 4 detailed gold spacer rings (daisy or granulated texture)
- Stretch cord (0.8mm crystal tec or similar elastic)
- Jewelry glue or clear nail polish
- Scissors
Step 1: Planning Your Pattern
-
Measure your wrist:
Before cutting any string, wrap a piece of string or measuring tape around your wrist to determine your ideal length. Add about 3-4 inches to this measurement to ensure you have enough slack for tying the final knot comfortably. -
Pre-stringing layout:
Lay your beads out on a bead board or a towel to visualize the sections. This design relies on asymmetry, featuring a long red section, a long green section, and a shorter blue accent segment.
Knot Security
Pre-stretch your elastic cord by pulling it firmly a few times before stringing. This prevents the bracelet from loosening up and becoming baggy after the first few wears.
Step 2: Stringing the Gryffindor Section
-
Start the red segment:
Begin threading your scarlet clay beads onto the elastic cord. You will need a substantial block here, approximately 15 to 20 beads, depending on the thickness of your discs. -
Add a gold breaker:
Slide on one of your large, smooth gold spacer beads. This adds a clean break in the color and a touch of elegance. -
Finish the red segment:
Continue adding scarlet beads after the gold spacer. Add another 8 to 10 red beads to complete the Gryffindor-inspired portion of the loop. -
Transition point:
Place a second large, smooth gold spacer bead at the end of the red section. This marks the transition into the next house color.
Hufflepuff Variation
Since this design focuses on three colors, you can easily swap the blue section for bright yellow ochre beads to repent a Hufflepuff-centric tri-color combination instead.
Step 3: Adding the Slytherin Green
-
Begin the green block:
Switch to your forest green heishi beads. Thread on a matching length to your first red section, aiming for about 15-20 beads. -
Insert gold accent:
Add your third large, smooth gold spacer bead here, mirroring the placement in the red section. -
Complete the green block:
Finish the Slytherin section by adding another 8-10 green beads. Check the length against your wrist occasionally to ensure the sizing is on track.
Step 4: The Ravenclaw Accent
-
Ornate transition:
Instead of a smooth bead, use two of your detailed gold spacer rings (the ones with the granulated or daisy texture). Sandwich these rings around the start of the blue section for extra visual interest. -
String the blue beads:
Add a small, distinct block of royal blue beads. This section is shorter than the others—use only about 5 or 6 beads to create a pop of Ravenclaw blue. -
Final gold details:
Cap off the blue section with two more detailed gold spacer rings. This frames the blue segment beautifully, making it look like a central gem or focal point. -
Close the loop:
If you need more length to fit your wrist, add a few more green or red beads near the ends, or a final gold spacer, until the two ends of the cord meet comfortably without stretching.
Step 5: Finishing Touches
-
Tie the knot:
Bring the two ends of the elastic together. Tie a standard surgeon’s knot—this is like a regular square knot, but you loop the string through twice on the first pass for extra grip. -
Secure the join:
Pull the knot tight, stretching the cord slightly as you do so to lock the knot in place. I always apply a tiny drop of jewelry glue or clear nail polish to the knot itself for peace of mind. -
Hide the knot:
Once the glue is tacky or dry, trim the excess cord carefully. If possible, gently tug the bracelet so the knot slides inside the hole of one of the larger gold beads to conceal it completely.
Now you have a sophisticated accessory that subtly nods to the wizarding world without sacrificing style
Single Initial House Bracelet
Embrace your ambitious side with this elegant Slytherin-inspired stretch bracelet. Featuring deep matte green stones and rich gold accents centering a rustic bone-white focal bead, it’s a sophisticated nod to house pride without being overly loud.
Step-by-Step Guide
Materials
- Matte dark green round beads (approximately 8mm-10mm)
- Textured gold round spacer beads (same size as green beads)
- Flat gold spacer rings
- Two ribbed gold barrel spacer beads
- One large off-white focal bead (bone or ceramic style, barrel shape)
- Strong elastic display cord (0.8mm or 1mm)
- Jewelry glue or clear nail polish
- Scissors
Step 1: Preparation
-
Measure your wrist:
Wrap a piece of string around your wrist to find your comfortable size. Add about half an inch to this measurement to ensure the bracelet isn’t too tight once the beads take up space on the inner circumference. -
Prepare the elastic:
Cut a length of elastic cord about 10-12 inches long. Having this extra length makes tying the final knot significantly easier than struggling with short ends. -
Pre-stretch the cord:
Give your elastic cord a few firm tugs before you start beading. This pre-stretching helps prevent the bracelet from sagging or loosening up immediately after you wear it for the first time.
Knot Security
Use a surgeon’s knot for extra security. Loop the elastic through twice on the first pass instead of once before pulling tight.
Step 2: Designing the Pattern
-
Identify the center:
Start by identifying your focal point components. You will need the large off-white barrel bead and the two ribbed gold barrel spacers that will flank it. -
String the focal section:
Thread one ribbed gold barrel spacer onto the elastic, followed immediately by the large white focal bead. -
Balance the center:
Add the second ribbed gold spacer on the other side of the white bead. This creates a symmetrical, framed look for your centerpiece. -
Start the main pattern:
On the right side of your centerpiece, add one matte green bead. -
Add gold accents:
Follow the green bead with a textured gold round bead to introduce metallic warmth. -
Establish the rhythm:
Add another matte green bead. The emerging pattern is green-gold-green, moving away from the center.
Step 3: Completing the Strand
-
Mirror the design:
Repeat the exact same sequence on the left side of the focal bead: one green bead, one gold bead, and one green bead. I find laying the beads out on a mat first helps keep track of the symmetry. -
Continue the pattern:
Continue stringing beads on both sides. Depending on your supplies, you can alternate between green and gold, or use gold beads only as occasional accents between sections of green. -
Incorporate flat spacers:
If you have flat gold rings, insert them occasionally between green beads to break up the color block without adding bulk. -
Check the fit:
Once you have strung enough beads to reach your measuerd length, wrap the strand around your wrist. The ends should touch comfortably without stretching the cord.
House Customization
Swap the green beads for deep red, navy blue, or yellow/black to represent Gryffindor, Ravenclaw, or Hufflepuff instantly.
Step 4: Finishing
-
Tie the knot:
Bring both ends of the elastic together. Tie a standard square knot (right over left, left over right) and pull it tight. -
Secure the knot:
Carefully place a tiny drop of jewelry glue or clear nail polish directly onto the knot. This prevents it from slipping over time. -
Hide the mechanics:
While the glue is still tacky but not wet, slide the knot inside the hole of the nearest large bead if possible to conceal it. -
Trim excess:
Once the glue is fully dry, trim the excess elastic tails with your scissors, being careful not to cut the main cord.
Slip on your new bracelet and enjoy carrying a subtle piece of house pride with you everywhere you go


What Really Happens Inside the Kiln
Learn how time and temperature work together inside the kiln to transform clay into durable ceramic.
House Traits Word Bracelet
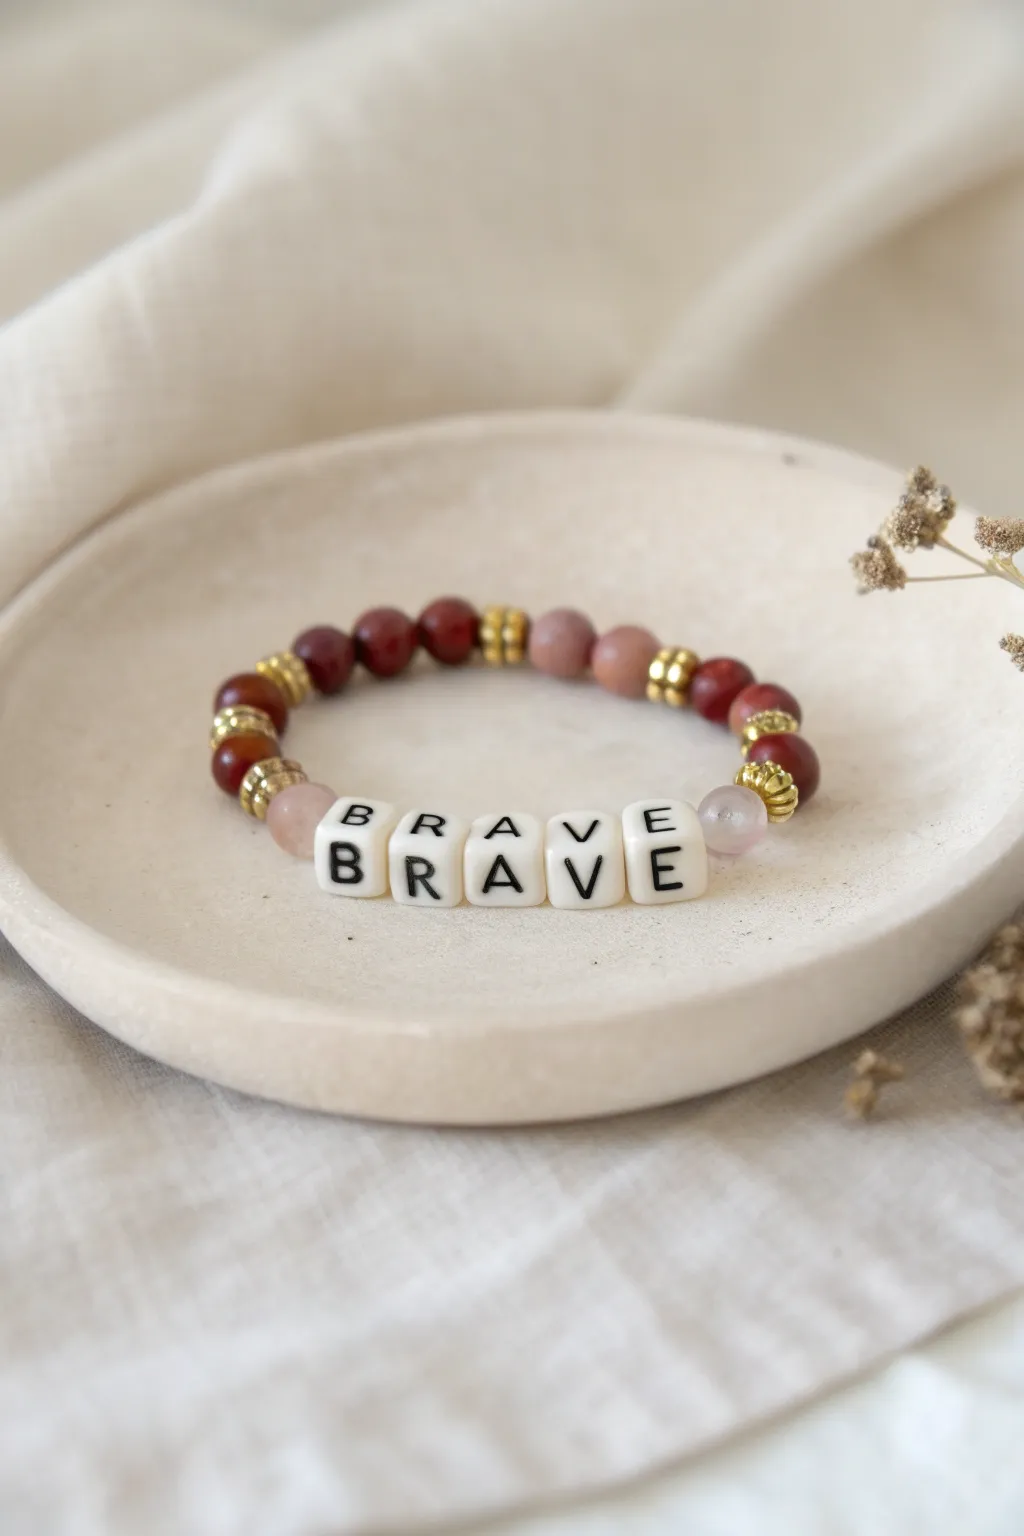
Channel the courage of Godric Gryffindor with this elegant beaded bracelet that spells out his house’s defining trait. Featuring deep red jasper tones paired with soft neutrals and gold accents, this accessory perfectly balances fandom pride with sophisticated, earthy style.
Detailed Instructions
Materials
- Stretch elastic cord (0.8mm clear)
- White electric square letter beads spelling B-R-A-V-E
- 8mm Round gemstone beads: Red Jasper or Red Creek Jasper (deep red/burgundy)
- 8mm Round gemstone beads: Rhodonite or Pink Opal (dusty pink/mauve)
- Gold plated brass heishi spacer beads (small discs)
- Gold plated stylized bead caps or rondelle spacers (textured)
Step 1: Planning and Sorting
-
Measure the wrist:
Before cutting any cord, wrap a measuring tape around the wrist you are designing for. Add about half an inch to this measurement for a comfortable fit that isn’t too tight. -
Select your letter beads:
Sort through your alphabet bead kit and pull out the letters B, R, A, V, and E. I personally like to lay them out first to make sure the print quality on each cube is centered and clear. -
Lay out the pattern:
On a bead design board or a piece of felt fabric, organize your beads. Place the ‘BRAVE’ letters in the center. Flank either side with a neutral pink bead, then begin your pattern of reds and golds outward from there.
Step 2: Stringing the Centerpiece
-
Prepare the elastic:
Cut a piece of elastic cord about 10-12 inches long. Having extra length makes the final tying process much less frustrating than struggling with short ends. -
Secure one end:
Place a bead stopper or a piece of tape on one end of the elastic to prevent beads from sliding off as you work. -
String the word:
Thread the letter beads onto the cord in order: B, R, A, V, E. Double-check the orientation so they are all facing the same way. -
Add the flanking beads:
On the immediate left of ‘B’, slide on one dusty pink bead. Do the same on the immediate right of ‘E’. This softens the transition from the white squares to the darker stones.
Knot Slipping Not Staying?
If the bead hole is too small to hide the knot, try widening it slightly with a bead ream tool, or simply ensure the knot is nestled tight against a bead rather than inside it.
Step 3: Building the Pattern
-
Add gold spacers:
Slide a gold textured spacer or bead cap next to each pink bead. These gold accents add that crucial Gryffindor metallic touch. -
Start the red sequence:
Add a deep red gemstone bead on each side. Follow this with a flat gold heishi disc spacer. -
Continue the pattern:
Repeat the pattern outward: Red Bead, Gold Disc, Red Bead. Continue adding to both sides evenly to keep the word ‘BRAVE’ centered on the wrist. -
Vary the shades:
If using natural gemstones like Jasper, alternate between darker burgundy beads and slightly lighter, rust-colored ones to create depth and visual interest. -
Mix in accent beads:
About halfway around the bracelet, swap a standard gold disc for one of the textured gold rondelle spacers to break up the rhythm slightly. -
Check the length:
Wrap the unfinished strand around your wrist to check the sizing. The ends should touch comfortably without stretching the cord.
Level Up: House Charm
Add a small lion charm or a sword charm using a jump ring attached to one of the gold spacers for an extra magical touch representing the house mascot.
Step 4: Finishing Touches
-
Pre-stretch the cord:
Give the elastic a few gentle tugs. This pre-stretching helps prevent the bracelet from sagging or loosening permanently after the first few wears. -
Tie the knot:
Remove the tape or stopper. Tie a standard surgeon’s knot (right over left, left over right, and loop through an extra time) to secure the bracelet loop. -
Add adhesive:
Dab a tiny drop of jewelry glue or clear nail polish onto the knot. This seals the fibers and ensures your bravery bracelet stays intact during daily adventures. -
Hide the knot:
Once the glue is tacky but drying, tug gently so the knot slips inside the hole of the nearest large bead (preferably one of the pink or red 8mm beads). -
Trim excess:
Use sharp scissors to snip off the excess elastic tail, being careful not to cut the main knot.
Wear this sophisticated tribute with pride and remember that bravery takes many forms
Metallic Spacer “Uniform” Pattern
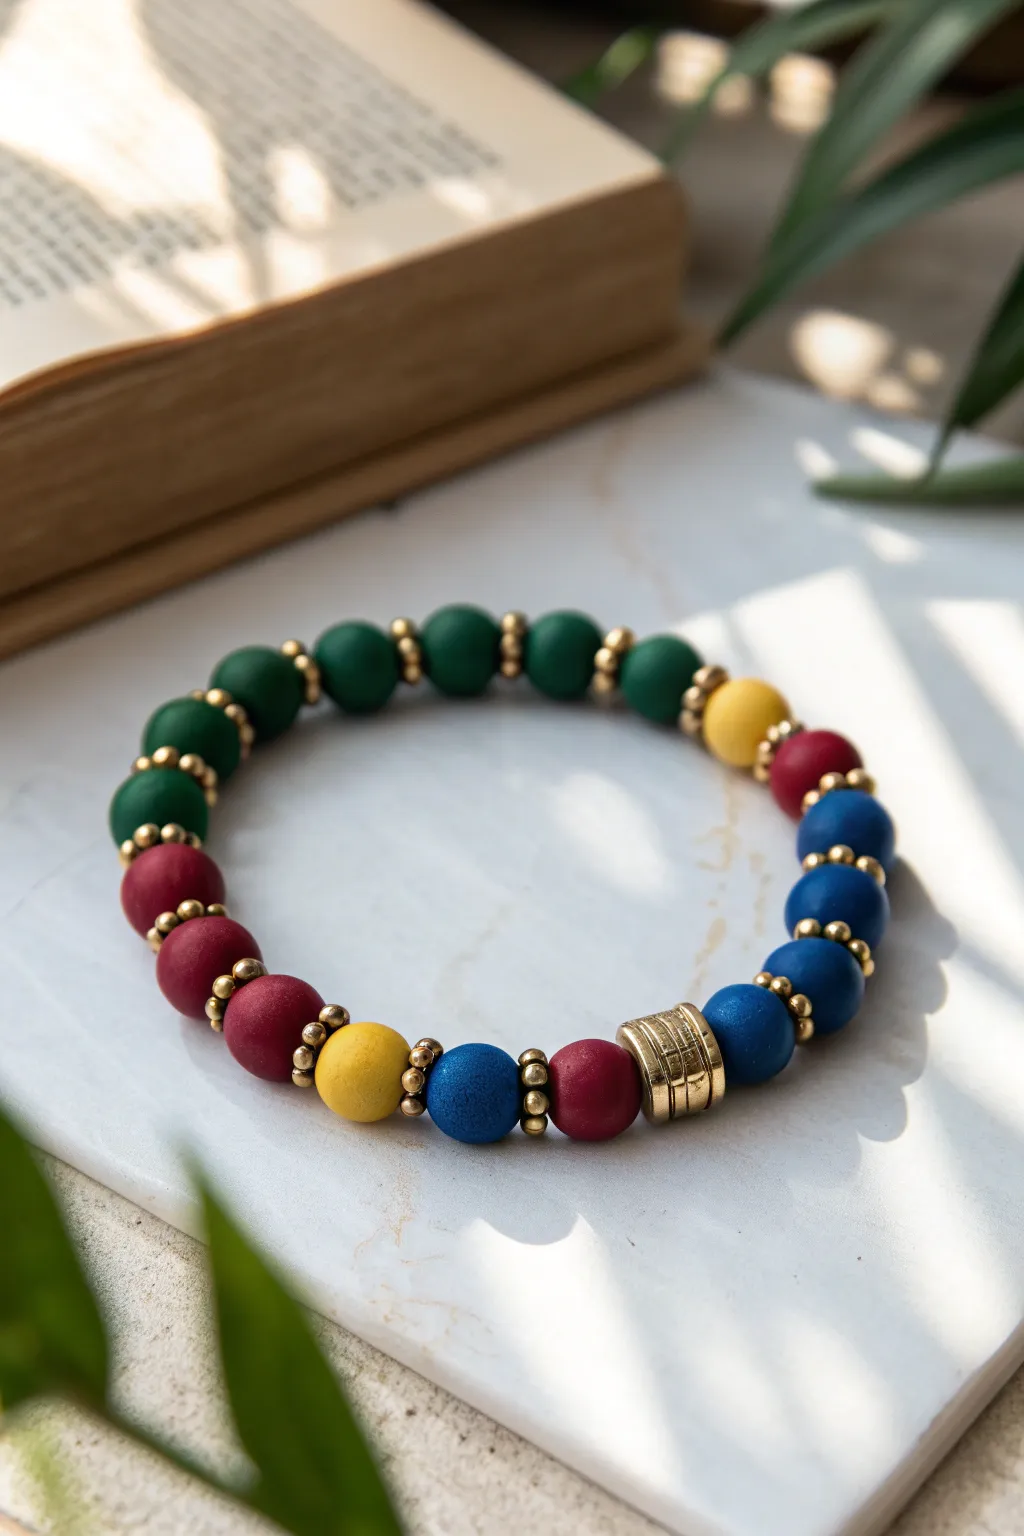
Celebrate all four Hogwarts houses with this sophisticated, color-blocked design featuring matte clay beads separated by elegant metallic accents. The rhythmic pattern of gold spacers gives this piece a structured, high-end look that elevates standard house colors into a wearable daily accessory.
Step-by-Step
Materials
- 10mm round matte polymer clay beads in Deep Green (Slytherin)
- 10mm round matte polymer clay beads in Burgundy/Red (Gryffindor)
- 10mm round matte polymer clay beads in Royal Blue (Ravenclaw)
- 10mm round matte polymer clay beads in Mustard Yellow (Hufflepuff)
- Small gold disc spacers or gold seed beads (approx. 3-4mm)
- One large barrel-shaped gold focal bead (textured or grooved)
- Strong elastic beading cord (0.8mm recommended)
- Super glue or jewelry cement
- Scissors
Step 1: Preparation and Planning
-
Measure your wrist:
Before cutting any cord, wrap a measuring tape around your wrist comfortably. Add about half an inch to this measurement for the beads’ bulk, which equates to the length of the finished bead strand you need. -
Sort your beads:
Separate your clay beads by color. You will need roughly 5-6 beads of each house color: green, red, blue, and yellow. -
Prepare the spacers:
Pour out a small pile of your gold spacers. You will need two spacers for every single clay bead used, so ensure you have plenty on hand. -
Cut the cord:
Cut a piece of elastic cord about 10-12 inches long. I always cut extra because it makes tying the final knot much less frustrating than struggling with short ends. -
Pre-stretch the elastic:
Give your cut elastic a few firm tugs. This pre-stretching prevents the bracelet from loosening up and becoming saggy after the first few wears.
Step 2: Stringing the Pattern
-
Start with the focal bead:
Thread the large, textured gold barrel bead onto the center of your elastic. This will anchor the design and hide the knot later if the hole is large enough. -
Begin the first color block:
On the right side of the barrel bead, slide on one Red bead followed immediately by a gold spacer. -
Establish the spacer rhythm:
The key to this look is flanking every clay bead. Slide on another Blue clay bead, but sandwich it with gold spacers. The pattern unit is: Gold Spacer + Clay Bead + Gold Spacer. -
Build the Blue section:
Continue adding Blue beads, ensuring a gold spacer sits between each one. Use about 4-5 blue beads for this section. -
Switch to Yellow:
Transition to the Hufflepuff section. Add a single Red bead as a connector if you want to mimic the chaotic mix, or strictly block your colors. In the image, we see a transition from Blue to Yellow. -
Create the Yellow block:
String 1-2 Yellow beads, maintaining the gold spacer separation. Notice the image uses a singular yellow bead as an accent amidst the red and blue, creating variety. -
Add the Green section:
On the other side of the bracelet (or continuing around), add your block of 5-6 Green beads. Remember: Spacer, Green Bead, Spacer. -
Add the Red section:
Complete the circle with your Red beads. The image shows a pattern where colors aren’t perfectly equal blocks but rather flow into each other, so feel free to mix a single yellow bead in between a red and blue section for visual interest. -
Check the fit:
Wrap the unfinished strand around your wrist. The ends should touch comfortably without stretching the cord visible between beads.
Pro Tip: Matte Maintenance
Matte beads can pick up oils. If they look dull over time, wipe them gently with a baby wipe to restore that crisp, velvety finish.
Step 3: Finishing Touches
-
Prepare for the knot:
Verify that your pattern ends with a gold spacer so it will meet the gold barrel bead seamlessly. -
Tie the knot:
Tie a surgeon’s knot (right over left, left over right, looping the second tie through twice). Pull the elastic tight so the beads compress snugly. -
Secure with glue:
Dab a tiny drop of super glue or jewelry cement directly onto the knot. Be careful not to get glue on the matte beads, as it will ruin their finish. -
Hide the knot:
While the glue is still tacky but not wet, gently pull the knot inside the large gold barrel bead if possible. If the hole is too small, simply trim the ends very close to the knot after the glue dries completely.
Level Up: House Charms
Attach a small golden charm of a lion, snake, badger, or eagle next to the barrel bead to declare your specific house allegiance.
Slip on your unified house bracelet and carry a bit of wizarding magic with you everywhere you go

TRACK YOUR CERAMIC JOURNEY
Capture glaze tests, firing details, and creative progress—all in one simple printable. Make your projects easier to repeat and improve.
Lightning Bolt Center Charm Bracelet

Channel the bravery of Gryffindor with this striking bracelet featuring deep scarlet clay beads and bright golden accents. It’s a perfect fan accessory that balances elegance with fandom, centered around a dazzling lightning bolt charm.
How-To Guide
Materials
- Red polymer clay (e.g., Fimo Soft or Premo in deep burgundy/scarlet)
- Gold metallic pigment powder or gold acrylic paint (optional for texture)
- Gold spacer beads (small flat rondelles or heishi style)
- Gold lightning bolt charm
- Gold jump ring (6-8mm)
- Strong elastic cord (0.8mm)
- Superglue or jewelry knot cement
- Bead reamer or toothpick
- One large focal gold bead (optional, for knot hiding)
- Oven for baking polymer clay
- Baking sheet and parchment paper
Step 1: Crafting the Clay Beads
-
Condition the Clay:
Begin by working your red polymer clay in your hands until it is soft, pliable, and free of any air bubbles. -
Portion the Clay:
Roll the clay into a long snake about 1/2 inch in diameter. Use a blade to slice equal sized portions to ensure your beads are uniform. -
Roll Spheres:
Take each slice and roll it between your palms to create a perfect sphere. Aim for beads that are approximately 8-10mm in diameter. -
Add Texture Explained:
For the matte, stone-like texture seen in the photo, gently roll the unbaked beads over a piece of coarse sandpaper or use a toothbrush to stipple the surface lightly. I find this gives them that rustic, magical look. -
Pierce the Holes:
Use a toothpick or bead pin to pierce a hole through the center of each bead. Twist the tool gently as you push through to avoid deforming the round shape. -
Bake the Beads:
Arrange your beads on a baking sheet lined with parchment paper. Bake according to your clay package instructions (usually 275°F/130°C for 15-30 minutes). Let them cool completely.
Stone Effect
Before baking, roll your beads in a pinch of salt or sugar. After baking, wash the beads; the granules dissolve, leaving realistic pits.
Step 2: Prepping the Charm
-
Select the Hanger:
To make the charm hang correctly, you’ll need a bail or a larger gold jump ring. In the reference, a sleek gold bead with a loop or a large jump ring acts as the carrier. -
Attach the Bolt:
Use pliers to open a small jump ring attached to the lightning bolt charm and connect it to your chosen carrier ring or bail. Close the jump ring securely.
Step 3: Assembly
-
Measure the Cord:
Cut a piece of elastic cord about 10 inches long. This gives you plenty of extra room to tie the knot comfortably. -
Stretch the Elastic:
Pre-stretch your elastic cord by pulling it firmly a few times. This prevents the bracelet from stretching out and becoming loose after you wear it. -
Start Beading:
Begin threading your beads onto the elastic. Start with one red clay bead, followed immediately by a gold spacer bead. -
Create the Pattern:
Continue this alternating pattern—red bead, gold spacer, red bead, gold spacer—until the strand is long enough to wrap around your wrist comfortably. -
Insert the Focal Point:
Once you have reached the halfway point of your desired length, slide on the gold ring/bail that holds your lightning bolt charm. It should sit between two red beads. -
Finish the Strand:
Continue the alternating pattern until the full length is achieved. Make sure you end with a bead that will allow the pattern to look continuous once tied. -
Knotting:
Tie the ends of the elastic together using a surgeon’s knot (right over left, then left over right twice). Pull the knot tight. -
Secure the Knot:
Apply a tiny dab of superglue or jewelry cement to the knot for extra security. Let it dry for a moment. -
Hide the Knot:
Trim the excess cord ends carefully. If possible, gently tug the elastic to pull the knot inside one of the adjacent clay beads or the large gold bead to hide it.
House Colors
Switch the red clay to green and silver spacers for Slytherin, or blue with bronze spacers for a Ravenclaw variation.
Wear your new magical accessory with pride or gift it to a fellow fan
Round Glasses Focal Bead Look
Capture the magic of the wizarding world with a bracelet that subtly nods to Gryffindor and Slytherin colors without screaming fandom. This sophisticated design combines earthy maroon, forest green, and natural wood tones, accented with antique gold for a timeless, academic aesthetic.
Step-by-Step Guide
Materials
- 8mm dark maroon round wood or clay beads
- 8mm dark forest green round beads (matte stone or jasper)
- 8mm cream/natural wood round beads
- Small antique gold spacer beads or heishi beads
- Gold tone crimp beads
- Gold tone jump rings
- 0.8mm elastic stretch cord
- Jewelry adhesive (e.g., G-S Hypo Cement)
- Scissors
Step 1: Planning and Stringing
-
Measure your wrist:
Cut a piece of elastic cord about 10-12 inches long. This generous length gives you plenty of room to knot securely without struggling against tension. -
Pre-stretch the cord:
Before adding any beads, give the elastic a few firm tugs. This pre-stretching prevents the bracelet from drooping or loosening immediately after you finish making it. -
Secure the end:
Attach a piece of tape or a binder clip to one end of the cord to stop beads from sliding off while you design your pattern. -
Start the pattern:
Begin your threading with a sequence of two cream wood beads. This establishes the neutral base that makes the house colors pop. -
Integrate the colors:
Next, string one dark maroon bead followed by one forest green bead. The contrast between these two deep shades creates that signature magical academy look. -
Add gold accents:
Place a small antique gold spacer bead next. These metallic touches elevate the design from a simple craft to jewelry suitable for daily wear. -
Repeat the core sequence:
Continue the pattern: two cream beads, one maroon, one green, and one gold spacer. I find repeating this rhythm keeps the design balanced. -
Check length frequently:
Wrap the strand around your wrist occasionally as you work. You want it to sit comfortably against the skin without digging in. -
Adjust the pattern ending:
End your stringing so the pattern flows seamlessly when connected. You may need to add or remove one gold spacer to make the loop look continuous.
Knot Slipping?
If your elastic knot keeps unraveling while you try to glue it, clamp it temporarily with a pair of flat-nose decorative pliers or a hemostat until the adhesive sets.
Step 2: Finishing Touches
-
The first knot:
Remove the tape or clip. Bring both ends of the elastic together and tie a simple overhand knot, pulling it tight to bring the beads together. -
The surgeon’s knot:
Tie a second knot, but loop the end through twice before pulling tight. This creates a surgeon’s knot, which is much less likely to slip on elastic cord. -
Secure with glue:
Apply a tiny dot of jewelry adhesive directly onto the knot. Be careful not to get glue on the surrounding beads, as it can stain wood or stone. -
Hide the knot:
While the glue is still slightly tacky, gently pull the knot inside one of the larger hole beads (usually the wooden ones work best for this). -
Let it cure:
Allow the bracelet to sit undisturbed for at least 15 minutes to let the glue set completely. -
Trim excess cord:
Once the glue is dry, use your small scissors to snip off the excess elastic tails as close to the bead hole as possible. -
Stretch test:
Give the finished bracelet a gentle horizontal stretch to ensure the knot is secure inside the bead and the tension is even all around.
Natural Texture
For a more rustic, Forbidden Forest verve, verify your wooden beads are unvarnished. The matte texture contrasts beautifully with the slight sheen of the gold spacers.
Now you have a stylish accessory perfect for studying in the library or sipping tea in your common room
Tiny Wand-Inspired Tube Beads
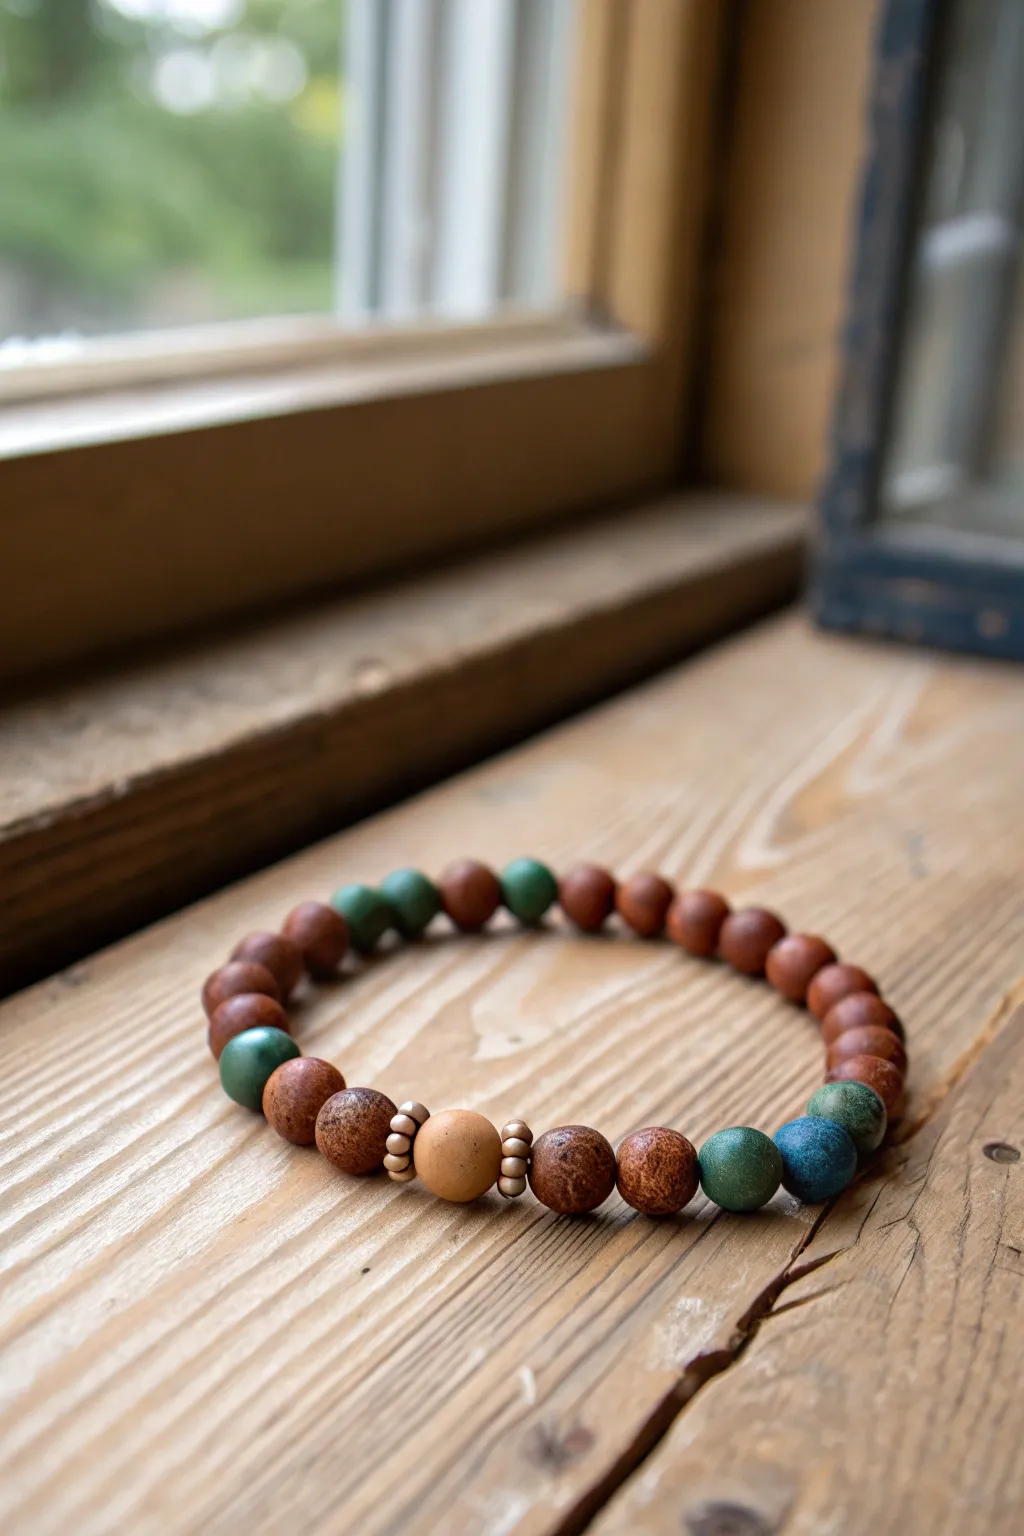
Capture the rustic, magical essence of wand woods and muted house colors with this textured polymer clay bracelet. The design features a central blonde-wood inspired bead flanked by rich mahogany tones and subtle pops of teal and green.
How-To Guide
Materials
- Polymer clay in burnt umber, tan, beige, and muted teal/green
- Gold or bronze spacer beads (4 small round ones)
- Strong elastic bead cord (0.8mm)
- Course grit sandpaper or a nail file
- Toothpick or bead piercing tool
- Acrylic paint in dark brown (for antiquing)
- Paper towel or rag
- Baking sheet and parchment paper
- Clay roller or pasta machine
- Jewelry glue (optional)
Step 1: Creating the Clay Mixes
-
Prepare the wood tones:
Start by conditioning your burnt umber clay until it is soft and pliable. If the brown is too uniform, I like to mix in a tiny pinch of black or translucent clay to give it depth, but don’t blend it completely—leave faint streaks to mimic wood grain. -
Mix the house colors:
For the blue/green accent beads, mix a standard teal with a little bit of brown or grey clay. You want these to look like aged stones or weathered wood, not bright plastic. -
Create the focal bead color:
Examine the center bead; it’s a lighter, blonde wood tone. Mix beige clay with a tiny amount of yellow ochre or gold clay to achieve this warm, lighter shade.
Grain Effect Tip
Twist two shades of brown clay together like a candy cane, fold, and twist again before rolling beads to simulate realistic wood grain stripes.
Step 2: Forming and Texturing
-
Roll the base spheres:
Roll your conditioned clay into spheres. You will need about 20-22 beads total: one large light focal bead, four teal/green accent beads, and the rest in your dark wood tone. Aim for about 8mm-10mm diameter for the standard beads and 12mm for the focal bead. -
Add wood texture:
This step makes a huge difference. Gently roll each ‘wood’ bead over coarse sandpaper. Alternatively, you can lightly tap them with a stiff toothbrush to create tiny pores and imperfections. -
Pierce the beads:
Using your bead piercing tool or a toothpick, carefully create a hole through the center of each bead. Rotate the bead as you push through to prevent it from squishing out of shape.
Fingerprints showing?
If you see fingerprints on your raw clay beads, lightly brush them with a little baby oil or cornstarch before baking to smooth them out.
Step 3: Baking and Finishing
-
Bake the beads:
Arrange the beads on a parchment-lined baking sheet. Bake according to your brand of polymer clay instructions (usually around 275°F/135°C for 30 minutes for this size). -
Cool down:
Allow the beads to cool completely before handling. They are fragile when hot. -
Antique the beads:
To enhance the wood texture, dilute a small amount of dark brown acrylic paint with water. Brush it over the beads, getting it into the textured crevices. -
Wipe away excess:
Quickly wipe the surface of the beads with a paper towel. The dark paint will stay in the pits and lines, making the texture pop while cleaning up the raised areas.
Step 4: Assembly
-
Cut the cord:
Cut a piece of elastic cord about 10-12 inches long. This gives you plenty of extra length for knotting. -
Stretch the cord:
Pre-stretch the elastic by pulling on it gently a few times. This prevents the bracelet from sagging later on. -
Arrange the pattern:
Lay out your design on a bead board or towel. The order should be: two bronze spacers, the large light focal bead, two bronze spacers, followed by the rest of the dark wood beads interspersed with the teal accents near the back or sides. -
String the beads:
Thread the beads onto the elastic in your chosen pattern. -
Tie the knot:
Bring the ends together and tie a strong surgeon’s knot (right over left, left over right, looping through twice on the first pass). Pull it tight. -
Secure the knot:
If possible, slide the knot inside one of the larger-holed beads to hide it. A tiny dot of jewelry glue on the knot ensures it never slips.
Wear your finished piece as a subtle nod to the wizarding world that fits perfectly with everyday style
Potion Bottle Color Recipe Bracelet
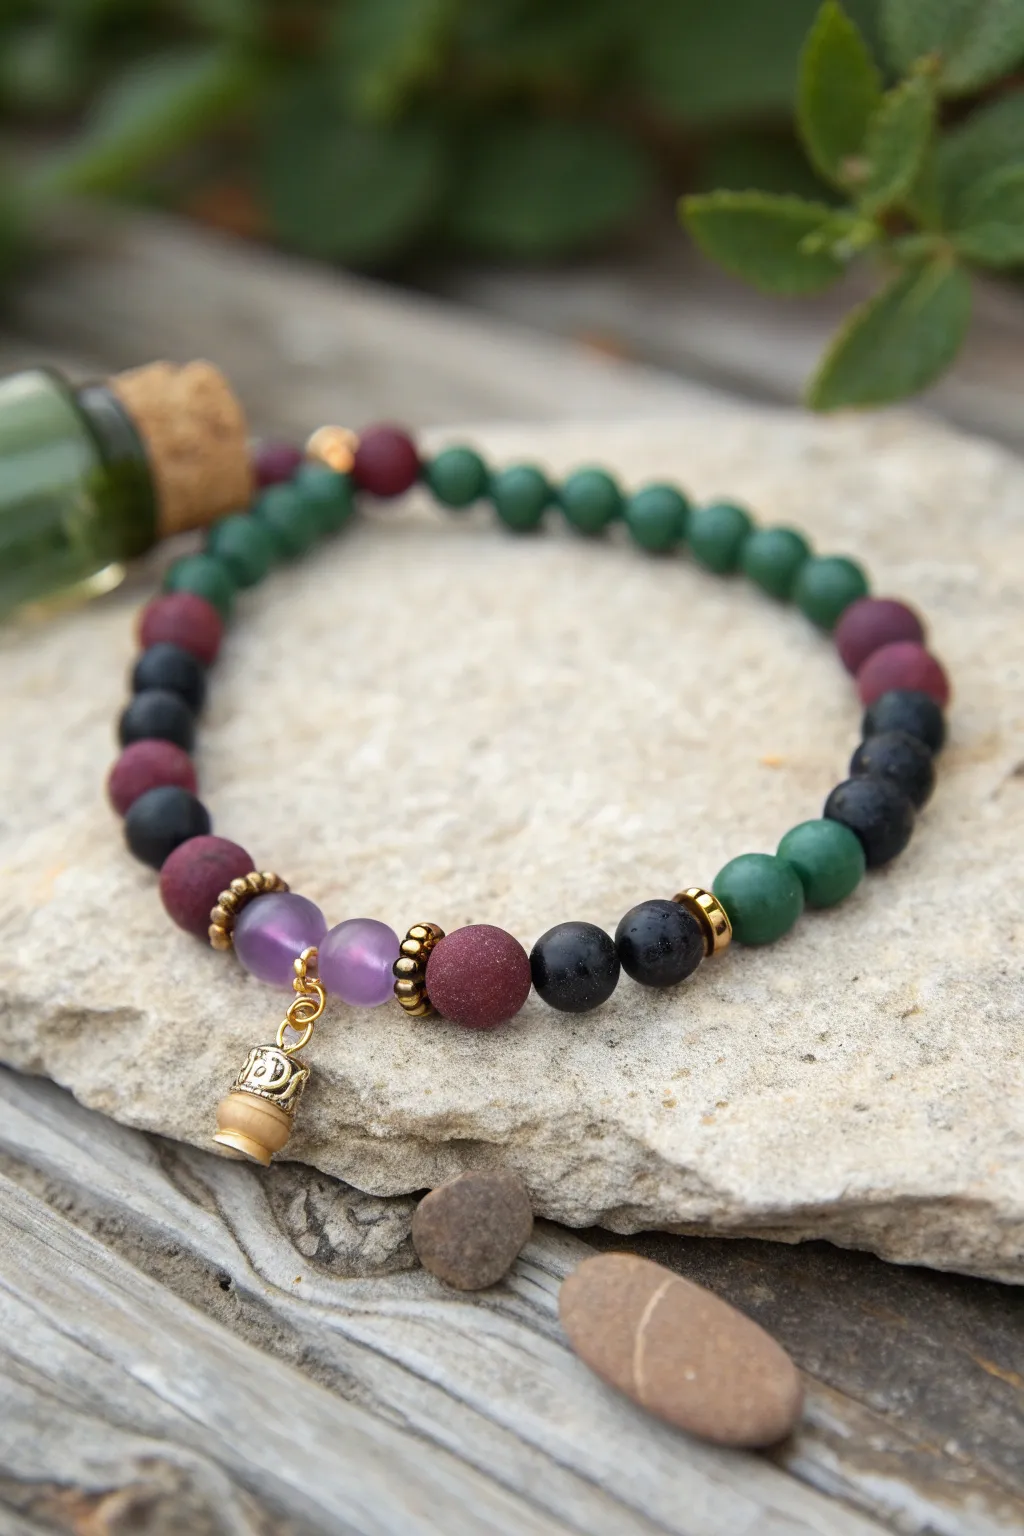
Capture the moody atmosphere of the dungeons with this rich, earth-toned bracelet featuring a unique hanging potion bottle charm. The combination of matte textures and translucent beads creates a sophisticated accessory perfect for any aspiring wizard.
Step-by-Step Tutorial
Materials
- Matte finish lava or gemstone beads (6mm) in forest green
- Matte finish lava or gemstone beads (6mm) in maroon/burgundy
- Matte finish lava or gemstone beads (6mm) in black
- Translucent purple glass or amethyst accent beads (6mm)
- Gold finish spacer beads (textured wheels or daisy spacers)
- Miniature potion bottle or chalice charm (gold and cork/wood)
- Small gold jump ring (4-5mm)
- Strong elastic jewelry cord (0.7mm or 0.8mm)
- Jewelry adhesive or clear nail polish
- Scissors
Step 1: Preparation
-
Measure and Cut:
Measure your wrist and add about 3-4 inches to determine your cord length. Cut the elastic cord to this size to ensure you have plenty of room for tying knots later. -
Pre-stretch the Cord:
Hold both ends of your cut elastic and give it a few firm tugs. This pre-stretching step helps prevent the bracelet from sagging or loosening shortly after you start wearing it. -
Plan the Pattern:
Before stringing, lay out your beads on a cloth or bead board. The design relies on specific blocking: a long run of green, followed by alternating maroon and black sections, leading to the focal point. -
Prepare the Charm:
If your potion bottle charm doesn’t have a jump ring attached, use pliers to open a small gold jump ring, slide on the charm loop, and close it securely.
Step 2: Stringing the Focal Section
-
Start the Center:
Thread one gold spacer bead onto the elastic. This will frame the central focal point. -
Add the Purple Accents:
Slide on the two translucent purple beads. These act as the ‘potion liquid’ color accent in the design. -
Attach the Charm:
Slide the jump ring of your potion bottle charm onto the cord so it sits directly between the two purple beads. Wait, I prefer to check that the charm swings freely before moving on. -
Finish the Focal Frame:
Add a second gold spacer bead after the second purple bead to complete the symmetrical center section.
Knot Slipping?
If your elastic knot feels insecure, try a ‘square knot’ followed by a ‘surgeon’s knot’. Pulling all four strands (the two ends and the two bead sides) simultaneously tightens it best.
Step 3: Completing the Beading
-
Create the First Transition:
On the right side of the focal point, add one maroon matte bead, followed by one black matte bead. -
Add a Side Accent:
Place one more black bead, then a gold spacer bead to create a visual break. -
Begin the Green Run:
Switch to your forest green matte beads. String at least 4-5 green beads to create the main body of color for this side. -
Mirror the Left Side:
Repeat the pattern on the other side of the focal point: one maroon bead, two black beads, and a gold spacer. -
Fill the Rest:
Continue stringing the remaining length of the bracelet with the forest green beads, stopping occasionally to check the fit against your wrist. -
Add Back Accents:
To add visual interest to the back of the wrist, intersperse 2-3 single maroon beads within the green section to break up the color block.
Pro Tip: Matte Beads
Matte beads absorb oils from skin, darkening slightly over time. To keep them pristine longer, wipe them with a damp cloth after wearing.
Step 4: Finishing and Tying
-
Check fit:
Wrap the beaded strand around your wrist one final time. It should be snug but not tight, with no gaps showing between beads. -
Tie the Knot:
Tie a surgeon’s knot (right over left, left over right twice) to secure the ends. Pull the elastic tight so the knot compresses. -
Secure the Knot:
Apply a tiny dot of jewelry glue or clear nail polish directly onto the knot. Allow it to dry for a minute. -
Hide the Knot:
Trim the excess cord ends to about 2mm. Gently tug the bracelet to pull the knot inside one of the adjacent beads to hide it completely.
Wear your new bracelet alone or stacked with other house colors to show off your magical pride
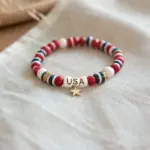
Starry Night Astronomy House Mix
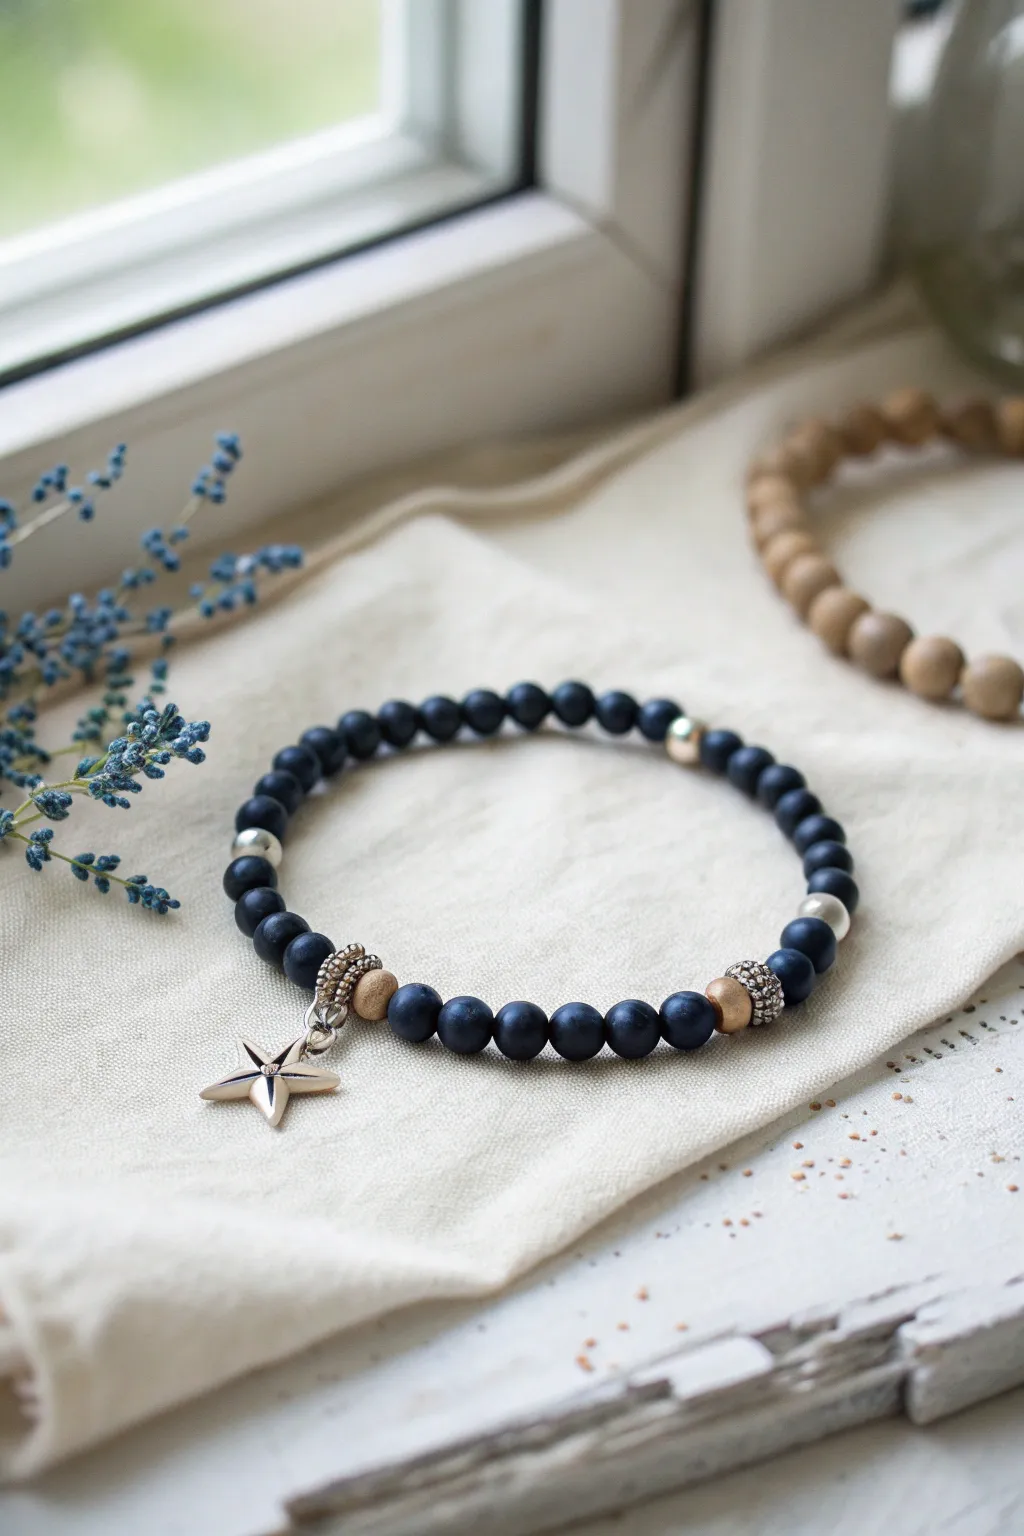
Reflecting the deep midnight blue of the Astronomy Tower sky, this elegant bracelet combines matte dark beads with celestial silver accents. The simple star charm acts as the perfect focal point for a piece that whispers magic without shouting it.
Step-by-Step Guide
Materials
- Matte dark navy blue or black round beads (approx. 6mm or 8mm)
- Small round silver spacer beads
- Textured silver ring spacer beads (rondelle style)
- Light natural wood beads (approx. 6mm)
- Silver five-point star charm
- Jump ring (silver)
- Beading elastic cord (0.8mm or 1mm)
- Jewelry glue (optional, e.g., G-S Hypo Cement)
- Scissors
Step 1: Planning and Stringing
-
Prepare your workspace:
Lay out a soft cloth or bead mat to prevent your beads from rolling away. It helps to envision your pattern before you start stringing. -
Cut the cord:
Cut a length of elastic cord about 10-12 inches long. This gives you plenty of extra room for tying the finishing knot without struggling. -
Pre-stretch the elastic:
Give the elastic cord a few gentle tugs. This pre-stretching prevents the bracelet from loosening up significantly after the first few times you wear it. -
Attach the charm:
Open a jump ring using pliers (or your fingers if it’s soft enough), slide on your star charm, and then slide the jump ring onto a decorative bail or bead carrier if you have one. If not, simply slide the closed jump ring directly onto the elastic cord to start. -
Secure the charm position:
Center the charm on your cord. This will be the anchor point for your symmetrical design.
Pro Tip: Matte Magic
Using matte beads instead of glossy ones mimics the deep, velvety look of the night sky better. If you can’t find matte beads, lightly buff glossy ones with fine sandpaper.
Step 2: Creating the Pattern
-
Add first silver accents:
On both sides of the charm, thread on a textured silver ring spacer bead. These frame the star beautifully. -
Incorporate earthly elements:
Next, add one light natural wood bead to each side. The contrast between the wood and the dark blue beads adds a nice organic touch, reminiscent of broomsticks. -
Begin the dark sequence:
Slide one dark matte blue bead onto the right side, followed by a small plain silver spacer bead. -
Repeat on the left:
Mirror that pattern on the left side: one dark matte bead, then one small silver spacer bead. -
Continue the main strand:
Now, fill the rest of the bracelet length primarily with the dark matte blue beads. This creates that ‘midnight sky’ effect. -
Mark the midpoint (optional):
About halfway through the remaining length on each side, you can add another small silver spacer bead to break up the darkness slightly, just like a distant star. -
Check the fit:
Wrap the unfinished strand around your wrist. The ends should touch comfortably without stretching the elastic. Add or remove dark beads as needed to get the perfect size.
Level Up: Galaxy Effect
Use a mix of dark blue, black, and very dark purple beads randomly instead of a solid color. This creates a subtle ‘nebula’ depth to your bracelet strand.
Step 3: Finishing Touches
-
Prepare for the knot:
Bring the two ends of the elastic together carefully, ensuring the beads don’t slide off. -
Tie the knot:
Tie a surgeon’s knot (right over left, left over right, and loop through an extra time). Pull it tight. -
Secure with glue:
I prefer to dab a tiny drop of jewelry glue on the knot to ensure it never slips. Let this dry for a few minutes. -
Hide the knot:
Once dry, trim the excess elastic ends close to the knot. Then, gently tug the bracelet so the knot slides inside the hole of one of the adjacent beads to hide it. -
Final inspection:
Give the bracelet a final gentle stretch test to ensure everything is secure and the charm hangs correctly.
Now you have a subtle piece of wizarding world flair to wear comfortably every day
Steam Train Ticket Palette Bracelet
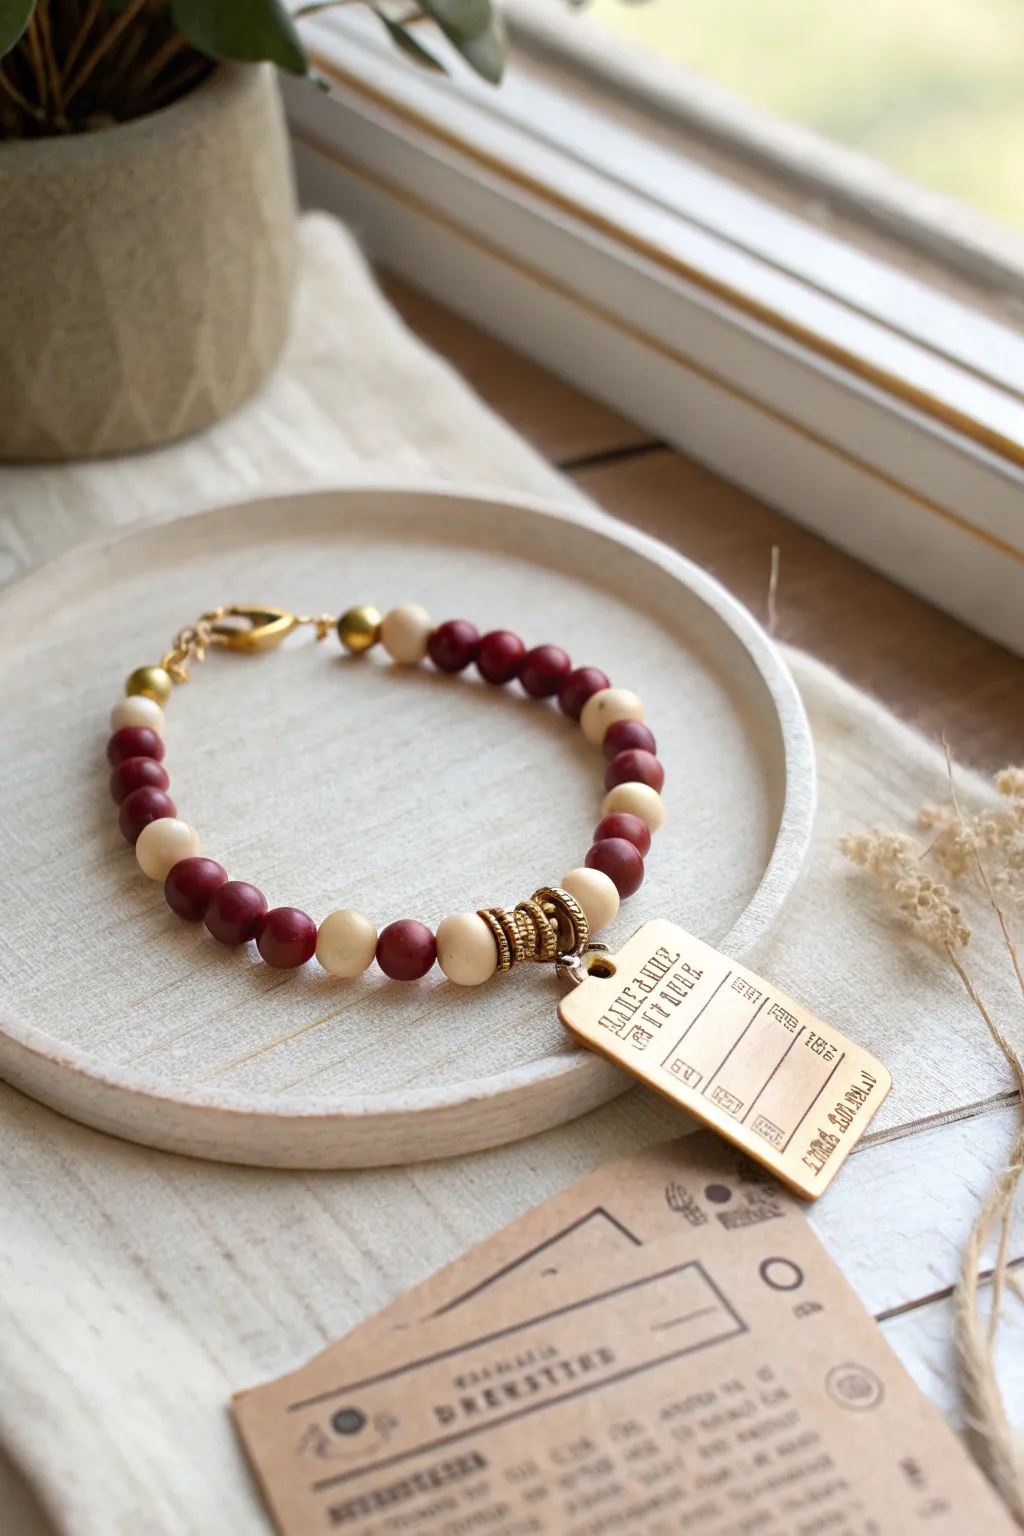
Capture the magic of the journey to Hogwarts with this elegant beaded bracelet inspired by the Hogwarts Express. Featuring a repeating pattern of deep burgundy and cream clay beads accented with gold, the centerpiece is a striking golden ticket charm that looks just like your passage to the wizarding world.
Step-by-Step Tutorial
Materials
- Polymer clay round beads (approx. 8mm): deep burgundy/maroon
- Polymer clay round beads (approx. 8mm): cream/off-white
- Gold tone metal spacer beads (small, round and disc-shaped)
- Gold tone decorative bail or jump ring carrier
- Gold tone rectangular train ticket charm (stamped metal)
- Beading wire (gold color or clear nylon coated)
- 2 Crimp beads (gold)
- 2 Crimp bead covers (gold)
- Lobster clasp (gold)
- Jump rings (gold, 4mm and 6mm)
- Wire cutters
- Flat nose pliers
- Crimping tool (optional but recommended)
Step 1: Preparation & Charm Assembly
-
Select your beads:
Gather your clay beads. You’ll need about 18-20 burgundy beads and 8-10 cream beads, depending on your wrist size. -
Cut the wire:
Cut a piece of beading wire approximately 10-12 inches long. It’s always better to have extra length to work with than to run short. -
Prepare the charm:
Attach the rectangular golden ticket charm to a decorative bail or a large, sturdy jump ring. Ensure the charm hangs freely and faces forward. -
Start the wire:
Thread a crimp bead onto one end of your wire, followed by a jump ring (which will later hold the receiving end of the clasp). Loop the wire back through the crimp bead. -
Secure the first end:
Use your flat nose pliers or crimping tool to flatten the crimp bead securely. I like to give it a gentle tug to ensure it won’t slip. -
Cover the crimp:
Place a gold crimp cover over the flattened crimp bead and gently close it with pliers to make it look like a seamless gold bead.
Step 2: Beading the Pattern
-
Begin the sequence:
Start by threading a small gold spacer bead to sit next to the hardware. Follow this with a cream bead, then a burgundy bead. -
Establish the rhythm:
The main pattern is a simple alternation: two or three burgundy beads followed by one cream bead. In the photo, the pattern varies slightly, sometimes grouping three reds, sometimes alternating single beads. -
Replicate the photo design:
To match the image exactly, try this sequence for the first half: Gold spacer, cream, red, red, cream, red, red, red, cream. -
Insert the centerpiece:
Once you reach the halfway point of your desired length, slide on a few decorative gold disc spacers. These add a touch of texture. -
Attach the charm:
Slide on your prepared charm bail. The weight of the train ticket will keep this at the bottom of the bracelet. -
Finish the center:
Add the matching set of decorative gold disc spacers on the other side of the charm to create symmetry. -
Complete the beading:
Mirror your bead pattern on the second side. If you did ‘cream-red-red-red’ on one side, reverse it here so the design looks balanced.
Wire Guardian Tip
Use wire guardians (small U-shaped metal pieces) at the ends where the wire loops onto the clasp. This prevents the wire from fraying over time due to metal-on-metal friction.
Step 3: Finishing Touches
-
Check the fit:
Wrap the unfinished bracelet around your wrist to ensure the size is correct. Add or remove burgundy beads at the ends if necessary. -
Apply the final crimp:
Thread a crimp bead onto the remaining wire end, followed by the lobster clasp. -
Loop and secure:
Pass the wire back through the crimp bead and pull tight, leaving just a tiny bit of slack so the bracelet remains flexible and doesn’t become rigid. -
Crimp and trim:
Flatten the crimp bead firmly with your pliers. Trim the excess wire flush with the bead using your wire cutters. -
Final polish:
Add the final crimp cover over the connection for a professional finish. Your Hogwarts Express inspired accessory is ready to wear.
House Colors Variant
Swap the burgundy and cream for green and silver (Slytherin), blue and bronze (Ravenclaw), or yellow and black (Hufflepuff) to represent your specific Hogwarts house allegiance.
Now you have a subtle yet magical piece of jewelry perfect for your next train ride to school
Parchment-and-Ink Neutral Spell Bracelet
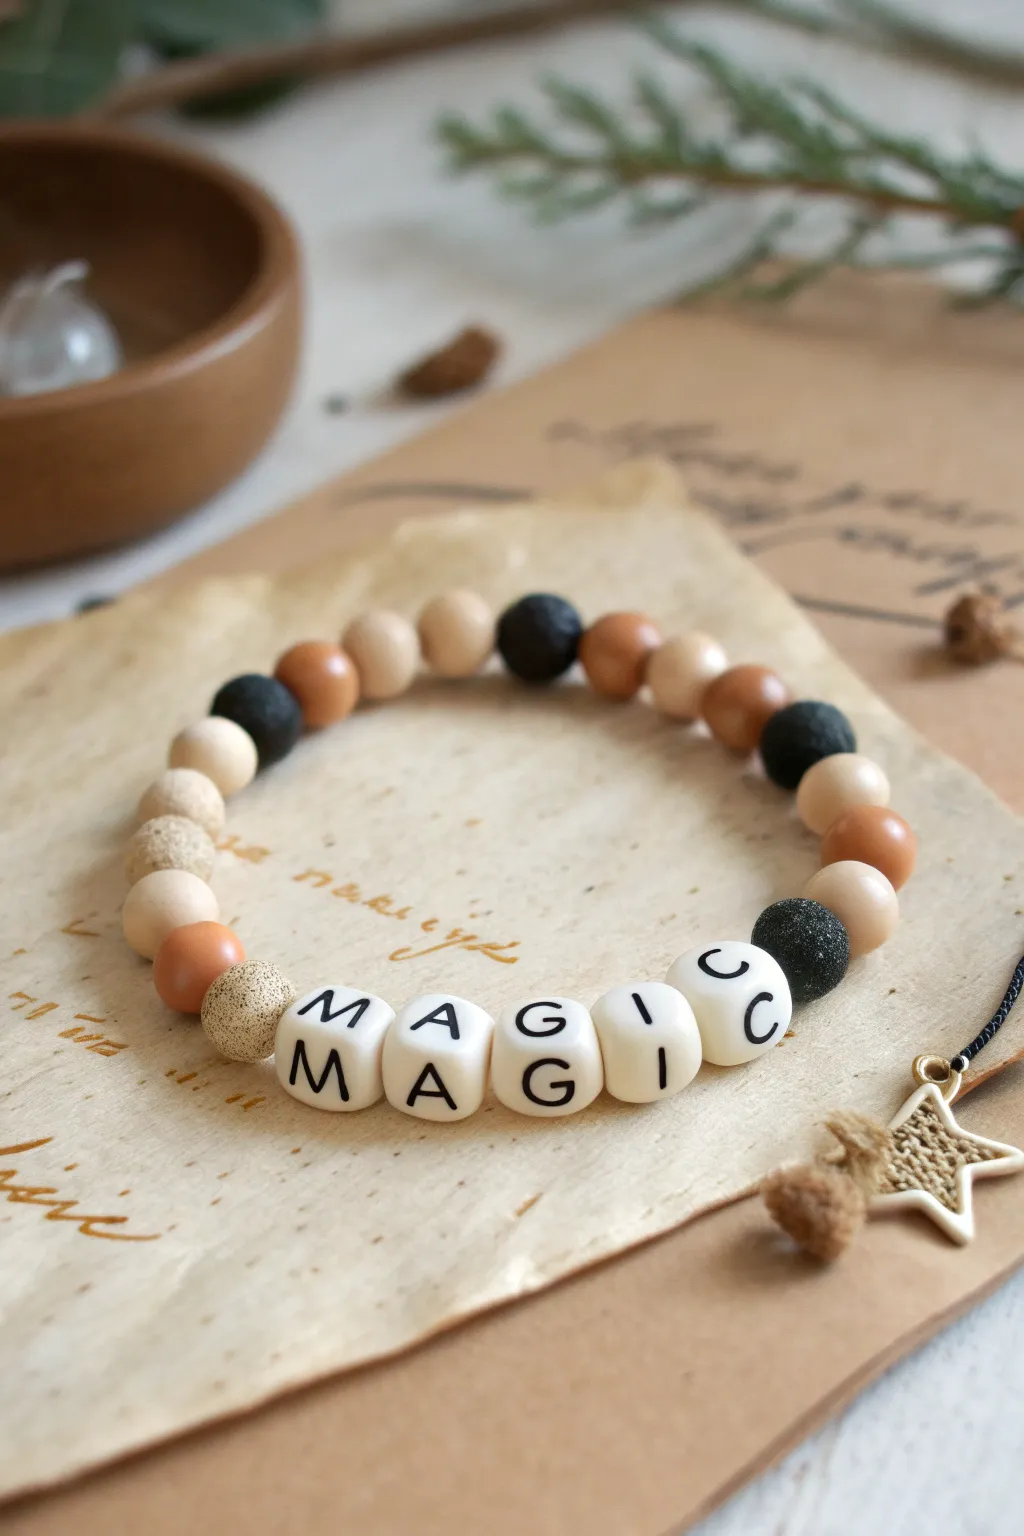
Capture the aesthetic of ancient parchment and ink with this subtle, sophisticated Harry Potter-inspired bracelet. Featuring earthy tones and rustic textures, this accessory spells out ‘MAGIC’ in a style that fits seamlessly into a dark academia wardrobe.
Step-by-Step Guide
Materials
- Elastic jewelry cord (0.7mm or 0.8mm)
- Square white alphabet beads (black lettering)
- Black lava stone beads (8mm-10mm)
- Wooden beads (8mm, natural finish)
- Clay or polymer beads (8mm, terracotta/brown)
- Textured speckled stone beads (sand color)
- Jewelry glue or clear nail polish
- Scissors
- Small metal star charm (gold or bronze)
- Jump ring (gold or bronze)
- Jewelry pliers (flat nose)
Step 1: Planning Your Spell
-
Measure the cord:
Cut a length of elastic cord about 10-12 inches long. Having extra length makes tying the final knot significantly easier than struggling with short ends. -
Stretch the elastic:
Before adding beads, give the elastic cord a few gentle tugs to pre-stretch it. This prevents the bracelet from drooping or loosening immediately after you wear it for the first time. -
Select your word:
Locate the five square alphabet beads needed to spell ‘MAGIC’. Set them aside in order so you don’t accidentally bead them backwards.
Aromatic Magic
Add 1-2 drops of essential oil (like cedarwood or vanilla) to the porous lava stone beads. They act as a natural diffuser, carrying a calming scent all day.
Step 2: Creating the Bead Pattern
-
Start the sequence:
Begin stringing beads on the left side of your word. I like to start with a textured speckled sand bead, followed by a smooth terracotta clay bead. -
Build the neutral gradient:
Continue the pattern by adding a smooth wooden bead, then a black lava stone bead. This alternating sequence of light-to-dark creates that earthy, parchment look. -
Repeat the pattern:
Repeat the sequence: terracotta, wood, lava stone. Do this for about 6-8 beads, depending on your wrist size. -
Add the centerpiece:
Thread your ‘MAGIC’ alphabet beads onto the cord. Ensure they are facing the correct direction so the word is legible when the bracelet is worn. -
Mirror the design:
On the other side of the word, mirror the pattern you started with. Place a textured sand bead first, then work outwards with your terracotta, wood, and lava beads. -
Check the fit:
Carefully wrap the unfinished strand around your wrist. The ends should meet comfortably without gaps. Add or remove filler beads near the back (opposite the word) if adjustments are needed.
House Colors
Swap the terracotta beads for deep red, emerald green, navy blue, or yellow to subtly represent your specific Hogwarts house while keeping the neutral vibe.
Step 3: Finishing Touches
-
Prepare the charm:
Using your flat nose pliers, open a small jump ring by twisting the ends away from each other (not pulling them apart). -
Attach the star:
Slide the metal star charm onto the jump ring. Then, loop the jump ring around the elastic cord between two beads—placing it near the back or side usually looks best. -
Close the ring:
Use the pliers to twist the jump ring closed again, ensuring the ends are flush so the charm doesn’t slip off. -
Tie the knot:
Bring the two ends of the elastic together. Tie a standard surgeon’s knot (right over left, left over right, and loop through an extra time) for maximum security. -
Secure with adhesive:
Apply a tiny dot of jewelry glue or clear nail polish directly onto the knot. This prevents the elastic from slipping over time. -
Hide the knot:
Once the glue is tacky but drying, pull the knot gently inside the hole of the nearest large bead (lava stones work great for this due to their larger holes). -
Trim the excess:
Use your scissors to snip off the remaining tail ends of the cord, getting as close to the bead as possible without cutting the knot itself.
Wear your new magical accessory as a subtle nod to the wizarding world that blends perfectly with everyday outfits
Owl Post Feather Accent Bracelet
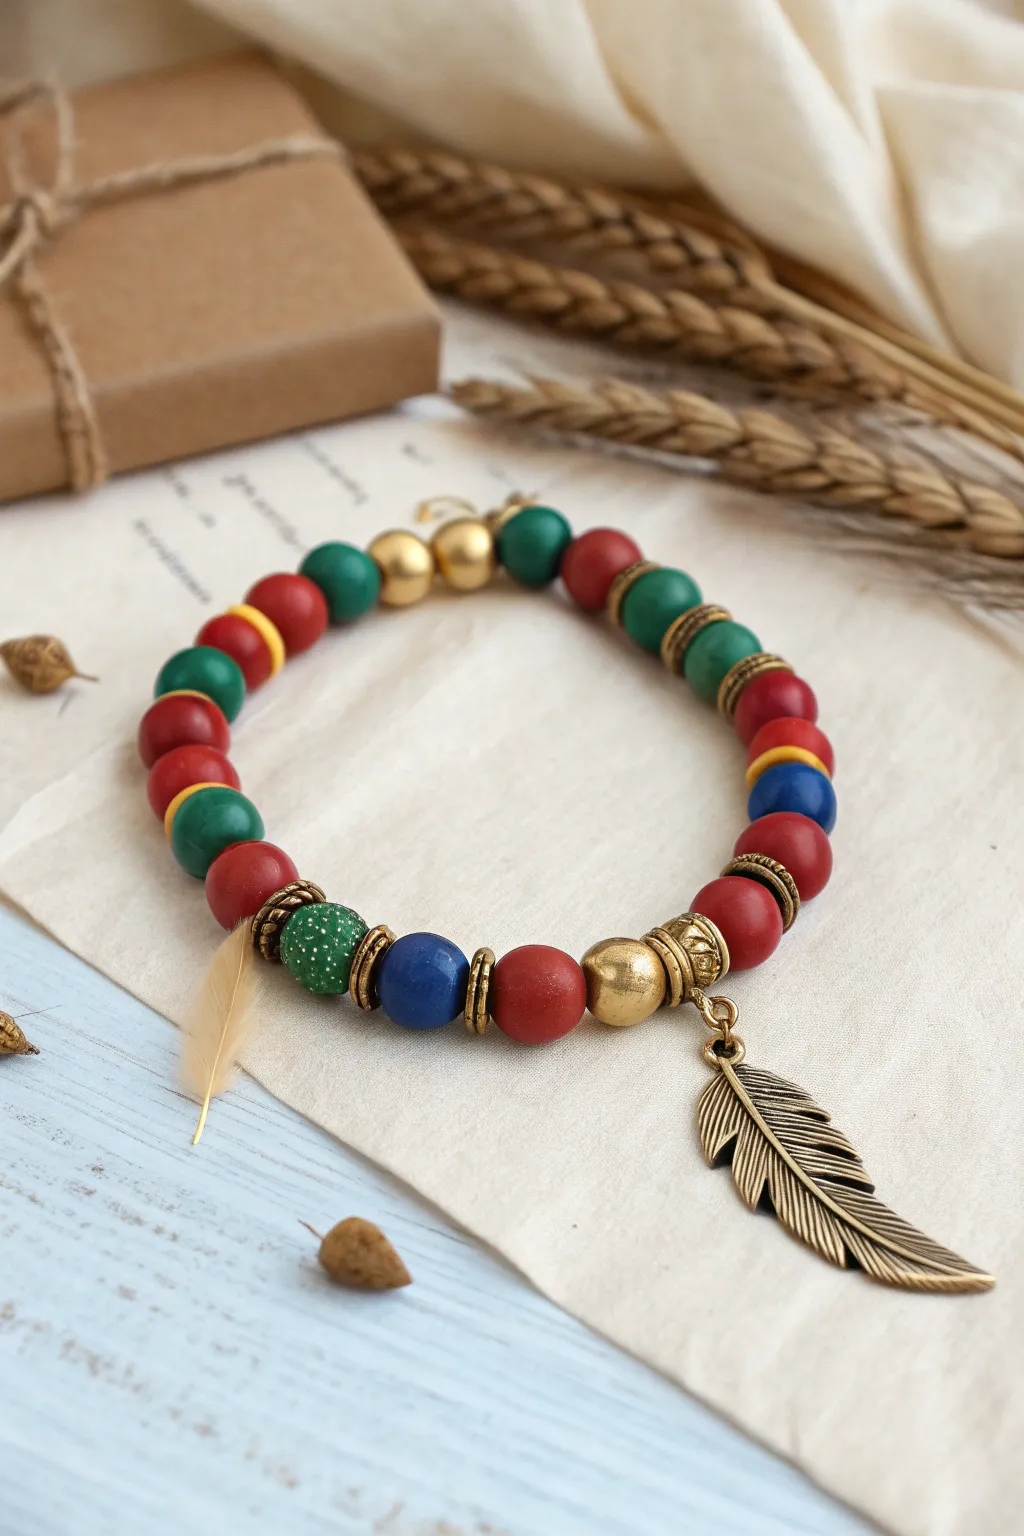
Capture the magic of Hedwig’s delivery service with this earthy, Hogwarts-inspired beaded bracelet. Featuring deep house colors, antique gold accents, and a striking feather charm, it’s a sophisticated nod to the wizarding world.
Step-by-Step Tutorial
Materials
- Polymer clay (Deep Red, Forest Green, Navy Blue, Golden Yellow)
- Gloss glaze for polymer clay (optional)
- Stretch cord (0.8mm or 1mm)
- Antique brass/gold feather charm
- Antique brass/gold textured spacer beads (various flat and ornate shapes)
- Antique brass/gold large round bead (focal)
- Needle tool or toothpick
- Baking sheet and oven
- Jump ring (antique brass)
- Jewelry pliers
- Super glue (gel type)
Step 1: Crafting the Clay Beads
-
Conditioning:
Start by conditioning your deep red, forest green, navy blue, and golden yellow polymer clay separately until they are soft and pliable. -
Rolling spheres:
Roll small, uniform spheres from the red, green, and blue clay, aiming for about 8-10mm in diameter. -
Creating the speckled bead:
For the special textured green bead shown near the charm, mix a tiny bit of white clay or glitter into a small ball of forest green clay to create a subtle speckled effect. -
Forming flat discs:
Take small amounts of yellow, red, and blue clay and flatten them into thin disc spacers (heishi style beads) rather than round spheres. -
Drilling holes:
Carefully poke a hole through the center of each bead using a needle tool or toothpick. I find it helps to rotate the needle as you push to avoid squishing the bead’s shape. -
Baking:
Arrange your beads on a baking sheet and bake according to your polymer clay package instructions (usually 275°F/130°C for 15-30 minutes). Let them cool completely.
Step 2: Assembling the Bracelet
-
Preparing the charm:
Open a jump ring with your jewelry pliers using a twisting motion (don’t pull it apart). Attach your feather charm to the jump ring and close it securely. -
Measuring the cord:
Cut a piece of stretch cord about 10-12 inches long. This gives you plenty of extra room for tying knots later. -
Setting the focal point:
Start stringing by threading the bronze feather charm carrier (or a jump ring), flanked by two large ornate antique gold spacers. -
Left side pattern:
On the left side of the charm, thread a red bead, a thin brass spacer, the blue bead, another thin spacer, and then the special speckled green bead. -
Right side pattern:
On the right side of the charm, thread a large antique gold round bead, a red bead, and then begin your alternating pattern. -
Building the strand:
Continue stringing beads, mixing your round clay beads with the flat clay discs and brass spacers. Try grouping colors, like placing a yellow disc between a green and red bead for a Gryffindor-meets-Slytherin vibe. -
Adding texture:
Intersperse the thinner, textured brass rings between the clay beads randomly to give the bracelet that ‘found object’ magical feel. -
Checking the size:
Wrap the strand around your wrist to check the fit. Add or remove beads until it sits comfortably without gaps.
Smooth Moves
To remove fingerprints from your raw clay beads before baking, gently roll them in a tiny amount of cornstarch or baby powder.
Step 3: Finishing Touches
-
Pre-stretching:
Before tying, give the elastic cord a few gentle tugs to pre-stretch it. This prevents the bracelet from loosening up after a few wears. -
Tying the knot:
Tie a surgeon’s knot (right over left twice, then left over right twice) and pull it tight. -
Securing:
Dab a tiny drop of gel super glue onto the knot. Wait a moment for it to set, then trim the excess cord, tucking the knot inside a neighboring large bead if possible.
Magical Texture
Use a crumpled piece of aluminum foil to gently press onto the raw clay beads. This creates a stone-like texture that looks ancient.
Now you have a charming accessory ready to send off with the morning post
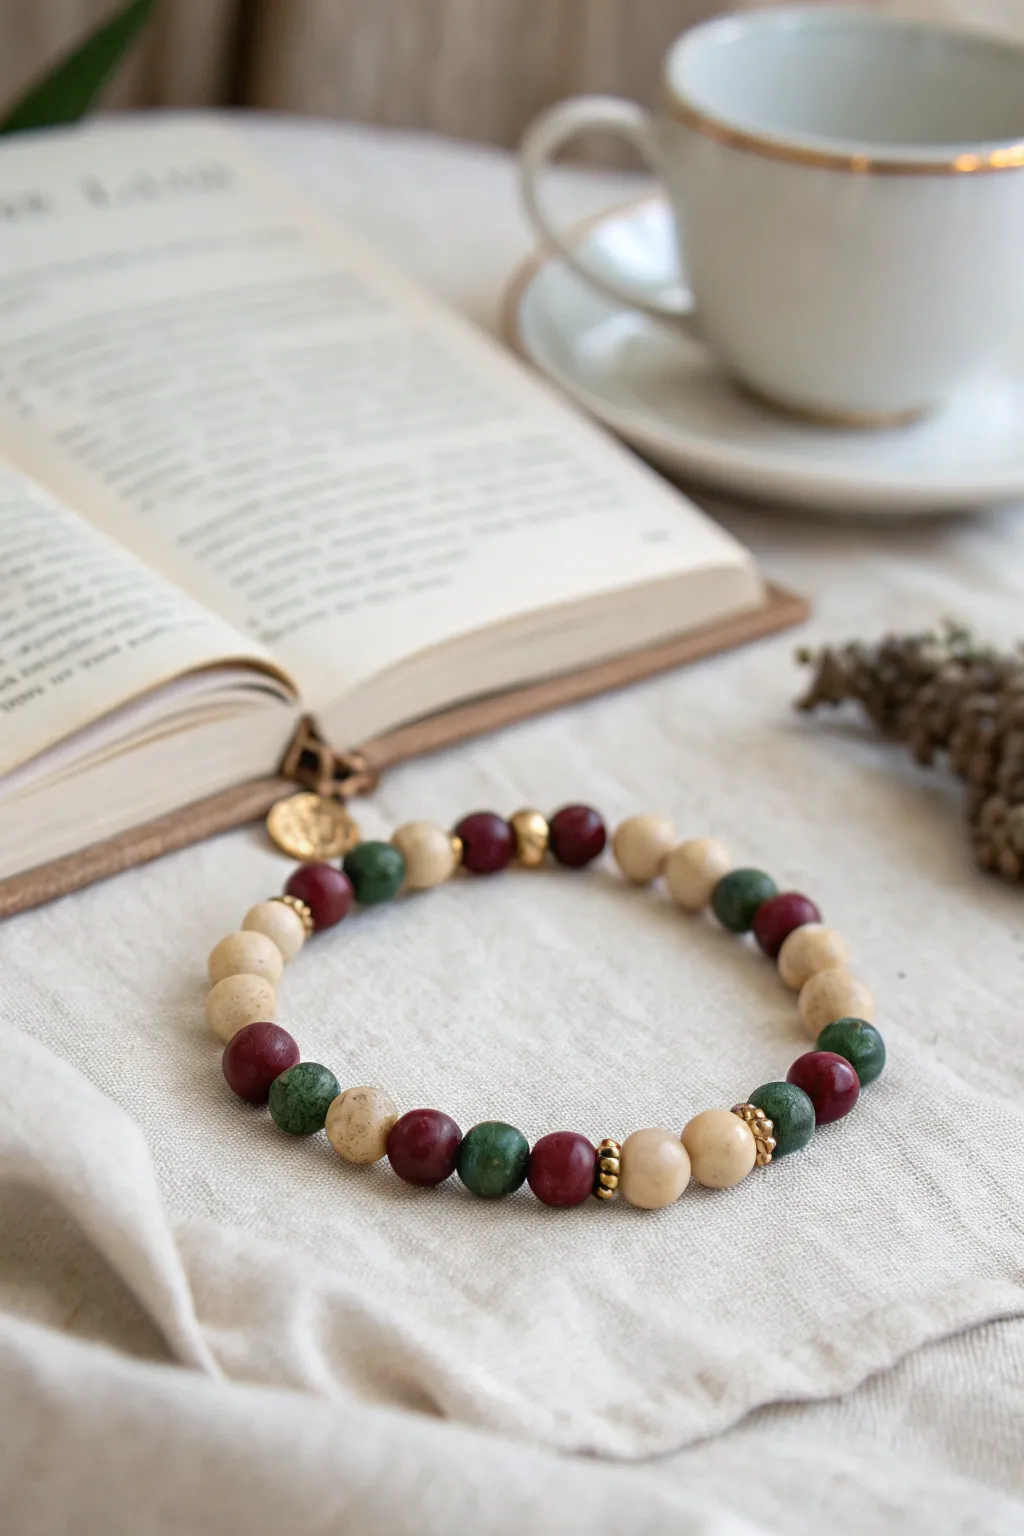
Hidden House Gradient Bracelet

This bracelet captures the earthy warmth of the Gryffindor common room with a sophisticated, subtle palette of matte rusts, creams, and shimmered golds. The gradient effect feels organic rather than rigid, making it a perfect everyday accessory for the stylish witch or wizard.
Detailed Instructions
Materials
- Polymer clay (rust red, terracotta, beige, cream/white, gold shimmer)
- Small round bead roller
- Gold spacer beads (heishi style or small discs)
- Gold bead caps or textured spacer beads
- Elastic stretch cord (0.7mm or 0.8mm)
- Super glue or jewelry cement
- Clay oven/toaster oven
- Baking tray and parchment paper
- Beading needle (optional but helpful)
- Scissors
Step 1: Creating the Clay Beads
-
Condition your clay:
Start by warming up your polymer clay blocks in your hands. You’ll need distinct piles for deep rust, terracotta, beige, cream, and a shimmering gold clay. -
Mix custom shades:
To achieve that natural, earthy look, avoid using colors straight from the package. Mix a little beige into your rust to soften it, and blend white into the terracotta for a faded pottery look. -
Measure equal portions:
Pinch off small pieces of clay for each bead. Aim for roughly pea-sized amounts to ensure your beads are uniform in size. -
Roll spheres:
Roll each piece of clay between your palms or use a bead roller tool to create perfectly smooth spheres. -
Add texture (optional):
For the shimmering gold beads, I like to gently roll the finished sphere over a piece of fine sandpaper or a textured sponge to give it a stone-like surface before baking. -
Create the holes:
Using a needle tool or toothpick, carefully pierce the center of each bead while it’s still raw. Twist the tool gently as you push through to avoid distorting the sphere shape. -
Bake the beads:
Arrange your beads on a parchment-lined baking tray and bake according to your clay manufacturer’s instructions (usually 275°F/135°C for 15-30 minutes). Let them cool completely.
Uneven Rollers?
If your hand-rolled beads are ending up lumpy or oval, refrigerate the raw clay for 10 minutes before rolling. The firmer clay holds a sphere shape better.
Step 2: Designing the Gradient
-
Lay out your design:
Arrange the cooled beads on a bead board or a towel. Group your colors: deep reds, lighter pinkish-browns, creams, and golds. -
Establish the pattern:
Instead of a strict pattern, aim for ‘clusters’ of color that transition smoothly. Place 3-4 dark rust beads, followed by 2-3 terracotta, then lighter beige, leading into the cream. -
Insert accents:
Interject the gold shimmer clay beads randomly to break up the color blocks. Add metal spacers next to the gold clay beads to enhance the metallic effect. -
Finalize the sequence:
Check the length against your wrist. The transition should look like a sunset—fading from dark warmth to light neutrals.
Step 3: Stringing and Finishing
-
Prepare the cord:
Cut a piece of elastic cord about 10-12 inches long. Pre-stretch the elastic by pulling it firmly a few times; this prevents the bracelet from loosening later. -
String the beads:
Thread your beads onto the elastic following your laid-out pattern. If the bead holes are tight, a flexible wire needle can save you a lot of time here. -
Double check the fit:
Wrap the strung beads around your wrist to ensure a comfortable fit. Add or remove a bead if necessary before tying. -
Tie the knot:
Tie a surgical knot (left over right, right over left) or a strong square knot. Pull the elastic tight so there are no gaps between beads. -
Secure and trim:
Place a tiny drop of super glue or jewelry cement directly on the knot. Let it dry for a moment, then trim the excess cord ends. -
Hide the knot:
Gently tug the bracelet so the knot slips inside the hole of the nearest bead, hiding it from view.
House Crest Charm
Add a small brass lion charm or a ruby crystal dangle near one of the gold spacer sections to make the house allegiance more obvious while keeping it classy.
Wear this subtle gradient bracelet solo or stack it with other house colors for a magical layered look
Best-Friends Four-House Bracelet Set
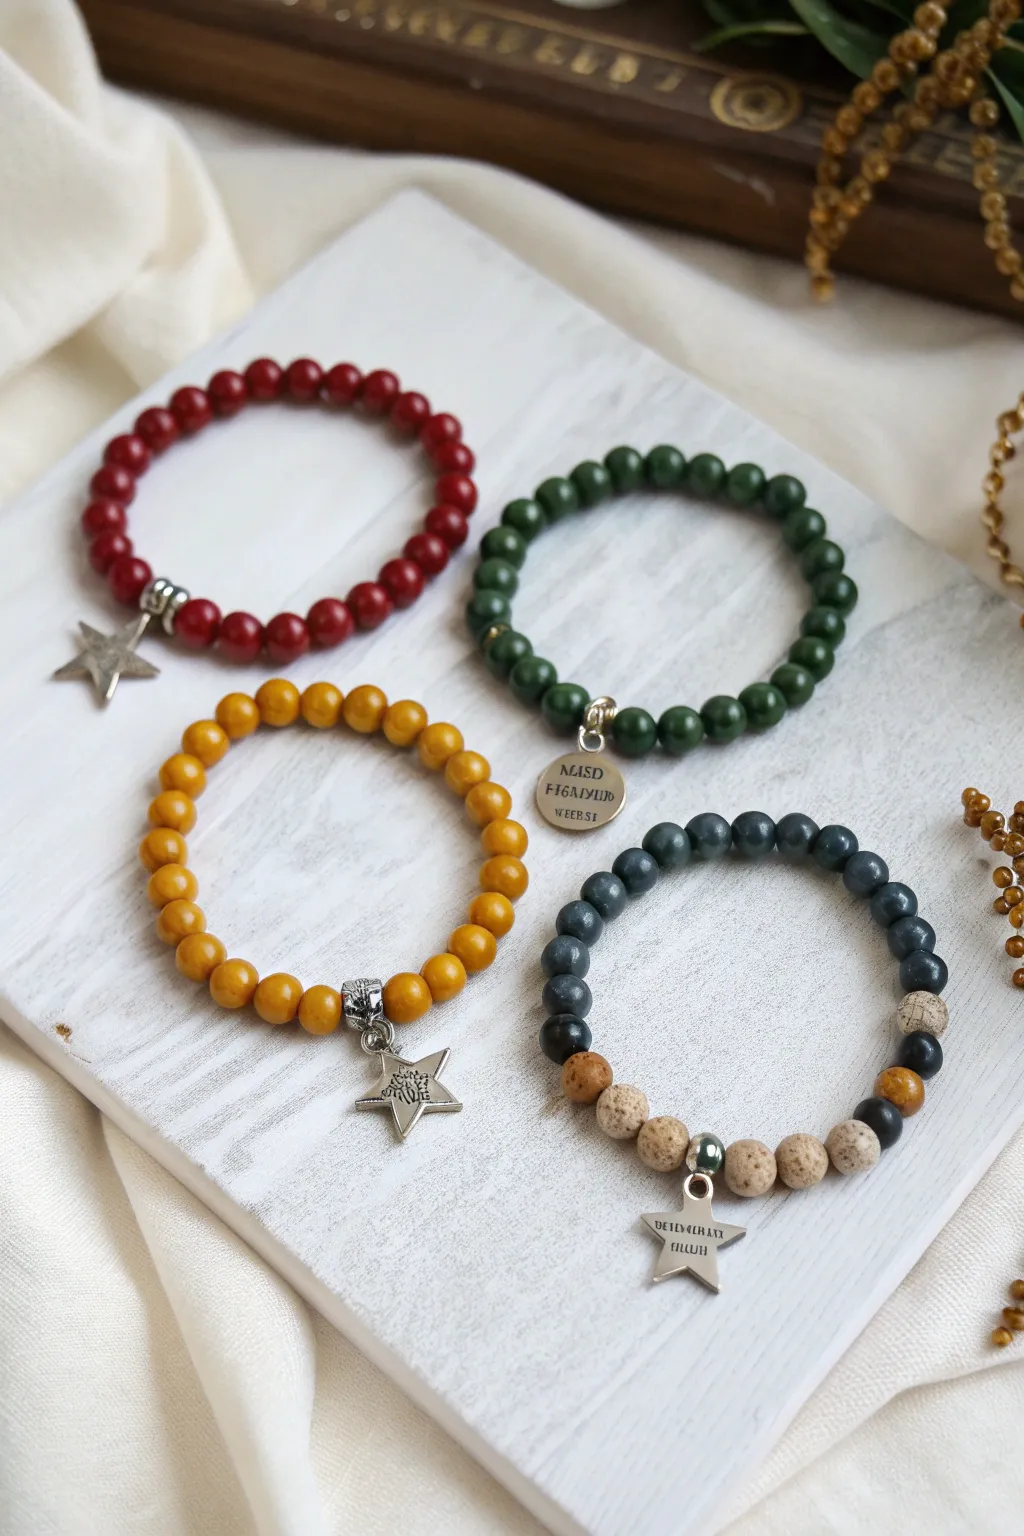
Show off your school pride or share the magic with friends by creating this sophisticated set of four stretch bracelets. Representing the colors of Gryffindor, Slytherin, Hufflepuff, and Ravenclaw, these clay and stone bead bracelets feature subtle charm accents for a grown-up take on fandom jewelry.
Step-by-Step
Materials
- 8mm round beads in deep red (jasper or clay)
- 8mm round beads in forest green (malachite or clay)
- 8mm round beads in mustard yellow (yellow jade or clay)
- 8mm round beads in dark blue/grey (blue tiger eye or clay)
- 8mm round porous lava stone beads (beige/tan)
- 8mm round porous lava stone beads (brown)
- 2 small silver star charms
- 1 small round stamped silver charm
- Silver bail beads or jump rings
- Silver spacer beads (optional)
- Strong elastic jewelers cord (0.8mm recommended)
- Jewelry adhesive or clear nail polish
- Scissors
- Bead design board or masking tape
Step 1: Preparation & Design
-
Measure your wrist:
Before cutting any cord, wrap a measuring tape around your wrist. For a comfortable fit, add about half an inch to your measurement to determine the bracelets’ final circumference. -
Cut the elastic cord:
Cut four strands of elastic cord, each about 10-12 inches long. Having plenty of excess cord makes tying the finishing knots much easier than struggling with short ends. -
Pre-stretch the cord:
Hold a strand of cord firmly between both hands and give it a few gentle pulls. This pre-stretching technique helps prevent the bracelet from sagging or loosening after you’ve worn it a few times. -
Secure the ends:
Place a piece of masking tape over one end of each cord strand, or use a bead stopper clip. This simple step saves you the heartbreak of watching beads slide right off the other side while you work.
Step 2: Red & Green Bracelets
-
String the Gryffindor red:
For the first bracelet, thread approximately 22-24 deep red beads onto your first cord. The exact number will depend on your wrist size, but aim for a solid block of color. -
Add the star charm:
Slide a silver bail bead onto the cord at the halfway point, or attach the star charm using a jump ring directly between two beads. If using a bail, make sure the charm hangs freely. -
String the Slytherin green:
On the second cord, thread your forest green beads. I find that darker, more muted green tones look more elegant than bright primary greens for this project. -
Attach the round charm:
Instead of a star, add the round stamped silver charm to this bracelet. Position it centrally just like the first one so the set looks cohesive but distinct.
Knot Slipping?
If your elastic knot won’t stay tight while you glue it, ask a friend to hold their finger on the knot, or clamp it gently with a small binder clip while the adhesive sets.
Step 3: Yellow & Blue Bracelets
-
String the Hufflepuff yellow:
Thread the mustard yellow beads for the third bracelet. Using a slightly marbled or matte finish bead here adds nice texture compared to plain glossy plastic. -
Include the second star:
Add your second silver star charm to the yellow bracelet. You can use a patterned bail bead here to add an extra touch of metallic detail. -
Design the Ravenclaw mix:
For the blue bracelet, we’ll create a pattern. Start by threading about 14-16 dark blue/grey beads to form the main section of the loop. -
Add texture with lava stones:
To break up the blue, add a symmetrical pattern of earth-toned lava beads near the charm area. Try a pattern like: one brown lava bead, three beige lava beads, and one more brown lava bead. -
Finish the blue strand:
Place your final charm (a star or text charm) in the center of the beige lava beads, creating a focal point that differs slightly from the solid-color bracelets.
Level Up: Aromatherapy
Since the Ravenclaw bracelet uses porous lava stone beads, add 1-2 drops of essential oil to them. They will diffuse the scent throughout the day for a magical calming effect.
Step 4: Finishing Touches
-
Tie the surgeon’s knot:
Remove the tape from your first bracelet. Cross the ends, loop one over the other twice, and pull tight. This extra loop creates friction that holds the elastic much better than a standard knot. -
Secure with glue:
Apply a tiny dot of jewelry adhesive or clear nail polish directly onto the knot. Let it dry for a moment before trimming the ends. -
Hide the knot:
Once dry, trim the excess cord carefully. If possible, gently tug the knot so it slips inside the hole of the nearest bead, hiding it from view entirely. -
Repeat for all strands:
Repeat the tying and gluing process for the remaining three bracelets. Allow the glue to cure fully (usually 24 hours) before wearing them to ensure maximum durability.
Now you have a charming set of house-themed bracelets ready to coordinate with any outfit
Glow “Guardian Spirit” Bead Pop
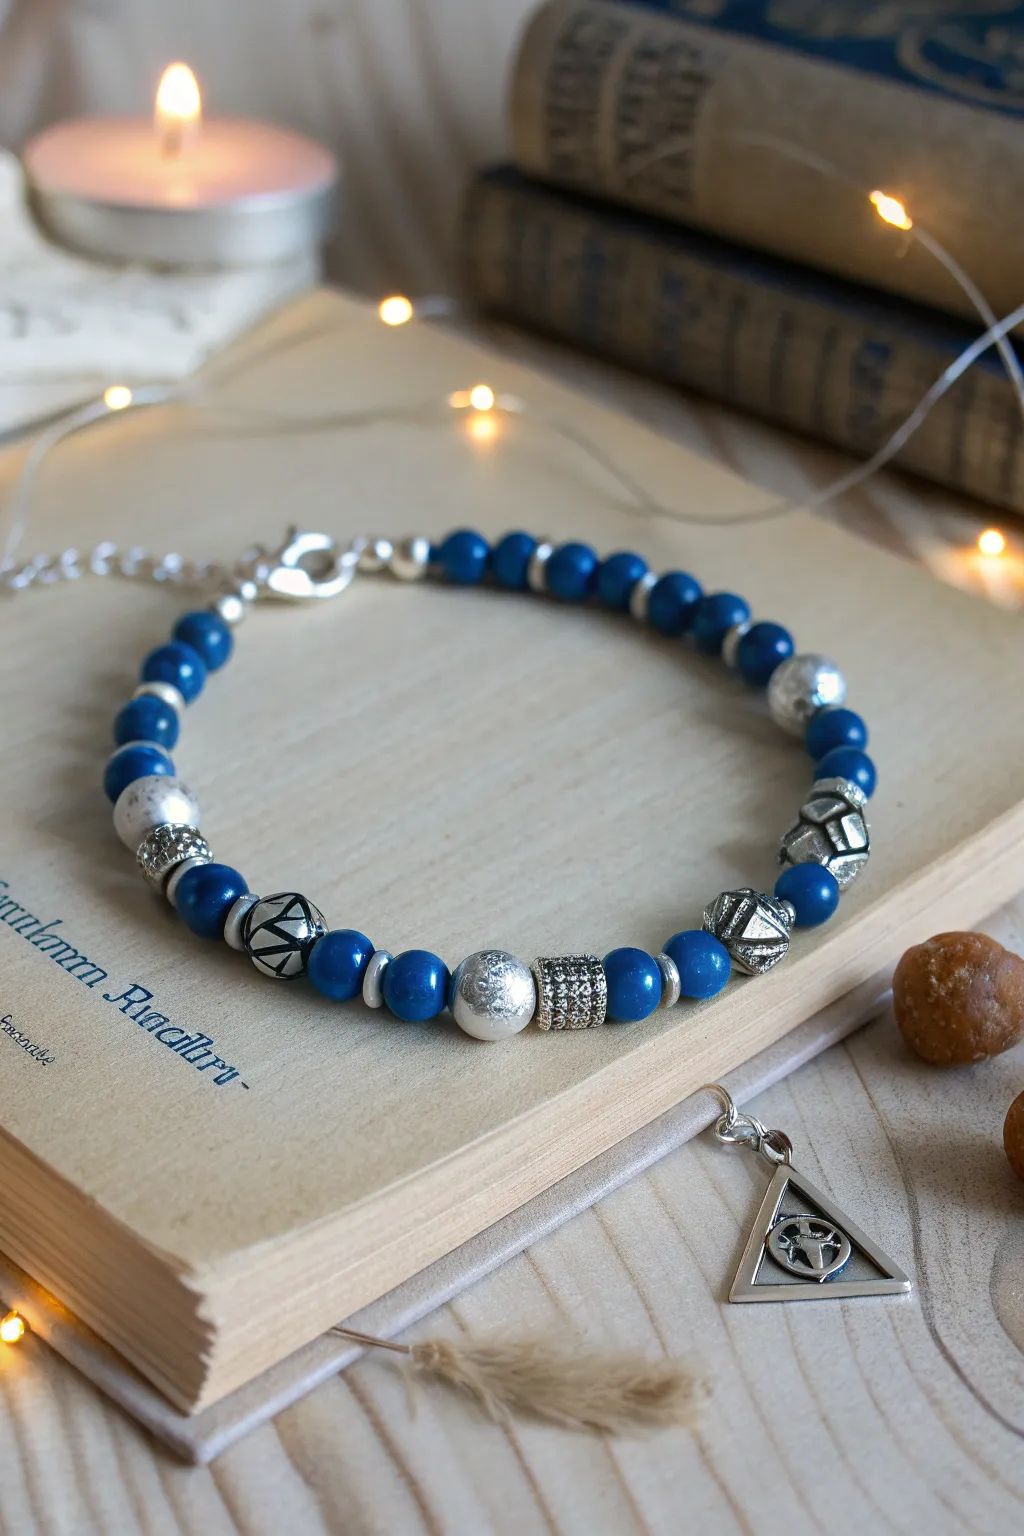
Keep your wits about you with this elegant accessory inspired by the house known for its intelligence and wisdom. Combining deep blue polished beads with intricate silver accents, this bracelet evokes the starry ceiling of the common room tower.
Step-by-Step Guide
Materials
- Deep blue polished agate or lapis lazuli beads (6mm)
- Silver spacer beads (discs or rings)
- Silver filigree or patterned metal feature beads (8mm and 6mm)
- Textured silver focal bead (cylinder or barrel shape)
- Silver stardust or matte metallic round beads (6mm)
- Strong elastic beading cord (0.7mm or 0.8mm)
- Silver crimp beads
- Silver jump rings
- Silver lobster clasp and extension chain
- Jewelry pliers (chain nose and flat nose)
- Scissors
Step 1: Planning the Design
-
Lay out your board:
Before stringing anything, use a bead board or a simple towel to lay out your beads. This prevents them from rolling away and lets you visualize the pattern. -
Establish the focal point:
Start from the center of your design. Arrange the textured silver cylinder bead as the absolute center. -
Build the center sequence:
On either side of the center cylinder, place a 6mm silver matte ‘stardust’ bead, followed by a polished specialty blue bead. -
Add symmetry:
Continue building outwards symmetrically. I like to add a thin silver spacer disc after every 2-3 blue beads to break up the color and add that subtle metallic gleam. -
Incorporate feature beads:
About an inch from the center on both sides, place your intricate silver filigree cage beads. These larger metal elements add weight and visual interest.
Too Stiff?
If the bracelet stands up in a rigid circle rather than draping softly, you strung it too tightly. Leave a tiny gap (1mm) of cord exposed before crimping to allow movement.
Step 2: Stringing the Bracelet
-
Prepare the cord:
Cut a length of elastic cord about 10-12 inches long. This gives you plenty of slack to work with when tying knots later. -
Stretch the elastic:
Give the elastic cord a few gentle tugs to pre-stretch it. This prevents the finished bracelet from sagging after you wear it a few times. -
Secure the end:
Place a piece of tape or a bead stopper on one end of the cord to stop beads from sliding off while you work. -
Begin stringing:
Following the pattern you laid out, thread the beads onto the cord. Start from one end of your design and work across. -
Check the fit:
Once all beads are strung, wrap the strand around your wrist. The ends should meet comfortably without gaps, but shouldn’t feel tight.
Knot Security
If you skip the clasp and just tie the elastic, use a surgeon’s knot (looping through twice) and add a dab of jewelry glue (like E6000) to the knot before hiding it inside a bead.
Step 3: Adding the Clasp Hardware
-
Add crimp beads:
Instead of a simple elastic knot, we will use a clasp for a professional finish. Thread a crimp bead onto one end of the elastic, followed by a jump ring attached to the extension chain. -
Loop and secure:
Pass the elastic back through the crimp bead to create a small loop holding the jump ring. Use your flat nose pliers to squeeze the crimp bead tightly flat. -
Hide the tail:
Thread the short tail of excess elastic back through the first couple of blue beads, then trim it close so it disappears inside. -
Attach the clasp:
Repeat the process on the other end: thread a crimp bead, then the lobster claw clasp. -
Final crimp:
Loop the wire back through the crimp bead, pull snugly (but leave a tiny bit of slack for movement), and squash the crimp bead flat with your pliers. -
Trim excess:
Tuck the remaining tail into the adjacent beads and trim away any extra cord carefully. -
Optional charm addition:
To match the photo’s vibe, you can attach a silver Deathly Hallows charm to the extension chain using a small jump ring and your pliers.
Now you have a stunning piece of jewelry ready to accompany you to the library
House Color Morse Code Secret Message
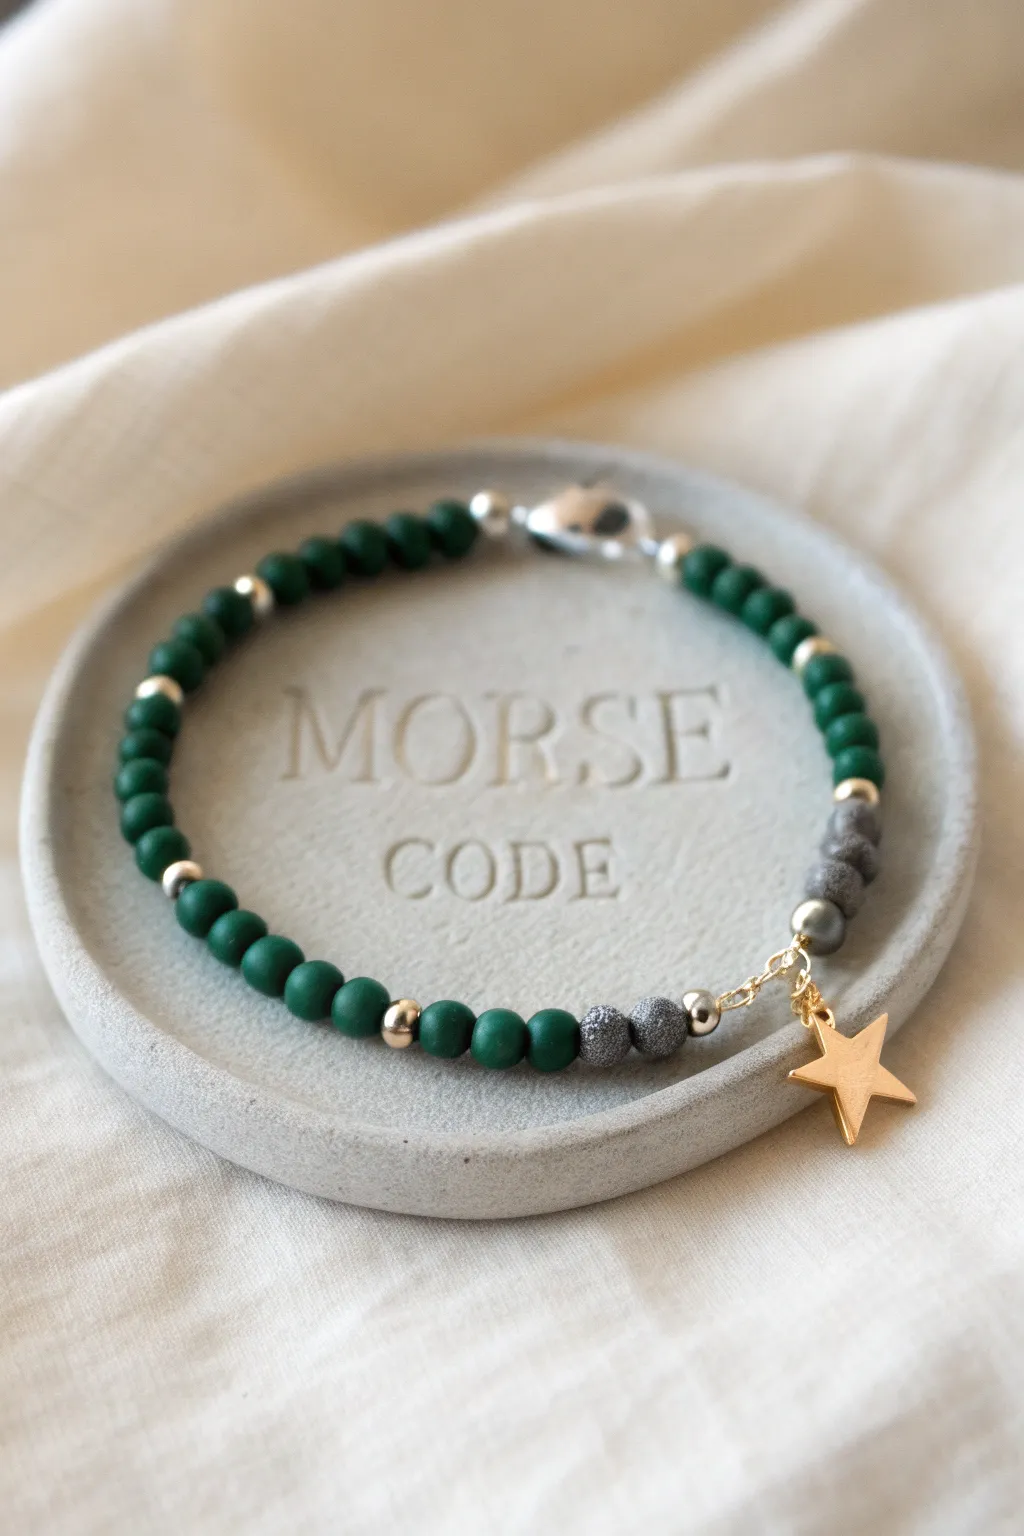
Channel your inner ambition with this understated Slytherin-inspired bracelet featuring a secret message hidden in plain sight. Using matte emerald green beads and metallic accents, you’ll craft a Morse code pattern that spells out a word of your choice, finished with a charming golden star.
How-To Guide
Materials
- Matte dark green round beads (4mm or 6mm)
- Small gold or silver spacer beads (2-3mm)
- Textured grey or gunmetal accent beads (same size as green beads)
- Elastic jewelry cord (0.7mm or 0.8mm)
- Small gold star charm
- Jump ring (gold)
- Jewelry glue or clear nail polish
- Scissors
- Tape or bead stopper
- Beading needle (optional)
Step 1: Planning Your Message
-
Decide on your code:
Choose a word related to your House, like ‘PRIDE’ or ‘SERPENT’. Write it down on a piece of paper. -
Translate to Morse code:
Look up the Morse code translation for your chosen word. Represent dots with one type of bead (e.g., small gold spacers) and dashes with another (e.g., the green beads), or use the spacers as separators between green bead letters. -
Lay out the design:
Arrange your beads on a bead board or a soft towel in the order you plan to string them. This visual check ensures your message is correct before you start stringing.
Step 2: Stringing the Beads
-
Prepare the cord:
Cut a piece of elastic cord about 10-12 inches long. This extra length makes tying the knot much easier later. -
Secure the end:
Place a piece of tape or a bead stopper on one end of the cord to prevent beads from sliding off as you work. -
Start with the base:
Begin stringing your matte green beads. These will form the non-coded section of the bracelet, wrapping around the back of the wrist. -
Add metallic accents:
Interperse a single gold or silver spacer bead every 10-15 green beads if you want a little extra shimmer, exactly as seen on the left side of the example. -
Insert the grey beads:
String on the textured grey or gunmetal beads next. These act as a distinct visual frame for the start or end of your design. -
String the message:
Now, carefully thread your Morse code section. Use your pre-planned pattern of green beads and metallic spacers to spell out your hidden word. -
Check the fit:
Wrap the unfinished strand around your wrist to check the size. Add or remove plain green beads from the starting end until it fits comfortably.
Knot Slipping?
If your elastic knot feels loose, try a drop of super glue specifically made for jewelry (GS Hypo Cement is great). It has a precise applicator tip.
Step 3: Finishing Touches
-
Pre-stretch the elastic:
Gently pull tightly on both ends of the cord a few times. This pre-stretching prevents the bracelet from sagging after you wear it. -
Tie the knot:
Tie a secure surgeon’s knot (right over left, left over right, looping through twice). Pull it tight. -
Add security:
Dab a tiny drop of jewelry glue or clear nail polish onto the knot. I like to let this dry for at least 15 minutes before trimming to ensure it holds perfectly. -
Hide the knot:
If hole sizes allow, gently tug the cord to slide the knot inside one of the adjacent beads to conceal it. -
Trim excess:
Once the glue is fully dry, trim the excess elastic cord close to the knot with your sharp scissors.
Code Clarity
To make your Morse code readable, use a distinctly different bead for spaces between letters, like a tiny seed bead in a contrasting color.
Step 4: Attaching the Charm
-
Open the jump ring:
Using pliers or your fingers, gently twist the jump ring open sideways (never pull it apart). -
Add the star:
Slide the gold star charm onto the open jump ring. -
Attach to bracelet:
Hook the jump ring around the elastic cord, ideally between a grey bead and a metallic spacer near your knot/clasp area. -
Close the ring:
Twist the jump ring back closed until the ends meet perfectly flush.
Wear your house colors proudly with a secret message that only the cleverest wizards will decode