
If you love clay but hate heavy, crack-prone chunks, hollow clay projects are where the magic is. I’m talking airy pinch-pot builds, smart slab forms, and pieces that feel light in your hands but still look bold on the shelf.
Hollow Planter Pots With Drainage
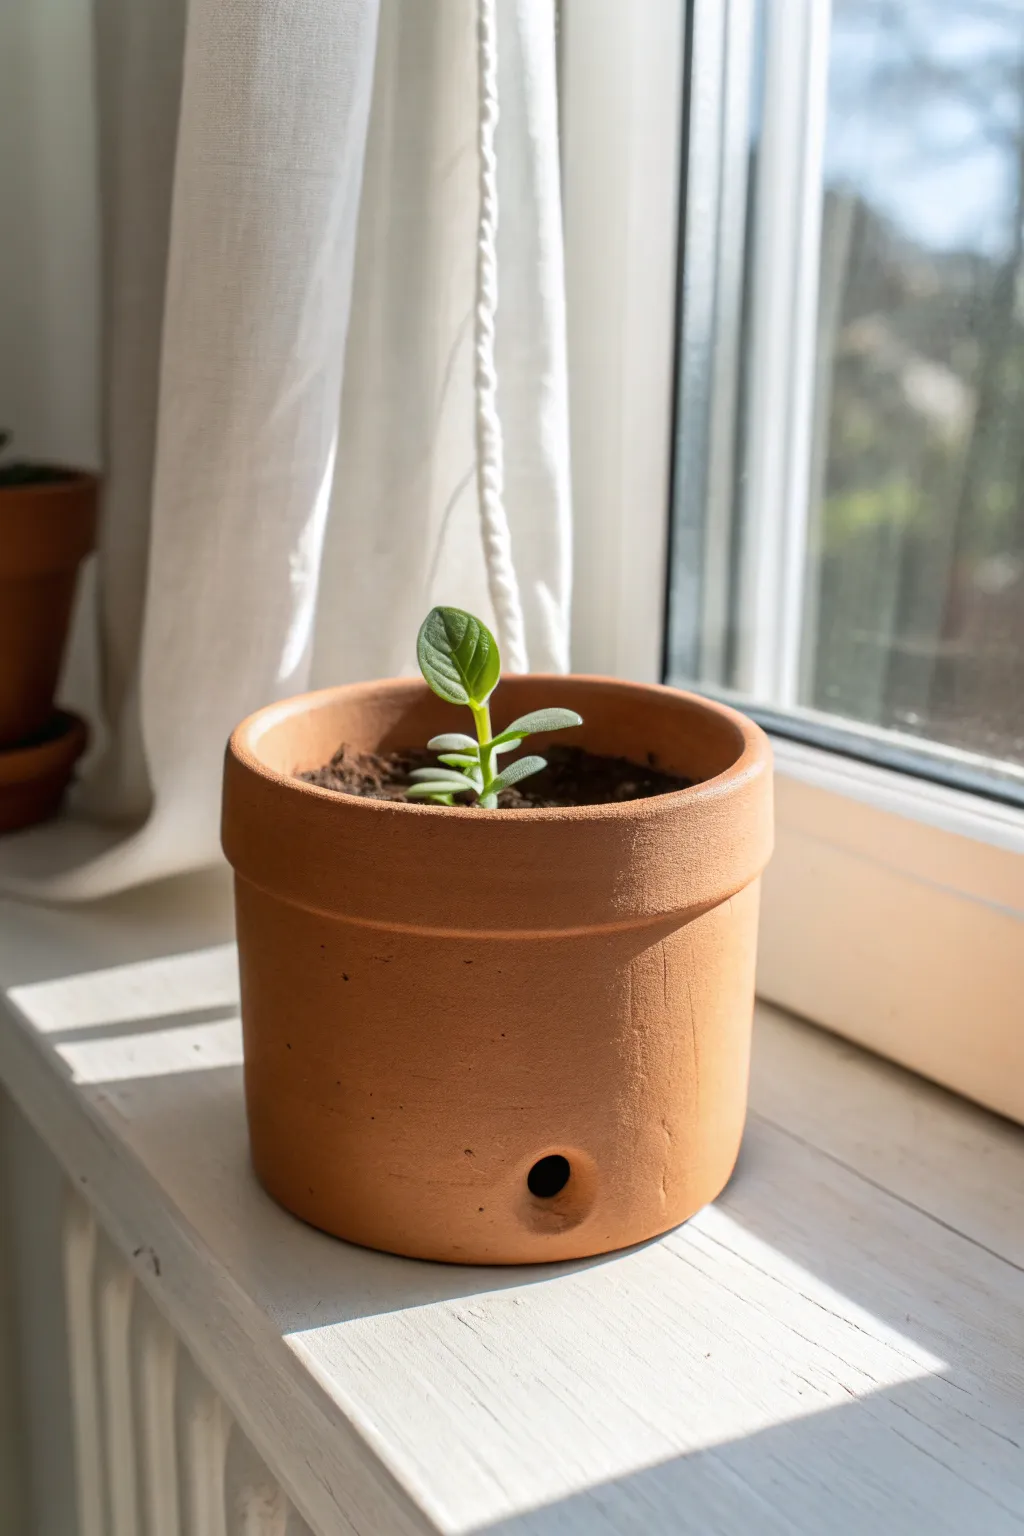
This minimalist, cylinder-style planter brings a clean and modern touch to any windowsill with its warm, earthy hue. The key feature is a clever side drainage hole, perfect for monitoring water levels or trying a semi-hydro setup.
Step-by-Step Tutorial
Materials
- Earthenware clay (terracotta color)
- Rolling pin
- Canvas or cloth mat
- Cylindrical form or mold (like a PVC pipe or large can) approx. 4-5 inches diameter
- Newspaper or paper
- Needle tool
- Fettling knife
- Score and slip tool (or toothbrush)
- Circular cutter or small tube (approx. 1/2 inch) for the drainage hole
- Sponge
- Water
Step 1: Preparing the Clay Slab
-
Wedge the clay:
Begin by thoroughly wedging your terracotta clay to remove any air bubbles. This ensures your walls will be strong and crack-free during firing. -
Roll out the slab:
On your canvas mat, roll the clay out into a long rectangular slab. Aim for an even thickness of about 1/4 to 3/8 inch throughout. -
Compress the slab:
Use a rubber rib or a damp sponge to smooth and compress the clay on both sides. This aligns the clay particles and creates a lovely, smooth surface texture. -
Measure and cut:
Measure the circumference of your cylindrical mold. Cut a rectangle from your clay slab that matches this length plus a tiny overlap, and the desired height for your pot.
Uneven Seams?
If the vertical seam is visible or bulging, paddle it gently with a flat wooden spatula while the mold is still inside to flatten it flush.
Step 2: Forming the Cylinder
-
Prepare the mold:
Wrap your PVC pipe or can in a sheet of newspaper. This prevents the clay from sticking to the form and makes removal effortless later. -
Wrap the clay:
Carefully lift your clay rectangle and wrap it around the paper-covered mold. Bring the two short ends together. -
Join the seam:
Score the edges where the clay meets and apply a dab of slip. Press the ends firmly together to create a secure seam. -
Blend the join:
Use a wooden tool or your thumb to blend the clay across the seam line until it disappears completely. Smooth it over with a sponge so the cylinder looks continuous.
Step 3: Adding the Base and Rim
-
Cut the base:
Roll out a separate small piece of clay for the bottom. Place your wrapped cylinder on top of it and trace around the base with a needle tool, then cut out the circle. -
Attach the base:
Score and slip the bottom edge of your cylinder and the outer edge of the clay circle. Press them together firmly. -
Seal the interior:
I find it helpful to roll a tiny coil of clay and press it into the interior seam where the wall meets the floor to ensure a watertight bond. -
Form the rim:
Roll a slightly thicker coil of clay. Score the top edge of your cylinder and attach this coil around the rim. Smooth it down to create that distinct, slightly thickened lip seen in the photo.
Level Up
Etch delicate vertical lines or geometric patterns into the clay surface before it fully dries for added visual texture.
Step 4: Review and Drying
-
Add the side hole:
Using your small circular cutter, punch a clean hole about 1 inch up from the bottom edge on the side of the pot. Smooth the edges of the hole with a damp finger. -
Remove the mold:
Once the clay has stiffened slightly (leather hard), carefully slide out the mold and peel away the newspaper. -
Final smoothing:
Go over the entire piece with a damp sponge to remove fingerprints and sharp edges. Pay attention to the rim and the drainage hole. -
Slow drying:
Loosely cover the pot with plastic to let it dry slowly over a few days. This helps prevent warping before the bisque fire. -
Firing:
Fire the piece in a kiln according to your clay body’s specifications (usually cone 04 for terracotta).
Once fired, pot your favorite sapling and enjoy the natural warmth it brings to your space


Lidded Hollow Trinket Jars
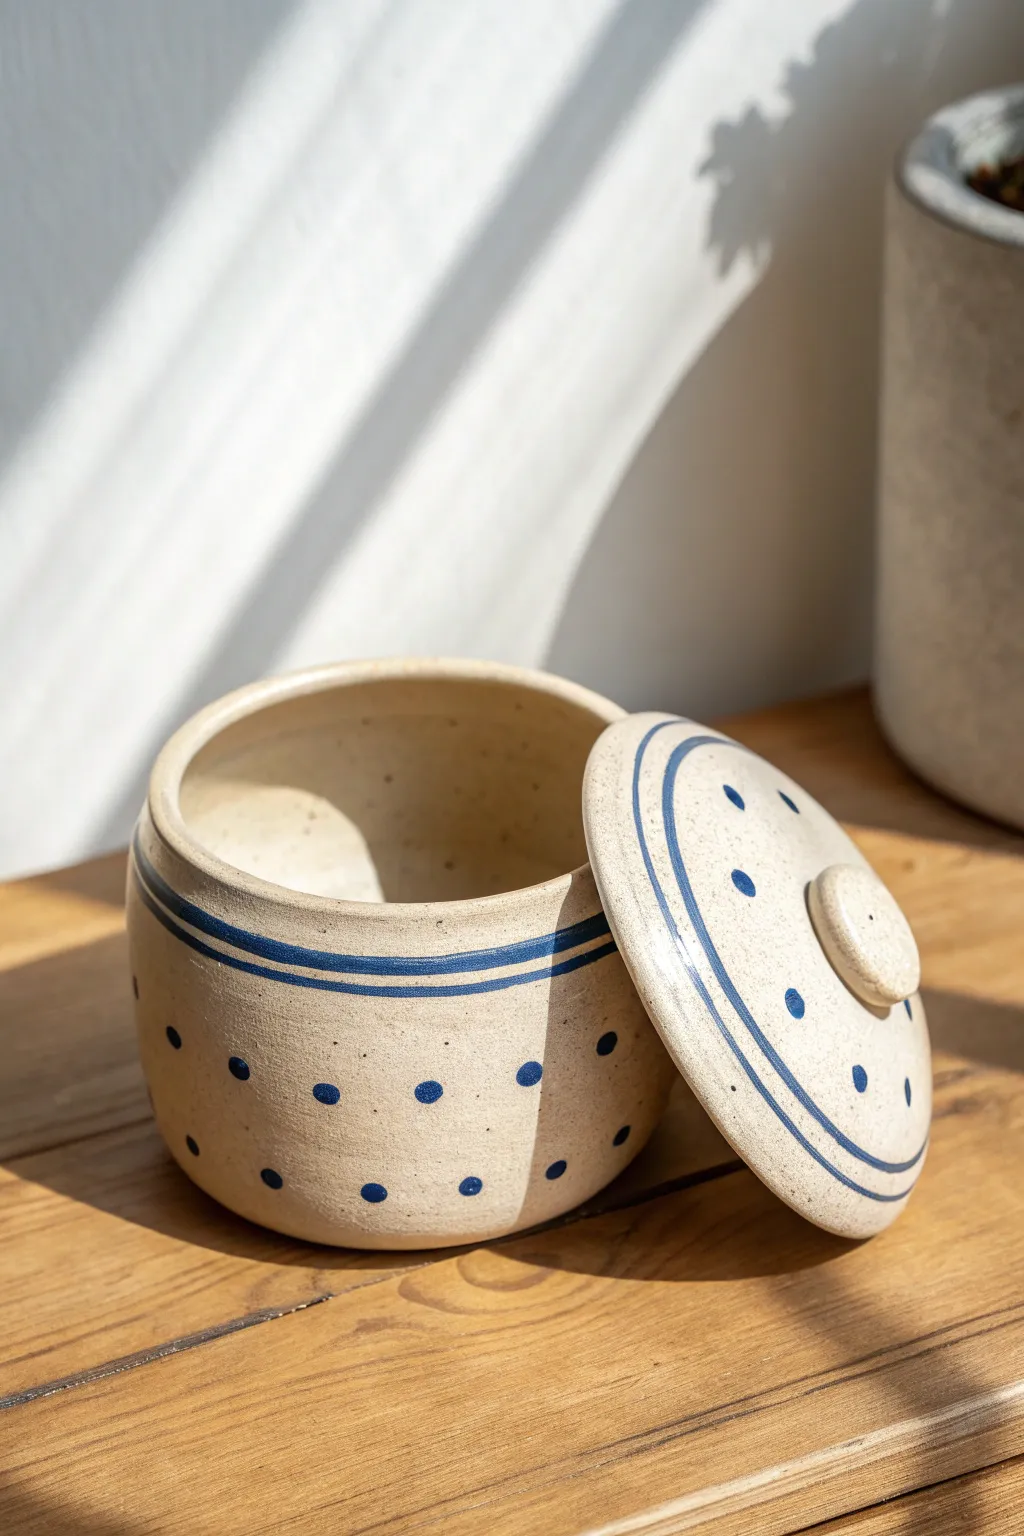
This charming, rustic trinket jar brings a touch of whimsy to any shelf with its classic speckled clay body and cheerful blue polka dots. The technique focuses on creating a well-fitted lid and achieving smooth, even walls for a piece that feels as good as it looks.
How-To Guide
Materials
- Speckled stoneware clay (approx. 1.5 – 2 lbs)
- Pottery wheel (or slab roller/coil tools for handbuilding)
- Throwing sponge
- Pin tool
- Wire cutter
- Wooden rib tool
- Metal rib tool
- Trimming tools
- Cobalt blue underglaze
- Small round paintbrush
- Detail liner brush
- Banding wheel
- Clear transparent glaze
Step 1: Throwing the Jar Body
-
Center the clay:
Start with about 1 pound of speckled clay. Slam it onto the wheel head and center it effectively using firm pressure and water. -
Open and pull:
Open the centered clay to create the floor, leaving it about 1/4 to 1/2 inch thick for trimming later. Pull the walls straight up into a cylinder shape. -
Shape the belly:
Using a rib tool on the outside and your hand on the inside, gently belly out the cylinder to give it a slightly rounded, pleasing curve. -
Form the gallery:
At the rim, use a wooden tool or your thumb to create a ‘gallery’—a small inset shelf where the lid will eventually sit. Ensure this ledge is flat and distinct. -
Measure the opening:
Before cutting the pot off the wheel, take precise measurements of the gallery diameter using calipers. This is crucial for making the lid fit.
Lid Wobbling?
If the lid rattles or doesn’t sit flat, apply a tiny amount of grinding paste to the gallery and spin the lid back and forth to grind a perfect fit.
Step 2: Creating the Lid
-
Throw the lid off the hump:
Using the remaining clay, throw the lid upside down (like a small bowl). Use your caliper measurement to ensure the rim of this ‘bowl’ matches the gallery of your jar. -
Refine the curve:
Shape the lid with a gentle curve. I like to keep the profile fairly low so it sits elegantly on the jar. -
Cut and dry:
Wire the lid off the hump and set both the jar and lid aside to dry to a leather-hard state.
Wax Resist Method
Paint wax dots over the raw clay before glazing. Then dip the whole pot in blue glaze. The dots will remain unglazed clay for a reverse effect.
Step 3: Trimming and Assembly
-
Trim the jar:
Center the leather-hard jar on the wheel and trim away excess weight from the bottom, creating a neat foot ring. -
Trim the lid:
Place the lid upside down (which is actually right-side up for the finished piece) on the wheel or a chuck. Trim the top smooth to remove cutting marks. -
Attach the knob:
Form a small button or knob of clay. Score and slip the center of the lid, then attach the knob securely, smoothing out the connection point. -
Check the fit:
Test the lid on the jar. If it’s too tight, carefully sand or trim the edge slightly until it sits comfortably in the gallery.
Step 4: Decoration and Glazing
-
Bisque fire:
Process the pieces in a bisque firing (Cone 04/06 depending on your clay body). -
Wipe clean:
Once cool, wipe the bisque ware with a damp sponge to remove any dust that might resist the glaze. -
Paint the lines:
Place the jar on a banding wheel. Hold a liner brush loaded with cobalt blue underglaze steady against the spinning pot to create the two parallel lines—one thick, one thin—near the rim. -
Repeat on lid:
Repeat the banding process on the lid, creating matching blue rings that follow the curve. -
Add polka dots:
Using a small round brush, dab spots of blue underglaze randomly around the jar body and the lid. Aim for loose spacing rather than perfect geometric grid patterns. -
Clear glaze application:
Dip the entire piece (lid and jar separately) into a clear transparent glaze. Wipe the foot of each piece clean with a sponge. -
Final firing:
Fire the piece to maturity (Cone 5/6 or 10, based on your clay specifications) to reveal the speckled clay body through the clear glaze.
Once cooled, your custom speckled jar is ready to hold tea, sugar, or your favorite little treasures


Cutout Hollow Luminaries
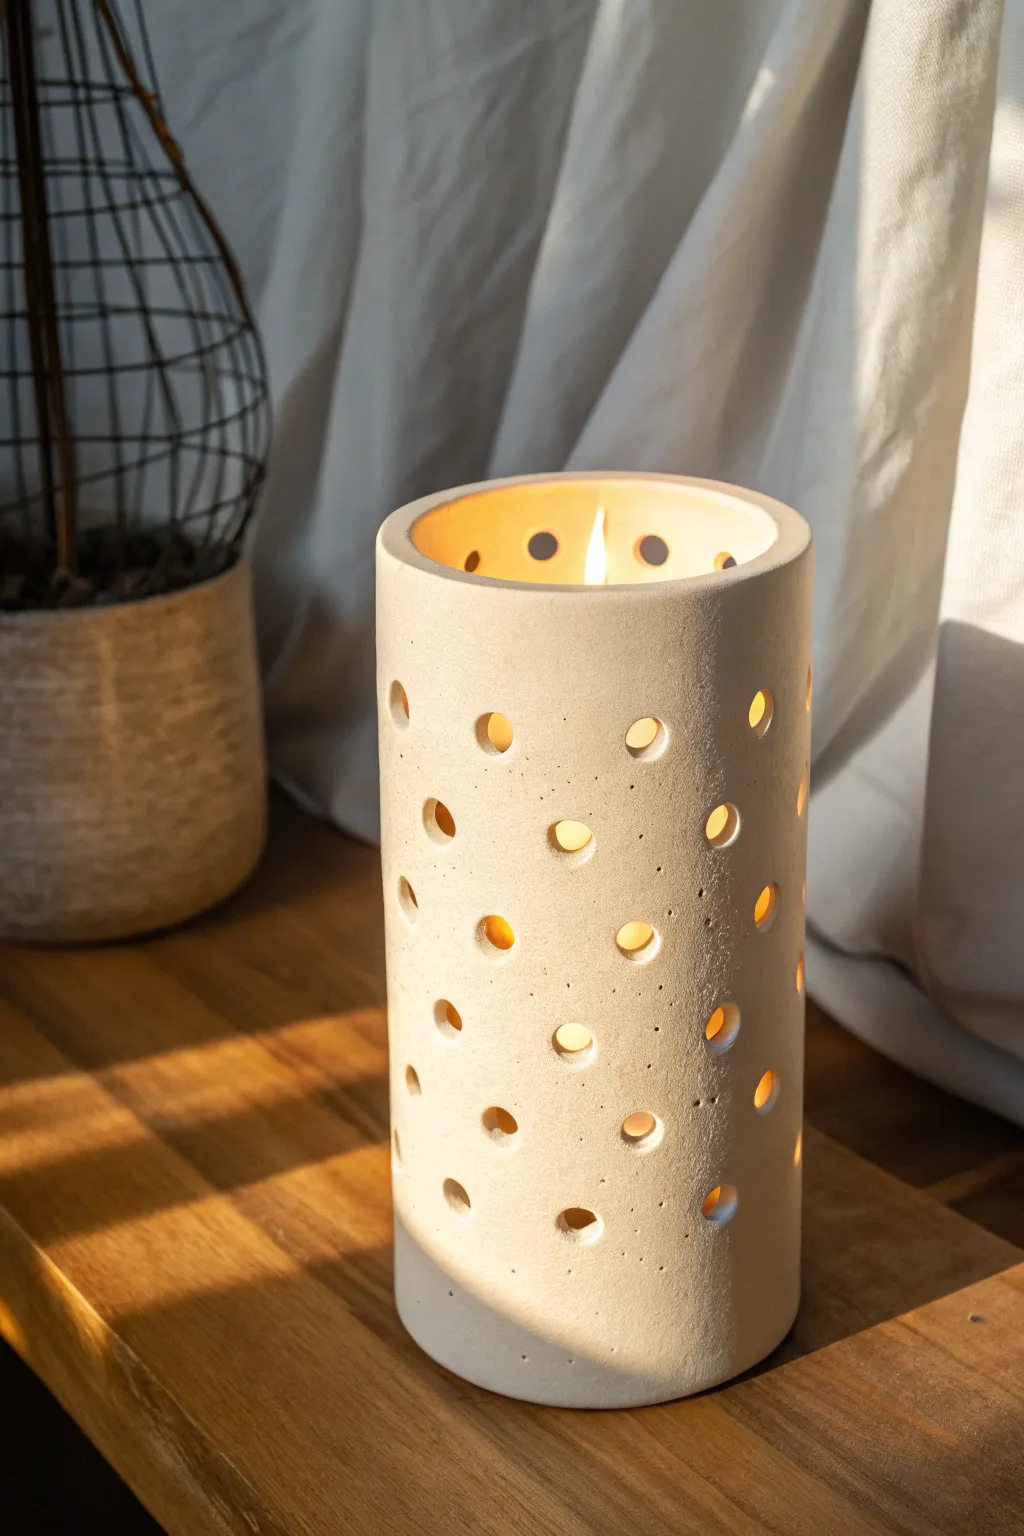
This elegant cylindrical luminary uses the beauty of negative space to cast a warm, speckled glow. Made from pale stoneware or porcelain clay, the simple repeating hole pattern transforms a basic slab-built form into a sophisticated centerpiece.
Step-by-Step
Materials
- Light-colored stoneware or porcelain clay body
- Rolling pin with visual thickness guides
- Canvas or slab mat
- Cylindrical form or wide PVC pipe (approx. 4-5 inch diameter)
- Newsprint or paper
- Circular hole cutters (various sizes or uniform)
- Needle tool
- Scoring tool or serrated rib
- Slip (clay and water slurry)
- Fettling knife
- Sponge
- Smooth rib tool
Step 1: Preparing the Slab
-
Wedge the Clay:
Begin by thoroughly wedging your clay to remove any air bubbles. Since this project relies on a clean, smooth surface, ensuring the clay is homogeneous is crucial for a crack-free finish. -
Roll Out the Slab:
Roll your clay onto a canvas or slab mat. Aim for a thickness of about 1/4 inch or slightly thicker (6-8mm). Use thickness strips or guides on either side of your rolling pin to ensure the slab is perfectly even from end to end. -
Smooth the Surface:
Before cutting anything, take a soft rubber rib and compress the clay on both sides. This aligns the clay particles, strengthens the slab, and creates that lovely smooth finish we want for the final piece. -
Measure and Cut:
Calculate the circumference of your cylinder mold (diameter x 3.14) and add an inch for overlap. Cut a clean rectangle from your slab using a ruler and fettling knife based on these dimensions.
Step 2: Forming the Cylinder
-
Prepare the Mold:
Wrap your PVC pipe or cylindrical object in a sheet of newsprint. Tape the paper to itself, not the pipe. This paper barrier allows the clay to slide off easily later without sticking. -
Wrap the Clay:
Carefully lift your clay slab and wrap it around the paper-covered form. Bring the two ends together until they touch. -
Bevel the Edges:
For a seamless join, cut through both overlapping layers of clay at a 45-degree angle. Remove the excess clay scraps from underneath and on top. -
Score and Slip:
Score the two fresh angled edges deeply with a serrated tool. Apply a generous amount of slipping to both sides. -
Seal the Seam:
Press the beveled edges firmly together. Use your thumb or a wooden tool to blend the clay across the seam line, working both the exterior and the interior (if accessible) until the join is invisible. -
Refine the Form:
I prefer to let the cylinder set up for about 30 minutes on the mold. Once it’s leather-hard—firm enough to hold its shape but still workable—carefully slide it off the form.
Warped Walls?
If the cylinder slumps when you remove the mold, the clay was too wet. Let the slab stiffen to a widely recognised ‘leather hard’ state on the mold before sliding it off.
Step 3: Creating the Illumination Holes
-
Plan the Layout:
Decide on your pattern. You can mark light dots with a pencil to guide you, or go freehand for a more organic, scattered look like the example image. Ensure you leave enough solid clay at the bottom for structural integrity. -
Cut the Holes:
Using a circular hole cutter tool, press firmly into the wall of the cylinder. Twist gently as you push through to get a clean cut, then pull the tool out to remove the plug of clay. -
Vary Spacing:
Create an airy aesthetic by spacing the holes somewhat randomly, rather than in a strict grid. Leave approximately 1 to 1.5 inches of space between the perforations. -
Clean the Edges:
Once the clay has stiffened a bit more, go back to each hole with a damp sponge or a fingertip. Gently smooth the sharp edges created by the cutter to give them a softened, finished look. -
Refine the Rim:
check the top rim of the cylinder. If it became distorted during cutting, gently reshape it into a perfect circle and smooth the edge with a damp chamois or sponge.
Clean Cuts Pro-Tip
Don’t discard the clay plugs immediately. Let them dry slightly inside the cutter tool; they push out easier. Also, twist the tool as you remove it, not just as you insert it.
Step 4: Finishing and Firing
-
Slow Drying:
Loosely cover the cylinder with plastic to let it dry slowly. Because the walls are punctured, drying too fast can cause warping or cracking around the holes. -
Bisque Fire:
Once bone dry, bisque fire the piece to cone 04 (or according to your clay body’s specifications). -
Glazing:
Apply a matte, creamy white glaze. You can choose to leave the tactile raw clay on the outside and glaze only the inside, or dip the whole piece. If dipping, blow gently through the holes immediately to pop any glaze bubbles. -
Final Fire:
Fire the piece to maturity (Cone 5/6 for stoneware). Once cool, place a pillar candle or LED light inside to see your handiwork come to life.
Enjoy the cozy atmosphere created by the speckled light dancing on your walls


Mini Hollow House Lanterns
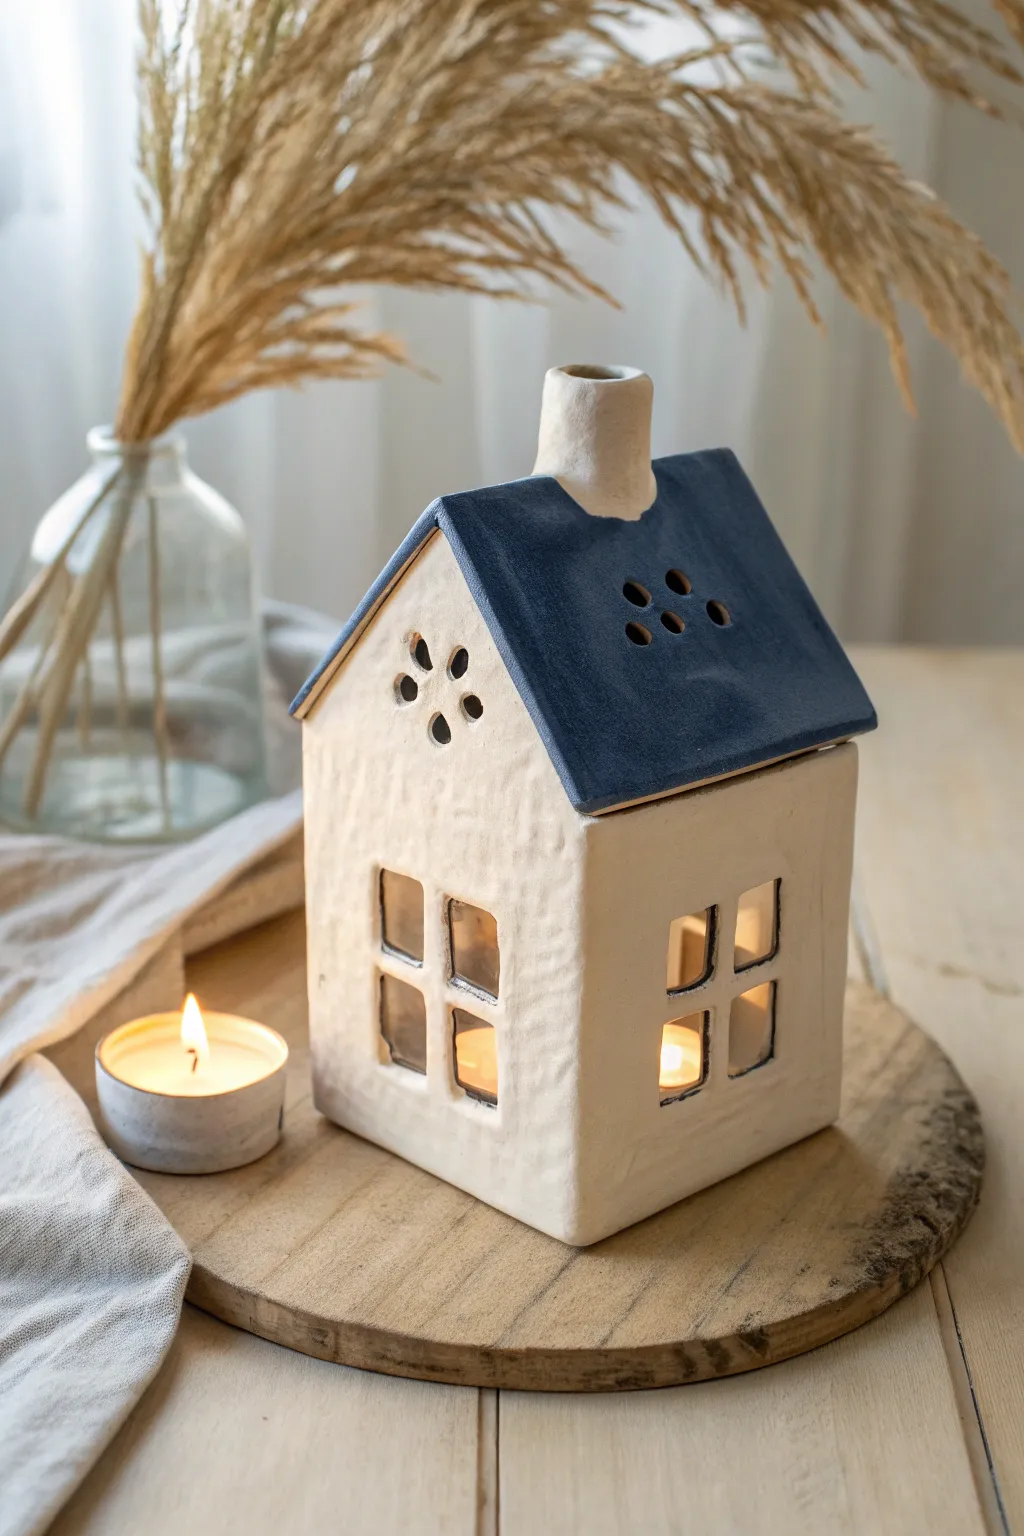
Bring a warm, homely glow to any corner with this charming handcrafted clay lantern. Featuring textured white walls, a deep blue roof, and delicate cut-out windows, this hollow house is designed to safely house a tea light and cast gentle shadows.
How-To Guide
Materials
- White earthenware or stoneware clay
- Rolling pin and guide sticks (approx. 5mm thickness)
- Ruler and craft knife (or fettling knife)
- Paper templates (roof, walls, floor)
- Clay slip and scoring tool
- Small square cookie cutters (optional) or precision knife
- Straw or small pipe for punching holes
- Sponge and water
- White glaze (glossy or satin)
- Dark denim blue glaze
- Kiln (if using firing clay) or sealant (if using air-dry clay)
Step 1: Planning and Cutting
-
Create templates:
Draft your paper patterns first. You’ll need two pentagon shapes for the front and back walls (the peaked gable ends), two rectangular side walls, two roof panels that overhang slightly, and a square floor piece. -
Roll out the slab:
Roll your clay out on a canvas cloth to a consistent thickness of about 5mm or 1/4 inch. Using guide sticks helps ensure the walls are even, which is crucial for structural integrity. -
Add texture:
Before cutting, I like to gently press a rough fabric or a textured rolling pin across the slab intended for the walls. This replicates the stucco-like finish seen in the original house. -
Cut structural pieces:
Place your templates on the slab and carefully cut around them using a sharp fettling knife or craft knife. Keep the edges clean and 90-degree squared.
Uneven Roof?
If the roof panels slide down during assembly, prop them up with crumpled newspaper or foam inside the house until the clay stiffens enough to hold its own weight.
Step 2: Assembling the Structure
-
Prepare the joins:
Score the edges of the floor piece and the bottom edges of all four wall pieces. Apply a generous amount of clay slip to these roughened areas. -
Erect the walls:
Attach the walls to the floor one by one, scoring and slipping the vertical seams where the walls meet. Press them firmly together, smoothing the inside seams with a modeling tool or your finger to reinforce the bond. -
Attach the roof:
Score and slip the top edges of the walls and the undersides of the roof panels. Place the roof panels so they meet at the peak and overhang the sides, pressing gently to secure them. -
Create the chimney:
Roll a small tube of clay to form the chimney. Cut the bottom at an angle to match the slope of the roof, score the attachment point, and secure it near the roof peak.
Step 3: adding Details and Cut-outs
-
Leather hard stage:
Let the house stiffen slightly until it is leather hard. This makes cutting windows much cleaner and prevents the walls from warping under pressure. -
Cut the windows:
Use a sharp knife to cut out four window pane squares on the front and side walls. Leave a thin cross of clay in the center to creates the ‘mullions’ of the window frame. -
Punch ventilation decorative holes:
Create the floral design on the gable end using a small circular cutter or straw. Arrange five holes in a circle with one in the center. Repeat this pattern with simple lines of dots on the roof for ventilation. -
Smooth the edges:
Take a damp sponge and gently wipe down all sharp edges, especially around the window cut-outs and the roof line, to soften the look. -
Make the candle access:
If you prefer not to lift the house, cut a large archway in the back wall now so you can slide a tea light in easily later.
Glow Up
Use translucent or semi-opaque glazes for the windows if you want to fill the panes, or leave them open. Add drops of gold luster to the chimney rim for a luxe touch.
Step 4: Firing and Glazing
-
Bisque fire:
Allow the house to dry completely (slowly, under loose plastic if necessary to prevent cracking). Fire it in the kiln to bisque temperature. -
Glaze the roof:
Apply 2-3 coats of deep denim blue glaze to the roof panels. Be careful to keep the line where the roof meets the wall crisp and clean. -
Glaze the body:
Apply a creamy white glaze to the walls and chimney. The glaze will break beautifully over the texture you added earlier, highlighting the stucco effect. -
Wipe the feet:
Ensure no glaze is on the bottom of the floor piece, or use stilts, to prevent it from sticking to the kiln shelf. -
Final fire:
Fire the piece again to the recommended maturation temperature for your specific glazes.
Once cooled, place a tea light inside and watch your little ceramic home radiate warmth

What Really Happens Inside the Kiln
Learn how time and temperature work together inside the kiln to transform clay into durable ceramic.
Hollow Monster Heads With Big Mouth Vents
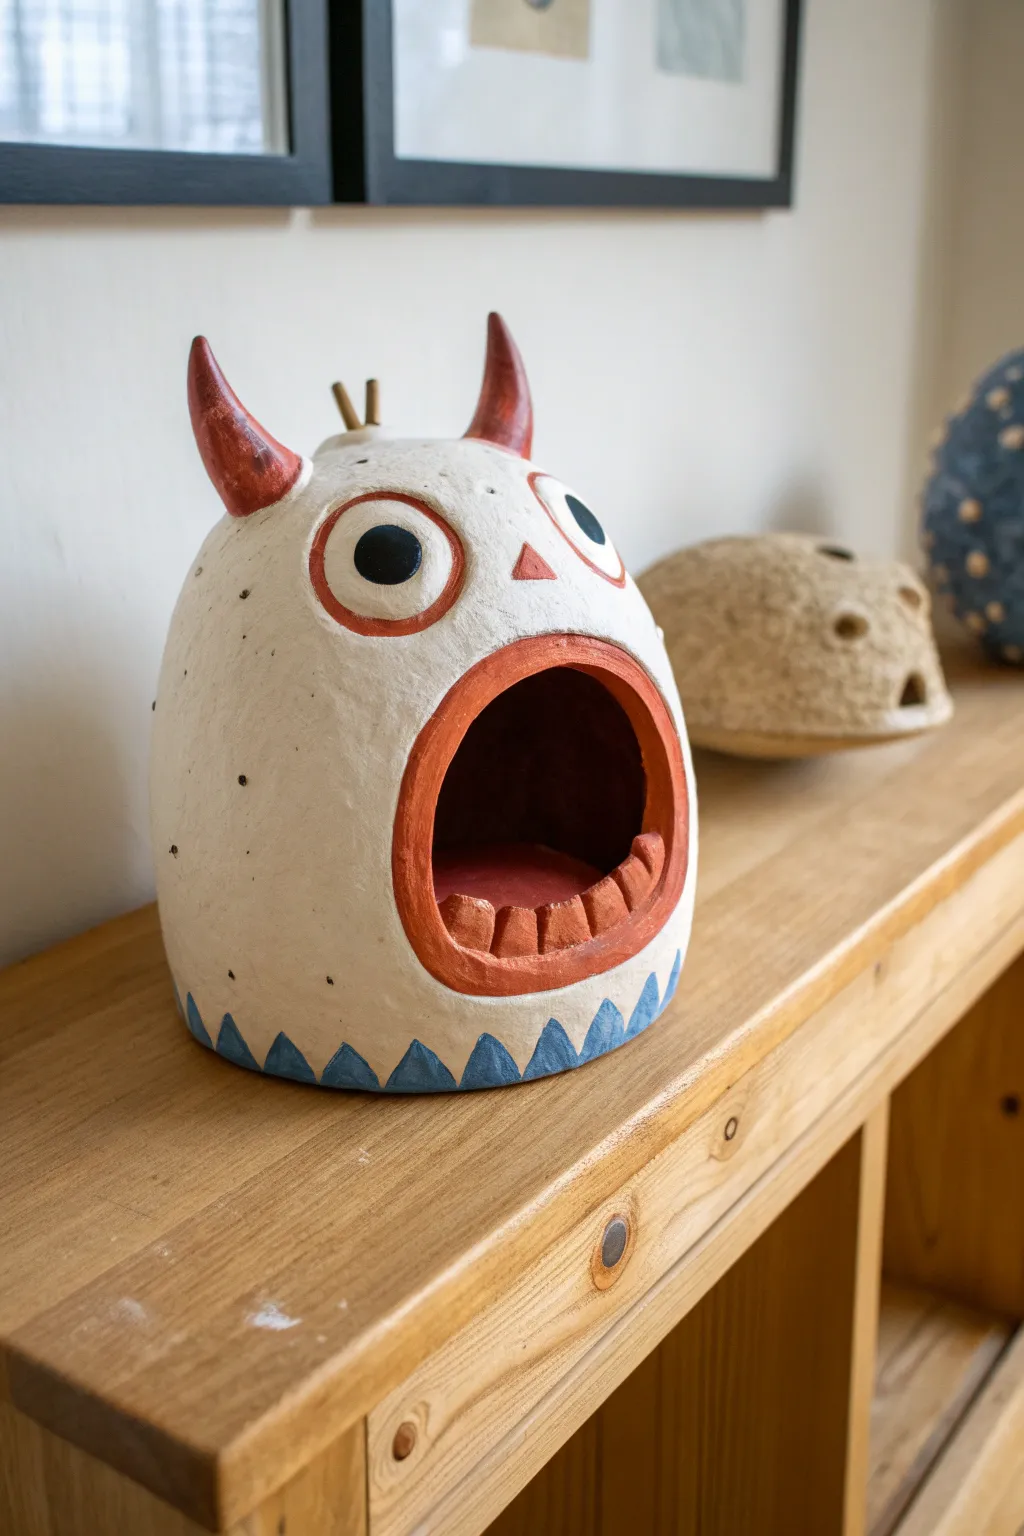
Create a whimsical, slightly surprised-looking monster sculpture featuring a textured white finish and bold red accents. This hollow-form project is perfect for beginners and serves as a quirky decorative piece or even a clever hiding spot for small treasures.
Detailed Instructions
Materials
- Low-fire white earthenware clay
- Pottery tools (needle tool, rib tool, loop tool)
- Slip and scoring tool (or serrated kidney)
- Underglazes: Bright Red, Black, Royal Blue, Gold/Yellow
- Matte white glaze (opaque)
- Detail brushes (fine round and medium flat)
- Sponge
- Kiln access
Step 1: Forming the Base Body
-
Pinch Pot Foundation:
Start with a softball-sized lump of clay. Create a deep pinch pot by inserting your thumb and pinching evenly while rotating the ball. Aim for walls about 1/4 inch thick. -
Extending the Form:
Perform the same pinch pot technique with a second, slightly smaller ball of clay. Score and slip the rims of both pots, then join them together to create a closed egg-like hollow form. -
Smoothing the Seam:
Use a wooden paddle or a rib tool to smooth over the seam where the two pots meet. Gently reshape the egg so it is slightly wider at the bottom for stability. -
Creating the Flat Base:
Tap the bottom of the form gently against your work surface to create a flat, stable base so the monster sits upright without wobbling.
Slumping Mouths
If the mouth opening sags while the clay is wet, loosely crumble a piece of newspaper or paper towel and stuff it inside the mouth hole to support the arch while it dries to leather-hard.
Step 2: Sculpting the Features
-
Carving the Mouth:
Sketch a large, wide arch shape on the lower front of the body for the mouth. Use a sharp fettling knife to carefully cut this section out. Save the clay scrap. -
Smoothing Mouth Edges:
Use a damp sponge or your finger to round off the sharp cut edges of the mouth opening. You want a smooth, lip-like transition, not a jagged cut. -
Adding the Lower Teeth:
Roll a small coil of clay and attach it inside the bottom lip of the mouth opening using slip. Use a modeling tool to press indentations into the coil, creating a row of blocky, rectangular teeth. -
Forming the Horns:
Roll two small cones of clay. Bend them slightly to give them a curve. Score and slip these onto the top sides of the head, blending the clay downwards for a seamless attachment. -
Adding Top Details:
Create two tiny, thin cylinders for the central head sprout. Attach them between the horns, keeping them upright and distinct.
Step 3: Surface Decoration & Glazing
-
Refining the Surface:
Once the clay is leather-hard, sponge the entire exterior to create a slightly pitted, organic texture rather than a perfectly smooth finish. -
Bisque Firing:
Allow the piece to dry completely (slowly, under loose plastic if needed to prevent cracking). Bisque fire the piece according to your clay body’s specifications. -
Drafting the Design:
Using a graphite pencil, lightly sketch where the large circular eyes, the triangular nose, and the zigzag pattern at the base will go. The graphite will burn off in the kiln. -
Painting the Base White:
Apply the matte white glaze to the main body of the monster, carefully painting around the areas you marked for the eyes, mouth rim, nose, and base pattern. Apply 2-3 coats for opacity. -
The Red Accents:
Use a bright red underglaze for the horns, the rim of the eyes, the small triangle nose, and the wide lip surrounding the mouth opening. I find a steady hand and a medium round brush work best here. -
Interior Color:
Paint the entire interior of the mouth cavity (excluding the teeth) with a dark red or maroon underglaze to give it depth. -
Teeth and Eye Details:
Paint the teeth with the same matte white or a creamy underglaze. For the eyes, paint the center circles black, leaving the surrounding sclera bare clay or painting it white. -
The Blue Zigzag:
Paint a row of royal blue triangles along the very bottom edge of the sculpture to create a decorative border. -
Sprout Detail:
Carefully paint the two small sprouts on top of the head with a metallic gold or yellow underglaze. -
Final Firing:
Clear glaze is likely unnecessary if you used a good matte white glaze, as the contrast between the matte texture and the underglaze colors is desirable. Fire the piece a final time to the glaze temperature.
Pencil Marks
Don’t worry about erasing pencil sketch lines on bisque ware. Regular graphite burns away completely in the kiln, leaving your glaze lines clean and unaffected.
Place your finished monster on a shelf where its gaping expression can greet everyone who walks by
Hollow Fish With Open Mouth Detail
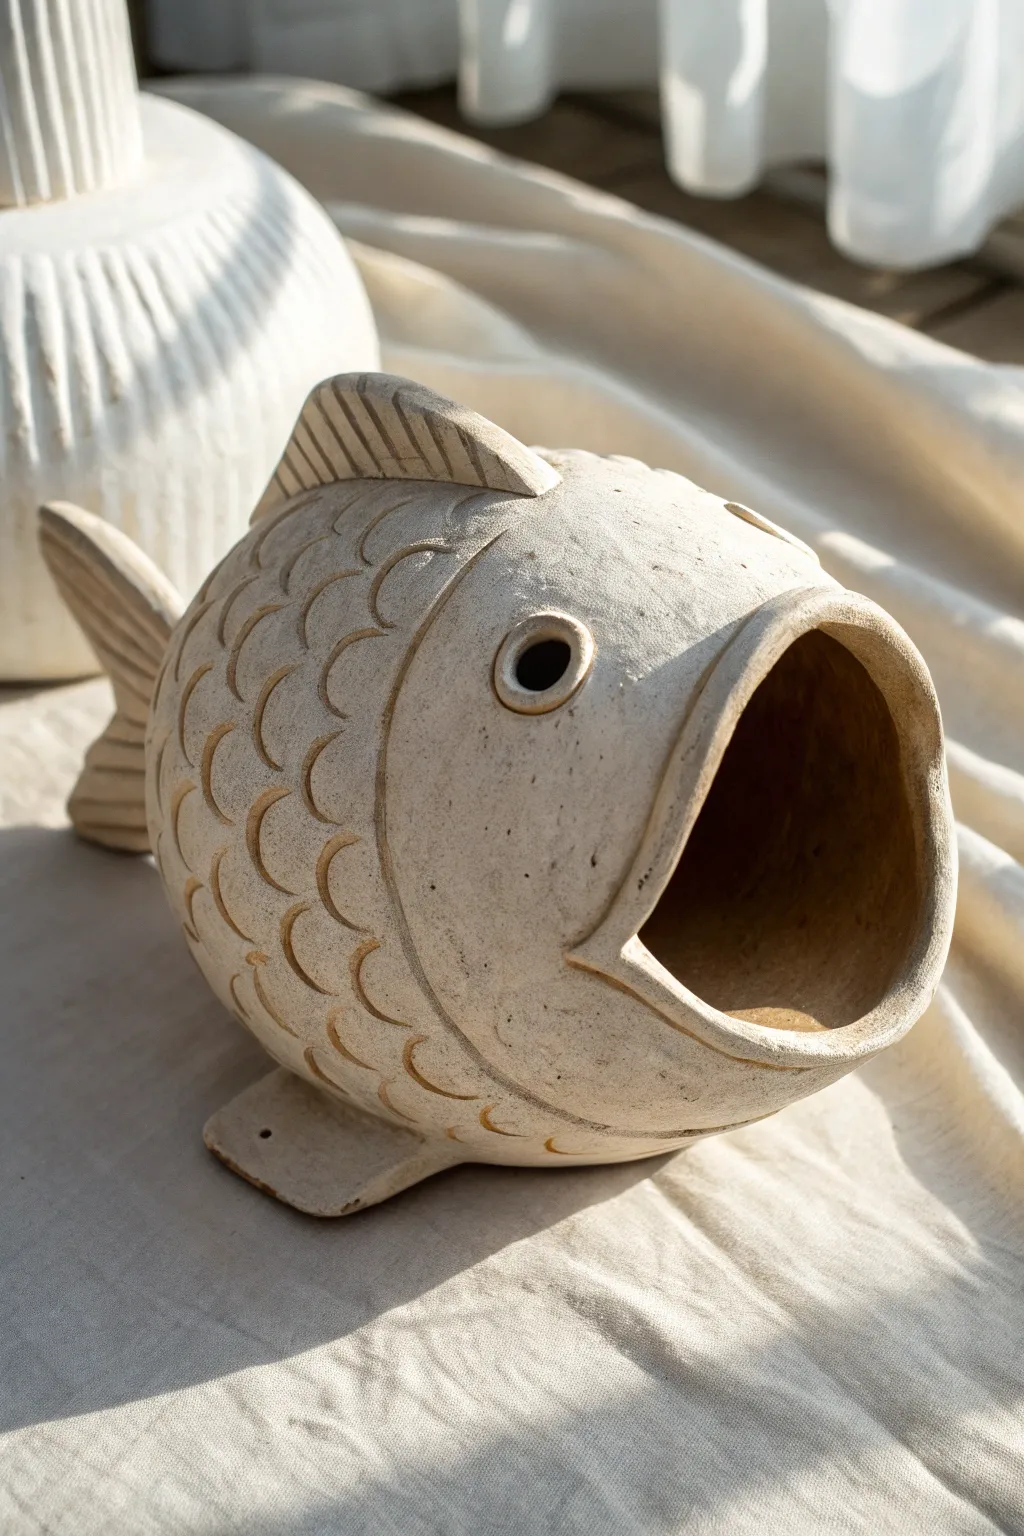
This charming hollow fish sculpture features a wide open mouth and textured scales, perfect for use as a uniquely shaped planter or a whimsical decorative piece. Its unglazed, natural stoneware finish highlights the rhythmic carving and organic form.
Step-by-Step
Materials
- Stoneware clay body (grogged for strength)
- Pottery tools (needle tool, rib tool, loop tool)
- Rolling pin
- Canvas or slab mat
- Slip and scoring tool (or serated rib)
- Wooden modeling tool
- Sponge
- Kiln for firing
Step 1: Forming the Hollow Body
-
Prepare the clay:
Begin by wedging your stoneware clay thoroughly to remove air pockets and ensure an even consistency. You will need a substantial ball of clay, roughly the size of a large grapefruit. -
Pinch pot method:
Divide the clay into two equal halves. Form one half into a smooth ball, insert your thumb, and pinch the walls evenly to create a deep bowl shape. Repeat this with the second half to make a matching bowl. -
Join the halves:
Score the rims of both pinch pots aggressively and apply slip. Press the two halves together firmly to create a closed, hollow sphere. Smooth the seam completely with a rib tool until the join is invisible. -
Shape the ovoid:
Gently paddle or roll the sphere on your work surface to elongate it slightly into an egg or football shape. This will form the main body of the fish. -
Create the mouth opacity:
Decide which end will be the face. Slice a vertical section off the front of the oval to create a flat plane, then gently widen this opening with your fingers to form the large, gaping mouth characteristic of this design. -
Refine the mouth rim:
Use a damp sponge or your fingers to smooth and slightly flare the rim of the mouth opening, giving it a soft, rounded lip.
Air Pressure Trick
When shaping the closed hollow form, the trapped air supports the walls. Don’t cut the mouth open until you are happy with the overall egg shape, or the form might collapse.
Step 2: Adding Fins and Details
-
Form the dorsal fin:
Roll out a small slab of clay about 1/4 inch thick. Cut a triangular shape for the top fin. Score and slip the top ridge of the fish’s body and attach the fin securely. -
Add the tail fin:
Cut a larger, slightly fan-shaped piece from your slab for the tail. Attach this to the rear of the body, blending the clay seamlessly onto the body for a strong bond. -
Attach the base fins:
Create two smaller, rectangular tabs for the bottom pectoral fins. These also act as feet to keep the sculpture stable. Attach them to the underbelly and press the fish down gently to ensure it sits flat. -
Define the face:
Roll a thin coil of clay and attach it in a curved line behind the mouth to define the gill plate/head area. Blend the back edge of the coil into the body, leaving the front edge distinct. -
Sculpt the eyes:
Make two small balls of clay and flatten them slightly. Attach them on either side of the head. Use a small loop tool or the back of a brush to press a deep indentation into the center of each for the pupil.
Level Up: Lantern Mode
Before the clay hardens, use a hole cutter to punch obscured holes deep between the scales. This turns the fish into a stunning luminary for a tea light.
Step 3: Carving Textures
-
Outline the scales:
Using a loop tool or a U-shaped carving tool, begin carving the scale pattern. Start behind the gill line and work your way back toward the tail. -
Carve rows of curves:
Press the tool into the clay and drag it in a ‘U’ motion to create raised scallop shapes. I find staggering the rows—like brickwork—makes the scales look more natural and rhythmical. -
Detail the fins:
Take a needle tool or a knife and score linear recessed lines into the dorsal and tail fins to mimic the ribbed texture of fin rays. -
Smoothing and refining:
Check the interior of the mouth and clean up any rough bits. Gently sponge the entire piece to remove sharp burrs from carving, but be careful not to wash away your crisp texture. -
Dry slowly:
Cover the fish loosely with plastic to allow it to dry slowly and evenly, preventing the fins from drying out faster than the body. -
The final fire:
Once bone dry, bisque fire the piece. For the look in the image, fire to maturity without glaze, or apply a very matte, dry wash oxide to enhance the textures before the final firing.
Enjoy the tactile process of carving those repetitive scales as you bring your stoneware fish to life


The Complete Guide to Pottery Troubleshooting
Uncover the most common ceramic mistakes—from cracking clay to failed glazes—and learn how to fix them fast.
Hollow Snail Shell Houses
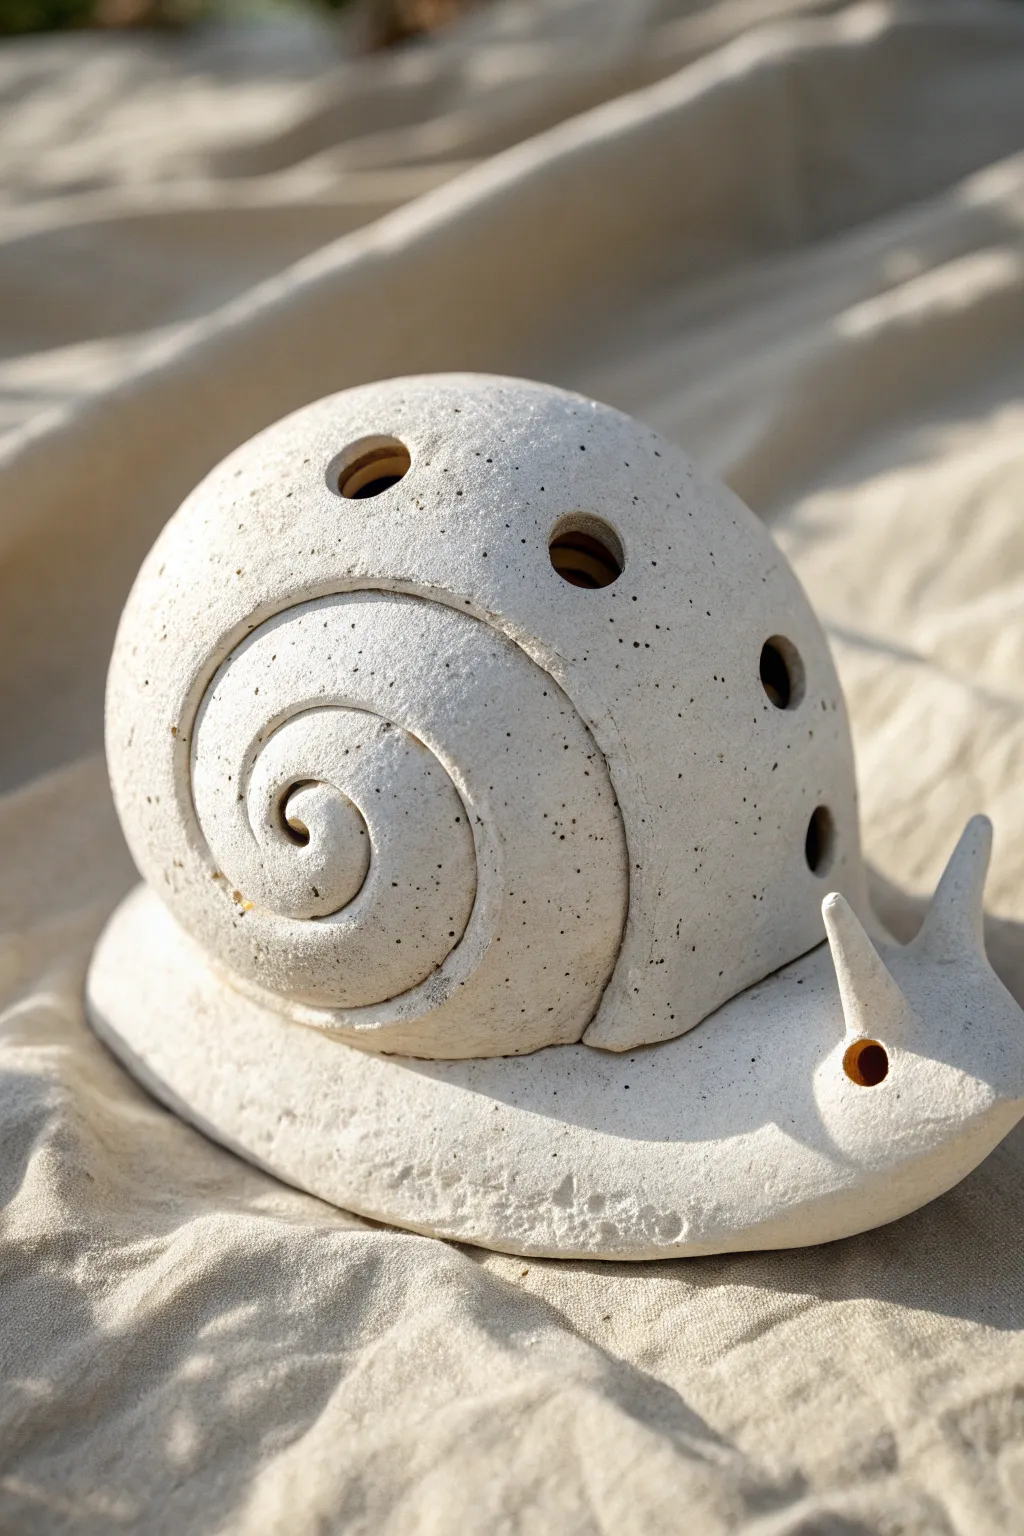
Create a whimsical garden companion with this hollow snail sculpture, featuring a spiraling shell design and charming cut-out accents. The natural, speckled finish of the stoneware clay gives this piece an organic feel perfect for housing a tea light or small LED candle.
Step-by-Step Tutorial
Materials
- White stoneware clay with speckles (grog)
- Potter’s needle tool
- Score and slip tool (or fork)
- Hole punch set (various sizes) or drill bit
- Wooden modeling tool
- Sponge
- Rolling pin
- Newspaper or paper towels
- Canvas working mat
Step 1: Sculpting the Body
-
Prepare the Base:
Begin by rolling a thick, elongated coil of clay to form the snail’s foot. Flatten the bottom gently against your canvas to create a stable base, tapering firmly at one end for the tail and leaving the other end thicker for the head. -
Shape the Head:
Gently curve the thicker end upward to define the head and neck area. Use your thumb to smooth the transition where the neck rises from the foot so it looks organic and seamless. -
Texture the Foot:
While the clay is still soft, lightly press a rough sponge or stone along the bottom edge of the foot to create the rock-like, uneven texture visible in the reference image.
Slumping Shell?
If the hollow shell sags while you work, lightly stuff it with crumpled newspaper before joining the pots. The paper will support the shape and burn out later in the kiln during firing.
Step 2: Constructing the Shell
-
Form the Pinch Pots:
Create two large pinch pots of equal size. Check that the rims match by pressing them gently together; they should form a hollow sphere. -
Join the Halves:
Score the rims of both pinch pots thoroughly and apply slip. Press them together firmly to seal the air inside, compressing the seam with a wooden tool until it disappears. -
Shape the Dome:
Gently paddle the joined sphere into a slightly flattened dome shape that will sit comfortably on the snail’s back. I like to continuously check the fit against the body piece to ensure proportion. -
Carve the Spiral:
Using a needle tool, lightly sketch a large spiral on one side of the sphere. Once satisfied with the placement, carve deep grooves along the line to define the snail’s shell segments. -
Refine the Groove:
Use a rounded wooden tool to widen and smooth the carved spiral groove, creating a deep, defined channel that separates the ‘coils’ of the shell. -
Add Ventilation Holes:
Using a circular hole cutter or a drill bit, carefully punch several graduated holes along the top curve of the shell. These add visual interest and allow light to escape. -
Attach the Shell:
Score the bottom of the shell and the top of the snail’s body. Apply slip and press the shell firmly onto the body, blending the clay where they meet underneath for a secure bond.
Glow Up
Leave the bottom of the shell open (cut a hole in the base plate) so you can place the finished snail over a solar garden light or an LED tea candle for a glowing nighttime decoration.
Step 3: Finishing Details
-
Create the Tentacles:
Roll two small, tapered cones of clay for the eye stalks (tentacles). Score the top of the head area and attach them, blending the clay downward to smooth the connection. -
Add Eyes:
Use a small hole cutter or the back of a paintbrush to create two distinct eye holes on the side of the head, giving the snail its expressive face. -
Clean and Smooth:
Wipe the entire piece down with a barely damp sponge to remove any sharp burrs or crumbs of clay, especially around the cut-out holes. -
Final Drying:
If you trapped air in the shell without a vent hole connecting to the main opening, poke a tiny hidden pinhole now to prevent exploding. Let the piece dry slowly under loose plastic. -
Firing:
Bisque fire the piece according to your clay body’s instructions. A clear glaze isn’t necessary if you want the matte, stony texture shown, but firing to vitrification is recommended for outdoor use.
Now you have a charming, durable stoneware snail ready to inhabit your garden or shelf
Perforated Hollow Spheres For Shadow Play
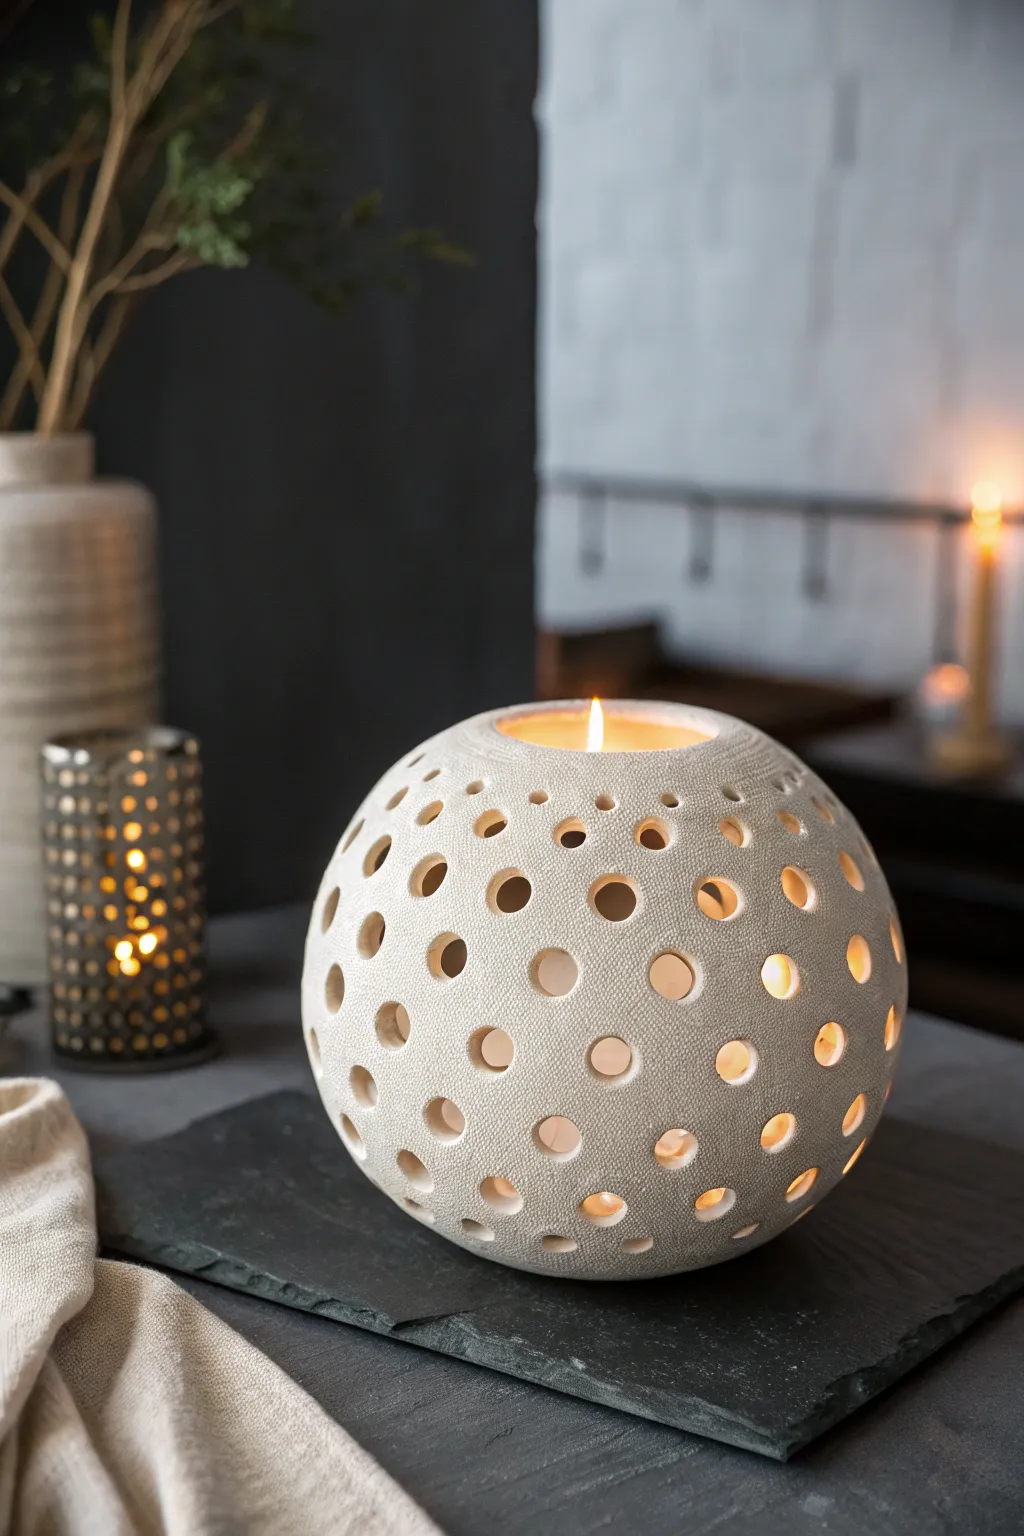
This elegant ceramic luminary combines a classic spherical form with playful, rhythmic perforations that cast a warm, speckled glow when lit from within. The textured, speckled clay body adds an organic touch, making it a perfect centerpiece for cozy evenings.
Step-by-Step Tutorial
Materials
- Speckled stoneware clay (mid-fire)
- Two pinch pots of equal size
- Serrated rib tool
- Slip (made from your clay body)
- Circular hole cutters (various sizes, 5mm to 15mm)
- Paddle (wooden)
- Sponge
- Fettling knife
- Soft rib (silicone or rubber)
- Needle tool
- Large circular cookie cutter (approximately 3 inches)
Step 1: Forming the Sphere
-
Prepare Clay Balls:
Start by weighing out two equal balls of speckled stoneware clay, roughly 1 pound each. Ensure the clay is well-wedged to remove air pockets. -
Create Pinch Pots:
Form a pinch pot from each ball. Gently push your thumb into the center and rhythmically pinch the walls while rotating, aiming for an even thickness of about 1/4 inch. -
Broaden the Openings:
Gently flare the rims of your pinch pots outward so they are wide and match each other in diameter as closely as possible. -
Score the Edges:
Use a serrated rib or needle tool to aggressively score the rim of both pinch pots. This rough texture is crucial for a strong join. -
Apply Slip:
Generously dab slip onto the scored edges. I prefer to apply it to both sides to ensure the bond is completely secure. -
Join the Halves:
Press the two pinch pots together, aligning the rims. Twist them slightly back and forth to lock the clay particles together. -
Seal the Seam:
Using your thumb or a wooden modeling tool, drag clay across the seam line from top to bottom, then smooth it horizontally to completely hide the join. -
Shape with a Paddle:
Trapped air inside will keep the form rigid. Gently paddle the exterior with a wooden paddle to round out any lumpy areas and refine the perfect spherical shape.
Step 2: Refining and Cutting
-
Create the Top Opening:
Place the large circular cookie cutter on the top center of the sphere. Press down and remove the circular plug of clay to create the opening for the candle. -
Smooth the Surface:
Wait until the clay reaches a soft leather-hard state. Use a metal rib to scrape away excess slip and unevenness, followed by a soft silicone rib for a smooth finish. -
Texture the Surface:
Use a damp sponge to dab the surface gently to reveal the grog or speckles in the clay body, enhancing the organic texture seen in the photo. -
Plan Perforations:
Identify where you want your holes. You can lightly mark dots with a needle tool to plan a random but balanced distribution. -
Cut Large Holes:
Using your largest hole cutter, punch holes through the leather-hard clay, twisting the tool as you pull it out to remove the plug cleanly. -
Add Medium Holes:
Switch to a medium-sized cutter and fill in the spaces around the larger holes, keeping roughly an inch of space between cuts to maintain structural integrity. -
Finish with Small Holes:
Use the smallest cutter to add tinier accents in the remaining gaps. Varying the sizes creates visual interest. -
Cleanup Edges:
Once all holes are cut, let the piece stiffen slightly more. Then, use a damp sponge or fingertip to gently smooth the sharp edges of every hole. -
Final Drying:
Allow the sphere to dry very slowly under loose plastic to prevent the thin areas between holes from cracking. -
Bisque Fire:
Fire the piece to bisque temperature (usually cone 04) once it is bone dry. -
Firing to Finish:
Since the raw clay texture is the goal here, fire the piece to maturity (cone 5 or 6) without glaze, or apply a very matte clear glaze if you prefer a sealed surface.
Clean Cuts Every Time
Twist your hole cutter 360 degrees before pulling it out. This shears the clay cleanly and prevents the plug from sticking inside the tool.
Sagging Sphere?
If the sphere starts to collapse while shaping, let it stiffen for 30 minutes, or gently blow warm air into the top hole with a hair dryer to firm the walls.
Place a tealight inside and watch the dancing shadows transform your room with warmth and charm