I love how a plain clay pot can turn into cute, custom decor with just a little paint and a no-stress pattern. These easy painted clay pot ideas are the kind you can knock out in an afternoon and still feel like you made something special.
Classic Color-Blocked Stripes
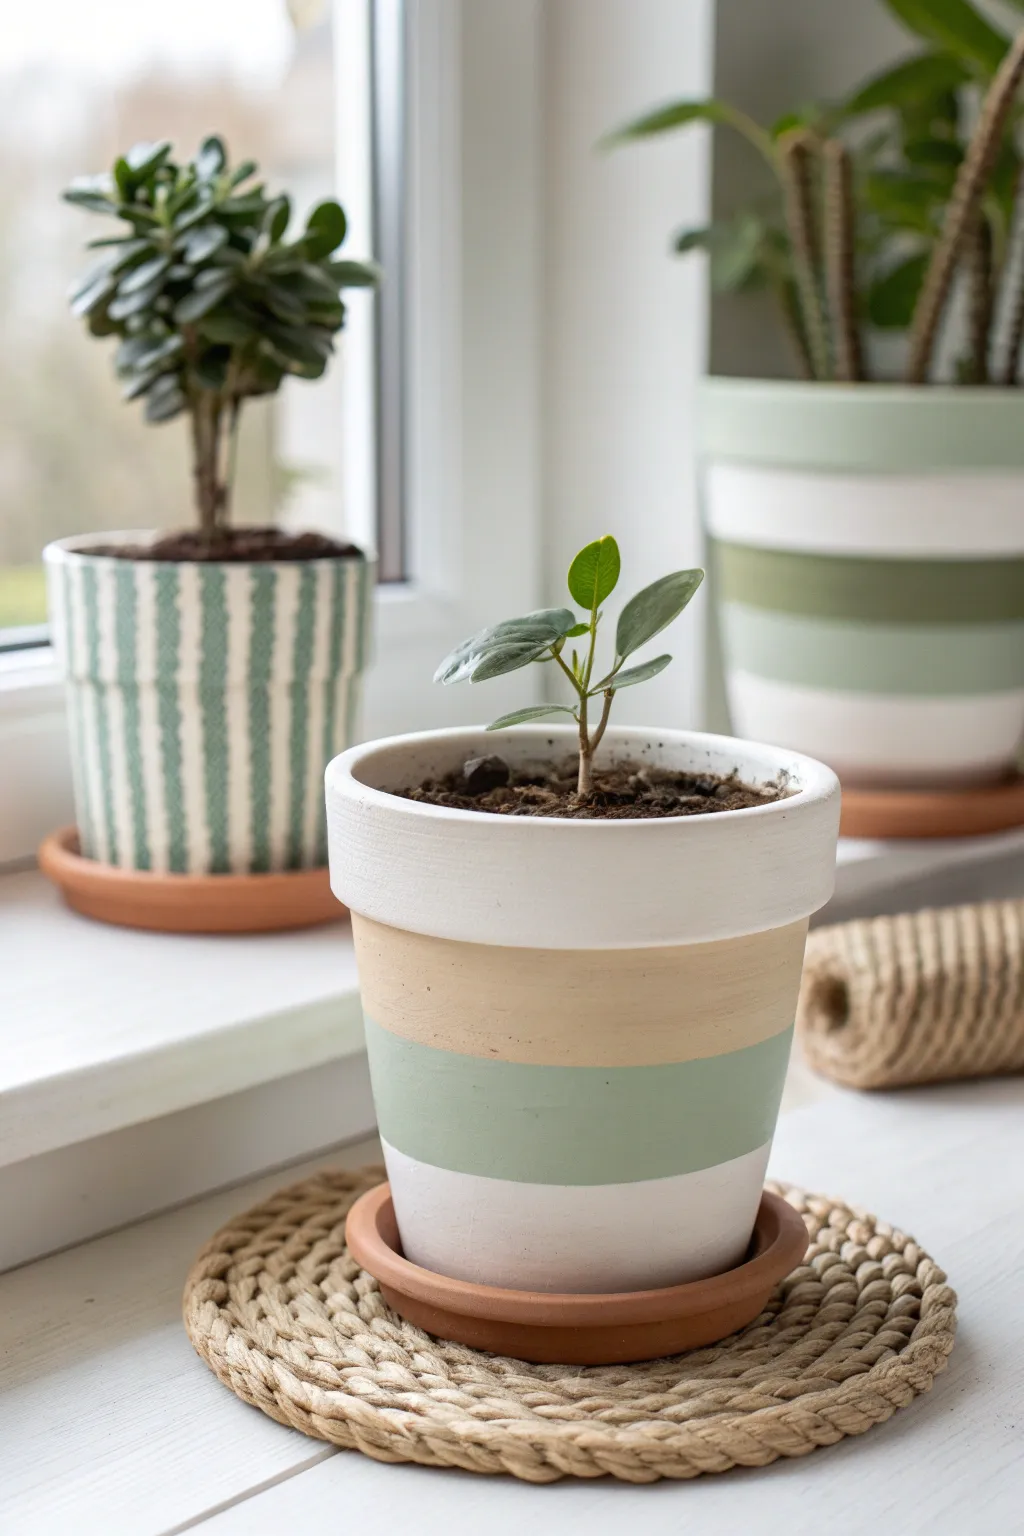
Embrace a calm, nature-inspired palette with this understated color-blocking design. By combining soft sage green, warm sand, and crisp white in simple horizontal bands, you can turn a standard terracotta pot into a modern, minimalist home for your favorite sapling.
Step-by-Step Guide
Materials
- Small to medium terracotta pot with saucer
- Acrylic craft paints: White, Sage Green, Beige/Sand
- Flat paintbrushes (medium width)
- Small detail brush
- Painter’s tape or masking tape
- Clear acrylic sealer (matte finish)
- Damp cloth or sponge
- Palette or paper plate
Step 1: Preparation & Base Coat
-
Clean the surface:
Begin by wiping down your terracotta pot with a damp cloth to remove any dust or manufacturing residue. Let it dry completely so the paint adheres properly. -
Prime with white:
Squeeze a generous amount of white acrylic paint onto your palette. Using a flat brush, apply a base coat to the entire exterior of the pot. -
Cover the rim:
Don’t forget to paint the top rim and just inside the upper lip of the pot, as this area will be visible once the soil is added. -
Check opacity:
Terracotta is porous and dark, so you will likely need a second or even third coat of white to get a solid, opaque finish. Allow about 15-20 minutes of drying time between layers.
Fixing Bleeds
Paint seep under the tape? Wait for it to dry completely, then use a small, stiff brush with the base color (white) to carefully paint over the mistake and straighten the line.
Step 2: Creating the Color Blocks
-
Define the first section:
Once your white base is fully dry (this is crucial to prevent peeling), apply a strip of painter’s tape horizontally around the pot. Position it about one-third of the way up from the bottom. -
Tape the upper boundary:
Place a second strip of tape roughly two-thirds of the way up the pot, just below the rim. This creates the middle area where your colored bands will live. -
Seal the tape edges:
Press down firmly on the edges of the tape with your fingernail or a credit card to ensure a tight seal and prevent paint bleed. -
Paint the bottom stripe:
For the bottom-most colored band, use your sage green paint. Fill in the area just above your lower tape line. I like to paint slightly onto the tape itself to ensure a crisp edge. -
Paint the top stripe:
Switch to your beige or sand-colored paint. Fill in the band immediately below the rim, meeting the sage green section in the middle. -
Refining the meeting point:
Where the beige and sage green meet, use a steady hand to create a clean line. You can use a piece of tape here if you wait for the green to dry first, or simply freehand it for a more organic feel. -
Layering the color:
Apply 2-3 coats of both colors, letting them dry in between, until the color is rich and even.
Texture Twist
Mix a teaspoon of baking soda into your beige paint before applying. This creates a terracotta-like texture that makes the band look like natural stoneware.
Step 3: Finishing Touches
-
Touch up the white base:
The bottom section of this design remains white. If any green or beige dripped down, use a small detail brush and white paint to tidy up the area. -
Remove the tape:
Carefully peel off the painter’s tape while the final coat is still slightly tacky—this often helps achieve the sharpest line. -
Detailing the saucer:
If you are using a saucer, you can leave it natural terracotta for contrast, or paint the rim to match one of your bands. -
Smooth any ridges:
If painting created ridges at the tape lines, you can very lightly sand them with fine-grit sandpaper once fully dry, though be gentle to avoid scratching the paint. -
Apply sealer:
Coat the entire painted exterior with a matte acrylic sealer to protect your design from water damage and UV fading. -
Final cure:
Let the pot cure for at least 24 hours before planting to ensure the finish is durable enough for moisture
Place your newly painted pot on a woven coaster or a sunny windowsill to enjoy the soothing aesthetic


Cheerful Polka Dot Pop
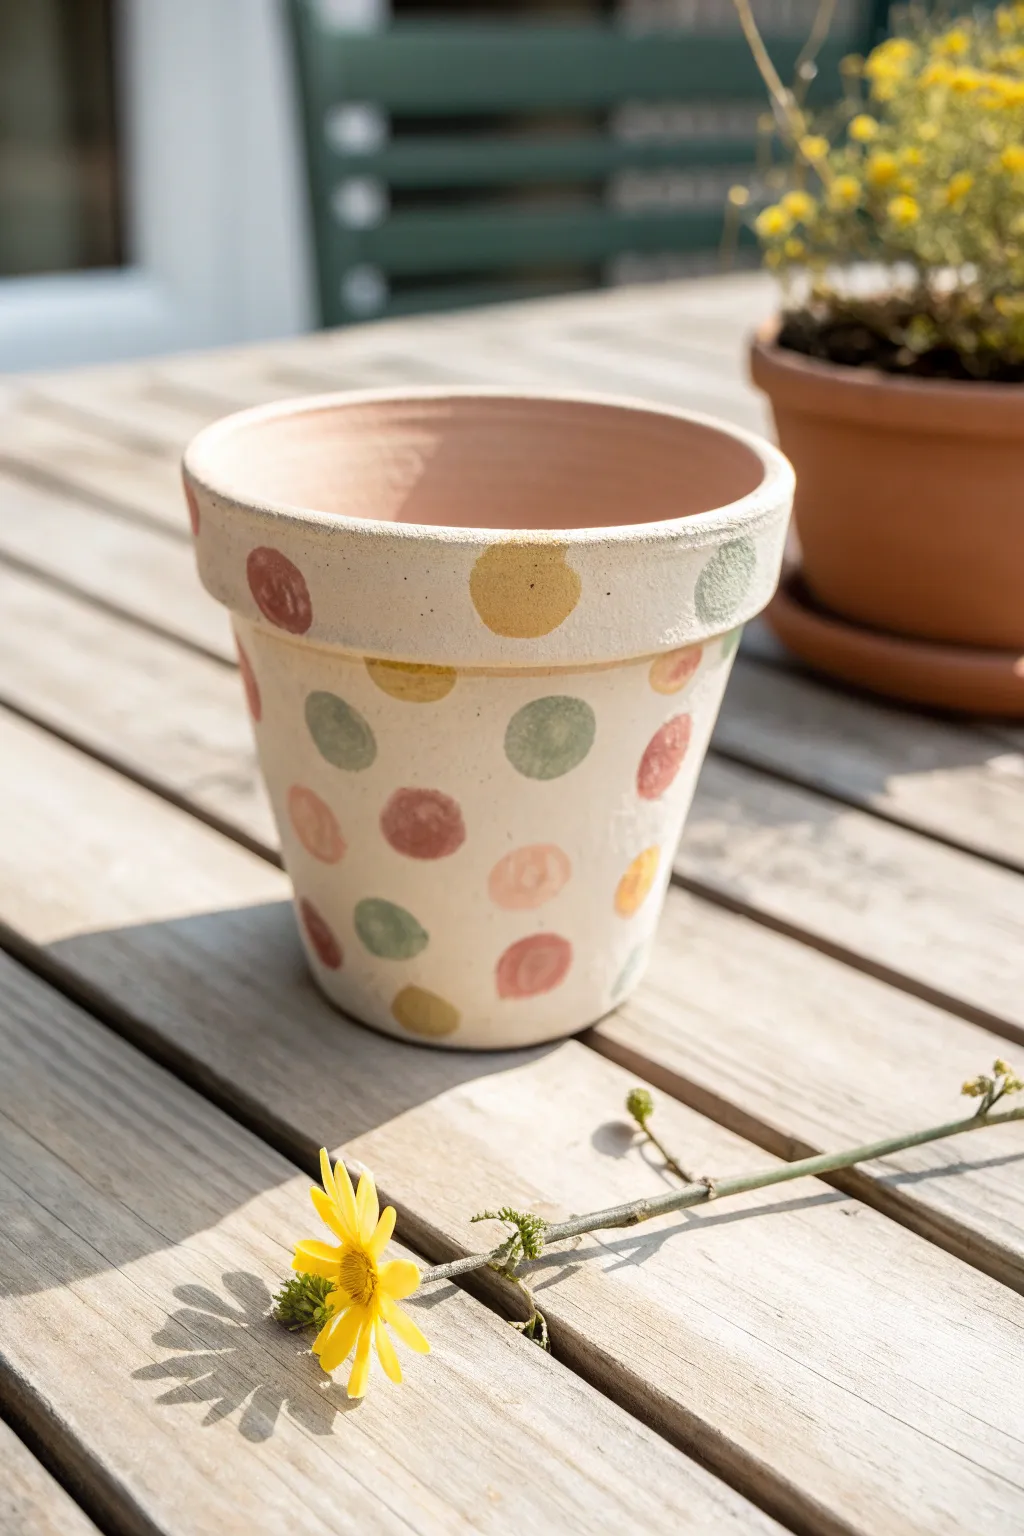
Brighten up your garden or windowsill with this delightfully simple polka dot design that embraces a soft, hand-painted aesthetic. The warm cream base and muted pastel circles create a charmingly imperfect look that feels both vintage and fresh.
Step-by-Step
Materials
- Terracotta pot (standard size)
- White or cream acrylic craft paint (for the base)
- Acrylic paints in muted tones: mustard yellow, sage green, dusty rose, peach
- Medium-sized round sponge pouncers (or round foam brushes)
- Small flat paintbrush
- Paper plate or palette
- Clear matte acrylic sealer (spray or brush-on)
- Water cup and paper towels
Step 1: Preparing the Canvas
-
Clean the surface:
Before starting, wipe down your terracotta pot with a damp cloth to remove any warehouse dust or loose clay particles. Let it dry completely. -
Mix the base color:
Squeeze a generous amount of white or cream acrylic paint onto your palette. If the white feels too stark, mix in a tiny drop of brown or yellow to warm it up. -
Apply the first coat:
Using your flat paintbrush, apply a smooth layer of the cream paint all over the exterior of the pot, including the rim. -
Detailed coverage:
Don’t forget to paint just inside the top rim (about an inch down) so the clay won’t show when the pot is filled with soil. -
Let it dry:
Allow this first coat to dry for about 20 minutes until it’s dry to the touch. -
Second coat application:
Apply a second coat of the cream base to ensure solid, opaque coverage where the orange clay doesn’t peek through, then let it dry fully.
Step 2: Adding the Polka Dots
-
Prepare your palette:
Pour nickel-sized puddles of your muted accent colors—mustard, sage, dusty rose, and peach—onto your paper plate, spacing them well apart. -
Load the sponge:
Dip your round sponge pouncer into the first color, for instance, the mustard yellow. Dab it on a clean part of the plate a few times to evenly distribute the paint and remove excess globs. -
Stamp the rim:
Press the sponge firmly onto the wide rim of the pot. Give it a gentle twist back and forth without lifting to get a solid circle, then pull straight off. -
Create a pattern:
Continue stamping dots around the rim, spacing them out randomly and switching colors as you go. I generally like to clean and dry the sponge between color changes or use a separate sponge for each shade. -
Move to the body:
Start adding dots to the main body of the pot. Aim for a staggered pattern rather than perfect rows to keep the look playful and organic. -
Vary the pressure:
Don’t worry if the edges of the dots aren’t razor-sharp or if the paint texture varies; the visible brush or sponge texture adds to the hand-crafted charm. -
Fill in gaps:
Step back and look at your pot. Identify any large empty spaces and fill them with a dot in a color that isn’t already nearby ensuring a balanced distribution. -
Touch ups:
If any dots look too faint, wait for them to dry slightly and carefully stamp over them again with the same color to increase opacity.
Sponge Stamper Tip
If you don’t have foam pouncers, cut a potato in half or use the flat end of a wine cork to stamp perfectly imperfect circles.
Step 3: Finishing Touches
-
Dry time:
Allow the polka dots to dry distinctively longer than the base coat, perhaps an hour, to prevent smearing during the sealing process. -
Seal the deal:
Apply a coat of clear matte sealer over the entire painted surface. This protects the paint from water damage and fading when the pot is in use.
Make It 3D
Once the paint is dry, use a small detail brush to add tiny white highlight curvature lines on the top right of each dot for a bubbly, 3D effect.
Now your cheerful pot is ready to be a cozy home for your favorite bloom


Simple Two-Tone Dipped Bottom
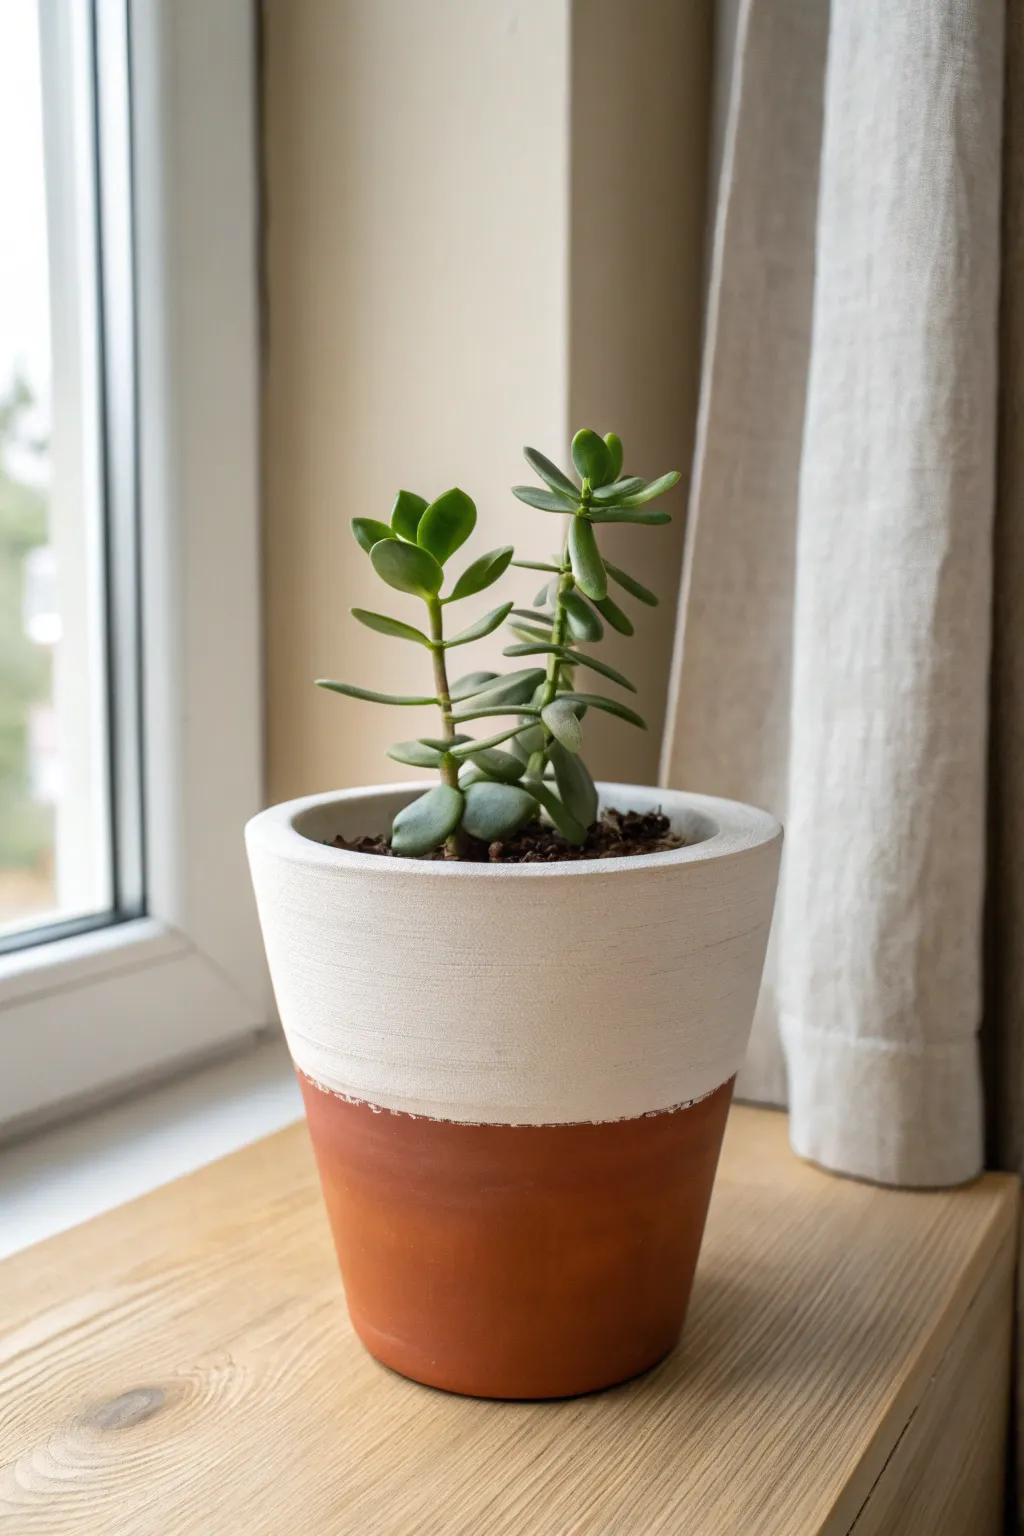
Embrace the beauty of contrast with this simple yet chic planter upgrade that marries crisp white texture with natural rustic terracotta. This project preserves the warmth of the clay while adding a contemporary brightness that perfectly frames your favorite succulents or houseplants.
Step-by-Step Guide
Materials
- Terracotta pot (clean and dry)
- White acrylic paint (matte finish) OR white chalk paint
- Baking soda (optional, for texture)
- Wide flat paintbrush
- Painter’s tape or masking tape
- Plastic cup for mixing
- Small stirring stick
- Clear matte sealer spray
Step 1: Preparation and Mixing
-
Prepare the surface:
Begin by ensuring your terracotta pot is completely clean and free of dust or price sticker residue. If you’ve just washed it, let it dry fully for 24 hours to prevent moisture from bubbling under your paint later. -
Mark the paint line:
Decide on your paint level. For the look in the photo, aim for a line that leaves about the bottom third of the pot exposed. -
Apply the tape:
Wrap a strip of painter’s tape around the circumference of the pot at your chosen height. Press the top edge of the tape down firmly to seal it against the clay. -
Create the texture mix:
Squeeze a generous amount of white paint into your plastic cup. To achieve that slightly gritty, stone-like finish seen in the image, I like to mix in one teaspoon of baking soda for every two tablespoons of paint. -
Stir consistency:
Mix the paint and baking soda until the powder is fully dissolved and the texture resembles a thick, fluffy mousse.
Uneven Lines?
If paint bleeds under the tape, don’t panic. Use a fine-grit sandpaper block to gently sand away the excess paint from the unsealed terracotta for a perfect edge.
Step 2: Painting Process
-
Paint the rim:
Start by painting the top rim of the pot, including the inner edge down to where the soil line will be. This ensures a finished look even if your soil settles later. -
Apply the first coat:
Using your wide flat brush, apply the paint mixture to the main body of the pot, working from the top rim down towards the tape. -
Create horizontal strokes:
Brush horizontally around the pot. The texture in the paint will leave subtle ridges, mimicking a ceramic glaze or plaster. -
Cover the tape edge:
Paint slightly over the top edge of the tape to ensure a crisp line, but avoid globbing it on too heavily right at the seam. -
Let it dry:
Allow the first coat to dry for about 30 minutes. The baking soda mix tends to dry faster than standard acrylic. -
Assess coverage:
If the terracotta color is still peeking through significantly, apply a second coat using the same horizontal strokes. -
Feather the texture:
While the second coat is wet, you can lightly dab the brush on areas that look too smooth to add more surface interest.
Add Subtle Color
Mix a tiny drop of beige or gray paint into the white mixture. It keeps the minimalist vibe but adds warmth that bridges the gap between the white and the clay.
Step 3: Finishing Touches
-
Remove tape carefully:
When the final coat is touch-dry but not fully cured (usually after about 45 minutes), gently peel off the painter’s tape. Pulling at a 45-degree angle helps prevent chipping. -
Clean up the line:
If any paint seeped under the tape, use a damp paper towel or a craft knife to gently scrape it away for a sharp transition. -
Soften the edge (optional):
For the slightly organic look shown in the photo, you can use your finger to lightly rub the painted edge, softening it slightly so it looks more like a dip than a hard tape line. -
Seal the work:
Once fully dry (give it a few hours), spray the painted section with a clear matte sealer. This protects the finish from water damage when you water your plants. -
Pot your plant:
Fill with potting soil and add your favorite green friend, like the jade plant shown here, to complete the look.
Place your newly refreshed pot on a sunny windowsill and enjoy the clean, modern update to your space


Easy Tape Triangle Pattern
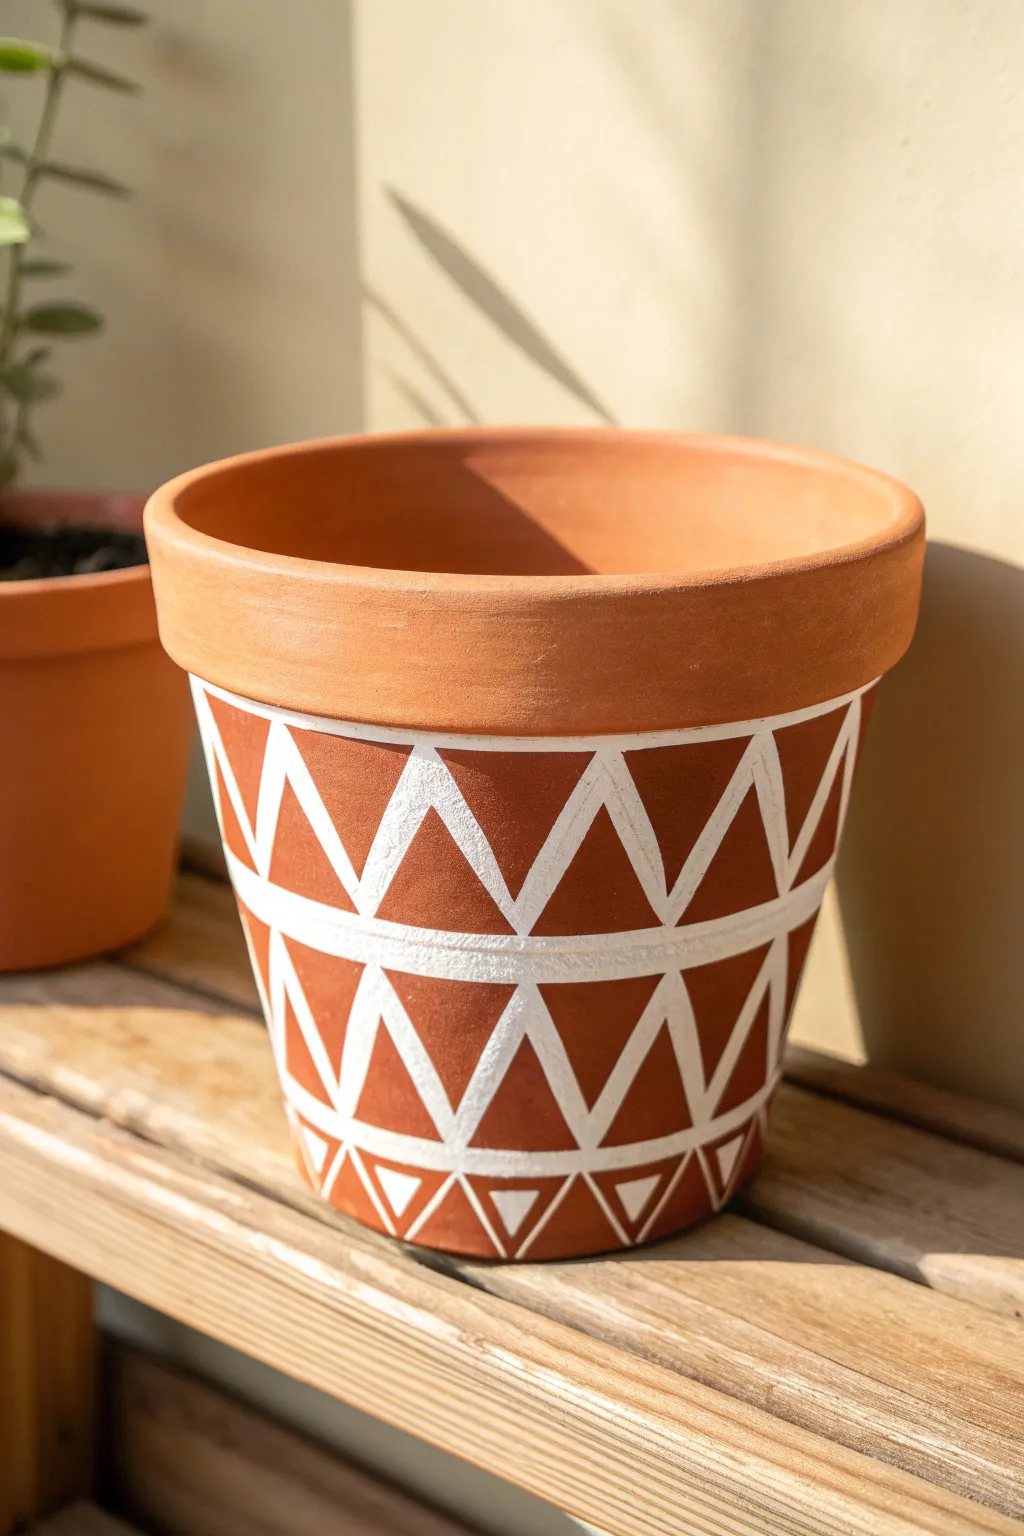
Transform a plain terracotta pot into a modern, geometric planter with crisp white lines against the warm clay background. This high-contrast look is surprisingly simple to achieve using basic masking tape to create a striking repeating triangle effect.
Step-by-Step Tutorial
Materials
- Clean terracotta pot
- White acrylic craft paint
- Flat paintbrush (1-inch width works well)
- Painter’s tape or thin masking tape (approx. 1/4 inch or 1/2 inch width)
- Scissors / craft knife
- Damp cloth
- Matte spray sealer (optional)
Step 1: Preparation
-
Clean surface:
Before you begin, wipe down your terracotta pot with a damp cloth to remove any warehouse dust or oils. Let it dry completely so the tape adheres properly. -
Analyze the zones:
Decide on your layout. For the look in the photo, you will keep the heavy rim of the pot completely unpainted, focusing your design only on the main body of the pot below the rim.
Step 2: Taping the Design
-
Create the horizontal dividers:
Apply a strip of tape horizontally around the middle of the pot’s body. This will serve as the separator between the top and bottom rows of triangles. -
Add the bottom border:
Apply a second horizontal strip of tape near the very bottom edge of the pot to create a clean finish line for the lowest pattern. -
Upper zigzag foundation:
Start creating your first zigzag pattern in the section just below the rim. Place diagonal strips of tape that connect from the bottom of the rim to the middle horizontal tape line. -
Complete the upper V-shapes:
Place tape strips diagonally in the opposite direction to meet the previous strips, forming a series of upside-down V shapes (or triangles) pointing upwards. -
Lower zigzag foundation:
Repeat this process for the section below the middle horizontal line. Place diagonal tape strips connecting from the middle line down to the bottom border tape. -
Check the alignment:
Look at your pattern from a distance. The points of your triangles on the bottom row should ideally align with the points on the top row to keep the geometry consistent. -
Press edges firm:
This is crucial: run your fingernail or a credit card firmly over all the edges of the tape. You need a tight seal to prevent paint from bleeding under the tape and ruining the crisp lines.
Bleeding Paint?
If lines aren’t crisp, paint a layer of clear matte medium over the tape edges first. This seals the tape so any ‘bleed’ is invisible clear paint, not white.
Step 3: Painting & Finishing
-
Load the brush:
Squeeze a small amount of white acrylic paint onto a palette or paper plate. Dip your flat brush in, but don’t overload it; too much paint leads to globs and seepage. -
Fill the gaps:
Paint the exposed terracotta spaces between your tape lines. These triangular gaps will become the white triangles you see in the final image. -
Painting technique:
I find it helpful to brush away from the tape edge rather than underneath it. This helps minimize the risk of pushing paint under the adhesive. -
Second coat:
Allow the first coat to dry until it’s just tacky to the touch. Apply a second coat of white paint to ensure solid, opaque coverage without streaks. -
Wait briefly:
Let the paint dry for about 10–15 minutes. You want it to be set but not fully cured hard, as peeling tape off fully dried paint can sometimes pull up chips of acrylic. -
The reveal:
Carefully peel away the tape slowly at a 45-degree angle. Start with the diagonal pieces and remove the horizontal bands last. -
Cleanup:
If any paint bled under the tape, use a damp toothpick or a craft knife to gently scrape it away while the paint is still relatively fresh to sharpen the lines. -
Seal (optional):
If you plan to use this outdoors, spray the painted area with a matte clear acrylic sealer to protect your hard work from moisture.
Level Up: Ombre Effect
Mix varying amounts of white into a second color. Paint the top row of triangles pure white, and the subsequent rows in gradually darkening shades.
Pop your favorite succulent inside and enjoy the striking geometry of your new planter

The Complete Guide to Pottery Troubleshooting
Uncover the most common ceramic mistakes—from cracking clay to failed glazes—and learn how to fix them fast.
Soft Ombre Fade
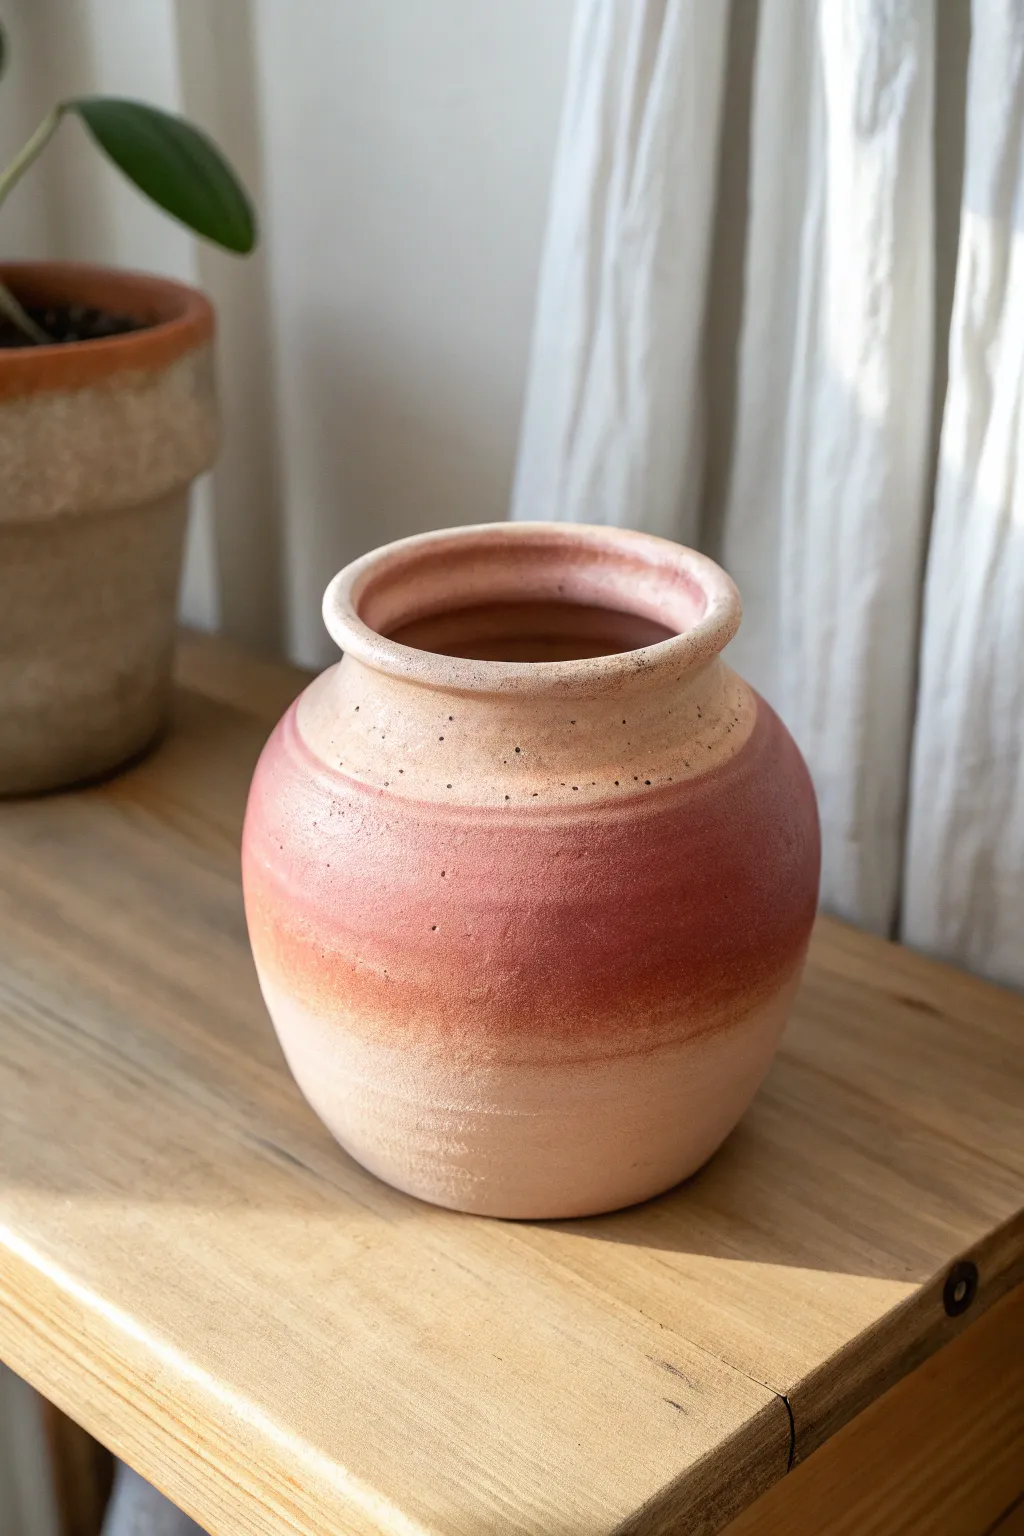
Capture the warmth of a setting sun with this gentle gradient technique that transforms a plain vessel into a piece of modern decor. The soft transition from creamy beige to deep terracotta creates a soothing, earthy aesthetic perfect for minimalist interiors.
Step-by-Step
Materials
- Round terra cotta vase or pot (clean and dry)
- Acrylic craft paints: Cream/Off-White, Deep Terracotta/Burnt Sienna, and Dusty Rose
- Makeup sponges or sea sponges
- Small mixing palette or paper plate
- Matte finish spray sealant
- Paper towels
- Medium flat synthetic brush (optional, for base coat)
Step 1: Preparation and Base
-
Clean surface:
Begin by wiping down your clay vase with a damp cloth to remove any pottery dust or oils. Let it dry completely before starting, as moisture can affect paint adhesion. -
Mix base color:
Create a warm, creamy base tone by mixing your white paint with just a tiny drop of the terracotta color. You want a color that looks like unbleached linen or pale sand. -
Apply base coat:
Using a sponge or flat brush, cover the entire exterior of the pot with your mixed cream color. Don’t worry about complete opacity yet; a slightly sheer look adds to the earthy vibe. -
Dry and repeat:
Allow the first coat to dry for about 15 minutes. If the terracotta is showing through too much, dab on a second thin layer of the cream paint.
Step 2: Creating the Gradient
-
Prepare palette:
Squeeze out your three main colors onto the palette: the cream base, the dusty rose, and the deep terracotta. Place them somewhat separate from each other. -
Start the center:
Dip a damp makeup sponge into the dusty rose paint. Blot off the excess on a paper towel until the sponge is almost dry. -
Apply the mid-tone:
Gently dab the dusty rose in a wide band around the middle belly of the vase. Keep the edges soft and uneven rather than painting a straight line. -
Deepen the color:
Pick up the deep terracotta paint with a fresh sponge. Dab this directly into the center of your rose band to create the darkest point of the gradient. -
Blend the darker tones:
While the paint is still slightly tacky, use the rose-colored sponge to tap over the edges where the terracotta meets the rose, blurring them together seamlessly.
Sponge Technique Tip
Always keep your sponges slightly damp but never soaking wet. A dry sponge creates a rough, textured look, while a damp sponge helps the acrylics blend smoothly.
Step 3: Softening and Finishing
-
Blend upward:
Using a clean sponge with a small amount of the cream base color, gently tap along the top edge of the pink band. -
Feather the transition:
Work your way up toward the rim, feathering the cream paint down into the pink so there are no harsh lines, just a soft fade. -
Blend downward:
Repeat this process for the bottom section. I like to use a specifically dry sponge here to drag the lighter color slightly up into the rose band. -
Refine the rim:
Dip a sponge lightly in the dusty rose and gently kiss the very top rim of the vase. This adds a nice definition to the opening. -
Texture check:
Step back and look at the pot. If the texture looks too heavy in one spot, lightly press a clean, damp sponge over it to lift excess paint. -
Add speckles (optional):
Dilute a tiny bit of dark brown or black paint with water. Flick the bristles of an old toothbrush to create subtle speckles over the gradient for a ceramic look. -
Seal the work:
Once fully dry (give it at least an hour), take the pot to a well-ventilated area and spray it with a clear matte sealant. This protects the ombre without making it shiny.
Add Faux Texture
Before painting, mix a teaspoon of baking soda into your acrylic paint. This creates a concrete-like, gritty texture that mimics expensive artisan pottery.
Place your new vase near a window where the light can catch the soft transition of colors
Paint-Drip Rim Effect
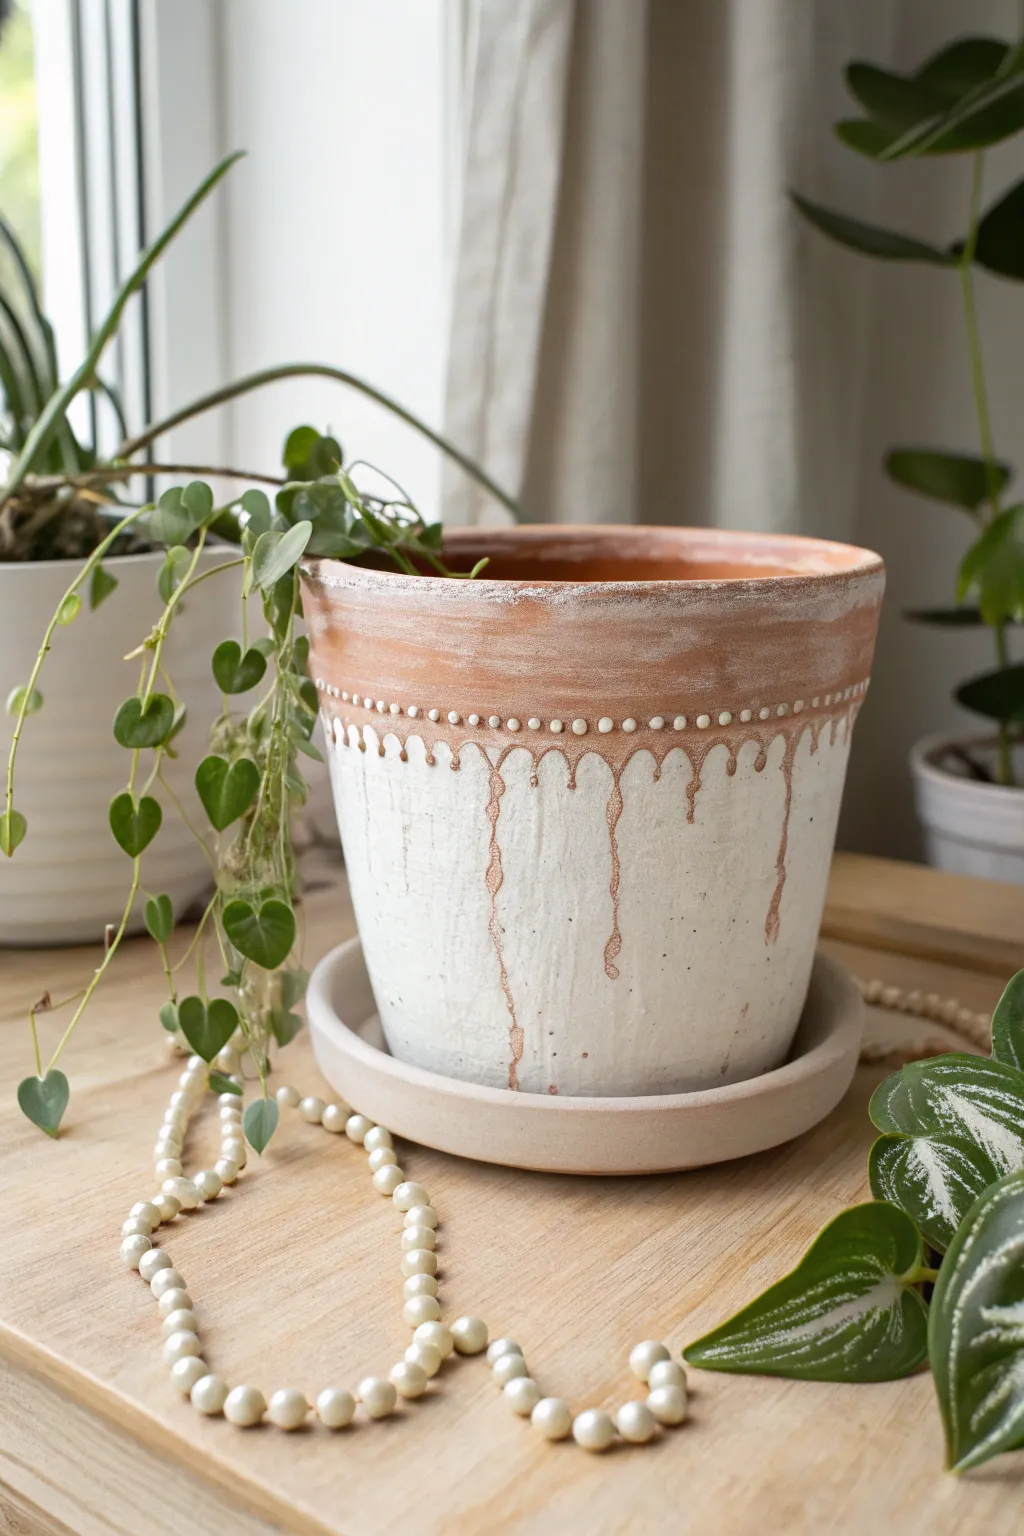
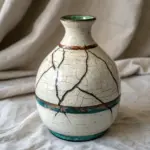
Transform a standard terracotta pot into an aged, bohemian masterpiece with this clever resist technique. By combining a whitewash finish with deliberate paint drips, you create a textured, organic look that highlights the clay’s natural warmth.
Step-by-Step Guide
Materials
- Standard terracotta pot with wide rim
- Matching terracotta saucer
- White or cream chalk paint
- Water for diluting paint
- Medium-sized flat paintbrush
- Small round paintbrush or dotting tool
- Liquid masking fluid or wax resist stick
- Paper towel or rag
- Fine-grit sandpaper (optional)
Step 1: Preparation and Resist
-
Clean the surface:
Begin by wiping down your terracotta pot with a damp cloth to remove any dust or debris. Let it dry completely to ensure the masking fluid adheres properly. -
Plan the drip line:
Visualize where the rim ends and the body of the pot begins. You will be applying your resist material right along this junction to preserve the natural clay color. -
Apply the drip resist:
Using a small brush dipped in masking fluid (or a wax resist stick), draw the outline of ‘drips’ coming down from the rim area. Make them vary in length—some long, some short—to look organic. -
Fill the drips:
Fill in the drip shapes you just outlined with the masking fluid. Any area covered by this fluid will remain terracotta-colored later. Allow the masking fluid to dry fully according to the package instructions. -
Create the dotted border:
Dab a minimal amount of masking fluid onto the handle of a paintbrush or a dotting tool. Press a horizontal row of small dots right along the collar of the pot, just above where your drips start. Let these dry completely.
Uneven Paint?
If the white paint looks too thick or opaque, simply dampen your rag with water and rub firmly to re-wet and lift the paint until you see the desired amount of clay.
Step 2: Painting and Distressing
-
Mix the whitewash:
In a small container, mix your white chalk paint with water. Aim for a 50/50 ratio initially; you want a consistency that is thinner than standard paint but not quite watery ink. -
Paint the bottom section:
Using the flat brush, apply the diluted white paint to the main body of the pot, painting right over your dried masking fluid drips. Don’t worry about being perfect; brush strokes add texture. -
Paint the rim:
Continue painting the rim section, covering the dotted masking fluid area. Ensure the entire exterior is coated with your whitewash mixture. -
Wipe back:
Creating that aged look is key. While the paint is still slightly tacky, use a crumpled paper towel to gently wipe away some paint, exposing patches of the clay underneath. -
Paint the saucer:
Apply the same whitewash mixture to the saucer. I usually give this a very light coat so it contrasts slightly with the heavier white on the pot body. -
Dry time:
Let the paint dry completely. Since terracotta is porous, this usually happens quite quickly, but give it at least 30 minutes to be safe.
Add Metallic Flare
Instead of leaving the drips raw terracotta, use a fineliner brush to paint over the revealed clay stripes with metallic gold leaf paint for a glam twist.
Step 3: The Reveal
-
Remove the resist:
Once the paint is bone dry, use your finger or a rubber cement eraser to gently rub away the masking fluid. As it peels off, it reveals the crisp raw clay color underneath. -
Refine the dots:
Carefully pick off the dried fluid from the small dots on the rim. A needle or pin can help lift the edge if they are stubborn. -
Sand for texture:
Take a piece of fine-grit sandpaper and lightly scuff the white painted areas. Focus on the high points and edges to enhance the weathered, antique aesthetic. -
Clean up:
Brush off any sanding dust or bits of rubbery masking fluid with a dry rag. -
Seal (Optional):
If this pot will live outside, apply a clear matte sealer spray. For indoor use, leaving it unsealed preserves the chalky, matte finish best.
Place a trailing plant inside to complement those artistic vertical lines you just created


What Really Happens Inside the Kiln
Learn how time and temperature work together inside the kiln to transform clay into durable ceramic.
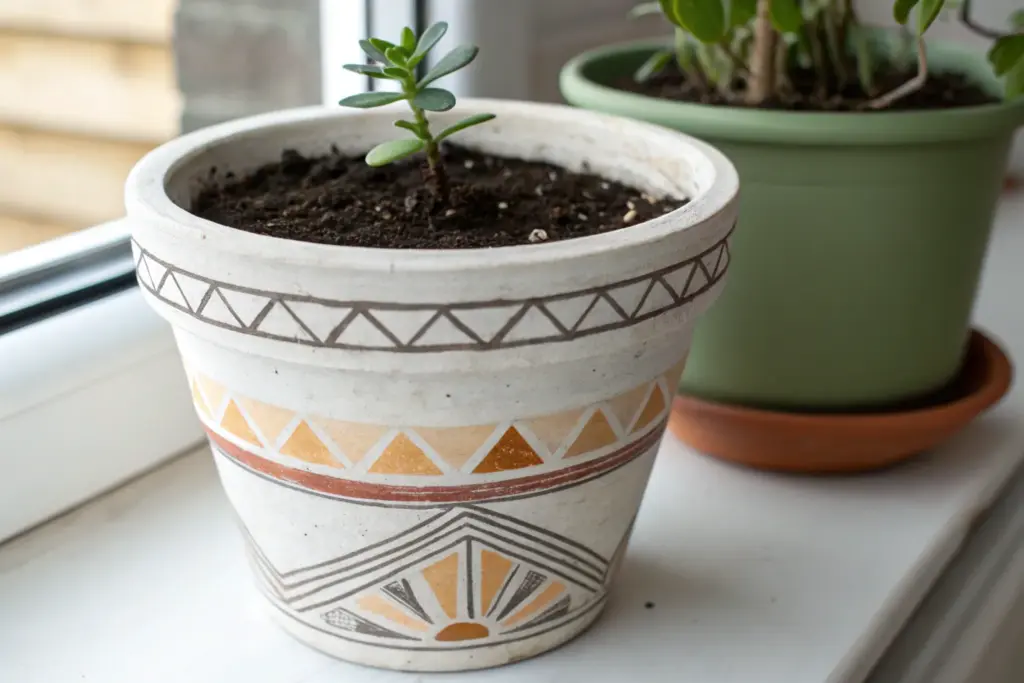
Beginner-Friendly Stenciled Shapes
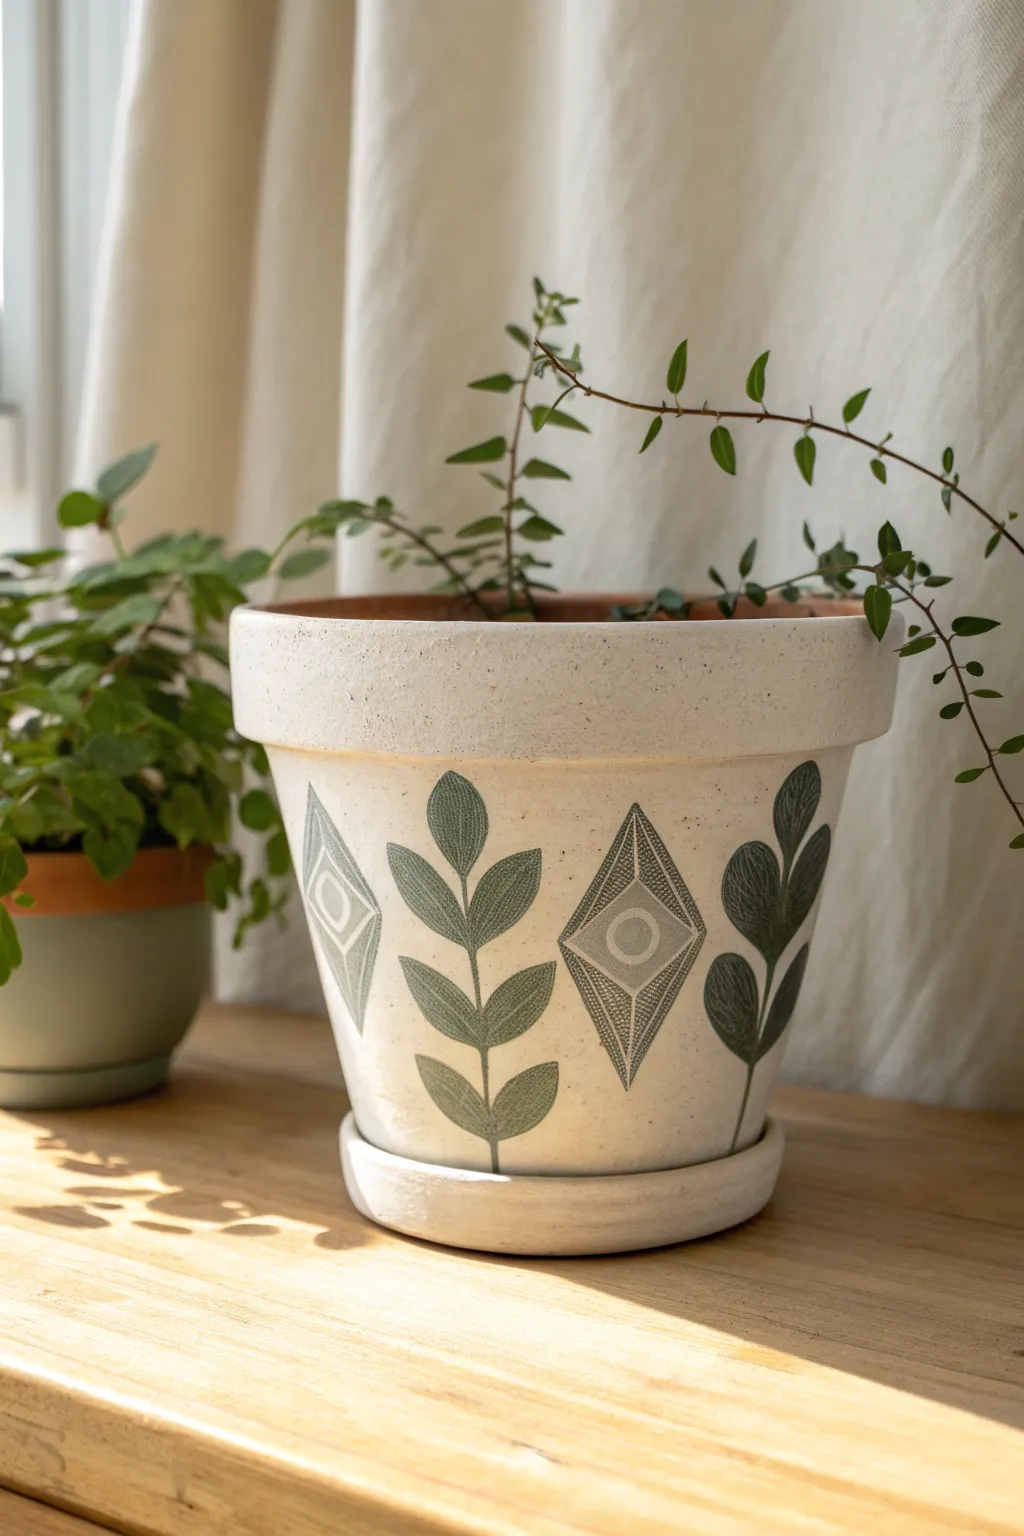
Bring a touch of modern bohemian style to your plant collection with this crisp and clean design. Contrasting organic leaf shapes with sharp geometric diamonds creates a balanced, artistic look that transforms a simple terracotta pot into a statement piece.
Step-by-Step Tutorial
Materials
- Terracotta pot and saucer (standard 6-8 inch)
- White or cream chalk paint (or matte acrylic)
- Sage green acrylic paint
- Dark forest green acrylic paint
- Flat paintbrush (medium size)
- Fine detail paintbrush (round)
- Adhesive stencils (leaf sprig & geometric diamond)
- Painter’s tape
- Stencil brush or cosmetic sponge
- Matte clear sealant spray
Step 1: Preparing the Base
-
Clean the surface:
Start by wiping down your terracotta pot and saucer with a damp cloth to remove any dust or nursery grit. Let it dry completely. -
Initial base coat:
Using your flat brush, apply an even coat of white or cream chalk paint to the exterior of the pot. Chalk paint is excellent here because it absorbs well into the clay and gives that lovely matte texture. -
Dry and repeat:
Allow the first coat to dry for about 20-30 minutes. Apply a second coat to ensure opaque coverage, making sure no orange clay shows through. -
Paint the saucer:
Don’t forget the saucer. Paint the visible outer rim and the top surface where the pot sits with the same white base color. -
Paint the inner rim:
Paint the top 1-2 inches of the inside of the pot. You don’t need to paint the entire inside, just far enough down so soil covers the unpainted line.
Fixing Bleeds
If paint seeps under your stencil, don’t panic. Wait for it to dry completely, then use a small flat brush and your white base paint to ‘erase’ the messy edges.
Step 2: Applying the Stencil Design
-
Plan the spacing:
Before sticking anything down, lightly mark four or five equidistant points around the pot’s circumference with a pencil to guide where your main motifs will go. -
Position the geometric stencil:
Place your diamond-shaped geometric stencil on the first mark. Use painter’s tape to secure the edges if the stencil’s adhesive isn’t strong enough. -
Stipple the sage green:
Load a sponge or stencil brush with a small amount of sage green paint—dab off the excess on a paper towel first. Lightly stipple the paint over the diamond design. This ‘dry brush’ technique prevents paint from bleeding under the stencil. -
Reveal the diamond:
Carefully peel back the stencil while the paint is still slightly wet to keep the edges crisp. Let this dry. -
Repeat the pattern:
Repeat the geometric diamond process at alternating intervals around the pot, leaving space in between for the leaf designs.
Step 3: Freehand Details & Leaves
-
Paint the center detail:
Once the diamond shapes are dry, use your fine detail brush and the cream base paint to add the small circle and diamond outline inside the sage shape, mimicking the ‘negative space’ look. -
Sketch the leaves:
In the spaces between the diamonds, lightly sketch a vertical line for a stem and simple oval leaf shapes using a pencil. -
Paint the stems:
Using the dark forest green paint and a fine liner brush, paint a thin vertical line for the stem. -
Fill the leaf shapes:
Paint simple almond-shaped leaves branching off the stem. I like to vary the green slightly by mixing a drop of sage into the forest green for a subtle gradient. -
Add texture:
For the specific look in the photo, wait for the green leaves to dry, then use a very fine brush or a white paint pen to draw tiny, delicate veins or cross-hatching to simulate a textured or printed look.
Level Up: Aged Look
Dilute brown acrylic paint with water (1:10 ratio). Brush this wash quickly over the dried white base and wipe it off immediately with a rag for a vintage patina.
Step 4: Sealing and Finishing
-
Clean up edges:
Check your white background for any accidental green smudges. Touch these up with a small dab of your base color. -
Apply sealant:
Once all paint is fully cured (usually 24 hours), take the pot outside and spray it with a matte clear sealant. This protects the design from water damage during watering. -
Pot your plant:
Add your potting soil and a trailing plant like the Muehlenbeckia shown, allowing the vines to drape beautifully over your new artwork.
Now you have a custom planter that looks hand-crafted and perfectly suits a cozy, botanical corner
Simple Botanical Sprigs
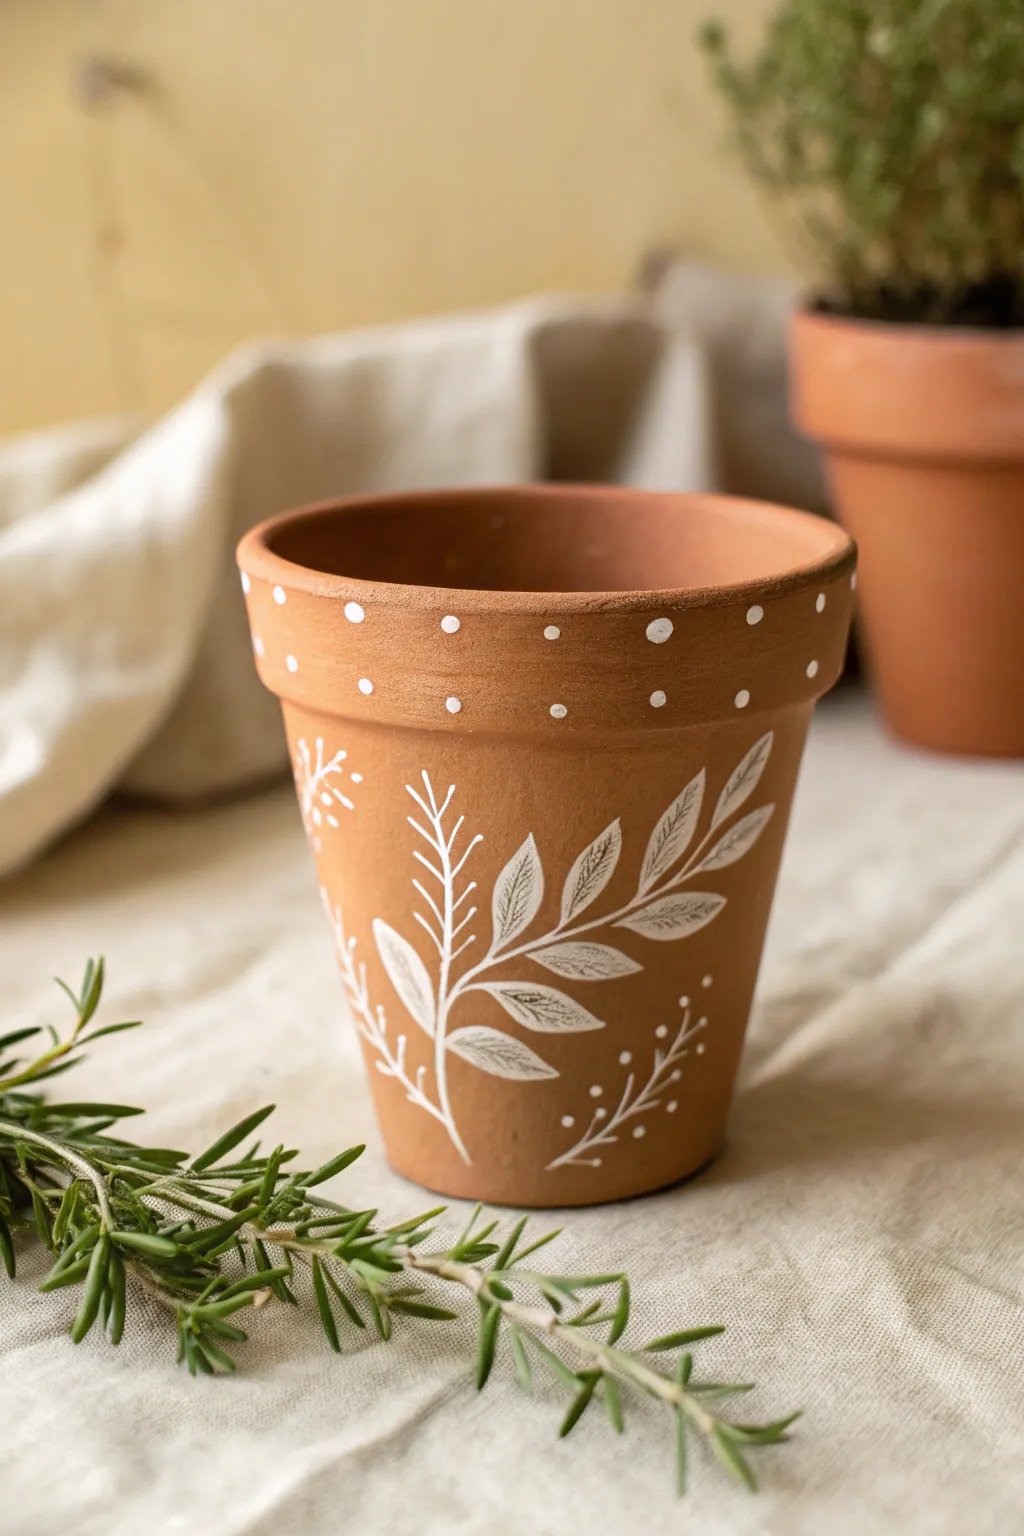
Transform a plain terracotta pot into a delicate piece of garden decor with nothing but white paint and a few simple strokes. This minimalist design features airy sprigs, leaves, and a charming dotted rim that instantly elevates your indoor greenery.
Step-by-Step
Materials
- Standard terracotta clay pot (cleaned and dried)
- White acrylic paint (outdoor multi-surface paint recommended)
- Fine detail paintbrush (size 0 or 00 round)
- Small dotting tool or the tail end of a paintbrush
- Paper towel
- Palette or paper plate
- Pencil (optional)
- Matte spray sealer (optional)
Step 1: Preparation
-
Clean the surface:
Ensure your terracotta pot is completely free of dust and debris. If you’ve just washed it, let it dry overnight so moisture doesn’t trap bubbles under the paint. -
Load your palette:
Squeeze a coin-sized amount of white acrylic paint onto your palette. If the paint feels too thick or gloopy, mix in a singular drop of water to improve the flow for fine lines.
Uneven Dots?
If your dots look messy or have peaks, lightly tap the wet paint with a damp finger to flatten them. Practice on a piece of paper first to gauge pressure.
Step 2: Painting the Rim
-
Create the first dots:
Dip your dotting tool or the wooden end of your brush handle into the white paint. -
Apply the top row:
Press gently onto the very top edge of the rim to create a circle. Space these dots out evenly, leaving about an inch between them all around the circumference. -
Stagger the second row:
Create a second row of dots slightly lower on the rim. Position each new dot directly below the midpoint of the gap between the two dots above it, creating a zig-zag or alternating pattern. -
Let it dry:
Allow the rim to dry for about 10-15 minutes so you don’t accidentally smudge it while handling the base.
Level Up: Color Pop
Mix a tiny drop of sage green or pale yellow into your white paint for the secondary sprigs to add subtle depth without breaking the minimalist vibe.
Step 3: Creating the Foliage
-
Start the main stem:
Using your fine liner brush, paint a thin, curved line starting from the bottom third of the pot and swooping upward. This will be the spine of your largest leaf sprig. -
Paint leaf outlines:
Along the main stem, paint almond-shaped outlines for the leaves. I find it easiest to paint one side of the leaf curve, then the other, meeting at a pointed tip. -
Fill with texture:
Instead of filling the leaves solidly, use very light, feathery strokes inside the leaf outlines to mimic veining. Leave some terracotta showing through for that sketched look. -
Add secondary stems:
Paint a few smaller, vertical lines branching off near the base of your main leaf sprig to act as stems for different types of foliage. -
Detail the twiggy sprigs:
On one of the vertical stems, add short, straight dashes coming off the sides in pairs to create a fern-like or rosemary-like texture. -
Create berry branches:
On another stem, paint tiny, thin branches curving outward. At the tip of each tiny curve, dab a very small dot of white paint to represent berries or buds. -
Balance the design:
Step back and look at the composition. If there are large empty spaces, add faint wispy lines or a floating singular leaf to balance the negative space.
Step 4: Finishing Touches
-
Clean up edges:
If any lines look too shaky, you can carefully refine them with a slightly damp clean brush to wipe away mistakes before they fully cure. -
Dry completely:
Let the pot sit undisturbed for at least an hour until the paint is dry to the touch. -
Seal (Optional):
If this pot will live outdoors or be watered heavily, spray a light coat of matte clear sealer over the entire exterior to protect your artwork.
Pop your favorite rosemary or thyme plant inside to complete this rustic, garden-ready look

TRACK YOUR CERAMIC JOURNEY
Capture glaze tests, firing details, and creative progress—all in one simple printable. Make your projects easier to repeat and improve.
Sweet Daisy Scatters
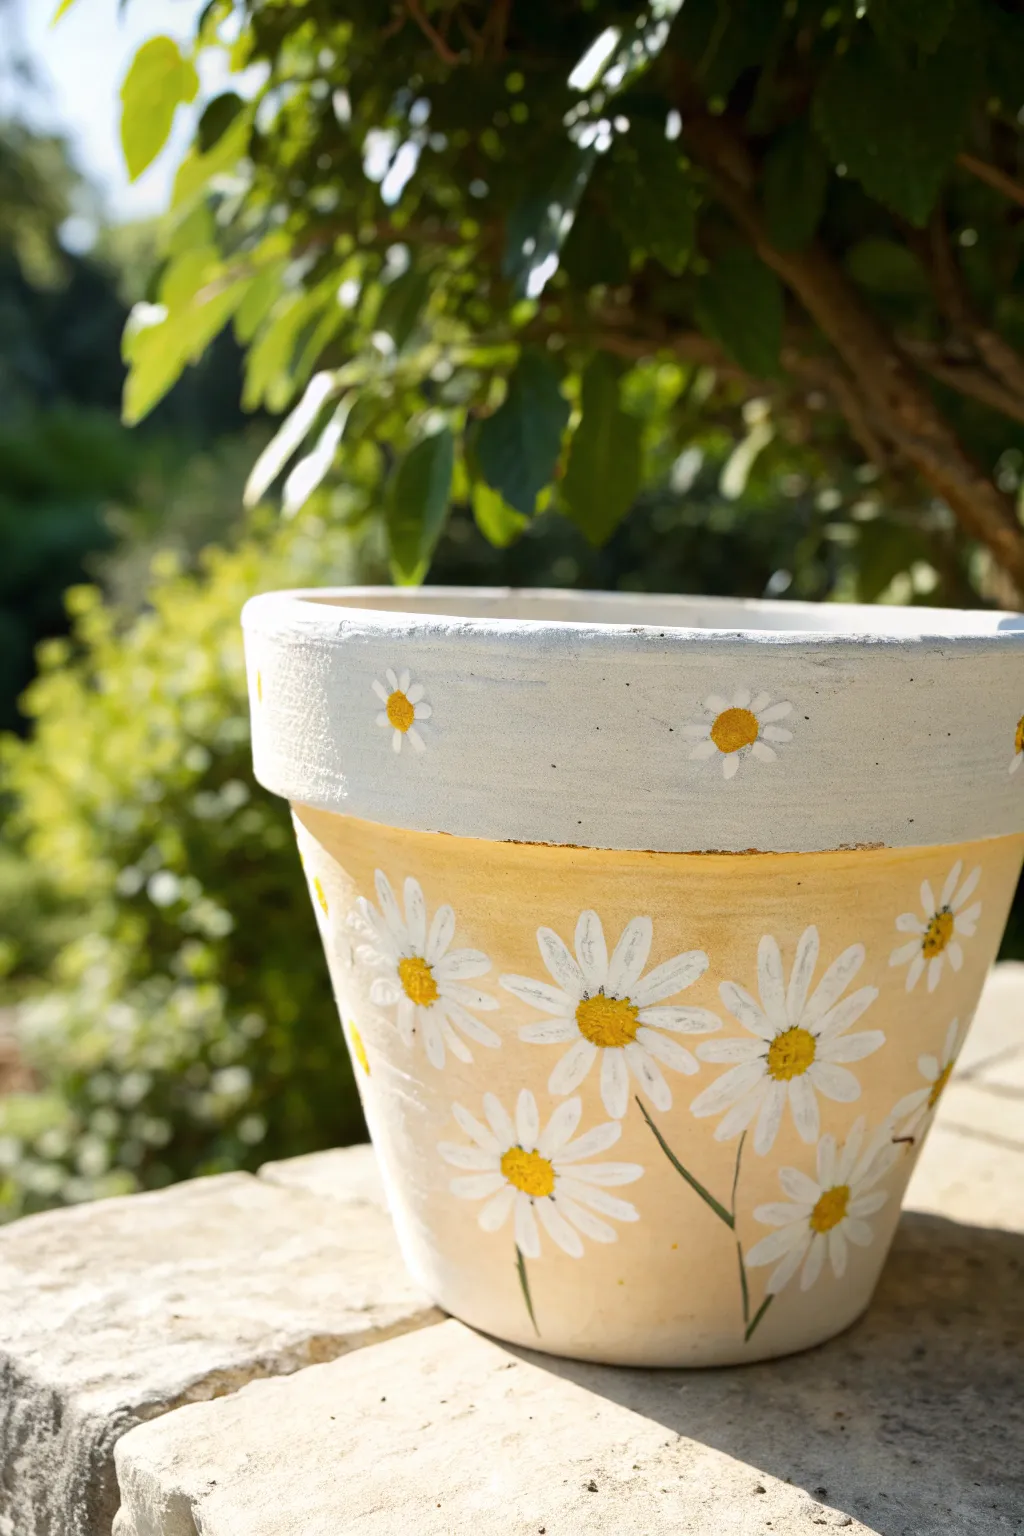
Bring the warmth of a summer garden onto your patio with this cheerful painted pot, featuring a creamy yellow base and a scattering of hand-painted daisies. The distinct white rim adds a delightful contrast, creating a rustic yet refined home for your favorite blooms.
How-To Guide
Materials
- Terracotta pot (clean and dry)
- White acrylic paint
- Cream or pale yellow acrylic paint (base color)
- Bright yellow acrylic paint (flower centers)
- Green acrylic paint (stems)
- Medium flat brush
- Small round brush (size 2 or 4)
- Fine liner brush
- Water cup and paper towels
- Clear acrylic sealer (spray or brush-on)
Step 1: Base Painting
-
Prep the pot:
Ensure your terracotta pot is completely clean and free of dust. If it’s an old pot, scrub it well and let it dry overnight to prevent moisture from bubbling under your paint. -
Paint the rim:
Using a medium flat brush, apply a solid coat of white acrylic paint to the upper rim of the pot. Don’t worry about being perfectly neat at the bottom edge of the rim yet. -
Add a second coat:
Once the first layer on the rim is dry to the touch, apply a second coat of white to ensure full, opaque coverage. -
Paint the body:
Switch to your cream or pale yellow paint. I find that mixing a tiny drop of orange into white creates a lovely warm buttermilk shade if you don’t have a premixed color. -
Create the border:
Carefully paint up to the bottom edge of the white rim. Use the edge of your flat brush to create a clean line where the yellow body meets the white top. -
Dry completely:
Allow the entire base coat to dry fully before moving on to the flowers. This usually takes about 20-30 minutes depending on humidity.
Petal Perfection
For uniform petals, practice the “press and lift” stroke on paper first. Press the brush down for the wide part, then lift as you pull back for the point.
Step 2: Painting the Daisies
-
Start the main petals:
Load a small round brush with white paint. For the large flowers on the yellow body, start by pressing the brush down and pulling outward to create teardrop-shaped petals. -
Form the flower shape:
Paint 8-10 petals in a circle, radiating from an imaginary center point. Leave a small gap in the middle for the yellow center we will add later. -
Vary the positions:
Paint several large daisies scattered around the pot. Place some lower and some higher to create a random, organic meadow look. -
Paint rim daisies:
On the white rim, paint smaller daisies. Since the background is white, these petals need to be subtle or slightly off-white, or you can simply paint just the yellow centers later for a minimalist look. However, to match the image, paint very small white petals that create a textured relief against the white background. -
Add the centers:
Dip the back end of your brush handle or a small round brush into bright yellow, textured paint. Dot this into the center of every flower, dabbing it to create a bumpy, pollen-like texture. -
Add detail to centers:
If you want extra depth, mix a tiny bit of brown into your yellow and dab a small shadow on the bottom curve of the yellow centers.
Step 3: Stems and Finishing
-
Draw the stems:
Using a fine liner brush and thinned green paint, draw very thin, delicate lines coming down from a few of the lower daisies. Not every flower needs a stem; just a few anchors the design. -
Add leaves:
Paint tiny, simple leaves branching off the stems using a quick flick of the liner brush. -
Touch ups:
Inspect your work. If the white petals look too transparent against the yellow background, carefully add a second layer of white to brighten them up. -
Final drying:
Let the daisy details dry for at least an hour to ensure the thick paint centers are solid. -
Seal the pot:
Apply a coat of clear acrylic sealer over the entire outside of the pot. This protects your artwork from water damage and fading when you water your plants.
Bee Friendly
Add tiny hand-painted bumblebees buzzing around the flowers. Use a small black oval, a yellow stripe, and two tiny white loops for wings.
Now your charming daisy pot is ready to be filled with soil and a bright green plant to complete the look
Bold Monogram Letter Pot
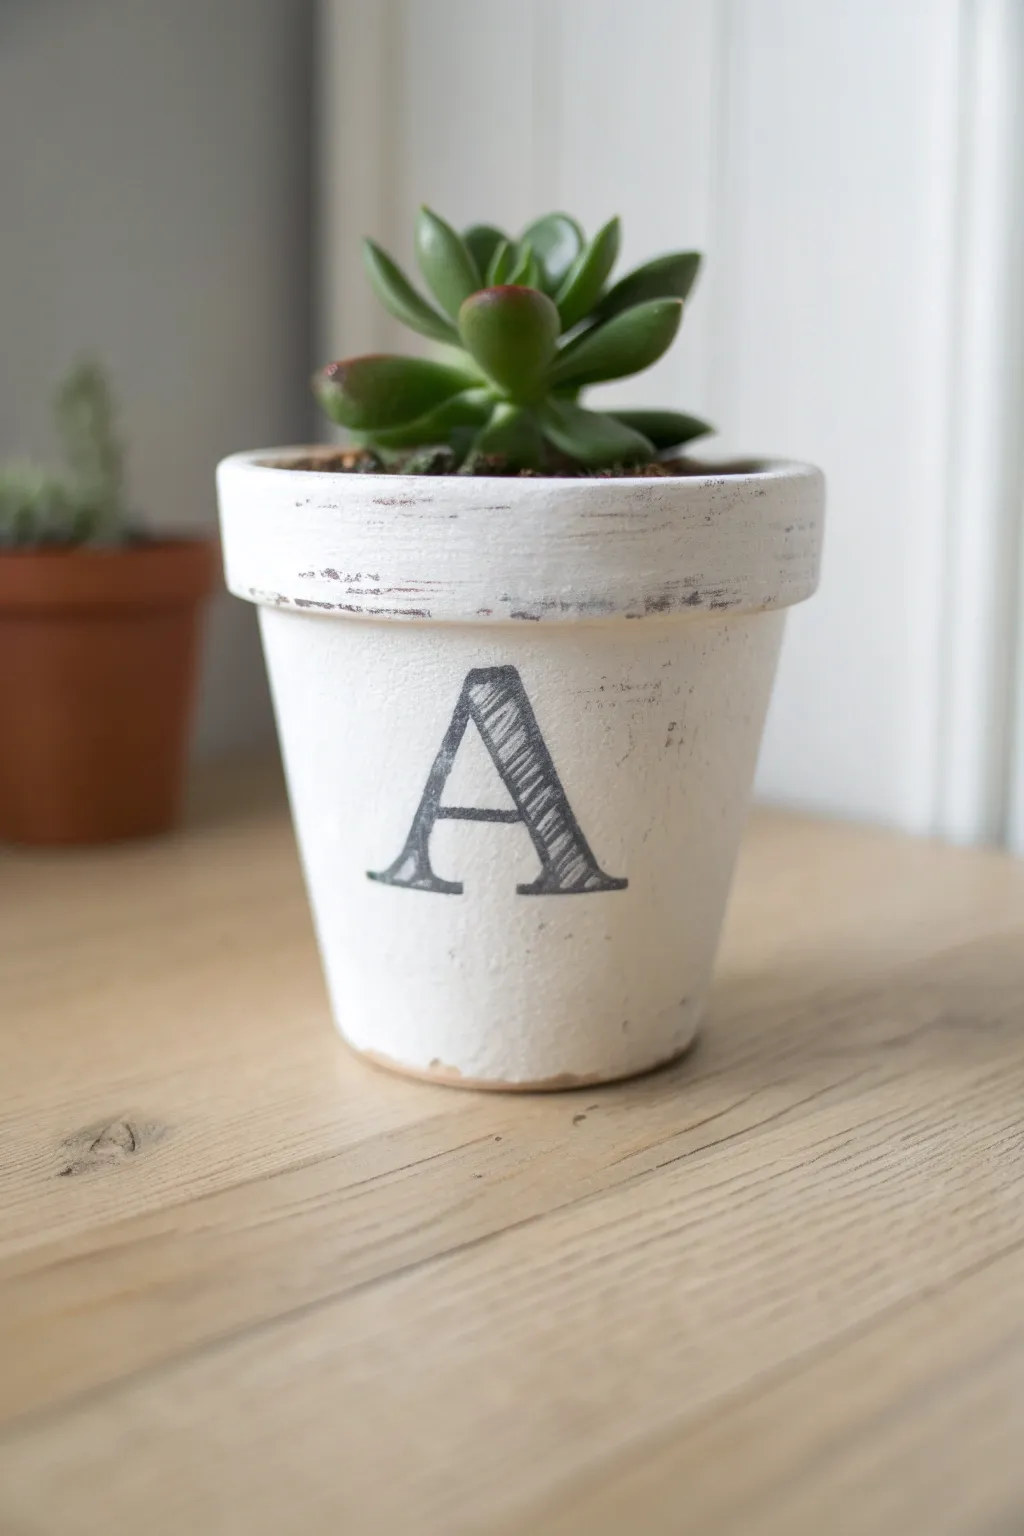
Elegantly simple, this project transforms a standard terracotta planter into a personalized piece of decor with a lovely distressed finish. The sketched monogram adds a touch of vintage charm, making it perfect for gifts or styling your own shelves.
Detailed Instructions
Materials
- Small terracotta pot (clean and dry)
- White or off-white acrylic craft paint (chalk paint works best for this look)
- Wide flat paintbrush
- Fine-grit sandpaper (around 120-150 grit)
- Black Sharpie or charcoal pencil
- Paper stencil or printed letter cut-out (optional)
- Pencil (for tracing)
- Clear matte sealer spray
Step 1: Preparing the Base
-
Clean surface:
Ensure your terracotta pot is completely free of dust and stickers. Wipe it down with a damp cloth and let it dry fully before starting. -
Base coat application:
Using a wide flat brush, apply a coat of white paint to the exterior of the pot. Don’t worry about perfect coverage; a slightly uneven application helps the final rustic look. -
Interior rim:
Paint the top rim and just an inch down into the inside of the pot so the terracotta doesn’t show when it’s filled with soil. -
Dry and repeat:
Allow the first coat to dry for about 20 minutes. Apply a second coat if the orange clay is showing through too much for your liking, but remember we will be sanding some off later. -
Full cure:
Let the pot dry completely for at least an hour. The paint needs to be hard before we start the distressing process.
Paint Smudging?
If using a charcoal pencil for the letter, spray your sealer in very light, misty coats. A heavy wet coat might cause the charcoal dust to run.
Step 2: Creating the Distressed Look
-
Sand the rim:
Take your fine-grit sandpaper and gently rub along the top rim of the pot. Focus on the edges where wear would naturally occur over time. -
Body distressing:
Lightly sand random horizontal patches on the body of the pot. You want the raw terracotta to just peek through the white paint in streaks. -
Clean up dust:
Wipe away all the sanding dust with a dry cloth or tack cloth so the surface is clean for the lettering step.
Make it Waterproof
For outdoor use, apply a waterproof sealant to the inside of the pot first. This stops moisture from migrating out and bubbling your exterior paint.
Step 3: Adding the Monogram
-
Position the letter:
Print out a large serif letter ‘A’ (or your chosen initial) to use as a template. Cut it out and hold it against the pot to find the center placement. -
Trace the outline:
Lightly trace the outline of your letter onto the pot using a regular lead pencil. Keep the pressure light so you don’t groove the paint. -
Outline in ink:
Using a black permanent marker or charcoal pencil, carefully go over your pencil lines to define the shape of the letter. -
Create the sketch effect:
Instead of filling the letter solid, use diagonal hatching lines to fill the thickest part of the letter stroke. This mimics the hand-drawn style seen in the inspiration photo. -
Refine the serifs:
Fill in the thinner serif feet of the letter slightly more solidly to anchor the design visually. -
Protect the art:
I usually recommend giving the pot a quick spray with a clear matte sealer to prevent the marker from smudging or fading when watered.
Once dry, pot your favorite succulent and enjoy this charming personalized addition to your home decor
Chalkboard Label Band for Herbs
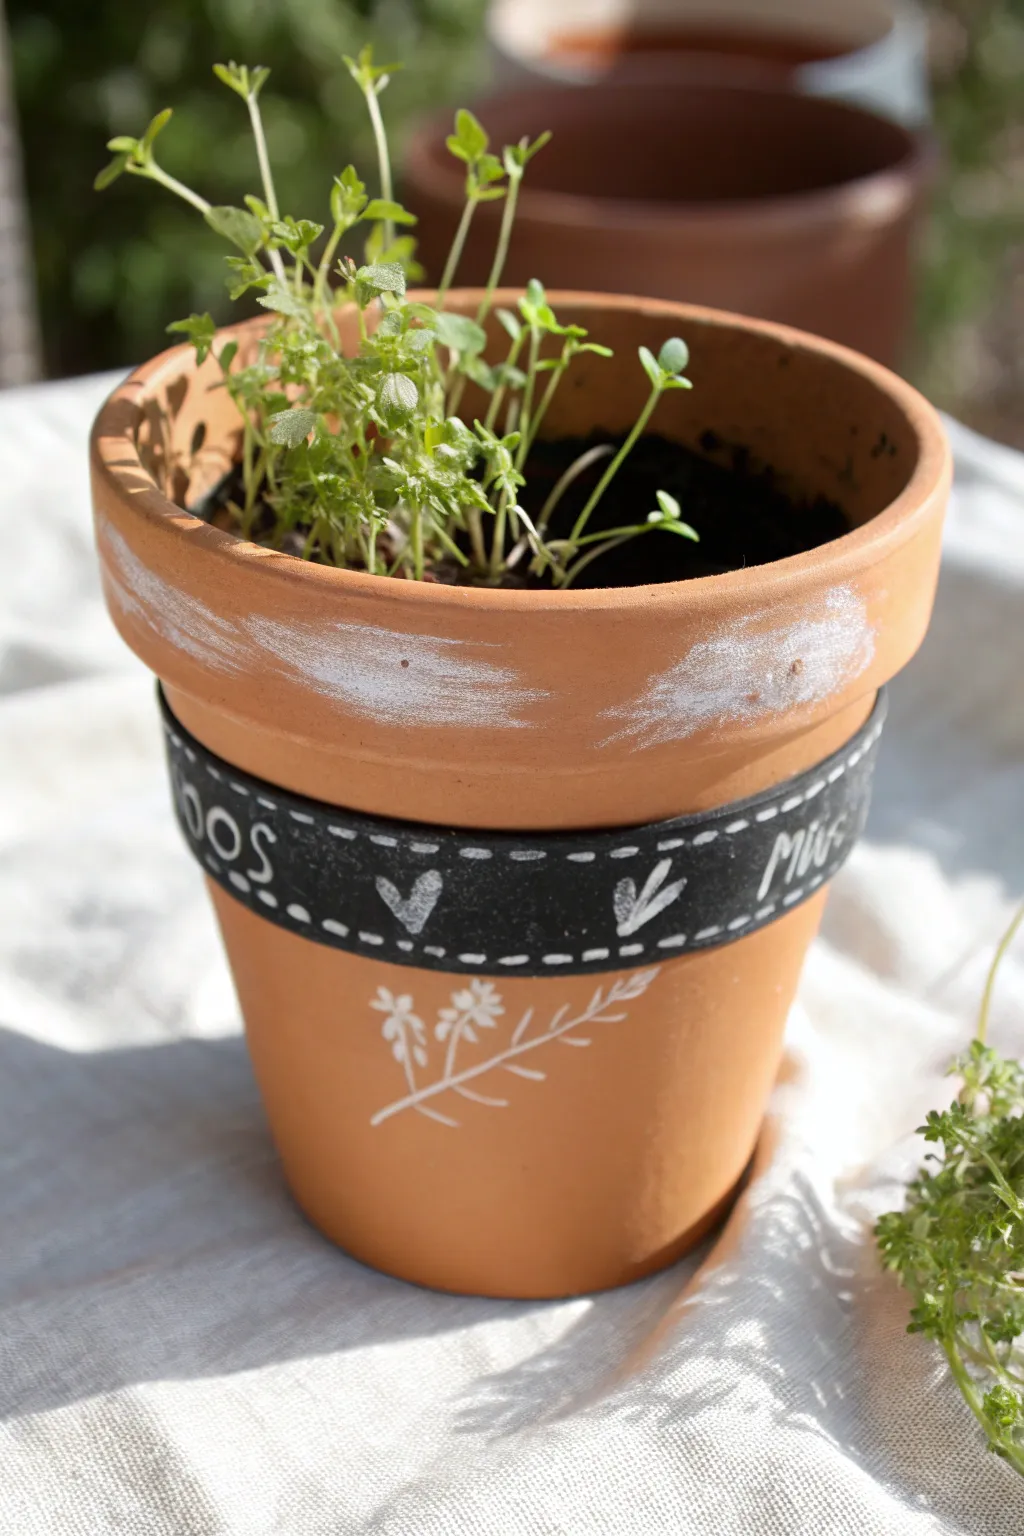
Transform a standard terra cotta pot into a charming herb home featuring a useful chalkboard band and delicate white accents. The rustic, distressed finish on the rim pairs beautifully with the crisp black band, giving your windowsill garden a handcrafted, farmhouse feel.
How-To Guide
Materials
- Terra cotta clay pot (standard size)
- Black chalkboard paint
- White acrylic paint
- Flat paintbrush (medium width)
- White paint pen (fine tip) or white chalk marker
- Painter’s tape (optional)
- Small piece of paper towel or rag
- Water cup
- Paper plate or palette
Step 1: Creating the Distressed Rim
-
Prepare the pot:
Ensure your terra cotta pot is clean and dry. Wipe away any dust with a damp cloth and let it dry completely before starting. -
Load the brush:
Squeeze a small amount of white acrylic paint onto your palette. Dip your flat paintbrush into the paint, but don’t overload it. -
Blot excess paint:
Dab the brush onto a paper towel or rag until most of the paint is removed. This dry-brush technique is key for the distressed look. -
Dry brush the rim:
Lightly sweep the brush horizontally across the rim of the pot. Apply very light pressure to let the brush texture show and allow the clay color to peek through. -
Build texture:
Add more strokes randomly, focusing on the center of the rim rather than the edges, creating a worn, whitewashed appearance rather than a solid coat.
Step 2: Painting the Chalkboard Band
-
Mark the band area:
Decide on the width of your black band, roughly 1 to 1.5 inches wide, situated just below the rim’s lip. You can freehand this for a rustic look or use painter’s tape for crisp lines. -
Apply chalkboard paint:
Using a clean brush, paint a horizontal band around the circumference of the pot using black chalkboard paint. -
Ensure coverage:
Apply the paint thick enough to be opaque. If the terra cotta absorbs the first coat quickly, I usually wait for it to dry and add a second coat for a deeper black finish. -
Let it cure:
Allow the chalkboard paint to dry completely according to the manufacturer’s instructions. This is crucial before drawing on it.
Dry Brushing Secret
If you apply too much white paint on the rim, quickly wipe it back with a slightly damp rag while wet to restore the distressed effect.
Step 3: Adding Delicate Details
-
Add ‘stitching’ details:
Using your fine-tip white paint pen or chalk marker, draw small dashed lines along the top and bottom edges of the black band to mimic stitching. -
Draw simple motifs:
In the center of the black band, sketch simple heart shapes or small leaf icons spaced out evenly. Keep them loose and hand-drawn in style. -
Lettering the contents:
Write the name of your herb or planting (like ‘MINT’ or ‘BASIL’) on the band. The image suggests a playful mix of script and print. -
Paint the bottom floral:
Below the black band, on the main body of the pot, use the white paint pen to draw a simple botanical sprig. -
Stem and leaves:
Draw a single long, curved line for the stem, and add small, almond-shaped leaves branching off alternatively along the stem. -
Add tiny flowers:
Top the stem with three small dots or tiny petal shapes to create a delicate flower cluster at the end of your sprig. -
Final drying time:
Let all the paint pen work dry completely before touching or potting your plants to prevent smudging.
Make It Changeable
Use a removable chalk marker instead of a permanent paint pen for the lettering so you can erase and rename it when you swap plants.
Now your custom pot is ready to welcome some fresh greenery into your home
Rainbow Rings Around the Pot
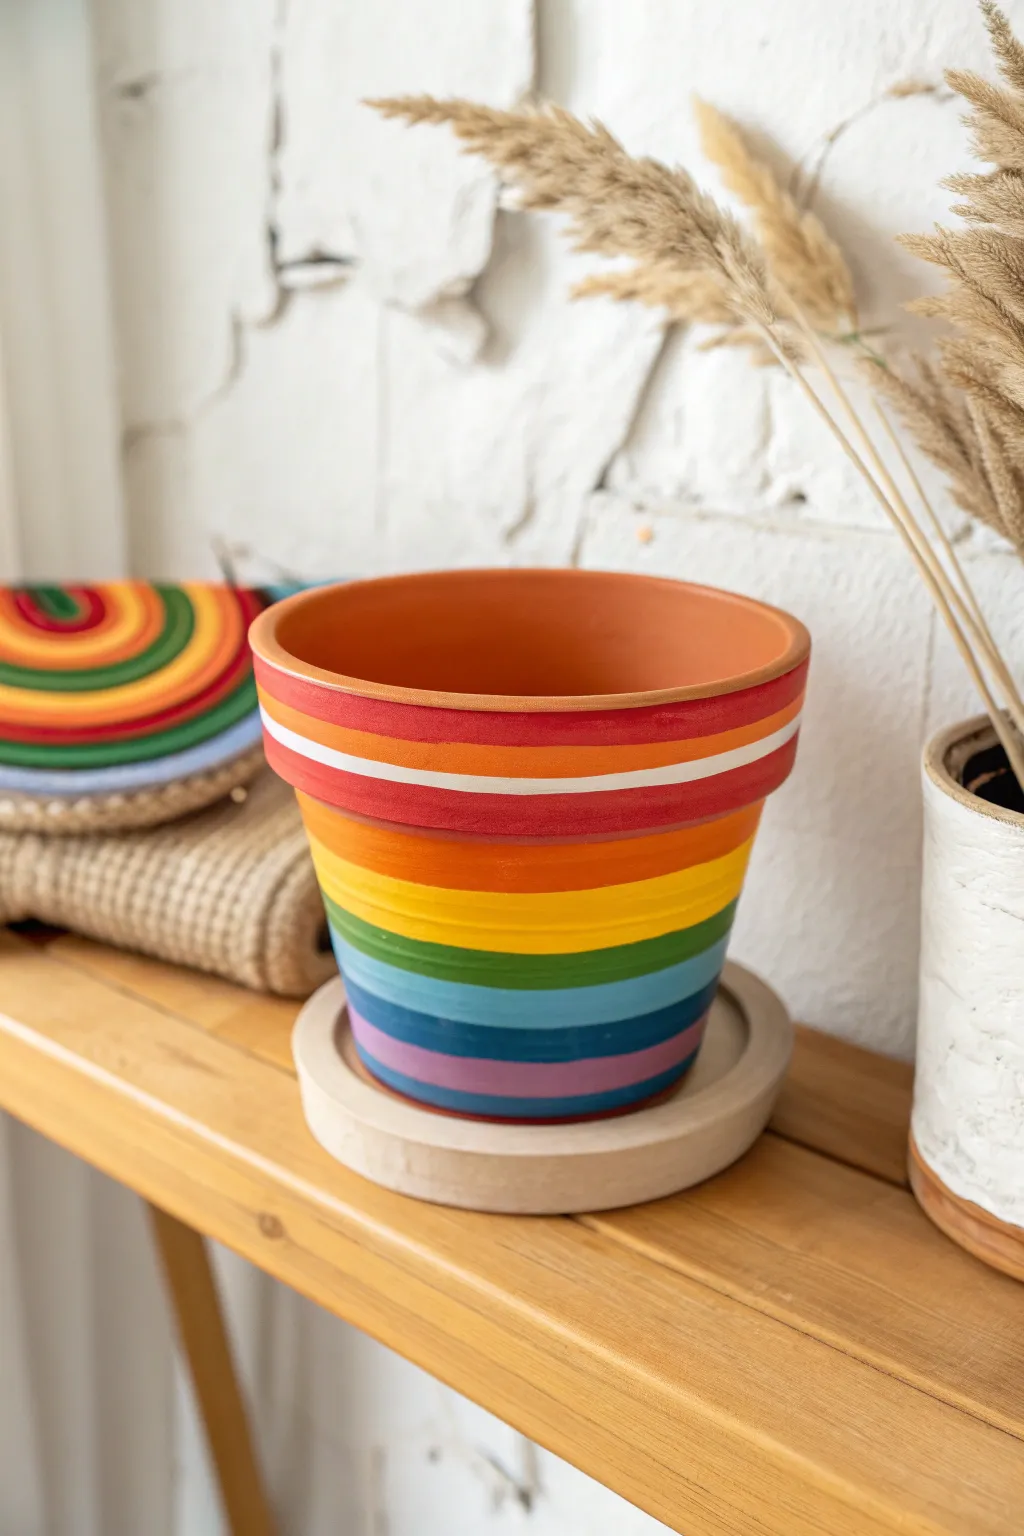
Brighten up your indoor garden with this cheerful terracotta transformation featuring bold, horizontal rainbow stripes. The crisp white band acts as a perfect visual break, making the classic spectrum colors pop even more against the clay texture.
Step-by-Step Guide
Materials
- medium terracotta pot (clean and dry)
- wooden or terracotta saucer (optional)
- white acrylic craft paint
- red, orange, yellow, green, blue, purple acrylic craft paints (primary colors)
- flat bristle brushes (medium and small sizes)
- masking tape or painter’s tape
- pencil
- palette or paper plate
- clear acrylic sealer spray (matte or gloss)
- cup of water
- paper towels
Step 1: Preparation & Base Taping
-
Clean surface:
Ensure your terracotta pot is completely clean and dry removing any stickers or residue. -
Mark the rim:
Starting just under the thick rim of the pot, use a pencil to lightly mark where your first color band will go. -
tape the white line:
To create the crisp white line seen in the photo, place a thin strip of painter’s tape horizontally around the middle of the upper rim section. -
Seal the tape edges:
Run your fingernail firmly over the tape edges to prevent paint from bleeding underneath.
Step 2: Painting the Rim
-
Paint the top red:
Using a flat brush, paint the area above your tape strip with bright red acrylic paint. -
Paint the bottom red:
Paint the area immediately below the tape strip red as well, covering the rest of the pot’s rim. -
Second coat:
Let the red paint dry for about 10 minutes, then apply a second coat for full opacity. -
Reveal the line:
Carefully peel away the tape while the paint is still slightly tacky to reveal the unpainted clay stripe. -
Fill the white:
Use a small detail brush to fill in that unpainted stripe with white acrylic paint. This is easier than taping over white paint later.
Wobbly Lines?
If freehand painting is tricky, wrap rubber bands around the pot to act as flexible guides for your stripes. They conform better than tape on tapered shapes.
Step 3: Creating the Spectrum
-
Plan the body stripes:
Visualize or lightly sketch roughly equal horizontal sections down the tapered body of the pot for the remaining colors: orange, yellow, green, blue, and purple. -
Apply orange:
Start directly under the rim with a band of orange paint. I find distinct brushstrokes add charm, so don’t worry about being perfectly smooth. -
Add yellow:
Paint the next band yellow, slightly overlapping the wet edge of the orange if you want a softer transition, or wait for it to dry for a hard line. -
Continue with green:
Paint the middle band area with a vibrant green. -
Add the blue band:
Move down to the blue section, keeping your brush horizontal as you circle the pot. -
Finish with purple:
Paint the final band at the bottom purple. You can extend this slightly onto the bottom edge for a clean look.
Make It Match
Use your leftover paint to decorate the saucer. Try painting the saucer rim in a solid coordinating color like yellow or repeating the rainbow rings on the saucer’s edge.
Step 4: Finishing Touches
-
Touch ups:
Once dry, check for any thin spots and gently touch them up with the appropriate color. -
Sealing:
Take the pot to a well-ventilated area and spray it with a clear acrylic sealer. This protects the paint from moisture when you water your plant. -
Dry time:
Allow the sealer to cure for at least 24 hours before adding soil and plants.
Now step back and admire how this vibrant spectrum brings instant energy to your plant collection
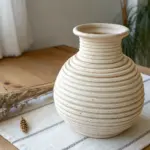
Speckled Stoneware Look
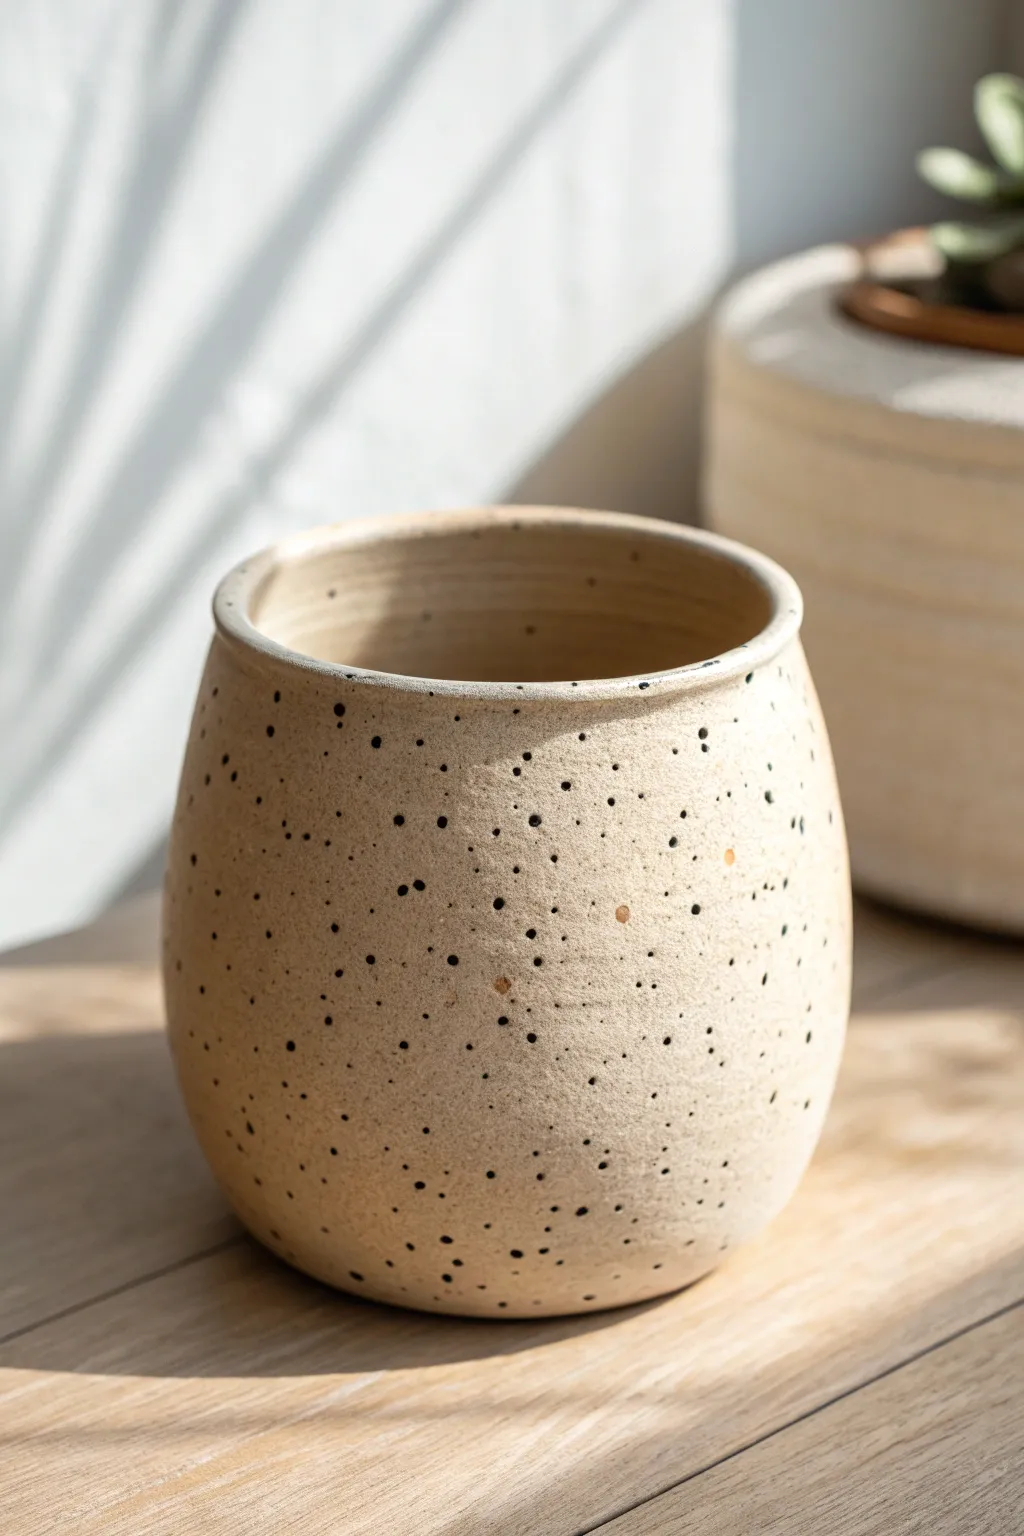
Achieve the high-end look of fired speckled clay without needing a kiln or expensive glazes. This technique transforms a standard, smooth vessel into a rustic, stylish planter that mimics the natural imperfections of stoneware.
Step-by-Step Tutorial
Materials
- Smooth terra cotta or ceramic pot (rounded shape works best)
- Matte acrylic paint (Warm Beige or Sand)
- Matte acrylic paint (Black)
- Matte acrylic paint (Toasted Almond or Light Brown)
- Small flat brush
- Old toothbrush
- Water cup
- Paper plate or palette
- Cardboard box (to contain splatter)
- Matte spray sealer
Step 1: Base Coat Application
-
Prepping the surface:
Wipe down your pot with a damp cloth to remove any dust or oils. If you are using a terra cotta pot, ensure it is completely dry before beginning. -
First layer of beige:
Squeeze a generous amount of your warm beige or sand-colored matte acrylic paint onto your palette. -
Painting the exterior:
Use the small flat brush to apply an even coat of the beige paint over the entire exterior of the pot. Don’t forget to paint the top rim and a few inches down the inside for a finished look. -
Drying time:
Allow this first coat to dry fast to the touch, which usually takes about 15 to 20 minutes. -
Adding opacity:
Apply a second coat of the beige paint. To minimize visible brush strokes, paint in a cross-hatch pattern or lightly stipple the wet paint with the tip of your brush. -
Full dry:
Let the base coat dry completely. The surface needs to be solid because the next step involves water, which could lift wet paint.
Uneven Splatter?
If your paint flicks are coming out as lines rather than dots, your paint is too thick. Add more water to the mix until it flows off the brush easily.
Step 2: Creating the Speckle Effect
-
Setting up the splash zone:
Place your dried pot inside a cardboard box or cover your work surface generously with newspaper. This step gets messy. -
Mixing the dark speckle:
Put a dime-sized amount of black acrylic paint on your palette and thin it with a few drops of water until it has an ink-like consistency. -
Loading the toothbrush:
Dip the bristles of your old toothbrush into the thinned black paint. Tap off any huge drips onto a paper towel. -
Flicking the paint:
Hold the toothbrush about 6 inches away from the pot with the bristles facing the surface. Use your thumb to firmly run across the bristles, flicking tiny droplets onto the pot. -
Rotating the pot:
Rotate the pot gradually as you flick to ensure even coverage. I like to vary the distance slightly—closer creates denser clusters, while farther away makes fine mist. -
Adding color depth:
Rinse the toothbrush thoroughly. Now, mix a small amount of the toasted almond or light brown paint with water, just as you did with the black. -
Layering the speckles:
Flick the brown paint over the black speckles. This second color adds dimension and mimics the natural mineral deposits found in real clay. -
Fixing mistakes:
If you get a glob that is too large, quickly blot it gently with the corner of a paper towel, or wait for it to dry and touch it up with the original beige base color.
Texture Trick
Mix a teaspoon of baking soda into your base beige paint. This creates a grainy, stone-like texture that makes the final stoneware illusion even more convincing.
Step 3: Sealing and Finishing
-
Long drying period:
The splattered dots can take longer to dry than a flat coat of paint. Let the pot sit undisturbed for at least an hour. -
Inspecting the finish:
Check the pot for any spots you might have missed near the bottom edge or under the rim and retouch if necessary. -
Sealing the work:
Take the pot to a well-ventilated area. Apply a light, even coat of matte spray sealer over the entire painted surface. -
Final cure:
Allow the sealer to cure according to the manufacturer’s instructions before potting your plant.
Place your favorite succulent inside and enjoy the organic warmth this faux-stoneware brings to your space
Watermelon Slice Painted Pot
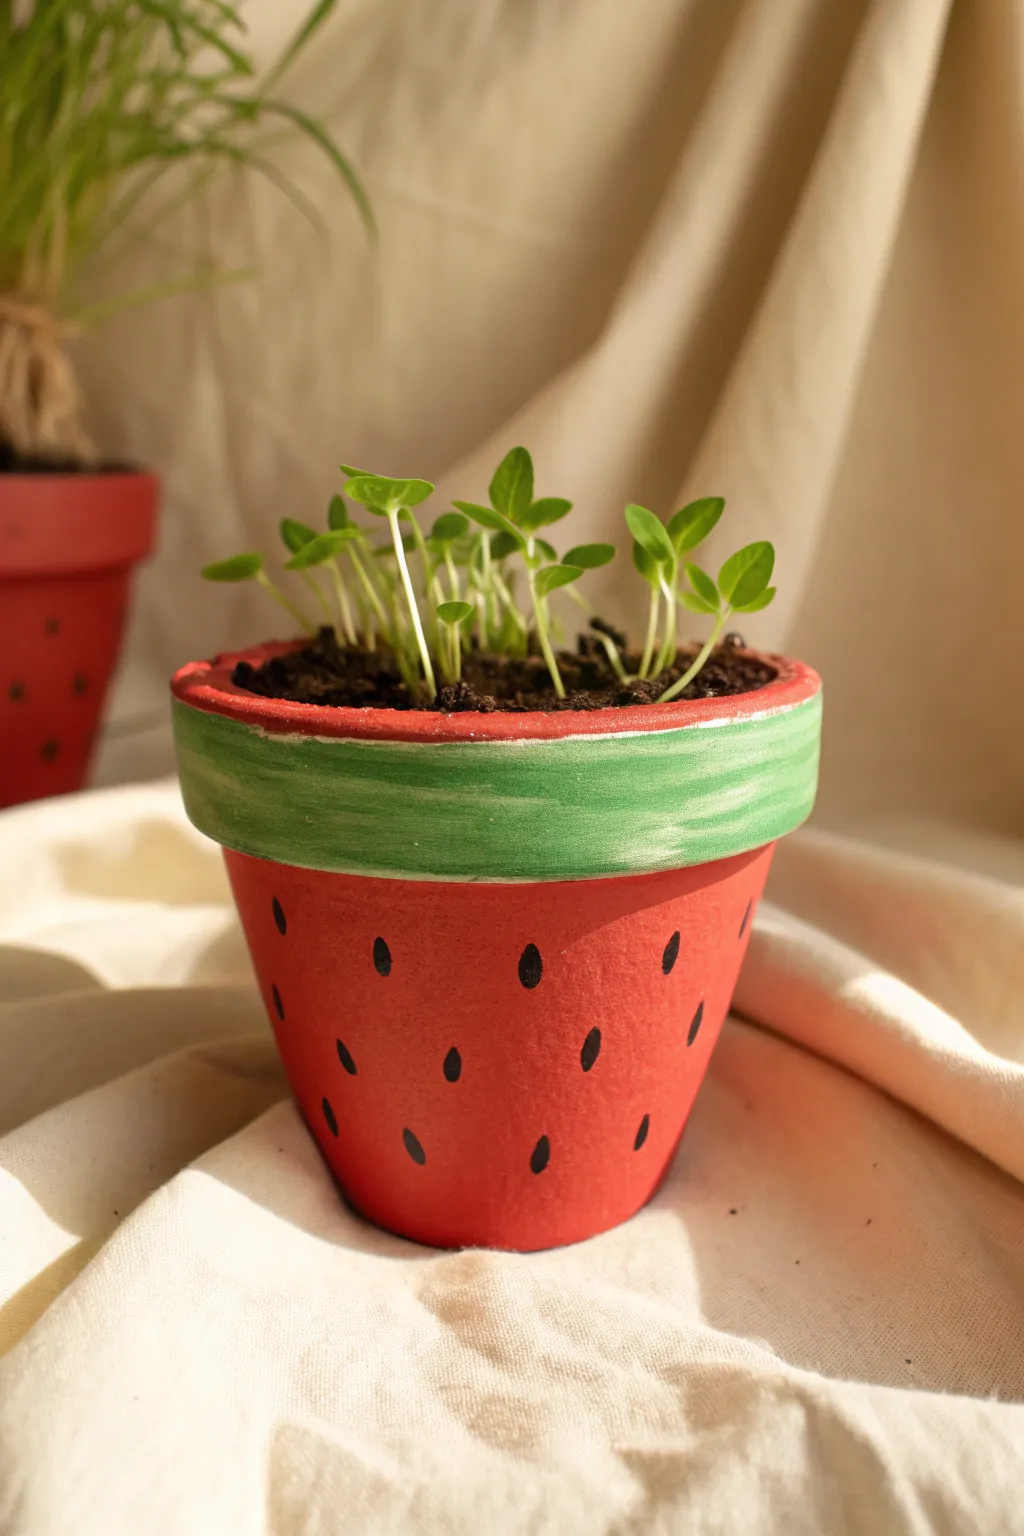
Bring a juicy slice of summer into your home with this adorable watermelon-themed planter. Using contrasting reds and greens, this project transforms a plain terracotta pot into a vibrant vessel that’s perfect for sprouting seedlings or succulents.
How-To Guide
Materials
- Small terracotta pot (approx. 3-4 inches)
- White acrylic paint (primer)
- Bright red acrylic paint
- Kelly green acrylic paint
- Light green or lime green acrylic paint (optional for blending)
- Black acrylic paint
- Flat paintbrush (medium width)
- Fine detail paintbrush
- Small cup of water
- Paper towels
- Sealer (Mod Podge or clear acrylic spray)
Step 1: Preparation & Base Coat
-
Clean the pot:
Start by wiping down your terracotta pot with a damp cloth to remove any dust or manufacturing residue. Let it dry completely before you begin painting. -
Apply a white primer:
Paint the entire exterior of the pot with a coat of white acrylic paint. This step is crucial because terracotta is porous and dark; the white base makes the red and green pop vividly. -
Let the primer dry:
Allow the white coat to dry fully. If the terracotta color is still showing through clearly, I like to add a quick second coat for better opacity.
Step 2: Painting the Fruit Flesh
-
Paint the body red:
Using your medium flat brush, paint the main body of the pot (below the rim) with bright red acrylic paint. Leave the thick rim unpainted for now. -
Smooth the strokes:
Work in horizontal strokes around the pot to minimize visible brush marks. Ensure you get good coverage right up to the bottom edge of the rim. -
Dry and recoat:
Let the first layer of red dry. Apply a second coat to achieve a rich, deep watermelon color that looks seamless.
Seed Spacing Tip
Imagine a checkerboard pattern when placing seeds, but keep it loose. This prevents clustering too many seeds in one spot while keeping the overall look balanced.
Step 3: Creating the Rind
-
Paint the rim green:
Switch to a clean flat brush. Paint the entire protruding rim of the pot with your kelly green acrylic paint. -
Define the edge:
Carefully run your brush along the bottom edge of the rim where it meets the red paint. A steady hand helps here to keep the line crisp. -
Add texture (optional):
To give the rind a more organic look, you can lightly streak a tiny amount of lighter green or white horizontally across the green band while it’s still slightly wet. -
Paint the top lip:
Don’t forget to paint the top flat surface of the rim and slightly inside the pot (just an inch or so down) so the soil line looks neat. -
Paint the transition line:
If you want an extra realistic detail, paint a very thin, uneven line of white right under the green rim, acting as the white rind layer between the skin and the red fruit.
Make It Sweet
Paint a matching saucer yellow to look like a pineapple slice, or paint the saucer dark green to complete the full watermelon look.
Step 4: Adding the Seeds
-
Prepare the black paint:
Switch to your finest detail brush and dip it into the black acrylic paint. You don’t need much paint on the brush for this. -
Practice the shape:
The seeds are essentially small teardrops. Press the brush down lightly to make the round bottom of the seed, then lift up quickly as you drag upward to make the point. -
Start loosely:
Begin painting the seeds scattered around the red section. Avoid placing them in perfect rows; a random distribution looks more natural. -
Vary the orientation:
Keep most seeds pointing upward, but slight tilts to the left or right add character. -
Fill the gaps:
Rotate the pot and check for any large empty red spaces, adding a seed or two to balance the design.
Step 5: Finishing Touches
-
Let everything cure:
Allow the pot to sit undisturbed until all paint layers are completely bone dry. -
Seal the pot:
Apply a coat of clear sealer or Mod Podge over the entire painted surface. This protects the paint from water damage when you water your plants.
Now your vibrant pot is ready to be filled with soil and your favorite little seedlings
Sunny Lemon Citrus Pot
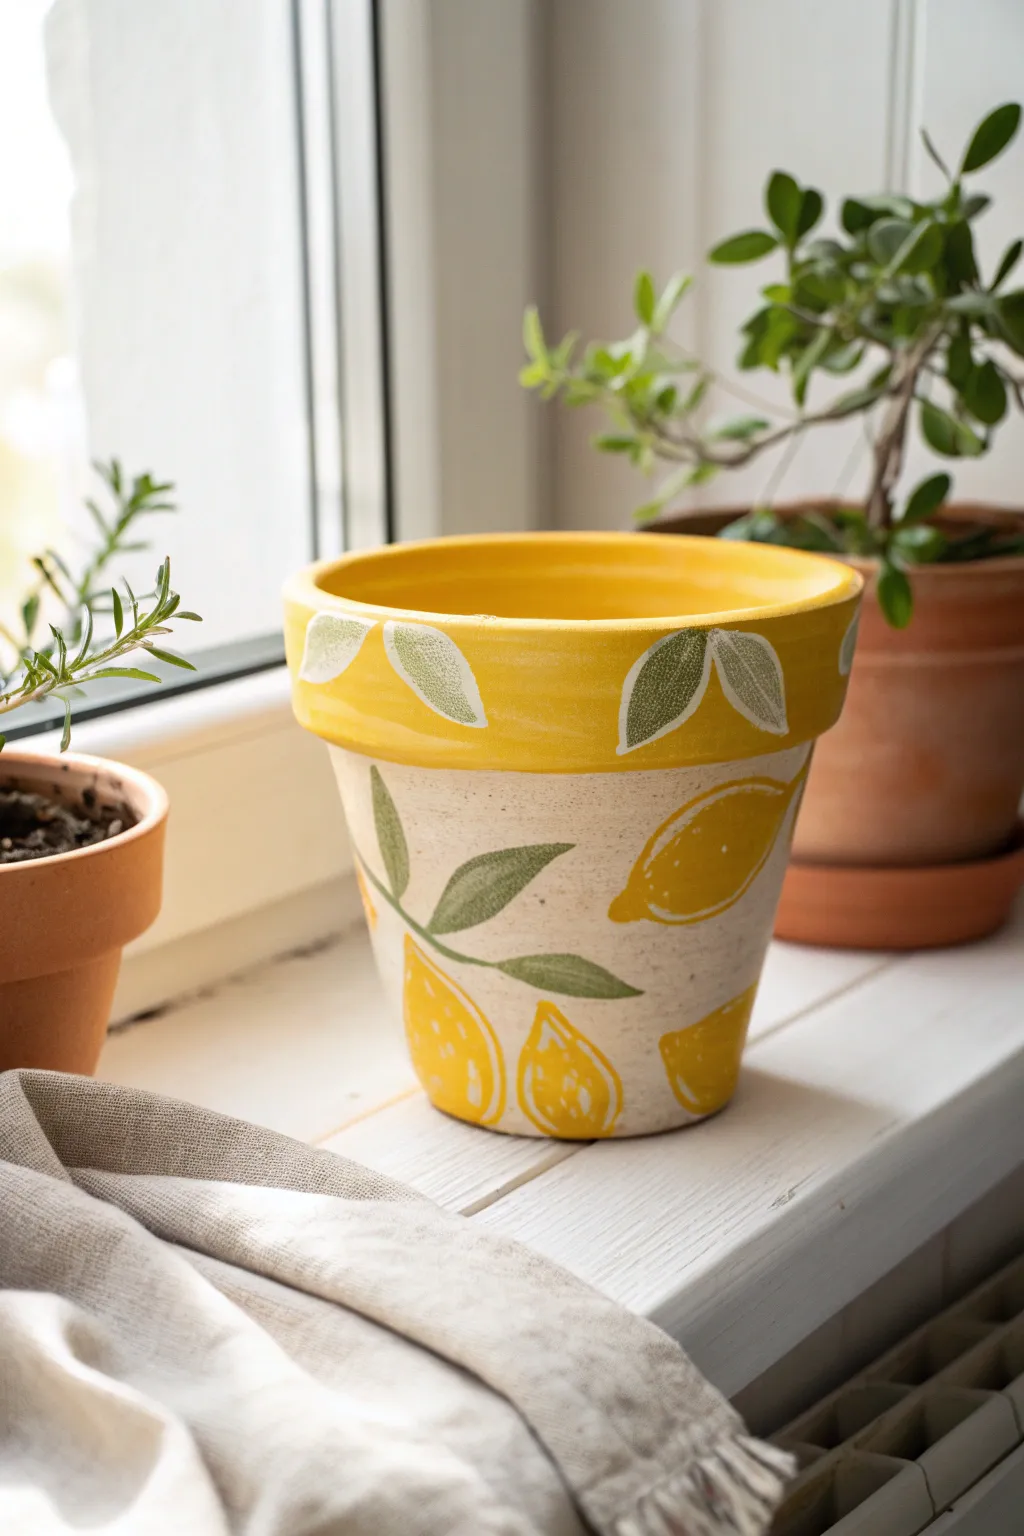
Bring a splash of Mediterranean sunshine indoors with this cheerful citrus-themed planter. The bright yellow lemons and earthy cream background create a warm, rustic look that perfectly complements kitchen herbs or succulents.
Step-by-Step Tutorial
Materials
- Terracotta clay pot (standard 6-inch size)
- Acrylic craft paints (Bright Yellow, Cream/Warm White, Sage Green, Dark Green, White)
- Flat paintbrush (medium width)
- Small round paintbrush (for details)
- Sea sponge or textured sponge
- Pencil
- Water cup and paper towels
- Clear matte or satin sealant spray
Step 1: Base Coating
-
Clean the surface:
Before you begin, wipe down your terracotta pot with a damp cloth to remove any dust or debris. Let it dry completely so the paint adheres properly. -
Paint the rim:
Using your medium flat brush, apply a coat of Bright Yellow paint to the entire rim of the pot. Don’t worry about the inside unless you plan to fill it below the rim line. -
Second rim coat:
Once the first yellow coat is dry to the touch, apply a second layer to ensure a solid, vibrant color without streaks. -
Create the textured body:
Dip a damp sea sponge into the Cream or Warm White paint. Dab the sponge over the main body of the pot below the rim. -
Build opacity:
Continue sponging until you have decent coverage, but allow a tiny bit of the terracotta texture to peek through for a rustic feel. Let this base dry completely, usually about 20 minutes.
Sponge Technique
Don’t drag the sponge when applying the cream base. Use an up-and-down blotting motion to get that specific stone-like texture shown in the photo.
Step 2: Painting the Lemons
-
Sketch the layout:
Lightly sketch oval lemon shapes and leaf outlines onto the cream body and the yellow rim using a pencil. Plan for a mix of whole lemons and leaf clusters. -
Paint lemon bodies:
Fill in your lemon sketches on the cream section with the same Bright Yellow used for the rim. Use the round brush to keep the edges relatively neat. -
Add highlights:
While the yellow is still slightly wet, mix a tiny drop of white into your yellow paint. Add a curved highlight stroke to the top curve of each lemon to give it dimension. -
Paint rim leaves:
On the yellow rim, paint the leaf shapes using Sage Green. I like to leave a small gap between the green leaf and the yellow background to define the edge. -
Paint body leaves:
Paint the leaves connected to the lemons on the main body using the Sage Green. Vary the sizes for a natural look. -
Add stems:
Using the very tip of your round brush and Dark Green paint, connect these leaves with thin, delicate stems.
Step 3: Refining Details
-
Detail the rim leaves:
Once the Sage Green on the rim is dry, use a fine brush with white paint (or very light green) to scratch in vein details or outline the leaf shapes loosely. -
Texture the lemons:
Using white paint, add small dots and little curved dashes onto the yellow lemons to mimic the pitted texture of citrus peel. -
Leaf definition:
Add a single stroke of Dark Green down the center of the body leaves to create a central vein. -
Clean up edges:
If any paint crossed over the dividing line between the rim and the body, use a small brush to touch up the line for a cleaner separation. -
Seal the pot:
Allow the pot to cure for at least 24 hours. Take it outside and spray with a clear matte or satin sealant to protect your artwork from water damage.
Go 3D
Before painting, use puff paint to outline your lemons and leaves. Let it dry, then paint over it to create a raised, embossed ceramic effect.
Place your favorite basil plant inside and enjoy the fresh summer vibes all year round
Waffle Cone Ice Cream Pot
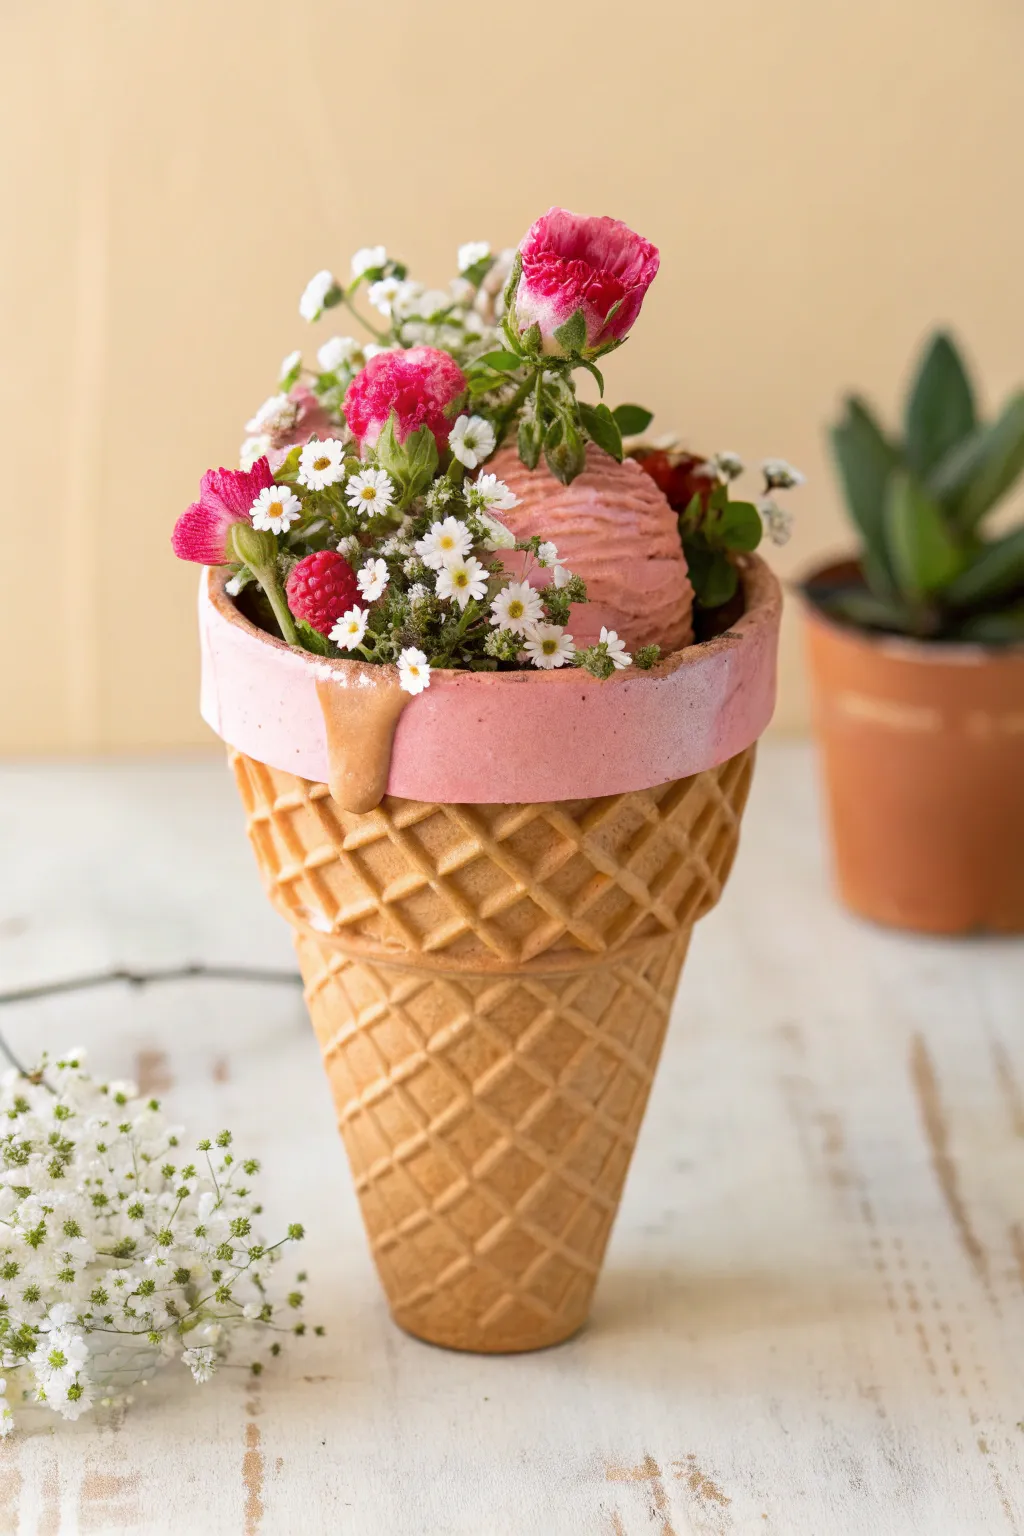
Transform a standard terracotta pot into a sweet treat with this playful waffle cone design. Featuring a painted dripping rim and a textured grid pattern, it’s the perfect vessel for a whimsical floral arrangement or a succulent.
Detailed Instructions
Materials
- Small terracotta pot (approx. 4-6 inches)
- Acrylic paint: beige/tan (waffle color), light pink (ice cream color), slightly darker tan (shading)
- White puff paint or texture paste (optional for texture)
- Medium flat paintbrush
- Small round paintbrush
- Thin liner brush
- Ruler (optional)
- Pencil
- Paper plate or palette
- Matte sealant spray
Step 1: Base Coating
-
Prep the surface:
Begin by wiping down your terracotta pot with a damp cloth to remove any dust or debris. Let it dry completely before starting, as terracotta absorbs moisture quickly. -
Paint the cone base:
Using a medium flat brush, apply a coat of beige or tan acrylic paint to the entire body of the pot below the rim. This will serve as the base color for your waffle cone. -
Mix the waffle shade:
If your beige feels too flat, mix a tiny dot of orange or brown into white paint to get that warm, baked-cone hue. Apply a second coat if the terracotta still shows through. -
Paint the rim:
Switch to your light pink acrylic paint. Cover the entire rim of the pot with a solid coat of pink. This represents the ice cream scoop sitting on top. -
Dry time:
Allow the base coats to dry completely to the touch preventing any smudging during the detailed work.
Step 2: Creating the Waffle Pattern
-
Draft the diagonal lines:
Using a pencil, lightly sketch diagonal lines across the beige body of the pot. Start from the top right and angle down to the bottom left. -
Complete the grid:
Sketch a second set of diagonal lines in the opposite direction (top left to bottom right) to create a diamond grid pattern. -
Paint the grid lines:
With a thin liner brush and a slightly darker tan or light brown paint, trace over your pencil lines. Keep your hand steady but don’t worry about perfection; organic lines look more like baked batter. -
Add dimension:
To make the waffle pattern look raised, mix a slightly lighter version of your base tan. Paint small highlights in the center of each diamond shape. -
Deepen the shadows:
I like to take a very diluted brown wash and paint it into the intersections of the grid lines to create depth, making the diamonds pop out visually.
Uneven Lines?
If your brush slips while painting the grid, wait for it to dry. Touch it up with the base tan color rather than wiping it wet, which smears paint.
Step 3: Adding the Drip Detail
-
Sketch the drip:
Decide where you want your ice cream to ‘melt.’ Lightly sketch a drip shape extending from the bottom of the pink rim down onto the waffle section. -
Create texture (Optional):
For a 3D effect, outline the drip with a little white puff paint or texture paste before painting. Let this dry hard if you choose to do it. -
Paint the drip base:
Using the same light pink as the rim, fill in the drip shape carefully. You may need two coats to cover the tan background fully. -
Add the caramel accent:
Looking closely at the inspiration, there is a caramel-colored drip accent. Mix a golden-brown paint and add a single, thick drip right alongside or over a section of the pink drip. -
Natural variation:
Dab a dry brush with a tiny bit of white paint gently onto the pink rim to give it a frosty, cold texture.
Add Sprinkles
For extra fun, use a toothpick to dot multicolored heavy-body paint onto the pink rim, creating a realistic confetti sprinkle effect.
Step 4: Finishing Touches
-
Seal the work:
Once all paint is perfectly dry, take the pot to a well-ventilated area. Spray it with a matte or satin sealant to protect the paint from water damage. -
Styling the pot:
To mimic the photo, place a small plastic cup or liner inside the pot before adding fresh flowers, berries, or scoops of floral foam.
Now you have a delightful piece of decor that looks good enough to eat and brightens up any corner
Cute Ladybug or Bumblebee Pot
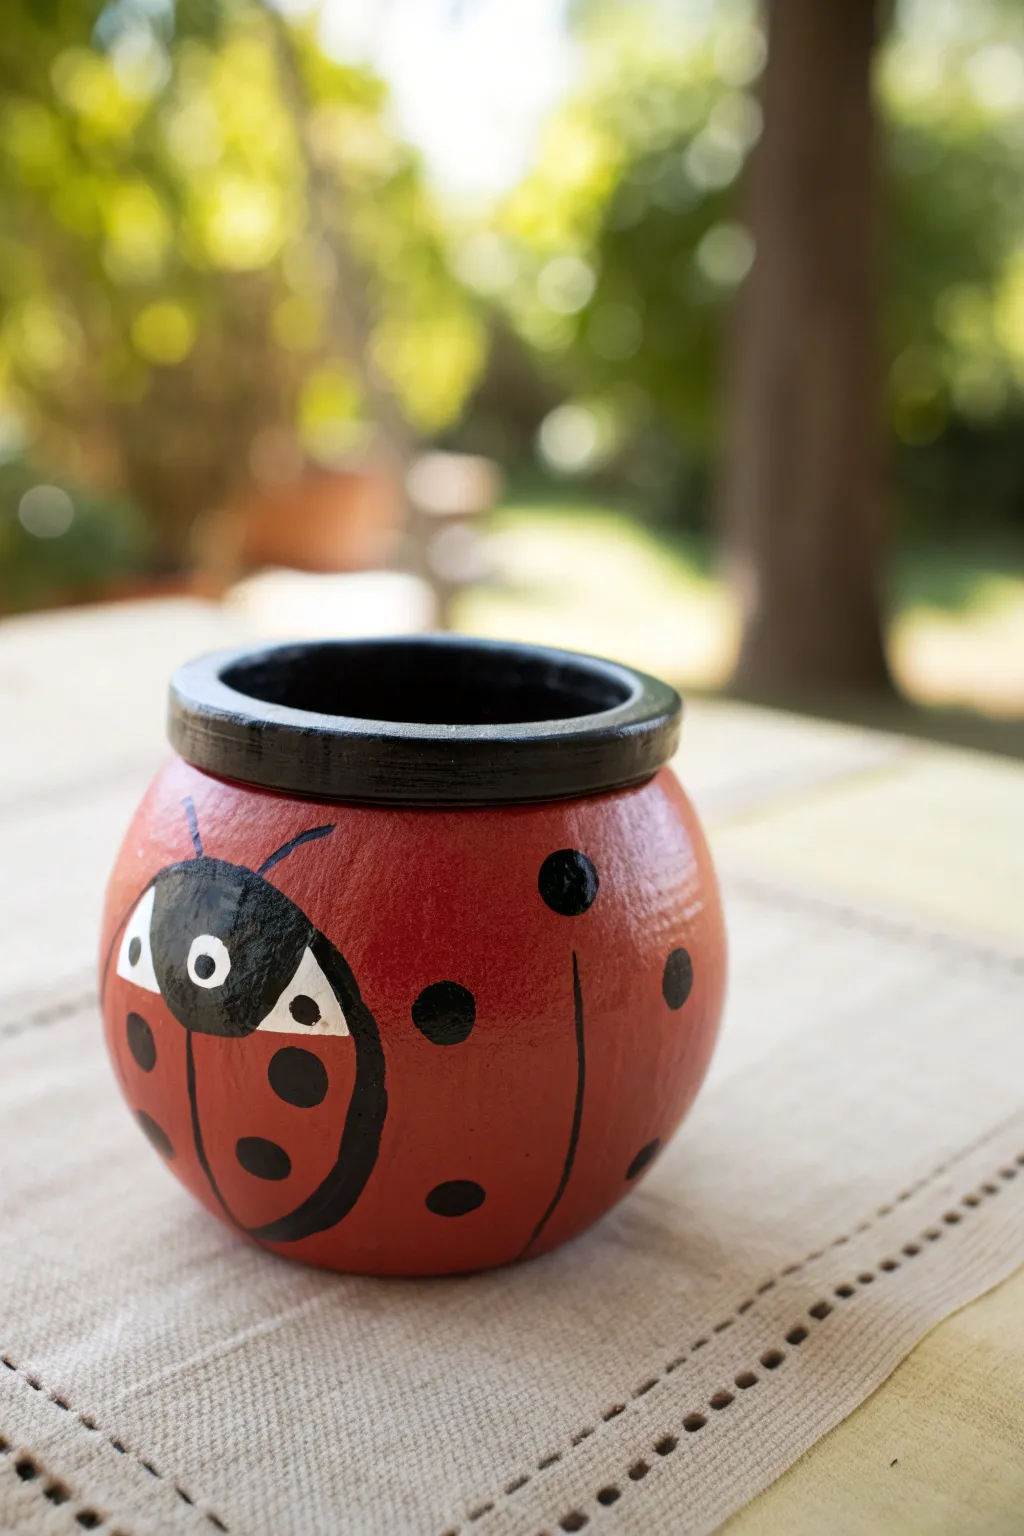
Transform a simple sphere-shaped clay pot into an adorable garden friend with this bright ladybug design. The rounded shape of the pot perfectly mimics a bug’s body, making for a cheerful home for small succulents or herbs.
How-To Guide
Materials
- Round clay pot (sphere shape)
- Red acrylic paint (bright cherry red)
- Black acrylic paint
- White acrylic paint
- Medium flat paintbrush
- Small round detail brush
- Pencil
- Water and palette
- Clean cloth or rag
- Matte or glossy sealer (optional)
Step 1: Base Painting
-
Clean surface:
Begin by wiping down your clay pot with a slightly damp cloth to remove any dust or debris, then let it dry completely. -
Inside rim:
Paint the inside of the pot first if you want a cleaner look, using black acrylic paint just for the interior neck area. -
First red coat:
Apply a coat of bright red acrylic paint over the entire exterior surface of the pot, stopping just below the raised rim. -
Dry and repeat:
Let the first coat become touch-dry, which usually takes about 15 minutes. Clay pots are porous and soak up paint, so apply a second or third coat of red until the color is solid and opaque. -
Paint the rim:
Using your black paint and a steady hand, paint the raised rim of the pot entirely black. I find resting my pinky finger on the pot helps stabilize my hand for this circular line.
Uneven Dots?
If you struggle painting perfect circles, use a round sponge dauber or the flat end of a pencil eraser dipped in paint as a stamp for uniform spots.
Step 2: Designing the Body
-
Sketch features:
Once the red base is fully dry, use a pencil to lightly sketch a large oval for the head on the front, wings down the back, and the placement of the dots. -
Start the face:
Fill in the large oval shape you sketched for the head with black paint. -
Wing division:
Paint a thin, vertical black curved line starting from under the rim on the side/back of the pot to represent where the beetle’s wings separate. -
Outline the head:
Carefully paint a thin black outline around the side of the ladybug’s body where the wings would fold, connecting to your sketched head. -
Add spots:
Using a small round brush, paint solid black circles of varying sizes scattered across the red body.
Make it a Bumblebee
Swap the red paint for bright yellow. Instead of spots, paint thick black horizontal stripes across the body for a buzzing alternative.
Step 3: Face Details
-
Eye base:
Paint two semi-circles or triangles in white near the sides of the black head oval to create the ‘cheeks’ or eye area. -
Pupils:
Dip the handle end of a paintbrush into black paint and dot it into the center of the white eye shapes for perfect circular pupils. -
Highlights:
Once the black pupils define dry, use a toothpick or a tiny brush to add a minuscule speck of white to each pupil for a lively sparkle. -
Antennae:
Using your finest brush, paint two thin, curved lines extending upward from the top of the black head.
Step 4: Finishing Touches
-
Clean up edges:
Inspect your lines, especially around the black rim. If any red paint is showing through or lines are shaky, touch them up now. -
Final dry:
Allow the entire project to cure for at least 24 hours before adding soil. -
Seal (optional):
For longevity, especially if placing outdoors, apply a coat of clear spray sealer.
Now your cheerful ladybug is ready to brighten up a windowsill or patio table
Funny Face Planter Buddy
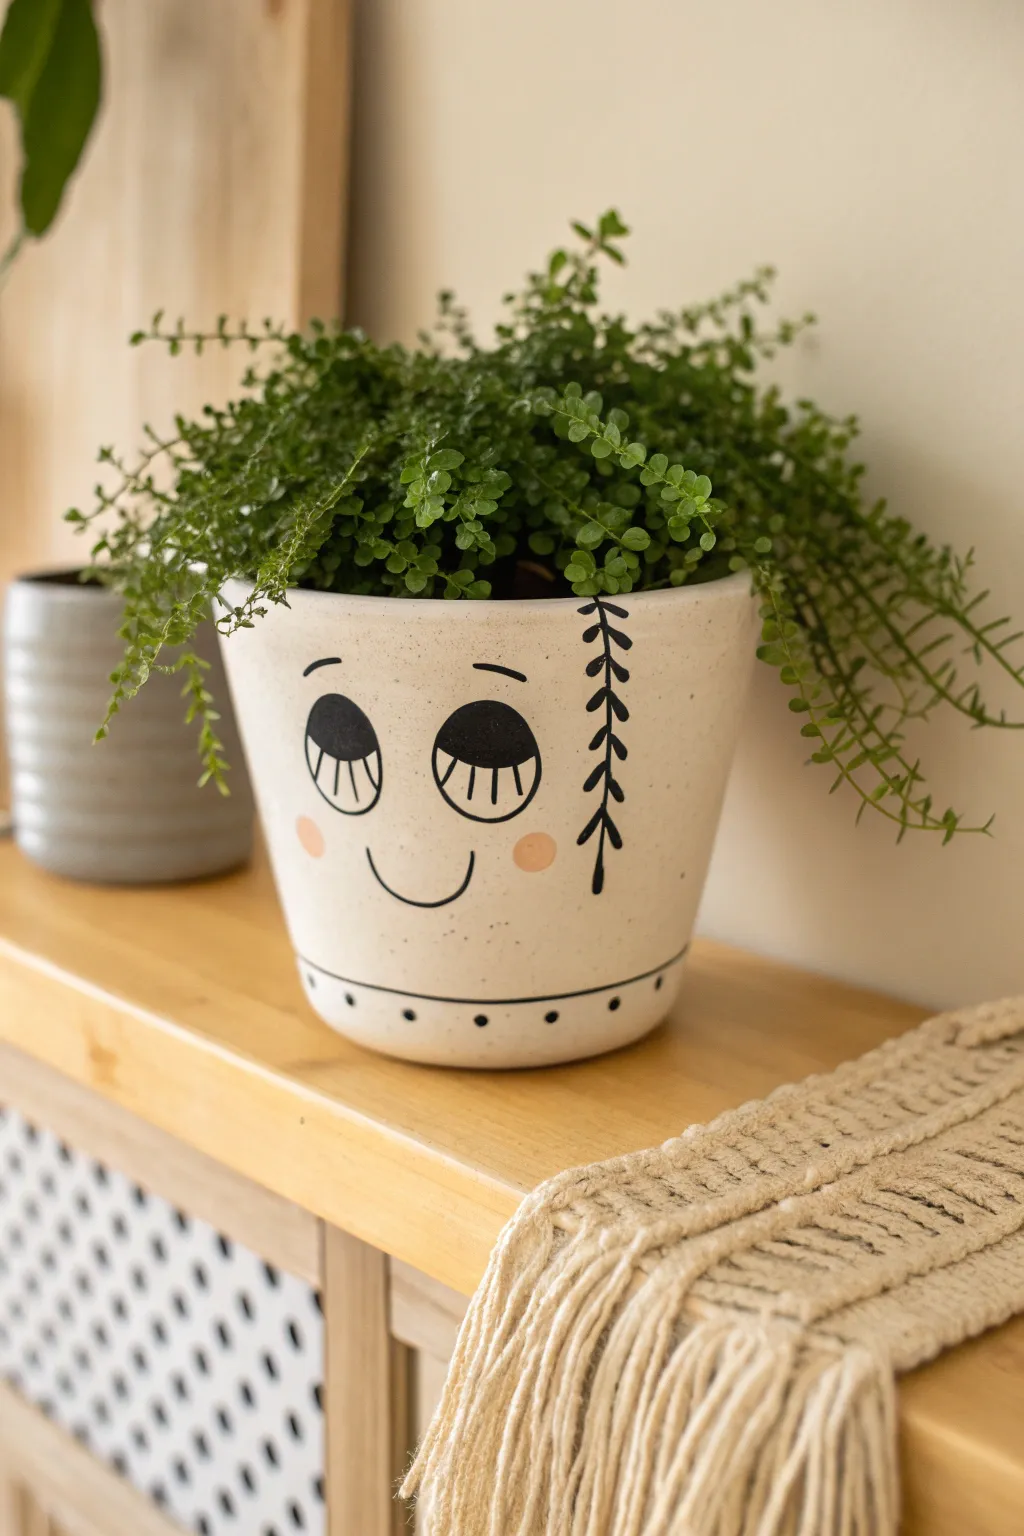
Give your favorite houseplant a cheerful new home with this adorable face planter that looks like it’s just waking up from a pleasant dream. The speckled cream base and simple black line art create a clean, modern look that adds personality to any shelf without overwhelming your decor.
Step-by-Step Guide
Materials
- Terracotta pot (clean and dry)
- Cream or off-white acrylic paint
- Black acrylic paint or black paint marker (medium tip)
- Soft pink acrylic paint
- Wide flat paintbrush
- Small round detail brush
- Old toothbrush (optional for speckling)
- Pencil with eraser
- Matte spray sealer
Step 1: Prepping the Canvas
-
Clean surface:
Ensure your terracotta pot is completely clean and free of dust or price sticker residue. Wipe it down with a damp cloth and let it dry fully before starting. -
Base coat application:
Using your wide flat brush, apply a coat of cream or off-white acrylic paint to the exterior of the pot. Don’t forget to paint the top rim. -
Build coverage:
Let the first coat dry for about 20 minutes. Apply a second or third coat until the terracotta color is completely hidden and the finish is opaque. -
Add speckles:
To mimic the ceramic look in the photo, dip an old toothbrush into slightly watered-down black or brown paint. Run your thumb over the bristles to flick tiny speckles onto the dry cream pot. Go lightly—less is more here.
Clean Lines Hack
If you struggle with painting steady lines, switch to a medium-tip acrylic paint marker. It feels just like drawing with a Sharpie but is much more durable on clay.
Step 2: Drawing the Features
-
Sketch the face:
Once the base is bone-dry, use a pencil to lightly sketch the face. Position two large, half-oval eyes slightly above the center line. -
Add details:
Draw a simple U-curve for the smile below the eyes. Sketch small eyebrows above the eyes and circle positions for the cheeks. -
Outline the leaf:
On the right side of the face, sketch a vertical line starting from the rim. Add small leaves angling downward on either side of this line to create a branch. -
Outline the base:
Draw a horizontal line circling the pot about an inch from the bottom edge.
Hair Stylist
Change the plant to change the character! A spikey aloe creates a punk rocker vibe, while a fern gives a wild, messy hair look.
Step 3: Painting the Design
-
Fill the eyes:
Using black paint and a small round brush (or a paint marker for better control), carefully fill in the large half-ovals for the eyes. -
Add lashes:
Paint vertical stripes inside the bottom half of the eye shapes to represent long lower lashes. Keep the spacing consistent. -
Trace lines:
Go over your pencil lines for the eyebrows, the simple smile, and the vertical branch detail with black paint. -
Leaf details:
Thicken the lines of the leaves slightly so they stand out against the cream background. -
Bottom border:
Trace the horizontal line near the bottom. I find rotating the pot on a lazy Susan helps keep this line steady. -
Add dots:
Place evenly spaced black dots just below the bottom border line, going all the way around the pot circumference. -
Rosy cheeks:
Dip your round brush or a foam pouncer into the soft pink paint. Dab two circles onto the cheek areas you sketched earlier.
Step 4: Finishing Touches
-
Erase guidelines:
Wait until the paint is absolutely dry to the touch, then gently erase any visible pencil marks. -
Seal the work:
Take the pot to a well-ventilated area and spray it with a clear matte sealer. This protects the paint from water damage when you water your plant. -
Plant:
Once the sealer is dry, pot a trailing plant like Baby’s Tears or String of Pearls to give your buddy some fun ‘hair’.
Enjoy your new leafy friend as it adds a touch of playful charm to your windowsill
Faux Tile Mosaic Pattern
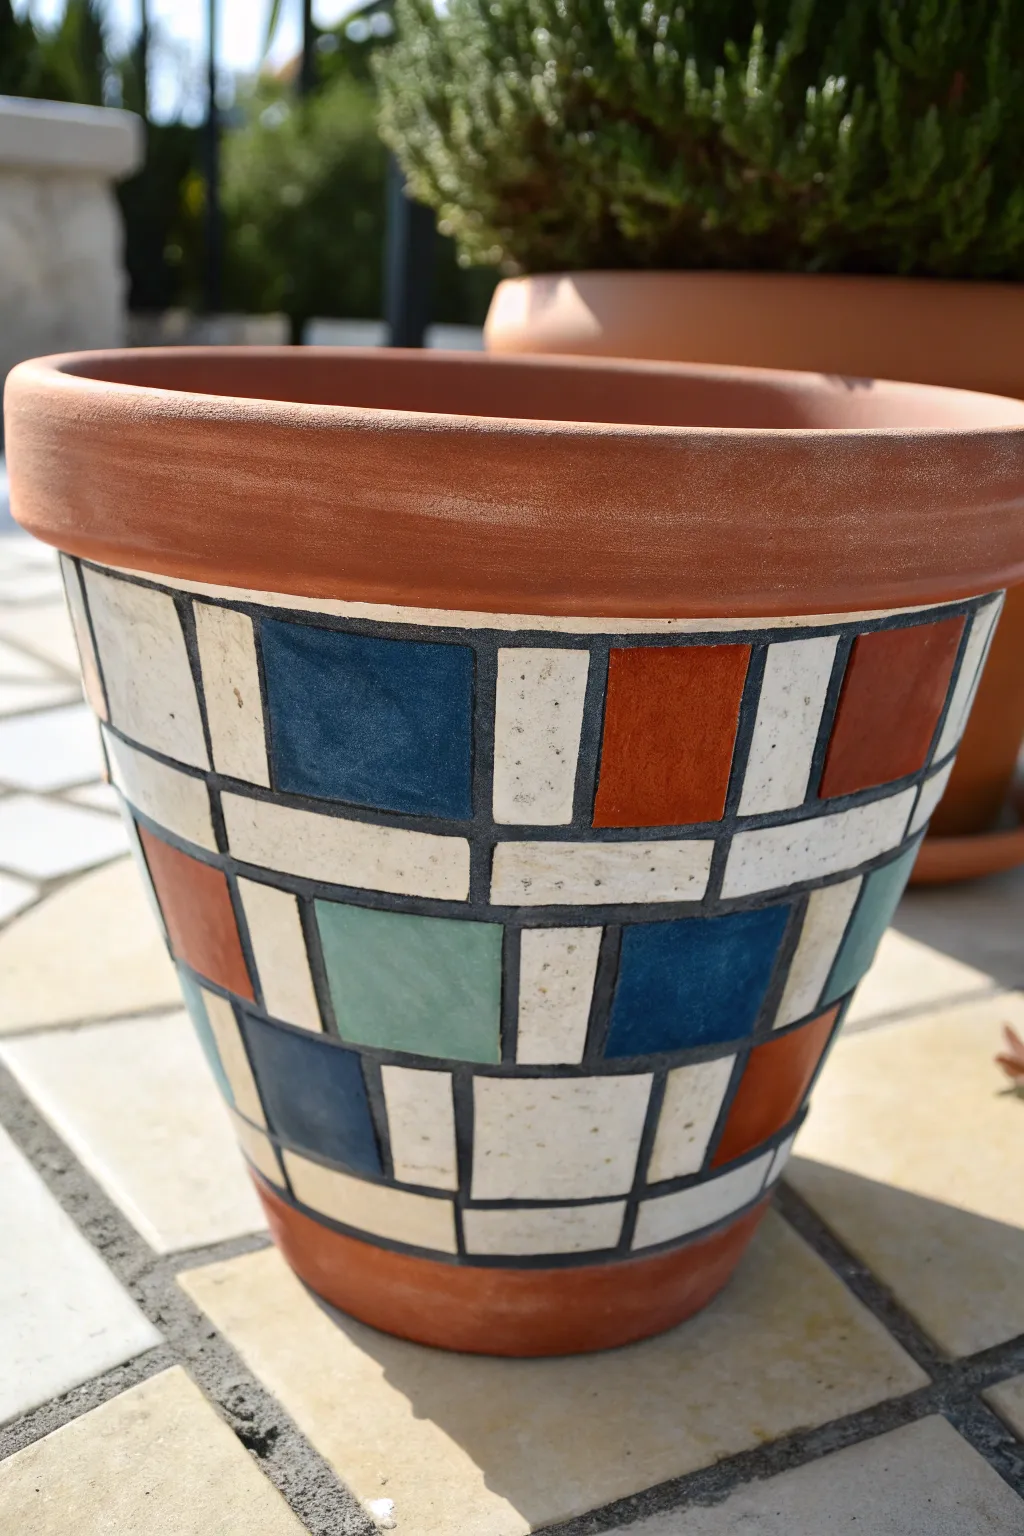
Transform a plain terracotta staple into a Mediterranean masterpiece with this clever painting technique. By varying the size of your geometric shapes and using contrasting colors, you can achieve the look of a high-end ceramic mosaic without gluing a single tile.
Detailed Instructions
Materials
- Standard terracotta pot (cleaned and dried)
- Acrylic craft paints: Deep Navy Blue, Burnt Orange, Muted Teal Green, Antique White
- Dark Charcoal or Black acrylic paint (for the grout lines)
- Black fine-tip paint pen or permanent marker (optional, for outlining)
- Flat shader brushes (medium and small sizes)
- Fine liner brush
- Pencil and eraser
- Painter’s tape or masking tape
- Ruler or flexible measuring tape
- Clear acrylic sealer spray (matte or satin finish)
Step 1: Planning the Grid
-
Mark the boundaries:
Begin by deciding where your mosaic pattern will start and stop. Use painter’s tape to mask off the thick rim at the top and a small band at the very bottom of the pot. These areas will remain natural terracotta to frame your design. -
Sketch vertical guides:
Using a pencil and your flexible measuring tape, lightly draw vertical lines down the pot. Spacing them about 1.5 to 2 inches apart works well for a standard pot, but adjust based on your pot’s circumference. -
Add horizontal lines:
Draw horizontal rings around the pot to create a grid. Don’t worry about making perfect squares; the charm of this mosaic look comes from having a mix of squares and rectangles. -
Refine the shapes:
Now, play with your grid. Erase some of the internal lines to merge two small squares into one longer rectangle. Aim for a randomized pattern where no two identical shapes are right next to each other.
Clean Lines Hack
If you struggle with shaky hands, apply thin 1/8″ masking tape (or nail art tape) over your pencil grid lines before painting. Peel it off when dry to reveal perfect gaps for your grout.
Step 2: Painting the Tiles
-
Start with the white tiles:
Select several rectangles and squares scattered across the design to be your Antique White tiles. Paint these shapes carefully, staying just inside your pencil lines. You will likely need 2-3 coats for the white to look opaque against the dark terracotta. -
Apply the accent colors:
Switch to your Burnt Orange paint. Fill in about a quarter of the remaining shapes. This color mimics the natural clay but adds a glazed, saturated look. -
Add the cool tones:
Paint the next set of shapes with Deep Navy Blue. These darker tiles add visual depth and contrast strongly with the white sections. -
Finish the color blocking:
Fill the final empty shapes with Muted Teal Green. I find stepping back every few minutes helps ensure the colors are balanced evenly around the pot. -
Let it cure:
Allow all the paint to dry completely. If any colors look streaky, apply one final thin coat to those specific tiles before moving on.
Step 3: Creating the Grout Lines
-
Mix the grout color:
Prepare your ‘grout’ color. Pure black can be too harsh, so I prefer mixing a drop of white into black paint to create a deep charcoal grey. -
Paint the vertical gaps:
Using a fine liner brush, carefully paint the lines between your colored shapes. Start with the vertical lines. The goal is a steady, even width, roughly 1/8th of an inch thick. -
Connect the horizontals:
Paint the horizontal grout lines, connecting them to your vertical lines. Don’t rush this step; crisp lines are the secret to the tiled illusion. -
Clean up edges (Optional):
If painting straight lines with a brush is difficult, you can use a black paint pen or thick permanent marker to draw the grout lines instead. This offers more control for beginners. -
Touch ups:
Once the dark lines are dry, look for any spots where the grout line accidentally bled onto a colored tile. Use your original colored paints to carefully touch up over these mistakes.
Add Texture
Mix a tiny pinch of baking soda or fine sand into your ‘Antique White’ paint. This gives the white tiles a subtle gritty texture, making them look like real tumbled stone or travertine.
Step 4: Sealing and Finishing
-
Remove the tape:
Gently peel off the painter’s tape from the rim and base. Peel slowly at a 45-degree angle to avoid lifting any paint near the edges. -
Protect the work:
Take the pot outdoors or to a well-ventilated area. Spray the entire exterior (including the unpainted terracotta parts) with a clear acrylic sealer. A matte finish looks most like natural stone or cement grout, while gloss looks like glazed ceramic. -
Wait for final drying:
Let the sealer cure for at least 24 hours before filling the pot with soil and plants.
Place your favorite greenery inside and enjoy the sophisticated, handcrafted look of your new faux-mosaic planter