Whenever I need a quick mood boost in the studio, I grab air-dry clay or polymer clay and make something tiny and adorable. These simple cute clay art ideas stick to chubby shapes, easy little faces, and sweet projects you can actually finish in an afternoon.
Chubby Bunny Buddies
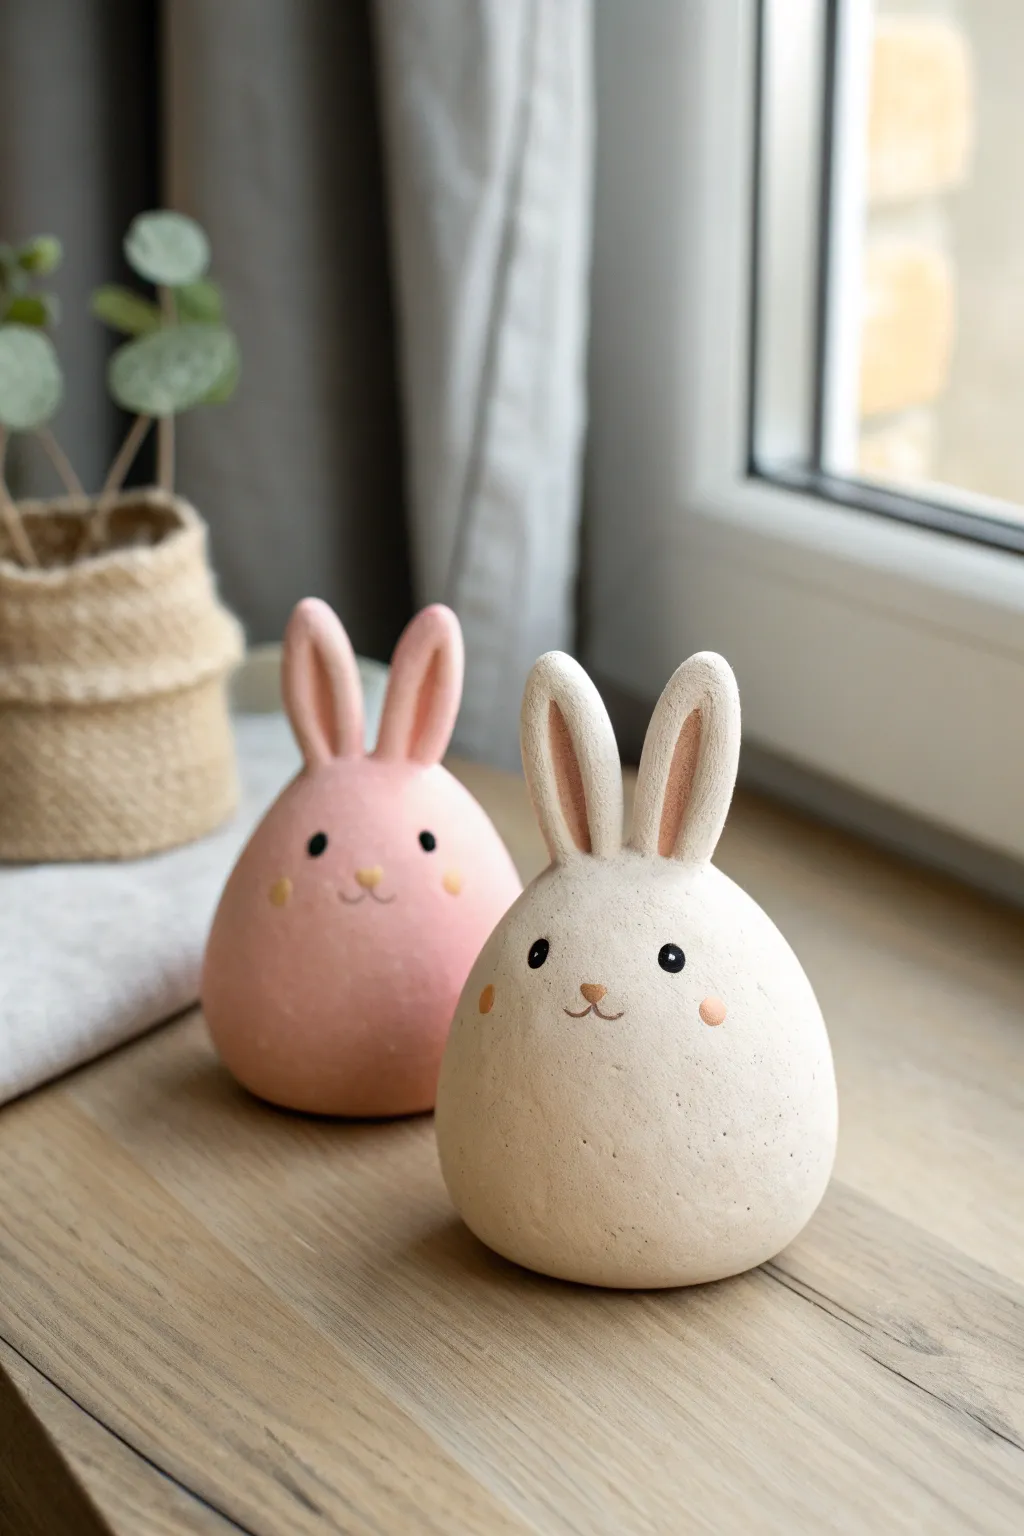
These adorable, egg-shaped bunnies are the perfect introduction to working with air-dry clay. With their minimal design and soft pastel colors, they make charming decor for a nursery or a festive spring vignette.
How-To Guide
Materials
- Air-dry clay (white)
- Acrylic paints (pink, white, black, light brown)
- Fine grit sandpaper
- Paintbrushes (medium flat and fine liner)
- Cup of water
- Aluminum foil (optional for core)
- Clay smoothing sponge
- Matte sealant spray or varnish
Step 1: Shaping the Bodies
-
Prepare the clay:
Start by kneading a handful of air-dry clay until it is warm and pliable. This conditioning step prevents cracks later on. -
Form the base:
Roll the clay into a smooth ball. Gradually roll it between your palms, applying slightly more pressure on top to taper it into a fat teardrop or egg shape. -
Flatten the bottom:
Gently tap the wider bottom of your egg shape onto your work surface. You want it to sit flat and stable without rocking. -
Refine the surface:
Dip your finger in a little bit of water and rub it over the clay to smooth out any fingerprints or tiny imperfections. The finish should be silky.
Cracks while drying?
Mix a tiny amount of fresh clay with water to make a paste. Fill the crack, smooth it over with a damp finger, and let it dry again before painting.
Step 2: Adding the Ears
-
Shape the ears:
Roll two smaller marble-sized balls of clay. Roll these into small logs, slightly pointed at one end. -
Create the inner ear:
Using a modeling tool or the handle of a paintbrush, gently press an indentation down the center of each ear log to create the inner ear canal. -
Attach the ears:
Score the bottom of the ears and the top of the egg body with a needle tool or toothpick. Apply a tiny bit of water or slip (clay mixed with water) to the scored areas. -
Blend the seams:
Press the ears firmly onto the head. Use a damp finger or a clay tool to drag the clay from the base of the ear down onto the body, blending the seam until it’s invisible. -
Final smoothing:
Give the entire bunny one last pass with a damp sponge to ensure the transition from ear to head is seamless and smooth. -
Dry completely:
Set your bunnies aside to dry. I find it takes about 24-48 hours depending on humidity; don’t rush this part or the paint might peel.
Keep it clean
Keep baby wipes nearby. Clay dust builds up on your hands and can dirty your white clay as you work, so wipe your palms frequently.
Step 3: Painting and Details
-
Sand imperfections:
Once fully dry, use fine-grit sandpaper to gently buff away any rough spots or lint that got stuck in the clay. -
Base coat:
Paint one bunny a solid creamy white and the other a soft pastel pink. You may need two coats for full opacity, letting the paint dry between layers. -
Paint inner ears:
For the white bunny, mix a lighter beige-pink and carefully paint the indented section of the ears. For the pink bunny, use a slightly darker or lighter pink for contrast. -
Add the eyes:
Using a fine liner brush or a dotting tool, dab two solid black circles for the eyes. Place them fairly wide apart for a cuter look. -
Draw the nose and mouth:
With a very fine brush and light brown paint, paint a tiny heart or oval for the nose. Extend two thin, curved lines downward to form the ‘w’ mouth shape. -
Highlights and cheeks:
Add a tiny white dot to each black eye for a sparkle. Finally, dab soft round cheeks using a diluted peachy paint. -
Seal the work:
Once the paint is completely dry, spray a light coat of matte varnish over the bunnies to protect them from dust and chipping.
Now you have a sweet pair of clay companions ready to brighten up any window ledge or shelf


Tiny Sleepy Cat Figurines
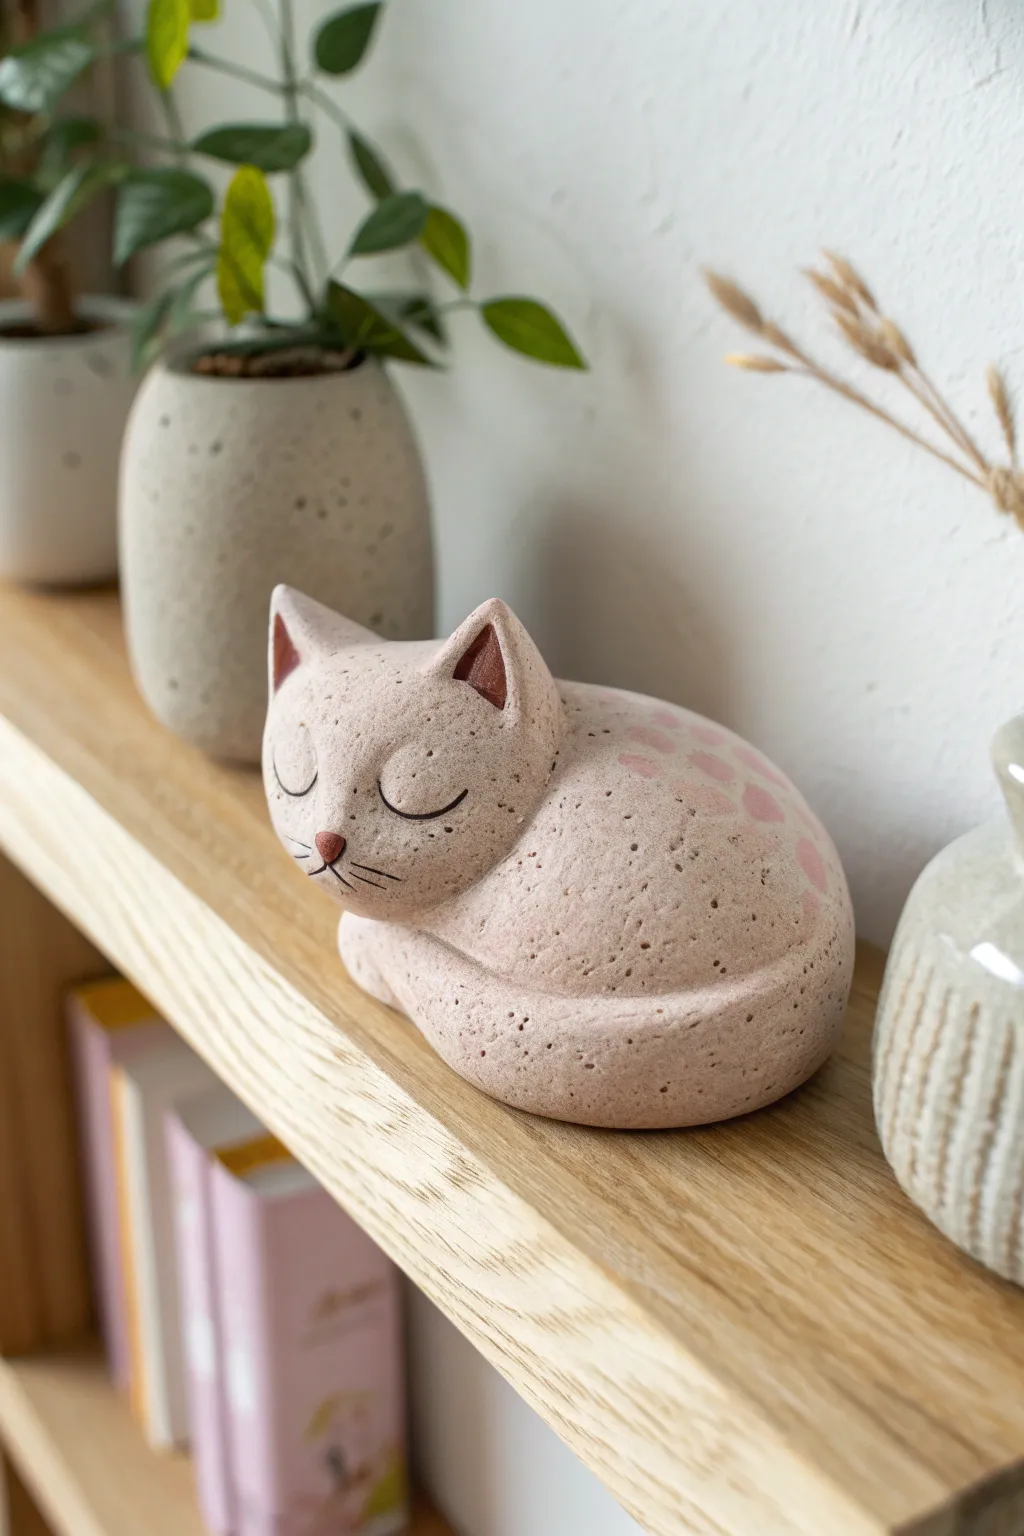
Capture the peaceful essence of a sleeping feline with this minimalist clay project. The design mimics the look of carved speckled granite or sandstone, featuring gentle curves and sweet, painted details.
Step-by-Step Guide
Materials
- Polymer clay (stone effect/granite color or beige with speckles)
- Pink chalk pastel or mica powder
- Soft paintbrush
- Modeling tools (needle tool/smooth sculpting tool)
- Black acrylic paint
- Terracotta or dark pink acrylic paint
- Very fine detail paintbrush
- Aluminum foil (for armature, optional)
Step 1: Shaping the Base
-
Condition the clay:
Begin by kneading your speckled stone-effect clay until it is warm and pliable. This particular finish helps hide fingerprints, which is a nice bonus. -
Form the body oval:
Roll the clay into a smooth, large egg shape. This will serve as the main body. If you want to save clay, you can ball up a small core of aluminum foil and wrap the clay around it. -
Flatten the base:
Gently press the ‘egg’ onto your work surface to create a flat bottom so the cat sits stable without rocking. -
Create the head:
Roll a smaller sphere of clay, roughly one-third the size of the body. Press it gently to flatten the back slightly. -
Attach the head:
Position the head on the narrower end of the body oval. Blend the clay seams at the neck area using a smoothing tool or your finger until the connection is seamless and invisible.
Uneven Seams?
If blending clay seams is difficult, use a tiny drop of clay softener or baby oil. It breaks down the surface tension and makes the clay merge seamlessly like butter.
Step 2: Adding Features
-
Shape the ears:
Form two small, equal-sized triangles. Pinch them slightly to give them a cat-ear shape, keeping them relatively thick at the base. -
Attach the ears:
Press the ears onto the top of the head. Use a small ball tool or just your finger to blend the base of the ears into the head so they look integral, not just stuck on. -
Indent the inner ear:
Use a smooth modeling tool to create shallow triangular depressions inside each ear. -
Form the tail:
Roll a snake of clay that tapers at one end. Flatten it slightly. -
Wrap the tail:
Wrap the tail around the front/side of the body, curving it to hug the cat’s form. Blend the starting point of the tail into the back of the body so it creates a seamless curve. -
Smooth everything:
Give the entire piece a final smoothing rub. I often use a tiny bit of baby oil on my finger here to remove any harsh tool marks.
Texture Twist
Before baking, gently tap the entire surface with a clean toothbrush or stiff bristle brush. This enhances the ‘stone’ look and removes any shiny spots.
Step 3: Color and Baking
-
Prepare the pink shading:
Scrape a little pink chalk pastel into a powder. Using a soft, dry brush, gently dust this powder into the inner ears and create a pattern of soft spots on the cat’s back. -
Bake:
Bake the figurine according to your specific clay package instructions. Let is cool completely before painting. -
Paint the inner ears:
Mix a terracotta or dark pink acrylic paint. Carefully paint inside the triangular depressions of the ears. -
Paint the nose:
Using the same terracotta color, paint a tiny inverted triangle for the nose in the center of the face. -
Paint the eyes:
With black acrylic paint and your finest brush, paint two downward curving semi-circles for the sleeping eyelids. Add tiny lashes if you have a steady hand. -
Add whiskers:
Paint three very delicate, short lines on each cheek area for the whiskers. Keep them light and horizontal.
Place this serene little kitty on a shelf next to a small plant for a perfectly cozy artistic touch


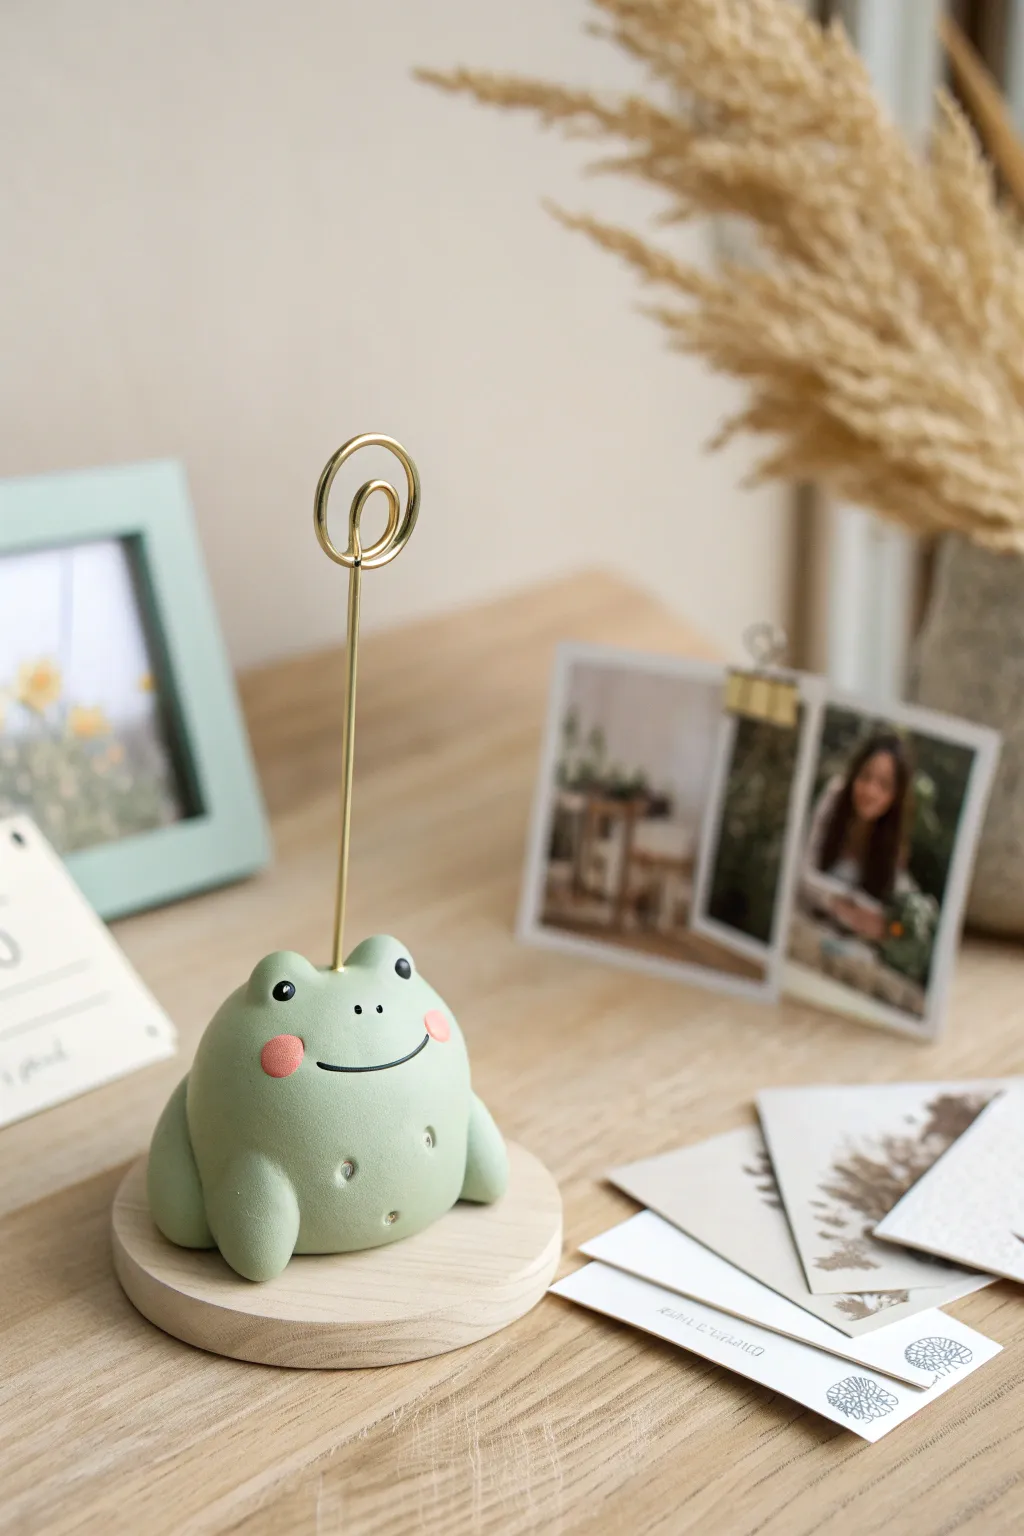
Little Frog Friends With Big Eyes

Create a charming duo of ceramic-style frogs perched on a smooth lily pad base. These delightful amphibians feature soft green hues, blushed cheeks, and expressive wide-set eyes that add personality to any desk or shelf.
How-To Guide
Materials
- Polymer clay or air-dry clay (sage green, light teal green, white, black, pink)
- Small wooden base or coaster
- Sculpting tools (needle tool, small ball stylus, smoothing tool)
- Acrylic paints (if using white clay)
- Matte varnish or sealant
- Rolling pin
- Aluminum foil (for armature core, optional)
Step 1: Forming the Base
-
Select the base color:
Start with your light teal or pale sage green clay to create the lily pad seat. If you are mixing colors, blend a small amount of green into white until you achieve a pastel, stony look. -
Shape the pad:
Roll the clay into a thick oval disc, roughly 1/2 inch high. The shape doesn’t need to be a perfect circle; an organic, slightly elongated oval works best for two frogs. -
Smooth the edges:
Use your fingers or a smoothing tool to round off the top edges of the base so it looks like a smooth river stone or a cartoonish leaf. -
Check the size:
Double-check that the base fits nicely on the wooden coaster you’ve selected for the final display.
Step 2: Sculpting the Frogs
-
Create the bodies:
Roll two balls of sage green clay. Make one slightly larger than the other. Shape them into rounded pear forms, flattening the bottom so they sit stability. -
Position the duo:
Place the two bodies onto the teal base, pressing them down gently so they adhere. Position them side-by-side, slightly angled toward each other to show they are friends. -
Add thigh muscles:
For each frog, roll two smaller balls of green clay for the rear legs. Flatten them slightly into ovals and attach them to the lower sides of the body, blending the seams at the back. -
Form the front legs:
Roll thin coils of green clay for the front arms. Attach them vertically along the front of the belly. I find it helpful to use a silicone tool to blend the top of the arm seamlessly into the body. -
Define the toes:
At the bottom of the front arms and back legs, use a needle tool or knife to make small indentations, suggesting webbed feet without needing complex sculpting.
Cracks Appearing?
If you see tiny cracks while smoothing air-dry clay, dip your finger in water and gently rub the area. For polymer clay, use a drop of baby oil to blend seams.
Step 3: Adding Personality
-
Make the eye sockets:
Roll small balls of the main body color clay and attach them to the top of the head for the eye mounds. Blend the bottom edges into the head so they look integrated. -
Insert the whites:
Press a tiny ball of white clay into the center of each green eye mound. Flatten it gently so it doesn’t protrude too much. -
Add pupils:
Place a minuscule dot of black clay into the center of the white clay. Position the pupils so the frogs appear to be looking forward or slightly at each other. -
Carve the smiles:
Use a needle tool or a small curved blade to press a wide, U-shaped mouth into the face. Ensure the line is clean and deep enough to see. -
Apply blush:
Take the tiniest amount of pink clay and flatten it into sheer circles. Press these onto the cheeks right under the eyes for a rosy glow. -
Texture the skin:
Lightly tap the surface of the clay with an old toothbrush or a stippling sponge to give the frogs a realistic, porous stone texture.
Garden Party
Try adding a tiny clay sculpted flower or a miniature mushroom between the frogs to add a pop of color and extra whimsy to the scene.
Step 4: Finishing Touches
-
Bake or dry:
Follow the manufacturer’s instructions for your specific clay. If baking polymer clay, ensure you don’t overcook the delicate light colors. -
Highlight the smile:
Once hardened, use a very fine brush and dark brown or black diluted acrylic paint to carefully line the indented mouth for better visibility. -
Seal the piece:
Apply a coat of matte varnish to the entire piece to protect it and unify the sheen. -
Mount textbase:
Glue the finished clay piece onto the rustic wooden slice base using strong craft glue or epoxy.
Now you have an adorable pair of amphibian friends ready to brighten up your favorite corner


Mini Teddy Bear Pocket Pals
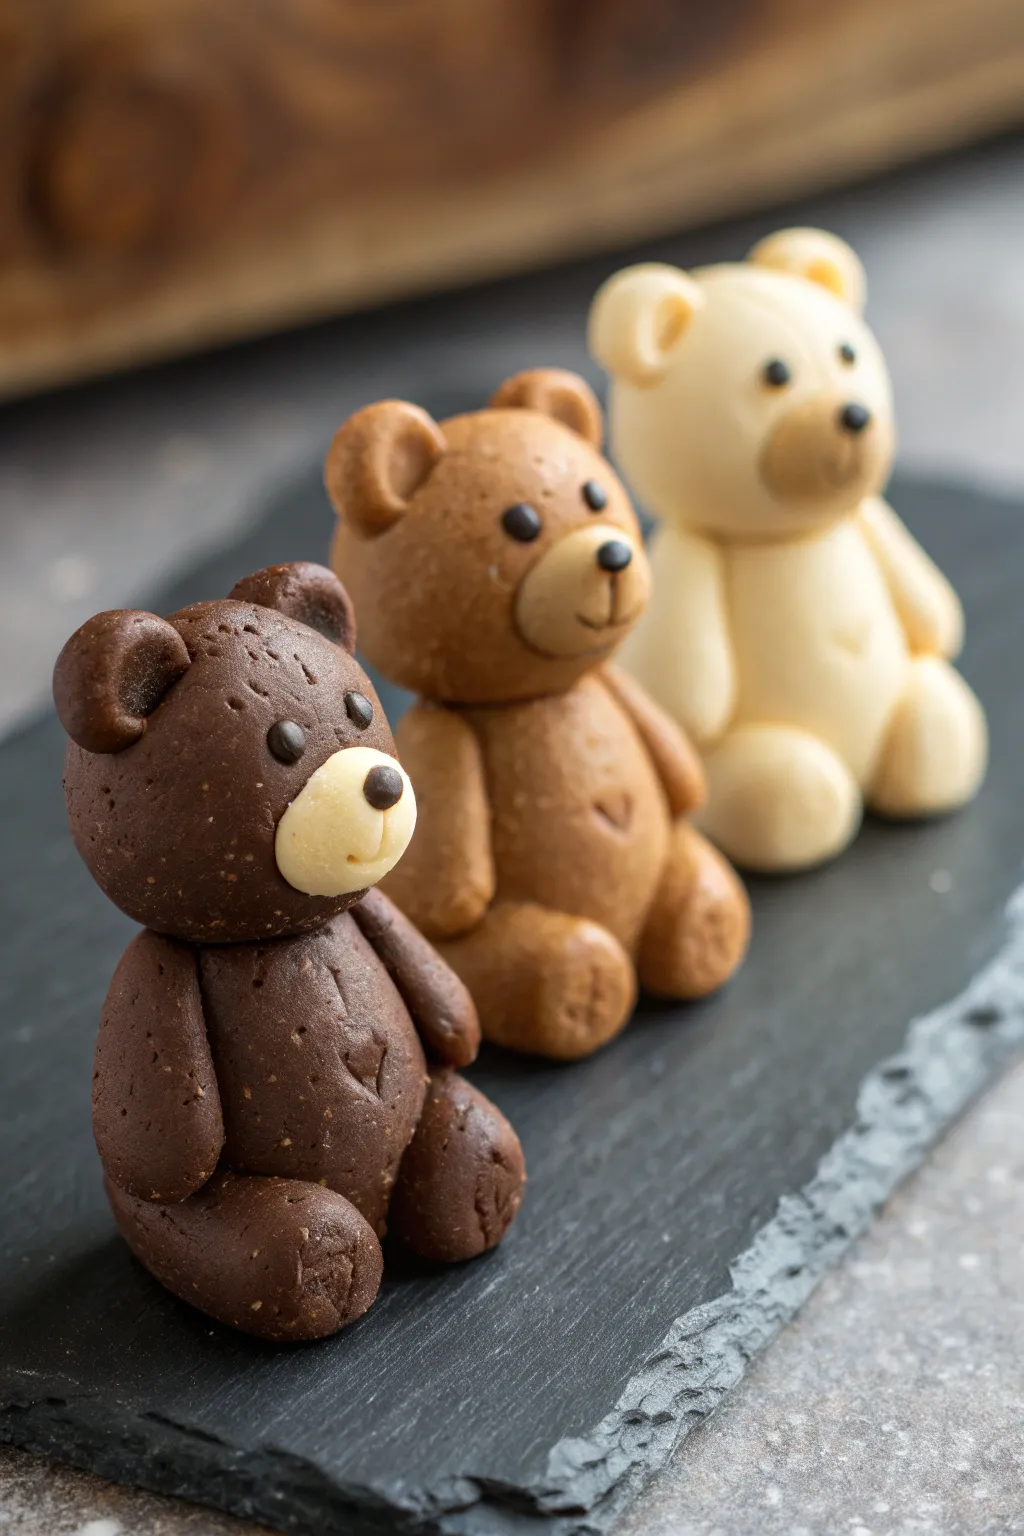
These adorable miniature bears are incredibly simple to sculpt, using basic shapes to build charming character. With their sweet expressions and rounded bellies, this trio—ranging from dark chocolate to creamy white—makes for perfect pocket-sized companions or desk decorations.
Step-by-Step
Materials
- Polymer clay in three colors: dark brown, light tan/caramel, and cream/white
- Small amount of black polymer clay for eyes and noses
- Ball tool or dotting tool
- Needle tool or toothpick
- Clean work surface (glass or tile recommended)
- Wet wipes (for cleaning hands between colors)
- Oven for baking (follow clay manufacturer’s instructions)
Step 1: Shaping the Bodies
-
Prepare your clay:
Start by conditioning your three main colors of clay (dark brown, tan, and cream) by kneading them until they are soft and pliable. Wash your hands thoroughly between colors to prevent staining the lighter shades. -
Form the torsos:
For each bear, roll a medium-sized ball of clay into a smooth sphere. Gently taper the top slightly to create a very subtle pear shape, which will be the bear’s sitting body. -
Flatten the base:
Press the bottom of each pear shape onto your work surface so the bodies sit upright securely without rolling over. -
Texture the surface (optional):
If you want that slightly fuzzy, matte look seen in the dark brown bear, gently dab the surface with a stiff toothbrush or a crumpled piece of aluminum foil. I find this adds a lovely realistic touch. -
Add a belly button:
Using a small needle tool or toothpick, prick a tiny heart or simple dot into the center of the tummy for a cute detail.
Step 2: Creating the Heads
-
Roll the heads:
Roll three slightly smaller spheres for the heads. They should be proportionate to the bodies but slightly large to give that cute, chibi look. -
Attach heads to bodies:
Press the head firmly onto the tapered top of the body. You can insert a small piece of toothpick or wire between the two pieces for internal support if you like. -
Create the snouts:
Roll three tiny balls of contrasting clay for the snouts. Use cream for the dark bear, tan for the light brown bear, and a slightly darker beige for the white bear. Flatten them into small ovals. -
Attach the snouts:
Press the oval snout onto the lower center of the face. -
Make the ears:
For each bear, roll two tiny balls of the main body color. Flatten them slightly and press them onto the top sides of the head using a ball tool to indent the centers.
Clean Hands Trick
Work from lightest to darkest colors (cream first, then tan, then brown). This prevents dark lint or dye transfer from ruining your white clay.
Step 3: Adding the Limbs
-
Form the legs:
Roll two sausage shapes for the legs. They should be thick and rounded at the ends. Attach them to the bottom sides of the body, facing forward. -
Form the arms:
Roll two slightly smaller sausage shapes for the arms. Attach them at the shoulder area, letting them rest naturally against the sides of the belly. -
Refine the seams:
Use your modeling tool or finger to gently blend the clay where the limbs join the body so they don’t fall off during baking.
Make Them Wearable
Before baking, insert a screw eye pin into the top of the head. Once baked and cooled, you can attach jump rings to turn them into charms or keychains.
Step 4: Facial Features & Baking
-
Add the noses:
Roll extremely tiny balls of black or dark brown clay. Press one onto the top center of each snout. -
Add the eyes:
Roll tiny black balls for eyes and press them into the face just above the snout. Alternatively, use a small ball tool to make indentations first, then place the beads of clay inside. -
Final inspection:
Check your bears from all angles. Smooth out any fingerprints (a tiny drop of baby oil on your finger helps with this). -
Bake:
Place your trio on a baking sheet and bake according to your clay package instructions. Temperature and time vary by brand, so double-check the label.
Once cooled, your trio of bears is ready to be displayed on a shelf or gifted to a friend

The Complete Guide to Pottery Troubleshooting
Uncover the most common ceramic mistakes—from cracking clay to failed glazes—and learn how to fix them fast.
Pocket-Sized Dino Pals
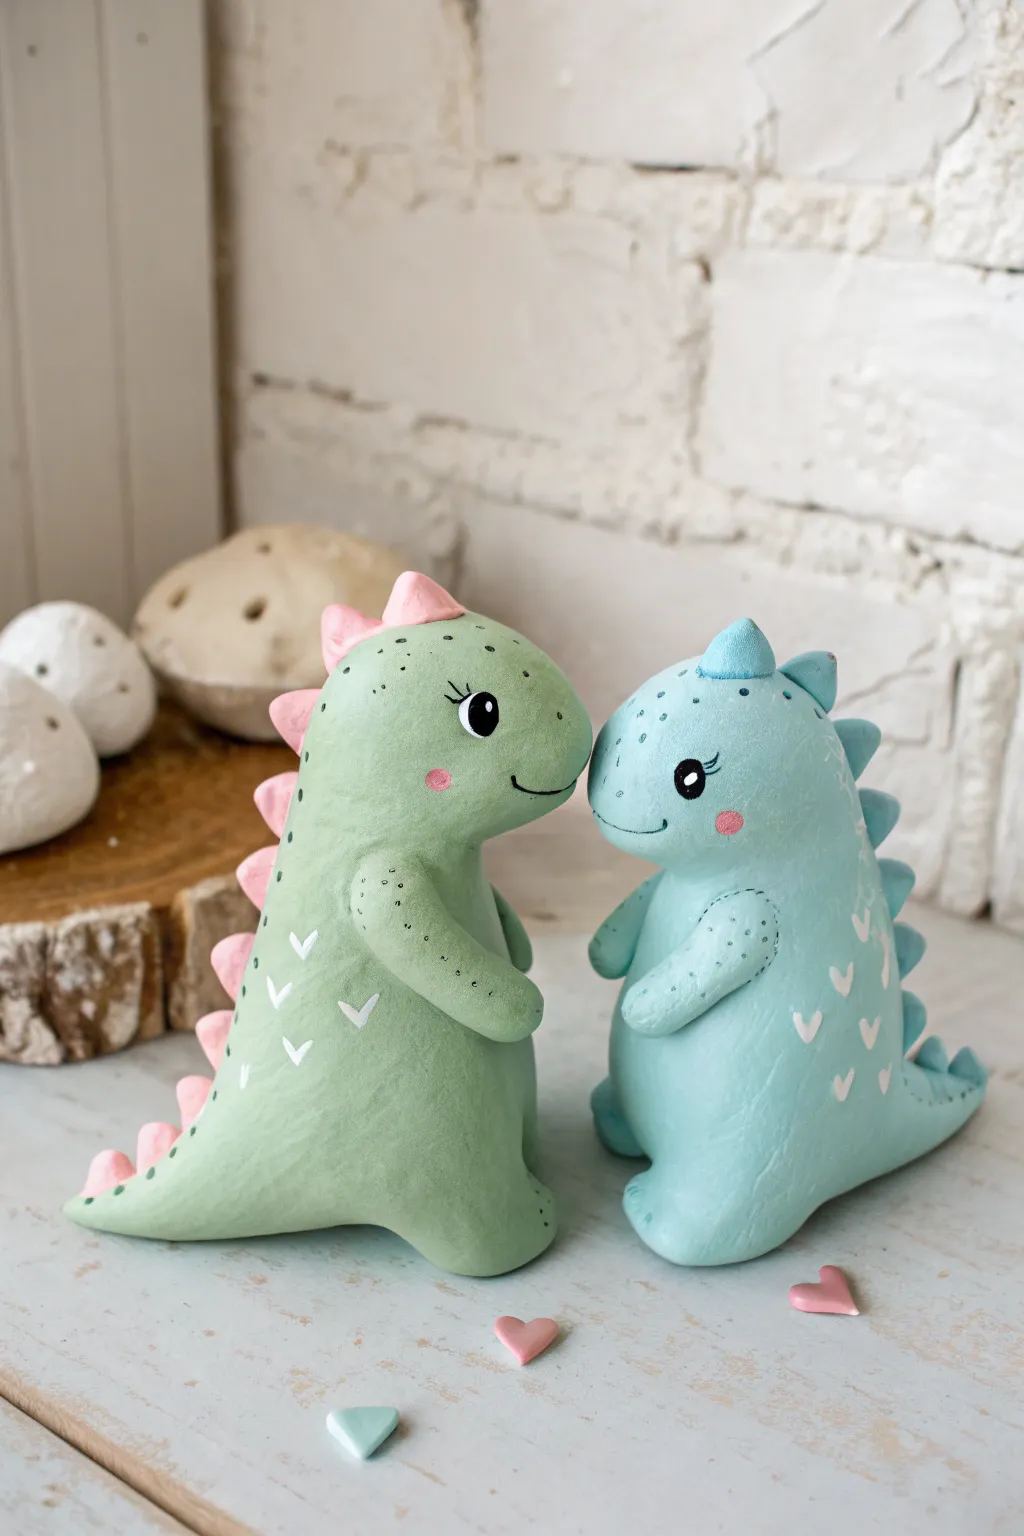
These two adorable dinosaur friends, posed nose-to-nose, are the perfect introduction to modeling cute characters. Their smooth, rounded bodies and sweet painted expressions make them charming desk companions or a heartfelt gift for a best friend.
How-To Guide
Materials
- Polymer clay (sage green, light blue, pastel pink)
- Small dotting tool or toothpick
- Acrylic paint (white, black, pink)
- Fine detail paintbrush
- Gloss or matte varnish (optional)
- Ball stylus tool
- Baking sheet and parchment paper
Step 1: Shaping the Bodies
-
Condition the clay:
Start by warming up your green and blue clay in your hands until it becomes soft and pliable, which prevents cracks during baking. -
Form the torso:
Roll two balls of clay, one green and one blue, each about the size of a golf ball. Gently elongate them into a pear shape, flattening the wider bottom so they can stand securely. -
Pull out the tail:
From the bottom backside of the pear shape, gently pinch and pull the clay outward to form a short, pointed tail. Smooth the transition so it looks seamless with the body. -
Model the head:
Create the head by gently pressing the top of the pear shape forward. You’re aiming for a seamless curve rather than a separate ball; sculpt it so the snout is rounded and slightly upturned. -
Add the arms:
Roll tiny sausage shapes from matching clay for the arms. I like to blend the shoulder area into the body using a sculpting tool so they look connected, keeping the little hands sticking out slightly.
Smoothing Secrets
Before baking, brush a tiny amount of baby oil or clay softener over the figure with your finger to remove all fingerprints for a professional finish.
Step 2: Adding Details & Spikes
-
Make the spike components:
For the green dino, roll tiny balls of pink clay. For the blue dino, use blue or teal clay. Pinch each ball into a small triangle shape. -
Attach the spine:
Starting from the top of the head and working down to the tail, press these triangles firmly onto the center of the back. You can use a tiny drop of liquid clay or water (if using air-dry clay) to ensure they stick. -
Create texture:
Using a needle tool or toothpick, add tiny poked dots along the bridge of the nose and the top of the head for a speckled skin texture. -
Stitch marks:
Use the same needle tool to gently press small dashes into the clay around the joining of the arms, mimicking a cute sewn-doll effect. -
Bake the figures:
Bake your creations according to your specific polymer clay package instructions—usually around 275°F (135°C) for 15-30 minutes. Let them cool completely before painting.
Step 3: Painting & Finishing
-
Paint the eyes:
Once cool, use a fine detail brush and black acrylic paint to create a solid circle for the eye. Add a tiny eyelash flick at the top corner. -
Add eye highlights:
Dip a pin or toothpick into white paint and add a tiny dot inside the black eye circle to bring the character to life. -
Cheeks and smiles:
Use a very dry brush with a tiny amount of pink paint to dab on rosy cheeks. Paint a thin, black curved line for the mouth. -
Decorative patterns:
Using white paint and a fine brush, paint tiny V-shapes or hearts scattered across the bodies to simulate scales or a patterned fabric look. -
Surprise hearts:
Roll out leftover pink and blue clay very thin and cut tiny heart shapes to scatter around your display.
Accessorize!
Before baking, press a small eye pin into the top of the head. After baking, you can attach a keychain ring or turn them into adorable charms.
Place these two sweet dinos together on a shelf and enjoy the colorful charm they add to your room
Sweet Chubby Chicks
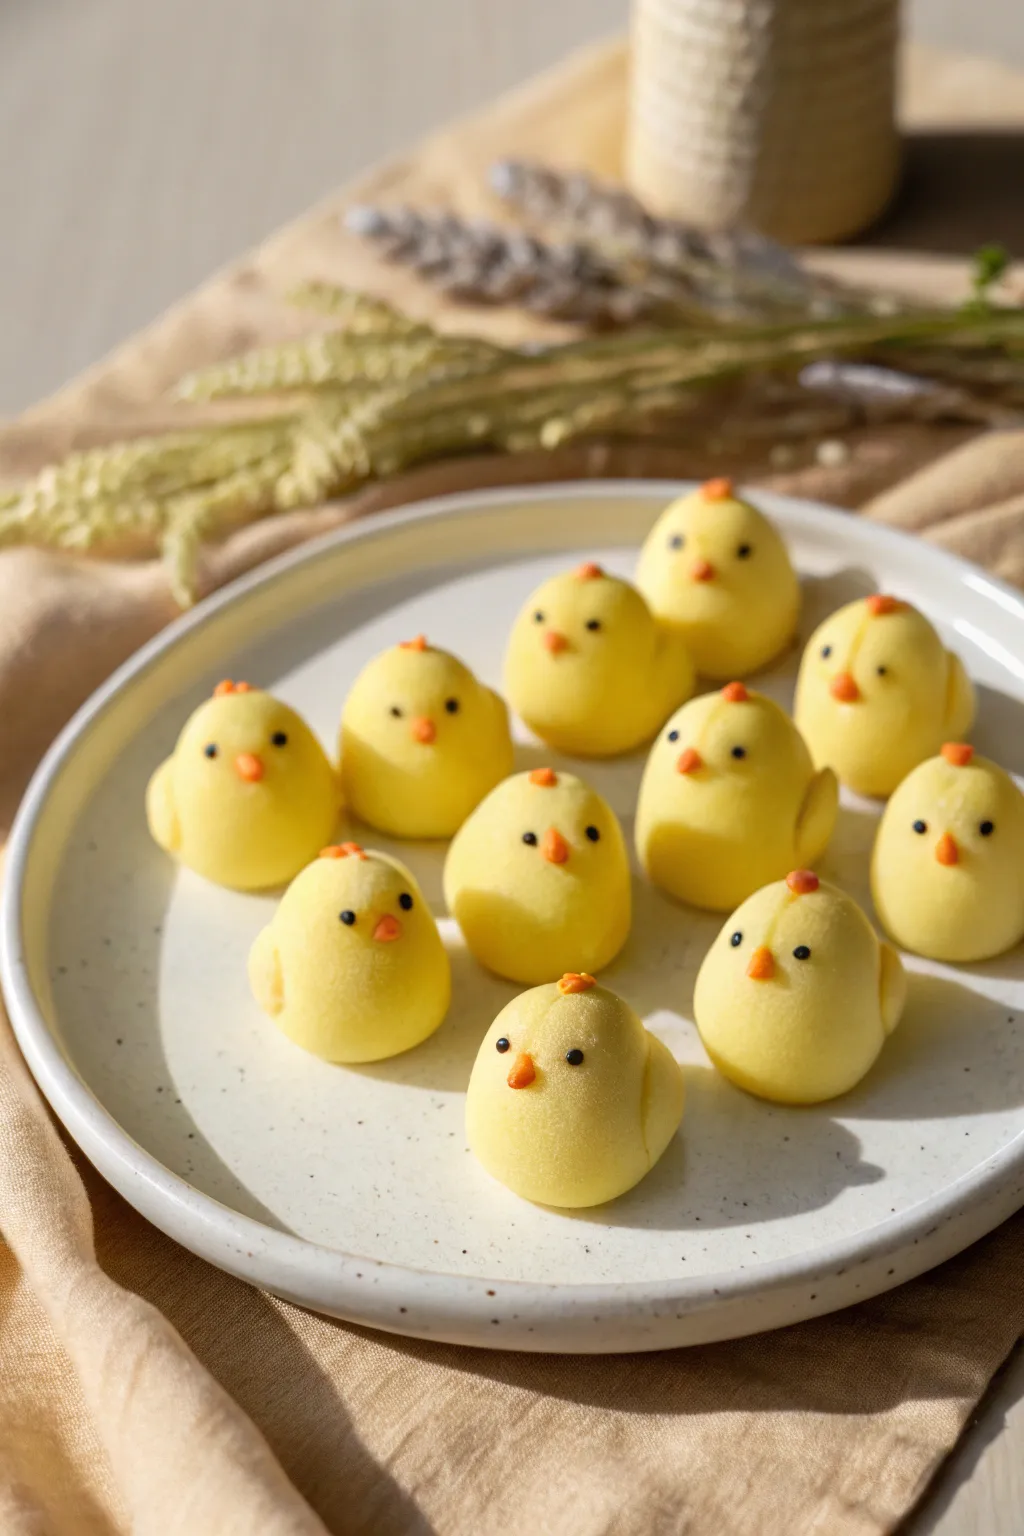
These adorable little birds are deceptively simple to sculpt, featuring a smooth, matte finish and tiny, expressive details. Their soft yellow hue and round, chubby bodies make them perfect for a spring decoration or a cheerful desk companion.
Step-by-Step
Materials
- Light yellow polymer clay or air-dry clay
- Orange clay (very small amount)
- Black clay, beads, or acrylic paint
- Sculpting tools (needle tool or toothpick)
- Smooth work surface or craft mat
- Soft brush (for smoothing)
- Baby oil or water (depending on clay type)
Step 1: Fledgling Form
-
Portioning:
Start by breaking off equal-sized marble chunks of your yellow clay to ensure your flock is uniform in size. -
Rolling:
Roll each chunk briskly between your palms to create a smooth, crack-free sphere. -
Shaping the body:
Gently pinch the top third of the sphere to slightly narrow it, differentiating the head from the wider body, creating a pear-like drop shape. -
Settling:
Tap the bottom of your pear shape on your work surface to flatten the base so the chick stands upright without wobbling. -
Smoothing:
Run your finger lightly over the surface to remove any fingerprints; I find a tiny drop of baby oil helps achieve that velvety finish seen in phase one.
Cracks Appearing?
If your yellow clay cracks while shaping, it’s too dry. Knead in a drop of baby oil or water immediately to rehydrate and smooth it out before continuing.
Step 2: Adding Wings & Tails
-
Making the wings:
Roll two tiny balls of yellow clay—about the size of a grain of rice—and flatten them into teardrop shapes. -
Attaching wings:
Press these flattened shapes onto the sides of the body, curving them slightly forward to hug the chick’s round tummy. -
Blending seams:
Use a sculpting tool or your thumb to gently blend the back edge of the wing into the body, leaving the front edge slightly raised for dimension. -
Adding a tail:
Pinch a very small amount of clay at the lower back of the chick and pull it outward to create a tiny, pointed tail. -
Refining the tail:
Use your finger to curve the tail upward just a tiny bit for a perky look.
Textured Fluff
For a ‘fuzzy’ look, gently tap the yellow surface with a clean toothbrush before baking to create a soft, feather-like texture.
Step 3: Face & Details
-
Beak placement:
Take a speck of orange clay and roll it into a minuscule cone. -
Attaching the beak:
Press the cone onto the center of the face area; use a needle tool to gently nudge it into a perfect triangle shape. -
Creating the comb:
Roll three microscopic balls of orange clay and press them in a line or cluster on the very top of the head to form the comb. -
Placing the eyes:
If using black clay, roll two poppy-seed-sized balls and press them onto the face, spaced slightly apart above the beak level. -
Alternative eyes:
Alternatively, you can use a needle tool to make tiny indentations and insert small black seed beads for a shiny eye effect. -
Final smooth:
Give the entire figure one last visual check and smooth out any accidental nail marks with a soft brush. -
Curing:
Bake (for polymer) or let dry (for air-dry clay) according to your specific material’s package instructions.
Arrange your finished flock on a plate or shelf to bring a bright, handcrafted smile to anyone who sees them


What Really Happens Inside the Kiln
Learn how time and temperature work together inside the kiln to transform clay into durable ceramic.
Smiley Mushroom Friends
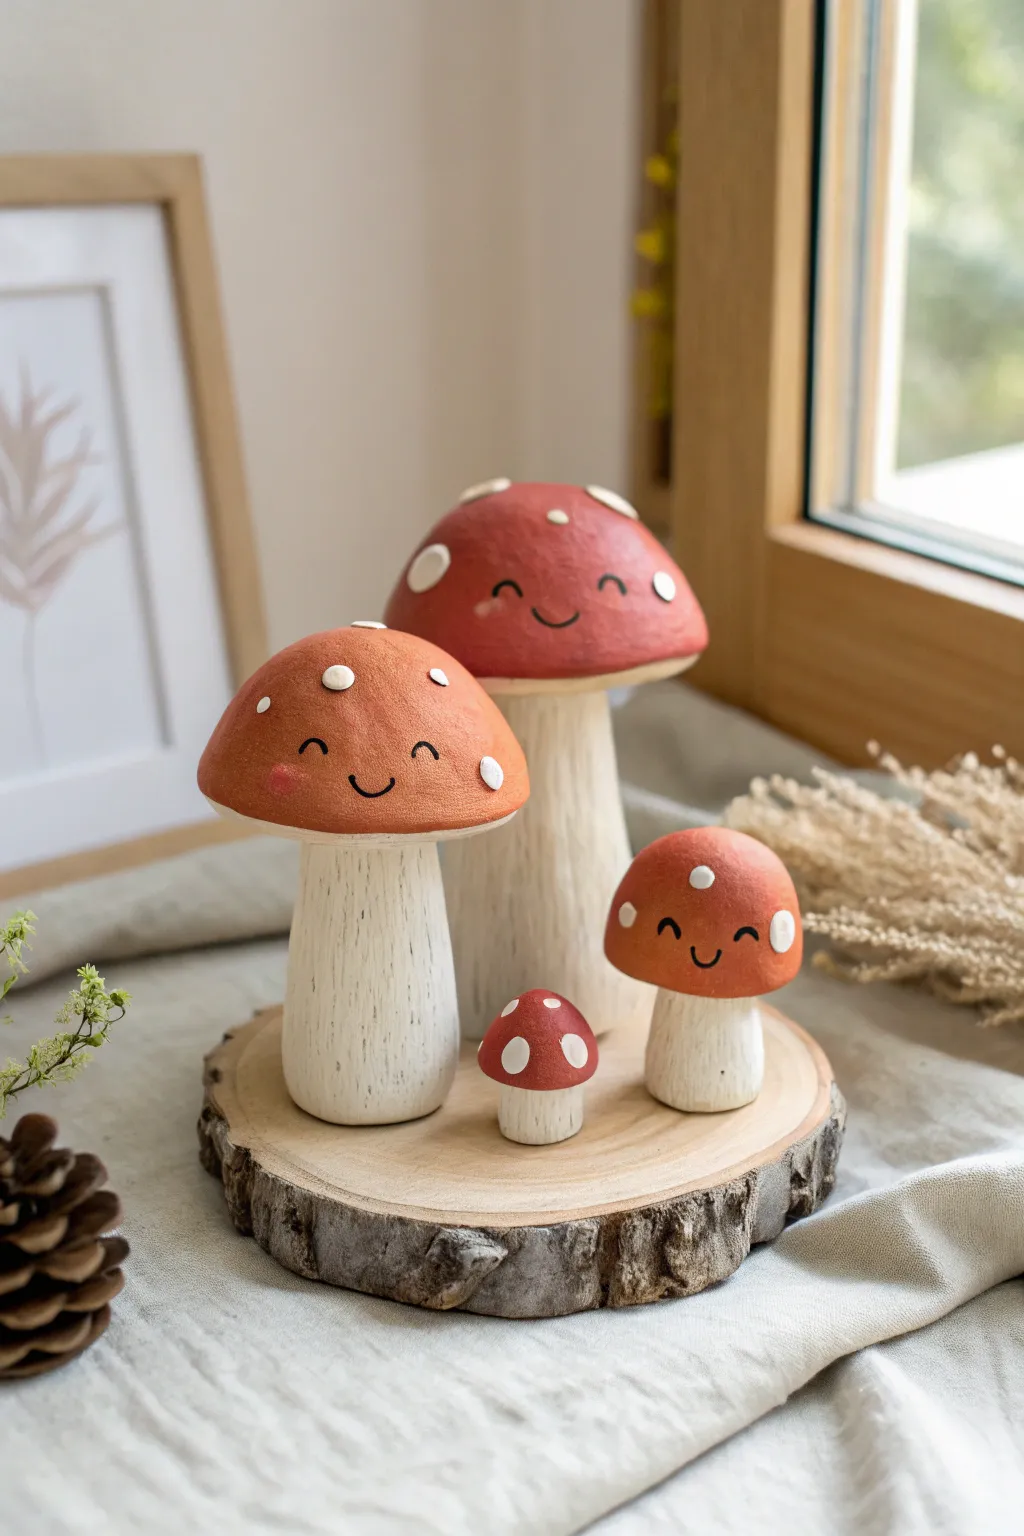
Brighten up any windowsill with this adorable family of clay mushrooms, featuring cheerful painted expressions and classic toadstool caps. This tutorial guides you through sculpting the simple forms and adding the charming details that bring each character to life.
Detailed Instructions
Materials
- Air-dry clay (white or terracotta)
- Acrylic paints (burnt orange, red, cream, white, black, pink)
- Set of small paintbrushes (flat and detail liner)
- Aluminum foil
- Water cup
- Sculpting tools or toothpick
- Sandpaper (fine grit)
- Matte varnish or sealant
- Wood slice (optional base)
Step 1: Forming the Cores
-
Prepare foil armatures:
Crumple aluminum foil into rough shapes for the largest two mushrooms. Create a cone shape for the stems and a dome shape for the caps. This saves clay and keeps the sculpture lightweight. -
Connect the parts:
Push the foil stem firmly into the underside of the foil cap. If they feel loose, you can secure them with a dab of hot glue or masking tape before adding clay.
Cracked Clay?
If small cracks appear while drying, mix a slurry of clay and water (slip) and fill the cracks. Smooth over with a finger and let dry again before painting.
Step 2: Sculpting the Shapes
-
Cover the stems:
Roll out a slab of clay about 1/4 inch thick. Wrap it around the foil stem, smoothing the seam with a bit of water on your finger until it disappears. -
Cover the caps:
Drape a second slab of clay over the foil dome. Gently press it down to conform to the shape, tucking the edges under to meet the stem. -
Sculpt the smaller mushrooms:
For the two tiniest mushrooms, create them entirely out of solid clay without foil. Roll a thick cylinder for the stem and a separate dome for the cap. -
Attach caps to stems:
Score the top of the solid clay stems and the underside of the caps (scratch hatch marks). Add a little water (slip) and press them together firmly to bond. -
Refine the surface:
Dip your finger in water and smooth out any fingerprints or cracks. I like to gently tap the bottom of the stems on the table so they stand perfectly flat. -
Add texture:
Take a sculpting tool or toothpick and drag light vertical lines down the stems to mimic the natural fibrous texture of a mushroom stalk. -
Dry completely:
Let your mushroom family dry for 24-48 hours. Turn them occasionally to ensure the bottoms dry out too.
Step 3: Painting and Details
-
Sand imperfections:
Once fully dry, use fine-grit sandpaper to buff away any unintentional bumps on the caps so they are smooth for painting. -
Base coat the stems:
Paint the stems with a creamy off-white color. Use a dry-brush technique (very little paint on the brush) with a slightly darker beige to highlight the vertical texture lines you carved. -
Paint the caps:
Mix burnt orange with a touch of red to get that earthy terracotta color. Paint the entire top of the caps, carefully cutting in the line where the cap meets the stem. -
Apply a second coat:
Depending on your paint’s opacity, apply a second layer to the caps for a solid, rich color. -
Add the spots:
Using the handle end of a paintbrush, dip it into white paint and dot it onto the caps to create perfect circles. Vary the sizes for a natural look. -
Paint the faces:
With your finest liner brush and black paint, draw small U-shapes for the smiling mouths and inverted U-shapes for the happy, closed eyes. -
Add rosy cheeks:
Dip a dry brush into a tiny amount of pink paint. Dab it on a paper towel until almost dry, then gently buff pink circles onto the cheeks. -
Seal the work:
Finish by applying a coat of matte varnish to protect the paint and give the mushrooms a finished, ceramic-like feel.
Pro Tip: Weighted Base
For the hollow foil mushrooms, I sometimes push a small stone or washer into the bottom of the stem clay before drying. This adds weight so they don’t tip over easily.
Arranging your little mushroom family on a wood slice creates a woodland scene right in your home
Cheery Strawberry Cuties
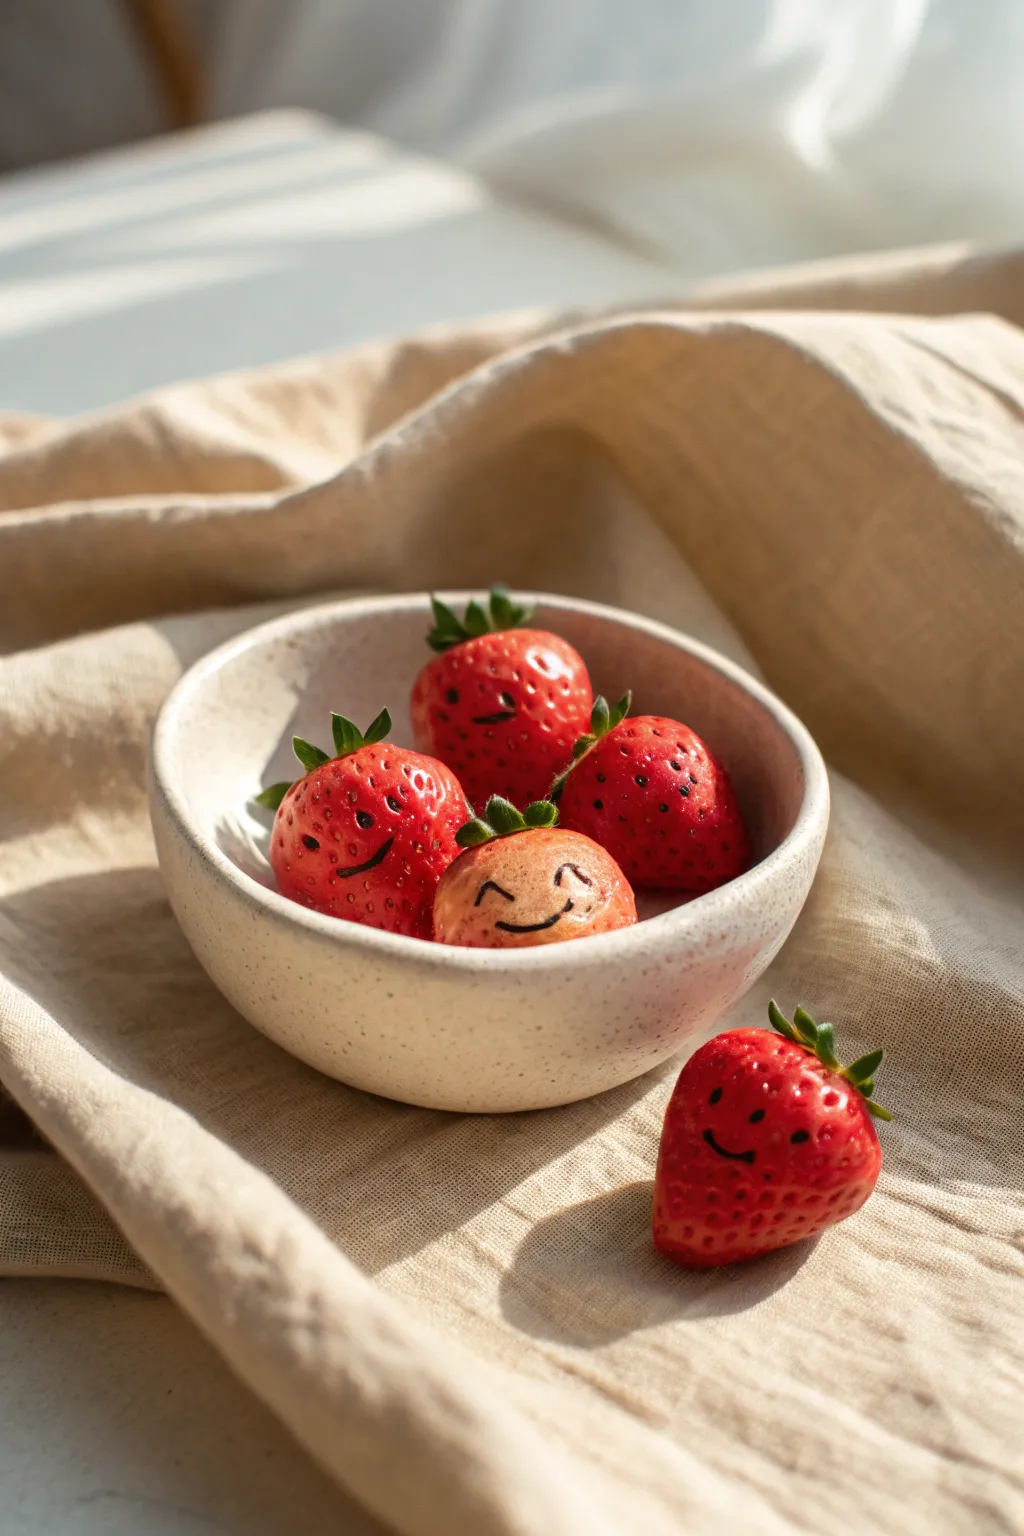
Bring a burst of summer sweetness to your desk with these adorable clay strawberries. With their rosy cheeks and charming little smiles, these hand-sculpted fruits are a delightful beginner project that captures the imperfect perfection of nature.
Step-by-Step Guide
Materials
- Polymer clay (red, pale yellow/translucent, and green)
- Fine-point black permanent marker or acrylic paint pen
- Ball stylus tool or a textured sponge
- Pointed sculpting tool or toothpick
- Gloss glaze or varnish
- Small paintbrush
- Baking sheet and parchment paper
Step 1: Sculpting the Base
-
Mix your colors:
Start by conditioning your red polymer clay until it’s soft and pliable. For a more realistic look, you can marble in a tiny amount of translucent or orange clay to break up the solid red color. -
Creating the variation:
If you want that one slightly unripe berry shown in the bowl, mix a small ball of pale yellow clay with a touch of red to create a peachy-pink gradient. -
Form the strawberry shape:
Roll your clay into a smooth ball about the size of a walnut. Gently pinch and roll one end between your fingers to taper it into a rounded cone shape, mimicking a natural strawberry silhouette. -
Round the top:
Softly press the wider top of the cone against your work surface to flatten it slightly, which creates the ‘shoulder’ where the leaves will sit.
Step 2: Adding Texture and Leaves
-
Texturize the surface:
Take your ball stylus or a toothpick and gently press small indentations all over the berry’s surface to simulate seeds. I find it looks best if these are random rather than in perfect rows. -
Prep the greenery:
Condition a small amount of green clay for the calyx (the leafy cap). Roll it into a very thin, flat sheet. -
Cut the leaves:
Using a craft knife or a star-shaped cutter, cut out a small 5- or 6-pointed star shape. If cutting by hand, keep the points jagged and irregular. -
Attach the cap:
Place the green star on the flat top of your strawberry. Gently press the center down so it bonds with the red clay. -
Detail the leaves:
Use your pointed tool to curl the tips of the green leaves slightly upward or downward. This separates them from the berry body and adds liveliness. -
Add a stem:
Roll a tiny sausage of green clay for the stem and attach it securely to the center of the leaf cap, blending the clay at the join point.
Seed texture secret
For ultra-realistic seeds, gently roll the finished red shape over fine sandpaper before adding indentations. This mimics the microscopic skin texture.
Step 3: Finishing Touches
-
Bake the batch:
Place your strawberries on a parchment-lined baking sheet. Bake according to your clay manufacturer’s instructions (usually around 275°F/135°C for 15-30 minutes). -
Cool down:
Let the pieces cool completely before handling. The clay is fragile while hot and hardens as it returns to room temperature. -
Draw the faces:
Using a fine-point black marker, carefully draw small, wide-set eyes and a simple curved smile on the smoothest side of each berry. -
Personalize expressions:
Vary the faces—give one a wink, another a tiny smirk, or closed happy eyes like the ones in the photo. -
Seal the deal:
Apply a coat of gloss glaze over the entire fruit surface. This not only protects the marker face but gives the berry that juicy, freshly-washed shine.
Smudged face fix
If your marker smudges when glazing, ensure the ink is 100% dry first. If it persists, dab the glaze on initially rather than dragging the brush.
Now you have a whole bowl of everlasting fruit to brighten up your kitchen shelf

TRACK YOUR CERAMIC JOURNEY
Capture glaze tests, firing details, and creative progress—all in one simple printable. Make your projects easier to repeat and improve.
Mini Cloud-and-Rainbow Charms
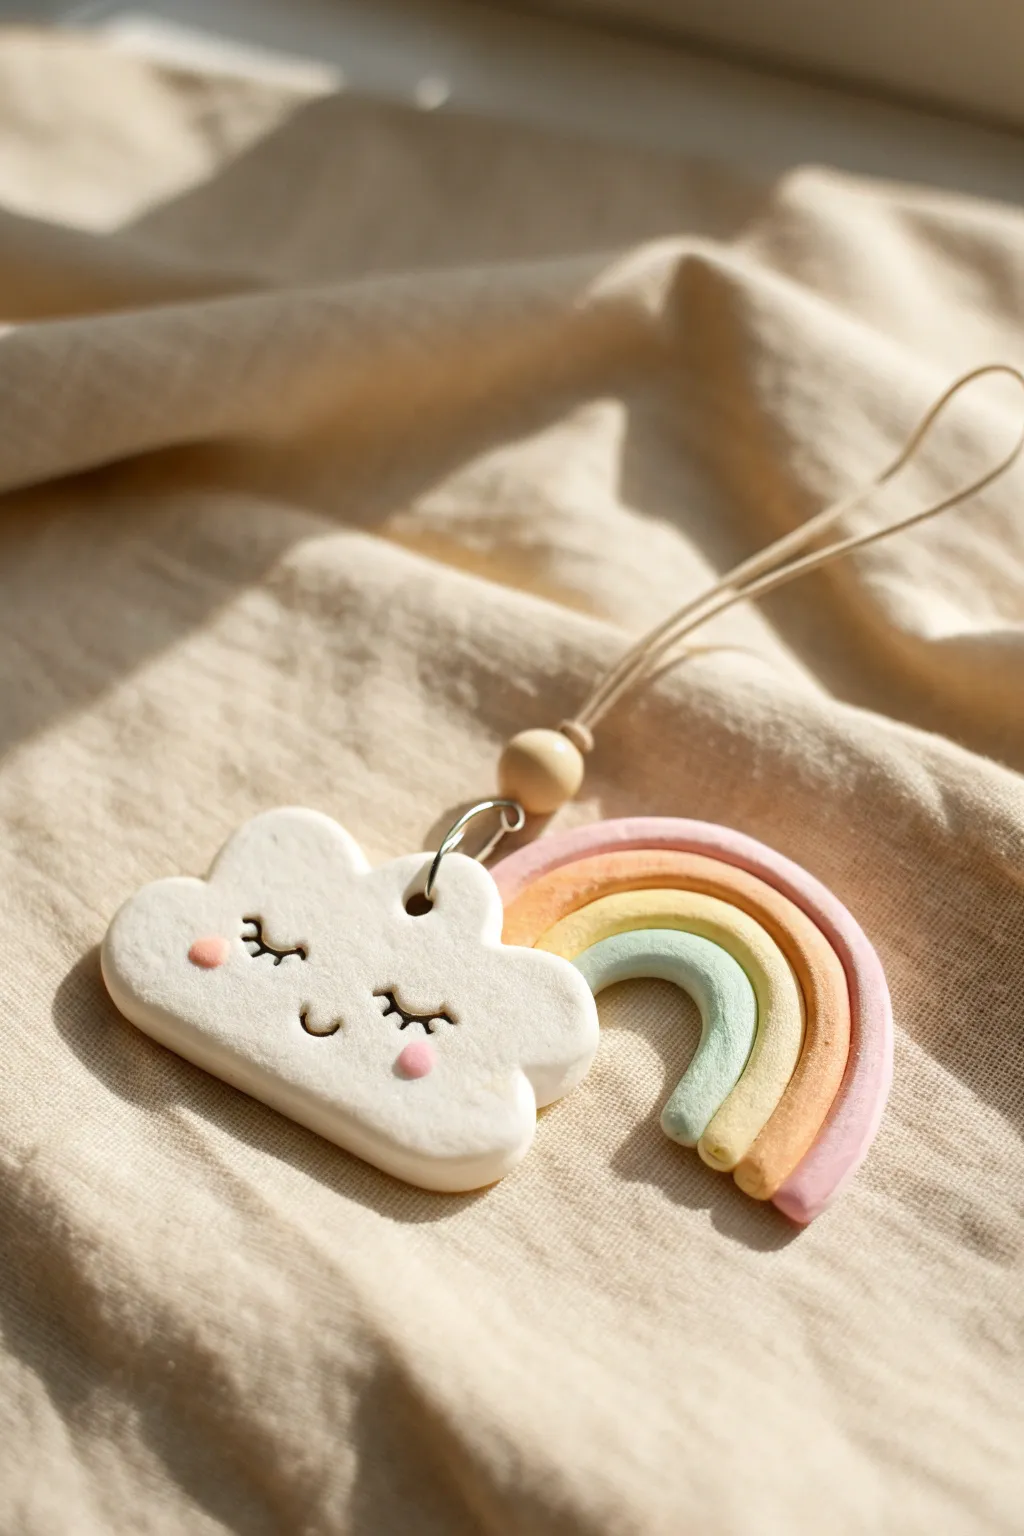
Brighten up your bag or keychain with this adorable polymer clay pairing featuring a sleepy, happy cloud and a soft pastel rainbow. This sweet charm uses simple shapes and gentle colors to create a cozy, handmade accessory perfect for gifting.
How-To Guide
Materials
- Polymer clay (White, Pastel Pink, Pastel Orange/Peach, Pastel Yellow, Pastel Green/Mint)
- Acrylic paint (Black and Pink)
- Fine detail paintbrush or dotting tool
- Rolling pin or pasta machine
- X-acto knife or clay blade
- Loop tool or small round cutter (optional for cloud curves)
- Thick needle tool or toothpick
- Jump rings
- Waxed cotton cord or macrame string
- Small wooden bead
- Pliers
- Oven for baking
Step 1: Sculpting the Cloud
-
Condition the white clay:
Start by kneading a chunk of white polymer clay until it is soft and pliable, ensuring there are no air bubbles trapped inside. -
Form the base shape:
Roll the clay into a smooth ball, then flatten it into a thick pancake shape, about 1/4 inch thick. -
Cut the cloud outline:
Using a clay blade or x-acto knife, gently cut away clay to form a fluffy cloud shape with bumps along the top and sides, and a flatter bottom. Alternatively, press small balls of clay together and smooth the seams to build the shape. -
Smooth the edges:
Dip your finger in a tiny bit of water or baby oil and gently run it along the cut edges to round them off, removing any sharp angles for a soft, pillowy look. -
Add a hole:
Use a needle tool or toothpick to pierce a hole near the top center of the cloud. Wiggle it slightly to ensure the opening is wide enough for a jump ring later.
Clean Clay Tip
Keep baby wipes nearby! Since you are working with white clay, wipe your hands and tools before sculpting the cloud to prevent lint or darker pigment transfer.
Step 2: Creating the Pastel Rainbow
-
Roll the snakes:
Take small portions of your pastel green, yellow, orange, and pink clay. Roll each color into a long, even snake of equal thickness. -
Form the arch:
Start with the innermost color (green). Curve it into a U-shape. Take the next color (yellow) and wrap it snugly around the outside of the green arch. -
Building the stack:
Continue wrapping the orange snake around the yellow, and finally the pink snake around the orange. Gently press them together so they adhere to one another. -
Trim the ends:
Use your blade to slice squarely across the bottom of the rainbow legs so all colors end at the same length. -
Pierce the rainbow:
Make a hole through the top of the pink arch using your needle tool, mirroring the placement on the cloud for hanging.
Step 3: Baking & Assembly
-
Bake the pieces:
Place your cloud and rainbow on a baking sheet lined with parchment paper. Bake according to your clay manufacturer’s instructions (usually 275°F/135°C for 15-30 minutes). -
Cool completely:
Let the pieces cool down fully before handling them to ensure they harden properly. -
Paint the face:
Using a very fine brush and black acrylic paint, carefully draw two U-shapes for closed eyes with eyelashes, and a small smile in the center of the cloud. -
Add rosy cheeks:
Dip a dotting tool or the back of a paintbrush into pink paint and stamp two small circles on either side of the smile for blush. -
Attach jump rings:
Once the paint is dry, use pliers to open a jump ring. Thread it through the hole in the cloud, and do the same for the rainbow. -
Connect the charms:
Loop a larger jump ring through the individual rings of both the cloud and the rainbow so they hang side-by-side but overlap slightly when moved. -
Add the cord:
Cut a length of cord, fold it in half, and loop it through the main jump ring using a lark’s head knot. -
Finish with a bead:
Thread both ends of the cord through a small wooden bead and slide it down toward the charms to secure the setup.
Glaze It Up
For extra durability and shine, coat the finished baked pieces with a layer of UV resin or glossy polymer clay varnish after the paint dries completely.
Now you have a charming little set of sky friends ready to hang.
Heart Trinket Dish With a Happy Face
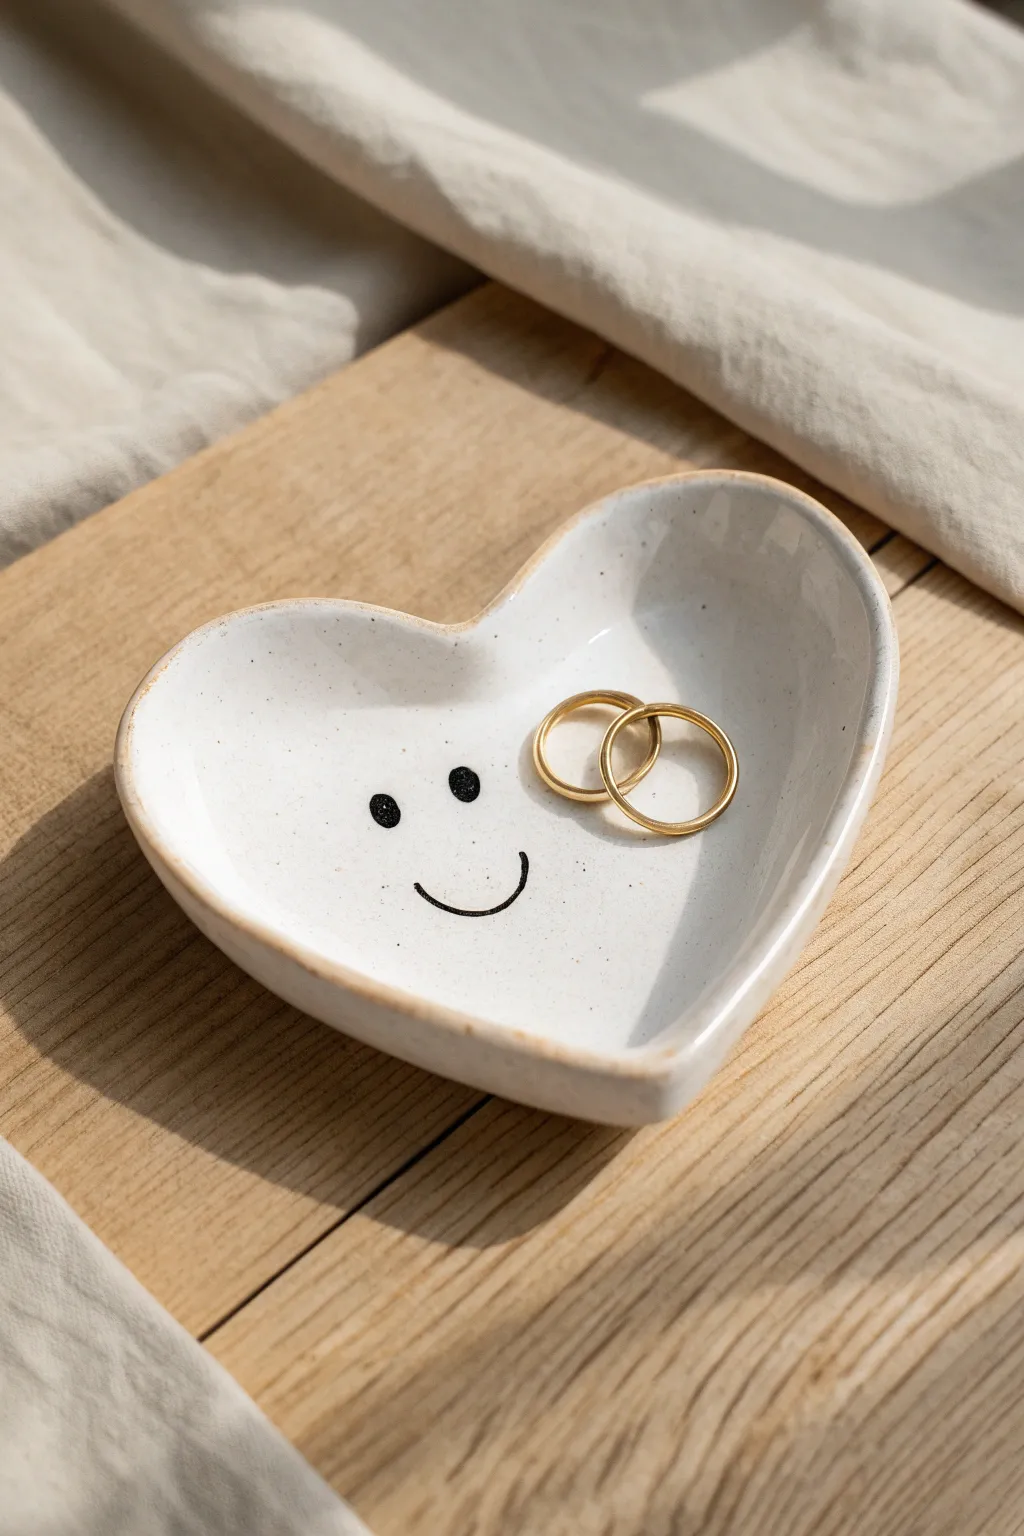
Brighten up your vanity with this charming heart-shaped trinket dish, complete with a cheerful hand-painted smile. The organic, slightly uneven edges and speckled glaze give it a lovely handmade feel that’s perfect for holding your favorite rings.
Step-by-Step Guide
Materials
- White air-dry clay or polymer clay
- Rolling pin
- Heart-shaped cookie cutter (large) or paper template
- Craft knife
- Bowl of water and sponge
- Fine grit sandpaper
- Black acrylic paint
- Fine tip paintbrush
- Clear gloss varnish or glaze
- Light brown acrylic paint or pastel chalk (optional, for edges)
Step 1: Shaping the Clay
-
Prepare your clay:
Start by taking a handful of white clay and kneading it in your hands until it becomes soft, pliable, and free of cracks. -
Roll it out:
Place the clay on a smooth surface or canvas mat. Use your rolling pin to flatten it into an even slab, aiming for a thickness of about 1/4 inch. -
Cut the shape:
Press a large heart-shaped cookie cutter firmly into the clay. If you don’t have a cutter, place a paper template on the slab and trace around it carefully with a craft knife. -
Soften the cut:
Remove the excess clay. The edges will be sharp from the cut, so dip your finger in a little water and gently run it along the perimeter to smooth and round them over. -
Create the curve:
To turn this flat heart into a dish, carefully lift the clay and pinch the edges upward slightly. -
Smooth the interior:
Use your thumbs to gently press the center of the heart downwards while supporting the outside, creating a shallow bowl shape. Keep the transition from the base to the rim gradual. -
Refine the form:
Check the symmetry of your heart. I often find the bottom point gets twisted, so gently nudge it back into center alignment if needed. -
Final smooth:
Take a slightly damp sponge and wipe the entire surface to remove any fingerprints or tiny imperfections before setting it aside.
Step 2: Drying and Refining
-
Let it dry:
Place the dish on a piece of paper towel or a wire rack. Allow air-dry clay to cure for 24-48 hours until completely hard and white. -
Sand the surface:
Once fully dry, use fine-grit sandpaper to gently buff away any remaining rough spots, paying special attention to the rim. -
Clean dust:
Wipe the dish with a barely damp cloth or dry brush to ensure no clay dust remains, as this will interfere with the paint.
Keep it clean
Work on wax paper or a silicone mat so your clay doesn’t stick. If your white clay attracts lint, keep a baby wipe nearby to clean your hands often.
Step 3: Decoration and Finishing
-
Paint the eyes:
Dip the handle end of a paintbrush into black acrylic paint. Press it gently onto the center of the dish to create two perfect dots for eyes. -
Draw the smile:
Using a very fine-tip brush, paint a simple, thin recurring U-shape below the eyes to form the smile. Keep the line steady and minimal. -
Add vintage edges:
To mimic the toasted look in the photo, lightly brush the very rim of the heart with watered-down light brown paint or smudge it with soft pastel chalk. -
Add speckles (optional):
For that ceramic look, you can flick a toothbrush with watered-down brown or grey paint over the dish to create tiny, subtle speckles. -
Seal the piece:
Apply a coat of clear gloss varnish or glaze over the entire dish. This seals the paint and gives it a finished, ceramic-like shine. -
Allow to cure:
Let the varnish dry completely according to the manufacturer’s instructions before placing any jewelry inside.
Fixing cracks
If tiny cracks appear as the clay dries, make a paste by mixing a small bit of clay with water. Smear this ‘slip’ into the crack and smooth it over.
Your adorable little jewelry tray is now ready to hold your treasures with a smile
Bunny Ring Holder Cone
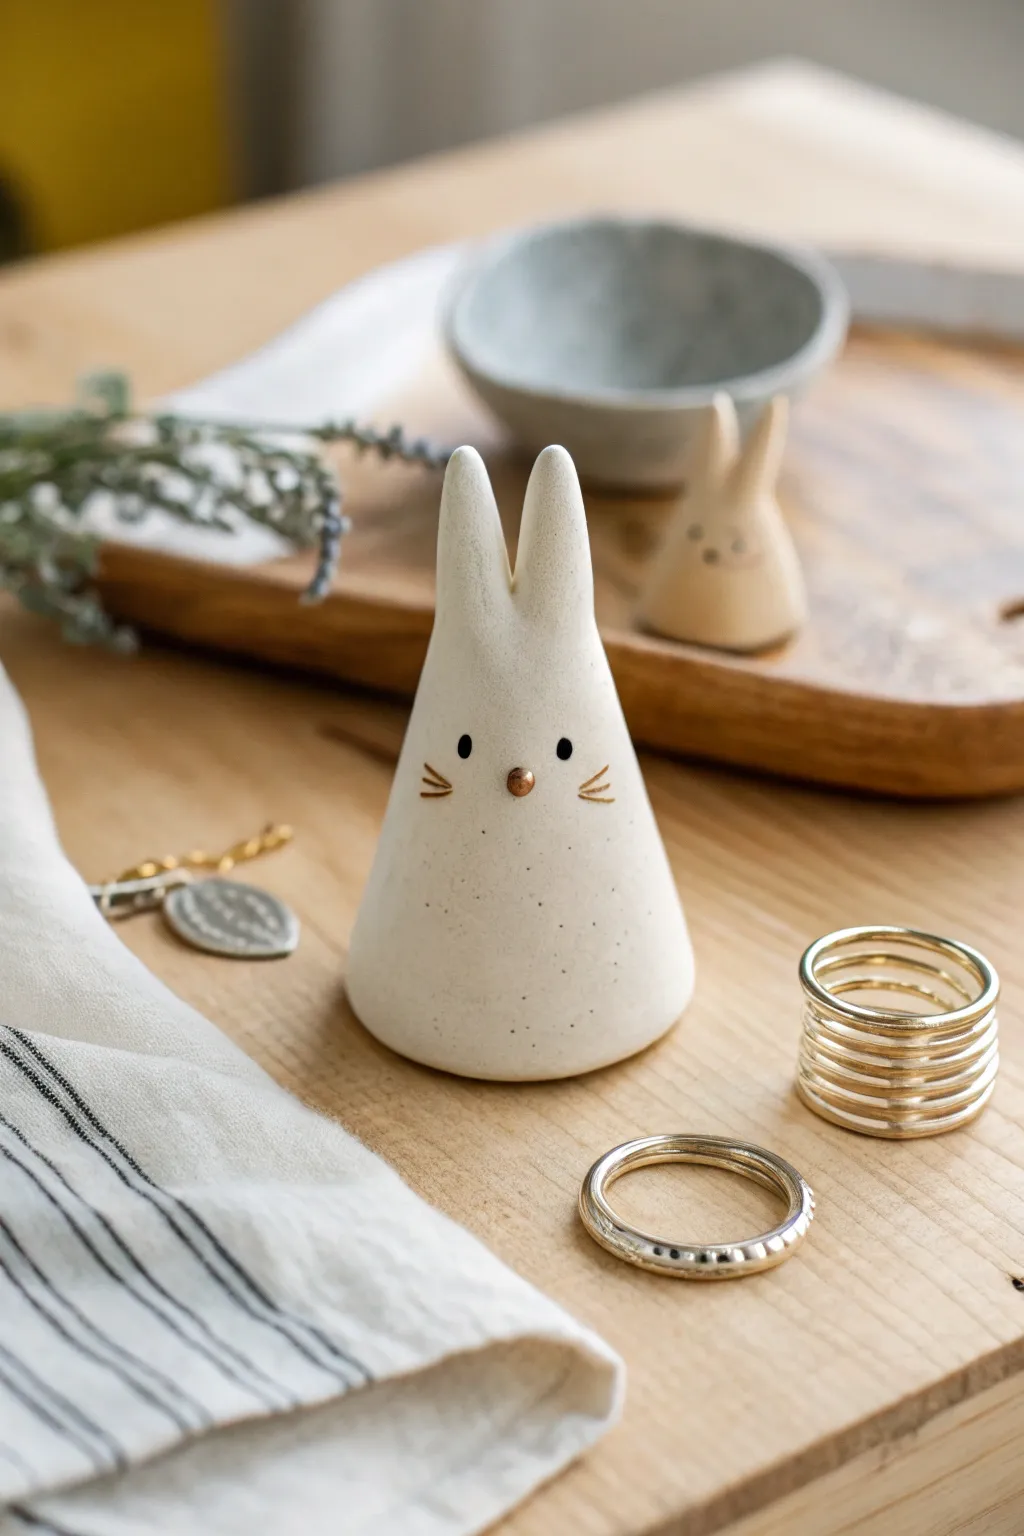
This elegant yet adorable project functions as both whimsical decor and practical storage for your favorite rings. Sculpted from white clay into a simple cone shape with perky ears, it features delicate golden details that give it a refined finish.
Step-by-Step Tutorial
Materials
- White polymer clay or air-dry clay
- Rolling pin
- Parchment paper or non-stick mat
- Craft knife or clay blade
- Needle tool or toothpick
- Sandpaper (fine grit)
- Black acrylic paint
- Gold or bronze metallic paint
- Fine detail paintbrush (size 000)
- Clean water and paper towels
- Optional: Gloss or matte varnish
Step 1: Sculpting the Base
-
Condition the Clay:
Begin by taking a chunk of your white clay, about the size of a golf ball. Knead it thoroughly in your hands until it becomes soft, pliable, and free of cracks. -
Form the Cone:
Roll the clay into a smooth ball first, then gently begin rolling it back and forth on your work surface while applying more pressure to one side. This will naturally form a tapered cone shape. -
Check the Size:
Stand the cone up and check its height. It should be tall enough to stack a few rings, roughly 3 to 4 inches high. If it’s too short, gently stretch and roll it longer. -
Flatten the Bottom:
Tap the wide base of the cone firmly against your table to create a completely flat bottom so the bunny stands sturdily without wobbling.
Pro Tip: Weighted Base
Before sealing the bottom, you can press a small metal washer into the base of the clay while it’s still wet. This adds weight and prevents the bunny from tipping over when it’s holding heavy rings.
Step 2: Adding the Ears
-
Shape the Ears:
Pinch the very top tip of your cone to flatten it slightly. Then, use your craft knife to make a vertical slice right down the center of the tip, extending about half an inch down. -
Separate and model:
Gently separate the two sliced sections. Use your fingers to round them off and shape them into long, pointed rabbit ears. -
Smoothing the Transition:
Carefully smooth the area where the ears meet the head. If the clay has cracked during shaping, dip your finger in a tiny bit of water (for air-dry clay) or baby oil (for polymer) and massage the cracks away. -
Refine the Silhouette:
Take a moment to look at the bunny from all angles. The body should be a smooth, continuous slope leading up to the ears.
Step 3: Setting or Baking
-
Final Surface Check:
Before curing, check for fingerprints. Lightly brush over the clay with a soft brush or your finger to remove any unwanted texture. -
Cure the Clay:
If using polymer clay, bake it in an oven according to the manufacturer’s package instructions (usually around 275°F/135°C for 15-30 minutes). If using air-dry clay, let it sit undisturbed for 24-48 hours until fully hard. -
Sanding:
Once hardened and cooled, use fine-grit sandpaper to gently buff the surface. This removes any minor bumps and gives the piece a professional, ceramic-like matte finish. -
Wipe Down:
Use a slightly damp cloth to wipe away all sanding dust. The surface must be perfectly clean for the paint to adhere crisply.
Troubleshooting: Cracks
If small cracks appear as your air-dry clay dries, mix a tiny bit of fresh clay with water to make a paste (slip). Fill the cracks with this paste, let dry, and sand smooth.
Step 4: Painting the Face
-
Mark the Features:
Using a needle tool, make extremely faint indentations where you want the eyes and nose to sit. This acts as a guide so your painting stays symmetrical. -
Paint the Eyes:
Dip the very tip of your finest brush—or a toothpick—into black acrylic paint. Dot the eyes carefully into the marked spots. Keep them small for a cute, modern look. -
Add the Nose:
Using the metallic gold or copper paint, add a small, round dot for the nose slightly lower than the eyes in the center of the face. -
Draw Whiskers:
For the whiskers, use your fine detail brush to paint two or three very short, thin metallic lines extending horizontally from each cheek area. I find holding my breath for a second helps keep the lines steady. -
Speckling (Optional):
To recreate the stoneware look in the photo, you can dilute a tiny bit of brown or grey paint and flick it off a toothbrush onto the clay for a speckled effect. Practice on paper first. -
Seal:
Allow the paint to dry completely. Finish by applying a thin coat of matte varnish if you want to protect the paint without making it look plasticky.
Now your little bunny is ready to keep your rings safe and add a touch of charm to your bedside table
Smiling Magnet Buddy Faces
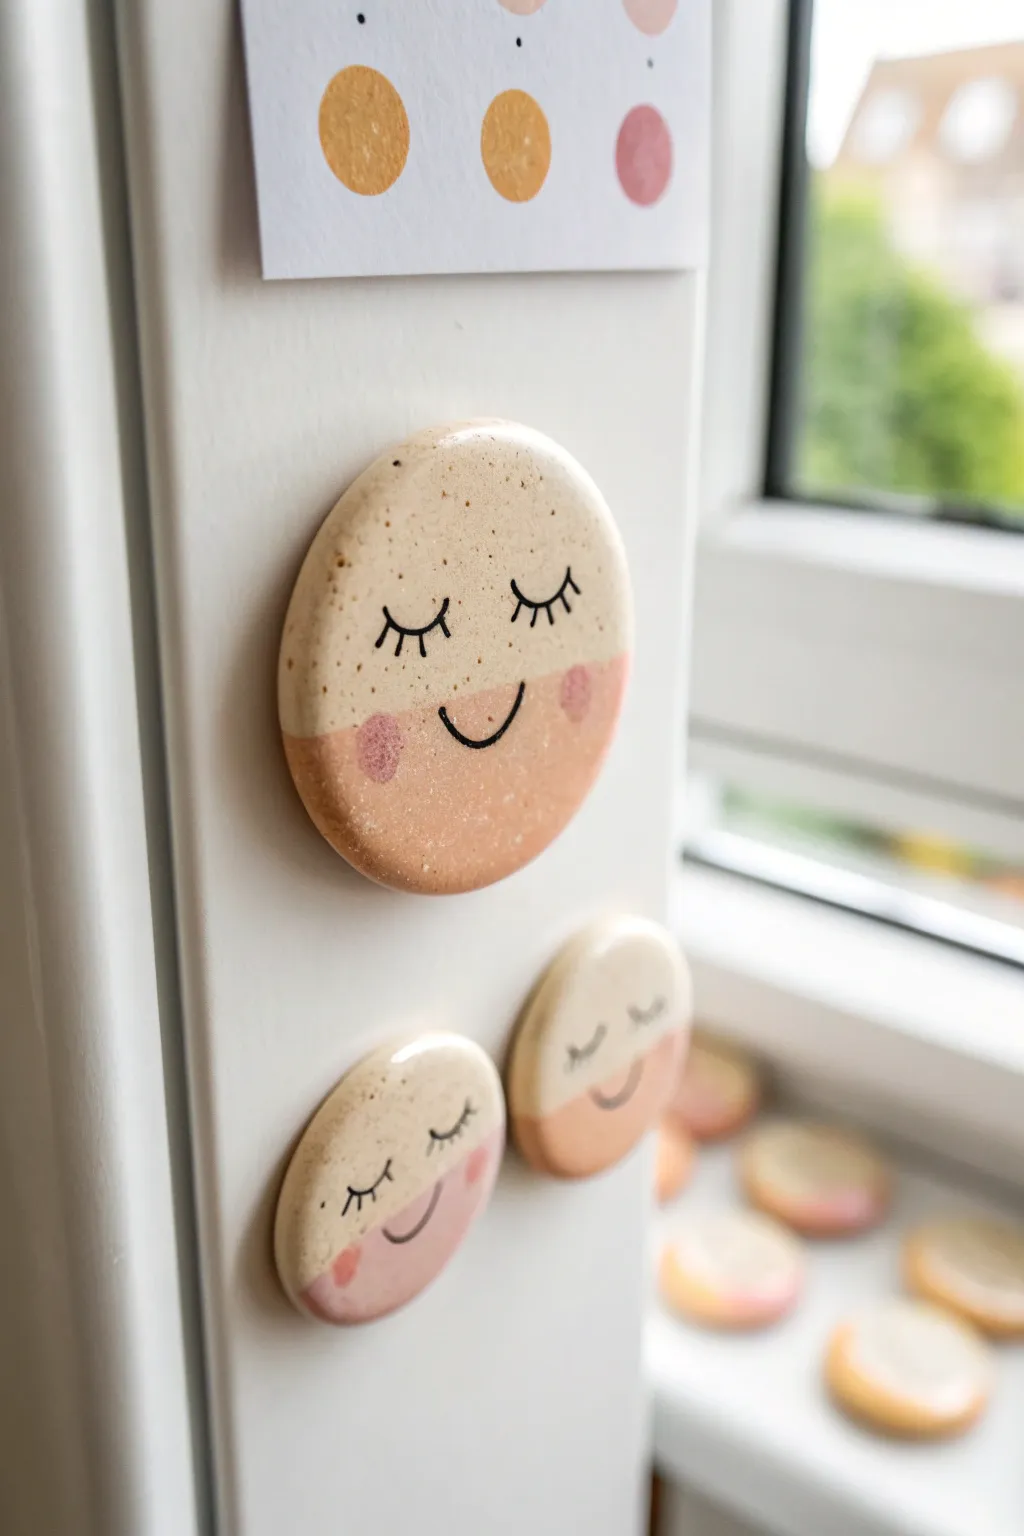
Bring a little joy to your kitchen with these charming, minimalist clay magnets. Their warm, speckled texture and sleeping expressions create a soothing, friendly vibe that holds your notes with care.
Detailed Instructions
Materials
- White or beige oven-bake polymer clay (fimo or sculpey)
- Speckled clay variant (or coarse black pepper/sand)
- Round cookie cutter (approx. 2 inches)
- Acrylic rolling pin
- Parchment paper
- Soft pink and peach acrylic paints
- Fine-point black permanent marker or posca pen
- Glossy water-based varnish or glaze
- Strong craft magnets
- Super glue or E6000
- Small paintbrush
- Q-tip or small sponge applicator
Step 1: Shaping the Base
-
Prepare the Clay:
Start by conditioning your clay until it is soft and pliable. If you want that lovely speckled look shown in the photo but only have plain clay, knead in a tiny pinch of coarse black pepper or craft sand until evenly distributed. -
Roll it Out:
Place your clay on a sheet of parchment paper to prevent sticking. Using an acrylic rolling pin, roll the clay out to a uniform thickness of about 1/4 inch. You want it substantial enough to hold the magnet but not too heavy. -
Cut the Circles:
Press your round cookie cutter firmly into the clay. Give it a little wiggle to ensure a clean cut, then lift away the excess clay. You can smooth the edges gently with your fingertip to remove any sharpness. -
Bake the Clay:
Transfer the parchment paper with the clay circles onto a baking sheet. Bake according to the specific temperature and time instructions on your package of clay. Typically, this is around 275°F (130°C) for 15-20 minutes. -
Cool Completely:
Once baked, remove the tray from the oven and let the clay circles cool down completely before touching them. They harden fully as they cool.
Uneven Edges?
If your circle edges look rough after baking, use a fine-grit nail file or sandpaper to gently smooth them down before you start painting.
Step 2: Decorating the face
-
Mix the Palette:
Prepare a soft palette of pinks. You’ll want a deeper peach tone for the bottom half of the face and a lighter rosy pink for the cheeks. Squeeze small amounts onto a plate or palette. -
Paint the Bottom Half:
Using a flat brush, paint a curved line across the bottom third of the circle to create the ‘chin’ area. Fill this section in with your peach or soft terracotta color. I find two thin coats look better than one thick one. -
Add Rosy Cheeks:
While the bottom half dries, dip a Q-tip or a small sponge dabber into the lighter pink paint. Gently stamp a small circle on the left and right side of the face, right where the raw clay meets the painted section. -
Draw the Features:
Once the paint is absolutely bone dry, take your fine-point black marker. Draw a small, simple ‘U’ shape for the smiling mouth between the cheeks. -
Add the Eyes:
Above the cheeks, draw two curved lines facing downward for closed eyes. Add three small vertical dashes to each curve to create delicate eyelashes.
Faux Ceramic Look
Apply a very thick layer of UV resin or dimensional glaze (like Diamond Glaze) as the topcoat. It mimics the thick, glassy look of fired pottery.
Step 3: Finishing Touches
-
Seal the Design:
Apply a coat of glossy varnish over the entire front face of the magnet. This gives it that ceramic-like shine and protects the paint from chipping. Let this layer dry fully, usually about 30 minutes. -
Flip and Glue:
Turn your finished faces over. Place a small dot of strong adhesive (like super glue or E6000) in the center of the back. -
Attach the Magnet:
Press a strong round magnet firmly into the glue. Hold it in place for 30 seconds to ensure a good initial bond, then let it cure according to the glue’s instructions.
Now you have a set of friendly faces to brighten up your fridge throughout the day
Tiny Critter Photo Holders
This adorable frog photo holder adds a dash of whimsy to your desk while keeping your favorite memories in plain sight. With its smooth, matte finish and rosy cheeks, it’s a delightful project that transforms simple clay into a charming desk companion.
How-To Guide
Materials
- Light green polymer clay (soft finish)
- Small amount of pink polymer clay
- Black acrylic paint or polymer clay for eyes
- Gold craft wire (16 or 18 gauge)
- Needle nose pliers
- Round wooden coaster or base
- Super glue or heavy-duty craft glue
- Smoothing tool or your finger
- Needle tool or toothpick
- Matte varnish (optional)
Step 1: Prepping the Photo Clip
-
Cut the wire:
Cut a piece of gold craft wire to your desired length, roughly 6-8 inches long. I like to leave a little extra length to trim later if needed. -
Form the spiral:
Using your needle nose pliers, grip one end of the wire and gently curl it inward to create a small loop. -
Expand the holder:
Continue curling the wire around that initial loop to form a larger spiral, like a paperclip shape, to hold the photo. Ensure the loops are tight enough to grip a picture firmly. -
Straighten the stem:
Once the spiral is formed, straighten the remaining length of the wire so it stands perfectly vertical.
Smooth Operator
Before baking, lightly brush your clay with a little cornstarch or baby powder. This helps remove fingerprints and gives that soft, matte finish seen in the photo.
Step 2: Sculpting the Frog Body
-
Condition the clay:
Take a large chunk of light green clay and knead it thoroughly in your hands until it is soft and pliable. -
Form the main body:
Roll the green clay into a smooth, even ball. Gently tap the bottom against your work surface to create a flat base so it sits securely. -
Shape the eyes:
Pinch two small sections at the top of the ball to form raised bumps for the frog’s eye sockets. Smooth the clay around these bumps to blend them seamlessly into the head. -
Create the legs:
Roll two smaller balls of green clay into teardrop shapes. Flatten them slightly. -
Attach the legs:
Press the teardrop shapes onto the sides of the main body, near the bottom, blending the edges with a smoothing tool so they look like tucked-in frog legs. -
Refine the surface:
Check for any fingerprints. Gently rub the surface with a tiny bit of baby oil or water to smooth out any imperfections before baking or drying.
Step 3: Adding Details & Assembly
-
Insert the wire:
Carefully push the straight end of your wire holder into the center top of the frog’s head. Push it deep enough to be stable. -
Secure the wire:
Remove the wire temporarily. I find it helps to add a tiny drop of bake-safe liquid clay or glue into the hole, then reinsert the wire for a permanent bond. -
Make the face:
Use a needle tool to gently impress a wide, curved smile onto the frog’s face. -
Add rosy cheeks:
Flatten two tiny balls of pink clay into thin discs and press them onto the cheeks, just outside the smile line. -
Create the eyes:
Press two tiny beads of black clay into the raised eye sockets you made earlier, or use a dotting tool to indent the area for painting later. -
Bake the project:
Bake the clay frog (with the wire inserted) according to your clay package instructions. Usually, this is around 275°F (135°C) for 15-30 minutes. -
Cool down:
Let the figure cool completely before handling. It will harden fully as it returns to room temperature. -
Glue to base:
Apply a strong adhesive to the bottom of the hardened frog and press it firmly onto the center of your wooden coaster. -
Finishing touches:
If you are painting the eyes, use black acrylic paint now. Optionally, seal the clay with a matte varnish for protection.
Wobbly Wire?
If the wire feels loose after baking, pull it out gently, add a dab of super glue to the end, and reinsert it immediately into the hole.
Now your happy little amphibian is ready to hold up your fondest memories with a smile
Axolotl Pencil Toppers
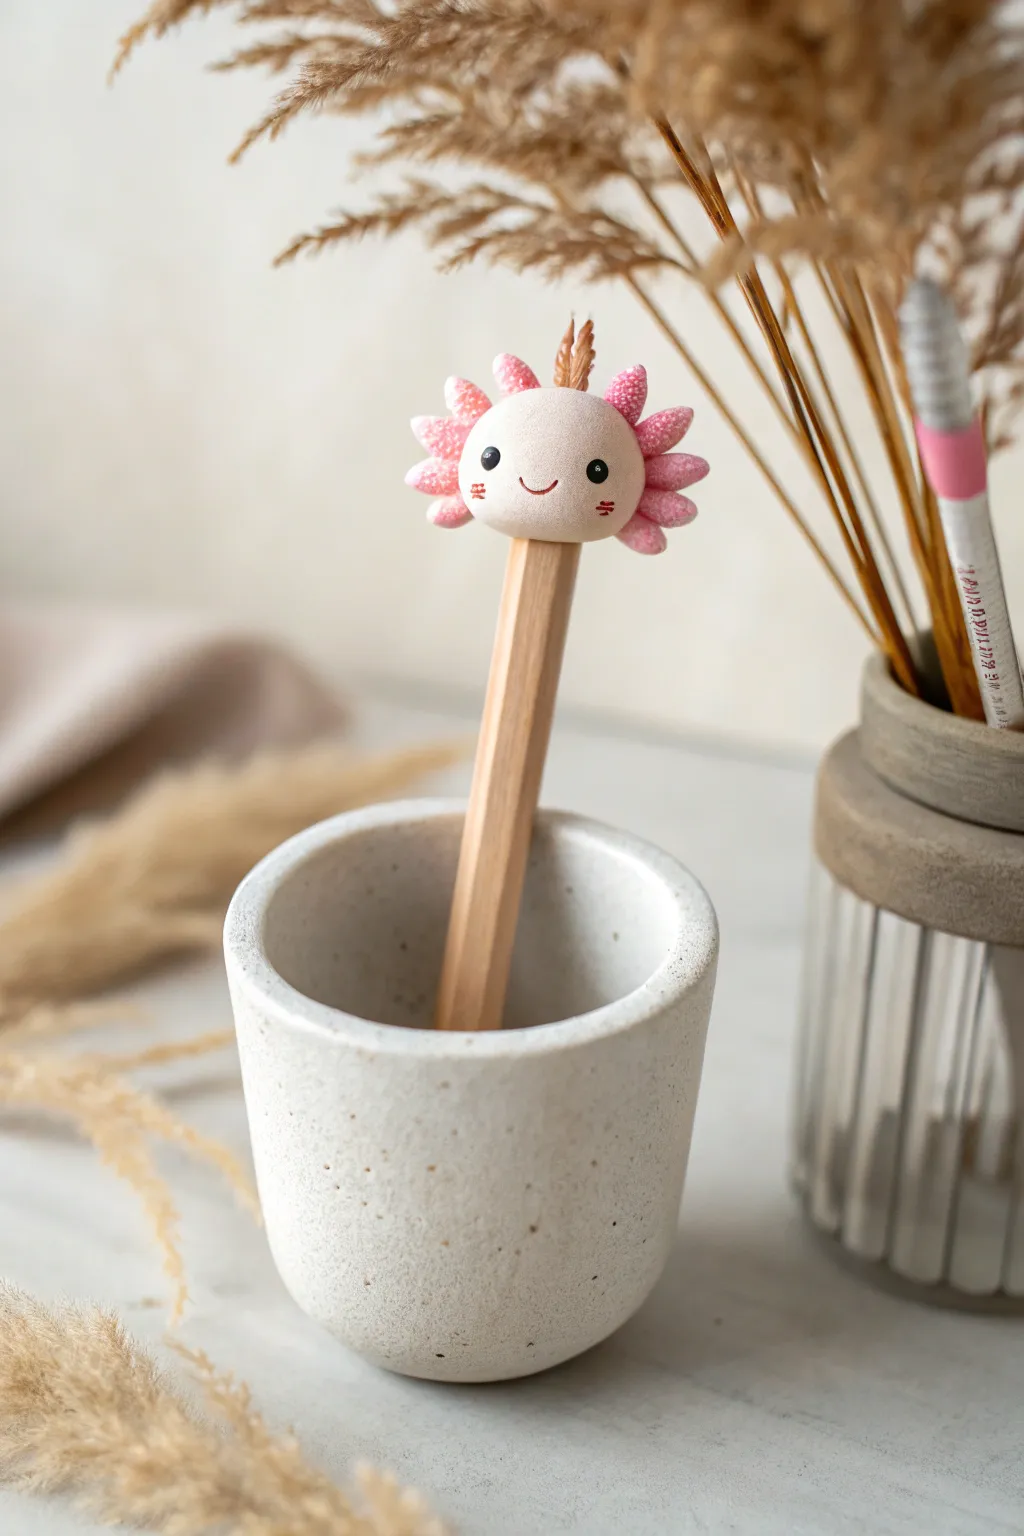
Transform a plain wooden pencil into an adorable writing companion with this simple clay project. This charming axolotl topper features soft pink gills and a sweet, minimalist face that brings a touch of joy to your stationery collection.
Step-by-Step Tutorial
Materials
- Polymer clay (white, pale pink, slightly darker rose pink, black)
- Wooden pencil (natural finish works well)
- Liquid polymer clay or bake-and-bond adhesive
- Ball stylus tool
- Needle tool or toothpick
- Soft blush or pink pastel chalk (optional)
- Small soft paintbrush
- Craft knife
- Oven for baking
Step 1: Forming the Base
-
Prepare the clay:
Start by conditioning your white polymer clay until it is soft and pliable. Mix in a tiny speck of pink if you want that very pale, creamy marshmallow tone seen in the photo. -
Shape the head:
Roll the conditioned clay into a smooth ball, approximately 1 inch in diameter. Slightly flatten it between your palms to create a thick, rounded disc shape rather than a perfect sphere. -
Fit the pencil:
Take your wooden pencil and gently press the eraser end (or the blunt end) into the bottom of the clay head to create an indentation. Remove the pencil. -
Secure the bond:
Apply a drop of liquid polymer clay or bake-and-bond into the indentation you just made. Re-insert the pencil, twisting slightly to ensure a tight fit against the clay. -
Smooth the seam:
Gently smooth the clay around the top of the pencil shaft so the head sits securely and transitions naturally onto the wood.
Baking Stability
To prevent flat spots, stick the pointy end of the pencil into a ball of scrap foil. This creates a stand so the axolotl head bakes suspended in the air.
Step 2: Adding the Details
-
Create the gills:
Roll your darker rose pink clay into a thin log. Cut six small, equal-sized segments using your craft knife. -
Shape the gill stalks:
Roll each small segment into a teardrop shape. Flatten them slightly so they look like little petals. -
Texture the gills:
Using a needle tool, poke tiny dots or stippling all over the surfaces of these pink teardrops. This gives them that fuzzy, coral-like texture. -
Attach the gills:
Press three gills onto the left side of the head and three on the right, fanning them out like a crown. I find it helpful to use a dab of liquid clay here to ensure they stick permanently. -
Add the crown detail:
For the center top feature, mix a small amount of beige or light brown clay. Create a tiny, textured spike or tuft and attach it right at the top center of the head, between the gill sets.
Make it a Set
Create a whole aquatic team by making matching toppers in different pastel colors—try a mint green turtle or a baby blue narwhal to keep your axolotl company.
Step 3: Bringing it to Life
-
Prepare the eyes:
Roll two extremely small balls of black clay. They should be tiny specks, as this is a kawaii-style face. -
Place the eyes:
Position the black balls wide apart on the face for that cute proportion. Press them gently so they sit flush with the surface. -
Add the highlight:
With a needle tip, place the tiniest speck of white clay onto each black eye to create a ‘sparkle’ reflection. -
Carve the smile:
Use a needle tool or small curved blade to gently imprint a shallow, U-shaped smile right between the eyes. -
Paint the cheeks:
There are tiny red marks on the cheeks in the reference. Roll microscopic snakes of reddish-pink clay and press two tiny horizontal lines under each eye. -
Add blush (optional):
For a softer look, shave a little pink pastel chalk into dust. Use a soft brush to gently dust rosy cheeks onto the clay before baking. -
Bake the project:
Bake the pencil and topper together according to your clay package instructions (usually 275°F/135°C for 15-30 minutes). Support the pencil upright in a jar of foil or baking beads to keep the head round.
Once cooled, your new little desk friend is ready to help you with your next drawing or homework session
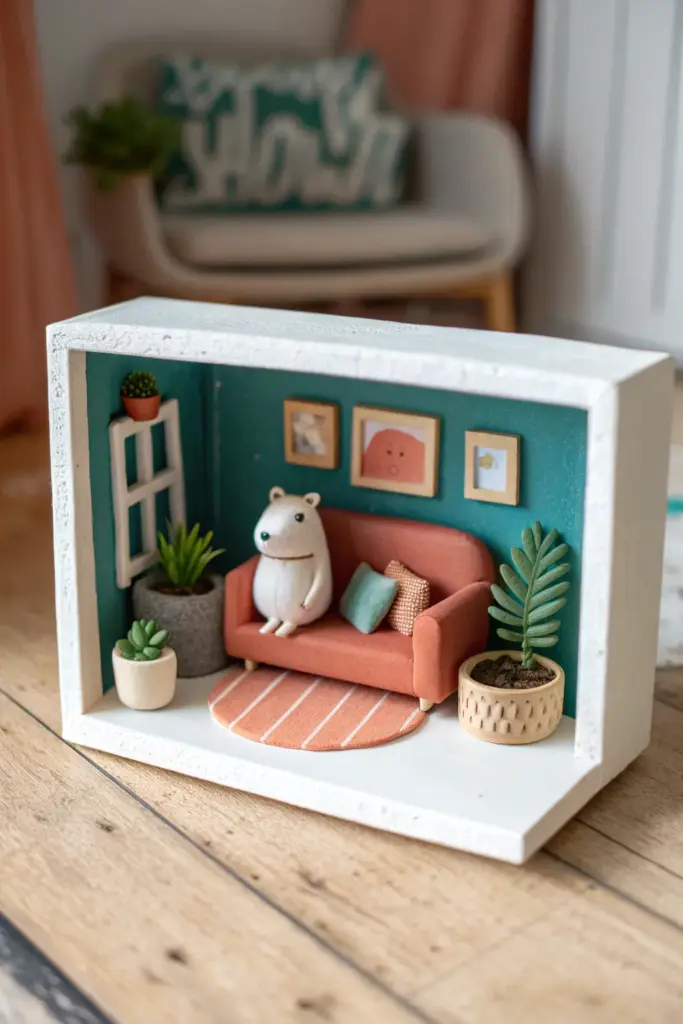
Mini Cozy Room Clay Diorama

Create a tiny, heartwarming world inside a simple wooden box with this adorable clay diorama project. Featuring a cozy sofa, lush miniature plants, and a whimsical character, this scene captures the comfort of a perfect living room in the palm of your hand.
Detailed Instructions
Materials
- Small wooden shadow box (approx. 6×4 inches)
- White acrylic paint
- Teal/Deep Green acrylic paint
- Air-dry clay or polymer clay (White, Terracotta/Orange, Green, Brown, Grey)
- Clay sculpting tools (needle tool, rolling pin, blade)
- Wooden craft sticks or balsa wood scraps (for frames)
- Tiny printed images (for wall art)
- Cardboard or cardstock
- Strong craft glue or hot glue
- Fine-grit sandpaper
- Matte varnish (optional)
Step 1: Preparing the Room Box
-
Paint the exterior:
Begin by painting the entire outside frame of your wooden shadow box with white acrylic paint. You may need two coats for a solid, clean finish. -
Paint the interior walls:
Paint the back wall and the inner sides of the box with a deep teal or rich green acrylic paint. This creates a cozy, modern backdrop for your furniture. -
Create the floor:
Paint the bottom interior surface white to mimic a bright floor, or line it with white cardstock cut to size for a smoother finish. -
Make the window frame:
Cut thin strips of clay or use small craft sticks to create a simple window grid. Paint it white and glue it to the left wall. Add a tiny clay pot with a green prickly ball on top to simulate a cactus on the sill.
Make It Soft
To remove fingerprints from polymer clay before baking, lightly brush the surface with a tiny amount of baby oil or cornstarch.
Step 2: Sculpting the Furniture
-
Form the sofa base:
Using terracotta or muted orange clay, shape a rectangular block for the seat cushion. Smooth the edges so they look soft and upholstered. -
Add sofa back and arms:
Roll out a thicker slab of the same orange clay. Cut a long strip to wrap around the back and sides of the seat, creating the backrest and armrests. Blend the seams gently with a smoothing tool or a bit of water. -
Attach the legs:
Roll four tiny balls of beige or light wood-colored clay into short cylinders. Attach these to the bottom corners of the sofa. -
Make throw pillows:
Shape two small squares from teal and textured brown clay. Use a needle tool to press a fabric texture onto the brown pillow, then place them on the sofa. -
Create the rug:
Roll out a thin sheet of orange clay and cut a semi-circle or oval shape. Paint thin white stripes across it once dry, or inlay very thin strips of white clay while it’s wet.
Step 3: Crafting the Character and Decor
-
Sculpt the character body:
Form a smooth, pear-shaped lump of white clay for the animal’s body. It should look slightly heavy at the bottom so it sits well. -
Add facial details:
Attach two tiny triangular ears to the top. Use a needle tool or black paint to mark the eyes and a small nose. Create a thin line for the mouth and add a simple collar line around the neck. -
Make the large plant:
Fill a small clay pot (textured with a basket weave pattern using a tool) with brown clay ‘soil’. Roll engaging long green distinct leaves and press a line down the center of each. attach them to a central stem in the pot. -
Make the medium plant:
Create a smooth grey pot from a ball of clay. Add a cluster of pointy green clay spikes to resemble an aloe or succulent plant. -
Make the small floor plant:
Fashion a small white pot and fill it with a rosette of chunky green leaves for a succulent look.
Falling Decor?
If wall art or shelves refuse to stick to the painted wood, lightly sand the paint away at the contact point to glue directly onto the wood.
Step 4: Final Assembly
-
Hang the art:
Cut small squares of balsa wood or cardboard to make frames. Glue tiny printed pictures or draw simple art inside them. Glue these to the back wall in a pleasing arrangement. -
Position the rug and sofa:
Glue the rug to the center of the floor first. Then, secure the sofa on top of the rug, slightly off-center. -
Place the character:
Glue your white clay character onto the sofa so it looks like it’s sitting comfortably. -
Arrange the plants:
Glue the tall basket plant to the right of the sofa, the grey pot to the left of the sofa, and the tiny white pot in the front left corner. -
Seal the piece:
I like to brush a coat of matte varnish over the clay parts once everything is fully dry to protect the finish and unify the sheen.
Display your miniature room on a bookshelf for a cozy touch of whimsy