Whenever I’m brainstorming ideas for things to make out of clay, I like to mix quick wins with a couple of “I can’t believe I made that” projects. Here are my favorite clay ideas—starting with the classics you’ll actually use, then drifting into the more playful, unexpected stuff.
Minimalist Ring Dishes
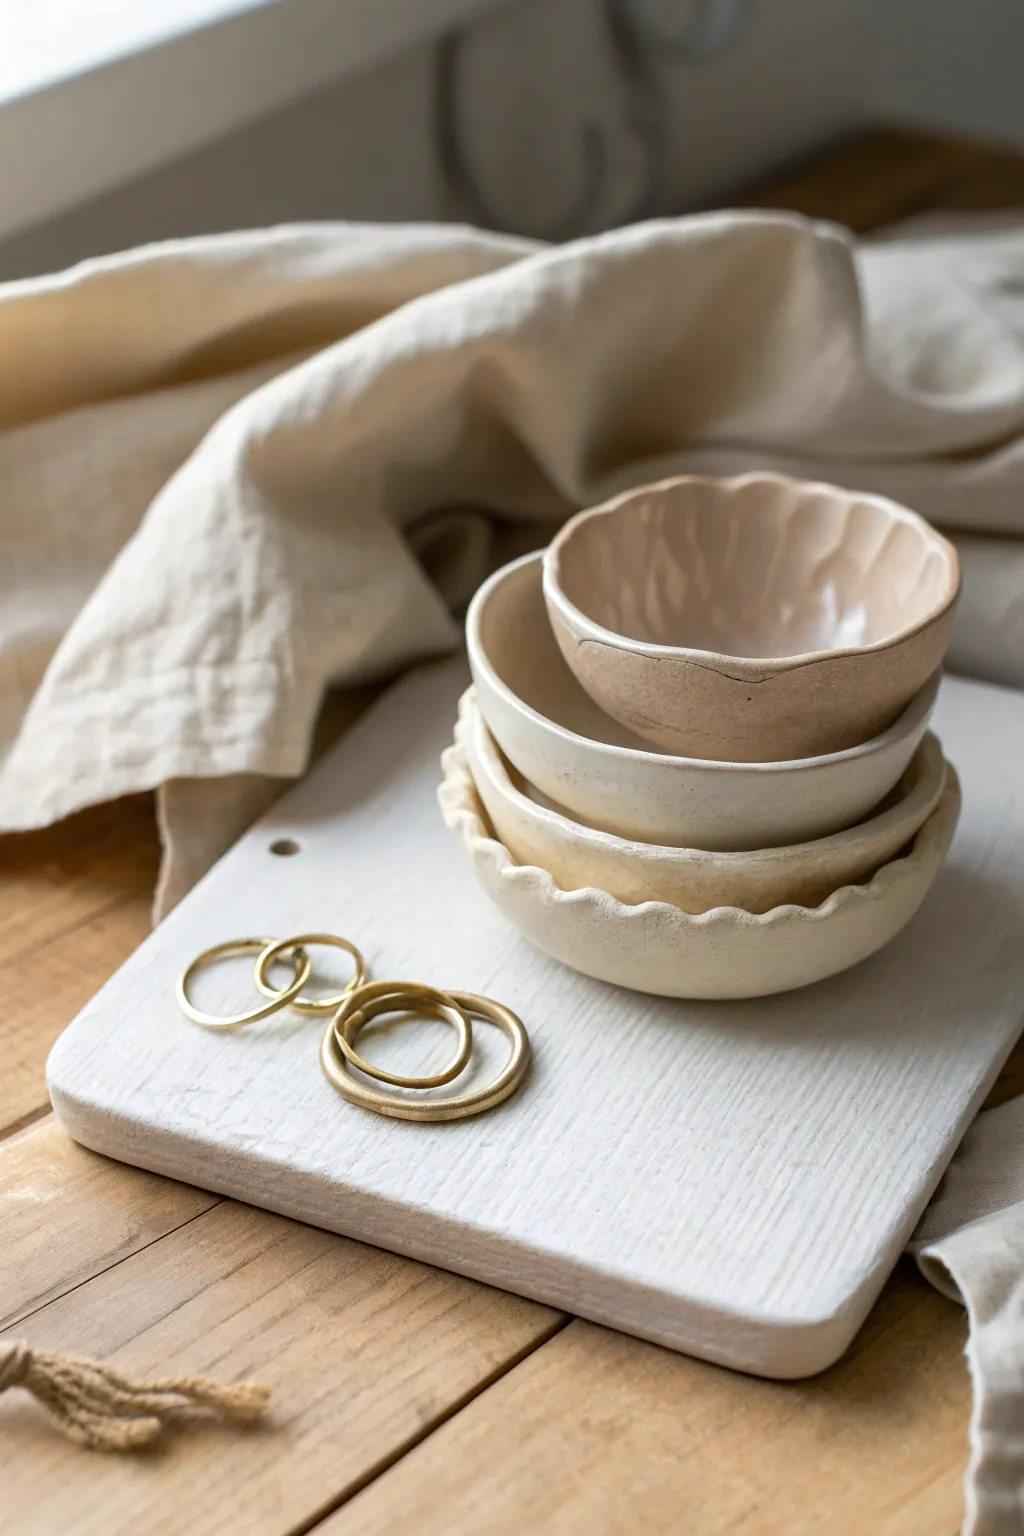
These charmingly imperfect nesting bowls capture the essence of wabi-sabi minimalist design. Perfect for holding dainty jewelry or simply stacking as a sculptural element, their soft waves and creamy matte finishes bring an earthy warmth to any vanity.
Step-by-Step Guide
Materials
- Air-dry clay (white or light tint)
- Small rolling pin or acrylic roller
- Small bowl of water
- Sponge
- Potter’s needle tool or a sharp knife
- Various small bowls (for molds)
- Fine-grit sandpaper
- Acrylic paints (Cream, beige, taupe)
- Matte or satin sealant varnish
- Canvas mat or parchment paper
Step 1: Preparing the Clay Body
-
Condition the clay:
Begin by taking a handful of air-dry clay and kneading it in your hands until it becomes pliable and warm. This removes air bubbles and makes the clay easier to work with without cracking. -
Roll out a slab:
Place the clay on your canvas mat or parchment paper. Using your rolling pin, roll the clay out to a consistent thickness of about 1/4 inch. Try to keep the thickness uniform so the bowls dry evenly. -
Cut the circles:
Find round objects of graduating sizes (like cookie cutters, glass rims, or varying bowl sizes) to trace onto the clay. Cut out four circles, each slightly smaller than the last, to create a nesting set.
Water Wisdom
Use water sparingly when smoothing! Too much water weakens air-dry clay and can cause warping or cracking as it evaporates during the drying process.
Step 2: Shaping the Forms
-
Smooth the edges:
Dip your finger in a little bit of water and run it along the cut edge of each clay circle. This softens the sharp cut lines and prevents future cracking. -
Form the basic curve:
Gently drape your clay circles into the small bowls you are using as molds. Don’t press too hard; just let gravity help the clay settle into a gentle curve. -
Create the scalloped effect:
For the bottom-most bowl in the stack, use your thumb and forefinger to gently pinch the rim at regular intervals. This creates that lovely organic, ruffled edge. -
Refine the fluted bowl:
For the top bowl, use the handle of a paintbrush or your finger to press vertical indentations gently on the inside walls, giving it a subtle fluted texture. -
Create the organic bowls:
Leave the two middle bowls relatively smooth, but don’t aim for perfection. I like to purposefully tap the rim slightly off-center to maintain that handmade, artisanal feel. -
Initial drying phase:
Let the bowls sit in their molds for about 2-3 hours until they hold their shape but are still leather-hard. -
Remove from molds:
Carefully pop the clay forms out of the molds. If the clay is still slightly damp, this is the perfect time to smooth out any fingerprints with a slightly damp sponge.
Cracked edges?
If hairline cracks appear while drying, mix a small amount of fresh clay with water to make a paste (slip) and fill the cracks, then sand smooth once dry.
Step 3: Finishing and Glazing
-
Full cure time:
Place the shaped bowls on a wire rack to allow air circulation. Let them dry completely for 24-48 hours. The clay should turn chalky white and feel room temperature, not cool to the touch. -
Sand for smoothness:
Once fully bone dry, use fine-grit sandpaper to gently buff the rims and any rough spots on the body. Wipe away the dust with a dry cloth. -
Mix your colors:
Prepare a palette of neutral tone acrylics. You want a creamy off-white for the scalloped bowl and slightly deeper beige or taupe tones for the others to create visual separation in the stack. -
Apply the base coat:
Paint the interior and exterior of each bowl. You may need two coats for full opacity, allowing the first coat to dry before applying the second. -
Add texture detail:
For the fluted bowl, mix a tiny bit of water into a darker beige paint and run a wash over the textured areas, wiping the excess off quickly. This highlights the grooves. -
Seal the project:
Finish by applying a matte or satin varnish over the entire surface of each bowl. This seals the porous clay and protects the paint from scratching when you toss your rings in.
Now you have a stunning custom set to display your favorite rings or gift to a friend


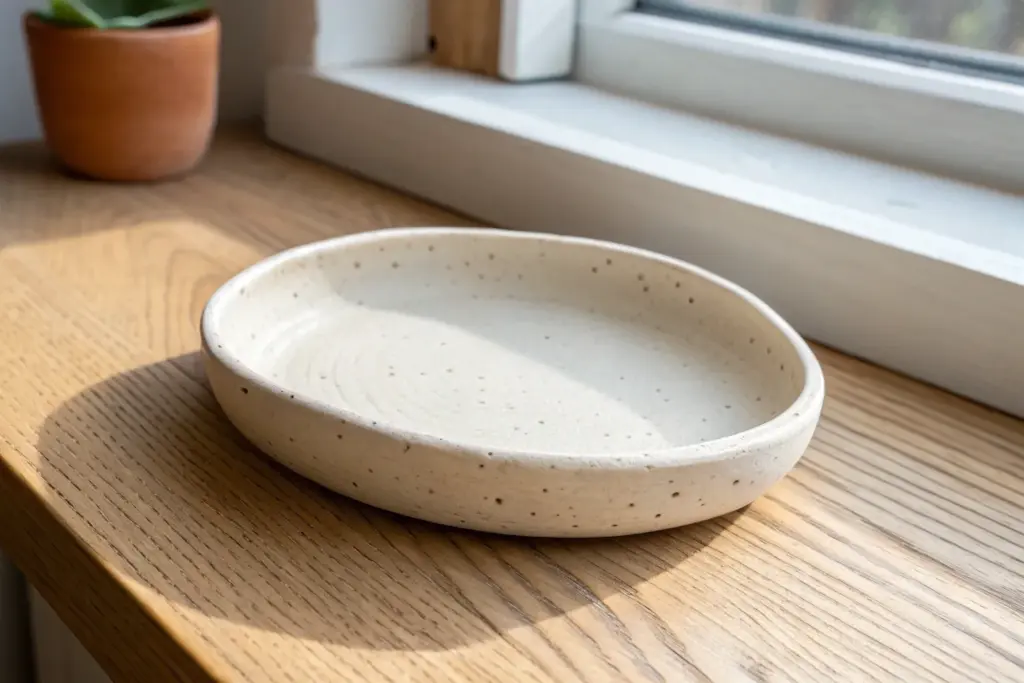
Wavy Trinket Bowls
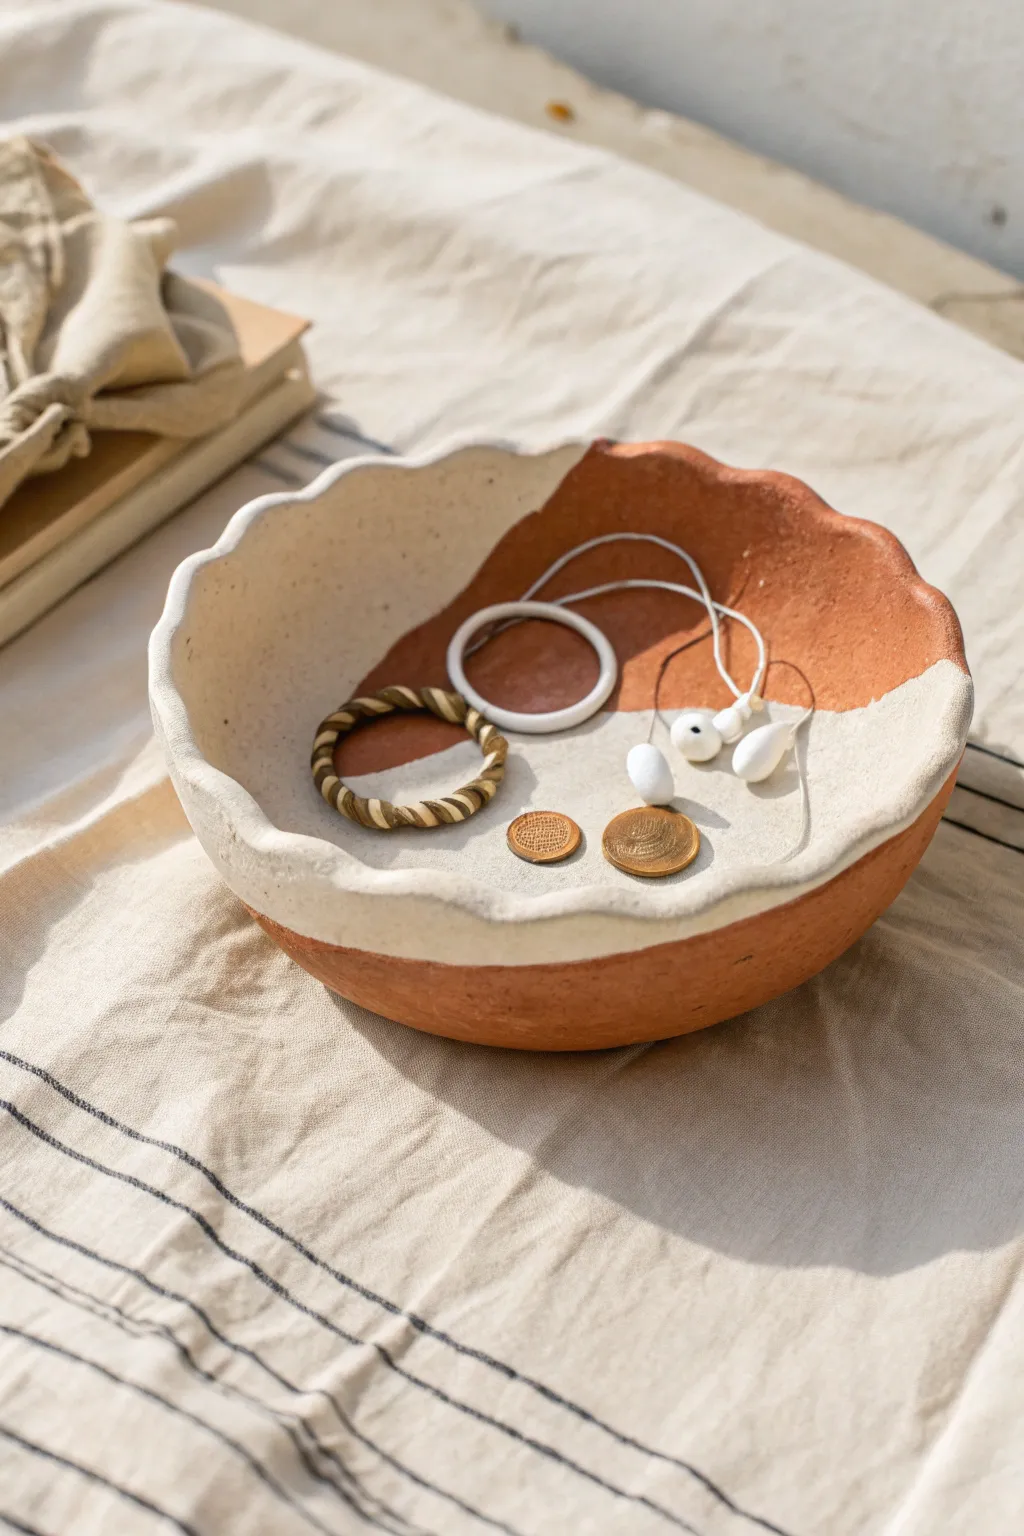
Embrace the beauty of imperfection with this lovely organic trinket dish. Featuring a warm terracotta base contrasting with a creamy specks-and-sand dip effect, this bowl is the perfect home for your daily jewelry rotation.
How-To Guide
Materials
- Terracotta air-dry clay or oven-bake polymer clay
- Rolling pin
- Medium-sized bowl (to use as a mold)
- Plastic wrap
- Potter’s needle tool or craft knife
- Sponge
- Water cup
- Sandpaper (fine grit)
- Cream or off-white acrylic paint
- Baking soda (optional, for texture)
- Matte sealant or varnish
Step 1: Shaping the Form
-
Prepare the workspace:
Lay down a canvas cloth or parchment paper to prevent sticking. Take a generous handful of terracotta clay and knead it until it’s warm and pliable. -
Roll the slab:
Roll out the clay into an even circle, aiming for a thickness of about 1/4 inch. Don’t worry about getting a perfect circle; the organic look is key here. -
Create the base curve:
Take a kitchen bowl that is slightly larger than your desired finished size. Cover it with plastic wrap to prevent sticking, then gently drape your clay slab inside the bowl to form the concave shape. -
Define the rim:
Using your needle tool or knife, trim the excess clay around the top edge of the bowl. Instead of a straight line, cut a gentle, uneven wavy pattern to mimic the natural look in the photo. -
Smooth the edges:
Dip your finger or a small sponge into water and run it along the cut rim. This rounds off the sharp angles and refines that beautiful wavy edge. I like to spend a little extra time here to ensure it feels soft to the touch. -
Dry or bake:
If using air-dry clay, leave it in the mold for 24 hours until firm, then remove and let it dry completely. If using polymer clay, bake according to the package instructions.
Cracking Clay?
If air-dry clay cracks while drying, mix a tiny bit of fresh clay with water to make a paste (slip). Fill the cracks, smooth it out, and let dry again.
Step 2: Adding Texture and Color
-
Sand for smoothness:
Once fully cured or dry, gently sand any rough spots on the rim or interior. Wipe away the dust with a damp cloth. -
Mix textured paint:
To achieve that stony, matte texture seen on the white sections, mix a teaspoon of baking soda into your cream acrylic paint. It creates a lovely faux-ceramic feel. -
Mark the design:
Lightly visualize where your color blocks will go. The design features a large asymmetrical dip that covers about two-thirds of the rim and interior. -
Apply the first coat:
Paint the selected section with your textured cream mixture. Use a flat brush to create a clean but organic line where the white meets the raw terracotta. -
Extend over the rim:
Make sure to bring the paint over the wavy rim and down the outside of the bowl, following the same heavy curve you painted on the inside. -
Add speckling (optional):
If your cream paint is too flat, flick a tiny amount of diluted brown paint onto the wet cream sections using an old toothbrush to mimic ceramic speckles. -
Let it cure:
Allow the paint to dry completely. The baking soda mixture might dry faster than standard paint. -
Seal the piece:
Finish the entire bowl, both the painted and unpainted sections, with a matte varnish. This deepens the terracotta color and protects the white paint from chipping.
Natural Texture
Before drying, gently press a piece of rough linen or canvas into the wet clay surface. This leaves a subtle fabric texture that enhances the rustic vibe.
Place your warm, earth-toned bowl on a dresser to beautifully display your favorite accessories


Terrazzo-Style Coasters
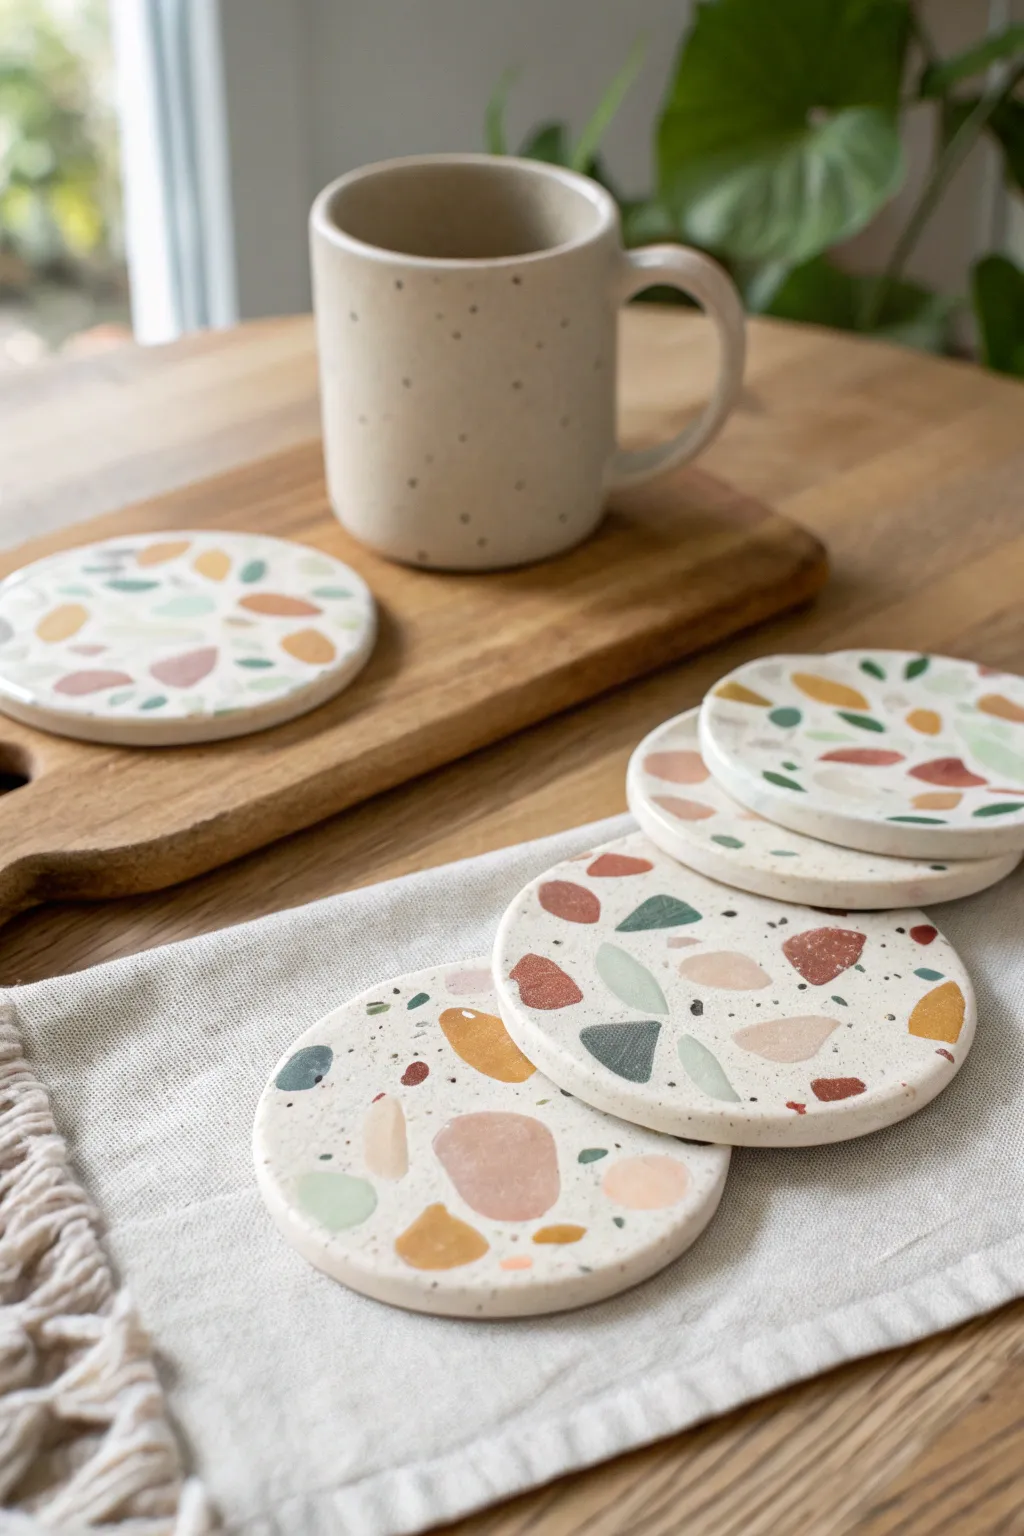
Bring a touch of modern, artisanal charm to your coffee table with these stunning terrazzo-style coasters. Featuring a matte white base speckled with organic chips of sage, terracotta, and ochre, they mimic the look of real stone without the need for concrete or resin.
Step-by-Step Guide
Materials
- White alcohol polymer clay (or air-dry clay)
- Colored polymer clay (terracotta, sage green, ochre yellow, deep teal, grey)
- Acrylic rolling pin
- Circle cookie cutter (approx. 4 inches)
- Parchment paper or craft mat
- Sharp craft knife or clay blade
- Fine-grit sandpaper (400-1000 grit)
- Matte or sealant varnish (polyurethane or water-based)
Step 1: Preparing the Chips
-
Condition the colored clay:
Start by taking small amounts of your colored clays—terracotta, sage, ochre, teal, and grey. Knead each color individually until they are soft and pliable to prevent cracking later. -
Roll out thin sheets:
Using your acrylic roller, roll each color into a thin, uneven sheet. They don’t need to be perfect; irregular shapes work best for this organic look. -
Create the terrazzo chips:
Use your craft knife to chop the colored sheets into small, random geometric shards. Aim for a variety of sizes, from tiny specks to larger triangles, and keep each color in a separate pile.
Sticky Situation?
If your clay sticks to the roller while embedding chips, keep a sheet of parchment paper as a barrier between the clay and the tool at all times.
Step 2: Creating the Base
-
Condition the white clay:
Take a large block of white clay (enough for 4-6 coasters) and condition it thoroughly. This will be the main body of your coaster. -
Initial rolling:
Roll the white clay out into a thick slab, about 1/4 inch thick. This initial thickness provides a sturdy base for the chips. -
Scatter the chips:
Taking pinchfuls of your pre-cut colored chips, scatter them over the surface of the white slab. Be generous but leave some white space visible. I prefer to press them gently with my finger first to set them in place. -
Embed the chips:
Cover the slab with a piece of parchment paper to prevent sticking. Use your rolling pin to roll over the clay again firmly. This forces the colored chips down so they become flush with the white surface. -
Repeat for density:
If the pattern looks too sparse after rolling, add more chips to the empty spots and roll again until the surface is smooth and flat.
Make it Sparkle
Mix small flakes of gold leaf or copper foil in with your clay chips before pressing them down to add a luxurious metallic pop to the terrazzo pattern.
Step 3: Shaping and Baking
-
Cut the circles:
Press your 4-inch circle cutter firmly into the patterned slab. If the clay sticks to the cutter, you can dip the rim in cornstarch or water first. -
Clean the edges:
Lift away the excess clay. Carefully smooth the rim of each circle with your fingertip to remove any sharp drag marks from the cutter. -
Bake the clay:
Place the cut circles on a parchment-lined baking sheet. Bake according to your polymer clay package instructions (usually 275°F/135°C for 15-30 minutes depending on thickness). Use an oven thermometer to ensure accuracy. -
Cool down:
Allow the coasters to cool completely on a flat surface. Do not attempt to sand them while they are still warm, as they may warp.
Step 4: Finishing Touches
-
Sand for smoothness:
Dip your fine-grit sandpaper in water and wet-sand the surface and edges of the coasters. This reveals the crisp shapes of the chips and removes any fingerprints. -
Wipe clean:
Rinse off the sanding residue and dry the coasters thoroughly with a lint-free cloth. -
Apply sealant:
Brush on a thin layer of matte varnish to protect the surface from moisture and stains. Let it dry completely. -
Add backing:
glue a circle of cork or felt to the bottom of each coaster to prevent slipping and protect your table surface.
Enjoy your beautiful, durable coasters for your next coffee break or gift them as a handmade set


Marbled Statement Earrings
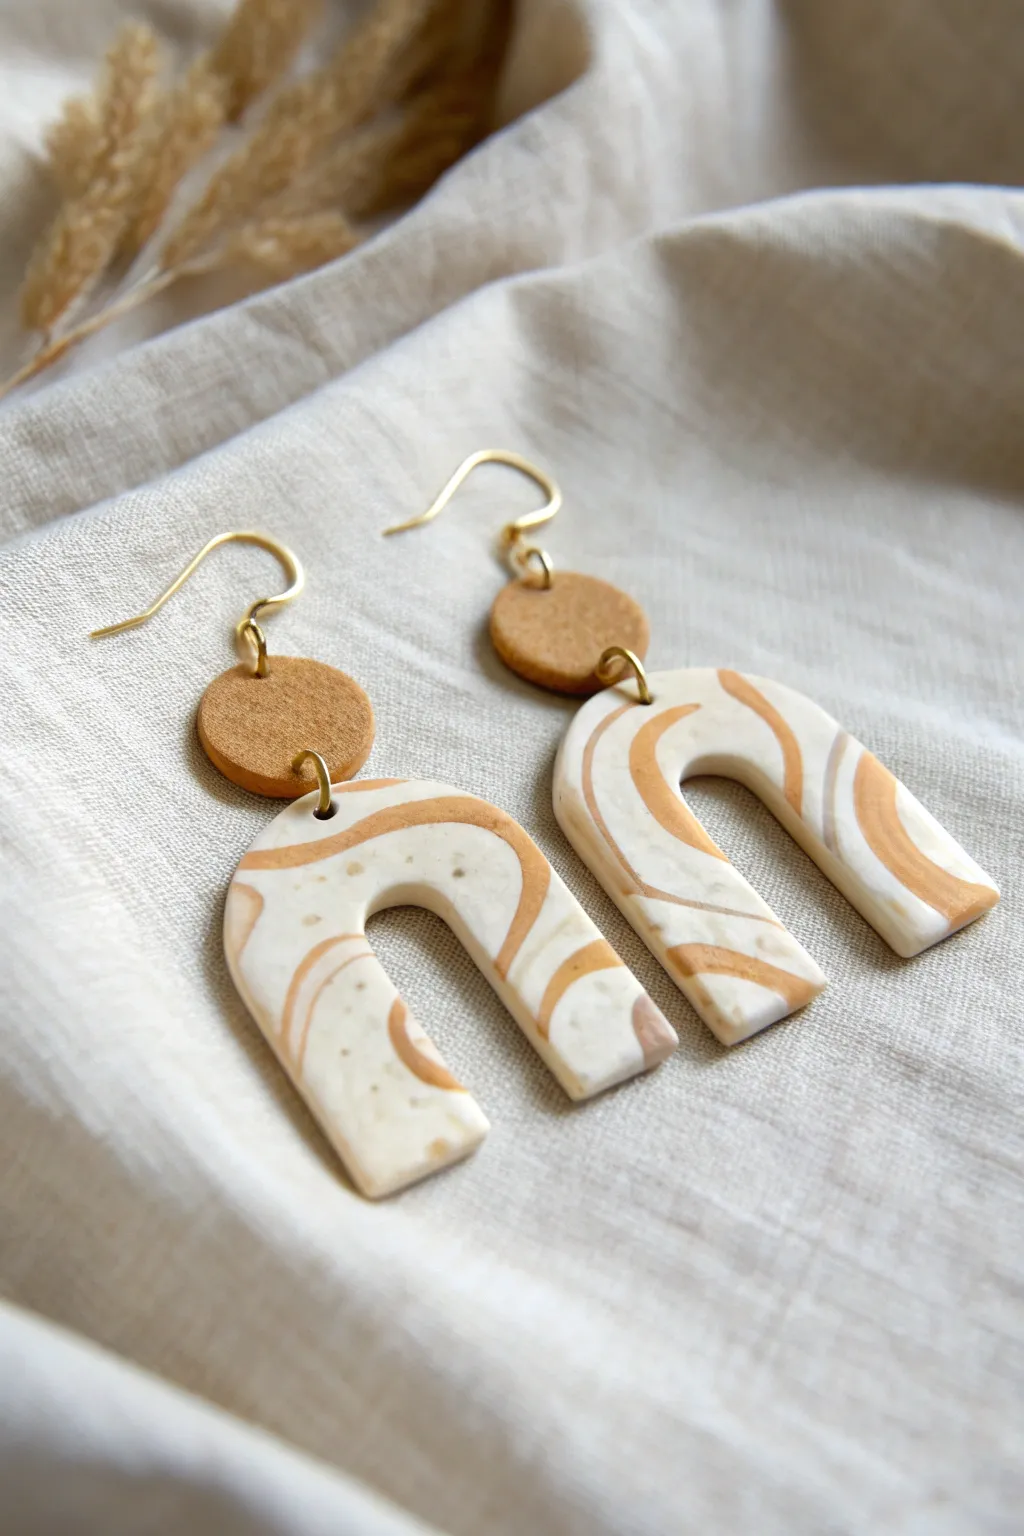
These elegant earrings combine earthy tones with a sophisticated abstract marble pattern for a look that is both modern and timeless. Capture the feel of soft sandstone and warm terracotta in lightweight polymer clay, perfect for everyday wear or special occasions.
Step-by-Step Tutorial
Materials
- Polymer clay in white or translucent white
- Polymer clay in beige/tan/sand
- Small pinch of black or brown clay (for speckles)
- Small circular clay cutter (approx. 10-12mm)
- U-shaped arch clay cutter (or a craft knife and paper template)
- Acrylic rolling pin or pasta machine
- Parchment paper or ceramic tile
- 4 to 6mm gold jump rings
- Earring posts and backs
- Super glue or liquid clay
- Hand drill or pin vibe
- Needle nose pliers
- Fine grit sandpaper (optional)
Step 1: Preparing the Clay
-
Condition the base:
Start by thoroughly kneading your white clay until it is soft and pliable. This creates our primary canvas. -
Mix the marble color:
Condition your tan or beige clay separately. If you want a speckled look like the example, knead in a tiny speck of black or brown clay, or better yet, mix in some real ground pepper or dried herbs for organic texture. -
Roll out ropes:
Roll both the white clay and the tan clay into long, thin snakes.
Clean Edges Pro-Tip
Before baking, gently rub a tiny amount of baby oil or cornstarch over the clay surface and edges with your finger. This smooths out fingerprints and softens sharp cut edges.
Step 2: Creating the Marble Effect
-
Twist and combine:
Lay the tan snake next to the white snake and twist them together tightly to form a rope. Fold this rope in half and twist again. -
Interupt breakage:
Gently pull and break the rope in a few places, then stack the pieces back together. This helps create those organic, disconnected swirls rather than perfect stripes. -
Form the slab:
Squish the twisted clay into a ball, but don’t over-knead it or the colors will blend into a single muddy hue. We want distinct separation. -
Roll the sheet:
Place the ball on your parchment paper and roll it flat with your acrylic roller (or pass it through a pasta machine) to a thickness of about 3mm. Check if you like the pattern; if not, fold and roll once more.
Step 3: Cutting and Baking
-
Cut the arches:
Position your U-shaped cutter over the most pleasing parts of the marbled slab. Press down firmly to cut two arch shapes. -
Create the stud tops:
Take some remaining solid tan clay—I usually reserve a bit before marbling—roll it to the same thickness, and cut two small circles for the tops. Texture them slightly with a toothbrush if you want a stone-like finish. -
Pierce holes:
Using a needle tool or toothpick, carefully poke a hole at the top center of each arch and the bottom edge of each circle. Make sure the hole is big enough for your jump rings. -
Bake:
Transfer the pieces (on the tile or parchment) to a baking sheet. Bake according to your clay manufacturer’s instructions, usually at 275°F (135°C) for about 30 minutes.
Level Up: Resin Shine
For a glossy, high-end ceramic look, apply a thin layer of UV resin to the marbled arches after baking and cure under a UV lamp. It makes the colors pop beautifully.
Step 4: Finishing and Assembly
-
Cool and sand:
Let the pieces cool completely. If there are any rough edges, gently sand them with fine-grit sandpaper for a professional finish. -
Attach posts:
Use a dab of strong super glue to attach the metal earring posts to the back of the small tan circles. Let them dry undisturbed. -
Connect pieces:
Open a jump ring by twisting it sideways with pliers. Thread it through the hole in the arch and the hole in the circle stud. -
Close and secure:
Twist the jump ring closed carefully so the gap disappears completely. Repeat for the second earring.
Now you have a stunning, lightweight pair of architectural earrings ready to wear

The Complete Guide to Pottery Troubleshooting
Uncover the most common ceramic mistakes—from cracking clay to failed glazes—and learn how to fix them fast.
Chunky Clay Bead Necklace
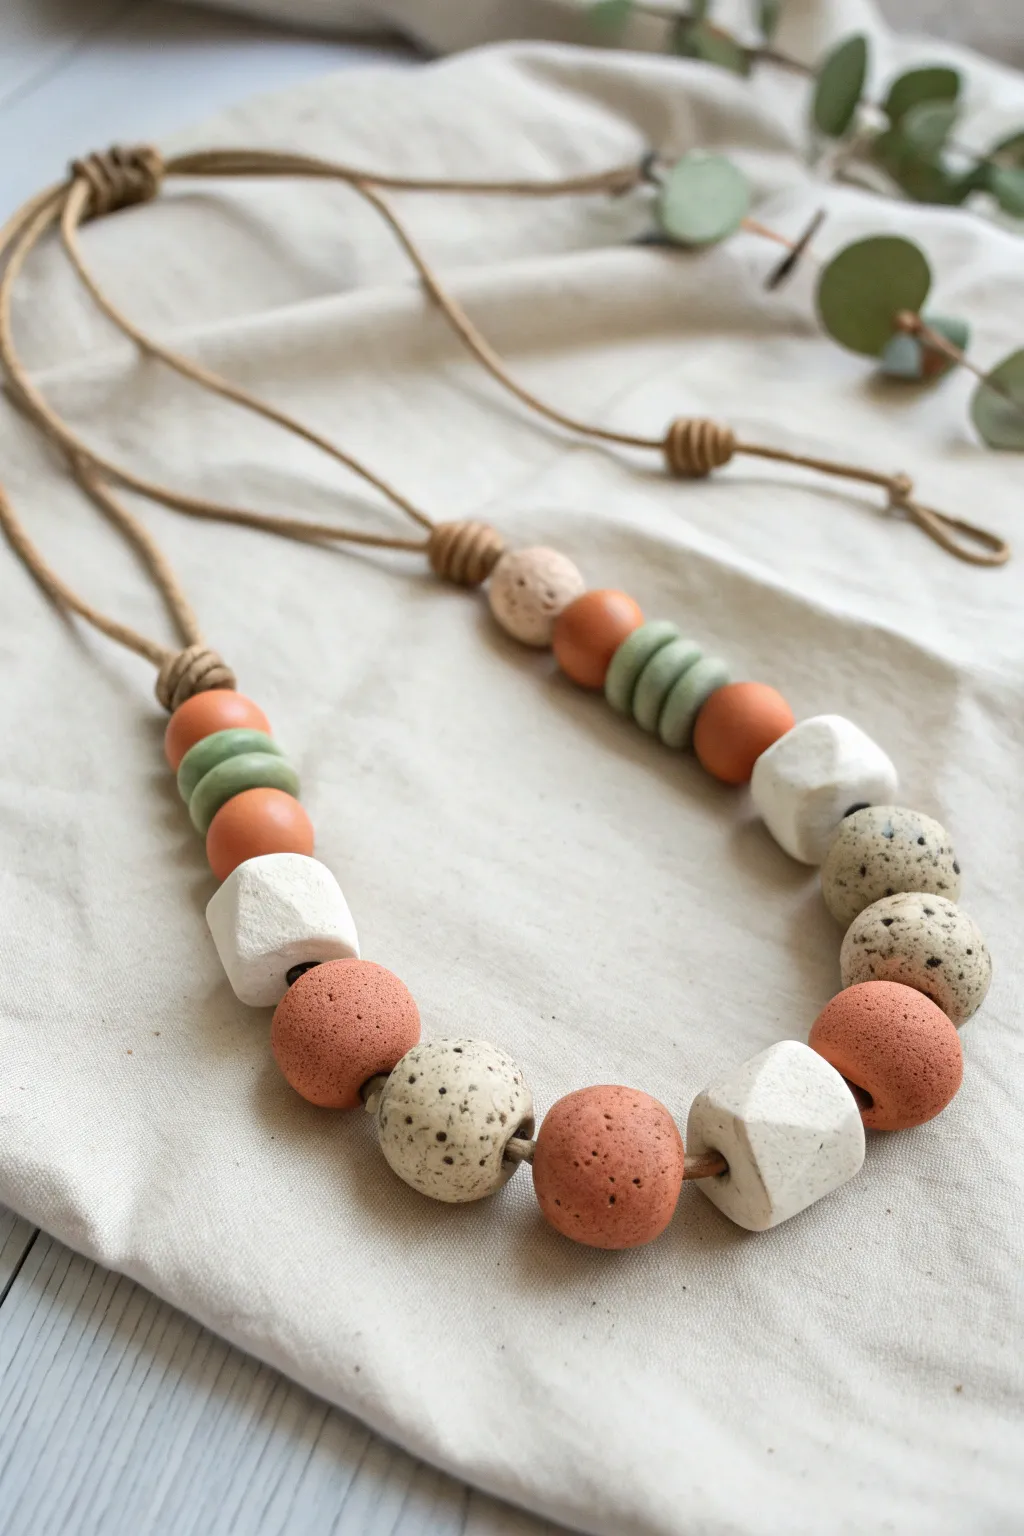
Embrace organic textures and earthy elegance with this chunky statement necklace featuring handcrafted clay beads. The mix of terracotta tones, speckled cream, and muted sage creates a natural, calming aesthetic that pairs perfectly with casual linen or cozy knits.
How-To Guide
Materials
- Polymer clay (terracotta/rust, sage green, plain white, and ‘granite’ or speckled white)
- Black pepper or dried coffee grounds (if creating faux granite effect manually)
- Leather or suede cord (natural tan color, approx. 1-2mm thick)
- A clean, smooth work surface (glass or ceramic tile)
- Sharp crafting blade or knife
- Toothpick, skewer, or bead reamer
- Baking sheet with parchment paper
- Sandpaper (fine grit)
- Oven (for baking polymer clay)
Step 1: Prepping and Shaping the Clay
-
Condition the clay:
Begin by kneading each color of clay separately until it is soft, pliable, and warm to the touch. This prevents cracking later. -
Mix the speckled clay:
If you don’t have pre-mixed granite clay, take a chunk of white clay and knead in ground black pepper or dried coffee grounds to create a speckled stone look. -
Roll the terracotta rounds:
Take the rust-colored clay and roll about six to eight medium-sized balls. Aim for a diameter of roughly 2cm, ensuring they are smooth and round. -
Create the texture:
For that porous, earthy texture seen in the photo, gently roll the terracotta balls over a piece of sandpaper or tap them lightly with a stiff toothbrush. -
Shape the geometric beads:
Using the plain white clay, roll three balls. Instead of keeping them round, gently slice off sides with your blade to create irregular, faceted geometric shapes. -
Form the sage disks:
Roll a snake of sage green clay and slice it into equal segments. Flatten these gently between your thumb and forefinger to create thick, coin-like disk beads. -
Make the speckled accents:
Form your speckled clay into large round beads. You need about three of these to serve as focal points alongside the geometric beads.
Fingerprint Fix
To avoid fingerprints entirely, lightly dust your fingertips with cornstarch before the final shaping roll. It buffs off easily after baking.
Step 2: Piercing and Baking
-
Pierce the holes:
Using a skewer or toothpick, carefully poke a hole through the center of every bead. I find twisting the tool as I push through helps prevent the bead from squashing. -
Checking hole size:
Double-check that your leather cord fits through the holes easily; the clay won’t shrink much, but it’s better to wiggle the tool a bit to widen them now. -
Bake the beads:
Arrange all your beads on a parchment-lined baking sheet. Bake according to your specific clay package’s instructions (usually around 275°F/130°C for 15-30 minutes). -
Cool and finish:
Let the beads cool completely before handling. If there are any fingerprints, lightly sand them away with fine-grit sandpaper.
Step 3: Assembly
-
Prepare the cord:
Cut a generous length of leather cord, longer than your desired necklace length to account for the knotting. -
String the beads:
Thread the beads onto the cord in the pattern shown: start with the smaller terracotta rounds and sage disks near the top, moving to the larger speckled and geometric beads in the center. -
Secure the beads:
Once your beads are centered, tie a simple overhand knot with the cord itself on both sides of the bead cluster to keep them from sliding up the neck. -
Create the adjustable closure:
Cross the two loose ends of the cord. Using a separate shorter piece of cord, or the ends themselves if long enough, tie sliding knots (often called a ‘double fisherman’s knot’) so the necklace length is adjustable. -
Add end details:
Optional: Tie small knots at the very tips of the cord tails to prevent them from slipping through the adjustable knot mechanism.
Make it Shine
For a contrast against the matte terracotta, apply a glossy glaze only to the geometric white beads after baking to make them look like polished ceramic.
Now you have a stunning, bespoke accessory ready for your next outfit
Cute Food Charms and Keychains
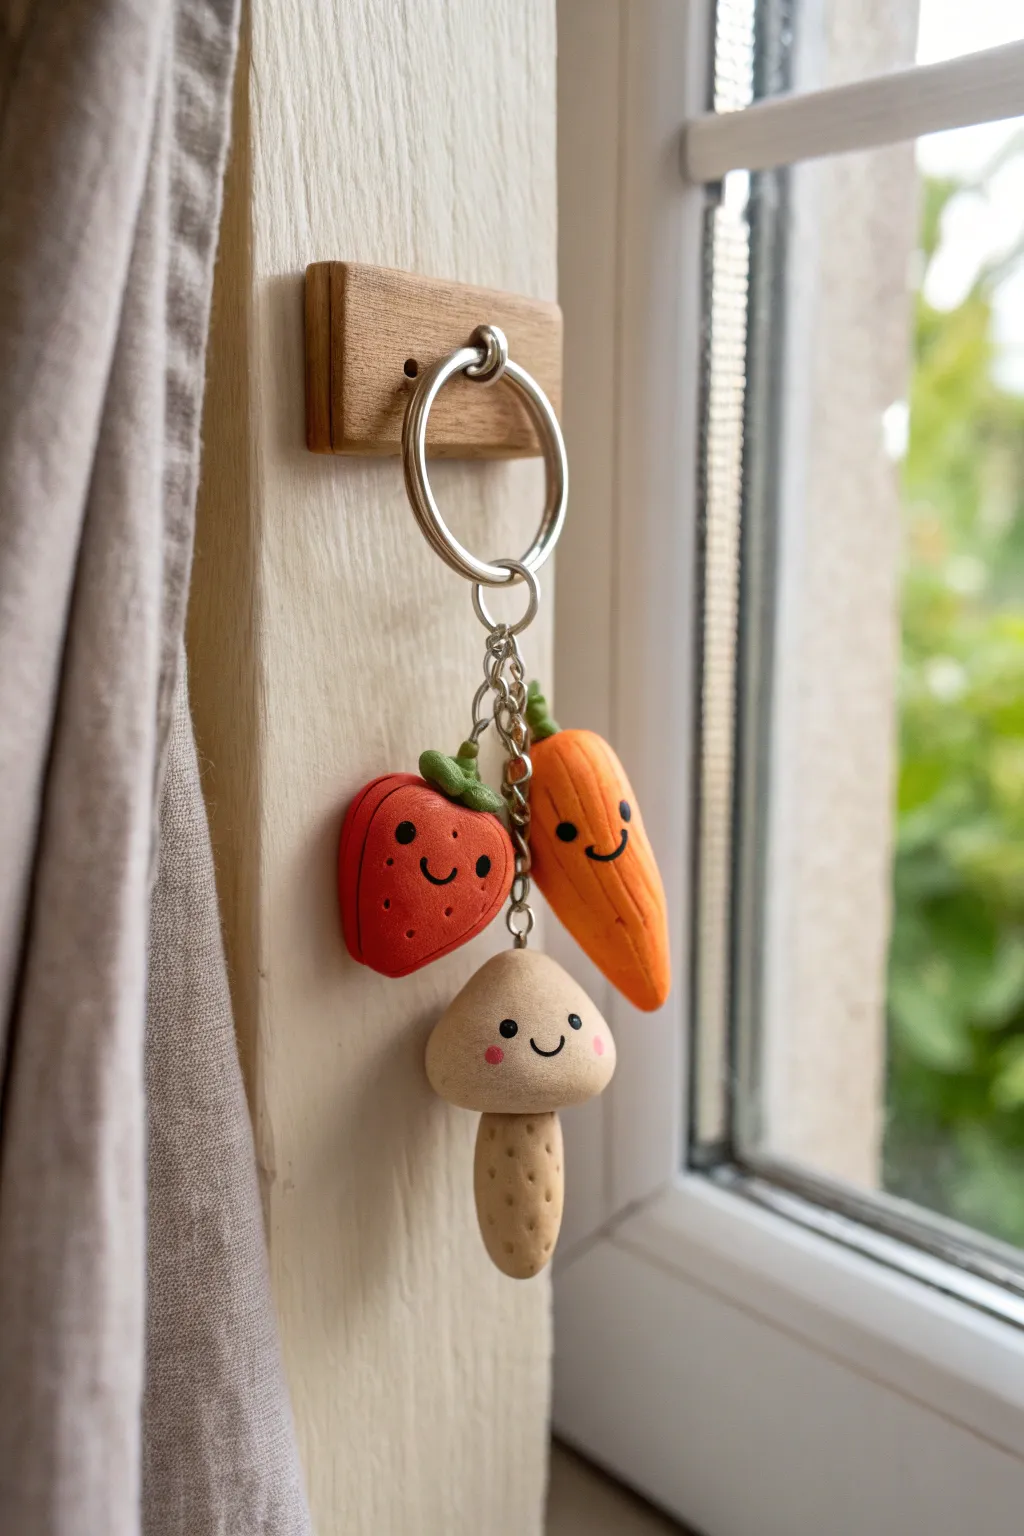
Brighten up your keys with this charming trio of polymer clay friends: a rosy-cheeked strawberry, a happy carrot, and a little smiling mushroom. These adorable charms are finished with a matte texture that gives them a soft, organic feel, perfect for gifting or keeping for yourself.
Step-by-Step
Materials
- Polymer clay (Red, Orange, Beige/Tan, Green, Biscuit/Light Brown)
- Black polymer clay or black acrylic paint (for faces)
- Pink soft pastel chalk or pink clay (for cheeks)
- Pointed detailing tool or needle tool
- Ball stylus tool
- Eyepins (silver)
- Jump rings and a keychain ring with chain
- Needle nose pliers
- Oven (for baking)
- Clear matte varnish (optional)
Step 1: Sculpting the Strawberry
-
Base Shape:
Start by conditioning a small ball of red clay. Gently roll it into a rounded shape, then taper one end slightly to form a classic strawberry heart silhouette. -
Adding Texture:
Using a needle tool or a small ball stylus, gently press tiny indentations all over the surface of the strawberry to mimic seeds. Keep them shallow and evenly spaced. -
Leaf Topper:
Take a tiny pinch of green clay and flatten it into a small star or flower shape. Press this onto the top, wider part of the strawberry. -
Stem Detail:
Roll a very small snag of green clay into a stem and attach it to the center of the leaf cap, smoothing the seam with your tool. -
Insert Hardware:
Carefully push a silver eyepin down through the center of the stem and into the body of the strawberry.
Loose Eyepins?
If an eyepin feels loose after baking, pull it out, add a drop of superglue to the metal shaft, and slide it back into the hole. Let it set for a secure hold.
Step 2: Creating the Carrot
-
Carrot Body:
Roll orange clay into a tapered cone shape. Keep the top rounded and somewhat thick, gradually thinning it out to a blunt point at the bottom. -
Texture Lines:
Use a knife tool or the side of your needle tool to press horizontal, slightly diagonal lines across the carrot. I prefer to vary the length of these lines to make it look organic. -
Greenery:
Shape a small mound of green clay for the top. Use a needle tool to create rough, vertical textures on it to simulate chopped greens, then attach it to the top of the carrot. -
Insert Hardware:
Insert an eyepin securely into the top of the greenery, ensuring it goes deep enough into the orange clay for stability.
Matte Finish Magic
To get the soft, natural look shown in the photo, skip the glossy glaze. Use a specialized matte varnish or leave the clay raw if it’s high quality.
Step 3: Making the Mushroom
-
Cap Shape:
Form a dome shape using light tan or beige clay. Flatten the bottom side gently so it has a defined edge. -
Stalk Creation:
Roll a cylinder of darker biscuit-colored clay for the stalk. Taper the top slightly so it fits neatly under the cap. -
Stalk Texture:
Before attaching, use a needle tool to poke random, textural dots and small dashes all over the stalk to give it an earthy look. -
Assembly:
Press the stalk firmly into the center of the underside of the cap. You can add a drop of liquid clay here if you want extra bond strength. -
Insert Hardware:
Insert your final eyepin through the top center of the mushroom cap.
Step 4: Faces, Baking & Assembly
-
Sculpting Faces:
For all three charms, use black clay rolled into microscopic balls for eyes and thin snakes for smiles. Press them gently onto the surfaces. Alternatively, create indentations now and paint them after baking. -
Adding Blush:
Scrape a little pink pastel chalk into a powder. Use a soft brush or your finger to dab rosy cheeks onto each character. -
Baking:
Bake the charms according to your clay manufacturer’s instructions (usually around 275°F/130°C for 15-30 minutes). Let them cool completely. -
Painting (Optional):
If you didn’t use black clay for faces, carefully paint the eyes and mouths now with black acrylic paint and a fine detail brush. -
Final Assembly:
Using pliers, open a jump ring for each charm. Attach the intricate vegetable charms to the chain links of your main keyring, staggering their heights slightly for a clustered look.
Now you have a delightfully healthy bunch of keys that look cute enough to eat


What Really Happens Inside the Kiln
Learn how time and temperature work together inside the kiln to transform clay into durable ceramic.
Animal Toothbrush Holder
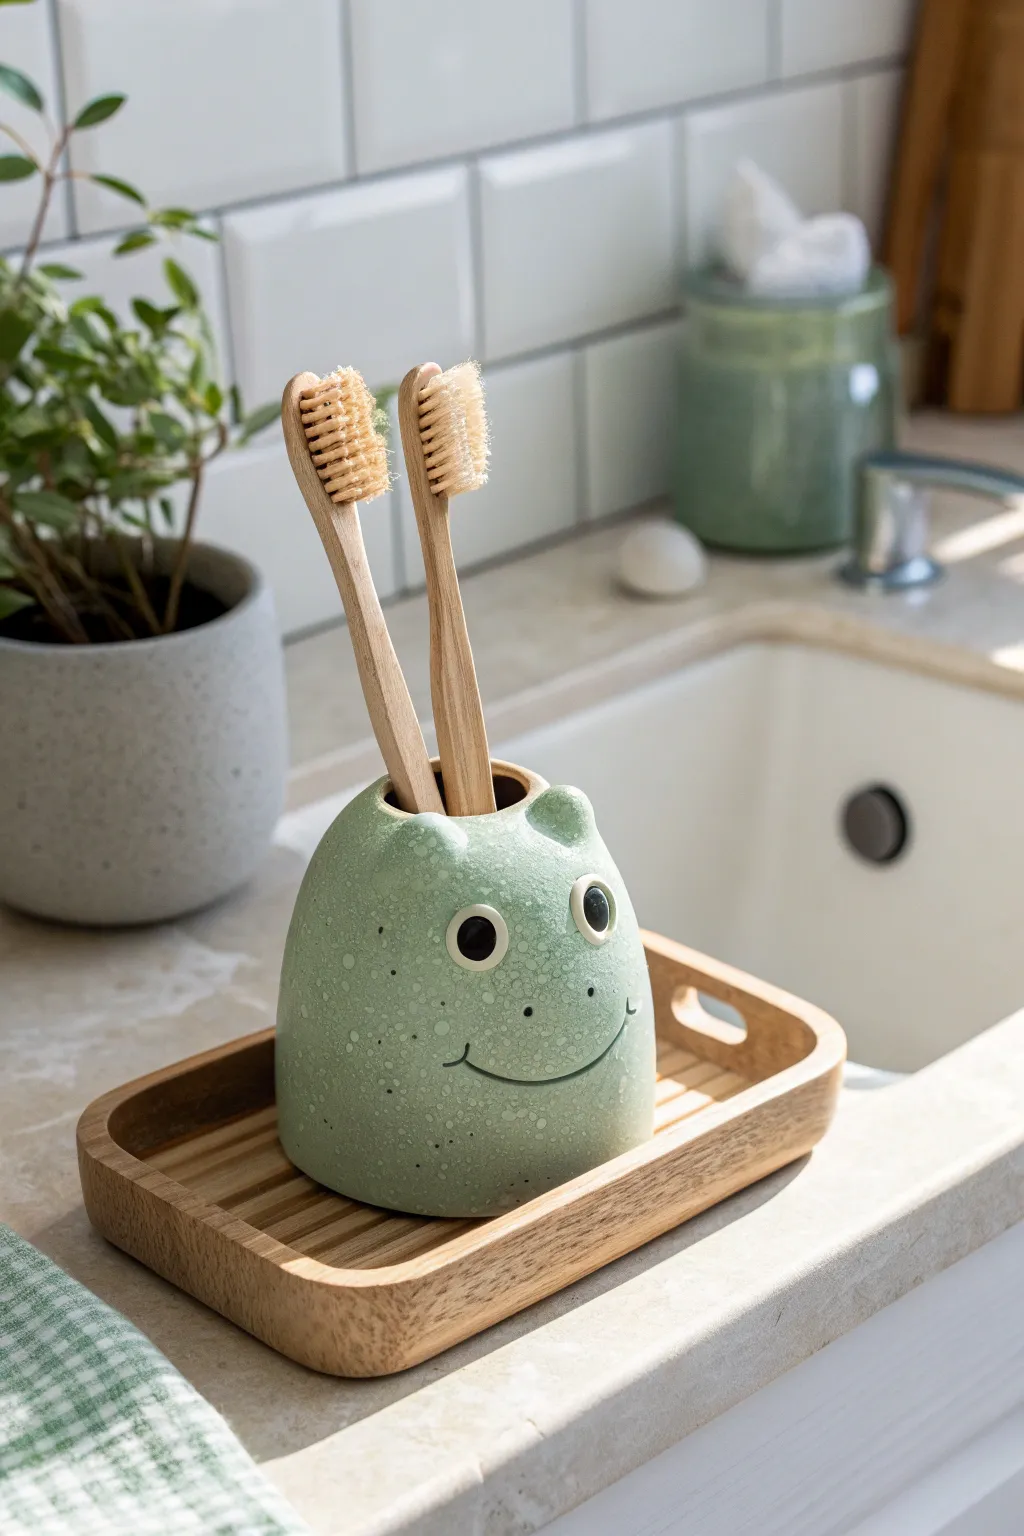
Brighten up your morning routine by sculpting this cheerful frog character, perfectly designed to hold two toothbrushes. This project features a charming speckled green finish and a simple, playful expression that adds a touch of nature-inspired fun to any bathroom sink.
Step-by-Step Tutorial
Materials
- Earthenware clay (white or light-bodied)
- Pottery wheel (helpful but hand-building is possible)
- Needle tool
- Sponge
- Small loop tool
- Underglazes: Mint green, dark green, black, white
- Clear transparent glaze
- Sea sponge for texturing
- Fine paintbrush
- Kiln
Step 1: Forming the Base
-
Throwing the body:
Begin with a well-wedged ball of clay, centering it on the wheel. Open the center and pull up the walls to create a dome or beehive shape, tapering inward at the top to close it off gently without sealing it completely. -
Refining the shape:
Use a rib to smooth the outside, ensuring the base is wider than the top for stability. I like to leave the walls slightly thick to support the carving later. -
Creating the openings:
Once the form is leather-hard, use a circle cutter or a needle tool to cut two distinct holes in the top section. These should be large enough to comfortably fit standard toothbrush handles.
Step 2: Sculpting the Features
-
Adding the eyes:
Roll two small balls of clay for the eyes. Score and slip the area just below the brush openings, then firmly press the balls onto the domed body. -
Shaping the brows:
Add two small curved ridges of clay above the toothbrush holes to act as the frog’s raised brow ridges, blending the seams smoothly into the main body. -
Carving the mouth:
Using a needle tool, gently incise a wide, U-shaped smile. Deepen the line slightly at the ends to give the frog distinct, happy cheeks. -
Smoothing the surface:
Go over the entire piece with a damp sponge to remove any sharp burrs or rough clay crumbs, paying special attention to the rims of the toothbrush holes.
Clean Edges Matter
Use a wet finger to smooth the inner rim of the toothbrush holes thoroughly. Rough edges can scratch toothbrush handles or trap toothpaste residue over time.
Step 3: Painting and Glazing
-
Applying the base color:
After bisque firing, apply three even coats of mint green underglaze to the entire body, avoiding the whites of the eyes. -
Detailed eye work:
Paint the eye mounds white. Once dry, use a fine brush to add large black pupils in the center of the white circles. -
Creating the speckled texture:
Dip a natural sea sponge into a slightly darker green underglaze. Dab off the excess on paper, then lightly stipple the sponge over the green body to create a mottled, realistic frog skin texture. -
Highlighting the mouth:
Run a very fine line of diluted dark green or black underglaze into the carved smile groove to make the expression pop. -
Sealing the piece:
Once the underglaze is completely dry, dip or brush on a clear transparent glaze over the entire piece to make it watertight and glossy. -
Final firing:
Fire the piece in the kiln according to your clay and glaze specifications (typically cone 5 or 6 for durability).
Wobbly Frog?
If the base isn’t flat, sand the bottom against a flat surface or piece of sandpaper after the bisque fire but BEFORE glazing to ensure it sits perfectly still.
Your new amphibian friend is now ready to keep your toothbrushes organized and bring a smile to your face every morning
Small Succulent Planter
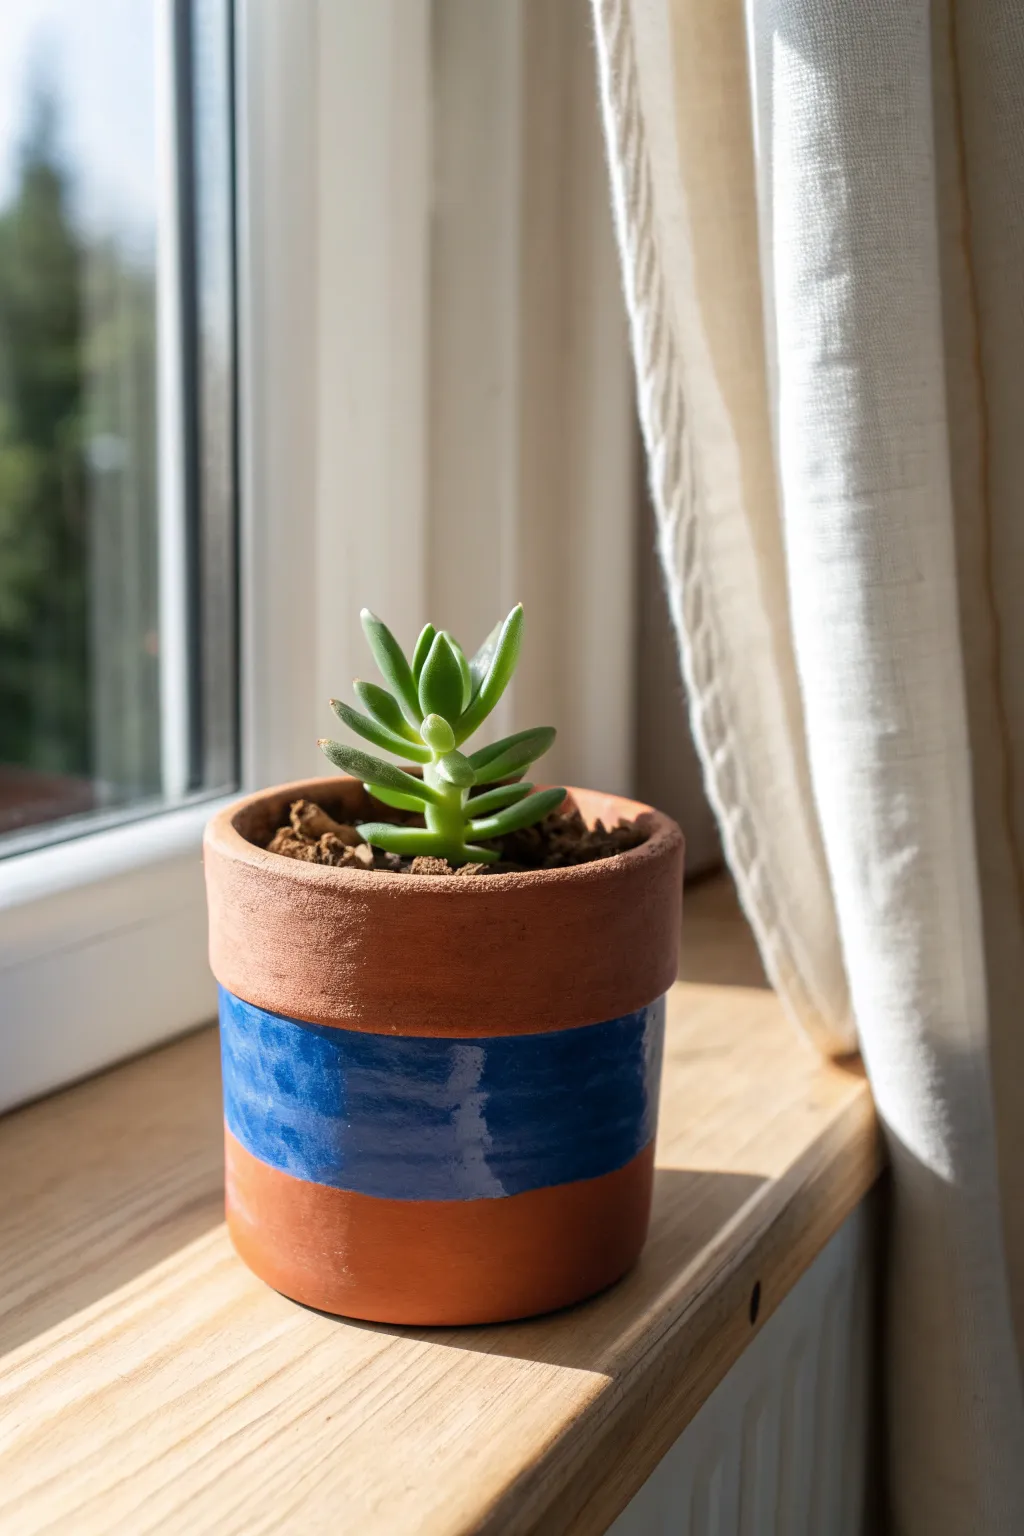
Brighten up any windowsill with this charming red clay planter featuring a bold, glossy blue stripe. The contrast between the matte terracotta texture and the smooth, vibrant glaze gives this simple cylinder pot a modern yet rustic appeal.
Step-by-Step Guide
Materials
- Terracotta clay (or red earthenware)
- Rolling pin
- Clay guide sticks (approx. 1/4 inch thick)
- Circular template or cookie cutter (approx. 3-4 inch diameter)
- Fettling knife or craft knife
- Scoring tool or old toothbrush
- Slip (clay and water mixture)
- Sponge
- Cobalt blue glaze suitable for earthenware
- Flat glazing brush
- Kiln access (or suitable oven for polymer alternatives)
Step 1: Forming the Base
-
Prepare the slab:
Begin by wedging your terracotta clay to remove air bubbles. Using guide sticks on either side, roll out a consistent slab of clay about 1/4 inch thick. -
Cut the base:
Use your circular template or cookie cutter to punch out a perfect circle from the slab. This will be the bottom of your pot. -
Measure the walls:
Calculate the circumference of your base circle. Cut a long rectangular strip from the remaining slab that matches this length plus a tiny bit for overlap, with a height of about 3 to 4 inches. -
Texture the edges:
Score the outer edge of your circular base and the bottom long edge of your rectangular strip using a scoring tool or fork to create a rough texture for bonding.
Wonky Walls?
If your cylinder keeps collapsing or warping while you build, the clay is too wet. Let the slab stiffen up to a leather-hard state for 20 minutes before assembling.
Step 2: Assembling the Cylinder
-
Join the walls:
Apply slip to the scored areas. Carefully wrap the rectangular strip around the base circle, pressing the scored edges together firmly. -
Seal the vertical seam:
Where the two ends of the wall meet, score and slip the edges. Overlap them slightly or butt them together, then smudge the clay across the seam with your thumb to seal it completely. -
Reinforce the interior:
Roll a very thin coil of clay and press it into the bottom interior seam where the wall meets the floor. Smooth this out with a modeling tool to ensure a watertight bond. -
Refine the shape:
With the pot constructed, use a damp sponge to smooth out any fingerprints or rough seams. Pay special attention to the rim; I like to gently round it off with the sponge so it isn’t sharp. -
Dry and fire:
Let the pot dry slowly under loose plastic to prevent cracking. Once bone dry, bisque fire it in the kiln according to your clay’s specifications.
Step 3: Glazing the Stripe
-
Clean the surface:
Wipe the bisque-fired pot with a damp sponge to remove any kiln dust, which can prevent the glaze from sticking properly. -
Mark the band:
Using a pencil, lightly sketch two horizontal lines around the middle of the pot to define where your blue stripe will go. A banding wheel helps keep the lines straight if you have one. -
Apply the glaze:
Dip your flat brush into the cobalt blue glaze. Carefully fill in the area between your pencil lines. The raw bisque absorbs moisture quickly, so apply confident, smooth strokes. -
Layer for opacity:
Let the first coat dry for a few minutes. Apply a second coat of glaze to ensure the deep blue color is solid and opaque after firing. -
Clean up edges:
If any glaze dripped outside your lines onto the raw clay area, carefully scrape it away with a knife or wipe it with a clean, damp corner of your sponge. -
Final firing:
Place the pot back in the kiln for the glaze firing. Ensure the unglazed bottom is clean so it doesn’t stick to the kiln shelf.
Masking Tape Trick
For a super crisp glaze line, use automotive masking tape or specialized ceramic tape to mark off stripe boundaries. Remove the tape before the glaze fully dries to avoid chipping.
Now you have a beautiful custom home ready for your favorite little plant succulent to take root

TRACK YOUR CERAMIC JOURNEY
Capture glaze tests, firing details, and creative progress—all in one simple printable. Make your projects easier to repeat and improve.
Face Vase or Bud Vase
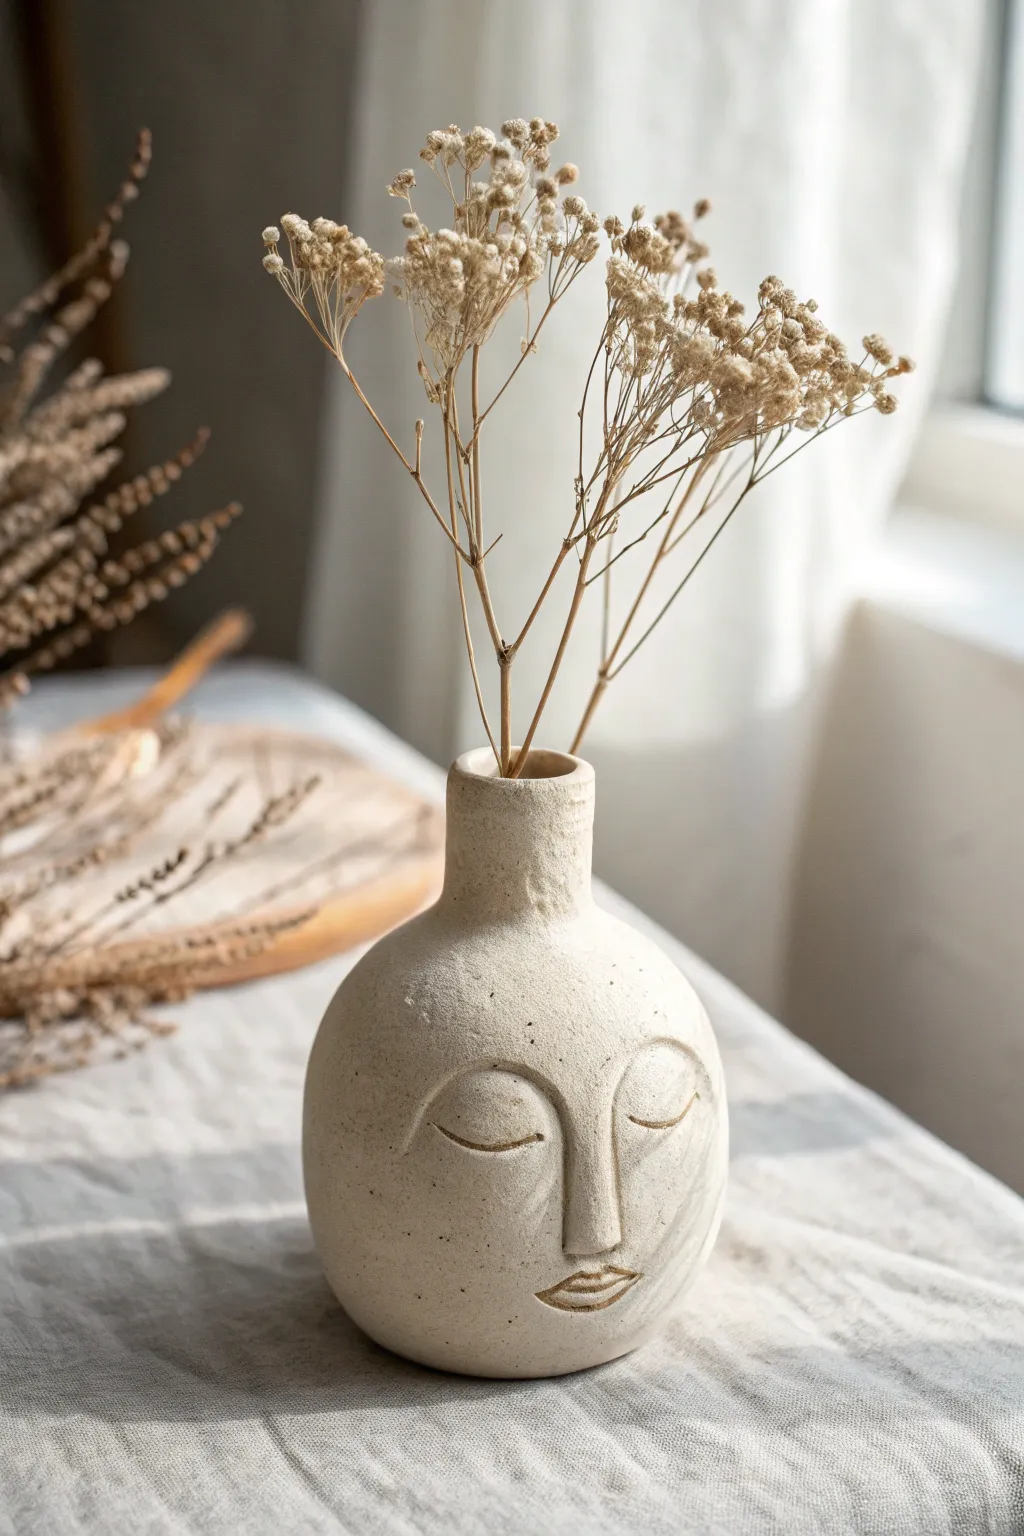
Capture a serene moment with this handcrafted clay bud vase featuring a stylized, peaceful face. Its rustic texture and creamy white finish give it an artisanal, earthen charm perfect for holding dried wildflowers.
Detailed Instructions
Materials
- Air-dry clay or polymer clay (white or cream)
- Small rolling pin
- Pottery needle tool or toothpick
- Modeling tool with a small ball end
- Small sponge
- Water (for smoothing)
- Sandpaper (fine grit)
- Matte white acrylic paint (optional)
- Matte varnish or sealant
Step 1: Forming the Vase Base
-
Prepare the clay:
Start by conditioning your clay. Knead a ball about the size of a large orange until it is warm, pliable, and free of air bubbles. -
Shape the main body:
Roll the clay into a smooth sphere. Gently tap the bottom against your work surface to create a flat base so the vase stands on its own without wobbling. -
Create the opening:
Using your thumb, press creating a hole in the center of the sphere. Pinch and rotate the clay to open up the internal space, ensuring the walls remain about 1/4 inch thick. -
Form the neck:
Instead of widening the opening further, gently squeeze the clay upwards at the top to form a narrow neck. You can roll a small coil of clay and blend it onto the rim to add height if needed. -
Smooth the surface:
Dip a small sponge in water and wipe down the exterior. We aren’t looking for perfection—a little grit adds character—but ensure there are no deep cracks.
Fixing Cracks
If small cracks appear while drying, don’t panic. Mix a tiny bit of fresh clay with water to make a paste and fill the gaps, then smooth over with a damp finger.
Step 2: Sculpting the Face
-
Mark the features:
Lightly trace the placement of the nose and eyes using a needle tool. The nose should start high on the sphere’s curve. -
Add the nose:
Roll a small, elongated triangle of clay. Score the back of it and the spot on the vase where it will sit. Add a dab of water (slip) and press the nose firmly onto the vase face. -
Blend the nose:
Use a modeling tool or your finger to smooth the edges of the nose into the vase body so it looks like it emerges naturally from the surface rather than just sitting on top. -
Create the eye sockets:
Roll two small, flat semi-circles of clay. Attach them on either side of the nose bridge to create the subtle relief of eyelids. -
Detail the eyes:
Using a needle tool, carve a simple, downward-curving arch into each eyelid pad to represent closed lashes. Press gently to create a distinct groove. -
Sculpt the mouth:
Roll a tiny oval for the lips. Attach it below the nose. Use your needle tool to press a horizontal line across the center, giving the lips definition. -
Refine the texture:
Take a stiff bristle brush or a crumpled ball of foil and gently tap it over the entire surface of the vase (avoiding the delicate facial features) to create a stone-like texture.
Step 3: Finishing Touches
-
Dry the piece:
Allow the clay to dry completely. For air-dry clay, this takes 24-48 hours. If using polymer, bake according to package instructions. -
Sand imperfections:
Once hardened, specific rough spots can be softened with fine-grit sandpaper, though leaving some texture enhances the rustic look. -
Paint (Optional):
If your clay isn’t the desired shade, apply a coat of matte white or cream acrylic paint. I prefer dabbing the paint on with a sponge rather than brushing to maintain that stone texture. -
Seal the work:
Apply a matte varnish to protect the surface. Note that unless you use a glass insert or specific waterproof sealant, air-dry clay vases are best for dried flowers only.
Adding Speckles
To mimic the speckled stoneware look in the photo, flick a toothbrush loaded with diluted brown paint over the finished white vase for a faux-ceramic finish.
Place your favorite dried stems inside and enjoy the calm presence this piece brings to your shelf
Geometric Candle Holders
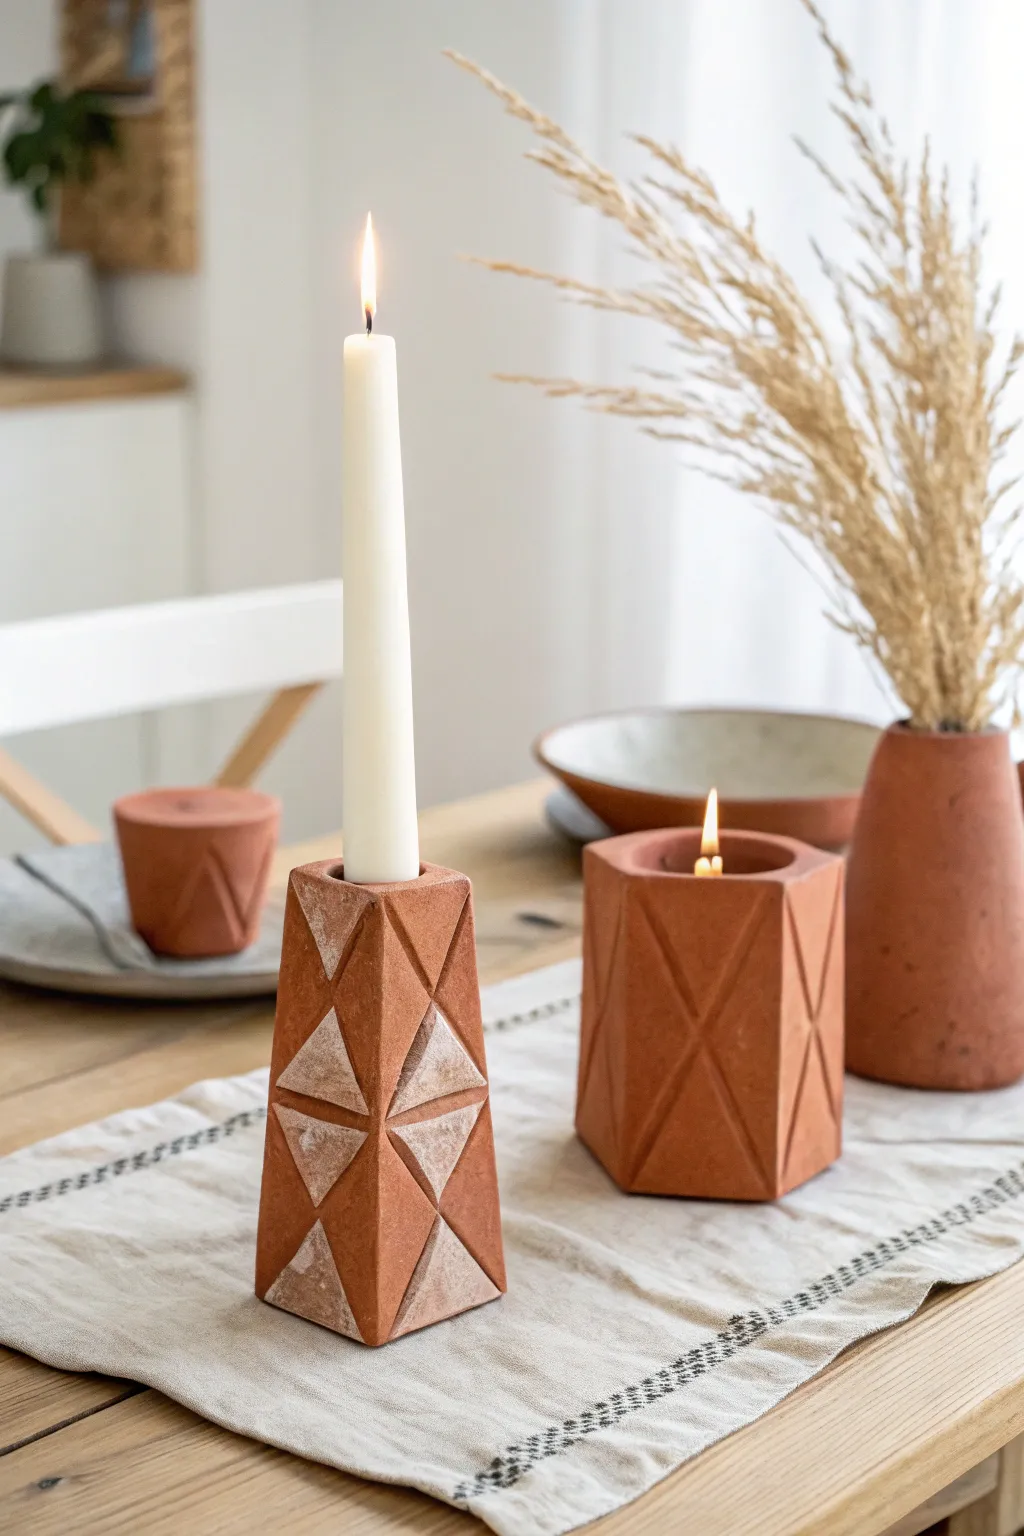
Bring earthy warmth to your table with these striking geometric candle holders, featuring deep relief patterns that play with light and shadow. Crafted from terracotta-colored clay, this set combines a tall tapered pillar for dinner candles and a sturdy hexagonal vessel for tea lights.
How-To Guide
Materials
- Terracotta air-dry clay or kiln-fire clay
- Rolling pin
- Two long wooden dowels (1/4 inch thick) for depth guides
- Carving tools (loop tool and needle tool)
- Ruler or straight edge
- Craft knife or fettling knife
- Slip (clay mixed with water)
- Small sponge
- Sandpaper (medium and fine grit)
- White acrylic paint (optional, for whitewash effect)
Step 1: Shaping the Tall Holder
-
Prepare the block:
Start with a solid block of clay roughly 3 inches wide and 6-7 inches tall. Slam it gently on your work surface to square off the bottom so it stands perfectly flat and stable. -
Taper the form:
Using a knife or a cheese cutter wire, slice the sides of the block so they slope inward toward the top, creating a truncated pyramid or obelisk shape. Smooth the cut sides with a damp sponge. -
Create the candle recess:
Center a standard taper candle on the top face of your clay tower. Trace around it, then carefully dig out a hole about 1 inch deep using a loop tool. Test the fit frequently; it should be snug but not tight. -
Draft the grid:
With a needle tool and a ruler, lightly score a grid of intersecting diagonal lines across all four vertical faces. Aim for large diamond shapes that can be bisected into triangles. -
Carve the relief:
Using a sharp ribbon tool, carve out alternating triangular sections. Angle your cuts inward to create deep, faceted recessions while leaving raised triangular plateaus. This depth is key for the geometric look.
Clean Lines Tip
When carving the geometric shapes, wait until the clay is ‘leather hard’ (firm like cheddar cheese). If it’s too soft, the lines will be mushy; too dry, and it will chip.
Step 2: building the Tealight Hexagon
-
Roll the slab:
Roll out a slab of clay to a consistent 1/4 inch thickness. I find using wooden dowels on either side of the rolling pin helps keep the slab perfectly even. -
Cut the walls:
Measure and cut a long rectangular strip, approximately 3 inches tall and long enough to fold into a hexagon (roughly 12-14 inches long). -
Cut the base:
Cut a separate hexagonal base piece that matches the intended width of your holder. -
Score and slip:
Score (scratch) the edges of the base and the bottom edge of your wall strip. Apply clay slip to these textured areas to act as glue. -
Assemble the form:
Wrap the wall strip around the base to form a hexagon. Score and slip the vertical seam where the walls meet, blending the clay with a modeling tool so the join is invisible. -
Thicken the rim:
Add a small coil of clay to the inner rim to create a wide, flat top edge. Smooth this down so the walls appear chunky and solid, typical of this geometric style. -
Carve the pattern:
Once the clay is leather-hard (firm but cool), sketch large X shapes on each hexagonal face. Use a carving tool to deepen the lines, creating grooves rather than removing entire sections like the tall holder.
Step 3: Finishing Touches
-
Drying:
Allow both pieces to dry slowly under a loose plastic sheet for 24-48 hours to prevent cracking, then uncover to dry completely. -
Sanding:
Once bone dry, sand the flat surfaces to sharpen the geometric angles. Use fine-grit sandpaper to smooth the rims. -
Whitewash technique:
Dilute white acrylic paint with water (50/50 mix). Brush it casually into the carved recesses of the tall holder. -
Wipe back:
Immediately wipe the surface with a damp cloth or paper towel. This leaves the white pigment in the deep textures while revealing the terracotta color on the raised surfaces.
Cracking Fix
If small hairline cracks appear during drying, mix a tiny amount of vinegar into your clay slip and fill the cracks. The vinegar helps the new clay bond to the dry clay.
Place your candles inside and enjoy the modern, architectural touch these bring to your living space
Photo and Card Holders
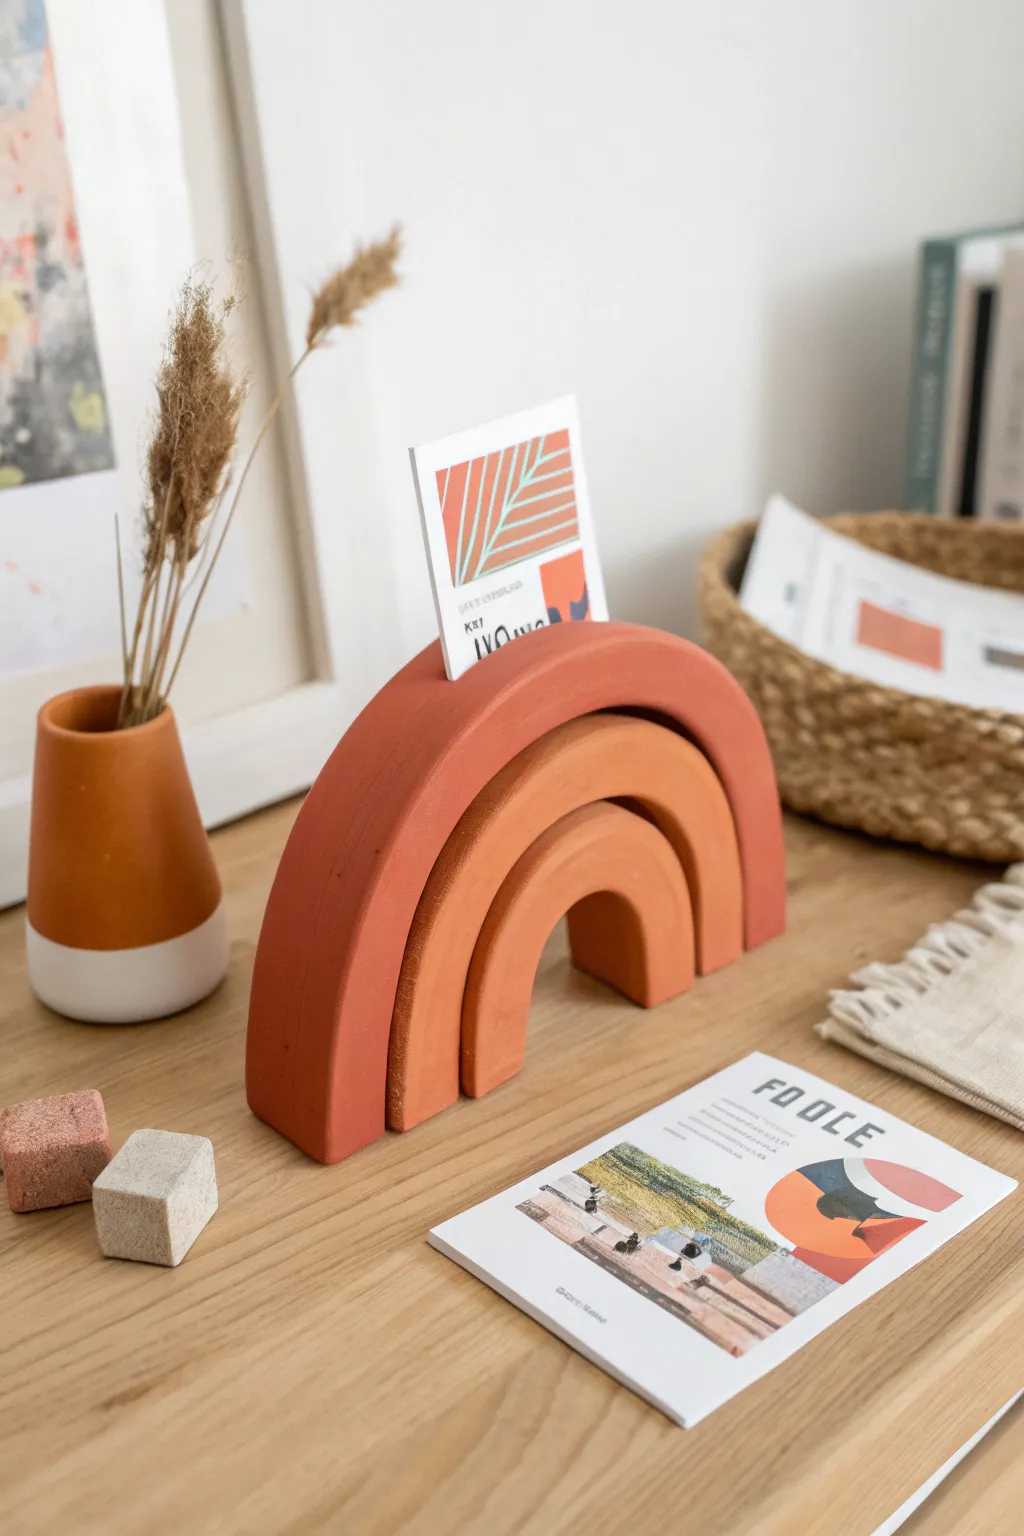
Bring warmth to your desk or shelf with this lovely triple-arch rainbow that doubles as a functional card holder. The project features natural terracotta tones and a nested design that creates a satisfying, architectural feel.
Step-by-Step Guide
Materials
- Terracotta-colored air-dry clay or polymer clay
- Lighter shade of terracotta or beige clay
- Rolling pin
- Sharp crafting knife or clay blade
- Ruler
- Sandpaper (fine grit)
- Parchment paper or smooth work surface
- Small bowl of water (for smoothing)
- Circle cutters or round objects of varying sizes (optional but helpful)
Step 1: Preparing the Clay
-
Condition the clay:
Start by warming up your terracotta clay in your hands. Knead it thoroughly until it becomes pliable and smooth, which prevents cracking later on. -
Mix your colors:
For the middle arch, create a slightly lighter shade by mixing your base terracotta clay with a small amount of white or beige clay. This subtle gradient adds depth to the finished piece. -
Roll out the slab:
Roll your main terracotta clay into a thick slab, approximately 3/4 inch (about 2 cm) thick. It needs to be substantial enough to stand upright on its own.
Cracking Up?
If you see small cracks appearing as the clay dries, mix a tiny bit of fresh clay with water to make a paste (slip) and fill them in, then smooth over.
Step 2: Forming the Arches
-
Cut the largest arch:
Using your knife, cut freehand or use a large round object as a guide to slice out the largest semi-circle arch. It should be roughly 6-7 inches wide at the base. -
Smooth the edges:
Dip your finger in a little water and run it along the cut edges of the clay to smooth out any harsh angles or knife marks. -
Roll the second slab:
Roll out your lighter mixed clay to the same 3/4 inch thickness as the first piece. -
Measure the gap:
Place your large arch on the work surface. Measure the negative space inside the arch to determine exactly how big your second arch needs to be to nestle inside comfortably. -
Create the middle arch:
Cut your second, lighter arch. Test the fit by placing it inside the larger one; you want a snug fit or a very tiny gap, depending on your preference. -
Form the smallest arch:
Repeat the process for the smallest center arch using the original darker terracotta color. This creates a pleasing sandwich of colors. -
Refine the fit:
Assemble all three pieces loosely. If any arch is too tall or wide, carefully trim thin slivers off the edges until they align perfectly at the bottom.
Level Up: Texture
Before drying, gently press a textured fabric or sandpaper onto the surface of the damp clay to give it a stone-like, speckled tactile finish.
Step 3: Adding the Card Slot
-
Create the incision:
Take the largest, outermost arch. Using your ruler as a straight guide, press your craft knife directly into the top center of the arch to create a slice. -
Widen the slot:
Gently wiggle the blade or slice a very thin ‘V’ shape to widen the cut slightly, ensuring it’s wide enough to hold a postcard or photo but tight enough to grip it. -
Check the depth:
Ensure the cut goes about 1/2 inch deep so the card will be stable, but be careful not to slice all the way through the arch.
Step 4: Finishing Touches
-
Final smoothing:
Give the entire surface one last check for fingerprints. A damp sponge or finger works wonders here to erase textures you don’t want. -
Drying setup:
Separate the arches slightly while they dry so they don’t stick together. Place them on a flat surface away from direct heat. -
Rotate while drying:
I find it helpful to flip the pieces over halfway through the drying process (usually after 24 hours for air-dry clay) to ensure the bottom dries evenly. -
Sanding:
Once fully cured and hard, use fine-grit sandpaper to gently buff the flat faces and rounded edges. This gives it that professional, matte ceramic look. -
Clean up:
Wipe away any clay dust with a slightly damp cloth or a soft brush. -
Assembly:
Stack the arches back together. You can glue them for a permanent structure or leave them loose to rearrange later.
Now you have a stylish, minimalist piece of decor ready to display your favorite memories
Desk Organizer Tray Set
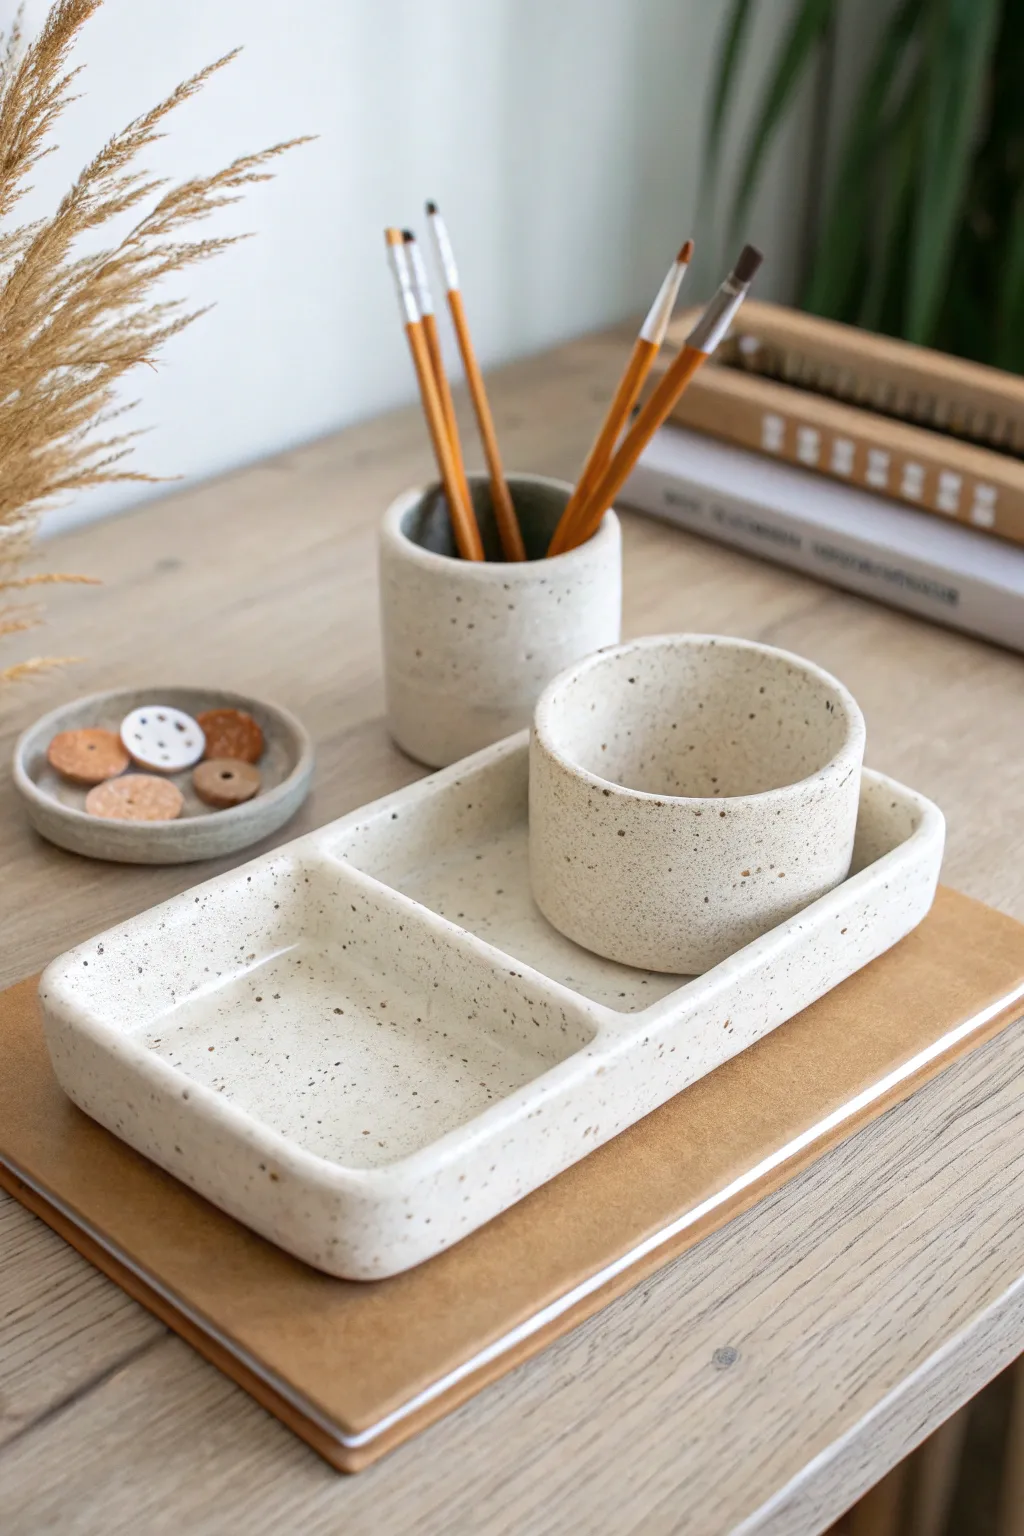
This minimalist desk organizer set features a sleek rectangular tray with a built-in divider, accompanied by matching cylindrical vessels for brushes and small items. The finish mimics the look of natural speckled stone, bringing a calm, earthy aesthetic to your workspace while keeping your essentials tidy.
Step-by-Step
Materials
- Air-dry clay (white or light grey)
- Acrylic rolling pin
- Clay knife or craft blade
- Ruler
- Slip (clay mixed with water)
- Small sponge
- Sandpaper (medium and fine grit)
- Acrylic paint (cream/off-white base)
- Acrylic paint (brown and black for speckling)
- Old toothbrush (for splatter technique)
- Matte sealant or varnish
- Clean water
Step 1: Forming the Main Tray
-
Roll the base slab:
Begin by conditioning your clay and rolling out a smooth slab approximately 1/4 inch thick. Use your ruler and knife to cut a rectangle measuring roughly 8 inches by 4 inches. -
Create the walls:
Roll out a long snake of clay and flatten it slightly to create a strip about 3/4 inch high. Measure the perimeter of your base to ensure the strip is long enough to wrap around the entire rectangle. -
Score and slip:
Score the edges of your rectangular base and the bottom edge of your wall strip using a needle tool or knife. Apply a generous amount of slip to both scored surfaces. -
Attach the walls:
Press the wall strip firmly onto the base. Where the ends of the wall meet, cut them at a 45-degree angle for a cleaner seam, score, slip, and join them together. -
Smooth the seams:
Use your finger or a modeling tool to blend the clay from the wall down onto the base on both the inside and outside. I like to use a slightly damp sponge here to really erase any join lines. -
Add the divider:
Cut a smaller strip of clay to fit the width of the tray. Score and slip the inside walls where you want the divider to go—place it slightly off-center to create one larger and one smaller compartment—and blend it in smoothly. -
Round the edges:
Gently run your wet finger along the top rim of the tray to soften the sharp edges, giving it that rounded, organic stone look seen in the photo.
Natural Texture
Add a teaspoon of used coffee grounds or fine sand into your clay body before rolling. This adds real texture that shows through the paint.
Step 2: Crafting the Vessels
-
Make the brush holder base:
Roll out a small slab and cut a circle about 2.5 inches in diameter for the tall cup’s base. -
Construct the cylinder:
Roll a rectangular slab that is tall enough for your brushes (about 3.5 inches) and long enough to wrap around the circular base. Attach it using the same score-and-slip method. -
Create the small catch-all:
Repeat the process to make a shorter, wider cylinder (or a shallow dish) for items like buttons or paperclips. Aim for a diameter of about 3 inches and a height of 1 inch. -
Refine the shapes:
Once constructed, check that the walls are vertical and the rims are even. Smooth everything with a damp sponge. -
Dry completely:
Let all pieces dry slowly away from direct heat for 24-48 hours. Rotate them occasionally to prevent warping.
Step 3: Finishing and Painting
-
Sand for smoothness:
Once fully dry, sand any rough spots or uneven edges. Start with medium grit and finish with fine grit for a polished stone feel. Wipe away all dust. -
Apply the base coat:
Paint all pieces with an off-white or cream acrylic paint. You may need two coats to get a solid, opaque finish. -
Prepare the speckle paint:
Mix a small amount of brown paint with a tiny drop of water to thin it slightly. Do the same with black paint in a separate palette well. -
Splatter the speckles:
Dip an old toothbrush into the thinned brown paint. Hold it over the pieces and run your thumb across the bristles to flick tiny droplets onto the surface. Repeat sparingly with the black paint. -
Seal the project:
Allow the paint to dry completely. Finish by applying a matte varnish or sealant to protect the surface and enhance the stone-like texture.
Use A Template
For perfectly fitting cylinders, wrap your clay slab around a PVC pipe or a drinking glass covered in parchment paper while forming the walls.
Now you have a sophisticated, custom-made set that brings order and style to your creative space
Mini Magnet Vases
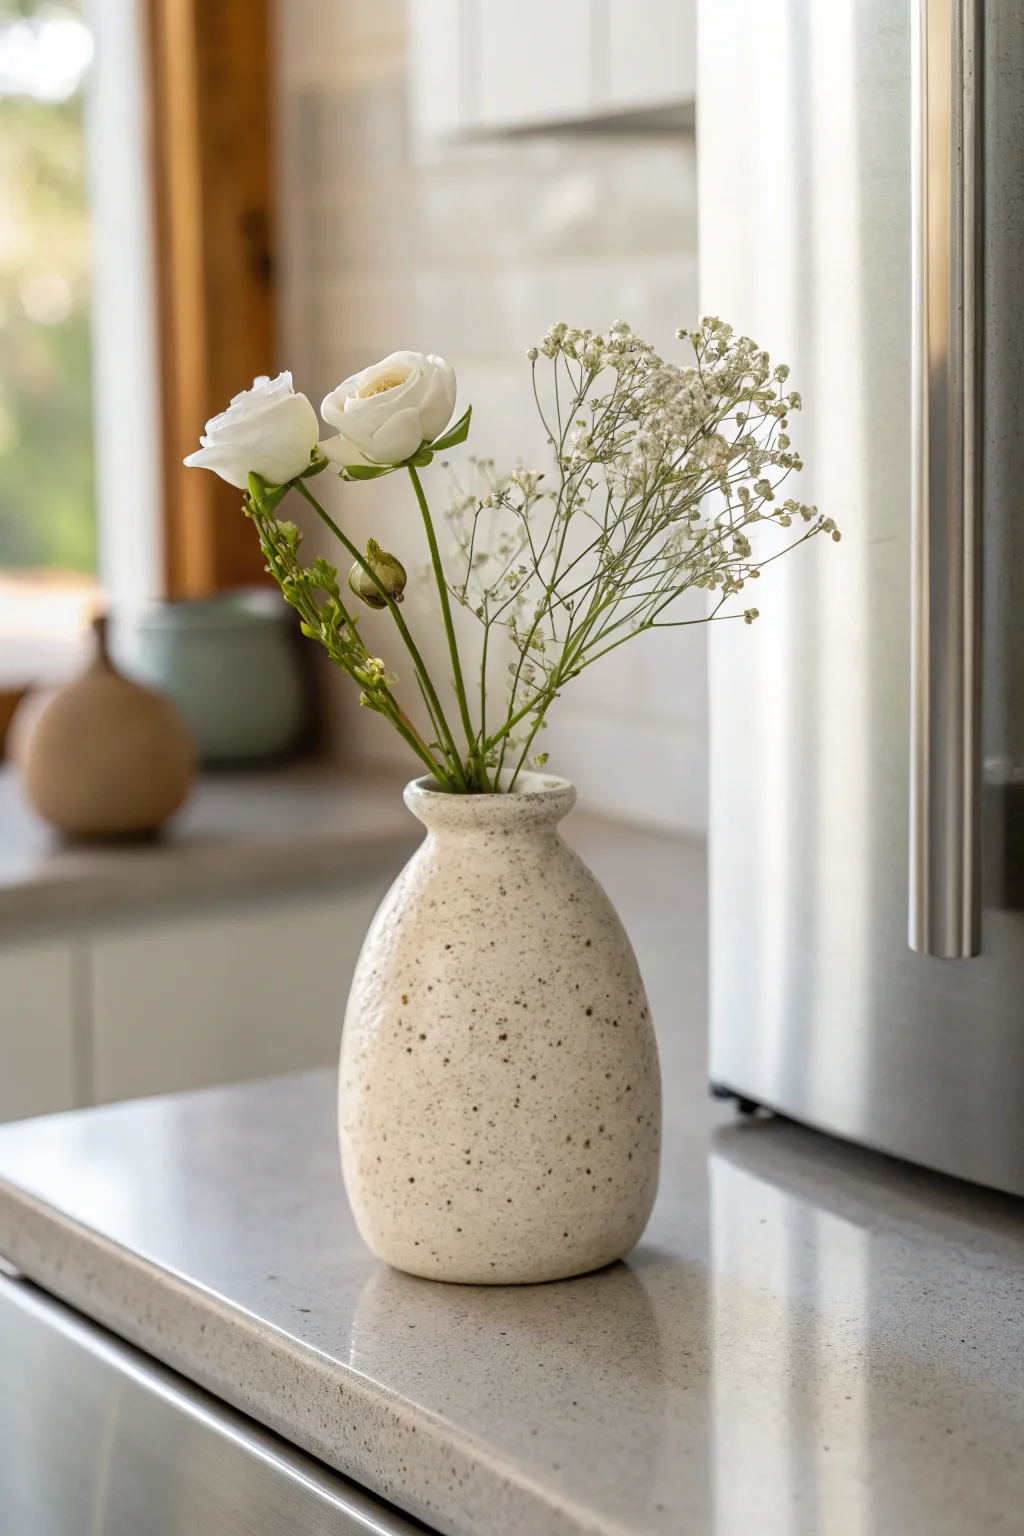
Bring a touch of organic minimalism to your kitchen with this petite, speckled clay vase. Its soft, egg-like shape and textured finish make it the perfect vessel for dainty blooms or dried grasses.
How-To Guide
Materials
- White air-dry clay or polymer clay
- Speckled clay additive (or coarse sand/black pepper)
- Small rolling pin
- Pottery sponge
- Water bowl
- Sculpting tools (needle tool, rib tool)
- Strong neodymium magnet (round disc)
- Two-part epoxy glue
- Gloss varnish or clear sealant (optional)
- Fine grit sandpaper
Step 1: Preparation & Modeling
-
Prepare the Clay Body:
Start by conditioning your white clay until it is soft and pliable. If your clay doesn’t come pre-speckled, knead in a small amount of coarse sand or even ground black pepper to achieve that natural, stony look shown in the photo. -
Form the Base:
Roll a ball of clay about the size of a large plum. Gently tap the bottom of the ball against your work surface to create a flat standing base, ensuring it can sit upright independently. -
Shape the Body:
Using your palms, gently smooth the sides of the ball upwards, tapering slightly as you go to create a subtle teardrop or egg-like silhouette. Keep the widest point near the bottom third. -
Create the Opening:
Press your thumb or a thick rounded tool into the top center of the form to create the interior cavity. Be careful not to go too deep or push through the bottom. -
Refine the Neck:
Pinch the clay around the opening to raise a short, distinct neck. I find that rotating the piece slowly while pinching helps keep the thickness uniform. -
Flare the Lip:
Gently gently press the very top edge of the neck outwards to create a slight soft flare or rim, giving it that classic pottery finish. -
Smooth the Surface:
Dip your finger or a pottery sponge lightly in water and run it over the entire exterior. This blends any fingerprints and enhances the smooth, organic feel. -
Flatten the Back:
Since this will be a magnet vase, carefully press the back side of the vase against a flat surface to create a flush plane where the magnet will eventually sit.
Natural Texture Hack
Mix dried coffee grounds into white clay for realistic speckles that smell great while working. The texture mimics expensive stoneware perfectly.
Step 2: Finishing & Assembly
-
Initial Drying:
Set the vase aside to dry according to your clay’s instructions. If using air-dry clay, rotate it occasionally to ensure even drying. -
Sanding:
Once fully cured, use fine-grit sandpaper to buff away any rough spots or sharp edges, particularly around the rim and base. -
Enhance the Speckles:
If your speckles aren’t showing through enough, you can lightly flick a toothbrush loaded with watered-down brown or black acrylic paint over the surface. -
Seal the Interior:
If you plan to use real water for fresh flowers, coat the inside thoroughly with a waterproof varnish or resin. Multiple thin coats work best here. -
Seal the Exterior:
Apply a satin or matte varnish to the outside to protect the clay while maintaining a natural, stoneware appearance. -
Attach the Magnet:
Mix a small amount of two-part epoxy glue in a well-ventilated area. -
Secure the Magnet:
Apply the epoxy to the flat spot you created on the back of the vase and press your neodymium magnet firmly into place. Let this cure undisturbed for several hours. -
Final Polish:
Give the piece a final wipe down with a soft cloth to remove any sanding dust or residue.
Magnet Sliding?
If the magnet slides down the fridge, the vase is too heavy. Hollow out the walls more or use two magnets vertically aligned for extra grip.
Pop in a few sprigs of baby’s breath and enjoy your charming magnetic accent piece
Decorative Wall Hanging Tiles
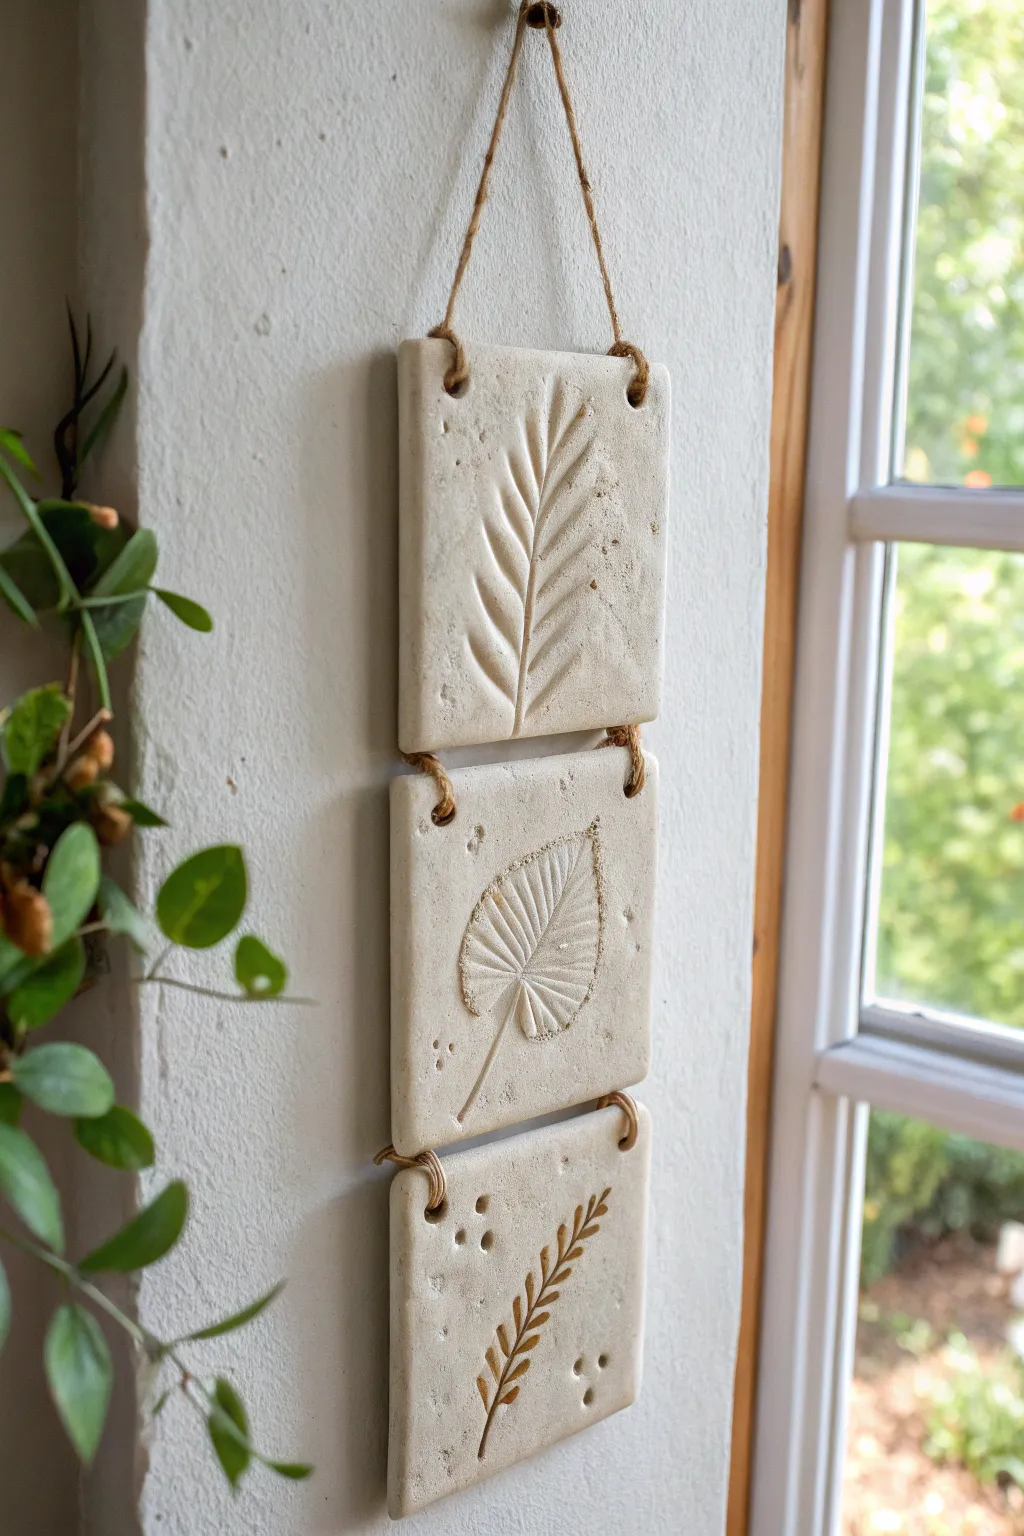
Bring a touch of nature indoors with this rustic three-tier wall hanging crafted from simple air-dry clay. Using real leaves to create delicate relief impressions, you’ll fashion a textured, earthy art piece that looks like fossilized stone.
Step-by-Step
Materials
- White or cream air-dry clay (approximately 1 lb)
- Rolling pin
- Square cookie cutter (approx. 4 inches) or knife and ruler
- Various textured leaves or fern fronds (fresh or faux)
- Wooden skewer or chopstick
- Jute twine or hemp cord
- Sandpaper (fine grit)
- Small bowl of water
- Parchment paper or canvas mat
- Clear matte varnish (optional)
Step 1: Shaping the Tiles
-
Prepare your workspace:
Lay down parchment paper or a canvas mat to prevent the clay from sticking to your table. Take a substantial chunk of air-dry clay and knead it briefly until it is pliable and smooth. -
Roll out the slab:
Using your rolling pin, flatten the clay into an even slab. Aim for a thickness of about 1/4 inch (6mm). If you want a more uniform look, place guide strips or rulers on either side of the clay to support the rolling pin. -
Cut the squares:
Press your square cookie cutter deeply into the clay to create three identical tiles. Alternatively, measure 4-inch squares with a ruler and cut them out cleanly with a craft knife or clay tool. -
Smooth the edges:
Dip your finger into a small bowl of water and gently run it along the cut edges of each square. This softens any sharp corners or jagged bits left by the cutting tool.
Step 2: Creating the Impressions
-
Select your botanicals:
Choose three distinct leaves or fronds that fit nicely within the square borders. Ferns, palm leaves, or simple oval leaves with strong veins work best for clarity. -
Position the first leaf:
Place your first leaf centrally on one clay square. Ensure the vein side is facing down into the clay, as the veins provide the most detailed impression. -
Press the design:
Gently roll over the leaf with your rolling pin, applying firm, even pressure. You want to embed the leaf flush with the clay surface without distorting the square’s shape. -
Reveal the imprint:
Carefully lift the stem of the leaf and peel it away from the clay. I find using a needle tool or tweezers helps grab the stem if it’s pressed in too deep. -
Repeat for remaining tiles:
Repeat the pressing process for the other two tiles using different leaf designs. For variety, you can use a small tool to add extra texture dots or ‘imperfections’ around the leaves for a stony look. -
Create hanging holes:
Use a wooden skewer or chopstick to poke holes in the corners of the tiles. The top tile needs two holes at the top and two at the bottom. The middle tile needs the same. The bottom tile only needs two holes at the top.
Use Fresh Leaves
Use fresh, green leaves rather than dried brittle ones. Fresh leaves are flexible and won’t crumble into the clay, leaving a much cleaner imprint.
Step 3: Assembly and Finishing
-
Let them dry:
Place the tiles on a flat wire rack or mesh screen to dry completely. This usually takes 24 to 48 hours depending on humidity. Flip them occasionally to ensure they dry flat. -
Sand for smoothness:
Once fully dry and hard, take a piece of fine-grit sandpaper and lightly buff the edges and surface. This removes any final roughness and gives the piece a professional finish. -
Seal the clay (optional):
If you want to protect the tiles from moisture or dust, apply a thin coat of clear matte varnish. This will slightly darken the clay but preserves the natural look. -
Cut the twine:
Cut four short pieces of jute twine (about 4 inches each) for the connections, and one longer piece (about 12 inches) for the main hanger. -
Connect the tiles:
Thread a short piece of twine through the bottom left hole of the top tile and the top left hole of the middle tile. Knot the ends securely at the front to create a rustic exposed knot. Repeat for the right side. -
Attach the bottom tile:
Repeat the knotting process to connect the bottom of the middle tile to the top of the final tile using the remaining short twine pieces. -
Add the hanger:
Thread the long piece of twine through both top holes of the uppermost tile. Knot the ends at the front of the tile, leaving a loop of slack cord in the middle for hanging.
Natural Dye Wash
After drying, rub a wash of diluted brown acrylic paint or strong coffee into the grooves of the leaves, then wipe the surface clean to make the texture pop.
Hang your new nature-inspired artwork near a window to let the natural light highlight the beautiful textures you created