
Air dry clay is one of my favorite ways to get that satisfying “I made this with my hands” feeling without needing any fancy equipment. If you’ve got a little table space and the urge to make something cute or useful, these air dry clay ideas will keep you happily busy.
Classic Pinch-Pot Trinket Dish
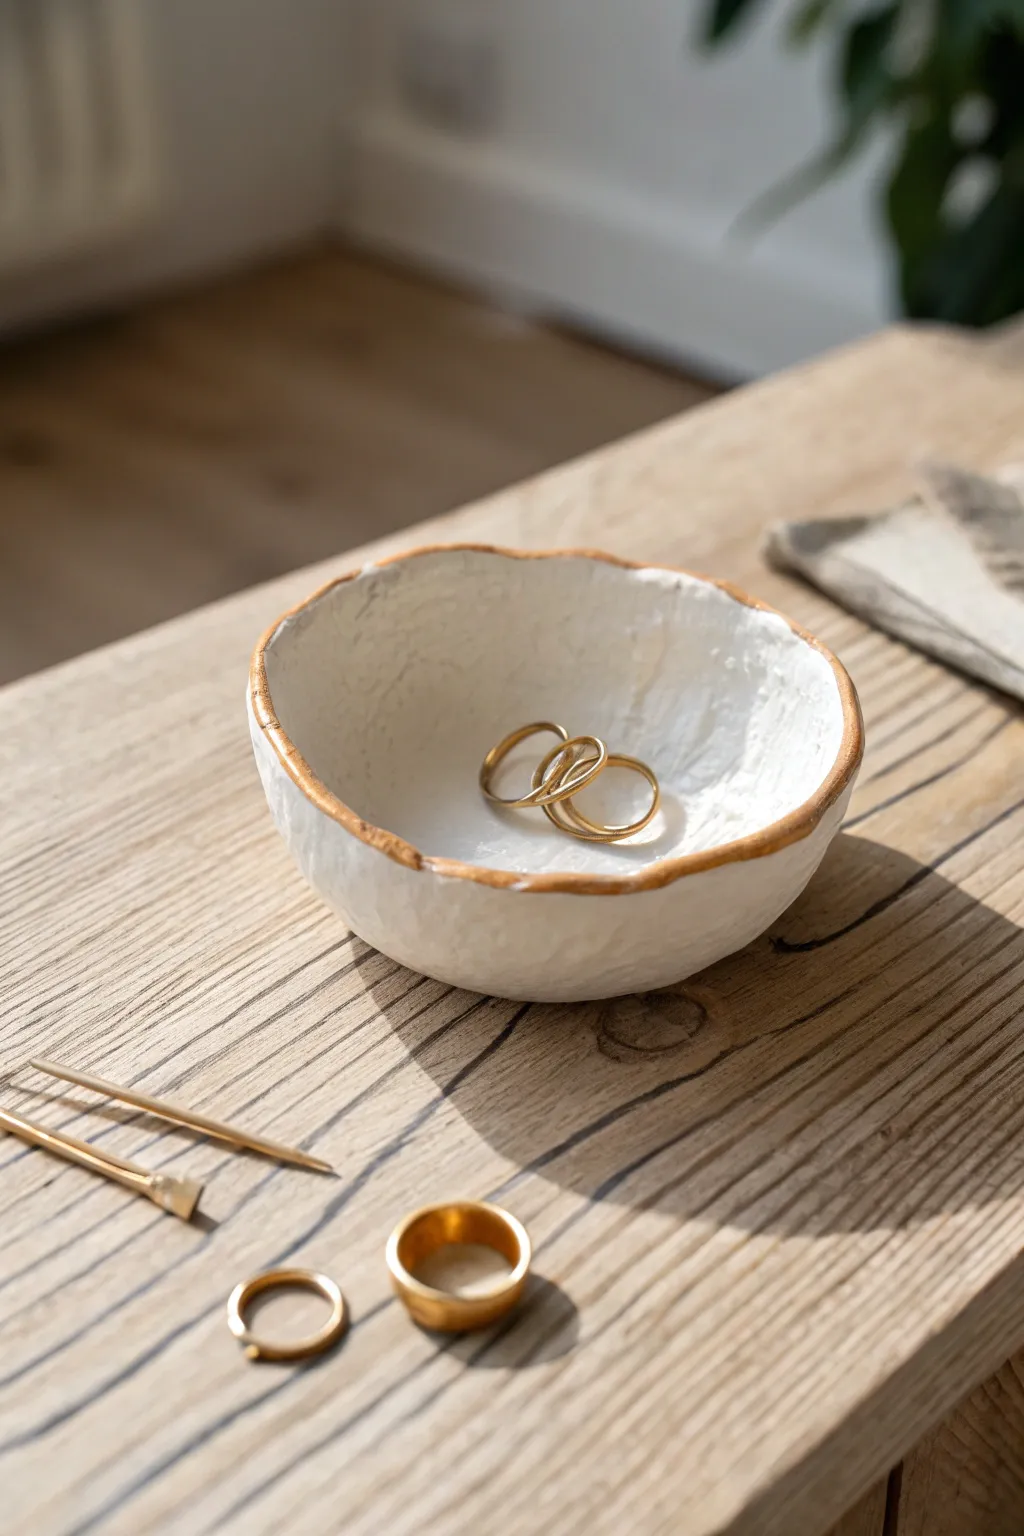
Embrace the beauty of imperfection with this lovely, organic-shaped trinket dish. The textured white clay paired with a delicate painted gold edge creates a high-end, artisanal look perfect for holding your favorite rings.
Detailed Instructions
Materials
- White stone air dry clay
- Small bowl of water
- Rolling pin (optional)
- Sandpaper (fine grit)
- Gold acrylic paint or liquid gold leaf
- Small round paintbrush
- Gloss varnish or clear sealant
Step 1: Shaping the Clay
-
Prepare your clay:
Start by grabbing a handful of air dry clay, roughly the size of a tangerine or a tennis ball, depending on how large you want your final dish to be. Knead it in your hands for a minute to warm it up and make it pliable. -
Form a sphere:
Roll the clay between your palms or on a clean work surface until you have a smooth, round ball. Try to smooth out any major cracks now, as they are harder to fix later. -
Start the pinch pot:
Hold the ball in one hand. With your other hand, push your thumb firmly into the center of the ball, stopping about a half-inch from the bottom. This creates the foundational opening. -
Pinch the walls:
Gently pinch the clay between your thumb (on the inside) and fingers (on the outside). Rotate the ball as you pinch, working your way around the circumference to thin out the walls evenly. -
Widen the bowl:
Continue pinching and pulling the clay slightly upwards and outwards. Aim for a wall thickness of about a quarter-inch. Don’t worry about perfect symmetry; the charm of this project is its organic feel. -
Flatten the base:
Once you are happy with the rough shape, gently tap the bottom of the bowl on your table to create a flat base so it sits stably without wobbling.
Smooth Operator
Keep a small sponge damp with water nearby. Use it to gently wipe the clay surface while shaping to prevent premature cracking without over-wetting the walls.
Step 2: Refining and Drying
-
Create texture:
Instead of smoothing everything perfectly with water, embrace the finger marks and slight dimples. I like to leave some of these natural impressions to give it that handmade, stone-like character seen in the photo. -
Refine the rim:
Run your finger along the top edge. It shouldn’t be sharp, but it also doesn’t need to be perfectly level. Allow it to wave slightly or dip in places for that rustic look. -
Smooth the interior:
Dip your finger in a tiny bit of water and run it smoothly over the inside bottom of the bowl. This ensures a nice clean surface for your jewelry to rest on, contrasting with the textured exterior. -
Let it dry:
Place your bowl in a safe spot away from direct sunlight. Allow it to dry completely for 24-48 hours. The clay will turn from a cool gray to a chalky white when fully dry. -
Sanding (optional):
If there are any sharp or jagged bits on the rim that you don’t like, gently buff them away with fine-grit sandpaper. Wipe away the dust with a barely damp cloth.
Step 3: Decoration
-
Prepare the gold:
Shake your liquid gold leaf or mix your gold metallic acrylic paint well. You want an opaque, rich metallic coverage for the rim. -
Paint the rim:
Using a small round brush, carefully paint the very top edge of the bowl. Let the brush naturally follow the uneven contours of the rim you created. -
Add the drip effect:
Allow the paint to extend just slightly down the outer and inner edge in a few random spots. This makes the gold look like it was dipped or naturally worn, rather than perfectly lined. -
Seal the piece:
Once the gold is completely dry, apply a coat of gloss varnish or clear sealant over the entire bowl. This protects the clay from moisture and gives it a finished ceramic sheen. -
Final cure:
Let the varnish cure according to the bottle instructions before placing any rings or jewelry inside.
Level Up: Speckled Stone
Knead roughly ground black pepper or dried coffee grounds into the wet clay before shaping to create a faux speckled pottery glaze effect.
Now you have a chic, handmade vessel ready to display your daily treasures.


Terrazzo-Style Coasters
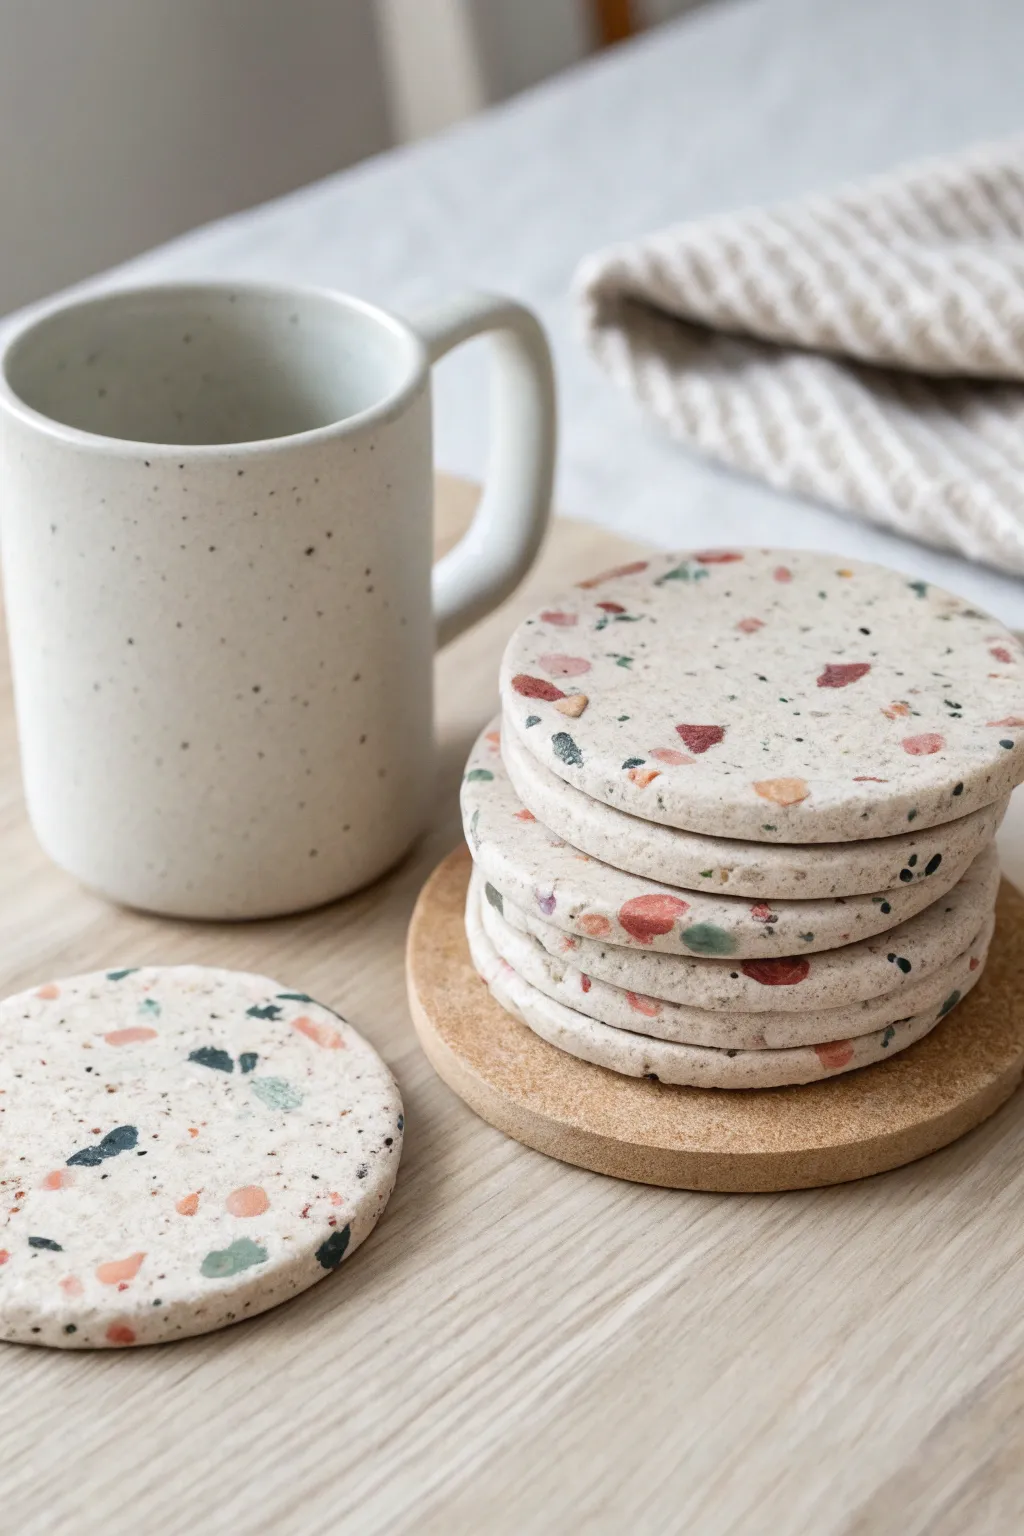
Bring the trendy Italian terrazzo look into your home with these deceptively simple speckled coasters. Using colored clay chips embedded into a neutral base, you’ll create a sophisticated, durable set that looks like polished stone but is light and easy to craft.
How-To Guide
Materials
- White or cream air dry clay
- Acrylic paints (terracotta, sage green, navy blue, mustard yellow)
- Rolling pin
- Circular cookie cutter or jar lid (approx. 3.5-4 inches)
- Sandpaper (medium and fine grit)
- Gloss or satin varnish/sealer
- Self-adhesive cork backing or thin cork sheet
- Craft knife
- Parchment paper or non-stick mat
Step 1: Preparing the Terrazzo Chips
-
Color small batches:
Pinch off small grap-sized balls of white clay. Knead a drop of acrylic paint into each ball to create your accent colors: terracotta, sage, navy, and mustard. -
Flatten the colored clay:
Roll each colored ball out very thinly on parchment paper until they are about 1-2mm thick. These don’t need to be perfect shapes. -
Dry the sheets:
Let these thin colored sheets dry until they are leathery or fully hard. Since they are thin, this might only take 30-60 minutes. -
Create the chips:
Once dry, crumble or cut the colored sheets into small, irregular shards. Aim for a mix of sizes, from tiny specks to larger chunks.
Chip Tip
Make your colorful chips completely dry and hard before rolling them into the white base. If they are wet, they will smear instead of keeping sharp, stone-like edges.
Step 2: Forming the Coasters
-
Prepare the base:
Take a larger chunk of white clay and roll it into a thick slab, approximately 1/4 inch thick. -
Add the chips:
Generously scatter your dried colored chips over the surface of the wet white slab. Press them gently so they stick. -
Embed the pattern:
Use your rolling pin to roll over the slab again. This forces the chips into the clay and creates a smooth, flush surface. -
Cut the circles:
Use your circular cutter or jar lid to cut out the coaster shapes. Clean up the edges with a bit of water on your fingertip to smooth any roughness. -
Slow drying:
Place the rounds on a wire rack or clean parchment paper. Let them dry for 24-48 hours, flipping occasionally to prevent warping.
Step 3: Finishing Touches
-
Sanding for stone effect:
Once bone dry, sand the top surface. Start with medium grit to expose the crisp edges of the colored chips, then switch to fine grit for a smooth finish. -
Dust off:
Wipe away all sanding dust with a slightly damp cloth or a dry brush. The pattern should look sharp and clear now. -
Seal the surface:
Apply 2-3 coats of a waterproof varnish or sealant. This is crucial for coasters to prevent moisture damage from cups. -
Add cork backing:
Cut circles of cork sheet slightly smaller than your clay rounds and glue them to the bottom, or attach pre-cut adhesive cork pads to protect your table.
Make It Marble
For a different vibe, don’t let the colored clay dry fully. partially knead wet colored clay into the white base for a swirled marble effect instead of terrazzo.
Stack your finished set on the coffee table and enjoy that modern, architectural feel with your morning coffee


Leaf-Imprint Jewelry Tray
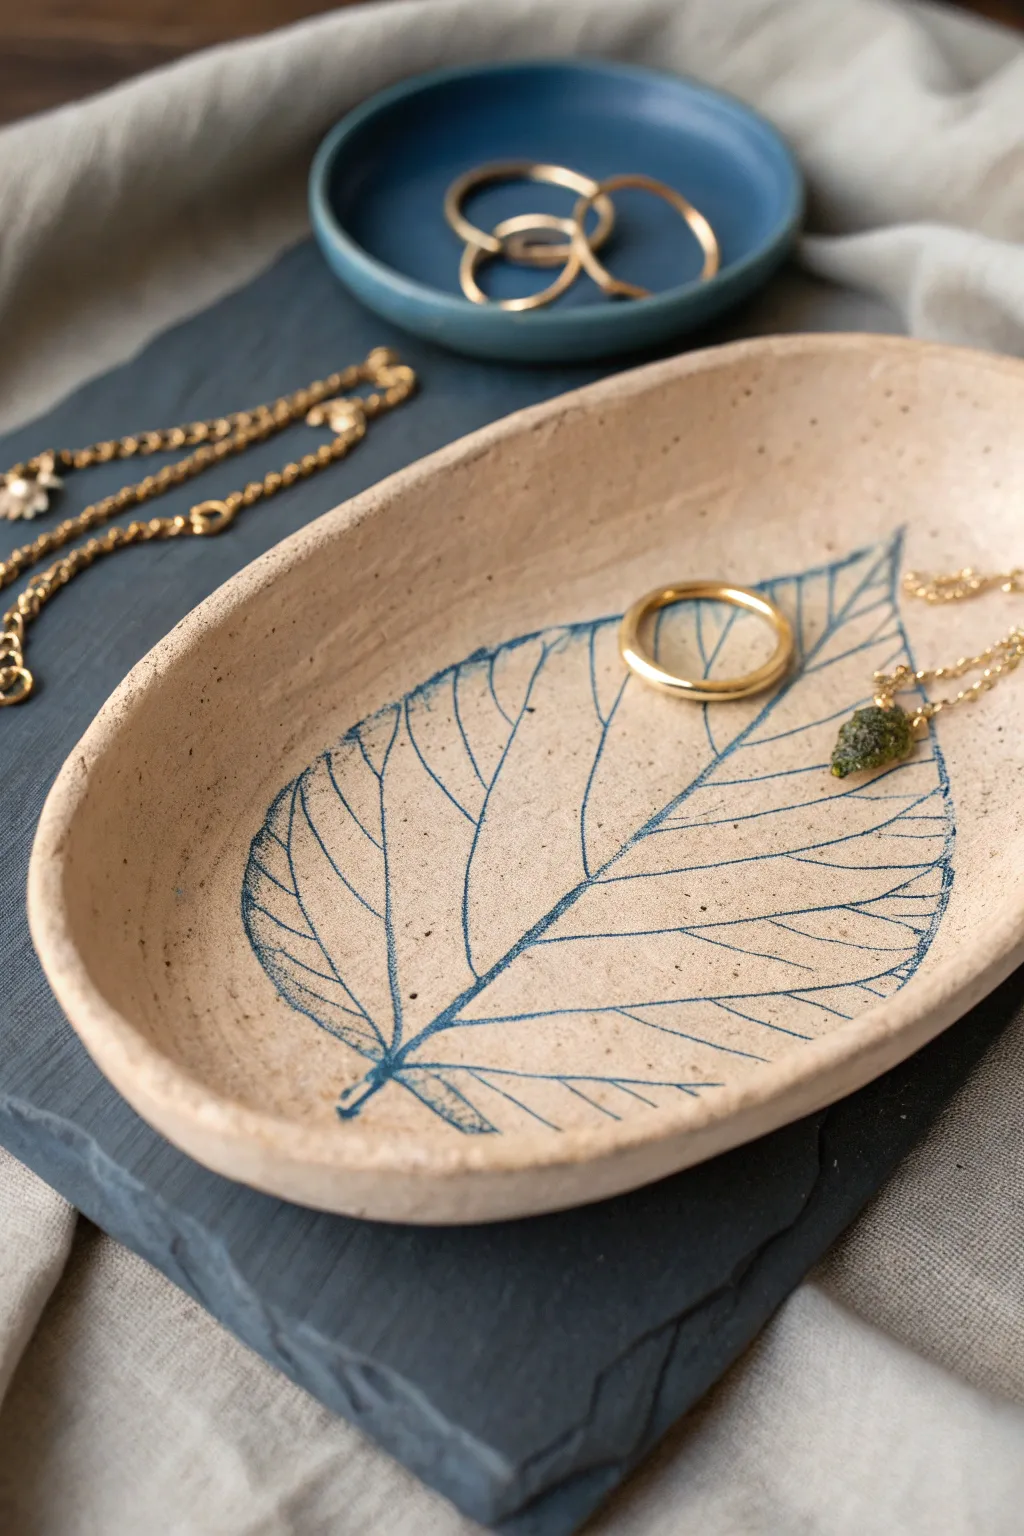
Bring a touch of nature indoors with this rustic, oval trinket dish featuring a delicate blue leaf skeleton imprint. It’s the perfect minimalist catch-all for your everyday rings and dainty necklaces.
Step-by-Step
Materials
- White or cream air dry clay
- Rolling pin
- Fresh leaf with prominent veins (like hydration or elm)
- Blue acrylic paint or ink
- Small paintbrush
- Craft knife or clay tool
- Small bowl of water
- Fine-grit sandpaper
- Matte or satin varnish
- Sponge
Step 1: Shaping the Base
-
Condition the clay:
Start by taking a handful of air dry clay and kneading it in your hands until it becomes soft, pliable, and free of cracks. -
Roll it out:
Roll the clay into a smooth ball regarding the size of a tennis ball, then flatten it slightly with your palm. -
Create a slab:
Use your rolling pin to roll the clay into an oval slab that is approximately 1/4 inch thick. Aim for an even thickness throughout. -
Impress the leaf:
Select your leaf and place it vein-side down onto the center of your clay slab. Gently roll over the leaf with the rolling pin to embed the vein details into the clay surface. -
Cut the shape:
Using a craft knife, cut a clean oval shape around the leaf imprint, leaving about an inch of margin around the leaf edges on the sides. -
Smooth the edges:
Dip your finger in a little water and run it along the cut edge of the clay to smooth out any roughness or sharp crumbs.
Vein Definition Tip
Use a leaf with hard, stiff veins rather than soft ones. If the imprint is too faint, re-score the main lines gently with a needle tool while the clay is wet.
Step 2: Forming and Detailing
-
Curve the rim:
Gently lift the edges of the oval slab and curve them upward to create a shallow bowl shape. -
Refine the walls:
Pinch the walls slightly to thin them out if they feel too chunky, ensuring the transition from the base to the wall is smooth. -
Remove the leaf:
Carefully peel the leaf away from the clay using tweezers or the tip of your knife to reveal the embossed texture. -
Smooth the interior:
Check the interior surface for any unwanted fingerprints and smooth them away with a damp sponge, being careful not to erase the leaf veins. -
Allow to dry:
Set the dish aside in a safe place to dry completely. This usually takes 24-48 hours depending on humidity. Flip it occasionally so the bottom dries evenly.
Warping Fix
If the edges curl up too much during drying, place a light bean bag or small bag of rice in the center of the dish to weigh it down gently as it cures.
Step 3: Finishing Touches
-
Sand imperfections:
Once fully dry and hard, use fine-grit sandpaper to buff the rim and outside edges for a professional, stone-like finish. -
Prepare the paint:
Squeeze a small amount of blue acrylic paint onto a palette. You want a dry-brush consistency for this step. -
Highlight the veins:
Very lightly dip a fine brush into the paint and trace the indented lines of the leaf imprint. I prefer to keep the hand shaky here for a more organic look. -
Create the outline:
Use the same fine brush to paint the outer perimeter of the leaf shape, connecting the vein lines. -
Add speckles (optional):
To mimic the ceramic look in the photo, dilute a tiny bit of brown or grey paint and flick it off a toothbrush onto the clay for subtle speckling. -
Seal the dish:
Protect your work by applying a coat of matte or satin varnish over the entire dish, ensuring the paint doesn’t smudge.
Now you have a serene, nature-inspired piece ready to hold your favorite treasures


Little Bud Vase for Dried Stems

Achieve the look of studio pottery without a kiln using this charming air dry clay project. This petite bud vase features a faux-ceramic finish with a speckled oatmeal glaze effect on top and a raw terracotta base, perfect for displaying lightweight dried florals.
Detailed Instructions
Materials
- Air dry clay (white or light grey)
- Rolling pin
- Small jar or bottle (for use as an internal armature)
- Clay knife or craft knife
- Sponge and water cup
- Sandpaper (medium and fine grit)
- Acrylic paints (Cream/Off-white, Tan/Terracotta, Brown)
- Paintbrushes (flat shader and an old stiff-bristled brush or toothbrush)
- Baking soda (optional for texture)
- Matte varnish or sealant used for clay
Step 1: Sculpting the Base Form
-
Prepare the workspace:
Lay down a canvas mat or parchment paper to prevent sticking. Take a handful of air dry clay and knead it until it’s pliable and smooth. -
Create the base:
Roll a ball of clay roughly the size of a tennis ball. Flatten the bottom slightly on your work surface to create a stable base so the vase won’t tip over. -
Insert the armature:
Take your small glass bottle or jar—a small spice jar works perfectly—and press it directly into the center of your clay ball. -
Cover the armature:
Work the clay up the sides of the jar, pushing and smoothing the material upward until the glass is completely encased. Add small pieces of clay if you need extra height to cover the rim. -
Shape the body:
Use your palms to round out the bottom half of the vase, giving it a bulbous, organic shape that tapers toward the neck of the jar.
Step 2: Refining the Neck and Surface
-
Form the collar:
Roll a small coil of clay, about the thickness of a pencil. Wrap this ring around the very top opening of your vase where the neck ends. -
Blend the collar:
Using a little water on your finger, smudge the bottom edge of the coil down into the neck to attach it seamlessly. Keep the top edge somewhat distinct to create that flared lip seen in the photo. -
Smooth the surface:
Dip a sponge in water and squeeze it out until it’s just damp. Wipe down the entire exterior to remove fingerprints and large cracks. -
Initial drying:
Set the vase aside in a cool, dry place. Let it dry for at least 24-48 hours. I like to rotate it occasionally so air reaches all sides evenly, preventing warping. -
Sanding for smoothness:
Once bone dry, use medium grit sandpaper to level out any bumps. Switch to fine grit to create a very smooth, ceramic-like surface. Wipe away all dust with a dry cloth.
Cracks while drying?
Mix a small amount of fresh clay with water to create a paste (slip). Fill the cracks with this paste, smooth it over with a finger, and let it dry again before sanding.
Step 3: Painting the Faux Glaze
-
Mix the base creamy color:
Mix white acrylic paint with a tiny drop of yellow styling and a hint of brown to get a warm ‘oatmeal’ or cream color. Mix in a pinch of baking soda if you want a grittier texture. -
Paint the top section:
Apply this cream mixture to the top 2/3 of the vase. Don’t worry about a perfectly straight line at the bottom; a slightly wavering line looks more handmade. -
Paint the bottom section:
Mix a tan, terracotta, or warm beige color. Paint the bottom third of the vase, carefully meeting the cream edge. You can blend them slightly while wet or keep a hard edge depending on your preference. -
Create the speckles:
Water down a small amount of dark brown paint. Dip an old toothbrush or stiff brush into it. -
Splatter technique:
Hold the brush near the vase and run your thumb across the bristles to flick tiny specks onto the creamy top section. Practice on paper first to control the spray. -
Seal the piece:
Once the paint is completely dry, apply two coats of matte varnish to protect the surface and give it a finished look. Note that air dry clay is not waterproof, so only use dried flowers.
Pro Tip: Weighted Base
Before sealing the clay around the jar armature, drop a few heavy coins or pebbles inside the glass jar. This adds weight and stability, preventing the dried flowers from tipping it over.
Place your favorite dried stems inside and enjoy the organic warmth this little vessel adds to your windowsill

What Really Happens Inside the Kiln
Learn how time and temperature work together inside the kiln to transform clay into durable ceramic.
Earring Organizer Slab
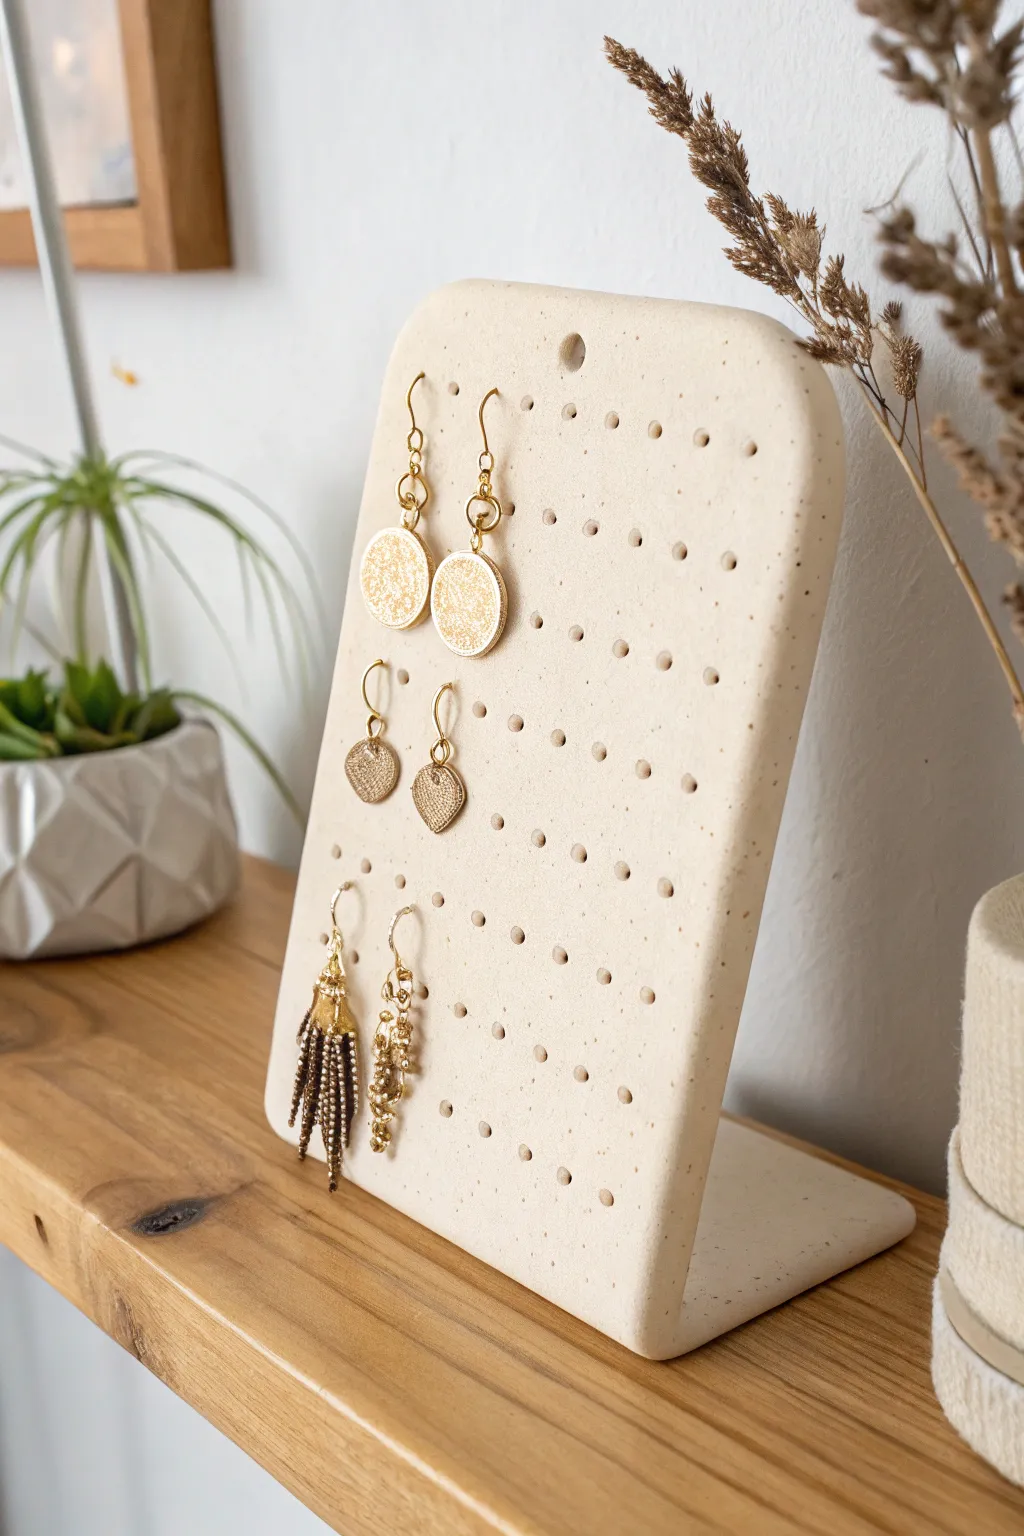
This L-shaped earring organizer combines modern minimalism with functional design. Its speckled texture and gentle curve give it a sophisticated, stone-like appearance while providing ample storage for your favorite dangles.
Detailed Instructions
Materials
- White air dry clay (approx. 500g)
- Black pepper or dried coffee grounds (for speckled effect)
- Non-stick rolling pin
- Parchment paper or craft mat
- Sharp craft knife
- Ruler
- Straw or wooden skewer (3-4mm diameter)
- Sandpaper (fine grit)
- Small bowl of water
- Acrylic rolling heavy object (like a large can) or a bookend for shaping
- Matte spray varnish (optional)
Step 1: Preparation and Conditioning
-
Mix the Speckles:
Begin by taking a generous chunk of white air dry clay. Flatten it slightly and sprinkle a pinch of coarse black pepper or dried coffee grounds onto the surface. -
Knead Thoroughly:
Fold the clay over the speckles and knead well. Keep folding and pressing until the speckles are evenly distributed throughout the entire ball of clay. -
Check Consistency:
If the clay feels too dry or cracks while kneading, dip your fingers in water and work the moisture in. It should be pliable but not sticky.
Cracking Support
If the bend area creates small cracks while drying, apply a ‘slip’ of water and clay mush into the cracks and smooth over with a finger.
Step 2: Shaping the Slab
-
Roll it Out:
Place the clay on a sheet of parchment paper. Use your rolling pin to flatten the clay into a large, even slab. -
Ensure Even Thickness:
Aim for a uniform thickness of about 1/4 inch (6mm). This thickness is crucial—too thin and it won’t support itself; too thick and it becomes heavy. -
Smooth the Surface:
Dip your finger in water and gently glide it over the surface of the slab to remove any rolling pin textures or small bumps. -
Cut the Rectangle:
Using your ruler as a guide, cut a long rectangle with your craft knife. A size of approximately 5 inches wide by 10 inches long works well for a standard stand. -
Round the Corners:
Use the craft knife or just your finger to gently round off the top two corners of the rectangle for a softer look. -
Smooth Edges:
Run a wet finger along all the cut edges to smooth them down, erasing the sharp lines left by the knife.
Terrazzo Twist
Mix in small chips of colored dried clay instead of pepper to create a vibrant, colorful terrazzo pattern instead of simple speckles.
Step 3: Creating the Grid
-
Mark the Grid:
Lightly press your ruler into the clay to create faint guide marks for your holes, spacing them about 1/2 inch to 3/4 inch apart. -
Punch the Holes:
Using a straw or the blunt end of a skewer, press straight down to punch holes at your guide marks. Twist slightly as you pull the tool out for a clean cut. -
Clean the Holes:
If clay gets stuck inside the holes or creates a lip on the back, smooth it gently with a small, damp tool or your fingertip. -
Add a Hanging Hole:
If you want the option to hang this piece later, or just for aesthetic balance, punch a slightly larger hole centered near the very top edge.
Step 4: Forming and Finishing
-
Create the Bend:
Carefully lift the clay slab. Measure about 3 inches from the bottom and gently bend the clay to create an L-shape. -
Support the Shape:
Prop the long vertical section against a heavy object, like a bookend or a large can, wrapped in parchment paper. Ensure the base sits flat on your work surface. -
Check the Angle:
Adjust the angle so the back leans slightly backward (past 90 degrees) to ensure better balance when loaded with heavy earrings. -
Dry Slowly:
Let the piece dry in place for 24-48 hours. I find that rotating the piece occasionally helps air reach all sides, preventing warping. -
Sand for Perfection:
Once fully dry and hard, use fine-grit sandpaper to buff away any remaining rough edges or uneven texture on the surface. -
Seal (Optional):
Spray a light coat of matte varnish over the stand to protect it from moisture and preserve the speckled finish.
Now you have a chic, custom-made display that turns your jewelry collection into functional art
Air Dry Clay Bead Necklace Charms
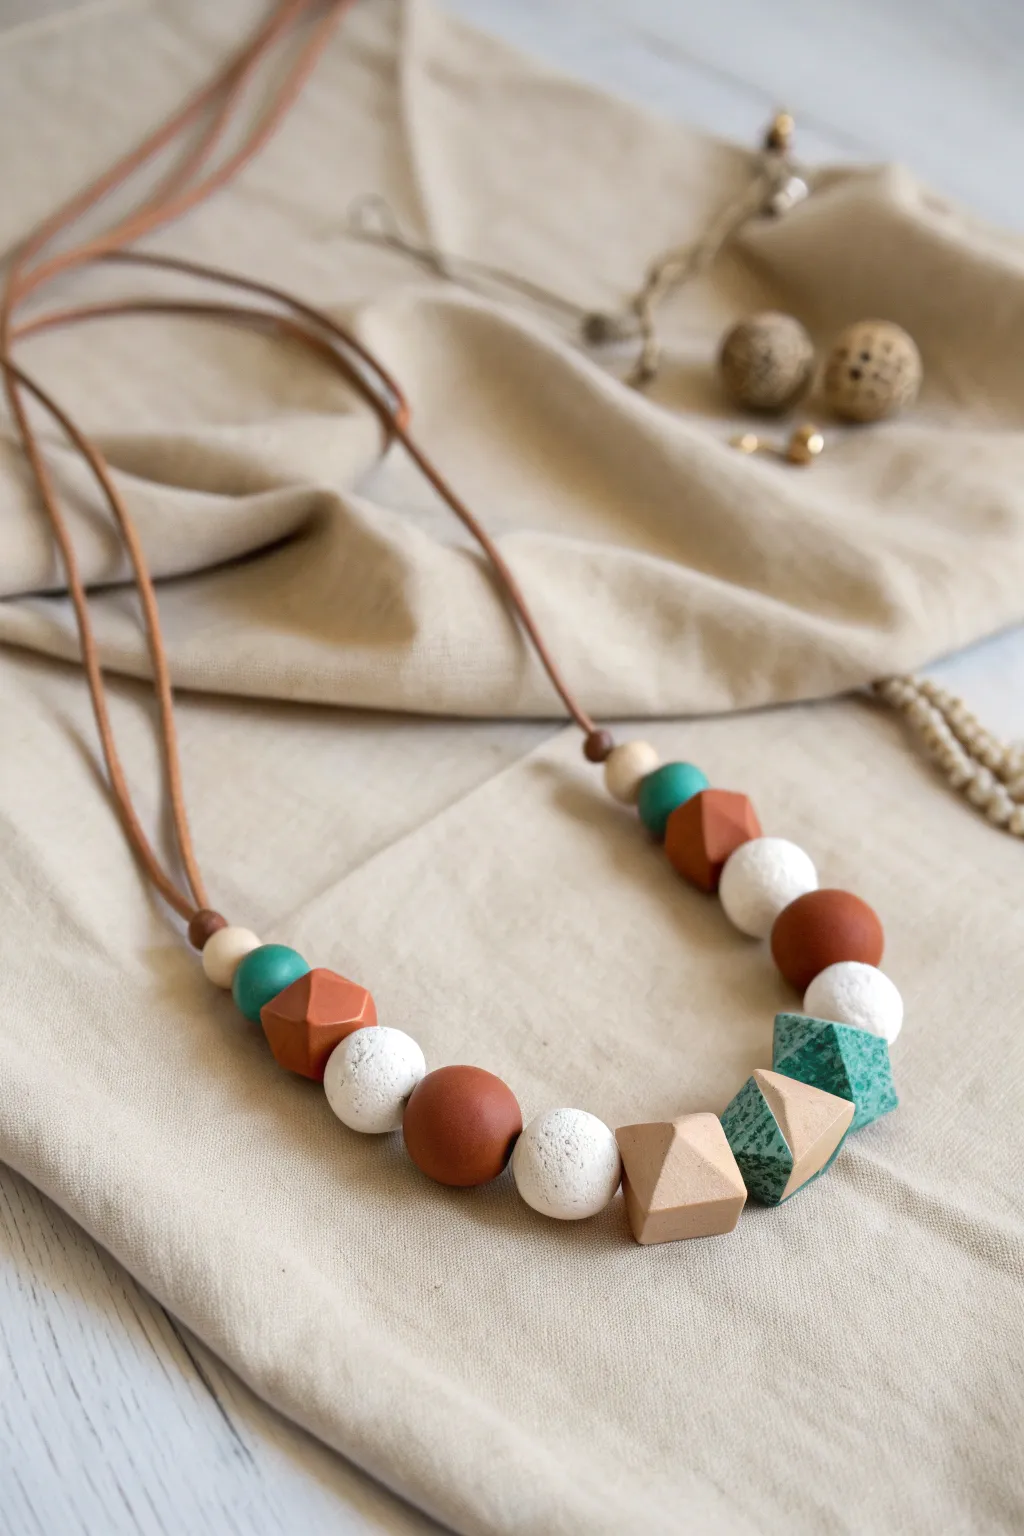
Elevate your accessory game with this chunky, geometric necklace that combines natural wood textures with the versatility of air dry clay. Featuring a warm palette of terracotta, cream, sage, and teal, this piece feels both modern and organic, perfect for layering over a simple linen tunic.
Step-by-Step Guide
Materials
- Air dry clay (white)
- Acrylic paints (terracotta/rust, sage green, teal/emerald turquoise, white)
- Wooden beads (assorted sizes: 10mm, 15mm, 20mm)
- Leather or faux leather cord (tan/medium brown)
- Rolling pin or smooth jar
- Sharp craft knife or clay blade
- Toothpick or skewer (for piercing holes)
- Fine-grit sandpaper (220 grit)
- Matte sealant or varnish
- Paintbrushes
- Small textured object (like a stone or stiff bristle brush) for texturing
Step 1: Shaping the Clay Beads
-
Condition the Clay:
Begin by taking a chunk of white air dry clay and kneading it in your hands until it becomes soft, pliable, and free of cracks. -
Roll Spheres:
Pull off small pieces of clay and roll them between your palms to create spheres. You will need about five round beads, varying slightly in size from 1.5 cm to 2.5 cm. -
Create Geometric Cubes:
Form a few cubes by gently pressing a clay ball against a flat work surface on six sides. Sharpen the edges by lightly pinching them or slicing the sides with your craft knife for a cleaner look. -
Carve Faceted Beads:
To make the faceted geometric beads seen near the center, start with a cube or oblong shape. Use your craft knife to slice off corners at random angles, creating jagged, gem-like planes. -
Add Texture:
For the white accent beads, I like to gently press a rough stone or a stiff toothbrush into the surface to give them a porous, organic texture similar to volcanic rock. -
Pierce the Holes:
While the clay is still wet, carefully push a toothpick or skewer through the center of each bead. Rotate the skewer as you push to prevent flattening the bead’s shape. -
Dry Thoroughly:
Set all your clay beads aside on a piece of parchment paper. Let them dry completely for 24-48 hours, flipping them occasionally to ensure even drying.
Cracked Clay?
If you see cracks forming as the beads dry, don’t panic. Simply mix a tiny bit of fresh clay with water to make a paste (slip) and fill in the cracks, then smooth it over with your finger.
Step 2: Painting and Finishing
-
Sand Imperfections:
Once bone dry, check your beads for any rough edges, especially around the drilled holes. Use fine-grit sandpaper to smooth them down gently. -
Paint the Terracotta Beads:
Mix a warm rust or terracotta acrylic paint. Apply 2-3 thin coats to two of the round beads and two of the smaller geometric beads, letting them dry between layers. -
Create the Speckled White Beads:
Leave the textured round beads white. To enhance the depth, you can lightly dry-brush a tiny amount of grey or cream over the high points of the texture. -
Paint the Teal & Sage Accents:
Paint the faceted geometric beads with a deep teal or emerald green. For a faux-stone look, you can spatter tiny flecks of white or black paint onto them using an old toothbrush. -
Paint the Natural Beige Bead:
Paint the central geometric diamond bead in a soft beige or tan color to mimic raw wood. -
Seal the Beads:
Apply a coat of matte varnish to all clay beads to protect the paint and prevent chipping. This also gives them a professional, finished sheen.
Spice It Up
Try marbleizing the clay before rolling! Twist together white and terracotta clay without fully blending them to create beautiful, swirling marble patterns on your round beads.
Step 3: Assembly
-
Prepare the Cord:
Cut a length of leather cord, approximately 30-36 inches long, depending on how low you want the necklace to hang. -
Arrange the Layout:
Lay out your beads on the table to finalize the pattern. Alternate between your painted clay beads and the raw wooden beads to create visual rhythm. -
String the Beads:
Thread the beads onto the cord. Since the leather can be thick, wrapping a small piece of tape around the tip of the cord can act as a needle. -
Set the Length:
Decide on the final hanging length. You can tie a simple decorative knot above the bead stack on each side if you want to keep them centered. -
Tie the Ends:
Finish the necklace by tying the two loose ends of the cord together using a sliding knot or a secure double knot.
Now you have a stunning, handcrafted statement piece that adds an artistic touch to any outfit


The Complete Guide to Pottery Troubleshooting
Uncover the most common ceramic mistakes—from cracking clay to failed glazes—and learn how to fix them fast.
Textured Candle Holder Trio
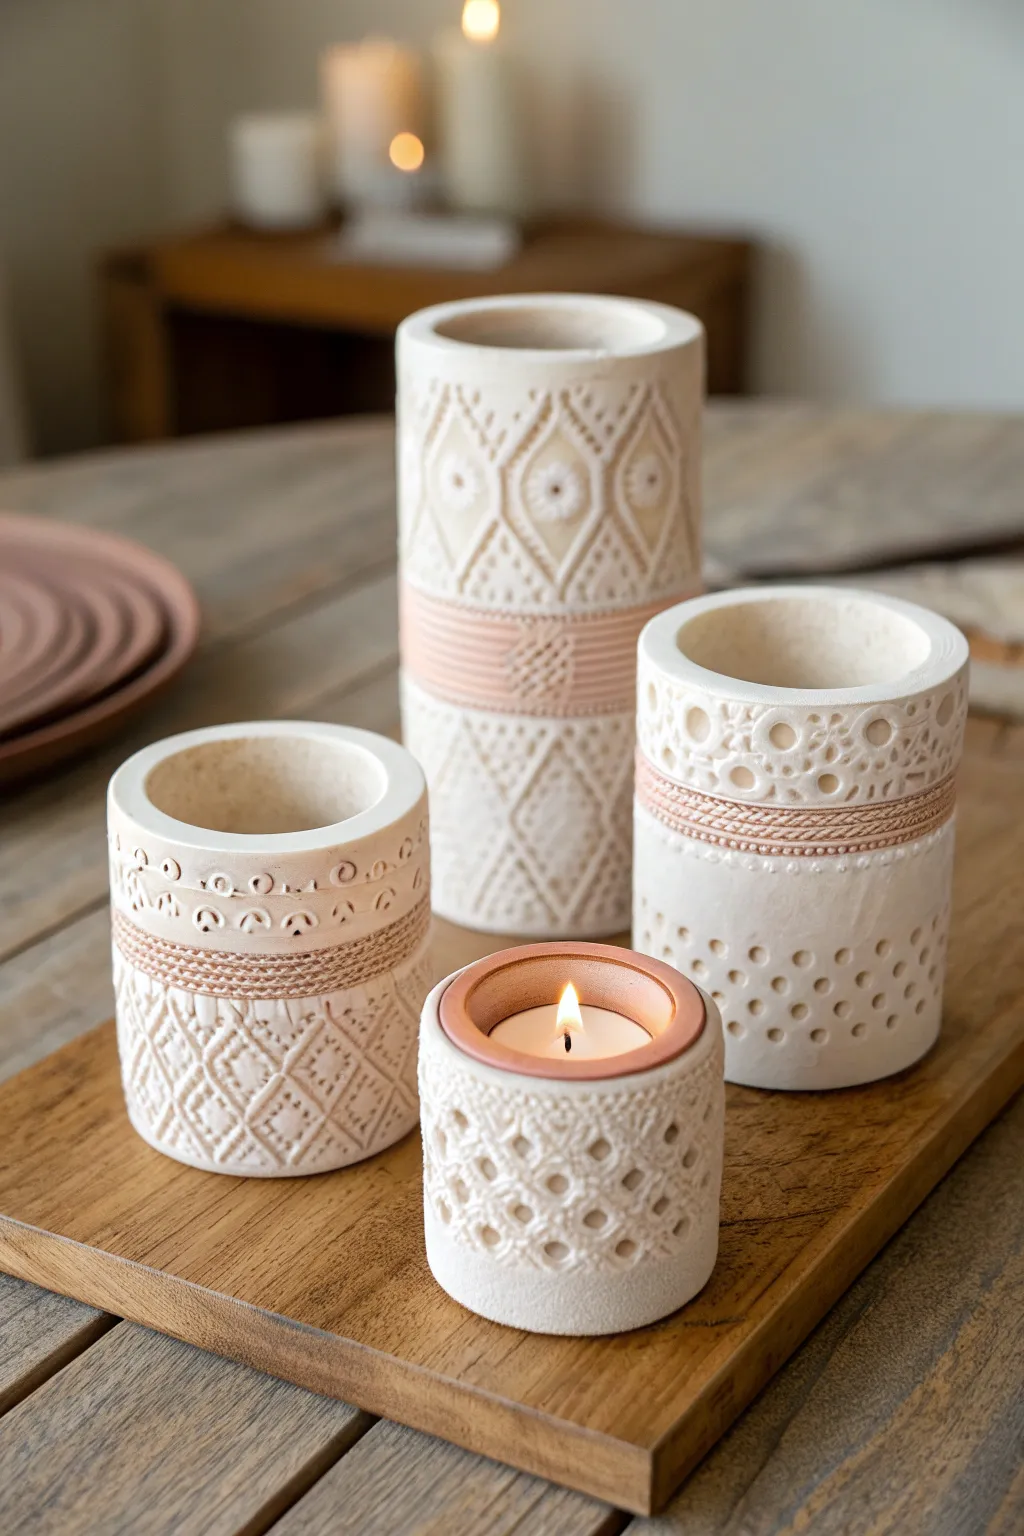
Elevate your home decor with this stunning set of air dry clay candle holders, featuring intricate embossed patterns and a soft, natural finish. The combination of geometric textures and warm copper accents creates a cozy, artisanal look perfect for any tabletop.
Step-by-Step
Materials
- Air dry clay (white or off-white)
- Rolling pin
- Cardboard mailing tubes or PVC pipes (various diameters for molds)
- Parchment paper
- Craft knife or clay cutter
- Texture tools (lace doilies, embossed rolling pin, stamps, or burlap)
- Rope or thick twine (for impressions)
- Sponge and water
- Fine-grit sandpaper
- Copper or rose gold acrylic paint
- Small flat paintbrush
- Clear matte varnish (optional)
Step 1: Preparing the Clay Base
-
Create your forms:
Gather your cardboard tubes or PVC pipes to use as inner forms. Cut them to your desired heights—staggering them (e.g., 6 inches, 4 inches, and 2 inches) creates a visually pleasing arrangement. -
Protect the forms:
Wrap each tube securely in parchment paper, tucking the excess paper into the ends. This crucial step prevents the clay from permanently sticking to your tube while it dries. -
Roll the slab:
Take a large chunk of air dry clay and knead it briefly to warm it up. Roll it out on a flat surface into a long, even rectangular slab, aiming for a thickness of about 1/4 inch. -
Measure the circumference:
Lay your tube on the clay to estimate the length needed to wrap around it fully, plus a little extra for the seam. Trim the excess clay with a craft knife to create a clean rectangle.
Step 2: Adding Texture and Detail
-
Apply the main texture:
Before wrapping the clay, press your chosen texture tools into the flat slab. For the diamond pattern shown, you can use specialized clay stamps or gently press a piece of textured fabric or lace into the surface. -
Create horizontal bands:
To mimic the horizontal rope detail, take a length of actual twisted rope or thick twine. Press it firmly into the clay slab in a straight horizontal line where you want the band to sit. -
Add detail strips:
For raised details, roll out a separate thin snake of clay or a small flat strip. Adhere this over the rope impression using a little water as ‘glue,’ then press a pattern into it with a toothpick or small tool. -
Smooth the edges:
Check the edges of your textured slab. I find that running a damp finger along the top and bottom edges now saves a lot of sanding time later.
Crack Control
If small cracks appear while drying, don’t panic! Mix a tiny bit of fresh clay with water to make a paste (slip) and fill the crack, then smooth it over.
Step 3: Assembling the Cylinder
-
Wrap the form:
Carefully lift your textured clay slab and wrap it around the parchment-covered tube. Bring the two cut ends together until they touch. -
Seal the seam:
Using a sculpting tool or your finger with a bit of water, blend the seam together on the inside and outside. Be gentle on the outside to avoid crushing your beautiful texture. -
Create the tea light cup:
For the smallest holder meant for a tea light (like the one in the foreground), you need a bottom. Cut a circle of clay slightly smaller than the tube diameter and press it inside the cylinder, smoothing the edges to seal it. -
Refine the rim:
If the top uneven, slice it gently with your craft knife while the clay is still on the tube. Smooth the cut edge with a damp sponge. -
Initial drying:
Let the cylinders stand upright in a cool, dry place. Allow them to dry on the form for at least 24 hours so they hold their shape.
Seamless Seams
Score (scratch) both edges of the clay where they will meet before adding water. This cross-hatching creates a stronger bond closer to a zipper than glue.
Step 4: Finishing Touches
-
Remove the form:
Once the clay is leather-hard (firm but not fully dry), gently slide the tube and parchment paper out. Let the clay continue drying completely for another 24-48 hours. -
Sand for smoothness:
When bone dry, use fine-grit sandpaper to smooth out the top rim and any sharp bits on the seam. Wipe away the dust with a slightly damp cloth or dry brush. -
Paint the accents:
Dip a small flat brush into copper or rose gold acrylic paint. Carefully paint specifically the horizontal bands or rapid details you created earlier, or paint the inner rim of the tea light holder for a warm glow, as seen in the foreground piece. -
Seal the piece:
Apply a coat of clear matte varnish to protect the clay from moisture and dust, ensuring your candle holders last for years.
Place battery-operated candles inside your new creations and watch the textured patterns cast beautiful shadows across your table
Desk Catchall and Paper Clip Bowl
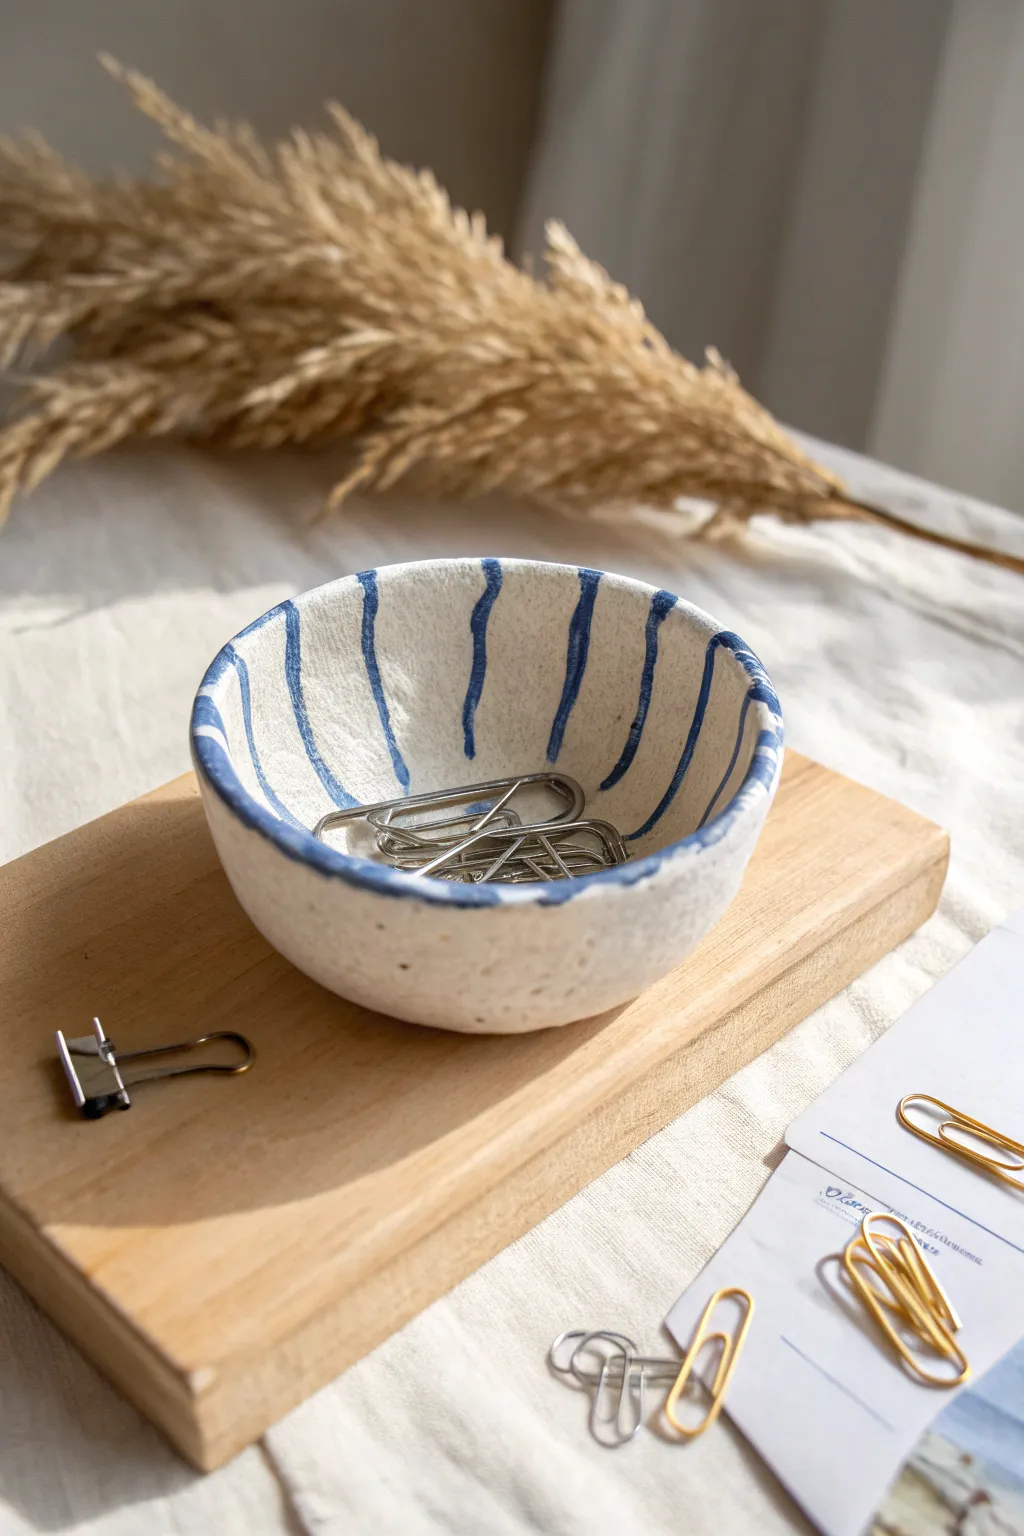
This charming, slightly irregular bowl brings a touch of wabi-sabi style to your desk organization. Its rough-hewn texture and simple blue stripes create a relaxed, artisan feel that is perfect for holding paper clips or small trinkets.
Step-by-Step Guide
Materials
- White air dry clay
- Small rolling pin
- Small bowl (for a mold)
- Plastic wrap
- Cup of water
- Sandpaper (medium to fine grit)
- Cobalt blue acrylic paint
- Fine round paintbrush
- Clear matte varnish or sealant
Step 1: Shaping the Form
-
Prep your clay:
Start by taking a handful of white air dry clay, roughly the size of a tennis ball. Knead it in your hands for a minute to warm it up and make it pliable. -
Roll it out:
On a clean, flat surface, roll the clay out into a slab that is approximately 1/4 inch thick. Don’t worry if the edges are a bit uneven; that adds to the charm. -
Prepare your mold:
Take a small kitchen bowl—a dessert or rice bowl works well—and cover the inside completely with plastic wrap. This prevents the clay from sticking. -
Press into the mold:
Gently lift your clay slab and press it into the bottom of the prepared bowl. Use your fingers to push the clay against the sides, smoothing out any major air bubbles. -
Trim the excess:
Using a craft knife or simply your fingers, tear or cut away the excess clay hanging over the rim. To match the photo, aim for an irregular, organic edge rather than a perfectly straight line. -
Smooth the interior:
Dip your finger in a little bit of water and run it over the inside surface of the clay to smooth out major fingerprints, though keeping some texture is desirable. -
Initial drying:
Let the clay sit in the bowl mold for about 24 hours to stiffen up. This ensures it holds its concave shape.
Cracking Up?
If you see small cracks forming while drying, mix a tiny bit of fresh clay with water to make a paste (slip) and fill the cracks. Smooth it over with your finger.
Step 2: Refining and Painting
-
Unmold the bowl:
Once the clay is firm enough to hold its shape but not bone dry, gently lift it out of the mold using the plastic wrap. -
Complete the drying:
Place the clay bowl upside down on a wire rack to allow air to circulate underneath. Let it dry completely for another 24-48 hours until it turns a chalky white. -
Sand the surface:
Using medium-grit sandpaper, gently sand the outside and rim of the bowl. We want to keep the “stone-like” texture visible in the photo, so don’t polish it smooth—just remove sharp snags. -
Wipe it down:
Use a slightly damp cloth or a dry brush to remove all the clay dust created by sanding. This is crucial for paint adhesion. -
Prepare the paint:
Squeeze a small amount of cobalt blue acrylic paint onto your palette. You may want to thin it with a tiny drop of water to help it flow. -
Paint the stripes:
Using a fine round brush, paint vertical stripes starting from the inside bottom of the bowl up to the rim. Keep the lines wavy and organic, allowing the brush pressure to vary naturally. -
Extend over the rim:
Continue your brush stroke over the top edge of the rim and just slightly down the exterior side. This creates the continuous “wrapped” look seen in the example. -
Dry the paint:
Allow the blue paint to dry fully, which should take about 15 to 20 minutes. -
Seal the piece:
Finish by applying a coat of clear matte varnish or mod podge over the entire bowl to seal the clay and protect the paint from chipping.
Texture Trick
To get that specific grainy look, dab the wet clay gently with a crumpled piece of aluminum foil before letting it dry.
Now you have a custom piece of desk decor ready to tackle your clutter pile

TRACK YOUR CERAMIC JOURNEY
Capture glaze tests, firing details, and creative progress—all in one simple printable. Make your projects easier to repeat and improve.
Magnet Minis With Simple Faces
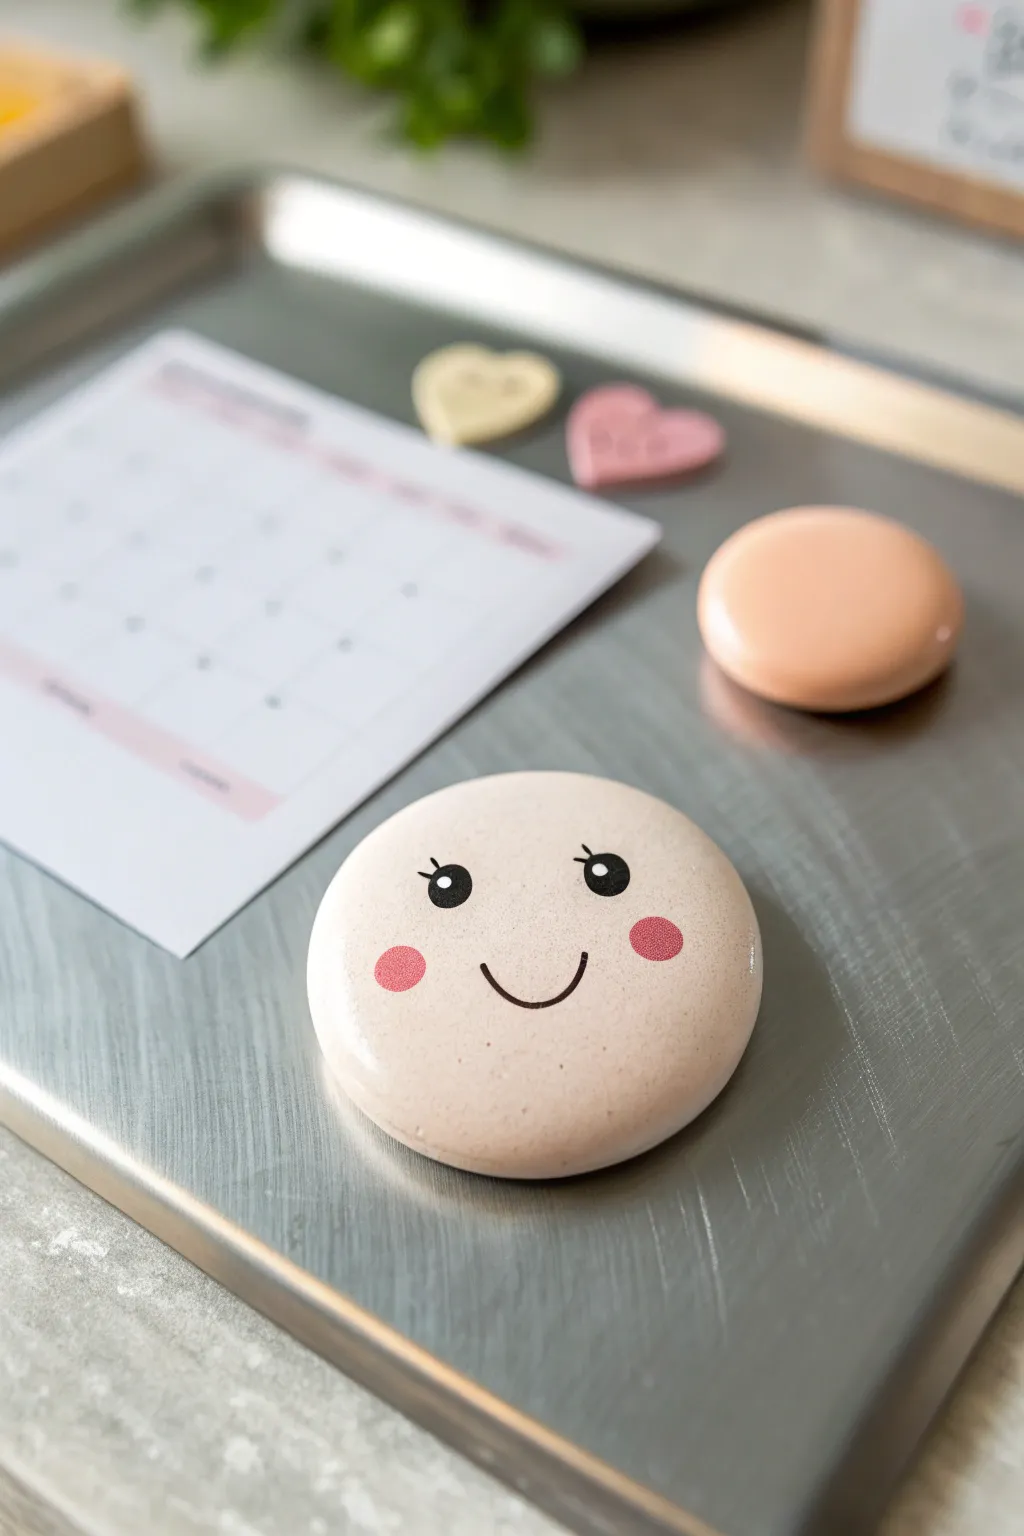
These charming, pebble-like magnets add a touch of personality to any fridge or magnetic board. With their smooth finish and sweet, minimalist faces, they are a simple yet satisfying project perfect for using up small scraps of air-dry clay.
Step-by-Step
Materials
- White or cream air-dry clay
- Rolling pin or smooth cylindrical object
- Round cookie cutter (approx. 2 inches)
- Sandpaper (fine grit)
- Acrylic paints (black, pink, optional beige)
- Fine detail paintbrush (size 0 or 00)
- Small dotting tool or toothpick
- Strong craft glue (E6000 or similar)
- Round ceramic or ferrite magnets
- Matte or satin varnish (optional water-based sealant)
Step 1: Shaping the Base
-
Condition the clay:
Begin by taking a small handful of air-dry clay and kneading it in your hands until it becomes soft, pliable, and free of cracks. If the clay feels dry, I like to dampen my fingertips slightly to reintroduce moisture. -
Roll out the slab:
Place the clay on a clean, smooth surface. Use a rolling pin to flatten it into an even slab. Aim for a thickness of about 1/4 inch (6mm) to ensure the magnet will be sturdy but not too heavy. -
Cut the shape:
Press your round cookie cutter firmly into the clay slab. Give it a tiny wiggle to separate the edges cleanly, then lift the cutter. If you don’t have a cutter, trace a small jar lid with a craft knife. -
Soften the edges:
Dip your finger in a little water and gently run it around the cut edge of the clay circle. You want to smooth out the sharp 90-degree angle created by the cutter into a soft, pebble-like curve. -
Dry thoroughly:
Place your clay circle on a piece of parchment paper or a wire rack to dry. Let it sit for at least 24-48 hours, flipping it over halfway through to prevent warping.
Smooth Surface Trick
Before cutting your shape, gently lay a piece of plastic wrap over the clay. Cut through the plastic with your cutter to instantly create soft, rounded edges without sanding
Step 2: Sanding and Painting
-
Sand for smoothness:
Once the clay is completely bone dry, take fine-grit sandpaper and gently buff the surface. Focus on refining the rounded edges and removing any fingerprints or uneven texture on the face. -
Base coat (optional):
If your clay dried a bright white and you prefer the warm, creamy stone look from the photo, mix a tiny drop of brown or beige paint into white acrylic. Paint a thin, even coat over the front and sides. -
Paint the cheeks:
Dip a circular sponge dauber, the end of a paintbrush handle, or a large dotting tool into pink acrylic paint. Press it gently onto the lower half of the face to create two perfectly round, rosy cheeks. -
Draft the features:
Before painting the details, you can lightly mark the position of the eyes and mouth with a pencil. Keep the face symmetrical and centered. -
Paint the eyes:
Using black acrylic paint and a medium-sized dotting tool (or large paintbrush end), stamp two solid black circles for the eyes. Position them slightly wider than the mouth for a cute look. -
Add the lashes:
Switch to your finest detail brush (size 00). Carefully drag three tiny, curved lines outward from the top outer edge of each eye to create delicate eyelashes. -
Draw the smile:
With the same fine brush and black paint, paint a simple, thin ‘U’ shape between the cheeks. Keep the line weight consistent and delicate. -
Add eye highlights:
Once the black paint is fully dry, dip a toothpick or very fine tool into white paint. Place a tiny dot on the upper right side of each black eye pupil to bring the character to life.
Make It 3D
Before the clay dries, press small extra balls of clay onto the circle to create 3D noses or ears, or press stamps into the clay for textured patterns
Step 3: Finishing Up
-
Seal the surface:
Protect your artwork by applying a coat of matte or satin varnish. This prevents the paint from scratching and gives the magnet a professional, finished look. Let this dry completely. -
Attach the magnet:
Flip the painted piece over. Apply a generous dab of strong craft glue to the center of the back. Press your round magnet firmly into the glue. -
Final cure:
Allow the glue to cure according to the manufacturer’s instructions (usually 24 hours for maximum strength) before sticking it to your fridge.
Your adorable magnet is now ready to hold up your most important notes and photos
Boho Clay Wall Hanging Tiles
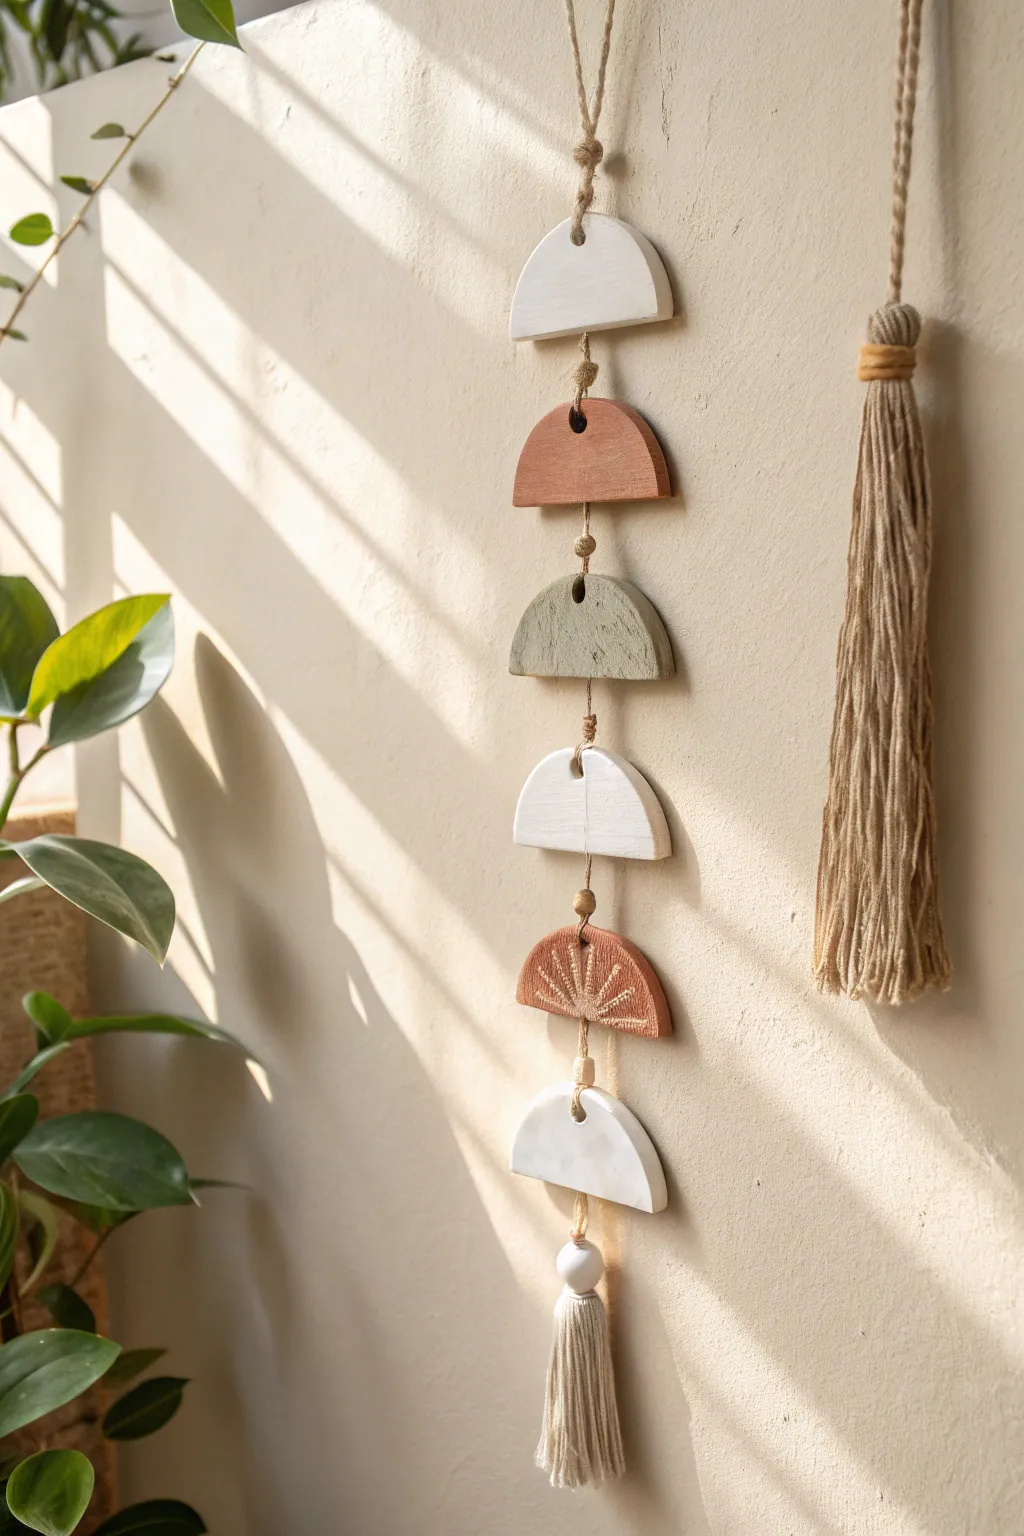
Bring a touch of earthy, bohemian charm to your walls with this textured moon phase mobile. Featuring soft sage, terracotta, and white geometric shapes strung on natural jute, this project perfectly balances rustic warmth with modern design.
How-To Guide
Materials
- Air dry clay (white)
- Acrylic paints (terracotta, sage green, white)
- Rolling pin
- Circle cookie cutter (approx. 3-4 inches)
- Craft knife or clay tool
- Jute twine or hemp cord
- Wooden beads (natural finish)
- Straw or skewer (for poking holes)
- Fine-grit sandpaper
- Paintbrushes
- A small tassel (handmade or store-bought)
Step 1: Shaping the Clay
-
Prepare the Clay:
Begin by kneading a large handful of air dry clay until it feels smooth and pliable. This warms it up and prevents cracking later on. -
Roll it Out:
Roll the clay out on a smooth surface or canvas mat to an even thickness of about 1/4 inch. Try to keep the thickness consistent for all pieces. -
Cut the Circles:
Using your circle cookie cutter, press firmly to cut out three distinct circles. Lift the excess clay away. -
Halve the Shapes:
Take your craft knife and carefully slice each circle exactly in half to create semi-circles. You will need six semi-circles total for this design. -
Create Hanging Holes:
Using a straw or skewer, poke a hole through the top and bottom center of five of the semi-circles. For the bottom-most piece, only poke a hole in the top center. -
Ensure Hole Size:
Give the straw a little wiggle to make sure the hole is wide enough for your jute twine to pass through easily once the clay shrinks slightly during drying. -
Add Texture:
Identify one of the pieces intended to be terracotta colored. Use a needle tool or toothpick to scratch a sunburst pattern into the surface while the clay is still wet. -
Let it Dry:
Place all pieces on a drying rack or parchment paper. Let them dry completely for 24-48 hours, flipping them occasionally to ensure they dry flat.
Smooth Operator
To get perfectly smooth edges without sanding later, dip your finger in a little water and run it along the cut edges of the wet clay immediately after cutting.
Step 2: Decorating and Assembly
-
Sand the Edges:
Once bone dry, use fine-grit sandpaper to gently smooth out any rough edges or burrs around the cut lines. -
Paint the Sage Piece:
Select one semi-circle and paint it with the sage green acrylic paint. Apply two thin coats for opaque coverage. -
Paint the Terracotta Pieces:
Paint two pieces with your terracotta color—one plain piece and the one with the scratched sunburst texture. Wipe the paint gently off the sunburst piece with a damp cloth if you want the white clay to peek through the grooves. -
Paint the White Pieces:
Paint the remaining three pieces with white acrylic paint to give them a clean, finished look that contrasts nicely with the raw clay texture. -
Prepare the Twine:
Cut a long piece of jute twine, about 3 feet long. Create a loop at the very top for hanging and knot it securely. -
String the First Piece:
Thread the twine through the top hole of your first white semi-circle. Tie a knot just below the bottom hole so the clay piece rests on the knot. -
Add Spacer Beads:
Thread a small wooden bead onto the twine, followed by a simple knot to hold it in place. Leave about an inch of space before the next knot where the subsequent clay piece will sit. -
Continue the Pattern:
Repeat the threading process, alternating colors as shown: white, terracotta, sage green, white, textured terracotta, and finally the bottom white piece. -
Attach the Tassel:
At the very bottom, after the final white semi-circle, thread a larger wooden bead and then tie your tassel securely to the end of the twine. -
Final Adjustments:
Hang the mobile up and gently rotate the pieces to ensure they are all facing forward and hanging straight.
Make it Shine
Add a coat of satin or gloss varnish to the finished painted pieces. This not only protects the paint but gives the mobile a polished, high-end ceramic look.
Hang your new creation near a window to catch the shifting light and enjoy the calming vibes it brings to your space
Moon Phase Mobile Decor
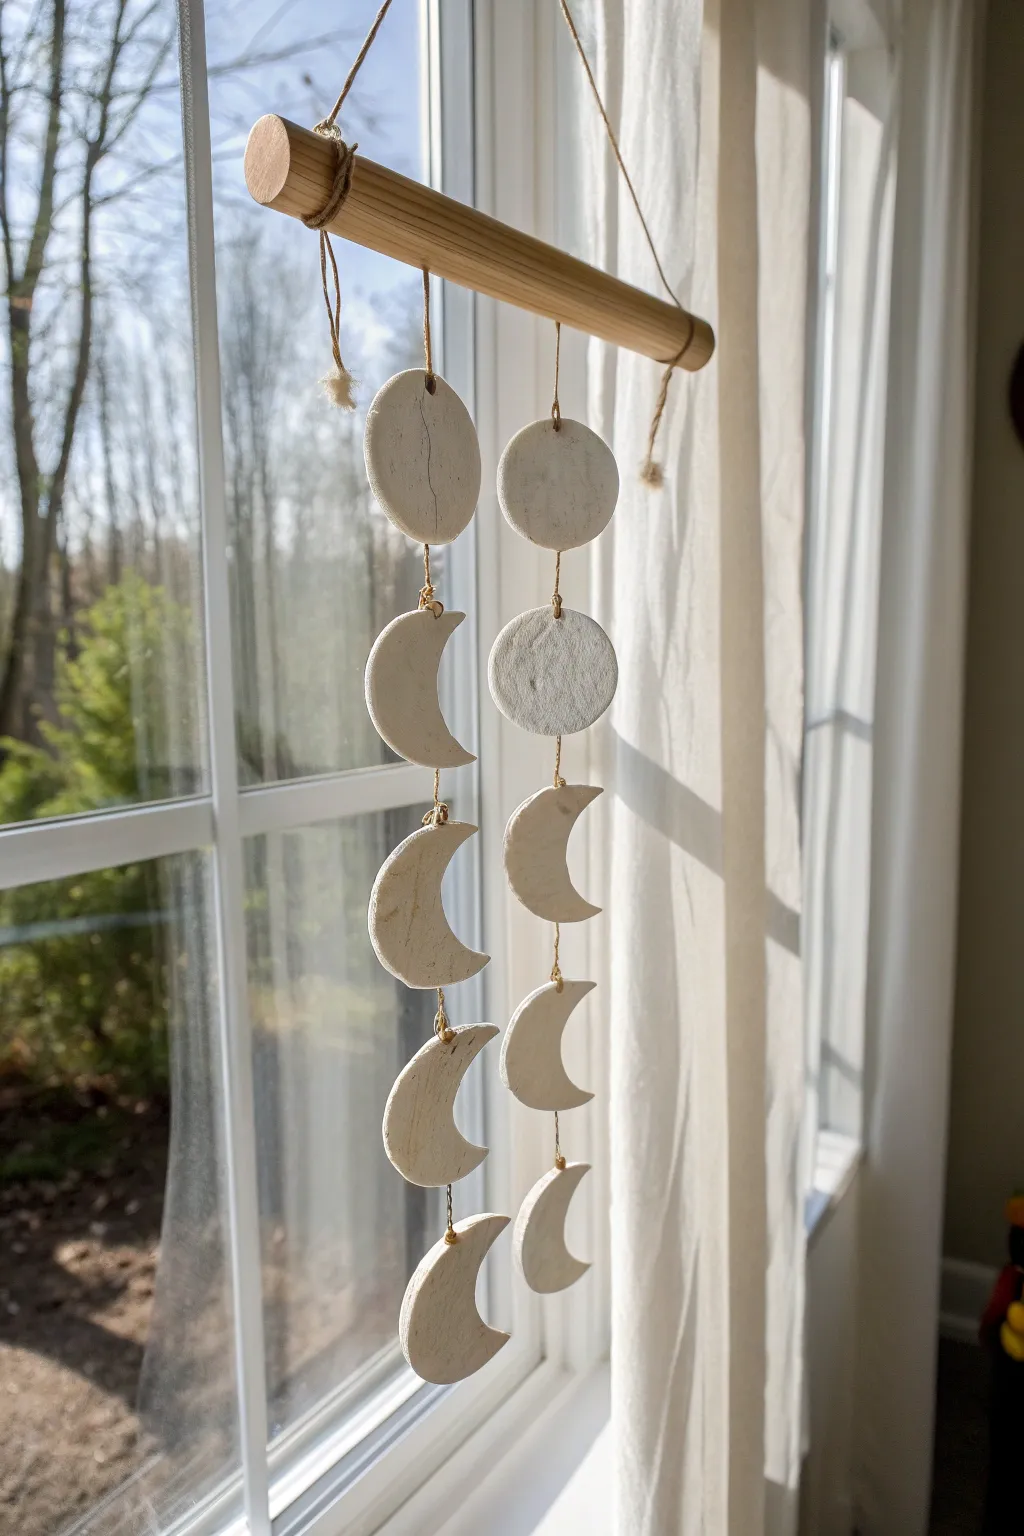
Bring a touch of celestial magic into your home with this minimalist hanging mobile. Featuring the textured, raw beauty of white air-dry clay, this project captures the lunar cycle in a vertical cascade that dances beautifully in the sunlight.
Step-by-Step
Materials
- White polymer or air-dry clay
- Rolling pin
- Circle cookie cutters (various sizes)
- Small wooden dowel (approx. 8-10 inches)
- Natural jute twine or hemp cord
- Needle tool or toothpick
- Fine-grit sandpaper
- Scissors
- Parchment paper or craft mat
Step 1: Shaping the Moons
-
Prepare your workspace:
Lay down parchment paper or a craft mat to prevent the clay from sticking. Pinch off a large chunk of white air-dry clay and knead it in your hands until it’s soft, warm, and pliable. -
Roll out the slab:
Using your rolling pin, flatten the clay to an even thickness of about 1/4 inch. If you want a consistent thickness, place two wooden rulers on either side of the clay as guides while rolling. -
Cut the base circles:
Press your circle cutter into the clay to create about 10 circles. You will need a few extras in case of breakage, but the final design uses 8 pieces total—two full circles and six crescents. -
Create the crescents:
Take one of the cut circles. Offset the cutter slightly over the edge of the circle and press down again to slice away a crescent shape. Repeat this to create varying phases: thin crescents and thicker gibbous moons. -
Smoothing the edges:
Dip your finger in a tiny bit of water and run it gently along the cut edges of your shapes to smooth out any ragged bits or burrs left by the cutter. -
Adding texture (optional):
If you like the rustic look in the photo, lightly press a piece of crumpled foil or use an old toothbrush on the surface to give the ‘moons’ a crater-like texture. -
Pierce the hanging holes:
Using a needle tool or toothpick, carefully poke a hole through the top and bottom of every piece, *except* for the very bottom crescent which only needs a top hole. Ensure the hole is wide enough for your twine.
Cracked Clay?
To fix hairline cracks during drying, make a paste of clay mixed with a little water (slip) and smooth it into the fissure with your finger, then let dry again.
Step 2: Drying and Finishing
-
Let them dry completely:
Lay all pieces flat on parchment paper in a cool, dry place. Flip them over carefully every few hours to ensure they dry evenly and don’t curl. This usually takes 24-48 hours depending on humidity. -
Sand for perfection:
Once bone dry, take fine-grit sandpaper and gently buff the edges or surface if you want a cleaner, more modern look. Wipe away the dust with a dry cloth.
Knot Security
Add a tiny dab of clear craft glue or superglue to the knots under each clay piece. This prevents them from slipping down the twine over time.
Step 3: Assembly
-
Prepare the dowel:
Cut a length of jute twine about 25 inches long. Tie each end securely to the outer edges of your wooden dowel to create the main hanging triangle. -
Measure the vertical strands:
Cut two long pieces of twine, each about 3 feet long. These will be the two vertical lines holding your moons. -
Attach the first strand:
Fold one long piece of twine in half and loop it onto the wooden dowel using a lark’s head knot. Position it about a third of the way in from the left side. -
Attach the second strand:
Repeat the process with the second string, positioning it a third of the way in from the right side. Space them evenly so the mobile hangs balanced. -
String the top elements:
Thread the twine through the top hole of your first shape (a full circle or large gibbous moon). Tie a small double knot underneath the hole to hold the clay in place, or thread it through to the bottom hole if your design allows. -
Connecting the chain:
Continue threading the twine down through the bottom hole of the first piece, leaving a gap of about 1-2 inches of string, and then tie a knot to support the top hole of the next moon phase. -
Balance the design:
I prefer to lay the whole arrangement on a table first to visualize the spacing. Repeat the tying process until you have 4 moon phases hanging on each vertical string. -
Secure and trim:
Once the bottom-most crescent is tied on, trim any excess twine below the final knot for a tidy finish.
Hang your new mobile near a sunny window and watch the shadows shift throughout the day
Tiny Fairy House Village
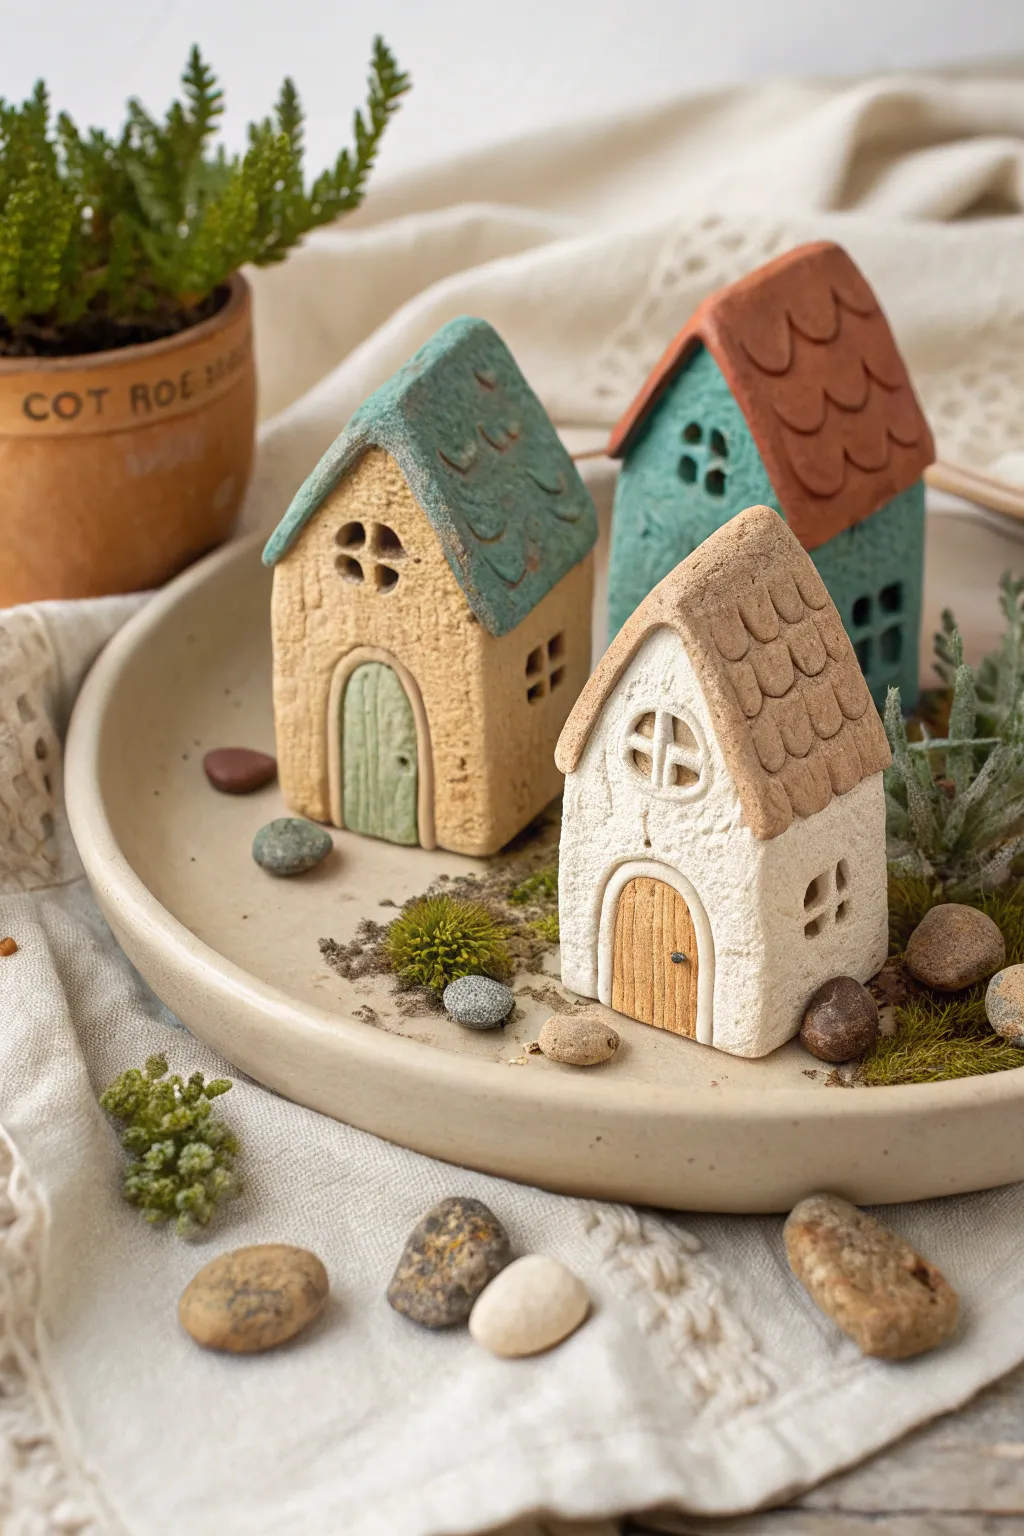
Create a charming miniature village with these rustic fairy houses made from air dry clay. Featuring textured walls, scalloped roofs, and tiny doorways, this project is perfect for adding a touch of magic to your shelves or planters.
Step-by-Step Guide
Materials
- Air dry clay (white or terracotta)
- Rolling pin
- Clay knife or craft knife
- Needle tool or toothpick
- Texture tools (sandpaper, toothbrush, or stiff bristle brush)
- Small round cutter or bottle cap (for window detail)
- Acrylic paints (cream, sage green, terracotta, light brown, white, dark grey)
- Fine detail paintbrushes
- Water cup
Step 1: Base Construction
-
Prepare the Clay:
Knead a golf-ball-sized amount of air dry clay until it is pliable and smooth. If it feels too dry, dip your fingers in water and work it in. -
Shape the Main Block:
Roll or press the clay into a thick, rectangular block about 2-3 inches tall. Gently tap the bottom on your work surface to flatten it so the house stands upright. -
Form the Roof Peak:
Pinch and press the top half of your rectangle to create a triangular peak. Smooth the sides with a little water to ensure the transition from wall to roof is seamless. -
Add Wall Texture:
Using a stiff toothbrush or a crumpled ball of aluminum foil, gently press texture into the four walls of the house to create a rough, stucco-like finish. Avoid texturing the roof area for now. -
Carve the Doorway:
Use your needle tool to lightly outline an arched door on the front. Lightly press the clay inward within this outline to recess the door slightly, giving it depth. -
Create the Door Plank Texture:
Score vertical lines into the recessed door area to mimic wooden planks. Add a tiny ball of clay for a doorknob.
Step 2: Roof & Details
-
Roll the Roof Slab:
Roll out a separate thin slab of clay, about 1/4 inch thick. Cut a rectangle large enough to drape over the peak of your house with a slight overhang. -
Attach the Roof:
Score the top peak of the house and the underside of the roof slab. Apply a tiny bit of water or slip, then press the roof firmly onto the house peak. -
Detail the Shingles:
Use a rounded tool or the back of a small paintbrush to impress U-shaped scallops across the roof surface, starting from the bottom edge and working your way up to the ridge. -
Add a Round Window:
Roll a tiny snake of clay and form a circle. Attach this to the front peak or side wall with a dab of water. Use a needle tool to press a cross shape inside for the window pane. -
Create Square Windows:
For side windows, simply press square indentations into the clay with a square tool or carve them out with a knife. Add a tiny cross piece inside if desired. -
Final Smoothing:
Check for any sharp burrs or unwanted fingerprints. Smooth them out with a slightly damp finger before setting the houses aside to dry completely for 24-48 hours.
Cracking Issues?
If small cracks appear while drying, don’t panic. Mix a tiny bit of fresh clay with water to make a paste and fill in the cracks, then smooth over.
Step 3: Painting & Finishing
-
Base Coat the Walls:
Paint the walls of the houses. I usually start with the lightest color first—use a creamy off-white or a warm sandy beige. It might take two coats for full coverage. -
Paint the Roofs:
Paint the roofs in contrasting earthy tones like muted terracotta, sage green, or a light brown. Let the paint settle into the scalloped grooves. -
Detail the Woodwork:
Use a fine brush to paint the doors a natural wood color. Use a slightly lighter shade than the door to highlight the vertical plank lines. -
Highlight the Texture:
Once the base coats are dry, use a technique called dry-brushing. Dip a dry brush into white or very light grey paint, wipe most of it off on a paper towel, and lightly skim over the textured walls and roof tiles to catch the raised edges. -
Add Depth to Windows:
Paint the inside recesses of the windows with a dark grey or black to simulate depth and shadow. -
Touch Up Knobs and Hinges:
Add a tiny dot of metallic or black paint to the doorknobs for a finishing detail.
Go Green
Make a tiny hole in the roof peak before drying. After painting, glue in a small sprig of dried moss or a tiny faux succulent for a ‘living roof’ look.
Arranging your finished cottages on a tray with smooth stones creates a wonderful display piece
Cute Animal Pencil Topper Set
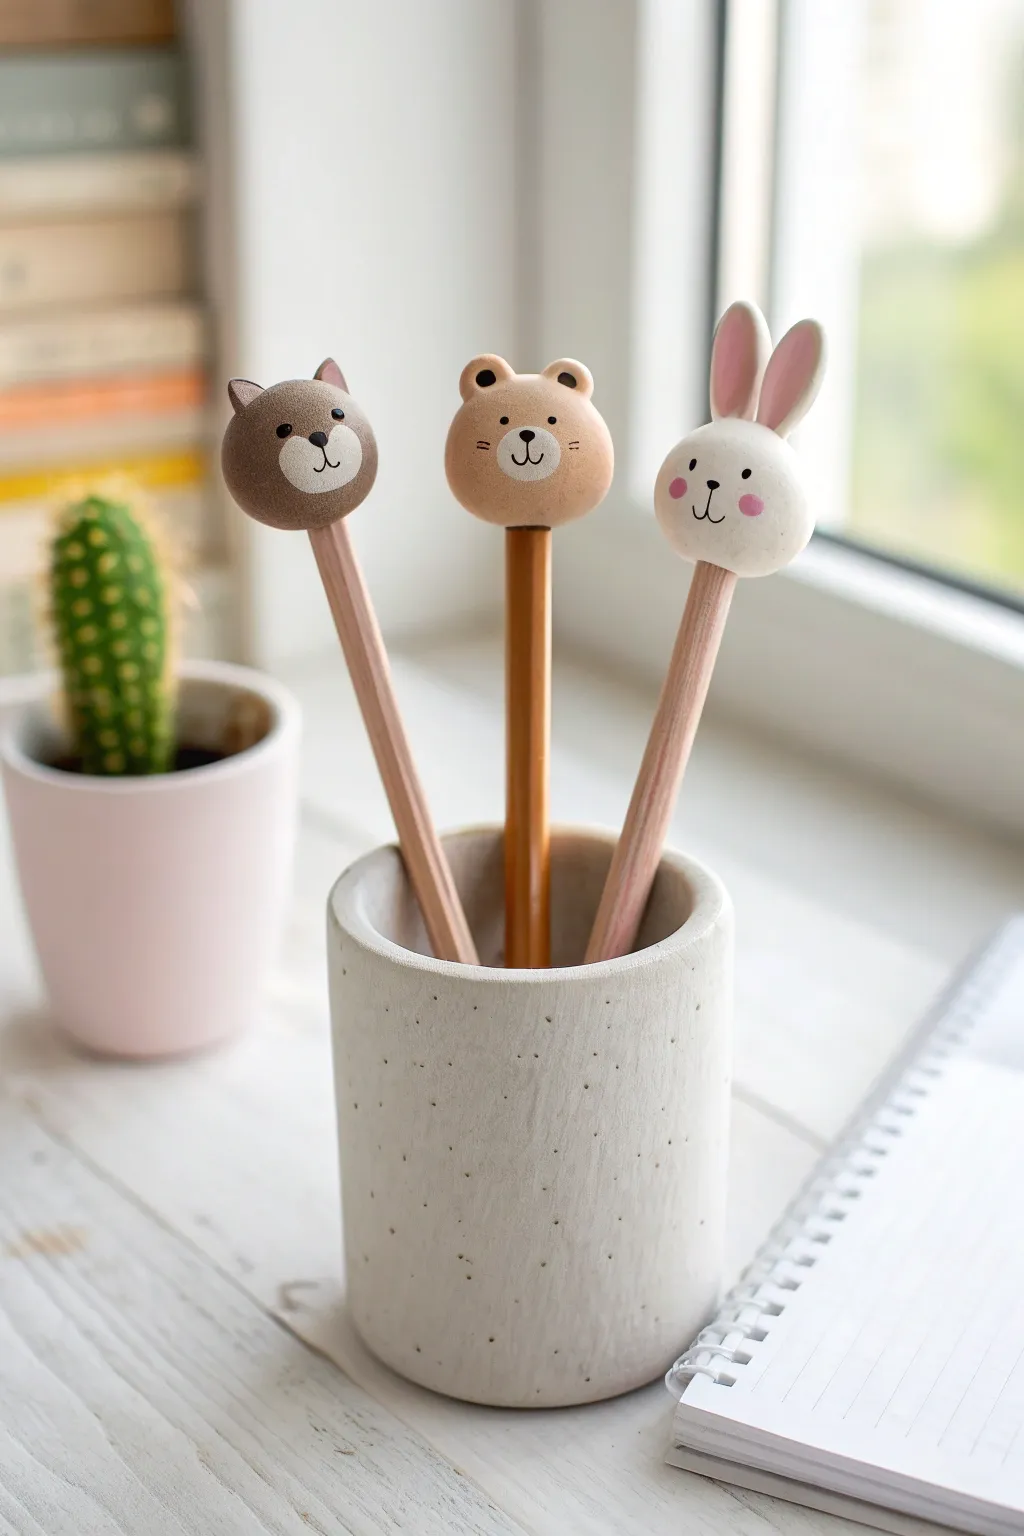
Transform ordinary pencils into adorable stationery with these charming animal friends. Featuring a cat, bear, and bunny, this set uses simple spheres and careful painting to create a clean, modern kawaii aesthetic.
Step-by-Step Tutorial
Materials
- White air-dry clay
- Standard wooden pencils
- Acrylic paints (brown, light tan, white, pink, black)
- Fine grit sandpaper
- Fine detail paintbrush (size 0 or 00)
- Small dotting tool or toothpick
- Water in a small cup
- Matte varnish or sealant
Step 1: Shaping the Bases
-
Prepare the clay:
Knead a small amount of white air-dry clay until it is smooth and pliable. You want to eliminate any air bubbles or cracks before shaping. -
Form the spheres:
Roll three balls of clay slightly larger than a large marble (about 1 inch in diameter). Roll them between your palms until they are perfectly round and smooth. -
Attach to pencils:
Gently push the eraser end of a pencil into the bottom of one sphere. Twist slightly as you push to create a snug fit about half an inch deep. Remove the pencil. -
Secure the fit:
Add a tiny dab of water or white glue to the pencil end and reinsert it into the hole. Smooth the clay around the base where it meets the pencil so it tapers seamlessly.
Smooth Operator
To get that perfectly polished look, dip your finger in water and smooth the clay constantly while shaping. Water acts like a slip, erasing fingerprints instantly.
Step 2: Adding Ears & Details
-
Cat ears:
For the cat, form two tiny triangles of clay. Attach them to the top of one sphere using a drop of water, smoothing the seams with your finger or a modeling tool. -
Bear ears:
For the bear, make two very small balls. Press them gently onto the top sides of the second sphere. Use a rounded tool to create a small indentation in the center of each ear. -
Bunny ears:
For the rabbit, roll two small logs of clay and flatten them slightly into long teardrops. Attach these to the top of the third sphere, ensuring the join is strong so they don’t snap off later. -
Smooth and dry:
Dip your finger in water and give all three toppers a final smoothing to remove fingerprints. Stand the pencils upright in a jar or foam block and let them dry completely, ideally for 24-48 hours.
Custom Characters
Use this same technique to make a whole zoo! Try painting a grey sphere for a koala, or add a flattened oval snout to a pink sphere for a piglet.
Step 3: Painting & Finishing
-
Sand for smoothness:
Once fully cured, use fine-grit sandpaper to gently buff away any remaining uneven spots. Wipe away the dust with a barely damp cloth. -
Base coats:
Paint the cat topper a medium brown and the bear a soft tan color. Leave the rabbit topper bare (or paint it white for a more opaque finish). Let these coats dry. -
Snout circles:
Mix a lighter shade for the snouts. Pant a light tan circle on the lower half of the cat’s face and a cream-colored circle on the bear. This creates the focal point for their expressions. -
Painting the bunny details:
Since the bunny is white, just paint the inner parts of the ears with a soft baby pink acrylic. -
Drawing the faces:
Using your finest brush or a black fine-liner pen, carefully draw the eyes. Place them wide apart for that cute look. Add a small nose and a ‘w’ shape for the mouth. -
Adding whiskers:
With a very steady hand, paint three tiny whiskers on each cheek for the bear. The cat and bunny look sweet with just the simple face, but feel free to add whiskers if you like. -
Rosy cheeks:
Dip a dotting tool or the back of a paintbrush into pink paint. I prefer to dab it on paper first to remove excess, then stamp rosy cheeks onto the bunny. -
Seal the deal:
Once all paint is completely dry, coat each topper with a matte varnish. This protects the paint from chipping during daily writing tasks.
Now you have a trio of supportive friends ready to help you with your next writing project