Whenever I’ve got a fresh lump of clay in front of me, I always want ideas that feel fun, doable, and actually useful once they’re done. Here are my go-to favorites—starting with the classics you’ll make on repeat, then drifting into the delightfully quirky stuff.
Simple Pinch Pot Trinket Dish
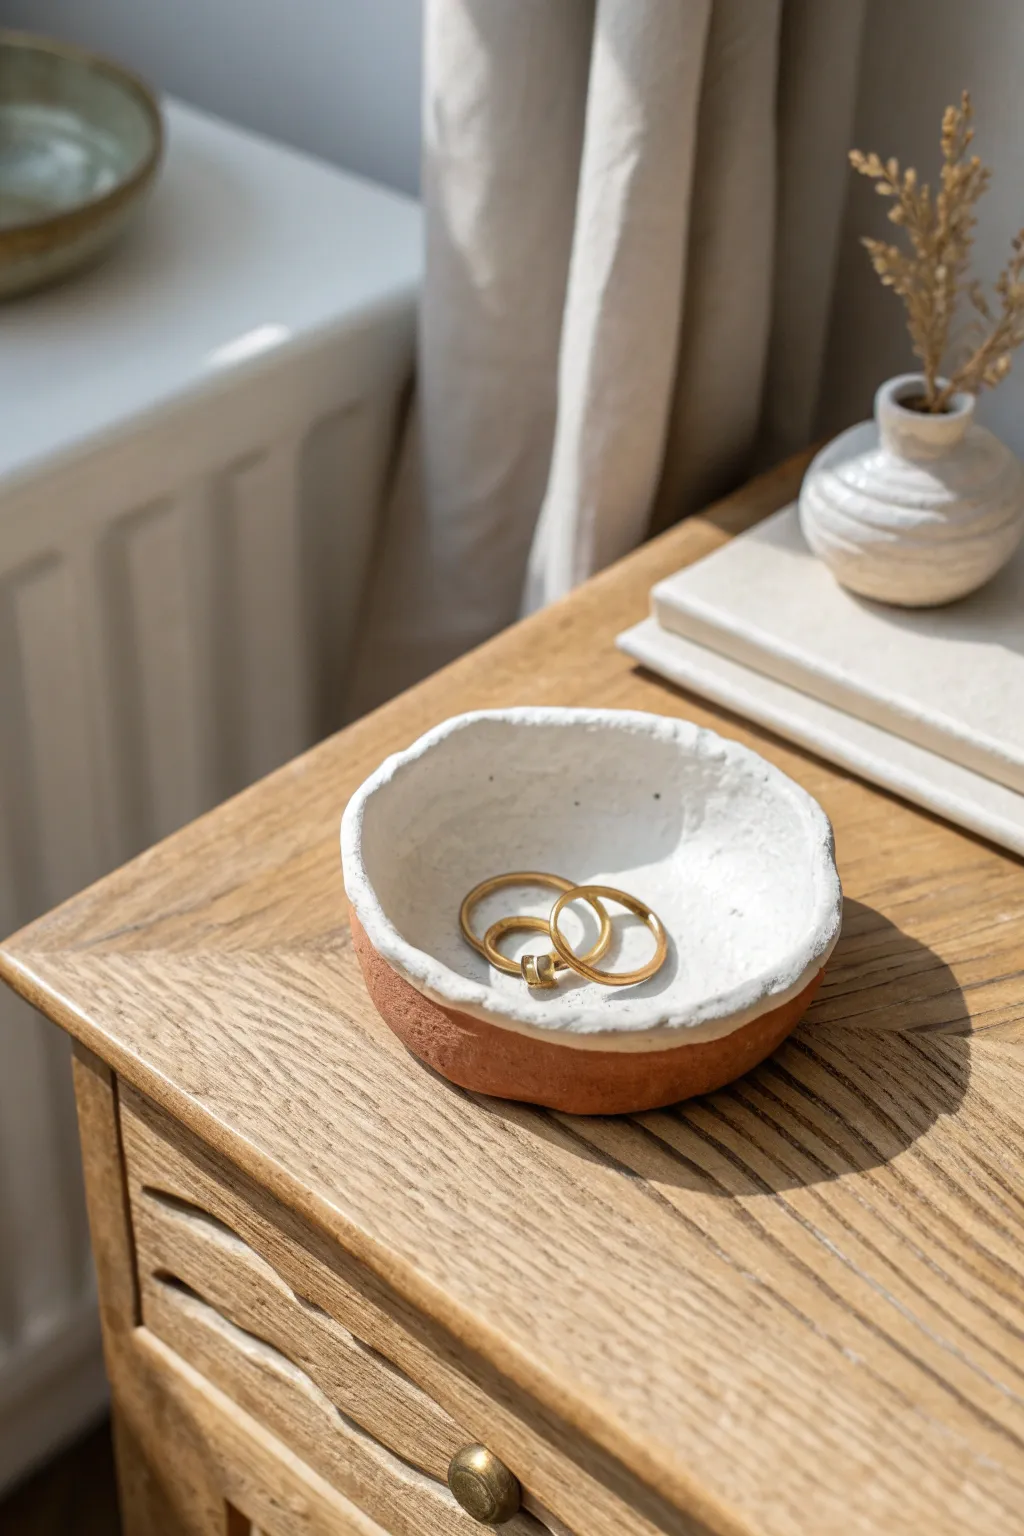
This rustic two-tone trinket dish embraces imperfection with its rough, organic edges and warm terracotta exterior. The crisp white glossy interior creates a beautiful modern contrast, making it the perfect minimalist spot to catch your favorite gold rings and everyday jewelry.
Step-by-Step Guide
Materials
- Terracotta air-dry clay or kiln-fire clay
- Glossy white acrylic paint (for air-dry) or white glaze (for kiln)
- Small sponge or wide paintbrush
- Water in a small cup
- Rolling pin (optional)
- Sandpaper (fine grit)
- Clear varnish sealant (for air-dry clay)
- Canvas or cloth work surface
Step 1: Shaping the Base
-
Prepare your clay:
Start by grabbing a handful of terracotta clay, roughly the size of a tennis ball. Knead it in your hands for a minute to warm it up and remove any trapped air bubbles, which helps prevent cracking later. -
Form the initial sphere:
Roll the clay between your palms until you have a smooth, round ball. It doesn’t need to be perfectly spherical, but try to smooth out any major creases. -
Start the pinch:
Hold the clay ball in one hand. With your other hand, push your thumb firmly into the center of the ball, stopping about a half-inch from the bottom. This sets your base thickness. -
Widen the walls:
Keep your thumb inside the hole and your fingers on the outside. Gently pinch and rotate the ball, pressing the clay walls outward to widen the opening. -
Shape the dish:
Continue pinching and turning until you have a shallow bowl shape. I like to aim for walls that are about a quarter-inch thick to keep it sturdy but dainty. -
Flatten the bottom:
Gently tap the base of your pot on your work surface to flatten it slightly. This ensures your trinket dish will sit stable and level on a table.
Embrace the uneven
Don’t overwork the rim! The beauty of this piece comes from the ‘wabi-sabi’ aesthetic. If the edge looks too perfect, pinch it again to make it irregular.
Step 2: Creating the Texture
-
Rough up the rim:
Instead of smoothing the rim perfectly, embrace the organic look. Use your fingers to gently tear or unevenly pinch the top edge, creating that deliberate, jagged silhouette seen in the photo. -
Initial smoothing:
Dip your finger in a little water and lightly run it over the interior of the bowl to smooth out any deep fingerprints, but leave the exterior slightly textured for that rustic appeal. -
Dry the clay:
Set your dish aside to dry completely. If using air-dry clay, this usually takes 24-48 hours depending on humidity. Rotate it occasionally so the bottom dries evenly. -
Sand the interior:
Once fully dry (and bone white/light pink), take fine-grit sandpaper and lightly sand just the inside of the bowl. You want a relatively smooth surface for the paint to adhere to. -
Dust off:
Wipe the entire piece with a dry cloth or a soft brush to remove any clay dust before moving on to the finishing steps.
Step 3: Painting and Finishing
-
Paint the interior:
Load a brush with glossy white paint. Apply a thick, even coat to the inside of the dish. Let the paint come up just to the top of the jagged rim, creating a ‘drip’ effect where the white meets the raw clay. -
Refine the edge:
Carefully dab the white paint along the very top surface of the rough rim, but stop immediately where the rim turns into the outer wall. This high-contrast line is key to the design. -
Add a second coat:
Allow the first layer to dry to the touch, then add a second coat of white inside to ensure full opacity. You shouldn’t see any terracotta color showing through the white. -
Seal the piece:
If using air-dry clay, apply a clear varnish over the entire piece—both the painted interior and the raw exterior. This deepens the terracotta color and protects the clay from moisture. -
Let it cure:
Allow the varnish or sealant to dry completely according to the bottle instructions before placing any jewelry inside.
Cracks happen
If small cracks appear while drying, mix a tiny bit of fresh clay with water to make a paste (slip) and fill them in, then smooth with a finger.
Now you have a charming, handmade vessel ready to display your daily treasures on your nightstand or vanity


Stamp-Textured Clay Coaster Set
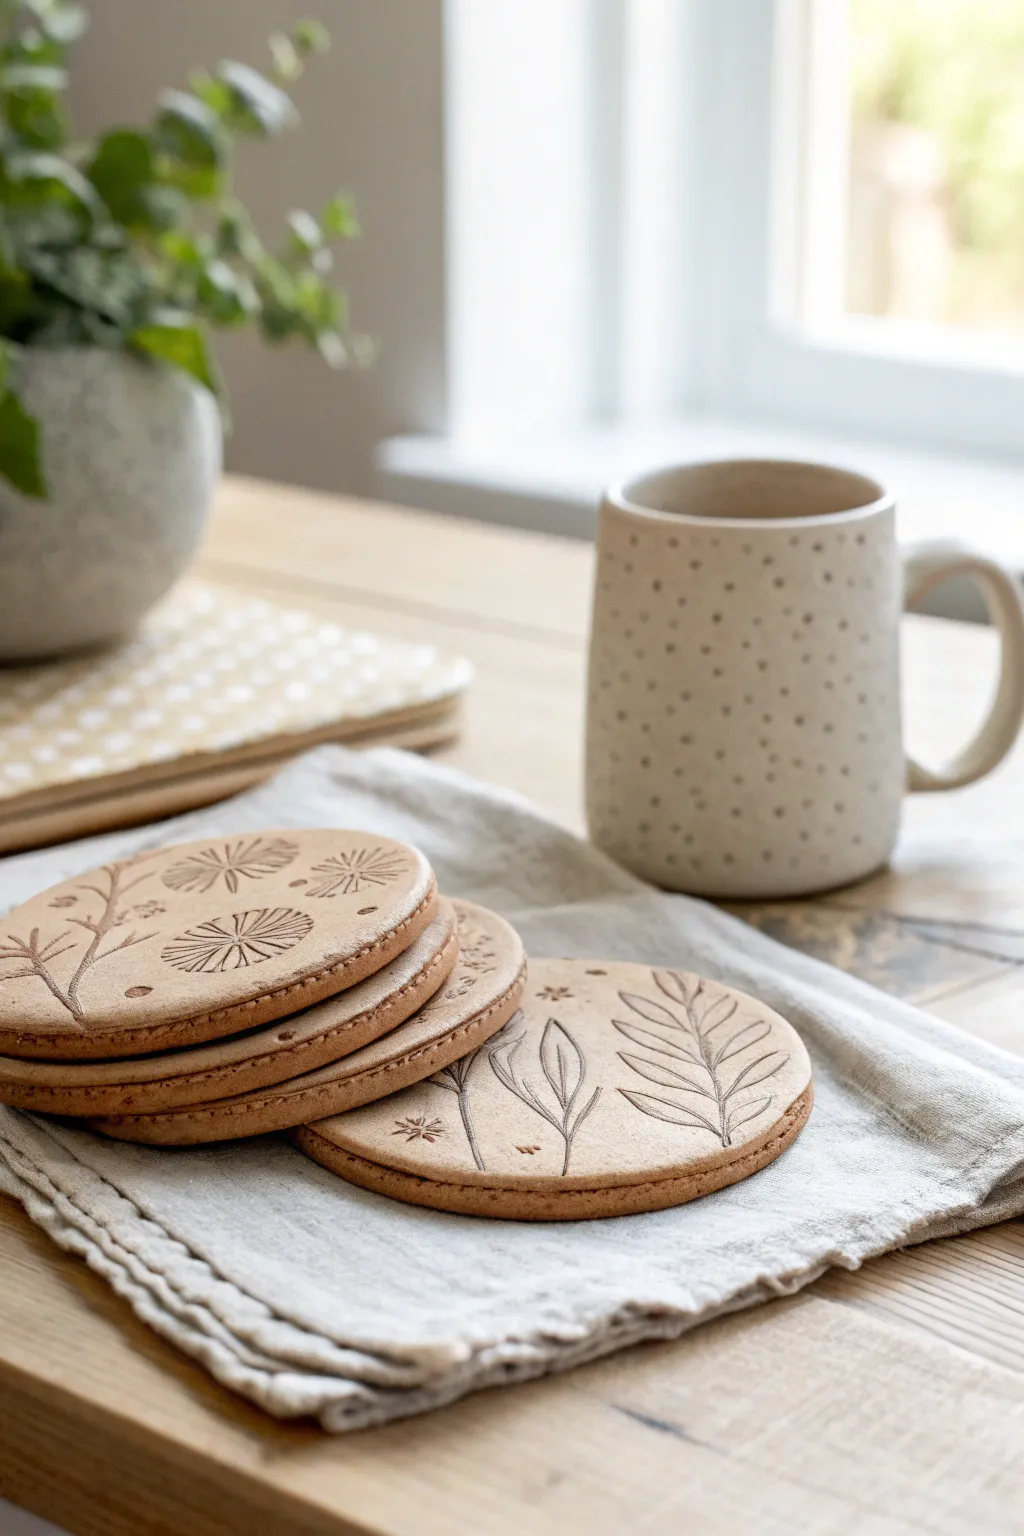
These charming coasters combine the rustic warmth of natural clay with delicate botanical impressions, perfect for protecting your surfaces in style. The set features a smooth, matte finish with intricate wildflower and leaf designs debossed into the surface, evoking a tranquil cottagecore aesthetic.
Step-by-Step
Materials
- Air-dry clay (terra cotta or sand color for the natural look)
- Rolling pin
- Circle cookie cutter (approx. 3.5-4 inches diameter)
- Botanical stamps (rubber or acrylic) or fresh/dried pressed flowers
- Fine-grit sandpaper (220-400 grit)
- Matte acrylic varnish or clay sealant
- Soft paintbrush
- Canvas cloth or parchment paper (for working surface)
- Small bowl of water
- Sponge
Step 1: Preparation and Rolling
-
Prepare your surface:
Lay down a piece of canvas cloth or parchment paper on a flat, sturdy table. This prevents the clay from sticking and picking up unwanted textures from the table. -
Condition the clay:
Take a generous handful of air-dry clay and knead it warm in your hands. You want it to be pliable and free of air bubbles, so work it until it feels smooth and uniform. -
Initial flattening:
Press the ball of clay down onto your work surface using the palm of your hand to create a thick, rounded disc. -
Roll out the slab:
Using your rolling pin, roll the clay out evenly. Aim for a thickness of about 1/4 inch (6mm). If you want perfect uniformity, place guides (like two wooden paint stirrers) on either side of the clay to rest the rolling pin on. -
Smooth the surface:
Dip your finger or a slightly damp sponge into water and gently glide it over the clay slab to remove any rolling pin marks or surface cracks.
Step 2: Cutting and Stamping
-
Cut the shapes:
Take your circle cookie cutter and press firmly into the clay slab. Cut as many circles as your slab allows, leaving a little space between each cut. -
Remove excess clay:
Peel away the scrap clay from around the circles. You can ball this up and save it for another project. Keep the circles on the cloth for now to avoid distorting their shape. -
Refine the edges:
Dip your finger in water again and run it gently around the cut rim of each coaster to smooth out any sharp edges or burrs left by the cutter. -
Plan your design:
Before committing to the clay, lightly rest your stamps (or real flowers) on top of a circle to visualize the composition. I prefer offsetting the design slightly to the side for a more organic look. -
Make the impression:
Press the botanical stamp firmly and evenly into the wet clay. Apply consistent pressure to ensure the delicate lines of the leaves and petals transfer clearly. -
Adding details:
If you are using smaller stamps for things like the flower heads or tiny stars, add those now to fill any negative space. -
Clean up the impressions:
Check the stamped areas. If the stamp pulled up any tiny jagged bits of clay, smooth them down very carefully with a damp fine-point brush.
Prevent Curling
If coasters start curling while drying, place a heavy book on top of them (sandwich them between parchment paper first) once they are semi-dry but still slightly flexible.
Step 3: Drying and Finishing
-
Initial drying:
Transfer the coasters carefully to a drying rack or a clean sheet of parchment paper. Let them sit undisturbed in a cool, dry place. -
Flip for even drying:
After about 12 hours, gently flip the coasters over. This is crucial for air-dry clay to prevent curling as the moisture evaporates from the bottom. -
Complete drying process:
Allow them to dry fully for another 24-48 hours. The clay will lighten in color and feel hard and room temperature (not cold) to the touch when ready. -
Sand for perfection:
Once bone dry, take your fine-grit sandpaper and lightly buff the edges and surface. Focus on smoothing the rim to ensure a professional feel. -
Dust off:
Wipe the coasters with a dry cloth or a soft brush to remove all the sanding dust before sealing. -
Seal only the design:
Dip a fine brush into your matte varnish and carefully paint into the deep grooves of the stamped design first to ensure they remain dark and defined. -
Final coat:
Apply a thin, even layer of matte varnish over the entire coaster (top, sides, and bottom). This protects the clay from moisture from mugs.
Stamp Clarity
If your stamp is sticking to the clay, lightly dust the stamp surface with cornstarch or baby powder before pressing it down for a clean release.
Enjoy your beautiful, handmade coasters with your next cup of coffee or tea


Mini Slab Jewelry Tray With Rounded Corners
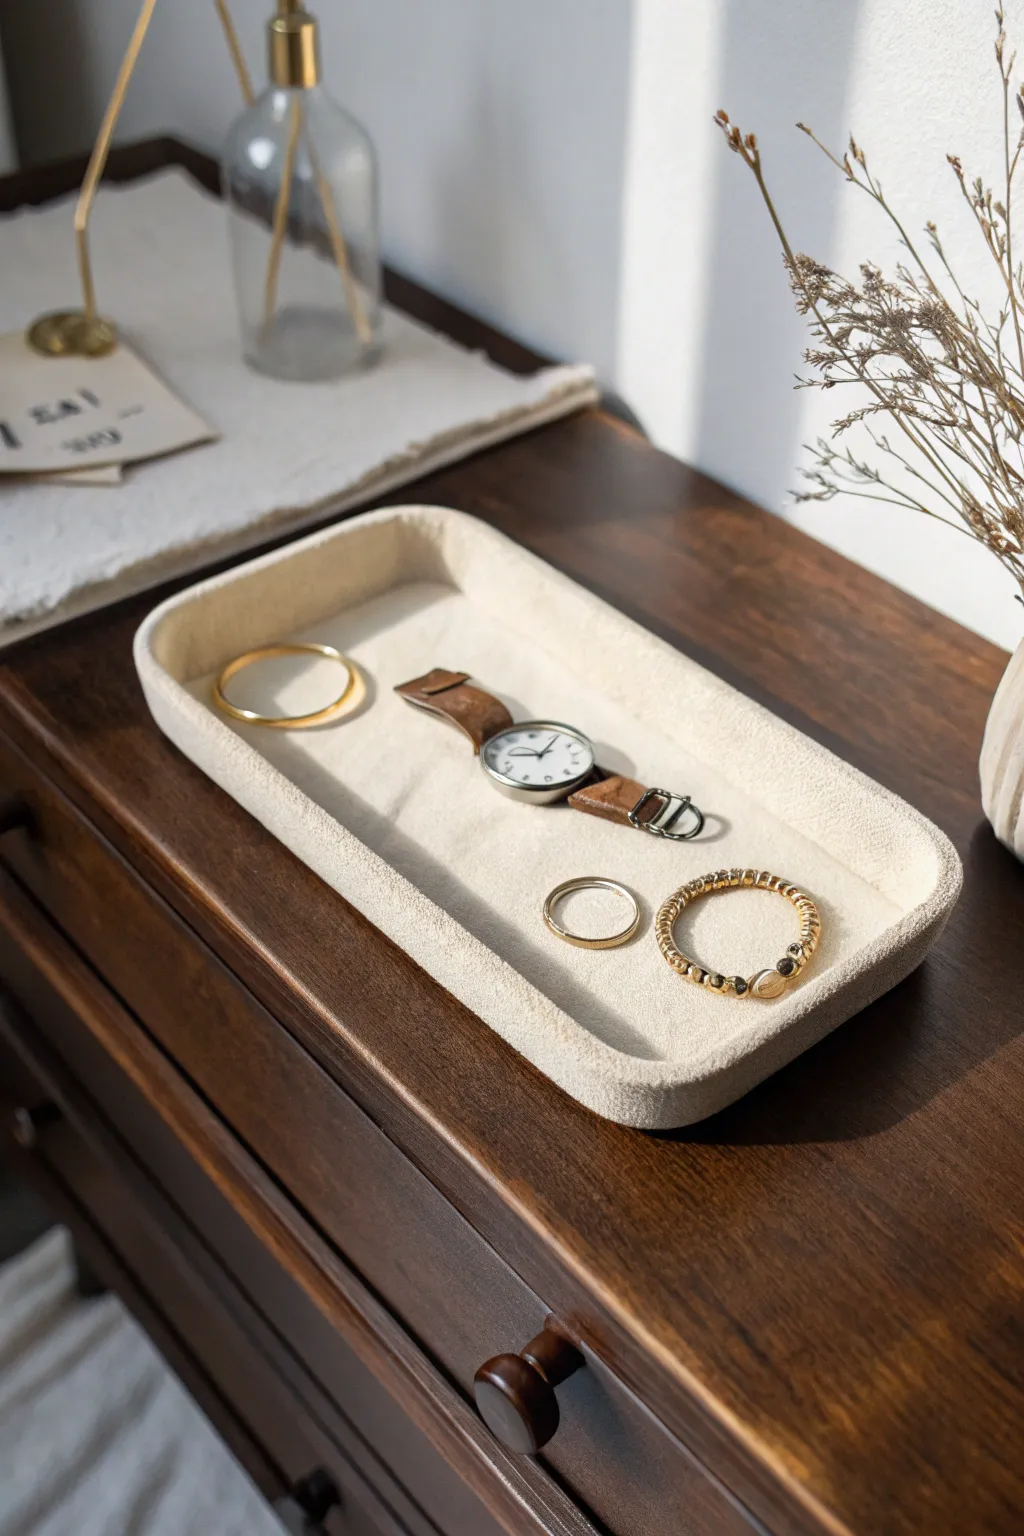
This elegant, beige tray features soft rounded corners and a raised edge, perfect for wrangling your daily essentials like watches and rings. Its clean, minimalist design mimics the look of high-end stone or ceramic but is easily achievable with clay immediately.
Detailed Instructions
Materials
- White or beige air-dry clay (or polymer clay)
- Rolling pin
- Sharp craft knife or clay blade
- Rectangular template (cardboard or paper)
- Small bowl of water
- Sponge
- Fine-grit sandpaper
- Matte sealant or varnish
- Rolling guides (optional)
Step 1: Preparing the Base
-
Condition the clay:
Start by taking a generous amount of clay and kneading it in your hands to warm it up. You want it pliable and free of air bubbles before you begin rolling. -
Roll out a slab:
Use your rolling pin to flatten the clay into a large, even sheet. Aim for a thickness of about 1/4 inch (6mm) to ensure the tray feels substantial and sturdy. -
Cut the rectangle:
Place your rectangular cardboard template on top of the clay slab. Using a sharp craft knife, trace around the template to cut out the base shape. -
Create the walls:
Roll out the remaining clay into long snakes or coils, approximately the same thickness as your base. Flatten them slightly with the rolling pin to create strips about 3/4 inch high.
Smooth Operator
Use a damp paintbrush instead of your finger to smooth hard-to-reach inside corners without leaving dents or nail marks in the soft clay.
Step 2: Assembling the Form
-
Score the edges:
Use a needle tool or knife to make small cross-hatch scratches along the perimeter of your rectangular base where the walls will attach. Do the same on the bottom edge of your clay strips. -
Apply slip:
Dab a little water (or liquid clay if using polymer) onto the scored areas to create a ‘glue’ that will bond the pieces together strongly. -
Attach the walls:
Place the clay strips along the edge of the base. Gently press them down to secure them. -
Shape the corners:
Instead of sharp 90-degree joins, curve the clay strip gently around the corners to create that characteristic rounded look shown in the photo. Trim any excess length. -
Blend the seams:
Using a modeling tool or your thumb, smooth the clay from the wall down onto the base on the inside, and from the base up onto the wall on the outside. The seams should disappear completely.
Stone Effect
Mix dried tea leaves or black pepper into your white clay before rolling. Sanding later reveals them as chic, faux-stone speckles.
Step 3: Refining and Finishing
-
Smooth surfaces:
Dip a sponge lightly in water and run it over the entire piece to smooth out fingerprints and uneven textures. Pay special attention to the top rim to ensure it is level. -
Texture application (optional):
To mimic the speckled, matte texture in the image, you can gently dab the surface with a coarse sponge or a toothbrush while the clay is still damp. -
Let it dry:
Allow the tray to dry completely. For air-dry clay, this usually takes 24-48 hours. I find turning it over halfway through helps the bottom dry evenly. -
Sand for perfection:
Once fully dry, take your fine-grit sandpaper and gently sand the edges and corners to make them buttery smooth and uniform. -
Dust off:
Wipe away all sanding dust with a slightly damp cloth or a dry soft brush. -
Seal the piece:
Apply a coat of matte varnish or sealant to protect the clay from moisture and stains without adding unwanted shine.
Now you have a stylish, custom tray ready to organize your bedside table.


Ring Cone Holder for the Sink
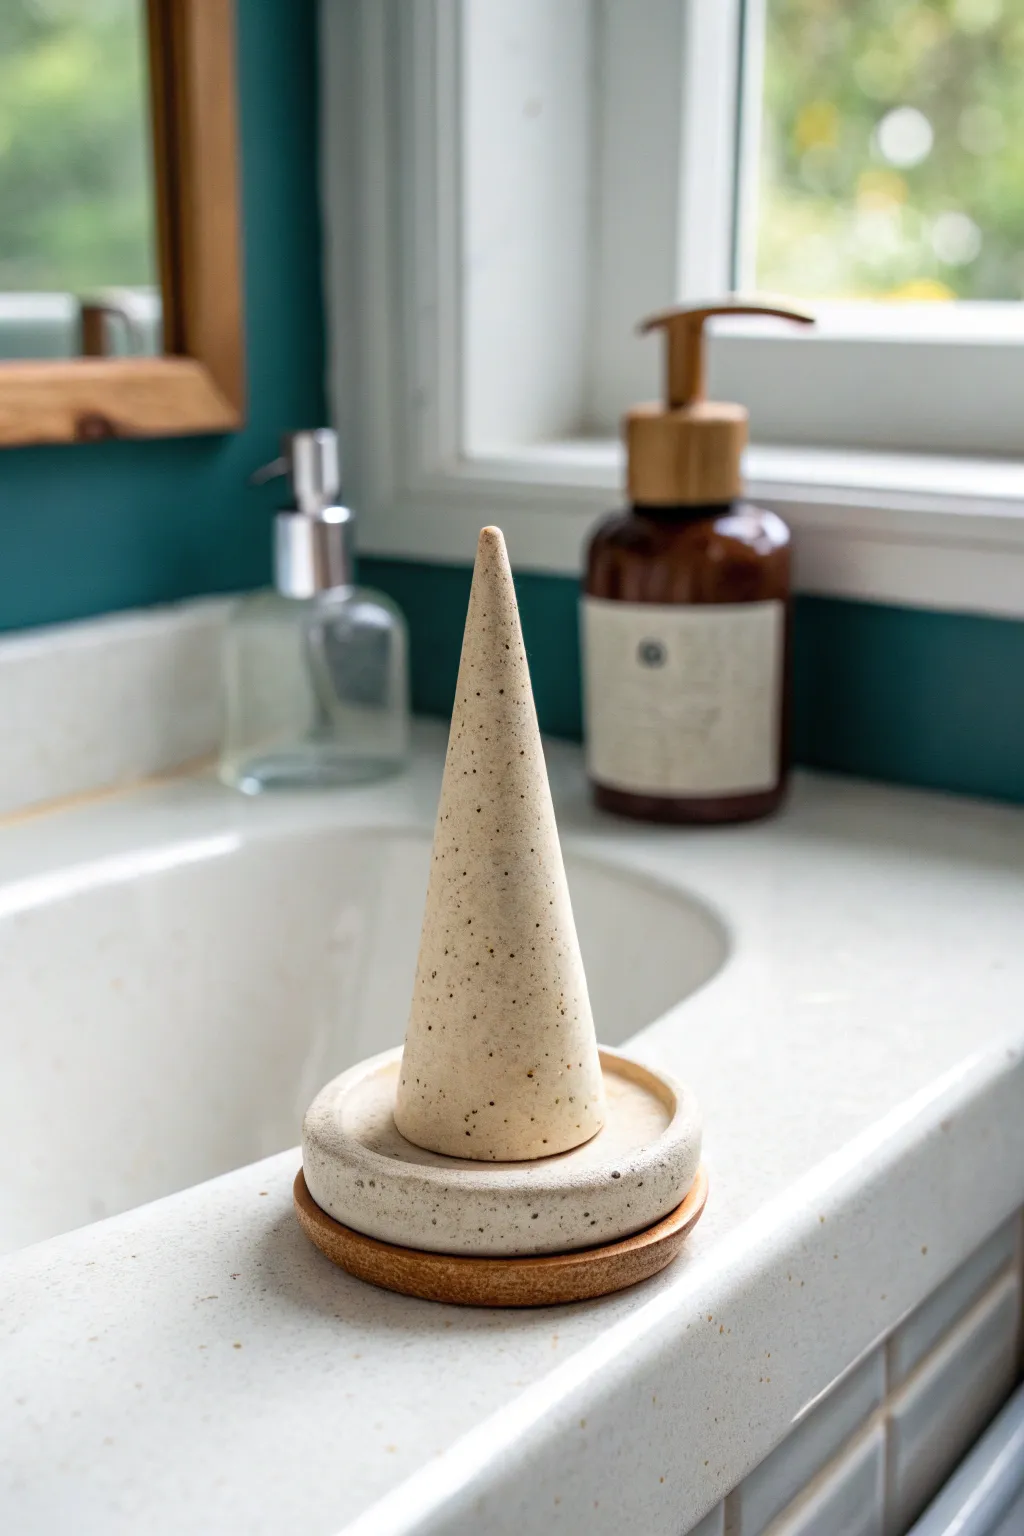
Keep your jewelry safe and stylish near the sink with this sleek, two-piece ring holder set. Featuring a tall central cone for stacking rings and a shallow catch-all dish base for earrings, the speckled finish gives it a trendy, modern ceramic look.
How-To Guide
Materials
- Polymer clay (beige or sand color)
- Course ground black pepper or dried used coffee grounds (for speckles)
- Rolling pin or acrylic roller
- Circle cutters (two sizes: approx. 3-inch and 3.5-inch)
- X-Acto knife or clay blade
- Sandpaper (fine grit)
- Oven for baking
- Matte spray varnish or sealant
- Small piece of cardboard (for making a cone template)
Step 1: Prepping and Mixing the Clay
-
Condition the clay:
Start by warming up a large block of beige polymer clay in your hands. Knead and twist it repeatedly until it becomes pliable and soft to the touch. -
Create the speckles:
Flatten the conditioned clay slightly and sprinkle a generous pinch of coarse black pepper or dried coffee grounds onto the surface. This imitates that classic stoneware pottery look. -
Incorporate the texture:
Fold the clay over the grounds and knead thoroughly again. Continue folding and pressing until the speckles are evenly distributed throughout the entire ball of clay. -
Roll it out:
Using your acrylic roller or rolling pin, roll the clay out into a smooth, even sheet. You want a thickness of about 1/4 inch to ensure the final piece feels substantial.
Pepper Perfection
Don’t over-knead after adding pepper! If you mix too long, the black specks might smear into gray streaks. Stop as soon as the distribution looks even.
Step 2: Forming the Ring Cone
-
Make a template:
Cut a small wedge shape (like a slice of pizza with a curved bottom) out of thin cardboard. This helps you get the cone shape right before cutting the clay. -
Cut the cone shape:
Place your template on the clay slab and use your clay blade to cut out the wedge shape. -
Roll the cone:
Gently curl the wedge into a cone shape, bringing the straight edges together. I like to overlap the edges just slightly to create a stronger bond. -
Seal the seam:
With your finger or a smoothing tool, gently rub the seam until it disappears completely. The outside should be perfectly smooth and continuous. -
Refine the tip:
Roll the pointy top gently between your fingers to ensure it isn’t too sharp, smoothing it into a soft point. -
Flatten the base:
Stand the cone upright on your work surface. If it wobbles, gently press it down or trim the bottom edge with your blade to ensure it stands perfectly straight.
Marble Magic
Instead of a single beige tone, loosely mix white and tan clay together before rolling. Stop before they fully blend to create a stunning marble effect.
Step 3: Creating the Base Dishes
-
Cut the top dish:
Roll out a fresh slab of your speckled clay (about 1/4 inch thick). Use your smaller circle cutter (around 3 inches) to punch out a perfect circle. -
Form the rim:
Take a long scrap of clay and roll it into a thin snake. Flatten this snake into a strip, then wrap it around the edge of your circle to create a raised rim. -
Blend the rim:
Use a modeling tool to blend the clay from the rim into the base circle so they become one solid piece. Smooth out any fingerprints. -
Create the bottom coaster:
For the darker bottom piece shown in the image, mix a small amount of brown clay into your beige mix to darken it slightly. Roll this out and cut a slightly larger circle (3.5 inches). -
Center the pieces:
While the clay is still raw, place the cone in the center of the lighter dish to check the fit, but don’t press them together permanently yet if you want to bake them separately for easier painting.
Step 4: Baking and Finishing
-
Bake the components:
Place all three pieces (the cone, the light dish, and the darker base) on a parchment-lined baking sheet. Bake according to your clay package instructions (usually around 275°F/135°C). -
Cool down:
Allow the pieces to cool completely inside the oven with the door slightly ajar to prevent cracking from temperature shock. -
Sand for smoothness:
Once cool, take a piece of fine-grit sandpaper and wet-sand the edges under running water. This removes any harsh lines and gives it that professional ceramic feel. -
Assemble the set:
Using a strong super glue or epoxy, glue the cone into the center of the light dish. Then, glue that assembly onto the slightly larger, darker base plate. -
Seal the deal:
Finish by applying two coats of matte varnish spray. This protects the faux-pottery finish from moisture near the sink.
Now you have a chic, functional piece of decor that looks like expensive stoneware.

The Complete Guide to Pottery Troubleshooting
Uncover the most common ceramic mistakes—from cracking clay to failed glazes—and learn how to fix them fast.
Tiny Bud Vase for One Stem
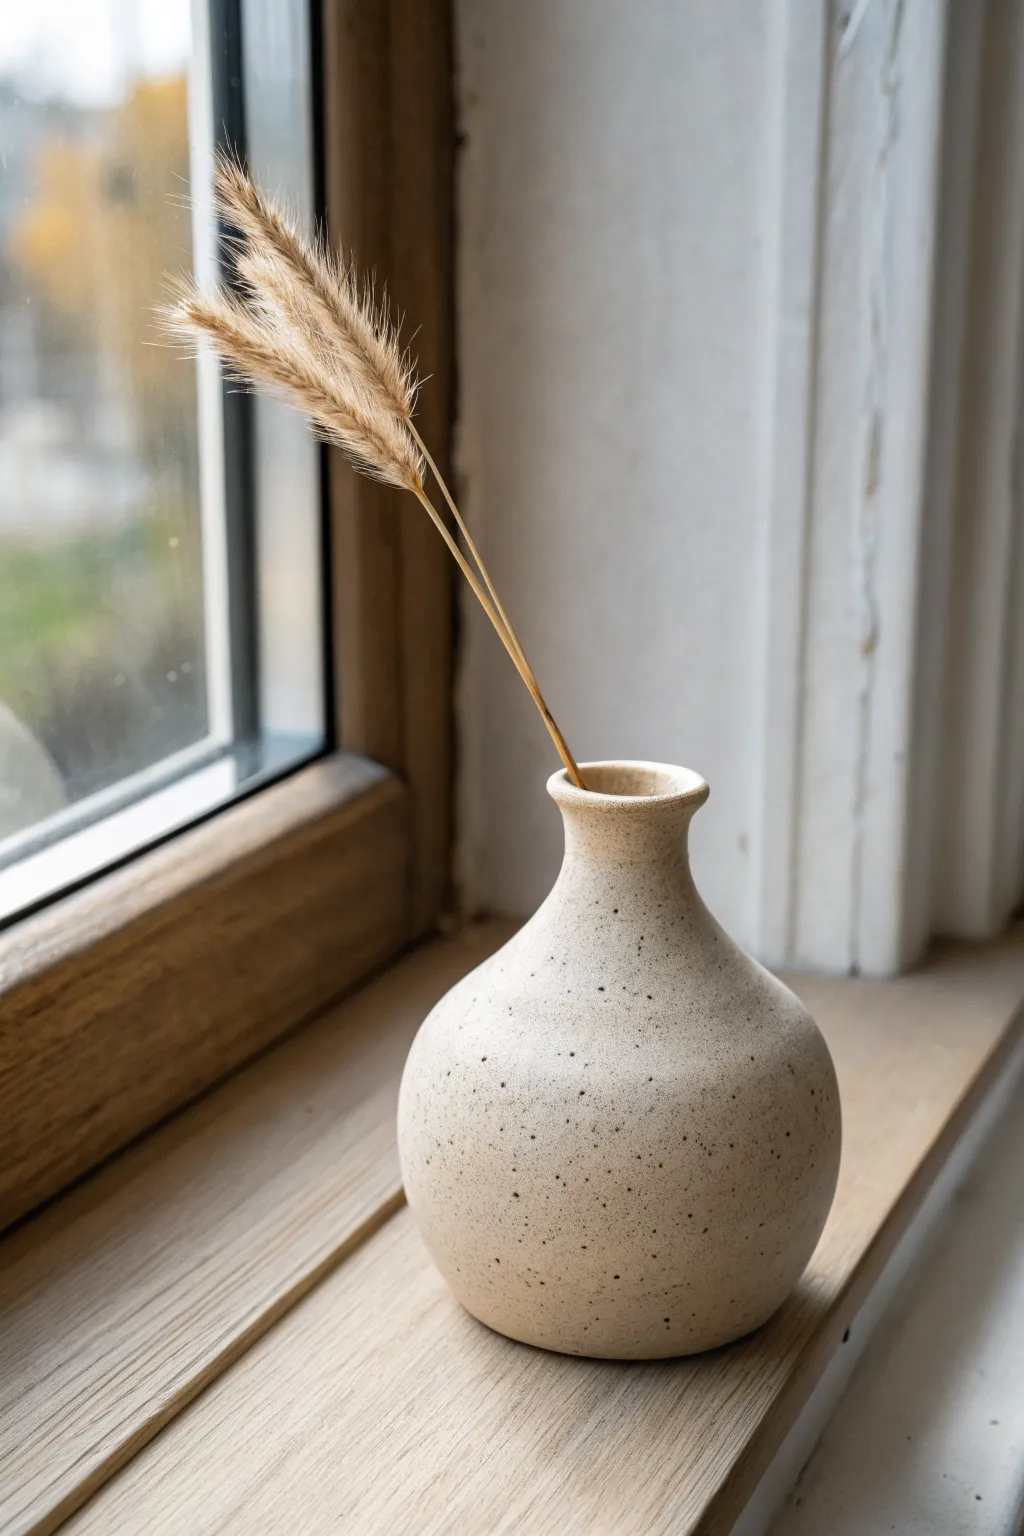
Capture the essence of rustic simplicity with this charming tiny bud vase, perfect for displaying a single dried stem. Its speckled oatmeal finish and organic bulbous shape bring a calming, earthy texture to any windowsill or shelf.
Step-by-Step
Materials
- Speckled stoneware clay (like ‘Speckled Buff’)
- Potter’s wheel (or hand-building tools if pinching)
- Needle tool
- Small sponge
- Wire cutter
- Rib tool (wood or rubber)
- Matte transparent glaze
- Kiln access
Step 1: Shaping the Base
-
Prepare the Clay:
Start with a small ball of speckled stoneware clay, roughly the size of a tangerine (about 3/4 lb). Wedge it thoroughly to remove air pockets and ensure even consistency. -
Center on the Wheel:
Throw the clay firmly onto the center of the wheel head. Use wet hands to cone the clay up and push it back down until perfectly centered. -
Open the Form:
Press your thumbs into the center to create the opening, leaving about a quarter-inch of thickness at the bottom for the base. Pull the floor out slightly, keeping it narrow since this is a small vase. -
Pull the Walls:
Slowly pull up the walls of the cylinder. Focus on maintaining thickness at the bottom while thinning out the top. Aim for an even cylinder before you start shaping. -
Belly Out the Form:
Using gentle pressure from the inside hand, push the clay outward to create a rounded, bulbous belly. Support the outside with your other hand to keep the curve smooth and controlled.
Step 2: Refining the Neck
-
Collar the Neck:
Place both hands around the upper portion of the vessel. Gently squeeze inward while the wheel spins to narrow the opening, creating a distinct transition from the round body to the neck. -
Elongate the Neck:
Once collared in, pull the clay at the neck upward slightly to give it height. This creates that elegant, slender profile perfect for a single stem. -
Flare the Rim:
At the very top, use your fingertip or a small chamois cloth to gently flare the rim outward just a tiny bit. This creates a soft, welcoming opening. -
Refine the Profile:
Use a wooden or rubber rib on the exterior to smooth out any throwing lines and emphasize that clean, round silhouette. I find this step crucial for getting that modern, minimalist look. -
Undercut the Base:
Use a wooden modeling tool to undercut the clay at the very bottom, creating a slight shadow line that makes the vase look like it’s floating slightly.
Collaring Cracks?
If the neck ripples or folds while narrowing, you’re collaring too fast. Slow down the wheel speed slightly and use more water or slip to reduce friction.
Step 3: Finishing and Firing
-
Cut and Dry:
Slide a wire cutter underneath the vase to separate it from the wheel. Carefully lift it off and set it aside to dry to leather-hard. -
Trimming (Optional):
If the bottom feels heavy, flip the leather-hard pot over and trim away excess clay from the base for a lighter weight and cleaner foot. -
Bisque Fire:
Once fully bone dry, fire the piece in a kiln to bisque temperature (usually Cone 04 or 06) to prepare it for glazing. -
Glaze Application:
Pour a matte transparent glaze inside the vase and swirl to coat the interior. For the exterior, either dip it quickly or brush on a thin layer to enhance the natural speckles without hiding them. -
Glaze Fire:
Fire the vase again to the final maturity temperature of your clay (commonly Cone 5 or 6). This will reveal the beautiful dark speckles within the clay body.
Texture Twist
Leave the exterior unglazed! If your clay is vitrified (water-tight) at full temperature, raw clay offers a wonderful tactile contrast to the smooth rim.
Place a single dried grass stem inside to complete your serene, handcrafted vignette
Easy Polymer Clay Statement Earrings
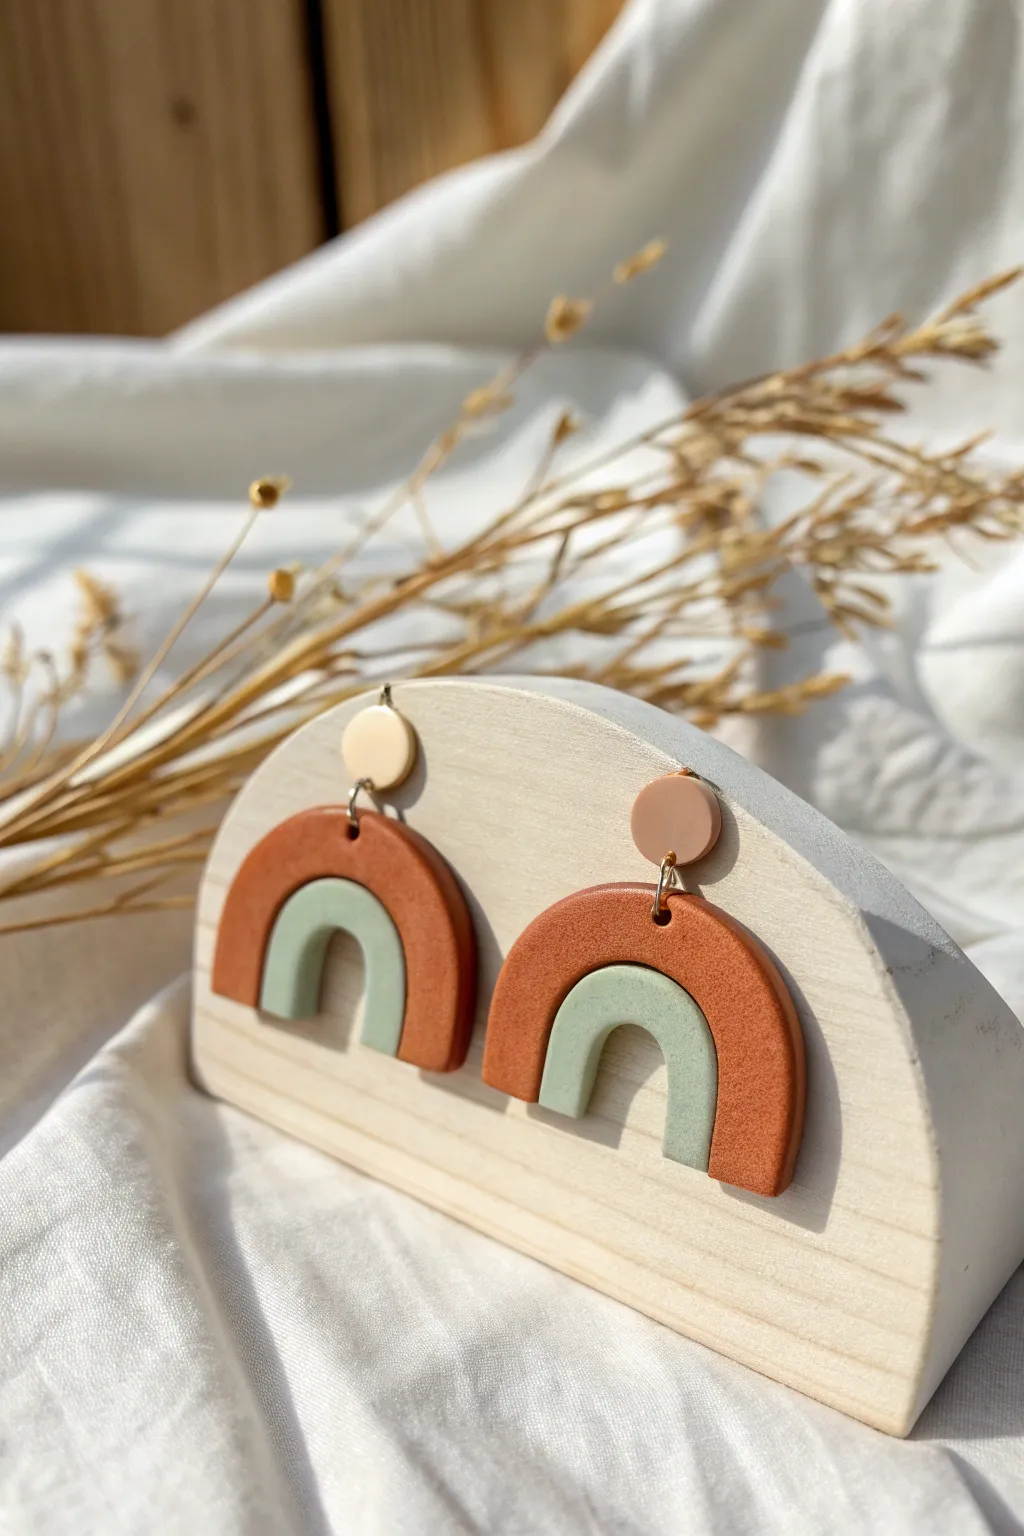
These earthy, boho-inspired statement earrings combine a warm terracotta tone with a soft sage green for a look that is both natural and modern. The subtle texture on the clay gives them a high-end, stone-like finish that feels beautifully organic.
How-To Guide
Materials
- Polymer clay (Terracotta/Burnt Orange, Sage Green, and Beige/Cream)
- Acrylic roller or pasta machine
- U-shaped clay cutters (two sizes: one large, one small)
- Small circular clay cutter (approx. 10mm)
- Texture sponge or stiff-bristled toothbrush
- Liquid polymer clay (Bake & Bond)
- Craft knife or tissue blade
- Hand drill or pin vibe
- Jump rings (gold)
- Earring posts and backs
- Jewelry pliers
- Oven and baking sheet
Step 1: Preparing the Clay Layers
-
Condition the clay:
Begin by kneading your terracotta and sage green polymer clays separately until they are soft and pliable. Good conditioning helps prevent cracks during baking. -
Roll out the sheets:
Roll both colors of clay out into flat sheets. You want them to be uniform in thickness, roughly 3mm to 4mm thick, to ensure the earrings are sturdy. -
Condition the stud color:
Take a small amount of beige or cream clay and roll it out slightly thinner than the other sheets, perhaps 2mm thick.
Uneven Texture?
If your texturing warps the clay sheet too much, texture *after* cutting the shape. Gently dab the sponge on the cut shape while it sits on the tile.
Step 2: Cutting and Texturing
-
Add texture:
Before cutting your shapes, take a coarse texture sponge or a clean, stiff toothbrush and gently press it all over the surface of the terracotta clay sheet. This creates that lovely stone-like stippled effect. -
Cut the outer arches:
Using your larger U-shaped cutter, press firmly into the textured terracotta sheet to cut two arch shapes. -
Cut the inner arches:
Switch to the sage green sheet. Using the smaller U-shaped cutter, cut out two smaller arches. I like to keep this surface smooth for contrast against the textured orange. -
Cut the studs:
Use your small circle cutter on the beige clay sheet to create two small discs. These will become the connector posts. -
Refine the edges:
Gently smooth the cut edges of all your pieces with your fingertip to seamlessness remove any stray bits of clay or sharp ridges.
Level Up: Granite Effect
Mix black pepper or dried tea leaves into the beige stud clay before rolling. This adds speckles that mimic real ceramic or granite stone instantly.
Step 3: Assembly and Baking
-
Nest the shapes:
Place the small sage arch inside the hollow space of the large terracotta arch. They should fit snugly but you can leave a tiny gap if you prefer the floating look. -
Bond the arches:
Apply a thin line of liquid polymer clay to the inner edge of the terracotta arch and a matching line on the outer edge of the sage arch. Press them gently together on your tile or baking sheet so they fuse into one solid unit. -
Create holes:
Use a needle tool or toothpick to poke a small hole at the very top center of each terracotta arch and near the bottom edge of each beige circle stud. -
Bake the batch:
Place all pieces on a baking tray lined with parchment paper. Bake according to your brand of clay’s instructions—usually around 275°F (130°C) for 30 minutes. -
Cool down:
Let the pieces cool completely inside the oven or on a wire rack before handling them, as warm clay is fragile.
Step 4: Final Jewelry Construction
-
Attach the posts:
On the back of the beige circles, glue your metal earring posts using strong jewelry glue or a dab of liquid clay (if re-baking). -
Connect the pieces:
Using two pliers, twist open a jump ring laterally. Loop it through the hole in the terracotta arch and the hole in the beige stud. -
Close the rings:
Twist the jump ring closed carefully, ensuring the ends meet flush so the ring doesn’t snag. -
Final check:
Give the earrings a gentle shake to ensure the movement is fluid and the jump rings are secure.
Now you have a stunning pair of architectural earrings ready to wear or gift.


What Really Happens Inside the Kiln
Learn how time and temperature work together inside the kiln to transform clay into durable ceramic.
Small Lidded Keepsake Box
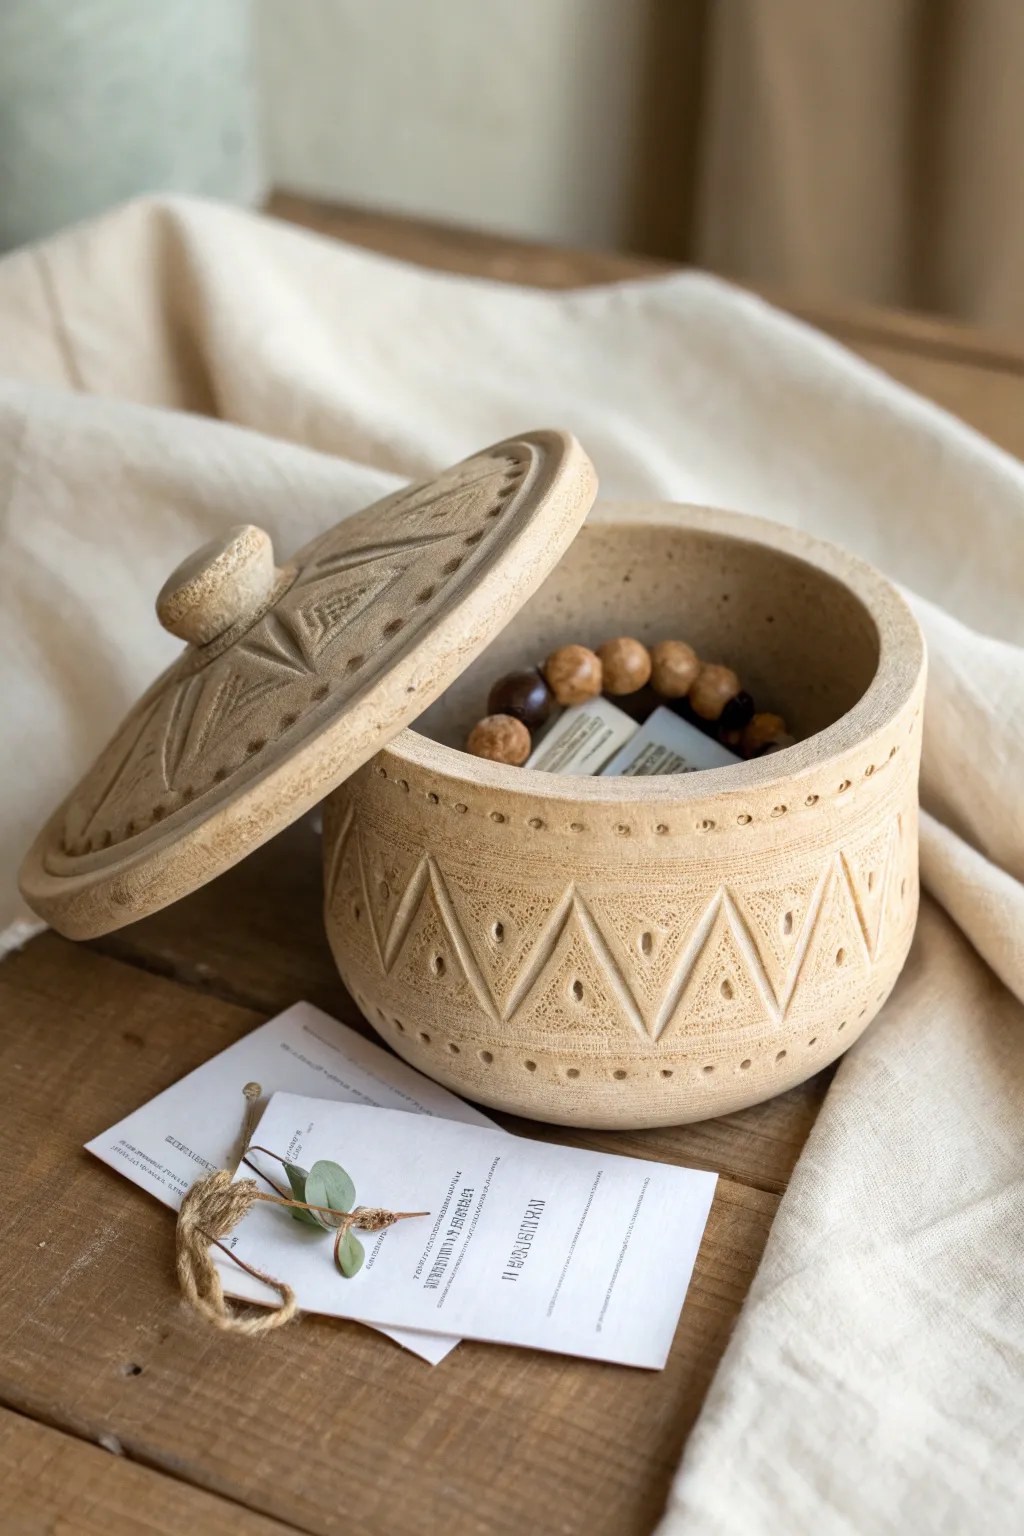
Create a charming, earthy vessel perfect for storing beads, small notes, or jewelry. This project features a satisfying carving technique to create geometric patterns on a natural-toned clay body, mimicking the look of ancient stone pottery.
Step-by-Step Guide
Materials
- Air-dry clay (stone or natural color) or stoneware clay
- Rolling pin
- Circle cutters (two sizes) or jar lids to trace
- Clay knife or fettling knife
- Needle tool or toothpick
- Small carving loop tool
- Slip (clay mixed with water) or vinegar
- Sponge
- Sandpaper (fine grit)
- Matte clear sealant (optional)
Step 1: Forming the Base
-
Roll the slab:
Begin by rolling out a medium-sized ball of clay into an even slab, approximately 1/4 inch thick. Ensure the thickness is consistent to prevent cracking later. -
Cut the base and walls:
Use your larger circle cutter to cut the bottom base. Then, cut a long, rectangular strip from the remaining slab. The strip’s length should be the circumference of your base circle, plus a little extra for overlap, and about 3 inches high. -
Assemble the cylinder:
Score the edges of the base circle and the bottom edge of your rectangular strip using a needle tool. Apply slip or vinegar to the scored areas. -
Join the seams:
Wrap the strip around the base, pressing the scored edges together firmly. Where the rectangle’s ends meet, cut through both layers at an angle (a beveled cut) for a seamless join. Score, slip, and smooth this vertical seam inside and out until it disappears. -
Smooth the form:
Use a slightly damp sponge to smooth out any fingerprints or rough spots on the walls and rim. I like to keep the rim slightly flat rather than rounded to help the lid sit better.
Keep it clean
Brush away clay crumbs frequently with a soft, dry makeup brush while carving. Blowing on the crumbs can dry out the clay too fast or get dust in your eyes.
Step 2: Creating the Lid
-
Cut the lid slab:
Roll out a fresh slab of clay, slightly thicker than the walls. Cut a circle that is just slightly larger than the top opening of your box. -
Add a flange:
Roll a small coil of clay. Flip your lid circle over and attach this coil in a ring smaller than the lid’s edge so it will fit *inside* the box opening. This creates a flange to keep the lid from sliding off. -
Form the knob:
Shape a small ball of clay into a flattened pebble shape. Score the center of the top of the lid and the bottom of the knob, add slip, and press firmly to attach. Smooth the connection point so it looks like one piece. -
Check the fit:
Gently place the lid on the box to ensure the flange fits inside comfortably. If it’s too tight, shave a little off the flange now while the clay is soft.
Uneven Lid?
If the lid wobbles after firing or drying, tape sandpaper to a flat table and gently rub the bottom of the rim of the box in circles to flatten the high spots.
Step 3: Carving the Design
-
Leather hard stage:
Let the box and lid sit until they are ‘leather hard’—stiff enough to hold shape but soft enough to carve without crumbling. This is crucial for crisp lines. -
Mark guidlelines:
With a needle tool, lightly scratch two horizontal lines around the middle of the box to create a band for your main pattern. Do the same near the rim. -
Sketch the triangles:
Lightly sketch a zigzag line between your center guidelines to form a row of triangles. Repeat a similar triangular radiatng pattern on the top of the lid. -
Carve the relief:
Using a small loop tool, carve out the interior of the triangles. Don’t dig too deep; you just want to remove the surface layer to create texture. -
Add detail dots:
Take a blunt tool or the back of a paintbrush to press small indentations (dots) centered inside each triangle and along the upper rim border for extra decoration. -
Refine the texture:
Use the needle tool to gently scratch texture inside the carved out triangle areas if you want a rougher contrast to the smooth clay.
Step 4: Finishing Touches
-
Dry slowly:
Place the lid on the box loosely and cover with plastic, letting it dry very slowly over several days to prevent warping. -
Sand and smooth:
Once bone dry, use fine-grit sandpaper to smooth any sharp edges on the rim or the carving. Wipe away dust with a barely damp cloth. -
Seal:
If using air-dry clay, apply a matte sealant to protect the surface and give it a finished, stone-like appearance.
Enjoy using your handcrafted vessel to hold your tiny treasures or dried herbs
Handbuilt Soap Dish With Drainage Ridges
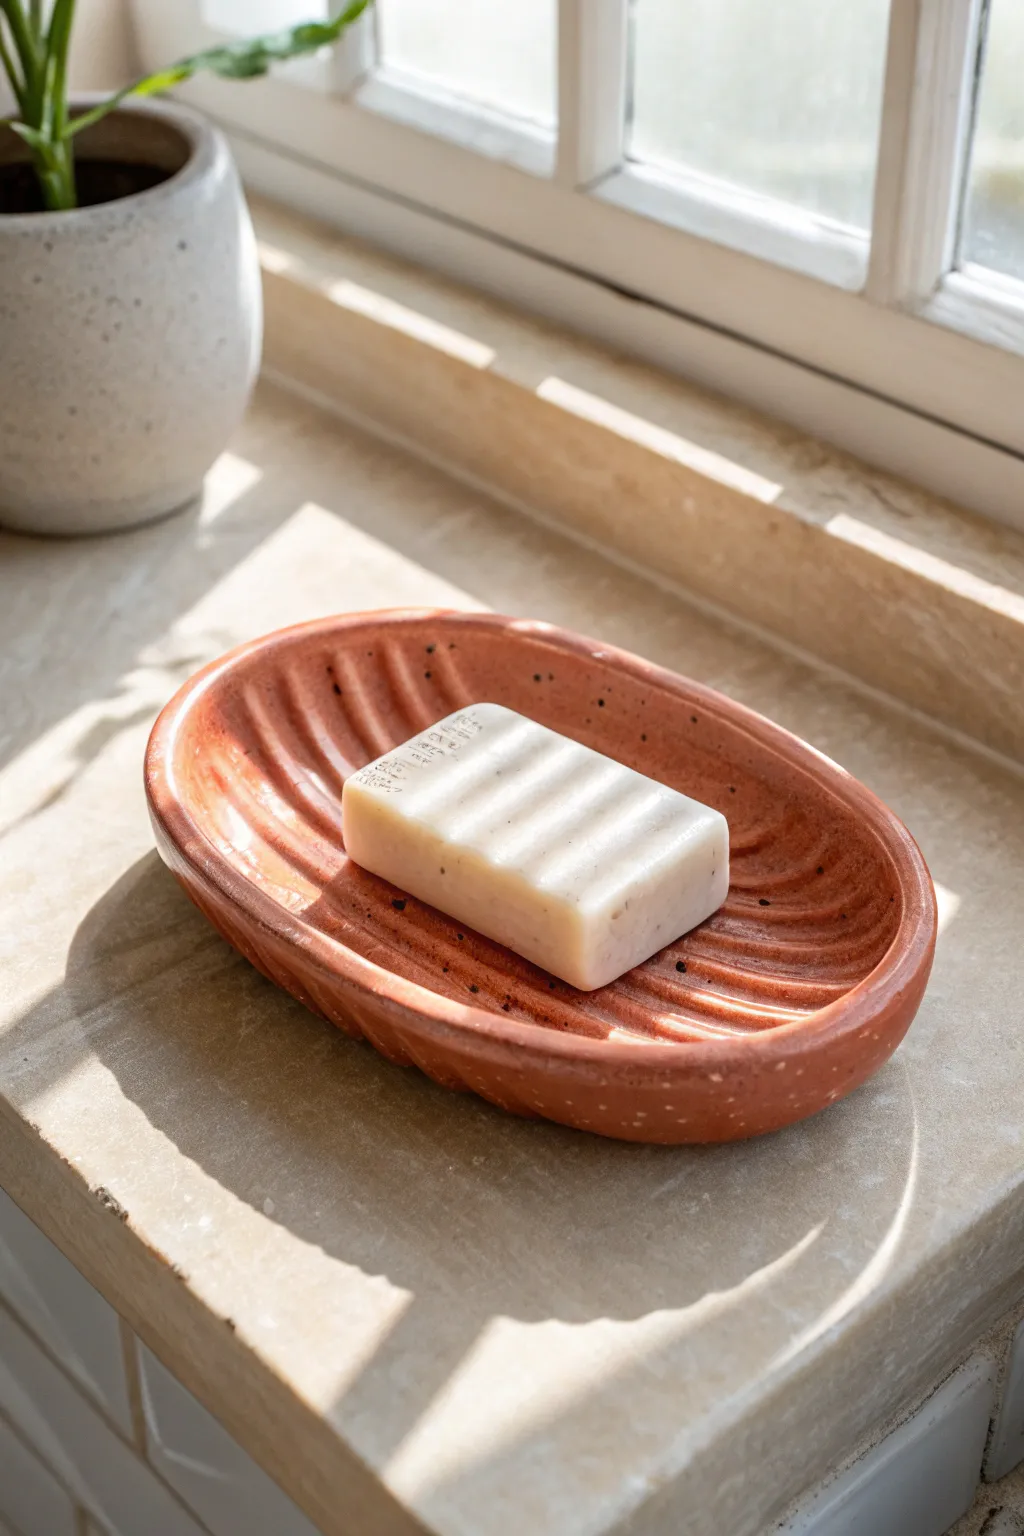
This rustic, oval soap dish combines functional design with the warmth of natural clay tones. Its defining feature is a series of hand-carved ridges that allow water to drain away, keeping your soap dry and prolonging its life.
Step-by-Step Tutorial
Materials
- Red earthenware or terracotta clay (speckled works great)
- Rolling pin
- Two wooden guide strips (approx 1/4 inch thick)
- Oval paper template (approx 5×7 inches)
- Needle tool or fettling knife
- Loop tool (medium size for carving)
- Small sponge
- Rib tool (wooden or silicone)
- Water slip or vinegar
- Clear matte or satin glaze (optional)
Step 1: Shaping the Base
-
Roll the slab:
Begin by wedging your clay to remove air bubbles, then place it on a canvas board or cloth. Set your wooden guide strips on either side of the clay and roll it into an even slab. -
Cut the oval:
Place your paper oval template onto the slab. Using a needle tool, trace around the shape and cut straight down to create a clean edge. Remove the excess clay. -
Smooth the edges:
Dip your finger or a small sponge in a tiny bit of water and run it along the cut rim to soften the sharp corners. You don’t want sharp edges on the finished piece. -
Create the walls:
Roll out a separate long coil of clay, slightly thinner than a pencil. This will become the rim foundation. -
Score and slip:
Score the outer perimeter of your oval slab and the underside of your coil. Apply a little slip or vinegar to the scored areas. -
Attach the rim:
Place the coil on top of the oval edge and press firmly to adhere. Use your thumb or a modeling tool to blend the clay downwards into the base, ensuring a seamless connection. -
Build up height:
Add a second coil if you want a deeper dish, repeating the scoring and slipping process. For this specific look, a shallow wall of about 1 inch is perfect. -
Refine the shape:
Pinch the walls gently to shape an upright, slightly flared rim. I find that using a rib tool on the inside helps compress the clay and creates that smooth, professional curve shown in the photo.
Clean Cuts Only
When carving the ridges with a loop tool, try to make each groove in one single, confident stroke. Starting and stopping midway can create uneven bumps that pool water.
Step 2: Carving and Finishing
-
Dry to leather hard:
Let the dish sit until it reaches a leather-hard state. It should be firm enough to handle without deforming but still cool to the touch. This creates the best surface for clean carving. -
Plan the ridges:
Using the tip of your needle tool, very lightly sketch horizontal lines across the interior floor of the dish to guide your carving. -
Carve the drainage channels:
Take your loop tool and drag it firmly across the base to create the grooves. Start from one side wall and pull across to the other, digging deep enough to create texture but not so deep you cut through the bottom. -
Refine the ridges:
Go back over the ridges with a damp brush or finger to smooth out any clay burrs left by the loop tool. The channels should be smooth so they are easy to clean later. -
Add texture (optional):
If your clay is smooth but you want the speckled look from the photo, you can flick iron oxide or a speckled underglaze onto the surface with a toothbrush before the final firing. -
Final drying:
Allow the piece to dry slowly under loose plastic for a day, then uncover it to dry completely. This slow process prevents the oval shape from warping. -
Bisque fire:
Fire the piece in a kiln to the appropriate cone for your clay body (usually Cone 04 for earthenware). -
Glaze application:
Apply a clear matte or satin glaze to seal the clay and make it waterproof. Avoid gloss glazes if you want to maintain that natural, earthy stone look. -
Final firing:
Load the kiln again for the glaze firing, making sure the bottom of the dish is wiped clean of glaze or sitting on stilts.
Drainage Holes
For better functionality, poke two small holes through the lowest points of the center grooves. This lets water drip right through into a sink below.
Once fired, place this beautiful dish by a sunny window and enjoy how the light catches those handmade ridges

TRACK YOUR CERAMIC JOURNEY
Capture glaze tests, firing details, and creative progress—all in one simple printable. Make your projects easier to repeat and improve.
Toothbrush Holder With a Cute Face
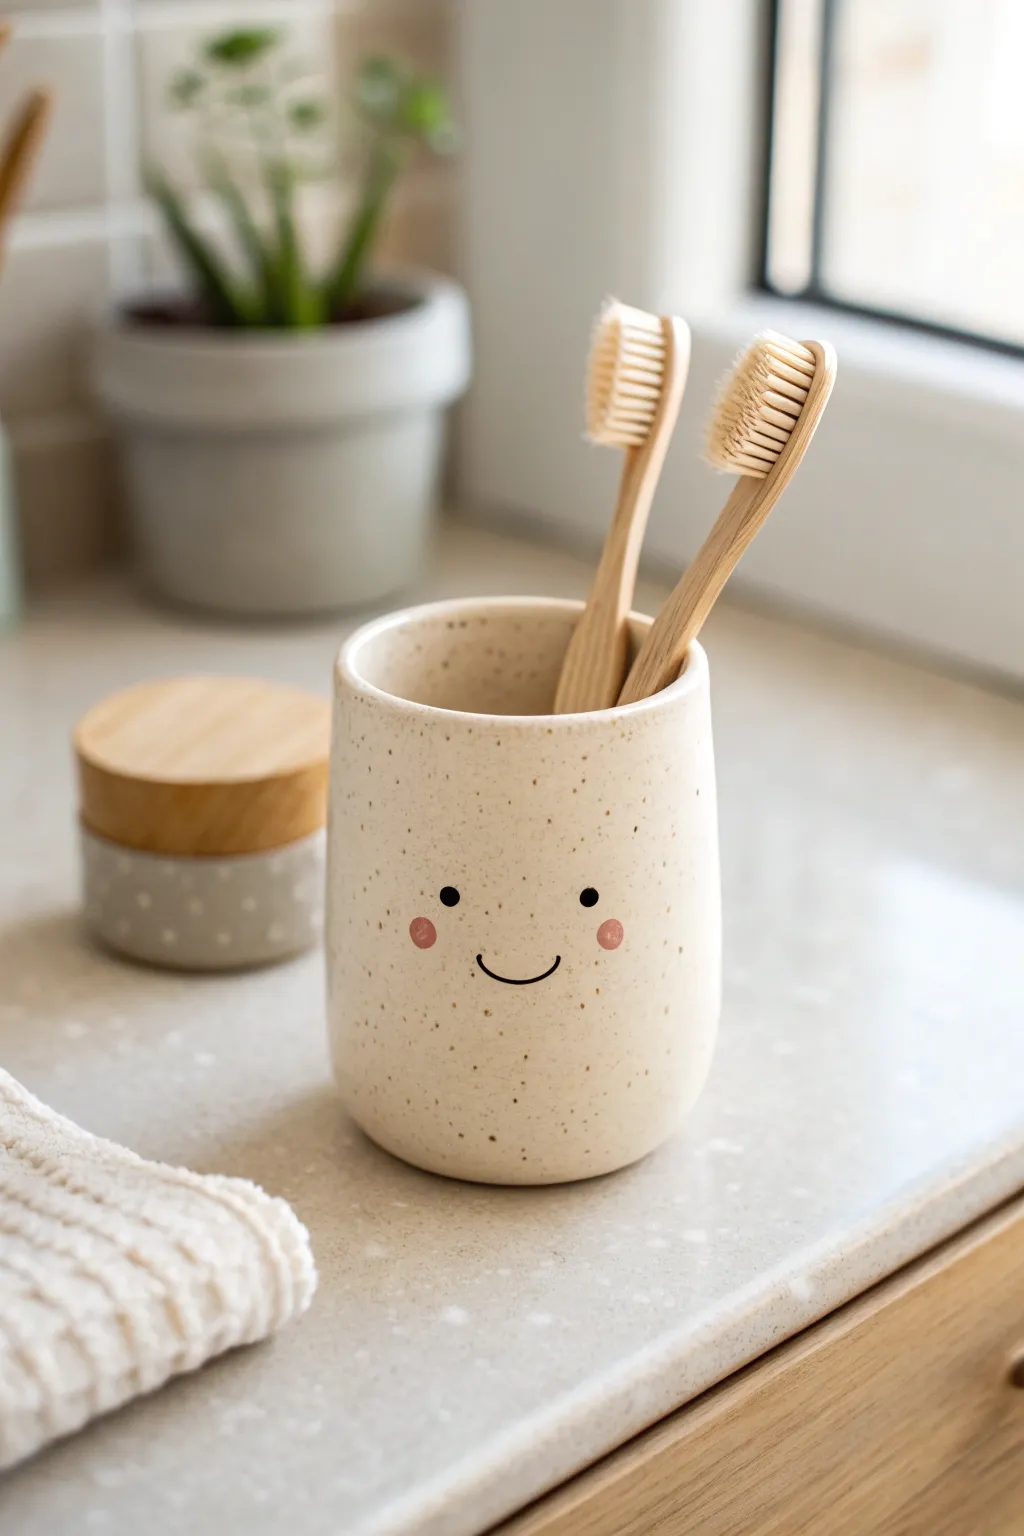
Brighten up your morning routine with this adorable, minimalist toothbrush holder that greets you with a friendly smile. Using speckled clay and a simple cylinder technique, this functional piece adds a touch of playful charm to any bathroom sink.
Detailed Instructions
Materials
- Speckled stoneware clay (approx. 1 lb)
- Rolling pin
- Canvas mat or cloth
- Needle tool or fettling knife
- Scoring tool (or fork)
- Slip (clay mixed with water)
- Small sponge
- Template (paper or cardstock)
- Black underglaze
- Pink underglaze
- Fine liner brush
- Clear transparent glaze
- Kiln (or access to a firing service)
Step 1: Forming the Cylinder
-
Prepare the template:
Before touching clay, cut a paper rectangle that is roughly 4 inches high and 10 inches wide. This will determine the size of your cup, allowing for shrinkage. -
Roll out the slab:
Take your speckled clay and roll it out on your canvas mat to a consistent thickness of about 1/4 inch. I like to use guide sticks on either side to ensure it’s perfectly even. -
Cut the clay:
Place your paper template onto the slab and carefully cut around it using your needle tool or knife. You will also need to cut a circle for the base; use a cookie cutter or a small bowl that matches the diameter of your eventual cylinder. -
Texture the surface:
If you want that very slight, natural unevenness seen in the photo, gently blot the surface with a damp sponge or a slightly crumpled paper towel before assembling. -
Bevel the edges:
Cut the short ends of your rectangle at opposite 45-degree angles. This allows for a stronger overlap joint that doesn’t add extra bulk to the seam. -
Score and slip:
Rough up the beveled edges and the outer edge of your circular base with your scoring tool. Apply a generous amount of slip to these roughened areas. -
Assemble the wall:
Stand the rectangle up and curve it into a cylinder, pressing the beveled edges together firmly. Smooth the seam inside and out until it is invisible. -
Attach the base:
Place the cylinder onto the scored base circle. Gently press the walls down onto the base, then use a wooden modeling tool or your finger to blend the clay from the base up into the wall to seal the joint. -
Refine the rim:
Using a slightly damp sponge or a piece of chamois leather, smooth the top rim of the cup so it is rounded and comfortable to the touch.
Pro Tip: Seamless Join
When smoothing the vertical seam, use a wooden rib inside the cylinder while pressing from the outside. The resistance helps fully compress the clay particles.
Step 2: Decoration and Finishing
-
Initial drying:
Let the piece dry slowly under plastic until it reaches the ‘leather hard’ stage, where it is firm but still cold to the touch. -
Plan the face:
Lightly sketch the position of the eyes and smile with a pencil directly on the leather-hard clay. Don’t worry, the graphite will burn off in the kiln. -
Paint the features:
Dip a fine liner brush into black underglaze. Paint two small, solid dots for eyes and a thin, curved line for the smile. I prefer to hold my breath for a moment while doing the line work to keep my hand steady. -
Add rosy cheeks:
Using pink underglaze, dab two small circles just outside the smile line to create the blushing cheeks. -
Bisque fire:
Allow the piece to dry completely until it is bone dry, then fire it in the kiln to a bisque temperature (usually cone 04). -
Apply clear glaze:
Once cool, wipe the bisque ware with a damp sponge to remove dust. Dip the entire cup into a clear transparent glaze, or brush on three even coats. -
Clean the foot:
Important: Use a sponge to wipe all glaze off the very bottom of the cup so it doesn’t fuse to the kiln shelf. -
Final firing:
Fire the piece again to the maturation temperature of your specific clay body and glaze (typically cone 5 or 6 for stoneware).
Level Up: Matching Set
Create a shorter, wider version of this vessel to use as a soap dish, or a tiny shallow dish for rings, giving the same face to create a cohesive bathroom set.
Place your new friendly cup on the sink ledge and enjoy the cheerful start to your day
Scalloped Desk Pen Cup
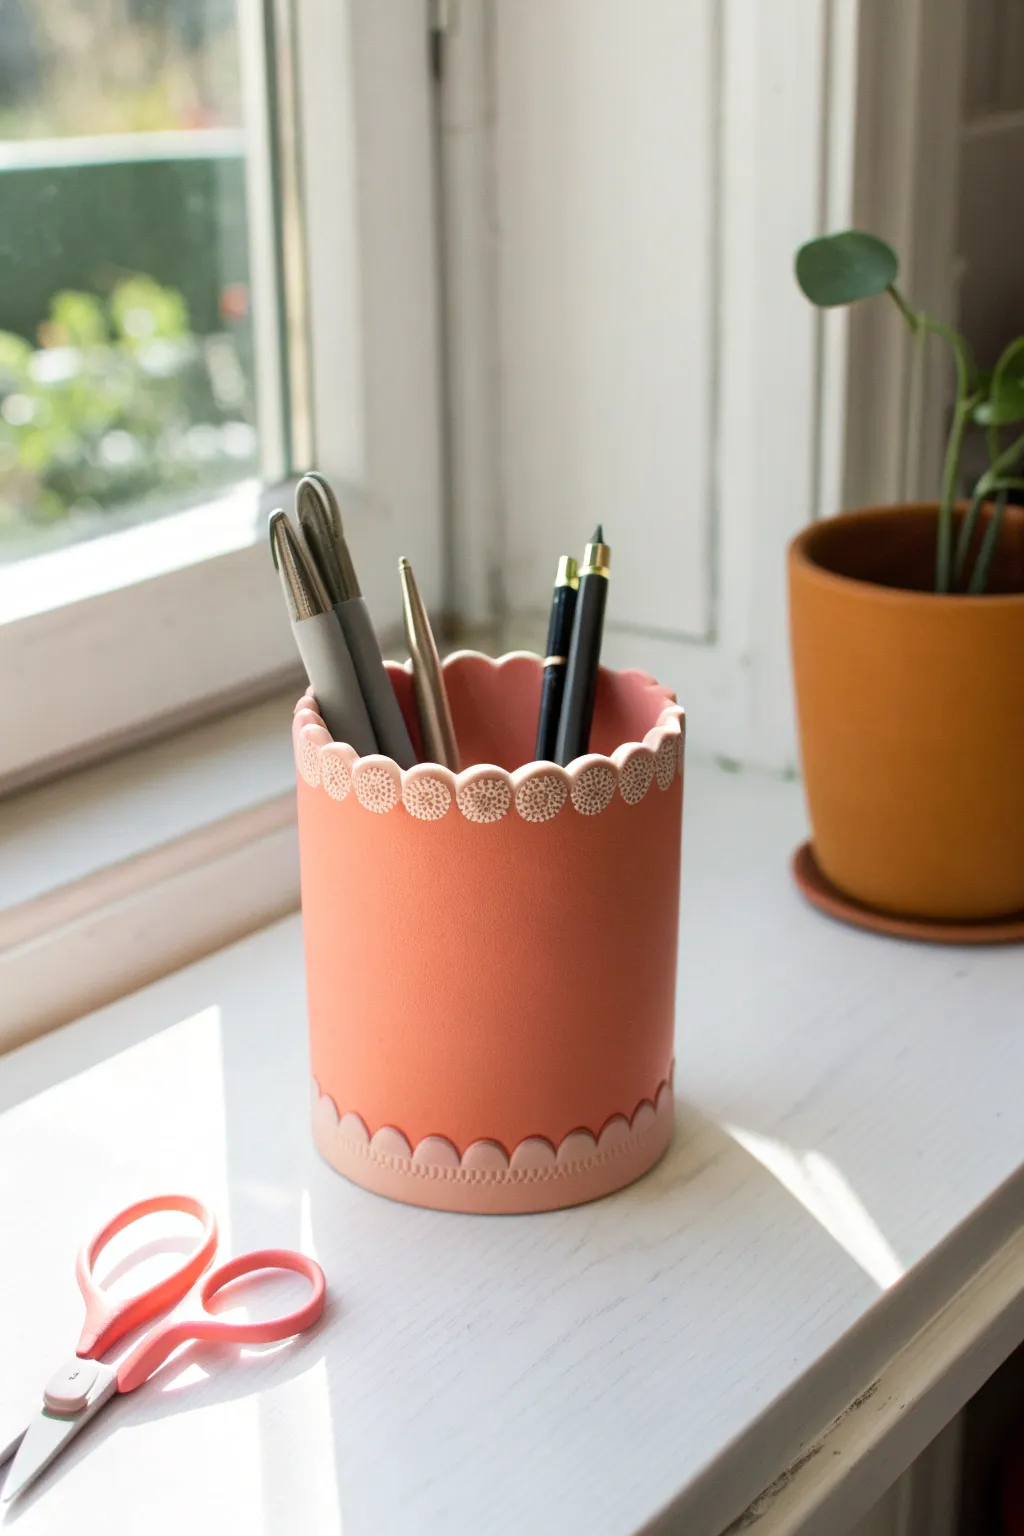
Bring a touch of warmth and organization to your desk with this charming cylindrical pen holder. Featuring a soft terracotta hue and delicate scalloped detailing, this project combines functionality with a sweet, hand-crafted aesthetic.
Step-by-Step Tutorial
Materials
- Terracotta colored polymer clay (approx. 4-6 oz)
- Lighter peach or beige polymer clay (small amount for accents)
- Acrylic roller or pasta machine
- Empty clean tin can or glass jar (as a form)
- Small round cutter (approx. 0.5 inch diameter)
- Sharp craft knife or clay blade
- Parchment paper
- Needle tool or toothpick
- Oven for baking clay
Step 1: Creating the Base
-
Condition the clay:
Start by thoroughly conditioning your terracotta-colored polymer clay until it is soft and pliable. This prevents cracking later on. -
Roll the main sheet:
Roll out the terracotta clay into a long rectangular sheet, about 1/4 inch thick. Ensure it is long enough to wrap completely around your chosen tin can or jar form with a little overlap. -
Trim to size:
Using your clay blade, trim the clay into a clean rectangle. The height should match how tall you want your cup to be. -
Wrap the form:
Wrap a piece of parchment paper around your tin can first to prevent sticking. Then, wrap the clay sheet around the parchment-covered form. -
Create the seam:
Where the clay edges meet, cut through both layers simultaneously with your blade to create a perfect butt joint. Smooth the seam together gently with your finger or a sculpting tool until it disappears. -
Cut the base:
Roll a separate piece of terracotta clay for the bottom. Place your wrapped form onto this sheet and cut around the base to create a circle. Press the edges of the circle into the cylinder walls to seal the bottom.
Step 2: Adding Scalloped Details
-
Prepare the accent clay:
Condition the lighter peach or beige clay. Roll it into a thin sheet, slightly thinner than your main cylinder walls. -
Cut scallop strips:
Cut two long strips of this lighter clay, roughly 3/4 inch wide. These will become the decorative bands for the top and bottom. -
Punch the scallops:
Use your small round cutter to cut a series of half-circles along one edge of each strip. This creates the scalloped pattern. Aim for consistent spacing. -
Attach the top band:
Gently press one scalloped strip onto the top rim of your cylinder. The straight edge should align with the rim, with the scallops pointing down. Smooth it down to ensure good adhesion. -
Detail the top scallops:
Using a needle tool, gently poke a dense cluster of small dots into each scallop on the top band. This adds the lovely textural contrast seen in the photo. -
Attach the bottom band:
Apply the second scalloped strip to the base of the cup. For the bottom, position the straight edge at the very bottom, with the scallops pointing upward. -
Smooth the bottom transition:
Use your finger to gently blend the bottom edge of the lower strip into the base so it sits flat on the table.
Seamless Finish
Use a tiny amount of baby oil or clay softener on your fingertip to buff out fingerprints before baking for a truly professional matte look.
Step 3: Finishing Touches
-
Refine the rim:
Go over the top rim of the cup one last time. If the accent clay created a lip, smooth it flush with the interior wall. -
Double check the texture:
Inspect your dotted texture. If any dots were flattened while handling the cup, refresh them now with your needle tool. -
Bake carefully:
Bake the project according to your clay package instructions (usually around 275°F/135°C). Keep the clay on the tin can form during baking to maintain the perfect cylinder shape. -
Cool and remove:
Let the piece cool completely inside the oven or on the counter. Once cool, carefully slide the tin can and parchment paper out.
Color Play
Try a dark green body with gold mica powder dusted onto the scalloped edges before baking for a luxe, sophisticated variation.
Place your favorite pens inside and enjoy a tidier, stylish workspace
Photo or Place Card Holder Block
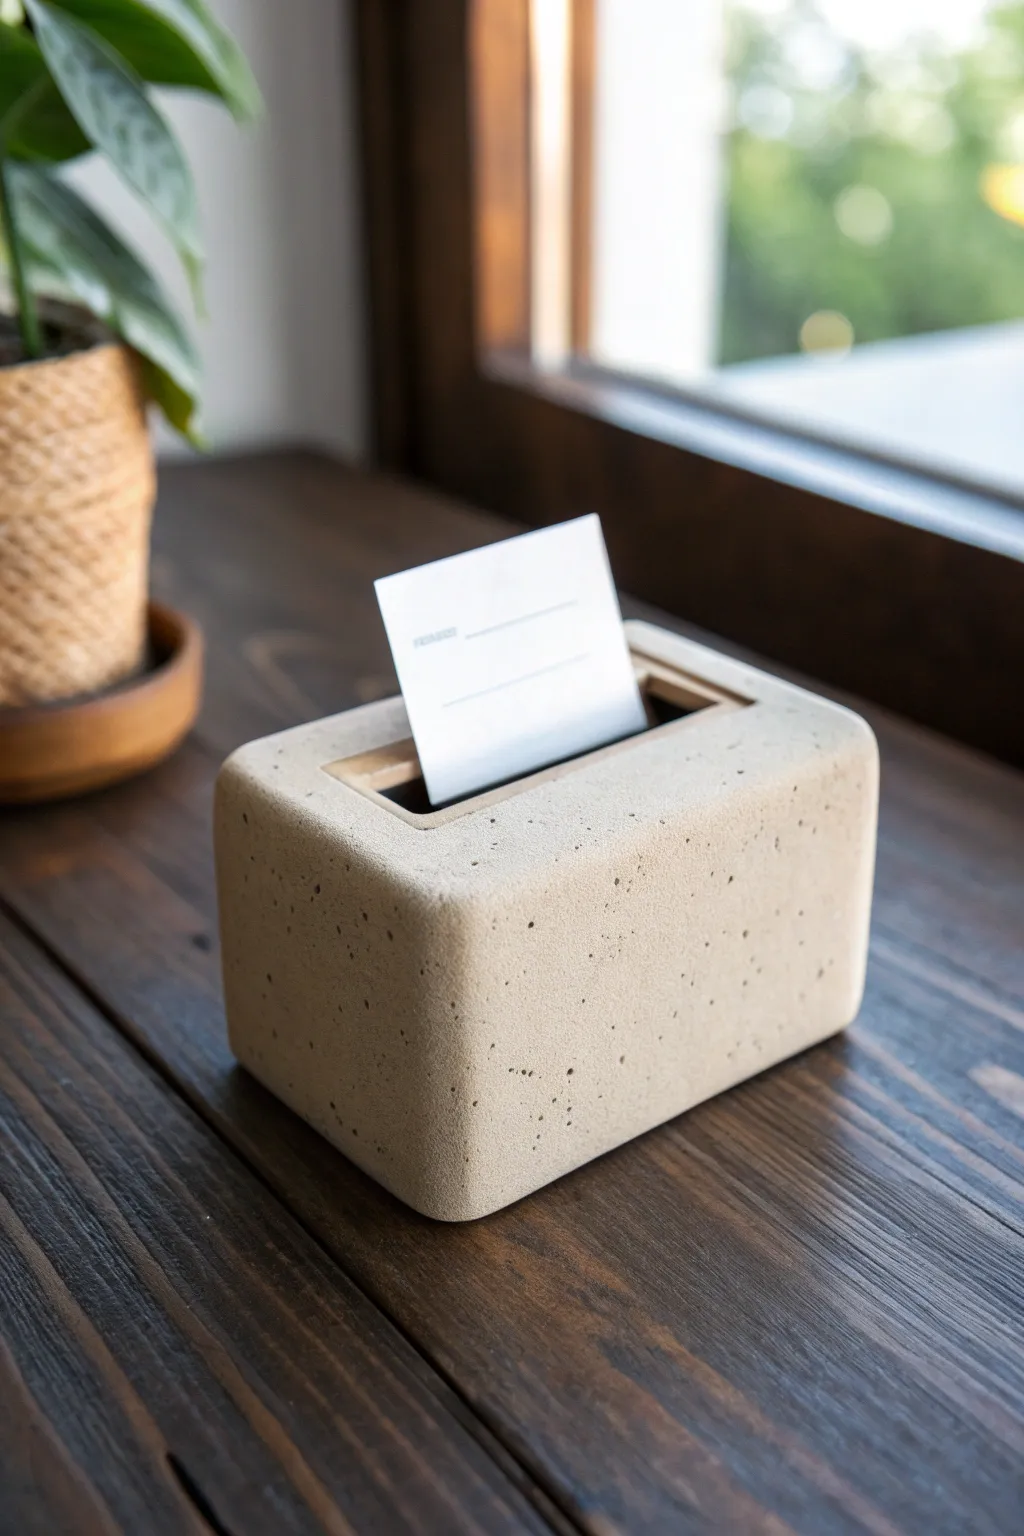
Achieve the trendy industrial aesthetic of concrete without the heavy lifting using a clever speckled clay technique. This sleek, rounded rectangular block features a deep central slot perfect for displaying photos, place cards, or important reminders on your desk.
Step-by-Step Guide
Materials
- Stone-effect polymer clay (granite or sandstone color)
- Translucent liquid clay (optional)
- Acrylic rolling pin
- sharp tissue blade or craft knife
- Coarse sandpaper or a stiff brush (for texturing)
- A rectangular block mold (silicone or sturdy cardstock)
- Thick cardstock or a thin wooden slat (to create the slot)
- Cornstarch (release agent)
- Black pepper or dried coffee grounds (optional for extra speckles)
Step 1: Preparing the Clay Base
-
Condition the Clay:
Begin by conditioning your stone-effect polymer clay until it is soft and pliable. If the clay feels too stiff, mix in a tiny drop of translucent liquid clay or clay softener. -
Enhance the Texture:
For a more realistic concrete look, I like to knead in a pinch of coarse black pepper or dried used coffee grounds. This adds those realistic imperfections found in poured cement. -
Form a Brick Shape:
Shape the clay into a rough rectangular brick by hand. It doesn’t need to be perfect yet, but try to get the volume approximate to your final desired size. -
Fill the Mold:
Dust your silicone rectangular mold lightly with cornstarch. Press the clay firmly into the mold, ensuring it fills every corner without trapping air bubbles at the bottom.
Step 2: Shaping and Refining
-
Level the Top:
Use your tissue blade to slice off any excess clay from the top of the mold, creating a perfectly flat surface. This will actually become the bottom of your block later. -
Unmold the Block:
Carefully pop the clay block out of the mold. At this stage, it might have sharp edges which we want to soften for that cast concrete appearance. -
Soften the Edges:
Gently tap the corners and edges of the clay brick with your finger or a flat acrylic block to round them off slightly. You want it to look like tumbled stone, not a sharp geometric solid. -
Create the Surface Texture:
To mimic the porous nature of concrete, take a stiff toothbrush or a ball of aluminum foil and gently dab it all over the surface. Do not press hard; just create purposeful micro-indentations.
Secret Texture Trick
Mix baking soda into your clay before baking! It adds a gritty, realistic texture that looks exactly like poured concrete once baked.
Step 3: Creating the Card Slot
-
Prepare the Insert:
Cut a piece of thick cardstock or find a small wooden slat that matches the width and depth you want for your card slot. Lightly coat this insert with cornstarch so it doesn’t stick. -
Position the Slot:
Center the insert on the top face of your clay block. Ensure it is perfectly parallel to the long edges for a symmetrical look. -
Press the Indentation:
Press the insert straight down into the clay block. Go deep enough to hold a card securely—usually about 1/2 to 3/4 of an inch feels right. -
Wiggle and Remove:
Very gently wiggle the insert back and forth to widen the slot microscopically, then pull it straight up to remove it. If the edges of the slot deformed, smooth them back down with a fingertip. -
Refine the Slot Edges:
Use a small modeling tool to neaten the inside rim of the rectangular opening, ensuring it looks intentional and clean.
Wood Accent Upgrade
Before baking, press a thin frame of balsa wood into the opening of the slot. Bake the wood right into the clay for a mixed-material look.
Step 4: Baking and Finishing
-
Baking Prep:
Place the clay block on a ceramic tile or baking sheet lined with parchment paper. Tent a piece of foil over it to prevent scorching. -
Bake the Clay:
Bake according to your polymer clay manufacturer’s instructions. Since this is a solid, thick block, bake for the maximum recommended time (often 45-60 minutes) to ensure the center cures fully. -
Cooling Down:
Allow the block to cool completely in the turned-off oven. This slow cooling helps prevent thermal shock cracks in thick pieces. -
Sanding for Realism:
Once cool, wet-sand the exterior lightly with fine-grit sandpaper. This will remove any fingerprints and enhance the matte, stony finish. -
Optional Wash:
If the texture isn’t popping enough, apply a very watery wash of grey acrylic paint, let it sit for a moment, and wipe it off. The dark paint will remain in the tiny pores you created.
Place this sturdy holder on your desk or windowsill to add a touch of modern calm to your space
Magnetic Mini Vase for Tiny Flowers
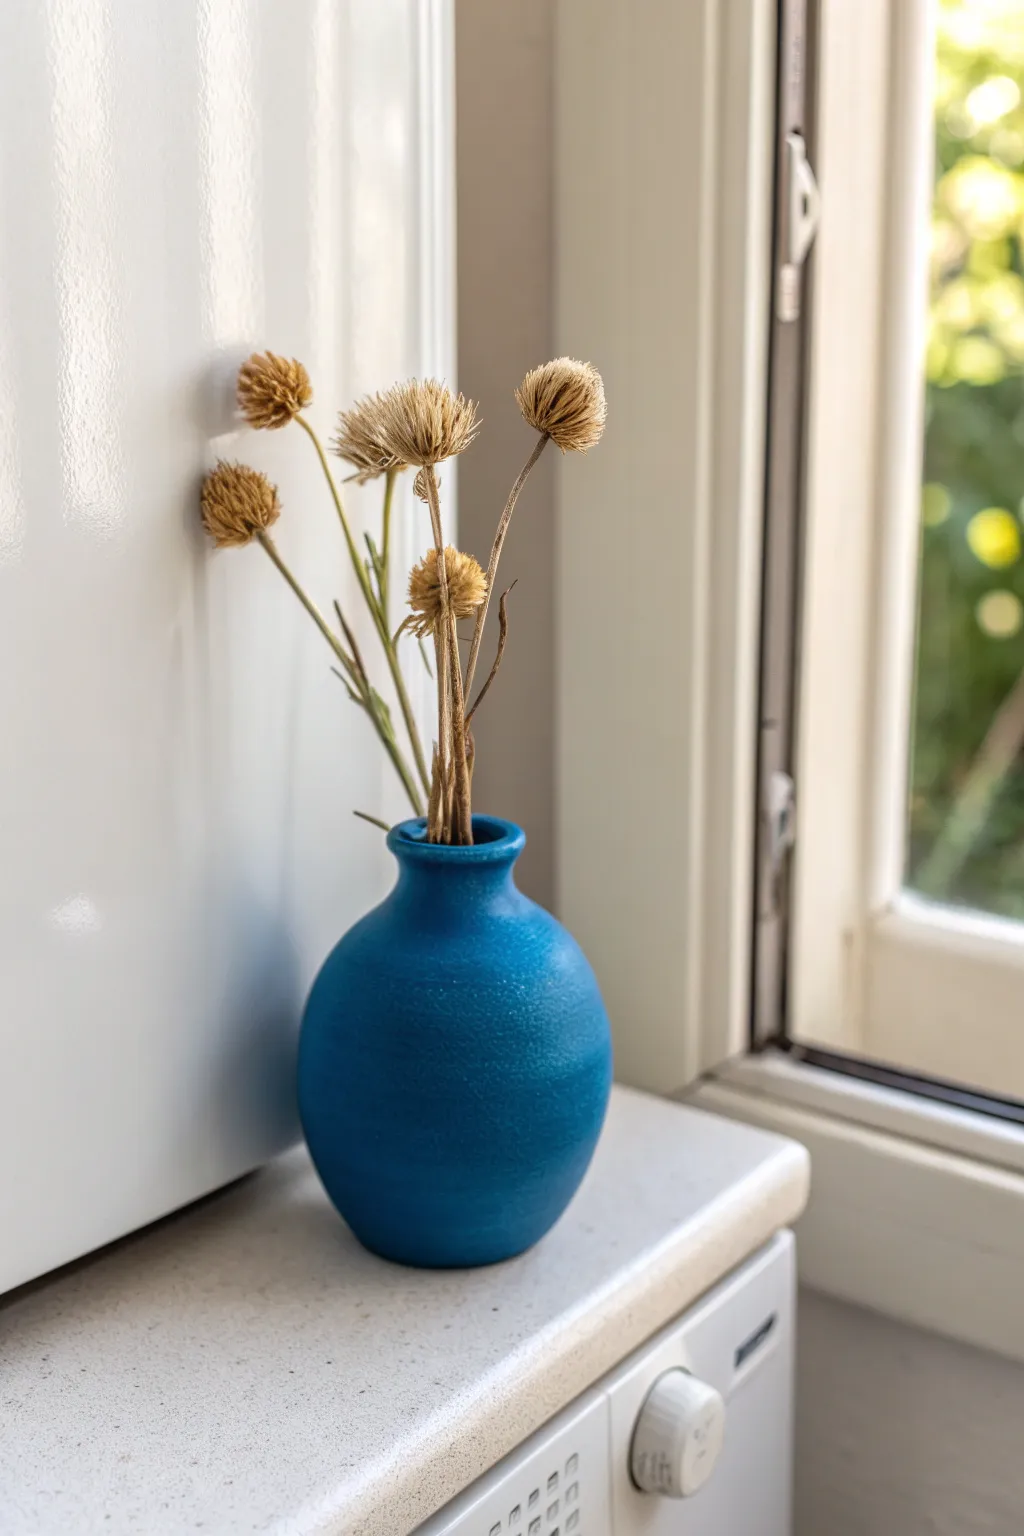
Brighten up your fridge or any magnetic surface with this charming miniature vessel. Crafted to look like a tiny piece of wheel-thrown pottery, this vibrant blue vase is perfect for displaying delicate dried botanicals.
Detailed Instructions
Materials
- White air-dry clay or polymer clay
- Rolling pin
- Small craft magnets (strong neodymium recommended)
- Super glue or heavy-duty craft adhesive
- Acrylic paints: Bright cobalt blue, white, and a hint of turquoise
- Paintbrushes: Soft round brush and a stiffer stippling brush
- Sandpaper (fine grit)
- Water and sponge (for smoothing)
- Gloss or satin varnish (optional)
- Modeling tools or a toothpick
Step 1: Shaping the Vessel
-
Prepare the Clay:
Start by conditioning a golf-ball-sized amount of clay in your hands until it is warm, pliable, and free of cracks. -
Form the Base:
Roll the clay into a smooth sphere. Gently tap the bottom against your work surface to create a flat base so it can stand upright on its own. -
Create the Opening:
Using your thumb or a round modeling tool, press a hole into the top center of the sphere. Don’t go all the way through; stop about a quarter-inch from the bottom. -
Pinch the Neck:
Gently pinch and pull the clay upwards around the opening to form a narrow neck. You want the body to remain bulbous while the neck tapers in. -
Flare the Rim:
At the very top of the neck, carefully press the clay outward to create a small, flared rim. This gives it that classic pottery silhouette. -
Refine the Shape:
Smooth out the transition between the round body and the neck with your fingers and a little water. I like to rotate it constantly to ensure it stays symmetrical. -
Create the Magnet Flat Spot:
On the back of the vase (choose the side that looks least perfect), press completely flat against the table. This flat area needs to be large enough to hold your magnet securely. -
Add Texture:
To mimic the stone-like texture in the photo, gently tap a stiff paintbrush or a ball of foil over the surface of the clay while it is still soft. -
Dry Completely:
Set the vase aside to dry according to your clay’s package instructions. Air-dry clay usually takes 24-48 hours depending on thickness.
Sliding down?
If the vase slides down the surface, your magnet isn’t strong enough. Try gluing a second magnet directly on top of the first one, or switch to a neodymium ‘rare earth’ magnet.
Step 2: Finishing and Assembly
-
Sand Imperfections:
Once fully cured, use fine-grit sandpaper to smooth out any unintentional bumps, especially around the rim, but leave the body texture intact. -
Base Coat:
Mix a small amount of white paint with your blue to create a primer layer. Paint the entire exterior and just inside the rim. -
Apply Main Color:
Load your brush with the bright cobalt blue. Apply this in thin layers, stippling the paint on rather than brushing it to enhance the stone texture. -
Add Dimension:
While the blue is tacky, pat on tiny amounts of a lighter turquoise or slightly lighter blue on the roundest part of the belly to create a subtle highlight. -
Seal the Work:
Protect your paint job with a coat of satin or matte varnish. This prevents the acrylic from chipping when you handle the vase. -
Attach the Magnet:
Apply a dot of strong adhesive to the flat spot you created on the back. Press the magnet firmly into place and let the glue cure completely. -
Arrange Flowers:
Select lightweight dried flowers, like the strawflowers shown. Trim the stems to varying lengths so they stagger nicely. -
Final Test:
Place your stems into the vase and attach it to your fridge to make sure the magnet is strong enough to hold the weight.
Textured Touch
For an even rougher, stone-like finish, mix a teaspoon of baking soda into your acrylic paint before applying. It creates a beautiful, grainy matte texture.
Pop your new mini masterpiece onto the fridge door and enjoy a little burst of nature every time you reach for a snack
Incense Holder With a Pebble Shape
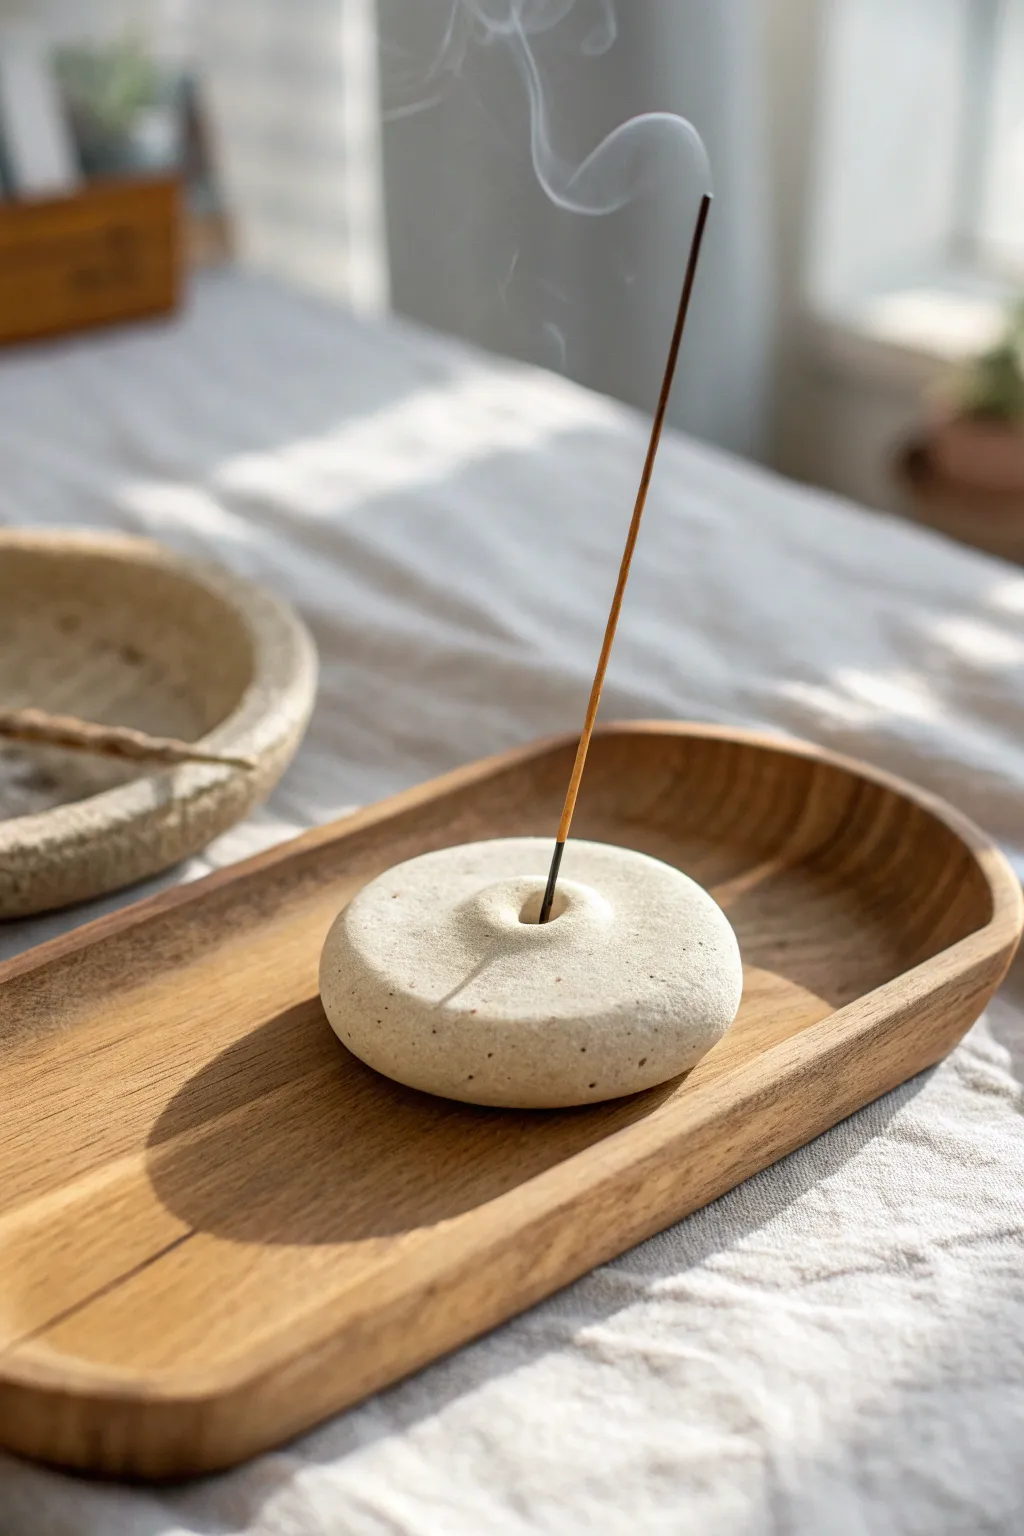
Bring a touch of minimalist tranquility to your space with this pebble-shaped incense holder. Its smooth, speckled finish and organic form mimic a river stone, creating a perfect simple rest for your favorite scents.
Step-by-Step Tutorial
Materials
- Air-dry clay (white or light grey)
- Speckled clay additive or dried coffee grounds (optional)
- Rolling pin
- Incense stick (for sizing)
- Small bowl of water
- Sponge
- Fine-grit sandpaper (220-400 grit)
- Matte sealant or clear acrylic spray
Step 1: Shaping the Pebble
-
Prepare the Clay:
Start with a lime-sized ball of white air-dry clay. Knead it thoroughly in your hands to warm it up and remove any air pockets. -
Add Texture (Optional):
To achieve the speckled look seen in the photo, kneading a tiny pinch of dried tea leaves or used coffee grounds into the white clay creates a beautiful organic texture. -
Initial flattening:
Place the ball on your work surface and press it down gently with your palm until it is a thick, rounded disc, about 1 inch high. -
Refine the edges:
Cup your hands around the disc and gently smooth the edges inward. You want to avoid sharp corners; aim for a soft, eroded stone look. -
Smooth the surface:
Dip your finger in a little water and glide it over the top surface to remove fingerprints. The top should be slightly domed, not perfectly flat.
Hole Shrunk Too Much?
If the incense won’t fit after drying, carefully twist a small drill bit (held in your hand, not a drill) into the hole to shave away excess dried clay.
Step 2: Creating the Holder
-
Find the center:
Locate the approximate center of your pebble. It doesn’t need to be mathematically perfect, as slight asymmetry adds to the natural feel. -
Create the indentation:
Use your pinky finger or the rounded end of a paintbrush to press a small, shallow divot into the center. This catches ash falling directly near the base. -
Pierce the hole:
Take an actual incense stick (the wooden core type works best) and press it firmly into the center of your indentation. -
Adjust the angle:
I like to angle the stick slightly rather than going perfectly vertical. This ensures the ash falls onto the pebble or tray, not just straight down. -
Wiggle for clearance:
Gently rotate the incense stick in a small circle to widen the hole just a hair. Clay shrinks as it dries, so the hole needs to be slightly larger than the stick. -
Clean the opening:
If the clay pushed up around the hole during piercing, gently pat it back down with a damp finger to keep the opening smooth.
Add a Stone Wash
Mix a tiny drop of grey or beige acrylic paint with water. Brush it over the dried clay and wipe it off immediately to tint the texture and add realistic depth.
Step 3: Finishing Touches
-
Initial drying:
Set the pebble aside in a cool, dry place. Let it dry for about 24 to 48 hours, turning it over halfway through to ensure the bottom dries evenly. -
Check for cracks:
Once fully dry, inspect the surface. If you see tiny hairline cracks, you can fill them with a watered-down clay slip and let it dry again. -
Sand for smoothness:
Using fine-grit sandpaper, gently buff the surface of the dry clay. Focus on the edges to make them feel weather-worn and soft to the touch. -
Dust off:
Wipe away all sanding dust with a slightly damp sponge or cloth so the surface is clean for sealing. -
Apply sealant:
Coat the entire piece with a matte sealant. A matte finish is crucial here to maintain that realistic stone appearance rather than looking like plastic. -
Second coat:
Let the first coat dry completely, then apply a second thin layer for durability, especially around the incense hole where heat occurs.
Now you have a serene, minimalist object ready to hold your favorite calming incense
Air-Dry Clay Plant Pot Cover With Texture
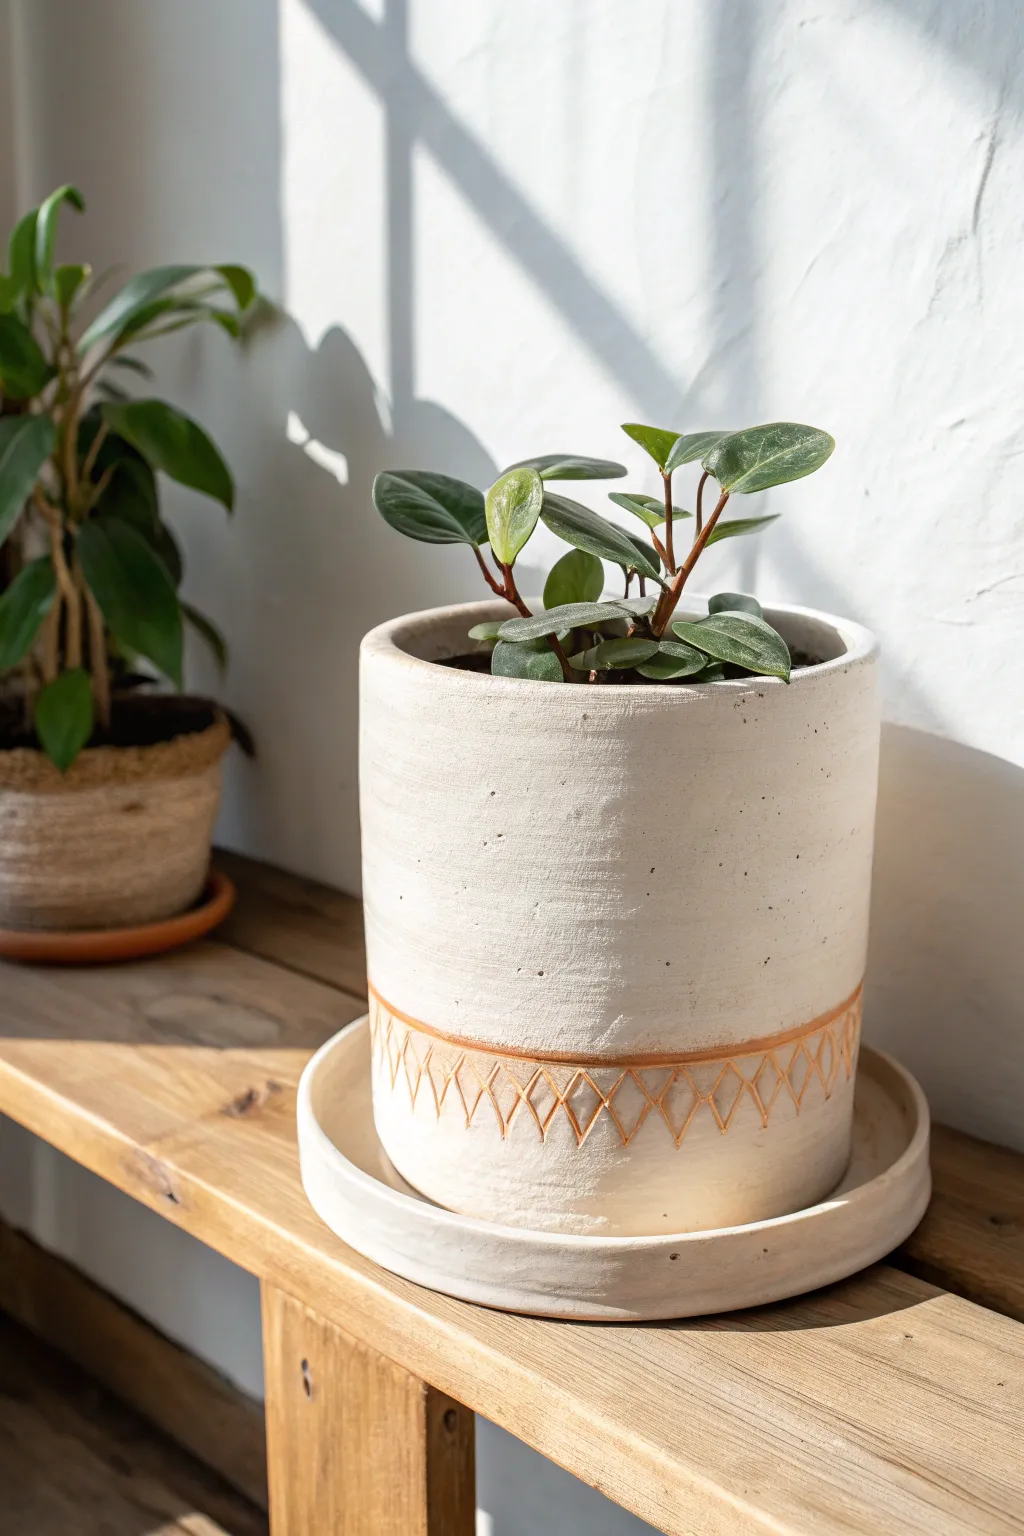
Transform a plain plastic nursery pot into a stunning décor piece with this textured air-dry clay cover. Featuring a natural stone finish and a delicate engraved geometric band, this project adds an organic yet modern touch to your indoor garden.
Step-by-Step Guide
Materials
- Air-dry clay (white or light grey)
- Can or cylindrical container (to use as a mold)
- Plastic wrap
- Rolling pin
- Clay knife or fettling knife
- Carving tool or toothpick
- Small cup of water
- Sponge
- Slip (clay mixed with water)
- Fine grit sandpaper
- Acrylic paint (warm terracotta or bronze)
- Fine detail paintbrush
- Sealer or varnish (matte finish)
Step 1: Forming the Base
-
Prepare your mold:
Select a cylindrical container that is slightly larger than the plant pot you intend to house. Wrap the outside of this cylinder completely in plastic wrap to ensure the clay doesn’t stick later. -
Roll out the slab:
Take a large chunk of air-dry clay and roll it out on a flat surface into a long rectangular slab. Aim for an even thickness of about 1/4 inch to ensure structural integrity without being too heavy. -
Cut to size:
Measure the height of your mold container. Using a ruler and your clay knife, cut the clay slab into a rectangle that matches this height and uses the circumference of the mold plus a little extra for the seam. -
Wrap the clay:
Carefully lift your clay slab and wrap it around the plastic-covered mold. Bring the two ends together. If the slab is too long, trim the excess now so the ends just meet. -
Seal the seam:
Score both edges where the clay meets by scratching cross-hatch marks with your tool. Apply a little slip (clay water) and press the edges firmly together to bond them. -
Blend the join:
Smoothing the seam is crucial. Use your fingers or a modeling tool to drag clay across the join line, blending it until the seam is invisible. I like to keep my fingers slightly damp for this part.
Crack Control
If you see small cracks forming while drying, mix a tiny bit of fresh clay with vinegar to make a paste and fill them in immediately. Smooth with a finger.
Step 2: Adding the Saucer and Texture
-
Cut the saucer base:
Roll out a separate, smaller circle of clay for the saucer. It should be wider than your main cylinder by at least an inch on all sides. Cut a long, narrow strip of clay for the saucer rim. -
Assemble the saucer:
Attach the strip to the edge of the circle base using the score-and-slip method to create a shallow dish. Smooth the connection points on both the inside and outside. -
Create surface texture:
Before the clay dries, take a slightly damp sponge and dab it all over the main cylinder and the saucer. This creates that rustic, stone-like texture seen in the photo instead of a perfectly smooth finish. -
Refine the rim:
Use your fingers to gently round off the top rim of the cylinder so it looks soft and hand-thrown rather than sharp and cut. -
Initial drying:
Let the cylinder dry on the mold for a few hours until it is leather-hard (stiff but still carveable). Carefully slide it off the mold.
Level Up: Faux Stone
Mix some used coffee grounds or fine sand into your clay block before rolling it out. This adds realistic grit and speckles for a convincing stone look.
Step 3: Carving and Finishing
-
Measure the band:
Lightly mark two horizontal lines around the bottom third of the cylinder to define the area for the geometric pattern. The space between lines should be about an inch high. -
Carve the diamonds:
Using a carving tool or a toothpick, draw a continuous zigzag line between your horizontal guides. Then, draw a second zigzag line that mirrors the first to create a repeating diamond pattern. -
Deepen the lines:
Go over your carved lines a second time to ensure they are deep enough to hold paint later. Brush away any little clay crumbs with a soft, dry brush. -
Full drying:
Allow both the pot cover and the saucer to dry completely. This usually takes 24-48 hours depending on humidity. The clay will turn white or light grey when fully dry. -
Sand imperfections:
Once bone dry, lightly sand the rims or any rough patches with fine-grit sandpaper. Be gentle to maintain the sponge texture you created earlier. -
Paint the details:
Load a fine brush with warm terracotta or bronze acrylic paint. Carefully paint inside the carved diamond lines, wiping away any mistakes on the surface immediately with a damp paper towel. -
Seal the project:
Apply a coat of matte varnish or sealer to the entire piece, inside and out. This protects the clay from moisture, though remember air-dry clay is never 100% waterproof.
Now you have a custom, handcrafted home for your favorite plant that looks like expensive pottery.
Clay Bead Bracelet or Necklace Set
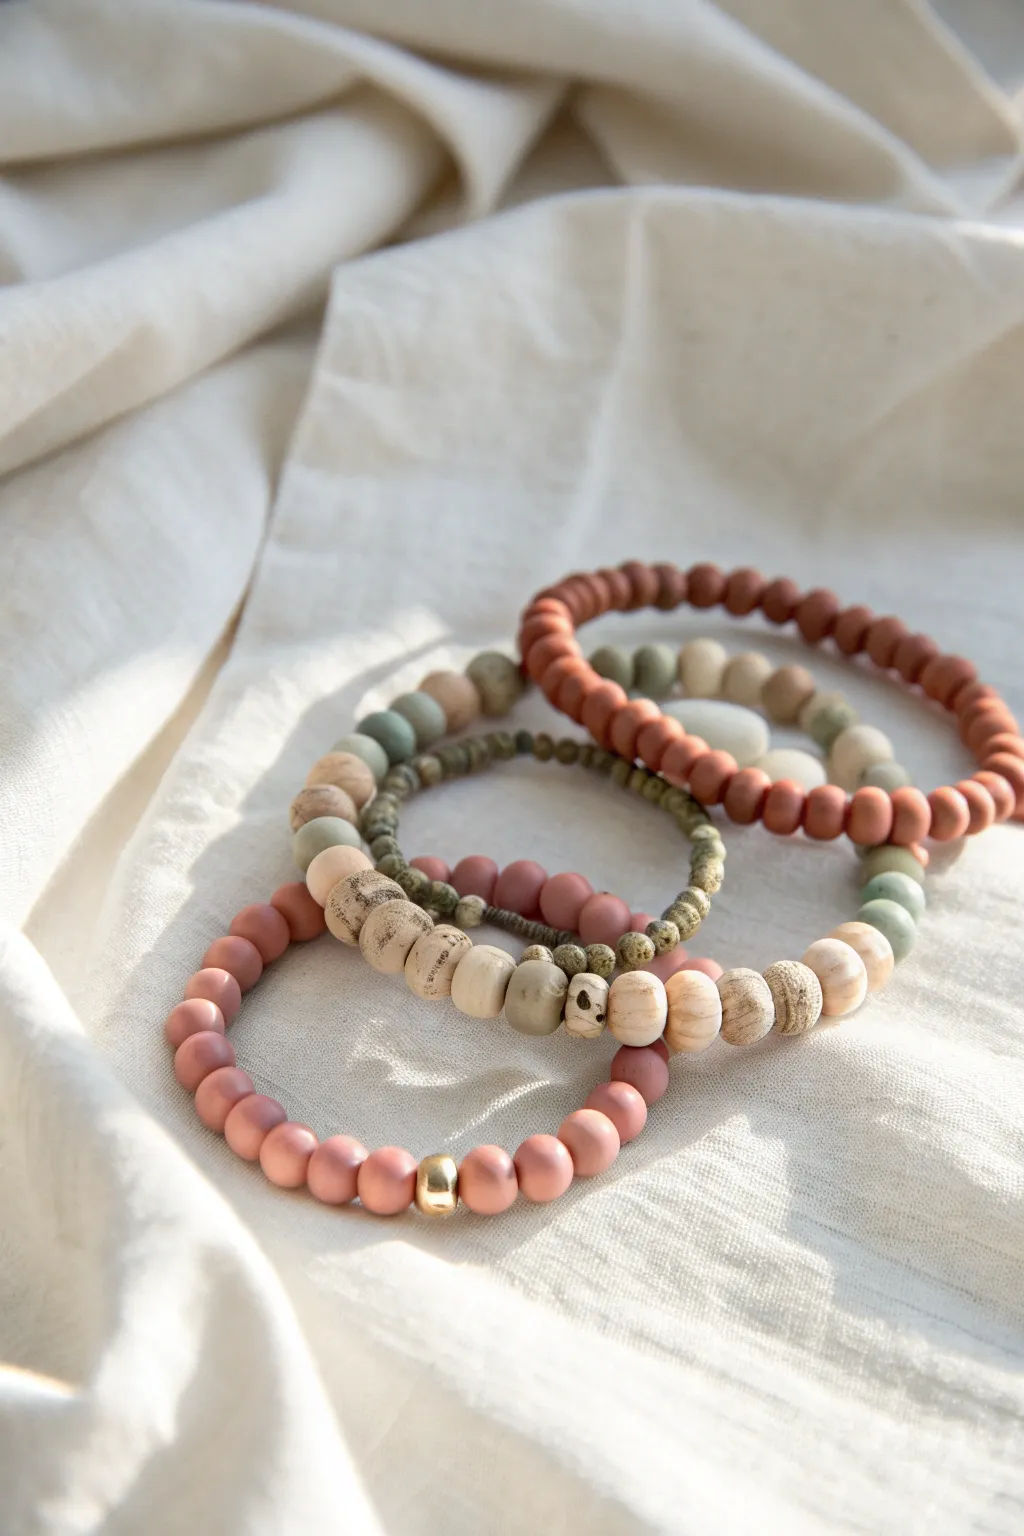
Create a stunning set of coordinated bracelets featuring organic textures and a soft, earthy color palette. These handmade polymer clay beads mimic the look of natural stone and wood, perfect for stacking or wearing individually.
How-To Guide
Materials
- Polymer clay (terracotta/dusty rose, beige, sage green, and white)
- Black acrylic paint or brown antique medium
- Gold accent bead (metal or gold-painted clay)
- Elastic beading cord (0.8mm or 1mm)
- Bead roller tool (optional)
- Toothpicks or a thin knitting needle
- Baking sheet with parchment paper
- Sandpaper (fine grit)
- Super glue or jewelry cement
- Paper towel or baby wipes
Step 1: Mixing and Shaping Beads
-
Condition the clay:
Start by warming up your polymer clay in your hands until it is soft and pliable. You’ll need three main color groups: a solid dusty rose, a sage green, and a beige mixture. -
Create the speckled beige:
To achieve the organic, stone-like look seen in the creamy beads, mix a small amount of black or brown clay crumbs into your beige clay. Knead briefly, but don’t mix fully—you want visible specks. -
Create the marbled green:
For the sage green beads, mix white clay with sage green. Twisting the two colors together without fully blending them creates a subtle, marbled effect. -
Roll the snakes:
Roll each color batch into a long, even snake shape, roughly the thickness you want your final beads to be. -
Cut equal sections:
Use a tissue blade or craft knife to slice the snakes into equal-sized segments. This ensures your beads are relatively uniform in size. -
Roll into spheres:
Roll each segment between your palms to form a ball. I like to keep them slightly imperfect rather than perfectly round to enhance the rustic aesthetic. -
Pierce the holes:
Gently twist a toothpick or needle through the center of each bead to create the stringing hole. Be careful not to squash the bead’s shape.
Uneven Holes?
If bead holes close up during baking, use a small hand drill or a bead reamer to widen them carefully after the clay has fully hardened and cooled.
Step 2: Texturing and Baking
-
Add surface texture:
For the darker accent beads seen in the middle bracelet, roll the raw clay balls gently over fine-grit sandpaper or a textured fabric scrap before piercing. -
Bake the beads:
Arrange your beads on a parchment-lined baking sheet. Bake according to your clay manufacturer’s instructions (usually around 275°F/135°C for 15-30 minutes). -
Cool down:
Allow the beads to cool completely before handling them. They will harden fully as they cool.
Step 3: Finishing and Assembly
-
Apply an antique wash:
To bring out the textures, dilute a tiny drop of black acrylic paint with water. Brush it over the textured beads and immediately wipe it off with a paper towel, leaving paint only in the crevices. -
Seal the beads (Optional):
If you prefer a matte finish, leave them as is. For durability, you can apply a thin coat of matte water-based varnish. -
Plan your patterns:
Lay out your beads on a design board or a towel. Create one solid pink strand, one mixed strand with greys and greens, and one primarily beige strand. -
String the rose bracelet:
Thread the dusty rose beads onto your elastic cord. Add the single gold accent bead in the center as a focal point. -
String the mixed bracelets:
Thread the remaining beads, alternating sizes and textures to mimic the stack in the image. -
Pre-stretch the cord:
Before tying, give the elastic cord a few gentle tugs. This prevents the bracelet from stretching out permanently the first time you wear it. -
Tie the knot:
Secure each bracelet with a surgeon’s knot (right over left, then left over right twice). Pull tight. -
Secure the knot:
Place a tiny drop of super glue on the knot. Once dry, trim the excess cord and slide the knot inside a neighboring bead to hide it.
Scent Diffuser
Make a few beads from unsealed terracotta or wood-colored clay. These porous beads can absorb essential oils, turning your bracelet into a portable diffuser.
Now you have a chic set of bracelets ready to complement any casual outfit
Personalized Keychain Charm
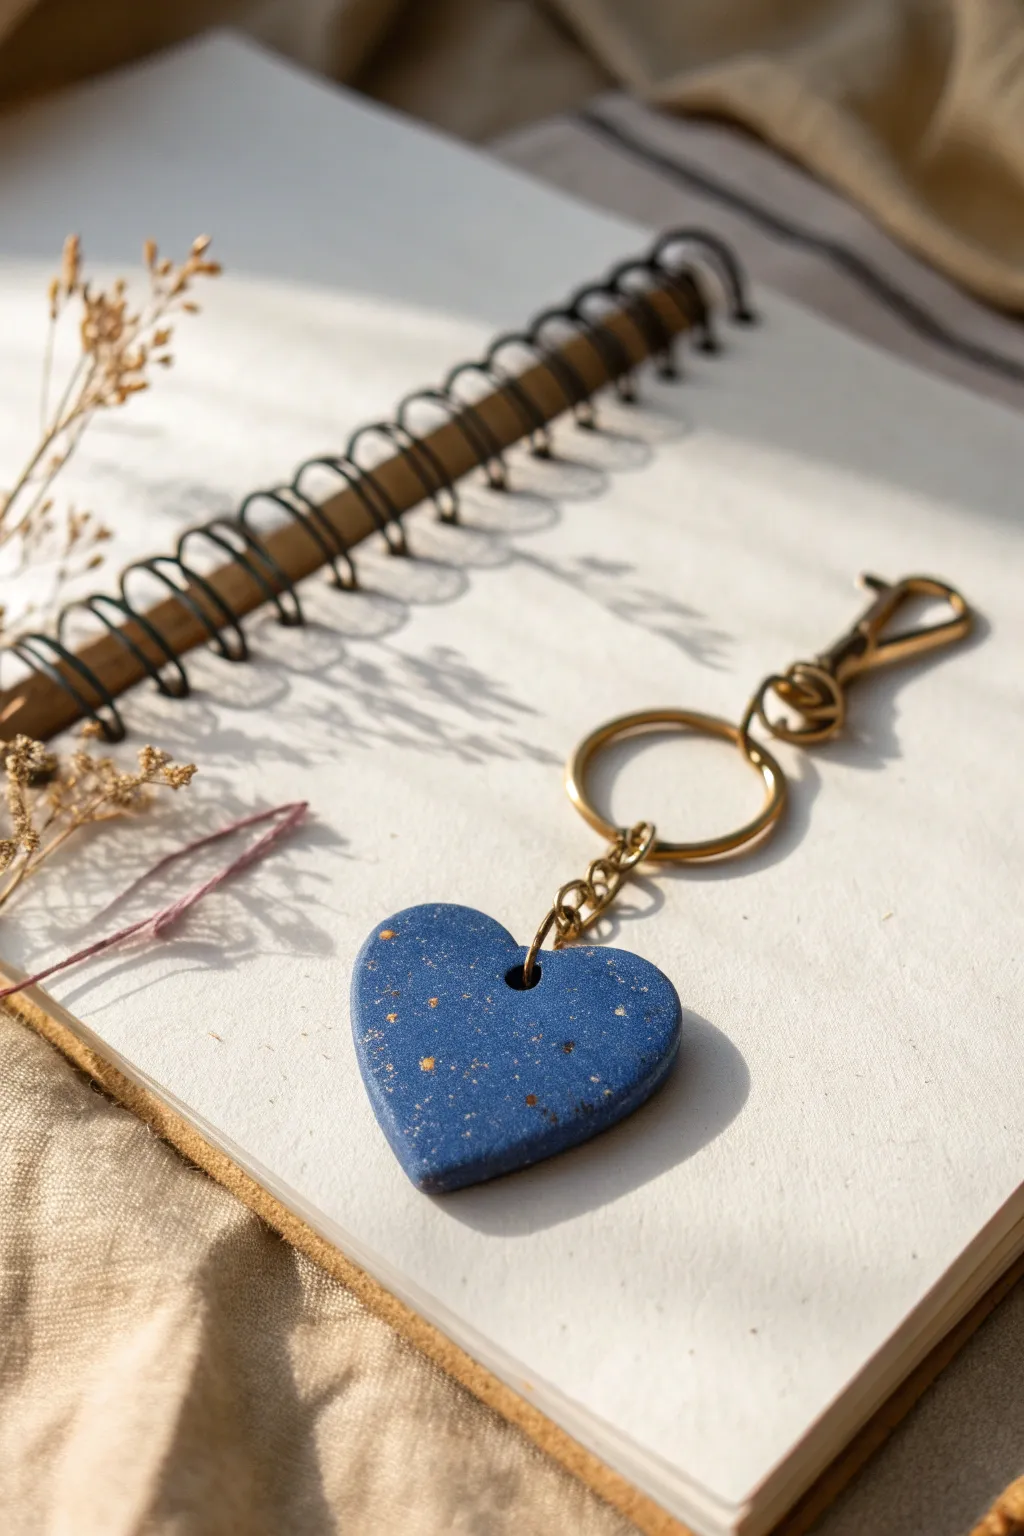
Create a meaningful, personalized accessory with this elegant blue heart charm, featuring subtle gold flecks that catch the light beautifully. This beginner-friendly polymer clay project results in a durable, polished keychain perfect for gifting or keeping for yourself.
Step-by-Step Tutorial
Materials
- Navy blue polymer clay
- Gold leaf flakes or gold glitter (fine)
- Small heart-shaped cookie cutter (approx. 1.5 – 2 inches)
- Acrylic rolling pin or clay machine
- Parchment paper or ceramic tile (work surface)
- Small round cutter or drinking straw (for the hole)
- Gold tone jump ring (8mm or 10mm)
- Gold keychain mechanism with lobster clasp
- Jewelry pliers (needle nose and flat nose)
- Oven (for baking)
- Fine-grit sandpaper (optional)
- Gloss glaze or UV resin (optional for shine)
Step 1: Preparing the Clay
-
Condition the clay:
Start by taking a portion of your navy blue polymer clay, about the size of a walnuts. Knead it thoroughly in your hands until it becomes soft, pliable, and warm to the touch. -
Add the gold accents:
Flatten the conditioned clay in your palm. Take a small pinch of gold leaf flakes or fine gold glitter and sprinkle it onto the center of the clay. -
Fold and mix:
Fold the clay over the gold inclusions to trap them inside. Knead the clay again gently to distribute the gold flecks. -
Check the distribution:
I prefer to stop kneading before the gold is completely uniform; leaving it slightly chunky adds organic texture. -
Roll it out:
Place the clay on your parchment paper or tile. Using your acrylic roller, roll the clay out to an even thickness of about 1/4 inch (6mm). A slightly thicker charm is more durable.
Step 2: Shaping and Refining
-
Cut the shape:
Position your heart-shaped cutter over the most interesting section of the rolled clay where the gold speckles are visible. Press down firmly to cut the shape. -
Release the cutter:
Gently wiggle the cutter to release the clay from the surrounding scrap material. Peel away the excess clay, leaving just the heart on your work surface. -
Smooth the edges:
Dip your finger in a tiny bit of water or cornstarch and gently run it along the cut edges of the heart to soften any sharp ridges left by the cutter. -
Create the hole:
Using a small round cutter or a straw, punch a hole near the top center of the heart lobes. Ensure the hole is not too close to the edge to prevent breakage later. -
Add surface texture (Optional):
If your gold flecks aren’t showing on the surface enough, you can press a few tiny pieces of gold leaf directly onto the top of the raw clay now.
Uneven surface?
If fingerprints are visible before baking, lightly brush the raw clay with baby oil or a silicone sculpting tool to smooth them out effortlessly.
Step 3: Baking and Assembly
-
Bake the charm:
Place the tile with your clay heart into a preheated oven. Bake according to your specific clay brand’s package instructions (usually around 275°F/135°C for 15-30 minutes). -
Cool down:
Once baked, remove the clay from the oven and let it cool completely. Do not try to manipulate it while hot, as polymer clay is fragile until cool. -
Sand edges (Optional):
If there are any rough spots, lightly wet-sand the edges with fine-grit sandpaper for a professional finish. -
Seal (Optional):
For a glossy look like the photo, brush on a thin layer of polymer clay glaze or UV resin and cure it. This also protects surface gold leaf. -
Open the jump ring:
Hold the jump ring with two pairs of pliers. Twist the ends away from each other (front to back), rather than pulling them apart, to maintain the circle shape. -
Attach the hardware:
Thread the open jump ring through the hole in your clay heart. -
Add the keychain:
Slide the bottom loop of the keychain mechanism onto the same open jump ring. -
Close the ring:
Using your pliers, twist the jump ring ends back toward each other until they meet flush and create a secure closure.
Level Up: Color Shift
Mix a tiny amount of translucent clay into your navy blue. This creates a semi-stone effect that gives the gold flakes deeper dimension.
Clip your new handmade charm onto your keys or bag and enjoy the subtle sparkle every day
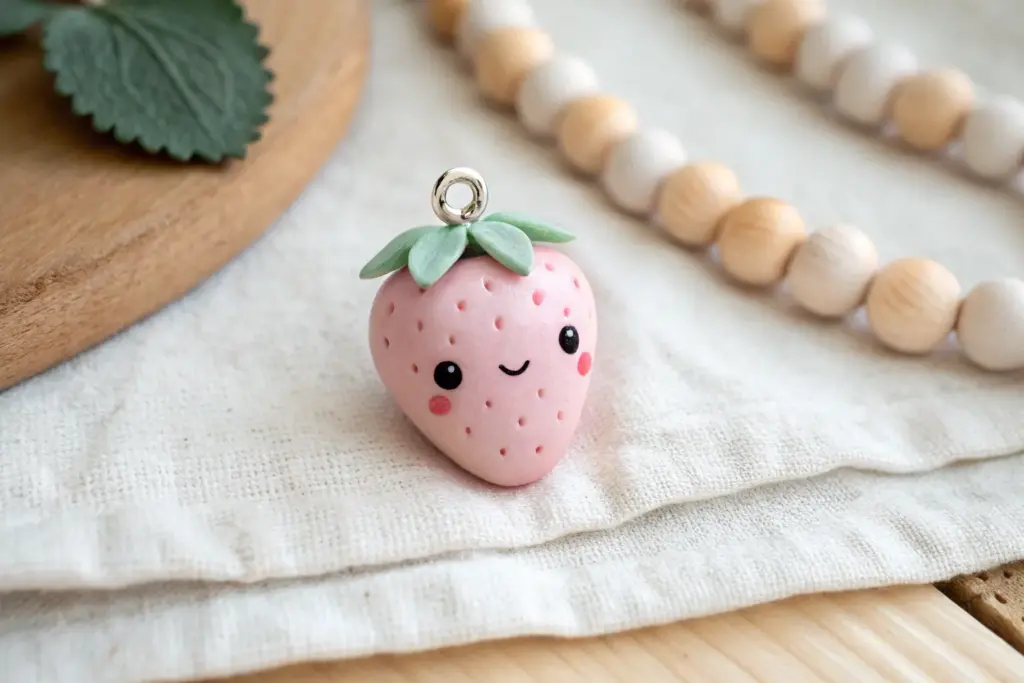
Cute Fruit or Veggie Magnets
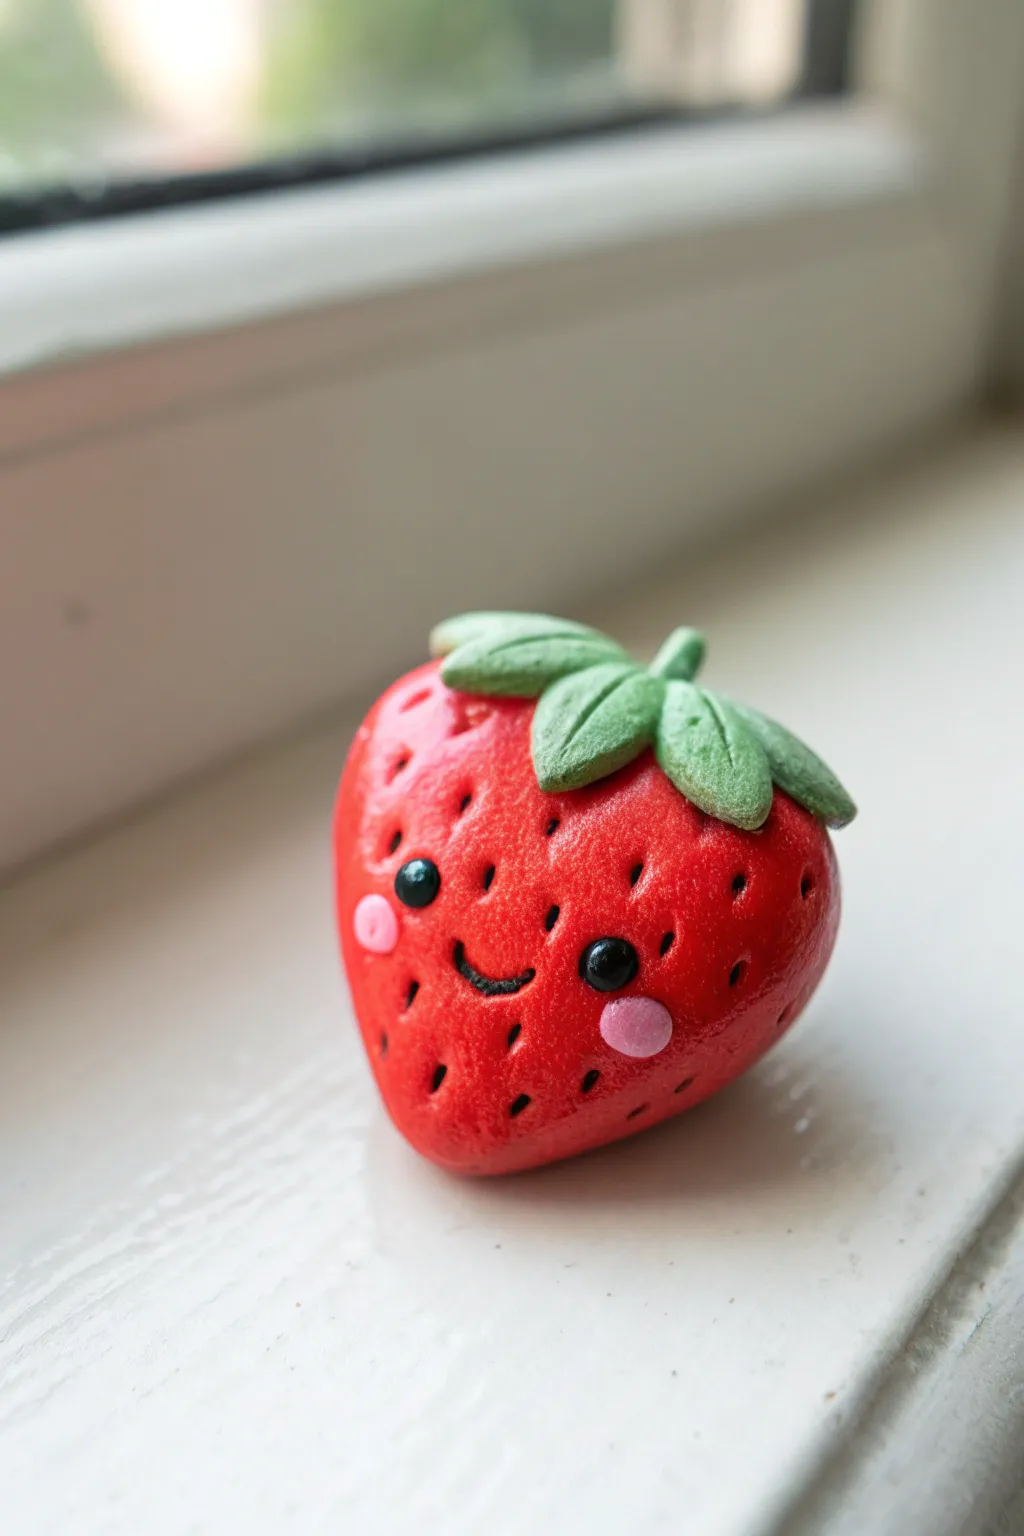
Add a burst of sweetness to your fridge with this adorable strawberry magnet, complete with blushing cheeks and a friendly smile. Its glossy finish and textured seeds make it look just vibrant enough to eat, though we definitely recommend sticking to clay.
Step-by-Step
Materials
- Red polymer clay
- Green polymer clay (leaf shade)
- Pink polymer clay
- Black polymer clay
- Needle tool or toothpick
- Small round sculpting tool or dotting tool
- Gloss glaze (polyurethane or water-based varnish)
- Soft paintbrush
- Strong craft glue (E6000 or super glue)
- Small round magnet
Step 1: Shaping the Berry Base
-
Condition the clay:
Start by taking a chunk of red polymer clay roughly the size of a walnut. Warm it up in your hands by rolling and squishing it until it’s soft and pliable, which prevents cracks later on. -
Form the initial ball:
Roll the conditioned clay into a smooth, seamless ball between your palms. -
Taper the shape:
Gently roll one end of the ball against your work surface to create a tapered point, shaping it into a rounded, fat cone that resembles a strawberry. -
Flatten the back:
Press the shape down gently onto your work surface to flatten the back side. This ensures the magnet will sit flush against the fridge later. -
Soften the edges:
Use your thumb to gently round off the top edges where the berry meets the flat back, keeping the front plump and 3D.
Fingerprint Woes?
If you notice fingerprints on your clay before baking, lightly brush the surface with a tiny bit of baby oil or cornstarch to smooth them away without ruining the shape.
Step 2: Adding Texture and Leaves
-
Create the seed indentations:
Take your needle tool or a toothpick and press small, shallow holes all over the red surface. Space them somewhat evenly, but keep it random enough to look natural. -
Make the leaves:
Condition a small amount of green clay. Divide it into four or five tiny tear-drop shapes. -
Flatten the leaves:
Press each green teardrop flat with your finger to create thin leaf shapes. -
Add leaf details:
Use the needle tool or a craft knife to gently score a central vein down the middle of each leaf for added realism. -
Attach the greenery:
Arrange the leaves on the top of the strawberry, pressing them down gently so they curve over the rounded top of the berry. Add a tiny green stem in the very center if desired.
Step 3: Creating the Kawaii Face
-
Socket the eyes:
Use a ball tool or the end of a paintbrush to press two small, round divots into the front of the strawberry where you want the eyes to sit. -
Insert the eyes:
Roll two tiny balls of black clay and press them securely into the divots you just made. Flatten them slightly so they aren’t bulging out too far. -
Add the smile:
Roll an extremely thin snake of black clay. Cut a tiny U-shape segment and gently press it onto the face between the eyes using your needle tool to guide it. -
Make the cheeks:
Take two tiny pieces of pink clay, roll them into balls, and flatten them into ovals. Press these onto the berry just below and to the outside of the eyes for that blushing look.
Level Up: Sparkle
Mix a tiny pinch of fine translucent glitter into the red clay before sculpting. It gives the strawberry a sugary, candy-like appearance perfect for sweet themes.
Step 4: Finishing Touches
-
Bake the strawberry:
Bake your clay creation according to the package instructions. Most polymer clays require 275°F (135°C) for about 15-20 minutes, depending on thickness. -
Cool down:
Let the piece cool completely before handling. It will still be slightly soft when hot but hardens as it cools. -
Glaze carefully:
Brush a coat of gloss glaze over the red berry and the eyes to make them shine. I usually skip glazing the leaves to keep a nice contrast in texture, but you can glaze the whole thing if you prefer. -
Attach the magnet:
Once the glaze is dry, flip the strawberry over and glue a strong magnet to the flat back using E6000 or super glue.
Now you have a charming little companion to hold up your grocery lists and photos
Abstract Wall Hanging Tiles
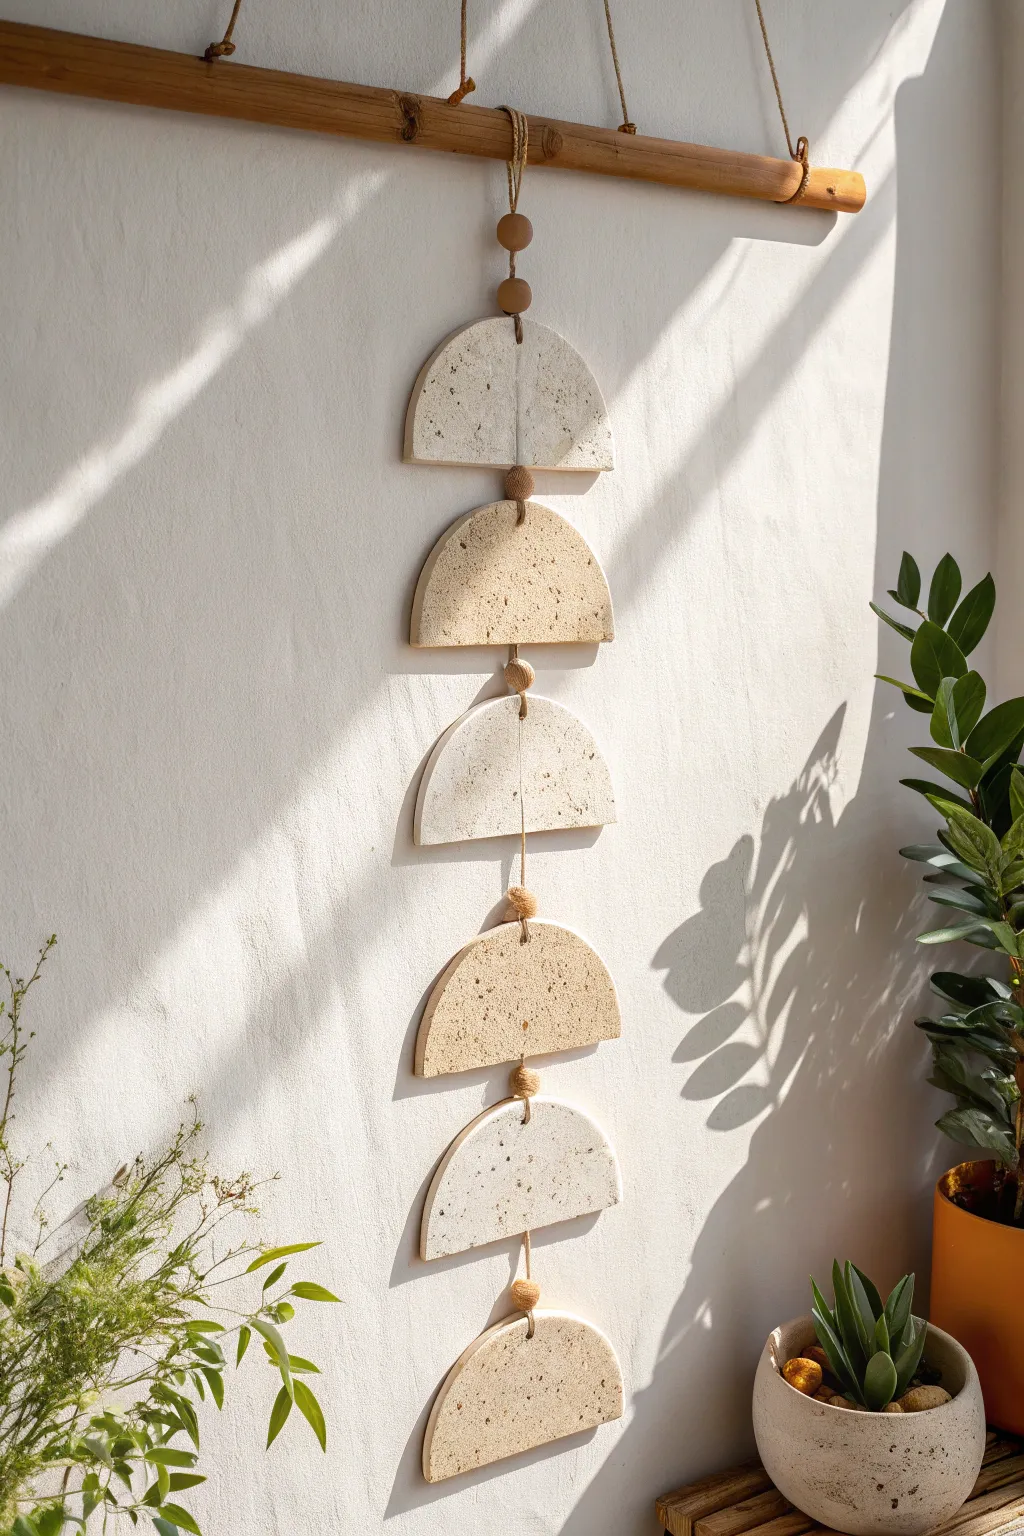
This earthy, minimalist wall hanging combines the raw beauty of speckled clay with a rhythmic, alternating color palette to create a soothing piece of decor. The six semi-circles sway gently on a single strand, bringing organic movement and texture to any empty wall space.
Detailed Instructions
Materials
- Air-dry clay (white)
- Air-dry clay (terracotta or beige)
- Rolling pin
- Round cookie cutter (approx. 4-5 inches) or a bowl to trace
- Knife or clay cutting tool
- Recycled coffee grounds or black pepper for speckling
- Straw or small dowel (for hole punching)
- Sandpaper (fine grit)
- Wooden dowel or branch (approx. 12-14 inches)
- Jute twine or hemp cord
- Wooden beads (natural finish)
- Matte acrylic sealer (optional)
Step 1: Preparing the Clay
-
Mix the Speckles:
Start by taking a chunk of your white air-dry clay. To achieve that organic, stone-like texture seen in the photo, knead in a small pinch of dried coffee grounds or coarsely ground black pepper. Do the same with your beige or terracotta clay. -
Marbling Technique:
Don’t over-mix the speckles; you want them visible. If you are mixing white and terracotta clay to get that soft beige shade, stop kneading before the colors fully blend for a slight marble effect. -
Roll It Out:
On a clean, flat surface, roll out your clay to a uniform thickness of about 1/4 inch. I find using guide sticks on either side of the rolling pin helps keep the slab perfectly even.
Uneven Drying?
If your clay tiles start curling up at the edges while drying, place a lightweight book on top of them (with parchment paper in between) once they are leather-hard to force them flat
Step 2: Shaping the Tiles
-
Cut the Circles:
Using your large round cutter or a bowl as a template, cut out three circles from the white clay and three from the beige clay. -
Create Half-Moons:
Carefully cut each circle directly in half to create semi-circles. You will need six half-moons total for this design, alternating colors, so you’ll have some spares for testing. -
Smooth the Edges:
Dip your finger in a little water and run it along the cut edges of each semi-circle to smooth out any sharpness or drag marks from the knife. -
Punching Holes:
Using a straw or a small tool, punch a hole in the exact center of the curved top edge. Directly below it, punch a matching hole in the center of the flat bottom edge. -
Modify the Bottom Tile:
For the very last tile at the bottom of the arrangement, you only need a top hole. Leave the flat bottom edge solid. -
Drying Time:
Lay the pieces flat on a piece of parchment paper or a drying rack. Let them dry for 24-48 hours, flipping them occasionally to prevent warping.
Level Up: Texture
Before the clay dries, gently press a piece of rough linen or canvas onto the surface with a rolling pin. This imparts a woven textile texture that catches the light beautifully
Step 3: Assembly
-
Sand and Seal:
Once fully dry, lightly sand any rough spots. If you want extra durability, apply a coat of matte acrylic sealer to protect the clay. -
Prep the Main Cord:
Cut a long length of jute twine, about 4 feet long. Tie a secure knot at one end, large enough that it won’t slip through the hole of your bottom tile. -
Thread the Bottom Tile:
Thread the un-knotted end of the twine through the back of the bottom tile’s single hole, so the knot rests hidden behind the clay. -
Add a Spacer Bead:
Slide a wooden bead down the twine until it rests on top of the bottom tile’s curve. -
Knotting for Spacing:
Determine the gap you want between tiles (about 1 inch looks balanced). Tie a knot in the twine where the next tile should sit to support it. -
Thread the Next Tile:
Thread the twine through the bottom hole of the next tile, run it up the back, and out through the top hole. -
Repeat the Pattern:
Continue this pattern: add a wooden bead, tie a support knot, and thread the next tile. Ensure you alternate the white and beige clay pieces as shown. -
Attach to Dowel:
Once the top tile is threaded and a final bead is added, tie the twine securely around the center of your wooden dowel. -
Hanging Rope:
Cut another piece of twine for the main hanger. Tie each end to the far edges of the wooden dowel to create a triangle shape for hanging.
Hang your new geometric creation near a window to catch the shifting shadows throughout the day
Tiny Clay Room Diorama Keepsake
Create a cozy, pocket-sized world with this charming clay room diorama. This project combines structural building with delicate miniature sculpting to form a perfectly preserved living space inside a sturdy white box frame.
Step-by-Step Tutorial
Materials
- White air-dry clay (or polymer clay)
- Terracotta-colored clay (or orange/brown mix)
- Blue clay
- Deep green and lighter green clay
- Wooden craft sticks or balsa wood strips
- Thick white cardstock or foam board (for the box structure)
- White texture paste or gesso
- Craft knife and cutting mat
- Rolling pin
- Strong craft glue (PVA or tacky glue)
- Needle tool or toothpick
- Fine-point paintbrush and acrylic paints (optional detailing)
- Small piece of paper (for the tiny magazine)
Step 1: Building the Room Structure
-
Construct the box base:
Cut your cardstock or foam board into five rectangles: one floor, a back wall, two side walls, and a ceiling. Assemble them into an open-faced box using strong glue, leaving the front completely open for viewing. -
Apply texture paste:
Using a palette knife or your fingers, coat the interior and exterior walls with white texture paste or a thin layer of white clay. Dab the surface gently to create a rough, specialized stucco plaster effect and let it dry completely. -
Create the terracotta floor:
Roll out a thin sheet of terracotta-colored clay cut to the exact dimensions of your box’s floor. Press a real stone or crumpled foil into it to give it a natural, earthy texture before gluing it into the bottom of the box.
Uneven Furniture?
If your sofa or table legs are wobbly, lightly sand the bottoms with an emery board or nail file after the clay has fully hardened to create a perfectly flat base.
Step 2: Sculpting the Furniture
-
Form the sofa base:
Take a large block of terracotta clay and shape it into a rectangular prism for the sofa’s main body. Add two smaller rectangular blocks on either side to serve as the armrests, smoothing the seams where the clay joins. -
Add sofa cushions:
Shape two plump squares for the seat cushions and two slightly taller rectangles for the back cushions. Soften the edges with your fingers so they look broken-in and comfortable, then press them onto the sofa frame. -
Make the coffee table:
Cut a small rectangle from light-colored clay or balsa wood for the table surface. Attach four tiny cylinders of black clay or painted toothpick segments to the corners for legs, ensuring the table stands level. -
Create the area rug:
Roll out a sheet of dark blue clay very thinly. Cut a rectangle slightly larger than the coffee table and press a piece of canvas or denim onto it to imprint a realistic fabric weave texture.
Add Lighting
Before plastering the ceiling, cut a small hole and thread a tiny battery-operated LED wire through it. You can conceal the bulb inside a clay lampshade for a working light.
Step 3: Crafting the Accessories
-
Sculpt the tall cactus:
Form a tall, thin cylinder of green clay. Using a needle tool, stipple the entire surface to mimic spines. Add two smaller offshoot arms near the bottom and plant it in a tiny terracotta-colored pot. -
Make the corner plant:
Shape a small burgundy pot from clay. Roll thin, pointed snakes of grey-green clay to create aloe-style leaves, clustering them together in the pot so they fan outward. -
Create the tabletop succulent:
Make a minuscule blue pot. Roll tiny balls of bright green clay, cluster them tightly together to form a textured succulent mound, and place it inside the pot. -
Assemble the tiny magazine:
Fold a small scrap of white paper. Use a fine utensil or a tiny splash of paint to scribble faux text and colorful images on the cover to simulate a magazine, then glue it to the coffee table.
Step 4: Wall Decor and Assembly
-
Make the large wall frame:
Roll thin snakes of blue clay and form a large square frame. Flatten it slightly against the table. I like to miter the corners with a knife for a cleaner look. -
Create miniature artwork:
Inside the blue frame, attach a flat square of dark blue clay as a backing board. Create two tiny clay ‘paintings’ using minuscule scraps of colored clay to make abstract landscapes and mount them on the backing. -
Mount the wall art:
Once the frame assembly is firm or baked (if using polymer), glue it centrally on the back wall of your white room box. -
Final arrangement:
Place the blue rug in the center of the floor. Position the terracotta sofa on the back edge of the rug. Place the coffee table in front of the sofa. -
Place the plants:
Glue the tall cactus in the front left corner and the smaller aloe plant in the back right corner to balance the composition. Place the tiny blue pot on the coffee table next to the magazine.
Display your miniature room on a shelf where the light can catch all the tiny details you created