Whenever I’m craving a low-stress clay session, I reach for air dry clay and make something kawaii—simple shapes, tiny faces, and sweet little details. Here are my favorite cute, beginner-friendly ideas that look adorable in soft pastel colors and feel totally doable at your kitchen table.
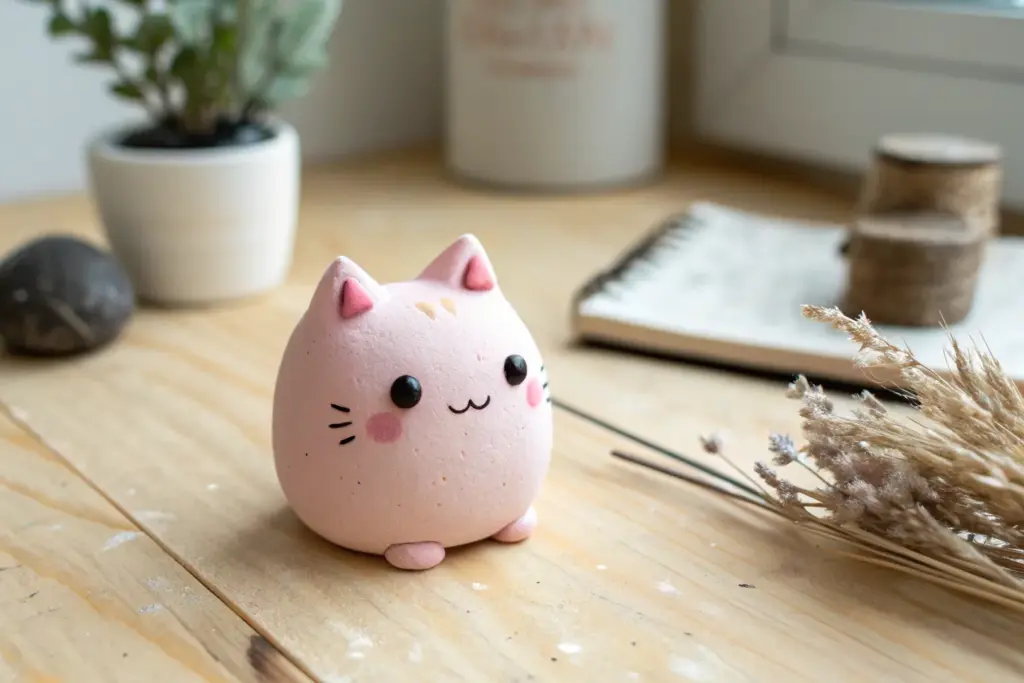
Kawaii Round Cat Figurines in Air Dry Clay
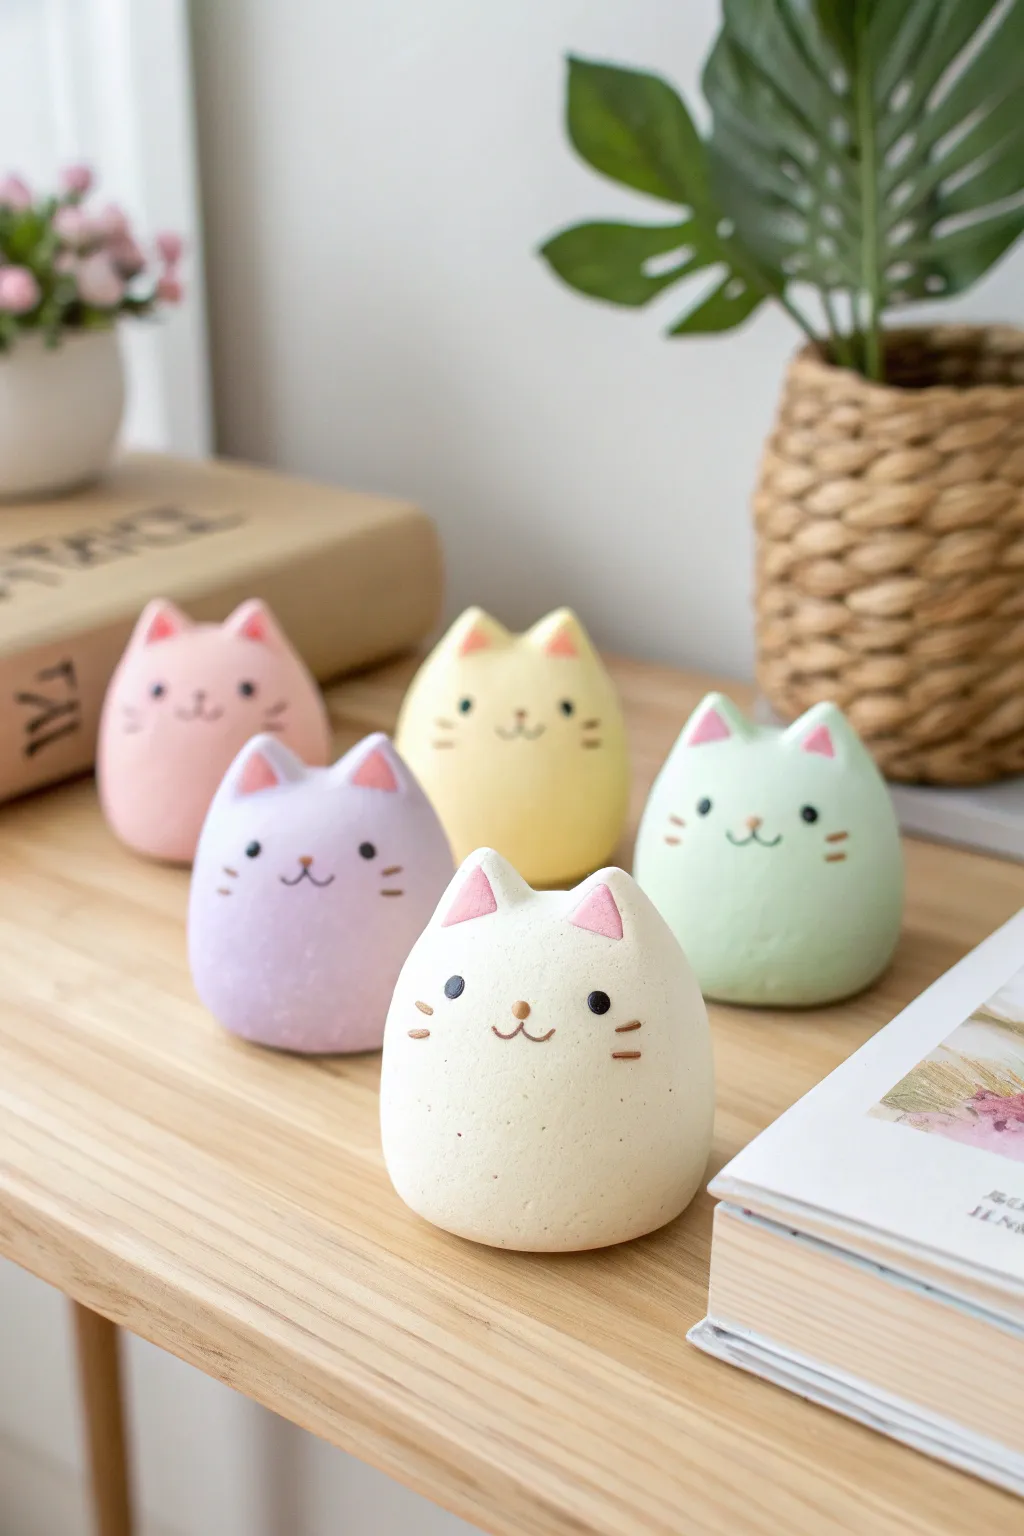
These adorable, minimalist cat figurines rely on simple shapes and soft pastel colors to create a soothing aesthetic. Their chubby, rounded bodies and tiny painted features make them perfect for beginners looking to practice smoothing techniques.
Step-by-Step Guide
Materials
- High-quality white air dry clay (e.g., Das or Crayola)
- Acrylic paints (White, Pastel Pink, Pastel Yellow, Lavender, Mint Green, Black, Brown)
- Rolling pin or smooth glass jar
- Small bowl or cup of water
- Fine-grit sandpaper (optional)
- Small detail paintbrush (size 00 or 0)
- Dotting tool or toothpick
- Clear matte varnish or sealant
Step 1: Base Shaping
-
Prepare the Clay:
Start by conditioning a golf-ball-sized amount of white air dry clay. Knead it thoroughly in your hands until it is warm, pliable, and free of cracks. -
Form the Body Sphere:
Roll the clay between your palms to create a perfect sphere. Spend extra time here to ensure there are no seams or folded lines visible. -
Create the Egg Shape:
Gently tap the bottom of the sphere on your work surface to create a flat base so the cat sits upright. Then, use your palms to slightly taper the top of the sphere, creating a very subtle egg shape rather than a perfect ball. -
Smoothing the Surface:
Dip your finger into a little water and gently run it over the entire surface of the clay. This ‘slip’ will fill in any micro-cracks and give that porcelain-smooth finish seen in the photo.
Step 2: Adding Ears
-
Form Ear Triangles:
Pinch off two very small, equal-sized pieces of clay. Roll them into tiny balls, then flatten them slightly into triangles. -
Attach the Ears:
Score the bottom of the triangles and the top of the cat’s head with a needle tool or toothpick. Apply a tiny dot of water to the scored areas. -
Blend the Seams:
Press the ears onto the head. Using a clay tool or your finger, drag the clay from the base of the ear down onto the head to blend the seam completely invisible. The ears should look like they grew out of the body, not just stuck on top.
Seamless Smoothness
Keep a small sponge damp with water nearby. Lightly sponging the clay before drying eliminates fingerprints better than just using your hands.
Step 3: Coloring and Drying
-
Pre-drying Check:
Give the entire figurine one last smoothing pass with a damp finger. Ensure the ears are symmetrical. Let the clay dry completely for 24-48 hours, turning it occasionally so the bottom dries too. -
Sanding (Optional):
Once fully hard, check for any bumps. If needed, very gently sand the surface with fine-grit sandpaper for an ultra-smooth finish. Wipe away dust with a damp cloth. -
Base Color Mixing:
Mix your acrylic paints to get soft pastels. For the finish shown, mix a large amount of white with a tiny drop of pigment (pink, mint, lavender, or yellow) to keep the colors milky and soft. -
Painting the Body:
Apply two to three thin coats of your pastel base color over the entire cat. I find thin layers prevent brush strokes better than one thick coat. Let each layer dry fully before adding the next.
Cracking Clay?
If cracks appear while drying, don’t panic. Mix a tiny bit of fresh clay with water to make a paste and fill the crack. Sand it smooth once dry.
Step 4: Detailing the Face
-
Paint the Inner Ears:
Using a small detail brush, paint a soft pink triangle inside each ear. Leave a small rim of the body color around the edges of the pink. -
Dot the Eyes:
Dip a dotting tool or the back end of a paintbrush handle into black acrylic paint. Press gently onto the face to create two wide-set eyes. They should be positioned roughly halfway down the body. -
Draw the Mouth:
Using your finest brush (size 00) and brown paint diluted slightly with water for better flow, paint a tiny ‘w’ shape between the eyes for the mouth. -
Add the Nose:
Paint a tiny, inverted triangle just above the center of the ‘w’ mouth using the same brown paint. -
Whisker Details:
Paint two short, horizontal lines on each cheek for whiskers. Keep these lines very thin and delicate. -
Sealing:
Once all paint is perfectly dry, finish with a coat of matte varnish to protect your work and unify the sheen.
Now you have a charming collection of pastel companions ready to brighten up your desk or shelf


Chubby Bunny Charms With Tiny Faces
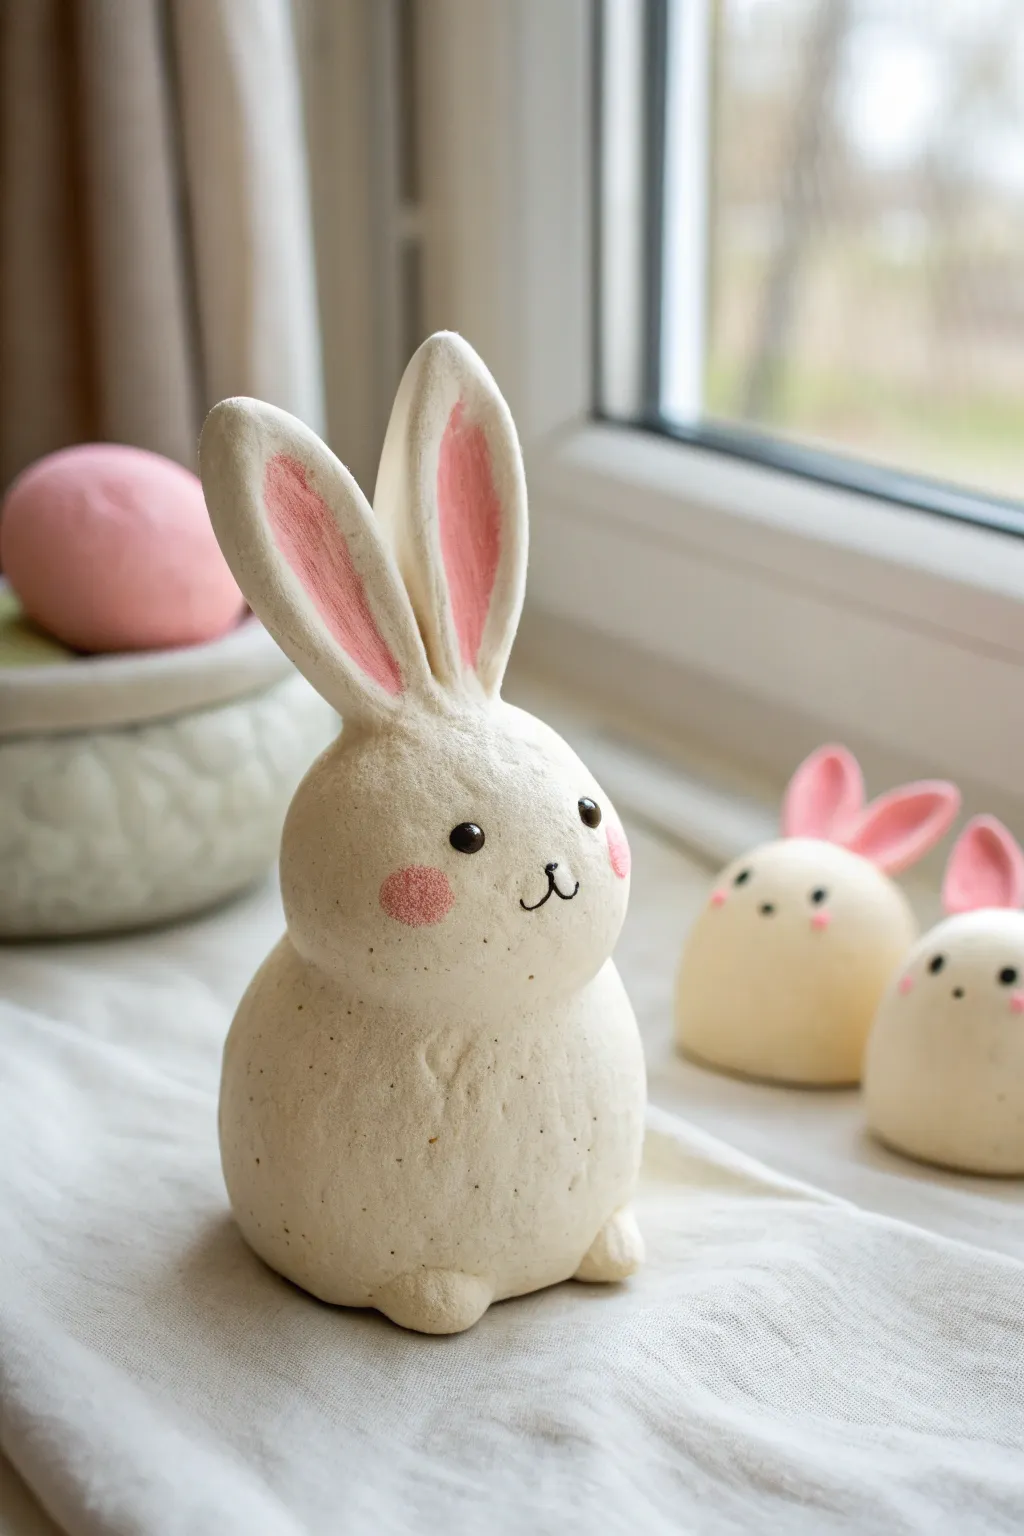
Create a charming family of chubby, textured bunnies perfect for spring decor or sweet desk companions. These air dry clay figures feature a delightful rustic finish and simple painted details that give them instant personality.
Step-by-Step Tutorial
Materials
- White smooth air dry clay
- Aluminum foil (for armature)
- Water in a small cup
- Toothpicks or crafting wire
- Acrylic paints: Black, Pink, White
- Small round paintbrush
- Fine detail brush or dotting tool
- Matte sealant or varnish
- Sandpaper (optional)
Step 1: Shaping the Body
-
Create a core structure:
Crumple a piece of aluminum foil into a firm, slightly flattened egg shape. This will serve as the core of the bunny’s body, saving clay and reducing drying time. -
Cover with clay:
Roll out a slab of air dry clay about 1/4 inch thick. Wrap this entirely around your foil core, pressing and smoothing the seams until you have a seamless, potato-shaped mound. -
Form the head:
Roll a smaller solid ball of clay for the head. It should be slightly oval-shaped to give the bunny chubby cheeks. -
Attach the pieces:
Insert a toothpick halfway into the top of the body. Score the clay surface around it (scratch cross-hatch marks), add a drop of water, and press the head firmly onto the body using the toothpick for support. -
Blend the neck:
Use your thumb or a modeling tool to smooth the clay where the head meets the body. I like to leave a little definition so it doesn’t look like a single blob provided the join is secure.
Seamless Smooth Tip
Use a little bit of water on your finger to smooth out fingerprints before texturing, but avoid soaking the clay or it may crack when drying.
Step 2: Adding Features
-
Sculpt the ears:
Roll two equal snake-like shapes of clay that taper at the ends. Flatten them gently to create long, distinct bunny ears. -
Create the inner ear:
Use a modeling tool or the handle of a paintbrush to press a long indentation down the center of each ear. -
Attach the ears:
Score the top of the head and the base of the ears. Apply a little water slip (clay mixed with water) and press the ears firmly in place, blending the clay at the base to secure them. -
Make the tail:
Roll a tiny ball of clay and attach it to the lower back of the body for a puffy tail. -
Add tiny feet:
Roll two small oval pieces of clay. Flatten slightly and attach them to the bottom front of the body so they poke out just a little, stabilizing the figure. -
Texturing:
For that rustic look seen in the photo, take a stiff bristle brush or a crumpled ball of aluminum foil and tap it gently all over the wet clay surface.
Step 3: Creating the Mini Companions
-
Shape the rounds:
For the background bunnies, simply roll balls of clay and flatten the bottom so they sit purely as rounded domes without separate distinct heads. -
Add mini ears:
Make much smaller, shorter ears and attach them directly to the top of the dome. -
Wait for drying:
Let all figures dry completely in a safe place away from direct heat. This usually takes 24-48 hours depending on humidity.
Make it a Trio
Turn the small round bunnies into ‘eggs’ by painting pastel zigzag patterns on them instead of faces for festive Easter variations.
Step 4: Painting and Finishing
-
Paint the inner ears:
Mix a soft, warm pink acrylic paint. Carefully paint inside the indented groove of the ears. -
Add rosy cheeks:
Dip a nearly dry brush into the pink paint and dab excess off on a paper towel. Stipple (tap) two round circle cheeks onto the face for a soft, textured blush effect. -
Paint the eyes:
Using black paint and a dotting tool or the back end of a paintbrush, place two solid black dots for eyes. Keep them wide-set for maximum cuteness. -
Draw the nose and mouth:
Use your finest detail brush or a fine-tip black marker to draw a tiny ‘Y’ or anchor shape between the cheeks for the nose and mouth. -
Add highlights:
Once the black eye paint is dry, add a minuscule dot of white paint to the upper corner of each eye to bring the bunny to life. -
Seal the work:
Protect your creation with a coat of matte spray varnish to preserve the texture without making it look plastic.
Place your new clay family on a windowsill to enjoy some handmade cheer every day


Tiny Smiling Frog Friends
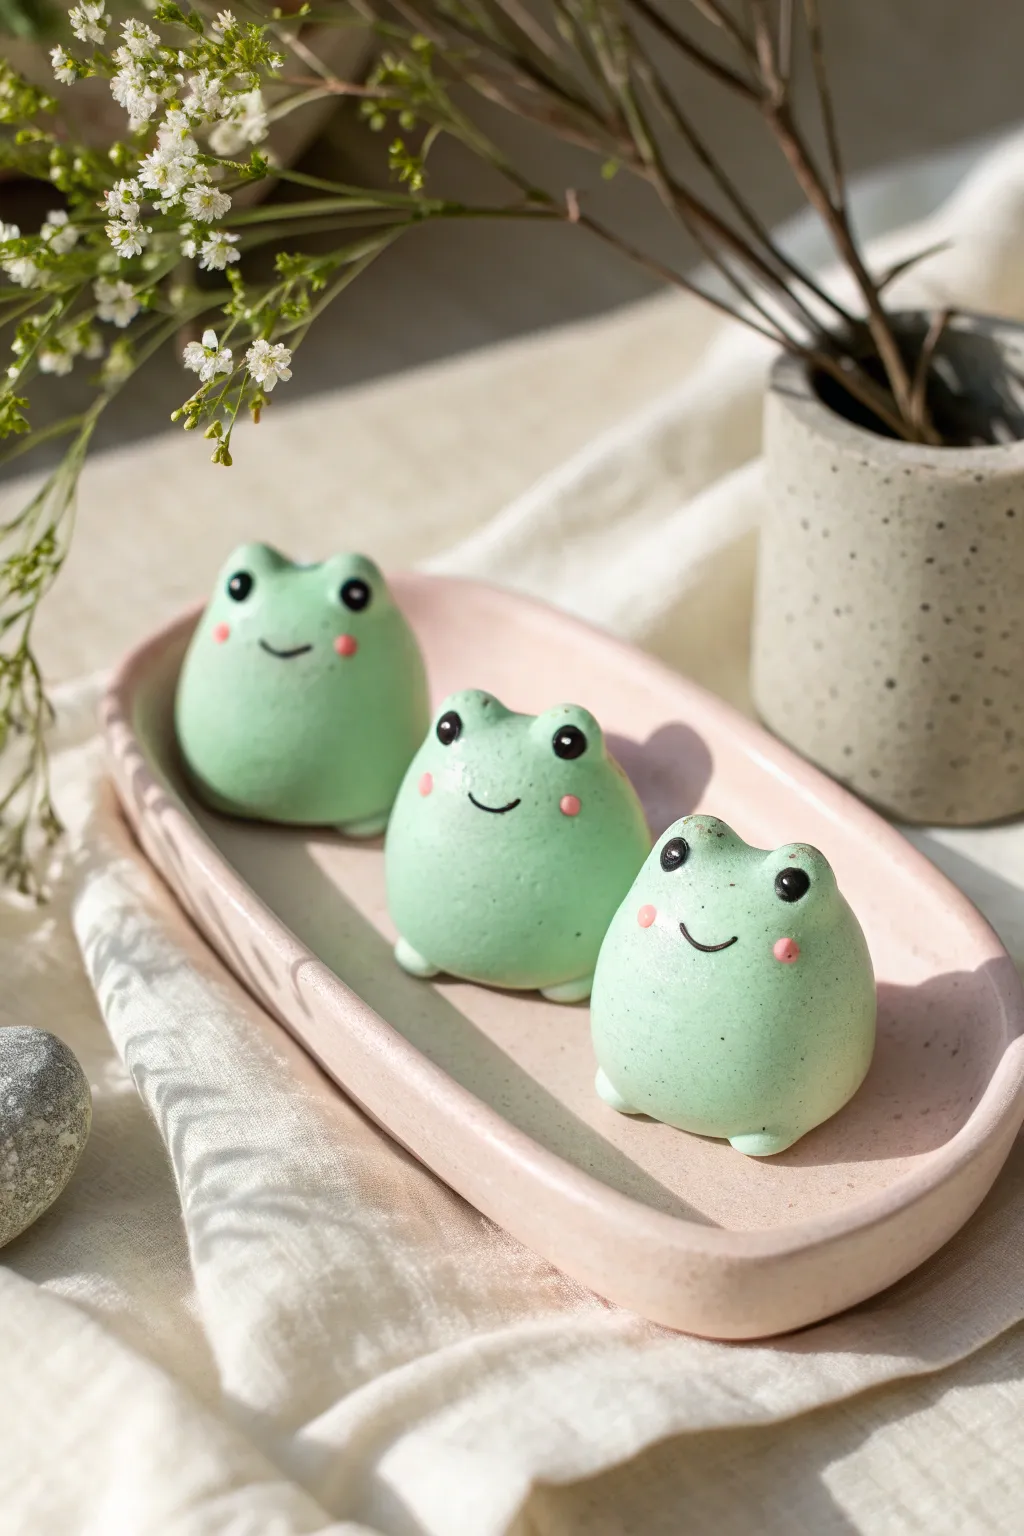
Create a charming set of matcha-colored frog friends that are perfect for brightening up any desk or shelf. These smooth, gentle figurines feature wide-set eyes and sweet smiles that make them impossible not to love.
Detailed Instructions
Materials
- White air dry clay (lightweight or porcelain style works best)
- Acrylic paint (Light Green, Black, Pink)
- Clay tools (or a toothpick)
- Small ball stylus tool
- Fine detail paintbrush (size 00 or 0)
- Matte varnish or sealant
- Water in a small cup
- Smooth work surface
Step 1: Shaping the Base
-
Prepare the Clay:
Start by conditioning your white air dry clay. Knead it thoroughly until it is warm, soft, and pliable to prevent cracking later. -
Tint the Clay:
Add a very small drop of light green acrylic paint to your ball of clay. Knead the color in until it is uniform; you want a soft, pastel ‘matcha latte’ green, so add paint sparingly. -
Divide the Portions:
Separate your green clay into three equal portions to create the trio shown in the photo, rolling each into a smooth sphere. -
Form the Bodies:
Take one sphere and gently settle it onto your work surface. Press down very slightly so the bottom flattens and the shape becomes a chubby, rounded mound rather than a perfect ball.
Cracks Appearing?
If you see hairline cracks while drying, mix a tiny bit of fresh clay with water to make a paste (slip) and fill the cracks, then smooth over.
Step 2: Sculpting Features
-
Create Eye Sockets:
While the clay is still fresh, pinch two very small bumps on top of the head to form the elevated eye mounds commonly seen on frogs. -
Smooth the Transition:
Dip your finger in a tiny bit of water and smooth the area where the eye mounds meet the head so there are no seams. -
Form the Feet:
Roll two tiny, pea-sized balls of green clay for each frog. Place them at the front base of the body, slightly apart. -
Attach the Feet:
Blend the back edge of the feet into the main body using a clay tool or your finger to ensure they stick securely. -
Refine the surface:
Do a final check for fingerprints. Because I prefer a flawless matte look, I use a slightly damp soft brush to gently sweep over the entire surface to erase any texture marks. -
Drying Time:
Let the frogs sit undisturbed for at least 24-48 hours. A slow dry helps keep that smooth, crack-free finish.
Get Flawless Cheeks
For perfectly round blush spots, use the flat end of a drill bit or the handle end of a paintbrush as a stamp instead of painting a circle.
Step 3: Painting and Finishing
-
Paint the Eyes:
Using your smallest detail brush or a ball stylus, dot pure black acrylic paint onto the front of the eye mounds. Aim for round, wide-set placements. -
Adding Highlights:
Once the black paint is tacky or dry, use a toothpick to add a microscopic dot of white to the upper corner of each eye for a spark of life. -
Draw the Smile:
Mix a tiny amount of water into your black paint to make it inky. Use your finest liner brush to paint a thin, shallow ‘U’ shape between the eyes for the mouth. -
Apply Blush:
Dip the end of a toothpick or a small dotting tool into pastel pink paint. Place a gentle dot on each cheek, just outside the corners of the smile. -
Seal the Project:
Use a matte varnish to protect your work without making it shiny, preserving that soft, marshmallow-like appearance seen in the photo.
Arranging your new froggy friends on a small dish makes them look even sweeter on display


Kawaii Blob Bears With Blush Cheeks
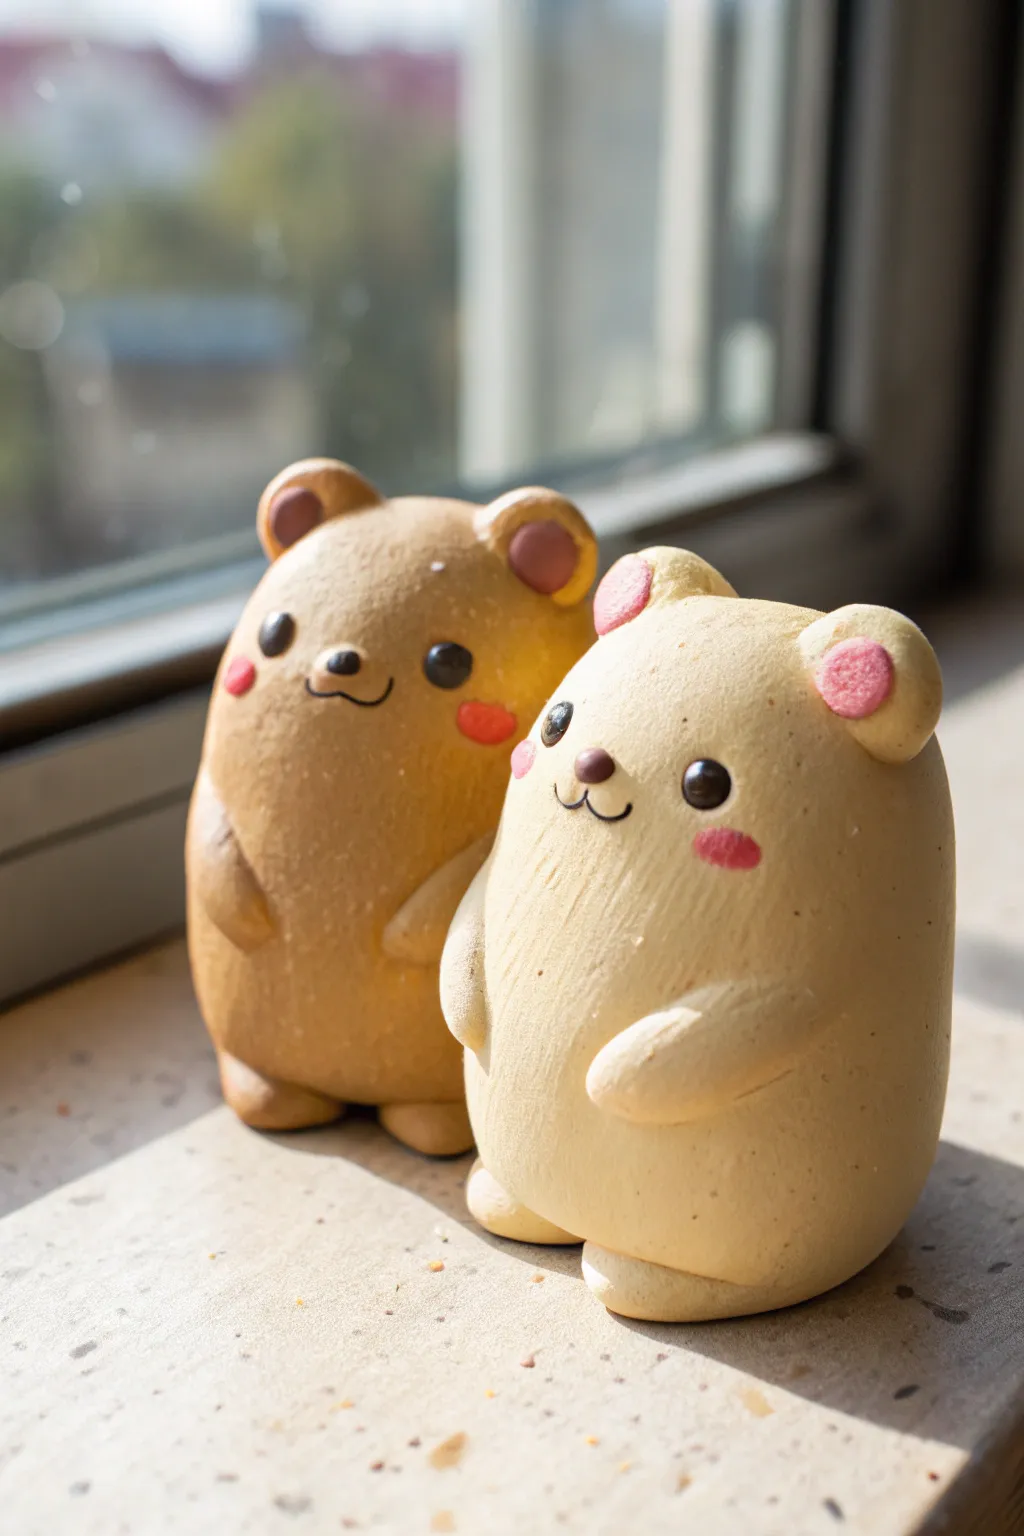
These delightfully chunky bear figurines are the perfect minimalist project for beginners, characterized by their seamless ‘blob’ shape where head meets body. With their warm, toasted biscuit colors and rosy cheeks, they make adorable desk companions that capture that soft, kawaii aesthetic perfectly.
Step-by-Step Tutorial
Materials
- Air dry clay (white or pre-colored beige/brown)
- Acrylic paints (toast brown, cream, black, pink)
- Small paintbrush (size 0 or 00)
- Dotting tool or toothpick
- Water in a small cup
- Aluminum foil (for armature core, optional)
- Smoothing tools or your fingertips
- Matte varnish (optional)
Step 1: Shaping the Base
-
Color Mixing:
Before sculpting, mix your clay colors. For the darker bear, knead a small amount of browny-orange acrylic paint into white clay until you get a warm ‘toasted biscuit’ shade. For the lighter bear, use a tiny drop of yellow ochre or cream paint to achieve a pale vanilla dough color. -
Form the Body:
Roll a smooth ball of clay about the size of a golf ball or slightly larger depending on your preference. -
Create the Blob Shape:
Gently roll the clay on your surface into a thick cylinder, slightly tapering the top so it looks like a very plump gumdrop. The bottom needs to be flat so it stands on its own. -
Smoothing:
Dip your finger in a tiny bit of water and smooth out any fingerprints or cracks on the surface. Getting this base perfectly smooth now is key, as sanding later can scratch the colored clay.
Cracks appeared?
If you see hairline cracks while drying, make a ‘slip’ by mixing a tiny bit of fresh clay with water into a paste. Paint this over the cracks and smooth it down with a damp finger.
Step 2: Adding Features
-
Tiny Ears:
Pinch off two very small, pea-sized balls of clay. Flatten them slightly against your finger to create rounded discs. -
Attach Ears:
Press the ears gently onto the top corners of the head. Use a specialized clay tool or the rounded back of a paintbrush to blend the bottom seam of the ear into the head so it looks integrated, not just stuck on. -
Inner Ear Detail:
Use a ball tool or the end of a paintbrush to make a shallow indentation in the center of each ear. -
Stubby Arms:
Roll two small teardrop shapes for the arms. They should be quite short to maintain the chibi look. -
Attach Arms:
Place the arms on the sides of the body, curving them slightly forward as if the bear is holding its belly. Blend the shoulder connection seamlessly into the body. -
Tiny Feet:
Create two small flattened ovals for the feet. Place them underneath the front of the body so they just barely peek out. -
Drying Time:
Set your bears aside to dry completely. Depending on humidity and thickness, this may take 24-48 hours. Rotate them occasionally so the bottom dries evenly.
Make it a Charm
Before drying, screw a small metal eye pin into the top center of the head. Add a dab of glue to the screw threads for security. Once dry, you can attach a keychain or lanyard.
Step 3: Painting the Kawaii Face
-
Prepare Paints:
Once fully dry and hard, prepare your palette with black, pink, and a lighter/darker accent color for the inner ears. -
Inner Ears:
Paint the indented circles of the ears. For the tan bear, use a darker brown; for the cream bear, use a soft pastel pink. -
The Eyes:
Using your smallest brush or a dotting tool, dab two solid black circles for the eyes. Place them wide apart to enhance the cute factor. -
Adding Highlights:
When the black paint is barely dry, add a minuscule white dot to the top right corner of each eye. This ‘catchlight’ brings the character to life. -
Nose and Mouth:
Between the eyes but slightly lower, paint a tiny oval nose. Draw a very thin ‘w’ shape underneath for the mouth. -
Rosy Cheeks:
Mix a soft pink paint or use pink pastel dust. Apply minimal paint to the cheek area, just under the outer corners of the eyes. I find dabbing with your pinky finger creates a softer, more natural blush. -
Protection:
Finish with a coat of matte varnish to protect your paint job and give the clay a professional finish.
Place your little bears on a sunny windowsill and enjoy their comforting presence

The Complete Guide to Pottery Troubleshooting
Uncover the most common ceramic mistakes—from cracking clay to failed glazes—and learn how to fix them fast.
Mini Chubby Dinosaur Buddies

These adorable, round dinosaurs are perfect for beginners looking to create something sweet and simple. With their soft pastel colors and chubby bellies, they make a charming addition to any desk or shelf display.
Step-by-Step
Materials
- Air dry clay (white)
- Acrylic paints (pastel purple, mint green, baby blue, pink, black)
- Clay sculpting tools (ball tool, needle tool)
- Water in a small cup
- Small paintbrush
- Toothpicks (optional for internal support)
- Matte varnish or sealant
Step 1: Shaping the Bodies
-
Mix your colors:
Start by tinting your white air dry clay. Mix a small amount of acrylic paint directly into distinct balls of clay to create your pastel purple, mint, and blue base colors. Knead until the color is completely uniform. -
Form the main shape:
Take a generous ball of colored clay and roll it into a smooth sphere. Gently roll the top portion slightly more to create a tapered pear shape, leaving the bottom nice and wide for that chubby look. -
Flatten the base:
Tap the bottom of your pear shape onto your work surface firmly. This creates a flat base so your dinosaur sits upright without wobbling. -
Add the tail:
Pinch a small amount of clay from the back bottom of your shape and gently pull it outward to form a short, pointed tail. Smooth the connection point with a wet finger so it looks seamless.
Cracks while crying?
If you see hairline cracks forming as the clay dries, mix a tiny bit of fresh clay with water to make a paste (slip) and fill in the gaps. Smooth it over with a finger.
Step 2: Adding Details
-
Create the arms:
Roll two tiny, rice-grain-sized pieces of matching colored clay. Attach them to the sides of the body, just below where the head area begins. I like to curve them slightly upward so the dino looks like it’s reaching out. -
Smooth the seams:
Use a silicone tool or a tiny bit of water on your finger to blend the upper seam of the arms into the body, leaving the bottom of the arms defined. -
Make the feet:
Roll two small balls of clay and flatten them slightly. Press these onto the bottom front of the body to act as little nubby feet. Ensure they stick out just enough to be visible. -
Prepare the spines:
Mix a contrasting color of clay (like a soft orange or light brown). Roll tiny balls of this clay, gradually decreasing in size. -
Attach the spines:
Starting from the top of the head and working down to the tail, press these tiny balls onto the back center line. Pinch the top of each ball gently to create a triangular spike shape.
Water Control is Key
Use water sparingly when smoothing joints. Too much water can make air dry clay slimy and weak. A barely damp finger is usually enough to blend seams perfectly.
Step 3: Finishing Touches
-
Let it dry completely:
Allow your figures to air dry for 24-48 hours. Turn them occasionally if possible to ensure the bottom dries evenly. -
Paint the eyes:
Using a very fine detail brush or a needle tool dipped in black paint, dot two wide-set eyes on the face. Keep them small for a kawaii effect. -
Add the smile:
With the finest brush you have, paint a tiny, curved smile between the eyes. Keep the line thin and delicate. -
Apply blush:
Dip a cotton swab or a dry brush into a tiny amount of pink paint. Dab off the excess, then gently apply rosy cheeks just below the eyes. -
Add decorative spots:
For extra texture like the purple dinosaur, use white paint to add small polka dots on the creature’s back or sides. -
Seal the project:
Once all paint is dry, apply a coat of matte varnish. This protects the clay and gives it that smooth, professional finish without being too shiny.
Group your little prehistoric pals together on a tray for the cutest Jurassic scene ever
Sweet Chick and Egg Duo
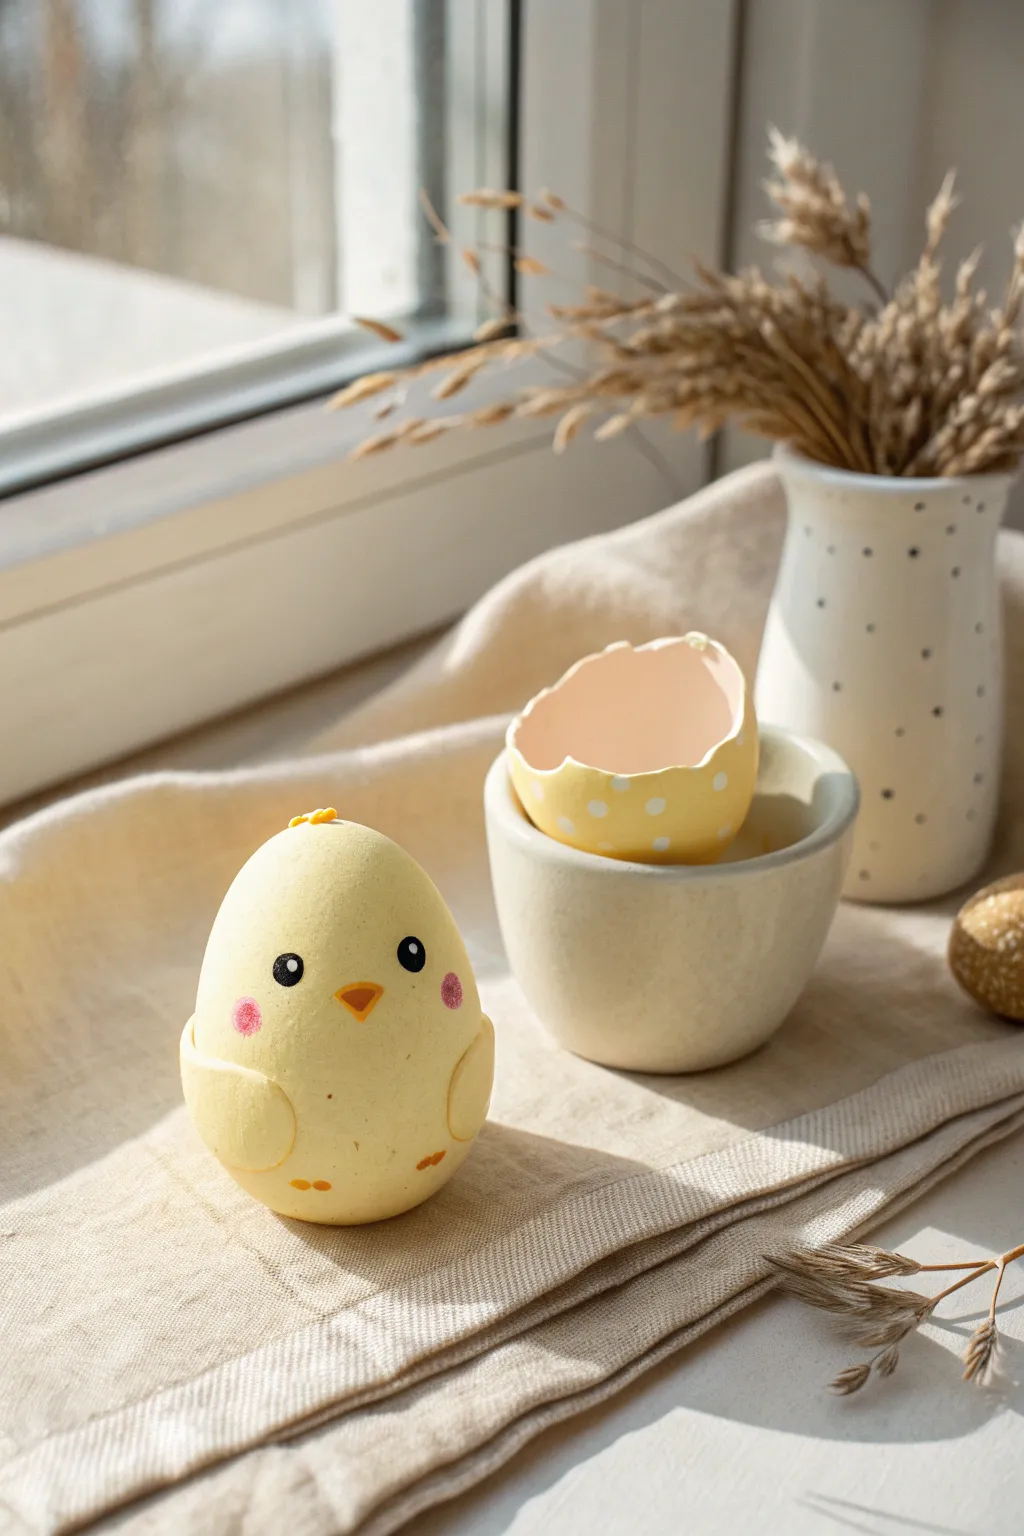
Brighten up your windowsill with this adorable yellow chick and its matching polka-dot eggshell cup. This beginner-friendly air dry clay project combines simple shapes with delicate painted details for a truly heartwarming result.
How-To Guide
Materials
- Air dry clay (white)
- Acrylic paints (pastel yellow, bright yellow, orange, black, pink, white)
- Fine grit sandpaper
- Small cup of water
- Sculpting tools (needle tool, blending tool)
- Fine detail paintbrush
- Rolling pin
- Small bowl or sphere for molding (optional)
Step 1: Sculpting the Chick
-
Form the Body:
Start with a generous handful of clay and roll it into a smooth ball. Gently taper the top half slightly to create a rounded egg-like shape for the chick’s body, ensuring the bottom is flattened so it stands upright. -
Smooth the Surface:
Dip your finger in a little water and glide it over the clay to remove any fingerprints or cracks. Getting the surface perfectly smooth now will save sanding time later. -
Create Wings:
Take two small balls of clay and flatten them into teardrop shapes. Press these firmly onto the lower sides of the body, blending the back edge into the main body while leaving the front curve slightly raised for dimension. -
Add the Feathers:
Pinch a tiny amount of clay and shape it into a small, three-pronged tuft. Attach this to the very top of the chick’s head using a dab of water (or slip) to secure it. -
Final Smoothing:
Give the chick one last inspection. Smooth out the wing seams and the tuft connection. Let the chick dry completely, which usually takes 24-48 hours depending on humidity.
Step 2: Crafting the Cracked Egg
-
Roll the Clay:
Roll out a portion of fresh clay until it includes a flat sheet about 1/4 inch thick. You want it sturdy enough to hold its shape but thin enough to look like a shell. -
Shape the Bowl:
Drape the clay sheet over a small ball or into a small bowl to get that curved, cup-like shape. If using a mold, use plastic wrap first to prevent sticking. -
Create the Cracked Edge:
Instead of cutting a straight rim, use your needle tool to cut a jagged, uneven zigzag pattern around the top edge to mimic a broken eggshell. -
Refine the Form:
Gently smooth the cut edges with a damp finger so they aren’t sharp. I like to let this firm up slightly in the mold before removing it to finish drying completely.
Smooth Operator
Use a baby wipe to smooth the clay before it dries. It works better than water alone and doesn’t make the clay too mushy or weak.
Step 3: Painting and Details
-
Prime the Surface:
Once fully dry, lightly sand any rough spots. Paint the entire chick and the *inside* of the eggshell with a soft pastel yellow acrylic paint. You may need two coats for opaque coverage. -
Paint the Shell Exterior:
Paint the outside of the eggshell in a slightly darker or matching yellow. Once dry, use the handle end of a paintbrush dipped in white paint to stamp small polka dots all over the exterior. -
Face Fundamentals:
Using a fine detail brush and black paint, carefully add two circular eyes on the chick roughly halfway down the body. -
Sparkle in the Eyes:
To bring the character to life, add a tiny white dot in the upper corner of each black eye pupil. -
The Beak:
Paint a small, inverted orange triangle between the eyes for the beak. Keep the edges sharp for a neat look. -
Rosy Cheeks:
Dilute a tiny bit of pink paint with water or use a dry-brush technique to gently dab circular pink blush marks just below the eyes. -
Feet Details:
Instead of sculpting feet, simply paint two small orange semi-circles or ovals at the very bottom front of the chick. -
Sealing:
Protect your hard work with a coat of matte varnish. This keeps the finish soft and prevents the paint from chipping over time.
Surprise Inside
Before the eggshell dries, hide a small magnet in the bottom. Do the same for the chick. Now the chick can ‘snap’ into the egg securely!
Place your little yellow friend next to its shell for a display that radiates springtime joy


What Really Happens Inside the Kiln
Learn how time and temperature work together inside the kiln to transform clay into durable ceramic.
Smiling Cloud and Star Minis
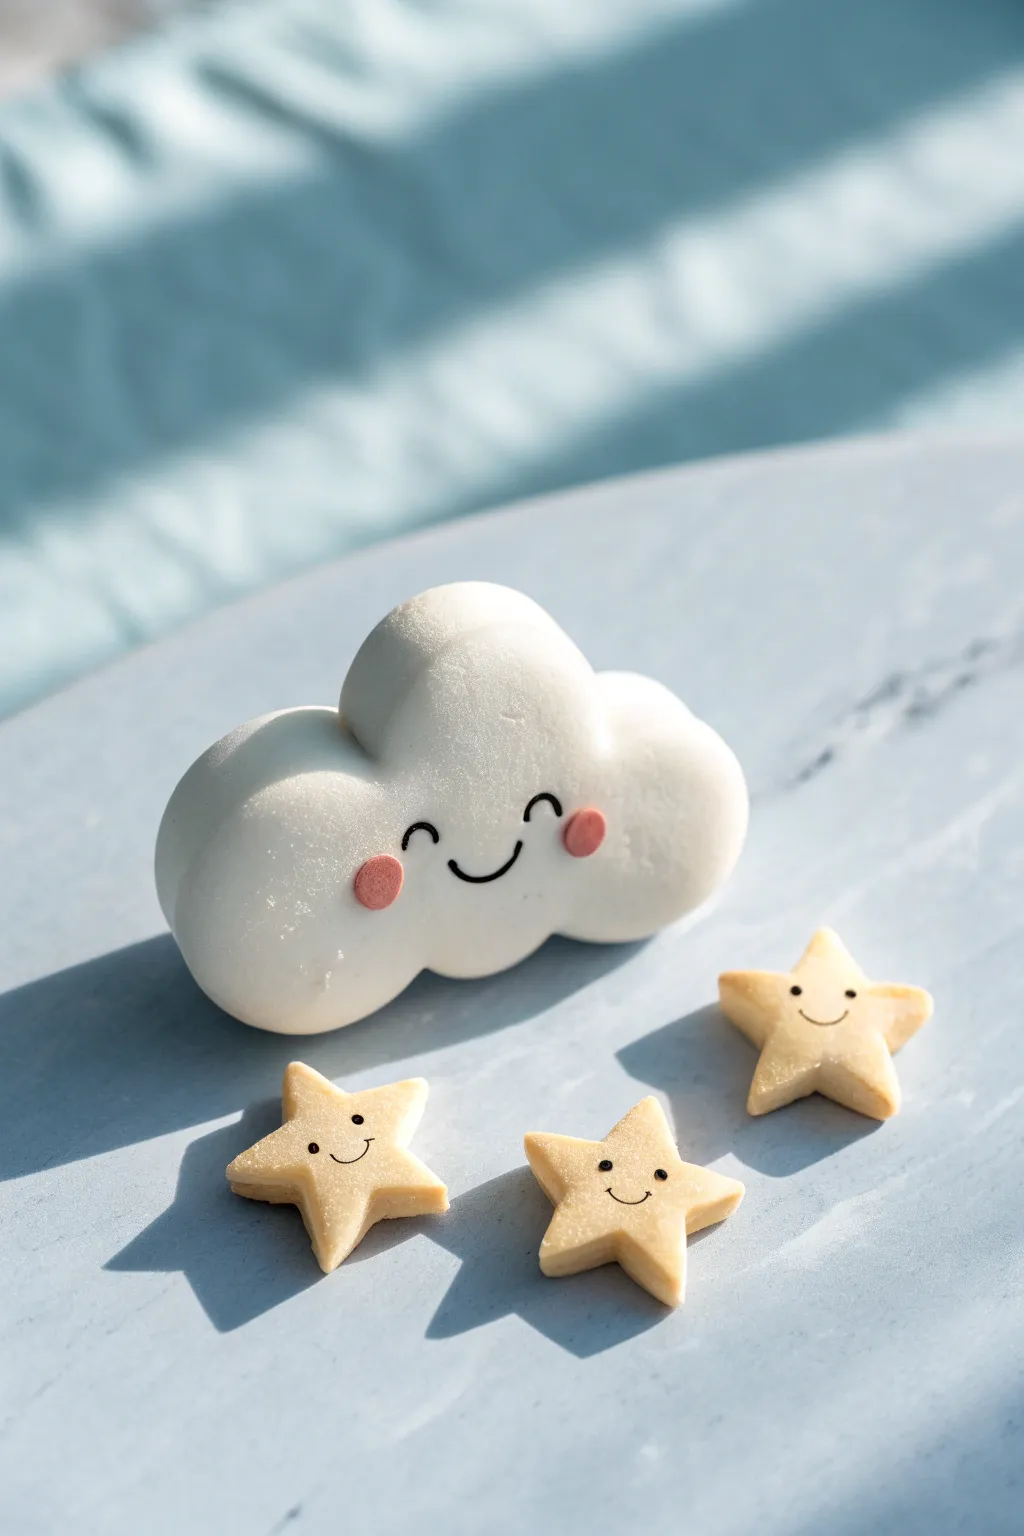
Capture the essence of a happy sky with this adorable set featuring a pillowy white cloud and three golden stars. This beginner-friendly air dry clay project focuses on smooth, puffed shapes and minimalist kawaii expressions for a polished finish.
Step-by-Step Guide
Materials
- White smooth air dry clay
- Yellow ochre acrylic paint (to tint clay)
- Pink acrylic paint or soft pastel
- Black acrylic paint
- Rolling pin
- Exacto knife or clay blade
- Very fine paintbrush (000 size) or fine-tip paint marker
- Small dotting tool or toothpick
- Water and smoothing tool
- Matte varnish (optional)
Step 1: Creating the Fluffy Cloud
-
Condition the clay:
Start by taking a generous amount of plain white air dry clay. Knead it thoroughly in your hands until it is warm, pliable, and free of any internal air bubbles. -
Form the base shape:
Roll the clay into a smooth, thick oval. You want this to be quite chubby—about 1 inch thick—so the cloud can stand upright on its own later. -
Define the cloud bumps:
Use your fingers to gently pinch and mold the top edge of the oval into three distinct rounded humps. The middle hump should be the tallest, with slightly smaller ones flanking it. -
Smooth the surface:
Dip your finger in a tiny bit of water and rub it over the clay to erase any fingerprints or cracks. The surface should be impeccably smooth like a marshmallow. -
Add blush cheeks:
Take two tiny pinch-sized balls of clay and tint them with a speck of pink paint. Flatten them into small discs and press them gently onto the cloud’s ‘face’ just below where the eyes will go. -
Initial Drying:
Set the cloud aside on a flat surface to firm up while you work on the stars. This prevents you from squishing it during the detailing phase later.
Cracks Appearing?
If small drying cracks form, make a ‘slip’ by mixing a little clay with water into a paste. Rub this paste into the cracks, smooth it over with a wet finger, and let it dry again.
Step 2: Shaping the Star Minis
-
Tint the clay:
Take a smaller portion of white clay and mix in a drop of yellow ochre acrylic paint. Knead until the color is a uniform, soft cookie-dough yellow. -
Roll out the slab:
Roll the yellow clay out on your work surface until it is approximately 1/4 inch thick. You want these to be substantial, not paper-thin. -
Cut the shapes:
Use a small star-shaped cookie cutter if you have one. If not, use an Exacto knife to cut out three five-pointed star shapes freehand for a more organic look. -
Soften the edges:
Freshly cut clay edges can be sharp. Gently tap the edges of the stars with your finger to round them off, giving them a soft, baked-good appearance. -
Full drying time:
Allow both the cloud and the stars to dry completely. Depending on humidity, this usually takes 24 to 48 hours. Turn them over halfway through to ensure even drying.
Make them Magnets
Before the clay dries, press a small, strong neodymium magnet into the back of the stars and the cloud. Secure with a dab of superglue after drying for cute fridge decor.
Step 3: Kawaii Details
-
Paint the cloud’s eyes:
Once the cloud is bone dry, use your finest brush or a black paint pen to draw two small, curved semicircles for closed, happy eyes. Place them right above the pink cheeks. -
Paint the cloud’s mouth:
Draw a small ‘U’ shape between the eyes for a smiling mouth. Keep the line weight thin and consistent. -
Detail the stars:
For the stars, painting on the raw clay can be tricky because they are small. I find it helpful to brace my hand against the table for stability. Draw tiny black dots for eyes and a small curved smile on each star. -
Seal the work:
If desired, apply a thin coat of matte varnish to protect the paint without making the clay look like plastic.
Now you have a charming sky scene to brighten up your desk or bookshelf
Cute Little Ghost Desk Friends
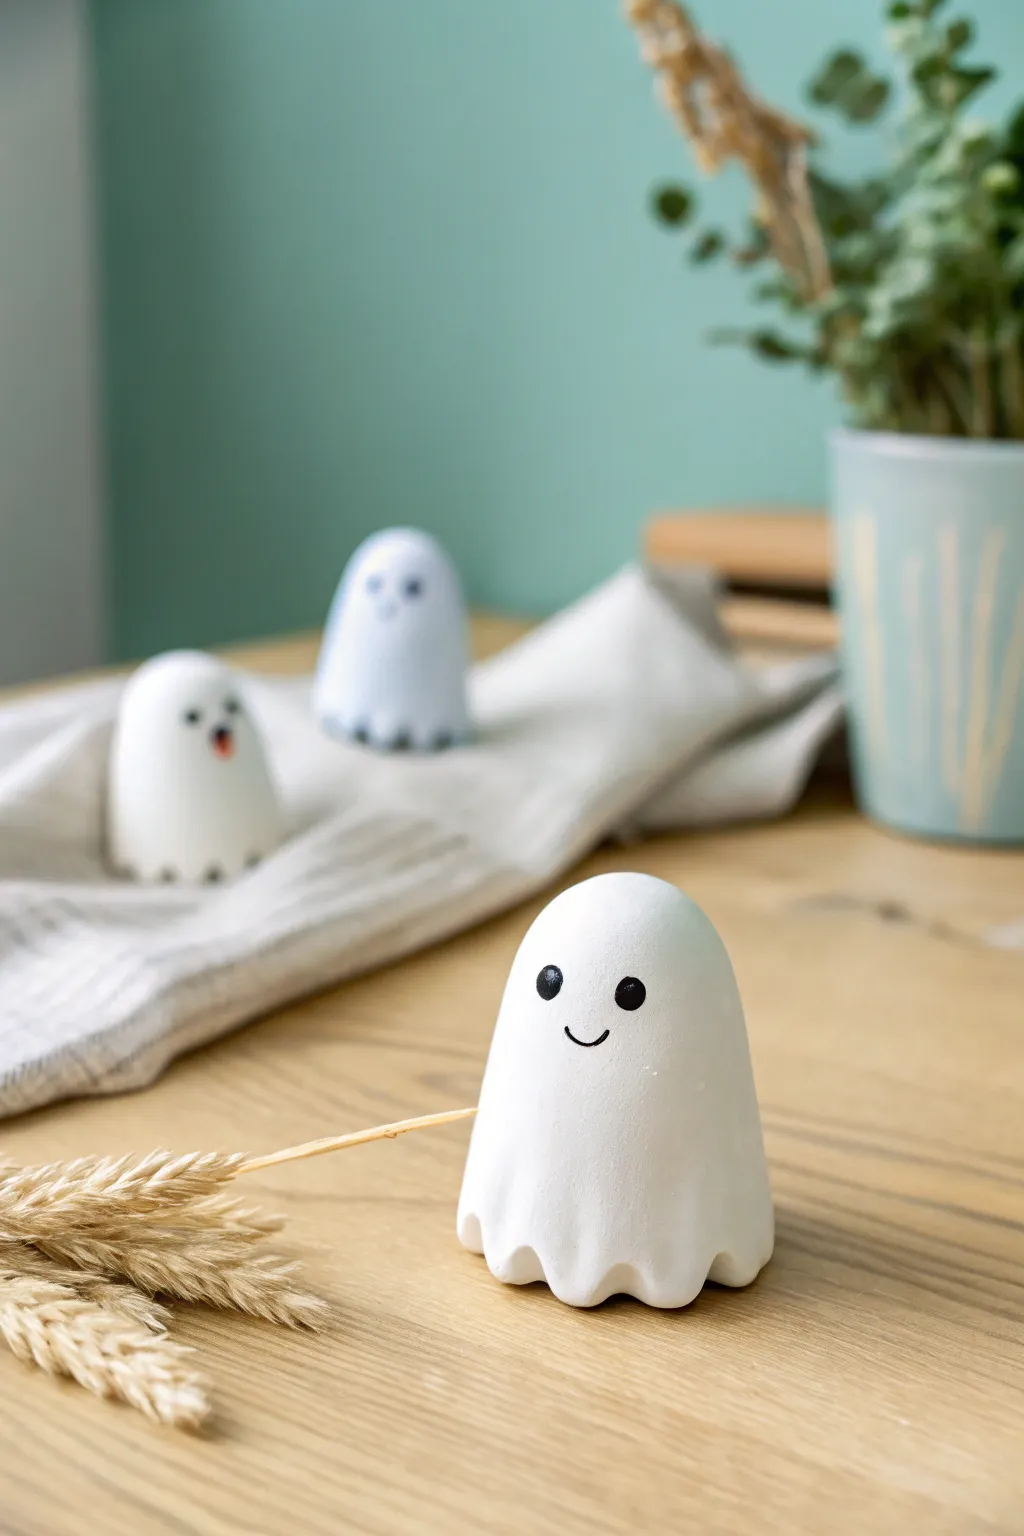
Create a hauntingly adorable trio of desk companions with these smooth, minimalist ghost figures. Their charmingly simple design features a classic draped sheet shape and tiny, friendly faces that are perfect for beginners to sculpt.
How-To Guide
Materials
- White air-dry clay
- Rolling pin or smooth glass jar
- Small round cutter or glass (approx. 2-3 inches diameter)
- Modeling tool with a rounded tip (or the end of a paintbrush)
- Black acrylic paint
- Fine detail paintbrush (size 0 or 00)
- Small bowl of water
- Parchment paper or silicone mat
- Fine-grit sandpaper (optional)
Step 1: Shaping the Ghost Body
-
Prepare the Clay:
Begin by taking a chunk of white air-dry clay roughly the size of a golf ball. Knead it in your hands until it is warm, pliable, and free of cracks. -
Roll a Sphere:
Roll the conditioned clay between your palms to create a smooth, seamless ball. This foundation will help ensure your ghost stands evenly. -
Form the Dome:
Gently press the ball onto your work surface to flatten the bottom. Using your palms and fingers, elongate the top upwards to form a smooth, rounded dome shape, resembling a classic gumdrop. -
Refine the Silhouette:
Smooth out the sides with a little water on your fingertip to remove any fingerprints. You want a clean, minimalist curve that tapers slightly toward the top of the head. -
Create the Base Waves:
To mimic a flowing sheet, use your thumb and forefinger to pinch the very bottom edge of the clay slightly outward. -
Sculpt the Folds:
Use the handle of a paintbrush or a rounded modeling tool to press gently into the bottom edge at regular intervals. This creates the undulating ‘scalloped’ look of the fabric folds where the ghost meets the table. -
Soften the Edges:
Go back over the bottom waves with a wet finger to soften any sharp indentations. The clay should look like soft, draped fabric rather than rigid plastic.
Water Smoothing Secret
Keep a small dish of water nearby. Frequently dipping your finger and smoothing the clay while wet is the key to that flawless, seamless ghost skin.
Step 2: Drying and Refining
-
Initial Drying:
Set your ghost aside on parchment paper to dry. I find it helpful to rotate the figure every few hours to ensure airflow reaches all sides evenly. -
Check for Cracks:
Monitor the drying process. If tiny surface cracks appear as the moisture leaves the clay, smooth a very small amount of fresh, wet clay or slip over the area immediately. -
Full Cure:
Allow the clay to dry completely for 24-48 hours. The ghost will turn from a cool grey-white to a bright, chalky white and feel lightweight when fully cured. -
Sand for Smoothness:
Once bone dry, take fine-grit sandpaper and very gently buff the surface. Focus on the top of the head and sides to get that perfectly matte, porcelain-like finish visible in the photo. -
Dust Off:
Wipe the figure down with a dry, soft cloth or a large fluffy brush to remove all sanding dust before you start painting.
Make It Glow
Knead in some glow-in-the-dark pigment powder into your white clay before sculpting. Your desk friends will softly illuminate your room at night!
Step 3: Painting the Face
-
Plan the Expression:
Visualize where the face will go. The eyes should be placed slightly higher than the center point to give it that cute, ‘chibi’ proportion. -
Paint the Eyes:
Dip the handle end of a paintbrush into black acrylic paint. Press it gently onto the face to create two perfectly round dots for eyes. -
Add the Smile:
Switch to your finest detail brush. With a steady hand, paint a tiny, thin ‘U’ shape between the eyes for a simple smile. Keep the line weight very delicate. -
Create Variation:
If making multiple ghosts, vary the expressions slightly. Try a small ‘O’ shape for a surprised mouth or wide-set eyes for a goofier look. -
Final Seal:
Once the paint is completely dry, you can apply a matte varnish to protect your work, although leaving the natural clay texture often looks best for this specific aesthetic.
Enjoy your new supernatural squad as they haunt your workspace with nothing but good vibes

TRACK YOUR CERAMIC JOURNEY
Capture glaze tests, firing details, and creative progress—all in one simple printable. Make your projects easier to repeat and improve.
Kawaii Fruit Characters With Tiny Faces
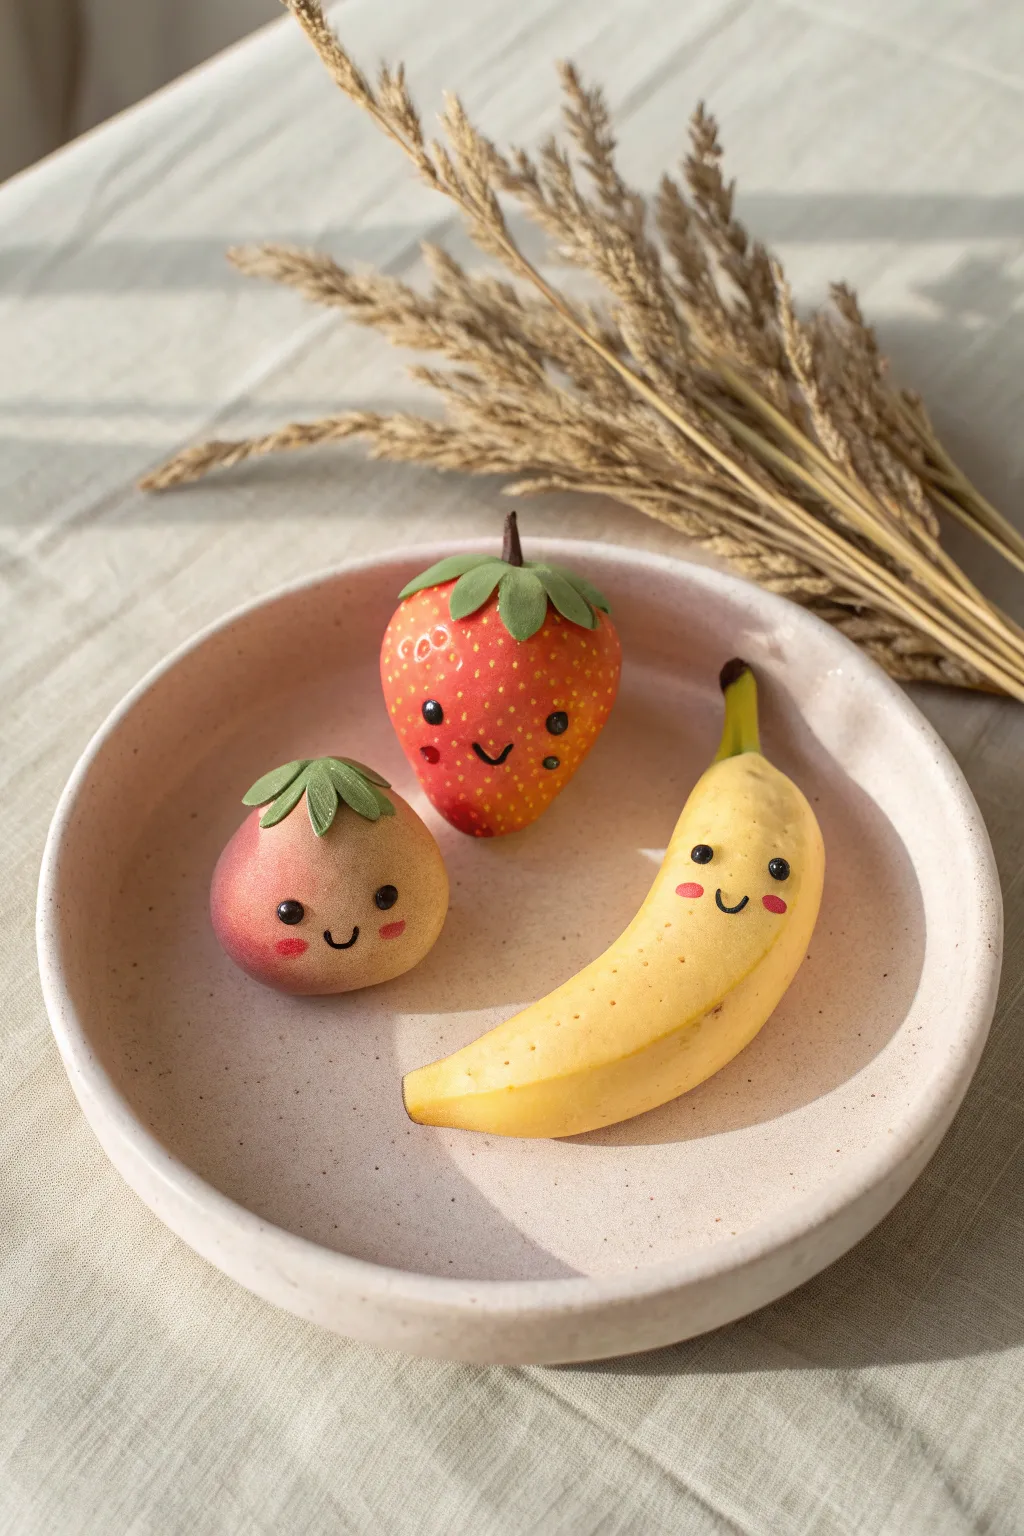
Create your own miniature fruit bowl with these adorable strawberry, peach, and banana characters. Using air dry clay and careful gradient painting, you’ll bring these sweet, smiling friends to life with charming realism.
Step-by-Step
Materials
- White air dry clay
- Acrylic paints (primary yellow, red, titanium white, sap green, brown)
- Small fine-point paintbrushes
- Makeup sponge or soft pastel foam applicator
- Sculpting tools (needle tool, small ball stylus)
- Water in a small cup
- Matte mod podge or varnish
- Brown fine-liner pen or black acrylic paint for faces
Step 1: Sculpting the Shapes
-
Shape the Bases:
Start by conditioning your white clay until it is smooth and pliable. Divide it into three pieces: one medium ball for the strawberry, a slightly smaller ball for the peach, and a long cylinder for the banana. -
Forming the Strawberry:
Take the medium ball and gently roll it into a rounded cone shape, flattening the top slightly where the leaves will sit. Smooth out any fingerprints with a drop of water. -
Forming the Peach:
Roll the smaller ball into a perfect sphere. Gently pinch the top to create a slight point, creating a teardrop shape that retains a chubby bottom. -
Forming the Banana:
Curve your cylinder slightly to mimic a banana’s arch. Taper one end to a point and shape the other end into a small, squared-off stem nub. -
Adding Texture:
Using a needle tool, gently poke small, evenly spaced indentations all over the strawberry’s surface for seeds. For the banana, invite realism by lightly scoring faint vertical lines down the sides.
Step 2: Adding the Greens
-
Creating Leaves:
Roll out a tiny thin sheet of clay for the leaves. Based on the photo, cut out small star-shapes or individual teardrop shapes with your needle tool. -
Attaching Strawberry Leaves:
Apply a tiny dab of water to the top of the strawberry. Place your clay leaves around the top center, letting the tips drape naturally over the fruit’s shoulder. -
Attaching Peach Leaves:
Repeat the process for the peach, but use slightly smaller, more rounded leaves clustered tightly at the peaked top. -
Adding Stems:
Roll a very tiny snake of clay for the stems. Attach a short, brown-colored stem to the center of the strawberry leaves, blending the connection point with a tool. -
Drying Time:
Allow all three figures to dry completely for typically 24-48 hours. I find that turning them occasionally helps them dry evenly without flat spots.
Sponge Tactics
When doing gradient painting on the strawberry and peach, wet your makeup sponge slightly first. This helps blend the acrylics smoothly without harsh lines.
Step 3: Painting & Details
-
Base Coating:
Once dry, paint the banana fully yellow. For the strawberry and peach, start with a white base coat to engage the colors, then apply a soft cream or pale yellow color. -
Gradient Shading:
This step makes them magical. Use a makeup sponge to dab red paint onto the strawberry, concentrating color at the bottom and fading to orange/yellow near the leaves. -
Blushing the Peach:
Similarly, sponge a soft dusty pink or reddish-orange onto just one side or the bottom of the peach for that ripe, fuzzy look. -
Painting Leaves & Stems:
Paint the leaves a muted olive green. Paint the stem of the strawberry brown, and add a touch of green/brown to the tips of the banana stem. -
Adding Seeds:
dip a needle tool or fine brush into yellow-orange paint and fill in the little seed indentations on the strawberry. -
Banana speckles:
Add tiny brown dots randomly on the banana skin to simulate ripeness.
Texture Play
Before painting the peach, gently tap the wet clay surface with a stiff toothbrush. This creates a subtle ‘fuzzy’ texture that looks amazing when painted.
Step 4: The Kawaii Faces
-
Mapping the Face:
Visualize where the face sits—keep it low on the shape for maximum cuteness. You can mark lightly with a pencil first. -
Painting Eyes:
Use a ball stylus dipped in black paint to perfect round dots for eyes. Space them somewhat wide apart. -
Adding Smiles:
With your finest brush or a brown fine-liner pen, draw a tiny ‘u’ shape between the eyes for a smile. -
Rosy Cheeks:
Dip a toothpick or small tool in pink paint and add tiny oval blushes under the eyes. -
Sealing:
Finish by coating your fruit friends with a matte varnish to protect the paint and give them a smooth, ceramic-like finish.
Arranging these little characters on a shallow dish creates an instant centerpiece of happiness
Pastel Donut and Cookie Sweet Treat Charms
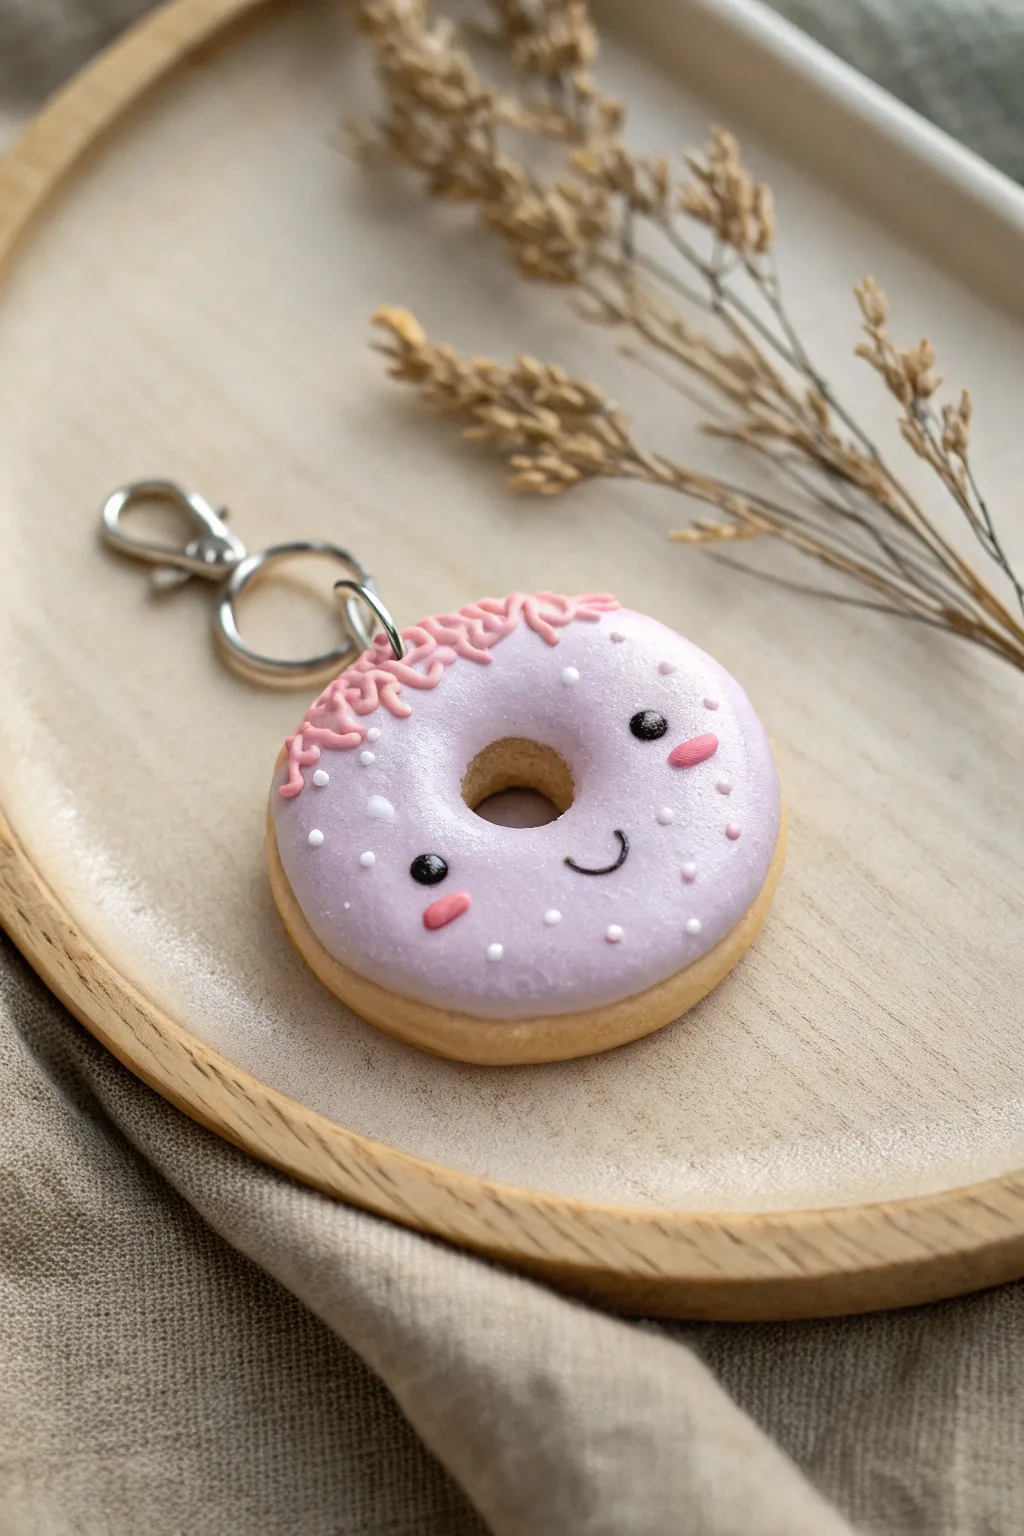
This adorable kawaii donut charm features a soft lavender glaze and a cheerful little face that instantly brightens your day. With its realistic dough texture and delicate icing details, it makes for a perfect beginner-friendly air dry clay project.
Detailed Instructions
Materials
- Air dry clay (white)
- Acrylic paints (yellow ochre, brown, lavender, pink, white, black)
- Texture tool (old toothbrush or crumpled aluminum foil)
- Clay sculpting tools (dotting tool, needle tool)
- Small paintbrush
- Rolling pin
- Small circle cutter (approx. 1.5 inch)
- Tiny circle cutter (or straw) for the donut hole
- Gloss varnish or UV resin
- Eye screw pin
- Jump rings and keychain clasp
- Strong craft glue (optional)
Step 1: Shaping the Dough Base
-
Mix Dough Color:
Start by mixing a small amount of yellow ochre and a tiny speck of brown acrylic paint into a ball of white air dry clay. Knead it thoroughly until you achieve a uniform, pale biscuit or cookie dough color. -
Form the Shape:
Roll the clay into a smooth ball, then gently flatten it into a thick disc. You want it to look plump, so keep the edges rounded rather than sharp. -
Cut the Hole:
Use a tiny circle cutter or a drinking straw to punch a hole directly in the center of your disc. Soften the sharp edges of the inner hole with your finger or a smoothing tool so it looks baked. -
Texturing:
Gently tap an old toothbrush or a ball of crumpled foil over the entire surface of the donut base. This creates a realistic, airy baked texture. -
Shading for Realism:
Using a dry brush technique, lightly dust the edges of the donut with pastel chalk or a tiny bit of brown paint to mimic a golden-brown baked look. Let this base dry slightly before moving on.
Step 2: Adding the Glaze and Details
-
Create Lavender Icing:
Mix a separate ball of white clay with a drop of purple or lavender paint. Roll this out thinly with your rolling pin. -
Cut the Icing Shape:
Use the same large cutter you used for the base to cut a circle from the lavender clay. Then, use a needle tool to trim the edges into a wavy, organic shape so it looks like poured glaze. -
Attach the Icing:
Apply a tiny bit of water or glue to the back of the lavender piece and press it onto your dough base. Pierce the center hole again to match the base below. -
Smooth the Edges:
Gently press the wavy edges of the lavender clay down so they hug the curve of the donut, ensuring there are no gaps between the icing and the dough. -
Insert Hardware:
Dip the end of an eye screw pin into a little glue and screw it carefully into the top of the donut. Do this while the clay is still wet to ensure a secure hold once dry.
Clay Paste Icing
To get realistic drizzled icing, mix your clay with water until it’s the consistency of heavy cream. You can then pipe it on for real 3D texture.
Step 3: Decorating the Face
-
Paint the Eyes:
Using a small dotting tool dipped in black acrylic paint, place two dots for the eyes. Space them wide apart for that classic kawaii look. -
Draw the Mouth:
Use a very fine liner brush or a fine-tip black marker to draw a small, U-shaped smile right between the eyes. -
Add Cheeks:
Dip a toothpick or small dotting tool into pink paint and add two small horizontal ovals just below the eyes for blushing cheeks. -
Highlight the Eyes:
Once the black paint is dry, add a tiny speck of white paint to the upper corner of each eye to bring the character to life.
Cracking Issues?
If you see cracks forming as the clay dries, smooth a tiny bit of water over the crack with your finger immediately. Adding a wet wipe over drying clay slows the process.
Step 4: Final Touches
-
Pink Drizzle Texture:
Mix a small amount of white clay with pink paint and water to create a thick paste (slip). Ideally, put this in a tiny piping bag, but you can also roll tiny noodle shapes. Apply this textured ‘drizzle’ to the top left side of the donut. -
Sprinkle Details:
Using a needle tool or toothpick dipped in white paint, add tiny constellation-like dots scattered across the lavender icing for a magical touch. -
Drying Time:
Allow the entire piece to dry completely. This usually takes 24-48 hours depending on the humidity and thickness of your clay. -
Varnishing:
Protect your charm with a coat of gloss varnish or UV resin. I prefer UV resin for that ultra-shiny, wet-glaze look, but water-based varnish works well too. -
Assembly:
Once the varnish is cured or dry, attach your jump rings and keychain clasp to the eye screw.
Now you have a sweet, squishy-looking companion ready to hang on your bag or keys
Dumpling Friends (Bao, Gyoza, and Little Buns)
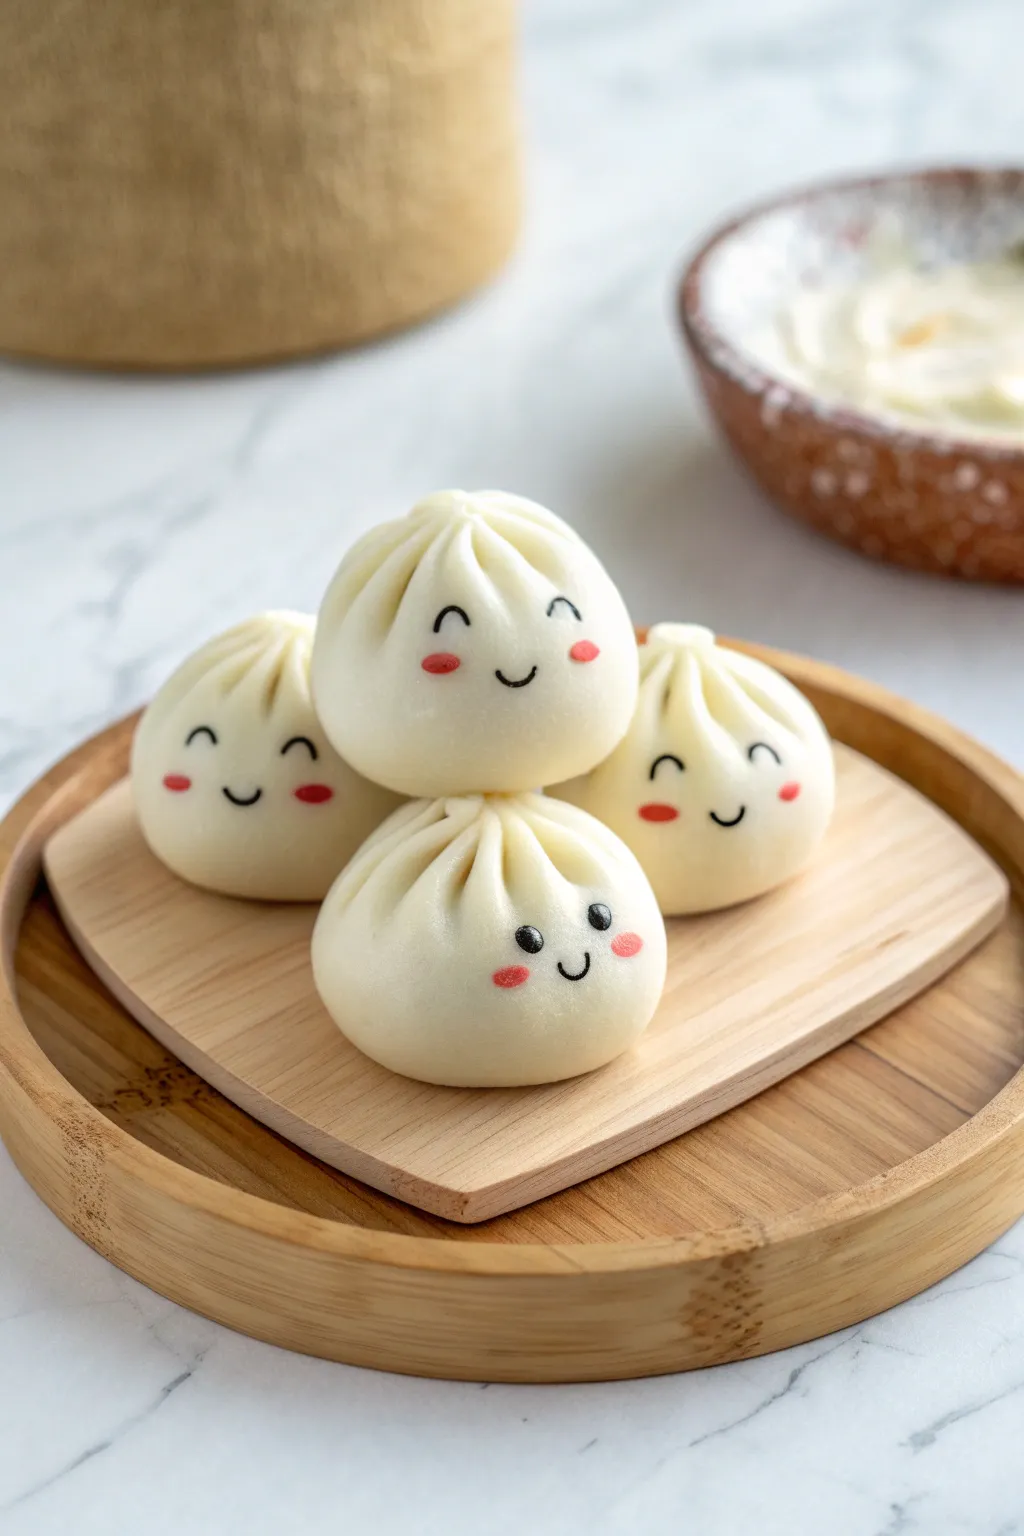
These adorable bao dumpling characters are guaranteed to bring a smile to your face with their rosy cheeks and cheerful expressions. Sculpted from smooth white air-dry clay, this project captures the soft, fluffy texture of real steamed buns in a permanent, kawaii form.
Step-by-Step Tutorial
Materials
- White lightweight air-dry clay (e.g., Hearty or Claycraft)
- Black acrylic paint or fine-point marker
- Pink acrylic paint or soft pastel
- Small paintbrush or cotton swab
- Modeling tool with a tapered edge (or a plastic knife)
- Small ball tool
- Matte varnish (optional)
Step 1: Shaping the Buns
-
Prepare the Clay:
Start by conditioning your white lightweight clay until it’s smooth and pliable. You want a consistently soft texture to mimic the look of dough, so knead it well to remove any cracks. -
Form the Base Spheres:
Divide your clay into four equal portions. Roll each portion between your palms to create a perfect sphere. Gently press the bottom against your work surface to flatten it slightly so the buns sit upright without rolling away. -
Pinch the Top:
On the very top center of one sphere, gently pinch a tiny bit of clay upward. This creates the central point where all the pleats will meet. -
Create the Pleats:
Using the tapered modeling tool or the back of a plastic knife, press indentations into the clay starting from the top center point and curving down the side of the bun. I find it easiest to make one mark, then rotate the bun slightly to make the next. -
Refine the folds:
Continue making these curved indentations all around the top half of the sphere. You want to create the illusion of dough being gathered and twisted. Soften any harsh edges with your finger to keep that fluffy steamed look. -
Repeat for All Buns:
Repeat the pleating process for the remaining three spheres. Try to vary the twist slightly on each one so they look like handmade dumplings rather than factory molds. -
Dry Completely:
Set your four buns aside in a safe, dry place. Lightweight clay can take 24 to 48 hours to dry fully, depending on humidity. They must be completely hard before you paint the details.
Cracking Clay?
If the clay creates small fissures while pleating, dip your finger in water and gently smooth the surface. Lightweight clay needs moisture to stay elastic.
Step 2: Adding Kawaii Expressions
-
Draft the Faces:
Once dry, you can lightly sketch the face placement with a pencil if you’re nervous about painting directly. Position the faces low on the bun for maximum cuteness. -
Paint the Eyes:
Dip a fine-point brush into black acrylic paint or use a black paint marker. Draw two small curved arches for ‘smiling’ eyes on three of the buns. For the bottom bun, paint two small solid circles for wide-open eyes. -
Add the Mouths:
Paint a tiny ‘U’ shape between the eyes for the mouth. Keep the lines thin and delicate. On the bottom bun with the open eyes, try a slightly wider smile to give it a unique personality. -
Create Rosy Cheeks:
For the blush, you have two options. You can use a tiny amount of pink paint on a cotton swab and dab it gently. Alternatively, scrape a bit of pink soft pastel into powder and brush it on dry for a diffuse, airbrushed look. -
Add Highlights:
If you painted solid black eyes on the bottom bun, use a toothpick to add a tiny dot of white paint to each eye. This ‘catchlight’ brings the character to life. -
Seal the Project (Optional):
If you want to protect your bao family, apply a coat of matte varnish. Avoid glossy finishes, as real steamed buns have a soft, matte texture.
Make it a Magnet
Before the clay dries, press a strong neodymium magnet into the flat bottom of each bun. Glue it in place after drying for adorable fridge decor.
Arranging these little dumpling friends together creates a display that looks good enough to eat
Kawaii Mushroom Minis With Happy Faces
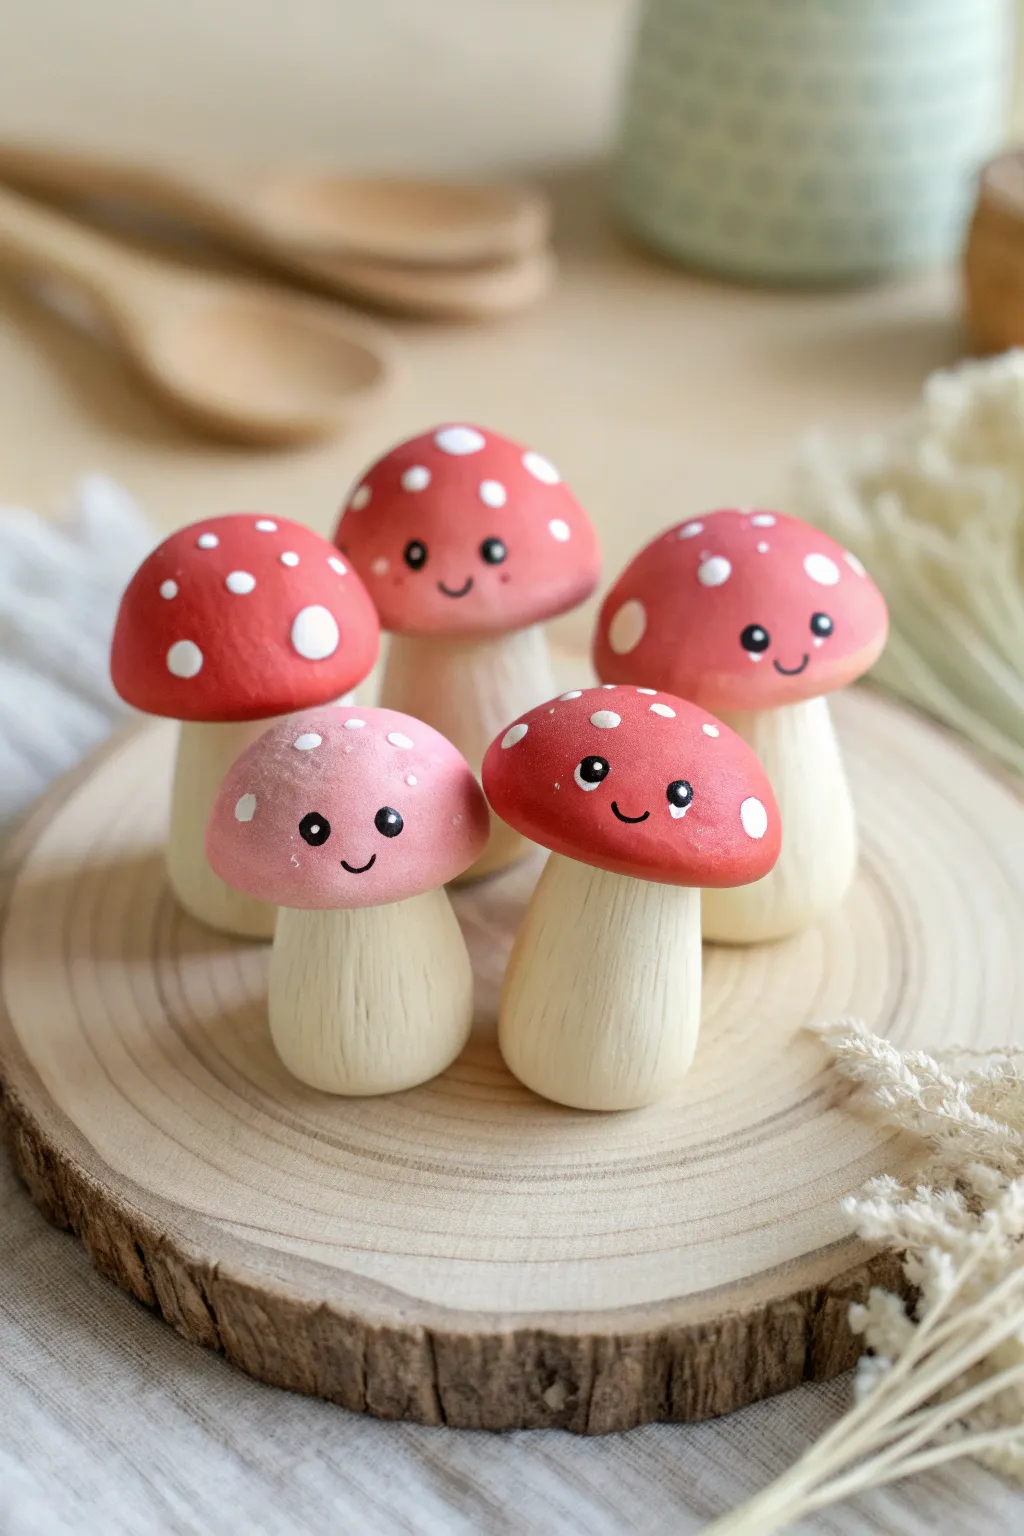
These adorable mushroom minis bring a touch of the forest into your home with their cheerful smiles and speckled caps. Perfect for beginners, this project combines simple shaping techniques with cute painted details for a truly heartwarming result.
How-To Guide
Materials
- White air dry clay
- Acrylic paints (red, pink, white, beige, black)
- Small styrofoam balls or aluminum foil (for armatures, optional)
- Clay sculpting tools (needle tool or toothpick)
- Fine grit sandpaper
- Fine liner paintbrush
- Ball tool or dotting tool
- Matte varnish or sealant
- Water cup
Step 1: Shaping the Stems
-
Prepare the Clay:
Start by conditioning your air dry clay. Knead a workable chunk in your hands until it feels warm, pliable, and free of cracks. -
Form the Base Shape:
Roll the clay into a thick cylinder. Gently taper the top slightly so it resembles a classic mushroom stalk—wider at the bottom for stability. -
Add Texture:
Before the clay dries, take a needle tool or the sharp end of a toothpick. Lightly drag it vertically down the stem to create wood-like grain lines all around the circumference. -
Smooth the Bottom:
Press the base of the stem gently onto your work surface to ensure it stands flat. Repeat this process for as many mushrooms as you plan to make.
Uneven Texture?
If your stems look too rough after drying, lightly sand them with fine-grit sandpaper before painting. This smooths out burrs while keeping that charming vertical texture intact.
Step 2: Creating the Caps
-
Roll Spheres:
Take a separate piece of clay and roll it into a smooth ball. This should be slightly wider than your stem. -
Shape the Dome:
Press the ball gently against your palm to flatten the bottom while keeping the top rounded. Smooth out the edges with a bit of water on your finger if fine cracks appear. -
Hollow the Connection:
Use a large ball tool or your thumb to create a slight indentation in the center of the flat underside. This helps the cap sit securely on the stem. -
Assemble Parts:
Score the top of the stem and the underside of the cap (scratch hatching lines). Apply a tiny dab of water or clay slip, then press the two pieces together firmly. -
Let it Dry:
Allow your assembled mushrooms to dry completely. This usually takes 24-48 hours depending on thickness. I like to rotate them occasionally to ensure even airflow.
Step 3: Painting & Details
-
Base Coat the Stems:
Paint the stems with a creamy beige or off-white acrylic paint. The textured lines you carved earlier will add lovely depth. -
Paint the Caps:
Choose your cap colors—classic bright red or softer pastel pink. Apply two thin coats for opaque coverage, letting the first layer dry before adding the second. -
Add Polka Dots:
Dip a dotting tool or the back end of a paintbrush into white paint. Stamp random dots of varying sizes all over the colored caps. -
Draw the Faces:
Using your finest liner brush and black paint, carefully paint two small circles for eyes towards the bottom of the cap. Add a tiny ‘u’ shape for the smile between them. -
Eye Highlights:
Once the black eyes are dry, use a sewing pin or tiny dotting tool to add a speck of white inside each eye. This ‘catchlight’ brings the character to life. -
Rosy Cheeks (Optional):
Mix a very watered-down pink and dab tiny cheeks next to the smile for extra cuteness. -
Seal the Work:
Protect your paint job with a coat of matte varnish. This removes the tacky feeling of dried acrylic and ensures your mushrooms last.
Make it a Scene
Glue your finished mushrooms onto a small wood slice or a preserved moss base. You can even add tiny clay pebbles or a miniature ladybug to create a complete forest floor diorama.
Place your happy little mushroom family on a shelf or desk to brighten your day
Mushroom House Trinket Dish With a Kawaii Twist
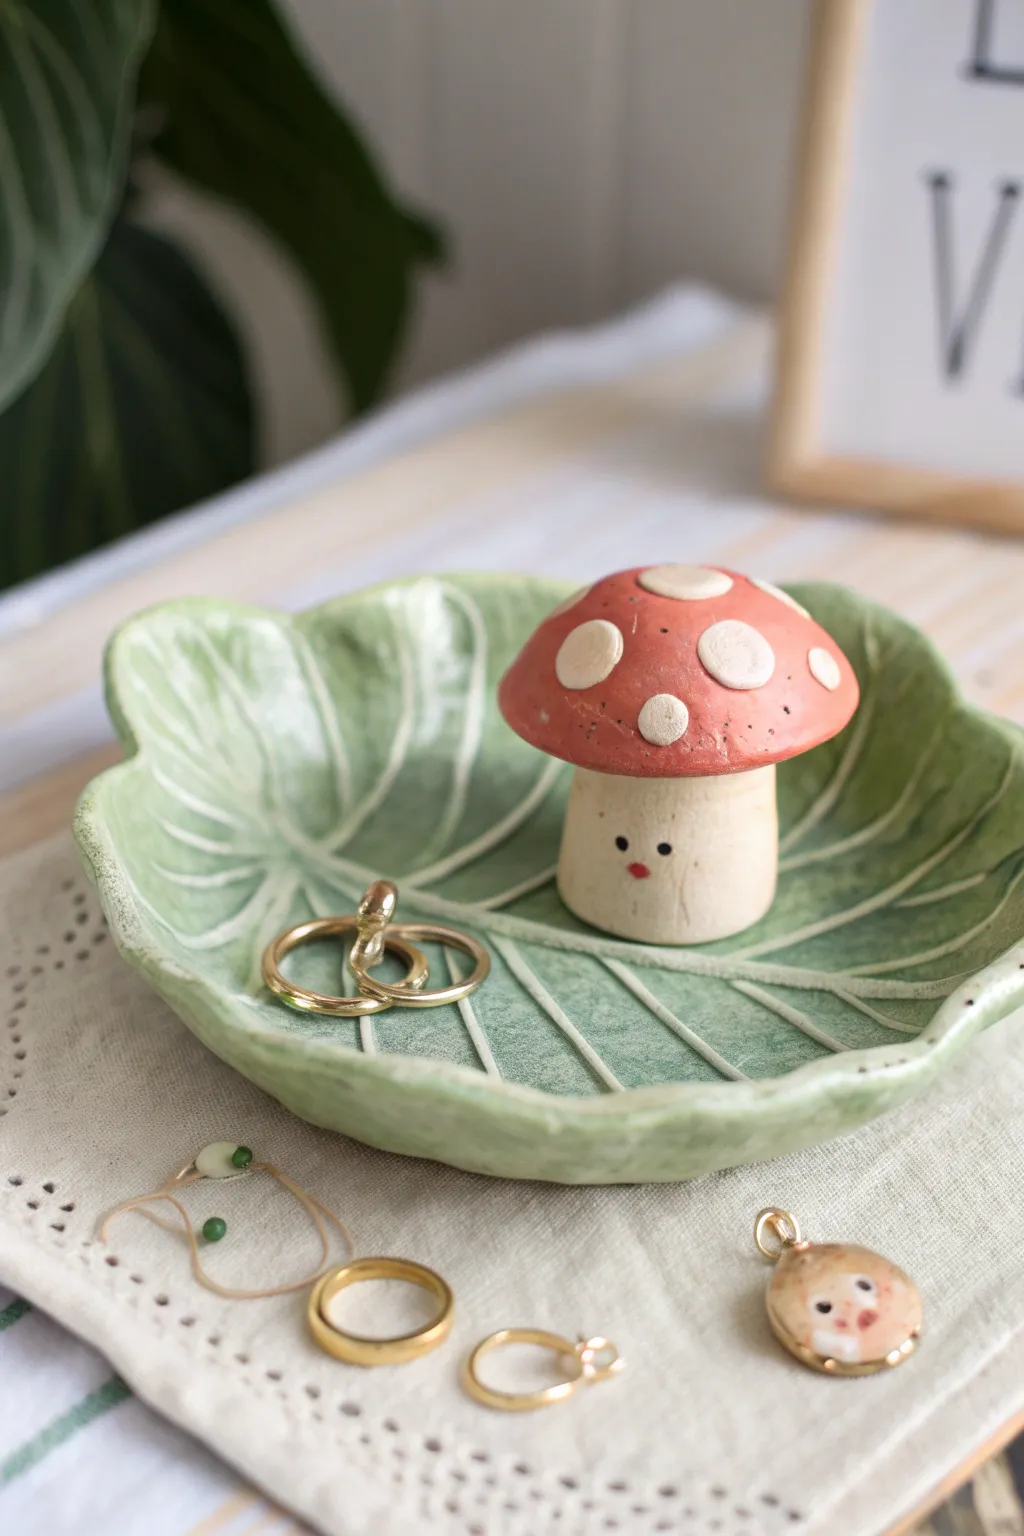
This adorable project combines a textured leaf-shaped tray with a removable, delightfully chubby mushroom guardian for your rings. The hand-painted details and glossy finish give it a polished, ceramic-like quality without needing a kiln.
Step-by-Step Guide
Materials
- Air dry clay (white)
- Acrylic paints (sage green, light beige, rust red, white, black/dark brown)
- Clay rolling pin
- Real leaf for texture (large, with prominent veins)
- Craft knife or clay tool
- Small bowl (for shaping drying curve)
- Fine grit sandpaper
- Glossy varnish or sealant
- Paintbrushes (flat brush and fine detail brush)
- Cup of water and sponge
Step 1: Crafting the Leaf Dish
-
Roll the clay:
Start by conditioning a large ball of clay until soft, then roll it out to a consistent thickness of about 1/4 inch on a smooth surface. -
Impress texture:
Place your chosen real leaf vein-side down onto the clay. Gently roll over it with your rolling pin to imprint the veins deeply into the surface. -
Cut the shape:
Using a craft knife, carefully trace around the edge of the leaf to cut out your shape. I find it helpful to leave a small border beyond the leaf itself for a smoother edge. -
Smooth the edges:
Dip your finger in a little water and run it along the cut edges of the clay leaf to remove any jagged bits or roughness. -
Curve the form:
Lift the clay leaf and place it inside a shallow bowl. Gently press it down so the edges curve upward, creating a dish shape rather than a flat plate.
Vein Definition
If painting veins is tricky, try the ‘wipe-back’ method: paint white into the grooves, then immediately wipe the surface with a damp cloth, leaving paint only in the cracks.
Step 2: Sculpting the Mushroom
-
Form the stem:
Roll a thick cylinder of clay for the mushroom stalk. It should be stout and wide enough to stand stable. -
Create the cap:
Roll a ball of clay, then flatten the bottom and round the top into a classic dome shape. Make sure it’s slightly wider than your stem. -
Attach parts:
Score (scratch) the top of the stem and the bottom of the cap. Add a dab of water or slip, then press them firmly together. Smooth the seam if desired, or leave it defined. -
Dry completely:
Allow both the leaf dish and the mushroom to dry fully. This usually takes 24-48 hours depending on humidity; flip the pieces occasionally for even drying. -
Refine surfaces:
Once bone dry, use fine-grit sandpaper to smooth out any rough patches, focused particularly on the rim of the dish and the mushroom stem.
Step 3: Painting & Finishing
-
Base coat the leaf:
Paint the entire leaf dish with a sage green acrylic paint. You may need two thin coats for opaque coverage. -
Highlight veins:
Mix a very light green or white paint. Using a fine brush, carefully trace over the indented veins to make the texture pop. -
Paint the mushroom stem:
Paint the stalk of the mushroom in a creamy beige or off-white tone. -
Color the cap:
Use a rust red or soft terracotta color for the mushroom cap. Let it dry completely before moving to the next step. -
Add cap details:
Paint varying sizes of white circles onto the red cap for the classic toadstool look. -
Paint the face:
Using your smallest brush or a toothpick, dot two wide-set black eyes and a tiny red mouth onto the stem to give him a kawaii expression. -
Add faux freckles:
For extra texture, you can splatter tiny specks of watered-down brown paint onto the cap, or dot them on manually. -
Seal the project:
Finish both pieces with a coat of high-gloss varnish. This protects the paint and gives it that shiny, fired-ceramic appearance.
Change the Vibe
Make it a full forest scene by sculpting tiny snails or ladybugs to glue permanently onto the leaf rim alongside your removable mushroom.
Now you have a charming woodland spot to keep your favorite rings safe and sound
Mini Planter Covers With Kawaii Animal Faces

Transform a plain glass jar or small plastic pot into an adorable succulent home with this sweet cat-faced cover. Using air-dry clay, you’ll sculpt a smooth, rounded vessel adorned with delicate pink details and a heartwarming expression.
How-To Guide
Materials
- White classic air-dry clay
- Small rolling pin
- Craft knife or clay modeling tools
- Small cup of water
- Sandpaper (fine grit)
- Acrylic paints: White, blush pink, black
- Small paintbrushes (flat and fine detail round)
- Matte spray varnish or sealant
- A small cylinder container to use as a mold (like a yogurt cup or jar)
Step 1: Shaping the Base
-
Prepare your template:
Find a small container to use as your structural base. A clean yogurt cup or a small glass jar works perfectly as a mold. -
Roll the clay:
Condition a ball of white air-dry clay in your hands until it’s pliable. Roll it out on a flat surface to an even thickness of about 1/4 inch. -
Create the base:
Cut a circle slightly larger than the bottom of your chosen mold. Place this circle at the bottom, smoothing the edges slightly. -
Cut the walls:
Measure the circumference and height of your mold. Cut a long rectangular strip of clay that matches these dimensions. -
Wrap the mold:
Wrap the clay strip around the side of your container. I usually wrap the container in plastic wrap first so the clay doesn’t stick permanently. -
Join the seams:
Score the edges where the clay meets (the vertical line and the bottom circle) using a needle tool or toothpick. Apply a little water as slip. -
Blend the surface:
With your fingers or a smoothing tool, blend the seams together until they are invisible. The pot should look like one seamless piece.
Step 2: Adding Kawaii Details
-
Form the ears:
Pinch off two very small, blueberry-sized pieces of clay. Flatten them slightly and shape them into triangles with rounded tips. -
Attach the ears:
Score the top rim of your planter where you want the ears to sit. Apply a dot of water and press the ears firmly onto the rim. -
Smooth the connections:
Use a small tool or wet finger to smooth the clay from the base of the ear down into the pot wall so it looks attached, not just stuck on. -
Let it dry:
Allow the clay to dry fully. This can take 24–48 hours depending on humidity. Flip it occasionally if possible to dry the bottom. -
Sand for perfection:
Once bone dry, take your fine-grit sandpaper and gently sand away any fingerprints or bumps to get that smooth, ceramic-like finish.
Water Smoothing Trick
Keep a wet sponge nearby while sculpting. Lightly wiping the clay before it dries eliminates fingerprints better than sanding later.
Step 3: Painting the Face
-
Prime the surface:
Even if your clay is white, paint the entire exterior with a coat of white acrylic paint. This creates a uniform canvas and seals the porous clay. -
Paint the dip-dye effect:
Mix a soft blush pink color. carefully paint the bottom third of the pot, creating a straight horizontal line all the way around. -
Add cheek spots:
Using the same pink, paint two small circles on the ‘face’ area for rosy cheeks. Add two pink triangles inside the ear shapes. -
Paint the eyes:
Switch to your finest detail brush and black paint. Paint two oval eyes with tiny eyelashes extending from the corners. -
Add the gleam:
Dip the tip of a toothpick into white paint and place a tiny dot near the top of each black eye for that sparkling life-like look. -
Draw the nose and mouth:
Paint a tiny pink heart for the nose between the eyes. Create a thin black ‘w’ shape directly underneath for the mouth. -
Seal the piece:
Finish by spraying the entire pot with a matte sealant to protect your paint job from moisture when watering your plant.
Cracks While Drying?
Mix a tiny bit of fresh clay with water to make a paste (slip). Fill the crack, smooth it over, and let it dry again before sanding.
Now just pop your favorite succulent inside and enjoy your cheerful new desk companion
Sleepy Tea Cup Buddies in Air Dry Clay
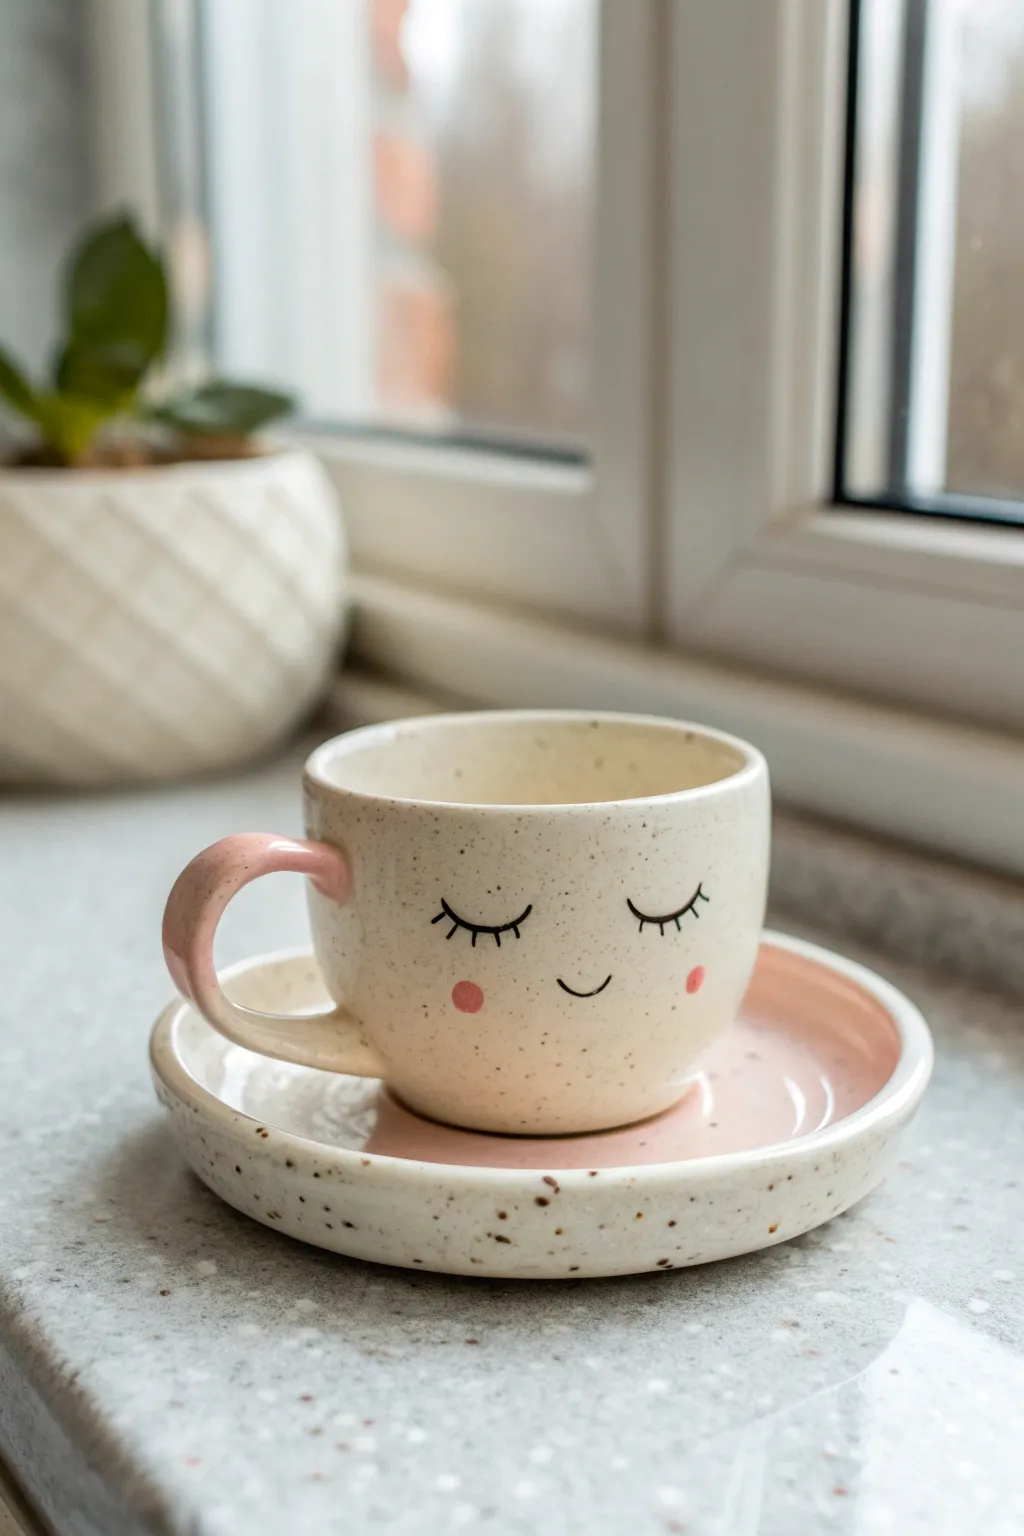
Transform simple air dry clay into a sweet, ceramic-style decorative set featuring a charming sleepy face and soft pink accents. While air dry clay isn’t food safe for hot liquids, this adorable saucer and cup make a perfect holder for jewelry, trinkets, or dried flowers.
Step-by-Step Guide
Materials
- White air dry clay
- Rolling pin
- Clay cutting tool or craft knife
- Cup and saucer templates (or actual dishware to trace)
- Sponge or fine-grit sandpaper
- Acrylic paints (Soft pink, black, white)
- Fine detail paintbrush
- Medium flat paintbrush
- Old toothbrush (for speckling)
- Small bowl of water
- High-gloss varnish or sealant
Step 1: Sculpting the Cup
-
Prepare the base:
Start by rolling out a slab of white air dry clay to about 1/4 inch thickness. Cut a long rectangular strip for the cup walls and a circle for the base. -
Form the cylinder:
Gently curve the rectangular strip into a cylinder shape so the ends meet. Score both ends with a needle tool, add a dab of water (slip), and press them together firmly to create a seamless join. -
Attach the bottom:
Score the bottom edge of your cylinder and the outer edge of your clay circle. Press the cylinder onto the circle base, using a modeling tool to blend the clay upwards on the outside and downwards on the inside to seal the seam completely. -
Smooth the shape:
Dip your fingers in a little water and smooth out any bumps or joining lines. Gently flare the top rim slightly outward for a classic tea cup silhouette. -
Add the handle:
Roll a small snake of clay and shape it into a ‘C’ or ear shape. Score and slip the attachment points on the side of the cup, then press the handle on, blending the clay where it touches the cup body for a strong bond.
Step 2: Creating the Saucer
-
Shape the dish:
Roll out another slab of clay and cut a larger circle. Gently curve the edges upward to create a shallow bowl shape. -
Create the foot ring:
Roll a thin snake of clay and attach it in a circle on the underside of the saucer. This acts as a foot ring to give it a realistic ceramic look. -
Refine edges:
Use a damp sponge to wipe around the rim of the saucer and the cup to ensure they are perfectly rounded and smooth before setting them aside. -
Dry thoroughly:
Let both pieces dry completely for at least 24-48 hours. I find flipping them occasionally helps them dry evenly and prevents warping. -
Sand for perfection:
Once bone dry, use fine-grit sandpaper to buff away any remaining roughness or fingerprints until the surface feels like smooth bisque pottery.
Ceramic illusions
To get that super bubbly, speckled ceramic look, you can actually mix dried tea leaves or used coffee grounds directly into the wet clay before rolling.
Step 3: Painting & Decoration
-
Base coat touches:
Keep the main body natural white or paint it a creamy off-white if your clay dried greyish. Paint the handle of the cup a soft pastel pink. -
Saucer details:
Paint the interior center of the saucer with the same soft pastel pink, leaving the outer rim natural white. -
Speckled effect:
Mix a tiny amount of brown or black paint with water. Dip an old toothbrush into it and run your thumb across the bristles to flick tiny speckles over the entire cup and saucer for that trendy stoneware look. -
Draw the face:
Using a very fine liner brush and black acrylic paint, carefully paint two closed semi-circles for eyes with long, sweeping lashes. Add a tiny ‘u’ shape for a smiling mouth. -
Add blush:
Dip the back end of a paintbrush into pink paint and dot it onto the cheeks to create perfectly round rosy spots. -
Seal:
Finish by applying two coats of high-gloss varnish. This mimics a glazed ceramic firing and protects your paint work.
Turn it into a planter
Poke a small hole in the bottom of the cup before drying to transform this cutie into a functional succulent pot. The saucer will catch excess water.
Place your finished set on a sunny shelf to enjoy its peaceful expression every day
Kawaii Pencil Topper Critters
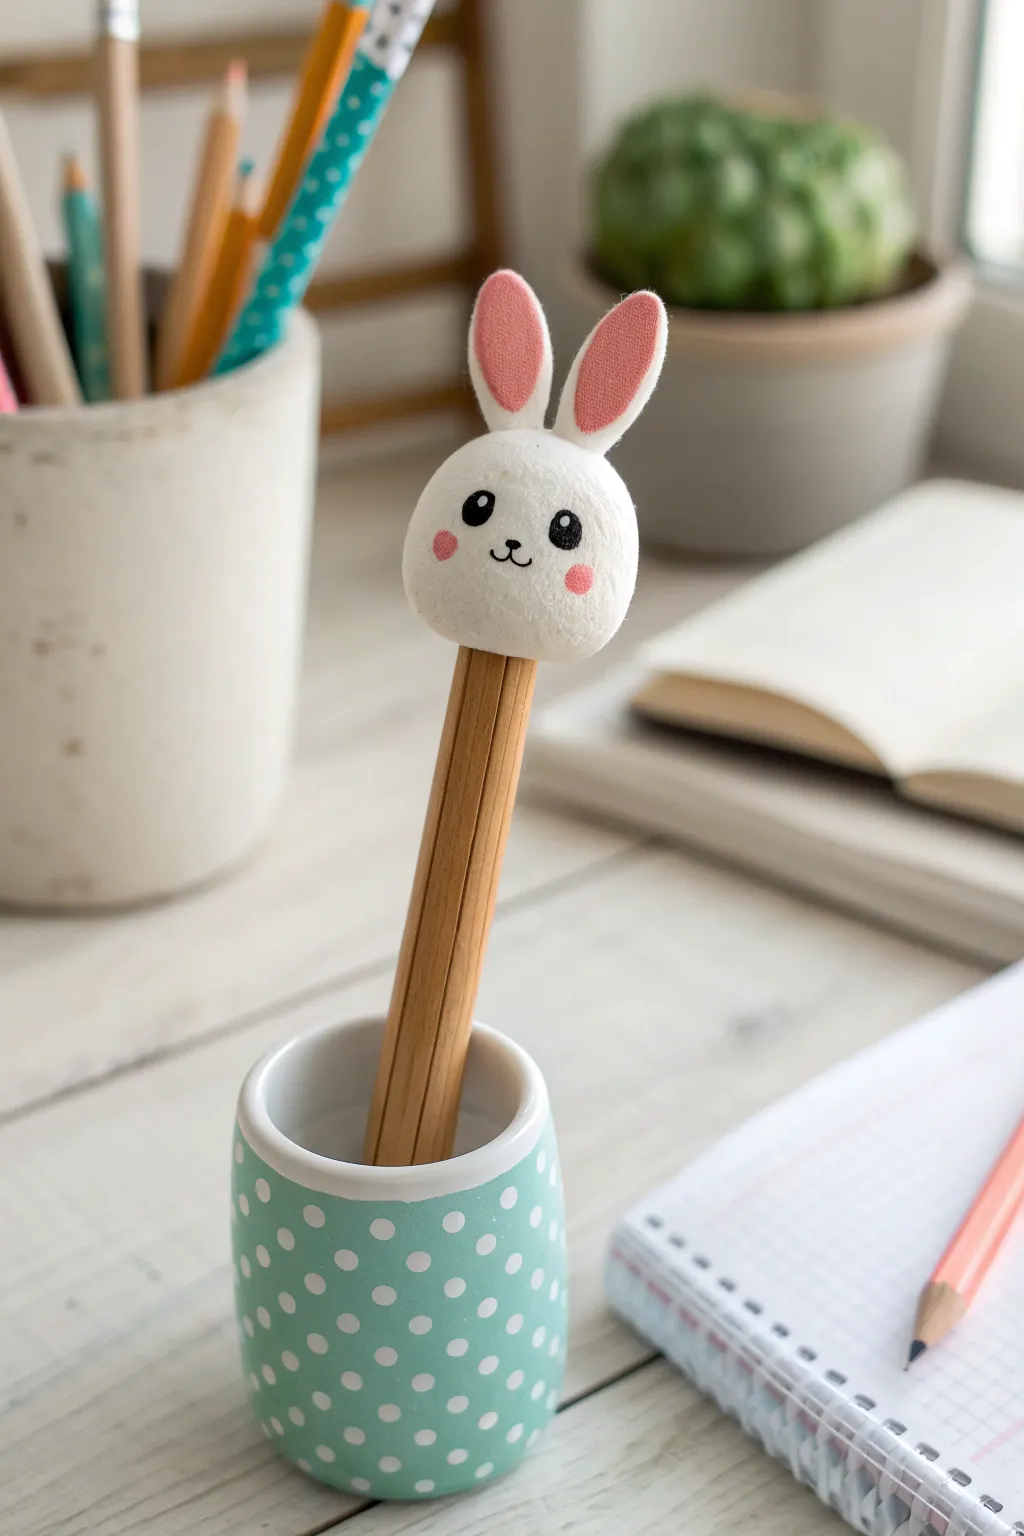
Transform a plain wooden pencil into an adorable study companion with this simple yet charming project. This kawaii bunny topper features a soft, rounded head and perky pink ears, adding a touch of sweetness to your stationery collection.
Detailed Instructions
Materials
- White lightweight air dry clay
- Wooden pencil (unsharpened end preferable)
- Black fine-point marker or acrylic paint
- Pink acrylic paint
- Small paintbrush or dotting tool
- Water
- Craft glue
- Sandpaper (optional)
Step 1: Shaping the Base
-
Prepare the pencil:
Take your wooden pencil and ensure the top end is clean. If it has an eraser you don’t want to cover, remove it carefully or plan to mold over it. Applying a tiny dab of craft glue to the tip of the pencil will help the clay adhere permanently. -
Form the head sphere:
Roll a ping-pong ball sized amount of white clay into a smooth, crack-free sphere. This will be the main head of your bunny. -
Attach to the pencil:
Gently push the sphere onto the glued end of the pencil. Don’t push it all the way through; stop when the pencil is securely embedded about halfway into the ball. I like to rotate the pencil slightly as I push to create a snug fit. -
Secure the join:
Using your finger and a tiny drop of water, smooth the clay downward around the pencil shaft to seal the connection. This ensures the head won’t wobble later. -
Refine the shape:
Gently pat the sphere to flatten the bottom slightly where it meets the pencil, giving it a soft, bun-like shape rather than a perfect circle.
Step 2: Ears and Details
-
Create the ears:
Roll two smaller balls of white clay, then elongate them into teardrop shapes. Flatten them gently between your fingers to form the rabbit ears. -
Add inner ear detail:
Before attaching, use a sculpting tool or the rounded end of a paintbrush handle to press a shallow indentation into the center of each ear. This creates the space for the pink inner ear color later. -
Attach the ears:
Apply a tiny bit of water or slip (clay mixed with water) to the bottom of the ears. Press them firmly onto the top of the bunny’s head. Smooth the seams with a wet finger so they look like one continuous piece. -
Texture the surface (optional):
To mimic the soft, almost felt-like look in the photo, take a clean, dry toothbrush and gently tap it all over the clay surface. This removes the shiny smoothness and adds a lovely matte texture. -
Let it dry:
Stand the pencil upright in a jar or cup to dry. Let it cure completely for 24-48 hours, depending on your clay brand.
Seamless Smoothness
Before drying, run a slightly damp finger over the clay repeatedly. This ‘burnishing’ process removes fingerprints and creates a professional porcelain-like finish.
Step 3: Face and Finishing Touches
-
Paint the inner ears:
Mix a soft pastel pink using your acrylic paints. Carefully paint the indented center of the ears, leaving a clean white border around the edges. -
Paint the rosy cheeks:
Using the same pink paint or a slightly darker shade, use a dotting tool or the back of a brush to place two small, round blush marks on the cheeks. -
Draw the eyes:
With a black fine-point marker or a tiny brush with black paint, draw two large, wide-set oval eyes. Adding a tiny white dot highlight inside each black eye really brings the character to life. -
Draw the nose and mouth:
Right between the eyes, draw a tiny rounded triangle for the nose. Extend two small curved lines downward to create the classic ‘w’ bunny mouth shape. -
Seal (Optional):
If you plan to use the pencil heavily, apply a coat of matte varnish over the painted areas to protect your artwork from smudging.
Seasonal Switch
Make different toppers for seasons! Try a bear with a scarf for winter or a frog holding a leaf for spring. Paint the pencil shaft to match your character.
Now you have a custom stationery piece that makes every writing task a little happier
Tiny Photo Holder With a Kawaii Character Base

Brighten up your desk with this adorable little bear photo holder, crafted from air dry clay and finished with blushing pink cheeks. Its simple, rounded shape makes it the perfect beginner project that doubles as a functional piece of décor.
Step-by-Step Guide
Materials
- White air dry clay
- Wire (16-18 gauge) or a pre-made memo clip holder stem
- Small wooden clothespin
- Acrylic paints (black, pink)
- Fine detail paintbrush
- Dotting tool or toothpick
- Water cup (for smoothing)
- Small square wooden base (optional)
- Superglue or craft glue
- Clear matte varnish (optional)
Step 1: Shaping the Base
-
Condition the clay:
Start by taking a handful of white air dry clay. Knead it thoroughly in your hands until it feels warm, pliable, and free of cracks. -
Form a sphere:
Roll the clay into a smooth ball between your palms. Aim for a size roughly slightly larger than a golf ball, depending on how big you want your bear. -
Create the dome shape:
Gently press the ball onto your work surface to flatten the bottom. You want a sturdy, rounded dome shape rather than a perfect sphere so it sits flat without rolling. -
Smooth the surface:
Dip your finger in a tiny bit of water and run it over the clay dome to erase any fingerprints or small seams. I like to take my time here to get a porcelain-like finish.
Cracked Clay?
If small cracks appear as the clay dries, mix a tiny bit of fresh clay with water to make a paste and fill them in like spackle.
Step 2: Adding Ears and Hardware
-
Make the ears:
Pinch off two small, pea-sized pieces of clay. Roll them into balls and then flatten them slightly to create thick discs. -
Attach the ears:
Score the bottom of the ears and the attachment points on the head with a needle tool or toothpick. Apply a dab of water (slip) and press the ears firmly onto the top sides of the head. -
Blend the seams:
Use a modeling tool or your finger to smooth the clay where the ears meet the head, ensuring they are fused securely as one piece. -
Insert the wire:
Cut a length of wire about 3-4 inches long. Insert one end straight down into the exact center of the bear’s head while the clay is still wet. -
Let it dry:
Allow the clay figure to dry completely. This usually takes 24-48 hours depending on humidity. Flip it over occasionally so the bottom dries evenly.
Level Up: Texture
Before the clay dries, gently dab the surface with a stiff toothbrush or crumpled foil to give the bear a fuzzy, fur-like texture.
Step 3: Painting the Kawaii Face
-
Prepare paint for ears:
Once fully dry, mix a soft pink acrylic color. You can mix red and white if you don’t have a pre-made pastel pink. -
Paint ear details:
Carefully paint a small circle or oval in the center of each ear using the pink paint to create the inner ear detail. -
Add the cheeks:
Using the same pink paint and a dotting tool (or the back end of a paintbrush), stamp two rosy cheeks below where the eyes will go. -
Create the eyes:
Dip a small dotting tool into black acrylic paint. Carefully place two solid black dots for eyes, spacing them widely apart for that classic kawaii look. -
Paint the nose and mouth:
Switch to your finest detail brush. Paint a tiny oval nose centered between the eyes, and draw a thin ‘w’ shape connecting to it for the mouth. -
Dry the paint:
Set the bear aside for roughly 15-30 minutes to ensure the face details are completely dry before handling.
Step 4: Assembly and Finishing
-
Prepare the clip:
While the paint dries, execute the photo holder mechanism. Take your small wooden clothespin and apply a drop of superglue to the side. -
Attach clip to wire:
Glue the clothespin vertically to the top of the exposed wire coming out of the bear’s head. Hold it in place for a few seconds until the glue sets. -
Seal the project:
If desired, apply a thin coat of clear matte varnish over the clay to protect the paint and give it a finished look. -
Mount on base (Optional):
For extra stability and style, glue the bottom of your clay bear onto a small square wooden coaster or block painted white. -
Add a photo:
Clip your favorite instant photo, note, or postcard into the clothespin to complete the display.
Now you have a sweet little desktop companion ready to hold your fondest memories
Make a Mini Kawaii “Army” Collection Tray
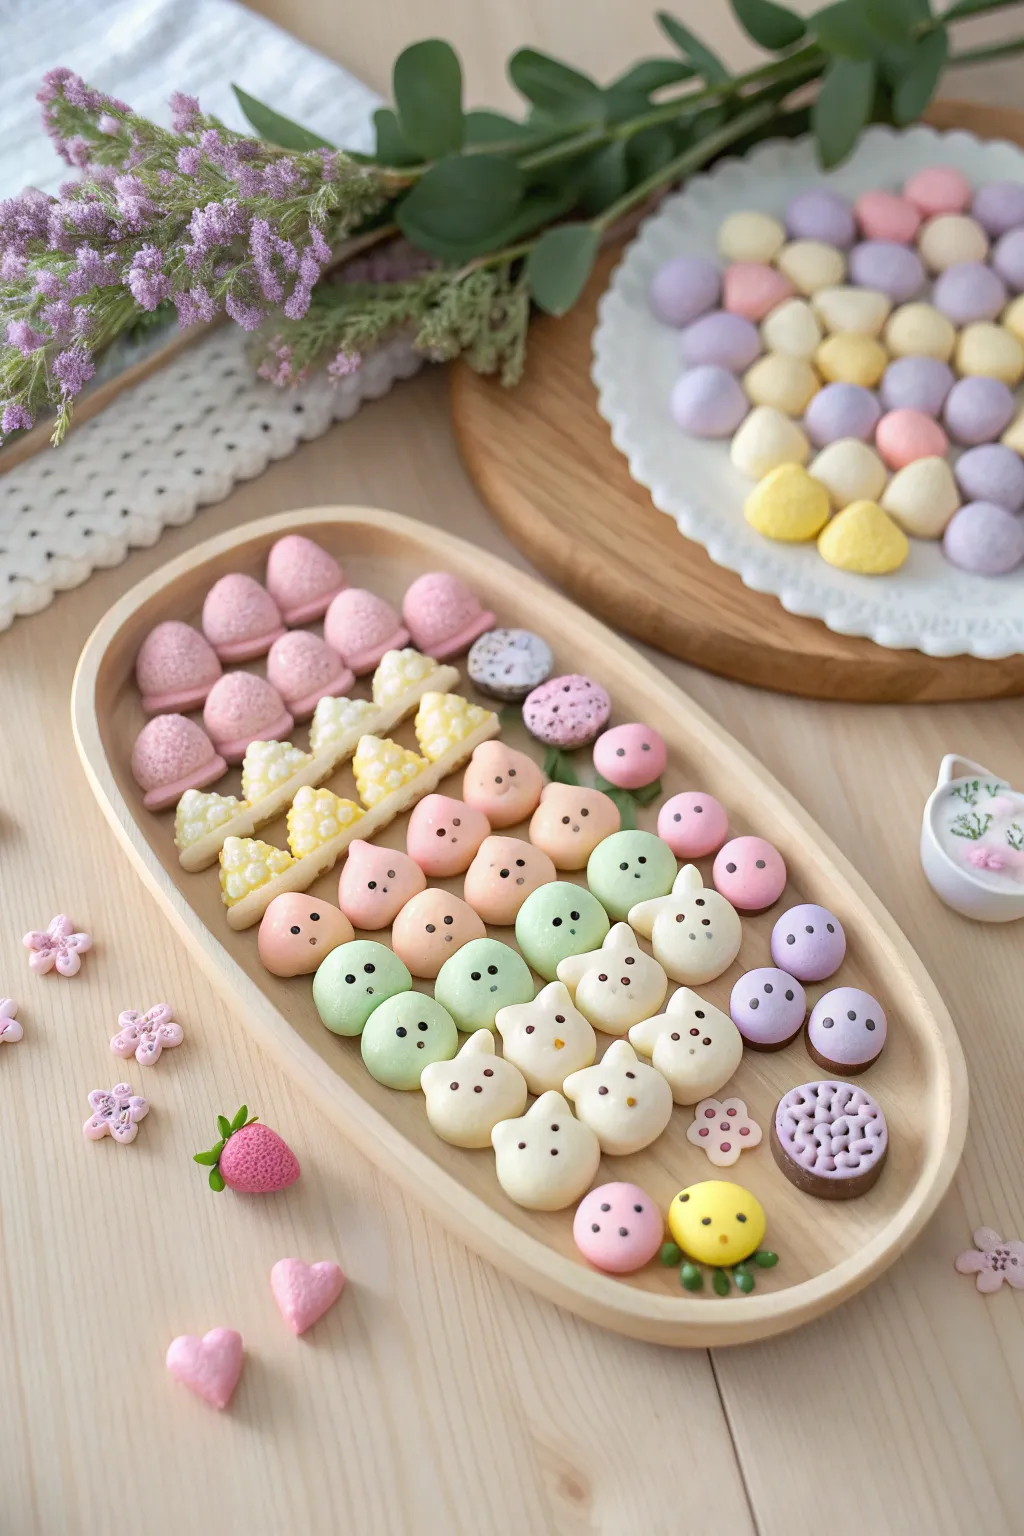
Create your own deliciously adorable assortment of miniature clay sweets, featuring everything from tiny bear truffles to smiling cat confections. This project combines soft pastel colors with simple shapes to build a heartwarming collection perfect for display.
How-To Guide
Materials
- Air dry clay (white)
- Acrylic paints (pink, yellow, pastel green, purple, soft brown, black)
- Clay tools (needle tool, small ball tool)
- Rolling pin
- Small oval wooden tray (for display)
- Superglue or craft glue
- Toothpicks
- Matte sealant or varnish
Step 1: Prepping and Coloring
-
Mix your palette:
Begin by dividing your white clay into several small portions. Keep the largest portion white. Mix very small amounts of acrylic paint into the other balls to create soft pastel shades: baby pink, lemon yellow, mint green, and lavender. Knead thoroughly until the color is consistent. -
Shape the base forms:
Roll several small spheres from each color, aiming for about 1/2 inch to 3/4 inch in diameter. Smooth out any cracks with a tiny bit of water on your finger. These will be the bases for your various characters and treats.
Step 2: Creating the Character Sweets
-
Make the pink blobs:
Take your pink spheres and gently pinch the top to create a soft teardrop or ‘Hershey’s Kiss’ shape. Flatten the bottom slightly so they sit upright. -
Form the pastel bear faces:
For the peach, pink, and green round characters, keep the sphere shape but flatten them slightly into domes. I find that pressing them gently against the table helps create a stable bottom. -
Sculpt the white cats:
Using white clay balls, pinch two tiny triangles at the top of the sphere to form ears. Smooth the seams where the ears meet the head using a clay tool or your finger. -
Add facial details:
Once the clay has formed a slight skin but isn’t filly dry, use a needle tool to poke shallow indentations for eyes. For the white cats, create tiny muzzle bumps with extra bits of white clay.
Keep it Clean
Keep wet wipes nearby! Pastel clay shows dirt easily. Wipe your hands and tools completely between colors, especially when switching back to white clay.
Step 3: Crafting the Bakery Items
-
Build the lemon bars:
Roll out a strip of white clay and a strip of yellow clay. Stack them, then cut into small triangles. Texture the yellow top by gently pressing a clean toothbrush or texturing tool onto the surface. -
Create the textured cookies:
Flatten small balls of purple or pink clay into thick discs. Use a needle tool to create a grid pattern or stippled texture on top to mimic a baked surface. -
Mold the striped cakes:
Layer thin ropes of white and yellow clay, then compact them into a rectangular log. Slice gently to reveal the stripes and shape into small wedges.
Make it a Magnet
Before the clay dries, press a small, strong magnet into the back of the flatter cookies or faces to turn your tray collection into a cute fridge set.
Step 4: Painting and Finishing
-
Paint the eyes and mouths:
Use a toothpick or a very fine detail brush dipped in black paint to fill in the eye indentations you made earlier. Add tiny smiles or noses. A steady hand is key here. -
Add rosy cheeks:
Dilute a tiny drop of pink paint with water. Using a cotton swab or small brush, dab gentle blush onto the cheeks of your character sweets. -
Create the ‘sugar’ coating:
For the pink mountain shapes, mix white paint with a little baking soda for texture, or dab thick white paint on the tips to look like powdered sugar. -
Scatter accessories:
Use leftover pink clay to mold tiny hearts and cherry blossoms. These serve as perfect filler items for the tray. -
Seal the collection:
Allow all pieces to dry completely (usually 24 hours). Apply a coat of matte varnish to protect the clay while keeping that soft, velvety look. -
Assemble the tray:
Arrange your finished sweets on the wooden tray. You can glue them in place for a permanent display or leave them loose to rearrange later.
Now you have a charming miniature bakery ready to display on your desk or shelf
Tiny Kawaii Diorama Box Scene
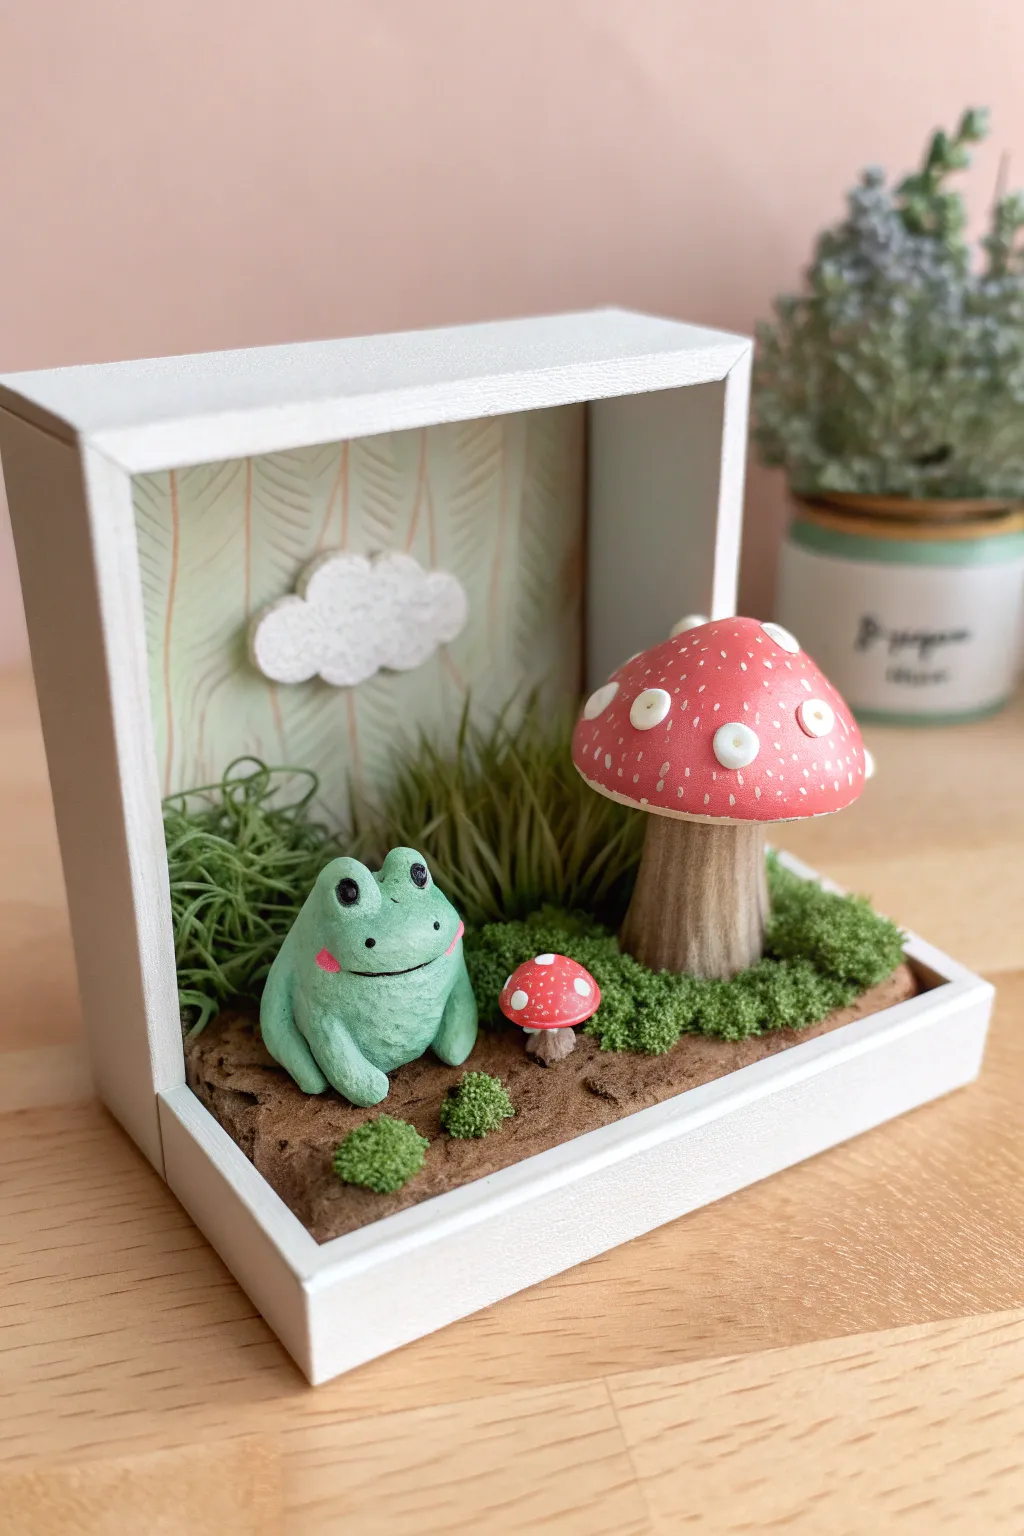
Capture a peaceful forest moment with this adorable diorama box, featuring a happy frog friend and whimsical mushrooms. It’s a perfect mixture of clay sculpting and miniature scene building that results in a charming 3D artwork.
Step-by-Step
Materials
- Air dry clay (white)
- Small wooden shadow box or deep frame (roughly 4×4 inches)
- Acrylic paints (green, red, white, brown, beige, light blue)
- Fine detail paintbrushes
- Textured brown paste or brown clay (for ground)
- Artificial moss and faux grass tufts
- Sculpting tools or dotting tools
- Strong craft glue or hot glue
- Patterned scrapbook paper or cardstock (light teal/leaf pattern)
- Scissors and pencil
Step 1: Setting the Scene
-
Prepare the box:
Start with your small wooden box. If it isn’t already white, give the entire frame a coat of white acrylic paint for a clean, modern look. -
Create the background:
Measure the inner back panel of your box. Cut a piece of light teal patterned paper to fit this space perfectly and glue it securely to the back wall. -
Sculpt the cloud:
Take a small ball of white clay and flatten it slightly. Scallop the edges with a modelling tool to create a fluffy cloud shape, then glue it to the upper center of your background paper.
Pro Tip: Textured Sponge
To give the frog a slightly organic, matte texture like in the photo, gently tap the wet green paint with a piece of dry kitchen sponge instead of using smooth brushstrokes.
Step 2: Sculpting the Characters
-
Form the frog base:
Roll a medium-sized ball of clay for the frog’s body. Gently pinch the top to define the head shape, keeping it round and chubby for maximum cuteness. -
Add frog features:
Roll two tiny balls for eyes and attach them to the top of the head. Create two small tear-drop shapes for arms and press them against the front of the body, smoothing the seams so they look integrated. -
Shape the mushroom cap:
Roll a ball of clay and press it into a smooth dome shape to make the large mushroom cap. Do the same for a miniature version for the baby mushroom. -
Make the stems:
Roll a thick cylinder for the main mushroom stem, widening it slightly at the base for stability. Make a tiny cylinder for the small mushroom. Texture the sides vertically with a needle tool to simulate bark. -
Dry time:
Let all your clay pieces dry completely. I usually leave them overnight to ensure they are hard enough for painting.
Level Up: Night Mode
Paint the tiny white dots on the mushroom caps with glow-in-the-dark acrylic paint. When the lights go out, your little forest scene will have a magical bioluminescent glow.
Step 3: Painting & Assembly
-
Paint the frog:
Mix a soft sage green and paint the entire frog. Once dry, use a dotting tool or toothpick to add black eyes and pink cheek blushes. Use a fine liner brush to draw a wide, simple smile. -
Paint the mushrooms:
Paint the mushroom caps a vibrant red. Paint the stems a woody beige-brown. Once the red is dry, carefully paint white dots on the caps—use raised dots of paint or tiny flat clay circles for texture. -
Lay the ground:
Fill the bottom of the box with a layer of textured brown paste to simulate soil. If you don’t have paste, layer brown air dry clay across the bottom and texture it with an old toothbrush. -
Plant the scene:
While the ground layer is still wet or tacky, press your large mushroom into the right side and the small mushroom near the center. -
Place the frog:
Nestle your dried frog into the soil on the left side, angling him slightly inward so he looks friendly. -
Add greenery:
Glue tall faux grass tufts behind the frog and in the back corner. Glue clumps of low-profile moss around the base of the mushrooms to soften the transition between stem and soil. -
Final touches:
Add a few tiny moss clumps in the foreground soil to balance the composition.
Now you have a tiny, peaceful world to display on your shelf or desk