When I’m craving a quick win at my worktable, I reach for polymer clay and make something kawaii-cute in miniature. These ideas are all about tiny, smiley characters and sweet pastel vibes you can turn into charms, earrings, magnets, and pocket-sized buddies.
Classic Kawaii Animal Charms
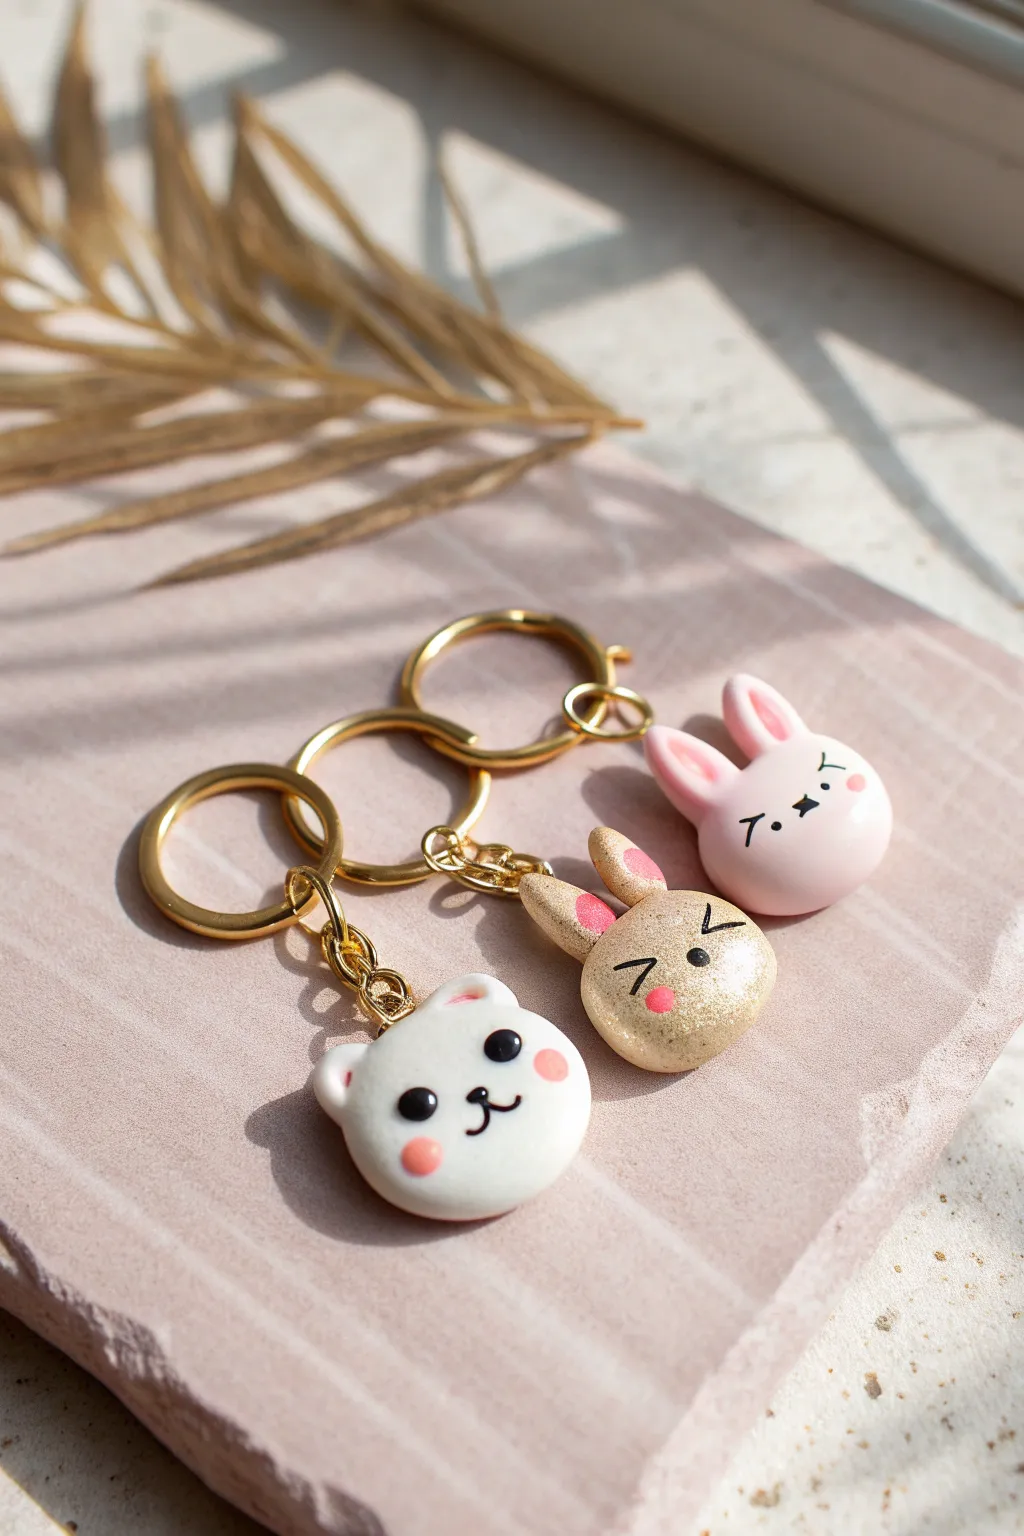
These utterly adorable polymer clay charms capture the essence of kawaii culture with their simple expressions and soft pastel tones. Perfect for beginners and seasoned crafters alike, this project creates a set of three animal friends—a white bear, a sparkly gold bunny, and a pink rabbit—attached to elegant gold keyrings.
Step-by-Step
Materials
- Polymer clay: Opaque White, Pastel Pink, and Gold with glitter/mica inclusions
- Gold screw-eye pins (small)
- Small gold jump rings (4-6mm)
- Gold split-ring keychains with connector chains
- Needle tool or toothpick
- Ball stylus tool (small)
- Black acrylic paint
- Fine detail paintbrush (000 size)
- Pink soft pastel chalk (for blushing)
- Glaze or polyurethane varnish (glossy or matte)
- Jewelry pliers (round nose and flat nose)
- Clean ceramic tile or baking sheet
- Oven
Step 1: Shaping the Animal Bases
-
Condition the clay:
Begin by thoroughly kneading your white, pastel pink, and gold clays separately until they are soft, pliable, and free of air bubbles. Clean your hands or wear gloves between colors to prevent staining the white clay. -
Form the heads:
Roll three equal-sized balls of clay, roughly 1 inch in diameter. You’ll need one white ball for the bear, one gold for the first bunny, and one pink for the second bunny. -
Flatten the shapes:
Gently press each ball down onto your work surface with the palm of your hand to create a smooth, thick disc. They should look like slightly flattened marshmallows, not thin pancakes. -
Create bear ears:
For the white bear, roll two tiny balls of white clay. Press them gently onto the top left and right sides of the white head, smoothing the seam at the back with your finger or a tool so they attach securely. -
Shape bunny ears:
For the gold and pink bunnies, roll small logs of matching clay. Taper one end of each log to a rounded point. Attach two ears to the top of each bunny head, blending the clay at the attachment point for a seamless look.
Clean Clay Tip
Keep baby wipes nearby! Use them to wipe your hands and tools completely clean before switching to the white clay to avoid transferring lint or darker pigments.
Step 2: Adding Details & Hardware
-
Add inner ear details:
Take extremely tiny amounts of pink clay and flatten them into teardrop shapes. Press these onto the front of the ears for the gold and pink bunnies to create the inner ear color. -
Indent eye sockets:
Using a small ball stylus, gently press two indentations into the face of the white bear where the eyes will go. This helps the painted eyes sit nicely later. Leave the bunnies smooth for now as their eyes are painted differently. -
Insert eye pins:
Screw a small gold eye pin into the center top of each head. To ensure they hold tight, you can add a tiny dab of liquid polymer clay or bake-and-bond to the threads before inserting. -
Bake the charms:
Place your charms on a ceramic tile or baking tray lined with parchment paper. Bake according to your clay manufacturer’s instructions (usually 275°F/135°C for 15-30 minutes per 1/4 inch thickness). Allow them to cool completely before painting.
Step 3: Painting & Assembly
-
Paint the bear’s face:
Using black acrylic paint and a fine detail brush (or a toothpick), fill in the indented eye sockets on the white bear. Paint a small, curved ‘w’ shape for the mouth and a tiny dot for the nose. -
Paint the bunny faces:
For the bunnies, create a ‘sleeping’ or ‘happy’ expression. Paint two upside-down ‘V’ shapes for closed eyes (like > and <). Add a tiny oval nose in the center. -
Apply the blush:
Here I prefer to use soft pastels for a natural look. Scrape a pink pastel stick into a powder. Use a small, dry brush or a Q-tip to gently dab pink circles onto the cheeks of all three animals. -
Seal the charms:
Once the paint is fully dry, apply a thin coat of glaze. A matte finish looks soft and modern, while a gloss finish protects the paint well. Let this dry completely. -
Attach the keychain:
Using your flat nose pliers and round nose pliers, twist open a jump ring. Loop it through the eye pin on the charm and the last link of the keychain chain. -
Close the jump ring:
Twist the jump ring closed carefully, ensuring the ends meet flush so the chain doesn’t slip out. Repeat for all three charms.
Personalize It
Make them matching charms for friends by painting their initial on the back of each animal head before you seal it with glaze.
Now you have a delightful set of critters ready to organize your keys or gift to a friend


Kawaii Cupcake Earrings With Tiny Sprinkles
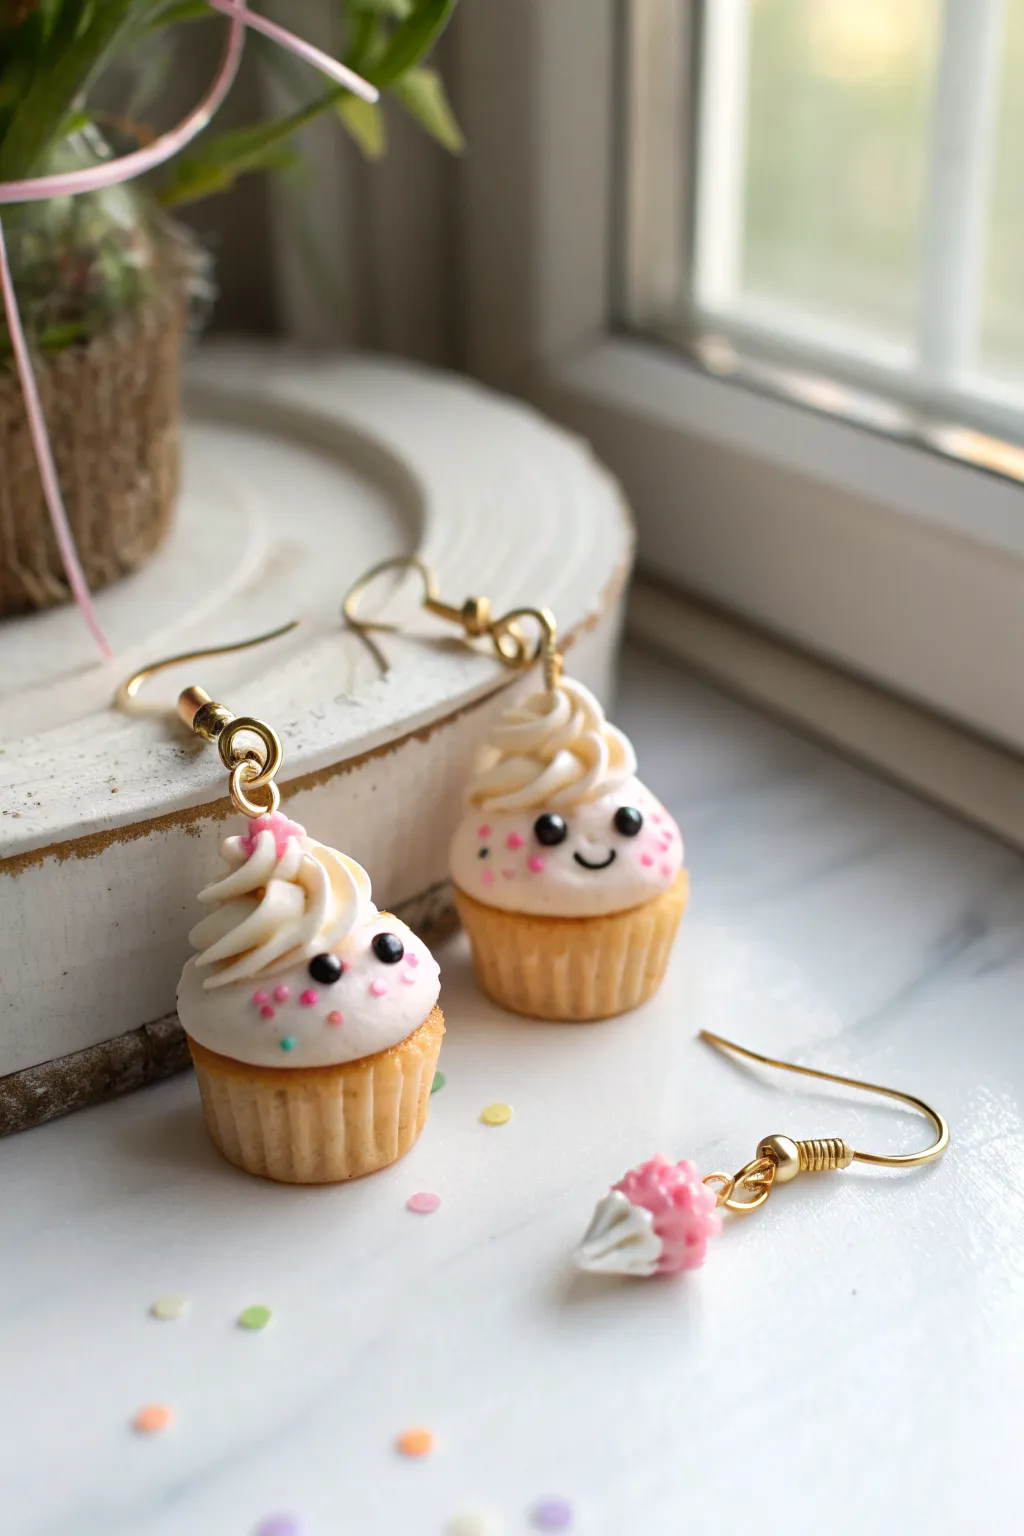
These miniature treats feature a fluffy swirl of vanilla frosting, complete with a tiny, happy face that makes them irresistible. With textured cake bases and delicate pastel sprinkles, these polymer clay earrings are the perfect mix of sweet and sophisticated.
Detailed Instructions
Materials
- Polymer clay (beige/tan for cake, white/cream for frosting, black, pink)
- Liquid polymer clay (translucent or white)
- Miniature cupcake silicone mold (optional, or shape by hand)
- Needle tool or toothpick
- Small star piping tip (metal or plastic)
- Eye screw pins (gold)
- Earring hooks (gold)
- Jump rings (gold)
- Jewelry pliers
- Soft pastel chalks in golden brown (for shading)
- Small paintbrush
- Gloss glaze (optional)
Step 1: Baking the Base
-
Mix the cake color:
Start by conditioning your beige or tan clay. If the color is too dark, mix in a little white or translucent clay to get a realistic ‘baked goods’ dough tone. -
Form the cupcake liner shape:
Roll two equal-sized balls of the tan clay, about 1cm in diameter. Press them gently into a tapered cylinder shape, slightly wider at the top than the bottom. -
Add texture:
Use a needle tool or toothpick to press vertical lines all around the sides of the cylinders to mimic the ridges of a paper cupcake liner. Make sure the spacing is relatively even. -
Shade the cake:
Grate a small amount of golden brown soft pastel chalk into a dust. Use a dry paintbrush to lightly dust the textured sides and the top edge of the cake bases to give them a golden-baked look. -
Insert eye pins:
Before adding frosting, trim your eye pins to an appropriate length. Dipping the end in a tiny bit of liquid clay or strong glue, insert them vertically into the center of the cake bases.
Frosting Texture Tip
Can’t pipe clay? extrude a clay ‘snake’ through a star-shaped disk in a clay extruder. Coil that star-shaped strand for perfect piping lines.
Step 2: Frosting & Faces
-
Prepare the frosting clay:
Condition your white clay thoroughly until it is very soft. I find mixing it with a few drops of liquid clay or baby oil creates a consistency that pipes better or molds more smoothly. -
Create the swirl:
Roll the white clay into a long, thin snake. Twist two snakes together gently to create a ‘swirled piping’ look, then coil this spiraled rope onto the top of your cake base, tapering to a point. -
Smooth the transition:
Gently press the bottom of the frosting coil onto the cake base so there are no gaps. The frosting should look generous and fluffy. -
Add the face:
Roll two extremely tiny balls of black clay for eyes and press them into the frosting about halfway up the swirl. Add a tiny, thin snake of black clay for a smile between them. -
Blush and sprinkles:
Use a dotting tool or toothpick to add tiny pink clay dots for cheeks right next to the eyes. Then, press tiny bits of pink and blue clay (or real polymer sprinkles) onto the frosting for decoration. -
Secure the hardware:
Ensure the loop of the eye pin is protruding from the top peak of the frosting. If the frosting covered it, carefully reveal it or add a new, shorter pin into the frosting top before baking.
Step 3: Finishing Up
-
Bake:
Place your cupcakes on a ceramic tile or baking sheet lined with parchment paper. Bake according to your specific clay brand’s instructions (usually 275°F/135°C for 15-30 minutes). -
Cool down:
Let the pieces cool completely inside the oven if possible to prevent thermal shock and cracking. -
Glaze (Optional):
If you want a shiny finish, lightly brush a coat of gloss glaze over the frosting area only, keeping the cake base matte for realism. -
Assemble earrings:
Open a jump ring with your pliers using a twisting motion. Thread it through the eye pin loop on the cupcake. -
Attach hooks:
Add the earring hook onto the open jump ring before bending the ring back securely to close it.
Fingerprint Fix
If you smudge the frosting while adding the face, lightly brush the area with a tiny bit of baby oil or rubbing alcohol to smooth it back out.
Now your adorable treats are ready to wear and sweetest of all, zero calories


Avocado Bestie Charms With Matching Faces
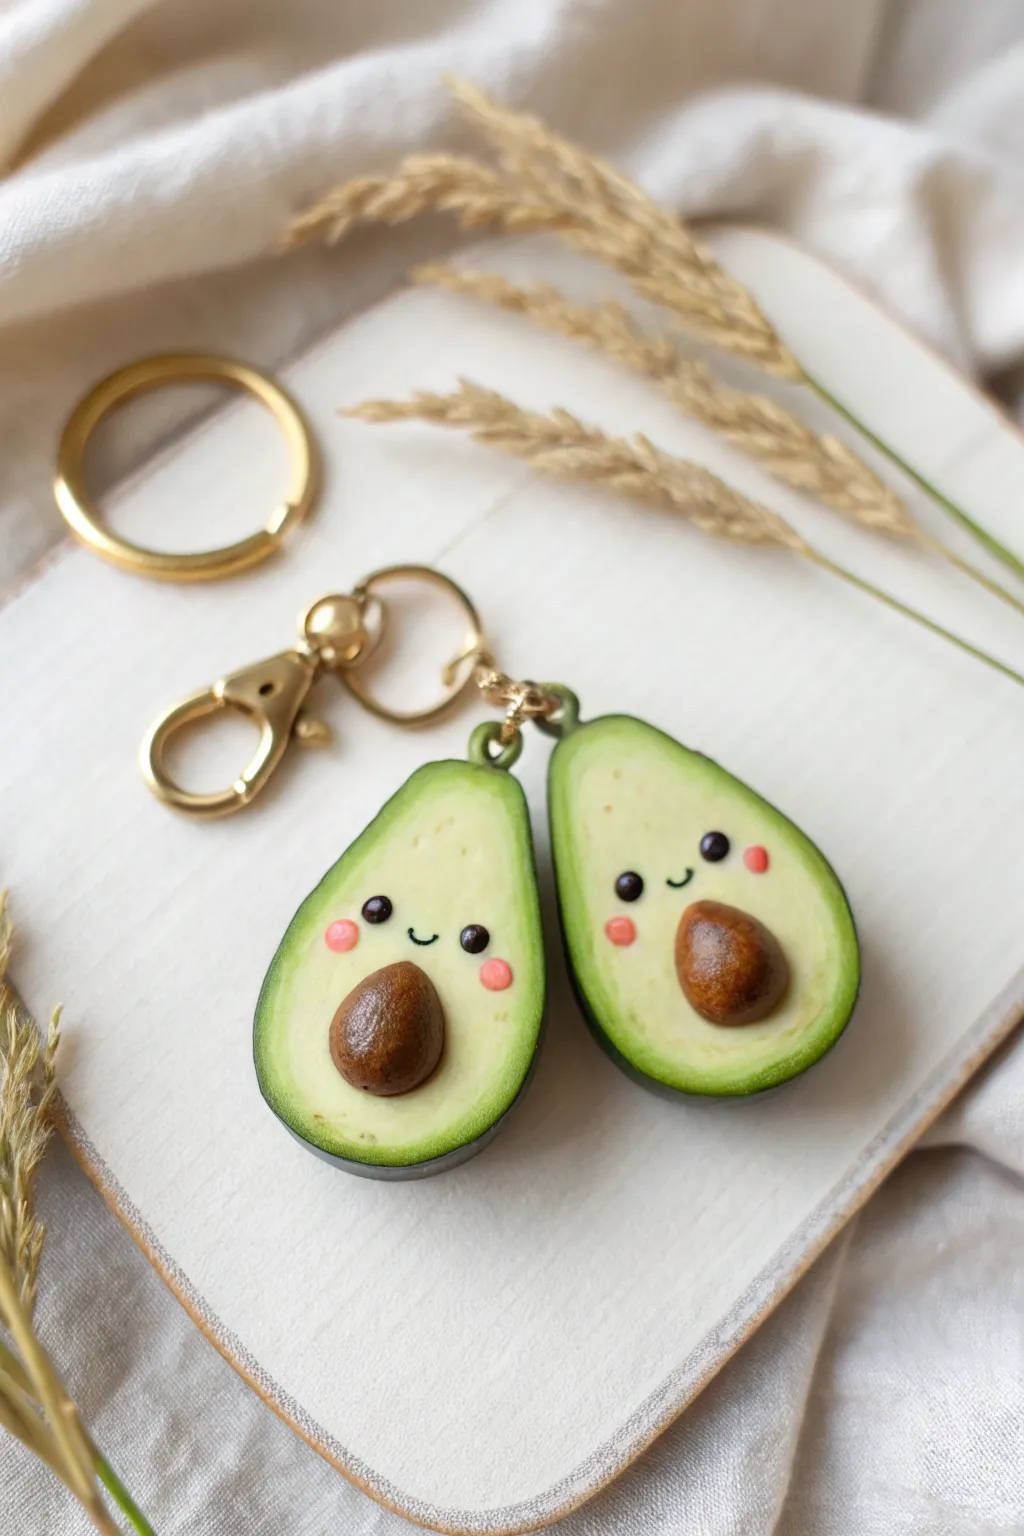
These adorable twin avocado charms are a match made in heaven, perfect for sharing with your real-life best friend. With their blushing cheeks and glossy seeds, these polymer clay creations capture the sweetest side of everyone’s favorite superfood.
How-To Guide
Materials
- Polymer clay (translucent white, light green, dark forest green, brown, pink, black)
- Small circle cutter
- Blade or X-Acto knife
- Needle tool or dotting tool
- Liquid polymer clay or bake-and-bond
- Gloss glaze or UV resin
- Soft pastel chalks in yellow, green, and brown
- Small paintbrush
- Gold screw eye pins
- Gold keychain hardware and jump rings
- Needle nose pliers
Step 1: Forming the Avocado Halves
-
Mix the flesh tone:
Start by conditioning your translucent white clay and mixing in a tiny amount of light green and yellow. You want a very pale, creamy green color that mimics the inner flesh of a real avocado. -
Shape the base:
Roll two equal-sized balls of your mixed clay and flatten them gently into teardrop shapes. Smooth the edges so they are rounded and organic-looking, not sharp. -
Create the gradient:
Using a blade, scrape some green and yellow soft pastel chalk into fine dust. With a dry brush, gently dust the outer edges of your teardrops with yellow-green, fading into a darker green at the very rim to create a realistic ripening effect. -
Add the skin:
Roll out a very thin sheet of dark forest green clay. Wrap this thin strip around the outer perimeter of your avocado teardrops, trimming the excess creates a clean ‘skin’ layer. -
Texture the flesh:
Take an old toothbrush or a stiff brush and gently tap it over the surface of the light green clay to give it a subtle, porous texture. -
Indents for the pits:
Use a large ball tool or your thumb to press a shallow, circular indentation into the lower, wider part of each avocado half where the pit will sit.
Realism Tip
For ultra-realism, lightly dust the brown pit with a reddish-brown pastel chalk before baking to give it a rich, nutty color variation.
Step 2: Adding the Details
-
Shape the pits:
Roll two balls of brown clay. I prefer mixing a bit of translucent clay into the brown to add depth. Press one into the indentation of each avocado half so they look comfortably nestled in. -
Texture the pits:
Use a needle tool to scratch tiny, subtle lines onto the brown pits to simulate the woody texture of a real seed. -
Add the eyes:
Roll incredibly tiny balls of black clay. Place two on each avocado, positioning them wide apart on the upper half of the flesh for that classic kawaii look. -
Create the mouth:
Roll a microscopic snake of black clay and curve it into a small ‘U’ shape. Gently press this between the eyes using a needle tool. -
Apply blush:
For the rosy cheeks, flatten two tiny discs of pink clay and place them just below and to the outside of the eyes. -
Insert hardware:
Screw a small gold eye pin into the top center of each avocado. If the clay is soft, you can push it in; if it’s firm, twist it carefully to avoid distorting the shape.
Step 3: Baking and Assembly
-
Bake the charms:
Place your avocados on a ceramic tile or baking sheet. Bake according to your clay manufacturer’s instructions, typically around 275°F (135°C) for 15-30 minutes. -
Cool down:
Let the pieces cool completely before handling. This ensures the clay hardens properly and prevents fingerprints on the warm surface. -
Secure the pin:
Once cool, gently twist the eye pin out, add a dab of super glue to the stem, and screw it back in for a permanent hold. -
Glaze the pit:
Apply a coat of gloss glaze or UV resin specifically to the brown pit. This contrast between the matte flesh and shiny seed makes the piece pop. -
Attach keychain:
Use pliers to open a jump ring, thread it through the eye pin, and attach your keychain hardware. Close the ring securely.
Level Up: Heart Pit
Make these charms specifically for Valentine’s Day or an anniversary by shaping the brown pits into hearts instead of circles.
Now you have a charming set of avocados ready to gift to your favorite person


Heart-Shell Kawaii Sea Turtle Keychains
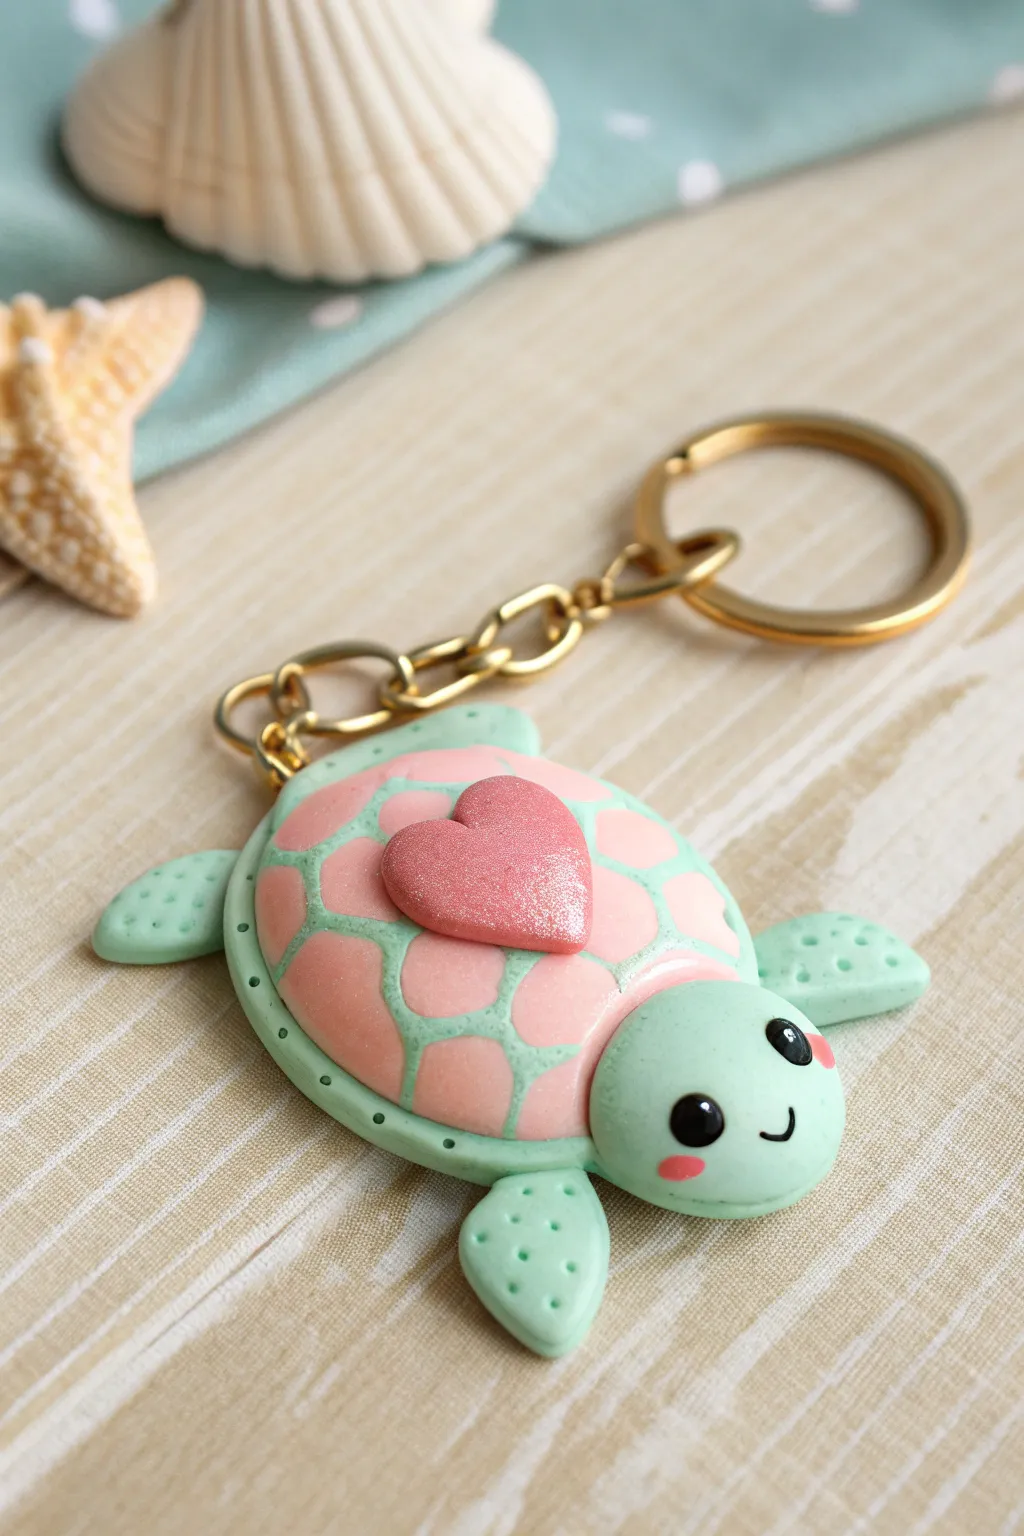
Carry a little ocean love wherever you go with this adorable mint and pink sea turtle keychain. Featuring a sparkly heart centerpiece and a sweet smiling face, this polymer clay charm is the perfect blend of seaside vibes and kawaii sweetness.
Step-by-Step Tutorial
Materials
- Polymer clay: Mint Green, Light Pink, Black
- Pink glitter or sparkly powder
- Gold keychain ring with chain and eye screw pin
- Liquid polymer clay (translucent or Bake & Bond)
- Dotting tools (needle tool and ball stylus)
- Acrylic rolling pin
- Clay knife or blade
- Pink pastel chalk or blush (for cheeks)
- Small paintbrush
- Gloss glaze (UV resin or polyurethane varnish)
Step 1: Shaping the Base
-
Mix the perfect mint:
Start by conditioning your mint green clay until it is soft and pliable. If the color is too saturated, mix in a little white clay to achieve that soft, pastel sea-foam look shown in the photo. -
Form the shell base:
Roll a medium-sized ball of mint clay and flatten it slightly into a smooth, thick oval. This will form the bottom layer and the ‘grout’ lines between the shell plates. -
Add the head:
Roll a smaller ball of fresh mint clay for the head. Press it gently against one end of the oval body base so it adheres well. -
Create the flippers:
Shape four small teardrops of mint clay. Flatten them slightly. Attach two near the front for the fore-flippers and two smaller ones at the back for the rear flippers. Blend the seams underneath with a tool to secure them. -
Texture the skin:
Using a small needle tool or a very fine dotting tool, gently poke tiny dots all over the flippers and the rim of the shell base to create a realistic, bubbly skin texture.
Smooth Operator
Before baking, brush the clay lightly with a little baby oil or clay softener on your finger. This removes fingerprints and creates a flawless, professional finish.
Step 2: Decorating the Shell
-
Prepare the shell plates:
Roll out a sheet of light pink clay. It should be thinner than your base. Cut out small, irregular polygon shapes to act as the shell scutes. -
Arrange the pattern:
Place the pink shapes onto the mint body, leaving small gaps between them so the green base shows through like grout lines. Gently roll over the top with your finger to smooth them down flush with the curve. -
Craft the heart:
Shape a small, puffy heart from pink clay. Before attaching it, I like to dust it with pink glitter or shimmer powder to give it that special sparkle seen in the image. -
Attach the centerpiece:
Place a tiny drop of liquid clay in the center of the shell and press your sparkly heart firmly on top.
Glow Up
Use glow-in-the-dark clay for the mint green body! Your turtle will look cute during the day and act as a glowing little guide when you’re looking for keys at night.
Step 3: Bringing it to Life
-
Add the eyes:
Press two small indentations into the head using a ball tool. Roll tiny balls of black clay and place them into the sockets, pressing gently to flatten them. -
Create the shine:
Take the tiniest speck of white clay (or white paint later) and add a reflection dot to the top corner of each black eye. -
Give it a smile:
Use a needle tool or a small curved blade to impress a tiny, happy smile right between the eyes. -
Blush the cheeks:
Use a small brush to apply scraped pink pastel chalk or real makeup blush underneath the eyes for a rosy, kawaii effect, paint two tiny pink ovals. -
Insert hardware:
Insert a gold eye screw pin into the top of the shell (near the head). Using a little liquid clay on the screw threads will help it bond permanently during baking.
Step 4: Finishing Touches
-
Bake carefully:
Bake the turtle according to your clay manufacturer’s instructions (usually 275°F/130°C for 15-30 minutes). Tent with foil to prevent scorching the pastels. -
Glaze specifically:
Once cool, apply a gloss glaze or UV resin ONLY to the eyes and the glittery heart. This contrast between matte skin and shiny details makes the piece look professional. -
Assemble keychain:
Open the jump ring on your gold keychain hardware using pliers, loop it through the eye screw, and close it securely.
Now you have a charming little sea friend ready to guard your keys

What Really Happens Inside the Kiln
Learn how time and temperature work together inside the kiln to transform clay into durable ceramic.
Chubby Kawaii Bee With Sparkly Wings

This adorable, egg-shaped bee brings a buzzy joy to any desk with its glittery wings and sweet pink cheeks. Its simple, rounded form makes it a perfect project for polymer clay beginners who want to practice smooth shapes and cute expressions.
Step-by-Step
Materials
- Polymer clay (yellow, black, pink)
- Translucent polymer clay
- Fine iridescent glitter
- Pink glitter or pigment powder
- Black acrylic paint
- Fine detail paintbrush
- Dotting tools or ball stylus tool
- White acrylic paint
- Needle tool
- Oven for baking
- Gloss glaze (optional)
- White gel pen (optional alternative for dots)
Step 1: Shaping the Body and Head
-
Form the base:
Start with a generous amount of yellow polymer clay. Condition it well by kneading until soft, then roll it into a large, smooth ball. -
Create the egg shape:
Gently taper the top of the yellow ball to create a distinct egg shape. Ensure the bottom is flattened slightly so the bee stands upright securely on your work surface. -
Smooth the surface:
Inspect the clay for any fingerprints or lint. I like to gently rub the surface with a tiny bit of baby oil on my finger to smooth out imperfections perfectly before moving on. -
Create the stripes:
Roll out black polymer clay into very thin, long snakes. Flatten them slightly with a roller or your finger to create ribbon-like strips. -
Apply the stripes:
Wrap three of these black strips around the lower half of the bee’s body. They don’t need to be perfectly straight; a little curve follows the roundness of the belly. -
Trim and blend:
Where the stripe is ends meet at the back, trim the excess carefully with a blade and gently smooth the seam so it disappears.
Step 2: Adding Facial Features
-
Make the eyes:
Roll two small balls of black clay. Press them onto the upper part of the yellow body, spacing them somewhat wide apart for that classic kawaii look. -
Add eye highlights:
Using a very small dotting tool and white acrylic paint (or tiny bits of white clay), add a small white reflection dot to the top right of each black eye. -
Paint the mouth:
Using a fine detail brush and black acrylic paint, draw a small, simple ‘U’ shape between the eyes to create a happy smile. -
Create rosy cheeks:
Take a tiny amount of pink clay and shape two small hearts. Press these onto the cheeks right below the eyes. The heart shape really adds to the sweetness. -
Add freckles:
Use a toothpick or fine dotting tool dipped in white paint to add delicate white dots across the forehead area, creating a whimsical freckle pattern. -
Form the antennae:
Roll two small teardrop shapes from black clay. Press the wider ends onto the very top of the head so they stick up slightly.
Sticky Fingerprints?
If you are leaving fingerprints on your smooth yellow egg shape, lightly dust your fingertips with cornstarch before handling the clay. This acts as a barrier and keeps the surface matte.
Step 3: Wings and Feet
-
Mix wing clay:
Mix translucent clay with fine iridescent glitter. Condition this mixture until the glitter is evenly distributed. -
Shape the main wings:
Form two flattened teardrop shapes from the glittery translucent clay. These will be the larger upper wings. -
Make the lower wings:
Mix a bit of pink glitter or pigment into a smaller portion of translucent clay. Shape two small circles for the lower wing sections. -
Assemble the wings:
Press the pink circular wing onto the bottom of the white teardrop wing, overlapping slightly. Attach this combined wing unit to the side of the bee’s body. -
Create the feet:
Roll two small balls of yellow clay and flatten them into rounded discs. Place these underneath the front of the body so they peek out. -
Bake the project:
Bake your bee according to the instructions on your specific brand of polymer clay (usually around 275°F or 130°C for 15-30 minutes). Let it cool completely before handling.
Pro Tip: Secure Wings
To ensure the wings don’t fall off after baking, apply a tiny drop of liquid polymer clay or ‘Bake & Bond’ to the contact point before pressing them onto the yellow body.
Place your sparkling little bee on a shelf or gift it to a friend to brighten their day
Baby Chick Mini Figures for Spring Vibes
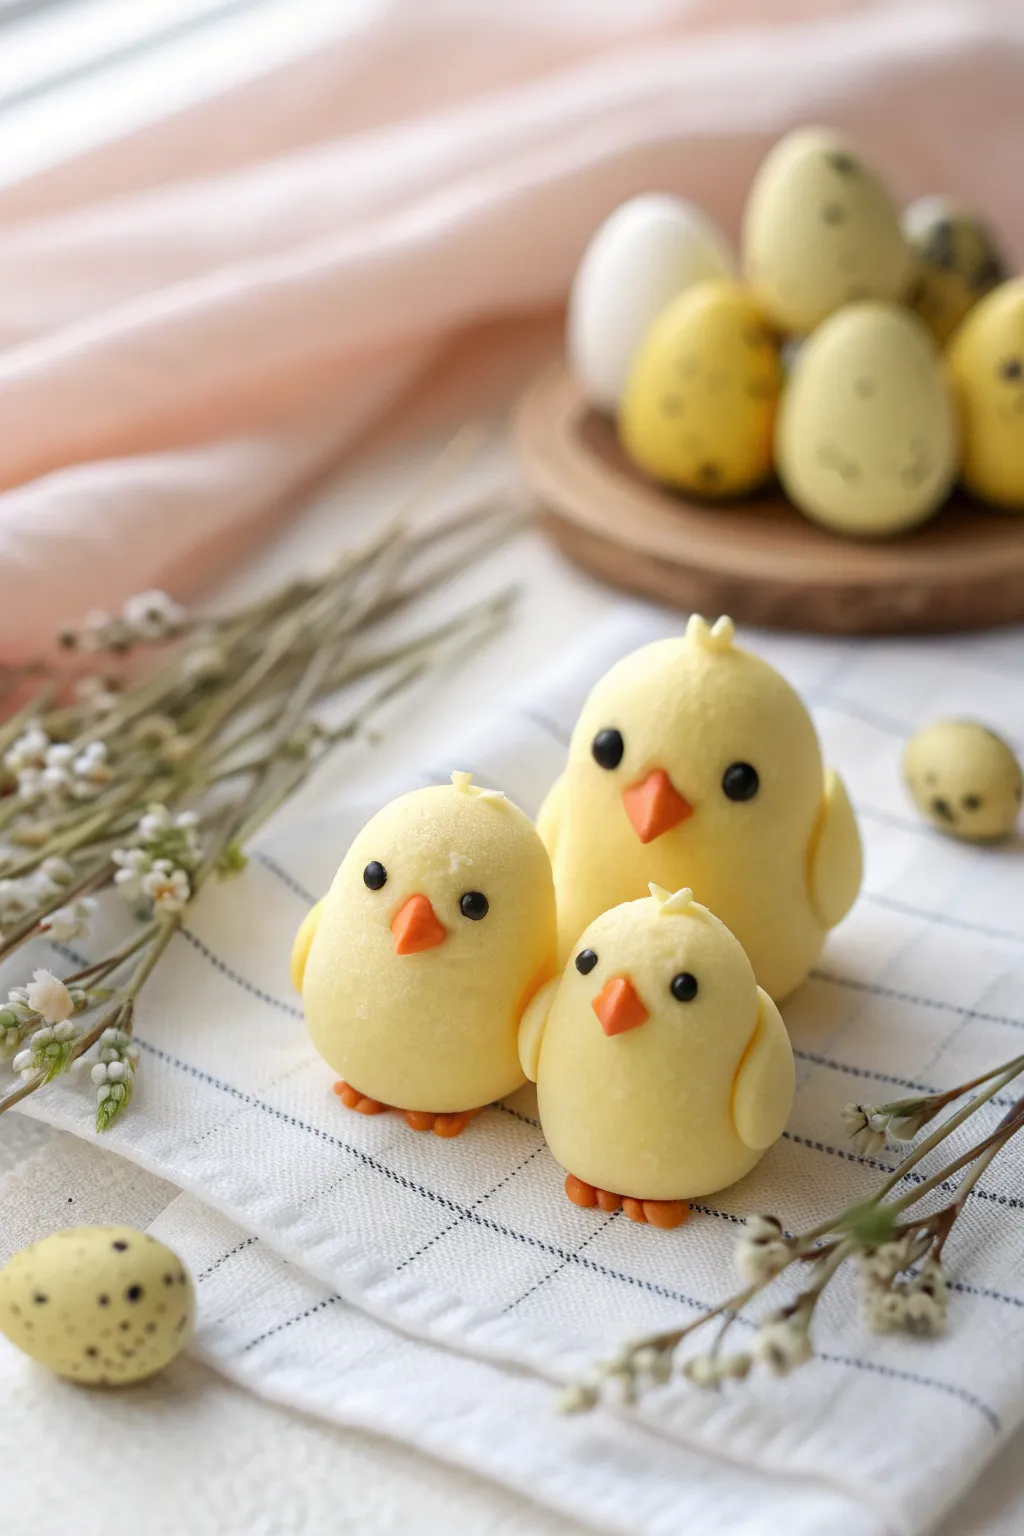
Brighten up your workspace or tiered tray decor with this adorable family of polymer clay chicks. Their soft matte finish and simple geometric shapes give them a clean, modern kawaii aesthetic perfect for spring.
Detailed Instructions
Materials
- Polymer clay (Soft Butter Yellow, Pumpkin Orange, Black)
- Clean ceramic tile or glass work surface
- Basic sculpting tools (ball tool, needle tool)
- Cornstarch or baby powder (to prevent fingerprints)
- Oven for baking
- Aluminum foil
- Small soft paintbrush (optional, for blending)
Step 1: Shaping the Bodies
-
Start with clean hands:
Before handling light yellow clay, wash your hands thoroughly and wipe down your work surface. Dust your fingertips lightly with cornstarch to prevent fingerprints and dust transfer. -
Portion the clay:
Cut three pieces of yellow clay in descending sizes: one large for the mama hen, a medium one for the fledgling, and a small one for the baby chick. -
Condition the clay:
Knead each yellow piece until warm and pliable. This prevents cracks during baking. -
Form the base shapes:
Roll each piece into a smooth ball. Then, gently roll the top third between your fingers to slightly taper it, creating a soft egg-like pear shape that is wider at the bottom. -
Flatten the base:
Gently tap the bottom of each chick on your work surface so they stand upright securely without wobbling. -
Smooth the surface:
I like to gently buff the surface with my thumb to ensure there are no seams or lint before moving on to the details.
Clean Clay Trick
Keep baby wipes handy! Wipe your hands meticulously between colors, especially after using black clay, to keep that pastel yellow perfectly bright.
Step 2: Adding Wings and Tufts
-
Create tiny wings:
For each chick, create two small teardrop shapes from the yellow clay. Flatten them slightly with your thumb. -
Attach the wings:
Press a wing onto each side of the body, about halfway down. Blend the upper seam into the body using a sculpting tool or your finger so it looks seamless, leaving the bottom tip slightly raised. -
Make the head tufts:
Pinch off extremely tiny bits of yellow clay. Roll them into tiny cones. -
Position the feathers:
Place one or two tiny cones on the very top of each head to simulate baby feathers. You can add a third tiny one for the largest chick for extra character.
Step 3: Face and Feet Details
-
Form the beaks:
Using the orange clay, roll three tiny cones. These should be quite small to maintain the ‘kawaii’ ratio. -
Place the beaks:
Press the flat side of the orange cone onto the center of the face area. Use a needle tool to gently neaten the edges if they distort. -
Create eyes:
Roll very small balls of black clay. You’ll need two for each chick. -
Attach the eyes:
Place the eyes wide apart on either side of the beak. Press them in gently so they are flush with the surface but strictly round. -
Make the feet:
Roll tiny orange balls—two per chick. Flatten them slightly into small discs or ovals. -
Assemble the feet:
Place the feet underneath the front edge of the body so just the little orange toes peek out. -
Texture the feet:
Use a dull knife tool or toothpick to make two small indentations in each orange foot to suggest toes. -
Final smooth:
Do a final check for fingerprints. If you find any, brush them lightly with a tiny bit of baby oil or cornstarch. -
Bake carefully:
Bake according to your clay package instructions. I suggest tenting them with aluminum foil to prevent the pale yellow from scorching or darkening.
Blush It Up
Before baking, brush a tiny amount of dry pink soft pastel dust onto the cheeks using a fluffy brush for an extra sweet, rosy-cheeked look.
Set your finished trio on a shelf to bring a little sunshine indoors


The Complete Guide to Pottery Troubleshooting
Uncover the most common ceramic mistakes—from cracking clay to failed glazes—and learn how to fix them fast.
Sleepy Kawaii Sloth Pocket Buddy
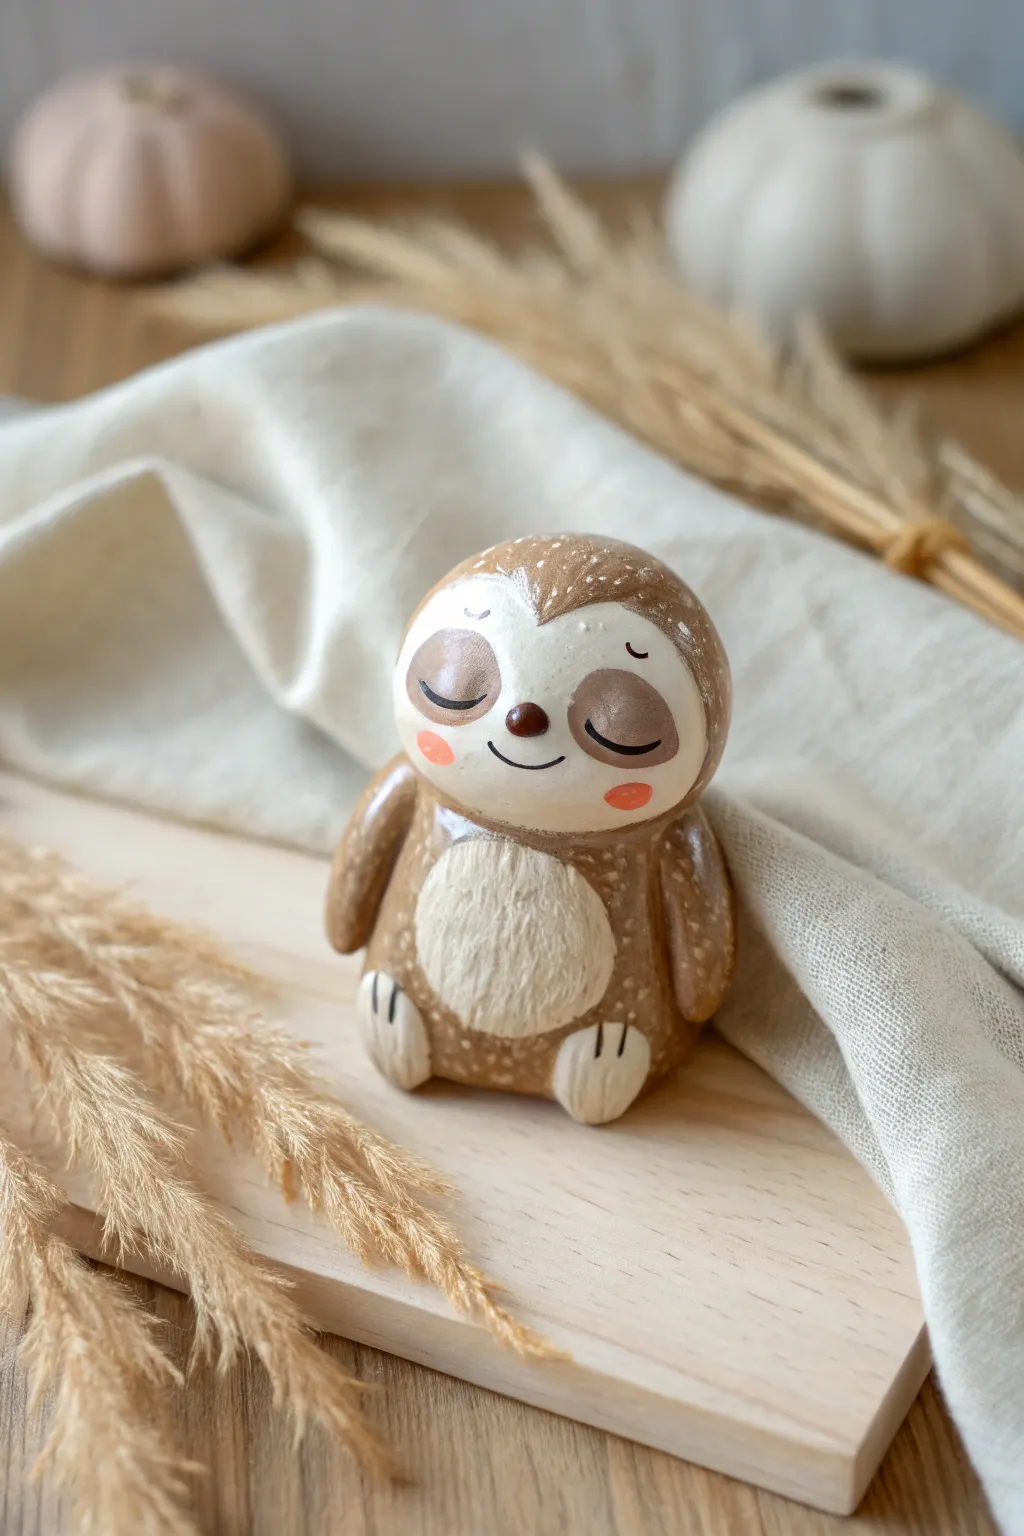
Craft a serene little companion with this sleepy sloth tutorial, featuring gentle earth tones and a cozy, textured finish. Its rounded form and peaceful expression make it perfect for a desk mascot or a calming pocket worry stone.
Step-by-Step Tutorial
Materials
- Polymer clay (light brown, off-white/cream, dark brown, pink)
- Modeling tools (dotting tool, needle tool)
- Acrylic paint (white, black)
- Small paintbrush
- Glossy glaze or UV resin (for nose/cheeks)
- Matte varnish (optional)
- Toothbrush or texturing sponge
- Baking sheet and oven
Step 1: Shaping the Base
-
Mix Your Colors:
Start by mixing translucent clay with a bit of brown to get a soft, milky coffee color, or simply use a light hazelnut shade straight from the pack. Condition the clay until it’s pliable and warm. -
Form the Body:
Roll a large ball of the light brown clay into a smooth egg shape. Flatten the bottom slightly on your work surface so the sloth sits upright without wobbling. -
Texture the Fur:
Using a clean toothbrush or a texture sponge, gently tap over the brown clay surface to create a subtle, fuzzy fur texture. Avoid the area where the face will go. -
Create the Stomach:
Flatten a smaller ball of cream-colored clay into a thin oval. Press this firmly onto the lower center of the body for the belly patch. -
Fur Details on Belly:
Use a needle tool to scratch delicate, vertical fur lines into the cream belly patch to give it a soft, hairy appearance similar to the reference photo.
Smudge Alert?
If you smudge the black eye paint, quickly wipe it away with a Q-tip dipped in rubbing alcohol or water before it dries. Acetone works for mistakes on baked clay.
Step 2: Adding Features
-
The Face Mask:
Roll a piece of cream clay into a wide heart shape or a rounded kidney bean shape. Press this onto the upper part of the body, wrapping it slightly around the sides of the head. -
Eye Patches:
Take two small pieces of darker brown clay and flatten them into teardrop shapes. Position them on the cream face mask, slanting them slightly downwards for that sleepy look. -
The Nose:
Roll a tiny ball of dark brown clay and place it centrally between the eye patches. Press it down gently to secure it. -
Arms:
Create two sausage shapes from the light brown clay. Attach them vertically along the sides of the body, blending the top seam into the neck area so they look seamless. -
Feet:
Shape two small balls of cream clay into ovals. Press them onto the bottom front of the body, just below the belly patch. -
Claws:
Use a knife tool to press two indentations into each cream foot to delineate the subtle claw toes. -
Initial Speckling:
To mimic the speckled look, you can add tiny flakes of unmixed white clay onto the head’s brown fur, or save this step for painting later.
Step 3: Baking and Finishing
-
Bake:
Bake your sloth according to the manufacturer’s instructions for your specific brand of polymer clay. Let it cool completely before painting. -
Paint the Expression:
Using a very fine detail brush and black acrylic paint, draw two curved ‘U’ shapes on the dark brown eye patches for closed eyelids. Add a small smile line under the nose. -
Rosy Cheeks:
Dilute pink acrylic paint with a little water or glaze, or use pink clay circles earlier. Paint soft, circular blushes on the cheeks. -
White Speckles:
Dip a stiff brush or toothbrush into white acrylic paint. Flick the bristles to splatter tiny white dots over the top of the head for a starry, textured effect. -
Glaze:
Apply a coat of glossy glaze or UV resin specifically to the nose and cheeks to make them shine. I usually leave the rest of the body matte to maintain the natural clay look.
Make it a Charm
Insert a screw eye pin into the top of the head before baking. Once cool, add a jump ring and lanyard to turn your sleepy sloth into a cute phone charm.
Now you have a peaceful little friend to keep you company during busy days
Mini Balloon Dog Charms in Pastel Colors
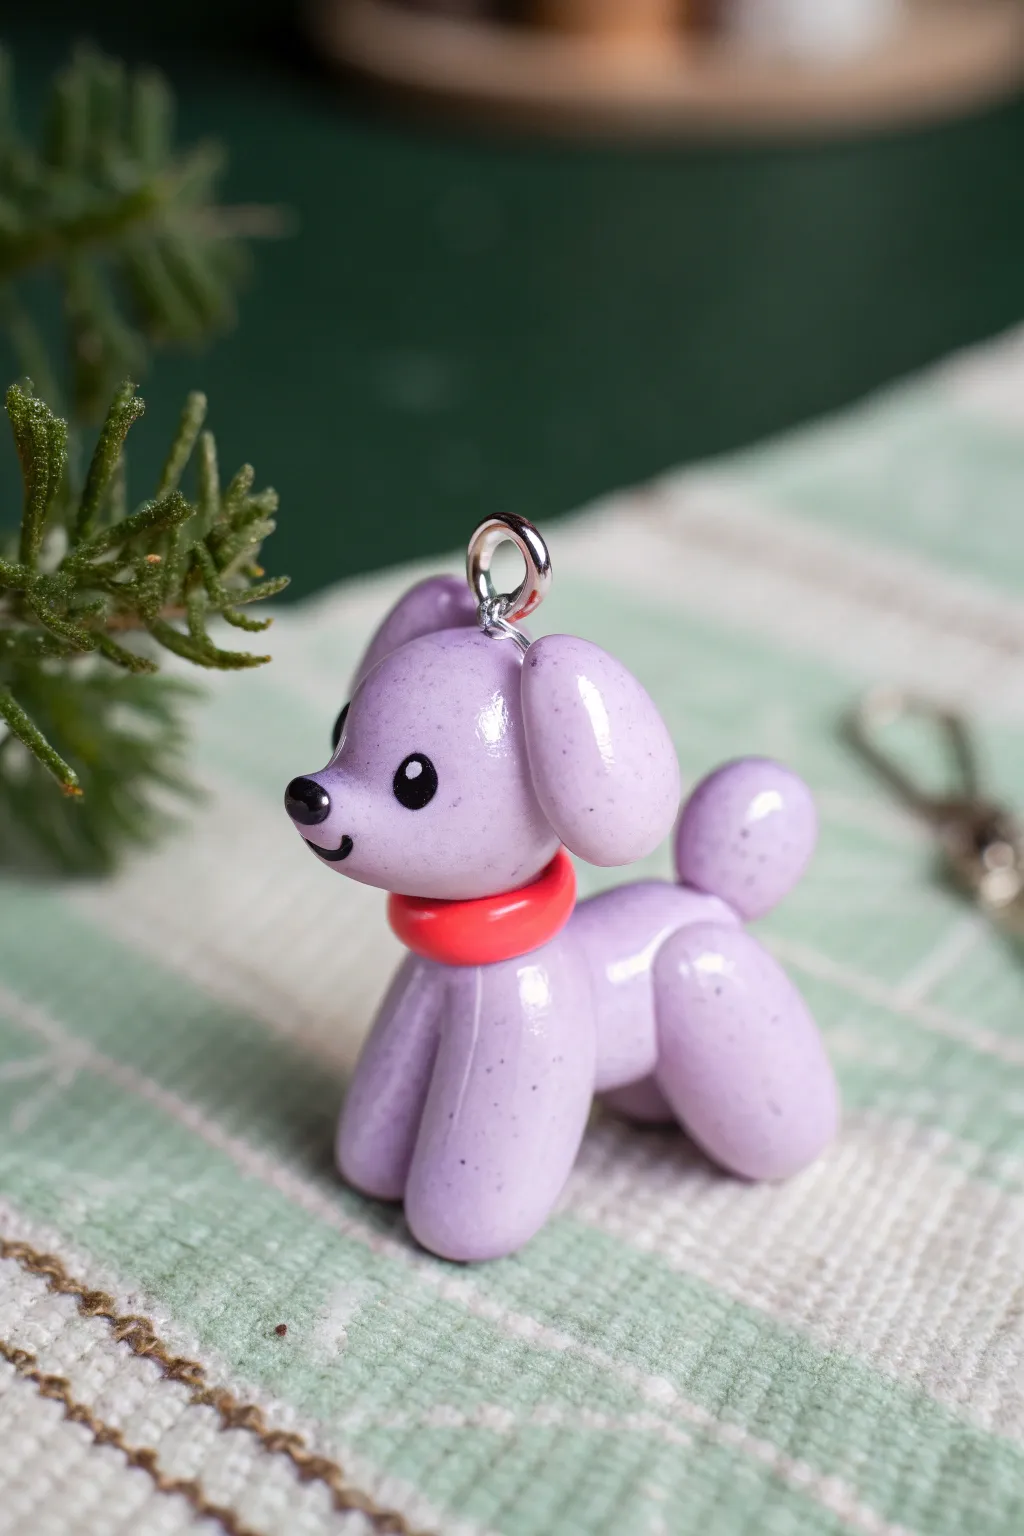
This adorable charm combines the bouncy, rounded shapes of a balloon animal with the permanence of polymer clay. With its soft lavender hue, bright red collar, and ultra-glossy finish, it makes a perfect zipper pull or keychain accessory.
Step-by-Step
Materials
- Polymer clay (Lavender/Light Purple)
- Polymer clay (Bright Red)
- Polymer clay (Black)
- Rolling pin or pasta machine
- Blade or craft knife
- Needle tool or toothpick
- Eye pin or screw eye
- Liquid polymer clay (optional, for bonding)
- Gloss glaze or UV resin
- Brush for glazing
- Small ball tool
Step 1: Forming the Body Parts
-
Condition the clay:
Start by thoroughly conditioning your lavender clay until it is soft and pliable. This prevents cracks during baking. I like to roll it into a snake and fold it a few times to ensure it’s smooth. -
Create the main segments:
Divide your lavender clay into several portions. Roll a medium-sized log for the body, about 1 inch long. Keep the ends rounded rather than flat. -
Shape the legs:
Roll four smaller logs for the legs. These should be slightly thinner than the body but have the same rounded, sausage-like ‘balloon’ appearance. Keeping them relatively thick adds to the cute, chubby aesthetic. -
Form the head:
Roll a ball for the head, slightly flattening the front area to create a distinct snout section. -
Make the ears and tail:
Create two flattened teardrop shapes for the floppy ears and a small, round ball for the puffy tail.
Clean Prints
Before baking, gently wipe the clay with a brush dipped in a tiny bit of rubbing alcohol or baby oil. This removes fingerprints and dust for a smooth finish.
Step 2: Assembly and Detailing
-
Attach the legs:
Press the four leg logs onto the bottom of the body log. If the clay isn’t sticky enough, a tiny dab of liquid clay helps secure them. Smooth the seams gently with a silicone tool or your finger to make it look like one continuous balloon shape. -
Attach the tail:
Place the small tail ball on the upper rear of the body. -
Add the collar:
Take a small amount of bright red clay and roll it into a thin snake. Wrap this ring around the neck area where the head will attach to the body. Flatten it slightly so the head sits securely. -
Connect the head:
Press the head firmly onto the red collar. Adjust the angle so the snout points slightly upward for a cheerful expression. -
Position the ears:
Attach the two ear teardrops to the sides of the head. Let them droop slightly to mimic a soft toy look.
Glitter Glaze
Mix a tiny pinch of extra-fine iridescent glitter into your gloss glaze. It gives the ‘balloon’ surface a magical shimmer without hiding the clay color.
Step 3: Face and Finishing Touches
-
Add the eyes:
Use a small ball tool to make two tiny indentations for the eyes. Roll two minuscule balls of black clay and press them into these sockets. -
Add the nose:
Roll a slightly larger flattened oval of black clay and press it onto the very tip of the snout. -
Create the sparkle:
For that kawaii anime look, add a microscopic dot of white clay (or white paint after baking) to the upper corner of each black eye. -
Draw the mouth:
Use a needle tool or a very thin snake of black clay to create a small, curved smile under the snout. -
Insert hardware:
Trim an eye pin to the right length and insert it into the center of the head. Adding a drop of liquid clay or super glue to the pin helps it stay put permanently. -
Bake the charm:
Bake according to your clay manufacturer’s instructions, usually around 275°F (130°C) for 15-20 minutes. Let it cool completely before handling. -
Apply glaze:
Once cool, coat the entire piece (except the metal loop) with a high-gloss glaze or UV resin. This mimics the shiny texture of a real balloon.
You now have a charming little companion ready to adorn your favorite bag or planner

TRACK YOUR CERAMIC JOURNEY
Capture glaze tests, firing details, and creative progress—all in one simple printable. Make your projects easier to repeat and improve.
Smiling Watermelon, Pineapple, and Citrus Slices
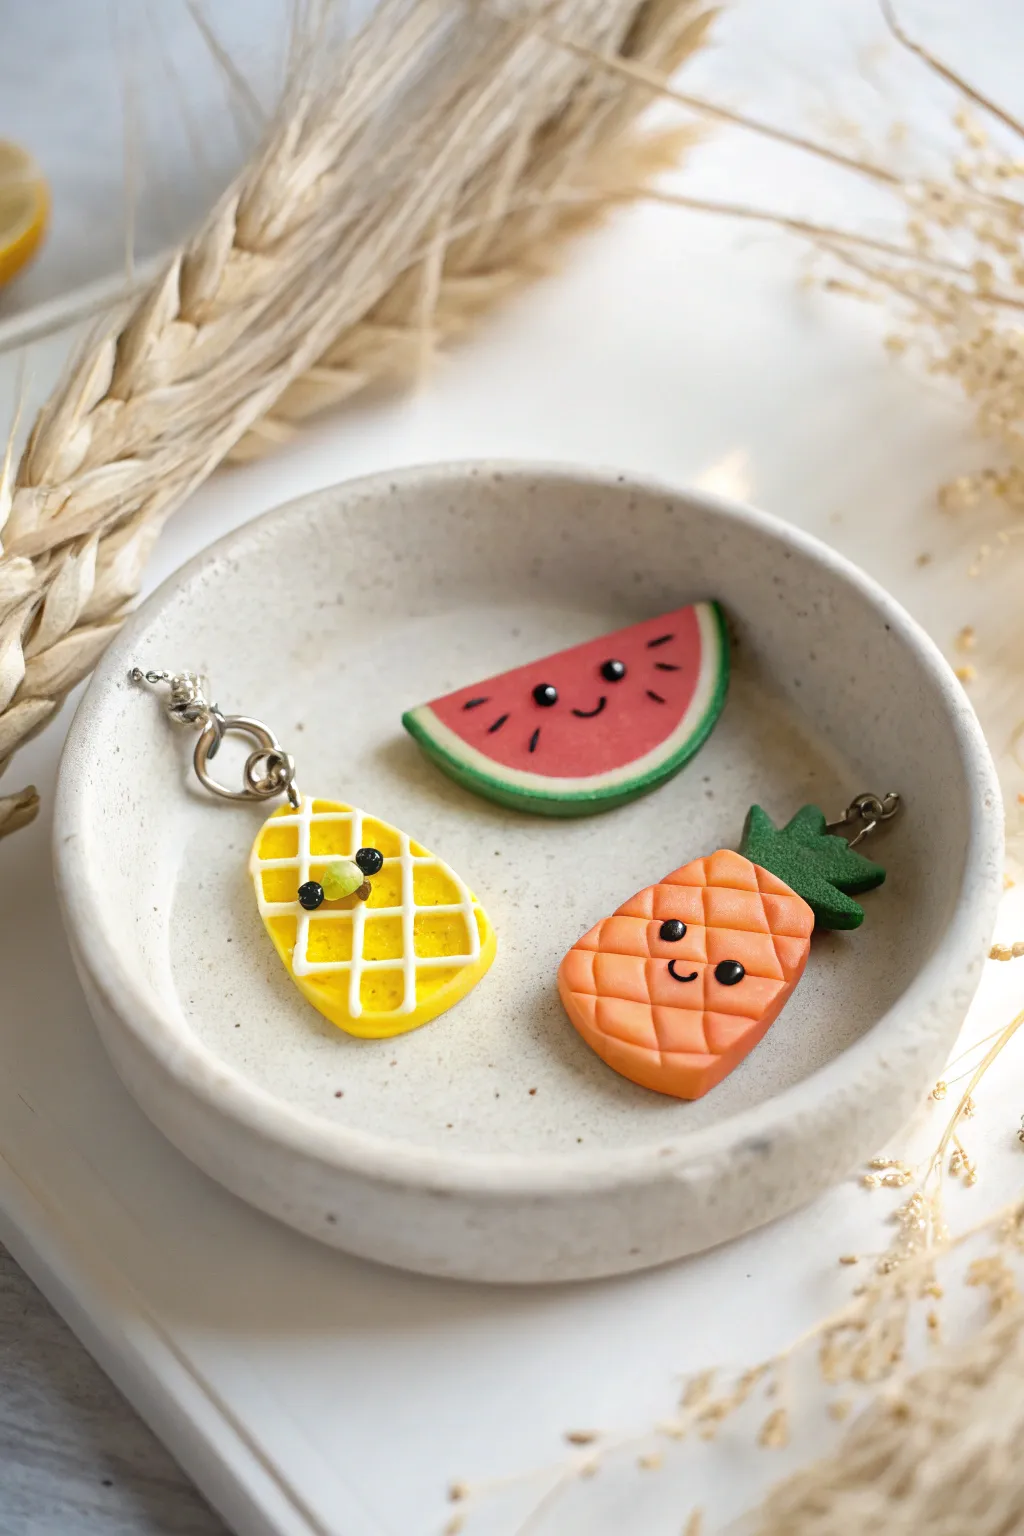
These miniature fruit charms bring a burst of summer joy with their adorable smiling faces and vibrant colors. Perfect for beginners, this project creates a happy watermelon slice, a textured pineapple, and a unique yellow fruit friend to brighten anyone’s day.
Step-by-Step Guide
Materials
- Polymer clay (pink, green, white, yellow, orange, black)
- Clay rolling pin or pasta machine
- Blade or X-Acto knife
- Needle tool or dotting tool
- Small eye pins (3)
- Pliers
- Gloss glaze or polyurethane varnish (optional)
- Small paintbrush
Step 1: Creating the Smiling Watermelon
-
Shape the Base:
Start by conditioning a small ball of pink clay and shaping it into a thick semicircle. Keep the top edge straight and the bottom curved. -
Add the Rind:
Roll out a thin sheet of white clay and a slightly thicker sheet of green clay. Wrap the curved bottom edge of your pink semicircle first with a strip of white, then with a strip of green. -
Smooth the Edges:
Gently roll the curved side on your work surface to blend the layers together seamlessly, ensuring the green rind hugs the white layer perfectly. -
Add the Face:
Using a needle tool, gently indent where the eyes will go. Roll two tiny balls of black clay and press them into the indents. Add a tiny snake of black clay for the smile. -
Add Seeds:
Roll very thin, tiny tapered teardrops of black clay for the seeds. I usually place two or three on the cheeks to mimic freckles or seeds, pressing them flat.
Sticky Fingerprints?
If you see fingerprints on your smooth fruit, lightly brush the unbaked clay with a tiny amount of baby oil or cornstarch to smooth them out instantly.
Step 2: Making the Happy Pineapple
-
Form the Body:
Take orange clay and shape it into a rounded rectangle that is slightly wider at the bottom than the top, flattening it gently so it’s not too thick. -
Texture the Surface:
Use the back of your blade to gently press diagonal lines across the body in one direction, then cross them in the other direction to create a diamond quilt pattern. -
Add the Crown:
Shape a small piece of dark green clay into a flat, spiky crown. Attach this securely to the top of the orange body. -
Create the Expression:
Just like the watermelon, indent spots for the eyes. Insert tiny black clay balls for eyes and a small curved snake for the smile right in the center of the diamond pattern.
Step 3: Crafting the Yellow Citrus Lattice
-
Shape the Drop:
Form yellow clay into a flattened teardrop shape, keeping the bottom wide and rounded and the top slightly more tapered. -
Create the Grid:
Roll extremely thin snakes of white clay. Lay them diagonally across the yellow shape to create a crisscross lattice pattern. -
Secure the Lines:
Gently press the white lines down so they adhere to the yellow base, trimming any excess hanging off the edges with your blade. -
Decorate the center:
In the middle of the lattice, add a tiny cluster using a small green clay ball and two black eye beads to create a little character face peeking out.
Make it Jewelry
Attach jump rings to the eye pins after baking to turn these into stitch markers, bracelet charms, or attach earring hooks for a fruity summer set.
Step 4: Finishing Touches
-
Insert Hardware:
Trim your eye pins if they are too long. Push one eye pin into the top center of each fruit charm. -
Bake:
Bake the pieces according to your clay manufacturer’s instructions, usually around 275°F (135°C) for 15-30 minutes depending on thickness. -
Seal:
Once fully cooled, apply a coat of gloss glaze to the eyes and seeds to make them sparkle, or varnish the entire piece for durability.
Now you have a trio of sweet, smiling friends ready to accessorize your life
Mix-and-Match Kawaii Faces for Mini Icons
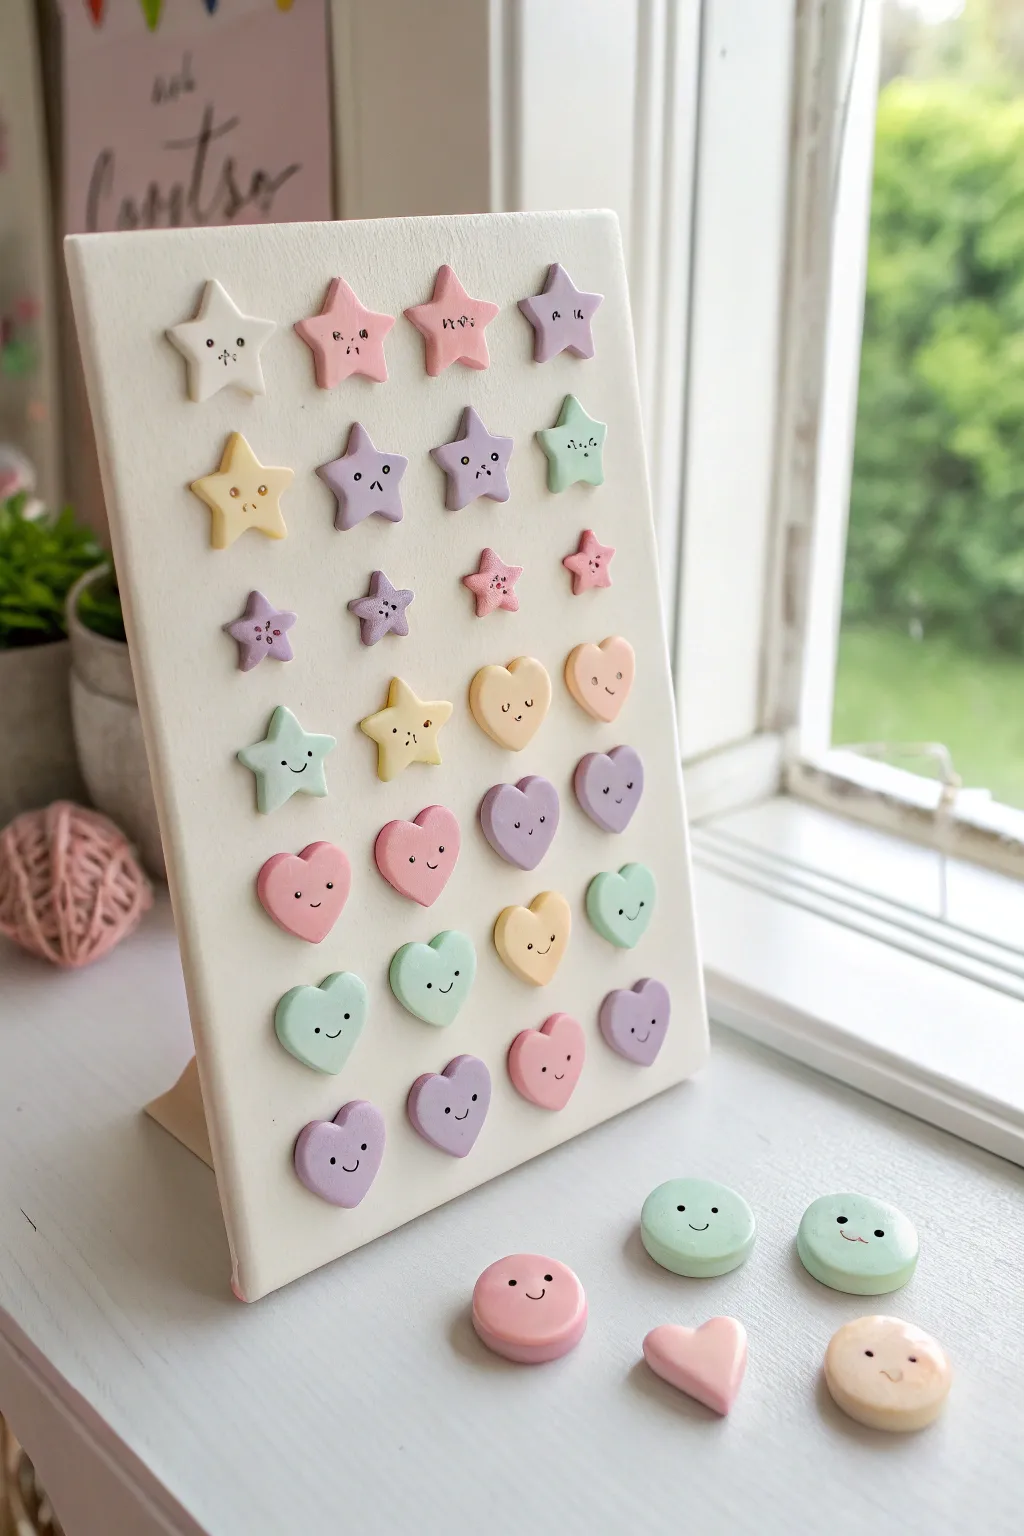
Create your own mood-boosting gallery of kawaii expressions with these tiny, mix-and-match clay icons. This project features soft pastel stars and hearts with adorable, hand-painted faces arranged neatly on a custom display board for a charming desk accessory.
How-To Guide
Materials
- Polymer clay in pastel pink, lavender, mint green, and pale yellow
- Small star and heart clay cutters (approx. 1 inch)
- Small circle cutter
- Acrylic paint (black for eyes, pink for cheeks)
- Fine detail paintbrush or dotting tool
- Rolling pin or clay machine
- Baking sheet and parchment paper
- Gloss or matte glaze (optional)
- Small wooden canvas board or thick cardstock
- Fabric for covering board (cream or white canvas)
- Small tabletop easel
- Strong craft glue or hot glue gun
Step 1: Prepping and Cutting Shapes
-
Condition the clay:
Begin by warming the polymer clay in your hands, kneading each pastel color separately until it is soft and pliable. This prevents cracking later. -
Roll out sheets:
Using a rolling pin or clay machine, roll your clay out to a uniform thickness, aiming for about 1/4 inch so the pieces have a nice, chunky feel. -
Cut the icons:
Press your cutters firmly into the clay to create an assortment of stars and hearts. I always like to wiggle the cutter slightly before lifting to ensure clean edges. -
Make the circle extras:
Cut a few circle shapes from leftover clay to create the little round tokens seen at the bottom of the display. -
Smooth the edges:
Gently run your finger around the cut edge of each shape to soften any sharpness or stray clay bits for a polished look. -
Bake the pieces:
Arrange your shapes on a parchment-lined baking sheet and bake according to your clay package instructions (usually 275°F/135°C for 15-30 minutes). Let them cool completely.
Smooth Surface Trick
Before baking, gently wipe each clay piece with a little bit of baby oil or cornstarch on your finger. This removes distinct fingerprints and dust.
Step 2: Painting the Kawaii Faces
-
Draft the expressions:
Before painting, lightly sketch different expressions on paper to plan your variety—think winking eyes, sleeping faces, and happy smiles. -
Paint the eyes:
Using a very fine detail brush or a dotting tool dipped in black acrylic paint, carefully add the eyes. Keep them wide-set for maximum cuteness. -
Add the mouths:
Paint tiny, simple mouths. A small ‘u’ shape makes a smile, while a tiny inverted ‘v’ can look like a singing or surprised face. -
Apply rosy cheeks:
Dip a rounded tool or the back of a brush into pale pink paint and gently dab it under the eyes to create sweet, blushing cheeks. -
Let the paint set:
Allow the acrylic paint to dry fully. If you want extra durability, apply a thin coat of matte or gloss glaze over each piece now.
Paint Not Sticking?
If the acrylic paint beads up on the baked clay, wipe the surface with a cotton swab dipped in rubbing alcohol to remove oils before painting again.
Step 3: Assembling the Display
-
Prepare the board:
Take your wooden board or sturdy cardstock and wrap it tightly with the cream fabric, gluing the edges on the back for a clean finish. -
Plan the layout:
Lay your finished clay pieces onto the fabric-covered board to determine the spacing. Arrange them in alternating rows of stars and hearts. -
Glue the first row:
Starting at the top, apply a small dot of strong glue to the back of each star and press it firmly onto the fabric. -
Continue the pattern:
Work your way down, gluing the subsequent rows. Try to alternate colors so no two identical shades are right next to each other. -
Final touches:
Place the board onto the small wooden easel. Scatter the extra loose clay pieces around the base for a playful, styled look.
Now you have a sweet collection of expressions to brighten up your workspace every day
Star and Sun Kawaii Charms for Bag Tags
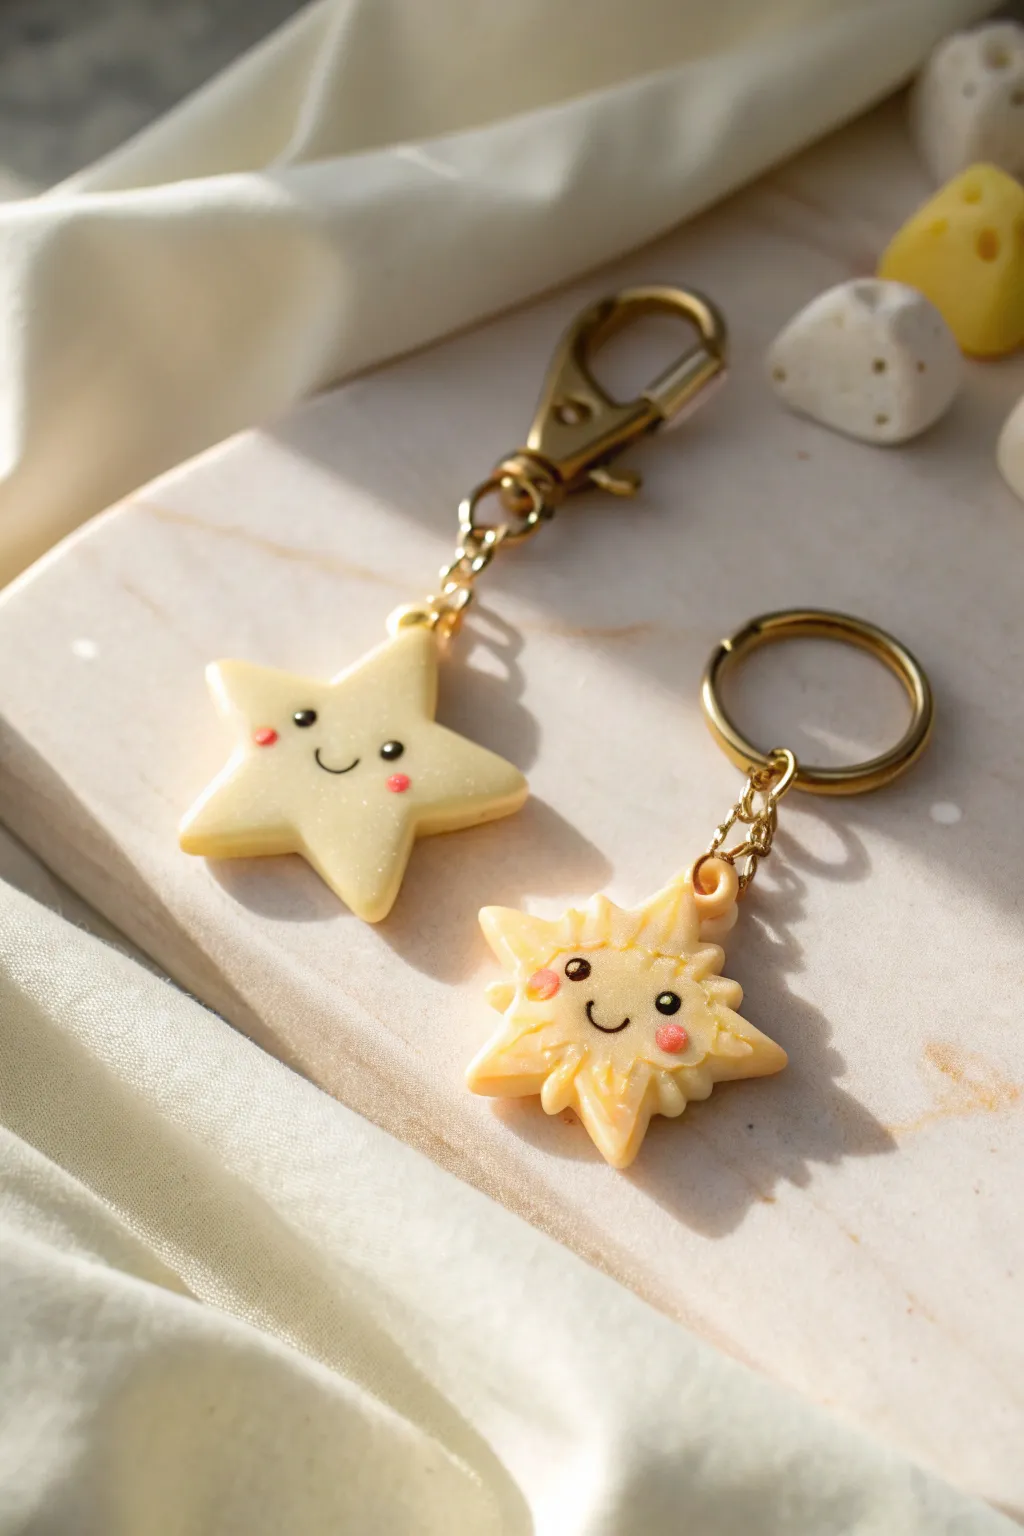
Brighten up your accessories with this adorable duo featuring a happy star and a radiant sun. These puffy, glossy charms use a milky yellow clay base and simple kawaii faces to create the perfect matching set for you and a friend.
Step-by-Step Guide
Materials
- Polymer clay: translucent white, pale yellow, black, and pink
- Star shaped cutter (approx. 1.5 inch)
- Sun shaped cutter (or round cutter + craft knife)
- Eye pins (gold)
- Ball stylus tool
- Gloss glaze or UV resin
- Soft pastel chalks in orange/dark yellow
- Small paintbrush
- Gold keychain hardware (swivel clasp and split ring)
- Jewelry pliers
- Jump rings (gold)
Step 1: Shaping the Celestial Bodies
-
Mix the perfect shade:
Start by conditioning your clay. Mix a large portion of translucent white with a very small amount of pale yellow to achieve that milky, custard-like color seen in the photo. It shouldn’t be opaque. -
Roll only thick:
Roll your mixed clay out on a clean surface. Keep it quite thick—about 1/4 inch or roughly 6mm—to give the charms their nice, puffy appearance. -
Cut the star:
Press your star cutter firmly into the clay. Before removing the clay from the cutter, gently rub the edges with your finger to round them off so the star looks soft rather than sharp. -
Form the sun:
Use a sun-shaped cutter for the second charm. If you don’t have one, cut a circle first, then use a craft knife to cut small triangles all around the edge to create the sun rays. -
Soften the edges:
Gently tap the points of both the star and the sun with your finger. You want significant rounding here to achieve the ‘bubble’ aesthetic shown in the reference. -
Add dimension to the sun:
Take a razor blade or knife tool and gently score lines separating the rays from the center face of the sun, adding slightly more definition than the star has. -
Shade the sun:
Scrape a little bit of orange or dark yellow soft pastel into a powder. Use a dry, soft brush to lightly dust the tips of the sun’s rays to give it a warm glow.
Clean Clay Pro Tip
Keep baby wipes or rubbing alcohol nearby. Clean your hands and tools thoroughly between colors, especially before handling the pale yellow clay, as lint shows up easily.
Step 2: Kawaii Details & Assembly
-
Insert hardware:
Take a gold eye pin and trim it if necessary so it doesn’t poke through the bottom. Insert it carefully into the top point of the star and the top ray of the sun. -
Mark the face placement:
Use a needle tool to make tiny guide marks where the eyes will go. Keeping the eyes wide apart and low on the face creates that classic cute look. -
Create the eyes:
Roll tiny spheres of black clay. They need to be very small. Press them gently into the guide marks you made, flattening them just slightly so they bond with the base. -
Add the smile:
Roll a microscopically thin snake of black clay. Cut two tiny ‘U’ shapes and carefully place them between the eyes using a needle tool or toothpick to curve them perfectly. -
Apply blush:
Roll tiny balls of pink clay and press them just under the outer corners of the eyes. Flatten them until they are almost flush with the surface. -
Bake:
Bake the pieces according to your specific brand of clay’s instructions (usually 275°F/135°C for 15-30 minutes). I recommend tenting them with foil to prevent that pale yellow from scorching. -
Cool and inspect:
Let the charms cool completely inside the oven if possible to prevent cracking. Once cool, check that the eye pins are secure; if loose, secure them with a drop of superglue. -
Glazing:
Apply a coat of gloss glaze or UV resin to the front and sides of the charms. This gives them that wet, candy-like shine and protects the pastel shading on the sun. -
Attach keychain hardware:
Use your jewelry pliers to open a jump ring. Loop it through the eye pin on the star and attach the gold swivel clasp. Close the ring securely. -
Final assembly:
Repeat the process for the sun charm, attaching it to the gold split ring via a jump ring and a short length of chain to mimic the dangling look in the photo.
Level Up: Sparkle
Mix varying sizes of iridescent glitter into your translucent clay base before rolling it out. This will give your celestial bodies a subtle, magical galaxy shimmer.
Now you have a charming set of celestial accessories ready to gift to a friend or keep for yourself
Kawaii Animal Bell Dangles
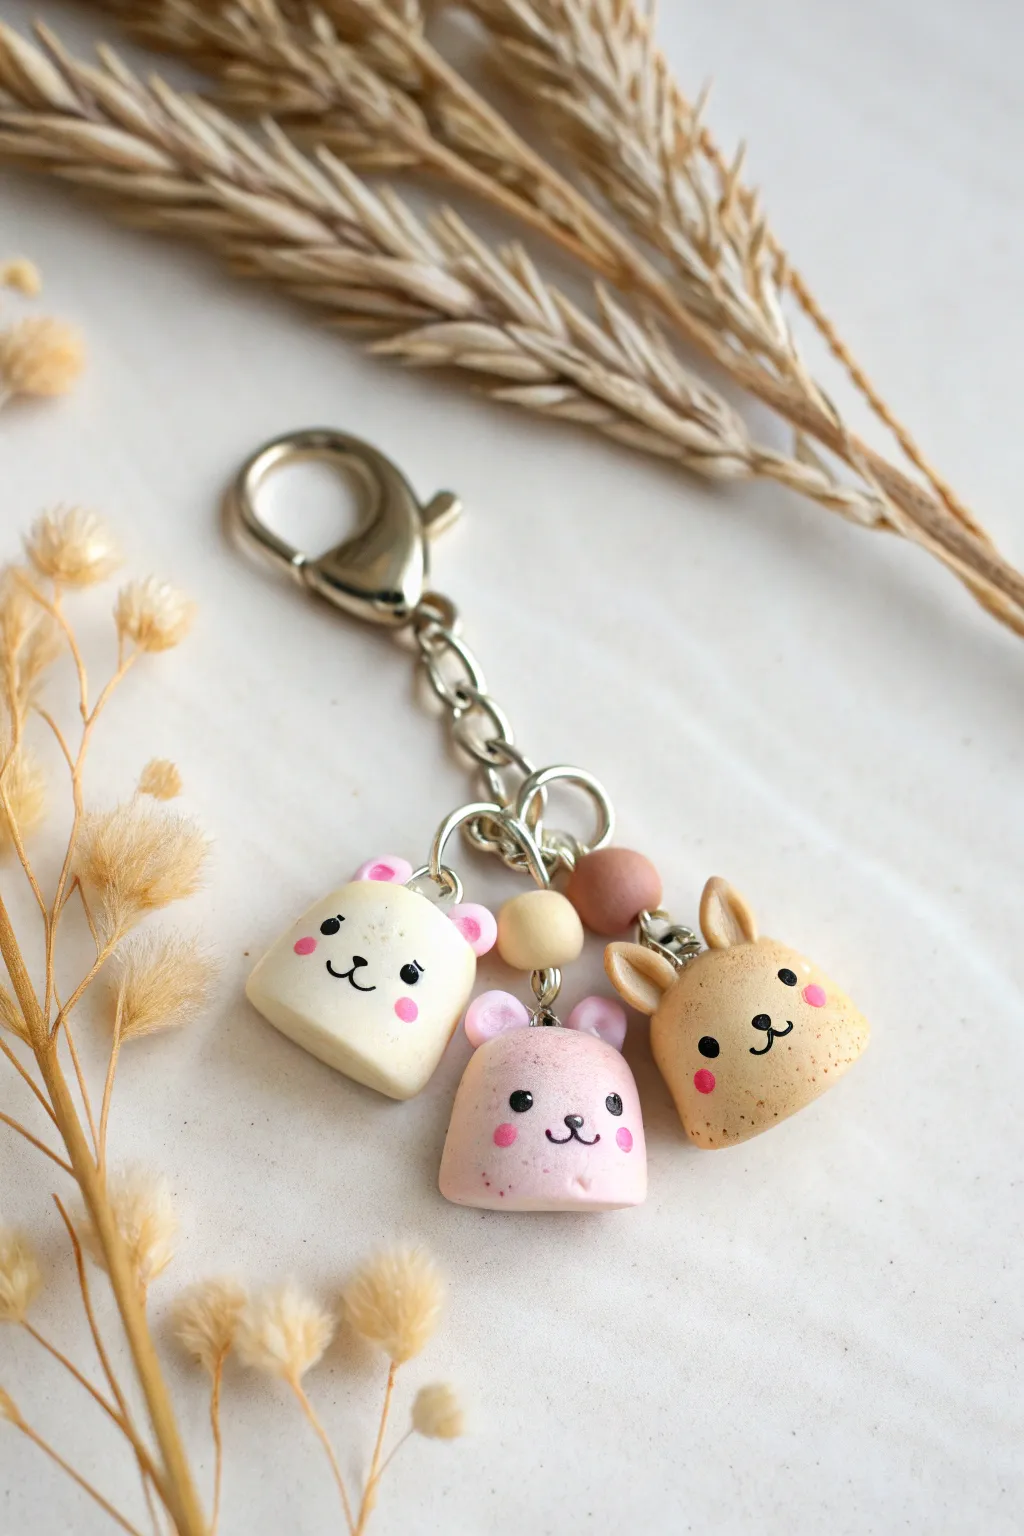
These adorable bell-shaped animal charms—a bear, a bunny, and a hamster—jingle softly on a single keychain. With their sweet expressions and pastel accents, this polymer clay project is perfect for adding a touch of whimsy to your bag or keys.
Step-by-Step
Materials
- Polymer clay (white, beige/tan, light pink, dark pink/brown for nose)
- Black acrylic paint
- Fine detail paintbrush or dotting tool
- Clay sculpting tools (specifically a small ball tool)
- Eye pins (at least 3)
- Jump rings
- Keychain clasp with chain extender
- Small wooden beads (natural and brown)
- Gloss glaze or UV resin (optional)
- Standard oven for baking clay
Step 1: Shaping the Bells
-
Create the base:
Start by conditioning your clay. For the white bear, roll a marble-sized ball of white clay. For the bunny, mix beige and a tiny bit of white for a soft tan. For the hamster, use pale pink clay. Ensure all three balls are roughly the same size. -
Form the bell shape:
Take your first ball and gently flatten the bottom against your work surface. Use your fingers to smooth the sides upward, creating a rounded dome shape that resembles a small gumdrop or bell. -
Hollow the inside:
Carefully pick up the shape. Use a large ball tool or your thumb to gently press into the bottom center, hollowing it out slightly like a real bell. Keep the walls thick enough to be sturdy.
Pro Tip: Clean Clay
White clay picks up dust instantly. Keep baby wipes or rubbing alcohol nearby to clean your hands and tools before handling the white bear charm to keep it pristine.
Step 2: Adding Animal Features
-
Sculpt the ears:
For the bunny, roll two small logs of tan clay and attach them to the top of the head. Use a small tool to indent the centers slightly. For the bear and hamster, roll tiny balls (white and pink respectively) and press them onto the upper corners of the heads. -
Detail the inner ears:
To make them pop, place tiny flattened dots of pink clay inside the bear and hamster ears. For the bunny, you can leave them plain or add a thin strip of pink inside the indentation. -
Smooth the seams:
Use a silicone tool or your finger to blend the seams where the ears attach to the head. This ensures they won’t pop off after baking. I like to give a final smooth-over to remove any fingerprints. -
Insert hardware:
Insert an eye pin through the top center of each animal head. If the pin is too long, trim it first. Twist the loop slightly to ensure the clay grips the metal.
Step 3: Baking and Painting
-
Bake the charms:
Place your three animal heads on a baking sheet or tile. Bake according to your specific brand of clay’s instructions (usually around 275°F/130°C for 15-30 minutes). Let them cool completely before handling. -
Paint the eyes:
Using a very fine dotting tool or a toothpick dipped in black acrylic paint, gently dab two small dots for the eyes on each face. Keep them wide-set for maximum cuteness. -
Draw the mouth:
With an ultra-fine brush, paint a tiny ‘w’ shape for the mouth between the eyes. For the bunny, make the center line slightly longer. -
Add rosy cheeks:
Dip a rounded tool into pink paint (or use pink chalk pastel dust) and stamp little rosy cheeks just below the eyes on the outer edge of the face. -
Seal the work:
Once the paint is fully dry, apply a thin coat of glaze or UV resin to protect the painted details and give the charms a finished shine.
Level Up: Real Jingles
Before baking, insert a tiny metal ball bearing or small bead into the hollow space and seal the bottom with a thin clay disk to make them rattle like real bells.
Step 4: Final Assembly
-
Secure the eye pins:
If your eye pins feel loose after baking, pull them out, add a dab of super glue to the stem, and reinsert them for a permanent hold. -
Prepare the chain:
Lay out your keychain clasp. Organize your sequence: you want the charms to hang at slightly different heights or cluster together nicely. -
Add accent beads:
Thread a jump ring through a wooden bead and attach it to the chain near where the charms will hang. This adds a nice natural texture contrast to the smooth clay. -
Attach the animals:
Using flat-nose pliers, open a jump ring, slide on an animal charm, and attach it to a link on the main chain. Repeat for all three animals, spacing them out slightly.
Enjoy the soft clinking sound of your new kawaii companions as you go about your day
Mini Kawaii Hand Fan Charms
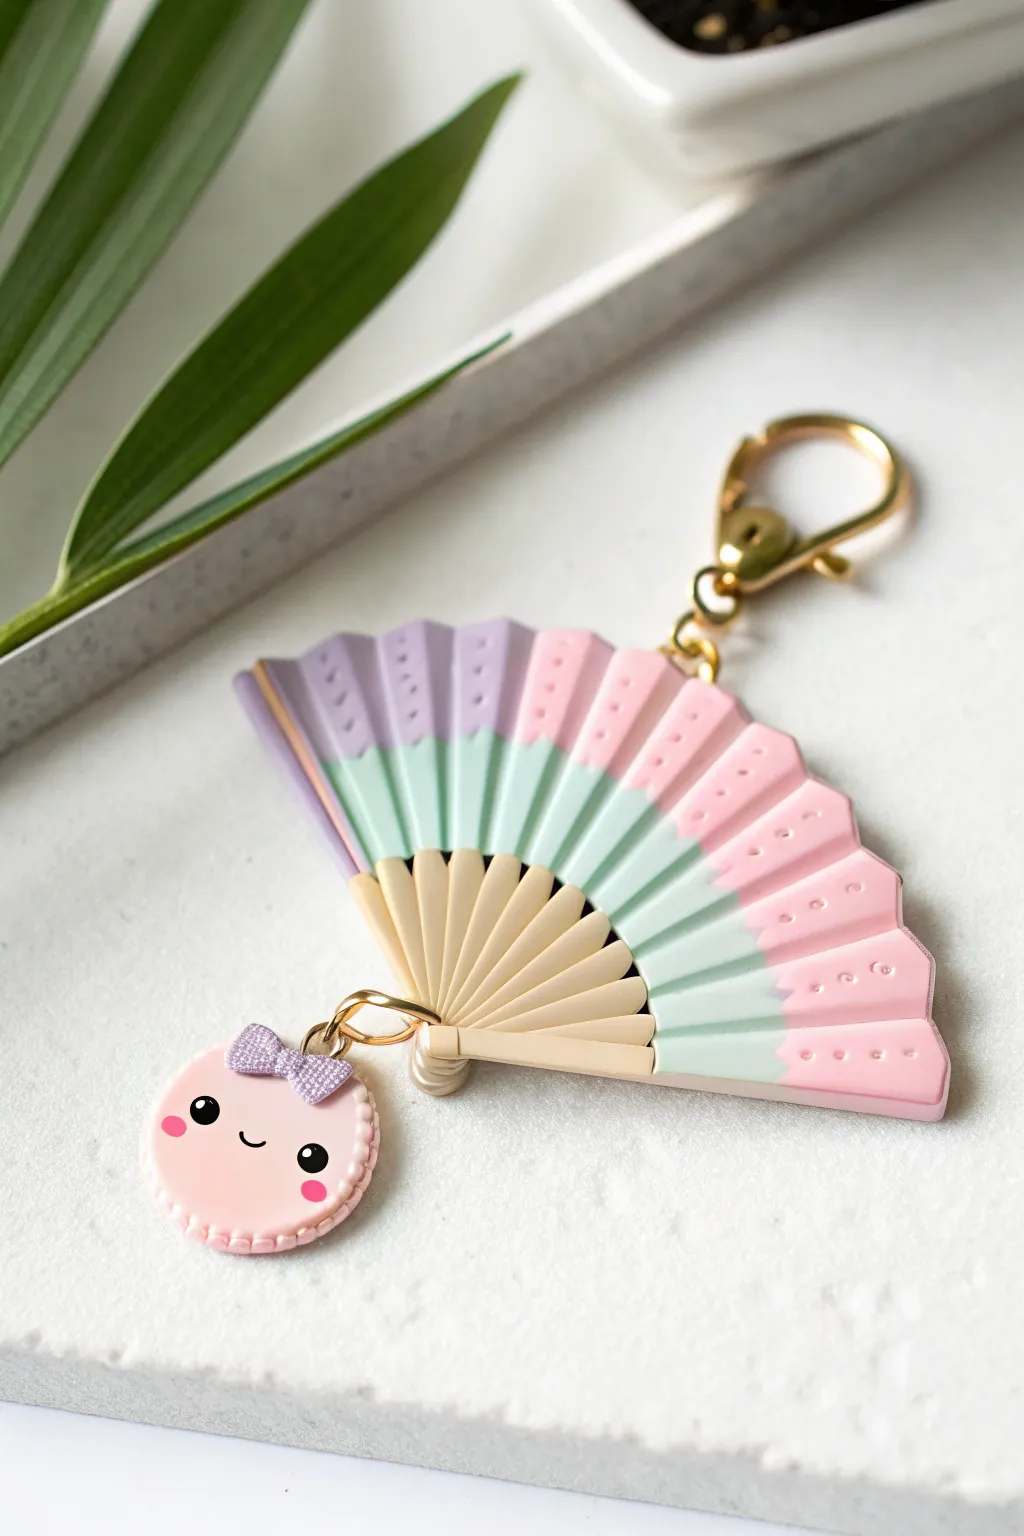
Embrace the elegance of summer with this intricate polymer clay folding fan charm, featuring soft pastel gradients and a delightful macaron companion. It’s the perfect accessory to add a touch of whimsy and sophisticated sweetness to your keychain or bag.
Step-by-Step
Materials
- Polymer clay in cream/light beige (for the structure)
- Polymer clay in pastel pink, mint green, and lavender
- Liquid polymer clay or bake-able adhesive
- Rolling pin or pasta machine
- Sharp blade or X-Acto knife
- Needle tool and dotting tool
- Black and pink acrylic paint (fine detail)
- Glazing medium (gloss or satin)
- Gold findings: jump rings, lobster clasp keychain, eye pins
- Small jewelry pliers
Step 1: Crafting the Fan Base
-
Prepare the slats:
Condition your cream-colored clay until smooth. Roll it out into a thin, even sheet, approximately 2mm thick. Using your blade, cut about 10-12 thin rectangular strips of equal length and width to serve as the fan’s wooden, structural slats. -
Fan assembly:
Arrange the slats in a radial fan shape. They should overlap significantly at the bottom (the pivot point) and spread out at the top. Gently press the overlapping bottom section together to bond the clay. -
Create the pivot pin:
Roll a tiny snake of cream clay and wrap it around the bottom pivot point to look like the pin holding the fan together. Use a needle tool to create a small hole through this pivot point if you want it to be functional, though for a charm, simple bonding is stronger. -
Top loop:
Insert a gold eye pin into the top center of the fan or embed a small loop of wire into the clay structure so you can attach it to a keychain later.
Drooping Slats?
If the fan blades are sagging while you work, bake the cream slat structure first for 10 minutes to harden it before adding the colored ‘paper’ layer on top.
Step 2: The Pastel Paper Effect
-
Create the pleated sheet:
Take your cream clay again and roll a separate sheet. Cut it into a fan-shaped arc that matches the spread of your slats. Carefully fold this sheet accordion-style to mimic the folded paper of a fan. -
Apply the color blocks:
Roll out very thin sheets of lavender, mint green, and pastel pink clay. Cut them into curved strips. Carefully lay these onto your pleated cream sheet to create the color-blocked design shown: lavender on the left, mint in the middle, pink on the right. -
Merge layers:
Gently press the colored clay into the cream pleats so they bond without losing the accordion texture. I like to re-crease the folds with the backside of my blade to keep them sharp. -
Attach to slats:
Apply a thin layer of liquid polymer clay to the upper half of your slat arrangement. Place the accordion-folded ‘paper’ section on top, aligning the folds with the slats underneath. -
Detailing:
Use a needle tool or a very small dotting tool to impress three tiny dots near the top edge of each fold for a decorative, perforated look.
Step 3: The Macaron Buddy
-
Macaron shells:
Roll two small balls of pink clay and flatten them slightly into uniform discs. Texture the edges with a needle tool to create the classic macaron ‘feet’ (the crumbly edge). -
Filling:
Create a thinner disc of white or cream clay for the filling. Sandwich it between the two pink shells. -
Face details:
Before baking, insert a small eye pin into the top of the macaron. You can paint the face after baking, or add tiny bits of black clay for eyes now. Add a tiny purple bow made of two small triangles and a center dot.
Texture Twist
Dust the unbaked clay with pearl mica powder before baking. This gives the fan a silky, shimmering fabric effect instead of a matte paper look.
Step 4: Finishing Touches
-
Baking:
Bake all pieces according to your clay manufacturer’s instructions (usually 275°F/130°C for 15-30 minutes). Let them cool completely. -
Painting the face:
Using a fine detail brush or a toothpick, paint two black eyes and a small smile on the macaron. Add rosy cheeks with a dab of pink paint. -
Glazing:
Apply a coat of gloss glaze to the macaron and the fan to protect the paint and give it a finished shine. -
Assembly:
Using jump rings and pliers, attach the macaron to the bottom pivot of the fan (or a jump ring near the bottom). Attach the top of the fan to the large lobster clasp keychain.
Enjoy the gentle clinking sound your new kawaii accessory makes as it brightens up your day
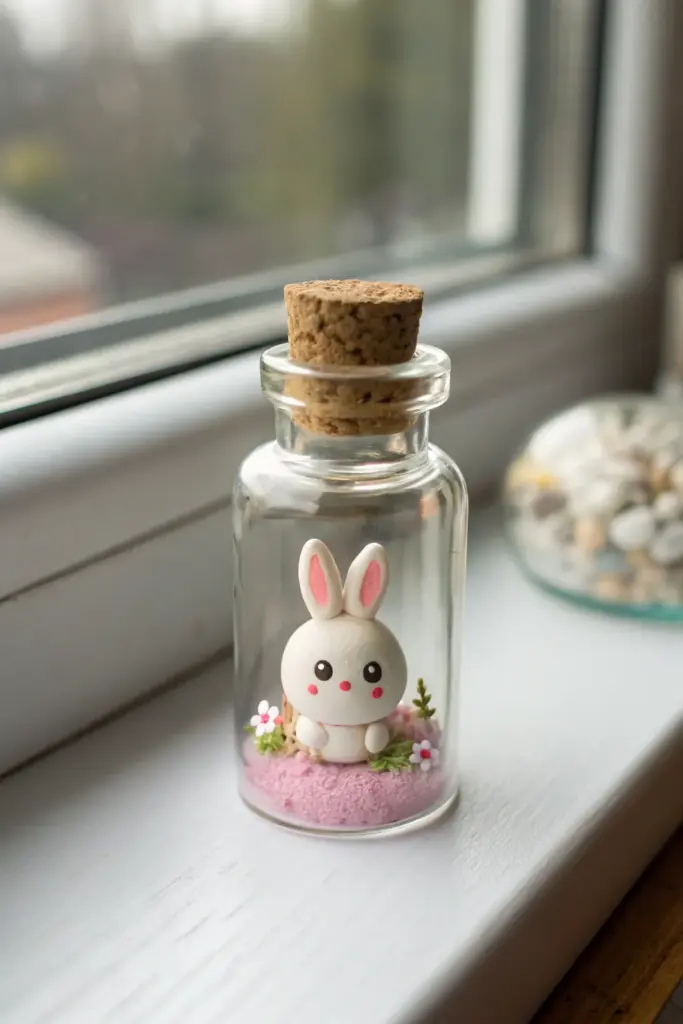
Tiny Kawaii Critter-in-a-Bottle Scenes

Capture a moment of pure sweetness with this miniature bunny scene, perfectly preserved inside a tiny glass vial. This project combines simple polymer clay sculpting with delicate assembly techniques for a delightful desk companion.
How-To Guide
Materials
- White, pink, and black polymer clay
- Small glass bottle with cork stopper (approx. 2-3 inches tall)
- Fine pink sand or decorative granules
- Dried moss (green)
- Liquid polymer clay (Fimo Liquid or similar) or strong craft glue
- Needle tool or toothpick
- Dotting tool or ball stylus
- Fine tweezers
- Rolling pin or smooth round object
- Oven for baking clay
Step 1: Sculpting the Bunny
-
Form the Body:
Start by conditioning a small ball of white polymer clay until it’s soft and pliable. Roll it into a smooth, slightly flattened sphere to create the bunny’s head and body in one chibi-style shape. -
Add Tiny Paws:
Create two very small balls of white clay. Flatten them slightly and attach them to the lower front of the body to serve as little paws resting on its belly. -
Shape the Ears:
Roll two small logs of white clay, tapering them at one end. Flatten them gently with your finger to create the ear shapes. -
Detail the Ears:
Roll two even smaller, thinner logs of pink clay. Flatten these and press them into the center of the white ear shapes to create the inner ear detail. -
Attach the Ears:
Press the wide bottom of the ears onto the top of the head. Use your needle tool to gently blend the clay at the seam so they are securely attached. -
Create the Face:
Using a very small dotting tool, make slight indentations where the eyes will go. Roll two tiny specks of black clay and press them into the smooth sockets. -
Add Cheeks and Nose:
Roll three microscopic balls of pink clay. Place one in the center for the nose and two slightly larger ones below the eyes for blushing cheeks. Gently press them flat.
Tweezer Trick
Wrap masking tape around the tips of your metal tweezers (sticky side in). This adds grip and prevents the metal from scratching or marking the soft clay surface during placement.
Step 2: Creating the Flora
-
Make Flower Centers:
Roll tiny balls of pink clay for the flower centers. You will need about three or four of these. -
create Petals:
For each flower, create five minuscule balls of white clay. Arrange them in a circle around a pink center and flatten gently to bond them together. -
Bake the Components:
Place your bunny and the tiny loose flowers on a ceramic tile or baking sheet. Bake according to your clay manufacturer’s instructions (usually 230°F – 275°F for 15-30 minutes). Let them cool completely.
Glow Up
Mix glow-in-the-dark powder into the white clay for the bunny, or add a tiny string of fairy lights inside the cork for a magical night-light effect.
Step 3: Assembly & Bottling
-
Prepare the Base:
Pour a layer of pink sand into the bottom of your clean, dry glass bottle. It should be deep enough to create a distinct colored floor, about 1/4 inch. -
Secure the Sand (Optional):
If you want the sand permanent, drip a little diluted white glue or scenic cement over it and let it dry overnight before proceeding. -
Insert the Bunny:
Apply a dab of strong glue to the bottom of your baked bunny. Using tweezers, carefully lower the bunny into the bottle and position it centrally on the sand. -
Add Greenery:
Tear off tiny tufts of green dried moss. Apply small dots of glue to the moss and use tweezers to place them around the bunny’s base, creating a grassy nest. -
Plant the Flowers:
Dab glue onto the backs of your baked clay flowers. Carefully lower them in with tweezers, nesting them into the moss or sand beside the bunny. -
Seal the Scene:
Place the cork stopper into the bottle neck. For extra security, you can glue the cork in place, but a snug fit is usually sufficient.
Now you have a tiny, adorable world captured in glass to brighten up any window sill.